

Nexgrill Outdoor gas grill Operating Instruction
Outdoor gas grill
operating instruction
Betjeningsinstruktionertil
udendørs gasgrill
Barbecue au gaz pour usage extérieur
instructions d'opération
Outdoor-Gasgrill
Bedienungsanleitung
Gasgrill för utomhusbruk
Bruksanvisning
Parrilla de gas
para exteriores
Instrucciones
de operación
720-0830XA
2531DL-0046
2531-20
SERIAL #/SERIENR./NUMÉRO DE SÉRIE
SERIENNR./SERIENUMMER/NÚM. DE SERIE: ____________________________________________________________
PURCHASE DATE/KØBSDATO/DATE D'ACHAT
KAUFDATUM/INKÖPSDATUM/FECHA DE COMPRA: ______________________________________________________
• This instruction manual contains important information necessary for the
proper assembly and safe use of the appliance.
• Read and follow all warnings and instructions before assembling and
using the appliance.
• Keep this manual for future reference.
Questions, problems, missing parts? For replacement part, contact call our customer service
department at +4562206336 or email ServiceDK@nexgrill.com
FOR OUTDOOR USE ONLY. NOT FOR COMMERCIAL USE.

Table of Contents
Safety Instruction . . . . . . . . . . . . . . . . . . . . .
Gas Hook–Up . . . . . . . . . . . . . . . . . . . . . . .
Installer Final Check List. . . . . . . . . . . . . . . .
European Gas Pressures and
Specifications . . . . . . . . . . . . . . . . . . . . . . . .
Leak Testing . . . . . . . . . . . . . . . . . . . . . . . . .
Operation Instructions . . . . . . . . . . . . . . . . . .
Lighting Instructions . . . . . . . . . . . . . . . . . . .
Component Identification . . . . . . . . . . . . . . .
3
7
7
8
9
10
10
11
Care and Maintenance . . . . . . . . . . . . . . . . .
Troubleshooting . . . . . . . . . . . . . . . . . . . . . .
Ordering Parts . . . . . . . . . . . . . . . . . . . . . .
Grill Hints . . . . . . . . . . . . . . . . . . . . . . . . . . . .
Grill Cooking Chart . . . . . . . . . . . . . . . . . ..
Grill Recipe Suggestion . . . . . . . . . . . . . . .
Limited Warranty . . . . . . . . . . . . . . . . . . . .
Parts Diagram . . . . . . . . . . . . . . . . . . . . . .
Part List . . . . . . . . . . . . . . . . . . . . . . . . . . . .
12
13
14
14
15
17
19
20
21
2
Safety Instruction
DANGER
If you smell gas:
• Shut off gas to the appliance.
• Extinguish any open flame.
• Open lid.
• If odor continues, keep away from the
appliance and immediately call your gas
supplier or your fire department.
DANGER
1. Never operate this appliance unattended.
2. Never operate this appliance within 3.05 m (10 ft.) of any structure, combustible material or
other gas cylinder.
3. Never operate this appliance within 7.62 m (25 ft.) of any flammable liquid.
4. Do not fill cooking vessel beyond maximum fill line.
5. Heated liquids remain at scalding temperatures long after the cooking process. Never
touch cooking appliance until liquids have cooled to 46ºC (115ºF) or less.
WARNING
1. Do not store or use gasoline or other
flammable liquids or vapors in the
vicinity of this or any other appliance.
2. An LPG cylinder not connected for use
shall not be stored in the vicinity of this
or any other appliance.
3. The operation of the rotisserie burner
and the main burner at the same time is
prohibited.
6. This appliance is not intended for and should never be used as a heater.
7. If a fire should occur, keep away from the appliance and immediately call your fire
department. Do not attempt to extinguish an oil or grease fire with water.
8. The flexible hose for connector shall not exceed 1.5 meters.
9. Do not modify the appliance.
10. Use Outdoors only! Read the instruction before using the appliance.
11. Do not move the appliance during use.
12. Turn off the gas supply at the gas cylinder after use.
13. Accessible parts may be very hot. Keep young children away.
14. It is recommended to change the flexible hose when the conditions require it.
Failure to comply with these instructions could result in a fire or explosion that could cause
serious bodily injury, death, or property damage.
Parts sealed by the manufacture shall not be altered by the user.
Your grill will be very hot. Never lean over the cooking area while using your grill. Do not
touch cooking surfaces, grill housing, lid or any other grill parts while the grill is in
operation, or until the gas grill has cooled down after use.
3
WARNING
Do not try lighting this appliance without reading the
“LIGHTING INSTRUCTIONS” section of this manual.
TESTED IN ACCORDANCE WITH EN 498:2012 & EN
484:1998 STANDARDS FOR OUTDOOR COOKING GAS
APPLIANCE. THIS GRILL IS FOR OUTDOOR USE ONLY.
Correct LPG Gas Tank Use
LPG gas grill models are designed for use with a standard
9 kg (20 lb.). Liquid Propane Gas tank, not included with
grill. Never connect your gas grill to an LPG gas tank that
exceeds this capacity.
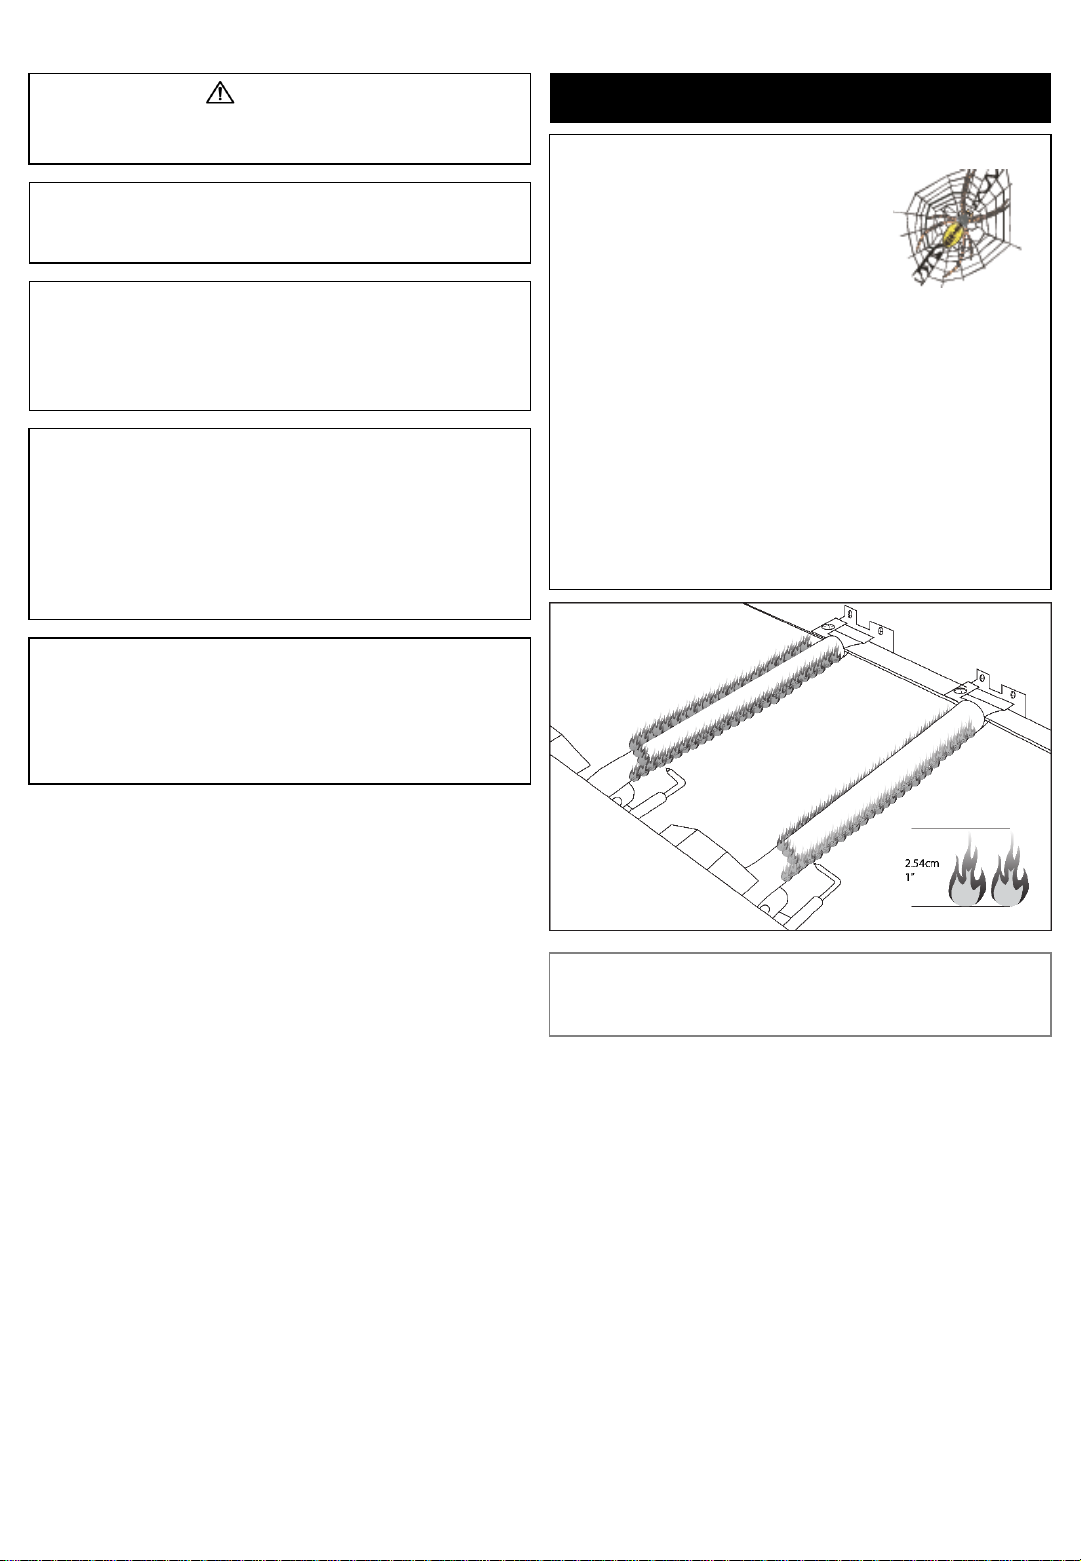
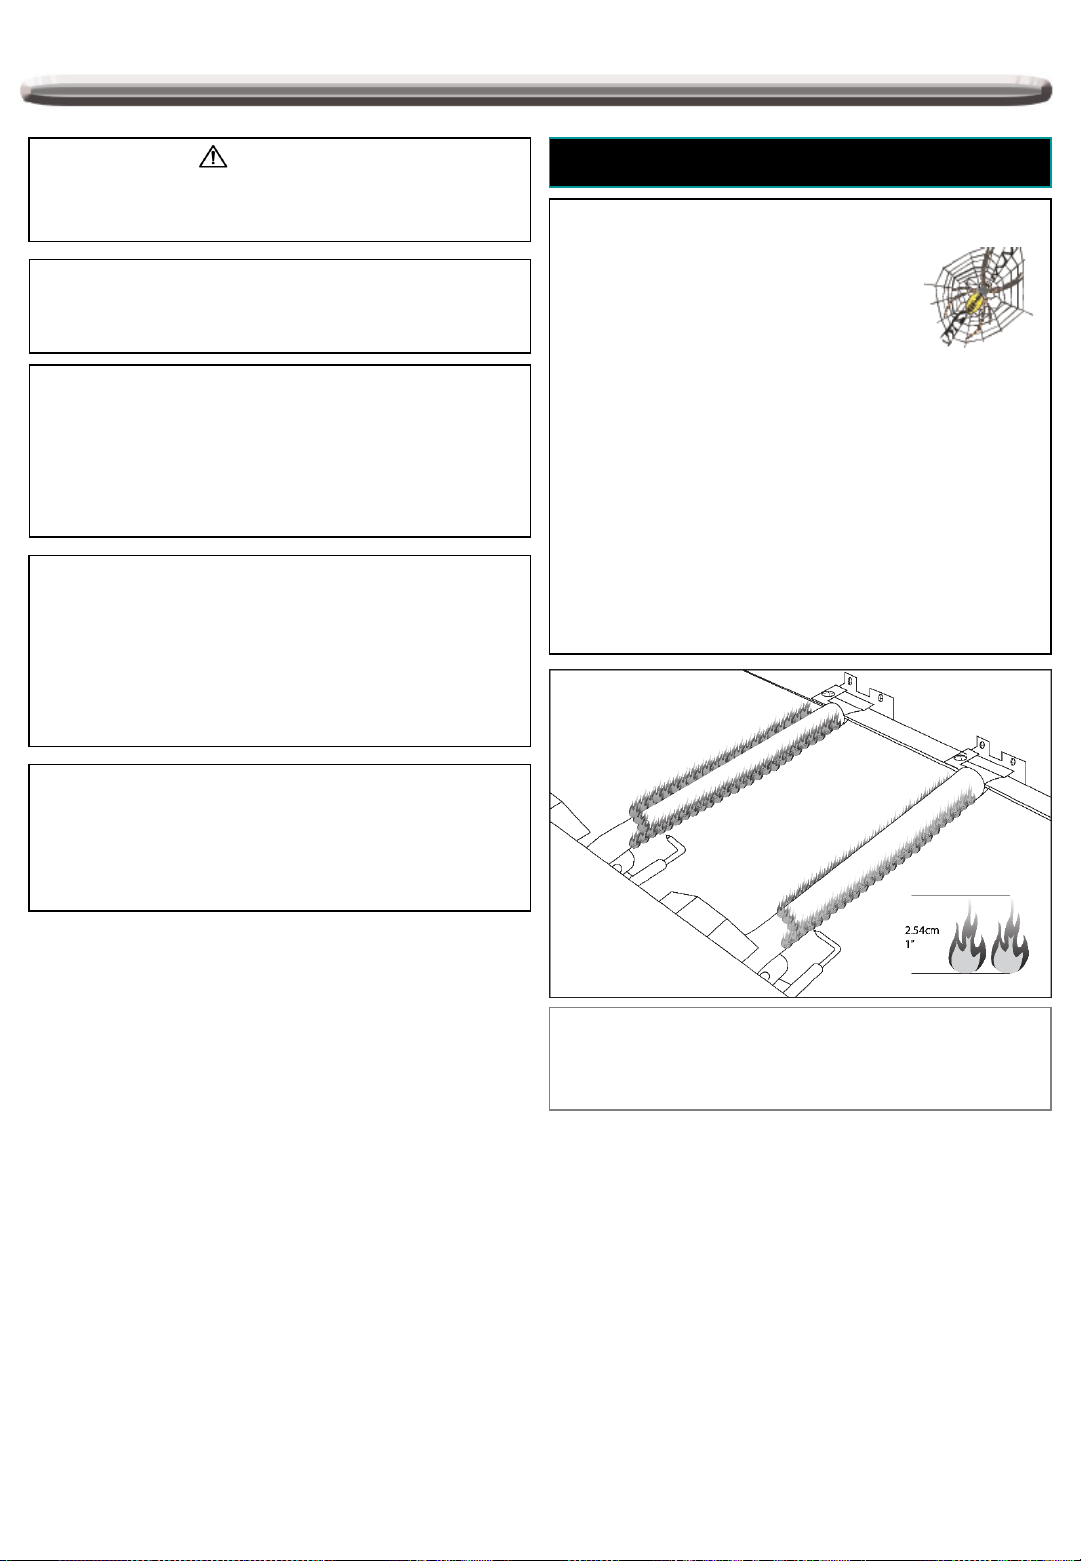
CAUTION: Beware of Flashback
CAUTION: Spiders and small insects occasionally
spin webs or make nests in the grill
burner tubes during transit and
warehousing. These webs can lead
to gas flow obstruction, which could
result in a fire in and around burner
tubes. This type of fire is known as
“FLASH-BACK” and can cause serious damage to your
grill and create an unsafe operating condition for the user.
Although an obstructed burner tube is not the only cause of
“FLASH-BACK”, it is the most common cause.
NOTE: The normal flow of gas through the regulator and
hose assembly can create a humming noise. A low volume
of noise is perfectly normal and will not interfere with
operation of the grill. If humming noise is loud and
excessive you may need to purge air from the gas line or
reset the regulator excess gas flow device. This purging
procedure should be done every time a new LPG gas tank
is connected to your grill.
The size of saucepan suitable for the usage on the side
burner is between 18~22 cm in diameter.
Do not place heavy item on the side table. Maximum
weight is 5 kg. Be careful when you put the items on the
side table. Remove the items first before pulling down the
table.
To reduce the chance of “FLASH-BACK”, you must clean
the burner tubes before assembling your grill, and at least
once a month in late summer or early fall when spiders are
most active. Also perform this burner tube cleaning
procedure if your grill has not been used for an extended
period of time. A clogged tube can be lead to a fire
beneath the grill.
Visually check the burner flames prior to each use. The
flames should look like this picture. If they do not, refer to
the burner main tenancy part of this manual.
4
LPG-Gas Supply System
• If the information is not followed
exactly, a fire resulting in death
or serious injury could occur.
304.8 mm
/ 12 in.
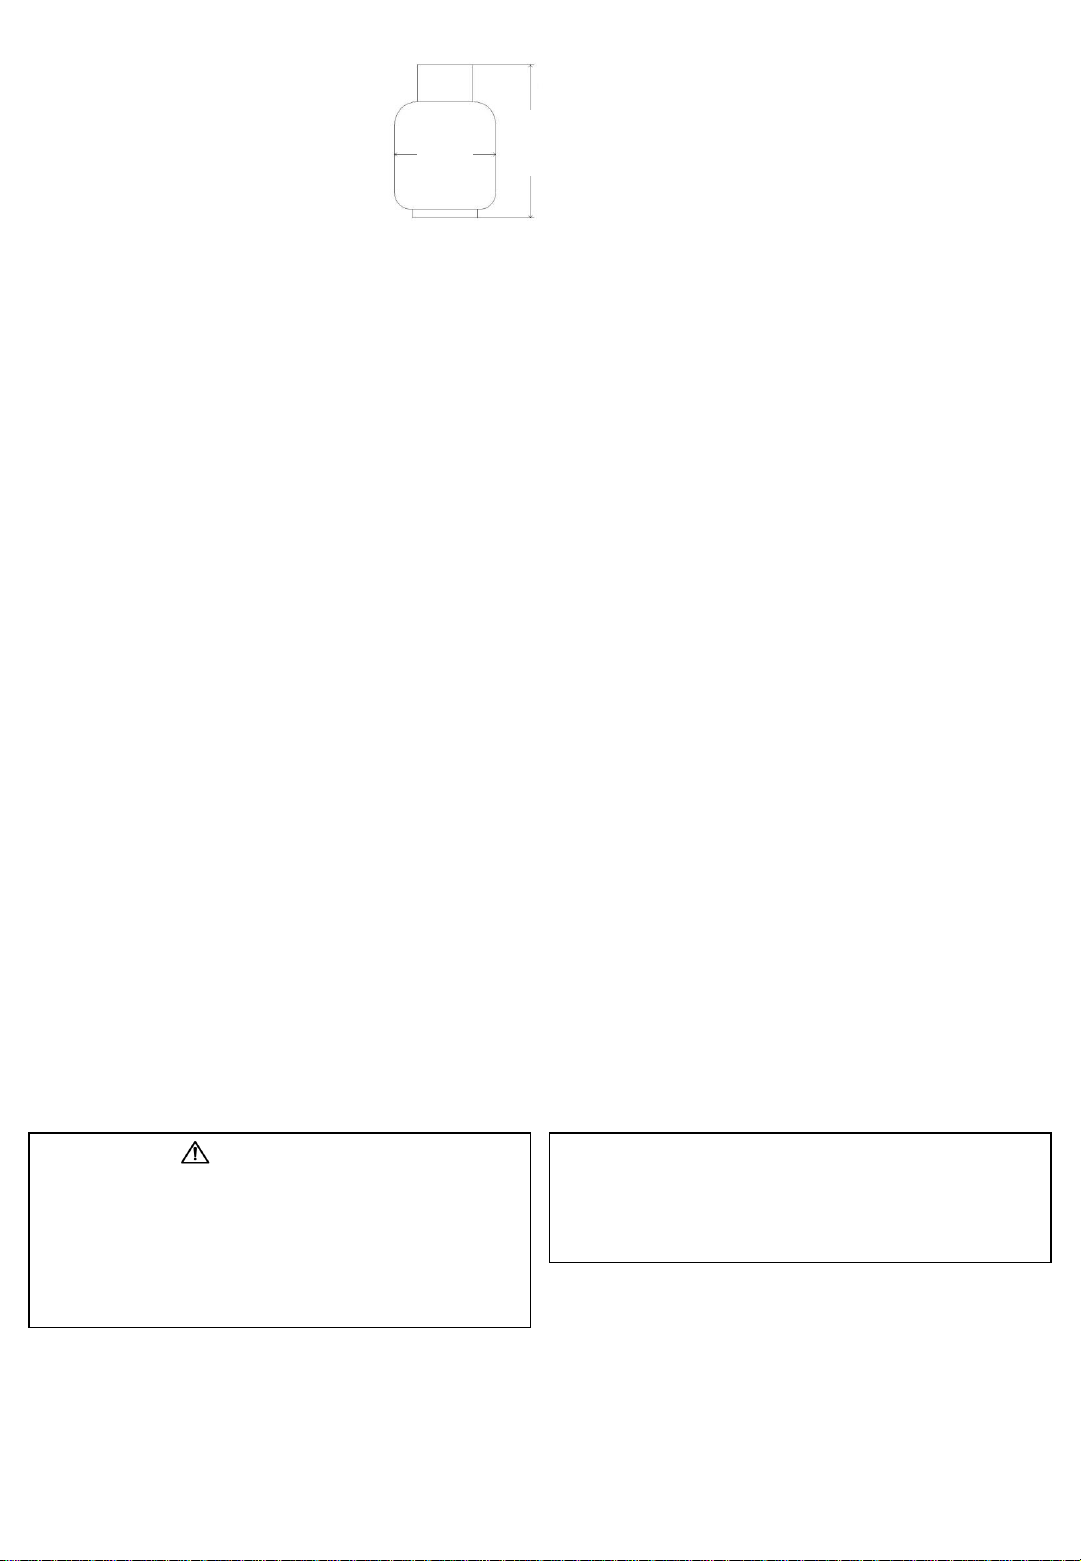
• A 9 kg (20 lb.) tank of approximately
304.8 mm (12 in.) diameter by 469.9 mm
(18.5 in.) high is the maximum size LPG gas tank to use.
• The tank supply system must be arranged for vapor
withdrawal.
• The LPG gas tank used must have a collar to protect the
tank valve.
• Place dust cap on cylinder valve outlet whenever the
cylinder is not in use. Only install the type of dust cap on
the cylinder valve outlet that is provided with the cylinder
valve. Other types of cap or plugs may result in leakage
of propane.
• Never connect an unregulated LPG gas tank to your gas
grill.
• This outdoor cooking gas appliance is equipped with a
high capacity hose/regulator assembly for connection to
a standard 9 kg (20 lb.) Liquid Propane cylinder.
• Have your LPG gas tank filled by a reputable propane
gas dealer and visually inspected and re-qualified at
each filling.
• Do not store a spare LPG gas cylinder under or near this
appliance.
• Never fill the cylinder beyond 80 percent full.
• Always keep LPG gas tanks in an upright position.
• Do not store or use gasoline or other flammable vapors
and liquids in the vicinity of this or any other appliance.
• Storage of an outdoor cooking gas appliance indoors is
permissible only if the cylinder is disconnected and
removed from the outdoor cooking gas appliance.
• When your gas grill is not in use the gas must be turned
off at LPG gas tank.
Proper Placement And Clearance Of Grill
• Never use your gas grill in a garage, porch, shed,
breezeway or any other enclosed area. Your gas grill is
to be used outdoors only.
• Do Not install this unit into combustible enclosures.
Minimum clearance from sides and back of unit to
combustible construction, 91.44 cm (36 in.) from sides
and 91.44 cm (36 in.) from back.
• DO NOT use this appliance under overhead combustible
surfaces. This outdoors cooking gas appliance is not
469.9 mm
/ 18.5 in.
intend to be installed in or on recreational vehicles
and/or boats.
• LPG gas tank must be stored outdoors in a wellventilated area and out of reach of children.
Disconnected LPG gas tanks must not be stored in a
building, garage or any other enclosed area.
• Do Not obstruct the flow of ventilation air around the gas
grill housing. Only use the regulator and the hose
assembly supplied with your gas grill. Replacement
regulators and hose assemblies must be those specified
in this manual.
• The regulator and hose assembly must be inspected
before each use of the grill. If there is excessive
abrasion or wear or if the hose is cut, it must be replaced
prior to the grill being put into operation. The
replacement hose assembly shall be that specified by
the manufacturer.
• Pressure regulator and hose assembly supplied with the
outdoor cooking gas appliance must be used. Never
substitute other types of regulator. Contact customer
service for manufacturer specified replacement parts.
• This outdoor cooking gas appliance is equipped with a
pressure regulator comply with the standard for
Pressure Regulating Valves for LPG Gas EN
16129:2013.
• Do not use briquettes of any kind in the grill.
• The grill is designed for optimum performance without
the use of briquettes. Do not place briquettes on the
radiant as this will block off the area for the grill burners
to vent. Adding briquettes can damage ignition
components and knobs, and void the warranty.
• Keep the back and side cart free and clear from debris.
Keep any electrical supply cord, or the rotisserie motor
cord away from the heated areas of the grill.
• Never use the grill in extremely windy conditions. If
located in a consistently windy area (oceanfront,
mountaintop, etc.) a windbreak will be required. Always
adhere to the specified clearance.
• Never use a dented or rusty propane tank.
• Keep any electrical supply cord and the fuel supply hose
away from any heated surface.
• While lighting, keep your face and hands as far away
from the grill as possible.
• Burner adjustment should only be performed after the
burner have cooled.
WARNING
Your grill will get very hot. Never lean over the cooking
area while using your grill. Do not touch cooking surfaces,
grill housing, lid or any other grill parts while the grill is in
operation, or until the gas grill has cooled down after use.
Failure to comply with these instructions may result in
serious bodily injury.
CAUTION: TO ENSURE CONTINUED PROTECTION
AGAINST RISK OF ELECTRIC SHOCK, CONNECT TO
PROPERLY GROUNDED OUTLETS ONLY, TO REDUCE
THE RISK OF ELECTRIC SHOCK, KEEP EXTENSION
CORD CONNECTION DRY AND OFF THE GROUND.
5

WARNING
Keep a spray bottle of soapy water near the gas supply
valve and check the connections before each use.
WARNING
This outdoor cooking gas appliance is not intended to be
installed in or on boats. And other recreational vehicles.
DO NOT USE ALUMINUM FOIL TO LINE THE GRILL
RACKS OR GRILL BOTTOM.
This can severely upset combustion airflow or trap
excessive heat in the control area.
When using the grill, do not touch the grill rack, burner grate
or immediate surroundings as these areas become
extremely hot and could cause burns. Use only dry
potholders. Moist or damp potholders on hot surfaces may
cause steam burns. Do not use a towel or bulky cloth in
place or potholders. Do not allow potholders to touch hot
portions of the grill rack.
Grease is flammable. Let hot grease cool before attempting
to handle it. Do not allow grease deposits to collect in the
grease tray at the bottom of the grill’s firebox. Clean the
grease tray often
Do not use aluminum foil to line the grill racks or grill bottom.
This can severely upset combustion air flow or trap
excessive heat in the control area.
SAFETY PRACTICES TO AVOID PERSONAL INJURY
When properly cared for your grill will provide safe, reliable
service for many years. However, extreme care must be used
as the grill produces intense heat that can increase accident
potential. When using this appliance basic safety practices
must be followed, including the following:
Do not repair or replace any part of the grill unless
specifically recommended in this manual. All other service
should be referred to a qualified technician.
This grill is not intended to be installed in or on recreational
vehicles or boats.
Children should not be left alone or unattended in an area
where the grill is being used. Do not allow them to sit, stand
or play in or around the grill at any time.
Do not store items of interest to children around or below the
grill.
Do not permit clothing, pot holders or other flammable
materials to come in contact with or too close to any grate,
burner or hot surface until it has cooled. The fabric could
ignite and cause personal injury.
For personal safety, wear proper apparel. Loose fitting
garments or sleeves should never be worn while using this
appliance. Some synthetic fabrics are highly flammable and
should not be worn while cooking.
For proper lighting and performance of the burners keep the
burner ports clean. It is necessary to clean them periodically
for optimum performance. The burners will only operate in
one position and must be mounted correctly for safe
operation.
Clean the grill with caution. To avoid steam burns, do not
use a wet sponge or cloth to clean the grill while it is hot.
Some cleaners produce toxic fumes or can ignite if applied
to a hot surface.
Turn off grill controls and make certain the grill is cool before
using any type of aerosol cleaner on or around the grill. The
chemical that produces the spraying action could, in the
presence of heat, ignite or cause metal parts to corrode.
Do not use the grill to cook excessively fatty meats or other
products which promote flare-ups.
Do not operate the grill under unprotected combustible
constructions. Use only in well ventilated areas. Do not use
in buildings, garages, sheds, breezeways or other such
enclosed areas.
Keep the area surrounding the grill free from combustible
materials including, fluids, trash, and vapors such as
gasoline or charcoal lighter fluid. Do not obstruct the flow of
combustion and ventilation air.
Only certain types of glass, heat-proof glass ceramic,
earthenware, or other glazed utensils are suitable for grill use.
These materials may break with sudden temperature
changes. Use only on low or medium heat settings in
accordance with the manufacturer’s guidelines.
Do not heat unopened food containers. A build-up of
pressure may cause the containers to burst.
Use a covered hand when opening the grill lid.
Never lean over an open grill.
When lighting a burner, pay close attention to what you are
doing. Make certain you are aware of which burner you are
lighting, so your body and clothing remain clear of open
flames.
NEVER CONNECT AN UNREGULATED GAS SUPPLY
LINE TO THE APPLIANCE. USE THE REGULATOR/HOSE
ASSEMBLY SUPPLIED.
This is a liquid propane configured grill. Do not attempt
to use another type of gas supply unless the grill has been
reconfigured for that type.
Total gas consumption (per hour) of this stainless steel gas
grill with all burners on :
Main burners 16 kW
Side burner 4.4 kW
Total 20.4 kW
6
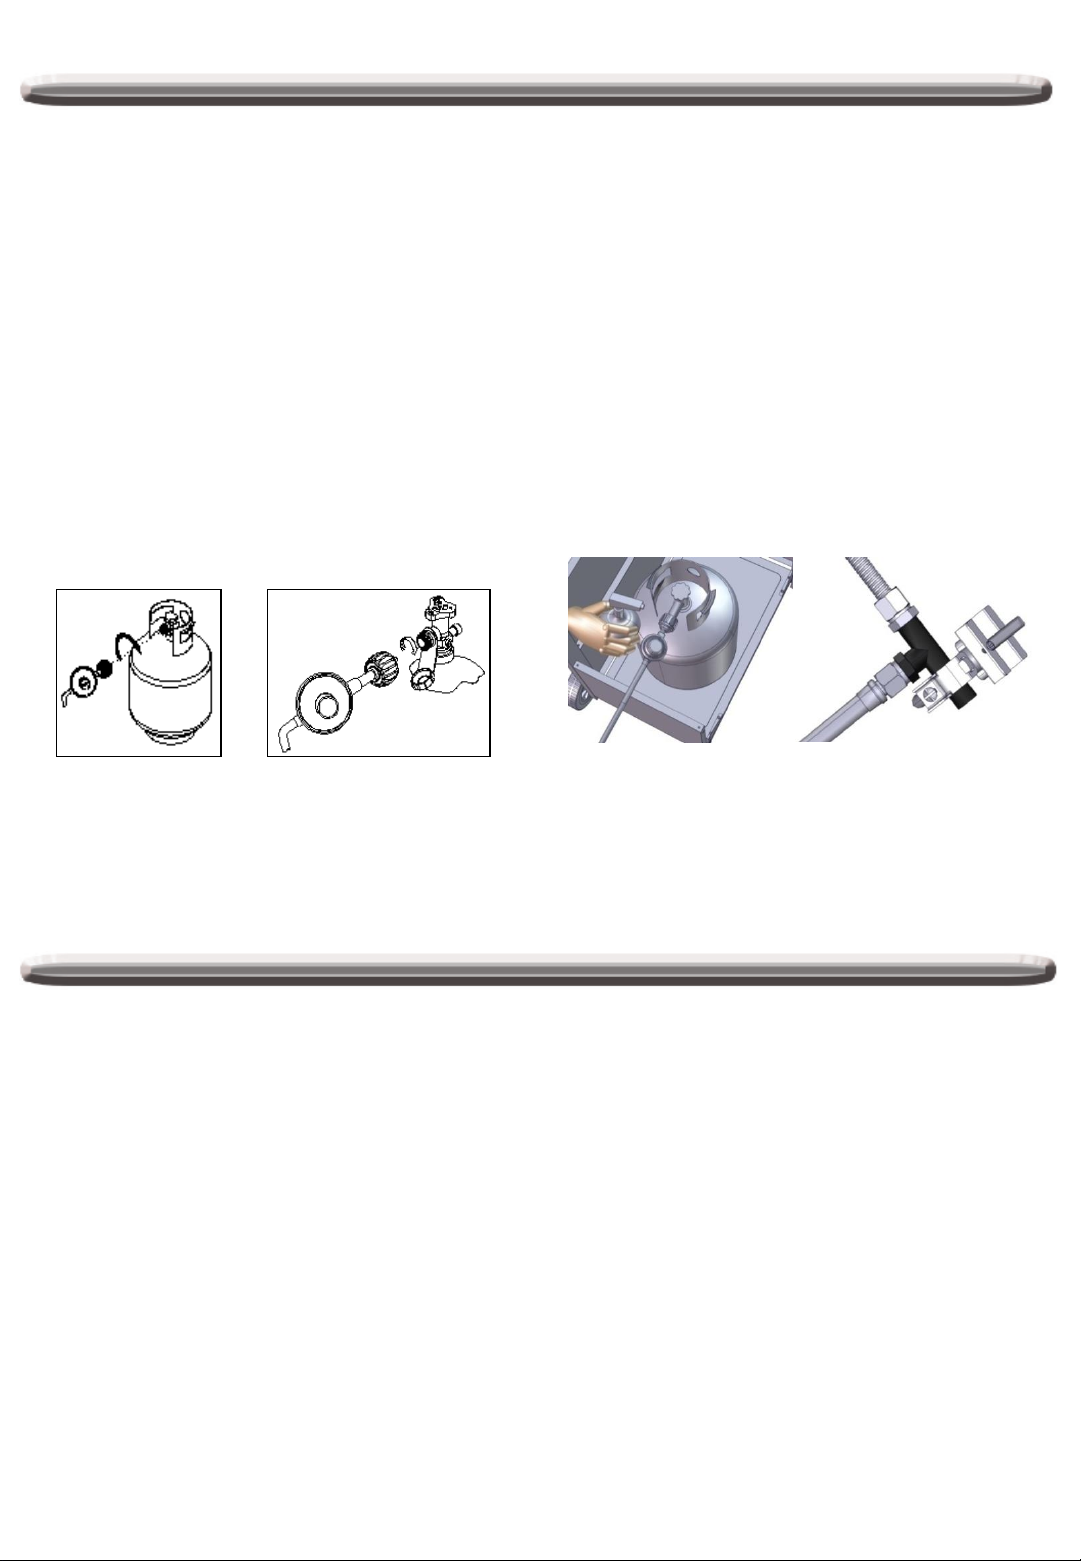
Gas Hook-Up
LPG TANK REQUIREMENT
A dented or rusty LPG tank may be hazardous and should be
checked by your LPG supplier. Never use a cylinder with a
damaged valve.
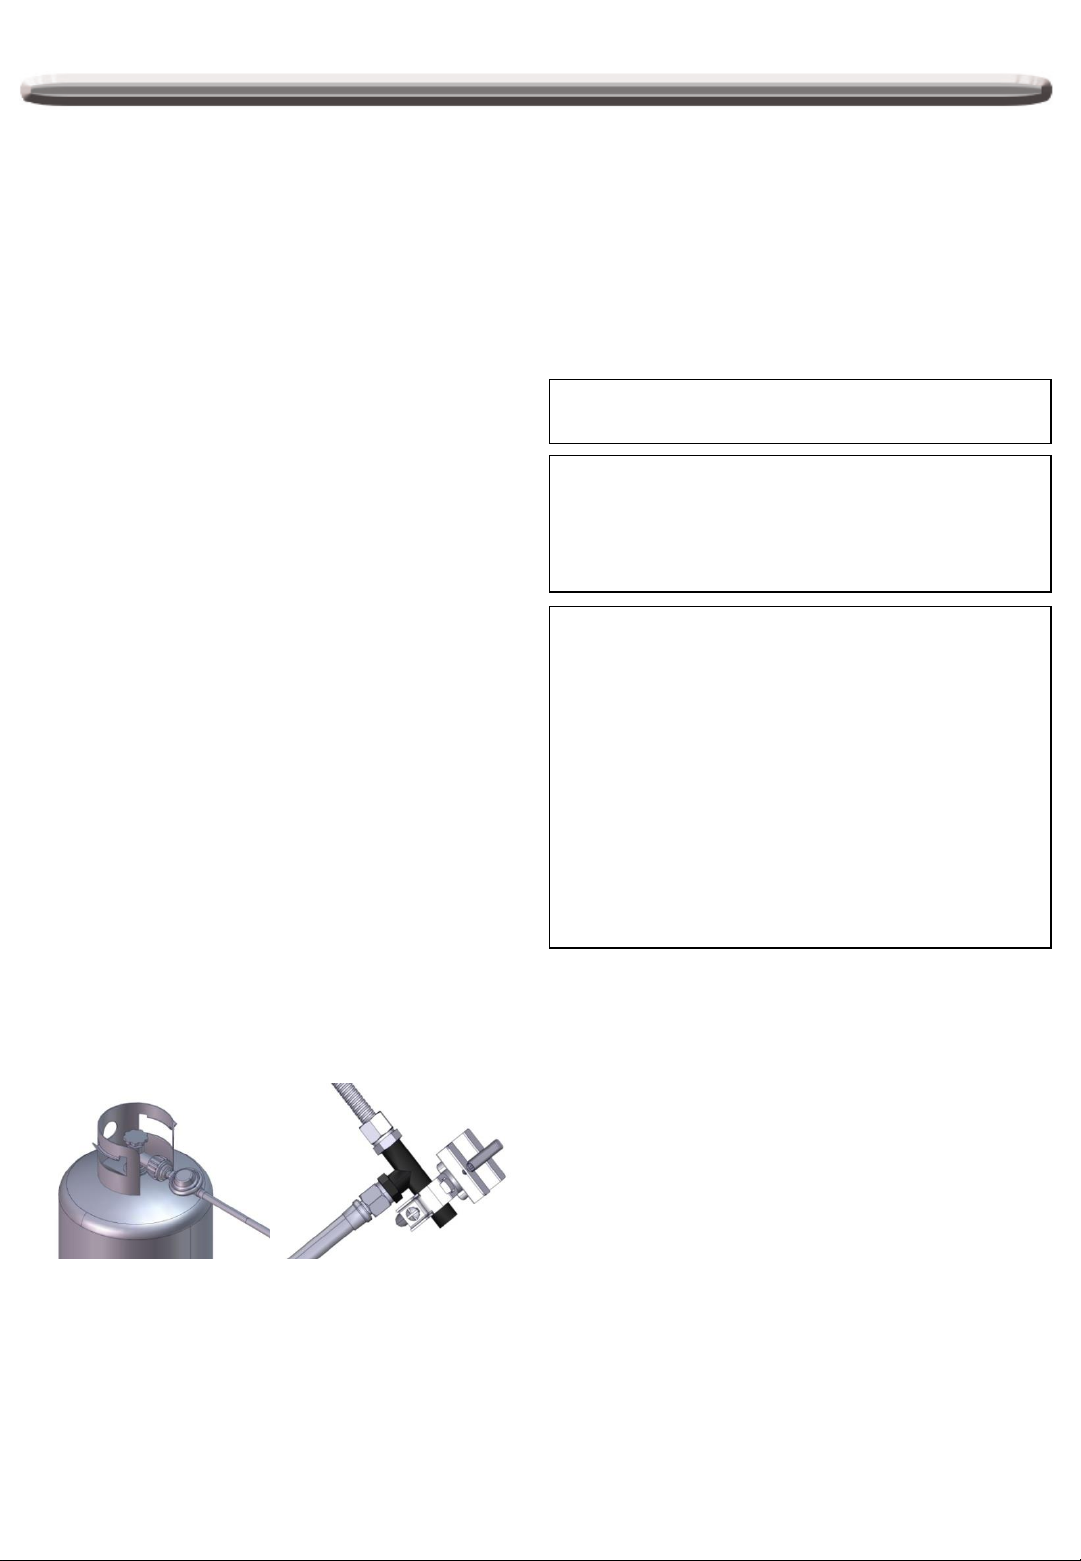
LPG GAS HOOK-UP
Ensure that the black plastic grommets on the LPG cylinder
valve are in place and that the hose does not come into
contact with the grease tray or the grill head.
CONNECTION
Your stainless steel grill is equipped with gas supply orifices
for use only with liquid propane gas. It is also equipped with a
high capacity hose/regulator assembly for connection to a
suitable gas cylinder. Please refer to page 5 “LPG-gas supply
system” for more details. Below are the steps for cylinder
connection:
1. Make sure tank valve is in its full off position (turn
clockwise to stop).
4. When connecting regulator assembly to the valve, hand
tighten the quick coupling nut clockwise to a complete
stop. Do not use a wrench to tighten. Use of a wrench
may damage the quick coupling nut and result in a
hazardous condition.
5. Open the tank valve fully. Apply the soap solution with
a clean brush to all gas connections. See below. If
growing bubbles appear in the solution the connections
are not properly sealed. Check each fitting and tighten
or repair as necessary.
6. If you have a gas connection leak you cannot repair,
turn gas OFF at supply tank, disconnect fuel line from
your grill and contact our customer service at
+4562206336 or email ServiceDK@nexgrill.com or
your gas supplier for repair assistance.
7. Also apply soapy solution to the tank seams. See below.
If growing bubbles appear, shut tank OFF and do not
use or move it! Contact an LPG gas supplier or your fire
department for assistance.
2. Make sure all burner valves are in their off position.
3. Inspect valve connections, port, and regulator assembly.
Look for any damage or debris. Remove any debris.
Inspect hose for damage. Never attempt to use
damaged or obstructed equipment. See your local LPG
gas dealer for repair.
✓ Minimum clearance from sides and back of unit to
combustible construction, 91.44 cm (36”) from
sides and 91.44 cm (36”) from back
✓ All internal packaging removed.
✓ Knobs turn freely.
✓ Burners are tight and sitting properly on orifices.
✓ Pressure regulator connected and set. Gas
connections to grill using hose & regulator
assembly provided (pre-set for 11” water column).
✓ Unit tested and free of leaks.
✓ User informed of gas supply shut off valve location
To disconnect LPG gas cylinder:
1. Turn the burner valves off.
2. Turn the tank valve off fully.
3. Detach the regulator assembly from the tank valve by
turning the quick coupling nut counterclockwise.
Installer Final Check List
USER, PLEASE RETAIN THIS MANUAL FOR FUTURE
REFERENCE.
PROPANE CYLINDER CAUTIONS
a) Do Not store a spare LPG-gas cylinder under or
near this appliance.
b) NEVER fill the cylinder beyond 80 percent full.
c) If the information in “a” and “b” is not followed
exactly, a fire or explosion causing death or serious
injury may occur.
7
European Gas Pressures and Specifications
Nexgrill Industries, Inc.
14050 Laurelwood Pl Chino, CA 91710 USA
Model 720-0830XA
Appliance Category I
Type of Gas Butane Propane Butane, Propane or their mixture
Gas Pressure (mbar) 28-30 37 30 37 50
Main Burner Injector Size (Ø mm)
Searing Side Burner Injector Size (Ø mm)
Nominal Heat Input (Hs) (kW) Main Burner (Total) + Searing Side Burner: 20.4
Gas Consumption (g/t)
3+(28-30/37)
0.90 0.90 0.83 0.80
1.02 1.02 0.94 0.84
Butane - Main Burner (Total) + Searing Side Burner: 1458
Propane - Main Burner (Total) + Searing Side Burner: 1485
I
3B/P(30)
I
3B/P(37)
NOTE:
Use 30 mbar regulator and its corresponding injector size for butane/propane under the category I3B/P(30).
Use 30 mbar regulator and its corresponding injector size for butane under the category I3+(28-30/37).
Use 37 mbar regulator and its corresponding injector size for propane under the category I3+(28-30/37).
Use 50 mbar regulator and its corresponding injector size for butane/propane under the category I3B/P(50).
Marking on the injector indicate the injector size. For example, "0.90" means the injector size is 0.90 mm.
2531DL-0046
ID: 2531-20
I
3B/P(50)
Country Gas Type Pressure
BE, FR, IT, LU, IE, GB, GR, PT, ES, CZ, CH, SI I3+ 28-30/37 mbar
BG, CY, CZ, DK, EE, FI, HU, IS, LT, LV, MT, IT, NL, NO, RO, SK, SE, SI I3B/P 30 mbar
PL I3P 37 mbar
AT, CH, CZ, DE I3B/P 50 mbar
*Country codes are in accordance with EN ISO 3166-1:2006.
8
Leak Testing
GENERAL
Although all gas connections on the grill are leak tested at
the factory prior to shipment, a complete gas leak test check
must be performed at the installation site due to possible
mishandling in shipment, or excessive pressure
unknowingly being applied to the unit. Periodically check the
whole system for leaks following the procedures listed
below. If the smell of gas is detected at anytime you should
immediately check the entire system for leaks.
It's recommended to use the regulator complied with EN
16129:2013.
The flexible hose should approved by EN 16436:2014.
As of category I
the regulator is: butane/propane 30 mbar;
Category I
propane 37 mbar; I
butane/propane 50 mbar.
BEFORE TESTING
Make sure that all packing material is removed from the grill
including tie-down straps.
DO NOT SMOKE WHILE LEAK TESTING.
NEVER PERFORM LEAK TEST WITH AN OPEN FLAME.
Make a soap solution of one part liquid detergent and one
part water. You will need a spray bottle, brush, or rag to
apply the solution to the fittings. For the initial leak test,
make sure the LPG cylinder is 80% full.
TO TEST
1. Make sure the control valves are in the “○” position,
2. Check all connections from the LPG gas regulator and
3. If a leak is present, immediately turn off the gas supply
4. Turn the gas back on and recheck.
5. Should the gas continue to leak from any of the fittings,
3+(28-30/37)
and turn on the gas supply.
supply valve up to and including the connection to the
manifold pipe assembly (the pipe that goes to the
burners). Soap bubbles will appear where a leak is
present.
and tighten the leaky fittings.
turn off the gas supply and contact Customer Service at
+4562206336 or email ServiceDK@nexgrill.com
, the gas type and outlet pressure of
3B/P(30)
, should be: butane 28-30 mbar or
, butane/propane 37 mbar; I
3B/P(37)
3B/P(50)
GAS FLOW CHECK
Each grill burner is tested and adjusted at the factory prior
to shipment; however, variations in the local gas supply may
make it necessary to adjust the burners. The flames of the
burners should be visually checked.
Flames should be blue and stable with no yellow tips,
excessive noise or lifting. If any of these conditions exist,
check to see if the air shutter or burner ports are blocked by
dirt, debris, spider webs, etc. If you have any questions
regarding flame stability, please call customer service at
+4562206336 or email ServiceDK@nexgrill.com
ALWAYS CHECK FOR LEAKS AFTER EVERY
LPG TANK CHANGE
,
Check all gas supply fittings for leaks before
each use. It is handy to keep a spray bottle of
soapy water near the shut-off valve of the gas
supply line. Spray all the fittings. Bubbles
indicate leaks.
CAUTIONS
Place dust cap on cylinder valve outlet when the
cylinder is not in use. Only install the type of dust
cap on the cylinder valve outlet that is provided
with the cylinder valve. Other types of caps or
plugs may result in leakage of LPG.
The gas must be turned off at the supply cylinder
when the unit is not in use.
If the appliance is stored indoors the cylinder
must be disconnected and removed from the
appliance. Cylinders must be stored outdoors in
a well-ventilated area out of the reach of children.
Your grill is ready to use!
Only those parts recommended by the manufacturer should
be used on the grill.
Substitution will void the warranty. Do not use the grill until
all connections have been checked and do not leak.
9
Operating Instructions
GENERAL USE OF THE GRILL AND ROTISSERIE
Each main burner is rated at 3.5 kW. The main grill burners
encompass the entire cooking area and are side ported to
minimize blockage from falling grease and debris. The
knobs are located on the lower center portion of the control
panel. Each knob is labeled on the control panel.
USING THE GRILL
Grilling requires high heat for searing and proper browning.
Most foods are cooked at the heat setting for the entire
cooking time. However, when grilling large pieces of meat or
poultry, it may be necessary to turn the heat to the lower
setting after the initial browning. This cooks the food through
without burning the outside. Foods cooked for a long time or
foods basted with a sugary marinade may need the lower
heat setting near the end of the cooking time.
NOTE: This grill is designed to grill efficiently without the
use of lava rocks or briquettes of any kind. Heat is radiated
by the stainless steel flame tamers positioned above each
burner.
WARNING: IMPORTANT!
BEFORE LIGHTING
Inspect the gas supply hose prior to turning the gas “ON”. If
there is evidence of cuts, wear, or abrasion, it must be
replaced prior to use. Do not use the grill if the odor of gas is
present. Only the pressure regulator and hose assembly
supplied with the unit should be used.
Never substitute regulators and hose assembly for those
supplied with the grill. If a replacement is necessary, contact
the manufacturer for proper replacement. The replacement
must be that specified in the manual.
WARNING
Always keep your face and body as far away from the
burner as possible when lighting.
TO LIGHT THE MAIN BURNER
Make sure all knobs are OFF then turn on the gas supply
from the LPG (Liquid Propane) tank. Always keep your face
and body as far from the grill as possible when lighting.
To light your main burner, push and turn main burner
control knob to , at the same time, press and hold
electronic ignition button to light the burner. Once the burner
is lit, release the electronic ignition button and knob. If the
burner does not light wait 5 minutes for any excess gas to
dissipate and then retry.
TO LIGHT THE SEARING SIDE BURNER
To light the sear burner and rear burner, remove any
cooking utensils from the burner grate. Push and turn the
control knob to , at the same time, press and hold
electronic ignition button to light the burner . Once the
burner is lit, release the electronic ignition button and knob.
If the burner does not light, turn the control knob to “○”. If
the smell of gas is detected and the igniter is not functioning,
immediately turn the control knob “○”. Allow 5 minutes for
any accumulated gas to dissipate. If the sear burner and
rear burner igniter are not functioning, see the following
section for match lighting.
NOTE: The hot grill sears the food, sealing in the juices. The
more thoroughly the grill is preheated, the faster the meat
browns and the darker the grill marks.
DO NOT LEAVE THE GRILL UNATTENDED WHILE
COOKING.
WARNING: IMPORTANT!
USING THE SEARING SIDE BURNER
Inspect the gas supply hose prior to turning the gas “ON”. If
there is evidence of cuts, wear or abrasion, it must be
replaced prior to use. Do not use the side burner if the odor
of gas is present.
Lighting Instructions
Keep a spray bottle of soapy water near the gas
supply valve and check the connections before each
use.
Do not attempt to light the grill if odor of gas is
present. Contact our customer service: +4562206336
or email ServiceDK@nexgrill.com
Each burner is adjusted prior to shipment; however,
variations in the local gas supply may make minor
adjustments necessary.
Match Light
1. If the burner will not light after several attempts
then the burner can be match lit, before using the
match allow 5 minutes for any accumulated gas to
dissipate.
2. Clip a match on one end of the lighting rod.
3. Light match.
4. Hold lighting rod and insert lighted match right
next to the burner ports or ceramic file.
5. Push and turn the designated control knob to .
6. Burner should ignite immediately.
10
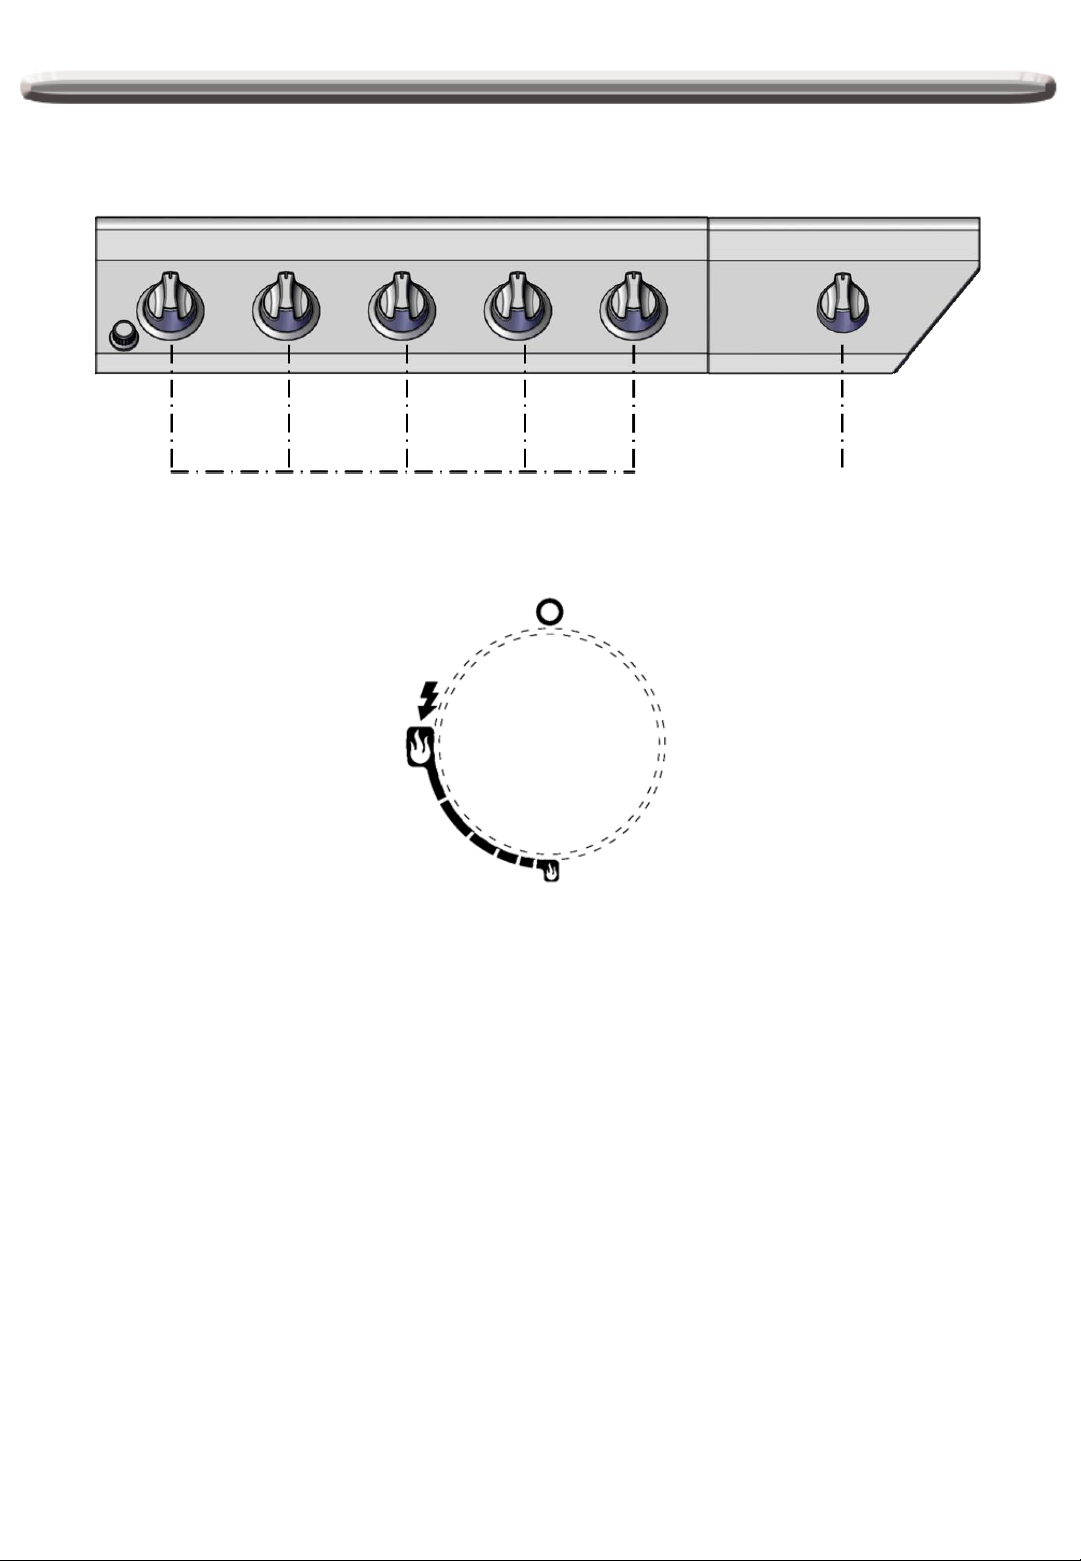
Component Identification
Note: Remove all packaging, including straps, before using the grill
Main Burner Searing Side Burner
Control Knob, Label
11
Care and Maintenance
STAINLESS STEEL
There are many different stainless steel cleaners available.
Always use the mildest cleaning procedure first, scrubbing
in the direction of the grain. Do not use steel wool as it will
scratch the surface. To touch up noticeable scratches in the
stainless steel, sand very lightly with dry 100 grit emery
paper in the direction of the grain. Specks of grease can
gather on the surfaces of the stainless steel and bake on to
the surface and give the appearance of rust. For removal
use a mild abrasive pad in conjunction with a stainless steel
cleaner.
GRILL GRATE
The easiest way to clean the grill is immediately after
cooking is completed and after turning off the flame. Wear a
barbeque mitt to protect your hand from the heat and steam.
Dip a barbeque brush in water and scrub the hot grill. Dip
the brush frequently in the bowl of water. Steam, created as
water contacts the hot grill, assists the cleaning process by
softening any food particles. If the grill is allowed to cool
before cleaning, cleaning will be more difficult.
ENSURE THAT THE GAS SUPPLY AND THE KNOBS
ARE IN THE “○” POSITION. MAKE SURE THE RANGE
TOP BURNER IS COOL BEFORE REMOVAL.
GRILL BURNERS
Extreme care should be taken when moving a burner as it
must be correctly centered on the orifice before any attempt
is made to relight the grill. Frequency of cleaning will
depend on how often you use the grill.
MAIN BURNER CLEANING
Ensure the gas supply is off and the knobs are in the “○”
position. Make sure the grill is cool. Clean the exterior of the
burner with a wire brush. Clear stubborn scale with a metal
scraper. Clear any clogged ports with a straightened paper
clip. Never use a wooden toothpick as it may break off and
clog the port. Please note if insects or other obstructions are
blocking the flow of gas through the burner, and if so you
will need to contact our customer service: +4562206336 or
email ServiceDK@nexgrill.com
GREASE TRAY CLEANING
The grease tray should be emptied and wiped down
periodically and wash with a mild detergent and warm water
solution. A small amount of sand may be placed in bottom
of grease tray to absorb the grease. Check the grease tray
frequently, do not allow excess grease to accumulate and
overflow out of the grease tray.
Warning: If you wish to replace main burner, we
strongly recommend that you hire a professionally
trained technician to replace it. Please understand that
we will not be responsible for any liability, personal
injury, or property damage resulting from an
improperly assembled burner.
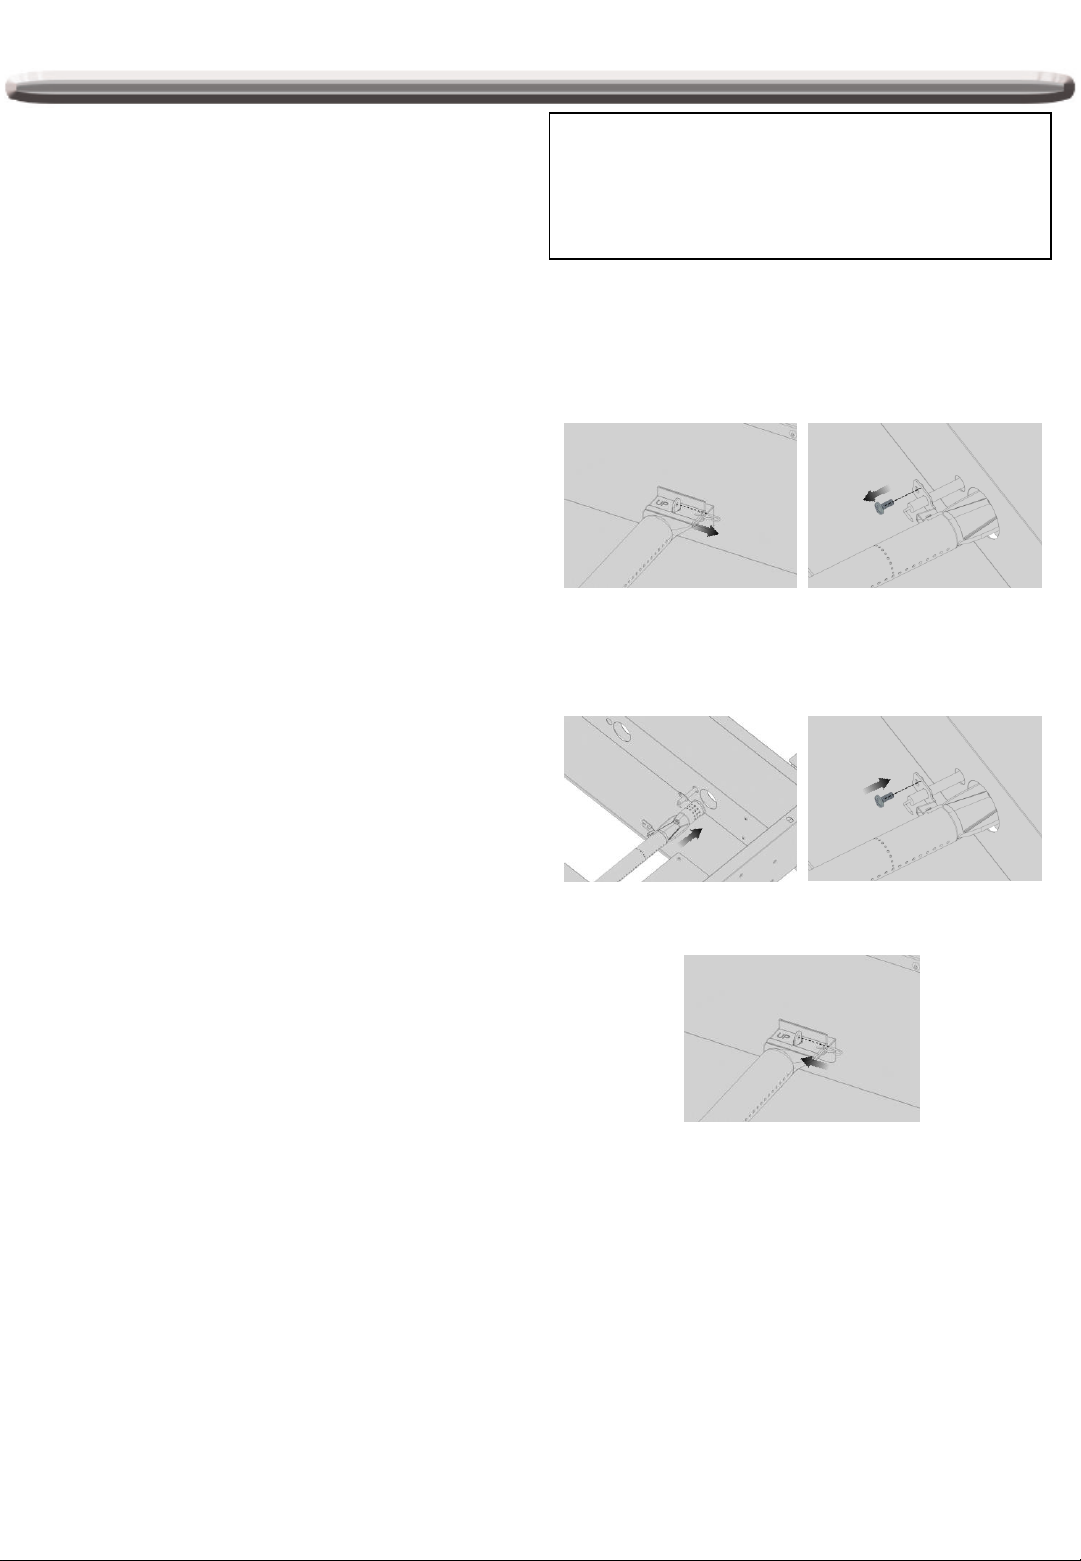
HOW TO REPLACE MAIN BURNER
Step 1. Remove the main burner “R” pin on the back wall
of fire box by using needle nose pliers. Use a flathead
screwdriver to remove burner pin cover, then remove the
burner on the front wall of fire box, as shown below.
Step 2. Insert the burner onto the orifice and secure the
burner pin cover on the burner, as shown below, make
sure burner hole aim at orifice .
Step 3. Secure the main burner on the back wall of fire box
with “R” Pin.
CAUTION
1. Keep outdoor cooking gas appliance area clear and
free from combustible materials, gasoline and other
flammable vapors and liquids.
2. Do not obstruct the flow of combustible and ventilation
air.
3. Keep the ventilation openings of the cylinder enclosure
free and clear from debris.
12

Troubleshooting
SPIDER AND INSECT WARNING
Checking and cleaning burner/ venturi tubes for insects and
insect nests. A clogged tube can lead to a fire beneath the
grill.
Although an obstructed burner tube is not the only cause of
“FLASH-BACK”, it is the most common cause.
To reduce the chance of “FLASH-BACK”, you must clean the
burner tubes before assembling your grill, and at least once a
month in late summer or early fall when spiders are most
active. Also perform this burner tube cleaning procedure if
your grill has not been used for an extended period of time.
WHEN TO LOOK FOR SPIDERS
You should inspect the burners at least once a year or
immediately after any of the following conditions occur:
1. The smell of gas in conjunction with the burner flames
appearing yellow.
2. The grill does not reach temperature.
3. The grill heats unevenly.
4. The burners make popping noises.
BEFORE CALLING FOR SERVICE
If the grill does not function properly, use the following check
list before contacting your dealer for service. You may save
the cost of a service call.
PREHEATING: The grill lid should be in a closed position
during the preheat time period. It is necessary to preheat the
grill before cooking certain foods, depending on the type of
food and the cooking temperature. Food that requires a high
cooking temperature needs a pre-heat
period of five minutes; food that requires a lower cooking
temperature needs only a period of two to three minutes.
COOKING TEMPERATURES
High setting-Use this setting for fast warm-up, for searing
steaks and chops, and grilling.
Low setting-Use this setting for all roasting, baking, and when
cooking very lean cuts such as fish.
These temperatures vary with the outside temperature and
the amount of wind.
Cooking with in-direct Heat: You can cook poultry and large
cuts of meat slowly to perfection on one side of the grill by
indirect heat from the burner on the other side. Heat from the
lit burner circulates gently throughout the grill, cooking the
meat or poultry without any direct flame touching it. This
method greatly reduces flare-ups when cooking extra fatty
cuts, because there is no direct flame to light the fats and
juices that drip down during cooking.
CAUTION: If burners go out during operation, close gas
supply at source, and turn all gas valves off. Open lid and
wait five minutes before attempting to relight (this allows
accumulated gas fumes to clear).
CAUTION: Should a grease fire occur, close gas supply at
source, turn off all burners and leave lid closed until fire is out.
CAUTION: DO NOT attempt to disconnect any gas fitting
while your grill is in operation. As with all appliances, proper
care and maintenance will keep them in top operating
condition and prolong their life. Your gas gill is no exception.
CAUTION: Side burner lid will get hot if used when lid is
closed.
PROBLEM SOLUTION
When attempting to light my grill, it will
not light immediately.
Rotisserie burner will not light when the
igniter button is pushed.
Regulator makes noise. Vent hose on the regulator may be plugged or regulator may be faulty. Ensure
Full size cover does not fit the grill. Cover may be incorrect for your grill. It may be a tight fit.
Make sure you have a spark while you are trying to light the burner (if no
spark) . Check if the battery is installed properly.
Ensure that the wire is connected to the electrode assembly.
Clean wire (s) and / or electrode with rubbing alcohol and a clean swab. Wipe
with a clean cloth.
Check to see if the other burners operate. If so. Check the gas orifice on the
malfunctioning burner for an obstruction.
Check to see if debris is blocking the electrode.
Check to see if there is a spark that jumps to the burner from the electrode. If no
spark is seen, check the battery located inside the igniter box. To open turn
counter
Does the infrared back burner light when attempting to light with a match ? If not,
check to ensure the gas is on.
the vent hole on the regulator is not obstructed. Clear the hole, close the gas
control valves. Wait ten minutes and re-start.
Check your flames for proper performance. If the flames are not correct,
replace regulator.
Ensure the cover is the correct length for your grill.
Measure it left to right. Compare to the grill’s measurement.
Compare the location and size of the hood portion of the cover to your grill.
Spread the cover and allow it to relax, preferably in warm sunlight or in a warm
room.
For grill with a side shelf bunch the cover like a sock, put on left to right.
13

PROBLEM SOLUTION
Rotisserie motor will not turn Ensure the motor is connected to a properly grounded power supply.
Ensure the on / off switch is in the on position.
Ensure that the spit is fully inserted into the rotisserie motor.
Ensure that the load does not exceed the 18 kg (40 pounds) operational
capacity.
Ensure that there is no encumbrance or drag.
Grill only heats to 93-149°C
/ 200-300°F.
Grill takes a long time to preheat.
Burner flames are not light blue. Too much or not enough air for the flame.
HOW TO ORDER REPLACEMENT PARTS
To make sure you obtain the correct replacement part (s) for
your gas grill, please refer to the parts list on page 21. The
following information is required to assure getting the correct
part. Please note the shipping cost for the delivery of any
replacement parts will be on yourself.
• Gas grills model number (see data sticker on grill).
• Part number of replacement part needed.
• Description of replacement part needed.
• Quantity of parts needed.
Check to see if the fuel hose is bent or kinked.
Make sure the grill area is clear of dust.
Make sure the burner and orifices are clean.
Check for spiders and insects.
The regulator has a safety device that restricts the flow of gas in the event of a
leak. This safety device can be triggered without a gas leak. To reset the
safety device, turn off all burners and close the LPG tank valve. Disconnect the
regulator from the LPG tank and wait one minute. Reconnect the regulator to
the LPG tank and slowly open the LPG tank valve until the valve is fully open.
Light all burners and observe the temperature.
Normal preheat 260-316°C / 500-600°F, takes about 10-15 min. Cold weather
and wind may effect your preheat time.
If you are using volcanic rock or briquettes they can increase the preheat time
and maximum temperature.
Elevation is the principal cause, however cold weather can affect the mixture.
Burner adjustment may be required.
Grill is in a windy location.
To obtain replacement parts, contact our customer
service: +4562206336 or email
ServiceDK@nexgrill.com
IMPORTANT
Use only factory authorized parts. The use of any part
that is not factory authorized can be dangerous. This
will also void your warranty.
Keep this assembly and operating instruction manual
for convenient referral, and for replacement parts
ordering.
Ordering Parts
The doneness of meat, whether rare, medium, or well done,
is affected to a large degree by the thickness of the cut.
Expert chefs say it is impossible to have a rare doneness
with a thin cut of meat.
The cooking time is affected by the kind of meat, the size and
shape of the cut, the temperature of the meat when cooking
begins, and the degree of doneness desired.
When defrosting meats it is recommended that it be done
overnight in the refrigerator as opposed to a microwave. This
in general yields a juicier cut of meat.
Grill Hints
Use a spatula instead of tongs or a fork to turn the meat, as
a spatula will not puncture the meat and let the juices run out.
To get the juiciest meats, add seasoning or salt after the
cooking is finished on each side and turn the meat only once
(juices are lost when the meat is turned several times). Turn
the meat just after the juices begin to bubble to the surface.
Trim any excess fat from the meat before cooking. To
prevent steaks or chops from curling during cooking, slit the
fat around the edges at 50.8 mm (2-in.) intervals.
DO NOT LEAVE THE GRILL UNATTENDED WHILE
COOKING.
14

Grill Cooking Chart
FOOD
Vegetables
Fresh Beets
Carrots
Turnips
Onion
Potatoes Sweet
White
Frozen Asparagus
Peas Green beans
Sprouts
French fries Medium 15 to 30 minutes
Meats
Beef
Hamburgers
WEIGHT OR
THICKNESS
1.3mm / 1/2 in.
slices
Whole
170 to 226g
/ 6 to 8 oz
1-2 cm
/ 1/2 - 3/4 in.
HEAT
SETTING
Medium 12 to 20 minutes
Medium 8 to 20 minutes
Medium
High
Medium 15 to 30 minutes
Medium 10 to 18 minutes
APPROXIMATE
TIME
40 to 60 minutes
45 to 60 minutes
SPECIAL INSTRUCTIONS
AND TIPS
Slice. Dot with butter or margarine. Wrap in
heavy -duty foil. Grill, turning occasionally.
Grill, turning once. Brush occasionally with
melted butter or margarine.
Season with Italian dressing, butter, or
margarine.
Wrap individually in heavy - duty foil. Grill,
rotating occasionally.
Dot with butter or margarine.
Wrap in heavy -duty foil. Grill, turning
occasionally.
Place in aluminum foil pan.
Grill, stirring occasionally
Grill, turning once when juices rise to the
surfaces.
Do not leave hamburgers unattended since a
flare-up could occur quickly. Cook to internal
temperature of 160 degrees
Tenderloin High 8 to 15 minutes
Rare 2.5 cm / 1 in. High 8 to 14 minutes
Well - done
Lamb
Chop & Steaks
Rare
Medium
Pork
Chops
Well -done
1.3 cm / 1/2 in.
2.5 cm / 1 in.
2.5 - 3.8 cm
/ 1-1/2 in.
2.5 cm / 1 in.
2.5 - 3.8 cm
/ 1-1/2 in.
2.5 cm / 1 in.
2.5 - 3.8 cm
/ 1-1/2 in.
2.5 cm / 1 in.
2.5 - 3.8 cm
/ 1-1/2 in.
2.5 cm / 1 in. Medium
2.5 - 3.8 cm
/ 1-1/2 in.
High
Medium
to High
Medium
Medium
Medium
to
High
Medium
to
High
Medium 30 to 40 minutes
11 to 18 minutes
12 to 22 minutes
16 to 27 minutes
18 to 30 minutes
16 to 35 minutes
10 to 15 minutes
14 to 18 minutes
13 to 20 minutes
18 to 25 minutes
20 to 30 minutes
Trim edges. Grill, turning onceMedium
Trim edges. Grill, turning once.
Trim edges. Grill, turning once. Cook to
desired doneness.
15
FOOD
WEIGHT OR
THICKNESS
HEAT
SETTING
APPROXIMATE
TIME
SPECIAL INSTRUCTIONS
AND TIPS
Ribs Medium
Ham steaks
(precooked)
Hot dogs Low 5 to 10 minutes Slit skin. Grill, turning once.
2.5 cm / 1 in.
slices
Poultry 900 to 1400 g
/ 2 to 3 lb
Breasts
well –done
Fish and
Seafood
Halibut
Salmon
Swordfish
Whole
Catfish
Rainbow trout
2 to 2.5 cm
/ 3/4 to 1 in.
113 to 226 g
/ 4 to 8 oz
High 4 to 8 minutes
Low
or
Medium
Medium
Medium
to
High
Medium
to
High
30 to 40
minutes
Up to 1 hour
30 to 45
minutes Marinate as desired.
8 to 15 minutes
12 to 20
minutes
During last few minutes brush with barbecue
Grill, turning once. Brush with melted butter,
Grill, turning once. Brush with melted butter,
margarine or oil. Brush with melted butter
Grill, turning occasionally.
sauce. Turn several times.
Trim edges. Grill, turning once.
Place skin side up. Grill, turning and
brushing frequently with melted butter,
margarine, oil or marinade.
margarine or oil to keep moist.
and lemon juice.
16

Grill Recipe Suggestion
BBQ SALMON
2 large salmon steaks
2 tbs. Oil
Salt & pepper
2 oz. thin bacon slices
2 tbs. Butter
1 tbs. Lemon juice
Spring of parsley
Lemon wedges
Preheat the BBQ. Brush the steaks with
oil and season with salt and pepper.
Place on BBQ grill and cook for 10
minutes, turning steaks over halfway
cooking time.
Meanwhile, fry the bacon in a pan on
the side burner. Drain on paper towels.
Melt the butter in a small saucepan
taking care not to discolor it. Arrange
the fish and bacon on serving plates.
Pour the butter over and sprinkle with
lemon juice. Garnish with parsley
springs and lemon wedges. Serve with
boiled potatoes tossed in butter and
sprinkled with chopped parsley and a
crisp lettuce salad.
Note: Substitute catfish, halibut or cod
for salmon.
BAKED CHILI CORN
6 medium ears corn, husked
3 tbs. Butter or margarine, melted
Dash ground cumin
Dash ground coriander
About ½ hour before cooking, turn the
butter on for grill. Place each corn on a
heavy-duty foil. In a bowl, combine
remaining ingredients. Mix well. Brush
1-1/2 tsp. Butter mixture over each ear.
Close foil and fold up ends to seal.
Place on grill. Cook, turning packets
occasionally 10 to 12 minutes or until
cooked through.
TANGY SEAFOOD KABOBS
1 lb. Large shrimp, shelled & deveined
¾ lbs. sea scallops
2/3 c. chili sauce
¼ c. cider vinegar
butter and sprinkled with chopped
parsley and a crisp lettuce salad
In medium bowl, combine shrimp and
scallops. In small bowl combine chili
sauce and next six ingredients. Pour
over seafood. Toss to coat. Cover,
refrigerate 2 hours.
3 tbs. chopped parsley
1 tbs. vegetable oil
1 tbs. Worcestershire sauce
½ tsp. prepared horseradish
1 cove garlic, minced
1 20 oz. Can pineapple chunks in juice,
drained half hour before cooking, turn
the burner to the grill on full. Drain
seafood reserving marinade. On each
of twelve 10” skewers, thread 2 shrimps
and 2 scallops, alternating with
pineapple chunks. Place skewers on
grill. Cook 7-10 minutes, often basting
and turning.
PORK CHOPS
4 Pork chops
Marinade
1 large onion
2 tbs. lemon juice or vinegar
2 tbs. oil
½ tsp. powdered mustard
2 tsp. Worcestershire sauce
½ tsp. freshly ground black pepper
1 tsp. sugar
½ tsp. paprika
1 clove garlic
Peel, grate onion, and add rest of the
ingredients except the pork chops. Mix
well. Pour over chops and marinate one
hour in a cool place. Turn the BBQ grill
on full. Heat 10 minutes.
BBQ the chops brushing with the
marinade occasionally. Serve with
mixed salad, dressed with vinaigrette
flavored with fresh dill.
BARBECUED LONDON BROIL
4 to 6 servings
¾ c. Italian dressing
1 tsp. Worcestershire sauce
1 tsp. dry mustard
¼ tsp. thyme, crushed
1 medium onion, sliced
1 pound flank steak, scored
2 tbs. butter, melted
Combine first 4 ingredients, add onion
and marinade flank steak with it.
Refrigerate at least 4 hours or overnight.
Remove steak and grill on your
preheated BBQ grill. Grill 5 to 7 minutes
on each side basting frequently with the
marinade. In the meantime sauté
onions from the marinade in butter in a
skillet on your side burner for 3 minutes.
To serve, slice steak diagonally into
thin slices, sprinkle onions over top.
Garnish with vegetable kabobs.
BARBECUED POTATOES and
CHEESE
1-1/2 cups shredded cheddar cheese
1 can (10-3/4 oz.) condensed cream of
mushroom soup
1/3 cup milk
2 tbs. barbecue sauce
¼ tsp. oregano
¼ tsp. salt
1/8 tsp. pepper
4 cups thinly sliced potatoes (4
medium-sized potatoes)
Preheat grill. Combine cheese,
condensed soup, milk, BBQ sauce,
oregano, salt and pepper in a large
mixing bowl. Stir in potatoes until well
coated. Turn into well buttered1-1/2
quart rectangular baking dish. Cover
dish with aluminum foil. Bake covered
25 minutes on medium with the lid of
your BBQ grill closed. Remove foil and
continue baking 15 minutes longer or
until potatoes are tender. Let stand 5
minutes before serving.
VEGETABLE KABOBS
3 medium-sized zucchini
12 cherry tomatoes
12 fresh mushrooms
Grated Parmesan cheese
Parboil whole zucchini 5 minutes on
your side burner or until just tender.
Drain and cut into ½ inch slices. Thread
zucchini, tomatoes and mushrooms
alternately on each of six skewers.
Brush with marinade made of Italian
dressing, Worcestershire sauce,
mustard and thyme. Grill 5 to 7 minutes
turning and basting occasionally.
Sprinkle liberally with Parmesan
cheese.
FAJITAS
1-1/2 lb. flank steak or boned chicken
breasts
2 tbs. oil
½ cup limejuice
½ tsp. salt
½ tsp. celery salt
¼ tsp. garlic powder
½ tsp. pepper
¼ tsp. oregano
¼ tsp. cumin
Flour tortillas lemon
Pound flank steak to ¼ inch thickness
or flatten chicken breasts. Mix oil, lime
juice and seasonings in a zip lock bag.
Add meat and shake bag to coat the
meat. Refrigerate overnight or at least 6
to 8 hours. Wrap tortillas in foil.
Remove meat from marinade. Cook on
a preheated gas grill for 5 to 8 minutes
on each side. While meat is cooking,
heat tortillas on grill. Slice meat across
grain in thin slices. Place on hot platter.
Squeeze lemon juice over. Wrap meat
and any of the following toppings in
tortillas: chopped tomatoes, guacamole,
sour cream, taco sauce.
17

FAJITAS
1-1/2 lb. flank steak or boned chicken
breasts
2 tbs. oil
½ cup limejuice
½ tsp. salt
½ tsp. celery salt
¼ tsp. garlic powder
½ tsp. pepper
¼ tsp. oregano
¼ tsp. cumin
Flour tortillas lemon
Pound flank steak to ¼ inch thickness
or flatten chicken breasts. Mix oil, lime
juice and seasonings in a zip lock bag.
Add meat and shake bag to coat the
meat. Refrigerate overnight or at least 6
to 8 hours. Wrap tortillas in foil. Remove
meat from marinade. Cook on a
preheated gas grill for 5 to 8 minutes on
each side. While meat is cooking, heat
tortillas on grill. Slice meat across grain
in thin slices. Place on hot platter.
Squeeze lemon juice over. Wrap meat
and any of the following toppings in
tortillas: chopped tomatoes, guacamole,
sour cream, taco sauce.
BEEF AND LAMB KABOBS
Serve 4
½ lb. boneless sirloin or beef cut into 1”
cubes
½ lb. boneless loin of lamb cut into 1”
cubes
2/3 c. water, divided
¼ c. chopped onion
2 tbs. soy sauce
¼ c. vegetable oil, divided
1 tbs. dark brown sugar
1 tbs. fresh lemon juice
2 cloves garlic, minced
¼ tsp. ground cumin
¼ tsp. ground coriander
¼ tsp. ground turmeric
1/8 tsp. ground red pepper
1/8 tsp. ground ginger
1 red pepper cut into chunks
1 large banana, cut into chunks
8 small mushrooms
1/3 c. smooth peanut butter
About ½ hour before cooking, turn the
butter on for grill. Place each corn on a
heavy-duty foil. In a bowl, combine
remaining ingredients. Mix well. Brush
1-1/2 tsp. Butter mixture over each ear.
Close foil and fold up ends to seal.
Place on grill. Cook, turning packets
occasionally 10 to 12 minutes or until
cooked through. Bring marinade to boil
on the side burner in a saucepan. Add
remaining 1/3 c. water and peanut
butter. Stir to blend. Heat through. If
sauce gets too thick, add 1 tbs. water.
Serve sauce with kabobs.
EGGPLANT CAVIAR
1 large eggplant
2 tbs. olive oil
2 tbs. wine vinegar
2 tbs. finely chopped onion
½ clove garlic, minced
1 medium tomato, chopped salt and
pepper
Roast eggplant on gas grill over
medium flame, turning occasionally until
thoroughly cooked. This may take 30
minutes. Remove from grill and cool for
handling. Strip off the skin and chop
eggplant finely. Add all the seasonings.
Chill thoroughly and serve on toast.
CHICKEN TANDOORI STYLE
8 large chicken thighs or drumsticks
1 c. plain nonfat yogurt
½ c. lemon juice
2 tsp. salt
½ tsp. cayenne
½ tsp. black pepper
½ tsp. crushed garlic
½ tsp. grated ginger
1 tbs. corn oil
Combine all the ingredients in a large
mixing bowl and marinate the chicken
for 8 hours in the refrigerator. Drain the
chicken and spread on the spit running
the rod on the fleshier side of the bone.
Roast using the rotisserie burner. Cook
on medium high heat for 40 minutes
basting occasionally with the remainder
of the marinade mixture. Serve with
sliced onions and lemon wedges.
SPARE RIBS
Marinade:
1 c. soy sauce
½ c. honey
½ c. vinegar
½ c. dry sherry
2 tsp. chopped garlic
2 tsp. sugar
1 c. water
1 chicken bouillon cube
1 can beer for basting sauce
Marinade ribs for 3 hours. Use
marinade for basting by adding beer to
it. Place pan under the ribs and baste
frequently. To cook ribs select lean,
meaty ribs and accordion pleat them
with your spit. Slide four prong meat
hook down the length of spit and tighten.
At the beginning of the rack and to its
center, penetrate the second rib with
the pointed end of the spit and push it
between the meat. Skip a couple and
continue the process until the entire
rack is accordion pleated. Fasten the
second meat hook into the rack. Turn
your rotisserie burner on high. Roast for
50 minutes or until done.
PORK ROAST
Apple cider vinegar basting sauce:
1 c. apple cider vinegar
6 oz. water
½ stick butter
Salt, pepper, parsley and garlic
seasoning
2 oz. lemon juice
10 lbs. pork roast
Time: 1-1/2 hours to 2 hours
Bring pork to room temperature before
placing it on the spit rod. Place on the
rod and test for balance. Light rotisserie
burner. Turn control knob to high. Use
the above basting sauce for rotissing.
TURKEY
12 lb. turkey
Beer basting sauce:
1 can beer
12 oz. water
1 stick butter
1 tsp. salt
1 tsp. pepper
½ tsp. garlic flakes
1 tsp. parsley
Thaw the bird completely. Wash inside
out. Securely tie the legs and wings.
Light rotisserie burner. Turn to high.
Combine all the ingredients for basting
sauce in a shallow pan. Place it under
the turkey 15 to 20 minutes. Cook for
approximately 3 hours. The basting
sauce combined with turkey drippings
makes a delicious gravy.
18

Limited Warranty
The manufacturer warrants to the original consumer-purchaser only that this product (Model #720-0830XA) shall be free from defects in
workmanship and materials after correct assembly and under normal and reasonable home use for the periods indicated below beginning
on the date of purchase. The manufacturer reserves the right to require photographic evidence of damage, or that defective parts be
returned, postage and/or freight pre-paid by the consumer, for review and examination. Nexgrill’s obligation is limited to repair,
replacement, or depreciated value, at the option of Nexgrill.
• TUBE BURNERS: 5 years LIMITED warranty against perforation.
• COOKING GRIDS and FLAME TAMERS: 2 year LIMITED warranty; does not cover dropping, chipping, scratching, or surface damage.
• STAINLESS STEEL PARTS: 2 year LIMITED warranty against perforation; does not cover cosmetic issues like surface corrosion,
scratches and rust.
• ALL OTHER PARTS: 2 year LIMITED warranty (Includes, but not limited to, valves, frame, housing, cart, control panel, igniter, regulator,
hoses) *Does not cover chipping, scratching, cracking surface corrosion, scratches or rust.
Upon consumer supplying proof of purchase as provided herein, Manufacturer will repair or replace the parts which are proven defective
during the applicable warranty period. Parts required to complete such repair or replacement shall be free of charge to you except for
shipping costs, as long as the purchaser is within the warranty period from the original date of purchase. The original consumer-purchaser
will be responsible for all shipping charges of parts replaced under the terms of this limited warranty. This limited warranty is applicable in
the United States and Canada only, is only available to the original owner of the product and is not transferable. Manufacturer requires
reasonable proof of your date of purchase. Therefore, you should retain your sales receipt and/or invoice. If the unit was received as a gift,
please ask the gift-giver to send in the receipt on your behalf, to the below address. Defective or missing parts subject to this limited
warranty will not be replaced without registration or proof of purchase. This limited warranty applies to the functionality of the product
ONLY and does not cover cosmetic issues such as scratches, dents, corrosions or discoloring by heat, abrasive and chemical cleaners or
any tools used in the assembly or installation of the appliance, surface rust, or the discoloration of stainless steel surfaces. Surface rust,
corrosion, or powder paint chipping on metal parts that does not affect the structural integrity of the product is not considered a defect in
workmanship or material and is not covered by this warranty. This limited warranty will not reimburse you for the cost of any
inconvenience, food, personal injury or property damage. If an original replacement part is not available, a comparable replacement part
will be sent. You will be responsible for all shipping charges of parts replaced under the terms of this limited warranty.
MANUFACTURER WILL NOT PAY FOR:
• Service calls to your home.
• Repairs when your product is used for other than normal, single-family household or residential use.
• Damage resulting from accident, alteration, misuse, lack of maintenance/cleaning, abuse, fire, flood, acts of God, improper
installation, and installation not in accordance with electrical or plumbing codes or misuse of product.
• Any food loss due to product failures.
• Replacement parts or repair labor costs for units operated outside the United States or Canada.
• Pickup and delivery of your product.
• Postage fees or photo processing fees for photos sent in as documentation.
• Repairs to parts or systems resulting from unauthorized modifications made to the product.
• The removal and/or reinstallation of your product.
• Shipping cost, standard or expedited, for warranty/non warranty and replacement parts.
DISCLAIMER OF IMPLIED WARRANTIES; LIMITATION OF REMEDIES
Repair or replacement of defective parts is your exclusive remedy under the terms of this limited warranty. Manufacturer will not be
responsible for any consequential or incidental damages arising from the breach of either this limited warranty or any applicable implied
warranty, or for failure or damage resulting from acts of God, improper care and maintenance, grease fire, accident, alteration,
replacement of parts by anyone other than manufacturer, misuse, transportation, commercial use, abuse, hostile environments (inclement
weather, acts of nature, animal tampering), improper installation or installation not in accordance with local codes or printed manufacturer
instructions.
THIS LIMITED WARRANTY IS THE SOLE EXPRESS WARRANTY GIVEN BY THE MANUFACTURER. NO PRODUCT
PERFORMANCE SPECIFICATION OR DESCRIPTION WHEREVER APPEARING IS WARRANTED BY MANUFACTURER EXCEPT TO
THE EXTENT SET FORTH IN THIS LIMITED WARRANTY. ANY IMPLIED WARRANTY PROTECTION ARISING UNDER THE LAWS
OF ANY STATE, INCLUDING IMPLIED WARRANTY OF MERCHANTABILITY OR FITNESS FOR A PARTICULAR PURPOSE OR USE,
IS HEREBY LIMITED IN DURATION TO THE DURATION OF THIS LIMITED WARRANTY.
Neither dealers nor the retail establishment selling this product has any authority to make any additional warranties or to promise
remedies in addition to or inconsistent with those stated above. Manufacturer's maximum liability, in any event, shall not exceed the
documented purchase price of the product paid by the original consumer. This warranty only applies to units purchased from an
authorized retailer and or re-seller. NOTE: Some states do not allow an exclusion or limitation of incidental or consequential damages, so
some of the above limitations or exclusions may not apply to you; this limited warranty gives you specific legal rights as set for herein. You
may also have other rights which vary from state to state.
If you wish to obtain performance of any obligation under this limited warranty, you should write to:
All consumer returns, parts orders, general questions, and troubleshooting assistance can be acquired by contacting our customer service:
+4562206336 or email ServiceDK@nexgrill.com
Nexgrill Customer Relations
14050 Laurelwood PI
Chino, CA 91710
19
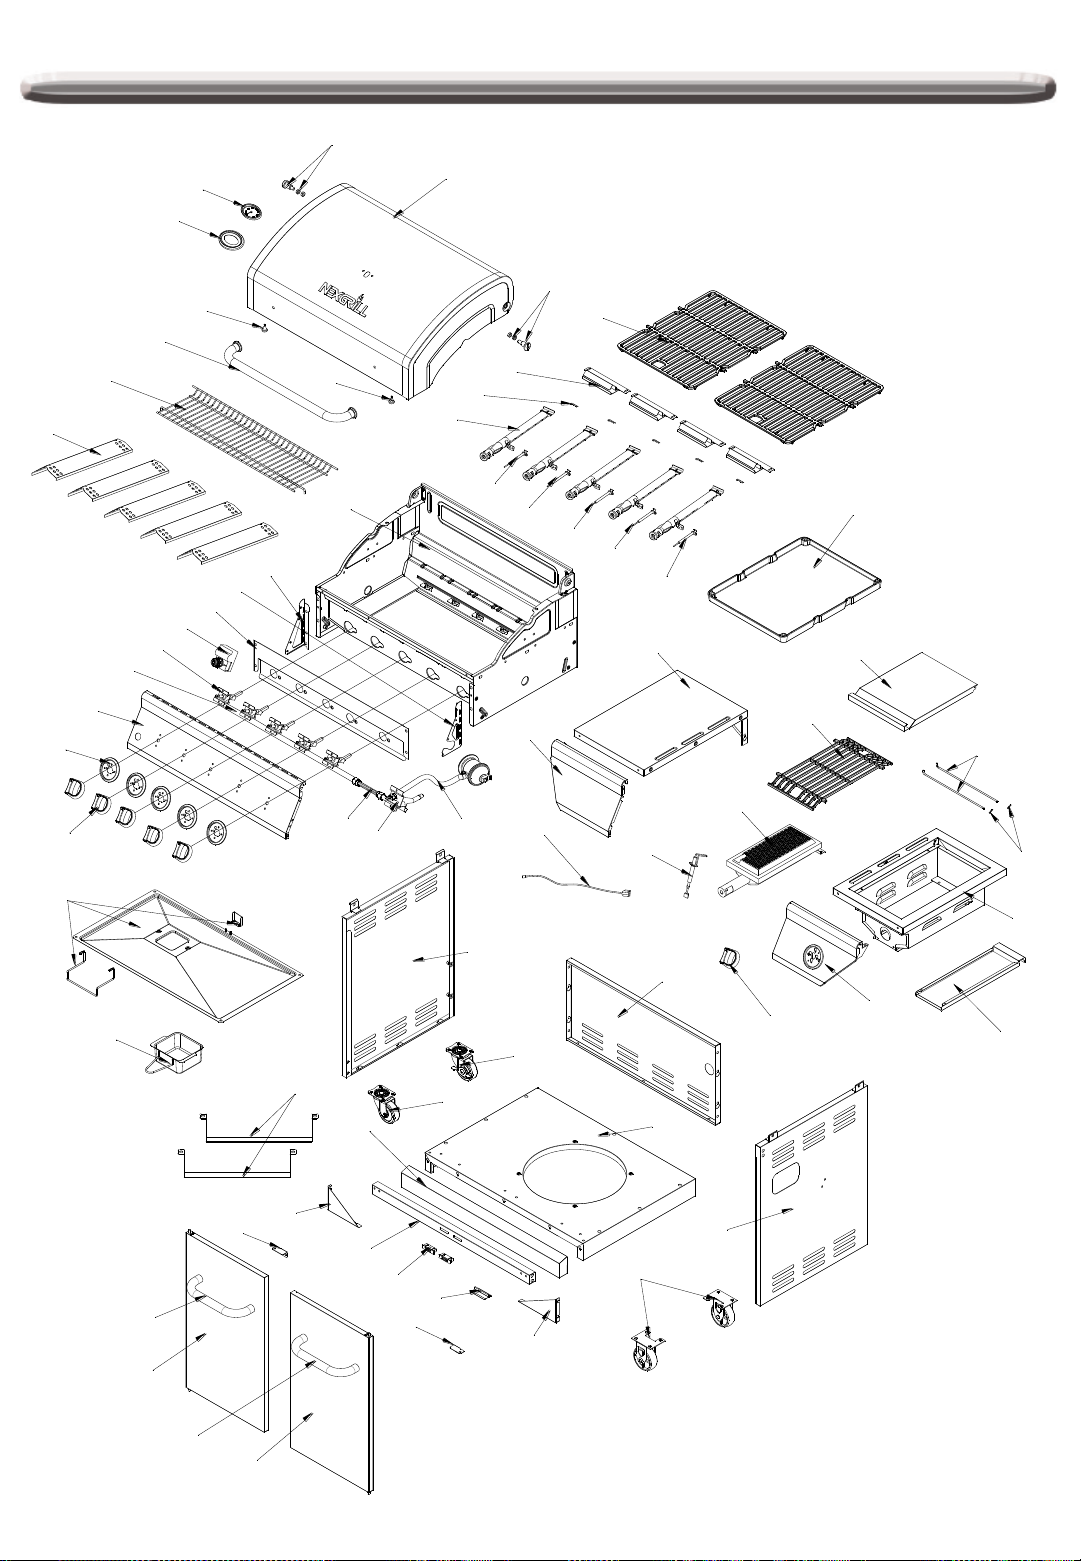
Parts Diagram
1
2
2
3
4
5
5
6
7
8
9
11
12
13
14
15
16
17
18
20
21
24
25
26
27
28
29
30
31
32
33
34
36
35
37
38
39
40
41
42
43
19
44
45
46
47
48
49
50
51
52
53
54
55
56
57
62
63
64
62
22
23
60
61
10
12
59
58
20
Parts List
No. Part (Description)
1 Main Lid
2 Main Lid Screw
3 Temperature Gauge
4 Temperature Gauge Housing
5 Hood Buffer A
6 Main Lid Handle Assembly
7 Warming Rack
8 Flame Tamer
9 Cooking Grids
10 Cooking Griddle
11 Flame Channel
12 Burner Pin Assembly 2 7 39 Sear Burner
Warranty
coverage
(year)
2
2
2
2
2
2
2
2
2
2
2
QTY No. Part (Description)
1 28 Bezel
2 29 Main Burner Control Knob
1 30 Grease Tray Assembly
1 31 Grease Box
2 32 Side Burner Flex Gas Line
1 33
1 34 LP Regulator
5 35 Side Shelf Panel, Left
2 36 Side Shelf, Left
1 37 Side Burner Lid
4 38 Side Burner Cooking Grid
Side Burner Gas Valve
Assembly
Warranty
coverage
(year)
2
2
2
2
2
2
2
2
2
2
2
2
QTY
5
5
1
1
1
1
1
1
1
1
1
1
13 Main Burner 5 5 40 Side Burner Igniter
14 Main Burner Igniter Wire A
15 Main Burner Igniter Wire B
16 Main Burner Igniter Wire C
17 Main Burner Igniter Wire D
18 Main Burner Igniter Wire E
19 Sear Burner Igniter Wire 2 1 46 Side Panel, Left
20 Main Burner Bowl Assembly
21 Left Panel of Main Control Panel
Right Panel of Main Control
22
Panel
23 Control Panel Heat Shield
24 Pulse Igniter Module
25 Main Gas Valve
2
2
2
2
2
Non-
replaceable
2
2
2
2
2
1 41 Side Burner Lid Hinge Rod Pin
1 42 Side Burner Firebox
1 43 Side Burner Control Panel
1 44 Rear Panel
1 45 Bottom Panel
1 47 Swivel Caster with Brake
1 48 Swivel Caster
1
1 50 Trim Piece of Bottom Panel
1 51 Triangle Bracket, Left
5
49
Gas Tank Bracket
52 Cart Frame, Front
2
2
2
2
2
2
2
2
2
2
2
2
2
1
2
1
1
1
1
1
1
1
2
1
1
1
26 Main Manifold
27 Main Control Panel 2 1
2 1
53 Door Magnet
54
21
Door Iron Piece
2
2
2
1

Parts List
No. Part (Description)
55 Triangle Bracket, Right 2 1 60 Door Hinge Fixed Plate, Left 2 1
56 Caster 2 2 61 Door Hinge Fixed Plate, Right 2 1
57 Side Panel, Right 2 1 62 Door Handle Assembly 2
58 Side Burner Grease Box 2 1 63 Door, Left 2 1
59 Side Burner Knob 2 1 64 Door, Right 2 1
Warranty
coverage
(year)
QTY No. Part (Description)
Warranty
coverage
(year)
QTY
2
22
Indholdsfortegnelse
Sikkerhedsinstruktioner . . . . . . . . . . . . . . . . .
Tilslutning af gas. . . . . . . . . . . . . . . . . . . . . .
Tjekliste til afsluttet installation . . . . . . . . . . .
Europæiske gastryk og specifikationer . . . . .
Lækagetest. . . . . . . . . . . . . . . . . . . . . . . . .
Betjeningsinstruktioner . . . . . . . . . . . . . . . . .
Antændingsinstruktioner. . . . . . . . . . . . . . . .
24
28
28
29
30
31
31
Komponentidentifikation . . . . . . . . . . . . . . . .
Pleje og vedligeholdelse . . . . . . . . . . . . . . .
Fejlfinding . . . . . . . . . . .. . . . . . . . . . . . . . . . .
Bestilling af dele . . . . . . . . . . . . . . . . . . . . . .
Begrænset garanti . . . . . . . . . . . . . . . . . . . .
Diagram over dele . . . . . . . . . . . . . . . . . . . .
Delliste . . . . . . . . . . . . . . . . . . . . . . . . . . . .
• Denne betjeningsvejledning indeholder vigtige oplysninger, som der
nødvendige af hensyn til korrekt samling og sikker brug af apparatet.
• Læs og følg alle advarsler og instruktioner før samling og brug af dette
apparat.
32
33
34
36
37
38
39
• Opbevar vejledningen af hensyn til fremtidig brug.
Spørgsmål, problemer, manglende dele? Ved behov for udskiftningsdele skal vores kundeservice
kontaktes på ServiceDK@nexgrill.com eller kontakt +4562206336.
KUN TIL UDENDØRSBRUG. IKKE TIL ERHVERVSMÆSSIG BRUG.
23

Sikkerhedsinstruktioner
FARE
Hvis du kan lugte gas:
• Luk for gassen til apparatet.
• Sluk evt. åben ild.
• Åbn låget.
• Hvis lugten fortsætter, skal der holdes
afstand til apparatet. Kontakt øjeblikkeligt
din gasleverandør eller brandvæsenet.
FARE
1. Lad aldrig dette apparat være i brug uden for opsyn.
2. Betjen aldrig dette apparat inden for 3,05 m (10 ft.) af nogen bygning, noget brændbart
materiale eller nogen gasflaske.
3. Betjen aldrig dette apparat inden for 7,62 m (25 ft.) af antændelige væsker.
4. Undgå at overfylde tilberedningsbeholderen.
5. Opvarmede væsker forbliver skoldhede længe efter tilberedningsprocessen. Berør aldrig
tilberedningsapparatet, før væskerne er kølet ned til mindst 46 °C (115 °F).
6. Dette apparat er ikke beregnet til og må aldrig benyttes som varmeapparat.
ADVARSEL
1. Undgå at opbevare eller brug benzin eller
øvrige letantændelige væsker i nærheden
af dette eller noget andet apparat.
2. En flydende propan-flaske, der ikke er
tilsluttet af hensyn til brug, må ikke
opbevares i nærheden af dette eller noget
andet apparat.
7. Hvis der opstår brand, skal der holdes afstand til apparatet. Ring øjeblikkeligt til
brandvæsenet. Forsøg ikke på at slukke en olie- eller fedtbrand med vand.
8. Den fleksible slange til stikket må ikke overskride 1,5 meter.
9. Foretag ikke ændringer på apparatet.
10. Kun udendørs brug! Læs instruktionerne, før apparatet tages i brug.
11. Flyt ikke apparatet, når det er i brug.
12. Sluk for gasforsyningen på gasflasken efter brug.
13. Tilgængelige dele kan blive meget varme. Hold mindre børn på afstand.
14. Det anbefales at udskifte den fleksible slange, når forholdene er til det.
Manglende overholdelse af disse instruktioner kan resultere i brand eller eksplosion, der
kan forårsage alvorlige kvæstelser, død eller tingskade.
Dele, der er forseglet af producenten, må ikke modificeres af brugeren.
Grillen bliver meget varm. Læn dig aldrig ind over tilberedningsområdet, når du benytter
grillen. Undgå at berøre tilberedningsoverflader, grillens kabinet, låget eller øvrige af
grillens dele, når grillen er i drift, eller før den er kølet af efter brug.
24
Sikkerhedsinstruktioner
ADVARSEL
Tænd ikke dette apparat, før du har læst afsnittet
"TÆNDINGSINSTRUKTIONER" i denne manual.
TESTET I OVERENSSTEMMELSE MED STANDARDERNE
498:2012 OG EN 484:1998 FOR UDENDØRS GASAPPARATER
TIL FØDEVAREBRUG. DENNE GRILL ER KUN BEREGNET TIL
UDENDØRSBRUG.
Korrekt brug af flydende propangasflasker
Flydende propangasgrillmodeller er designet til brug
sammen med almindelige 9 kg (20 lb.). propangasflasker,
der ikke medfølger til grillen. Slut aldrig gasgrillen til en
flydende propangasflaske, der overskrider denne
kapacitet.
BEMÆRK: Normal gennemstrømning af gas igennem
regulator- og slangedelen skaber en hvislende lyd. Denne
lyd er ved svag lydstyrke helt normal og forstyrrer ikke drift
af grillen. Hvis den hvislende lyd er høj og overdreven, skal
du muligvis udtømme gas fra gasslangen eller nulstille
enheden til overskydende gasgennemstrømning. Denne
udtømningsprocedure skal gennemføres hver gang, en ny
flydende propangasflaske sluttes til grillen.
FORSIGTIG: Fare for flashback
FORSIGTIG: Edderkopper og mindre insekter spinder
lejlighedsvist spind eller bygger reder i grillens
brænderrør i forbindelse med transport og
lageropbevaring. Disse spindelvæv kan føre
til blokering af gassen, hvilket kan
resultere i brand i og omkring
brænderrørene. Denne type ild kaldes for
"flashback" og kan forårsage alvorlige skader på grillen
samt skabe usikre driftsforhold for brugeren.
Selvom et blokeret brænderrør ikke er den eneste årsag til
flashback, er det den mest almindelige.
Med henblik på at reducere risikoen for flashback skal
brænderrørene rengøres for samling af grillen samt mindst
én gang om måneden i sensommeren eller i løbet af det
tidslige forår, hvor edderkopper er mest aktive. Gennemfør
også proceduren til rengøring af brænderrørene, hvis
grillen ikke har været brugt igennem længere tid. Et
tilstoppet rør kan føre til brand under grillen.
Størrelsen af pander, der bruges til sidebrænderen er 1822 cm i diameter.
Undgå at placere tunge genstande på sidebordet. Maks.
vægt er 5 kg. Udvis forsigtighed, når du placerer noget på
sidebordet. Fjern først genstandene, før du trækker ned i
bordet.
Kontroller brænderens flammer visuelt før hver brug.
Flammerne skal se ud som på dette billede. I modsat fald
skal du se vedligeholdelsesafsnittet for hovedbrænderen i
denne manual.
25

Sikkerhedsanvisninger fortsat
Flydende propangasforsyningssystem
• Hvis instruktionerne ikke overholdes
omhyggeligt, kan der opstå brand med
død eller alvorlige kvæstelser til følge.
304.8 mm
/ 12 in.
• A 9 kg (20 lb.) flaske på med en
diameter på 304,8 mm (12 in.) og en
højde på 469,9 mm (18.5 in.) er den
største flydende propangasflaske, der må bruges.
• Flaskens forsyningssystem skal kunne trække dampe
væk.
• Den benyttede flydende propangasflaske skal have en
krave, der beskytter flaskens ventil.
• Placer en støvhætte på ventiludløbet, når flasken ikke er
i brug. Monter kun den type støvhætte på flaskeventilens
udløb, der medfølger til flaskeventilen. Andre typer
hætter eller propper kan resultere i propanlækage.
• Slut aldrig en ikke-reguleret flydende propangasflaske til
gasgrillen.
• Dette udendørsgasapparat til fødevaretilberedning er
udstyret med en slange/regulator-del med høj kapacitet
til tilslutning til en almindelig 9 kg (20 lb.) flydende
propanflaske.
• Sørg for, at den flydende propangasflaske påfyldes af en
velkendt propangasforhandler og visuelt inspiceres og
rekvalificeres efter hver påfyldning.
• Undgå at opbevare ekstra flydende propangasflasker
under eller i nærheden af dette apparat.
• Påfyld aldrig flasken til mere end 80 % af dens kapacitet.
• Opbevar altid flydende propangasflasker i lodret
position.
• Undgå at opbevare eller brug benzin eller øvrige
letantændelige væsker nærheden af dette eller noget
andet apparat.
• Opbevaring af et udendørsgasapparat til
fødevaretilberedning indendørs er kun tilladt, hvis
flasken er afbrudt og afmonteret fra
udendørsgasapparatet til fødevaretilberedning.
• Når gasgrillen ikke er i brug, skal gassen fra den
flydende propan gasflaske afbrydes.
Korrekt placering af grillen og frirum omkring den
• Brug aldrig gasgrillen i en garage, på en veranda, i et
skur eller under overdækning m.v. Gasgrillen er kun til
udendørsbrug.
• Installer ikke denne enhed i brændbare kabinetter.
Minimumsfrirummet fra siderne og bagsiden til
brændbare materialer er 91,44 cm (36 in.).
• BRUG IKKE dette apparat under brændbare materialer.
Dette udendørsgasapparat til fødevaretilberedning er
469.9 mm
/ 18.5 in.
ikke beregnet til installation i eller på campingvogne m.v.
og/eller både.
• Flydende propangasflasker må kun opbevares udendørs
i et velventileret område og uden for børns rækkevidde.
Afbrudte flydende propangasflasker må ikke opbevares i
en bygning, garage eller andet indelukket område.
• Undgå at blokere for ventilationsgennemstrømningen
omkring gasgrillens kabinet. Brug kun regulatoren og
den slangedel, der medfølger til gasgrillen. Hvis
regulatoren og slangedelene skal udskiftes, skal dette
foregå med de dele, der fremgår af denne manual.
• Regulatoren og slangedelen skal inspiceres før hver
brug af grillen. Hvis der er voldsom slitage, eller hvis
slangen er hullet, skal den udskiftes, før grillen tages i
drift. Udskiftningsslangedelen skal udskiftes med den
del, som producenten har angivet.
• Den trykregulator og slangedel, der leveres sammen
med udendørsgasapparatet til fødevaretilberedning, skal
benyttes. Benyt aldrig andre type regulatorer. Kontakt
kundeservice vedr. spørgsmål om de udskiftningsdele,
som producenten har specificeret.
• Dette udendørsgasapparat til fødevaretilberedning er
udstyret med en trykregulator, der er i
overensstemmelse med standarden for trykregulerende
ventiler: EN 16129:2013.
• Benyt ikke briketter af nogen art i grillen.
• gGrillen er designet til optimal ydeevne uden brug af
briketter. Placer ikke briketter på stråledelen, eftersom
dette vil blokere for det område, hvor grillbrænderne
ventilerer. Tilsætning af briketter kan beskadige
tændingskomponenter og knapper og ugyldiggøre
garantien.
• Hold bagsiden og siden af vognen fri for fragmenter.
Hold alle el-ledninger og rotisserimotoren på afstand af
grillens opvarmede områder.
• Benyt aldrig grillen i voldsom blæst. Hvis grillen benyttes
i et vindblæst område (ved havet, på toppen af et bjerg
m.v.), skal der benyttes vindafskærmning. Overhold altid
den angivne sikkerhedsafstand.
• Benyt aldrig en bulet eller rusten gasflaske.
• Hold el-ledninger og brændstofforsyningsslanger på
afstand af alle opvarmede overflader.
• Hold ansigt og hænder på så lang afstand af grillen som
muligt, når du tænder op.
• Justering af brænderen må først foregår, når brænderen
er kølet ned.
ADVARSEL
Grillen bliver meget varm. Læn dig aldrig ind over
tilberedningsområdet, når du benytter grillen. Undgå at
berøre tilberedningsoverflader, grillens kabinet, låget eller
øvrige af grillens dele, når grillen er i drift, eller før den er
kølet af efter brug.
Manglende overensstemmelse med disse instruktioner
kan resultere i alvorlige kvæstelser.
FORSIGTIG: MED HENBLIK PÅ AT SIKRE KONSTANT
BESKYTTELSE IMOD ELEKTRISK STØD MÅ ENHEDEN
KUN SLUTTES TIL JORDEDE STIKKONTAKTER.
REDUCER RISIKOEN FOR ELEKTRISK STØD VED AT
HOLDE FORLÆNGERLEDNINGER TØRRE OG PÅ
AFSTAND AF JORDEN.
26
Sikkerhedsanvisninger fortsat
ADVARSEL
Opbevar en sprayflaske med sæbevand i nærheden af
gasforsyningsventilen, og kontroller tilslutningerne før hver brug.
ADVARSEL
Dette udendørsgasapparat til fødevaretilberedning er ikke
beregnet til installation på både. Dette er også gældende for
campingvogne m.v.
BENYT IKKE STANNIOL TIL AT FORE GRILLRISTE ELLER
BUNDEN AF GRILLEN.
Dette kan forstyrre forbrændingsluftstrømmen markant eller
indespærre overskydende varme i kontrolområdet.
SIKKERHEDSPRAKSISSER TIL FORHINDRING AF
PERSONKVÆSTELSER
Hvis apparatet plejes korrekt, vil det levere sikker, pålidelig
drift i mange år. Der skal dog udvises ekstrem forsigtighed,
eftersom grillen danner intens varme, der kan forøge risikoen
for ulykker. Ved brug af dette produkt skal der træffes
grundlæggende forholdsregler, herunder følgende:
Undgå at reparere eller udskifte nogen del i denne grill,
medmindre dette specifikt anbefales i denne manual. Al øvrig
service skal udføres af en fagperson.
Denne grill er ikke beregnet til montering i eller på
autocampere eller både.
Børn må ikke efterlades uden for opsyn i området omkring
grillen, når den er i brug. Lad ikke børn sidde på, stå på eller
lege i eller omkring grillen på noget tidspunkt.
Undgå at opbevare genstande, der kan være af interesse for
børn, omkring eller under grillen.
Lad ikke tøj, grydelapper eller øvrige letantændelige
materialer komme i kontakt med eller komme for tæt på riste,
brændere eller varme overflader, før disse er kølet ned.
Stoffet kan antændes og forårsage personkvæstelser.
Af hensyn til din egen sikkerhed bør du bære et passende
forklæde. Bær aldrig løst tøj eller løse ærmer, når du benytter
dette apparat. Visse syntetiske materialer er yderst
letantændelige og bør ikke bæres under tilberedning.
Kun visse typer glas, varmesikkert glaskeramik, stentøj eller
øvrige glaserede redskaber egner sig til grillbrug. Disse
materialer kan gå i stykker ved pludselige
temperaturændringer. Benyt kun lave eller mellemhøje
varmeindstillinger i overensstemmelse med producentens
anvisninger.
Opvarm ikke åbnede fødevarebeholdere. Opbygning af tryk
kan for beholderne til at briste.
Brug hånden til at dække med, når du åbner låget til grillen.
Læn dig ikke indover en åben grill.
Når du tænder op i en brænder, skal du udvise omhyggelig
opmærksomhed. Vær sikker på, hvilken brænder du forsøger
at antænde, således at din krop og dit tøj holdes på afstand
af åben ild.
Ved brug af grillen må du ikke berøre grillristen eller de
umiddelbare omgivelser, eftersom disse bliver ekstremt
varme og kan forårsage forbrændinger. Benyt kun tørre
grydelapper. Fugtige eller våde grydelapper på varme
overflader kan forårsage skoldning. Brug ikke et håndklæde
eller andre tykke klæder i stedet for grydelapper. Lad ikke
grydelapper komme i kontakt med grillristens varme dele.
Fedt er letantændeligt. Lad varmt fedt køle af, før du
forsøger på at håndtere det. Lad ikke fedtaflejringer samle
sig i fedtskuffen nederst i grillens ildboks. Rengør ofte
fedtskuffen
Benyt ikke stanniol til at fore grillriste eller bunden af grillen.
Dette kan forstyrre forbrændingsluftstrømmen markant eller
indespærre overskydende varme i kontrolområdet.
Af hensyn til korrekt antænding og ydeevne for brænderne
skal brænderportene holdes rene. Det er nødvendigt at
rengøre dem periodisk af hensyn til optimal ydeevne.
Brænderne kan kun arbejde i én position og skal monteres
korrekt af hensyn til sikker drift.
Rengør grillen med omhu. Forebyg skoldning ved ikke at
benytte en våd svamp eller et vådt klæde til at rengøre
grillen med, når den er varm. Visse rengøringsmidler kan
danne giftige dampe eller antændes, hvis de påføres en
varm overflade.
Sluk for grillens kontroller, og sørg for, at grillen er kold, før
der benyttes nogen former for aerosolrengøringsmidler på
eller omkring grillen. Det kemikalie, der danner sprayeffekten
kan ved tilstedeværelse af varme antændes eller korrodere
metaldele.
Benyt ikke grillen til at tilberede ekstremt fedt kød eller andre
produkter, der kan fremme selvantænding.
Benyt ikke grillen under ubeskyttede letantændelige
konstruktioner. Benyt kun i velventilerede områder. Må ikke
bruges i bygninger, garager, skure, under overdækninger
eller i øvrige indelukkede områder.
Hold omgivelserne fri for brændbare materialer, herunder
væsker, affald og dampe fra f.eks. benzin eller lightervæske.
Bloker ikke for forbrændingsgennemstrømning og
ventilationsluft.
SLUT ALDRIG EN IKKE-REGULERET
GASFORSYNINGSSLANGE TIL APPARATET. BRUG DEN
MEDFØLGENDE REGULATOR/SLANGEDEL.
Dette er en grill, som er konfigureret til flydende propan.
Benyt ikke naturgas,
medmindre grillen er blevet rekonfigureret til det.
Det samlede gasforbrug (pr. time) for denne stålfri gasgrill
med alle brændere tændt :
Hovedbrænder 16 kW
stegebrænderen 4.4 kW
Samlet 20.4 kW
27
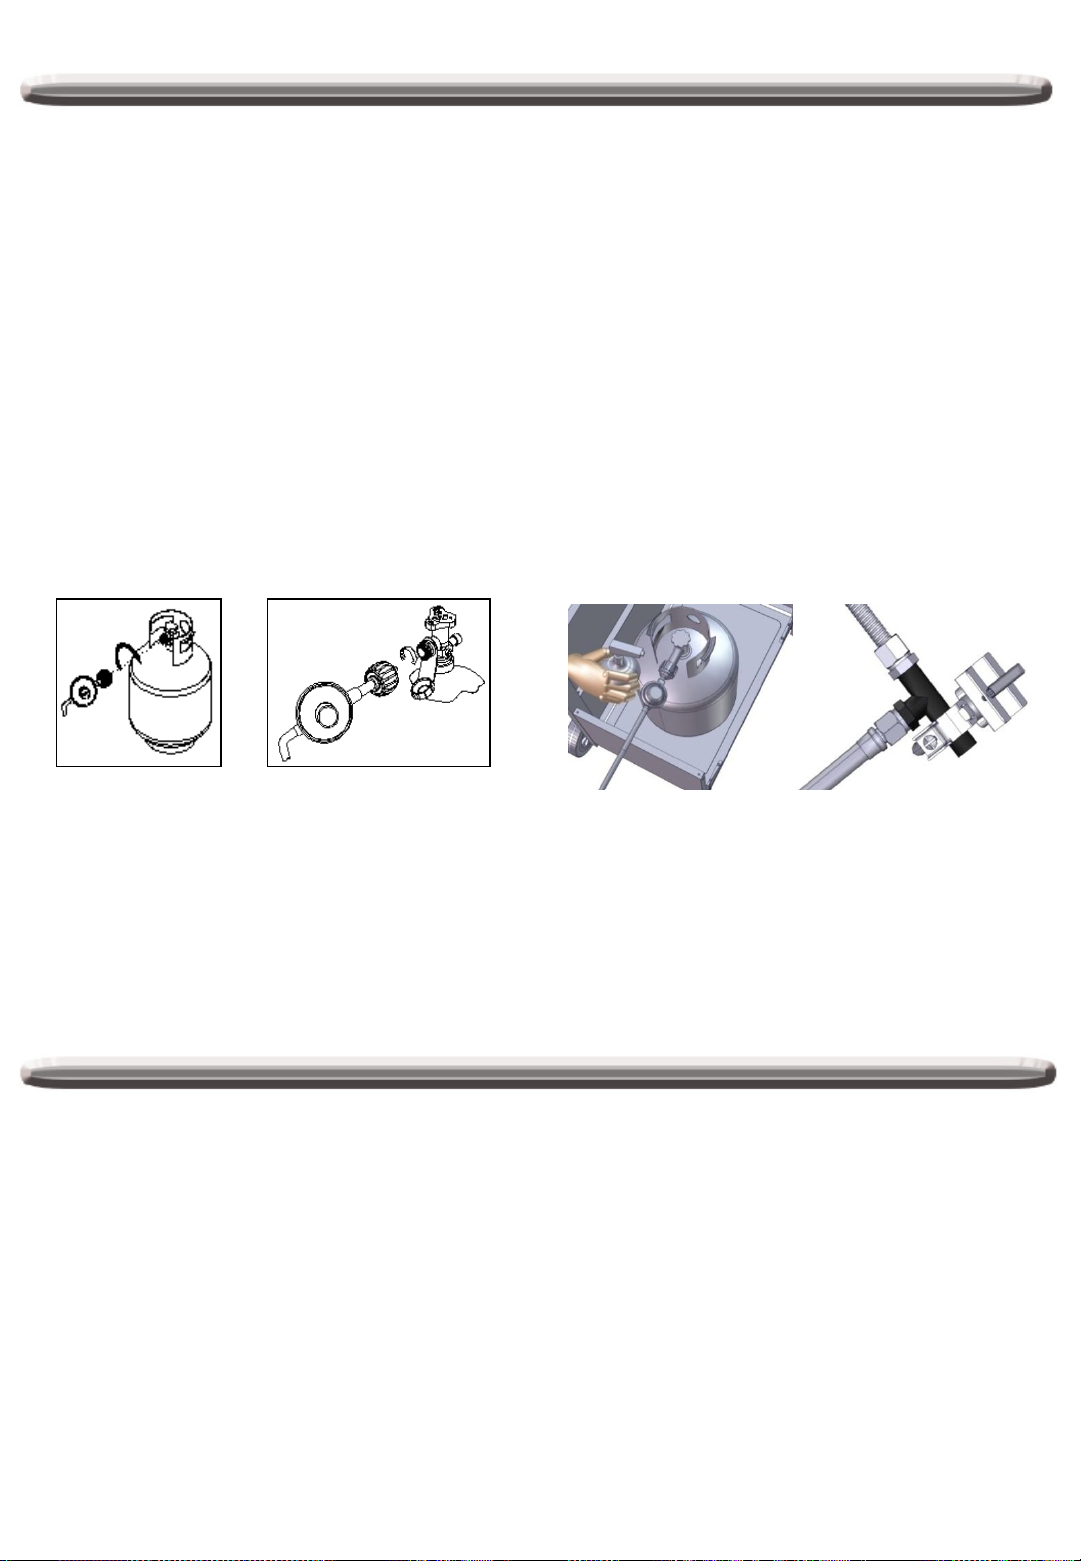
Tilslutning af gas
KRAV TIL FLYDENDE PROPANFLASKER
En bulet eller rusten flydende propanflaske kan være farlig
og skal inspiceres af din flydende propan-leverandør. Benyt
aldrig en flaske med en beskadiget ventil.
TILSLUTNING AF FLYDENDE PROPANGAS
Sørg for, at de sorte plastikstropper på den flydende
gasflasker sidder på plads, og at slangen ikke kommer i
kontakt med fedtskuffen eller grillhovedet.
FORBINDELSE
Den rustfri grill er udstyret med gasforsyningshuller til brug
sammen med flydende propangas alene. Den er også
udstyret med en slange/regulator-del med høj kapacitet til
tilslutning til en passende gasflaske. Se side 5:
"Forsyningssystem til flydende propangas" for at få yderligere
oplysninger. Nedenfor er det vist trin til cylindertilslutning:
1. Sørg for, at flaskeventilen er placeret helt i positionen fra
(drej ventilen hele vejen med uret, indtil den stopper).
4. Ved tilslutning af regulatordelen til ventilen skal
møtrikken håndstrammes i retning med uret, indtil den
stopper af sig selv. Brug ikke en skruenøgle til at
stramme. I modsat fald kan lynkoblingen tage skade, og
der kan opstå en farlig situation.
5. Åbn flaskeventilen helt. Påfør sæbeopløsningen med en
ren børste på alle gastilslutninger. Se nedenfor. Hvis der
dannes voksende bobler i opløsningen, er tilslutningerne
ikke tætte. Kontroller tilslutningen, og stram/reparerer
efter behov.
6. Hvis der er lækager i gastilslutningen, som du ikke kan
reparere, skal du AFBRYDE gastilslutningen på
gasflasken og ringe på kontakte vores servicelinje at
sende mail tilndeservice: ServiceDK@nexgrill.com eller
kontakt +4562206336.
7. Påfør også sæbevand på tankens svejsesømme. Se
nedenfor. Hvis der dannes voksende bobler, skal tanken
AFBRYDES. Brug eller flyt den ikke efterfølgende!
Kontakt en leverandør af flydende propangas eller det
lokale brandvæsen for at få hjælp.
2. Sørg for, at alle fire brænderventiler befinder sig i den
åbne position.
3. Inspicer ventiltilslutningens port og regulatordel. Hold øje
med skader og fragmenter. Fjern evt. fragmenter.
Inspicer slangen for skader. Forsøg aldrig på at reparere
beskadiget eller tilstoppet udstyr. Kontakt din forhandler
af flydende propangas af hensyn til reparation.
✓ Minimumsfrirummet fra siderne og bagsiden til
brændbare materialer er 91,44 cm (36 in.)
✓ Al indvendig emballage er fjernet.
✓ Knapperne kan dreje frit.
✓ Brænderne er tilstrækkeligt tætte og sikker korrekt
på hullerne.
✓ Trykregulatoren er tilsluttet og aktiveret.
Gastilslutningerne til grillen er opretter ved brug af
den medfølgende slange/regulator-samling
(forudindstillet til vandsøjle på 11").
✓ Enheden er blevet testet og er fri for lækage.
✓ Brugeren er blevet informeret om placeringen af
afbryderventilen til gassen
Sådan afbrydes den flydende propangasflaske:
Sluk for brænderens ventiler.
Sluk helt for flaskeventilen.
Afbrud regulatordelen fra flaskeventilen ved at
drejelynkoblingens møtrik i retning mod uret.
Tjekliste til afsluttet installation
BRUGEREN SKAL OPBEVARE DENNE MANUAL AF
HENSYN TIL FREMTIDIG BRUG.
FORHOLDSREGLER VEDR. PROPANFLASKER
Undgå at opbevare ekstra flydende propangasflasker
under eller i nærheden af dette apparat.
Påfyld ALDRIG flasken til mere end 80 % af dens
kapacitet.
Hvis instruktionerne "a" og "b" ikke overholdes
omhyggeligt, kan der opstå brand med død eller
alvorlige kvæstelser til følge.
28

Europæiske gastryk og specifikationer
Nexgrill Industries, Inc.
14050 Laurelwood Pl Chino, CA 91710 USA
Modelnummer 720-0830XA
Anvendelseskategori I
Gastype Butan Propan Butan, propan eller en blanding heraf
Gastryk (mbar) 28-30 37 30 37 50
Dysestørrelse for hovedbrænder (Ø mm)
Dysestørrelse for stegebrænderen (Ø mm)
Nominelt varmeinput (Hs) (kW) Hovedbrænder (samlet) + stegebrænderen: 20.4
Gasforbrug (g/t)
3+(28-30/37)
0.90 0.90 0.83 0.80
1.02 1.02 0.94 0.84
Butan - Hovedbrænder (samlet) + stegebrænderen: 1458
Propan - Hovedbrænder (samlet) + stegebrænderen: 1485
I
3B/P(30)
I
3B/P(37)
2531DL-0046
ID: 2531-20
I
BEMÆRK:
Brug 30 mbar regulator og dens tilsvarende injektorstørrelse for butan / propan under kategori I
Brug 30 mbar regulator og dens tilsvarende injektorstørrelse for butan under kategori I
Brug 37 mbar regulator og dens tilsvarende injektorstørrelse til propan under kategori I
3+(28-30/37)
3+(28-30/37)
Brug 50 mbar regulator og dens tilsvarende injektorstørrelse for butan / propan under kategori I
3B/P(30)
.
.
3B/P(50)
.
.
Mærkning på injektoren angiver indsprøjtningsstørrelsen. For eksempel betyder "0,90" injektorstørrelsen er 0,90 mm.
3B/P(50)
Land Gastype Gastryk
BE, FR, IT, LU, IE, GB, GR, PT, ES, CZ, CH, SI I3+ 28-30/37 mbar
BG, CY, CZ, DK, EE, FI, HU, IS, LT, LV, MT, IT, NL, NO, RO, SK, SE, SI I3B/P 30 mbar
PL I3P 37 mbar
AT, CH, CZ, DE I3B/P 50 mbar
*Landekoder er i overensstemmelse med EN ISO 3166-1: 2006.
29
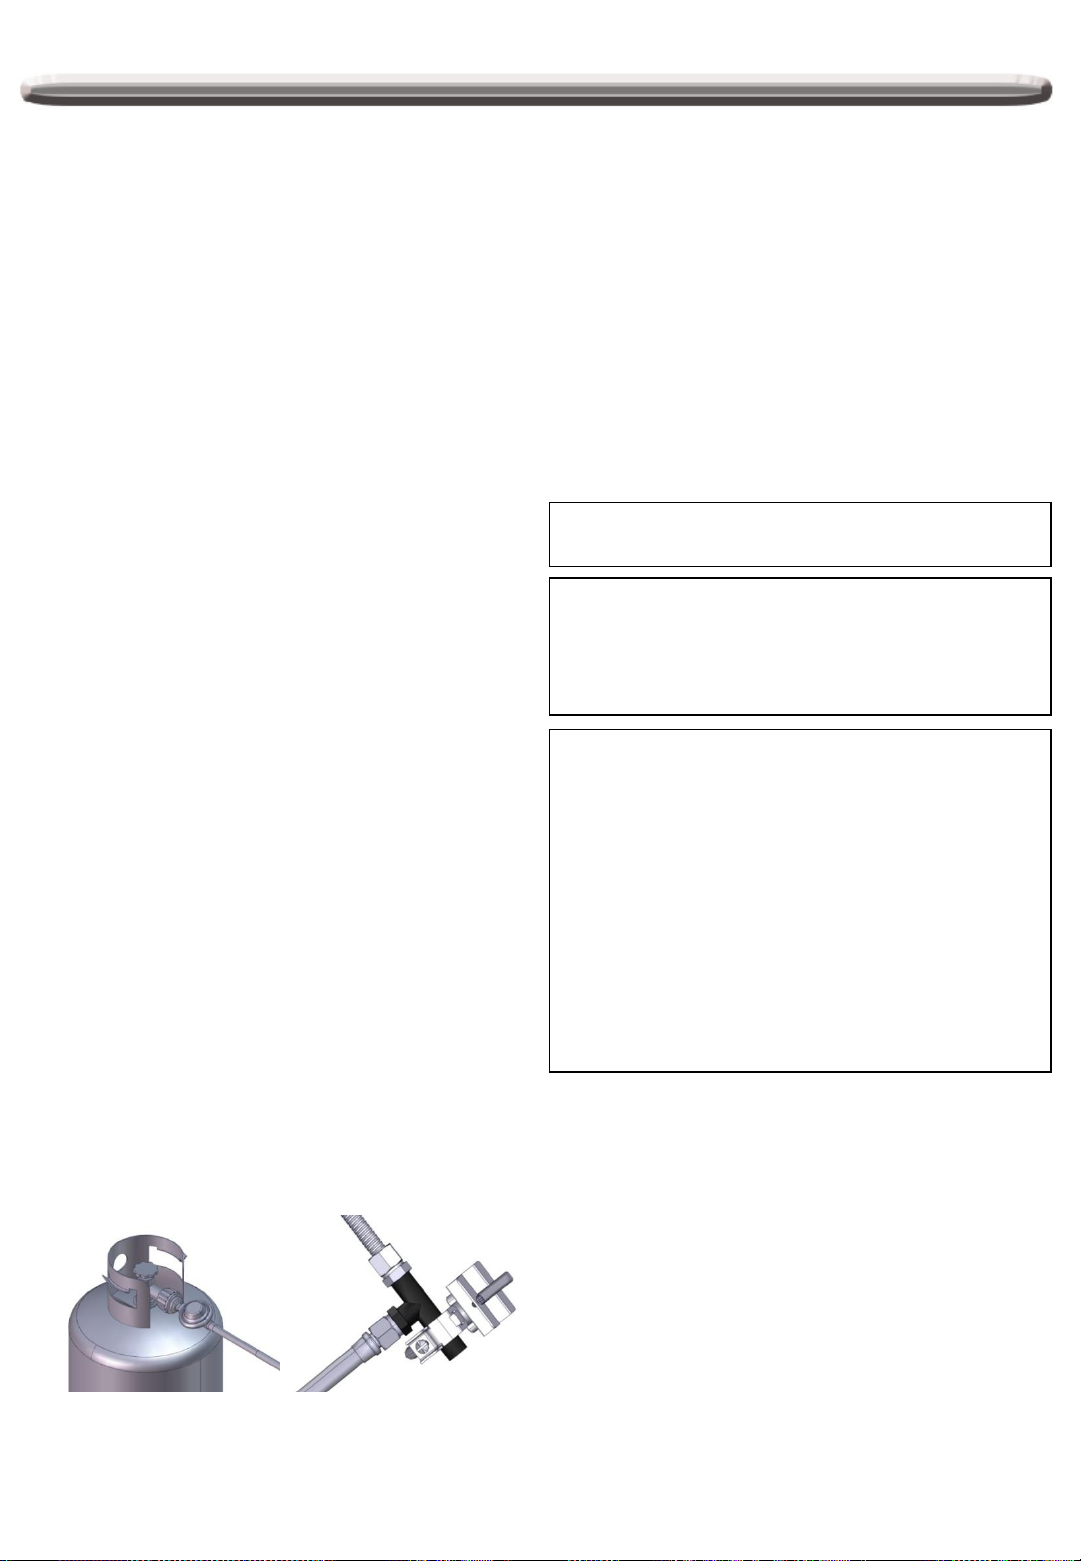
Lækagetest
GENERELT
Selvom alle gastilslutninger på grillen er blevet
lækagetestet før forsendelse, skal der gennemføres en
komplet lækagetest på installationsstedet pga. evt.
fejlhåndtering under forsendelse eller utilsigtet voldsom
trykopbygning i enheden. Kontroller løbende hele
systemet for lækage ved at følge de procedurer, der
fremgår nedenfor. Hvis du bemærker gaslugt på noget
tidspunkt, skal du øjeblikkeligt kontrollere hele systemet
for lækage.
Vi anbefaler brug af en regulator, der er i overensstemmelse
med EN 16129:2013.
Den fleksible gasslange skal være godkendt iht. EN 16436:2014.
Gastypen og udløbstrykket befinder sig i kategori I3B/P(30) og
er butan/propan ved 30 mbar.
Kategori I3+(28-30/37) skal være: butan 28-30 mbar eller
propan 37 mbar, I3B/P(37), butan/propan 37 mbar, I3B/P(50),
butan/propan 50 mbar.
FØR TEST
Sørg for, at alt emballeringsmateriale er blevet fjernet fra
grillen, herunder fastholdningsstropper.
UNDGÅ RYGNING I FORBINDELSE MED LÆKAGETEST.
UDFØR ALDRIG LÆKAGETEST I NÆRHEDEN AF ÅBEN
ILD.
Lav en sæbeopløsning bestående af 1 del
opvaskemiddel og 1 del vand. Forbered en sprayflaske,
børste eller klud for at påføre opløsningen på
tilslutningerne. Ved den indledende lækagetest skal den
flydende propanflaske være 80 % fuld.
SÅDAN TESTER DU
Sørg for, at kontrolventilerne befinder sig i positionen
"○", og tænd for gasforsyningen.
Kontroller alle tilslutninger fra den flydende
propangasregulator og forsyningsventilen frem til og
med tilslutningen til manifoldrørdelen (det rør, der går
op til brænderne). Der opstår sæbebobler på steder med
lækage.
Hvis der er lækage til stede, skal du øjeblikkeligt afbryde
gasforsyningen og tilstramme tilslutninger med lækage.
Tænd for gassen igen, og kontroller på ny.
Hvis gassen fortsætter med at lække fra nogen af
tilslutningerne, skal du afbryde gasforsyningen og du
kontakte vores servicelinje at sende mail tilndeservice:
ServiceDK@nexgrill.com eller kontakt . +4562206336.
KONTROL AF GASGENNEMSTRØMNING
Hver enkelt grillbrænder er blevet testet og justere fra
fabrikkens side før afsendelse. Variationer i den lokale
gasforsyning kan dog gøre det nødvendigt at justere
brænderne. Brændernes flammer skal kontrolleres
visuelt.
Flammerne skal være blå og stabil uden gule spidser,
voldsom støj eller flakken. Hvis nogen af disse forhold
er til stede, skal du kontrollere, om luftspjældet eller
brænderportene er blokeret af snavs, fragmenter,
edderkoppespind m.v. Hvis du har spørgsmål vedr
bedes du kontakte vores servicelinje at sende mail
tilndeservice: ServiceDK@nexgrill.com eller kontakt
+4562206336.
KONTROLLER ALTID FOR LÆKAGER EFTER
HVERT FLYDENDE PROPANGASFLASKESKIFT
Kontroller alle gasforsyningstilslutninger før
lækage før hver brug. Det er en god idé at have
en sprayflaske med sæbevand i nærheden af
forsyningslinjens afbryderventil. Sprøjt på alle
tilslutninger. Bobler er et tegn på lækage.
FORSIGTIG
Placer en støvhætte på ventiludløbet, når flasken
ikke er i brug. Monter kun den type støvhætte på
flaskeventilens udløb, der medfølger til
flaskeventilen. Andre typer hætter eller propper
kan resultere i lækage flydende propan.
Gassen skal afbrydes ved forsyningscylinderen,
når enheden ikke er i brug.
Hvis apparatet opbevares indendørs, skal
cylinderen afbrydes og fjernes fra apparatet.
Gasflasker skal opbevares udendørs i oprejst
stilling og utilgængeligt for børn.
Din grille er klar til brug!
Kun de dele, der anbefales af producenten, må bruges
på grillen.
Andre dele ugyldiggør garantien. Brug ikke grillen, før
alle tilslutninger er blevet kontrolleret for lækage.
30
 Loading...