

Page 1
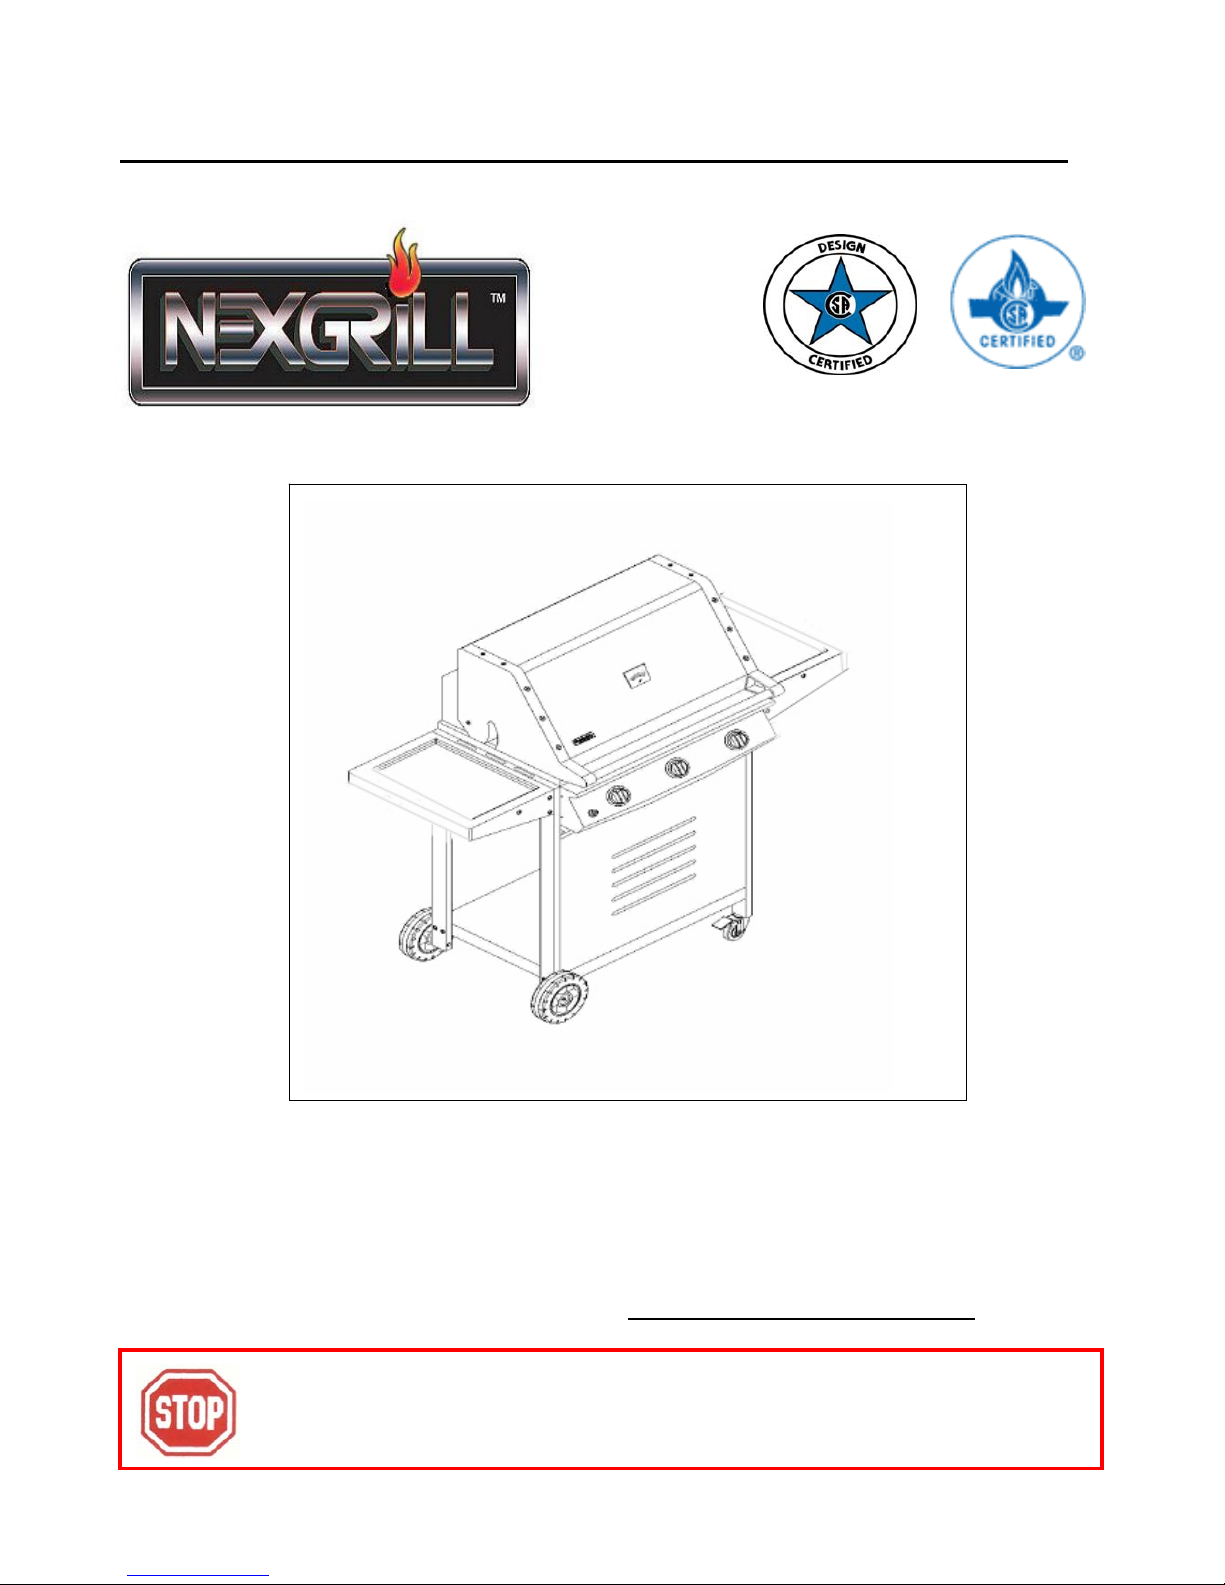
ASSEMBLY & OPERATING INSTRUCTIONS
MODEL# 720-0311
FOR OUTDOOR USE ONLY
PLEASE CONTACT 1-866-984-7455 FOR ASSISTANCE
DO NOT RETURN TO PLACE OF PURCHASE
Page 2

MESSAGE TO OUR CONSUMERS
Thank you for selecting our stainless steel gas grill.
Because this appliance contains features which may not found on other grill, we recommend that
you read this entire booklet before your first use. Keep it in handy place as it has answers to
questions that may occur during future use.
Read this booklet carefully and be sure your gas grill is properly assembled, installed and maintained.
Failure to follow these instructions could result in serious bodily injury and/or property damage. This gas grill
in intended for outdoor use only and is not intended to be installed in or on recreational vehicles or boats.
NOTE TO INSTALLER: Leave these instructions with the consumer after installation.
NOTE TO CONSUMER: Retain for future reference.
TABLE of CONTENTS
SECTION ONE
Precaution ……………………………...1
Placement of the grill ………………… 3
SECTION TWO
Assembly instructions ………………...4
SECTION THREE
Gas hook-up …………………………. 12
Leak testing ……….………………..... 13
Operation Instructions...………………14
Grill lighting instruction …………….. ..15
SECTION FIVE
Care and maintenance ………………….16
Lighting Illustration……………………….17
To match light the grill……………………18
Troubleshooting ………………………… 19
SECTION SIX
Exploded view…………………………….20
Parts list ………………………………… .21
Ordering parts ……………………………22
Grill hints ………………………………….22
SECTION SEVEN
Grill Cooking Chart ………………………23
SECTION EIGHT
Grill recipe suggestions …………………25
SECTION NINE
Warranty ………………………………….28
Page 3

PRECAUTIONS
FOR YOUR SAFETY
If you smell gas:
1. Shut off gas to the appliance.
2. Extinguish any open flames.
3. Open lid.
4. If odor continues, immediately call
your gas supplier or your fire
department
WARNING
Do not try to light this appliance without first
reading the “LIGHTING INSTRUCTIONS”
FOR YOUR SAFETY
1. Do not store or use gasoline or other
flammable vapors and liquids in the
vicinity of this or any other appliance.
2. An LP cylinder not connected for use
shall not be stored in the vicinity of
this or any other appliance..
TESTED IN ACCORDANCE WITH ANSI
Z21.58b-2005 STANDARD FOR OUTDOOR
COOKING GAS APPLIANCES. THIS GRILL IS
FOR OUTDOOR USE ONLY.
Check your local building codes for the proper
method of installation. In the absence of local
codes, this unit should be installed in accordance
with the National Fuel Gas Code No.
Z223.1-1988 and the National Electrical Code
ANSI/NFPA No. 70-1990.
SAFETY PRACTICES TO AVOID PERSONAL
INJURY
When properly cared for, your stainless steel grill will
give safe, reliable service for many years. However,
extreme care must be used since the grill produces
intense heat and that can increase accident potential.
When using this appliance basic safety practices must
be followed, including the following:
Read this Care and Use Manual carefully and
completely before using your grill to reduce the risk of
fire, burn hazard or other injury.
Do not repair or replace any part of the grill unless
specifically recommended in this manual. All other
service should be referred to a qualified technician.
CHILDREN SHOULD NOT BE LEFT ALONE OR
UNATTENDED IN AN AREA WHERE THE GRILL IS
BEING USED. NEVER ALLOW THEM TO SIT, STAND
OR PLA Y ON OR AROUND THE GRILL AT ANY TIME.
The Installation of this appliance must conform
with local codes or, in the a bsence of local cod es, with
the national fuel gas code, ANSI Z223. 1a-1988.
Installation in Canada must be in accordance with the
Standard CAN/CGA-B149.1, Natural Gas Installation
Code or CAN/CGA-B149.2, Propane Installation
Code and local codes.
FOR YOUR SAFETY
- Do not store or use gasoline or other flammable
vapors and liquids in the vicinity of this or any
other appliance.
CALIFORNIA PROPOSITION 65-WARNING
The burning of gas fuel generates some byproducts,
which are on the list of substances that are known by
the State of California to cause cancer or reproductive
harm. California law requires businesses to warn
customers of potential exposure to such substances.
To minimize exposure to these substances, always
operate this unit according to the use and care
manual, ensuring you provide good ventilation when
cooking with gas.
1
Page 4

PRECAUTIONS
DO NOT STORE ITEMS OF INTEREST TO
CHILDREN AROUND OR BELOW THE GRILL
OR IN THE CART. NEVER ALLOW CHILDREN
TO CRAWL INSIDE OF THE CART.
Never let clothing, pot holders or other flammable
materials come in contact with or too close to any
grate, burner or hot surface until it has cooled.
Fabric may ignite and result in personal injury.
For personal safety, wear proper apparel. Loose
fitting garments or sleeves should never be worn
while using this appliance. Some synthetic fabrics
are highly flammable and should not be worn
while cooking.
Only certain types of glass, heat-proof glass
ceramic, earthenware, or other glazed utensils
are suitable for grill use. Theses types of
materials may break with sudden temperature
changes. Use only on low or medium heat
settings according to the manufacturer’s
directions.
Do not heat unopened food containers as a
build-up of pressure may cause the container to
burst.
Use a covered hand when opening the grill lid.
Never lean over an open grill.
WHEN LIGHTING A BURNER, ALWAYS PAY
CLOSE ATTENTION TO WHAT YOU ARE
DOING. BE CERTAIN YOU ARE TURNING THE
IGNITER LABELED FOR THE BURNER YOU
INTEND ON USING.
When using the grill, do not touch the grill rack,
burner grate or immediate surroundings as these
areas become extremely hot and could cause
burns. Use only dry potholders.
Moist or damp potholders on hot surfaces may
cause burns from steam. Do not use a towel or
bulky cloth in place or potholders. Do not let
potholders touch hot portions of the grill rack.
Grease is flammable. Let hot grease cool before
attempting to handle it. Avoid letting excess grease
deposits collect in the grease tray at the bottom of
the grill’s firebox. Clean often.
DO NOT USE ALUMINUM FOIL TO LINE THE
GRILL RACKS OR GRILL BOTTOM. This can
severely upset combustion air flow or trap
excessive heat in the control area.
For proper lighting and performance of the burners
keep the burner ports clean. It is necessary to clean
them periodically for optimum performance. The
burners will only operate in one position and must
be mounted correctly for safe operation.
Clean the grill with caution. Avoid steam burns; do
not use a wet sponge or cloth to clean the grill while
it is hot. Some cleaners produce noxious fumes or
can ignite if applied to a hot surface.
Keep the cover of the grill closed during preheat
period
INSECT WARNING!!! Spiders and insects can
nest in the burners of this and any other grill, and
cause the gas to flow improperly. This is a very
dangerous condition which can cause a fire to occur
behind the value panel, thereby damaging the grill
and making it unsafe to operate. Inspect the grill
twice a year.
Be sure all grill controls are turned off and the grill is
cool before using any type of aerosol cleaner on or
around the grill. The chemical that produces the
spraying action could, in the presence of heat, ignite
or cause metal parts to corrode.
2
Page 5

PRECAUTIONS
Do not use the grill for cooking excessively fatty
meats or products which promote flare-ups. Do
not operate the grill under unprotected
combustible construction. Use only in well
ventilated areas. Do not use in buildings,
garages, sheds, breezeways or other such
enclosed areas. THIS UNIT IS FOR OUTDOOR
USE ONLY.
Keep the area surrounding the grill free from
combustible materials, trash, or combustible
fluids and vapors such as gasoline or charcoal
lighter fluid. A minimum of 24” clearance away
from combustible material. Do not obstruct the
flow of combustion and ventilation air. If the unit is
stored indoors ensure that it is cool. If propane is
used, the cylinder must be unhooked and the
propane cylinder stored outside in a well
ventilated area, out of the reach of children.
DO NOT USE BRIQUETTES OF ANY KIND IN
THE GRILL.
This stainless steel grill is designed for optimum
performance without the use of briquettes. Do not
place briquettes on the radiant as this will block off the
area for the grill burners to vent. Adding briquettes
can damage ignition components and knobs, and
void the warranty.
Keep the back of the cart free and clear from debris.
Keep any electrical supply cord, or the rotisserie
motor cord away from the heated areas of the grill.
Never use the grill in extremely windy conditions. If
located in a consistently windy area (oceanfront,
mountaintop, etc.) a windbreak will be required (see
below). Always adhere to the specified clearance.
NEVER USE A DENTED OR RUSTY PROPANE
TANK.
PLACEMENT OF THE GRILL
Locate the grill only in a well-ventilated area. Never
locate the grill in a building, garage, breezeway, shed
or other such enclosed areas without an approved
ventilation system. During heavy use, the grill will
produce a lot of smoke. Lock the wheels after the grill
is placed in a suitable position according to the sticker
located beneath the right door. Keep any electrical
supply cord and the fuel supply hose away from any
heated surfaces. Storage of an outdoor gas cooking
appliance indoor is permissible only if the cylinder is
disconnected and removed from the appliance.
This outdoor cooking gas appliance shall be used
only outdoor and shall not be used in a building,
garage or any other enclosed area. This appliance
is not intended to be installed on or on recreational
vehicles and/or boats
CLEARANCE
To Non-Combustible Construction
A minimum of 3” clearance from the back of the
grill to non-combustible construction is required
for the lid to open fully.
DO NOT INSTALL THIS UNIT INTO
COMBUSTIBLE ENCLOSURES!
LOCATION
When determining a suitable location take into
account concerns such as exposure to wind,
proximity to traffic paths and keeping any gas
supply lines as short as possible.
3
Page 6
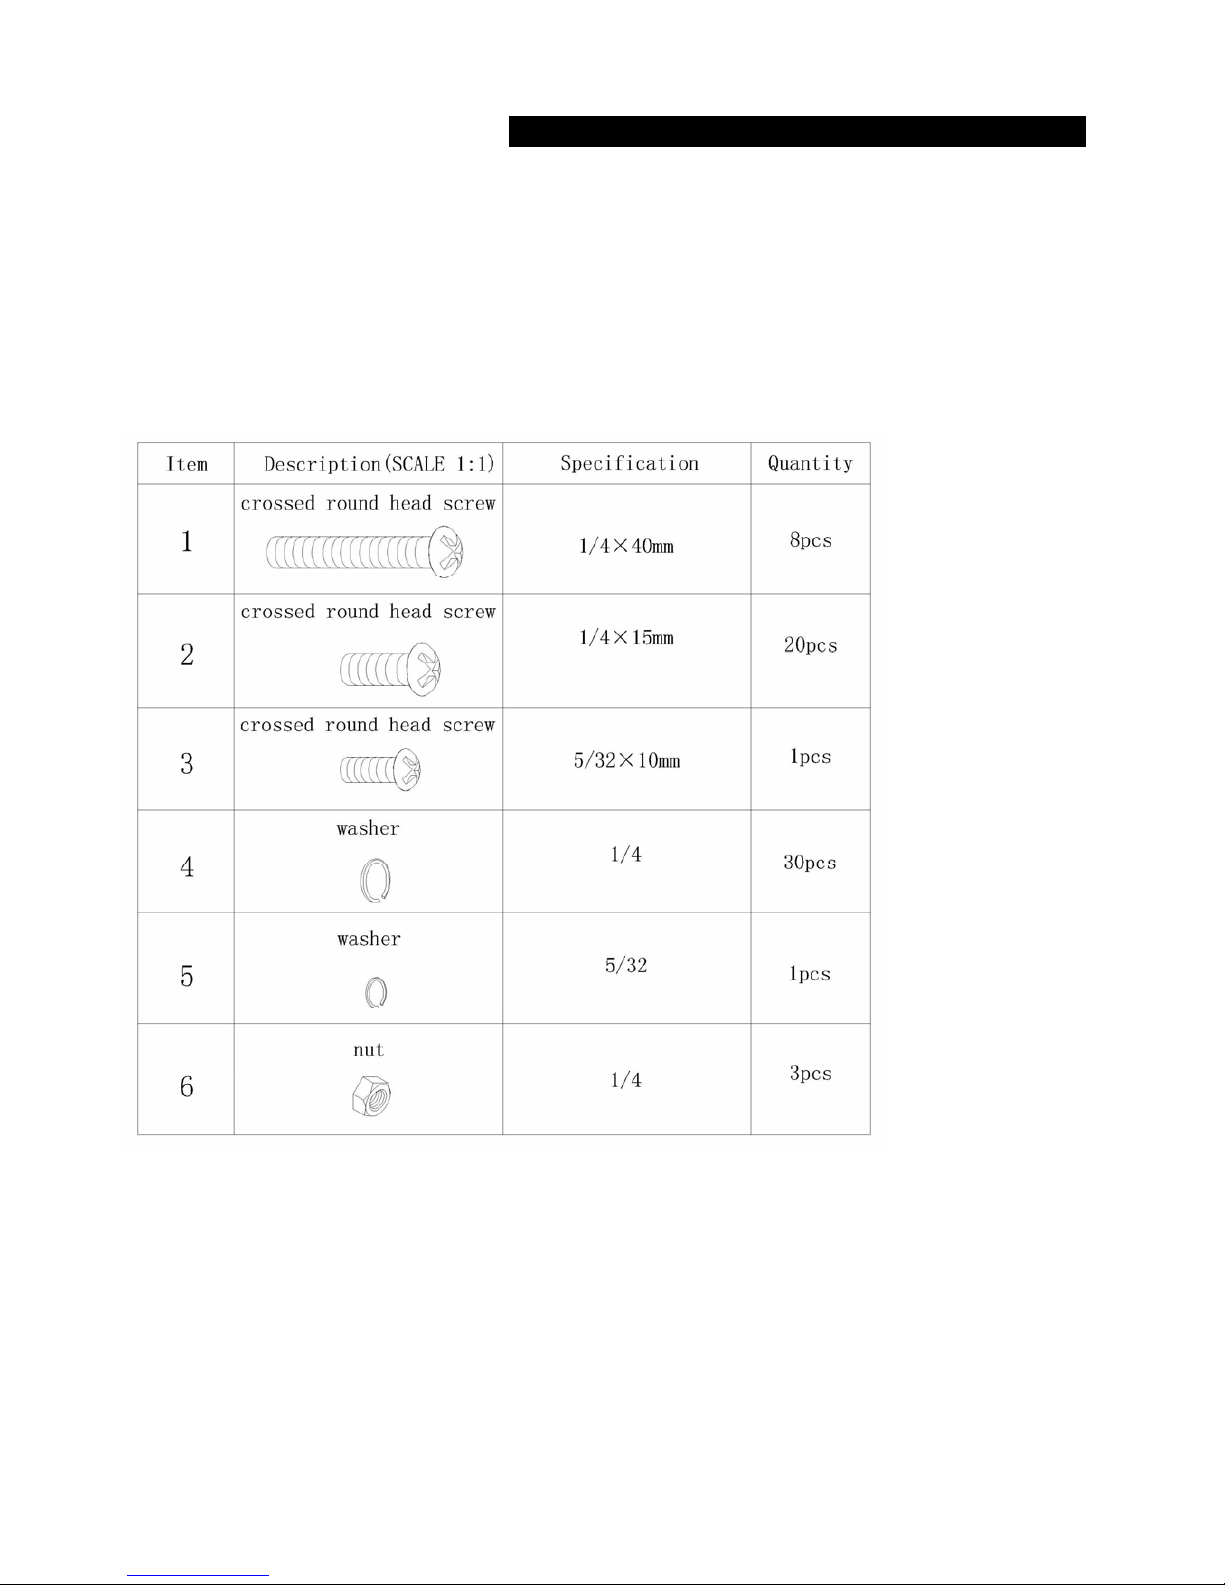
ASSEMBLE INSTRUCTIONS
PLEASE READ THE INSTURCTION CAREFULLY AND FOLLOW STEP BY STEP
¾ Propane Tank is not included
¾ Philips head Screwdriver (not provided)
¾ The following hardware is provided
4
Page 7
4
4
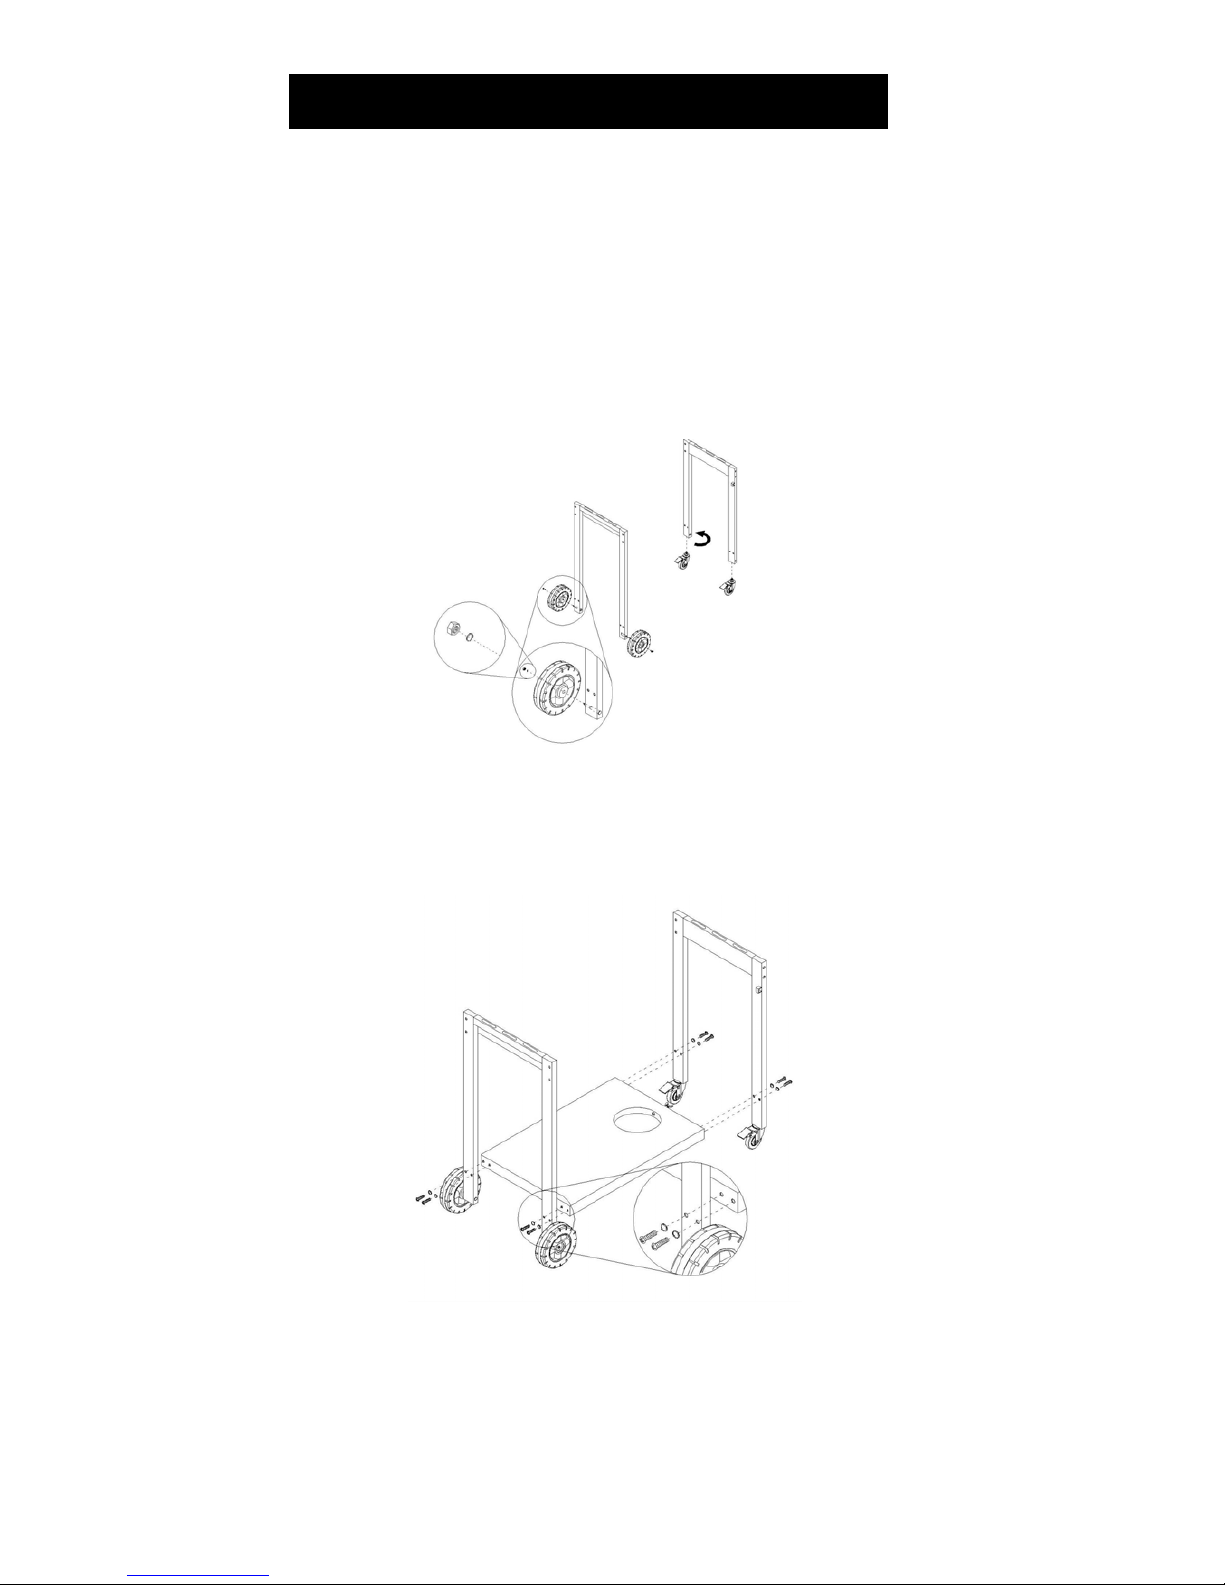
PLEASE READ THE INSTRUCTIONS CAREFULLY AND FOLLOW STEP BY STEP.
Caution: Please lock casters during installation process
STEP 1: Remove side panel legs (L+R), 2 rubber casters with brake and 2 plastic
wheels from carton. Remove hardware attached to panel legs to secure 2 plastic
wheels. Then screw in regular casters with brake on opposite panel legs as shown in
figure below.
STEP 2: Attach bottom panel to side panel legs with 8 truss head screw (1/4” x
40 mm) and 8 lock washers to secure bottom panel and side panel legs.
5
Page 8
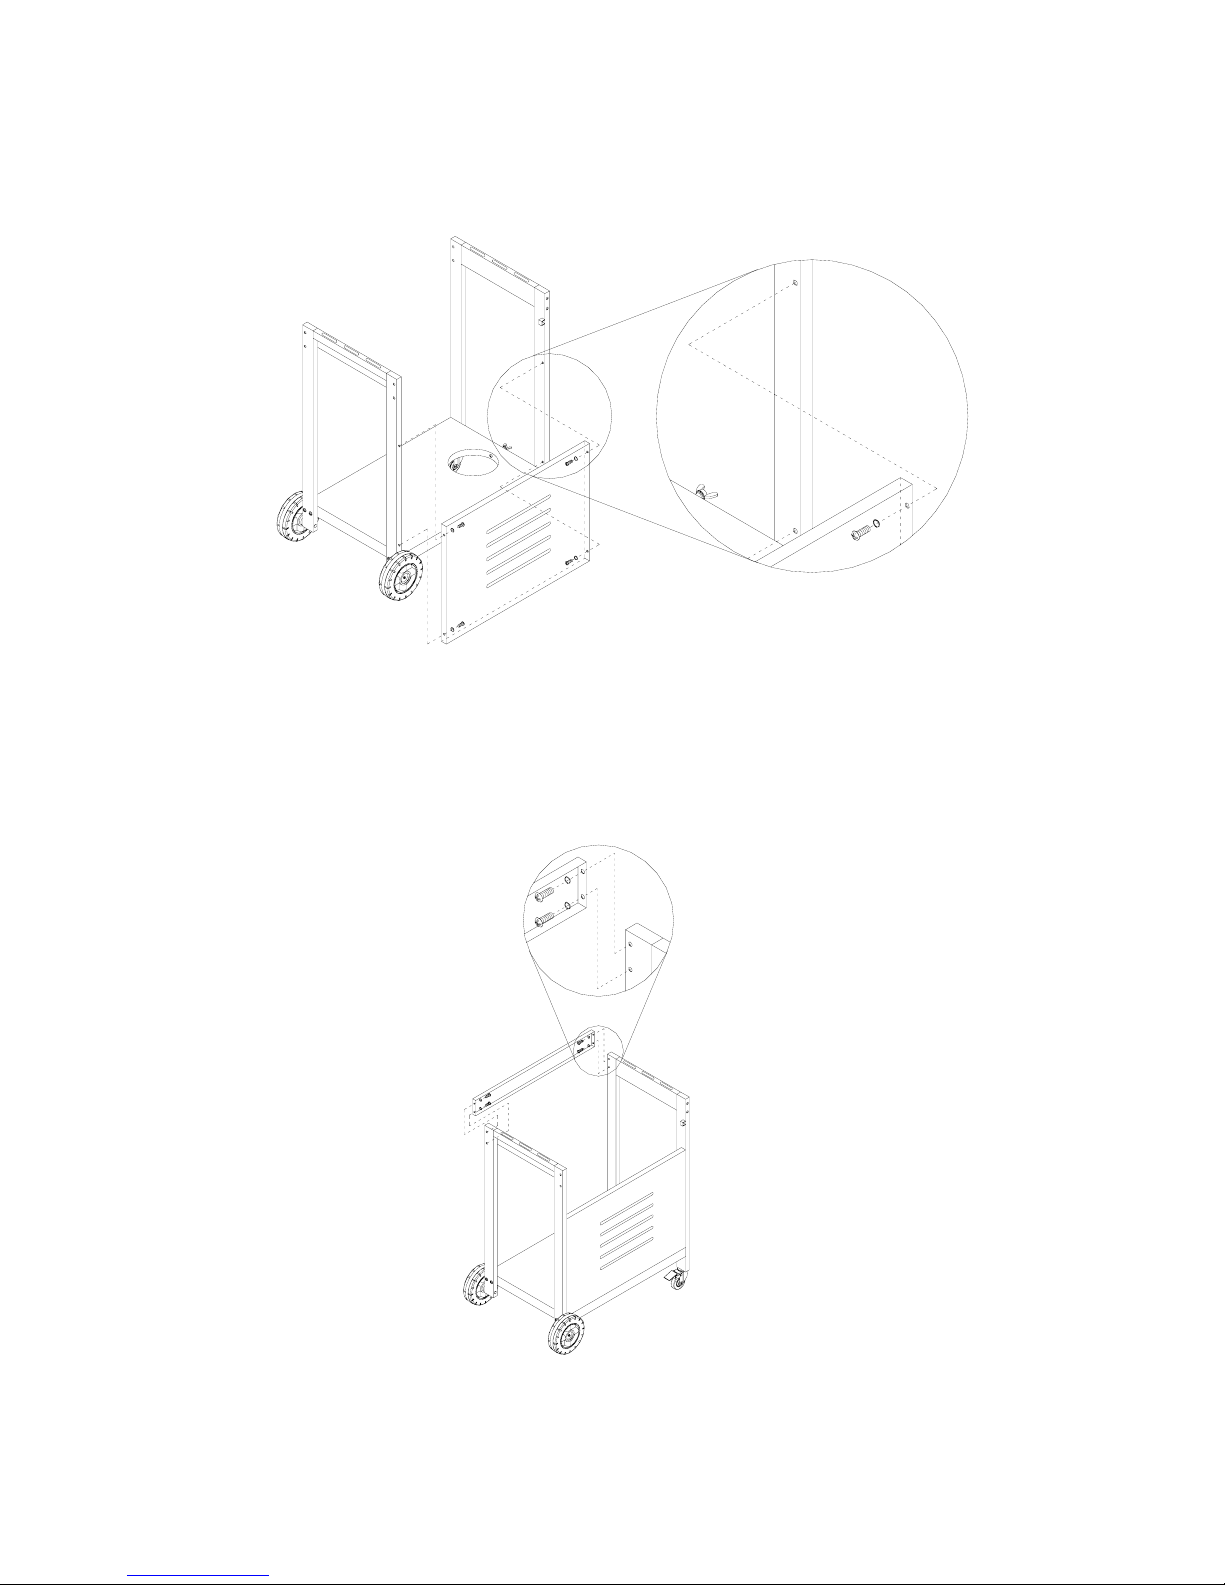
STEP 3: Assemble front panel to side panel legs with 4 (1/4” x 8mm) truss head screw
as shown fi
g
ure below.
STEP 4: Fix cart frame cross bar to both side panel-legs with 4 (1/4” x 15mm) truss head screw, 2
on each side.
Caution : Leave cross bar loose to allow easy installation of head unit.
6
Page 9
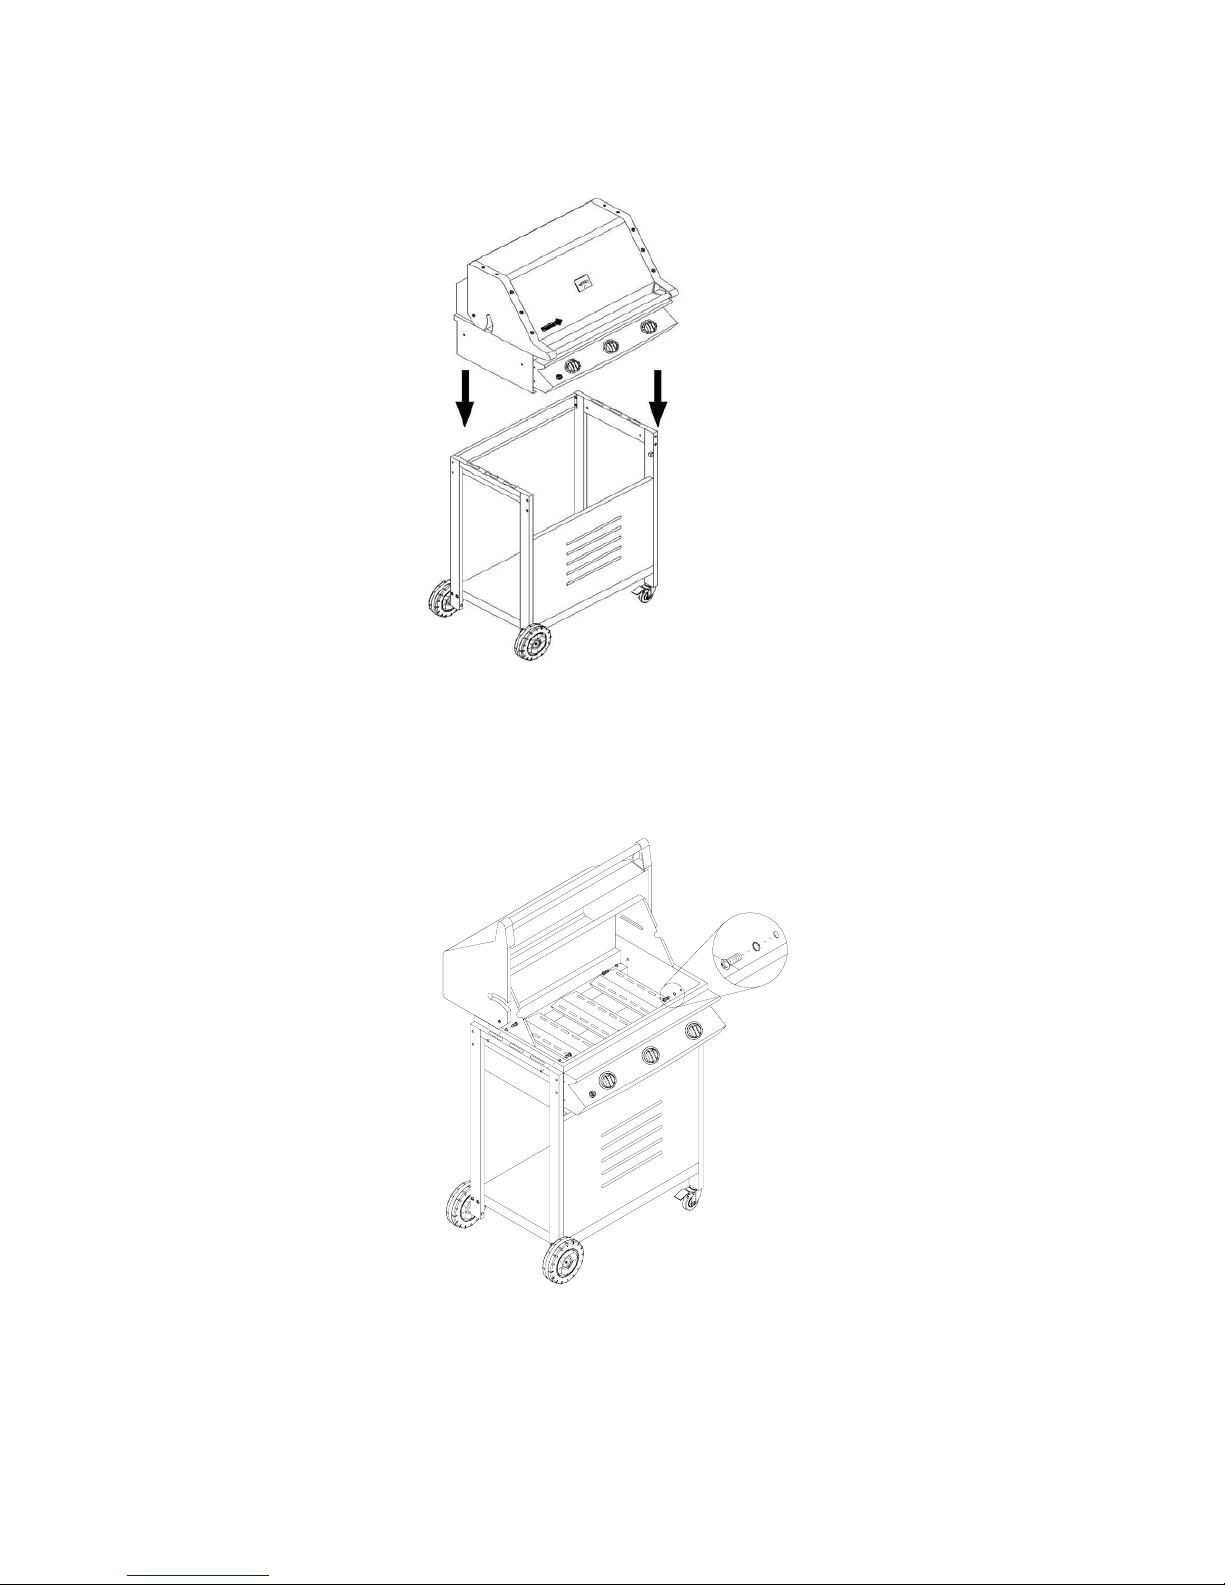
STEP 5: Remove grill head unit from carton . Place onto cart from above as shown on
diagram ( below). And secure to cart frame.
Caution!! Head unit is heavy, to avoid injury, we strongly recommend 2 or more
persons for this step.
STEP 6: Secure the head unit to cart with 4-truss head screws (1/4” x 15mm) and
split lock washers as shown on diagram below. (Note: Remove cooking grids and
7
Page 10
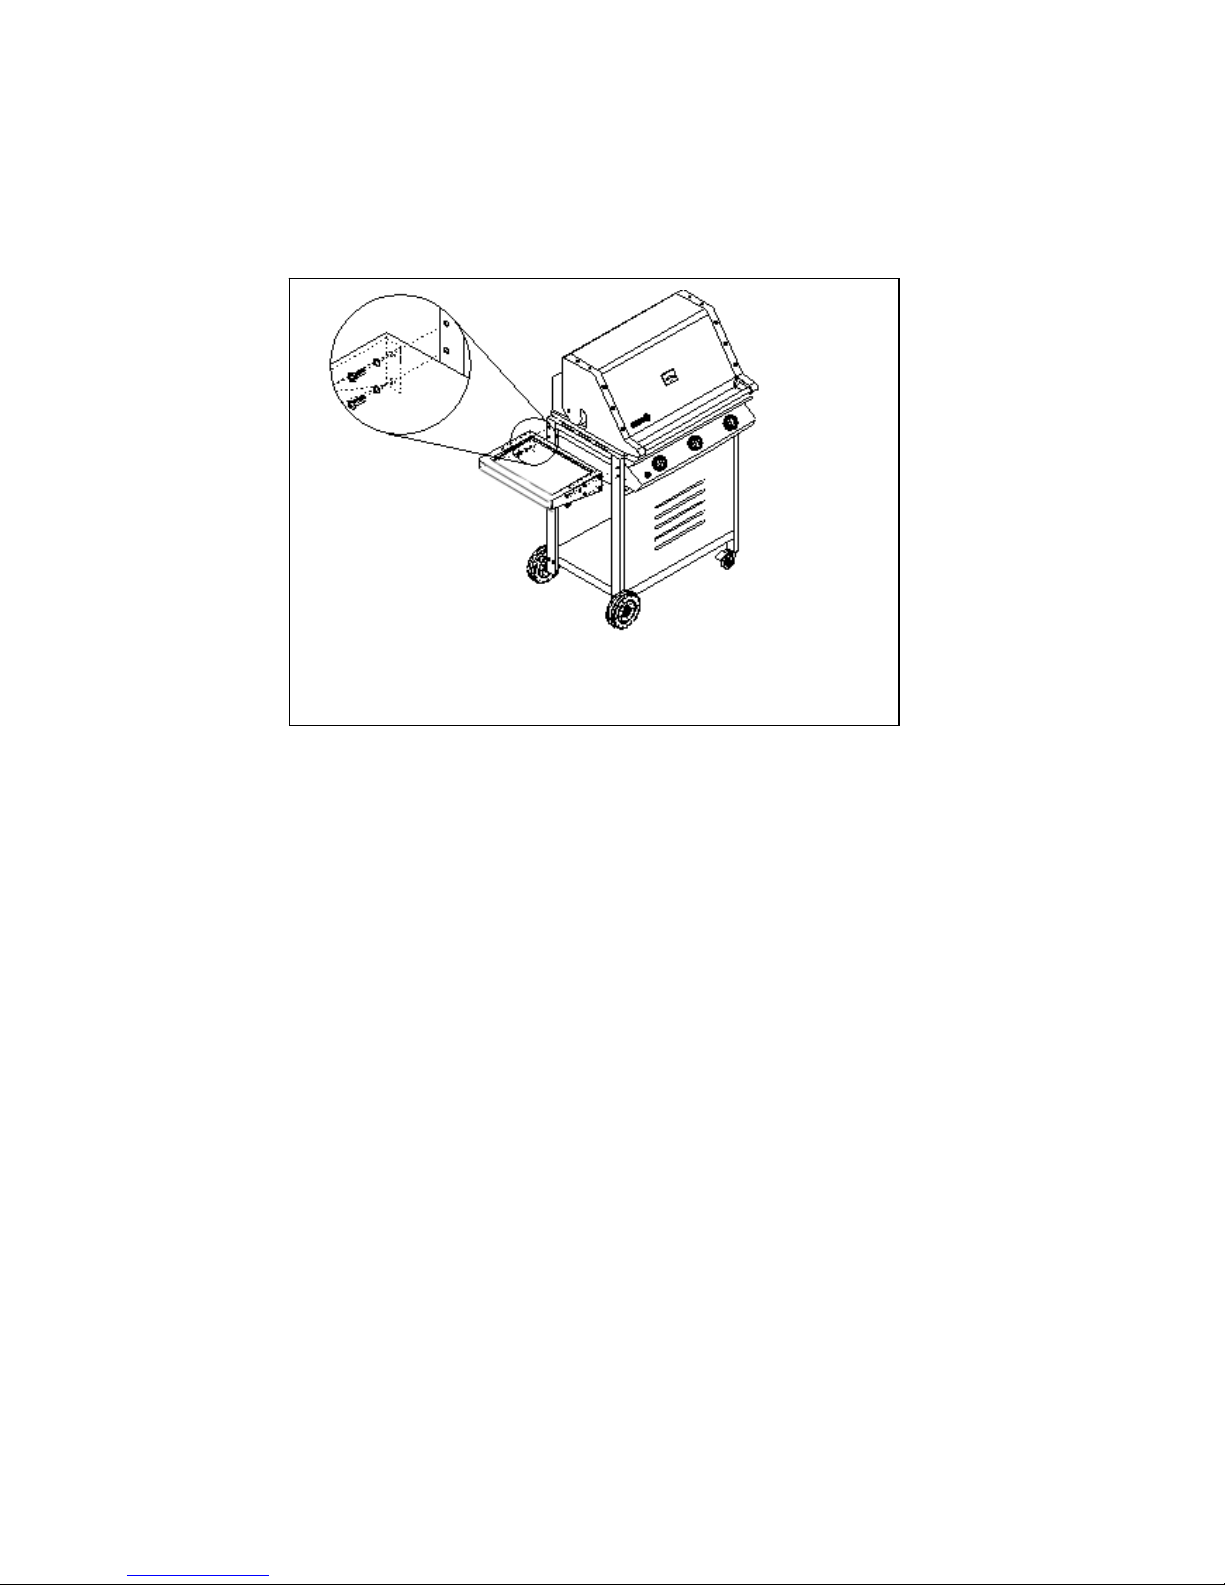
STEP 7:Attach side shelf with 4 truss head screws (1/4” x 15mm) as shown on figure
below.
8
Page 11
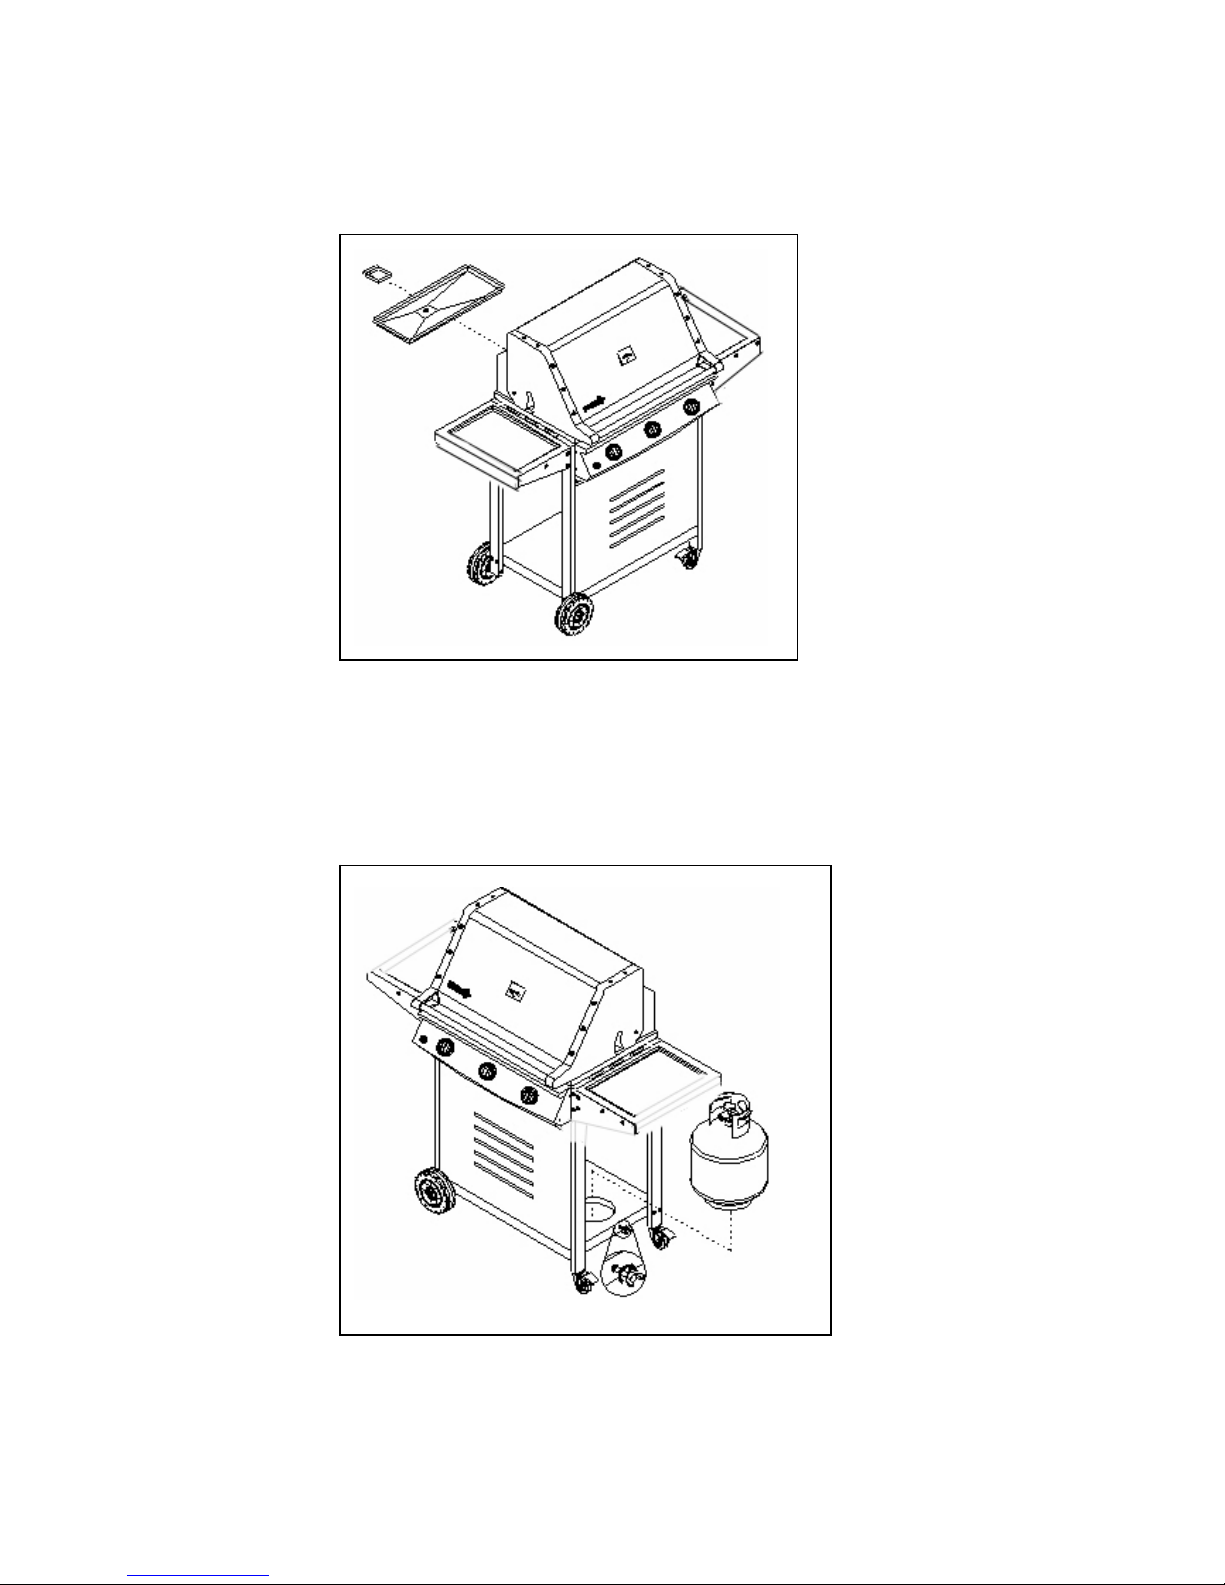
STEP 9: Place grease dip into slide rails under fire box from back of grill. Place
Grease tray into rails on grease slide.
STEP 10: Place L.P tank in tank seat hole and secure with retention wing-bolt.
9
Page 12
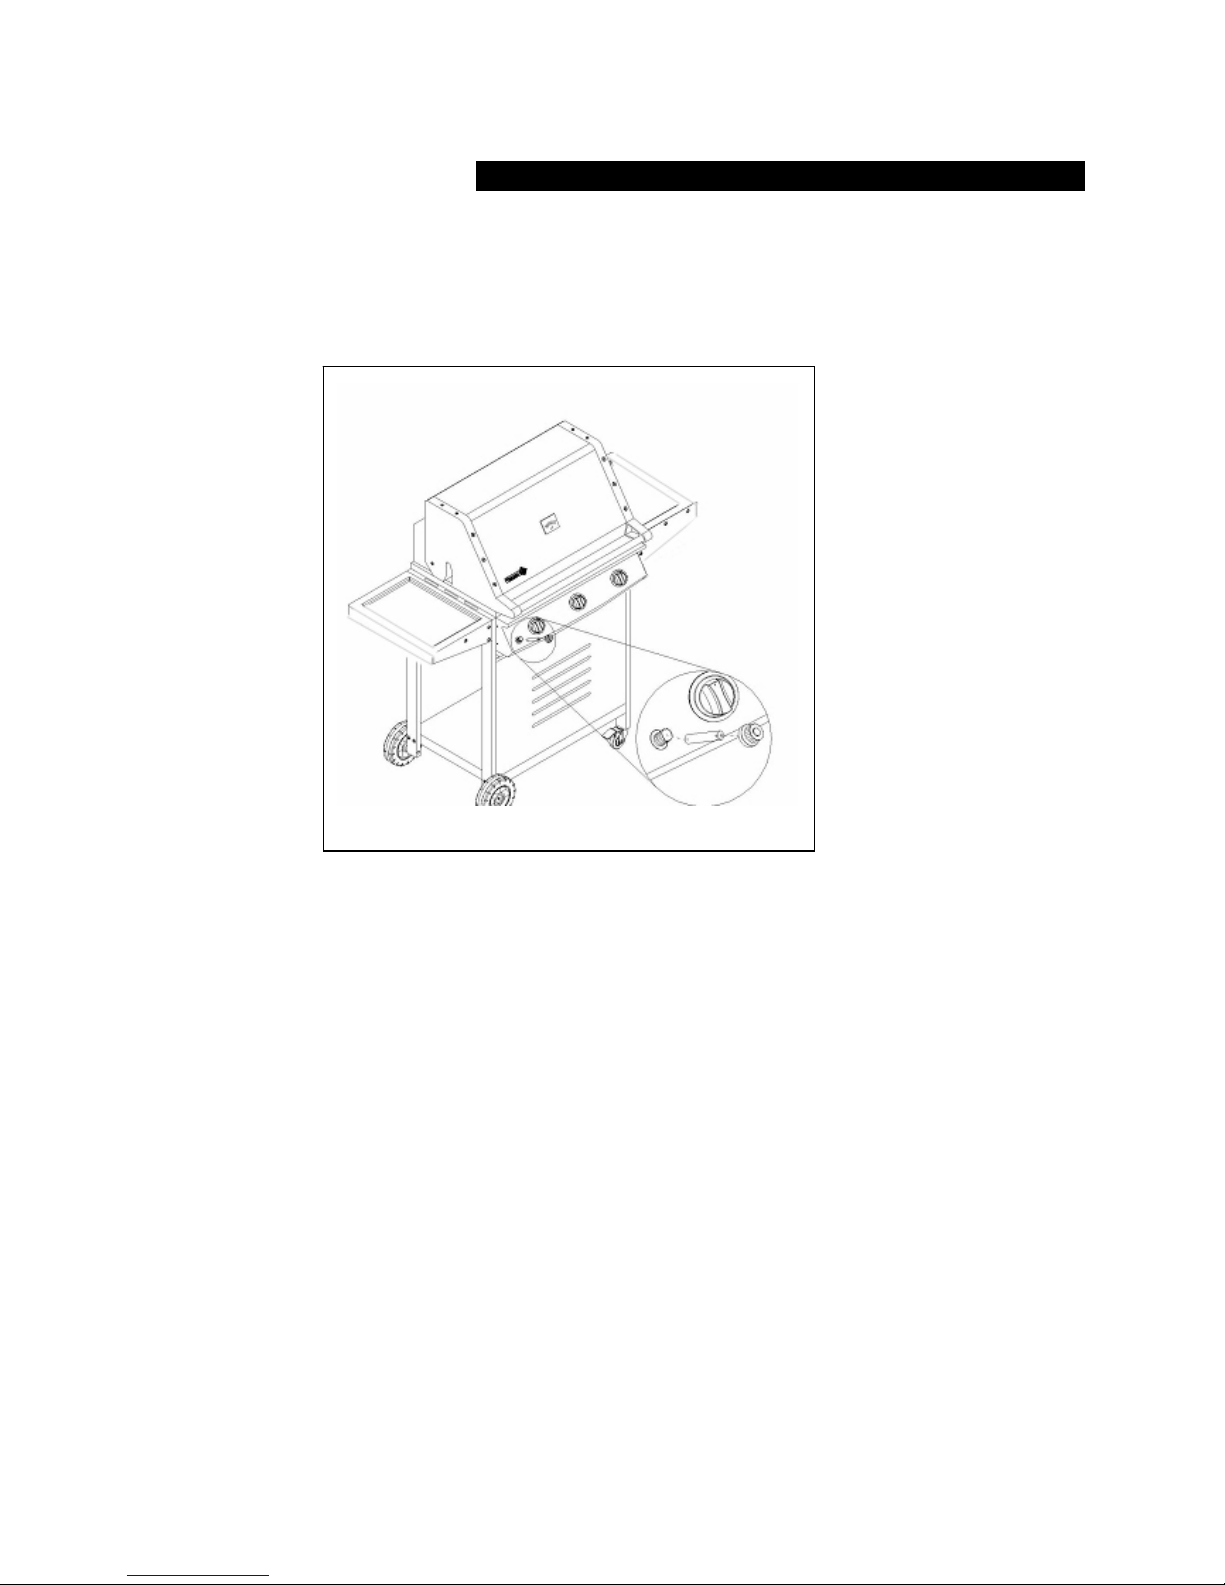
BA TTER Y ASSEMBLE
1. Unscrew the ignition battery cap. (Found at far-left of control panel)
2. Insert battery into ignition box with the positive terminal facing outward.
3. Re
p
lace the ignition battery capafterthe batter
y
has been installed.
10
Page 13
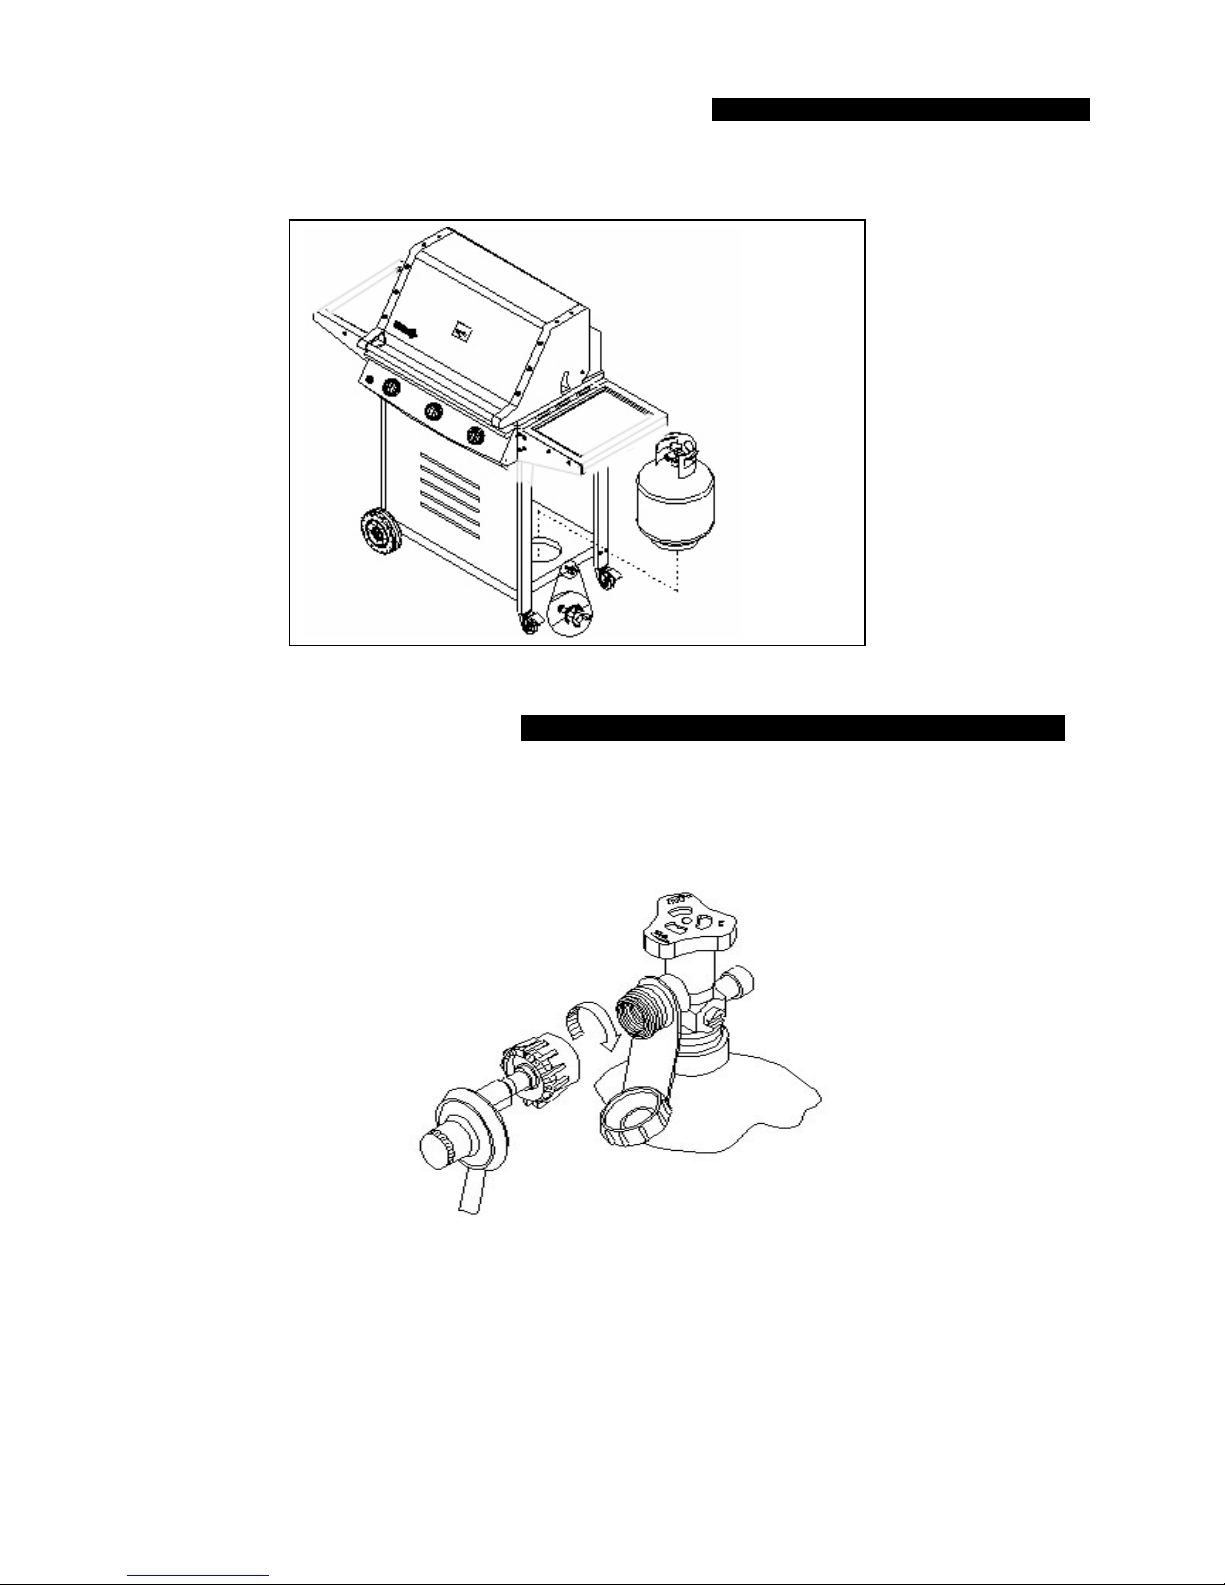
LIQUID PROPANE CYLINDER RETENTION
Attach regulator to prop-tank turning the regulator noble, clockwise, and by hand until tight as shown in figure
below. LP gas cylinder must be fitted with a listed overfill prevention device (OPD)
PROPANE TANK ASSEMBLE
Place liquid propane tank in tank seat hole & secure with retention wing-bolt.
11
Page 14

GAS HOOK-UP
L.P. GAS HOOK-UP
Ensure that the black plastic grommets on the LP
cylinder valve are in place and that the hose does
not come into contact with the grease tray or the
grill head.
CONNECTION
Y our stainless steel grill is equipped with gas supply
orifices for use only with liquid propane gas. It is
also equipped with a high capacity hose/regulator
assembly for connection to a standard 20lb. L.P.
cylinder (18-1/4” high, 12-1/4” diameter).
To connect the L.P. gas supply cylinder, please
follow the steps below:
NEVER CONNECT AN UNREGULATED GAS
SUPPLY LINE TO THE APPLIANCE. USE THE
REGULA TOR/HOSE AS SEMBLY SUPPLIED.
This is a liquid propane configured grill. Do no
attempt to use a natural gas supply unless the grill
has been reconfigured for natural gas use.
t
12
Total gas consumption (per hour) of this stainless
steel gas grill with all burners on “HI”:
Main burner 33,000 Btu/hr.
Total 33,000 Btu/hr.
The installation of this appliance must conform with
local codes or, in the absence of local codes, with
the national fuel gas code, ANSI Z223. 1a-1988.
Installation in Canada must be in accordance with
the Standard CAN/CGA-B149.1, Natural Gas
Installation Code or CAN/CGA-B149.2, Propane
Installation Code and local codes
.
L.P. TANK REQUIREMENT
A dented or rusty L.P. tank may be hazardous and
should be checked by your L.P. supplier. Never use
a cylinder with a damaged valve. The L.P. gas
cylinder must be constructed and marked in
accordance with the specifications for L.P. gas
cylinders of the U.S. Department of Transportation
(DOT) or the National Standard of Canada,
CAN/CSA-B339, Cylinders, Spheres and Tubes for
Transportation of Dangerous Goods; and
Commission, as applicable. Overfilling prevention
device (OPD) shall be provided on cylinder & QCCI
connection on the cylinder valve, ANSI/CGA-V-1.
The cylinder supply system must be arrange for
vapor withdrawal. The cylinder must include a collar
to protect the cylinder valve. The cylinder must be
provided with a shut off valve terminating in an L.P.
gas supply cylinder valve outlet specified, as
applicable, for connection type QCC1 in the
standard for compressed gas cylinder valve outlet
and inlet connection ANSI/CGA-V-1.
Manifold pressure: (operating): 10” water column
(W.C.), (non-operating): 11.2” water column (W.C.).
1. Make sure tank valve is in its full off position
(turn clockwise to stop)
2. Check tank valve to assure it has proper
external male threads (type 1 connection per
ANSIZ21.81)
3. Make sure all burner valves are in their off
position.
4. Inspect valve connections, port, and regulator
assembly. Look for any damage or debris.
Remove any debris. Inspect hose for damage.
Never attempt to use damaged or obstructed
equipment. See your local L.P. gas dealer for
repair.
5. When connecting regulator assembly to the
valve, hand tighten the nut clockwise to a
complete stop. Do not use a wrench to tighten.
Use of a wrench may damage the quick
coupling nut and result in a hazardous
condition.
6. Open the tank valve fully (counterclockwise).
Use a soapy water solution to check all
connections for leaks before attempting to light
the grill, see below. If a leak is found, turn the
tank valve off and do not use the grill until a
local L.P. gas dealer can make repairs.
12
Page 15
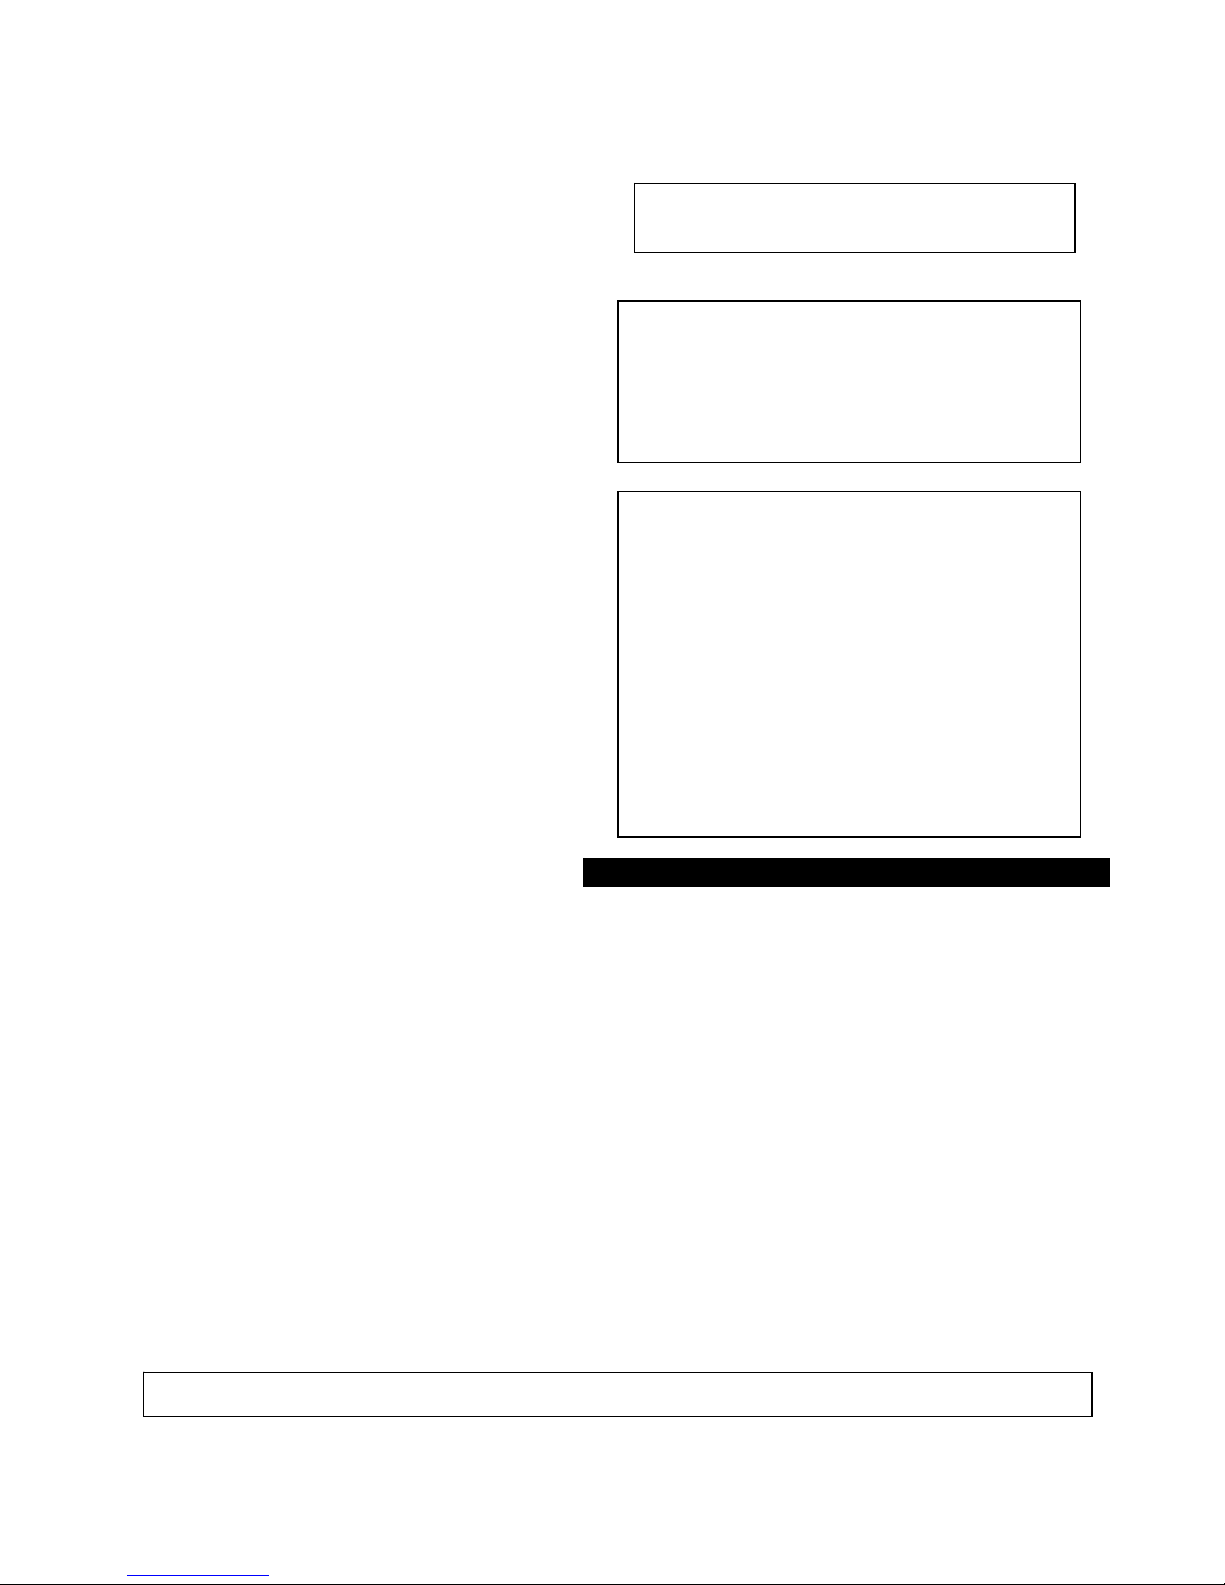
To disconnect L.P. gas cylinder:
1. Turn the burner valves off.
2. Turn the tank valve off fully (turn clockwise
to stop).
3. Detach the regulator assembly from the
tank valve by turning the quick coupling nut
counterclockwise.
ALWAYS CHECK FOR LEAKS AFTER
EVERY L.P. TANK CHANGE
Check all gas supply fittings for leaks before
each use. It is handy to keep a spray bottle of
soapy water near the shut-off valve of the gas
supply line. Spray all the fittings. Bubbles
indicate leaks.
LEAK TEST
GAS FLOW CHECK
Each grill burner is tested and adjusted at the
factory prior to shipment; however, variations in
the local gas supply may make it necessary to
adjust the burners. The flames of the burners
should be visually checked.
Flames should be blue and stable with no
yellow tips, excessive noise or lifting. If any of
these conditions exist, check to see if the air
shutter or burner ports are blocked by dirt,
debris, spider webs, etc. If you have any
questions regarding flame stability, please call
customer service 1-866-984-7455
Disconnected L.P. cylinders must have
threaded valve plugs tightly installed, and
must not be stored in a building, garage or any
other enclosed area.
The gas must be turned off at the supply
cylinder when the unit is not in use.
If the appliance is stored indoors the cylinder
must be disconnected and removed from the
appliance. Cylinders must be stored outdoors
in a well-ventilated area out of the reach of
children.
INSTALLER FINAL CHECK LIST
9 Specified clearance maintained 24” from
combustibles.
9 All internal packaging removed.
9 Knobs turn freel y.
9 Burners are tight and sitting properly on
orifices.
9 Pressure regulator connected and set for
11.2” W.C. L.P. gas. Gas connections to grill
using hose & regulator assembly provided
(pre-set for 11.0” water column).
9 Unit tested and free of leaks.
9 User informed of gas supply shut off valve
location
PROPANE CYLINDER CAUTIONS
a) Do Not store a spare LP-gas cylinder
under or near this appliance.
b) NEVER fill the cylinder beyond 80 percent
full.
c) If the information in “a” and “b” is not
followed exactly, a fire causing death or
serious injury may occur.
USER, PLEASE RETAIN THESE INSTRUCTIONS FOR FUTURE REFERENCE.
13
Page 16

OPERATING INSTRUCTIONS
GENERAL USE OF THE GRILL
Each main burner is rated at 11,000 Btu/hr. The
main grill burners encompass the entire cooking
area and are side ported to minimize blockage from
falling grease and debris. Above the burners are
stainless steel radiants (flame covers). The igniter
knobs are located on the lower center portion of the
valve panel. Each rotary igniter is labeled on the
control panel.
USING THE GRILL
Grilling requires high heat for searing and proper
browning. Most foods are cooked at the “HI” heat
setting for the entire cooking time. However, when
grilling large pieces of meat or poultry, it may be
necessary to turn the heat to a lower setting after the
initial browning. This cooks the food through without
burning the outside. Foods cooked for a long time or
foods basted with a sugary marinade may need a
lower heat setting near the end of the cooking time.
NOTE: This stainless steel grill is designed to grill
efficiently without the use of lava rocks or briquettes
of any kind. Heat is radiated by the stainless steel
flame tamers positioned above each burner.
NOTE: The hot grill sears the food, sealing in the
juices. The longer the preheat, the faster the meat
browns and the darker the grill marks.
DO NOT LEAVE THE GRILL UNATTENDED
WHILE COOKING.
14
Page 17
GRILL LIGHTING INSTRUCTIONS
TO MATCH LIGHT THE GRILL
If the burner will not light after several attempts then
the burner can be match lit.
Lighting rod-Here is your instruction:
Match light extension rod
Use this device to match light your burners
Simply place a lighted match between the coils on the
end of the extension rod and hold next to the burner to
ignite. (see reference Pg)
If you’ve just attempted to light the burner with the
igniter, allow 5 minutes for any accumulated gas to
dissipate. Keep your face and hands as far away from
the grill as possible. Insert a lit match attached to tight
lighting rod or lighter through the cooking
grids to the burner.(see next page) Press the control
knob and rotate left to the HI setting, continue to press
the knob until the burner ignites. Burner should light
immediately. If the burner does not light in 4 seconds
turn the knob off, wait 5 minutes and try again.
WARNING: IMPORTANT!
BEFORE LIGHTING…
Inspect the gas supply hose prior to turning the gas
“ON”. If there is evidence of cuts, wear, or abrasion, it
must be replaced prior to use. Do not use the grill if
the odor of gas is present. Only the pressure regulator
and hose assembly supplied with the unit should be
used. Never substitute regulators for those supplied
with the grill. If a replacement is necessary, contact
the factory for proper replacement.
Screw the regulator (type QCC1) onto the tank. Leak
check the hose and regulator connections with a soap
and water solution before operating the grill.
TO LIGHT THE GRILL BURNER:
Make sure all knobs are “OFF” then turn on the gas
supply from the LP tank. Always keep your face and
body as far from the grill as possible when lighting.
Your stainless steel grill has an exclusive patented
built-in ignition. The igniter is built in to the valve. To
ignite each burner simply push and turn the control
knobs to the HI setting, you will hear the valve click as
it sends a spark to the pilot flame. If the burner does
not light wait 5 minutes for any excess gas to
dissipate and then retry.
FLAME CHARACTERISTICS
Check for proper burner flame characteristics. Each
burner is adjusted prior to shipment; however,
variations in the local gas supply may take minor
adjustments necessary.
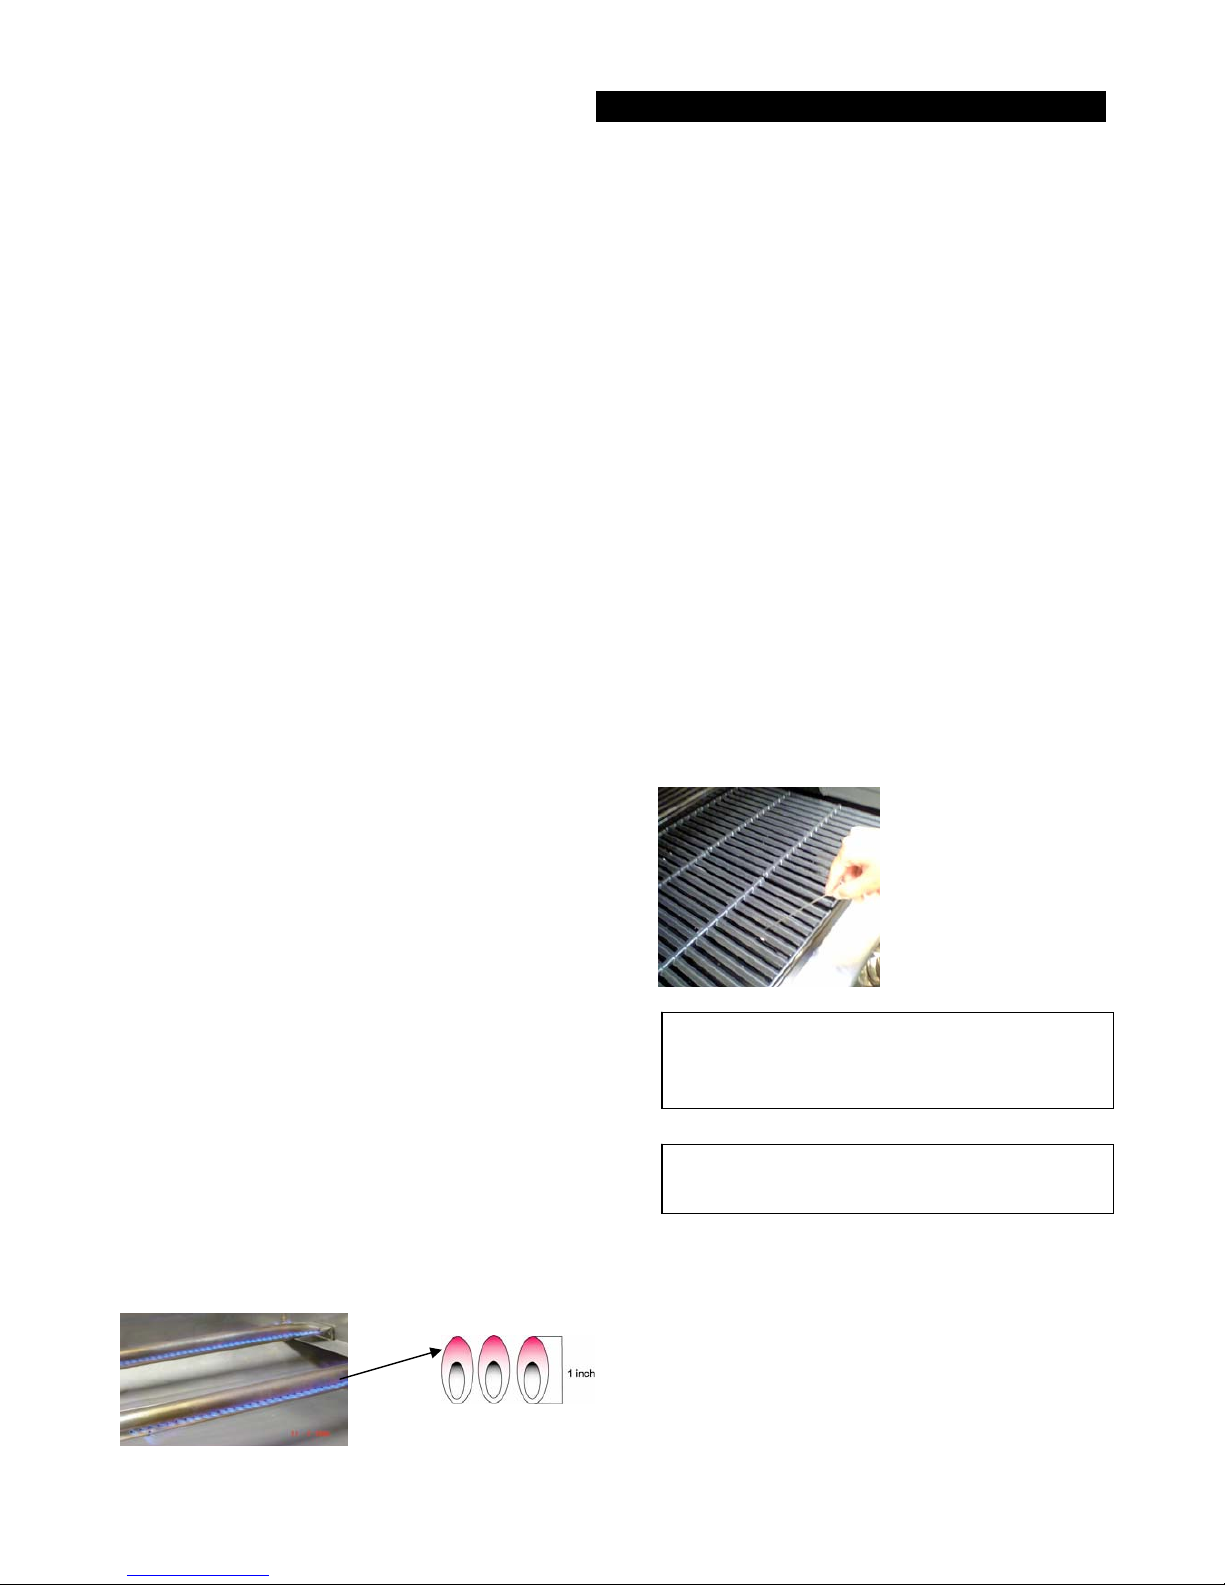
Burner flames should be blue and stable with no
yellow tips, excessive noise, or lifting. If any of these
conditions exist call our customer service line. If the
flame is yellow, it indicates insu fficient air. If the flame
is noisy and tends to lift away from the burner, it
indicates too much air.
Keep a spray bottle of soapy water near the gas
supply valve and check the connections before
each use.
Do not attempt to light the grill if odor of gas is
p
resent. Call for service 1-866-984-7455
15
Page 18

CARE AND MAINTENANCE
STAINLESS STEEL
The grill is made from non-rusting and non-magnetic
stainless steel. There are many different stainless
steel cleaners available. Always use the mildest
cleaning procedure first, scrubbing in the direction of
the grain. To touch up noticeable scratches in the
stainless steel, sand very lightly with dry 100 grit
emery paper in the direction of the grain. Specks of
grease can gather on the surfaces of the stainless
steel and bake on to the surface and give the
appearance of rust. For removal use an abrasive pad
in conjunction with a stainless steel cleaner.
GRILL RACK
The easiest way to clean the grill is immediately after
cooking is completed and after turning off the flame.
Wear a barbeque mitt to protect your hand from the
heat and steam. Dip a brass bristle barbeque brush in
tap water and scrub the hot grill. Dip the brush
frequently in the bowl of water. Steam, created as
water contacts the hot grill, assists the cleaning
process by softening any food particles. The food
particles will fall and burn. If the grill is allowed to cool
before cleaning, cleaning will be more difficult.
E
16
NSURE THAT THE GAS SUPPLY AND THE KNOBS
ARE IN THE “OFF” POSITION. MAKE SURE THE
RANGETOP BURNER IS COOL BEFORE REMOVAL.
GRILL BURNERS
Extreme care should be taken when moving a burner as it
must be correctly centered on the orifice before any
attempt is made to relight the grill. Frequency of cleaning
will depend on how often you use the grill.
MAIN GRILL BURNER CLEANING
Ensure the gas supply is off and the knobs are in the
“OFF” position. Make sure the grill is cool. Clean the
exterior of the burner with a wire brush. Clear stubborn
scale with a metal scraper . Clear any clogged ports with a
straightened paper clip. Never use a wooden toothpick as
it may break off and clog the port. Please note if insects or
other obstructions are blocking the flow of gas through the
burner, and if so you will need to call our customer service
line.
GREASE TRAY CLEANING:
The grease tray should be emptied and wiped down after
each use and washed in a mild detergent and warm water
solution.
A small amount of sand or cat litter may be placed in
bottom of grease tray to absorb the grease. Check the
grease tray frequently, don’t allow excess grease to
accumulate and overflow out of the grease tray.
16
Page 19
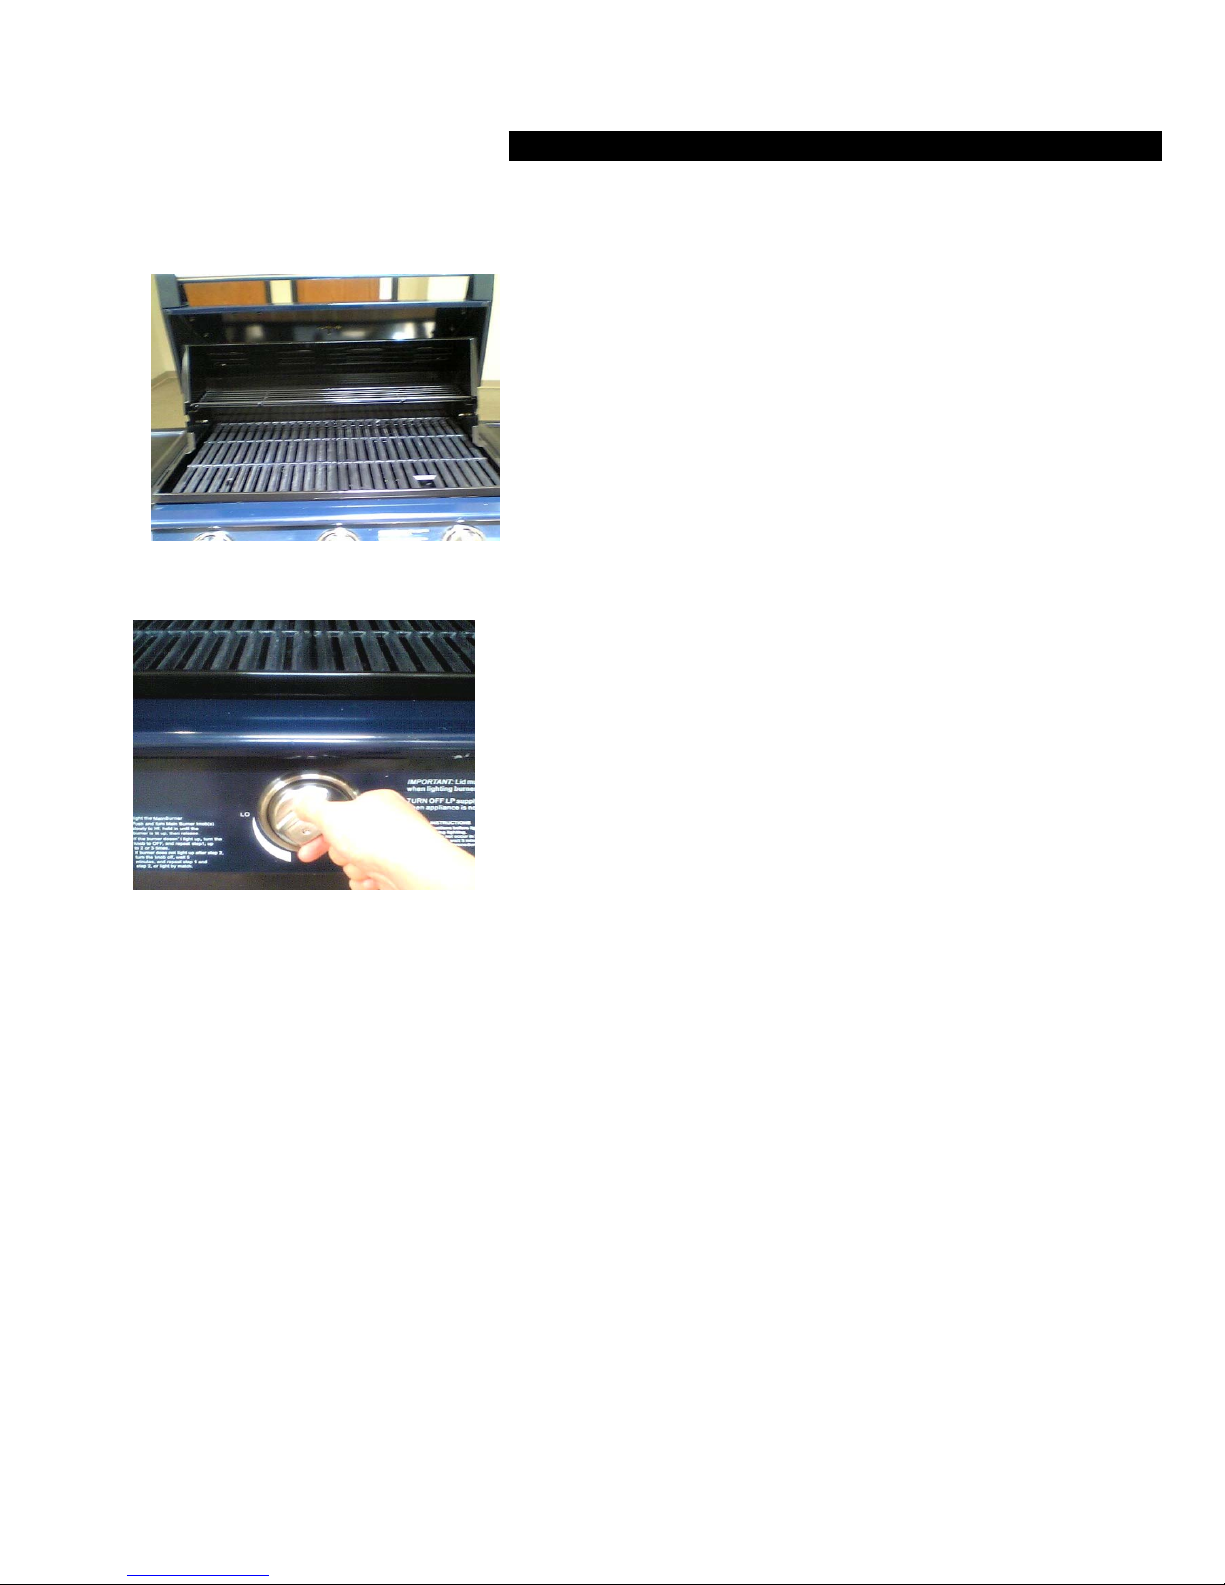
LIGHTING ILLUSTRATIONS
Main & Side Burner Lighting Illustration
Step 1. Make sure the Lid is open
Step 2. Push and turn one of main knobs to HI position
Step 3. You may need 3 or 4 trials to light the burner. After the burner is lit, adjust the
knob as desired
17
Page 20
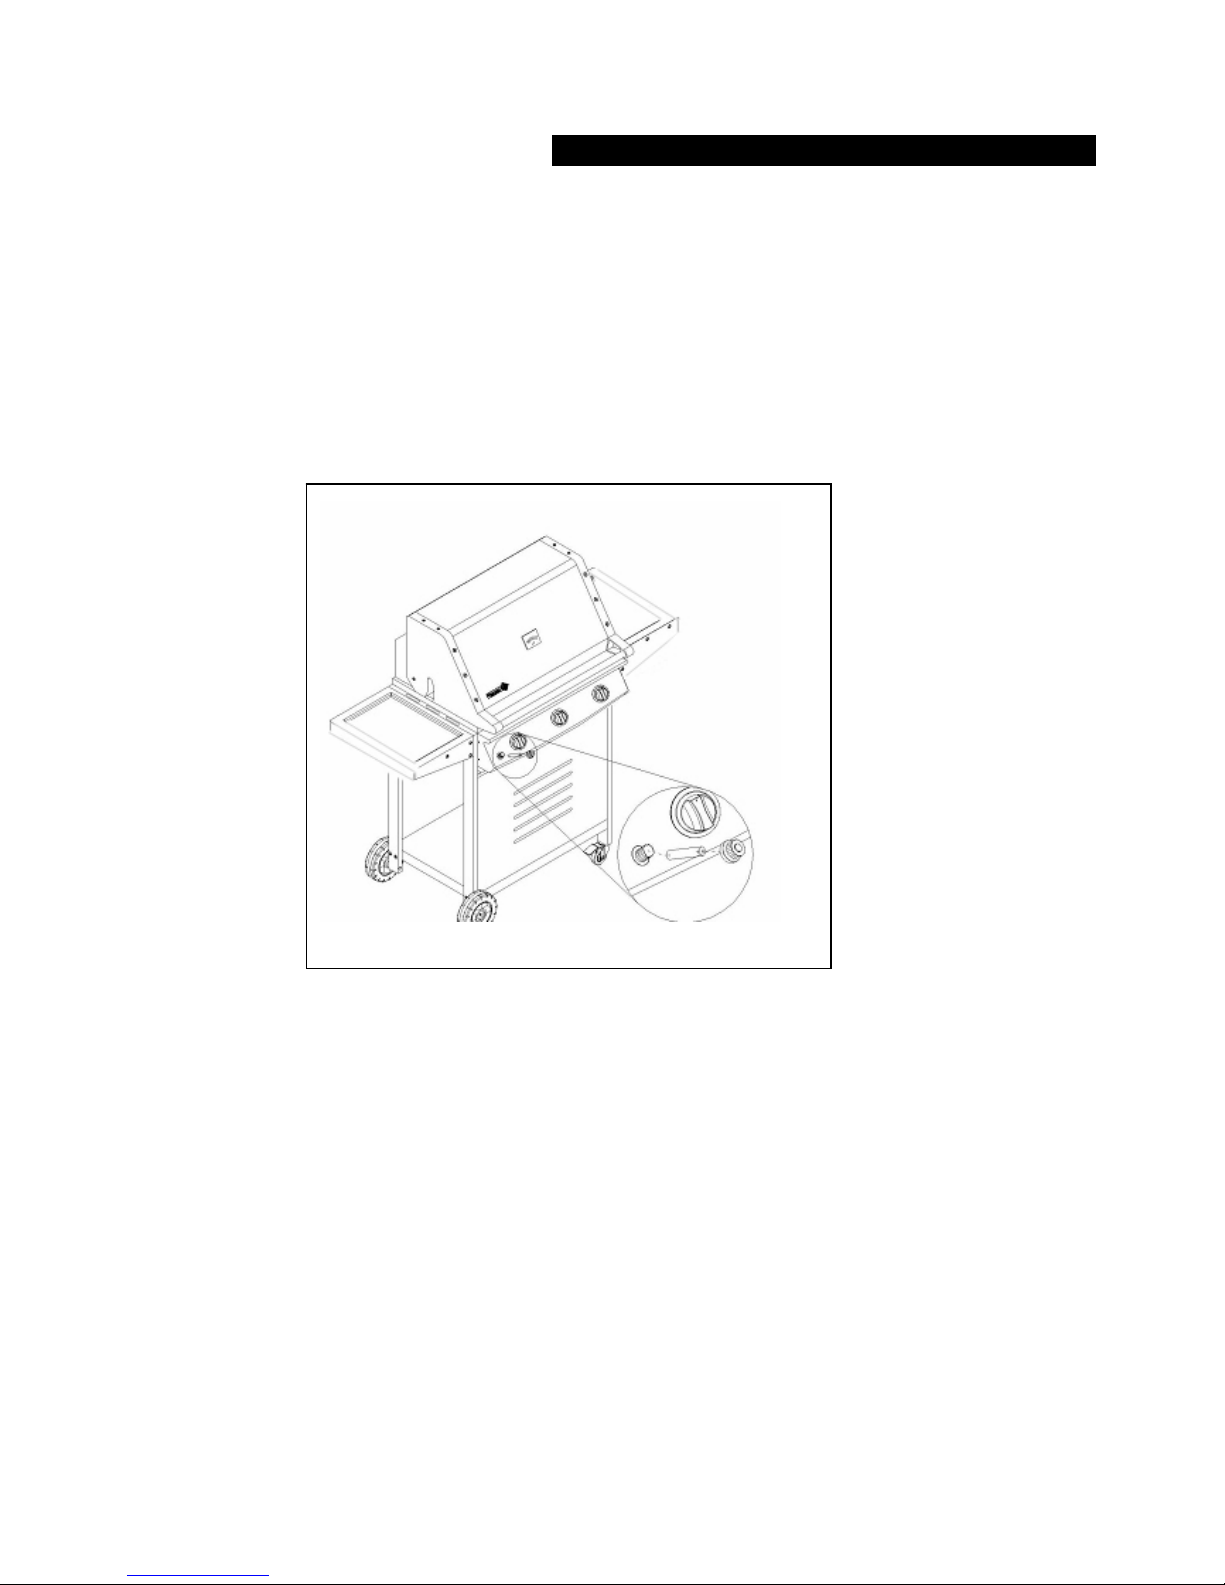
TO MATCH LIGHT THE GRILL
If the burner will not light after several attempts then the burner can be match lit.
If you’ve just attempted to light the burner with the igniter, allow 5 minutes for any accumulated gas to dissipate.
Keep your face and hands as far away from the grill as possible. Insert a lit light rod or lighter through the cooking
grids to the burner. Press the control knob and rotate left to the HI setting, continue to press the knob until the
burner ignites. Burner should light immediately. If the burner does not light in 4 seconds turn the knob off, wait 5
minutes and try again.
18
Page 21

TROUBLE SHOOTING
SPIDER AND INSECT WARNING!!!
Spiders and insects can nest in the burners of
this or any other grill, and cause the gas to flow
from the front of the burner. This is a very
dangerous condition which can cause a fire to
occur behind the valve panel, thereby damaging
the grill and making it unsafe to operate.
WHEN TO LOOK FOR SPIDERS
You should inspect the burners at least once a year
or immediately after any of the following conditions
occur:
1. The smell of gas in conjunction with the burner
flames appearing yellow.
2. The grill does not reach temperature.
3. The grill heats unevenly.
4. The burners make popping noises.
BEFORE CALLING FOR SERVICE
If the grill does not function properly, use the following checklist before contacting your dealer for service. You
may save yourself the cost of a service call.
PROBLEMS WHAT TO DO
Grill will not light when the control
knob is rotated.
• Check to see if the LP tank is empty.
• Clean wire(s) and/or electrode with rubbing alcohol and a clean
swab. Wipe with a dry cloth.
• Make sure the wire is connected to the electrode assembly.
• Check to see if the other burners operate. If so, check the gas
orifice on the malfunctioning burner for an obstruction.
Burner flame is yellow or orange,
in conjunction with gas odor.
• Call customer service at
1-866-984-7455
Low heat with the control knob on
the “HI” setting.
• Check to see if the fuel hose is bent or kinked.
• Make sure the grill area is clear of dust.
• Check your gas regulator and pressure.
• Make sure the burner and orifice are clean.
19
Page 22
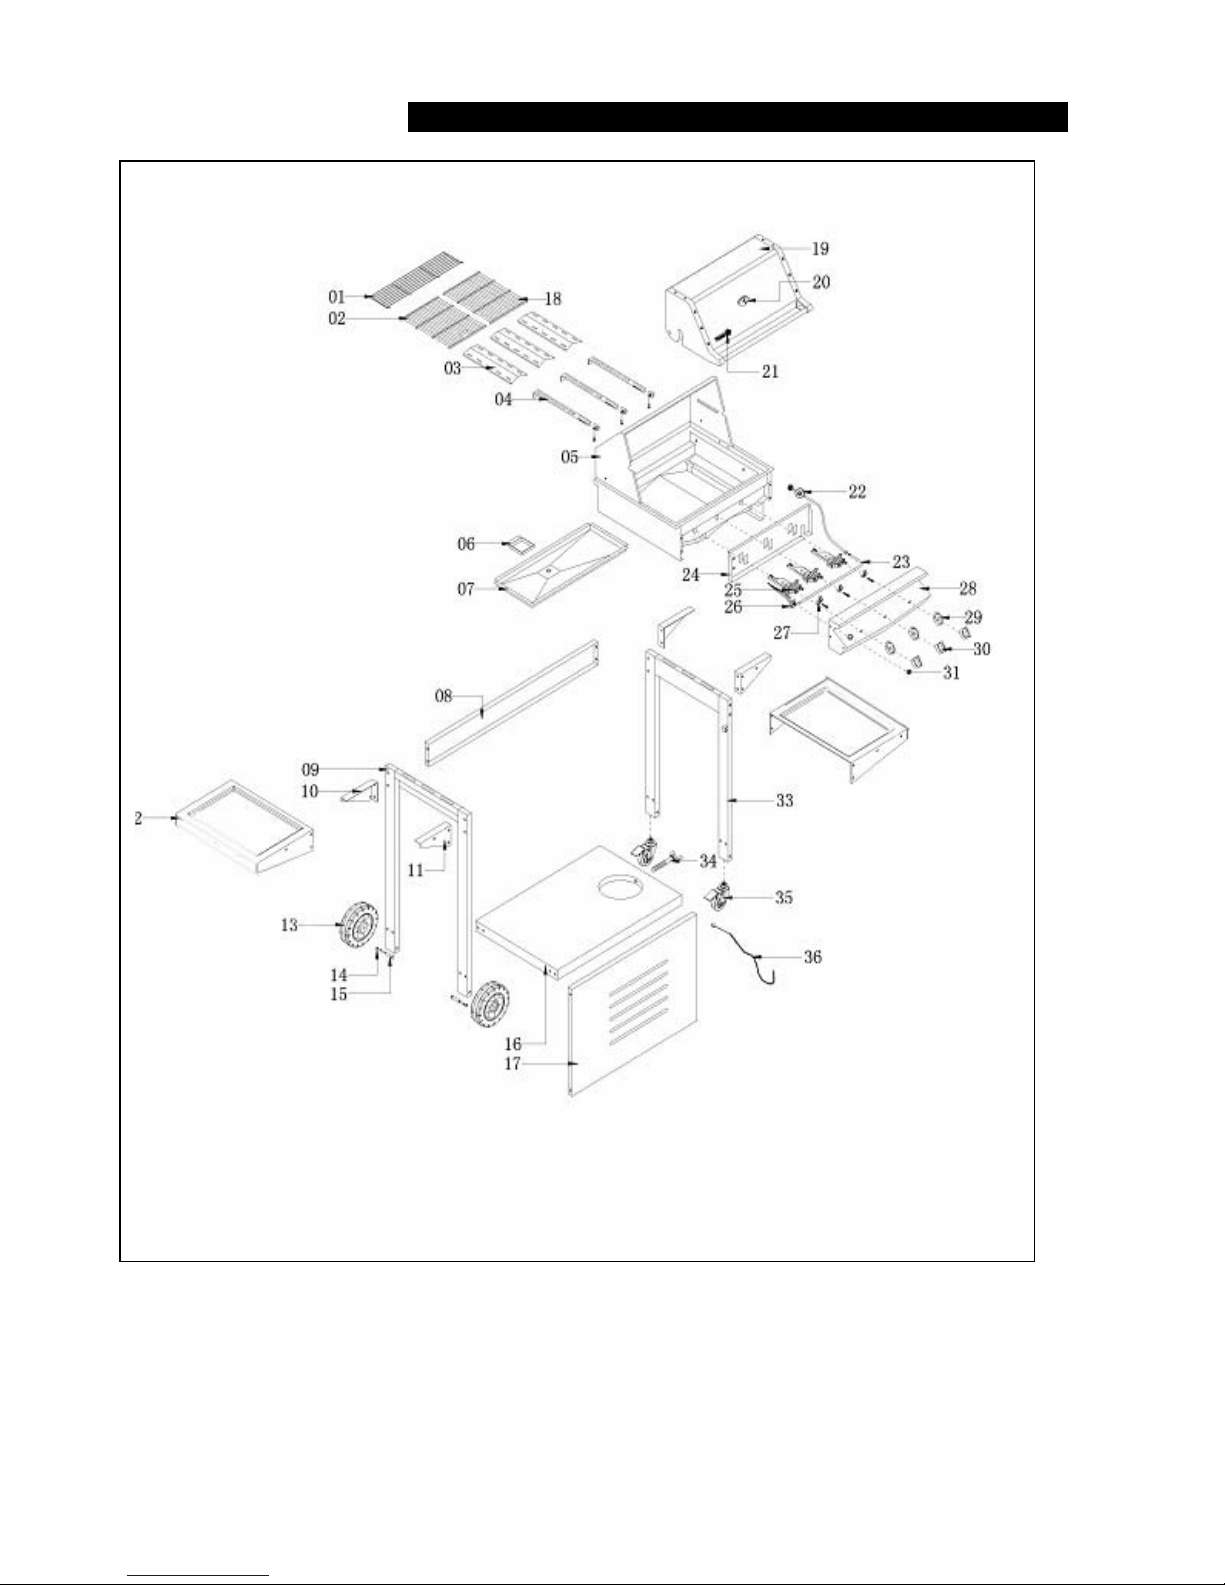
EXPLODED VIEW
20
Page 23
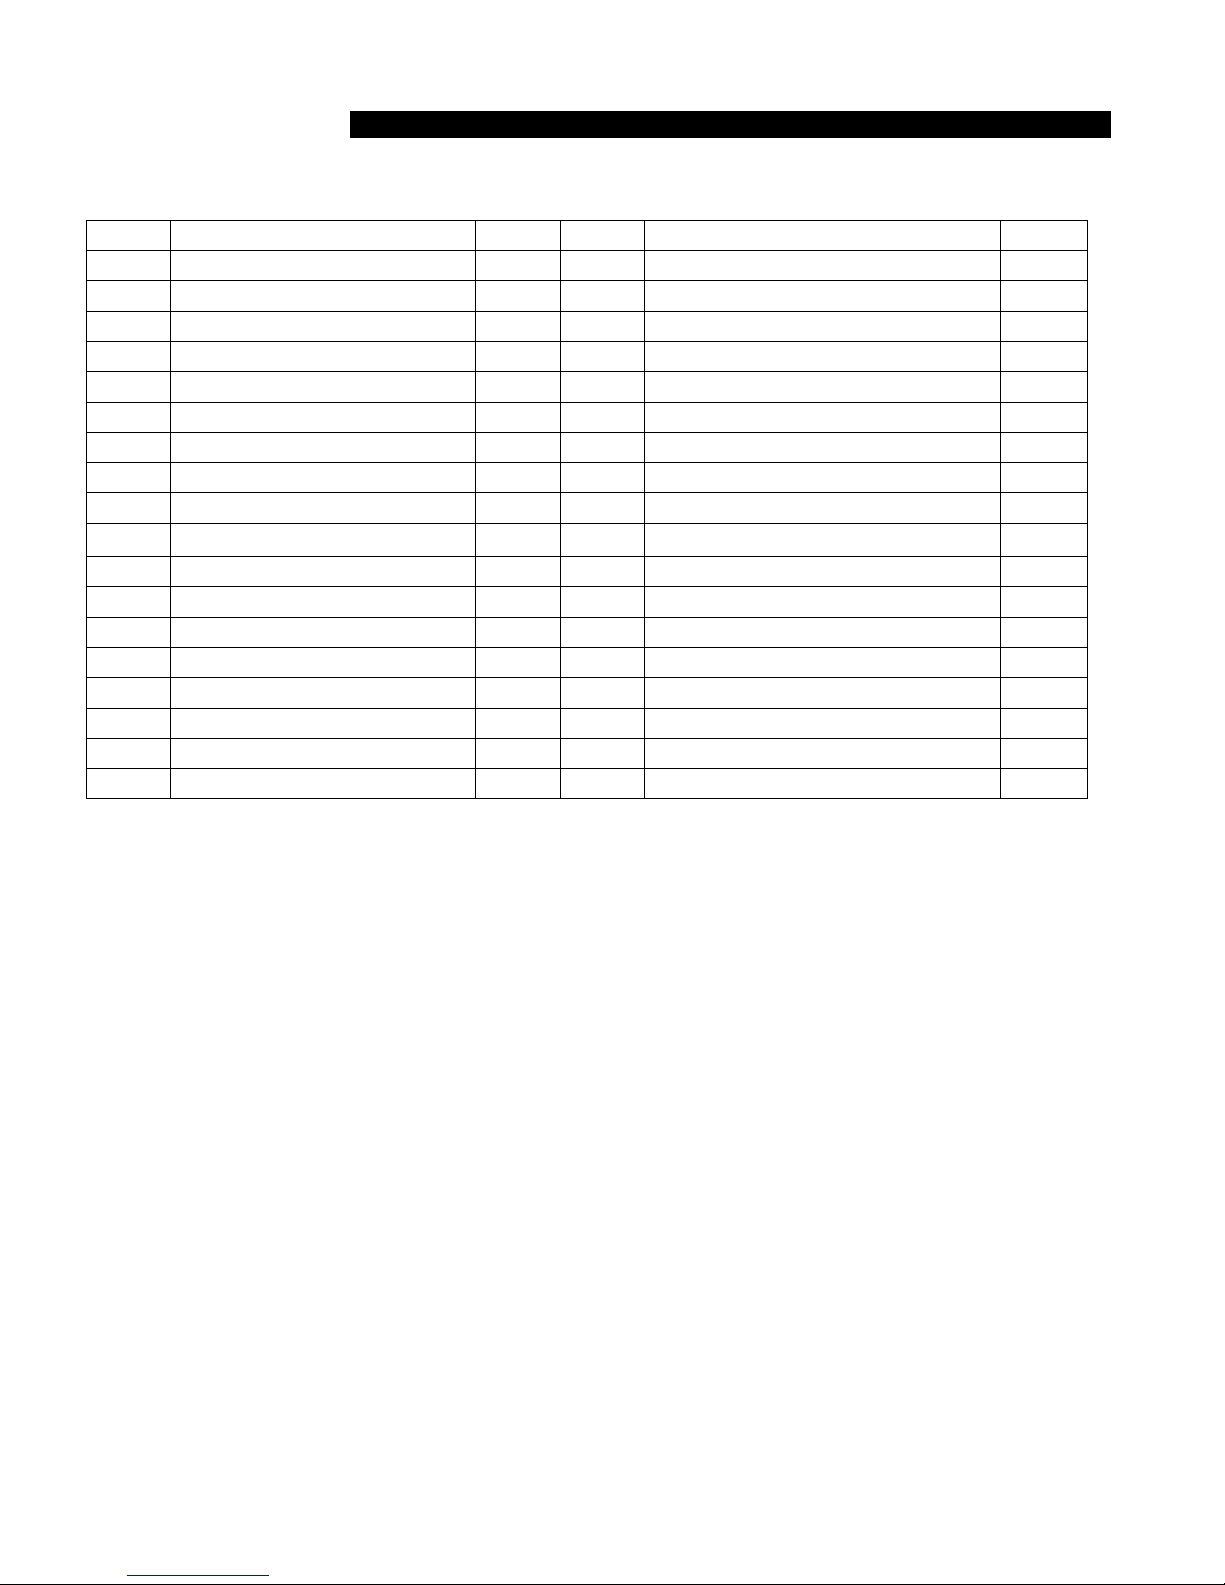
PARTS LIST
REF# DESCRIPTION Q’TY REF# DESCRIPTION Q’TY
1
Warming Rack 1 19 Main lid
1
2
Cooking Grid With Hole 1 20 Heat Indicator
1
3
Flame Tamer 3 21 Name Plate
1
4
Main Burner 3 22 Regulator LP
1
5
Bowl Assembly 1 23 Manifold
1
6
Grease Tray 1 24 Front Baffle
1
7
Grease Slide 1 25 Gas Valve, Main Burner
3
8
Cart Frame Cross Bar 1 26 Battery ignition Box
1
9
Left Cart Panel Legs 1 27 Ignition line
3
10
Left side shelf bracket 2 28 Control Panel
1
11
Right side shelf bracket 2 29 Control Knob Seat ( Bezel)
3
12
Side Shelf 2 30 Control Knob
3
13
Wheels 2 31 Electric Ignition Cover
1
14
Screw thread cover 2 33 RT Cart Panel Legs
1
15
Screw thread staff 2 34 Retention Wing Bolt
1
16
Bottom Panel 1 35 Caster With Brake
2
17
Front Panel 1 36 Lighting Rod
1
18
Cooking Grid 1
21
Page 24

ORDERING PARTS
HOW TO ORDER REPLACEMENT PARTS
To make sure you obtain the correct replacement
part(s) for your gas grill, please refer to the parts list
on this page. The following information is required to
assure getting the correct part.
•Gas grills model number (see data sticker on grill).
•Part number of replacement part needed.
•Description of replacement part needed.
•Quantity of parts needed.
To obtain replacement parts, contact the dealer from
which products was purchased. If dealer service is
not available, contact: Nexgrill Industries, Inc.
customer service 1-866-984-7488 or fax
909-598-7699.
IMPORTANT
Use only factory authorized parts. The use of any
part that is not factory authorized can be
dangerous. This will also void your warranty.
Keep this assembly and operating instruction
manual for convenient referral, and for replacement
parts ordering.
CAUTION
Gas valves are present at the factory (valve
assembly will be marked accordingly). If you wish
to convert at some later date, be sure to contact
your gas supplier or grill dealer before making the
conversion.
Different orifices must be installed when converting
from one type of gas to another. You will also need
a data plate indicating what type of gas is used by
the grill.
GRILLING HINTS
To get the juiciest meat, add seasoning or salt after
cooking is finished and turn the meat only once
during cooking. Juices are lost when the meat is
turned several times. Turn the meat just after the
juices begin to bubble to the surface.
Trim excess fat from the meat before cooking. To
prevent steaks or chops from curling during cooking,
slit the fat around the edges at 2 inch intervals.
WARNING
Do not leave the grill unattended while cooking.
The preparation of meat, whether rare, medium, or
well done, is affected to a large degree by the
thickness of the cut.
The cooking time is affected by the type of meat, the
size and shape of the cut, the temperature of the
meat when cooking begins, and the degree of
preparation desired.
It is recommended that meat be defrosted overnight
in the refrigerator as opposed to a microwave. This
generally yields a juicier cut of meat.
Use a spatula instead of tongs or a fork to turn the
meat. A spatula will not puncture the meat and let
the juices run out.
22
Page 25
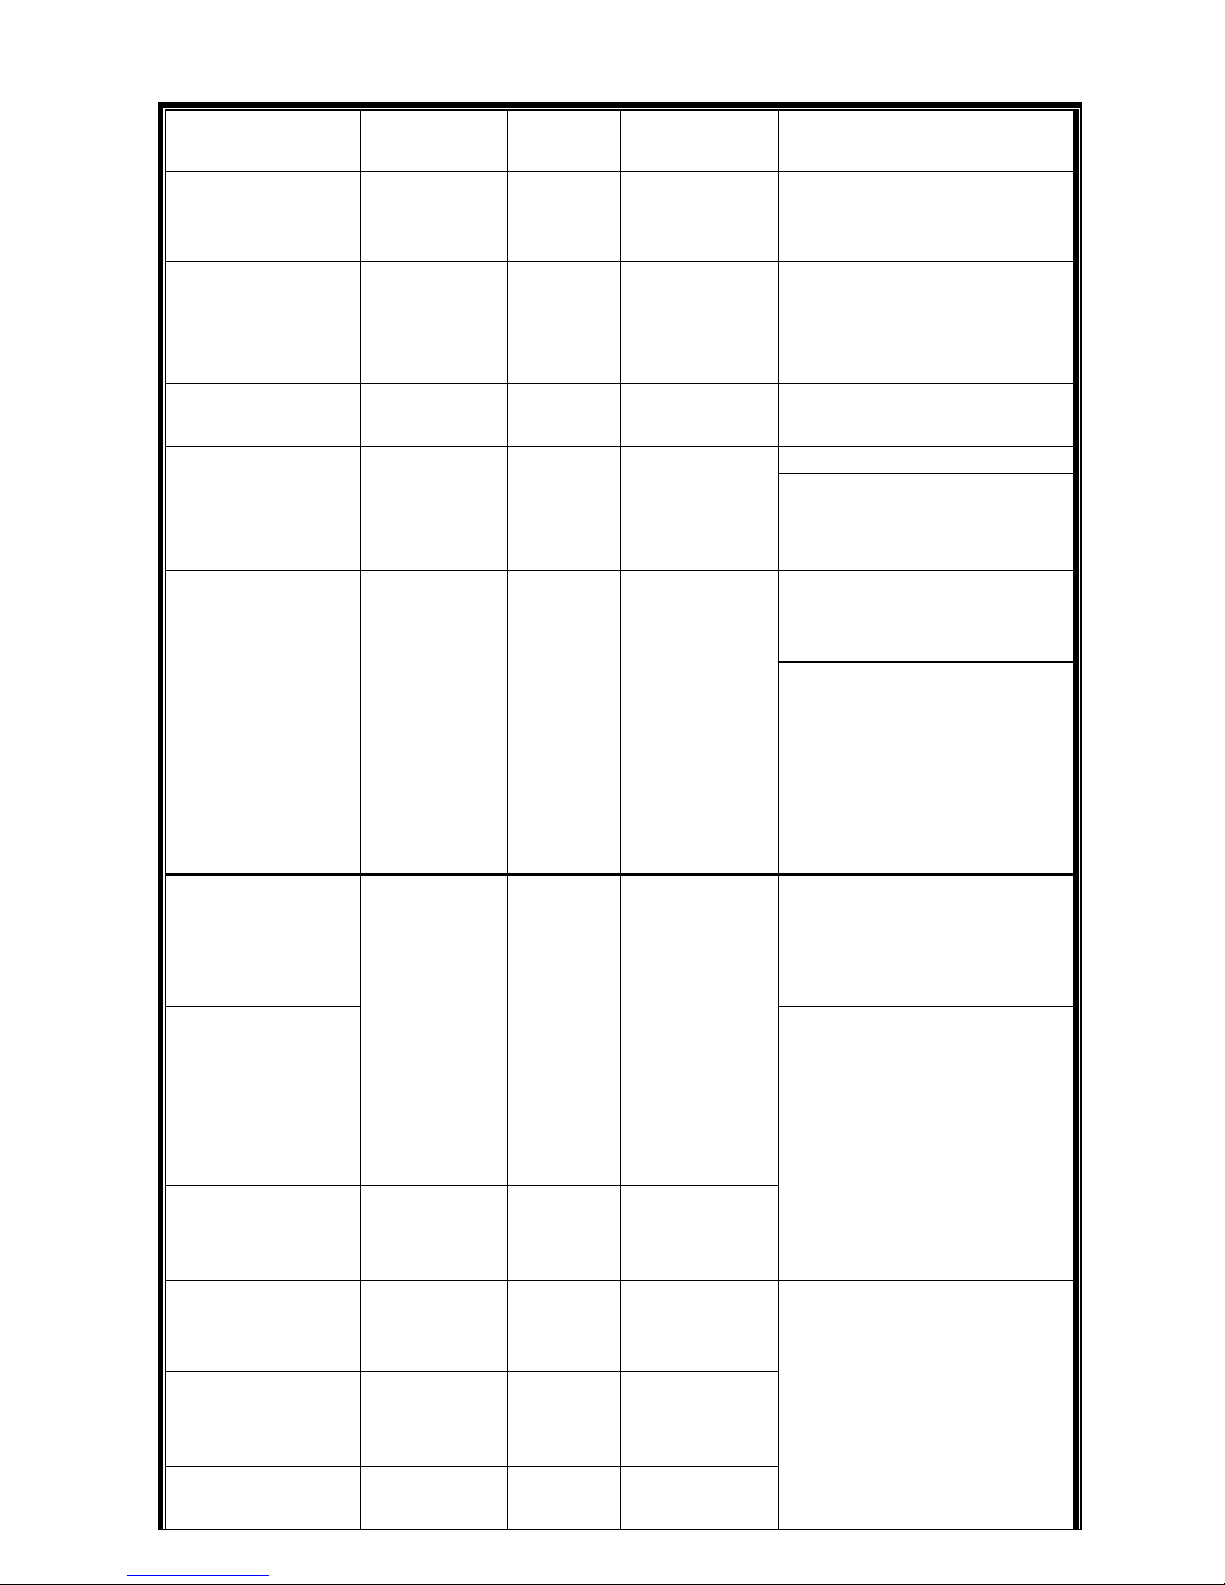
FOOD WEIGHT OR
THICKNESS
FLAME
SIZE
APPROXIMATE
TIME
SPECIAL INSTRUCTIONS
AND TIPS
VEGETABLES
Slice. Dot with butter or margarine.
Wrap in heavy-duty foil. Grill,
turning occasionally.
Fresh
Beets
Carrots
Turnips
Medium 12 to 20 minutes Grill, turning once. Brush
occasionally with melted butter o
r
margarine.
Onion 1/2 inch slices Medium 8 to 20 minutes
Season with Italian dressing, butter,
or margarine.
Potatoes
Sweet Whole Medium 40 to 60 minutes Wrap individually in heavy-duty foil.
Grill, rotating occasionally.
White 6 to 8 ounces High 45 to 60 minutes
Frozen
Asparagus
Peas
Green beans
Sprouts
Medium
15 to 30 minutes
Dot with butter or margarine.
Wrap in heavy-duty foil. Grill,
turning occasionally.
Broccoli
Brussels
French fries Medium 15 to 30 minutes Place in aluminum foil pan.
Grill, stirring occasionally.
MEATS BEEF
Hamburgers
1/2 to 3/4 inch
Medium
10 to 18 minutes
Grill, turning once when juices ris
e
to the surface. Do not leav
e
hamburgers unattended. A flare-u
p
could occur quickly.
Tenderloin, High 8 to 15 minutes
Porterhouse,
Rib eye
Rare 1 inch High 8 to 14 minutes Remove excess fat from edges.
Slash remaining fat at 2-inc
h
intervals. Grill, turning once.
Medium 1-1/2 inch High 1 1 to 18 minutes
1 inch Medium to 12 to 22 minutes
1-1/2 inch High 16 to 27 minutes
Well-done 1 inch Medium 18 to 30 minutes
1-1/2 inches Medium 16 to 35 minutes
Page 26

Lamb
FOOD WEIGHT
OR THICKNESS
FLAME
SIZE
APPROXIMATE
TIME
SPECIAL
INSTRUCTIONS
AND TIPS
Chops & Steaks
Rare 1 inch High 10 to 15 minutes Remove excess fat from edges.
Slash remaining fat at 2 inc
h
intervals. Grill, turning once.
1-1/2 inch High 14 to 18 minutes
Medium 1 inch Medium to 13 to 20 minutes
1-1/2 inch High 18 to 25 minutes
Well-done 1 inch Medium 17 to 30 minutes
Pork
Chops
1 inch Medium 20 to 30 minutes Remove excess fat from edges.
Slash remaining fat at 2 inc
h
intervals. Grill, turning once. Coo
k
well done.
Well-done 1-1/2 inches Medium 30 to 40 minutes
Ribs
Pork
Medium 30 to 40 minutes Grill, turning occasionally.
During last few minutes, brush with
barbecue sauce, turning several
times.
Ham steaks
(precooked)
1/2 inch slices High 4 to 8 minutes Remove excess fat from edges.
Slash remaining fat at 2 inch
intervals. Grill, turning once.
Hot dogs Medium 5 to 10 minutes Slit skin. Grill, turning once.
POULTRY
Broiler/fryer
2 to 3 pounds Low or
1 to 1-1/2 hours Place skin side up. Grill, turning and
brushing frequently with
melted butter, margarine, oil o
r
marinade.
Breasts
well-done
Medium 30 to 45 minutes Marinate with Italian dressing
FISH AND
SEAFOOD
Steaks
Grill, turning once. Brush with
Halibut 3/4 to 1 inch Medium to 8 to 15 minutes Melted butter, margarine or oil
Salmon High To keep moist.
Swordfish
Whole
Catfish
4 to 8 ounces Medium to 12 to 20 minutes
Grill turning once. Brush wit
h
melted butter, margarine or oil.
Rainbow trout High
Brush with melted butter and lemo
n
juice.
23
24
GRL COOKING CHART
Page 27

GRILL RECIPE SUGGESTIONS
BBQ SALMON
2 large salmon steaks
2 tbs. Oil
Salt & pepper
2 oz. thin bacon slices
2 tbs. Butter
1 tbs. Lemon juice
Spring of parsley
Lemon wedges
Preheat the BBQ.
Brush the steaks with oil and
season with salt and pepper.
Place on BBQ grill and cook for
10 minutes, turning steaks over
halfway cooking time.
Meanwhile fry the bacon in a pan
on the side burner. Drain on
paper towels. Meld the butter in a
small saucepan taking care not to
discolor it. Arrange the fish and
bacon on serving plates. Pour the
butter over and sprinkle with
lemon juice. Garnish with parsley
springs and lemon wedges.
Serve with boiled potatoes
tossed in butter and sprinkled
with chopped parsley and a crisp
lettuce salad.
Note: Substitute catfish, halibut
or cod for salmon.
BAKED CHILI CORN
6 medium ears corn, husked
3 tbs. Butter or margarine, melted
Dash ground cumin
Dash ground coriander
About ½ hour before cooking,
turn the butter on for grill. Place
each corn on a heavy-duty foil. In
a bowl, combine remaining
ingredients. Mix well. Brush 1-1/2
tsp. Butter mixture over each ear.
Close foil and fold up ends to
seal. Place on grill. Cook, turning
packets occasionally 10 to 12
minutes or until cooked through.
Half hour before cooking, turn the
burner to the grill on full. Drain seafood
reserving marinade. On each of twelve
10” skewers, thread 2 shrimps and 2
scallops, alternating with pineapple
chunks. Place skewers on grill. Cook
7-10 minutes, often basting and
turning.
BARBECUED LONDON BROIL
4 to 6 servings
¾ c. Italian dressing
1 tsp. Worcestershire sauce
1 tsp. dry mustard
¼ tsp. thyme, crushed
1 medium onion, sliced
1 pound flank steak, scored
2 tbs. butter, melted
Combine first 4 ingredients, add onion
and marinade flank steak with it.
Refrigerate at least 4 hours or
overnight. Remove steak and grill on
your preheated BBQ grill. Grill 5 to 7
minutes on each side basting
frequently with the marinade. In the
meantime sauté onions from the
marinade in butter in a skillet on your
side burner for 3 minutes. To serve,
slice steak diagonally into thin slices,
sprinkle onions over top. Garnish with
vegetable kabobs.
BARBECUED POTATOES and
CHEESE
1-1/2 cups shredded cheddar cheese
1 can (10-3/4 oz.) condensed cream of
mushroom soup
1/3 cup milk
2 tbs. barbecue sauce
¼ tsp. oregano
¼ tsp. salt
1/8 tsp. pepper
4 cups thinly sliced potatoes (4
medium-sized potatoes)
TANGY SEAFOOD KABOBS
1 lb. Large shrimp, shelled &
deveined
¾ lbs. sea scallops
2/3 c. chili sauce
¼ c. cider vinegar
butter and sprinkled with
chopped parsley and a crisp
lettuce salad.
Note: Substitute catfish, halibut
or cod for salmon.
PORK CHOPS
4 Pork chops
Marinade
1 large onion
2 tbs. lemon juice or vinegar
2 tbs. oil
½ tsp. powdered mustard
2 tsp. Worcestershire sauce
½ tsp. freshly ground black
pepper
1 tsp. sugar
½ tsp. paprika
1 clove garlic
Peel, grate onion, and add rest of
the ingredients except the pork
chops. Mix well. Pour over chops
and marinate one hour in a cool
place. Turn the BBQ grill on full.
Heat 10 minutes. BBQ the chops
brushing with the marinade
occasionally. Serve with mixed
salad, dressed with vinaigrette
flavored with fresh dill.
3 tbs. chopped parsley
1 tbs. vegetable oil
1 tbs. Worcestershire sauce
½ tsp. prepared horseradish
1 cove garlic, minced
1 20 oz. Can pineapple chunks in
juice, drained
In medium bowl, combine shrimp
and scallops. In small bowl
combine chili sauce and next six
in
g
redients. Pour over seafood.
25
Page 28

Pound flank steak to ¼ inch
thickness or flatten chicken
breasts. Mix oil, lime juice and
seasonings in a zip lock bag.
Add meat and shake bag to coat
the meat. Refrigerate overnight
or at least 6 to 8 hours. Wrap
tortillas in foil. Remove meat
from marinade. Cook on a
pre-heated gas grill for 5 to 8
minutes on each side. While
meat is cooking, heat tortillas on
grill. Slice meat across grain in
thin slices. Place on hot platter.
Squeeze lemon juice over.
Wrap meat and any of the
following toppings in tortillas:
chopped tomatoes, guacamole,
sour cream, taco sauce.
BEEF AND LAMB KABOBS
Serve 4
½ lb. boneless sirloin or beef cut
into 1” cubes
½ lb. boneless loin of lamb cut
into 1” cubes
2/3 c. water, divided
¼ c. chopped onion
2 tbs. soy sauce
¼
Parboil whole zucchini 5
minutes on your side burner or
until just tender. Drain and cut
into ½ inch slices. Thread
zucchini, tomatoes and
mushrooms alternately on each
of six skewers. Brush with
marinade made of Italian
dressing, Worcestershire
sauce, mustard and thyme. Grill
5 to 7 minutes turning and
basting occasionally. Sprinkle
liberally with Parmesan cheese.
Preheat grill. Combine cheese,
condensed soup, milk, BBQ
sauce, oregano, salt and
pepper in a large mixing bowl.
Stir in potatoes until well coated.
Turn into well buttered1-1/2
quart rectangular baking dish.
Cover dish with aluminum foil.
Bake covered 25 minutes on
medium with the lid of your BBQ
grill closed. Remove foil and
continue baking 15 minutes
longer or until potatoes are
tender. Let stand 5 minutes
before serving.
VEGETABLE KABOBS
3 medium-sized zucchini
12 cherry tomatoes
12 fresh mushrooms
Grated Parmesan cheese
FAJITAS
1-1/2 lb. flank steak or boned
chicken breasts
2 tbs. oil
½ cup limejuice
½ tsp. salt
½ tsp. celery salt
¼ tsp. garlic powder
½ tsp. pepper
¼ tsp. oregano
¼ tsp. cumin
Flour tortillas lemon
c. vegetable oil, divided
1 tbs. dark brown sugar
1 tbs. fresh lemon juice
2 cloves garlic, minced
¼ tsp. ground cumin
¼ tsp. ground coriander
¼ tsp. ground turmeric
1/8 tsp. ground red pepper
1/8 tsp. ground ginger
1 red pepper cut into chunks
1 large banana, cut into chunks
8 small mushrooms
1/3 c. smooth peanut butter
In blender, process 1/3 c. water,
onion, soy sauce, 2 tsp. oil and
the next 8 ingredients until
smooth. Pour over meat cubes
and marinate about 4 hours,
turning occasionally. Drain and
reserve marinade. Onto to four
12” skewers alternately thread
meat, pepper, banana and
mushrooms. Preheat grill.
Brush the kabobs with oil. Grill
7-8 minutes each side.
Bring marinade to boil on the
side burner in a saucepan. Add
remaining 1/3 c. water and
peanut butter. Stir to blend.
Heat through. If sauce gets too
thick, add 1 tbs. water. Serve
sauce with kabobs.
EGGPLANT CAVIAR
1 large eggplant
2 tbs. olive oil
2 tbs. wine vinegar
2 tbs. finely chopped onion
½ clove garlic, minced
1 medium tomato, chopped salt
and pepper
Roast eggplant on gas grill over
medium flame, turning
occasionally until thoroughly
cooked. This may take 30
minutes. Remove from grill and
cool for handling. Strip off the
skin and chop eggplant finely.
Add all the seasonings. Chill
thoroughly and serve on toast.
26
Page 29

minutes. Cook for approximately 3
hours. The basting sauce combined
with turkey drippings
rack and to its center, penetrate
the second rib with the pointed
end of the spit and push it
between the meat. Skip a couple
and continue the process until
the entire rack is accordion
pleated. Fasten the second meat
hook into the rack. Turn your
rotis burner on high. Rotis for 50
minutes or until done.
PORK ROAST
Apple cider vinegar basting
sauce:
1 c. apple cider vinegar
6 oz. water
½ stick butter
Salt, pepper, parsley and garlic
seasoning
2 oz. lemon juice
10 lbs. pork roast
Time: 1-1/2 hours to 2 hours
Bring pork to room temperature
before placing it on the spit rod.
Place on the rod and test for
balance. Light rotis burner. Turn
control knob to high. Use the
above basting sauce for
rotissing.
TURKEY
12 lb. turkey
Beer basting sauce:
1 can beer
12 oz. water
1 stick butter
1 tsp. salt
1 tsp. pepper
½ tsp. garlic flakes
1 tsp. parsley
Thaw the bird completely. Wash
inside out. Securely tie the legs
and wings. Light rotis burner.
Turn to high. Combine all the
ingredients for basting sauce in a
shallow pan. Place it under the
turkey 15 to 20 minutes.
CHICKEN TANDOORI STYLE
8 large chicken thighs or
drumsticks
1 c. plain nonfat yogurt
½ c. lemon juice
2 tsp. salt
½ tsp. cayenne
½ tsp. black pepper
½ tsp. crushed garlic
½ tsp. grated ginger
1 tbs. corn oil
Combine all the ingredients in a
large mixing bowl and marinate
the chicken for 8 hours in the
refrigerator. Drain the chicken and
spread on the spit running the rod
on the fleshier side of the bone.
Rotis using the rotis burner. Cook
on medium high heat for 40
minutes basting occasionally with
the remainder of the marinade
mixture. Serve with sliced onions
and lemon wedges.
SPARE RIBS
Marinade:
1 c. soy sauce
½ c. honey
½ c. vinegar
½ c. dry sherry
2 tsp. chopped garlic
2 tsp. sugar
1 c. water
1 chicken bouillon cube
1 can beer for basting sauce
Marinade ribs for 3 hours. Use
marinade for basting by adding
beer to it. Place pan under the ribs
and baste frequently. To cook ribs
select lean, meaty ribs and
accordion pleat them with your
spit. Slide four prong meat hook
down the length of spit and
tighten. At the beginning of the
Page 30

27
LIMITED WARRANTY
MODEL 720-0266
STAINLESS STEEL OUTDOOR GAS GRILL
Nexgrill Industries, Inc. warrants to the original consumer purchaser of each Outdoor Gas Grill that when
subject to normal residential use, it is free from defects in workmanship and materials for the periods
specified below. This warranty excludes grills used in rental or commercial applications. There will be a
shipping and handling charge for the delivery of the warranty part(s).
Component Warranty Period
Burners: 3 Years
Flame Tamer: 3 Years
Cooking Grids: 3 Years
Valves: 1 Year
Frame, Housing, Cart, Control Panel, Igniter, and Related Parts: 1 Year
All Stainless Steel Parts 3 Years
Our obligation under this warranty is limited to repair or replacement, at our option, of the product during the
warranty period. The extent of any liability of Nexgrill Industries, Inc. under this warranty is limited to repair
or replacement. This warranty does not cover normal wear of parts, damage resulting from any of the
following: negligent use or misuse of the product, use on improper fuel/gas supply, use contrary to
operating instructions, or alteration by any person other than our factory service center. The warranty
period is not extended by such repair or replacement.
Warranty claim procedure: If you require service or parts for your grill, please contact our Warranty
Service Center for factory direct assistance. Our hours of operation are 8 AM to 5 PM PST. Our number is
1-866-984-7455 and our FAX number is 1-909-5987699. Please direct all correspondence to: Nexgrill
Industries, Inc. 280 Machlin Court, City of Industry, CA 91789 ATTN: Warranty Service Center.
Product repair as provided under this warranty is your exclusive remedy . Nexgrill Industries, Inc. shall not
be liable for any incidental or consequential damages for breach of any express or implied warranty on its
products. Except to the extent prohibited by applicable law, any implied warranty or merchantability or
fitness for a particular purpose on this product to the duration of the above warranty. Some states do not
allow the exclusion or limitation of incidental or consequential damages, or allow limitations on how long an
implied warranty lasts, so the above limitations or exclusions may not apply to you. This warranty gives
you specific legal rights, and you may have other rights, which vary from state to state.
28
 Loading...