

Page 1
USER MANUAL
Read this manual thoroughly prior to equipment set-up, operation or maintenance.
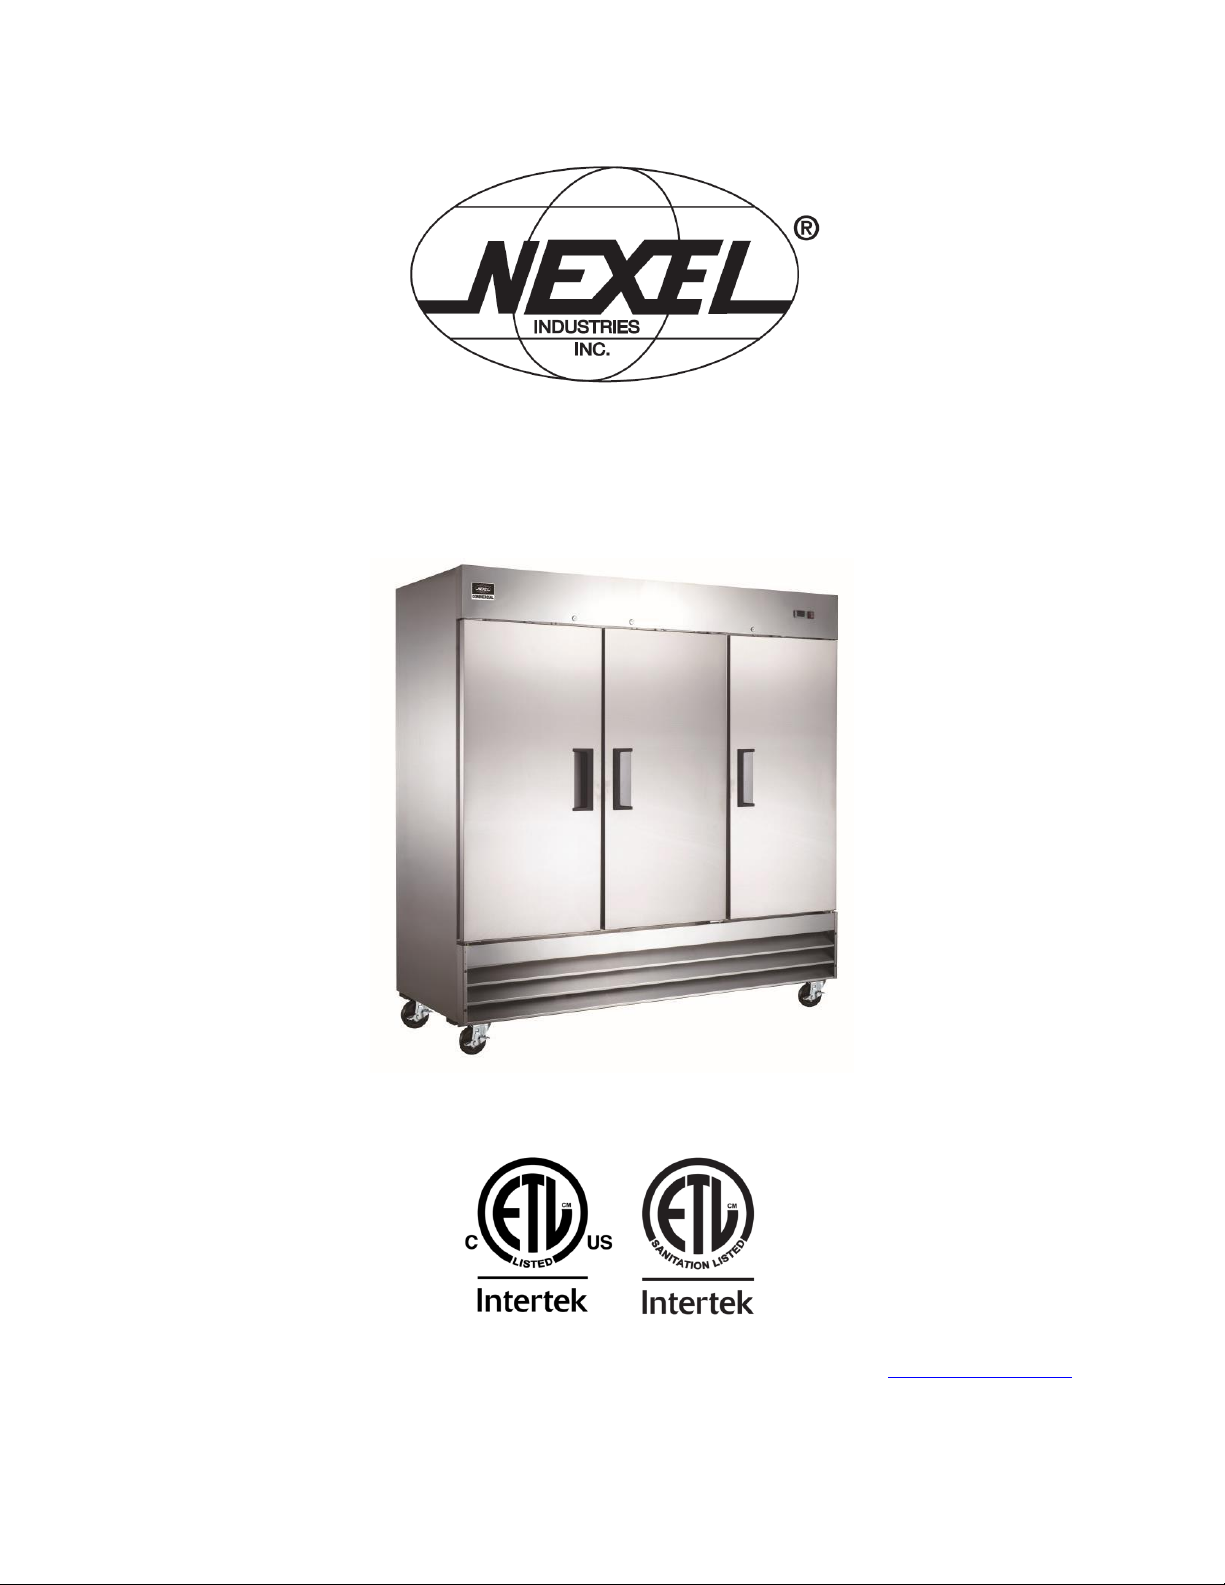
Model 243036
NEXEL® Commercial Reach-In Freezer, 3 Door
For questions, please contact NEXEL® Customer Service at 1-800-245-6682 or visit www.nexelwire.com
1
Page 2
WARNING
DANGER – RISK OF FIRE OR EXPLOSION. FLAMMABLE REFRIGERANT USED. TO BE REPAIRED ONLY BY
TRAINED SERVICE PERSONNEL. DO NOT PUNCTURE REFRIGERANT TUBING.
PELIGRO - RIESGO DE INCENDIO O EXPLOSIÓN. CONTIENE REFRIGERANTE INFLAMABLE. DEBE SER REPARADO
SOLAMENTE POR UN PERSONAL DE SERVICIO CALIFICADO.
DANGER – RISQUE DE FEU OU D’EXPLOSION. LE FRIGORIGÈNE EST INFLAMMABLE. CONFIER LES
RÉPARATIONS À UN TECHNICIEN SPÉCIALISÉ. NE PAS PERFORER LA TUBULURE CONTENANT LE FRIGORIGENE.
CAUTION – RISK OF FIRE OR EXPLOSION. FLAMMABLE REFRIGERANT USED. CONSULT REPAIR
MANUAL/OWNER’S GUIDE BEFORE ATTEMPTING TO SERVICE THIS PRODUCT. ALL SAFETY PRECAUTIONS
MUST BE FOLLOWED.
ATENCION - RIESGO DE INCENDIO O EXPLOSIÓN. CONTIENE REFRIGERANTE INFLAMABLE. CONSULTE EL
MANUAL DE REPARACIÓN / GUÍA DEL PROPIETARIO ANTES DE INTENTAR DAR SERVICIO A ESTE PRODUCTO.
DEBEN CUMPLIR CON TODAS LAS PRECAUCIONES DE SEGURIDAD.
ATTENTION – RISQUE DE FEU OU D’EXPLOSION. LE FRIGORIGÈNE EST INFLAMMABLE. CONSULTER LE
MANUEL DU PROPRIÉTAIRE/GUIDE DE RÉPARATION AVANT DE TENTER UNE RÉPARATION. TOUTES LE
MESURES DE SÉCURITÉ DOIVENT ÊTRE RESPECTÉES.
CAUTION – RISK OF FIRE OR EXPLOSION DUE TO PUNCTURE OF REFRIGERANT TUBING; FOLLOW HANDLING
INSTRUCTIONS CAREFULLY. FLAMMABLE REFRIGERANT USED.
ATENCION - RIESGO DE INCENDIO O EXPLOSIÓN DEBIDO A LA PERFORACIÓN DE LA TUBERÍA REFRIGERANTE;
SIGA LAS INSTRUCCIONES DE MANIPULACIÓN CON CUIDADO. CONTIENE REFRIGERANTE INFLAMABLE.
ATTENTION – RISQUE DE FEU OU D’EXPLOSION SI LA TUBULURE CONTENTANT LE FRIGORIGÈNE EST
PERFORÉE; SUIVRE LES INSTRUCTIONS DE MANUTENTION AVEC SOIN. LE FRIGORIGÈNE EST INFLAMMABLE.
CAUTION – RISK OF FIRE OR EXPLOSION DUE TO FLAMMABLE REFRIGERANT USED. FOLLOW HANDLING
INSTRUCTIONS CAREFULLY IN COMPLIANCE WITH LOCAL GOVERNMENT REGULATIONS.
ATENCIÓN – RIESGO DE INCENDIO O EXPLOSIÓN DEBIDO A REFRIGERANTE INFLAMABLE UTILIZADO. SIGA LAS
INSTRUCCIONES DE MANEJO DE ACUERDO CON LAS REGULACIONES DEL GOBIERNO LOCAL.
ATTENTION – RISQUE DE FEU OU D'EXPLOSION EN RAISON DU REFRIGERANT INFLAMMABLE UTILISE. SUIVRE
LES INSTRUCTIONS DE MANUTENTION AVEC SOIN CONFORMÉMENT AUX RÈGLEMENTATION
GOUVERNEMENTALE LOCAUX.
2
Page 3
SPECIFICATIONS
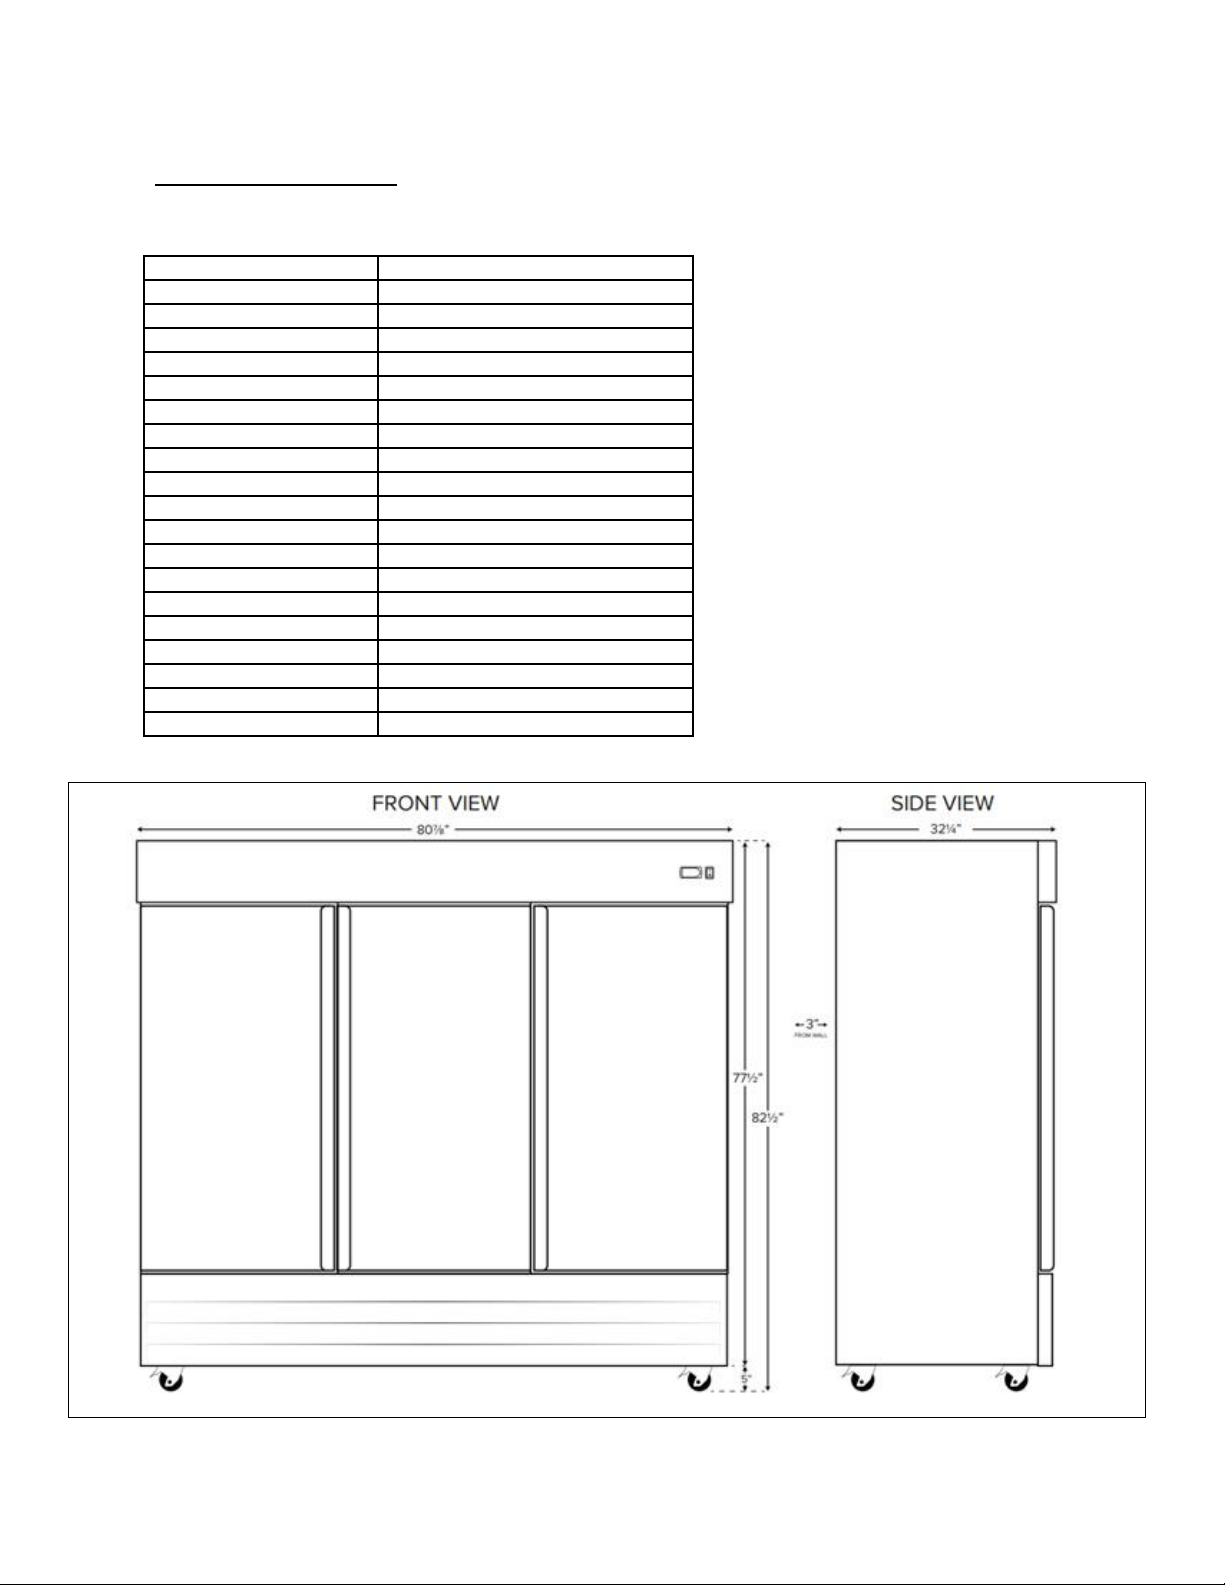
Dimensions
80-7/8”L x 32-1/4”W x 82-1/2”H
Number of Doors
3
Number of Shelves
9
Casters
(4) 3" PP Swivel (2 locking)
Capacity (Cubic Ft.)
72
HP
1-1/4
Voltage
115
Amps
12
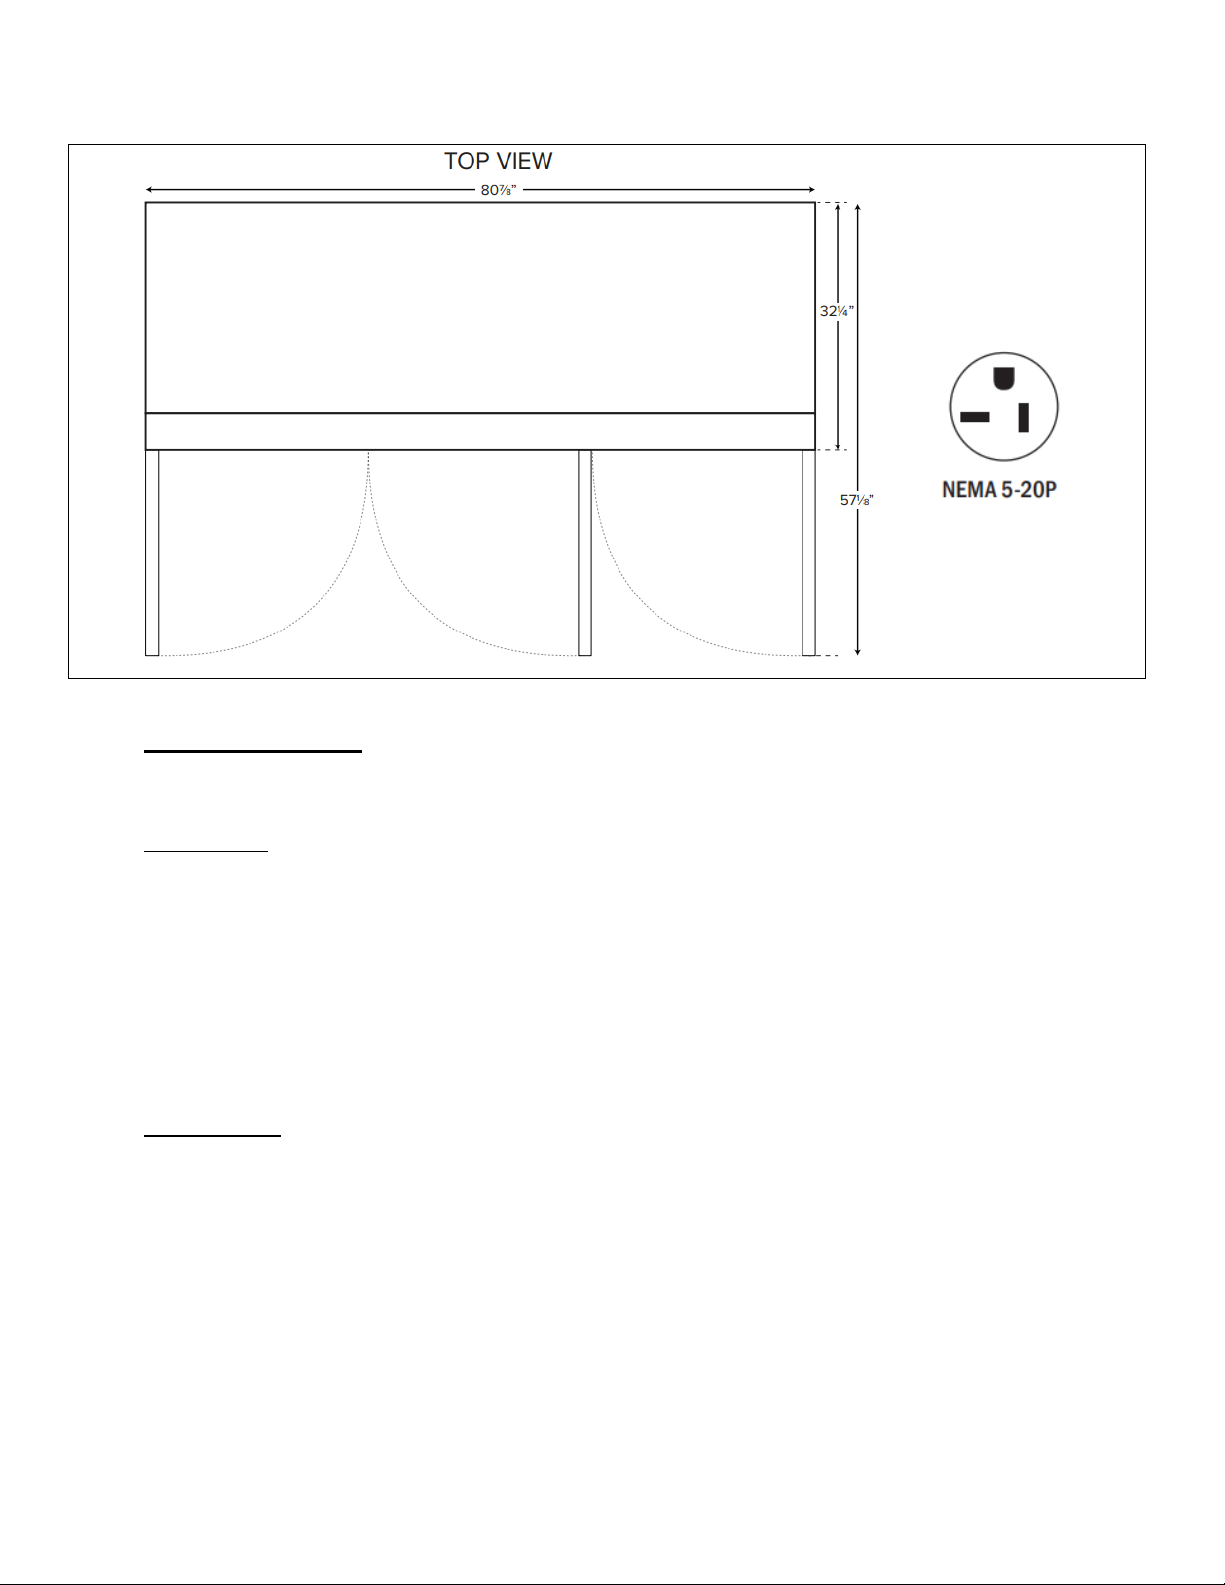
Plug Type
NEMA 5-20P
Temperature Range
-8°F to -1°F
Exterior Construction
430 Stainless Steel
Interior Construction
Aluminum
Shelf Construction
Epoxy-Coated Steel
Refrigerant
R290
Unit Weight
615 lbs.
Hertz
60 Hz
Phase
1
Cord Length
8-ft.
Lighting
LED
Warranty
1 Year
3
Page 4
INSTALLATION
Read this entire manual thoroughly prior to equipment set-up, operation and/or maintenance.
IMPORTANT:
If the freezer has recently been transported on its side, allow the unit to stand upright for a
minimum of 24 hours before plugging it in.
Make sure all shelves and accessories are properly installed before plugging in the unit.
Do not attempt to remove or repair any component of the unit. Consult an authorized service
technician for all servicing and repair needs.
Do not hang on doors or stand inside the unit.
Make sure the freezer has reached the desired temperature before loading.
Location Guide
Install unit on a strong and leveled surface. If the surface is uneven, the freezer may be noisy or
malfunction.
Install unit in an indoor, well ventilated area. Outdoor use may cause decreased efficiency and
damage to the unit. Avoid direct sunlight.
For best performance, allow 6” of clearance on sides and the back of the unit during operation.
Avoid installation in high humidity and/or dusty areas. High humidity can cause the unit to rust and
may decrease efficiency. Dust collected on the condenser coil may cause unit to malfunction.
Select a location away from heat and moisture-generating equipment. High ambient temperatures
may cause the compressor to malfunction.
4
Page 5
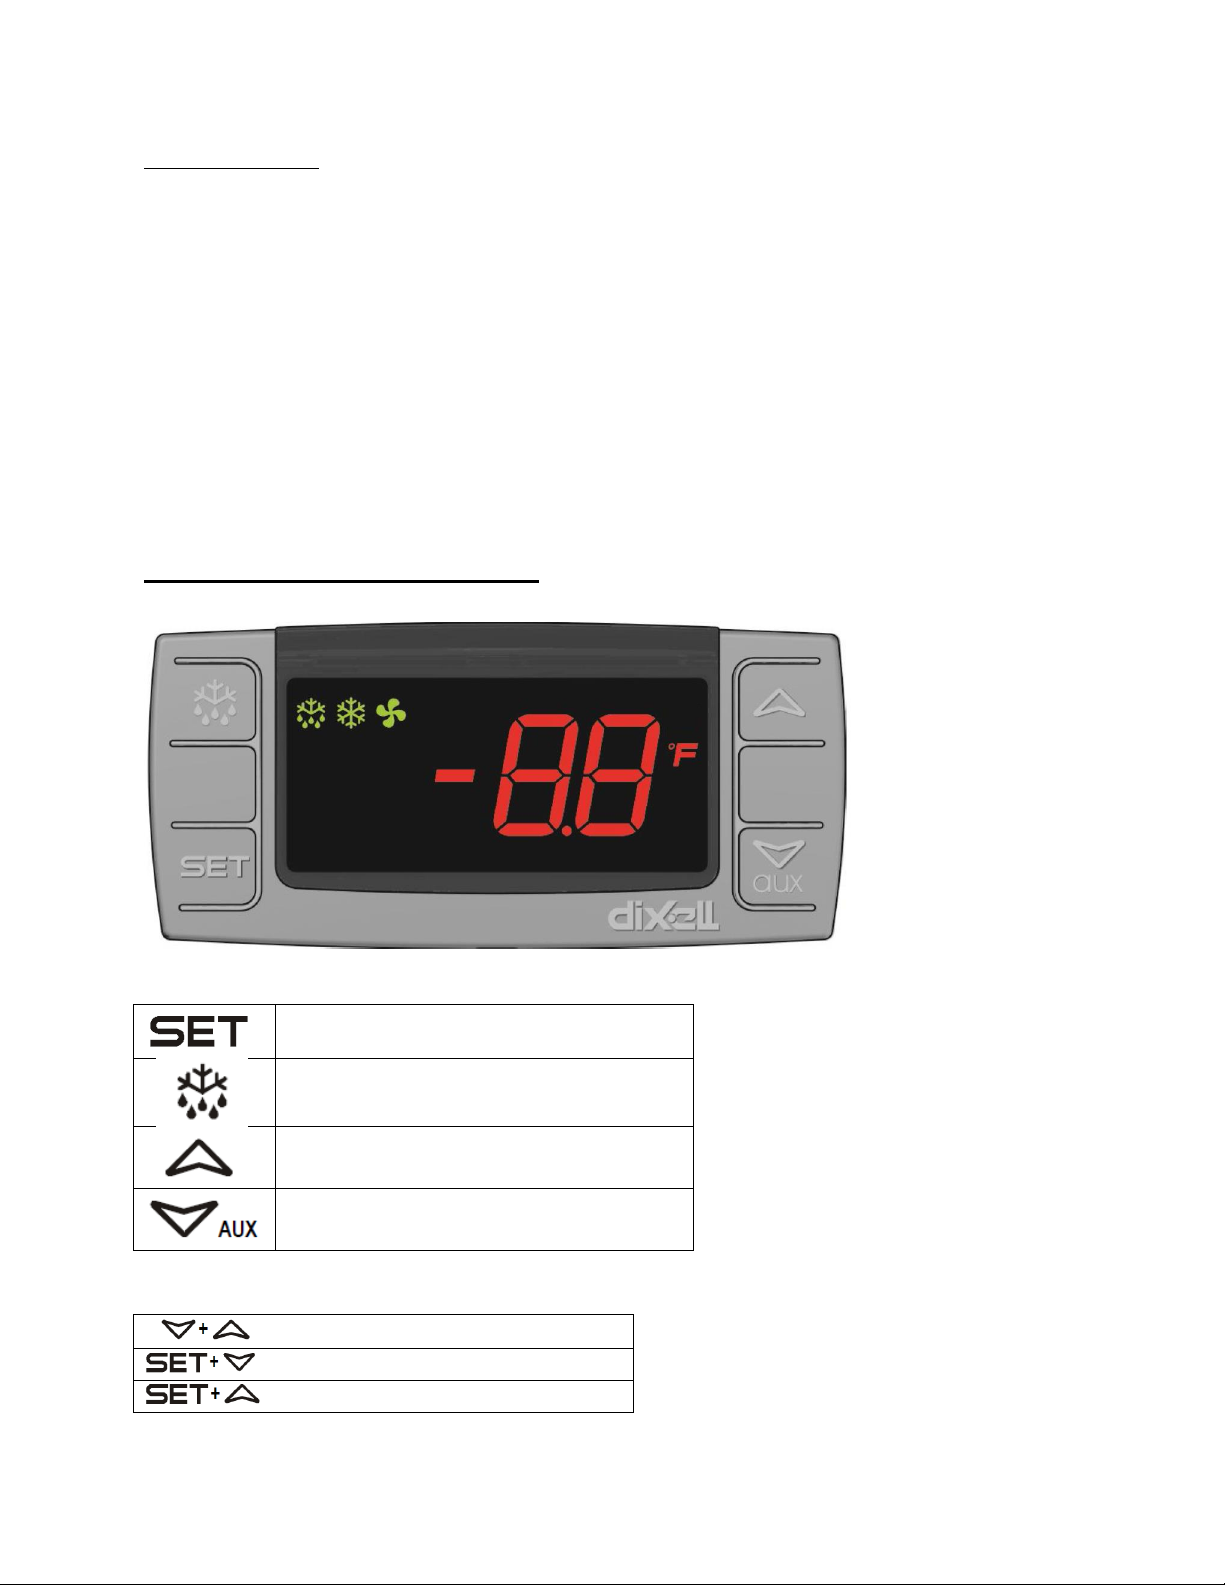
Electrical Warnings
To display the set temperature. In programming
mode it selects a parameter or confirms an operation.
To start a manual defrost.
In programming mode it browses the parameter
codes or increases the displayed value.
In programming mode it browses the parameter
codes or decreases the displayed value.
Ensure that the required voltage is being supplied at all times.
The freezer should be plugged into a grounded and properly-sized electrical outlet with appropriate
overcurrent protection. Each unit should have its own dedicated outlet. Please refer to the
electrical requirements on the unit’s nameplate.
Do not use extension cords.
Ensure the freezer is not resting on or against the electrical cord.
If the unit is not in use for a long period of time, unplug it from the outlet.
To avoid shock and fire hazards, do not plug in or unplug the unit with wet hands.
After unplugging the unit, wait 10 minutes prior to plugging it back in. Failure to do so could cause
damage to the compressor.
TEMPERATURE CONTROLS
KEY COMBINATIONS
To Lock or Unlock the Keyboard
To Enter Programming Mode
To Return to Room Temperature Display
5
Page 6
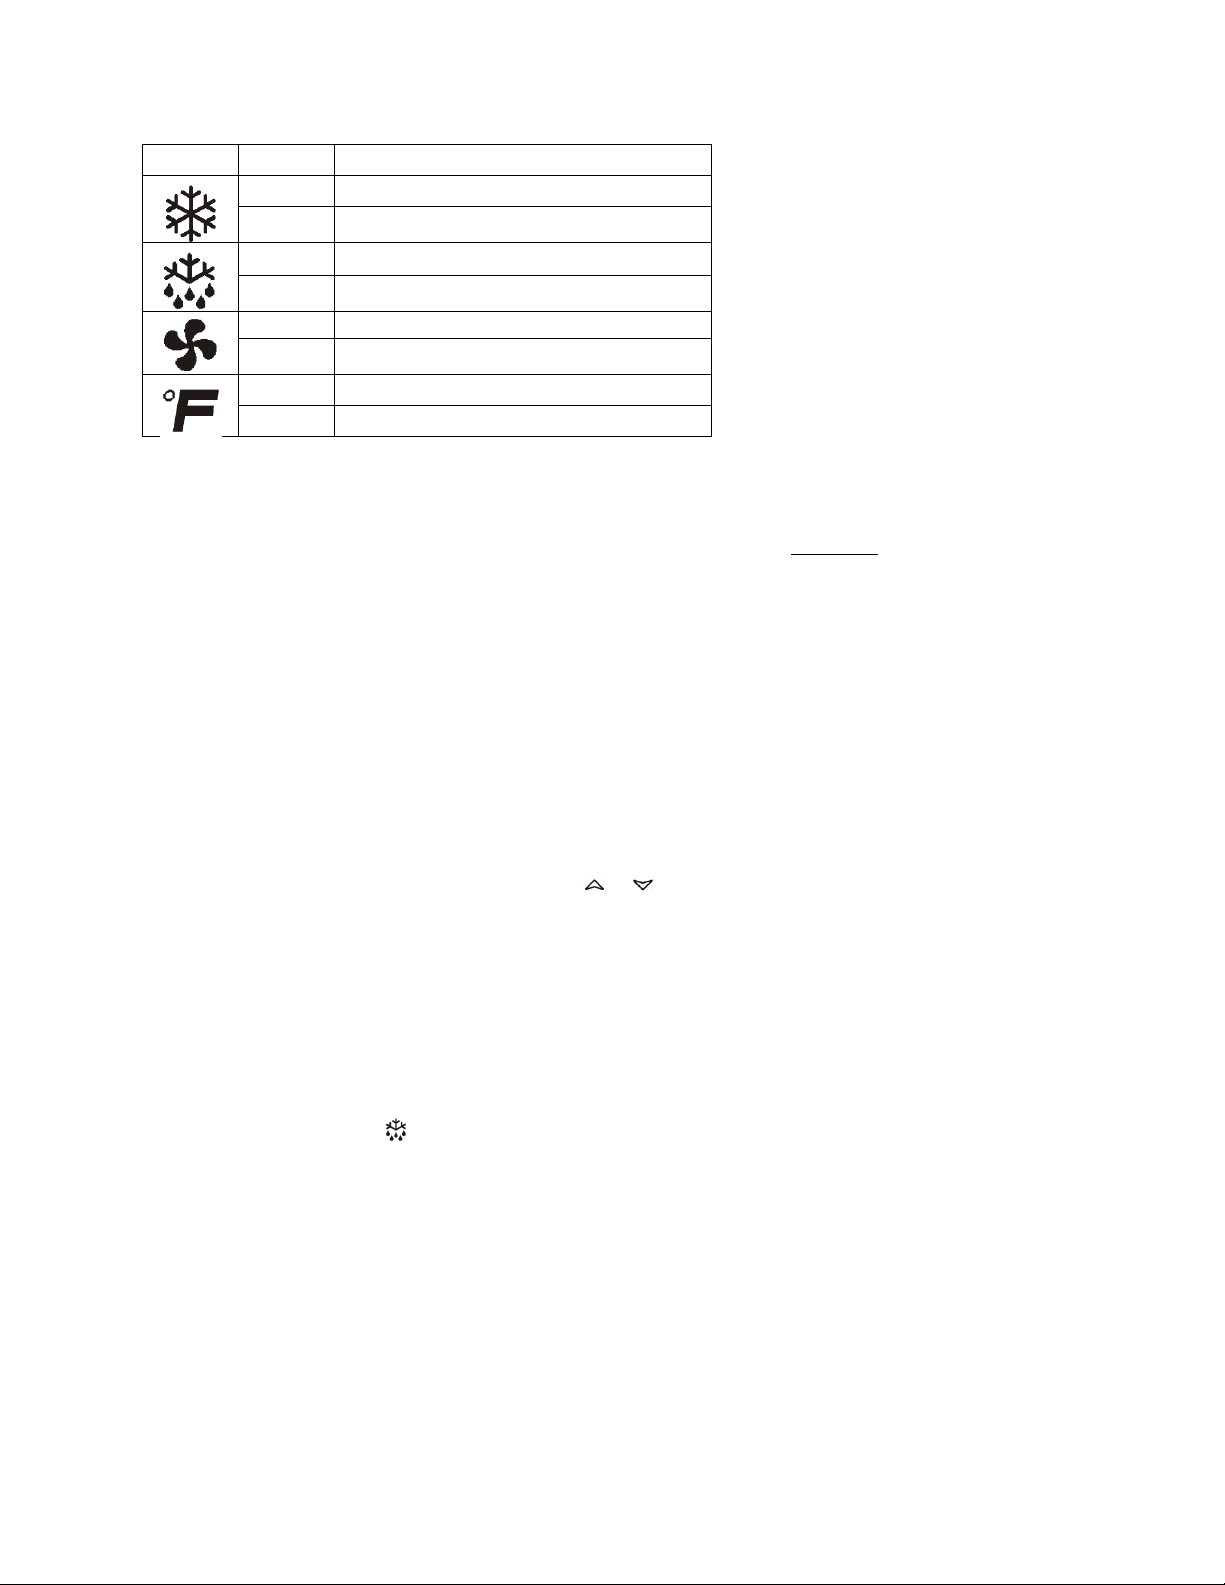
LED
MODE
INDICATES
On
Compressor Enabled
Flashing
Anti-Short Cycle Delay Enabled (AC Parameter)
On
Defrost in Progress
Flashing
Dripping in Progress
On
Fans Output Enabled
Flashing
Fans Delay After Defrost
On
Measurement Unit
Flashing
Programming Mode
NOTE: Your new freezer is already factory-set to run at optimum temperatures for food safety and
should require no adjustments. Your freezer is set to cycle between a minimum temperature of -5°F and
a maximum temperature of 2°F. Adjusting the temperature changes the minimum temperature your
unit will run at. Your freezer will not run constantly at this temperature setting.
HOW TO VIEW THE SET TEMPERATURE
1. Push and immediately release the SET key, the set temperature will be displayed.
2. To return to standard view, wait about 5 seconds or push and immediately release the SET key
again.
HOW TO CHANGE THE SET TEMPERATURE
1. Push and hold the SET key for 2 seconds.
2. The °F LED will start to blink and the current temperature will be displayed.
3. To change the set temperature push the or arrows.
4. Push the SET key to store the new temperature or wait 10 seconds and new temperature will
automatically be set.
HOW TO START A MANUAL DEFROST
NOTE: Your new freezer is pre-programmed to run automatic defrost cycles at preset intervals and for
pre-determined durations. To run a manual defrost cycle at any time, follow these instructions:
1. Push and hold the key for 2 seconds.
2. Repeat to stop the defrost cycle.
Freezer coils are defrosted electrically. Automatic defrost timers automatically initiate at pre-set
intervals and for a predetermined duration.
6
Page 7

OPERATION/MAINTENANCE
NOTE: It is strongly recommend that any servicing be performed by an authorized service technician.
During maintenance and cleaning, please unplug the unit.
LOADING PRODUCTS
Do not block the inside air duct/fan at the top of your freezer. Maintain a minimum clearance of
4” between products and the fan at all times.
Ensure all shelves are level and properly secured prior to loading products.
Do not store flammable and/or explosive gas or liquids inside the unit.
CLEANING THE CONDENSER COIL
For efficient operation, keep the condenser surface free of dust, dirt and lint.
We recommend cleaning the condenser coil at least once per month.
Clean the condenser with a commercial condenser coil cleaner, available from any kitchen
equipment retailer.
CLEANING THE FAN BLADES AND MOTOR
If necessary, clean the fan blades and motor with a soft cloth.
If it is necessary to wash the fan blades, cover the fan motor to prevent moisture damage.
CLEANING THE INTERIOR OF THE UNIT
When cleaning the cabinet interior, use a solvent of warm water and mild soap.
Do not use steel wool, caustic soap, abrasive cleaners or bleach that may damage the interior
finish of the cabinet.
Wash door gaskets on a regular basis, preferably weekly. Simply remove the door gasket from the
frame of the door, soak it in warm water and soap for 30 minutes. Dry with soft cloth and replace.
Check door gaskets for proper seal after they are replaced.
Periodically remove the shelves and shelf brackets from the unit, and clean them with a mild soap
and warm water.
7
Page 8
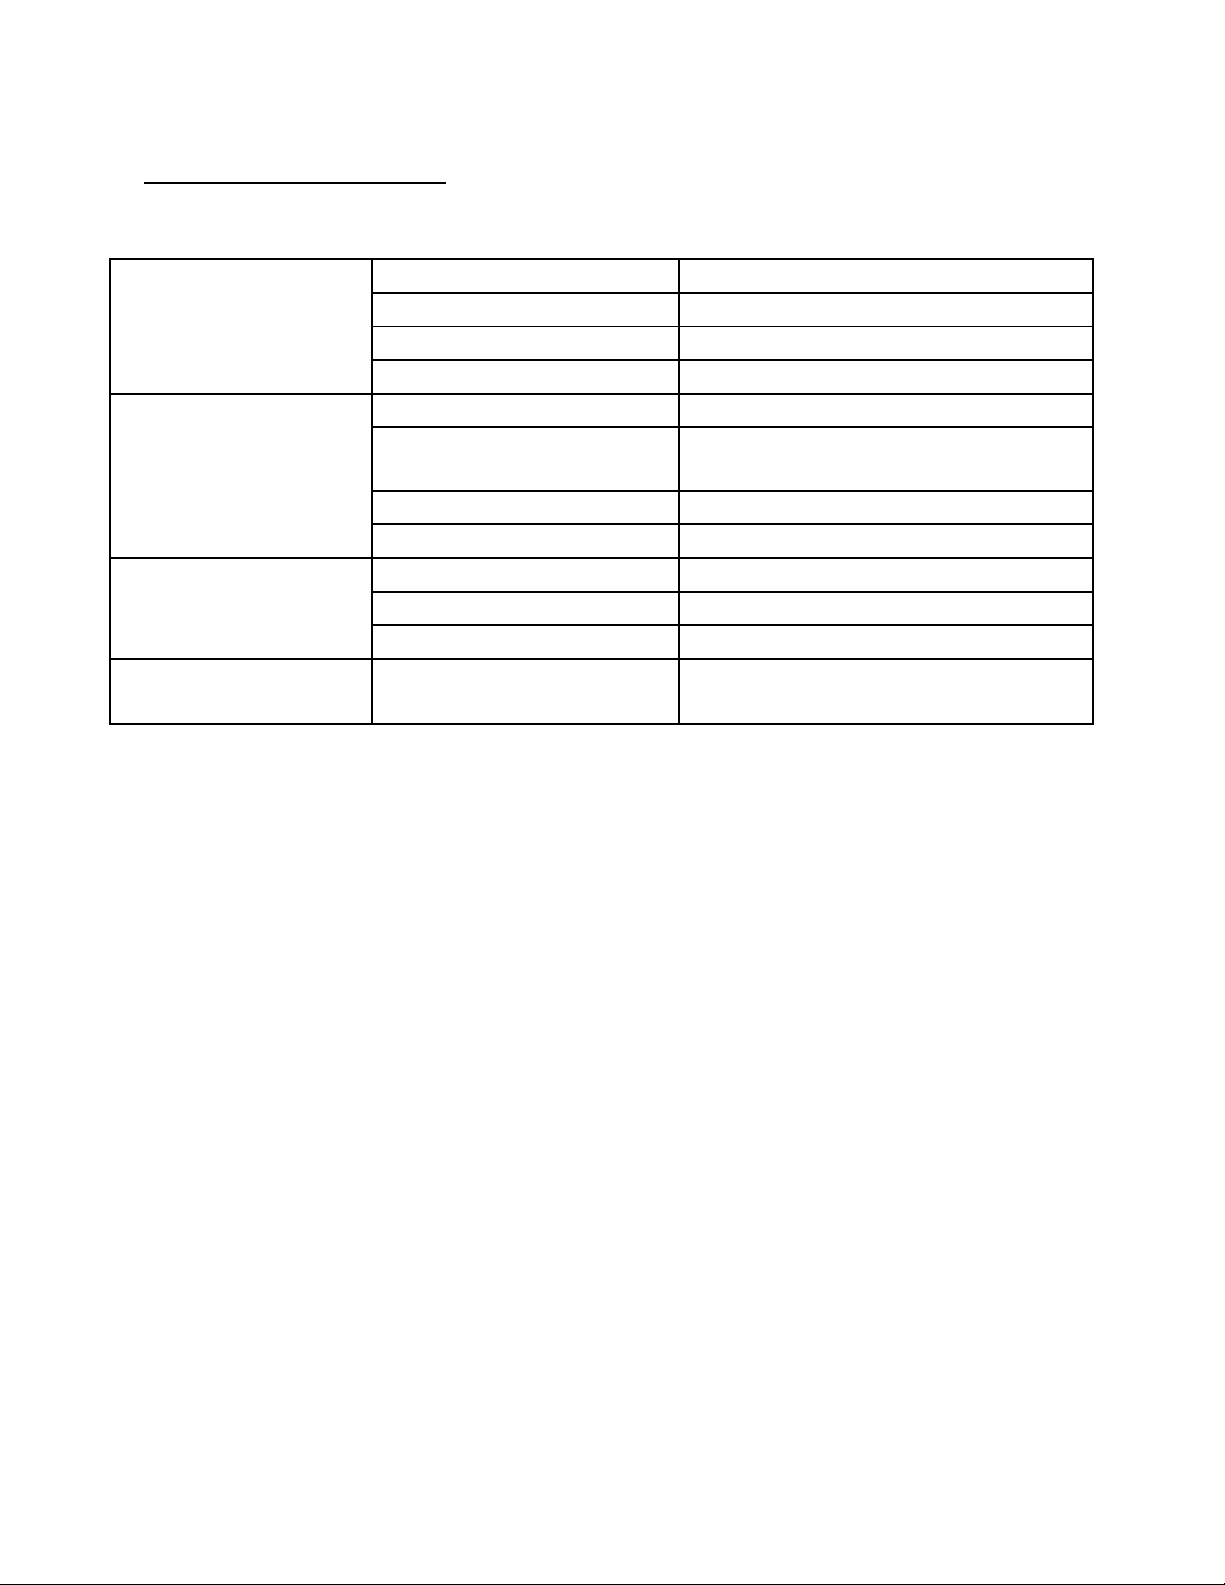
TROUBLESHOOTING
PROBLEMS
CAUSES
SOLUTIONS
Compressor is Not Running
Fuse blown or circuit breaker tripped.
Replace fuse or reset circuit breaker.
Power cord unplugged.
Plug in power cord.
Thermostat set too high.
Set thermostat to lower temperature.
Cabinet in defrost cycle.
Wait for defrost cycle to finish.
Cabinet Temperature is too Warm
Thermostat is set too high.
Set thermostat to lower temperature.
Airflow is blocked.
Re-arrange products to allow for proper air flow. Make sure
there is at least four inches of clearance from the fan.
Low refrigerant levels.
Contact a service technician to check refrigerant levels.
Door is slightly ajar.
Make sure door is completely closed.
Interior Light is Not Working
Poor switch connection.
Turn off light switch and turn it back on.
Bulb is not connected.
Make sure the bulb is correctly inserted in the socket.
Bulb has burned out.
Replace the bulb.
Condensation is Collecting on the
Cabinet and/or Floor
Gasket is not sealing properly.
Clean, repair, or replace the gasket as necessary.
8
 Loading...