

Page 1

NEXCOM International Co., Ltd.
NEXCOM International Co., Ltd.
Published May 2018
www.nexcom.com
Intelligent Platform & Services Business Unit
Embedded Computing (Mini-ITX Motherboard)
NEX 614B
User Manual
Page 2

Copyright © 2018 NEXCOM International Co., Ltd. All Rights Reserved.
ii
NEX 614B User Manual
Content
Contents
Preface
Copyright ............................................................................................. iv
Disclaimer .............................................................................................. iv
Acknowledgements ............................................................................... iv
Regulatory Compliance Statements ........................................................ iv
Declaration of Conformity ...................................................................... iv
RoHS Compliance ................................................................................... v
Warranty and RMA ................................................................................ vi
Safety Information ................................................................................viii
Installation Recommendations ...............................................................viii
Safety Precautions .................................................................................. ix
Technical Support and Assistance ............................................................ x
Conventions Used in this Manual ............................................................ x
Global Service Contact Information ........................................................ xi
Package Contents .................................................................................xiii
Ordering Information ............................................................................xiv
Chapter 1: Product Introduction
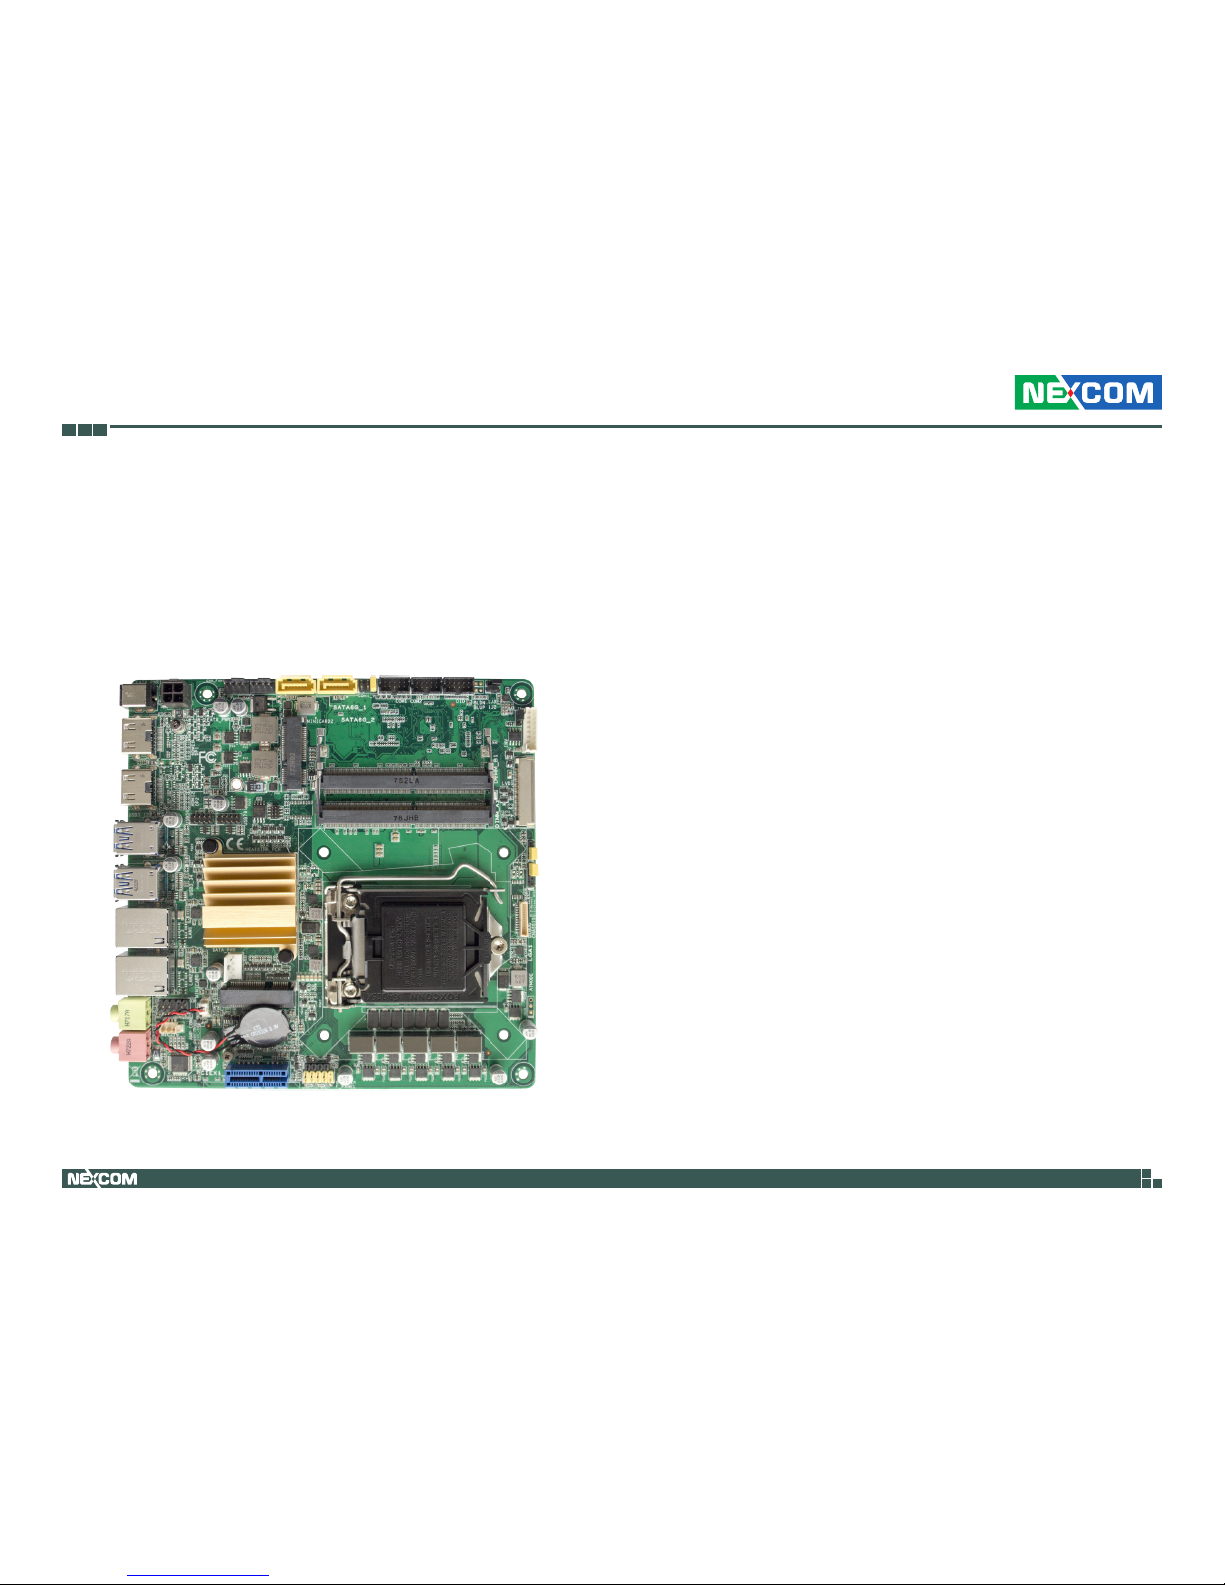
Overview ................................................................................................1
Key Features ...........................................................................................1
Hardware Specifications ..........................................................................2
Knowing Your NEX 614B ........................................................................4
Edge I/O View......................................................................................5
Chapter 2: Jumpers and Connectors
Before You Begin ....................................................................................6
Precautions ............................................................................................6
Jumper Settings ......................................................................................7
Locations of the Jumpers and Connectors ...............................................8
Jumpers ..................................................................................................9
Clear RTC RAM ...................................................................................9
COM1 Ring/+5V/+12V Selection ..........................................................9
LVDS Panel Voltage Select ..................................................................10
Inverter Voltage Select .......................................................................10
Inverter Backlight Control Mode Select ..............................................11
Chassis Intrusion Jumper ...................................................................11
Connector Pin Definitions .....................................................................12
Internal Connectors ........................................................................... 12
SATA Power Connector ..................................................................12
Audio Amplifier Connector ............................................................12
Chassis Fan Connector ...................................................................13
CPU Fan Connector ........................................................................13
LVDS Connector ............................................................................. 14
Embedded DisplayPort ...................................................................14
Digital I/O Connector .....................................................................15
System Panel Connector .................................................................15
Serial ATA 6.0Gb/s Connector 1 .....................................................16
Serial ATA 6.0Gb/s Connector 2 .....................................................16
Speaker Connector ........................................................................17
Page 3

Copyright © 2018 NEXCOM International Co., Ltd. All Rights Reserved.
iii
NEX 614B User Manual
Content
USB 2.0 Connectors .......................................................................17
SPI Flash Programmable Connector ................................................18
Battery Connector ..........................................................................18
Backlight Inverter Power Connector ...............................................19
Serial Port Connector (COM1) ........................................................19
Serial Port Connector (COM2) ........................................................20
4-pin DC-In Power Connector ........................................................20
Front Panel Audio Connector .........................................................21
Block Diagram
.................................................................................22
Chapter 3: BIOS Setup
About BIOS Setup .................................................................................23
When to Configure the BIOS .................................................................23
Default Configuration ...........................................................................24
Entering Setup ......................................................................................24
Legends ................................................................................................24
BIOS Setup Utility ..................................................................................26
Main .................................................................................................26
Advanced ..........................................................................................27
Chipset ..............................................................................................35
Security .............................................................................................37
Boot ..................................................................................................38
Save & Exit ........................................................................................38
Page 4

Copyright © 2018 NEXCOM International Co., Ltd. All Rights Reserved.
iv
NEX 614B User Manual
Preface
PrefaCe
Copyright
This publication, including all photographs, illustrations and software, is
protected under international copyright laws, with all rights reserved. No
part of this manual may be reproduced, copied, translated or transmitted in
any form or by any means without the prior written consent from NEXCOM
International Co., Ltd.
Disclaimer
The information in this document is subject to change without prior notice and
does not represent commitment from NEXCOM International Co., Ltd. However,
users may update their knowledge of any product in use by constantly checking
its manual posted on our website: http://www.nexcom.com. NEXCOM shall
not be liable for direct, indirect, special, incidental, or consequential damages
arising out of the use of any product, nor for any infringements upon the rights
of third parties, which may result from such use. Any implied warranties of
merchantability or fitness for any particular purpose is also disclaimed.
Acknowledgements
NEX 614B is a trademark of NEXCOM International Co., Ltd. All other
product names mentioned herein are registered trademarks of their
respective owners.
Regulatory Compliance Statements
This section provides the FCC compliance statement for Class A devices and
describes how to keep the system CE compliant.
Declaration of Conformity
FCC
This equipment has been tested and verified to comply with the limits for
a Class A digital device, pursuant to Part 15 of FCC Rules. These limits are
designed to provide reasonable protection against harmful interference when
the equipment is operated in a commercial environment. This equipment
generates, uses, and can radiate radio frequency energy and, if not installed
and used in accordance with the instructions, may cause harmful interference
to radio communications. Operation of this equipment in a residential area
(domestic environment) is likely to cause harmful interference, in which
case the user will be required to correct the interference (take adequate
measures) at their own expense.
CE
The product(s) described in this manual complies with all applicable
European Union (CE) directives if it has a CE marking. For computer systems
to remain CE compliant, only CE-compliant parts may be used. Maintaining
CE compliance also requires proper cable and cabling techniques.
Page 5

Copyright © 2018 NEXCOM International Co., Ltd. All Rights Reserved.
v
NEX 614B User Manual
Preface
RoHS Compliance
NEXCOM RoHS Environmental Policy and Status
Update
NEXCOM is a global citizen for building the digital
infrastructure. We are committed to providing green
products and services, which are compliant with
European Union RoHS (Restriction on Use of Hazardous Substance in
Electronic Equipment) directive 2011/65/EU, to be your trusted green
partner and to protect our environment.
RoHS restricts the use of Lead (Pb) < 0.1% or 1,000ppm, Mercury (Hg)
< 0.1% or 1,000ppm, Cadmium (Cd) < 0.01% or 100ppm, Hexavalent
Chromium (Cr6+) < 0.1% or 1,000ppm, Polybrominated biphenyls (PBB) <
0.1% or 1,000ppm, and Polybrominated diphenyl Ethers (PBDE) < 0.1% or
1,000ppm.
In order to meet the RoHS compliant directives, NEXCOM has established an
engineering and manufacturing task force in to implement the introduction
of green products. The task force will ensure that we follow the standard
NEXCOM development procedure and that all the new RoHS components
and new manufacturing processes maintain the highest industry quality
levels for which NEXCOM are renowned.
The model selection criteria will be based on market demand. Vendors and
suppliers will ensure that all designed components will be RoHS compliant.
How to recognize NEXCOM RoHS Products?
For existing products where there are non-RoHS and RoHS versions, the
suffix “(LF)” will be added to the compliant product name.
All new product models launched after January 2013 will be RoHS compliant.
They will use the usual NEXCOM naming convention.
Page 6

Copyright © 2018 NEXCOM International Co., Ltd. All Rights Reserved.
vi
NEX 614B User Manual
Preface
Warranty and RMA
NEXCOM Warranty Period
NEXCOM manufactures products that are new or equivalent to new in
accordance with industry standard. NEXCOM warrants that products will
be free from defect in material and workmanship for 2 years, beginning on
the date of invoice by NEXCOM. HCP series products (Blade Server) which
are manufactured by NEXCOM are covered by a three year warranty period.
NEXCOM Return Merchandise Authorization (RMA)
▪ Customers shall enclose the “NEXCOM RMA Service Form” with the
returned packages.
▪ Customers must collect all the information about the problems
encountered and note anything abnormal or, print out any on-screen
messages, and describe the problems on the “NEXCOM RMA Service
Form” for the RMA number apply process.
▪ Customers can send back the faulty products with or without accessories
(manuals, cable, etc.) and any components from the card, such as CPU
and RAM. If the components were suspected as part of the problems,
please note clearly which components are included. Otherwise, NEXCOM
is not responsible for the devices/parts.
▪ Customers are responsible for the safe packaging of defective products,
making sure it is durable enough to be resistant against further damage
and deterioration during transportation. In case of damages occurred
during transportation, the repair is treated as “Out of Warranty.”
▪ Any products returned by NEXCOM to other locations besides the
customers’ site will bear an extra charge and will be billed to the customer.
Repair Service Charges for Out-of-Warranty Products
NEXCOM will charge for out-of-warranty products in two categories, one is
basic diagnostic fee and another is component (product) fee.
Repair Service Charges for Out-of-Warranty Products
NEXCOM will charge for out-of-warranty products in two categories, one is
basic diagnostic fee and another is component (product) fee.
System Level
▪ Component fee: NEXCOM will only charge for main components such as
SMD chip, BGA chip, etc. Passive components will be repaired for free,
ex: resistor, capacitor.
▪ Items will be replaced with NEXCOM products if the original one cannot
be repaired. Ex: motherboard, power supply, etc.
▪ Replace with 3rd party products if needed.
▪ If RMA goods can not be repaired, NEXCOM will return it to the customer
without any charge.
Board Level
▪ Component fee: NEXCOM will only charge for main components, such
as SMD chip, BGA chip, etc. Passive components will be repaired for free,
ex: resistors, capacitors.
▪ If RMA goods can not be repaired, NEXCOM will return it to the customer
without any charge.
Page 7

Copyright © 2018 NEXCOM International Co., Ltd. All Rights Reserved.
vii
NEX 614B User Manual
Preface
Warnings
Read and adhere to all warnings, cautions, and notices in this guide and
the documentation supplied with the chassis, power supply, and accessory
modules. If the instructions for the chassis and power supply are inconsistent
with these instructions or the instructions for accessory modules, contact
the supplier to find out how you can ensure that your computer meets
safety and regulatory requirements.
Cautions
Electrostatic discharge (ESD) can damage system components. Do the
described procedures only at an ESD workstation. If no such station is
available, you can provide some ESD protection by wearing an antistatic
wrist strap and attaching it to a metal part of the computer chassis.
Page 8

Copyright © 2018 NEXCOM International Co., Ltd. All Rights Reserved.
viii
NEX 614B User Manual
Preface
Installation Recommendations
Ensure you have a stable, clean working environment. Dust and dirt can get
into components and cause a malfunction. Use containers to keep small
components separated.
Adequate lighting and proper tools can prevent you from accidentally
damaging the internal components. Most of the procedures that follow
require only a few simple tools, including the following:
▪ A Philips screwdriver
▪ A flat-tipped screwdriver
▪ A grounding strap
▪ An anti-static pad
Using your fingers can disconnect most of the connections. It is recommended
that you do not use needle-nose pliers to disconnect connections as these
can damage the soft metal or plastic parts of the connectors.
Safety Information
Before installing and using the device, note the following precautions:
▪ Read all instructions carefully.
▪ Do not place the unit on an unstable surface, cart, or stand.
▪ Follow all warnings and cautions in this manual.
▪ When replacing parts, ensure that your service technician uses parts
specified by the manufacturer.
▪ Avoid using the system near water, in direct sunlight, or near a heating
device.
▪ The load of the system unit does not solely rely for support from the
rackmounts located on the sides. Firm support from the bottom is highly
necessary in order to provide balance stability.
▪ The computer is provided with a battery-powered real-time clock circuit.
There is a danger of explosion if battery is incorrectly replaced. Replace
only with the same or equivalent type recommended by the manufacturer.
Discard used batteries according to the manufacturer’s instructions.
Page 9

Copyright © 2018 NEXCOM International Co., Ltd. All Rights Reserved.
ix
NEX 614B User Manual
Preface
Safety Precautions
1. Read these safety instructions carefully.
2. Keep this User Manual for later reference.
3. Disconnect the equipment from any AC outlet before cleaning or installing
a component inside the chassis. Use a damp cloth. Do not use liquid or
spray detergents for cleaning.
4. To prevent electrostatic build-up, leave the board in its anti-static bag
until you are ready to install it.
5. For plug-in equipment, the power outlet socket must be located near the
equipment and must be easily accessible.
6. Keep the board away from humidity.
7. Put the board on a stable surface. Dropping it or letting it fall may cause
damage.
8. Wear anti-static wrist strap.
9. Do all preparation work on a static-free surface.
10. Make sure the voltage of the power source is correct before
connecting the equipment to the power outlet.
11. Hold the board only by its edges. Be careful not to touch any of the
components, contacts or connections.
12. All cautions and warnings on the board should be noted.
13. Use the correct mounting screws and do not over tighten the screws.
14. Keep the original packaging and the anti-static bag; in case the board
has to be returned for repair or replacement.
Page 10
Copyright © 2018 NEXCOM International Co., Ltd. All Rights Reserved.
x
NEX 614B User Manual
Preface
Technical Support and Assistance
1. For the most updated information of NEXCOM products, visit NEXCOM’s
website at www.nexcom.com.
2. For technical issues that require contacting our technical support team or
sales representative, please have the following information ready before
calling:
– Product name and serial number
– Detailed information of the peripheral devices
– Detailed information of the installed software (operating system,
version, application software, etc.)
– A complete description of the problem
– The exact wordings of the error messages
Warning!
1. Handling the unit: carry the unit with both hands and handle it with care.
2. Maintenance: to keep the unit clean, use only approved cleaning products
or clean with a dry cloth.
Conventions Used in this Manual
Warning:
Information about certain situations, which if not observed,
can cause personal injury. This will prevent injury to yourself
when performing a task.
CAUTION!
CAUTION!CAUTION!
Caution:
Information to avoid damaging components or losing data.
Note:
Provides additional information to complete a task easily.
Page 11

Copyright © 2018 NEXCOM International Co., Ltd. All Rights Reserved.
xi
NEX 614B User Manual
Preface
Global Service Contact Information
Headquarters
NEXCOM International Co., Ltd.
9F, No. 920, Chung-Cheng Rd.,
ZhongHe District, New Taipei City, 23586,
Taiwan, R.O.C.
Tel: +886-2-8226-7786
Fax: +886-2-8226-7782
www.nexcom.com
America
USA
NEXCOM USA
2883 Bayview Drive,
Fremont CA 94538, USA
Tel: +1-510-656-2248
Fax: +1-510-656-2158
Email: [email protected]
www.nexcom.com
Asia
Taiwan
NEXCOM Intelligent Systems
Taipei Office
13F, No.920, Chung-Cheng Rd.,
ZhongHe District,
New Taipei City, 23586, Taiwan, R.O.C.
Tel: +886-2-8226-7796
Fax: +886-2-8226-7792
Email: [email protected]
www.nexcom.com.tw
NEXCOM Intelligent Systems
Taichung Office
16F, No.250, Sec. 2, Chongde Rd.,
Beitun Dist.,
Taichung City 406, R.O.C.
Tel: +886-4-2249-1179
Fax: +886-4-2249-1172
Email: [email protected]
www.nexcom.com.tw
Japan
NEXCOM Japan
9F, Tamachi Hara Bldg.,
4-11-5, Shiba Minato-ku,
Tokyo, 108-0014, Japan
Tel: +81-3-5419-7830
Fax: +81-3-5419-7832
Email: [email protected]
www.nexcom-jp.com
China
NEXCOM China
Floor 5, No.4, No.7 fengxian middle Rd.,
(Beike Industrial Park), Haidian District,
Beijing, 100094, China
Tel: +86-10-5704-2680
Fax: +86-10-5704-2681
Email: [email protected]
www.nexcom.cn
Page 12

Copyright © 2018 NEXCOM International Co., Ltd. All Rights Reserved.
xii
NEX 614B User Manual
Preface
Europe
United Kingdom
NEXCOM EUROPE
10 Vincent Avenue,
Crownhill Business Centre,
Milton Keynes, Buckinghamshire
MK8 0AB, United Kingdom
Tel: +44-1908-267121
Fax: +44-1908-262042
Email: [email protected]
www.nexcom.eu
Italy
NEXCOM ITALIA S.r.l
Via Lanino 42,
21047 Saronno (VA), Italia
Tel: +39 02 9628 0333
Fax: +39 02 9625 570
Email: [email protected]
www.nexcomitalia.it
NEXCOM Shanghai
Room 603/604, Huiyinmingzun Plaza Bldg., 1,
No.609, Yunlin East Rd.,
Shanghai, 200333, China
Tel: +86-21-5278-5868
Fax: +86-21-3251-6358
Email: [email protected]
www.nexcom.cn
NEXCOM Surveillance Technology Corp.
Room202, Building B,
the GuangMing Industrial Zone Zhonghua Rd.,
Minzhi Street, Longhua District,
Shenzhen 518131, China
Tel: +86-755-8364-7768
Fax: +86-755-8364-7738
Email: [email protected]
www.nexcom.cn
NEXCOM United System Service
Hui Yin Ming Zun Building Room 1108,
Building No. 11, 599 Yunling Road, Putuo District,
Shanghai, 200062, China
Tel: +86-21-6125-8282
Fax: +86-21-6125-8281
Email: [email protected]
www.nexcom.cn
Page 13

Copyright © 2018 NEXCOM International Co., Ltd. All Rights Reserved.
xiii
NEX 614B User Manual
Preface
Package Contents
Before continuing, verify that the NEX 614B package that you received is
complete. Your package should have all the items listed in the following
table.
Item Name Qty
1 NEX 614B motherboard 1
2 I/O panel shield 1
Optional Accessories
Item Part Number Name Description
1 7400060028X00 12V DC Power Adapter FSP: FSP060-DIBAN2 60W 12V/5A Level VI for McAfee
2 603COM0093X00 COM Port Cable CP: NEX-171109-02
COM Port Cable CP: NEX-171109-02 DB9(M) to IDC
10P PIT:2mm L=250mm
3 603USB0084X00 USB Cable for EBC-355A ST:MD-5606151 USB CON x 2 + Bracket to Dupont 10P PIT:2.0mm 200mm
Page 14

Copyright © 2018 NEXCOM International Co., Ltd. All Rights Reserved.
xiv
NEX 614B User Manual
Preface
Ordering Information
The following below provides ordering information for NEX 614B.
NEX 614B (P/N: 10G00061402X0)
6th/7th Generation Intel® Core™ i7/i5/i3, LGA1151 Socket Processor, Max.
65W TDPs, H110, DDR4 x2, HDMI x2, USB 3.0 x4, USB 2.0 x4, GbE x2, SATA
x2, RS232 x2, Mini-PCIe x2, PCIe (x1) x1, 12VDC, 0 ~ 60°C.
Optional
▪ 12V, 60W power adapter w/o power cord
(P/N: 7400060028X00)
▪ COM port cable
(P/N: 603COM0093X00)
▪ USB cable
(P/N: 603USB0084X00)
▪ SATA cable
(P/N: 60233ATA48X00)
▪ SATA power cable
(P/N: 60233PW168X00)
Page 15
Copyright © 2018 NEXCOM International Co., Ltd. All Rights Reserved.
1
NEX 614B User Manual
Chapter 1: Product Introduction
ChaPter 1: ProduCt IntroduCtIon
Key Features
▪ 6th/7th Generation Intel® Core™ i7/i5/i3, LGA1151 Socket Processor,
Max. 65W TDPs, LGA1511 and H110
▪ Support two DDR4 SO-DIMM sockets
▪ Support multiple displays from two HDMI and LVDS
▪ 2 x SATA III, 2 x GbE LAN, 2 x COM, 4 x USB 3.0, 4 x USB 2.0, 8-bit DIO,
HD Audio, 1 x PCIe 2.0 [X1] and 2 x Mini PCIe
▪ DC Input +12V
▪ Low profile system
▪ Optional: Wi-Fi module/TPM module
Overview
Page 16

Copyright © 2018 NEXCOM International Co., Ltd. All Rights Reserved.
2
NEX 614B User Manual
Chapter 1: Product Introduction
Hardware Specifications
CPU Support
▪ 6th/7th Generation Intel® Core™ i7/i5/i3, LGA1151 Socket Processor,
Max. 65W TDPs
Display
▪ 2 x HDMI connector
(resolution up to 4096 x 2160 @ 24 Hz / 2560 x 1600 @ 60 Hz)
▪ LVDS connector (resolution up to 1920 x 1080 @ 60Hz)
System
▪ 2 x DDR4 2133 SO-DIMM sockets support up to 32GB, non-ECC
▪ 2 x SATAIII 6Gb/s connector
▪ 1 x SATA power connector
▪ 2 x Realtek RTL8111G PCIe GbE LAN controller
▪ 2 x Dual deck USB 3.0
▪ 2 x USB 2.0 2x5 2.0mm header
▪ 2 x Serial ports:
- 1 x RS232/485/422 by COM1
- 1 x RS232 by COM2
▪ 1 x 8-bit DIO header (4-in/4-out)
▪ WDT 1~255 steps by software program
▪ 1 x TPM connector
▪ Support Realtek HD Audio:
- 2 x HD Audio jack (Line-out, Mic-in)
- 1 x Speaker out header (4Ω/2W)
- 1 x Front Panel connector
▪ 1 x DC jack (5.5/2.5mm), 1 x ATX 4-pin power connector
BIOS
▪ 64Mbit Flash ROM x 1, AMI BIOS
Storage Device
▪ 2 x SATA III 6.0Gb/s
Expansion
▪ 1 x PCIe 2.0 [x1] (Gen2)
▪ 2 x Mini PCI Express slots:
- 1 x Half Size, supports PCIe + USB interface
- 1 x Full Size, supports mSATA (Default) / (PCIe + USB Optional)
Power Requirements
▪ 12V DC input:
- DC lockable jack or ATX 4-pin power connector
- AT/ATX mode select jumper (Optional)
Rear I/O
▪ 1 x DC power jack
▪ 2 x HDMI
▪ 2 x USB 3.0 (double deck)
▪ 2 x GbE controller
▪ 1 x Mic-in
▪ 1 x Line-out
Mechanical & Environment
▪ Operating Temperature: 0°C ~ 60°C
▪ Storage Temperature: -20°C ~ 80°C
▪ Relative humidity: Operating 10%~90%, non-condensing
Dimension
▪ Display Head: Mini-ITX, 6.7” x 6.7” (170mm x 170mm)
Page 17

Copyright © 2018 NEXCOM International Co., Ltd. All Rights Reserved.
3
NEX 614B User Manual
Chapter 1: Product Introduction
Operating System
▪ Windows® 10 64-bit
▪ Windows
®
8.1 64-bit
▪ Windows® 7 32/64-bit
▪ Linux Fedora
Note: The 7th Generation Intel
®
CoreTM Processors support Windows 10
64-bit only.
Certifications
▪ EMC & Safety
▪ CE/FCC Class A
Page 18
Copyright © 2018 NEXCOM International Co., Ltd. All Rights Reserved.
4
NEX 614B User Manual
Chapter 1: Product Introduction
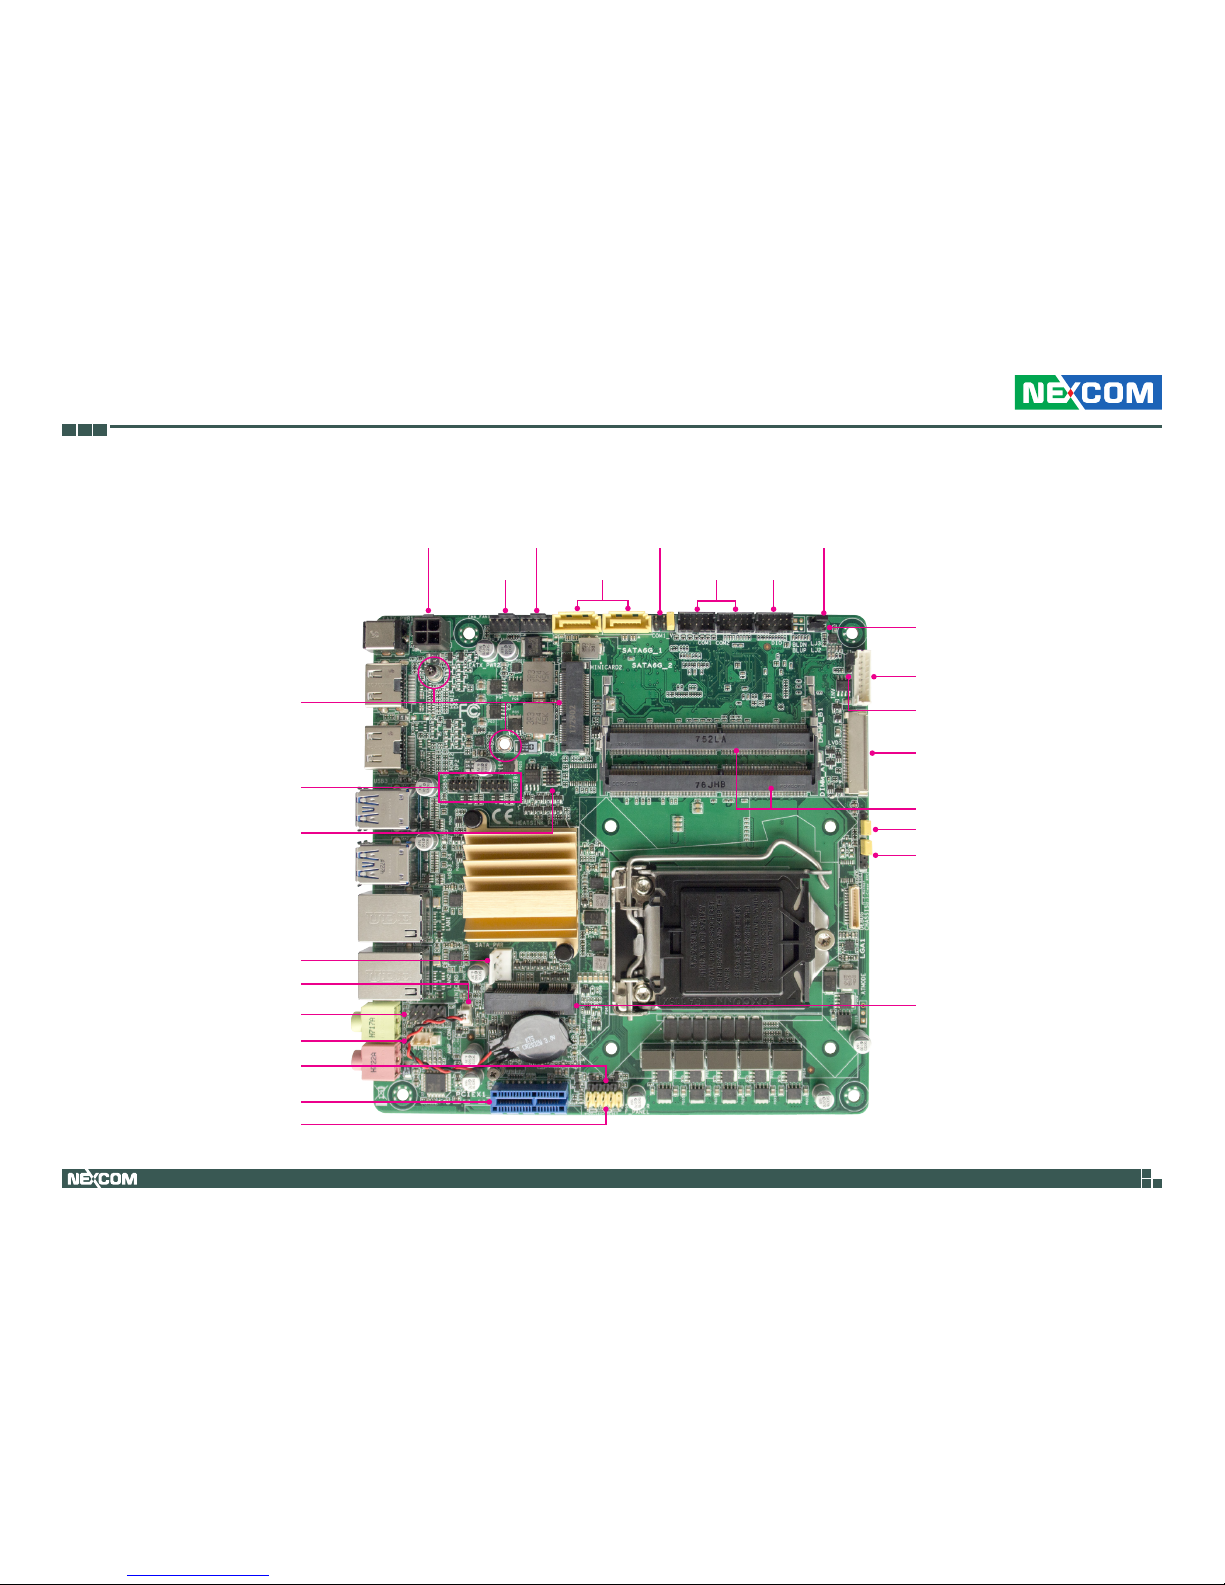
Knowing Your NEX 614B
Front Panel Audio
Audio Amplifier
Full-size Mini-PCIe
(mSATA)
Half-size Mini-PCIe
(PCIe + USB)
Top: LVDS
Bottom: EDP
PCIe x1
USB 2.0
SATA Power
Front System Panel
Battery Connector
Speaker Connector
SPI Flash Programmable
Inverter Voltage Select
DDR4 SO-DIMM
COM1 Ring/+5V/+12V Select
Chassis Fan
CPU Fan
SATA1, SATA2
4-pin EATX Power
Digital I/OCOM1, COM2
Clear RTC RAM
Backlight Inverter Power
LVDS Panel Voltage Select
Inverter Backlight Control Mode Select
Chassis Intrusion
Page 19
Copyright © 2018 NEXCOM International Co., Ltd. All Rights Reserved.
5
NEX 614B User Manual
Chapter 1: Product Introduction
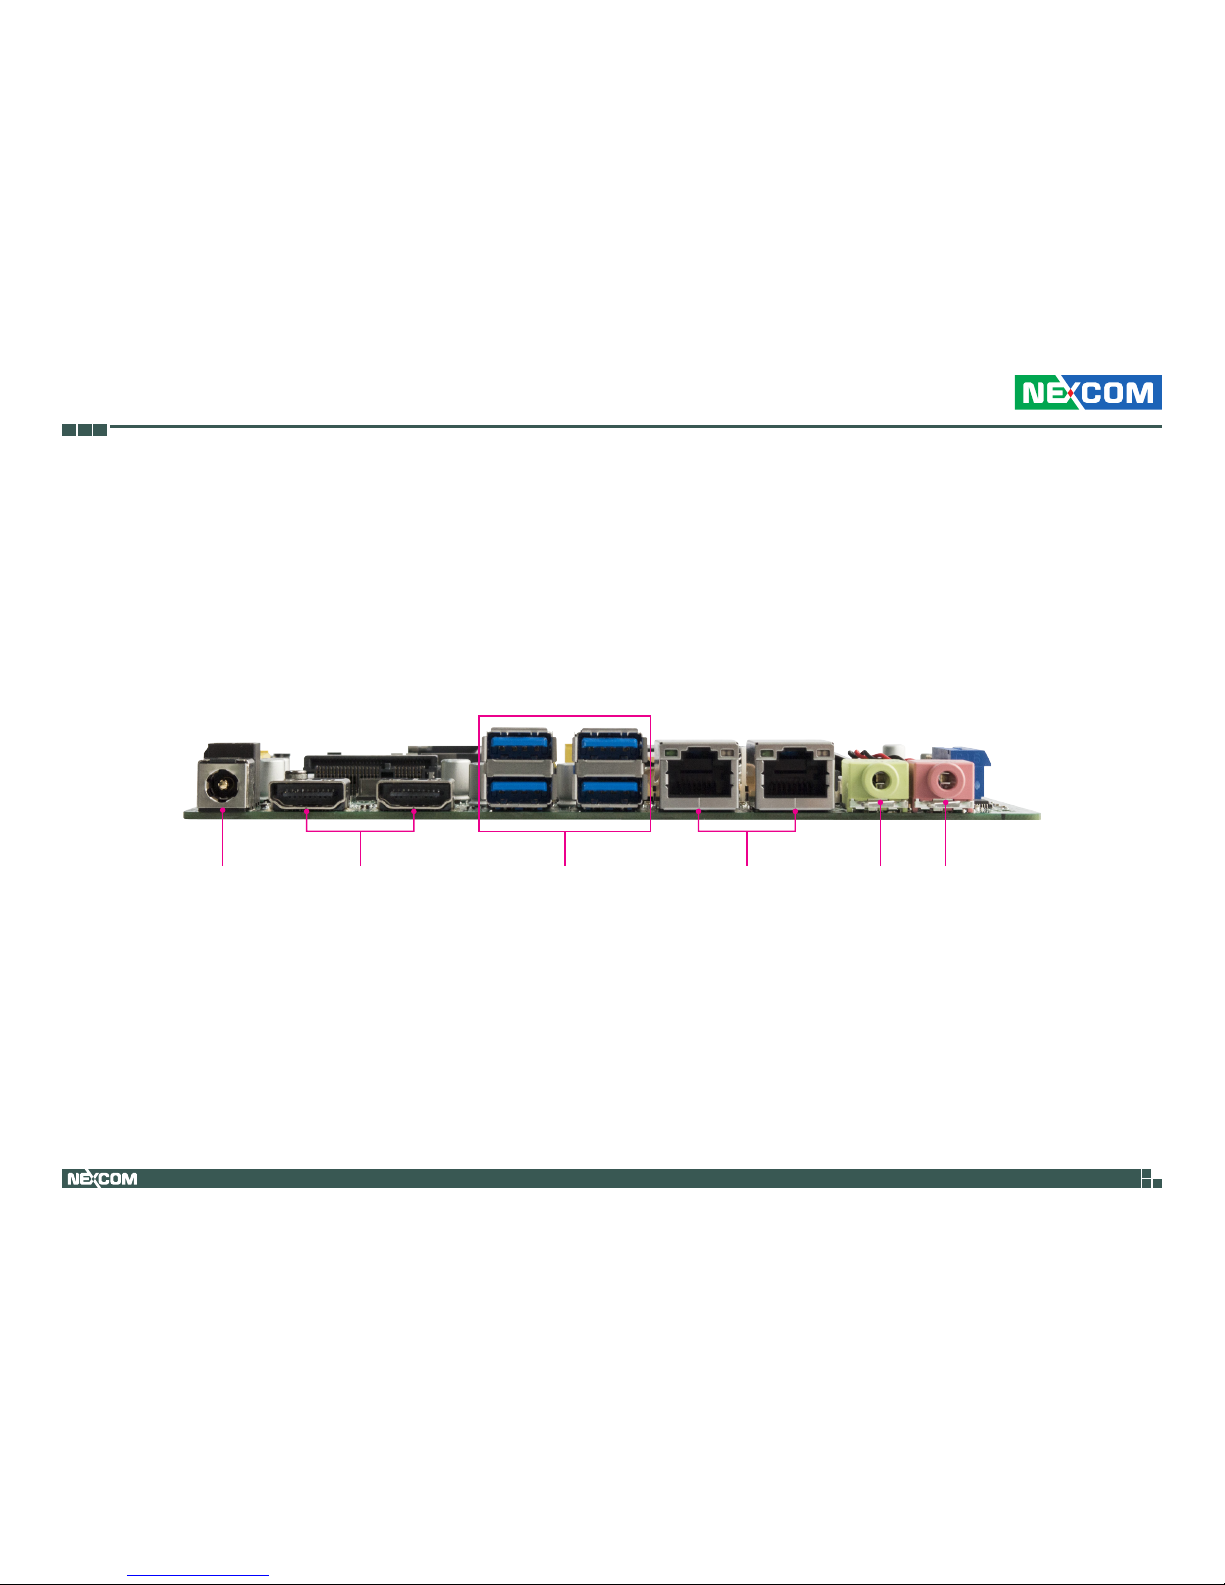
Edge I/O View
RJ45 LAN PortsDC Jack Mic-inLine-outUSB 3.0HDMI
Page 20

Copyright © 2018 NEXCOM International Co., Ltd. All Rights Reserved.
6
NEX 614B User Manual
Chapter 2: Jumpers and Connectors
ChaPter 2: JumPers and ConneCtors
This chapter describes how to set the jumpers and connectors on the
NEX 614B motherboard.
Before You Begin
▪ Ensure you have a stable, clean working environment. Dust and dirt can
get into components and cause a malfunction. Use containers to keep
small components separated.
▪ Adequate lighting and proper tools can prevent you from accidentally
damaging the internal components. Most of the procedures that follow
require only a few simple tools, including the following:
– A Philips screwdriver
– A flat-tipped screwdriver
– A set of jewelers screwdrivers
– A grounding strap
– An anti-static pad
▪ Using your fingers can disconnect most of the connections. It is
recommended that you do not use needle-nosed pliers to disconnect
connections as these can damage the soft metal or plastic parts of the
connectors.
▪ Before working on internal components, make sure that the power is off.
Ground yourself before touching any internal components, by touching
a metal object. Static electricity can damage many of the electronic
components. Humid environments tend to have less static electricity than
dry environments. A grounding strap is warranted whenever danger of
static electricity exists.
Precautions
Computer components and electronic circuit boards can be damaged by
discharges of static electricity. Working on computers that are still connected
to a power supply can be extremely dangerous.
Follow the guidelines below to avoid damage to your computer or yourself:
▪ Always disconnect the unit from the power outlet whenever you are
working inside the case.
▪ If possible, wear a grounded wrist strap when you are working inside the
computer case. Alternatively, discharge any static electricity by touching
the bare metal chassis of the unit case, or the bare metal body of any
other grounded appliance.
▪ Hold electronic circuit boards by the edges only. Do not touch the
components on the board unless it is necessary to do so. Don’t flex or
stress the circuit board.
▪ Leave all components inside the static-proof packaging that they shipped
with until they are ready for installation.
▪ Use correct screws and do not over tighten screws.
Page 21
Copyright © 2018 NEXCOM International Co., Ltd. All Rights Reserved.
7
NEX 614B User Manual
Chapter 2: Jumpers and Connectors
Jumper Settings
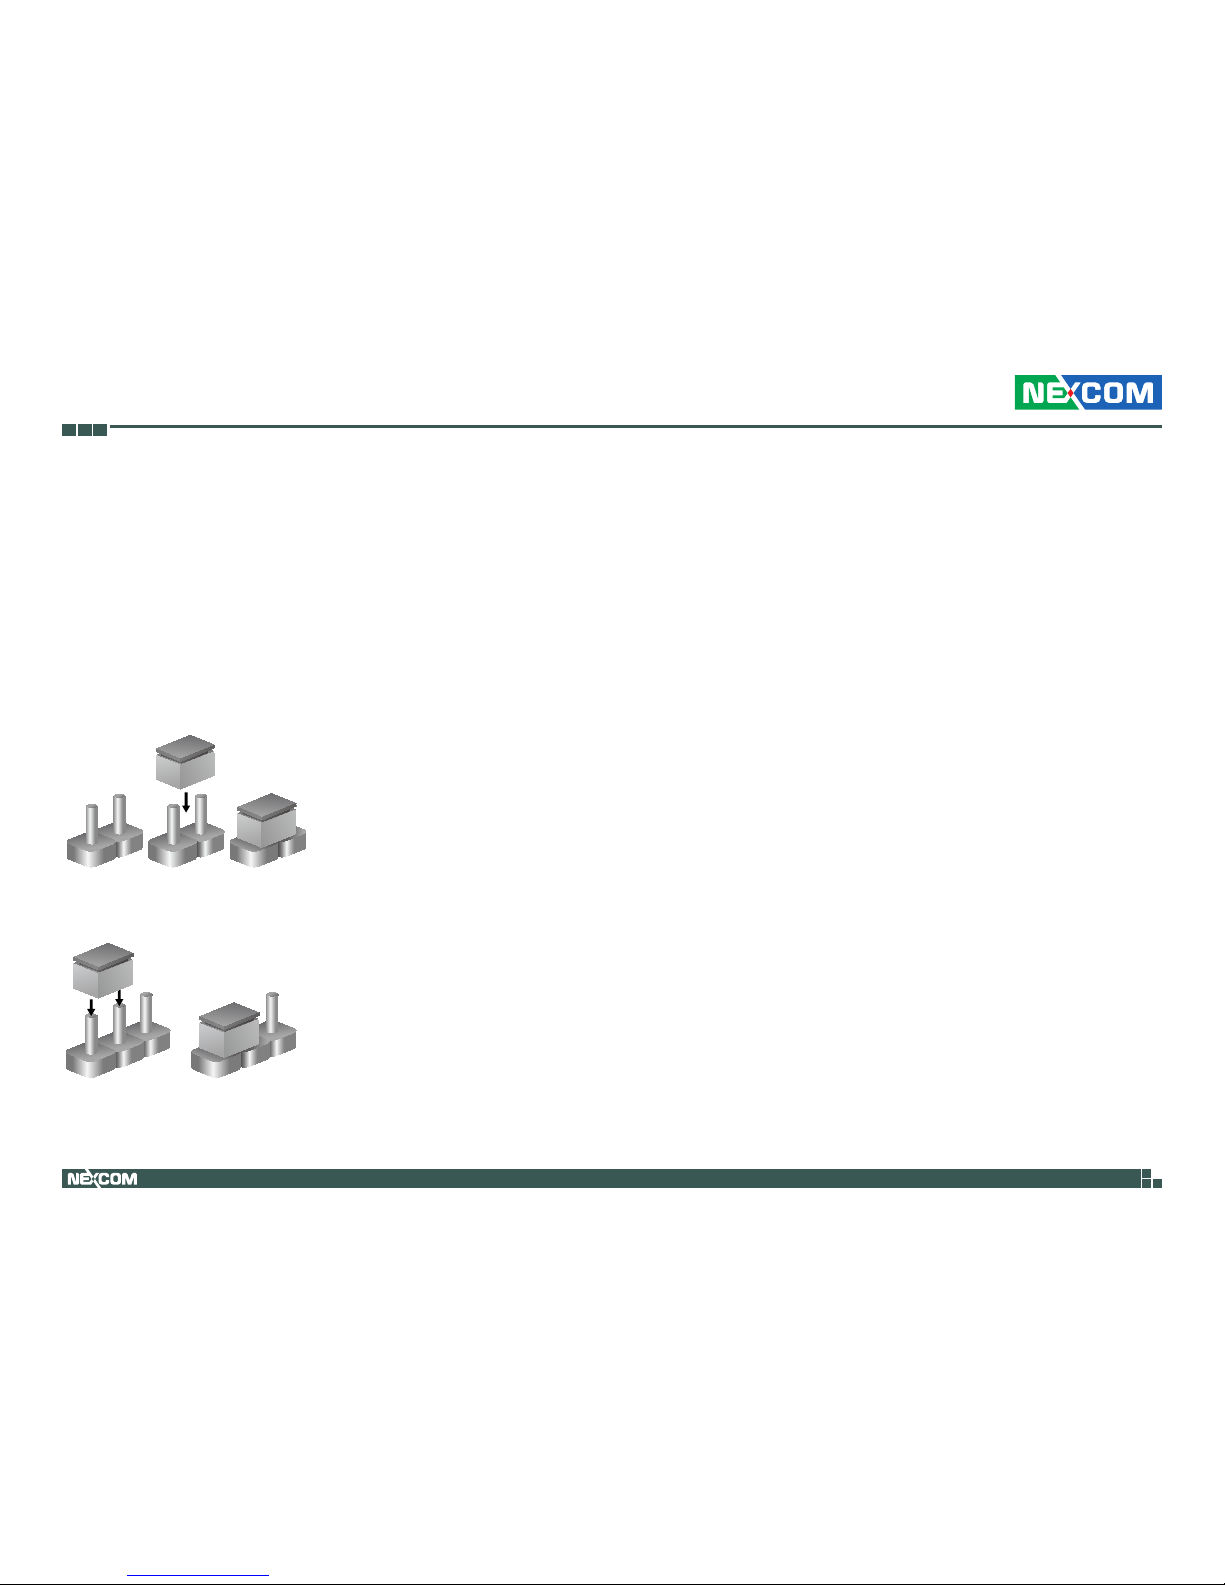
A jumper is the simplest kind of electric switch. It consists of two metal
pins and a cap. When setting the jumpers, ensure that the jumper caps are
placed on the correct pins. When the jumper cap is placed on both pins, the
jumper is short. If you remove the jumper cap, or place the jumper cap on
just one pin, the jumper is open.
Refer to the illustrations below for examples of what the 2-pin and 3-pin
jumpers look like when they are short (on) and open (off).
Two-Pin Jumpers: Open (Left) and Short (Right)
Three-Pin Jumpers: Pins 1 and 2 are Short
1
2
3
1
2
3
Page 22
Copyright © 2018 NEXCOM International Co., Ltd. All Rights Reserved.
8
NEX 614B User Manual
Chapter 2: Jumpers and Connectors
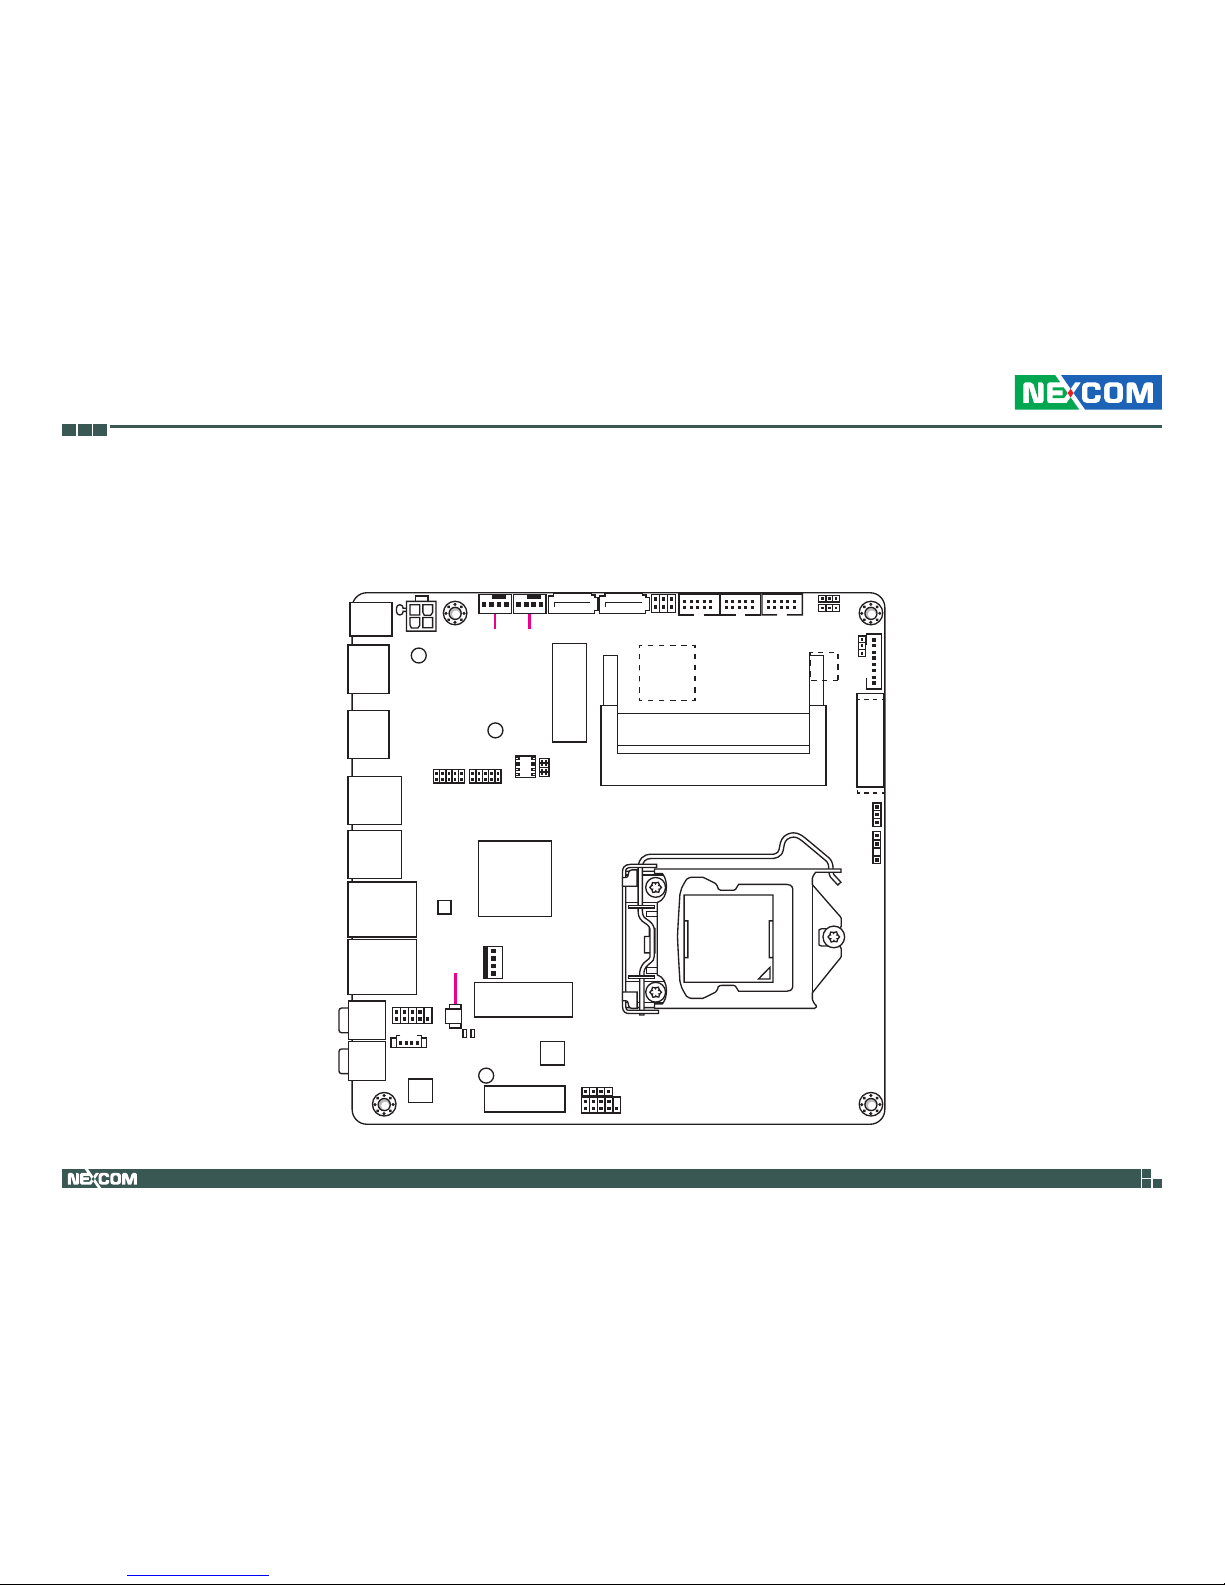
Locations of the Jumpers and Connectors
The figure below shows the location of the jumpers and connectors.
EATX_PWR2
EATX_PWR1
USB3_12
USB3_34
LAN2
LAN1
CLRTC
RTL
8111G
SATA6G_2SATA6G_1
F_PANEL
SPEAKER
CHASSIS
USB78USB56
CHA_FAN1 CPU_FAN1
DDR4 DIMM_A1 (64bit, 260-pin module)
DDR4 DIMM_B1 (64bit, 260-pin module)
INV
LJ2
LJ1
LJ3
DIOCOM2COM1
COM1_VSET
LVDS
BOTTOM:EDP
DP1
or
HDMI1
DP2
or
HDMI2
SATA_PWR
ALC
887
RT3607CE
BIOS_P
Intel
®
H110
Super
I/O
PCIEX1_1
MINICARD1
MINICARD2
CH7511
LGA1151
LINE-OUT
MIC-IN
AMP_CON
AAFP
BATTERY_H
LED_+5V
LED_+5VSUS
128Mb
BIOS
Page 23
Copyright © 2018 NEXCOM International Co., Ltd. All Rights Reserved.
9
NEX 614B User Manual
Chapter 2: Jumpers and Connectors
Jumpers
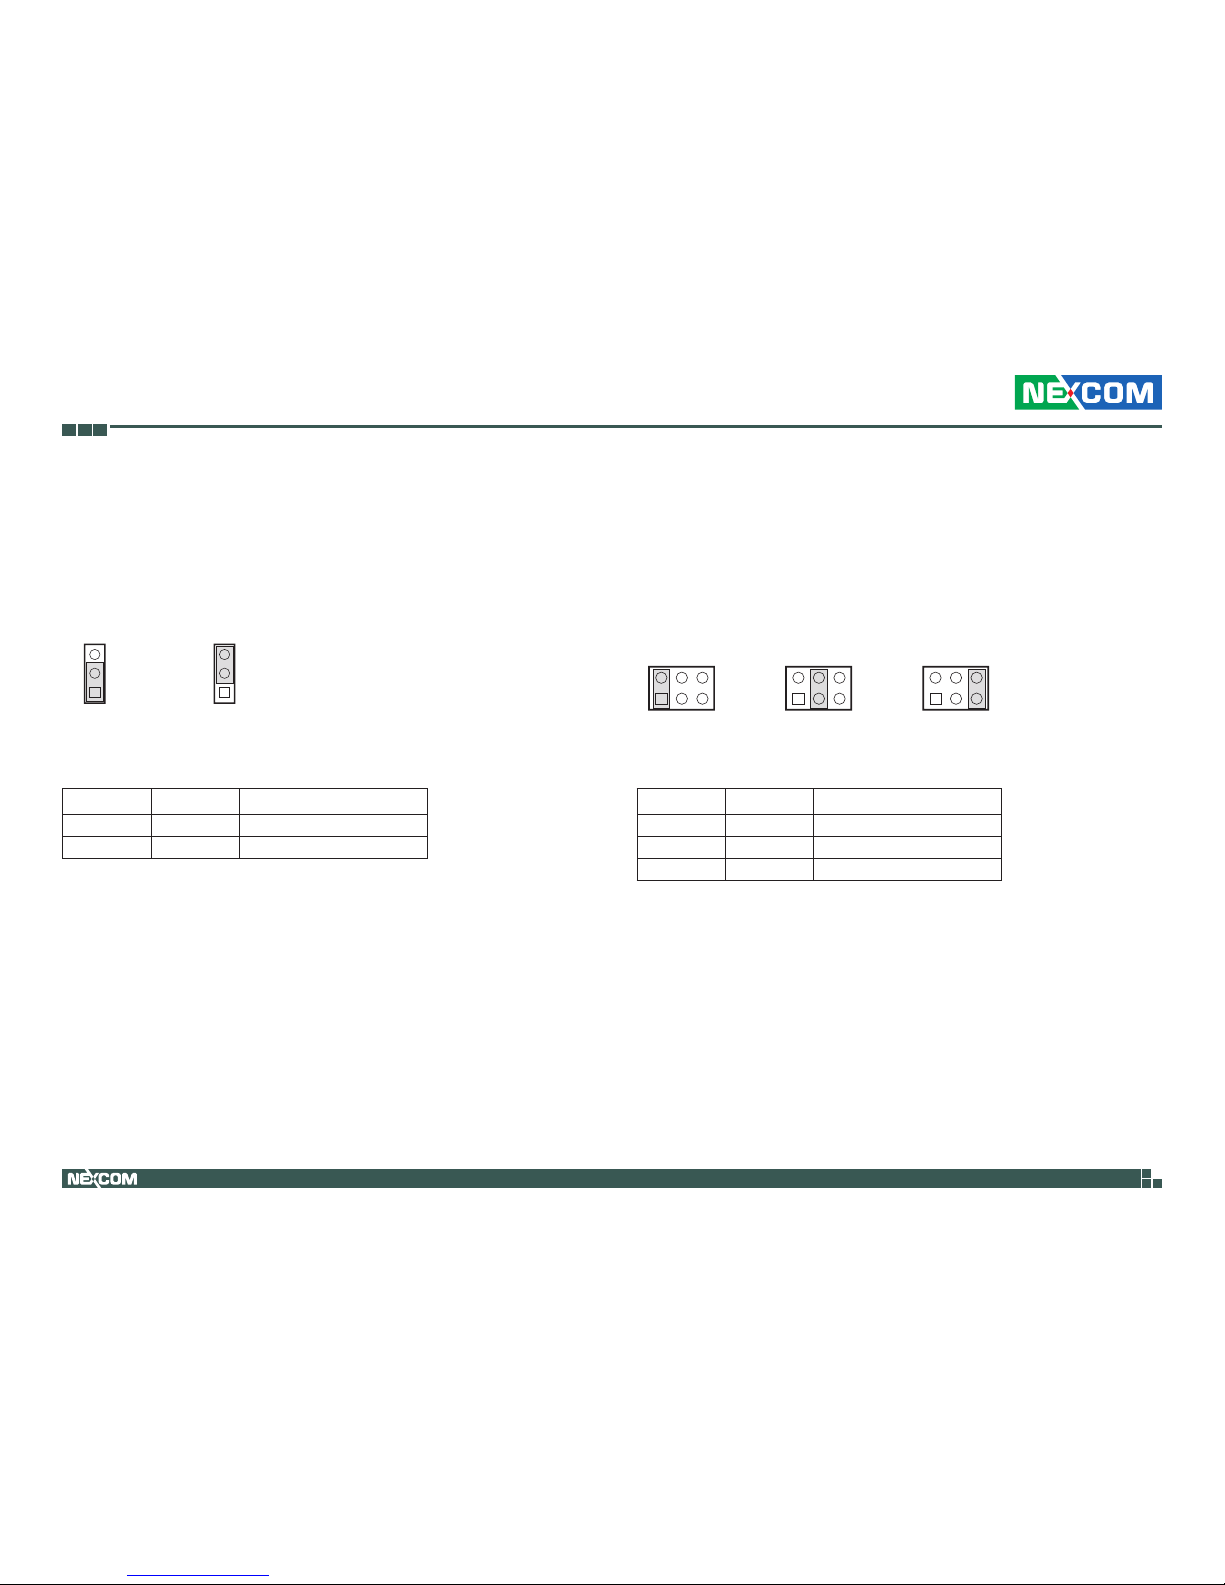
Clear RTC RAM
Connector type: 1x3 3-pin header
Connector location: CLRTC
Pin Status Definition
1-2 Short Normal
2-3 Short Clear CMOS
Pin Status Definition
1-2 Short +12V
3-4 Short +5V
5-6 Short Ring
COM1 Ring/+5V/+12V Selection
Connector type: 2x3 6-pin header
Connector location: COM1_VSET
1
3
1
3
1-2 Short
(Default)
2-3 Short
1-2 Short 3-4 Short 5-6 Short
(Default)
15
26
15
26
15
26
Page 24
Copyright © 2018 NEXCOM International Co., Ltd. All Rights Reserved.
10
NEX 614B User Manual
Chapter 2: Jumpers and Connectors
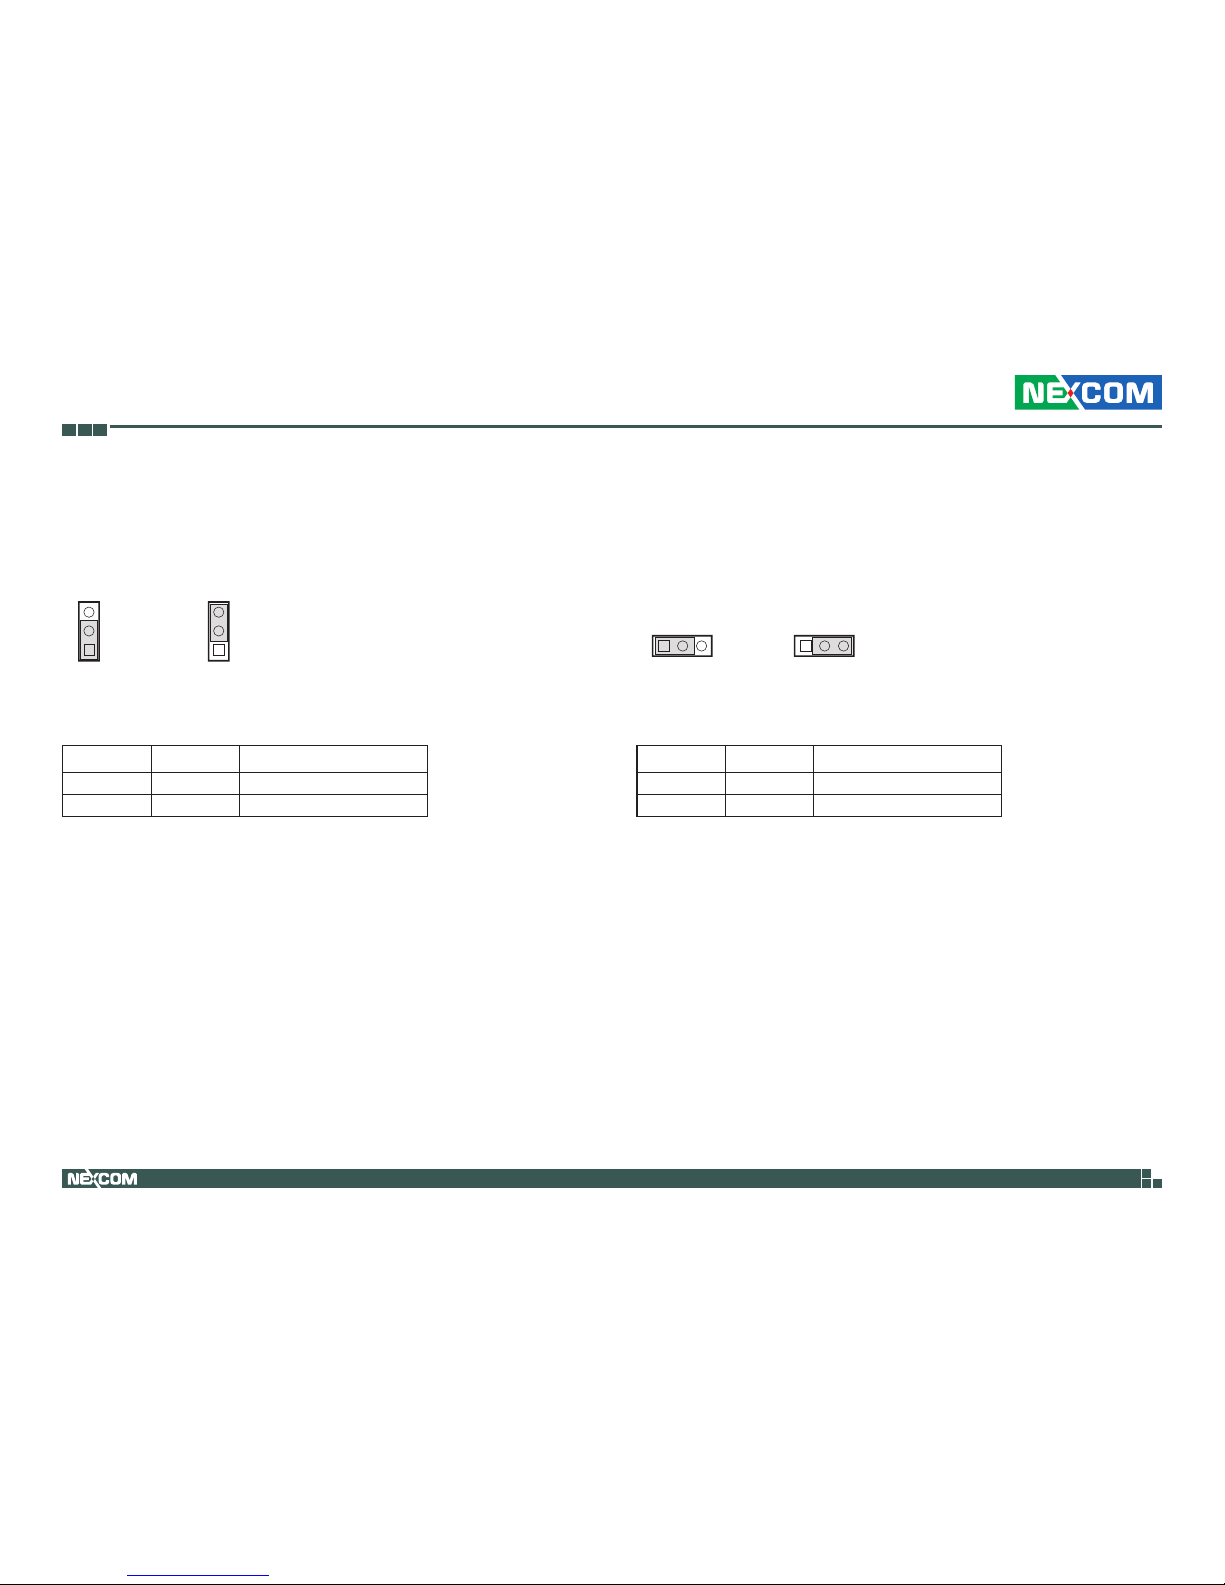
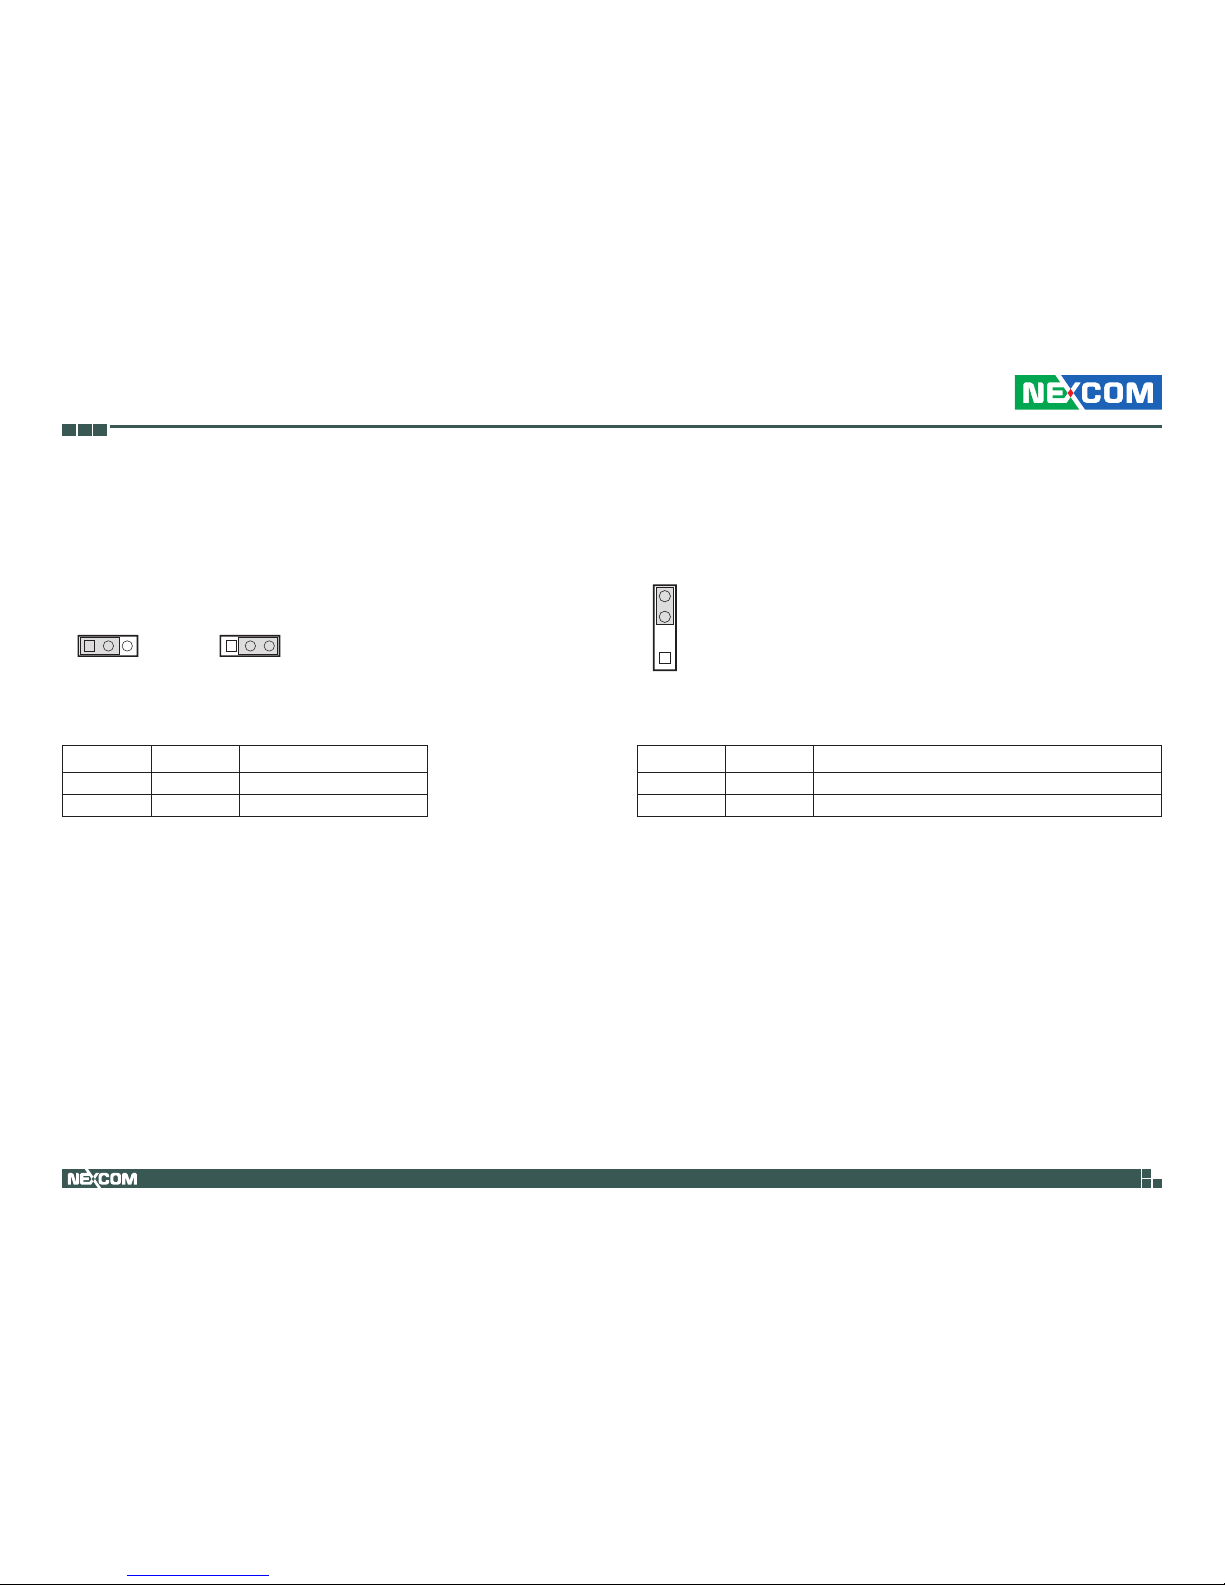
Pin Status Definition
1-2 Short +5V
2-3 Short +3.3V
LVDS Panel Voltage Select
Connector type: 1x3 3-pin header
Connector location: LJ1
1
3
1
3
1-2 Short
1-2 Short
(Default)
2-3 Short
(Default)
2-3 Short
1 3 1 3
Inverter Voltage Select
Connector type: 1x3 3-pin header
Connector location: LJ2
Pin Status Settings
1-2 Short DC Voltage Control
2-3 Short PWM Control
Page 25
Copyright © 2018 NEXCOM International Co., Ltd. All Rights Reserved.
11
NEX 614B User Manual
Chapter 2: Jumpers and Connectors
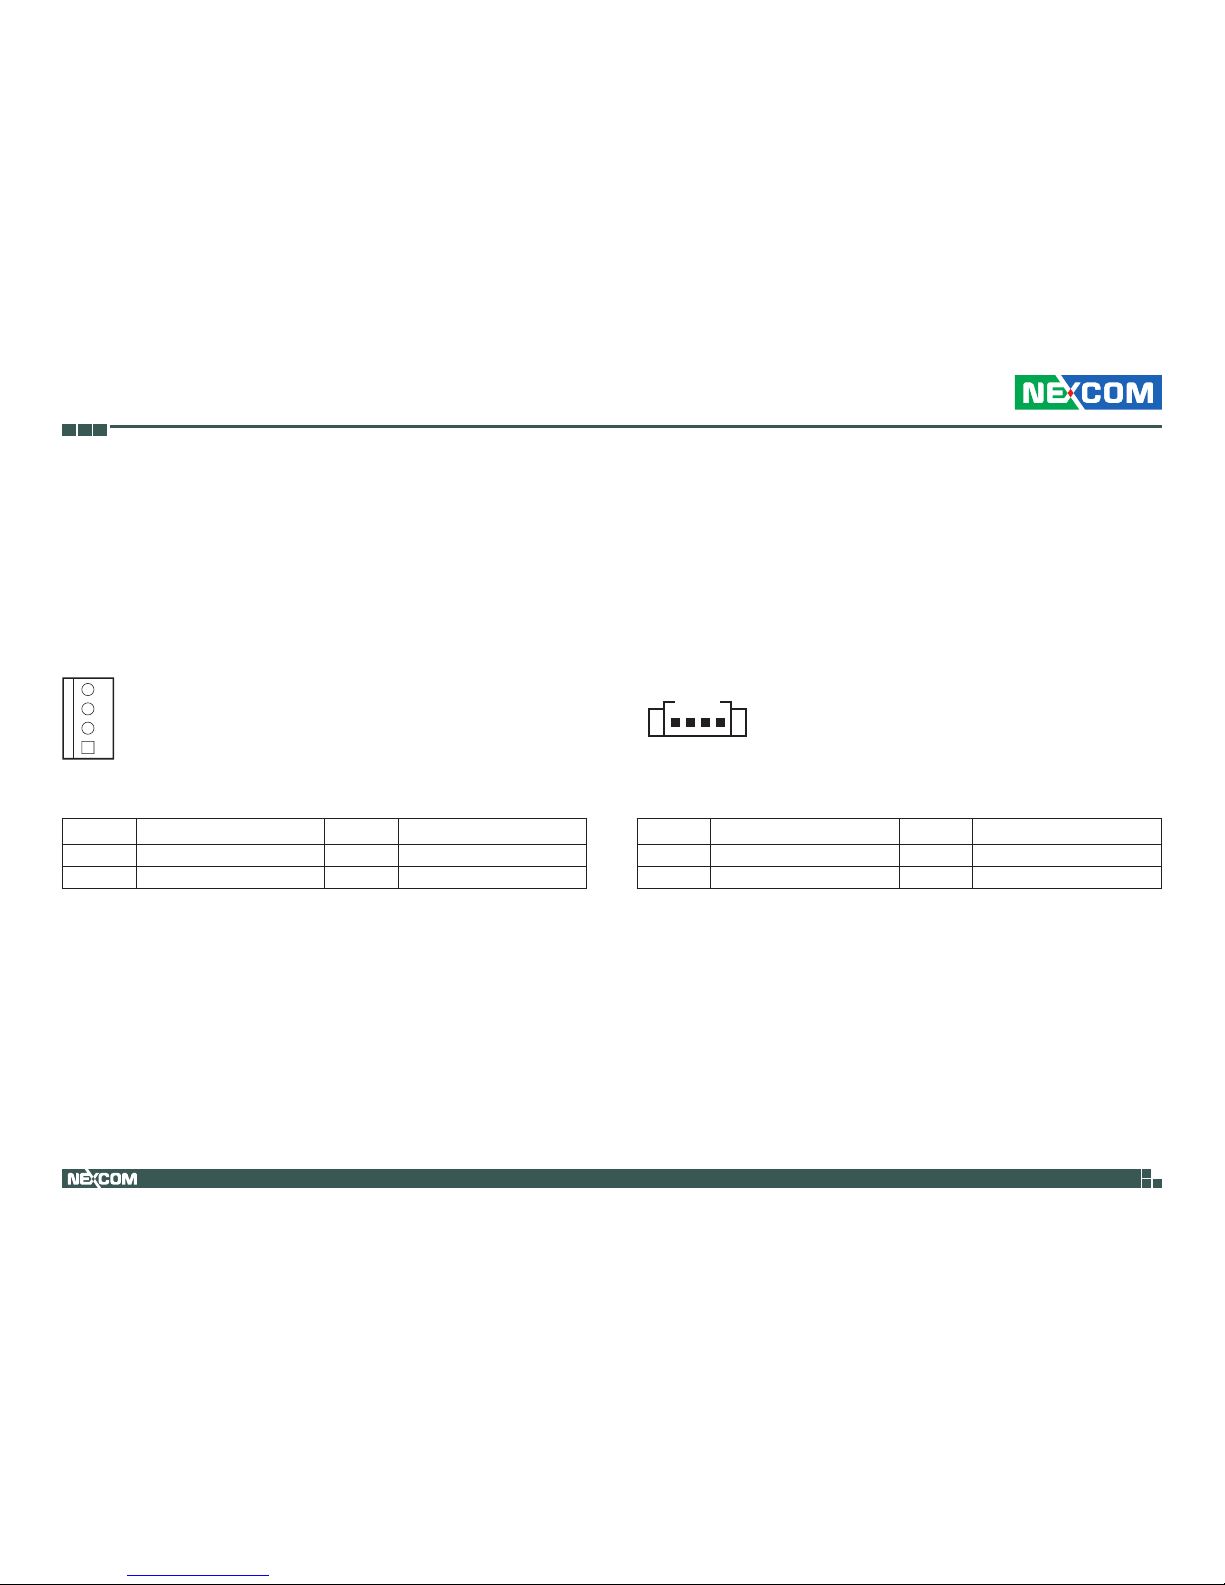
1-2 Short 2-3 Short
(Default)
1 3 1 3
Inverter Backlight Control Mode Select
Connector type: 1x3 3-pin header
Connector location: LJ3
Pin Status Settings
1-2 Short +12V
2-3 Short +5V
Chassis Intrusion Jumper
Connector type: 1x4 4-pin header
Connector location: CHASSIS
Pin Status Settings
1-2 Open Enables the chassis intrusion detection feature
3-4 Short Disables the chassis intrusion detection feature
3-4 Short
(Default)
1
4
Page 26
Copyright © 2018 NEXCOM International Co., Ltd. All Rights Reserved.
12
NEX 614B User Manual
Chapter 2: Jumpers and Connectors
Connector Pin Definitions
Internal Connectors
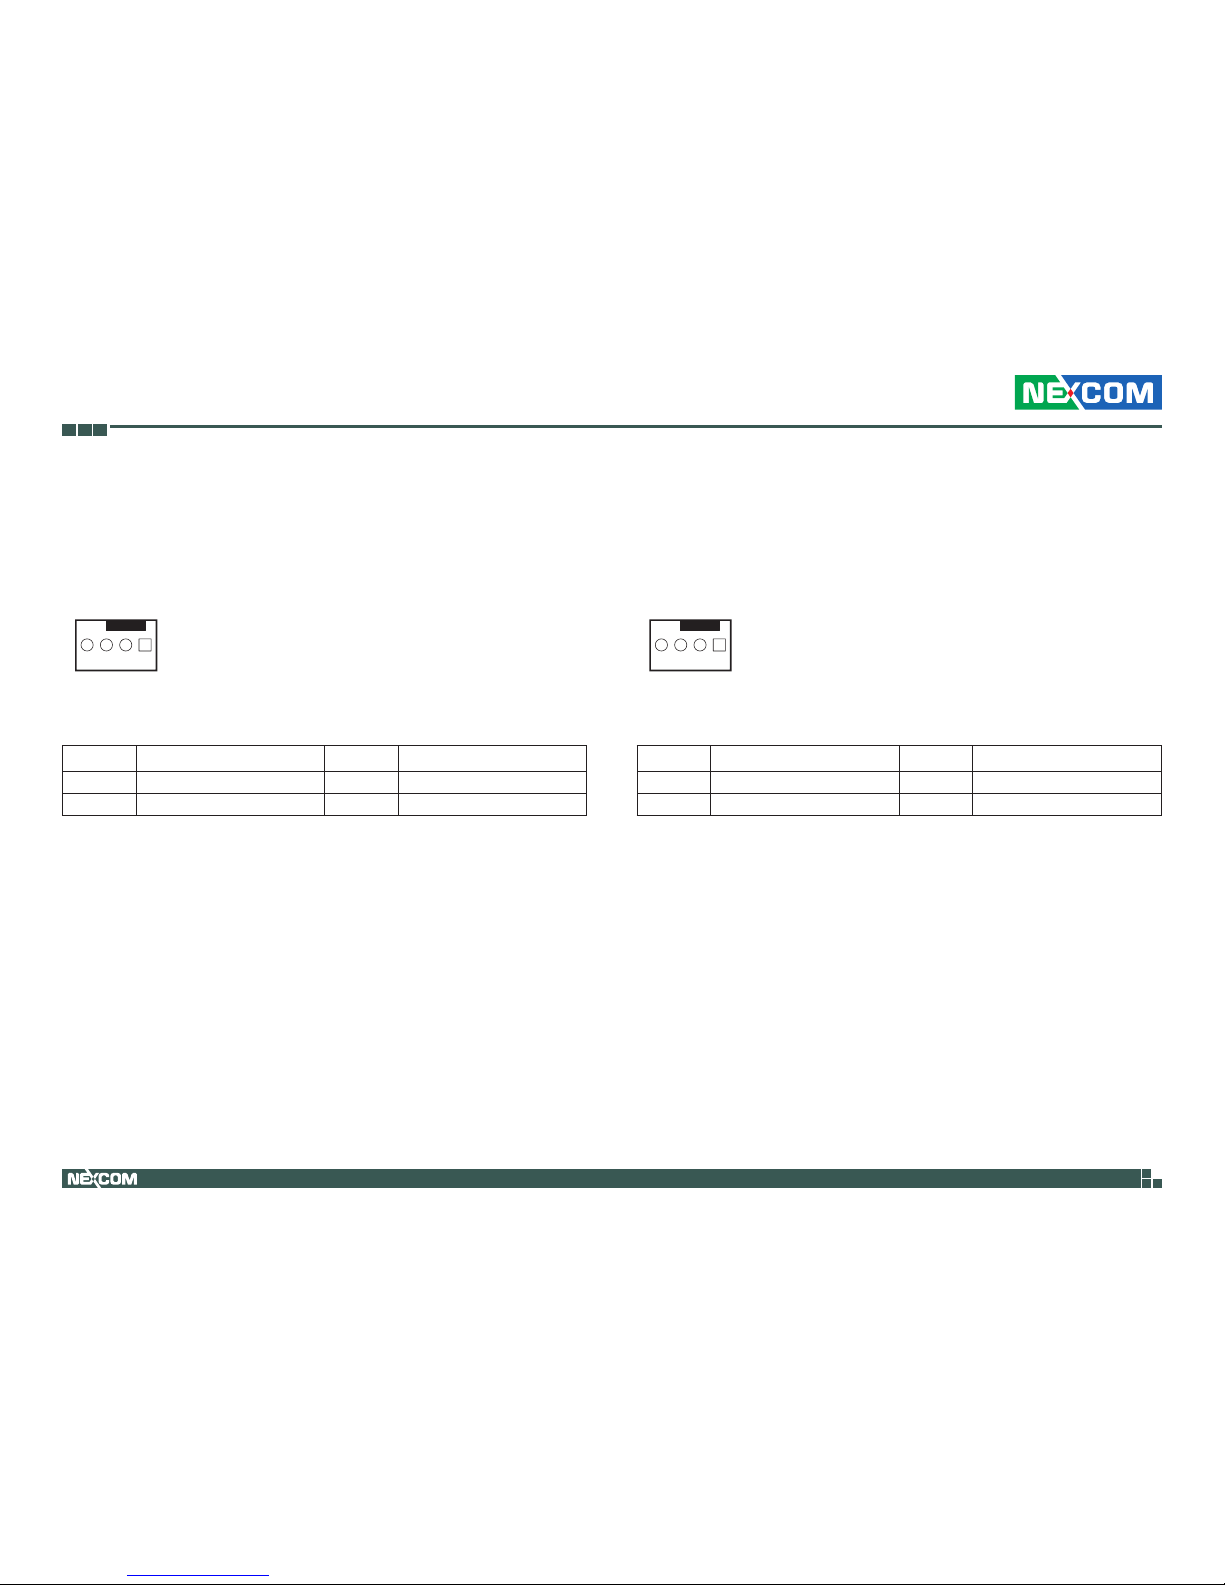
SATA Power Connector
Connector type: 1x4 4-pin header
Connector location: SATA_PWR
Pin Definition Pin Definition
1 +5V 2 GND
3 GND 4 +12V
Audio Amplifier Connector
Connector type: 1x4 4-pin header
Connector location: AMP_CON
Pin Definition Pin Definition
1 ROUTP 2 ROUTN
3 LOUTN 4 LOUTP
4
1
14
Page 27
Copyright © 2018 NEXCOM International Co., Ltd. All Rights Reserved.
13
NEX 614B User Manual
Chapter 2: Jumpers and Connectors
Chassis Fan Connector
Connector type: 1x4 4-pin header
Connector location: CHA_FAN1
CPU Fan Connector
Connector type: 1x4 4-pin header
Connector location: CPU_FAN1
Pin Definition Pin Definition
1 PWM 2 SENSE
3 VCC 4 GND
Pin Definition Pin Definition
1 PWM 2 SENSE
3 VCC 4 GND
41 41
Page 28
Copyright © 2018 NEXCOM International Co., Ltd. All Rights Reserved.
14
NEX 614B User Manual
Chapter 2: Jumpers and Connectors
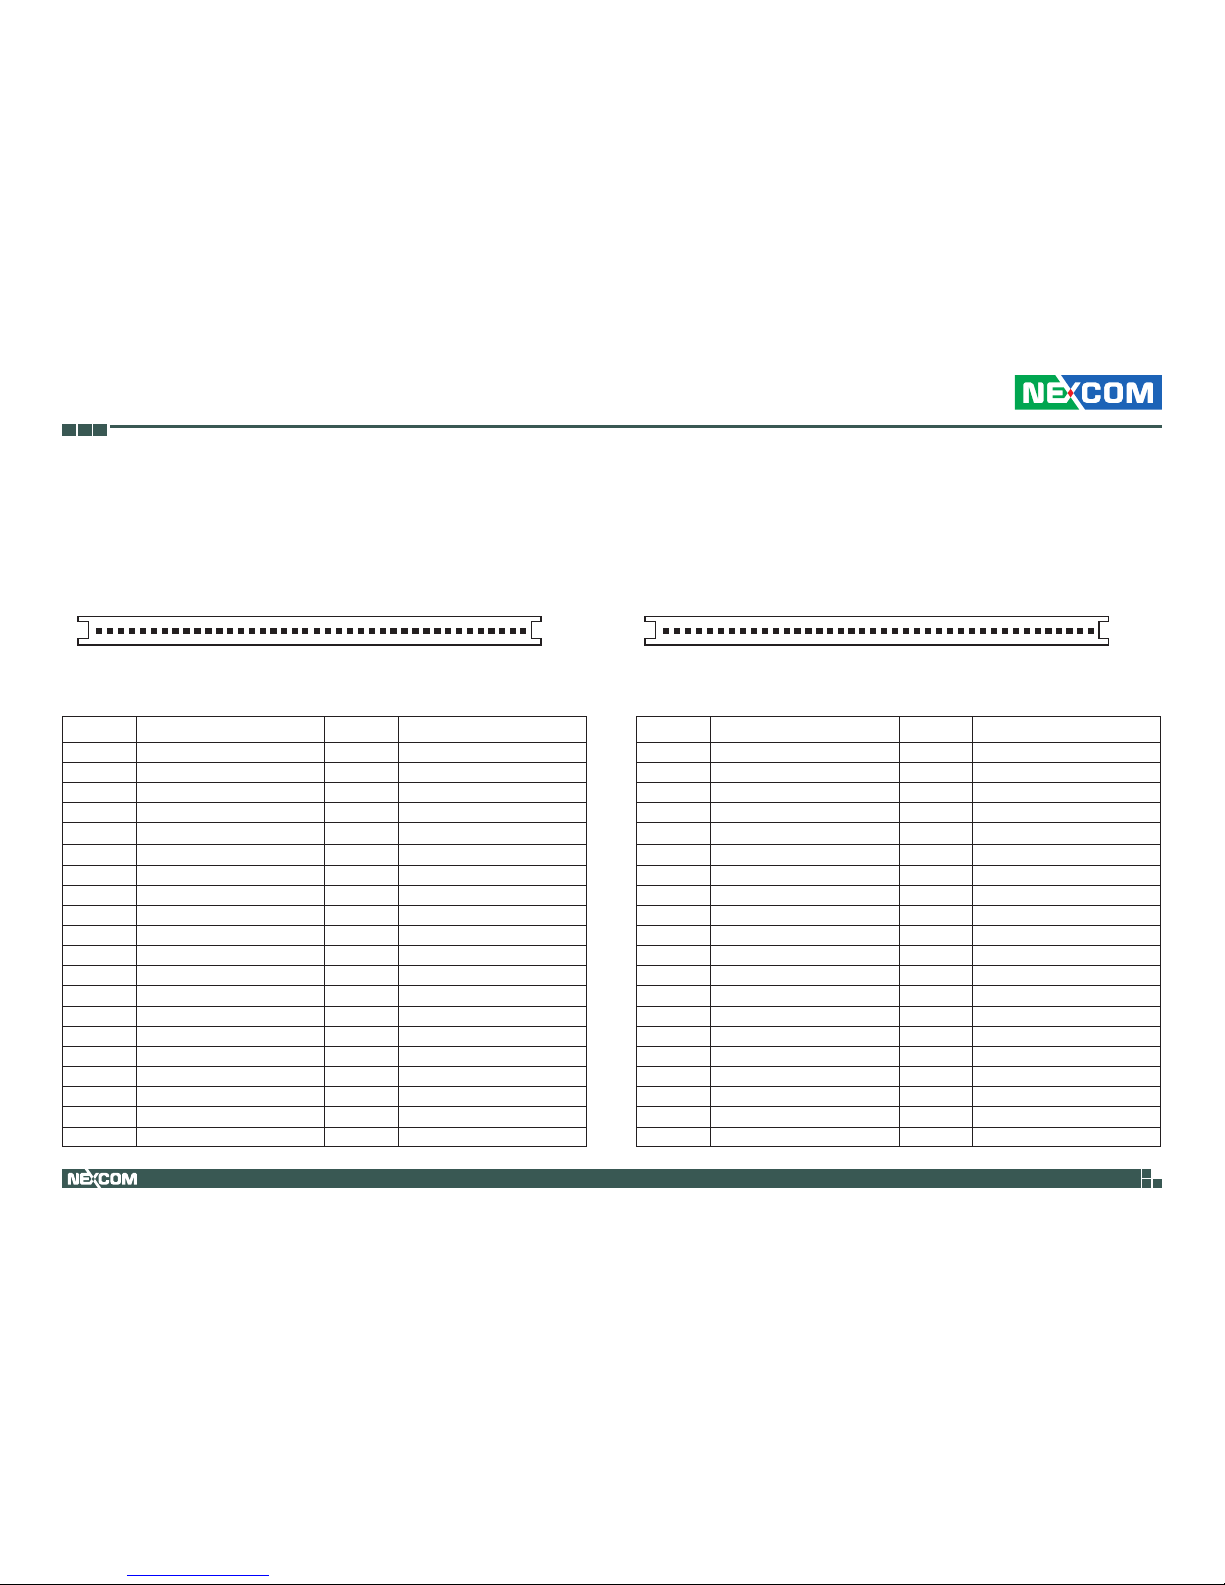
LVDS Connector
Connector type: 1x40 40-pin header
Connector location: LVDS
Embedded DisplayPort
Connector type: 1x40 40-pin header
Connector location: EDP
Pin Definition Pin Definition
1 LVDS0_D3+ 2 LVDS0_D33 LVDS0_D2+ 4 LVDS0_D25 LVDS0_D1+ 6 LVDS0_D17 LVDS0_D0+ 8 LVDS0_D0-
9 LVDS1_D3+ 10 LVDS1_D3-
11 LVDS1_D2+ 12 LVDS1_D213 LVDS1_D1+ 14 LVDS1_D115 LVDS1_D0+ 16 LVDS1_D017 GND 18 +V_PANEL
19 +V_PANEL 20 +V_PANEL
21 NC 22 +3V
23 GND 24 GND
25 GND 26 LVDS0_CLK+
27 LVDS0_CLK- 28 GND
29 GND 30 GND
31 SPC1 32 INV_ENABKL
33 VCON 34 LVDS1_CLK+
35 LVDS1_CLK- 36 +BLVCC
37 +BLVCC 38 +BLVCC
39 NC 40 SPD1
Pin Definition Pin Definition
1 NC 2 GND
3 eDP_TXN3_C 4 eDP_TXP3_C
5 GND 6 eDP_TXN2_C
7 eDP_TXP2_C 8 GND
9 eDP_TXN1_C 10 eDP_TXP1_C
11 GND 12 eDP_TXN0_C
13 eDP_TXP0_C 14 GND
15 eDP_AUXP_C 16 eDP_AUXN_C
17 GND 18 +V_PANEL
19 +V_PANEL 20 +V_PANEL
21 +V_PANEL 22 NC
23 GND 24 GND
25 GND 26 GND
27 eDP_HPD_RRR 28 GND
29 GND 30 GND
31 GND 32 BKLTEN_R
33 BKLTCTL_R 34 NC
35 NC 36 +BLVCC
37 +BLVCC 38 +BLVCC
39 +BLVCC 40 NC
140
401
Page 29
Copyright © 2018 NEXCOM International Co., Ltd. All Rights Reserved.
15
NEX 614B User Manual
Chapter 2: Jumpers and Connectors
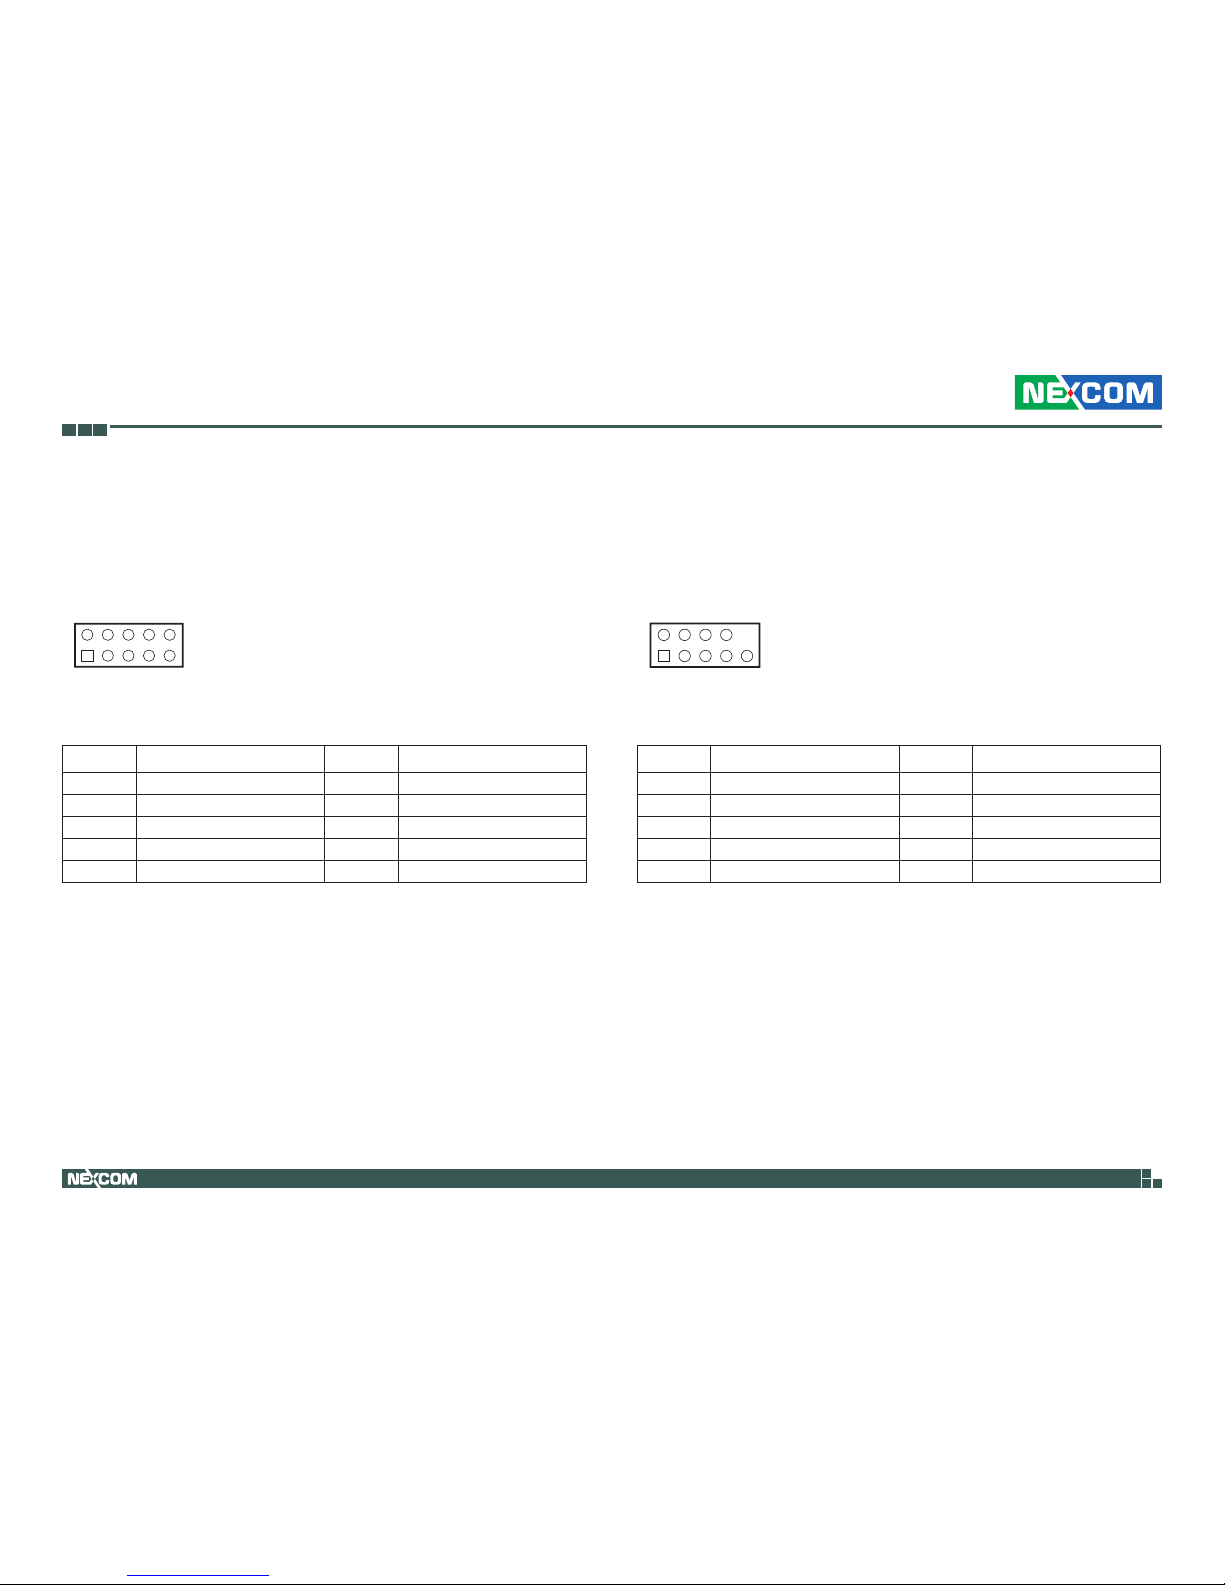
Digital I/O Connector
Connector type: 2x5 10-pin header
Connector location: DIO
19
21
0
Pin Definition Pin Definition
1 DIO_I#1 2 DIO_I#2
3 DIO_I#3 4 DIO_I#4
5 DIO_O#1 6 DIO_O#2
7 DIO_O#3 8 DIO_O#4
9 +5V 10 GND
System Panel Connector
Connector type: 2x5 10-pin header
Connector location: F_PANEL
Pin Definition Pin Definition
1 HDD_LED+ 2 PWR_LED+
3 HDD_LED- 4 PWR_LED5 GND 6 PWRBTN#
7 RSTCON#_PANEL 8 GND
9 NC 10 NA
10
2
91
Page 30
Copyright © 2018 NEXCOM International Co., Ltd. All Rights Reserved.
16
NEX 614B User Manual
Chapter 2: Jumpers and Connectors
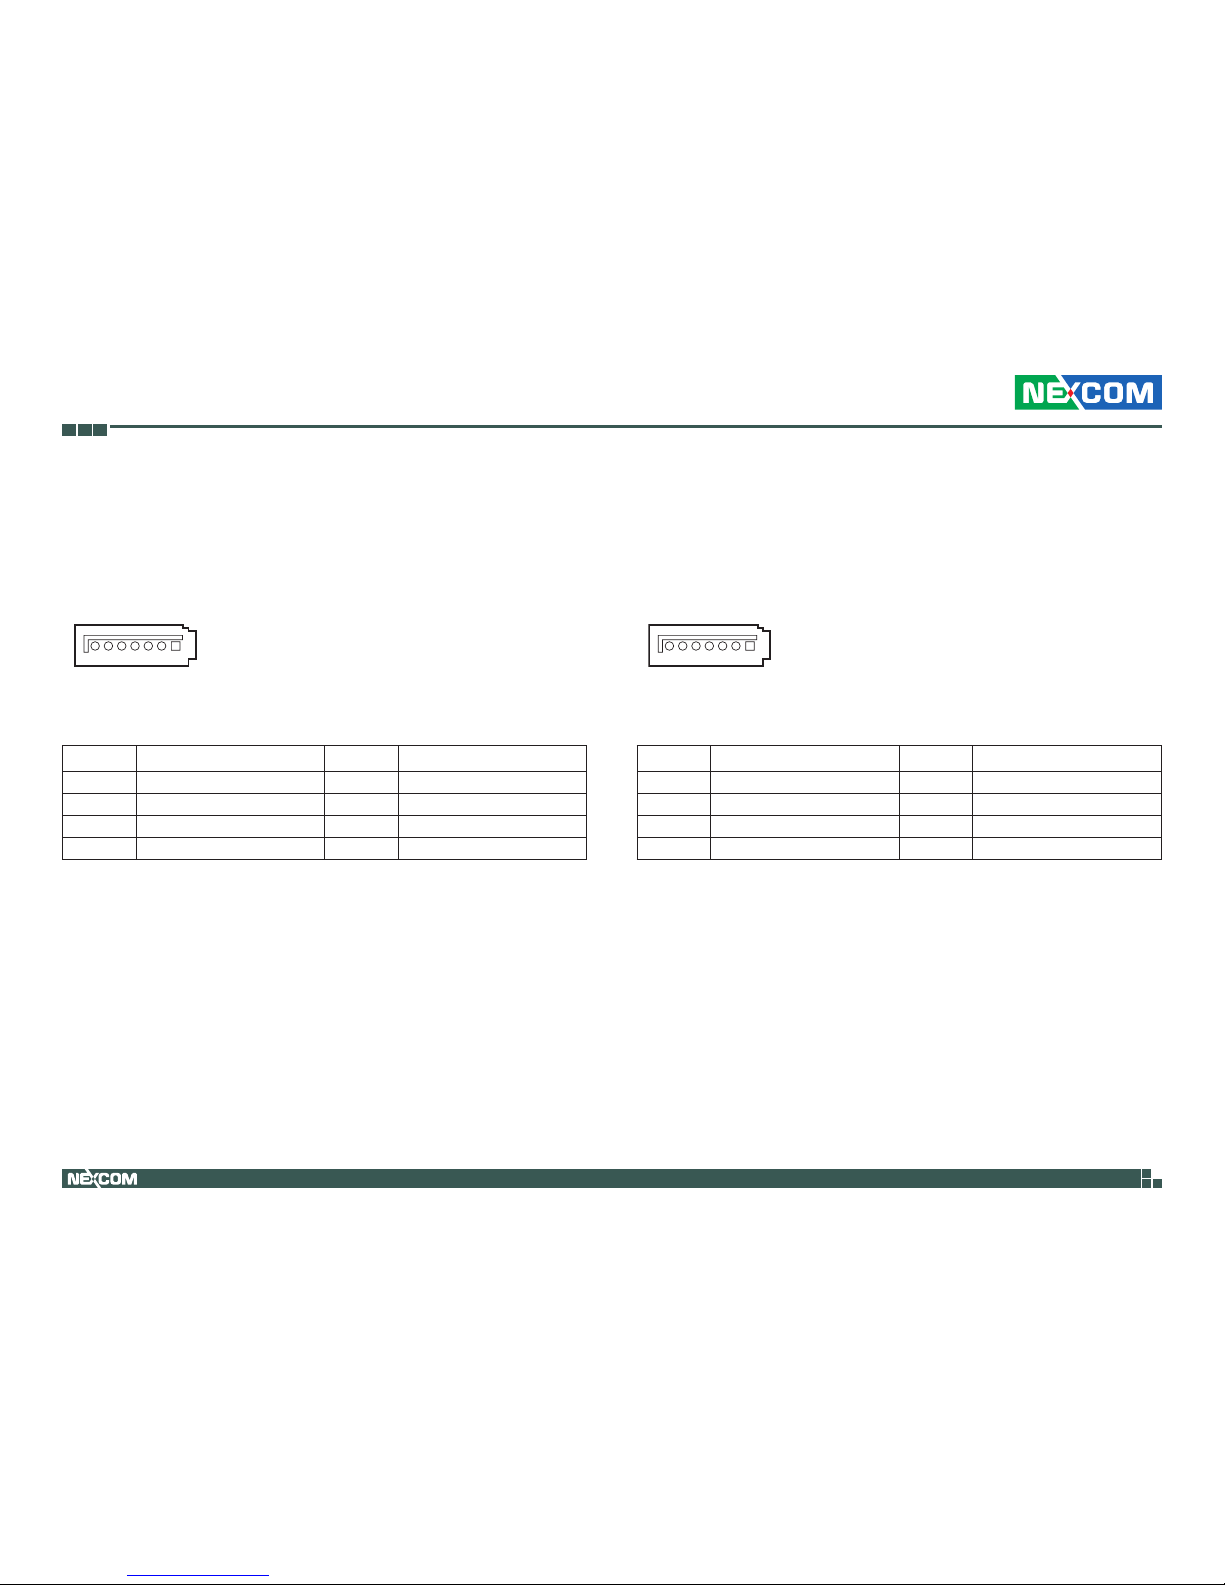
Serial ATA 6.0Gb/s Connector 1
Connector type: Standard Serial ATA 7P (1.27mm, SATA-M-180)
Connector location: SATA6G_1
Pin Definition Pin Definition
1 GND 2 RSATA_TXP1
3 RSATA_TXN1 4 GND
5 RSATA_RXN1 6 RSATA_RXP1
7 GND
7 1
Serial ATA 6.0Gb/s Connector 2
Connector type: Standard Serial ATA 7P (1.27mm, SATA-M-180)
Connector location: SATA6G_2
Pin Definition Pin Definition
1 GND 2 RSATA_TXP2
3 RSATA_TXN2 4 GND
5 RSATA_RXN2 6 RSATA_RXP2
7 GND
7 1
Page 31
Copyright © 2018 NEXCOM International Co., Ltd. All Rights Reserved.
17
NEX 614B User Manual
Chapter 2: Jumpers and Connectors
14
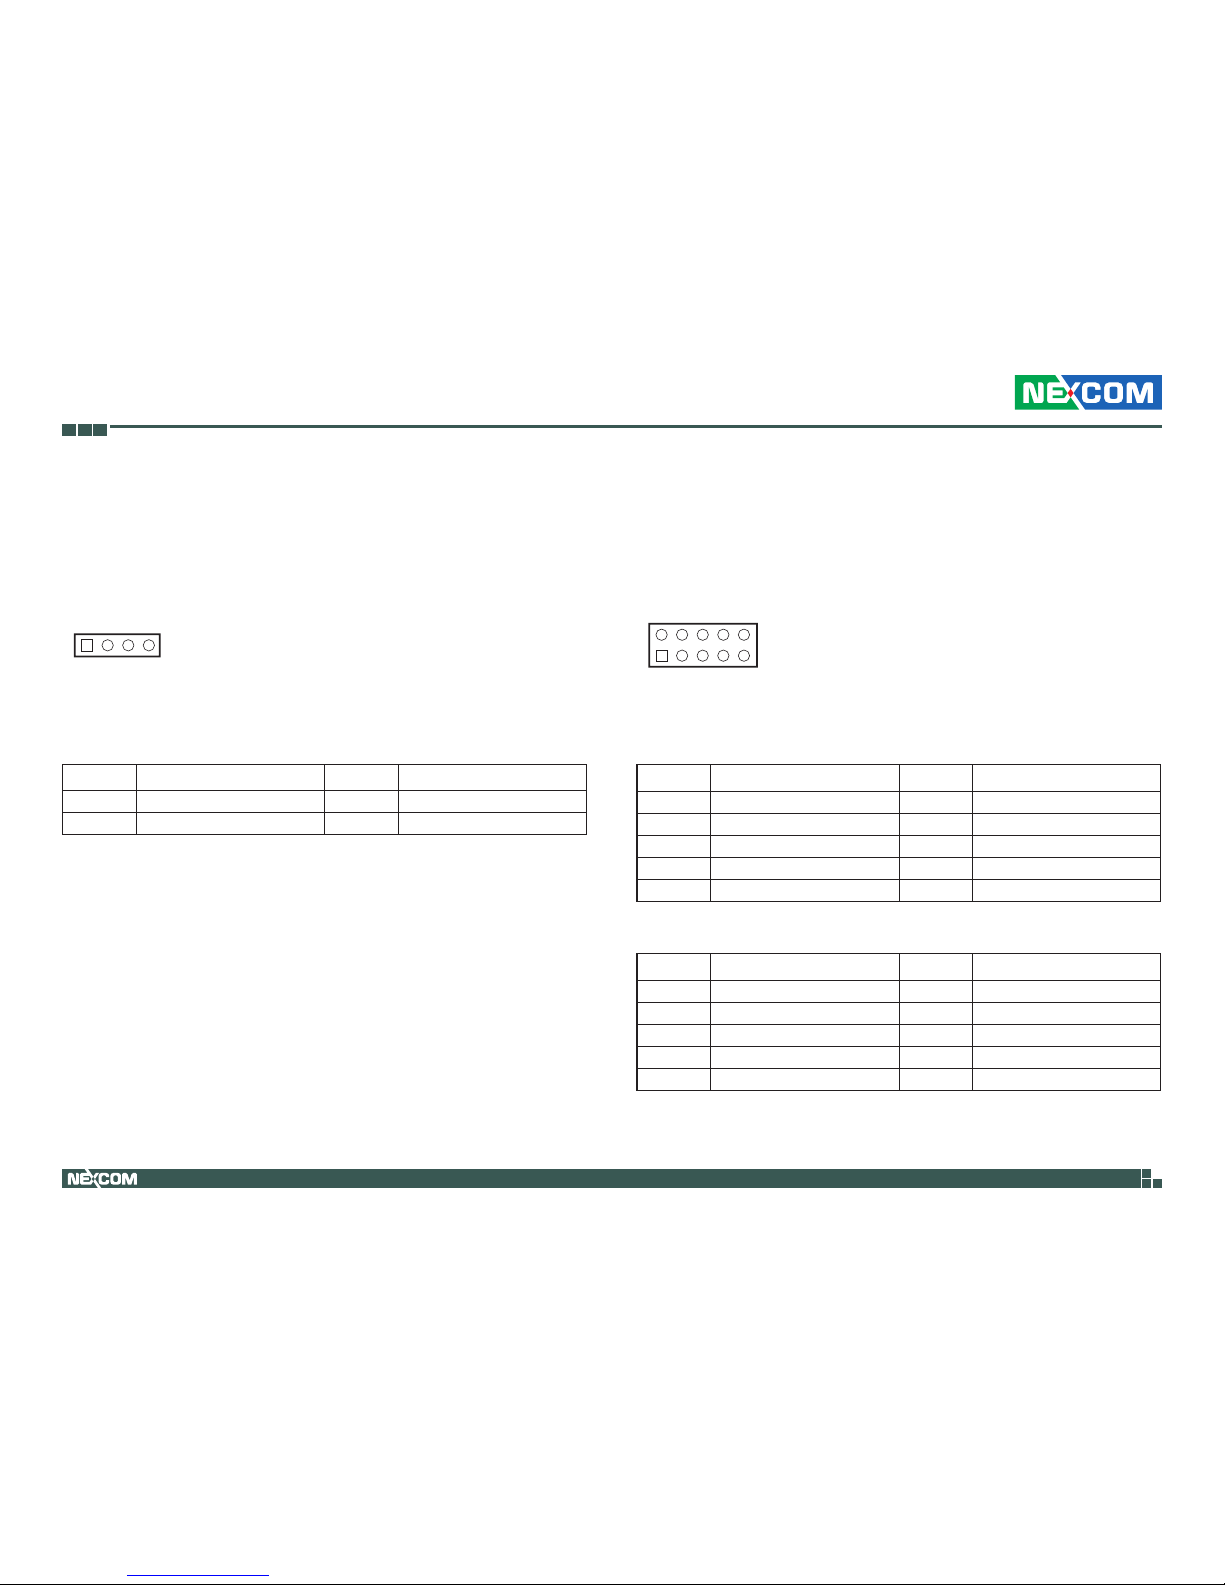
Speaker Connector
Connector type: 1x4 4-pin header
Connector location: SPEAKER
Pin Definition Pin Definition
1 +5V 2 GND
3 GND 4 SPKO
USB 2.0 Connectors
Connector type: 2x5 10-pin header
Connector location: USB56 and USB78
19
21
0
USB56
Pin Definition Pin Definition
1 +5V 2 GND
3 S_USB_PN 4 GND
5 S_USB_PP 6 S_USB_PP
7 GND 8 S_USB_PN
9 GND 10 +5V
USB78
Pin Definition Pin Definition
1 +5V 2 GND
3 S_USB_PN 4 GND
5 S_USB_PP 6 S_USB_PP
7 GND 8 S_USB_PN
9 GND 10 +5V
Page 32
Copyright © 2018 NEXCOM International Co., Ltd. All Rights Reserved.
18
NEX 614B User Manual
Chapter 2: Jumpers and Connectors
827
1
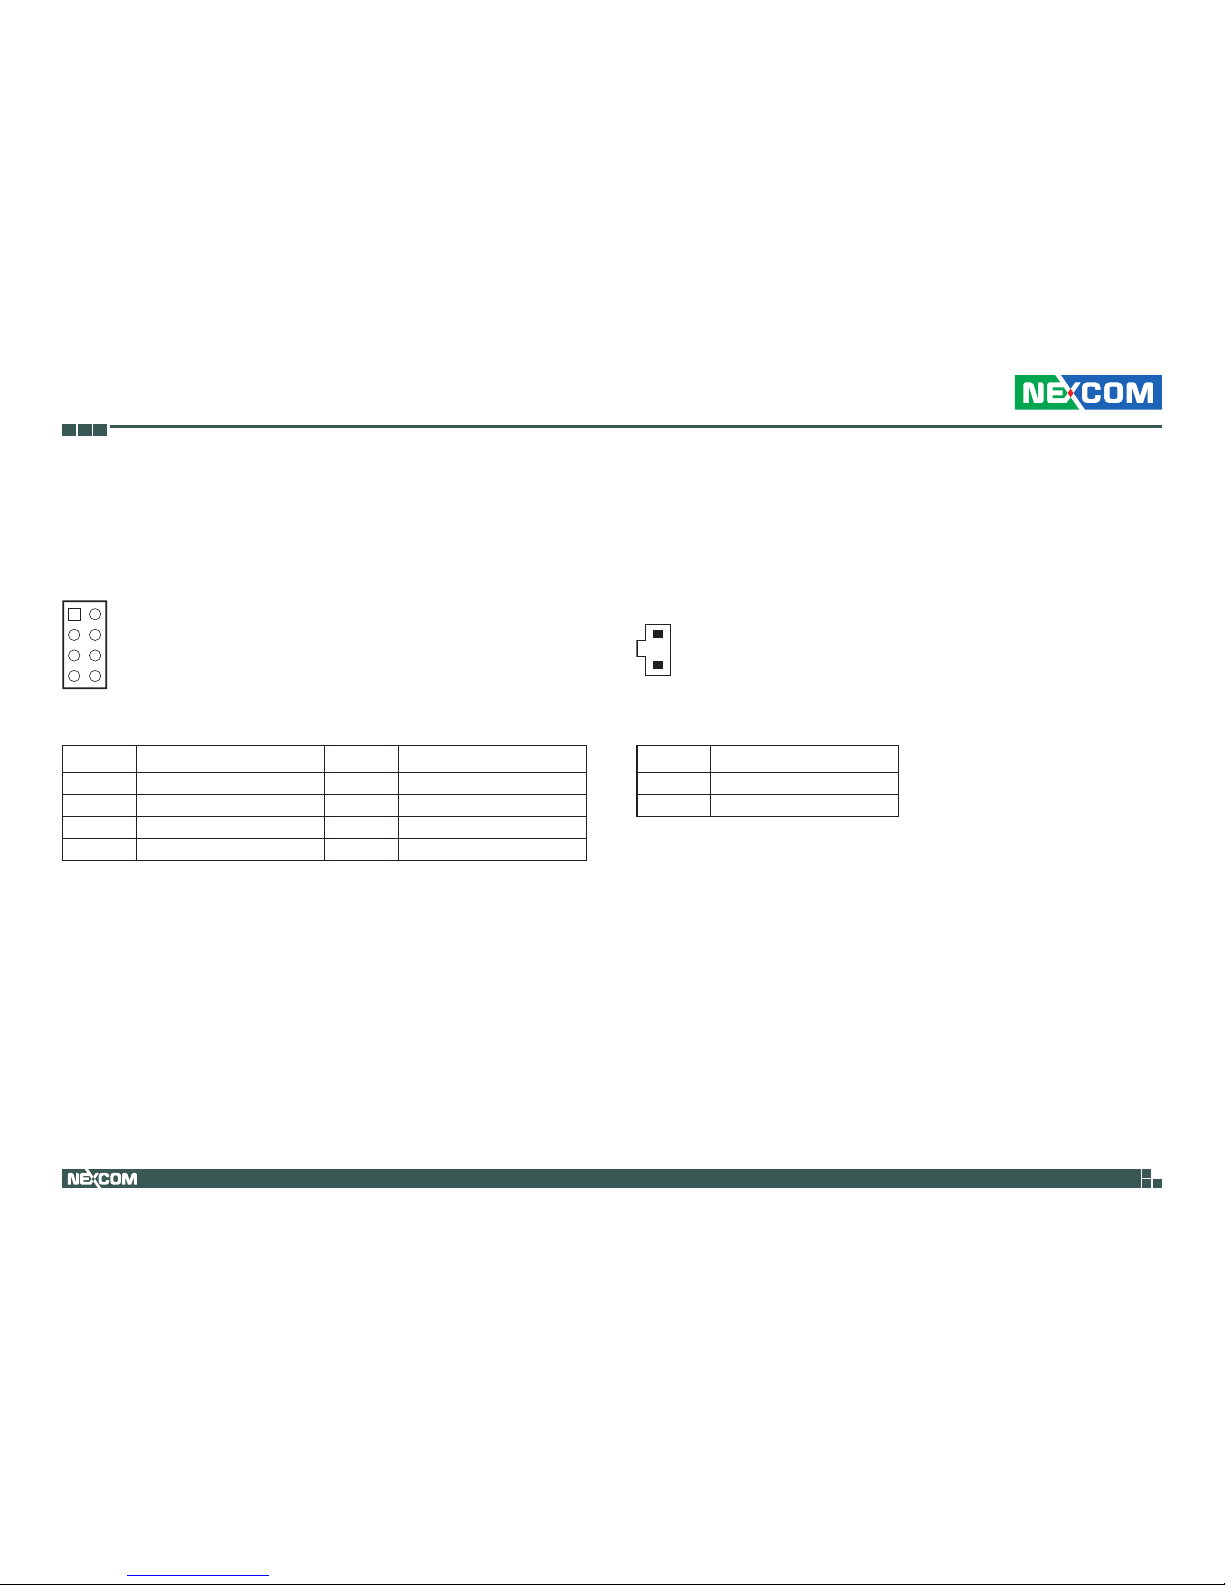
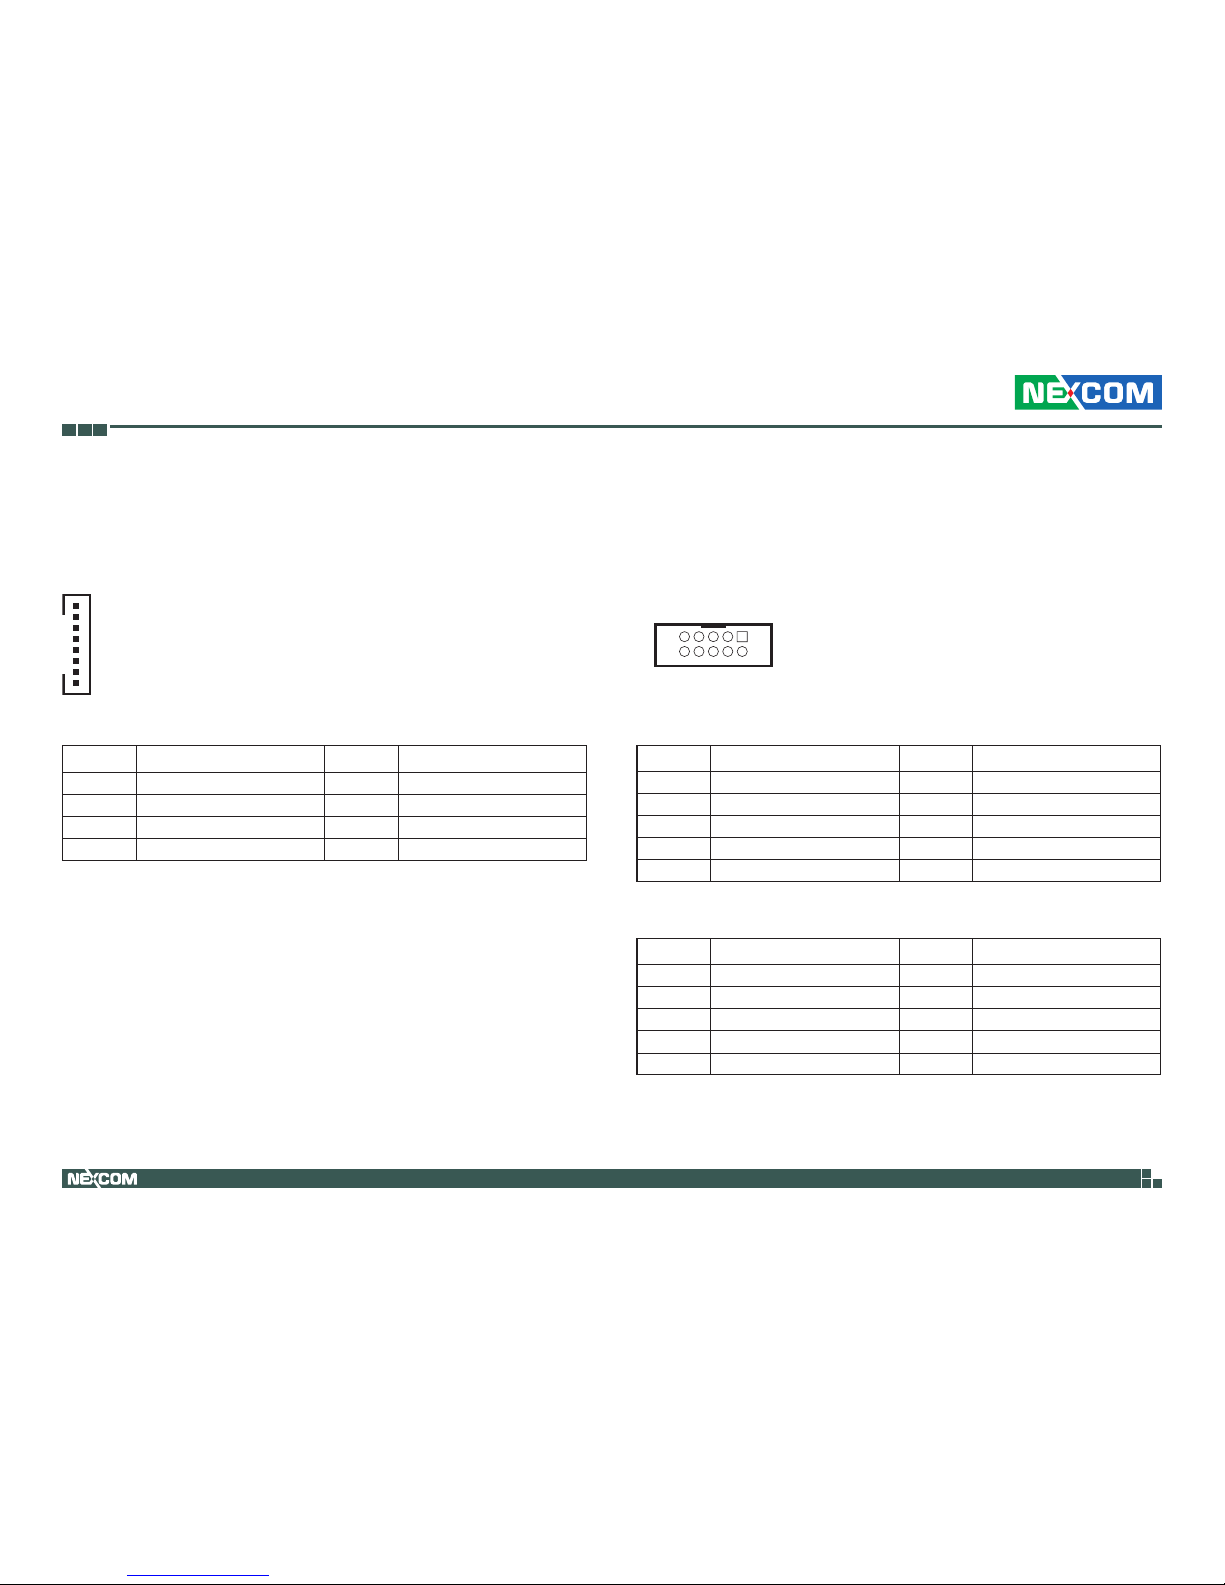
SPI Flash Programmable Connector
Connector type: 2x4 8-pin header
Connector location: BIOS_P
Pin Definition Pin Definition
1 +3V_SPI 2 GND
3 S_SPI_CS1#Q 4 S_SPI_CLK_2Q
5 S_SPI_MISO_2Q 6 S_SPI_MOSI_2Q
7 NC 8 NC
Battery Connector
Connector type: 1x2 2-pin header
Connector location: BATTERY_H
Pin Definition
1 +BAT
2 GND
1
2
Page 33
Copyright © 2018 NEXCOM International Co., Ltd. All Rights Reserved.
19
NEX 614B User Manual
Chapter 2: Jumpers and Connectors
1
8
Backlight Inverter Power Connector
Connector type: 1x8 8-pin header
Connector location: INV
Pin Definition Pin Definition
1 INV_ENABKL 2 VCON
3 +BLVCC 4 +BLVCC
5 GND 6 GND
7 BLUP#_R 8 BLDN#_R
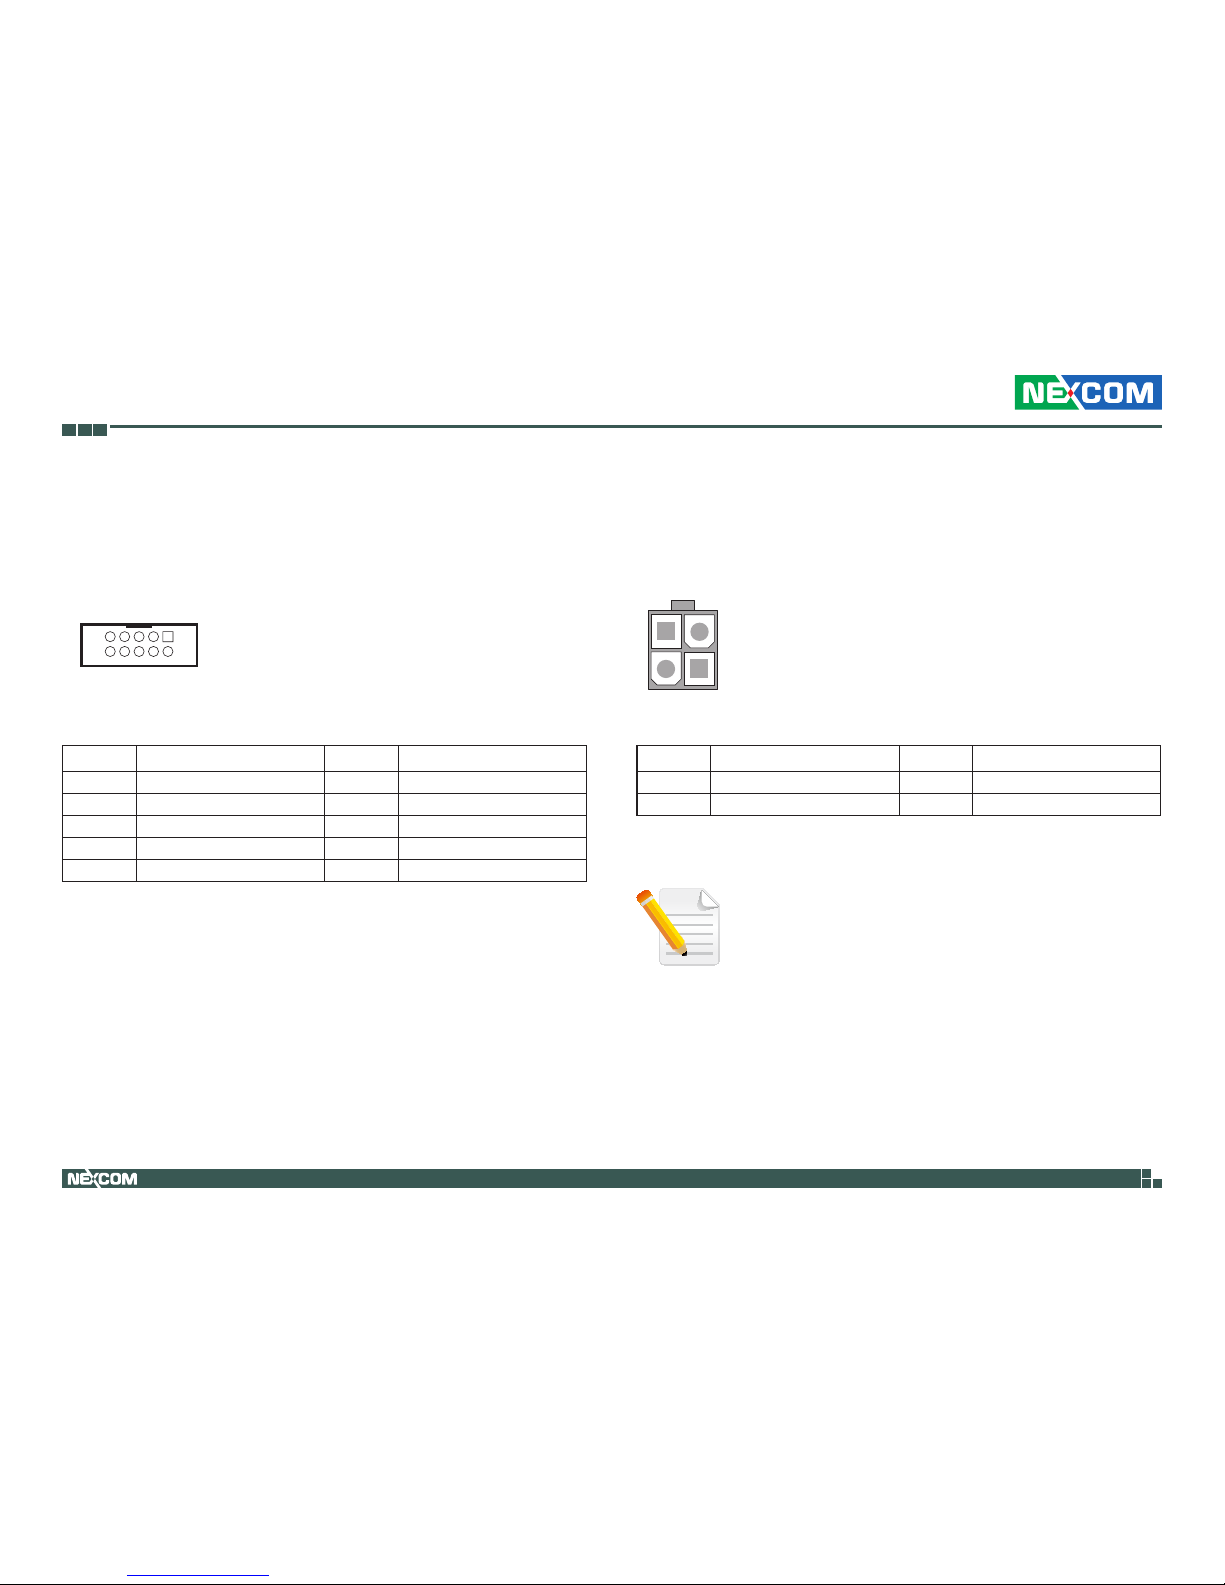
2
1
10
9
Serial Port Connector (COM1)
Connector type: 2x5 10-pin header
Connector location: COM1
RS-232
Pin Definition Pin Definition
1 DCD 2 RXD1
3 TXD 4 DTR1
5 GND 6 DSR1
7 RTS1 8 CTS1
9 RI1_F_VCC 10 NC
RS-422 and RS-485 (Only COM1 supports RS-422 and RS-485)
Pin Definition Pin Definition
1 422TXD-/485DATA- 2 422RXD+
3 422TXD+/485DATA+ 4 422RXD5 GND 6 DSR
7 RTS 8 CTS
9 RI/+12V/+5V 10 NC
Page 34
Copyright © 2018 NEXCOM International Co., Ltd. All Rights Reserved.
20
NEX 614B User Manual
Chapter 2: Jumpers and Connectors
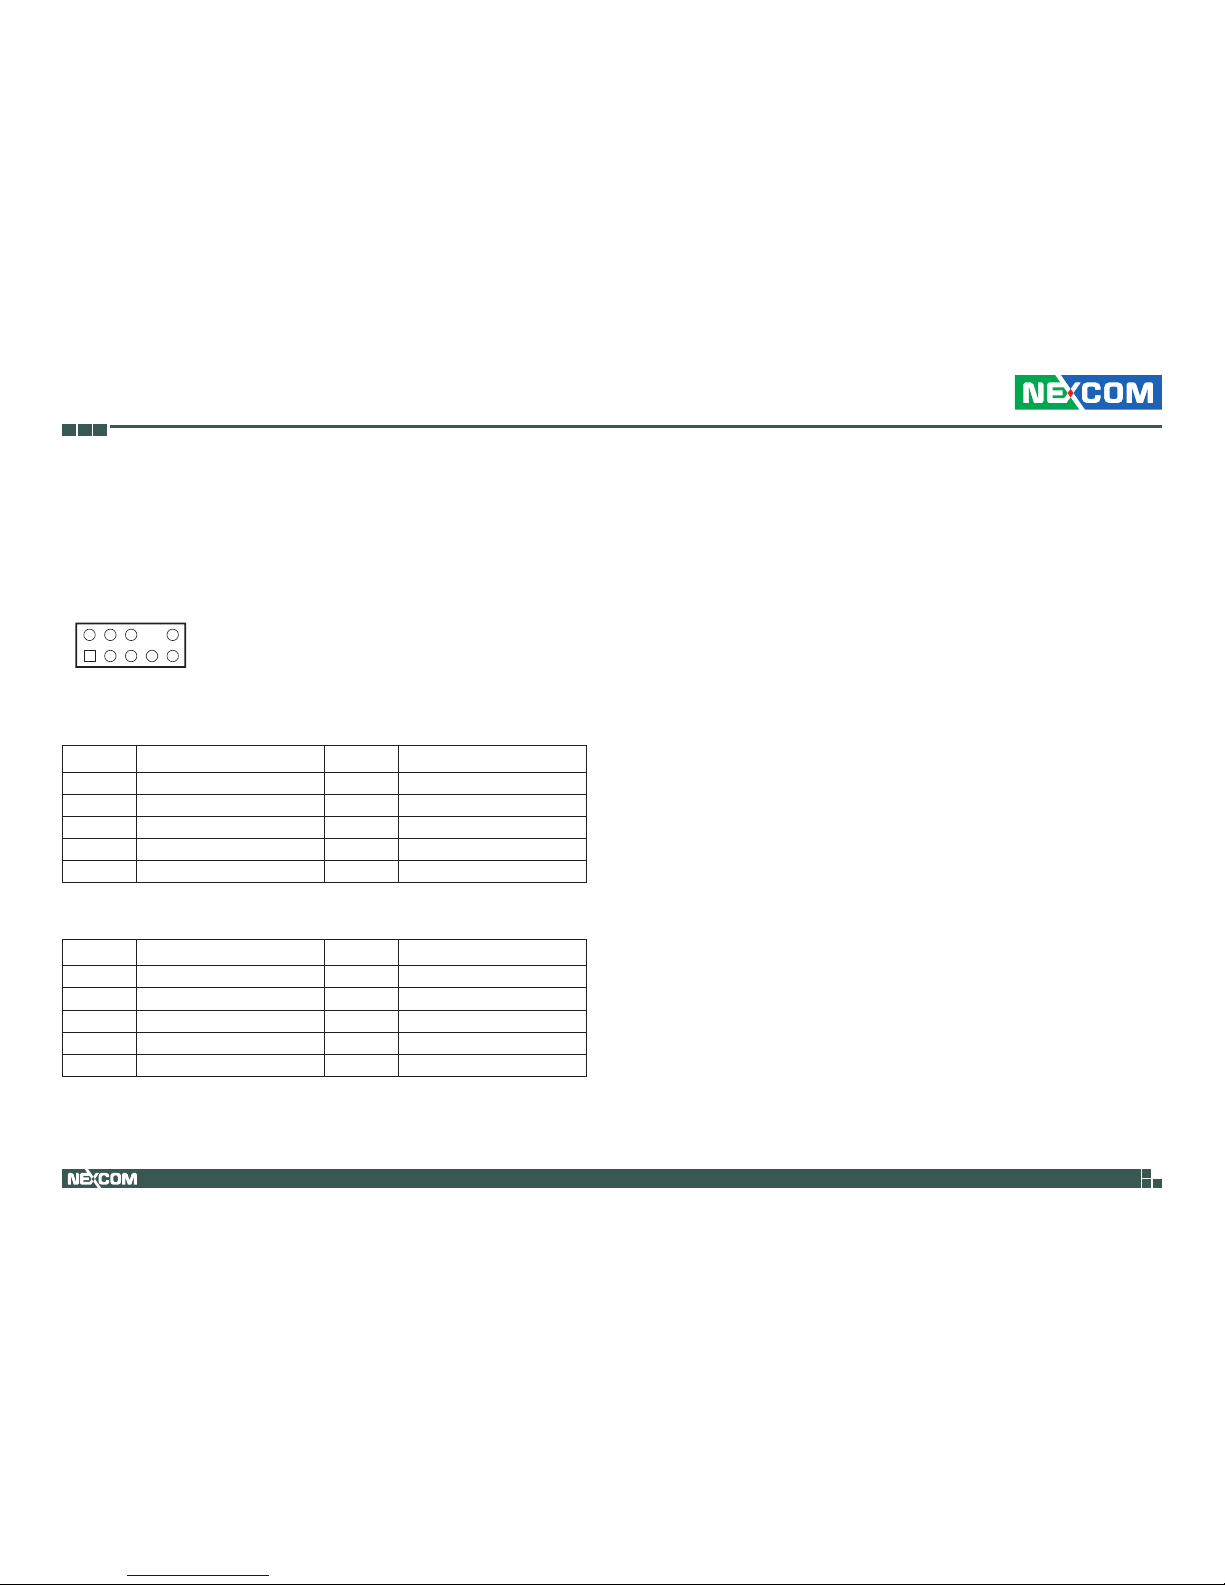
2
1
10
9
Serial Port Connector (COM2)
Connector type: 2x5 10-pin header
Connector location: COM2
Pin Definition Pin Definition
1 DCD 2 RXD
3 TXD 4 DTR
5 GND 6 DSR
7 RTS 8 CTS
9 RI1_F_VCC 10 NC
4-pin DC-In Power Connector
Connector type: 2x2 4-pin header
Connector location: EATX_PWR2
Pin Definition Pin Definition
1 GND 2 GND
3 DC_IN 4 DC_IN
12
34
Note:
DC JACK SPEC max + 12V / 7A. It is preferred that
EATX_PWR2 is used when using a 65W CPU.
Page 35
Copyright © 2018 NEXCOM International Co., Ltd. All Rights Reserved.
21
NEX 614B User Manual
Chapter 2: Jumpers and Connectors
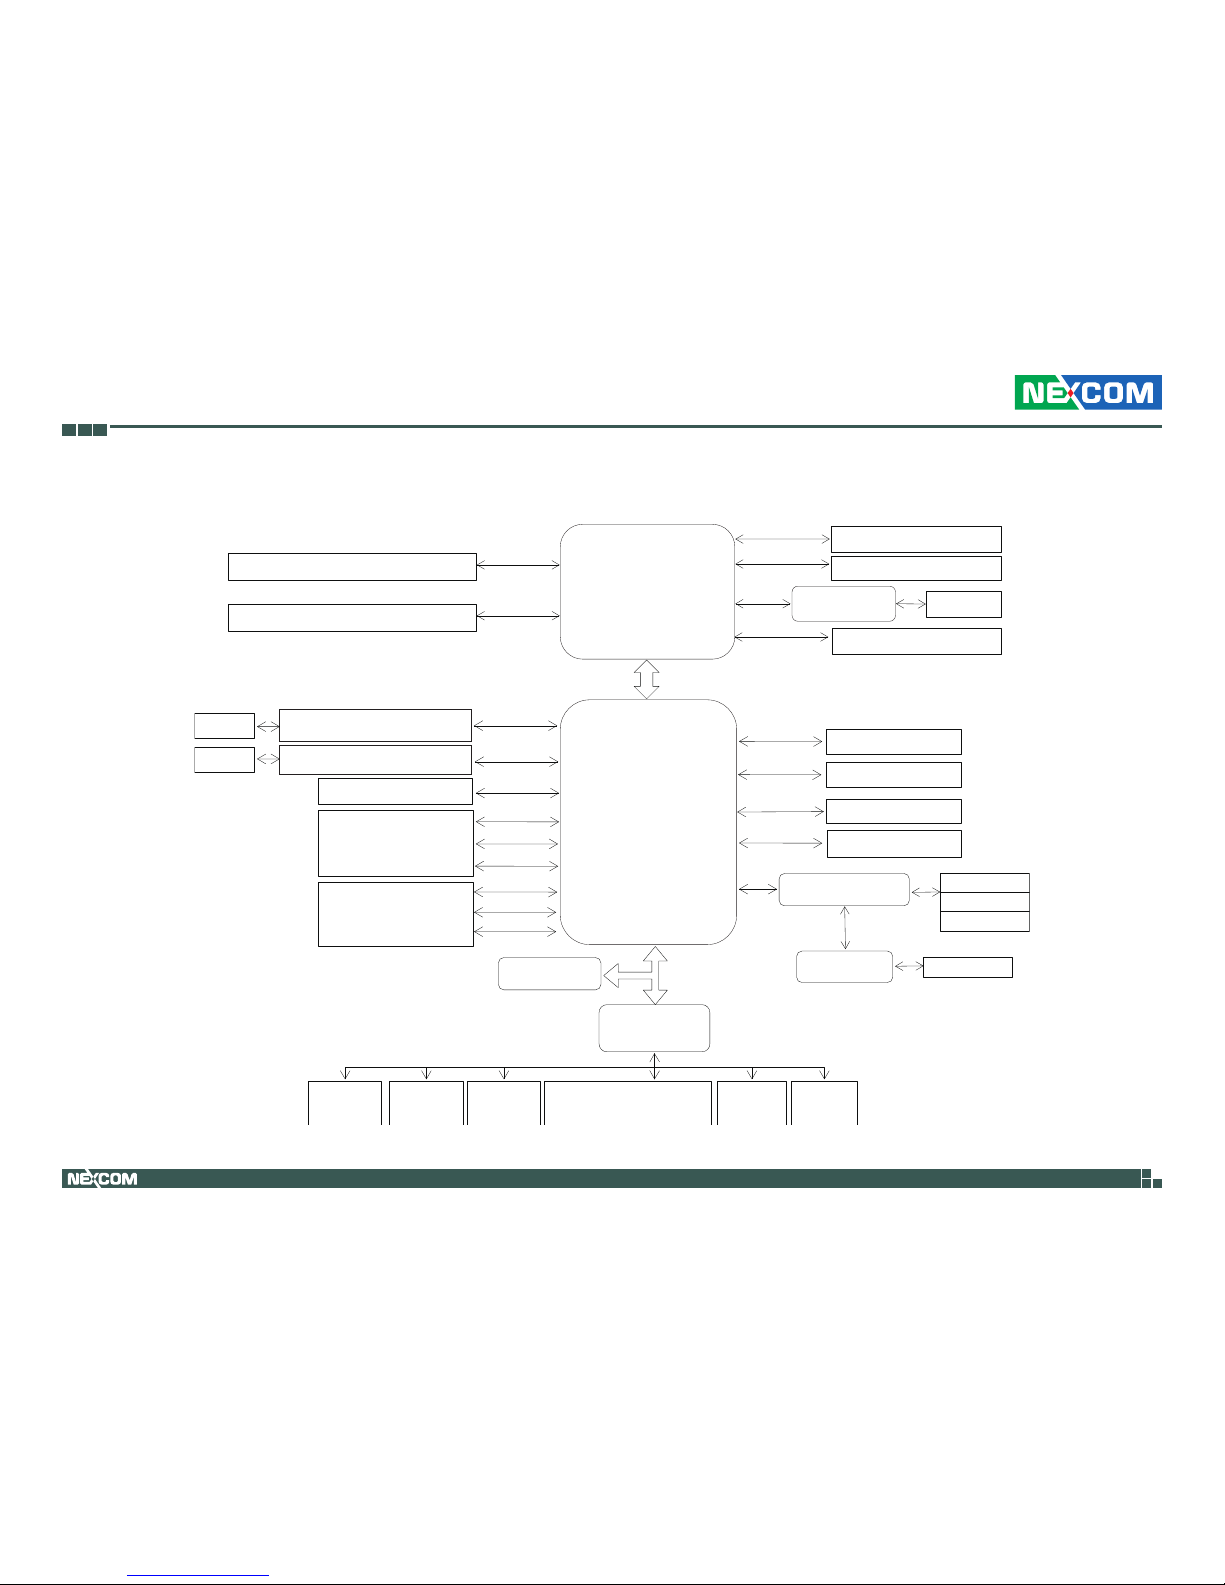
Front Panel Audio Connector
Connector type: 2x5 10-pin header
Connector location: AAFP
HD Audio Compliant Pin Definition
Pin Definition Pin Definition
1 PORT1 L 2 AGND
3 PORT1 R 4 NC
5 PORT2 R 6 SENSE1_RETUR
7 SENSE_SEND 8 NC
9 PORT2 L 10 SENSE2_RETUR
Legacy AC’97 Compliant Pin Definition
Pin Definition Pin Definition
1 MIC2 2 AGND
3 MICPWR 4 NC
5 NC 6 NC
7 Line out_R 8 NC
9 Line out_L 10 NC
10
2
91
Page 36
Copyright © 2018 NEXCOM International Co., Ltd. All Rights Reserved.
22
NEX 614B User Manual
Chapter 2: Jumpers and Connectors
Block Diagram
Intel®
PCH H110
Intel® 6th/7th Gen.
Core™ I Series,
LGA 1151 CPU
Channel A
DDR4 SO-DIMM x1 2133/1867MHz
DMI (Gen3)
Channel B
2x SATAIII
SPI ash
LPC
6 Gbps
LAN1_RTL8111G
LAN2_RTL8111G
4 x USB 3.0/2.0
PCIe
Nuvoton
NCT6791D
PCIe 2.0 [x1]
eDP
HDMI / DP (optional)
LVDS
Port B
Port C
Port D
Chassis
Fan
COM1 (RS-232/422/485)
& COM2
HW
Monitor
DIO
8-bit
SATA III
RJ-45
RJ-45
TPM 1.2/2.0
SLB96xx
Line out
Micin
HDMI / DP (optional)
Port E
CH7511B
DDR4 SO-DIMM x1 2133/1867MHz
PCIe
Audio ALC887
Audio AMP
IntSPK
CPU
Fan
SPI
4x USB 2.0
USB 3.0/2.0
USB 2.0
PCIe
Full Size Mini Card
(default mSATA)
USB 2.0
PCIe
Watch
Dog
PCIe
Half Size Mini Card
SATA III
USB 2.0
AAFP
Page 37

Copyright © 2018 NEXCOM International Co., Ltd. All Rights Reserved.
23
NEX 614B User Manual
Chapter 3: BIOS Setup
ChaPter 3: BIos setuP
This chapter describes how to use the BIOS setup program for NEX 614B.
The BIOS screens provided in this chapter are for reference only and may
change if the BIOS is updated in the future.
To check for the latest updates and revisions, visit the NEXCOM website at
www.nexcom.com.tw.
About BIOS Setup
The BIOS (Basic Input and Output System) Setup program is a menu driven
utility that enables you to make changes to the system configuration and
tailor your system to suit your individual work needs. It is a ROM-based
configuration utility that displays the system’s configuration status and
provides you with a tool to set system parameters.
These parameters are stored in non-volatile battery-backed-up CMOS RAM that
saves this information even when the power is turned off. When the system is
turned back on, the system is configured with the values found in CMOS.
With easy-to-use pull down menus, you can configure such items as:
▪ Hard drives, diskette drives, and peripherals
▪ Video display type and display options
▪ Password protection from unauthorized use
▪ Power management features
The settings made in the setup program affect how the computer performs.
It is important, therefore, first to try to understand all the setup options, and
second, to make settings appropriate for the way you use the computer.
When to Configure the BIOS
This program should be executed under the following conditions:
▪ When changing the system configuration
▪ When a configuration error is detected by the system and you are
prompted to make changes to the setup program
▪ When resetting the system clock
▪ When redefining the communication ports to prevent any conflicts
▪ When making changes to the Power Management configuration
▪ When changing the password or making other changes to the security
setup
Normally, CMOS setup is needed when the system hardware is not consistent
with the information contained in the CMOS RAM, whenever the CMOS
RAM has lost power, or the system features need to be changed.
Page 38
Copyright © 2018 NEXCOM International Co., Ltd. All Rights Reserved.
24
NEX 614B User Manual
Chapter 3: BIOS Setup
Default Configuration
Most of the configuration settings are either predefined according to
the Load Optimal Defaults settings which are stored in the BIOS or are
automatically detected and configured without requiring any actions. There
are a few settings that you may need to change depending on your system
configuration.
Entering Setup
When the system is powered on, the BIOS will enter the Power-On Self
Test (POST) routines. These routines perform various diagnostic checks; if an
error is encountered, the error will be reported in one of two different ways:
▪ If the error occurs before the display device is initialized, a series of beeps
will be transmitted.
▪ If the error occurs after the display device is initialized, the screen will
display the error message.
Powering on the computer and immediately pressing <Del> allows you to
enter Setup.
Press the
key to enter Setup:
Legends
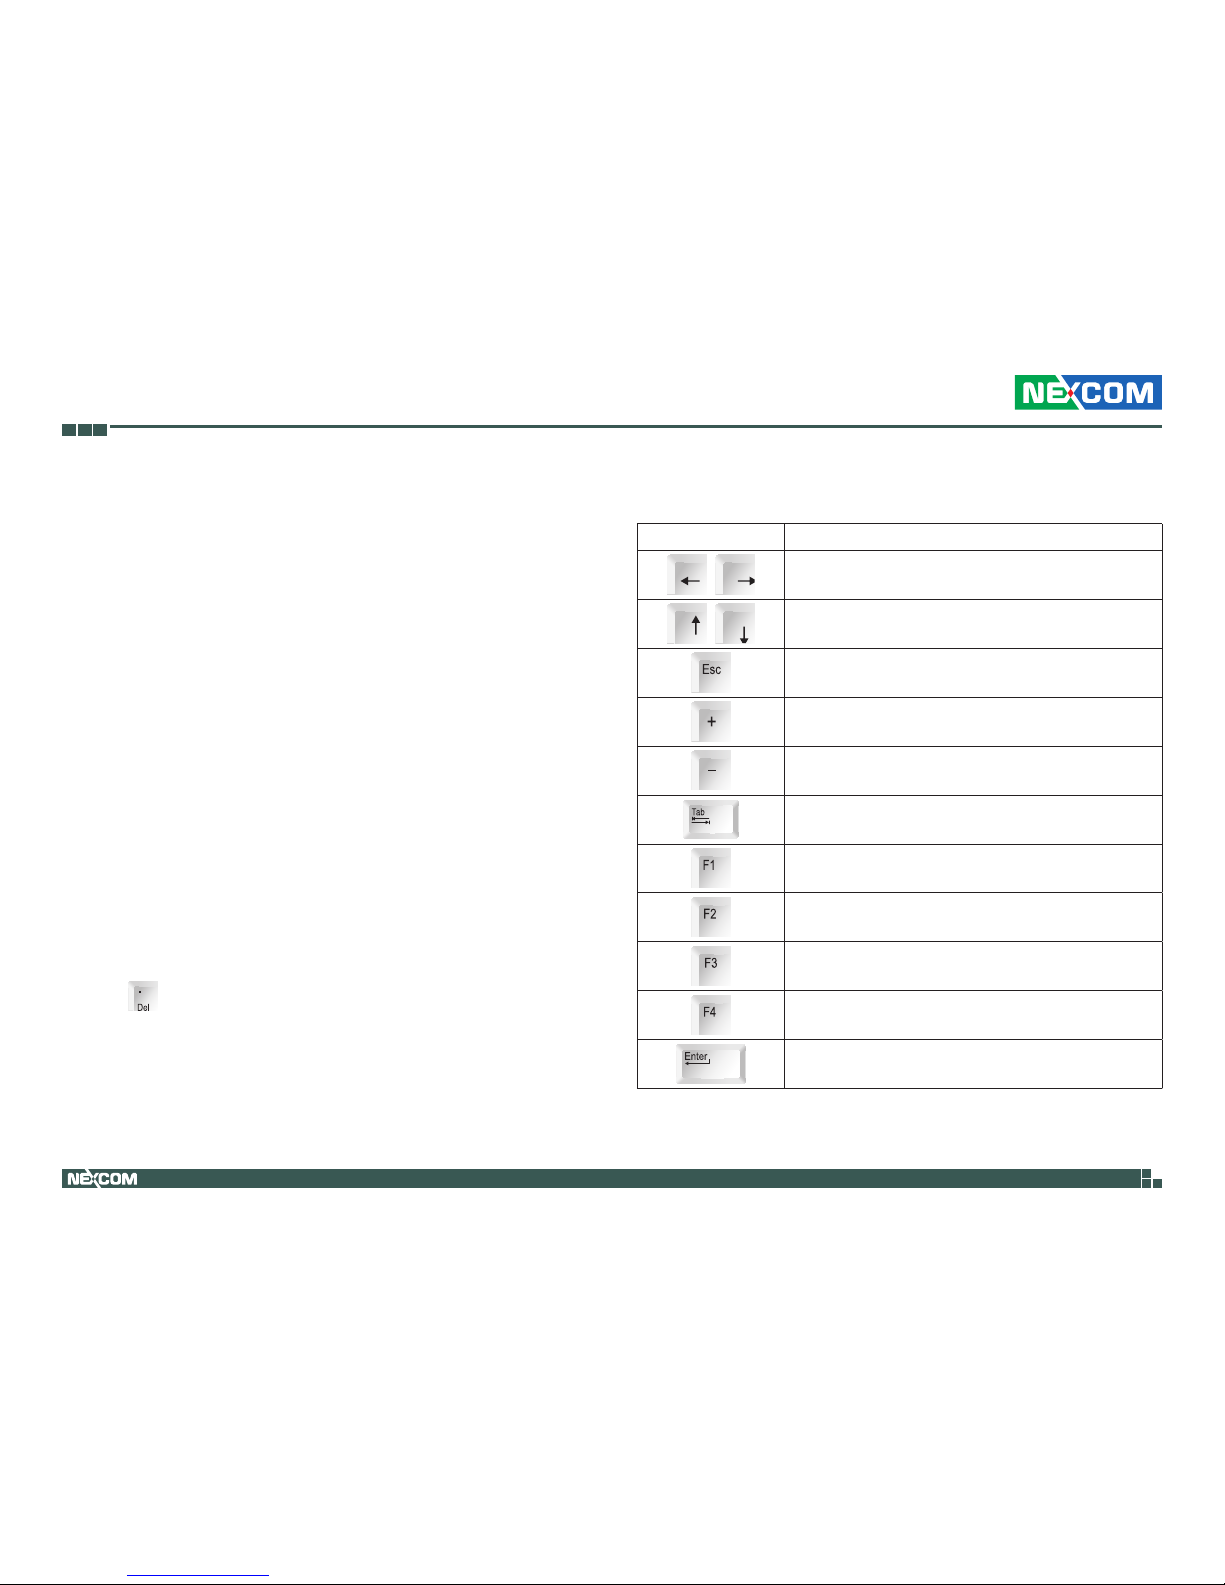
Key Function
Moves the highlight left or right to select a menu.
Moves the highlight up or down between sub-menu
or fields.
Exits the BIOS Setup Utility.
Scrolls forward through the values or options of the
highlighted field.
Scrolls backward through the values or options of
the highlighted field.
Selects a field.
Displays General Help.
Load previous values.
Load optimized default values.
Saves and exits the Setup program.
Press <Enter> to enter the highlighted sub-menu
Page 39
Copyright © 2018 NEXCOM International Co., Ltd. All Rights Reserved.
25
NEX 614B User Manual
Chapter 3: BIOS Setup
Scroll Bar
When a scroll bar appears to the right of the setup screen, it indicates that
there are more available fields not shown on the screen. Use the up and
down arrow keys to scroll through all the available fields.
Submenu
When “” appears on the left of a particular field, it indicates that a
submenu which contains additional options are available for that field. To
display the submenu, move the highlight to that field and press .
Page 40
Copyright © 2018 NEXCOM International Co., Ltd. All Rights Reserved.
26
NEX 614B User Manual
Chapter 3: BIOS Setup
BIOS Setup Utility
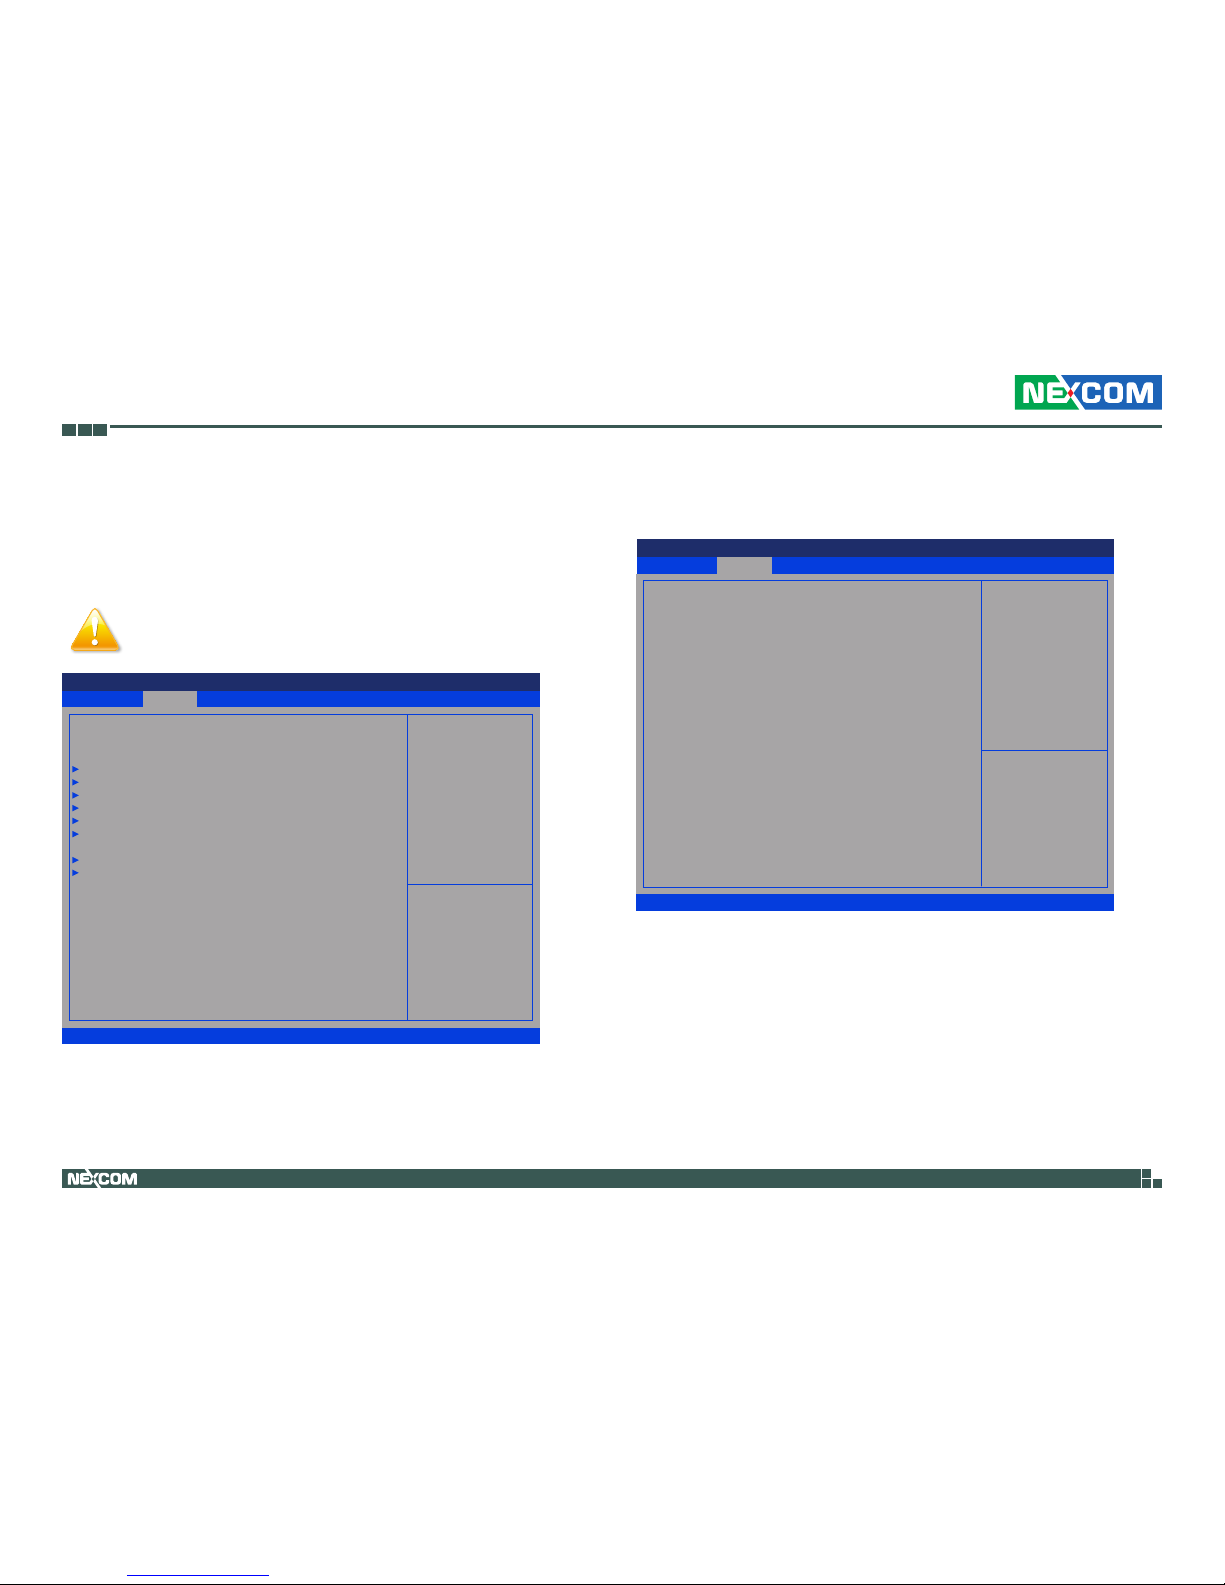
Once you enter the AMI BIOS Setup Utility, the Main Menu will appear on
the screen. The main menu allows you to select from several setup functions
and one exit. Use arrow keys to select among the items and press to
accept or enter the submenu.
Main
The Main menu is the first screen that you will see when you enter the BIOS
Setup Utility.
Save & ExitAdvanced Chipset Security BootMain
Version 2.17.1255. Copyright (C) 2017 American Megatrends, Inc.
Aptio Setup Utility - Copyright (C) 2017 American Megatrends, Inc.
→←: Select Screen
↑↓: Select Item
Enter: Select
+/-: Change Opt.
F1: General Help
F2: Previous Values
F3: Optimized Defaults
F4: Save & Exit
ESC: Exit
Set the Date. Use Tab to switch
between Date elements.
BIOS Information
R1.6 (EHB0AM16) (03/31/2017)
BIOS Vendor
Compliancy
System Date
System Time
Access Level
American Megatrends
UEFI 2.4; PI 1.3
[Sat 01/28/2017]
[00:10:20]
Administrator
System Date
The date format is <day>, <month>, <date>, <year>. Day displays a day,
from Monday to Sunday. Month displays the month, from January to
December. Date displays the date, from 1 to 31. Year displays the year, from
1999 to 2099.
System Time
The time format is <hour>, <minute>, <second>. The time is based on the
24-hour military-time clock. For example, 1 p.m. is 13:00:00. Hour displays
hours from 00 to 23. Minute displays minutes from 00 to 59. Second displays
seconds from 00 to 59.
Page 41
Copyright © 2018 NEXCOM International Co., Ltd. All Rights Reserved.
27
NEX 614B User Manual
Chapter 3: BIOS Setup
Advanced
The Advanced menu allows you to configure your system for basic operation.
Some entries are defaults required by the system board, while others, if
enabled, will improve the performance of your system or let you set some
features according to your preference.
Setting incorrect field values may cause the system to
malfunction.
Case Open Warning
Enables or disables case open warning detection function.
Save & ExitAdvanced Chipset Security BootMain
Version 2.17.1255. Copyright (C) 2017 American Megatrends, Inc.
Aptio Setup Utility - Copyright (C) 2017 American Megatrends, Inc.
→←: Select Screen
↑↓: Select Item
Enter: Select
+/-: Change Opt.
F1: General Help
F2: Previous Values
F3: Optimized Defaults
F4: Save & Exit
ESC: Exit
Case Open detecting function
Case Open Warning
Chassis Opened
CPU Conguration
SATA Conguration
USB Conguration
PCH-FW Conguration
SIO Conguration
Hardware Monitor
Power Management
Digital IO Port Conguration
[Disabled]
[No]
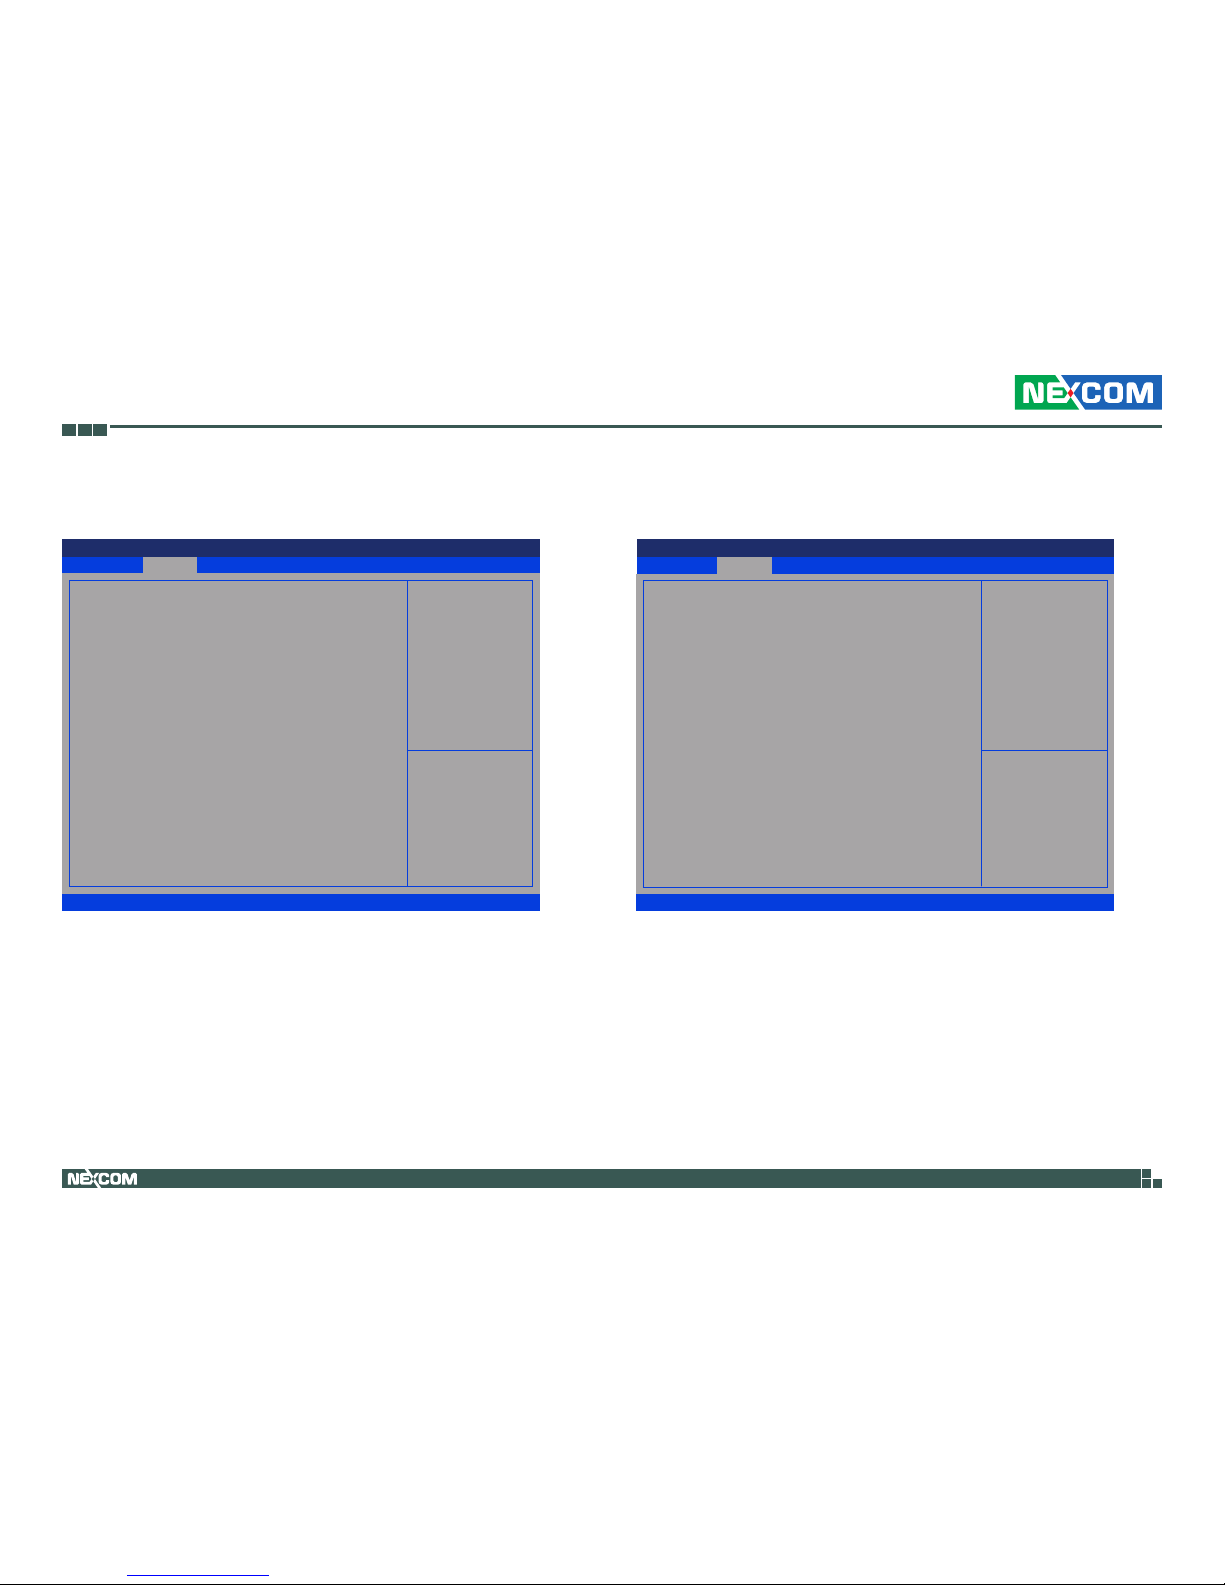
CPU Configuration
This section is used to configure the CPU settings.
Advanced
Version 2.17.1255. Copyright (C) 2017 American Megatrends, Inc.
Aptio Setup Utility - Copyright (C) 2017 American Megatrends, Inc.
→←: Select Screen
↑↓: Select Item
Enter: Select
+/-: Change Opt.
F1: General Help
F2: Previous Values
F3: Optimized Defaults
F4: Save & Exit
ESC: Exit
Enabled for Windows XP and
Linux (OS optimized for
Hyper-Threading Technology)
and Disabled for other OS (OS
not optimized for
Hyper-Threading Technology).
When Disabled only one thread
per enabled core is enabled.
CPU Conguration
Intel(R) Core(TM) i7-6700 CPU @ 3.40GHz
CPU Signature
Microcode Patch
Max CPU Speed
Min CPU Speed
Processor Cores
64-bit
Hyper Threading Technology
Intel VT-x Technology
L1 Data Cache
L1 Code Cache
L2 Cache
L3 Cache
Hyper-threading
Intel Virtualization Technology
506E3
A6
3400 MHz
800 MHz
4
Supported
Supported
Supported
32 kB x 4
32 kB x 4
256 kB x 4
8 MB
[Enabled]
[Enabled]
Hyper-threading
Enables or disables hyper-threading technology.
Intel® Virtualization Technology
When this field is set to Enabled, the VMM can utilize the additional
hardware capabilities provided by Vanderpool Technology.
Page 42
Copyright © 2018 NEXCOM International Co., Ltd. All Rights Reserved.
28
NEX 614B User Manual
Chapter 3: BIOS Setup
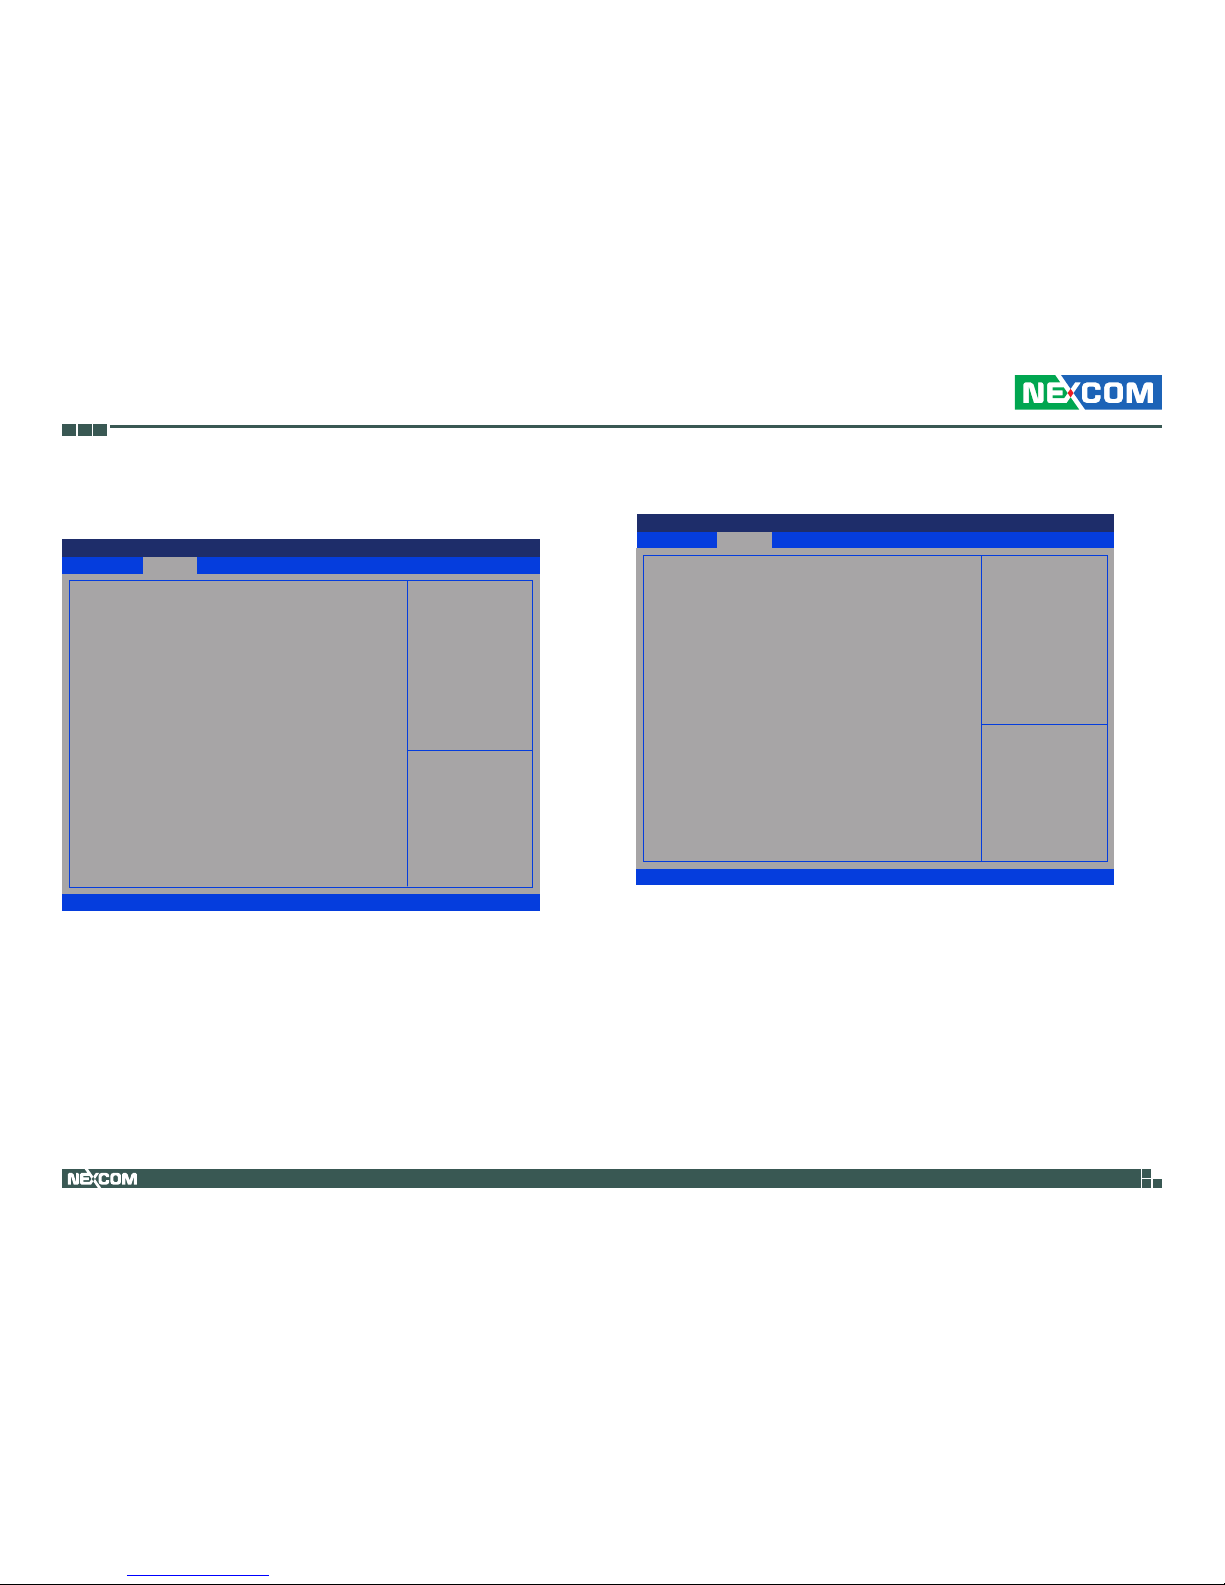
SATA Configuration
This section displays information of the SATA drives.
Port 0, Port 1 and Port 3
Enables or disables SATA port 0, port 1 or port 3.
Hot Plug
Enables or disables hot plugging feature on SATA port 0, port 1 or port 3.
Advanced
Version 2.17.1255. Copyright (C) 2017 American Megatrends, Inc.
Aptio Setup Utility - Copyright (C) 2017 American Megatrends, Inc.
→←: Select Screen
↑↓: Select Item
Enter: Select
+/-: Change Opt.
F1: General Help
F2: Previous Values
F3: Optimized Defaults
F4: Save & Exit
ESC: Exit
Enable or Disable SATA Port
SATA Conguration
Serial ATA Port 0
Software Preserve
Port 0
Hot Plug
Serial ATA Port 1
Software Preserve
Port 1
Hot Plug
Serial ATA Port 3
Software Preserve
Port 3
Hot Plug
Empty
Unknown
[Enabled]
[Disabled]
Empty
Unknown
[Enabled]
[Disabled]
Empty
Unknown
[Enabled]
[Disabled]
Advanced
Version 2.17.1255. Copyright (C) 2017 American Megatrends, Inc.
Aptio Setup Utility - Copyright (C) 2017 American Megatrends, Inc.
→←: Select Screen
↑↓: Select Item
Enter: Select
+/-: Change Opt.
F1: General Help
F2: Previous Values
F3: Optimized Defaults
F4: Save & Exit
ESC: Exit
Enables Legacy USB support.
AUTO option disables legacy
support if no USB devices are
connected. DISABLE option will
keep USB devices available
only for EFI applications.
USB Conguration
1 Keyboard
Legacy USB Support
XHCI Hand-off
[Enabled]
[Enabled]
Legacy USB Support
Enable Enables Legacy USB.
Auto Disables support for Legacy when no USB devices are connected.
Disable Keeps USB devices available only for EFI applications.
XHCI Hand-off
This is a workaround for OSs that does not support XHCI hand-off. The
XHCI ownership change should be claimed by the XHCI driver.
USB Configuration
This section is used to configure the USB.
Page 43
Copyright © 2018 NEXCOM International Co., Ltd. All Rights Reserved.
29
NEX 614B User Manual
Chapter 3: BIOS Setup
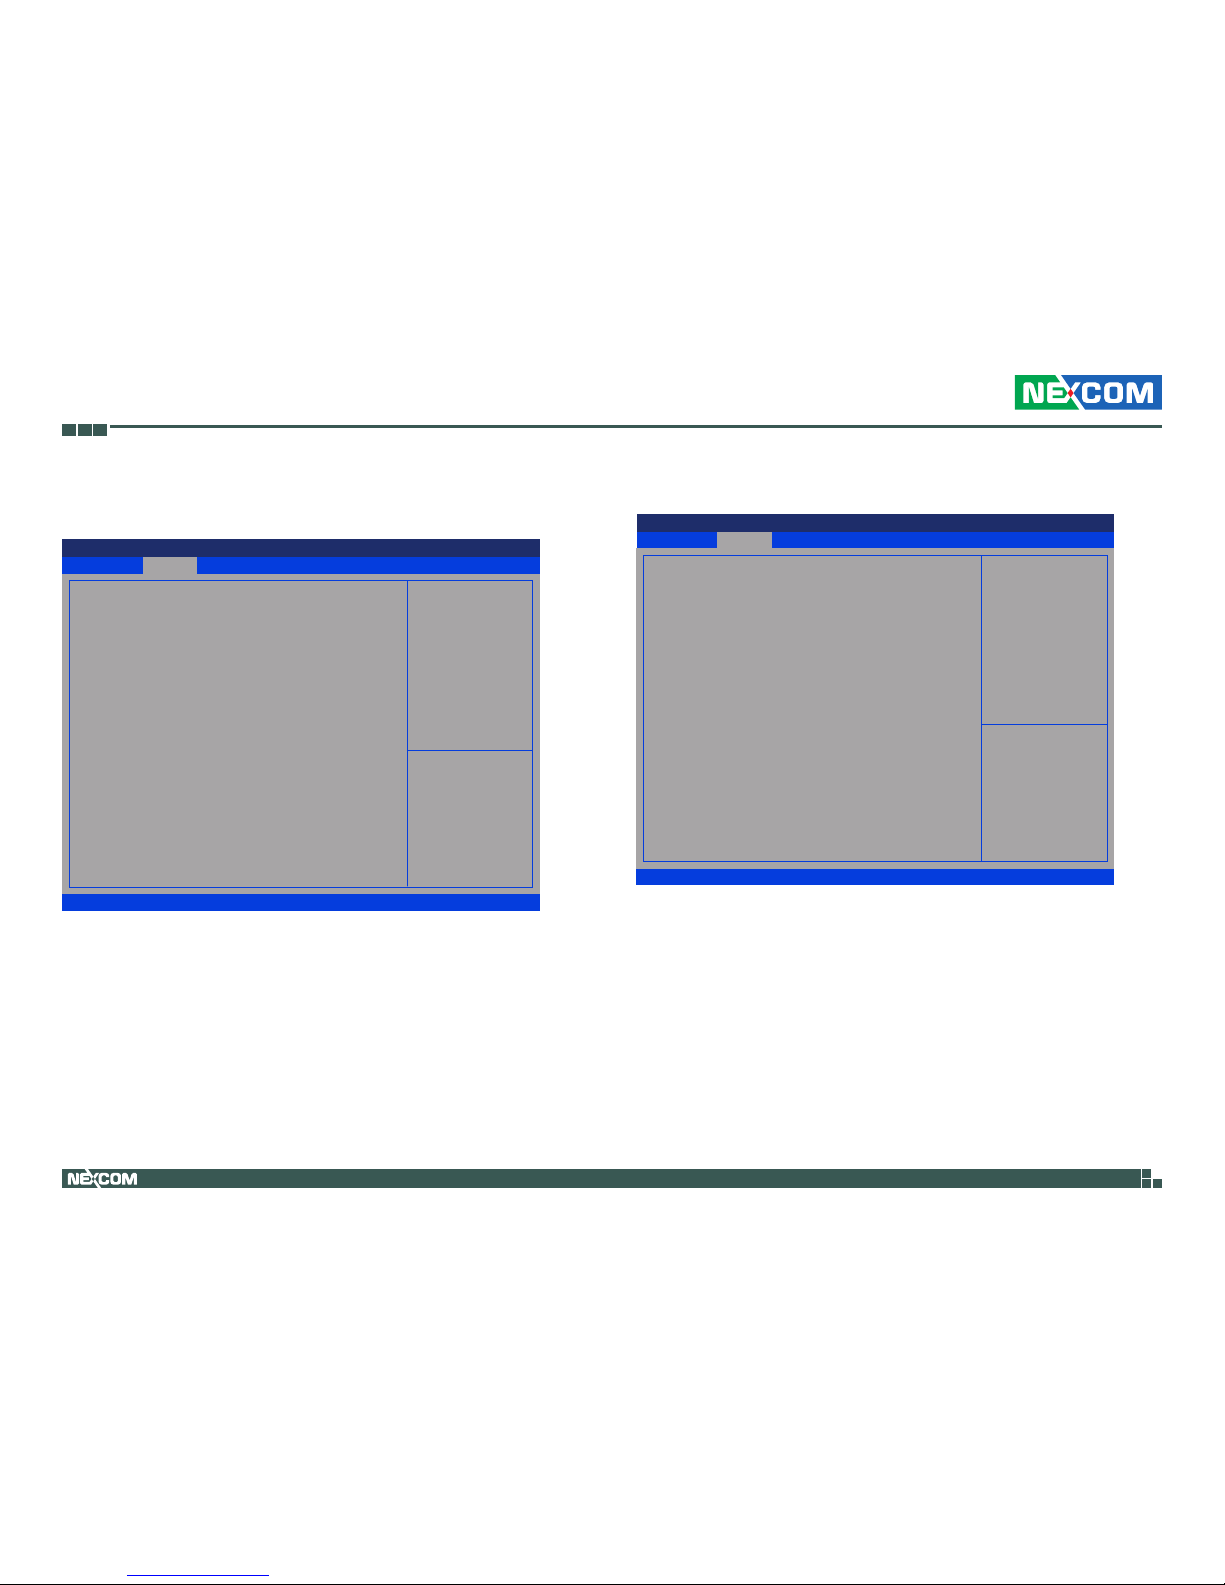
PCH-FW Configuration
This section is used to configure the firmware update options.
Firmware Update Configuration
Firmware Update Configuration
Enters the Firmware Update Configuration submenu.
Me FW Image Re-Flash
Enables or disables the ME firmware image re-flash function.
Local FW Update
Enables or disables the local firmware update function.
Advanced
Version 2.17.1255. Copyright (C) 2017 American Megatrends, Inc.
Aptio Setup Utility - Copyright (C) 2017 American Megatrends, Inc.
→←: Select Screen
↑↓: Select Item
Enter: Select
+/-: Change Opt.
F1: General Help
F2: Previous Values
F3: Optimized Defaults
F4: Save & Exit
ESC: Exit
Congure Management Engine
Technology Parameters
ME FW Version
ME Firmware Mode
ME Firmware Type
ME Firmware SKU
Firmware Update Conguration
11.0.0.1194
Normal Mode
Full Sku Firmware
Consumer SKU
Advanced
Version 2.17.1255. Copyright (C) 2017 American Megatrends, Inc.
Aptio Setup Utility - Copyright (C) 2017 American Megatrends, Inc.
→←: Select Screen
↑↓: Select Item
Enter: Select
+/-: Change Opt.
F1: General Help
F2: Previous Values
F3: Optimized Defaults
F4: Save & Exit
ESC: Exit
Enable/Disable Me FW Image
Re-Flash function.
Me FW Image Re-Flash
Local FW Update
[Disabled]
[Enabled]
Page 44
Copyright © 2018 NEXCOM International Co., Ltd. All Rights Reserved.
30
NEX 614B User Manual
Chapter 3: BIOS Setup
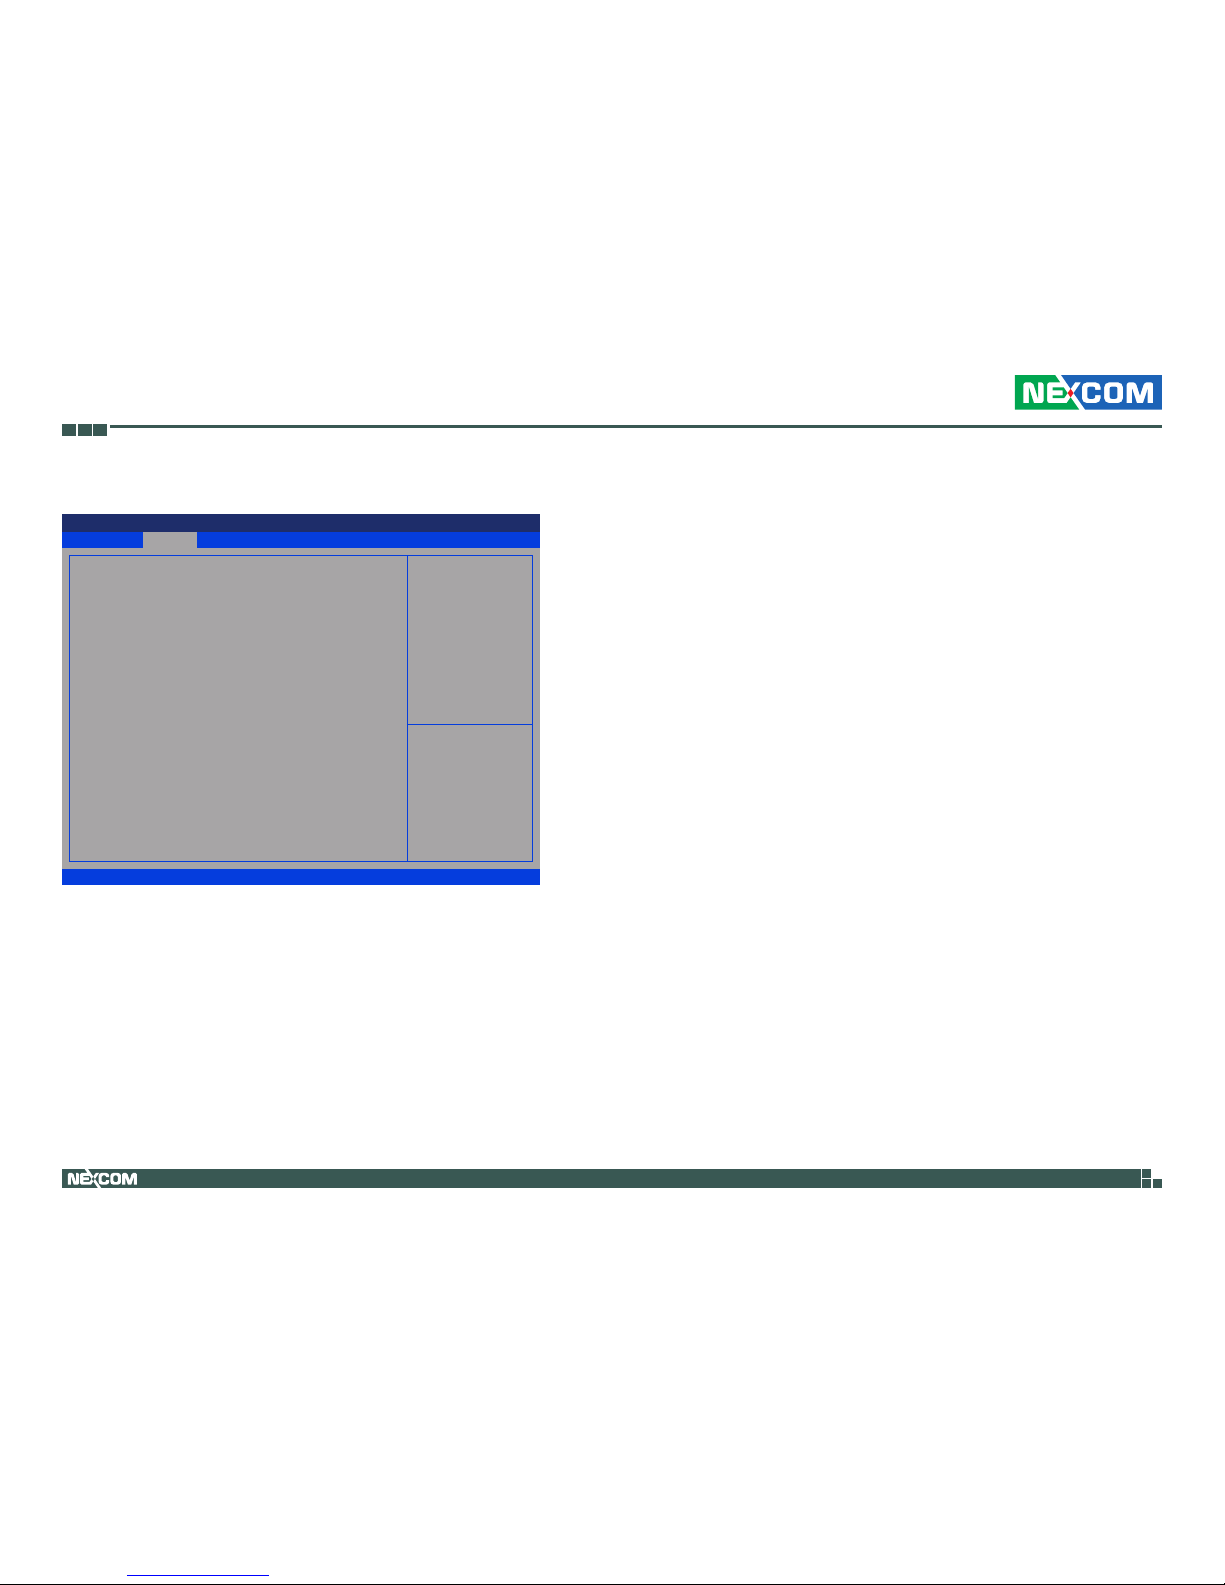
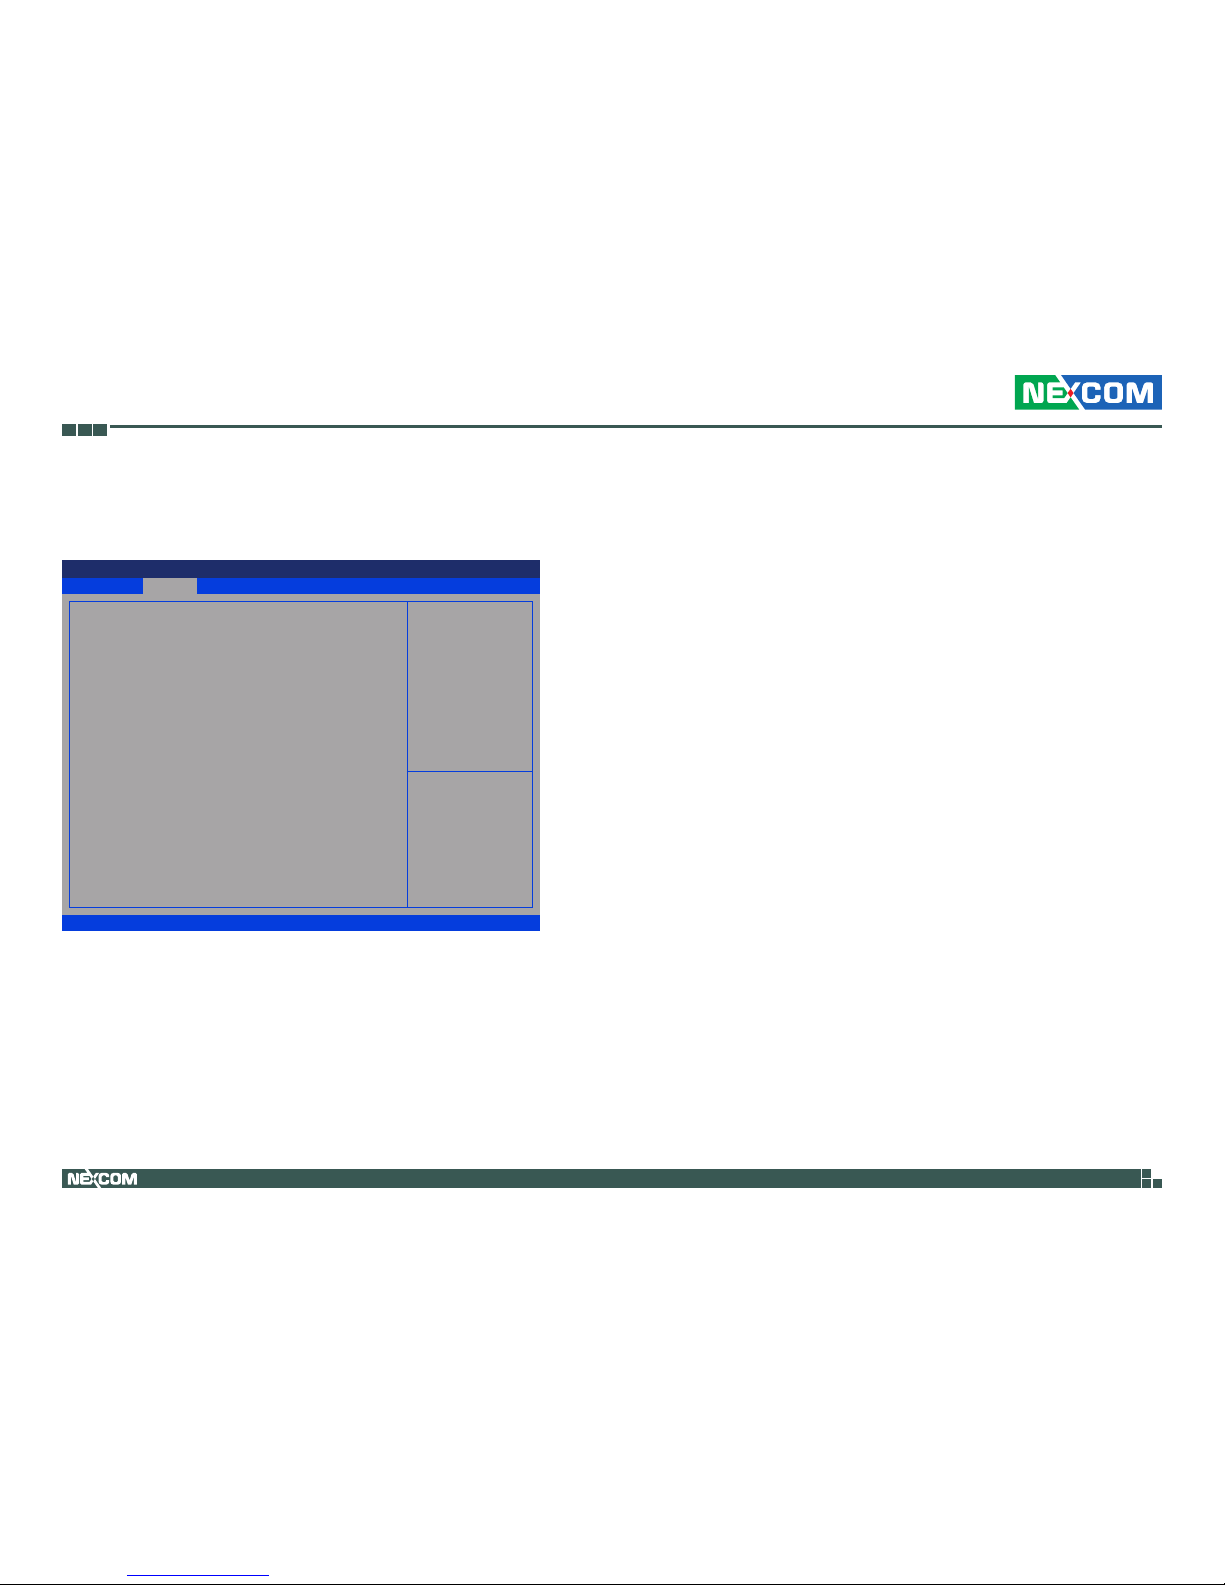
SIO Configuration
This section is used to configure the serial ports.
[*Active*] Serial Port 1 and [*Active*] Serial Port 2
Enters the submenu of [*Active*] Serial Port 1 and [*Active*] Serial Port 2.
Advanced
Version 2.17.1255. Copyright (C) 2017 American Megatrends, Inc.
Aptio Setup Utility - Copyright (C) 2017 American Megatrends, Inc.
→←: Select Screen
↑↓: Select Item
Enter: Select
+/-: Change Opt.
F1: General Help
F2: Previous Values
F3: Optimized Defaults
F4: Save & Exit
ESC: Exit
View and Set Basic properties of
the SIO Logical device. Like IO
Base, IRQ Range, DMA Channel
and Device Mode.
AMI SIO Driver Version: A5.05.03
Super IO Chip Logical Device(s) Conguration
[*Active*] Serial Port 1
[*Active*] Serial Port 2
WARNING: Logical Devices state on the left side of the
control, reects the current Logical Device state. Changes
made during Setup Session will be shown after you restart
the system.
[*Active*] Serial Port 1
Use This Device
Enables or disables the serial port.
Possible:
Configures the base address for the serial port.
Mode
Configures the serial port mode to RS232, RS422 or RS485.
Advanced
Version 2.17.1255. Copyright (C) 2017 American Megatrends, Inc.
Aptio Setup Utility - Copyright (C) 2017 American Megatrends, Inc.
→←: Select Screen
↑↓: Select Item
Enter: Select
+/-: Change Opt.
F1: General Help
F2: Previous Values
F3: Optimized Defaults
F4: Save & Exit
ESC: Exit
Enable or Disable this Logical
Device.
Serial Port 1 Conguration
Use This Device
Logical Device Settings:
Current: IO=3F8h; IRQ=4;
Possible:
Mode :
WARNING: Disabling SIO Logical Devices may have unwanted
side effects.
PROCEED WITH CAUTION.
[Enabled]
[Use Automatic Settings]
[RS232]
Page 45
Copyright © 2018 NEXCOM International Co., Ltd. All Rights Reserved.
31
NEX 614B User Manual
Chapter 3: BIOS Setup
[*Active*] Serial Port 2
Use This Device
Enables or disables the serial port.
Possible:
Configures the base address for the serial port.
Advanced
Version 2.17.1255. Copyright (C) 2017 American Megatrends, Inc.
Aptio Setup Utility - Copyright (C) 2017 American Megatrends, Inc.
→←: Select Screen
↑↓: Select Item
Enter: Select
+/-: Change Opt.
F1: General Help
F2: Previous Values
F3: Optimized Defaults
F4: Save & Exit
ESC: Exit
Enable or Disable this Logical
Device.
Serial Port 2 Conguration
Use This Device
Logical Device Settings:
Current: IO=2F8h; IRQ=3;
Possible:
WARNING: Disabling SIO Logical Devices may have unwanted
side effects.
PROCEED WITH CAUTION.
[Enabled]
[Use Automatic Settings]
Page 46
Copyright © 2018 NEXCOM International Co., Ltd. All Rights Reserved.
32
NEX 614B User Manual
Chapter 3: BIOS Setup
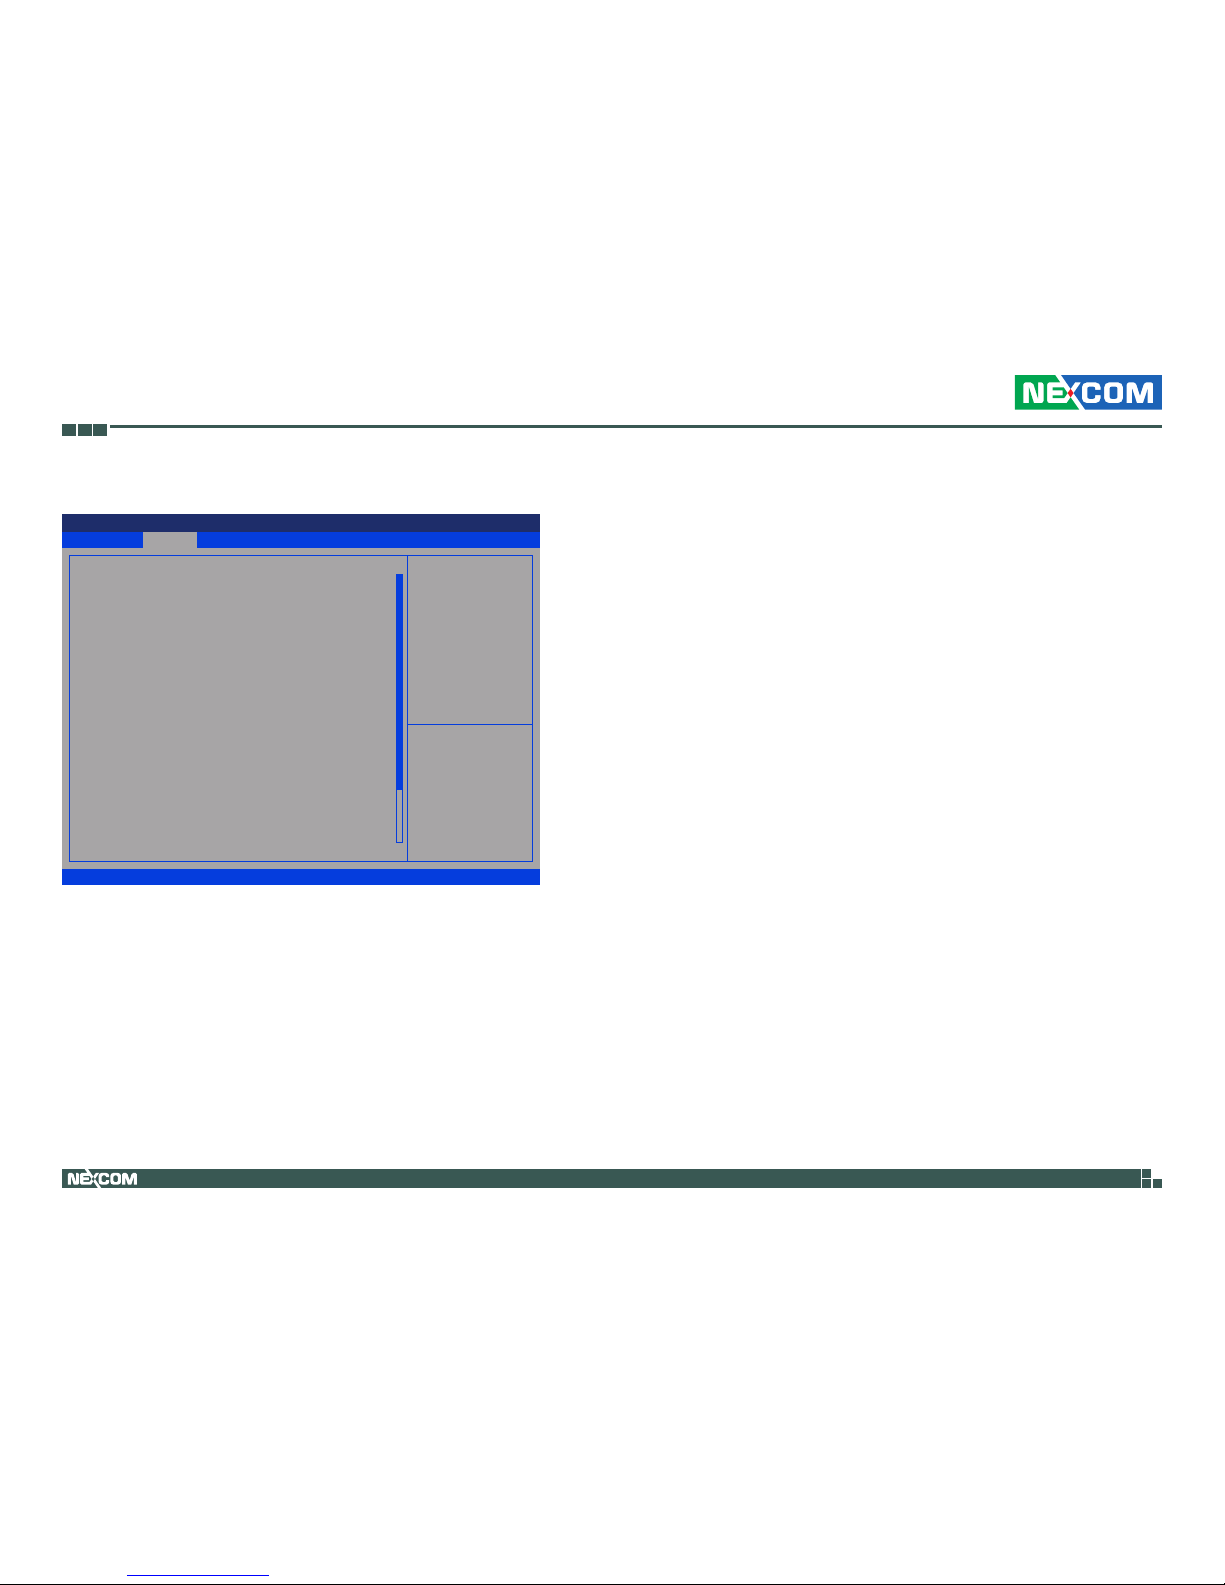
Hardware Monitor
This section is used to monitor hardware status such as temperature, fan
speed and voltages.
System Temperature
Detects and displays the current system temperature.
CPU Temperature (PECI)
Detects and displays the current CPU temperature.
Chassis Fan1 Speed
Detects and displays the current chassis fan speed.
Advanced
Version 2.17.1255. Copyright (C) 2017 American Megatrends, Inc.
Aptio Setup Utility - Copyright (C) 2017 American Megatrends, Inc.
→←: Select Screen
↑↓: Select Item
Enter: Select
+/-: Change Opt.
F1: General Help
F2: Previous Values
F3: Optimized Defaults
F4: Save & Exit
ESC: Exit
Smart Fan Conguration
Smart Fan Conguration
System Temperature
CPU Temperature (PECI)
Chassis Fan 1 Speed
CPU Fan Speed
VCORE
+12V
+5V
3VSB
+3.3V
VBAT
: +40 °c
: +100 °c
: N/A
: N/A
: +0.992 V
: +11.904 V
: +5.100 V
: +3.392 V
: +3.392 V
: +3.120 V
CPU Fan Speed
Detects and displays the current CPU fan speed.
VCORE to VBAT
Detects and displays the output voltages.
Page 47
Copyright © 2018 NEXCOM International Co., Ltd. All Rights Reserved.
33
NEX 614B User Manual
Chapter 3: BIOS Setup
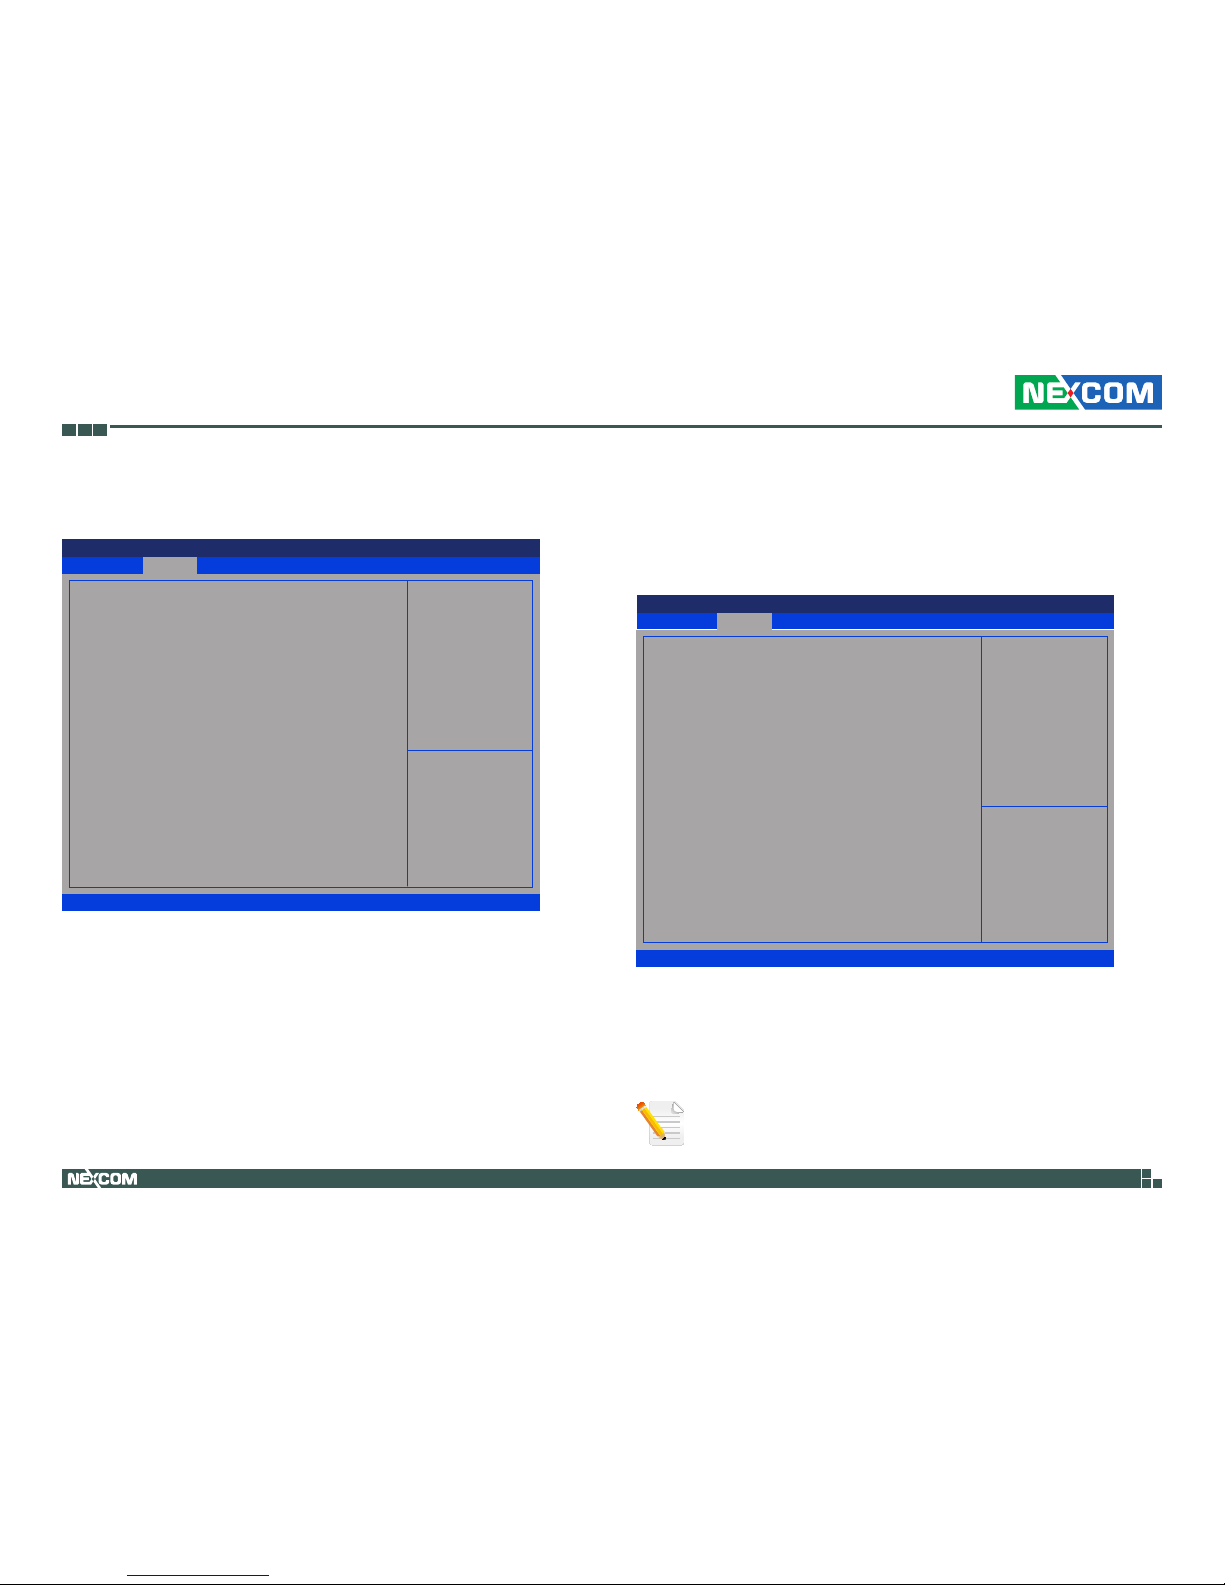
CPU Smart Fan Control
Enables or disables CPU smart fan function.
Fan Control Mode (For CPU Fan)
Configures the fan mode of the CPU fan. The options are Manual Mode,
Thermal Cruise Mode (automatic fan mode), Speed Cruise Mode and
SMART FAN IV Mode.
Temperature Source (For CPU Fan)
Selects the temperature source.
Temperature 1 to Temperature 4 (For CPU Fan)
Configures the temperature setting.
Fan PWM 1 to Fan PWM 4 (For CPU Fan)
Configures the amount of fan PWN for Smart Fan IV Mode.
Tolerance of Temperature (For CPU Fan)
Configures the tolerance of target temperature.
Critical Temperature (For CPU Fan)
Configures the time that Fan Out requires for reducing its value by one step.
Critical Temp Tolerance (For CPU Fan)
Configures the tolerance of critical temperature.
Chassis 1 Smart Fan Control
Enables or disables chassis 1 smart fan function.
Temperature Source (For Chassis 1 Fan)
Selects the temperature source.
Fan Control Mode (For Chassis 1 Fan)
Configures the fan mode of the CPU fan. The options are Manual Mode,
Thermal Cruise Mode (automatic fan mode), Speed Cruise Mode and
SMART FAN IV Mode.
Temperature 1 to Temperature 4 (For Chassis 1 Fan)
Configures the temperature setting.
Fan PWM 1 to Fan PWM 4 (For Chassis 1 Fan)
Configures the amount of fan PWN for Smart Fan IV Mode.
Tolerance of Temperature (For Chassis 1 Fan)
Configures the tolerance of target temperature.
Critical Temperature (For Chassis 1 Fan)
Configures the time that Fan Out requires for reducing its value by one step.
Critical Temp Tolerance (For Chassis 1 Fan)
Configures the tolerance of critical temperature.
Smart Fan Configuration
Advanced
Version 2.17.1255. Copyright (C) 2017 American Megatrends, Inc.
Aptio Setup Utility - Copyright (C) 2017 American Megatrends, Inc.
→←: Select Screen
↑↓: Select Item
Enter: Select
+/-: Change Opt.
F1: General Help
F2: Previous Values
F3: Optimized Defaults
F4: Save & Exit
ESC: Exit
Enable/Disable CPU Smart Fan
Function
Smart Fan Conguration
CPU Smart Fan Control
Fan Control Mode
Temperature Source
Temperature 1
Temperature 2
Temperature 3
Temperature 4
Fan PWM 1
Fan PWM 2
Fan PWM 3
Fan PWM 4
Tolerance of Temperature
Critical Temperature
Critical Temp Tolerance
Chassis 1 Smart Fan Control
Temperature Source
Fan Control Mode
Temperature Source
Temperature 1
Temperature 2
Temperature 3
Temperature 4
[Enabled]
[SMART FAN IV Mode]
[PECI Agent 0]
40
50
60
70
150
170
200
220
0
75
0
[Enabled]
[PWM Mode]
[SMART FAN IV Mode]
[SYSTIN]
40
50
60
70
▼
▲
Page 48
Copyright © 2018 NEXCOM International Co., Ltd. All Rights Reserved.
34
NEX 614B User Manual
Chapter 3: BIOS Setup
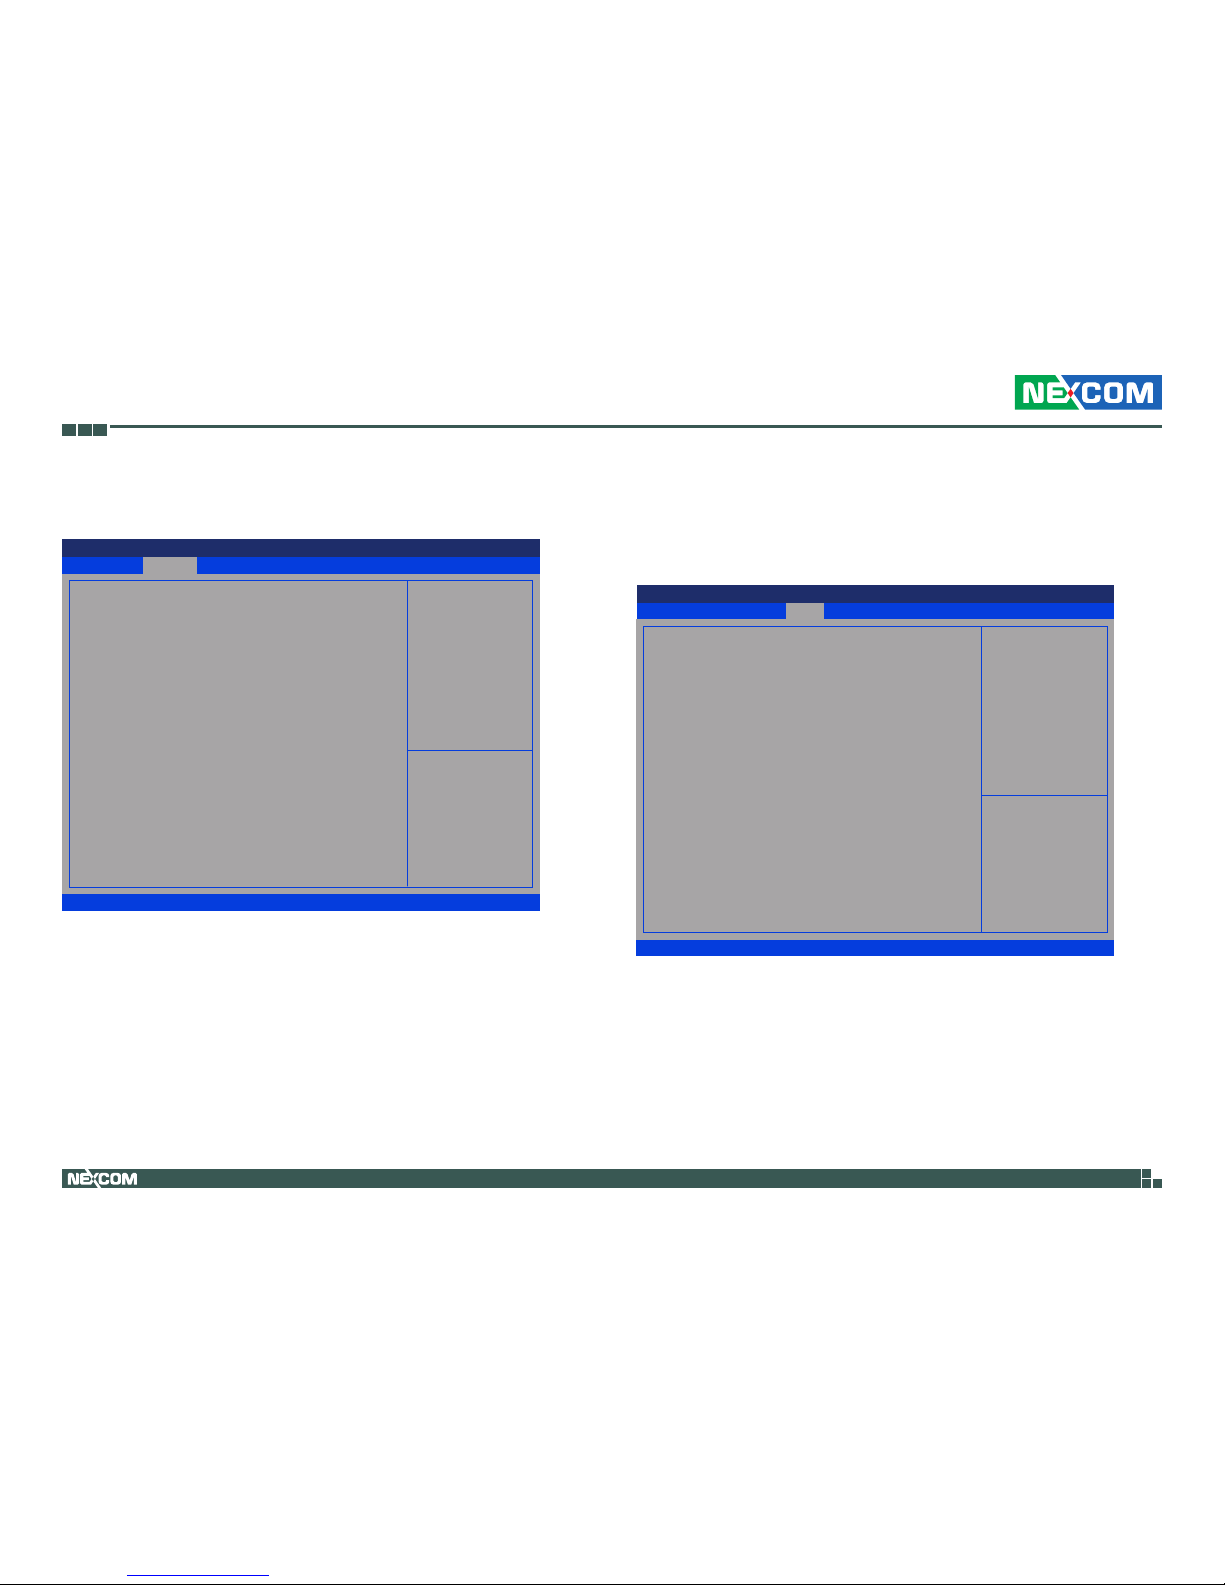
Power Management
This section is used to configure the power management features.
RTC wake system from S5
Enables or disables system wake up from S5.
Fixed Time: System will wake on the hr:min:sec specified.
Dynamic Time: System will wake on the current time + increase minute(s).
Power Mode
Configures the power supply mode.
Power Saving(ERP) Control
Enables or disables power saving mode function.
Restore AC Power Loss
Select the AC power state when power is re-applied after a power failure.
Advanced
Version 2.17.1255. Copyright (C) 2017 American Megatrends, Inc.
Aptio Setup Utility - Copyright (C) 2017 American Megatrends, Inc.
→←: Select Screen
↑↓: Select Item
Enter: Select
+/-: Change Opt.
F1: General Help
F2: Previous Values
F3: Optimized Defaults
F4: Save & Exit
ESC: Exit
Select system power mode.
Power Management
Power Mode
Power Saving(ERP) Control
Restore AC Power Loss
Wake Events
RTC wake system from S5
Wake up day
Wake up hour
Wake up minute
Wake up second
Resume from PME#
Resume from PCIE/RI
[ATX Type]
[Disabled]
[Last State]
[Fixed Time]
0
0
0
0
[Enabled]
[Enabled]
Advanced
Version 2.17.1255. Copyright (C) 2017 American Megatrends, Inc.
Aptio Setup Utility - Copyright (C) 2017 American Megatrends, Inc.
→←: Select Screen
↑↓: Select Item
Enter: Select
+/-: Change Opt.
F1: General Help
F2: Previous Values
F3: Optimized Defaults
F4: Save & Exit
ESC: Exit
Fixed Time: System will wake
on the hr:min:sec
specied./n Dynamic Time:
System will wake on the current
time + Increase minute(s)
Power Management
Power Mode
Power Saving(ERP) Control
Restore AC Power Loss
Wake Events
RTC wake system from S5
Wake up minute increase
Resume from PME#
Resume from PCIE/RI
[ATX Type]
[Disabled]
[Last State]
[Dynamic Time]
1
[Enabled]
[Enabled]
Resume from PME#
Enables or disables resume from PME# function.
Resume from PCIE/RI
Enables or disables resume from PCIE/RI function.
Note: USB does not support S3, S4 and S5 wake.
Page 49
Copyright © 2018 NEXCOM International Co., Ltd. All Rights Reserved.
35
NEX 614B User Manual
Chapter 3: BIOS Setup
Digital IO Port Configuration
This section is used to configure digital I/O port settings.
DIO Port1 to DIO Port8
Configures DIO port1 to port8 as input or output.
Output Level
Configures the output level as high or low.
System Agent (SA) Configuration
Enters the System Agent (SA) Configuration submenu.
PCH-IO Configuration
Enters the PCH-IO Configuration submenu.
Advanced
Version 2.17.1255. Copyright (C) 2017 American Megatrends, Inc.
Aptio Setup Utility - Copyright (C) 2017 American Megatrends, Inc.
→←: Select Screen
↑↓: Select Item
Enter: Select
+/-: Change Opt.
F1: General Help
F2: Previous Values
F3: Optimized Defaults
F4: Save & Exit
ESC: Exit
Set DIO as Input or Output
Digital IO Port Conguration
DIO Port1
Output Level
DIO Port2
Output Level
DIO Port3
Output Level
DIO Port4
Output Level
DIO Port5
DIO Port6
DIO Port7
DIO Port8
[Output]
[High ]
[Output]
[High ]
[Output]
[High ]
[Output]
[High ]
[Input ]
[Input ]
[Input ]
[Input ]
Chipset
This section gives you functions to configure the system based on the
specific features of the chipset. The chipset manages bus speeds and access
to system memory resources.
Save & ExitAdvanced Chipset Security BootMain
Version 2.17.1255. Copyright (C) 2017 American Megatrends, Inc.
Aptio Setup Utility - Copyright (C) 2017 American Megatrends, Inc.
→←: Select Screen
↑↓: Select Item
Enter: Select
+/-: Change Opt.
F1: General Help
F2: Previous Values
F3: Optimized Defaults
F4: Save & Exit
ESC: Exit
System Agent (SA) Parameters
System Agent (SA) Conguration
PCH-IO Conguration
►
►
Page 50
Copyright © 2018 NEXCOM International Co., Ltd. All Rights Reserved.
36
NEX 614B User Manual
Chapter 3: BIOS Setup
Max TOLUD
Configures the maximum value of TOLUD.
Max Link Speed
Configures the maximum link speed of the PEG device.
System Agent (SA) Configuration Graphics Configuration
Chipset
Version 2.17.1255. Copyright (C) 2017 American Megatrends, Inc.
Aptio Setup Utility - Copyright (C) 2017 American Megatrends, Inc.
→←: Select Screen
↑↓: Select Item
Enter: Select
+/-: Change Opt.
F1: General Help
F2: Previous Values
F3: Optimized Defaults
F4: Save & Exit
ESC: Exit
Maximum Value of TOLUD.
Dynamic assignment would
adjust TOLUD automatically
based on largest MMIO length of
installed graphic controller
System Agent Bridge Name
Memory Configuration
Memory Frequency
Total Memory
DIMM#0
DIMM#1
Max TOLUD
Max Link Speed
Graphics Conguration
Skylake
2133 MHz
16384 MB
16384 MB
Not Present
[Dynamic]
[Auto]
Chipset
Version 2.17.1255. Copyright (C) 2017 American Megatrends, Inc.
Aptio Setup Utility - Copyright (C) 2017 American Megatrends, Inc.
→←: Select Screen
↑↓: Select Item
Enter: Select
+/-: Change Opt.
F1: General Help
F2: Previous Values
F3: Optimized Defaults
F4: Save & Exit
ESC: Exit
Select which of IGFX/PEG/PCI
Graphics device should be
Primary Display Or select SG
for Switchable Gfx.
Graphics Configuration
Primary Display
Primary IGFX Boot Display
LVDS
LVDS Panel Type
Skylake
[Auto]
[VBIOS Default]
[Enabled]
[1024x768,18bit,60Hz]
Primary Display
Select which IGFX/PEG/PCI graphics device should be the primary display or
select SG for Switchable Gfx.
Primary IGFX Boot Display
Select the video device which will be activated during POST. Has no effect
if external graphics is present. Secondary boot display selection will appear
based on your selection. VGA modes will be supported only on primary display.
LVDS
Enables or disables LVDS.
LVDS Panel Type
Configures the LVDS panel resolution.
Page 51
Copyright © 2018 NEXCOM International Co., Ltd. All Rights Reserved.
37
NEX 614B User Manual
Chapter 3: BIOS Setup
HD Audio
Control detection of the HD Audio device.
Disabled HD Audio will be unconditionally disabled.
Enabled HD Audio will be unconditionally enabled.
Auto HD Audio will be enabled if present, disabled otherwise.
PCH-IO Configuration
Chipset
Version 2.17.1255. Copyright (C) 2017 American Megatrends, Inc.
Aptio Setup Utility - Copyright (C) 2017 American Megatrends, Inc.
→←: Select Screen
↑↓: Select Item
Enter: Select
+/-: Change Opt.
F1: General Help
F2: Previous Values
F3: Optimized Defaults
F4: Save & Exit
ESC: Exit
Control Detection of the
HD-Audio device.
Disabled = HDA will be
unconditionally disabled
Enabled = HDA will be
unconditionally enabled
Auto = HDA will be enabled if
present, disabled otherwise.
PCH-IO Configuration
HD Audio
[Enabled]
Security
Save & ExitAdvanced Chipset Security BootMain
Version 2.17.1255. Copyright (C) 2017 American Megatrends, Inc.
Aptio Setup Utility - Copyright (C) 2017 American Megatrends, Inc.
→←: Select Screen
↑↓: Select Item
Enter: Select
+/-: Change Opt.
F1: General Help
F2: Previous Values
F3: Optimized Defaults
F4: Save & Exit
ESC: Exit
Set Administrator Password
Password Description
If ONLY the Administrator’s password is set,
then this only limits access to Setup and is
only asked for when entering Setup.
If ONLY the User’s password is set, then this
is a power on password and must be entered to
boot or enter Setup. In Setup the User Will
have Administrator rights.
The password length must be
in the following range:
Minimum length 3
Maximum length 20
Administrator Password
User Password
Administrator Password
Select this to reconfigure the administrator’s password.
User Password
Select this to reconfigure the user’s password.
Page 52
Copyright © 2018 NEXCOM International Co., Ltd. All Rights Reserved.
38
NEX 614B User Manual
Chapter 3: BIOS Setup
Boot
Quiet Boot
Enabled Displays OEM logo instead of the POST messages.
Disabled Displays normal POST messages.
Launch PXE ROM
Controls the execution of UEFI and legacy PXE OpROM.
Boot Option Priorities
Adjust the boot sequence of the system. Boot Option #1 is the first boot
device that the system will boot from, next will be #2 and so forth.
Save & Exit
Save Changes and Reset
To save the changes and reset, select this field then press <Enter>. A dialog
box will appear. Confirm by selecting Yes.
Discard Changes and Reset
To exit the Setup utility and reset without saving the changes, select this field
then press <Enter>. You may be prompted to confirm again before exiting.
Restore Defaults
To restore the BIOS to default settings, select this field then press <Enter>. A
dialog box will appear. Confirm by selecting Yes.
Save & ExitAdvanced Chipset Security BootMain
Version 2.17.1255. Copyright (C) 2017 American Megatrends, Inc.
Aptio Setup Utility - Copyright (C) 2017 American Megatrends, Inc.
→←: Select Screen
↑↓: Select Item
Enter: Select
+/-: Change Opt.
F1: General Help
F2: Previous Values
F3: Optimized Defaults
F4: Save & Exit
ESC: Exit
Reset the system after saving
the changes.
Save Changes and Reset
Discard Changes and Reset
Restore Defaults
Save & ExitAdvanced Chipset Security BootMain
Version 2.17.1255. Copyright (C) 2017 American Megatrends, Inc.
Aptio Setup Utility - Copyright (C) 2017 American Megatrends, Inc.
→←: Select Screen
↑↓: Select Item
Enter: Select
+/-: Change Opt.
F1: General Help
F2: Previous Values
F3: Optimized Defaults
F4: Save & Exit
ESC: Exit
Enables or disables Quiet Boot
option
Boot Conguration
Quiet Boot
Launch PXE ROM
Boot Option Priorities
[Enabled]
[Disabled]
 Loading...