

Page 1

NEXCOM International Co., Ltd.
Published February 2010
www.nexcom.com
NEXCOM International Co., Ltd.
Multi-Media Solutions
Digital Signage Platform
NDiS 164
User Manual
Page 2

Copyright © 2010 NEXCOM International Co., Ltd. All Rights Reserved.
ii
NDiS 164 User Manual
Contents
Co n t e n t s
Preface
Copyright ............................................................................................. iv
Disclaimer ............................................................................................. iv
Acknowledgements .............................................................................. iv
Regulatory Compliance Statements ....................................................... iv
Declaration of Conformity ...................................................................... iv
RoHS Compliance ................................................................................... v
Warranty and RMA ................................................................................ vi
Safety Information ................................................................................vii
Installation Recommendations ................................................................vii
Safety Precautions .................................................................................viii
Technical Support and Assistance ........................................................... ix
Conventions Used in this Manual ........................................................... ix
Global Service Contact Information ......................................................... x
Package Contents ..................................................................................xii
Ordering Information ............................................................................xiii
Chapter 1: Product Introduction
Overview ................................................................................................1
Key Features .........................................................................................1
Hardware Specifications .......................................................................... 2
Main Board (NDiB 164) ........................................................................2
NDiS 164 System ..................................................................................4
Getting to Know NDiS 164 .....................................................................6
Front Panel ...........................................................................................6
Rear Panel ............................................................................................6
Mechanical Dimensions ...........................................................................8
Chapter 2: Jumpers And Connectors
Before You Begin ....................................................................................9
Precautions .............................................................................................9
Jumper Settings .................................................................................... 10
Locations of the Jumpers and Connectors .............................................11
Jumpers ................................................................................................12
Clear CMOS Select ...........................................................................12
Hardware Reset ................................................................................ 12
Connector Pin Definitions .....................................................................13
External I/O Interface ........................................................................13
HDMI Type A Connector ..............................................................13
Line-out Jacks ..............................................................................13
Dual USB and LAN Ports ..............................................................14
Dual USB Ports .............................................................................14
Serial (RS232) Ports ......................................................................15
COM RX/TX Connector ................................................................15
DC Power Input ...........................................................................16
Power Switch Button ...................................................................16
Page 3

Copyright © 2010 NEXCOM International Co., Ltd. All Rights Reserved.
iii
Contents
NDiS 164 User Manual
Internal Connectors .......................................................................... 17
SATA Power Connector ................................................................ 17
SATA DOM Power Connector .......................................................17
uDOC Connector .........................................................................18
IrDA Pin Header ...........................................................................18
SMBus Connector ........................................................................19
SATA Ports ...................................................................................19
Fan Connectors ...........................................................................20
SATA Status LED ..........................................................................20
Power Status LED .........................................................................20
Mini-PCIe Slots ............................................................................21
Chapter 3: System Setup
Removing the Chassis Cover ................................................................ 22
Installing a DIMM ..................................................................................24
Installing the CPU .................................................................................26
Installing the uDOC Module .................................................................. 31
Installing a Wireless LAN Module ..........................................................33
Installing a SATA Hard Drive .................................................................. 37
Installing a TV Tuner Module ................................................................. 43
Appendix A: Video Driver Installation and Settings
Installing the Video Driver ..................................................................... 47
Appendix B: Audio Driver Installation and Settings
Installing the Audio Driver ..................................................................... 60
Appendix C: Watchdog Timer
Watchdog Timer ...................................................................................64
Appendix D: Power Consumption
Power Consumption ............................................................................. 67
Page 4

Copyright © 2010 NEXCOM International Co., Ltd. All Rights Reserved.
iv
NDiS 164 User Manual
Preface
Pr e f a C e
Regulatory Compliance Statements
This section provides the FCC compliance statement for Class A devices
and describes how to keep the system CE compliant.
Declaration of Conformity
FCC
This equipment has been tested and verified to comply with the limits for
a Class A digital device, pursuant to Part 15 of FCC Rules. These limits are
designed to provide reasonable protection against harmful interference
when the equipment is operated in a commercial environment. This equipment generates, uses, and can radiate radio frequency energy and, if not
installed and used in accordance with the instructions, may cause harmful
interference to radio communications. Operation of this equipment in a
residential area (domestic environment) is likely to cause harmful interference, in which case the user will be required to correct the interference
(take adequate measures) at their own expense.
CE
The product(s) described in this manual complies with all applicable European Union (CE) directives if it has a CE marking. For computer systems to
remain CE compliant, only CE-compliant parts may be used. Maintaining
CE compliance also requires proper cable and cabling techniques.
Copyright
This publication, including all photographs, illustrations and software, is
protected under international copyright laws, with all rights reserved. No
part of this manual may be reproduced, copied, translated or transmitted
in any form or by any means without the prior written consent from
NEXCOM International Co., Ltd.
Disclaimer
The information in this document is subject to change without prior notice
and does not represent commitment from NEXCOM International Co., Ltd.
However, users may update their knowledge of any product in use by constantly checking its manual posted on our website: http://www.nexcom.
com. NEXCOM shall not be liable for direct, indirect, special, incidental, or
consequential damages arising out of the use of any product, nor for any
infringements upon the rights of third parties, which may result from such
use. Any implied warranties of merchantability or fitness for any particular
purpose is also disclaimed.
Acknowledgements
NDiS 164 is a trademark of NEXCOM International Co., Ltd. All other product names mentioned herein are registered trademarks of their respective
owners.
Page 5
Copyright © 2010 NEXCOM International Co., Ltd. All Rights Reserved.
v
NDiS 164 User Manual
Preface
RoHS Compliance
NEXCOM RoHS Environmental Policy and Status
Update
NEXCOM is a global citizen for building the digital
infrastructure. We are committed to providing green
products and services, which are compliant with European Union RoHS (Restriction on Use of Hazardous Substance in Electronic
Equipment) directive 2002/95/EU, to be your trusted green partner and to
protect our environment.
RoHS restricts the use of Lead (Pb) < 0.1% or 1,000ppm, Mercury (Hg)
< 0.1% or 1,000ppm, Cadmium (Cd) < 0.01% or 100ppm, Hexavalent
Chromium (Cr6+) < 0.1% or 1,000ppm, Polybrominated biphenyls (PBB)
< 0.1% or 1,000ppm, and Polybrominated diphenyl Ethers (PBDE) < 0.1%
or 1,000ppm.
In order to meet the RoHS compliant directives, NEXCOM has established
an engineering and manufacturing task force in to implement the introduction of green products. The task force will ensure that we follow the
standard NEXCOM development procedure and that all the new RoHS
components and new manufacturing processes maintain the highest
industry quality levels for which NEXCOM are renowned.
The model selection criteria will be based on market demand. Vendors and
suppliers will ensure that all designed components will be RoHS compliant.
How to recognize NEXCOM RoHS Products?
For existing products where there are non-RoHS and RoHS versions, the
suffix “(LF)” will be added to the compliant product name.
All new product models launched after January 2006 will be RoHS compliant. They will use the usual NEXCOM naming convention.
Page 6

Copyright © 2010 NEXCOM International Co., Ltd. All Rights Reserved.
vi
NDiS 164 User Manual
Preface
Warranty and RMA
NEXCOM Warranty Period
NEXCOM manufactures products that are new or equivalent to new in
accordance with industry standard. NEXCOM warrants that products will
be free from defect in material and workmanship for 2 years, beginning
on the date of invoice by NEXCOM. HCP series products (Blade Server)
which are manufactured by NEXCOM are covered by a three year warranty
period.
NEXCOM Return Merchandise Authorization (RMA)
Customers shall enclose the “NEXCOM RMA Service Form” with the ?
returned packages.
Customers must collect all the information about the problems encoun- ?
tered and note anything abnormal or, print out any on-screen messages,
and describe the problems on the “NEXCOM RMA Service Form” for
the RMA number apply process.
Customers can send back the faulty products with or without acces- ?
sories (manuals, cable, etc.) and any components from the card, such as
CPU and RAM. If the components were suspected as part of the problems, please note clearly which components are included. Otherwise,
NEXCOM is not responsible for the devices/parts.
Customers are responsible for the safe packaging of defective products, ?
making sure it is durable enough to be resistant against further damage
and deterioration during transportation. In case of damages occurred
during transportation, the repair is treated as “Out of Warranty.”
Any products returned by NEXCOM to other locations besides the cus- ?
tomers’ site will bear an extra charge and will be billed to the customer.
Repair Service Charges for Out-of-Warranty Products
NEXCOM will charge for out-of-warranty products in two categories, one
is basic diagnostic fee and another is component (product) fee.
System Level
Component fee: NEXCOM will only charge for main components such ?
as SMD chip, BGA chip, etc. Passive components will be repaired for
free, ex: resistor, capacitor.
Items will be replaced with NEXCOM products if the original one cannot ?
be repaired. Ex: motherboard, power supply, etc.
Replace with 3rd party products if needed. ?
If RMA goods can not be repaired, NEXCOM will return it to the cus- ?
tomer without any charge.
Board Level
Component fee: NEXCOM will only charge for main components, such ?
as SMD chip, BGA chip, etc. Passive components will be repaired for
free, ex: resistors, capacitors.
If RMA goods can not be repaired, NEXCOM will return it to the cus- ?
tomer without any charge.
Page 7

Copyright © 2010 NEXCOM International Co., Ltd. All Rights Reserved.
vii
NDiS 164 User Manual
Preface
Warnings
Read and adhere to all warnings, cautions, and notices in this guide and
the documentation supplied with the chassis, power supply, and accessory
modules. If the instructions for the chassis and power supply are inconsistent with these instructions or the instructions for accessory modules,
contact the supplier to find out how you can ensure that your computer
meets safety and regulatory requirements.
Cautions
Electrostatic discharge (ESD) can damage system components. Do the described procedures only at an ESD workstation. If no such station is available, you can provide some ESD protection by wearing an antistatic wrist
strap and attaching it to a metal part of the computer chassis.
Safety Information
Before installing and using the device, note the following precautions:
Read all instructions carefully.
▪
Do not place the unit on an unstable surface, cart, or stand. ▪
Follow all warnings and cautions in this manual. ▪
When replacing parts, ensure that your service technician uses parts ▪
specified by the manufacturer.
Avoid using the system near water, in direct sunlight, or near a heating
▪
device.
The load of the system unit does not solely rely for support from the
▪
rackmounts located on the sides. Firm support from the bottom is highly
necessary in order to provide balance stability.
The computer is provided with a battery-powered real-time clock circuit.
▪
There is a danger of explosion if battery is incorrectly replaced. Replace
only with the same or equivalent type recommended by the manufacturer. Discard used batteries according to the manufacturer’s instructions.
Installation Recommendations
Ensure you have a stable, clean working environment. Dust and dirt can
get into components and cause a malfunction. Use containers to keep
small components separated.
Adequate lighting and proper tools can prevent you from accidentally
damaging the internal components. Most of the procedures that follow
require only a few simple tools, including the following:
A Philips screwdriver•
A flat-tipped screwdriver•
A grounding strap•
An anti-static pad•
Using your fingers can disconnect most of the connections. It is recommended that you do not use needlenose pliers to disconnect connections
as these can damage the soft metal or plastic parts of the connectors.
Page 8

Copyright © 2010 NEXCOM International Co., Ltd. All Rights Reserved.
viii
NDiS 164 User Manual
Preface
Safety Precautions
1. Read these safety instructions carefully.
2. Keep this User Manual for later reference.
3. Disconnect this equipment from any AC outlet before cleaning. Use a
damp cloth. Do not use liquid or spray detergents for cleaning.
4. For plug-in equipment, the power outlet socket must be located near
the equipment and must be easily accessible.
5. Keep this equipment away from humidity.
6. Put this equipment on a stable surface during installation. Dropping
it or letting it fall may cause damage.
7. Do not leave this equipment in either an unconditioned environment
or in a above 40
o
C storage temperature as this may damage the
equipment.
8. The openings on the enclosure are for air convection to protect the
equipment from overheating. DO NOT COVER THE OPENINGS.
9. Make sure the voltage of the power source is correct before connect-
ing the equipment to the power outlet.
10. Place the power cord in a way so that people will not step on it. Do
not place anything on top of the power cord. Use a power cord that
has been approved for use with the product and that it matches the
voltage and current marked on the product’s electrical range label.
The voltage and current rating of the cord must be greater than the
voltage and current rating marked on the product.
11. All cautions and warnings on the equipment should be noted.
12. If the equipment is not used for a long time, disconnect it from the
power source to avoid damage by transient overvoltage.
13. Never pour any liquid into an opening. This may cause fire or electrical shock.
14. Never open the equipment. For safety reasons, the equipment should
be opened only by qualified service personnel.
15. If one of the following situations arises, get the equipment checked
by service personnel:
a. The power cord or plug is damaged.
b. Liquid has penetrated into the equipment.
c. The equipment has been exposed to moisture.
d. The equipment does not work well, or you cannot get it to work
according to the user’s manual.
e. The equipment has been dropped and damaged.
f. The equipment has obvious signs of breakage.
16. Do not place heavy objects on the equipment.
17. The unit uses a three-wire ground cable which is equipped with a
third pin to ground the unit and prevent electric shock. Do not defeat
the purpose of this pin. If your outlet does not support this kind of
plug, contact your electrician to replace your obsolete outlet.
18. CAUTION: DANGER OF EXPLOSION IF BATTERY IS INCORRECTLY
REPLACED. REPLACE ONLY WITH THE SAME OR EQUIVALENT TYPE
RECOMMENDED BY THE MANUFACTURER. DISCARD USED BATTERIES ACCORDING TO THE MANUFACTURER’S INSTRUCTIONS.
19. The computer is provided with CD drives that comply with the appropriate safety standards including IEC 60825.
Page 9

Copyright © 2010 NEXCOM International Co., Ltd. All Rights Reserved.
ix
NDiS 164 User Manual
Preface
Conventions Used in this Manual
CAUTION!
CAUTION!CAUTION!
Warning: Information about certain situations, which if not
observed, can cause personal injury. This will prevent injury to
yourself when performing a task.
Caution: Information to avoid damaging components or losing
data.
Note: Provides additional information to complete a task easily.
Technical Support and Assistance
1. For the most updated information of NEXCOM products, visit NEXCOM’s website at www.nexcom.com.
2. For technical issues that require contacting our technical support team
or sales representative, please have the following information ready
before calling:
– Product name and serial number
– Detailed information of the peripheral devices
– Detailed information of the installed software (operating system,
version, application software, etc.)
– A complete description of the problem
– The exact wordings of the error messages
Warning!
1. Handling the unit: carry the unit with both hands and handle it with
care.
2. Maintenance: to keep the unit clean, use only approved cleaning products or clean with a dry cloth.
3. CompactFlash: Turn off the unit’s power before inserting or removing a
CompactFlash storage card.
Page 10

Copyright © 2010 NEXCOM International Co., Ltd. All Rights Reserved.
x
Preface
NDiS 164 User Manual
Headquarters
Taiwan
18F, No. 716, Chung-Cheng Rd. Chung-Ho City,
Taipei County 235, Taiwan, R.O.C.
Tel: +886-2-8228-0606
Fax: +886-2-8228-0501
http://www.nexcom.com.tw
USA
3758 Spinnaker Court Fremont,
CA 94538, USA
Tel: +1-510-656-2248
Fax: +1-510-656-2158
http://www.nexcom.com
France
Z.I. des Amandiers, 17, Rue des entrepreneurs
78420 Carrières sur Seine, France
Tel: +33 (0)1 71 51 10 20
Fax: +33 (0)1 71 51 10 21
http://www.nexcom.eu
Global Service Contact Information
Germany
Leopoldstraße Business Centre, Leopoldstraße 244 80807
Munich, Germany
Tel: +49-89-208039-278
Fax: +49-89-208039-279
http://www.nexcom.eu
Italy
Via Gaudenzio Ferrari 29, 21047 Saronno (VA), Italia
Tel: +39 02 9628 0333
Fax: +39 02 9619 8846
http://www.nexcom.eu
United Kingdom
10 Vincent Avenue, Crownhill Business Centre
Milton Keynes, Buckinghamshire, MK8 0AB
United Kingdom
Tel: +44-1908-267121
Fax: +44-1908-262042
http://www.nexcom.eu
Page 11

Copyright © 2010 NEXCOM International Co., Ltd. All Rights Reserved.
xi
Preface
NDiS 164 User Manual
Japan
9F, Tamachi Hara bldg, 4-11-5,
Shiba Minato-ku Tokyo 108-0014, Japan
Tel: +81-3-5419-7830
Fax: +81-3-5419-7832
http://www.nexcom-jp.com
China-Beijing
Room 301, Block E, Power Creative Building, No. 1
Shangdi East Rd. Haidian Dist., Beijing, 100085, China
Tel: +86-10-5885-6655
Fax: +86-10-5885-1066
http://www.nexcom.cn
China-Shanghai Office
Room 1505, Greenland He Chuang Building,
No. 450 Caoyang Rd. Shanghai, 200063, China
Tel: +86-21-6150-8008
Fax: +86-21-3251-6358
http://www.nexcom.cn
China-Nanjing Office
Hall C, Block 17,TianXingCuiLang,
No. 49 Yunnan North Rd. Nanjing, 210018, China
Tel: +86-25-8315-3486
Fax: +86-25-8315-3489
http://www.nexcom.cn
China-Shenzhen Office
Western Room 708, Block 210, Tairan Industry & Trading Place,
Futian Area, Shenzhen, 518040, China
TEL: +86-755-833 27203
FAX: +86-755-833 27213
http://www.nexcom.cn
Page 12
Copyright © 2010 NEXCOM International Co., Ltd. All Rights Reserved.
xii
Preface
NDiS 164 User Manual
Pa C k a g e Co n t e n t s
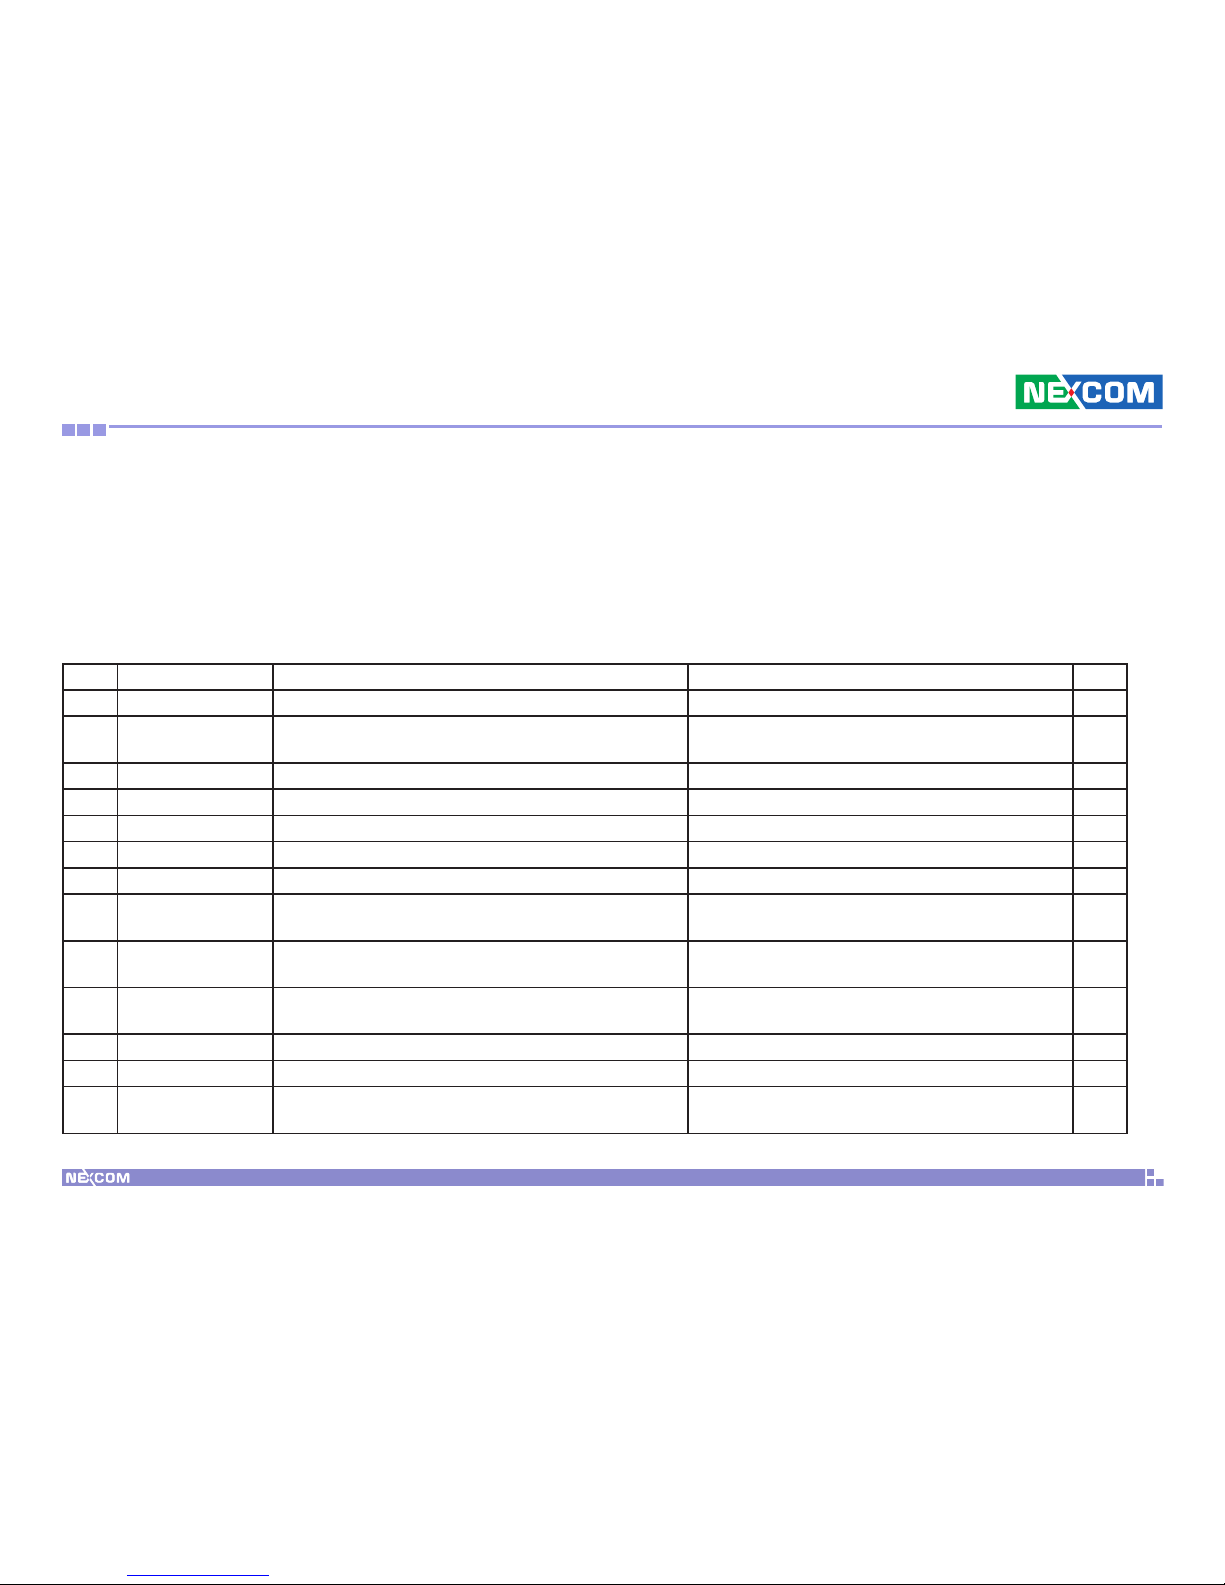
Before continuing, verify that the NDiS 164 package that you received is complete. Your package should have all the items listed in the following table.
Item P/N Name Specification Qty
1 60233ATA16X00 SATA CABLE SATA FEMALE 7-PIN 1
2 60233PW102X00 SATA POWER CABLE SATA 15-PIN TO 3022H-04 4-PIN PITCH 5.08mm,
L: 80mm
1
3 50311F0119X00 I HEAD BOLTS SCREW LONG I 3x12.5 AXISx 8.5mm SCREW x4mm 4
4 6029900037X00 DOW CORNING 340 Silicone Heat Sink Compound (3g ) 1
5 7400060002X00 (N)POWER ADAPTER FSP:FSP060-1AD101C (N09001) 60W 12V/5A MINI DIN 4P 1
6 602DCD0258X00 (N)NDiS 164 CD DRIVER 1
7 5060100019X00 DAMPER INSIDE DIA. KITAGAWA:VB-1209-80BK 6mm/OUTSIDE DIA.12mm H:9mm TPS (BLACK) 4
8 50344C0056X00 COPPER POST 10x5xM3 WITH MALE/FEMALE
(FEMALE)10mmx(MALE)5mmxM3
1
9 50344C0067X00 COPPER POST LONG FEI:16x5xM3mm(NI) WITH MALE/FEMALE
(FEMALE)16mmx(MALE)5mmxM3
1
10 50311F0100X00 ROUND HEAD SCREW W/SPRING+FLAT WASHER LONG
FEI:P3x6L
P3x6 iso/SW6x0.5 NI 2
11 6023300227X00 SATA DOM POWER CABLE MOX1.25 2P TO MOX1.25 2P L=50mm 1
12 5043330314X00 FOOT BRACKET 190x24x6mm 2
13 50311F0120X00 ROUND HEAD SCREW LONG S/W PRING+FLAT WASHER P6#
32Tx1/4/SW7x0.8NI
4
Page 13

Copyright © 2010 NEXCOM International Co., Ltd. All Rights Reserved.
xiii
Preface
NDiS 164 User Manual
or d e r i n g in f o r m a t i o n
The following provides ordering information for NDiS 164.
NDiS 164 (P/N: 10W00016400X0)•
- AMD Athlon™ 64 / 64 X2 family processor
- AMD 780E/SB710 chipset
Page 14
Copyright © 2010 NEXCOM International Co., Ltd. All Rights Reserved.
1
NDiS 164 User Manual
Chapter 1: Product Introduction
Ch a P t e r 1: Pr o d u C t in t r o d u C t i o n
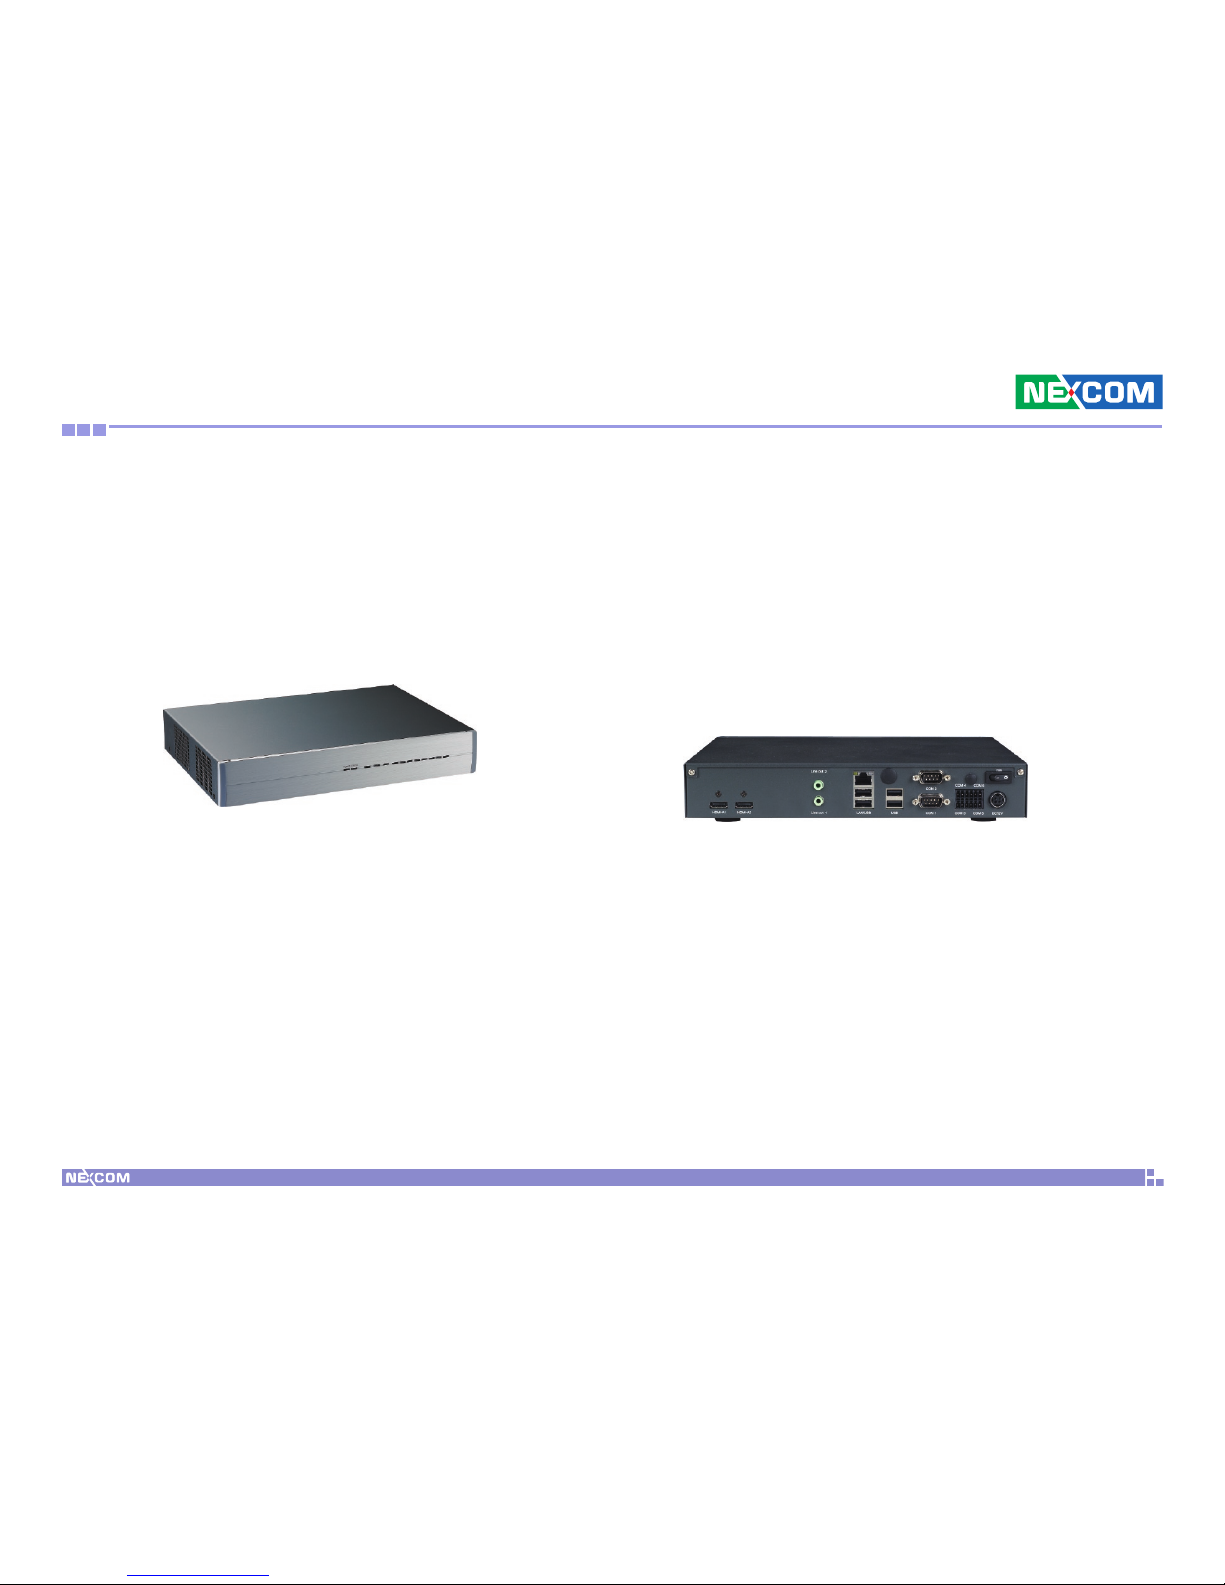
Overview
Key Features
Powerful Digital Signage Player with AMD •
Athlon™ 64 / 64 X2/PhenomII X4 processor
Slim and Compact Design•
AMD 780E/SB710 solution•
2 x HDMI•
2 x Audio•
Dual GbE LAN•
4 x USB•
6 x Serial ports•
1 x 2.5” SATA HDD / SATA DOM•
ATI Radeon HD 3200 GPU•
Front
Rear
Page 15

Copyright © 2010 NEXCOM International Co., Ltd. All Rights Reserved.
2
NDiS 164 User Manual
Chapter 1: Product Introduction
Hardware Specifications
Main Board (NDiB 164)
Processor
AMD AM2+ socket •
Supports AMD AM2 / Athlon™ 64 / 64 X2 series processor•
AMD embedded processor list (Longevity CPU)•
- Athlon™ 64 X2 4200+, 2.2GHz
- Athlon™ 64 X2 3600+, 1.9GHz
- Athlon™ 64 X2 3400e, 1.8GHz
- Athlon™ 64 3100+, 2.0GHz
- Athlon™ 64 3000+, 1.8GHz
- Athlon™ 64 2600+, 1.6GHz
Chipset
Northbridge: AMD 780E•
Southbridge: AMD SB710•
Main Memory
Two 240-pin DDR2 DIMM sockets •
Supports DDR2 800MHz SDRAM with unbuffered and non-ECC memory •
module up to 4GB
The supported memory capacity will depend on the memory size al-•
located by the OS
Graphics
Graphics chip•
- AMD 780E integrated with ATI Radeon HD3200 based core
HDMI Interface•
AMD 780E integrated with ATI Radeon HD3200 supports:
- HDMI A1: HDMI signal from NB 780E
- HDMI A2: DVI signal from NB 780E
Resolution•
- Wide screen resolution supports up to 1920x1080p
Network
One Realtek 8111C-GR PCI Express Gigabit Ethernet controllers•
- One RJ45 connectors with LED
Supports PXE LAN boot ROM for Ethernet boot up. •
Supports Wake on LAN•
Page 16

Copyright © 2010 NEXCOM International Co., Ltd. All Rights Reserved.
3
NDiS 164 User Manual
Chapter 1: Product Introduction
Storage
2 SATA ports•
1 SATA 2.5 HDD•
1 SATA DOM•
Audio
IDT 92HD206 8-channel HD AUDIO CODEC•
Supports 2 independent line-out jacks (two stack phone jacks) •
Expansion Slots
One Mini-PCIe slot - supports Wireless LAN module•
One Mini PCIe slot - supports TV tuner module•
I/O Interfaces
IrDA•
- Onboard IrDA pin header (Tx/Rx)
Serial•
- Two COM ports support RS232
- One 2x6 pin Terminal port for 4 RS232 (Tx/Rx)
USB•
- Four USB 2.0 ports
- Two USB ports with Type A double-stack each on Edge I/O
- 2x5 pin-header x1 for USB x2. Supports u-DOC x1.
Edge I/O•
- ATX Power-on button
- Power-on LED (Green)
- Storage LED (Yellow)
- Reserved holes for Wifi antenna, TV tuner antenna
Others•
- One onboard buzzer
- Three 3-pin fan connectors (for CPU, System)
- One 4-pin header SMBus 2.0 controller
- One 2.5” HDD power DC output (Big-4P)
Power Supply
Internal•
- +12V +/-5% DC input
- 4-pin Mini-DIN power jack
- ATX power mode
External adapter•
- +12V DC output 60W
RTC Battery
On chip RTC with battery backup •
RTC tolerance less than 2 sec (24 hours) under 25•
o
C environment
Page 17

Copyright © 2010 NEXCOM International Co., Ltd. All Rights Reserved.
4
NDiS 164 User Manual
Chapter 1: Product Introduction
BIOS
AMI system BIOS •
Plug and Play supported•
Advanced Power Management and Advanced Configuration & Power •
Interface
8Mbit flash ROM•
System Management
Monitoring•
- Monitors 4 voltages, 3 temperatures and 3 fan speeds
- 4 voltages (+3.3V, +5V, +12V, Vcore)
- 3 temperatures (CPU and two external temperature sensors)
- 2 fan speeds (CPU and system fans)
Watchdog•
- Watchdog timeout is programmable by software from 1 second to 255
seconds and from 1 minute to 255 minutes
- Tolerance: 15% under room temperature 25°C
NDiS 164 System
Physical Characteristics
Dimensions (W x D x H)•
- 272mm x 195mm x 44mm (1U Height)
Color•
- Black
Mounting•
- Wall mount bracket
Cooling system•
- Main chip’s heat sink and 2 high speed system fans
External I/O
Front I/O•
- One power-on LED (green)
- One HDD LED (yellow)
Rear I/O•
- ATX Power-on switch
- Two HDMI connectors
- Two stack phone-jacks for line-out; total of 2 independent line-out
connectors
- One RJ45 port with LEDs for 10/100/1000Mbps Ethernet
- Two dual-stack USB connectors; total of 4 USB ports
- One dual-stack DB9 connector, total of two RS-232 ports
- One Mini-DIN 4-pin +12V DC-in jack
- Reserved for optional antenna of WiFi
- Reserved for optional antenna of TV
Storage
One 2.5” SATA HDD bay•
Environment
Operating temperature: 0~40°C •
Storage temperature: -20°C~85°C •
Relative humidity (non-condensing): 90%•
Page 18

Copyright © 2010 NEXCOM International Co., Ltd. All Rights Reserved.
5
NDiS 164 User Manual
Chapter 1: Product Introduction
Vibration
Non-operating (X-Y-Z): Sine vibration (HDD/SSD)
Sine wave vibration test - Acceleration: 1g rms•
- Frequency: 5 – 500 Hz
- Test axis: X,Y,Z axis
- Test time: 10 minutes per axis
- Total test time: 90 minutes
Operating (X-Y-Z): Random vibration (SSD)
Random vibration test (operating) - Acceleration: 2g rms•
- Frequency: 5 – 500 Hz
- Test axis: X,Y,Z axis
- Test time: 1 hour per axis
- Total test time: 3 hours
Operating (X-Y-Z): Random vibration (HDD)
Random vibration test (operating) - Acceleration: 0.3 g rms•
- Frequency: 5 – 500 Hz
- Test axis: X,Y,Z axis
- Test time: 1 hour per axis
- Total test time: 3 hours
Shock
30g peak acceleration (16 msec. duration) - HDD•
Certificate
CE•
FCC Class A•
Page 19
Copyright © 2010 NEXCOM International Co., Ltd. All Rights Reserved.
6
NDiS 164 User Manual
Chapter 1: Product Introduction
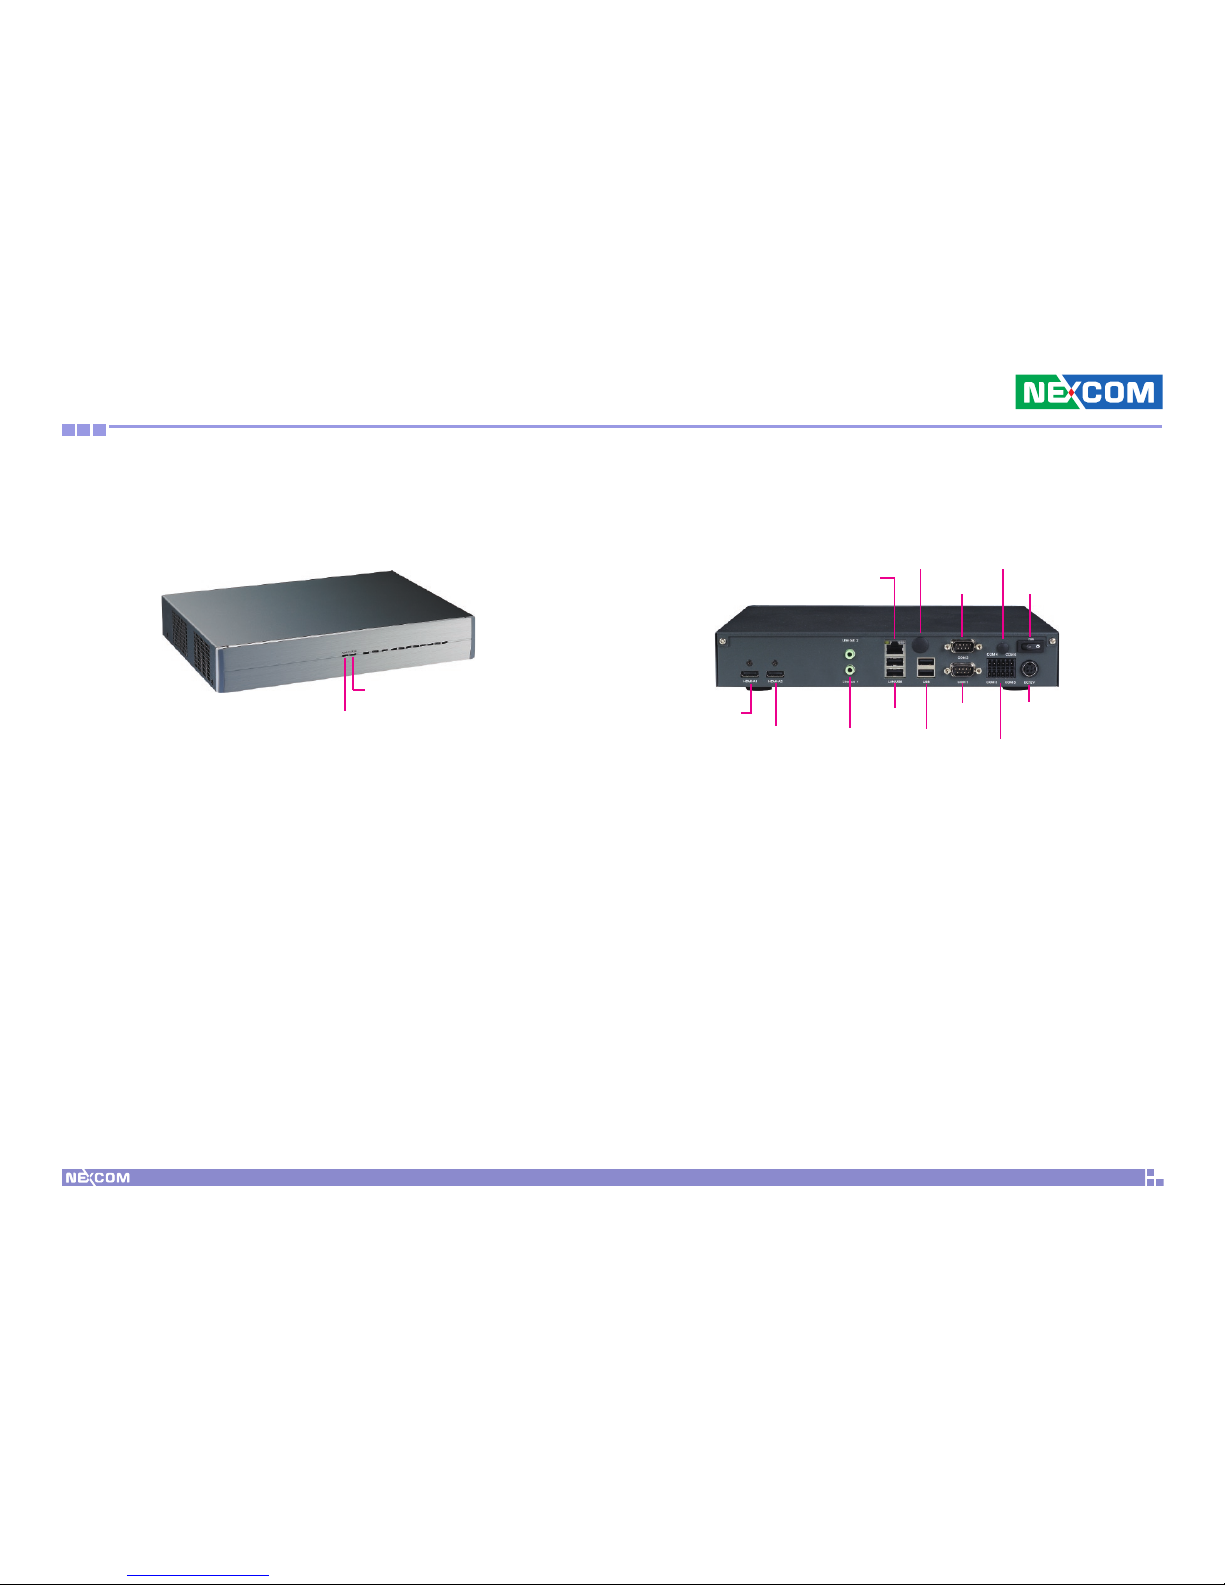
Getting to Know NDiS 164
Power LED
Indicates the power status of the system.
HDD LED
Indicates the status of the hard drive.
Front Panel
Rear Panel
Power LED
HDD LED
12V DC-in
WiFi
antenna
hole
USB
RJ45 LAN
COM
RS232
COM
terminal
port
Power switch
USB
Line-out
HDMI A1
COM
RS232
TV
antenna
hole
HDMI A2
RJ45 LAN
Used to connect the system to a local area network.
TV Antenna Hole
Used to install the TV tuner antenna.
COM
The COM port supports RS232 compatible serial devices.
Wifi Antenna Hole
Used to install the Wifi antenna.
Power Switch
Press to power-on or power-off the system.
Page 20

Copyright © 2010 NEXCOM International Co., Ltd. All Rights Reserved.
7
NDiS 164 User Manual
Chapter 1: Product Introduction
HDMI A1
Supports HDMI signal from NB 780E. Used to connect digital audio/video
HD display.
HDMI A2
Supports DVI signal from NB 780E. Used to connect digital audio/video HD
display.
Line-out
Used to connect a speaker.
USB
Used to connect USB 2.0/1.1 devices.
COM Terminal Port
Supports 4x RS232 compatible serial devices.
+12V DC Input
Used to plug a DC power cord.
Page 21
Copyright © 2010 NEXCOM International Co., Ltd. All Rights Reserved.
8
NDiS 164 User Manual
Chapter 1: Product Introduction
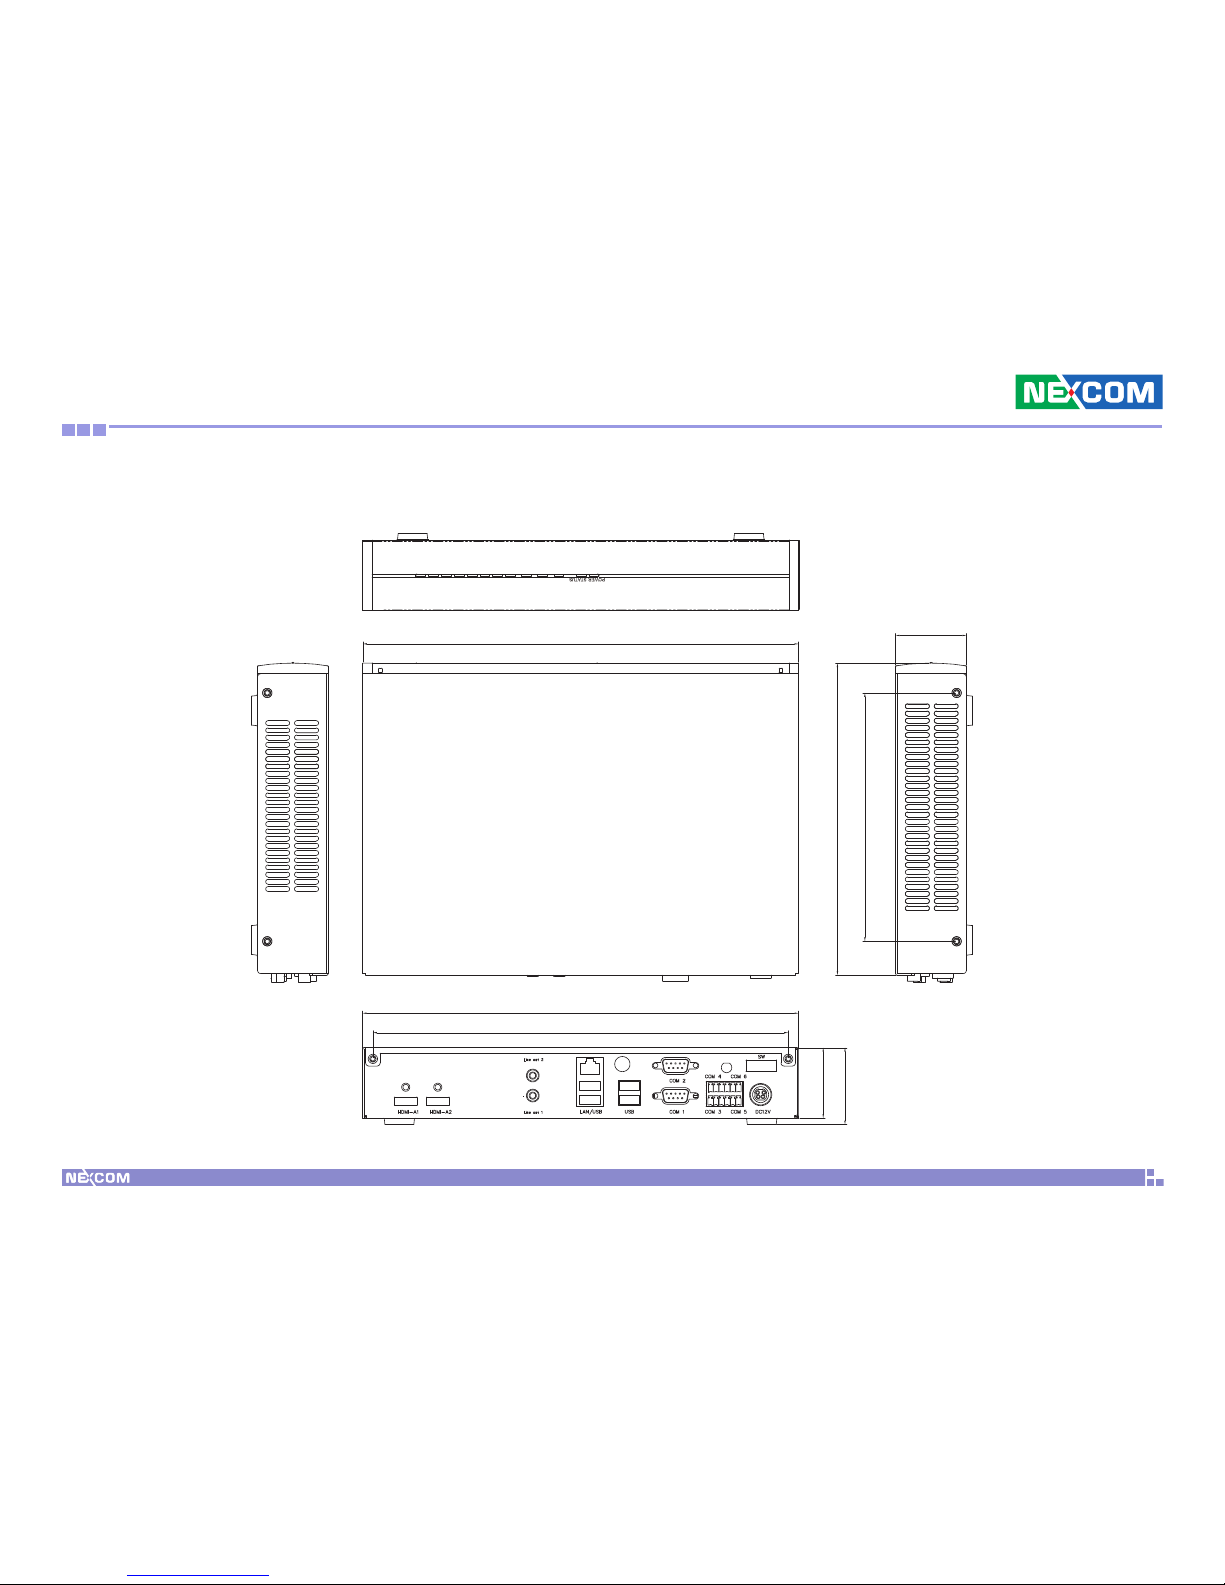
Mechanical Dimensions
272
194.6
155
44
272
259
44
48
Page 22

Copyright © 2010 NEXCOM International Co., Ltd. All Rights Reserved.
9
Chapter 2: Jumpers and Connectors
NDiS 164 User Manual
This chapter describes how to set the jumpers on the motherboard. Note
that the following procedures are generic for all NDiS 164.
Before You Begin
Ensure you have a stable, clean working environment. Dust and dirt can •
get into components and cause a malfunction. Use containers to keep
small components separated.
Adequate lighting and proper tools can prevent you from accidentally
•
damaging the internal components. Most of the procedures that follow
require only a few simple tools, including the following:
A Philips screwdriver
•
A flat-tipped screwdriver •
A set of jewelers Screwdrivers •
A grounding strap •
An anti-static pad •
Using your fingers can disconnect most of the connections. It is recom-•
mended that you do not use needle-nosed pliers to disconnect connections as these can damage the soft metal or plastic parts of the connectors.
Before working on internal components, make sure that the power
•
is off. Ground yourself before touching any internal components, by
touching a metal object. Static electricity can damage many of the elec-
tronic components. Humid environment tend to have less static electricity than dry environments. A grounding strap is warranted whenever
danger of static electricity exists.
Precautions
Computer components and electronic circuit boards can be damaged by
discharges of static electricity. Working on the computers that are still connected to a power supply can be extremely dangerous.
Follow the guidelines below to avoid damage to your computer or yourself:
Always disconnect the unit from the power outlet whenever you are
•
working inside the case.
If possible, wear a grounded wrist strap when you are working inside
•
the computer case. Alternatively, discharge any static electricity by
touching the bare metal chassis of the unit case, or the bare metal body
of any other grounded appliance.
Hold electronic circuit boards by the edges only. Do not touch the com-
•
ponents on the board unless it is necessary to do so. Don’t flex or stress
the circuit board.
Leave all components inside the static-proof packaging that they
•
shipped with until they are ready for installation.
Use correct screws and do not over tighten screws.
•
Ch a P t e r 2: Ju m P e r s a n d Co n n e C t o r s
Page 23
Copyright © 2010 NEXCOM International Co., Ltd. All Rights Reserved.
10
Chapter 2: Jumpers and Connectors
NDiS 164 User Manual
Jumper Settings
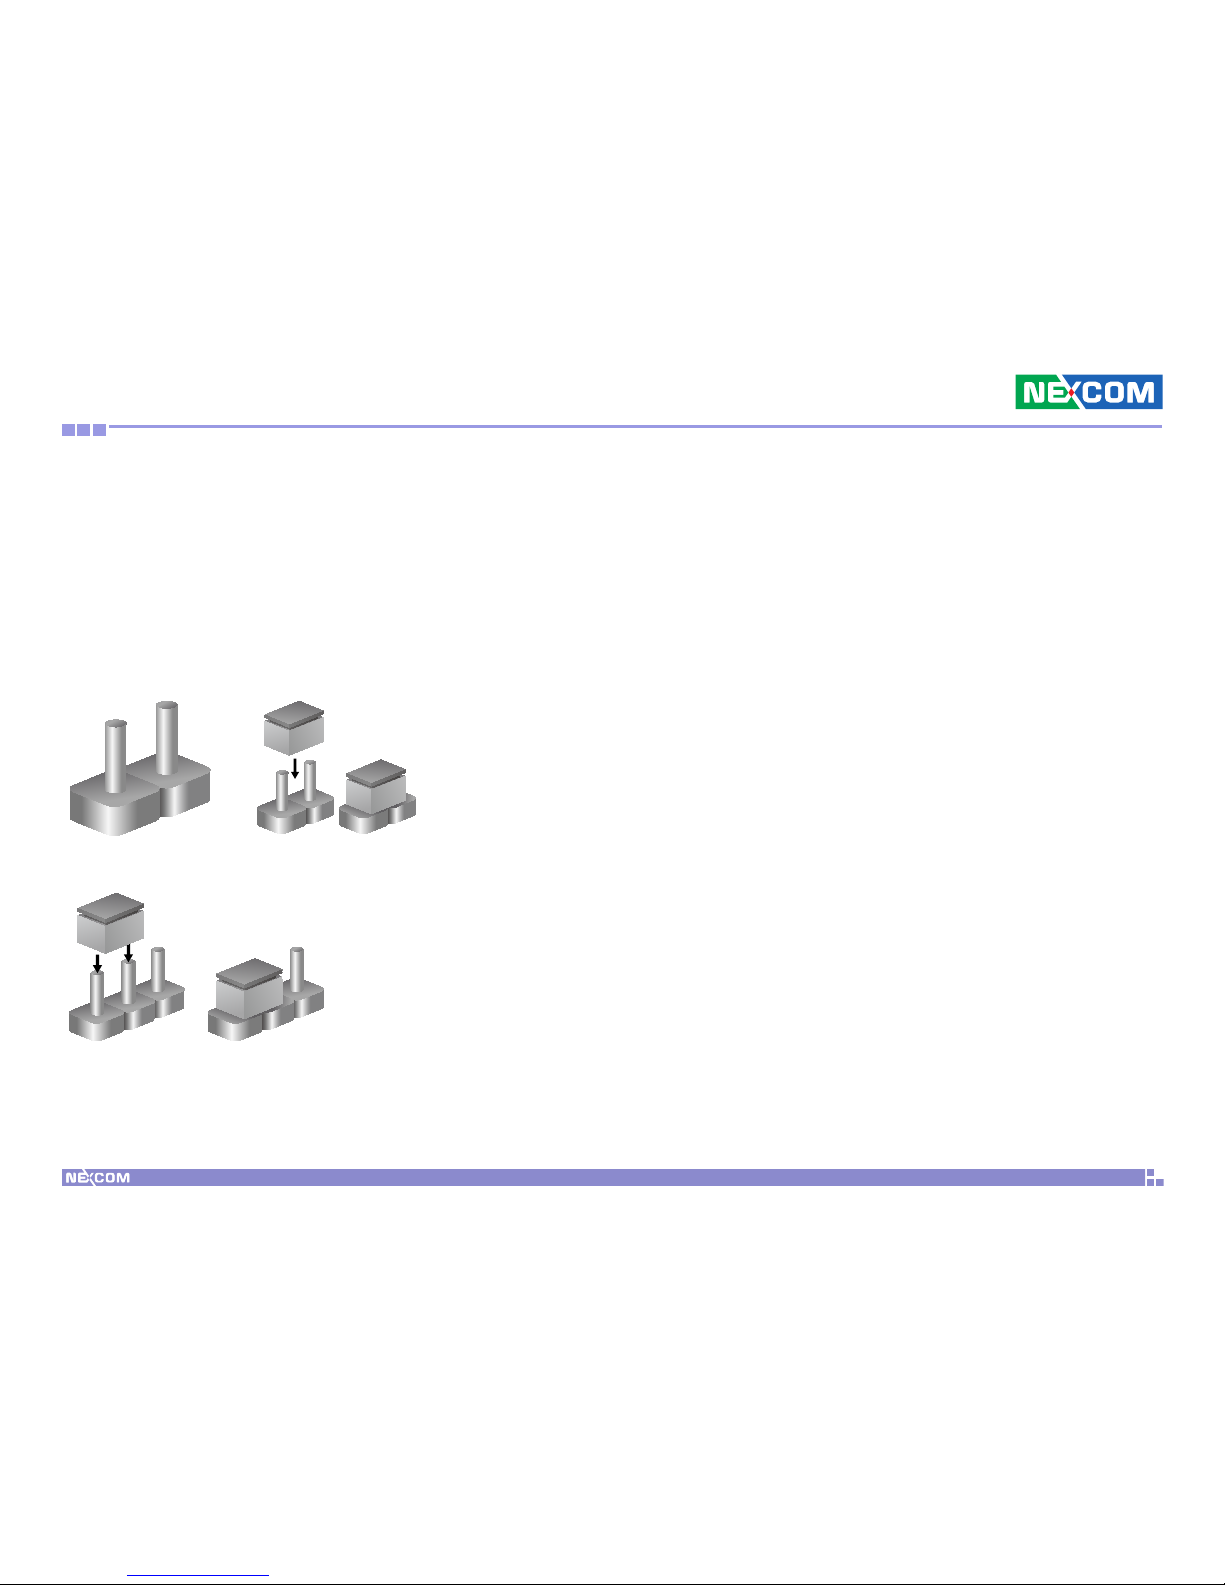
A jumper is the simplest kind of electric switch. It consists of two metal
pins and a cap. When setting the jumpers, ensure that the jumper caps are
placed on the correct pins. When the jumper cap is placed on both pins,
the jumper is short. If you remove the jumper cap, or place the jumper
cap on just one pin, the jumper is open.
Refer to the illustrations below for examples of what the 2-pin and 3-pin
jumpers look like when they are short (on) and open (off).
Two-Pin Jumpers: Open (Left) and Short (Right)
Three-Pin Jumpers: Pins 1 and 2 Are Short
1
2
3
1
2
3
Page 24
Copyright © 2010 NEXCOM International Co., Ltd. All Rights Reserved.
11
Chapter 2: Jumpers and Connectors
NDiS 164 User Manual
Locations of the Jumpers and Connectors
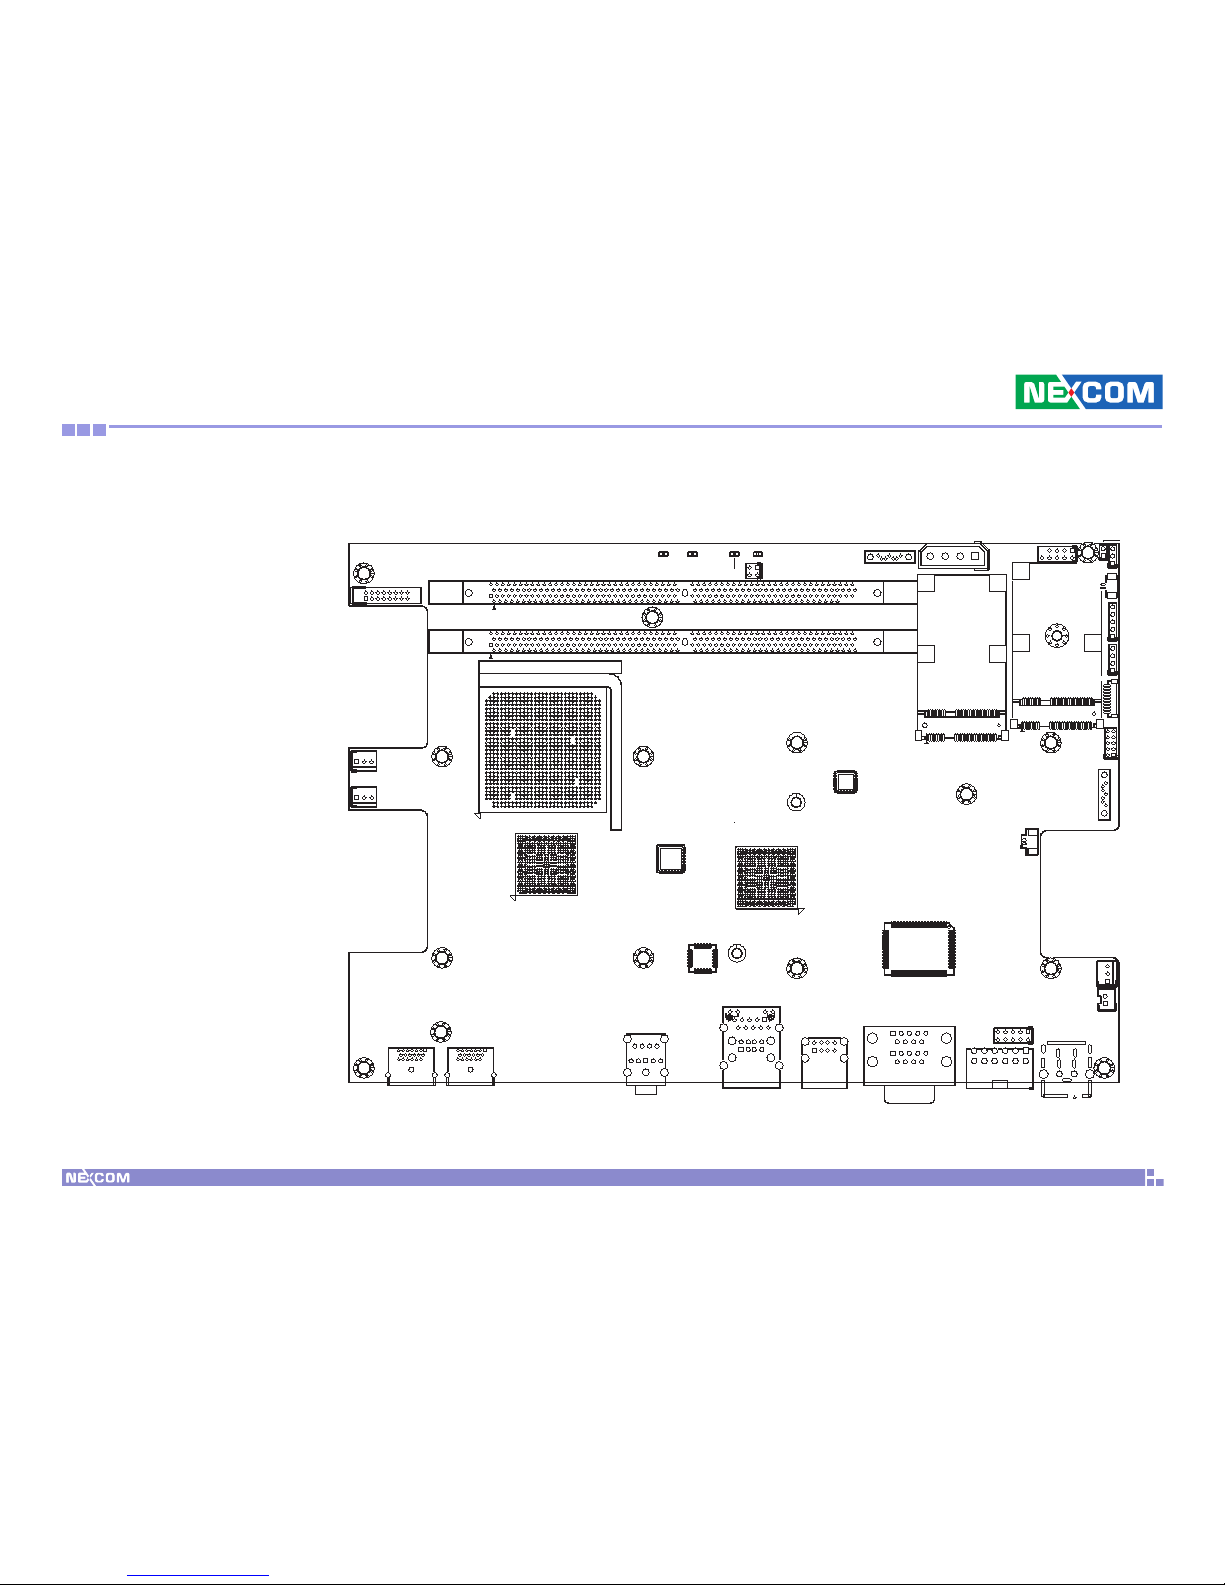
NDiB 164
The figure on the right is the NDiB 164
motherboard which is the motherboard
used in the NDiS 164 system. It shows
the locations of the jumpers and connectors.
J8
2
1
9
2
1
10
J9
3
2
1
4
JP7
1
2
15
16
CN1
1
4
J7
CN8
J11
2
1
LED2
LED1
HDD-LED3
PWR-LED4
1
J10
2
1
JP2
3
1
JP4
3
1
FAN1
3
1
FAN2
3
1
FAN3
4
1
JP6
5
1
JP5
1
7
CN9
17
CN5
1
JP1
CON1
USB1
10
1
J12
CN2
COM1
CN4
J6
1
J5
1
HDMI1
SATA PWR
SMBUS
IRDA
HWRST
uDOC
HDMI2
1
2
910
JP3
VGA
Page 25
Copyright © 2010 NEXCOM International Co., Ltd. All Rights Reserved.
12
Chapter 2: Jumpers and Connectors
NDiS 164 User Manual
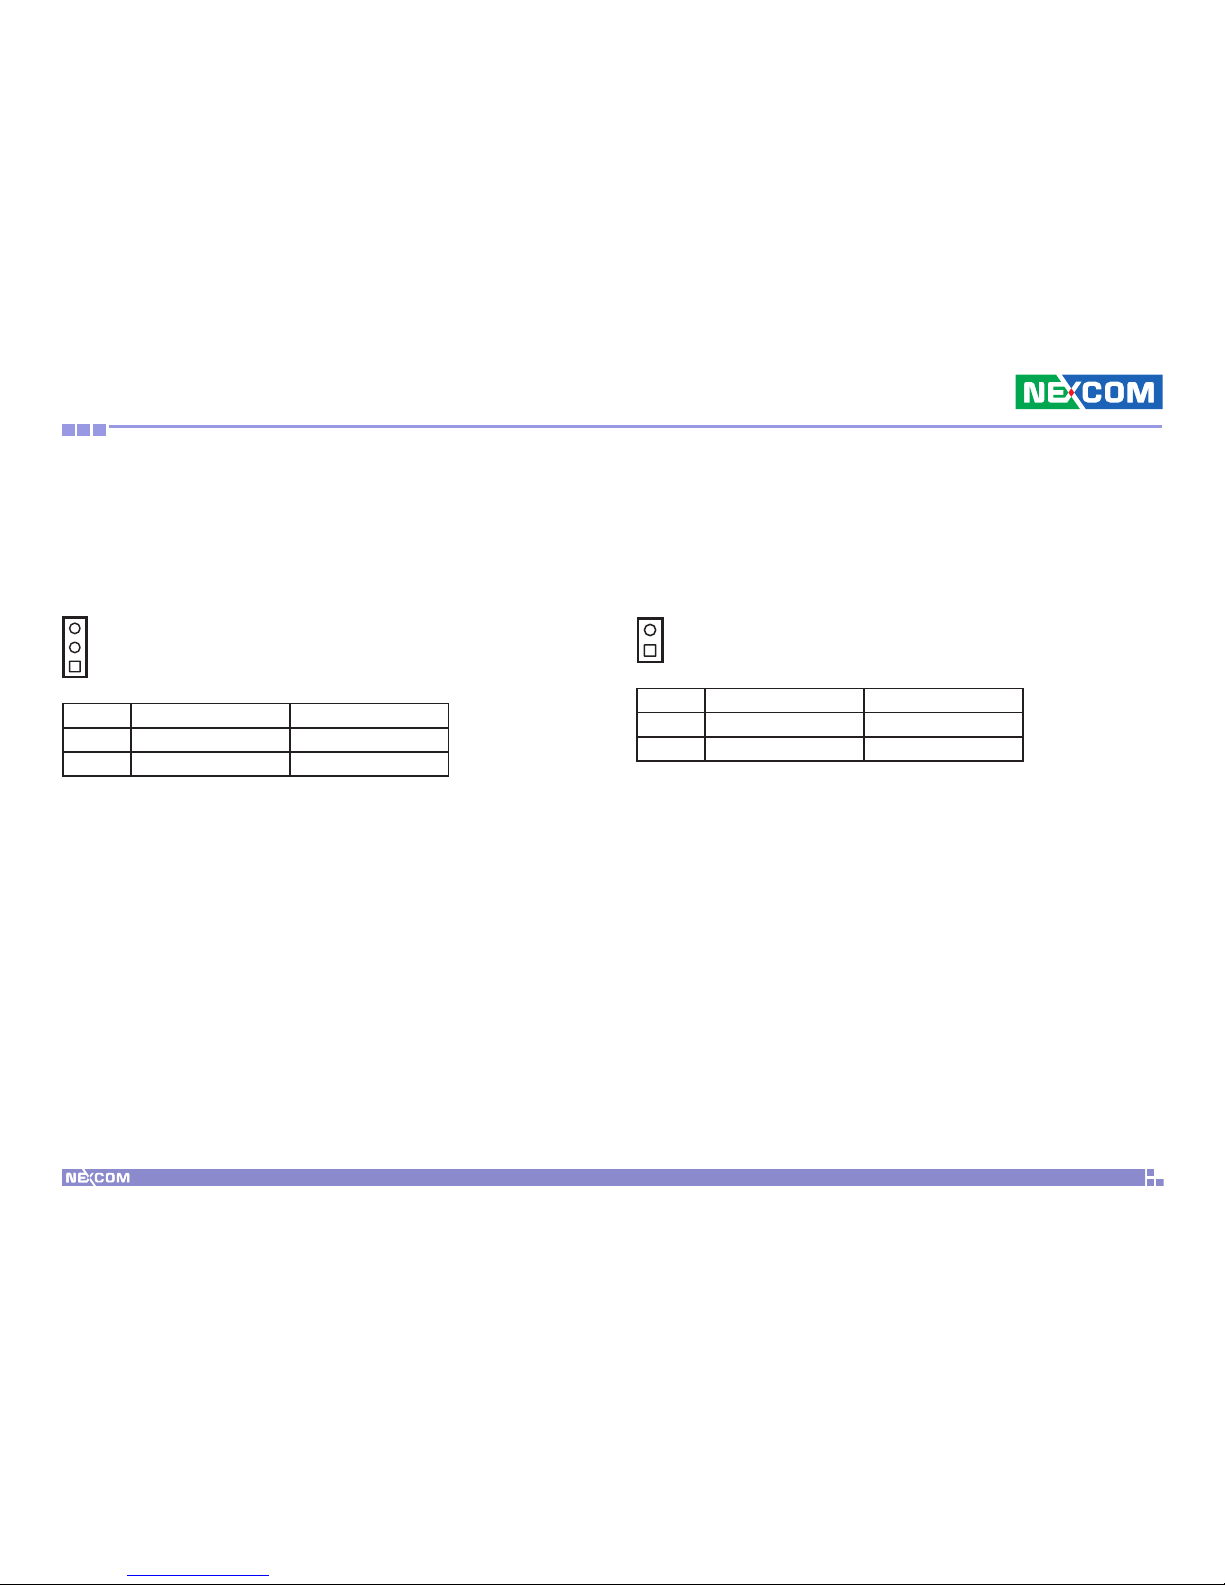
Pin No. Status Function Description
1-2 Short (default) VBAT IN
2-3 Short Clear CMOS
Jumpers
Clear CMOS Select
Connector size: 1x3, 2.54mm
Connector location: JP4
1
3
Hardware Reset
Connector size: 1x2, 2.5mm
Connector location: JP2
1
2
Pin No. Status Function Description
1-2 Open (default) Normal
1-2 Short Reset#
Page 26
Copyright © 2010 NEXCOM International Co., Ltd. All Rights Reserved.
13
Chapter 2: Jumpers and Connectors
NDiS 164 User Manual
External I/O Interface
Connector Pin Definitions
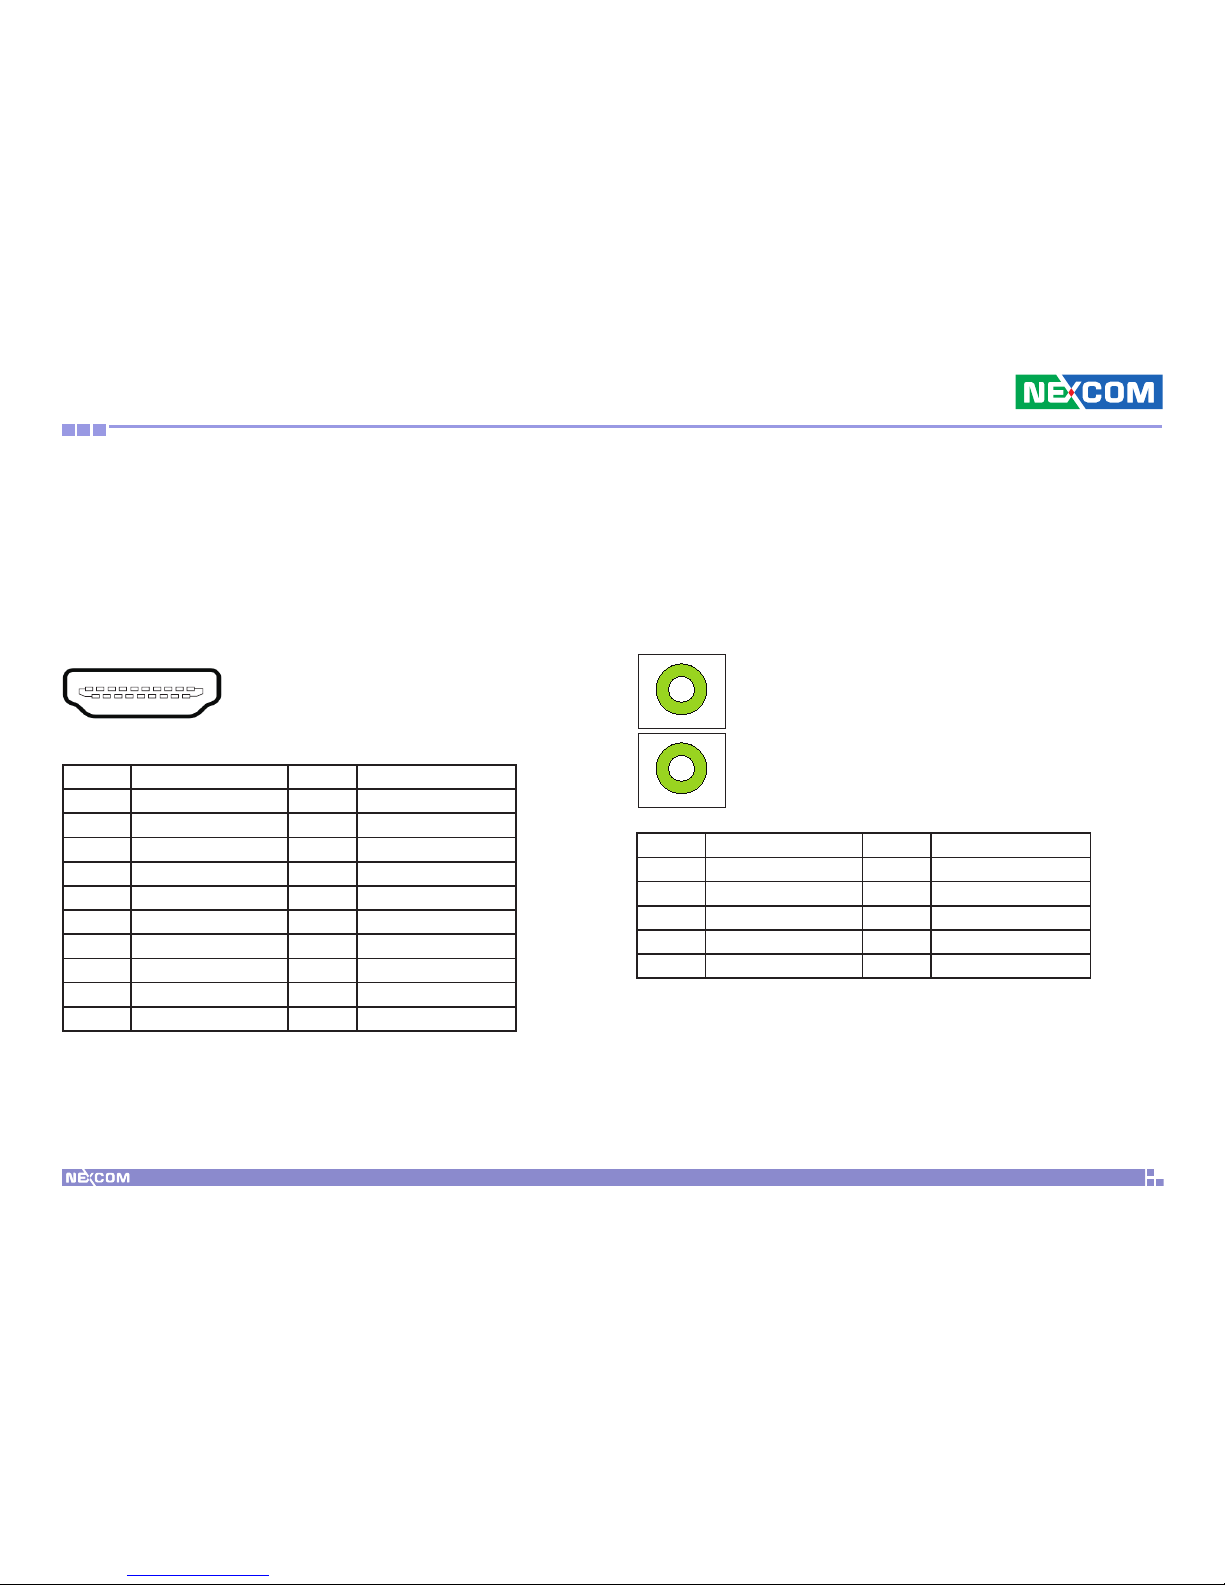
HDMI Type A Connector
Connector size: 19-pin
Connector location: HDMI 1-4 J1, J2
1
2
19
18
Pin Definition Pin Definition
1 HDMI D2P 2 HDMI_GND
3 HDMI D2N 4 HDMI D1P
5 HDMI_GND 6 HDMI D1N
7 HDMI D0P 8 HDMI_GND
9 HDMI D0N 10 HDMI LKP
11 HDMI_GND 12 HDMI LKN
13 NC 14 NC
15 HDMI_CTL_CLK 16 HDMI_CTL_SDA
17 HDMI_GND 18 +5V
19 HDMI_HDP
Line-out Jacks
Connector size: 5-pin jack, 25.9x12.6x17.0mm
Connector location: CN2
Pin Definition Pin Definition
1 GND
2 LOUT_L1 22 LOUT_L2
3 NC 23 NC
4 NC 24 NC
5 LOUT_R1 25 LOUT_R2
Page 27
Copyright © 2010 NEXCOM International Co., Ltd. All Rights Reserved.
14
Chapter 2: Jumpers and Connectors
NDiS 164 User Manual
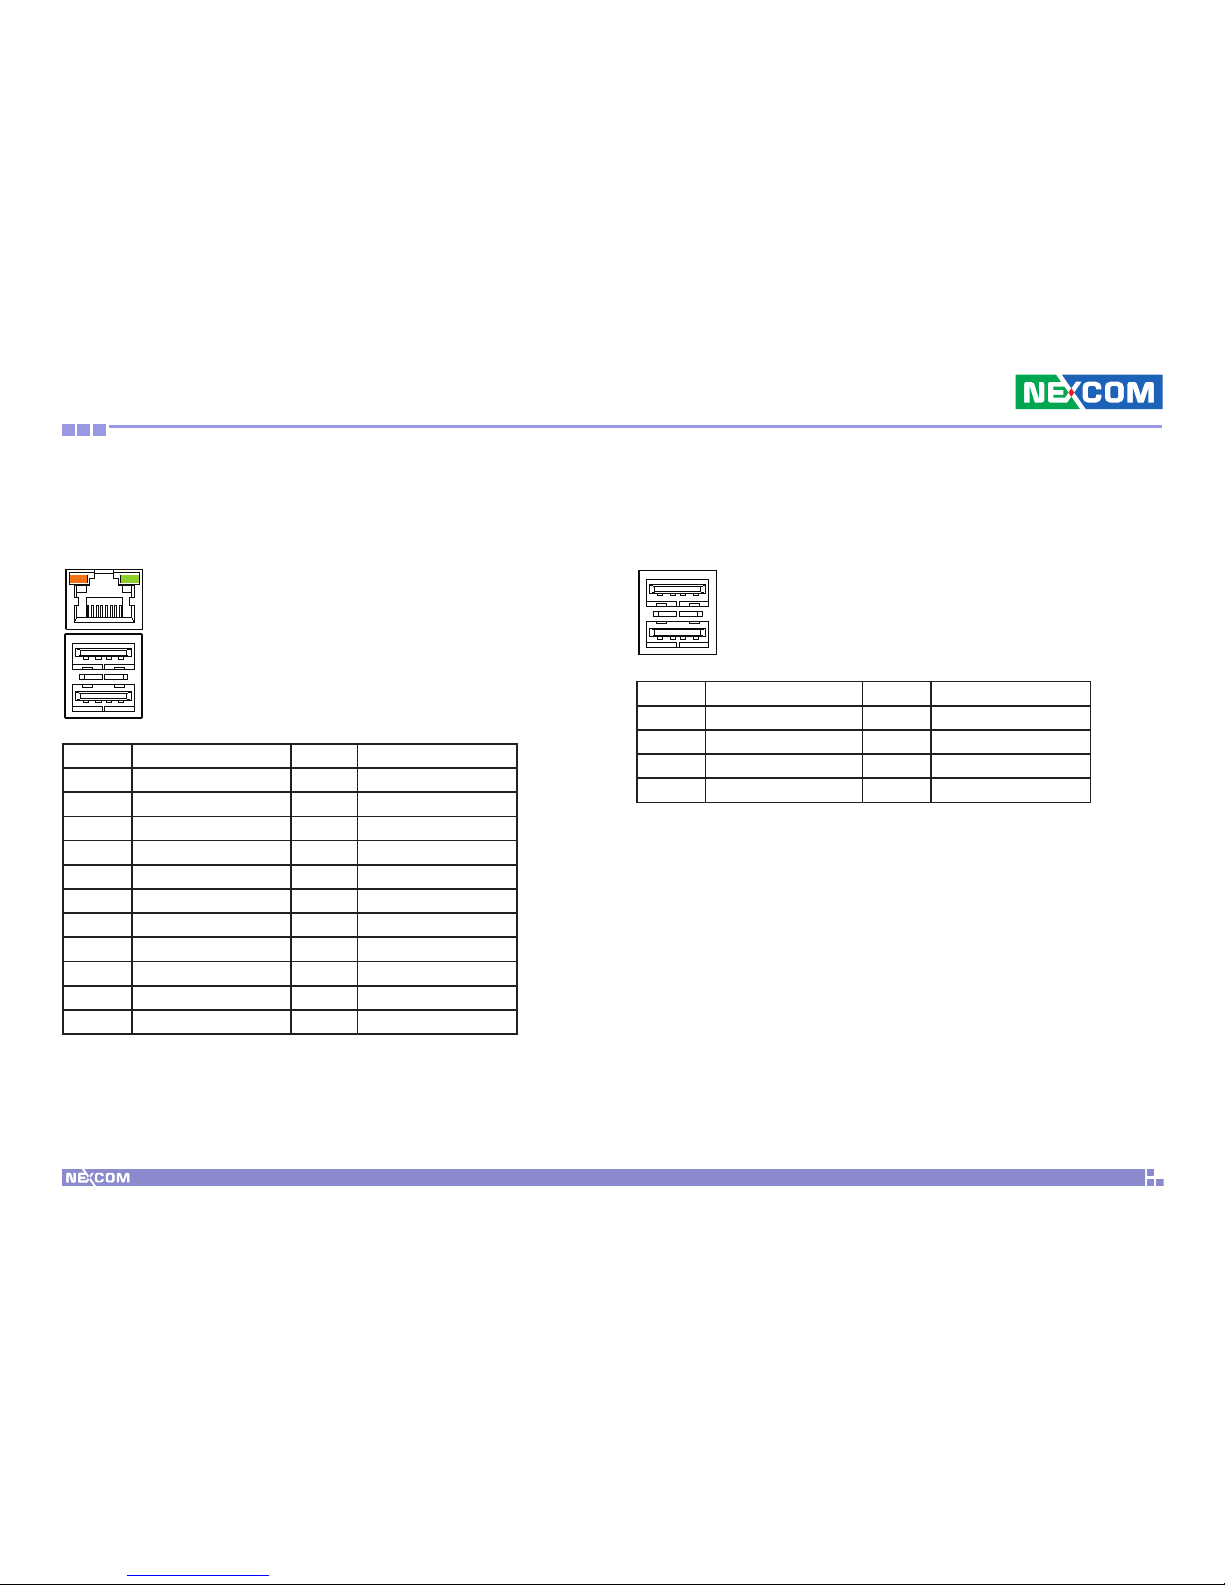
Dual USB and LAN Ports
Connector size: RJ-45 and Dual USB
Connector location: CN4
Pin Definition Pin Definition
1 USB0_VCC 2 USB_0#
3 USB_0 4 U0_GND
5 USB1_VCC 6 USB_1#
7 USB_1 8 U1_GND
9 LAN_VCC 10 LAN_MDI0P
11 LAN_MDI0N 12 LAN_MDI1P
13 LAN_MDI1N 14 LAN_MDI2P
15 LAN_MDI2N 16 LAN_MDI3P
17 LAN_MDI3N 18 GND
19 LAN_LED1+ 20 LAN_ACTLED#
21 LAN_LED2+ 22 LAN_LED2-
LAN
USB1
USB0
Dual USB Ports
Connector size: Dual USB
Connector location: USB1
USB
USB
Pin Definition Pin Definition
1 +5V 5 +5V
2 USB0_N 6 USB1_N
3 USB0_P 7 USB1_P
4 GND 8 GND
Page 28
Copyright © 2010 NEXCOM International Co., Ltd. All Rights Reserved.
15
Chapter 2: Jumpers and Connectors
NDiS 164 User Manual
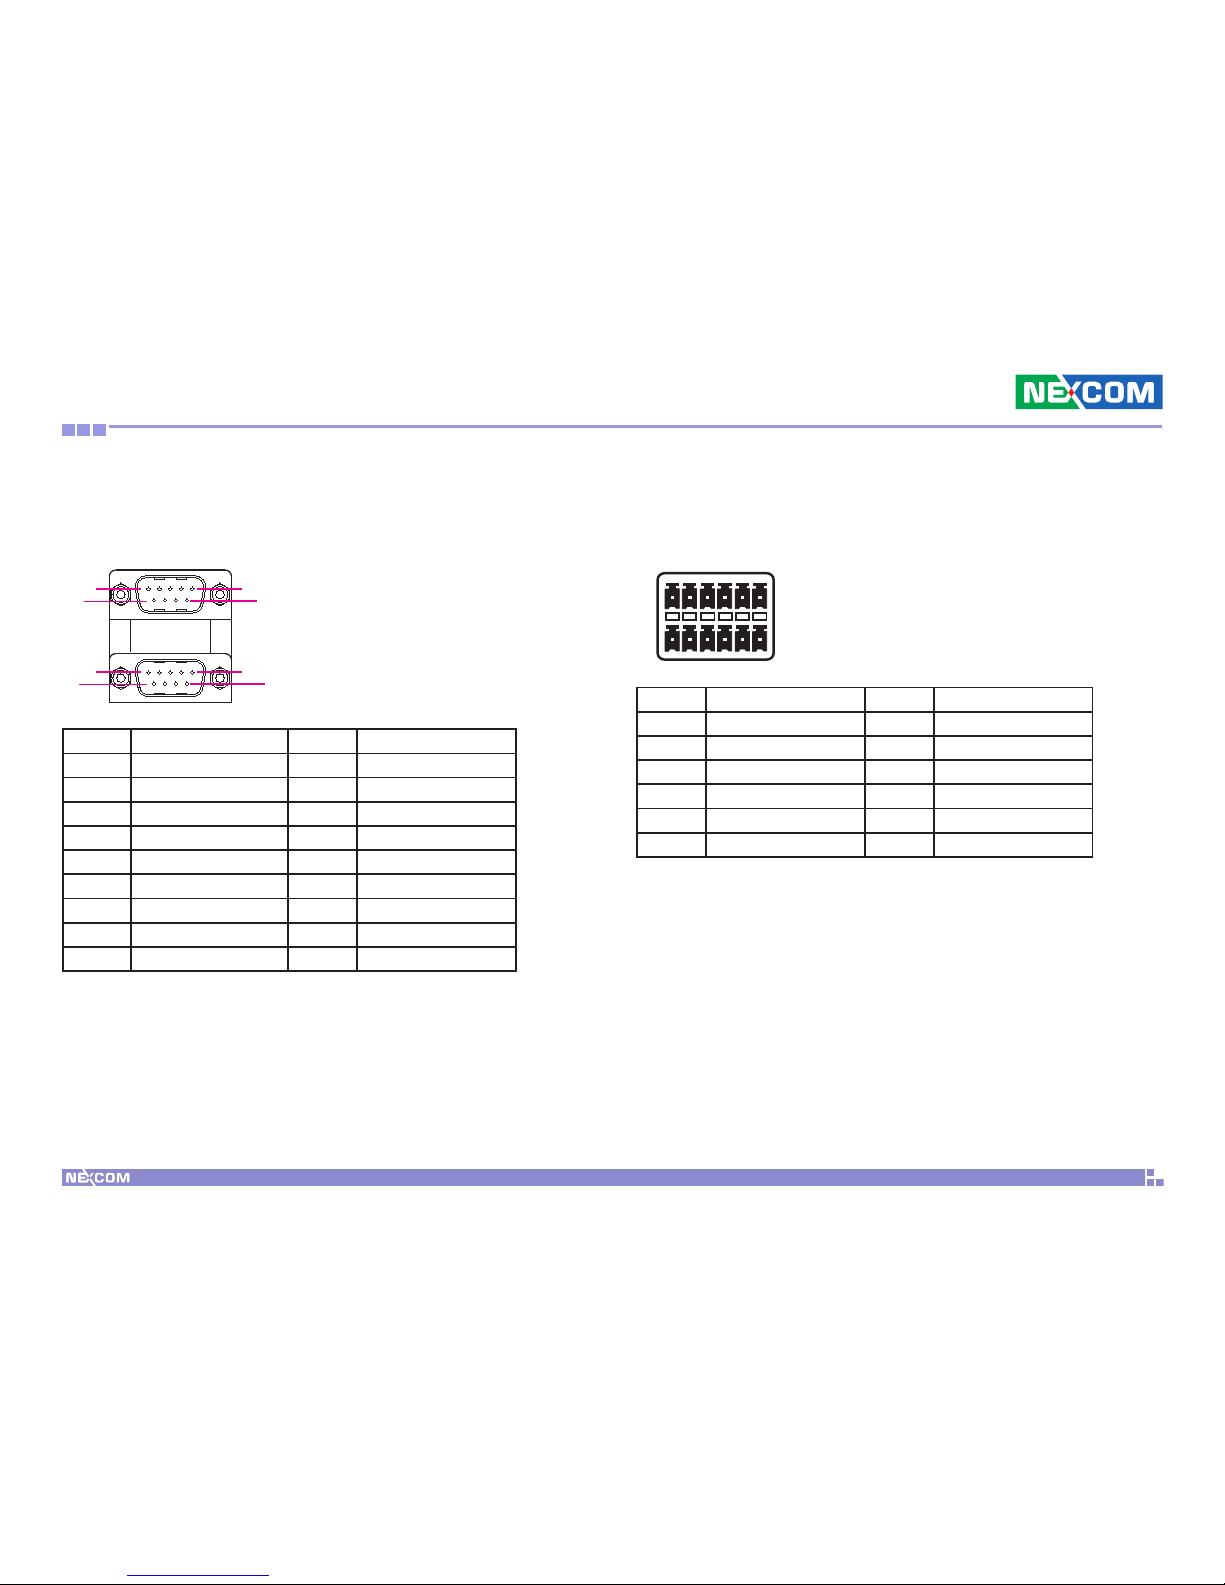
Serial (RS232) Ports
Connector size: DB-9 port
Connector location: COM1
Pin Definition Pin Definition
1 SP_DCD_A 2 SP_RXD_A
3 SP_TXD_A 4 SP_DTR_A
5 GND 6 SP_DSR_A
7 SP_RTS_A 8 SP_CTS_A
9 SP_RI_A 10 SP_DCD_B
11 SP_RXD_B 12 SP_TXD_B
13 SP_DTR_B 14 GND
15 SP_DSR_B 16 SP_RTS_B
17 SP_CTS_B 18 SP_RI_B
6
1 5
9
15
10 14
18
COM RX/TX Connector
Connector size: 2x6 pin
Connector location: CON1
Pin Definition Pin Definition
1 TXD-6 2 RXD-6
3 GND 4 TXD-4
5 RXD-4 6 GND
7 TXD-5 8 RXD-5
9 GND 10 TXD-3
11 TXD-3 12 GND
6 1
12
7
Page 29
Copyright © 2010 NEXCOM International Co., Ltd. All Rights Reserved.
16
Chapter 2: Jumpers and Connectors
NDiS 164 User Manual
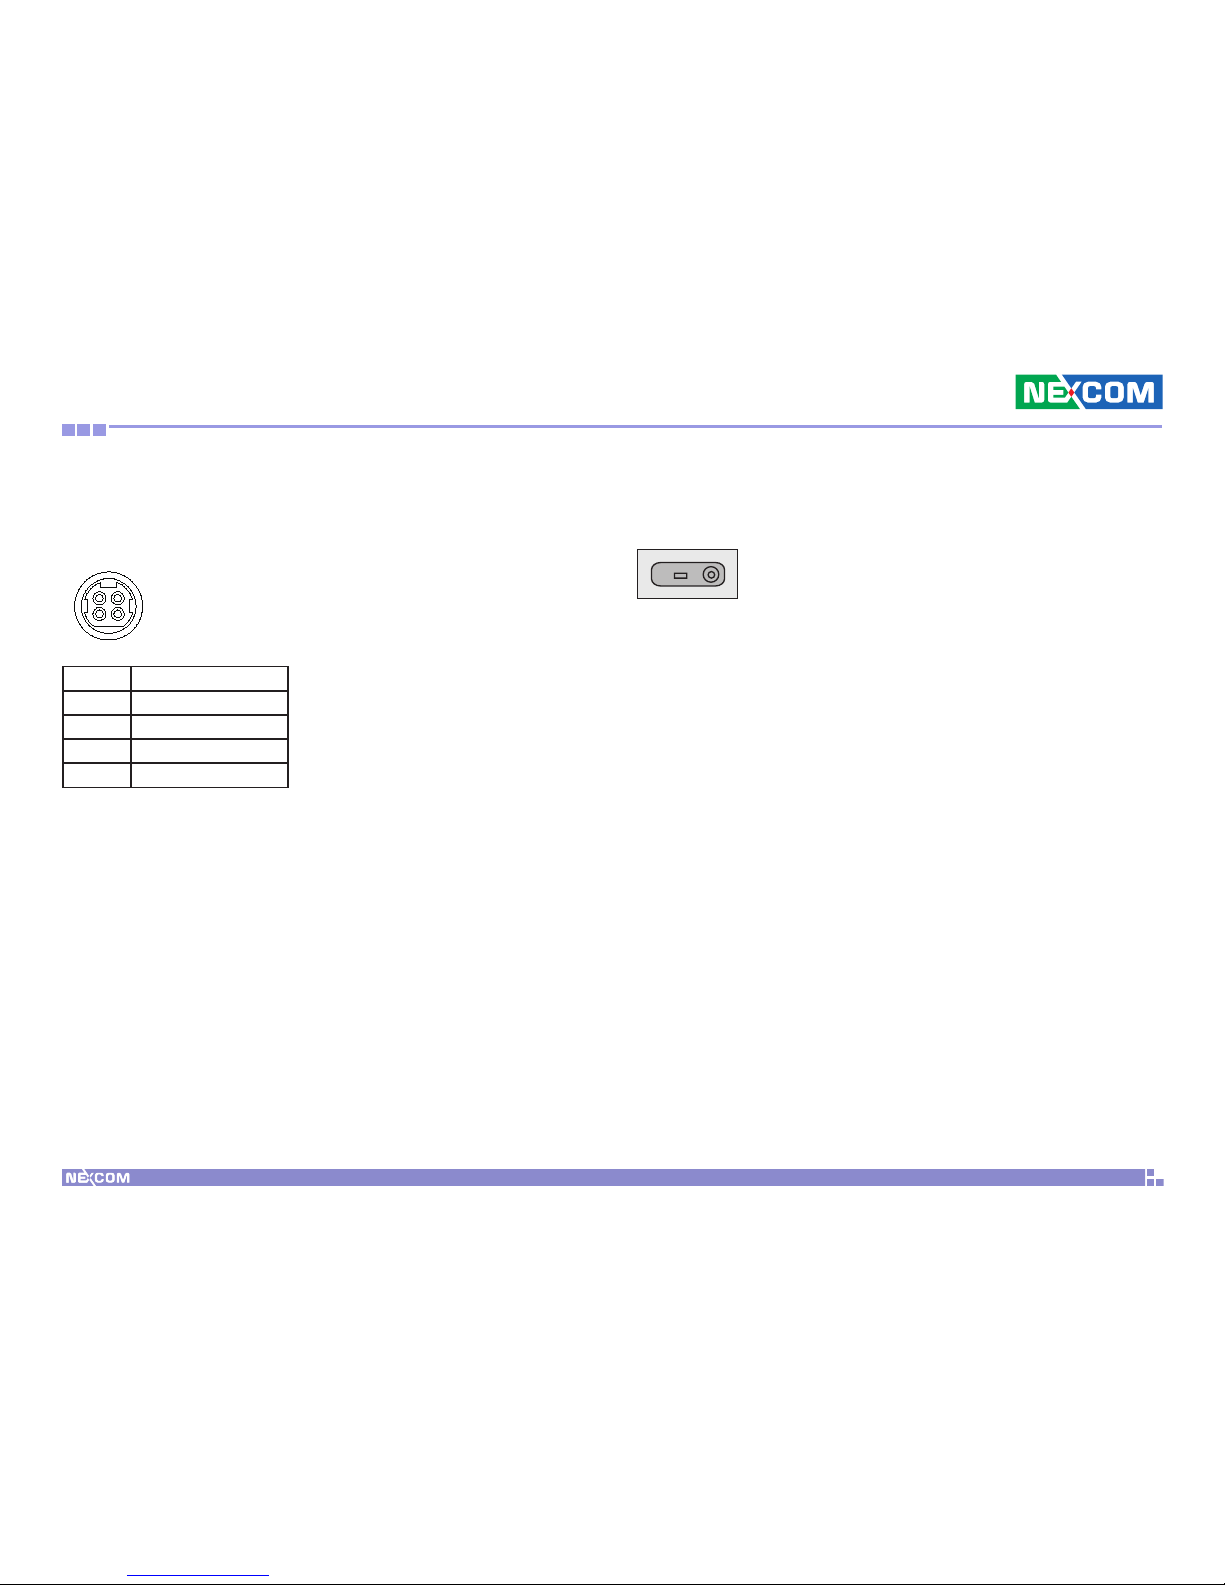
DC Power Input
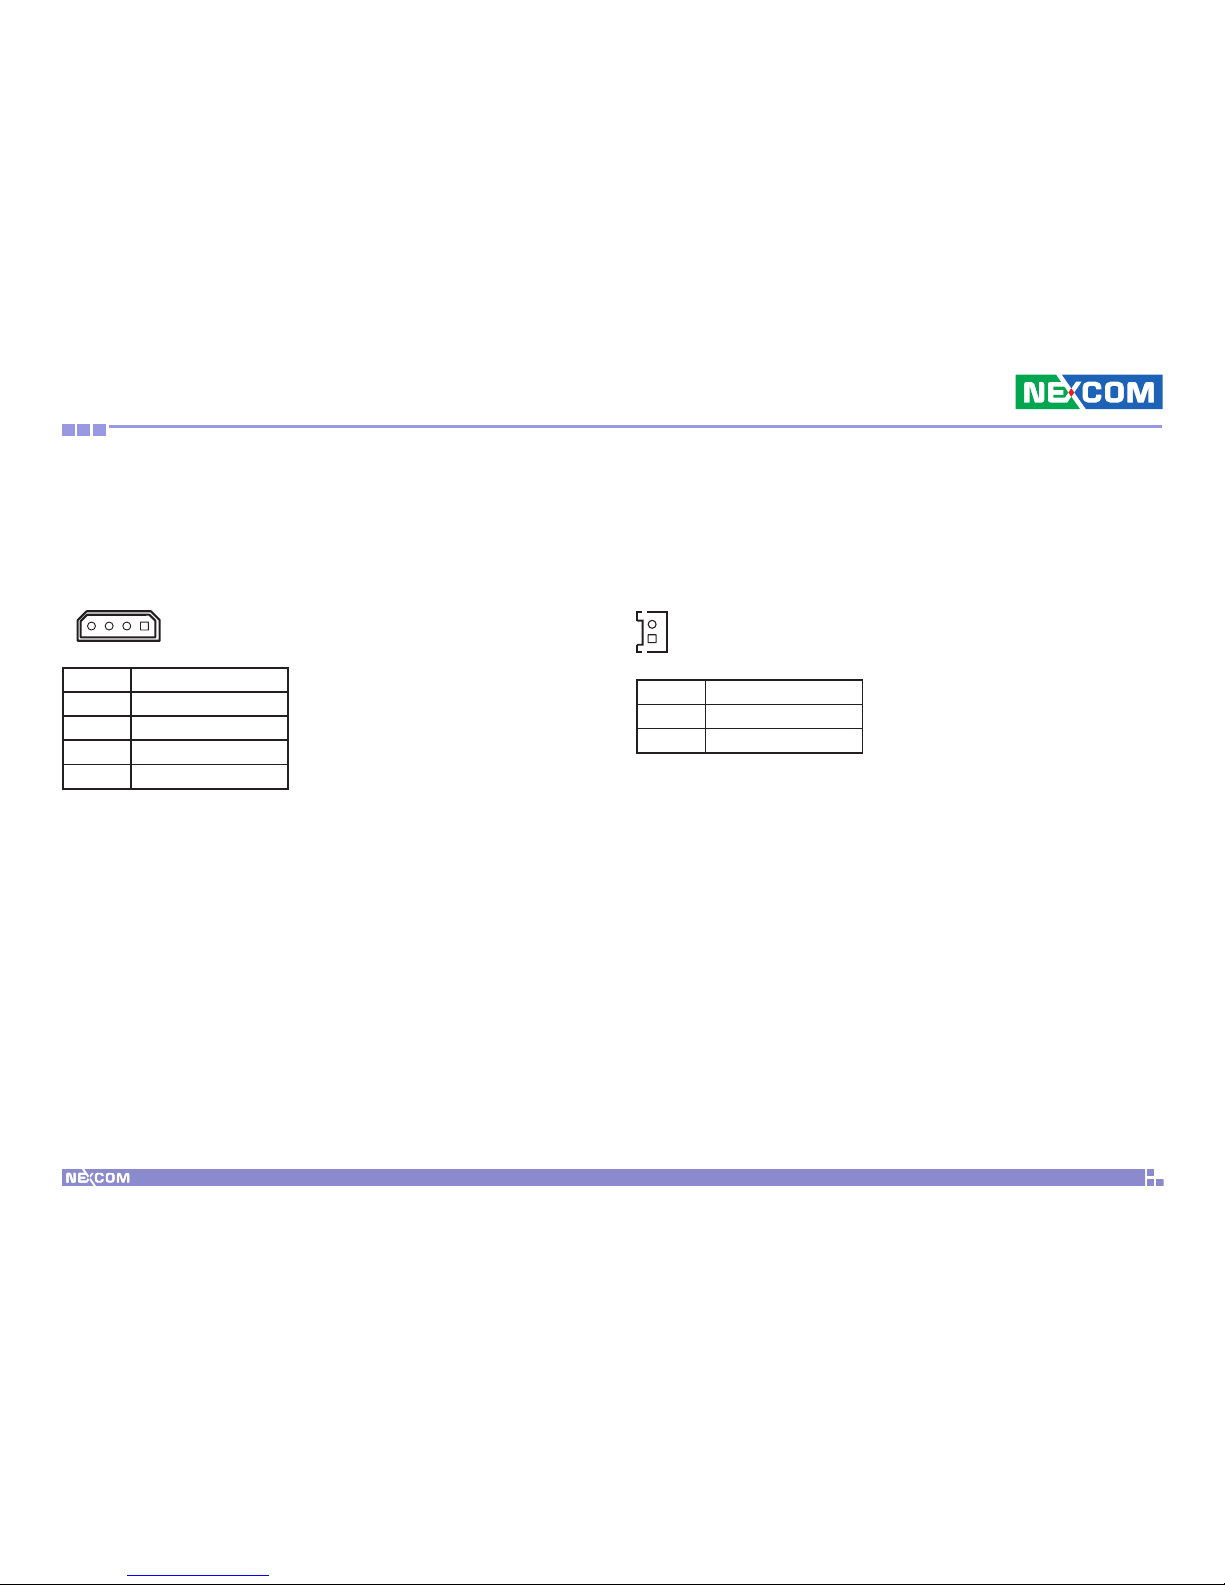
Connector size: 4-pin power jack
Connector location: CN8
3
1
2
4
Pin Definition
1 +12V
2 +12V
3 GND
4 GND
Power Switch Button
ATX switch, unlock
Page 30
Copyright © 2010 NEXCOM International Co., Ltd. All Rights Reserved.
17
Chapter 2: Jumpers and Connectors
NDiS 164 User Manual
Internal Connectors
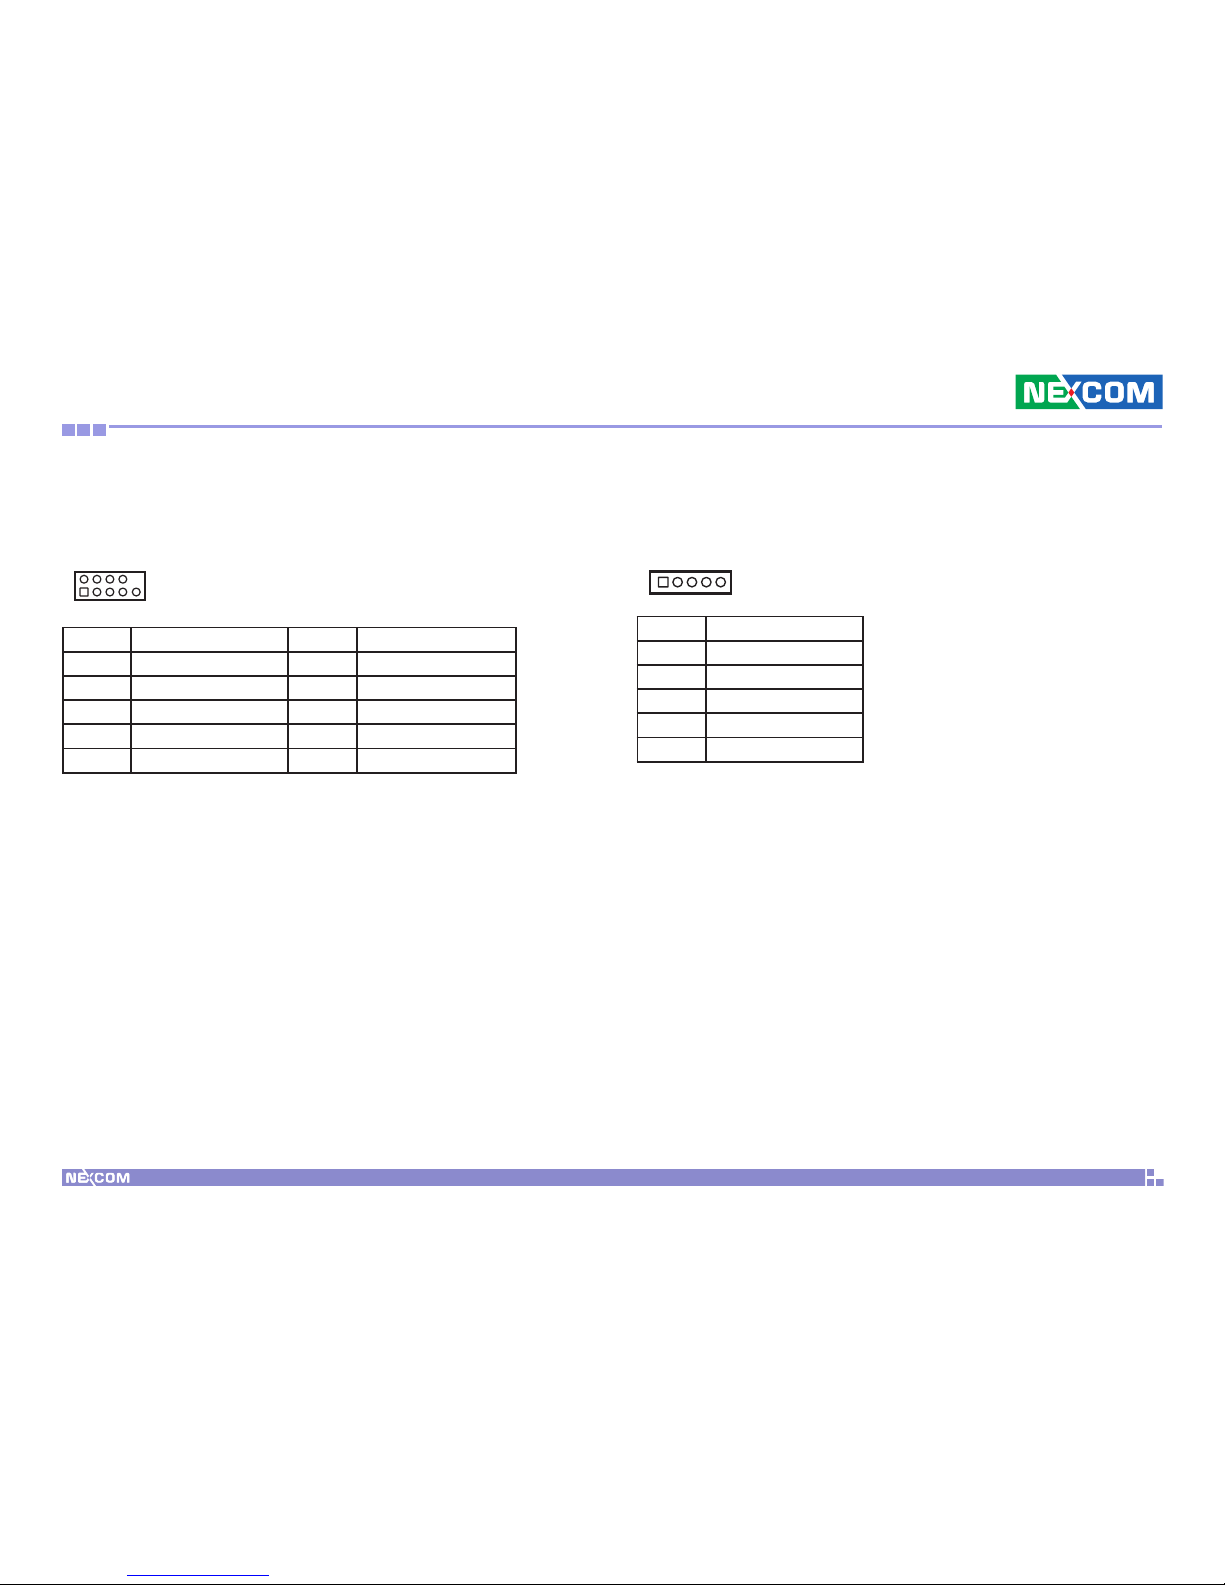
SATA Power Connector
Connector size: 1x4 pin
Connector location: J7
1
4
Pin Definition
1 +V12S
2 GND
3 GND
4 +V5S
SATA DOM Power Connector
Connector size: 2-pin, JST 2.54 mm pitch
Connector location: J8
Pin Definition
1 GND
2 +5V
1
2
Page 31
Copyright © 2010 NEXCOM International Co., Ltd. All Rights Reserved.
18
Chapter 2: Jumpers and Connectors
NDiS 164 User Manual
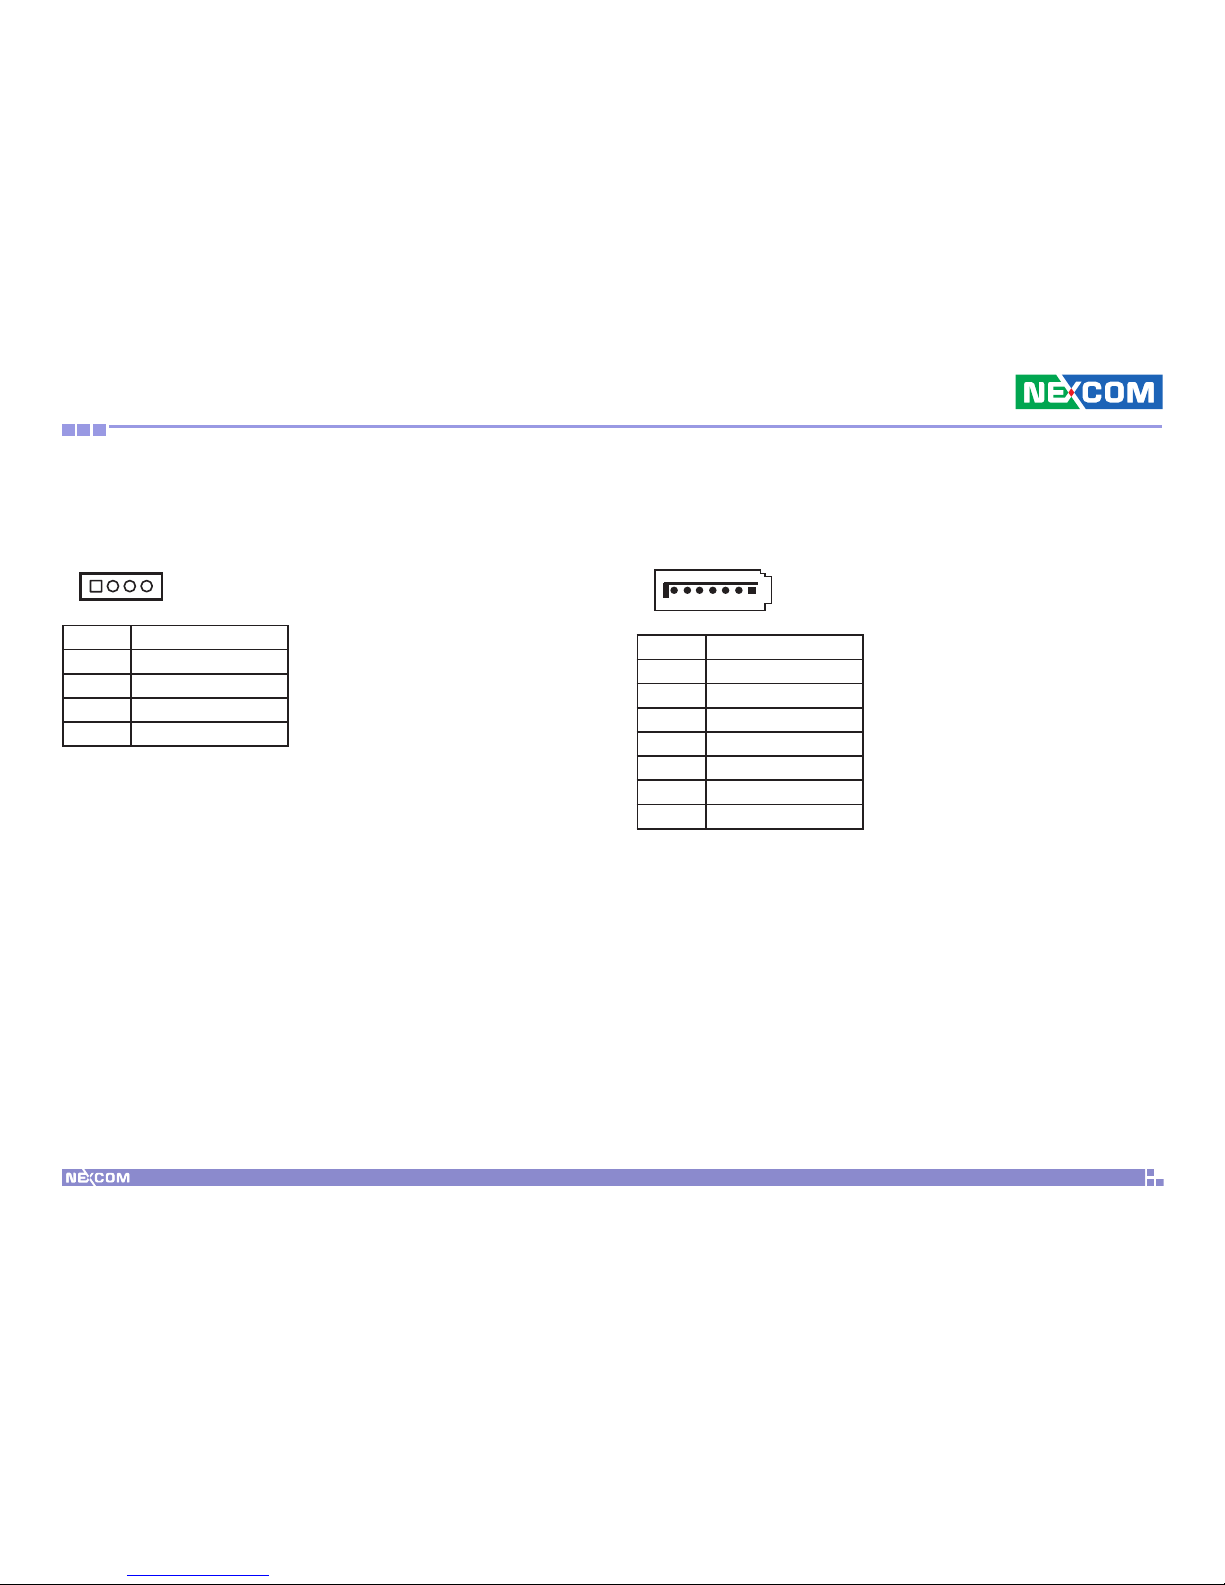
uDOC Connector
Connector size: 10-pin header, 2.0 mm pitch
Connector location: J9
1
2
9
10
Pin Definition Pin Definition
1 VCC5 2 VCC5
3 USB4# 4 USB5#
5 USB4 6 USB5
7 GND 8 GND
9 NC 10
IrDA Pin Header
Connector size: 1x5 (2.0mm)
Connector location: JP5
1
5
Pin Definition
1 +5V_ATX
2 NC
3 IR_RX
4 GND
5 IR_TX
Page 32
Copyright © 2010 NEXCOM International Co., Ltd. All Rights Reserved.
19
Chapter 2: Jumpers and Connectors
NDiS 164 User Manual
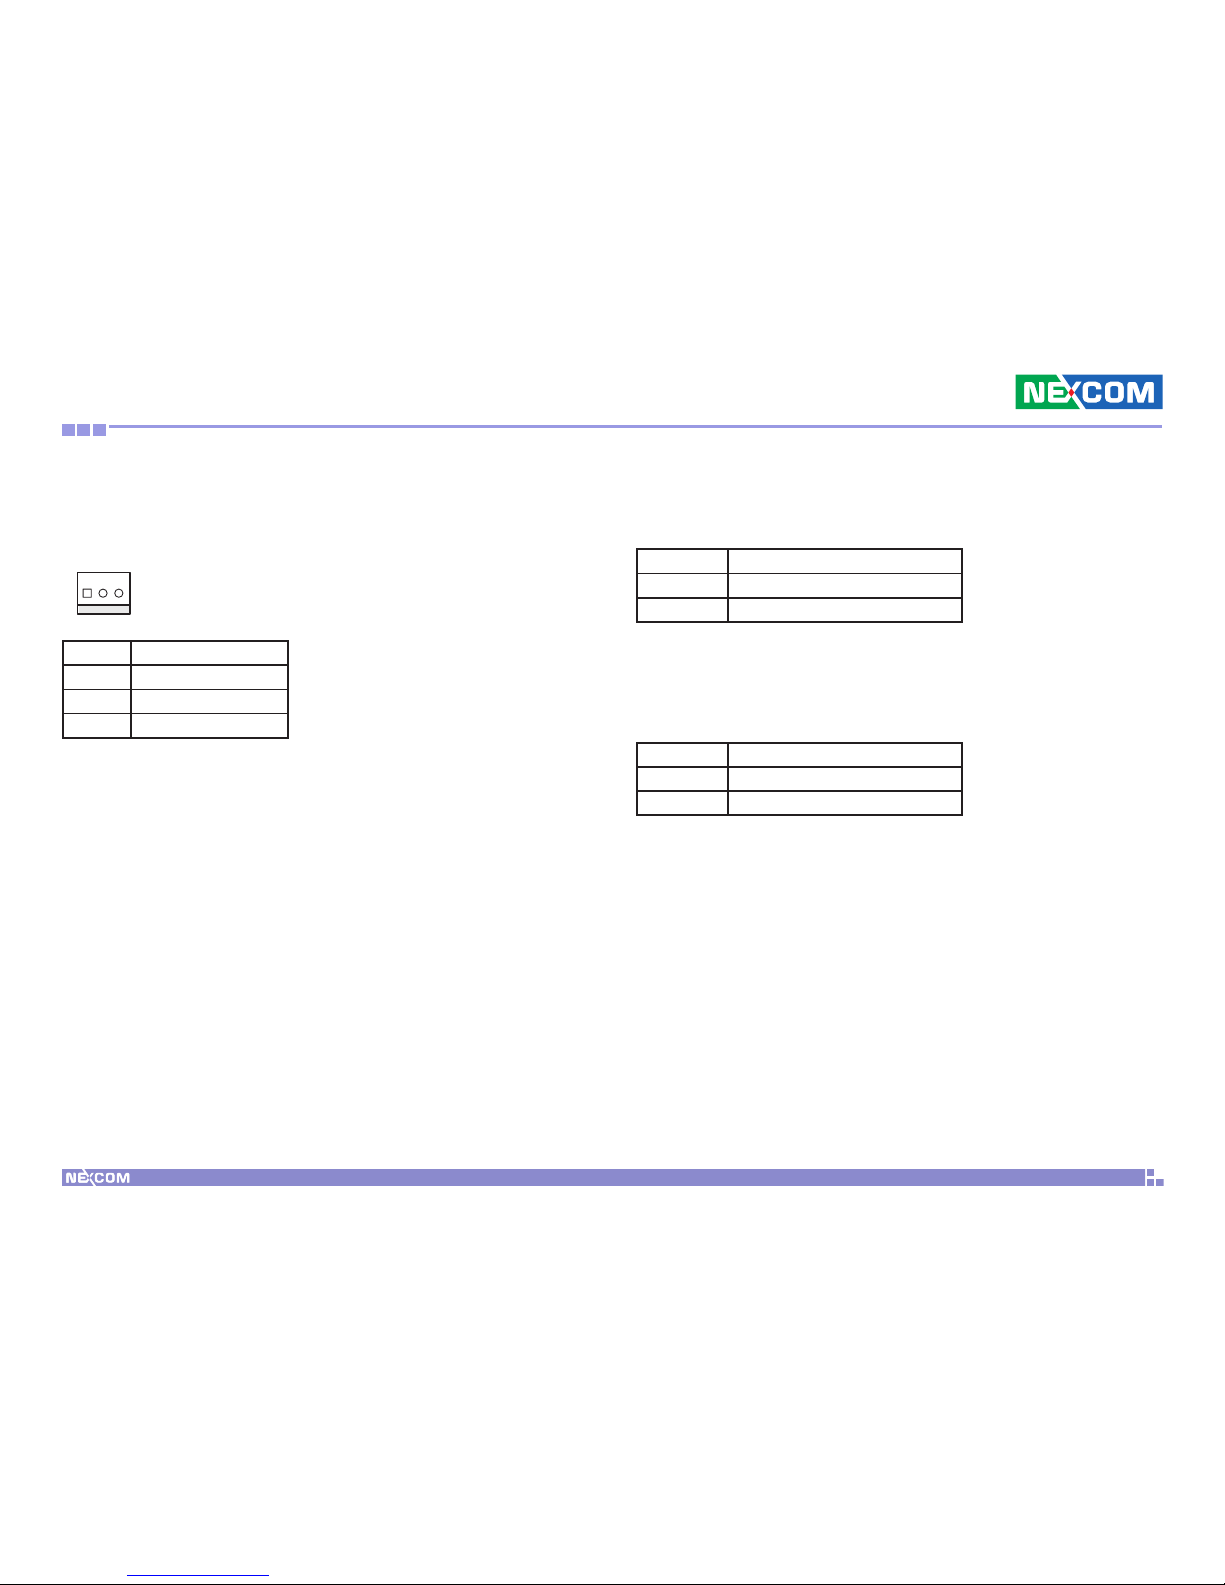
SMBus Connector
Connector size: 1x4 (2.54mm)
Connector location: JP6
1
4
Pin Definition
1 +3.3V
2 SMB0_CLK
3 SMB0_DAT
4 GND
SATA Ports
Connector size: Standard Serial ATAII 7P (1.27mm)
Connector location: CN5, CN9
7 1
Pin Definition
1 GND
2 SATA_TXP0 -
3 SATA_TXN0
4 GND
5 SATA_RXN0
6 SATA_RXP0
7 GND
Page 33
Copyright © 2010 NEXCOM International Co., Ltd. All Rights Reserved.
20
Chapter 2: Jumpers and Connectors
NDiS 164 User Manual
Fan Connectors
Connector size: 3-pin Wafer, 5.08mm
Connector location: FAN1, FAN2, FAN3
1 3
Pin Definition
1 GND
2 +12_ATX
3 FAN SPEED
SATA Status LED
Connector location: LED3
LED Color Status
Dark NO DATA TRANSFER ON SATA
Yellow SATA ACTIVE
Power Status LED
Connector location: LED4
LED Color Status
Dark POWER OFF
Green +5V POWER ON OK
Page 34
Copyright © 2010 NEXCOM International Co., Ltd. All Rights Reserved.
21
Chapter 2: Jumpers and Connectors
NDiS 164 User Manual
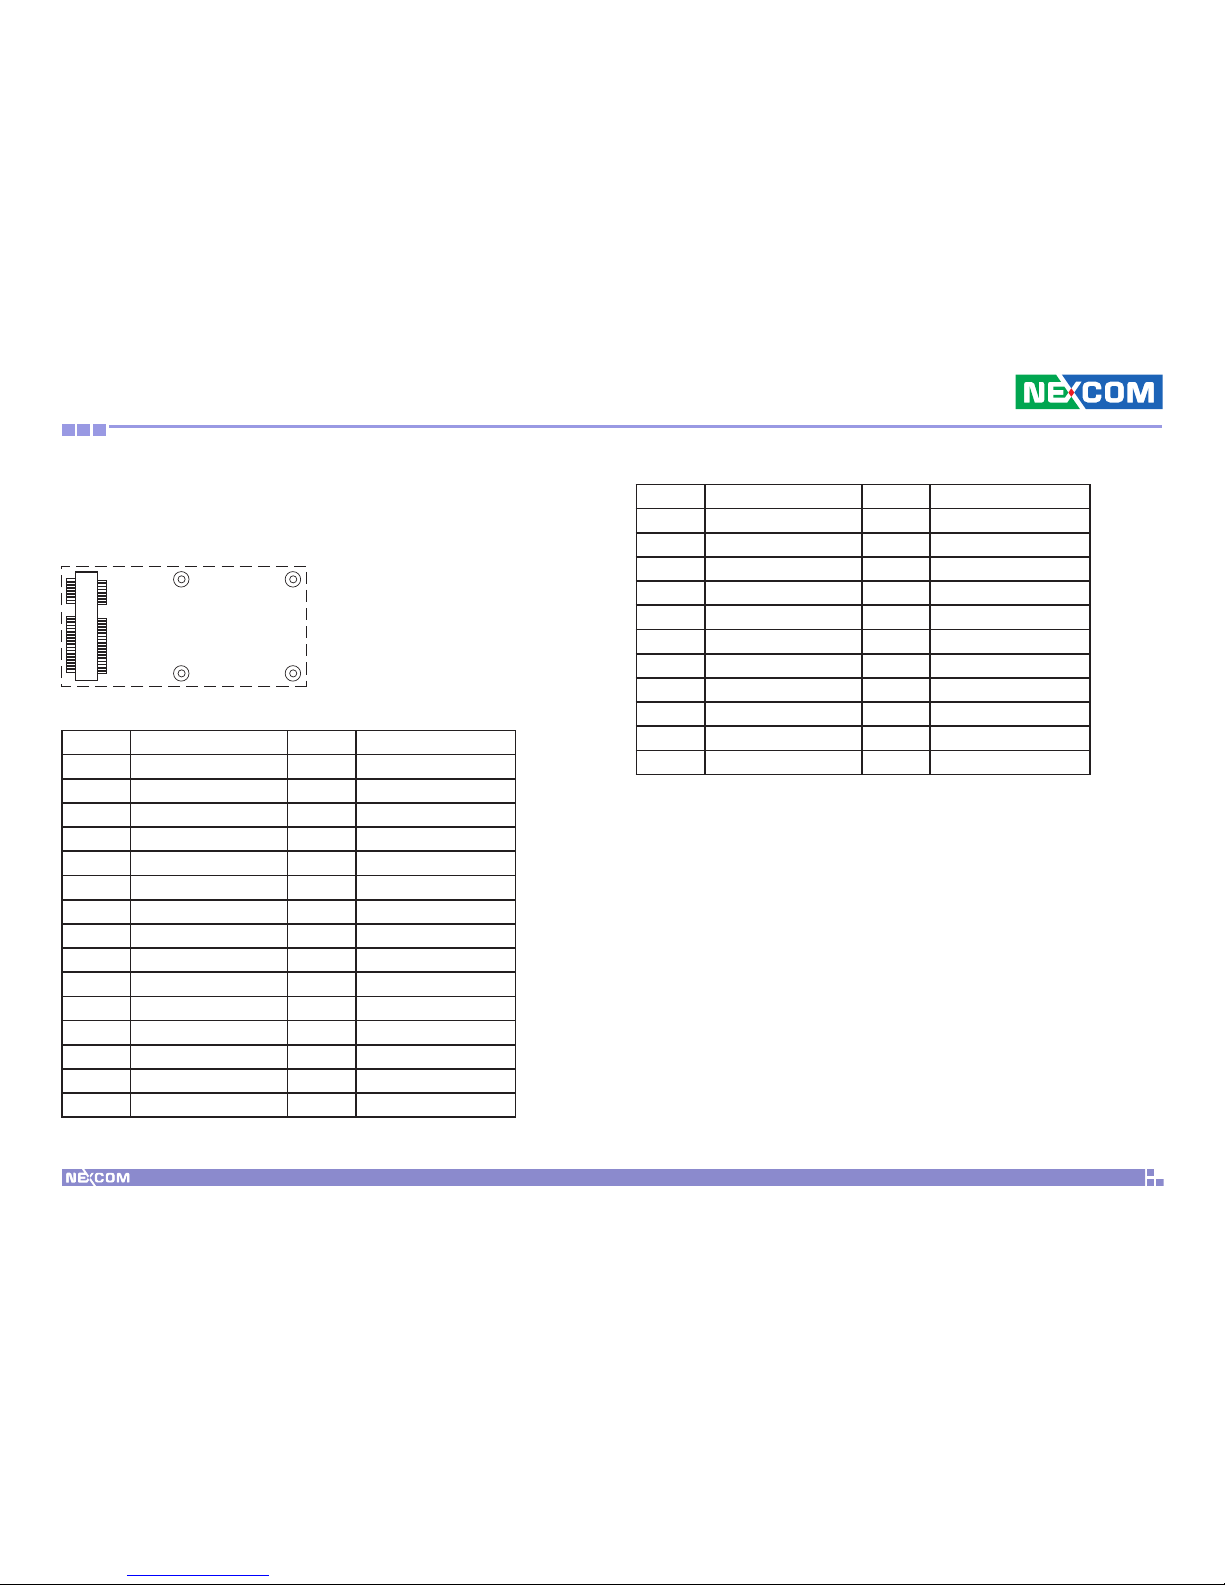
Mini-PCIe Slots
Connector location: CN6, CN7
51152
2
Pin Definition Pin Definition
1 WAKE0# 2 +V3.3_MINI
3 NC 4 GND
5 NC 6 +1.5S_MINI
7 PCIE_MINI_CLKREQ#1 8 NC
9 GND 10 NC
11 GPP_CLK1_N 12 NC
13 GPP_CLK1_P 14 NC
15 GND 16 NC
17 NC 18 GND
19 NC 20 MINICARD1_DIS#
21 GND 22 PCIE_RST#
23 PCIE_RX1- 24 +V3.3A_MINI
25 PCIE_RX1+ 26 GND
27 GND 28 +V1.5S_MINI
29 GND 30 SMB1_CLK
Pin Definition Pin Definition
31 PCIE_TX1- 32 SMB1_DAT
33 PCIE_TX1+ 34 GND
35 GND 36 USB_6N_L
37 GND 38 USB_6P_L
39 +V3.3A_MINI 40 GND
41 +V3.3A_MINI 42 NC
43 GND 44 LED_WLAN_N
45 NC 46 NC
47 NC 48 +V1.5S_MINI
49 NC 50 GND
51 NC 52 +V3.3A_MINI
Page 35
Copyright © 2010 NEXCOM International Co., Ltd. All Rights Reserved.
22
Chapter 3: System Setup
NDiS 164 User Manual
Ch a P t e r 3: sY s t e m se t u P
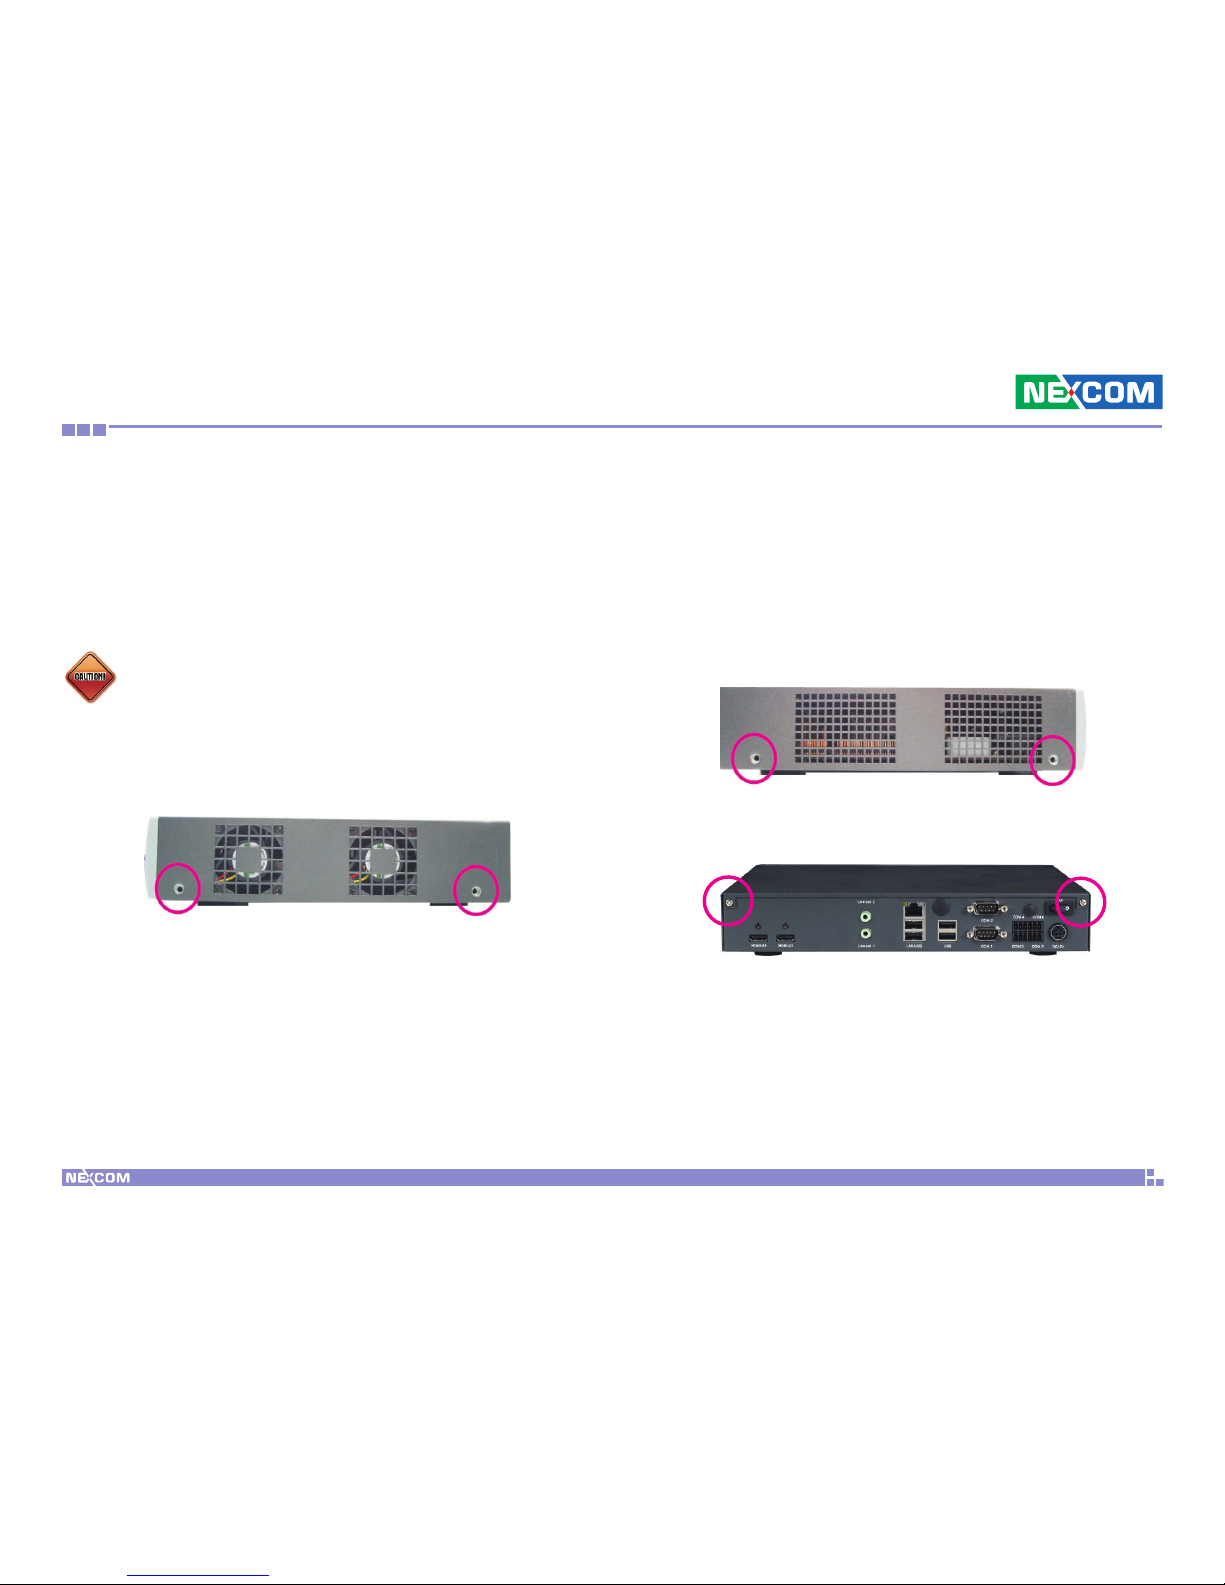
Removing the Chassis Cover
Right View
Left View
CAUTION!CAUTION!
Prior to removing the chassis cover, make sure the unit’s power is
off and disconnected from the power source to prevent electric
shock or system damage.
1. The six screws on the cover are used to secure the cover to the chassis.
Remove these screws and put them in a safe place for later use.
Remove the screws that are on one side of the chassis.
Rear View
2. Remove the screws that are on the other side of the chassis.
3. Remove the screws that are at the rear of the chassis.
Page 36
Copyright © 2010 NEXCOM International Co., Ltd. All Rights Reserved.
23
Chapter 3: System Setup
NDiS 164 User Manual
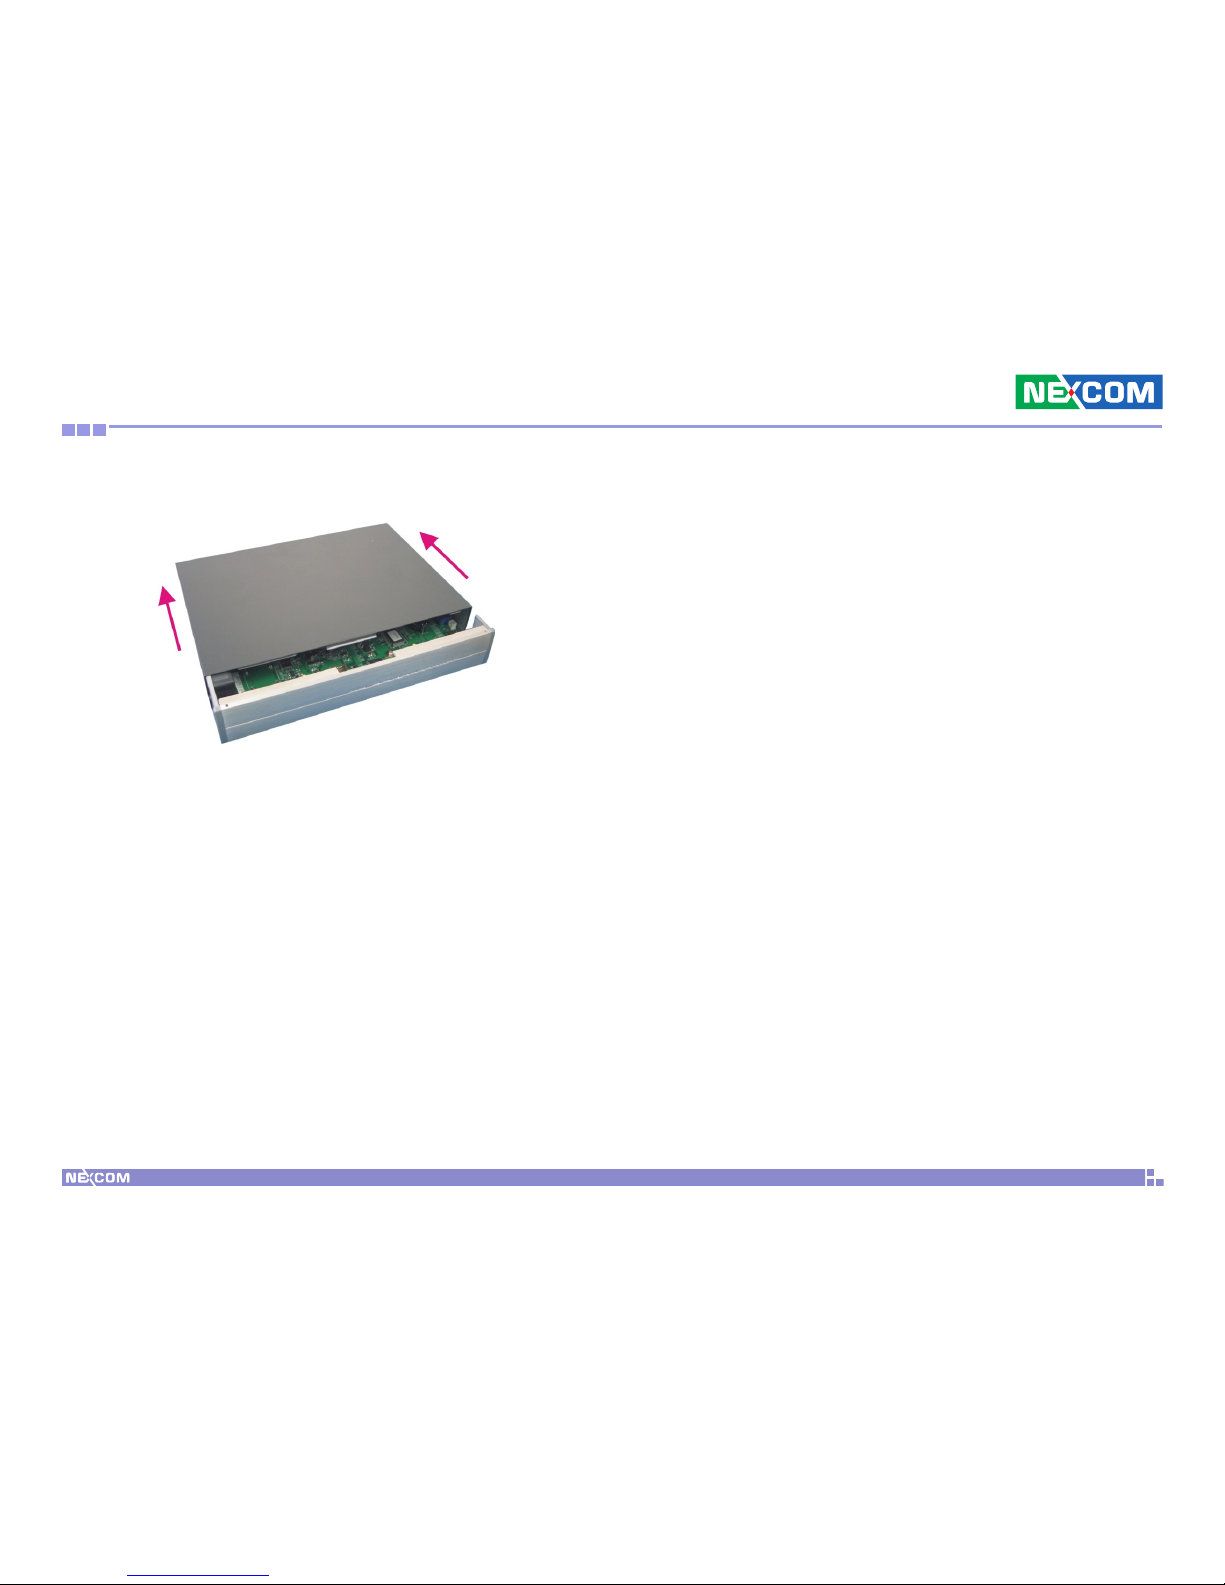
4. Slide the cover backward then remove it from the chassis.
Page 37
Copyright © 2010 NEXCOM International Co., Ltd. All Rights Reserved.
24
Chapter 3: System Setup
NDiS 164 User Manual
Installing a DIMM
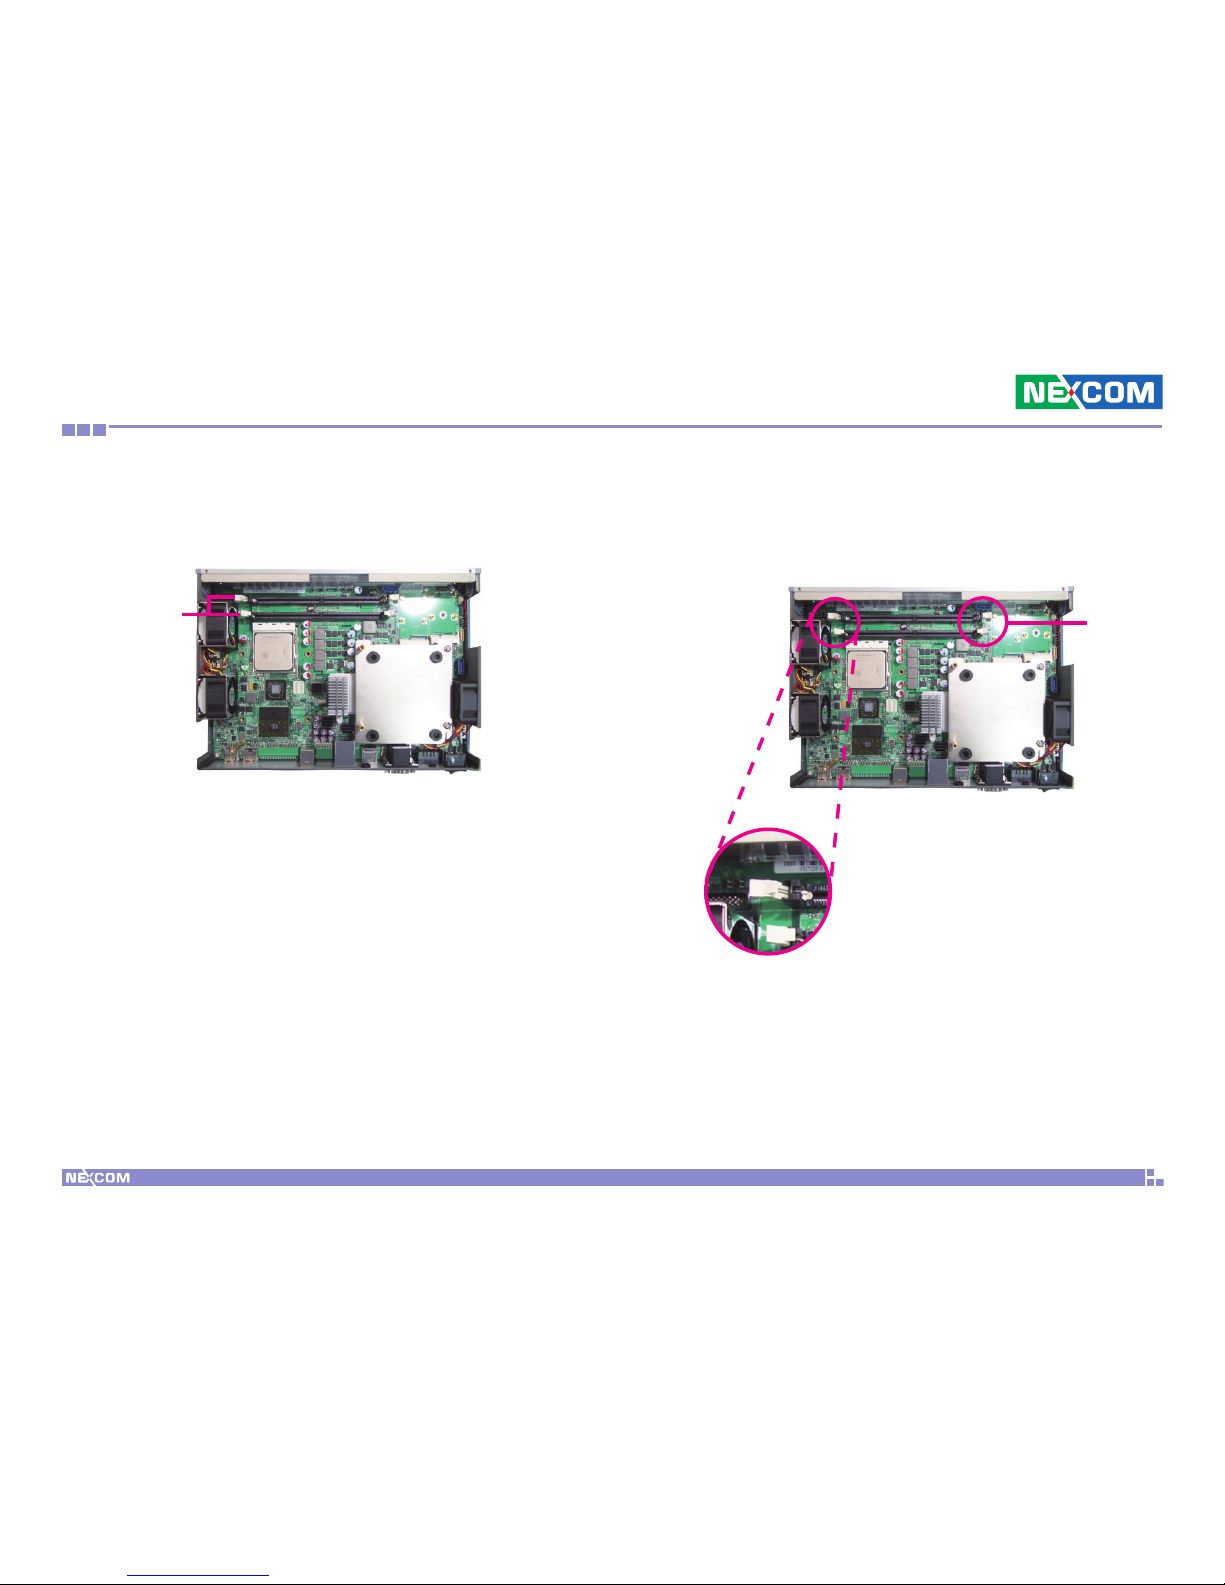
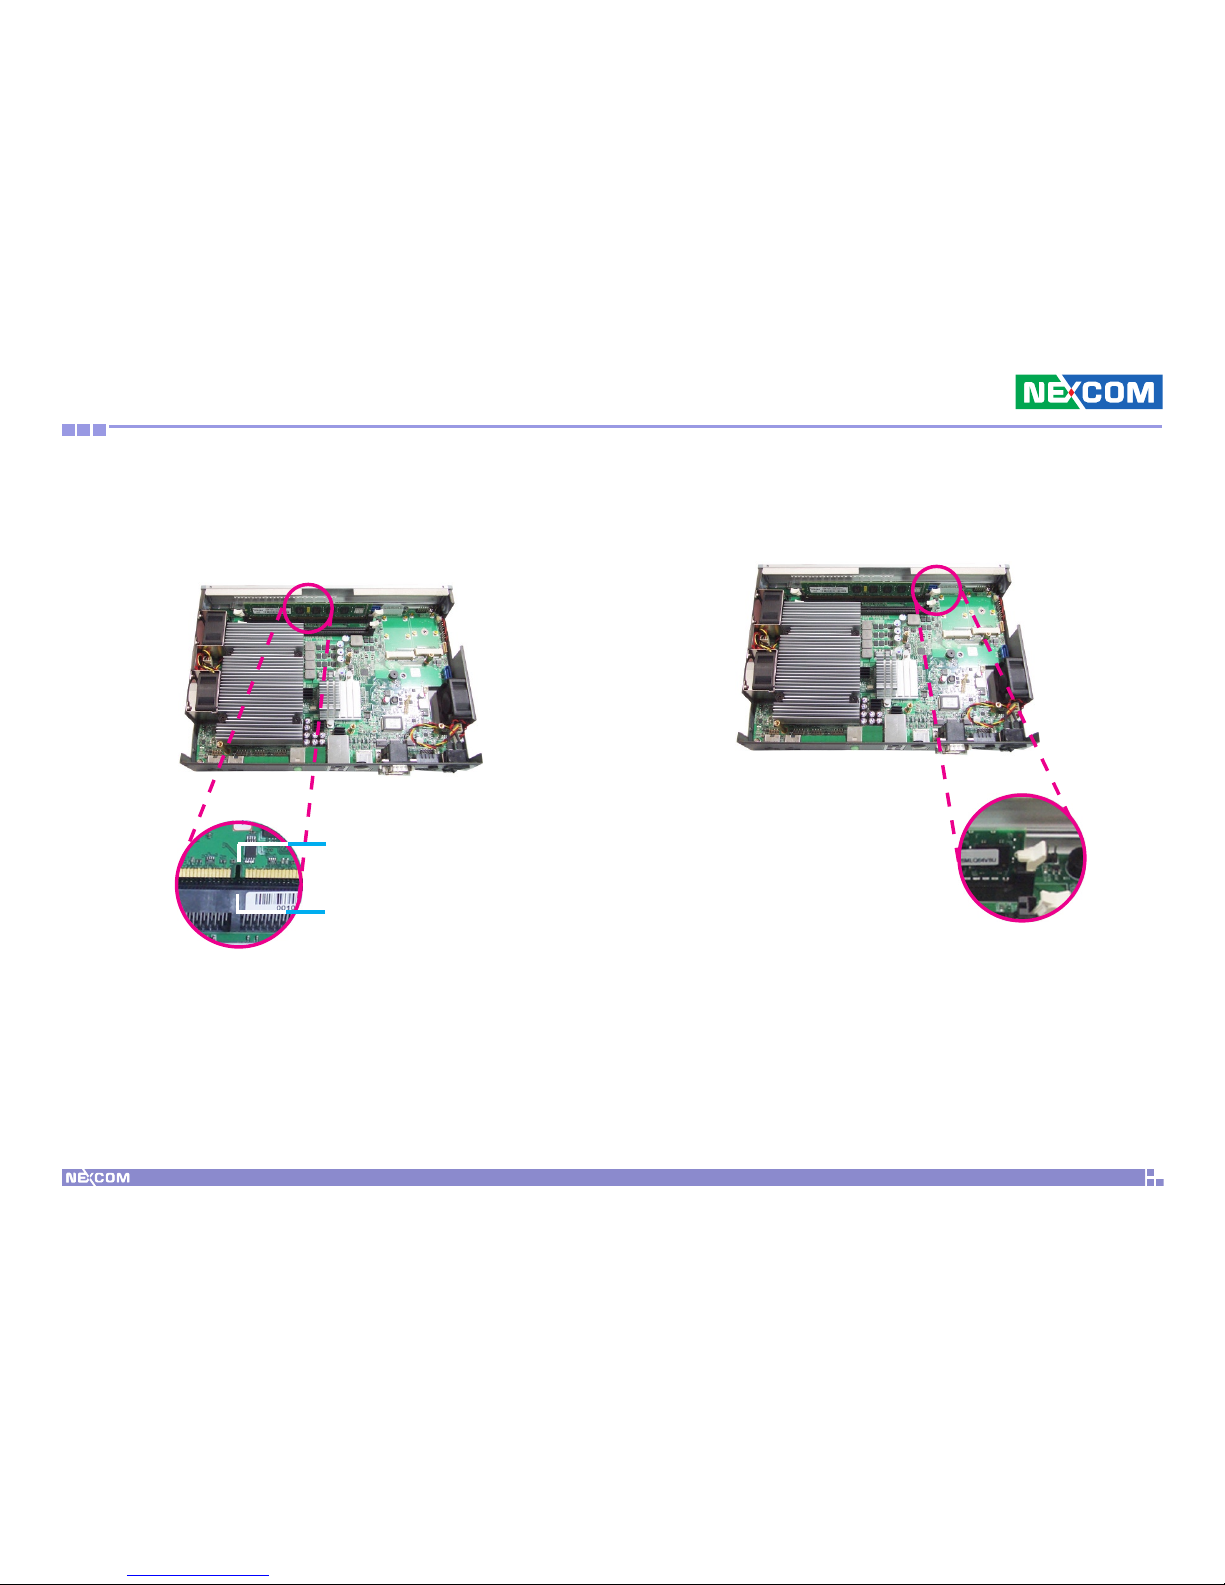
1. Locate for the DIMM sockets on the board.
DIMM
sockets
2. Push the ejector tabs which are at the ends of the socket outward. This
indicates that the socket is unlocked.
Ejector
tab
Page 38
Copyright © 2010 NEXCOM International Co., Ltd. All Rights Reserved.
25
Chapter 3: System Setup
NDiS 164 User Manual
3. Note how the module is keyed to the socket. Grasping the module by
its edges, align the module with the socket so that the “notch” on the
module is aligned with the “key” on the socket. The key ensures the
module can be plugged into the socket in only one direction.
Notch on the
module
Key on the
socket
4. Seat the module vertically, pressing it down firmly until it is completely
seated in the socket. The ejector tabs at the ends of the socket will automatically snap into the locked position to hold the module in place.
Page 39
Copyright © 2010 NEXCOM International Co., Ltd. All Rights Reserved.
26
Chapter 3: System Setup
NDiS 164 User Manual
Installing the CPU
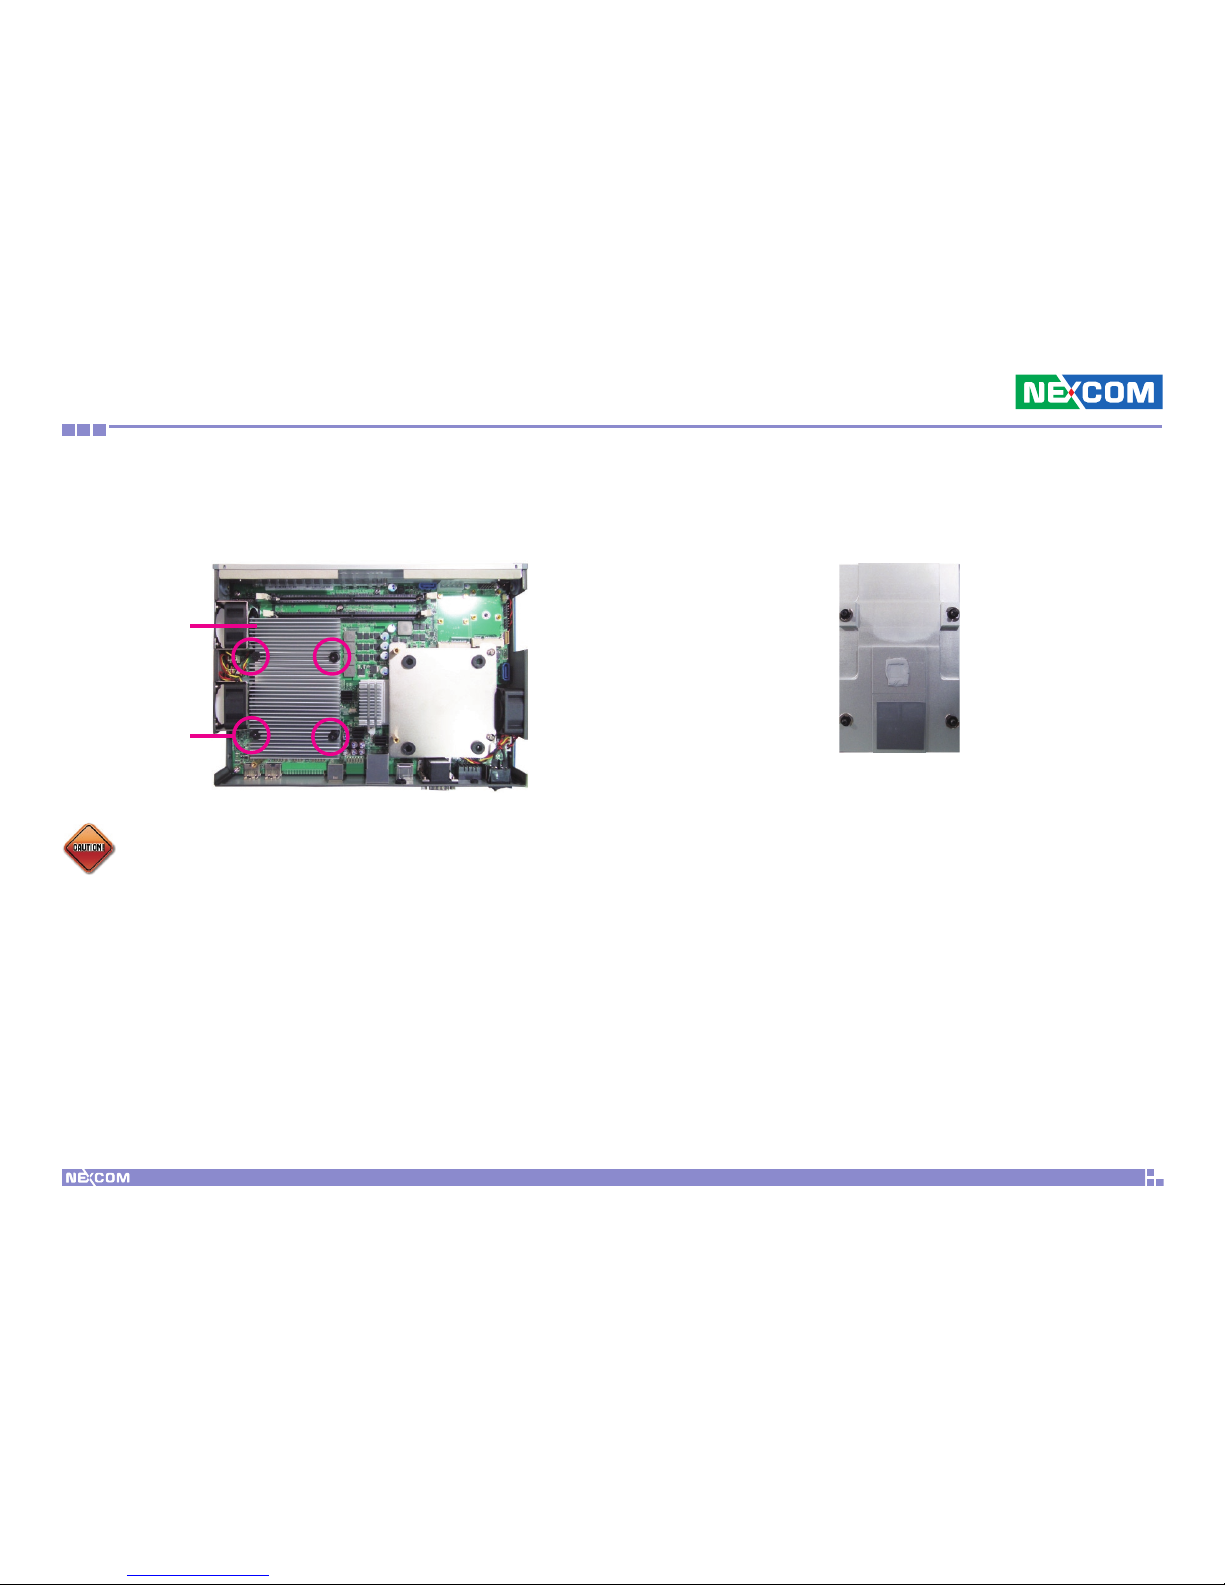
1. Loosen the screws that secure the heat sink to the chassis.
2. Now remove the heat sink to access the CPU socket.
Bottom Side of the Heat Sink
Remove
screw
Make sure all power cables are unplugged before you install •
the CPU.
The CPU socket must not come in contact with anything other •
than the CPU. Avoid unnecessary exposure.
Heat sink
CAUTION!CAUTION!
Page 40
Copyright © 2010 NEXCOM International Co., Ltd. All Rights Reserved.
27
Chapter 3: System Setup
NDiS 164 User Manual
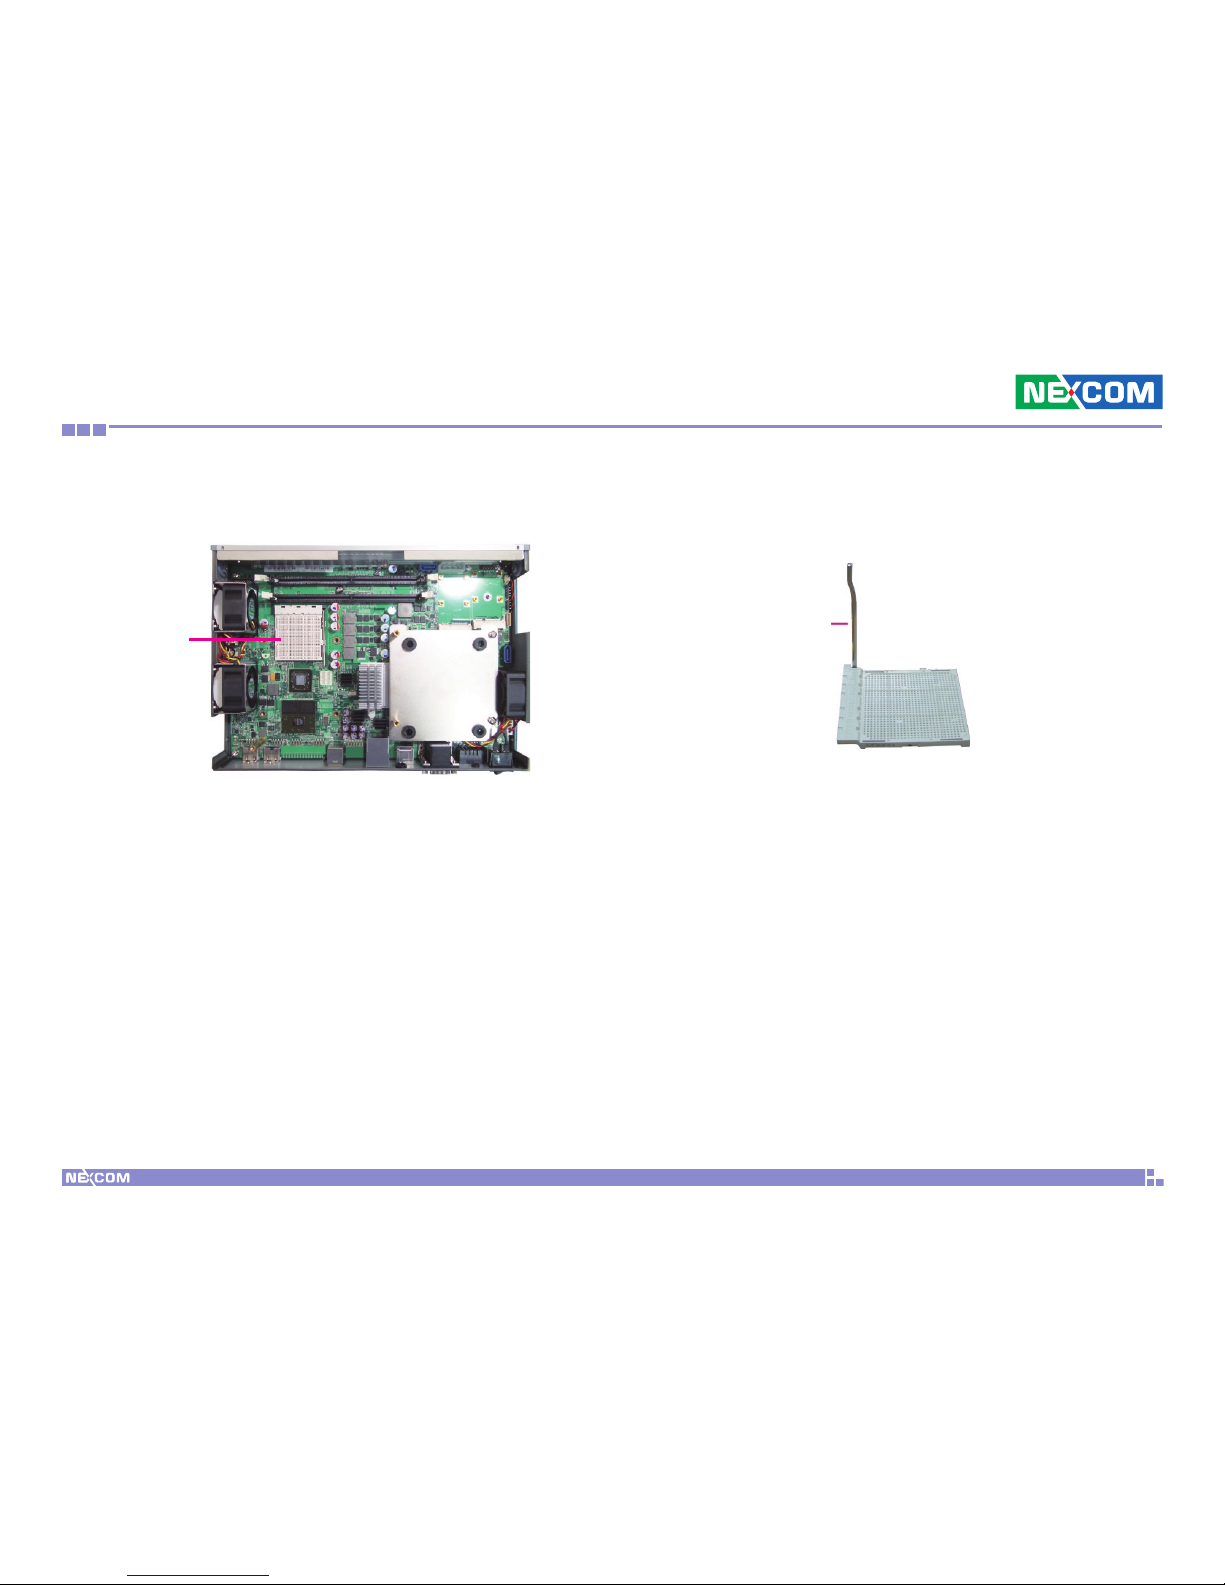
3. The CPU socket is readily accessible after you have removed the heat
sink.
CPU socket
4. Unlock the socket by pushing the lever sideways, away from the
socket, then lifting it up to a 90
o
angle. Make sure the lever is lifted to
this angle otherwise the CPU will not fit in properly.
Lever
Page 41
Copyright © 2010 NEXCOM International Co., Ltd. All Rights Reserved.
28
Chapter 3: System Setup
NDiS 164 User Manual
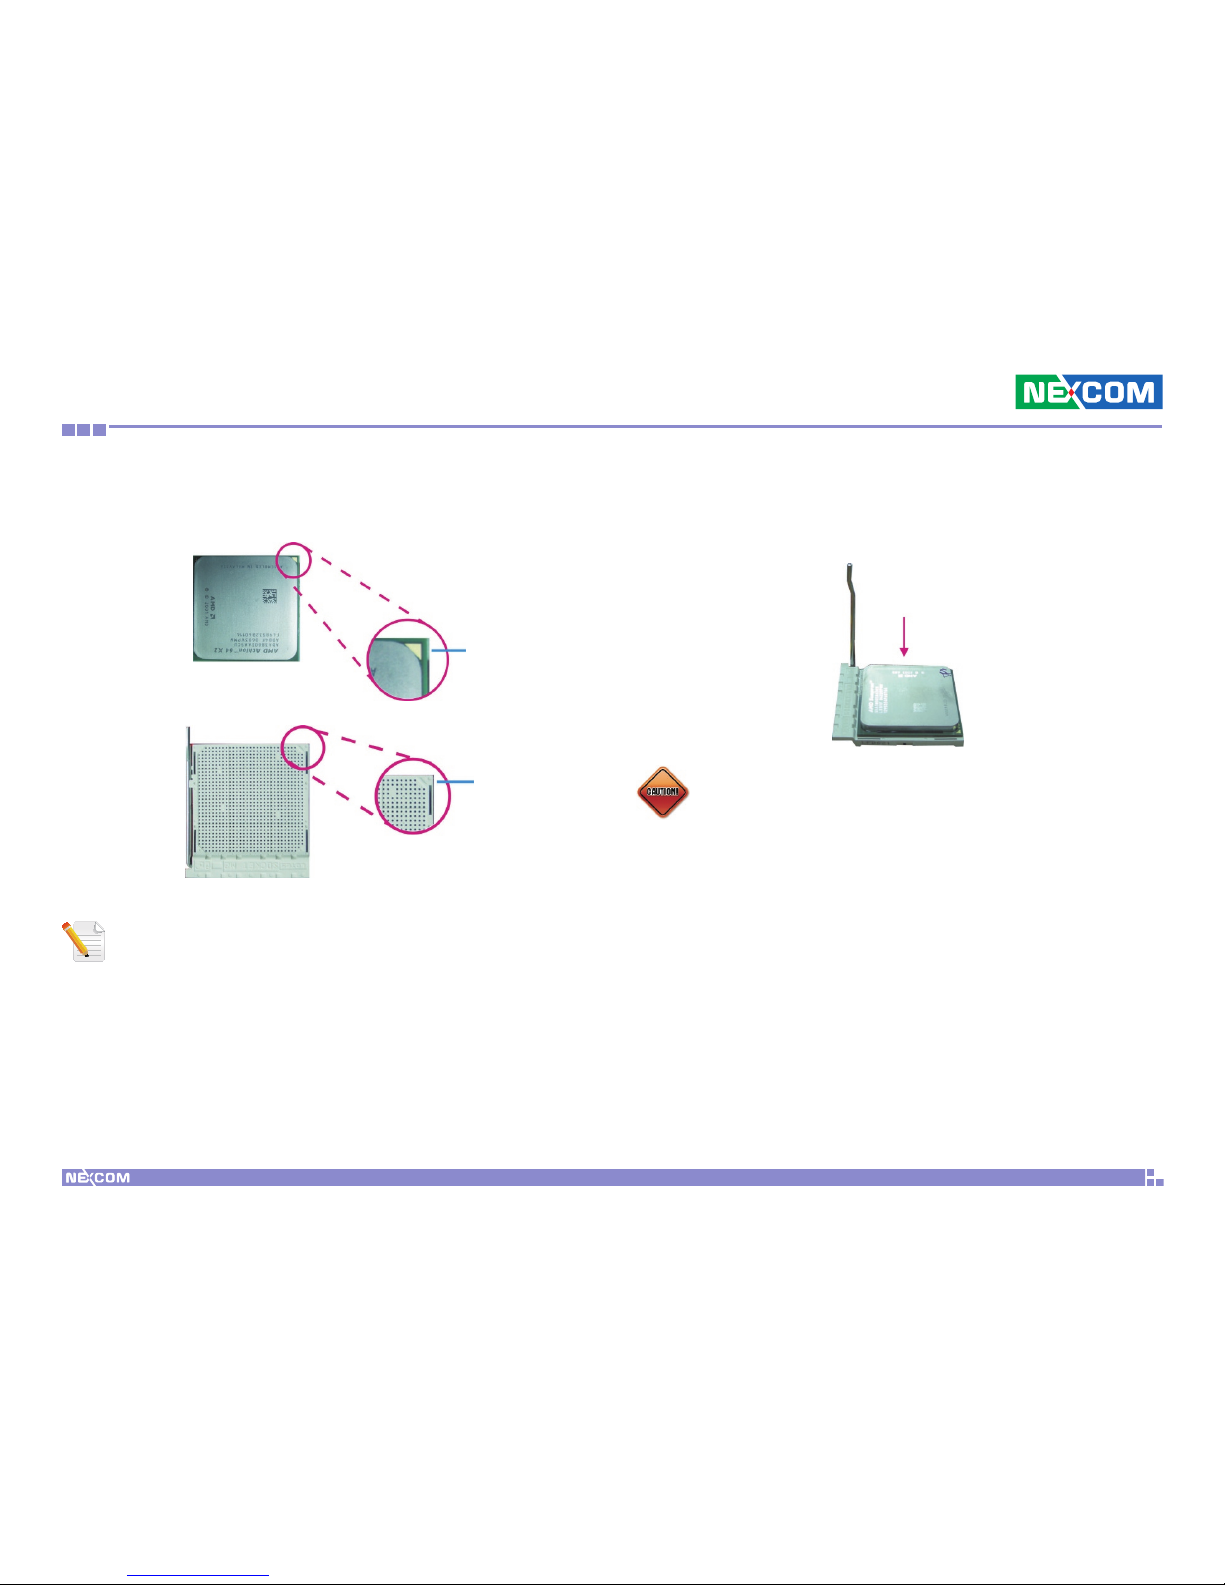
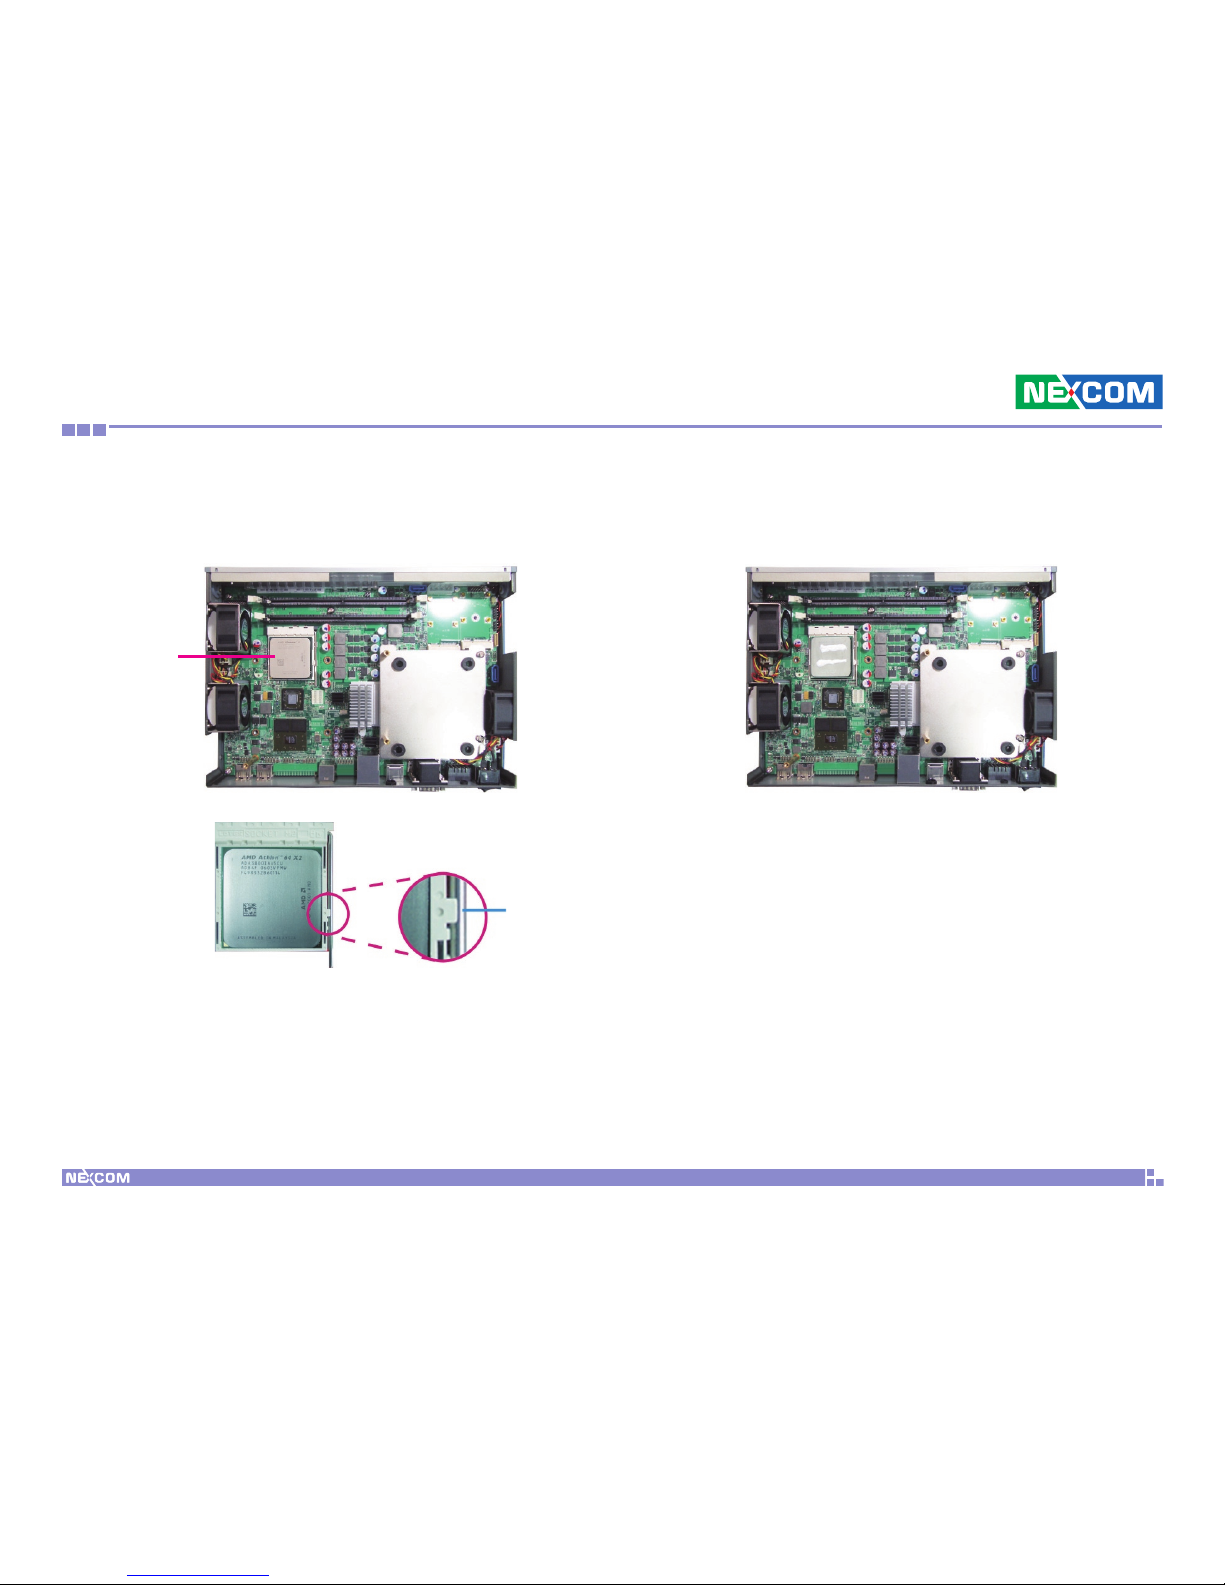
5. Position the CPU above the socket. The gold mark on the CPU must
align with pin 1 of the CPU socket.
Pin 1
CPU
CPU Socket
Pin 1
Handle the CPU by its edges and avoid touching the pins.
6. Insert the CPU into the socket until it is seated in place. The CPU will fit
in only one orientation and can easily be inserted without exerting any
force.
Do not force the CPU into the socket. Forcing the CPU into the
socket may bend the pins and damage the CPU.
CAUTION!CAUTION!
Page 42
Copyright © 2010 NEXCOM International Co., Ltd. All Rights Reserved.
29
Chapter 3: System Setup
NDiS 164 User Manual
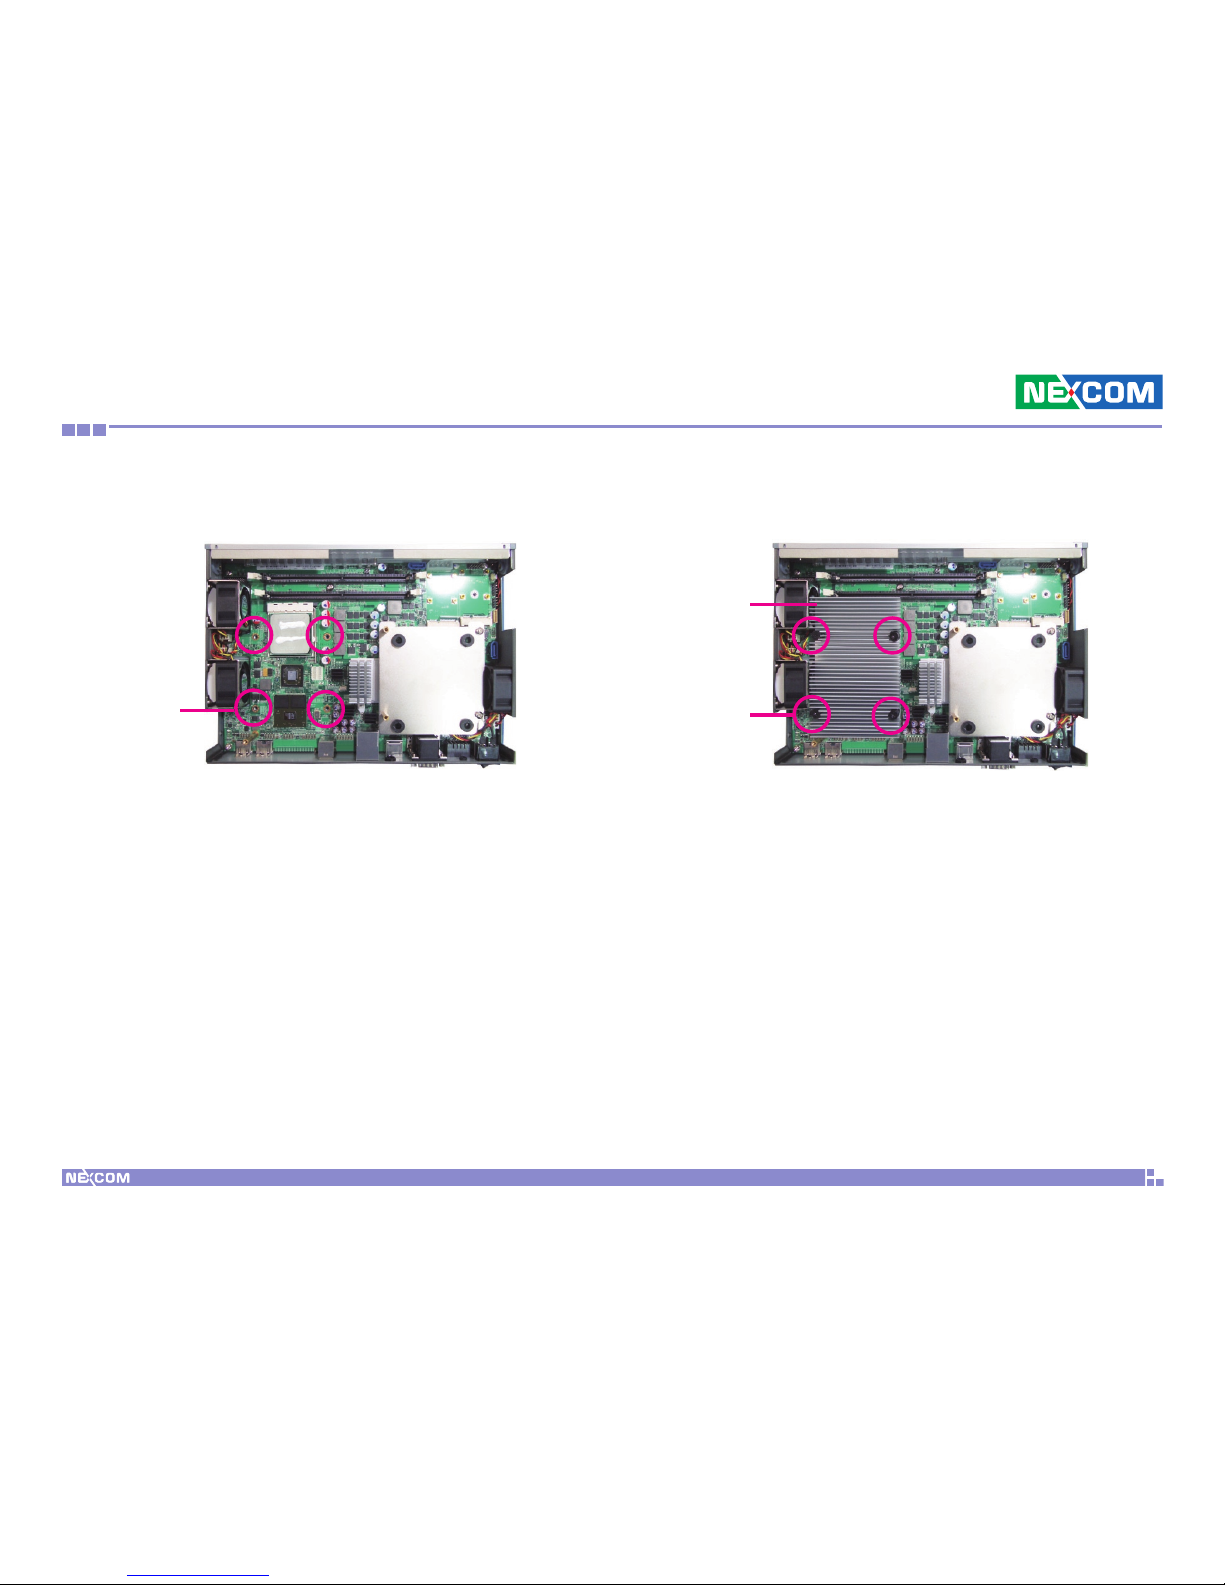
7. Once the CPU is in place, push down the lever to lock the socket. The
lever should click on the side tab to indicate that the CPU is completely
secured in the socket.
Side tab
CPU
8. Apply thermal paste on top of the CPU. Do not spread the paste all
over the surface. When you later place the heat sink on top of the
CPU, the compound will disperse evenly.
Page 43
Copyright © 2010 NEXCOM International Co., Ltd. All Rights Reserved.
30
Chapter 3: System Setup
NDiS 164 User Manual
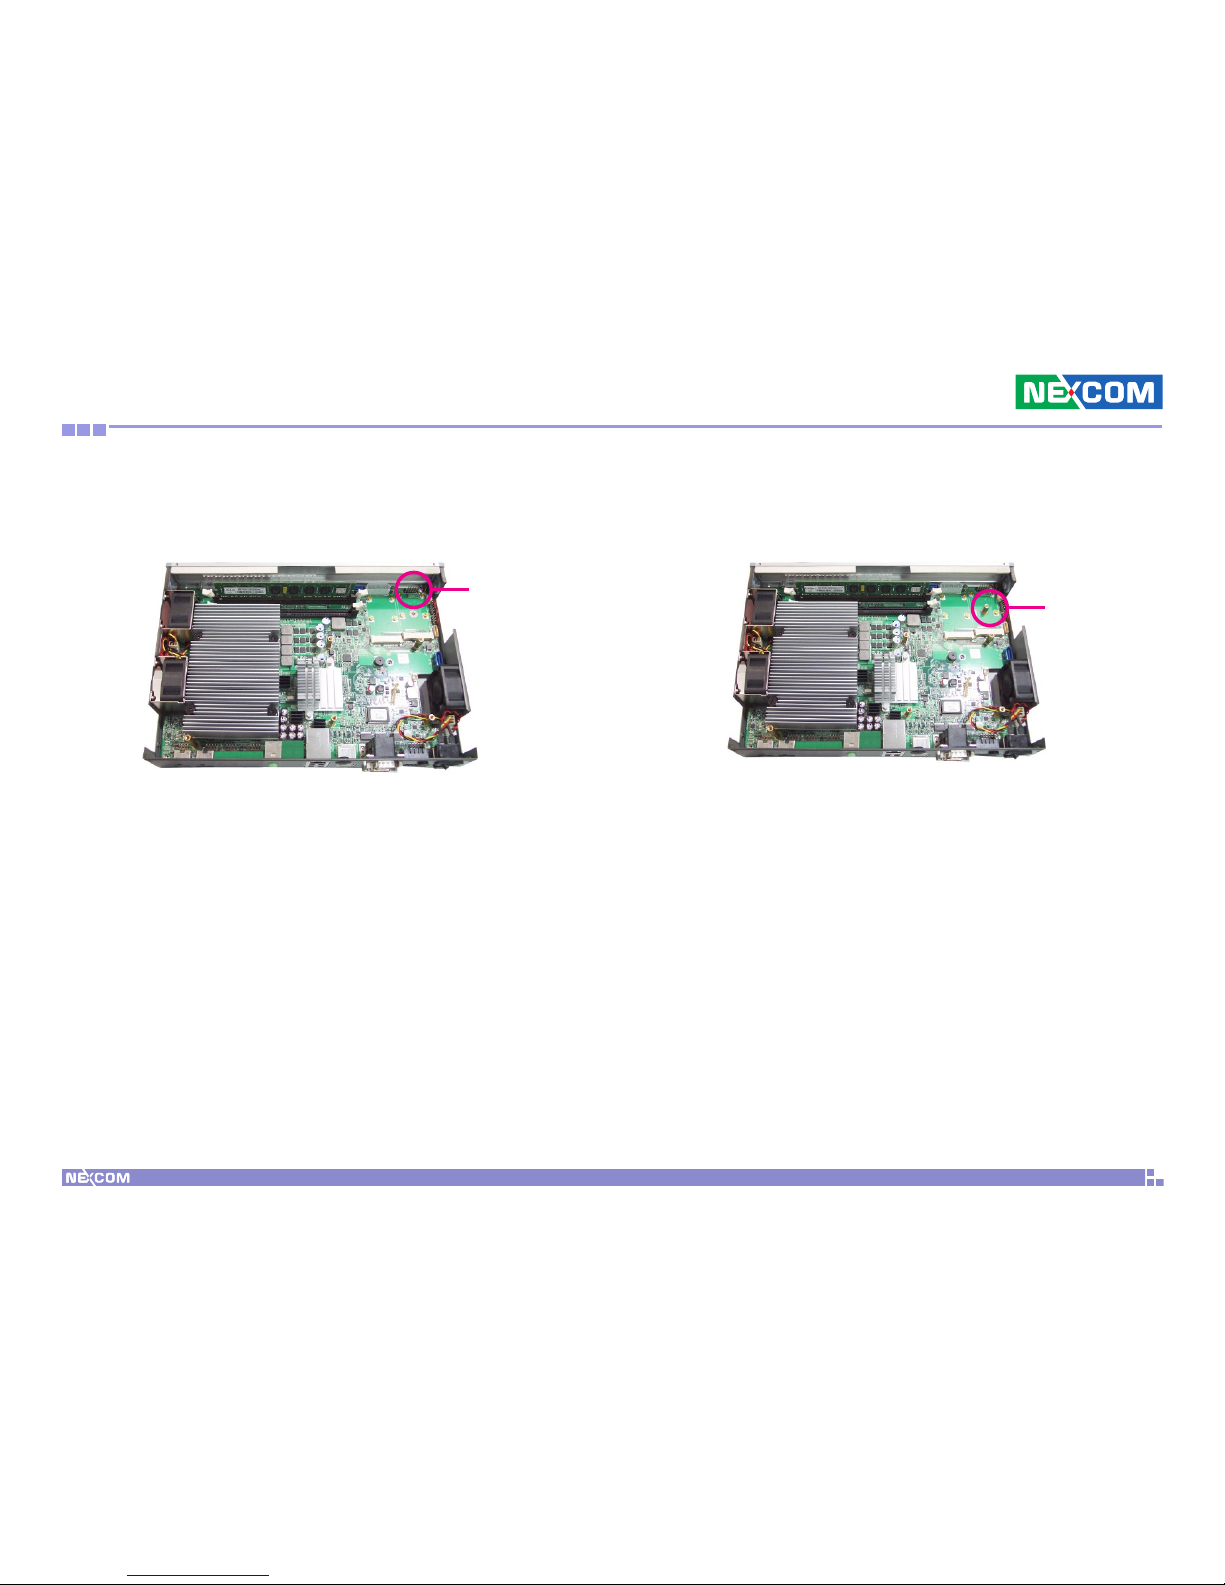
9. The mounting holes on both sides of the CPU socket are used to secure
the heat sink to the board.
Mounting
hole
10. Align the mounting screws of the heat sink with the mounting holes
on the board then tighten the screws to secure the heat sink in place.
Mounting
screw
Heat sink
Page 44
Copyright © 2010 NEXCOM International Co., Ltd. All Rights Reserved.
31
Chapter 3: System Setup
NDiS 164 User Manual
Installing the uDOC Module
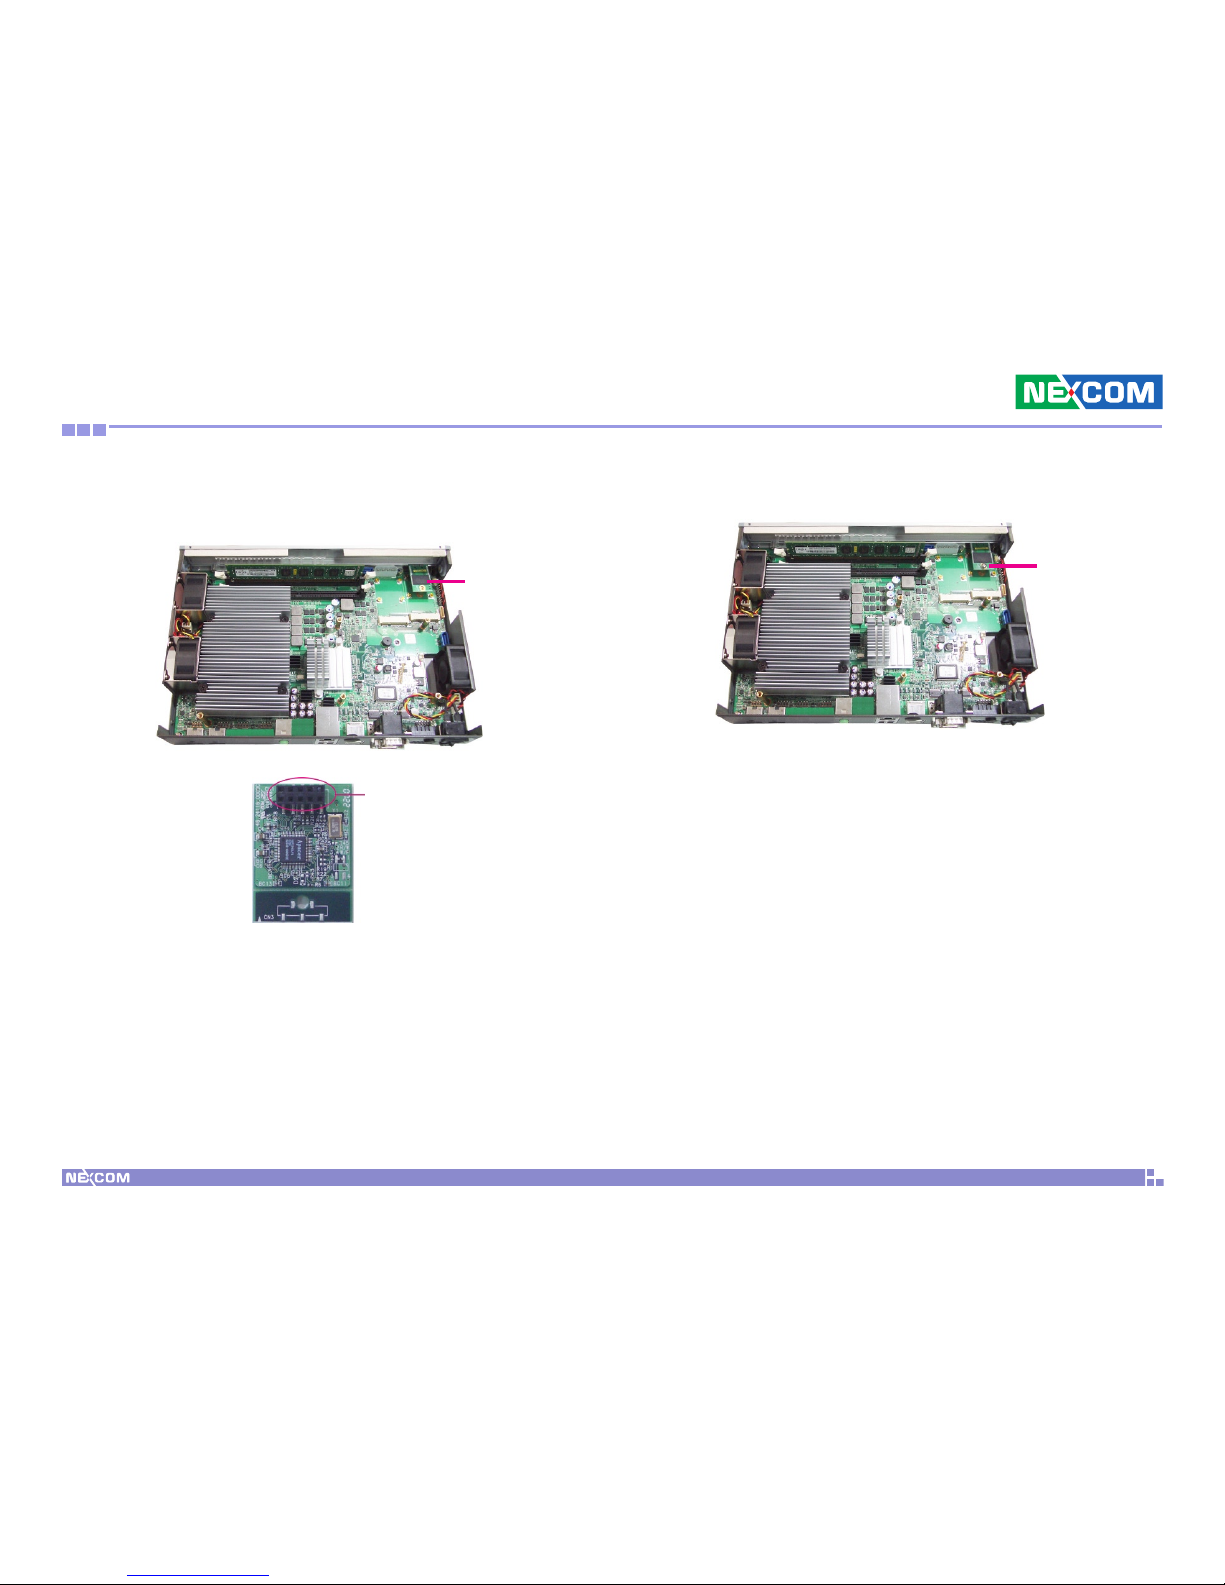
1. Locate for the uDOC connector on the board.
2. Install the provided mounting stud as shown in the illustration below.
uDOC
connector
Mounting
stud
Page 45
Copyright © 2010 NEXCOM International Co., Ltd. All Rights Reserved.
32
Chapter 3: System Setup
NDiS 164 User Manual
3. Align the connector located on the solder side of the uDOC module to
the uDOC connector that is on the board then press it down firmly.
uDOC module
(solder side)
uDOC
connector
4. Secure the uDOC module with the provided mounting screw.
uDOC
module
Mounting
screw
Page 46
Copyright © 2010 NEXCOM International Co., Ltd. All Rights Reserved.
33
Chapter 3: System Setup
NDiS 164 User Manual
Installing a Wireless LAN Module
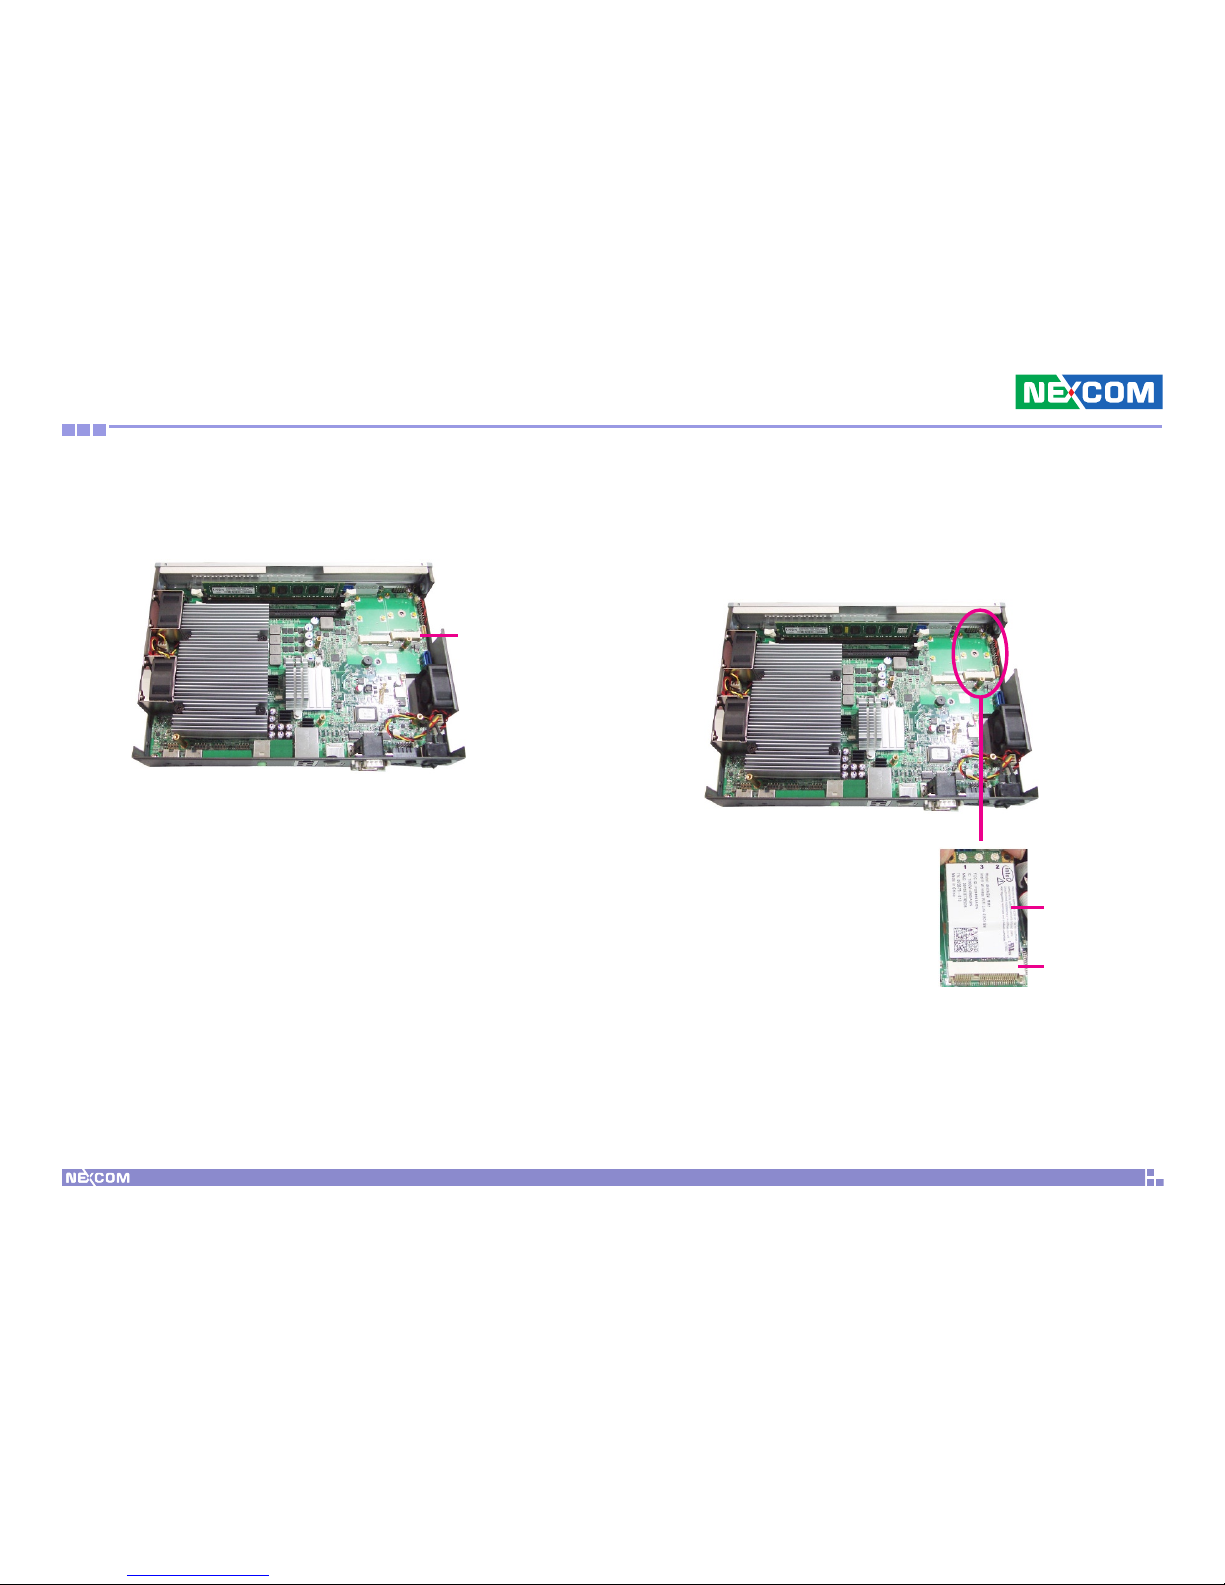
1. Locate for the Mini PCI Express slot on the board.
2. Insert the wireless LAN module into the Mini PCI Express slot at a 45
degrees angle until the gold-plated connector on the edge of the module completely disappears inside the slot.
Mini PCI
Express slot
Wireless LAN
module
Mini PCI
Express slot
Page 47
Copyright © 2010 NEXCOM International Co., Ltd. All Rights Reserved.
34
Chapter 3: System Setup
NDiS 164 User Manual
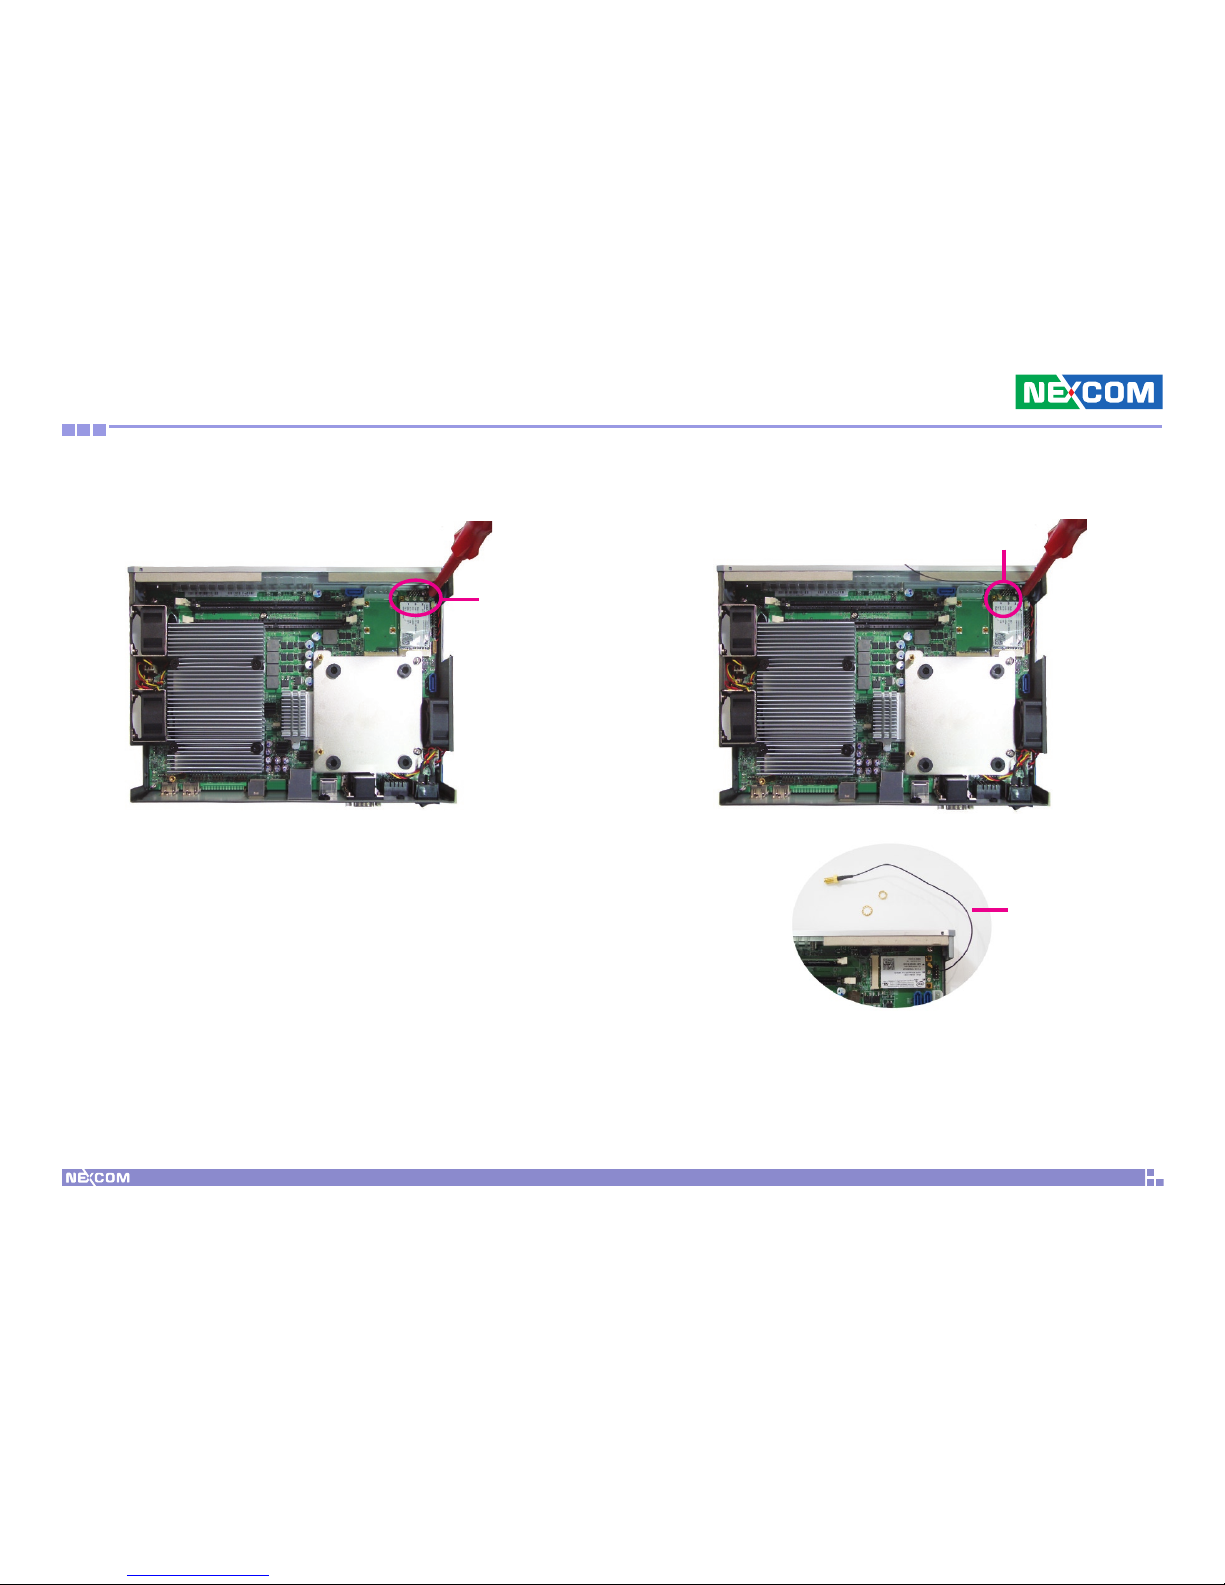
4. Attach one end of the RF cable onto the module.
RF cable
3. Push the module down then secure it with mounting screws.
Mounting
screws
RF cable
Page 48
Copyright © 2010 NEXCOM International Co., Ltd. All Rights Reserved.
35
Chapter 3: System Setup
NDiS 164 User Manual
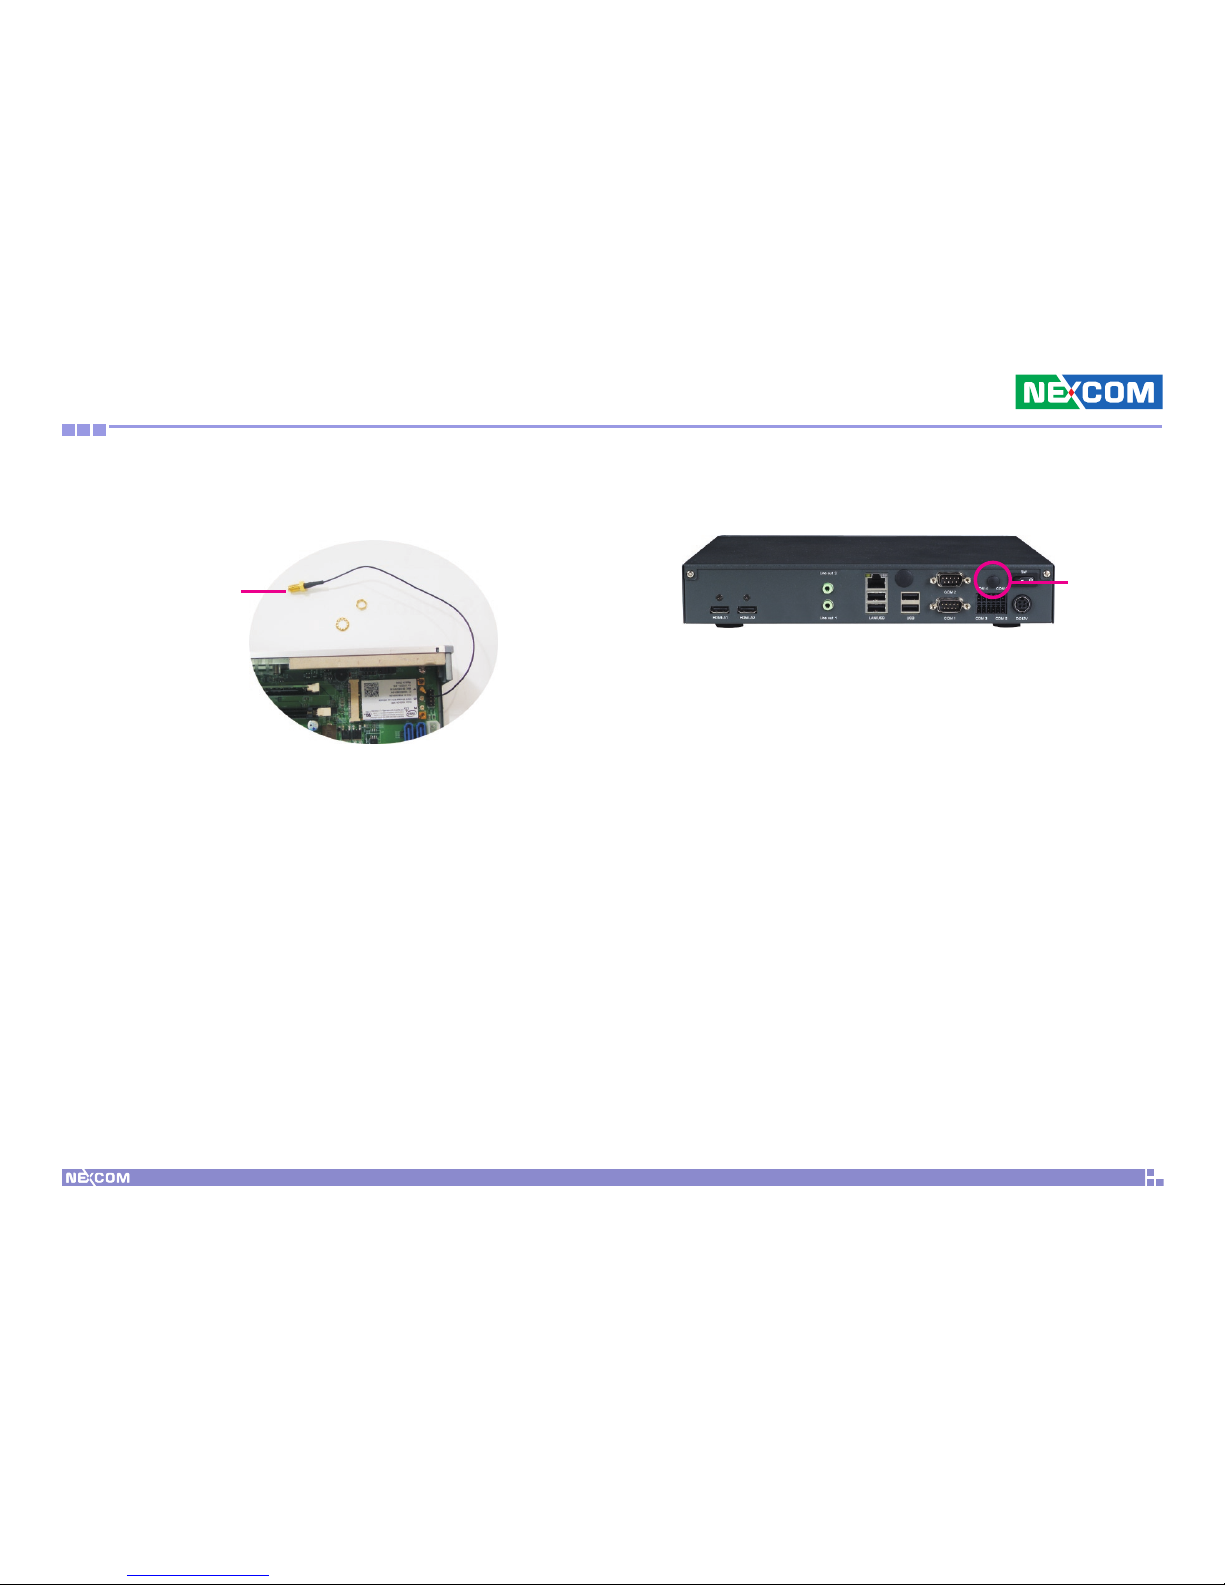
5. Insert the 2 rings (ring 1 then ring 2) onto the WIFI antenna jack end of
the cable.
Ring 1
Ring 2
6. Remove the WIFI antenna hole cover that is located at the rear panel of
the chassis.
WIFI antenna
hole cover
Antenna jack
Page 49
Copyright © 2010 NEXCOM International Co., Ltd. All Rights Reserved.
36
Chapter 3: System Setup
NDiS 164 User Manual
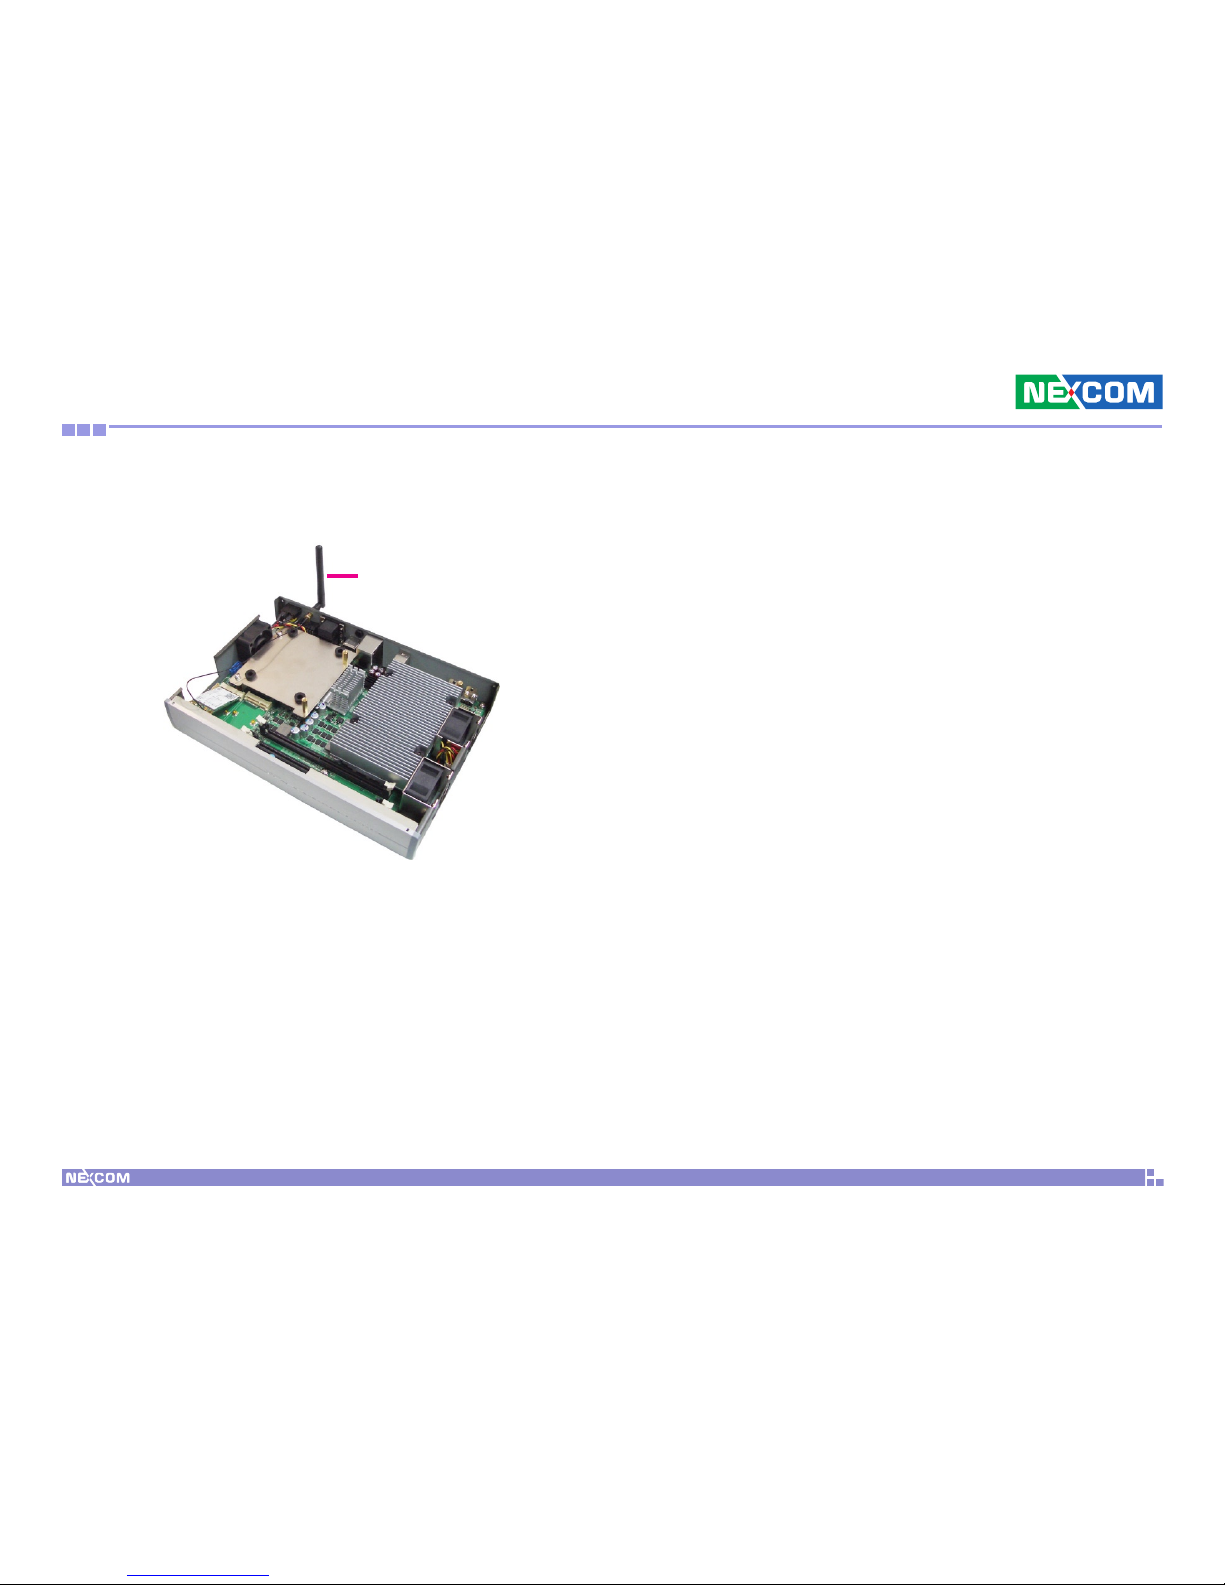
7. Mount the WIFI antenna jack to the antenna hole then connect an
external antenna to the WiFi antenna jack.
Antenna
Page 50
Copyright © 2010 NEXCOM International Co., Ltd. All Rights Reserved.
37
Chapter 3: System Setup
NDiS 164 User Manual
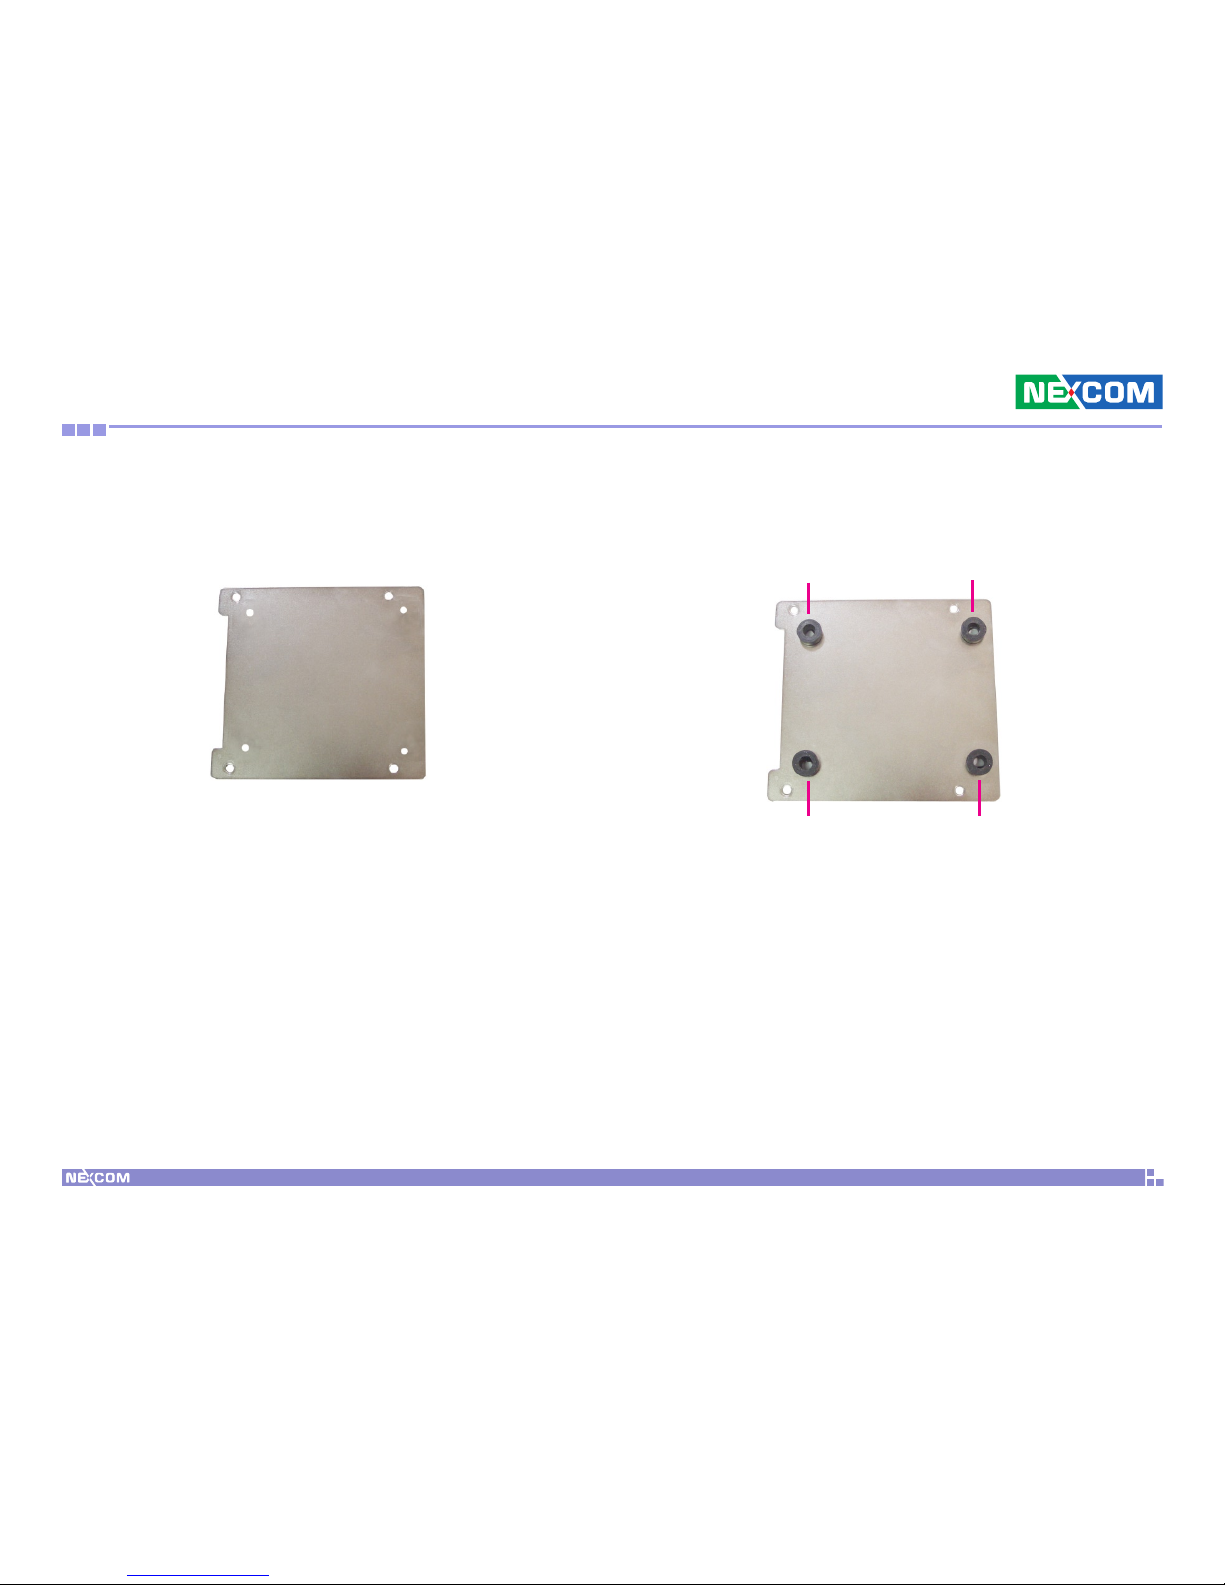
Installing a SATA Hard Drive
The drive bay included in the package is used to hold a SATA hard 1.
drive.
Drive Bay
2. Insert the four dampers into the dampter mounting holes.
Damper Damper
Damper Damper
Page 51
Copyright © 2010 NEXCOM International Co., Ltd. All Rights Reserved.
38
Chapter 3: System Setup
NDiS 164 User Manual
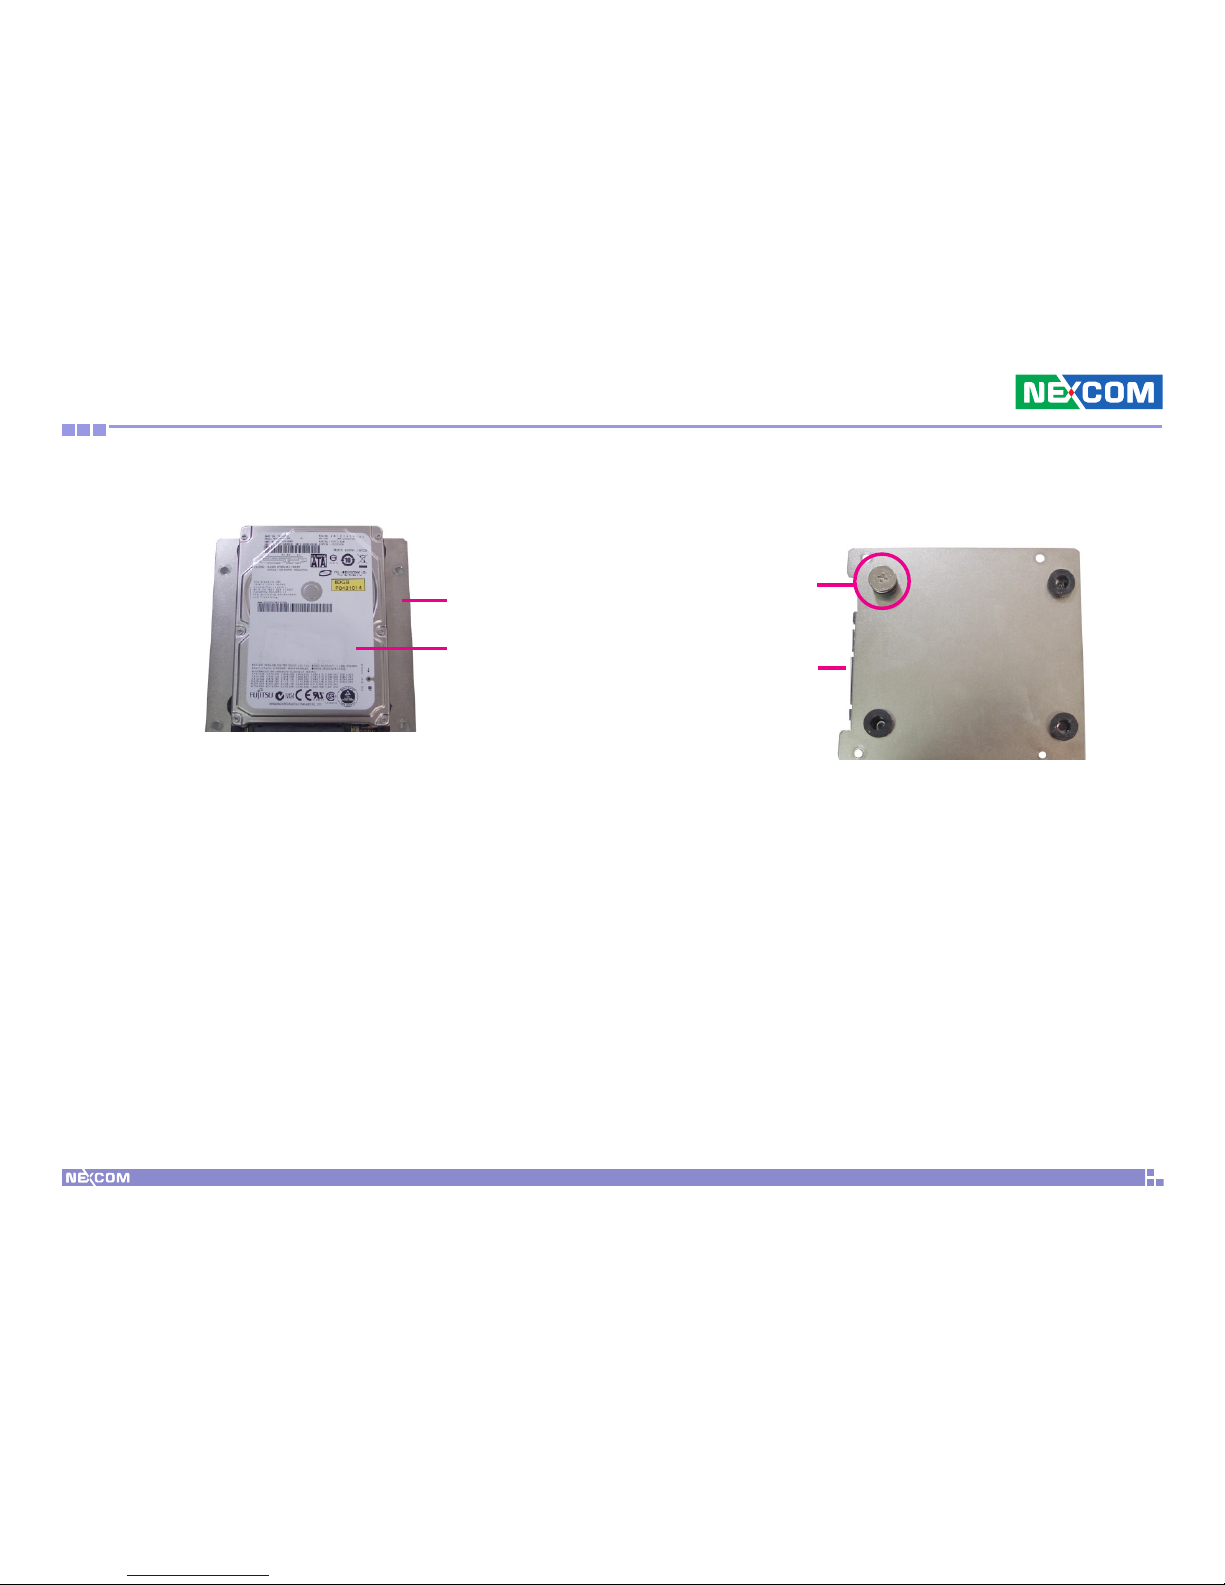
3. Place the SATA drive on the drive bay.
Connector side of
the SATA drive
4. Turn to the other side of the bay then use the provided mounting
screws to secure the SATA drive to the drive bay.
Drive bay
SATA drive
Mounting screw
Page 52
Copyright © 2010 NEXCOM International Co., Ltd. All Rights Reserved.
39
Chapter 3: System Setup
NDiS 164 User Manual
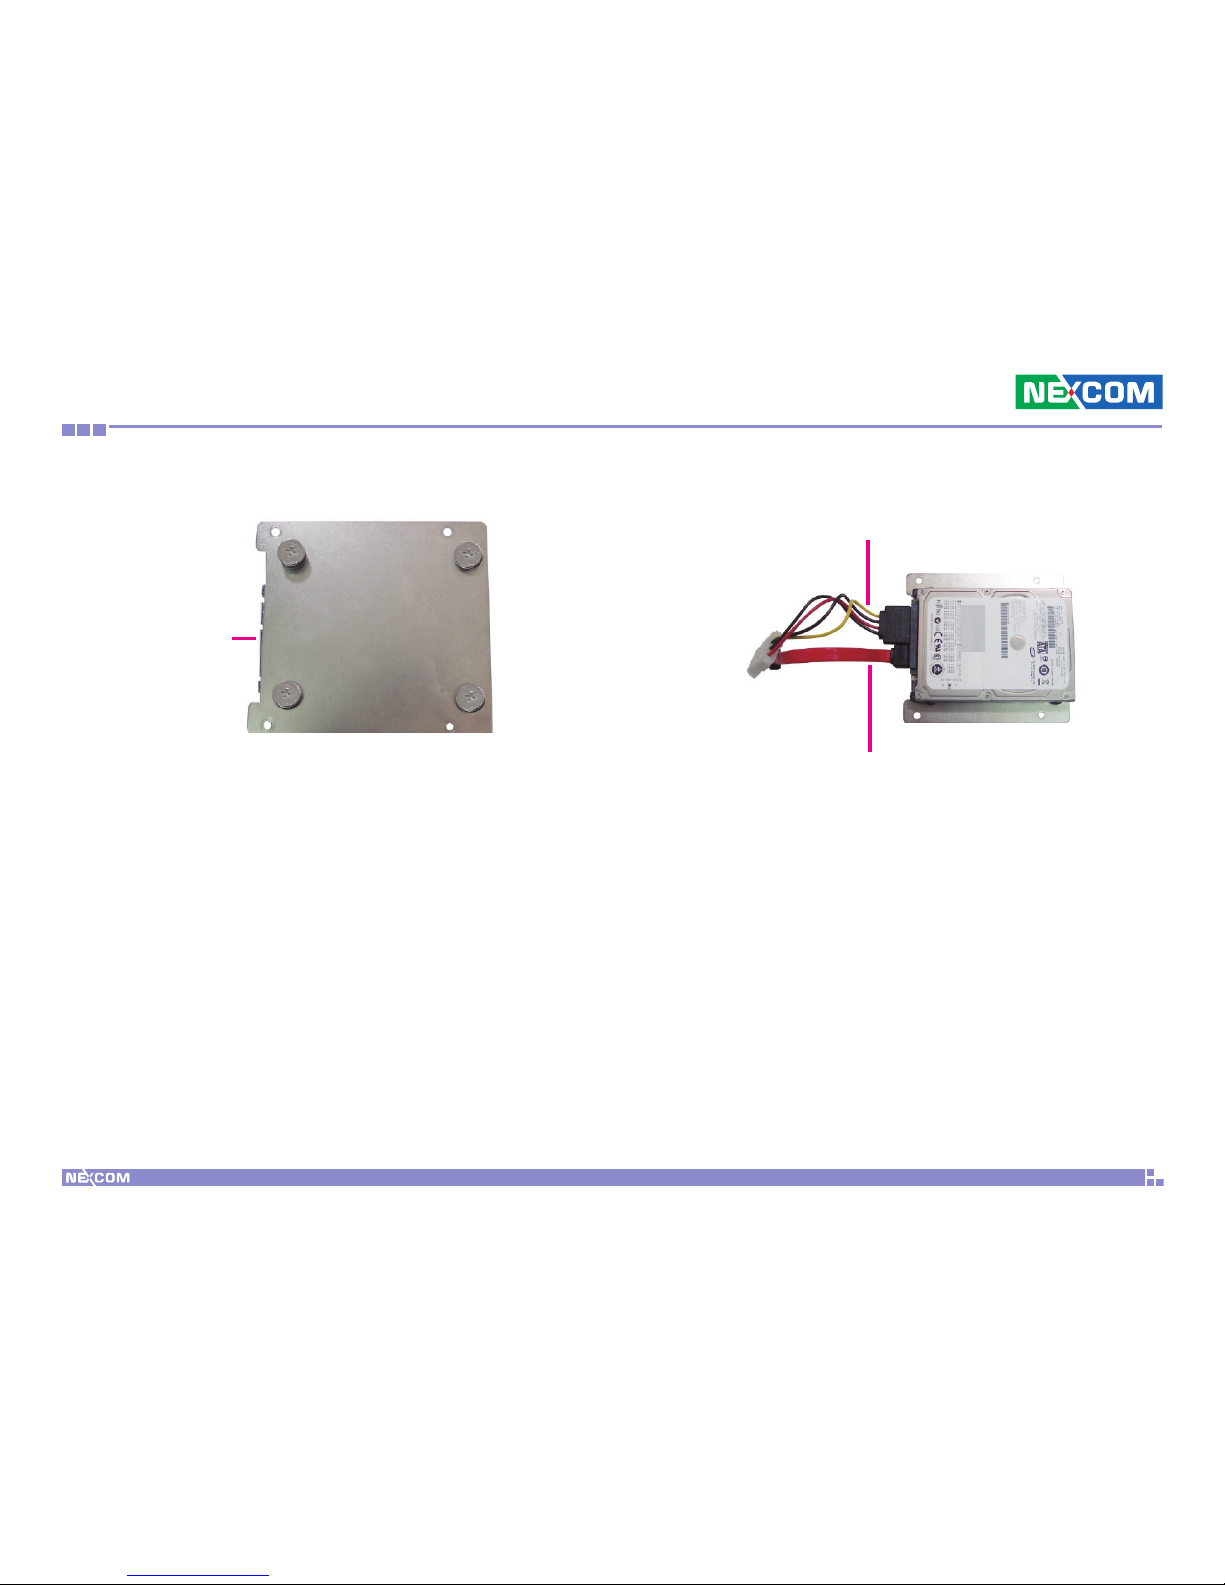
5. The photo below shows the screws mounted on the drive bay.
SATA drive located
underneath
6. Connect the SATA data cable and SATA power cable to the SATA drive.
SATA power cable
SATA data cable
Page 53
Copyright © 2010 NEXCOM International Co., Ltd. All Rights Reserved.
40
Chapter 3: System Setup
NDiS 164 User Manual
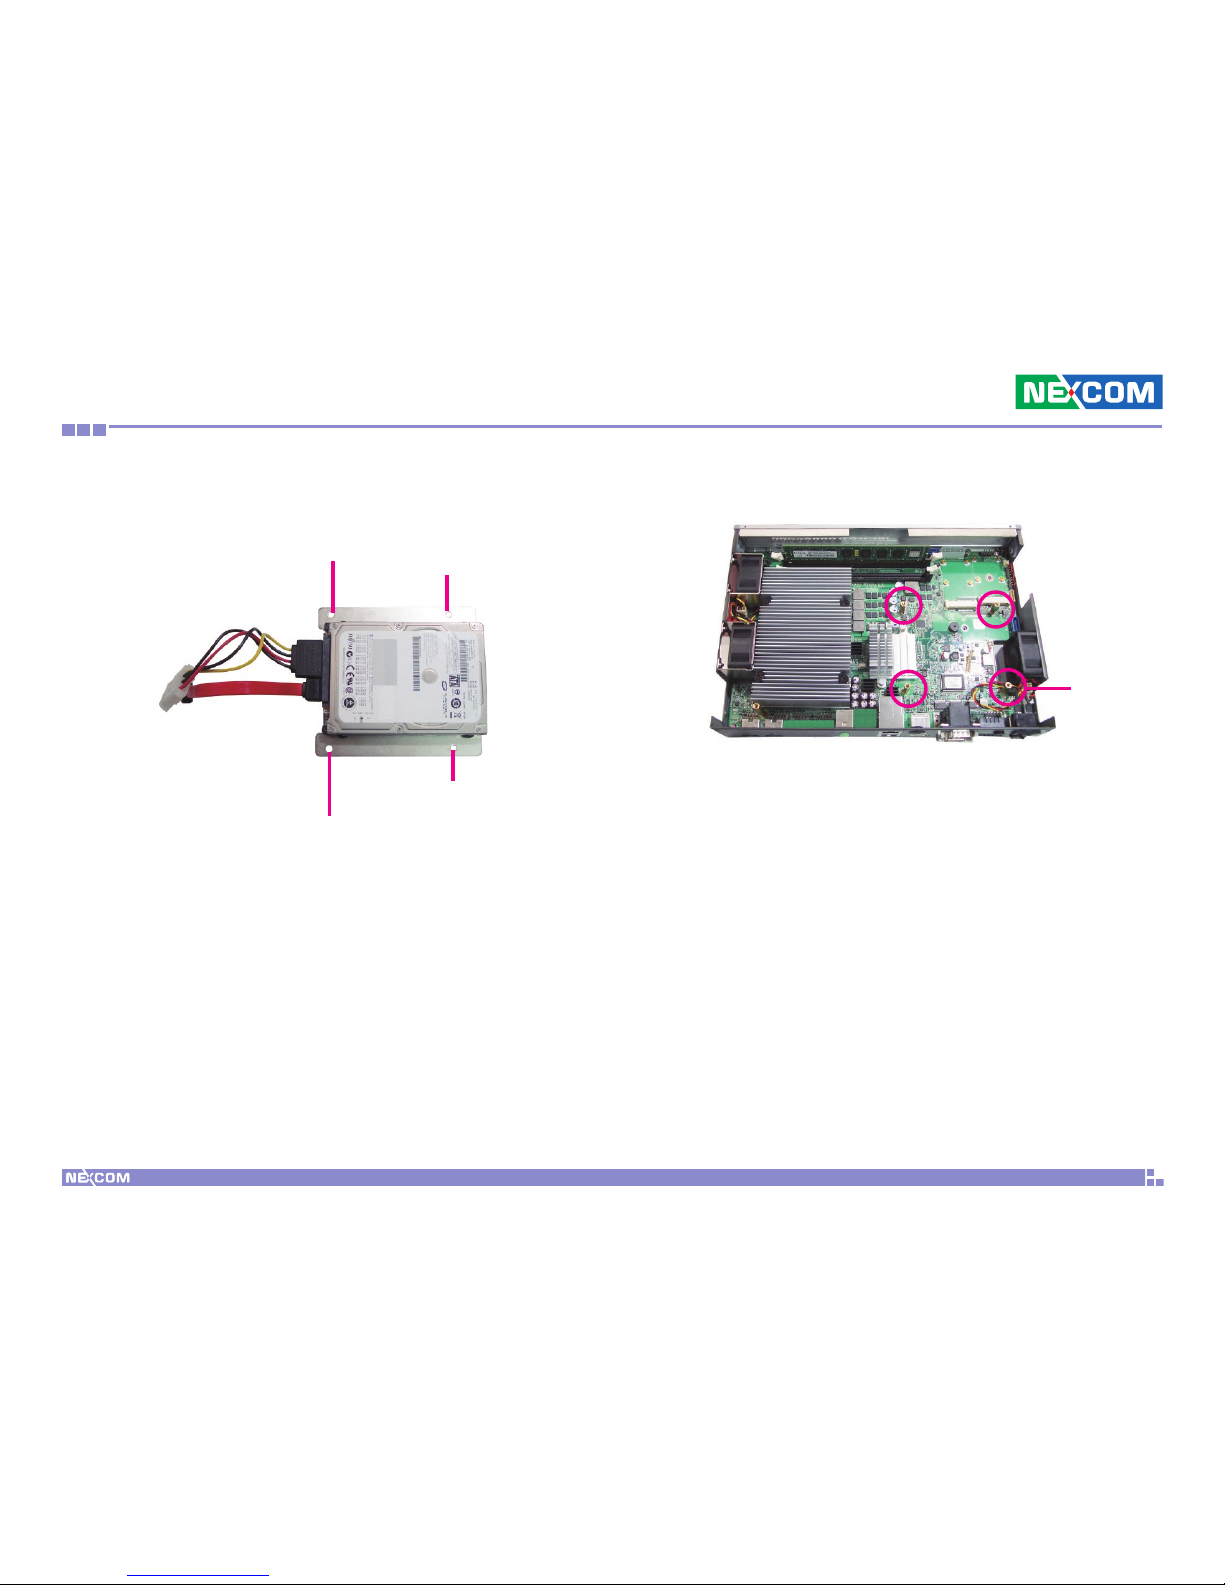
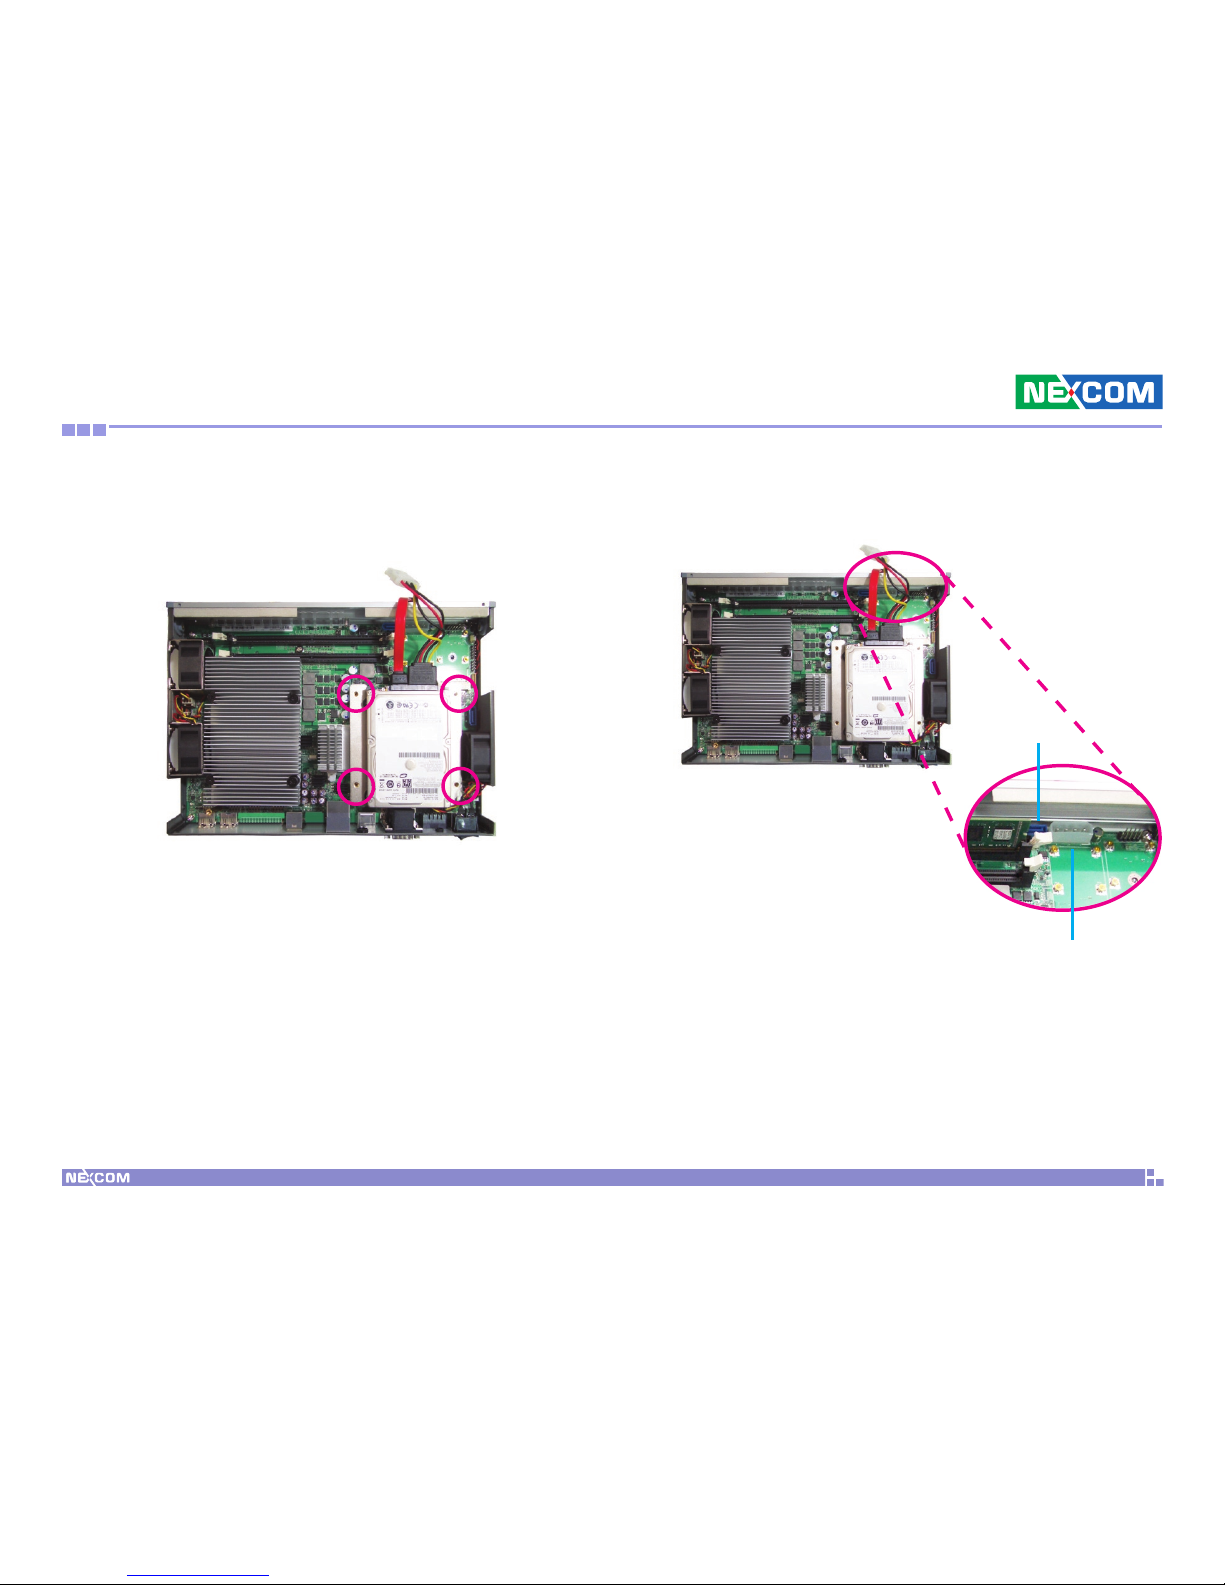
7. The mounting holes on the drive bay are used to secure the bay to the
chassis.
Mounting hole
Mounting hole
Mounting hole
Mounting hole
Mounting
stud
8. Locate for the mounting studs on the board.
Page 54
Copyright © 2010 NEXCOM International Co., Ltd. All Rights Reserved.
41
Chapter 3: System Setup
NDiS 164 User Manual
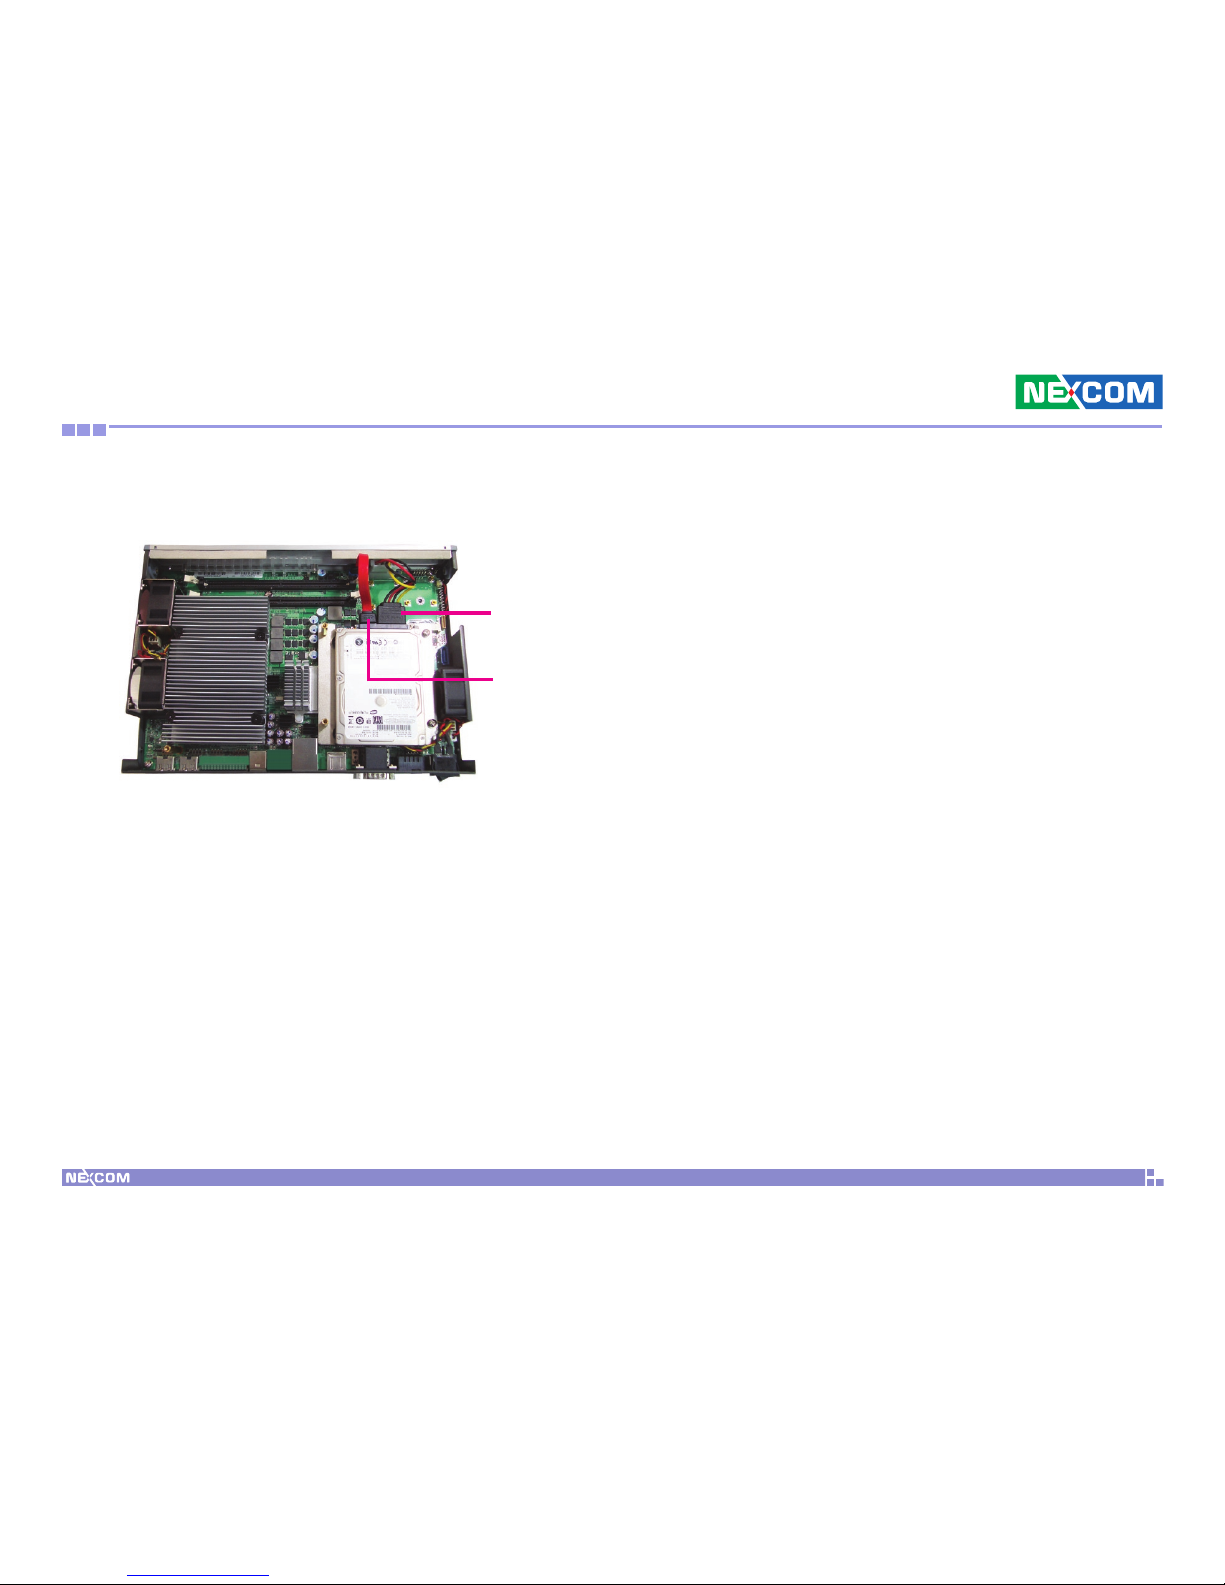
9. Align the mounting holes of the drive bay with the mounting studs on
the board then use the provided mounting screws to secure the drive
bay in place.
10. Locate for the SATA data connector and the SATA power connector
on the board.
SATA data
connector
SATA power
connector
Page 55
Copyright © 2010 NEXCOM International Co., Ltd. All Rights Reserved.
42
Chapter 3: System Setup
NDiS 164 User Manual
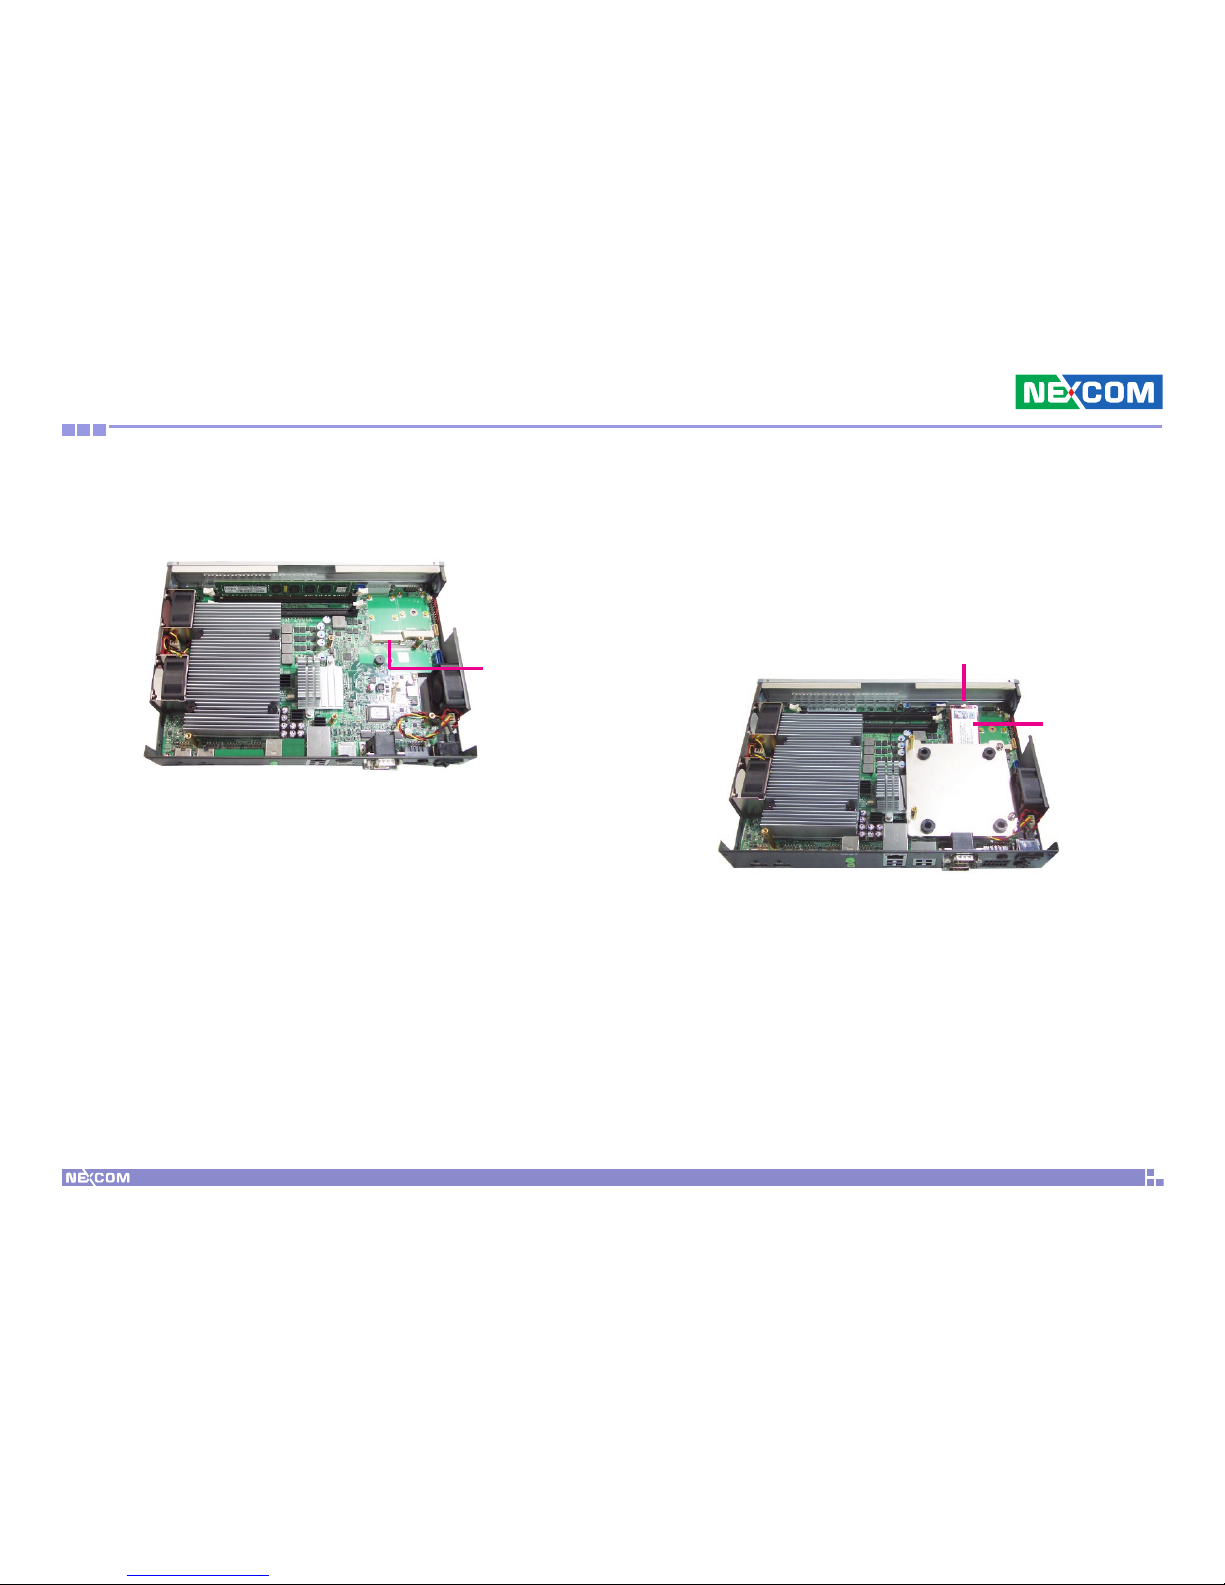
11. Connect the SATA data cable and SATA power cable to the connectors.
SATA power
cable
SATA data
cable
Page 56
Copyright © 2010 NEXCOM International Co., Ltd. All Rights Reserved.
43
Chapter 3: System Setup
NDiS 164 User Manual
Installing a TV Tuner Module
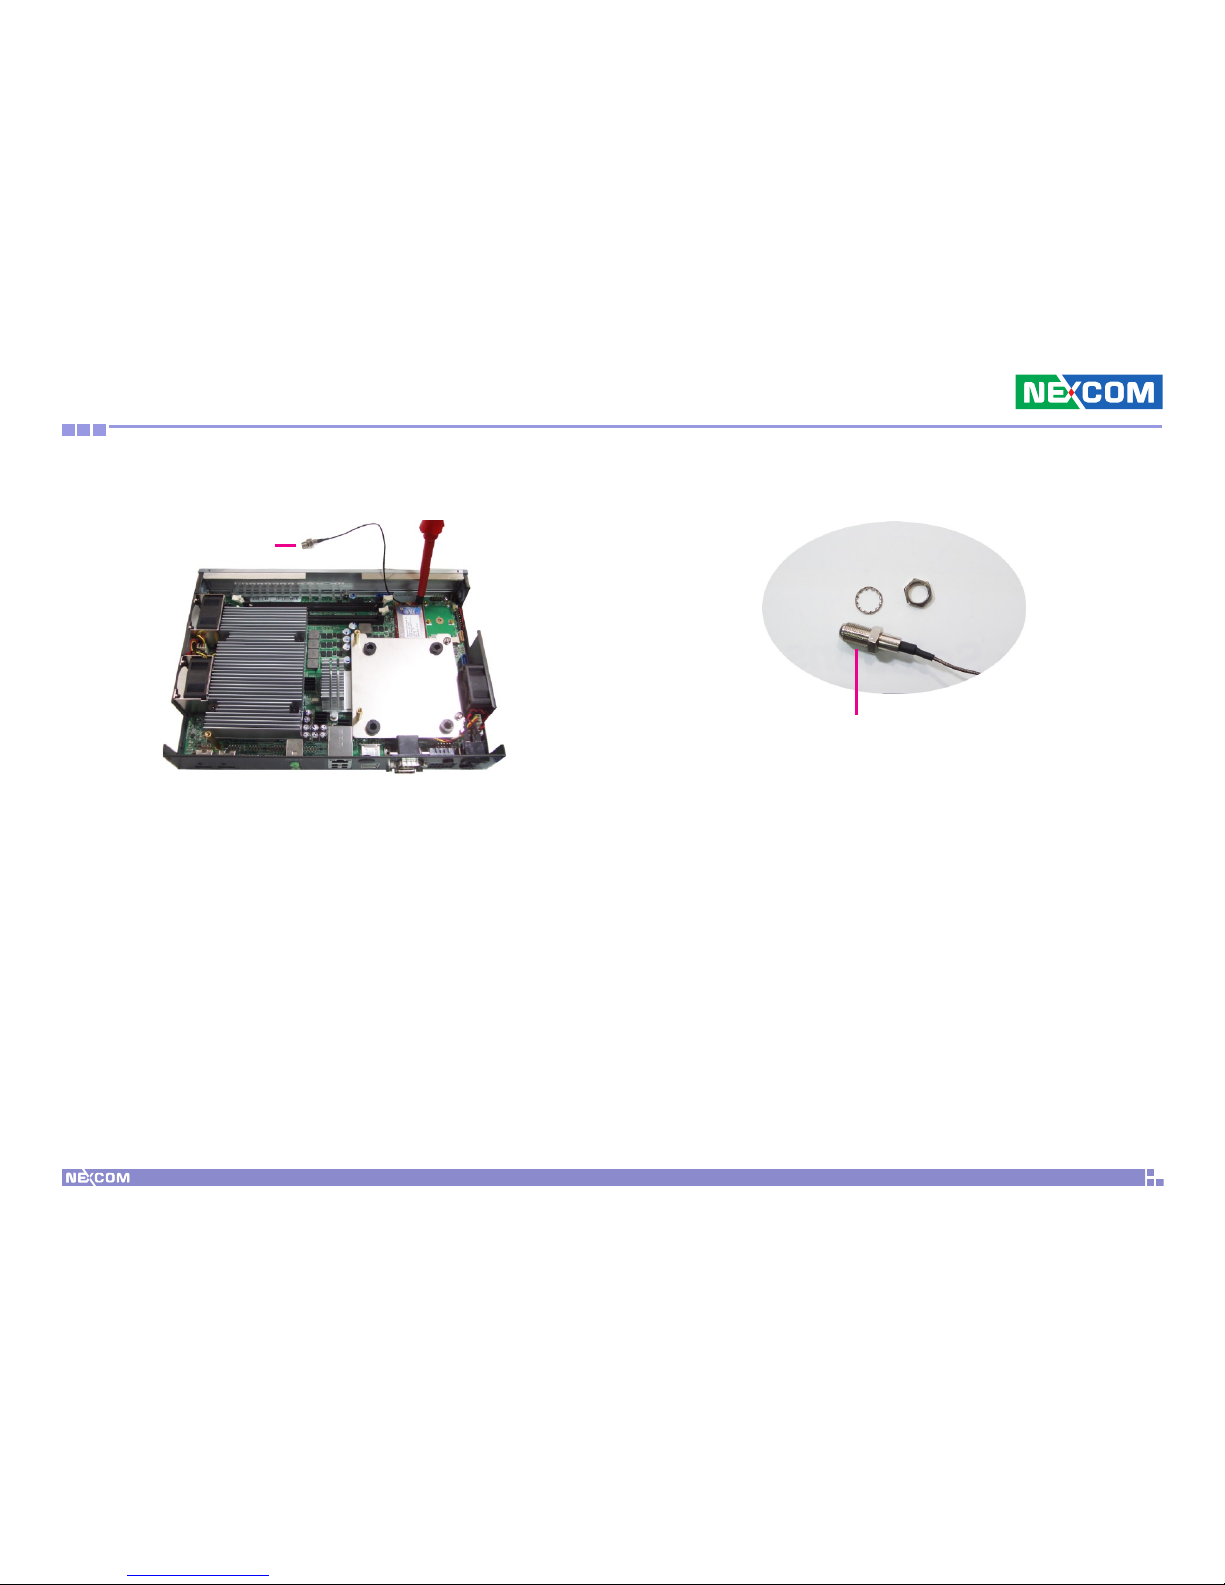
1. Locate for the Mini PCI Express slot on the board.
2. Attach one end of the RF cable onto the module.
Insert the TV Tuner module into the Mini PCI Express slot at a 45 de-
grees angle until the gold-plated connector on the edge of the module
completely disappears inside the slot.
TV Tuner
module
Mini PCI
Express slot
RF cable attached to
the module
Page 57
Copyright © 2010 NEXCOM International Co., Ltd. All Rights Reserved.
44
Chapter 3: System Setup
NDiS 164 User Manual
3. Push the module down then secure it with mounting screws.
RF cable
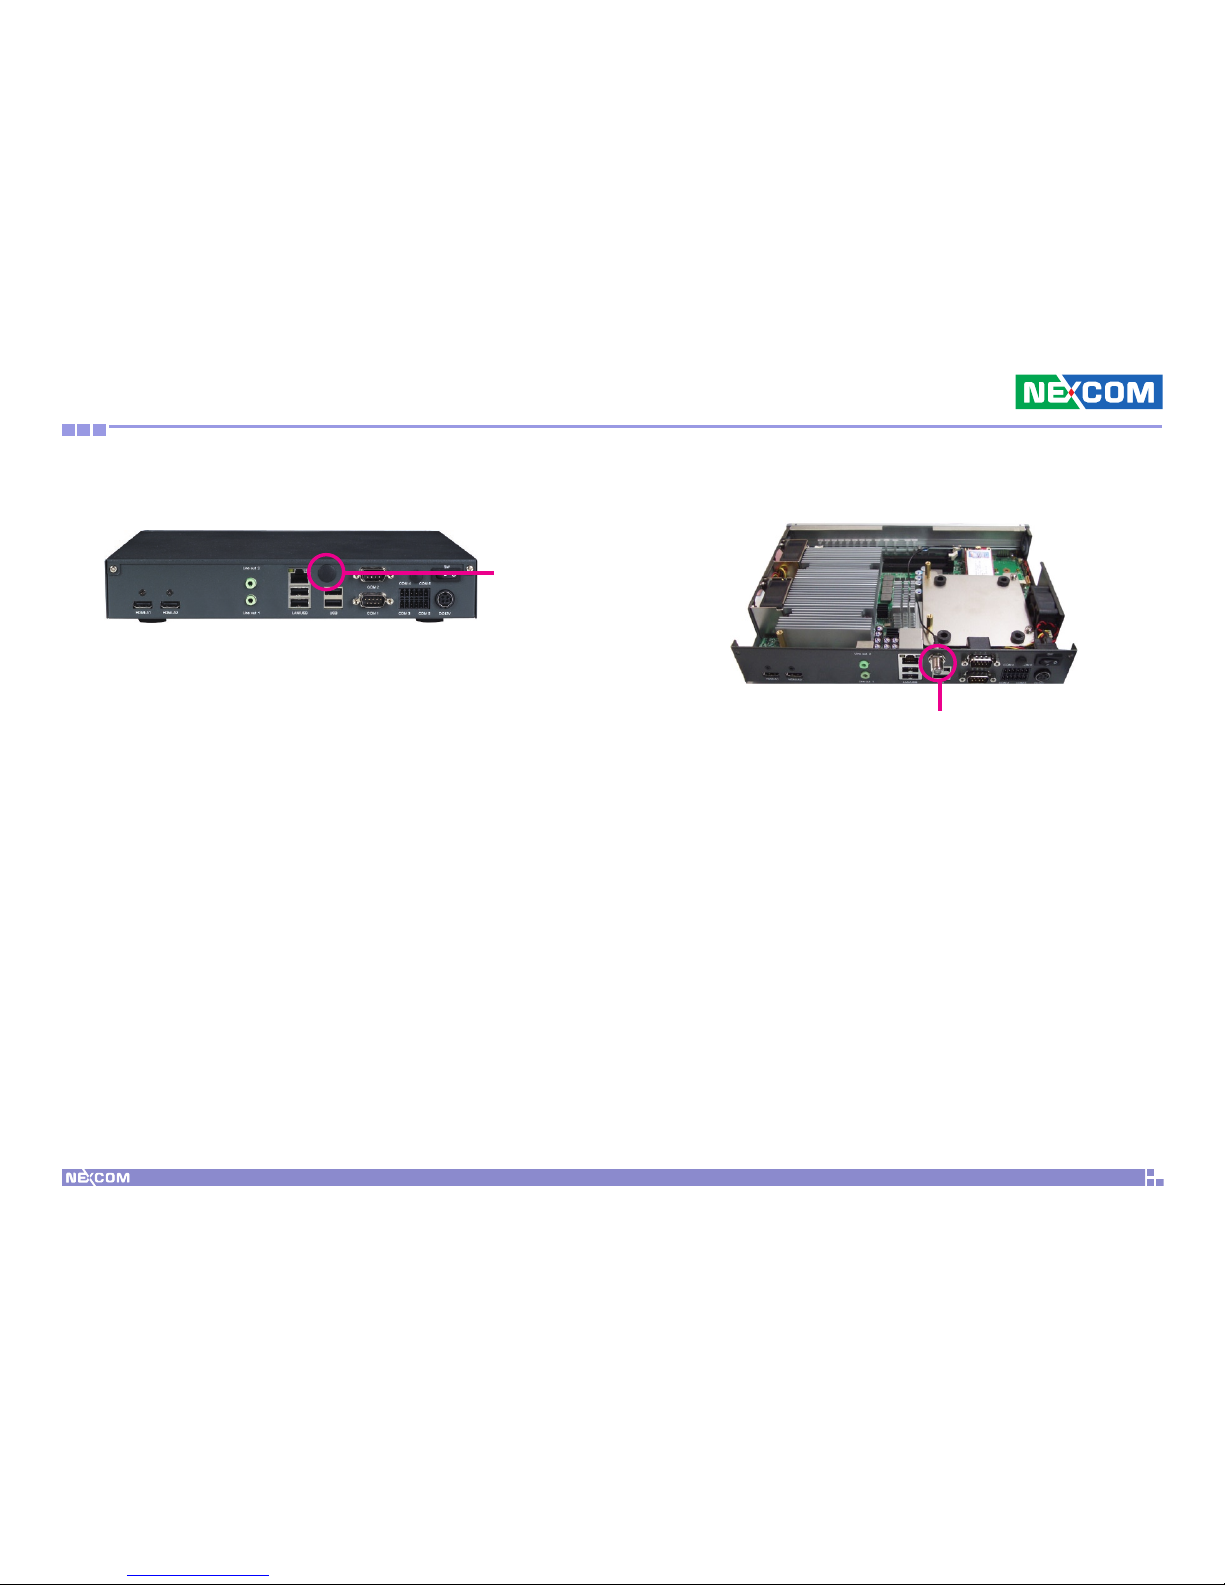
4. Insert the 2 rings (ring 1 then ring 2) into the TV antenna jack.
Ring 1
Ring 2
TV antenna jack
Page 58
Copyright © 2010 NEXCOM International Co., Ltd. All Rights Reserved.
45
Chapter 3: System Setup
NDiS 164 User Manual
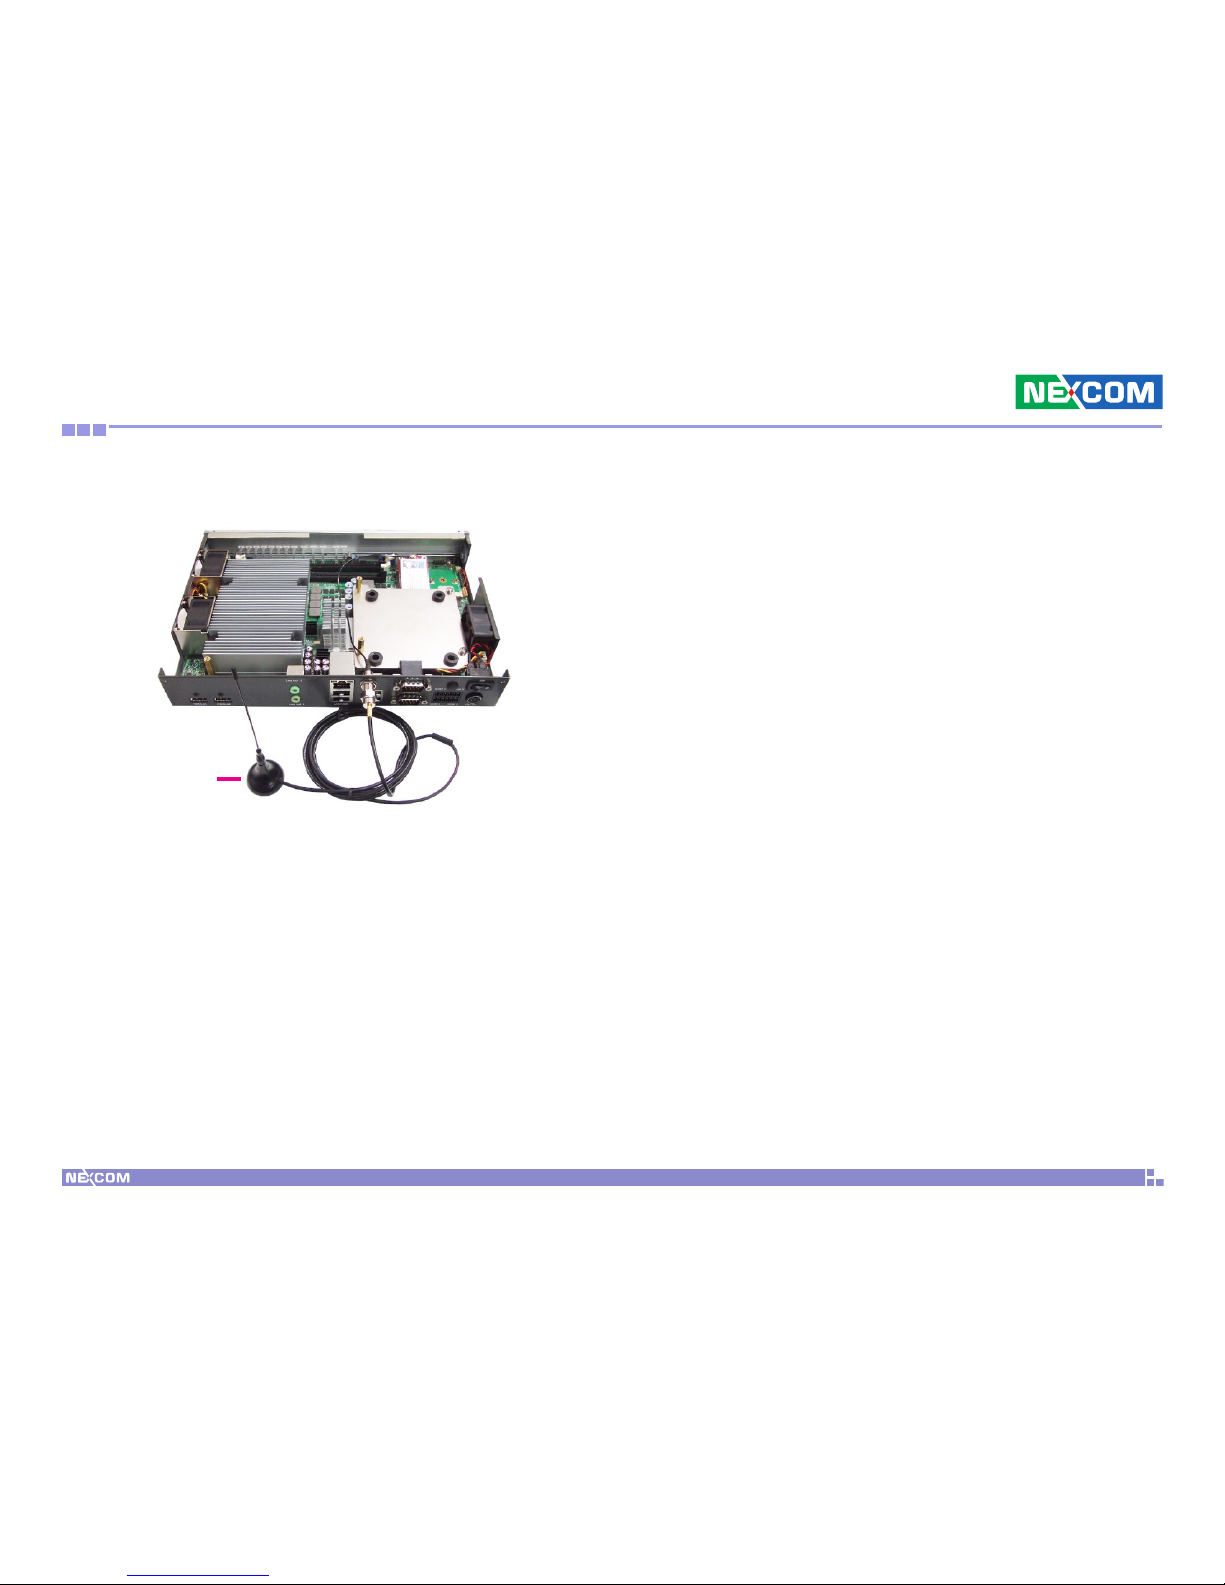
6. Mount the TV antenna jack to the TV antenna hole.5. Remove the TV antenna hole cover that is located at the rear panel of
the chassis.
TV antenna
hole cover
TV antenna jack
Page 59
Copyright © 2010 NEXCOM International Co., Ltd. All Rights Reserved.
46
Chapter 3: System Setup
NDiS 164 User Manual
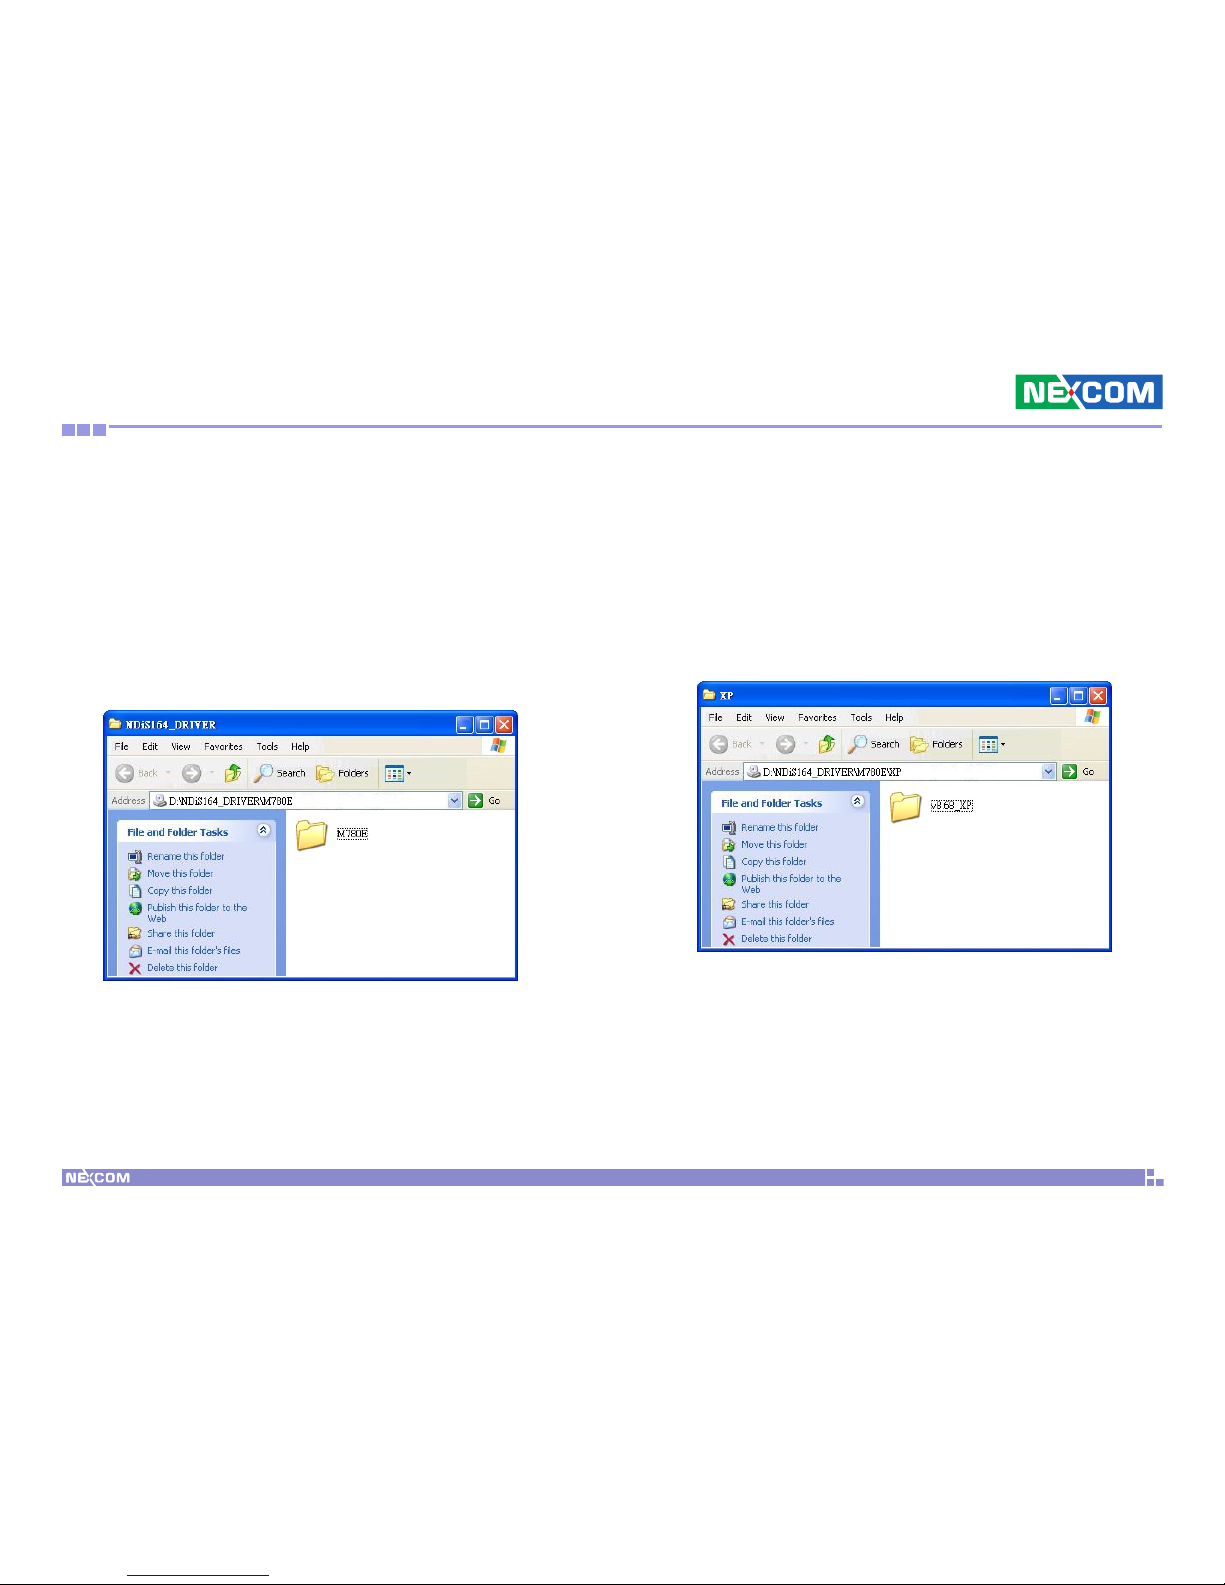
7. Connect an external TV antenna to the TV antenna jack.
TV antenna
Page 60
Copyright © 2010 NEXCOM International Co., Ltd. All Rights Reserved.
47
Appendix A: Video Driver Installation and Settings
NDiS 164 User Manual
aP P e n d i x a: Vi d e o dr i V e r in s t a l l a t i o n a n d se t t i n g s
Installing the Video Driver
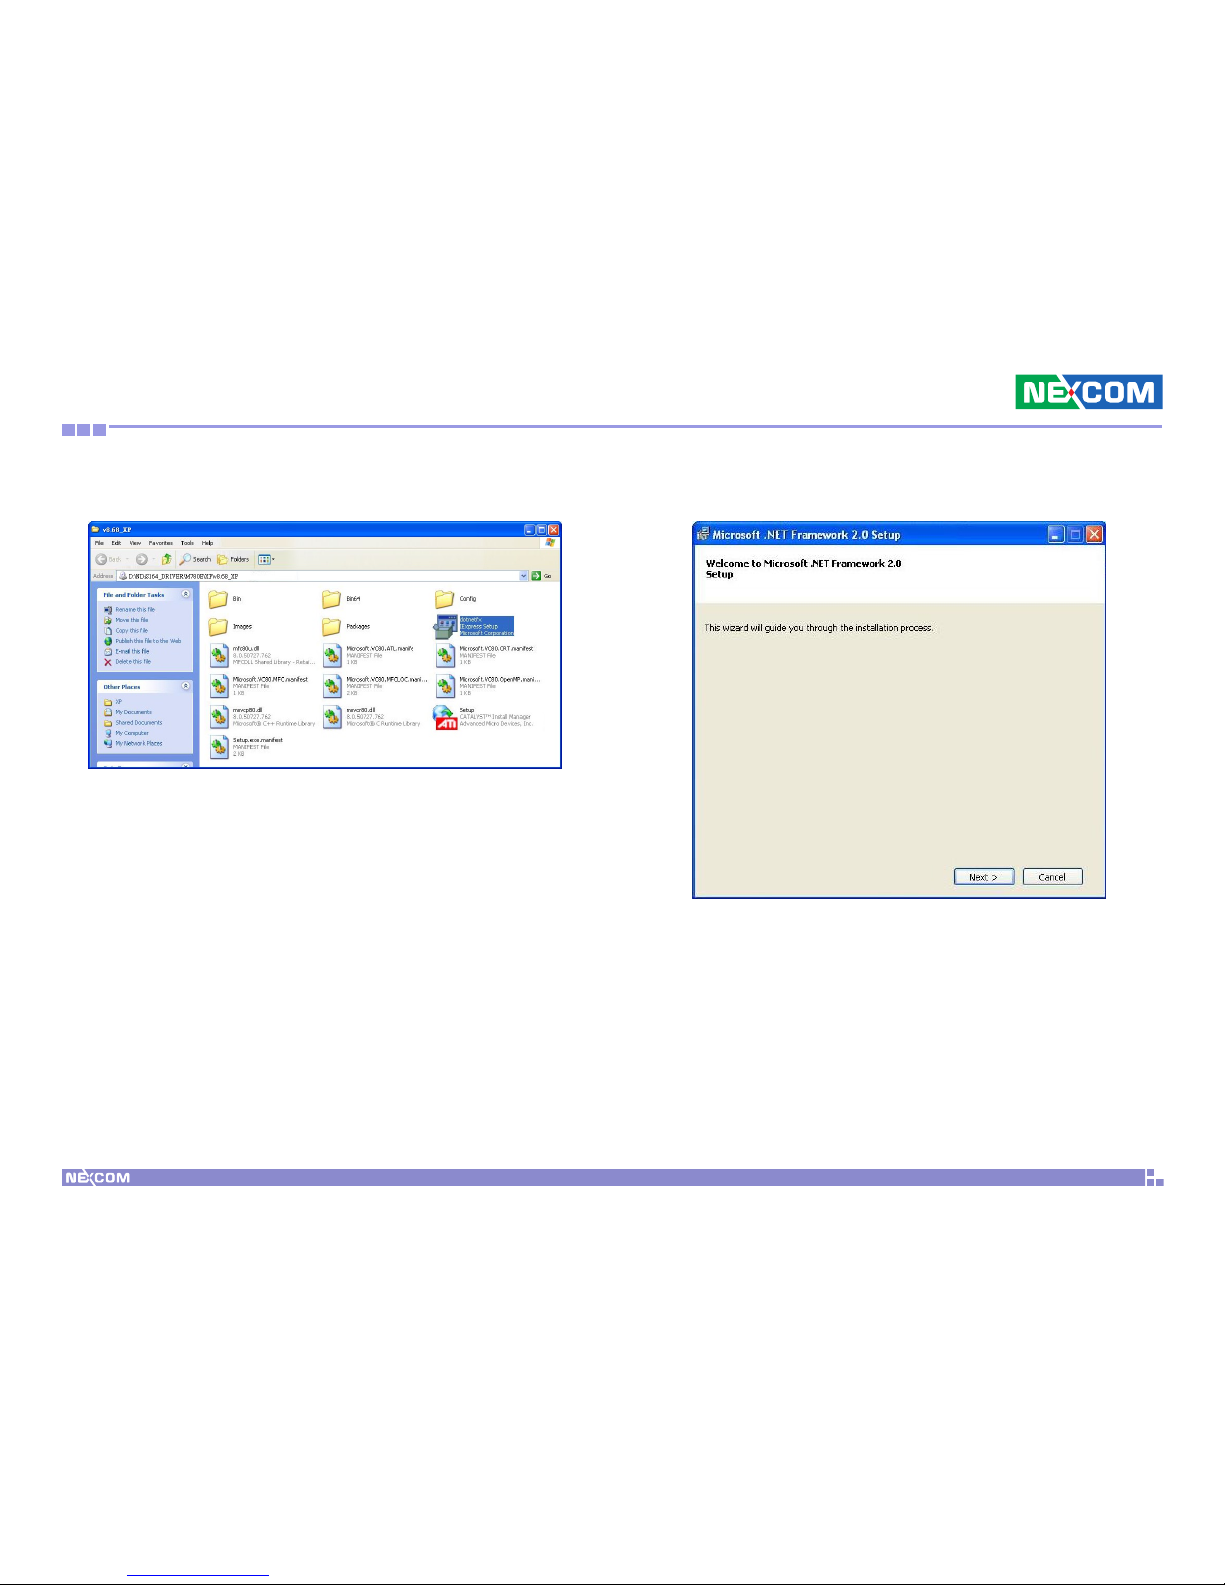
1. Insert the provided CD into a CD-ROM drive.
2. Open the M780E folder.
3. Open the required system folder, for instance XP.
Page 61
Copyright © 2010 NEXCOM International Co., Ltd. All Rights Reserved.
48
Appendix A: Video Driver Installation and Settings
NDiS 164 User Manual
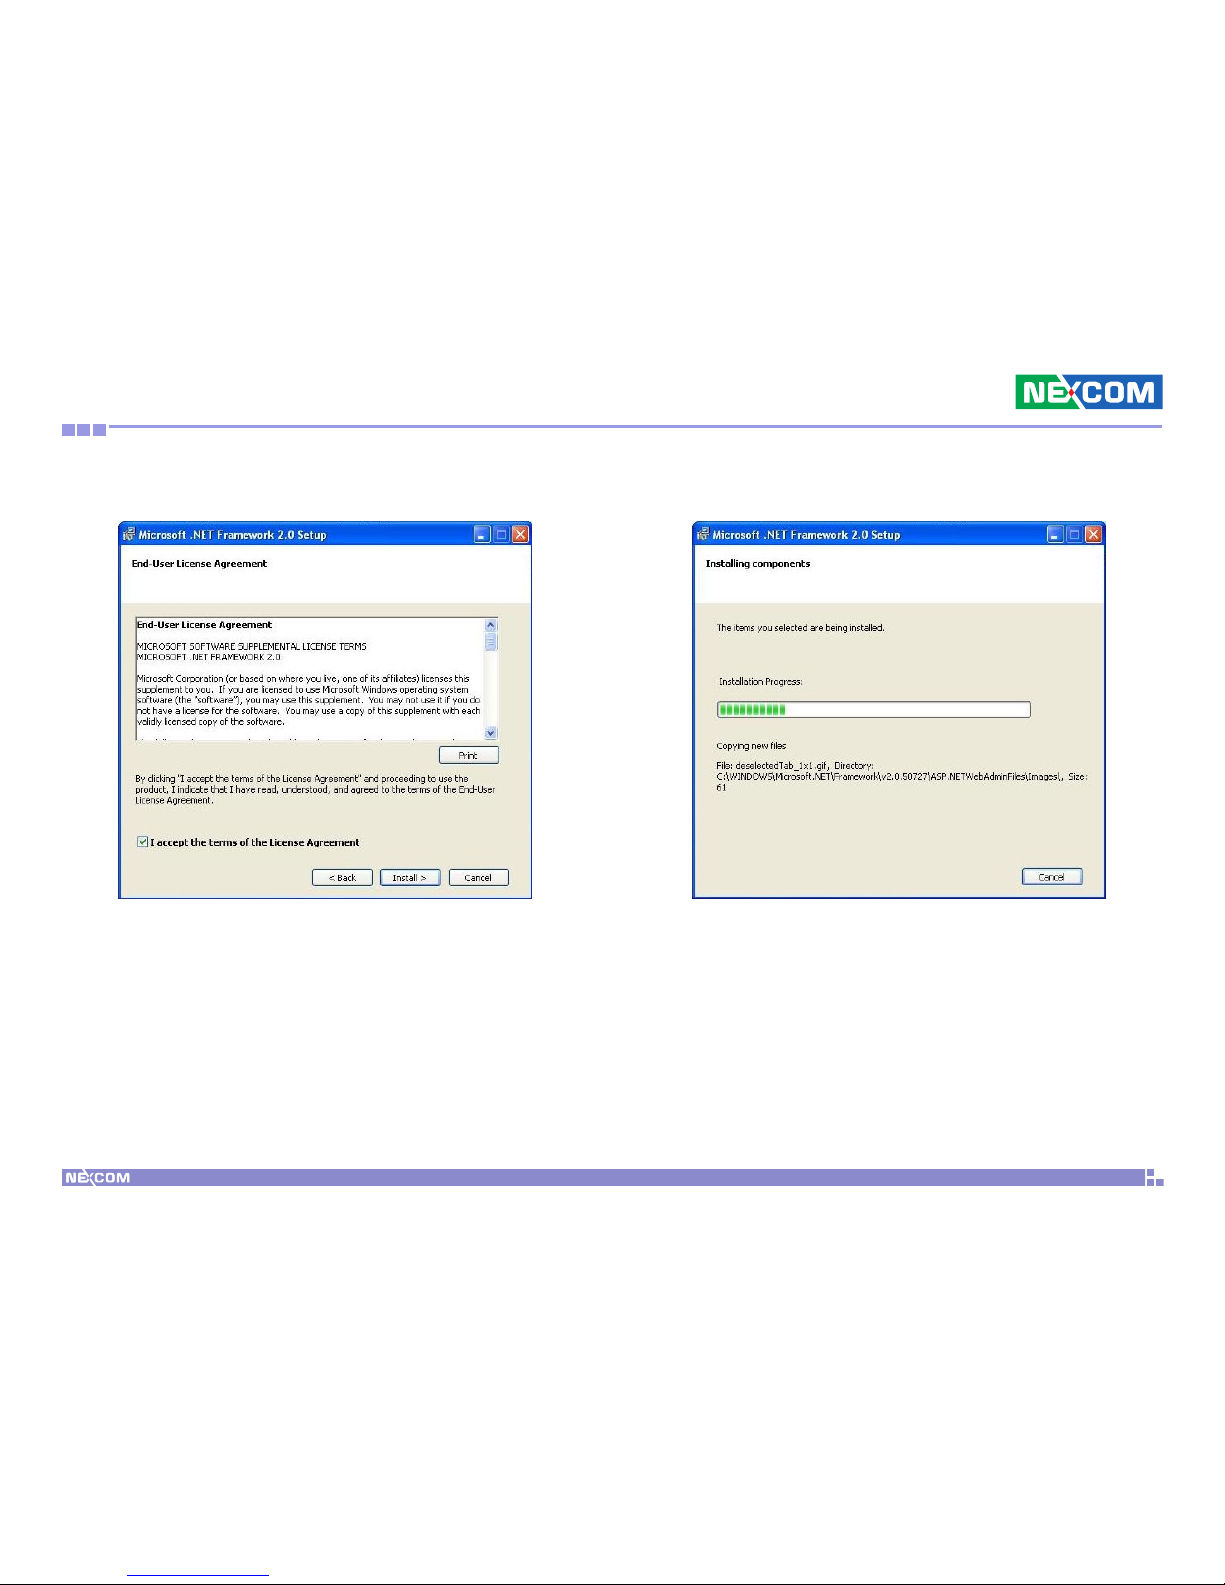
4. Run Framework 2.0 dotnetfx setup. 5. Click “Next” install .NET Framework 2.0.
Page 62
Copyright © 2010 NEXCOM International Co., Ltd. All Rights Reserved.
49
Appendix A: Video Driver Installation and Settings
NDiS 164 User Manual
6. Read the license agreement then click accept Install. 7. Run Setup.
Page 63
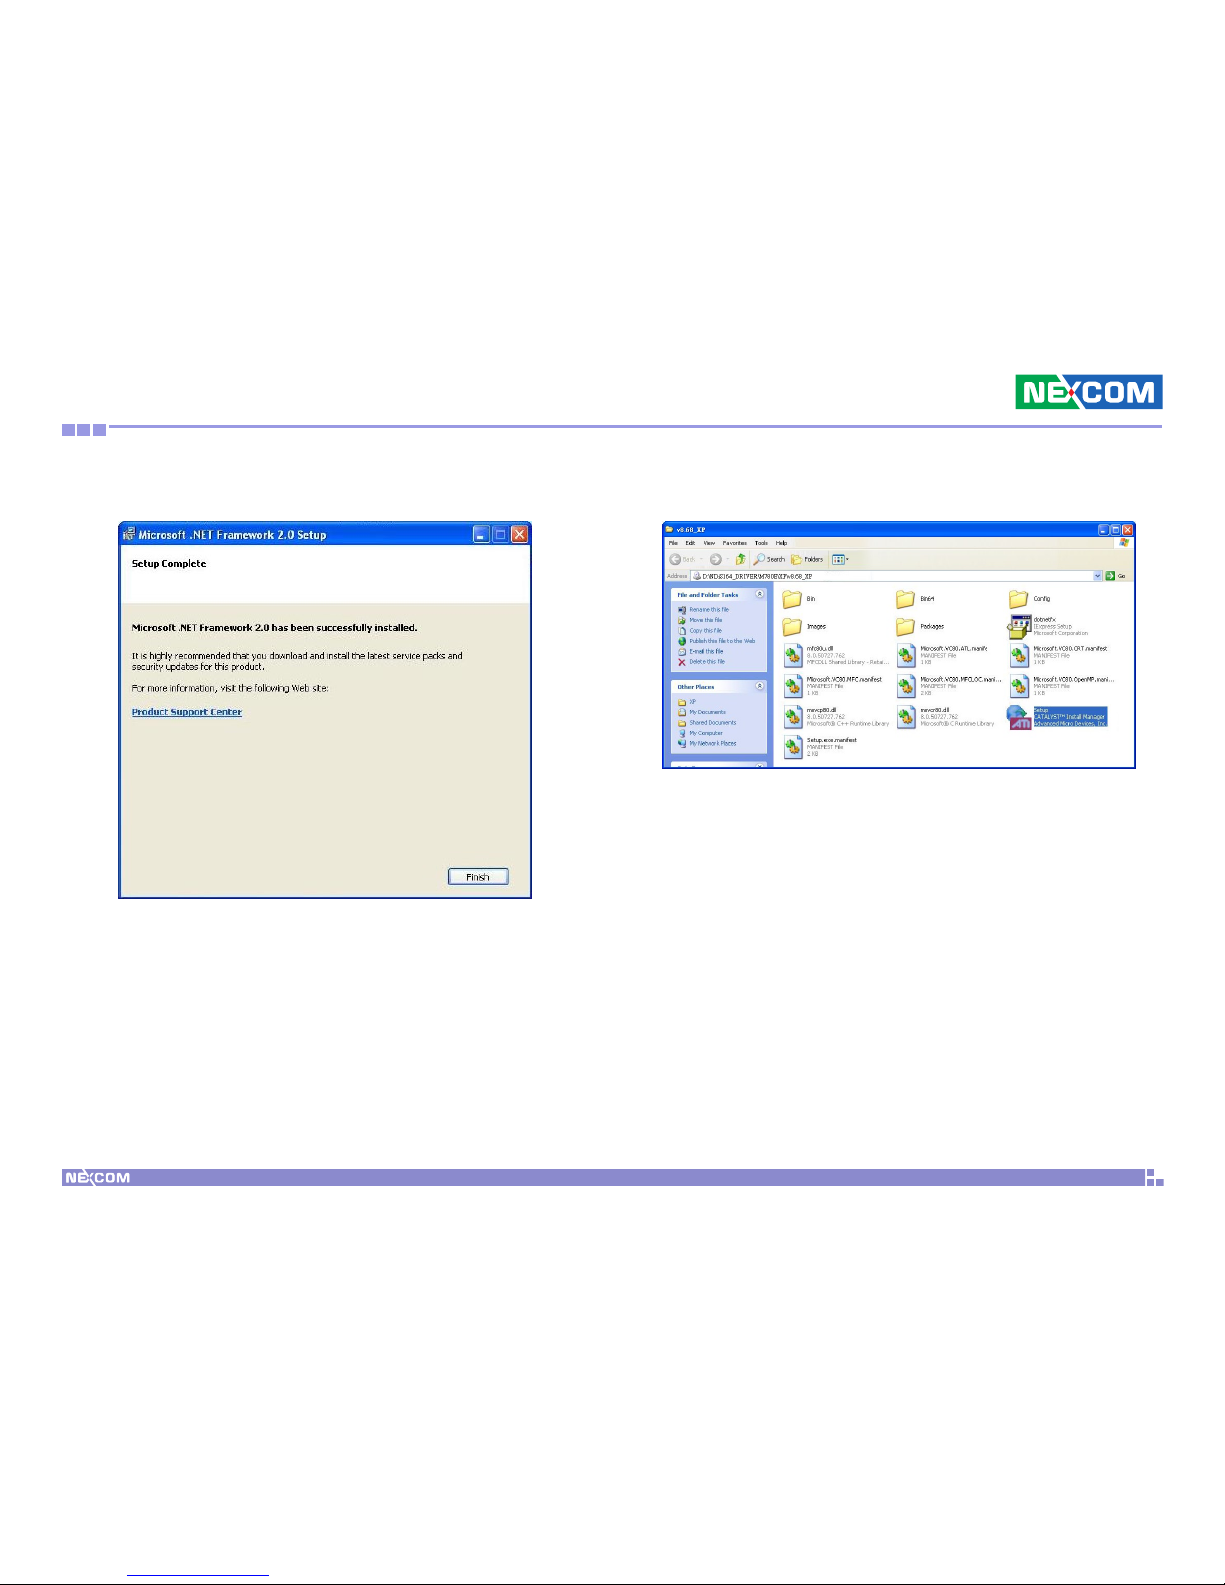
Copyright © 2010 NEXCOM International Co., Ltd. All Rights Reserved.
50
Appendix A: Video Driver Installation and Settings
NDiS 164 User Manual
8. Setup complete then click Finish. 9. Run Setup.
Page 64
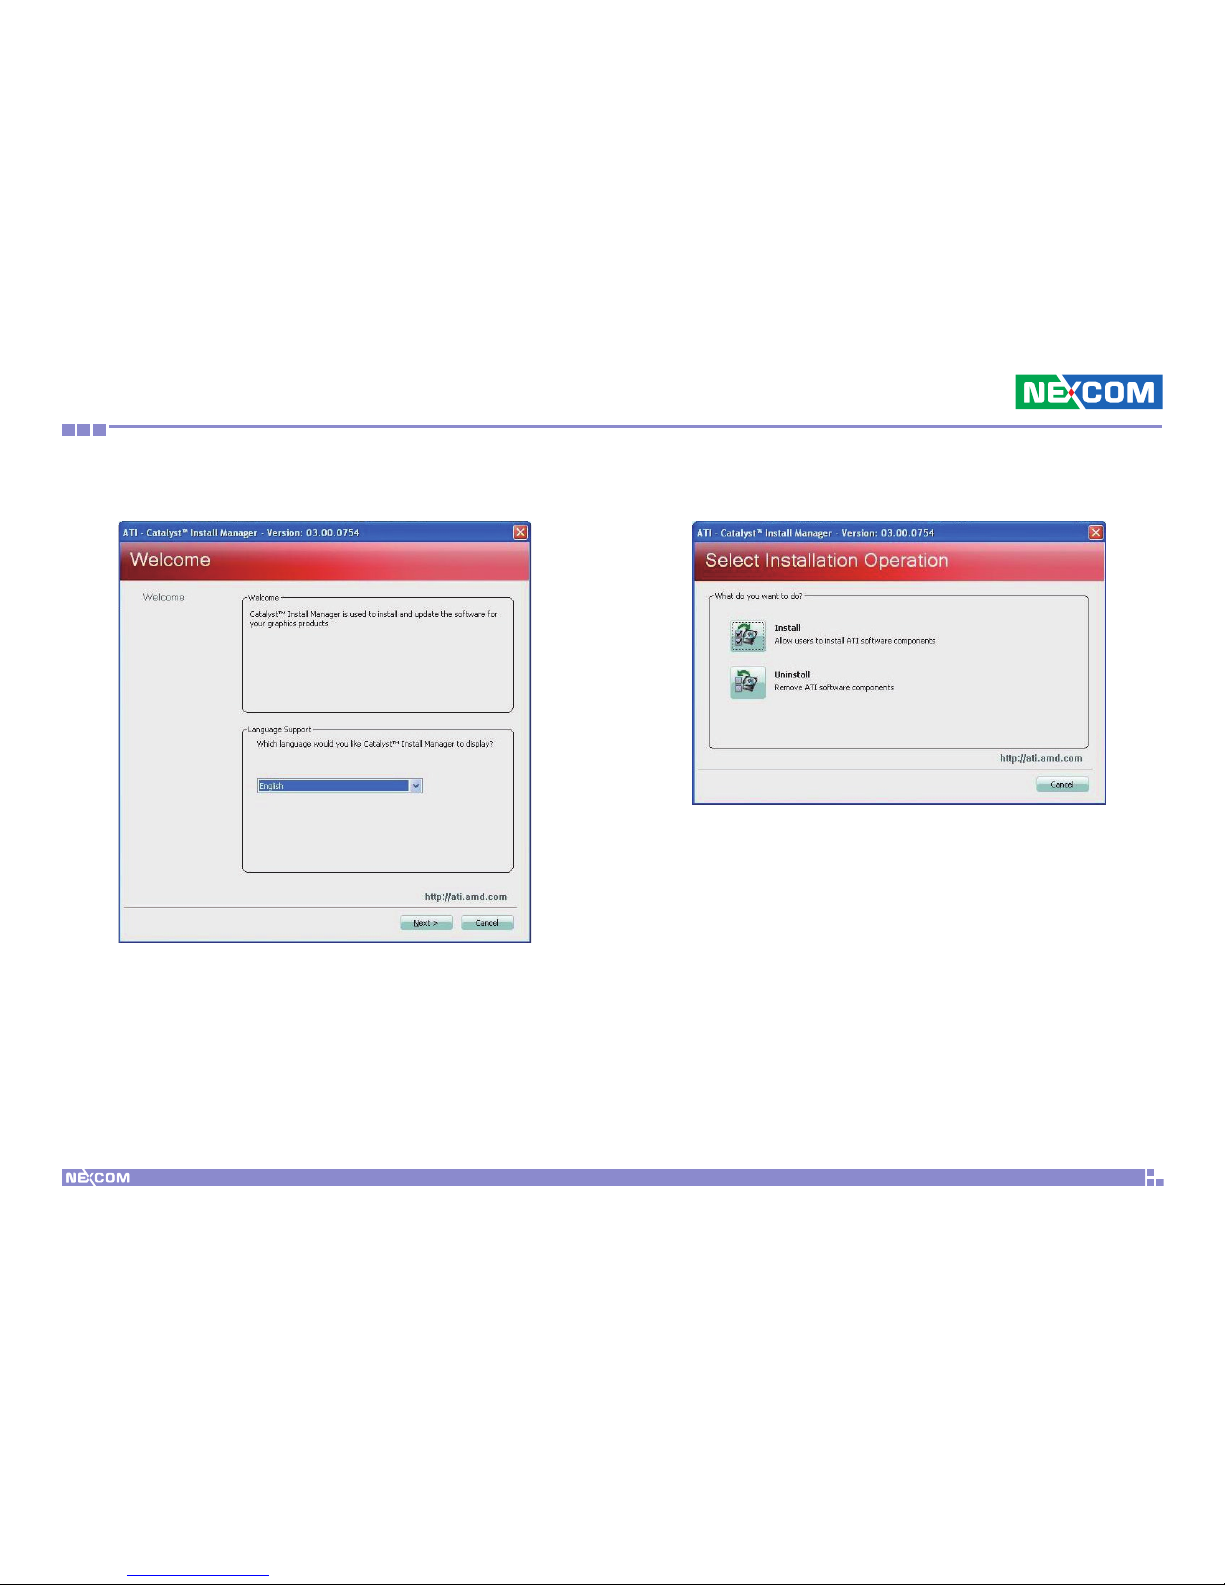
Copyright © 2010 NEXCOM International Co., Ltd. All Rights Reserved.
51
Appendix A: Video Driver Installation and Settings
NDiS 164 User Manual
10. Select language support then click Next. 11. Select Express then click Next.
Page 65
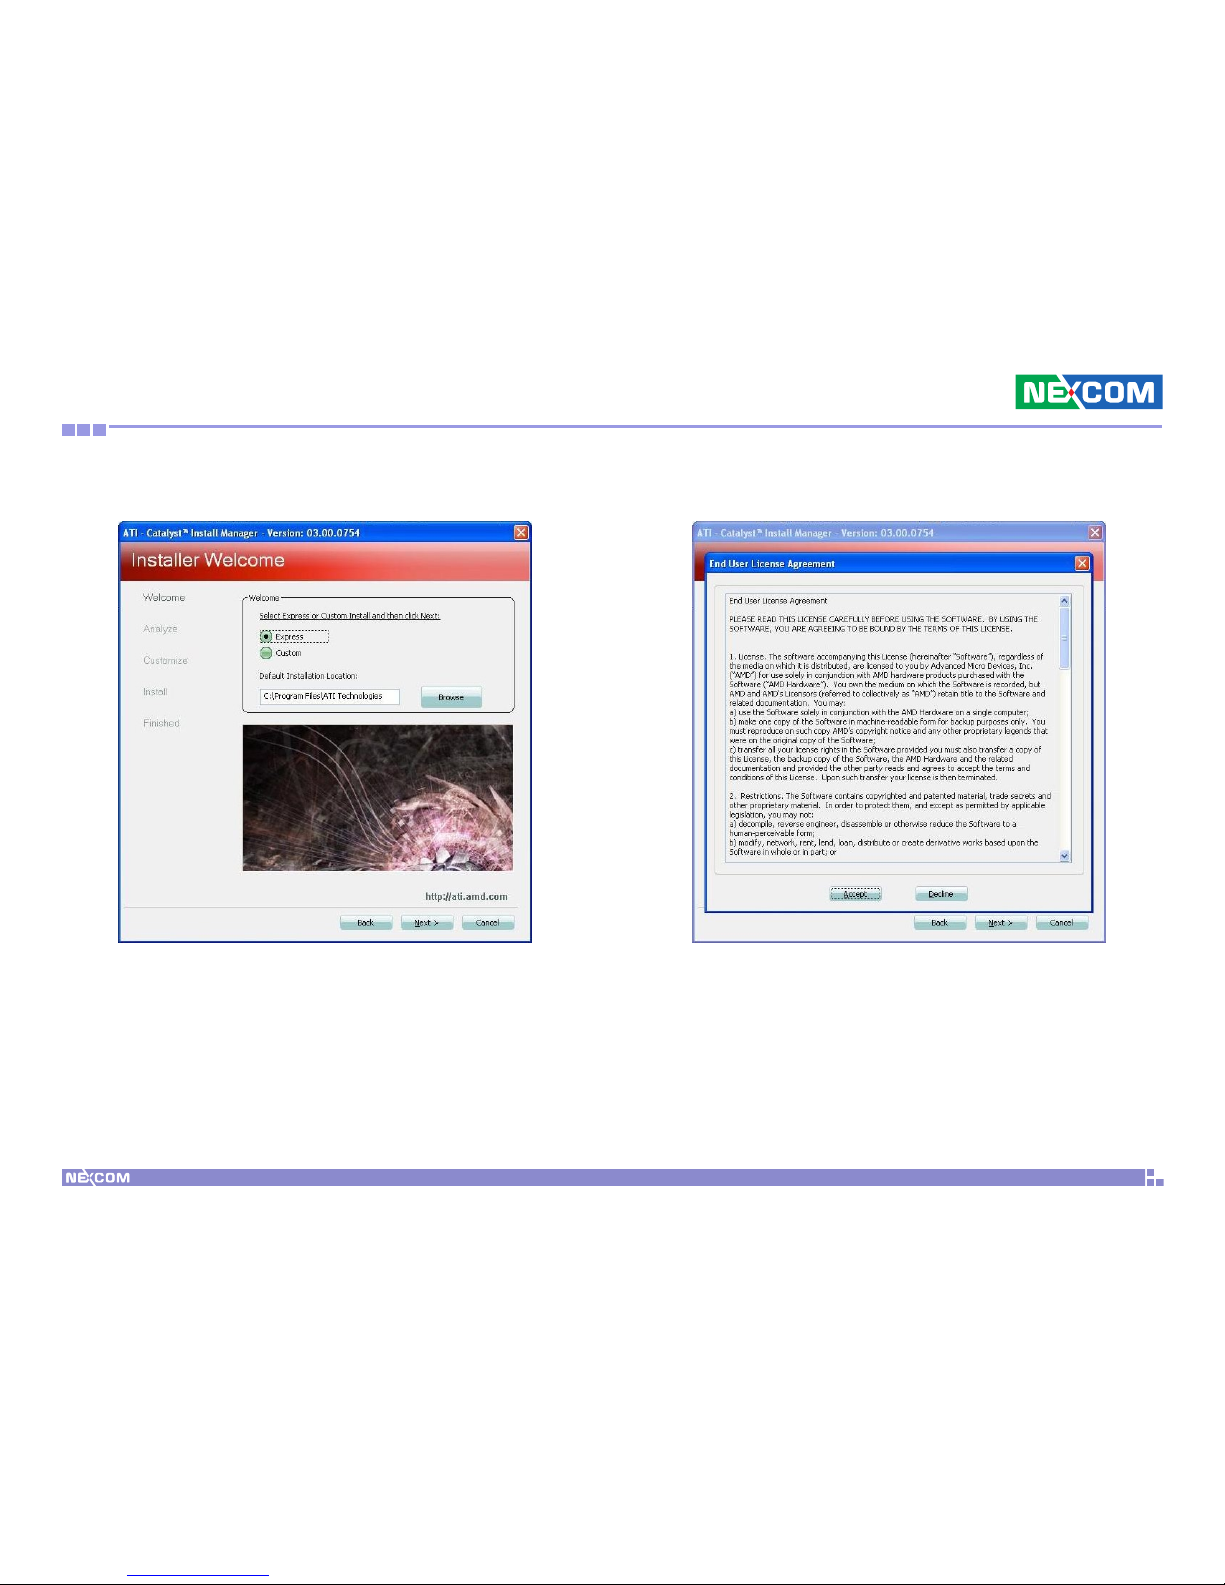
Copyright © 2010 NEXCOM International Co., Ltd. All Rights Reserved.
52
Appendix A: Video Driver Installation and Settings
NDiS 164 User Manual
12. Click “Express“ then click Next. 13. Read the license agreement then click Next.
Page 66
Copyright © 2010 NEXCOM International Co., Ltd. All Rights Reserved.
53
Appendix A: Video Driver Installation and Settings
NDiS 164 User Manual
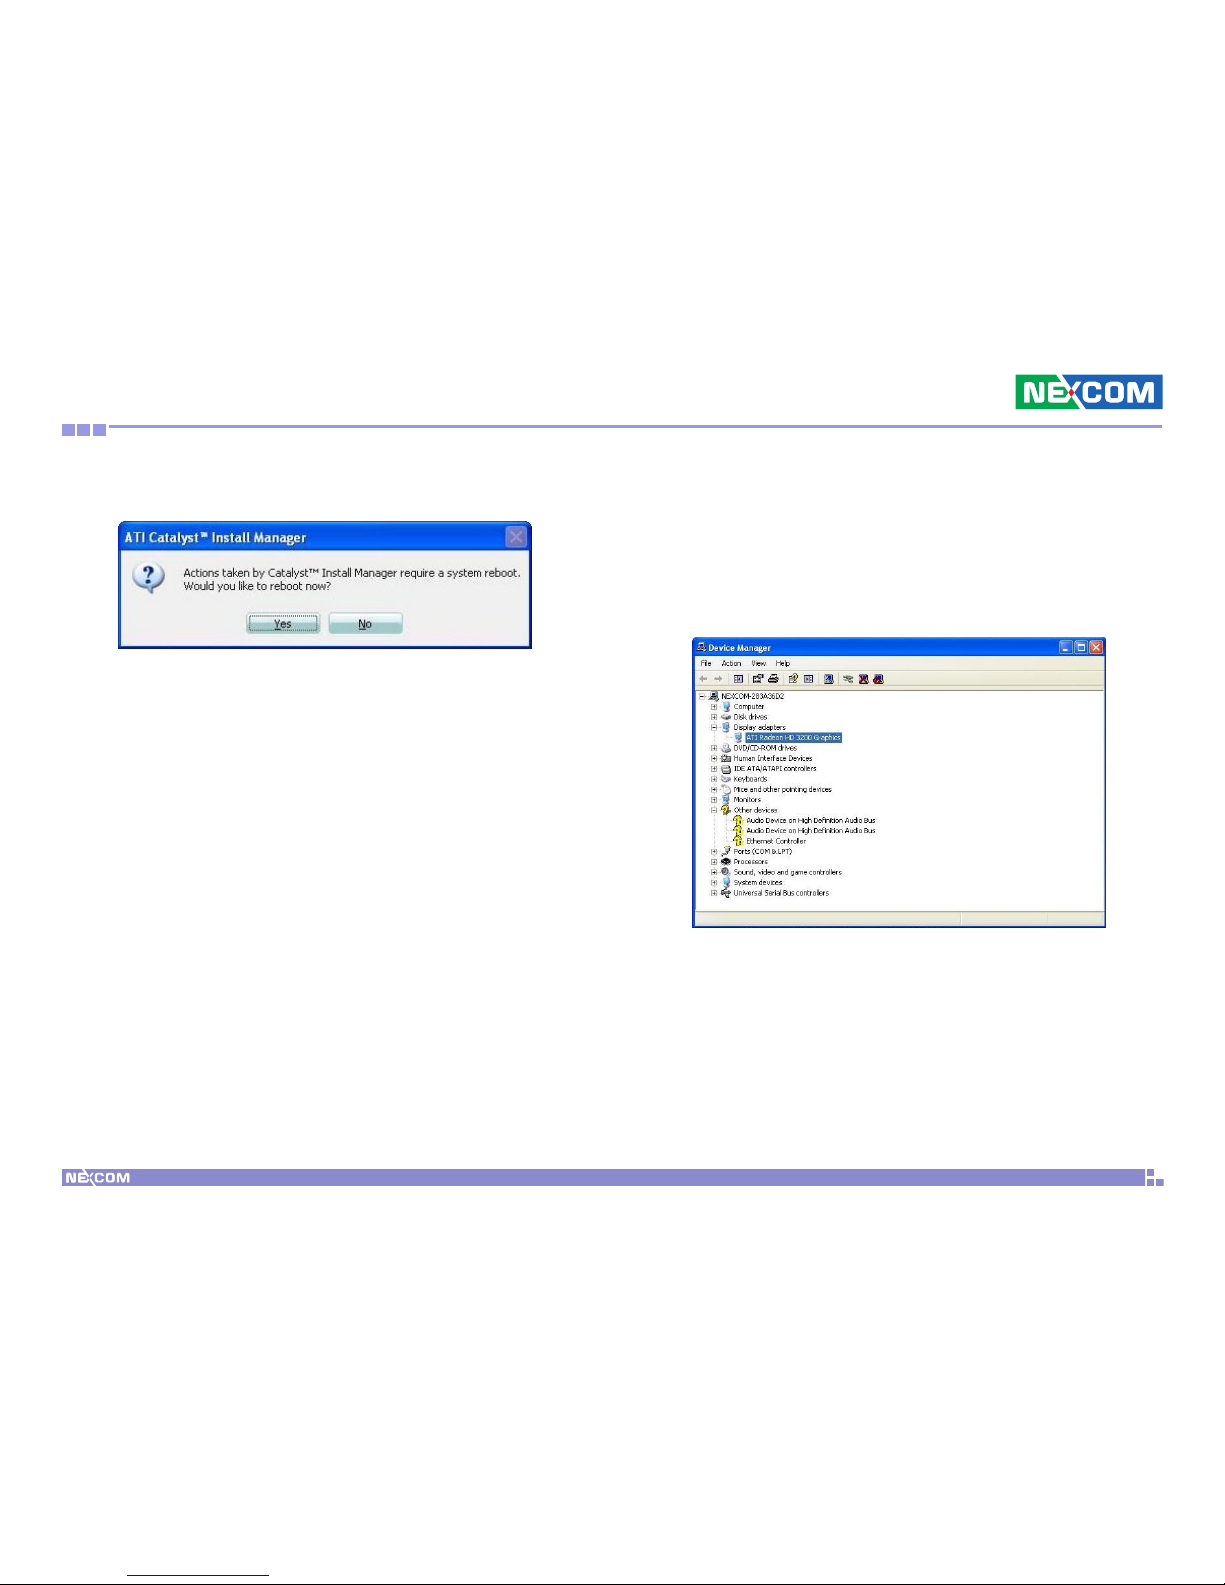
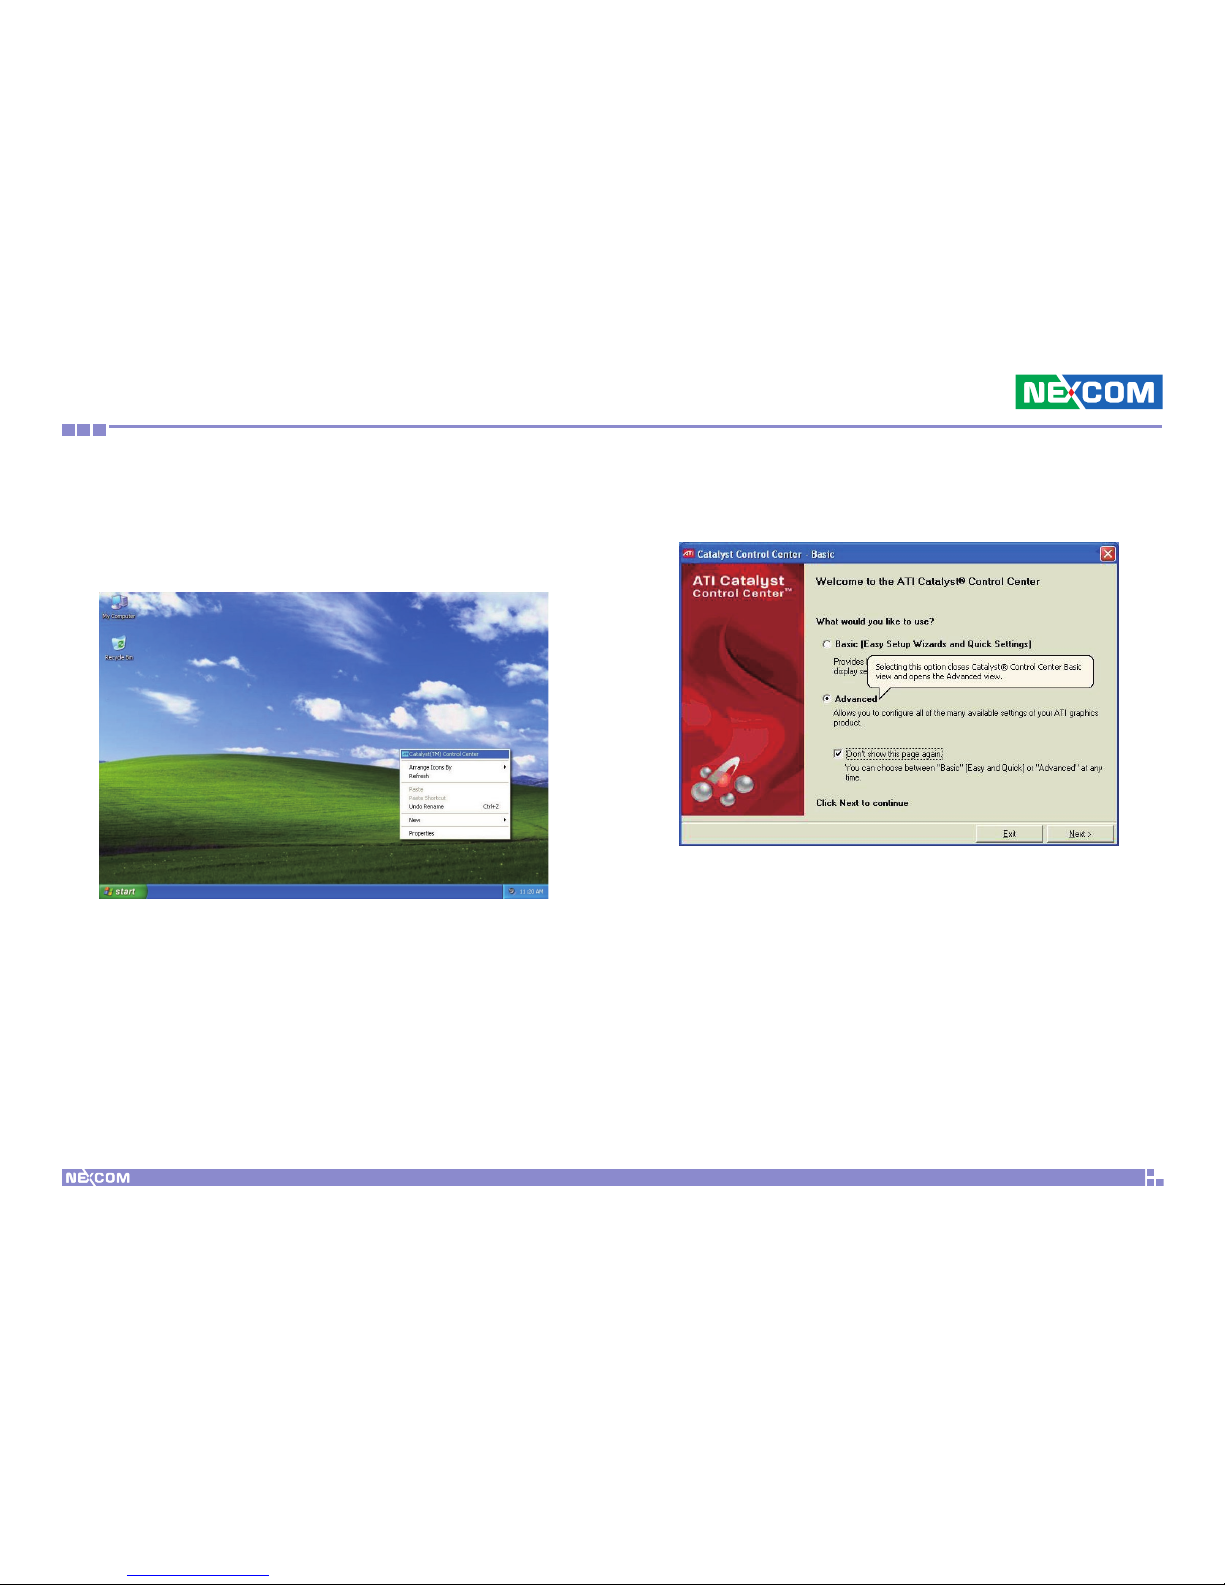
14. Click “Yes“, system reboot. 15. After restarting the system, you can view the status of the VGA driver
in the Device Manager list.
To open Device Manager, click Start, and then click Control Panel.
Double-click System. On the Hardware tab, click Device Manager.
The list below shows the VGA driver successfully installed in the system.
Page 67
Copyright © 2010 NEXCOM International Co., Ltd. All Rights Reserved.
54
Appendix A: Video Driver Installation and Settings
NDiS 164 User Manual
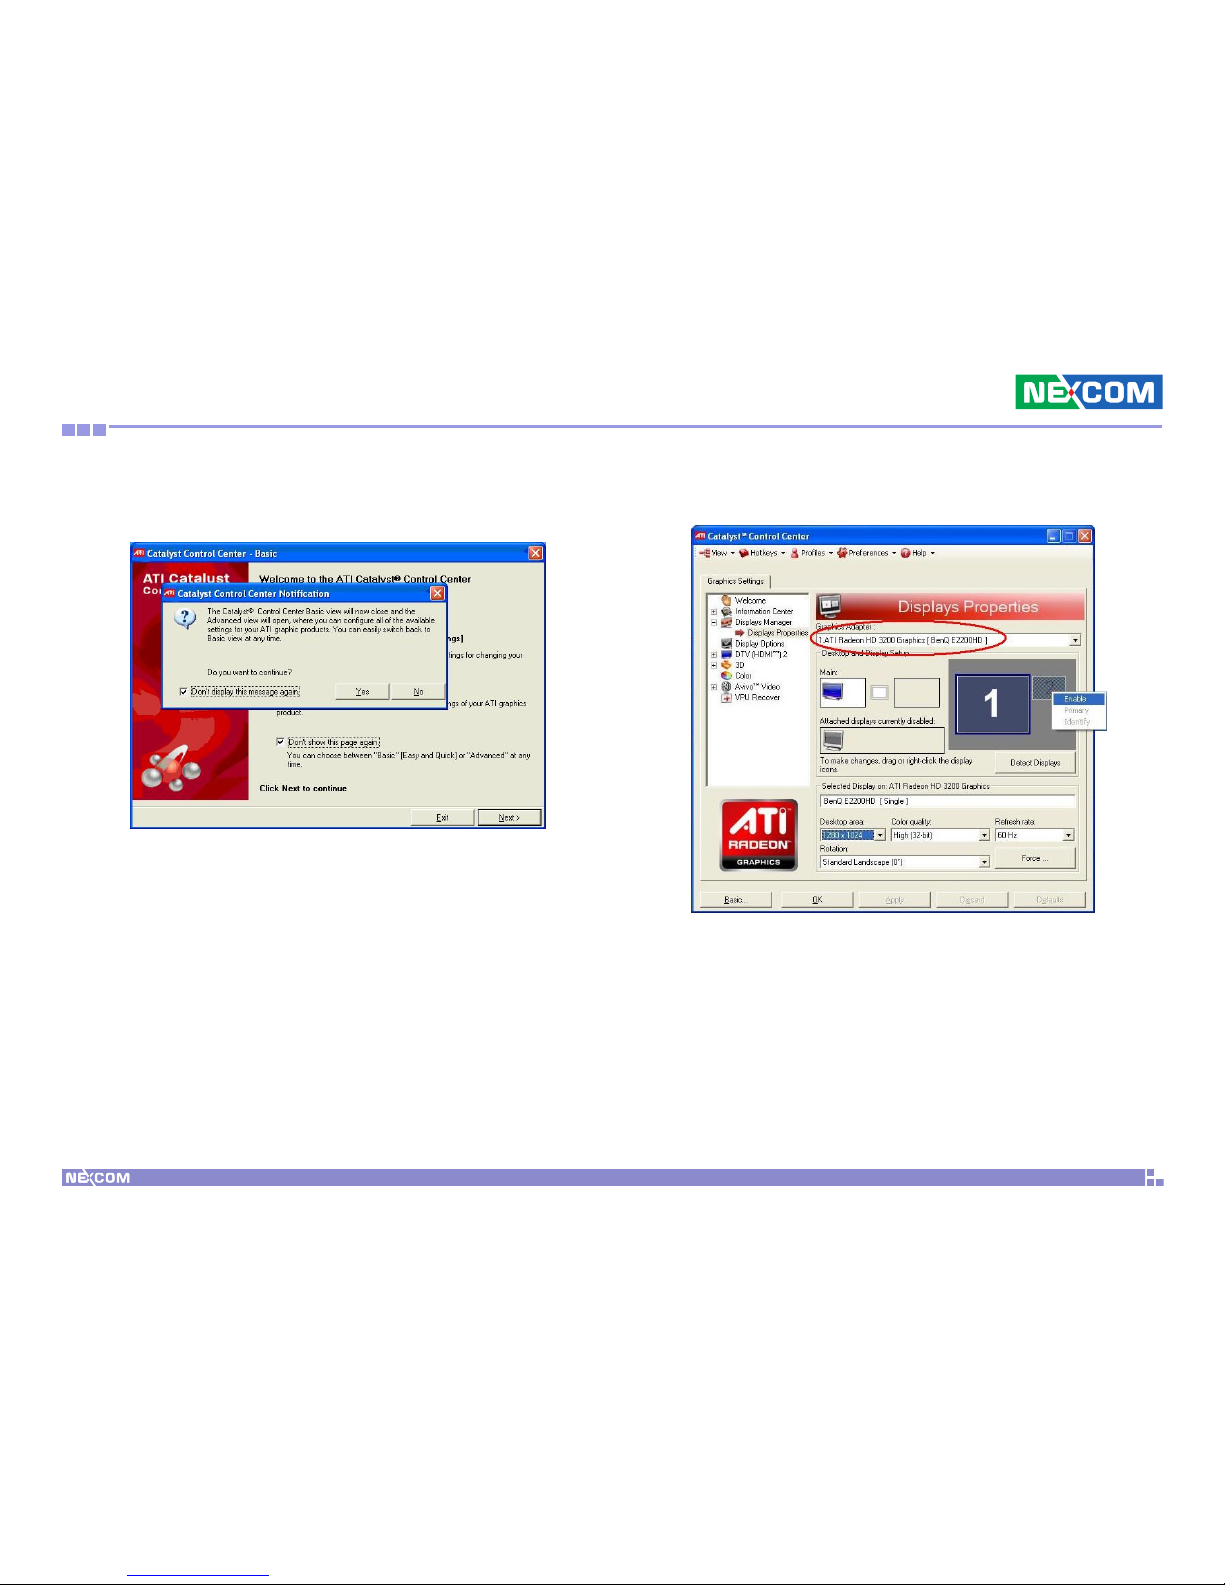
16. You will notice the ATI icon already added in the Windows notification
area. Right-click this icon then select Catalyst(TM) Control Center.
You can also right-click anywhere on your desktop then select
Catalyst(TM) Control Center.
17. Select Advanced then click Next. Selecting Advanced allows you to
configure all the available settings.
Page 68
Copyright © 2010 NEXCOM International Co., Ltd. All Rights Reserved.
55
Appendix A: Video Driver Installation and Settings
NDiS 164 User Manual
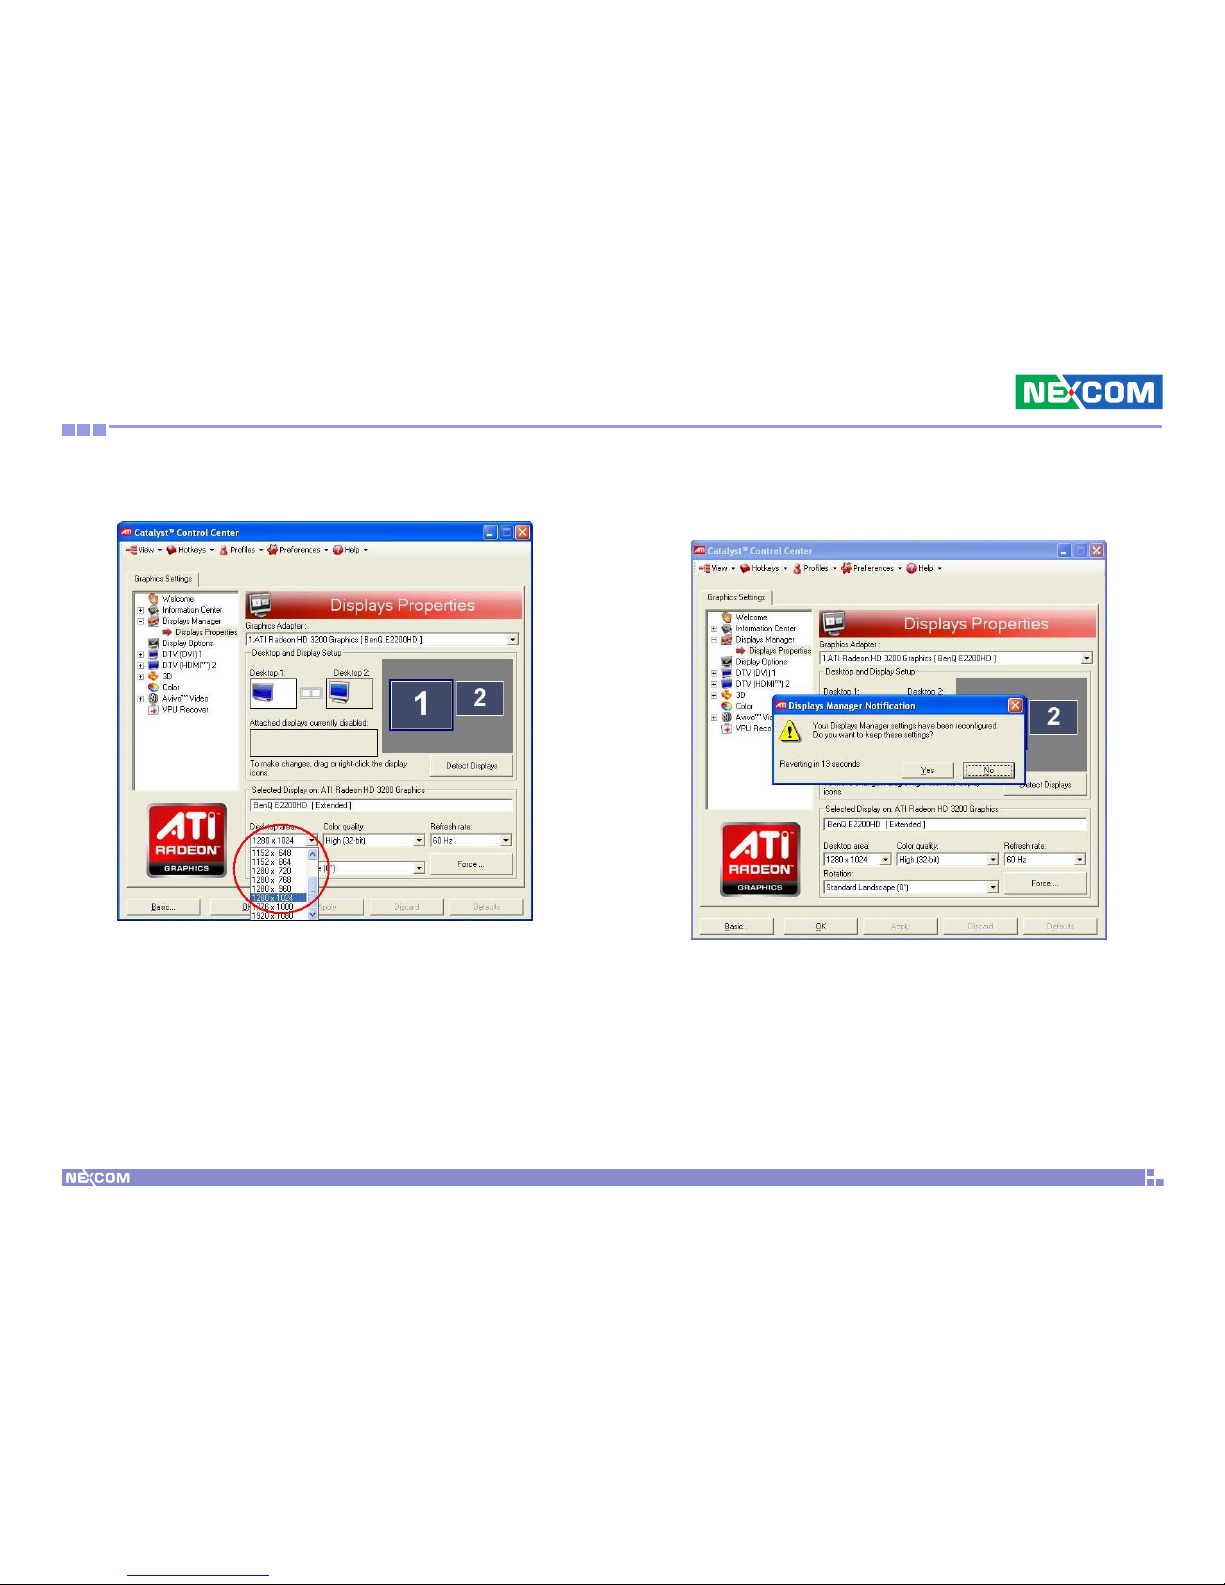
18. Click Yes to switch from the Catalyst Control Center Basic view to the
Advanced view.
19. Select ATI Radeon HD 3200.
Page 69
Copyright © 2010 NEXCOM International Co., Ltd. All Rights Reserved.
56
Appendix A: Video Driver Installation and Settings
NDiS 164 User Manual
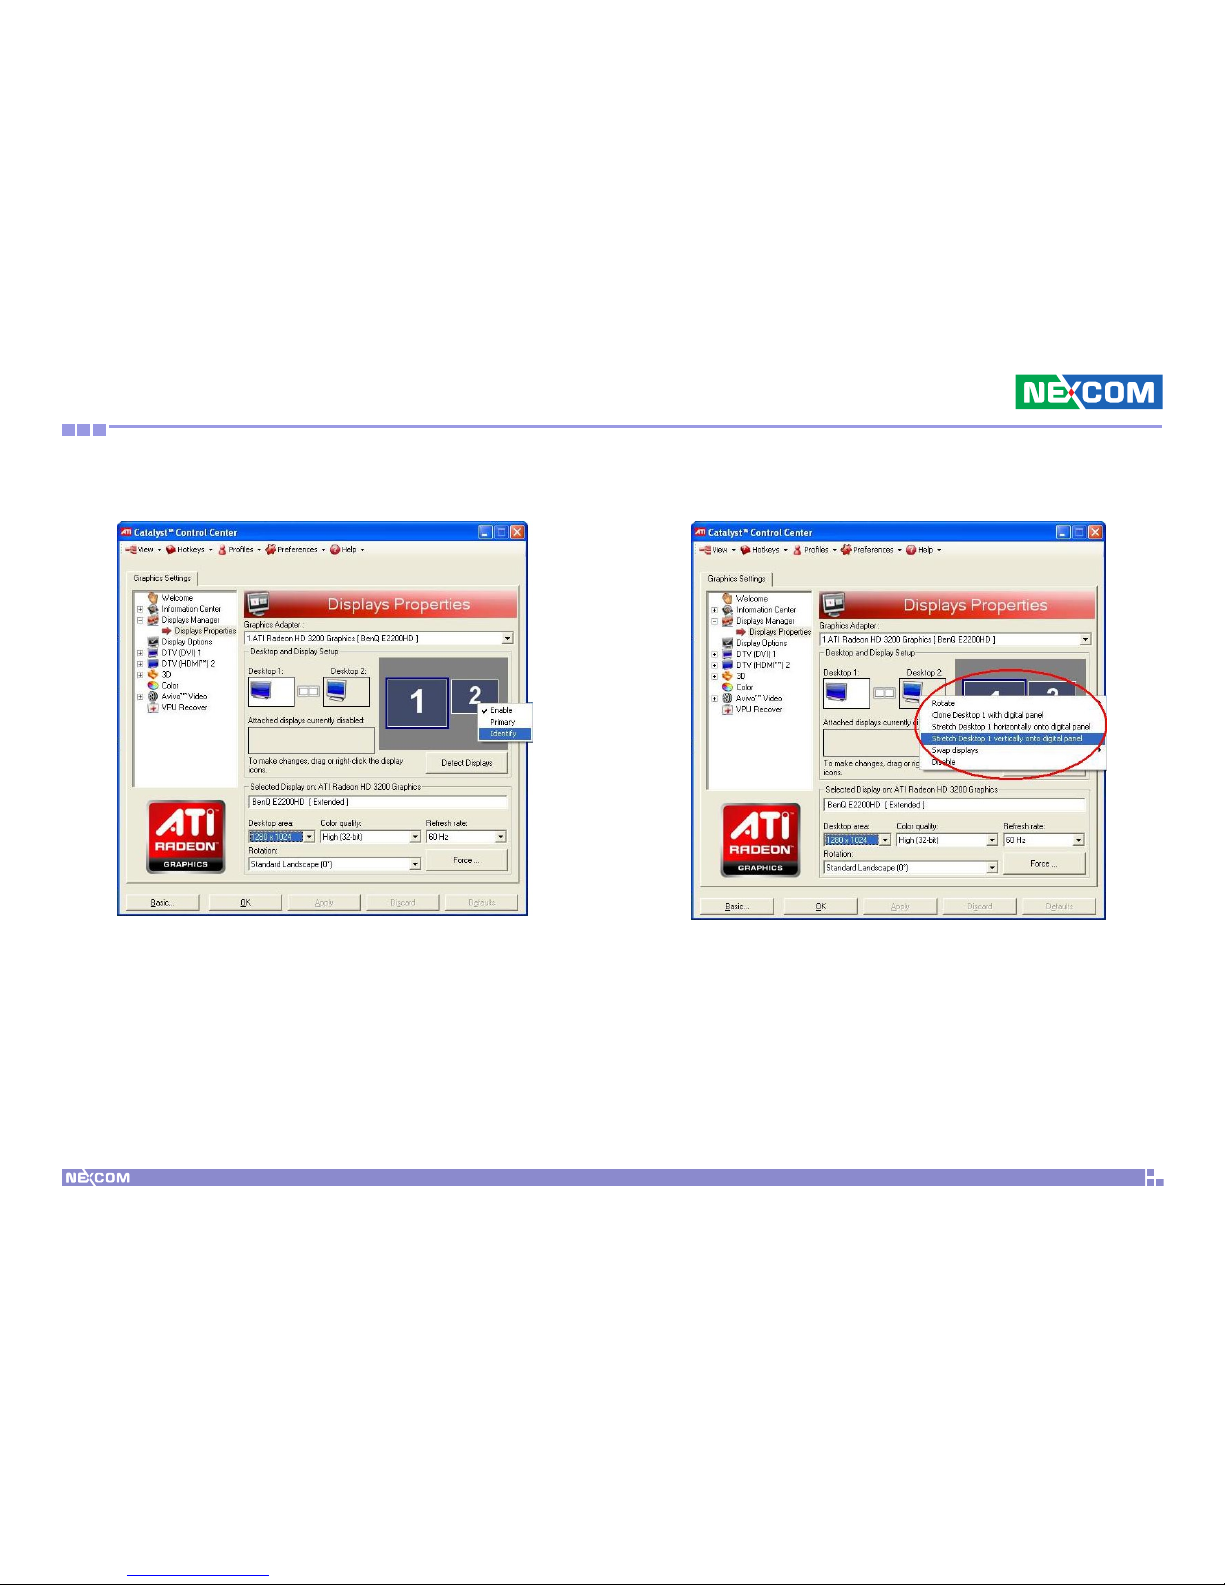
20. Select the display resolution. 21. Display Manager has reconfigured the settings for Display 2. Click Yes
to continue.
Page 70
Copyright © 2010 NEXCOM International Co., Ltd. All Rights Reserved.
57
Appendix A: Video Driver Installation and Settings
NDiS 164 User Manual
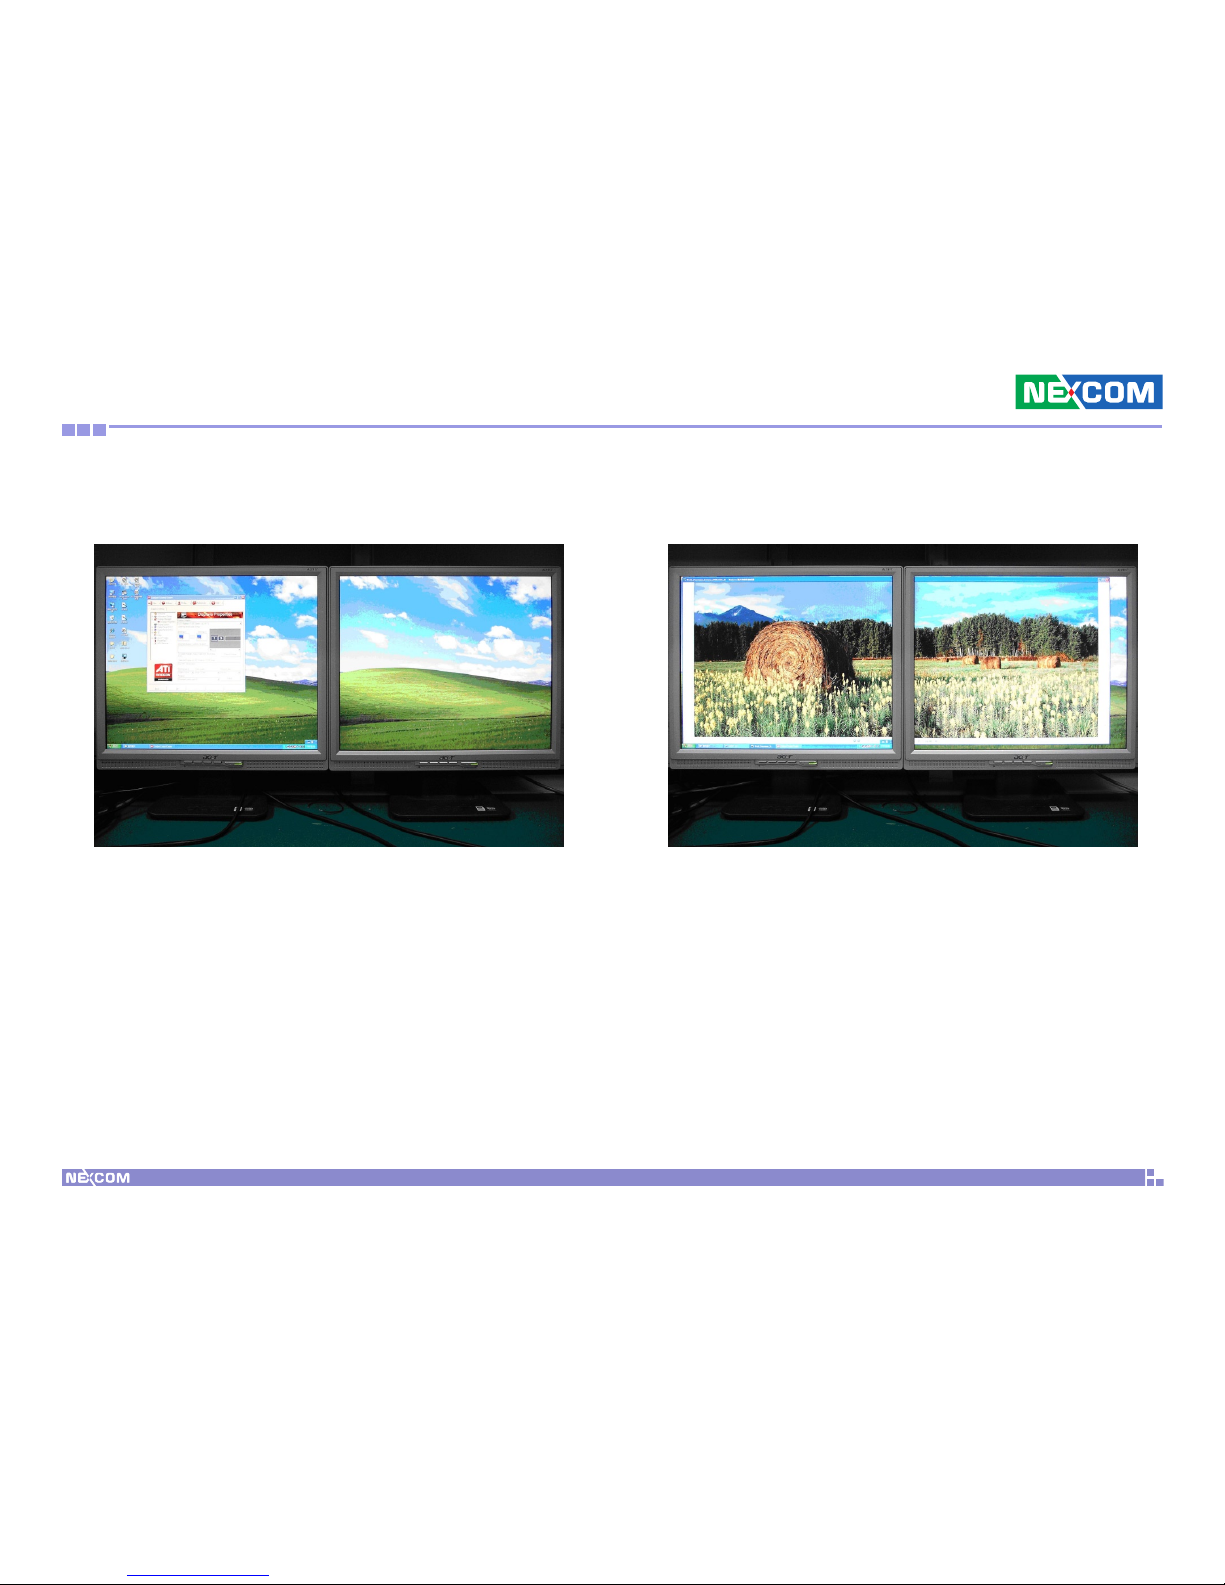
22. Display 2 is now enabled and is identified as Display 1. 23. Select the display mode.
Page 71
Copyright © 2010 NEXCOM International Co., Ltd. All Rights Reserved.
58
Appendix A: Video Driver Installation and Settings
NDiS 164 User Manual
24. If you have selected the “Extend Main onto digital panel” mode, your
display will appear as shown below.
25. If you have selected the “Stretch Main horizontally onto display
panel” mode, your display will appear as shown below.
Page 72
Copyright © 2010 NEXCOM International Co., Ltd. All Rights Reserved.
59
Appendix A: Video Driver Installation and Settings
NDiS 164 User Manual
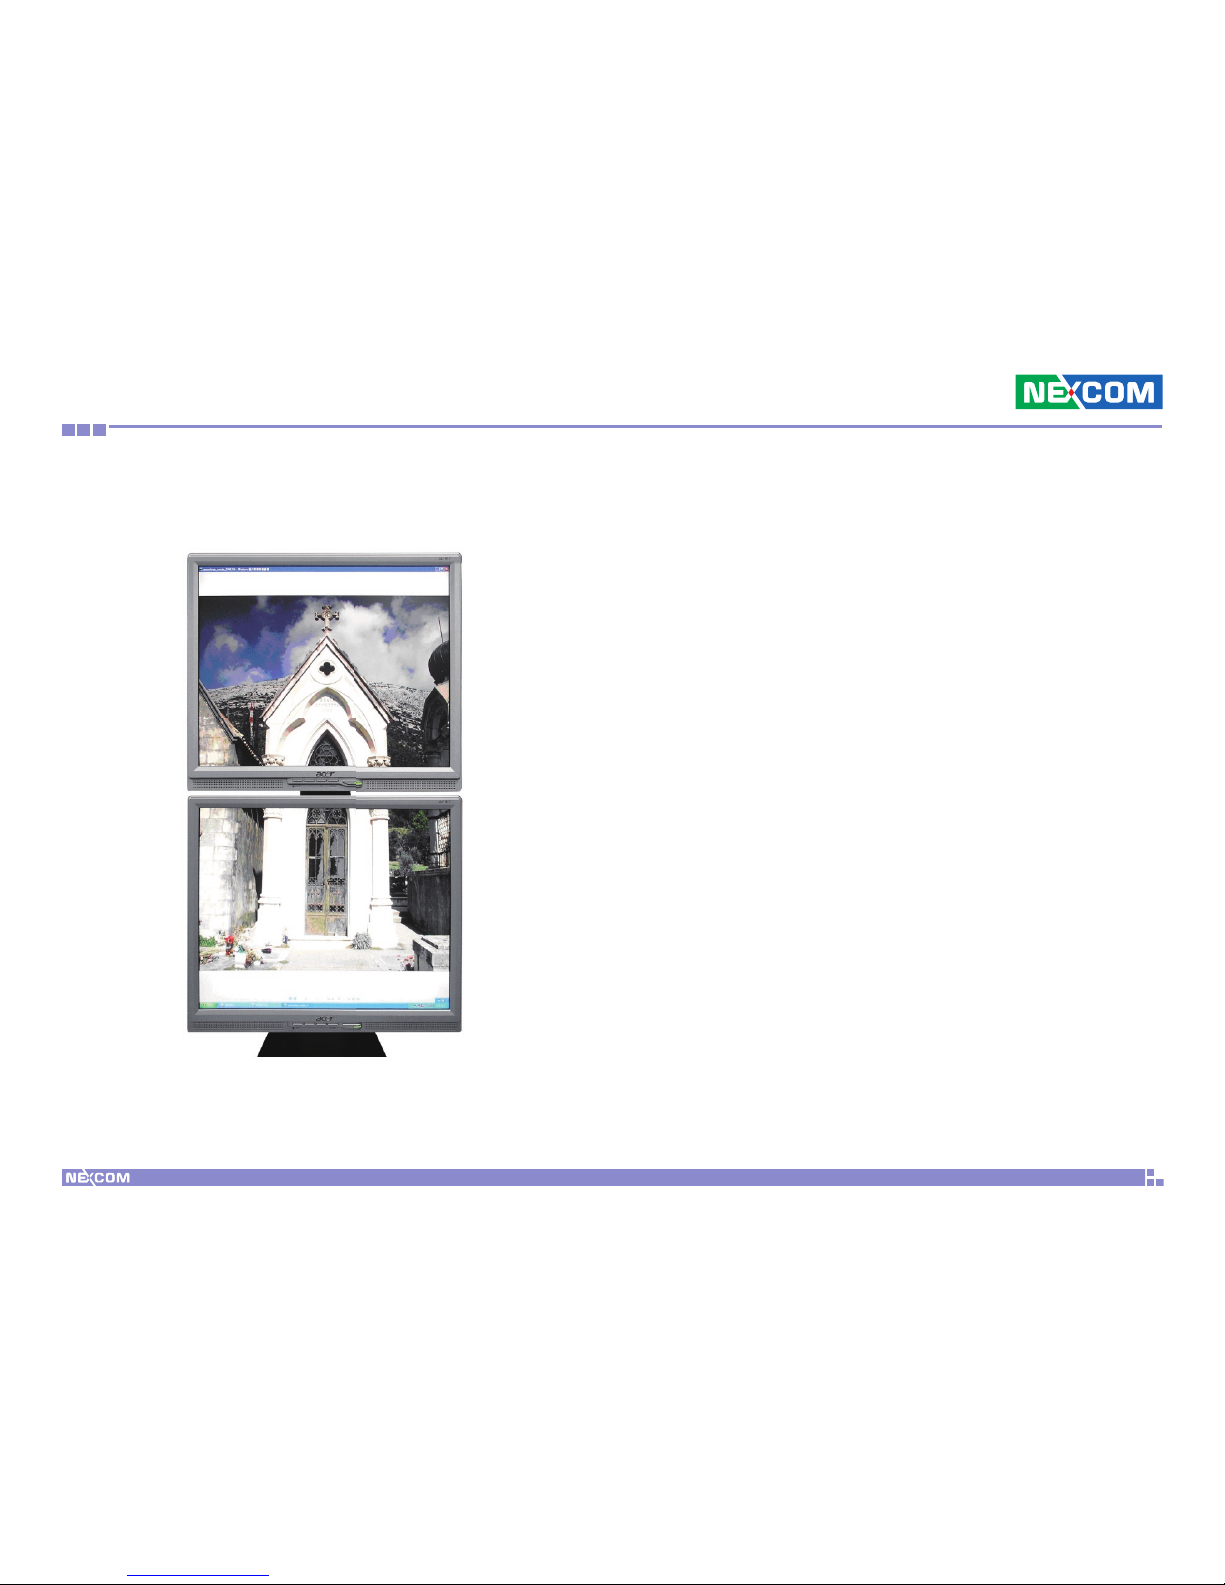
26. If you selected the “Stretch Main vertically onto display panel“ mode,
your display will appear as shown below.
Page 73
Copyright © 2010 NEXCOM International Co., Ltd. All Rights Reserved.
60
Appendix B: Audio Driver Installation and Settings
NDiS 164 User Manual
aP P e n d i x B: au d i o dr i V e r in s t a l l a t i o n a n d se t t i n g s
Installing the Audio Driver
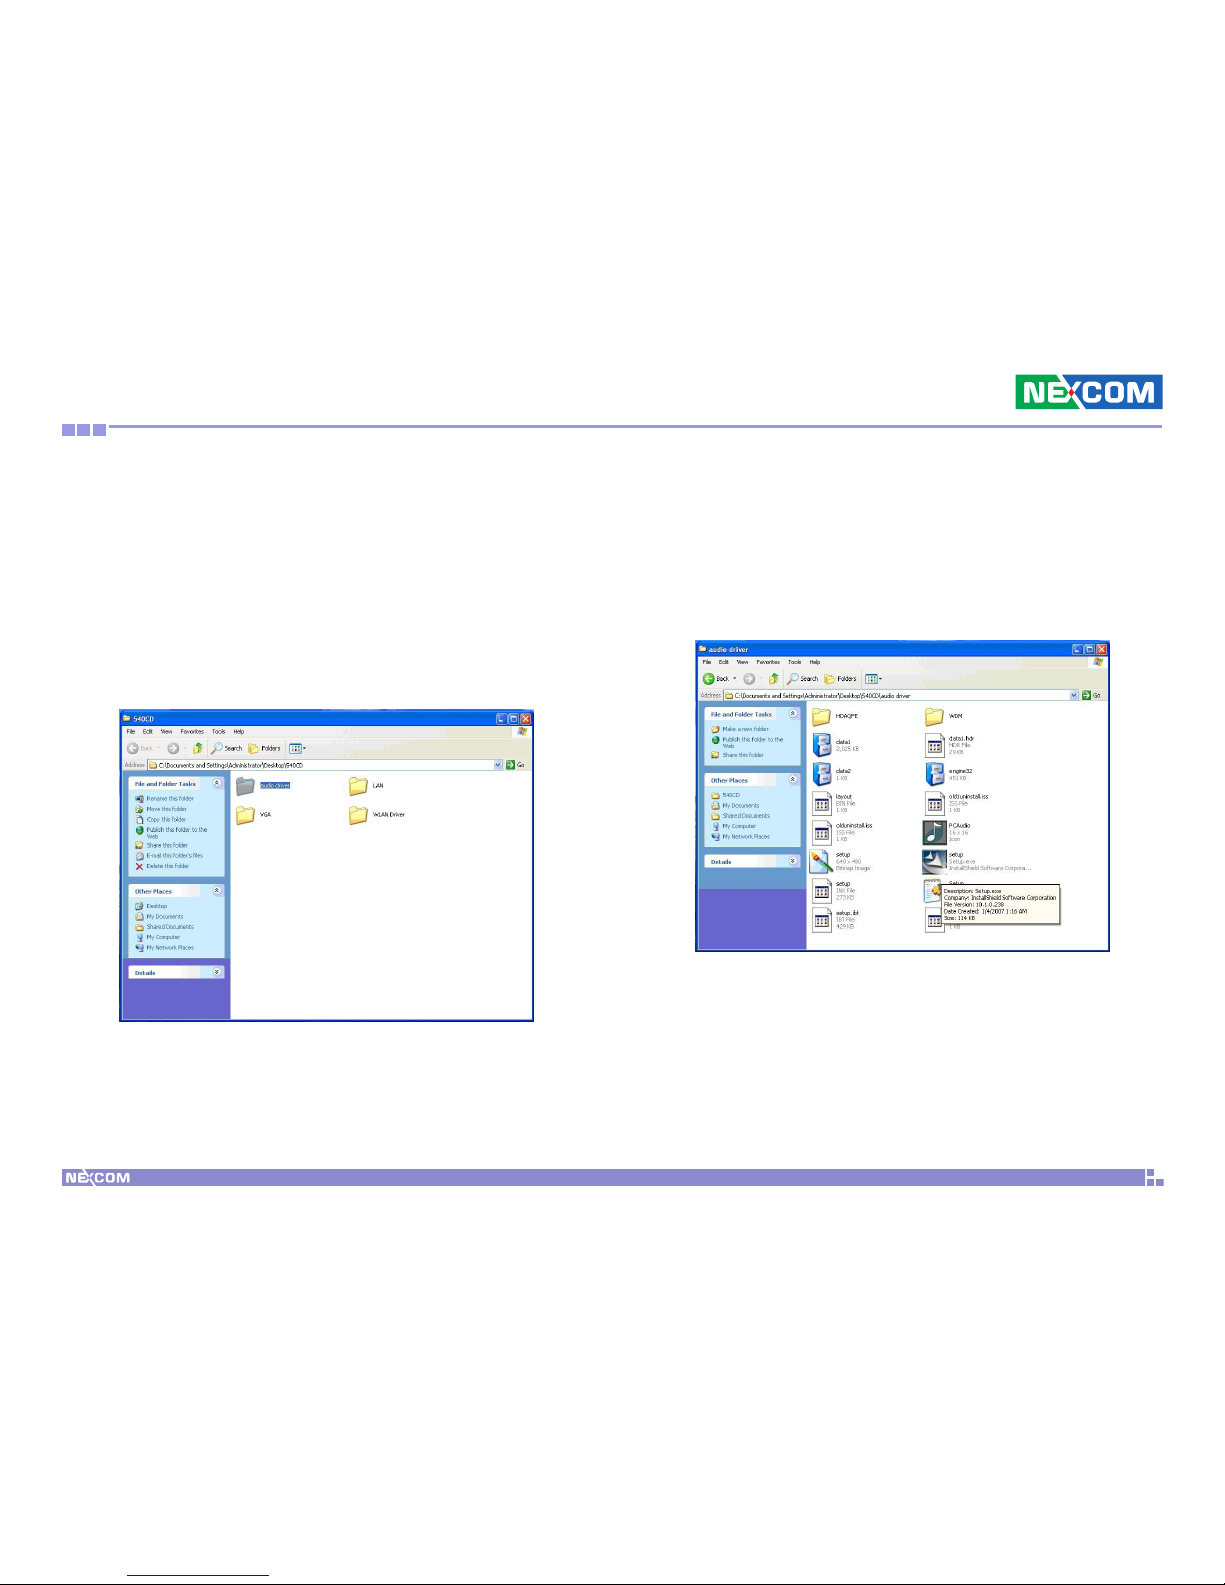
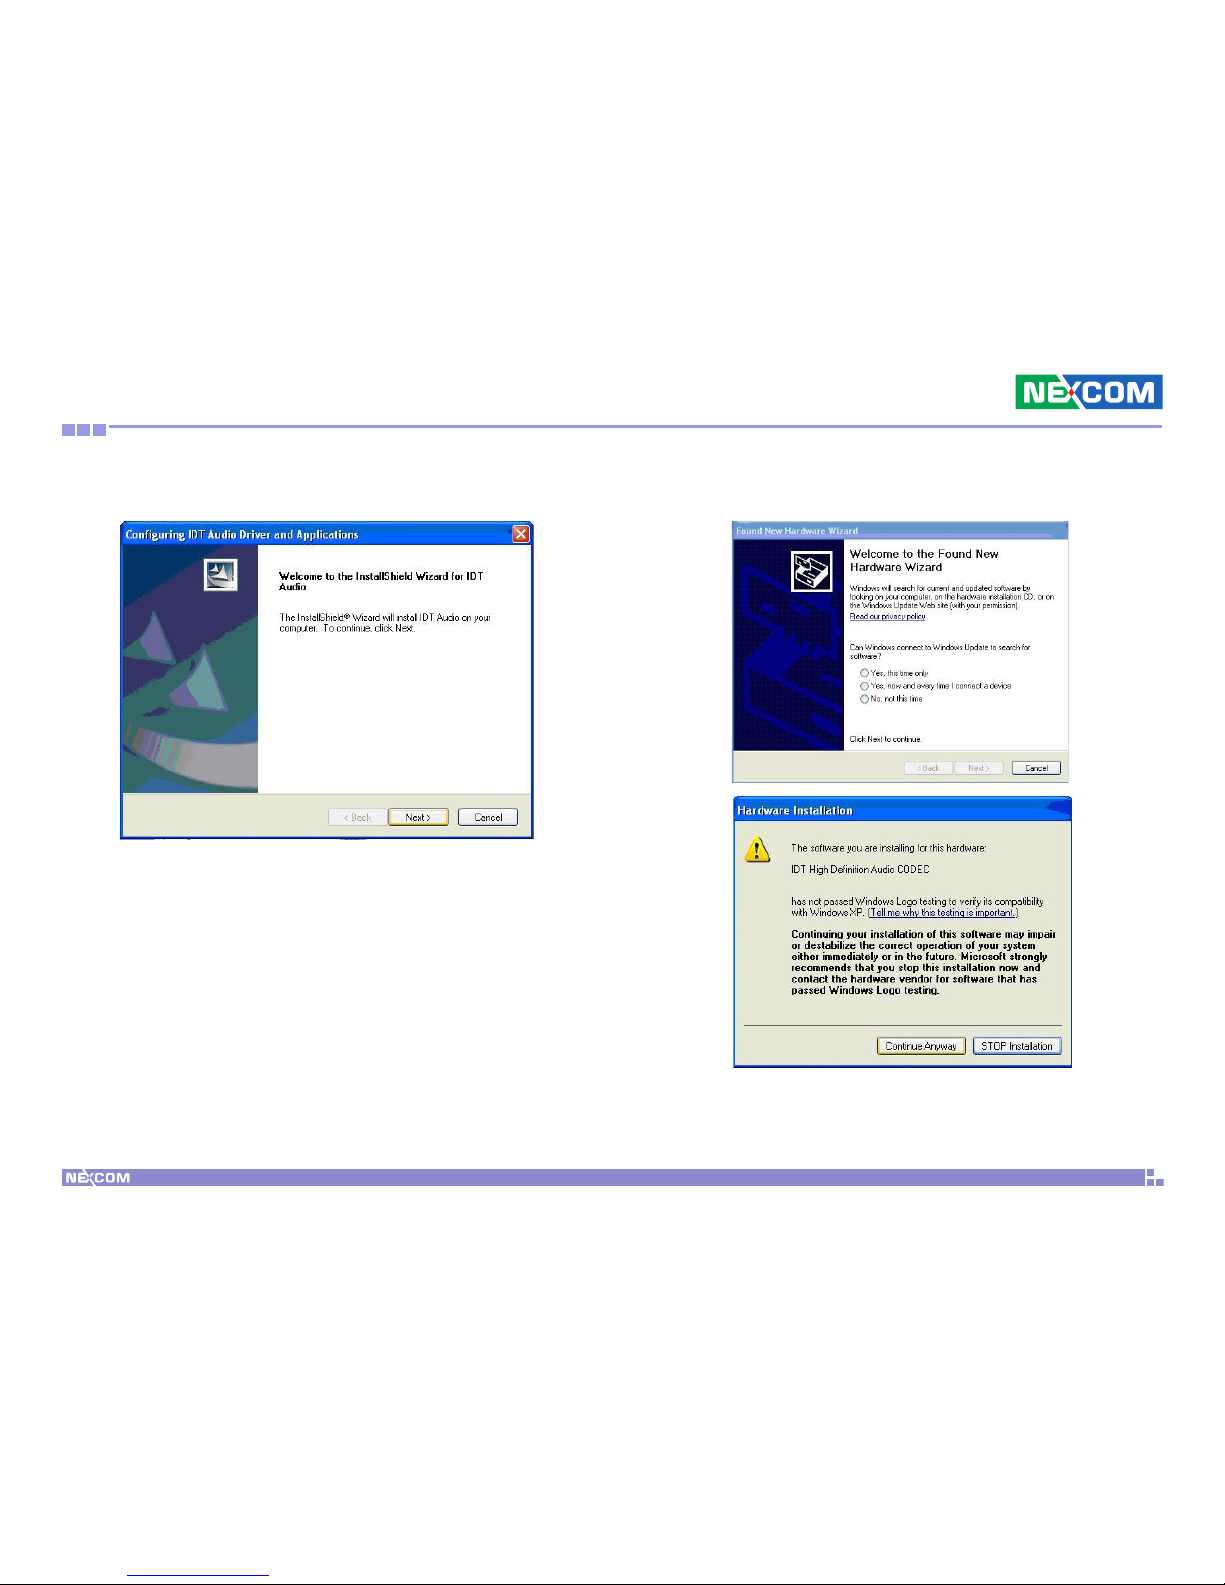
1. Insert the provided CD into a CD-ROM drive.
2. Open the Audio Driver folder.
3. In the Audio Driver folder, run Setup.
Page 74
Copyright © 2010 NEXCOM International Co., Ltd. All Rights Reserved.
61
Appendix B: Audio Driver Installation and Settings
NDiS 164 User Manual
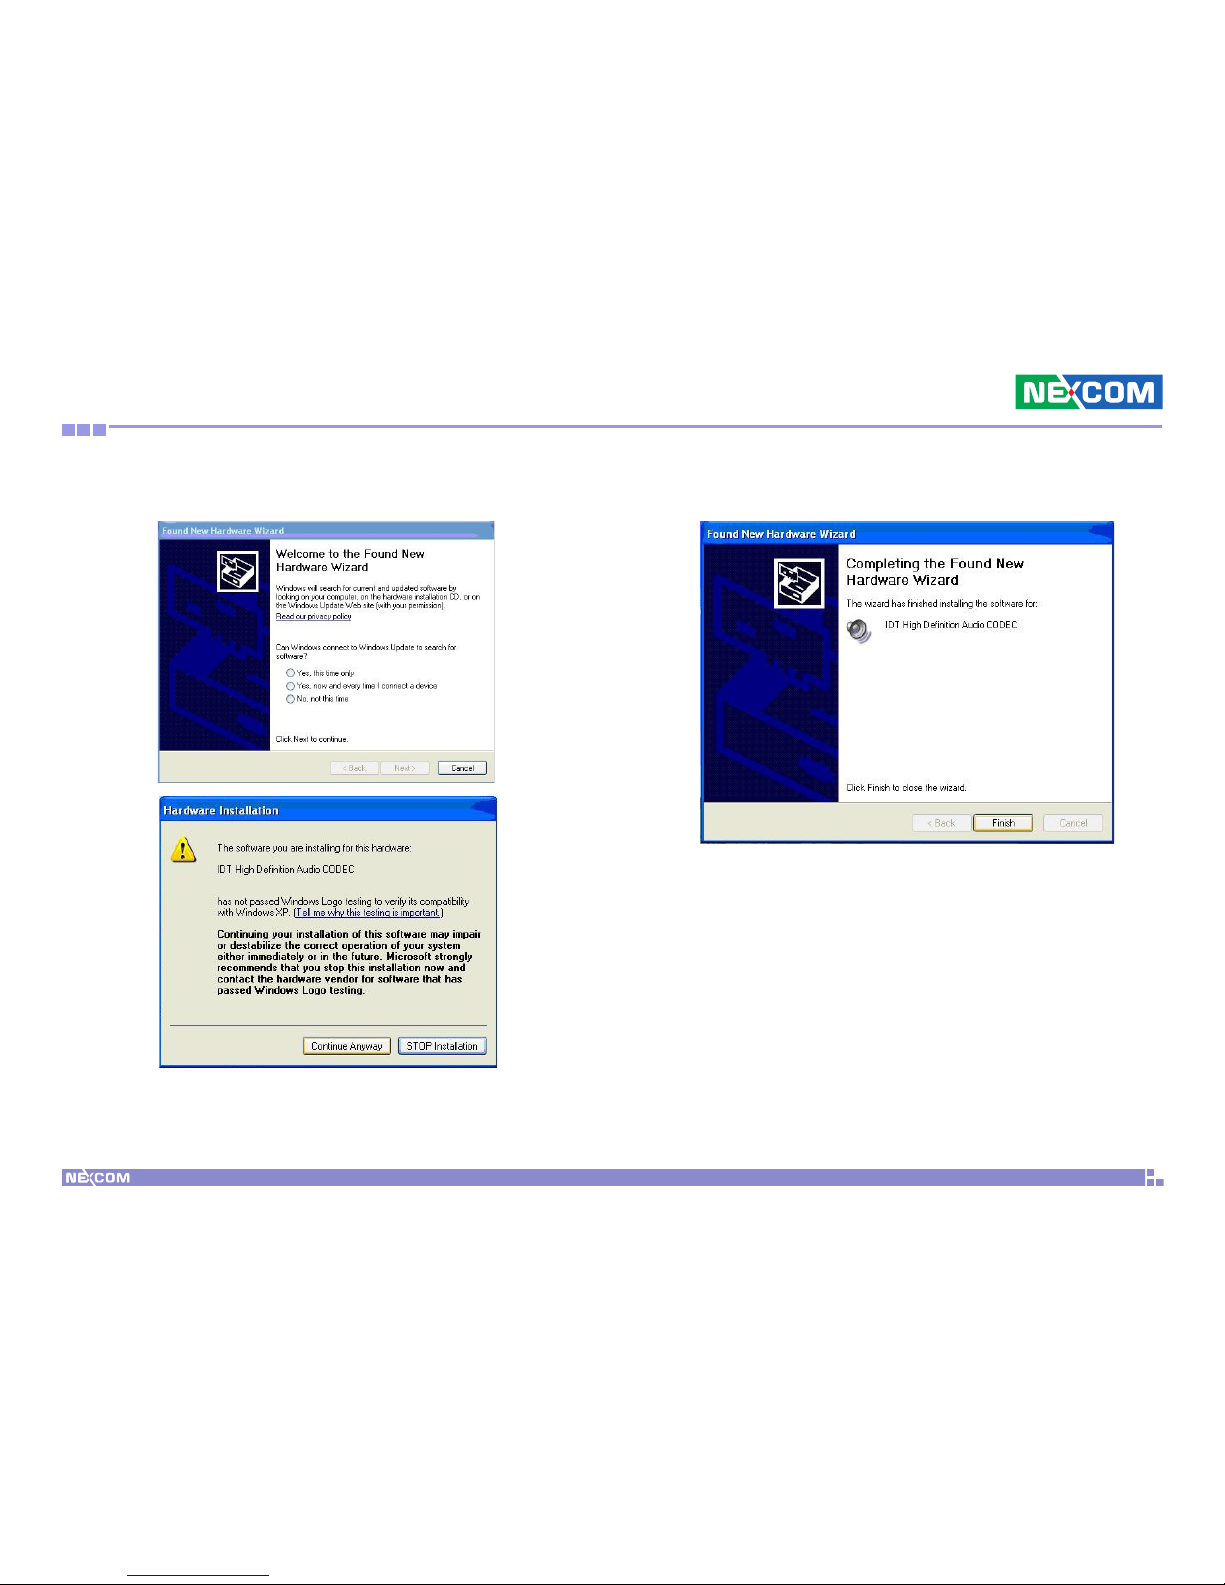
4. Click Next to begin installing the driver. 5. Select “Continue Anyway” to install the 1st audio driver.
Page 75
Copyright © 2010 NEXCOM International Co., Ltd. All Rights Reserved.
62
Appendix B: Audio Driver Installation and Settings
NDiS 164 User Manual
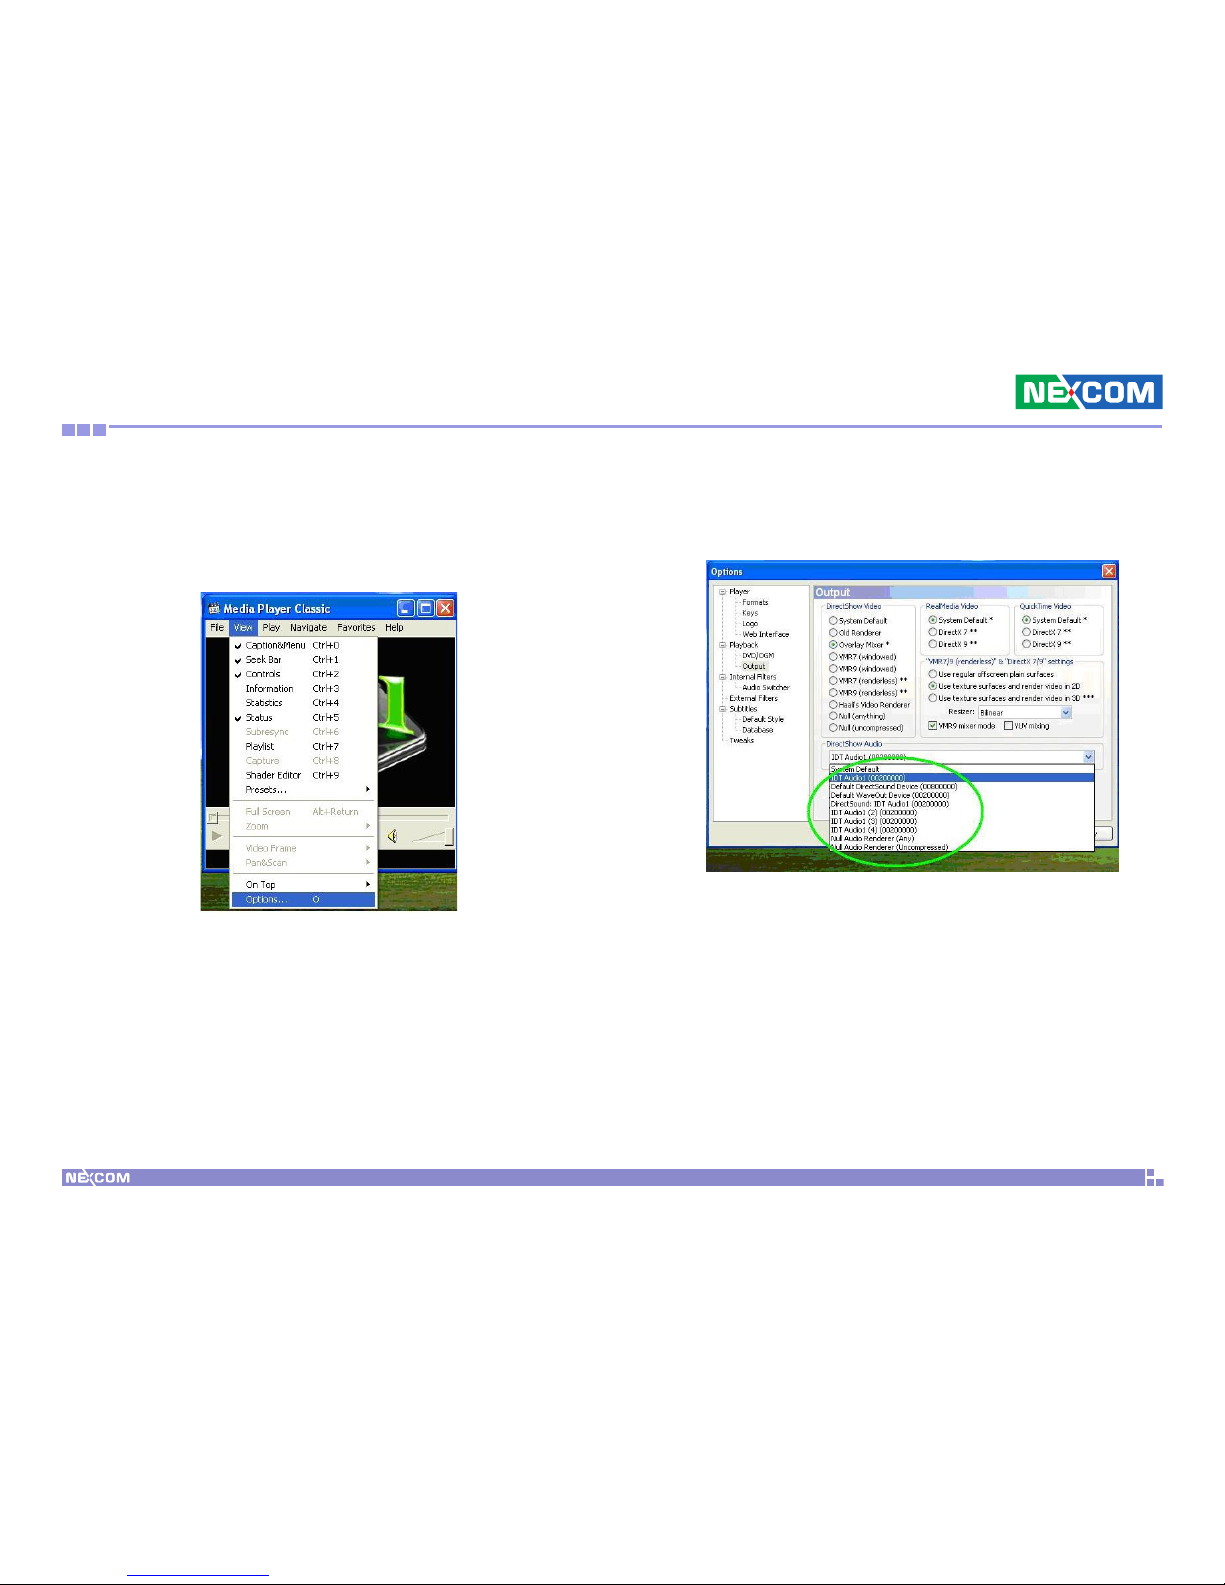
6. Select “Continue Anyway” to install the 2nd audio driver. 7. Click Finish.
Page 76
Copyright © 2010 NEXCOM International Co., Ltd. All Rights Reserved.
63
Appendix B: Audio Driver Installation and Settings
NDiS 164 User Manual
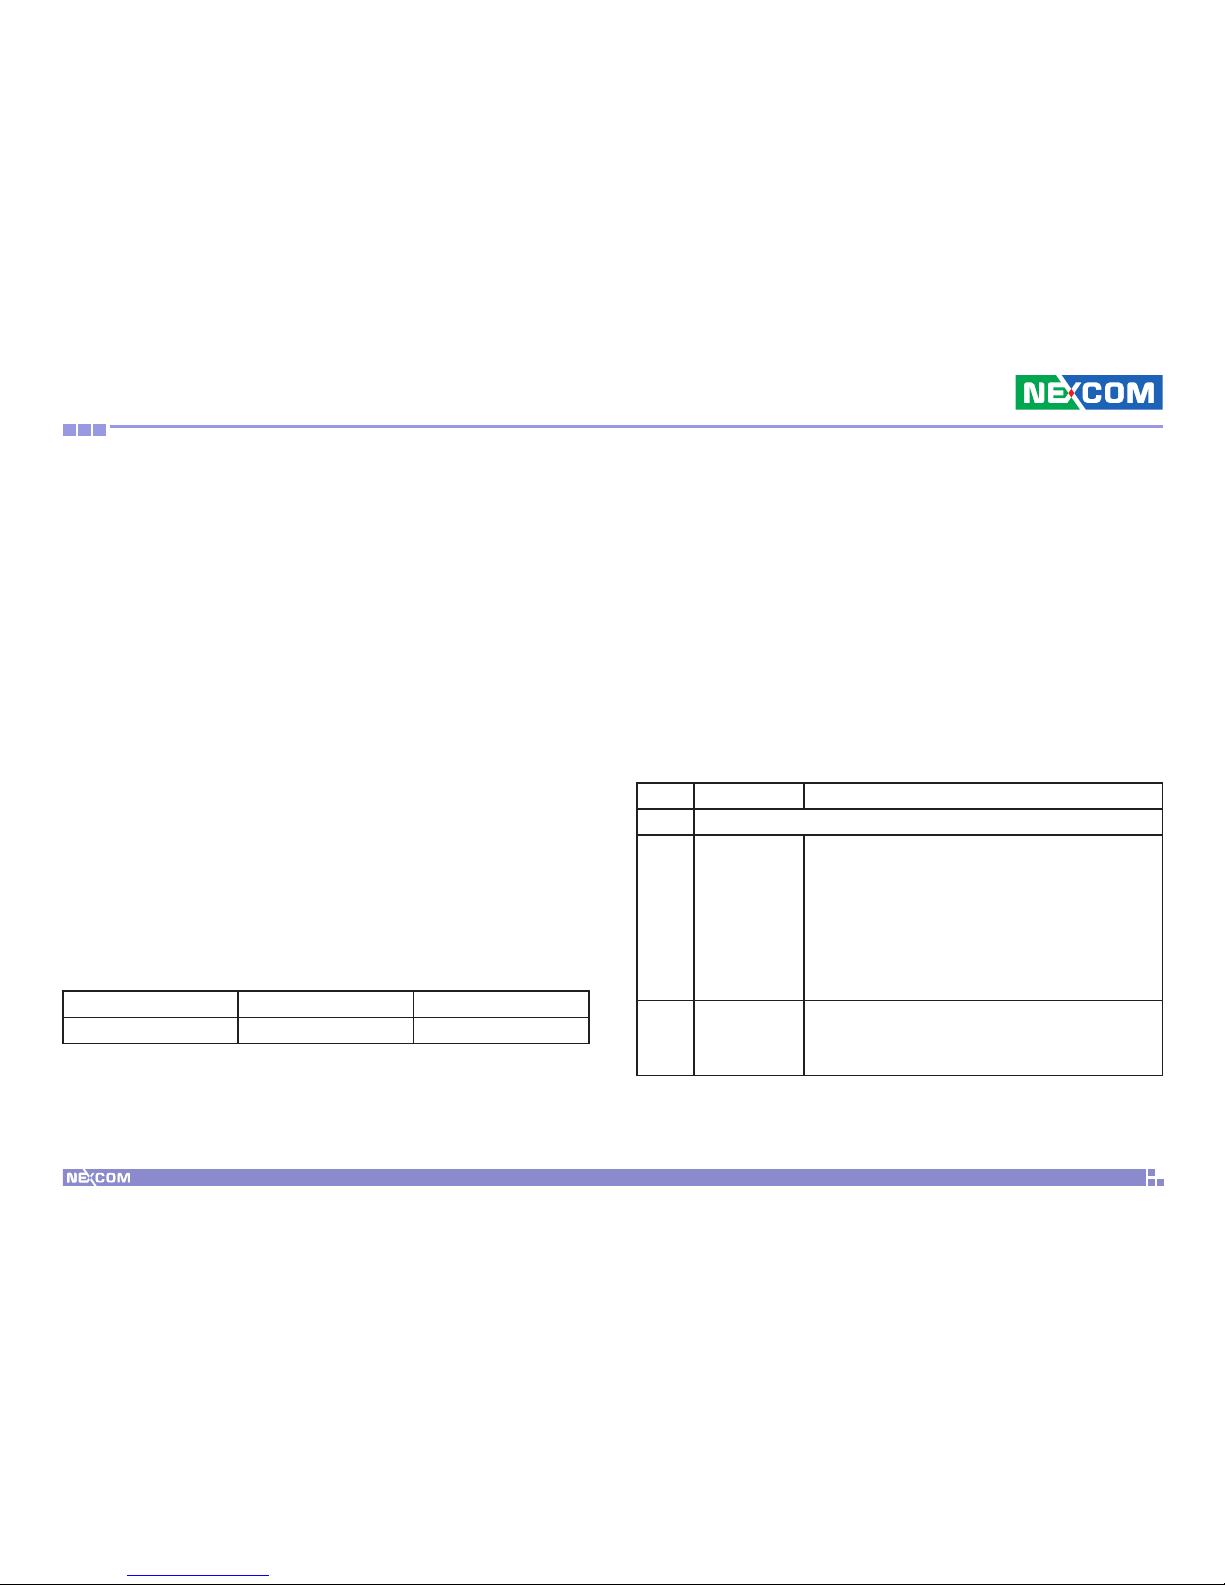
8. The following uses the Media Player Classic as an example in showing
how to set 2 audio output.
Run Media Player Classic for 2 simultaneous times. Click the View menu
then select Options.
9. Select different IDT Audio, “IDT Audio1 (00200000)”, “IDT Audio1 (2)
(00200000)” for each audio output.
Page 77
Copyright © 2010 NEXCOM International Co., Ltd. All Rights Reserved.
64
NDiS 164 User Manual
Appendix C: Watchdog Timer
aP P e n d i x C: Wa t C h d o g ti m e r
WINBOND W83627UHG LPC I/O supports the Watchdog Timer functionality.
1. To place the chip into the Extended Function Mode, two successive
writes of 0x87 must be applied to Extended Function Enable Registers
(EFERs, 4Eh).
2. The chip selects the Logical Device and activates the desired Logical
Devices through Extended Function Index Register (EFIR) and Extended
Function Data Register (EFDR). The EFIR is located at the same address as
the EFER, and the EFDR is located at address (EFIR+1).
First, write the Logical Device Number (i.e. 0x07) to the EFIR and then
write the number of the desired Logical Device to the EFDR. If accessing
the Chip (Global) Control Registers, this step is not required.
Secondly, write the address of the desired configuration register within
the Logical Device to the EFIR and then write (or read) the desired configuration register through the EFDR (i.e. 0x08).
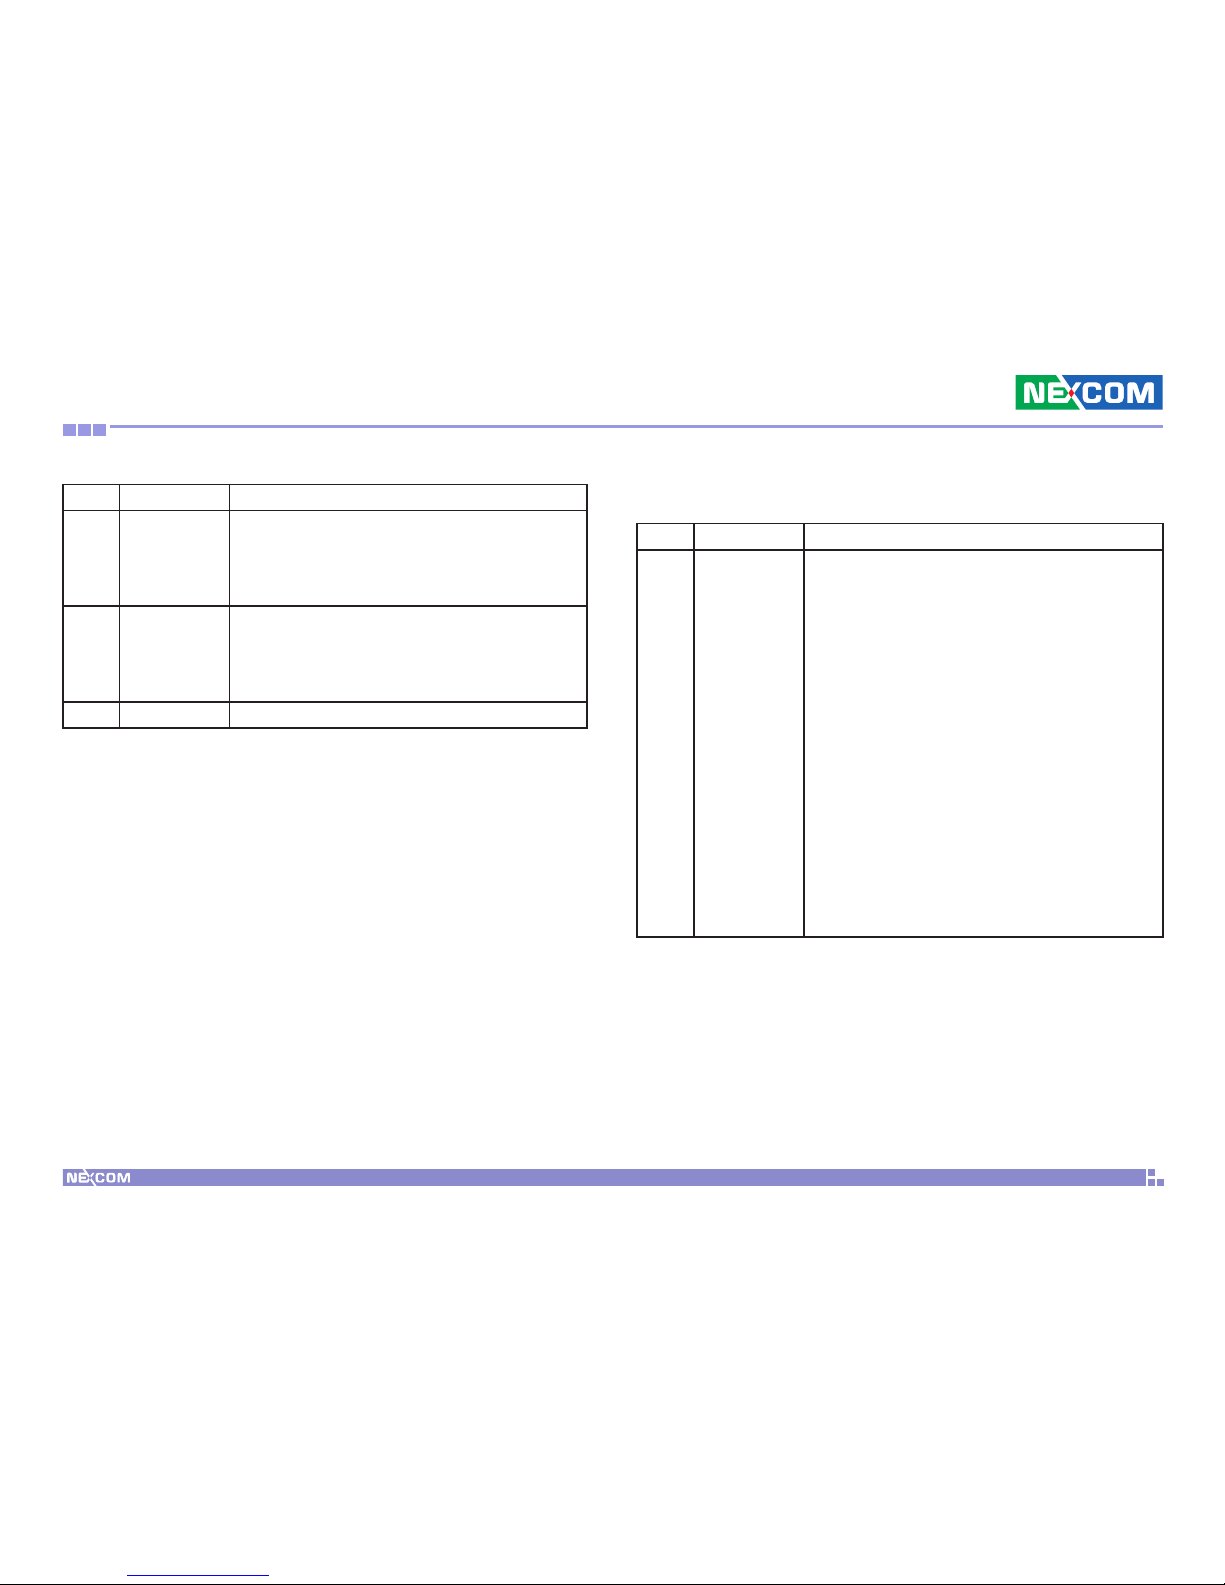
CR 07h. (Logical Device; Default 00h)
Bit Read / Write Description
7-0 R/W Logical device number
3. The units of Watchdog Timer counter are selected at Logical Device 8,
CR[F5h], bit[3]. The time-out value is set at Logical Device 8, CR[F6h].
Writing zero disables the Watchdog Timer function. Writing any nonzero value to this register causes the counter to load this value into the
Watchdog Timer counter and start counting down.
Logical Device 8 (WDTO#, PLED, GPIO5, 6 & GPIO Base Address)
CR F5h. (WDTO# and KBC P20 Control Mode Register; Default 00h)
Bit Read / Write Description
7-5 Reserved
4 R/W 1000 times faster in WDTO# count mode.
0: Disable
1: Enable
(If bit-3 is Second Mode, the count mode is
1/1000 sec.)
If bit-3 is Minute Mode, the count mode is
1/1000 min.)
3 R/W Select WDTO# count mode.
0: Second Mode
1: Minute Mode
Page 78
Copyright © 2010 NEXCOM International Co., Ltd. All Rights Reserved.
65
NDiS 164 User Manual
Appendix C: Watchdog Timer
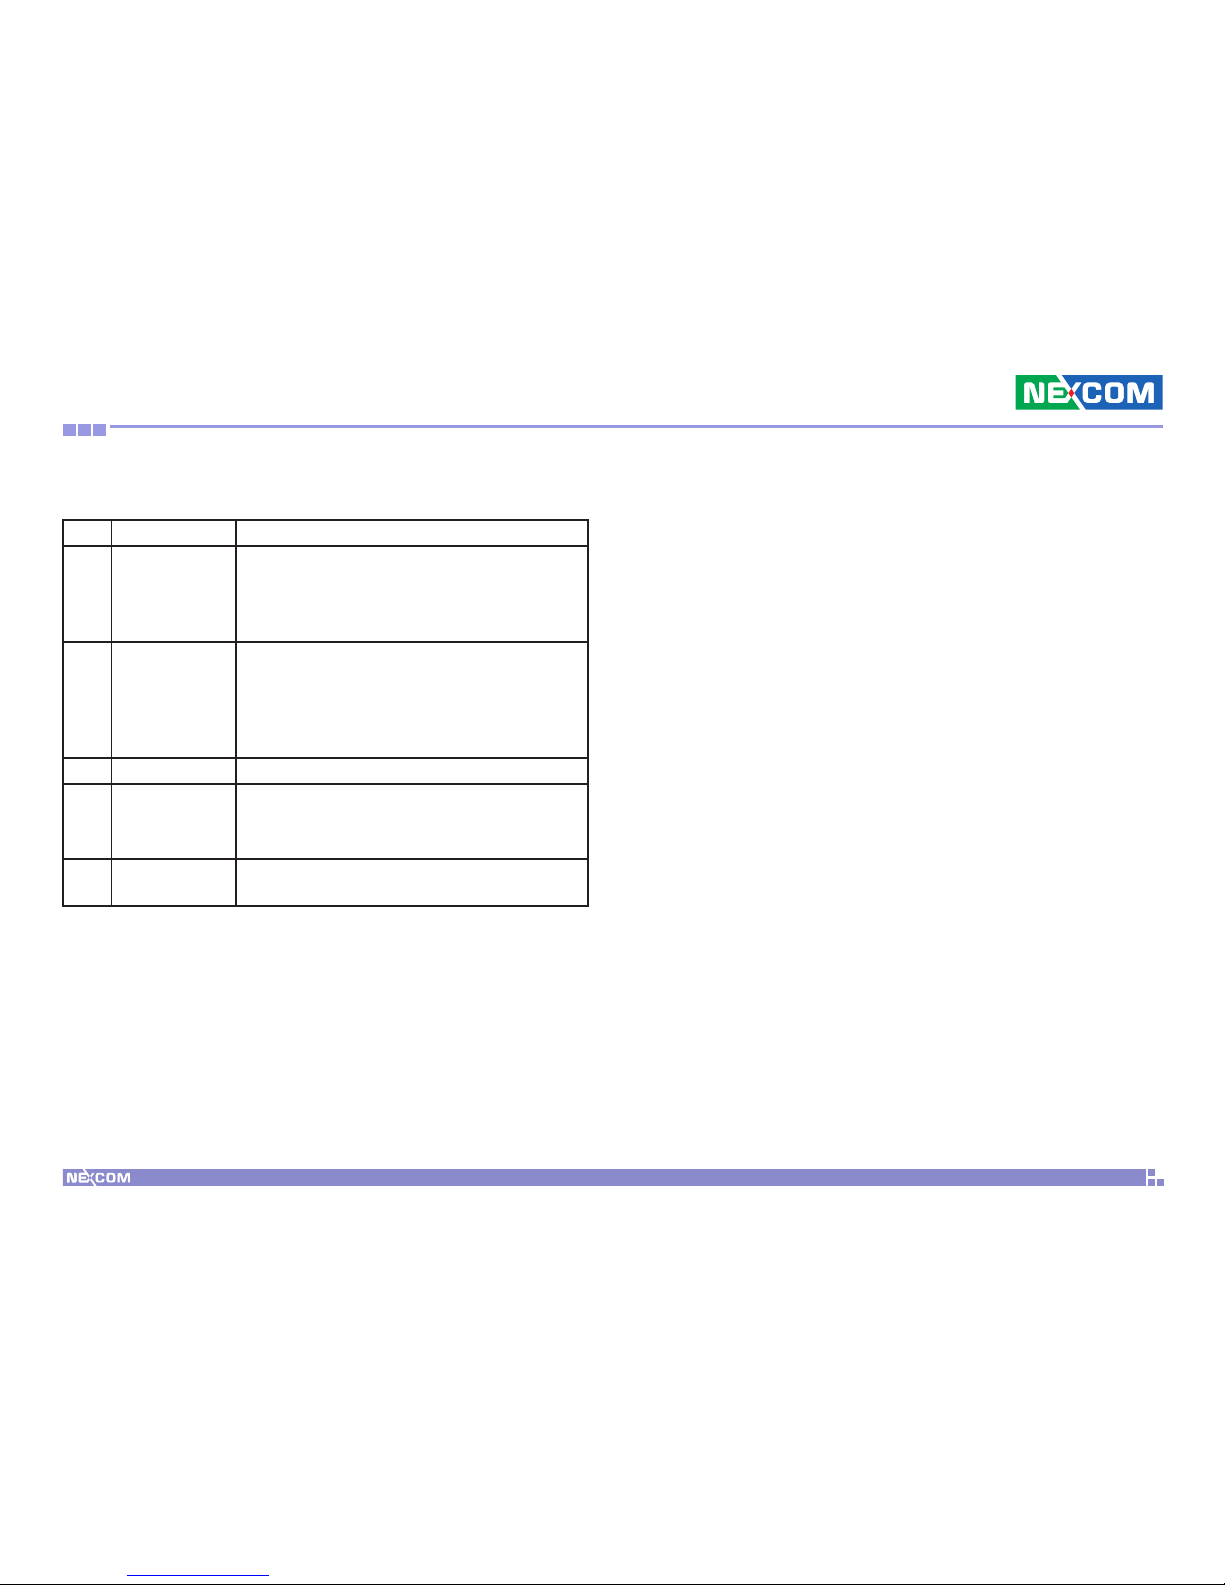
Bit Read / Write Description
2 R/W Enable the rising edge of KBC reset (P20) to is-
sue time-out event.
0: Disable
1: Enable
1 R/W Disable/Enable the WDTO# output low pulse to
the KBRST# pin (PIN60)
0: Disable
1: Enable
0 Reserved
CR F6h. (WDTO# Counter Register; Default 00h)
Bit Read / Write Description
7-0 R/W Watchdog Timer Time-out value.
Writing a non-zero value to this register causes
the counter to load the value to Watchdog
Counter and start counting down.
If bits 7 and 6 of CR F7h are set, any Mouse
Interrupt or Keyboard Interrupt event will also
cause the reload of previously-loaded non-zero
value to Watchdog Counter and start counting down. Reading this register returns current
value in Watchdog Counter instead of Watchdog
Timer Time-out value.
00h: Time-out Disable
01h: Time-out occurs after 1 second/minute
02h: Time-out occurs after 2 seconds/minutes
03h: Time-out occurs after 3 seconds/minutes
.......................................................................
FFh: Time-out occurs after 255 seconds/minutes
Page 79
Copyright © 2010 NEXCOM International Co., Ltd. All Rights Reserved.
66
NDiS 164 User Manual
Appendix C: Watchdog Timer
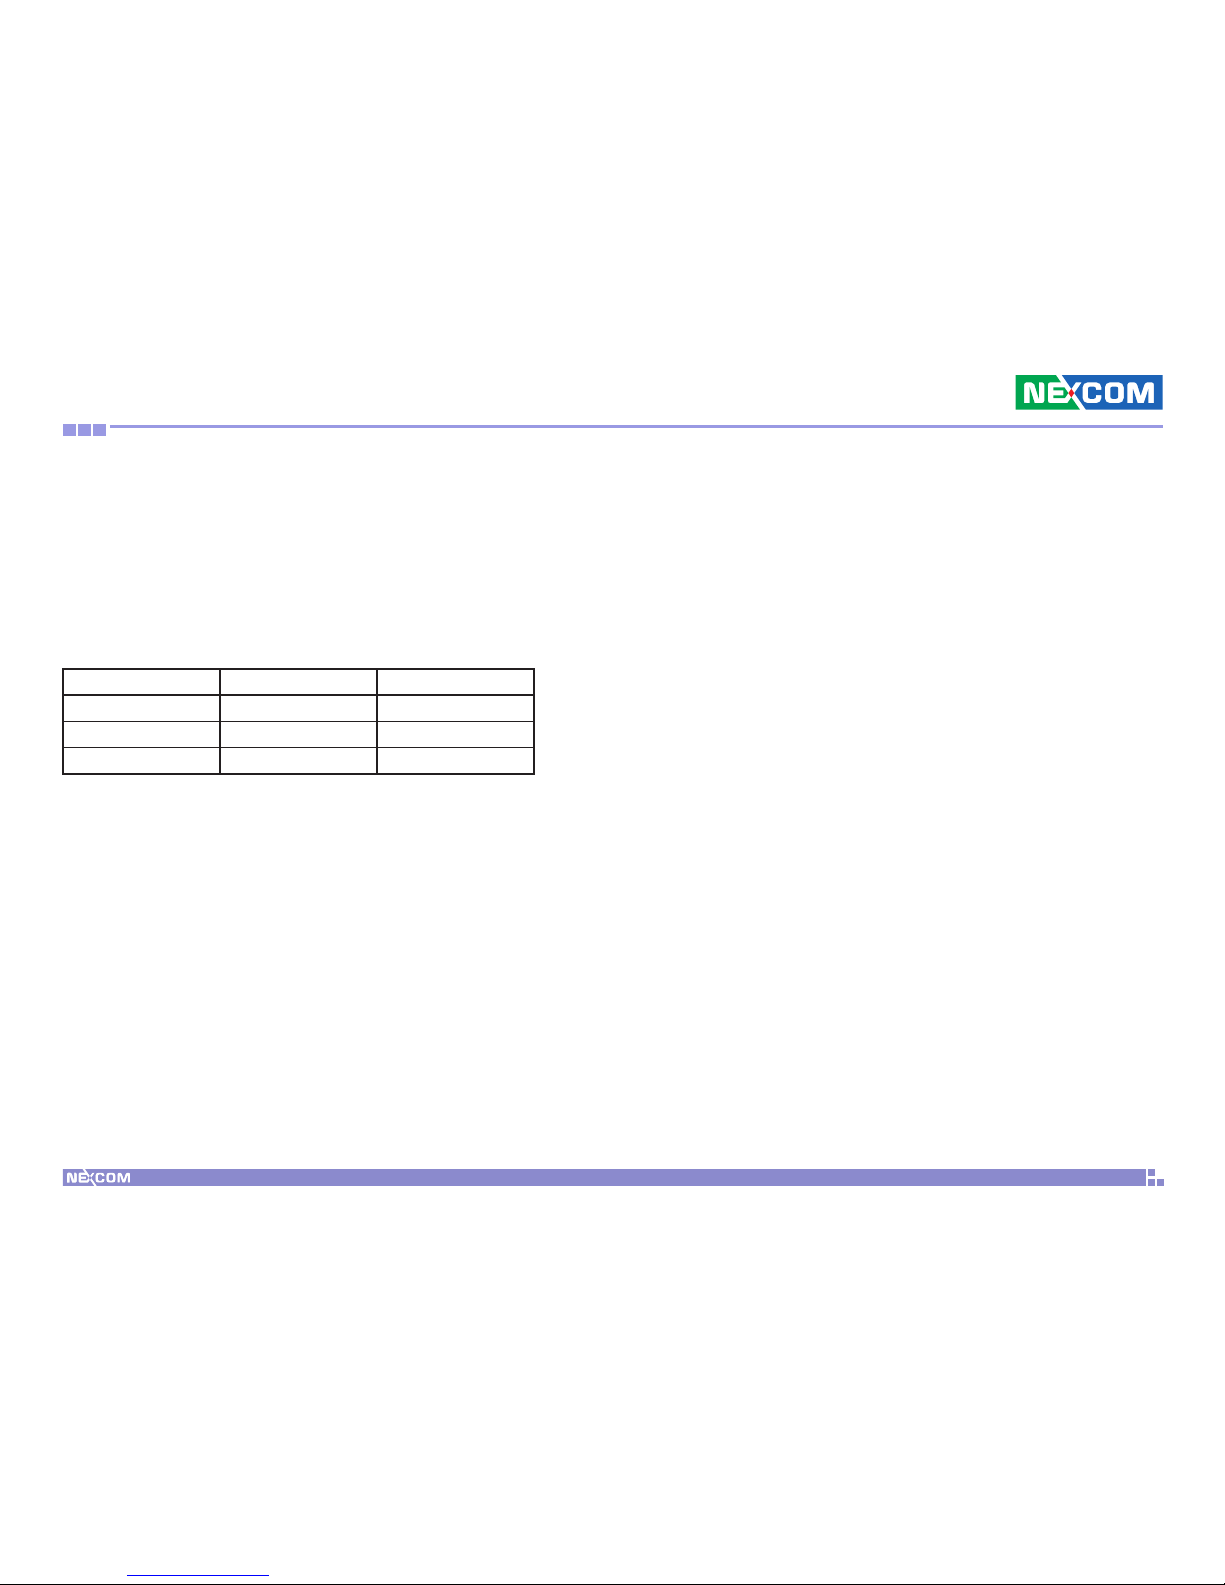
CR F7h. (WDTO# Control & Status Register; Default 00h)
Bit Read / Write Description
7 R/W Mouse interrupt reset watchdog timer enable
0: Watchdog timer is not affected by mouse
interrupt.
1: Watchdog timer is reset by mouse interrupt.
6 R/W Keyboard interrupt reset watchdog timer enable
0: Watchdog timer is not affected by keyboard
interrupt.
1: Watchdog timer is reset by keyboard interrupt.
5 Write “1” Only Trigger WDTO# event. This bit is self-clearing.
4 R/W
Write “0” Clear
WDTO# status bit
0: Watchdog timer is running
1: Watchdog timer issues time-out event.
3-0 R/W These bits select IRQ resource for WDTO#. (02h
for SMI# event.)
EX.
Debug <Enter>
- O 4E, 87 <Enter>
- O 4E, 87 <Enter>
- O 4E, 07 <Enter>
- O 4F, 08 <Enter>
- O 4E, F6 <Enter>
- O 4F, 04 (Where “04” is 1 sec. and “FF” is 255 sec.)
Page 80
Copyright © 2010 NEXCOM International Co., Ltd. All Rights Reserved.
67
NDiS 164 User Manual
Appendix D: Power Consumption
aP P e n d i x d: Po W e r Co n s u m P t i o n
CPU Type: Athlon 64 X2 4200+, 2.2GHz
DC Input: 12V DC
Mode Current Total Watts
Full 5.55A 66.60
Idle 3.91A 46.92
Standby (S3) 1.59A 19.08
* WLAN, USB x4, 2GB x1, DVI x4, 80GB SATA HDD
 Loading...