

Page 1
Instruction manual
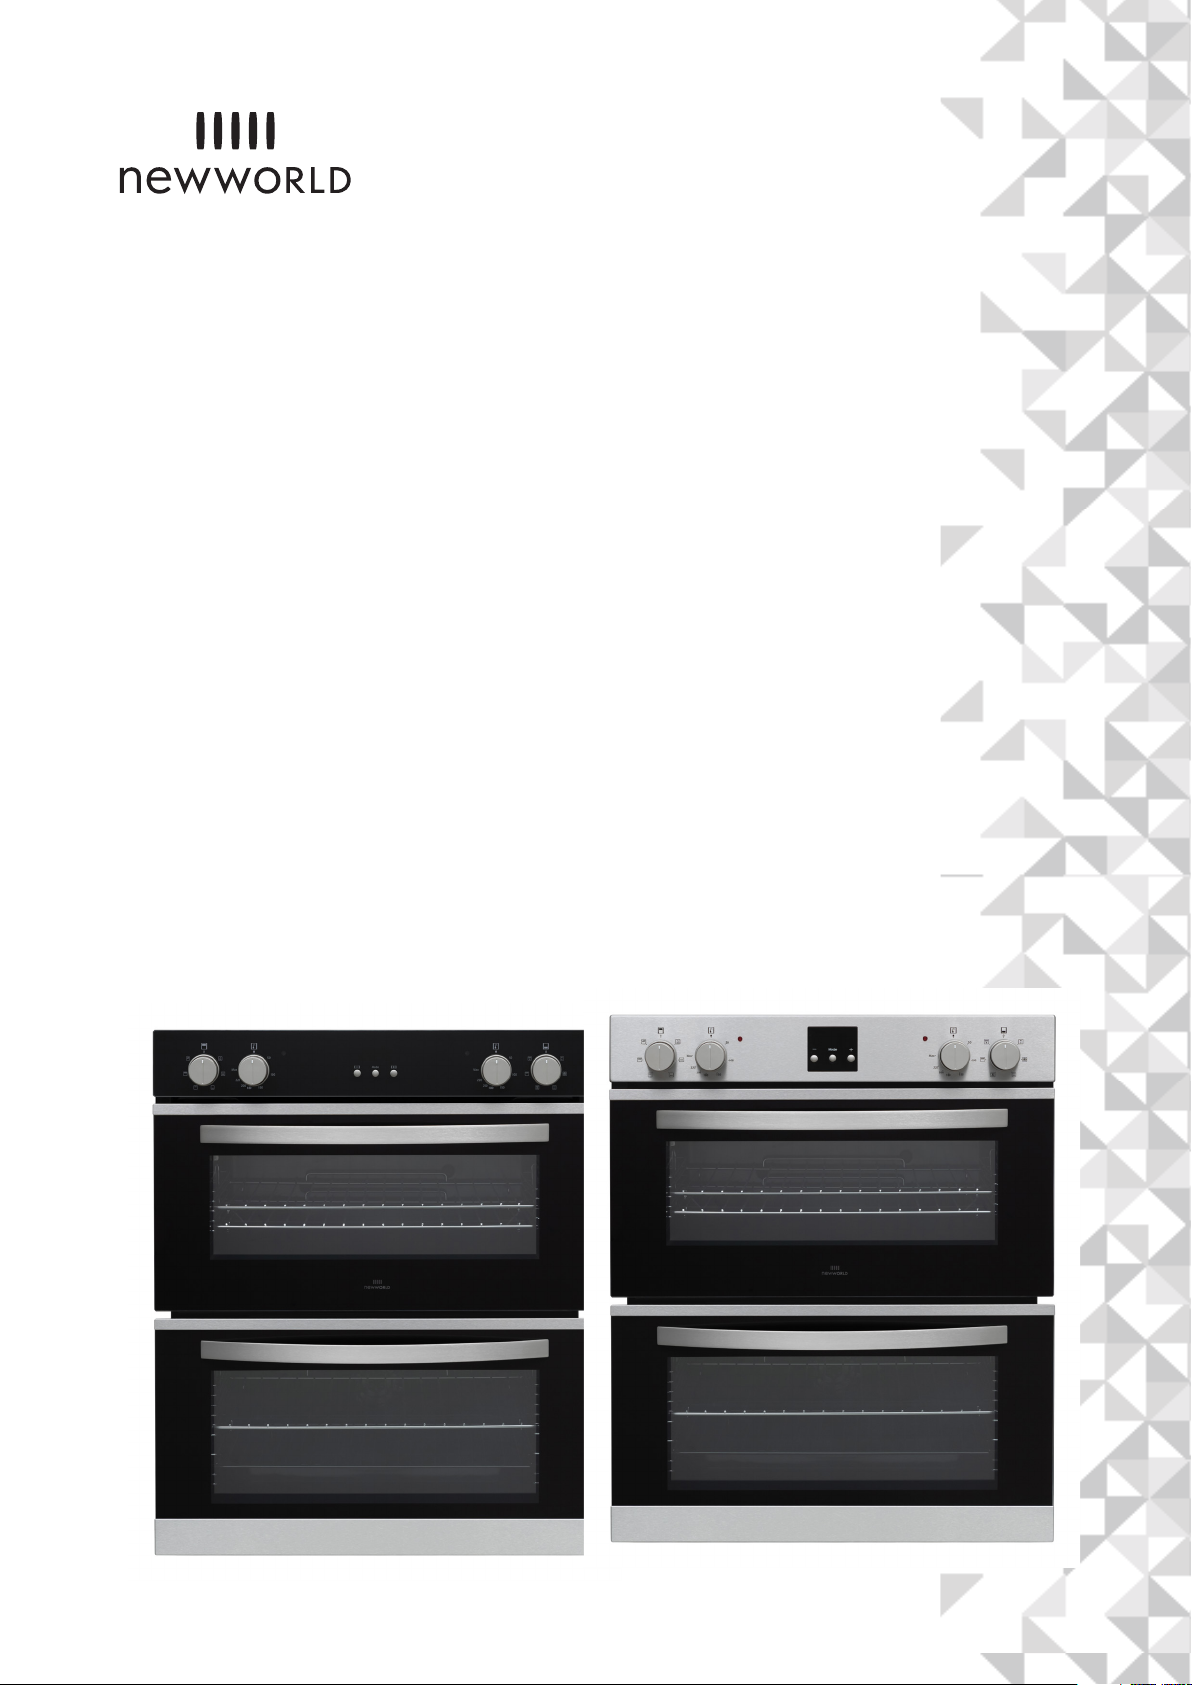
Built-in Double Oven / User Manual
NWCMBUOI
NWCMBUOB
Page 2

If you require any technical guidance or find that your product is not operating as intended, a simple solution can often be found in the Troubleshooting section of these instructions,
You’ll soon be enjoying your new Cooker.
It all begins here, with your instructions. Don’t worry,
there’s nothing too technical coming up. Just simple,
step-by-step guidance to get you up and running
quickly. Sound good? Then let’s get started.
Help and Guidance
We’re here to help you get the most from your Cooker. Should you require any guidance,
a simple solution can often be found online at:
www.newworldassist.co.uk
If you still require further assistance, call one of our experts on 0333 3052263.
2
Page 3

or online at www.newworldassist.co.uk If you still require further assistance, call one of our experts on 0333 3052263.
Contents
Safety information
1
Safety information 6
Getting to know your cooker
2
Ready? Let’s begin 10
Product features
Control panel 11
Installation and preparation for
3
use
Instructions for the Installer 16
Installation of the oven
Electrical connection and safety 21
17
Care and maintenance
6
Cleaning 38
Maintenance 39
Product support
7
Troubleshooting 42
Transport 42
Help and assistance 43
Declaration of conformance to product
standards 44
Disposal 44
Guarantee 45
Functions
4
Oven function control knob 26
Oven thermostat knob 26
Maion oven functions 27
Top oven Functions
Using your cooker
5
Accessories 32
Technical specifications 33
3
Page 4
Safety information
Safety information
If you require any technical guidance or find that your product is not operating as intended, a simple solution can often be found in the Troubleshooting section of these instructions,
Important - Please read these instructions fully before
installing or operating
SAFETY INSTRUCTIONS
• Carefully read all instructions before using your
appliance and keep them in a convenient place for
reference when necessary.
• This manual has been prepared for more than one
model therefore your appliance may not have some
of the features described within. For this reason, it is
important to pay particular attention to any figures
whilst reading the operating manual.
1.1. General Safety Warnings
• This appliance can be used by children aged from
8 years and above and by persons with reduced
physical, sensory or mental capabilities or lack
of experience and knowledge if they have been
given supervision or instruction concerning use
of the appliance in a safe way and understand the
hazards involved. Children should not play with the
appliance. Cleaning and user maintenance should
not be made by children without supervision.
WARNING: The appliance and its accessible parts
become hot during use. Care should be taken to avoid
touching heating elements. Keep children less than 8
years of age away unless they are continually
supervised.
WARNING: Danger of fire: Do not store items
on the cooking surfaces.
WARNING: If the surface is cracked, switch off
the appliance to avoid the possibility of electric shock.
• Do not operate the appliance with an external timer
or separate remote-control system.
• During use the appliance will get hot. Care should
be taken to avoid touching heating elements inside
the oven.
• Handles may get hot after a short period during use.
• Do not use harsh abrasive cleaners or scourers
to clean the oven door glass and other surface.
They can scratch the surfaces which may result in
shattering of the door glass or damage to surfaces.
• Do not use steam cleaners for cleaning the
appliance.
WARNING: To avoid the possibility of electric
shock, make sure that the appliance is switched off
before replacing the lamp.
CAUTION: Accessible parts may be hot when
cooking or grilling. Keep young children away from the
appliance when it is in use.
• Your appliance is produced in accordance with all
applicable local and international standards and
regulations.
• Maintenance and repair work should only be carried
out by authorised service technicians. Installation
and repair work that is carried out by unauthorised
technicians may be dangerous. Do not alter or
modify the specifications of the appliance in any
way. Inappropriate hob guards can cause accidents.
• Before connecting your appliance, make sure
that the local distribution conditions (nature of
the gas and gas pressure or electricity voltage and
frequency) and the specifications of the appliance
are compatible. The specifications for this appliance
are stated on the label.
CAUTION: This appliance is designed only for
cooking food and is intended for indoor domestic
household use only. It should not be used for any other
purpose or in any other application, such as for nondomestic use, in a commercial environment or for
heating a room.
• Do not use the oven door handles to lift or move
the appliance.
• All possible measures have been taken to ensure
your safety. Since the glass may break, care should
be taken while cleaning to avoid scratching. Avoid
hitting or knocking the glass with accessories.
• Make sure that the supply cord is not trapped or
damaged during installation. If the supply cord is
damaged, it must be replaced by the manufacturer,
its service agent or similarly qualified persons in
order to prevent a hazard.
• Do not let children climb on the oven door or sit on
it while it is open.
• Please keep children and animals away from this
appliance.
1.2. Installation Warnings
• Do not operate the appliance before it is fully
installed.
• The appliance must be installed by an authorised
4
Page 5
Safety information
or online at www.newworldassist.co.uk If you still require further assistance, call one of our experts on 0333 3052263.
Safety information
Important - Please read these instructions fully before
installing or operating
technician. The manufacturer is not responsible
for any damage that might be caused by defective
placement and installation by unauthorised people.
• When the appliance is unpacked, make sure that
it is has not been damaged during transportation.
In case of any defect do not use the appliance
and contact a qualified service agent immediately.
The materials used for packaging (nylon, staplers,
Styrofoam, etc.) may be harmful to children and
they should be collected and removed immediately.
• Protect your appliance from the atmosphere. Do
not expose it to effects such as sun, rain, snow, dust
or excessive humidity.
• Any materials (i.e. cabinets) around the appliance
must be able to withstand a minimum temperature
of 100°C.
• The appliance must not be installed behind a
decorative door, in order to avoid overheating.
1.3. During Use
• When you first use your oven you may notice a
slight smell. This is perfectly normal and is caused
by the insulation materials on the heater elements.
We suggest that, before using your oven for the
first time, you leave it empty and set it at maximum
temperature for 45 minutes. Make sure that the
environment in which the product is installed is well
ventilated.
• Take care when opening the oven door during or
after cooking. The hot steam from the oven may
cause burns.
• Do not put flammable or combustible materials in
or near the appliance when it is operating.
• Always use oven gloves to remove and replace food
in the oven.
• Under no circumstances should the oven be lined
with aluminium foil as overheating may occur.
• Do not place dishes or baking trays directly onto
the base of the oven whilst cooking. The base
becomes very hot and damage may be caused to
the product.
Do not leave the oven unattended while
cooking with solid or liquid oils. They may catch fire
under extreme heating conditions. Never pour water
on to flames that are caused by oil, instead switch the
oven off and cover the pan with its lid or a fire blanket.
• If the product will not be used for a long period of
time, turn the main control switch off.
• Make sure the appliance control knobs are always in
the “0” (stop) position when it is not in use.
• The trays incline when pulled out. Take care not to
spill or drop hot food while removing it from the
ovens.
• Do not place anything on the oven door when it is
open. This could unbalance the oven or damage
the door.
• Do not hang towels, dishcloths or clothes from the
appliance or its handles.
1.4. During Cleaning and Maintenance
• Make sure that your appliance is turned off at
the mains before carrying out any cleaning or
maintenance operations.
• Do not remove the control knobs to clean the
control panel.
• To maintain the efficiency and safety of your
appliance, we recommend you always use original
spare parts and to call our authorised service agents
in case of need.
CE Declaration of conformity
We declare that our products meet the
applicable European Directives,
Decisions and Regulations and the
requirements listed in the standards
referenced.
This appliance has been designed to be used only for
home cooking. Any other use (such as heating a room)
is improper and dangerous.
5
Page 6
Safety information
Safety information
If you require any technical guidance or find that your product is not operating as intended, a simple solution can often be found in the Troubleshooting section of these instructions,
Important - Please read these instructions fully before
installing or operating
The operating instructions apply to several
models. You may notice differences between these
instructions and your model.
Disposal of your old machine
This symbol on the product or on its
packaging indicates that this product should
not be treated as household waste. Instead
it should be handed over to the applicable
collection point for the recycling of
electrical and electronic equipment. By ensuring this
product is disposed of correctly, you will help prevent
potential negative consequences for the environment
and human health, which could otherwise be caused
by inappropriate waste handling of this product. For
more detailed information about recycling of this
product, please contact your local city office, your
household waste disposal service or the retailer who
you purchased this product from.
6
Page 7

Safety information
or online at www.newworldassist.co.uk If you still require further assistance, call one of our experts on 0333 3052263.
Safety information
Important - Please read these instructions fully before
installing or operating
7
Page 8

Getting to know your cooker
You’ll be up and running in no time
Getting to know your Cooker
If you require any technical guidance or find that your product is not operating as intended, a simple solution can often be found in the Troubleshooting section of these instructions,
Ready? Let’s begin...
Please read these instructions carefully. They contain
important information which will help you get the
best from your Cooker and ensure safe and correct
installation and operation.
If you require any further assistance, our technical
experts are happy to help. For full details, refer to
the product support section at the end of these
instructions.
8
Page 9
Getting to know your cooker
You’ll be up and running in no time
Getting to know your Cooker
or online at www.newworldassist.co.uk If you still require further assistance, call one of our experts on 0333 3052263.
Product features
Important: Specifications for the product vary and
the appearance of your appliance may differ from
that shown in the figures below.
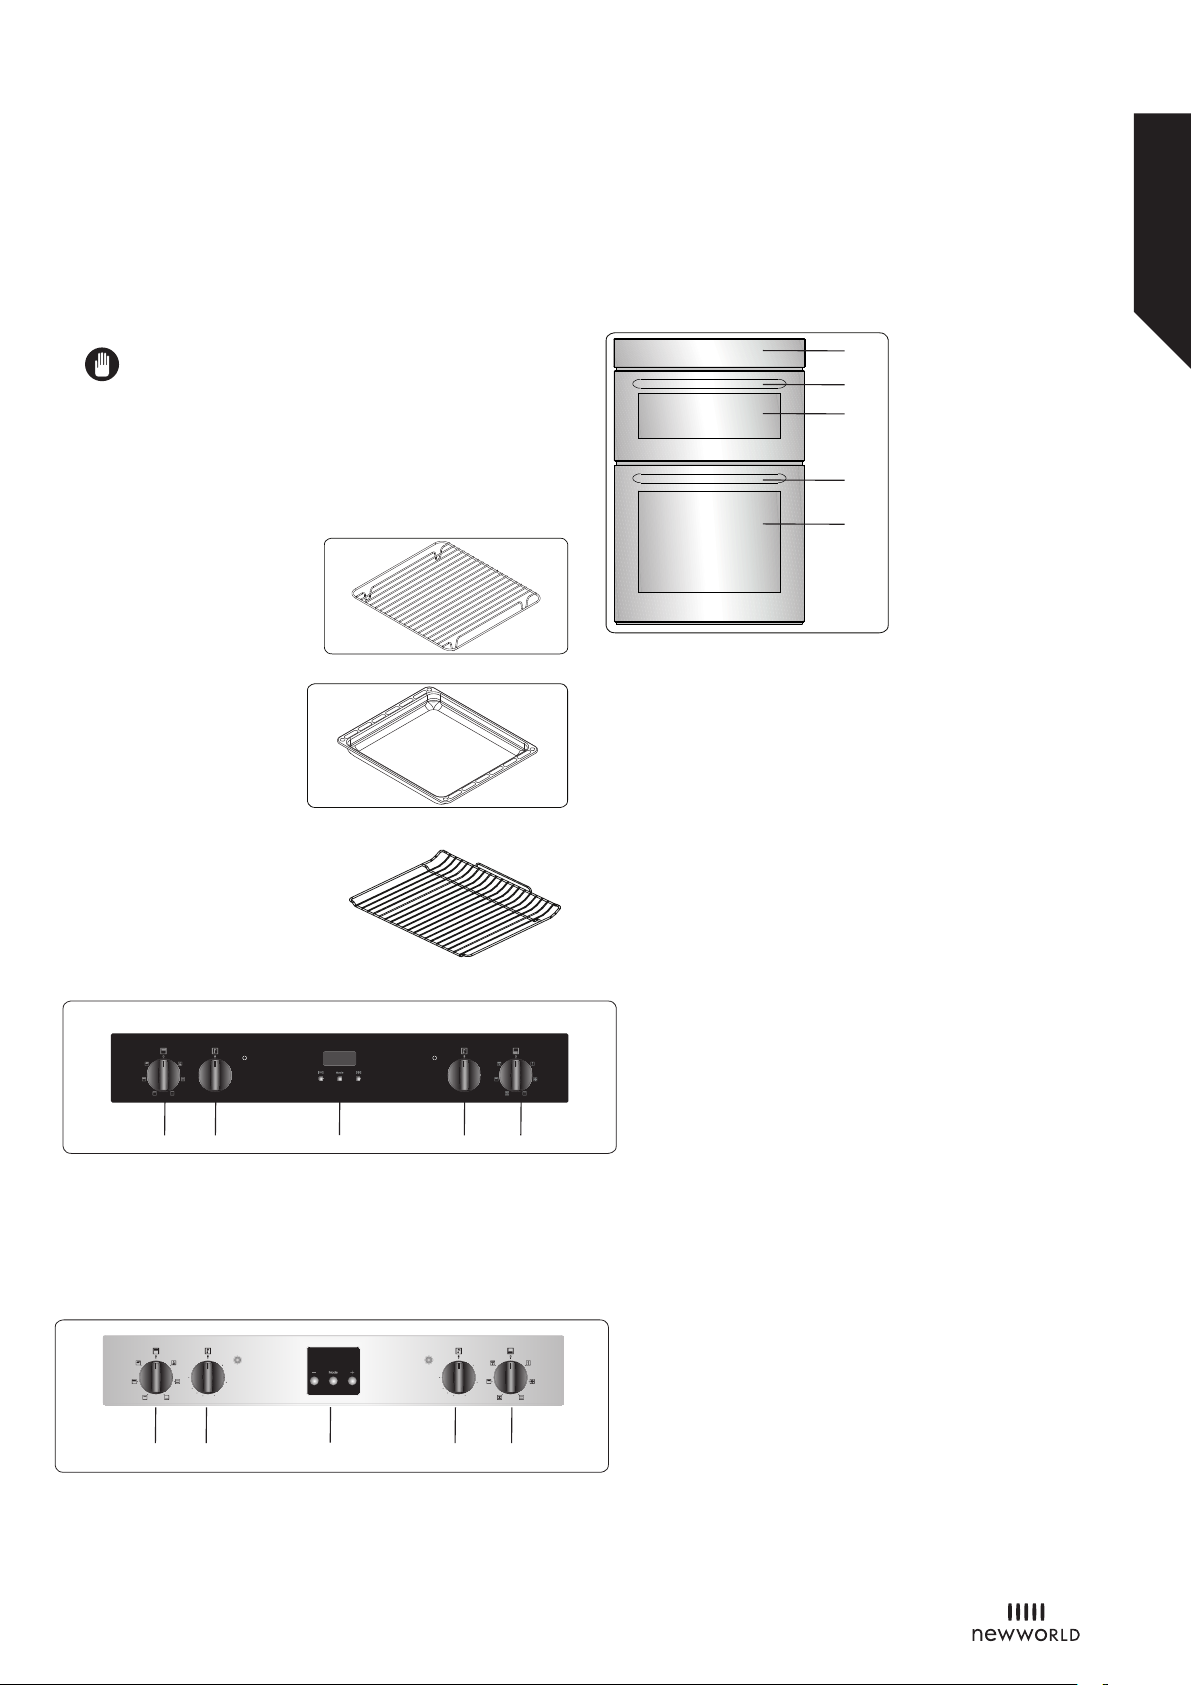
Accessorries
The Wire Grid for Deep Trays
The Deep Tray
The wire grid
List of Components
1
2
3
4
5
1. Control panel
2. Top oven Door Handle
3. Top oven Door
4. Main oven Door Handle
5. Main oven Door
Control panel (NWCMBUOB)
50
Max
100
220
200
150
180
8
6
6. Oven Control Knob
7. Timer
8. Hob Control Knob
Control panel (NWCMBUOI)
50
Max
100
220
200
150
180
8
6
6. Oven Control Knob
7. Timer
50
Max
100
220
200
150
180
7
Max
220
200
180
7
8
8
8
8
8
50
100
150
8
8. Hob Control Knob
9
Page 10
Installing your cooker
Bringing it all together
Installing your cooker
If you require any technical guidance or find that your product is not operating as intended, a simple solution can often be found in the Troubleshooting section of these instructions,
INSTALLATION AND PREPARATION FOR USE
WARNING : This appliance must be installed by an
authorised service person or qualified technician,
according to the instructions in this guide and in
compliance with the current local regulations.
• Incorrect installation may cause harm and
damage, for which the manufacturer accepts no
responsibility and the warranty will not be valid.
• Prior to installation, ensure that the local distribution
conditions (electricity voltage and frequency) and
the adjustments of the appliance are compatible.
The adjustment conditions for this appliance are
stated on the label.
• The laws, ordinances, directives and standards in
force in the country of use are to be followed (safety
regulations, proper recycling in accordance with the
regulations, etc.).
Instructions for the Installer
General instructions
• After removing the packaging material from the
appliance and its accessories, ensure that the
appliance is not damaged. If you suspect any
damage, do not use it and contact an authorised
service person or qualified technician immediately.
• Make sure that there are no flammable or
combustible materials in the close vicinity, such as
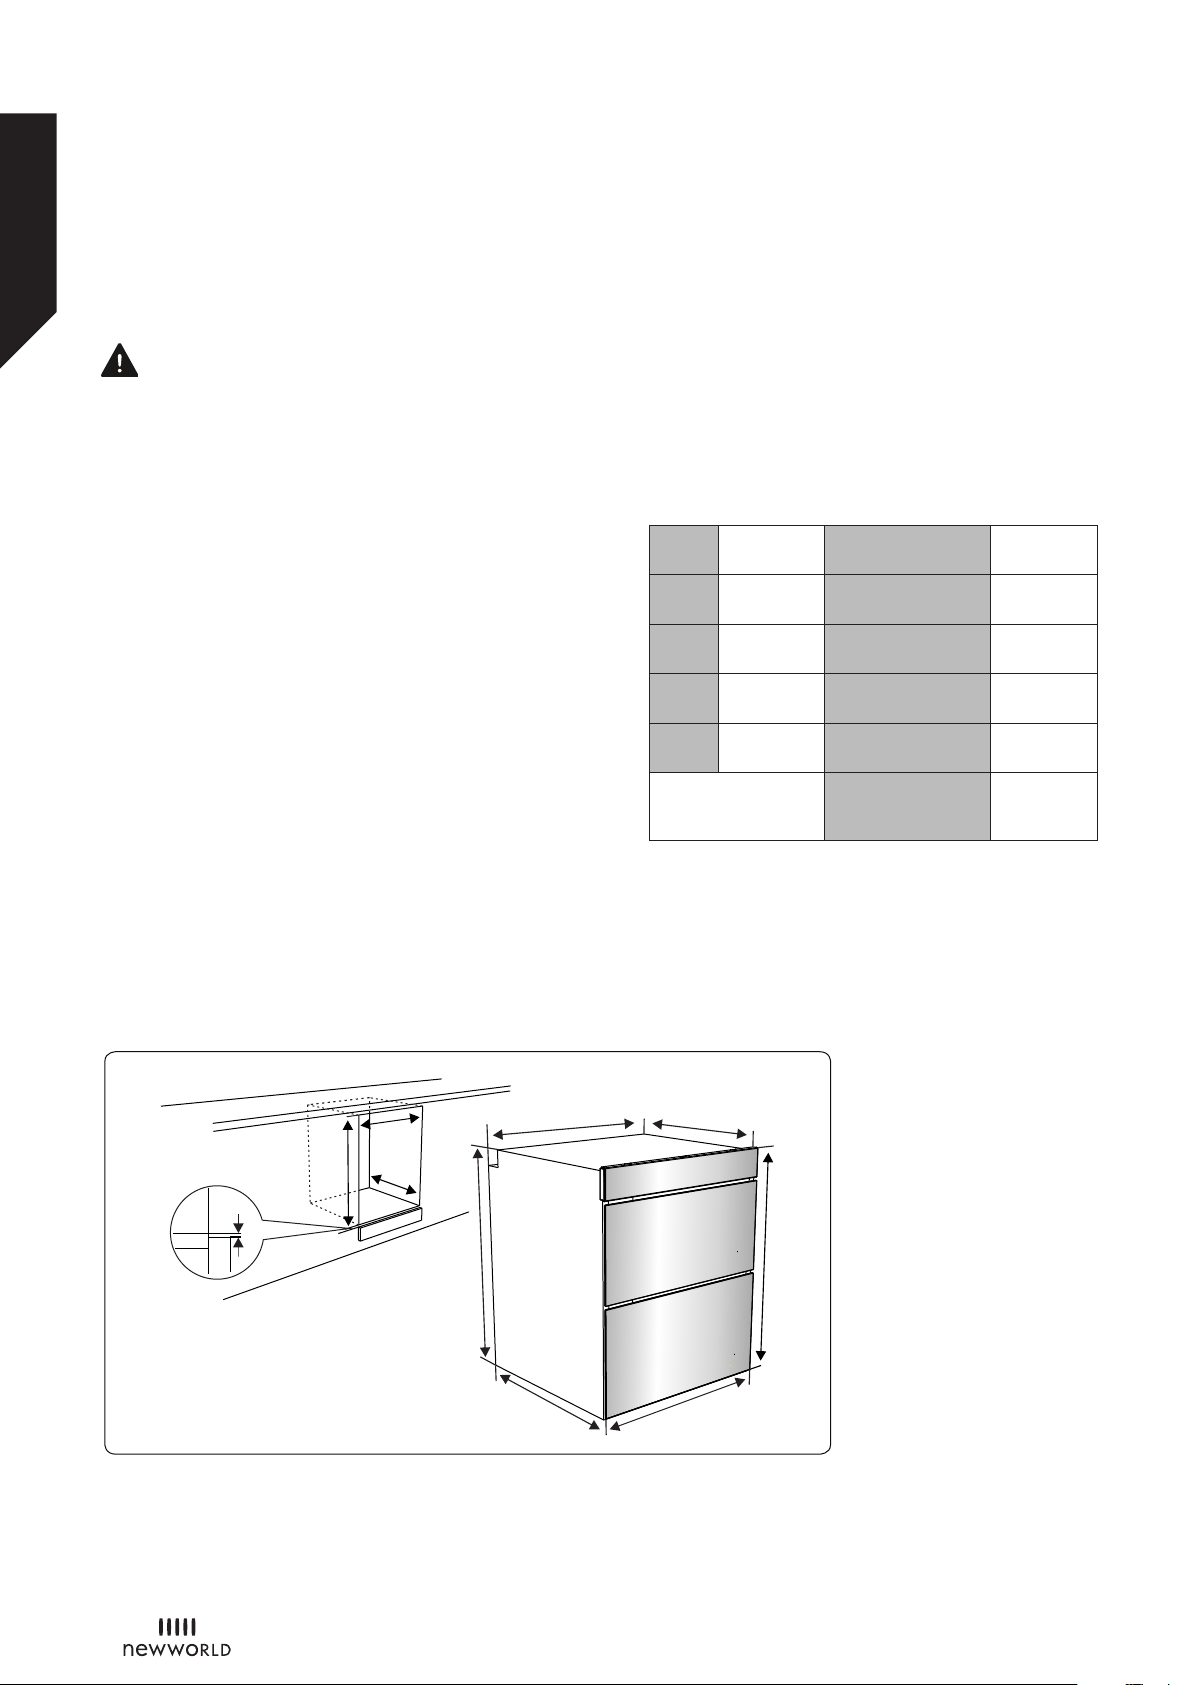
Installation under a worktop (A)
curtains, oil, cloth etc. which may catch fire.
• The worktop and furniture surrounding the
appliance must be made of materials resistant to
temperatures above 100°C.
• The appliance should not be installed directly above
a dishwasher, fridge, freezer, washing machine or
clothes dryer.
A
(mm)
B
(mm)
H
(mm)
C
(mm)
D
(mm)
557 E (mm) 712
550 min./max. F (mm) 560/580
720 min. G (mm) 555
595 min. L/I (mm) 725/715
575 min. J/K (mm) 5/10
M (mm) 40
1.5. Installation of the Oven
The appliances are supplied with installation kits and
can be installed in a worktop with the appropriate
dimensions. The dimensions for hob and oven
installation are given below.
10
F
L
J
G
E
A
D
B
H
C
Page 11
Installing your cooker
Bringing it all together
Installing your cooker
or online at www.newworldassist.co.uk If you still require further assistance, call one of our experts on 0333 3052263.
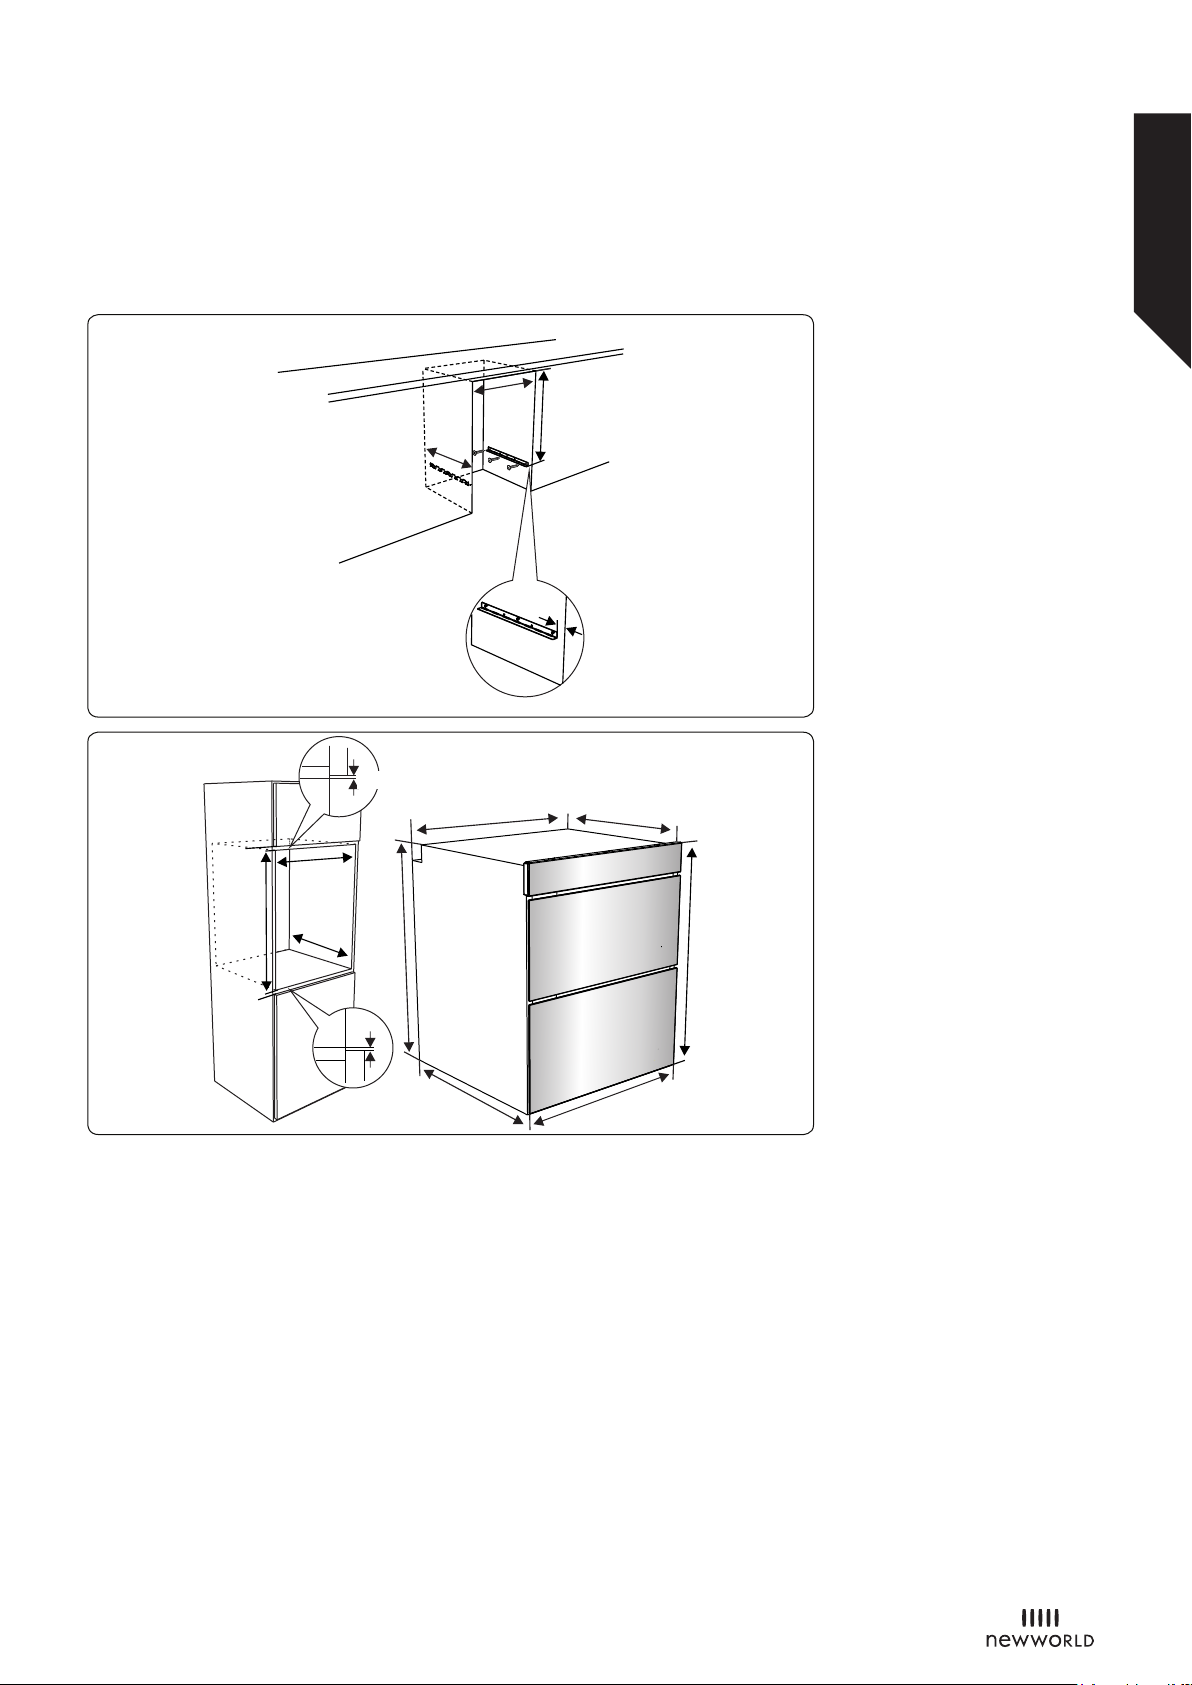
Installation under a worktop (B)
Installation in a wall unit
K
F
L
G
M
A
F
I
G
E
J
D
After making the electrical connections,
insert the oven into the cabinet by pushing it forward.
Open the oven door and insert 2 screws in the holes
located on the oven frame. While the product frame
touches the wooden surface of the cabinet, tighten the
screws.
B
H
C
11
Page 12
Installing your cooker
Bringing it all together
Installing your cooker
If you require any technical guidance or find that your product is not operating as intended, a simple solution can often be found in the Troubleshooting section of these instructions,
• The appliance is designed for a power supply of
220-240V ~ and 380-415V 3N~. If your supply is
different, contact the authorised service person or a
qualified electrician.
• The power cable (H05VV-F) must be long enough
to be connected to the appliance, even if the
appliance stands on the front of its cabinet.
• Ensure all connections are adequately tightened.
• Fix the supply cable in the cable clamp and then
close the cover.
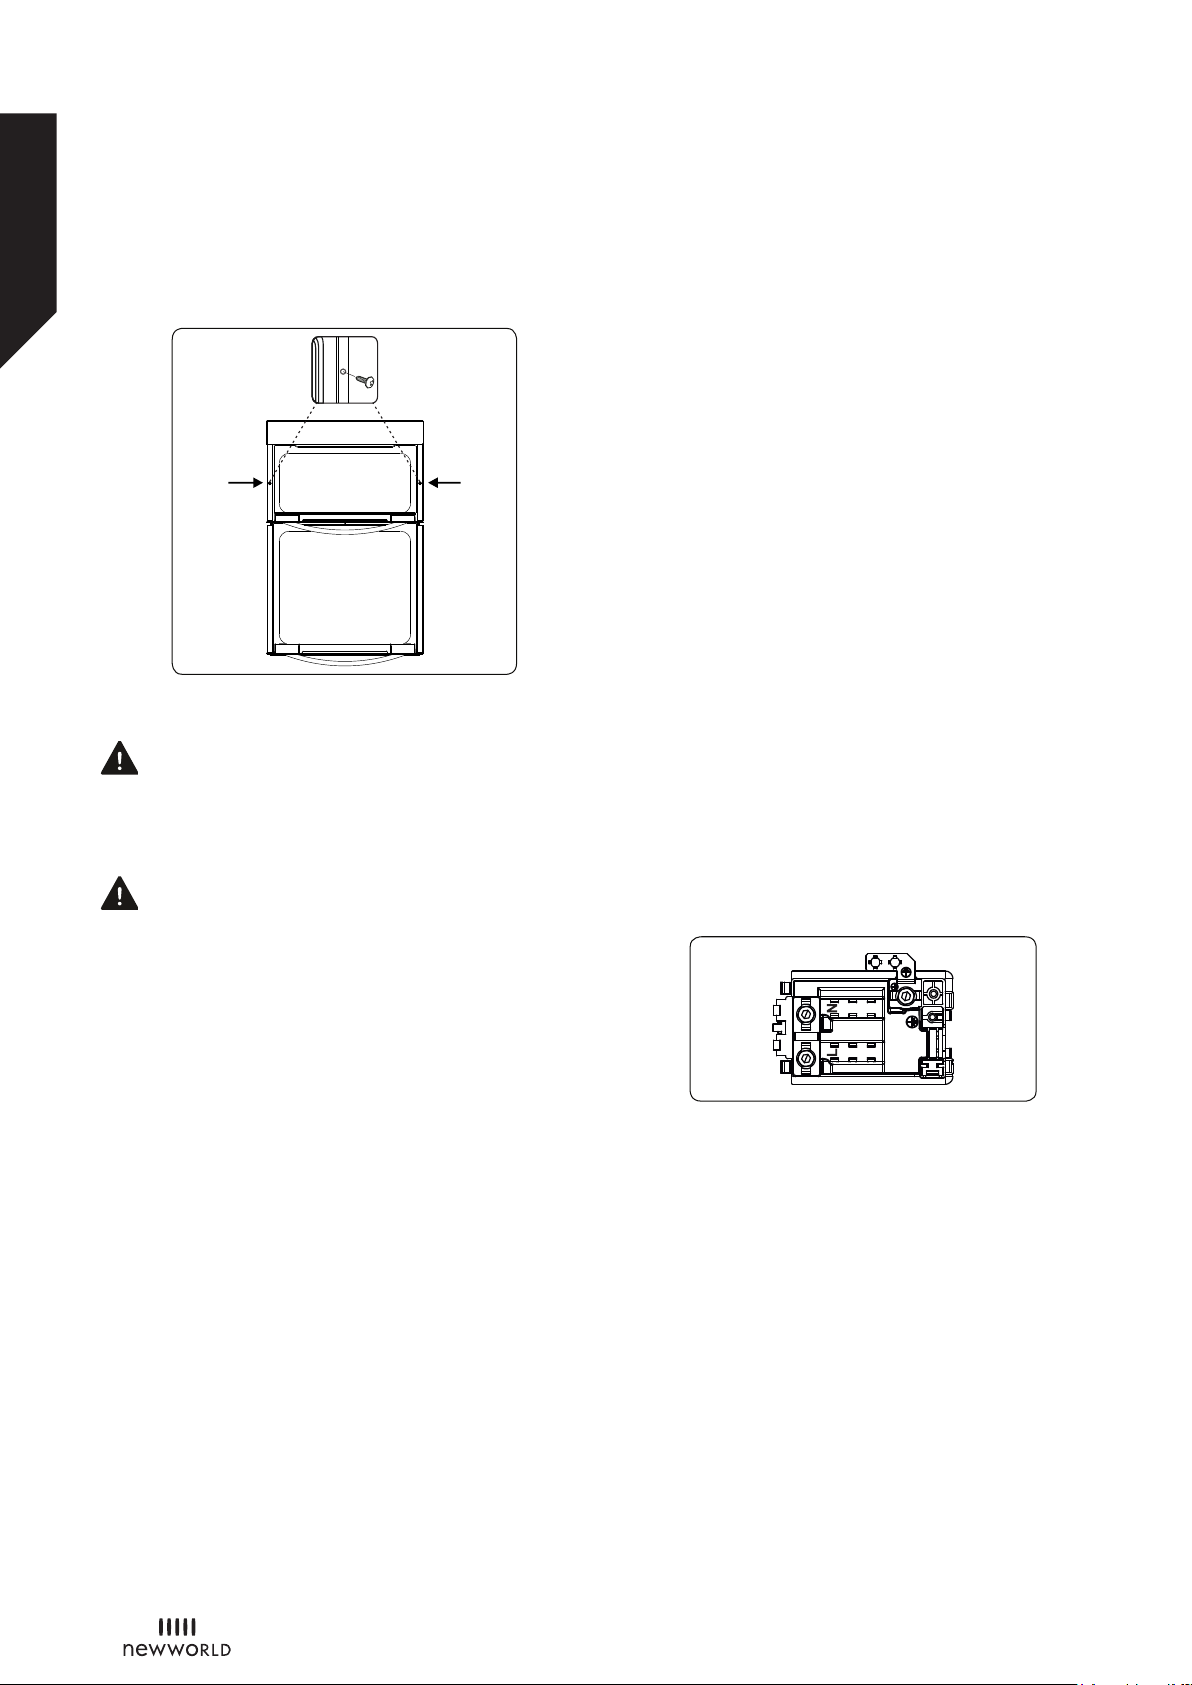
• The terminal box connection is placed on the
terminal box.
Electrical Connection and Safety
WARNING: The electrical connection of this
appliance should be carried out by an authorised
service person or qualified electrician, according to the
instructions in this guide and in compliance with the
current local regulations.
WARNING: THE APPLIANCE MUST BE EARTHED.
• Before connecting the appliance to the power
supply, the voltage rating of the appliance (stamped
on the appliance identification plate) must be
checked for correspondence to the available mains
supply voltage, and the mains electric wiring should
be capable of handling the appliance’s power rating
(also indicated on the identification plate).
• During installation, please ensure that isolated
cables are used. An incorrect connection could
damage your appliance. If the mains cable is
damaged and needs to be replaced this should be
done by a qualified personnel.
• Do not use adaptors, multiple sockets and/or
extension leads.
• Green/Yellow (Earth) wire to the terminal marked
“PE”.
• Brown (Live) wire to the terminal marked “L”.
• Blue (Neutral) wire to the terminal marked “N”.
• For this connection, a ‘Twin and Earth 6242Y’ type
cable should be used.
• The supply cord should be kept away from hot
parts of the appliance and must not be bent or
compressed. Otherwise the cord may be damaged,
causing a short circuit.
• If the appliance is not connected to the mains with
a plug, a all-pole disconnector (with at least 3 mm
contact spacing) must be used in order to meet the
safety regulations.
12
Page 13

Installing your cooker
Bringing it all together
Installing your cooker
or online at www.newworldassist.co.uk If you still require further assistance, call one of our experts on 0333 3052263.
13
Page 14
Functions
Simple everyday use
Functions
If you require any technical guidance or find that your product is not operating as intended, a simple solution can often be found in the Troubleshooting section of these instructions,
Oven Controls
Oven function control knob
Turn the knob to the corresponding symbol of the
desired cooking function. For the details of different
functions see ´Oven Functions`.
Oven thermostat knob
After selecting a cooking function, turn this knob to set
the desired temperature. The oven thermostat light will
illuminate whenever the thermostat is in operation to
heat up the oven or maintain the temperature.
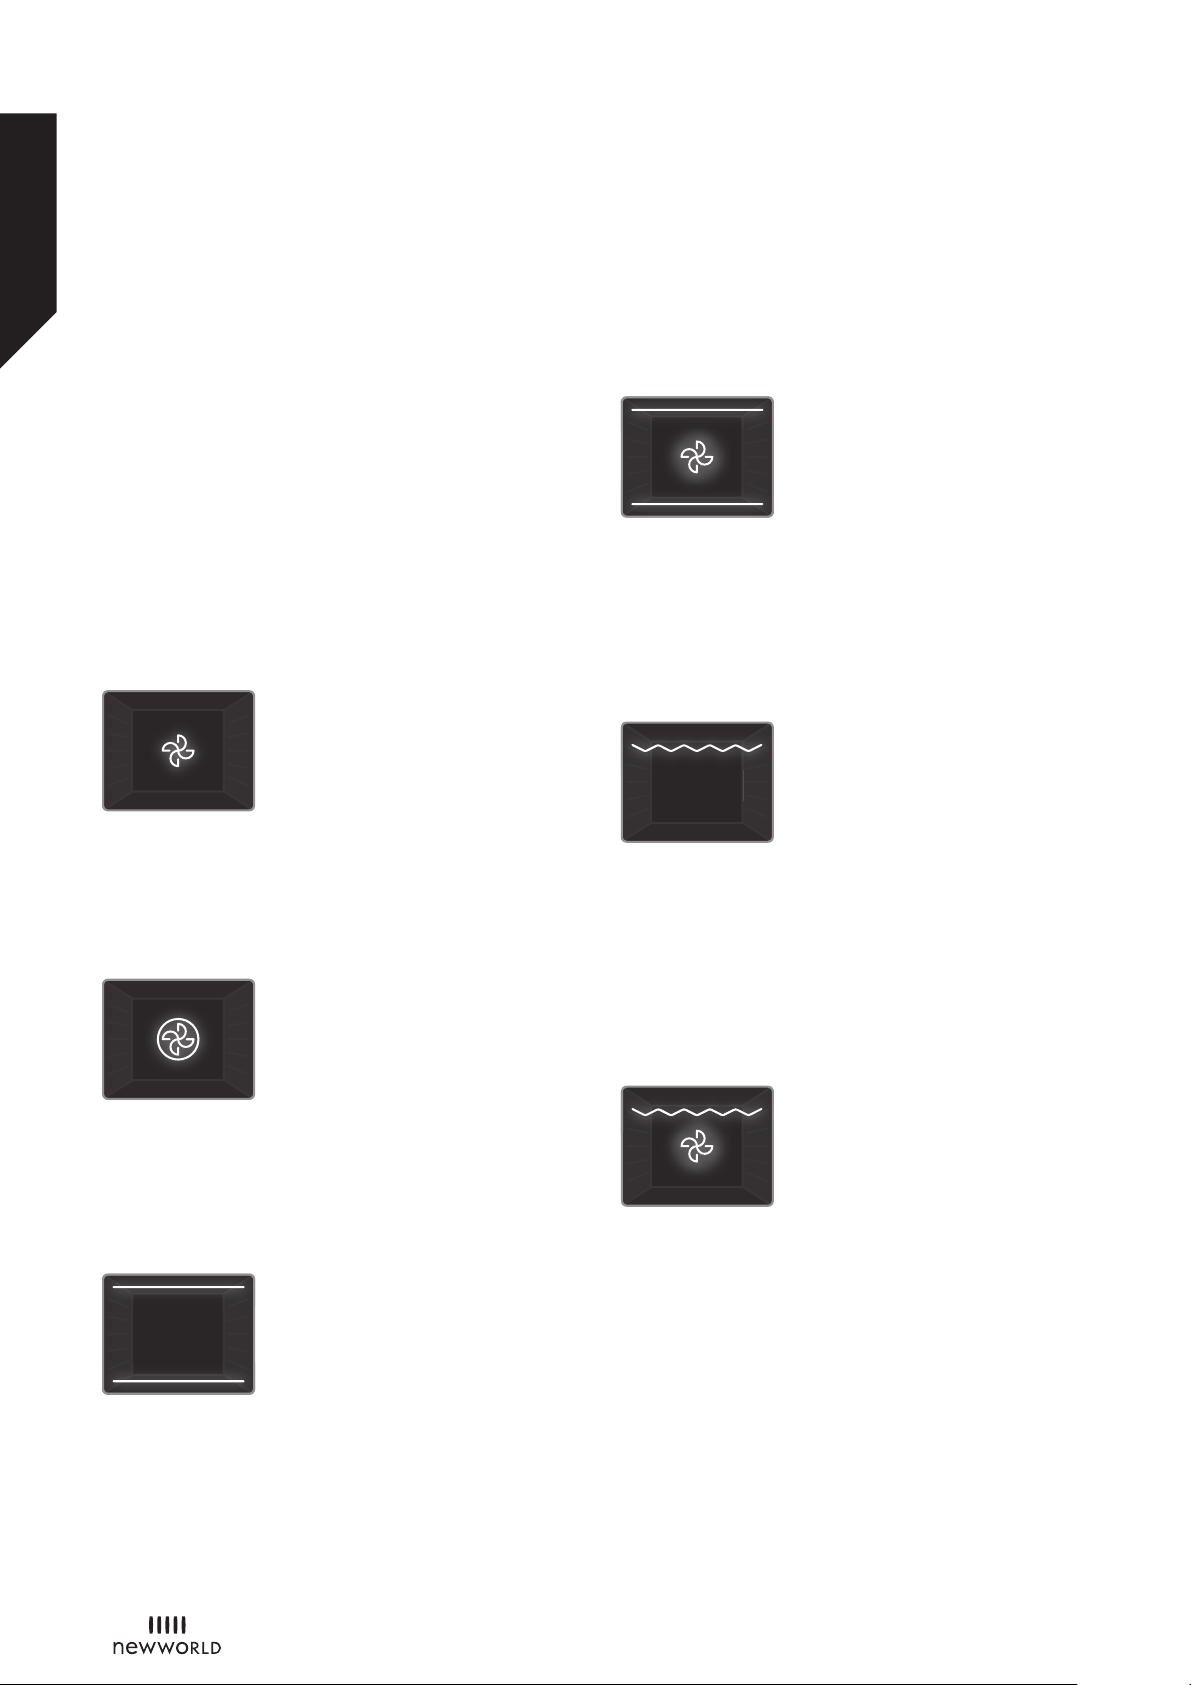
Main Oven Functions
* The functions available on your oven may differ from
those listed below depending on the model purchased.
Defrost Function: Switch on the
DEFROST function using the main
oven function control knob. The
oven’s warning lights will switch on,
and the fan will start operating. To
use the defrost function, place your
frozen food on a shelf in the middle of the oven. It is
recommended that you put an oven tray under the
defrosting food to catch accumulated water due to
melting ice. This function will not cook or bake your
food, it will only help to defrost it.
Turbo Function: Switch on the
TURBO function using the main
oven function control knob. The
oven’s thermostat and warning
lights will switch on, and the ring
heating element and fan will start operating. The
temperature can be adjusted using the main oven
function control knob. The turbo function evenly
disperses the heat in the oven so all food on all racks
will cook evenly. It is recommended that you preheat
the oven for 10 minutes.
Static Cooking Function: Switch on
the STATIC function using the main
oven function control knob. The
oven’s thermostat and warning
lights will switch on, and the lower
and upper heating elements will
start operating. The temperature can be adjusted using
the main oven function control knob. The static
cooking function emits heat, ensuring even cooking of
food. This is ideal for making pastries, cakes, baked
pasta, lasagne and pizza. Preheating the oven for 10
minutes is recommended and it is best to cook on
only one shelf at a time in this function.
Fan Function: Switch on the FAN
function using the main oven
control knob. The oven’s thermostat
and warning lights will switch on,
and the upper and lower heating
elements and fan will start operating.
The temperature can be adjusted using the main oven
thermostat knob. Cooking is carried out by the lower
and upper heating elements within the oven while the
fan provides air circulation, dispersing the heat and
giving the food a slightly grilled effect. It is
recommended you preheat the oven for 10 minutes.
Grilling Function: Switch on the
GRILLING function using the main
oven control knob. The oven’s
thermostat and warning lights will
switch on, and the grill heating
element will start operating. The
temperature can be adjusted using the main oven
thermostat knob. This function is used for grilling and
toasting food. Use the upper shelves of the oven.
Lightly brush the wire grid with oil to stop food sticking
and place food in the centre of the grid. Always place a
tray beneath the food to catch any drips of oil or fat. It
is recommended that you leave the grill to preheat for
10 minutes.
Grill and Fan Function: Switch on
the GRILL AND FAN function using
the main oven control knob. The
oven’s thermostat and warning
lights will switch on, and the grill
heating element and fan will start
operating. The temperature can be adjusted using the
main oven thermostat knob. This function is ideal for
thicker foods. When grilling, use the upper shelves of
the oven. Lightly brush the wire grid with oil to stop
food sticking and place food in the centre of the grid.
Always place a tray beneath the food to catch any drips
of oil or fat.
14
Page 15
Functions
Simple everyday use
Functions
or online at www.newworldassist.co.uk If you still require further assistance, call one of our experts on 0333 3052263.
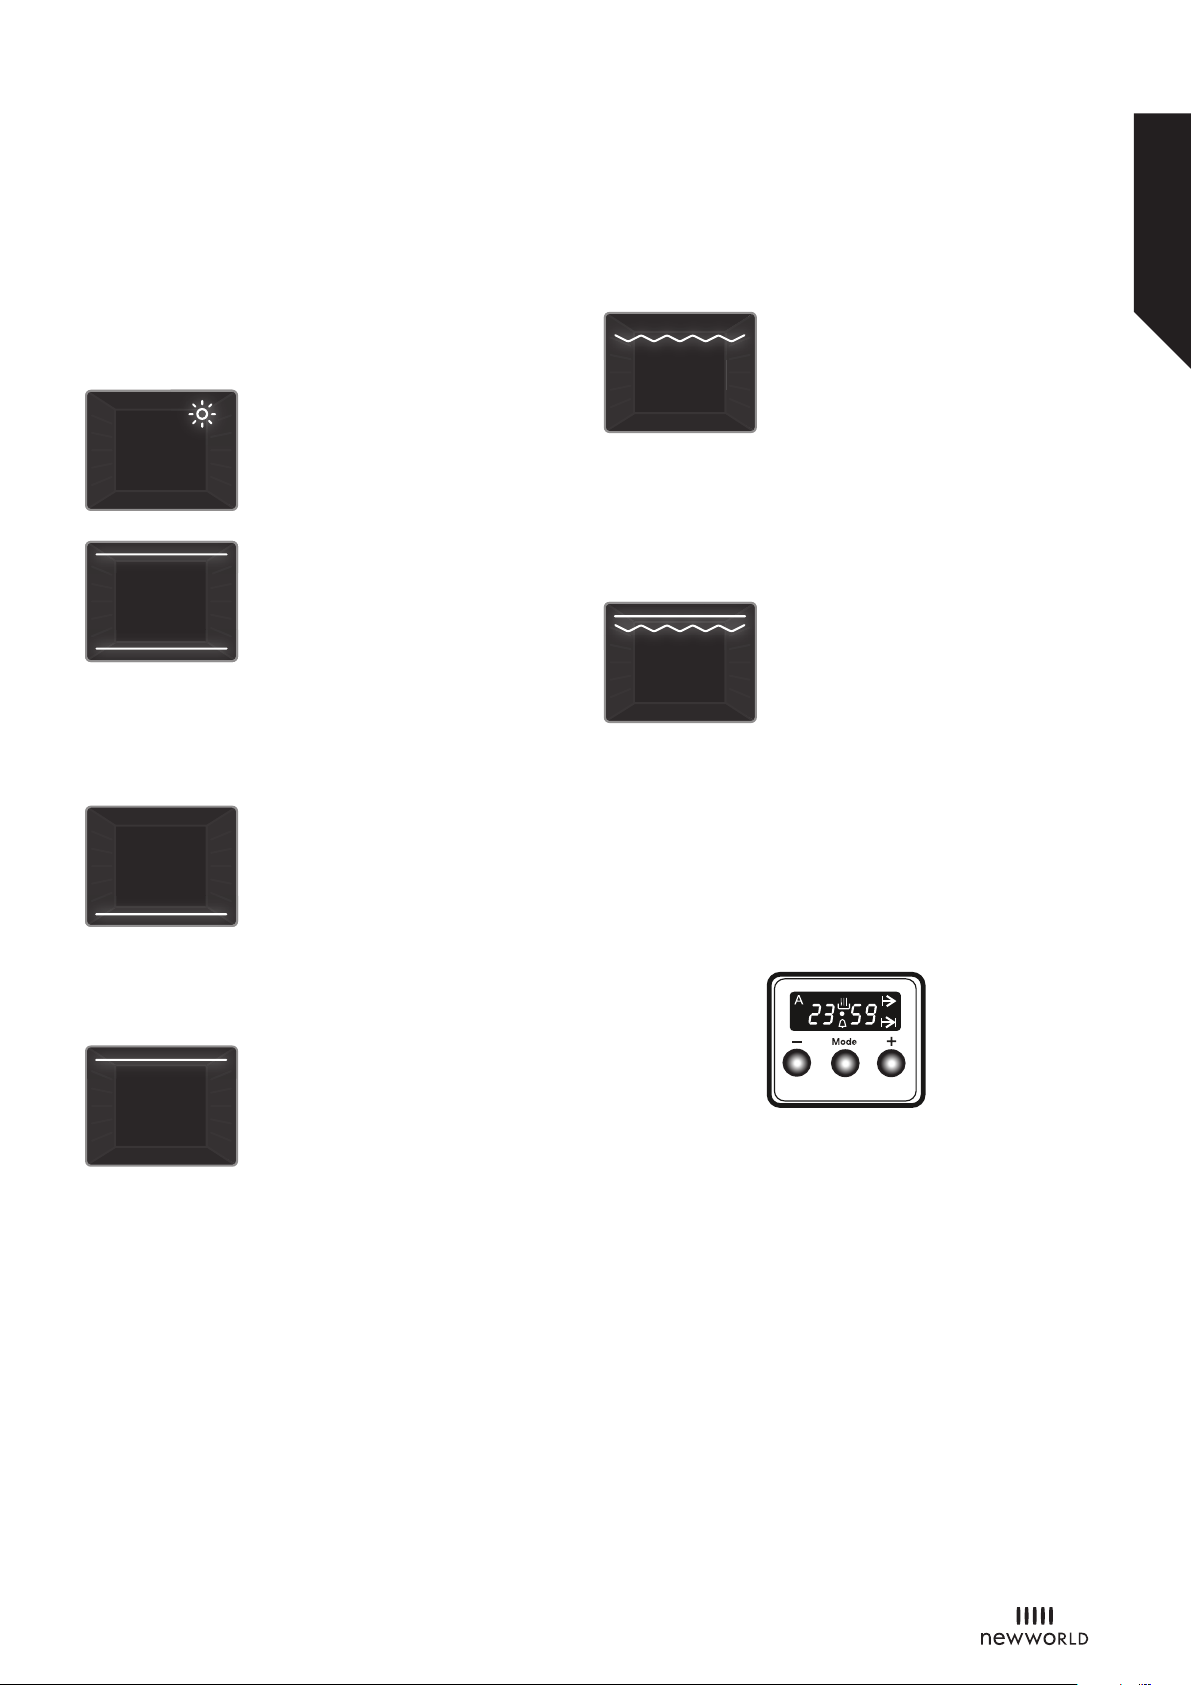
Top Oven Functions
* The functions of you
model of your product.
food. This is ideal for making pastries, cakes, baked
pasta, lasagne and pizza. Preheating the oven for 10
minutes is recommended and it is best to use only one
shelf at a time in this function.
the bottom of the oven and warms the food up. This
function is appropriate for heating food instead of
cooking.
side of the food. The upper heating function is ideal for
frying the upper side of already cooked food and
heating food.
r oven may be different due to the
Oven Lamp: Only the oven light will
switch on. It will remain on for the
duration of the cooking function.
Static Cooking Function: The oven’s
thermostat and warning lights will
switch on, and the lower and upper
heating elements will start operating.
The static cooking function emits
heat, ensuring even cooking of
Lower Heating Function: The oven’s
thermostat and warning lights will
switch on, and the lower heating
element will start operating. The
lower heating function is ideal for
heating pizza as the heat rises from
Upper Heating Function: The oven’s
thermostat and warning lights will
switch on, and the upper heating
element will start operating. The
heat emanating from the upper
heating element will cook the upper
Grilling Function: The oven’s
thermostat and warning lights will
switch on, and the grill heating
element will start operating. This
function is used for grilling and
toasting foods on the upper shelves
of the oven. Lightly brush the wire grid with oil to stop
food sticking and place food in the centre of the grid.
Always place a tray beneath the food to catch any drips
of oil or fat. It is recommended that you preheat the
oven for about 10 minutes.
Faster Grilling Function: The oven’s
thermostat and warning lights will
switch on, and the grill and upper
heating elements will start operating.
This function is used for faster
grilling and for grilling food with a
larger surface area, such as meat. Use the upper
shelves of the oven. Lightly brush the wire grid with oil
to stop food sticking and place food in the centre of
the grid. Always place a tray beneath the food to catch
any drips of oil or fat. It is recommended that you
preheat the oven for about 10 minutes.
Use of the Digital Timer
15
Page 16
Functions
Simple everyday use
Functions
If you require any technical guidance or find that your product is not operating as intended, a simple solution can often be found in the Troubleshooting section of these instructions,
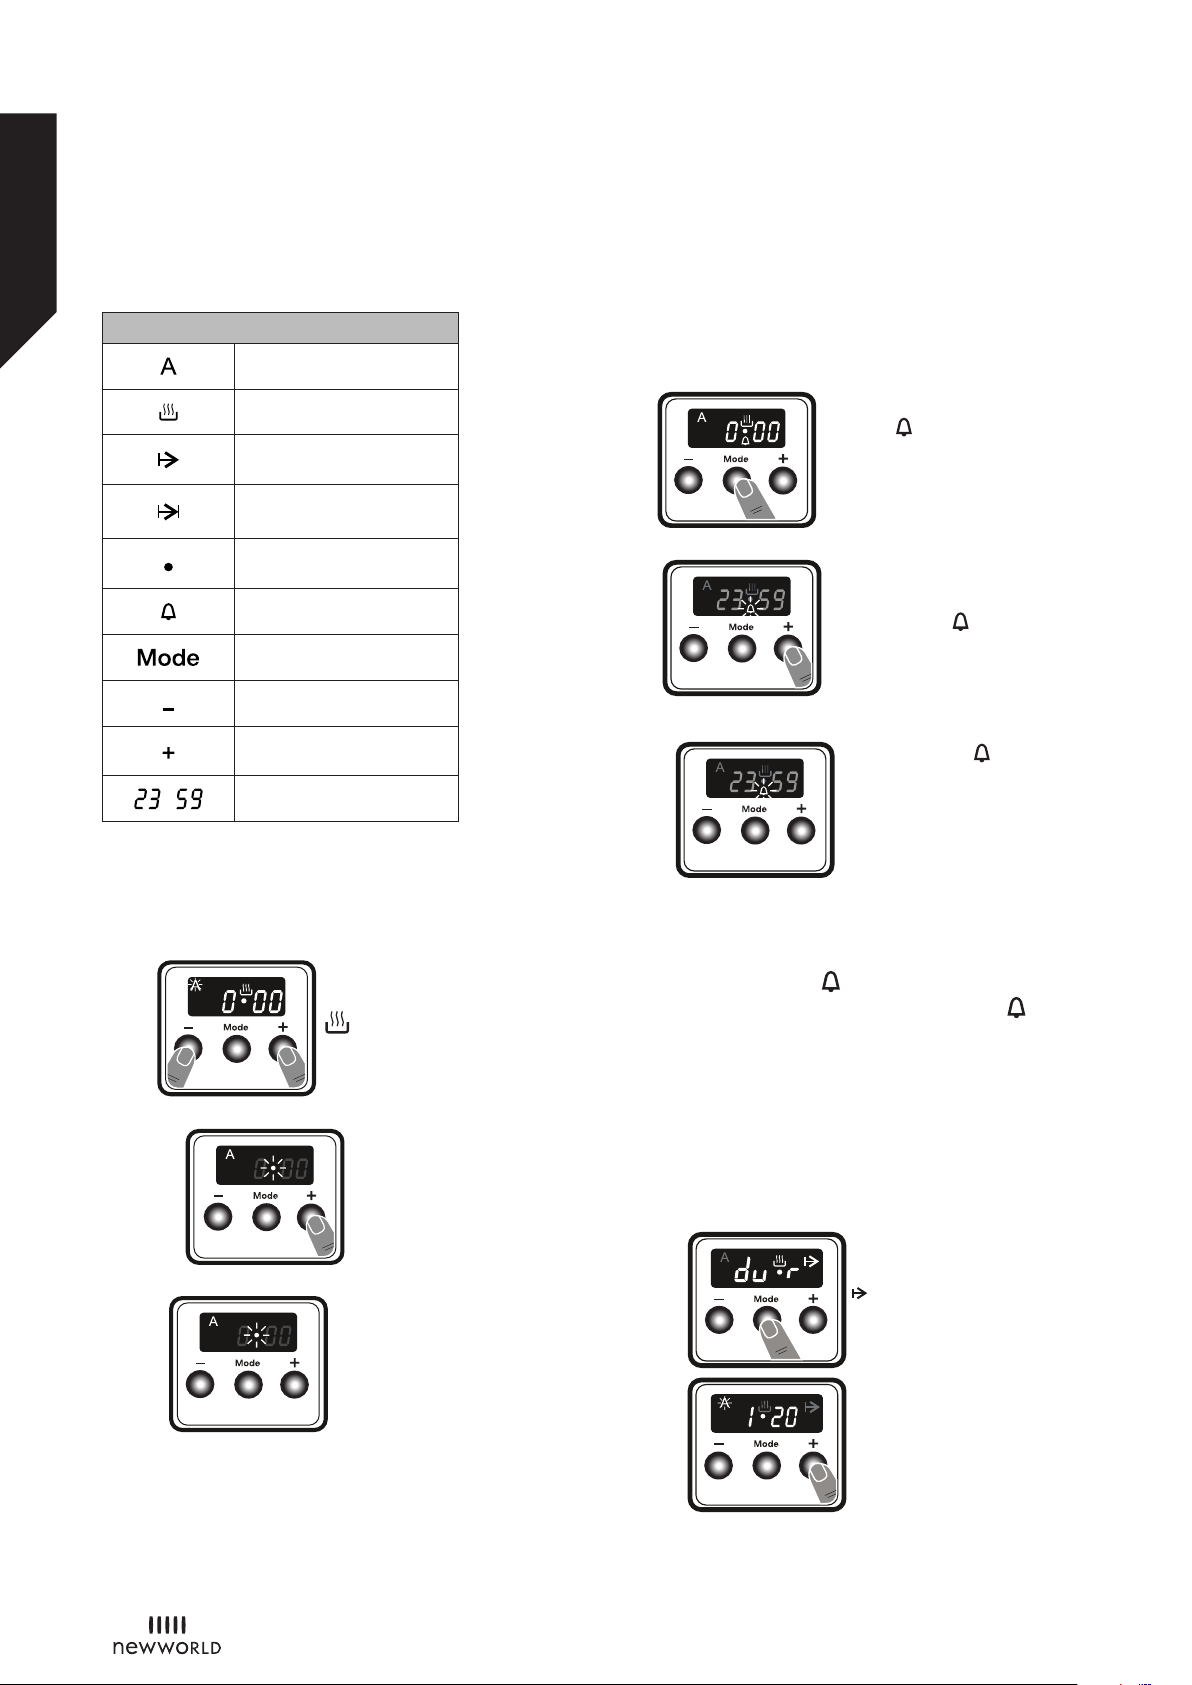
Function Description
Auto cooking
Manual cooking
Cooking time
Cooking end time
Dot
Minute minder
Mode function
Decrease timer
Increase timer
Timer display
Time adjustment
The time must be set before you start using the oven.
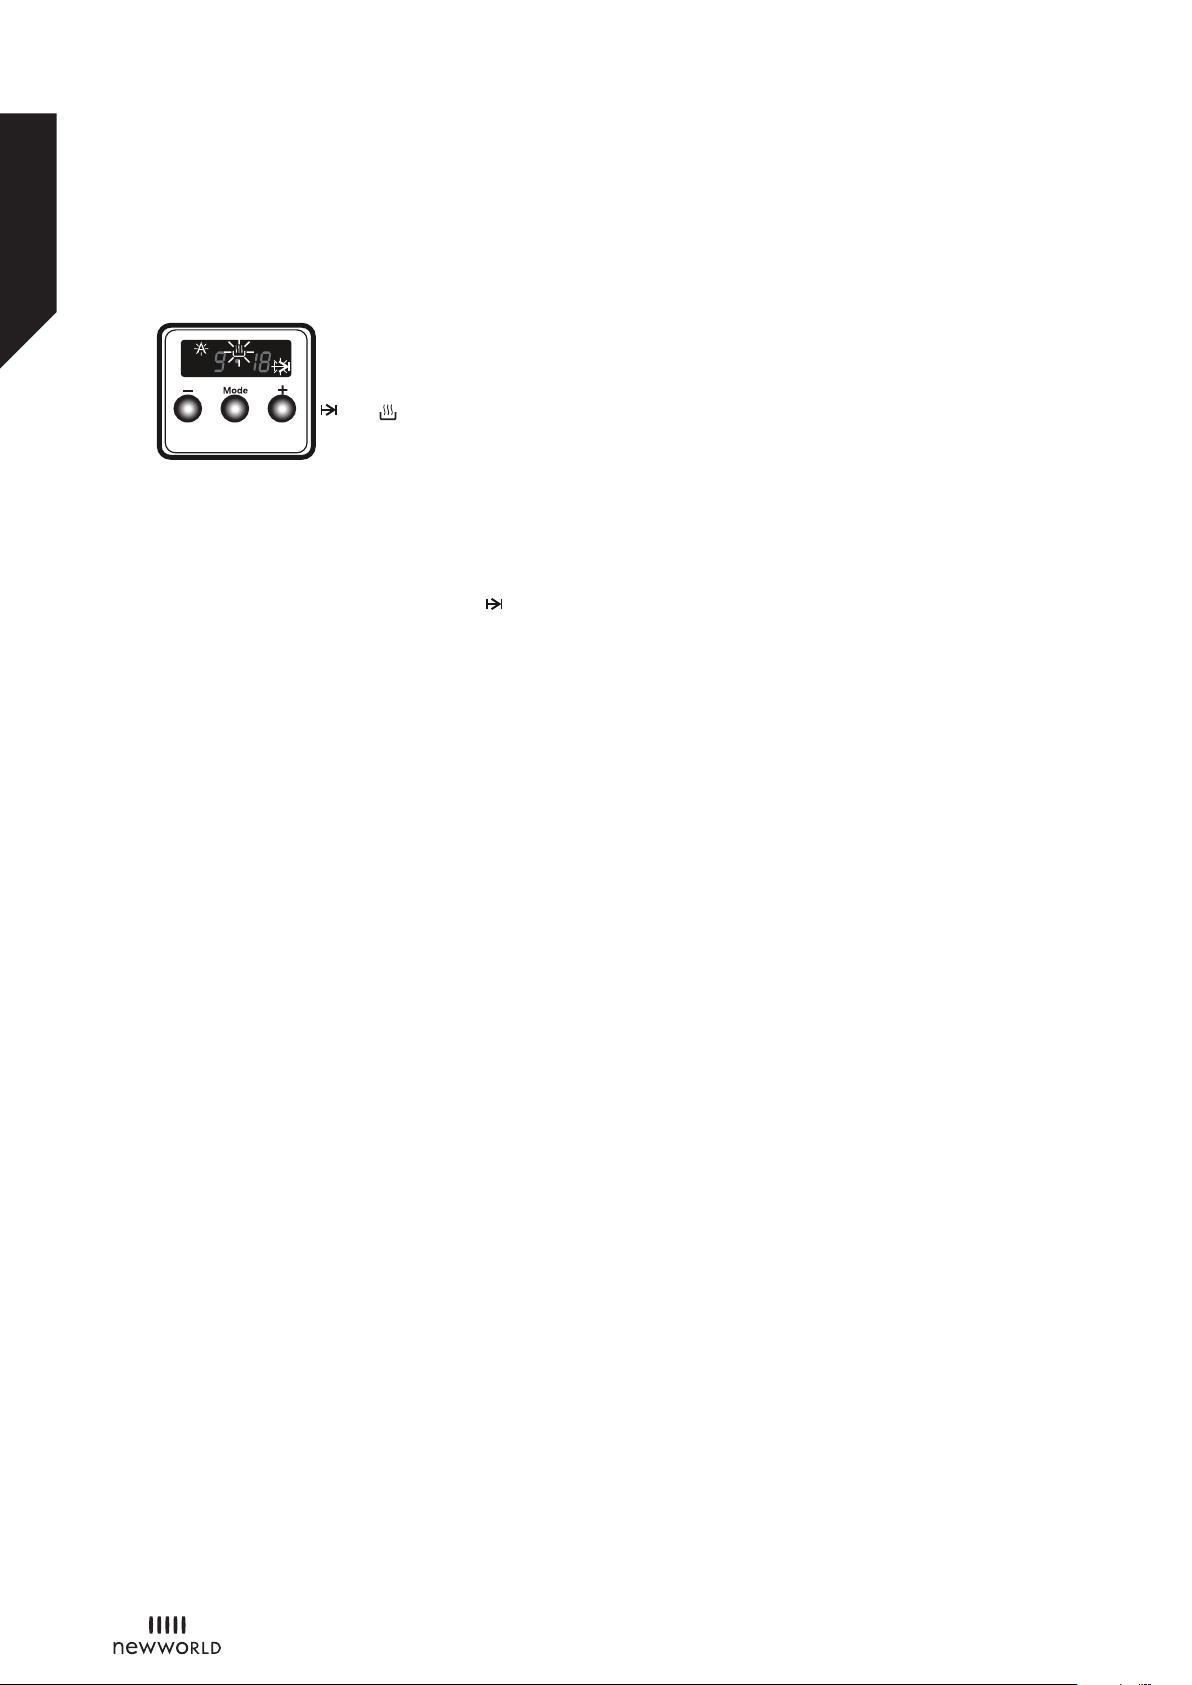
Following the power connection, the symbol “A” and
“000” will flash on the display.
1. Press the “+” and “-”
keys simultaneously.
Symbol will appear,
and the dot in the
middle of the screen
will start to flash.
2. Adjust the time
while the dot is
flashing using the
“+” and “-” keys.
3. After a few
seconds, the dot will
stop flashing and will
remain illuminated.
Audible warning time adjustment
The audible warning time can be set to any time
between 0:00 and 23:59 hours. The audible warning
time is for warning purposes only. The oven will not be
activated with this function.
1. Press “MODE”. The
symbol will begin to flash
and “000” will be displayed.
2. Select the desired time
period using the “+” and
“-” keys while is flashing.
3. The symbol will
remain illuminated, the
time will be saved and
the warning will be set.
When the timer reaches zero, an audible warning will
sound and the symbol will flash on the display. Press
any key to stop the audible warning and the symbol
will disappear.
Semi-automatic time adjustment (cooking period)
This function helps you to cook for a fixed period of
time. A time range between 0 and 10 hours can be set.
Prepare the food for cooking and put it in the oven.
1. Select the desired cooking function and the
temperature using the control knobs.
2. Press “MODE” until
you see “dur” and
symbol on the
display screen. The
symbol “A” will flash.
3. Select the desired
cooking time period
using the “+” and “-”
keys.
16
Page 17
Functions
Simple everyday use
Functions
or online at www.newworldassist.co.uk If you still require further assistance, call one of our experts on 0333 3052263.
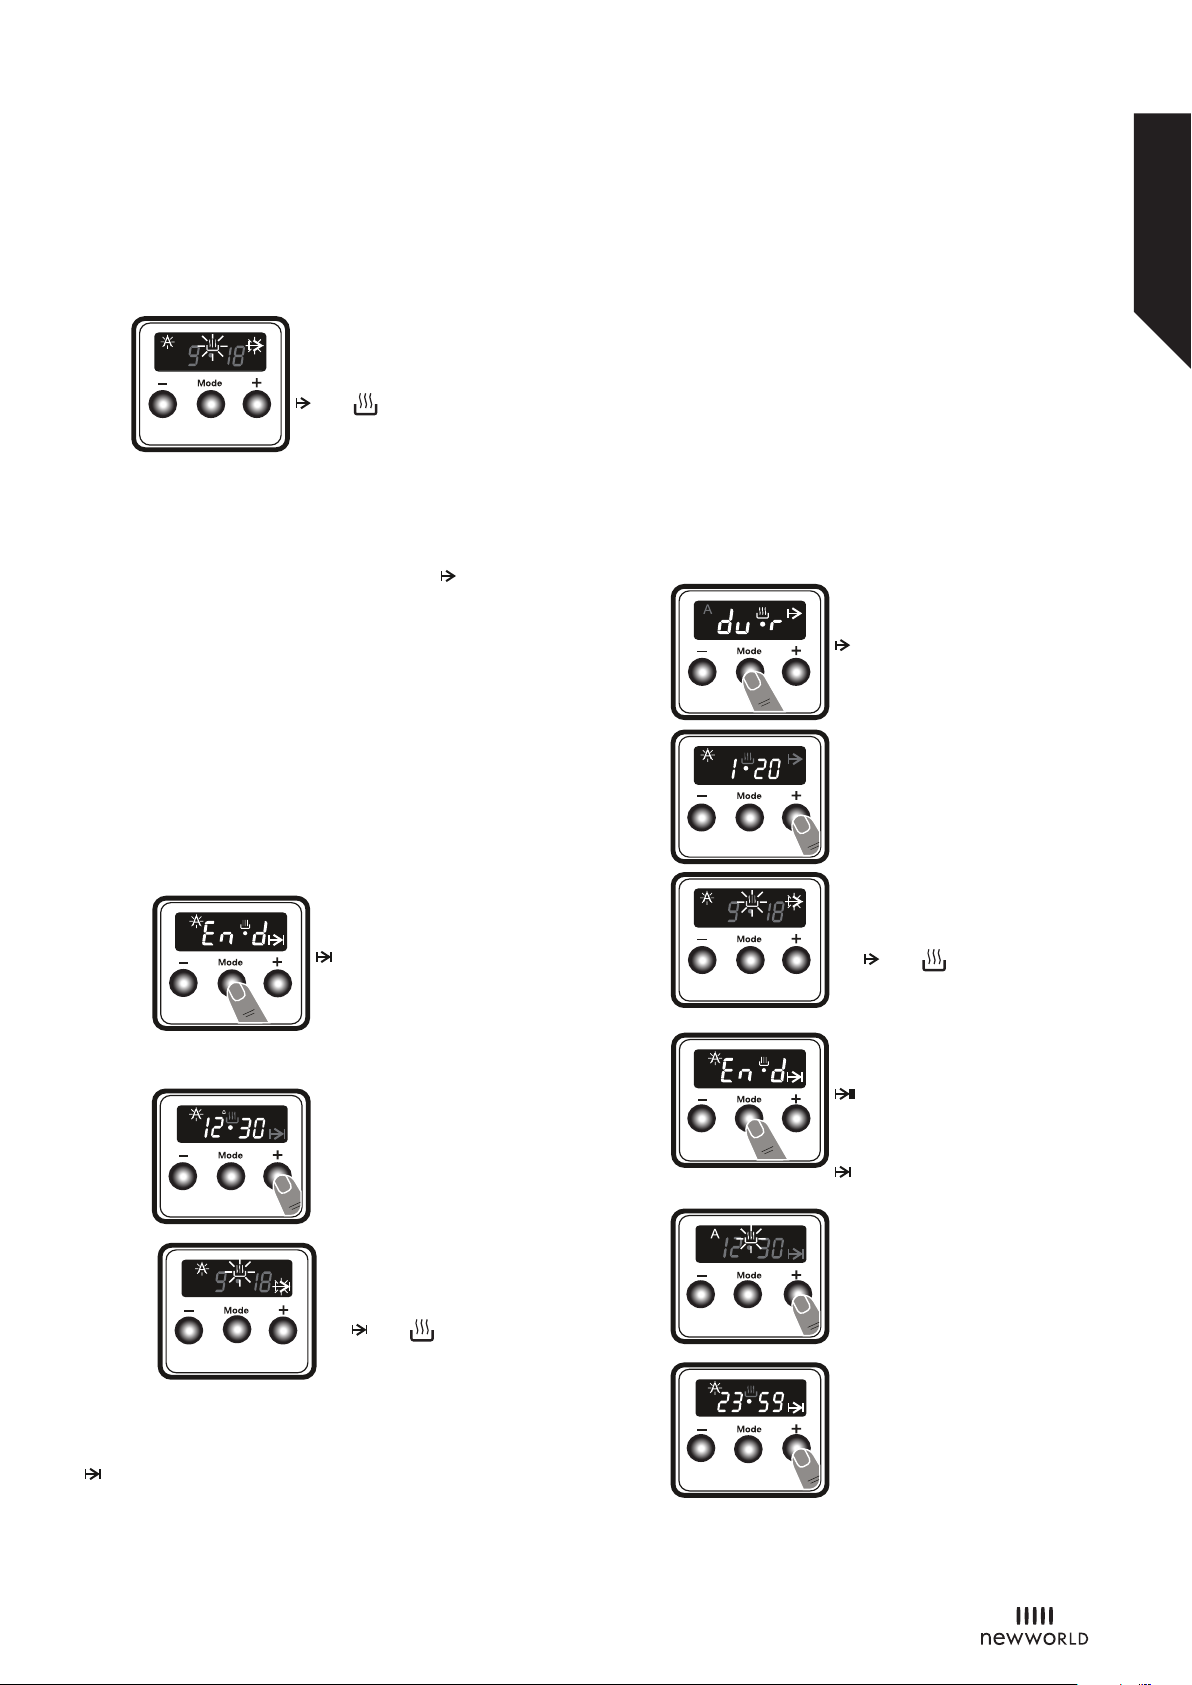
4. The current time will
reappear on the screen,
and the symbols “A”,
and will remain
illuminated.
When the timer
reaches zero, the oven will switch off and an audible
warning will sound. The symbols “A” and will flash.
Turn both control knobs to the “0” position and press
any key on the timer to stop the warning sound. The
symbols will disappear and the timer will switch back to
manual function.
Semi-automatic time adjustment (finishing time)
This function automatically starts the oven so that
cooking will finish at a set time. You can set an end
time of up to 10 hours after the current time of day.
Prepare the food for cooking and put it in the oven.
1. Select the desired cooking function and the
temperature using the control knobs.
2. Press “MODE” until
you see “end” and
symbol on the
display screen. “A”
and the current time
of day will flash.
3. Use the “+” and
“-” buttons to set
the desired finishing
time.
manual function.
Full-automatic programming
This function is used to start cooking after a certain
period of time and for a certain duration. A time of up
to 10 hours after the current time of day can be set.
Prepare the food for cooking and put it in the oven.
1. Select the desired cooking function and the
temperature using the control knobs.
2. Press “MODE” until
you see “dur” and
symbol on the
screen. The symbol
“A” will flash.
3. Select the desired
cooking time period
using the “+” and “-”
keys.
4. The current time
will reappear on the
screen, the symbols
“A”, and will
remain illuminated.
5. Press “MODE” until
you see “end” and
symbol on the
screen. The time and
the symbols “A” and
will flash.
4. The current time
will reappear on the
screen, the symbols
“A”, and will
remain illuminated.
When the timer reaches zero, the oven will switch off
and an audible warning will sound. The symbol “A” and
will flash. Turn both control knobs to the “0” position
and press any key on the timer to stop the sound. The
symbol will disappear and the timer will switch back to
6. Select the desired
finishing time using
the “+” and “-” keys.
7. Add the cooking
period to the current
time of day. You
can set a time of up
to 23 hours and 59
minutes after this.
17
Page 18
Functions
Simple everyday use
Functions
If you require any technical guidance or find that your product is not operating as intended, a simple solution can often be found in the Troubleshooting section of these instructions,
The operating time will be
calculated and the oven will automatically start so that
cooking will finish at the set finishing time. When the
timer reaches zero, the oven will switch off, an audible
warning will sound and the symbols “A” and will flash.
Turn both control knobs to the “0” position and press
any key to stop the sound. The symbol will disappear
and the timer will switch back to manual function.
Sound Adjustment
To adjust the volume of the audible warning sound,
while the current time of day is displayed, press and
hold the “-” button for 1-2 seconds until an audible
signal sounds. After this, each time the “-” button is
pressed, a different signal will sound. There are three
different types of signal sounds. Select the desired
sound and do not press any other buttons. After a short
time, the selected sound will be saved.
8. The current time will
reappear on the screen,
and the symbols “A”,
and will remain
illuminated.
18
Page 19

Functions
Simple everyday use
Functions
or online at www.newworldassist.co.uk If you still require further assistance, call one of our experts on 0333 3052263.
19
Page 20
Using your cooker
Getting the most from your appliance
Using your cooker
If you require any technical guidance or find that your product is not operating as intended, a simple solution can often be found in the Troubleshooting section of these instructions, or online at www.newworldassist.co.uk If you still require further assistance, call one of our experts on 0333 3052263.
Accessories
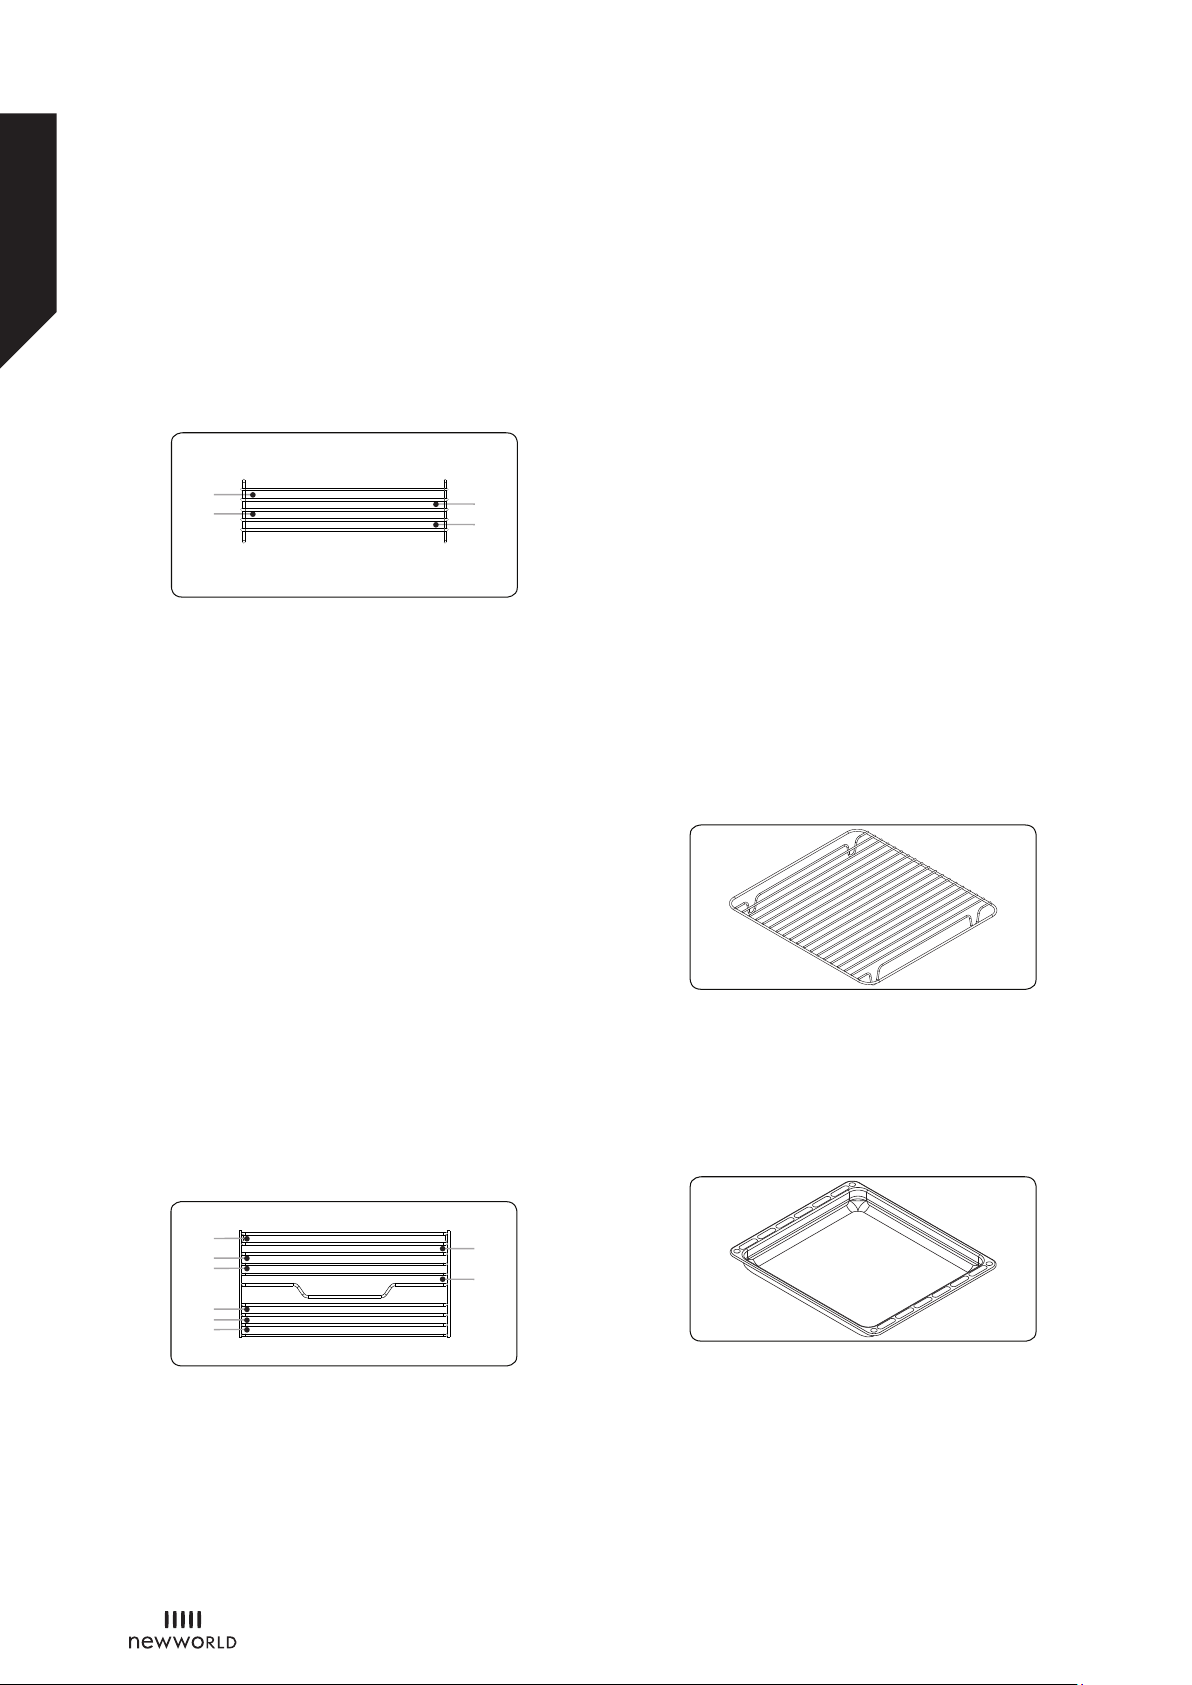
The EasyFix Wire Rack
Clean the accessories thoroughly with warm water,
detergent and a soft clean cloth on first use.
4
2
• Insert the accessory to the correct position inside the
oven.
• Take care removing cookware and/or accessories
out of the oven. Hot meals or accessories can
cause burns.
• The accessories may deform with heat. Once they
have cooled down, they will recover their original
appearance and performance.
• Trays and wire grids can be positioned on any level
from 1 to 4.
3
1
from 1 to 7.
• Telescopic rails can be positioned on level T1, 1, 2,
4, 5, 6, 7.
• Level 2 is recommended for single level cooking.
• Level 1 is recommended for single level cooking
with the telescopic rails.
• Level 2 and Level 4 are recommended for double
level cooking.
• Level 1 and Level T1 are recommended for double
level cooking with the telescopic rails.
****Accessories may vary depending on the model
purchased.
The Wire Grid for Deep Trays
Make sure the wire grid is correctly placed within a
deep tray. It is recommended to use this accessory for
grilling steaks, meatballs and similar food.
• Telescopic rails can be positioned on levels 1, 2, 3
and 4.
• Level 2,3 and 4 is recommended for single level
cooking with the telescopic rails.
****Accessories may vary depending on the model
purchased.
**** Level is 4 recommended for grill cooking.
The EasyFix Wire Rack
Clean the accessories thoroughly with warm water,
detergent and a soft clean cloth on first use.
7
5
4
3
2
1
6
T1
• Insert the accessory to the correct position inside
the oven.
• Allow at least a 1 cm space between the fan cover
and accessories.
The Deep Tray
The deep tray is best used for cooking stews.
Put the tray into any rack and push it to the end to
make sure it is placed correctly.
The Wire Grid
The wire grid is best used for grilling or for processing
food in oven-friendly containers.
• Trays and wire grids can be positioned on any level
20
Page 21
Using your cooker
Getting the most from your appliance
Using your cooker
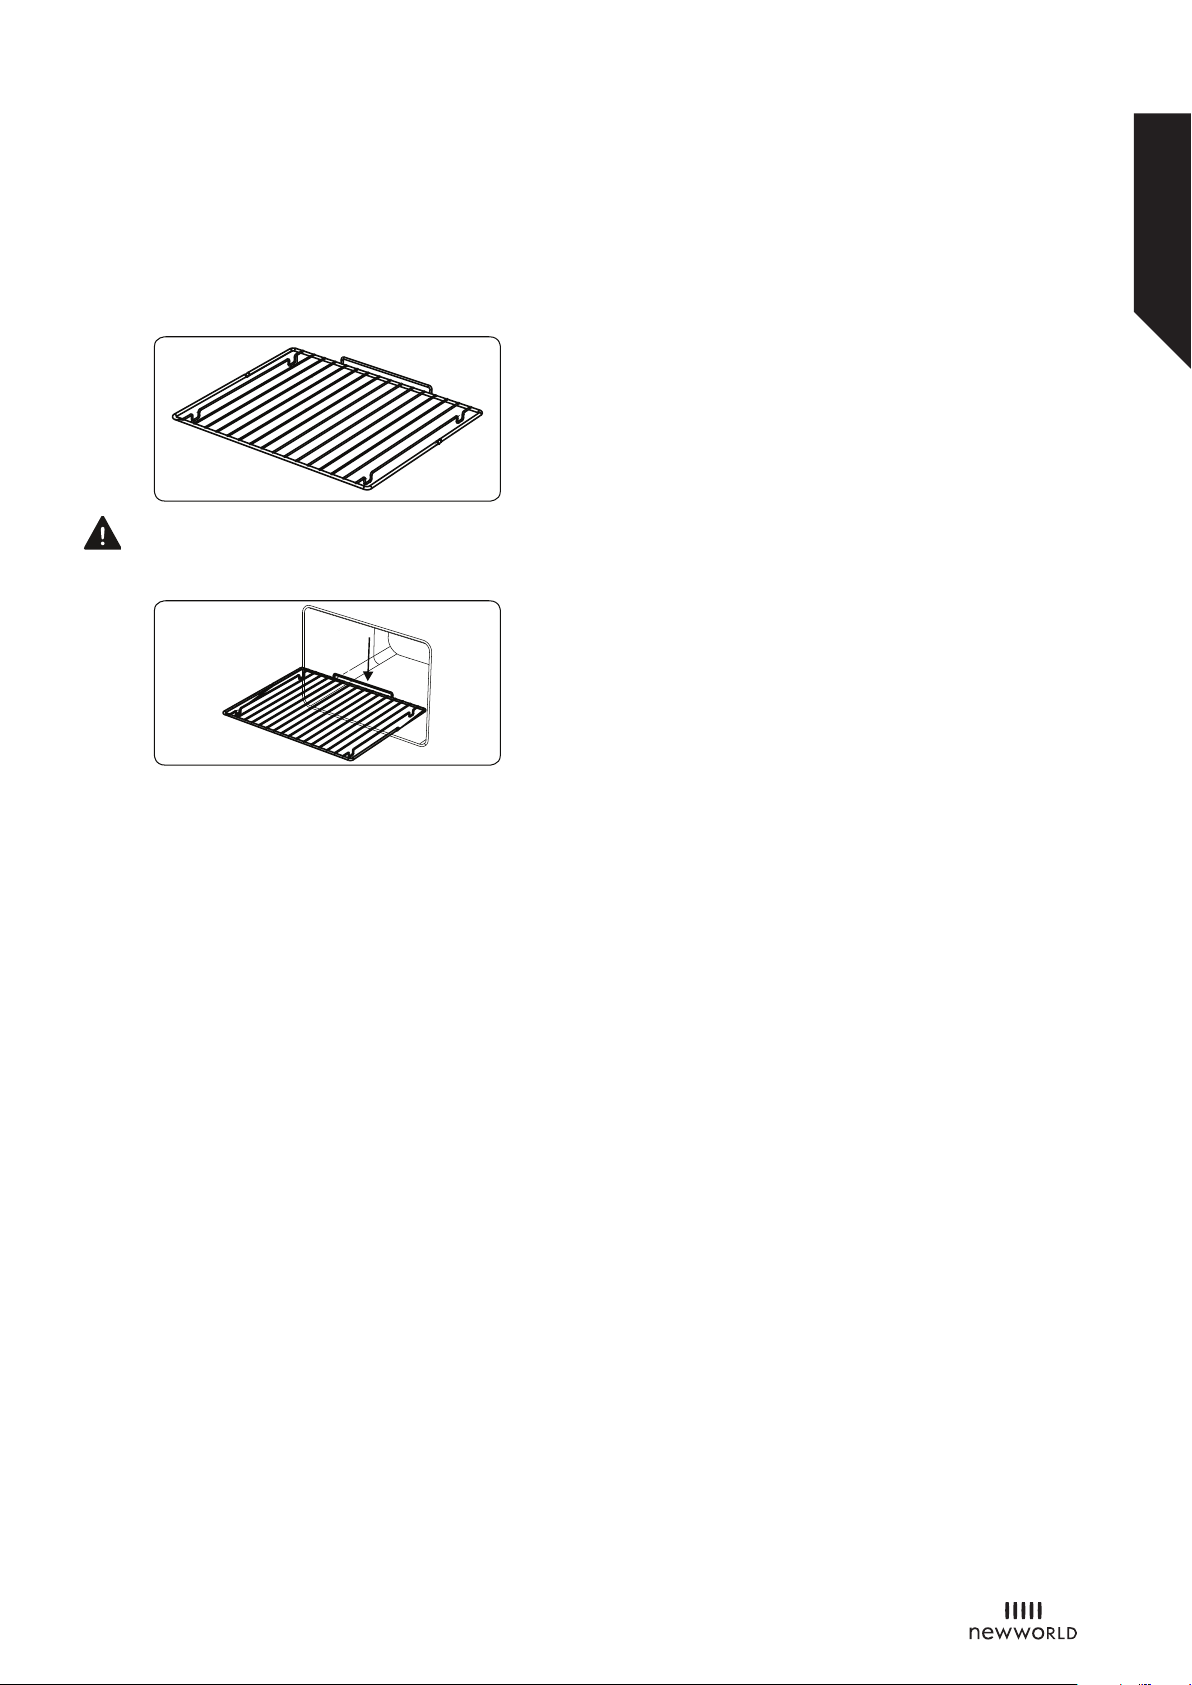
WARNING
Place the grid to any corresponding rack in the
oven cavity correctly and push it to the end.
21
Page 22
Using your cooker
Getting the most from your appliance
Using your cooker
If you require any technical guidance or find that your product is not operating as intended, a simple solution can often be found in the Troubleshooting section of these instructions, or online at www.newworldassist.co.uk If you still require further assistance, call one of our experts on 0333 3052263.
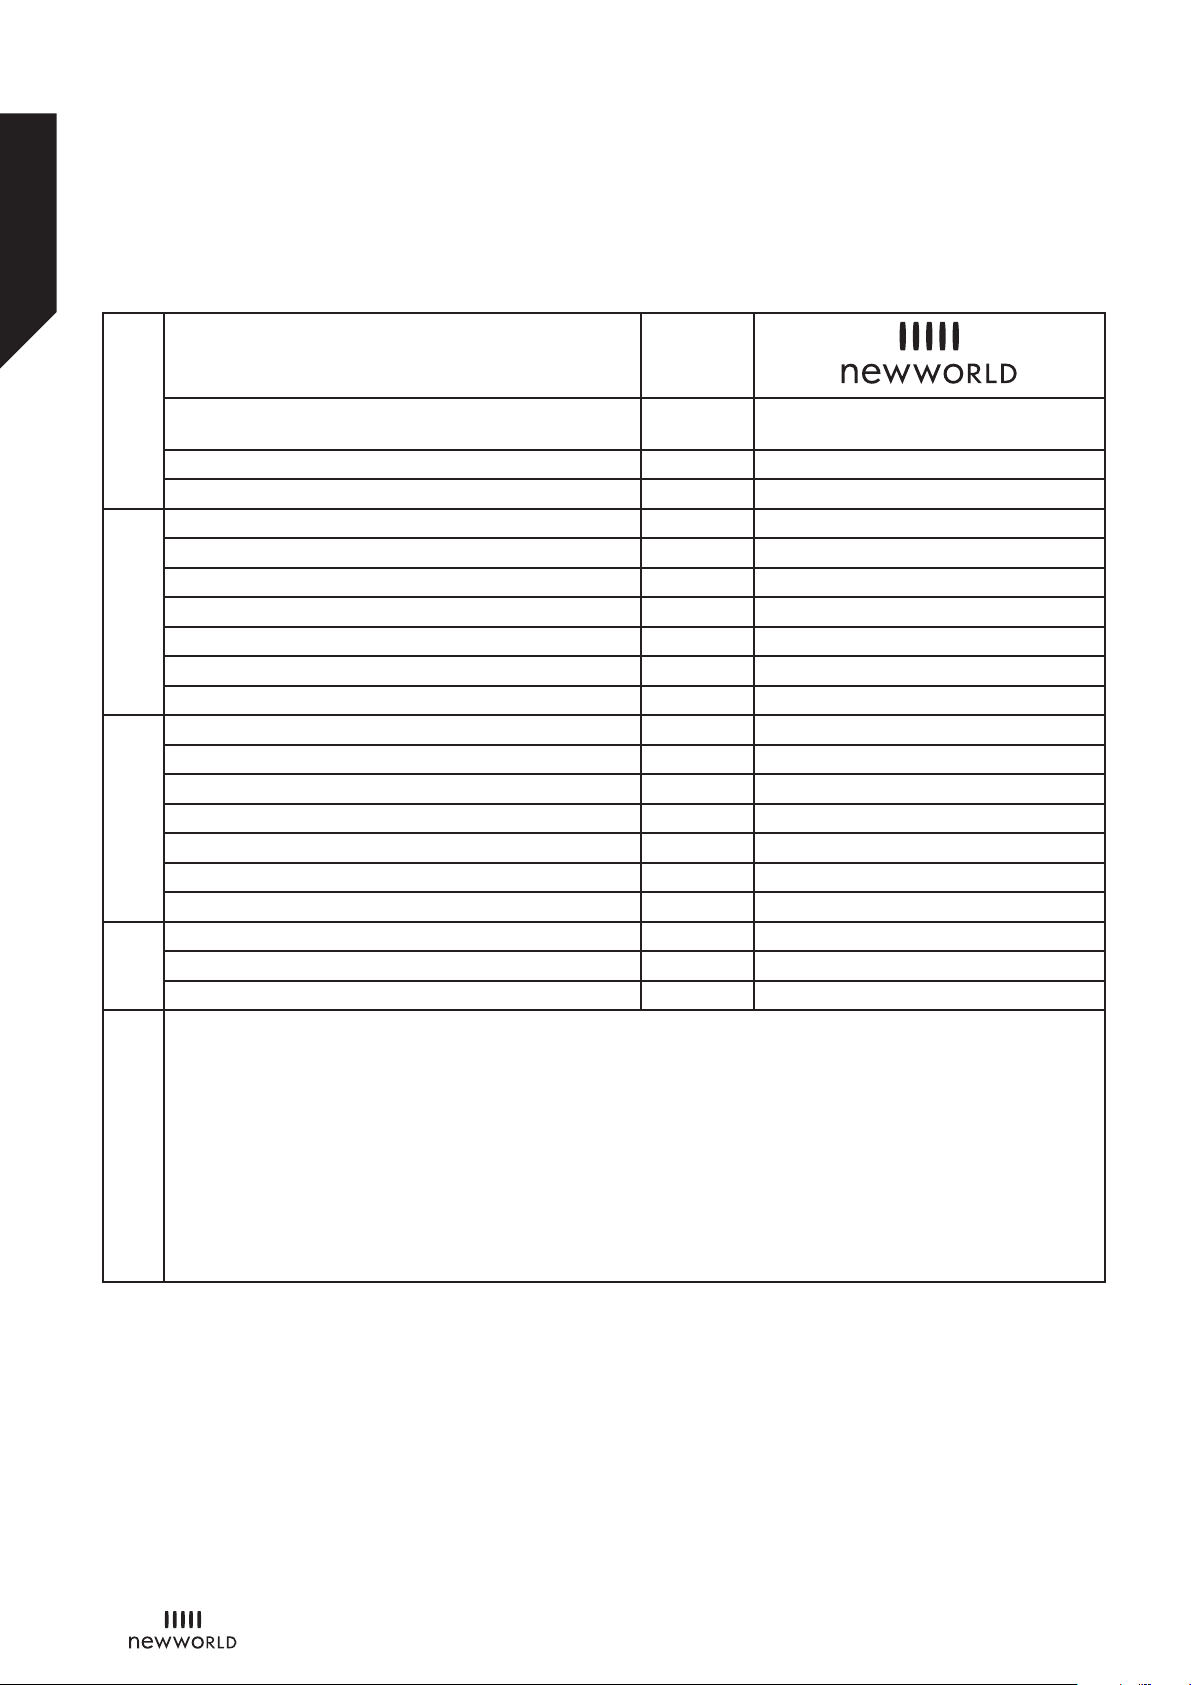
Brand
Model NWCMBUOI
Type of Oven ELECTRIC
Mass kg 36,0
Energy Efficiency Index - conventional 93,9
Energy Efficiency Index - fan forced Energy Class A
Energy consumption (electricity) - conventional kWh/cycle 0,67
Energy consumption (electricity) - fan forced kWh/cycle -
Upper Cavity
Heat Source ELECTRIC
Volume l 39
Energy Efficiency Index - conventional 93,4
Energy Efficiency Index - fan forced 93,4
Energy Class A
Energy consumption (electricity) - conventional kWh/cycle 0,71
Energy consumption (electricity) - fan forced kWh/cycle 0,71
Lower Cavity
Heat Source ELECTRIC
Volume l 50
Number of cavities 2
This oven complies with EN 60350-1
NWCMBUOB
Energy Saving Tips
Oven
- Cook the meals together, if possible.
- Keep the pre-heating time short.
- Do not elongate cooking time.
- Do not forget to turn-off the oven at the end of cooking.
- Do not open oven door during cooking period.
22
Page 23

Using your cooker
Getting the most from your appliance
Using your cooker
23
Page 24

Using your cooker
Getting the most from your appliance
Using your cooker
If you require any technical guidance or find that your product is not operating as intended, a simple solution can often be found in the Troubleshooting section of these instructions, or online at www.newworldassist.co.uk If you still require further assistance, call one of our experts on 0333 3052263.
24
Page 25

Using your cooker
5
Page 26
Care and maintenance
Looking after your appliance
Care and maintenance
If you require any technical guidance or find that your product is not operating as intended, a simple solution can often be found in the Troubleshooting section of these instructions,
Cleaning
Cleaning
WARNING: Switch off the appliance and allow
it to cool before cleaning is to be carried out.
General Instructions
• Check whether the cleaning materials are
appropriate and recommended by the
manufacturer before use on your appliance.
• Use cream cleaners or liquid cleaners which do
not contain particles. Do not use caustic (corrosive)
creams, abrasive cleaning powders, rough wire
wool or hard tools as they may damage the cooker
surfaces.
Do not use cleaners that contain particles as they
may scratch the glass, enamelled and/or painted
parts of your appliance.
• Should any liquids overflow, clean them
immediately to avoid parts becoming damaged.
Do not use steam cleaners for cleaning any part of
the appliance.
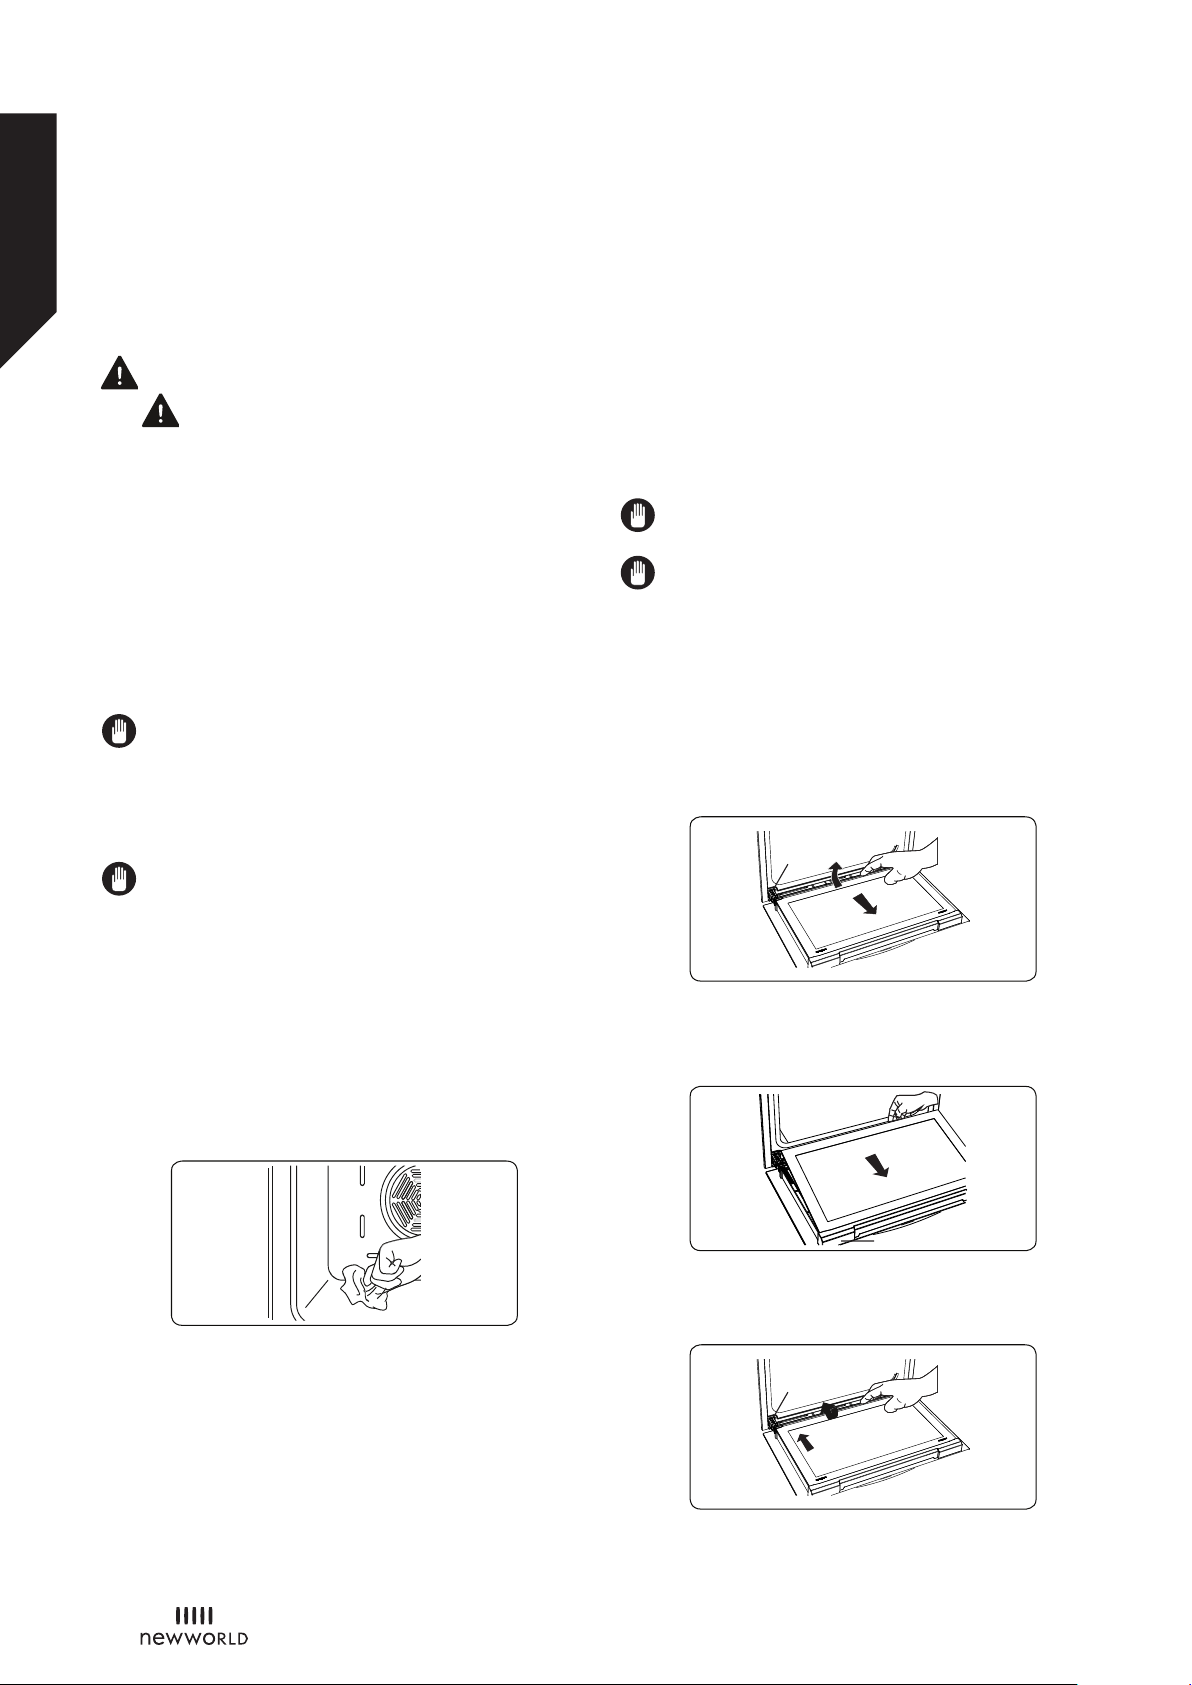
Cleaning the Inside of the Oven
• The inside of enamelled ovens are best cleaned
while the oven is warm.
• Wipe the oven with a soft cloth soaked in soapy
water after each use. Then, wipe the oven over
again with a wet cloth and dry it.
Cleaning the Stainless Steel Parts (if available)
• Clean the stainless steel parts of your appliance on
a regular basis.
• Wipe the stainless steel parts with a soft cloth
soaked in only water. Then, dry them thoroughly
with a dry cloth.
Do not clean the stainless steel parts while they
are still hot from cooking.
Do not leave vinegar, coffee, milk, salt, water,
lemon or tomato juice on the stainless steel for a
long time.
Removal of the Inner Glass
You must remove the oven door glass before cleaning,
as shown below.
1. Push the glass in the direction of B and release
from the location bracket (x). Pull the glass out in the
direction of A.
A
x
B
To replace the inner glass:
1. Push the glass towards and under the location
bracket (y), in the direction of B.
• You may need to use a liquid cleaning material
occasionally to completely clean the oven.
Cleaning the Glass Parts
• Clean the glass parts of your appliance on a regular
basis.
• Use a glass cleaner to clean the inside and outside
of the glass parts. Then, rinse and dry them
thoroughly with a dry cloth.
26
B
y
3. Place the glass under the location bracket (x) in the
direction of C.
x
C
Page 27
Care and maintenance
Looking after your appliance
Care and maintenance
or online at www.newworldassist.co.uk If you still require further assistance, call one of our experts on 0333 3052263.
If the oven door is a triple glass oven door, the
third glass layer can be removed the same way as
the second glass layer.
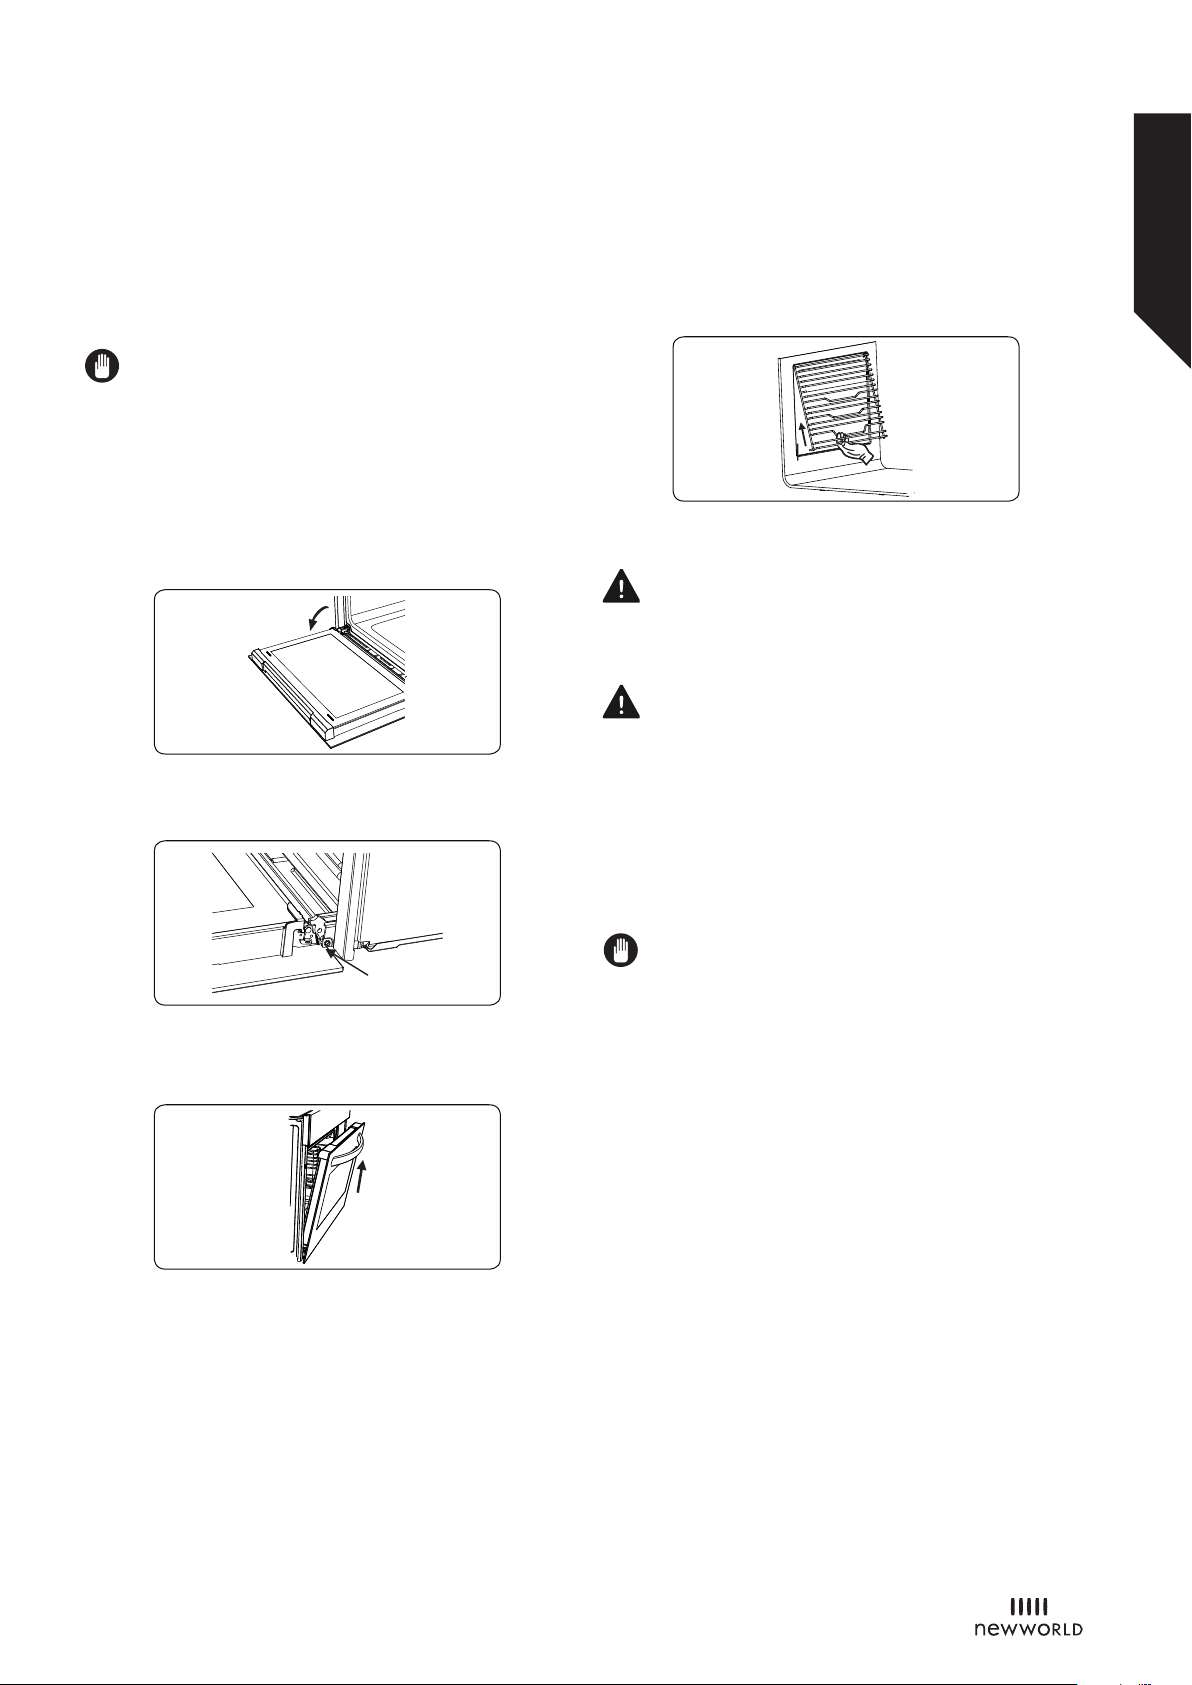
Removal of the Oven Door
Before cleaning the oven door glass, you must remove
the oven door, as shown
below.
1. Open the oven door.
a
Maintenance
WARNING: The maintenance of this appliance
should be carried out by an authorised service
person or qualified technician only.
Changing the Oven Lamp
WARNING: Switch off the appliance and allow it to
cool before cleaning your appliance.
• Remove the glass lens, then remove the bulb.
2. Open the locking catch (a) (with the aid of a
screwdriver) up to the end position.
a
3. Close the door until it is almost in the fully closed
position, and remove the door by pulling it towards
you.
Removal of the Wire Shelf
To remove the wire rack, pull the wire rack as shown in
the figure. After releasing it from the clips (a), lift it up.
• Insert the new bulb (resistant to 300 °C) to replace
the bulb that you removed (230 V, 15-25 Watt, Type
E14).
• Replace the glass lens, and your oven is ready for
use.
The lamp is designed specifically for use in
household cooking appliances. It is not suitable
for household room
27
Page 28

Care and maintenance
Looking after your appliance
Care and maintenance
If you require any technical guidance or find that your product is not operating as intended, a simple solution can often be found in the Troubleshooting section of these instructions,
28
Page 29

Product support
7
Page 30
Product support
Help is always at hand
Product support
If you require any technical guidance or find that your product is not operating as intended, a simple solution can often be found in the Troubleshooting section of these instructions,
Troubleshooting
Troubleshooting
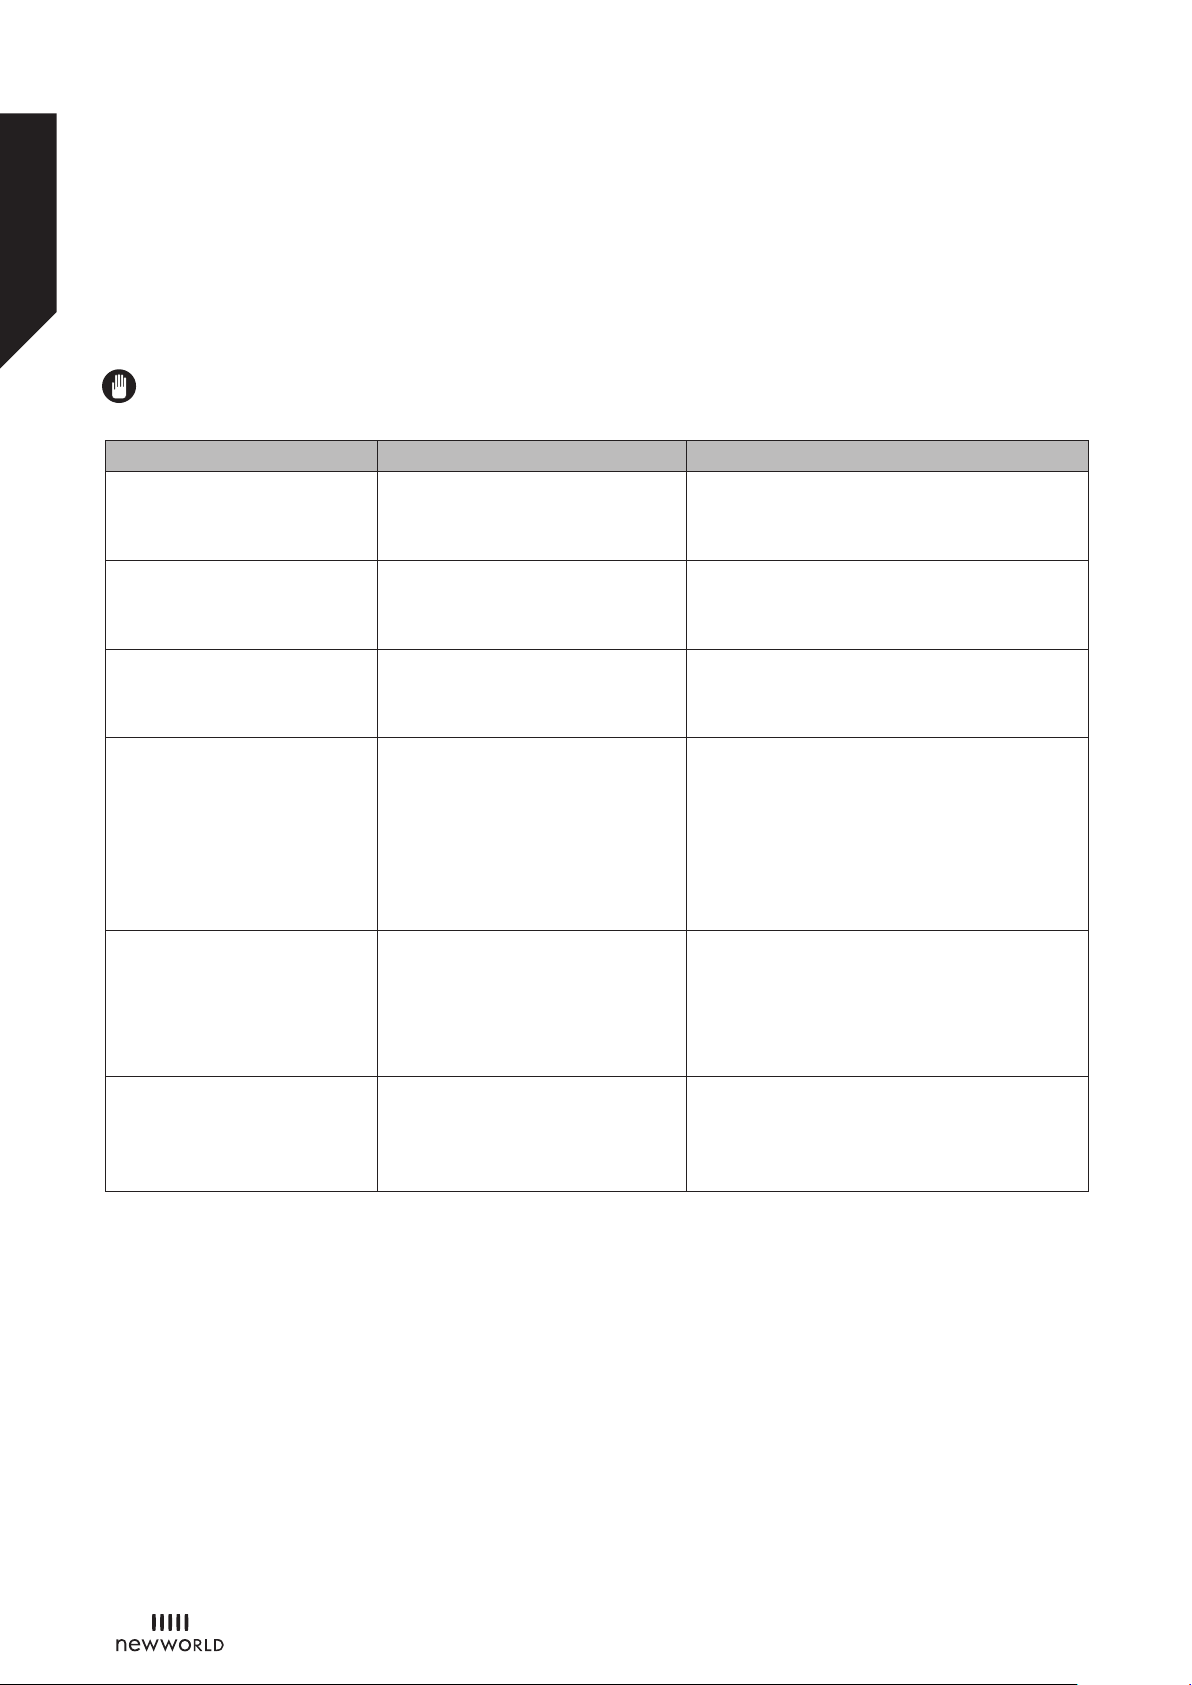
If you still have a problem with your appliance after checking these basic troubleshooting steps, please
contact an authorised service person or qualified technician.
Problem Possible Cause Solution
Oven does not switch on. Power is switched off.
No heat or oven does not
warm up.
Oven light (if available) does
not operate.
Cooking is uneven within the
oven.
The timer buttons cannot be
pressed properly.
The oven fan (if available) is
noisy.
Oven temperature control is
incorrectly set.
Oven door has been left open.
Lamp has failed.
Electrical supply is disconnected
or switched off.
Oven shelves are incorrectly
positioned.
There is foreign matter caught
between the timer buttons.
Touch model: there is moisture
on the control panel.
The key lock function is set.
Oven shelves are vibrating.
Check whether there is power supplied.
Also check that other kitchen appliances are
working.
Check that the oven temperature control
knob is set correctly.
Replace lamp according to the instructions.
Make sure the electrical supply is switched
on at the wall socket outlet.
Check that the recommended temperatures
and shelf positions are being used.
Do not frequently open the door unless you
are cooking things that need to be turned.
If you open the door often, the interior
temperature will be lower and this may
affect the results of your cooking.
Remove the foreign matter and try again.
Remove the moisture and try again.
Check whether the key lock function is set.
Check that the oven is level.
Check that the shelves and any bake ware
are not vibrating or in contact with the oven
back panel.
Transport
If you need to transport the product, use the original product packaging and carry it using its original case. Follow
the transport signs on the packaging. Tape all independent parts to the product to prevent damaging the product
during transport.
If you do not have the original packaging, prepare a carriage box so that the appliance, especially the external
surfaces of the product, is protected against external threats.
30
Page 31
Product support
or online at www.newworldassist.co.uk If you still require further assistance, call one of our experts on 0333 3052263.
Help and assistance
If you require any technical guidance or find that your Gas oven is not operating as intended, a simple solution can
often be found in the Troubleshooting section of these instructions or online at
www.newworldassist.co.uk
If you still require further assistance, call one of our experts on 0333 3052263. To help give us give you a fast and
efficient service please have the following information ready:
Model Ref.
You can find these on
the rating plate - a small
information panel (usually
a sticker or metal plate) on
Serial number
Date of purchase
Local call rates applies*
Lines open 9am-5pm M
*Calls to Newworld enquiry lines may attract a charge and set up fee from residential lines depending on your call plan/tariff. Mobile and
other providers costs may vary, see www.bt.com/pricing for details.
For Security and training purposes, telephone calls to and from customer service centres maybe recorded and monitored. Calls from
Republic of Ireland will attract international call charges.
onday to Friday.
the rear of your appliance
This will be shown on
your receipt
31
Page 32

Product support
Help is always at hand
Product support
If you require any technical guidance or find that your product is not operating as intended, a simple solution can often be found in the Troubleshooting section of these instructions,
Declaration of conformance to
product standards
We declare that our products meet the applicable
European Directives, Decisions and Regulations and
the requirements listed in the standards referenced.
We apologise for any inconvenience caused by any
minor inconsistencies in these instructions , which
may occur as a result of product improvemenst and
development.
Disposal
• The symbol on the product or on its
packaging indicates that this product may
not be treated as household waste. Instead
it shall be handed over to the applicable
collection point for the recycling of
electrical and electronic equipment.
• By ensuring this product is disposed of correctly,
you will help prevent potential negative
consequences for the environment and human
health, which could otherwise be caused by
inappropriate waste handling of this product.
• For more detailed information about recycling of
this product, please contact your local city office,
your household waste disposal service or the shop
where you purchased the product.
32
Page 33

Product support
or online at www.newworldassist.co.uk If you still require further assistance, call one of our experts on 0333 3052263.
Product support
Help is always at hand
C
all us now and activate your 24 month guarantee
Thank you for choosing Newworld. Your new product is guaranteed against faults and
breakdowns for 24 months. Don’t forget to register it with us today so we can provide
you with our best possible after-sales service and useful updates.
www.newworldassist.co.uk
0333 3052263
Your NewWorld Guarantee
This product is guaranteed for twelve months from the date of original purchase. Any defect that arises due to
faulty materials or workmanship will be repaired free of charge (or if applicable the product will be replaced or the
purchase price refunded) where possible during this period by the dealer from who your purchased the unit.
The guarantee is subject to the following provisions:
• The guarantee does not cover accidental damage,
misuse, cabinet parts, knobs or consumable items.
• The product must be correctly installed and
operated in accordance with the instructions
contained in the manual.
• It must be used solely for domestic purposes. The
guarantee will be rendered invalid if the product is
re-sold or has been damaged by inexpert repair.
• Specifications are subject to change without notice.
• Newworld disclaim any liability for loss or damage
arising from the breakdown of the product.
• This guarantee is in addition to and does not
diminish your statutory or legal rights.
Important Data Protection Information
To find out how we use your data please refer to the guarantee registration material or visit www.newworldassist.
co.uk.
33
Page 34

Contact:
www.newworldassist.co.uk
Helpline: 0333 3052263
52310593
 Loading...