

Page 1
MULTIFUNCTION OVEN
MODEL:NWCMBOB
WARNING: Read the instructions before using the appliance.
Page 2
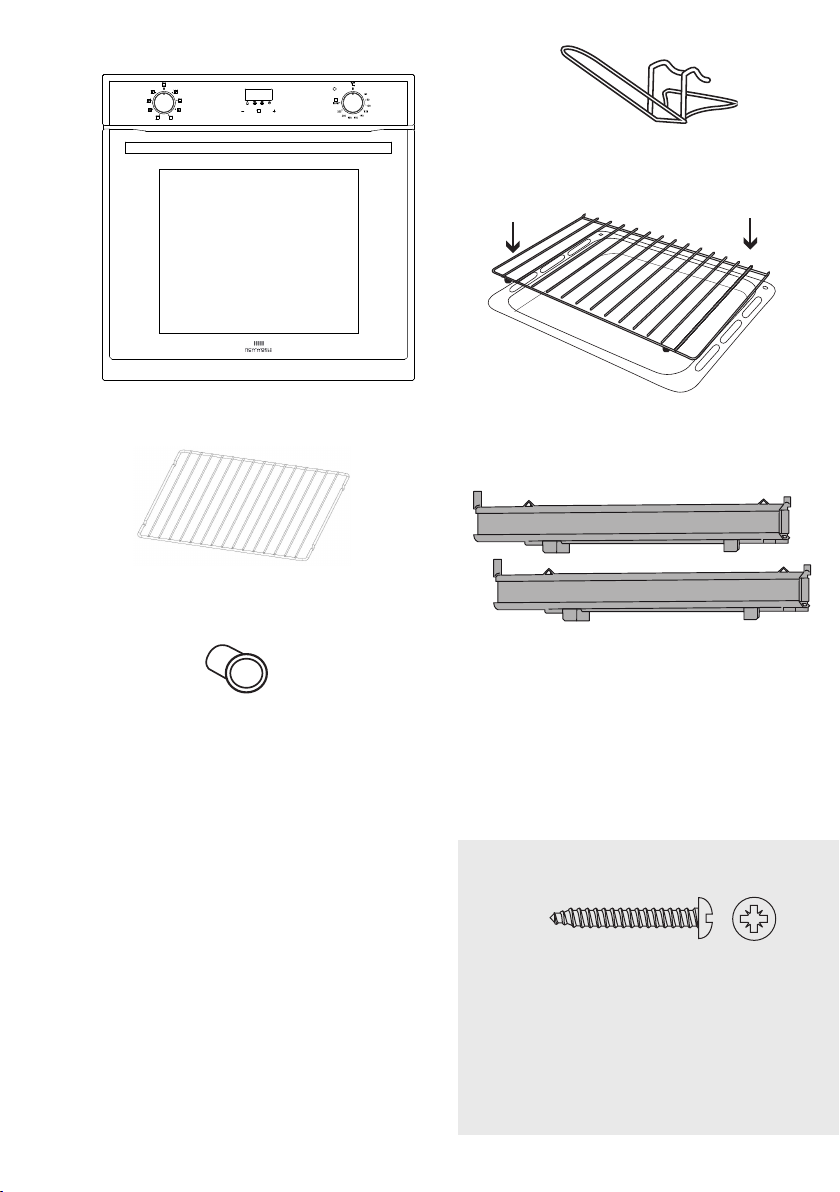
[02] x 1
[01] x 1
[04] x 1
[06] x 2
Supplied parts description
[01] Oven
[02] Handle for tray
[03] Grill pan set
[04] Oven Shelf
[05] Telescopic runner
[06] Oven mounting gasket
[07] Oven mounting screw
[03] x 1
[05] x 1 (Set) installed
1 : 1
[07] x 2
(Ø4mm x 25mm)
Page 3

Let's
get started...
These instructions are for your safety. Please read through them
thoroughly before use and retain them for future reference.
Getting started…
Your product
Before you start
Safety
In more detail…
Operation
Care and maintenance
Troubleshooting
Recycling and disposal
Technical and legal information
04
05
06
12
22
27
28
28
Appendix...
Installation
Guarantee
29
35
3
Page 4
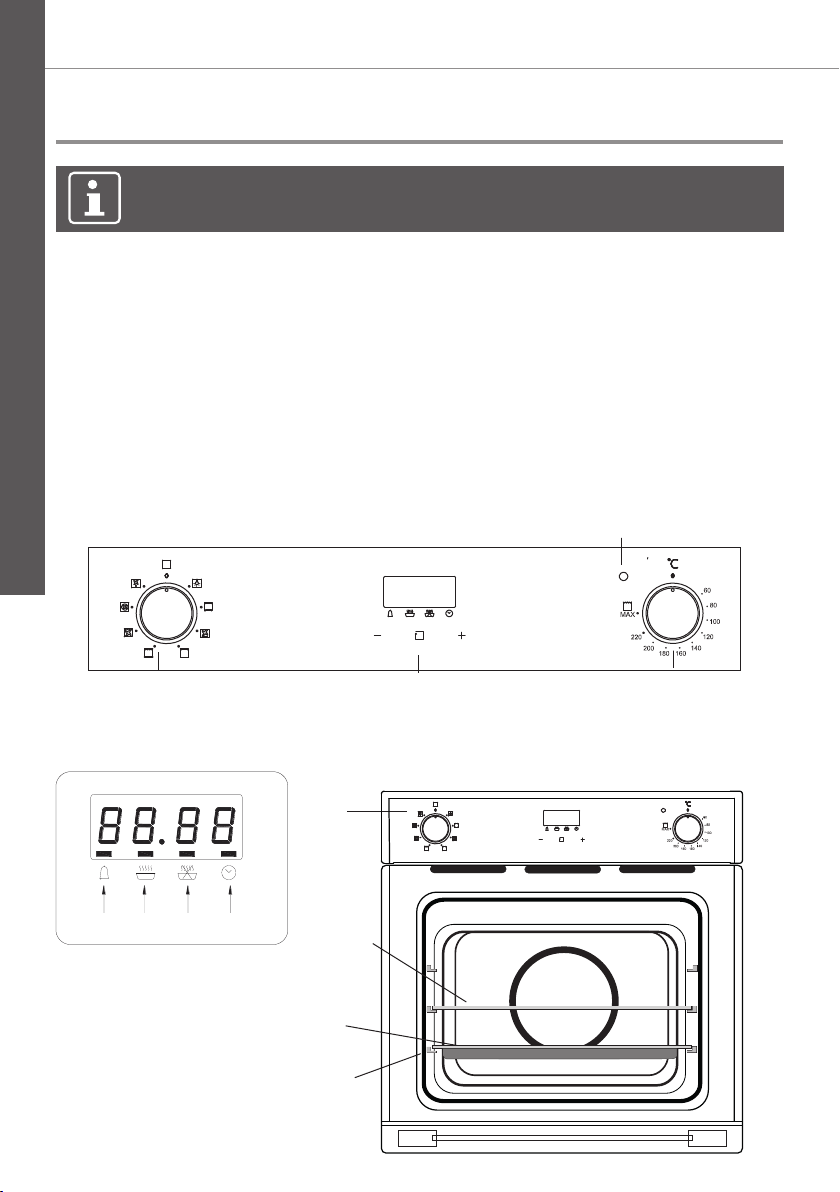
Getting started...
Your product
Your product
Note!
This diagram may be slightly different from the layout of the appliance.
A. Control panel
B. Cooking mode selection knob
C. Cooking temperature selection knob
D. Electronic programmer - allows you to programme the desired cooking by
selecting the cooking time and the end cooking time. It can also be used as
a timer
E. Oven indication light
F. Tray
G. Oven shelf
H. Guides for sliding the shelf or tray in and out
E
B
D Electronic programmer
1 2 3
1. Timer
2. Cooking time
setting
3. End cooking time
setting
4. Clock
4
D
A
4
G
F
H
C
Page 5
Getting started...
Things to check before you start
To avoid the risks that are always present when you use an electrical
appliance it is important that this appliance is installed correctly and that
you read the safety instructions carefully to avoid misuse and hazards.
Please keep this instruction booklet for future reference and pass it on to
any future owners. After unpacking the appliance please check that it is
not damaged. If in doubt, do not use the appliance but contact Customer
Services on 0333 305 2263.
Check the package and make sure you have all of the parts listed.
Decide on the appropriate location for your product.
If this product contains glass please take care when tting or handling to
prevent personal injury or damage to the product.
The specications plate is available on this appliance. This plate displays
all the necessary identication information for ordering replacement parts.
If you sell the appliance, give it away, or leave it behind when you move
house, make sure you also pass on this manual so that the new owner
can become familiar with the appliance and its safety warnings.
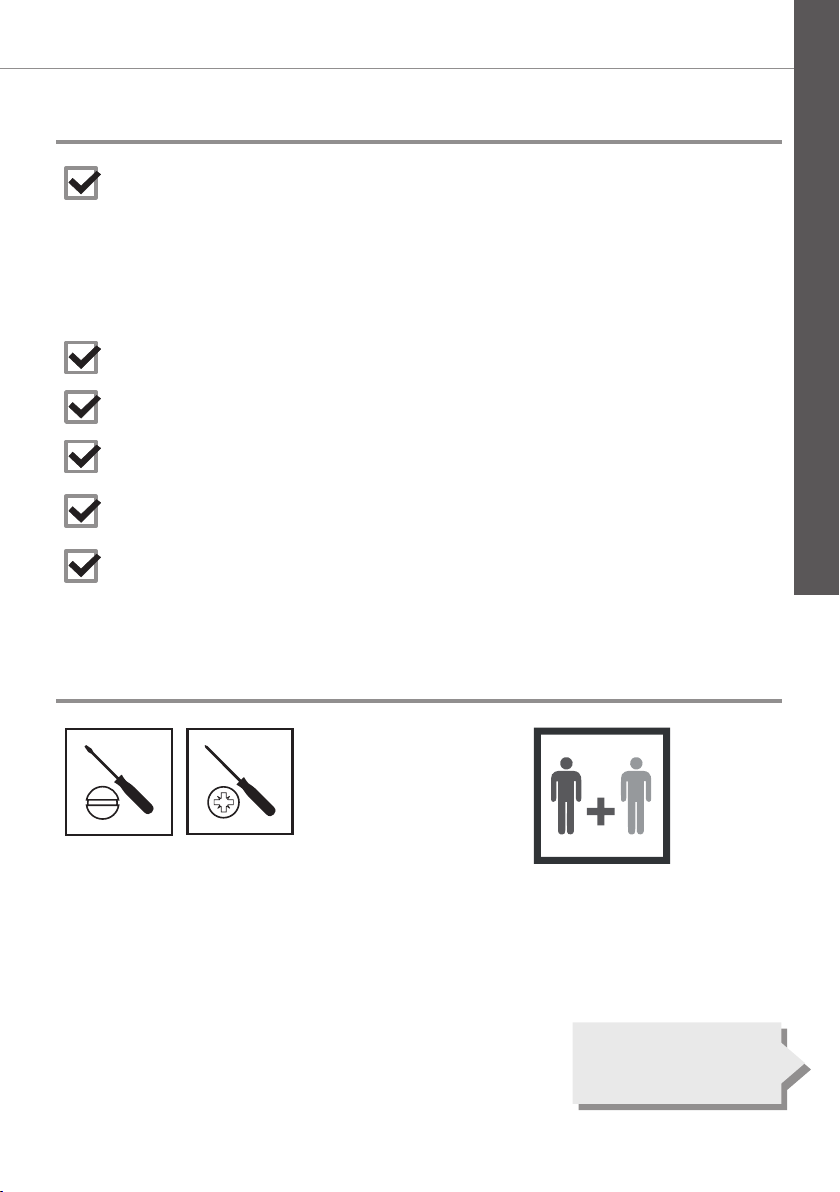
Before you start
You will need
We advise when installing
this appliance two people are
recommended.
Installation guide
located at the end of
the guidebook
5
Page 6

Getting started...
Safety
INSTALLATION WARNINGS
IMPORTANT: Prior to Installation ensure that
the local supply conditions (electricity voltage
and frequency) are compatible with the requirements of your built-in oven.
IMPORTANT: Carefully unpack and examine
the appliance for any damage. If you think
there is a defect, do not use the appliance and
contact Product Support on 0333 305 2263.
Packaging materials should be collected
together and disposed of immediately as they
may be harmful to children.
IMPORTANT: Keep the electrical cable (not
supplied) of your built-in oven away from the
hot areas of your appliance, do not let the
cable touch the appliance. Keep the cable
away from sharp edges and heated surfaces.
IMPORTANT: Ensure that the electric supply
cable is not trapped or damaged during installation.
IMPORTANT: In the event that the cable connecting your built-in oven becomes damaged, it
must be replaced by a suitably qualified
person. This cable must not be replaced by an
unauthorised person.
6
Page 7
Getting started...
Safety
IMPORTANT : Protect your built-in oven
against atmospheric effects. Do not expose
your oven to effects such as sun, rain, snow
etc.
IMPORTANT: The materials surrounding the
appliance (cabinets) must be able to withstand
a minimum temperature of 100°C.
IMPORTANT: When using your oven for the
first time it may give off an un-usual odour from
the heating elements and insulation materials.
This is normal for cooking appliances. To
eliminate this odour run the oven at 250
degrees for 40-60 mins with the oven empty.
WARNING: Before obtaining access to terminals, all supply circuits must be disconnected.
DURING USAGE
IMPORTANT: This appliance can be used by
children aged from 8 years and above and persons with reduced physical, sensory or mental
capabilities or lack of experience and knowledge if they have been given supervision or
instruction concerning use of the
7
Page 8

Getting started...
Safety
appliance in a safe way and understand the
hazards involved. Children shall not play with
the appliance. Cleaning and user maintenance
shall not be made by children without supervision.
WARNING: The appliance and its accessible
parts become hot during use. Care should be
taken to avoid touching heating elements. Children less than 8 years of age shall be kept
away unless continuously supervised.
WARNING: NEVER try to extinguish a cooking
fire with water. Instead switch off the appliance
and cover flame e.g. with a lid or a fire blanket.
CAUTION: Do not allow children in the kitchen
when cooking or after, as the parts may still be
hot. Many parts of the oven will become hot
and present a considerable hazard to children.
CAUTION: When the oven is hot never touch
the oven glass by hand or with tools.
CAUTION: Before starting to use your appliance, ensure curtains, paper or flammable
items are kept away from your appliance. Do
not keep flammable materials inside of or
around your oven.
CAUTION: Take care when closing the oven
door that there is nothing obstructing it from
closing as this may break the glass door.
8
Page 9

Getting started...
Safety
IMPORTANT: When using the grill the oven
door must be kept closed.
IMPORTANT: Make sure the oven control
knobs are all in the off position when not in
use.
IMPORTANT: If you do not intend to use your
built-in oven for a long period of time turn off
the electric supply to the oven.
GENERAL SAFETY WARNINGS
IMPORTANT: This appliance has been designed for non-professional, domestic use only.
Do not use this ovenfor commercial use or any
other application e.g. room heating.
WARNING: Danger of fire: do not store
flammable items on or near the cooking
surfaces or inside the oven.
IMPORTANT: Do not try to lift or move this
appliance by pulling on the door handle.
WARNING: Ensure that the appliance is
switched off before replacing the lamp to avoid
the possibility of electric shock.
9
Page 10

Getting started...
Safety
IMPORTANT: Your appliance is produced in
accordance with all applicable local and international standards and regulations.
IMPORTANT: Maintenance and repair work
must only be performed by authorised service
technicians. Installation and repair work that is
carried out by unauthorised technicians is dangerous and could invalidate your guarantee.
IMPORTANT: When the door of the oven is
open, do not hang or lean anything on it. You
may unbalance your appliance or damage the
door or door hinges.
IMPORTANT: Do not hang towels, dishcloths
10
or clothes from the built-in oven or its handles.
CLEANING AND MAINTENANCE
IMPORTANT: Always turn the appliance off
before operations such as cleaning or maintenance. You can do this by switching the built-in
oven off using cooker isolation switch.
IMPORTANT: Do not remove the control knobs
to clean the control panel.
Page 11

Getting started...
Safety
WARNING: Do not use harsh abrasive cleaners or sharp metal scrapers to clean the oven
door glass since they can scratch the surface,
which may result in shattering of the glass.
TO MAINTAIN THE EFFICIENCY AND
SAFETY OF YOUR APPLIANCE, WE RECOMMEND YOU ALWAYS USE OUR AUTHORISED SERVICE AGENTS AND ORIGINAL
SPARE PARTS.
FOR ASSISTANCE CALL NEW WORLD
PRODUCT SUPPORT ON 0333 305 2263.
11
Page 12

In more detail...
Operation
Introduction
Note:
This multifunction oven combines the advantages of traditional
convection ovens with those of the more modern fan assisted models
in a single appliance.
It is an extremely versatile appliance that allows you to choose easily
and safely between different cooking modes. The various features
offered by the oven are selected by means of selector knob "B" and
thermostat "C" situated on the control panel.
Note:
Before using the oven for the first time we recommend that the oven
is switched on and set to it's highest temperature. Keep the oven
door closed and leave the appliance on for 30 minutes with nothing
in it. Ensure adequate ventilation during this process by opening any
doors and windows in the room. Any odours created during this
operation is due to the evaporation of substances used to protect
the appliance during storage prior to installation.
12
Note:
Place the grill pan provided on the bottom shelf of the oven when
cooking fatty foods to prevent grease droplets forming on the base of
the oven. For all types of cooking never place anything on the bottom
of the oven when it is in operation because this could damage the
enamel. Place your cookware (dishes, aluminium foil, etc. etc.) on the
shelves provided.
Page 13

In more detail...
Operation
Product functions
> The oven is controlled by a thermostat between 60ºC and 250ºC, depending
on the temperature required. The thermostat pilot light turns on and off to
indicate the temperature control during use.
> The required cooking mode is selected using the multifunctional control
button. The functions that may be selected are:
Turning control knob to this setting, the oven light
Oven Light
Conventional heat
will illuminate in the oven cavity, and will operate
on all selected functions.
This function uses the upper and lower heating
elements. Natural convection creates a perfect
cooking zone in the centre of the oven, ideal for
dark fruit cakes and pastries.
Lower element
with Fan
Top Heat
Grill
Fan Assisted
Grill
Fan Oven
Defrost
> Read the information of the food packaging for the cooking temperatures and
times. Once familiar with the performance of the appliance, the temperatures
and times may be varied to adapt them to your personal tastes.
> Check that frozen food is completely thawed before cooking, unless indicated
otherwise.
Gentle form of heating using base heat and fan.
Suitable for pastries, cakes and open tarts, for
examples quiches.
Top heating is used to brown the food at the
end of cooking.
This function uses the Grill and top element and
disperses a rapid heat for browning and grilling.
This function uses the fan to circulate the heat
from the grill element around the food.
The circular rear element and fan come on together
and the heat is dispersed evenly through out the
cavity. Temperatures are achieved quicker,
reducing or even removing the need to preheat.
Using the fan, this oven function circulates the air
around the oven cavity, speeding up the natural
defrost process.
13
Page 14

In more detail...
Operation
The information given in the following charts is intended only as a
guide. Select the lowest temperature quoted and check the food at
the end of the shortest duration quoted.
CONVENTIONAL
Cakes/Biscuits Temperature °C Shelf Position
Cake Mixture Desserts in Moulds
Sponge cake 150 – 170 1 60 – 70
Marble, nut cake (tin) 150 – 170 1 60 – 80
Fresh fruit cake (tray) 170 – 190 2 45 – 50
Flan base 170 – 190 1 20 – 25
Biscuits (tray) 170 – 190 2 20 – 20
Sponge cake
(3 to 6 eggs)
Swiss roll 180 – 200 1 12 – 16
Short Pastry Dessert in Moulds
Tart / an base 170 – 190 2 15 – 20
Streusel cake 170 – 190 2 45 – 55
Cheesecake 170 – 190 2 10 – 20
Apple pie 170 – 190 1 90 – 90
Apricot tart with topping 170 – 190 1 55 – 75
Raised Dough Dessert in Moulds
Streusel cake 170 – 190 1 35 – 45
White bread 180 – 200 1 40 – 50
Pizza (tray) 190 – 210 1 35 – 45
Onion tart 180 – 200 1 25 – 35
Apple turnovers 160 – 180 2 25 – 30
Choux pastry, Eclairs 180 – 200 2 25 – 35
Puff Pastry 190 – 210 2 15 – 25
Meringues, Macaroons 120 – 140 2 25 – 50
170 – 190 1 20 – 35
(Recommended)
from the bottom
Cooking Time
in min.
> Pre-heat the oven for 10 mins.
14
Page 15

In more detail...
CONVENTIONAL
Operation
Food Recommended
shelf level
from the bottom
Roast beef, approx. 1 kg 1 190 – 210 100 – 120
Beef llet, approx. 1 kg 1 200 – 220 45 – 55
Venison, approx. 1 kg 1 190 – 210 90 – 120
Pork joint, approx. 1 kg 1 200 – 220 100 – 120
Pork joint, approx. 2 kg 1 180 – 200 120 – 150
Ham joint, approx. 1 kg 1 200 – 220 60 – 70
Meat loaf, approx. 1 kg 1 190 – 210 70 – 80
Veal, approx. 1.5 kg 1 190 – 210 100 – 120
Leg of lamb, approx. 1.5 kg 1 220 – 220 90 – 120
Rack of lamb, approx. 1.5 1 190 – 210 50 – 60
Poultry, 0.8 – 1 kg 1 190 – 210 60 – 70
Poultry, approx. 2 kg 1 190 – 210 90 – 110
Poultry stuffed, approx. 2 1 190 – 210 110 – 130
Poultry, approx. 4 kg 1 180 – 200 150 – 180
Fish, whole, approx. 1.5 kg 1 190 – 210 35 – 55
> Pre-heat the oven for 10 mins.
> Read the information of the food packaging for the cooking temperatures and times. Once
familiar with the performance of the appliance, the temperatures and times may be varied to
adapt them to your personal tastes.
> Check that frozen food is completely thawed before cooking, unless indicated otherwise.
Temperature °C
Time in min.
15
Page 16

In more detail...
Operation
FAN MODE
Cakes / biscuits Temperature
(ºC)
Cake Mixture Desserts in Moulds
Sponge cake 150-170 1 60-70
Marble, nut cake (tin) 150-170 1 60-80
Fresh fruit cake (tray) 150-170 1 35-45
Flan base 150-170 1 25-30
Biscuits (tray) 150-170 1, 3 20-25
Sponge cake (3 to 6 eggs) 160-180 1 25-35
Swiss roll 160-180 1 20-25
Short Pastry Desserts in Moulds
Tart / an base 150-170 1 20-25
Streusel cake 150-170 1 45-55
Cheesecake 150-170 1 70-90
Apple pie 150-170 1 50-70
Apricot tart with topping 150-170 1 55-75
Raised Dough Desserts in Moulds
Streusel cake 150-170 1 35-45
White bread 160-180 1 40-50
Pizza (tray) 170-190 1 35-45
Onion tart 170-190 1 35-45
Apple turnovers 150-170 1, 3 25-30
Choux pastry, Eclairs 160-180 1, 3 30-40
Puff pastry 170-190 1, 3 20-25
Meringues, Macaroons 120-140 1, 3 25-50
Poultry, approx. 4 kg 160-180 1 150-180
Fish, whole, approx. 1.5 kg 160-180 1 35-55
Shelf Position
(Recommended)
from the bottom
Cooking Time
in min.
1) Pre-heat the oven.
2) Unless otherwise stated, the times given are for an oven which has not been pre-heated.
16
Page 17

In more detail...
Operation
Food to be
grilled
Thin cuts
Steak 3 or 4 maximum 10-16 maximum 20-25
Kebabs 3 maximum 25-30 maximum 16-20
Chicken kebabs 3 maximum 20-25 maximum 23-27
Cutlets/schnitzel 3 or 4 maximum 12-18 maximum 23-27
Liver 3 or 4 maximum 8-12 maximum 12-15
Burgers 3 or 4 maximum 14-20 maximum 18-22
Sausages 3 or 4 maximum 10-15 maximum 9-13
Fish llet 3 or 4 maximum 12-16 maximum 13-18
Trout 3 or 4 maximum 16-20 maximum 20-25
Toast 3 or 4 maximum 2-4 maximum 3-6
Cheese toast 3 or 4 maximum 7-9 maximum 5-8
Tomatoes 3 or 4 maximum 6-8 maximum 8-10
Peaches 2 maximum 6-8 maximum 15-20
Thicker cuts
Chicken
(approx. 1 kg)
Rolled meat, 7 cm
(approx. 1 kg)
Pork
(approx. 1 kg)
Sirloin
(approx. 1 kg)
Recommended
shelf level
from the
bottom
1 maximum 50-60 maximum 60-85
1 maximum 75-85 maximum 100-110
1 maximum 100-120 maximum 95-100
1 - - maximum 25-35
GRILL FAN GRILL
Temperature
setting
Total
grilling
Time in
min.
Temperature
setting
Total
grilling
Time in
min.
1) Turn half way through the grilling time.
2) Select the appropriate shelf level for the thickness of the food.
3) Use the 2nd shelf level from the bottom for "Fan grill".
17
Page 18

In more detail...
Operation
3-key timer procedure cooking mode
Adjust the clock after switch on
Once it connected with electrical power, the display will show “12:00” with the
square symbol above “ ”.
Press the + or - button will increase or decrease the number until it reaches the
right time. After 5 seconds it will start automatically.
Function button
function button
Note
The time should be set before any operation of the oven which is
controlled by the electrical control.
If you want to change the time, press the function button repeatedly
until the square symbol above flashes. Then you can adjust the time.
Automatic setting (set the time of full automatic starting and ending)
1. Press the function button repeatedly until the square symbol above the “
flashes, and press + or - button to set the required cooking time eg 45mins.
2. Press the function button repeatedly until the square symbol above the “ ”
flashes, and press + or - button to set the time e.g 14:00 to switch off.
3. Adjusting the baking method (thermostat, oven operation setting).
When the time is up, the alarm will sound, press any button to cancel the alarm.
Remark: The maximum between current time and off time is 23 hours 59 minutes.
For example: If the food is required to bake for 45 minutes, and it is supposed to
stop at 14:00.
18
=
”
Page 19

In more detail...
Operation
Semi-automatic setting
Setting the required time frame for baking (10 hours maximum)
• Press the function button repeatedly until the square symbol above “ ”,
and set the required time using the + and - buttons.
• Adjusting the baking method (thermostat, oven operation).
• When the baking is done the alarm will sound. To cancel the alarm press any
button.
Timer
• The longest time frame can be set is 23 hours and 59 minutes. For setting
time, press the function button repeatedly until the square symbol above “
” ashes, and press “+ or - button until the desired time shows on the display.
The time countdown begins to work. When it reaches the set time, the alarm
sounds. To cancel the alarm press any button.
Note!
Once a function has been selected, setting the time needs to
be started within 5 seconds. If the power fails unexpectedly all
programmes and the set time will be cancelled.
Once power has been restored “12:00” and the square symbol above
“
” will show on the display. You will need to reset the time and any
programmes required.
19
Page 20

In more detail...
Operation
Cooling ventilation
• In order to cool down the exterior of the appliance, this model is equipped
with a cooling fan, which comes on automatically when the oven is hot.
• When the fan is on, a normal ow of air can be felt exiting between the oven
door and the control panel
Practical cooking advice
• The oven offers a wide range of alternatives which allow you to cook any type
of food in the best possible way. With time you will learn to make the best
use of this versatile cooking appliance and the following directions are only a
guideline which may be varied according to your own personal experience.
Using the oven light
Set knob "B" to the “ ” symbol to turn it on. It lights the oven and stays on when
any of the electrical heating elements in the oven come on.
Using the conventional oven
This is traditional convection cooking using the top and bottom elements and the
heat is diffused by natural convection. This mode is recommended for foods that
require the same temperature both internal and external such as a roast.
Using the low heat with fan mode
This mode uses the lower heating element and fan to circulate the air and is
ideal for pizzas, pastries and cakes. It is recommended for foods that require
more heat to be from the bottom of the oven.
Using the top heat mode
This function uses the top .element only. Idea for browning the top of food.
Using the grill
To use the grill ensure that your food is located in the centre of the oven cavity
and adjust the height of the grill pan to control the browning.
20
Page 21

In more detail...
Operation
Using the fan assisted grill
Use the grill in the same way as the standard grill, always ensure the oven door is
closed. This mode is recommend for quick browning on the outside but keeping
the juices in. Ideal for chops and burgers.
Using the fan oven mode
The rear circular element and the fan come on and the heat is dispersed by
forced convection. This mode is suitable for roasting joints when you want it well
cooked on the outside and tender in the middle. The oven does not need any preheating when using this mode.
Using the defrost mode
In this mode only the oven fan comes on. This mode is suitable for the quick
thawing of frozen foods. Thawing times vary depending on the quantity and type
of food to be defrosted.
Note!
When cooking is done, the fan stays on until the oven cools down
sufciently.
The following shows how to reduce total environmental impact (e.g. energy use)
of the cooking process).
1. Try not to open or close the oven door frequently during cooking.
2. Keep the oven door clear so that you can look in during cooking easily.
3. If possible, defrost frozen food in a way which does not need any power
consumption.
4. It takes less time to cook food which has large surface area to volume ratio.
21
Page 22

In more detail...
Care and maintenance
Care and maintenance
Warning
Always switch off the electricity supply before
performing maintenance work. In the event of a fault,
contact customer services.
Caution
Do not use hot water, diluents, petrol, alcohol, kerosene, washing
powder, cleanser, alkaline detergent, acid, chemical cloth, etc. for
cleaning to not damage the enamel coating and plastic. The
appliance must not be cleaned directly with water as this could
cause
rusting or render the insulation less efficient.
• The enamelled and stainless steel parts of the appliance should be wiped
clean using a damp cloth using the minimum possible amount of soap and
lukewarm water. Do not use abrasive powders or corrosive substances
which could ruin the surfaces. Remember stainless steel could tarnish and
restoring these surfaces can be difficult. Specialist stainless steel cleaners
are available from major supermarkets. After cleaning, these surfaces
should be wiped with a clean cloth and lukewarm water to remove any
traces of detergent.
• The inside of the oven should ideally be cleaned when the oven is still warm
using a damp cloth and the minimum possible amount of soap and hot water.
After cleaning the soap should be removed using a clean damp cloth and hot
water. Dry the interior of the oven with a soft dry cloth after cleaning.
FUSE
OFF
Warning!
DO NOT USE EXCESSIVE AMOUNTS OF WATER WHEN
CLEANING THE PRODUCT.
• Do not use abrasive powders, cleaners, sponges or acids (lime scale
remover) to clean the interior as these can damage the enamel. If the interior
is very difcult to clean use a specialist oven cleaner. Follow closely the
instructions provided on the packaging.
Warning!
NEVER USE A STEAM CLEANER TO CLEAN THE INSIDE OF THE
OVEN.
• If the oven is in use for an extended length of time condensation may form.
Once the oven has cooled remove the condensation using a dry cloth.
22
Page 23

In more detail...
Care and maintenance
How to keep your oven in good condition
Before cleaning your oven, or performing maintenance, disconnect it from the
power supply.
To extend the life of your oven, it must be cleaned frequently, keeping in mind that
• The enamelled or stainless steel parts should be washed with luke warm
water without using any abrasive powders or corrosive substances which
could ruin them. Stainless steel could become stained. If these stains are
difficult to remove, use special products available on the market. After
cleaning, it is advisable to rinse thoroughly and dry.
• The inside of the oven should preferably be cleaned immediately after use,
when it is still warm, with hot water and soap. The soap should be rinsed
away and the interior dried thoroughly. Avoid using abrasive detergents (for
example cleaning powders, etc.) and abrasive sponges for dishes or acids
(such as lime scale remover, etc.) as these could damage the enamel. If the
grease spots and dirt are particularly tough to remove, use a specialised
product for oven cleaning, following the instructions provided on the packet.
• Never use a steam cleaner for cleaning inside of oven.
• If you use your oven for an extended period of time, condensation may form.
Dry it using a soft cloth.
• There is a rubber seal surrounding the oven opening which guarantees
its perfect functioning. Check the condition of this seal on a regular basis. If
necessary, clean it and avoid using abrasive products or objects to do so.
Should it become damaged, please contact your After-Sales Service Centre.
We recommend you avoid using the oven until it has been repaired.
• Never line the oven bottom with aluminum foil, as the build up of heat could
compromise cooking and even damage the enamel.
• Clean the glass door using non-abrasive products or sponges and dry it with
a soft cloth.
23
Page 24

In more detail...
Care and maintenance
How to remove the oven doors
For a more thorough clean, you can remove the oven door. To remove the oven
door use the following instructions:
1. Open the door to the full extent. 2. Open the lever A completely on the
left hand hinges.
A
B
3. Open the door to angle as
shown.
4. Close the door until the left & right
hand levers A are hooked to part B
of the as shown in diagram of step 2.
24
5. Withdraw the hinge hoods for there
position following arrow C.
To replace the door, reverse the above
procedure.
C
Page 25

In more detail...
Removing the glass from the door
Follow the procedure to remove the door.
Place the door on a soft and clean surface.
With both hands hold the door and push
the buttons on either side of the oven door
One the top cap has been removed you
will have access to the glass. Flip the glass
retainers and gently remove the glass.
Clean the glass with soap and water and
place on a clean, dry and soft surface.
Reassemble the door in the reverse order.
Telescopic rails
Care and maintenance
Fig 1
• To un-clip the telescopic rail [05] for cleaning or repositioning purposes you must
apply outward pressure on the underside of the telescopic rail to release, as
shown in Fig 1 (Note: reverse of rail shown).
• To re-fit the telescopic rail, locate the clip into the top rail on the shelf guide and
push downward, the rail will clip into place.
• The telescopic rail is designed to support either a shelf or grill pan and can be
installed on any of the shelf guides positions as shown in Fig 2.
Fig 2
1
2
3
25
Page 26

In more detail...
Care and maintenance
Replacing the oven lamp
Warning!
Disconnect the appliance from the electricity supply, open the
oven door and remove the oven shelves. During use the appliance
becomes hot. Care should be taken to avoid touching heating
elements inside the oven.
Remove the glass cover that
protects the light bulb by turning
it anticlockwise.
90’
Unscrew the old light bulb
and dispose of it safely and
ecologically, change it for one as
specied in the “Technical and
legal information section” and
replace the cover.
26
Page 27

In more detail...
Troubleshooting
Troubleshooting
What should I do if the oven doesn’t heat up?
Check to see if one of the following actions resolves the issue:
• The oven may not be switched on. Switch the oven on.
• The clock may not be set. Set the clock (see section “Setting the clock”).
• Check to see if the required settings have been applied.
• A household fuse may have blown or a circuit breaker may have tripped.
Replace the fuses or reset the circuit. If this happens repeatedly, call the
Service Centre.
What should I do if, even though the oven function and temperature have
been set, the oven does not heat up?
There may be problems with the internal electrical connections. Call your local
Service Centre.
What should I do if the time display is blinking?
There was a power failure. Set the clock (see section “Setting the clock”).
What should I do if the oven light does not illuminate?
The oven light is faulty. Replace the oven light bulb (see section “Changing the lamp”).
What should I do if the oven’s fan is running without having been set?
Following use, the oven’s fan runs until the oven has cooled down. Call your local
service centre if the fan continues to run after the oven has cooled down.
The grill does not heat up properly?
The grill power is set to low, turn the temperature control knob to maximum.
27
Page 28

In more detail...
Recycling and disposal
Technical and legal information
Recycling and disposal
Environmental protection
Waste electrical products should not be disposed of with household waste.
Please recycle where facilities exist. Check with your Local Authority or retailer for
recycling advice.
The symbol on the product or its packaging indicates that this
product cannot be treated as normal household waste. This product
must be handed over to an electric and electronic equipment
collection point for recycling.
On ensuring that this product is disposed of correctly, you will help to avoid
possible negative consequences for the environment and public health, which
could occur if this product is not handled correctly. To receive more detailed
information about recycling this product, contact your local government, domestic
waste disposal services or the outlet where the product was bought.
Technical and legal information
Technical information:
Power supply :
Power consumption :
220-240V~, 50/60Hz
2218-2640W
Legal information
The Manufacturer declines all liability for damage caused to persons and objects
due to incorrect or improper installation of the appliance.
Information for dismantling
Do not dismantle the appliance in a way which is not shown in the user manual.
The appliance could not be dismantled by user. At the end of life, the appliance
should not be disposed of with household waste. Check with you Local Authority
or retainer for recycling advice.
28
Page 29

Installation
01
594
Only a qualied person in compliance with the instructions
provided must install the appliance. The manufacturer declines all
responsibility for improper installation, which may harm persons
and animals and damage property.
Caution
The power supply to the appliance must be cut off before
any adjustments or maintenance work is carr
ied out.
Installation of Built-in Ovens
For correct installation this product can be tted under the work
surface in a built under housing unit or in a tall oven housing unit.
NOTE:
May have to
remove base to
achieve required
550
548
air gap
21
579
550
= Airow
29
548
595
594
595
21
579
Note!
•
The panels of the adjacent cabinets must be made of heatresistant material. In particular the adhesive that bonds the
plastic laminate to the furniture must be able to withstand
temperatures of not less than 150°C to avoid delamination. The
appliance must be housed in heat-resistant cabinets.
Page 30

Electrical connection
02
This appliance must be installed by a qualified electrician to comply with the
relevant Institution of Engineering and Technology (I.E.T.) regulations and
also the local electricity supply company requirements.
This appliance must not be connected to an ordinary domestic power point.
The mains terminal is situated on the back of the oven.
•
•
•
GREEN AND YELLOW = EARTH
BLUE = NEUTRAL
BROWN = LIVE.
The fuse must be rated not less than 16 Amps.
As the colours of the wires in the mains lead for the appliance may not correspond
with the coloured markings identifying the terminals in your spur box, proceed as
follows:
7KHZLUHZKLFKLVFRORXUHGJUHHQDQG\HOORZPXVWEHFRQQHFWHGWRWKHWHUPLQDOPDUNHG(
(DUWKRUFRORXUHG*UHHQ
7KHZLUHZKLFKLVFRORXUHGEOXHPXVWEHFRQQHFWHGWRWKHWHUPLQDOPDUNHG11HXWUDORU
FRORXUHG%ODFN
7KHZLUHZKLFKLVFRORXUHGEURZQPXVWEHFRQQHFWHGWRWKHWHUPLQDOPDUNHG//LYHRU
FRORXUHG5HG
Connect the cable to the correct terminals. Check that the links are correctly
fitted and that the terminal screws are tight. Secure the mains cable using the
cable clamp. Ensure the cable route avoids the risk of trapping or touching
hot surfaces.
Warning: Connect the power cord must be in aceordance with the
instructions listed in the table below.
30
Min1.5 Min1.5 Min1.5
Page 31

)LWWLQJRQD3RZHU6XSSO\&DEOH
2SHQLQJWKHWHUPLQDOERDUG
· 8VLQJDVFUHZGULYHUSUL]HWKHEROW
RQWKHVLGHWDEVRIWKHWHUPLQDO
ERDUGFRYHU
· 8VLQJDVFUHZGULYHUXQKRRNLQJWKH
QR IL[LQJKRRNVSXOORSHQWKH
FRYHURIWKHWHUPLQDOERDUG7R
LQVWDOOWKHFDEOHSURFHHGDV
IROORZV
1. Open the terminal board
2. Remove the wire clamp screw and the three contact screws L-N -
3. Fasten the wires beneath the screw heads using the following color scheme : Blue (N)
Brown (L) Yellow-Green
4. Fasten the supply cable in place with the clamp and close the cover of the terminal
board.
31
Page 32

03
Connect to mains power supply ensuring the cable is not bent.
Lift oven into housing unit, do not lift the oven with the handle otherwise the glass
door might shatter.
Fixing the
Note: If the supply cord is damaged, it must be replaced by the
manufacturer, its service agent or similarly qualied persons in order
to avoid a hazard.
oven
04
[06]
[06] x 2
[07] x 2
Once the oven has been lifted into place in either of the housing units insert the
2 x plastic washers [06] into the holes located within the sides of the metal
casing of the oven and secure with 2 x screws [07].
Also ensure that you adjust the furniture doors adjacent to the sides of the oven
so there is a 4 - 6mm gap between them, otherwise heat displaced from the oven
might damage the furniture door.
The appliance is now ready to use.
32
[07]
Page 33

05
Adjusting the shelf position.
33
Page 34

Information for domestic ovens
- Symbol Value Unit
Model identication -
Type of oven - Built-in electric oven -
Mass of the appliance M
Number of cavities - 1 -
Heat source per cavity
(electricity or gas)
Volume per cavity V
Energy consumption
(electricity) required to heat a
standardised load in a cavity
of an electric heated oven
during a cycle in conventional
mode per cavity (electric nal
energy)
Energy consumption required
to heat a standardised load
in a cavity of an electric
heated oven during a cycle
in fan-forced mode per cavity
(electric nal energy)
Energy Efciency Index per
cavity
Energy efciency class - A -
1kWh/cycle= 3.6MJ/cycle
Electricity - -
electric cavity 0.74 kWh/cycle
EC
electric cavity 0.81 kWh/cycle
EC
cavity 88.1 -
EEI
NWCMBOB -
37.8 Kg
68 L
The measurement and calculation method of the above table was done in
accordance with commission regulation (EU) No 65/2014 & 66/2014.
34
Page 35

Help and assistance
If you require any technical guidance or find that your washing machine is not operating as intended, a simple
solution can often be found in the Troubleshooting section of these instructions or online at
www.newworldassist.co.uk
If you still require further assistance, call one of our experts on 0333 3052263*. To help give us give you a fast and
efficient service please have the following information ready:
Model Ref.
Serial number
Date of purchase
Local call rates applies*
You can find these on
the rating plate - a small
information panel (usually
a sticker or metal plate) on
the rear of your appliance
This will be shown on
your receipt
Lines open 9am-5pm Monday to Friday.
*Calls to New World enquiry lines may attract a charge and set up fee from residential lines depending on your call plan/tari. Mobile and
other providers costs may vary, see www.bt.com/pricing for details.
For Security and training purposes, telephone calls to and from customer service centres maybe recorded and monitored. Calls from
Republic of Ireland will attract international call charges.
35
Page 36

Product support
Help is always at hand
Call us now and activate your 24 month guarantee
Thank you for choosing New World. Your new product is guaranteed against faults and
breakdowns for 24 months. Don’t forget to register it with us today so we can provide you
with our best possible after-sales service and useful updates.
www.newworldassist.co.uk
0333 305 2263
Your New World Guarantee
This product is guaranteed for 24 months from the date of original purchase. Any defect that arises due to faulty
materials or workmanship will be repaired free of charge (or if applicable the product will be replaced or the
purchase price refunded) where possible during this period by the dealer from who your purchased the unit.
The guarantee is subject to the following provisions:
• The guarantee does not cover accidental damage,
misuse, cabinet parts, knobs or consumable items.
• The product must be correctly installed and
operated in accordance with the instructions
contained in the manual.
• It must be used solely for domestic purposes. The
guarantee will be rendered invalid if the product is
re-sold or has been damaged by inexpert repair.
• Specifications are subject to change without notice.
• New World disclaim any liability for loss or damage
arising from the breakdown of the product.
• This guarantee is in addition to and does not
diminish your statutory or legal rights.
Important Data Protection Information
To find out how we use your data please refer to the guarantee registration material or visit
www.newworldassist.co.uk
If you require any technical guidance or find that your product is not operating as intended, a simple solution can often be found in the Troubleshooting section of these instructions,
36
or online at www.newworldassist.co.uk If you still require further assistance, call one of our experts on 0333 305 2263.
Product support
Page 37

Contact:
www.newworldassist.co.uk
Helpline: 0333 305 2263
52292964
 Loading...