

Page 1
100cm Dual Fuel Range Cooker
LOMOND100DFCRM
MUNROS100DFIN
NESS100DFB
Instruction manual
ɑ
1
标记
设计
校对
审核
工艺
处数
分区
技术要求:
1.材质:铜版纸,材质符合ROHS标准,每平米105g;
2.尺寸:A4(210x290mm);
3.黑白印刷,印刷字迹清晰明了.
4.图为说明书封面。
Revision 22-01-05
P22ZK0021 1ɑ
更改文件号
标准化
批准
签名
年月日
名称
MUNROS100DFIN & LOMOND100DFCRM说明书
品号
阶段标记
共 1 张 第 1 张
英国ARGOS
商标NEWWORLD
F106GF7TSE4L5R865
40400400338
数量
1
比例
图号
KSMS-ARGOS(Newworld)-08-001
材料
铜版纸
浙江安德电器有限公司
Page 2

100cm Dual Fuel Range Cooker
LOMOND100DFCRM
MUNROS100DFIN
NESS100DFB
Instruction manual
Page 3

You’ll soon be enjoying your new Freestanding Cooker
It all begins here, with your instructions. Don’t worry, there’s
nothing too technical coming up. Just simple, step-by-step
guidance to get you up and running quickly. Sound good? Then
let’s get started.
Help and Guidance
We’re here to help you get the most from your Freestanding Cooker. Should you require any guidance, a
simple solution can often be found online at:
www.newworldassist.co.uk
If you still require further assistance, call one of our experts on 0333 305 2263
Page 4

Contents
Safety information
1
Safety information
Getting to know your
2
Freestanding Cooker
Ready? Let’s begin
Accessories
Installing your Freestanding
3
Cooker
Installation requirements
Data Label
First Use
Unpacking
Technical Data
Installation details
Gas Conversion
4
7
9
10
10
10
10
10
11
15
Care and Maintenance
5
Cleaning
Removing the door
Replacing the lamps
Maintenance
Technical specifications
Energy fiche
Circuit Diagram
Product support
6
Troubleshooting
Help and assistance
Declaration of conformance to product
standards
Disposal
Guarantee
23
24
24
25
26
27
28
29
30
31
31
32
Using your Freestanding
4
Cooker
Controls
Using the hob top burners
Using the oven
Cooking modes
Using the digital clock
Practical advice
Cooking guides
16
16
17
19
20
21
22
Page 5

Safety information
Important - Please read these instructions fully before installing
or operating
INSTALLATION WARNINGS
IMPORTANT: This product MUST be installed
by a qualified Gas Safe registered installer in
accordance with local regulations. Particular
attention should be given to the ventilation
requirements.
IMPORTANT: Prior to Installation ensure that
the local supply conditions (gas type and
pressure, electricity voltage and frequency)
are compatible with the requirements of
your cooker.
IMPORTANT: Carefully unpack and examine
the appliance for any damage. If you think
there is a defect, do not use the appliance
and contact NEW WORLD Product Support
on 0333 305 2263. Packaging materials
should be collected together and disposed
of immediately as they may be harmful to
children.
IMPORTANT: Keep the electrical cable (not
supplied) of your cooker away from the hot
areas of your cooker; do not let the cable
touch the appliance. Keep the cable away
from sharp edges and heated surfaces.
DURING USAGE
IMPORTANT: This appliance can be used by
children aged from 8 years and above and
persons with reduced physical, sensory or
mental capabilities or lack of experience and
knowledge if they have been given
supervision or instruction concerning use of
the appliance in a safe way and understand
the hazards involved. Children shall not play
with the appliance. Cleaning and user
maintenance shall not be made by children
without supervision.
WARNING: The appliance and its accessible
parts become hot during use. Care should be
taken to avoid touching heating elements.
Children less than 8 years of age shall be kept
away unless continuously supervised.
WARNING: Cooking on a hob with fat or oil
can be dangerous and should not be left
unattended.
WARNING: NEVER try to extinguish a cooking
fire with water. Instead switch o the
appliance and cover flame e.g. with a lid or a
fire blanket.
IMPORTANT: Ensure that the electric supply
cable is not trapped or damaged during
installation.
IMPORTANT: In the event that the cable
connecting your cooker becomes damaged,
it must be replaced by a suitably qualified
person. This cable must not be replaced by
an unauthorised person.
IMPORTANT: Protect your cooker against
atmospheric eects. Do not expose your
cooker to eects such as sun, rain, snow etc.
CAUTION: Cookers may topple forward if a
child climbs onto the cooker door. Children
should be supervised in the kitchen at all
times and this cooker must be secured to the
wall using the fixing kit (included) to prevent
accidents.
CAUTION: Do not allow children in the
kitchen when cooking or while cooker parts
may still be hot. Many parts of the cooker will
become hot and present a considerable
hazard to children.
4
Page 6

Safety information
Important - Please read these instructions fully before installing
or operating
IMPORTANT: The materials surrounding the
appliance (cabinets) must be able to
withstand a minimum temperature of 100°C.
IMPORTANT: When using your oven for the
first time your cooker may give o smoke or
an unusual odour from the heating elements
and insulation materials. This is normal for
new cookers. To eliminate this odour run the
oven at 250 degrees for 40-60 mins with the
oven empty.
WARNING: Before obtaining access to
terminals, all supply circuits must be
disconnected.
IMPORTANT: Position pans over the centre
of the burners and turn handles to a safe
position where they can not be knocked or
grabbed.
IMPORTANT: Make sure the cooker control
knobs are all in the o position when not in
use.
CAUTION: When the oven is hot never touch
the oven glass by hand or with tools.
CAUTION: Before starting to use your
appliance, ensure curtains, paper or
flammable items are kept away from your
appliance. Do not keep flammable materials
inside of or around your cooker.
CAUTION: Take care when closing the oven
door that there is nothing obstructing it from
closing as this may break the glass door.
IMPORTANT: When using the grill the oven
door must be kept closed.
IMPORTANT: When the door of the oven is
open, do not hang or lean anything on it. You
may unbalance your appliance or damage
the door or door hinges.
IMPORTANT: Do not hang towels, dishcloths
or clothes from the cooker or its handles.
IMPORTANT: If you do not intend to use
your cooker for a long period of time turn o
the gas and electric supply to the cooker.
CAUTION: Using gas cooking appliances
results in the production of heat, moisture
and the products of combustion. Ensure that
the room where your cooker is installed is
well ventilated particularly while the cooker
is in use. Keep natural ventilation holes open
or install a mechanical ventilation device
(extractor hood) Prolonged intensive use of
your cooker may call for additional
ventilation (by opening a window) or by
increasing the level of mechanical ventilation
where present.
5
Page 7

Safety information
Important - Please read these instructions fully before installing
or operating
GENERAL SAFETY WARNINGS
IMPORTANT: This appliance has been
designed for non-professional, domestic
use only. Do not use this oven for
commercial use or any other application
e.g room heating.
WARNING: Danger of fire: do not store
flammable items on or near the cooking
surfaces or inside the oven.
IMPORTANT: Do not try to lift or move this
appliance by pulling on the door handle.
WARNING: Ensure that the appliance is
switched o before replacing the lamp to
avoid the possibility of electric shock.
IMPORTANT: Your appliance is produced in
accordance with all applicable local and
international standards and regulations.
IMPORTANT: Maintenance and repair work
must only be performed by authorised
service technicians. Installation and repair
work that is carried out by unauthorised
technicians is dangerous and could invalidate
your guarantee.
CLEANING AND MAINTENANCE
IMPORTANT: Always turn the appliance o
before operations such as cleaning or
maintenance. You can do this by switching
the freestanding cooker o using the cooker
isolation switch
IMPORTANT: Do not remove the control
knobs to clean the control panel.
WARNING: Do not use harsh abrasive
cleaners or sharp metal scrapers to clean the
oven door glass since they can scratch the
surface, which may result in shattering of the
glass.
WARNING: Do not clean your oven with a
steam cleaner.
TO MAINTAIN THE EFFICIENCY AND
SAFETY OF YOUR APPLIANCE, WE
RECOMMEND YOU ALWAYS USE OUR
AUTHORISED SERVICE AGENTS AND
ORIGINAL SPARE PARTS.
FOR ASSISTANCE CALL NEW WORLD
PRODUCT SUPPORT 0333 305 2263.
6
Page 8

Getting to know your Freestanding Cooker
ou’ll be up and running in no time
Y
Rea
Please read these instructions carefully. They contain
important information which will help you get the best
from your freestanding cooker and ensure safe and
correct installation and operation.
If you require any further assistance, our technical
experts are happy to help. For full details, refer to
the product support section at the end of these
instructions.
dy?
Let’s beg
in...
7
Page 9
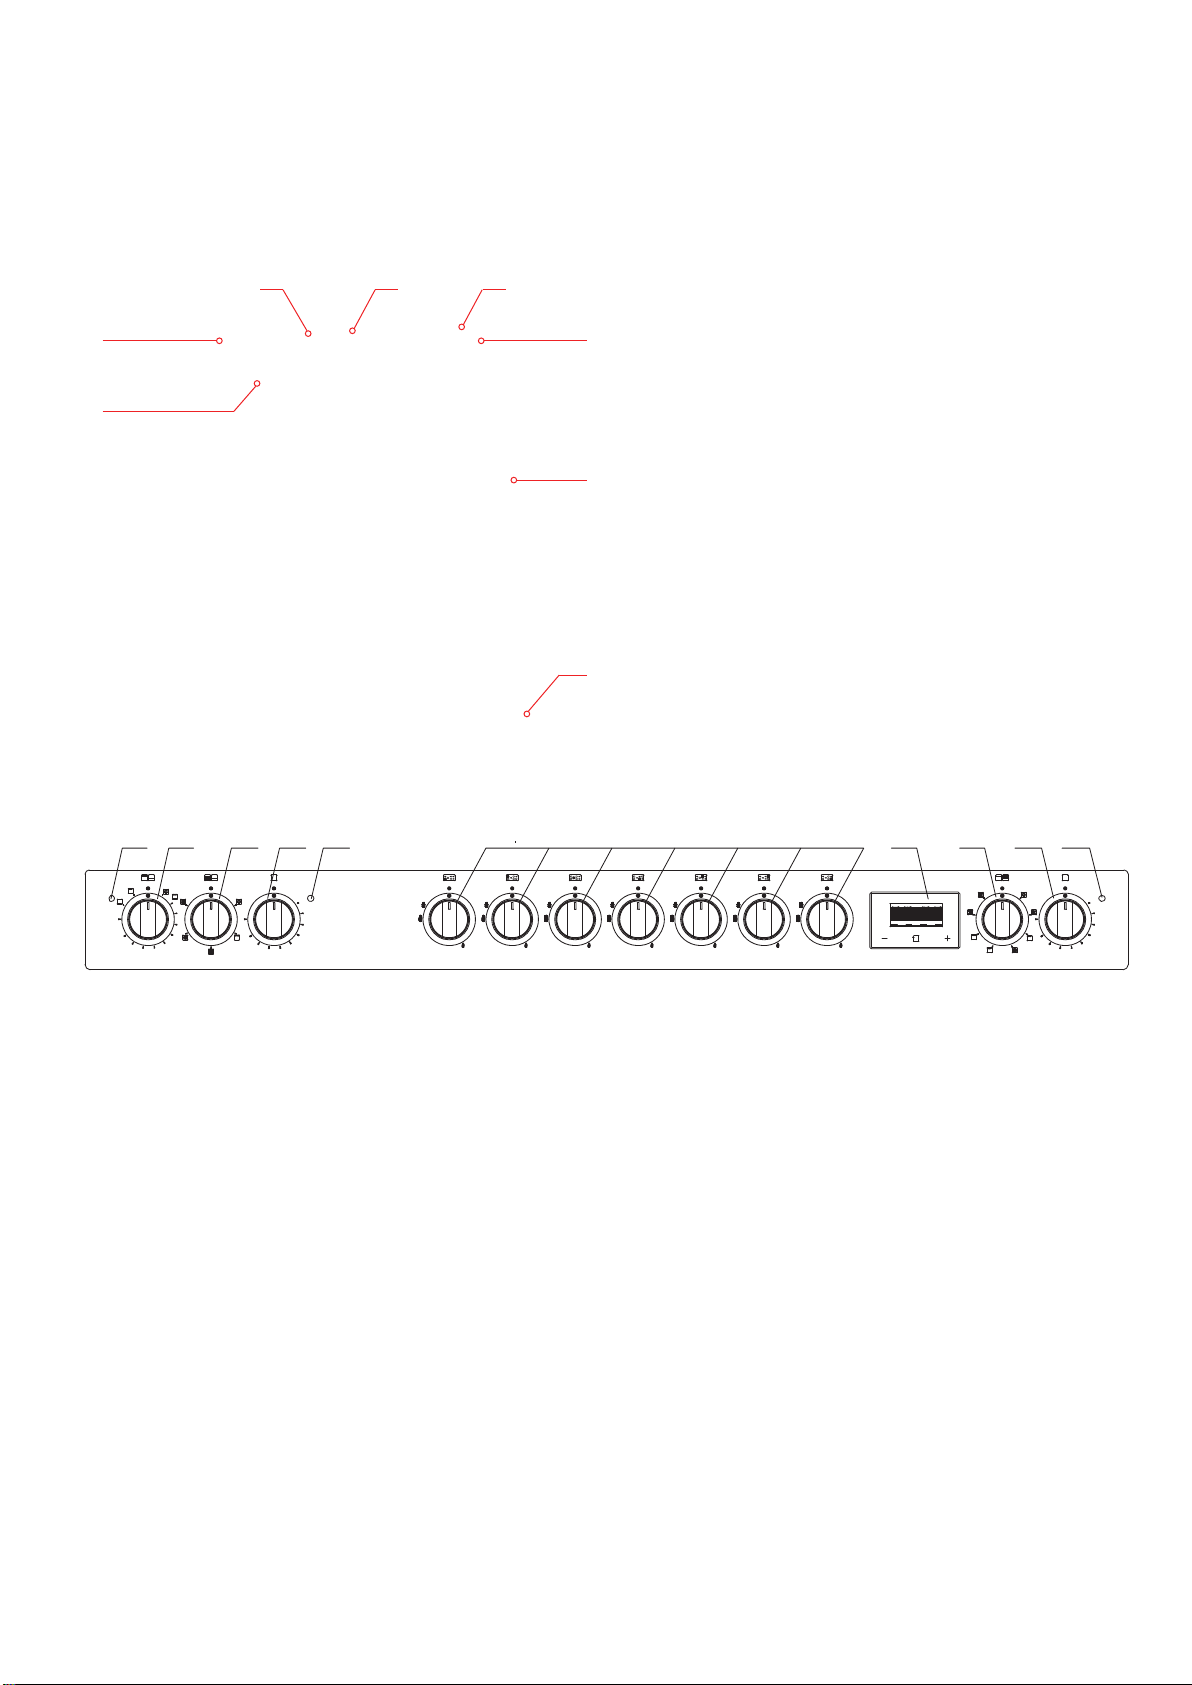
Getting to know your Freestanding Cooker
You’ll be up and running in no time
3
4
2
1
5
Control Panel
6
7
1.
Rapid Burner
2.
3.
Wok Burner
4.
Trivets
5.
Semi-rapid Burner
6.
Auxiliary Burner
7.
Oven Door
8.
Anti-Slip Feet
8
9
10 11 12
9
13 14 15 16
9
℃
60
MAX
220
9.
10.
11.
12.
80
100
120
140
200
160
180
Oven indicator light
Function/temperature control knob - upper left oven
Function control knob - lower left oven Function control knob - upper right oven
Temperature control knob - lower left oven Temperature control knob - upper right oven
MAX
60
80
100
120
220
140
200
160
180
13.
Gas hob control knobs
14.
Programmable timer
MAX
220
200
15.
16.
1. LED display
1
2. Minute minder indicator
3. Programmable timer indicator
4. Programmable timer indicator
5. Clock indicator
4
3
2
6
5
7
8
6. Decrease button
7. Display function button
8. Increase button
℃
60
80
100
120
140
160
180
8
Page 10

Getting to know your Freestanding Cooker
You’ll be up and running in no time
Oven Accessories
1. Grill pan
Wire shelf x4
2.
Grill pan wire insert and
3.
handle x1
Other Accessories Included
1
2
3
1.
2.
3.
1
2
3
9
Page 11
Installing your Freestanding Cooker
Bringing it all together
Installation requirem ents
THIS COOKER MUST BE INSTALLED
ACCORDING TO BS 6172: 2010 BY A SUITABLY
QUALIFIED GAS SAFE REGISTERED INSTALLER
IMPORTANT: CONTACT AN
AUTHORISED SERVICE AGENT FOR
INSTALLATION OF YOUR OVEN!
Data Label
The Data Label is located on the rear of the
appliance is suitable for Natural Gas
and Universal LPG; ensure that the available gas
supply matches the Data Label and the gas
type label.
First Use
IMPORTANT: When using your oven for the first time
heating elements and insulation materials. This is
normal for new cookers. To eliminate this odour run
the oven at 250 degrees for 40-60 mins with the
oven empty.
Unpacking
Carefully unpack and examine the appliance for
any damage. If you think there is a defect, do not
use the appliance and contact
Packaging materials should be collected
together and disposed of immediately as they
may be harmful to children.
10
Page 12

Installing your Freestanding Cooker
Bringing it all together
Instal
lation of Cooker
Gas
This modern cooker was manufactured with parts and
materials of the highest quality and was designed to
meet your cooking needs. You should read this manual
so that you are able to use the cooker correctly and to
avoid any potential problems with using the cooker.
The following information outlines the required rules
for correct installation and service of your cooker. This
is particularly important for the technician who will
install the appliance.
CONTACT AN AUTHORISED SERVICE AGENT FOR
INSTALLATION OF YOUR OVEN!
VENTILATION REQUIREMENTS
For rooms with a volume of less than 5 m³ - permanent
ventilation of 100 cm² is required see figure 1 and 2 for
an example.
For rooms with a volume of between 5 m³ and 10m³
a permanent ventilation of 50 cm² will be required
unless the room has a door which opens directly to
the outside, in which case no permanent ventilation is
required.
There must be enough natural ventilation to provide
the gas to be used in the environment. The average air
flow must directly come in through ventilation from the
outside.
Emptying of the Burned Gases from Environment
For cooking appliances that operate with gas, burned
gas wastes are exhausted directly to the outside
or through cooker hoods that are connected to a
chimney that opens directly to the outside. If it is not
possible to install a cooker hood, it is required to set
an electric fan on the window or wall that has access
to fresh air. This electric fan must have the capacity to
change the volume of air in the kitchen environment
4-5 times per hour.
Air inlet section min 100 cm²
For rooms with a volume greater than 10 m³ - no
permanent ventilation is required.
Attention: Regardless of room size, all rooms
containing the appliance must have direct access to
the outside air via an openable window or equivalent.
The room containing the cooker should have an air
supply in accordance with BS 5440: Part 2.
Environment where your appliance will be installed
Your cooker must be set up and used in a place where
it will always have ventilation. While operating, this
appliance needs 2m³/h air per kw input.
Air inlet section min 100 cm²
11
Page 13

Installing your Freestanding Cooker
Bringing it all together
Gas Connection
IMPORTANT - All Gas installations must be carried
out by a suitably qualified pe son. For information
on choosing a gas installer contact the ‘Gas Safe
Register’.
www.gassaferegister.co.uk
The appliance can be placed close to other furniture
on condition that the furniture’s height does not
exceed the height of the cooker panel.
ther
as curtains, in the vicinity of the installation.
There must be at least 2cm of free space between the
back wall and the rear of the appliance to allow for
ventilation and air circulation.
e no combustible or flammable materials, such
e ar
Make sure that
Figure 3
Positioning
The furniture close to the cooker must be
manufactured resistant to temperatures up to 100°C.
If the kitchen furniture are higher than the hob plate
of the cooker, it must be at least 10cm away from the
cooker’s side.
Surrounding furniture, cabinets and extractor fans
should be positioned in accordance with the diagram
shown in figure 3. If fitted, the extractor fan must be at
least 65cm above the hob.
If no fan is fitted the minimum distance between the
hob and any cabinet or other structure must be 70cm.
12
Page 14
Installing your Freestanding Cooker
Bringing it all together
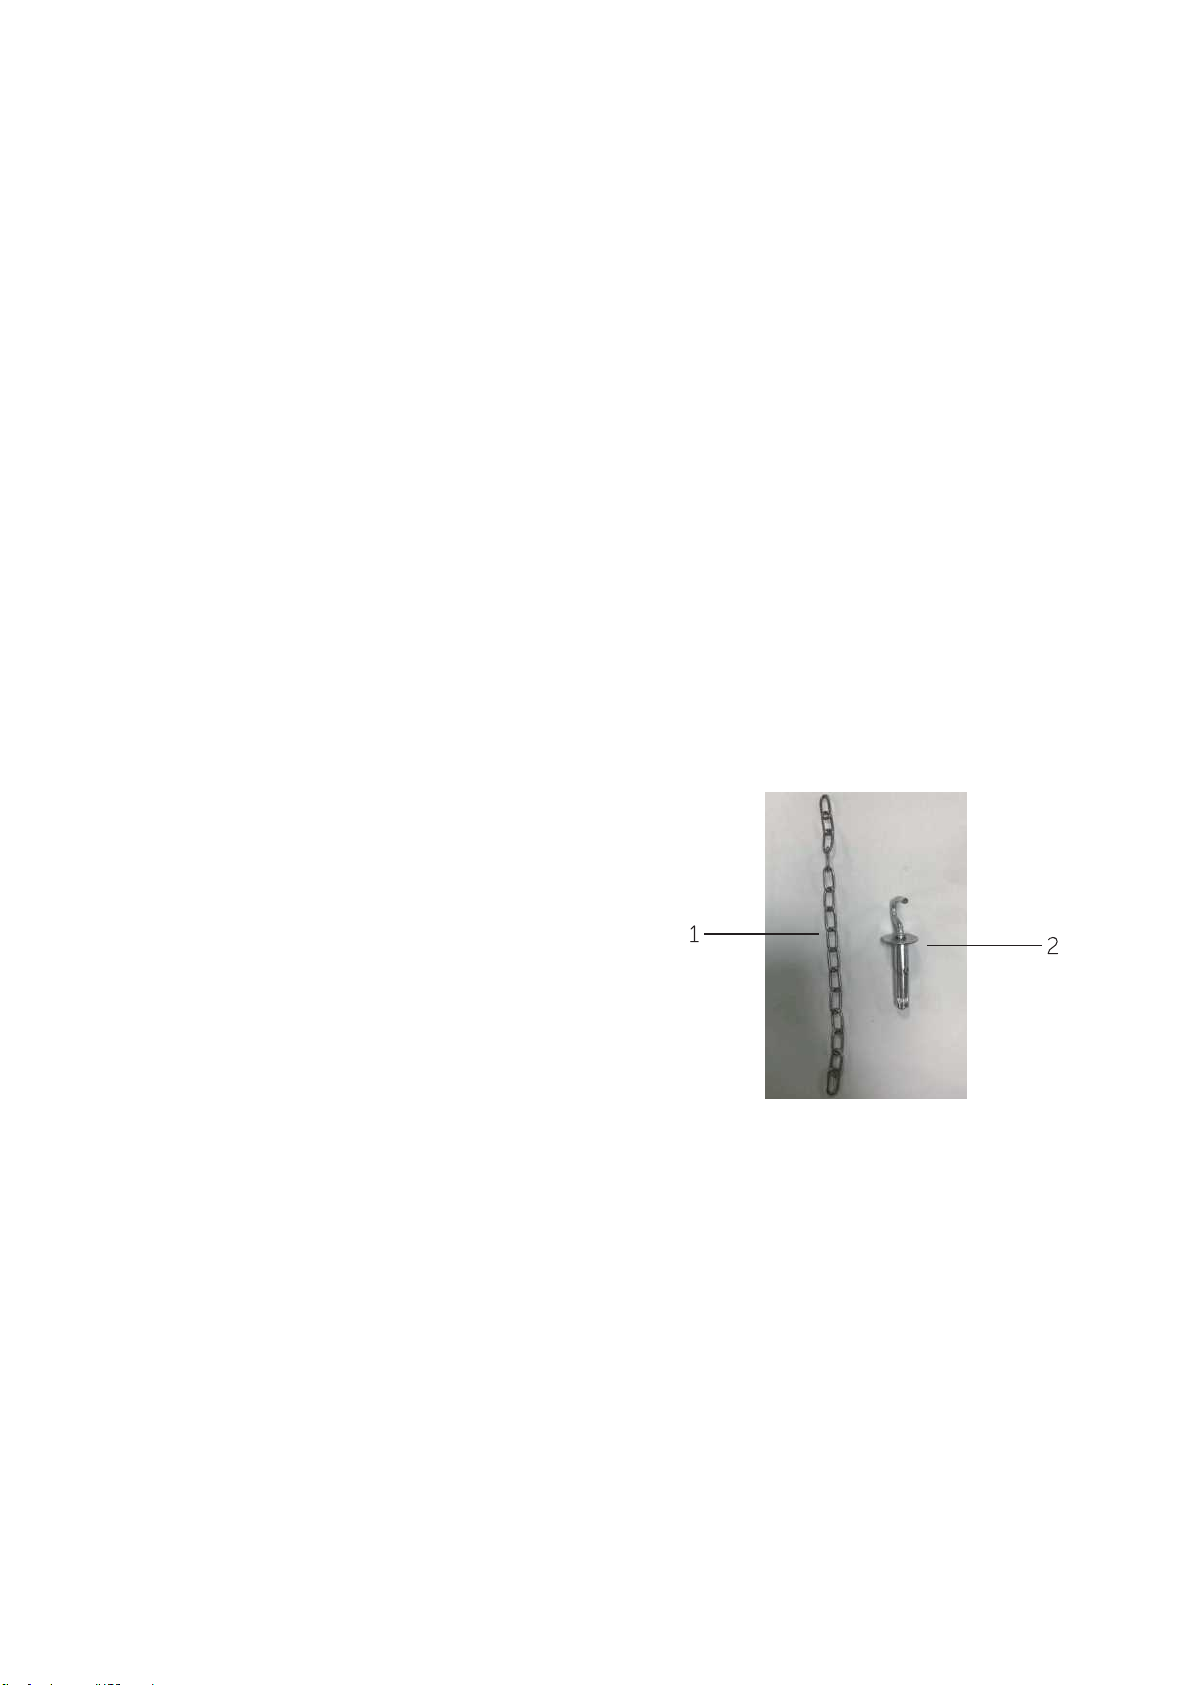
Anti-tilting chain
The cooker is supplied with an anti-tilting chain to prevent the appliance from tilting forward and
causing accidental damage to the gas pipe. Make a hole in the wall behind, at the same height as
the fixing chain. Using the fixing assembly insert the plug into the hole and then screw in the hook
until it is firmly fixed to the wall. Fix the chain to the hook. You can adjust to the level of the cooker
by inserting the feet provided.
1
2
3
4
5
Safety chain (supplied and mounted to oven)
Stability hook
Chain attachment for the rear of the cooker
Rear of the cooker
Kitchen wall
13
Page 15
Installing your Freestanding Cooker
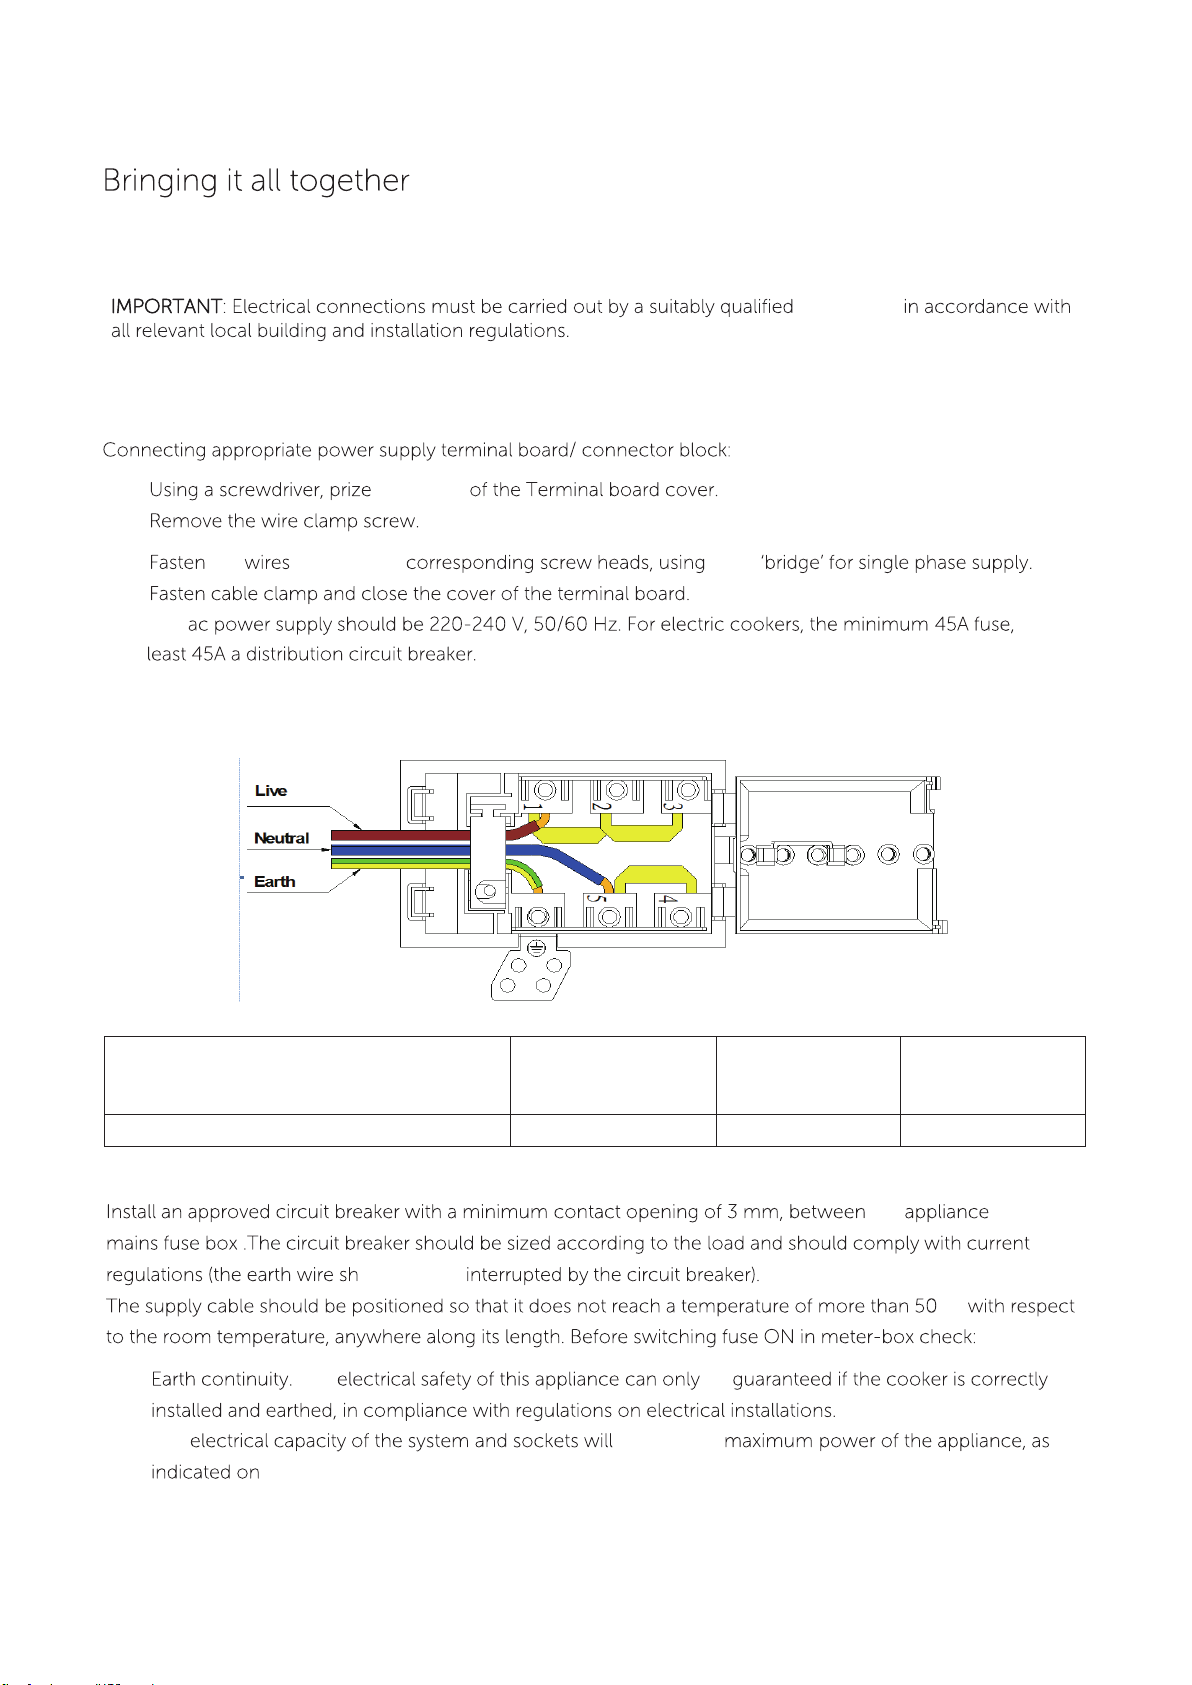
Electrical connection
T T person and
Fitting on a Power Supply Cable
open tabs
the beneath the brass
The or at
Warning: Connect the power cord in accordance with the instructions listed in the table below
Wire cross-sectional area(mm2)
Connection mode
Connecting the supply cable to the mains
The be
The support the
1N~
ould not be
the data plate
L
Min4 Min4 Min4
N
the and the
℃
E
14
Page 16
Installing your Freestanding Cooker
Bringing it all together
Gas Conversion (NG to U-LPG)
Parts needed
- Test Point Assembly
- Auxiliary Jet 0.5mm
- Wok Jet 0.95mm
CONVERSION TO A DIFFERENT GAS TYPE MUST BE
CARRIED OUT BY A SUITABLY QUALIFIED GAS SAFE
REGISTERED INSTALLER
Changing the jets
1. Remove pan supports, burner heads and caps.
2. Use a size 7 socket wrench to unscrew and remove
the jets, replacing them with those supplied in the
conversion kit. Ensure you use the correct jet for the
corresponding burner.
3. Reassemble the burner heads, caps and pan
supports.
4. Fit the Gas type label supplied in the conversion kit
next to the gas connection point and remove the
existing label.
- ULPG Gas Type label
- Semi-Rapid Jet 0.65mm
- Rapid Jet 0.85mm
Setting the minimum level
1. Light one of the burners and turn the tap to
minimum flame.
2.
Remove the control knob which controls the ignited
burner.
3.
Use a thin blade screwdriver to turn the by-pass
screw located above left of the gas valve shaft as
shown below. Turn the by-pass screw fully
clockwise. The result should be a small, stable flame
which is uniform around the entire burner ring. If not,
turn the by-pass screw anti-clockwise until satisfied
with the flame.
4. Check that the burner does not go out when the tap
is turned quickly from the maximum to the minimum
position.
5. Repeat for each burner.
15
Page 17

Using your Freestanding Cooker
Getting the most from your appliance
Controls
Control knob (Hob top Burners)
Upper & lower left cavity
1
1. Upper left function and temperature knob
2. Lower left function knob
3. Lower left temperature knob
Upper right cavity
2
3
Instructions for use (hob top burners)
The symbols on the control knobs mean
the following:
N
Maximum gas flow or ‘high’ flame and
lighting position
Minimum gas flow or ‘low’ flame
All operating positions must be set between the
maximum and minimum flow settings, and never
between the maximum setting and the closed
position.
Gas Burner Components
A B Burner cap
Burner Head
C Burner Bowl
D E Thermocouple (where fitted)
Electrode
1
1. Upper right function knob
2. Upper right temperature knob
2
These parts can be removed for cleaning
periodically. After cleaning, they must be well
dried and correctly replaced. It is important to
check that the burner bowl and cap have been
correctly positioned. Failure to do so can cause
serious problems.
16
Page 18
Using your Freestanding Cooker
Getting the most from your appliance
To light the hob burners
To light the burner, press the control knob fully
down and hold the knob down before rotating
anti clockwise to the High Flame position. The
ignition device is integrated into the control knob
and is automatically activated by pushing down
on the control knob.
After lighting the flame, keep the knob pressed for
about 10 seconds: this time is necessary to heat
up the thermocouple and activate the safety valve,
step only applies where flame failure device is
fitted.
In the instance of a power failure, place a lit match
near the burner and proceed as described above.
If the flame does not light after the first attempt,
wait 5 minutes for the gas to dissipate before
attempting to re-light the burner.
Once lit, check that the flame is even and turn the
control knob to adjust the flame as required. If the
flame is uneven, check that the ‘burner head/skirt’
and ‘burner cap’ are correctly positioned. To
The use of pans in excess of the maximum
diameter recommended in the table above can
result in over heating/discoloration of hob surface.
During cooking processes involving fats and
oils, watch your f
substances may catch fire if overheated.
How to use your oven
This freestanding cooker enables the versatility of
cooking by having three operational cavities with
various cooking modes. Each mode can be
selected using the cooking mode and
temperature knob.
To operate the oven:
- Ensure that manual mode is selected.
- Turn the cooking mode selection knob to the
desired cooking mode.
- PLEASE NOTE: When using the 'Defrost' 'Grill'
'Warming oven' and 'Browning oven' these are
pre-set to temperature and cannot be adjusted.
oods carefully because these
symbol) Before removing
flame.
For correct use of the hob top
use only flat-bottomed pan of dimensions suitable
for the burners, as shown in the table below. Also
as soon as a liquid comes to the boil take care to
turn the flame down to a level that will just keep it
boiling.
Burner Min. Diameter
Large (rapid 150mm 260mm
Medium (semi-rapid) 130mm 180mm
Small (Auxiliary) 90mm 160mm
Triple Flame (Wok) 210mm 270mm
The first time you use your appliance, we
recommend that you set the thermostat to the
highest setting, set the cooking mode selection
knob to a cooking mode and leave the oven
on for about half an hour with nothing in it and
the oven door shut. Then, open the oven door
and allow the oven to cool. Any odour that may
be detected during this initial use is due to the
evaporation of substances used to protect the
oven during storage.
Max. Di
ameter
17
Page 19

Using your Freestanding Cooker
Getting the most from your appliance
Positioning the oven trays & shelves
The Baking Tray, Grill Tray or Oven Shelves can be
located in any of the four height positions in the
oven.
When fitting the trays or shelves, ensure they
are fitted between the two moulds inside the
cavity that are closest together. Oven Shelves
have a stop so that they are not fully withdrawn by
accident. To fully remove the Oven Shelves, lift
the front of the shelf slightly and withdraw fully
from the oven. Note that the Grill Tray and Baking
Tray do not have a stop position and can be fully
withdrawn without interruption, so be careful not
to accidentally fully withdraw the trays.
Note: Place the Baking Tray provided on the
bottom shelf position of the oven to prevent any
spillages from dripping onto the bottom of the
oven. Never place anything (including foil and
oven trays) on the bottom of the oven when it
is in operation because this could damage the
enamel. Only place your cookware (dishes, trays,
aluminium foil, etc.) on the Oven Shelves
provided with the appliance.
18
Page 20

Using your Freestanding Cooker
Getting the most from your appliance
MAIN OVEN COOKING MODES
Convection mode
When set to Convection mode, the top and
bottom heating elements operate together like a
‘normal’ conventional oven that you have
probably used before.
Convection mode is best suited for traditional
baking and roasting and you should only use one
shelf at a time, otherwise the heat distribution will
be uneven. You can balance the amount of heat
between the top and the bottom of the dish by
selecting a different shelf height. If you want
more heat at the top of the dish place the dish
on the top or second shelf. For more heat at the
bottom of the dish, place the dish on third or
fourth shelf.
Grill Mode
Select ‘Grill’ mode with cooking mode selection
knob and turn cooking temperature selection
knob to ‘Max’. When set to Grill mode, the top
inner element operates. The extremely high and
direct temperature of the grill make it possible
to brown the surface of meats and roasts while
locking the juices in to keep the tender. Grill
mode can also be used for dishes that require a
temperature on the surface such as beef steaks,
veal, rib, steak, filets, hamburgers, etc.
Grill food with the oven door closed.
Warming Oven
This setting uses heat produced only by the bottom
element and is pre-set to 250°C.
Fan with bottom element mode
When set to Fan with bottom element mode, this
is a good function that circulates heat from the
bottom quickly. A great way to crisp up pizza
bases.
When set to Baking mode, the fan element
and the fan operate providing a delicate heat distributed uniformly
throughout the oven. This mode is ideal for baking and cooking delicate
foods on multiple shelves, especially cakes that need to rise such as cream
puffs and for certain tartlets, sweet or savoury biscuits, savoury puffs, swiss
rolls and small portions of vegetables, etc.
Baking mode
This gives an ideal setting for cooking pizza.
Oven light function
When set to the light function this
enables you to see directly into
the cavity or oven.
Full grill mode
This function allows you to grill
food along the full length of the
cavity.
Defrost mode
When set to ‘Defrost’ mode, the fan located at the back of the oven circulates room temperature air around
the food. This is recommended for the defrosting of all types of food, but in particular for delicate types of
food which do not require heat, for example: ice cream cakes, cream or custard desserts, fruit cakes, etc. By
using ‘Defrost’ mode, the defrosting time is approximately halved. In the case of meat, fish and bread, it is
possible to accelerate the process by selecting
‘Multi Cooking mode’ and setting the temperature between 0°c to 100°c.
Fan grill
The top central heating elements and the fan come on. This combination of features increases the
effectiveness of the unidirectional thermal radiation of the heating elements through forced circulation of the
air throughout the oven. This helps prevent food from burning on the surface, allowing the heat to penetrate
right into the food.
19
Page 21

Using your Freestanding Cooker
Getting the most from your appliance
Programmable Timer
This model has a digital display, 24hr clock with 3
control buttons. When the power is connected,
the screen displays ‘AUTO’.
Adjusting the digital clock
For first use of cooker, the time must be set by
using the digital timer. The time must be set every
time the cooker has been reset by the mains. To
set the correct time, press the button to
remove 'AUTO' first, then + or - button to
advance forward or backward until the correct
time is displayed.
Manual operation setting
If ‘AUTO’ is flashing, automatic or semi-automatic
program has been set. Press
will clear from the display and the oven can be
operated manually.
Automatic setting
Automatic setting of the oven allows you to
select the end time, cooking time, temperature
and cooking mode. The oven will switch on,
cook according to the selected cooking mode
and temperature and then switch off
automatically;
button, ‘AUTO’
As an example: If cooking time takes 45 minutes
and you want it to finish at 14:00
1. Press the function button repeatedly until the
bar above flashes and set the cooking time 45
minutes.
2. Press the function button repeatedly until the
bar above flashes and set the finish time to 14:00.
After the above setting , the current time is displayed
and the bars above and will flash, indicating that
automatic cooking feature of the oven is set. When
the clock displays 13:15, the oven will start cooking
automatically.
While cooking the bar will flash.
1. Press the function button repeatedly until the bar
above flashes , then press + or – button to set the time
frame for baking.
2. Press the function button repeatedly until the bar
above flashes , then press + or – button to set the time
to switch off.
3. Set cooking temperature and cooking mode by
turning the thermostat knob and selector knob.
After these setting , the bars above and will flash,
indicating that automatic cooking feature of the oven is set.
20
Page 22

Using your Freestanding Cooker
Getting the most from your appliance
The oven starts immediately, and ‘AUTO’ will
flash. When the finish time is reached, the oven
automatically stops cooking. The alarm will ring
button and the and ‘AUTO’ will flash, press the
ringing will stop.
When the button is pressed during semiautomatic cooking, the set cooking time is
displayed. If the button is pressed and the time
is set back to ‘O’, the semi-automatic setting will
be cancelled. When button is pressed again,
the oven will revert to the manual mode.
Timer
The digital countdown timer can be set up to 23
hours and 59 minutes maximum.
To set the timer, press the button and then + or
- button until the desired time is displayed. Once
the button is released, the current time and U
is displayed. When the button is pressed the
remaining time is displayed. When the set time is
reached, disappears and the alarm will ring. To
stop the alarm, press the button.
Note: When cooking is finished, the cooking fan
continues to operate until the oven cools down
and then switches o automatically.
PRACTICAL COOKING ADVICE
The oven oers a wide range of settings which
allow you to cook any type of food in the best
possible way. With time you will learn to make the
best use of this versatile cooking appliance and
the following directions are only a guideline which
may be varied according to your own personal
experience.
Preheating
If the oven needs to be preheated, the ‘Convection’
mode or ‘Baking’ mode should be selected.
These are the most ecient modes, which will
reach the desired temperature as quickly as
possible using the least amount of energy.
Once the food has been placed in the oven, the
desired cooking mode should then be selected.
Note: After pressing the button, timer settings
should be done within 5 seconds.
In case of a power failure, all settings including
the time display will be lost. When the power is
returned, three ‘O’ and ‘AUTO’ will be displayed.
The oven light
Set cooking mode selection knob to symbol
to switch on the oven light/s. The oven light/s stay
on when the oven is operating.
Cooling ventilation
In order to cool down the exterior of the
appliance, this model is equipped with a cooling
fan, which switches on automatically. When the
cooling fan is on, you will notice a flow of air
exiting between the oven door and the control
panel.
Multi shelf cooking
If you want to cook food on several shelves, select
the ‘Baking’ mode as this is the only cooking
mode that allows you to do so.
When cooking delicate foods on more than one
shelf, use the ‘Baking’ mode. This mode allows
you to cook on 3 shelves at the same time. Refer
to the ‘Cooking Guide’ table.
21
Page 23

Using your Freestanding Cooker
Getting the most from your appliance
Cooking pizza
For best results when cooking pizza:
• Preheat the oven for at least 10 minutes.
• Use a light aluminium pizza pan, placing it on
the shelf supplied with the oven. Don’t use the
dripping pan since this will extend the cooking
time, making it dicult to get a crispy crust.
• Do not open the oven door frequently while the
pizza is cooking;
• If the pizza has a lot of toppings (three or four),
we recommend you add the mozzarella cheese
on top halfway through the cooking process.
• For best results, only use one shelf at a time,
but if you want to cook on two shelves, use
the 2nd and 4th racks from the bottom with a
temperature of 220°c and swap them halfway
through cooking.
Using the Grill
Use the ‘Grill’ mode with the oven door closed,
place the food on the centre of the grill pan,
insert and fit the grill pan on either the 3rd or 4th
shelf from the bottom. Note: only the central part
of the top heating element operates for grilling.
When using ‘Grill’ mode, the temperature is
automatically set to the highest setting. This
means you are unable to adjust the temperature
when using the grill mode.
PLEASE NOTE: Always grill with the door closed.
Cooking fish and meat
When cooking white meat, fowl and fish, use a
temperature setting from 180°C to 200°c.
For red meat that you want well done on the
outside while tender and juicy in the inside, it
is best to start with a high temperature setting
(200°C-220°C) for a short time, then turn the oven
down afterwards.
In general, the larger the roast, the lower the
temperature setting. Place the meat on the centre
of the shelf and place the dripping pan beneath it
to catch the fat.
Make sure that the shelf is inserted so that it is
in the centre of the oven. If you would like to
increase the amount of heat from below, use a
lower shelf height. For savoury roasts (especially
duck and wild game), dress the meat with lard or
bacon on the top.
22
Page 24

Care and maintenance
Looking after your appliance
Cleaning
WARNING! Isolate the power supply to the cooker and
make sure that the oven is cool.
Before cleaning your oven or performing
maintenance, make sure that the cooking mode
selection knob and the cooking temperature
selection knob is set to ‘OFF’. To extend the life
of your oven, it must be cleaned frequently.
The inside of the oven should preferable be
cleaned immediately after use, when it is still
warm (but not hot), with warm water and
soap. The soap should be rinsed away and the
interior dried thoroughly. Avoid using abrasive
detergents, scourers, acidic cleaners such as lime
scale remover, etc, as these could damage the
enamel, and can result in development of rust
and corrosion. If stains are particularly tough to
remove, use cleaners specifically recommended
to clean ovens and follow the instructions
provided with the cleaner. Never use steam
cleaner for cleaning inside the oven.
Burner Caps:
Periodically, the enamelled pan support,
enamelled covers and burner heads must be
washed with warm soapy water, rinsed and dried.
After drying them thoroughly, place them back in
their original positions on the burners
Enamelled Parts:
In order to keep enamelled parts as new, it is
necessary to clean them frequently with mild
warm soapy water and then dry with a cloth. Do
not wash them while hot and never use abrasive
powders or abrasive cleaning materials. Do not
leave anything spilled onto enamelled parts for
long periods of time.
Stainless Steel:
Stainless steel parts must be cleaned frequently
with mildly warm soapy water and a soft sponge
and then dried with a soft cloth. Do not use
abrasive powders or abrasive cleaning materials.
Do not leave anything spilled onto stainless steel
parts for long periods of time.
Do not clean using caustic creams, abrasive
cleaning powders, thick wire wool or hard tools.
Enamelled parts of the oven can be damaged
if excess cleaning liquids are not immediately
removed.
After cleaning the interior parts of the oven with a
soapy cloth, rinse it and then dry thoroughly with
a soft cloth.
Clean the glass surfaces with special glass
cleaning agents.
Never use flammable agents like acid, thinner or
petrol when cleaning your oven.
Do not clean your oven with a steam cleaner.
Do not wash any part of your oven in a
dishwasher.
23
Page 25

Care and maintenance
Looking after your appliance
Replacing the oven lamps
Replacement lamps are available from our support team.
Please call 0333 305 2263.
Light source shall be replaced by professional.
WARNING: Ensure that the appliance is switched o
before replacing the lamp to avoid the possibility of
electric shock.
Remove the glass cover of the lamp-holder as
shown below.
Remove the lamp and replace with a lamp
resistant to high temperatures (300°C) with the
following characteristics:
- Voltage: 220-240V
- Wattage: 25W
--Type: E 14 (Incandescent light)
Energy eciency class : G
Replace the glass cover and reconnect the oven
to the mains power supply.
WARNING: Please do not use screwdrivers or other
utensils to remove the light cover. This could damage
the enamel of the oven or the lamp holder lamp holder.
PLEASE NOTE: The bulb replacement is not covered by
your guarantee.
24
Page 26
Care and maintenance
Looking after your appliance
Routine maintenance
and the pressure regulator (if installed) checked
periodically. If anomalies are found, do not repair
components but have the faulty component
replaced. To ensure good performance and
safety, the gas regulator taps must be greased
periodically.
Periodic lubrication of the taps and any other
appliance service must only be carried out by
Authorised Personnel.
Abnormal operation
Any of the following are considered to be
abnormal operation and may require servicing:
• Yellow tipping of the burner flame.
• Sooting up of cooking utensils.
• Burners not igniting properly.
• Burners failing to remain alight.
• Burners extinguished by cupboard doors.
In case the appliance fails to operate correctly,
contact our Support Team on 0333 305 2263.
25
Page 27
Care and maintenance
Looking after your appliance
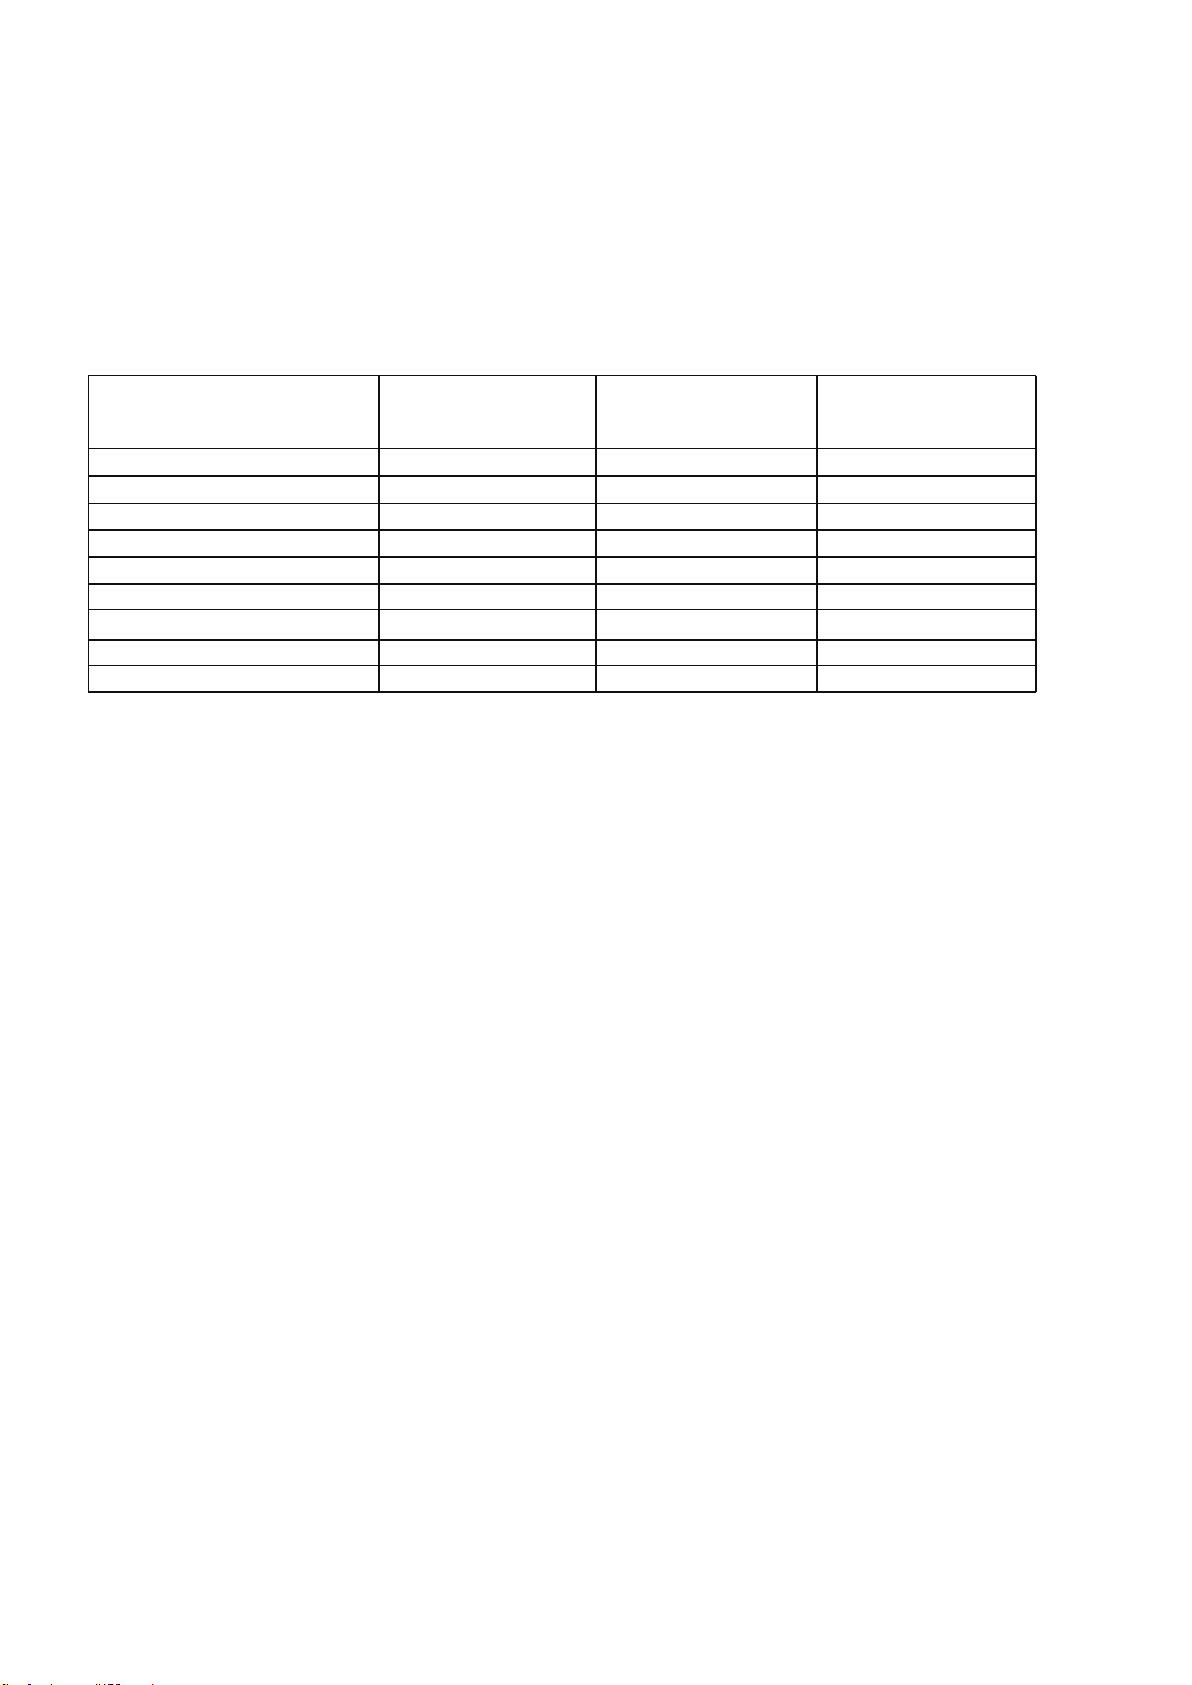
Technical specification
MUNROS100DFIN/
LOMOND100DFCRM/
NESS100DFB
Cavity volume (L)
Top element power (W)
Rear element power (W)
Bottom element power (W)
Circulating fan power (W)
Cooling fan power (W)
Lamp power (W)
Total power (W)
Energy class
Upper right cavity
57 5732
1100-1400
1550 1550
1100
13 13
22
25 25
2160-2570 1600-1900 1710-2030
A
Upper left cavity Lower left cavity
1100 1400
-
700
-
-
A
-
-
25
A
We apologise for any inconvenience caused by minor inconstancies within these instructions that may
occur due to product improvements and development
All images and drawings are for illustration purposes only.
26
Page 28
Energy fiche
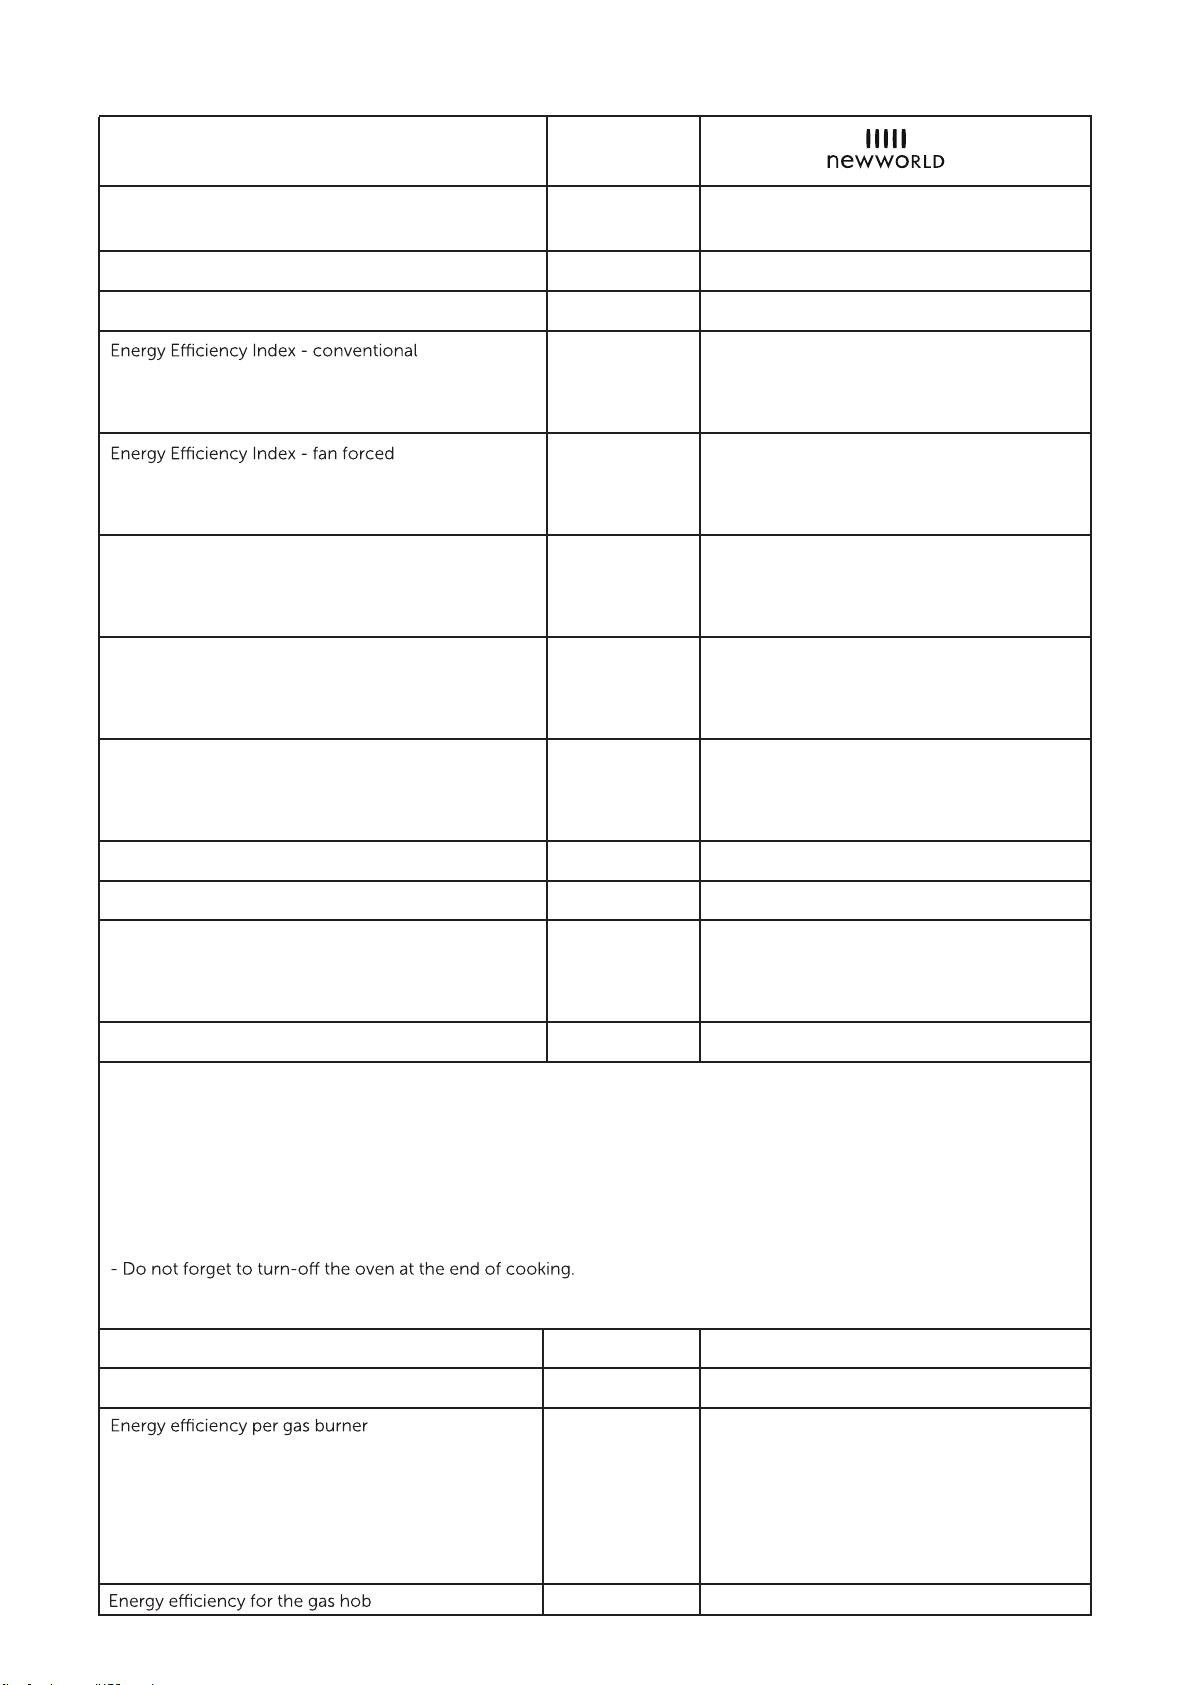
Brand
Model
Type of oven
Mass
Energy Class
Energy consumption (electricity) - conventional
Energy consumption (electricity) - fan forced
kg
kWh/cycle
kWh/cycle
MUNROS100DFIN / LOMOND100DFCRM /
NESS100DFB
Electric
87 (+/-2)
100.0 (upper-left oven)
N.A.(lower-left oven)
103.9 (upper-right oven)
N.A. (upper-left oven)
95.00 (lower-left oven)
105.1 (upper-right oven)
A (upper-left oven)
A (lower-left oven)
A ( upper-right oven)
0.68 (upper-left oven)
N.A. (lower-left oven)
0.82 (upper-right oven)
N.A. (upper-left oven)
0.75 (lower-left oven)
0.83 (upper-right oven)
Number of cavities
Heat Source
Volume
This oven complies with EN 60350-1
Energy Saving Tips
Oven
- Cook the meals together, if possible.
- Keep the pre-heating time short.
- Do not elongate cooking time.
- Do not open oven door during cooking period.
Type of hob
Number of gas burners
L
EE gas burner
EE gas hob
27
3
Electric
32 (upper-left oven)
57 (lower-left oven)
57 ( upper-right oven)
Energy Saving Tips
Hob
- Use cookwares having flat base.
- Use cookwares with proper size .
- Use cookwares with lid.
- Minimize the amount of liquid or fat.
- When liquid starts boiling , reduce the setting.
Gas hob
7
Triple Ring Burner-1: 53.38%
Rapid burner-1: 59.60%
Rapid burner-2: 59.60%
Semi-rapid burner-1: 58.76%
Semi-rapid burner-2: 58.76%
Semi-rapid burner-3: 58.76%
Auxiliary burner-1: N.A.
58.14%
Page 29
Circuit Diagram
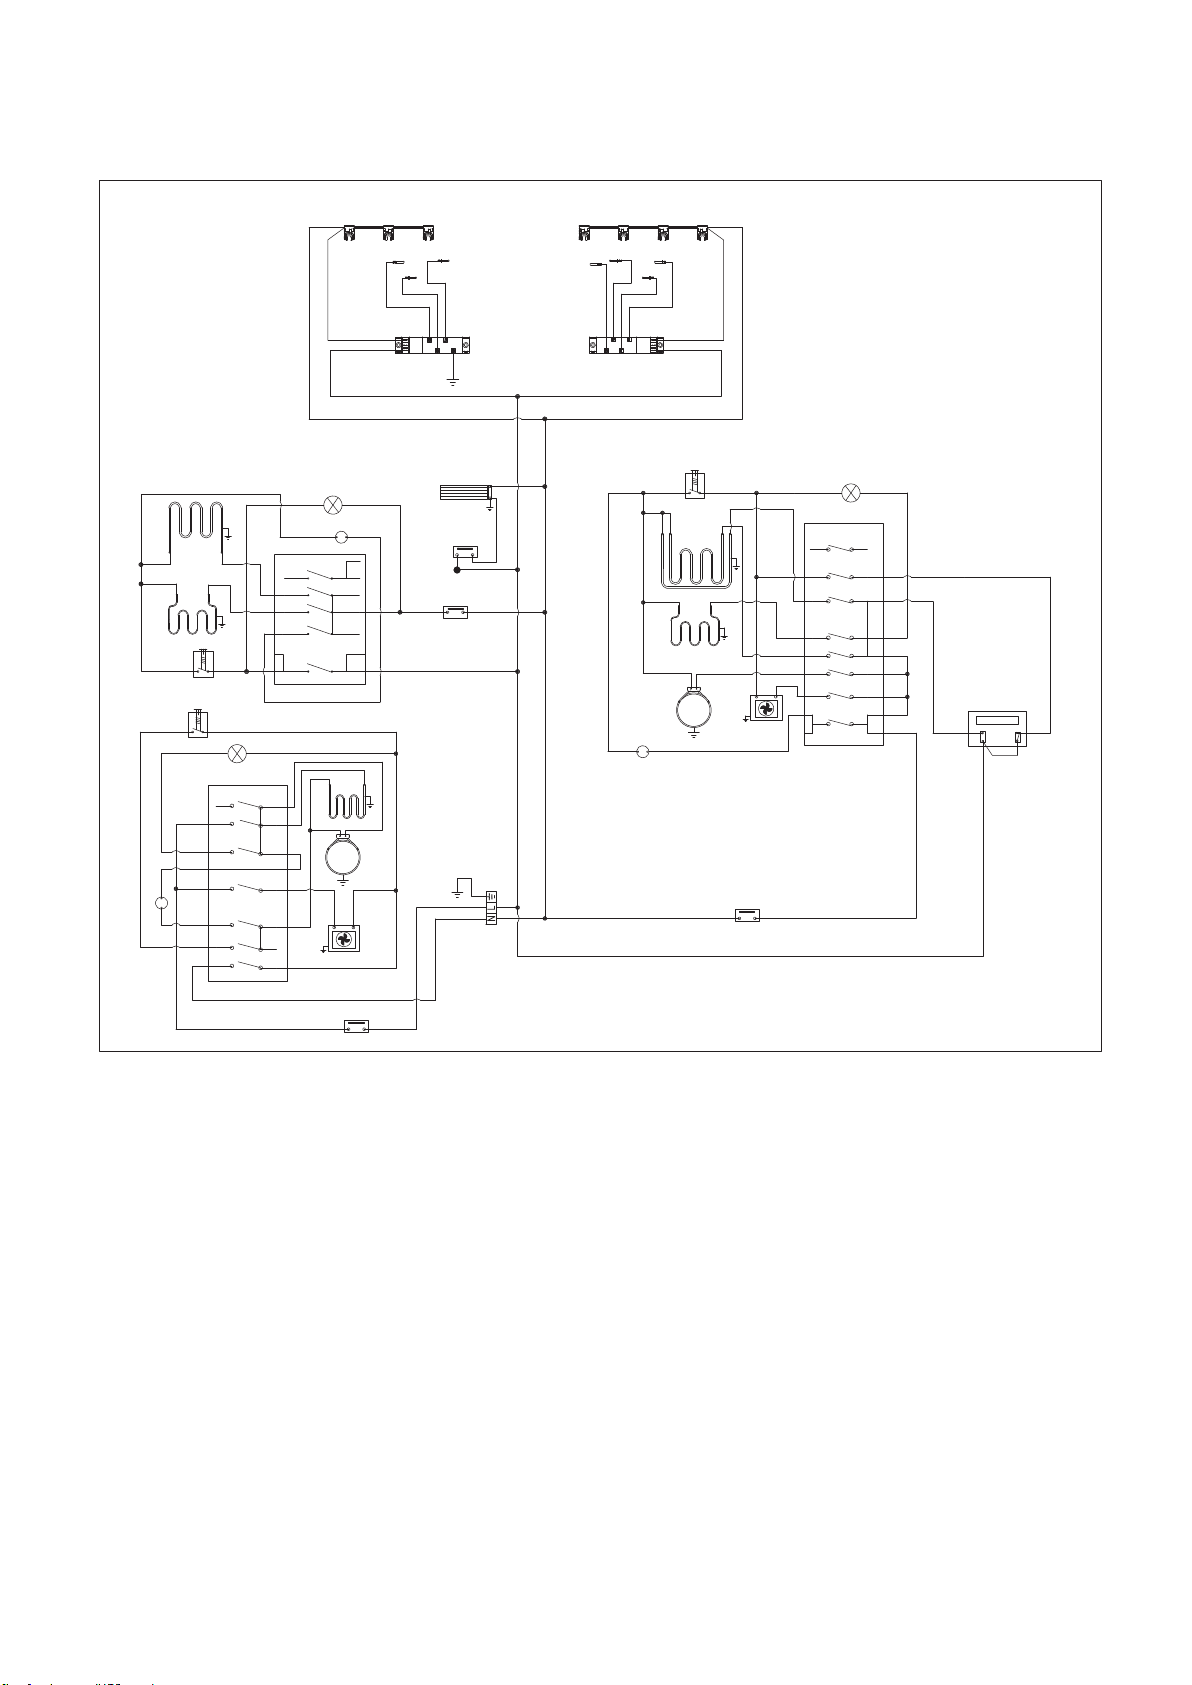
MI MI
Top Grill
Bottom
Grill
Thermostat switch
Thermostat switch
7a
6a
5a
4a
3a
2a
1a
Light
P7
P6
P5
P4
P3
P2
P1
4
3
1
2
5
7
6
5
4
3
2
1
Light
Lamp
P2
P1
P3
Top Grill
Back
Grill
Circulation fan
CA
CA
CA
L N
GA GA
Heat dissipation fan
45°C
Temperature
adjuster
120°C
Thermal cut-out
junction
box
CA
CA
Lamp
CA
CA
N
L
Thermostat switch
Top Grill
Bottom
Grill
Back
Grill
Circulation fan
120°C Thermal cut-out
Light
P8
8
P7
7
6
P6
P5
5
4
P4
P3
3
2
P2
P1
1
Electronic timer
12 : 00
A7
A8
A6
A9
120°C Thermal cut-out
40402501151
28
Page 30

Product support
Help is always at hand
Troubleshooting
1. If no electrical functions appear to work, check
the cooker isolation switch has not been turned
o also check the fuse in the switch and the
circuit breaker in you consumer unit
2. After replacing the fuse or resetting the circuit
breaker turn on individual parts of your cooker
one at a time to check function
Problem Possible Cause Solution
Only parts of the cooker
work it may be that the ovens
Links may be missing in
the rear connector box
or the grill, do not work
Nothing works (completely
dead)
Power is turned o at
the isolation switch or
the consumer unit
3. DO NOT ATTEMPT TO REPAIR THIS
COOKER YOURSELF. CALL NEWWORLD
Product Support on 0333 305
2263 OR CONSULT A GAS SAFE
REGISTERED INSTALLER
Refer to the Quick Start
Guide to check the correct
placement of the links
This must be done by a
qualified competent person
Ensure isolation switch is on
Check consumer unit has not
tripped out
Poor electrical connection
The hob burners do not
operate correctly
Check if the burner parts
are correctly assembled
(especially after cleaning).
Oven not heating up Oven temperature not set
correctly
Door is not properly
closed
Have the connections
checked by a qualified
electrician
The gas supply pressure may
be too low/high.
For appliances working with
bottled LPG, the LPG cylinder
may be depleted.
Ensure that the correct
temperature has been
selected and the door is
properly closed
29
Page 31
Product support
Help and assistance
www.newworldassist.co.uk
Model Ref.
Serial number
Troubleshooting
0333 305 2263*
Date of purchase
Lines open 09:00- 17:30 Monday to Friday.
30
Page 32

Declaration of conformance to
product standards
This appliance conforms to all relavant standards
applicable to domestic appliances sold in the UK
Disposal
This appliance/tting is marked
according to the European directive
2012/19/EU on Waste Electrical and
Electronic Equipment (WEEE).
By ensuring this product is disposed of
correctly, you will help prevent potential
negative consequences for the environment
and human health, which could otherwise be
caused by inappropriate waste handling of
this product.
The symbol on the product, or on the
documents accompanying the product, the
crossed out wheelie bin symbol, indicates
that this appliance/tting may not be treated
as household waste. Instead it shall be
handed over to the applicable collection point
for the recycling of electrical and electronic
equipment.
Disposal must be carried out in accordance
with local environmental regulations for waste
disposal.
For more detailed information about
treatment, recovery and recycling of this
product, please contact your local authority,
your household waste disposal service or the
retailer where you purchased the product.
31
Page 33
Call us now and activate your 24 month guarantee
Thank you for choosing New World. Your new product is guaranteed against faults and
breakdowns for 24 months. Don’t forget to register it with us today so we can provide you
with our best possible after-sales service and useful updates.
www.newworldassist.co.uk
0333 305 2263
Your New World Guarantee
The guarantee is subject to the following provisions:
Important Data Protection Information
3
2
Page 34

Page 35

Page 36

Page 37

Contact:
www.newworldassist.co.uk
Helpline: 0333 305 2263
 Loading...