

Page 1

1
Getting Started
This chapter describes how to connect your Newton device to your computer,
install the Newton Connection Utilities, and use the utilities to create your
first backup.
About the Newton Connection Utilities
With the Newton Connection Utilities, you can connect your Apple
MessagePad or other Newton device to your computer and do the following:
m Back up Newton information and store it on your computer.
m Install packages (applications, system updates, and so on) on your
Newton device.
m Use your computer’s keyboard to enter information on your Newton device.
m Import information from your computer to your Newton device and export
information from your Newton device to your computer.
m Import information from your computer to the Newton Works application
on your Newton device and export Newton Works information from your
Newton device to your computer.
m Keep your applications synchronized by updating information on both your
computer and your Newton device.
1
Page 2

The Newton Connection Utilities work with the Newton 2.0 or 2.1 operating
system. If you have a Newton device that uses an earlier version of the Newton
operating system and you don’t plan to upgrade, Apple recommends you use
the Newton Connection Kit 2.0 instead of the Newton Connection Utilities.
Note: The Newton Works import, Newton Works export, and Auto Dock
features of the Newton Connection Utilities work only on Newton devices
with the Newton 2.1 operating system.
Installation requirements
To use the Newton Connection Utilities, you need the following:
m A computer using the Mac OS with a 68030, 68040, or PowerPC
microprocessor
m Mac OS version 7.1 or higher
m 8 megabytes (MB) of total RAM with 4 MB available (12 MB
recommended for a Power Macintosh)
m A hard disk drive with 10 MB of available disk space
m An available printer port, modem port, or printer-modem port
m A serial cable or AppleTalk cable
m If you have a MessagePad 2000, a Newton Serial Adapter
Connecting a Newton device to your computer
To use the Newton Connection Utilities, you connect your Newton device to
your computer in one of the following ways:
m using a serial cable
m using an AppleTalk network
2
Chapter 1
Page 3

Connecting with a serial cable
You use a serial cable to connect your Newton device to the printer or modem
port on the back of your computer. If you don’t have a serial cable, you can
purchase one from an authorized Apple dealer. The cable has mini DIN-8
connectors on both ends.
To connect with a serial cable, follow these steps:
1Make sure both your computer and your Newton device are turned off.
2Plug one end of the serial cable into the Newton InterConnect port (or the
Communication port) on your Newton device (or, if you have a MessagePad 2000,
connect to the Newton Serial Adapter, and then plug the adapter into the Newton
InterConnect port).
Note: If you’re using a MessagePad 2000, be sure to connect the cable to the
serial adapter first and then connect the adapter to your MessagePad 2000—
otherwise, your MessagePad may not establish a connection properly.
If you’re using an eMate 300, you can plug the serial cable into either the
Newton InterConnect port or the serial port.
Getting Started
3
Page 4
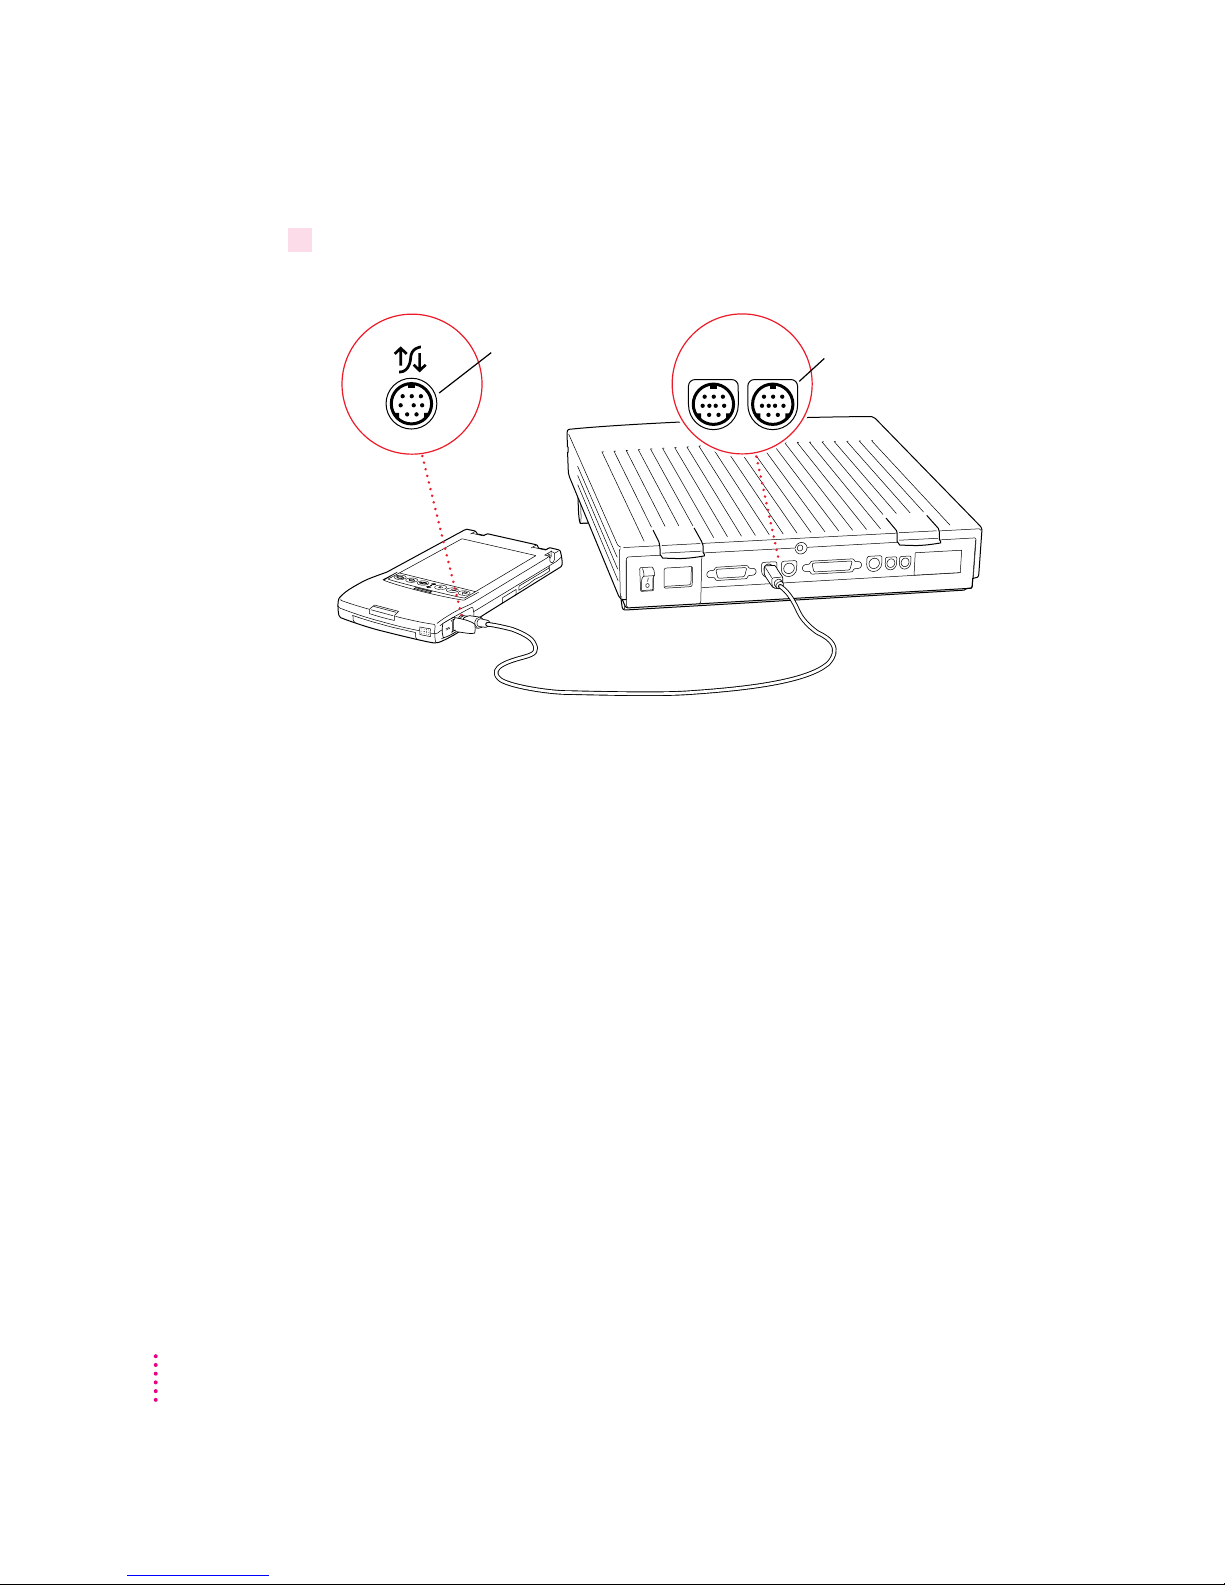
3Plug the other end of the serial cable into the printer port (
the printer-modem port on your computer.
[
), the modem port (W), or
If you use the printer port,
go to the Chooser and
make sure AppleTalk
is inactive.
IMPORTANT
Connect to an Apple
MessagePad or other
Newton device.
[W
If you connect your Newton device to a PowerBook that has an
internal modem, make sure AppleTalk is inactive and Modem is set to
Normal in the PowerBook Setup control panel.
That’s it! Go on to “Installing the Newton Connection Utilities,” later in
this chapter.
4
Chapter 1
Page 5

Connecting over an AppleTalk network
Use a LocalTalk kit or other type of AppleTalk connection kit to connect your
Newton device to an AppleTalk network. If your computer is already
connected to an AppleTalk network, you need one connection kit. If not, you
need two kits.
LocalTalk connection kit
See the instructions
that came with your
connection kit to connect
to an AppleTalk network.
Plug this end of the cable
into your Newton device.
IMPORTANT
If your computer is part of an EtherTalk network or another kind
of network, see your system administrator for help with connecting your
Newton device.
To connect with a LocalTalk cable, follow these steps:
1Make sure your computer and your Newton device are turned off.
2 Follow the instructions that came with your connection kit to connect the LocalTalk
cable to the computer.
3Plug the LocalTalk cable into the Newton InterConnect port or the Communication port
on your Newton device (or, if you have a MessagePad 2000, connect to the Newton Serial
Adapter, and then plug the adapter into the Newton InterConnect port).
Note: If you’re using a MessagePad 2000, be sure to connect the cable to the
serial adapter first and then connect the adapter to your MessagePad 2000—
otherwise, your MessagePad may not establish a connection properly.
If you’re using an eMate 300, you can plug the LocalTalk cable into either the
Newton InterConnect port or the serial port.
4 Turn on your computer and choose the Chooser from the Apple (
K
) menu.
Getting Started
5
Page 6
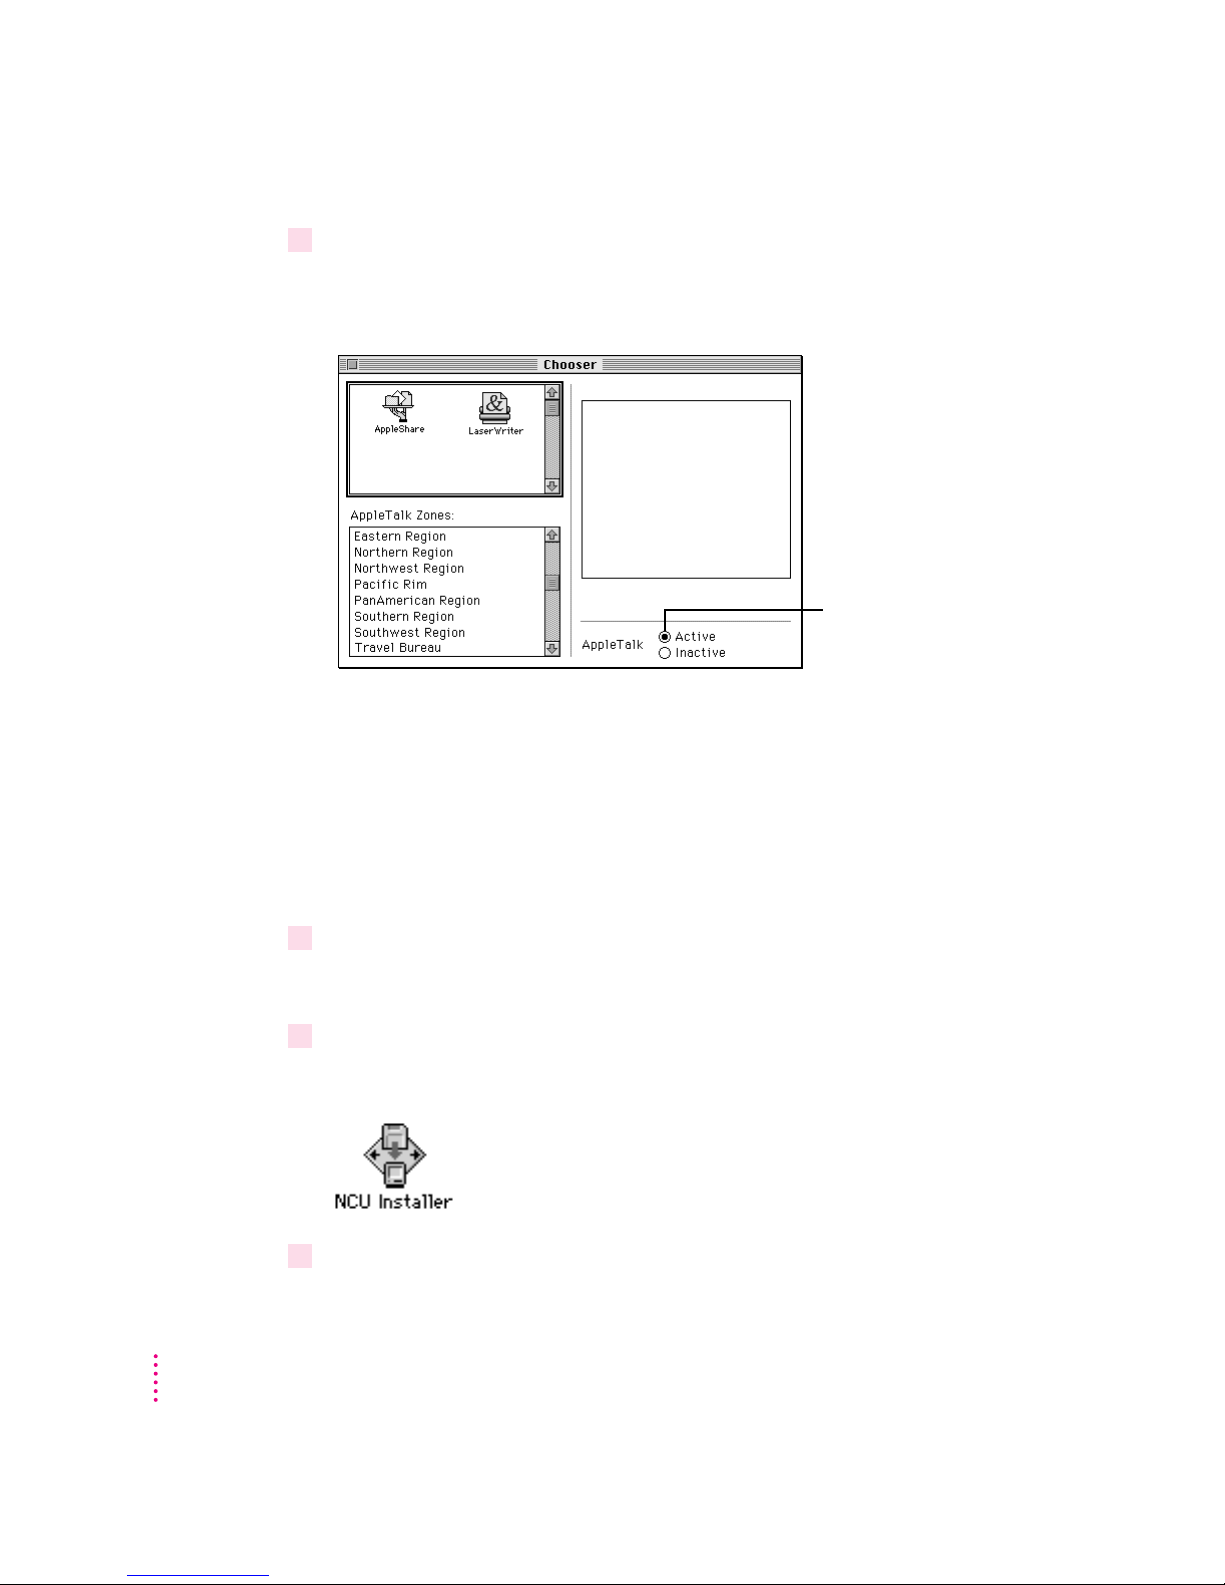
5Make sure AppleTalk is active.
If not, click the AppleTalk Active button. If instructions appear on screen,
follow them.
Make sure AppleTalk
is active.
That’s it! You’ve connected your Newton device to your computer on a
AppleTalk network. Go on to the next section.
Installing the Newton Connection Utilities
Before your computer can communicate with your Newton device, you need to
install the Newton Connection Utilities on your computer. Follow these steps:
6
1 Insert the
you have an eMate 300, insert the CD that came with it into your CD-ROM drive) and open
the disk by double-clicking its icon.
2 Open the Installer by double-clicking its icon.
If the software is on a CD, you may have to navigate to find it.
3 In the Installer Welcome dialog box that appears, click Continue.
Chapter 1
Install 1
disk for the Newton Connection Utilities into a floppy disk drive (or, if
Page 7
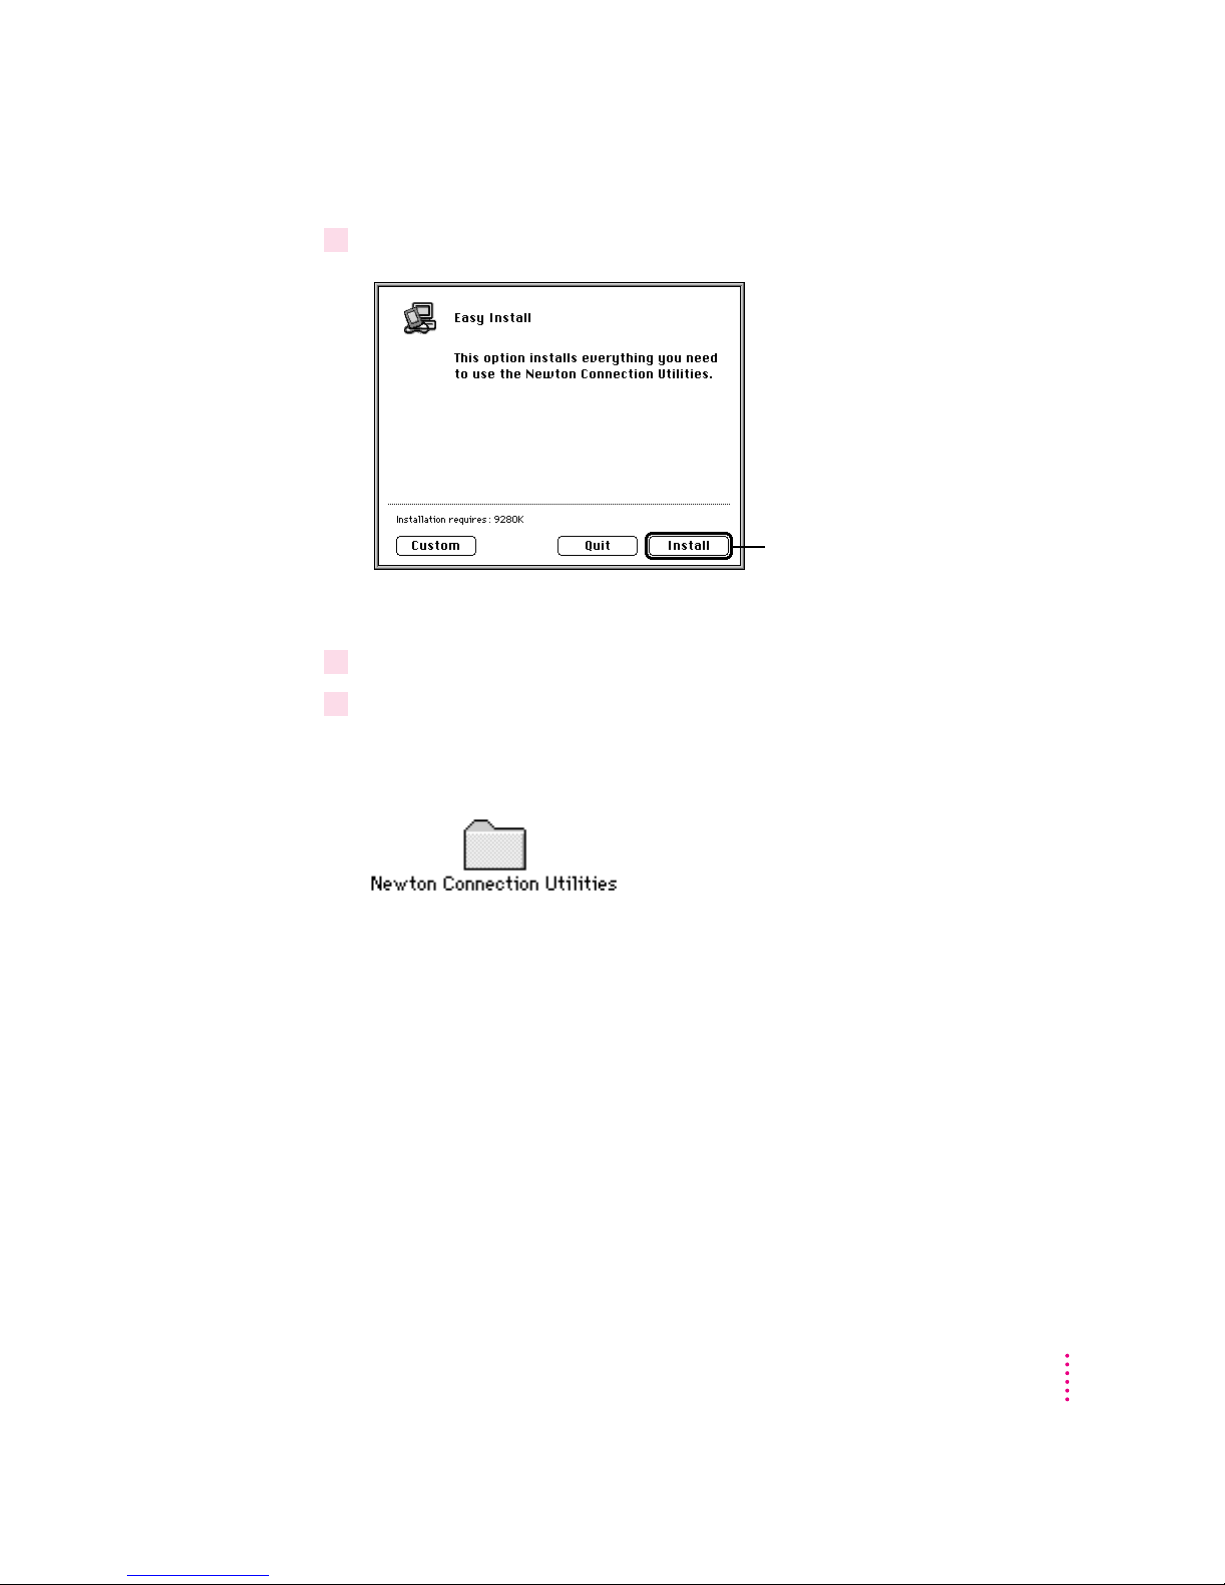
4 In the dialog box, click Install.
Click to start the
installation.
A status box keeps you informed of progress during installation.
5 Follow the instructions on your screen.
6When you see a message reporting that the installation was successful, follow the
instructions on the screen.
Yo u’ ll find a folder named Newton Connection Utilities on your hard disk.
Within this folder are the Newton Connection Utilities application, a folder
containing translators, and a Backups folder.
IMPORTANT
Don’t move the items inside the Newton Connection Utilities
folder. You can change the location where backup files are stored by selecting
a different location using the Preferences command in the Edit menu. You
can also place an alias for the application or other items in the folder in a
different location.
Getting Started
7
Page 8
Preparing your computer
To prepare your computer for communication with a Newton device, follow
these steps.
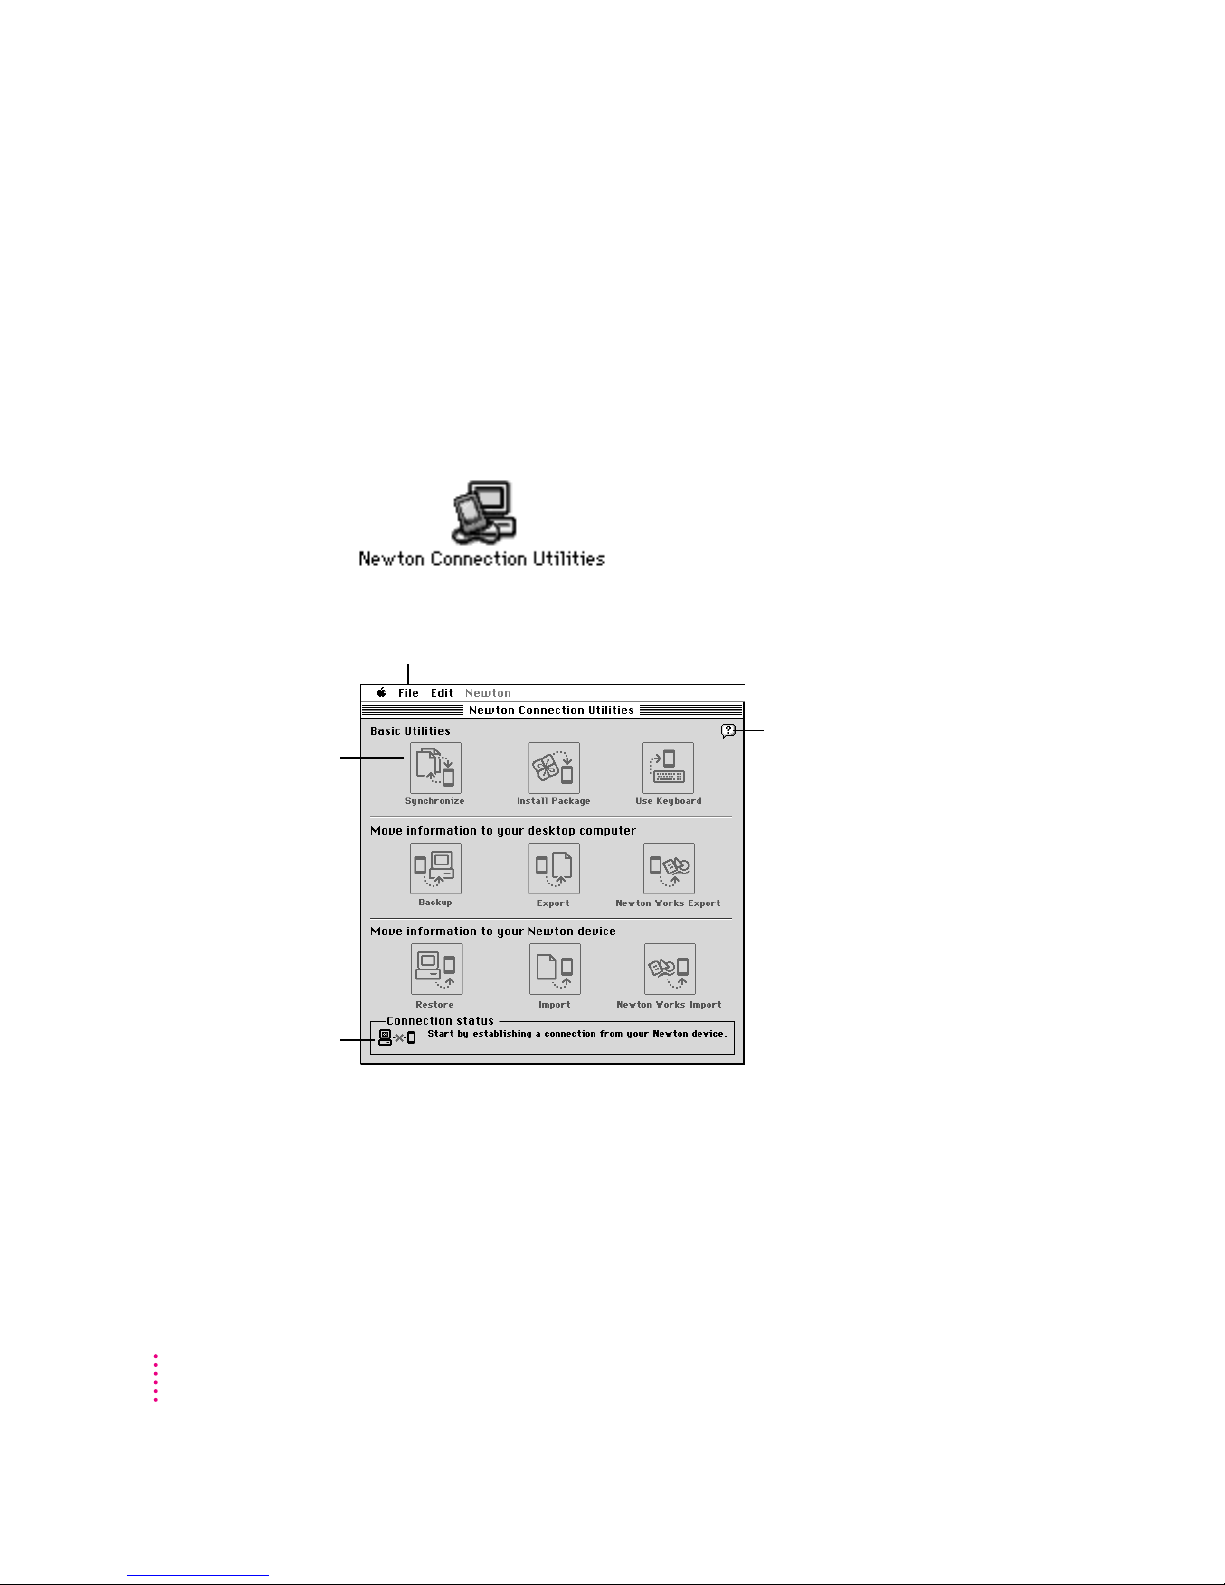
Opening the Newton Connection Utilities
m
On your computer, open the Newton Connection Utilities folder and double-click the
Newton Connection Utilities icon.
The Newton Connection Utilities window appears on your computer.
Buttons are dimmed
until you establish a
connection from your
Newton device.
Newton Connection Utilities menus
Click here to turn on (or off)
Balloon Help for this screen.
When Balloon Help is on, you
can move the pointer over a
button to learn what it does.
Displays connection
messages and other
information
8
Chapter 1
Page 9
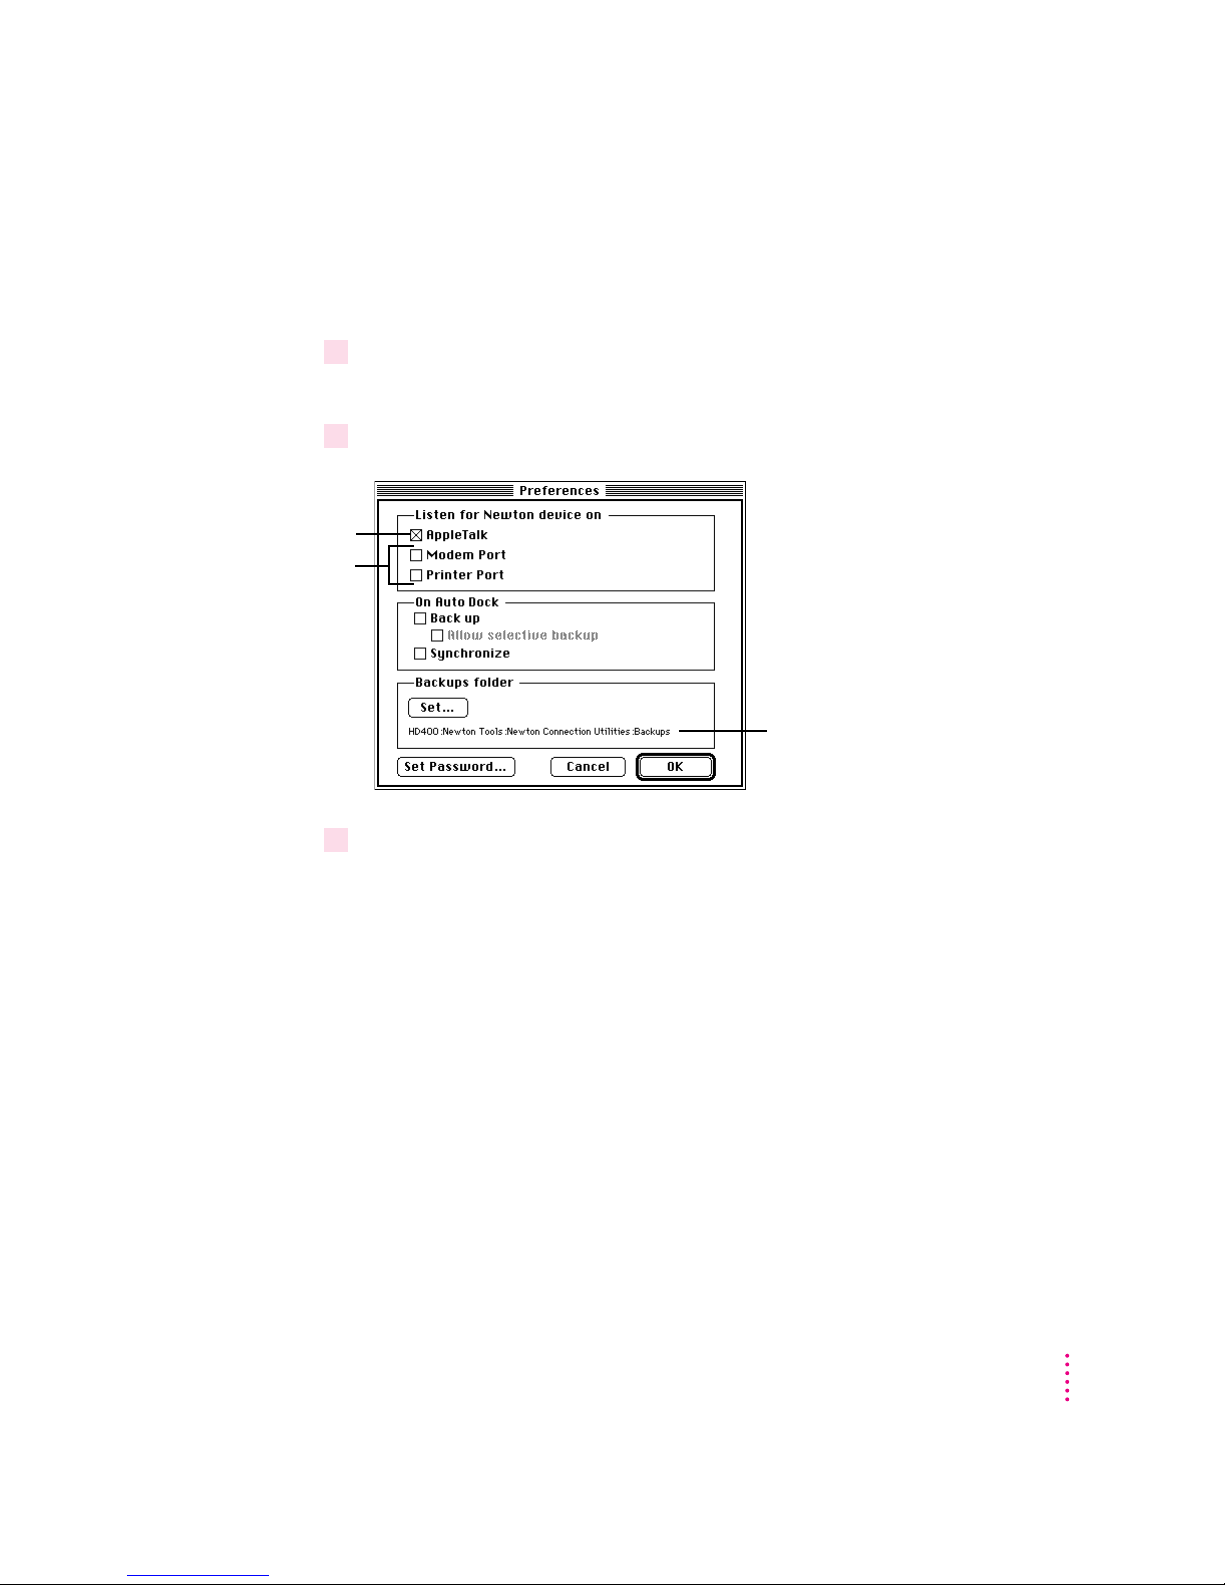
1Choose Preferences from the Edit menu.
2 Select the type of connection.
Select AppleTalk
if you have an
AppleTalk connection.
If you have a serial
connection, select the
port you’re using on
your computer. You
can use either port for
a serial connection.
Selecting the type of connection on your computer
The first time you use the Newton Connection Utilities, you need to specify
how the Newton device is connected to your computer.
A dialog box appears with a list of connection preferences for your computer.
Shows the location of backup files
created on your computer. By default,
the Backups folder is in the Newton
Connection Utilities folder.
3Click OK to save your choices and close the dialog box.
The type of connection you select is saved and remains set until you
change it.
Getting Started
9
Page 10

Preparing your Newton device
Before you use the Newton Connection Utilities, you need to tell your
Newton device how it is connected to the computer.
1 On your Newton screen, tap Dock.
Tap to select another
type of connection.
IMPORTANT
Make sure you enter your name and other owner information on
your Newton device. The computer uses this name when it creates a backup
file. See your Newton user’s manual to learn how to enter your name. Also, it’s
a good idea to name the storage cards you use with your Newton device.
Selecting the type of connection on your Newton device
Note: On some Newton devices, Dock is called Connection. To open it, first
open the Extras drawer ´, tap the Extras folder tab, tap All Icons, then tap
Connection (or Dock k). If you’re using the eMate 300, you can customize
the Dock key on the keyboard so that it opens Dock. See the documentation
that came with your eMate for instructions.
A slip appears showing the type of connection currently set for your
Newton device.
Shows the type of connection
set for your Newton device
2If the type of connection that appears in the slip is not correct, tap “Connect via” to
change the type of connection.
A list of connection types appears.
If you choose Serial, your connection setup is complete. Skip to the next
section, “Establishing a Connection.” If you choose AppleTalk, continue with
step 3.
10
Chapter 1
Page 11
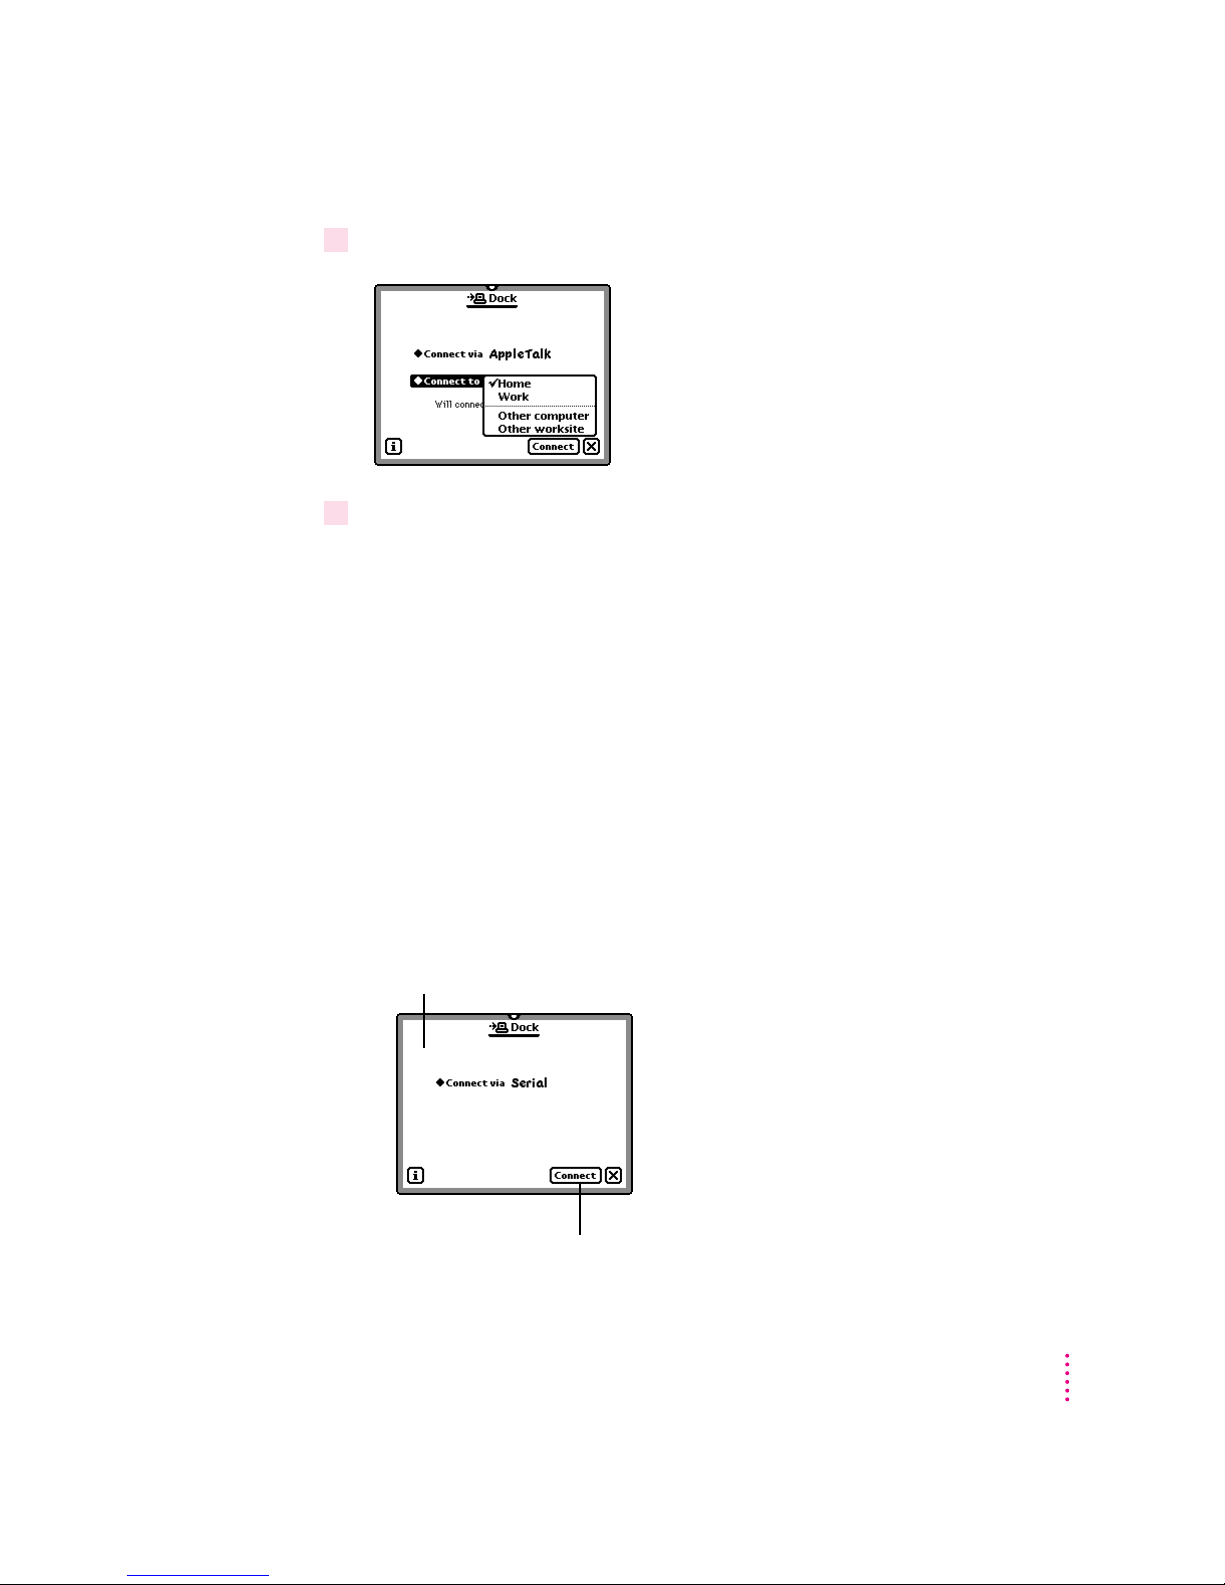
3 Tap “Connect to.”
4 In the list that appears, tap the worksite or computer you want to connect to.
If you tap “Other computer,” a slip appears. Tap the computer you want to
connect to. Only computers that have the Newton Connection Utilities
installed and running appear in the slip.
If you tap “Other worksite,” a slip appears. Enter information about the
worksite, then tap X to close the slip.
The type of connection you select is saved and remains set until you
change it.
Establishing a connection
After you select the type of connection, you need to establish a connection
between your Newton device and your computer.
m
Tap Connect.
Connection slip for a
serial connection
Tap here to connect.
Getting Started
11
Page 12
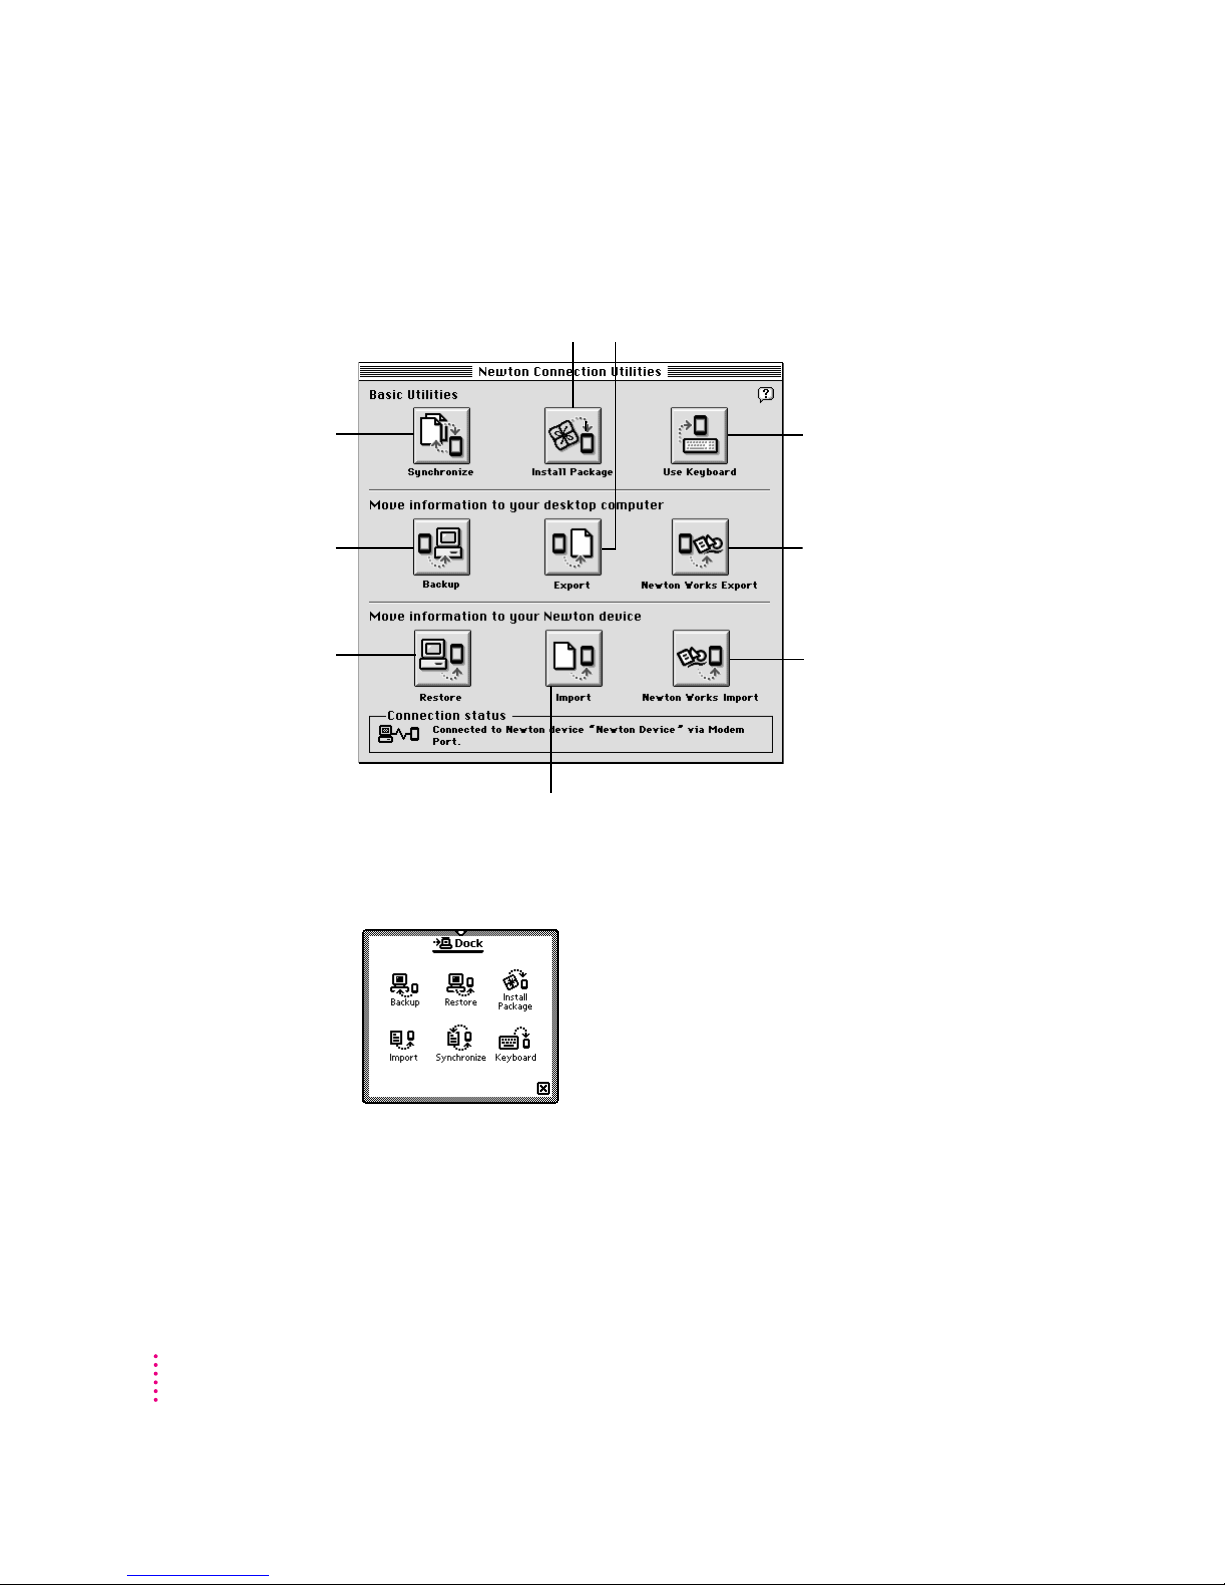
After a few moments, the connection is established and the buttons in the
Newton Connection Utilities window are no longer dimmed.
Click to update
information on both
your Newton device
and your computer.
Click to back up
Newton information and
save it on your computer.
Click to restore
information you’ve
backed up.
Click to install a package on
your Newton device.
Click to import information from your
computer to your Newton device.
Click to export information from your
Newton device to your computer.
Click to use your computer’s
keyboard to enter information
on your Newton device.
Click to export information
from a Newton Works
document on your Newton
device to your computer.
Click to import information
from your computer into a
Newton Works document
on your Newton device.
In addition, Newton Connection Utilities buttons appear on your
Newton screen.
As with the Newton Connection Utilities buttons on your computer, you
can use these buttons to select a utility (except Newton Works import and
export, and exporting from Newton to your computer).
Note: For simplicity, the instructions in this book describe using the Newton
Connection Utilities from your computer, but you can also start the utilities
from your Newton device. See Chapter 11, “Using the Utilities From Your
Newton Device,” for more information.
12
Chapter 1
Page 13
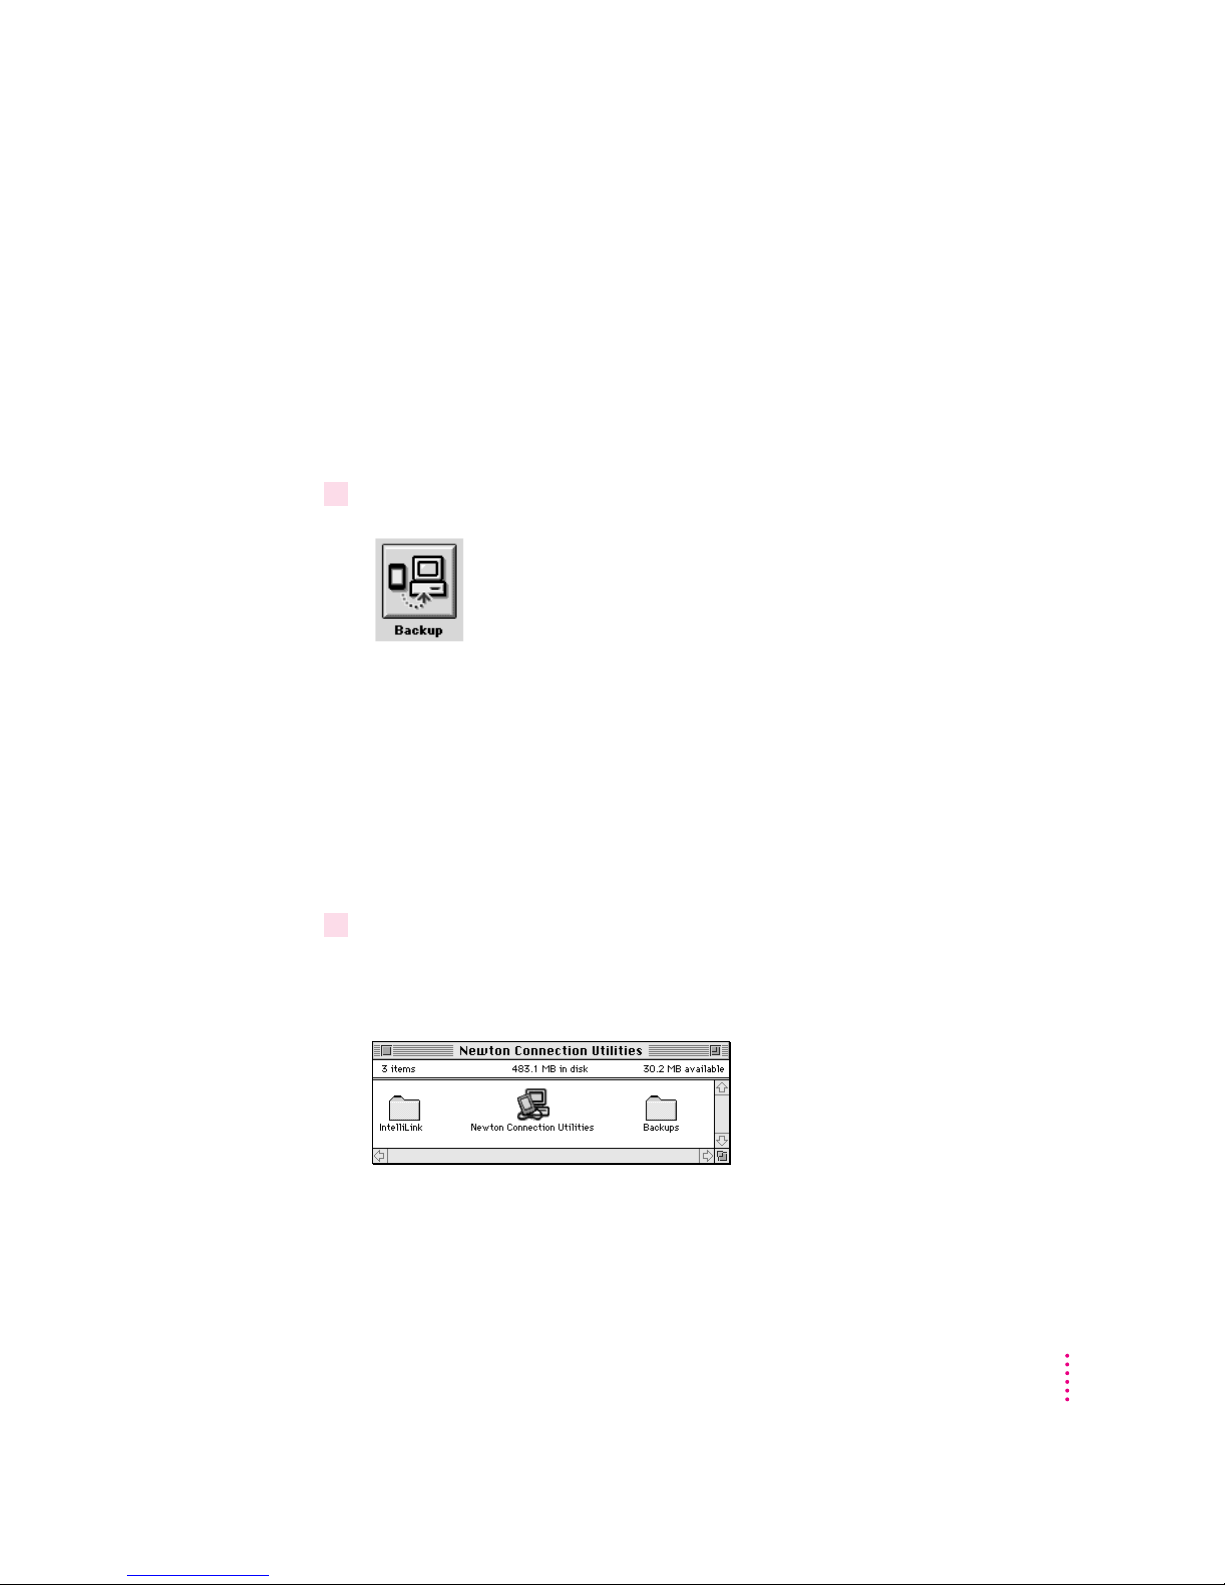
Creating your first backup
After you establish a connection, you can make a backup of information and
packages on your Newton device and store it on your computer.
Backing up your Newton device provides a safe way to store information in
case it gets lost or deleted by mistake. Also, it’s a good idea to back up your
Newton device before you import, export, or synchronize information.
To create your first backup, follow these steps:
1Click the Backup button in the Newton Connection Utilities window.
Because this is your first backup, the Newton Connection Utilities create a
full backup of all your Newton information and packages. If you have a
storage card inserted in your Newton device, information on the storage card
is also backed up.
During the backup, a status window appears on your computer screen to
show what information is being backed up.
After a few minutes, the window disappears and the backup is complete.
2Check the Backups folder on your computer.
When you back up your Newton device, a backup file is created and placed in
a folder named Backups in the Newton Connection Utilities folder.
For more information about backup files and folders, including how to
change the location of the Backups folder, see Chapter 2, “Backing Up and
Restoring Information.”
Getting Started
13
Page 14
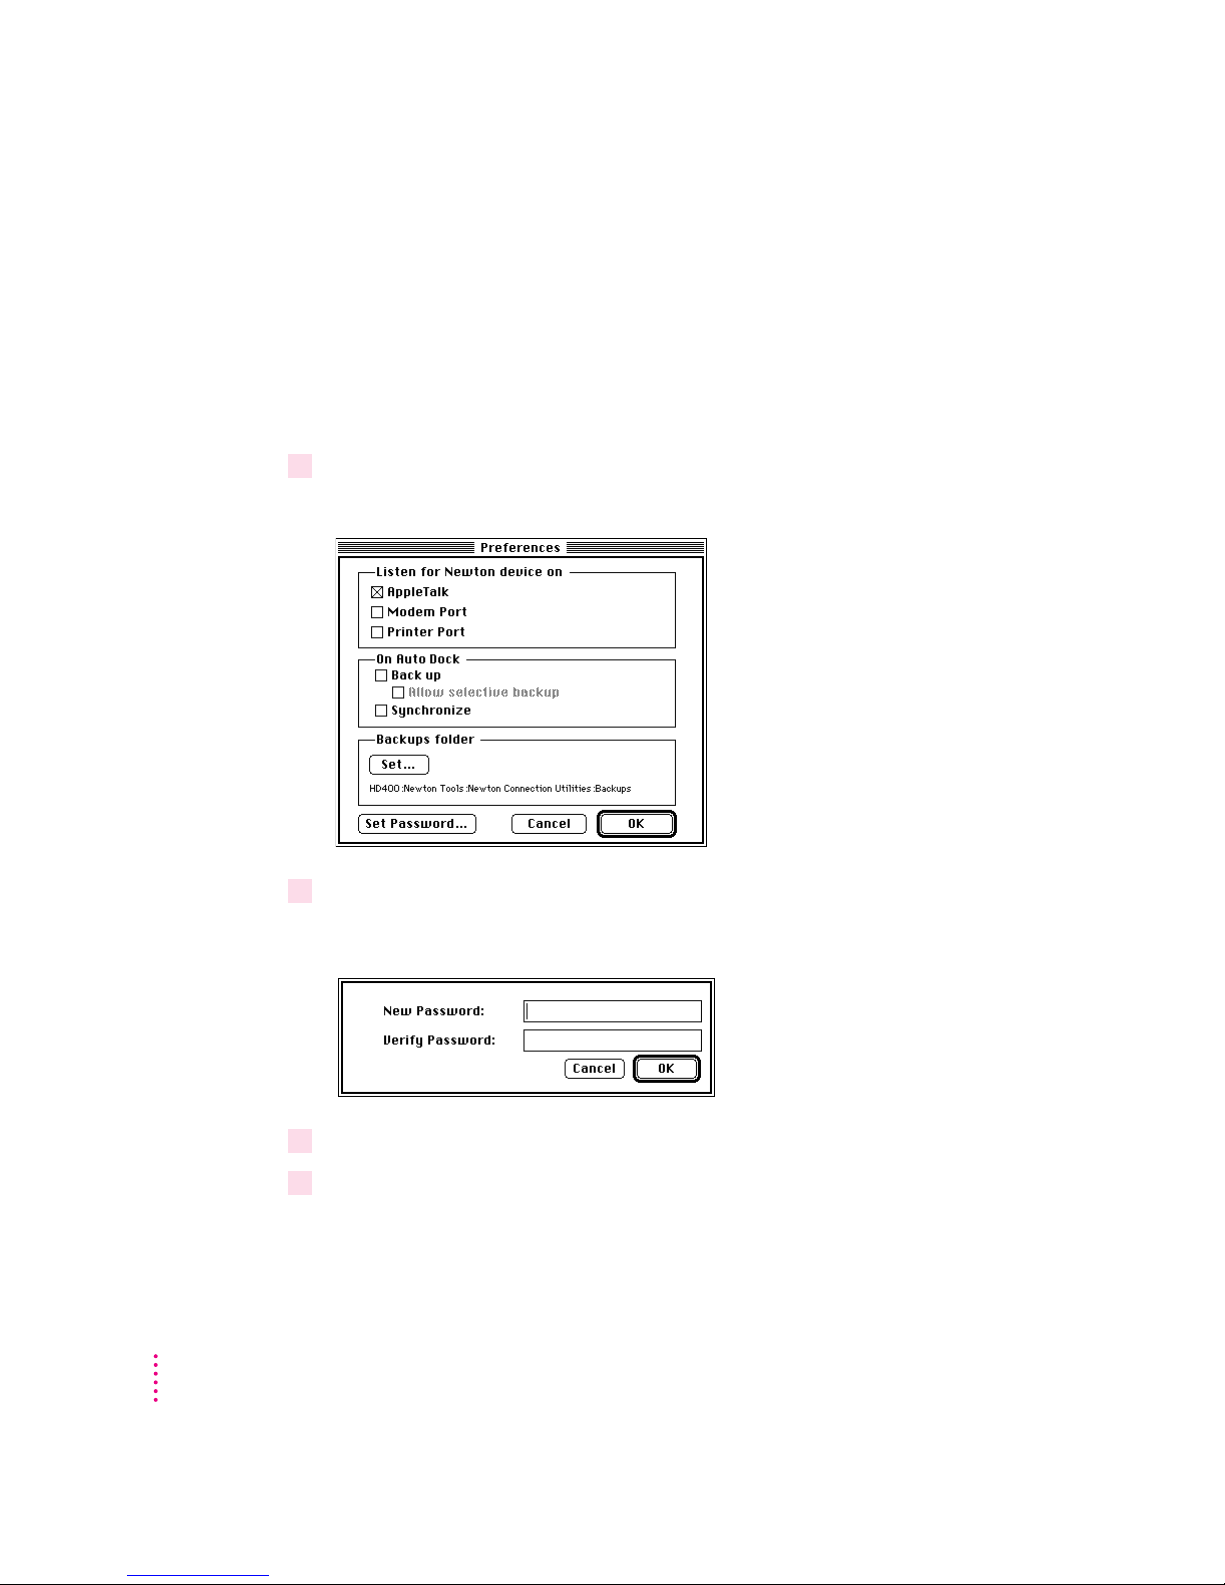
Setting a connection password
If you like, you can set a connection password for the Newton Connection
Utilities. This password prevents others from using the Newton Connection
Utilities without your permission.
The password you set works for serial or AppleTalk connections.
To set a connection password, follow these steps:
1 Open the Newton Connection Utilities and choose Preferences from the
Edit menu.
14
2Click Set Password in the Preferences dialog box.
A dialog box appears.
3Type the new password. Then retype the password to verify what you’ve entered.
4 Click OK.
Chapter 1
Page 15

The next time you establish a connection between your Newton device and
your computer, a prompt appears on your Newton device asking you to enter
your desktop connection password. The password helps prevent unauthorized
users from accessing your computer or Newton device, either directly or via
an AppleTalk network.
If you forget your password, you can enter a new one by clicking Set
Password in the Preferences dialog box.
Note: The password you enter for the Newton Connections Utilities is not
the same as the Personal Identification Number (PIN) you enter on your
Newton device.
Setting up for Auto Dock
If you’re using the Newton 2.1 operating system, you can set up the Newton
Connection Utilities to automatically back up or synchronize your Newton
device when you tap the Auto Dock button. (Your Newton device must be
connected to your computer.)
Note: The automatic backup and synchronize feature (Auto Dock) works only
on Newton devices using the Newton 2.1 operating system.
To set up Auto Dock, you need to
m Prepare your computer for Auto Docking.
m Set up your Newton device for Auto Docking.
To prepare your computer for Auto Docking, follow these steps:
Getting Started
15
Page 16
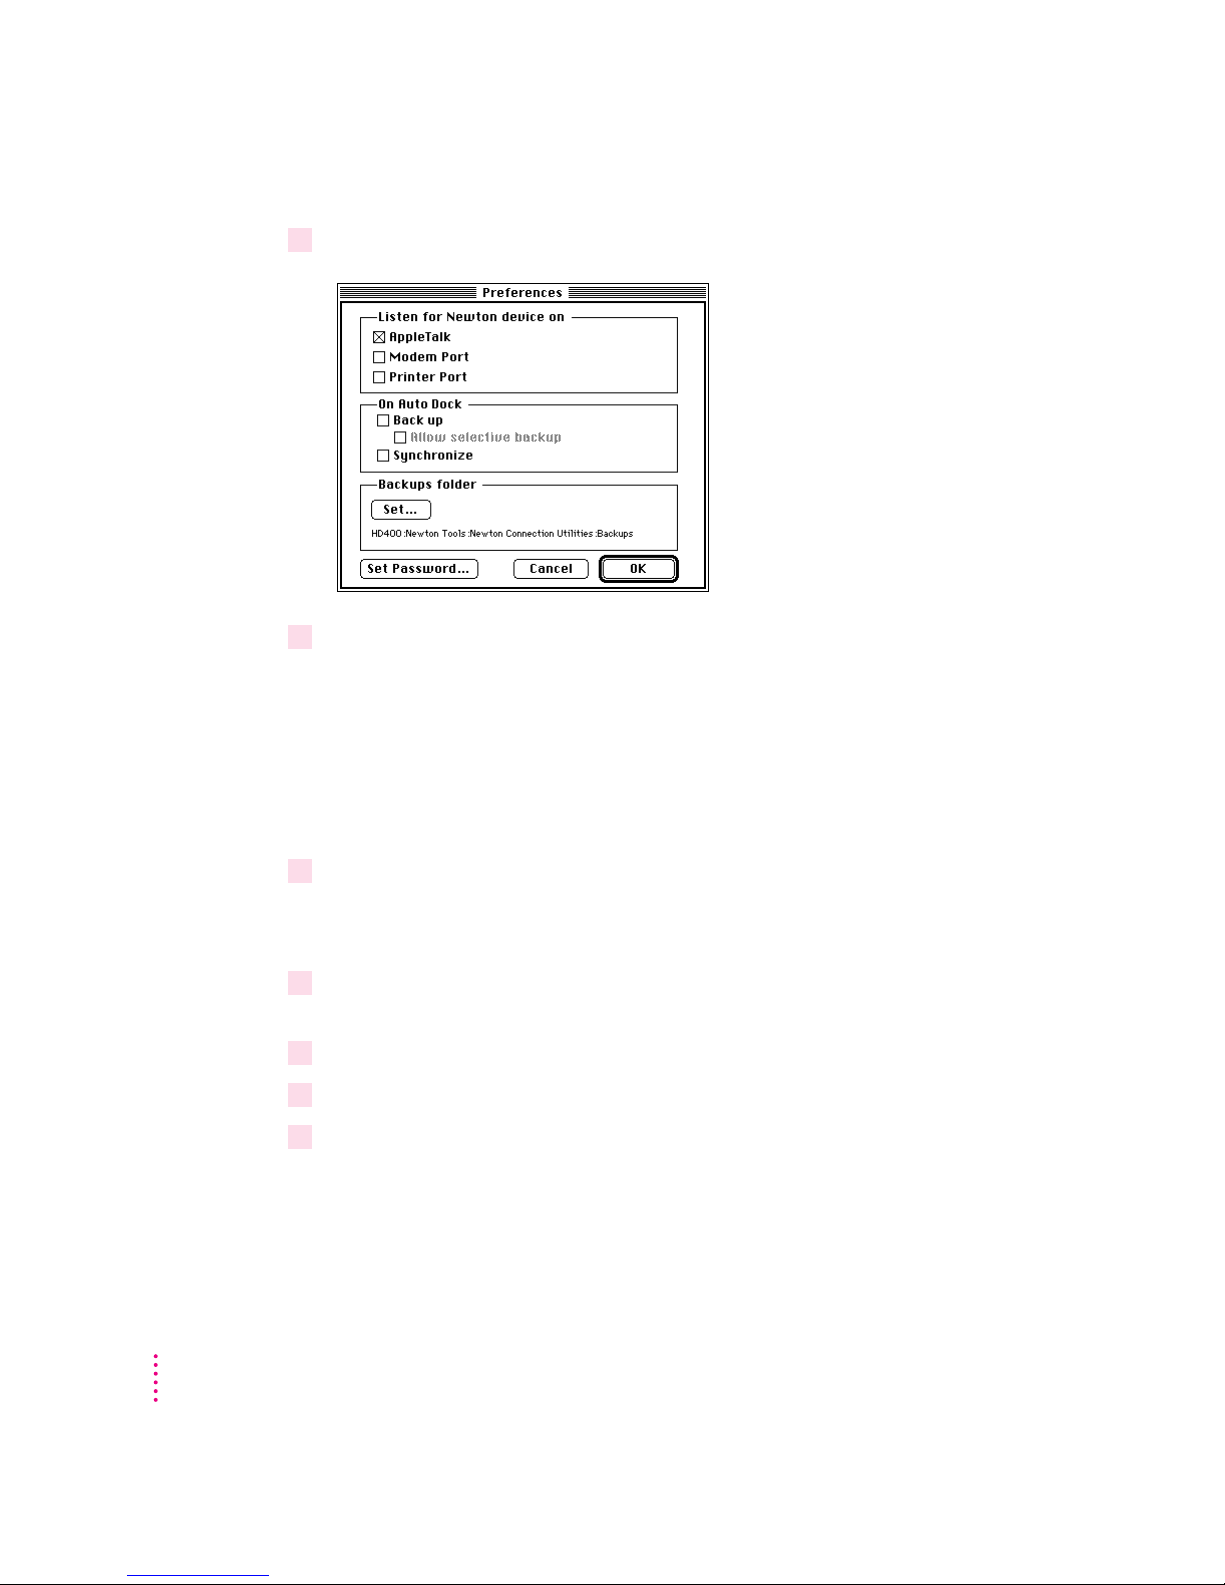
1 Open the Newton Connection Utilities and choose Preferences from the Edit menu.
2Choose the options you want.
m Select “Back up” if you want to back up all information during an Auto
Dock session.
m Select “Allow selective backup” if you want to be prompted to choose the
information to back up during an Auto Dock session.
m Select Synchronize to have the Newton Connection Utilities perform a
synchronization during an Auto Dock session.
16
3 Click OK.
You must also set up your Newton device for Auto Docking by following
these steps:
1 Open the Extras drawer ´, tap the folder tab at the top of the Extras drawer, tap All
Icons, then tap Prefs π.
2Tap Auto Dock in the Preferences slip.
3Tap to add a checkmark to Enable Auto Docking.
4 Tap all Xicons to close the slips.
Chapter 1
Page 17

The remaining steps set up the Dock application for Auto Docking.
5 On your Newton device, tap Dock, tap the information
appears, tap Prefs.
;
button, and in the list that
The Dock Preferences slip appears.
6Tap to add a checkmark to Auto Dock.
When you select Auto Dock, the slip expands, allowing you to select the type
of connection for your Newton device.
You can also tap to add a checkmark to “Always backup all information” to
have all your information backed up during an Auto Dock session. If this
option isn’t checked, a slip appears during Auto Docking that allows you to
back up selected applications.
7 Tap all Xicons to close the slips.
To perform an Auto Dock procedure (which works on devices using the
Newton 2.1 operating system), connect the cable to your Newton device
and computer.
Note: If you’re using an eMate 300, you must connect the cable to the Newton
InterConnect port (not the serial port) to use Auto Dock.
After your Newton and computer are connected, start up the Newton
Connection Utilities on your computer. A slip appears for initiating the
Auto Dock procedure. If you choose to perform an Auto Dock, the
Newton Connection Utilities back up or synchronize according to your
selected preferences.
Getting Started
17
Page 18

Quitting the Newton Connection Utilities
To end a connection and quit the Newton Connection Utilities:
m Choose Quit from the File menu on your computer screen.
The connection is ended and the Newton Connection Utilities window
disappears.
You can also end a connection from your Newton device by tapping the X
next to the Newton Connection Utilities buttons.
18
Chapter 1
Page 19

2
Backing Up and Restoring Information
The previous chapter described how to use the Newton Connection Utilities
to create your first backup. This chapter describes how to do additional
backups and how to restore information you’ve backed up.
About backup files
It’s important to back up your Newton information. Backup files provide a
safe way to store information in case it gets lost or deleted by mistake.
With the Newton Connection Utilities you can back up all information on
your Newton device or just selected information.
The first time you create a backup, the Newton Connection Utilities back up
all information on your Newton device (including any storage cards you’ve
inserted) and store the information in a folder named Backups.
19
Page 20
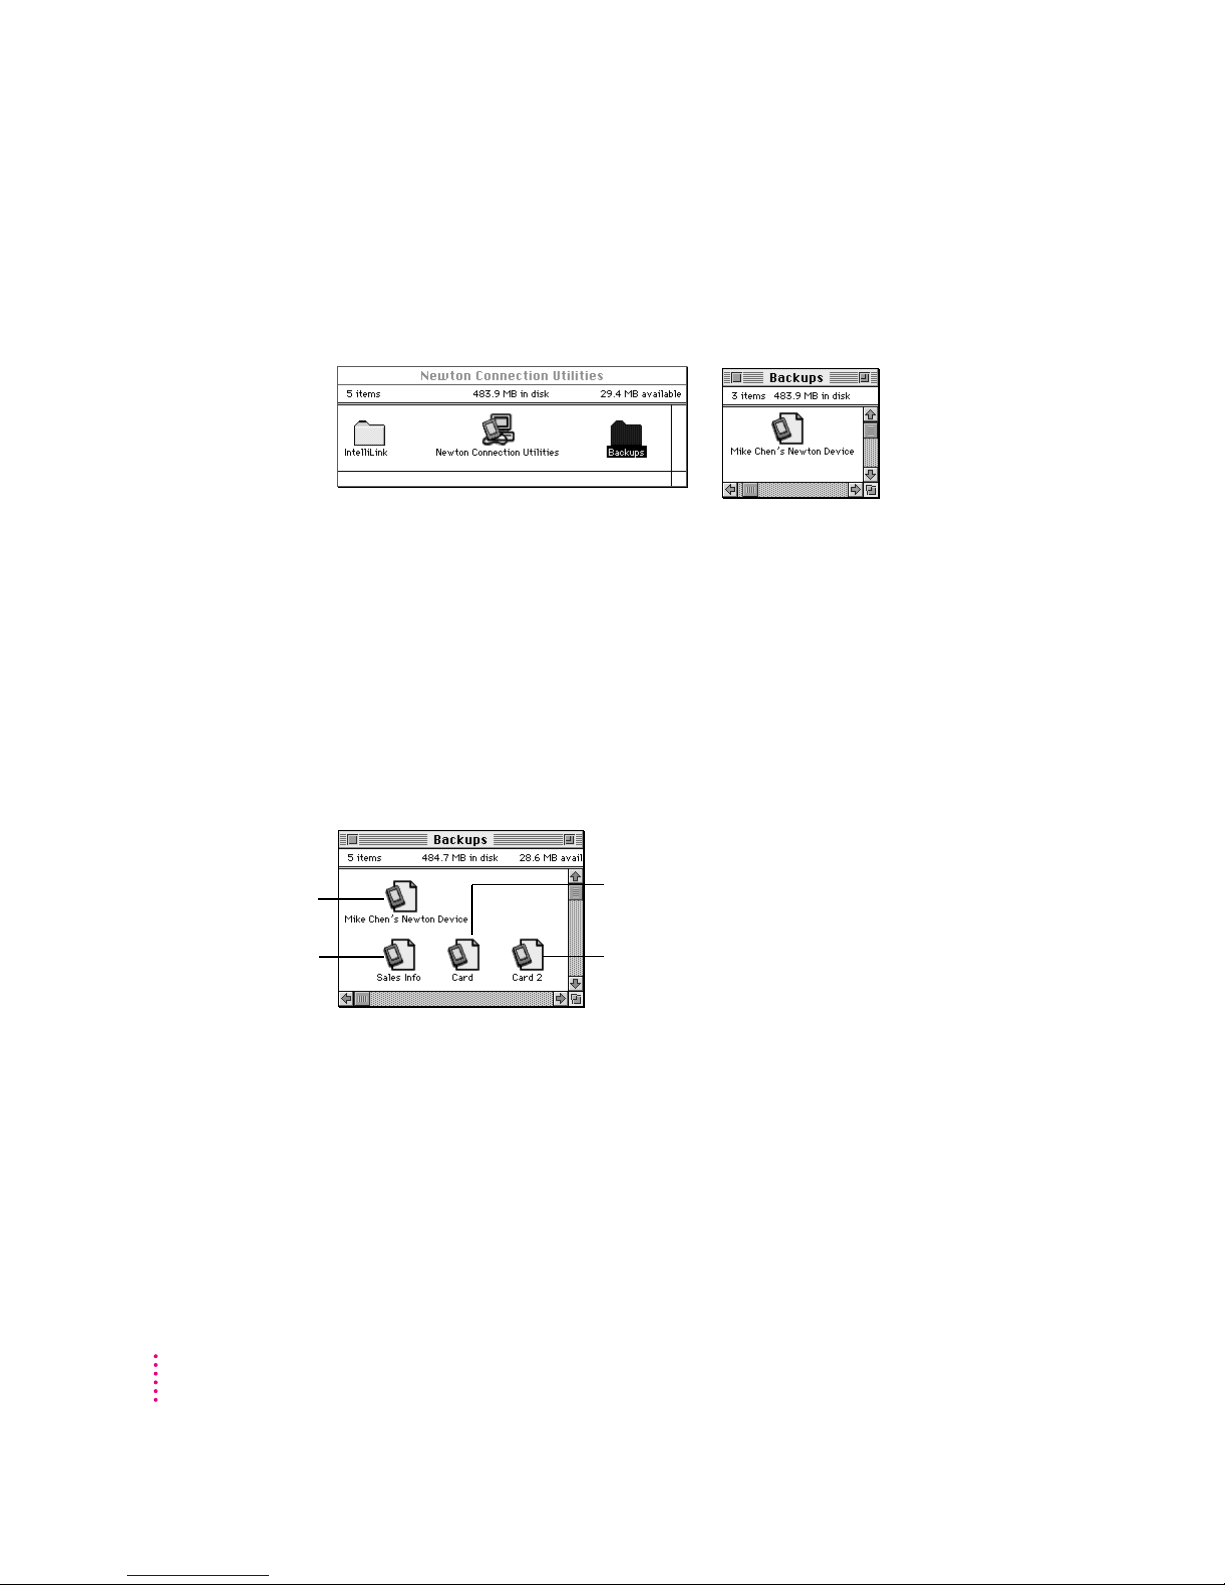
Inside the Backups folder is a file with a name derived from the owner’s name
you entered on your Newton device. This file contains the latest backup
information. If you haven’t entered an owner’s name on your Newton device,
the file is called “Newton Device.”
By default, the Backups folder is located in the Newton Connection Utilities
folder. You can change the location of this folder. See “Changing the Location
of the Backups Folder” later in this chapter.
Backing up cards
When you back up a storage card, a separate backup file is created with the
name of the card. If you haven’t entered a name for your card, the file is called
Card. If you back up more than one unnamed card, the backup files are
named Card, Card 2, Card 3, and so on.
20
Backup file for your
Newton device’s
internal memory
Backup file for a
storage card named
Sales Info
Chapter 2
Backup file for an
unnamed card
Backup file for another
unnamed card
Note: To avoid confusion and possible loss of information when doing
backups, it’s best to name all your storage cards. For more information
on naming storage cards, see the user’s manual that came with your
Newton device.
Page 21
Most recent backup
of your Newton
Most recent backup
of a storage card
Previous backups
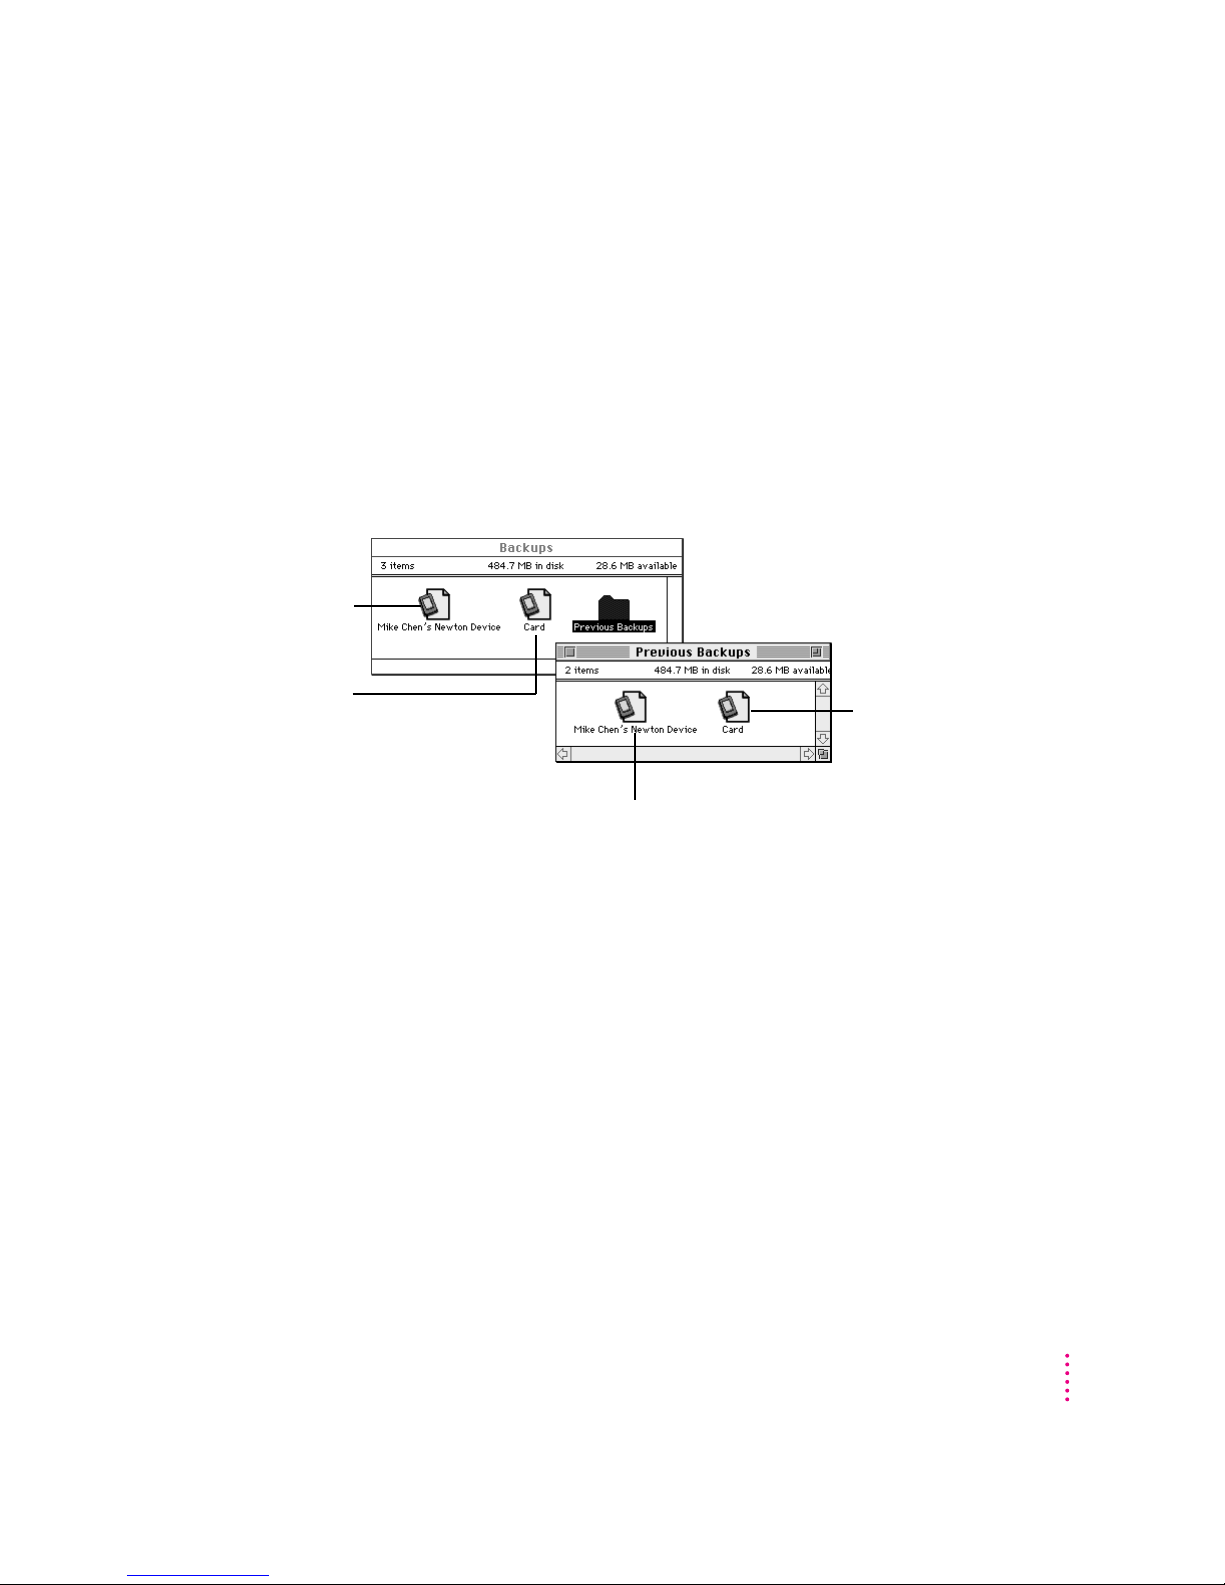
Every time you back up, the Newton Connection Utilities make a copy of the
previous backup file and store it in a folder called Previous Backups. This
folder is located in your Backups folder.
For example, if the owner’s name for your Newton device is Mike Chen,
the Newton Connection Utilities create a file named Mike Chen’s
Newton Device the first time you back up. The next time you back up, the
Newton Connection Utilities copy the original file and place it in a Previous
Backups folder.
Previous backup of
a storage card
Previous backup of your Newton
The Newton Connection Utilities maintain a current and previous backup file
for all information in your Newton device’s internal memory and a current
and previous backup file for each storage card you back up.
Backing Up and Restoring Information
21
Page 22

Creating backup files
You can back up all information and packages on your Newton device or you
can just back up selected information and packages. The following section
describes how to back up all information. To back up selected information
and packages, see “Backing Up Selected Information and Packages” later in
this chapter.
Backing up all information and packages
Before you begin, make sure your Newton device is connected to your
computer. For instructions, see Chapter 1, “Getting Started.”
To back up all information on your Newton device, follow these steps:
1 On your computer, open the Newton Connection Utilities.
To open the Newton Connection Utilities, double-click the Newton
Connection Utilities icon.
2Establish a connection from your Newton device.
See Chapter 1, “Getting Started,” for instructions.
3 On your computer, click the Backup button.
22
Chapter 2
Page 23
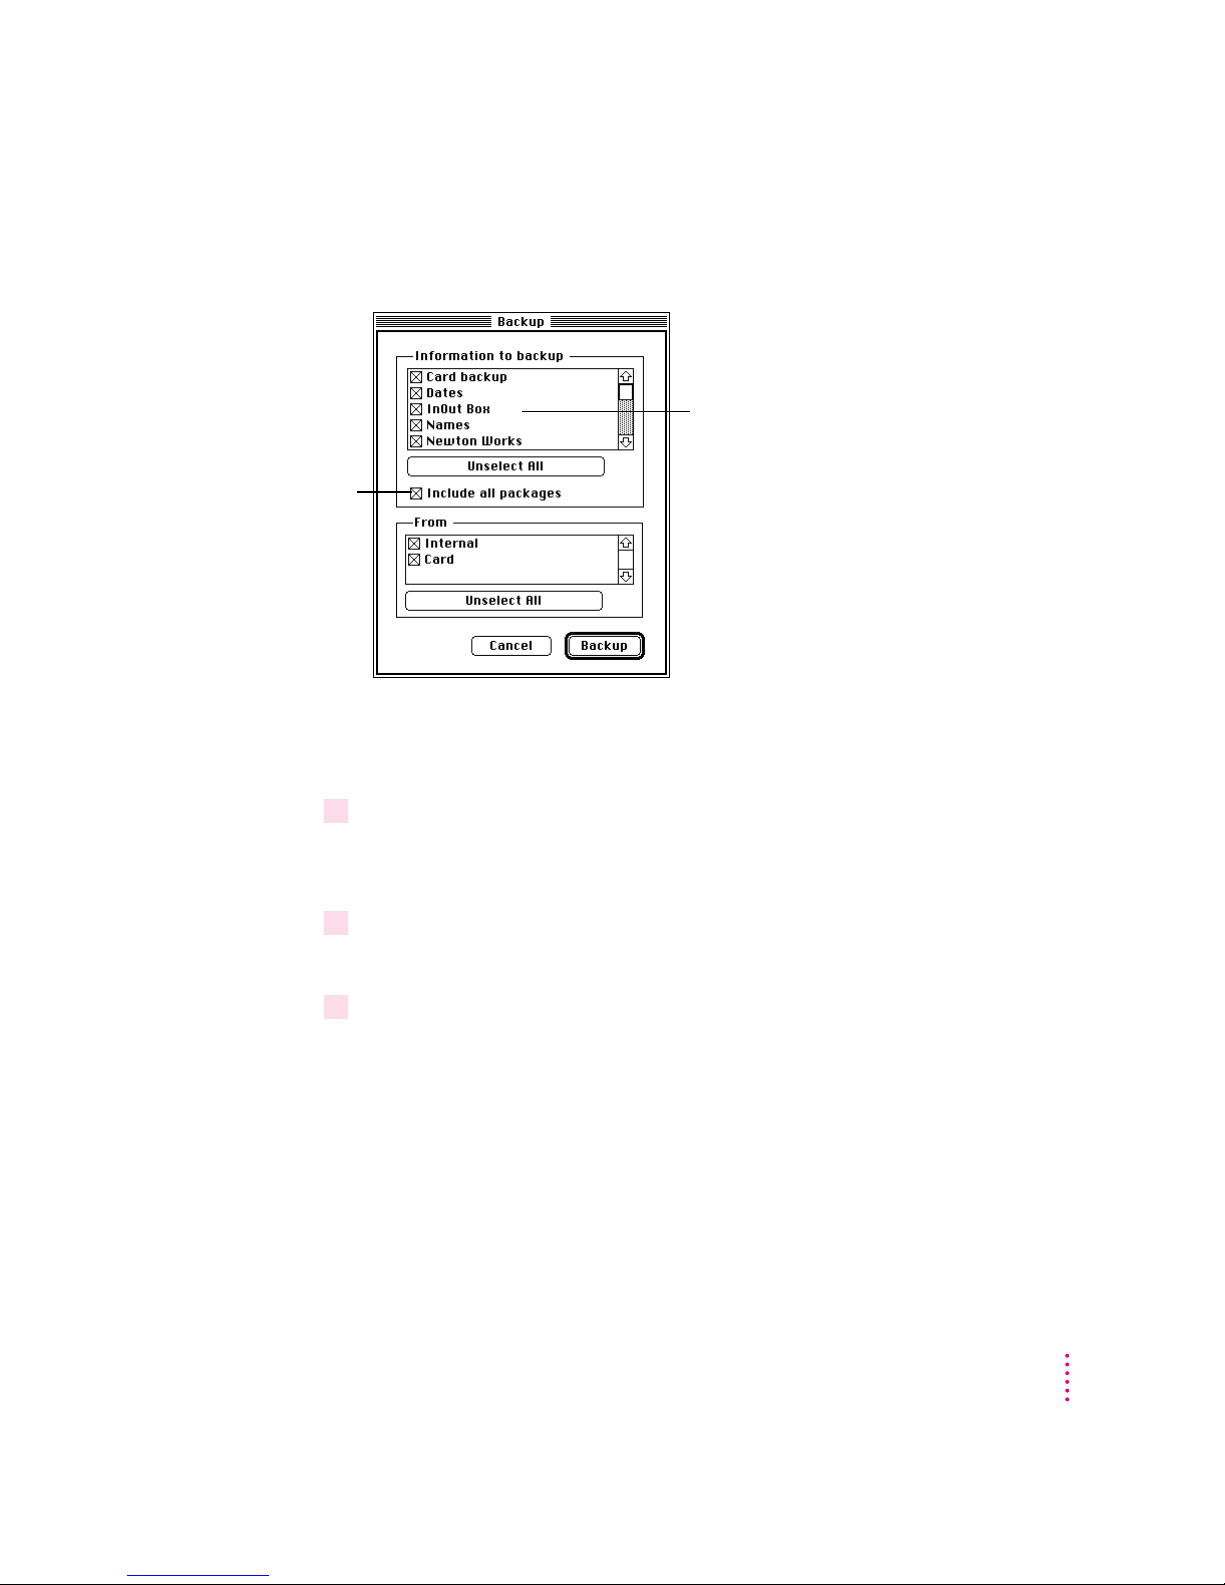
Select to include all
packages (including
packages from other
software publishers) in
the backup. This box
only appears if you
have packages
installed on your
Newton device.
4 Click Select All.
A dialog box appears with a list of items to back up. To select an item, click
the box next to it to add an X.
List of information on your Newton device.
To see more items on the list, use the scroll bar.
Note: When you back up your Newton device for the first time (no backup
file exists), this dialog box doesn’t appear. Instead, a full backup of the
Newton device begins as soon as you click Backup.
If you see an Unselect All button instead of Select All, all information is
already selected.
5Make sure “Include all packages” is selected so that your packages are also backed up.
This choice appears if packages are stored on your Newton device.
6Click Backup.
A status window appears indicating a backup is in progress. Messages in the
window show what information is being backed up.
The window disappears and the backup is complete.
Backing Up and Restoring Information
23
Page 24
Backing up selected information and packages
In general, it’s a good idea to back up all information on your Newton device.
However, if you’ve only added information to one or two applications, you
can specify which applications and information to back up. For example, you
can choose to back up just the information in your Newton Dates application.
Ty pically, selective backup is faster than backing up all information and
packages. When you selectively back up information, the new information is
added to your most recent backup file.
1Open the Newton Connection Utilities and establish a connection.
2On your computer, click the Backup button.
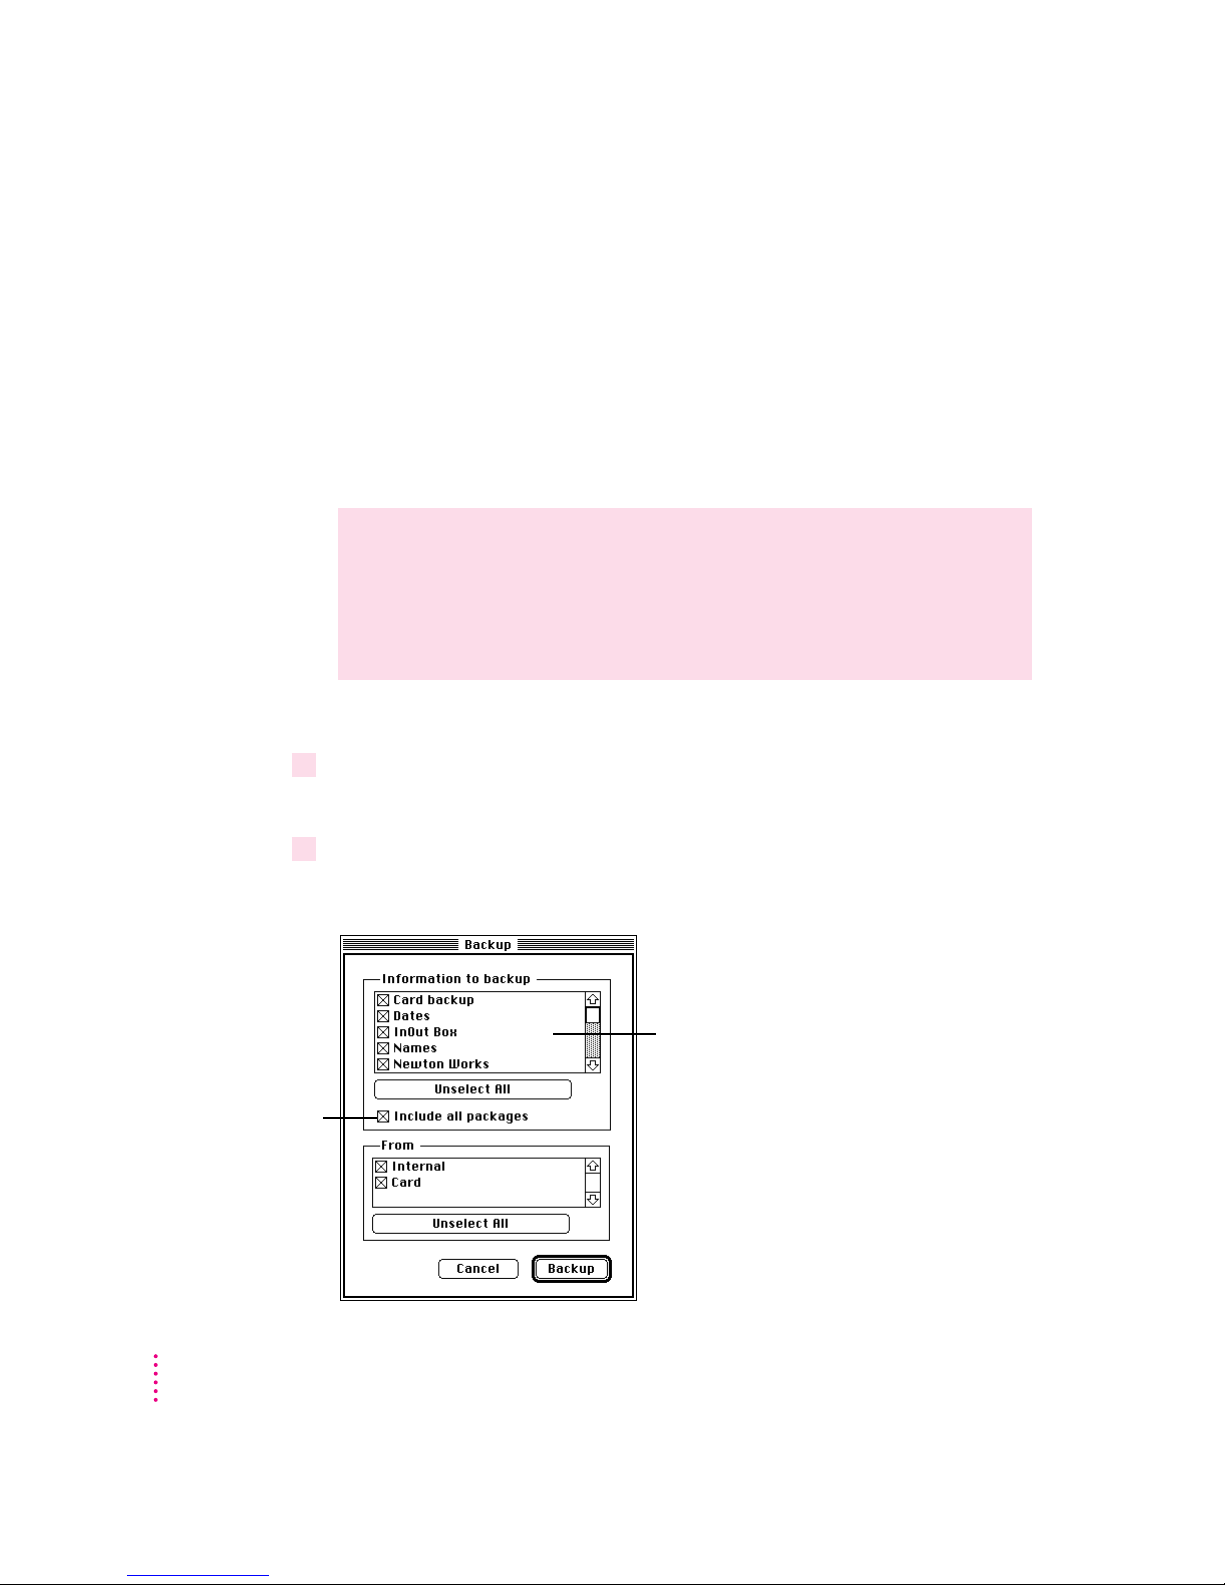
Select to include
all packages
(including packages
from other
software publishers)
in the backup.
WARNING
If you back up selectively, be careful when you restore
information. You may remove information that has not been backed up.
Apple recommends you restore information only from a backup that
includes all information and packages. See “Restoring Information and
Packages” later in this chapter.
To back up selected information on your Newton device, follow these steps:
See Chapter 1, “Getting Started,” for instructions.
A dialog box appears with a list of information to back up.
Select the information
you want to back up.
24
Chapter 2
Page 25
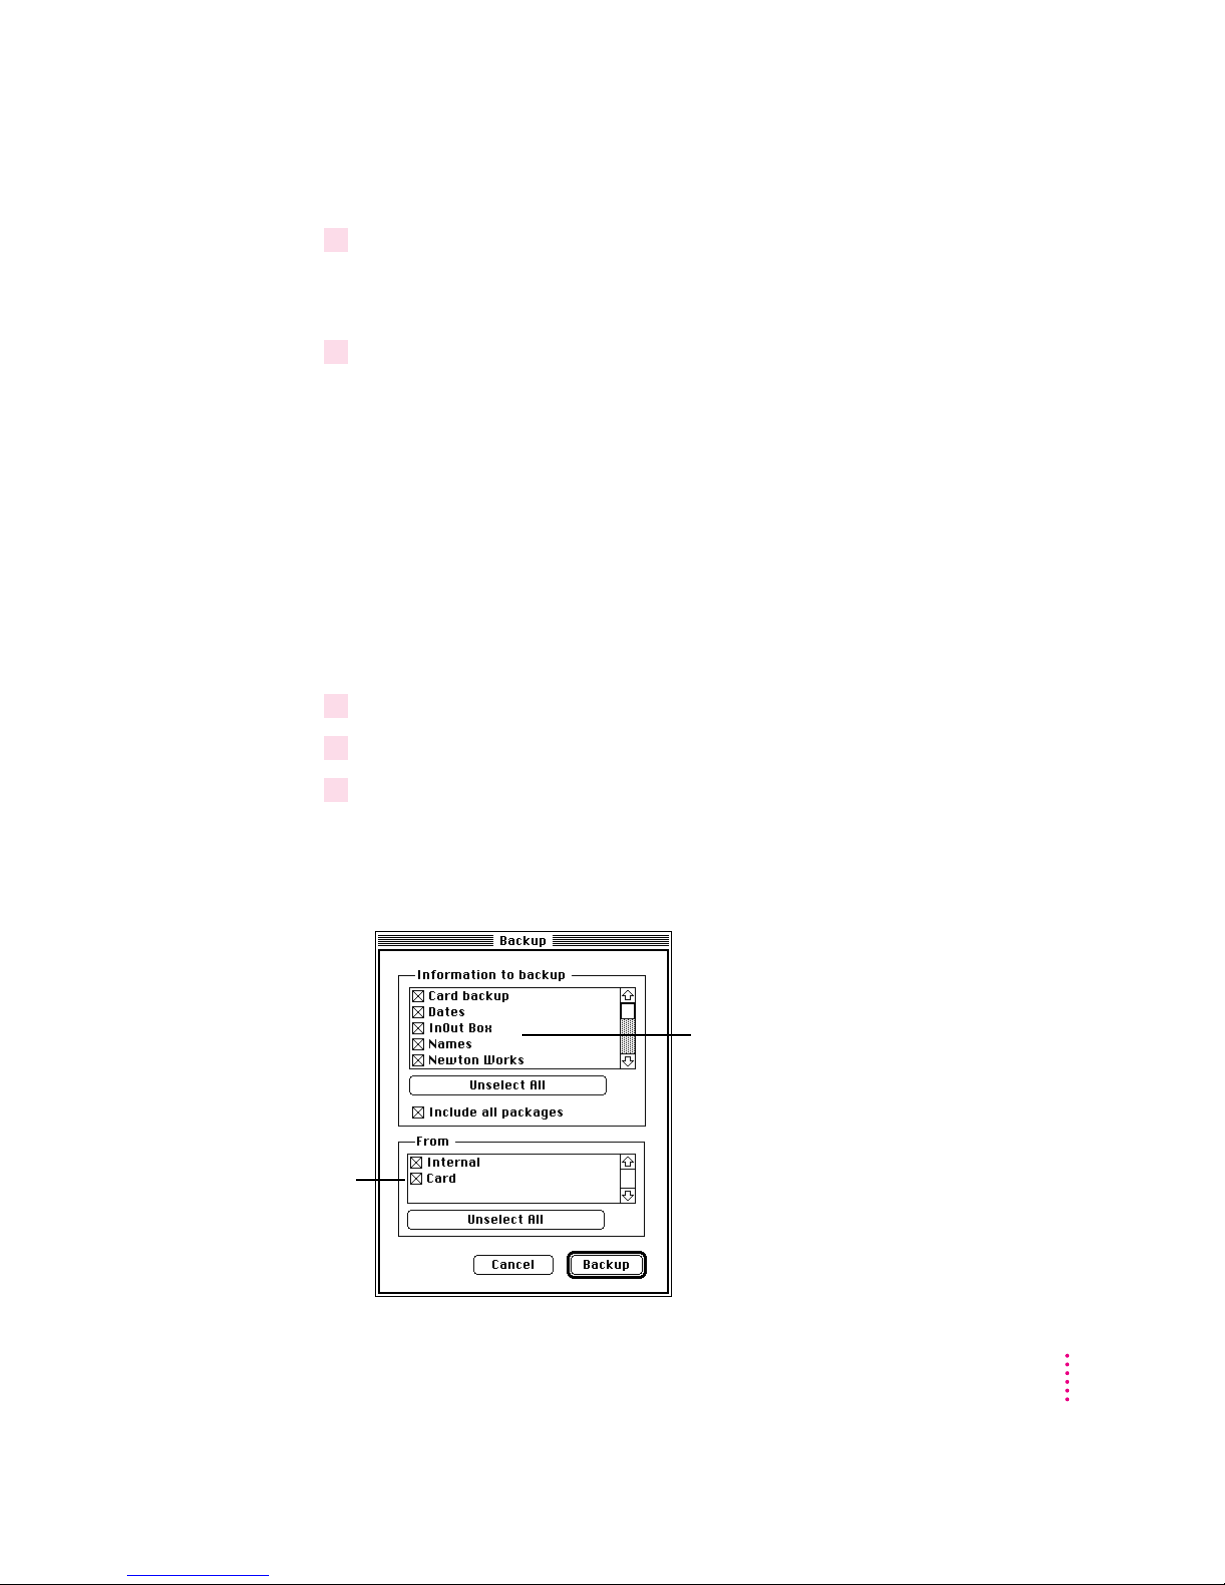
3Select the information to back up.
To select an item to back up, click the box next to it to add an X. Only items
marked with an X will be backed up.
4Click Backup.
A status window appears indicating a backup is in progress. Messages in the
window show what information is being backed up.
When the window disappears, the information you selected has been added
to the latest backup file.
Backing up a storage card
You can use the Newton Connection Utilities to back up the contents of a
storage card.
To back up a storage card, follow these steps:
1 Insert the storage card.
2 Open the Newton Connection Utilities and establish a connection.
3Click Backup.
Select to back
up a card.
The Backup dialog box appears. It includes a list of cards currently inserted
in your Newton device. To select an item to back up, click to place an X in the
box next to it.
Select the information
you want to back up.
Backing Up and Restoring Information
25
Page 26
4Make sure the card you want to back up is selected.
5Click Backup.
The card is backed up and a backup file with the name of the card appears in
your Backups folder.
Changing the location of the Backups folder
By default, the Backups folder is automatically stored in the Newton
Connection Utilities folder on your computer.
To change the location of the Backups folder, follow these steps:
1 Open the Newton Connection Utilities.
2Choose Preferences from the Edit menu.
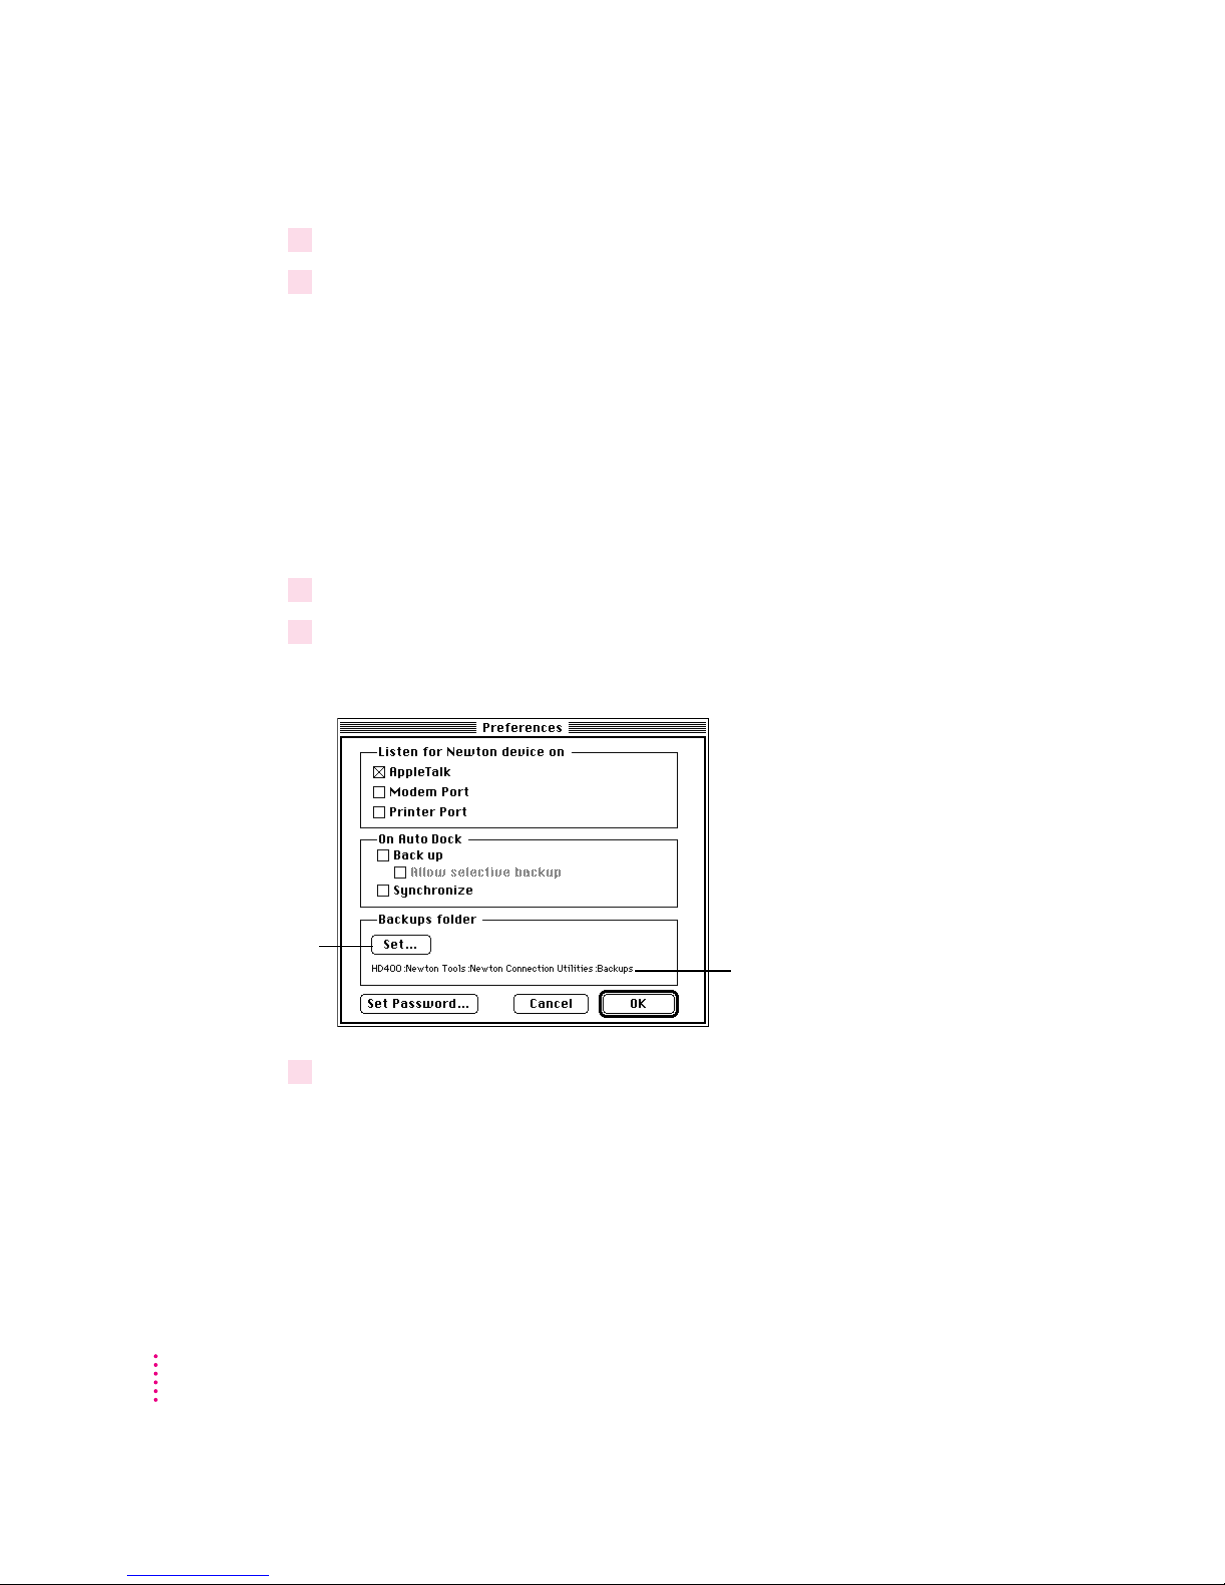
A dialog box appears.
26
Click to change the
location of the
Backups folder.
3Click Set in the Backups folder box.
Chapter 2
Shows the current location of
the Backups folder
A dialog box appears.
Page 27
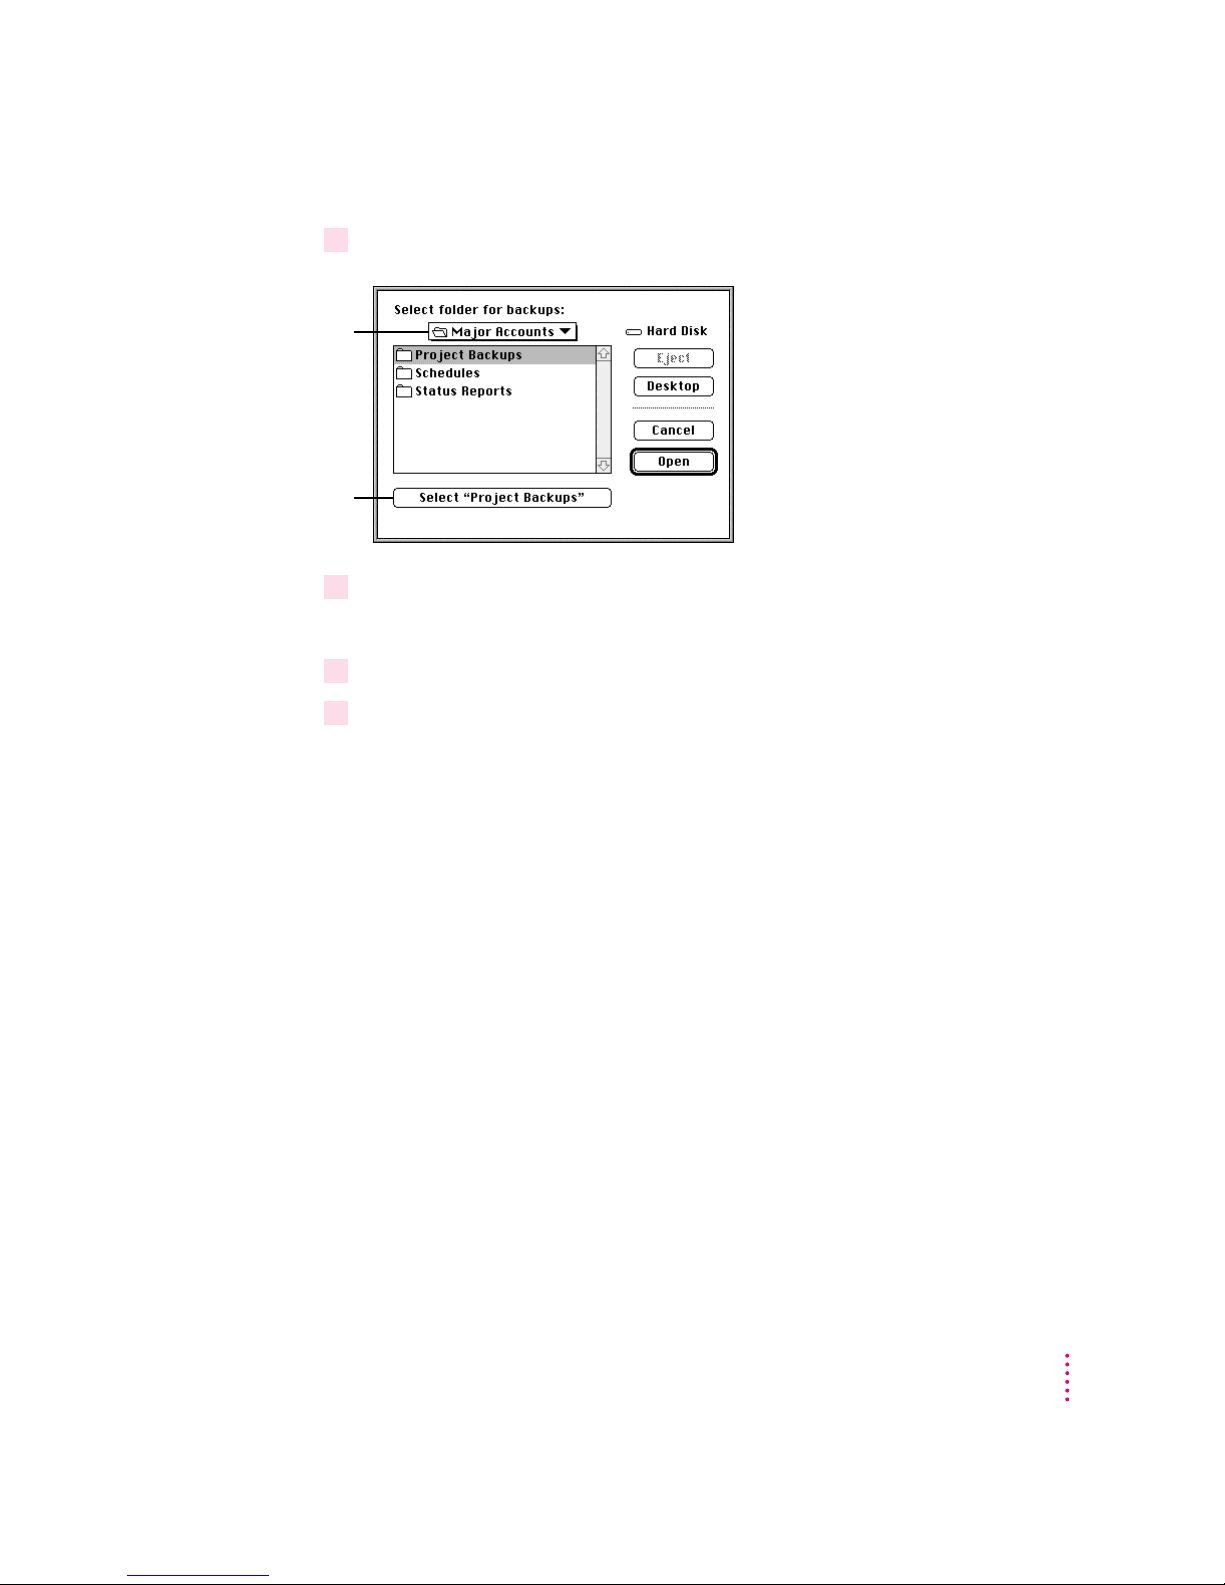
4Select a new location for your Backups folder.
Click to display a
pop-up menu of
disks and folders
on your computer.
Click to select
a folder.
5Click Select.
6Establish a connection from your Newton device.
7Click the Backup button and back up all information and packages on your
The new location you specified is saved.
Newton device.
For more information, see “Backing Up All Information and Packages”
earlier in this chapter.
A new Backups folder with backup files appears in the location you specified.
Note: To avoid confusion with previous backups, you may want to remove or
rename backup files stored in other locations.
Backing Up and Restoring Information
27
Page 28

Restoring information and packages
If something goes wrong and you lose information on your Newton device,
you can restore information from the latest backup file on your computer.
You can restore all information in a backup file or select which information
you want to restore. You can also restore the information from storage cards
you’ve backed up.
WARNING
Restoring replaces information on your Newton device with
information from a backup file on your computer. Make sure you select
the correct information to restore.
Before you begin, make sure your Newton device is connected to your
computer. For instructions, see Chapter 1, “Getting Started.”
To restore information, follow these steps:
1 Open the Newton Connection Utilities and establish a connection.
2Click the Restore button.
28
Chapter 2
Page 29
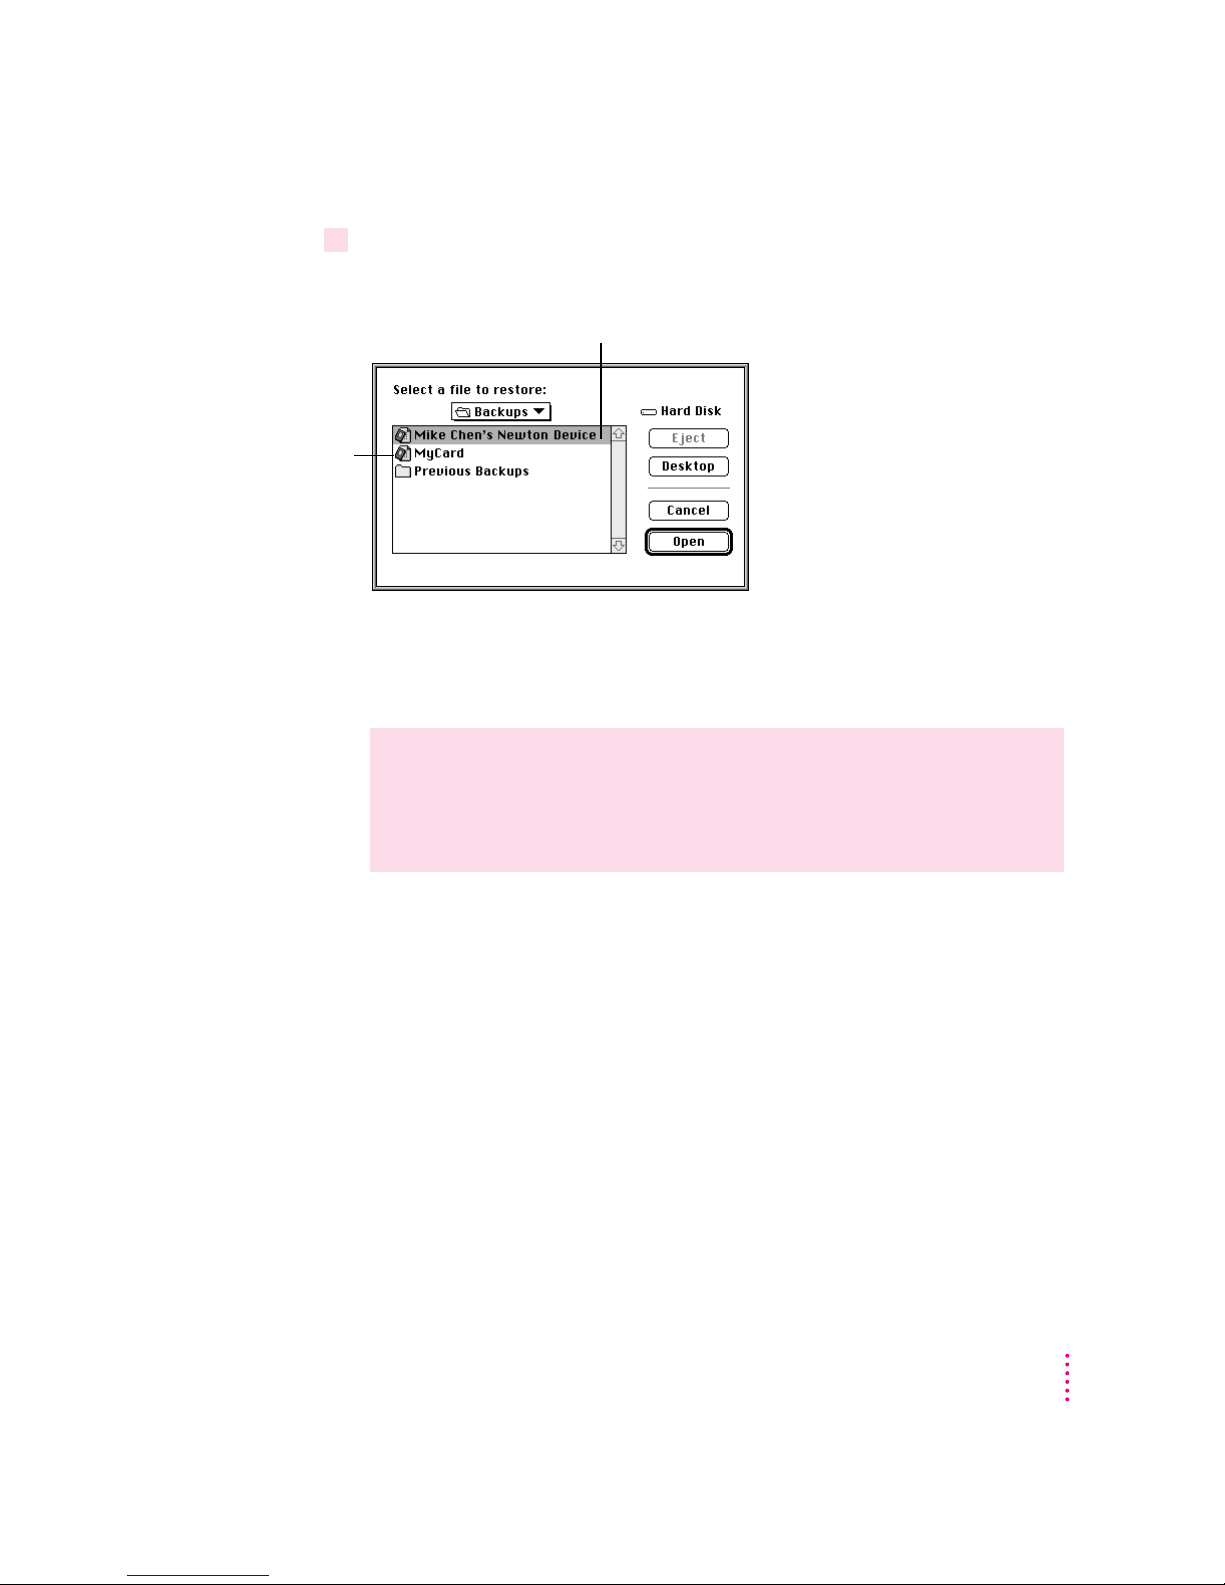
3 In the dialog box that appears, choose the file that contains the information you want
To restore storage
card information,
select the latest
backup file
for the card.
to restore.
Select the latest backup file
for your Newton device.
Note: With the Newton Connection Utilities, you can restore information
from a card backup file to a card. You cannot restore information from a card
backup file to your Newton’s internal memory.
WARNING
If you back up selectively, be careful when you restore
information. You may remove information that has not been backed up.
Apple recommends you restore information only from a backup that
includes all information and packages.
Backing Up and Restoring Information
29
Page 30
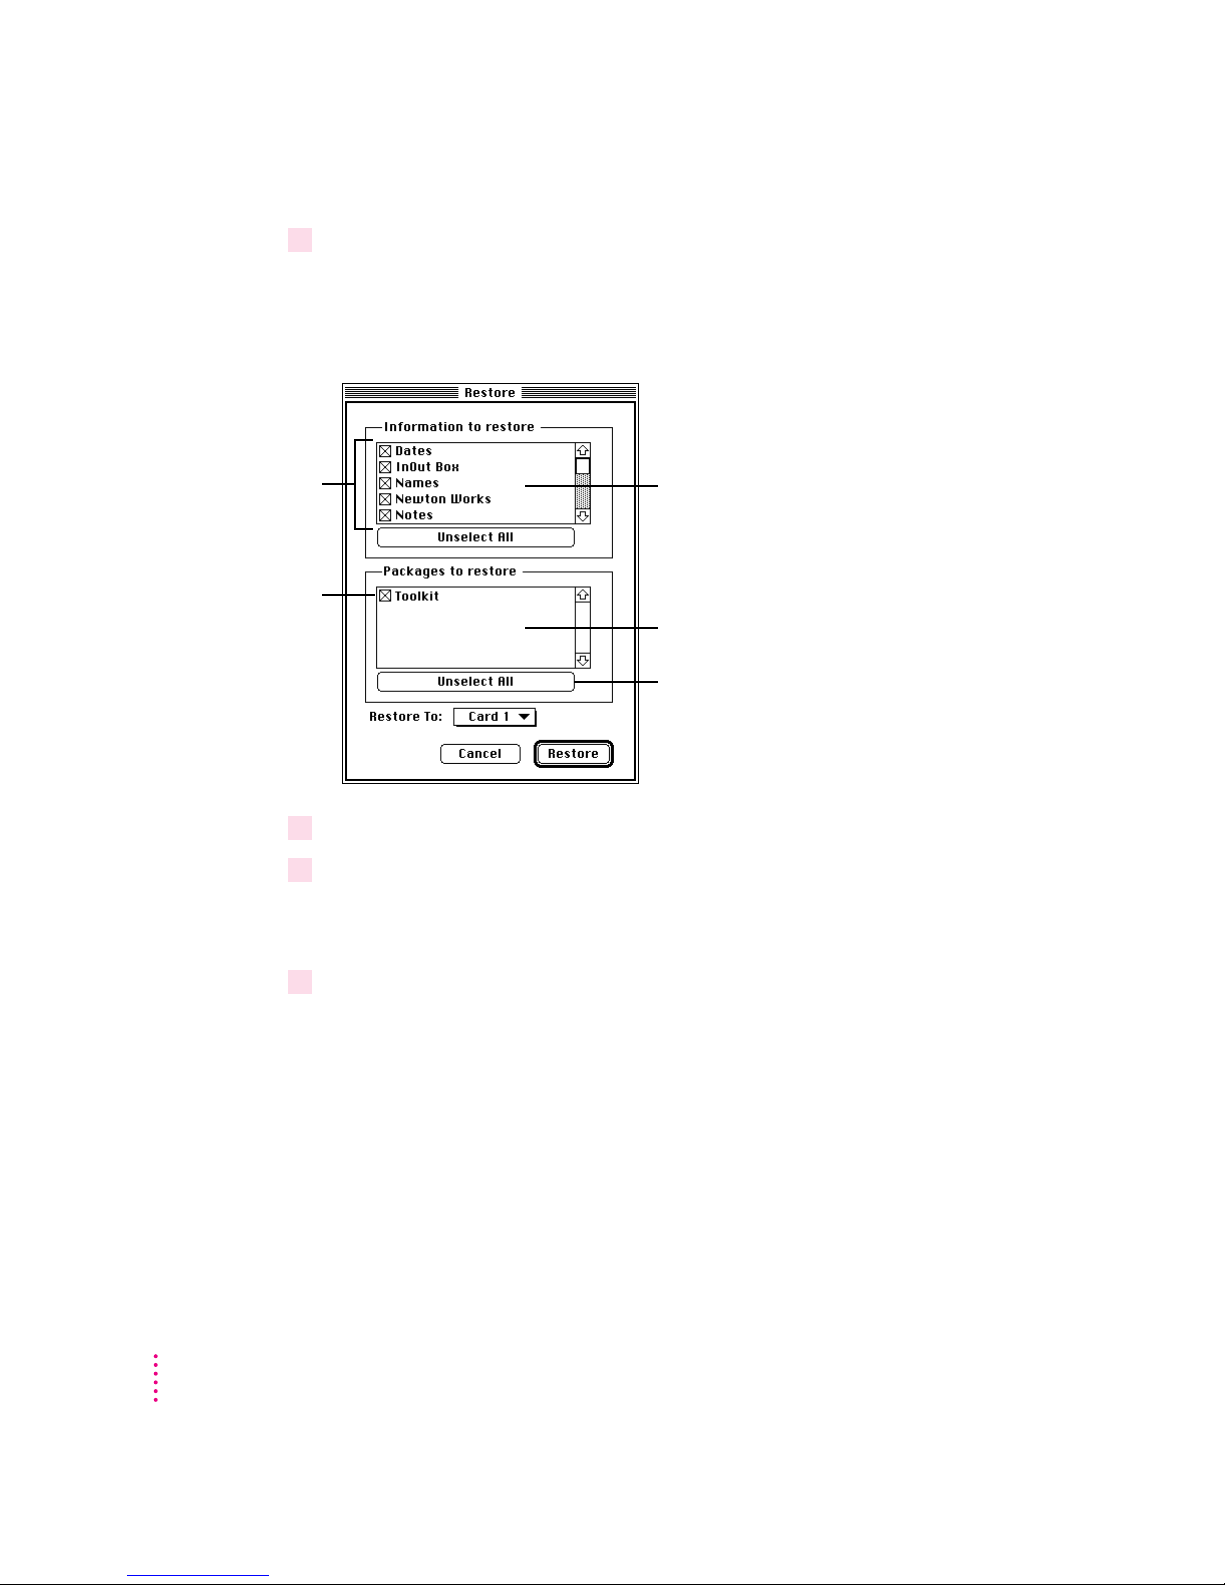
4 Click Open.
You see a list of information and packages that can be restored. You can
choose items to restore or restore all the items. To select an item, click the
box next to it to add an X.
Select the information
you want to restore.
Select the packages
you want to restore.
5Select the items you want to restore.
6Click Restore.
7 Click OK.
List of information to restore.
To see more items on the list,
use the scroll bar.
List of packages to restore
Click to deselect all packages
in the backup file. You can
then select specific information
to restore.
A message appears asking you to confirm that you want to restore
information from your computer onto your Newton device.
Information you selected is restored to your Newton device. A status window
on your computer keeps you informed of the progress.
When you restore, only information and packages on your Newton device that
correspond to information and packages in the backup file are replaced. For
example, if your backup file contains Names and Dates and your Newton
device contains Names, Dates, and Notes, the Names and Dates information
on your Newton device are replaced by Names and Dates from the backup
file, but the Notes information on your Newton device remains intact.
30
Chapter 2
Page 31

When the restoration is complete, a message appears on your Newton screen
asking you to restart.
8Tap Restart.
Your Newton device restarts.
Note: If you have a personal identification number (PIN) assigned to your
Newton device, the number is not restored. You’ll need to reassign a PIN. For
more information on assigning a PIN, see the handbook that came with your
Newton device.
Tips on managing backups
The following tips can help you back up and restore files on your
Newton device.
m If you’re using more than one computer, you can set up a central location
for backup files. That way, you’ll always know where the latest backup files
are located. See “Changing the Location of the Backups Folder” earlier in
this chapter.
m You can copy backup files and rename them (or store them in a separate
directory) to prevent them from being replaced by another backup. This is
useful for managing or storing different sets of information.
Backing Up and Restoring Information
31
Page 32

Page 33

3
Installing Packages
This chapter describes how to use the Newton Connection Utilities to install
packages.You can install packages on your Newton device or on a storage card.
Installing a package on your Newton device
A package is a special file that adds features to your Newton device. Examples
of packages include applications, electronic books, and system updates.
Before you begin, make sure your Newton device is connected to your
computer. For instructions, see Chapter 1, “Getting Started.”
IMPORTANT
your Newton device. Nothing is erased.
To install a package, follow these steps:
1 Insert the floppy disk containing the package into your computer.
If the package is on your computer’s hard disk, skip this step.
2 On your computer, double-click the Newton Connection Utilities icon.
The Newton Connection Utilities window appears on your computer.
3 On your Newton device, establish a connection.
See Chapter 1, “Getting Started,” for instructions.
The package you install is added to the information already on
33
Page 34
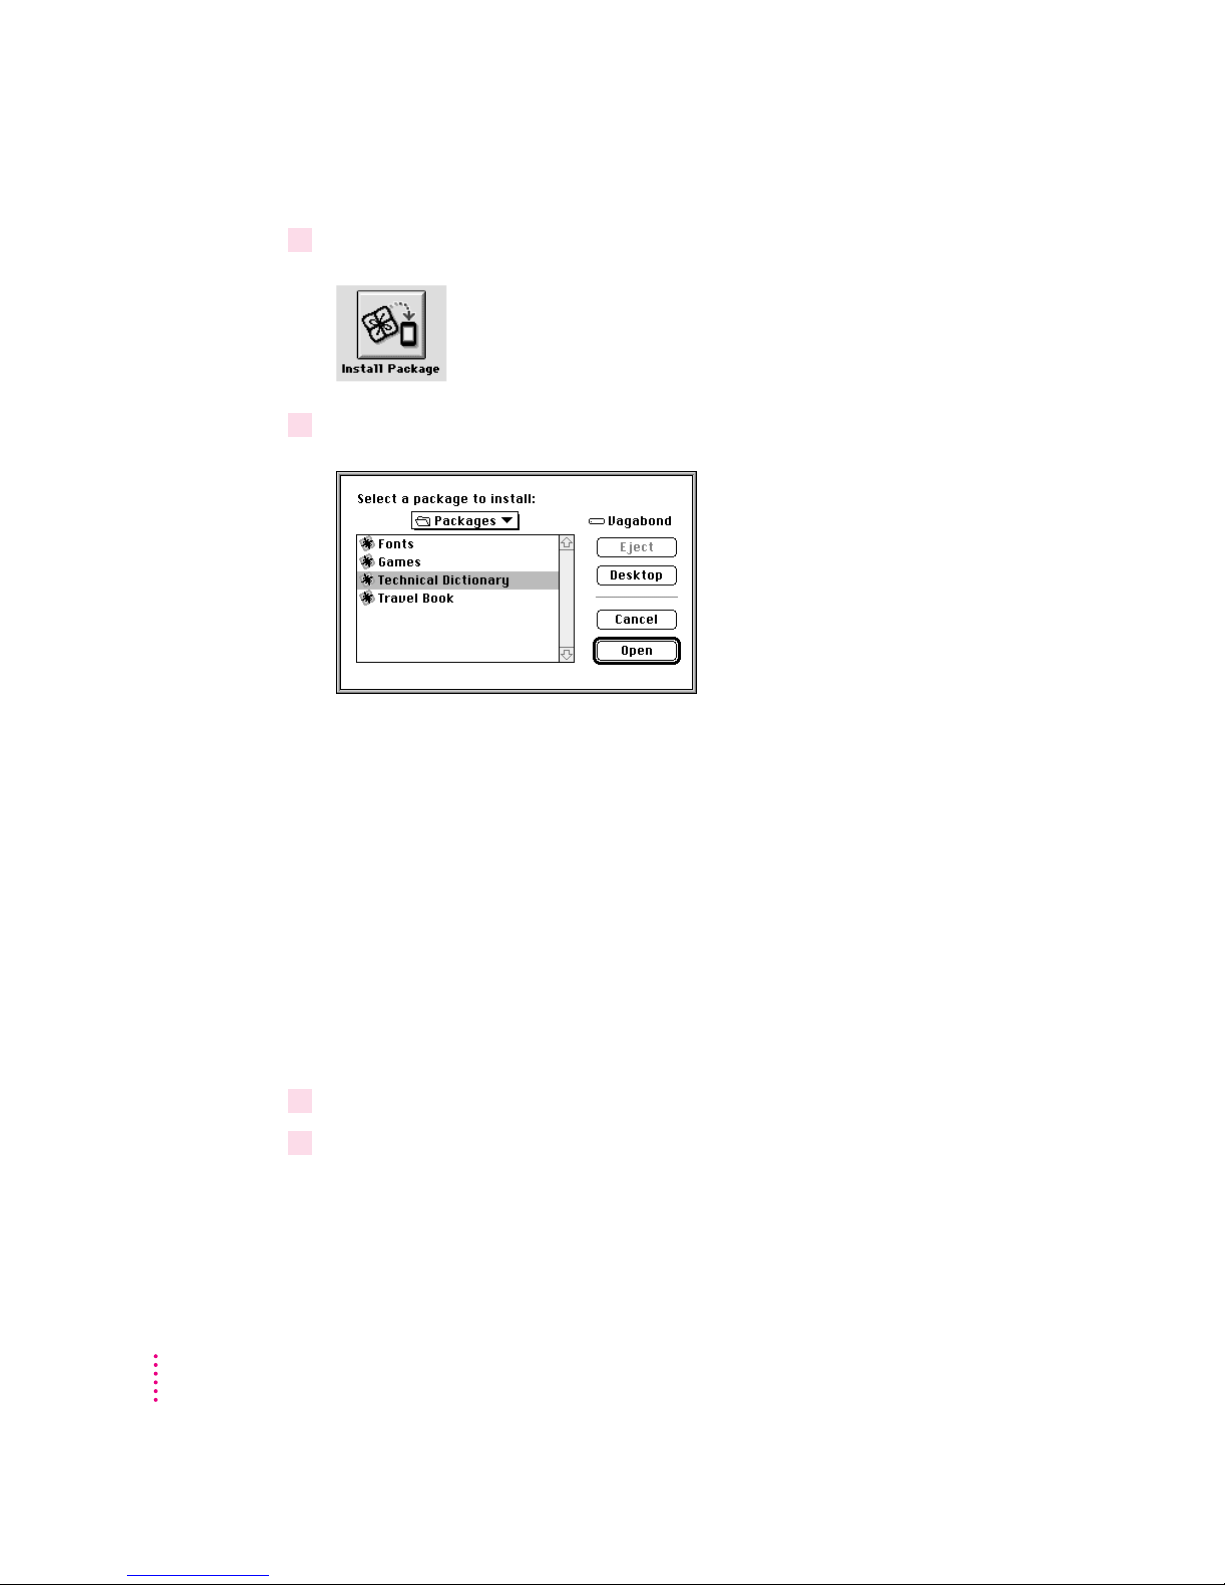
4Click the Install Package button.
5 In the dialog box that appears, select the package you want to install and click Open.
The package is installed on your Newton device. A status window on your
computer keeps you informed of the progress.
Note: If you stop a package installation, the connection between your Newton
device and your computer is ended. You'll need to re-establish the connection
from your Newton device.
34
Installing packages by dragging
You can also install packages by dragging package icons to the Newton
Connection Utilities application icon on your computer or into the Newton
Connection Utilities window.
To install a package by dragging, follow these steps:
1 Open the Newton Connection Utilities and establish a connection.
2Locate a package icon on your floppy disk or your computer’s hard disk.
Chapter 3
Page 35
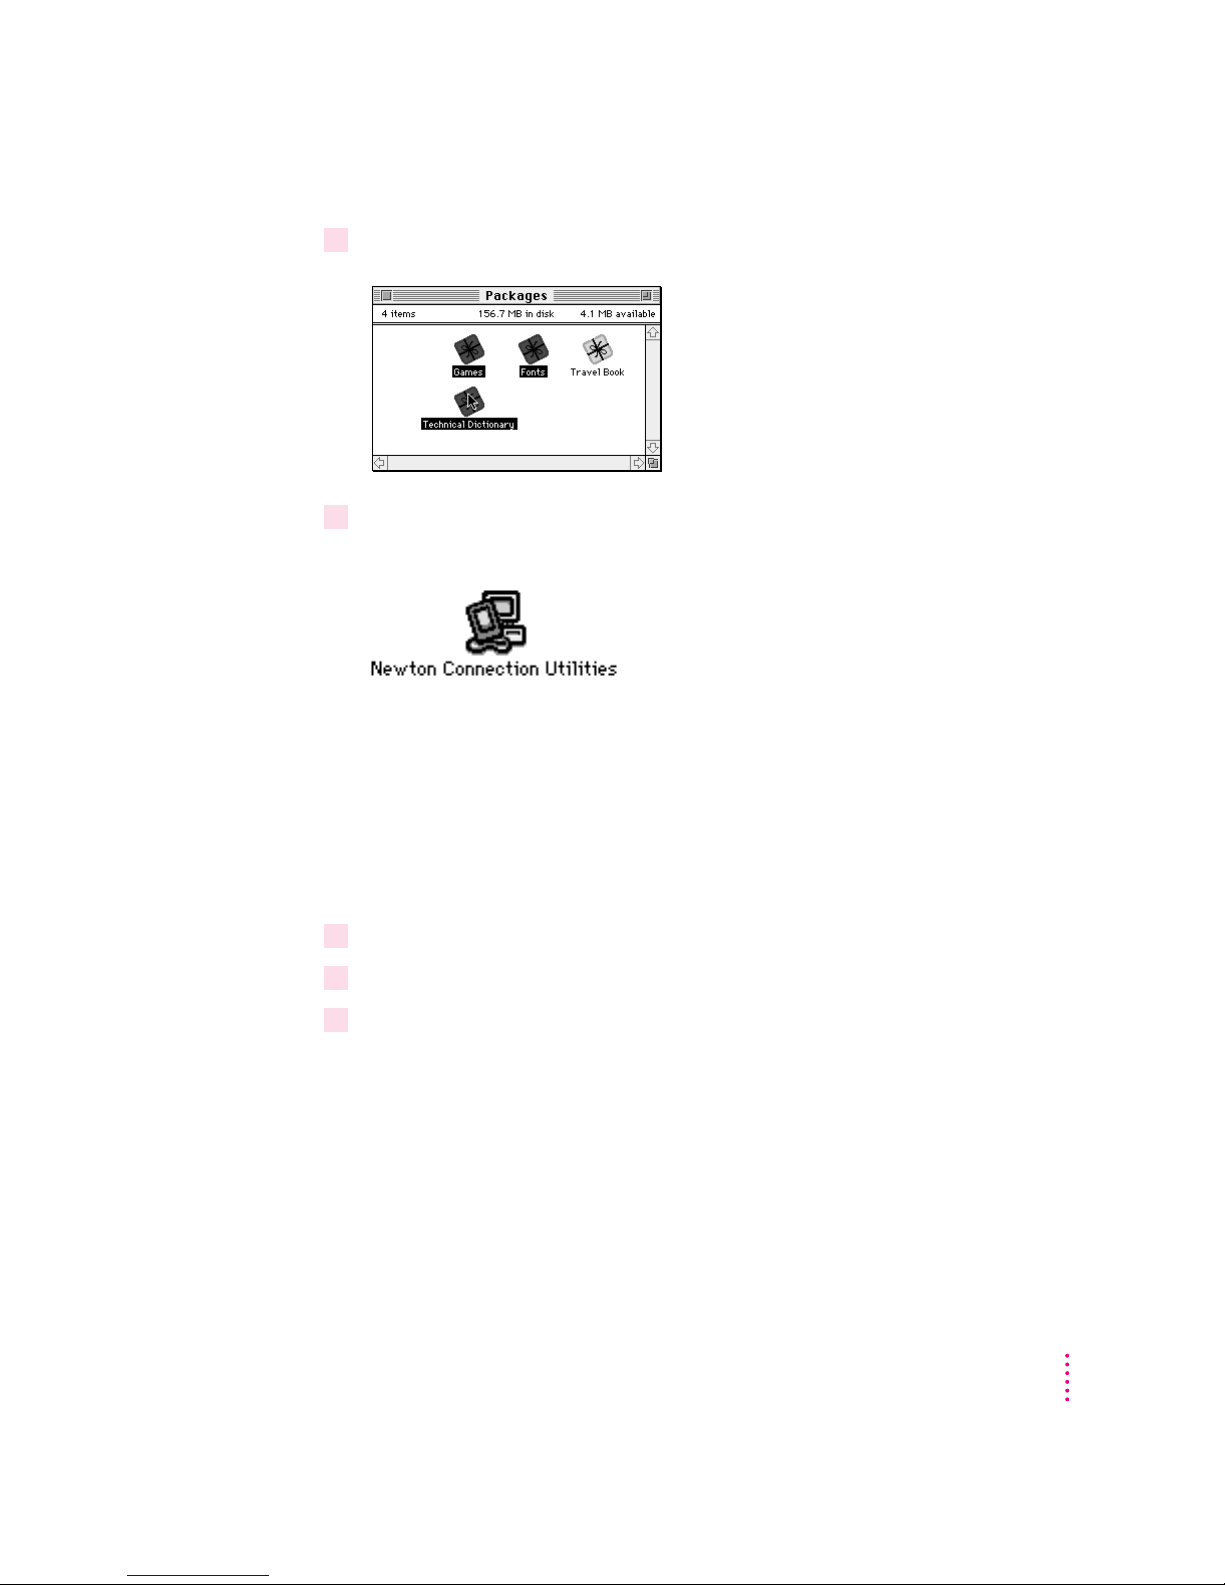
3Select one or more package icons.
4 Drag the icons to the Newton Connection Utilities icon, or into your Newton Connection
Utilities window.
The packages are installed.
Installing a package on a storage card
You can install packages on a storage card rather than in your Newton device’s
internal memory.
To install a package on a storage card, follow these steps:
1 Insert the card in your Newton device.
2 In the slip that appears, select “Save new info and packages on this card.”
3 Follow the steps described in “Installing a Package on Your Newton Device,” earlier.
With “Save new info and packages on this card” turned on, the Newton
Connection Utilities automatically install packages on the storage card.
Installing Packages
35
Page 36

Page 37

4
Using Your Computer’s Keyboard
This chapter describes how to use your computer’s keyboard to enter
information on your Newton device.
About keyboard entry
With the Newton Connection Utilities, text you type on your computer’s
keyboard can appear on your Newton device. For example, you can open a
new Name slip on your Newton device and use your computer’s keyboard to
fill in the information.
Your computer’s keyboard is useful when you need to enter long notes or a
large number of names and addresses on a Newton device that doesn’t have a
built-in keyboard.
In addition to typing, you can use the keyboard to copy information from your
computer’s Clipboard to your Newton device.
37
Page 38
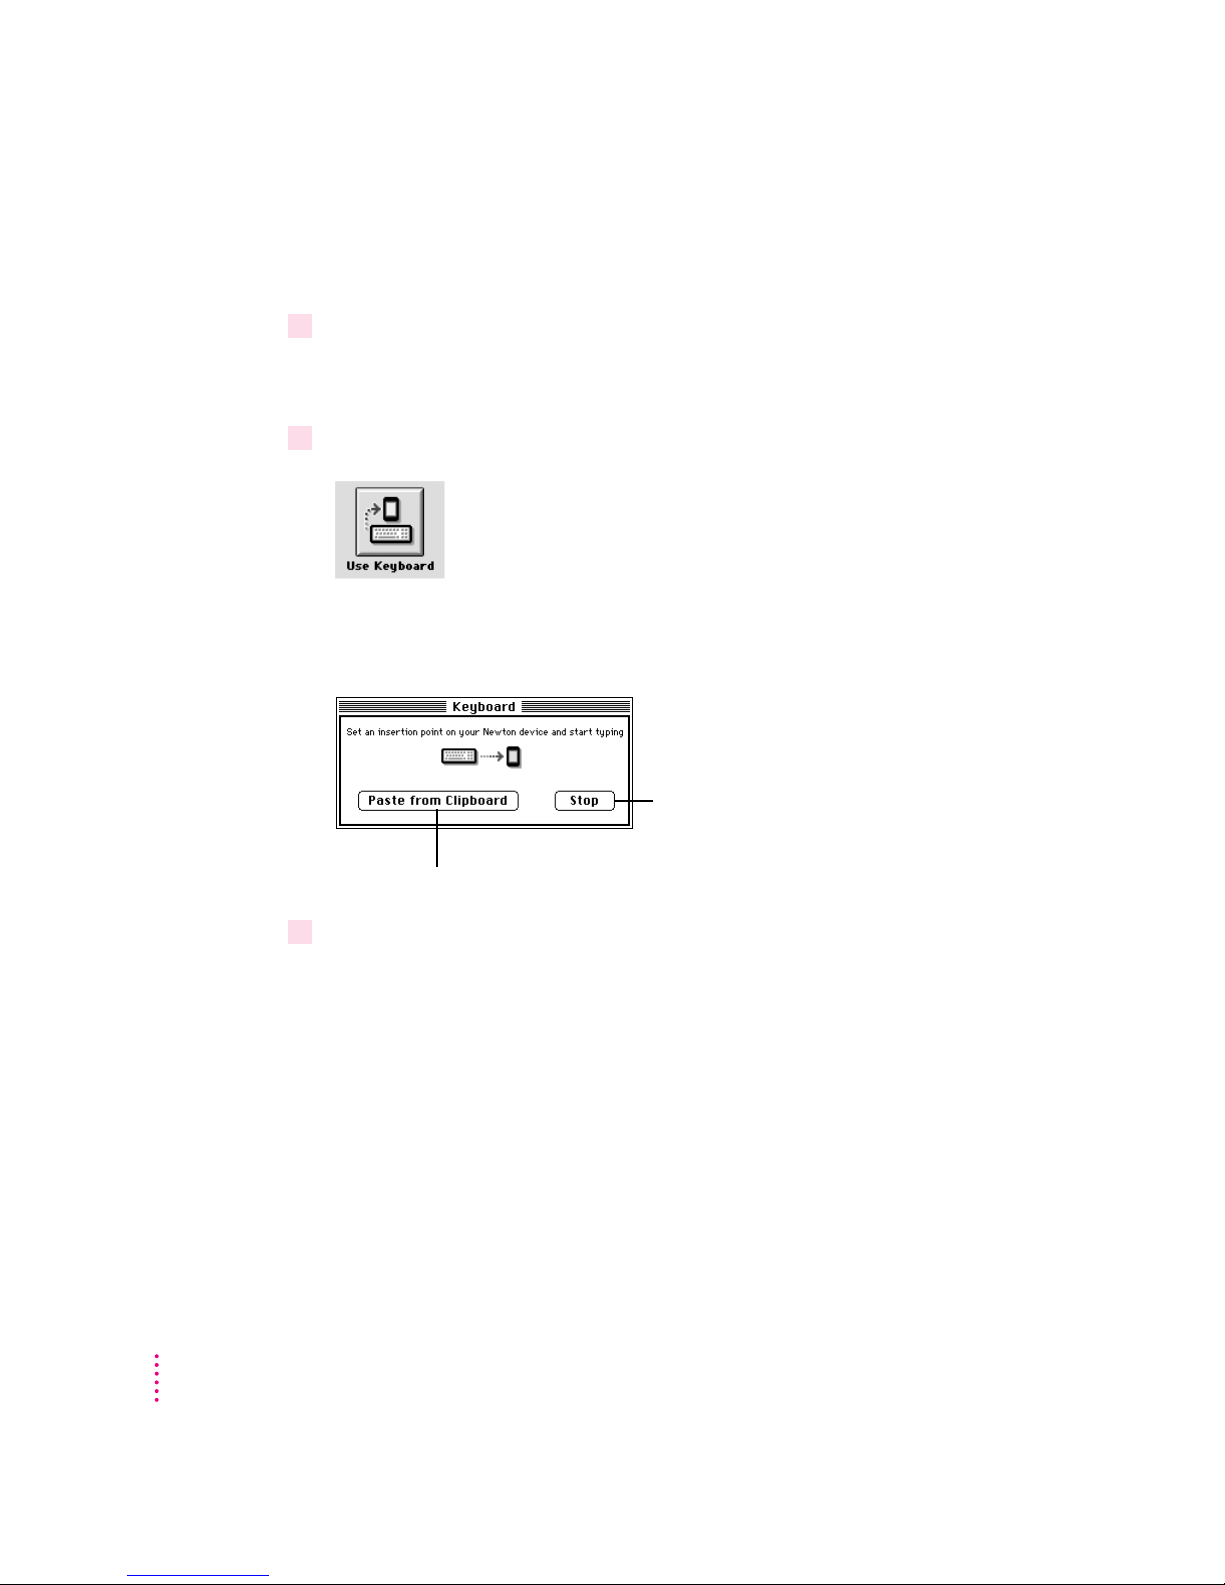
Starting a keyboard session
To start a keyboard session, follow these steps:
1 Open the Newton Connection Utilities and establish a connection from your
Newton device.
For instructions, see Chapter 1, “Getting Started.”
2Click the Use Keyboard button in the Newton Connection Utilities window.
A status window appears and your Newton device is ready to accept
information from your computer’s keyboard.
Click to end a keyboard session.
38
Click to copy text from your computer’s
Clipboard to your Newton device.
3 On your Newton device, open the stationery or slip you want to add information to.
You can navigate as usual on your Newton device, using the pen to open
drawers, set insertion points, and so on.
Chapter 4
Page 39
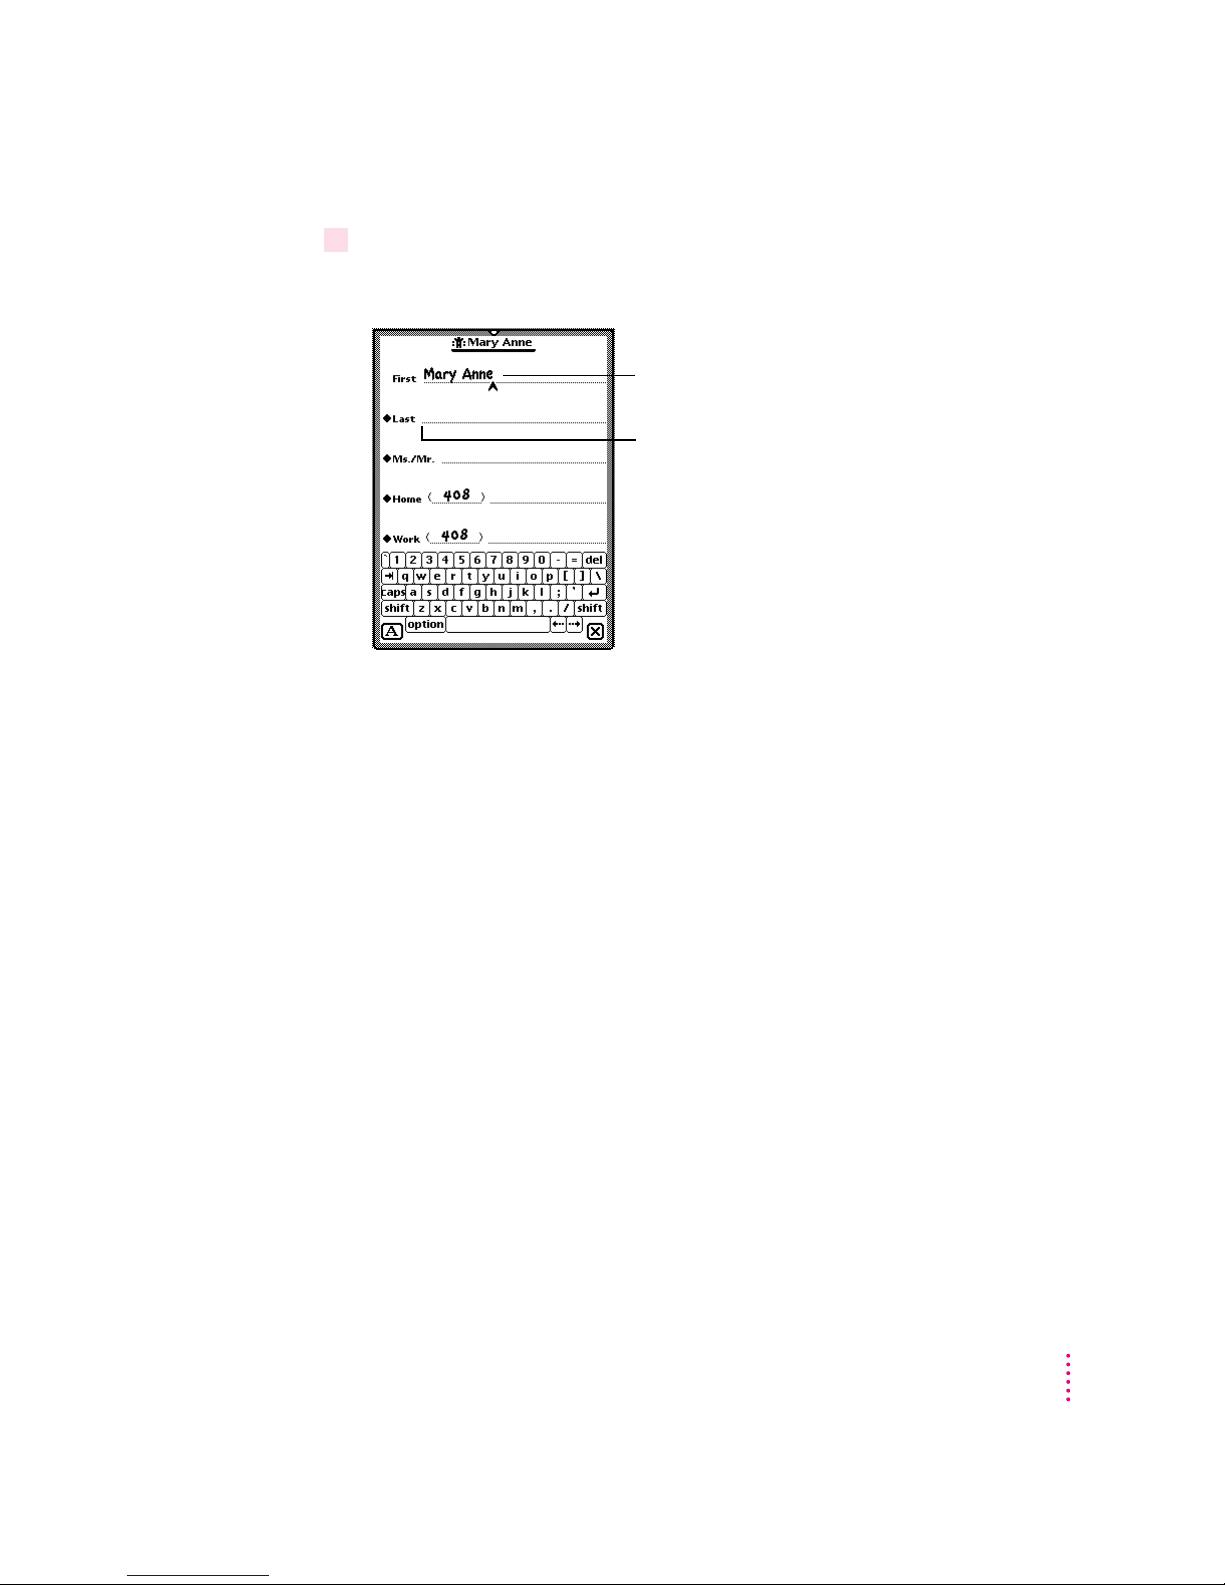
4 Begin typing on your computer’s keyboard.
The text you type appears at the insertion point on your Newton device.
Characters you type on your computer’s
keyboard appear at the insertion point.
Press the Tab or Return key to move to
a new text entry area.
You can use all standard alphabetic and numeric keys on your keyboard
to enter information on your Newton device. You can also use the Tab and
Return keys to move between text entry areas. Special keys, such as F1,
are not supported.
During a keyboard session, characters appear on your Newton device only
when the Newton Connection Utilities window is active on your computer.
If another window is active, characters you type appear on your computer
and not on your Newton device.
Using Your Computer’s Keyboard
39
Page 40

Ending a keyboard session
When you’ve finished entering information from the keyboard, you can end a
keyboard session by any of the following methods:
m On your computer, click the Stop button in the Keyboard status window.
m On your Newton device, tap the Dock button. When a message appears
asking whether you want to end your keyboard session, tap Yes.
m Tap the star (
✩) at the top of your Newton screen and tap Dock. When a
message appears asking whether you want to end your keyboard session,
tap Yes.
Copying text from the Clipboard
During a keyboard session, you can copy text from your computer’s Clipboard
to your Newton device.
To copy text from the Clipboard, follow these steps:
1 Open the Newton Connection Utilities and start a keyboard session.
For instructions, see “Starting a Keyboard Session” earlier in this chapter.
2 On your computer, copy text to the Clipboard.
3Set the insertion point on your Newton device.
4Click the “Paste from Clipboard” button in the Keyboard status window.
Te xt from the Clipboard appears on your Newton device.
Note: You can also paste text by typing x-V on your computer’s keyboard.
When you copy text to your Newton device:
m Graphics are not copied.
m The “Paste from Clipboard” button is dimmed if the Clipboard contains
no text.
m It may take a few seconds for large amounts of text to appear on your
Newton device.
40
Chapter 4
Page 41

5
About importing
Importing Information to Your Newton Device
This chapter describes how to import information from a file on your
computer to an application on your Newton device. To learn about importing
information into your Newton Works application, see Chapter 8, “Importing
Into Newton Works.”
You can import information from your computer to your Newton device in the
following ways:
m Direct import: The Newton Connection Utilities come with translators that
convert files created by popular PIM (personal information manager)
applications into information on your Newton device.
For a list of translators included with the Newton Connection Utilities, see
the Read Me file that comes with the utilities.
m Text files: Many applications can create plain or delimited text files. You
can import from a text file when no translator exists for the application you
want to use.
IMPORTANT
device before you import. For more information on backing up your
Newton device, see Chapter 2, “Backing Up and Restoring Information.”
It’s a good idea to make a backup of information on your Newton
41
Page 42
Choosing when to import
Ty pically, you import when you want to transfer a large amount of
information from your computer and maintain the information on your
Newton device. For example, you might have a list of customer names you
want to add to your Newton Names application.
However, if you have information you want to keep current on both your
Newton device and your computer (for example, your appointment calendar),
you may prefer to synchronize instead of import. For more information, see
Chapter 7, “Synchronizing Information.”
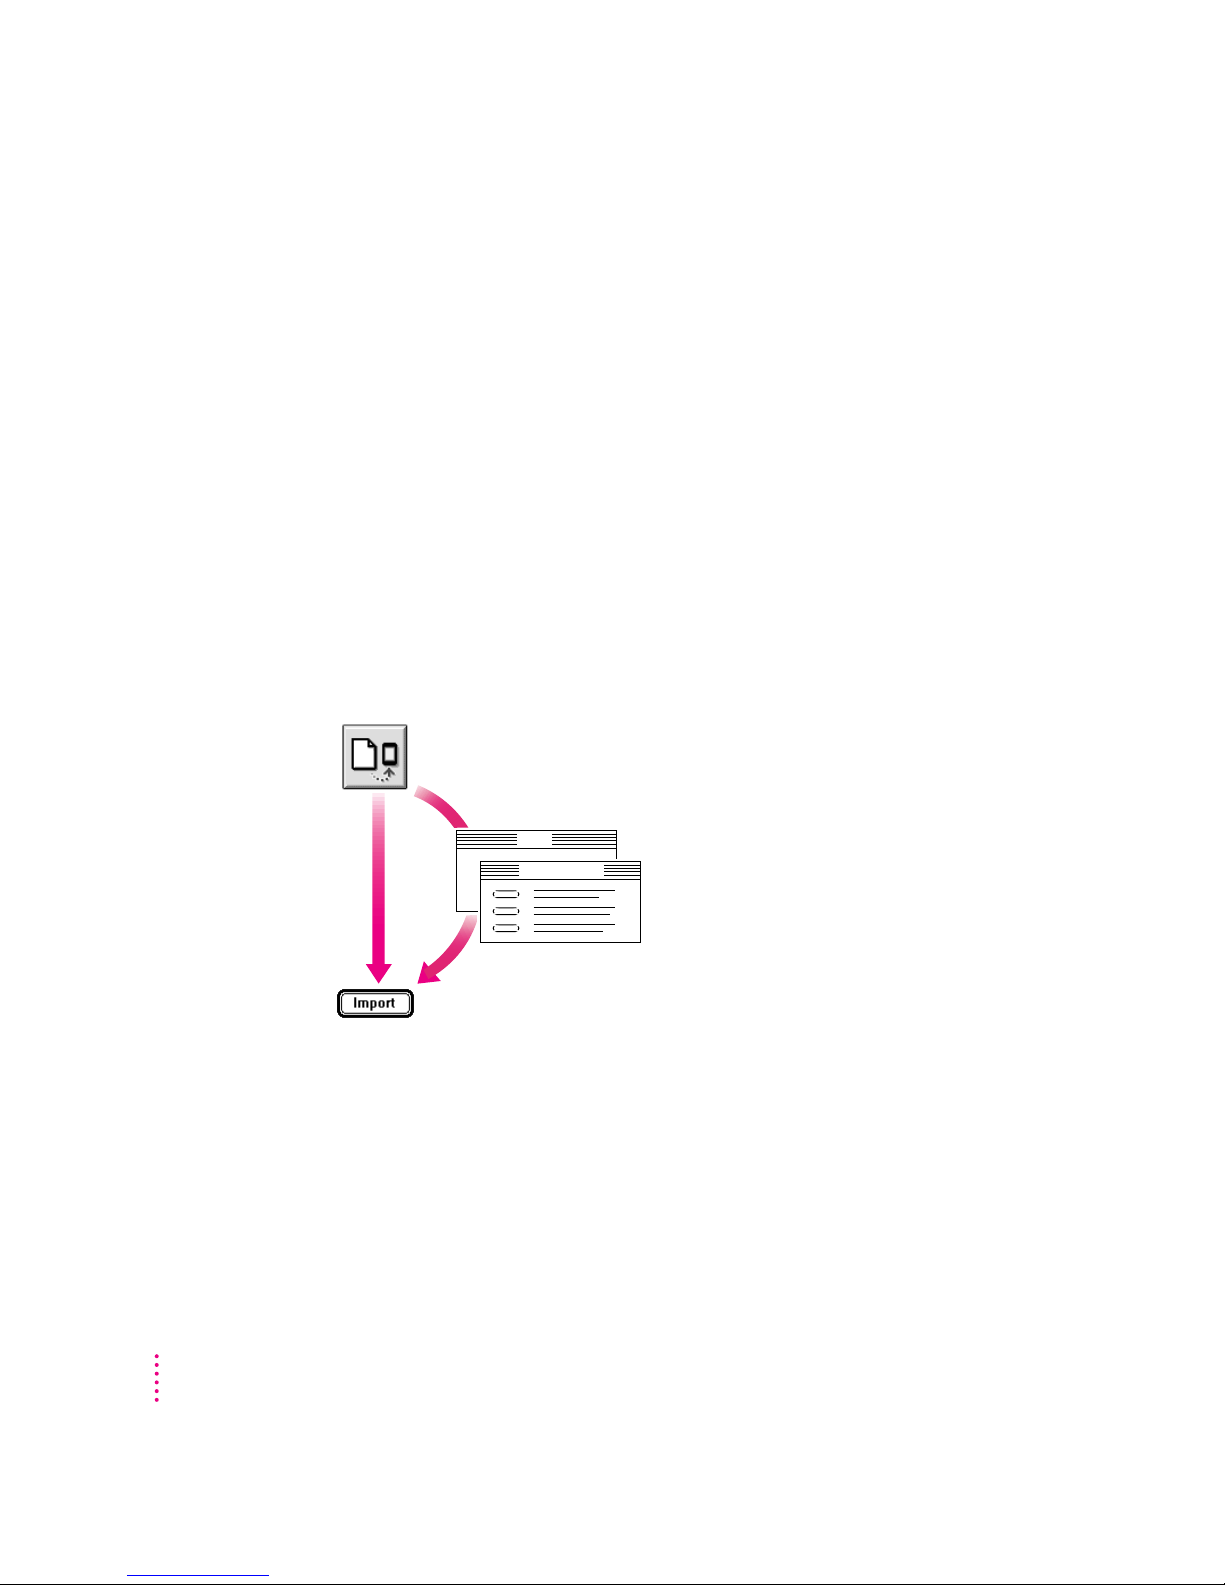
An overview of importing
The following illustration shows the steps you take to import information.
This chapter describes how to import without setting advanced options.
Chapter 10, “Setting Advanced Options,” describes how to set advanced
options when you import.
1. Start importing.
Select a file on your computer to import.
Select a Newton application to import to.
42
Chapter 5
3. Import.
Import
Advanced Options
2. If desired, use Advanced Options to set
m
Date range
m
Conflict resolution
m
Field mapping
m
Miscellaneous options
Page 43

Importing
Importing a file
When you import information, the Newton Connection Utilities look at the
file you’re importing to determine which translator to use to convert the file.
This section describes what happens when the Newton Connection Utilities
automatically recognize which translator to use and which Newton application
should receive the information.
The next section, “Importing an Unrecognized File,” describes what happens
if more than one translator can be used to convert the file or if more than one
Newton application can receive the information you’re importing.
Note: Before you import, make sure the file you’re importing is in a format
supported by the Newton Connection Utilities. See the Read Me file for a list
of file formats (translators) supported by the Newton Connection Utilities.
To import a file, follow these steps:
1 Open the Newton Connection Utilities and establish a connection from your
Newton device.
For instructions, see Chapter 1, “Getting Started.”
2Click the Import button in the Newton Connection Utilities window.
Importing information to Your Newton Device
43
Page 44
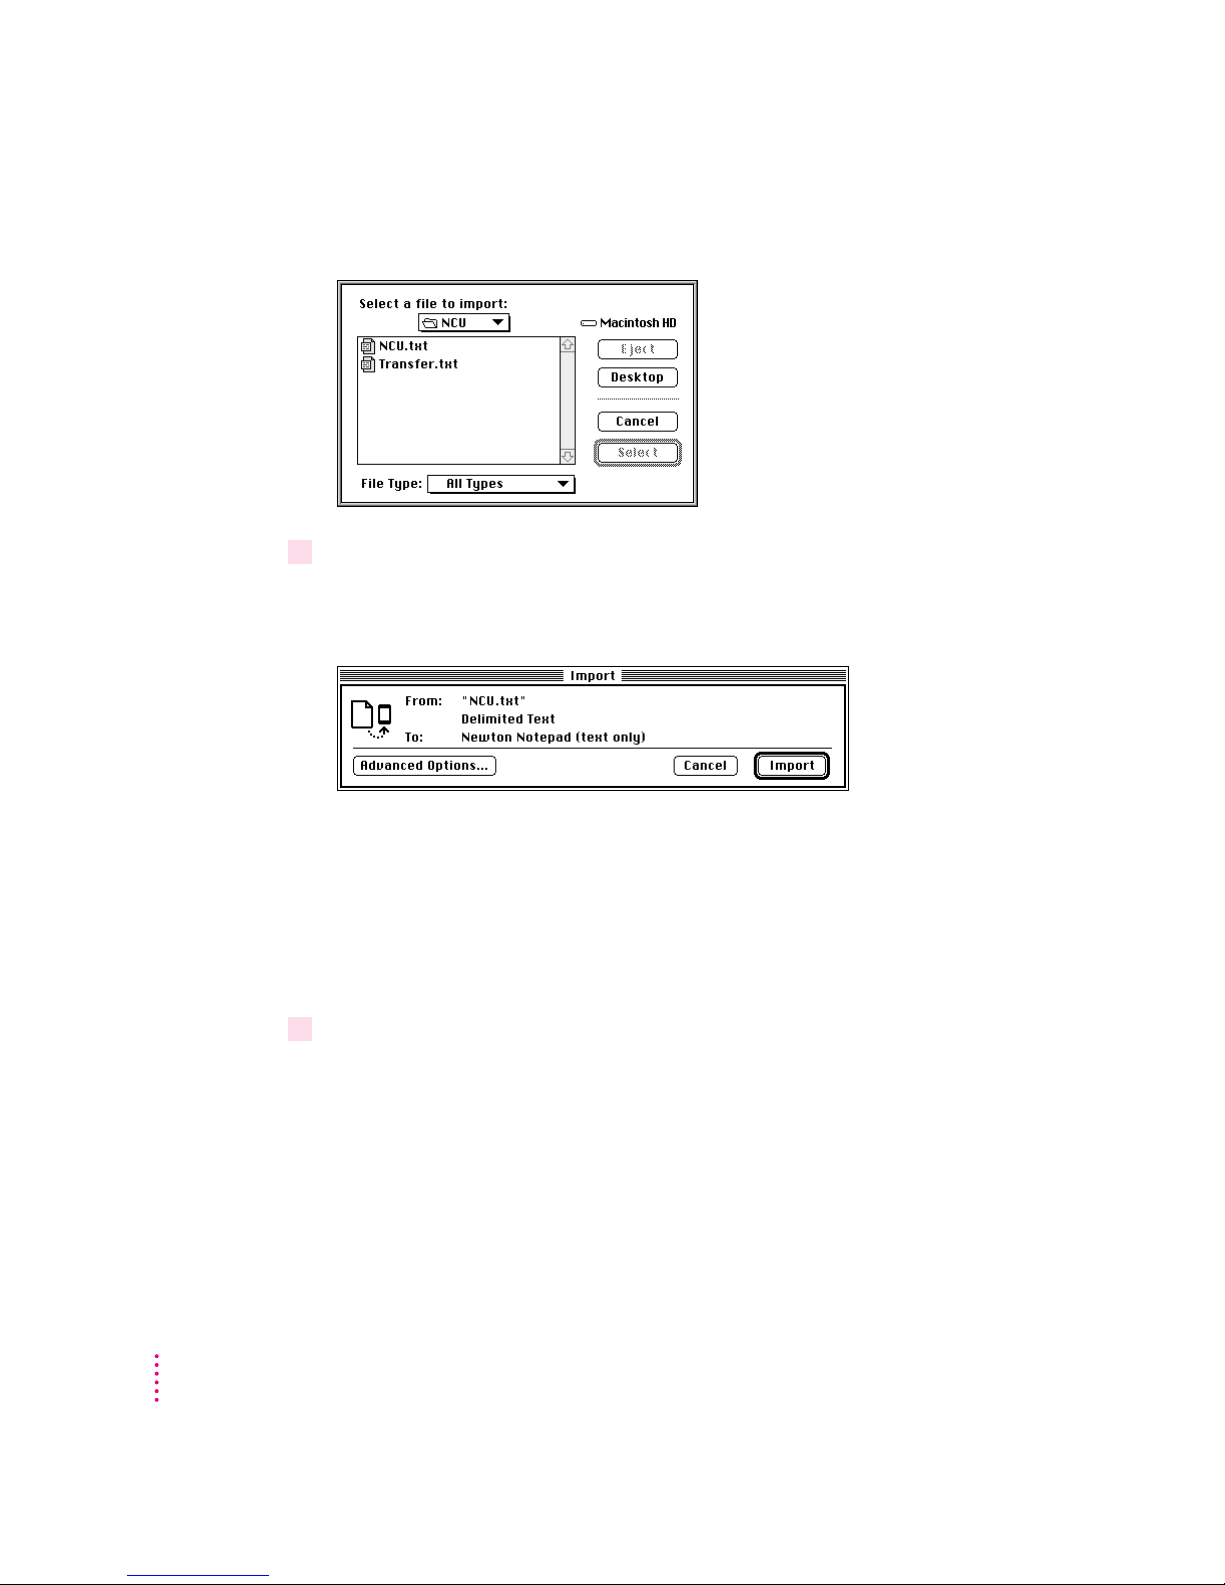
A dialog box appears with a list of files to import.
3 Select a file to import and click Select.
If the Newton Connection Utilities recognize the file you’re importing, a
dialog box similar to the following appears.
44
Note: The contents of this dialog box depend on the type of file you’re
importing and the application you’re importing to. See Chapter 10, “Setting
Advanced Options,” for more information about advanced options.
If the file is not recognized by the Newton Connection Utilities, a dialog box
appears asking you to select the type of file you’re importing. For more
information, see “Importing an Unrecognized File,” next.
4 Click Import.
The information is imported to your Newton application.
Chapter 5
Page 45
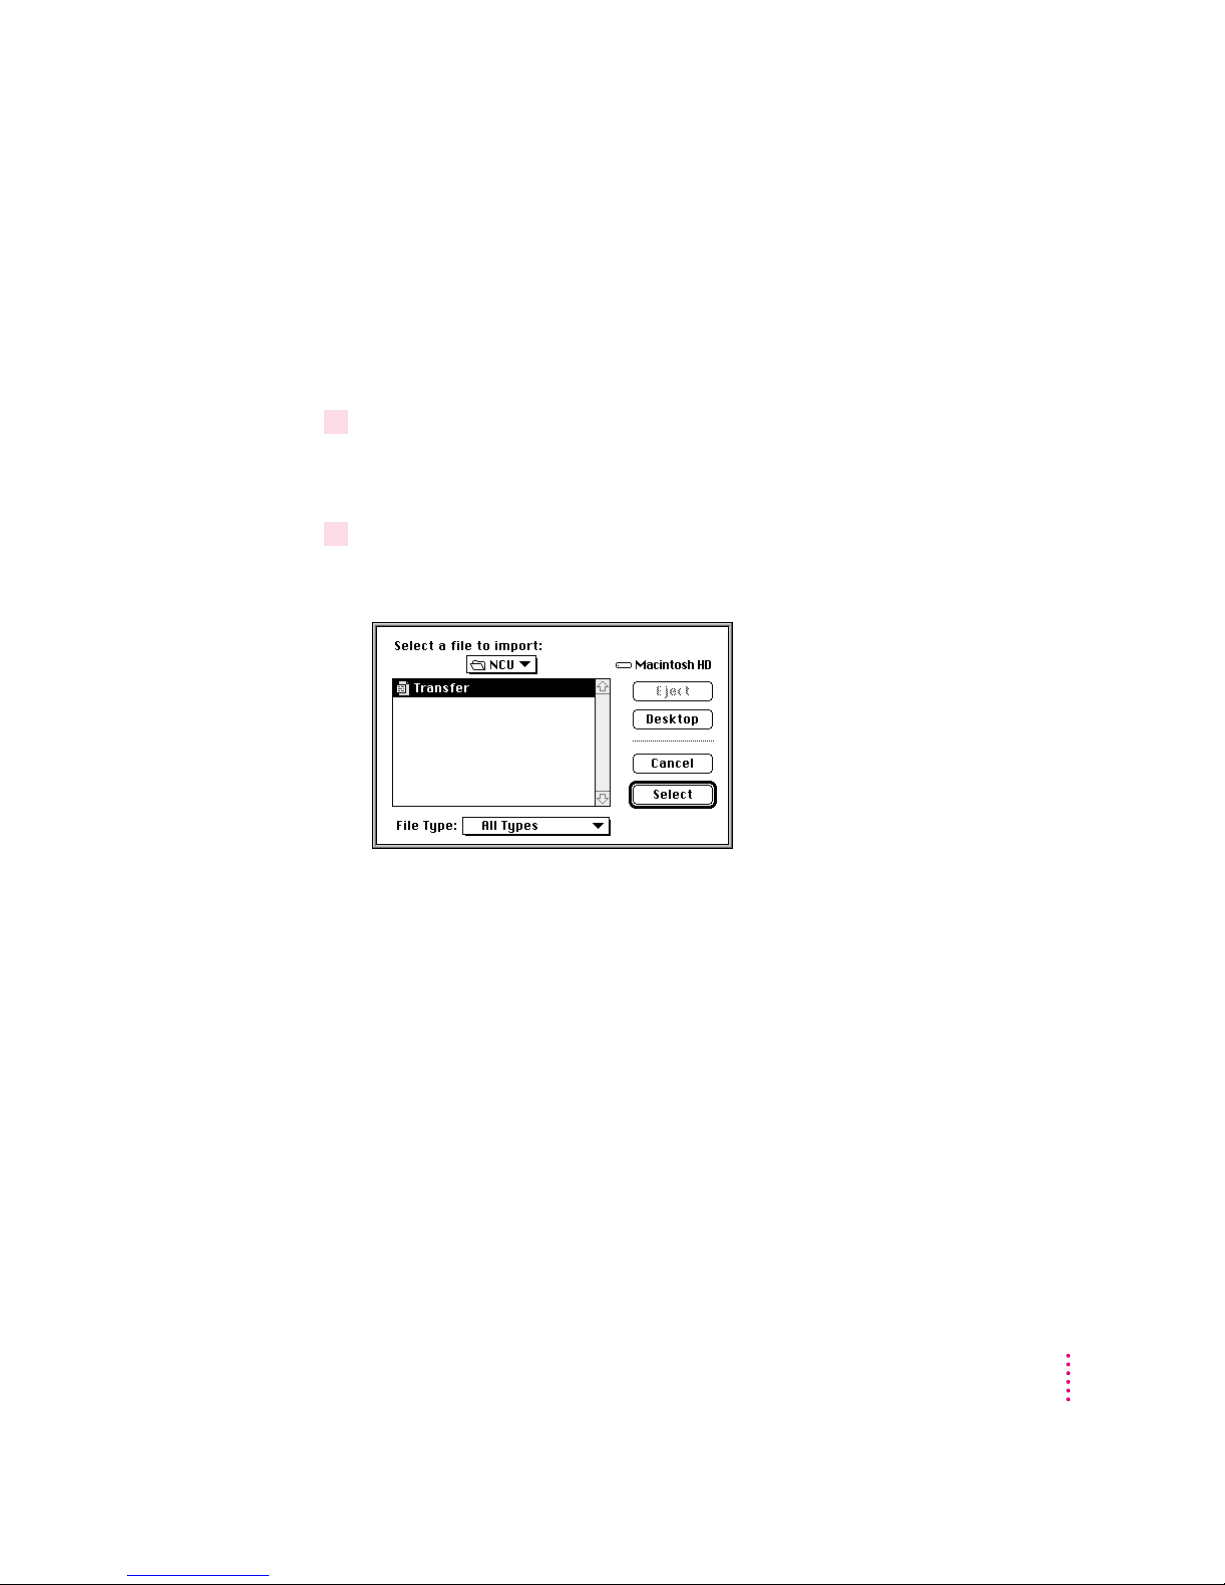
Importing an unrecognized file
This section describes what happens if more than one translator can be used
to convert the file you’re importing and if more than one Newton application
can receive the information you’re importing.
To import a file, follow these steps:
1 Open the Newton Connection Utilities and establish a connection from your
Newton device.
For instructions, see Chapter 1, “Getting Started.”
2Click the Import button in the Newton Connection Utilities window.
A dialog box appears with a list of files to import.
Importing Information to Your Newton Device
45
Page 46
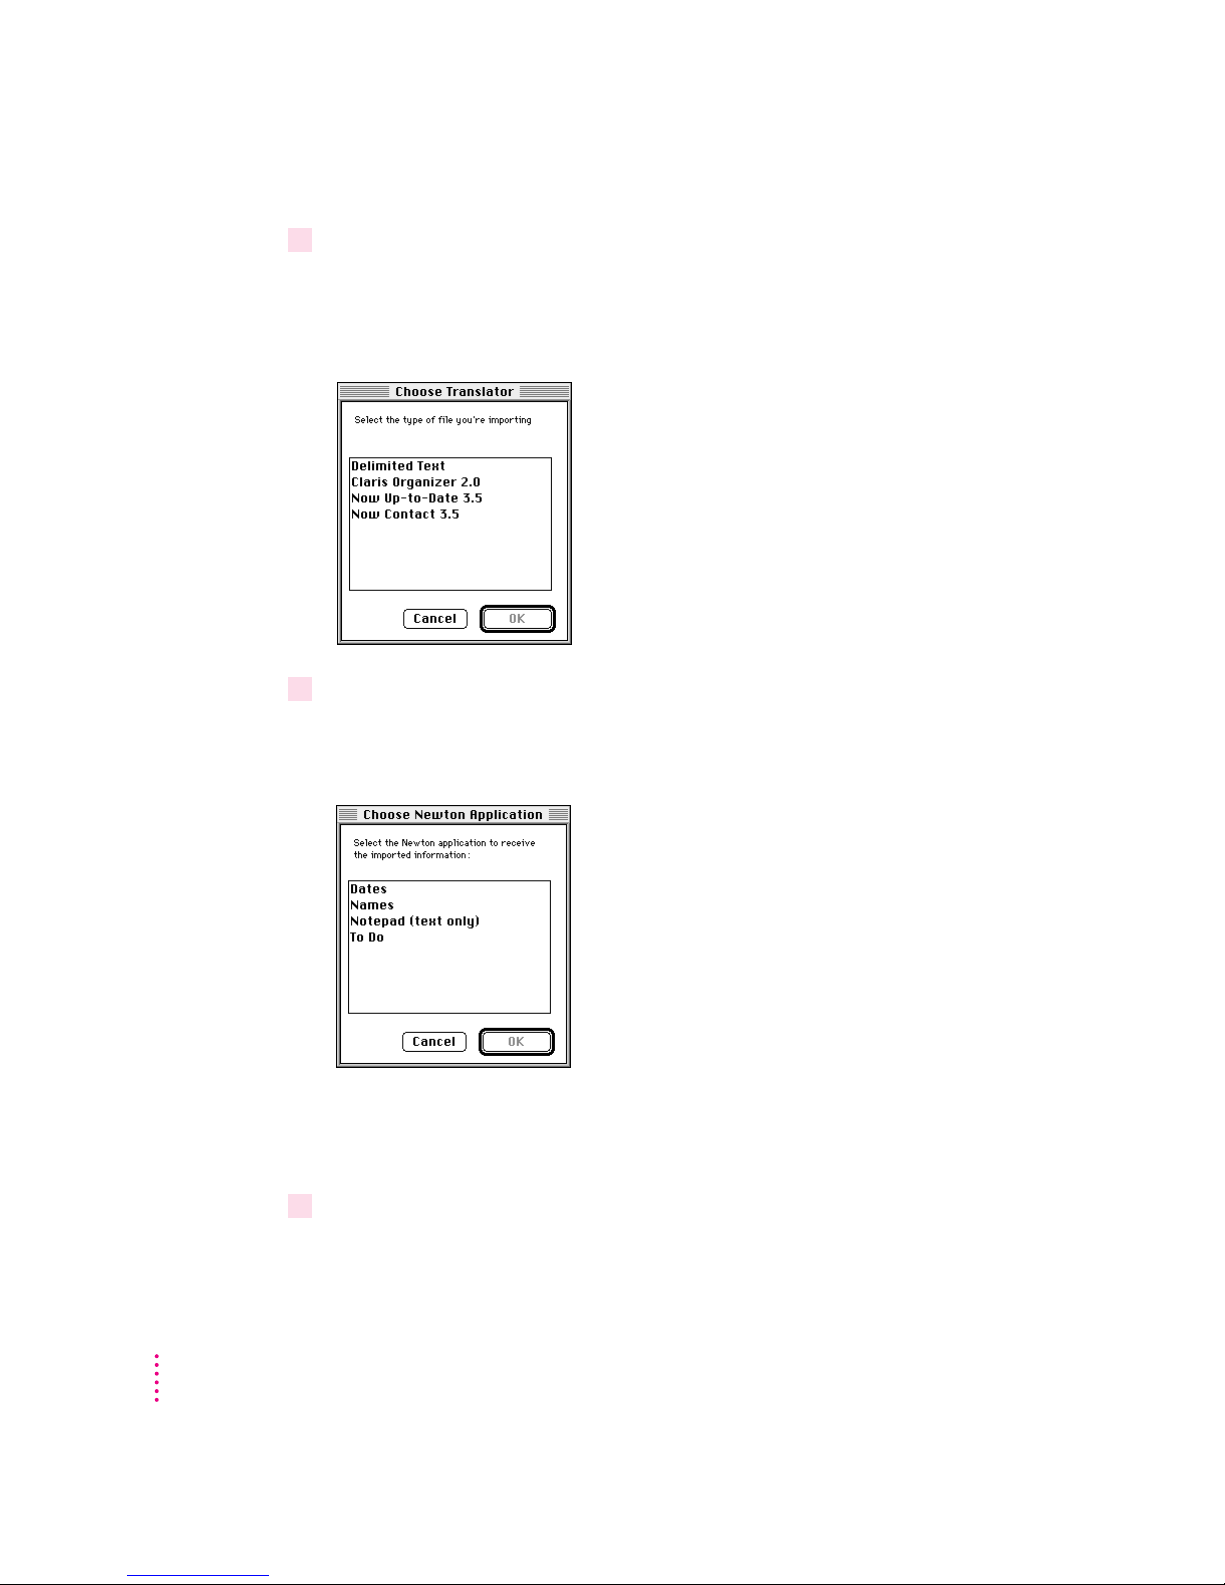
3 Select a file to import and click Select.
A dialog box appears listing the translators available to convert the file you’re
importing. (You may see a different list of translators, depending on the type
of file you’re importing.)
4Select the type of file you’re importing and click OK.
A dialog box appears with a list of Newton applications that can receive the
information.
Note: This dialog box appears only if the information you’re importing can
be transferred to more than one Newton application. Otherwise, the
appropriate Newton application is selected automatically.
5Select the Newton application you want to import to.
46
Chapter 5
Page 47
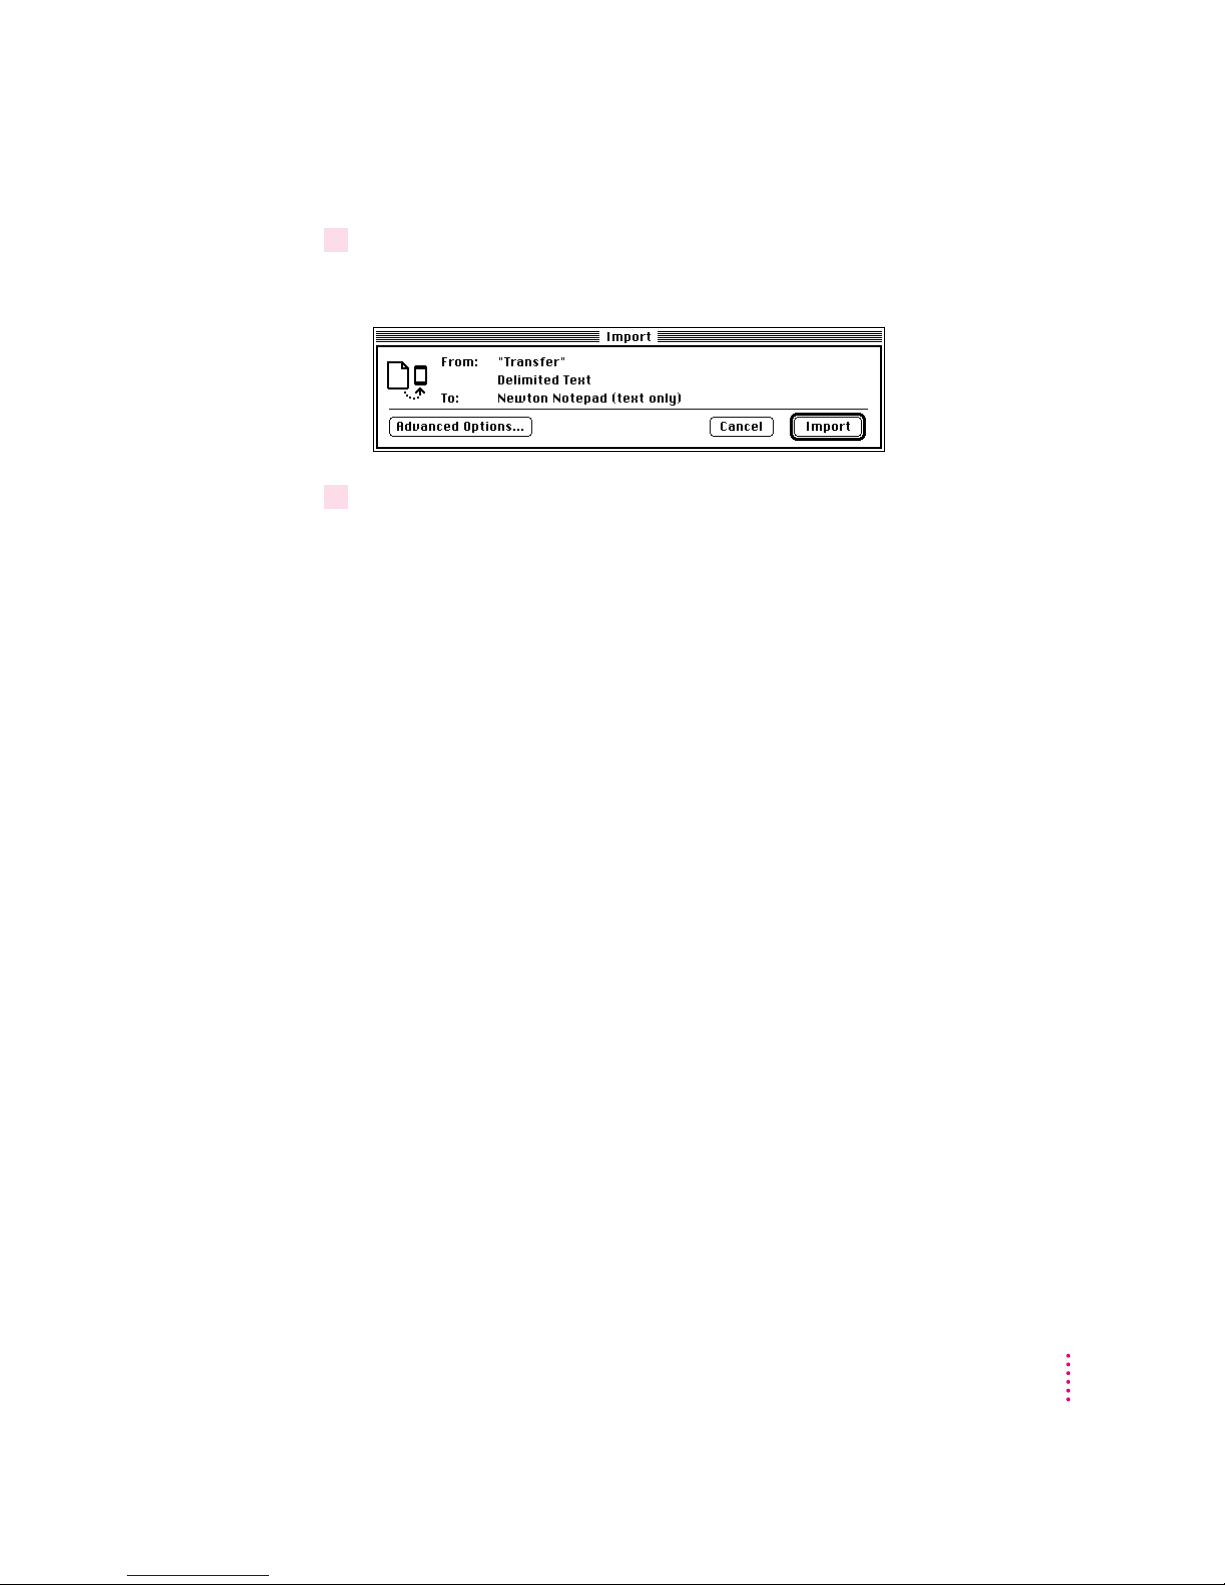
6 Click OK.
The Import dialog box appears.
7 Click Import.
The information is imported to your Newton application.
Importing a text file
You can import two types of text file: delimited text and plain text.
Applications, such as database managers, which store information organized
in records and fields, can often save information as a delimited text file.
Within the delimited file, individual items or fields of information are
separated by special characters such as commas or tab characters. Entire
entries within the text file are separated by return characters. The special
characters in a delimited text file maintain the organization of the records and
fields. An application that can read delimited text files can then import the
information into the fields and records of its own files.
A plain text file does not use such special characters to maintain the
organization of fields and records. For example, word-processing applications
can often save documents as plain text files, but they don’t use extra commas
or tab characters to organize the file. The information is saved as a long
sequence of text (including carriage returns that separate paragraphs). You
can import a plain text file into the Newton Notepad application, but not into
an area such as Names.
Importing Information to Your Newton Device
47
Page 48

When you import a delimited text file, you can specify what characters
separate information in the file. For example, fields of information might be
separated by commas (,) and entries (records) might be separated by return
characters.
You can also specify whether the text file includes column headings (field
names) at the top of the file.
By default, the Newton Connection Utilities import delimited text files with
the following format. You can change these settings. See “Setting
Miscellaneous Options” in Chapter 10, “Setting Advanced Options,” for
more information.
Column headings
show the
field names.
Column headings
Fields of information
are separated by tab
characters.
"First","Last","Street","City","State","Zip","Phone"
"Michael","Jen","333 West Point","San Juan","CA","94000","(415)555-1234"
"Sheila","Black","222 West Market","New York","NY","10000","(212)555-4321"
"Sanjay","Manni","","Dallas","TX","75111",("214)555-4444"
"Ian","Smit","555 Minny Dr","Atlanta","GA","50000",""
Blank fields are marked
by quotation marks ("").
Fields of information are
separated by commas.
The following is an example of a delimited text file that uses tabs to
separate fields:
"First" "Last" "Street" "City" "State" "Zip" "Phone"
"Michael" "Jen" "333 West Point" "San Juan" "CA" "94000" "(415)555-1234"
"Sheila" "Black" "222 West Mark" "New York" "NY" "10000" "(212)555-4321"
"Sanjay" "Manni" "" "Dallas" "TX" "75111" "(214)555-4444"
"Ian" "Smit" "555 Minny Dr" "Atlanta" "GA" "50000" ""
Blank fields are marked
by quotation marks ("").
48
Chapter 5
Page 49

Changing how information is imported
When you import database information to your Newton device, the
information is transferred using a field map, a template to determine how
fields in your computer’s application are mapped to fields in your Newton
application.
In most cases, the default field map works fine for importing information, but
you can change the field map to meet your specific needs — if, for example,
you have custom fields in your computer’s application.
In addition to changing the field map, you can choose a date range for
calendar information, specify how conflicting information is handled, and set
application-specific options. See Chapter 10, “Setting Advanced Options,” for
more information.
Importing Information to Your Newton Device
49
Page 50

Page 51

6
About exporting
Exporting Information From Your Newton Device
This chapter describes how to transfer information from an application on
your Newton device to a file on your computer. To learn about exporting
Newton Works information to your computer, see Chapter 9, “Exporting From
Newton Works.”
You can export information from your Newton device to your computer in the
following ways:
m Direct export: The Newton Connection Utilities come with translators
that convert Newton information into commonly used file formats.
For example, you can transfer information into formats used by popular
PIM (personal information manager) applications.
For a list of translators included with the Newton Connection Utilities, see
the Read Me file that comes with the utilities.
m Text files: Many applications can read delimited text files. You can export
to a delimited text file when no translator exists for the application you
want to use.
You can export all the information in a Newton application or you can export
selected information. See “Exporting All Information” and “Exporting
Selected Information” later in this chapter.
51
Page 52
Choosing when to export
Ty pically, you export when you want to transfer a large amount of information
from your Newton device to your computer and maintain the information on
your computer. For example, you might export information in your Notepad
from your Newton to include in a report you’re writing on your computer.
However, if you have information you want to keep current on both your
Newton device and your computer (for example, your appointment calendar),
you may prefer to synchronize instead of export. For more information, see
Chapter 7, “Synchronizing Information.”
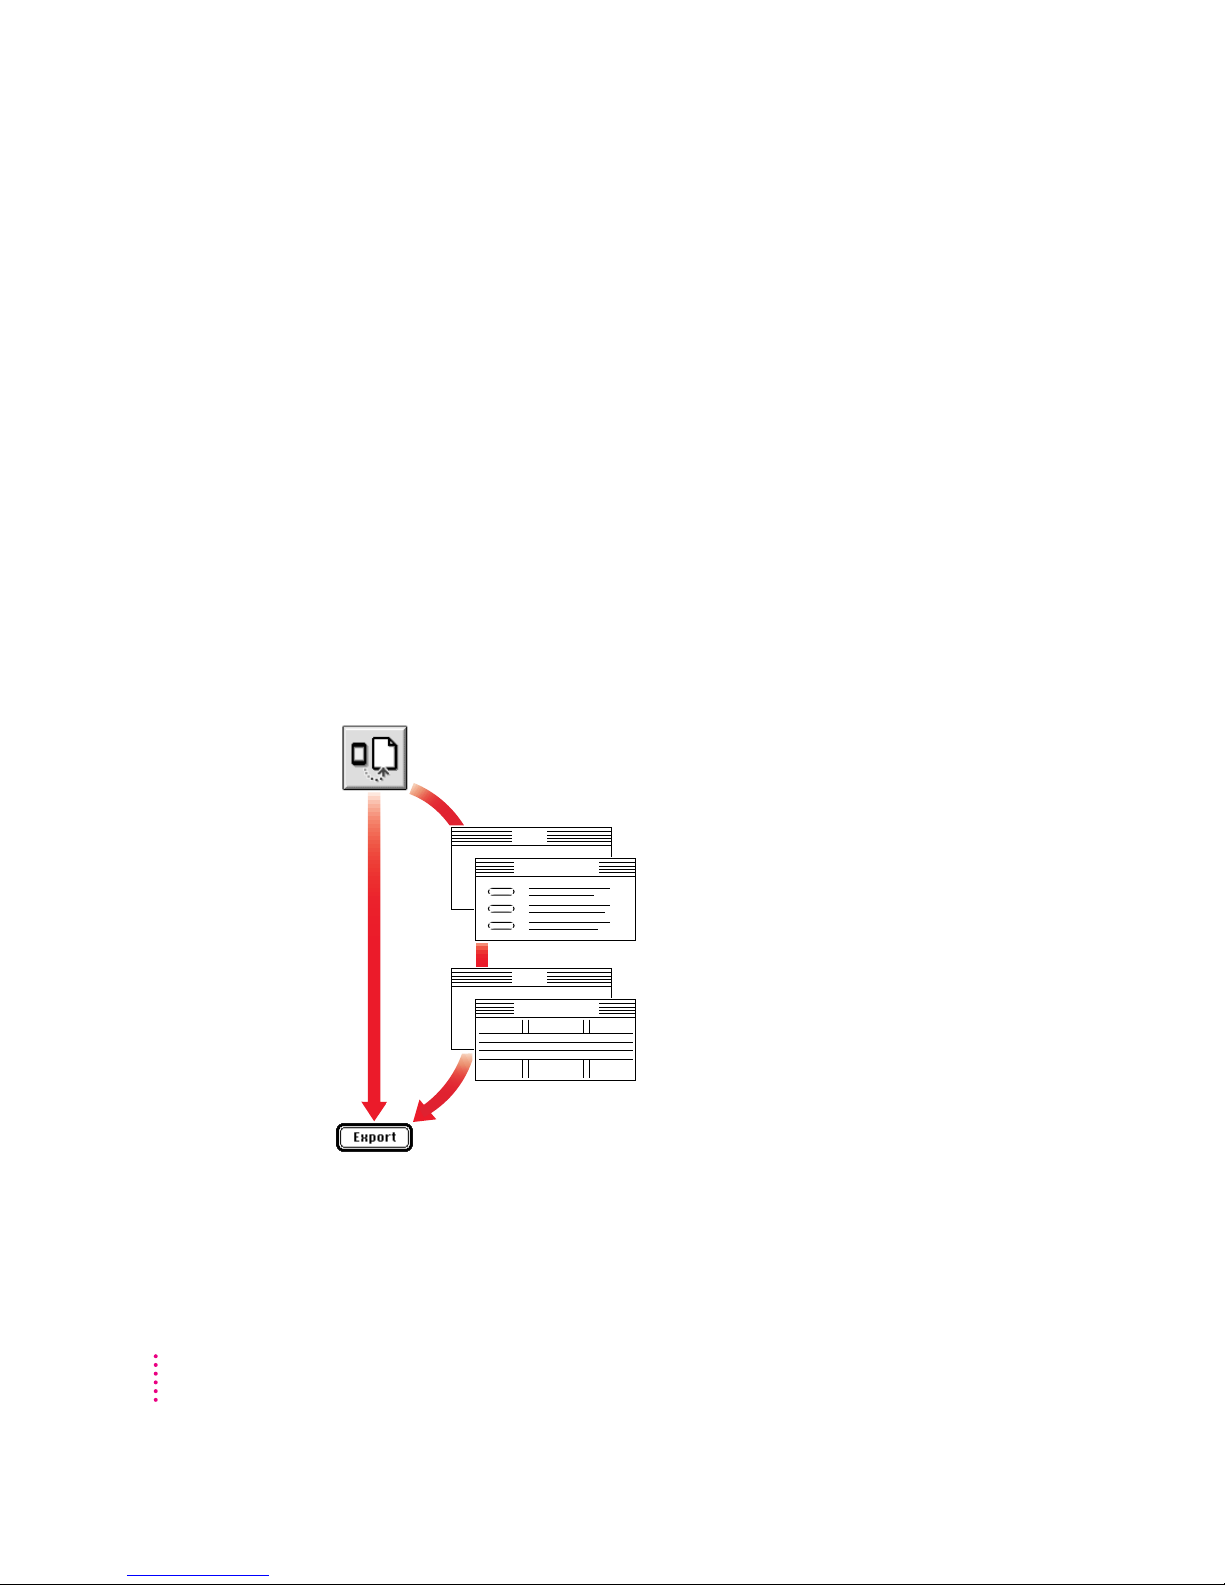
An overview of exporting
The following illustration shows the steps you take to export information.
This chapter describes how to export information without setting advanced
options. Chapter 10, “Setting Advanced Options,” describes how to set
advanced options when you export.
1. Start exporting.
Select a Newton application to export.
Select a file to export to.
52
Chapter 6
4. Export.
Export
Advanced Options
Export
Export Selected
2. If desired, use Advanced Options to set
m
Date range
m
Field mapping
m
Miscellaneous options
3. If desired, select specific entries
to export.
Page 53
Exporting all information
To export all information from a Newton application, follow these steps:
1 Open the Newton Connection Utilities and establish a connection from your
Newton device.
For instructions, see Chapter 1, “Getting Started.”
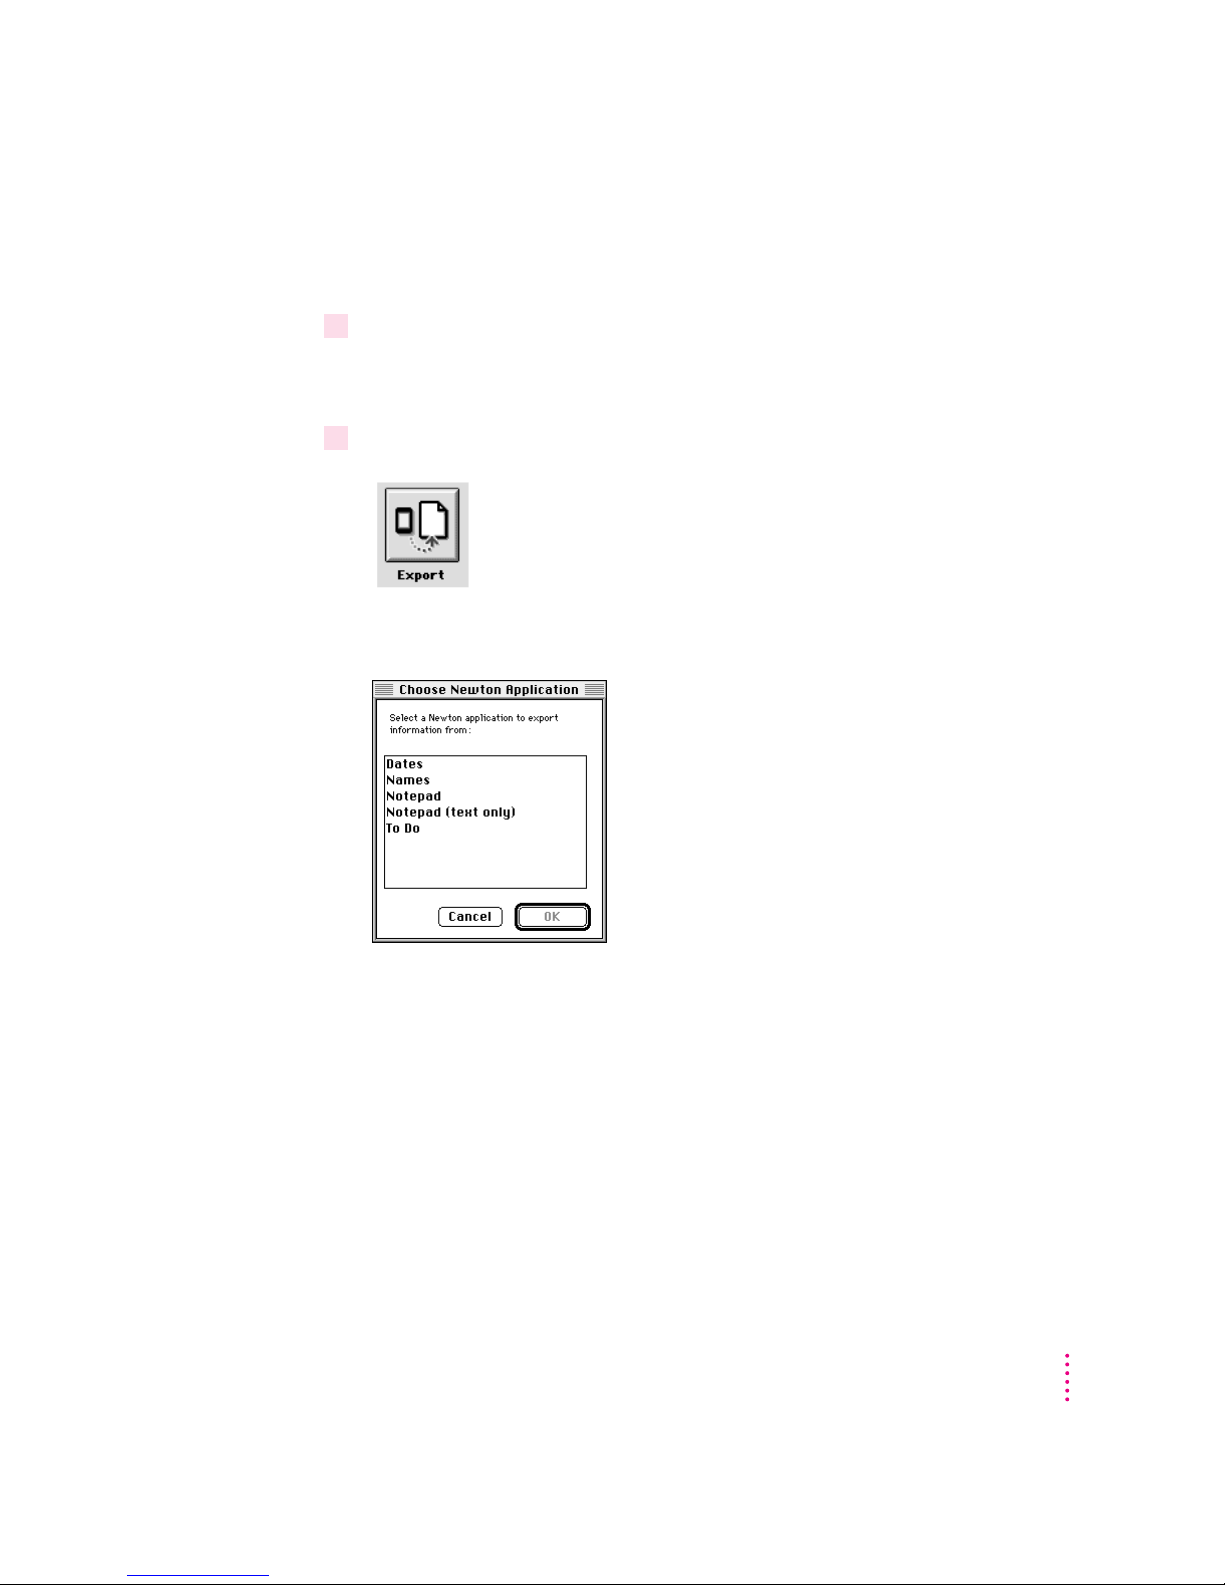
2Click the Export button in the Newton Connection Utilities window.
A dialog box lists Newton applications you can export information from.
You can choose to export both text and graphics from your Notepad or only
text. You would choose to export only text when the computer application
receiving your information does not support graphics.
Exporting Information From Your Newton Device
53
Page 54
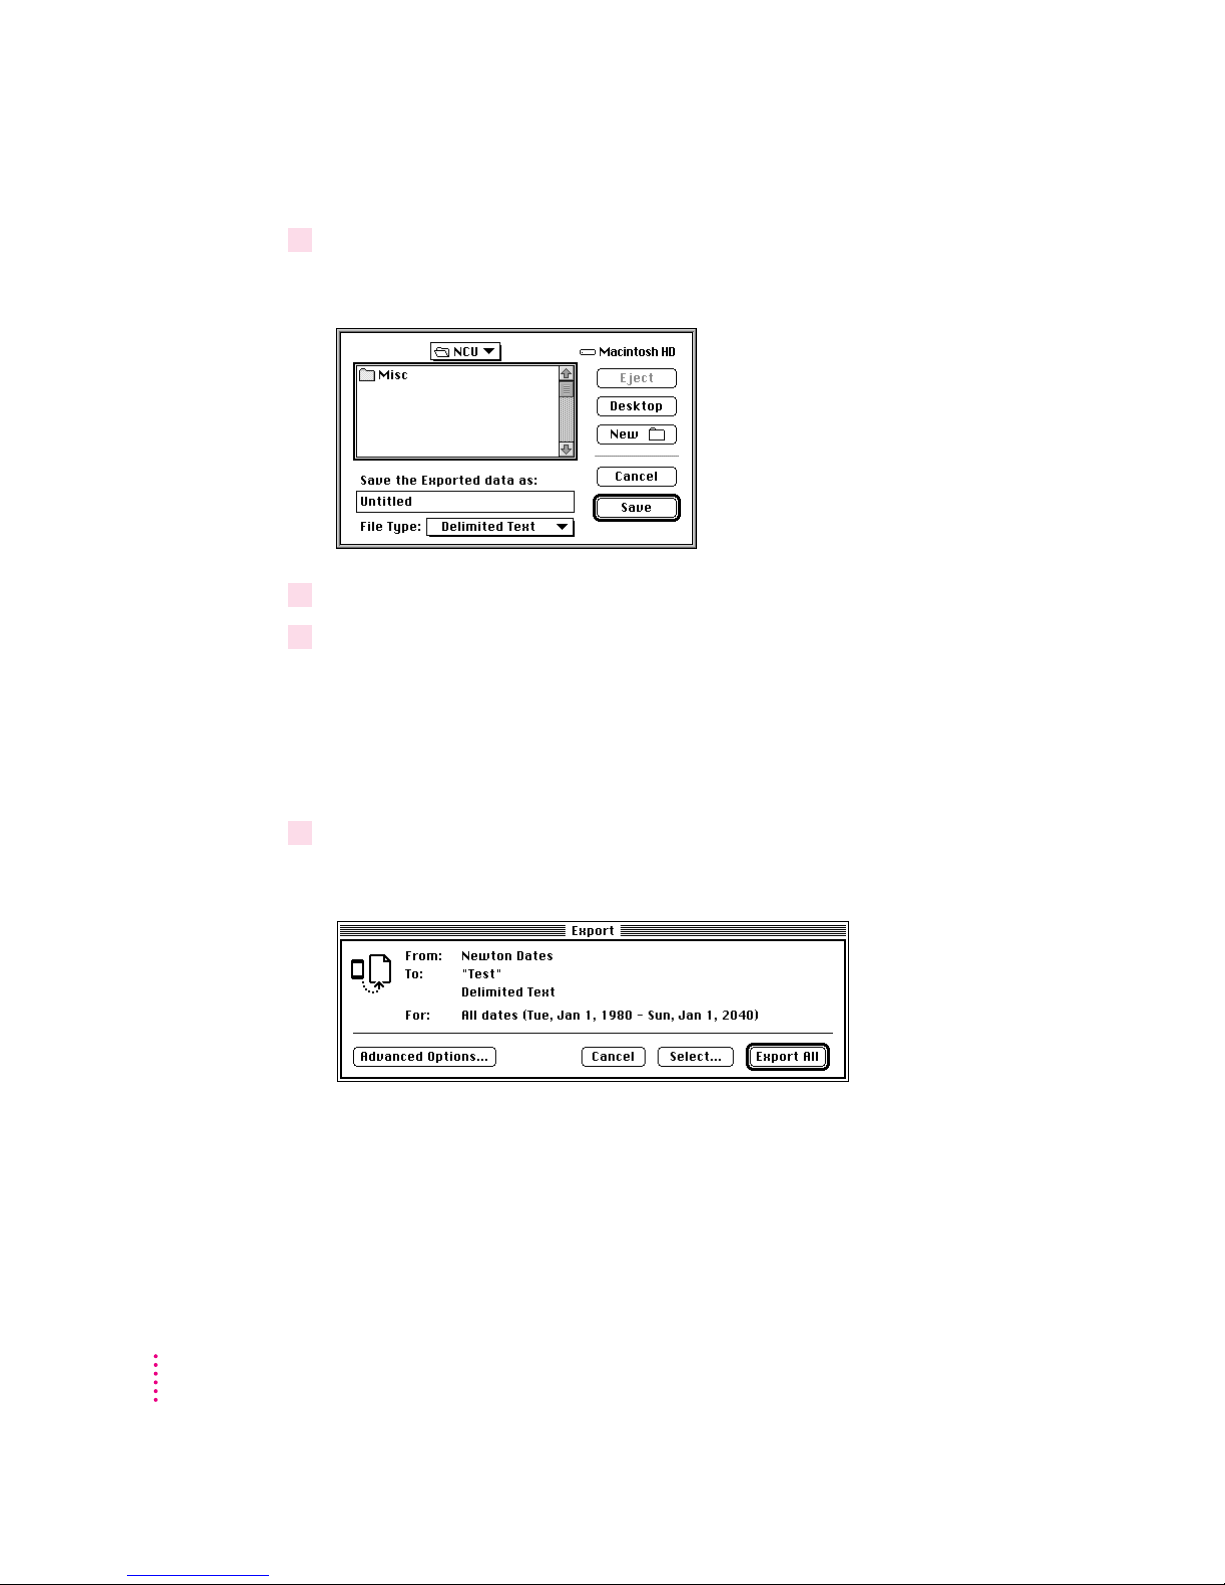
3Select an application and click OK.
A Save dialog box appears.
4Type a name for the file that will contain the exported information.
5Choose the type of file to create from the File Type pop-up menu.
The File Type menu lists file formats you can create when you export
Newton information. Items in the File Type menu vary depending on which
translators you have installed and which Newton application you are
exporting from. If a translator doesn’t exist for the type of file you want to
export, you can export a text file or a delimited text file.
54
6Click Save.
The Export dialog box appears.
Note: The contents of this dialog box depend on the type of file you’re
exporting and the application you’re exporting from.
Chapter 6
Page 55

7 Click Export All.
All information is exported from your Newton application to a new file with
the format you selected. If you changed settings in Advanced Options, the
information is exported according to your new settings.
Exporting a text file
When you export to a delimited text file, fields of information are separated
by commas (,) and entries (records) by returns. Column headings with the
names of each field are included at the top of the file.
Column headings
show the
field names.
Column headings
Fields of information
are separated by tab
characters.
"First","Last","Street","City","State","Zip","Phone"
"Michael","Jen","333 West Point","San Juan","CA","94000","(415)555-1234"
"Sheila","Black","222 West Market","New York","NY","10000","(212)555-4321"
"Sanjay","Manni","","Dallas","TX","75111",("214)555-4444"
"Ian","Smit","555 Minny Dr","Atlanta","GA","50000",""
Blank fields are marked
by quotation marks ("").
Fields of information are
separated by commas.
You can change the characters used to separate fields and entries in the text
file, and you can add or remove column headings. See “Setting Miscellaneous
Options” in Chapter 10, “Setting Advanced Options,” for more information.
The following is another example of a delimited text file.
"First" "Last" "Street" "City" "State" "Zip" "Phone"
"Michael" "Jen" "333 West Point" "San Juan" "CA" "94000" "(415)555-1234"
"Sheila" "Black" "222 West Mark" "New York" "NY" "10000" "(212)555-4321"
"Sanjay" "Manni" "" "Dallas" "TX" "75111" "(214)555-4444"
"Ian" "Smit" "555 Minny Dr" "Atlanta" "GA" "50000" ""
Blank fields are marked
by quotation marks ("").
Exporting Information From Your Newton Device
55
Page 56
Exporting selected information
You can export only selected information in a Newton application. For
example, if you’re exporting information from your Newton Names
application, you can choose to export only the names stored in a particular
folder.
To export selected information, follow these steps:
1Follow steps 1 to 6 in the previous section, “Exporting All Information.”
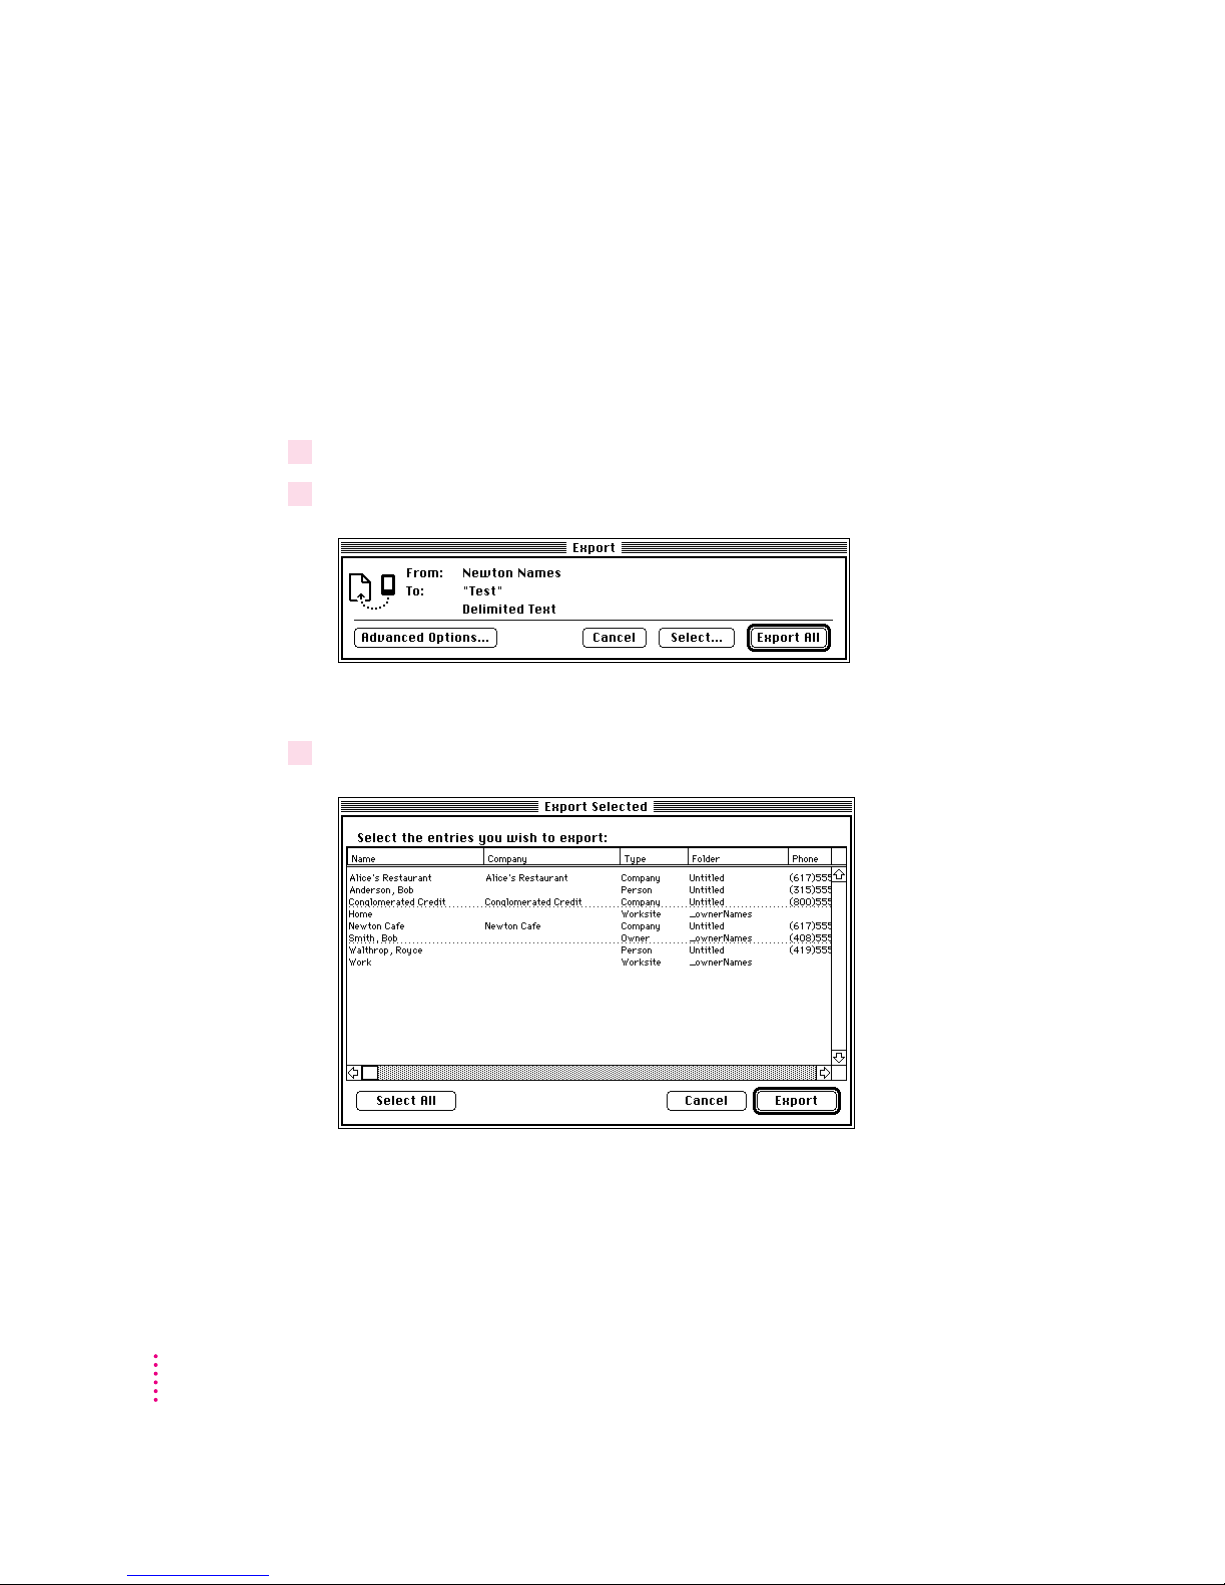
2When the Export dialog box appears, click Select.
A window appears with a list of information to export.
3 Select the entries you want to export.
56
Chapter 6
Page 57

Click an entry to select it for export. You can select groups of entries by
dragging or Shift-clicking. You can select noncontiguous entries by holding
down Command (x) and clicking or dragging. To select all entries in the
window, click Select All.
To rearrange columns, click the column heading and drag the column to a
new location. To sort column entries, click the column heading you want to
sort by.
If an entry is already selected, you can click to deselect it.
4 Click Export.
After a few moments, the entries you selected are exported and the Export
window disappears.
Note: If you select entries, your selections override the date range chosen in
Advanced Options. See Chapter 10, “Setting Advanced Options.”
Changing how information is exported
When you export information from your Newton device, the information
is transferred using a field map—a template to determine how information
from your Newton application is mapped to information in your computer’s
application.
You can change the field map to meet your specific needs—if, for example,
you have custom fields in your computer’s application.
You can further refine how information is exported by choosing a date range
for calendar information and setting application-specific options. See
Chapter 10, “Setting Advanced Options,” for more information.
Exporting Information From Your Newton Device
57
Page 58

Page 59

7
Synchronizing Information
This chapter describes how to synchronize information on your Newton
device with information on your computer.
About synchronization
Synchronization lets you keep applications on your Newton device up-to-date
with applications on your computer. For example, you might have a calendar
application on your computer that you want to contain the same information
as your Newton Dates application.
When you synchronize, the Newton Connection Utilities compare information
in the file on your computer with information in your Newton application.
Then the information is combined and updated in both areas based on the
latest changes.
You can synchronize your Newton applications with a number of popular PIM
(personal information manager) applications. For a list of applications you
can use to synchronize, see the Read Me file that comes with the Newton
Connection Utilities.
Your Newton device cannot synchronize files created by word-processing
applications. To transfer information between your Newton device and a
word-processing file, you need to use import or export.
59
Page 60
An overview of synchronizing
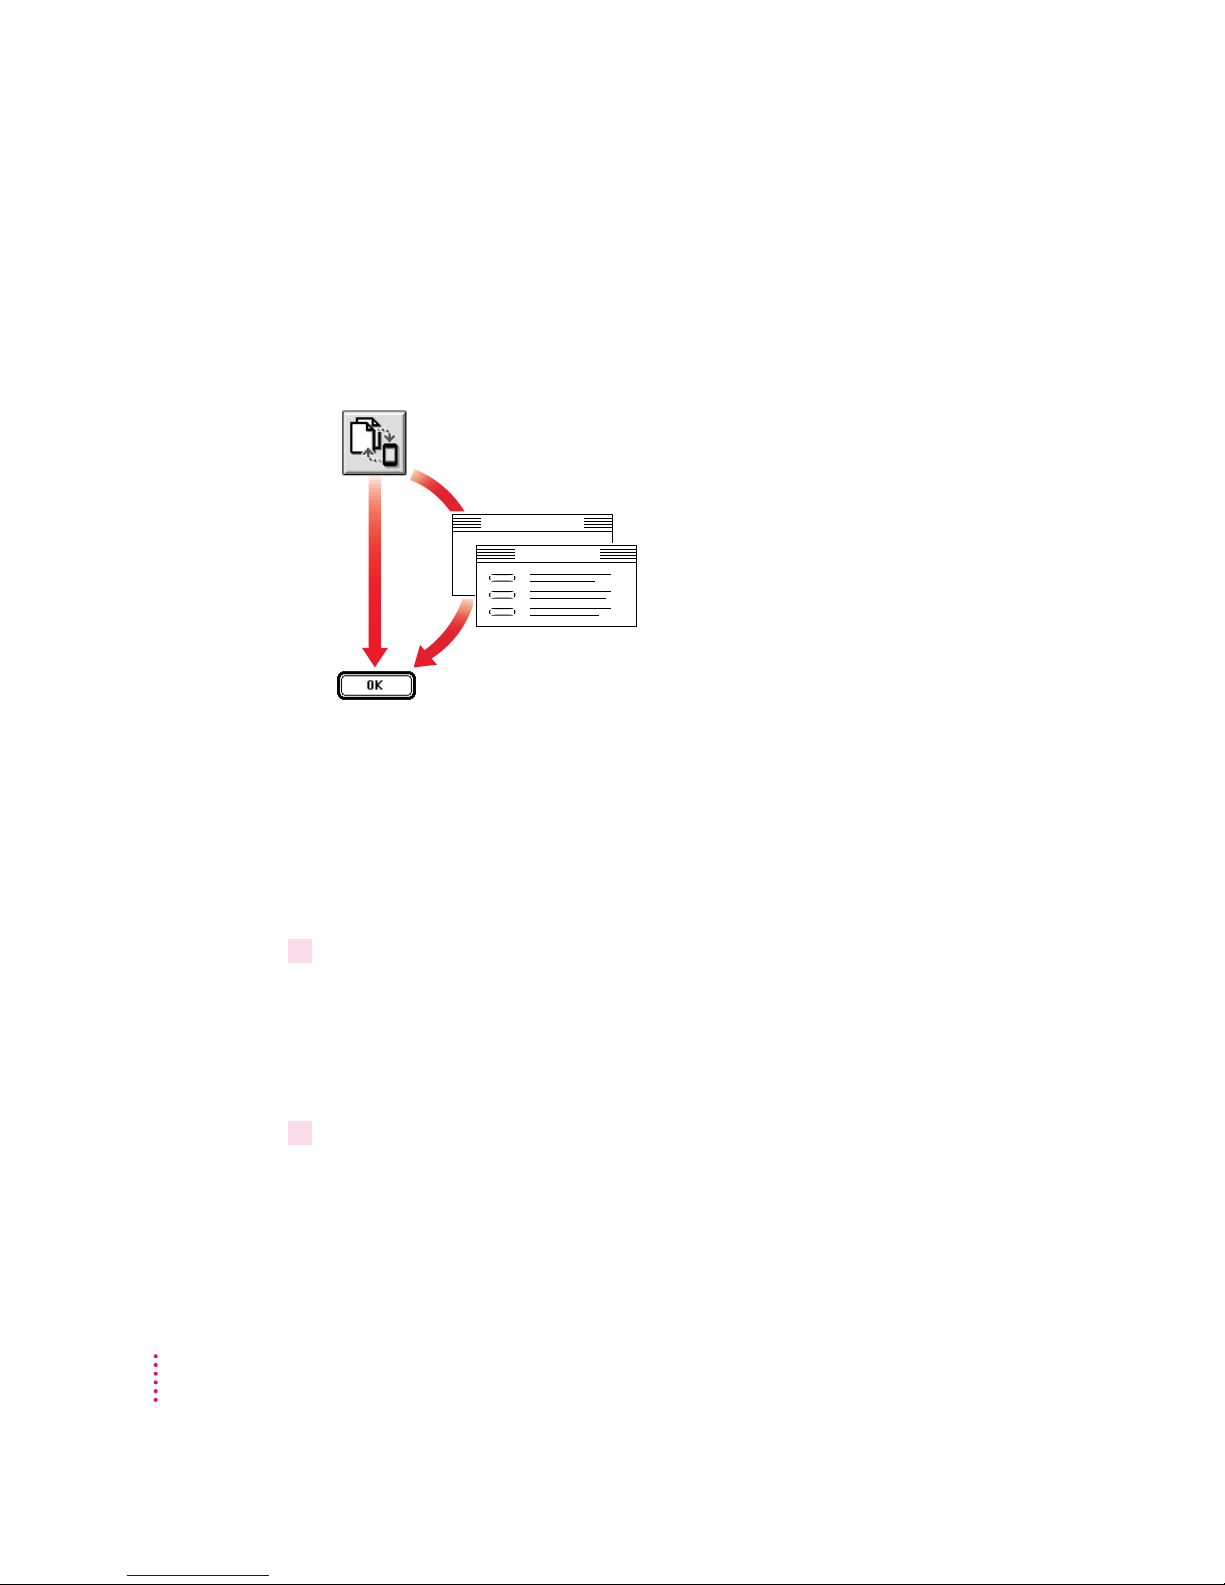
The following illustration shows the steps you take to synchronize
information for the first time. This chapter describes how to synchronize
without setting advanced options. Chapter 10, “Setting Advanced Options,”
describes how to set advanced options when you synchronize.
1. Set up your synchronization.
Select a Newton application to synchronize.
Select a file on your computer.
After entering up your synchronization settings, you can synchronize your
information with a single click of the Synchronize button.
Preparing to synchronize
Before you synchronize, follow these steps:
1Make a backup of information on your Newton device.
For instructions, see Chapter 2, “Backing Up and Restoring Information.”
When you synchronize, you might want to experiment with different field
maps to get the desired results. In these cases, a recent backup will ensure you
don’t lose information.
Synchronization Setup
Advanced Options
3. Synchronize.
2. If desired, use Advanced Options to set
m
Date range
m
Conflict resolution
m
Field mapping
m
Miscellaneous options
2 On your computer, create a file to synchronize with.
See the Read Me file for a list of file formats (translators) you can use
for synchronizing.
60
Chapter 7
Page 61
Synchronizing for the first time
To synchronize for the first time, follow these steps:
1 Open the Newton Connection Utilities and establish a connection from your
Newton device.
For instructions, see Chapter 1, “Getting Started.”
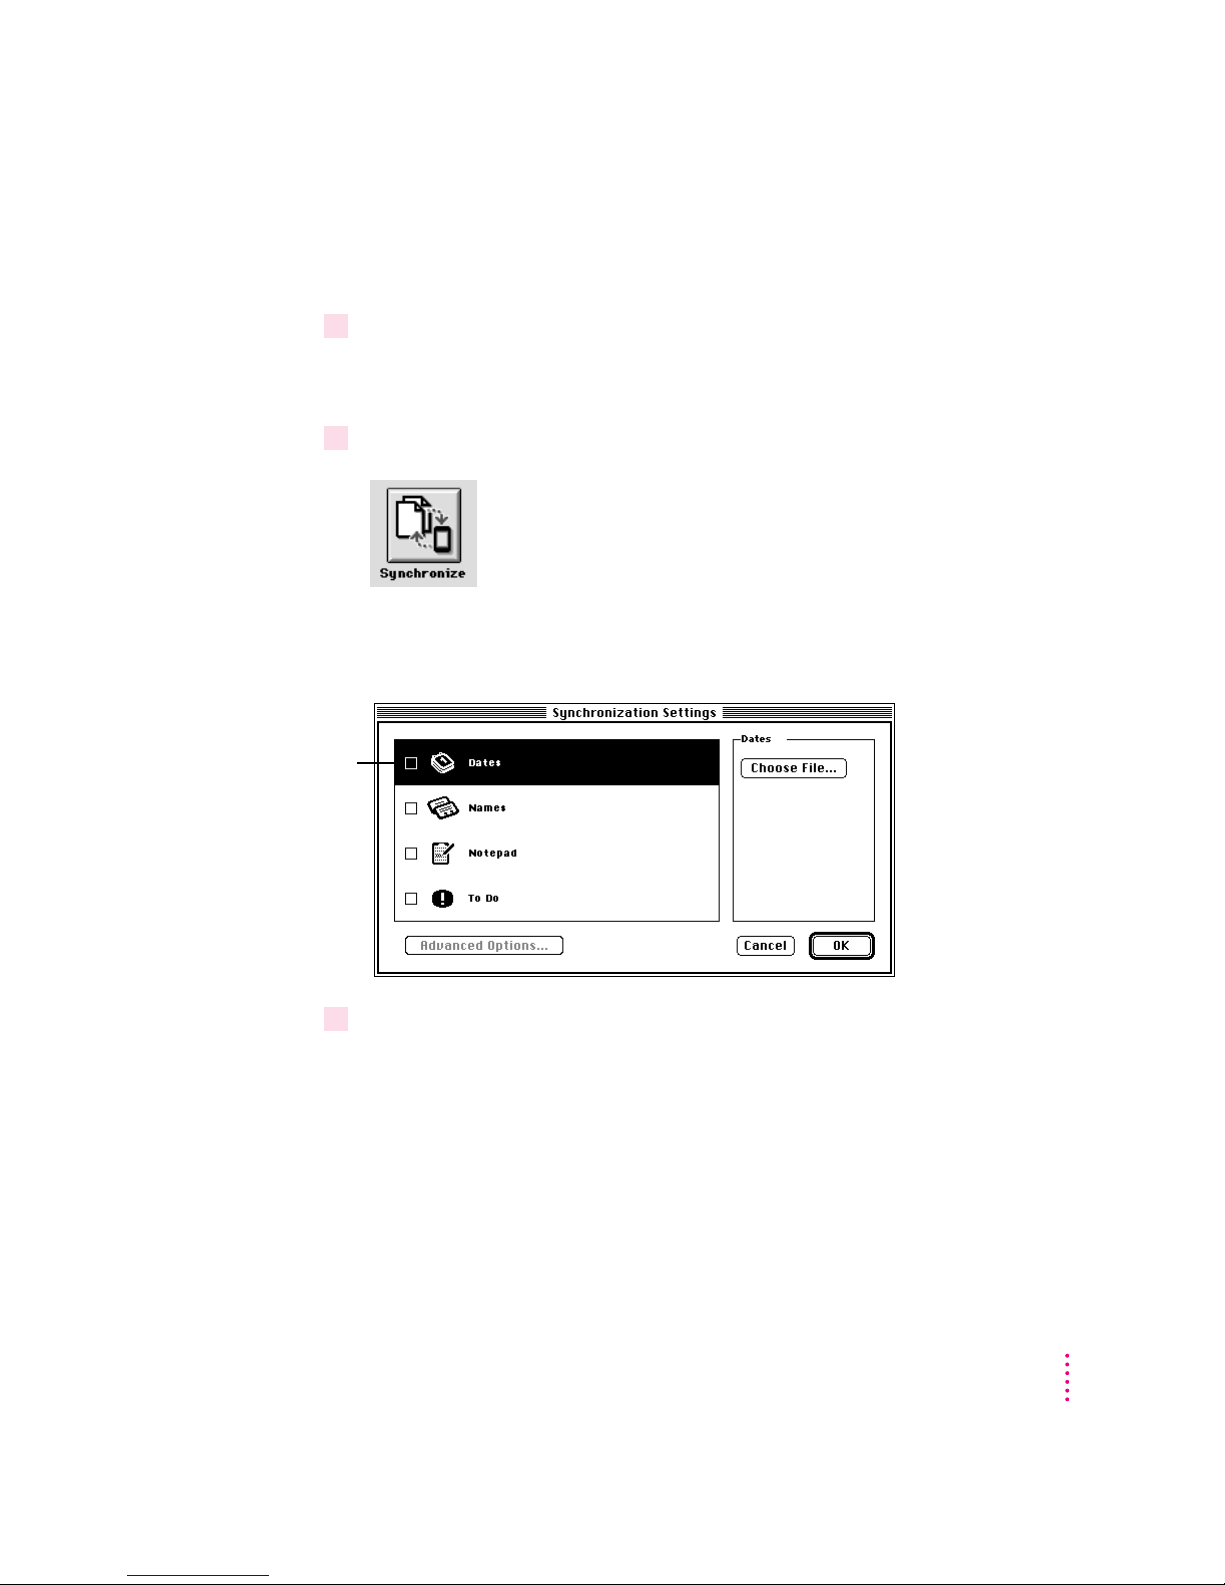
2Click the Synchronize button in the Newton Connection Utilities window.
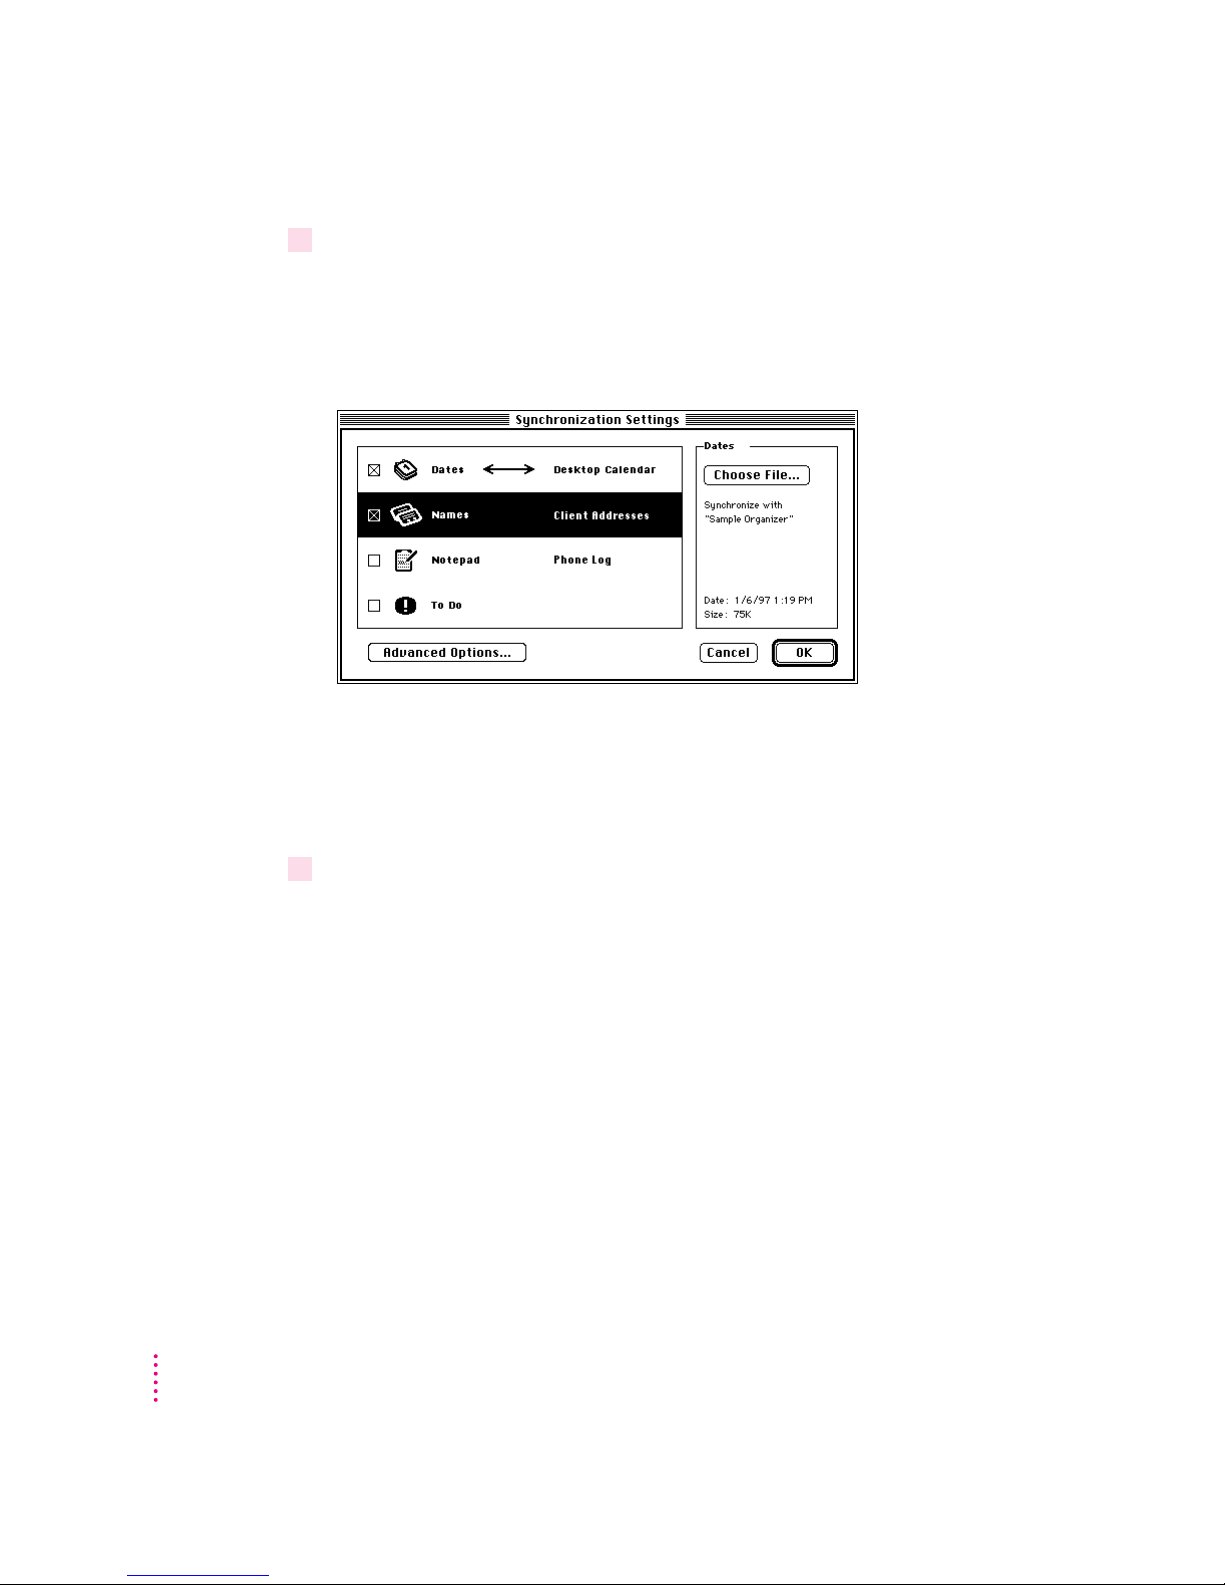
When you synchronize for the first time, the Synchronization Settings
window appears automatically.
The highlight shows
which application is
currently selected.
3Select the Newton application you want to synchronize by clicking to highlight it.
Synchronizing Information
61
Page 62
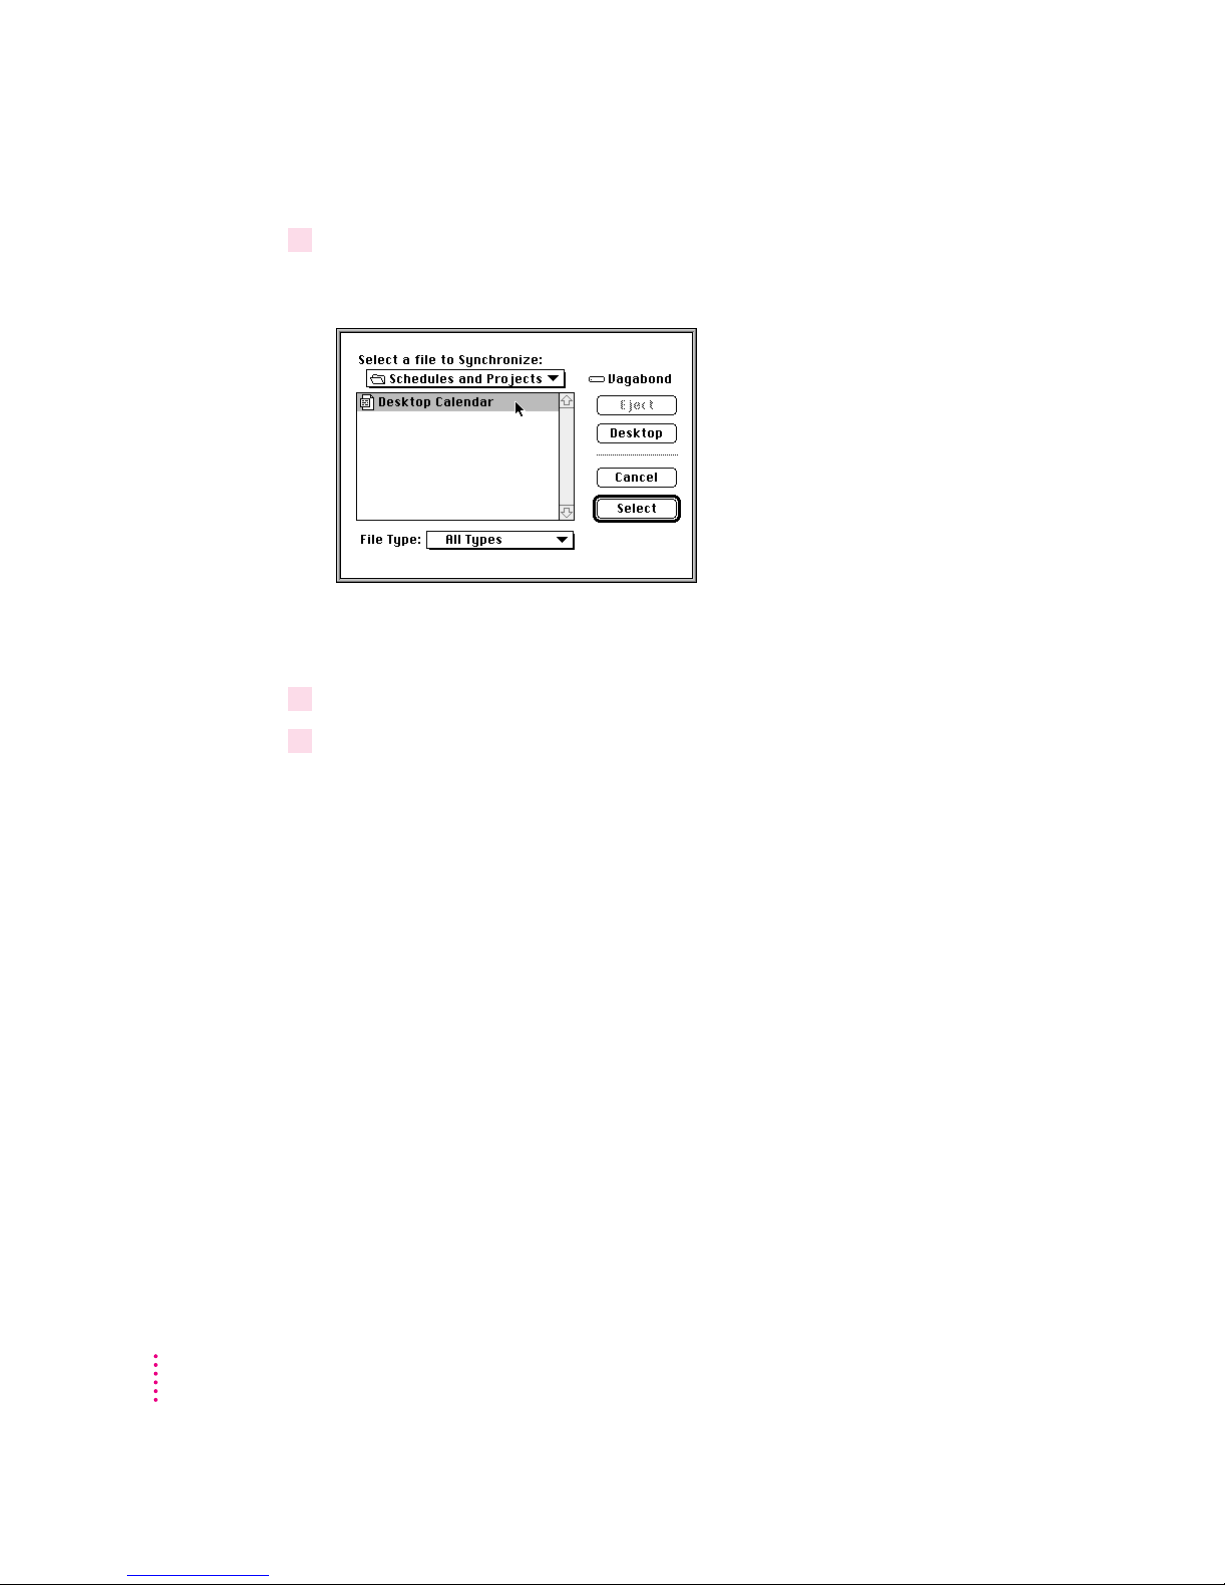
4Click Choose File.
A dialog box appears with a list of files on your computer.
You can specify which types of files appear in the file list by choosing a file
type from the File Type pop-up menu.
5 Select the file you want to synchronize.
6 Click Select.
The dialog box disappears and the name of the file you’re synchronizing
appears in the Synchronization Settings window.
62
Note: If the Newton Connection Utilities don’t recognize the type of file
you’ve selected, a dialog box appears asking you to specify which translator to
use. Select a translator and click OK.
Chapter 7
Page 63
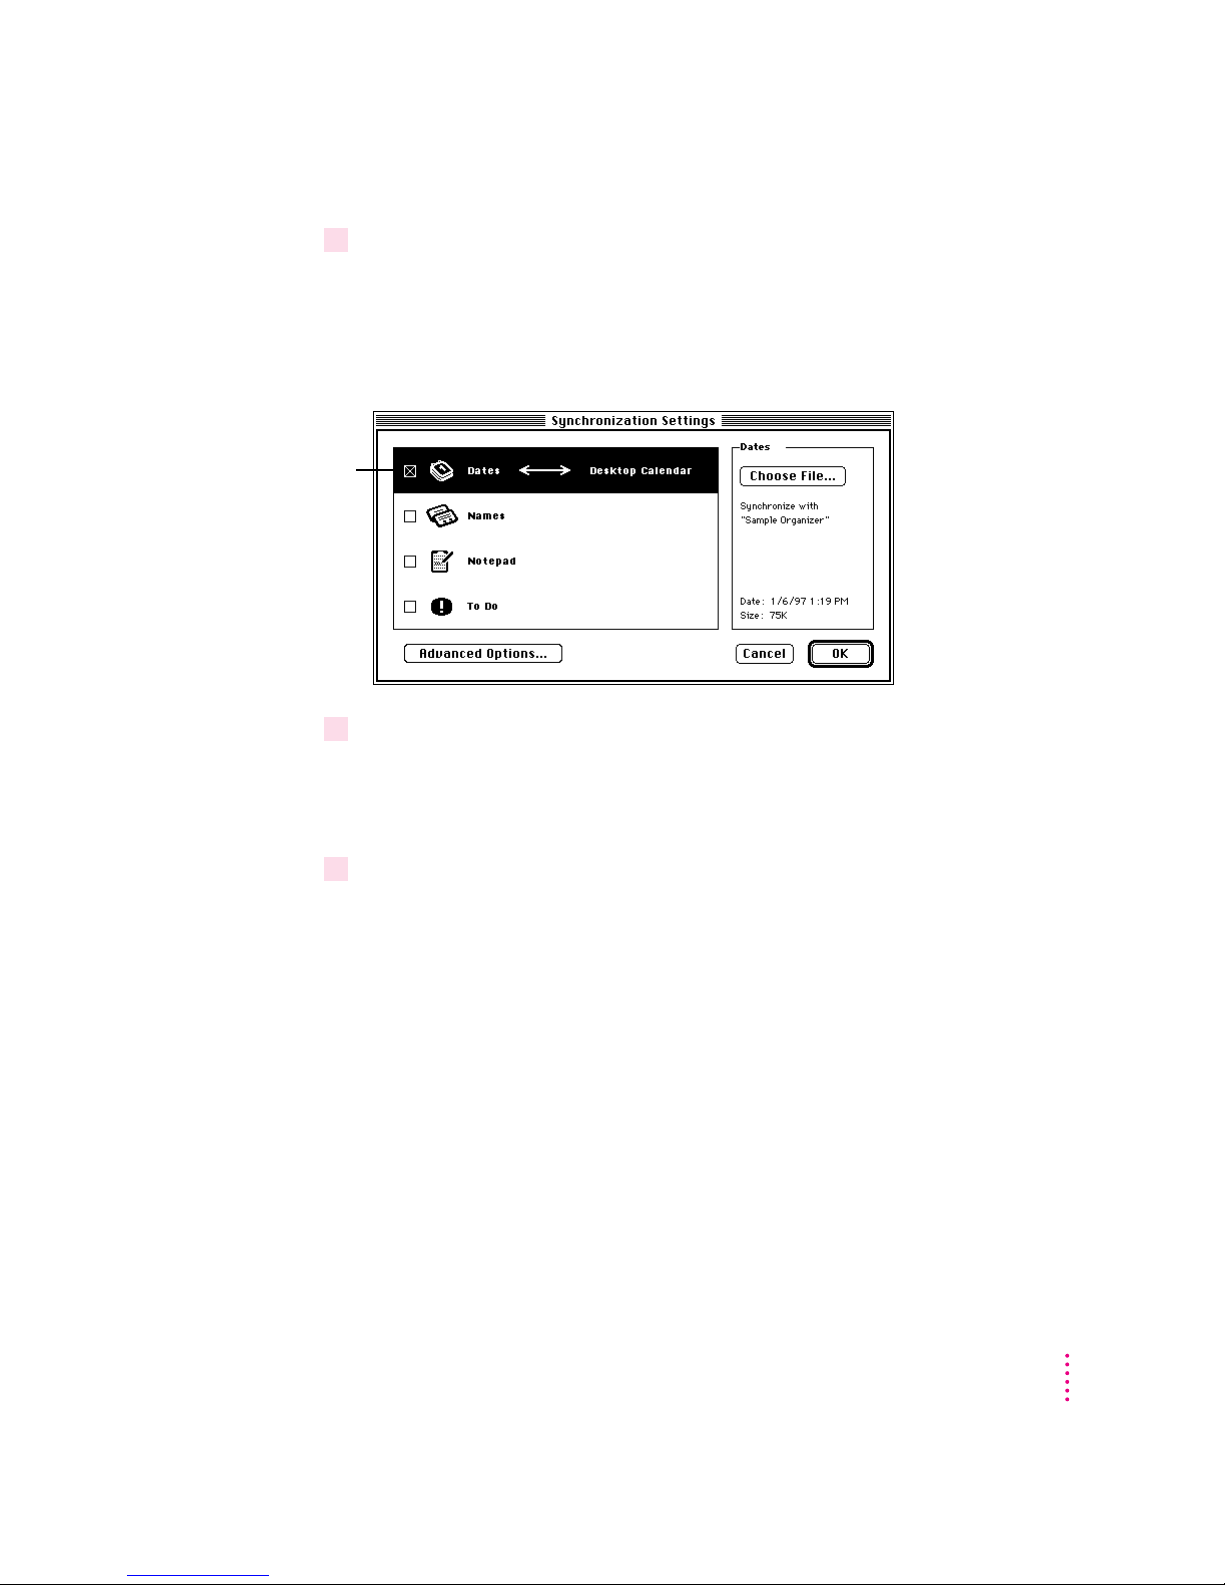
7Make sure the checkbox to the left of the Newton application is selected.
The X in the
checkbox indicates
the application will be
synchronized. The
double-headed arrow
points to the file
with which it will
be synchronized.
8 Repeat steps 3 to 7 for all Newton applications you want to synchronize.
Each application in the Synchronization Settings window has a checkbox
next to it. You use this checkbox to turn synchronization on and off. If an X
appears in the checkbox, the application will be synchronized. If no X
appears, the application will not be synchronized.
You can select any combination of applications to synchronize. Each
application you synchronize must have a file assigned and the checkbox to the
left of the application must have an X in it.
9When you’ve finished setting up your synchronization, click OK.
The Synchronization Settings window disappears and synchronization begins.
Your synchronization settings are saved and remain in effect until you
change them.
After a few minutes, the applications you chose are synchronized. Information
in your Newton applications is combined with information in the computer
files you selected. Both the file and your Newton application are updated.
Note: When you synchronize an application, the Conflict Resolution set for
the application determines how information from your Newton device is
combined with information in your computer’s file. By default, conflicting
entries in your Newton application (entries that are similar to but not identical
to entries in the computer file) are added to your computer’s file. For more
information, see “Resolving Transfer Conflicts” in Chapter 10, Setting
Advanced Options.”
Synchronizing Information
63
Page 64
Resynchronizing your information
Whenever you change information on your Newton device or in your
computer’s file, you can resynchronize to keep your applications up-to-date.
For example, if you add meetings to your Newton Dates information, you can
synchronize the information so the calendar on your computer matches your
Newton device.
To resynchronize information, follow these steps:
1 Open the Newton Connection Utilities and establish a connection from your
Newton device.
For instructions, see Chapter 1, “Getting Started.”
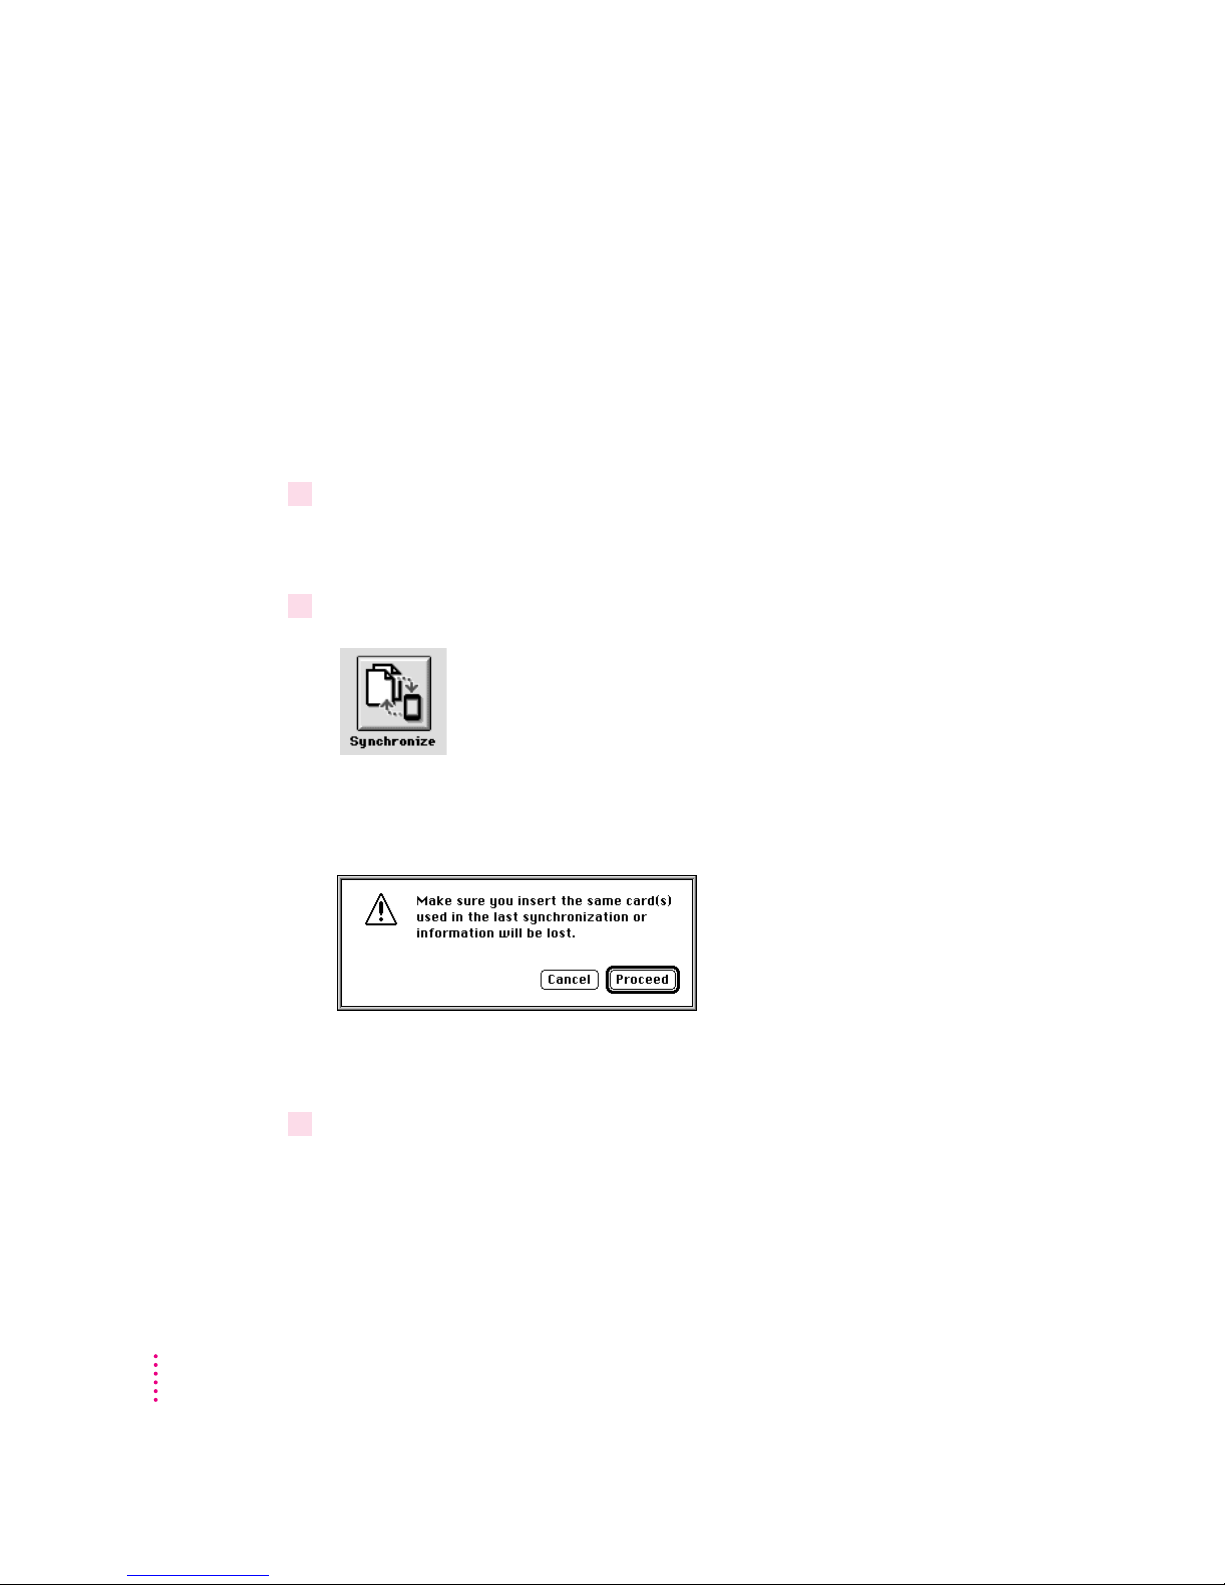
2Click Synchronize in the Newton Connection Utilities window.
A warning appears reminding you to make sure the correct storage card is
inserted in your Newton device.
If you need to insert a storage card, click Cancel and start the procedure over
with the card inserted.
3Click Proceed.
Your Newton applications are resynchronized based on information in the
Synchronization Settings window.
Synchronization happens automatically when you click the Synchronize
button. No prompt appears asking you to confirm the synchronization.
64
Chapter 7
Page 65

Using a storage card when you synchronize
If you have a storage card inserted in your Newton device when you
synchronize, the appropriate information on the card is included in the
synchronization. For example, if you’re synchronizing the Newton Names
application, all names on the card are included in the synchronization.
IMPORTANT
If you’re synchronizing information on a card, be careful when
you resynchronize to insert the same card you inserted when you last
synchronized. Otherwise, you may lose information.
Changing synchronization settings
To change synchronization settings, follow these steps:
1 Open the Newton Connection Utilities and establish a connection from your
Newton device.
For instructions, see Chapter 1, “Getting Started.”
2Choose Synchronization Settings from the Edit menu.
The Synchronization Settings window appears.
3Select the application whose settings you want to change by clicking to highlight it.
Synchronizing Information
65
Page 66
4Change the synchronization settings as desired.
For example, you can change the file you’re synchronizing with and you
can select or deselect the Newton applications to synchronize by clicking
the checkboxes. You can also set advanced options (see Chapter 10, “Setting
Advanced Options,” for more information).
Click a checkbox to select an application to be synchronized. Click the
Choose File button to change the computer file you’re synchronizing.
See Chapter 10, “Setting Advanced Options,” for more information about
setting advanced options.
5When you’ve finished making changes, click OK.
The Synchronization Settings dialog box disappears and your changes
are saved.
Changing how information is synchronized
When you synchronize, information is transferred and combined using a
default field map, a template that determines how information from your
Newton application is mapped to information on your computer. You can
change the field map to meet your specific needs.
You can further refine how information is synchronized by choosing a date
range for calendar information, specifying how conflicting information is
handled, and setting application-specific options. See Chapter 10, “Setting
Advanced Options,” for more information.
66
Chapter 7
Page 67

8
About importing
Importing Into Newton Works
This chapter describes how to import information from a file on your
computer into the Newton Works application on your Newton device. For
information about importing into other applications on your Newton device,
see Chapter 5, “Importing Information to Your Newton Device.”
Note: You can import information into Newton Works only if your Newton
device uses the Newton 2.1 operating system.
You can import text and drawings into Newton Works on your Newton device.
You must use files in a format that the Newton Connection Utilities can
translate. After importing a file into Newton Works on your Newton device,
you can use Newton Works to open and change the file.
Importing a file
Note: Before you import, make sure the file you’re importing is in a format
supported by the Newton Connection Utilities. See the Read Me file for a list
of file formats (translators) supported by the Newton Connection Utilities.
67
Page 68
To import a file into Newton Works, follow these steps:
1 Open the Newton Connection Utilities and establish a connection from your Newton
device.
For instructions, see Chapter 1, “Getting Started.”
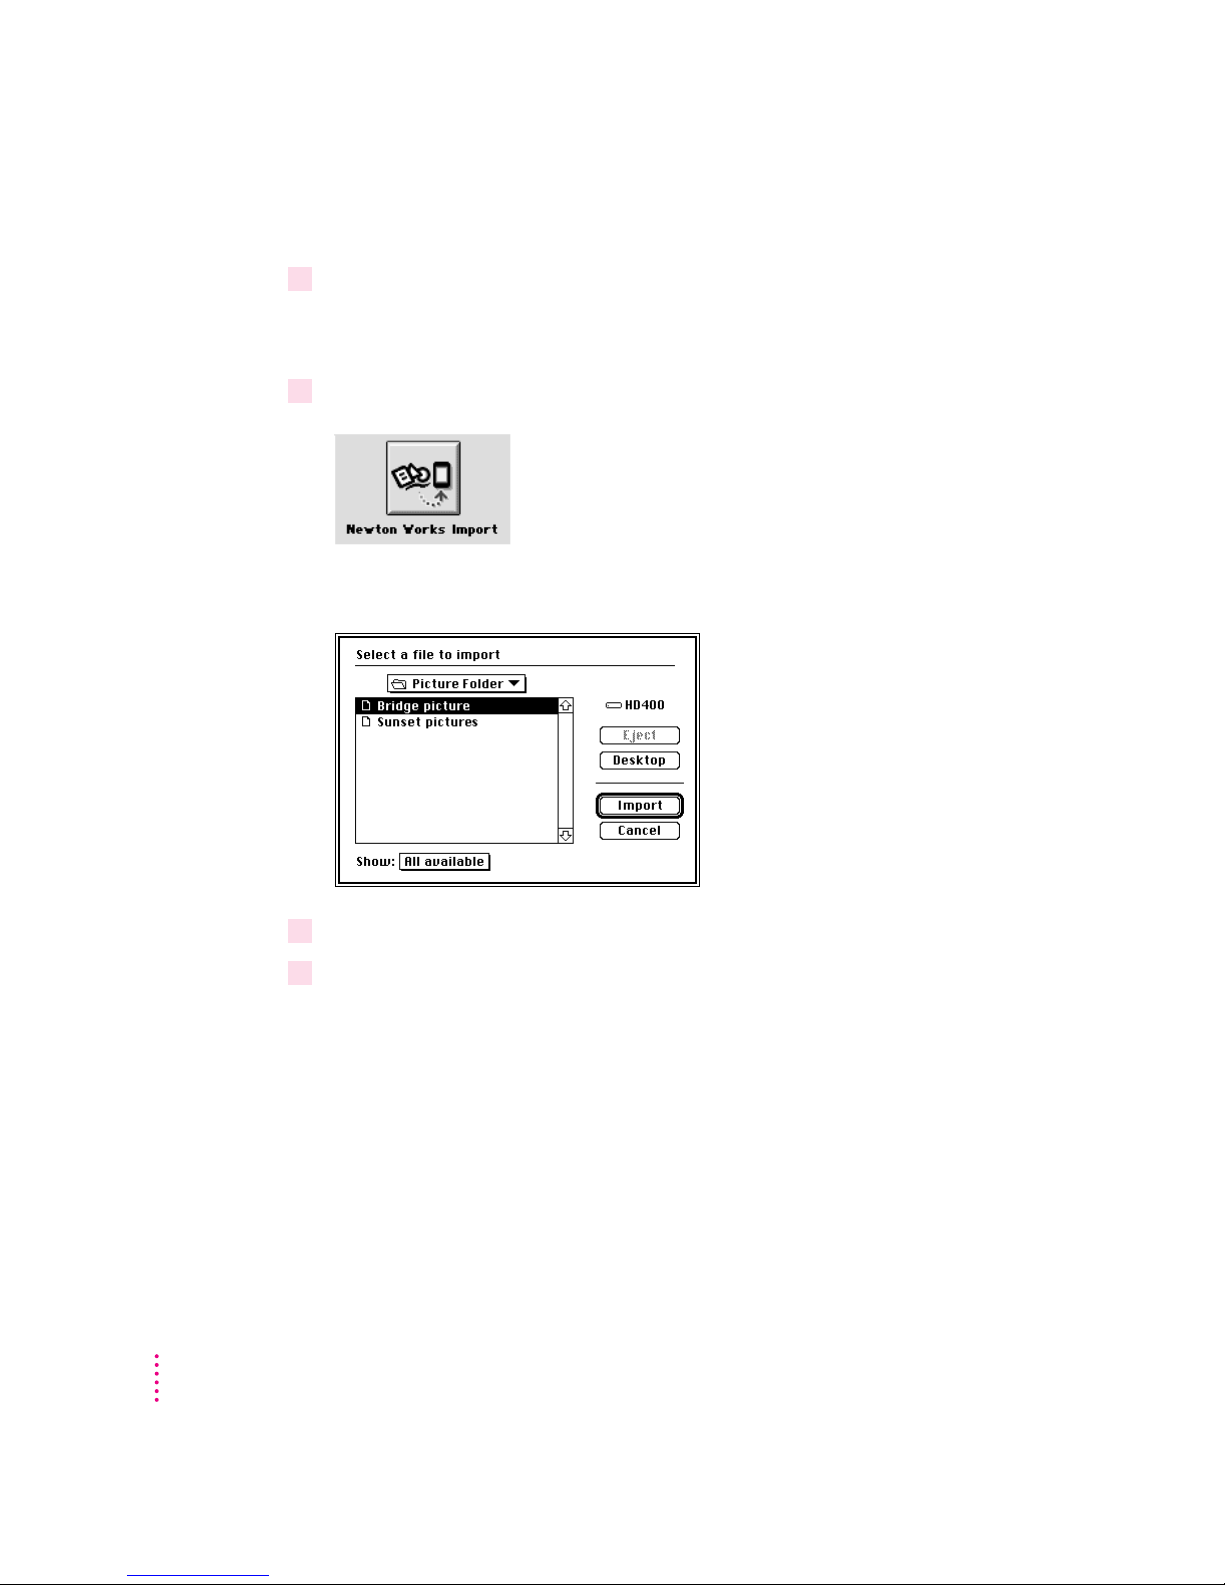
2Click the Newton Works Import button in the Newton Connection Utilities window.
A window appears in which you can select the file to be imported.
68
3 Select the file you want to import and click Import.
4If a translator list appears, select the type of file you’re importing from the list and
click Open.
The Newton Connection Utilities translate the file and import it into your
Newton Works application.
Chapter 8
Page 69

9
About exporting
Exporting From Newton Works
This chapter describes how to export Newton Works information on your
Newton device to a file on your computer. For information about exporting
information from other Newton applications, see Chapter 6, “Exporting
Information From Your Newton Device.”
Note: You can export information from Newton Works only if your Newton
device uses the Newton 2.1 operating system.
You can export Newton Works documents to your computer by selecting the
file and specifying the format the new computer file should have. You can
only export information into a format that the Newton Connection Utilities
can translate. After exporting a file from Newton Works, you can use an
application on your computer to open and change the file.
Exporting a file
Note: Before you export, make sure your computer application can read the
file format that you select for the Newton Works document. See the Read Me
file for a list of file formats (translators) supported by the Newton Connection
Utilities. Check your application’s manual for information about file formats
that the application can read.
69
Page 70
To export a file from Newton Works, follow these steps:
1 Open the Newton Connection Utilities and establish a connection from your
Newton device.
For instructions, see Chapter 1, “Getting Started.”
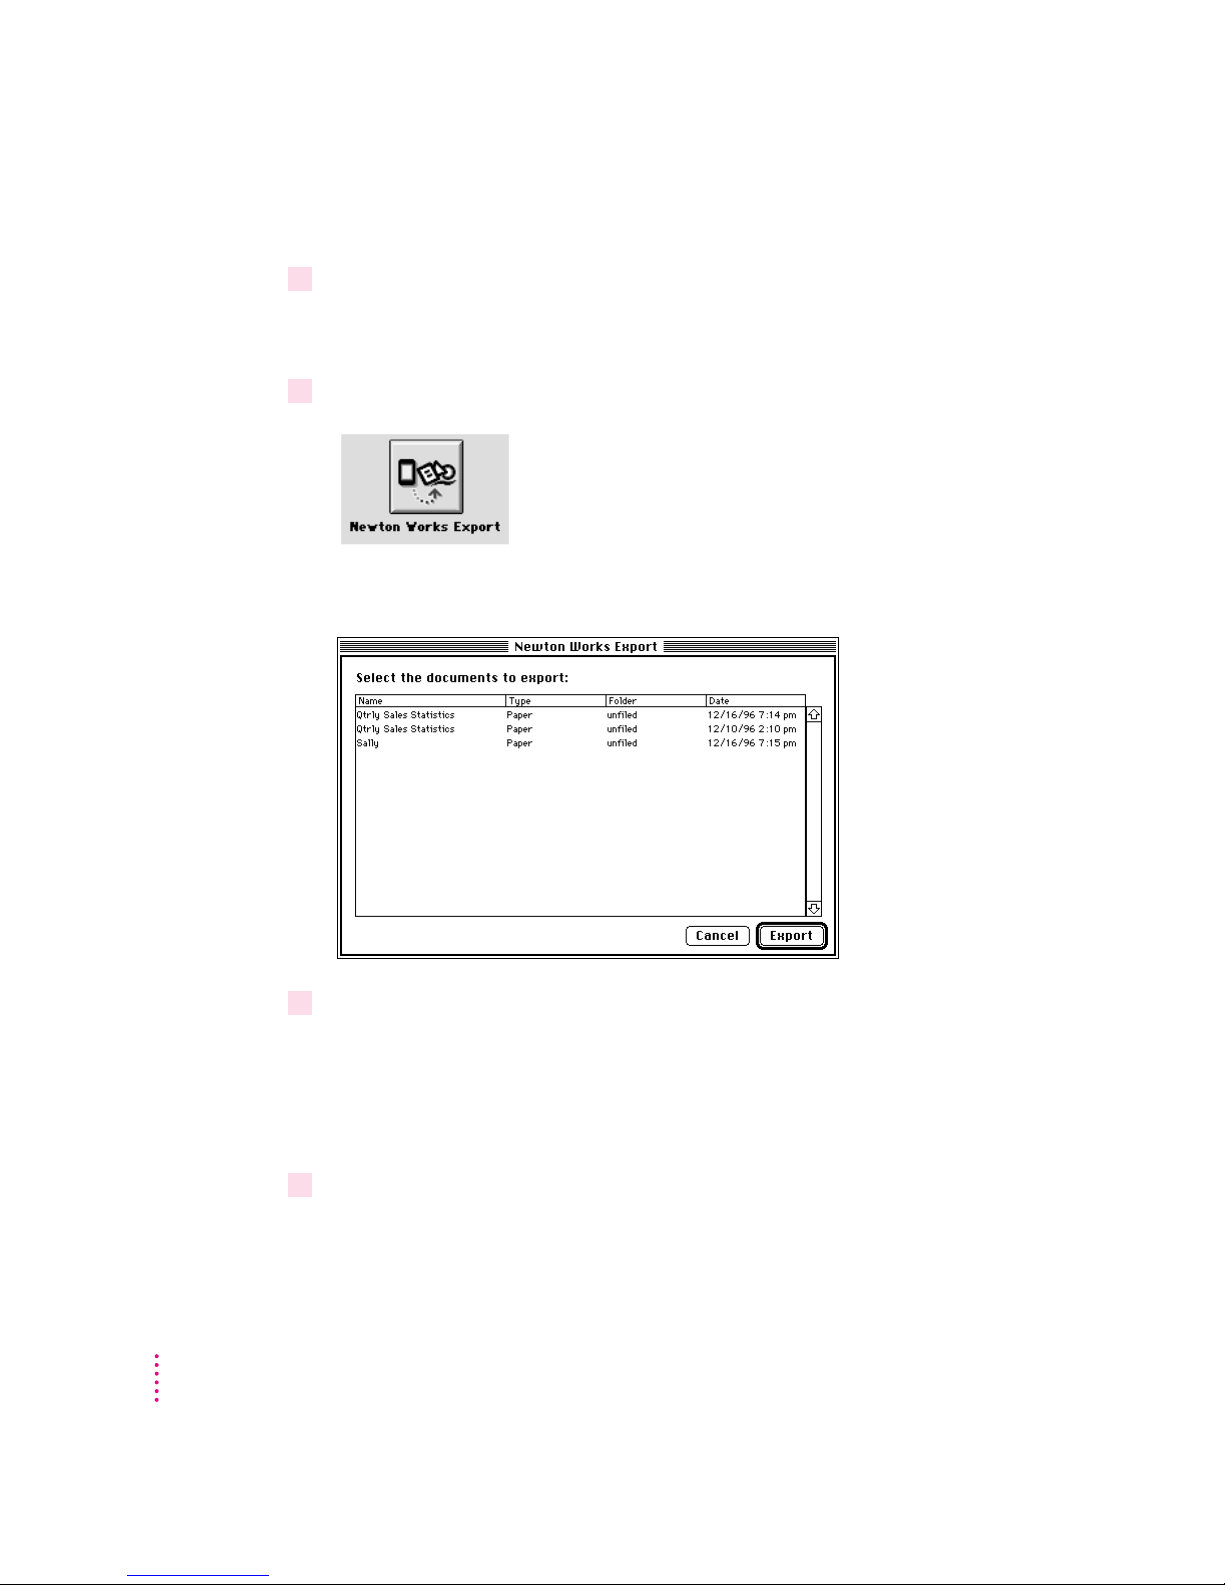
2Click the Newton Works Export button in the Newton Connection Utilities window.
A window appears in which you can select Newton Works files to be exported.
3 Select the files you want to export and click Export.
You can select groups of files by dragging or using Shift-click, or select
noncontiguous files by holding down Command (x) and clicking or dragging.
A window appears in which you can specify a name for the computer file and
select a file type.
4Enter a name for the file, select a file type, and click Save.
The Newton Connection Utilities translate the file and export it to
your computer.
70
Chapter 9
Page 71

10
Setting Advanced Options
This chapter describes how to use advanced options when you import, export,
or synchronize to change how information is transferred between your
Newton device and your computer. For information about importing or
exporting with Newton Works, see Chapter 8, “Importing Into Newton
Works” or Chapter 9, “Exporting From Newton Works.”
Note: When you initiate a synchronization from your Newton device, the
Newton Connection Utilities use the settings selected with your computer
application. If you want to change settings, use the Newton Connection
Utilities on your computer.
About advanced options
The Newton Connection Utilities allow you to use the following methods to
further refine how information is transferred:
m Date Range: For calendar applications, you can set a date range to specify
which calendar entries to transfer. See “Changing the Date Range.”
m Conflict Resolution: When you transfer information, you can specify how
conflicting information is handled. For example, should entries on your
Newton device replace similar (but not identical) entries on your computer,
or vice versa? See “Resolving Transfer Conflicts.”
71
Page 72
m Field Mapping: You can change how categories, or fields, of information in
your Newton application are matched to fields of information in your
computer’s application. See “Using Field Maps.”
m Miscellaneous Options: You can set options specific to the applications
sending and receiving the information. See “Setting Miscellaneous Options.”
Changing the date range
By default, if you transfer information from a calendar or datebook
application, all information is transferred. You can use advanced options to
set a date range.
The following section shows you how to set a date range when you export
information from your Newton device. You can also use it as a model for
specifying a date range when you import or synchronize.
To change the date range, follow these steps:
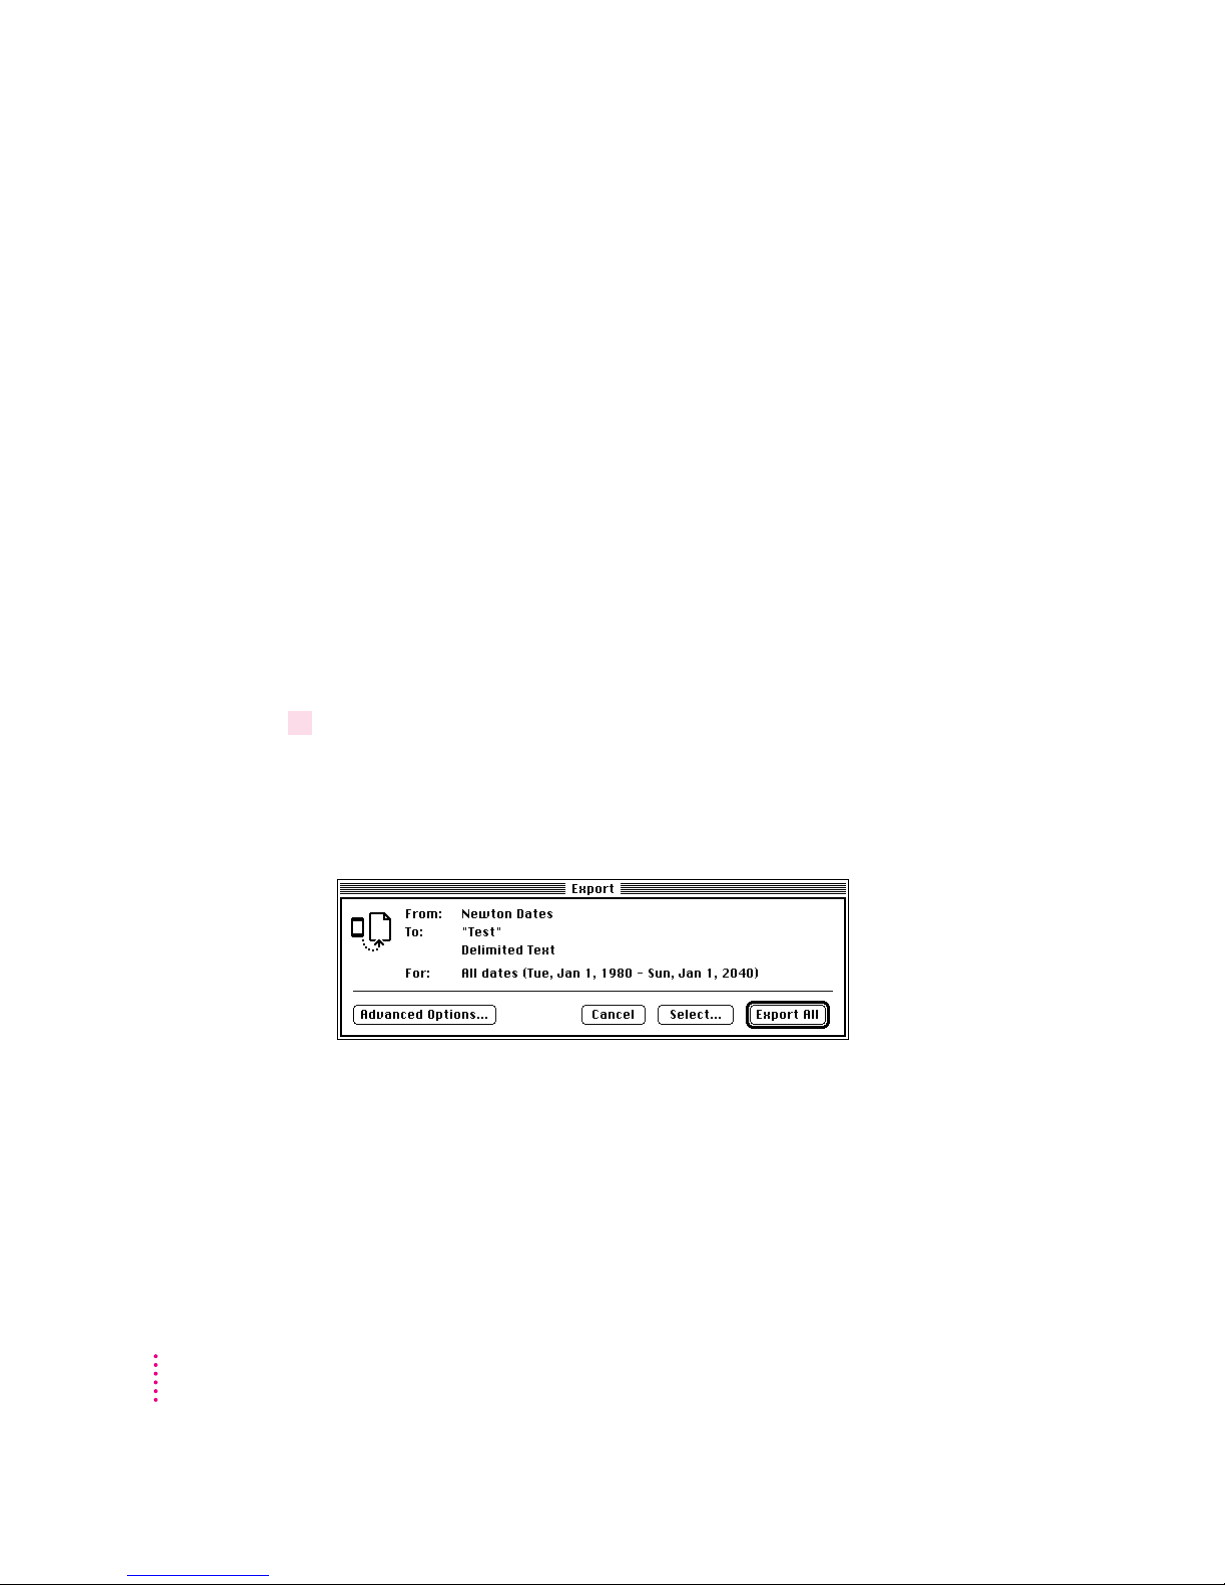
1 Open the Newton Connection Utilities and follow the steps to export.
For instructions, see Chapter 6, “Exporting Information From Your
Newton Device.”
72
The Export dialog box appears.
Chapter 10
Page 73
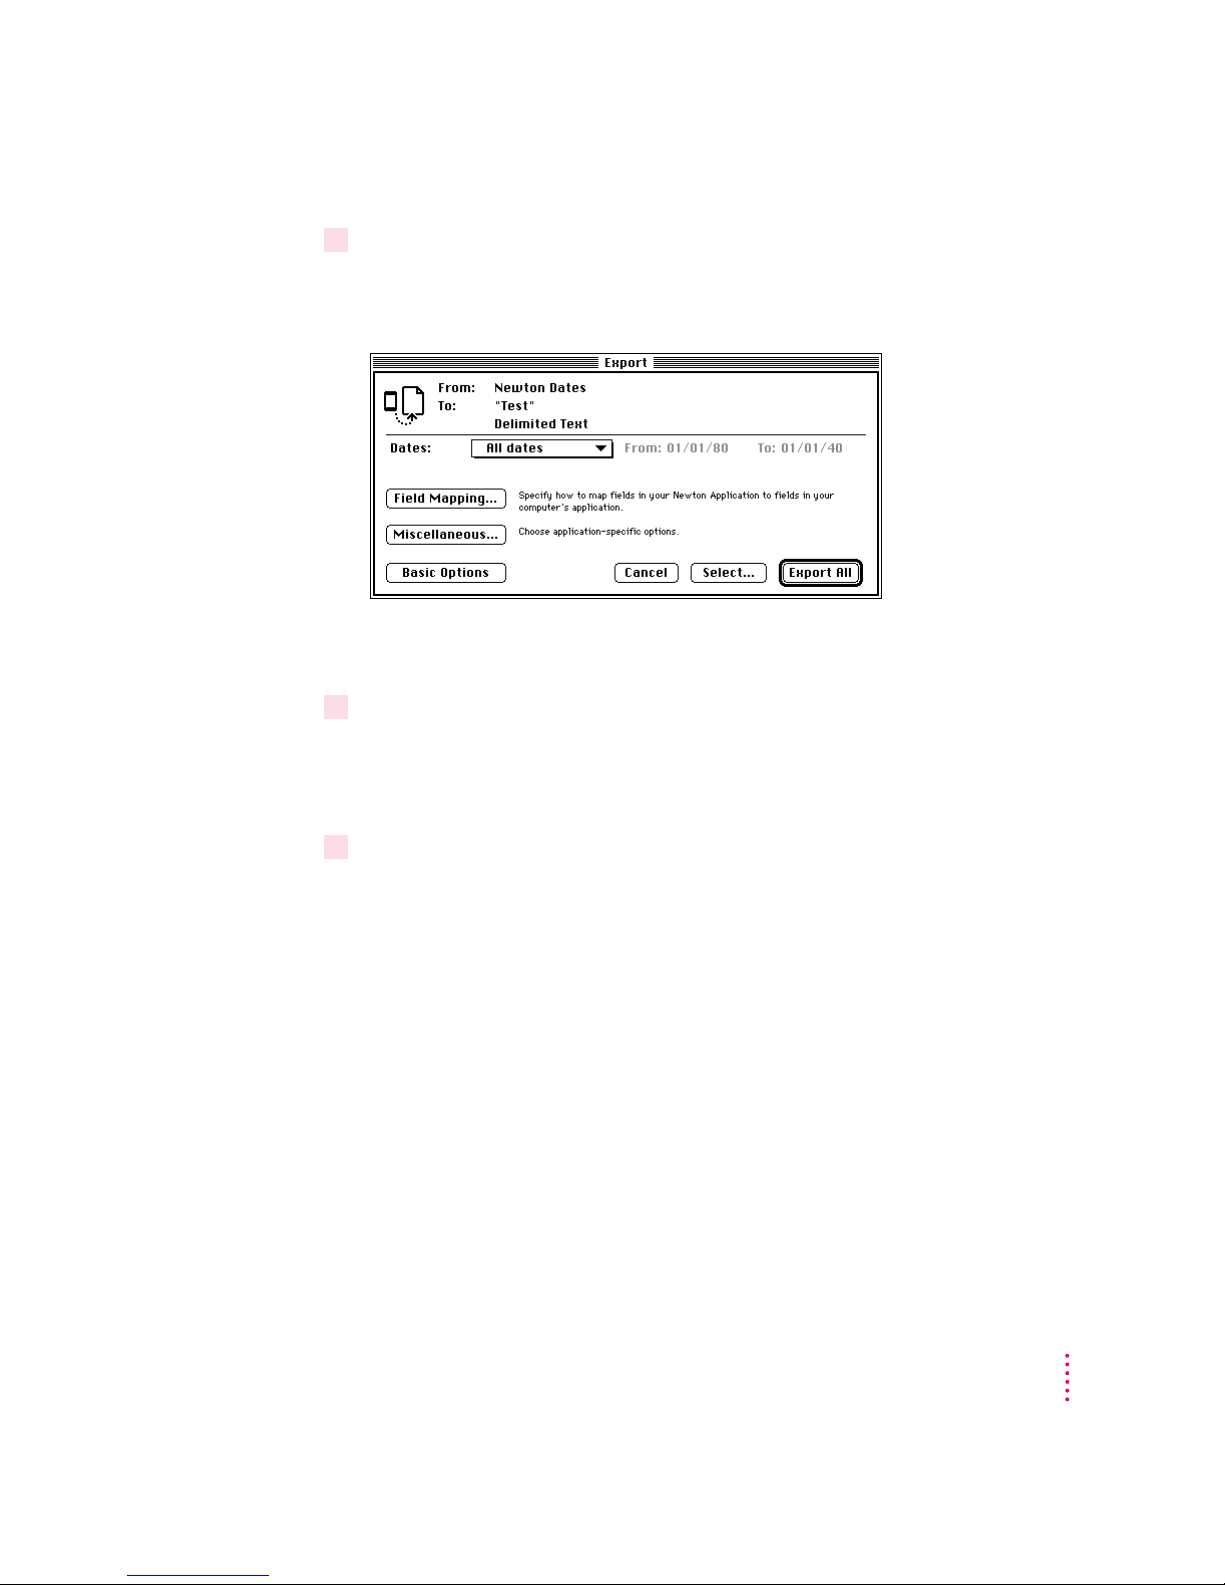
2 Click Advanced Options.
The Export dialog box expands to show more options for defining how
information is exported.
Note: The date range options appear only if you’re transferring information
from a calendar or datebook application.
3Choose a date range from the Dates pop-up menu.
If you choose Custom, you can change the dates that appear to the right of the
menu. Select the month, date, or year you want to change and use the up or
down arrows to change the date.
4 Click Export All.
The information from your calendar application is exported using the date
range you specified.
Setting Advanced Options
73
Page 74

Resolving transfer conflicts
About conflict resolution
You can specify how conflicts are resolved when you transfer information
between your Newton device and your computer.
A conflict occurs when key fields of information in your Newton application
match key fields of information in your computer’s application, but not all
fields are the same. For example, your Newton and your computer might have
two different phone numbers for the same person at a particular company.
The Newton Connection Utilities determine there’s a conflict because the
information in the key fields for the person’s name and company are the same,
but other information is not the same (in this case the phone number). The
utilities must then determine whether to keep or change the conflicting
information—for example, whether to keep the phone number from the
computer file or from the Newton device.
You can determine how the Newton Connection Utilities handle conflicting
entries. For example, if you usually make changes on your Newton device and
always want those changes kept or transferred to your computer files, you can
select a conflict resolution that always keeps your Newton application
information. In this case, the information on the Newton is said to win,
because it always replaces conflicting information in the computer file.
74
You can also have your computer win. Conflicting information is then updated
from the computer file to your Newton device.
You can also have the utilities keep all information, adding all conflicting
entries to your files so that nothing is lost.
Chapter 10
Page 75

When importing, you can have the information in your computer files replace
information on your Newton device, but not change specific information that
resides only on your Newton device. Say, for example, you keep birth dates in
your Newton Names application, but don’t keep them in your computer file.
You can import information from your computer file into your Newton device
without losing the birth dates. To do so, you set up the field mapping between
the computer file and Newton application so that no information is transferred
to the birth date field (the birth date field is unmapped). You can then choose
the Merge conflict resolution to import information from your computer file to
your Newton device without losing your birth date information.
If the utilities detect a conflict when synchronizing, they can make no
changes to either the computer file or Newton device, ignoring the differences
in information and maintaining both the computer and Newton device
information as is. To leave conflicting information unchanged, you choose the
Ignore conflict resolution.
Because the utilities use key fields to determine conflicts, the field mapping
you set up for your computer and Newton device files is important. For more
information, see “Using Field Maps” later in this chapter.
Note: Conflict resolution applies only when you import or synchronize
information, not when you export.
Conflict resolution for importing
When you import, your choices for conflict resolution are:
m Add: All conflicting entries from your computer’s application are added to
your Newton application.
m Computer Wins: Entries from your computer’s application replace
conflicting entries in your Newton application.
m Newton Wins: Entries from your computer application do not replace
conflicting entries in your Newton application. (Thus, conflicts
are ignored.)
m Merge: Entries in your computer’s application replace conflicting entries in
your Newton application, but unmapped fields in your Newton application
do not change. Only the fields that conflict are replaced. All unmapped or
nonconflicting fields are left unchanged.
Setting Advanced Options
75
Page 76
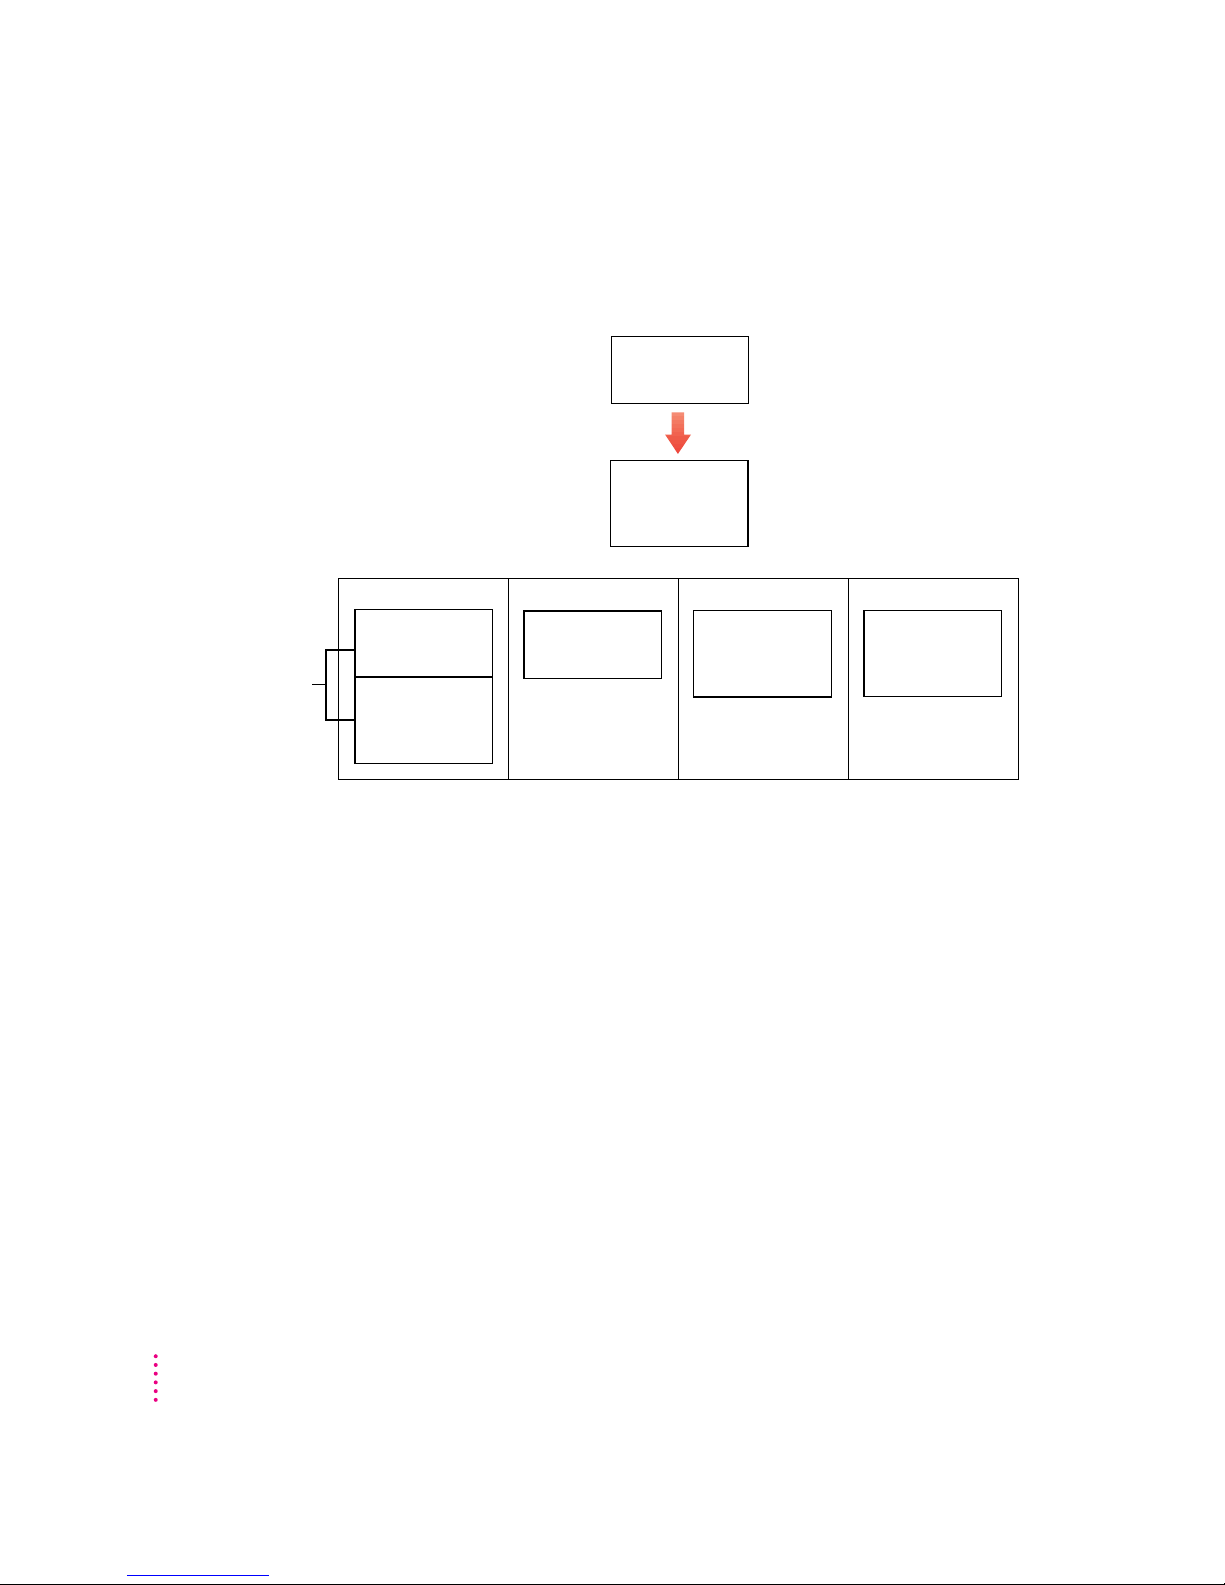
The following illustration shows how a conflict would be resolved when an
entry from an address book on your computer is imported to your Newton
Names application.
Both entries appear
on your Newton
device.
Desktop File
Samuel Wong
1049 Chestnut Street
(510) 555-1200
Import
Add
Samuel Wong
1049 Chestnut Street
(510) 555-1200
Samuel Wong
1049 Chestnut Street
(415) 555-9289
[email protected]
Newton Names
Computer Wins
Samuel Wong
1049 Chestnut Street
(510) 555-1200
Samuel Wong
1049 Chestnut Street
(415) 555-9289
[email protected]
Newton Wins
Samuel Wong
1049 Chestnut Street
(415) 555-9289
[email protected]
Merge
Samuel Wong
1049 Chestnut Street
(510) 555-1200
[email protected]
Conflict resolution for synchronizing
When you’re synchronizing, your choices for conflict resolution are
m Add: Conflicting entries on your Newton device are added to entries on
your computer and vice versa.
76
m Newton Wins: Conflicting entries on your Newton device replace entries on
your computer.
m Computer Wins: Conflicting entries on your computer replace entries on
your Newton device.
m Ignore: Conflicting entries on your computer and your Newton device
are unchanged.
Chapter 10
Page 77
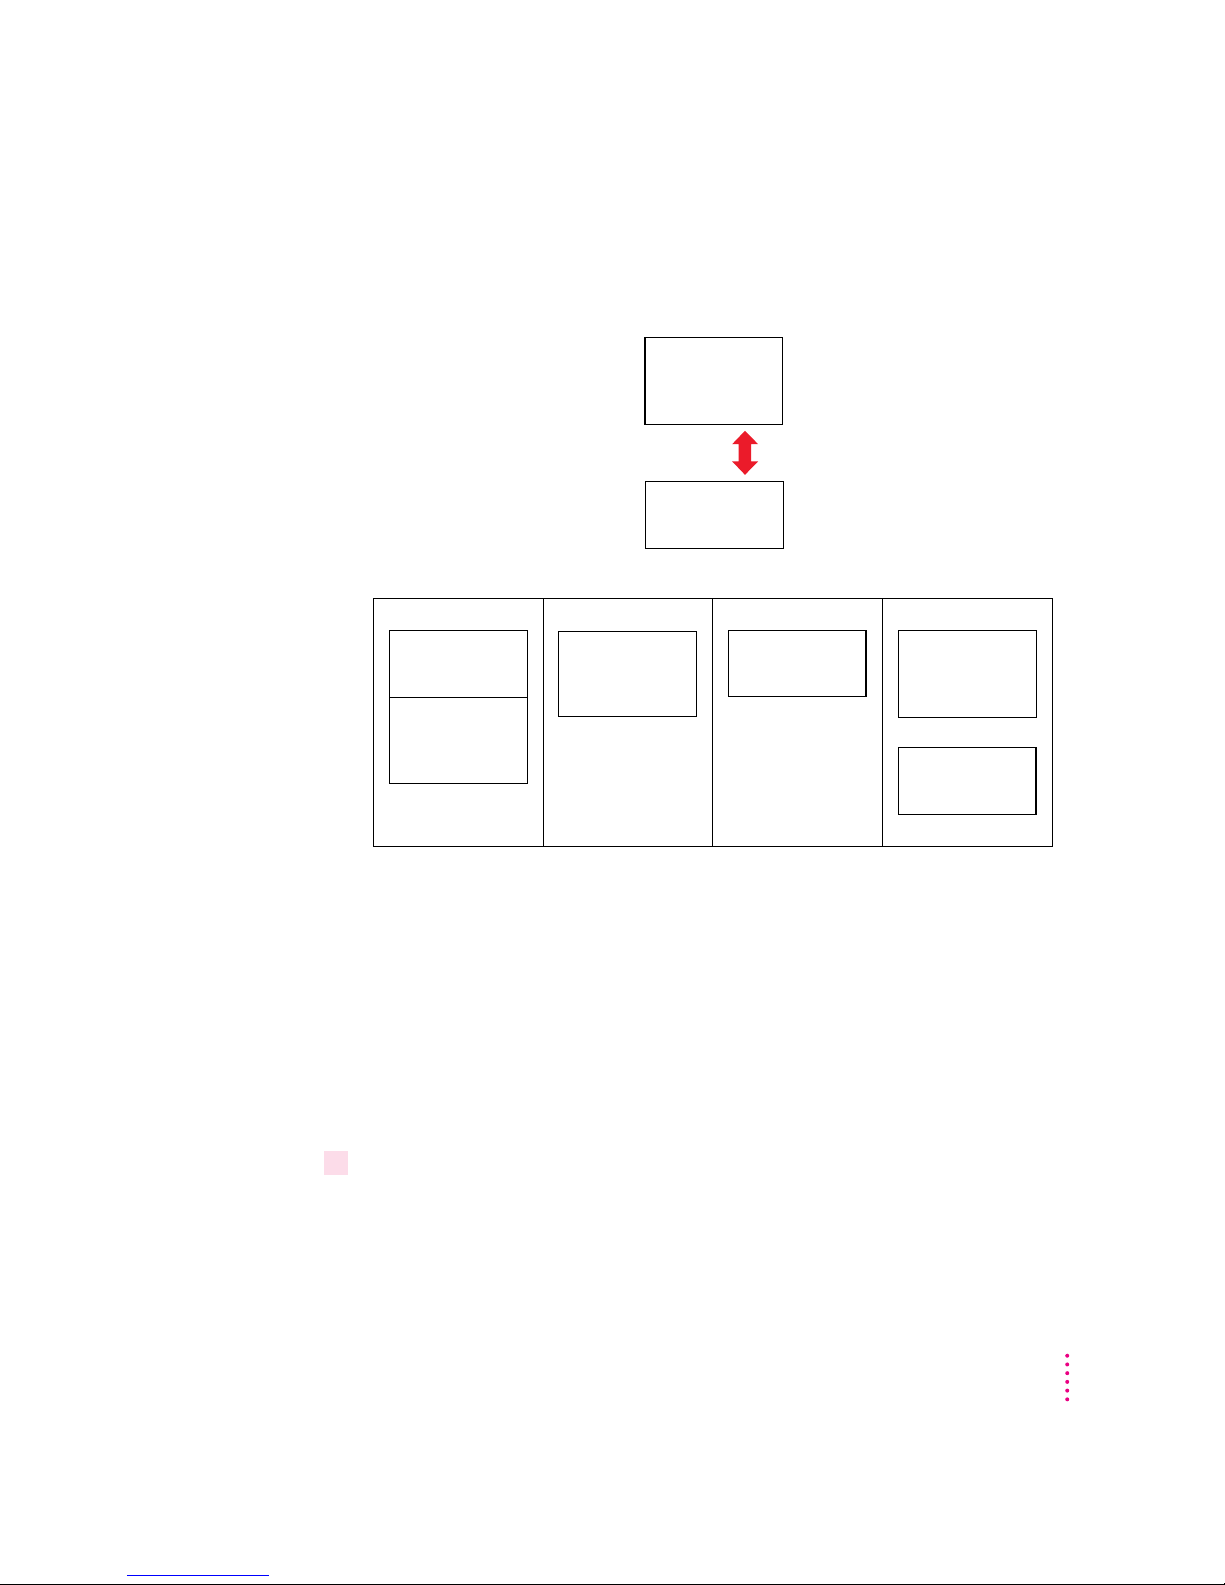
The following illustration shows how a conflict is resolved when an entry
from an address book on your computer is synchronized with your Newton
Names application.
Newton Names
Samuel Wong
1049 Chestnut Street
(415) 555-9289
[email protected]
Synchronize
Add
Samuel Wong
1049 Chestnut Street
(510) 555-1200
Samuel Wong
1049 Chestnut Street
(415) 555-9289
[email protected]
Newton Names
and Desktop File
Desktop File
Newton Wins
Samuel Wong
1049 Chestnut Street
(415) 555-9289
[email protected]
Newton Names
and Desktop File
Samuel Wong
1049 Chestnut Street
(510) 555-1200
Computer Wins
Samuel Wong
1049 Chestnut Street
(510) 555-1200
Newton Names
and Desktop File
Ignore
Samuel Wong
1049 Chestnut Street
(415) 555-9289
[email protected]
Newton Names
Samuel Wong
1049 Chestnut Street
(510) 555-1200
Desktop File
For information on how to specify a conflict resolution when you transfer
information, see “Choosing a Conflict Resolution,” next.
Choosing a conflict resolution
The following section describes how to choose a conflict resolution when you
import information. You can also use it as an example for resolving conflicts
when you synchronize.
To choose a conflict resolution, follow these steps:
1 Open the Newton Connection Utilities and follow the steps to import.
For instructions, see Chapter 5, “Importing Information to Your
Newton Device.”
Setting Advanced Options
77
Page 78
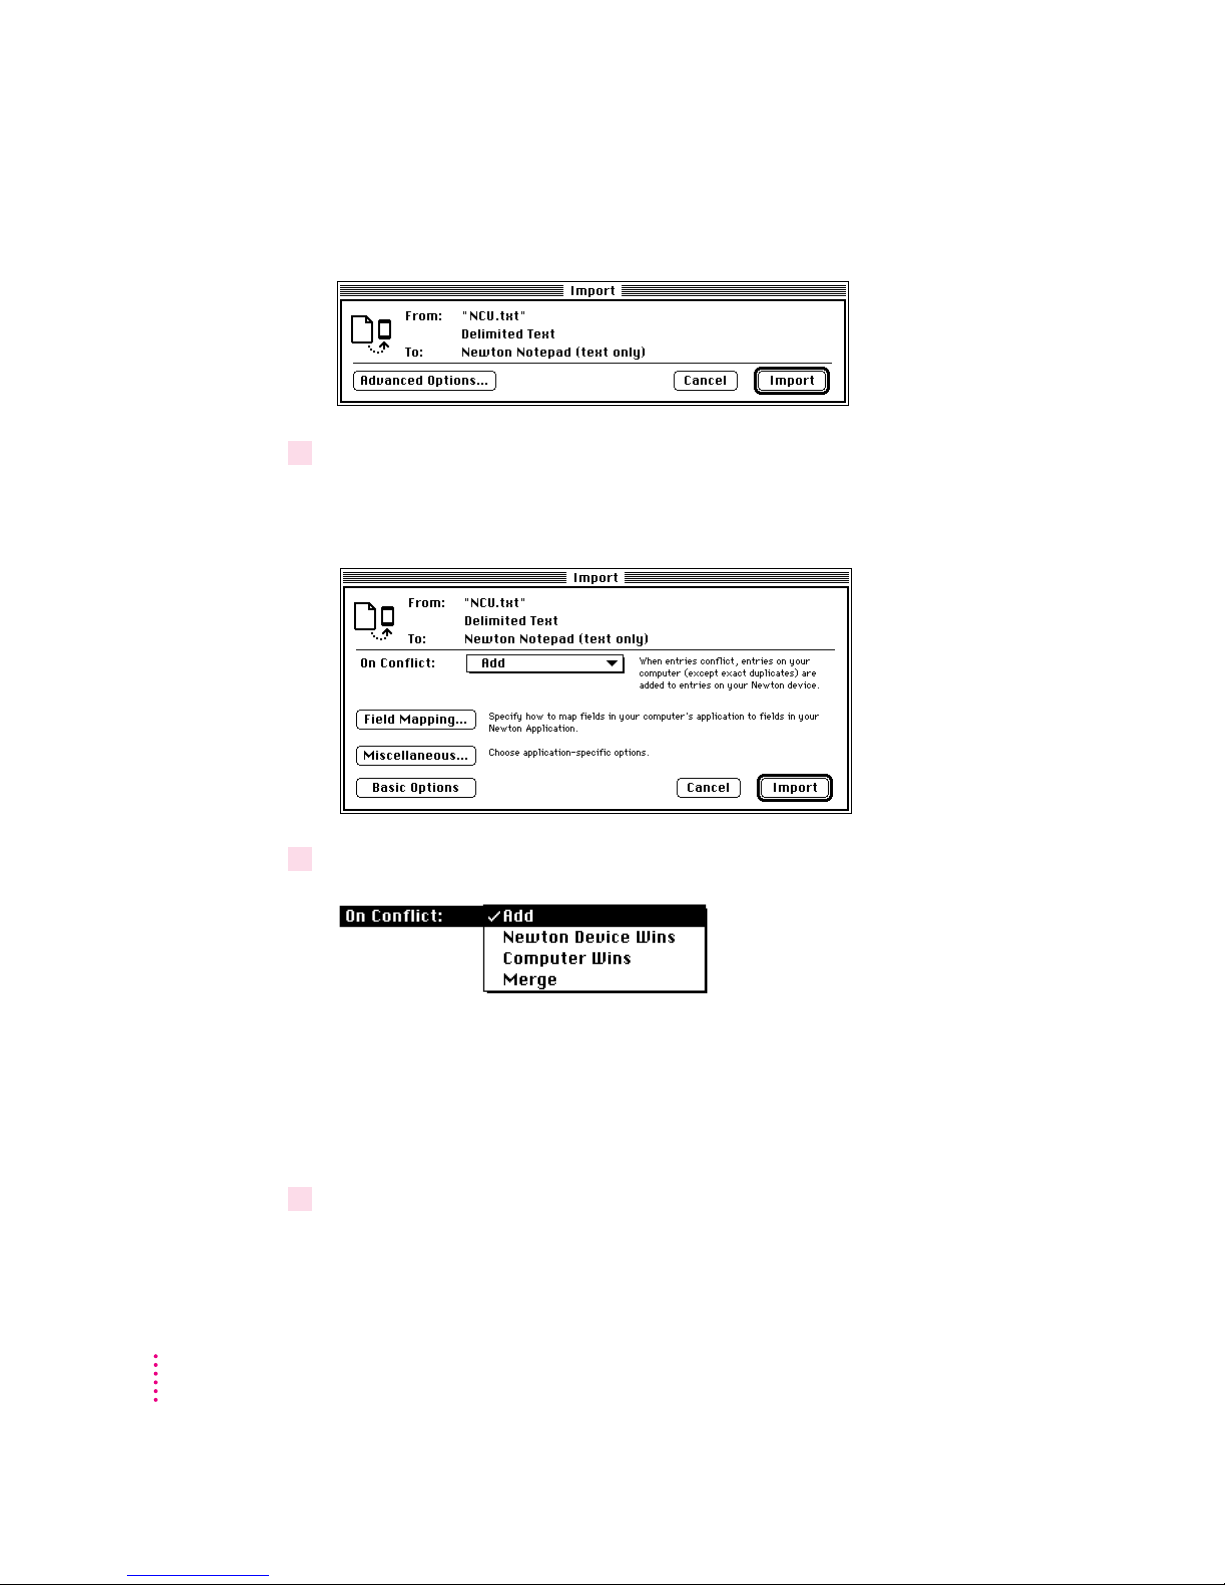
The Import dialog box appears.
2Click Advanced Options.
The Import dialog box expands to show advanced options, including a pop-up
menu with a choice of conflict resolutions.
78
3Choose the desired conflict resolution from the On Conflict pop-up menu.
Note: The contents of this menu depend on whether you’re importing or
synchronizing information. For more information, see “About Conflict
Resolution” earlier in this chapter.
After you set conflict resolution, you can import or you can set other
advanced options.
4 Click Import.
The information is imported and conflicting entries are resolved based on the
conflict resolution you specified.
Chapter 10
Page 79

Using field maps
You can create a new field map for transferring information.
About field maps
Application programs store information in categories, called fields, that
describe the type of information entered. For example, an entry in an Address
Book application might have several fields: a Name field, an Address field, a
Phone field, a Job Title field, and so on.
Different applications may have different names for these fields. For example,
one application might have a Work Address field and another might have an
Office field. Despite the different names, the type of information entered in
these fields is essentially the same.
Some applications have fields that don’t exist in another application. For
example, a Fax Number or E-mail Address field might appear in one
application, but not another.
When you import, export, or synchronize information on your Newton device,
the information is transferred using a default field map. This field map
determines how information in your Newton application is mapped to
information in your computer’s application. It also lists which fields are
transferred and which are not.
In most cases, the default field map will work fine for transferring
information. However, you can change the default field map to meet your
specific needs.
Setting Advanced Options
79
Page 80
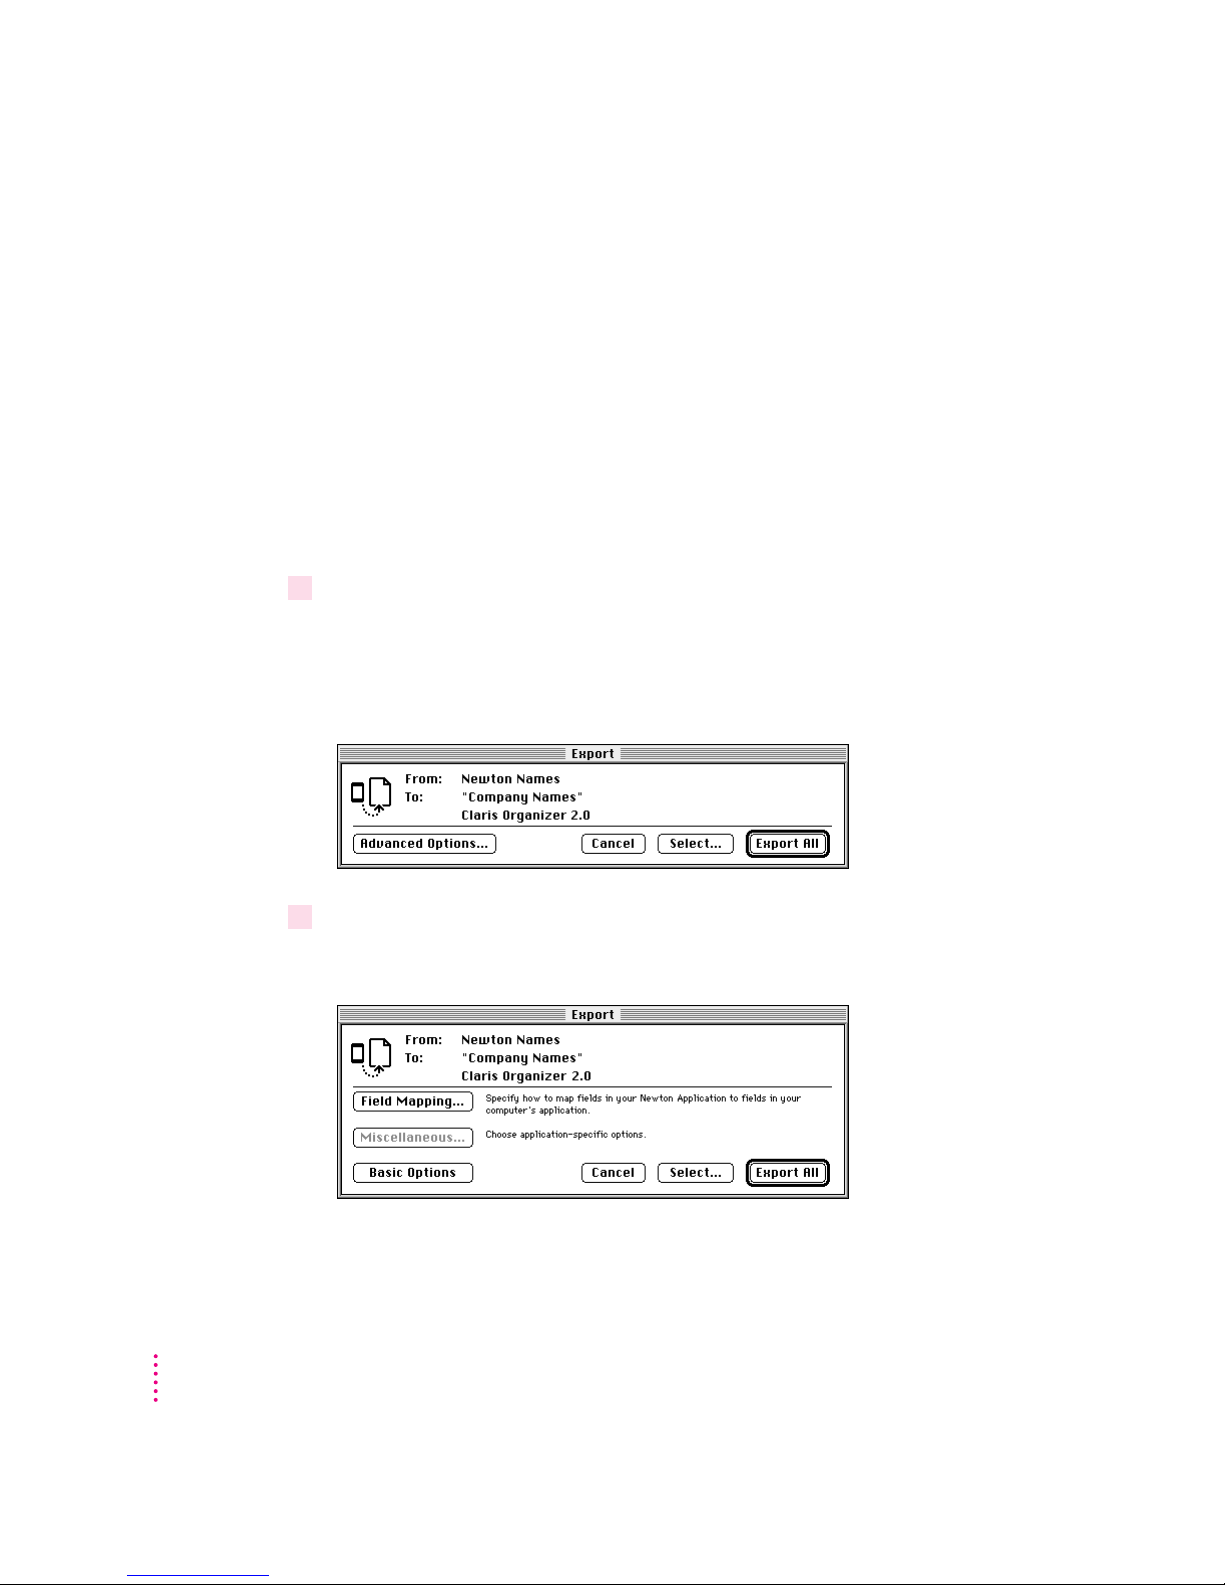
Changing a field map
The following section describes how to change a field map when you export
information. You can also use it as an example for changing field maps when
you import or synchronize.
IMPORTANT
Be careful when you change a field map. The field map you
create for each pair of applications (the Newton application and the
corresponding computer application) applies whenever you import, export, or
synchronize information between the two applications. If you make a mistake,
you might lose information.
To change a field map, follow these steps:
1 Open the Newton Connection Utilities and follow the steps to export.
For instructions, see Chapter 6, “Exporting Information From Your
Newton Device.”
The Export dialog box appears.
2Click Advanced Options.
The Export dialog box expands.
80
Chapter 10
Page 81
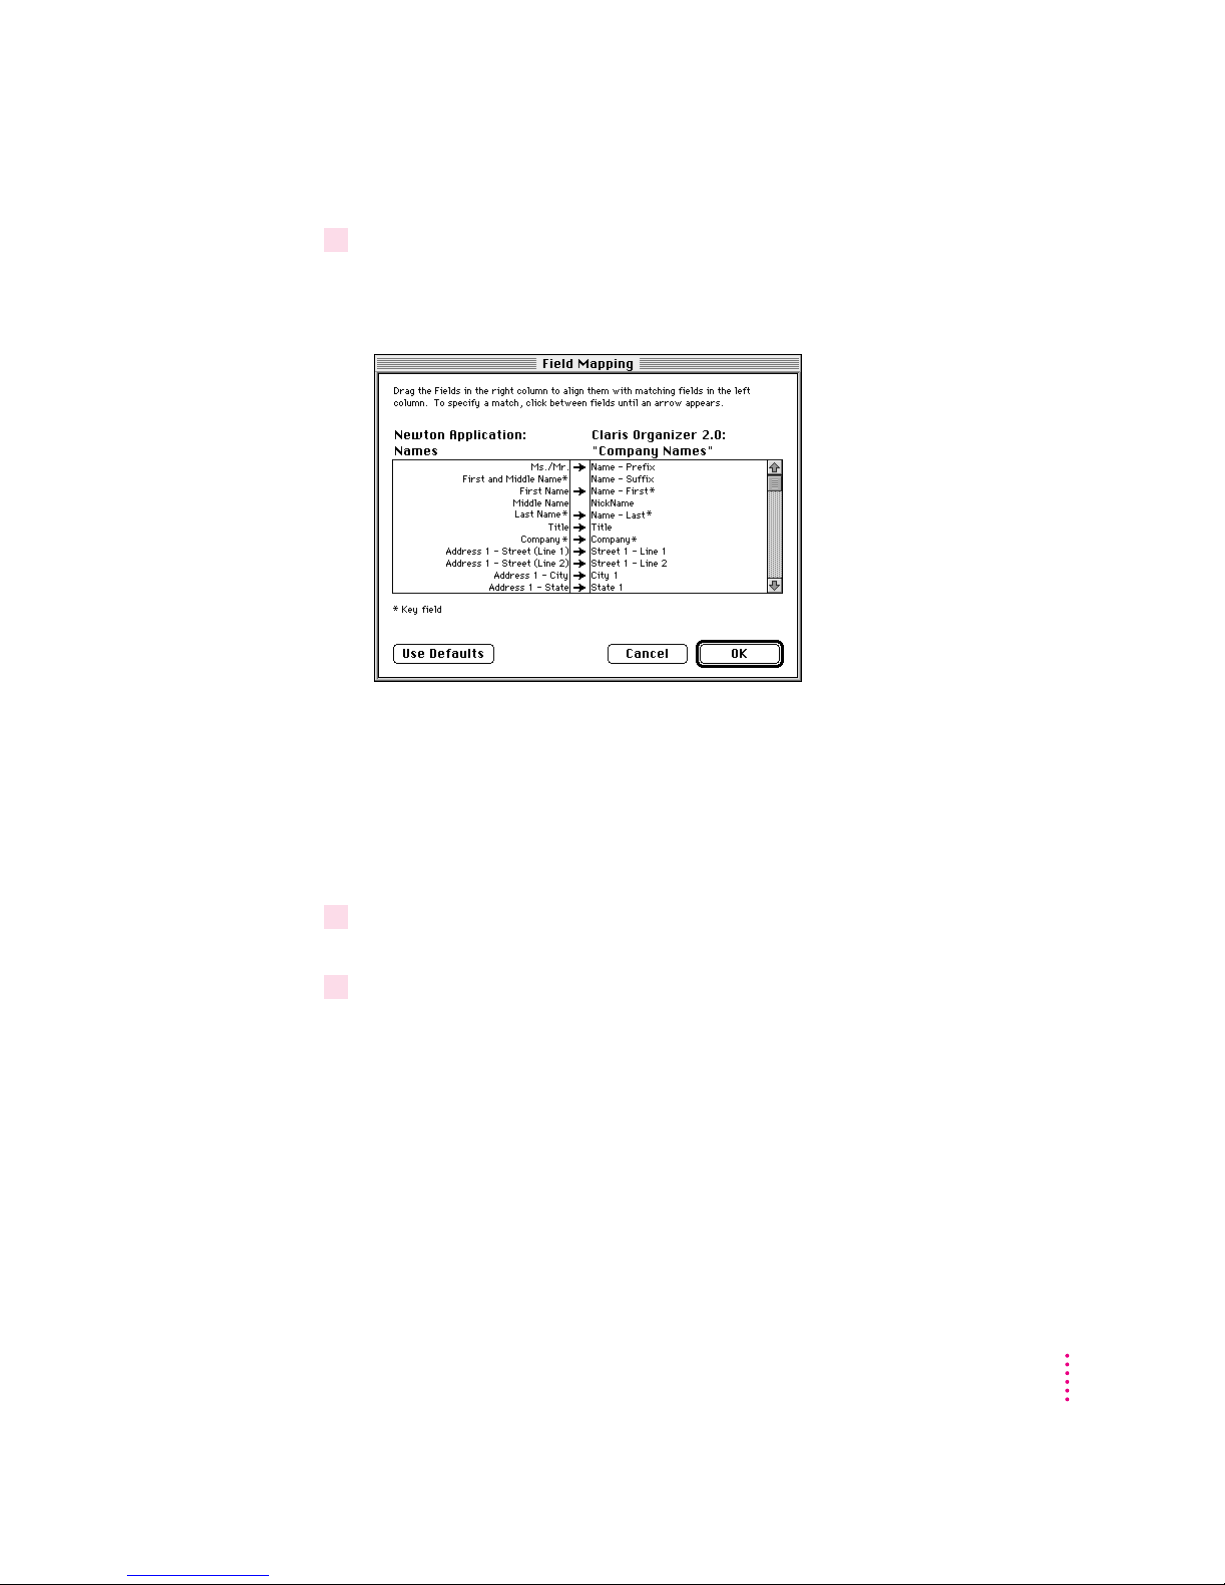
3Click Field Mapping.
The Field Mapping dialog box appears. The contents vary depending on the
applications you’ve selected for transferring information.
One column lists the application you’re transferring information from (the
source application). The other column lists the application you’re transferring
information to (the target application). The column of arrows shows which
fields of information will be transferred. Click to add or remove arrows.
Note: Fields that show an asterisk are key fields that must be mapped
for transfer.
4 Drag fields in the right column (the target application) to match fields in the left column
(the source application).
5Make sure the fields you want to transfer are selected.
To select a field for transfer, click in the arrow column to add an arrow next to
the field. Information without arrows will not be transferred.
Setting Advanced Options
81
Page 82
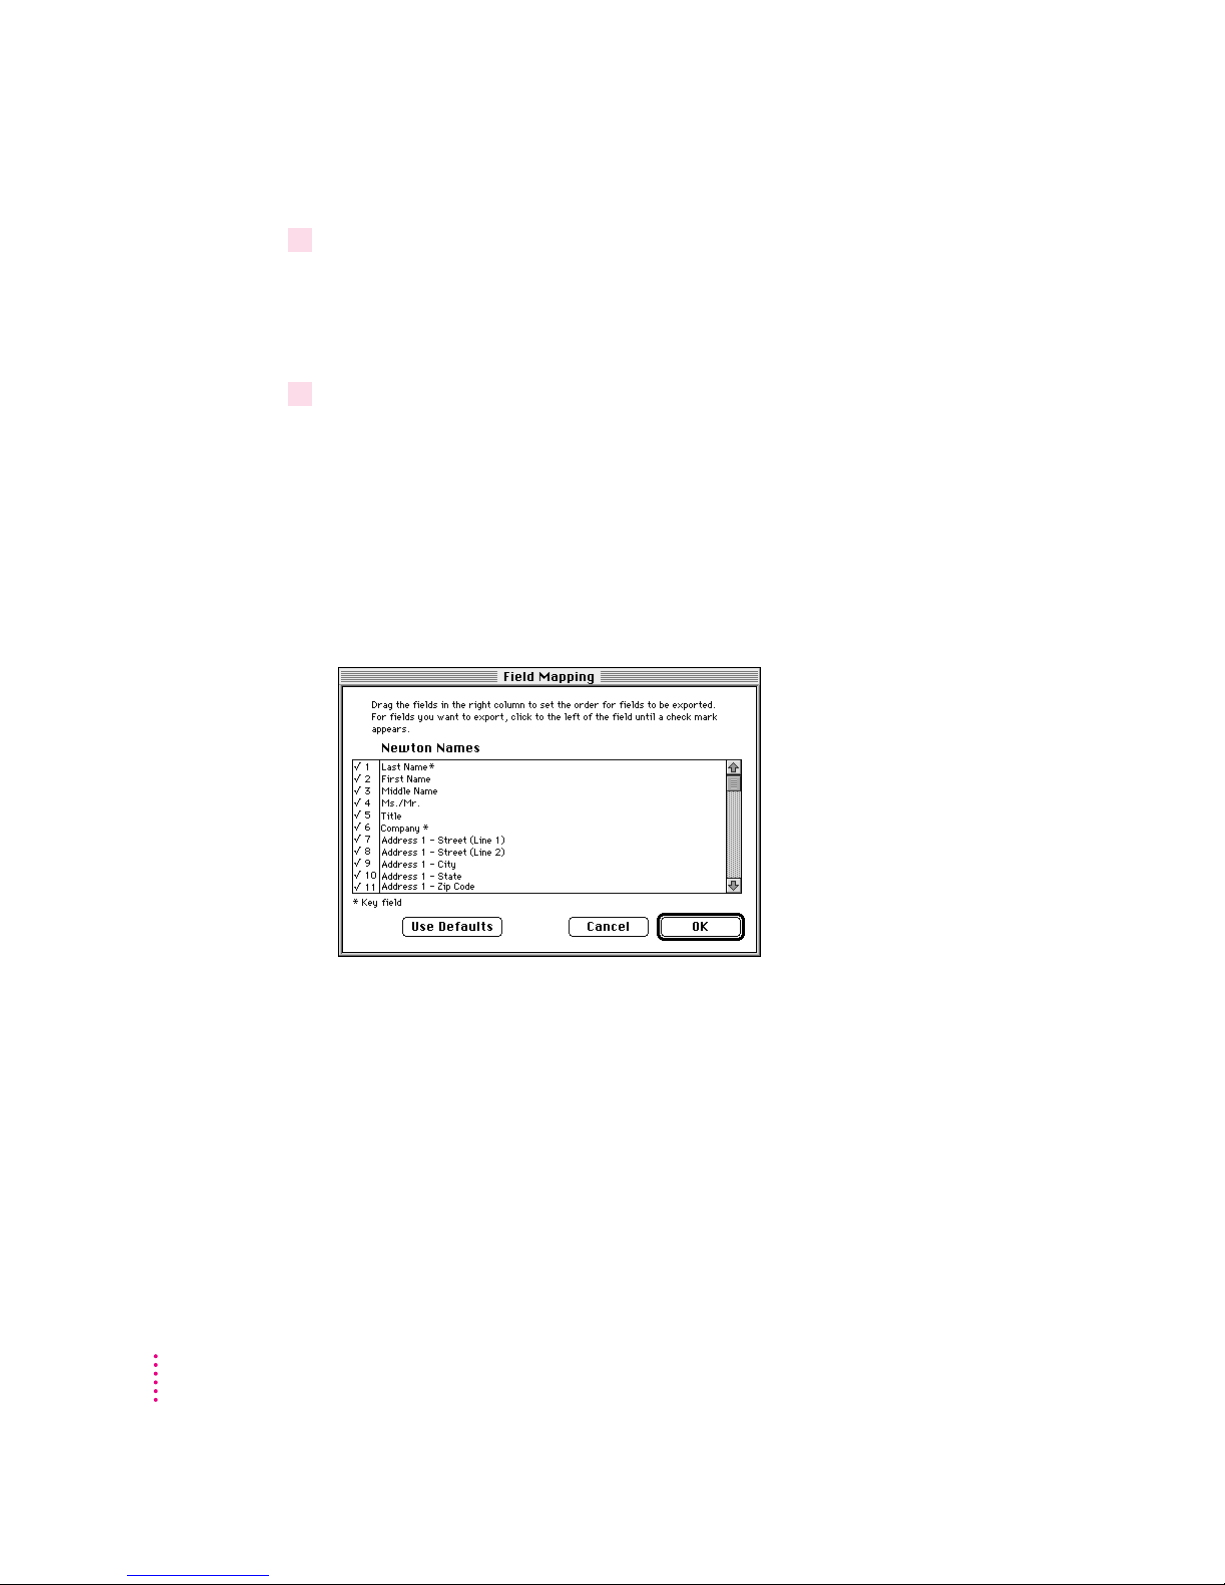
6When you’ve finished making changes to the field map, click OK.
Your field map changes are saved and the Field Mapping dialog box disappears.
After you’ve created a new field map, you can export or you can set other
advanced options.
7 Click Export All.
The information from your source application is exported to your target
application using the field map you defined. This field map remains in effect
for all transfers between the applications until you change it.
Changing a field map for a text file
When you import or export a text file, the field map is slightly different from
from the one used for transferring information from another type of file.
The right column shows the application you’re exporting from and its fields.
The column of numbers indicates the order in which fields will appear in the
text file. A checkmark indicates the field will be exported.
You can drag fields in the Newton application column to change the order of
fields in the text file.
You can select which fields will be exported. To select a field for export, click
in the numbers column until a checkmark appears. Unchecked fields will not
be exported.
82
Chapter 10
Page 83
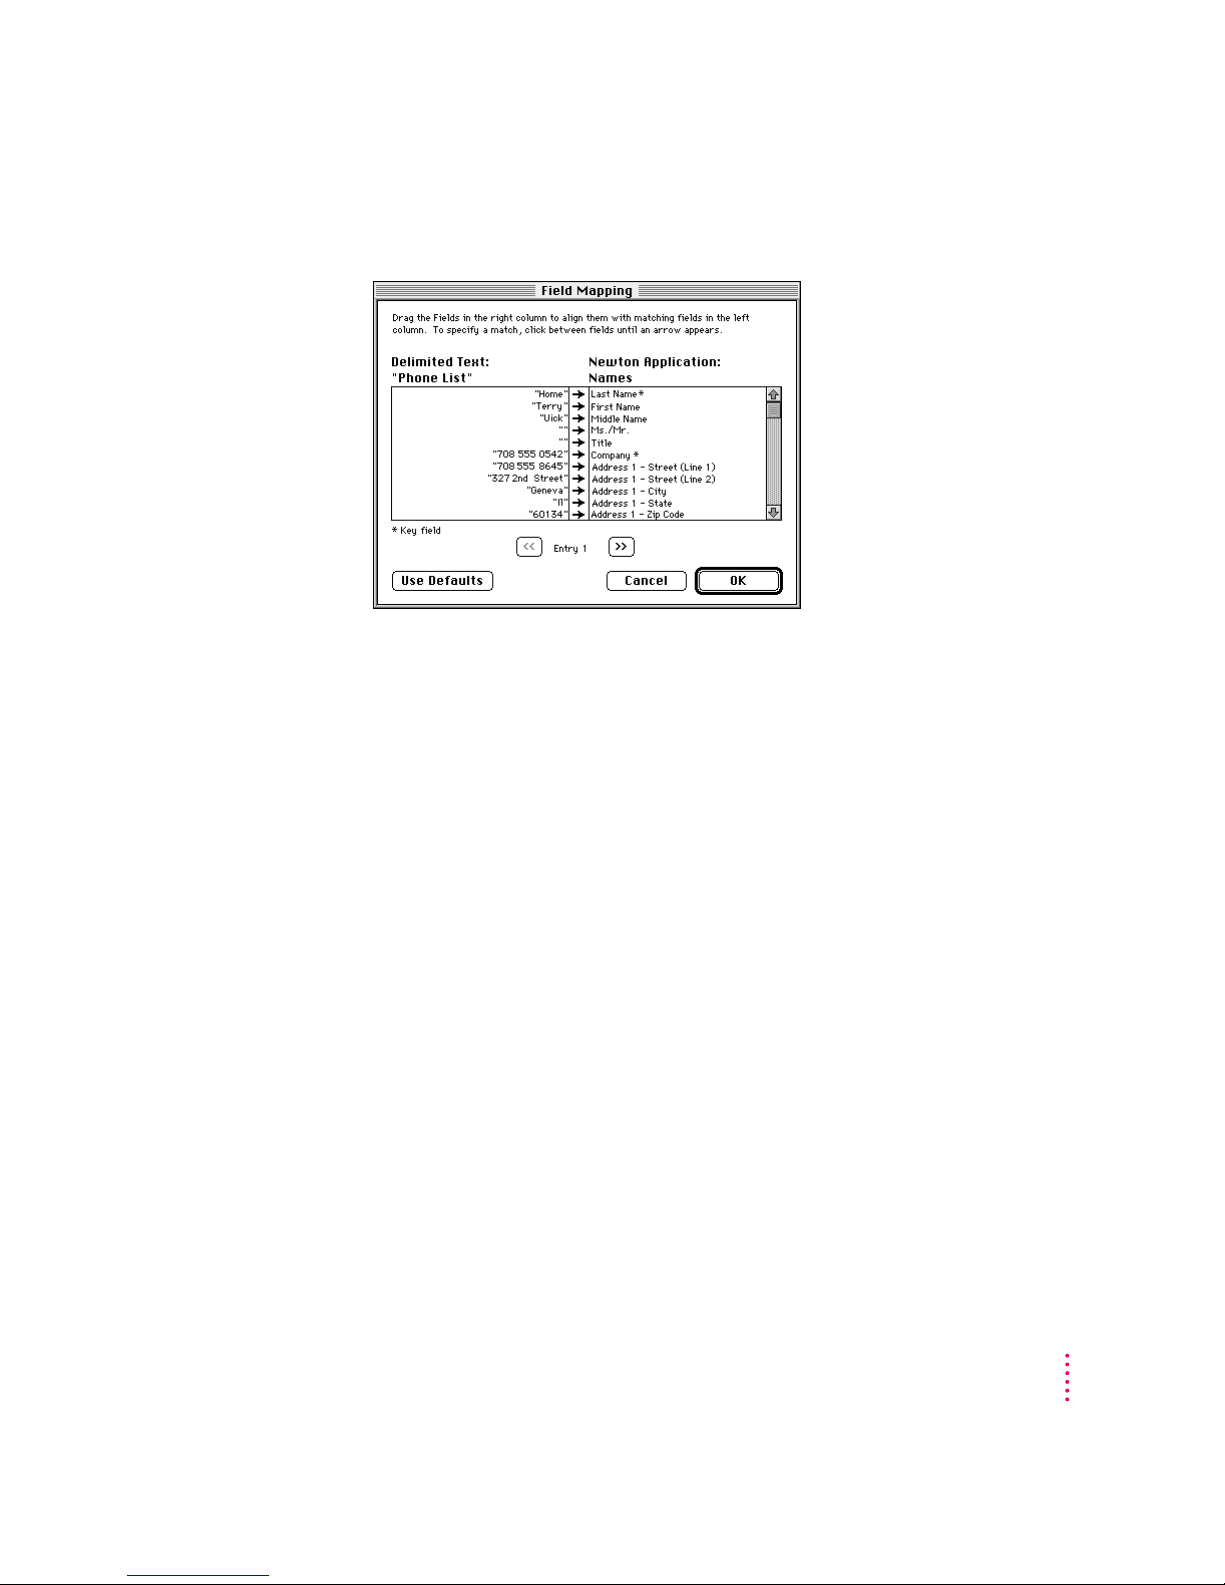
When you import a delimited text file, the field map looks like this:
One column shows entries in the file you’re importing. You can move through
entries by clicking the forward and backward arrow buttons.
The other column shows the Newton application you’re importing into and
lists its fields. You can drag the fields to rearrange them.
The column of arrows indicates what information in the left column will be
transferred to the fields in the right column. If no arrow appears, the
information will not be imported. You click to add or remove an arrow.
Note: If you’re importing a text file with column headings, the column
headings appear when you display Entry 1.
Setting Advanced Options
83
Page 84
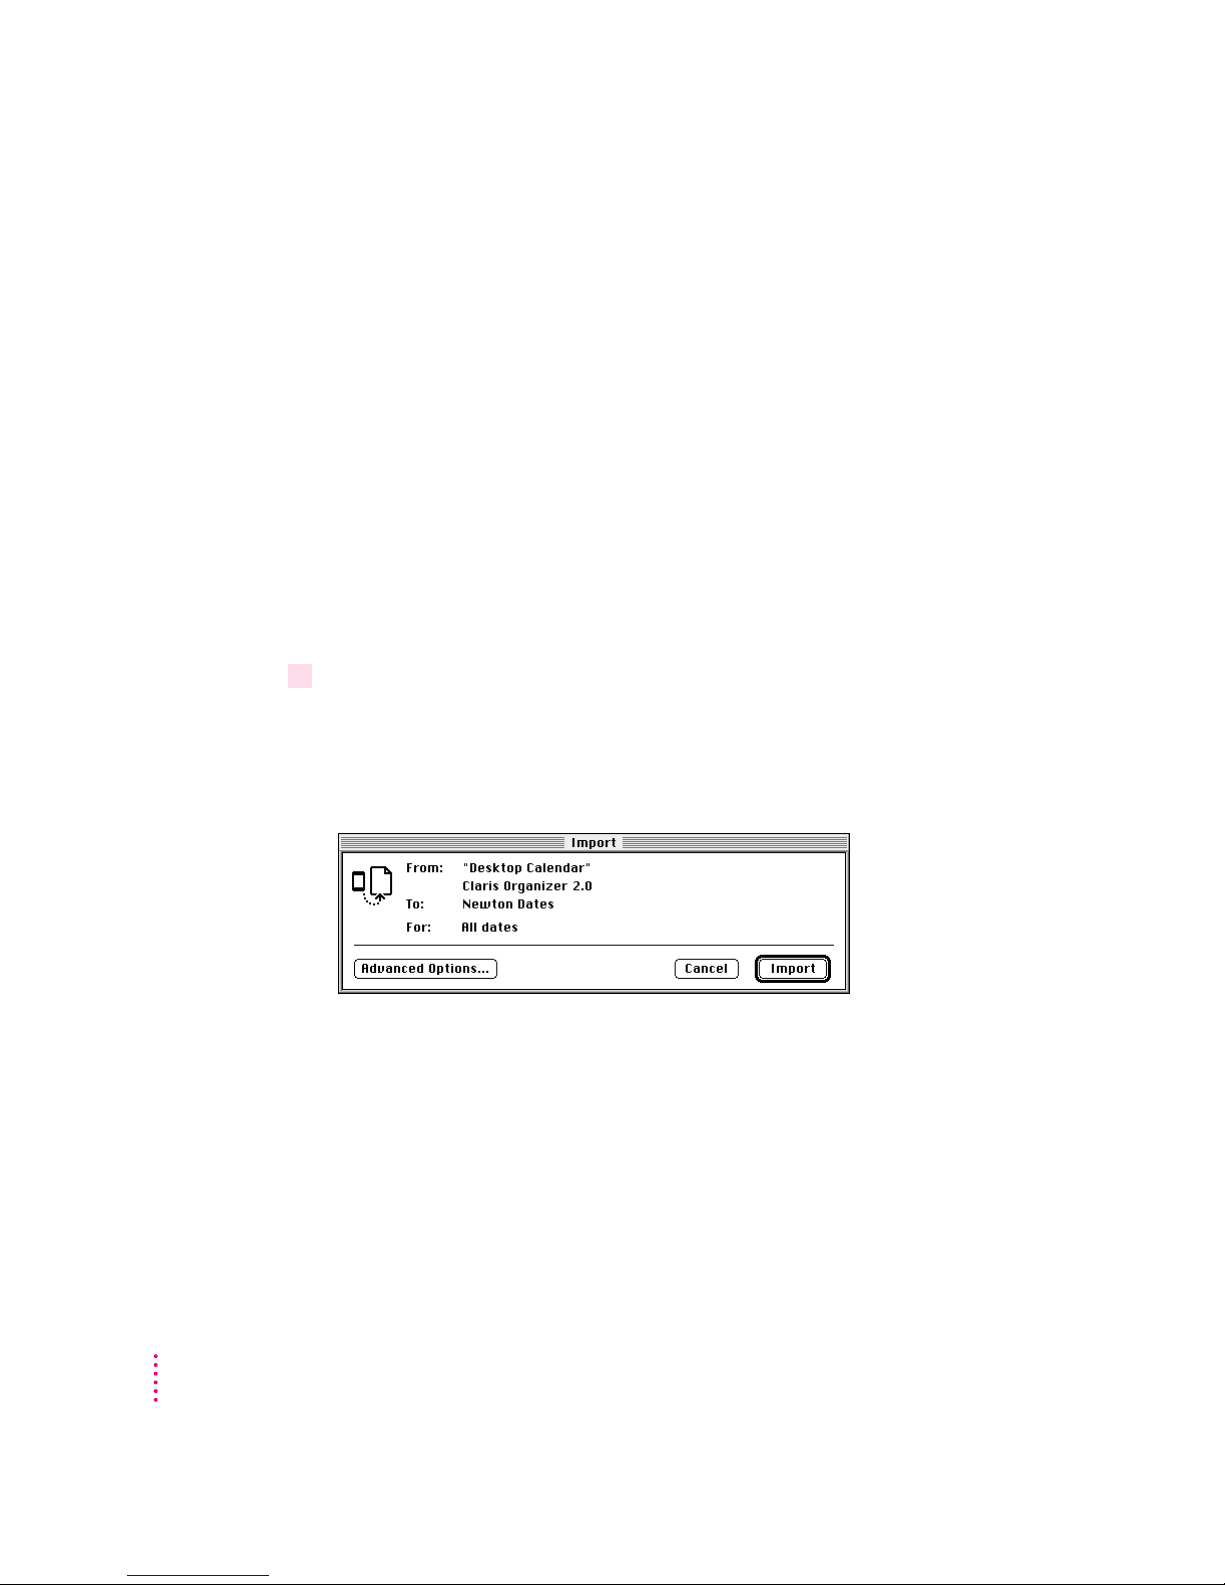
Setting miscellaneous options
To further refine how information is transferred, you can set miscellaneous
options specific to the type of information you’re transferring. For example, a
calendar application might have an option to control how ongoing meetings
are handled.
You can also set options specific to the translation program used to transfer
the information. For example, if you’re exporting an application to a text file,
you can specify whether the text file includes column headings and what
character is used to separate fields.
The following example shows you how to set miscellaneous options when
you’re importing information. You can also use it as a model for setting
miscellaneous options when you’re exporting or synchronizing.
To set miscellaneous options, follow these steps:
1 Open the Newton Connection Utilities and follow the steps to import.
See Chapter 5, “Importing Information to Your Newton Device,” for
more information.
The Import dialog box appears.
84
Chapter 10
Page 85
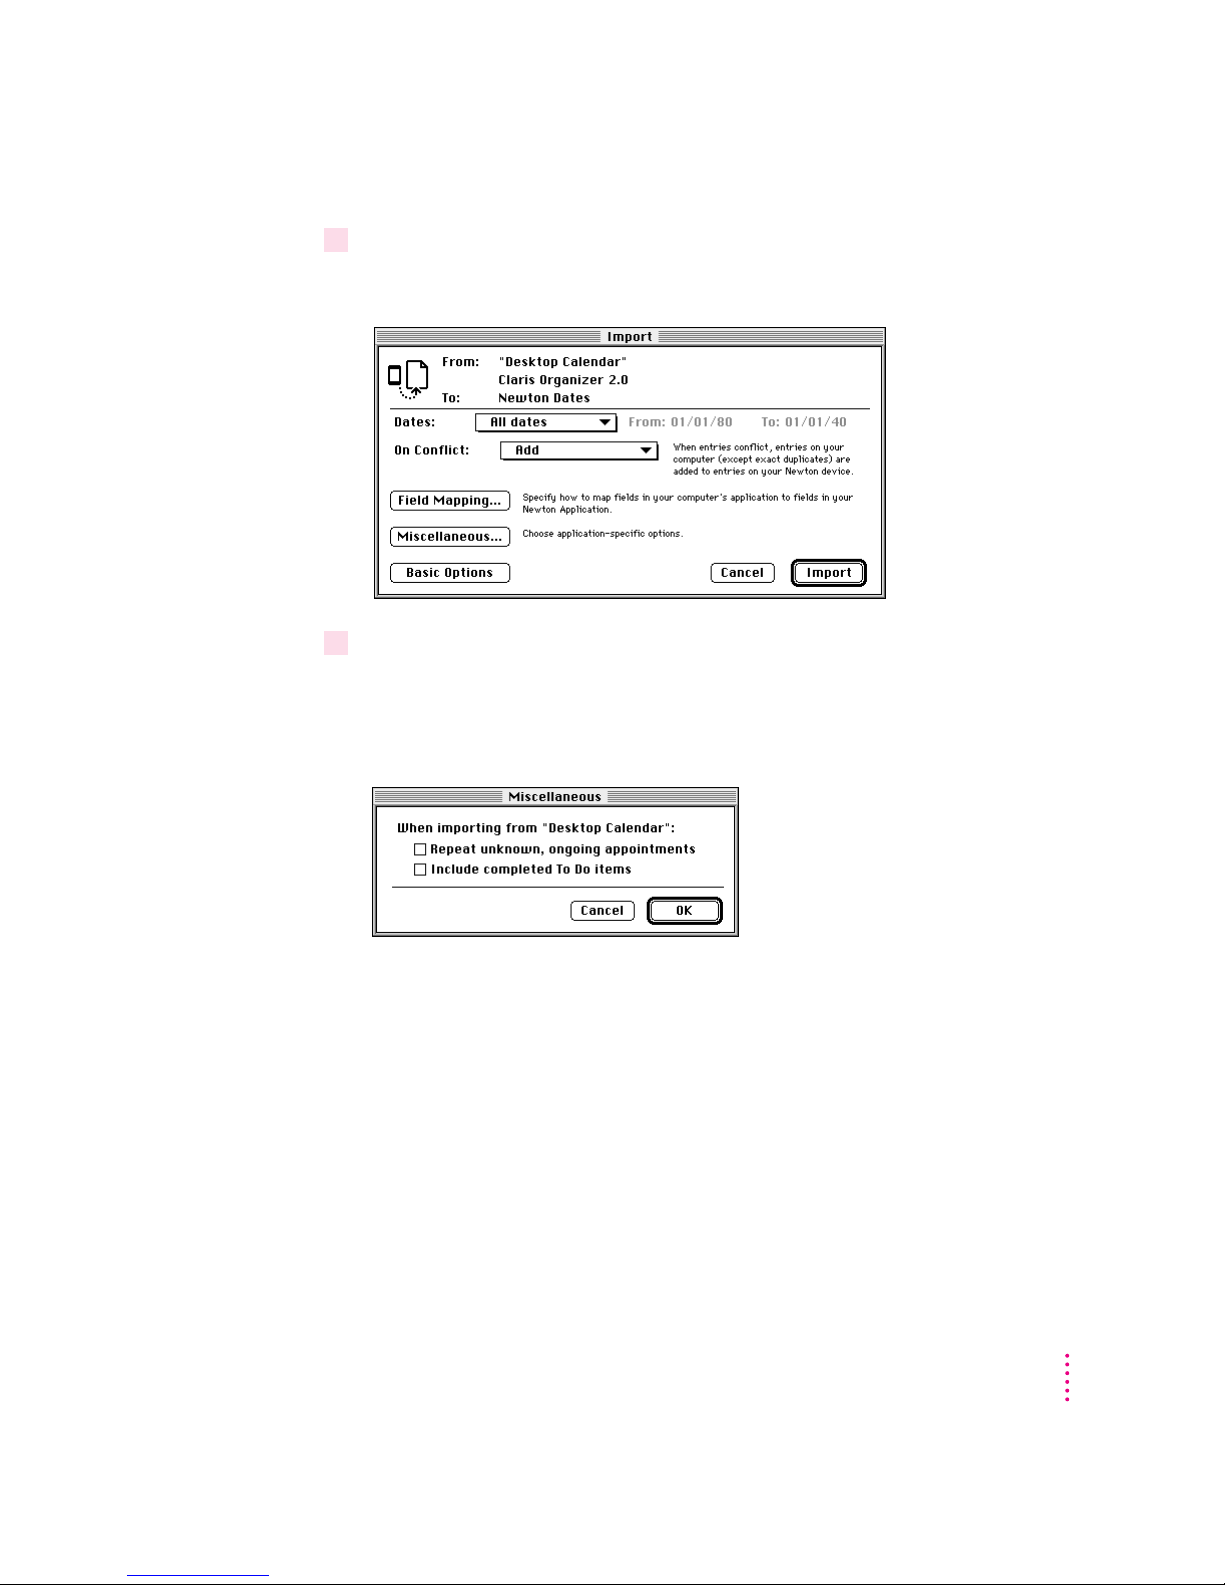
2 Click Advanced Options.
The Import dialog box expands.
3 Click Miscellaneous.
The Miscellaneous dialog box appears. The contents of the dialog box
depend on the application you’re using to transfer information. Following are
some examples:
The above dialog box appears when you’re exporting from a calendar
application.
Setting Advanced Options
85
Page 86
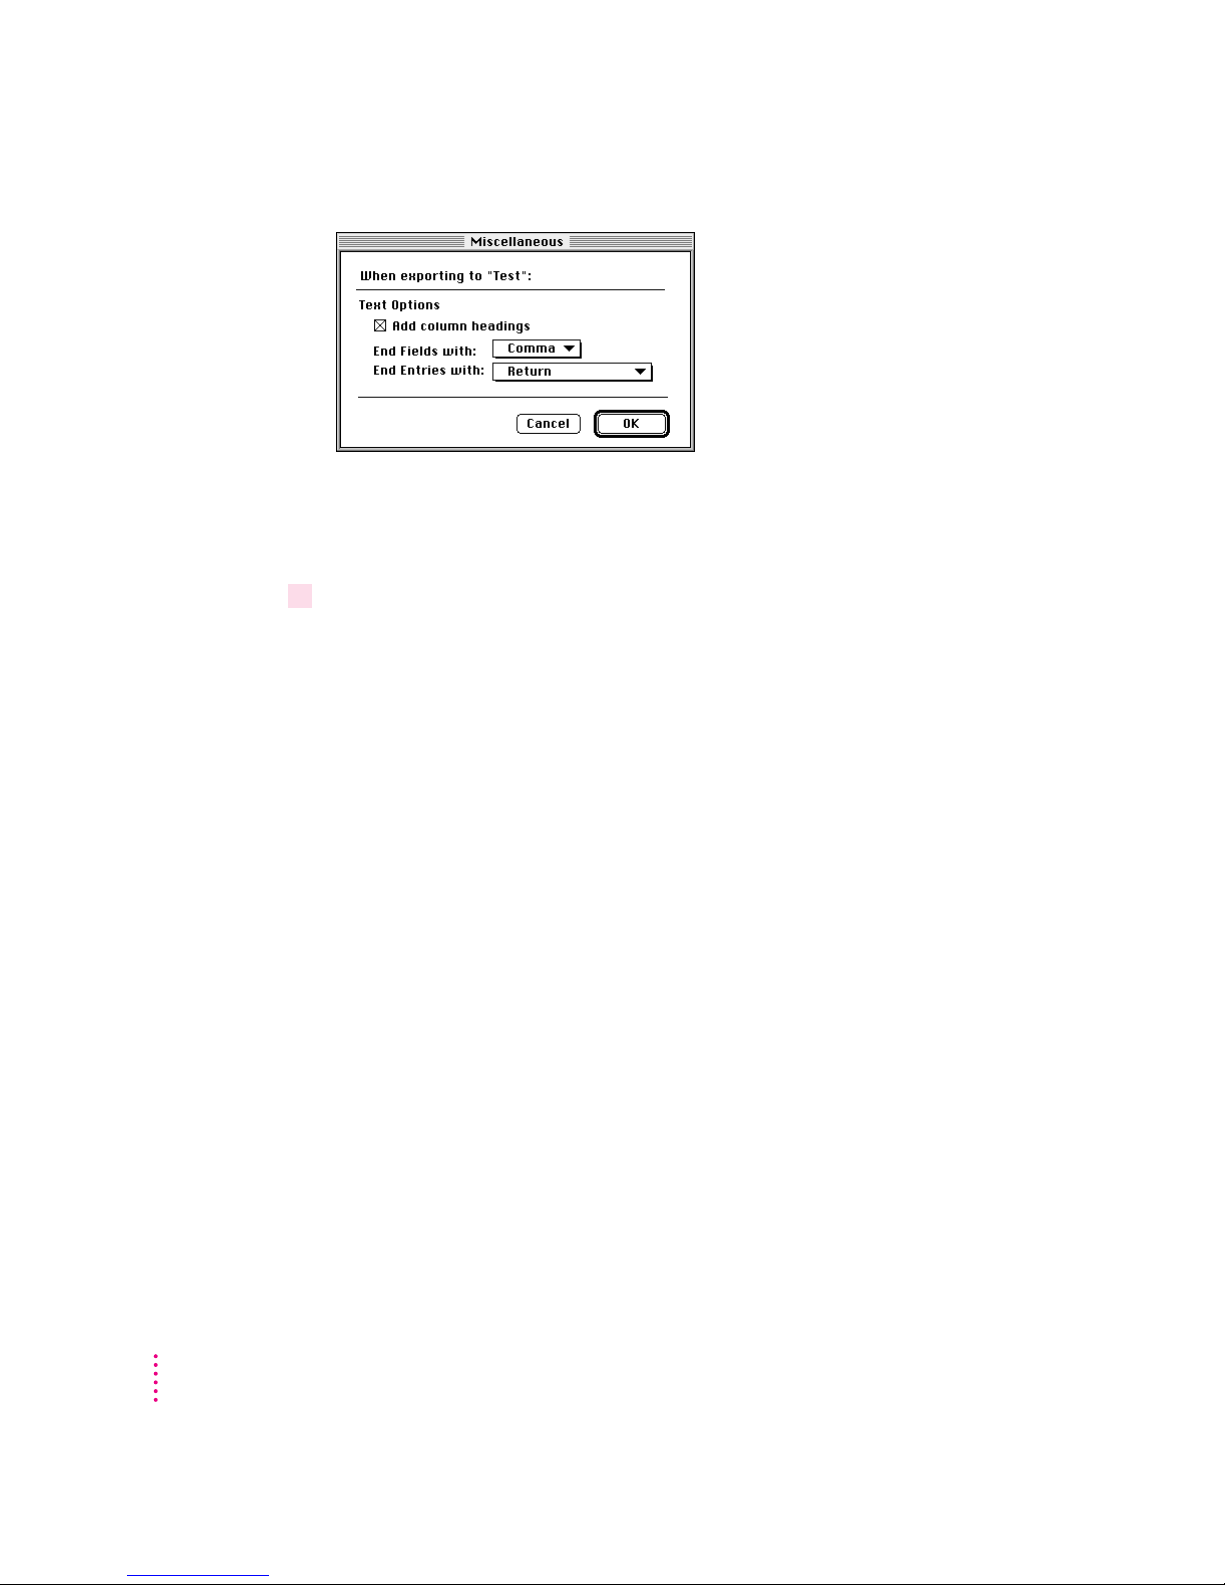
This dialog box appears when you’re exporting to a text file. The options that
appear are specific to the text translator. You use these options to specify how
fields and entries are separated in the text file.
4 Select the desired options.
Typical items you can set in Miscellaneous options include:
m Repeat unknown, ongoing appointments: Some calendar applications allow
you to set ongoing appointments—for example, a meeting that occurs
every third Thursday of the month. Select this option if you want to
transfer all occurrences of your repeating meetings. If you don’t select this
option, and the file you’re exporting to doesn’t support repeating meetings,
only the first occurrence of each repeating meeting will be transferred.
86
Chapter 10
IMPORTANT
With some calendar applications that don’t support ongoing
meetings, if you transfer ongoing meetings, the application may treat each
occurrence as a separate meeting. To remove these meetings, you’d have to
delete each instance individually.
m Include completed To Do items: Select this option if you want to include
completed items when you transfer a To Do list.
m Column headings: If you’re exporting information to a text file, select this
option to include field names in the first line of the text file. If you’re
importing information from a text file, select this option if field names are
included in the first line of the text file.
Tip: If your file has column headings and you turn on the Column
headings option, the Newton Connection Utilities can create more accurate
default field maps.
Page 87

m End Fields with or Fields end with: If you’re exporting information to a text
file, choose the character to separate fields in the text file. If you’re
importing information from a text file, choose the character that separates
fields in the text file.
m End Entries with or Entries end with: If you’re exporting information to a
text file, choose the character to separate entries in the text file. If you’re
importing information to a text file, choose the character that separates
entries in the text file.
5 Click OK.
The Miscellaneous dialog box disappears. The options you selected remain in
effect until you change them.
After you set miscellaneous options, you can import or you can set other
advanced options.
6 Click Import.
The information is imported using the miscellaneous options you selected.
Setting Advanced Options
87
Page 88

Page 89

11
Using the utilities
Using the Utilities From Your Newton Device
This chapter describes how to use the Newton Connection Utilities from your
Newton device instead of from your computer.
To use the Newton Connection Utilities from your Newton device:
m
Open the Newton Connection Utilities and establish a connection from your
Newton device.
For instructions, see Chapter 1, “Getting Started.”
The Newton Connection Utilities buttons appear on your Newton screen. You
can use these buttons to select a utility.
89
Page 90
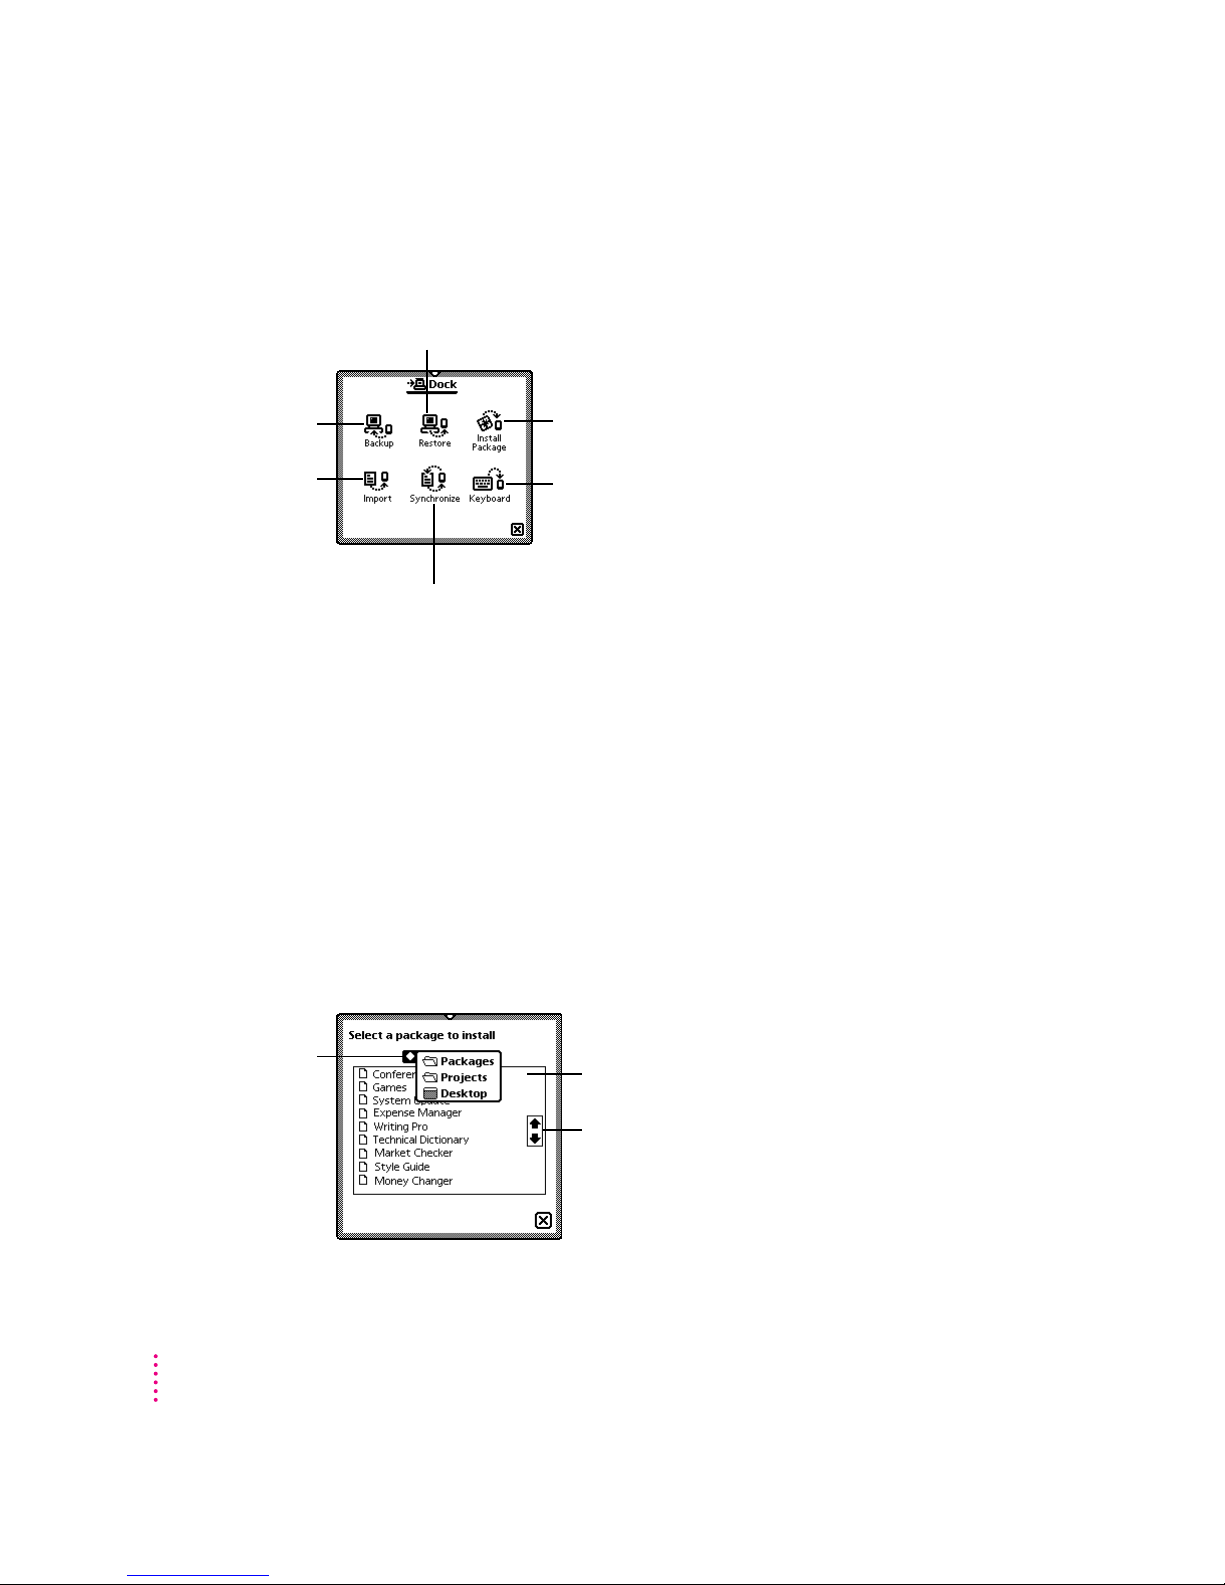
Note: The options to export from Newton applications (including
Newton Works) and to import into Newton Works are available only
from the computer.
Tap to restore a backup file to your Newton device.
Tap to back up your
Newton device.
Tap to import
information to your
Newton device.
Tap to install a package.
Tap to use your computer’s keyboard.
Tap to synchronize information.
The utilities on your Newton device work the same way as their counter parts
on your computer. To export information from your Newton device, or
import into Newton Works, use the Newton Connection Utilities window on
your computer.
When you use the Newton device to initiate synchronization with your
computer, the utilities use the settings previously selected on your computer.
Use the utilities on your computer to change these settings, if necessary.
Finding files on your computer from your Newton device
When you need to select a file on your computer (for example, when you
restore files or install packages), a slip appears with a list of files.You locate
files from your Newton device just as you would from your computer.
Tap to display a list of
folders and disks on
your computer.
90
Chapter 11
The files in the disk or folder
you choose are listed here.
Tap the up or down arrow to
see more files in the list.
Page 91
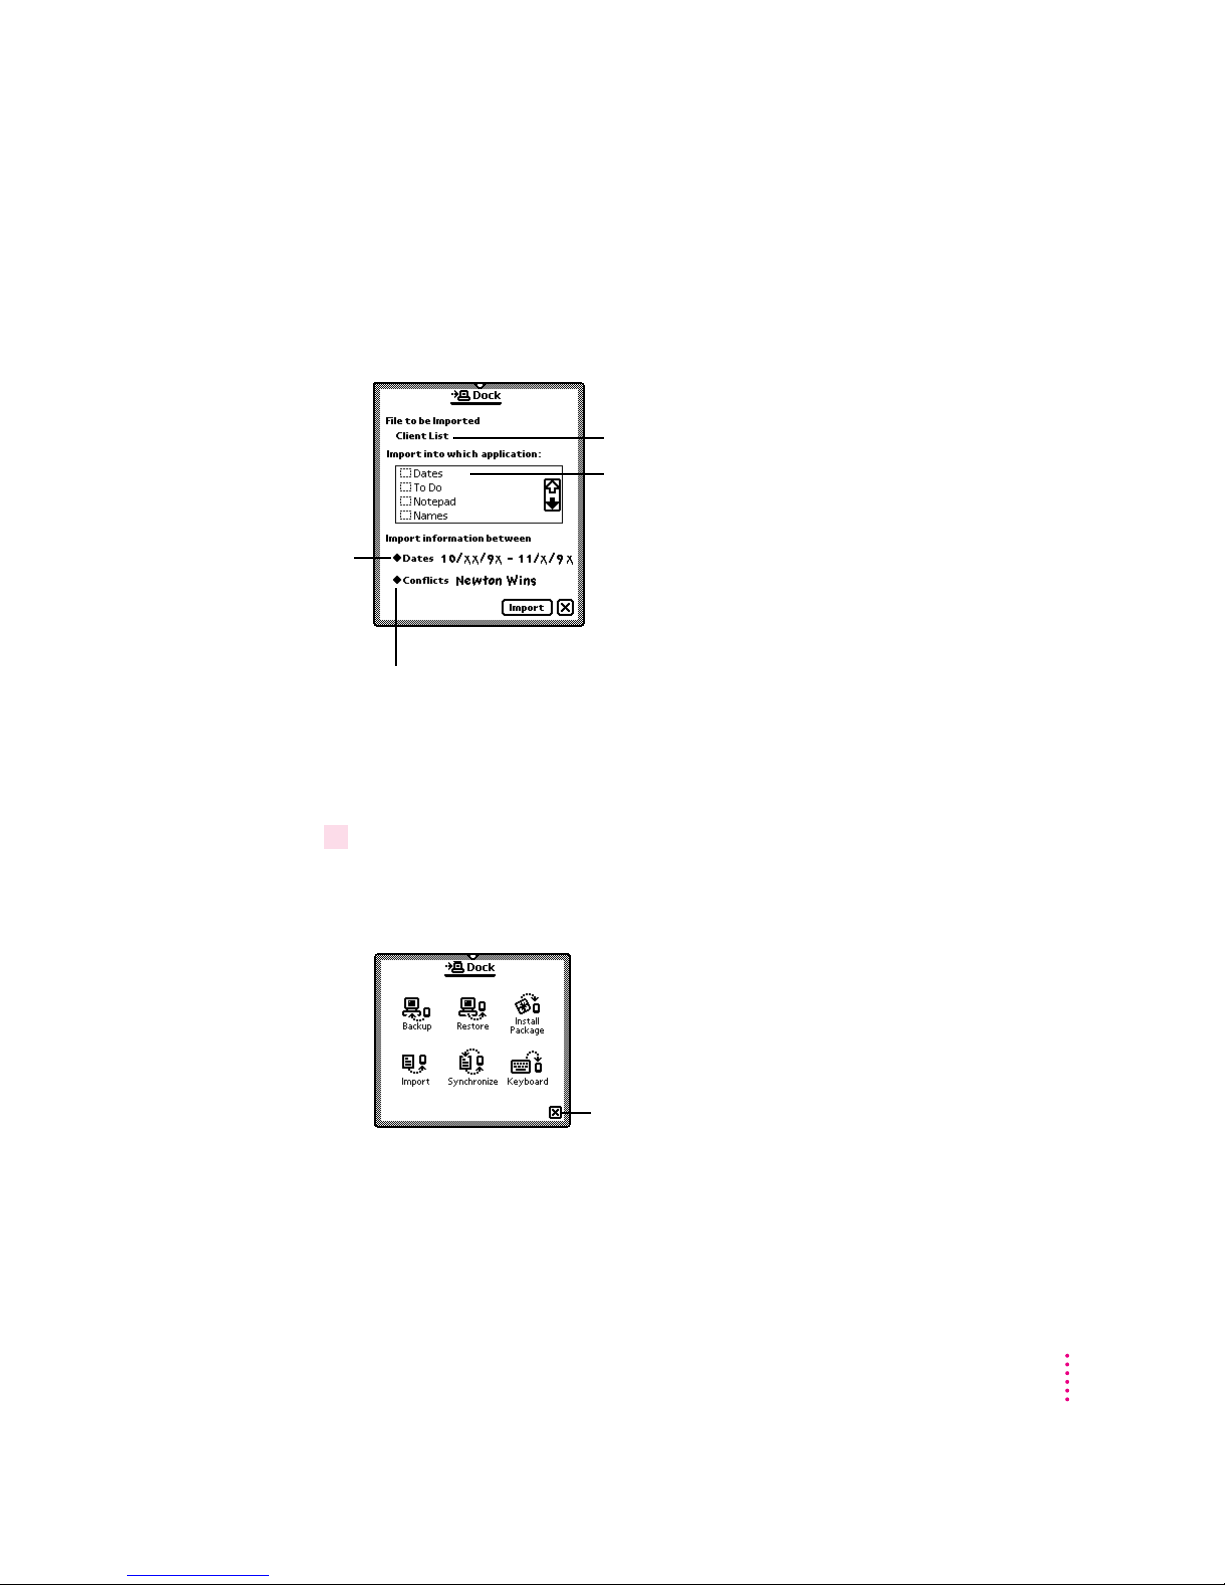
Importing information using your Newton device
When you import information, a slip appears asking you to select a file to
import. You may also need to choose a translator for the file. Your Newton
slip may appear different depending on the type of file you’re importing:
Tap to set a
date range.
Tap to select a conflict resolution.
Changing Dock preferences
To change Dock preferences on your Newton device, follow these steps:
Shows the file you’re importing
Select which application will
receive the information.
1 Tap Xto close the Newton Connection Utilities slip and end the connection.
You cannot change connection preferences while a connection is established
between your Newton device and your computer.
Tap to close the slip and end
the connection.
Using the Utilities From Your Newton Device
91
Page 92
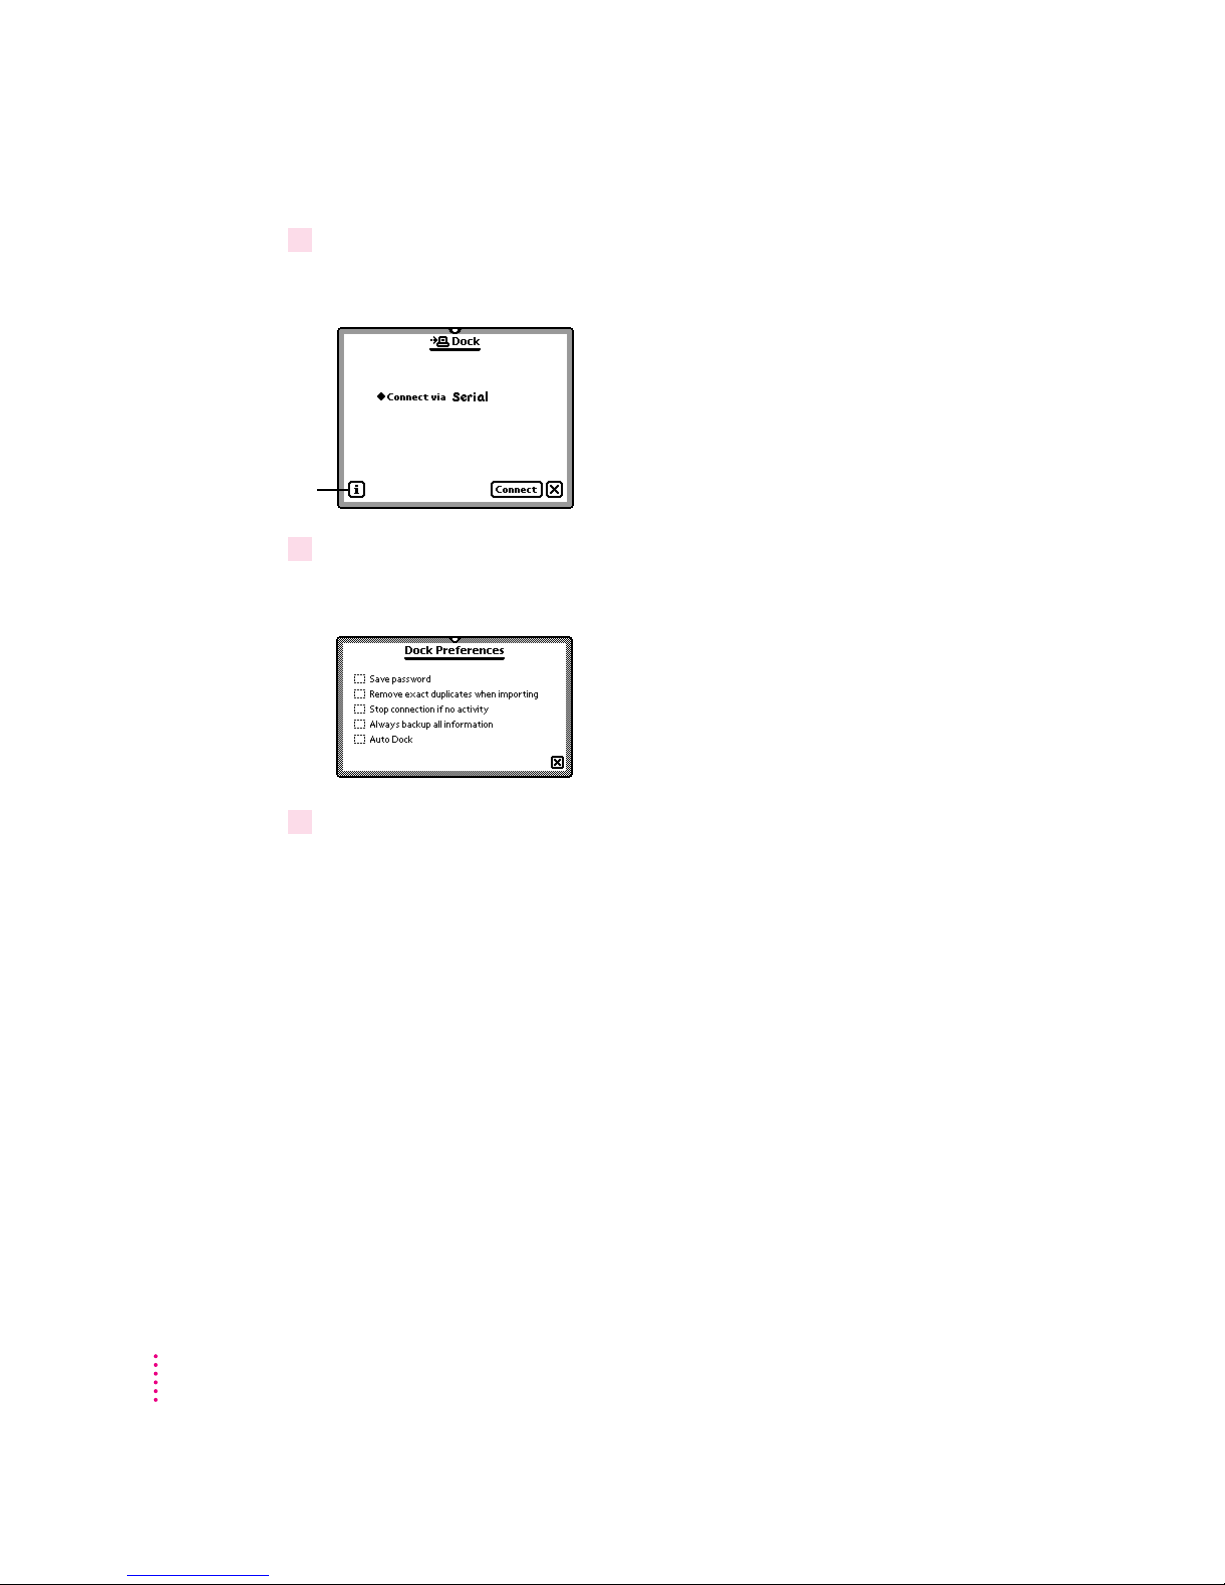
2 On your Newton screen, tap Dock (or Connection
Tap to change
connection
preferences.
3Tap the information ;button and tap Prefs in the list.
k
).
.
A slip appears.
A slip appears with a list of connection preferences.
92
4Select the desired Dock preferences.
Connection preferences include the following:
m Save password: Saves the password you’ve set for the Newton Connection
Utilities. If this item is selected, you only need to enter the password once
rather than every time you connect to the Newton Connection Utilities. For
more information on setting a password, see “Setting a Connection
Password” in Chapter 1, “Getting Started.”
m Remove exact duplicates when importing: You don’t need to turn on this
option. The Newton Connection Utilities automatically prevent exact
duplicates when you import.
m Stop connection if no activity: Ends the connection between your Newton
device and your computer after a period of inactivity determined by the
Sleep preferences you’ve set on your Newton device. This allows your
Newton to go to sleep. It applies only if you’re using your Newton device
with battery power.
Chapter 11
Page 93

m Always backup all information: Automatically backs up all information and
packages when you tap Backup.
m Auto Dock: When this option is selected, the Newton device automatically
backs up or synchronizes whenever you establish a connection, according
to the settings you selected in the Newton Connection Utilities. For more
information, see “Setting Up for Auto Dock” in Chapter 1, “Getting
Started.”
Note: This option is available only on Newton devices using the Newton 2.1
operating system.
5 Tap Xto close the slip.
Your connection preferences are saved and will be used when you connect
your Newton device to your computer.
Using the Utilities From Your Newton Device
93
Page 94

Page 95

12
Tr oubleshooting
This chapter describes some problems you may encounter when using the
Newton Connection Utilities. For problems related to your Newton device, see
the user’s manual that came with your Newton device. For the latest product
and troubleshooting information, check the Read Me file located in the
Newton Connection Utilities folder or see Apple’s Newton site on the World
Wide Web (http://www.newton.apple.com).
Problems installing the utilities
An error message appears when I try to install the Newton Connection Utilities.
m Make sure your computer meets the installation requirements. See
“Installation Requirements” in Chapter 1, “Getting Started.”
m If you have a virus protection program on your computer, turn it off. After
you install the Newton Connection Utilities, you can reactivate the virus
protection program.
I moved the application to a new location on my computer and now it won’t work.
m The Newton Connection Utilities need to remain inside the Newton
Connection Utilities folder. If you moved the application out of the folder,
replace it within the folder. You can move the entire folder to a new
location, and you can use an alias if you want to access the application
from a different location. You can also select a different location for the
Backups folder from within Newton Connection Utilities.
95
Page 96

Problems establishing a connection
I can’t establish an AppleTalk or serial connection from my Newton device.
m Check your connection cables to make sure they’re connected properly.
See “Connecting a Newton Device to Your Computer” in Chapter 1,
“Getting Started.”
m If you’re connected via an AppleTalk network, make sure AppleTalk is
active. See “Connecting Over an AppleTalk Network” in Chapter 1. Also
make sure the network is up and running.
m Make sure you’ve selected the correct type of connection on your
computer. See “Preparing Your Computer” in Chapter 1.
m Make sure you’ve selected the correct type of connection on your Newton
device. See “Preparing Your Newton Device” in Chapter 1.
m If you have a MessagePad 2000, make sure you connected the serial
adapter to your Newton device before connecting it to the serial cable.
I can’t choose menu commands or click buttons in the Newton Connection
Utilities window.
m Most menu commands and buttons are dimmed in the Newton Connection
Utilities window until you establish a connection from your Newton
device. See “Establishing a Connection” in Chapter 1, “Getting Started.”
Problems backing up and restoring information
I can’t create a backup file.
m Make sure your Newton device is connected to your computer and you’ve
selected the correct type of connection on your computer. See “Connecting
a Newton Device to Your Computer” and “Preparing Your Computer” in
Chapter 1, “Getting Started.”
m Make sure you’ve selected the correct type of connection on your Newton
device. See “Preparing Your Newton Device” in Chapter 1.
m Make sure you’ve established a connection from your Newton device. See
“Establishing a Connection” in Chapter 1.
m Make sure you have enough disk space on your hard disk for the
backup file.
96
Chapter 12
Page 97

I can’t locate backup files in the Newton Connection Utilities folder.
m You may have changed the location of backup files to another folder. See
“Changing the Location of the Backups Folder” in Chapter 2, “Backing Up
and Restoring Information.”
When I back up a storage card, the information on the card is backed up, but not
the packages.
m Make sure you’ve selected “Include all packages” in the Backup dialog box.
See “Backing Up All Information and Packages” in Chapter 2, “Backing
Up and Restoring Information.”
m The Newton Connection Utilities do not back up packages on a storage
card if you’re using the Newton 2.1 operating system and the storage card is
formatted for an earlier version of the Newton operating system. You may
be able to back up packages using another connection utility or by moving
them to the Newton’s internal storage area.
I can’t restore backup files created with the Newton Connection Kit 2.0 or 1.0.
m The Newton Connection Utilities do not read files created with Newton
Connection 2.0 or 1.0.
I can’t restore because the most recent backup file is damaged or lost.
m Use a previous backup from the Previous Backups folder. See “Previous
Backups” in Chapter 2, “Backing Up and Restoring Information.”
I can’t restore a backup file because there’s not enough memory available on my
Newton device.
m Delete items you no longer use from your Newton device and try
restoring again.
I can’t restore a backup file because there’s not enough memory available on
my computer.
m You may have to increase the amount of memory allocated to the Newton
Connection Utilities. Select the application, choose Get Info from the File
menu, and type a larger number in the Preferred Size box.
When I restore information from a Newton device that uses an earlier version of the
Newton operating system to a Newton device that uses the Newton 2.1 operating system,
my To Do list disappears.
m You may have set the wrong date on your Newton device. Correct the date
and try restoring again.
Troubleshooting
97
Page 98

My backup files on my computer are increasing in size even though I’ve eliminated
information that I’m backing up from the Newton device.
m Try moving your backup files to a different location, then make a new
backup. The new backup files should be smaller. You can then erase the
old files and use the new smaller ones.
Problems installing packages
I can’t install a package.
m You may not have enough free storage space on your storage card or
Newton device. Try deleting packages and information you don’t need.
m Contact the software publisher to make sure the package is compatible with
the Newton 2.0 or 2.1 operating system.
A package I installed on my Newton device takes up less memory than on my computer.
m Some packages are compressed when you install them on your Newton
device. The package will work properly.
I can’t establish a serial connection from my PowerBook or PowerBook Duo.
m Choose the Chooser from the Apple (K) menu and make sure AppleTalk
is inactive.
m Open the PowerBook Setup control panel and make sure Modem is set
to Normal.
When I restore a package to my Newton device, an “X” appears on top of the package.
m An “X” means the package is not activated or is a duplicate. To activate
the package, restart your Newton device, or open the package by tapping
its icon.
Problems importing, exporting, and synchronizing
I can’t import a text file.
m Make sure the file is in plain text format. You can only import plain text
files into the Newton Notepad.
m Make sure you’ve specified the correct field and entry separators in the
file. See “Setting Miscellaneous Options” in Chapter 10, “Setting
Advanced Options.”
98
Chapter 12
Page 99

My application is not synchronizing when I click the Synchronize button.
m Make sure you’ve selected a file to synchronize. See “Synchronizing for the
First Time” in Chapter 7, “Synchronizing Information.”
m Make sure the checkbox to the left of the application is checked (an X
appears in it) in the Synchronization Settings dialog box. See
“Synchronizing for the First Time” in Chapter 7.
Information in my source application is not mapping correctly to information in my
target application.
m You may need to change the field map for the applications. See “Changing
a Field Map” in Chapter 10, “Setting Advanced Options.”
I can’t set a custom date range.
m Make sure you’ve selected Custom from the Dates pop-up menu. See
“Changing the Date Range” in Chapter 10, “Setting Advanced Options.”
When I transfer calendar items that represent repeating meetings, I only see future
meetings, not meetings already passed.
m Some calendar applications don’t support ongoing meetings. If you transfer
repeating meetings, they may be treated as many separate meetings instead
of a repeated occurrence of a single event. A limited number of meetings
are transferred. For example, if a daily repeating meeting is transferred, a
month’s worth of separate meetings are set up on the computer. Meetings
that occurred in the past are generally not exported, unless the number of
meetings has been set in a date range.
Information on my Newton Notepad doesn’t look the same when I transfer it to
my computer.
m Some information in your Newton Notepad may not translate directly to an
application on your computer and vice versa. See the Appendix, “Working
With Translators.”
m Graphics and ink text are converted to asterisks when exported to a file on
your computer. If the file is imported to the Newton device again, the
original items will not appear in place of the asterisks.
Troubleshooting
99
Page 100

 Loading...