


USER'S MANUAL
7" DIGITAL WIRELESS
MONITORING & RECORDING SYSTEM
PLEASE READ THIS MANUAL CAREFULLY BEFORE
OPERATING YOUR SET
RETAIN IT FOR FUTURE REFERENCE.
The material in this document is the intellectual property
of our department .
No part of this manual may be reproduced, copied,
translated, transmitted, or published in any form or by any
means without our department prior written permission.
Our products are under continual improvement and we
reserve the right to make changes without notice. But no
guarantee is given as to the correctness of its contents.
We do not undertake any responsibility for the harms
cause by using our product.
The model of the products in the user's manual only for
recognition, but these names also perhaps are belong to other
company's registered trademark or the copyright.
The product picture may differ from the actual product,
only for your reference.The accessories will probably be
different according to the different selling areas. For details of
accessories, please refer to your local distributor.
copyright reserved
1-512-756-1678
WL24MNK


USER'S MANUAL
IMPORTANT SAFETY INSTRUCTIONS ……………………………………………………………1
SAFETY INSTRUCTION …………………………………………………………….………………2
CAUTIONS ……………………………………………………………………………………….……3
1. INTRODUCTION ………………………………………………………………………4
1.1 Outline …………………………………………………………………………………………4
1.2 Features ………………………………………………………………………………………4
2. ACCESSORIES…………………………………………………………………….……4
3 SPECIFICATION…………………………………………………………………………5
4 INSTALLATION GUIDELINE……………………………………………………………6
4.1 Product Overview ………………………………………………………………………………6
4.1.1 Front controls ……………………………………………………………………………6
4.1.2 Side conntols ……………………………………………………………………….……6
4.2 Remote control …………………………………………………………………………………7
4.3 Camera Overview ……………………………………………………………………….……7
5. SYSTEM OPERATION…………………………………………………………….……7
5.1 Live display ………………………………………………………………………………..……7
5.1.1 Manual channel selection ………………………………………………………………8
5.1.2 Auto switching mode ……………………………………………………………………8
5.2 Recording mode ………………………………………………………………………….……8
5.2.1 Manual recording mode………………………………………………………...………9
5.2.2 Schedule recording mode …………………………………………………………..…9
5.2.3 Motion detection recording mode …………………………………………………..…9
5.3 Playback operation …………………………………………………………………………...10
5.3.1 Select the file ………………………………………………………………………...…10
5.3.2 paly the file …………………………………………………………………………..…10
5.3.3 Delete files ………………………………………………………………………….….11
5.4 Camera pairing ………………………………………………………………………………...11
5.5 AV output……………………………………………………………………………………...…12
5.6 Format SD card……………………………………………………………………………....…12
5.7 Firmware Upgrate …………………………………………………………………………...…12
6.OSD Menu Readmap……………………………………………………………………13
7. Troubleshooting……………………………………………………………………….…14
CONTENTS

- 14 -
USER'S MANUAL
.
If you have problems with the system, there is often a quick and simple solution.
Please try the following:
USER'S MANUAL
1) Read these instructions.
2) Keep these instructions.
3) Heed all warnings.
4) Follow all instructions.
5) Do not use this aparatus near water.
6) Clean only with dry cloth.
7) Do not block any ventilation openings. Install in accordance with the
manufacturer's instructions.
8) Do not install near any heat sources such as radiators, heat registers, stoves, or
other apparatus (including amplifiers) that produce heat.
9) Do not defeat the safety purpose of the polarized or grounding-type plug.
A polarized plug has two blades with one wider than the other.
A grounding type plug has two blades and third grounding prong.
The wide blade or the third prong are provided for your safety.
If the provided plug does not fie into your outlet, consult an electrician for
replacement of the obsolete outlet.
10) Protect the power cord from being walked on or pinched particularly at plugs,
convenience receptacles, and the point where they exit from the apparatus.
11) Only use attachments/accessories specified by the manufacturer
12)
Use only with the cart, stand, tripod, bracket, or table specified by the manufacturer
, or sold with the apparatus.
When a cart is used, use caution when moving the cart/apparatus combination to avoid
injury from tip-over.
13)Unplug this apparatus during lightning storms or when unused for long periods
of time.
14) Refer all servicing to qualified service personnel. Servicing is required when the
apparatus has been damaged in
anyway such as power-supply cord or plug is damaged, liquid has been spilled or ,
objects have fallen into the
apparatus, the apparatus has been exposed to rain or moisture, does not operate
normally, or has been dropped.
- The apparatus shall not be exposed to dripping or splashing and that no objects
filled with liquids, such as vases,
shall be placed on the apparatus.
- Minimum distances(e.q. 10cm) around the apparatus for sufficient ventillation.
"WARNING - To reduce the risk of fire or electric shock, do not expose the
apparatus to rain or moisture."
"The apparatus shall not be exposed to dripping or splashing and no objects filled
with liquids, such as vaces, shall be placed on the apparatus.
- 1 -
IMPORTANT SAFETY INSTRUCTIONS
7. TROUBLESHOOTING
Problem
Solution
No picture from a camera
1. Check all connections to the camera. Make sure
the daptor is plugged in.
2. Make sure that the receiver is ON.
3. Make sure that the camera is in range of the receiver.
The picture is dropping
1. Move the camera closer to the receiver.
2. Try repositioning the camera, receiver or both to
improve the reception.
Audio problems
1. Increase the volume when there is no sound.
2. Make sure that there is sound within range of the
camera microphone.
3. If the unit emits a loud screeching noise (audio
feedback), move the camera or receiver farther apart.
The picture is or has become
choppy
The picture may become choppy when experiencing a
lower frame rate (i.e. 10 frames per second vs. a higher
20 frames per second). Try moving the camera closer to
the receiver. Remove obstructions between the receiver
and camera.
The Picture appears to be
grainy when using AV out
function to view on a large
screen TV/Monitor
The purpose of the AV output is for convenience only.
When using with large screen TV/Monitor, the picture
might be grainy as the camera limits video resolution to
VGA (640x480 pixels). This is not a product defect.
1. For best performance use with TV/Monitor PIP (Picture
in Picture) func ion. Check your TV/Monitor product
manual to see if this feature is available on your TV/Monitor.
2. View video on a smaller screen TV/Monitor.
Recording Problems
1. Make sure the SD card is inserted to SD card slot
correctly.
2. Check the SD card is not full of memory.
3. Make sure the size of SD card is compatible with
the system. The system can support up to 32GB SD card.

- 13 -
USER'S MANUAL
Motion Record Time
Main Menu
Camera Setup
Record Setup
System Setup
Play Back
Activation
Brightness
Pairing
Quality
Volume
Motion Detect Activity
Motion Sensitivity
Schedule recording
SD overwrite
Date Time Setup
Load Default Setting
SD Format
TV Out
Version
Zoom
Upgrade
- 2 -
USER'S MANUAL
SAFETY INSTRUCTION
Thank you for purchasing our product. Before operating this product,please read the instruction
manual.
1. Unplug this product from the wall outlet before cleaning.Do not use liquid cleaners or aerosol
cleaners. Use a damp cloth for cleaning.
2. Do not use this product near water.
3. Do not place this product on unstable cart,stand or table.The product may fall,causing
serious damage to he product.
4.
slots and openings in the cabinet and the back are provided for ventilation: to ensure reliable
operation of the product,these openings must not be blocked by placing the product on bed,sofa,
rug or other similar surface. This poduct shousld never be placed near or over a heat register.
This product should not be placed in a built-in installation unless proper ventilation is provided.
5. this product should be operated from the type of power source indicated on the marking label.
If you are not sure of the type of power available,consult your dealer or local power company.
6. this product is equipped with a 3 wire grounding type plug having a third(grounding)pin.
This is a safty feature if you are unable to insert the plug into the outlet,contact your electrician
to replace your obsolete outlet. Do not defeat the purpose of the grounding-type plug.
7.
Do not allow anyth
ing to rest on the power cord. Do not locate this product where persons will
walk on the cord.
8. if an extension cord is used with this product,make sure that the total of the ampere
ratings on the products plugged into the extension cord do not exceed the extention cord
ampere rating.Also,make sure that the total of all products plugged into the wall outlet does
not exceed 10 amperes.
9.
never push objects of any kind into this product through cabinet slots as they may touch
dangerous voltage points or short out parts that could result in a risk of fire or electric
shock. Never spill any kind of liquid on the product.
10. Do not attempt to service this product yourself, as opening or removing covers may expose
you to dangerous voltage points or other risks.Refer all servicing to seveice personnel.
11. Unplug this product from the wall outlet and refer servicing to qualified service personnel
under the following conditions:
•When the power cord or plug is damaged or frayed.
•If liquid has been spilled into the product.
•If the product has been exposed to rain or water.
•If the product does not operate normally when the operating instructions are followed.
Adjust only those controls that are covered by the operating instructions since improper
adjustment of other controls may result in damage and will often require extensive work
by a qualified technician to restore normal operation.
•If the product has been dropped or the cabinet has been damaged.
•If the product exhibits a distinct change in performance,indicating a need for service.
6.OSD Menu Readmap

- 3 -
- 12 -
USER'S MANUAL
This symbol is intended to alert the user to the presence of uninsulated
“dangerous voltage” within the product’s enclosure that may be of sufficient
magnitude to constitute a risk of electric shock to persons.
This symbol is intended to alert the user to the presence of important
operating and manintenance(servicing)instructions in the literature
accompanying the appliance.
RISK OF ELECTRIC SHOCK
DO NOT OPEN
WARNING
TO REDUCE THE RISK OF ELECTRIC SHOCK, DO NOT REMOVE COVER
(OR BACK). NO USER-SERVICEABLE PARTS INSIDE. REFER SERVICING
TO QUALIFIED SERVICE PERSONNEL.
CAUTIONS
NEVER REMOVE THE BACK COVER
Removal of the back cover should be carried out only by qualified personnal.
DO NOT USE IN HOSTILE ENVIROMENTS
To prevent shock or fire hazard, do not expose the unit to rain or moisture. This unit
is designed to be used in the office or home. Do not subject the unit to vibrations,
dust of corrosive gases.
KEEP IN A WELL VENTILATIED PLACE
Ventilation holes are provided on the cabinet to prevent the temperature from rising.
Do not cover the unit or place anything on the top of unit.
AVOID HEAT
Avoid placing the unit in direct sunshine or near a heating appliance.
TO ELIMINATE EYE FATIGUE
Do not use the unit against a bright back ground and where sunlight or other light
sources will shine directly on the monitor
BE CAREFUL OF HEAVY OBJECT
Neither the monitor itself nor any other heavy object should rest on the power cord.
Damage to a power cord can cause fire or electrical shock.
5. SYSTEM OPERATION
4. A message will be dispalyed on the receiver screen. The receiver will count down
from 10 to 0 you must press the “pair” button on the camera during this time
to successfully pair the camera.
If the button on the camera is not pressed, the receiver will display” Pair Fail” and
no pairing will take palce.
5. press the “pair” button on the back
of the camera in 10 seconds.
5.5 AV output
(1). Use the specific output cable,
(2). Enter “SYSTEM SETUP”
“TV output”
(3). Select “PAL” or “NTSC”, then press” ” and then select
“yes” to confirm.
(4). Press the “AV” button to transfer the signal to
anther monitor.
(5). Press the “AV” button again to return LCD display.
5.6 Format SD card
Enter “SYSTEM SETUP” “SD format”, select “yes” to
Confirm formatting the SD card.
* Caution: All the data will be delete after format
the SD card.
5.7 Firmware Upgrade
(1). Copy the upgrade program to the root of the
SD card.
(2) Insert the SD card in the SD card slot.
(3) Enter “SYSTEM SETUP”/ “Upgrade”, then select
“YES” to perform the upgrade.
(4). Reboot the machine after upgrade finished.

- 4 -
1. INTRODUCTION
1.1 Outline
This is a smart 7" wireless monitoring and recording system which with DIY design
and professional features to take care of you and your property
,
1.2 Features
■
■
■
■
■
■
■
■
■
■
■
MPEG4 compression, support VGA,QVGA two kinds of resolution
support SD card capacity 32G
Multiple recording mode
Up to 300ft wireless transmission range
Support 4channel auto switching
Support QUAD image view
VGA resolu ion: 640x480
With CDS to control IR LED
2. ACCESSORIES
Power Adaptor(for monitor) User Manual Bracket
Remote Controller Monitor
Power Adaptor(for camera)
USER'S MANUAL
▲
▲
▲
▲
▲
▲
▲
▲
- 11 -
USER'S MANUAL
.
▲
▲
▲
▲
(1)Press“ ” button to play or pause the video.
lay Back
2 0
T G /
2 0 1 2 0 5 0 4
Pl B k
/ T t l : 1 G / 6 G
A S F 0 5 6 0 0 8 M B
5.3.2 Play the file
(2)Press ” “ button to rewind the video.
(3) Press ” “ button to fast-forward the video
5.SYSTEM OPERATION
5.3.3 Delete the file
Delete the folder
(1).Press “ ” button to select the desired folder.
(2)Long press “ ” button or “DEL” button on the remote.
(3) Press “ ” button to select “YES”or“NO”.
(4)Press “ ” button to confirm.
Delete the file
(1).Press “ ” button to select the desired file.
(2)Long press “ ” button or “DEL” button on the remote.
(3) Press “ ” button to select “YES”or“NO”.
(4)Press “ ” button to confirm
5.4 CAMERA PAIRING
The system comes with camera(s) that have already been paired at the factory.
Power on the receiver and camera by connecting it to power outlet with supplied
power adaptor respectively.
The pairing function assigns each camera to a different channel on the wireless
Receiver(up to 4 cameras),and is necesssary for configuring additional cameras.
NOTE:It is highly recommended to pair the cameras to the receiver before
Permanently mounting the cameras.
1. Power on the receiver and camera by connecting it to power outlet with supplied
Power adaptor
2.Pess the Menu button on receiver or remote controller to select “cameras
Setup/pairing”
3.select a channel by pressing the “ ”buttons on the remote controller or pushing
upwards/downwards the joystick on the reveiver.press “ ” to confirm the selection.
r.
Built in microhpone
IR LED for night vision
Interference free, secure and private signal CAMERA
MONITOR
▲
▲
AV cable
Camera-C707DW4 or C110DW4

1
1
A 9
2 5 -
0 2
▲
▲
- 10 -
USER'S MANUAL
l y B
V I D E O
/ t G / G
Pl ck
2 0 1 0
G
2 5 0 4
Play Back
O C K
/ t G / G
1 2 C L O C K
C L O
Play ack
/ t l G / G
F 0 M
ITEM
Display Screen
Resolution
USER'S MANUAL
λ
Model NO.
PARAMETER
Φ
- 5 -
Video standard
Frequency range
Auto switching dwell time
Receiving rage
Receiving sensitivity
Video output
Audio ouput
Picture compression
MONITOR
3. SPECIFICATION
System
Wireless video &
audio input
AV output
Record &
playback
Connector
Environmental
Recording resolution
Recording mode
Frame rate
Data storage
Mini USB
SD card
Power Supply
Power consump ion
Operating temperature
Operating Humidity
Atmosphere Pressure
Dimension(W*H*D)
Weight(without package)
PARAMETER
7” TFT LCD(16:9)
800(H) X RGB X 480 (V)
PAL/NTSC
2.400GHZ ~ 2..483GHZ
5 seconds
Up to 300ft at the open air
-85dBm
1ch CVBS 1.0Vp-p, impedance 75Ω
1ch audio output, impedance 600Ω
MPEG4
VGA/QVGA
Manual/Schuedule/motion detection
30fps@QVGA 25fps@VGA
24 hours continuous recording at VGA with 16G SD card
32G max
100-240V~50/60Hz 5V/1A
4W max.
0 ~ +40
10%~90%
86Kpa ~ 06Kpa
183mm x 136mm x 30mm
450g
℃
℃
CAMERA
ITEM
Power Supply
Power consumption
Operating temperature
Dimension
Weight
Image Sensor Type
Efficitive pixel
Lens
IR LED
AGC
Electronic shutter
White Balance
TX Power
Environment Rating
System
Environmental
Color CMOS image sensor
640 x 480
f = 2.5mm
24pcs, =850mm
Auto
Auto
1/60 ~ 1/15.000 sec
14dbm
IP 64
5V/1A
3W max
95 x 140 mm
200g
0 ~ +40
℃
℃
5. SYSTEM OPERATION
5.3 Playback operation
5.3.1 Select the file
(1) Press “ ” button to enter VIDEO interface
(2) Press” ”button to select the desired folder
(3) Press “ ” button to enter file list
(4) Press “ ” button to select the desired file.
(5) press” ” button to play he file
▲
▲
420g
Φ
70*60 mm

- 9 -
USER'S MANUAL
/ 5 / 2 - 1 9
A 0 1
/ 1
1
A 0 1 7
2 / / 2 :
- 6 -
▲
▲
USER'S MANUAL
S
S
SS
4
3
2 3 45 8 6 7 9
11
1
10
2
1
5
▲
▲
▲
▲
5. SYSTEM OPERATION
Before recording, you need to insert a SD card to the SD card slot. The system can support the
size of up to 32G SD card
5.2.1 Manual recording mode
(1) In the live display mode, press” REC” button to start recording, a record file will be
automatical created every 2 minutes.
(2). Press “REC” button again to exit the record mode.
Live mode After Press ”REC” Button
5.2.2 Schedule Recording Mode
(1) Enter” Record Setup” menu, then set the “schedule recording” to “ON”
(2) Set start time on “Start Time” item.
(3) Set end time on “End Time” item.
(4) The system will automatically start and stop recording based on the times entered.
START T ME: record start time
END TIME: record end time
SCHEDULE RECORD: ON-valid, OFF-invalid
5.2.3 Motion Detection Recording Mode
(1) Enter “Record Setup” menu, then set the “Motion detection activity” to “ON”.
(2) In this mode the receiver starts recording when montion detected by any activated camera.
Start Record End Record
4. INSTALLATION GUIDELINE
4.1 Monitor Overview
4.1.1 Front controls
1) IR Sensor:
Remote controller sensor.
2) Power button:
Long press to turn on or off the Monitor
3) AV button: press to togle between AV output and LCD
display
4) Button:
play or pause the selected file under “PLAYBACK/VIDEO”
menu.
Press to select “SINGLE/QUAD/AUTO” display mode.
5)/6) button:
In the on-screen menu, press to select setting item.
In playback mode, use the buttons to fast-forward or rewind
In single mode, press button to select CH1/ CH2/ CH3 /CH4.
In “PLAYBACK/VIDEO” menu, press ” ” button to the delete unnecessary files.
7)/8) button
In the on-screen menu, press to select setting item.
In playback mode, use the buttons to increase/decrease volume.
9) REC/STOP button
10) MENU button: press to enter or exit the Main-menu.
11) LED indicator
The LED lights with blue when the power is turn ON.
The red LED will be blinking when camera signal is received
12) Bracket
4.1.2 Side connector
(1) SD card socket:
Insert SD card to this SD card slot for both
Video and audio recording.
(2) Mini USB socket
(3) Audio/Video output:
Connect the included A/V cable to view video
From the receiver on TV or monitor.
(4) DC power outlet: DC 5V/1A
(5) Antenna: sends and receives signals to
or from the Camera.
.
Press button to select” SINGLE/QUAD/AUTO” display mode.
ON:valid channel
OFF:invalid channel
SINGLE QUAD
4. INSTALLATION GUIDELINE
4.2 Remote control
2) CH1-CH4 Button: single image view mode.
1) Power Button: Power on/off the display screen.
3) Quad Button: Quad image view mode.
4)
Auto Button: Press to enter auto sequencing mode(CH1~CH4).
5)
REC/STOP Button: Press to enter or exit recording mode.
6) AV Button: Press to output audio/video. When outputting audio
and video, the LCD screen will be switched to black. Press AV button
again to return LCD display mode.
7)
Button: Play or pause the selected file under “PLAYBACK/VIDEO”
menu . Press to select SINGLE/QUAD/AUTO display mode
8/9) Button:
In the on-screen menu, press to select setting item.
In playback mode, use the buttons to fast-forward or rewind
In single mode, press button to select CH1/ CH2/ CH3 /CH4.
10/11) button:
In the on-screen menu, use the bottons to scroll up or down.
In live or playback mode, use the buttons to increase the volume.
12) Menu button: press to enter or exit to the Main-menu.
13) DEL Button: Press to delect Unnecessary files
4.3 Camera Overview
1. Camera Antenna: Sends signals to the
receiver or receives signal from the receiver.
2. Lens: Catches the video in front of the
lens and transmits video from camera to receiver.
3. IR LED
4. Bracket: Use the bracket to mount the
camera on a wall or other flat surfaces.
5.DC power supply socket.
5. SYSTEM OPERATION
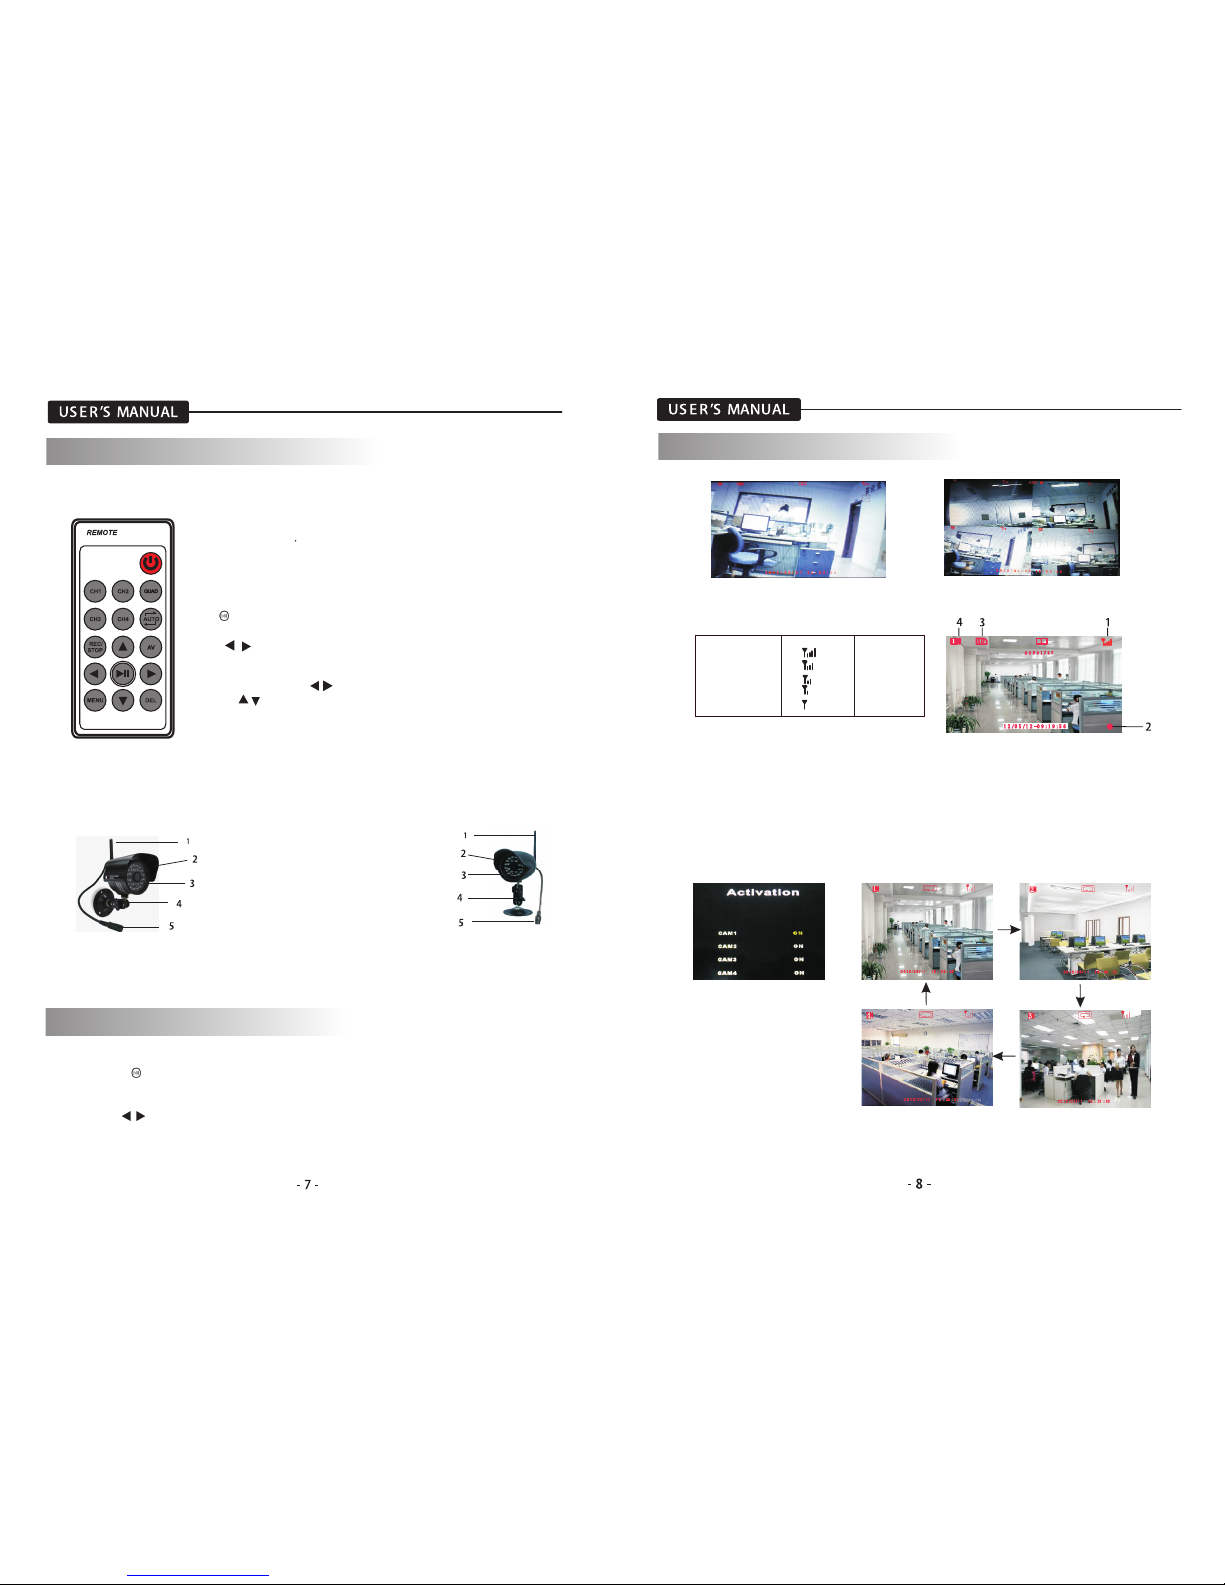
5.1 Live Display
5.1.1 Manual channel selection
Press “ ” button to view each channel(CH1~CH4) individually in SINGLE mode.
5. SYSTEM OPERATION
(1). signal indicator-- The signal indicator shows the strength of its singal being of the camera.
(2). Recording Indicator—when the receiver is recording, the red indicator REC will be shown
on the LCD screen.
(3). SD card indicator—when a SD card is inserted into the SD card slot, the indicator will be
shown on the LCD screen.
(4). Channel indicator—Displays the current channel number. Press the “CH1/ CH2/ CH3 /CH4”
button on the remote control to switch between available cameras.
5.1.2 Auto switching mode
The switching channels are set in menu”Camera Setup/ Activation”
5.2 Recording Mode
The system is designed for SD card recording. You can manually, scheduled record the video.
Signal indicator:
Signal Strength Indecator warning
Perfect None
Good None
Fair Low signal
Low Low signal
No Signal No signal
 Loading...