

Page 1

New Rock Technologies, Inc.
Wireless Office Communication System
Installation Guide
WROC2002
WROC2011
http://www.newrocktech.com
Tel: +86 21-61202700
Fax: +86 21-61202704
Document Version: IW0-E001-P
Page 2

Contents
1 Overview ..................................................................................................................................................... 1-1
1.1 Introduction ........................................................................................................................................................ 1-1
1.2 Device Structure ................................................................................................................................................ 1-2
2 Connecting to the Network ....................................................................................................................... 2-1
2.1 Cabling ............................................................................................................................................................... 2-1
2.2 Checking LED .................................................................................................................................................... 2-1
2.3 Checking Telephone Wiring ............................................................................................................................... 2-1
2.4 Connecting PC to the Device ............................................................................................................................. 2-2
2.4.1 Windows 7 .............................................................................................................................................. 2-2
2.4.2 Windows XP ........................................................................................................................................... 2-3
2.4.3 iPad ........................................................................................................................................................ 2-4
2.5 Connecting the Device to Internet ...................................................................................................................... 2-5
3 Installing the Soft Phone on iPad ............................................................................................................ 3-1
4 USB for File Sharing .................................................................................................................................. 4-1
5 FAQ ............................................................................................................................................................. 5-1
6 Technical Specifications ........................................................................................................................... 6-1
Page 3

Contents of Figure
Figure 1-1 WROC2011 front panel .......................................................................................................................... 1-2
Figure 1-2 WROC2011 back panel .......................................................................................................................... 1-2
Figure 2-1 Cabling the equipment ............................................................................................................................ 2-1
Figure 2-2 Select wireless network (for Windows 7) ................................................................................................ 2-2
Figure 2-3 Enter SSID key (for Windows 7) ............................................................................................................. 2-2
Figure 2-4 Connected the PC (for Windows 7) ........................................................................................................ 2-2
Figure 2-5 View available wireless network (for Windows XP) ................................................................................ 2-3
Figure 2-6 Select wireless network (for Windows XP) ............................................................................................. 2-3
Figure 2-7 Enter SSID key (for Windows XP) .......................................................................................................... 2-3
Figure 2-8 Connected the PC (for Windows XP) ..................................................................................................... 2-3
Figure 2-9 Select wireless network (for iPad) .......................................................................................................... 2-4
Figure 2-10 Enter SSID key (for iPad) ..................................................................................................................... 2-4
Figure 2-11 Connected the PC (for iPad) ................................................................................................................. 2-4
Figure 2-12 Open your browser ............................................................................................................................... 2-5
Figure 2-13 Login the Web utility ............................................................................................................................. 2-5
Figure 2-14 Select an application scenario .............................................................................................................. 2-5
Figure 2-15 Select the type of Internet connection .................................................................................................. 2-5
Figure 2-16 Enter the network account information ................................................................................................. 2-5
Figure 2-17 Modify SSID key for security ................................................................................................................. 2-6
Figure 2-18 Obtain phone number and password .................................................................................................... 2-6
Figure 2-19 Check the phone number ..................................................................................................................... 2-6
Figure 3-1 Download Linphone ................................................................................................................................ 3-1
Figure 3-2 Install Linphone ...................................................................................................................................... 3-1
Figure 3-3 Enter registration information .................................................................................................................. 3-1
Figure 3-4 Making a call ........................................................................................................................................... 3-2
Figure 4-1 Insert USB disk ....................................................................................................................................... 4-1
Figure 4-2 Choose access method and modify password ....................................................................................... 4-1
Page 4

Contents of Table
Table 6-1 Technical Specifications .......................................................................................................................... 6-1
Page 5

Wireless Office Communication System Installation Guide
www.newrocktech.com 1-1
1 Overview
1.1 Introduction
The WROC (WiReless Office Communication), which includes WROC2011/2002, combines the
functions of the IP-based PBX t elephone systems with the full featured 3G/WLAN broadband router to
deliver an all-in-one communication system for small business and home. With the WROC2011/2002,
your communication and working terminals such as legacy and video phones, computers, webcam,
laptop, tablets, smart phones, USB storage are interconnected via in-house wireless-N or public 3G
broadband network and legacy telephony network (PSTN) and Internet Telephony Service Provider
(ITSP), no matter where you are. The WROC2011/2002 is so easy to configure that a fully working
private network with data, voice and video communication capability can be set up in minutes.
Benefits for Small Business
One system with all communication functions that help to grow business and save budget
Compatible with mobile voice and video communication terminals, such as SIP phones, soft phone on
handset, computer or tablets, and provide mobile extension for employees
Powerful 3G and wireless-N broadband router capability to build-up office network on-fly
Dual USB2.0 ports to support USB storage and turns your low-cost printer into a shared network
printer
Benefits for Home Users
Build-up wireless digital home network to interconnect wireless and wired line terminals, such as
telephone, IPAD, surveillance webcam, digital camorra, USB storage and etc
Built-in IP telephony server function allows family members and friends to call home or each other
through Internet
Get rid of Ethernet cables and phone lines in your home, and the terminals and network appliances are
free to move
The WROC2011/2002 has a rich set of voice system features such as an auto-attendant, hunt group,
self-configurable interactive voice response, three way call conferencing, intercom, music on hold,
follow-me (call forking), call transfer, call-forwarding and much more.
The WROC2011/2002 opens up access to the benefits of VoIP, including allowing up to eight
SIP-based phones and soft phones registered to the system and making calls through internet. The
integrated 3G and wireless-N router enables unique features, such as connecting your business phone to
the ISTP through 3G broadband in case the wired line broadband access is not available in the area, and
enhanced QoS in which the priority of voice communication exceeding the data access. It has an
integrated Web server that allows features to be configured using a Web browser in local network or
Page 6
Installation Guide Wireless Office Communication System
1-2 www.newrocktech.com
remotely.
Rich Connectivities
The connectivity is the strength of WROC2011. Either WAN or 3G connection can be used to connect
terminals to ISP, two LAN ports provides the wired connection to terminals or switches, the FXO port
provides connectivity to PSTN and the FXS port allows you to maintain legacy devices, such as analog
telephone, fax machine, answering machine, or POS machine.
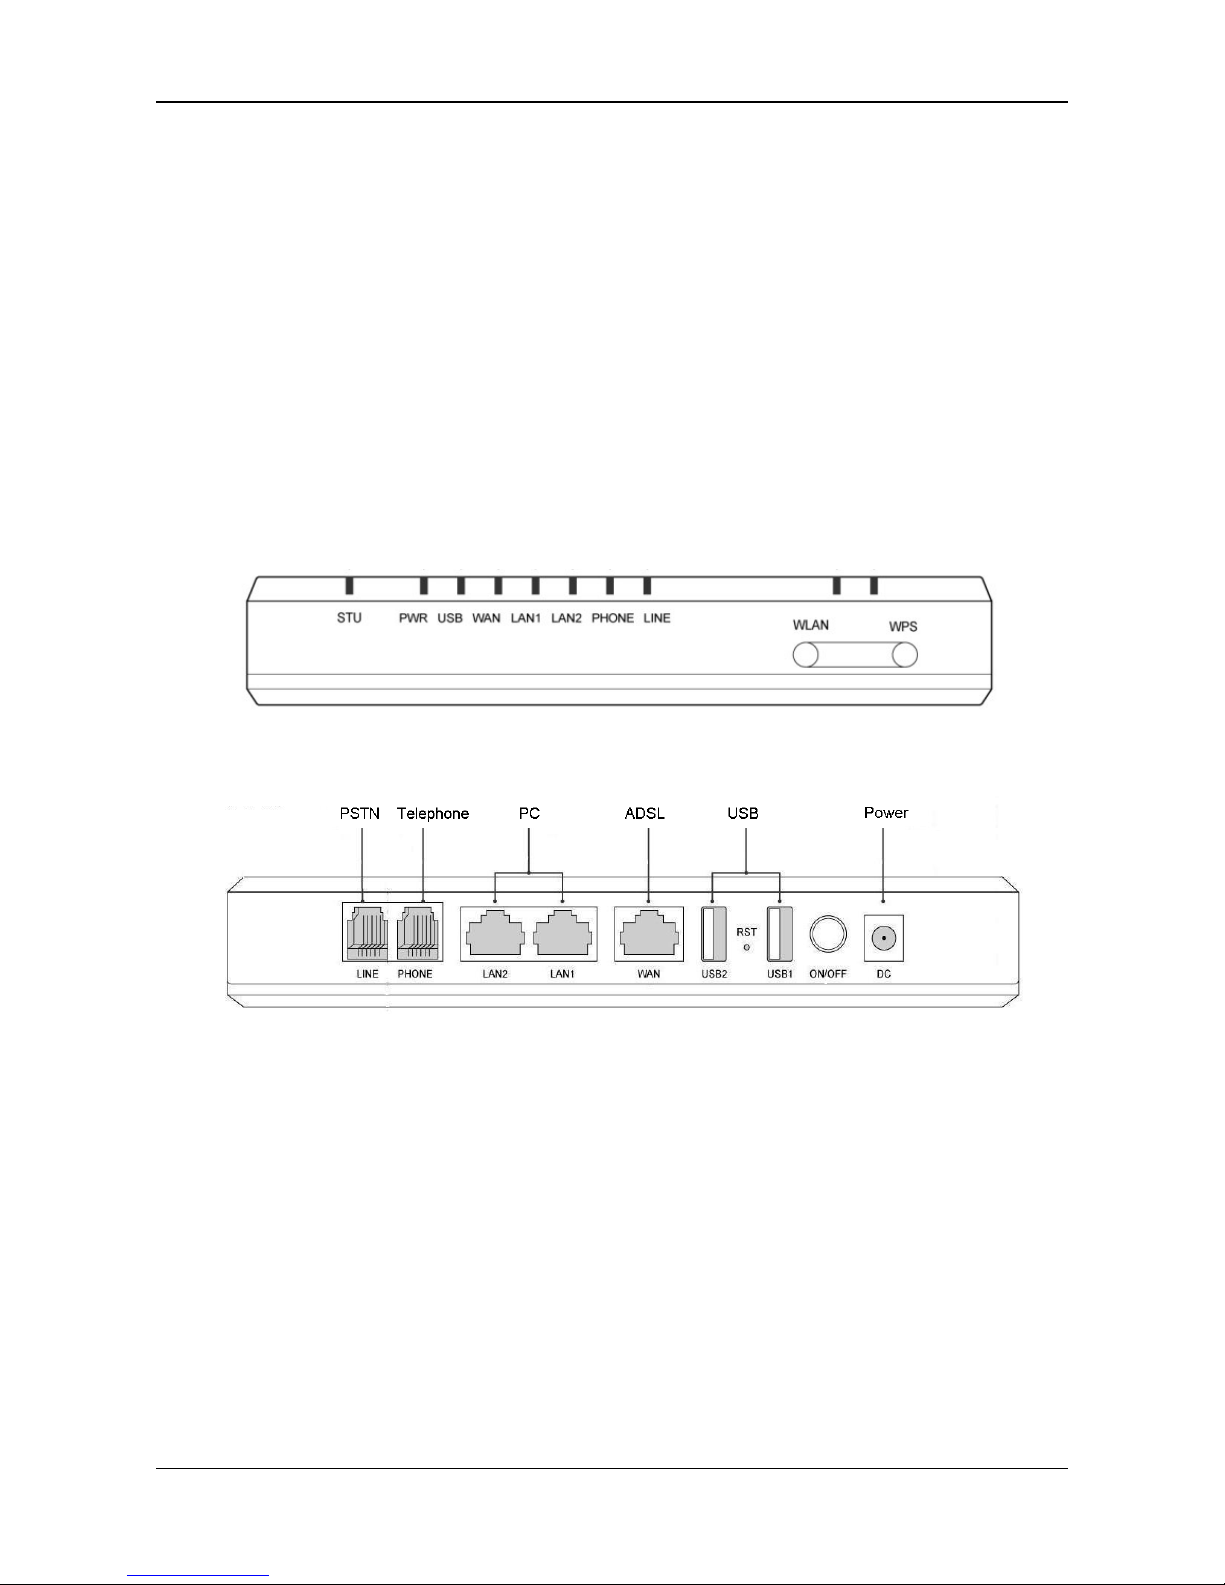
1.2 Device Structure
Note: WROC2011 is illustrated in the figu re, which has 1 phone port and 1 CO line port . WROC2002
has 2 phone ports.
Figure 1-1 WROC2011 front panel
Figure 1-2 WROC2011 back panel
Page 7
Wireless Office Communication System Installation Guide
www.newrocktech.com 2-1
2 Connecting to the Network
2.1 Cabling
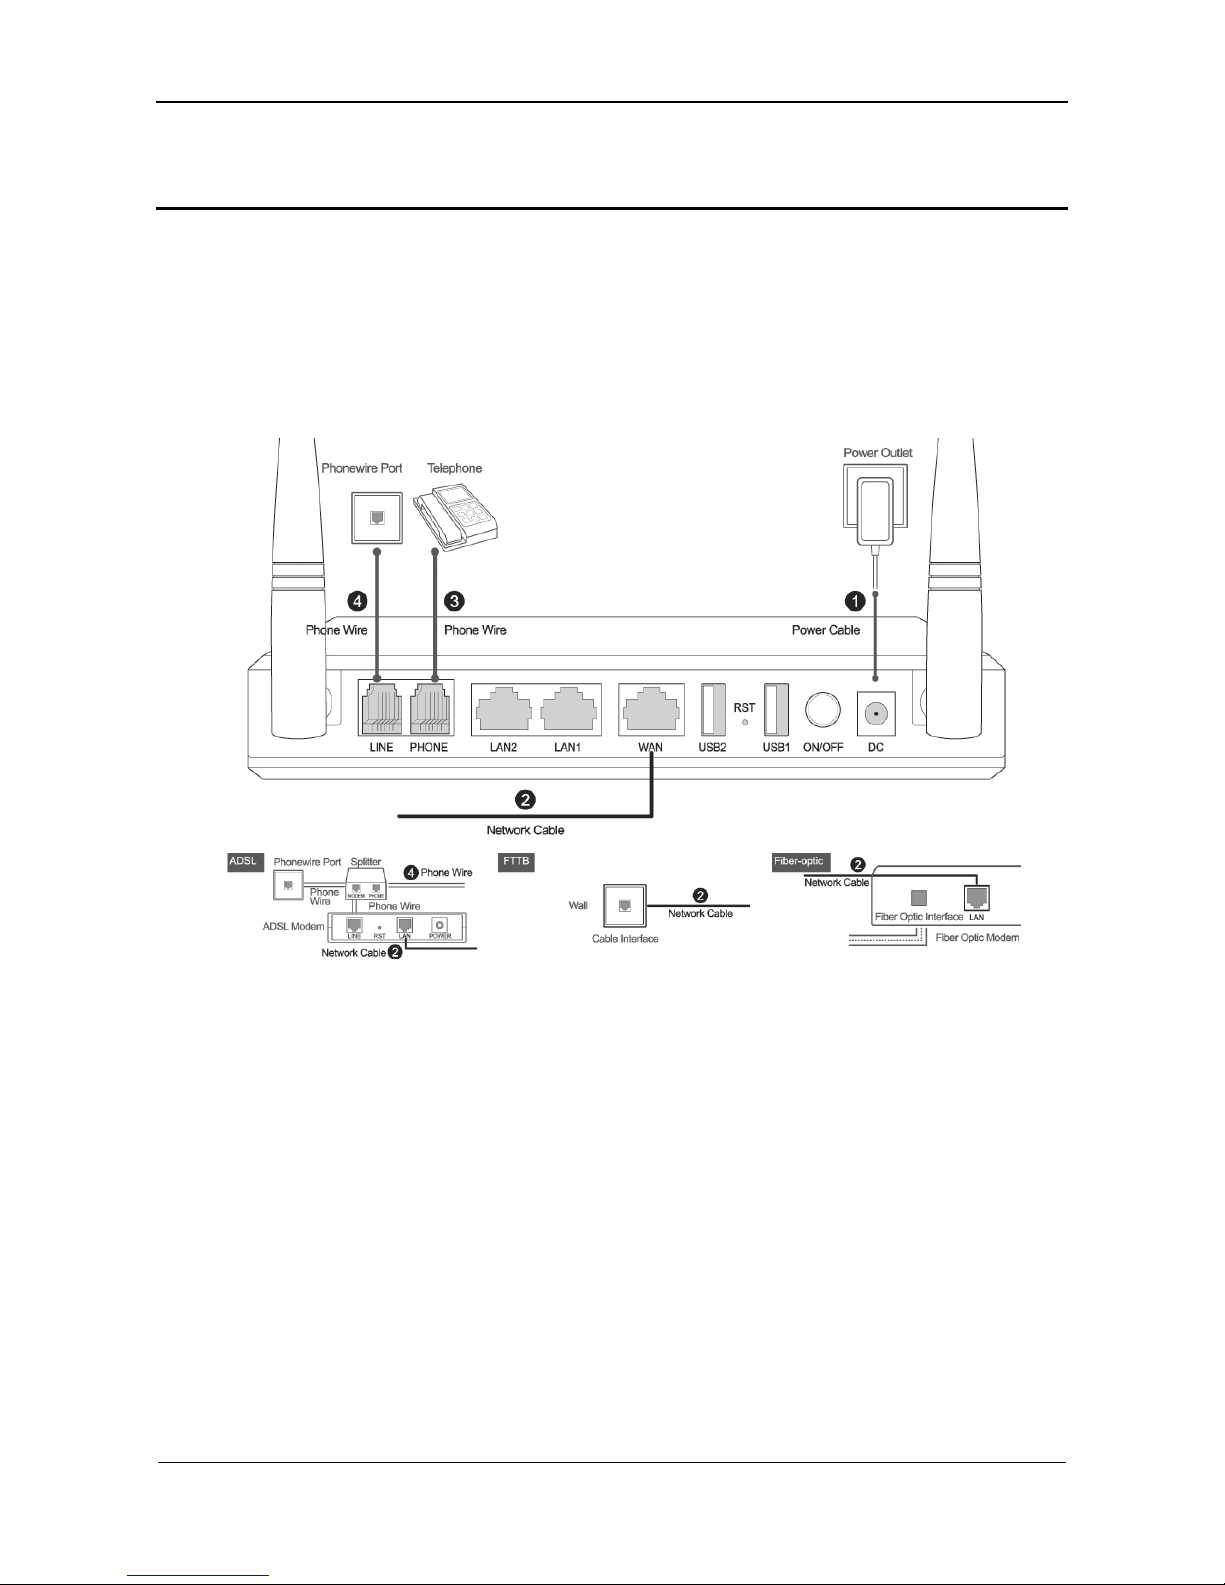
Connect the power cord, Ethernet cable, phone lines and CO lines. See Figure 2-1.
Figure 2-1 Cabling the equipment
2.2 Checking LED
PWR/WAN:Green Light
STU:Green Flashing
PHONE/LINE:It should remain green when the phone is off-hook, and turn flashing during the talk.
2.3 Checking Telephone Wiring
Pick up the phone, and you should hear the dial tone. If not, please check the phone wiring.
Place a test call.
Page 8
Installation Guide Wireless Office Communication System
2-2 www.newrocktech.com
2.4 Connecting PC to the Device
Note: ensure your PC has a wireless network adapter.
2.4.1 Windows 7
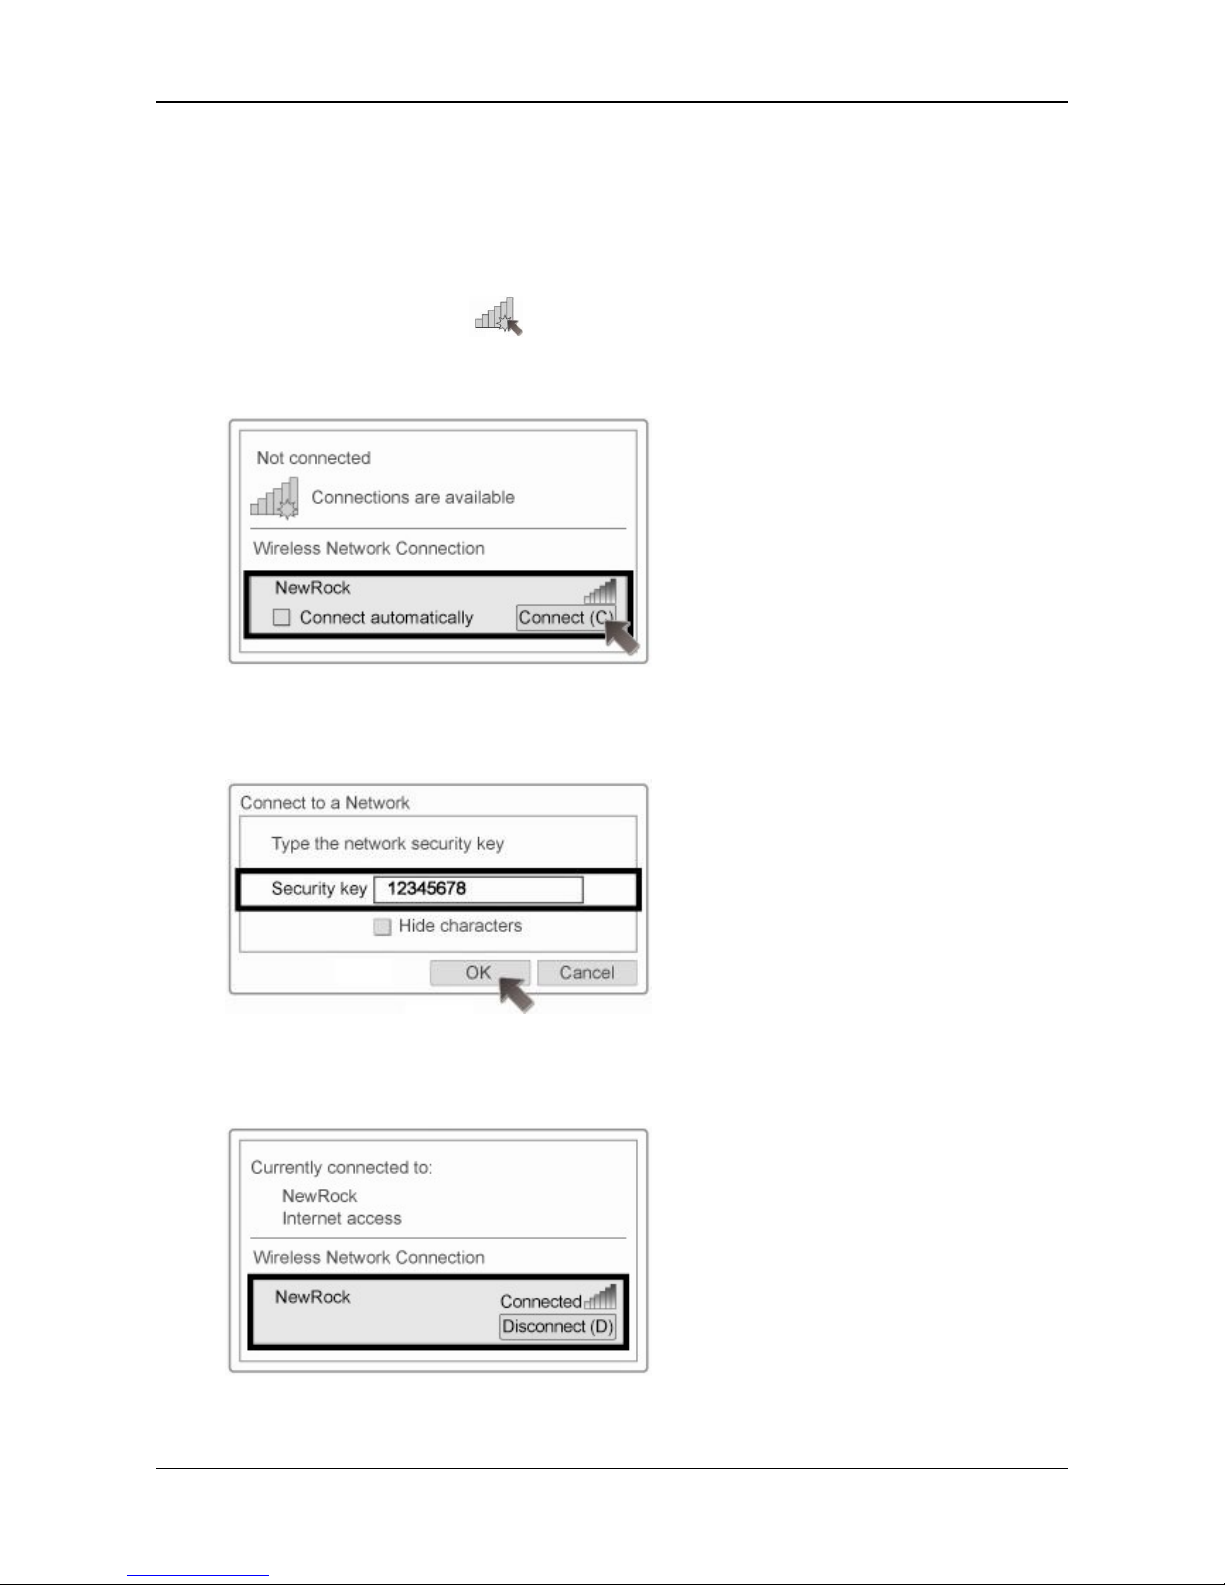
Step1 Click the desktop icon
Step2 Select wireless network: NewRock
Figure 2-2 Select wireless network (for Windows 7)
Step3 Enter SSID key: 12345678
Figure 2-3 Enter SSID key (for Windows 7)
Step4 Connected the PC
Figure 2-4 Connected the PC (for Windows 7)
Page 9
Wireless Office Communication System Installation Guide
www.newrocktech.com 2-3
2.4.2 Windows XP
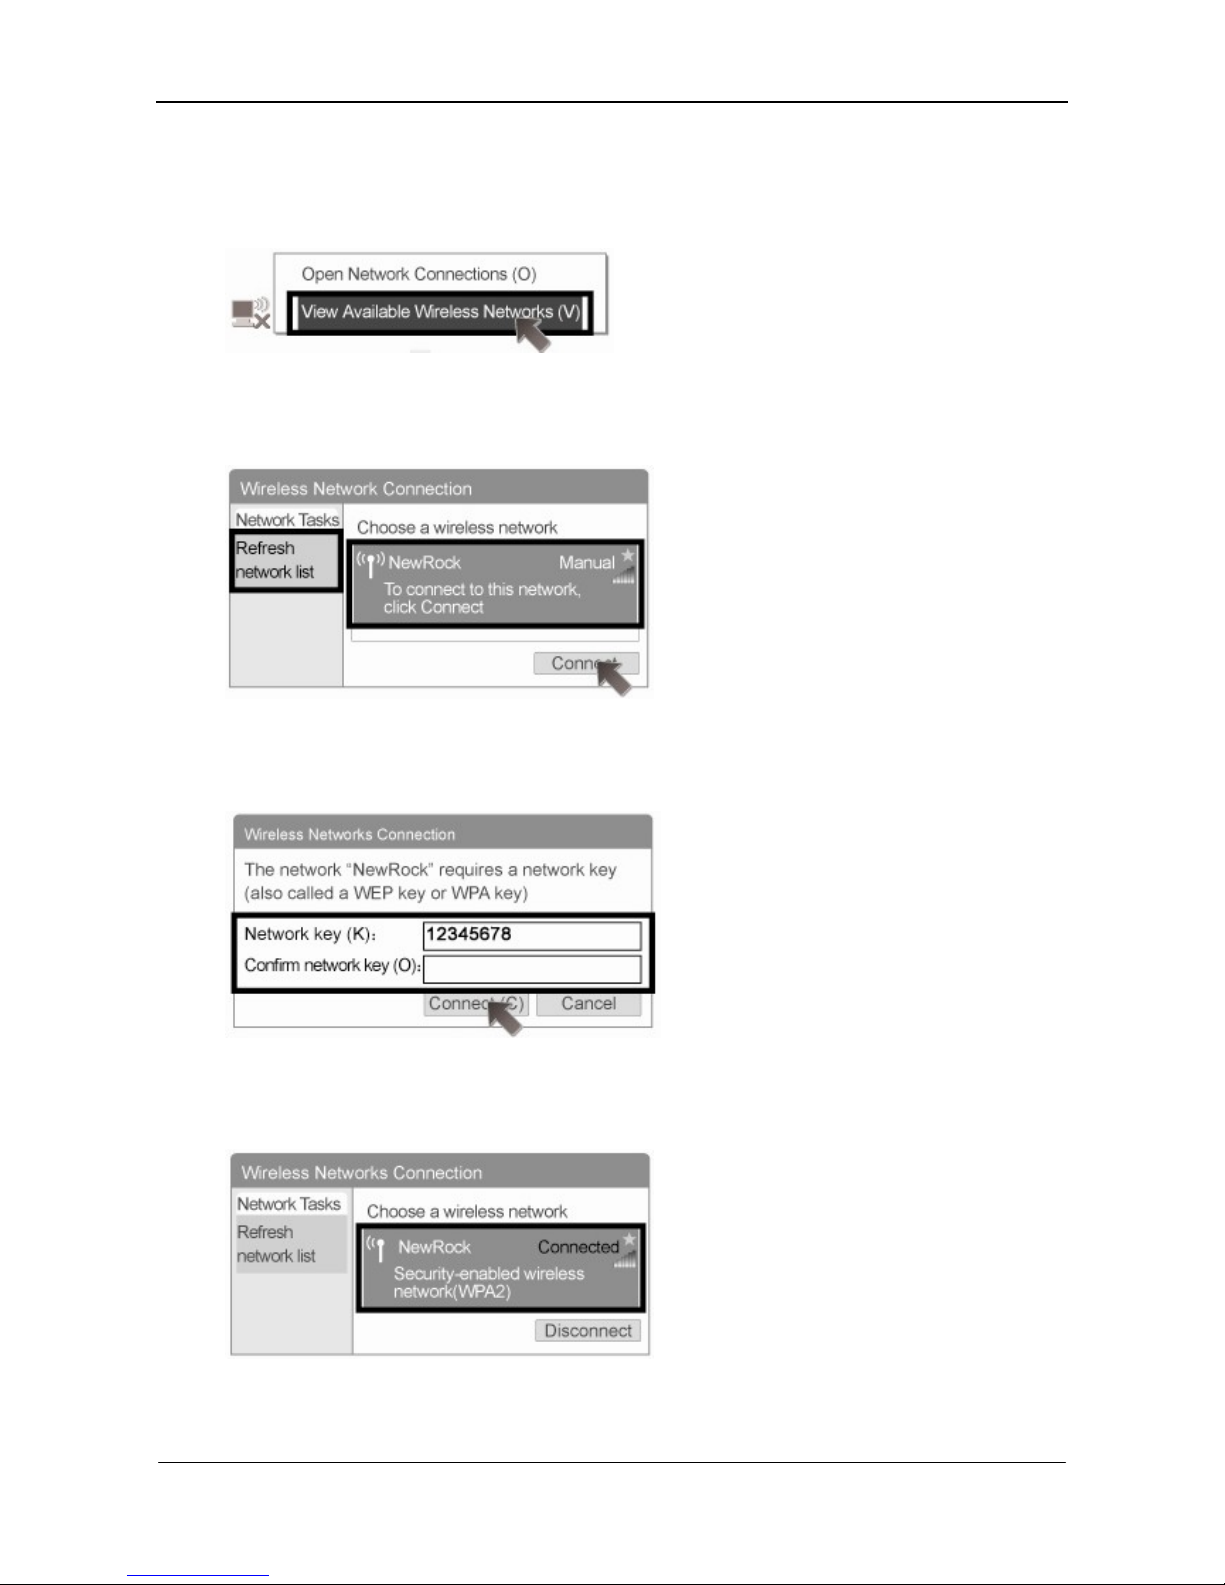
Step1 Click the desktop icon
Figure 2-5 View available wireless network (for Windows XP)
Step2 Select wireless network: NewRock
Figure 2-6 Select wireless network (for Windows XP)
Step3 Enter SSID key: 12345678
Figure 2-7 Enter SSID key (for Windows XP)
Step4 Connected the PC
Figure 2-8 Connected the PC (for Windows XP)
Page 10
Installation Guide Wireless Office Communication System
2-4 www.newrocktech.com
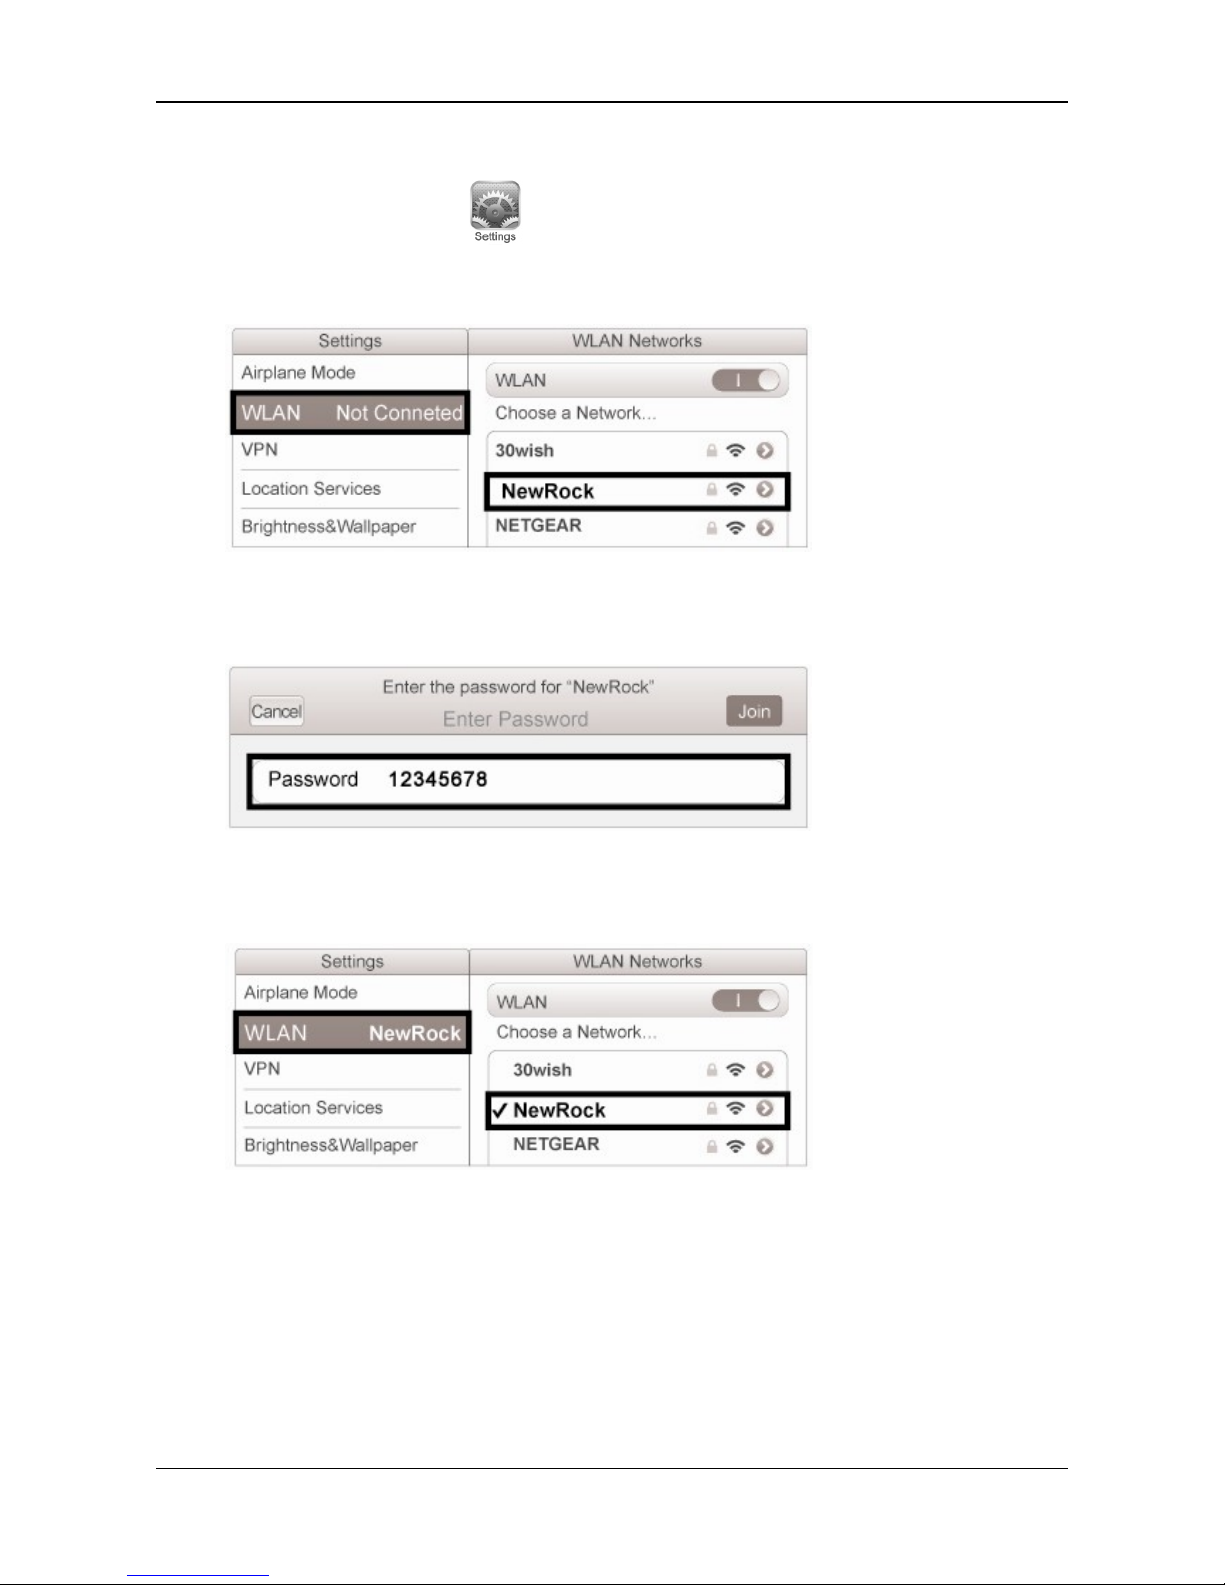
2.4.3 iPad
Step1 Click the desktop icon
Step2 Select wireless network: NewRock
Figure 2-9 Select wireless network (for iPad)
Step3 Enter SSID key: 12345678
Figure 2-10 Enter SSID key (for iPad)
Step4 Connected the PC
Figure 2-11 Connected the PC (for iPad)
Page 11
Wireless Office Communication System Installation Guide
www.newrocktech.com 2-5
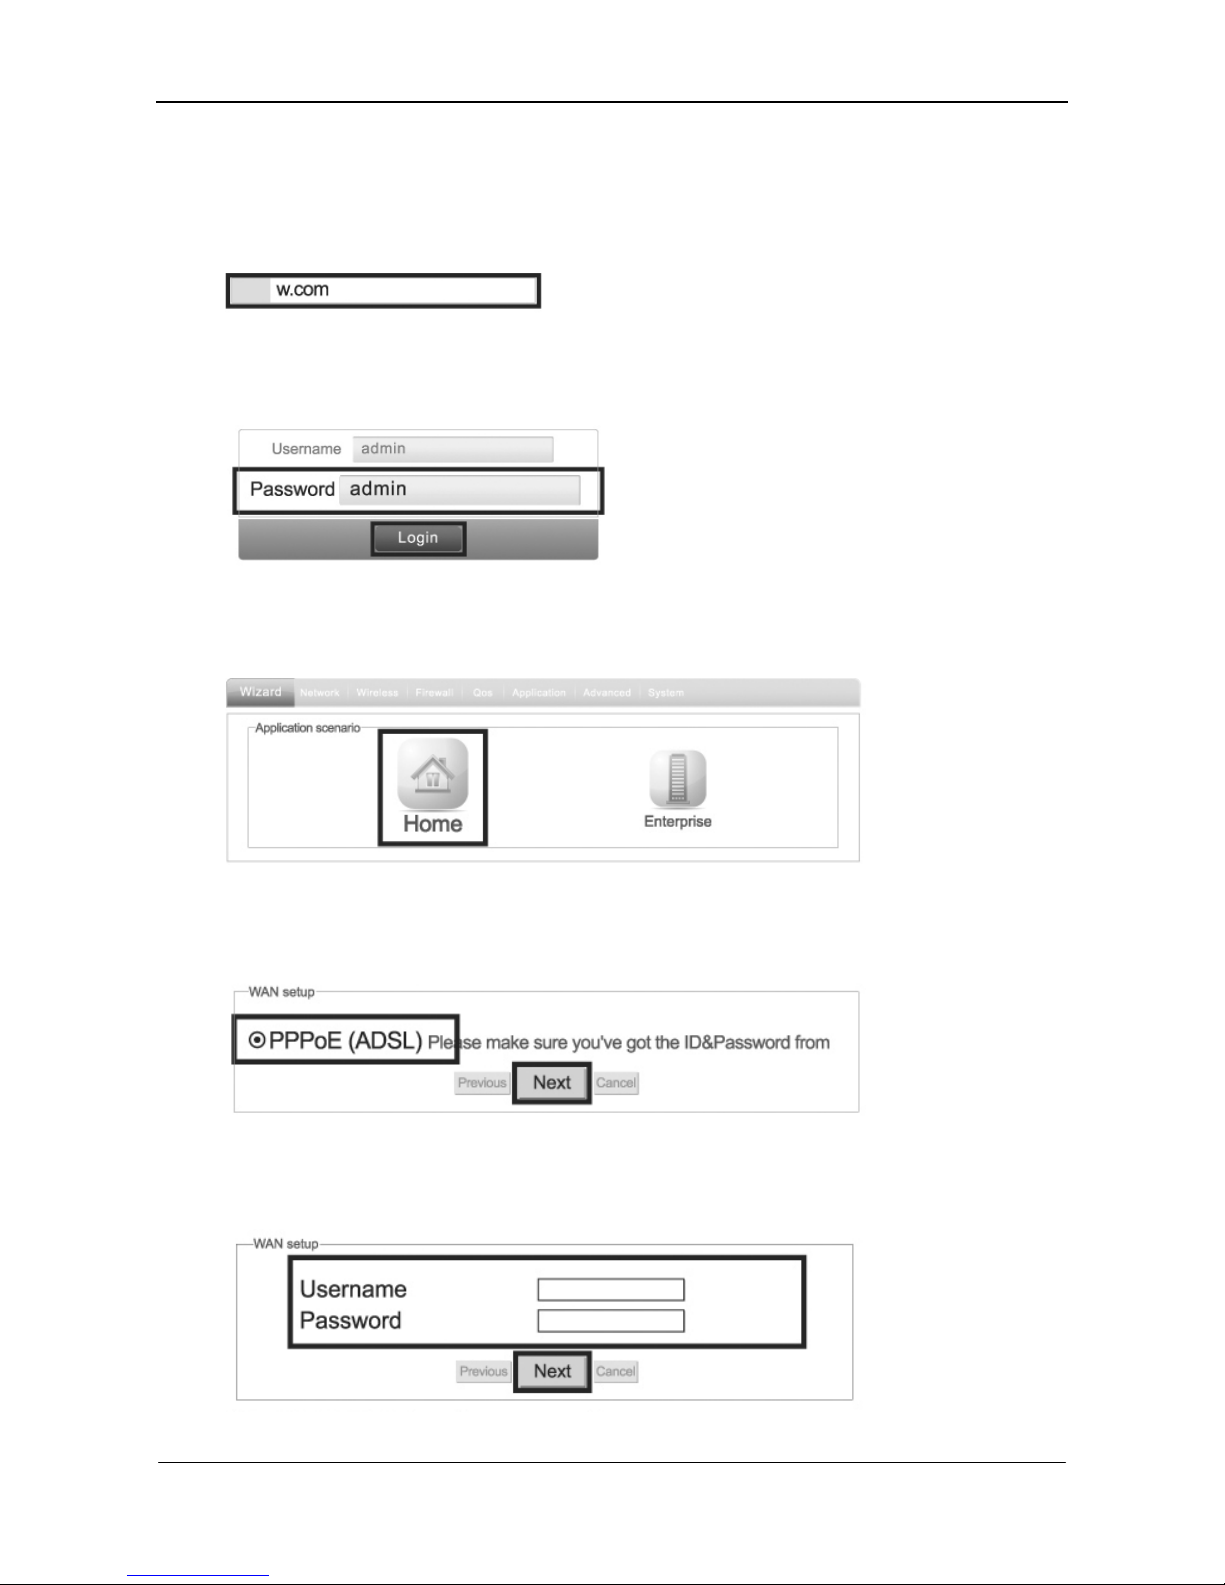
2.5 Connecting the Device to Internet
Step1 Open your browser
Figure 2-12 Open your browser
Step2 Login the Web utility
Figure 2-13 Login the Web utility
Step3 Select an application scenario (Home illustrated)
Figure 2-14 Select an application scenario
Step4 Select the type of Internet connection
Figure 2-15 Select the type of Internet connection
Step5 Enter the network account information
Figure 2-16 Enter the network account information
Page 12
Installation Guide Wireless Office Communication System
2-6 www.newrocktech.com
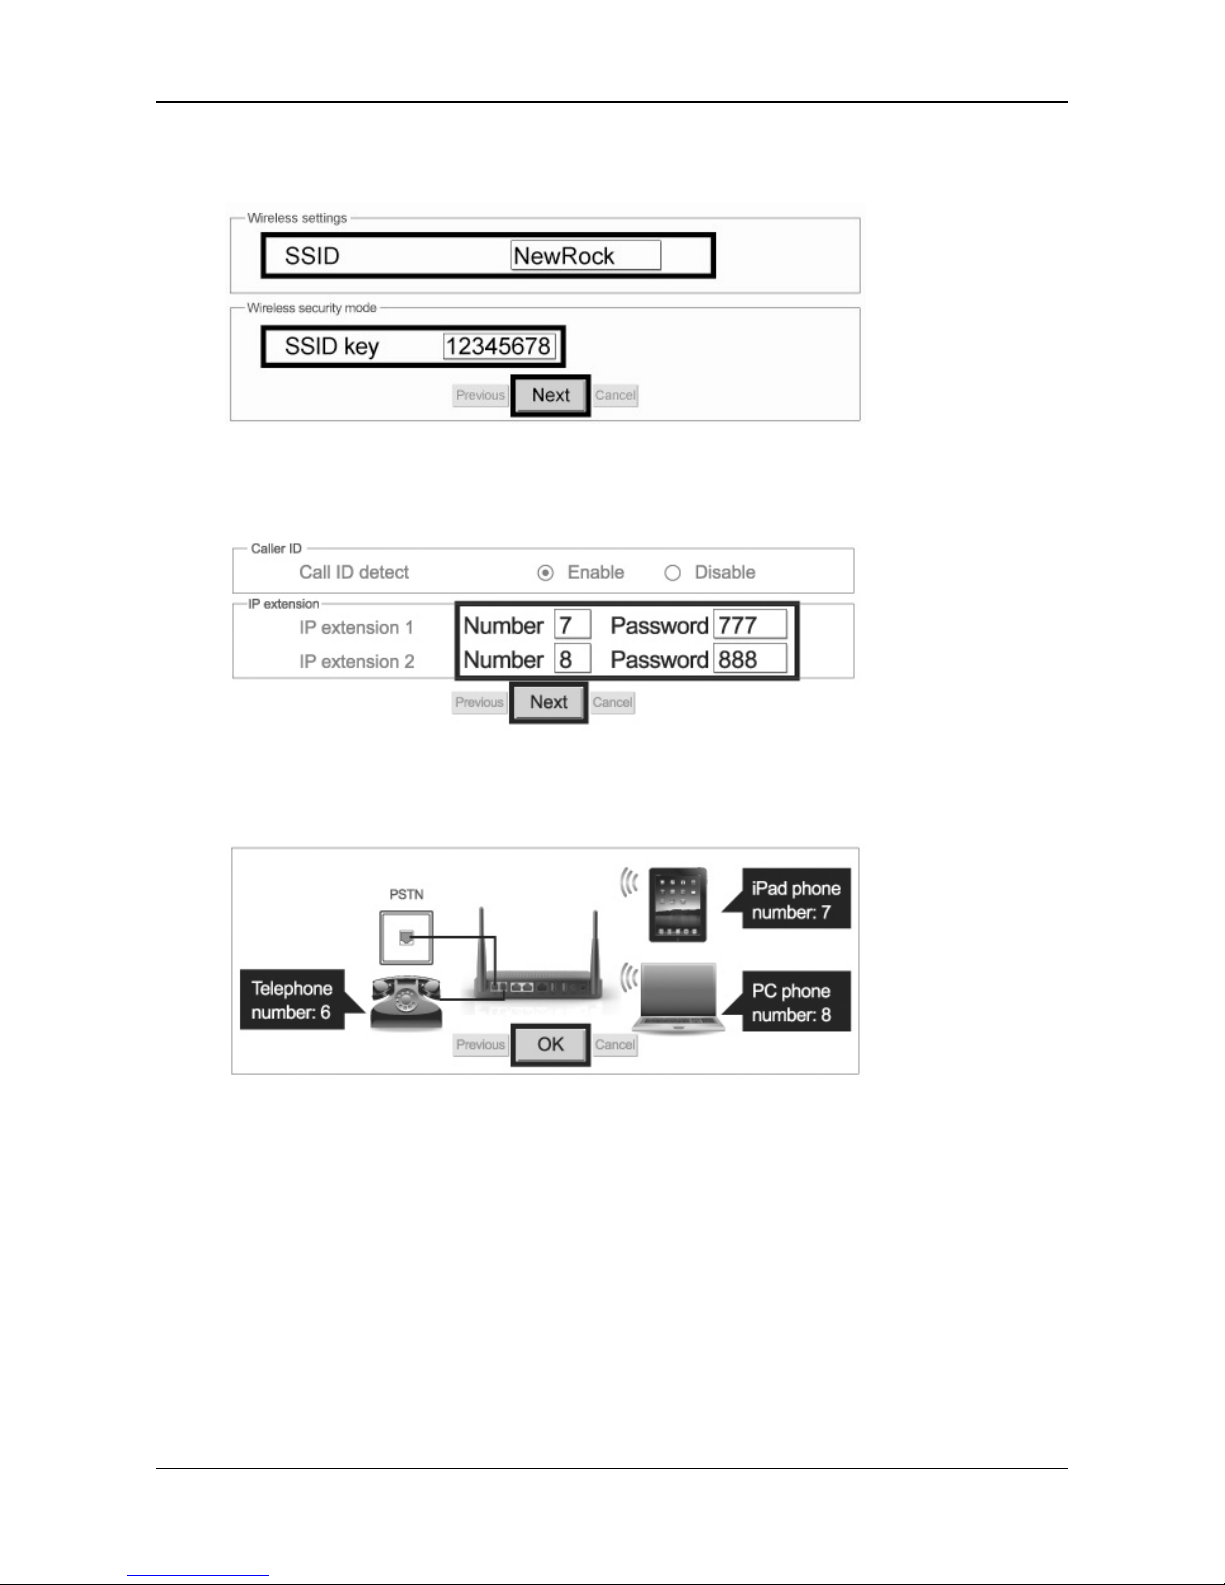
Step6 Modify SSID key for security
Figure 2-17 Modify SSID key for security
Step7 Obtain phone number and password
Figure 2-18 Obtain phone number and password
Step8 Check the phone number
Figure 2-19 Check the phone number
Step9 Surf the Internet
Click OK to surf the Internet. If you cannot connect to the Internet, please refer to FAQ. If you need to
configure IP phone for iPad, refer to 3 Installing the soft phone on iPad.
Page 13
Wireless Office Communication System Installation Guide
www.newrocktech.com 3-1
3 Installing the Soft Phone on iPad
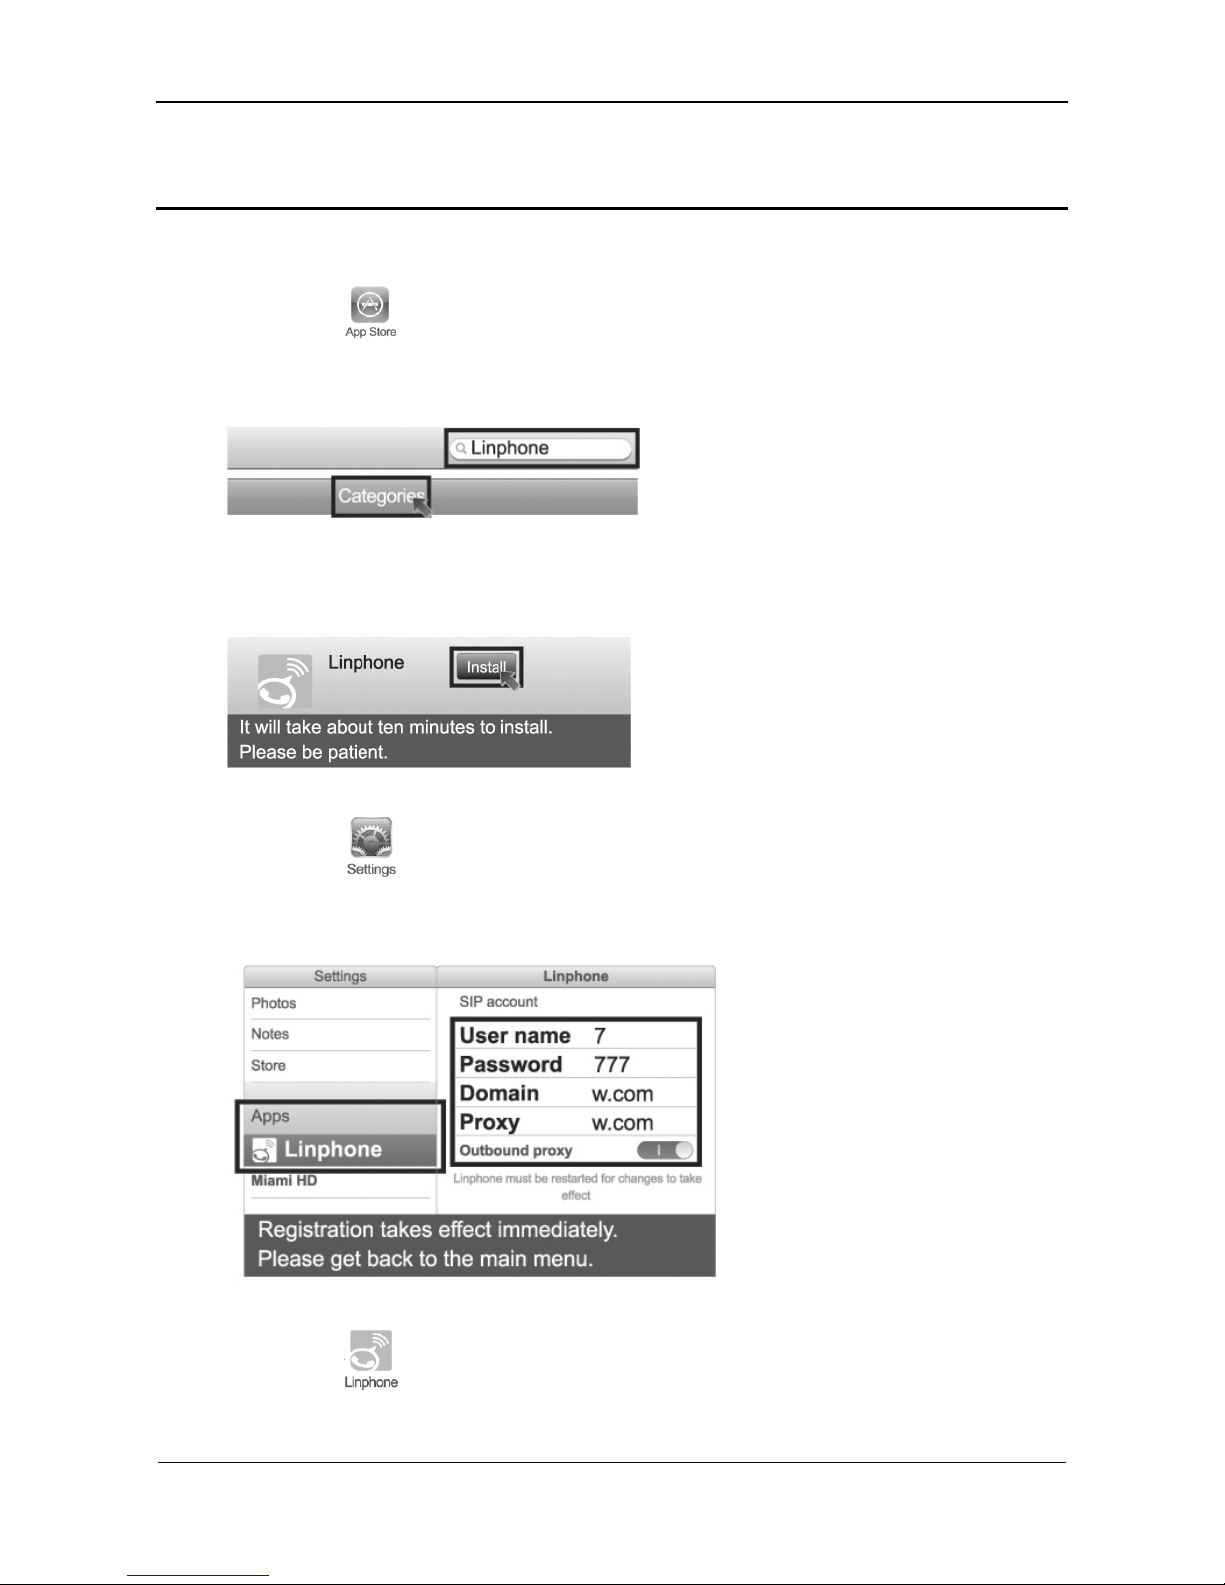
Step1 Click
Step2 Download Linphone
Figure 3-1 Download Linphone
Step3 Install Linphone
Figure 3-2 Install Linphone
Step4 Click
Step5 Enter registration information
Figure 3-3 Enter registration information
Step6 Click
Page 14
Installation Guide Wireless Office Communication System
3-2 www.newrocktech.com
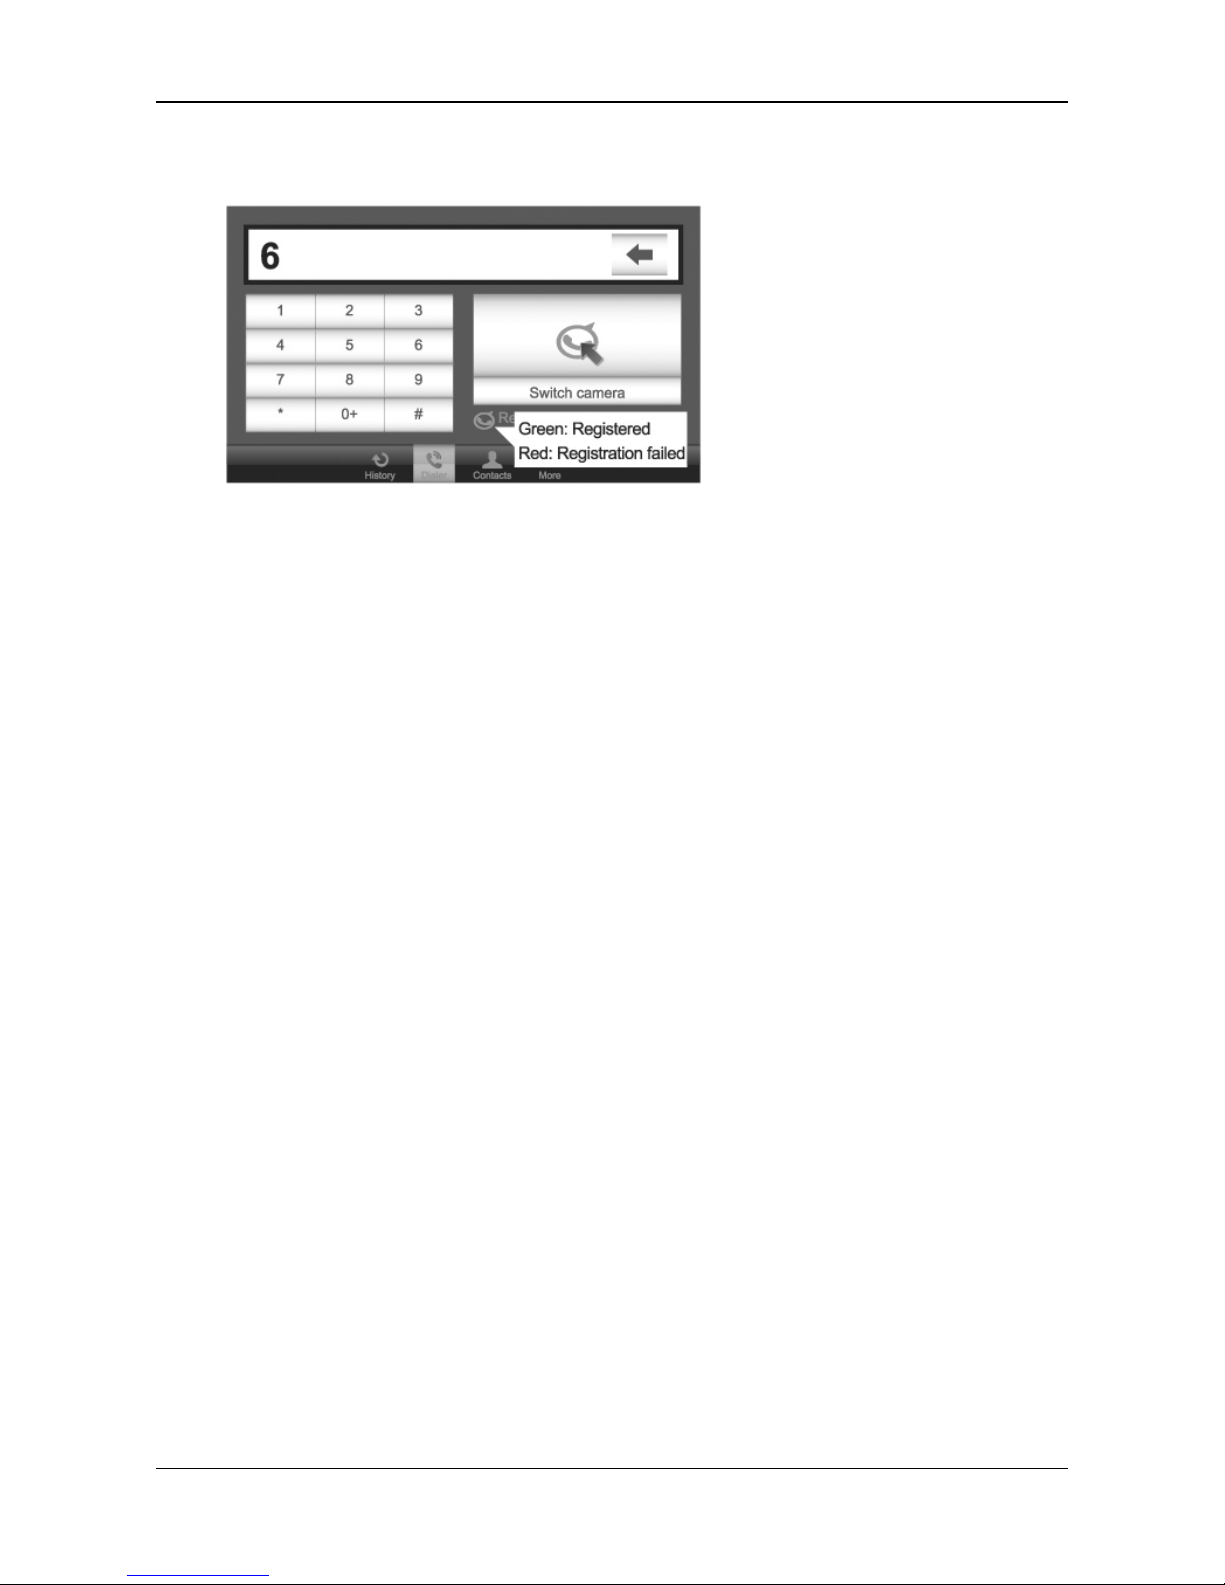
Step7 Making a call
Figure 3-4 Making a call
Page 15
Wireless Office Communication System Installation Guide
www.newrocktech.com 4-1
4 USB for File Sharing
Step1 Cabling (Refer to 2.1 )
Step2 Checking (Refer to 2.2 and 2.3 )
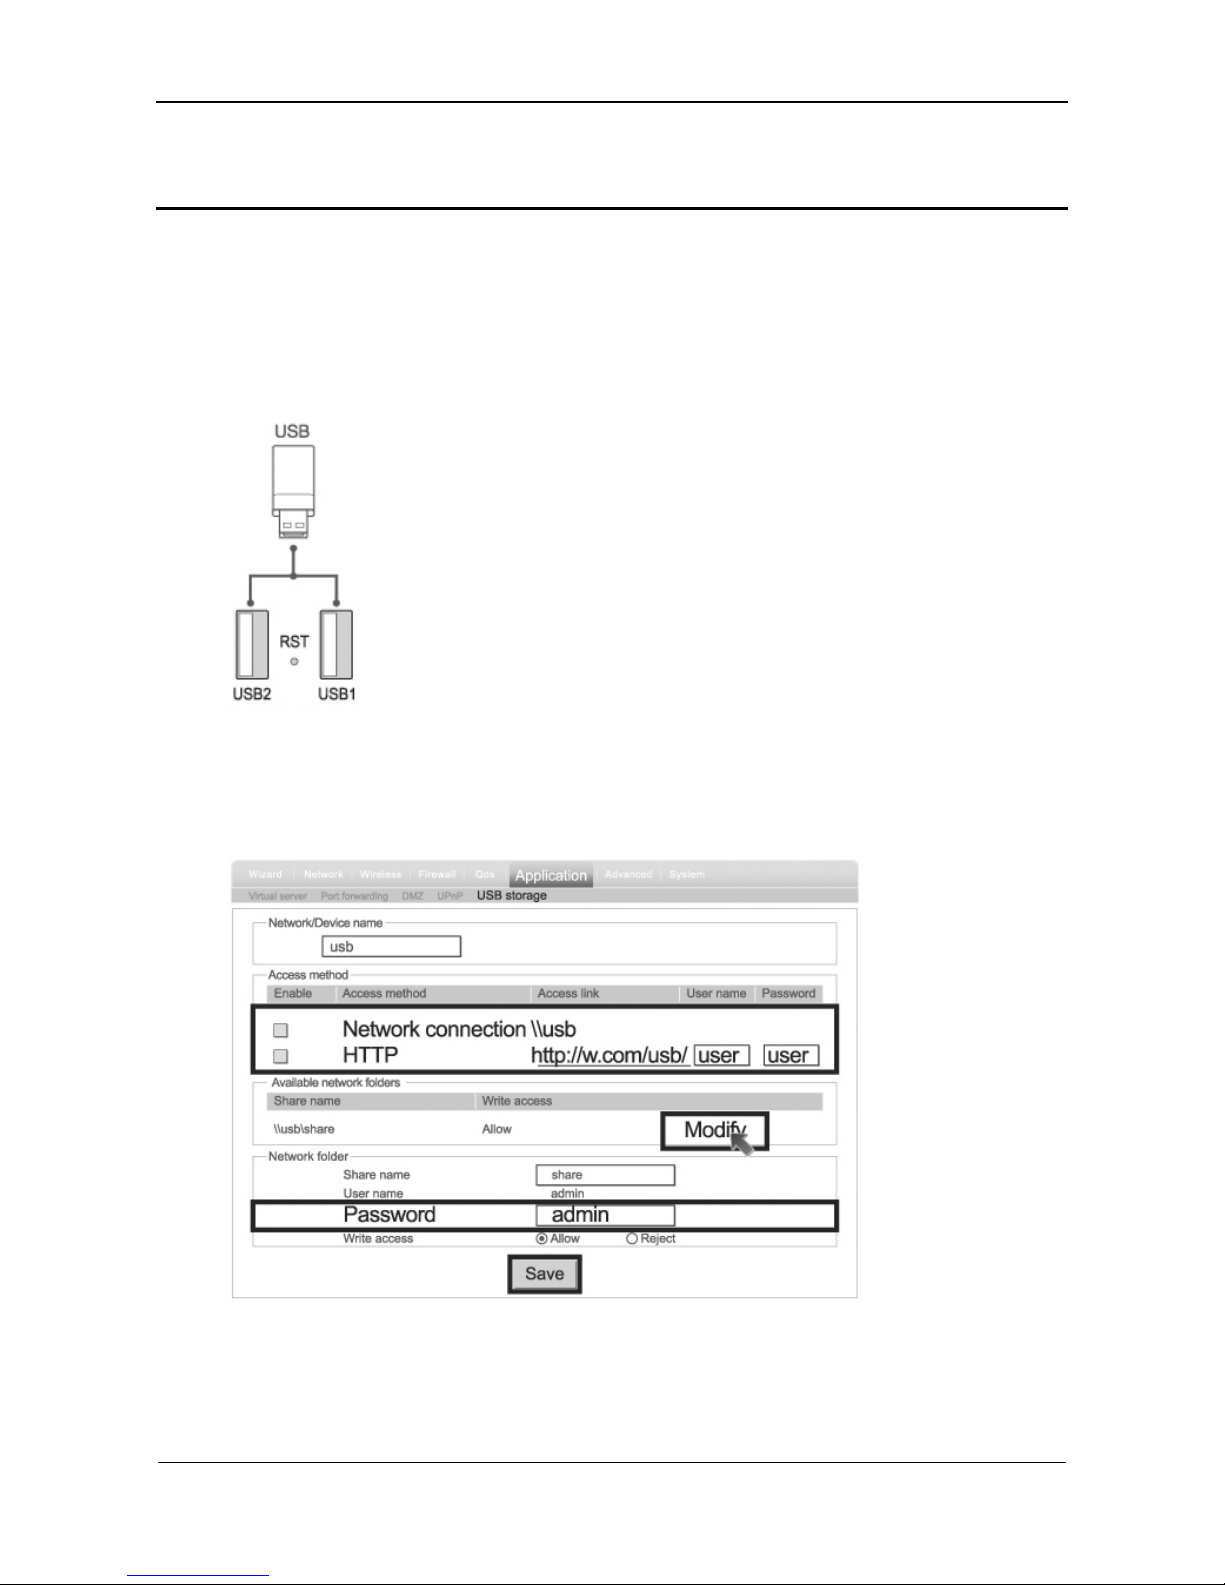
Step3 Insert USB disk
Figure 4-1 Insert USB disk
Step4 Login the web utility (Refer to 2.5 )
Step5 Choose an access method and modify password
Figure 4-2 Choose access method and modify password
Page 16
Installation Guide Wireless Office Communication System
4-2 www.newrocktech.com
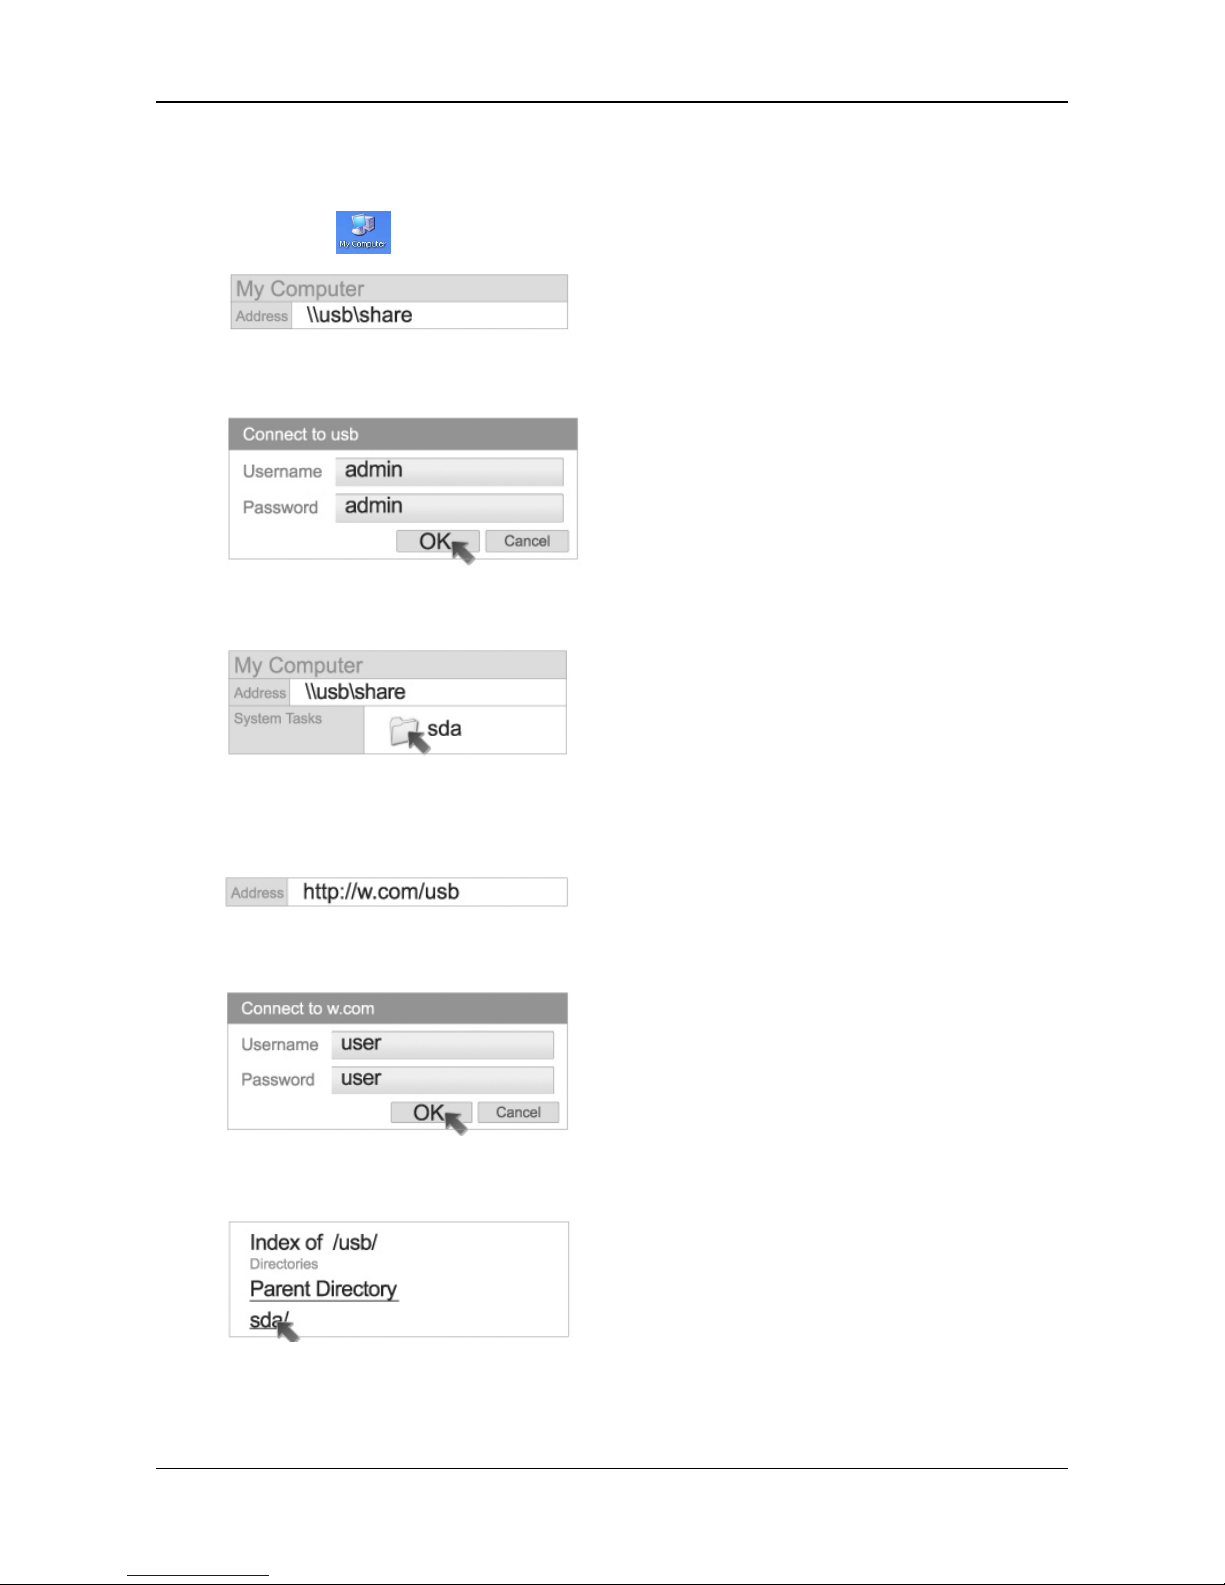
Step6 Navigating the USB disk info
Network connection
Double click
,Enter \\usb\share
Enter username and password
Navigating the USB disk info
HTTP
Enter http://w.com/usb
Enter username and password
Navigating the USB disk info
Page 17

Wireless Office Communication System Installation Guide
www.newrocktech.com 5-1
5 FAQ
Why can’t I login to the device via WAN IP address?
Make sure your device has activated remote access. Go to the Internet > Firewall > System security
interface to click on Enable under Remote Management. For network security, we recommend to use
3 or 4 digit numbers as the remote management port.
Note: you can find the WAN IP address on the Internet > System interface.
What should I do when my PC cannot surf the Internet after configuration?
Ensure correct cabling and normal LED status.
For wired connection
Modify DHCP for your PC’s Internet Protocol.
For wireless connection
Keep your PC connected to wireless network NewRock after the configuration. Refer to 2.4 if the
connection is disabled.
Why is my Internet connection so slow?
Probably someone else is within the same wireless network with you. Please ensure that a SSID key is
configured on the device.
Security Module: WPA/WPA2-PSK
SSID key: a combination of 8-digit numbers & letters
What is the difference between Home and Enterprise?
Home
The device is configured such that inbound and outbound calls can be made directly.
Enterprise
Auto attendant feature is enabled for inbound calls.
How to restore factory settings?
Press RST button for about 3 seconds, and release it when STU and PWR turn red.
Page 18

Wireless Office Communication System Installation Guide
www.newrocktech.com 6-1
6 Technical Specifications
Table 6-1 Technical Specifications
Name Description
Basics
Data rate 300Mbps
WiFi Standards IEEE 802.11b/g/n, 802.3, 802.3u
3G Standards WCDMA, CDMA2000
WiFi Bund Rate
2.4~2.4835GHz
WiFi
Channel 1-13
Spread Spectrum DSSS, OFDM
Modulation BPSK, QPSK, CCK, 16-QAM, 64-QAM
Rx Sensitivity OFDM 54M -73/-73dBm, CCK 11M -87/-87dBm, HT40 MCS7 -66/-66dBm
Tx Power OFDM 54M 14.5/14.5dBm, CCK 11M 17/17dBm
Antenna Dual external antenna, 3dBi
Range Indoor 100M; outdoor 300M(open space)
Network Features
WAN Connection Type Static IP, DHCP, PPPoE, PPTP, L2TP, 3G
Networking Protocals
IEEE802.11b/g/n, 802.11s/e/r/I, 802.3,802.3u, 802.1d/p/q/x, CSMA/CA,
CSMA/CD, TCP/IP, DHCP, ICMP, PPPoE, HTTP, SNTP, LLTD, SNTP client,
IGMP, Telnet, UPnP, FTP
Advanced WiFi Features Change/disable SSID broadcast, 802.1x, WDS, VPN, wireless roaming
Wireless Security
WEP, WPA/WP A2, WPA-PSK/WPA2-PSK, WPS ( PIN and push button) ,
Client filtering
Management
Traffic statistics
Syslog
Remote Web configuration
Configuration file import and export
Firmware upgrade through Web
NAT Port mapping, DMZ
Qos
WMM & WMM Power Save
Bandwidth control
802.1P
DSCP
Firewall
IP/MAC binding for anti ARP spoofing,
IP/MAC filtering
Website filtering
Power Supply
Power Adaptor
DC 9V~12V, 1A
Page 19

Installation Guide Wireless Office Communication System
6-2 www.newrocktech.com
Name Description
Power Consumption 7W
Authentication
FCC Support
CE Support
IPPBX
Auto Attendant
IVR with time schedule
Queuing
Operator handling
Soft console for call monitoring and click to transfer
Incoming Call
DID
Caller ID
Call rejection
Call waiting
Forking (direct a call to dual terminals)
Call forwarding
Do not disturb
Distinctive ring patterns
CRBT
Call Pickup Call pickup
Making Call
Intercom
White list
Select trunk with dial prefix
Speed dial
Hot line (immediate and delay)
Dial-in System Access
Authentication with PIN
Authentication with caller’s phone number
Extension Features
Blind transfer
Consultation transfer
Call transfer to PSTN
Call hold
Park
Three-way conference
Recording *
Recording on-fly *
SIP Proxy Support up to 8 SIP clients
SIP Trunk IMS/NGN
Multi-site
Inter-site calling via IP network
Outbound trunk sharing
Soft Pad*
Click-to-call
Contact list
Presence
Listen to recording and voice message
Call history
Page 20

Wireless Office Communication System Installation Guide
www.newrocktech.com 6-3
Name Description
Media Stream
G.711/G.729A codec
Echo cancellation
Busy tone detection
Fax: G.711 pass-through, T.38 relay *
Video Protocol Pass-through
Interface Type
LAN 2 10/100M LAN, Auto MDI/MDIX
WAN 1 10/100M WAN, Auto MDI/MDIX
Voice
WROC2002: 2 phone ports
WROC2011: 1 phone port and 1 CO line port
USB 2 USB2.0 hosts for 3G dongles, storage, printer and etc
Control Button Reset, power on/off, WLAN, WPS
Environment
Requirement
Working Temperature
0℃ - 40℃
Storage Temperature
-40℃ - 70℃
Working Humidity 10% -90%RH(Non conducing)
Storage Humidity 5% - 90%RH (Non conducing)
Physical Specification
LEDs STU, PWR, USB, WAN, LAN, PHONE/LINE, WLAN, WPS
Dimensions 182 x 136 x 30 mm
Weight Net Weight: 300g Gross Weight: 600g
Note: * The feature will be supported in future release.
 Loading...