

Page 1
GSM/GPRS Digital
Mobile Phone
User Manual
Page 2

Welcome
Thanks for purchasing CP41 series mobile phone.
Please read this user guide to understand the
operation of this device and appreciate its perfect
functions and simple operation methods.
This mobile phone is a bar phone designed for
GSM/GPRS network, Suitable for old people
specially. Besides basic communication functions, it
provides you with English and Deutsch input method,
phonebook, schedule power on/off, hands-free
communication etc, providing convenience for your
work and entertainment. Allow you to understand the
operation of the mobile phone completely with this
user guide.
The CP41 mobile phone accords with the GSM
Technical Specification and are approved by
domestic and foreign authoritative organizations.
The contents of this user guide are subject to
changes without prior notices.
1
Page 3

Contents
General Notices .................................................................
1. About the device ............................................................
2. About the battery ...........................................................
3. About the charger..........................................................
4. Cleaning and maintenance ...........................................
Getting Started ...................................................................
1. The battery .....................................................................
2. Connecting to the network ...........................................
Handset appearance and keypad illustration .................
Basic Features ...................................................................
1. Making Calls ...................................................................
2. Making an emergency call ............................................
3. Answering a call ............................................................
4. Call history .....................................................................
5. Call options ....................................................................
6. FM radio. .........................................................................
Description of Function Menu ..........................................
1. Phonebook .....................................................................
2. Messages .......................................................................
3. Call history .....................................................................
4. Settings ..........................................................................
5. SOS .................................................................................
6. Organizer ........................................................................
7. Input Method ..................................................................
8. Common Troubles and Trouble Removal ...................
2
Page 4

Safety Instructions
If your device is lost or stolen, please contact
your service provider or a sales agent
immediately to restrict your SIM card from
being used. This will prevent economic loss
caused by unauthorized calls made from your
mobile phone.
When you contact the service provider or a
sales agent, tell them the IMEI number of your
mobile phone. Remove the battery to expose
the number located on the label on the back of
the device. Please copy this number and keep
it in a safe place for future use.
In order to avoid the misuse of your mobile
phone, please take the following preventative
measures:
- Set the PIN code of your device’s SIM
card. This code may prevent the SIM card
from unauthorized use.
- Please keep the phone out of sight if
leaving it in a vehicle. It is best to carry it on
or lock it in the trunk.
Safety Warnings and Precautions
Please read these safety notices before using your
mobile phone to assure the safe and proper use of
the phone.
General Notices
Turn off your mobile phone on airplanes, in
hospitals and in other places with mobile
phone use restricted. Otherwise, the normal
operation of electrical equipment and medical
instruments will be affected. Please obey local
3
Page 5

regulations while using your mobile phone.
Obey local laws and regulations with regard to
mobile phone use while driving. If you have to
talk on the phone while driving, obey the
following rules: Concentrate on driving and be
aware of traffic conditions; if your mobile phone
has a hands-free function, use it in this mode;
stop the car before you dial or pick up the
phone in case of poor driving conditions.
Obey laws, regulations, and signs when near
an area storing fuel, chemicals, or explosive
articles.
Keep your device, battery, and charger out of
the reach of small children. They may mistake
them as tools. This may cause injuries.
In order to prevent damages to your mobile
phone, only accessories, such as batteries and
chargers, designated by the company may be
used with your phone. The use of other
batteries or chargers could result in battery
leakage, overheating, cracking, fire, or other
malfunctions.
Do not use the device near weak signals or
precision electronic equipment. Radio wave
interference may cause the failure of such
electronic equipment and other problems.
Special attention must be paid near the
following equipment: hearing aids, pacemakers,
and other electronic medical equipment, fire
detectors, automatic doors, and other
automatic control installations. To find out the
influence of mobile phones on a pacemaker or
other piece of electronic medical equipment,
contact the manufacturers or local sales
agents of the equipment.
Do not impacts, shake, or throw your device
violently, avoiding it from malfunction or a fire.
4
Page 6

Do not place the battery, mobile phone, or
charger in a microwave oven or high-pressure
equipment. This may lead to unexpected
accidents such as damage to the circuitry or
fire.
Do not use your device near flammable or
volatile gases. This could result in failure of the
device or a fire.
Do not expose your mobile phone to high
temperatures, high humidity, or dusty places.
This may cause failure of the device.
Do not place your phone on uneven or
unstable surfaces, preventing it from falling
and malfunctioning or being damaged.
1. About the device
Do not disassemble or modify the mobile
phone. This will cause damage to the phone,
such as battery leakage or circuitry failure. If
needed, please send the device to a
professional maintenance point.
Nonprofessionals are not allowed to
disassemble the device on their own.
Do not subject the LCD to impact or use it to
strike things. This could damage the LCD
board and cause leakage of the liquid crystal.
There is a risk of blindness if the liquid crystal
substance gets into the eyes. It this occurs,
rinse eyes immediately with clean water (under
no circumstances rub your eyes) and go
immediately to a hospital for treatment.
Under very rare circumstances, using the
device in certain model cars may negatively
affect the internal electronic equipment. In
order to assure your safety in such cases, do
not use the mobile phone.
5
Page 7

If your car is equipped with an airbag, do not
place your phone on top of or within the
contact area of the airbag in order to avoid
seriously hurts towards the driver when the
airbag inflates.
Do not use needles, pen tips, or other sharp
objects on the keypad. This may damage the
mobile phone or cause failures.
Avoid letting the phone come into close contact
with magnetic objects such as magnetic cards,
as the radiation waves of the mobile phone
may erase the information stored on floppy
disks, pre-paid phone cards, and credit cards.
Keep small metal objects, like thumbtacks, far
away from the receiver. When the speaker is in
use, it becomes magnetic and may attract
these small metal objects and thus may cause
injury or damage the mobile phone.
Keep the device dry and away from water or
other liquids. The entering of liquids into the
phone could cause short circuit, battery leak, or
other failures.
Use the mobile phone in a place away from
fixed line telephones, televisions, radios, and
automatic office equipment as much as
possible to prevent them from being affected.
2. About the battery
Do not disassemble or modify the battery. This
will cause the battery to leak, overheat, crack,
or catch fire.
Do not dispose of old batteries with general
domestic garbage. Dispose of them at
specified places with specific corresponding
rules.
Do not throw batteries into a fire. This could
6
Page 8

cause the battery to catch fire and explode.
While installing the battery, do not use force or
pressure. This could cause the battery to leak,
overheat, crack, or catch fire.
Do not short-circuit the battery with metal
objects like electrical wire and needles. Do not
put the battery and metal objects together. This
may cause the battery to leak, overheat, crack,
or catch fire.
Do not solder the contact points of the battery.
This will cause the battery to leak, overheat,
crack, or catch fire.
If the liquid in the batteries goes into the eyes,
there is a risk of blindness. Do not rub the eyes
upon this case and immediately rinse eyes with
clean water and go to hospital.
Do not use or place the battery near high
temperature places, such as a fire or heating
vessel. This may cause the battery to leak,
overheat, crack, or catch fire.
If the battery overheats, changes in color, or
deforms during use, charging, or storage, stop
using and replace it with a new one.
If the liquid from the battery contacts skin or
clothing, rinse with clean water and seek
medical attention immediately if necessary, as
this could cause burning of the skin.
If the battery leaks or gives off a strange odor,
remove it from the vicinity of the open fire to
avoid fire or explosion.
Keep the battery dry. Otherwise, the battery
may overheat, smoke, and corrode due to the
dampness inside.
Do not use or place batteries in places of high
temperature such as in direct sunlight. This
could cause the battery to leak and overheat,
lowering the performance and shortening the
7
Page 9

service life.
Do not continuously charge for more than 24
hours.
Place the battery in a cool, shady, and
well-ventilated place out of direct sunlight.
The life of all mobile phone batteries is limited.
The usable time of batteries decreases with
frequent charging. When charging becomes
ineffective, this means that the battery is at the
end of its service life. Replace it with a new one
of the designated type.
3. About the charger
Do not disassemble or modify the charger. This
may lead to bodily injury, electrical shock, fire,
or damage to the charger.
Please use AC 220 volts. The use of any other
voltage will cause battery leakage, fire, and
damages to the mobile phone and charger.
It is forbidden to short circuit the charger. This
could cause electrical shock, smoking, and
damage to the charger.
Do not use the charger if the power cord is
damaged. This could cause fire or electrical
shock.
Clean any dust gathered on the electrical outlet
in time.
Do not place vessels with water near the
charger in order to avoid water splashing onto
the charger and causing an electrical shortage,
leakage or other malfunctions.
If the charger contacts water or other liquids,
the power must immediately be switched off to
avoid a short circuit, fire, electrical shock, or
malfunction of the charger.
8
Page 10

Do not use the charger in the bathroom or
other excessively moist areas. This could
cause electrical shock, fire, or damage to the
charger.
Do not touch the charger, electrical wire, and
power socket with wet hands. This may cause
electrical shock.
Do not place heavy objects on or modify the
power cord. This may cause electrical shock
and fire.
Before cleaning or carrying out maintenance,
unplug the charger from the electrical outlet.
While unplugging the charger, hold on to the
body of the charger rather than pull on the cord,
as pulling on the cord may damage the cord
and lead to electrical shock or fire.
Do not charges in high temperature
environment like direct sunlight, moist or humid,
dusty places or places with excessive vibration,
which may cause failure; or near appliances,
such as televisions and radios, as the picture
and sound effect may be affected.
4. Cleaning and maintenance
Do not use the mobile phone, battery, and
charger in the bathroom or other excessively
moist areas. Avoid them to get wet in the rain
as well.
Use a soft and dry cloth to clean the mobile
phone, battery, and charger.
Do not use alcohol, thinner, benzene or other
solvents to wipe the mobile phone.
A dirty outlet will cause poor electrical contact,
loss of power and even inability to recharge.
Please clean regularly.
9
Page 11

Getting Started
1. The battery
The battery owns half electric quantity initially, can
be immediately used after unpacking. It performs
best after full charge/discharge for the first three
times.
1.1 Removing and installing the battery
To remove the battery, follow the steps below:
A. Unscrew the two screws back cover at the
downside of the device;
B. Push the battery cover downwards;
C. Raise the bottom of the battery;
D. Take it out from the battery flat.
Warning: Power off the device first or change to
assistant battery before taking the SIM card out;
otherwise, your SIM card may be damaged.
To install the battery, follow the steps below:
E. Insert the top of the battery into the flat with top
metal contact of the battery aligned with that of
the flat;
F. Slide the back cover to the phone until it closes
in place.
G. Tighten the two screws on the battery cover.
1.2 Charging the battery
In charging mode, the battery indicator flashes. If
the device is switched off during charging, a
charging indicator appears on the screen,
indicating that the battery is being charged. If the
battery is totally discharged, it may take a few
minutes before the charging indicator shows.
When the battery is fully charged, the indicator
displays full battery and stops scrolling. If your
device is turned off, an image indicating that the
battery is fully charged appears on the screen.
10
Page 12

Generally, the charge process takes about two
and half an hour. During the charge process, your
battery, device, and the charger may become
warm. This is normal.
When charging is finished, disconnect the AC socket
from the charger and your phone.
Note: Please place your phone at the ventilated
place with the temperature ranging from -10°C to
+45°C. Use the provided charger only. Using
unauthorized chargers may cause danger and
violate the warranty rules of the phone. If charging
causes too high or low temperature, the device
warns automatically and charging is stopped,
avoiding damages or dangers.
2. Connecting to the network
2.1 SIM card
Please insert a valid SIM (subscriber identity module)
card into the phone before use.
Everything about setting connection to the network is
saved in the SIM card, together with the information
of contacts’ names and phone numbers in
Phonebook as well as messages. Do not touch the
metal surface of the card in case that information in
the card may be lost or destroyed. Keep the card
away from electricity and magnetism.
2.2 Installing and removing the SIM card
Power off your phone; remove the battery;
disconnect other outer power sources.
Plug an SIM card into the SIM slot.
Please power off your phone and remove the
battery before you remove the SIM card.
2.3 Switching on/off the device
Press and hold the right soft key in the standby mode
11
Page 13

to power on/off your device. The device will
automatically test whether the SIM card is plugged in
after power-on. Then, the screen will display the
following messages in turn:
Input PIN –if the password of the SIM card has
been set.
Search –the phone starts search signals until a
proper network is found and connected.
2.4 Unlocking the SIM card
By setting PIN (personal identification number) code
of the SIM card, you can protect your SIM card from
illegal use. After this function is activated and the PIN
protection code is set, you have to input the PIN
code to unlock the SIM card for regular use every
time you power on your phone.
Users can clear the code. In this condition, the SIM
card cannot be protected from illegal use.
Hold the right soft key to switch on the
phonebook;
Input the PIN1 code, press “Clear” to erase the
input errors and “Ok” to stop. For example, to
set the PIN1 as “1234”, input 1, 2, 3, and 4 in
turn; then, press “Ok”.
If you enter an incorrect PIN code three times in a
row, the network will lock your SIM card and the
phone will ask for PUK1 code.
Note: Your network service provider will set a
standard PIN code (4-8 digits) for your SIM
card. Please change it with your private
password soon.
2.5 Connecting to the network
After the SIM card is unlocked, the mobile phone will
automatically search for the network and the screen
displays a searching mark. Now you are registered
on the network.
12
Page 14
Note: The prompt of “Emergency” shown on the
screen indicates that your phone is beyond
the network service area or your card is not
validated. However, you still can make an
emergency call according the signal strength.
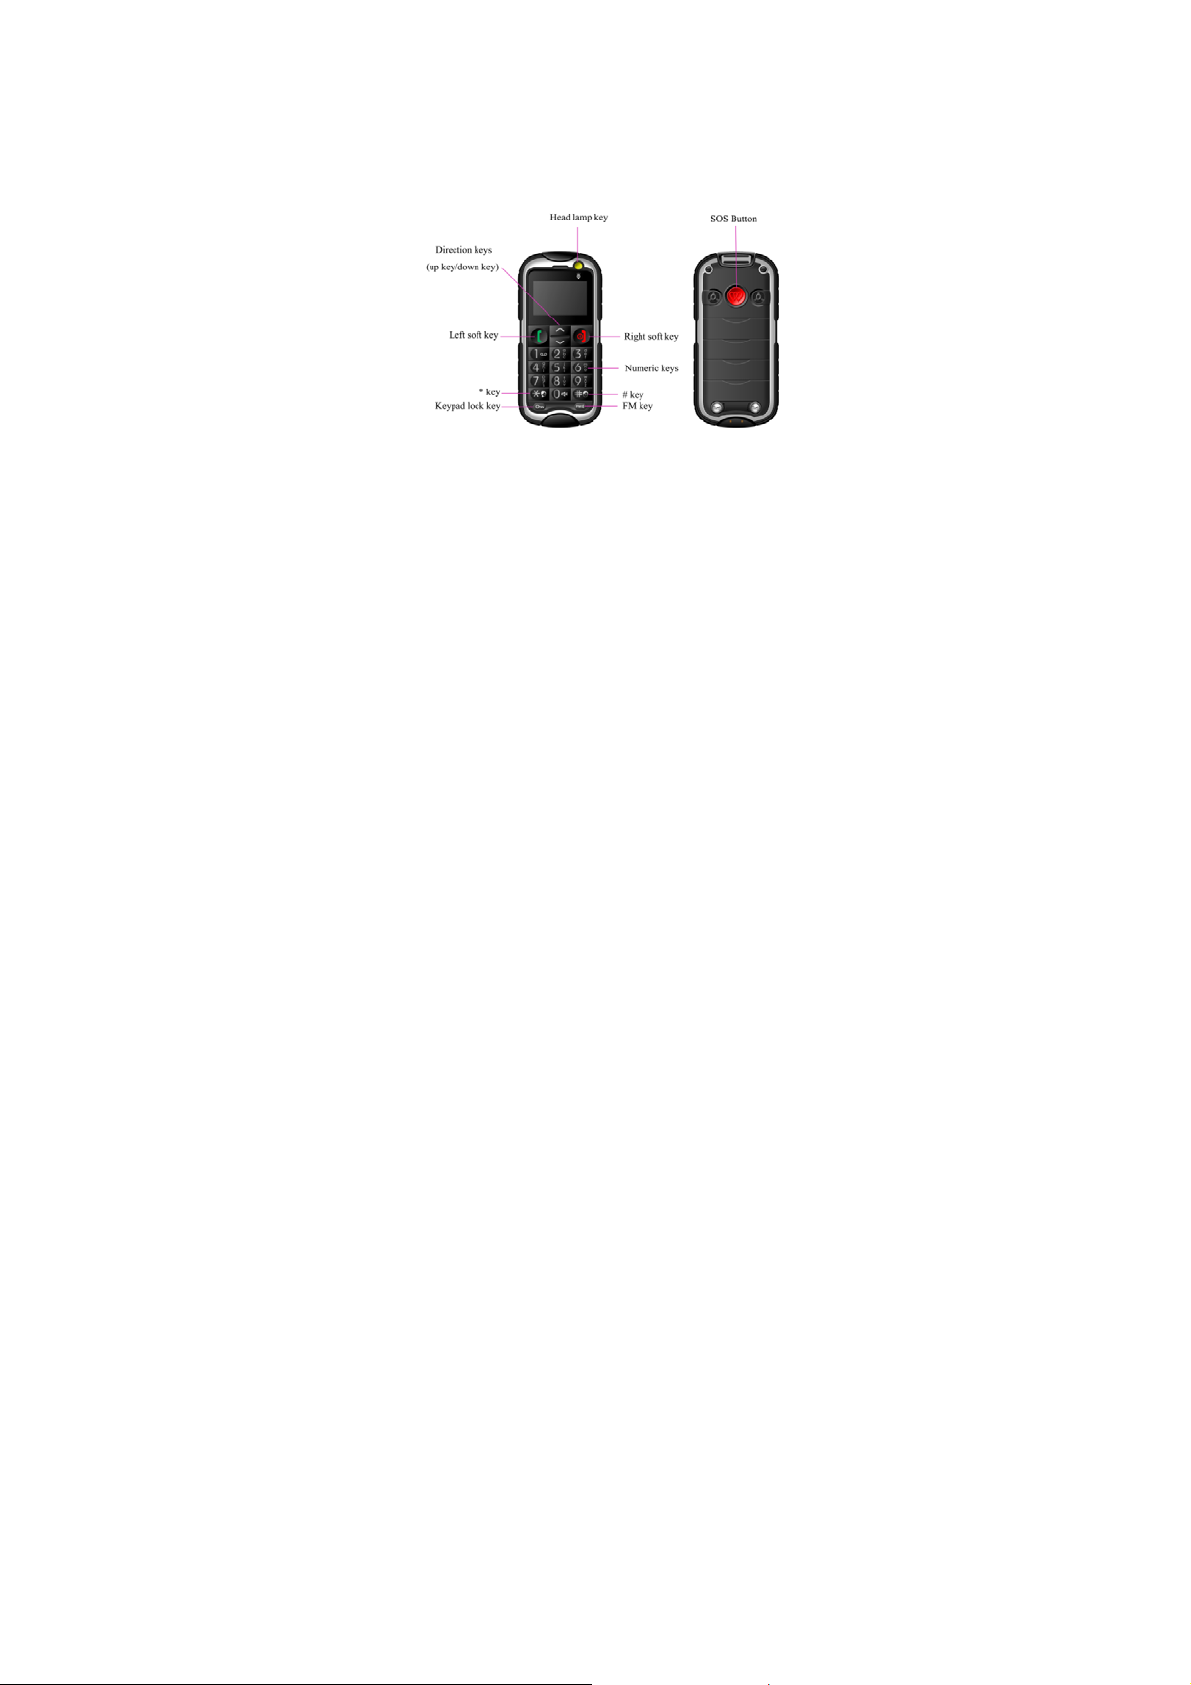
Handset appearance and keypad illustration
Use notice
1. Press FM key in the standby mode to access
FM radio function.
2. Press the head lamp key in the standby mode
to turn on/off the head lamp.
3. Press the keypad lock key in the standby
mode to lock/unlock the keypad.
4. Long press 0 Ke y to switch vibration mode
and general mode.
13
Page 15

5. Push the SOS button in the standby mode to
make an emergency dial.
Basic Features
1. Making Calls
Once the mark of the network provider appears on
the screen, you can make or answer a call. The
signal bar on the left of the screen shows the
strength of your phone’s connection to the network.
The appearance of four bars indicates the strongest
signal.
The performance, which can be affected by barriers,
may be improved from moving within a small range.
1.1 Making DDD
Enter telephone number-by-number keys. Press the
left soft key and choose “call” to make a call. To
change a phone number, press the right soft key to
clear the number. During dialing, a corresponding
animation displays on the screen. Once the other
party answers, the screen displays the call status. If
the number does not belong to the Phone Book List,
the screen of your device only displays the other
party’s number. Otherwise, the name would be
displayed.
1.2 Dialing an extension number
For extension number, you have to dial the
telephone exchange; then, press * key to switch in a
row until “P” shows on the screen. Now you can call
an extension.
Allow you to follow the sequence below to call can
extension:
Area code, telephone exchange, extension number
and Call key.
14
Page 16

1.3 Making IDD
press * Key continuously, and release it to enter the
character “+” which replaces the international access
code. This allows you to make a call towards any
country without knowing the local international
access code, for instance, it is “00” in China.
Allow you to follow the sequence below to make an
international call: “+”, country code, whole telephone
number, and Call key.
After inputting the access code, enter your required
country code and the complete telephone number.
The country code follows the regular practice, such
as 49 for German, 44 for Britain, and 46 for Sweden.
Omit “0” in front of a city code while dialing the
number just as you dial the international call.
For instance, to dial the number of Shanghai Service
Hotline from other country, just dial: +86 21 114.
1.4 Dialing the number in the list
All calls you have made or received are saved in the
list of Call History. The recently dialed, received and
un-answered numbers are grouped as Dialed
calls ,Received calls and Missed calls. When the list
is full, old numbers will be deleted automatically. To
vie the list for the following key operations,
Press the left soft key in the standby mode to
view dialed call logs.
Allow you to press option to choose “call” to
dial in the list directly.
When a number list appears, press Option to
select an operation like send SMS, save to
Phonebook,delete etc.
2. Making an emergency call
As long as the network service is available, which
can be checked via viewing the signal strength bar
15
Page 17

on the left of the screen, you can make an
emergency call. If your network provider does not
provide roaming service in the area, the screen will
only display “SOS”, indicating that you can make
emergency calls only. If you are located in a service
area of the network, emergency calls can also be
made without an SIM card.
And you can also push the SOS button to make an
emergency call with an SIM card.
3. Answering a call
Press the left soft key access “Answer” to answer an
incoming call. And press the right soft key to mute or
reject. If an earphone is installed, your phone will
automatically answer an incoming call after the ring
or vibration,and you can use the key on the earphone
to end a call.
4. Call history
Your device is able to save information like the
Dialed Calls, Received Calls, Missed calls, Delete
call logs, Call Times.
5. Call options
During a call, press the left soft key to enter the
option menu, you can select H-free, Mute, New call,
End single call, Phonebook, Messages.
6. FM radio.
Press FM key to access to FM broadcasting with
your cell phone. Press "Volume" to adjust the
volume. Press "Options" to make a setting as
below:
16
Page 18

Preset auto search: it will receive the frequency
modulating broadcasting information according
your location and save into the channel list.
Channel list: Allows you to save 9 channels into
the list.
Manual input: Allows you to input the desired
frequency modulating broadcasting programs
manually.
Description of Function Menu
1. Phonebook
This allows you to save information like names and
numbers.
The phone numbers can be saved to your device or
the SIM card. Two hundred and fifty records can be
stored in the device. For the SIM card, the quantity of
the records depends on the capacity of the card.
Access the submenu, Press "Options" to make a
setting as below:
View/Edit
Allow you to view or edit the current contact.
Call
Allow you to call the current contact.
Quick Search
Allow you to view all records in the phonebook. In
this interface, you can enter through the alphabet to
find records.
Delete
Allow you to delete all records one by one in the SIM
card or the phone.
Send SMS
Allow you to send SMS to the current contact.
Copy
Allow you to copy the current contact to the SIM card
17
Page 19

or the phone.
Add new contact
Add a new entry in the directory To SIM or To Phone.
Then set the items below besides information of
Name and Number.
Move
Allow you to move the current contact to the SIM
card or the phone.
Settings
■ Speed dial:Allow you to set this function as ON or
OFF, and set the number. Set it as on to access the
standby interface, long press the number from 2to 9,
* key and # key, then you can directly allocated by
the set of numbers.
■ Owner number:Allow you to edit or erase the
owner number.
■ Memory Status: Allow you to view the storage
capacity of the phone and the SIM card, as well
as the space occupied.
■ Copy all: Allow you to copy all records from the
SIM card to your phone
or vice versa.
■ Delete contact: Allow you to delete all contacts
from phone or the SIM card. It also can delete
one by one.
2. Messages
2.1 Write message
Access the "write message" editing interface to write
the text. Allow you to press Options to have the
following operations.
■ Send:Allow you to send only, save and send,
send to many.
■ Save to draft box:Allow you to save the
message to the draft box.
18
Page 20

■ Insert contact info:Allow you to insert contact
information into the
Message.
■ Use templates:Allow you to insert the templates.
■ Input method:Allow you to select the input
method.
2.2 Inbox
Select it to view the received messages.
While viewing the message list, use the Up/Down
key to select the previous or next message. press
“Ok” to read a message. In this interface, press
Options and you will find the following entries : Reply ,
Delete, Edit, Forward, Copy to phone/SIM, Move to
phone/SIM, Copy all, Move all and Use number.
2.3 Outbox
Select it to view the messages you save in the device
or the SIM card.
While viewing the message list, press “Ok” to read
details.
While reading a message, you can press ”Option” to
select your required operation as Send, Edit, Delete,
Copy to phone/SIM, Move to phone/SIM, Copy all,
Move all and Use number.
2.4 Drafts
Select it to view the messages you save in the device
or the SIM card.
While viewing the message list, press “Ok” to read
details.
While reading a message, you can press ”Option” to
select your required operation as Send, Edit, Delete,
Copy to phone/SIM, Move to phone/SIM, Copy all,
Move all and Use number.
19
Page 21

2.5 Voice mail server
If you cannot answer a call, you can ask the other
party leave a message to you via this service. Then,
access the Voice Mail Server to listen to the
message. The network operator should support this
service. Thus, you need to apply for activation before
use.
2.6 Delete
Allow you to Delete Inbox, Delete Outbox, Delete
Drafts and Delete All.
2.7 Templates
There are several short sentences as default SMS
that could be editd,erased or writed message.
2.8 SMS Settings
2.8.1 Memory Status
Displays the occupied memory of your SIM card and
phone.
2.8.2 Preferred storage
Allows you to select SIM or Phone to store the
message perferred.
3. Call history
3.1 Dialed calls
To view information about the dialed calls. Press the
Options,it have the following operations for you: View,
Call, Send SMS, Save to phonebook and Delete.
3.2 Received calls
To view information about the received calls. Press
the Options,it have the following operations for you:
View, Call, Send SMS, Save to phonebook and
20
Page 22

Delete.
3.3 Missed calls
To view information about the missed calls. Press
the Options,it have the following operations for you:
View, Call, Send SMS, Save to phonebook and
Delete.
3.4 Delete call logs
Access the submenu, allow you to delete Dialed
calls,Received calls,Missed calls and Delete all.
3.5 Call times
Allow you to view the call time of Last call, Dialed
calls, Received calls and Reset all time.
4. Settings
4.1 Phone setup
4.1.1 Time and date
Allow you to Set Time/Date.
4.1.2 Language
Allow you to set the display language as English or
Deutsch.
4.1.3 Schedule Power on/off
Four-time entry is provided for you to edit. The phone
can be switched on or off as you preset.
Note: If the time options are set same, they may not
be activated at the same time. This may cause
a conflict.
4.1.4 LCD Backlight
Allow you to set the time of the LCD background
light.
4.1.5 Breath led
Allow you to select deactivate or activate the breath
led.
4.1.6 Auto keypad lock
Allow you to select none, 5 sec, 30 sec to lock
21
Page 23

keypad automatically.
4.2 Call settings
Access the submenu of Call Settings to set the
following items.
4.2.1 Call waiting
You will be notified for a new call during the current
one after this function is activated. For more
information, contact your network provider.
4.2.2 Call divert
This service enables you to forward an incoming call
of a certain business to the telephone number you
specified. This service requires the support of the
network. Contact your network supplier to open this
service.
Allow you to select any one from Divert all voice calls
(A forwarding icon displays at the status bar in
standby mode after it is activated), Divert if
unreachable, Divert if no answer, Divert if busy, and
Divert all data calls. Then, the following options
appear.
Activate: Allow you to set the Divert Number.
Deactivate: Allow you to cancel call-forwarding
service.
Query Status: Allow you to check the status of
the service.
To bar the functions above while not in need, select
Cancel All Diverts.
4.2.3 Call barring
Access the submenu, and you can set the following
items to improve the security. Some network
providers may not offer this service. For more
information, contact your network supplier. Your
network provider will provide you with a four-digit
password to activate this service. Enter the menu,
and then you have the following items.
22
Page 24

Outgoing Calls: Allow you to activate,
deactivate, or check this restriction towards all
calls, International calls or International Calls
except to home PLMN.
Incoming calls: In this menu, you can activate,
deactivate, and check the restriction of all
incoming calls, i.e. bar All Calls; or activate,
deactivate, and check all incoming calls When
roaming.
Cancel all: Allow you to cancel all call barring
services by inputting your password.
Change Barring password: Enter the old call
barring password and then the new one.
4.2.4 Network selection
Allow you to search new network and select the
required network. For the Selection Mode, you can
change between Manual and Automatic.
4.3 Organizer
4.3.1 Tone setup
Allow you to make a setting for these item:Incoming
call, Alarm, Power on, Power off, Message tone and
Keypad tone.
4.3.2 Alert type
Allow you select alert type:Ring only, Vib. Only, Vib.
And ring, Vib. Then ring or Silent.
4.3.3 Volume
Allow you adjust the volume of ringtone and key
tone.
4.4 SIM lock
To turn the SIM lock on or off by inputting the
password.
Change password
It’s impossible to change the password of SIM, with
the passwords 4-8 numbers with confirmation to
23
Page 25

change the password successfully.
4.5 Report time
Allow you to activate or deactivate this
function.When activate this function, the phone will
report the whole point of time for you.
4.6 Voice Dial
Allow you to activate or deactivate this function.
When activate this function, allow you to make a
voice dial.
4.7 Restore factory settings
In this menu, input the phone password and press
Ok. Then, the settings of corresponding parameters
will be restored as default.
NOTE: the password is 1122.
5. SOS
5.1 SOS Num Setting
Allow you to edit or erase the SOS number.
5.1 SOS SMS
Allow you to edit the SOS Sms.
5.1 Display Screen Setting
Allow you to edit phone name, blood, sick history,
family name and family number.
6. Organizer
6.1 Calculator
The phone provides you with a calculator featuring
basic functions. To perform addition, subtraction,
multiplication, and division, press up and down
direction key to select the required arithmetic.
Note: This calculator features rounding error due to
24
Page 26

limited accuracy.
6.2 Alarm
Five alert types and power-off alarm are supported.
In the alarm clock list, select one to set the following
entries, On/Off, 00:00 (Time), Repeat, Snooze(mins),
and the Alert Type. The Repeat entry can be set as
Once, Everyday or Days.
6.3 Reminder
Allow you to view, add, edit, delete, delete all the tips.
Allow you add Reminder, Shuttle baby and Elderly
Activities. Allow you to edit the date, time, note,
alarm, repeat. The Repeat entry can be set as Once,
Everyday, days, weekly and monthly.
6.4 Calendar
In the submenu, the screen displays four dates for
the current month and the actual date is marked with
special color background. Press Search to view the
date.
6.5 Stopwatch
Press Up/Down key to select nWay stopwatch or
Typital stopwatch.
The nWay stopwatch including split timing, lap timing
and view record.
Typital stopwatch: Press "Start" to start timing. Press
left soft key to stop or continue, press "reset" to
continue to return to zero.
7. Input Method
7.1 Overview
Your device supports the following input methods:
English, Multitap Deutsch, Smart Deutsch, numbers
25
Page 27

and symbols.
7.2 Key definitions
Navigation key (Up/Down key): Press to move the
cursor or for selection.
7.3 Instructions on input method
7.3.1 English
For this input method, the keypad is defined as
below.
For the keypad definition in English input mode,
including Capital English input and Normal English
input, refer to the table below. In the column of
“Corresponding character or function”, the mark “;”
works as the division for English ABC and English
abc. When there is no semicolon, it indicates that the
two corresponds to the same characters:
Key name Corresponding character or
Number key
“0”
Number key
“1”
Number key
“2”
Number key
“3”
Number key
“4”
Number key
“5”
Number key
“6”
Number key
“7”
function
0, space
Symbols
ABC2; abc2
DEF3; def3
GHI4; ghi4
JKL5; jkl5
MNO6; mno6
PQRS7; pqrs7
26
Page 28

Number key
TUV8; tuv8
“8”
Number key
WXYZ9; wxyz9
“9”
* key Call the symbol input box
# key Change the input method
Up key Move the cursor leftward
Down key Move the cursor rightward
Right soft key Back or Clear
7.3.2 Using the keypad
For general operations, refer to the part below.
Each key allows you to input more than one
character. Press a key repeatedly and fast
until your required character shows.
To enter an English punctuation or special
symbol, press * key to show the special
symbols input box in the English input mode,
including capital mode and normal mode.
To change an input method, press # key.
To input a space in English input mode, press
Number key “0” once.
To clear one input error, press the Right Soft
key. To clear all, press and hold the same key.
7.3.3 Multitap Deutsch
For the keypad definition in Multitap Deutsch input
mode, including Capital Deutsch input and Normal
Deutsch input. For general operations, refer to the
part below.
Each key allows you to input more than one
character. Press a key repeatedly and fast
until your required character shows.
To enter a Deutsch punctuation or special
symbol, press * key to show the special
symbols input box in the Deutsch input mode,
including capital mode and normal mode.
27
Page 29

To change an input method, press # key.
To input a space in Deutsch input mode, press
Number key “0” once.
To clear one input error, press the Right Soft
key. To clear all, press and hold the same key.
7.3.4 Smart Deutsch
After "S DE" or "S de" is chosen, you can input letters
or words by clicking the corresponding letters or
words on the screen.
Click each key associated with the letter you want to
enter only once. While entering text, click ‘Clear’
once to delete the last character on the display. To
clear all, press and hold the same key.
7.3.5 Number
Refer to the table below for key definitions in this
mode.
For this input method, the keypad is defined as
below.
Key name Corresponding character or
function
Number key
1
“1”
Number key
2
“2”
Number key
3
“3”
Number key
4
“4”
Number key
5
“5”
Number key
6
“6”
Number key
7
“7”
Number key
8
“8”
28
Page 30

Number key
“9”
Number key
“0”
# key Change the input method
Up key Move the cursor leftward
Down key Move the cursor rightward
Left soft key Ok
Right soft key Back or Clear
7.3.6 Using the keypad
For general operations, refer to the part below.
Press the Number key (0-9) to enter the
corresponding number.
To change an input method, press # key.
To delete wrong inputs, press the Right
Soft key to select Clear. Press and hold it to
delete all.
7.3.7 Symbol
Using the keypad
To access the symbol box during editing mode,
press * key. To select your required symbol, press
the navigation keys. Then, press Ok to confirm.
9
0
8. Common Troubles and Trouble
Removal
Prior to contacting the after-sales service providers,
please make the following simple inspection to save
the maintenance time and expenses for you as much
as possible.
Common
Troubles
Causes and Resolutions
29
Page 31

cannot be
powered
on
Impossible
to connect
network
It display
message
upon
startup
Check if the pressing on the
Startup Key for at least more
than 1 second;
Check if the batteries are
poorly contacted, please take
out the batteries first and then
re-load and then re-start up;
Check if the batteries are out,
please charge them;
Signals are too weak, please
try to another place with
stronger signal;
The cell phone is out of the
network coverage of network
service provider;
SIM card is invalid, please
contact your network
supplier;
Check if SIM card is installed
correctly;
The auto lock function is
selected, please input the cell
phone password before use;
Input PIN and input PIN
function is enabled for every
startup, you must input PIN
code;
Input PUK code: The cell
phone will be locked when
incorrect PIN codes are
inputted for three times, you
have to input PUK code
provided by your network
30
Page 32

Poor
quality of
calls
Standby
time is
curtailed
SIM card
error
operator;
Please check if the volume is
adjusted improperly;
When this cell phone is used
in the areas with poor
receiving signals, like near
the high buildings or in the
basements, the wireless
electric wave cannot be
transmitted effectively;
When this cell phone is used
in calling intensity period, like
the rush hours, calling failure
is caused by network
congestion;
Standby time is related to the
system setting of network,
maybe the cell phone is used
in the area with poor receiving
signals. Upon no signals, the
cell phone will constantly
launch signals to search for
base station and batteries will
run out, so the standby time is
curtailed. Please use the cell
phone in places with stronger
signal or power off it;
Please replace batteries;
There is filth on the metal
surfaces of SIM cards, please
use the clean cloth to wipe the
metal contact point of SIM
card;
31
Page 33

Calls
cannot be
dialed
The caller
cannot
contact you
SIM card is not installed well;
SIM card is damaged, please
contact with your network
service provider;
Please make sure if dial key is
pressed after dialing;
Please make sure if calling is
barred for charges in arrears;
Please make sure if SIM card
is valid;
Please make sure if call
barring function is set;
Please make sure if
immovable dialing function is
set;
Please make sure if the cell
phone is powered on and
connected to network;
Please make sure if calling is
barred for charges in arrears;
Please make sure if SIM card
is valid;
Please make sure if call
barring function is set;
Please make sure if
immovable dialing function is
set;
32
Page 34

Poor contact, please check if
t
the plug is connected well;
Charge in the environment
It’s cannot
be
charged
with the temperature lower
than -10℃ or higher than
55℃, please change the
charging environment;
Battery or charger is
damaged, please replace it;
Wrong operation;
Some
functions
cannot be set
The network supplier does no
support this function or you
have not applied for this
function.
9. FCC Notice to User
The SAR limit of USA (FCC) is 1.6 W/kg averaged
over one gram of tissue. Device types CP41 (FCC
ID: XY2CP41 has also been tested against this
SAR limit. The highest SAR value reported under
this standard during product certification for use
at the ear is 0.696 W/kg and when properly worn
on the body is 0.522 W/kg. This device was tested
for typical body-worn operations with the back of
the handset kept 1.5cm from the body. To
maintain compliance with FCC RF exposure
requirements, use accessories that maintain a
1.5cm separation distance between the user's
body and the back of the handset. The use of belt
clips, holsters and similar accessories should
not contain metallic components in its assembly.
33
Page 35

The use of accessories that do not satisfy these
requirements may not comply with FCC RF
exposure requirements, and should be avoided.
This device complies with part 15 of the FCC
rules. Operation is subject to the following tw o
conditions: (1) this device may not cause harmful
interference, and (2) this device must accept an y
interference received, including interference that
may cause undesired operation.
NOTE: The manufacturer is not responsible for
any radio or TV interference caused by
unauthorized modifications to this equipment.
Such modifications could void the user’s
authority to operate the equipment.
NOTE: This equipment has been tested and
found to comply with the limits for a Class B
digital device, pursuant to part 15 of the FCC
Rules. These limits are designed to provide
reasonable protection against harmful
interference in a residential installation. This
equipment generates uses and can radiate radio
frequency energy and, if not installed and used in
accordance with the instructions, may cause
harmful interference to radio communications.
However, there is no guarantee that interference
will not occur in a particular installation. If this
equipment does cause harmful interference to
radio or television reception, which can be
determined by turning the equipment off and on,
the user is encouraged to try to correct the
34
Page 36

interference by one or more of the following
measures:
- Reorient or relocate the receiving antenna.
- Increase the separation between the equipment
and receiver.
-Connect the equipment into an outlet on a
circuit different from that to which the receiver is
connected.
-Consult the dealer or an experienced radio/TV
technician for help
This manual aims at helping you use the product
correctly but it does not necessarily mean that it
provides any descriptions for software and
hardware configurations of this product. For
relevant product configurations, please refer to
the relevant contracts (if any) or consult your
seller. This manual is only for your reference. If it
is inconsistent with the actual products, it shall
be subject to the actual products. Thank you!
35
 Loading...