


NEWLONG INDUSTRIAL CO., LTD.
BAG SEWING HEAD
MODEL

For Operator Safety
Thank you for purc h a s ing t he N LI
Model DKN-1 Bag Sewing Machine Head.
• This
manual
the
Model
sure
to
use the
•
Keep
Be
when lending
company.
• Please order this
is
lost.
•
The
contents
without prior notice for improvement and safety
purpose.
&Hazard
•
Be
careful, when you insert a bag
the
sewing
machine,
the
machine
•A•
Hazardous" mark
sewing,
be
sure not to touch on the
the
DKN-1
understand manual before
near the
sure
to
attach
or
transferring
manual
of
this manual are subject
of
Bein1 Cau1ht
or
between the presser foot and
iB
Sewing
sewing
manual
it
to
another person
from the nearest
in
the
to
ycur
fingers may
attached
to
the machine.
machine.
be closed into
Head.
for
to the
NLI
office
to
Machine
be
caught in
feed
Be
use
and
machine
or
if
change
dog.
When
:..:i.-P
:J:3Ji:i,
e
,:O)J&fJHllJHFl-;t
itffl
16tlill
:iE
•
;::O)J&flll
ltQJ:?,
DKN-1
,:O)J&fllllJI
it
e.:©J6tf1ia1J1•~~~~tt,tt;&½tt:.~-P~~I-
(m½m!i1Mi;il:.:::~ttX<tt:~1,
1/!/II@(.)
,J::lf\, ,'ft.te~°fl
DKN-1~1\ltl!ffl:::
J:
O)J':Ui*ll:6~ie«~n
l!JH!f
~~-
-f
:toff
L-<
~
itffl
<tt:~1,
'o
l!JH!fli~v~QJ-c
f*tfl.,
't"<tt:~"'·
~JU~ffl~~~~l.,l:f:IL,,
1'fa-1hU:.:::~t..,
DKN-1
~
M;
li-<
tt:~1;
J'!l:.:::,
R~ffl
~~1,
'*To
~~O)
,:-1,
''ti"
o
~
'o
l".1$~+~J.mff¥L-
1,
'--:>'1:t>~IJffl
'3:1tl~Jlill0);&€N-;S:
i:-<
tt:~t-
'.,
\,
• .:©16tii~M•1~lltm1AJJ:*1ttt~½©1t~,
l:~J!i"o.:>:.iJ~ib~'£To
&-~~-
• ~~~1r.aa-1'7'-to>:.~t.t~•L-'.t"'~tt~¥fl:c.~
1:.:::*i)i•~lb *M~tL:61~tJ*i" o
• ~v~lr.1-J:#ib~;i:-?-~~~-:> 't°ll
flii,S~v1/lr.i«-~tJ~ftl, '.l:?
'°£Ta
l:.:::ttB:L-
't°(~~ll
~
V1/~
16tlill
itffl
t.m:.:
7i!ftit..
,jj#;_}:.
©
,:-
1,
,tttt:
'o
~ Hazard
• A Needle Bar end Needle Thread Take-Up
moving
to
the
keep fingers and yourself away from the Needle Bar
and
Needle
of
Being Caught
at
high speed. A·
machine.
When
Thread Take-Up.
Hazardous"
the
machine
in
the
Machine
mark
is attached
is in operation,
are
~
-~~-
• tt•J:J:*~ffJ":J:ii.il("t*lbv
~v~lr.t;t~~-~-~~M-:>-Clr
~~~»~11J1,
ili:-?,ttt1r \
,,:-1,
'o.!:::~1-J:tt*fi.!:::l:*~~1r.m~f*a-
"t*(
~~l,
'o
''t°"
'*i°o
'*i"
a
• The instruction manual
• =o.>lDlllll'-1•
/,
and
<--.:,•J
parts list
A H:t•1ua:i
is
subject
..1:
o.>t::~~trt~L.r=•J!T
to
change without prior notice.
.f>=~titt>
~
*1'"
D

WARNING
Wilt
P E R S O N A L I N J U R Y M A Y
RESULT
SAFETY
NOT
OBSERVED.
1.
BE
SURE
FREE
OF
OIL,
RUBBISH
INJURY.
2.
DO
NOT
CONDIT
3.
DO
NOT
INSTRUCTION
4.
DO
NOT
THAN
SPECIFIED
5.
BE
SURE
ELECTRICAL
6.
BE
SURE
BEFORE
PARTS
CLEANING.
IF
THE
PRECAUTIONS
THE
AREA
SURROUNDING
ALL
HAZARDS
OR
OPERATE
IONS.
OPERATE
MANUAL.
OPERATE
MACHINE
SAFETY
POWER
PERFORMING
REPLACEMENT,
SUCH
ANYTHING
MACHINE
MACH I NE
MACHINE
FOR
IS
ON
THE
CONNECTED
GROUND
(AND
AIR
MACHINE
FOLLOWING
MACHINE
AS
FIRE,
THAT
CAN
UNDER
MACHINE.
ADJUSTMENTS
WET
BEFORE
READ I NG
VOLTAGES
TO
BUILDING
(EARTH).
SUPPLY)
MAINTENANCE,
ARE
IS
WATER,
CAUSE
OTHER
IS
OFF
OR
~~©~~~§~~~L~~~~~e
l:::11$i!iS(©ffl\~
L < t=~
1.
It~
~--
(f::~l,\o
2.
1J<fr2i
l,\""(:(f::~l,\o
a
~mm~•~~~~~-c:~;•~~~tiL
-C
(
4. lt~O)}~>E'.ffll±J~Bi--c:l;t~fi
~l,\0
5.
7-AftfJfti*!c
t::
~
6.
-~O)Jf-filfi • $~3'.tf'l •
AAl::~~~:Ji
t::
~
0)
Jal
11<
..
tJf
i~Ji
f::~
I,
\0
I,
\0
(,\0
u1
im
..
i!Uli
l,\o
c.
~
1.J
"t"t©"t:5±~ L
I:: $
i!&
~
®
.:.
9
i:iJ:l!~tJ:ctJftJ:1,,tJ,.fiitJ,~-c
I::
fJ,
tJ,
7a>
II
:J:;t-c:
~*1,
-CI,
,7a>$~m~ L -C
~ff
C.&tFI7-:Ji)
mi
~
c.
f.J:
l;t
fl
ffl L
Lf.J:L'-C:
•
:Rl;;l:tffllf*O)
~~-:,-C(
7a>
!k
t.J:
<
t::
<
7.
DO
NOT
OPERATE
COVERS
8.
DO
AND
REMOVED.
NOT
TOUCH
MOVING
OPERATION.
9.
BE
SURE
MACHINE
(LEVEL)
MA
I
NTENANCE,
ADJUSTMENTS,
10.
BE
SURE
THE
COMPLIES
11.
DO
II
NLI,,
WITH
NOT
USE
GENUINE
MACHINE
KNIFE,
PARTS
SURFACE
NEEDLE,
WHEN
IS
PLACED
WHEN
PARTS
CLEANING
MATERIAL
THE
SPARE
TO
MACHINE
PARTS
PARTS.
WITH
GUARDS
PULLEY,
MACHINE
ON
AND
BELT
IS
IN
A
SMOOTH
PERFORMING
REPLACEMENT,
OR
STORAGE.
BE
SEWN
OR
CLOSED
SPECIFICATIONS.
OTHER
THAN
7.
ii~:ti
f.J:I,\""(:
~
-~O)~ti$~:ti~,-
~Jv
f.J:I,\""(:
9.
-~O)--filfi·!B~3'.tf'l·~--fffl~~~~O)
~[::[;t:ijI
10.
-~
7a>
11
11.
-tlffl L
1{-tJf~*1,f=~~-c:l;tlt~~~,ii
<
t::~
1,\0
.....
1--
-f
O)ft!ll1.J
<
t::~
;t.J::flj:iJr[::Thfl,\""(
-3
c.
"t"
tJ,mtJ,~ -c <
=.:i.-CJ~~I¥(+*)"
~I,'
1,'
-c
1,'
7a>
~
rJfl::
l,\0
<
7a>~~tJflt~O)i±~l::-€i"-:,
t::
~
1,
,0
~iE!B~~~[;t
1: <
t::
~
I,
'0
~-~-
l;t-¥
t::~
l,\0
L
..
~Mn
-C
1,,

Identifying and Ordering Parts
Cautions When Using the Machine
Maintenance
Where
stamped with its part number.
include part number, part name
machine.
•
•
•
the
construction permits, each part
On
all
and
model name
Safety Rules
To prevent personal injury:
All
power sources
before threading, oiling, adjusting or replacing parts.
All
cover and guards must be in position before
operating machine.
Do
not tamper with safety cover, guards, etc., while
machine
is
in operation.
to
the machine must be turned
is
orders, please
Safety Precautions
l)Always
adjusting
2)Wear safety glasses.
turn
power off before threading, oiling, and
the
machine or replacing parts.
of
•
:=.::i.
-01/:t'I:~
8'1=1:a:-'M-uml.,
• :::·r±xO)~l'i,
<tc~'v'o
off
(~)
~00i!l!if4tffl'l;:.fj: DKN-1
-C:t3VJ~To
/';-o/D7.J--O)/-/;-o/:ffi:%t1;~--c-:::·m~
•~fflJ::~~~~~&O~ffl~O)~-~~-~~,~
O)ft!tlf-vmttt·--c-mVJ
L,t~:=.::i.
r,!;j~O)~,
:a:-~m~<tc~v
-o1/:1'I~(~)~OOJ!i!if4tffl'l;:.;::'J!!!if4t< tc~v
~f.11;' ~~:ffi:%'
1>~~~VJ·*-wJnO)t'e:O)*ifill.,,
$8'1=13t~,
V
\o
f:Ji1:"r,¢.e~f'f~O)trJf;:.~,--r•n»::a:--wJ0-c<tt~
'~T
1;:.<1v
,~,g-1-;t,
J::5:td!ffiv
:t3J'lv
,J::Jf1v
~y1/JijHf~1;'
'v
,t~t.,~-t"a
*0)3t~,
2)W.Om{'f~O)t'e:l'i'tc~}jj-*O)~ffl:a:-:t3-t"-t"0'>L,~-t"o
O)KuliIEI~
,t~tt'e:~
~y1/:ffl:%
~rm,
wmm,
'a
that
3)Make sure, before starting the machine,
in
covers and shields are
4)Do not touch on the machine when it
5)Turn power off and make sure
operate before you put your fingers under the
blades and the needles
6)Do not touch on the machine when it
place and closed.
the
cutter
to
adjust.
is
is
run.
run.
all
does not
cutter
• Please keep in mind
and
to
maintain
• Thread fuzz or dust must be cleaned with air or
brush on throat plate, in the groove of feed dog or
around looper after
• Wipe
• Check the machine for loose screws and tighten
• Good maintenance
the
area easy
them, if any, once a month.
to
handle
the
machine in good condition.
the
day's work.
to
rust with oil cloth.
will
the
prolong
machine carefully
the
machine life.
4).iJ/'{-ftt·7i~M~0-Cv ,;s::.t:a:-$~L,
~V\o
5)iJ-O) r 1;:.-¥:a:-An-5t'e:l'i,
{~;E!l!w.ffmO)
:a:-$~L,
•
~y1/Jljf~l'i~-\tft1J,~ft$
r±Jt~<
t'e: l'i,
~,
-ci'i,Gf'F~:a:-n-0-c<tc~v
I&:lJk5
ttt
~,
--rtn»::a:--wJ0
--rm:n»::a:--wJ
8'1=1i'i'Gl±Hf~J::i'i~0
f;:. m 1;:.m,o;
-c7i,G3ffi'.~L,
VJ~y1/7i~IIJ7i,ftv
'a
f;:.,tAtHt-c
• - a O)f'f~i'i~~TL,~L,t~G, ittfO)J::,
~,
1v-/';-O)~:bVJ 1;:.~~0tdl::.VJ~l'i'e:nv
~1v,-c<tc~'v'o
•
-¥
AnO)
~
Ull
L,
l'i~~
0)
~~
f ;:.~9
L,
<tc~'v'o
-c
<tc~v
-Cv
'~Ta
< tc~v
'a
j!!J~0)7$\:0)
,1;:.I&VJ
~TO)
--c-
:::·
-c<tc
'a
,::.t
r±tt
ii

CONTENTS/
1.
Specifications/{±~ 2
2.
Threading/*iffil,
3.
Lubrication
4.
Adjustment/1.ffilff
4-1 Needle
4-2
Looper
a) Check
b)
Needle Height1*(J)?ili~
c) Space Adjustment between needle and
d)
Setting
4-3
Aqjustment of Feeding
a) Level Adjustment/
b)
Vertical
c) Longitudinal Aqjustment/jW'~(J)wl/1• 6
d)
Crosswise Adjustment/ti.ti(J)wl/1
e) Setting Upper Feed Dog/ J:~lJ:&(J)wl/1
/~AA
Setting/*(J):it~----------------------------4
Aqjustment/Jv-r{-(J)wl/1•
the
Loop
Aqjustment/Jk-'jZ-(l)wl/J•-------------------------6
distance between needle
--------------------2,3
center
and looper
............................................................................................................................................................................................
looper/*.l:::1v-/S:-(J)ri,i~
Guide/1v---;/'7J~p-
Function/~lJ:&(l)wl/J•---------------------6
J:T(l)wl/J!ifl:--------------------------6
.........................................................................................................................................................................
......................................................................................................................................................................
..........................................................................................................................................................
edge/*.l:::1v-/S:-(J)iel!ll----------4
~
1X
.................................................................................................
2,3
4
4
4
5
5
5
5
4-4
Chenge of Stitching Length/ffl!it,\
4-5
Needle Guard
4-6
Presser
a)
b)
c) Mounting Top Feed Lifter/ J:~1J:&1J7?"-(J)wl/J•
4-7
Thread
a) Setting Thread
b)
c)
5.
T
roubleshooting/3:
Parts
Foot
Presser
Presser
Tension/i(::wl/J-f-~1*--------------------------9
Setting Upper Thread Guide/ 1:
Castoff
List/$£~
Numerical
Aqjustment/*:Jf-]-'(J)wl/J•----------------------7
Adjustment/W.::r::&(J)wl/l!ifl:-----------------------8
Bar Height/iWi~wlll•
Foot Pressure/fljl.::r:fE(J)wl/1•
Tension/if::wl/J-f--------------------------9
Wire/
if::
"Ji;.
1...,
.................................................................................................................................................................................................. 9
"1/'~
-------------------------13-
index
of Parts//~---o/71{5[
!::l
ijljl'j(J)wl/J•----------------------7
.................................................................................................................................................................................
............................................................................................................................................................
-------------------8
.ff.:
ft
~F
...........................................................................................................................................................
1'
7"/
Jv(l)
)]j{
~
~M;r&
------------32,33
List of Screw, Nut & Washer/;.f'1/, To/1',
---------10,11
?o/"1/'-Y---~!i~
9
9
9
----34,35

1.
Specification/{±~
Maximum speed:
Stitch range :
Seam:
Lubrication system :
Application:
Maximum thickness
Thread:
Mode/·~~
Bag type
Seam
Needle
Feed
Dog,
upper
Feed
Dog,
lower
Throat Plate
Presser Foot
Looper
Throat Plate
Thread Retainer
of
material:
~fiffi
~§~;i:\;
it
1::*!J1i'l
*%k
itt.oc
}ljl::r..1]}:
1v~.1-{~
itt&Jl\
~
i@i@J
~~
~§~i
~§~;i:\;
*S-lm
~~~
~~P=J[
3,500rpm
4-8.5mm
Double thread chain stitch (type 401) 2 :m]\lt~ (401)
Fully automatic
For PP woven cloth bags and PP Paper bags PP
6ply gusseted kraft paper sack or equivalent
Vinylon Synthetic or cotton,
*
DKN-1
PP
Paper Bag
~~
Double Thread Double Thread
2
mffl~
DN-1 #25
51126N
51105N
51124E
51120N
51108E
-
Woven
Cloth Bag Cloth Bag
pp
::7t:1A~
2mffl~
UY143GS
754031 51126N
754021 51105N 6605L
754011 51124M 6624L
752011A 51120N
51108E 51108K 51108E
-
13
1b*S'7ll3
200
20/6
or
20/9
Paper Bag
*.El;~
Single Thread
.lj:f.ffl~
DN-1 #25
AV
::7t:1A~·*.E!;~
*.E!;~~JJ
DKN-1BP
PP
PP::7t:IA~
Double Thread
2
UY143GS
75-1827F
6
/ii:::::$f
Woven
mffl~
-
-
fst=\'-
200
2.
Threading/*
3.
Lubrication/mM
Oil
is
completely drained out of the machine
when delivery.
before starting the machine. The
procedure.
• Open the
with
oil
line. (Fig.l) Use mineral
40°C.
• A brand
certain period should be
a)
Upper needle bar bushing (51154C) and lower
needle bar bushing (51154D)
b)
Feed bar (51134X) and upper feed bar (51134L)
c) Feed crank stud (51136E)
d)
Feed lift eccentric ass'y (29476DY) and looper avoid
eccentric ass'y (294760S)
• After
necessary to
line. Check
• To drain oil, take out the plug screw © beneath the
pulley. (Fig.
• Change
Be
sure
oil
cap @ mounted on shoulder lid, and
till the
oil
Example: Shell Tellus
new
machine or a machine out of service for a
oil
bathed once as mentioned above, it
fill
oil
oil
level every time when operating machine.
l)
to
new
oil
iffi
L-
in
our plant
to
fill
with
oil
in
the
oil
reservoir
followings
level of the gauge ® comes
oil
of
22
to
oil
#32.
well
oiled as
unless
oil
level indicates below lower
after every 2,000 hours operation.
32 cSt
follows;
are the best
in
viscosity at
to
upper
is
not
fill
DKN-1
tc:l*~'t"/±lfi/JL
flii~fflL
G~~L-c<tc~1t'o
• l::iH::.-01t ,-ci., '0::?J--11v=\'--y::.,7"@(39582L)~lllHt,
•
•
e
• 7ll31±~1/J~OO 2000
ru~~J:ll~~<1/f'i
-Cv
-Cv'ftv'~1/1/~~~T6c1:::~I±,
7ll3L,
-C::?J--1
;v,1/~1/®(50-648)~
""-JvO)
J::0)7..{1/I;::.
40°
T671Bl'i
~ffll.,-C<tc~v'o
C f;::.:t3ft01b*i!iil'.
(f1tl)1/.:r.Jv77A::?J-..{
~u,~1/1/bfl:l
5t0)::?J-..{
't"r=l:7ll3L,-C<tc~1t'o
a)
b)
c)
d) * !J
e) itf*v.1~~!)::..,,::7(54)
1v;o;-\Wn
it-$7:;.,1/.::z.l::·T(51154C, 51154D)
*!J
±il'(51134X),1::*!J
*!Jwl31{fi$fb(51136E)
1::
r
7J
A
(294760S)
~1/1/~-'¥-c:}!g(L
~1/1/~
.:r.1vH;::.L,.7j.:bfcGit'*To -i-O)~{l}V~t~1;::.r=t7ll3L,
G~~~~a.lfJ-c<tc~v'o
4if:
-/i'.r=l:7ll3L,'*""t
Gftv
l'i,
-c<tc~v
7ll3;o;~1t'*""to
10
000ffl/i'.f.!f5*-c:}!g[L
f::l
O)~~irrJt;::.~,f::?)-..{ JvV""-Jv~l/i~l.,-C<tc~v'
'~ilJ,
r=l:7ll30)~,~l±iblJ'*itlvo
7"~
!J
~O)
T t;::.;b6
\0
~1/1/~:t'~!J~fjf)Jt;::. Tl-f-C{~IOt6c1:::M
131/J~Mru~1/1/l'Ti0;71B~~1t'
"*To
W.lfJ-c~~T6c1:::~,
~71Bl'i~O)im1Jh:.f-]'-:i-C<tc~1t'o
~/t;o;G,
<6
'*'t"r=l:71BL
-C
<tc~v 'o (Fig. l)r=l:A
22cSt-32
'*fdl:l
~,fr=l:ML
M;o;::?J--11vv
cSt O)jt7ll3~
Jv#32
~~rJ.l~fflL
-Cv
'0~:h,;o;iblJ'*""t;o>G,
*1J.
(294
-CrltG;o,1;::.@J~T0.:.c1:::~$~L,fcibc1:::,
-c1t,ft1t
±il'(51134L)
76DY)
,
Jv ~ .1-{
-c,
,~1/1/l'i,
~,f
~
~j
L,
7ll3~7E01;::.::?J-..{
c1:::7ll3;o;::?J--11vv""-1v0) T 0)7..{::..,,;o,G
~00-c:3'.t~L
7"'7~'©(Fig.1)(22571A)~l'ifL,
-c<tc~v'o
7ll3~~<c1:::~
m'lb®
.c¥~L
7J
~~
-C;o>
r=t
A
*..ll
1v7
-C;o>
0
T;o;
.lj:f.l;::.
2

AU.
MAIN
Oil
*
Cap
,'(
)l,~-r:,:1
1
Needle
(J:.Kt)
2
Thread
Looper
("'FKt)
Mltaf'
C
+
......
~
Thread
Plug Screw
*~
CAUTION!
ALL
OIL
BEFORE
MACHINE
BEFORE
RESERVOIR
STARTING.
HAS
BEEN
SHIPPING.
tta!
-~~:.,~m&1"
l&"rttMIL:C<t:~I.
• ,::~:0,0).il Ip l.t~..,
-~-1.
illlff:
\"((f:~I.
DRAINED
'•
'o
~-~
~~ Oil
ef
- -
KEEP
BETWEEN
·
OIL
LEVEL
LINES
Gauge
*"'
)1,J/~.)
3

4.
Acijustment/wi.Jm
The machine
before shipment. However, in case
yau
to
or
replacement
manner.
4-1
Needle
Insert a
The concave part
stitching direction. Then, tighten
to
avoid loosening of needle. (Fig.2)®
• Confirm if
to
move needle up-and-down.(4-1)
• For your
distance between upper
lowest point
goes up
4-2
Looper
a) Check
edge.
When the looper is reaching farthest right position,
adjust
edge
direction, on
twn
* Pay attention
b) Needle Height (Fig.2)
Adjust the height of needle bar so
can accord with looper hole when
is passing
done
the
hu
been adequately adjusted
that
adjust in the field according to disassembly, mending
of
parts,
follow
Setting
new
reference,
to
Acijuatment
the
{Fig.3)
the distance between needle center and looper
to
be
unclockwise direction.
by
moving needle
screw A
(Fig.2)
needle into needle bar as deep as
of
needle should
or
not the needle face is
it
is the easiest manner to adjust the
surface
of
needle hole
the
highest point. {Fig.2)©
distance between needle center and looper
3.9±0.lmm,
the
to
the
.rear
side
of
needle bar holder. (Fig.2)@
turn the joint rod(C) clockwise
contrary, if more than 3.9 ± 0.1mm,
nut A
of
needle. The adjustment is
bar
the
be
the
of
to
be
as
it
is left-threaded.
the
up-and-down after loosening
at
our factory
it
is
necessary for
below mentioned
it
faced
to
rear
needle bar nut iinnly
set
correctly, trying
throat plate and
19.5mm
that
when needle
the
needle hole
left edge
of
will go.
side of
the
looper
to
be
DKN-1
t)l,
~t-#
4-1
!f!tv~l~!i*tl::-r!il:iEt.ttlll!lfEt-L,
tns&i
~-fl~"t'IMJlt>S~,Jf •~flt.I*
lfff
VC111!£L,
"C
< fe~i,
'o
tf-0~-
"Cl:f::\Jil,
L,ft;'
"(\,'*T
1k
0)1/l'iJJljj
tl-OJJ&#lt (Fig.2)
ttt-fflt#lt
a)
fJ-0)
l;:1fiHt-Cfflt#•t-c<t.:~1,
b)
tt•l~tt~•t.,;.M:rl::~,
,bA,
-o~~l-.tll•ti~l::?l~=
.it.
<"tJ~(ft~lli:<
~<
,e~i,
O)D!J/v~1,
'o
-tUJib~tt;lt-r7t-(56):(:l,-:>tJ:.tJ.ao-0
-0ibt.1"£i'"
o
'-oi6~~)~0)jlfjjjraJ
'o
(Fig.2) @
tttii-0:ti:.;to*~-~,;:-1..,
•t-c<t.:~11,.
tto.>
..t.
"'F
• tt~J:"'fL,ftl::~l~tj:, ftO)raJ~l=tttL, "C<t=~i,,.
•
ttiMi'l>J:iJ~"'.:>/t.utlR"t',
~~
19.5mm
i'". (Fig.2) ©
ru
ttOJraJ~~lflJil*--ol::,
lr.tJ:tJ
,~ibt.>-ltol::Jv-.1{-0)PJJIO)l::~11.illi"t'
"£To
tttii
dlr
ttUttJ:.'!,ft~OJ"'fffii"£~OJ-t
1v-.1{-~tfl~ibtttJ,
tittJ.
*it.ttlr.
{It,~~~
-ob~Wtt.,
*Wtt.
IHll'Cltii~~~r*i"• ~1..,1,,ftl::~-1..,-c<te~i,,.
4-2
)l,-1(-0)9.I.
a) tt.!::1v-.r~-UJffi!ff (Fig.3)
,1,,-.,.{-titttJAL,
MM.!::tf-UJtp
le~
A(269), B(18}~lJaD-CPo/r C(43242N)~JIL,
<t=~i,,.
tf-l::lv-
"C,
ru
-r,;,f-(269)1'1~-*V~i'". Jli'":ntal
,C.,*~UJitiM1'1
1,,.
1v-.1{-Vs
.r~-0) Ill
iQ!l::k~i, ,.-ft-1:tliMl:Bt.,
"C:ll'l>tiill!l
,(
l!lti~,J,.;1,
l~~tt.!::~.
3.9mm±0.lmm
~l-
P,;,
r(43242N)
,;!l½tj:, Po/
"C<t=~i,
l:~,lt,
1v-.1{-0)~
l::.1'!£L,
UJ
-r-:1
"C1'flEL,
r~~M
'•
l~JWL,
"C<t.:~
1,,.
b)
tf-O)jl!fj~
1t--rt-t)!:nfjjll,
i"-o~~' ,1,,-.,.{-0)~,!::tf-~tJ(-§ci"-oJ:;
~~--L,
Rf£1'1tf-*-1@&~(51254H)OJ-*
(51117)~
"C<t.:~11,.
J:
-C,
Jt,-.1{-0)~i\'ltlltf-O):fl,!,~lffiil
{Fig.2) @
"'f~-lt"(ftffjl,
V(22562A)~llao,
"C<t.:~1,
,.
l=tt•O)jl!fj
ti-*'
-c<
f-
"(
Concave
;r.!f!}f6
Needle
tth:.\'-
A Screw (22562A)
-*V
Bar
Conneotion
(51254H)
Part~
.
JJ
/A\
'-&
==
..,
Ball
Joint
~-,trh,{:Yf-
(52841.A)
~
LF--
Clamp
Nut
(56)
tt•-ro/l-
0,
4-_
®
Looper Rocker
Jv-.1<-,c±'tt
4
1
111
3.9±
0
·
1mm
j
~
Frame
(51244)
ANut (269) (43242N)
'To/I-
!
Looper
/t,-;'{-±it
Rocker
Rod
(753071)
P,;,r
1---Dscrew
C
looper
(225~
*~
Connect.ing Rod
~
,1,,-.,..i:-Vs--f~I-Po/t:'
(29192)
Fig.3

C)
Space
Ac:tiustment
Adjust
the
space between concave
to
looper
and pa.sses
-0.05mm,
frame shown on
d)
Setting
Set the loop guide so
side
be A=0-0.05mm when the looper goes forward
rear
first loosen the screw D
Loop
Guide
of
needle when
Looper
,1,,-.1~-
o--o.osmm
between
side
of
needle.
Fig.3 and
(Fi1.5)
that
the
looper moves forward.
(51108E)
needle
and
looper
part
To
obtain
the
of
then
incline looper rocker.
it
will
slightly contact the front
(Fig.4)
of
needle and
figure
A=O
looper rocker
C)
tt
~Ji,-,
Jv-/~-fflllfJ"-A(51244B)O)..:t-~(22519H)a~-Clv
-.1~-±-ti'(29192)~·10t-Clll~L, -C(t.:~1,
,t--.1~-il;tfr~L
SU.!:::1t--.,.~-.!:::O)IIIJl!f'H'i
1t
'o
d)
Jl,-:1:fl..(t: (Fig.5)
1t---:/P-1'r(75308l)J'11t--.1{-0JIIJ~l::.
<
.!:::~,
lt',,
~-o.>IUI
1111
-Ctf-0.)tl?l~ilillli"'o.!:::~,
{Fig.4)
fJ-0.)ifJ"t-~~Tillf
o-o.osmm
::.W!bi"'
8
Throat
Plate
tt-*l(51124E)
l::.tHliL--C<t.:~
oJ:;
l::.Jtit
A
Feed
~!J~51105N)
'o
(Fig.3)
tf-0.);t
.:t""'.J
-Cii:
~
M lt-c < te
Dog
@
<'~
l::.IIJ
~
Needle
tt
Loop
1v--:/P-1'r
Guide (753081)
Looper (51108E)
Screw (73)
*~
Fig.4
Feed Dog
i!!J.
Fig.5
5
Fig.7
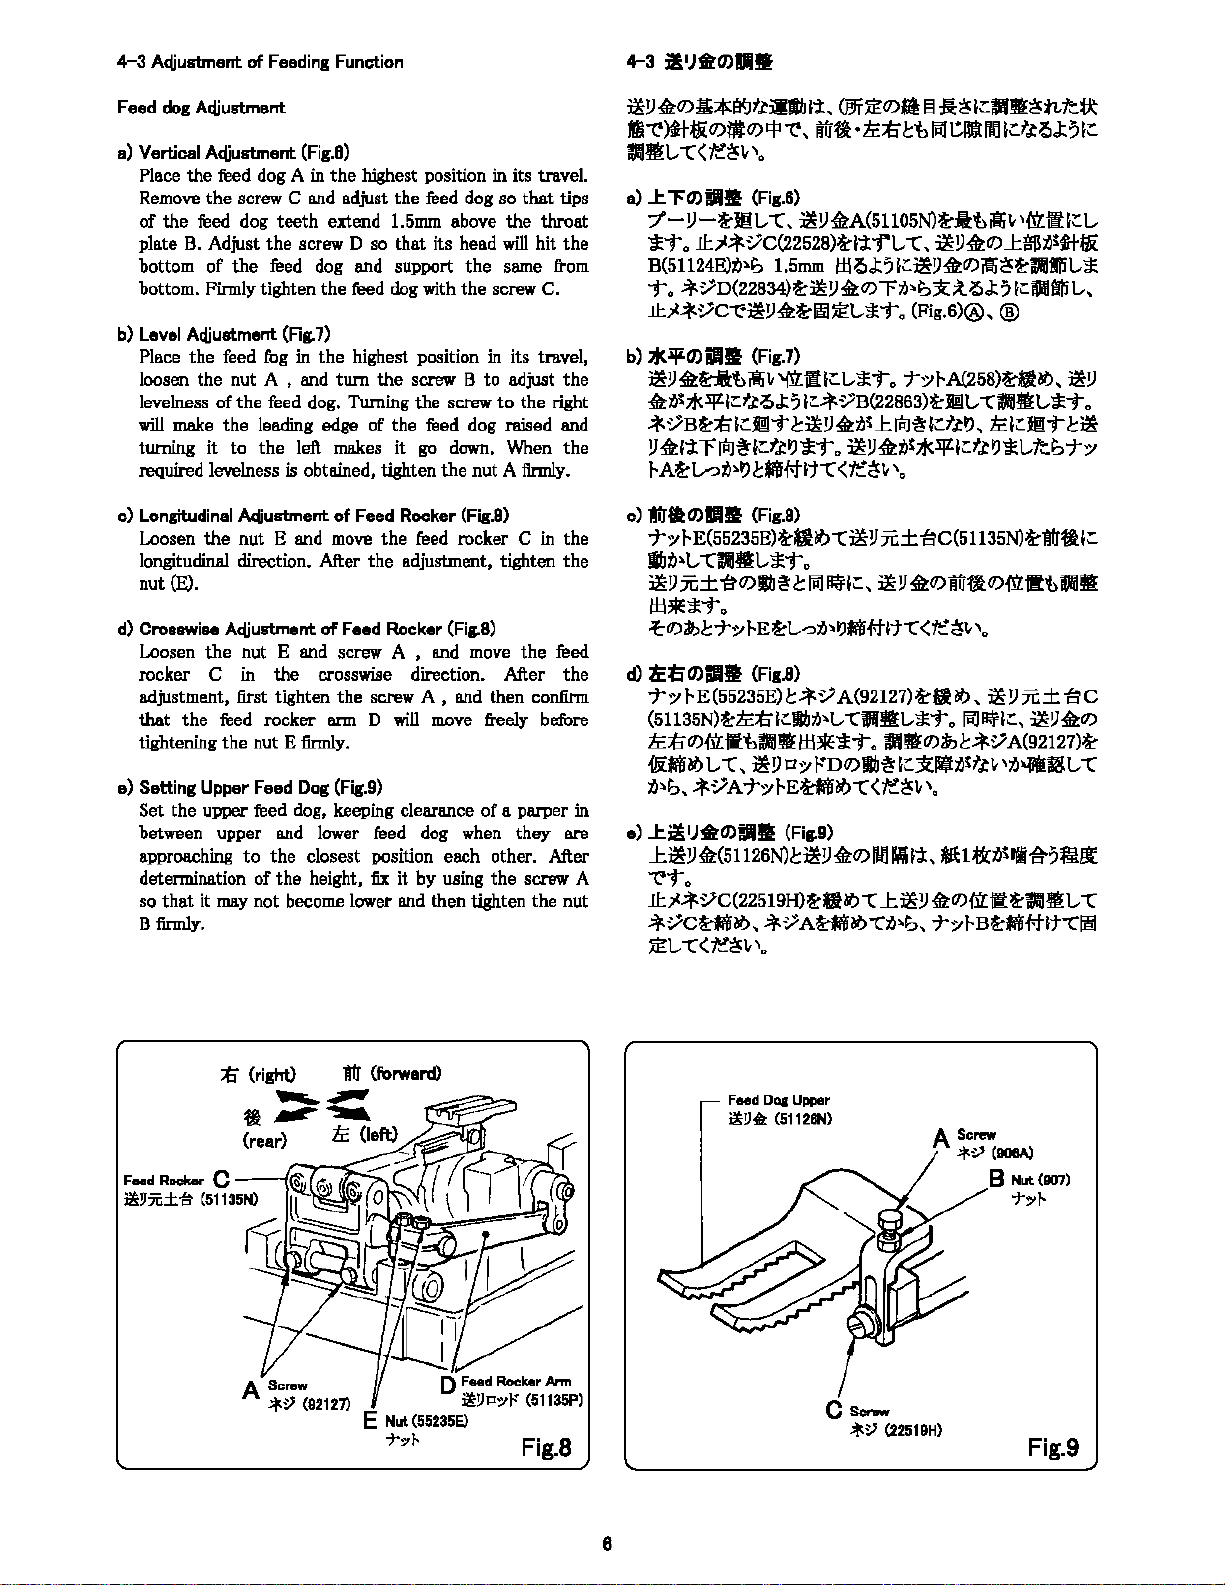
4-3
Acljustment
of
Feeding Funation
4-3 i1
1
J•0••
Feed dog
a)
b)
c)
d)
e)
Adjustment
Vertical
Place
Remove
of
plate B. Adjust
bottom
bottom.
Level
Place
loosen
levelness
will make
tuming
.required levelness is obtained, tighten
Longitudinal
Loosen
longitudinal direction. After
nut
Crosswise Acliustment
Loosen
rocker C in
adjustment, first tighten
that
tightening
Setting
Set
between upper and lower feed dog when
approaching
determination
so
B firmly.
A<fiuatment
the
feed dog A in
the
screw C and adjust
the
feed dog
of
the
Firmly tighten
Ac:Uuatment
the
feed fog in
the
nut A , and
of
the
the
it
to
A<tiustment
the
nut
(E).
the
the
feed rocker arm D
the
Upper
the
upper feed dog, keeping clearance
that
it
may
(Fig.8)
the
highest position
teeth
extend 1.5mm above
the
screw D
feed dog and support
(Flg.7)
feed dog. Turning
leading edge
the
left makes
E and move
nut E and screw A , and move
the
nut
E
firmly.
Feed
Dog
to
the
closest position each other. After
of
the
not become lower and then tighten the nut
so
the
feed dog with
the
highest position in
tum
the
of
of
Feed
the
the
of
Feed
crosswise direction. After
the
screw A , and then confirm
(Fig.9)
height. fix it by using
the
feed dog
that
its
screw B
the
screw
the
feed dog raised and
it
go
the
Rocker
feed rocker C in
adjustment, tighten
Rocker (Fig.8)
will
move freely before
head
the
the
down,
nut
(Fig.8)
of
in
its
travel.
so
that
the
will
hit
same from
screw
its
travel,
to
adjust
to
the right
When
A finn]y.
the
a parper
they
the
screw A
tips
throat
the
C.
the
the
the
the
feed
the
in
are
~!J1tl(J)&*$9t.c•lblj:,
S"'('')tt*J:i(J)$(J)tp"-e,
<PJr~(J)l,il
nut&•
ii:::t"
~
:ll:~l::Nl'E~n~t\::
ct>
PllCR!Jtflfl
lO~o~?
111mt...-c<te~1,,o
a)
..l:."'FO)illf
-f-!J-t-Jff
*i"'
0
B(51124E):IJ:.b
To
-*
1.1:Jt-*VC-e~!J:ftt-lil~L-*T.,
b)
*3110>11.
~!J
{tdt
1ttt.ii,l(.ljll::f.toJ:5
VB'k::t"
*
(Fig.6)
t...-C,
~!J1tlA(SllOSN)t-M'.tiiit-
J.b1.:f
VC(22528)t-l-j:--rt...
1.5mm
l±lo~5lr.~!}{tt1)jl!fj~a-Jllltlit...*
VD(22834)a-~!J~(J)
(Fig.7)
J6i,
'fil:W
l:.
t,*i"' o 'To/
l:.-*VB(22863)t-i!lt...
l-:tm-t
<!:~!1
•tii
-C,
~!){ttl)
"f
ti:.b;l(;;t.,5~;
(Fig.6)@,.
J.
A(258)dao,
J:.
!Pl~
l.:f.ttJ, ii:
'OllRl-:t...
J:.tffl;blft~
J::l\lf
@
-Cllill'EL-*T
l:.ffl-t
JJ{t1tr1P1~1::t.ttJ*i"' D ~!J{t;>)I,Klll•=t.ctJ*t...~~r,,
f.At-l/.>iJl>t).!::*f#•t-c
c)
1irft0>•t1
'To/
f..E(55235E)t-.ab-C~!J jc±'f:?C(51135N)t-tfJttl::.
lb:b~t...
~!J
JC±
(Fi1.8)
~--L-*"t
'E?(J)IJ ~ .!::
0
lffl
<tt:~i, ',.
ll~H::,
~
!J
{t(J)
nufl
(J)-fitR'b
l±l**To
-ctl)il>J:1"'!1
d) tfti0allll (Fic.8)
'To/
r
(51135N)t-ti::::t"l::I/Jti:.L,
f..E'k
E(55235E)
L,~tl:.tJMM-.t-C
.!::-*
V A{92127)t-ll
-Cft!IIL,*"t o fiiJ~l::,
<tt.
~"
ab
'o
..
~
!1
jc±-f:r C
~!]·'1)
ii:::t"tl)utfRtlll'El±l**Ta lll'Et1)i,.!::*VA(92127)t-
-OiM~
t,
-c,
~!Joo/ ro(J)I/J~ l::xl!iJ»tt.ti, '>NiiiSt,
tJ:.b, *VA'T:YrEt-Mao-c<f!~i,,.
1
e)
J:.m
)'.0)illf
J:.~!J•Cs1126N)c~!J1tl(J)flOMU-.t,
(Fig.9)
~1~:b11i-A-:>&Ul
~To
.I.I:;(*
VC(22519H)a-a~~ J:.~!J •(J)fltiRa-R!IIL,
*Vet-Mao,
~L,
-c<f!~l,
-*VA'a:Mab-Cti:.;, To/rB'kM#lt-Cfflif
,0
1-:
ffljl,,
~!J
o
J:~
11§1
-c
-C
::t"
FMdRoeker C
ia!J;u±-t;t
(51135N)
(right}
....__,,.
-.r~
(rear} ii: (left)
A
Screw
*~
(82127)
tfr
(forward)
E
Nut
7'71-
D
(55235E)
Feed
Rocker
i!!Ji:r::,J:
Feed
i!!J.
Ann
(51135P)
Fig.8
6
Doa
Upper
(51128N)
C Scntw
*V
A Screw
C22St9H)
*~
(908A)
8 Nut(807)
-t-::,J-
Fig.9

4-4
Change
The
7mm
change
mentioned.
• Loosen
{Pay attention
•
The
stamp number
(The figures mean
• Confirm
stitch length
tightening
nut
of
Stitching
machine
in
A firmly.
is
our
plant
the stitch
the
nut A of
indicated plate C should be corresponded with
if
or
not
the
Length
(Fig.10)
properly
as
of
nut A • After
actiusted
before
delivery.
length,
by
follow
feed crank stud.
it
is left-threaded.)
the
stitch regulator end cap.
the
number
the machine has obtamed
trial operations after tentative]y
by
Should
the
procedures
of
stitch
the
confirmation, tighten
the
stitch
you
per
length
require
as
an inch.)
the
required
of
to
below
the
the
4-4
al!!l.0>i1Hf (Fig.10)
DKN-1 m!Uffl~v;:.,f-;tai
*To
fl
El
ffi'k~J!"t-ol:~li,
•
~9111Jif11117)7o/J--
tt)1--,t-A
• ~9111'i
tt~i,
l;Uf*~~T
8(51185D)~DL-
'•
~!)'9flj
1Xl7)Jll.ff~llmL-
A(269)f:ll~--C
B f::~J/vielt*t.t.{:.-f,,~!'JO)it
tt~-r.
e °To/r A
TAt-fi©jli
tr~).{l(IRLL.-?:bi.~ftr-t•t"'C
~abl.-
El
f.-.Jl
"'C<~~lt'o
"'C7Arfl1, '~l.---C(fe~\,
--C,
(-*~©al
1*fM.tJ1ffB~'*L-~~'To/r
<te~v
El
(17mm 1:llmL-
(te~1,
o
•-t:1:Hti)l::tta1.,
--C
W:ilfi'L-
--c
<te~1,
\,
-C(t::~l.'o
"'CO;!aj::~li~&H:::-Etb1t--C
'o
El
(ll:::t.t-:,"'(1,,-?,tJl.!!:>
A(269)a-
'o
--c1,'
'o
<
811)
<Attention>
In
case
that
the
stitch
length
is
changed,
the
needle
guard
as
well.
(Refer
4-3-3)
4-5
Needle
Guard
Actjustment
the
Set
come
concave
by
position
between needle and needle guard. Simultaneously adjust
needle guard
needle hole shall
needle guard so
in contact with needle when looper is passing
part
of
needle.
the
screw A when
to
the
the
needle, keep
by
the
screw B
be
corresponded with
(Fig.11)
that
the
To
mount
the
needle guard comes
the
clearance
so
that
absolutely
edge
of
looper may not
needle guard properly
to
the
of
o-0.05mm
the
lowest point of
the
•
x·
level.
adjust
closest
the
the
tt>
am
•~•E-t-i>4!:~rt.
~l,
"C(tl~I.
4-5
tt:fl-t:O>ilHI (Fig.11)
'·
1>-rtt:n-i:cs122s>0>111m
tttJ-t:'(51225)f'i, Jv-~<-:bttf-11);.l <"~iU©ll~iltr.!::
~,
,i.,-~~-0),9ct1/ibltftl~$-?tJ\~ti1,
tf-~jJ-~17)111Jlat.t,
(Fig.11)@
*~
A(2258B)dab--Ctl-1J-~f.-l/Jt)\l.-
B(22834)
(Fig.
nm:b~~-:ittt:,,
l,
'•
f.-
ll)@X
JI
l.-
7-{1/a--,C~-lt*"t'.
M'.biff--:,1,
"'C
,
tt
A'.
11)
r iii
*~
A<22ss5s>a-L-....:i:b\!'J.!::*l-t-t•t"'C<r-:~
,ttl:~
l:
tt
,J::;
l:::PilflL-*"t
o-o.osmm
"'CPIJIL-,
jJ
*1t*~
-
1-.9
11)
..I:
o
~To
iii
11)
C Indicetor
ffljf-~ (51186E)
Stitch
B
Re1111ator
~!JIiii
End
<msso>
Cap
A Nut(289)
'To/I-
(Left-t:hread)
Fig.10
7
®
s-w
*~
(22585B)
~
®
B Screw
*~
Fig.11
(22834)

4-6
Presser
a)
Presser
Press
check
the lowest position and the presser foot can be
disassembled, it means that the presser bar is correctly
mounted. The adjustment of presser bar height shall be
done by
Foot
Adiustment
Bar
Height
(Fig.12)@
down
the lifter lever installed
the
height
of
needle bar. When
following
manner.
(Fig.12)
at
the rear side and
the
needle bar is
at
H ~I.fl0>:111
a)
-~--
(Fig.12)
(Fig.12)@
l1f!.:r.fl.ifv /<-(51183B)~:1'-!J-(1.)Ji!P]
.:r.*1t~.H1,
t.>J'±-fL-tis1:1:1*otitmti~i11E"t'-t
tt~AltJ:J11tuttal::L-tt.~'!,
o
&:.-~l1JIL,
l1fl.:r.~o:>l&
-Cl1JI
• Set the presser bar connection by
the clearance between upper surface of throat plate and
lower surface
up the presser
b)
Presser
Adjust the pressure
be
sewn
adjuster
and
will cause thread break, and too
result in mis-chaining
c)
Tum
upper feed dog comes in contact
not, it is
0.3mm
upper feed dog
position.
B in clockwise direction
unclockwise
Mounting
the
between
of
presser foot will be
foot
by the lifter lever.
Foot
Pressure
of
presser foot, so that
is
fed
uniformly.
direction to decrease. Too
Top
Feed
pulley for a rotation by hand
fixed
in
the
the
hook
at
where
Tum
of
stitch.
Lifter (Rg.12)@
exact manner. Then, set the clearance
of
top feed lifter and
the
upper feed
the
screw W so that
5.5mm
when
the
material to
the
presser bar spring
to
increase the pressure,
much
pressure
weak
pressure
to
check if
with
the top feed lifter. If
dog
will
or
the
is the lowest
not
edge of
lifting
often
the
•
l1f!.:r.fl~~l1PL-,
IW~
5.5mm.
~.:r.n~o:>-*~
l-it!IL-
b)
~I.EEO>D.111
-c
a11<-,r1:a
w.:r.~~
~o
(F'ig.12)@
A(531)~,
<tt:~1,
'o
1:.1
tli ~n.r,J:-;1:~I.flO)~I.EE~amL;~
J:Jftt~$,
~.:r.*flt@~(51257M)o:>«!W
tt*1iitW.:r.~o:>ri11
To
l1Jl~A:1'!J::.,-~pjli
t.ttJ,
ftl::D-r~ff(t.t~*i"., ¥Px$tJ~!li'~obf.~Wno:>
JJj(t!in:.tl~t*i" 0 *ttfii"~oc~a11
c) J:m•J••J:,,-0)
J:i*!J.!J7~-(51105G)CT>ot•f~.
B(51256N)l-~J:.tm-t~l1Jl.:r.J:EtJ~n<
,tis1±1tl<t.t~*i"
••
(Fig.12)@
:1'-!J-~
1
IID«i~-tt
tt~~, J:~!J.»s97~-l;:~vt;,tiltntfil1E"t'"to
J:;l!J:&tJSJit "ftJS~t.:c~,
Iii~
0.3mm
"t'i'. (Fig.12)@
.:f~
C(95)~aiii>-Cl\'l~L,,
1,\,
!J7~-o:>_1eWi1~J:j;&!)~o:>ni,
97~-o:>«£-~iiBL,
-C(ie~
0
Foot
Lifter
jlp~Ln<-
s-wA
*v
Screw
*v
Lowr
(531)
C
C95)
(51]83B)
-;::,---<
,,,<-
11/
{(
I:
I
'
i
B Pre,ter
.
:·
--r---u.J
Spring
jlp~:;l'!J~?'iilffi
Regulator
(51258N)
5.5mm
I
@
Serew
*~
(95)
Fig.12
8
 Loading...