

Page 1
QUICK START GUIDE
1
Page 2
Q Pro Series Quick Start Guide
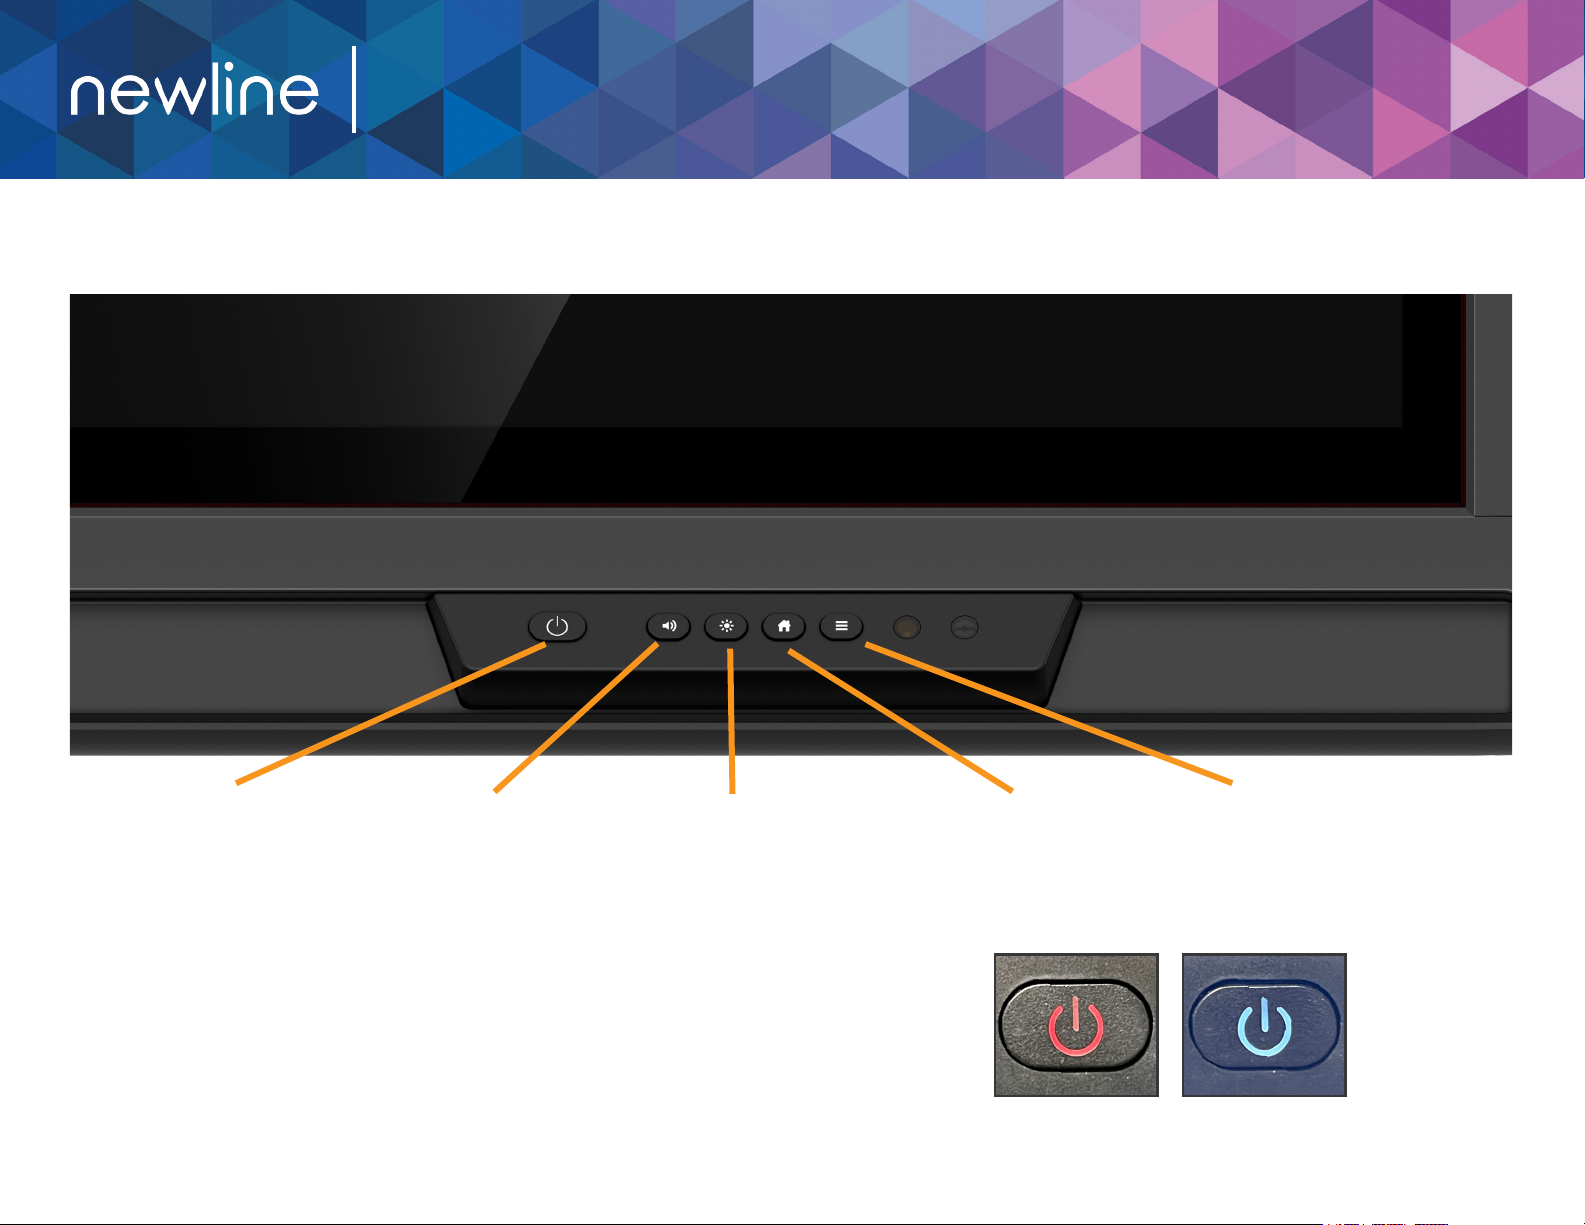
Q Pro Series Panel Front Buttons
Power Button
Turns the display on/off.
Volume Button
Adjusts the sound
volume higher or lower.
Brightness Button
Adjusts the brightness of
the screen higher or lower.
Turning On the Display
1. Press the Power button on the bottom right side of the display.
2. The button will change color from red to white once the display is powered on.
2
Home Button
Takes you to the
Home Screen.
Off On
Settings Button
Brings up the settings
menu.
Page 3
Q Pro Series Quick Start Guide
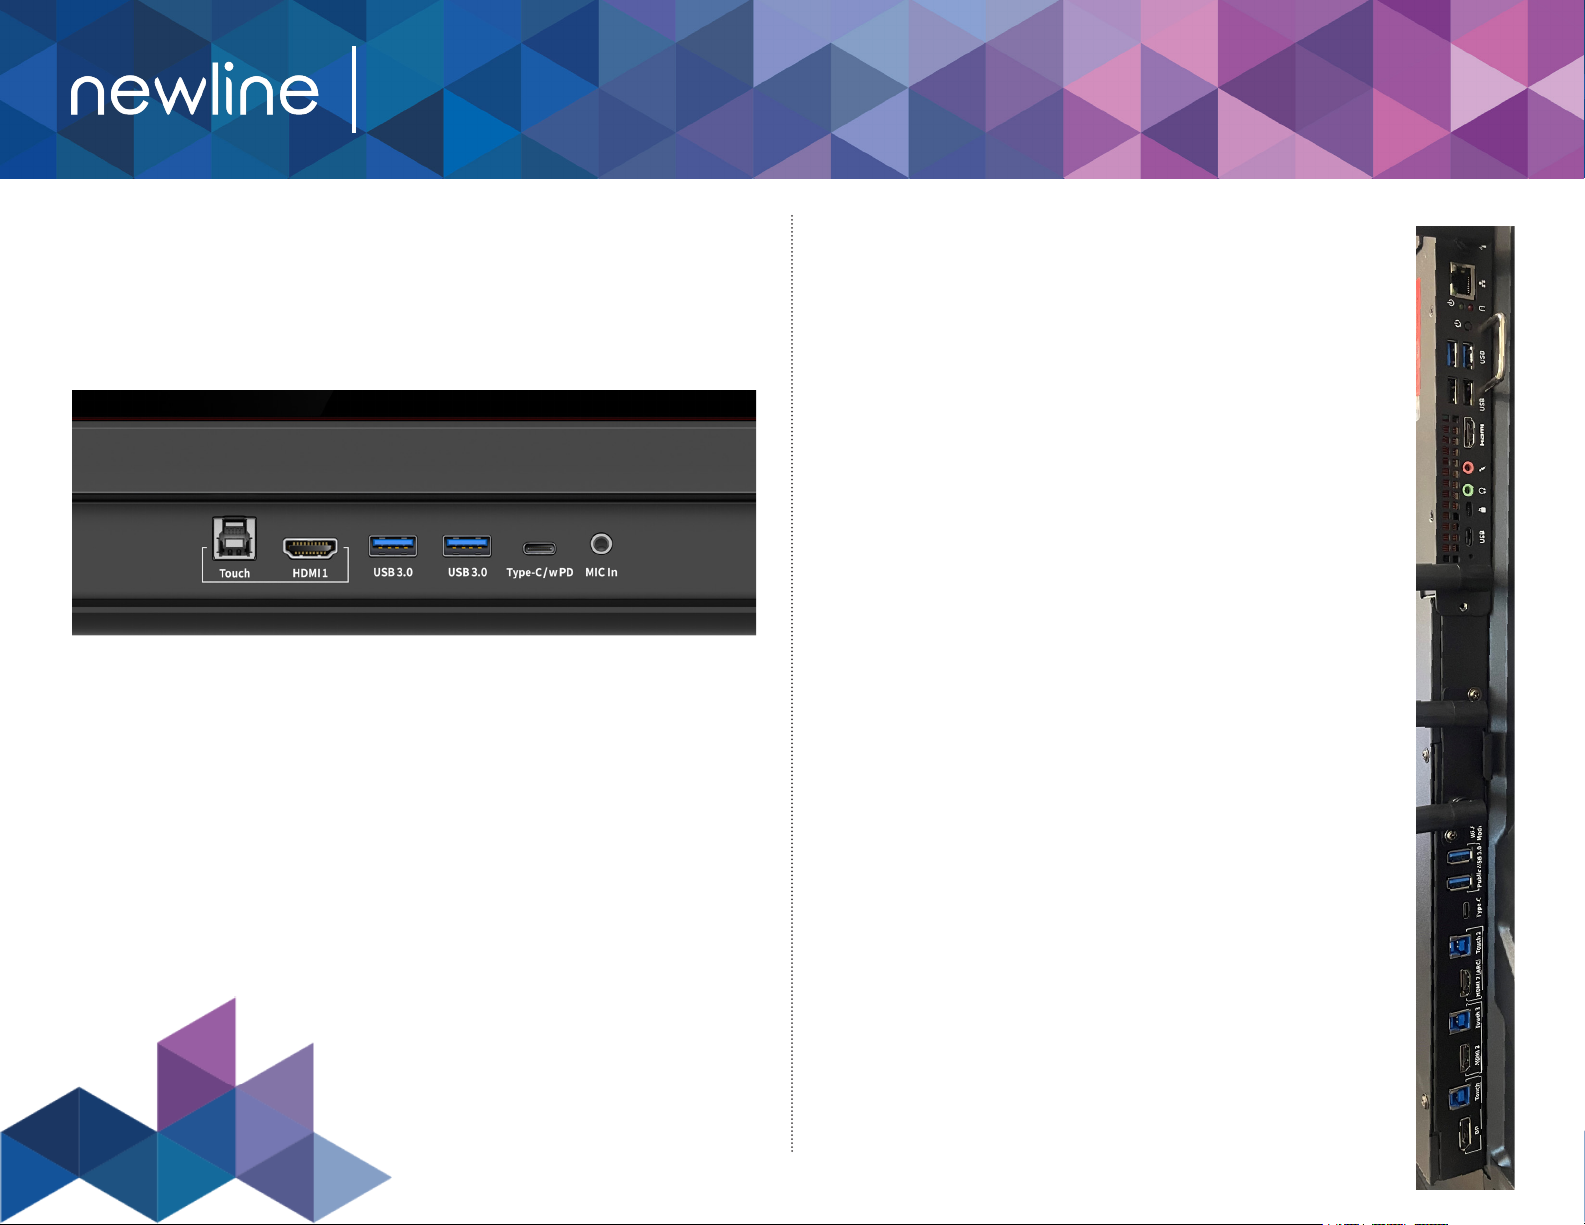
The Front Ports
There are six ports located on the bottom left-hand side of the front of
the panel: one USB Touch port, one HDMI port, two USB 3.0 ports, a USB
Type-C with 65 watts power delivery port, and a mic-in port.
The Side Ports
The following ports are located on the left side of the
panel:
HDMI IN 2.0 x 2
DisplayPort 1.2 x 1
USB Type-B (Touch) x 3
USB Type-C (no PD) x 1
USB 3.0 Type-A x 2
USB 3.0 Type-A to Android x 1,
HDMI OUT 2.0 x 1
RS232 x 1
RJ45 (Gigabit) IN x 1 & OUT x 1
SPDIF x 1
SDM/VGA x 1
Audio Line out x 1
Wi-Fi module slot
OPS Slot
3
Page 4
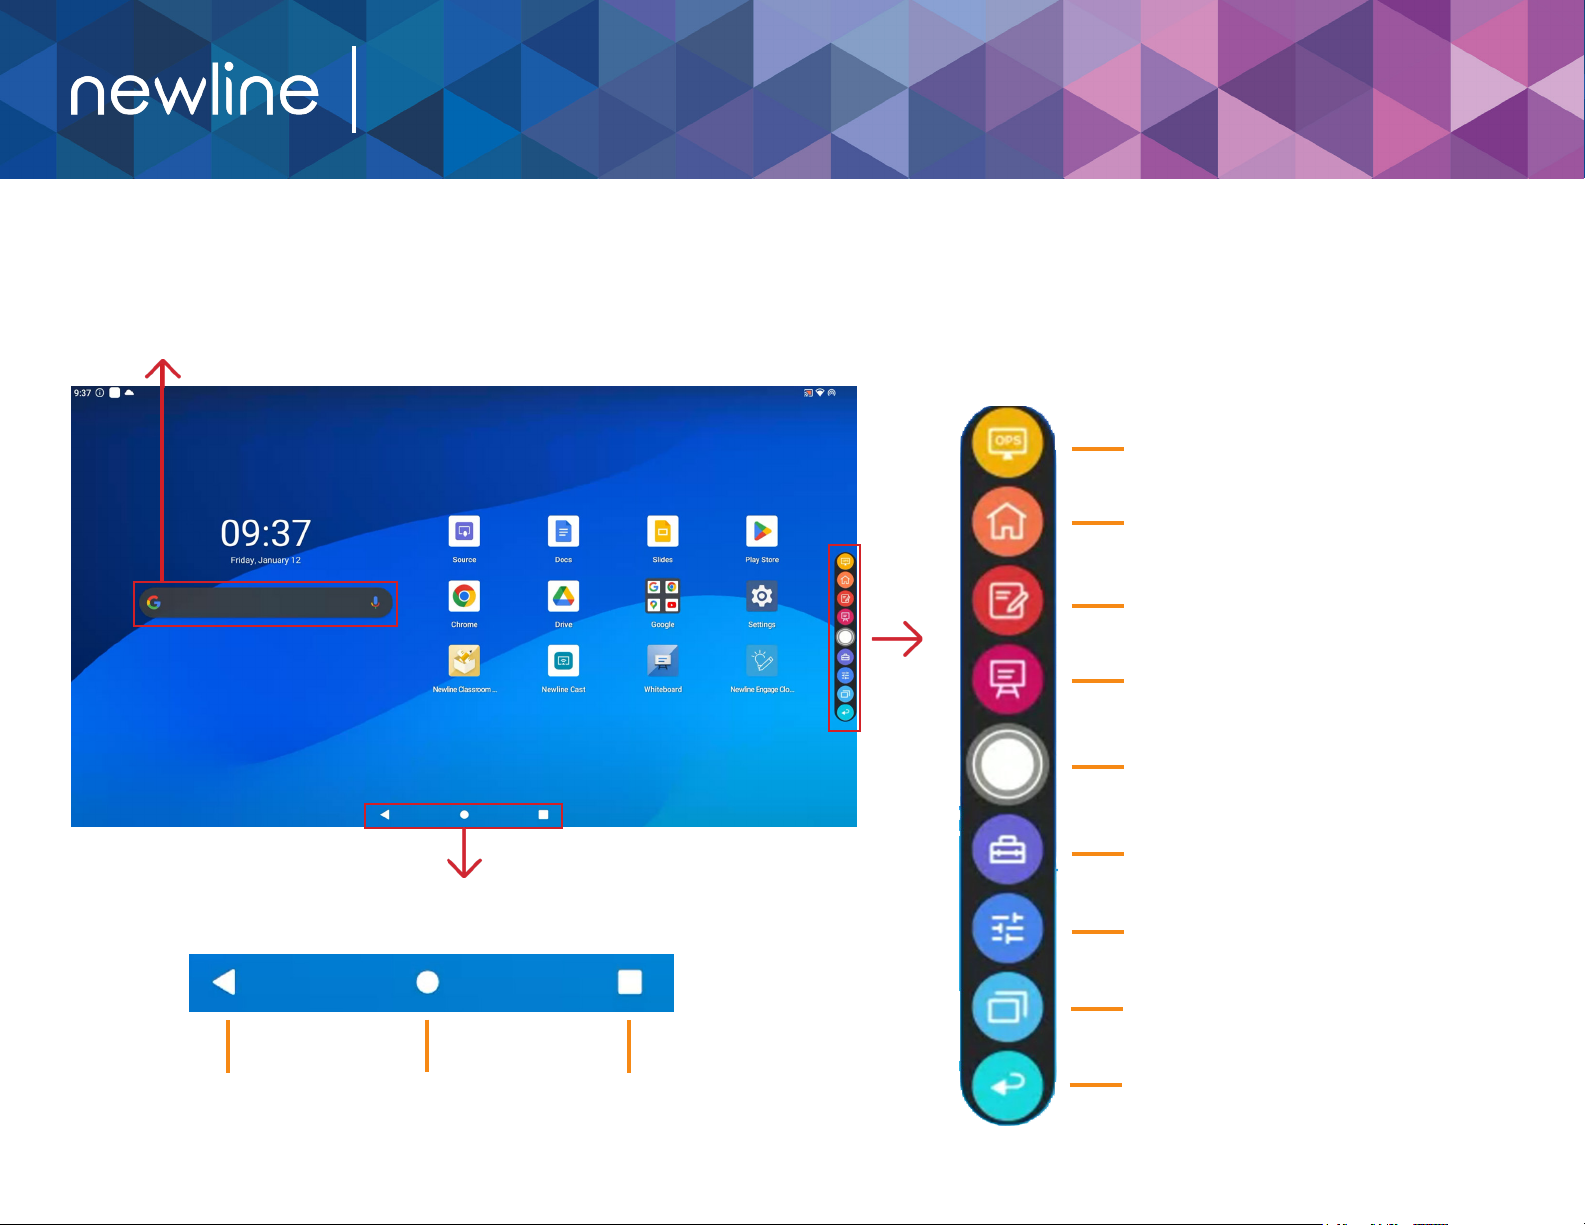
The Home Screen
Q Pro Series Quick Start Guide
Google Search Bar
Search the web and the contents of your panel directly from the homescreen!
Android Toolbar
One the bottom on the panel screen is the Android toolbar. Use this toolbar for the
following quick access tools:
Quick Access Toolbar
The Quick Access Toolbar can be accessed by tapping the white circle
on either the left or right side of the screen. To minimize the Quick
Access Toolbar, tap the white circle again.
OPS/Sources Shortcut
Takes you to the on-board computer (OPS). Tap and hold
to pull up additional icons that can take you to the Sources
menu, letting you easily switch between available sources.
Home Shortcut
Takes you to the main Home Screen.
Annotation Shortcut
Brings up whiteboarding options on top of whatever is on
the current screen. Tap a second time to save a screenshot.
Whiteboard Shortcut
Takes you to the whiteboarding screen, letting you draw and
takes notes instantly.
Quick Access Menu Button
Tap to open the Quick Access Menu. Tap again to minimize
the menu.
Quick Access Bar
Opens up a menu to quickly access Classroom tools,
calendar, calculator, clock, and more.
Sound Settings
Opens up a menu where you can adjust the sound settings.
Back
Goes back one screen
or to the previous app.
Can also be used to
exit an app.
Home
Takes you to the
main Home Screen.
Task Switcher
Pulls up all apps currently
running on the panel.
Running Apps Shortcut
Pulls up all apps currently running on the panel.
Back Shortcut
Goes back one screen or to the previous app. Can also be
used to exit an app.
4
Page 5
Q Pro Series Quick Start Guide
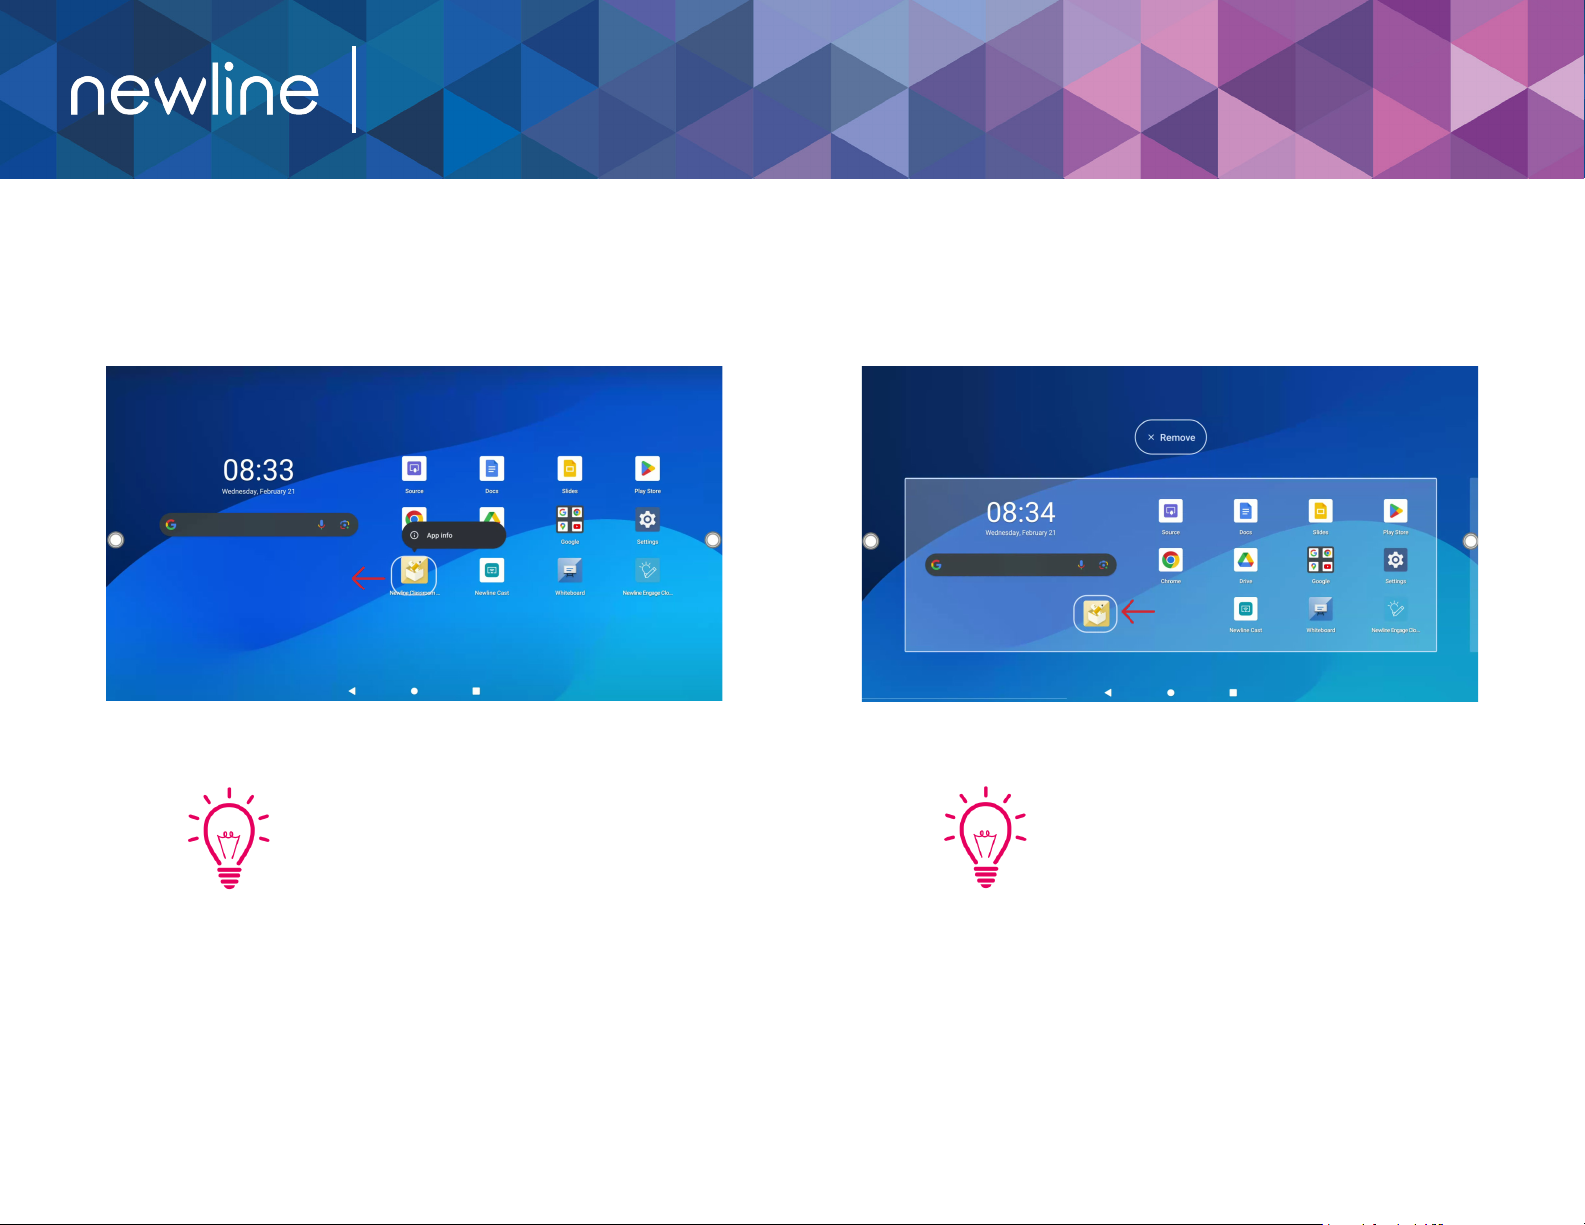
Moving Apps to Customize Home Screen
1. On the home screen, long press on any app to move its location. The panel will show you where you can place an app by creating a white rectangle in your
desired location.
Bonus Tip:
To create a folder of multiple apps, simply
move one app on top of another app. A folder
will be created automatically. Long press on
the folder to rename the folder.
Bonus Tip:
By long pressing, you also have the option
to remove the app from the home screen or
uninstall the app completely.
5
Page 6
Q Pro Series Quick Start Guide
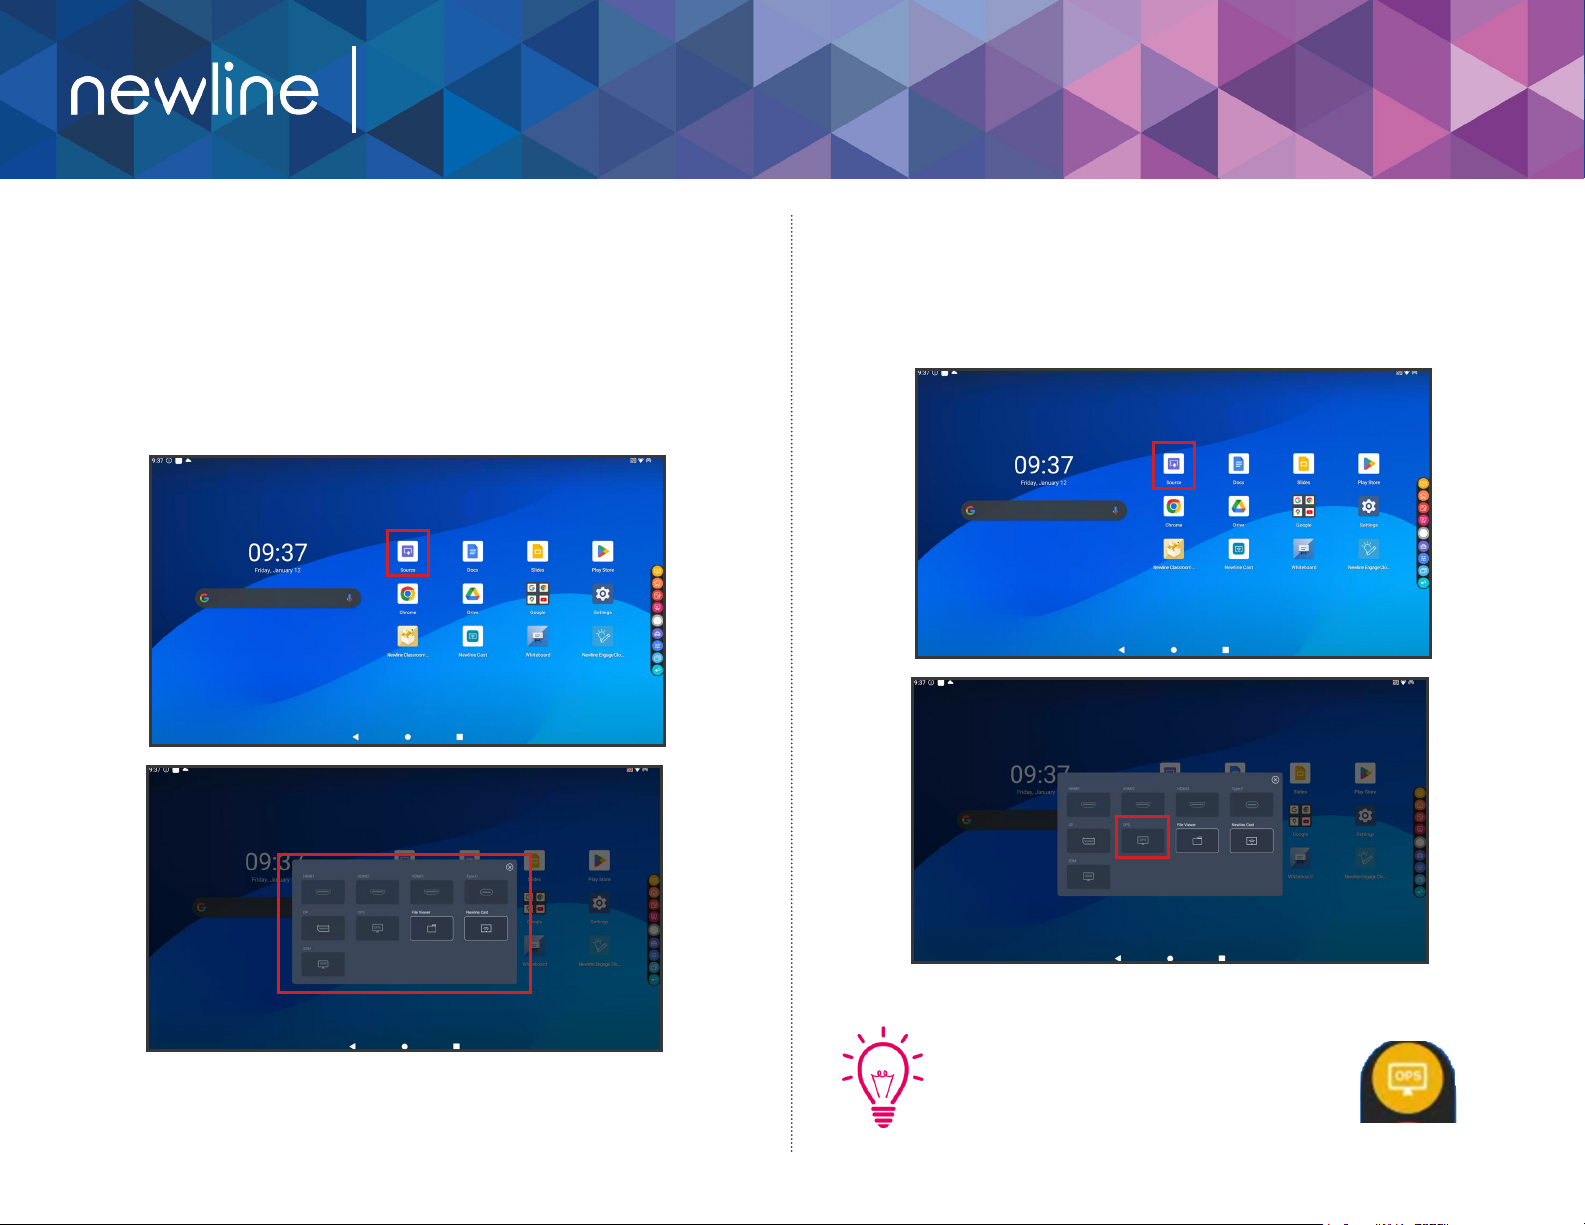
Switching Sources Accessing the Built-In OPS Computer
1. Tap the Source icon on the home screen.
2. Any device currently connected to the display will light up in
white in the Source window on the home screen.
3. Tap the icon of the source you want to switch to.
4. Plugging your device into the front ports will automatically
bring up the device on screen.
1. Tap the Source icon on the home screen.
2. In the Source window that pops up, tap on the “OPS” button.
3. You will now be viewing and using the built-in OPS Computer.
Bonus Tip:
You can also quickly navigate to the OPS
using this icon on the oating menu on both
sides of the display:
6
Page 7
Q Series Quick Start Guide
Switching Sources
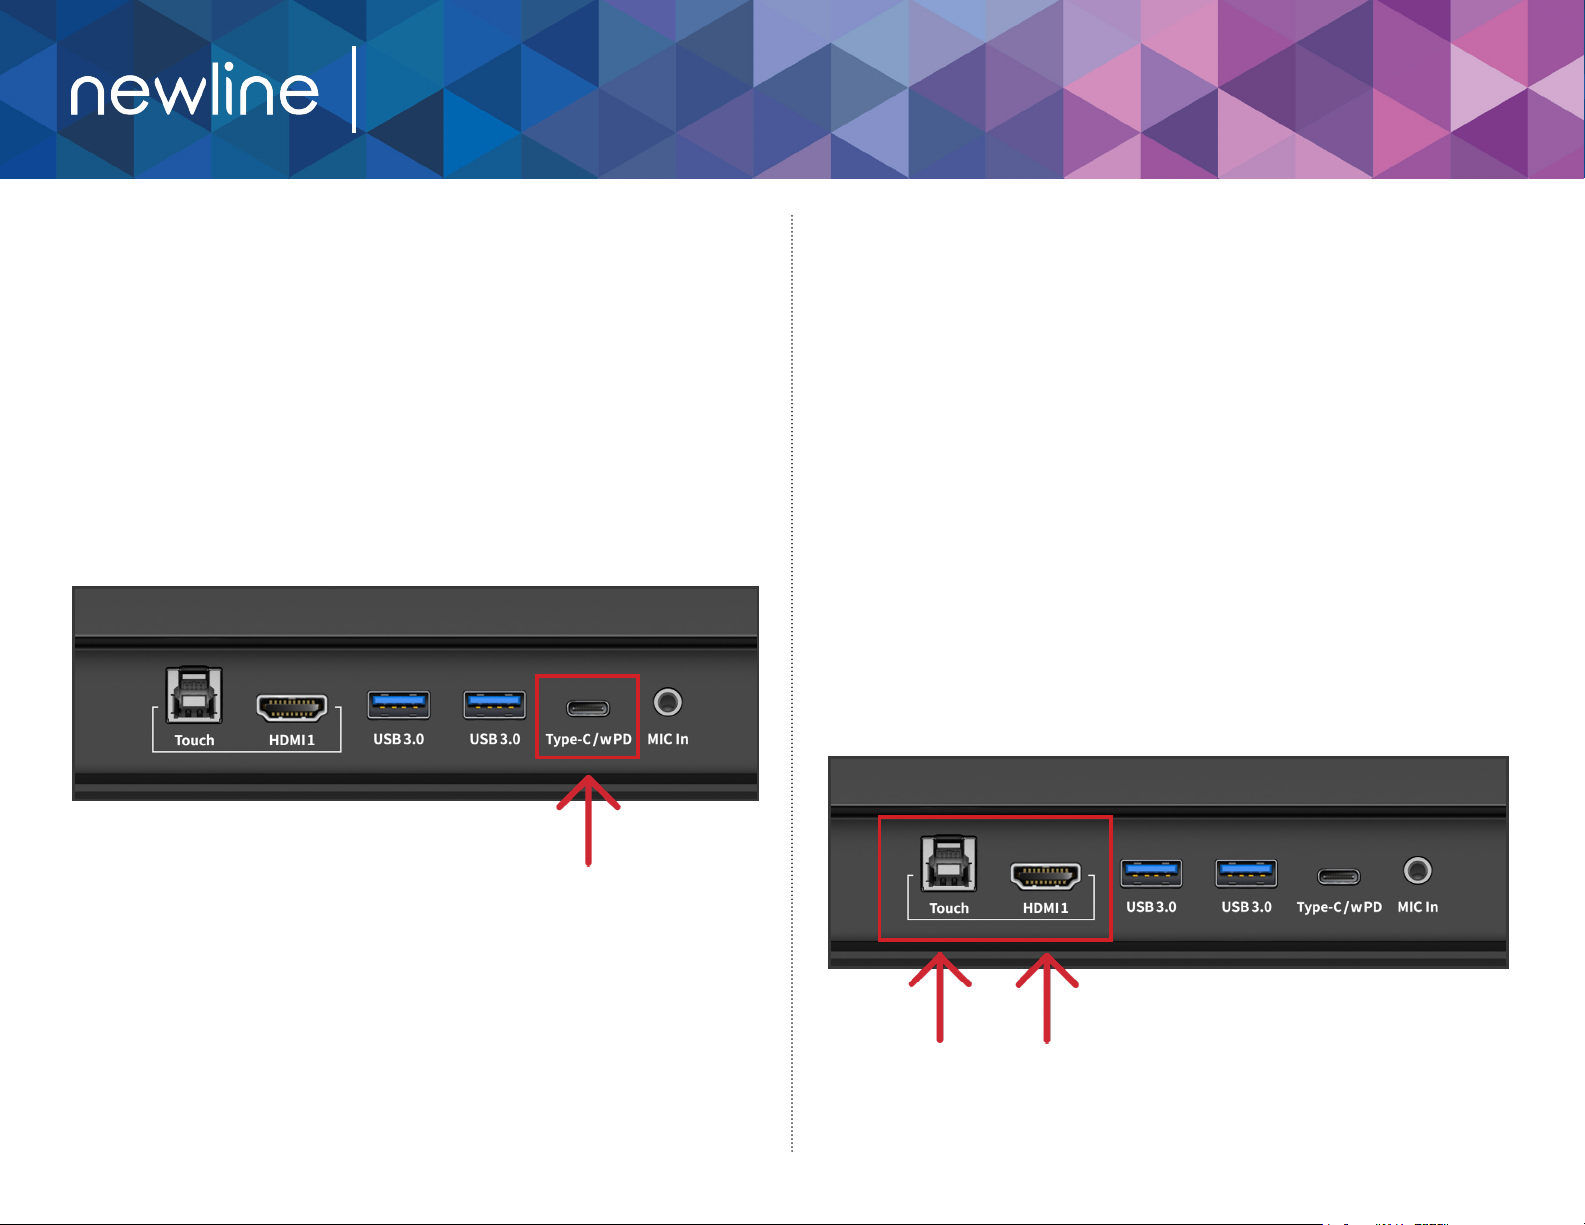
Connecting a Computer with USB-C
1. You will need a USB Type-C cable to connect a computer.
2. Plug in one end of the USB-C cable into the front or side USB-C port.
3. Take the other end of the USB-C port and plug it into the USB-C port
on your computer.
4. Once both cables have been plugged into the display and the
computer, the matching port should turn white on the Source
window.
Switching Sources
Connecting a Computer with USB & HDMI
1. You will need an HDMI cable and a USB A to B cable to connect a
computer.
2. On the front or side ports of the Q Series, plug in one end of the
HDMI cable into one of the HDMI ports.
3. Take the other end of the HDMI port and plug it into the HDMI port
on your computer.
4. Plug in the USB-B end of the USB cable into one of the front or side
ports labeled “USB Touch.”
5. Take the USB-A end of the USB cable and plug it into the USB port on
your computer.
6. Once both cables have been plugged into the display and the
computer, the matching port should turn white on the Source
window.
7
Page 8
Q Pro Series Quick Start Guide
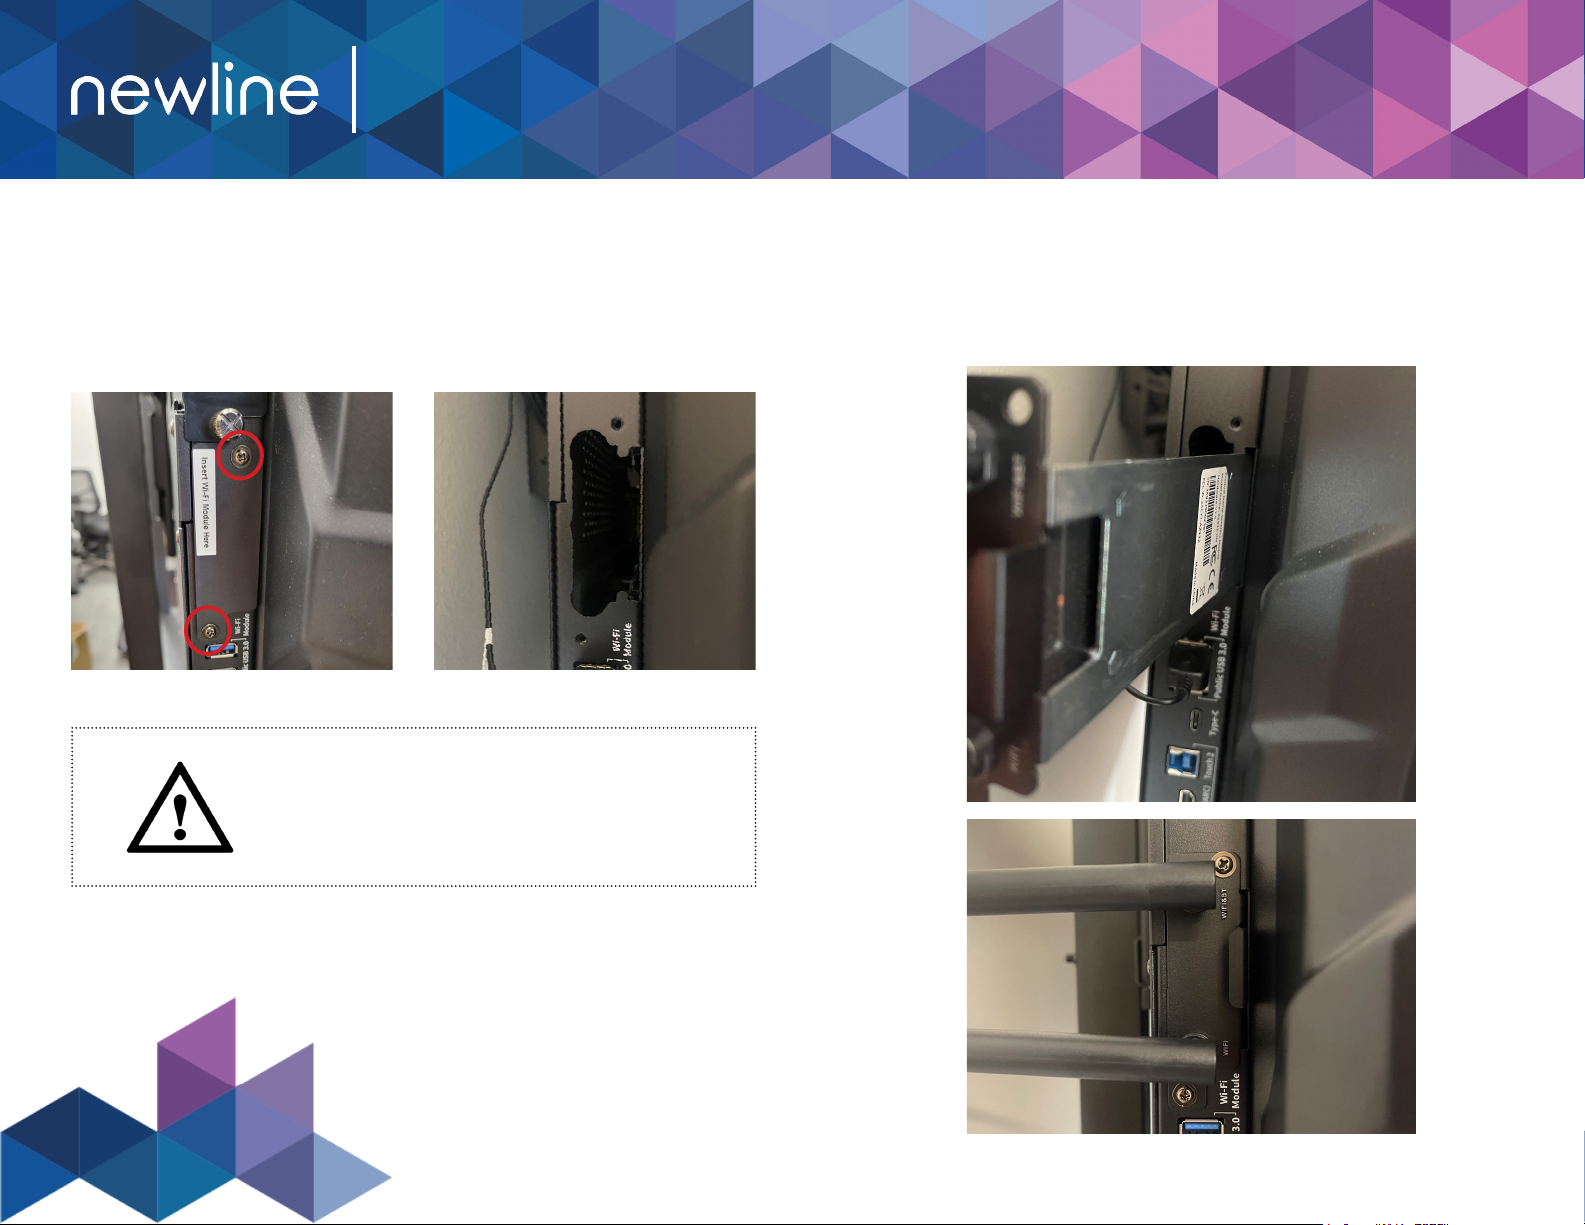
Installing the Wi-Fi Module
1. Unscrew the 2 screws on the Wi-Fi Module port on the rear of the
panel and remove the shielding cover.
Caution
The Wi-Fi Module does not support hot plugging.
Therefore, you must insert or remove the Wi-Fi Module
when the display is powered off. Otherwise, the displays
or Wi-Fi Module may be damaged.
2. Insert the Wi-Fi Module into the port until rmly seated, then use the
2 screws to secure it.
8
Page 9
Q Pro Series Quick Start Guide
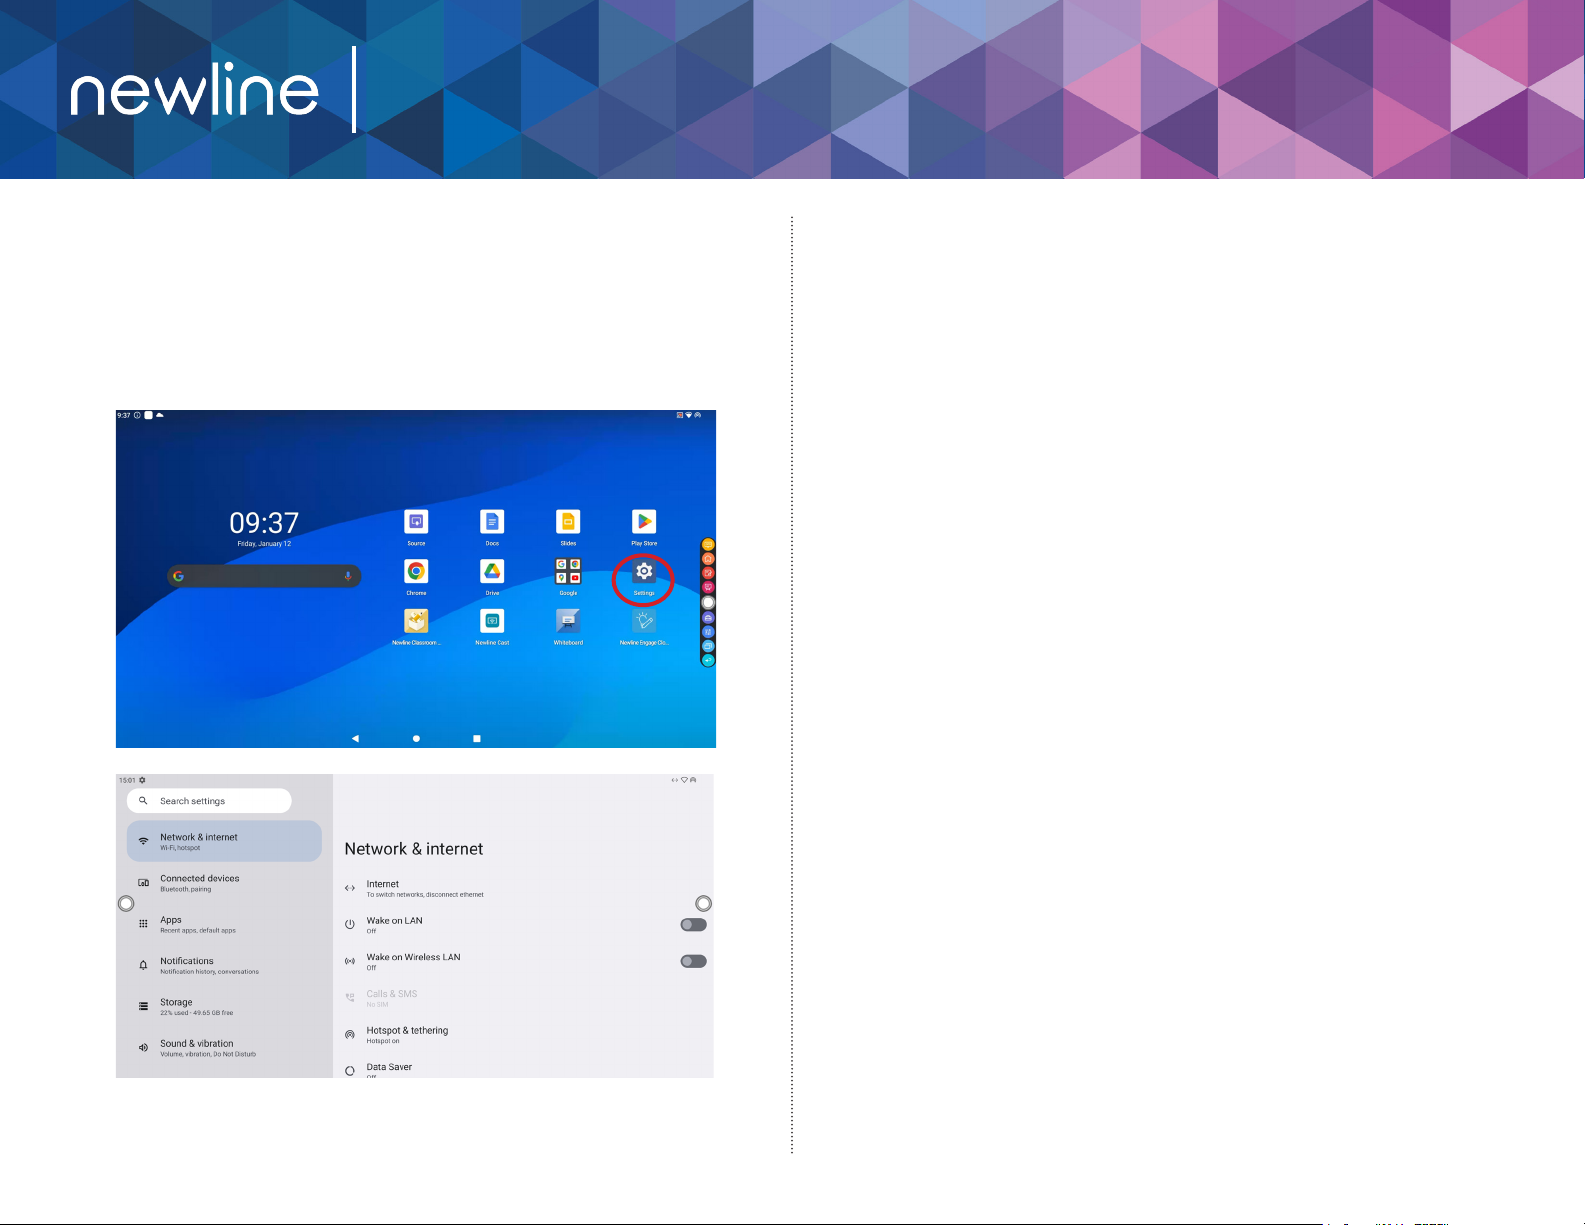
Changing the Settings
1. From the home screen, select the Settings menu item.
2. From the Settings menu, you can adjust things like the Power
settings, Internet Network settings, Date & Time, Wallpapers,
and more.
Launching Updates
Updates to Firmware and Apps launch automatically “over the air.”
A pop-up item will appear on the screen when the update is ready
to be downloaded.
9
Page 10
Q Pro Series Quick Start Guide
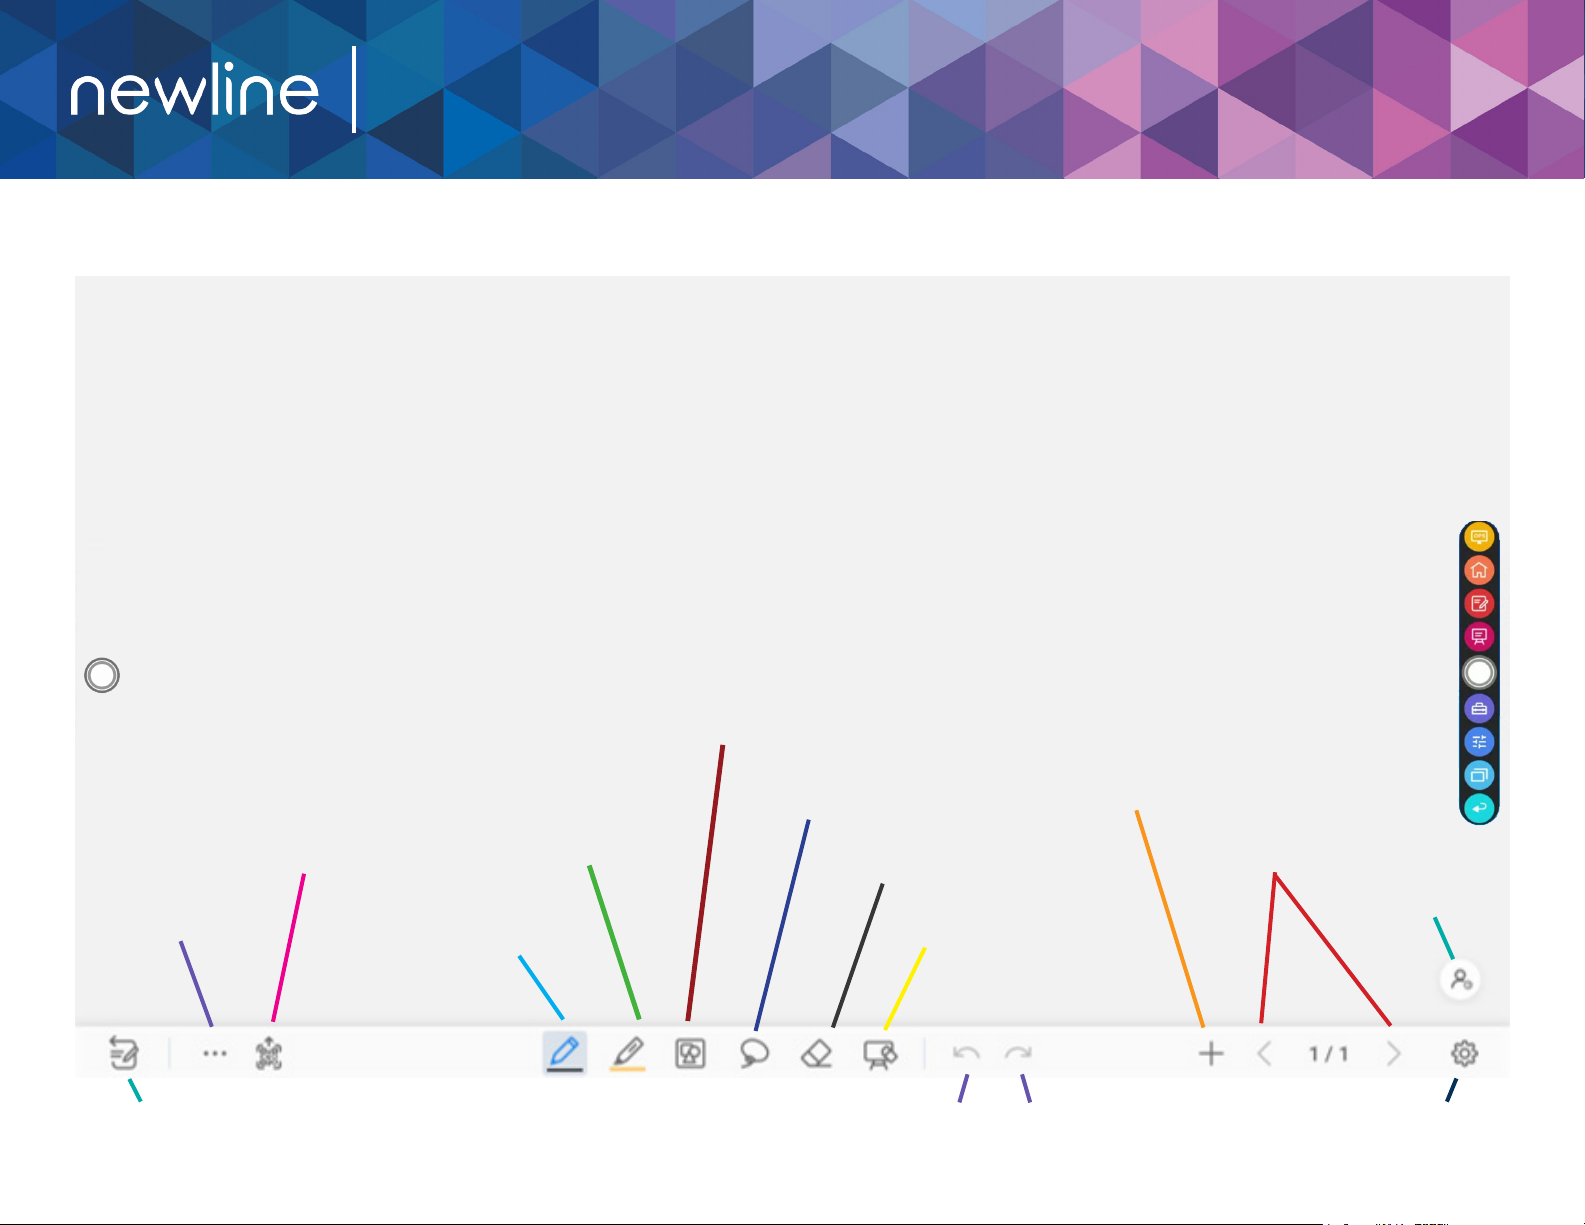
Whiteboard Tools
QR Code for saving &
sharing whiteboard
More options
& tools
Switch between Screen
Annotation Mode
Highlighter tool
Pen tool
Insert shape
Lasso to
select items
Eraser
10
Add whiteboard
Clear whiteboard
Undo Redo
page
Whiteboard page
navigation
Google account
sign-in
Whiteboard
settings
Page 11
Q Pro Series Quick Start Guide
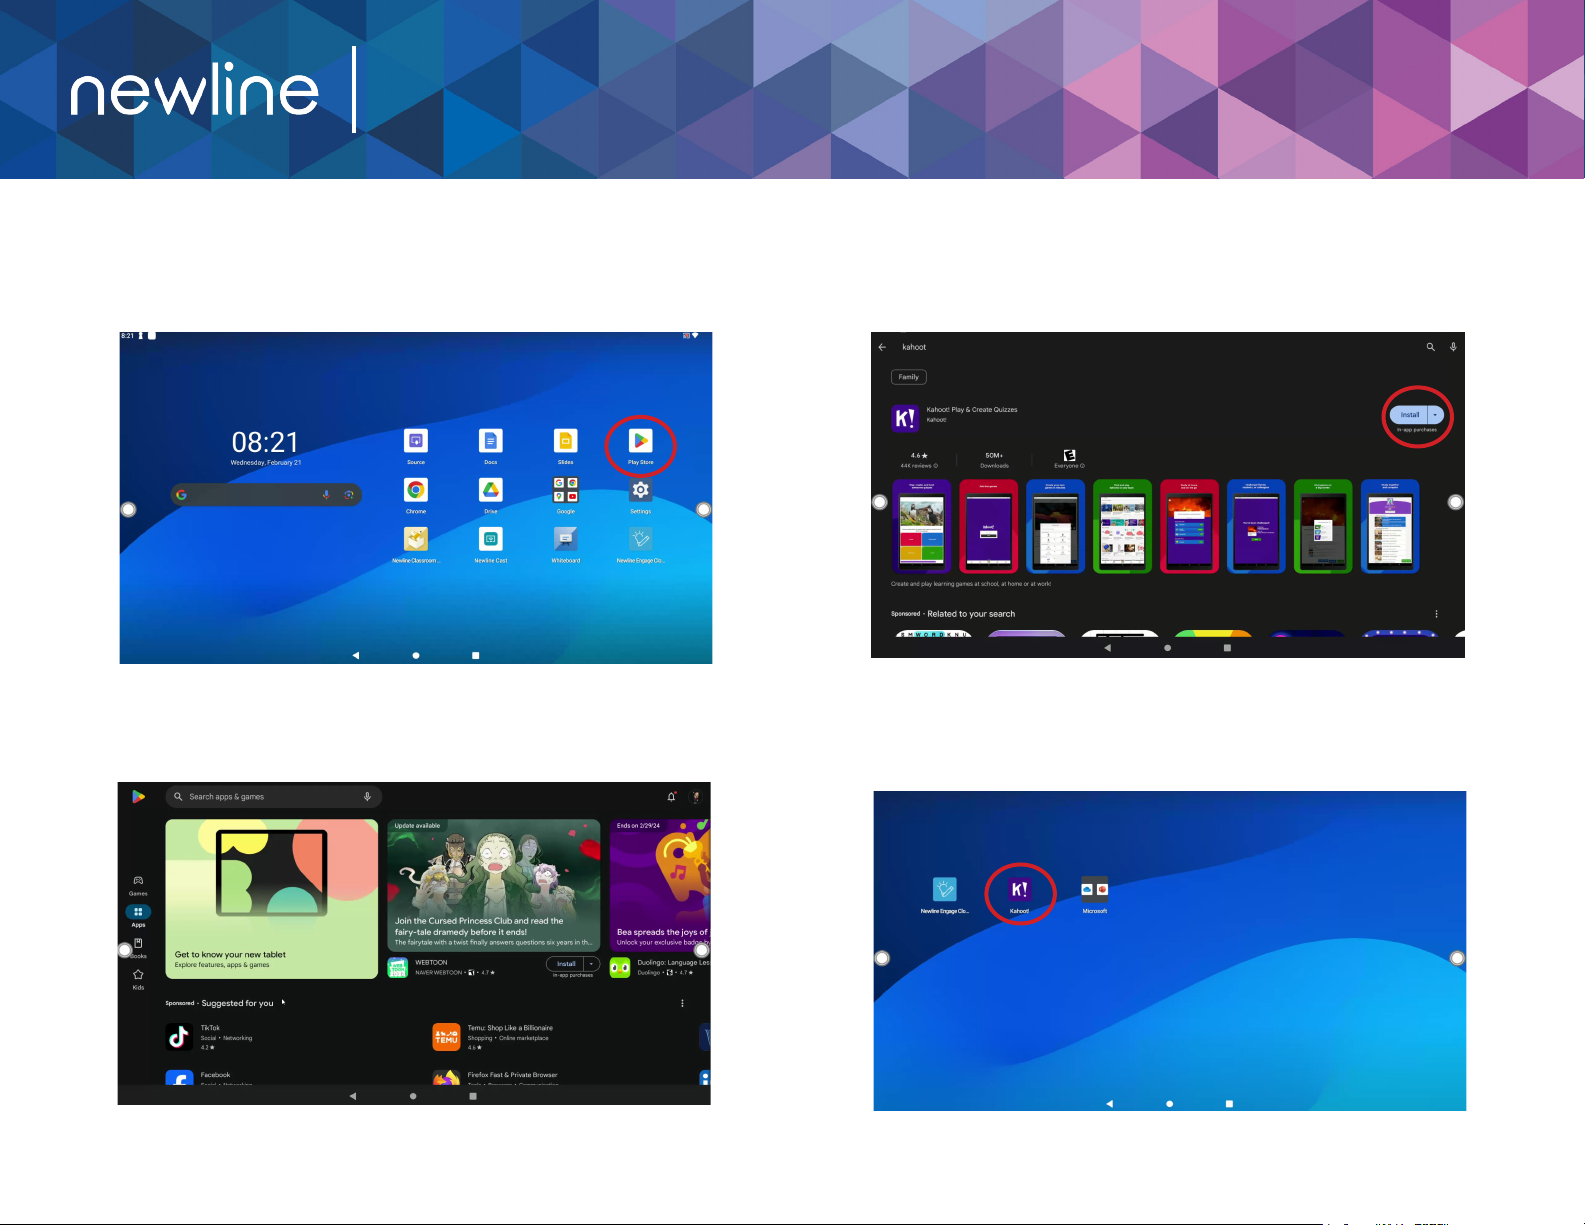
Accessing the Google Play Store
1. On the Home Screen, tap on the “Google Play Store” button.
2. In the Google Play Store, search and select the App you want to
download.
3. On the App details screen, tap Install.
4. Once installed, new apps will appear on the second of the home
screen. Swipe left to access this page. If you want to move the
location of your downloaded apps, see page 5.
11
Page 12
Q Pro Series Quick Start Guide
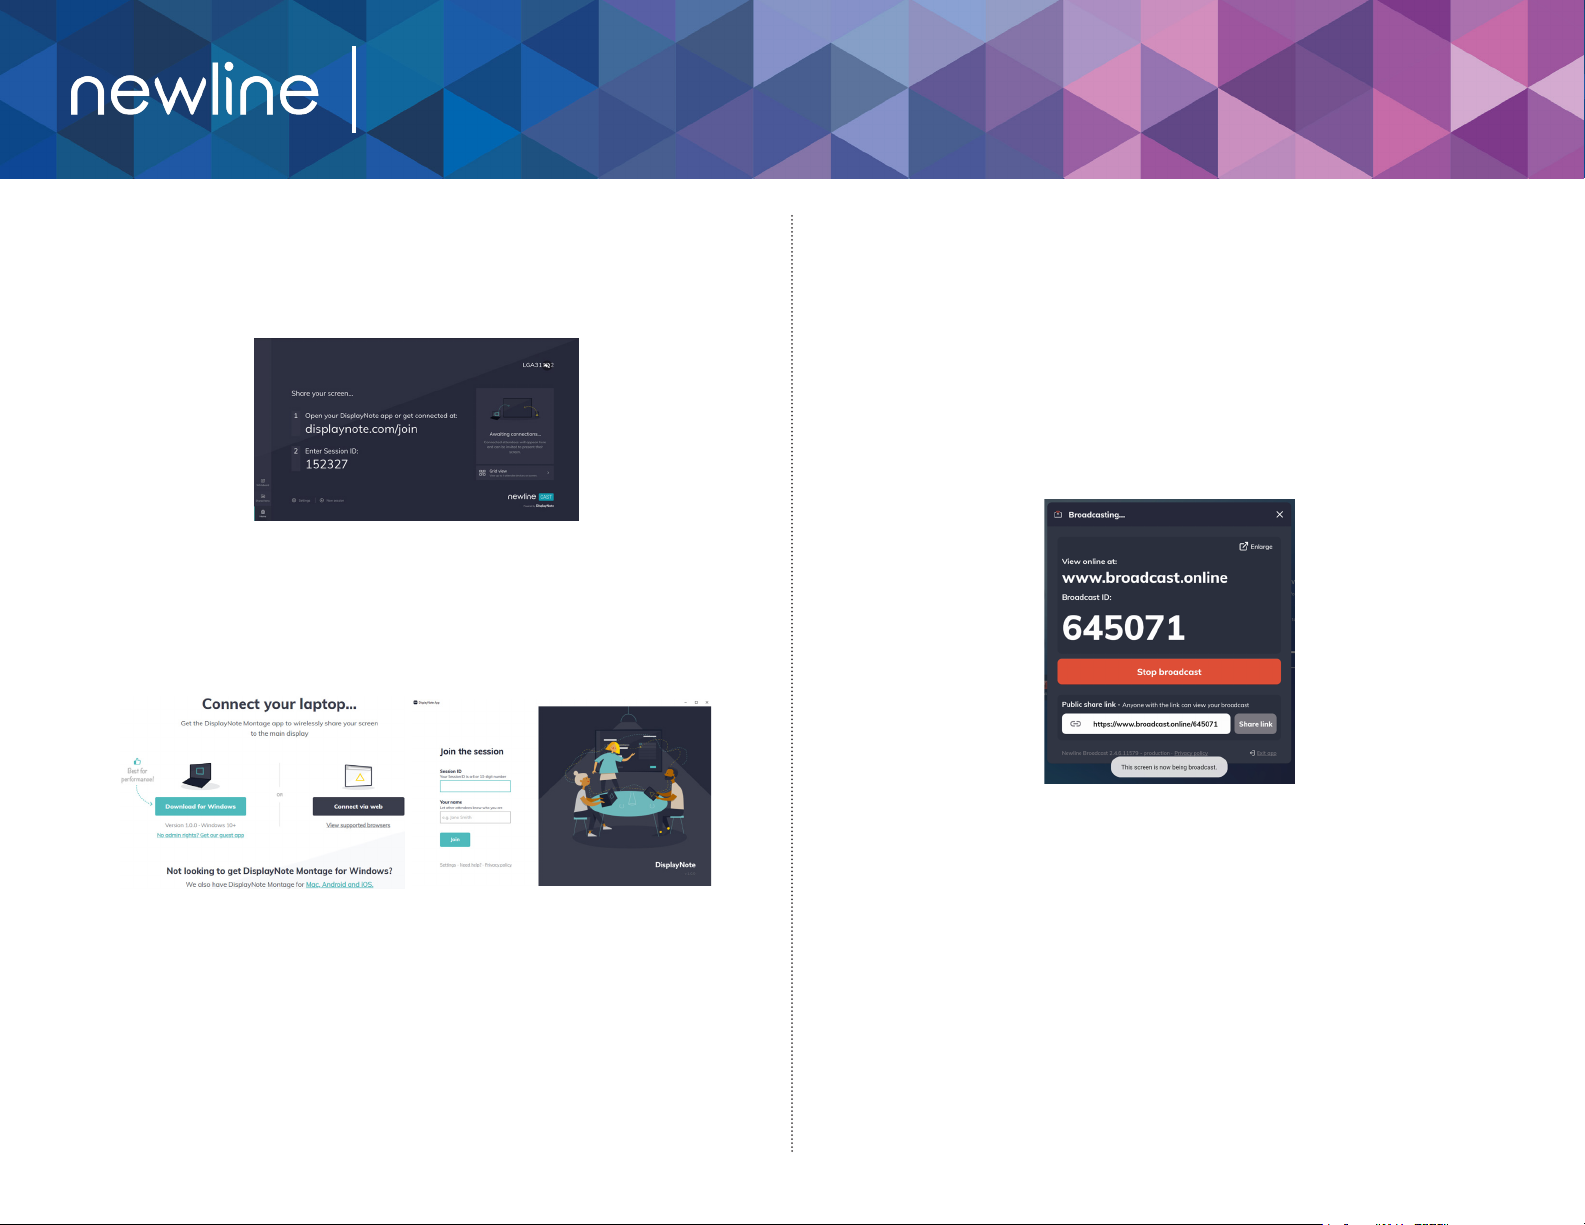
Using Newline Cast
Connecting to Newline Cast Using the DisplayNote Windows App
1. Open the Newline Cast app on your display.
2. Download the DisplayNote Windows App from displaynote.com/join
on your computer.
3. Open the DisplayNote app on your laptop.
4. Type in the Session ID you see on the display and your name.
5. Select “Join” once both Session ID and Name are lled in.
Using Newline Broadcast
Share your Panel Screen to Student Devices
1. Turn on the display.
2. Begin a session by opening the Broadcast application and pressing
the “Start broadcast” button.
3. Share the public share link with your viewers.
4. Begin your presentation.
5. To end the Broadcast, press the Stop Broadcast button.
Connecting to Newline Cast from a Web Browser
1. Open the Newline Cast app on your display.
2. Visit www.displaynote.com/join on your laptop and select
“Connect via web.”
3. Type in the Session ID you see on the display and your name.
4. Select “Join” once both Session ID and Name are lled in.
5. When asked, select whether you want to share your entire screen,
or just a specic application window.
6. Click “Share.”
Viewing a Broadcast
1. Click the link sent by the broadcast host, or go to broadcast.online,
enter the 6-digit Broadcast ID and press Connect.
2. Users can interact with the “Enlarge” option to enlarge the broadcast
information. This is designed to help users view the broadcast
information from afar.
3. To leave a broadcast, press the Stop button at any time.
12
Page 13

350 W Bethany Dr
1-888-233-0868
Suite 330
Allen, TX 75013
To learn more, visit: www.newline-interactive.com
13
 Loading...