

BREWIE+
QUICK SETUP GUIDE
Thank you for purchasing the Brewie+. In this guide, you will find the necessary
information to get you started. Consult the online user manual for further information
if necessar y by following the QR code or the web address.
The online user manual contains a detailed lists of conditions and limitations of use.
By purchasing the Brewie+ you accepted the Terms and Conditions, found at:
http://www.brewie.org/terms-and-conditions
For more information, please visit:
http://www.brewie.org/manual
SAFETY PRECAUTIONS
· For Indoor Use Only.
· The appliance is only to be ins talled in locations where its
use and maintenance is res tricted to trained personnel.
· The appliance must not be cleaned by a water jet.
· Access to the service area is restricted to pers ons having
knowledge and prac tical experience of the appliance, in
particular as far as safety and hygiene are concerned.
· The applian ce has to be placed in a horizontal position
whether in use or not.
MAINTENANCE:
Please clean the machine regularly. Cleaning not only
ensures th e sterile brewing conditions but also rem oves
all the contamination that shortens the lifetime of the
machine.
SAFETY PRECAUTIONS FOR MAINTENANCE:
We advise you to use sanitizers and deterg ents provided
by Brewie.
Only use food grade chemicals when cleaning the machine
or any fermentation equipment.
When working with chemicals the use of protective gloves
and glass es is recomm ended.
Do not use brush or abra sive clothes to clean the cover of
Brewie since it might damage the surfa ce.
APPLICABLE INGREDIENTS:
Only use food grade b eer brewing ingredients in the
machine, except when an official pro gram instructs otherwise. Make sure that the ingredients are not expired and
not contaminated.
If expired, contaminated or n on-food grade ingredients
have been a dded to the machine, make sure that it has
been thoroughly cleaned.
Make sure that dr y matter cannot be washed out from the
hop cages and Brewie Bags as even a small amount can
clog the pumps or valves .
If dry matter is placed outside of the hop cages or Brewie
Bags, make sure that it’s dissolvable in cold water in order
to prevent clogging.
SPECIFICATIONS:
Voltage 230V / 120VAC
Dimension 73.7 x 33.8 x 46.7 cm /
Weig ht 29 kg / 64 pounds
Capacity Of Tanks 27 liters / 7,13 gallons
Brewing Capacity 10-20 litres / 2.64-5.28 gallons
Power Watts
Operating temperature ºC~ ºC
Storage temperature ºC~ ºC
FCC Statement
This device com plies with Part 15 of the F CC Rules. Oper ation is subject to
the following two conditions:
(1)This device may not caus e harmful inter ference.
(2)This device mus t accept any interf erence receive d, including inter ference
that may cause undesired operation.
2. Changes or m odifications no t expressly app roved by the par ty respon sible
for complianc e could void the use r’s authority t o operate the equip ment.
Note:This equipment ha s been tested a nd found to comply w ith the limits
for a class B digi tal device,pur suant to Part 15 of the FCC Rul es. These limit s
are designe d to provide reas onable protec tion against ha rmful interfe rence
in a residential installation.
This equipme nt generates us es and can radiate r adio frequen ce energy
and,if not ins talled and use d in accordance with t he instructio ns,may
cause harmf ul interference to radio comm unications. However,there is no
guarantee th at interference w ill not accor in a par ticular installati on.if this
equipmemt do es cause harmf ul interference to radio or tel evision recep
tion,which can b e determined by tur ning the equipme nt off and on,th e
user is enco uraged to tr y to correct the inter ference by one or more of the
following measures:
• Reorient or re locate the recei ving antenna.
• Increase th e separation be tween the eq uipment and recei ver.
• Conne ct the equipment into an autlet on a cir cuit different f rom that to
which the recei ver is connect ec.
• Consult the dea ler or an experien ced radio/ TV technician f or help.
This equipment should be installed and operated with minimum distance 20cm
between the radiator & your body.
Newity Kf t.
— 13/a Kiralyi Pal St., 1053 Budapest, Hungary
29 x 13.3 x 18.4 inch
-
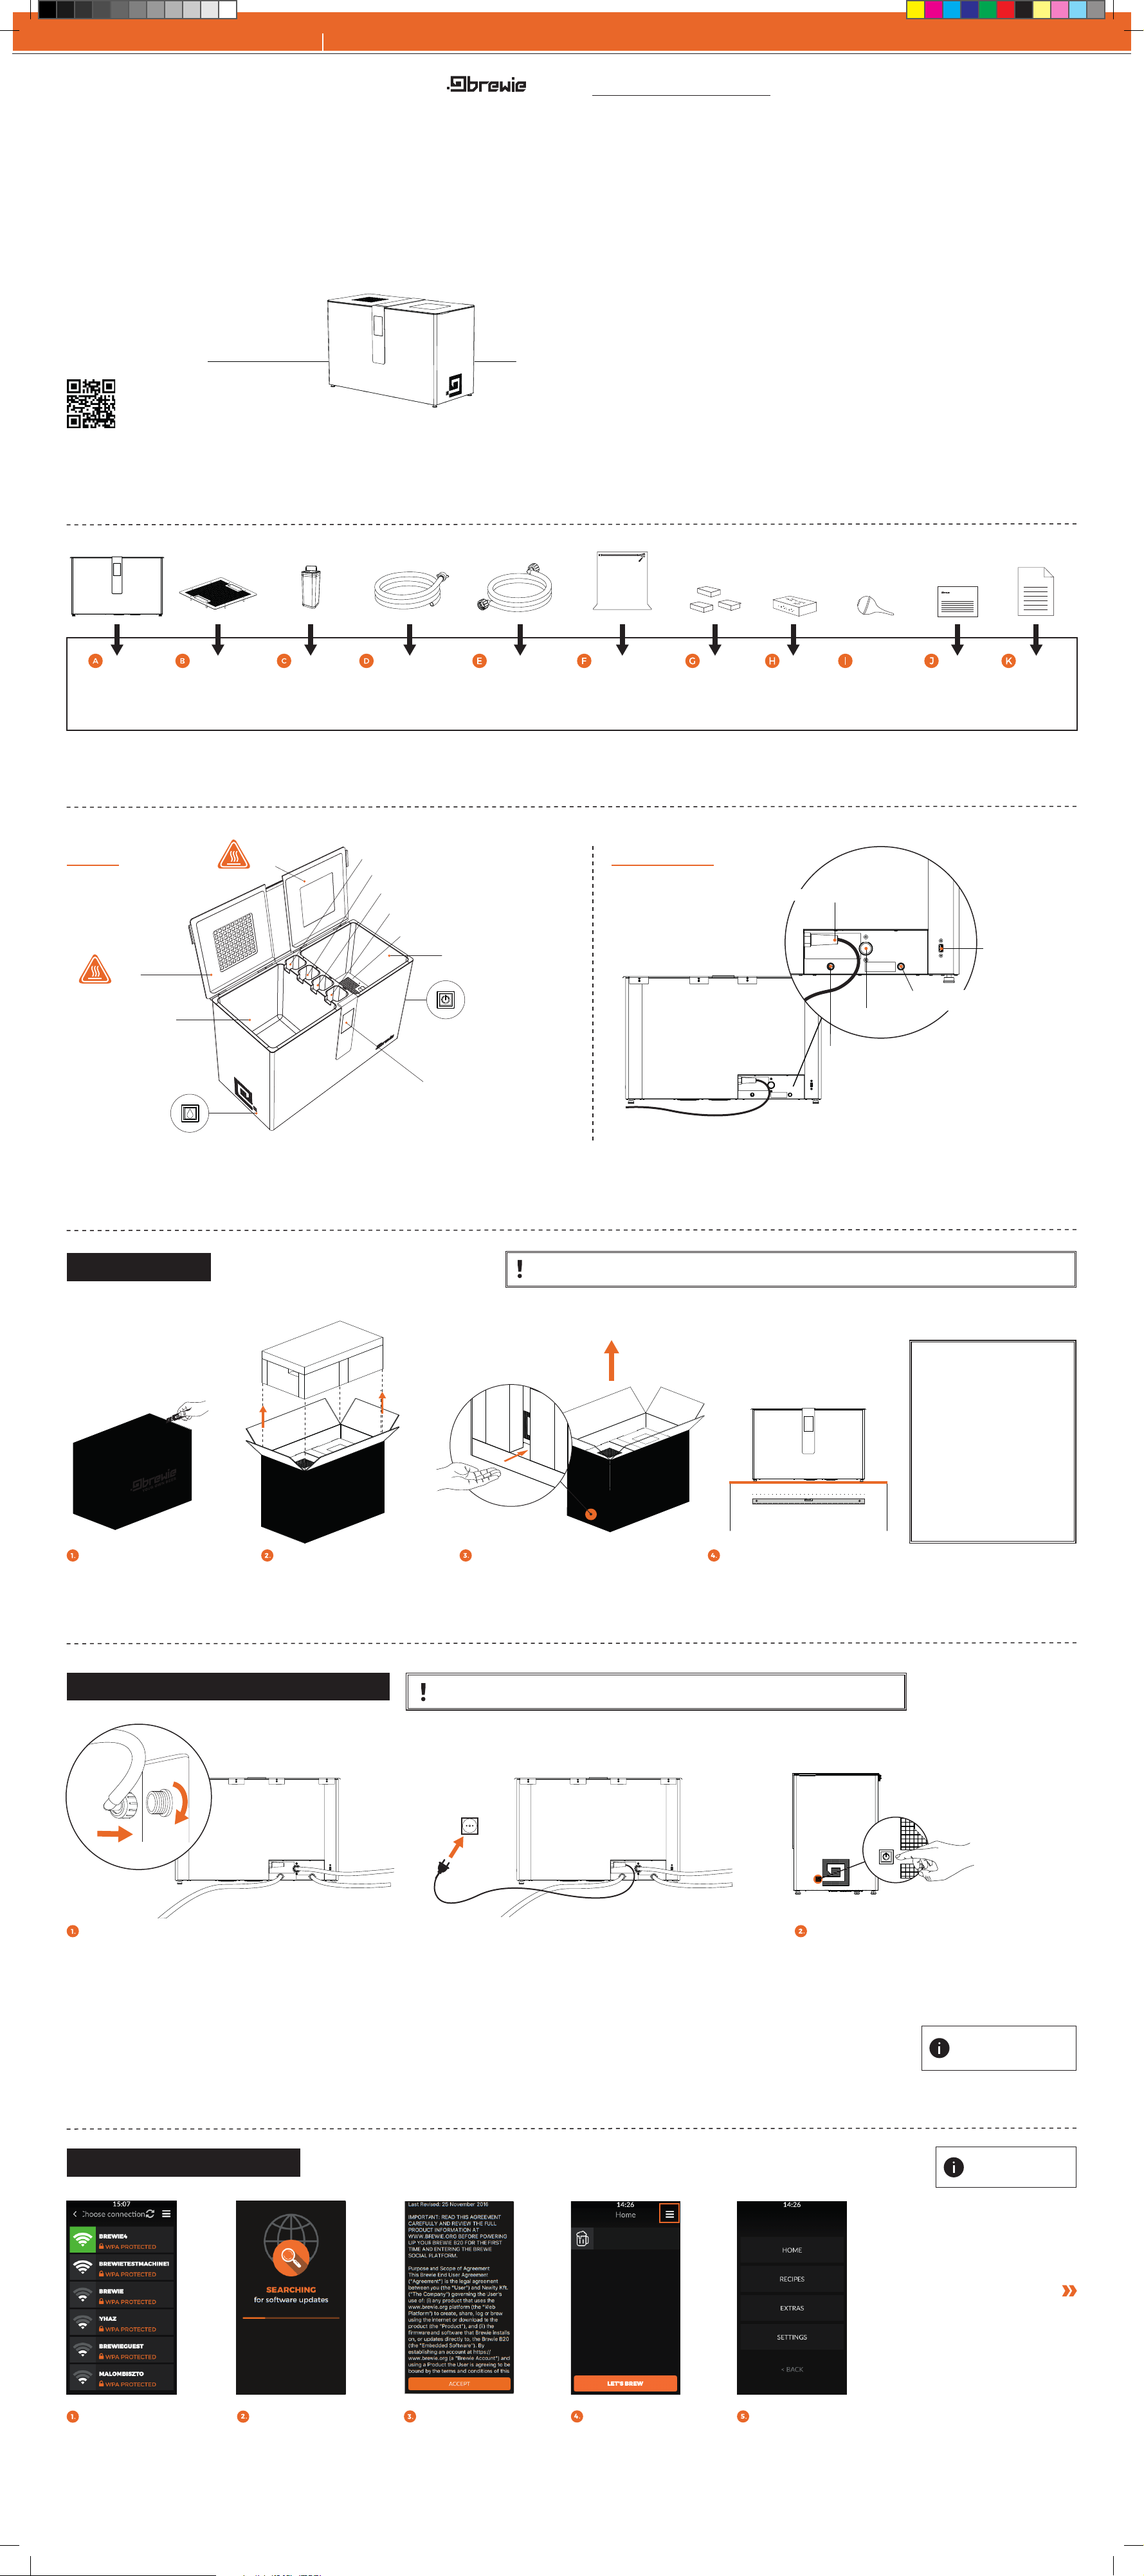
1. CONTENTS OF THE BOX
1×
BREWIE
1×
FALSE BOTTOM
To separate the heated
bottom of the tank from
the ing redients.
4×
HOP CAGES
For ho ps.
2×
LOW PRESSURE
HOSES
For dr aining the cooling
water a nd the wort. 1/2 inch
1×
HIGH PRESSURE
HOSE
For w ater intake.
3/4 inch
3×
STANDARD
BREWIE BAGS
For yo ur own ingredients.
Make sur e the bag
is unda maged.
DETERGENT
For f ull cleanin g.
2. MEET YOUR BREWIE
PARTS BACK PANEL
Hot Surfa ce
LID
Hot Surfa ce
BOILING TANK
LID
HOP TANK 1
HO P TAN K 2
HOP TANK 3
HOP TANK 4
FALSE BOTTOM
MASHING TANK
POWER BUTTON
Press and ho ld to turn
on or off the m achine.
8×
1×
SPONGE
For cleaning.
POWER CABLE
1×
RUBBER
AS PIR ATO R
For un clogging
purposes
WATER INLET
WARRANTY
CERTIFICATION
QUICK S ET UP GUIDE
1×
QUICK
SETUP GUIDE
USB SOCKET
(Service Port)
1×
WARRANTY
LETTER
WORT OUTLET/
CLEANING WATER OUTLET
LCD DISPLAY
DRAIN BUTTON
Press to pau se during
a draining program.
3. SETTING UP YOUR BREWIE
3.1. BEFORE SETUP
Never set up the Brewie+ alone. Both the weight and
size may lead to injuries. Otherwise, follow standard
precautions for installing large household appliances.
COOLING WATER OUTLET
CAUTION: The duration of guarantee is 18 months after delivery.
WE RECOMMEND YOU TO KEEP THE ORIGINAL PACKAGE IN CASE OF TRANSFER OR GUARANTEE SHIPPING.
IMPORTANT!
Please make sure that both
the packaging and the unit
have no visible damages.
If you believe your unit has
been damaged during shipping please immediately
contact Brewie Customer
Support and report the
issue with attached photos
of the damages. Any damaged claims received 3 days
after Takeover Day can not
be accepted.
OPEN THE BOX
REMOVE THE UPPER PART
Do not place or store the box
upside down. Cut the packing
straps!
3.2. INSTALLING AND STARTING YOUR BREWIE+
REACH DOWN INTO THE BOTTOM OF
THE BOX AND LIFT TEH MACHINE
Remove the Brewie+ from the package
and unpack the parts from the tanks.
SET UP YOUR BREWIE+
Place the Brewie+ on a hard,
horizontal surface for the water
sensor to operate properly.
CAUTION: DURING THE BREWING PROCESS, UP TO 100 L OF WASTE WATER IS PRODUCED.
WE ADVISE YOU TO CONNECT THE MACHINE TO THE HOUSEHOLD WATER SYSTEM.
CONNECT THE HOSES
1. Check if the gaskets are well-placed in the plugs.
2. Attach the high pressure water hose to the Brewie+’s water
inlet and to your household water system. Do not forget to
make sure the household water valve is closed. Use extension
hoses if necessary.
3. Attach the low pressure hoses to the wort/ cleaning and
cooling water outlets respectively. Ensure that the drained
liquid can be captured securely (wort) or transported away
(cooling water, cleaning water).
4. FIRST STEPS
4.1. INITIAL SOFTWARE SETTINGS
Follow the instructions on the screen.
Consult the online User Manual or Star ter's Guide for further information if necessary.
4. Settle the Brewie+ in the position you wish to use it and make
sure all hoses are still securely attached and unbroken.
5. Open the household water valve. Check the water pressure.
Low water pressure may cause the machine to display error
messages. (Do not forget to close the water valve after brewing
is finished.)
6. Plug the power cable into the power socket. Make sure that
the socket is rated a minimum of 10A at 230V or 15A at 120V.
Use a grounded socket. Make sure that the power cord or any
extension cords are kept dry.
TURN THE BREWIE+ ON BY PRESS ING
THE POWER BUT TON ON THE RIGHT
SIDE OF THE MACHINE
Keep the button pressed until you
hear a beep and it lights up.
More information:
Starter's Guide:
Assembling the Brewie
More information:
Starter's Guide:
First steps
NEXT STEPS ON
THE OTHER S IDE
CONNECT TO WIFI
Select a WIFI connection
and enter the password
if prompted.
UP DAT E
The machine will
automatically update to
the latest sof tware version.
ACCEPT THE LICENCE
AGREEMENT
Please, make sure
you've read it carefully.
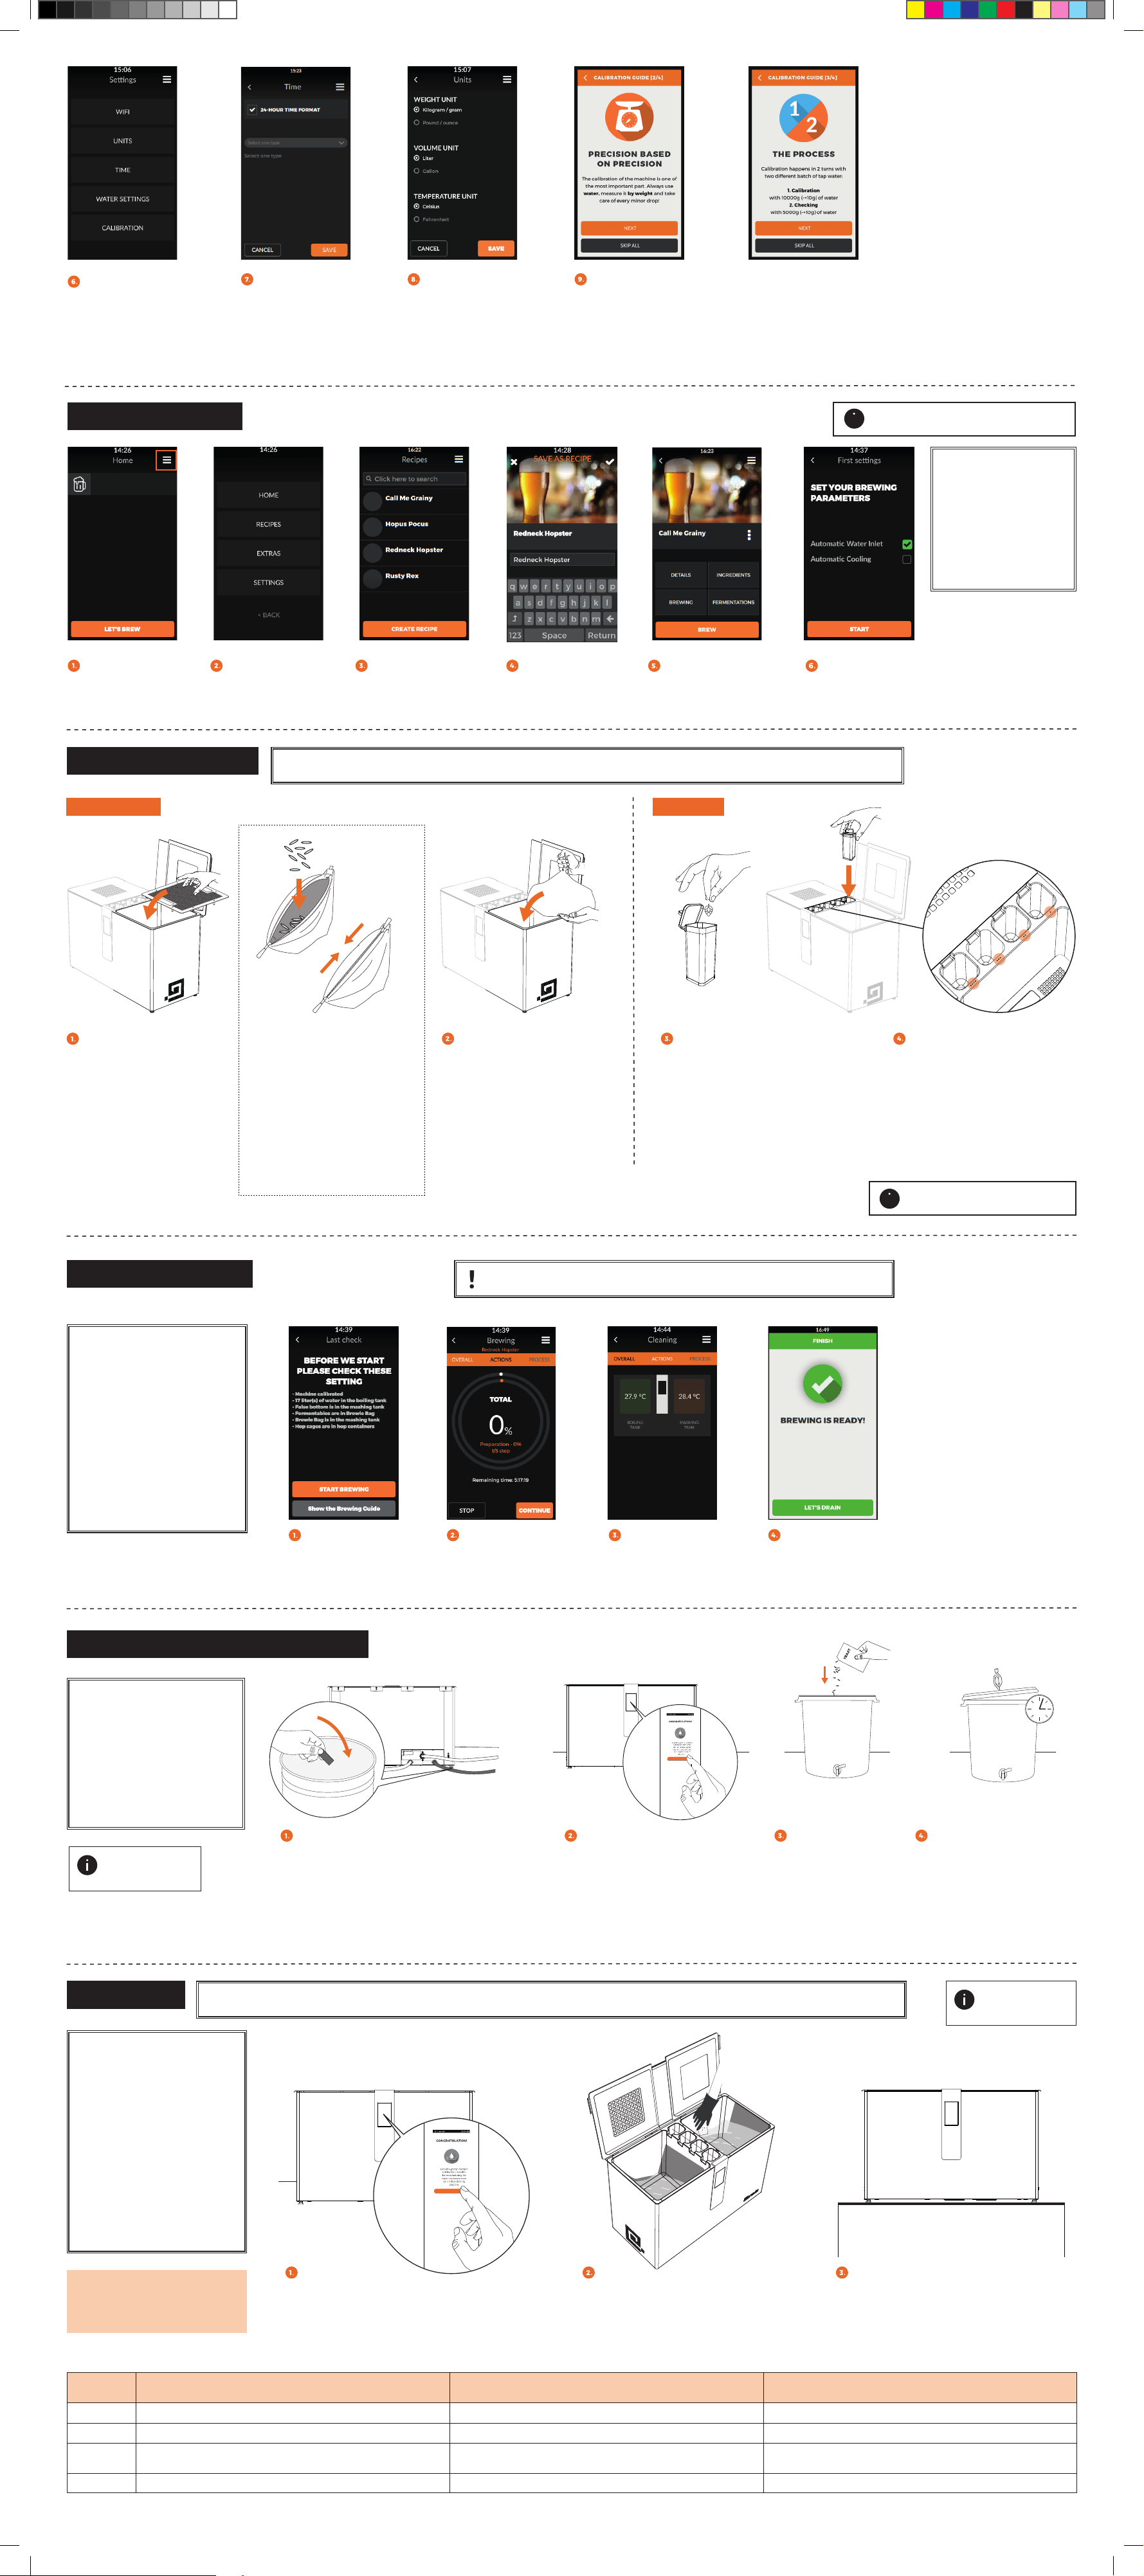
CLICK THE MENU
BUTTON
in the upper right corner.
CLICK THE SETTINGS
BUTTON
1.
CHOOSE FROM THE
OPTIONS
5. BREWING
SET TIMEZONE
SET UNITS
Choose the preffered
units of measurement.
CA LI B RAT E
In order to make sure that the water sensors will work properly we
strongly suggest you to re-calibrate the machine before your first brew.
Don't touch the machine during calibration. Follow the instructions
on the screen.
5.1. CHOOSING A RECIPE
CLICK THE MENU
BUTTON
in the upper right corner.
5.2. ADDING INGREDIENTS
Follow the instructions on the screen.
CLICK THE RECIPES
BUTTON
!
More information: Starter's Guide Brewing
I
CHOOSE RECIPE
CAUTION: THE BASIC REQUIREMENT OF BREWING IS TO HAVE EVERYTHING CLEAN. ALWAYS INSPECT THE BREWIE+
AND ALL ASSORTED BEER BREWING EQUIPMENT FOR CLEANLINESS BEFORE USING IT. (HOSES, FALSE BOTTOM ETC.)
OR CREATE A NEW ONE
PRESS BREW
Check section 5.2 on how to
correctly add ingredients. Without
ingredients you risk overflowing.
SET THE PARAMETERS
AND PRESS START
IMPORTANT!
After choosing automatic
water addition, do not
disturb the Brewie+
during the water inlet
process. Disturbances can
cause the water sensor to
report false data.
MASHING TANK
PLACE THE FALSE BOTTOM
INTO THE MASHING TANK
LEGS BRACED AT THE BOTTOM
OF THE TANK
• Never brew without the false
bottom. The false bottom holds
the mashing bag above the
bottom of the mashing tank to
minimize heat risk. Falling to put
in the false bottom might cause
problems during brewing.
• The false bottom should be
removed af ter each brew and
washed in a dishwasher or by hand.
OPTIONAL
BREWING WITH YOUR OWN
INGREDIENTS
Grind your malt
Make sure that the Brewie Bag is
undamaged
Place the malt into the Brewie Bag.
Make sure that you close the Brew-
ie Bag properly.
One bag can hold a max. 8kgs /17,64
pounds of malt
Never place any solids in to the
mashing tank without bagging it.
PLACE THE BREWIE BAG INTO
THE MASHI NG TANK
Align the four corners of the Brew-
ie Bag with the four corners of the
mashing tank.
Malt+water ≤ max. capacity
(22 liter /5.8 gallons)
Never add water to the mashing tank
Do not use damaged bags.
HOP TANKS
PLACE THE HOP INTO THE HOP
CAGE
Never place any solids into the hop
tank without a hop cage.
A maximum of 30 g of pellets or 15 g
of whole hops can be used.
A maximum of 4 hop cages can be
automatically used during a brew.
You can add more than one variety of
hop into a single container.
PUT THE CAGES INTO THE HOP
TAN KS
Pay careful attention to the symbols of
the tanks so the hops are added in the
correct order.
When you're brewing with the Brewie
Pads, pay attention to the signs on the
hop bags to place them in the right
cages.
More information: Starter's Guide
I
Brewing
5.3. STARTING THE BREW
BEFORE WE START, PLEASE
CHECK THE FOLLOWING:
Machine is calibrated.
Hoses are connected.
The water valve is open.
The false bottom is inside
the mashing tank.
Ingedients are added.
The drained liquid can be
captured securely.
Close the lids for the whole
process. Note that brewing
with opened lids will result in
a higher water loss (cca 2-3 l /
0,53-0,79 gallons)
Follow the instructions on the screen.
START BREWING
Follow the instructions
on the screen.
5.4. DRAINING THE WORT AND FERMENTING
CAUTION: HOT! BREWIE+'S SURFACE CAN GET EXTREMELY HOT DURING THE
BREWING CYCLE. HANDLE BREWIE+, HOSES AND COMPONENTS WITH CARE.
BREWING IS IN
PROGRESS
MONITORING
You can follow the brewing
process in the Actions Menu.
REA DY
The machine confirms
that brewing is f inished.
IMPORTANT!
Confirm that the brewing is
finished.
Check the hose connections.
Don't open the lid because
the wort may get infected.
Sanitize the hoses and the
tank as well – ever ything that
will interact with the wort.
Check that the tap of the
fermentation tank is closed.
More information:
Starter's Guide
Fermentation
5.5. CLEANING
IMPORTANT!
Cleaning your Brewie+ after every
brew is important, so the Brewie+
has several built-in cleaning programs to aid you.
Before launching the cleaning
program, make sure the Brewie+
is connected to the water system
and take everything out of the
machine (Brewie Bag, false
bottom, hop cages). The items
may be hot when removed from
the machine.
Handle them with care!
The false bottom and the hop
cages are dishwasher safe.
CAUTION: DURING THE CLEANING PROCESS EXCESS IVE AMOUNT OF WASTE WATER IS DRAINED THROUGH THE WORT/ CLEANING
!
WATER OUTLET. WE ADVISE YOU TO PLACE THE OUTLET TUBE INTO A SINK OR ATTACH IT TO THE HOUSEHOLD WASTEWATER SYSTEM.
PLACE THE UNCONNECTE D END
of the low pressure hose into your fermentation
tank. Note that the Brewie+ does not contain a fermentation compartment, but it is compatible with
any kind of keg or fermentation tank. To ensure the
most efficient way to drain, place the fermentation
bucket lower than the Brewie+. Make sure all hoses
are still securely attached and unbroken.
DRAINS
Choose the preferred draining mode
from the drain menu. Draining will start
automatically. Press the button on
the left side of the machine to pause
draining at any time, press and hold to
re-start.
ADD THE YEAST
into the fermentation
tank.
You can learn more about
pitching the yeast in the
Knowledge Center.
SEAL THE FERMENTATION TANK
AND INSERT THE
AIRLOCK .
Generally 10 days at room temperature in a dark place is enough
for primary fermentation. After
that you can transfer the new
beer into bottles/kegs or barrels.
More information:
Starter's Guide
Cleaning
Always turn of f the Brewie+
with the button on the right
sidebefore pulling out its
!
plug from the socket.
WHEN after every brew after short clean or if you haven’t used the machine in a while after ever y 5th brew or if you haven't used the machine recently
TAR GE T to remove contaminants disinfecting disinfecting the machine and the tubes
HOW
DURATION 6 minutes 1,5 ho ur s 2 hours
wipe out with a non-abrasive cloth or sponge
(automatic / manual)
(no chemicals, no hot water)
SHORT CLEANING
Launch the Shor t Clean after each brewing.
Follow standard touchscreen cleaning instructions for cleaning your Brewie+'s LCD display.
SHORT CLEAN
Certain parts of your Brewie+ may need
manual cleaning. Use a non-abrasive cloth or
sponge to clean the Brewie+ on the outside.
Please refer to the onscreen intructions!
SANITIZING CLEAN
(automatic / manual)
hot water chemical (tabs) + hot water + wiping (when instructed)
YOUR BREWIE+ IS READY FOR THE NEX T
BREWING PROCESS!
Depending on what you'll do with the Brewie+
(prepare next brewing or store it) pick the
relevant column from the table and follow the
instructions.
FULL CLEAN
(automatic / manual)
 Loading...