

Page 1
Page 2

TABLE OF CONTENTS
Important Warnings ............................... 1
Introduction ............................................ 2
Specifications ........................................ 2
Assembly ................................................ 4
Assembly Instructions .......................... 5
Installation .............................................. 8
Operation ............................................... 9
Paint Curing ..........................................10
Maintenance .........................................10
Stove Usage & Storage .......................12
Service and Warranty Information ....13
IMPORTANT WARNINGS
ATTENTION
Do not store or use gasoline or other
flammable vapors and liquids, solid
combustibles in the vicinity of this
appliance. Keep a safe distance away
from the heater as it is extremely hot
during operation.
FOR OUTDOOR USE ONLY
• This outdoor patio heater must be used for
outdoors only in a well ventilated area and
not to be used in a vehicle or any enclosed
building or area.
IMPORTANT: FOR YOUR SAFETY
• Your safety is very important, please read
this manual thoroughly before you install,
operate, and maintain this heater.
• If you have questions about assembly,
operation, servicing or repair of this heater,
please call us directly, we will gladly provide
asistance as required.
WARNING
Fuels used in gas, wood or oil-fired
appliances and the products of combustion
of such fuels, contain chemicals know to
the State of California to cause cancer,
birth defects and other reproductive harm.
California Health & Safety Code
Sec. 25249.6
IMPORTANT FOR YOUR SAFETY
• Improper installation, adjustment, alteration,
service or maintenance can cause injury
or property damage from hazards of fire,
explosion, burn, asphyxiation, carbon
monoxide poisoning.
• Please be sure you understand all operating
instructions before you operate or service this
heater and cookstove.
• Read this installation, operation and
maintenance instructions thoroghly before
installing or servicing this equipment.
• Follow the correct lighting and usage
procedures. Handle metal parts with care
to avoid injuries. Never allow children to
operate this heater.
• Do not store or use gasoline or
other flammable vapors and liquids,
solidcombustibles in the vicinity of this
heating appliance.
• Maintain a safe distance away from heater as it
is extremely hot during operation.
• Retain this manual for future reference.
1 www.newfireoutdoors.com | 1-800-977-7344
Page 3
Thank you for choosing the Cascade Complete Cookstove. Please take the time
to read these instructions and follow each step carefully for safe operation.
Retain this manual for future reference. If you have any question regarding these
instructions or operation of this device, please contact us directly for assistance.
CONTACT INFORMATION
If you have ANY issues with your order, questions about products or
anything else at all, you can contact us in the following ways:
Call Us Toll-Free:
1-800-977-7433
7:30am - 5:00pm CST Monday - Friday
Live Chat:
7:30am - 5:00pm CST Monday - Friday
Live Chat:
Service@NewfireOutdoors.com
Mail:
Newfire Outdoors.
2625 Kotter Avenue
Evansville, IN 47715
INTRODUCTION
SPECIFICATIONS
Type of Fuel ⁄” diameter by ⁄” long wood pellets
Input Rating 35,000 BTU/HR
Overall Height 74 Inches
Ignition System Manually light with a match and alcohol gel firelighter
Electrical
Connections
Non Required
Net Weight 87 IBS
Boxed Dimensions 29 x 15 x 28
Cascade Complete Cookstove Owner’s Manual 2
Page 4
3 www.newfireoutdoors.com | 1-800-977-7344
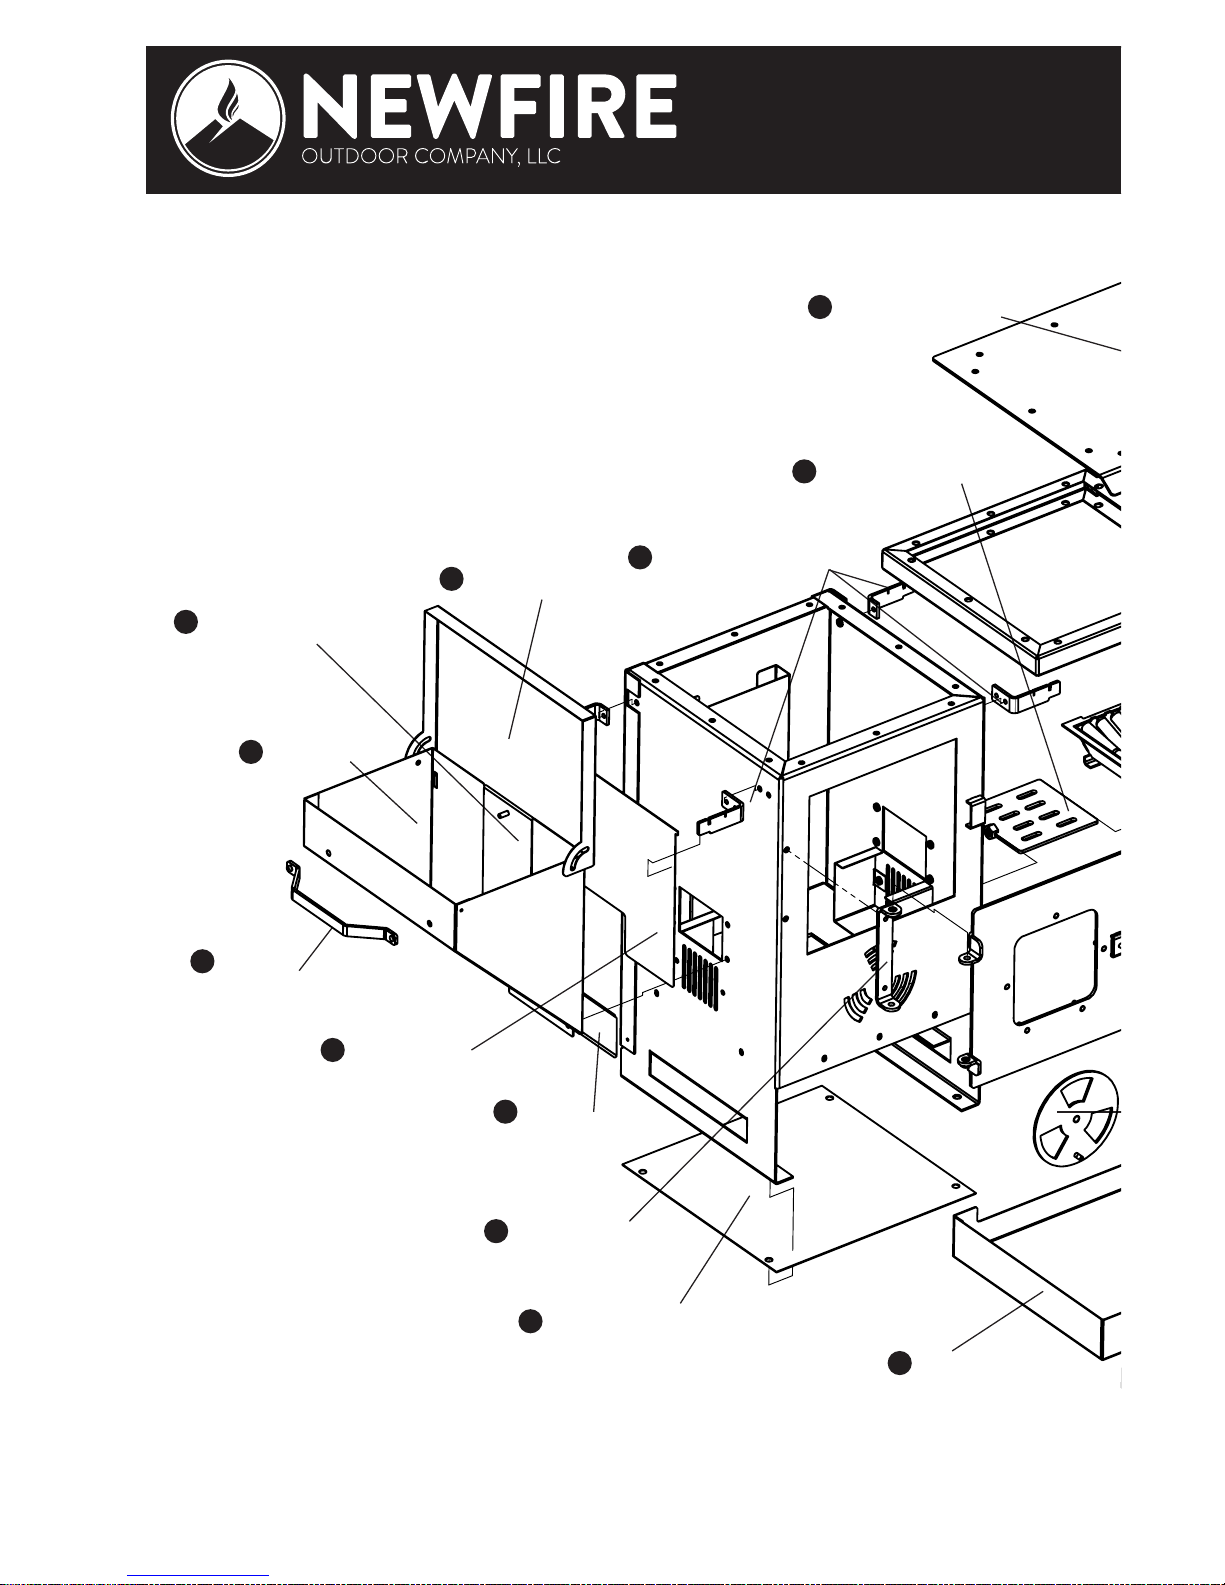
Cookstove Top
Handle
Hopper
I
Hopper Shut Off
Hopper Lid
Hopper Brackets
Bottom Grate
Door Hinge
Shoot
Heat Shield
Heater Bottom Heat Shield
Ash Pan
A
B
C
D
E
F
G
H
J
K
L
Page 5
Cascade Complete Cookstove Owner’s Manual 4
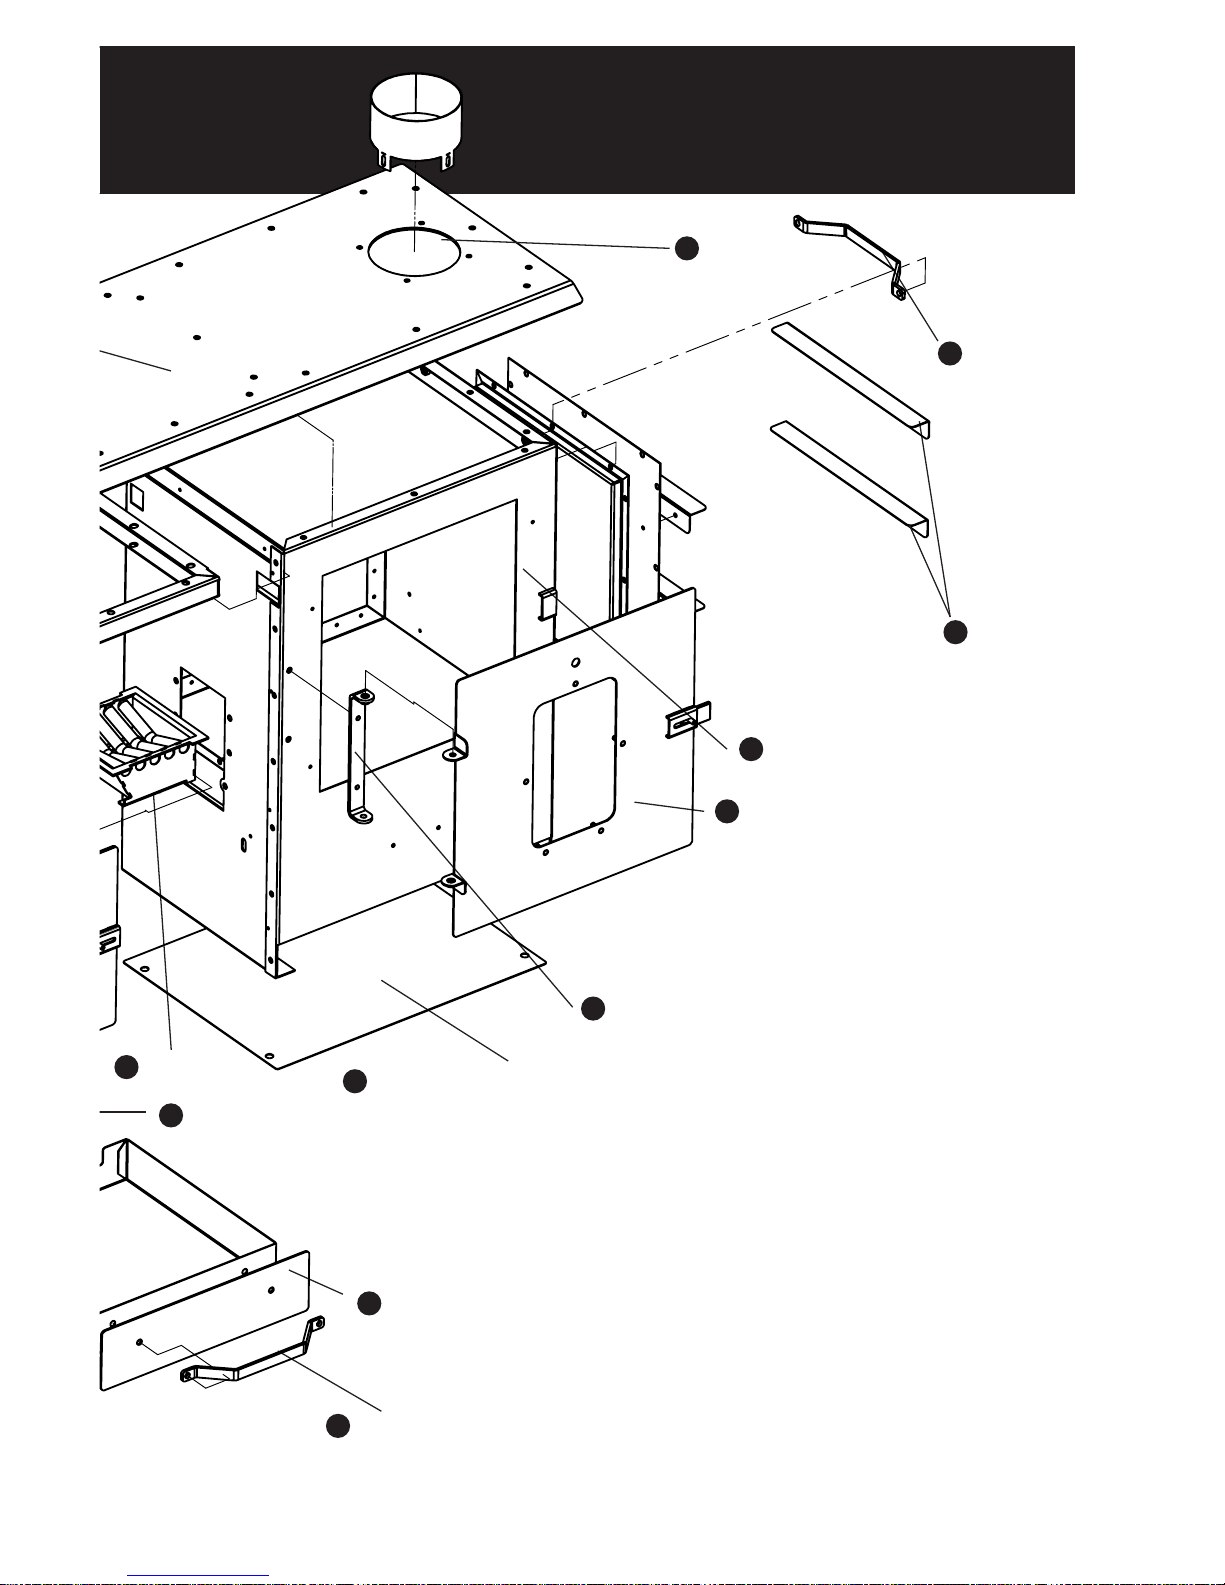
Cascade Complete Cookstove
FIG. 1
Cookstove Door
Cookstove
Brackets
Handle
Handle
Door Hinge
Cookstove Bottom Heatshield
Ash Pan Front
Damper
Firepot
Collar
G
G
M
N
O
P
Q
R
S
T
U
Page 6
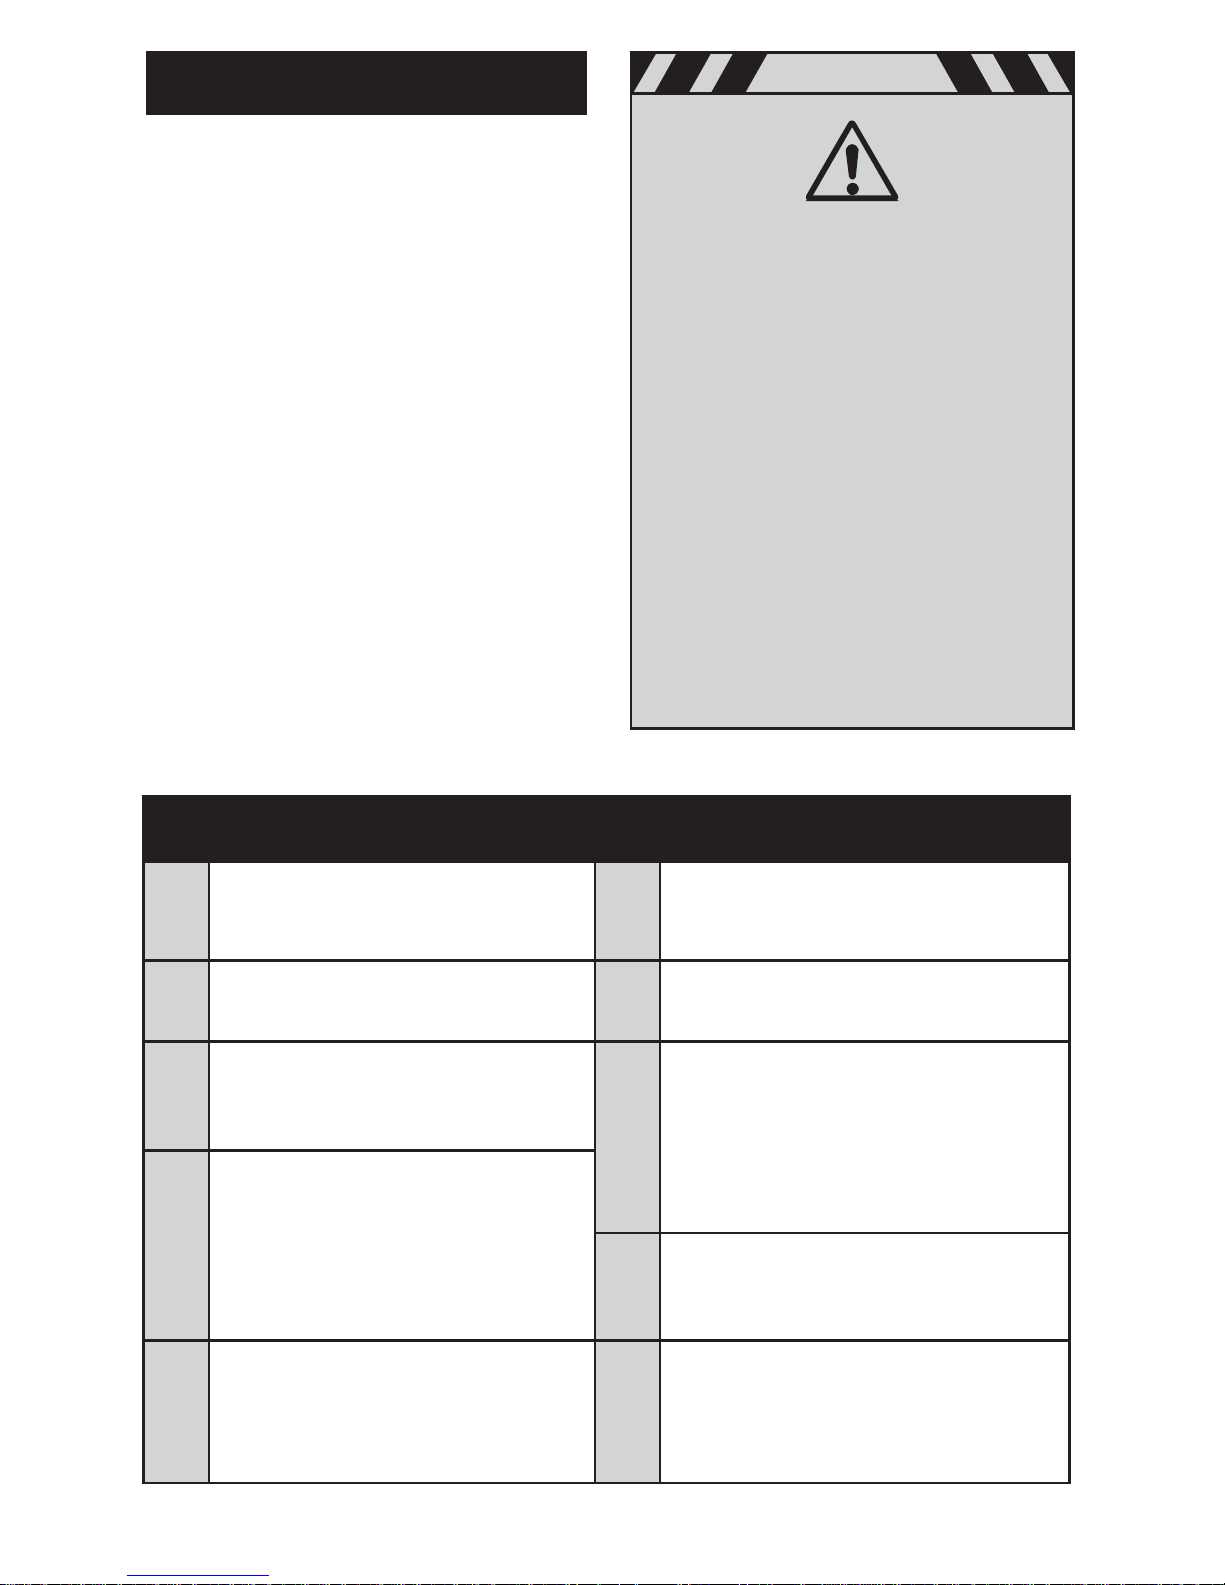
ASSEMBLY
WARNING
To ensure safe use of your outdoor
Cook Stove, you are requested to pay
close attention to these essential safety
requirements. This is a wood pellet,
direct-vented outdoor Cook Stove, all of
the combustion products leave the heater
from the chimney/smokestack. Byproducts
of combustion from this unit include carbon
monoxide. Carbon monoxide is toxic.
Carbon Monoxide can build up in a
heated space and failure to provide
adequate ventilation could result in
death. Always be sure there is plenty
of ventilation when the heater is in use.
Always follow the advice about ventilation
in these operating instructions.
NOTE BEFORE ASSEMBLY:
Partial assembly has been done for you. Use
this assembly as an example for the remaining
parts. The assembly of this heater requires
basic mechanical skills. Proper assembly is the
responsibility of the purchaser. All service and
repairs should be done by a qualified person.
TOOLS REQUIRED FOR ASSEMBLY:
• Phillips Screwdriver
• Drill with Philips bit
• Cresent Wrench
UNPACKING:
Carefully remove the all parts from the box. The
paint on the heater is not fully cured until after
you fire the unit on its initial firing, so use care
when handling painted parts. Find and identify the
following parts found in “FIG. 1”.
Also included in the box is a hardware bag containing the marked pieces to their corresponding parts:
5 www.newfireoutdoors.com | 1-800-977-7344
CORRESPONDING HARDWARE
1.
Use (2) ¼-20 x ¼’’ bolts and lock
washers for attaching G handle to
L Cookstove.
7.
Install G Hopper Handle using (2) ¼-20 x
¾’’ bolts inserted through holes
on handle.
2.
Use ⁄’’ Washer for connecting B Bottom
Grate into O Firepot.
8.
Use (2) ⁄’’ metal screws perrail and align
over holes and tighten install T Brackets
3.
Use (2) ⁄ x ½’’ bolts side with nut
at top. Use (2) ¼-20 x ⁄’’ bolts secure
each door to their J Door Hinges.
9.
Use (2) ½’’ metal screws to attach
wooden handle to stainless handles. Use
(2) ¼-20 x 3/4’’ bolts to place M Ash Pan
front plate over L Ash Pan aligning over
holes. Use ⁄”-20 x ⁄” bolts to place G
handle over holes.
4.
Use (2) ⁄ x ½’’ bolts for the front
bracket and (1) ⁄ x ⁄” bolt for the
rear bracket. Attach Hopper flange
using (4) 10/32 x ½’’ bolts.
11.
Fasten using two ½’’ metal screws and
(2) ¼-20 X 1/2” bolts, ¼-20” lockwashers
and nuts to assemble hopper handles.
5.
Attach D Hopper Lid using (2) ⁄ x
½’’ bolts and lock nuts.
12.
Use (3) ⁄ x ⁄” bolts for zerts on
Raincap brackets. attach bottom of
bracket to raincap collar using (3) ⁄ x
½’’ bolts and nuts through holes in collar.
Page 7
Cascade Complete Cookstove Owner’s Manual 6
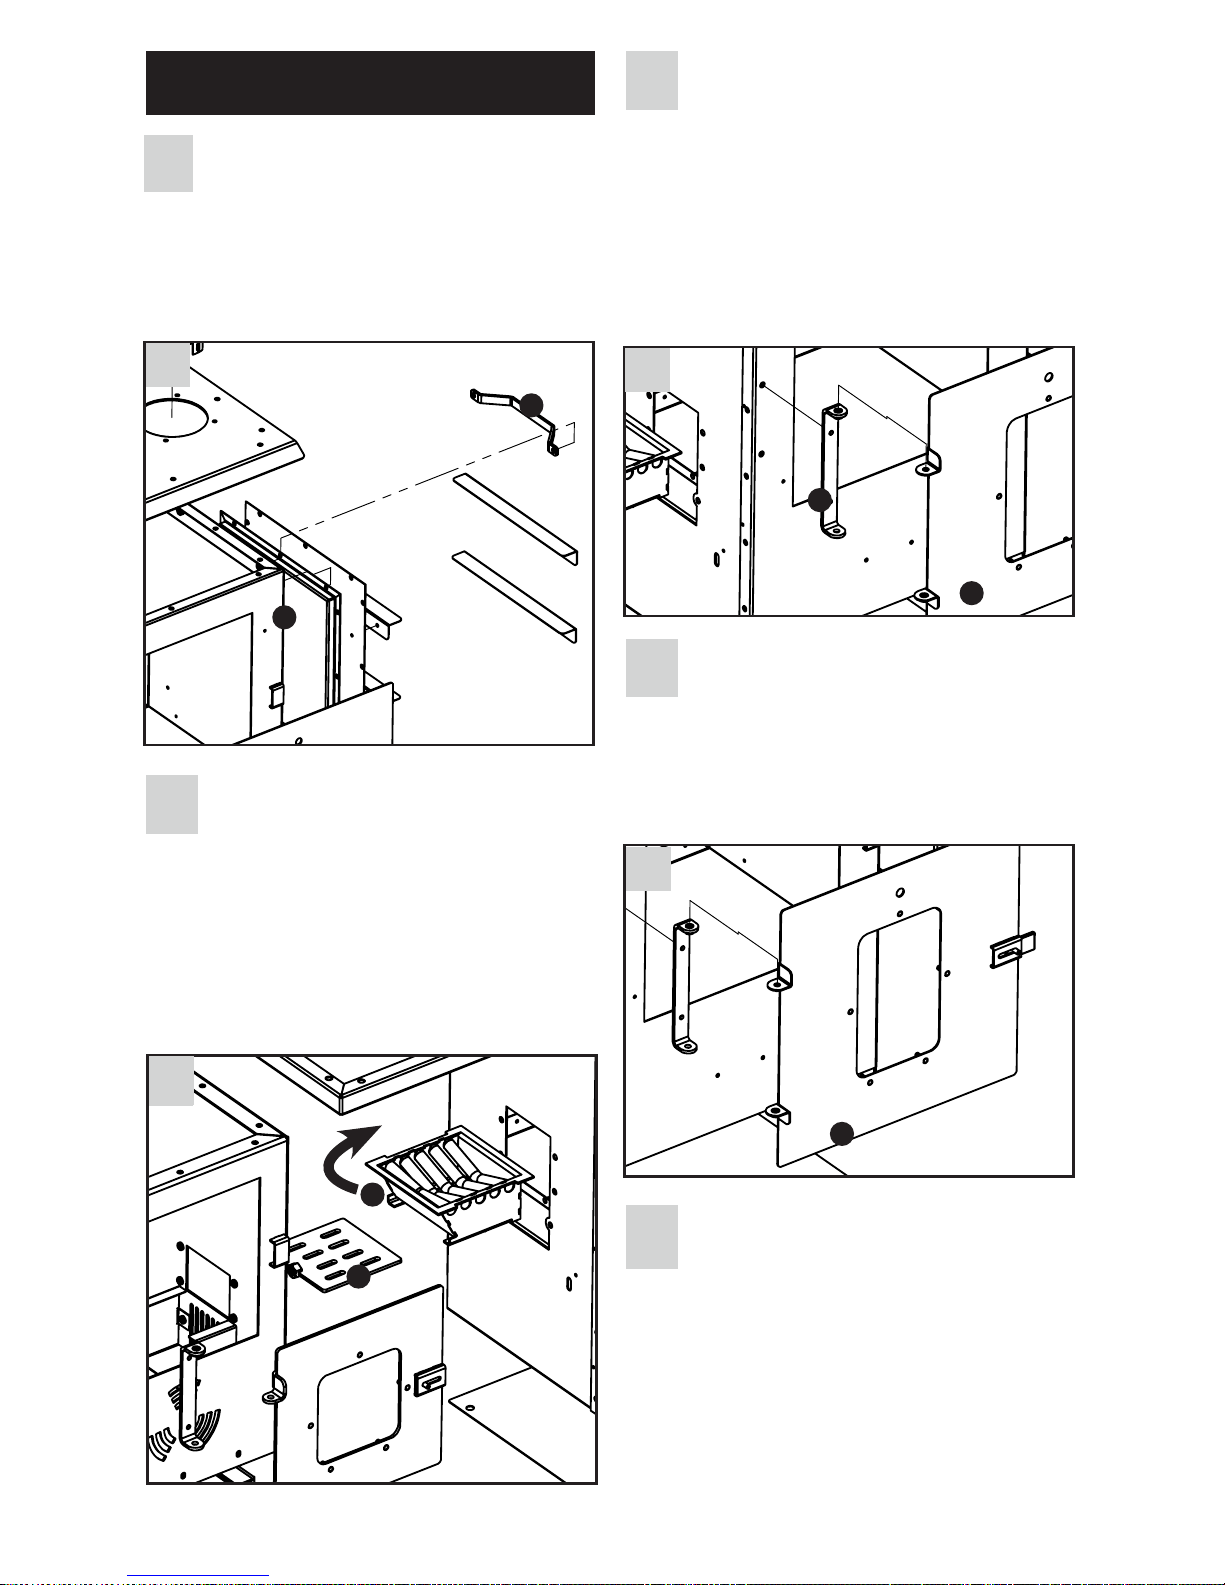
ASSEMBLY INSTRUCTIONS
1
Attach Right Side Cookstove Handle.
Attach G Wood Handle to stainless handle
by centering groove in wood on outside of handle
and fasten using two ½’’ metal screws. Attach
handle to L Cookstove right side using two ¼-20
x ¼’’ bolts and lock washers.
1
4
3
2222
2
2
Insert Firepot. Place O Firepot with slanted
side towards the rear. Insert B Bottom Grate
into bottom slot of O Firepot. Insert Rod with Spring
Handle including ⁄’’ Washer into rear slot on
heater and connect with nut on B Bottom Grate into
O Firepot. Pull Rod and make sure B Bottom Grate
slides out and pushes back all the way so that the
Bottom Grate is completely forward and sealed.
3
Install heater Door Hinge and doors.
Install heater U Door Hinge using two
⁄ x ½’’ bolts side with nut at top. Using two
¼-20 x ⁄’’ bolts secure each door to their Door
Hinges. Do not tighten all the way leaving room
for the door to open and close with ease. To
move door up and down for proper door latch
alignment tighten or loosen top and bottom
bolts accordingly.
4
Insert Glass into heater and Cookstove
Doors. Doors-Use the small black
retaining washers to hold glass flush to inside
wall. Push retaining washers tight to glass.
Banana Shape Retaining washers face curved
part towards stud.
5
Installing the Hopper. Place C Hopper
Brackets on left side of Heater and
connect using (2) ⁄ x ½’’ bolts for the front
bracket and (1) ⁄ x ⁄ ‘’ bolt for the rear
bracket. Slide Hopper chute into slot on side of
heater down through air chute inside of heater.
Insert F Hopper into C Hopper Brackets until
dropped into slots in bracket. Attach Hopper
flange using (4) ⁄ x ½’’ bolts.
G
L
B
O
U
R
R
Page 8
5
8
6
7
9
6
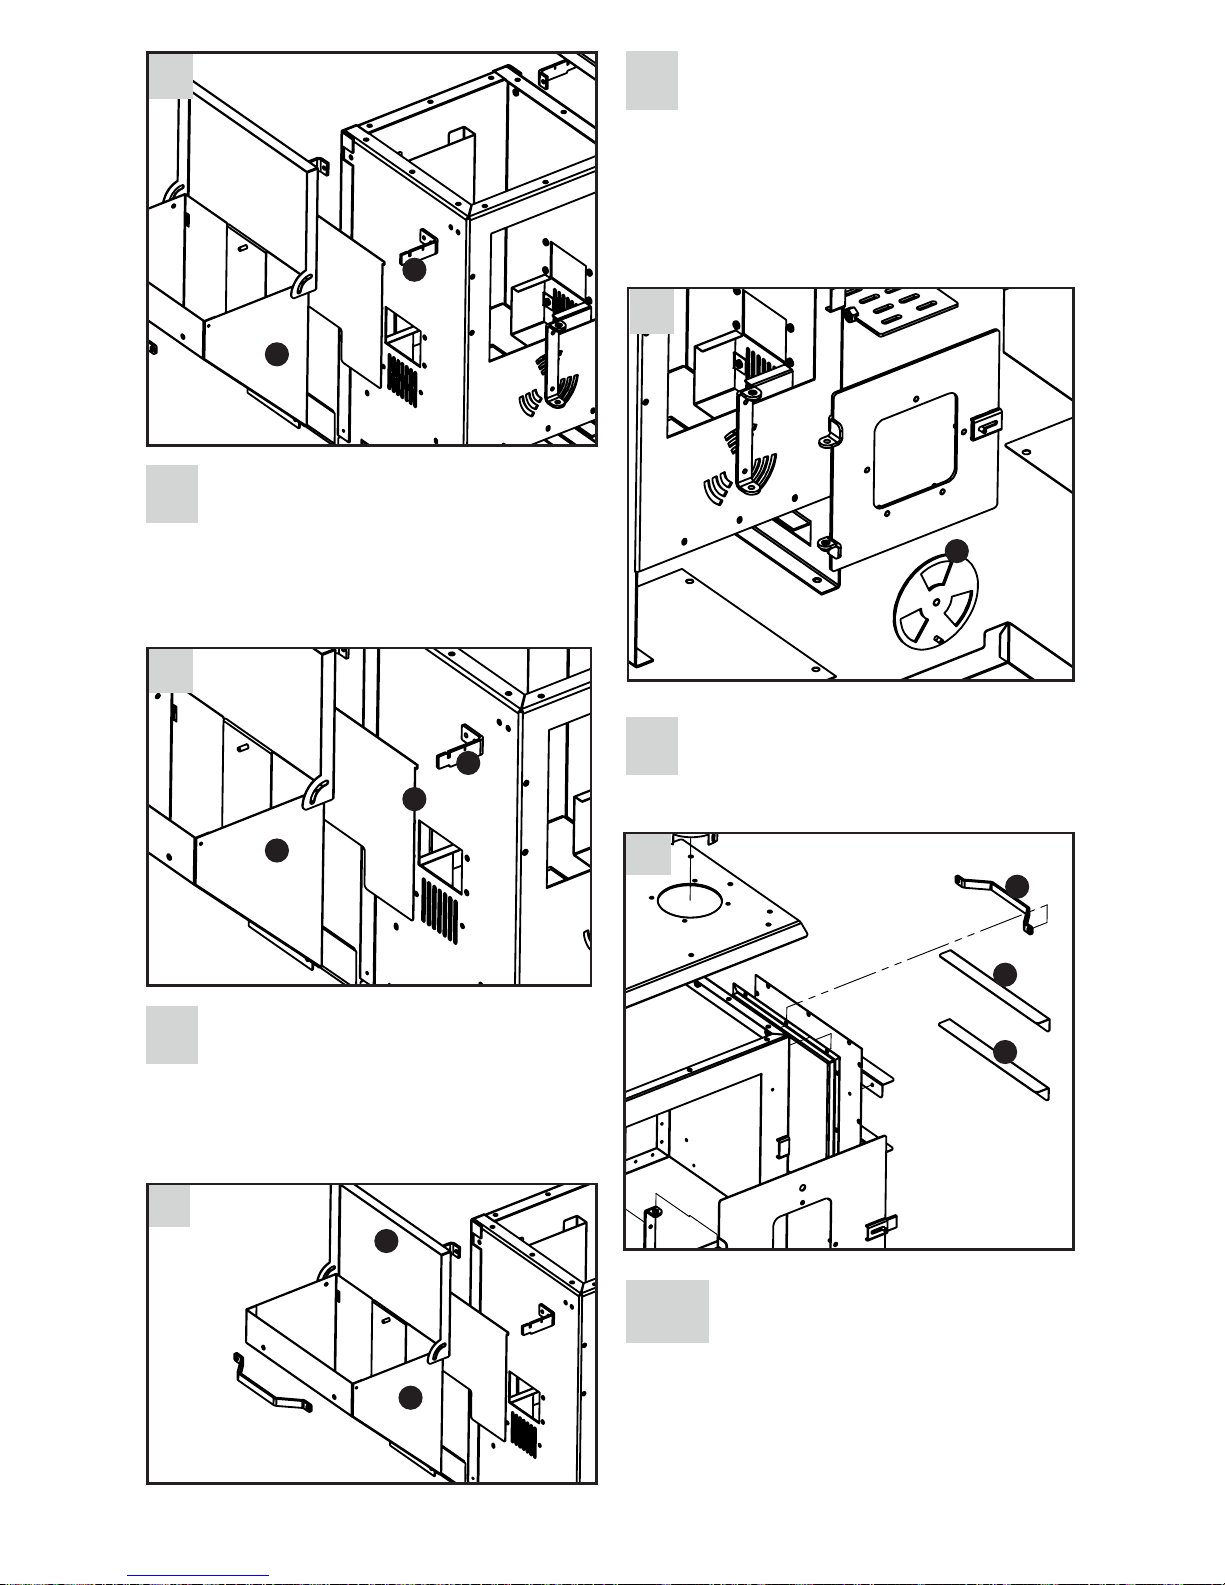
Installing the Hopper Heat Shield.
Insert stainless H Heat Shield between
hopper and heater by dropping from the top
down into position. Tabs in H Heat Shield will
sit in slots on C Hopper Brackets.
8
Installing Spring Handles. Place
Attach spring handles to the shut
o plate, doors and N Damper by twisting
clockwise until secure. Do not overtighten on
doors allowing them to move freely. Install G
Hopper Handle using two ¼-20 x ¾’’ bolts
inserted through holes on handle.
9
Installing the Grill Rails. T Brackets
should face downward. Using two ⁄’’ metal
screws perrail. Align over holes and tighten.
7
Installing the Hopper Lid. Attach D
Hopper Lid using two ⁄ x ½’’ bolts
and lock nuts. Do not tighten past threads
on nut to allow for enough room so lid shuts
completely when closed.
7 www.newfireoutdoors.com | 1-800-977-7344
10
Installing Grills. Insert Bottom Grill.
Insert at angle to allow clearance.
Insert Top Grill.
F
F
F
C
H
C
D
N
T
T
G
Page 9
Cascade Complete Cookstove Owner’s Manual 8
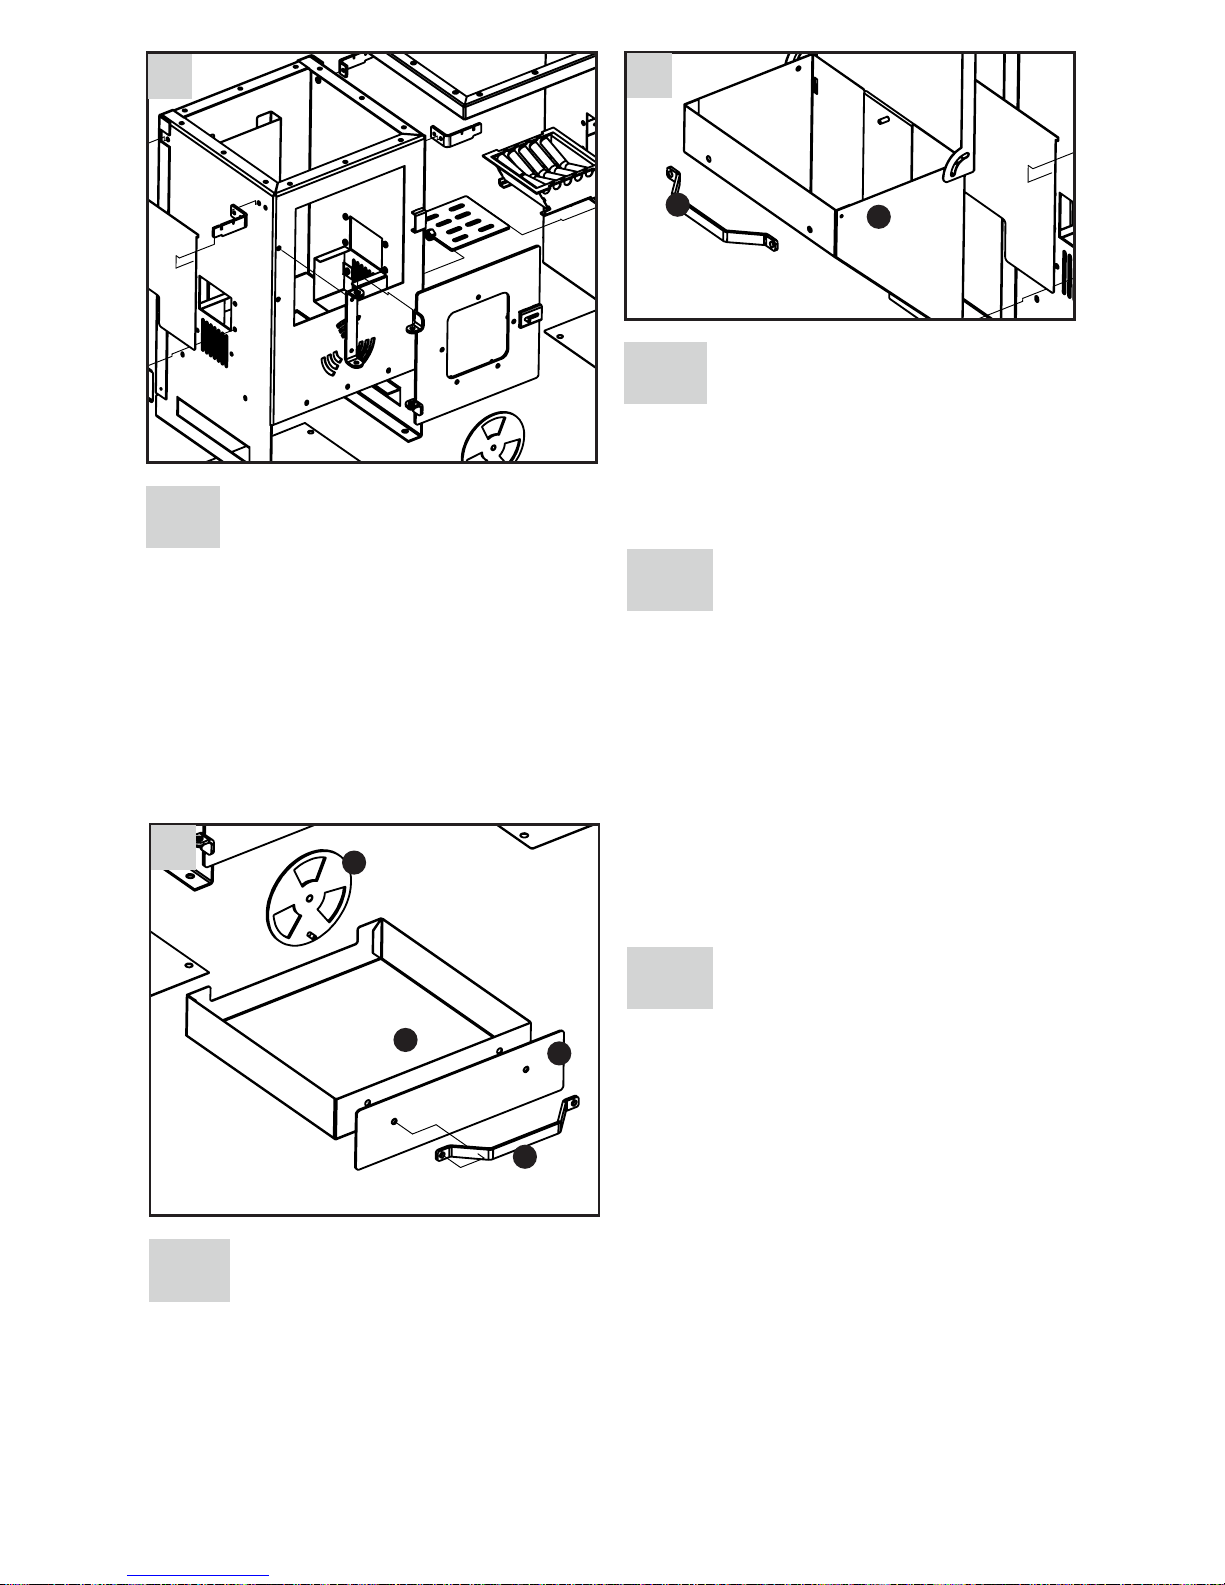
11
Assembling the Ash Pan. Attach
Wood Handle to stainless handle
by centering groove in wood on outside of
handle and fasten using two ½’’ metal screws.
Using (2) ¼-20 x ⁄’’ Bolts place M Ash Pan
front plate over L Ash Pan aligning over holes.
Painted side out with shorter distance from
holes to top up. Place G Handle over holes
and insert bolts ⁄-20 x ⁄” bolts. Tighten using
(2) ¼-20” lock washers and nuts.
13
Installing the Dome Thermometer
Remove Nut from Dome thermometer.
Insert rod part of dome thermometer through
front Top hole Centered on Cookstove
Oven door. Assemble nut to backside Dome
Thermometer on backside of door.
12
Assembling Hopper Handle. Attach
wood handle to stainless handle
by centering groove in wood on outside of
handle. Fasten using (2) ½’’ metal screws.
Using (2) ¼-20 X ⁄ ‘’ bolts, ¼-20 lockwashers
and nuts.
10
12
11
14
Assembling Stove Pipe and Raincap.
Place first piece of stove pipe over
collar on top of stove with the crimped end
facing up. Attach second piece of stove pipe
again with crimped end up. Fold flanges with
holes in collar out to assemble. Next build the
raincap by inserting (3) ⁄ x ⁄” bolts and
tightening to zerts on Raincap brackets. Next
attach bottom of bracket to raincap collar
using (3) ⁄ x ½’’ bolts and nuts through
holes in collar. Set on Second Piece of stove
pipe for snug fit.
15
Installing the Bottom Heat Shields
and the Feet. Position the Bottom
Heat Shields in place over the four holes on
the inside 1” flange of the bottom of the firebox
and cook stove. Place washer over plastic
washer on feet/glides, then insert into bottom
flange holes on perimeter of cookstove. Attach
using ¼” lock washers and nuts. Middle 4
holes on bottom of Cookstove Complete use
¼-20” bolts and nuts to attach both bottom
heat shields.
N
G
L
M
G
F
Page 10
WARNING
The installation must conform with local, state and federal codes. In absence of such
codes, install in accordance with the current American National Standard (ANSI) / National
Fire Protection Association (NFPA) codes. Please check local EPA laws to conform with
local regulations.
INSTALLATION
NOTE BEFORE INSTALLATION:
This heater is intended to be used outdoors only! It should never be used in an enclosed area or a
confined space.
SHUTOFFS:
The stove is supplied with one hopper shutos. Attach spring handle to shuto. Thehopper has a
slot for centering the shuto. When shutting o stove slide shuto down back side o hopper until
you reach a fully closed position. You must be able to shut hopper lid to ensure stove shuto is in
proper position.
MINIMUM CLEARANCES:
A minimum 36” clearance from this heater and all its parts to combustible materials must be
maintained at all times while the heater is in operation.
This Heater is to be used on a flat level non-combustible surface only. Install on flat level noncombustible surface (concrete, tile, stone, etc.)
Once again, thank you for choosing the Cascade Complete Cookstove. We
hope you enjoy this step by step instructional manual. If you have any issues,
problems, or concerns, please contact us at in the following ways:
Call Us Toll-Free:
1-800-977-7433
7:30am - 5:00pm CST Monday - Friday
Live Chat:
7:30am - 5:00pm CST Monday - Friday
Live Chat:
Service@NewfireOutdoors.com
Mail:
Newfire Outdoors.
2625 Kotter Avenue
Evansville, IN 47715
9 www.newfireoutdoors.com | 1-800-977-7344
Page 11

Cascade Complete Cookstove Owner’s Manual 10
OPERATION
PREPERATION BEFORE LIGHTING:
1. Check any possible shipping
damage of the heater. If any is
found, call us directly.
2. Please review thoroughly and be
sure you understand all of the “safety
precautions and warnings”.
3. Make sure the fire grate is in its proper
position with slots running from the
front (Door) to the back of the heater.
4. Pour pellets in both hoppers.
5. Damper Control is both temperature
control as well as combustion
eciency control. To reduce
temperature of stove by 250 degrees
open damper to see slots. To
increase temperature by 250 degrees
close damper fully seeing no slots.
Opening damper will also clean up
particulates (smoke) by increasing
oxygen to fire. Closing damper will
increase temperature.
ATTENTION
Fire the unit and let it burn through all
of the pellets and then let the heater
cool. You will now be free to use the
unit according to the remainder of
these directions. On your first firing,
the high temperature paint on the
unit will cure. When curing, the paint
gives o smoke. This will happen for
about the first 15 minutes of operation.
Do not breath these fumes, they can
make you sick.
INITIAL FIRING OF THE HEATER:
On initial firing fill the hoppers ¾
full about 7 lbs of pellets. This one
time initial firing needs to be done
to cure the paint on the unit. Open
the damper on the heater and leave
it open for the entire initial burn
period. Having the damper closed
on initial firing will result in very high
temperatures and potentially damage
your heater voiding your warranty.
PREPERATION BEFORE FIRING:
1. Never attempt to relight a hot heater,
always wait until the heater is cool.
2. Fill both hoppers completely with pellets.
3. Open the door and squirt about
two tablespoons of alcohol fire gel
on the mound of wood pellets in
the middle of the firebox. Pellets
will have funneled down from the
right hopper chute and the left
hopper chute. Do not use charcoal
lighter to light the unit, it will raise
the temperature too quickly, could
aect the paint on the unit, and is a
dangerous flammable liquids.
4. Light the alcohol fire gel with a match
and close the door.
5. Open the (N) Damper below the door
for the first ten minutes of a burn.
6. Standard burn time for the heater
on two full hoppers (20lb) is about
2.5 hours.
Page 12

MAINTENANCE
PAINT CURING
AFTER USE:
When you are finished using the Heater you should make sure that the fire is completely out.
• Allow at least 45 minutes for the heater to cool down before transporting.
• This stove is supplied with a slanted fire grate to help burn hotter longer reducing the ash
content while burning. Clean grate and slots either by removing from stove or using a hard
pointy object to shue ash down slot holes.
Store the heater upright in a sheltered area away from inclement weather such as rain, snow and
dust. This unit is manufactured as an “Outdoor Unit” from steel. If you leave it in the weather it will
accumulate rust. This is normal and can be treated by using touch up paint in spray cans available
from Wood Pellet Products.
Caution:
Never burn stick wood or plastic or other combustibles in this heater. Burn only ¼”
diameter wood pellets. Never spray any cleaning product on or into any of the doors,
air intakes, or dampers.
To obtain the best performance from your heater make sure you perform the following
maintenance activities on a regular basis:
After a burn and once the heater is completely cooled, clean out any remaining ashes from on
top of the fire grate and in the ash pan. Do not dump an ash pan with hot embers or pellets in
it into a garbage can or any other combustible area. It will start a fire.
Keep exterior surfaces clean. Use warm soapy water for cleaning. NEVER use flammable or
corrosive cleaning agents on or near this Heater. Airflow through dampers and out of the spark
arrester must be unobstructed, clean regularly.
Curing Paint on this heater is easy. Simply fire both hoppers and open the damper. Keep lids open
only until paint has cured on lids. About 10 minutes after stove has been on for at least 20 minutes or
until temperature of stove is hot. Allow to burn at least one half of each full hopper before shutting o.
Continue use if desired.
NOTE:
Open the (N) Damper below the door for the first ten minutes of a burn. Standard burn
time for the heater on two full hoppers (20lb) is about 2.5 hours. You can extend this burn
time by adding pellets to the hoppers during the burn.
11 www.newfireoutdoors.com | 1-800-977-7344
Page 13

Cascade Complete Cookstove Owner’s Manual 12
STOVE USAGE & STORAGE
When you are finished using the Stove/Heater you should make sure that the fire is completely out.
NOTE: Allow at least 45 minutes for the Stove/Heater to cool down before transporting.
Store the Stove/Heater upright in a sheltered area away from inclement weather such as rain, snow
and dust. This unit is manufactured as an “Outdoor Unit” from steel. If you leave it in the weather
it will accumulate rust. This is normal and can be treated by using touch up paint in spray cans
available from Newfire Outdoor Company.
SAFETY PRECAUTIONS:
To ensure safe use of your outdoor patio heater, you are requested to pay close attention to these
essential safety requirements. This is a wood pellet, direct-vented heater, all of the combustion
products leave the heater from the chimney/smokestack. By products of combustion from this unit
include carbon monoxide. Carbon monoxide is toxic. Carbon Monoxide can build up in a heated
space and failure to provide adequate ventilation could result in death. Always be sure there is
plenty of ventilation when the heater is in use. Always follow the advice about ventilation in these
operating instructions:
FOR OUTDOOR USE ONLY. DO NOT USE THIS UNIT IN A CLOSED SPACE.
Alert both children and elders to the hazard of high surface temperatures.
Care must be taken for the supervision of children in the vicinity of an operating or hot heater.
Your children and pets should be supervised when they are in area of heater.
This outdoor patio heater must be used for outdoors only in a well ventilated area and
not be used in a vehicle or any enclosed building or space.
Always place the heater on a level stable surface.
Do not move or touch the heater while it is hot or burning.
Do not alter or modify the heater in any manner
Always keep at least a 36 ‘’ clearance from the stove to any combustible material.
Do not use the heater if the wind velocity is greater than 10 miles per hour.
Do not spray aerosols near the heater while in use.
Do not clean heater with combustible or corrosive cleaners. Use warm, soapy water.
Do not operate a damaged heater.
Page 14

SERVICE AND WARRANTY INFORMATION
Do not hang clothing or flammable materials either on or near heater
Allow 45 minutes for the heater to cool down after use before attempting to move your heater.
NEVER USE PETROLEUM BASED FLAMMABLE VAPORS OR LIQUIDS IN OR NEAR HEATER
To learn how to service and procure parts for worn out, defective or damaged components, please
call us directly for assistance. Warning: Use our original equipment replaced parts only. Use of
unauthorized parts or modification of parts can void warranty and create an unsafe condition.
WARRANTY TERMS:
Subject to the conditions set out below, this product is warranted to the original purchaser to
be free from defects in workmanship and materials for 90 days from the date of purchase. This
warranty does not include the paint and or finish on the heater.
• Satisfactory proof of the purchase date must be furnished at the time of notification of the
defect for any claim under the warranty to be enforceable.
• This warranty covers all parts found defective in workmanship and / or materials during the
warranty period and can be repaired or replaced at the discretion of the manufacture at no
cost to the original purchaser.
BURNING REAL WOOD:
This unit is capable of burning real wood. We recommend the use of real wood only when
wood pellets are unavailable. Simply place chunk of wood over burn area. Start fire using
wood pellets and fire gel to help initiate coal bed for chord wood. Use only one chunk of
wood at a time and never overfill the firebox with wood. Be certain wood is dry. Burning
real wood is not as ecient as burning pellets. Therefore if using real wood more often be
certain to cleanout unit by removing all ash content from firebox and burn pot prior to the
next pellet firing.
TEMPERATURE CONTROL:
AFTER USE: Oven temps are regulated by the damper wheel at the front of the heater.
Burning wood pellets and leaving the damper fully open will allow the stoves lowest possible
temp at 325 degrees. Fully closed will bring the temperature up to 525 peak temperature.
You may also dial in between temps based on how much air you allow through the damper.
Elevation, quality of fuel, and ambient temperature will all play important roles in this stoves
operation.
13 www.newfireoutdoors.com | 1-800-977-7344
Page 15

Patent Pending: Newfire Outdoor Company LLC.com
© 2015, All Rights Reserved
Cascade Complete Cookstove Owner’s Manual 14
• This warranty will be void and accordingly no claim of any nature will be enforceable if
the product has not been assembled, installed or operated according to the instructions,
subjected to abuse, improperly treated, neglected, rusted by exposure to the elements,
misused and / or if any repairs, maintenance, or service has been done by an unauthorized
person.
• Return must be properly packaged and freight prepaid to us.
• Each of the manufacturer, distributor and retailer will not be liable for any incidental or
consequential loss or damage arising from the installation or operation for the product and
or the failure of any part for any reason.
• There are no other express or implied warranties, except for those stipulated herein. This
warranty gives specific rights and the original purchaser may have additional rights and
remedies in law.
• This warranty does not cover commercial or rental use.
• Rust and oxidation is a normally occurring process for any metal exposed to the elements and
is expressly not covered under out warranty.
Page 16

 Loading...