

Page 1

Wireless–N Client Adapter
Quick Installation Guide
Version 2.2
Page 2

Table of Contents
English
WLAN Adapter Quick installation Guide................................................................................................2
Utility and Driver Installation..................................................................................................................2
Hardware Installation ............................................................................................................................4
Wireless Network Setup........................................................................................................................5
WPS Function.......................................................................................................................................6
1
Page 3
Copyright statement
No part of this publication may be reproduced, stored in a retrieval system, or transmitted in any form
or by any means, whether electronic, mechanical, photocopying, recording, or otherwise without the
prior writing of the publisher.
JULY 2007
WLAN Adapter Quick installation Guide
Note: Ne pas insérer l'Adaptateur WLAN dans votre ordinateur
avant d'avoir fini l'installation de l'Utilitaire et du Pilote.
Utility and Driver Installation
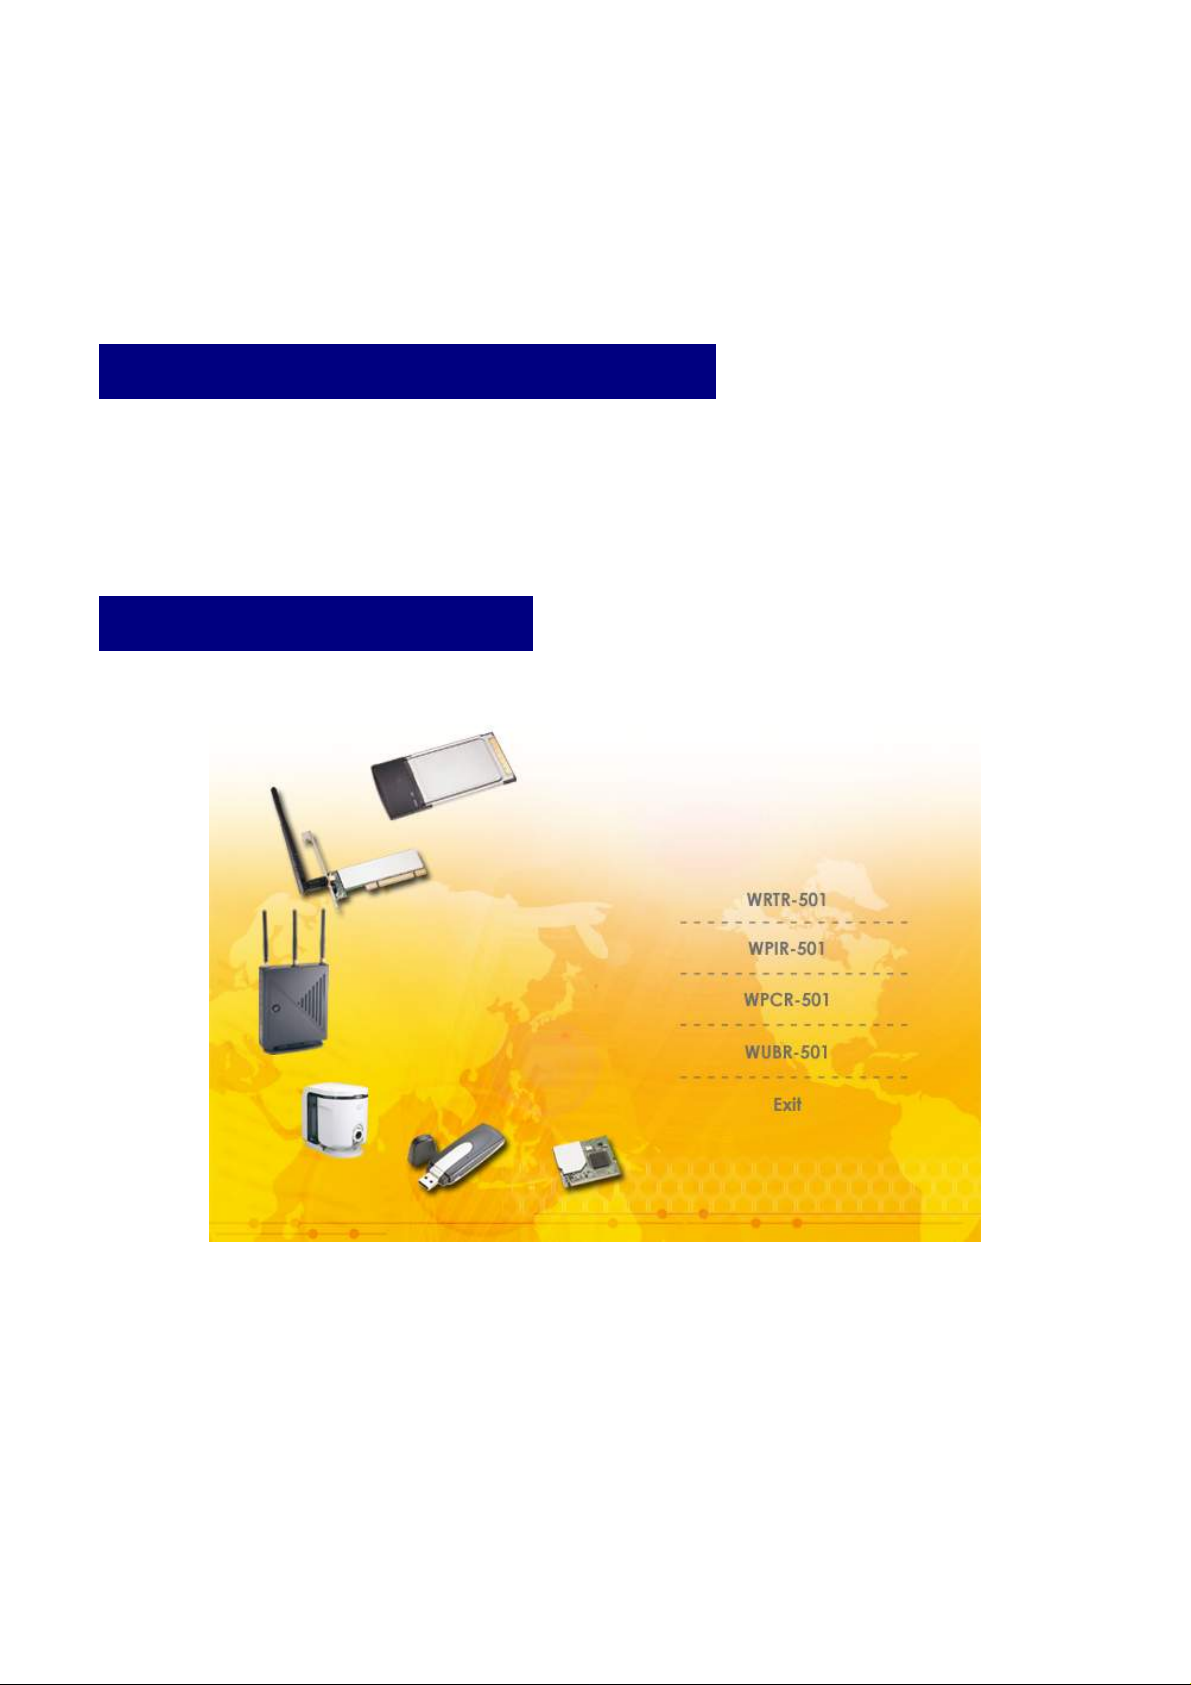
1. Turn “On” your computer. Insert the Driver CD then wait for the Autorun prompt like below.
2. If Autorun does not work, please browse the CD content and double click the “ Autorun.exe ”.
3. Click the model name which you had bought.
4. Click “Next” and then follow the instructions on the screen to continue the installation.
2
Page 4
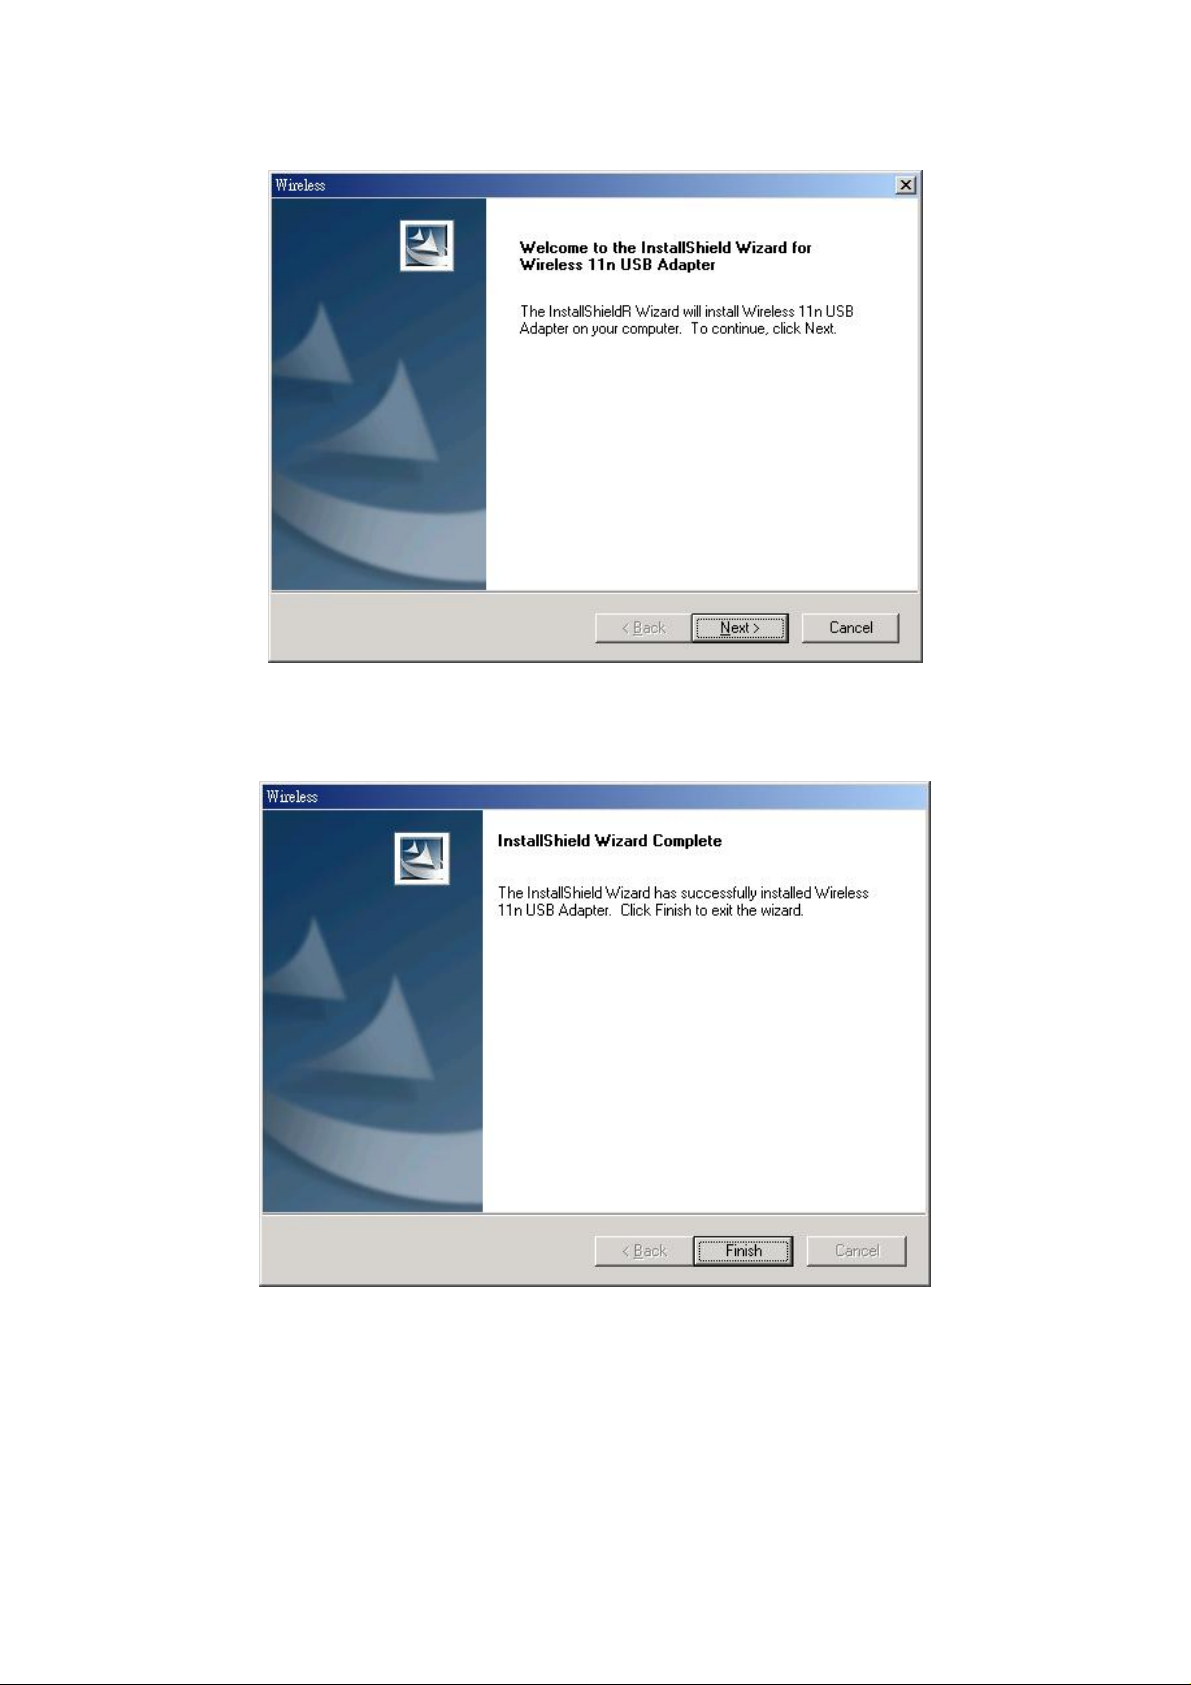
5. Click the Finish button in this screen; both the driver and the Configuration Utility are installed on
your computer.
3
Page 5
Hardware Installation
For PCMCIA or USB adapters, simply insert or connect the adapter after running the setup file.
For PCI cards, you must shut down the computer, plug the card in an available PCI slot, and restart the
operating system.
After the computer boots back up, it will detect the wireless card and then start the New Hardware
Found wizard. Respond to the prompts displayed by the wizard, and select the option, “Install the
software automatically (Recommended) ”; the operating system will find the driver automatically.
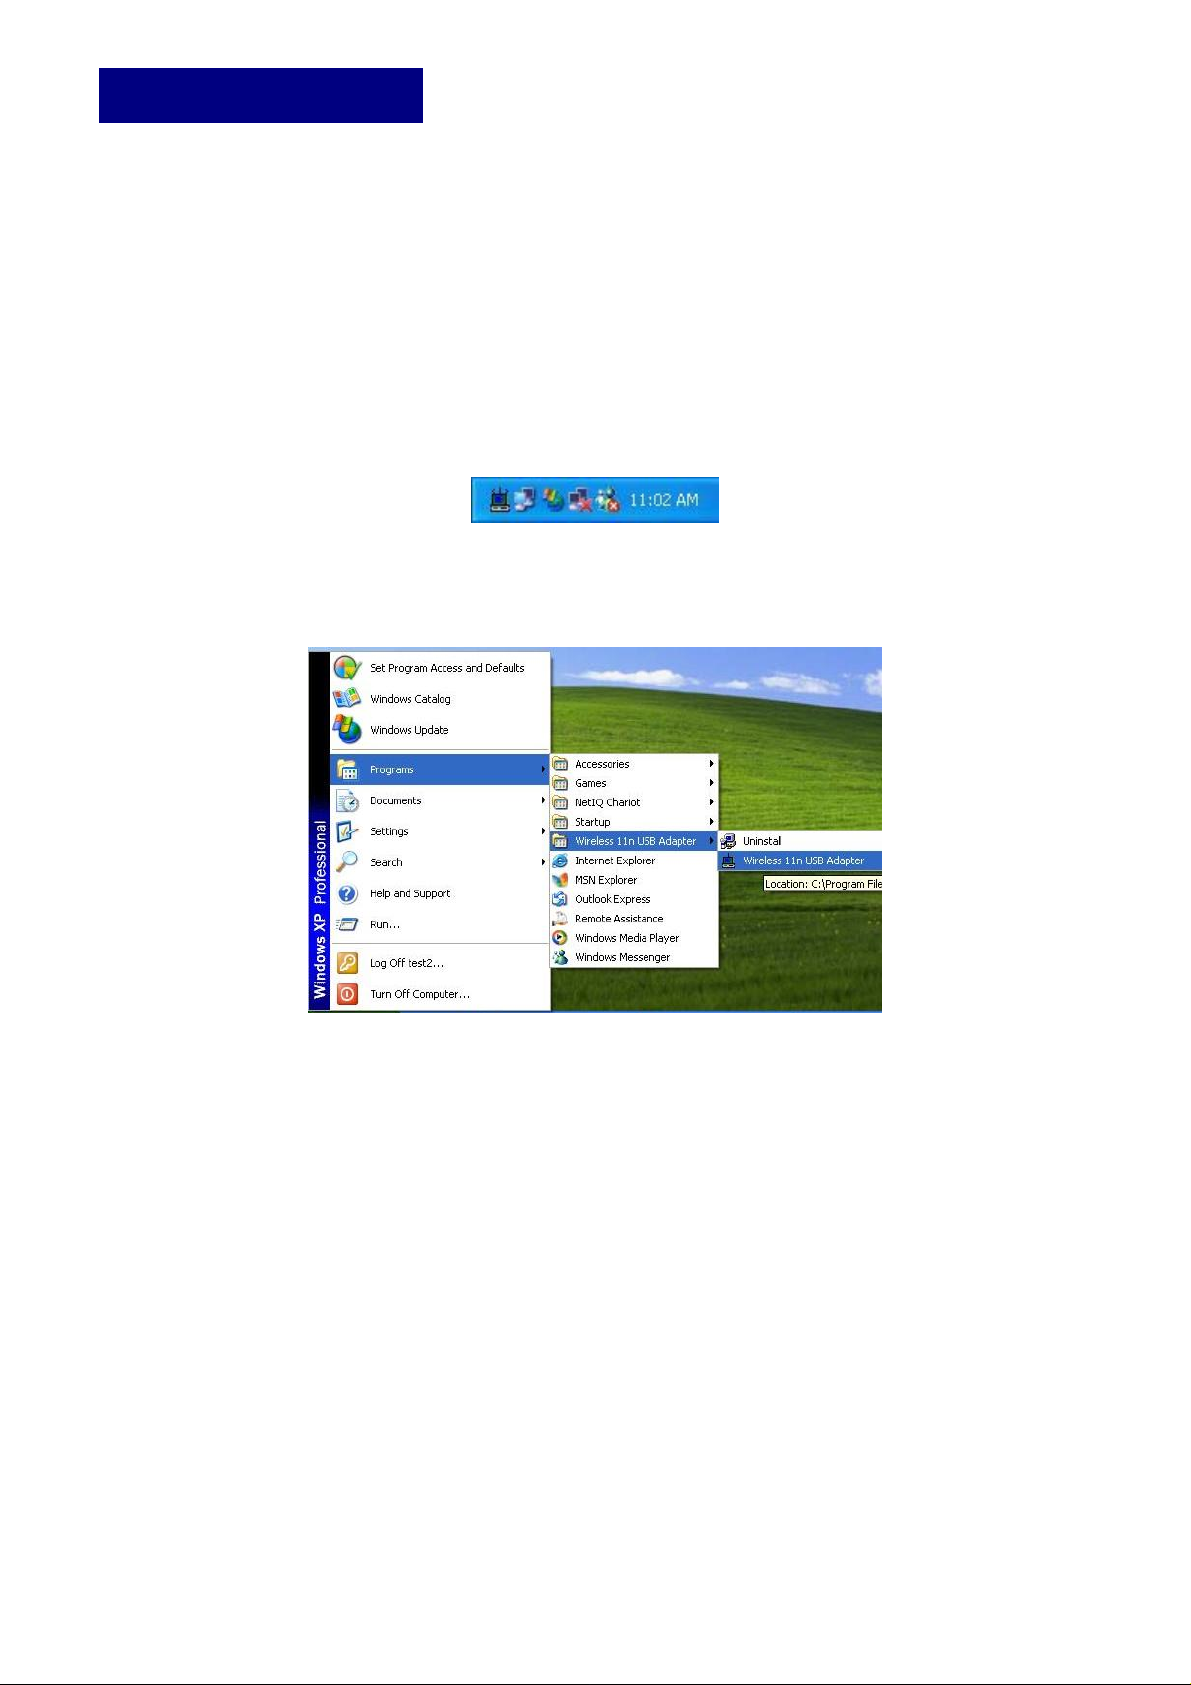
You can launch the Configuration Utility by clicking the left mouse button on the Configuration Utility
icon and selecting Advanced Configuration.
If the Configuration Utility icon is not displayed in the System Tray, you can restart the Configuration
Utility from the Start Menu by selecting Programs and Wireless Network Utility Configuration.
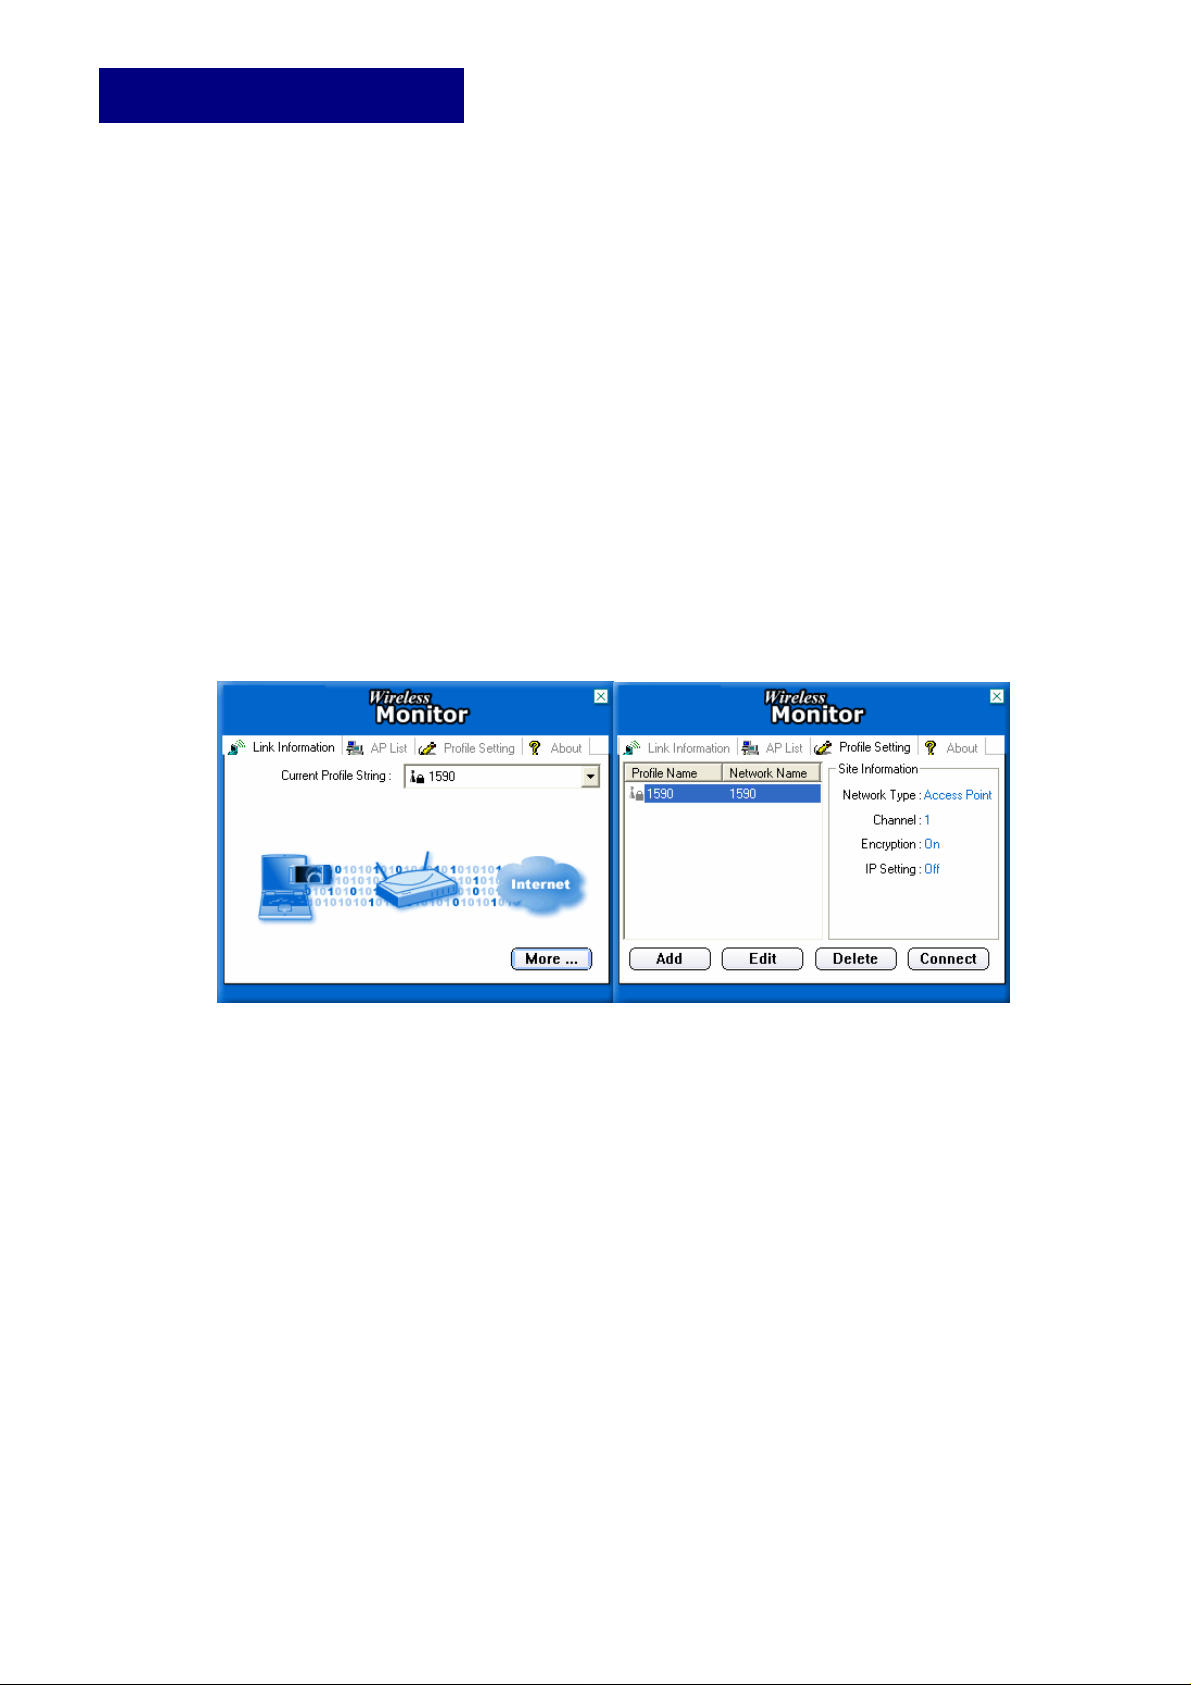
The Configuration Utility consists of window with four tabs: Link Information, AP List, Profile Setting,
and About. Please find information about these tabs in the User’s Guide (from the CD contents, select
Manual & QIG that shown with PDF format.)
4
Page 6
Wireless Network Setup
1. Peer-to-Peer: Connects with other wireless client(s). This does not require Access Point. Please
make sure the “Network Name” (SSID or ESSID) and “Peer-to-Peer” channel are the same for
all clients in the same wireless network. Double click on the Configuration Utility icon to open the
utility.
- Click on “Profile Setting” tab and “Add” to create a new profile.
- Enter a name that the profile correspond, click “Next”.
- Select the “Network Type”, click on the drop-down arrow and select “Peer-to-Peer”, and then at
“Peer-to-Peer Channel”, use the up/down arrows to select the channel number, and then click
“Next”.
- Select the Authentication Mode to enable the “Encryption” if you have any security concern.
Once you enable the encryption function, then you should input the corresponding key. Click
“Next”.
- On IP Setting select “Enable” or “Disable” to make used of it. Click
“Complete” to finish the configuration.
2. Access Point: Connects to network via Access Point.
- Click “AP List” tab.
- Select the listed Wireless Network to Join.
- Click “Connect” to join the network.
* Note: You might need to configure a Profile before if the destination network had a “WEP KEY”
protected.
The equipment has been tested and found to comply with FCC and CE Rules.Operation is subject to the following
two conditions:
(1) This device may not cause harmful interference.
(2) This device must accept any interference received including interference that may cause undesired operation.
5
Page 7
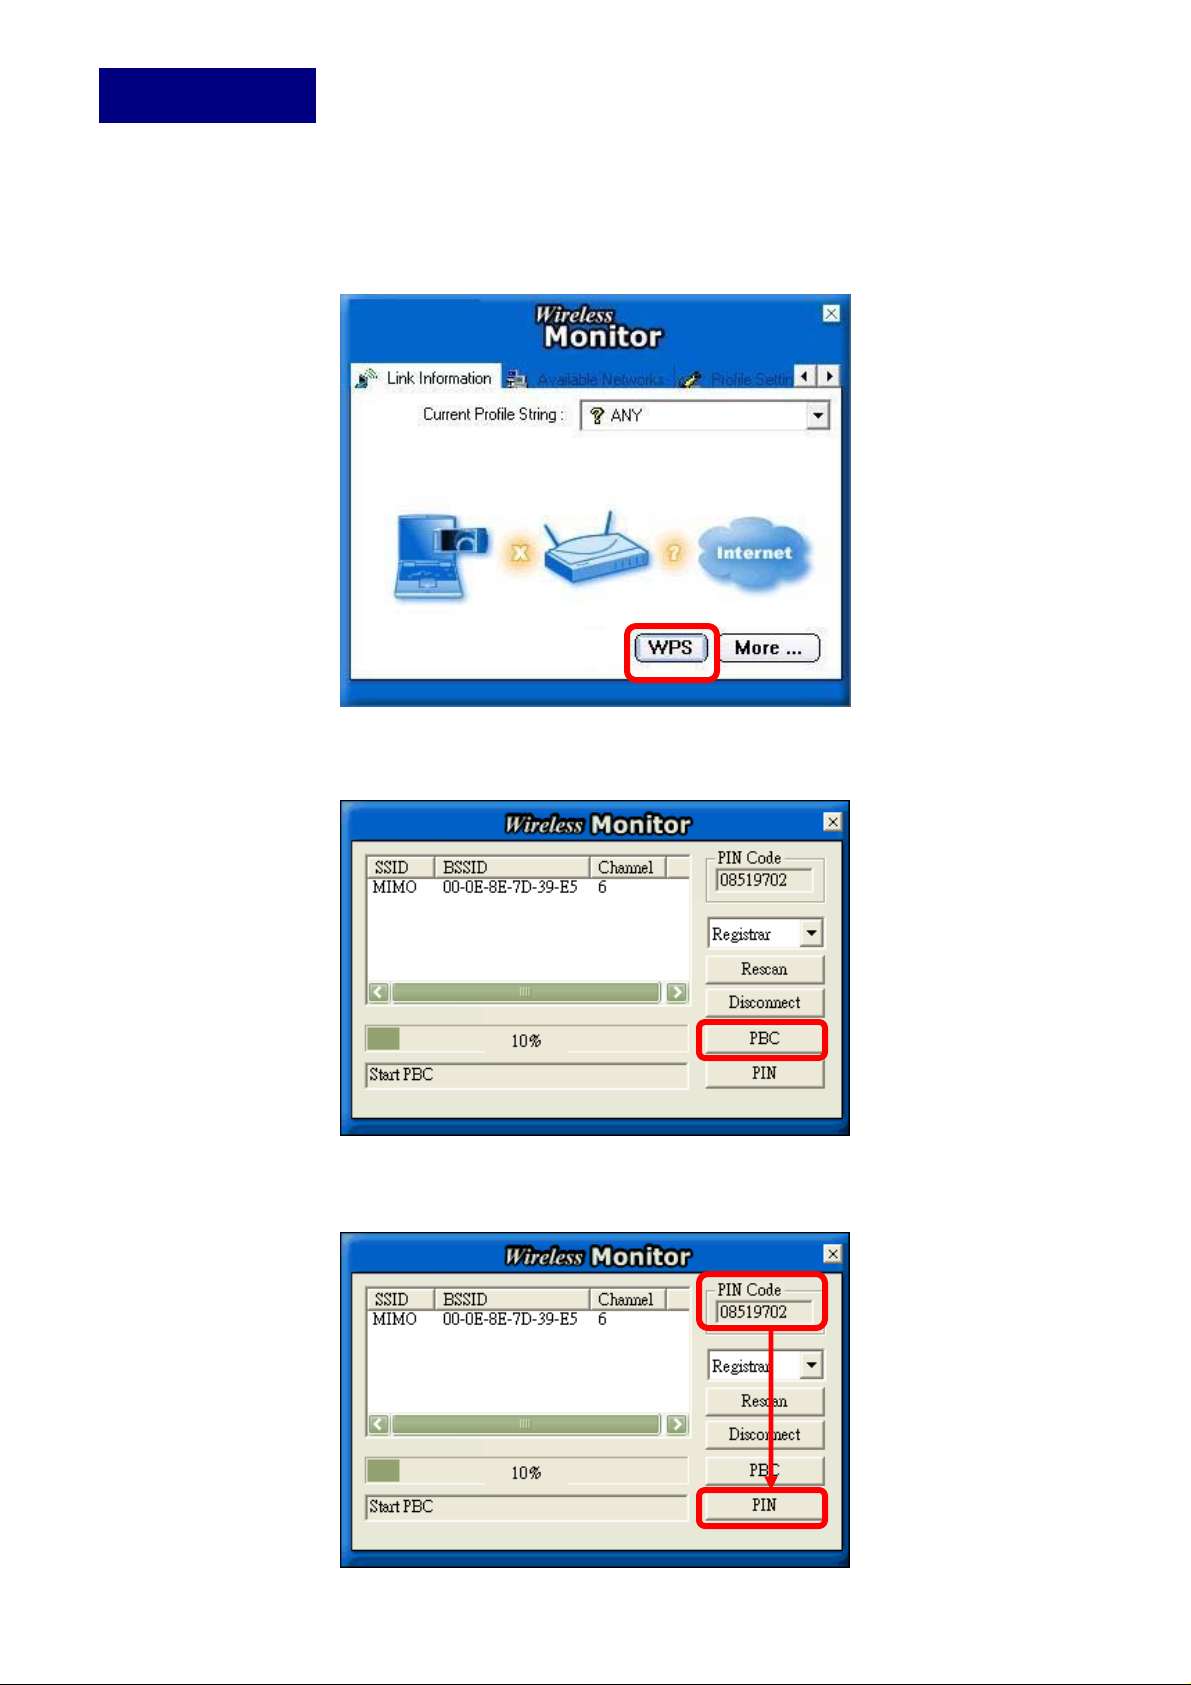
WPS Function
Wi-Fi Protected Setup (WPS) is a standard for easy and secure establishment of a wireless home
network, created by the Wi-Fi Alliance. The goal of the WPS protocol is to simplify the process of
connecting any home device to the wireless network.
To secure your wireless network, you could push the “WPS” button under user interface as below:
There are two ways to enable WPS connection:
1. PBC mode: Choose a Router in the list then click “PBC” button.
2. PIN mode: Choose a Router in the list and check the PIN codes are the same between Router and
Client then click “PIN” button.
6
Page 8

Federal Communication Commission Interference Statement
This equipment has been tested and found to comply with the limits for a Class B digital device,
pursuant to Part 15 of the FCC Rules. These limits are designed to provide reasonable protection
against harmful interference in a residential installation. This equipment generates, uses and can
radiate radio frequency energy and, if not installed and used in accordance with the instructions, may
cause harmful interference to radio communications. However, there is no guarantee that interference
will not occur in a particular installation. If this equipment does cause harmful interference to radio or
television reception, which can be determined by turning the equipment off and on, the user is
encouraged to try to correct the interference by one of the following measures:
- Reorient or relocate the receiving antenna.
- Increase the separation between the equipment and receiver.
- Connect the equipment into an outlet on a circuit different from that to which the receiver is
connected.
- Consult the dealer or an experienced radio/TV technician for help.
This device complies with Part 15 of the FCC Rules. Operation is subject to the following two conditions:
(1) This device may not cause harmful interference, and (2) this device must accept any interference
received, including interference that may cause undesired operation.
FCC Caution: Any changes or modifications not expressly approved by the party responsible for
compliance could void the user's authority to operate this equipment.
IMPORTANT NOTE:
FCC Radiation Exposure Statement:
For Cardbus & USB: This equipment complies with FCC radiation exposure limits set forth for an
uncontrolled environment. End users must follow the specific operating instructions for satisfying
RF exposure compliance. To maintain compliance with FCC RF exposure compliance requirements,
please follow operation instruction as documented in this manual.
SAR compliance has been established in typical laptop computer(s) with Cardbus / USB slot, and product
could be used in typical laptop computer with Cardbus / USB slot. Other application like handheld PC or
similar device has not been verified and may not compliance with related RF exposure rule and such
use shall be prohibited.
For PCI adapter: This equipment complies with FCC radiation exposure limits set forth for an
uncontrolled environment. This equipment should be installed and operated with minimum distance
20cm between the radiator & your body.
This transmitter must not be co-located or operating in conjunction with any other antenna or transmitter.
The availability of some specific channels and/or operational frequency bands are country dependent
and are firmware programmed at the factory to match the intended destination. The firmware setting
is not accessible by the end user.
7
 Loading...