

Newer Technology MaxPower 802.11, MaxPower User Manual
User Manual
MaxPower 802.11n/g/b Wireless Guide

2
Table of Contents
Introduction 3
Package Contents 3
Indicators & Ports 4
Front Panel 4
Rear Panel 4
Basic Setup 5
Hardware Installation 5
Router Configuration 5
DDNS Settings 11
MAC Address Clone 13
Basic Wireless Configuration 14
Wireless Security 15
Wireless MAC Filter 16
Advanced Wireless Settings 18
Wireless WDS Settings 21
VPN Passthrough 22
Internet Access Policy 23
Port Range Forwarding 24
Port Range Triggering 26
DMZ 27
Management 28
Log 29
Diagnostics 30
Factory Defaults 31
Router Status 32
Local Network Status 33
Wireless Network Status 34
Troubleshooting 35
Contacting Tech Support/Customer Service 37
Introduction
Thank you for purchasing the Newer Technology MaxPower
802.11n/g/b Wireless Router! This guide will walk you through
the setup process step by step and get you up and running
with your new storage device quickly.
Setup of the Newer Technology MaxPower 802.11n/g/b Wire-
less Router is straightforward, but you do need to follow this
guide for proper setup. We suggest reading through the whole
manual before hooking up the MaxPower 802.11n/g/b Wireless
Router..
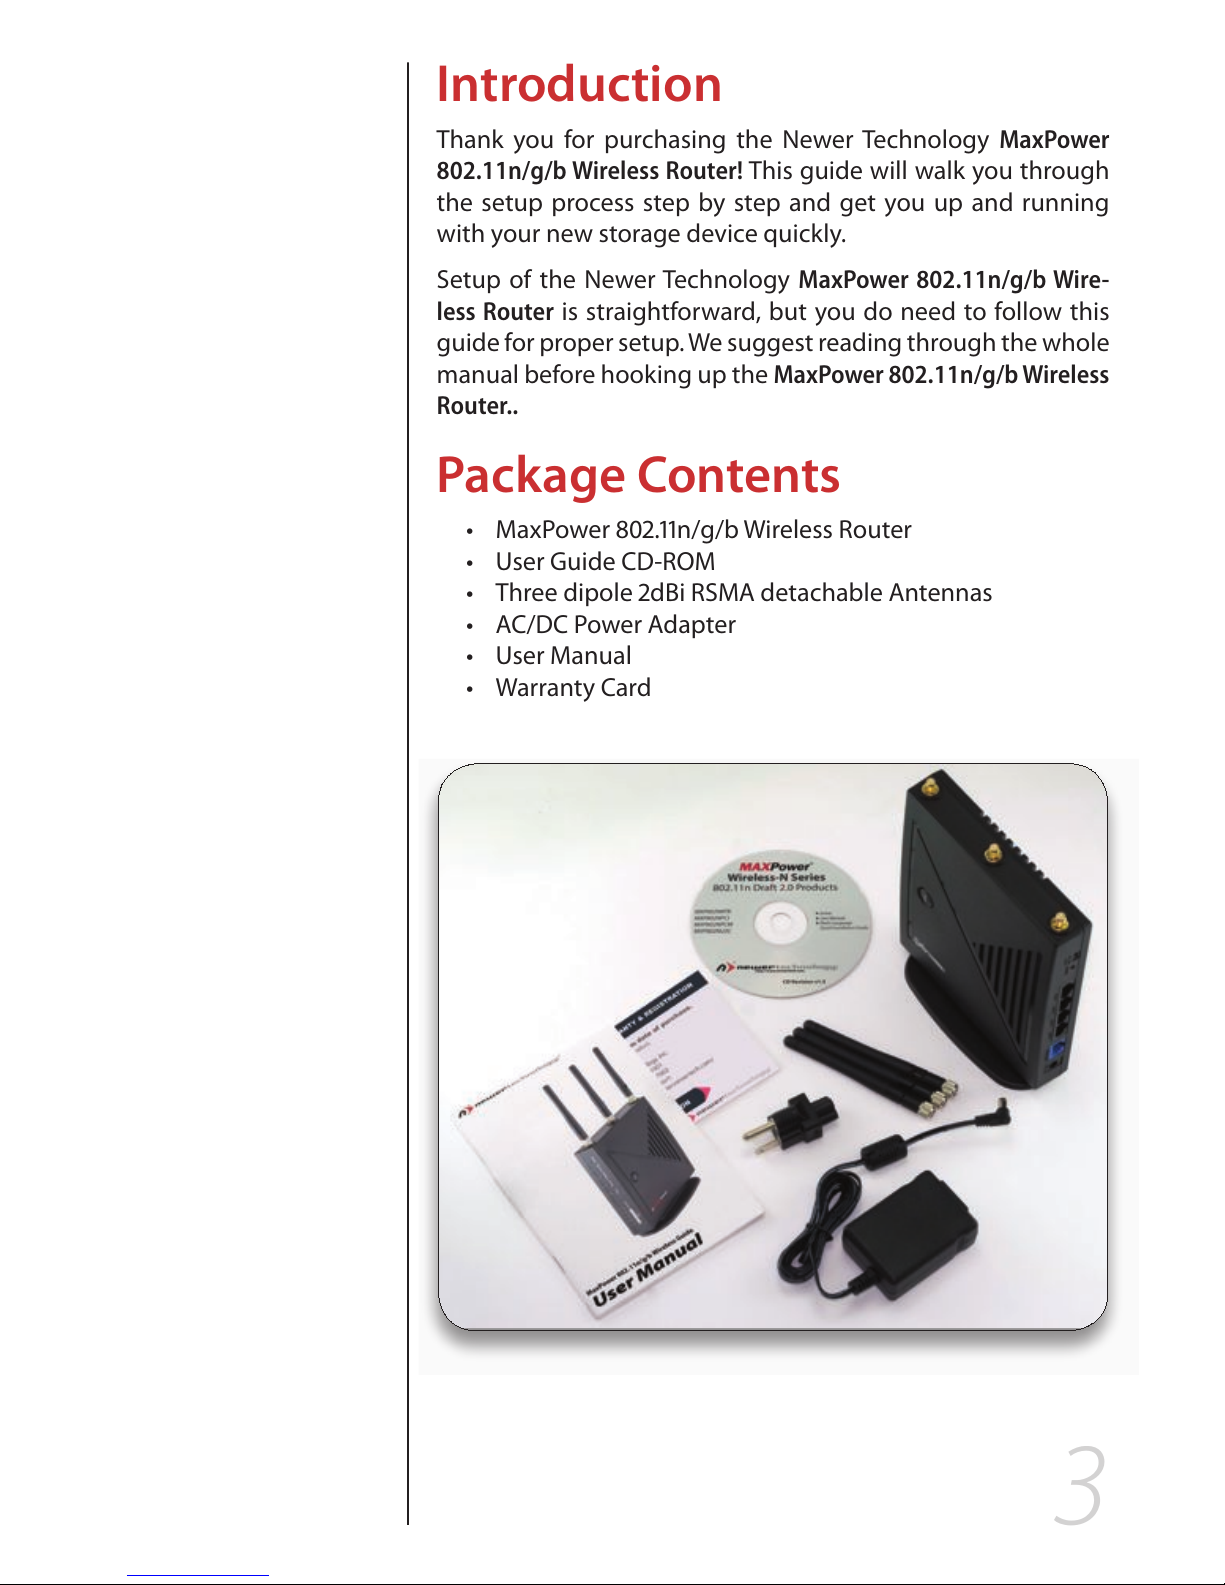
Package Contents
MaxPower 802.11n/g/b Wireless Routert
User Guide CD-ROMt
Three dipole 2dBi RSMA detachable Antennast
AC/DC Power Adaptert
User Manualt
Warranty Cardt
4
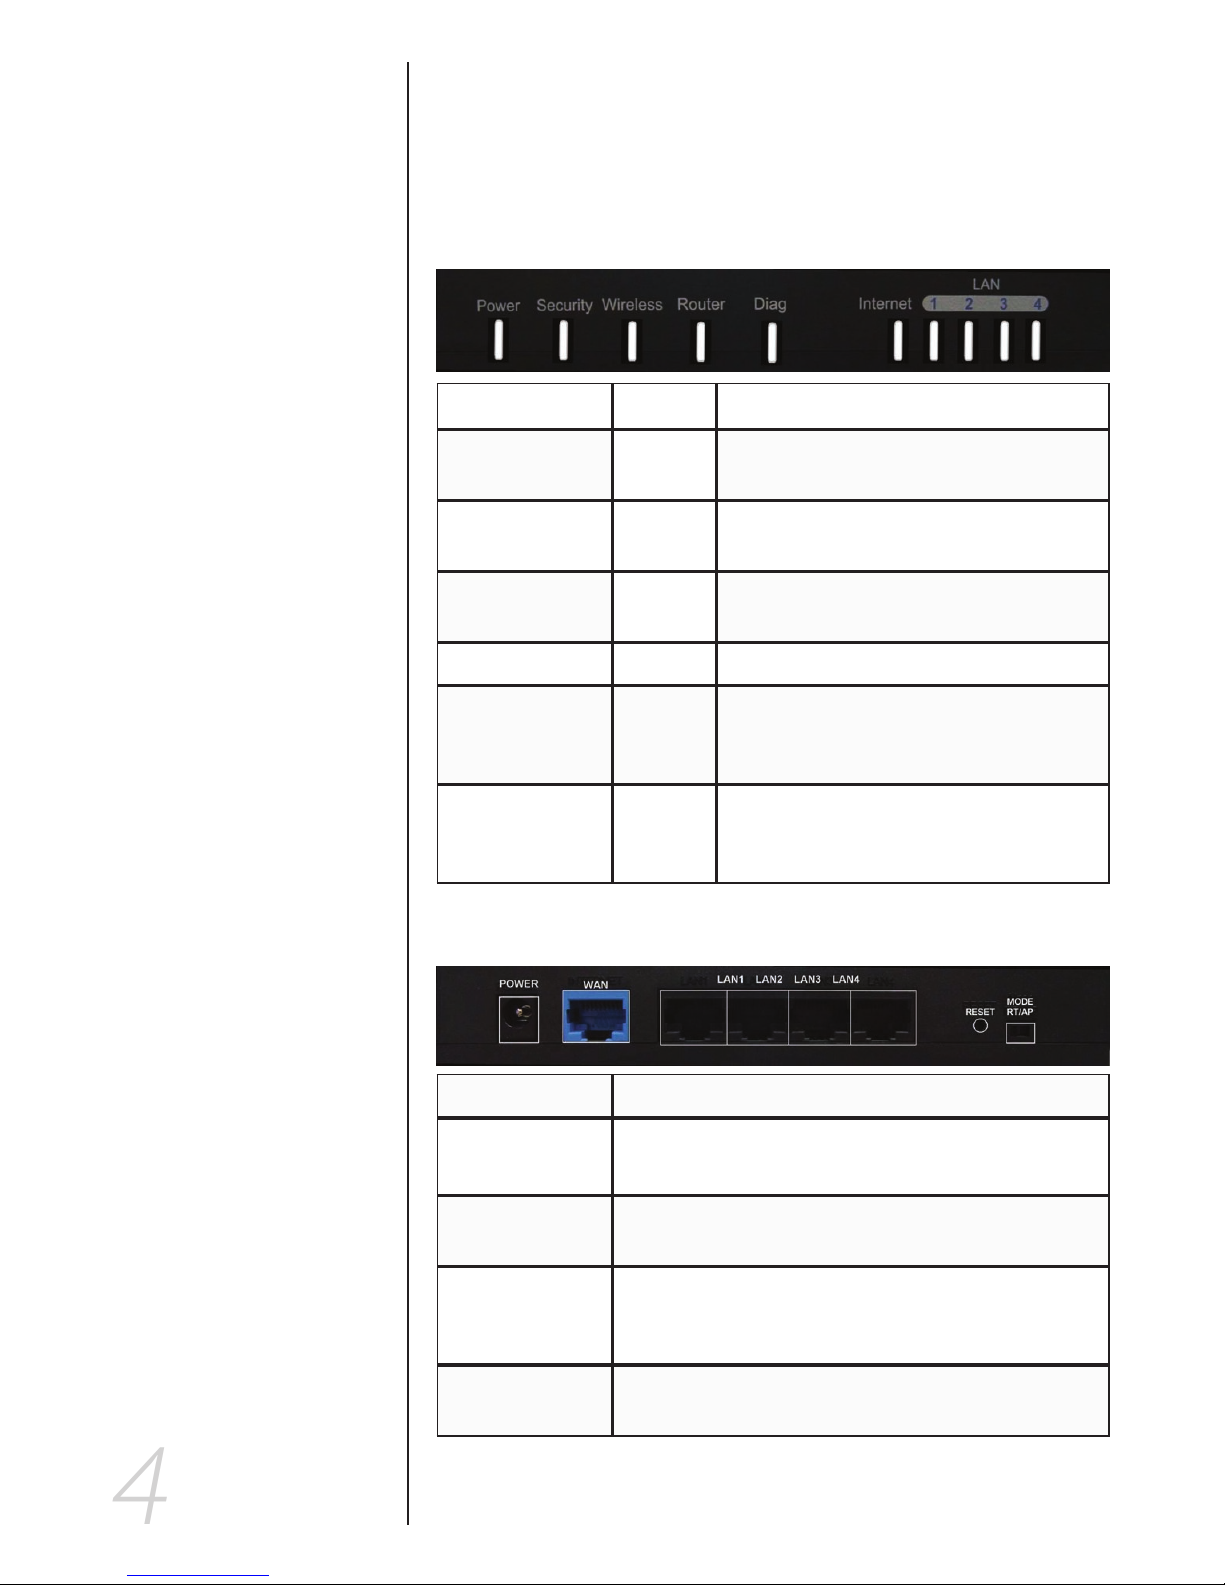
Indicators and Ports
Front Panel
The front panel consists of device status LEDs. Use the table
below to determine what each means.
Indicator Color Function
Power Green Indicates whether the unit is getting
power or not
Security Orange When blinking, this LED indicates the
WPS encryption function is active.
Wireless Green Indicates wireless network availability
and activity.
Router Green Lit when unit is working as a “Bridge.”
Diag Red Lights during startup diagnosis and
firmware updating. Also indicates when
system is functioning abnormally.
Internet/LAN 1-4 Green These indicators will light up when a link
has been established. Data transmission
is indicated by rapid blinking.
Rear Panel
Power The power adapter attaches here.
WAN
Your broadband internet connection attaches
here.
LAN 1-4 These ports connect the router to your networked
PCs and other Ethernet network devices.
Reset The RESET button can restore device to factory
default settings by press this button for approx. 10
seconds while the unit is powered on
Router Mode
Switch
Allows you to switch between Router and Access
Point modes.

Basic Setup
Hardware Installation
This installation is suitable for most hardware setups.
Power o your network devices.1.
Locate an optimum location for the 2. MaxPower 802.11n/g/b
Wireless Router. The best place for the unit is usually at the
center of your wireless network, with line of sight to all of
your wireless devices.
Attach and adjust the antennas. Normally, a higher loca-3.
tion of your MaxPower 802.11n/g/b Wireless Router should
get better performance.
Using a standard Ethernet network cable, connect to the 4.
MaxPower 802.11n/g/b Wireless Router’s WAN port to your
broadband modem.
Connect your network PCs or Ethernet devices to the 5.
Router’s LAN ports using standard Ethernet network cable.
Connect the AC power adapter to the 6. MaxPower 802.11n/
g/b Wireless Router’s Power port, Then connect the other
end to an electrical outlet. Only use the power adapter
supplied with the unit. Use of a dierent adapter may
cause product damage.
The Hardware installation is completed. You may now 7.
congure the unit.
Router Configuration
You will need to use a modern web browser in order to con-
gure your MaxPower 802.11n/g/b Wireless Router.
Open a Web browser window on computer that is either 1.
connected to the router via Ethernet or that you have
chosen to connect via wireless, as per the instructions for
that particular machine.
Connect to 2. http://192.168.1.1
In order to congure the 3. MaxPower 802.11n/g/b Wireless
Router, you must input the password into the Password
box, leaving the username eld blank. The default pass-
word is “admin”.
Once you have
logged-in as the
administrator, it is
a good idea to change the
administrator password to
ensure a secure connec-
tion. You can do this under
the Administration tab on
conguration page.
Once you have entered the password, a screen with the fol-4.
lowing information will be displayed.
Most users will be able to congure the MaxPower 802.11n/g/b
Wireless Router and get it working properly using the default
settings. Some Internet Service Providers (ISPs) will require
that you enter broadband specic information into this device,
such as User Name, Password, IP Address, Default Gateway
Address, or DNS IP Address for Internet access. This information can be obtained from your ISP, if required. More detailed
information about the dierent options for dierent settings
follows.
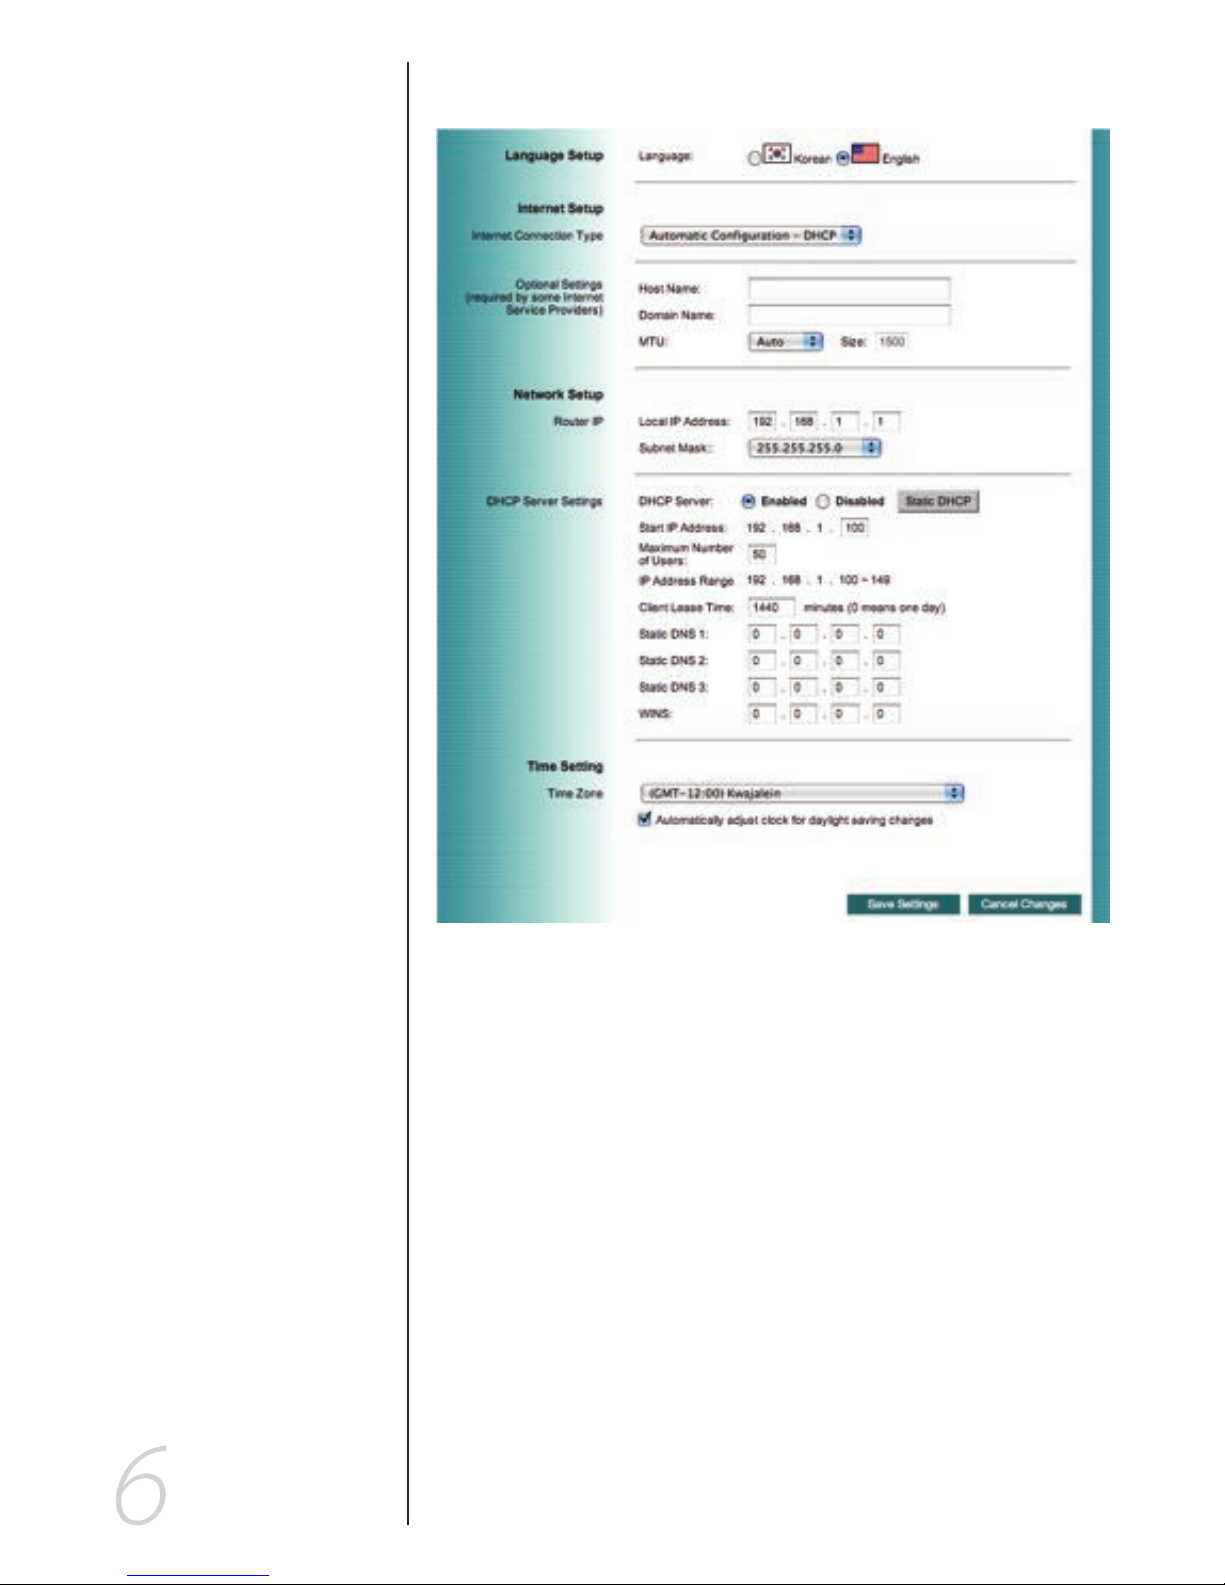
Internet Setup
Internet Connection Type:
Automatic Configuration – DHCPt
This is default connection type. If your ISP supports
DHCP assigning dynamic IP address then please select
this type.

Static IPt
If you are required to use a xed IP address to connect to
the Internet, then select Static IP.
Internet IP Address: This is the Router’s WAN IP address.
It is provided by your ISP.
Subnet Mask: This is the Router’s Subnet Mask. If needed,
it will be provided by your ISP.
Default Gateway: This is the Router’s Gateway Address.
It, too, will be provided by your ISP.
DNS (1-3): Your ISP will provide you with at least one DNS
Server IP Address, which you will need to input here
PPPoEt
PPPoE (Point-to-Point Protocol over Ethernet) is a very
common connection type. If you are connected to the
Internet through DSL, check with your ISP to see if they
use PPPoE. If so, you will need to enable PPPoE.
User Name and Password: Enter the User Name and
Password provided by your ISP.
Connect on Demand: The Max Idle Time is allows the
Router to disconnect the Internet connection if there is
no trac through this Router during a specied period
of time. If your Internet connection has been terminated
due to going over this idle time, the Connect on Demand
option will trigger the Router to automatically re-establish your connection as soon as you try to access the Internet again.
Keep Alive: The Redial Period causes the Router to periodically check your Internet connection by a set period
of time. If the connection is terminated, then the Router
will automatically reconnect.
PPTPt
Point-to-Point Tunneling Protocol (PPTP), is a VPN tunnel
method that can use to encrypt data and prevent the unauthorized viewing of condential data that is transmitted across public networks.
Internet IP Address and Subnet Mask: This is the Router’s
IP Address and Subnet Mask. If your Internet
connection requires a Static IP address, then
your ISP will provide these numbers to you.

Default Gateway: Your ISP will provide you with the
Gateway IP Address.
User Name and Password: This is PPTP login User Name
and Password. Your ISP will provide you this information.
Keep Alive: The Redial Period causes the Router to periodically check your Internet connection by a set period
of time. If the connection is terminated, then the Router
will automatically reconnect.
These connection types can be selected from the Internet
Connection Type drop-down menu. Fields for the appropriate information will be displayed, depending on the connection type selected.
Optional Settings
Your ISP may require these settings. If your ISP provides this
information, make sure to enter it in the appropriate elds
here.
Host Name and Domain Name: These elds allow you to
input a host and domain name for the Router. Some ISPs require these names as identication. You may have to check
with your ISP to see if your broadband Internet service has
been congured with a host and domain name. In most
cases, leaving these elds blank will work.
MTU: MTU is the Maximum Transmission Unit. It species
the largest packet size permitted for Internet transmission.
Select Manual if you want to manually enter the largest
packet size that will be transmitted. The recommended
size, entered in the Size eld, is 1500. You should leave this
value in the 1200 to 1500 range. To have the Router select
the best MTU for your Internet connection, please select the
default setting--Auto.
Network Setup
The Network Setup section changes the Router’s local network
settings.
Router IP
IP Address and Subnet Mask: This is your router’s LAN
IP Address and Subnet Mask. The default IP Address is
192.168.1.1 and the default Subnet Mask is 255.255.255.0.

DHCP Server Settings
The settings allow you to congure the Router’s Dynamic Host
Conguration Protocol (DHCP) server function. The Router
can be used as a DHCP server for your network. A DHCP
server automatically assigns an IP address to each computer
on your network. If you choose to enable the Router’s DHCP
server option, you must make sure there is no other DHCP
server on your network. If you disable the Router’s DHCP
server function, you must congure the IP Address, Subnet
Mask, and DNS for each connected computer (note that each
IP Address must be unique).
DHCP Server: DHCP is enabled by factory default. If you already have a DHCP server on your network or you do not
want a DHCP server, then select Disable from the options.
Assign Static DHCP: This function can enable the DHCP
server to assign a particular IP address for an appointed
computer. If you want a computer to be assigned the same
IP address every time, then click the Assign Static IP button.
How to set a PC as Static DHCP client
On the Static DHCP Client List screen, enter the static
local IP address in the Assign this IP eld, and enter the
MAC address of the computer in the “To this MAC” eld.
Then, click the Enabled checkbox. When you have nished
your entries, click the Save Settings button to save your
changes or click the Cancel Changes button to cancel your
changes. To exit this screen, click the Close button.
How to set a DHCP client as Static DHCP client
Click the DHCP Client Table button can see a list of DHCP
client. On the DHCP Client Table, you will see a list of DHCP
clients with the following information: Client Names, Interfaces, IP Addresses, and MAC Addresses. From the “To
Sort by” drop-down menu, you can sort the table by Client
Name, Interface, IP Address, or MAC Address. If you want
to add any of the DHCP clients to the Static DHCP Client
List, then click the Save to Static DHCP Client List checkbox
and then click the Save Settings button. Click the Cancel
Changes button to cancel your changes. To view the most
up-to-date information, click the Refresh button. To exit
this screen, click the Close button.
Start IP Address: Enter a value for the DHCP server to start with
when issuing IP addresses. Because the Router’s default IP address is 192.168.1.1, the Starting IP Address must be
192.168.1.2 or greater, but smaller than 192.168.1.254.
The default Starting IP Address is 192.168.1.100.

Maximum Number of Users: Enter the maximum number
of PCs that you want the DHCP server to assign IP addresses
to. The absolute maximum is 253 - possible if 192.168.1.1 is
your starting IP address. The default is 50.
IP Address Range: The range of DHCP addresses. This range
is determined by the Maximum Number of Users.
Client Lease Time: The Client Lease Time is the amount
of time a network user will be allowed connection to the
Router with their current dynamic IP address. Enter the
amount of time, in minutes, that the user will be “leased”
this dynamic IP address. Once the leased time is up, the user
will get a new dynamic IP address automatically. The default
is 0 minutes, which means one day.
Static DNS 1-3: The Domain Name System (DNS) is how the
Internet translates domain or website names into Internet
addresses or URLs. Your ISP will provide you with at least
one DNS Server IP Address. If you wish to utilize another,
enter that IP Address in one of these elds. You can enter up
to 3 DNS Server IP Addresses here. The Router will use these
for quicker access to functioning DNS servers.
WINS: The Windows Internet Naming Service (WINS) manages each PC’s interaction with the Internet. If you use a
WINS server, enter that server’s IP Address here. Otherwise,
leave this blank.
Time Settings
Select your time zone from this pull-down menu. Click the
check box if you want to automatically adjust for daylight savings time.
Once you are done changing the settings, click the Save Settings button to apply your changes or Cancel Changes to revert to what they were before. For further information click
Help.
DDNS Settings
The Router oers a Dynamic Domain Name System (DDNS)
feature. DDNS lets you assign a xed host and domain name
to a dynamic Internet IP address. It is useful when you are hosting your own website, FTP server, or other server behind the
Router. Before using this feature, you need to sign up for DDNS
service with one of two DDNS service providers, DynDNS.org
or TZO.
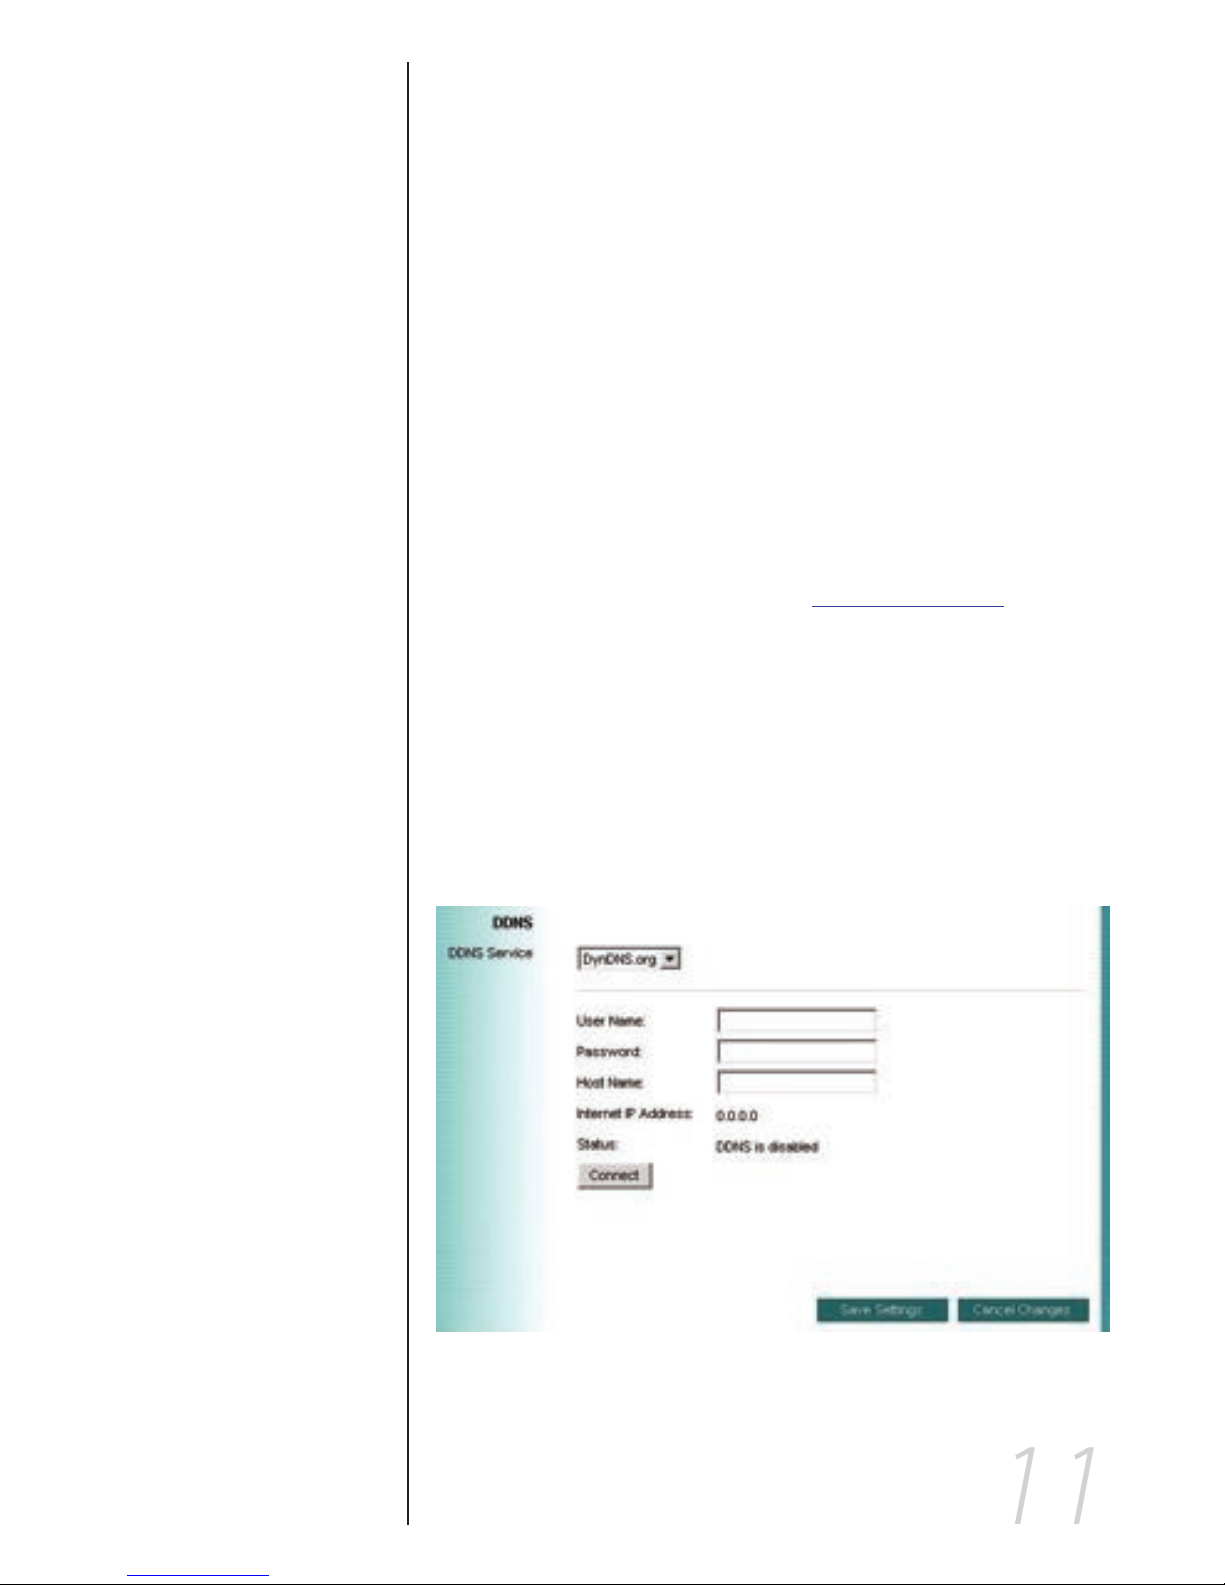
DynDNS service
To enable DDNS Service using DynDNS.org, follow these instructions:
On the DDNS screen, select DynDNS.org from the DDNS 1.
Service Provider drop-down menu.
Sign up for DynDNS service at 2. www.dyndns.org for
applying one DDNS account. Write down your account
information.
Complete the User Name, Password, and Host Name 3.
elds.
Once you are done changing the settings, click the Save 4.
Settings button to apply your changes or Cancel Changes
to revert to what they were before. For further information click Help.
12
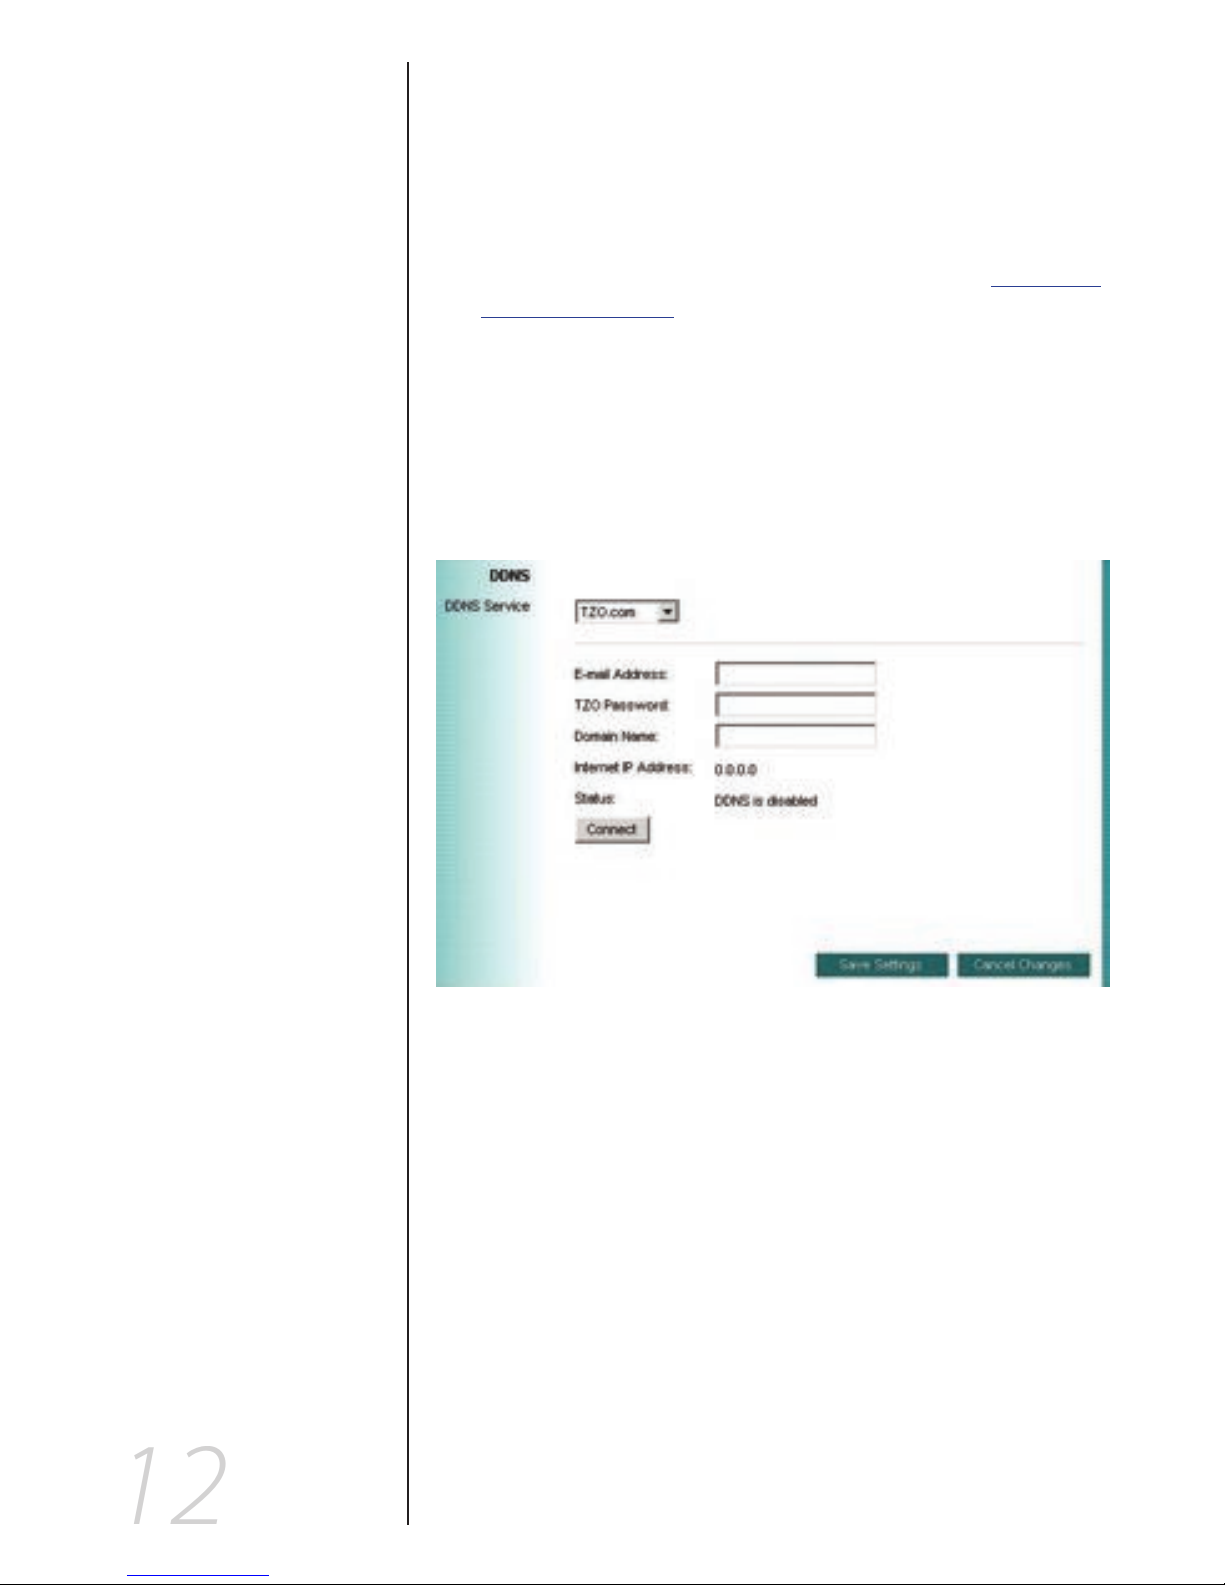
TZO service
To enable DDNS Service using TZO, follow these instructions:
On the DDNS screen, select TZO.com from the DDNS 1.
Service Provider drop-down menu.
Sign up for a free, 30-day trial of TZO service at 2. www.tzo.
com/order.html . Write down your account information.
Complete the Email Address, TZO Password Key, and 3.
Domain Name elds.
Once you are done changing the settings, click the Save 4.
Settings button to apply your changes or Cancel Changes
to revert to what they were before. For further information, click Help.
Internet IP Address: The Router’s current Internet IP Address
is displayed here.
Status: The status of the DDNS service connection is displayed
here.
 Loading...