

Page 1
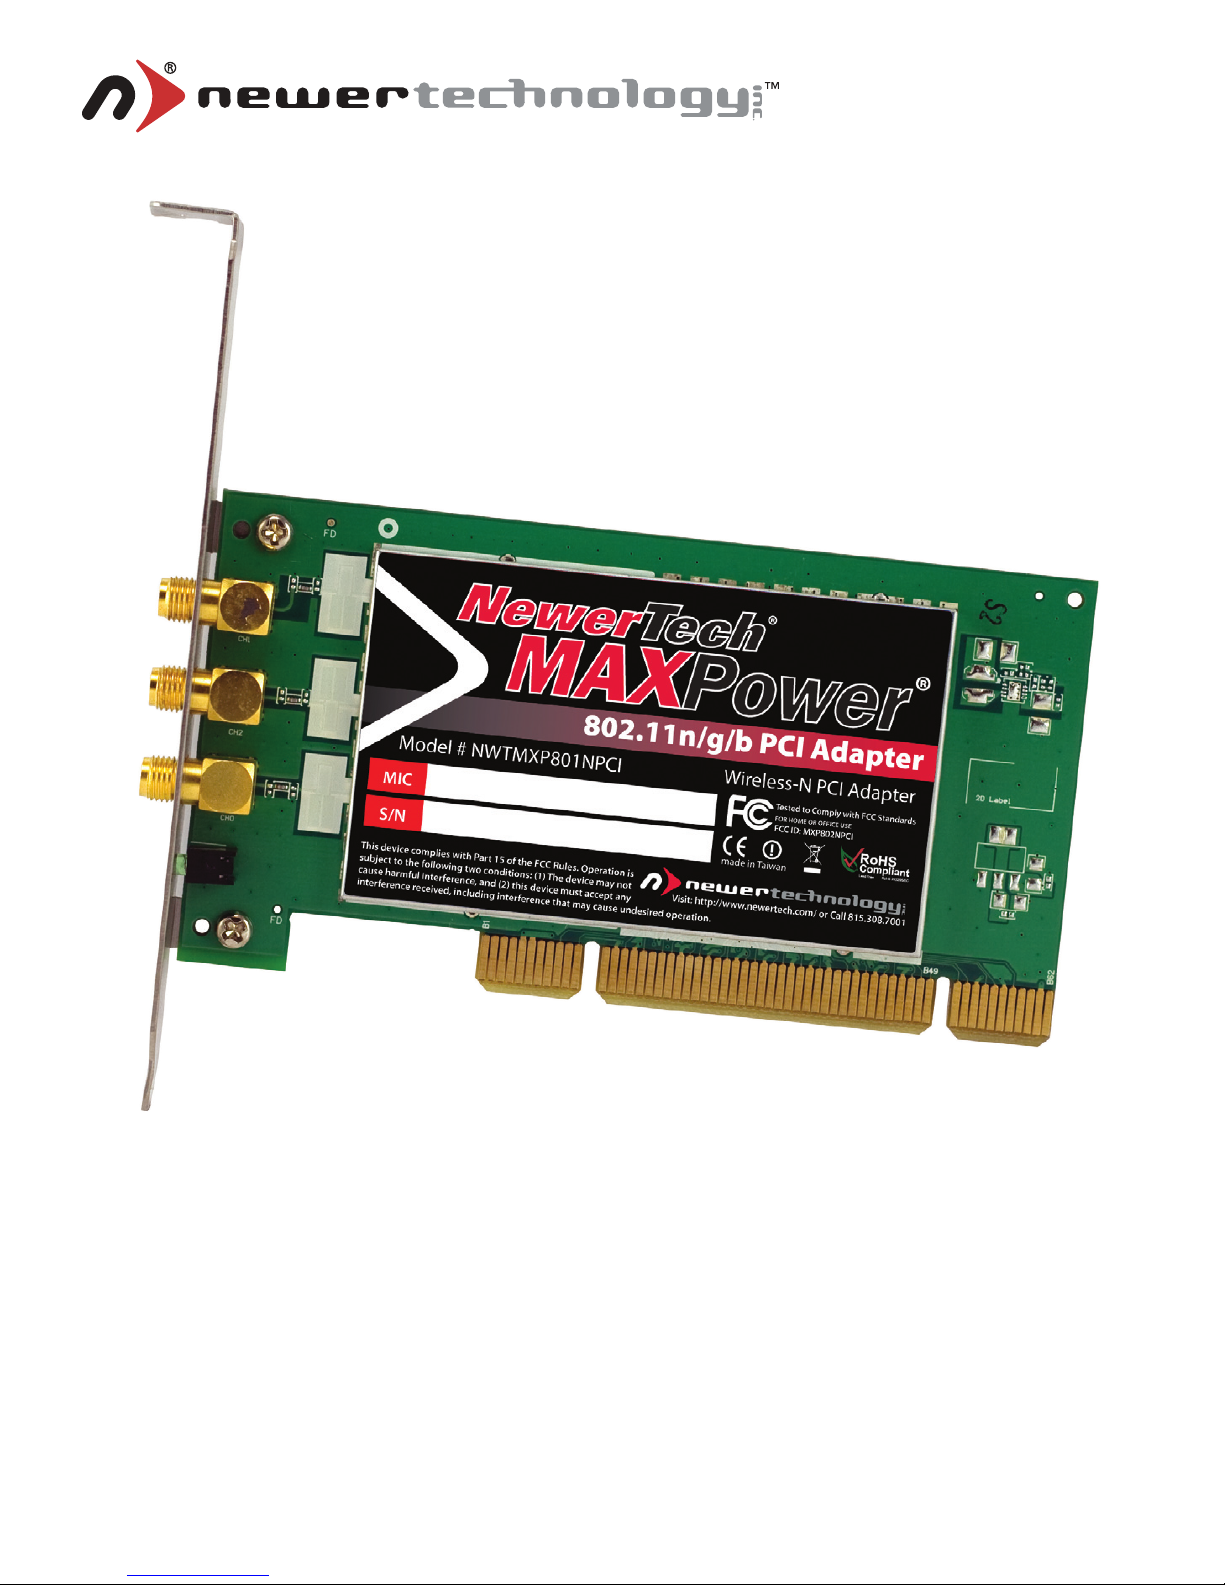
User Manual
MAXPower® 802.11n/g/b PCI Card
Page 2

2
Table of Contents
Before You Start 3
Network Information 3
Introduction 4
Package Contents 4
Installation for Macintosh 5
Software Installation 5
Wireless Configuration 7
Adding the Utility to Startup Items 9
Installation for Windows 10
Installation 10
Wireless Configuration 11
Troubleshooting/FAQ 15
Contacting Tech Support 17
Page 3

3
Before You Start…
For your convenience, this is a short checklist of information
required to set up your MaxPower 802.11n/g/b PCI Card.
You will also need this information prior to contacting Technical Support. We recommend filling in the information into the
spaces provided for easy reference. If you don’t know the information, you may need to consult your Router’s manual, your
Internet Service Provider and/or your System Administrator.
Network Information
Router Mfg/Model:•
Router IP:• . . .
Router Username: •
Router Password:•
SSID:•
Channel: •
Authentication Type:•
Encryption Type:•
E• ncryption Key:
- or -
Password:
Page 4
4
Introduction
Thank you for purchasing the Newer Technology MaxPower
802.11n/g/b PCI Card! This guide will walk you through the
setup process step by step and get you up and running with
your new wireless device quickly.
Setup of the Newer Technology MaxPower 802.11n/g/b PCI
Card is straightforward, but you do need to follow this guide
for proper setup. We suggest reading through the whole manual before hooking up the MaxPower 802.11n/g/b PCI Card.
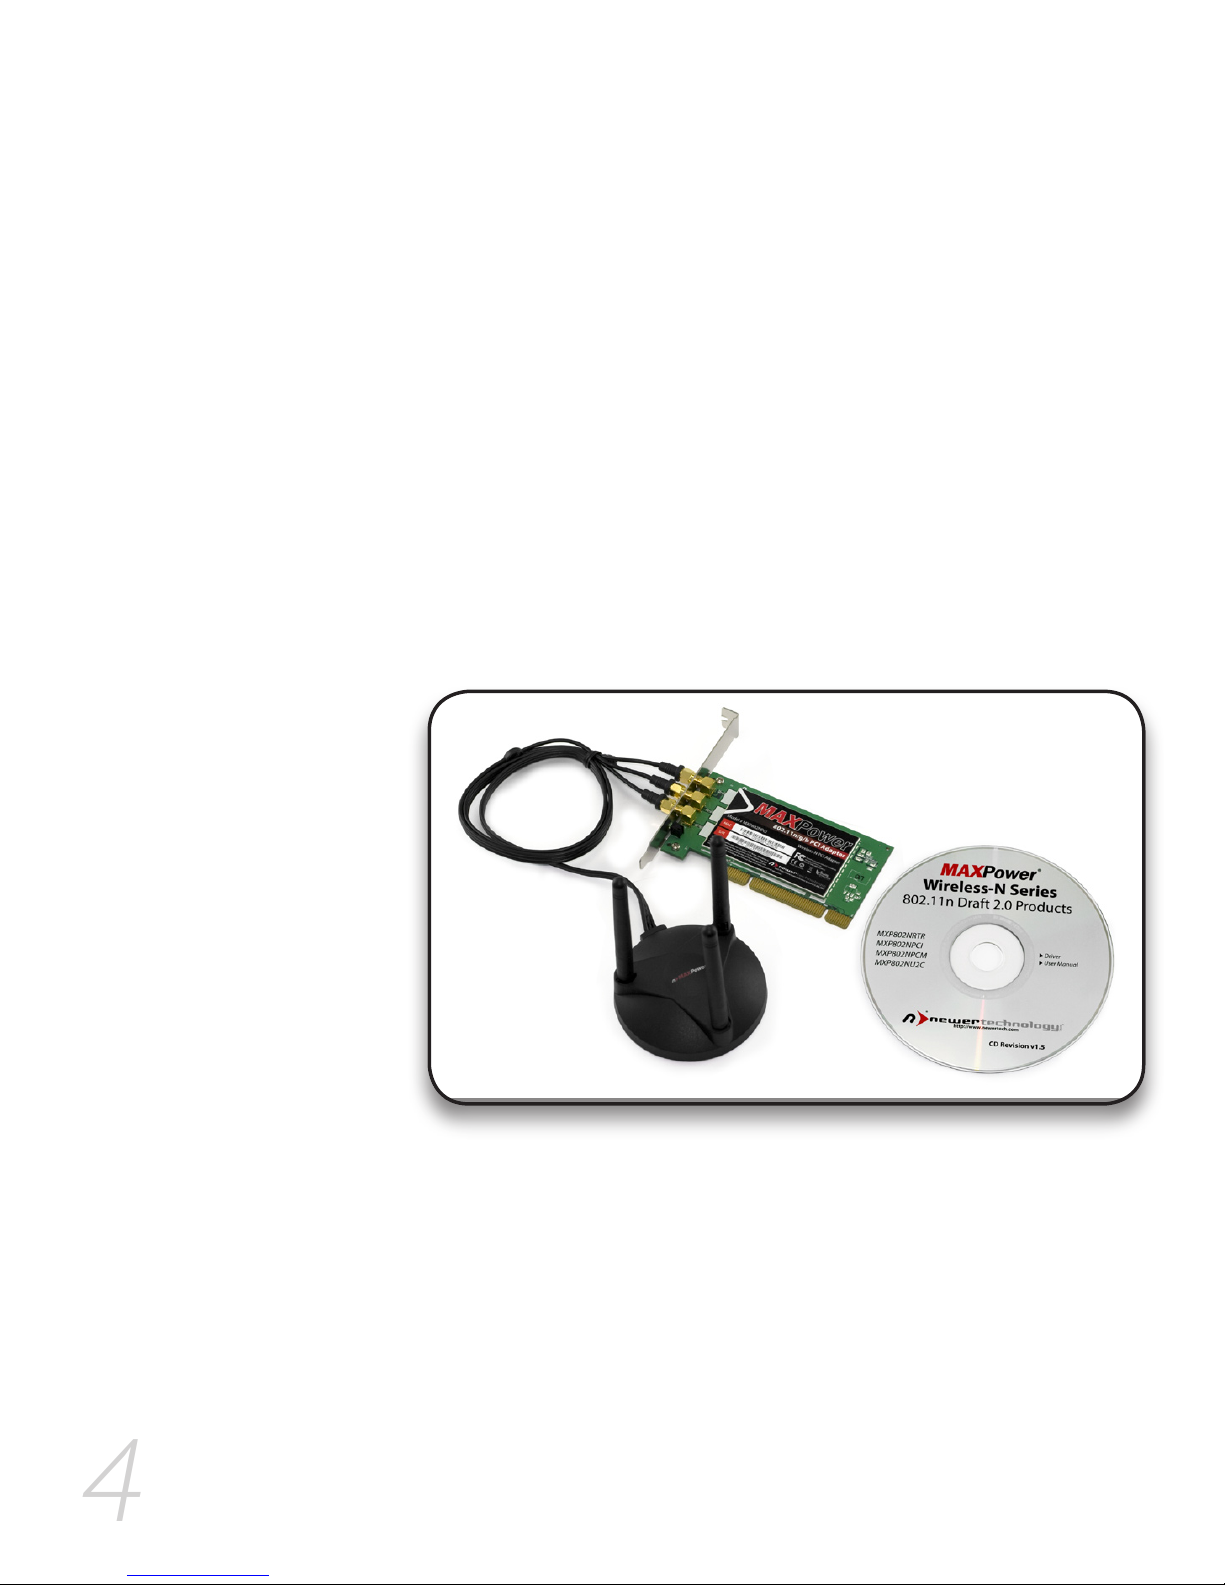
Package Contents
MaxPower .n/g/b PCI Card•
External Antenna Assembly•
Installation & Driver CD•
Page 5
5
Installation for Macintosh
Software Installation
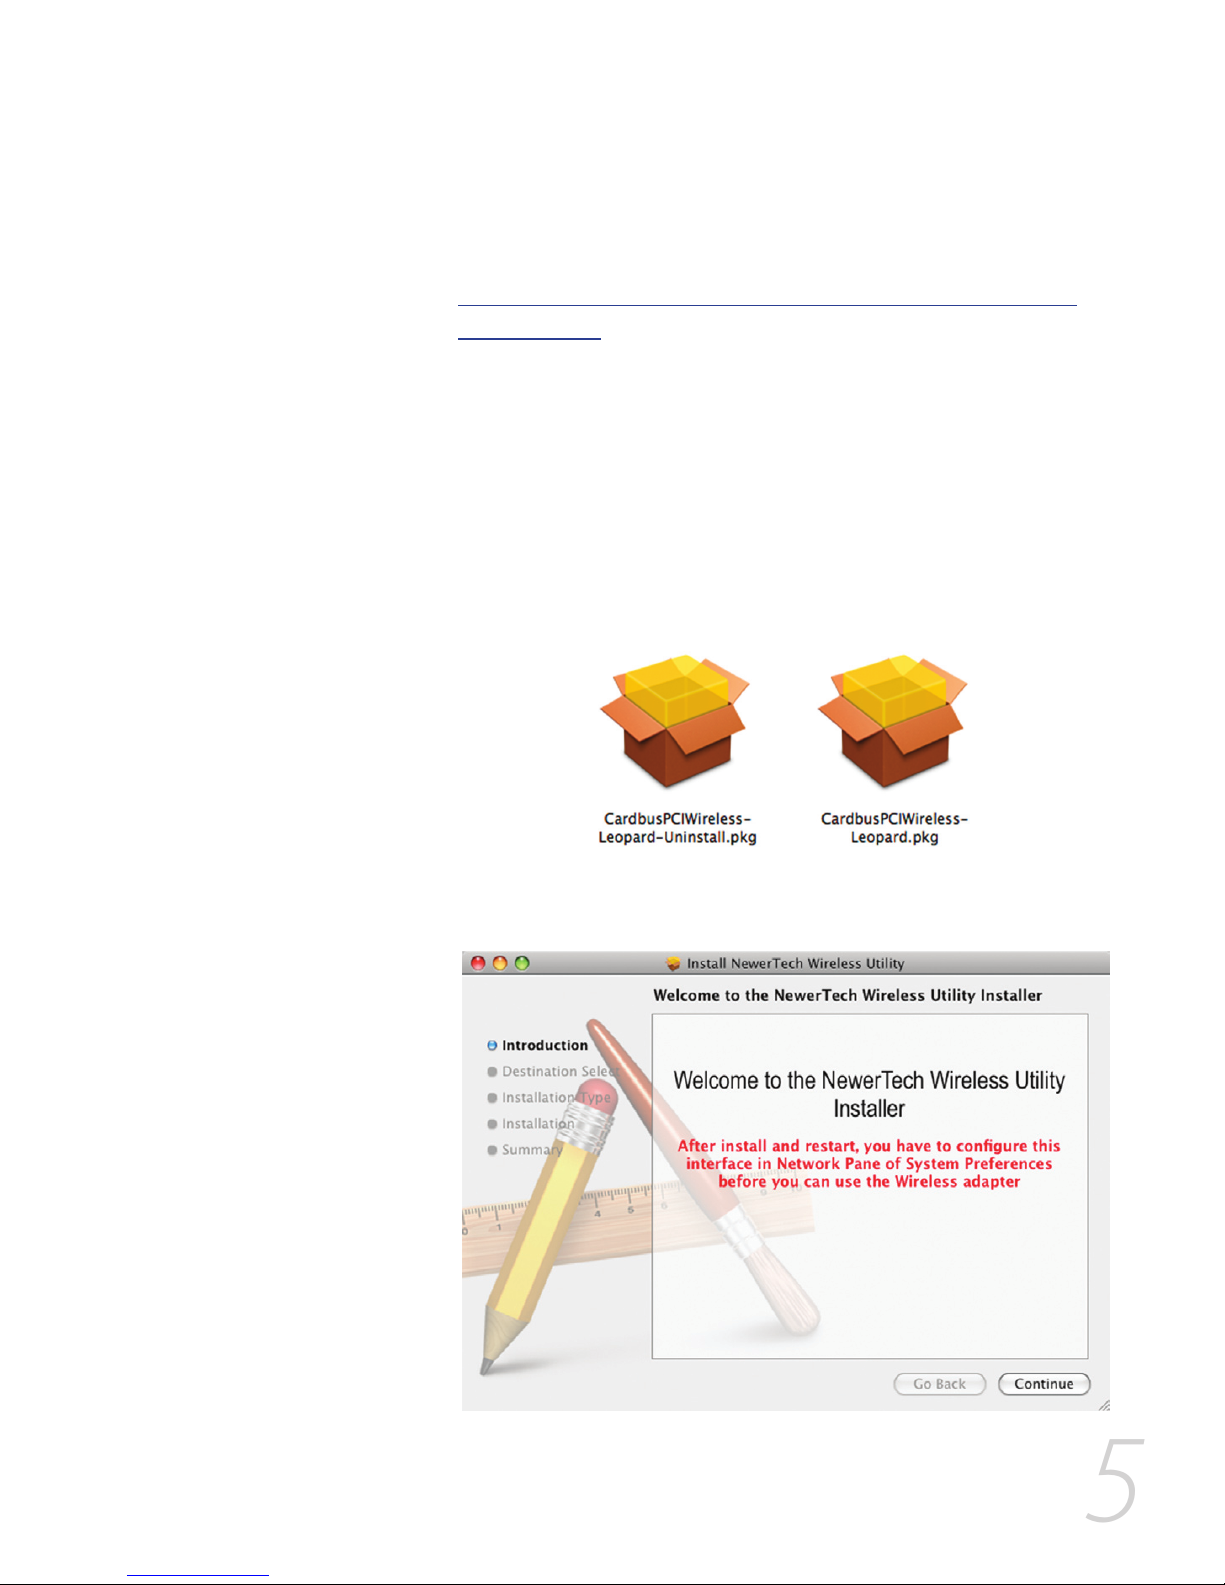
You can find the Mac OS X drivers either on the included 1.
CD or download them from the following URL:
http://www.newertech.com/downloads/maxpower_
card_n.dmg
After you put the CD in your computer and it loads, or you 2.
double-click on the .dmg file you downloaded, the disk
volume should appear. Open this to reveal folders with the
different versions of the drivers.
Open the folder that corresponds to the Operating System 3.
you are running. There will be two .pkg files – an installer
and an uninstaller.
Double click on the installer .pkg file. The installer will 4.
open.
Click “Continue”.5.
Page 6
6
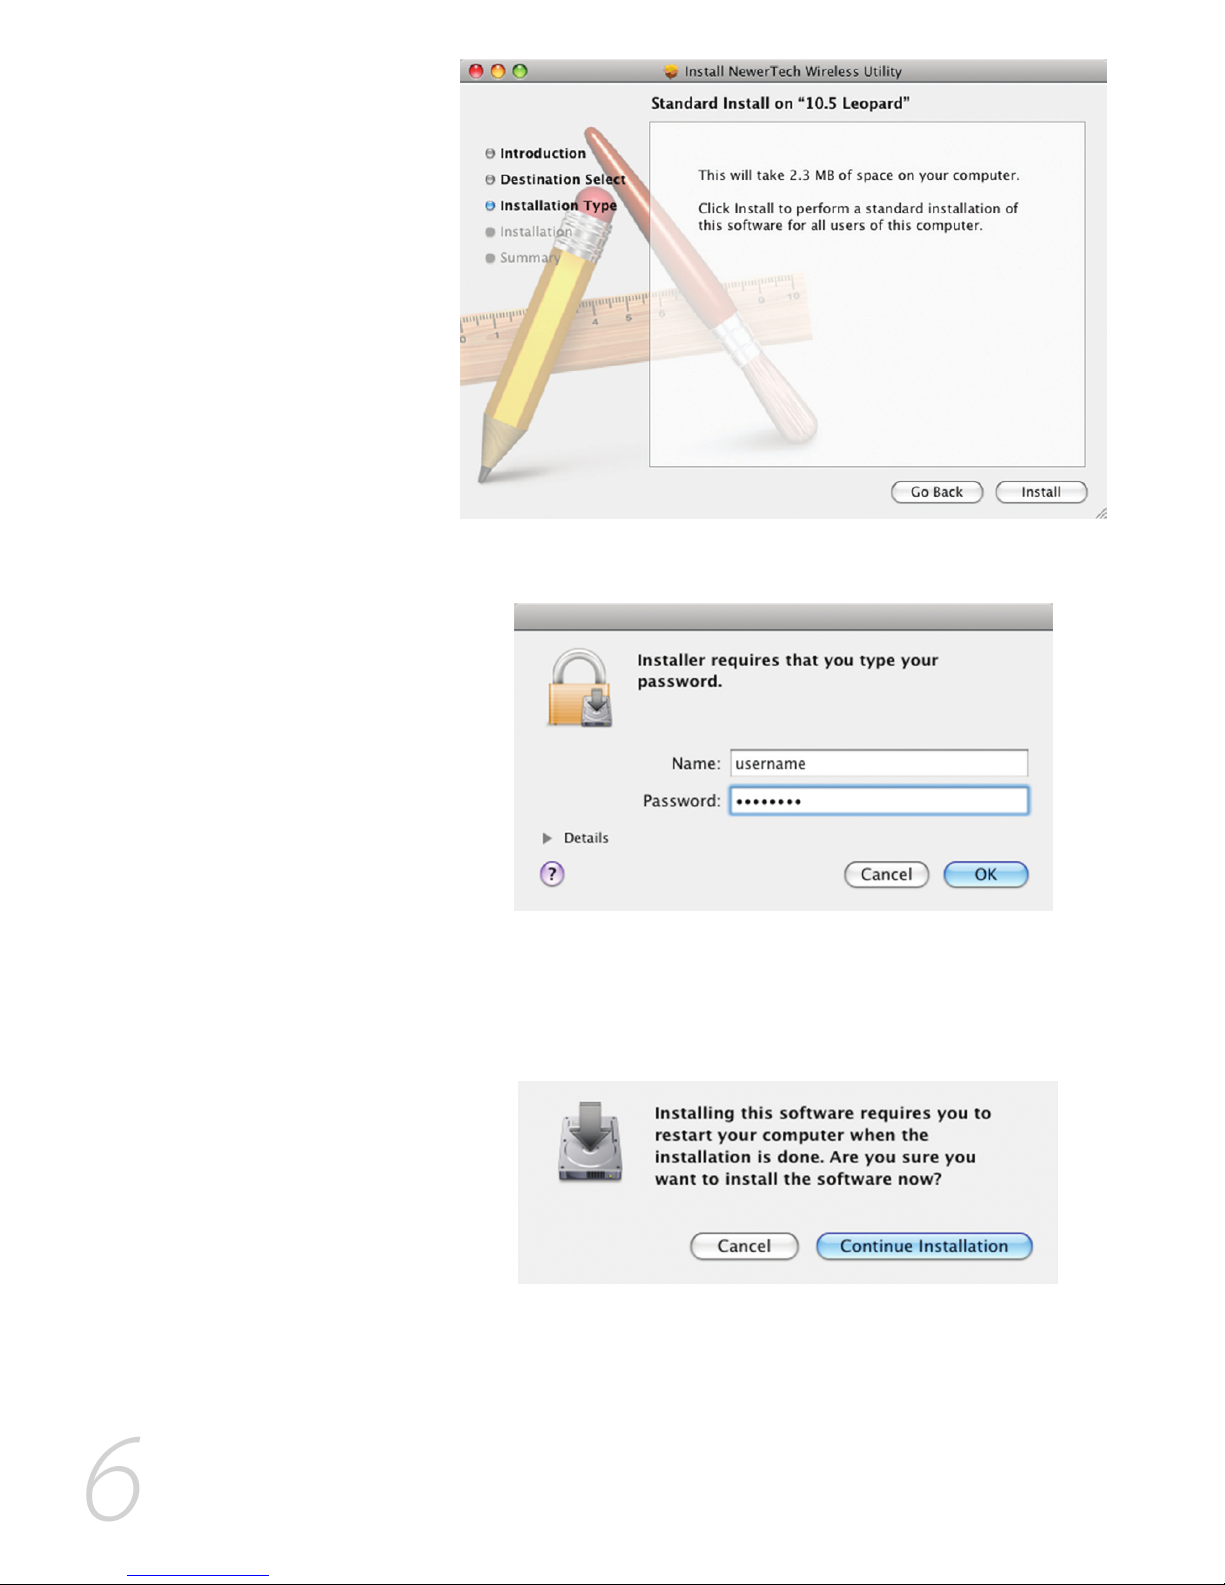
Click “Install”.6.
You will be prompted for your user name and password, 7.
please enter it and hit “OK”.
Note: You must have Administrative privileges to install this
software on your Mac.
When Prompted, close any other open Applications, and 8.
click “Continue Installation”.
Page 7
7
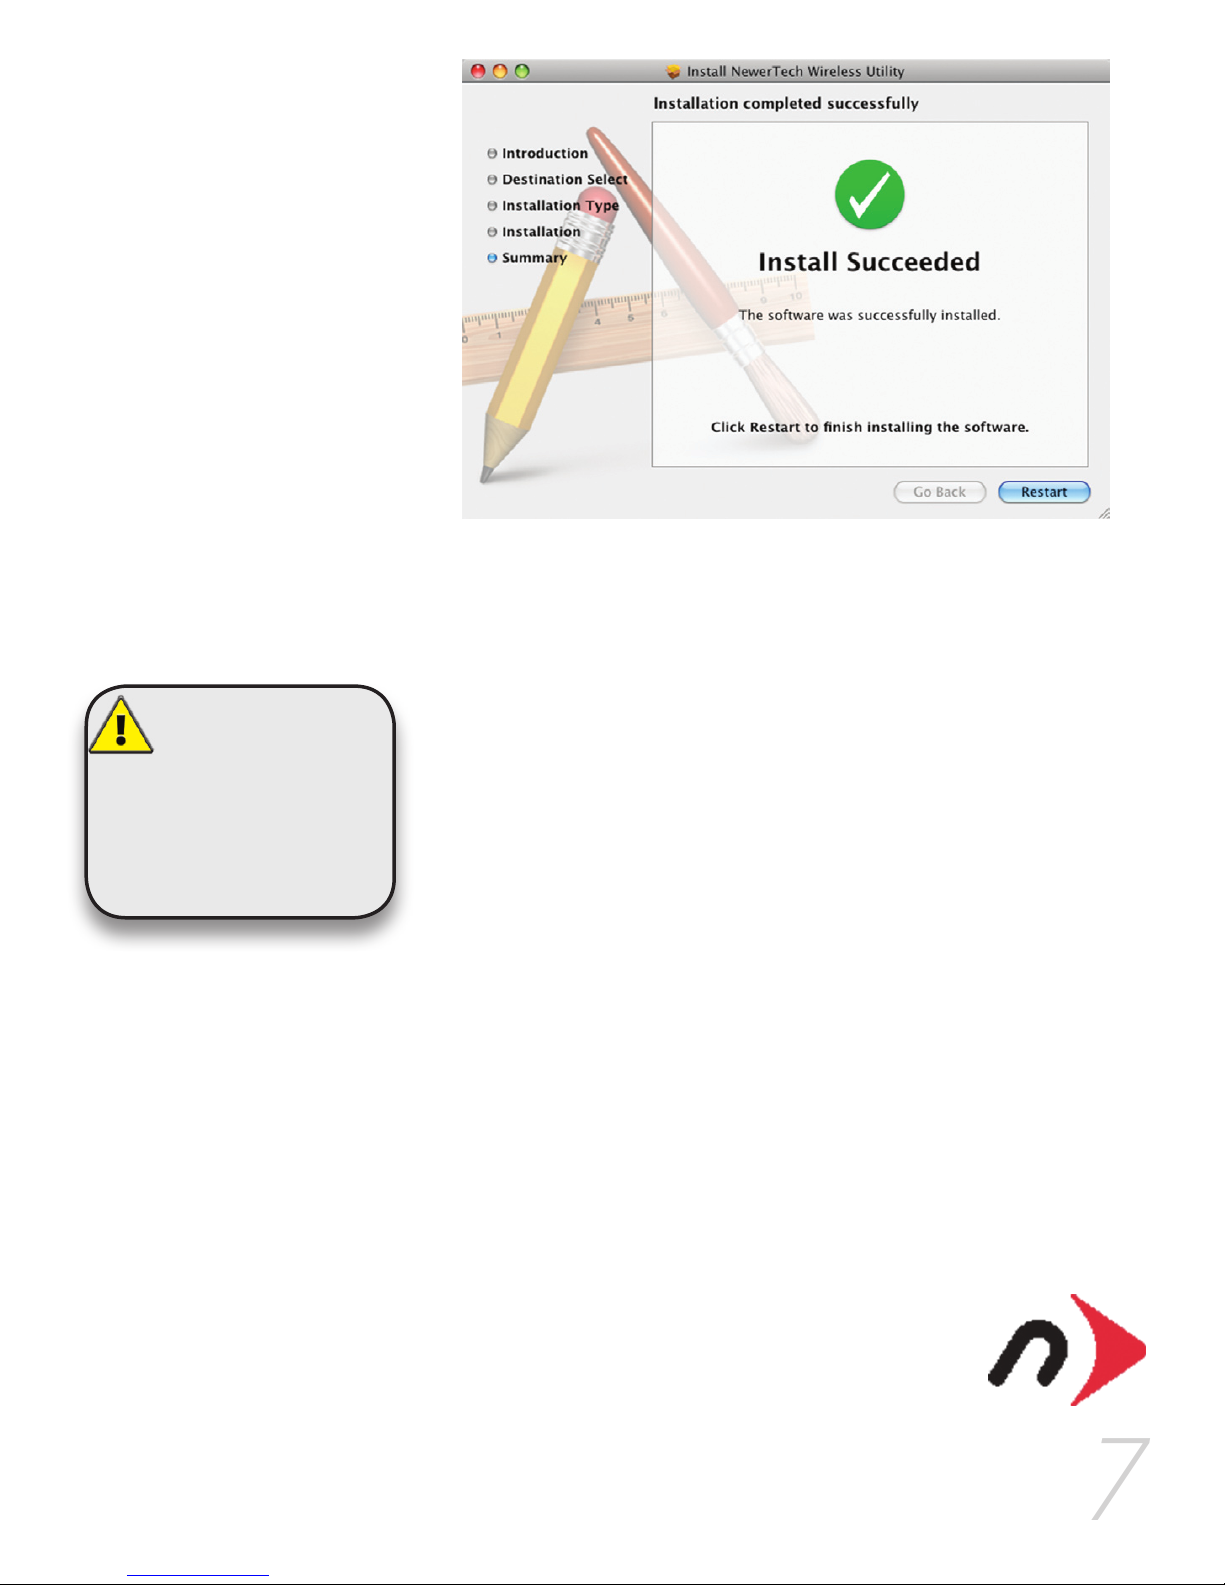
Wait for the Installer to finish, then click the “Restart” but-9.
ton. Your computer will restart. The Wireless software may
open at startup. Quit the application and proceed with the
installation.
Even though the
configuration utility
may open immediately
after installation, you
must perform these steps
as listed in order for your
Adapter to work properly.
Wireless Configuration
When you restarted your computer, the 1.
NewerTech Wireless Utility should have
opened automatically. If it did not, or you
quit the program, you can find it in your
Applications folder.
Hardware Installation
Shut down your computer.1.
Insert the 2. MaxPower 802.11n/g/b PCI Card into any avail-
able PCI slot. See your computer’s manual for details on
this process.
Attach the external antenna.3.
Restart your computer.4.
Go to the “Apple” menu and select “System Preferences”.5.
Click on the “Network” preference pane icon.6.
The “Detected a new Network port” dialog should pop up. 7.
Click “OK”.
Click “Apply” and close System Preferences.8.
Page 8
8
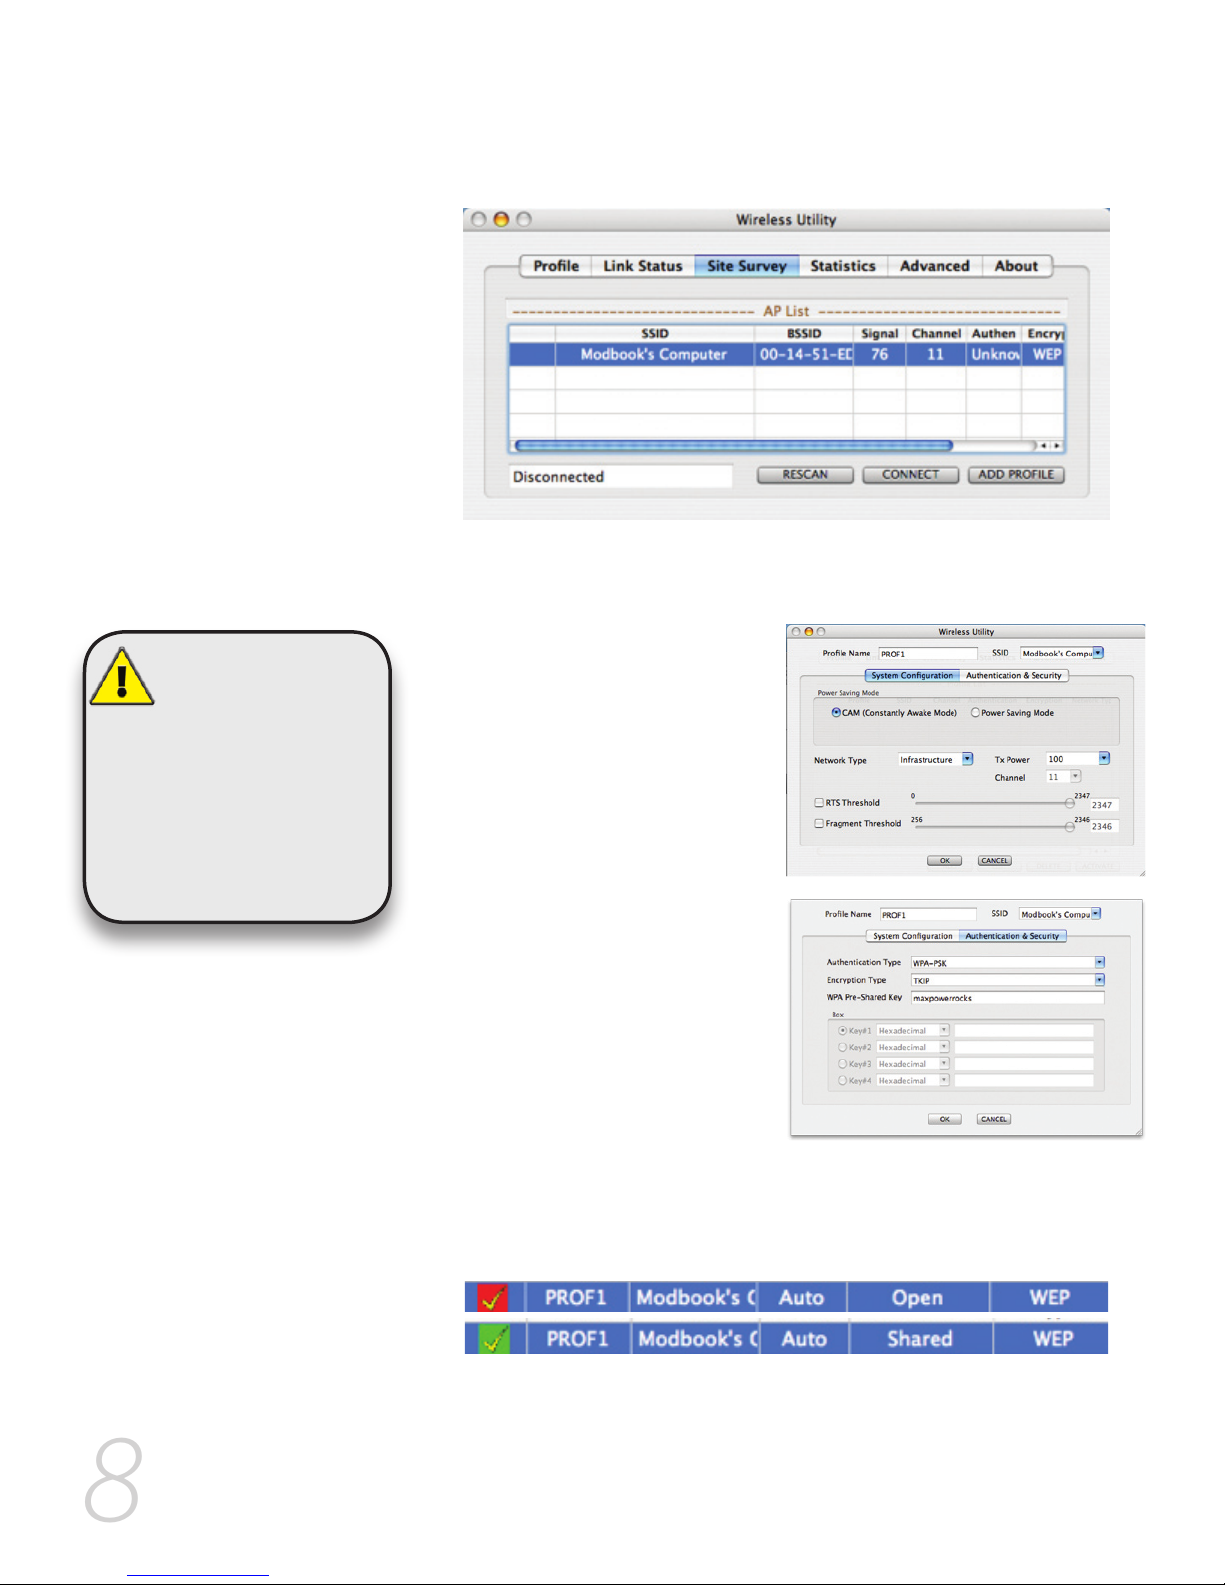
Click “OK” and go to the “Profiles” tab. Highlight the net-6.
work you just added and click “Activate” to use that profile.
You will notice the connection go from red to green when
you are connected. Your wireless connection is now set up
and ready to be used.
Once the Wireless Utility window is active, click on the “Site 2.
Survey” tab. You should see your wireless network listed here.
If you don’t, click “Rescan”. If your network still doesn’t appear,
consult your wireless router’s manual or technical support.
Click on the wireless network you want to connect so it is 3.
highlighted and click “Add Profile”.
In the “System Configura-4.
tion” tab, you can name the
profile and adjust any settings needed to connect to
the network.
As settings for
wireless routers
can vary, you will
want to check your
particular router’s manual
or technical support for
information regarding
security settings and
wireless configuration.
Click on “Authentication & 5.
Security” to enter any security information needed
to connect to your wireless
network.
Page 9
9
Adding the Utility to Startup Items
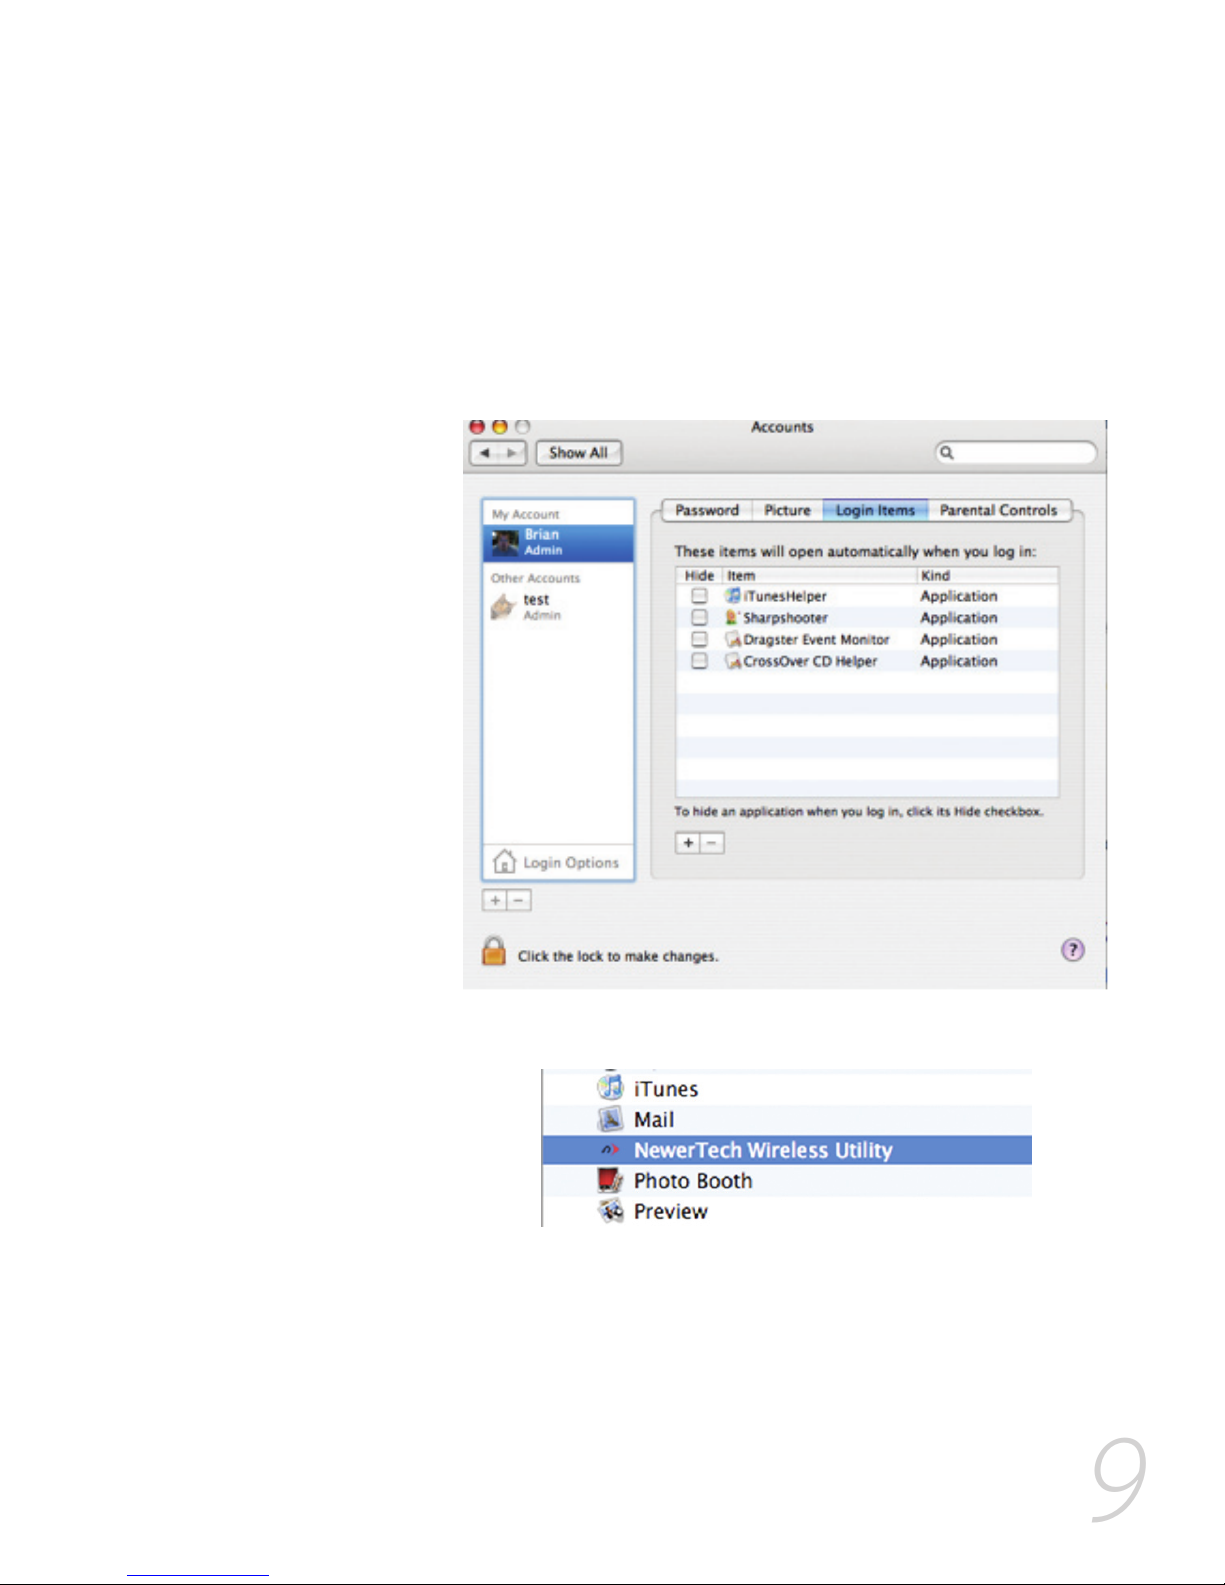
If the Wireless Utility does not automatically open upon insertion of the wireless adapter, you can set the Wireless Utility to
open on startup by performing the following steps.
Go to the “Apple” menu and select “System Preferences”. 1.
Click on the “Accounts” Preference Pane.2.
Highlight the account you want to add the Wireless Utility 3.
as a startup item and click on the “Login Items” tab.
Click the “+” sign at the bottom.4.
Select the Wireless Utility in your Applications folder. 5.
Close the System Preferences window.6.
Page 10
10
Installation for Windows
Installation
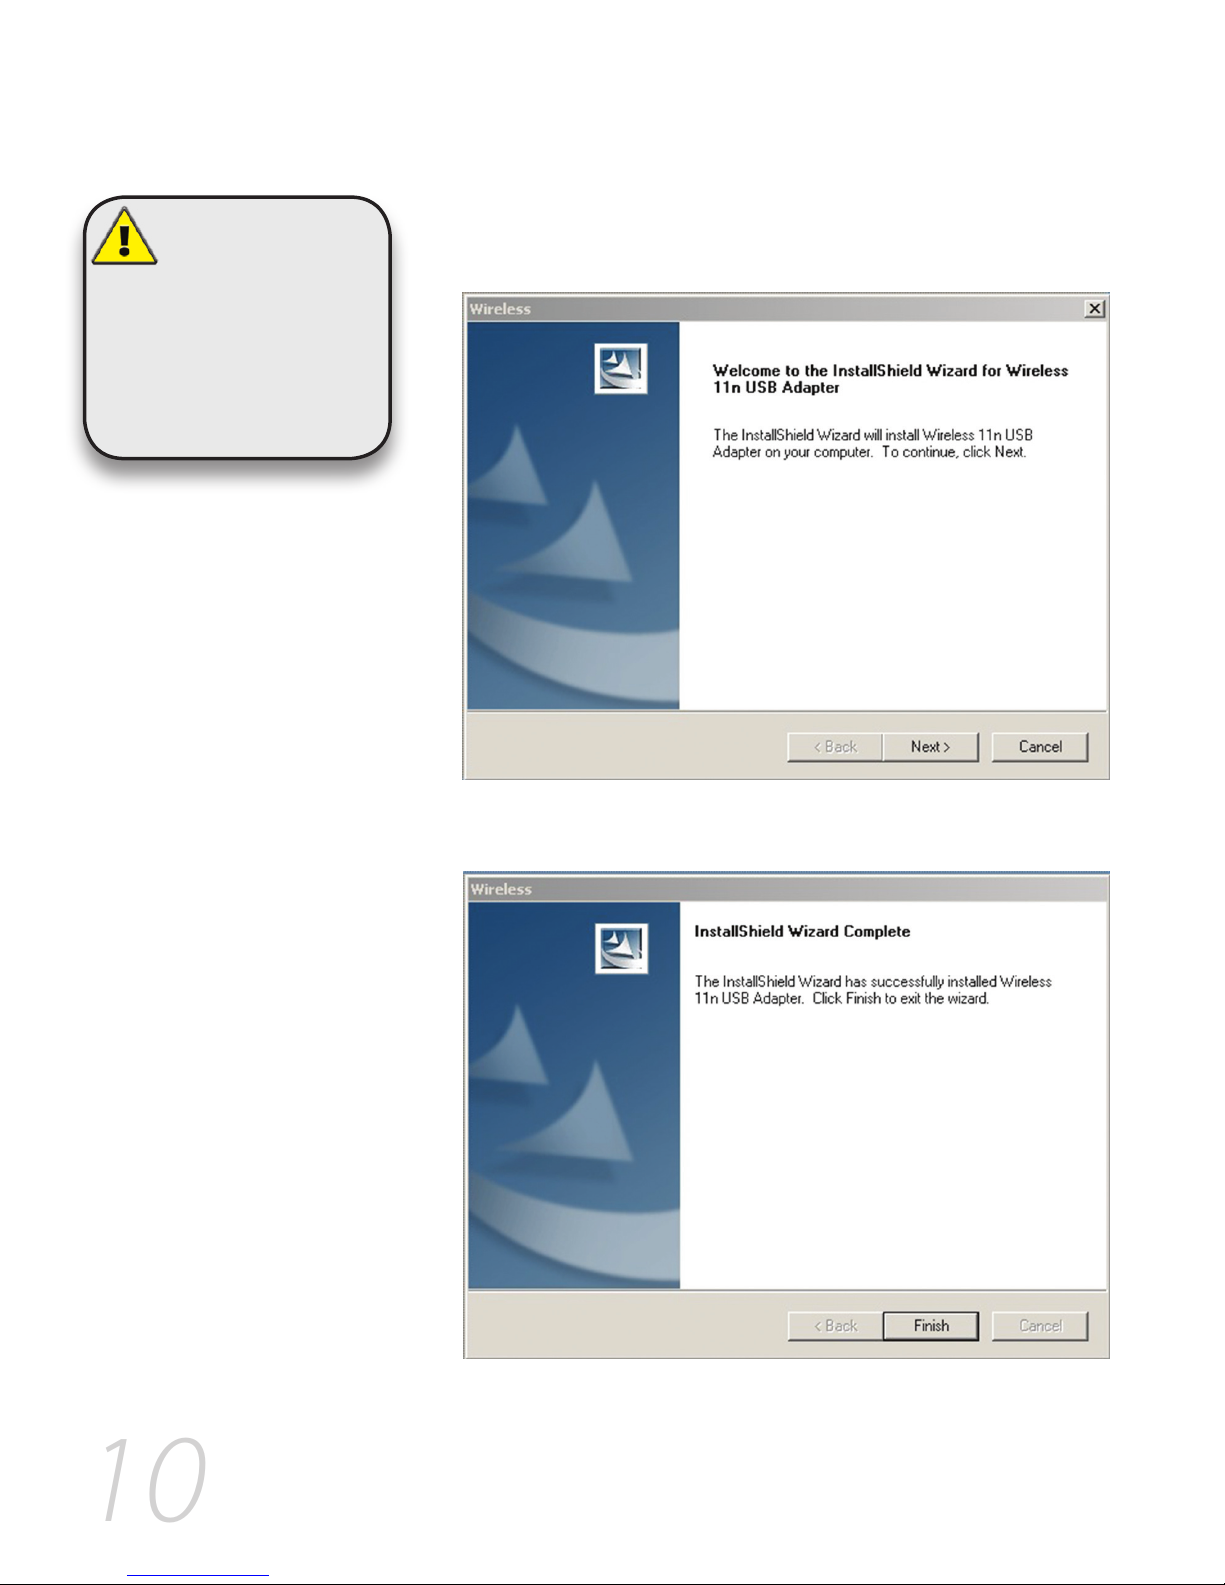
Insert the included Install CD. Navigate to the “Windows 1.
Driver” folder and run the Installer.
Follow the instructions on the Installer Wizard, clicking 2.
“Next” when each step is completed.
After completing the Installer Wizard, click the “Finish” 3.
button. You may now shut down your computer and insert
your MaxPower 802.11n/g/b PCI Card into an empty PCI slot.
DO NOT
connect the
MaxPower 802.11n/g/b
PCI Card until you are
instructed to do so.
Improper insertion may
result in unsuccessful
installation of the device.
Page 11
11
Wireless Configuration
Once you have the 1. MaxPower 802.11n/g/b PCI Card installed
in an empty PCI slot, restart the computer.
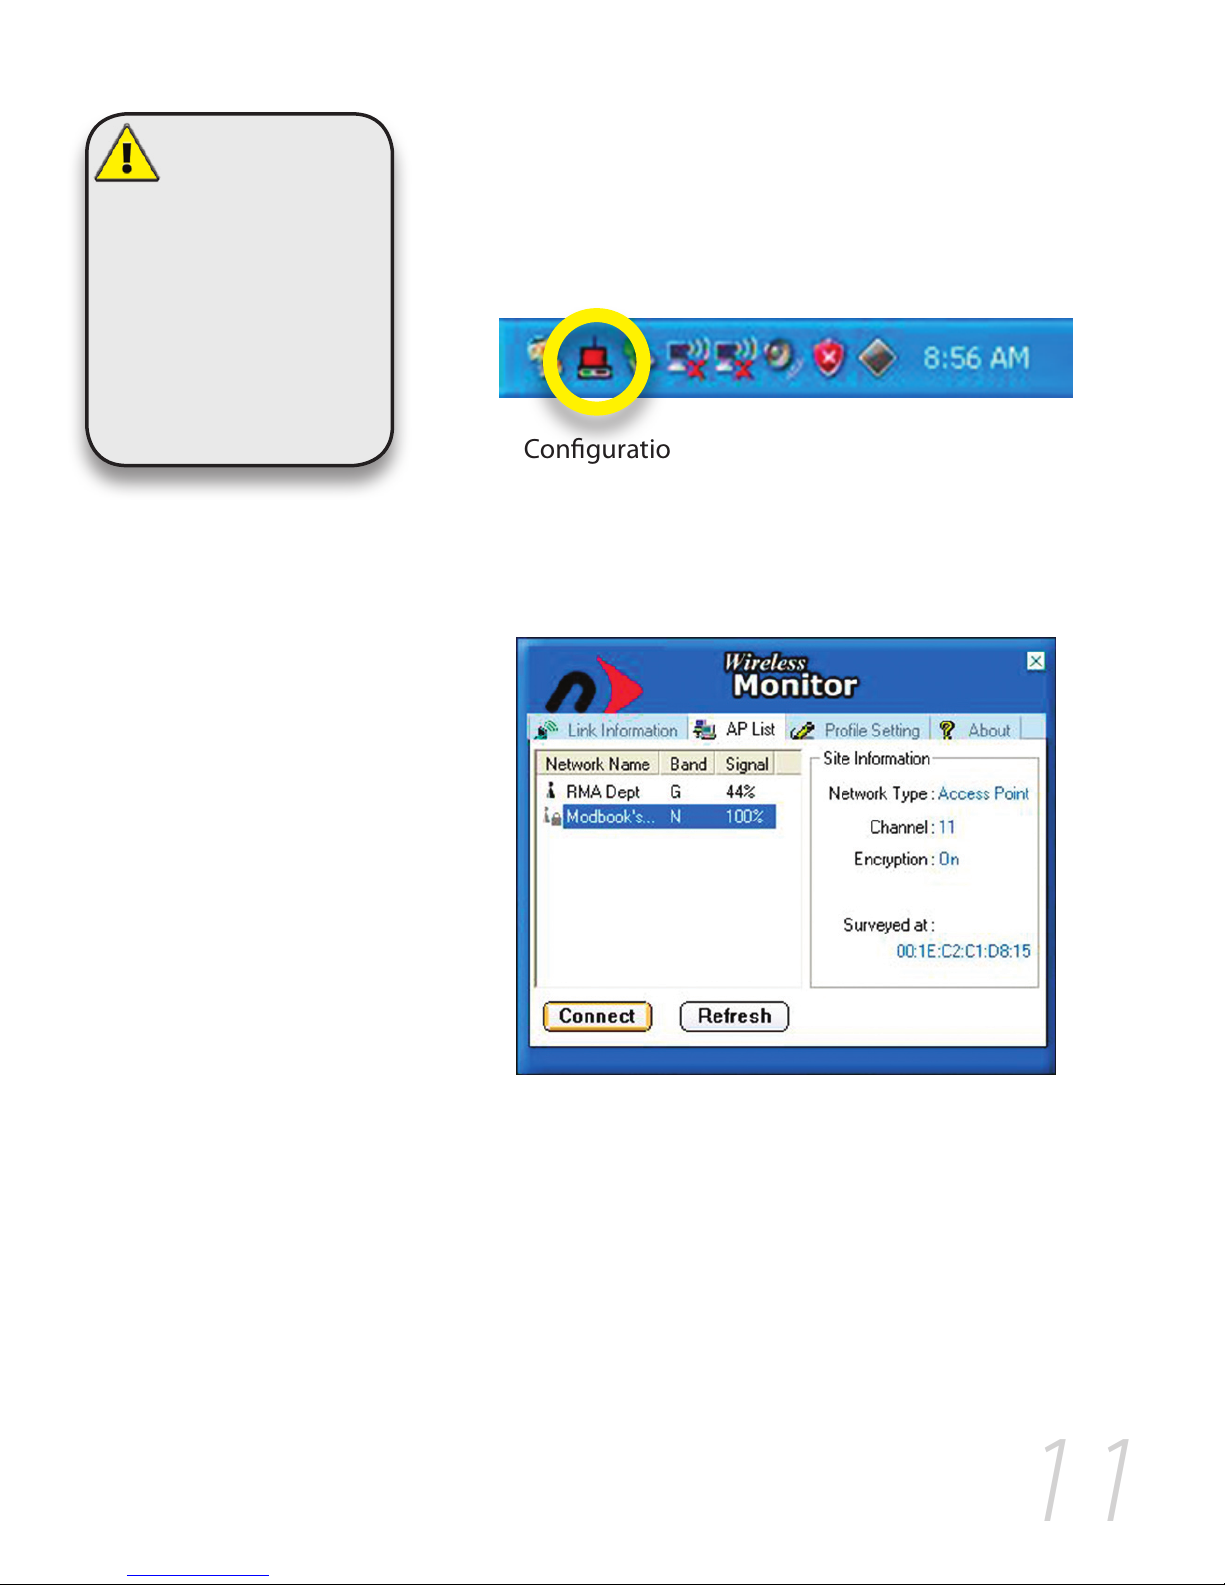
You can launch the Configuration Utility by clicking the left 2.
mouse button on the Configuration Utility icon and selecting
Advanced Configuration.
If the Configuration Utility icon is not displayed in the System Tray, you can restart the Configuration Utility from the
Start Menu by selecting Programs ➔ Wireless Network
Utility Configuration.
The Configuration Utility consists of window with four tabs: 3.
Link Information, AP List, Profile Setting, and About.
Click the name of the wireless network you wish to connect 4.
to highlight it, and then click the “Connect” button to open
the Connection Wizard”.
At this point, you
should make
sure that your wireless
router is turned on and
that you have all the
information listed on
Page 3 of this manual.
Once you have done
this, you can continue
with the installation and
configuration.
Page 12
12
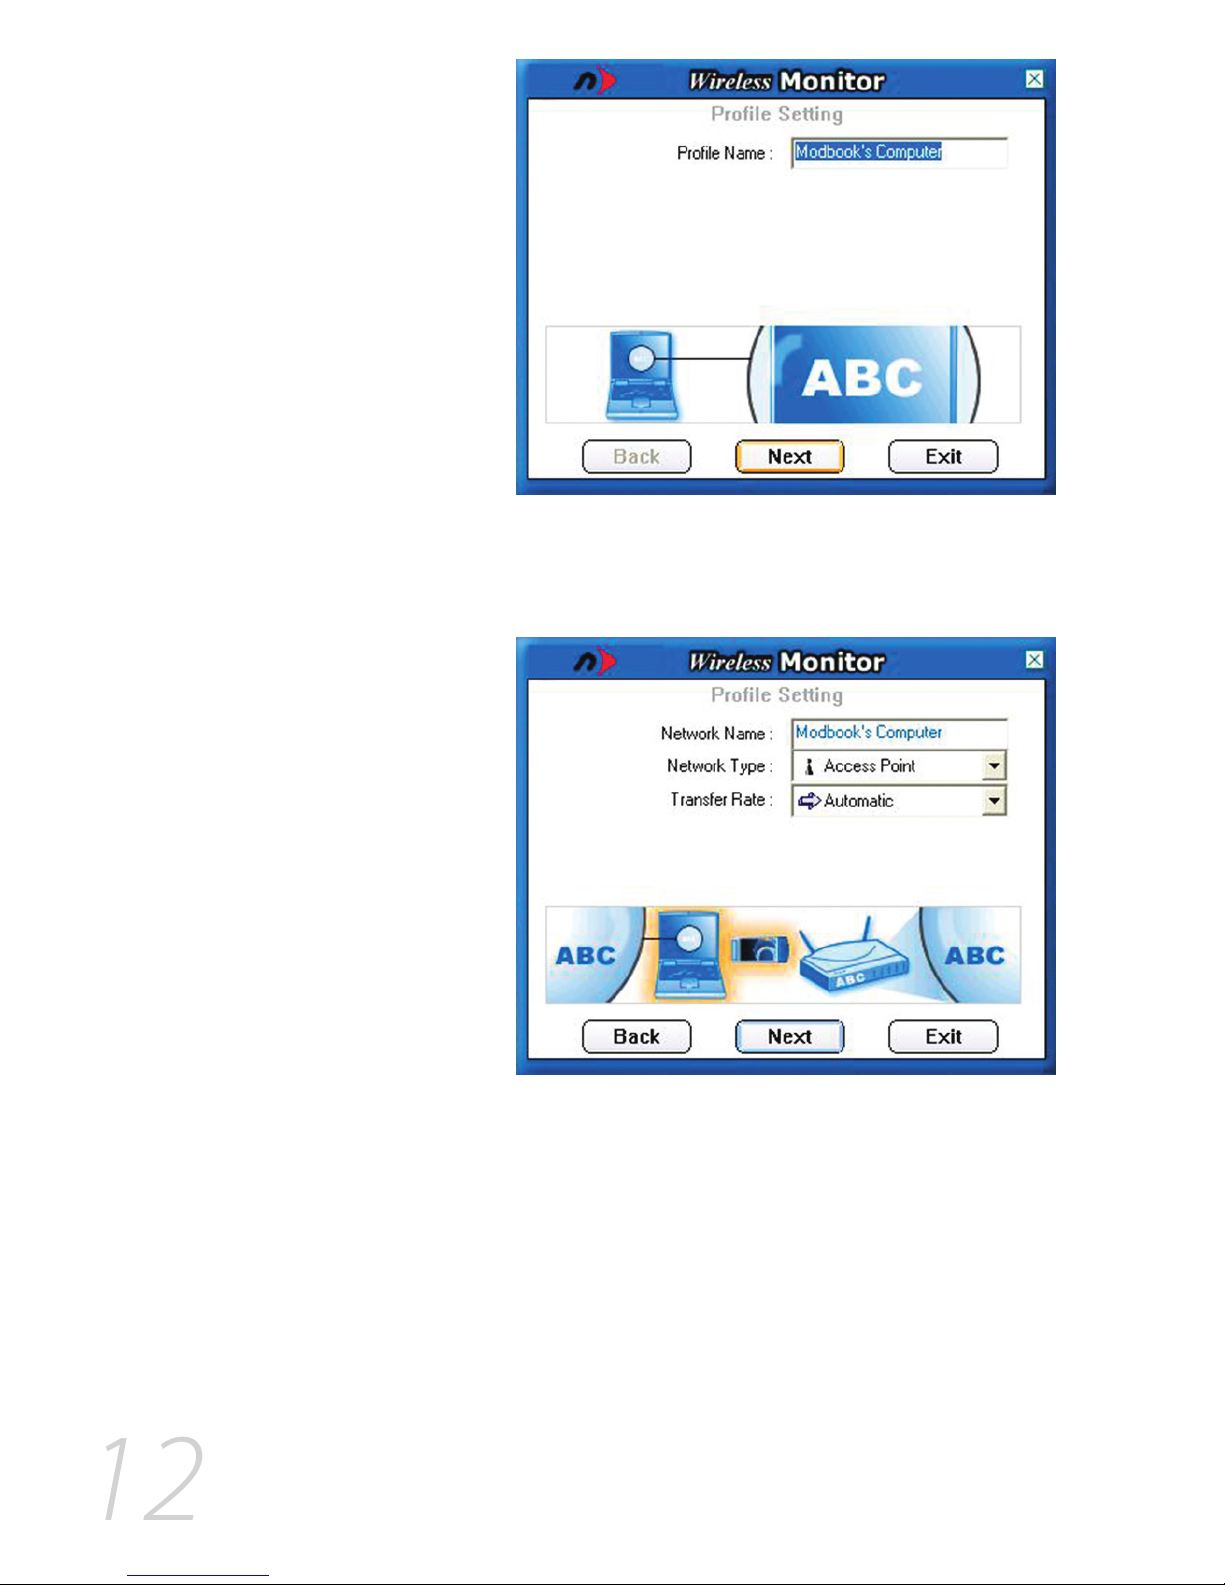
By default, the Profile Name is the name of the network you 5.
are connecting to. If you wish to use a different name, you can
change it now. Once the name is to your liking, click “Next”.
Select the “Network Type”, click on the drop-down arrow 6.
and select the kind of network you’re using.
A “Peer-to-Peer” network is one that connects two “clients”
(such as two computers) to one another directly, connecting
to no other devices.
Under most circumstances, though, you will need to
connect via an “Access Point”.
Leave the Transfer Rate set to “Automatic” unless your
router requires you to choose a specific rate.
Once these options are set, click “Next”.
Page 13
13
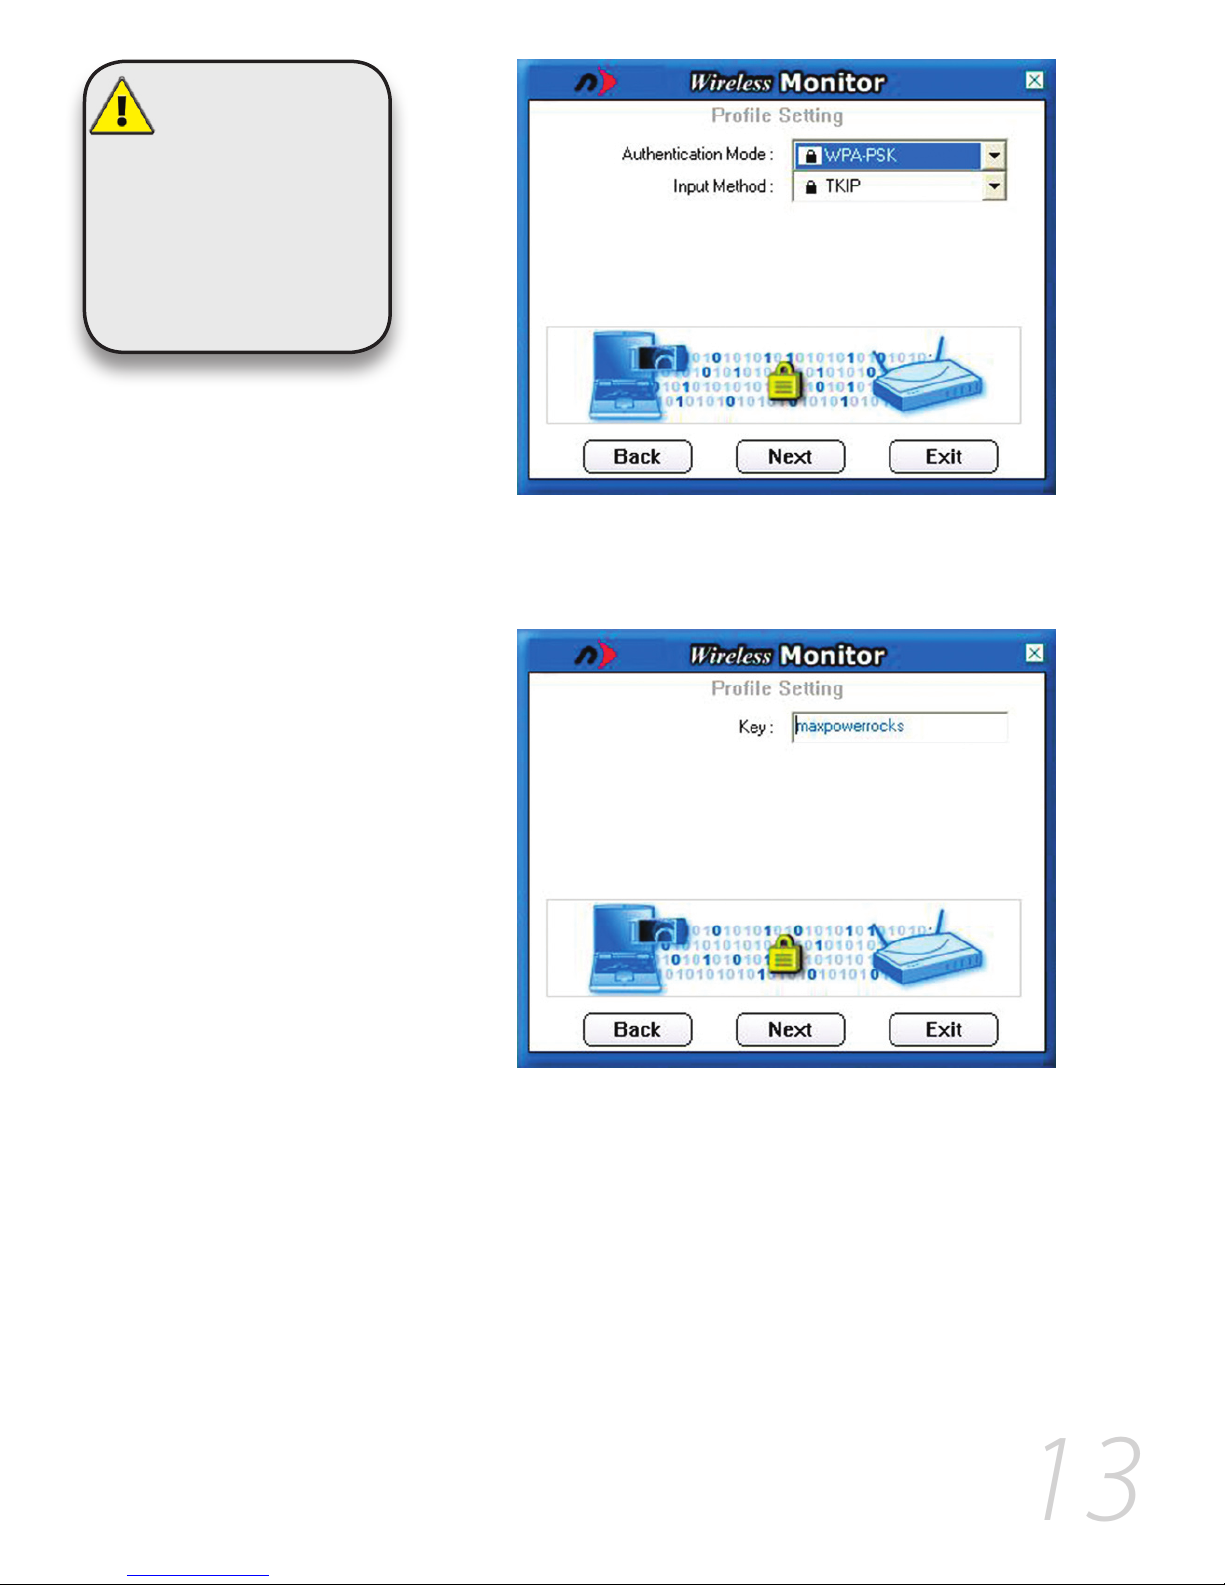
Select the Authentication Mode and Input Type to match 7.
the kind of Authentication/Encryption used by your router/
access point. Once set, click “Next”.
In the “Key” field, enter your network password (if required), 8.
then click “Next”.
As settings for
wireless routers
can vary, you will
want to check your
particular router’s manual
or technical support for
information regarding
security settings and
wireless configuration.
Page 14
14
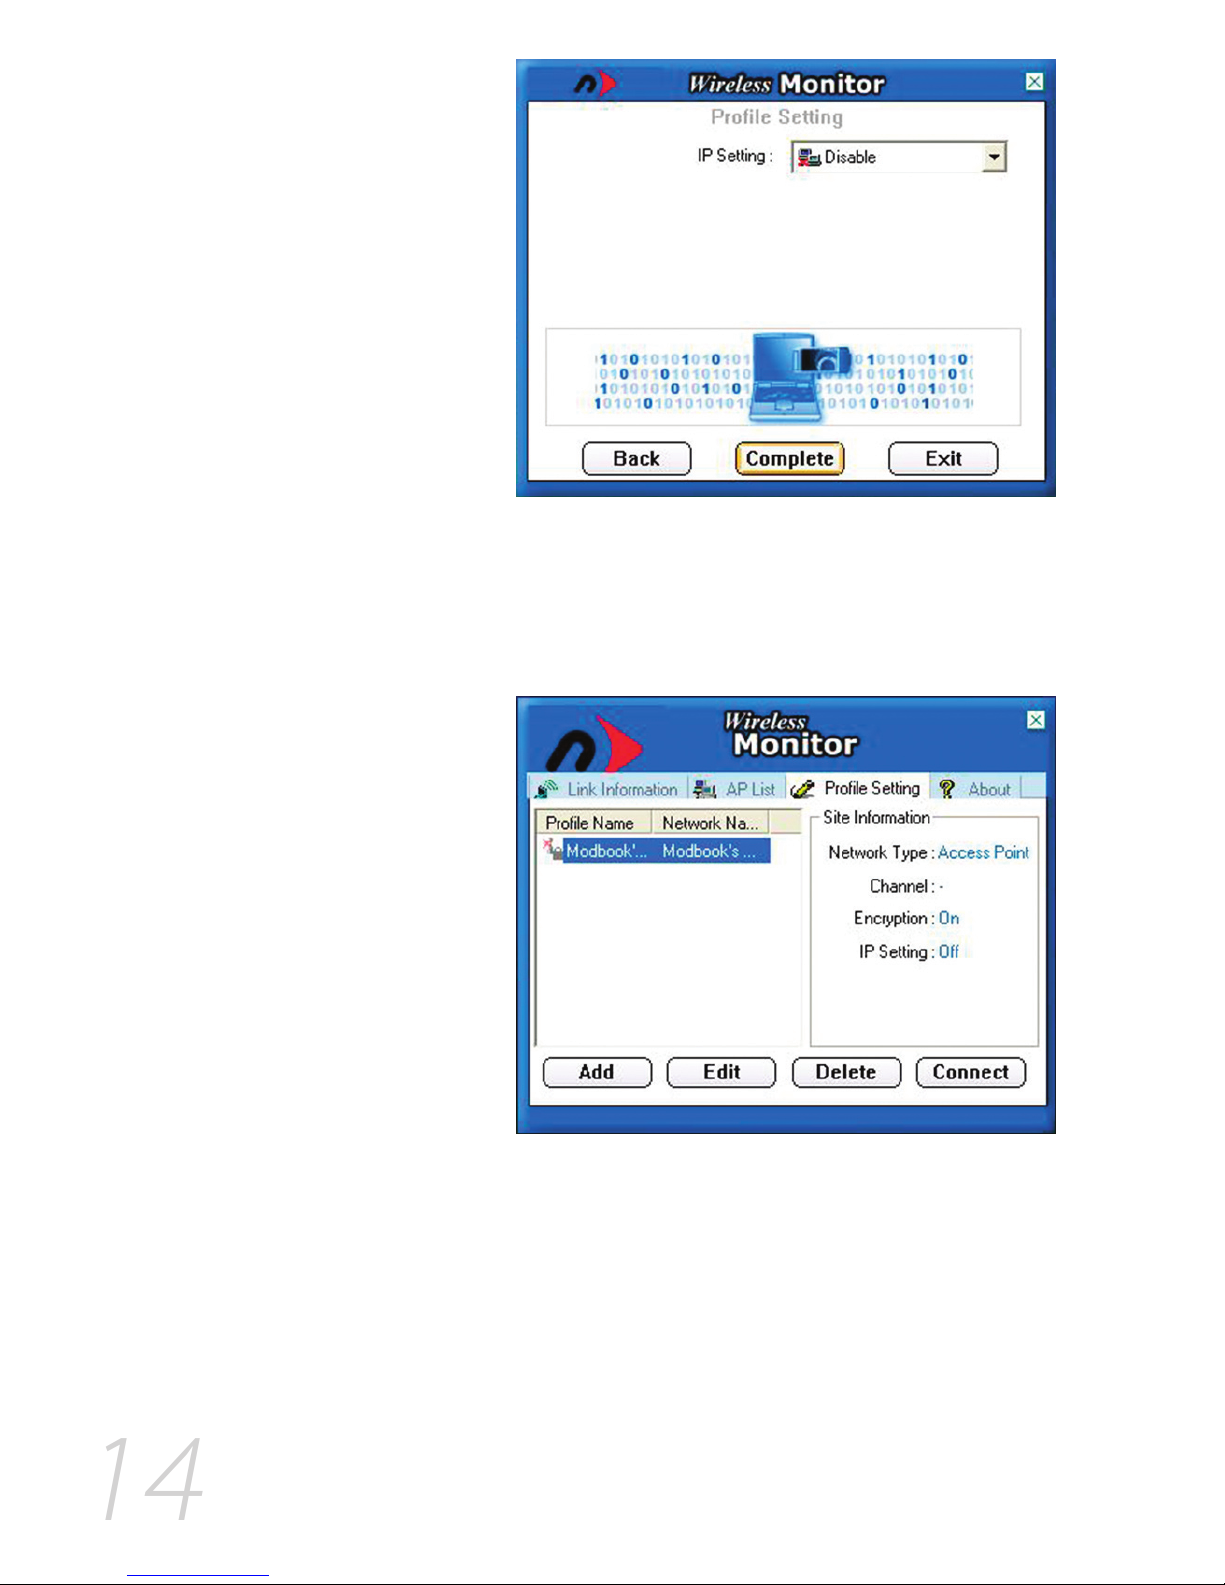
If you need to manually enter your IP address to access 9.
your network, choose the “Enable” option from the dropdown menu, click “Next” and fill in the appropriate information. Otherwise, set it to “Disable” and click “Complete”
to finish the account setup.
To connect to the network, click on the “Profile Setting” 10.
tab. Select the profile you wish to use by clicking on the
name, then click the “Connect” button.
Basic information about the wireless connection, such as 11.
signal strength, is located on the “Link Information” tab.
Page 15

15
Troubleshooting/FAQ
PROBLEM:
Network connection frequently drops.
SOLUTION:
Some wireless frequencies and channels are more common
than others, resulting in interference. Try changing your
wireless router’s channel (1-11) and/or frequency. Make
sure these settings are matched in your wireless devices.
PROBLEM:
Can’t connect to wireless network with hidden SSID.
SOLUTION:
The MaxPower 802.11n/g/b PCI Card does work properly
with SSID disabled. When you first startup , it will usually
take 5-10 seconds for the MaxPower 802.11n/g/b PCI Card to
automatically find and reconnect to the network that is using SSID disabled settings.
PROBLEM:
My current router is set for 5GHz, and I am unable to connect.
SOLUTION:
The MaxPower 802.11n/g/b PCI Card only runs at 2.4GHz. In
order to use this card with your wireless network, you will
need to set your router (and all other devices on this network) to run at 2.4GHz.
PROBLEM:
I need to save settings for multiple networks.
SOLUTION:
You can save multiple profiles for different networks by repeating the same steps for the first connection you created.
Once you have saved the profile, you can click
on the Profile Manager and select the profile
you wish to connect with.
Page 16
16
PROBLEM:
The MaxPower 802.11n/g/b PCI Card won’t automatically
connect to the Internet on my Mac.
SOLUTION:
In OS X 10.4.x or earlier:
1. Go to the Network Preference Pane.
2. Click on the “Show” drop-down menu and select “Network Port Configurations”.
3. In the list that shows, find the option for your PCI interface and drag it to the top of the list.
4. Click “Apply” and close the Preferences window.
In OS X 10.5.x:
1. Go to the Network Preference Pane.
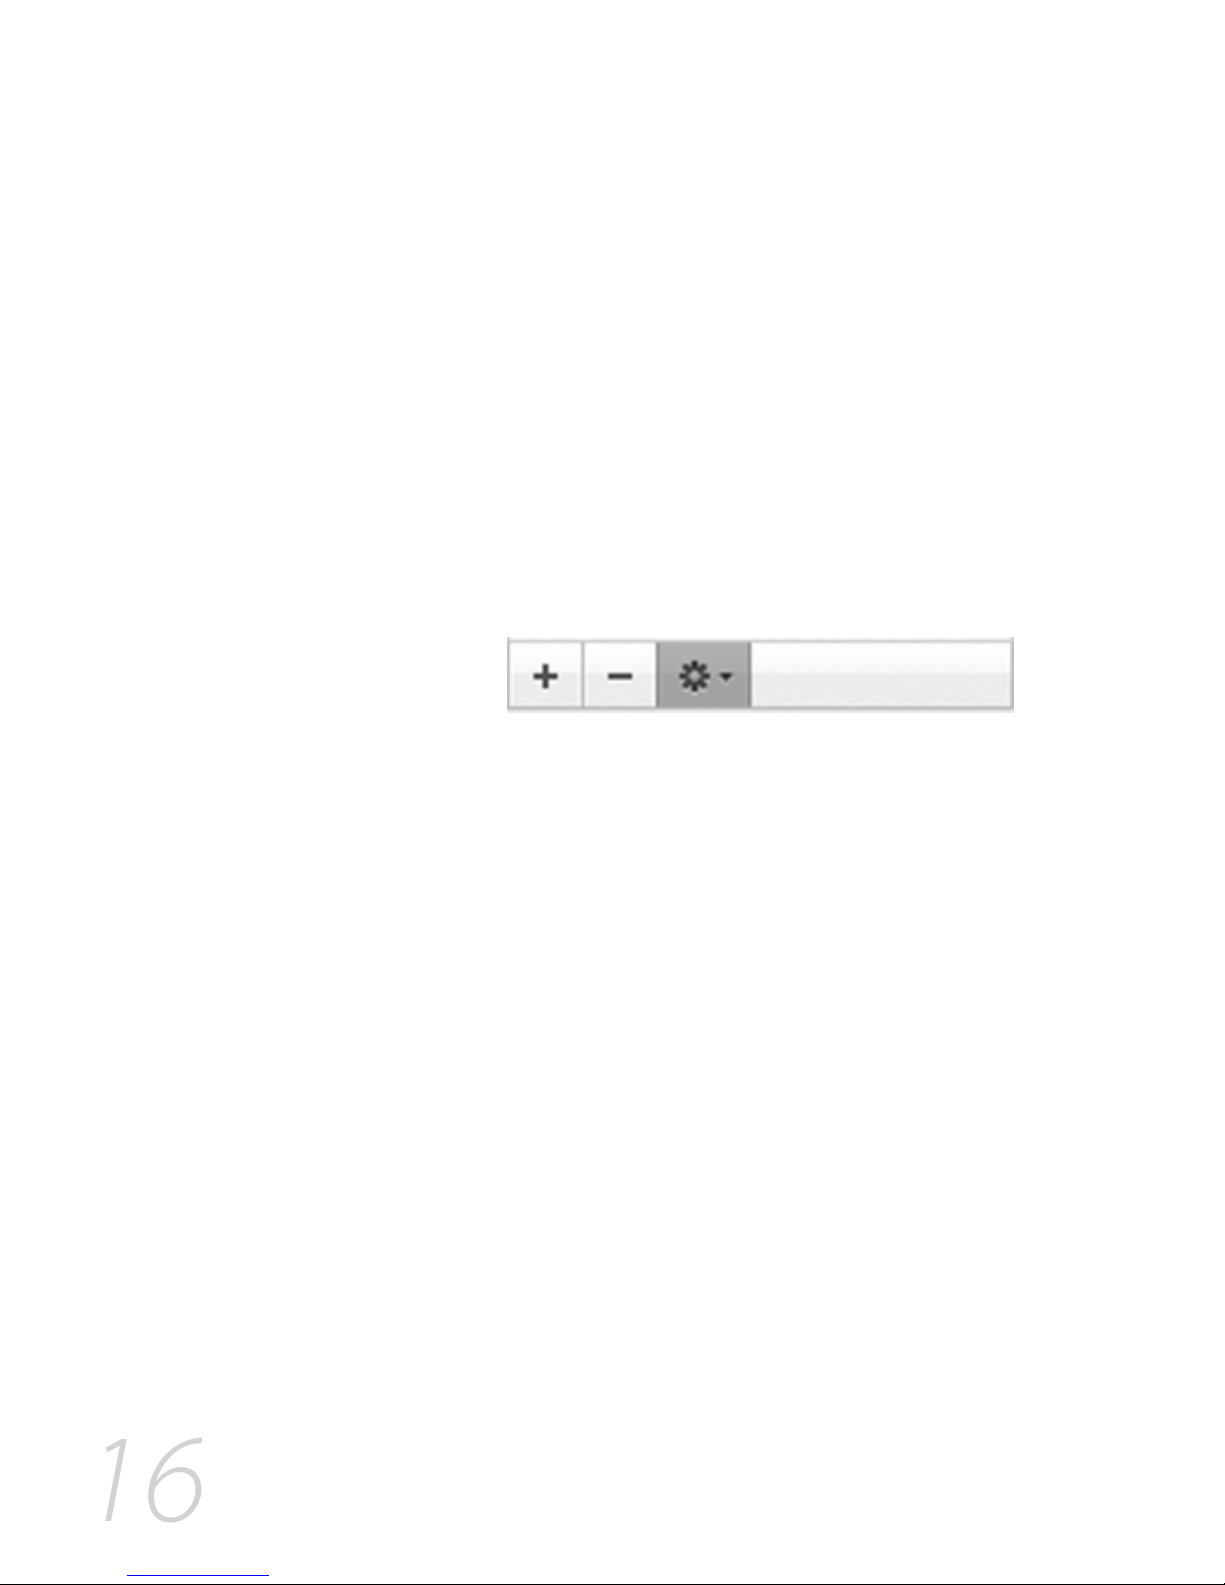
2. Click on the “Action” menu (it looks like a gear, as shown
below).
3. Select “Set Service Order…” from the menu that shows.
4. Click “Apply” and close the Preferences window.
5. Drag the PCI interface to the top of the list, then click
“OK”.
6. Click “Apply” and close the Preferences window.
PROBLEM:
I am unable to configure the MaxPower 802.11n/g/b PCI Card
using Apple’s built-in AirPort software.
SOLUTION:
This wireless adapter requires the use of the included software. It
will not work using Apple’s native wireless software and drivers.
PROBLEM:
I tried attaching the MaxPower 802.11n/g/b PCI Card to a
game console (PlayStation, XBox, Wii, etc.) that has a USB
port, and I can’t get it to connect to my network.
SOLUTION:
The MaxPower 802.11n/g/b PCI Card requires a software
driver, specific to Mac OS X and Windows, to run. No driver
software is available for any game console.
Page 17

17
Contacting Tech Support
You can register your MaxPower 802.11n/g/b PCI Card at
NewerTech’s Web site:
http://newertech.com/tech_support/ntwty.php
If you need support, there are three ways to contact Technical
Support / Customer Service:
email•
You can submit your email support request at: »
http://helpcenter.newertech.com/
Phone•
815-308-7001 - Option 2 »
8am–8pm CST Monday–Friday »
9am–4pm CST Saturday »
LiveChat•
NewerTech’s distributor, OWC, offers live technical »
assistance at: http://eshop.macsales.com/
7am-10pm CST Monday–Friday »
10am-4pm CST Saturday »
12pm-4pm CST Sunday »
Page 18

18
Copyrights
Copyright © 2008 Newer Tech nology, Inc. All right s reserved. No par t of this pub lication m ay be reproduced, stored in a re trie val system, or tra nsmitte d in any form or by any means, electronic, mec hanical, p hotocopying, rec ording or o therwise,
with out the prior writ ten consent of Newer Tec hnology.
Changes
The material in this d ocument is for in formation only a nd subjec t to chang e without notice. While reasonable effo rts have
been made in the preparation of thi s doc ument to assur e its accurac y, Newe r Techn ology assumes no liability resu lting from
erro rs or omissions i n this doc ument, or from the use of the information contai ned herein. Newer Technology res erves the
right to make changes or revisi ons in the product design or the product manual withou t reserva tion and with out obligat ion
to notify any person of such revisions and changes.
FCC Statement:
This equipment has been tested and found to comply with the limits for a Class B digital device, pursuant to
Part 15 of the FCC Rules. These limits are designed to provide reasonable protection against harmful interference
in a residential installation. This equipment generates, uses and can radiate radio frequency energy and, if not
installed and used in accordance with the instructions, may cause harmful interference to radio communications.
However, there is no guarantee that interference will not occur in a particular installation. If this equipment does
cause harmful interference to radio or television reception, which can be determined by turning the equipment
off and on, the user is encouraged to try and correct the interference by one or more of the following measures:
Reor ient or relo cate the re ceiving an tenna.•
Increase the s eparation between the eq uipment an d receiver.•
Conne ct the equ ipment int o an outlet on a circui t different from that to which t he receive r is connec ted.•
Consu lt the deale r or an exper ienced radio/T V technician for help.•
FCC Caution
FCC Caution: Any chang es or modifications not exp ressly approved by the part y respo nsible f or compliance co uld void the
user ’s authori ty to operate this eq uipment.
This device com plies with Part 15 of the FCC Rules. Operat ion is subje ct to the following t wo condit ions: (1) This dev ice may
not cause har mful interference, and (2) this device mus t accept any inter ference received, inclu ding interference that may
caus e undesired opera tion.
IMPORTANT NOTE:
FCC Radiation Exposure Statement:
This equipment complies with FCC radiatio n exposure limits set forth for an unco ntrolled environment. T his eq uipment
should be inst alled and operated with minimum dis tance 20cm between the rad iator & your body.
This transmitter must not be co -locate d or operat ing in conjunctio n with any oth er antenna or transmitter.
The availability of s ome sp ecific channels and/or operational frequ ency bands are country depen dent and ar e firmw are
prog rammed at the factory to match the intended destina tion. The fir mware set ting is not accessible by the end user.
The MXP802NPCM / MXP802GU2/ MXP802NU2C / MXP802NPCI / MXP802NRTR (FCC ID UNH - MXP802NPCM, MXP802GU2, MXP802NU2C, MXP802NPCI, MXP802NRTR) is limited in CH1~CH11 for 2.5GHz by
specified firmware controlled in U.S.A.
R&TTE Compliance Statement
Product Article Code: MXP802NPCM / MXP802GU2/ MXP802NU2C / MXP802NPCI / MXP802NRTR
Product Description: Wireless-N Notebook Adapter / Wireless-N USB Dongle / Wireless-N PCI Adapter
/ Wireless-N Broadband AP/Router
Product Manufacturer / Importer: Newer Technology, Inc.
This equipment complies wi th all the requirements of DIR ECTIVE 1999/5/EC OF THE EUROPEAN PARLIAMENT AND THE
COUNCIL of March 9, 1999 on r adio e quipment and telecomm unication terminal Equipm ent and the mut ual recognit ion
of their conformity (R&TTE)
The R&TTE Directive repeal s and replaces in the directi ve 98/13/EEC (Teleco mmunicat ions Terminal Equipment and Satellite
Ear th Station Equipment) As of April 8, 200 0.
Page 19

19
Safety
This equipm ent is designed with the utmo st care for the safety of those who inst all and use it. H owever, special at tention
must be paid to the dangers of e lectri c shock and static electricit y when wor king with electrical equipm ent. All guidelines
of this and of the computer manufacture m ust there fore be allowed at all times to ensure the s afe use of the equipm ent.
EU Countries Intended for Use
The ETSI version of this device is intended for home and office use in Aus tria, Belgium, Denmark, F inland, France, Ger many,
Gree ce, Ireland, Italy, Luxembour g, the Netherlands, Portu gal, Spain, Sweden, and the United Kingd om.
The E TSI version of t his device is also auth orized f or use in EFTA membe r states : Iceland, Liech tenstein, Norw ay, and Switzerland.
EU Countries prohibited for use
None.
EU Countries where usage of the product as described below is limited to:
Franc e: The use of ot her channe ls than 10 through 13 is proh ibited by law.
Health And Safety Precautions
Read this User ’s Guide care fully, and fo llow the cor rect pro cedure when sett ing up the device.•
Do not open your wirele ss product or attempt to disasse mble or modify it. Never insert any meta llic object into the •
device to avoid any risk of e lectrical sh ock, fir e, shor t-circuiting or dangerous emissio ns. Your wireless pro duct contains no user-serviceable p arts. If it appears to be malfun ctioning, have it inspec ted by a qualified Newer Technology
Technical Supp ort representative.
Never expose your device to rain, or use it near water, or in damp or wet conditions. Never place objects contai ning liq-•
uids on the device, as t hey may spill into its openings. Doing so i ncreases the risk of electric al shock, short-circuiting,
fire or p ersonal injury.
General Use Precautions:
Do not expose the w ireless produc t to temperatur es outsi de the range of 5° C to 40 ° C (41° F to 104° F). Doing so may •
damage th e device or disfigure its c asing. Avoid placing your wireless produc t near a so urce of hea t or exposin g it
to s unlight (even through a window). Inver sely, pl acing your wireless product in an environment that is too cold or
humid may damage the unit.
Alway s unplug the wirele ss produc t from the elect rical out let if ther e is a risk of lightning or if it wi ll be unused for an •
ext ended period of tim e. Otherwise, there is an inc reased risk of elec trical s hock, sho rt-circ uiting or fi re.
Use only the powe r supply shi pped with t he device.•
Do not use the wireless pro duct near other electr ical appliances such as televisions, rad ios or spe akers. Doing so may •
caus e interference which will a dversel y affect the operat ion of the other products.
Do not place the wi reless produc t nea r sour ces of magne tic interference, such as computer dis plays, televisi ons or •
speakers. Magnetic interf erence can a ffect the o peration and stab ility of yo ur wireless product.
Do not p lace heavy o bjects o n top of the wireless produc t or use excessive force on it.•
Never use e xcessive force on your wireless produc t. If you de tect a problem, consult the Troubleshooting sec tion i n •
this manual.
Protect your wireless pr oduct from excessive exposure to dust during use or st orage. Dust can build up i nside the •
device, incre asing the risk of damage or malf unction.
Newer Technol ogy recommends the use of normal glass c leaning p roduct s to keep the high lustre finish at it’s fin est •
with t his product. Be sure to not get any moisture inside the ho les and if you d o, allow time to air dry b efore use.
Do not block the ventilation ou tlets on the rear of the wireless product. These help to keep yo ur device coo l during •
oper ation. Blocking th e venti lation outlets may cause damage to your d evice and c ause an inc reased risk of shortcirc uiting or fire.
Page 20

NWTMAN802NPCI
©2008 Newer Technology, Inc. All Rights Reserved
Revision 2, 12/08 - MCS
 Loading...