

New England Arbors VA84231 User Manual

ASSEMBLY INSTRUCTIONS
The Faireld Grande Arbor
86.5 in
80.5 in
107.75 in
80 in
88 in
www.newenglandarbors.com
52.25 in
58.5 in
10.3 in
24 in
32 in
82 in
Please read through before starting assembly.
IMPORTANT: CHECK THE INSIDE OF YOUR POSTS FOR ALL MATERIALS.
Check Box for These Contents
In the event of missing or defective parts please call our customer service dept. at
1. Rafters (8)
2. Pergola End Caps (20)
3. Post Caps (4)
4. Posts (4)
5. Post Trims (4)
6. Carrying Beams (4)
7.
Side Panel Top-Rails
8. Side Panel Vertical Spindles (10)
9. Side Panel Middle Rails (2)
10. Side Panel Square Lattices (2)
11. Steel Stiffener Inserts (2)
12. Carrying Beam Coupler (2)
13. Side Panel Horizontal Bottom Rails (2)
14.
3 in. (7.6 cm.)
Tube of Vinyl Glue (1)
15.
1 1/2” x 4 1/2” x 38"
4” x4” x 84"
1 1/2” x 4 1/2” x 46 1/2"
(2)
1 1/2” x 1 1/2” x 31 5/8“
Stainless Steel Screws
7/8” x 1 1/2” x 10 3/8”
1 1/2” x 1 1/2” x 31 5/8“
1/2” x 26 1/2” x 47 3/4”
1/2” x 4 1/2”
1 1/2” x 1 1/2” x 31 5/8"
(44)
1
2
3
4
5
6
Tools You Will Need
• Hammer
• Tape Measure
• Level
• Stool or Short Ladder
• Shovel or Auger
• Cordless Drill
1 800 282 9346, ext #20 (Mon. to Fri. 8:00 AM to 4:00 PM EST).
7
8
9
10
11
12
13
General Information
Read Instructions through carefully before beginning assembly.
•
• When assembling components, place on a non-abrasive surface
(i.e. shipping box) to avoid scratching.
• We recommend an area approx 10’x 8’ for unobstructed assembling.
• You should not need to use excessive force when assembling components.
14
(Not to scale)
Ver 2/OCT 2010
1
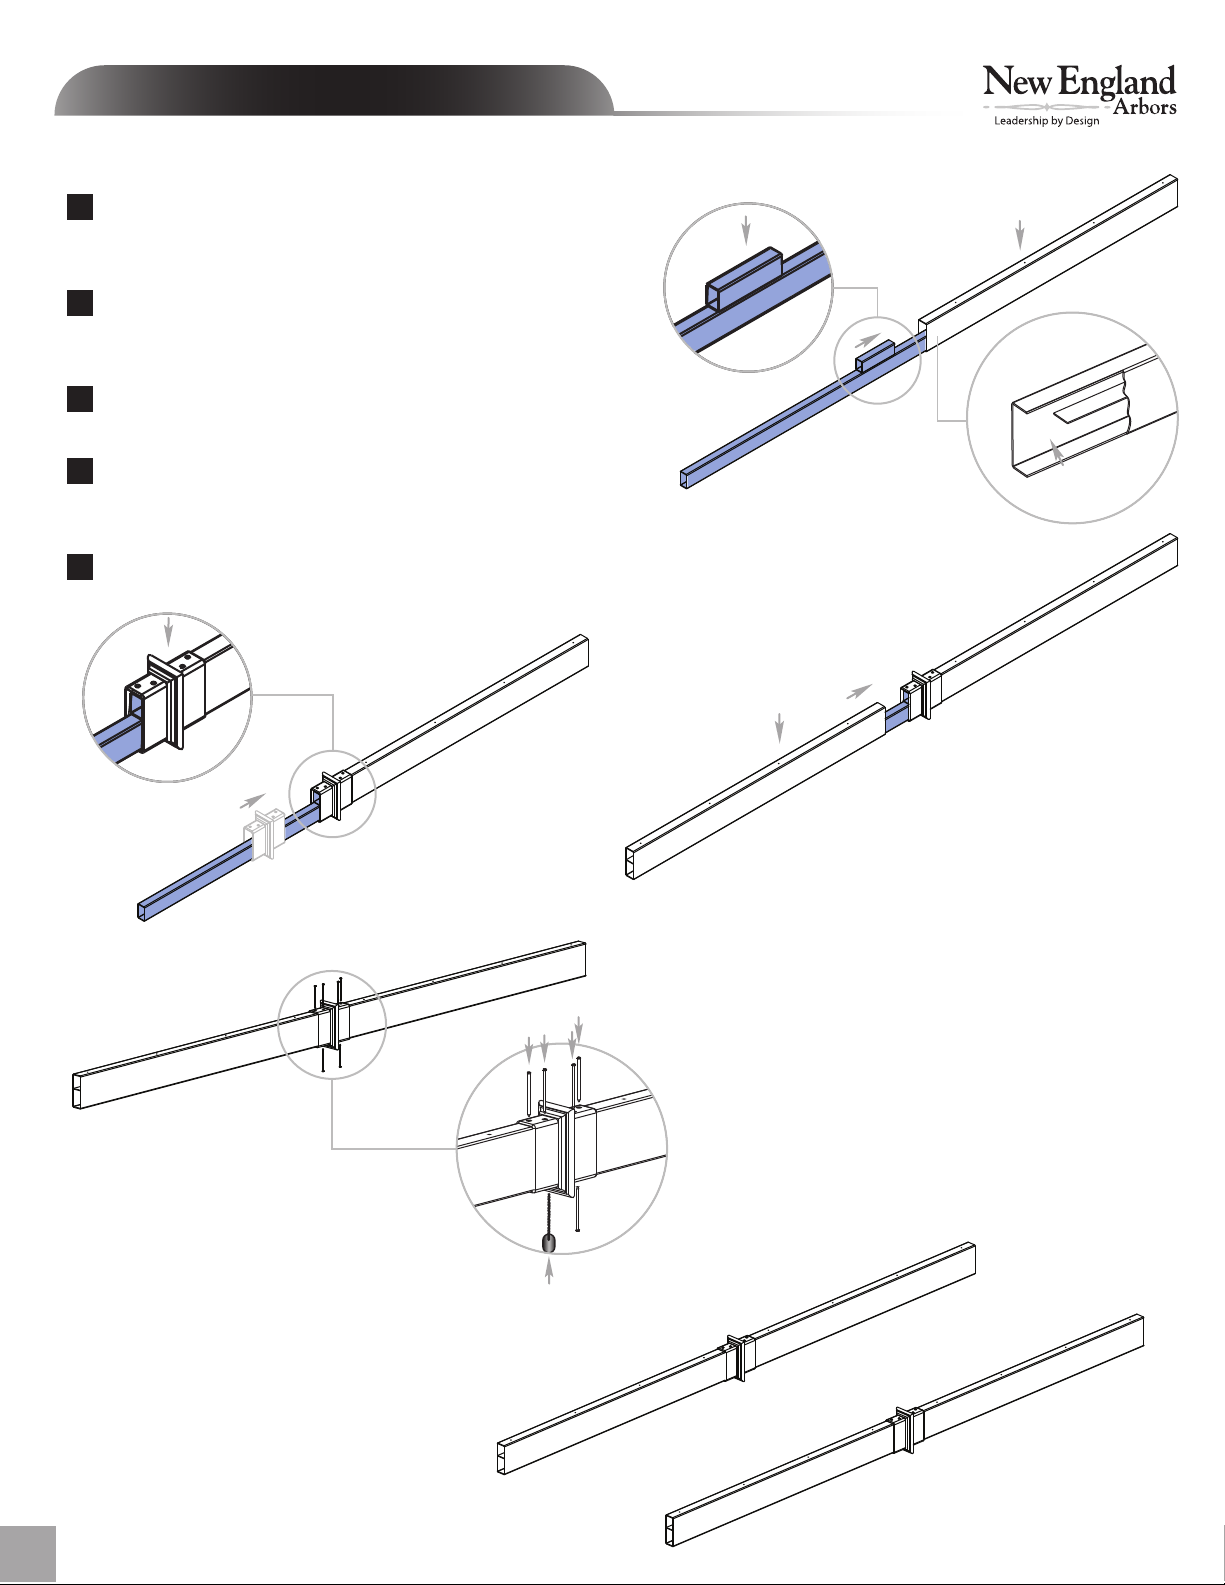
STEP ONE
Assemble the Arbor Beams
Insert one steel stiffener (with steel block facing up) into
1
the lower pocket of the beam past the joiner. Push until
steel block hits the internal ribbing.
Slide the beam coupler over the beam. Install the coupler
2
so that the four holes are facing up. Push firmly until the
coupler bottoms out on the beam.
Slide a second beam coupler over the steel insert and into
3
the coupler.
Screw the coupler to the vinyl beams and steel using 3”
4
screws. The bottom and top holes will need to be predrilled using the bit provided.
Repeat for second beam.
5
Four holes facing up
Steel block should be facing up
1
www.newenglandarbors.com
Predrilled holes facing up
accomodate steel
stiffener
Beam rib
is removed to
Predrilled holes facing up
3
2
4
Th e Fair eld Grande Arbor
2
Pre-drill holes on bottom and top to
accomodate for internal steel stiffener.
5
 Loading...