

Page 1

Contents
Recharging the Battery Pack
Safety Instructions............................................................................................................3
Getting Started.................................................................................................................
Cordless Telephone Operation.........................................................................................8
Preparing for Use.....................................................................................................8
Receiving Calls ......................................................................................................8
Placing Calls...........................................................................................................9
Using the Headset Feature...................................................................................10
Redial Feature......................................................................................................10
Caller ID System Operation............................................................................................11
Caller ID System......................................................................................................
Viewing Caller Information During Incoming Calls.............................................
Message Waiting ..............................................................................................11
Call Waiting .......................................................................................................
Voice Mail Function...........................................................................................
Forwarded Call..................................................................................................12
Long Distance Call.............................................................................................
Caller List ...............................................................................................................12
Viewing the Caller List ................................................... ..................................13
Placing a Call from the Caller List .....................................................................
Saving the Name and Number in the Caller List into the Phone Book..............13
Deleting All Records in the Caller list............... ................................................14
Selective Deleting in the Caller List...................................................................14
Phone Book............................................ ..........................................................14
Viewing the Phone Book....................................................................................14
Speed Viewing the Phone Book................................... . ...................................15
11
11
12
12
12
13
Battery Type
5
Use the following type and size of BATTERY PACK:
Cordless Telephone BATTERY PACK 3.6V, 600mAh
NOTE: During a power interruption, the BASE UNIT does
not operate, and a phone conversation cannot be
made on the HANDSET.
Ni-MH
Recharging the Battery Pack
The nickel metal hydride(Ni-MH) BATTERY PACK in the HANDSET can be recharged many
times using the built-in charger in the BASE UNIT.
When the BATT LOW symbol appears on the LCD screen , a "beep" sound will be heard
every 10 seconds. This indicates that the BATTERY PACK needs to be recharged.
Charge the BATTERY PACK at least once every 90 days of non-use to avoid battery
failure. When the BATTERY PACK can no longer be charged, replacement of the
BATTERY PACK will be necessary.
The BATTERY PACK used in your telephone may develop a condition known as
"MEMORY". Once subjected to a regular short discharging routine, the BATTERY PACK
assumes the discharging pattern it was subjected to. This causes rapid discharging
thereby shortening the BATTERY PACK charge span. If you believe your BATTERY PACK
has developed a "MEMORY "condition, do not charge the HANDSET until the BATT LOW
symbol appears on the LCD Screen. When the BATT LOW symbol appears on the LCD
Screen, charge the HANDSET fully for 12 hours.
.
IMPORTANT
In order to get maximum life from the HANDSET
BATTERY PACK, be sure to charge the HANDSET
for 12 hours before initial use.
1
26
Page 2

Security
Contents
NOTES:
1. You can store a maximum of 16 characters on the letter icon.
2. You can store a maximum of 16 digits on the number icon.
Security System
Your cordless telephone uses a digital coding security system to prevent unauthorized
use of your telephone line by another nearby cordless telephone. The system has its
own identifying signal created by microcomputers in both the BASE UNIT and the
HANDSET.
Security Code
This telephone has an internal security code with 65,536 possible combinations.
Resetting Security Code and Channel Information
Communication between HANDSET and BASE UNIT may not be possible in any of
the following situations:
1. After a power failure.
2. After relocating the BASE UNIT by disconnecting the AC ADAPTOR.
3. After replacing the HANDSET BATTERY PACK.
To reset, place the HANDSET on the BASE UNIT for 2 to 5 seconds.
Multi-Channel Access
Your cordless telephone lets you select a channel from the 40 frequencies available to
transmit signals between the BASE UNIT and the HANDSET. When you notice
interference from other cordless telephones, change to another channel by pressing
DEL
the button on the HANDSET.
/SCAN
Saving in the Phone Book.............................................................................15
Preferred Calls...............................................................................................
Blocked Calls................................................................................................15
Editing the Number in the Phone Book .........................................................
Placing Calls from the Phone Book................................................................17
Deleting All Records in the Phone Book.........................................................18
Selective Deleting in the Phone Book.............................................................18
Function Operation.................................................................................................19
A. Language ...................................................................................................20
B. First Ring On/Off.........................................................................................20
C. Time Set.....................................................................................................20
D. Ringer Volume............................................................................................21
E. LCD Contrast .............................................................................................21
F. AREA CODE................................................................................................21
G. Flash Time..................................................................................................22
H. Pause Time.................................................................................................22
I. Voice Mail.....................................................................................................23
J. MSG Waiting(Message Waiting)...................................................................23
Telephone Keypad Characters...............................................................................24
Security............................................................................................................................25
Recharging the BATTERY PACK....................................................................................26
Changing the BATTERY PACK.......................................................................................27
Problem Solving..............................................................................................................28
Technical Information.......................................................................................................29
Notes...............................................................................................................................30
FCC Regulations.............................................................................................................31
15
16
25
2
Page 3
Safety Instructions
Caller ID System Operation
IMPORTANT SAFETY INSTRUCTIONS
To reduce the risk of fire, electric shock and /or injury, always follow these
basic safety precautions when using your cordless telephone equipment.
1. Read and understand all instructions.
2. Follow all warnings and instructions marked on the telephone.
3. Do not use this telephone near a bathtub, kitchen sink, wash bowl, laundry tub,
in a wet basement, near a swimming pool, or anywhere else where there is water.
4. Avoid using a telephone(other than a cordless type) during an electrical storm.
There may be a remote risk of electric shock from lighting.
5. Do not use the telephone to report a gas leak in the vicinity of the leak.
6. Use only the power cord and BATTERY PACK indicated in the Owner's Manual.
Do not dispose of the BATTERY PACK in a fire .The BATTERY PACK may explode .
Check with local codes for possible special disposal instructions.
7. Unplug this telephone from the wall outlet before cleaning or replacing
the BATTERY PACK. Do not use liquid cleaners or aerosol cleaners on the
telephone. Use a damp cloth for cleaning.
8. Place this telephone on a stable surface. Serious damage and/or injury may result
if the telephone falls.
9. Do not cover the slots and openings on this telephone. This telephone should never
be placed near or over a radiator or heat register. This telephone should not be
placed in a built-in installation unless proper ventilation is provided.
10.Operate this telephone using the electrical voltage as stated on the BASE UNIT or
in the Owner's Manual .If you are not sure of the voltage in your home , consult your
dealer or local power company.
11.Do not place anything on the power cord. Install the telephone where no one will
step or trip on the cord.
12.Do not overload wall outlets or extension cords as this can increase the risk of fire
or electric shock.
13.Never push any objects through the slots in the telephone. They could touch
dangerous voltage points or short out parts that could result in a risk of fire or
electric shock. Never spill liquid of any kind on the telephone.
14.To reduce the risk of electric shock, do not take this telephone apart. If service
or repair work is required on this telephone, take it to a qualified service
representative. Opening or removing covers may expose you to dangerous voltage
or other risks. Incorrect reassembly can cause electric shock when the appliance is
subsequently used.
15. Unplug this telephone from the wall outlet and consult a qualified service
representative in any of the following situations:
A. When the power supply cord is frayed or damaged.
B. If liquid has been spilled into the telephone.
C. If the telephone has been exposed to rain or water.
D. If the telephone does not operate normally by following the operating instructions.
Adjust only those controls that are covered by the operating instructions. Improper
adjustment may require extensive work by a qualified technician to restore the telephone
to normal operation.
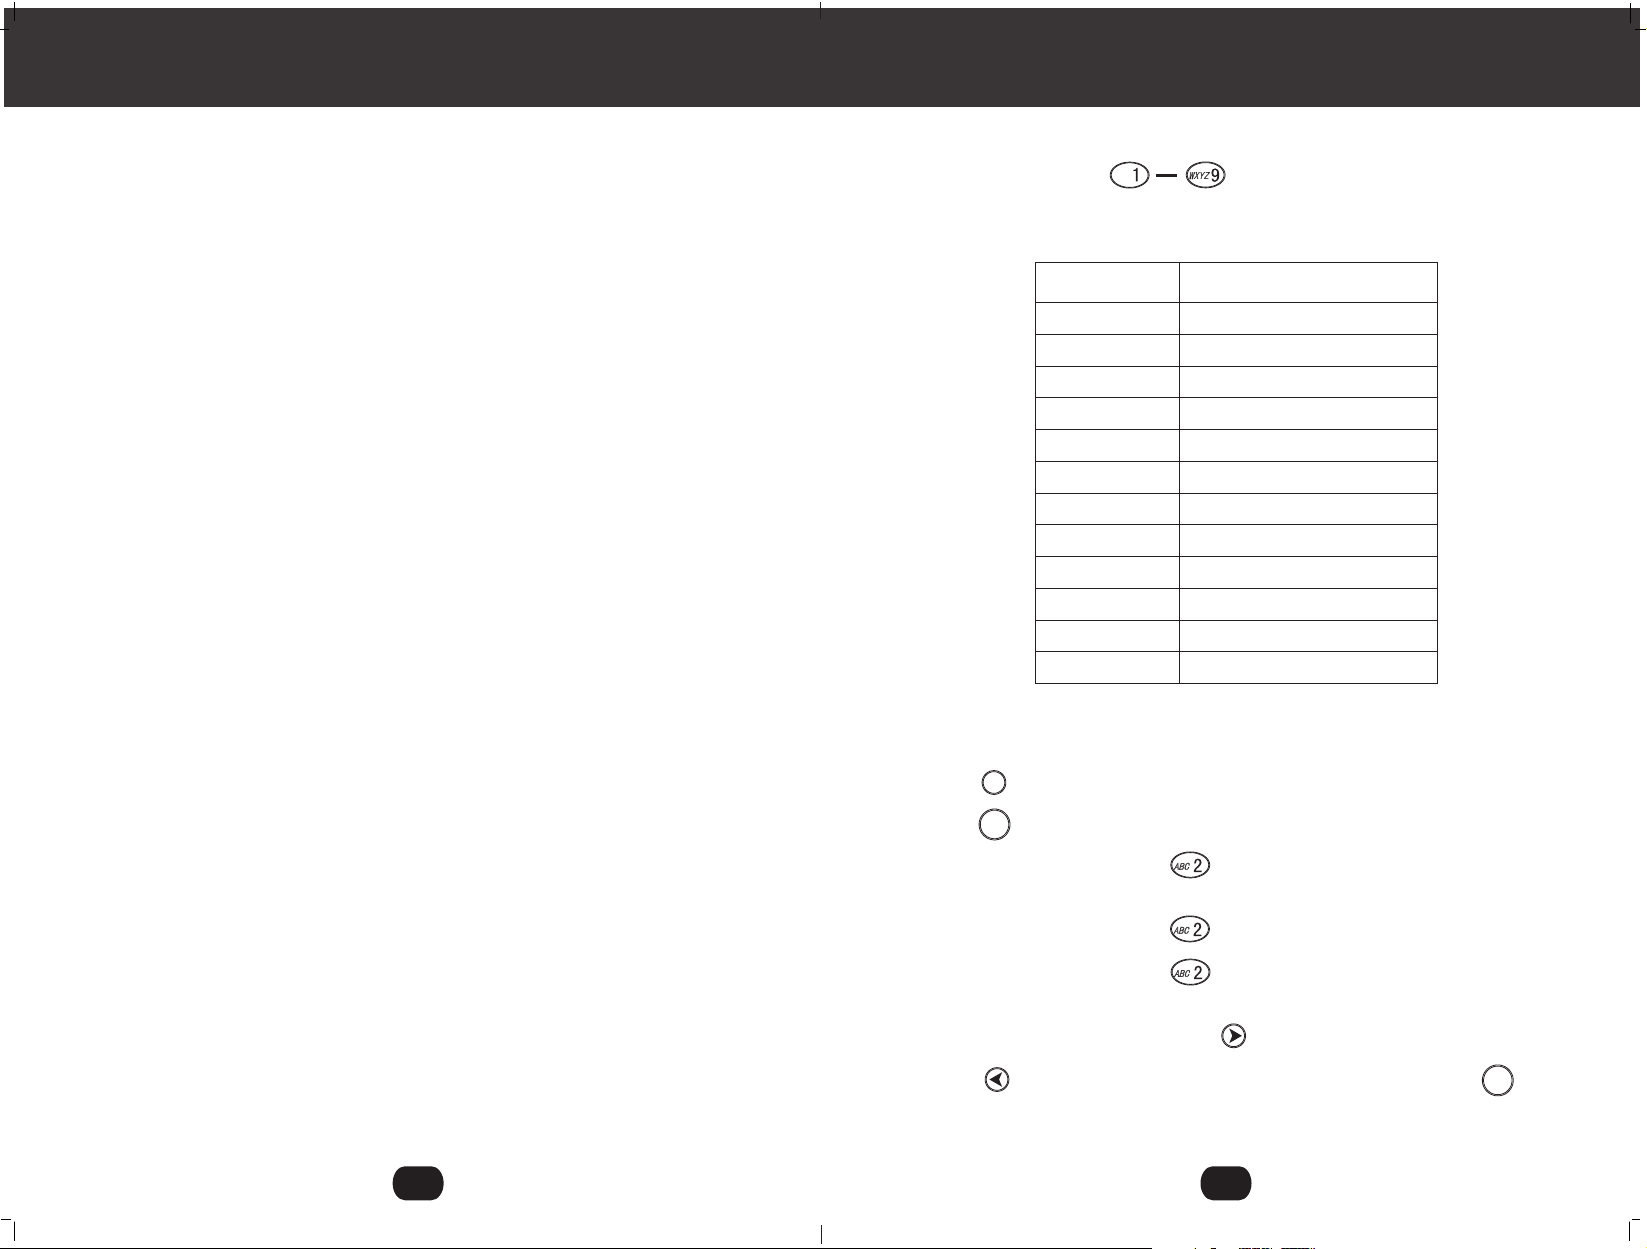
TELEPHONE KEYPAD Characters
The TELEPHONE KEYPAD button are used to enter characters when
entering names. You can enter names in the UPPER CASE or LOWER CASE letters.
Press the appropriate TELEPHONE KEYPAD button to get the following characters.
KEYPAD
BUTTONS
SPACE1 &' ( ).
1
2
3
4
5
6
7
8
9
*
0
#
EXAMPLE:
If you want to enter the character "Abc" on the HANDSET LCD Screen.
1. Press the button.
2. Press the Button.
3. Press the TELEPHONE KEYPAD button,"A" will be displayed. The cursor will
automatically move to the next character after 2 seconds.
4. Press the TELEPHONE KEYPAD button for 5 times to display"b".
5. Press the TELEPHONE KEYPAD button for 6 times to display"c"
The cursor will automatically move to the next character within 2 seconds after entering
the first character. Press the SHIFT RIGHT button to produce a space. If you want to
change any character, you can go back to the incorrect character by pressing the
SHIFT LEFT button. To delete the character inside the cursor, press the
button.
DIR
EDIT
/FLASH
CHARACTERS
ABCabc2
DEFdef3
GHIghi4
JKLjkl5
MNOmno6
PQRSpqrs7
TUVtuv8
WXYZwxyz9
*
0
#
DEL
/SCAN
3
24
Page 4
Caller ID System Operation
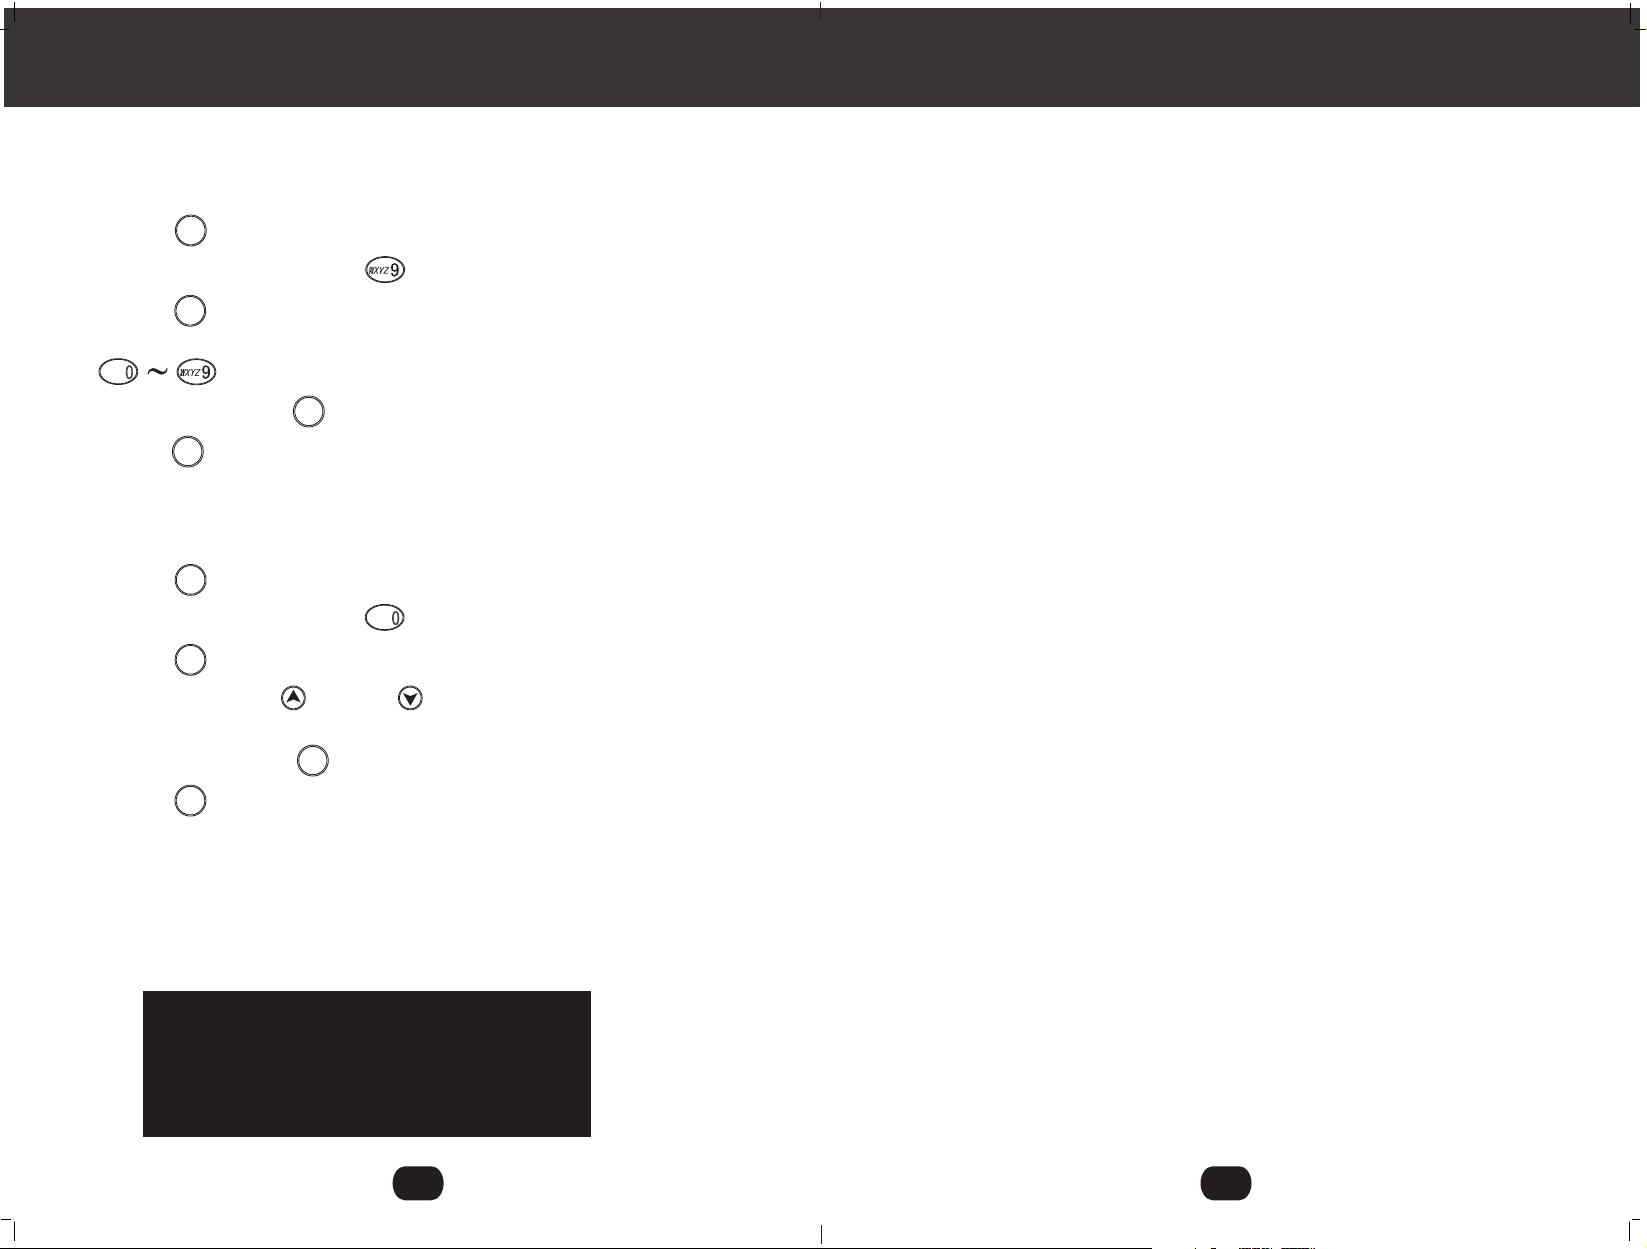
I .VOICE MAIL
This telephone enables you to store the Voice Mail Post Code number in your area.
This will automatically connect you to the Voice Mail service provider with one touch
dialing.
1. Press the button and hold down.
2. Press the TELEPHONE KEYPAD button.
3. Press the button.
FUNC
EDIT
/MAIL
/FLASH
Safety Instructions
E. If the telephone has been dropped or the case has been damaged.
F. If the telephone exhibits a distinct change in performance.
16. Never install telephone wiring during a lighting storm.
17. Never install telephone jacks in wet locations unless the jack is specifically designed
for wet locations.
18. Never touch uninsulated telephone wires or terminals unless the telephone line has
been disconnected at the network interface.
19. Use caution when installing or modifying telephone lines.
4. Enter the Voice Mail Post Code number by using the TELEPHONE KEYPAD
OPER
buttons.
/ SAVE
5. Press and hold down the button.
/ SAVE
6. Press the button to return to STANDBY mode.
R/P
R/P
J. MSG Waiting (Message Waiting )
To turn off the Message Waiting LCD Screen indicator.
FUNC
EDIT
FUNC
/MAIL
/FLASH
/MAIL
R/P
OPER
/ SAVE
1. Press the button and hold down.
2. Press the TELEPHONE KEYPAD button.
3. Press the button.
4. Press the SCROLL UP or DOWN button to select MSG Waiting ON or OFF
when MSG Waiting is active.
5. Press and hold down the button.
6. Press the button to return to STANDBY mode.
IMPORTANT:
Message waiting LCD Screen indicator will automatically turn ON. If you have
subscribed to Voice Mail message service and if yo have Visual Message indication
from your local telephone company.
Battery Safety
CAUTION:
Danger of explosion if the BATTERY PACK is incorrectly replaced. Replace
only with the same or equivalent type.To reduce the risk of fire or personal
injury, read and follow these instructions:
1. Use only the following type and size BATTERY PACK:
Cordless Telephone BATTERY PACK
3.6V, 600mAh.
Ni-MH BATTERY
2. Do not dispose of the BATTERY PACK in a fire. It may explode. Check with local codes
for possible special disposal instructions.
3. Do not open or mutilate the BATTERY PACK. Released electrolyte from a BATTER
PACK is corrosive and may cause damage to the eyes or skin. Electrolyte may be
toxic if swallowed.
4. Exercise care in handling the BATTERY PACK to prevent shorting the BATTERY PACK
with conductive material such as rings, bracelets and keys. The BATTERY PACK or
conductor may overheat and cause burns.
5. Charge the BATTERY PACK provided with (or identified for use with) this telephone
only in accordance with the instructions and limitations specified in this manual.
6. Observe proper polarity orientation between the BATTERY PACK and BATTERY
CHARGER.
SAVE THESE INSTRUCTIONS.
IMPORTANT
In order to utilize the Caller ID feature, you
must subscribe to Caller ID service from
your local telephone company.
23
ATTENTION:
The telephone that you have purchased contains a rechargeable BATTERY PACK. The
BATTERY PACK is recyclable. At the end of its useful life, under various state and local
laws, it may be illegal to dispose of this battery into the municipal waste stream. Check
with your local solid waste officials for details in your area for recycling options or proper
disposal.
4
Page 5
Getting Started
Caller ID System Operation
Connecting Your Phone
This section is a reference guide to the basic functions and operations of your cordless
telephone. For more detailed descriptions of the operations and features of this telephone,
refer to the Contents on page 1.
1. Carefully remove your cordless telephone from its shipping carton. If there is any
visible damage, do not attempt to operate this equipment. Return it to the place of
purchase.
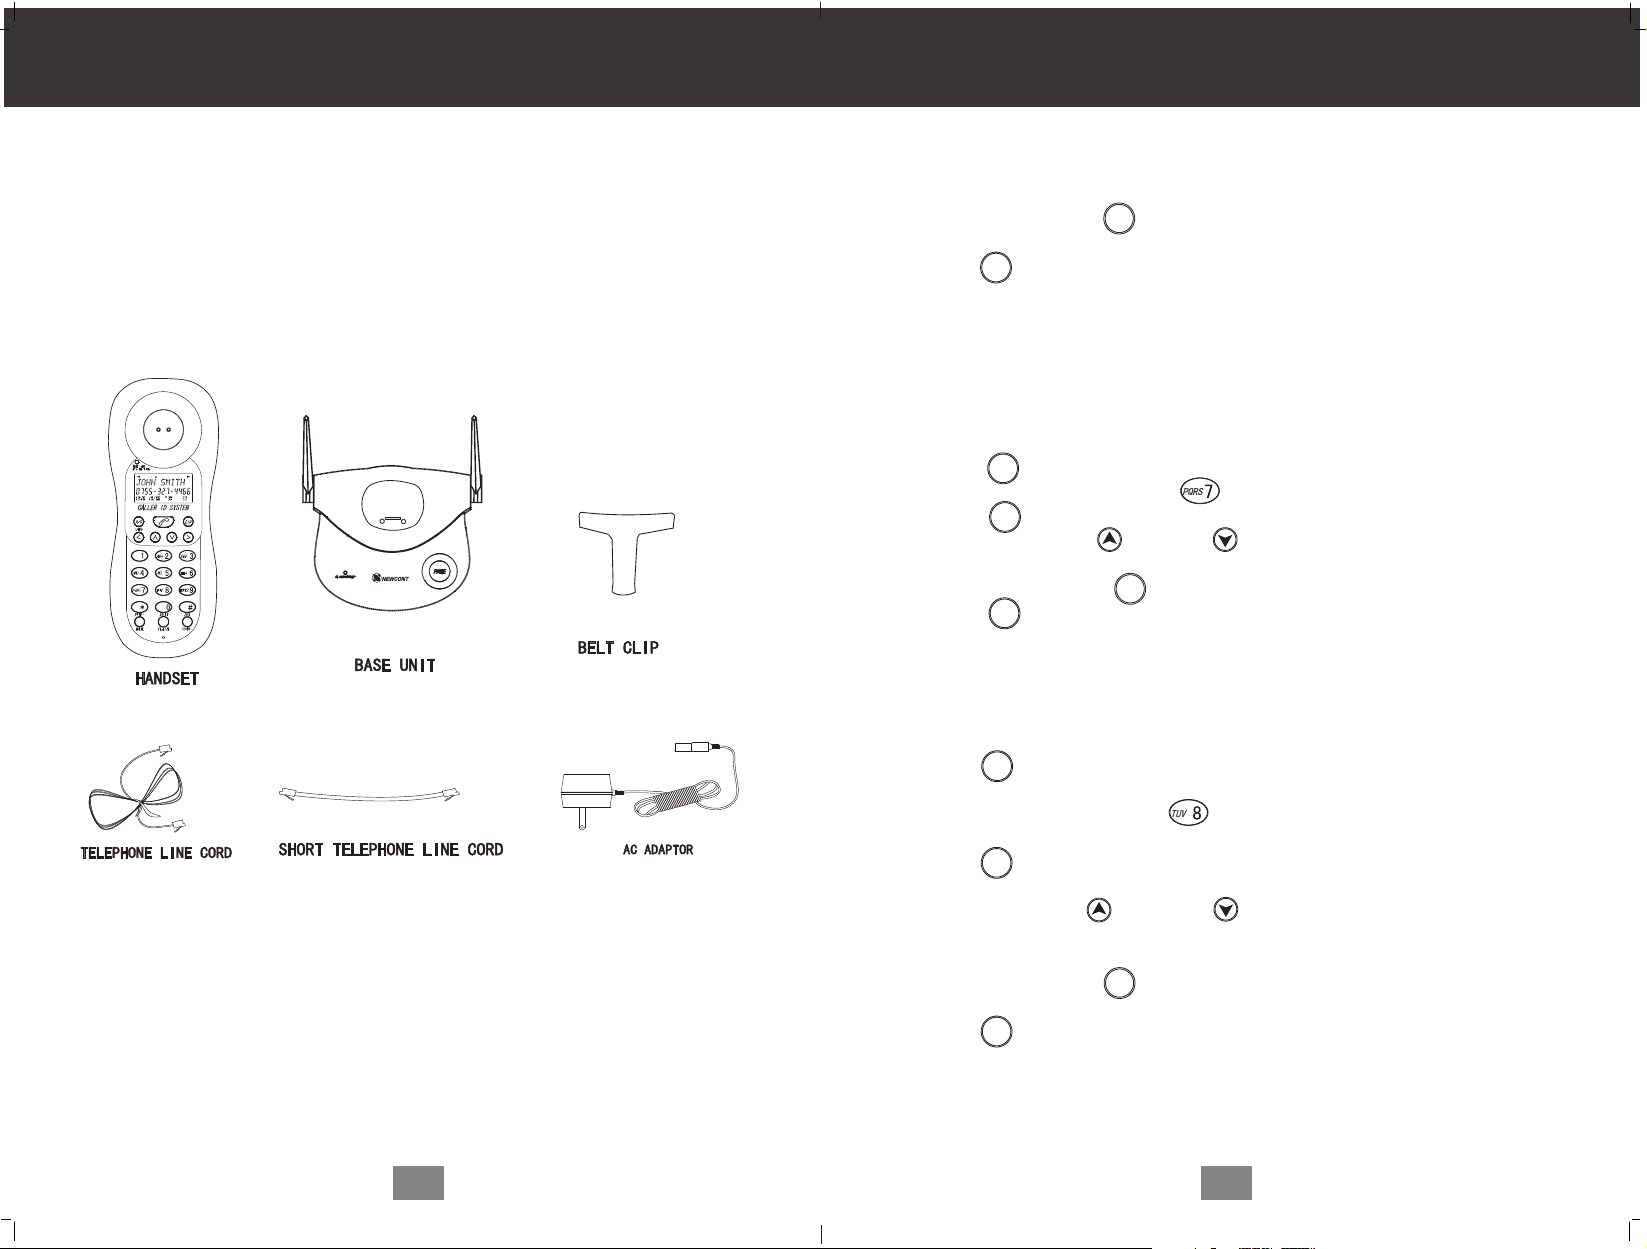
2. Check to be sure you have all items that come with this cordless telephone system.
You should have a HANDSET, BASE UNIT, AC ADAPTOR, TELEPHONE LINE
CORD, SHORT TELEPHONE LINE CORD ,BELT CLIP and Owner's Manual.
L D C C F
MSG DIR
BATT
CALLS
SEC RPT
MIN
AM
PM
TOTAL
NEW
900 MHz
4. Use the dial pad to enter the three digit area code there your phone numbers
begins with.
/ SAVE
5. Press and hold down the button.
FUNC
6. Press the button to return to STANDBY mode.
/MAIL
R/P
G. FLASH TIME
This unit enables you to select the standard FLASH TIME applicable to your calling
area. If you are not sure of the FLASH TIME you are using ,call your local telephone
company.
FUNC
EDIT
FUNC
/MAIL
/FLASH
/MAIL
R/P
/ SAVE
1.Press the button and hold down.
2.Press the TELEPHONE KEYPAD button.
3.Press the button.
4.Press the SCROLL UP or DOWN button to select the FLASH TIME. The
preset FLASH TIME is 600 milliseconds.
5.Press and hold down the button.
6.Press the button to return to STANDBY mode.
H. PAUSE TIME
This unit enables you to adjust the PAUSE TIME when placing a call using a
switchboard system or dialing a Long Distance calls.
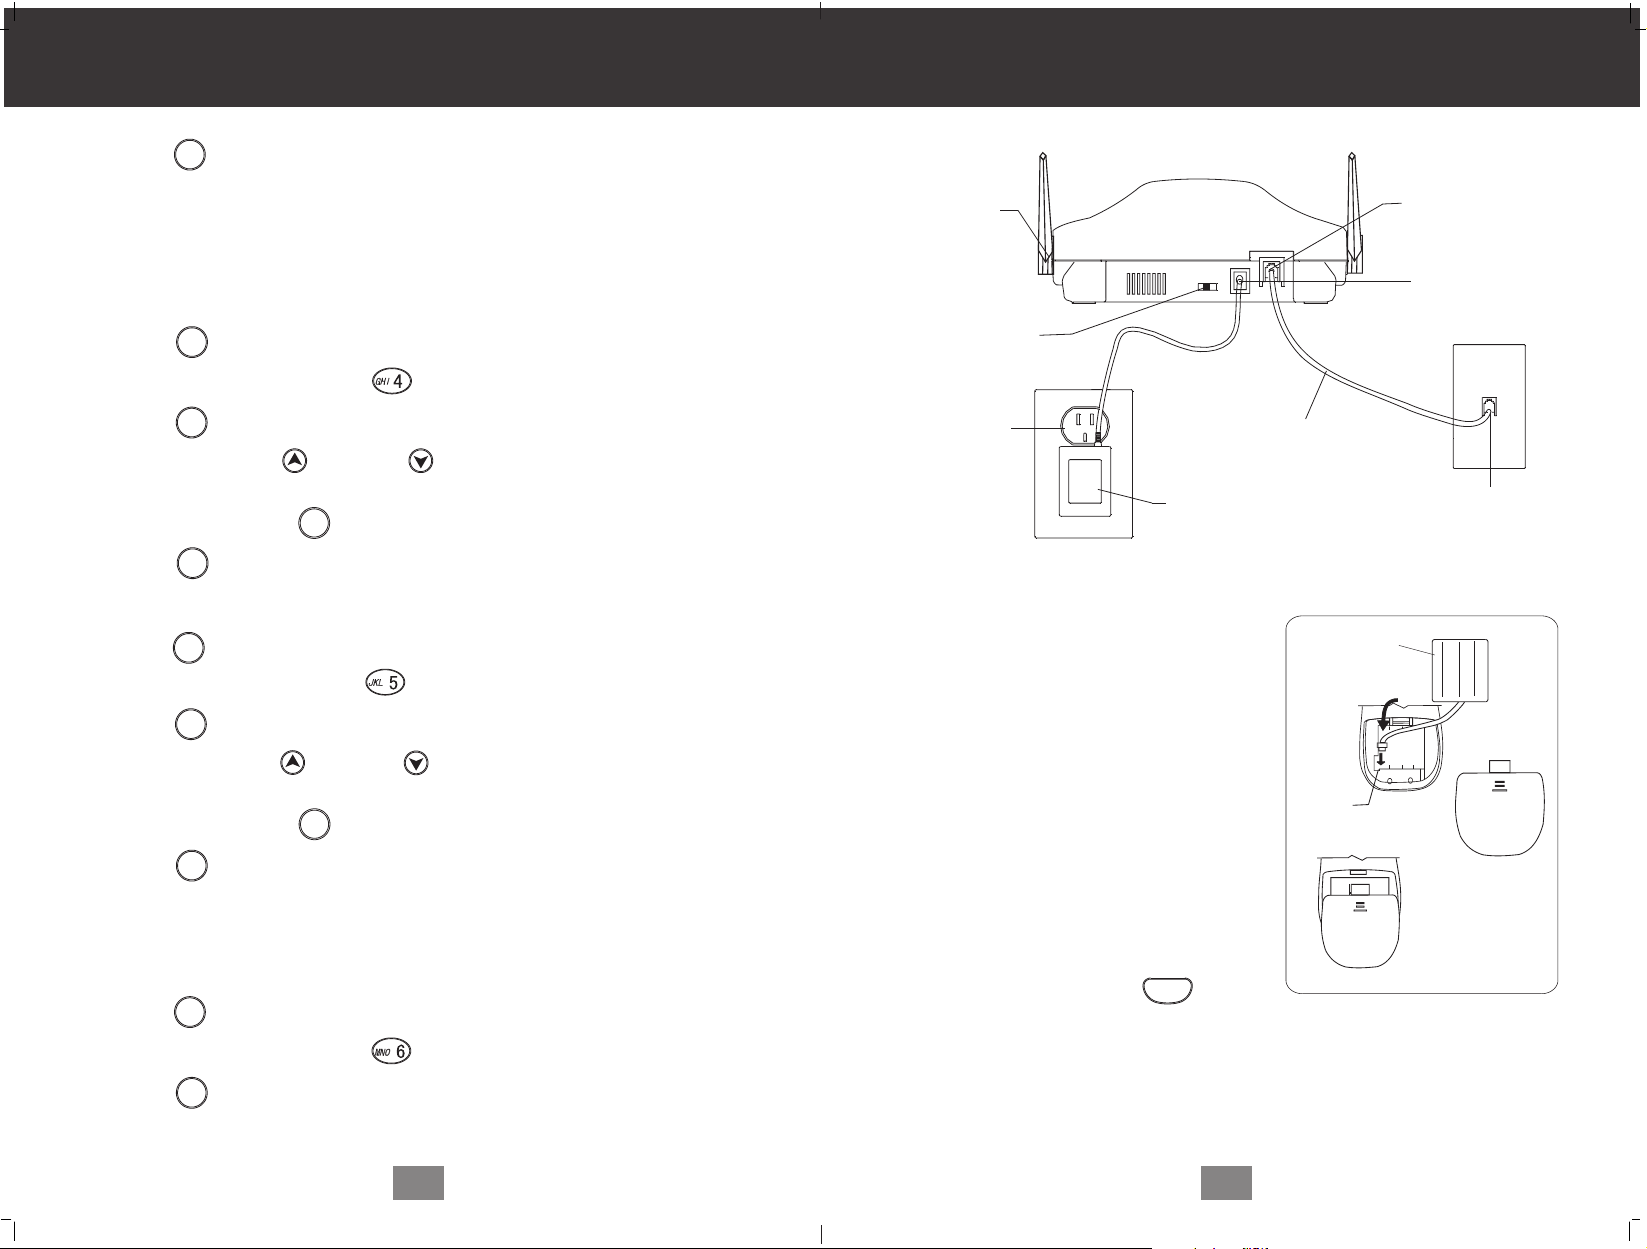
3. Insert the small plug on the end of the AC ADAPTOR into the POWER-IN CONNEC TION JACK at the back of the BASE UNIT.
4. Plug the AC ADAPTOR into a 120V AC wall outlet.
USE ONLY WITH CLASS 2 POWER SOURCE 9V DC,300mA
5. Insert one plug of the TELEPHONE LINE CORD into the house TELEPHONE JACK
and the other end into the TELEPHONE LINE CONNECTION JACK at the back of the
BASE UNIT. (If you have an older 4-prong TELEPHONE JACK, you will need an
RJ-11C TELEPHONE JACK ADAPTOR. This adaptor is available at the same place
you purchased your telephone.)
6. Raise or reposition the ANTENNA on the BASE UNIT for the best reception.
7. We recommend not placing this unit next to appliances, Doing so may cause
interference.
5
FUNC
1. Press the button and hold down.
/MAIL
2. Press the TELEPHONE KEYPAD button.
EDIT
3. Press the button.
/FLASH
4. Press the SCROLL UP OR DOWN button to adjust the pausing time. The
preset pause time is 4 seconds.
/ SAVE
5. Press and hold down the button.
FUNC
6. Press the button to return to STANDBY mode.
/MAIL
R/P
22
Page 6
Caller ID System Operation
FUNC
FUNC
/MAIL
/MAIL
6. Press the button to return to the STANDBY mode.
NOTE: The date and time will automatically set, if you have subscribed to the Caller ID
service from your local telephone company.
D. RINGER VOLUME
This function enables you to adjust the ringer volume from HI, LOW and OFF as
desired.
1. Press the button and hold down.
2. Press the TELEPHONE KEYPAD button.
Getting Started
BASE UNIT
ANTENNA
TONE/PULSE
SELECT SWITCH
BASE UNIT
TELEPHONE LINE
CONNECTION
JACK
POWER-IN
CONNECTION
JACK
EDIT
3. Press the button.
/FLASH
4. Press the SCROLL UP OR DOWN button to adjust the ringer volume
suitable for your convenience. HI is the preset ringer volume.
/ SAVE
5. Press and hold down the button.
FUNC
6. Press the button to return to STANDBY mode.
/MAIL
R/P
E. LCD CONTRAST
This unit enables you to select 8 brightness levels for the Large LCD Screen.
1. Press the button
FUNC
/MAIL
and hold down
.
2. Press the TELEPHONE KEYPAD button.
EDIT
3. Press the button.
/FLASH
4. Press the SCROLL UP OR DOWN button to adjust the brightness of the
LCD Screen. Level 4 is the preset brightness.
/ SAVE
5. Press and hold down the button until a confirmation"beep" is heard.
FUNC
6. Press the button to return to STANDBY mode.
/MAIL
R/P
F. AREA CODE
At any time during options programming of a home area code where 7-digit is using
for ease of call back and others features cdo not program if you use 10-digit to call
numbers in your area.
FUNC
EDIT
/MAIL
/FLASH
1. Press the button and hold down.
2. Press the TELEPHONE KEYPAD button.
3. Press the button.
120VWALL
OUTLET
AC ADAPTOR
TELEPHONE LINE CORD
8. Install the BATTERY PACK by plugging it
into the BATTERY CONNECTOR inside the
BATTERY COMPARTMENT.
9. Place the BATTERY PACK inside the
BATTERY COMPARTMENT.
10.Slide the HANDSET BATTERY COMPART MENT COVER firmly into place in its closed
position.
11. IMPORTANT:Before initial use, charge the
HANDSET for 12 hours.
12.TONE/PULSE Select Switch:
A. If your home is equipped with a tone
dialing system, set the TONE/PULSE
select switch to the TONE position.
B. If you have a rotary dialing system, set
TONE/PULSE select switch to the
PULSE position.
C. If you are unsure which system you have,
set the TONE/PULSE select switch to the
TONE position. Press the button
TALK
on the HANDSET to make a call. If the
call connects, leave the switch as is;
otherwise set to the PULSE position.
BATTERY PACK
BATTERY
CONNECTOR
TELEPHONE
JACK
B ATTERY
COMPARTMENT
COVER
21
6
 Loading...