

Page 1
INSTALLATION and OPERATION MANUAL for VIP II BREWERS
P/N 111525 Rev 081003
N E W C O E N T E R P R I S E S
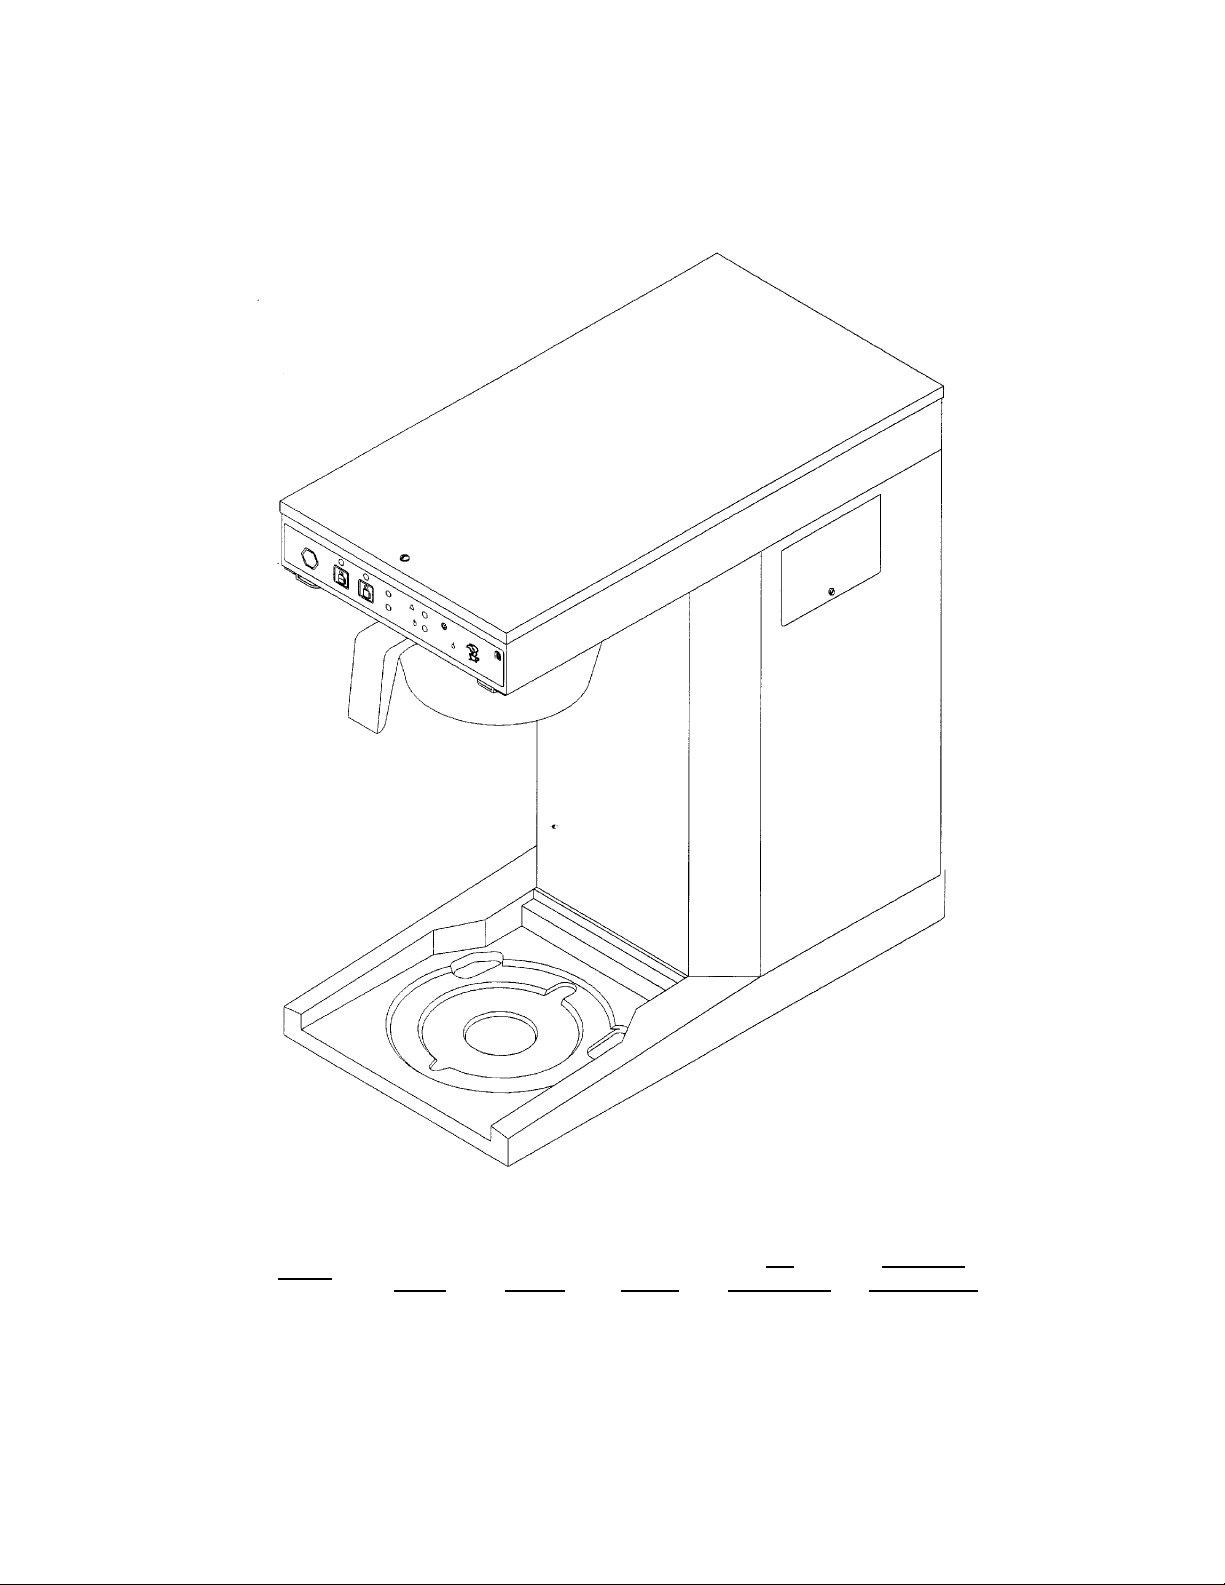
BREWER SPECIFICATIONS
Model
VIP-LD 8-5/8” 16-5/8” 17-1/2” 13 11.7
VIP-TD 8-5/8” 16-5/8” 23-3/4” 13 11.7
NOTE: Automatic models without faucet is also available.
Width
Length
Height
Model VIP-LD
US
120V Amps
CANADA
120V Amps
Page 2

PLUMBER'S INSTALLATION INSTRUCTIONS
CAUTION: Power to brewer must be OFF before proceeding with plumbing installation.
1) Flush water line before installing brewer. Brewer should be connected to COLD WATER LINE for best operation.
2) Water pressure should be at least 20 lbs. For less than a 25 ft run, use 1/4" copper tubing and connect to 1/2" or
larger water line. For longer runs, use 3/8" copper tubing & connect to 1/2" or larger water line and provide an
adapter fitting for connection to the brewer.
3) If installed with saddle valve, the valve should have a minimum of 1/8" porthole for up to 25 ft run, and 5/16" porthole
for over 25-ft runs.
4) Ensure that the PDS flow control is installed on the rear of the brewer. Connect incoming water line to the flow
control device on the back of the brewer. Manufacturer recommends connecting to copper tubing. Turn on water
supply and check for leaks.
INITIAL SETUP INSTRUCTIONS
WARNING:
void if machine is connected to any voltage other than that specified on the nameplate.
Tank Fill
1) Brewer should be connected to water supply as outlined in PLUMBERS INSTALLATION INSTRUCTIONS above.
Place an empty decanter in place below the brewbasket to catch any water which may be dispensed during the tank
fill process. Plug or wire brewer to the appropriate voltage circuit as indicated on the serial tag. Turn power switch
located on the rear of machine to the on position and tank will begin to fill. The expansion chamber in the brewer has
a water level probe in it. When the water reaches this probe, 5-6 minutes, the fill solenoid will shut off and the tank
will begin heating. Allow 10-15 minutes for the water to heat to the preset temperature. Some water may be
dispensed through the sprayhead during the initial fill process.
Volume Check and Adjustment
2) Place a suitable decanter in place below the brew basket to catch water during the volume check and calibration
procedure. Depress the full brew switch (full cup). If the tank is up to the preset temperature, temperature
adjustment dial is in the off position or if the autoarm feature has been disabled the brew cycle will begin. Otherwise
the brewer will go into the autoarm mode. In the autoarm mode the heating light will be lit and the corresponding
switch light will begin to flash indicating that the unit is in the brew mode but is not up to temperature. When the tank
reaches the preset temperature the brew cycle will begin. Note: To accelerate the set up time the "Tank Temp"
adjustment dial may be rotated to the off position momentarily until the brew cycle begins and then turned back. The
autoarm mode can also be bypassed by simply holding in the brew button for 3 seconds. The brew cycle may be
canceled by depressing the cancel switch.
3) After the brew cycle has finished check volume of water in the container. Adjust the "Brew Time" with the control
board located behind the right side access plate. Turn the dial Clockwise to increase the volume of water and
counterclockwise to decrease it The range of adjustment is 30 seconds to 5 minutes. The dial labeled “Visa” on the
timer may be set for an additional amount of time to flash the brewing light. This will allow time for the coffee to finish
draining from the brew basket after the fill cycle has completed. See Fig on page 3 for control board setting
information.
Temperature Check and Adjustment
4) Allow approximately 10 minutes for the water in the tank to heat to brewing temperature. The ready light will be lit
when the unit is up to temperature. Run one brew cycle to check for the proper temperature setting with an accurate
thermometer. Take the temperature of this water at a point below the brew basket opening, at the start of the brew
cycle and when the decanter is half full. Recommended temperature of the water is approximately 195 F. (Note:
Brew cycle may be canceled by depressing the cancel button). The brewer features an electronic temperature
control circuit and the temperature may be adjusted with the control board located behind the right side access plate.
See Fig on page 3 for control board setting information.
5) In higher altitude locations (5000 feet above sea level) the tank temperature may have to be adjusted lower to
prevent boiling. Turning adjustment knob in a clockwise direction will increase water temperature. This unit features
an electronic temperature control. Adjustment is located on the control board behind the front access plate.
- Read and follow instructions before plugging or wiring in machine to electrical circuit. Warranty will be
6) CAUTION: The water faucet will dispense hot water when the handle is pulled.
2
Page 3

Fig 1 - Control Board Setting Information
COFFEE PREPERATION PROCEDURES
1) Place filter into brew basket.
2) Put the appropriate amount of ground coffee into the filter for the volume of coffee being brewed.
3) Slide the brew basket into holder.
4) Remove the dispenser lid unless it is a brew through design. Place the dispenser directly under the brew basket.
5) Press the desired “regular” or “half” brew start switch.
6) If the autoarm feature is enabled and the brewer is not up to temperature, the heating light and corresponding brew
switch light will begin to flash indicating that the brewer is heating and will begin to brew immediately after the
heating cycle is complete. To override autoarm and begin brew cycle immediately, depress and hold the appropriate
brew switch for 3 seconds until brewing begins. Do not remove dispenser. Brew cycle may be canceled by
depressing the cancel switch. The heating and brew switch light should no longer be flashing.
7) Hot water will be delivered through the sprayhead. This distributes the hot water evenly over the coffee bed within
the brew basket. The coffee brew will drain from the brew basket into the dispenser below.
8) The brew switch light should continue to flash until all the liquid has finished flowing from the brew basket. Do not
remove dispenser until the brewing process has stopped and all liquid has stopped flowing from the brewbasket.
9) The resultant coffee brew should be crystal clear and have the desired properties attainable through excellent
extraction.
10) To empty brew basket simply remove from brew rails and dump filter into wastebasket. The brewing process, as
described above, can now be started again.
3
Page 4

BREW SYSTEM DESIGN FEATURES
FEATURE SUMMARY TABLE
Feature Settings Available Controls/Indicates
Brew Time 30-300 seconds (.5-5 minutes). Volume of water delivered for coffee.
Visi-Brew 30-240 seconds (.5-4 minutes). Duration of flashing brewing light after brew time
elapses to indicate coffee still draining from basket.
Temperature
Autoarm On or Off; (Wiring determines value). Flashes heating light when heating and brew switch is
Power Modes Power Save; Adjustable 30-240 mins.
Use "RUN TIME..." DIAL
Digital Brew Timing
seconds.
AutoCal Function
brew basket due to the delay in cessation of the sprayhead delivery and the final drainage from the brewbasket. If
doing so place a wide mouth pitcher of suitable volume and with desired volume level indicated on pitcher below
sprayhead to capture brewed water. Brew time adjustment knob may be turned all the way up and then a brew cycle
started. During the brew cycle, as the volume approaches the correct level in the decanter, slowly rotate the dial
down until brewing stops. The timer is now set for the delivered amount of water. (As an alternate to this temporarily
replace the standard brewbasket with a basket which has had the outlet enlarged to allow the water to flow out as
fast as it comes in. Do not use this basket for brewing coffee.)
Auto Arm
the water temperature in the tank is below the value set by the "Solid State Thermostat" on the control board when
the brew cycle is initiated the fill portion of the brew cycle is delayed. The heating light will begin to flash indicating
that the unit is in the brew mode but is not up to temperature (brewing light will also be on). The tank heater will
begin heating and when the tank reaches the preset temperature the fill portion of the brew cycle will begin. This
feature may be disabled if desired by connecting the 1 pole connector with blue wire to the mating connector with
red wire. Connectors are positioned above the fill valve. Refer to wiring diagram on page 6. The autoarm feature
may be bypassed for individual brew cycles by holding in the brew start switch for about 3 seconds. Release switch
when brew cycle starts.
Visa-Brew
that the brewed hot coffee has not finished draining from the brew basket. This popular feature has been enhanced
with an autocal feature similiar to the brewing autocal described above. Simply turn the adjustment dial all the way
up, start a normal brew cycle as described under the "OPERATION INSTRUCTIONS", and after the brewed coffee
has quit dripping from the basket turn the dial down just until the brewing light turns off. Visa Brew is now custom set
for your machine, filters, and coffee.
Power Save Mode
time. In this mode the tank heater will be set back to 170°F after being idle for the selected time. To select the
timeframe before power save mode is engaged, rotate the dial on the board labeled "Run Time Before System
Shutdown" to the desired setting. If the dial is put in the off position the brewer fill be in a normal mode mode the
tank temperature will be maintained at the temperature set on the control board at all times. Starting a brew cycle
will reinitialize the timer and the set time frame starts over. If the autoarm has not been disabled the tank will be
brought up to temperature before brewing when the brew start switch is depressed.
Solid State Thermostat
degrees. Full off position is at the extreme left of the adjustment dial. The only wear item, a remotely mounted relay,
may be replaced without disturbing the tank or re calibrating the temperature. This also allows the incorporation of
several other convenience and safety features as explained below.
Initial Tank Fill Circuit
element in the tank when setting the brewer up. This acts as a backup to the unique mechanical heater control
incorporated into the brewers tank system to ensure that the tank element or its components are not damaged by
premature heatup. The fill solenoid will run until water contacts the probe in the upper expansion chamber or for up
to 6 minutes, whichever comes first. See "Tank Fill" under the "INITIAL SETUP INSTRUCTIONS" for operation.
170-208
Normal. Default when dial is in off position. Maintains tank at set temperature.
- Ensures that the brewer is up to temperature prior to brewing to ensure proper extraction is obtained. If
- Continues to flash the brewing light after the fill portion of the brew cycle has stopped alerting the user
° F.
- Brew time is accurate to within .1 seconds over the entire adjustment range of 30 to 360
- Allows the brew volume to be set with one brew cycle. To use feature it is best to remove the
- Allows you to automatically save energy when the brewer is not in use for a specified length of
- Maintains temperature within 3 degrees throughout the adjustment range of 170-208
- Prevents the tank element from coming on before water level in tank has covered the
Water temperature in tank.
depressed.
Tank temperature reduced to 170
° F after set time.
4
Page 5

Temperature Override
- Turns the tank heater on at the start of a brew cycle to the maximum setting for 1 minute.
This assures a more uniform brew temperature and reduces the recovery time required for rebrewing. As an
additional safety check on the heater circuit the control board continuously monitors how long the element is on. If
the run time exceeds 30 minutes the tank element is shut down and an error message is produced. See the
following section for an explanation of all error messages.
Service Alert System
- Monitors key elements of brewer operation and shuts brewer down if an error condition
occurs. If the tank heater element runs for more than 30 minutes continuously, the fill valve runs for more than 6
minutes (1-1/2 minutes during brew cycle) continuously without probe contact or if the temperature sensor opens or
shorts this will trigger the system to shut down. The service alert system illuminates the various indicator lights on
the front of the brewer to indicate the type of error encountered. The table below list the different error codes
produced by the service alert system, the posssible cause and what to check when the brewer will not operate.
Error Code: Problem Area: Cause: Check:
Autobrew/Heating &
brewing lights on steady
Autobrew/Heating &
ready lights on steady
Auto Brew/heating&
ready lights on steady
Autobrew/Heating & half
Water Fill System detects that fill valve has run for 6 min. (1-1/2
min. during brew cycle) w/o making contact with probe.
Water supply to brewer, water filters &
water probe to see if limed up.
Tank Heater Tank heating system has run for 20 minutes. Tank heater relay, tank heater,
limit thermostat.
See cause Blue wire is not connected to either black or
Red wire
Blue wire connection. Black to enable
Auto Arm or red to Disable Auto Arm
Temperature Probe Thermistor is open. Replace Thermistor.
brew lights on steady
Autobrew/Heating & full
Temperature Probe Thermistor shorted. Replace Thermistor.
brew lights on steady
IN CASES WHERE THERE IS A HEATER OR FILL PROBE ERROR, THE BREWER CAN BE RESET BY HOLDING DOWN THE
CANCEL BUTTON FOR APPROXIMATELY 5 SECONDS. ERROR WILL CLEAR.
REPLACEMENT PARTS LIST
Part No Description Part No Description
Tank Components
110777 Element, tank, 1250 W 120 V 111164 O-ring, exp pan, 6.484 ID x .139 W
110792 Element, tank, 1400 W 120 V 111176 Spring, check valve, expansion pan
110791 Element, tank, 1550 W 120 V 111226 Cover, expansion pan
110762 Protector, element 111227 Pan, expansion
110764 Washer, element 111228 Retainer, Ball
110765 Screws, element 111401 Ball, 1/2 diameter
110766 Washer, element, locking 111402 Screw, #6 x 3/8", for plastic
110767 Ring tab 111403 Screw, #4 x 3/8", for plastic
110752 Seal, element 111519 Level probe
110758 O-ring, Tank, 5.975 ID x .275 W 704222 Gasket, pan outlet, 4 holes
111080 Lid, plastic 110978 Sprayhead fitting ass'y
111153 Sensor, temperature
Electrical Components
Valves and faucet
111050 Valve, Inlet 110378 Board, display
110305 Flow control, PDS, low flow 111515 Board, control
111396 Faucet 105057 Relay, heater, 12 V coil
110506 Clamp, drain tube
111517 Insert, 3/8 tube insert Miscelaneous components
110985 Brewbasket
Tubing and gaskets 104010 Brewrail, RH
152218 Tubing, Silicone, 1/4 ID x 3/8 OD 104011 Brewrail, LH
152213 Tubing, Silicone, 3/8 ID x 5/8 OD 100024 Sprayhead, S/S, 5 hole
102544 Tubing, Silicone, 3/8 ID x 1/2 OD 201173 Nut, sprayhead, 7/16-20
101931 Tubing, Silicone, 5/8 ID x 3/4 OD 701985 Sprayhead tube assembly
111105 Nipple, fitting, Silicone 110381 Spacer, 5/16" hex, display board
100025 Gasket, sprayhead 110991 Screw, 6-32 x 3/16, PPHMS, Nylon
102836 Grommet, probe & thermistor 108014 Access Plate
111198 Standoff, .144 ID x 3/8 L, Brass
Expansion Pan Parts
110626 Switch, On/Off, DPST, rocker
5
Page 6

WARRANTY
Newco coffee brewers are warranted against defects in workmanship or materials, under normal use, for 90 days from
the date of purchase. Brewer parts are warranted against defect for 12 months from date of purchase.
Liability in all events is limited to the purchase price paid and liability under the aforesaid warranty is limited to replacing
or repairing any part or parts which are defective in material or workmanship, and returned to our factory, shipping cost
prepaid. No warranty expressed or implied, other than the aforesaid is made or authorized by Newco Enterprises, Inc.
Prompt disposition will be made if item proves to be defective, within warranty. Before returning any item, write or call
Newco, or the dealer, from whom the product was purchased, giving model number, serial number, and date of
purchase, and describe the nature of the defect. If damage was incurred during transit to you, file claim with the carrier
WIRING DIAGRAM
Newco Enterprises, Inc. * 1735 South River Rd. * P.O. Box 852 * St. Charles, MO 63303
6
 Loading...