

Page 1
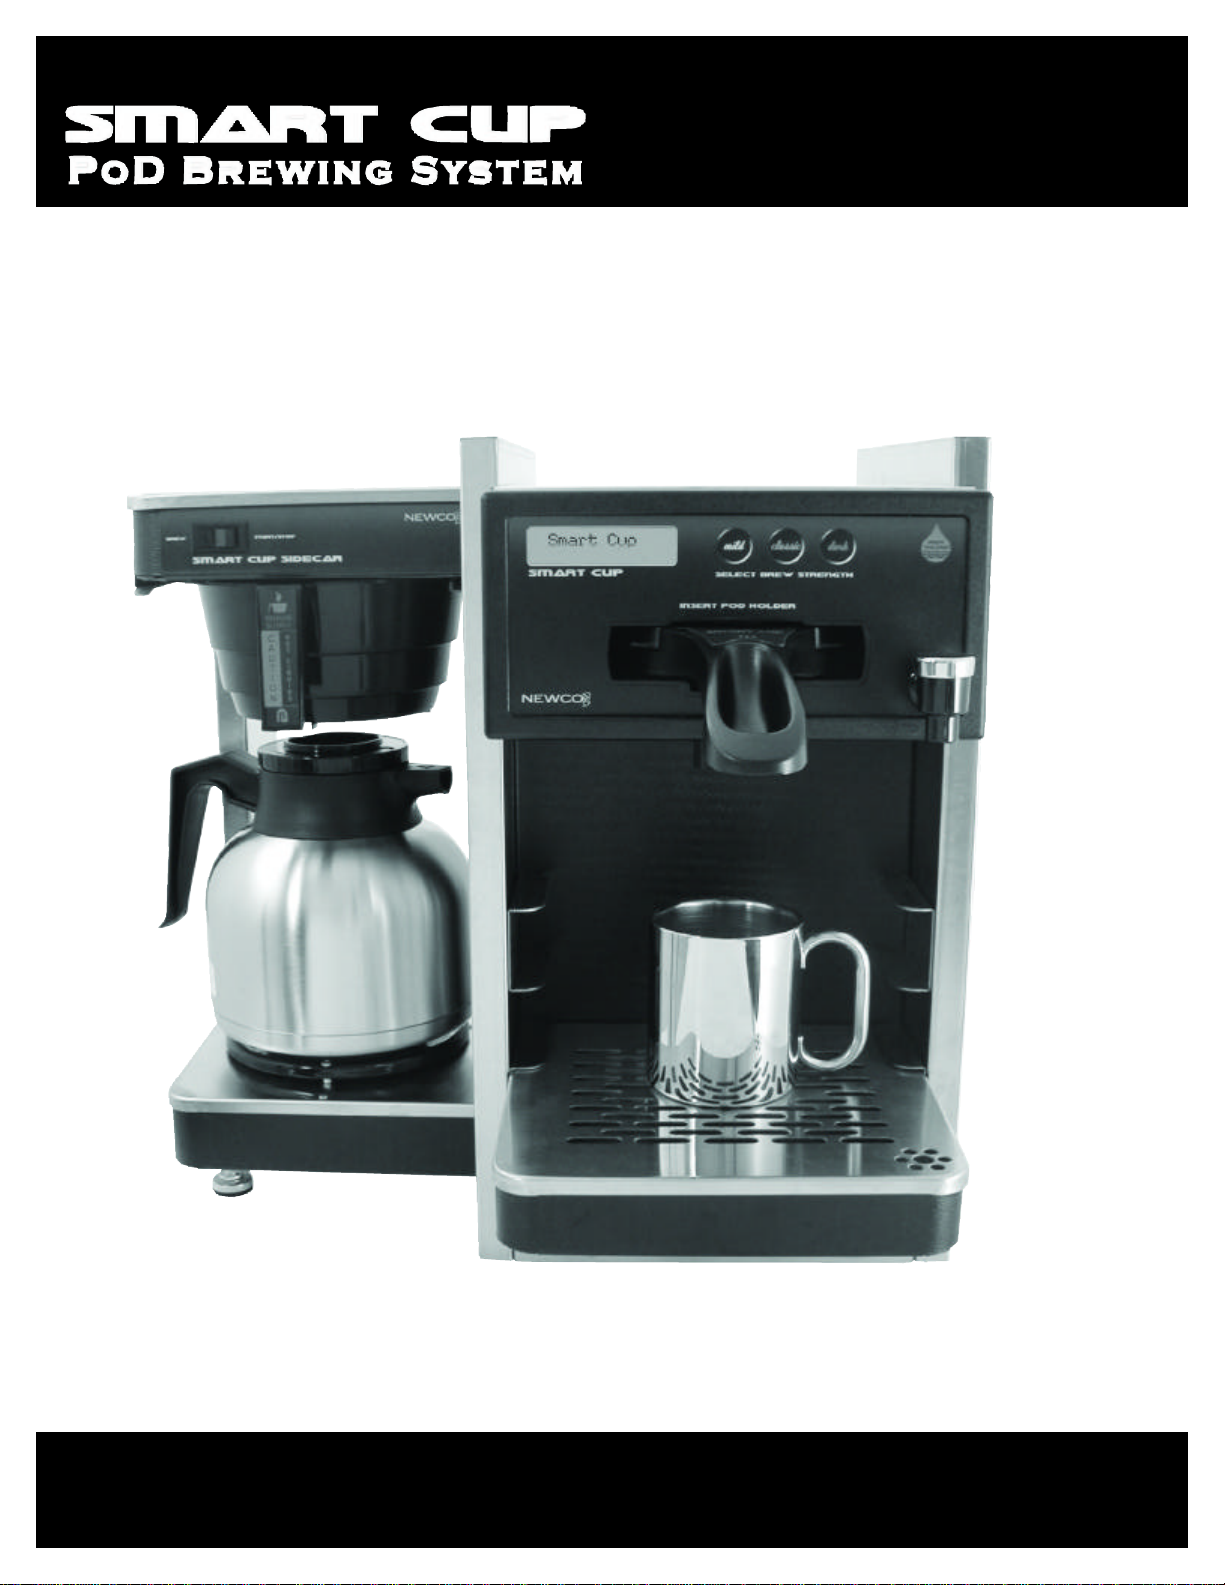
Operating Manual
Page 2
Calibration of Smart Cup
Calibration of Side Car
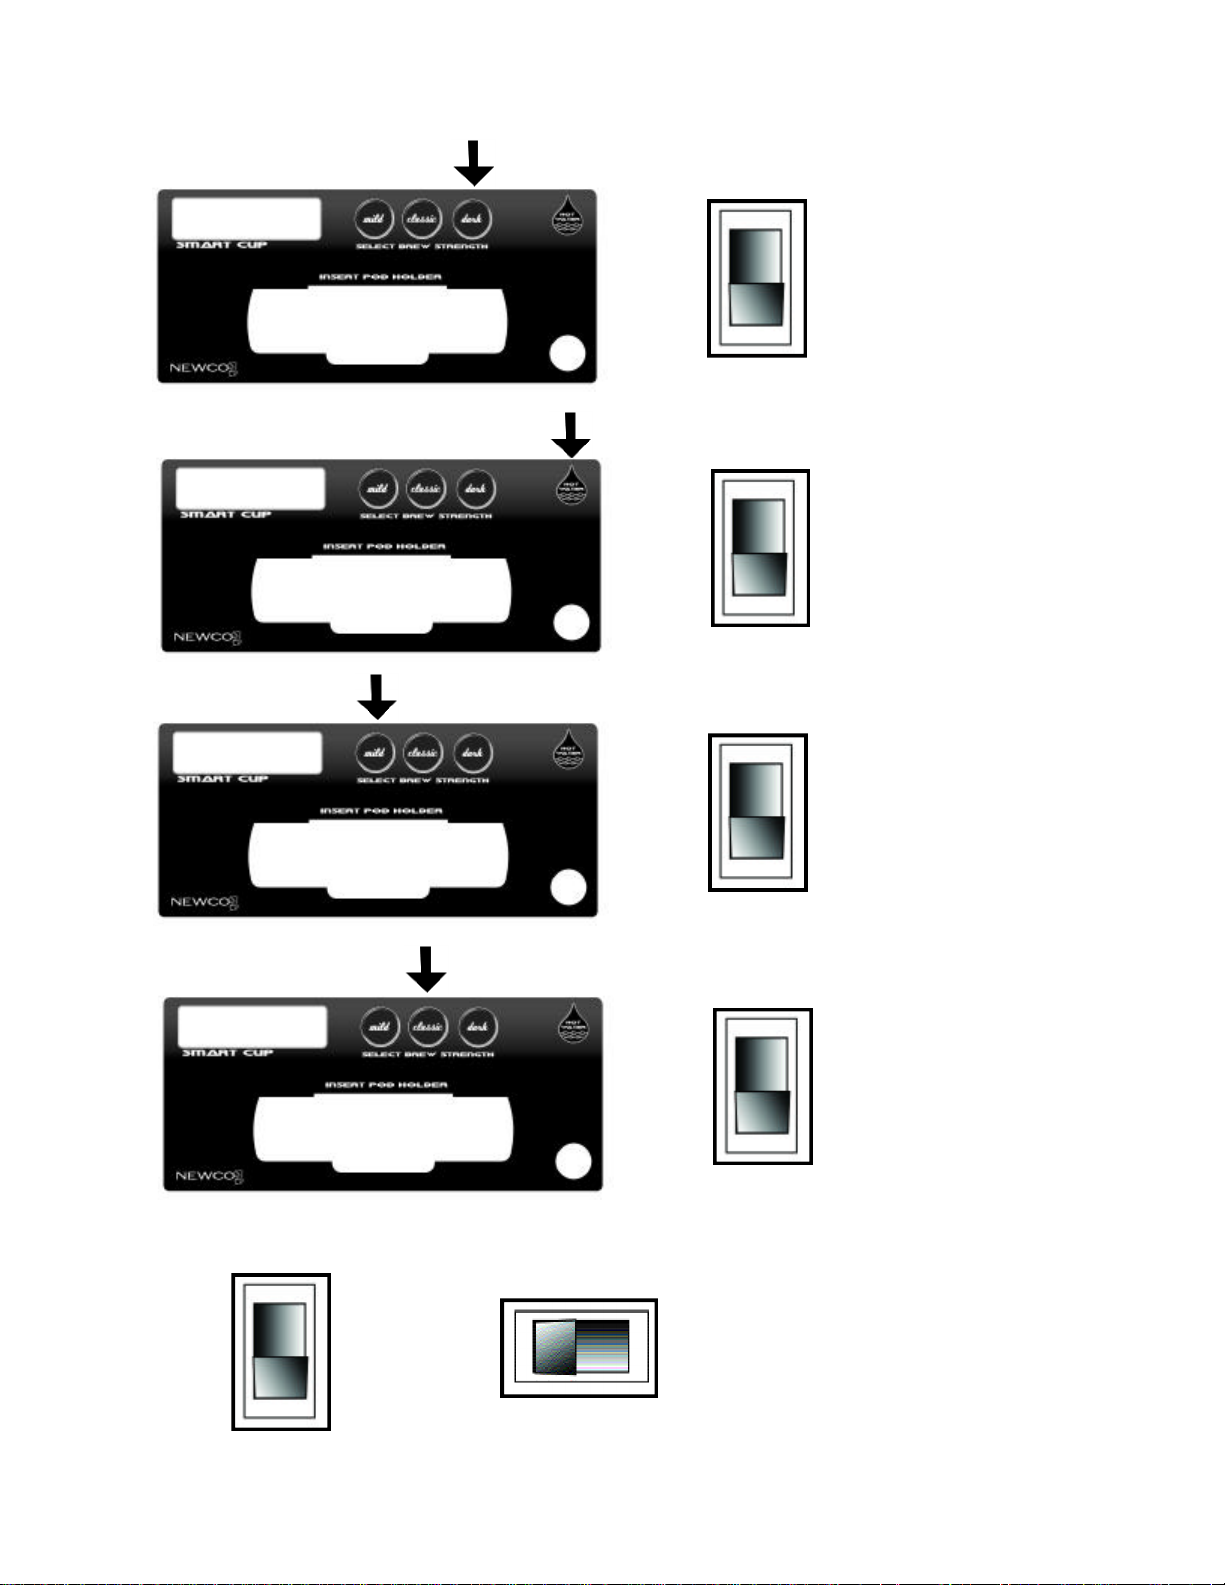
Pod Holder Programming
Power up your Smart Cup while pressing the
1
corresponding button to reach different program modes.
1
2
3
+
+
+
Power switch on
back of brewer
Power switch on
back of brewer
=
=
=
Heat Exchange
fill/Tank Drain
Page:
Page: 4
Page: 13
4
5
Power switch on
back of brewer
+
+
Side Car Start
switch
Power switch on
back of brewer
Power switch on
back of brewer
Programming of Side Car
=
Page:
=
Product Usage
Page:
Page 3
Installation and Operation Instructions: SMART CUP Brewing System
Water pressure should be at least 20 psi up to a maximum of 90 psi and have a minimum flow rate of
Mechanical connector on brewer is ¼"male flare connector. For less than a 25 ft. run, use ¼" copper
tubing and connect to ½" or larger water line. For longer runs, use 3/8" copper tubing connected to ½" or
Hold
release
2
INSTALLATION INSTRUCTIONS:
1. Flush water line before installing brewer. Brewer should be connected to COLD WATER LINE for
best operation.
2.
1.5 gallons per minute.
3.
larger water line and provide an adapter fitting for connection to the brewer.
4. If installed with saddle valve, the valve should have a minimum of 1/8" port hole up to 25 ft. run,
and 5/16" port hole for over 25 ft. run.
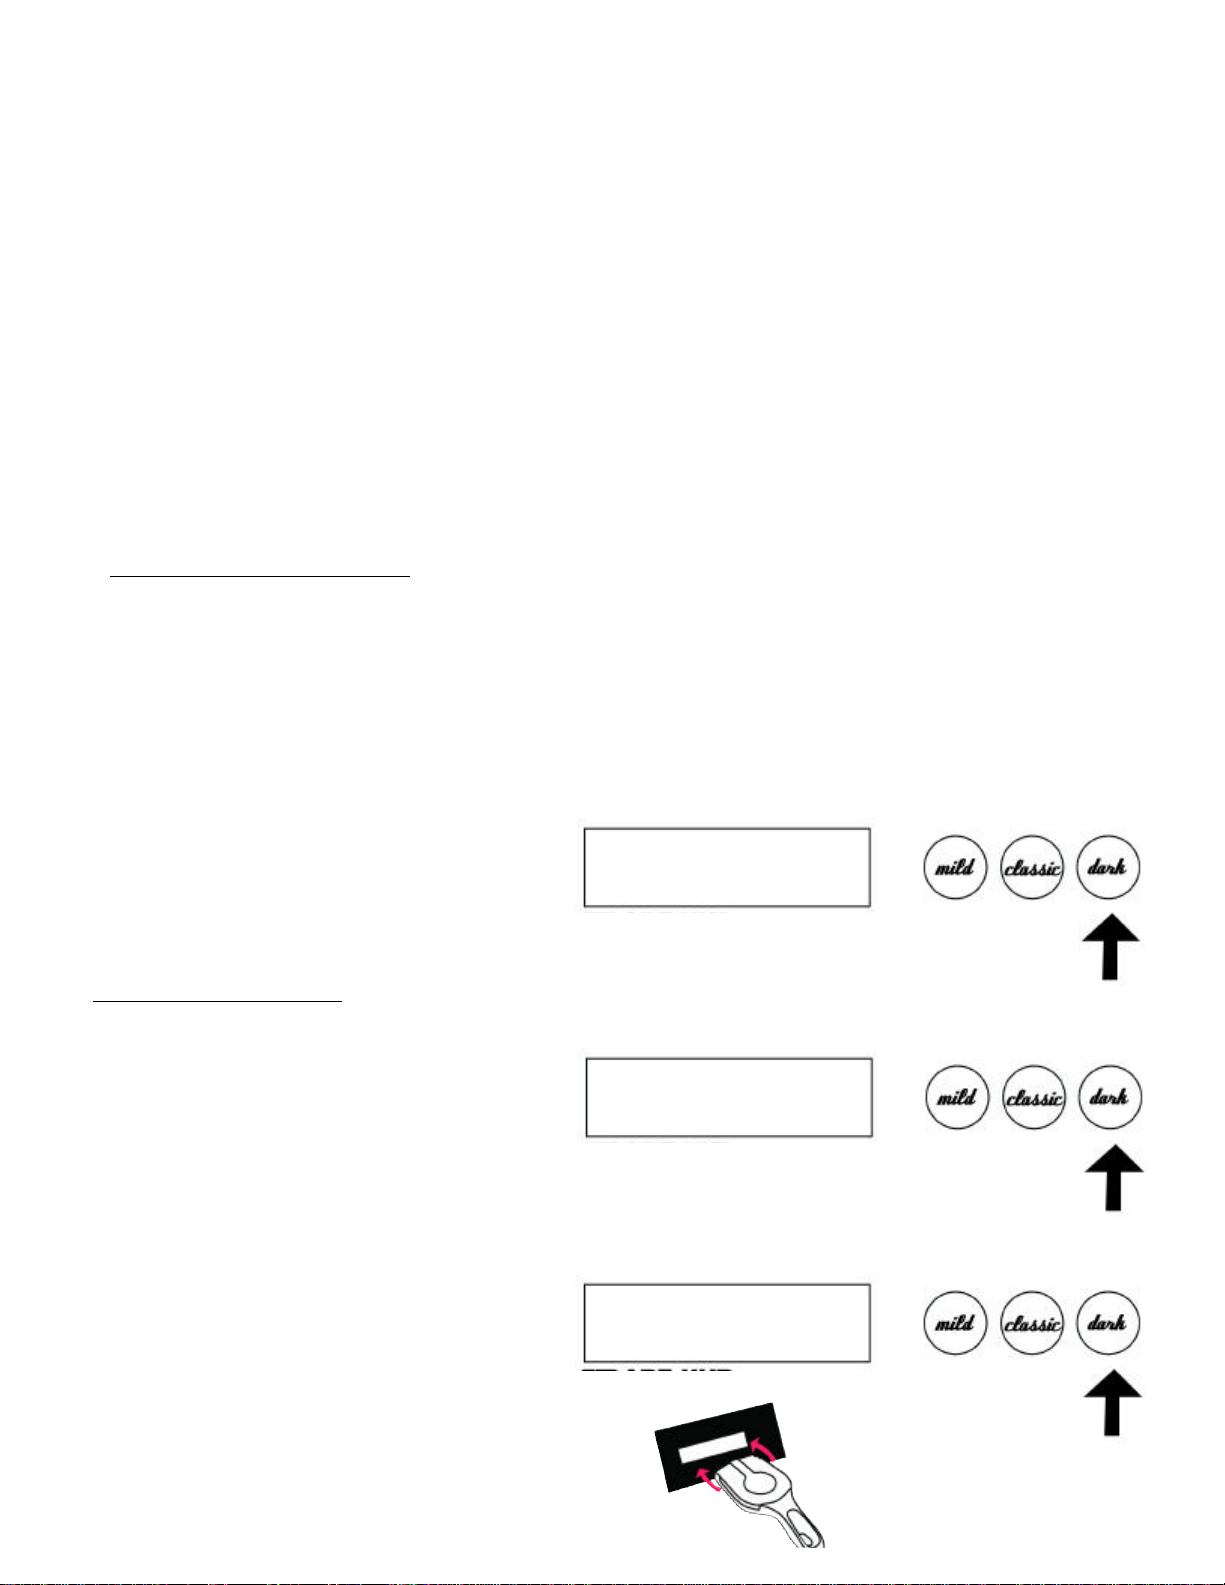
PRE-FILL FUNCTIONS: Main Water Tank & Heat Exchange Reservoir
1. Main Hot Water Tank Pre-fill: When the brewer is plugged in, and the master on-off switch is
turned on, the main hot water tank will start to fill automatically. The fill process will take approximately 2
to 3 minutes to complete. Note: The function of the main hot water tank is to supply hot water to the
faucet and the Side Car only.
2. Upon completion of filling the main tank, power down the brewer.
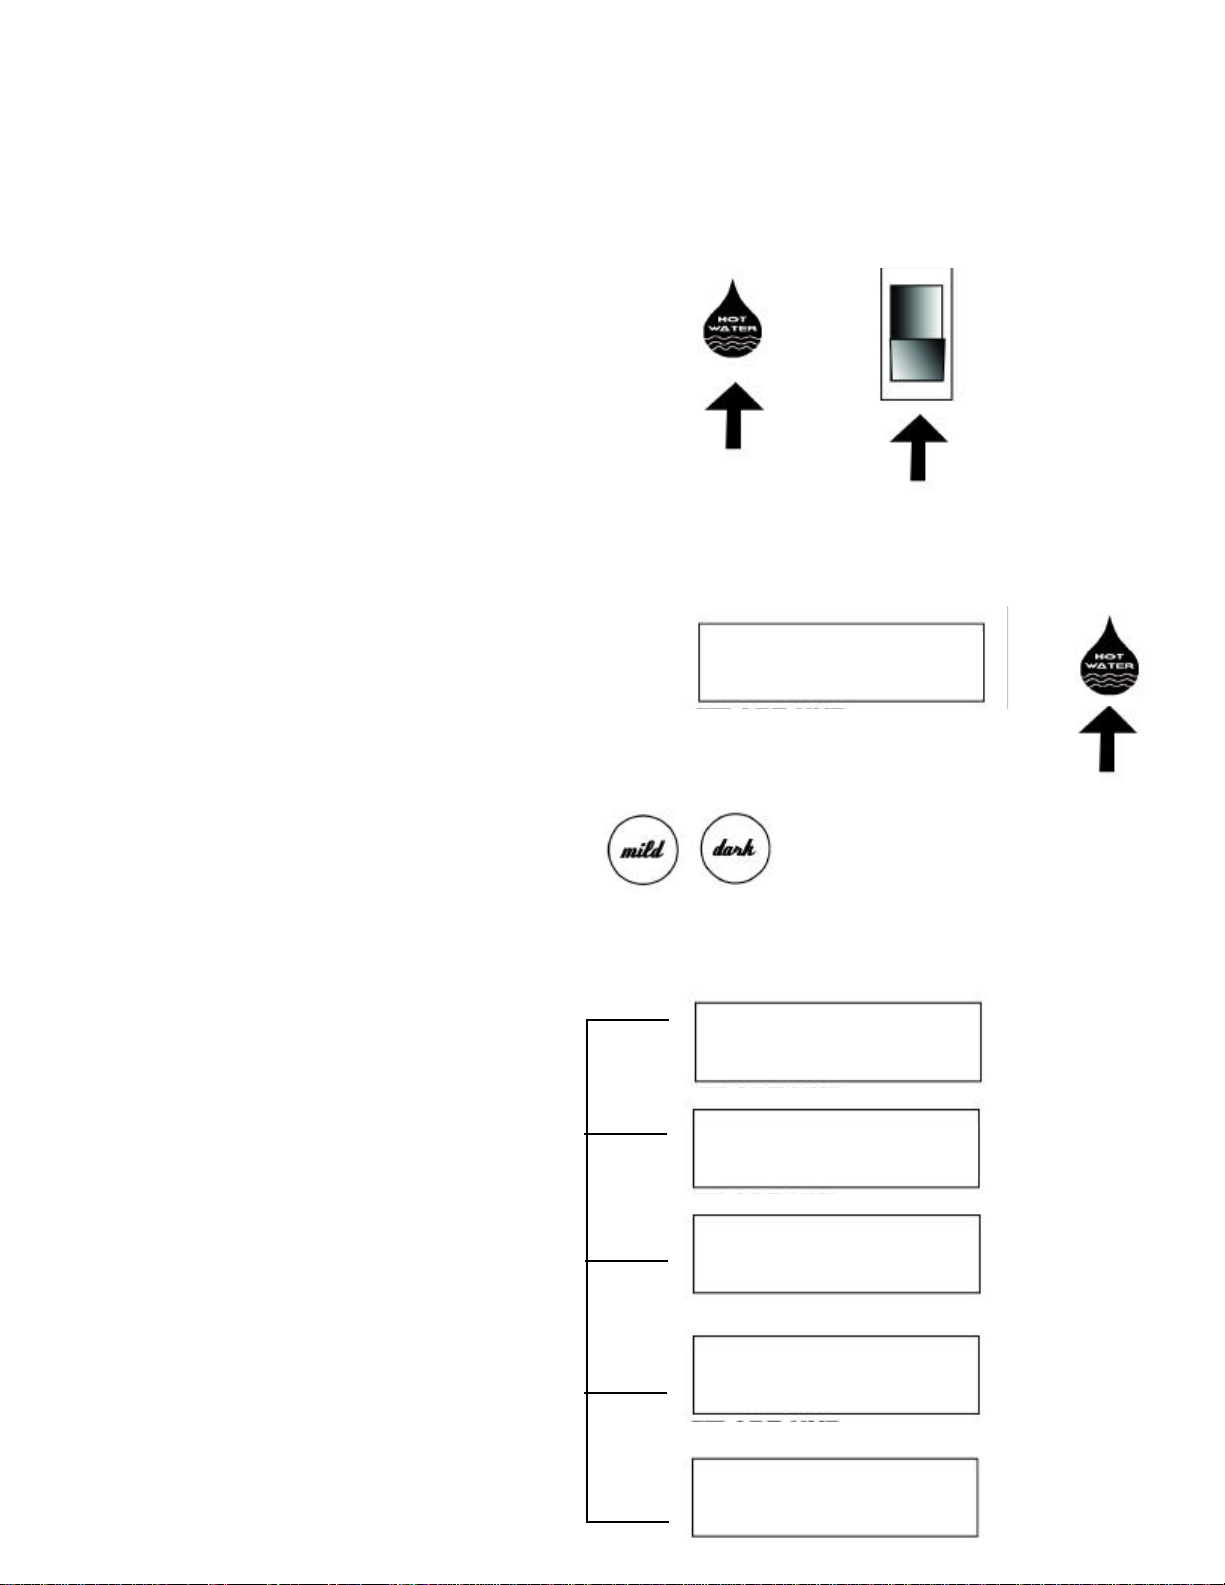
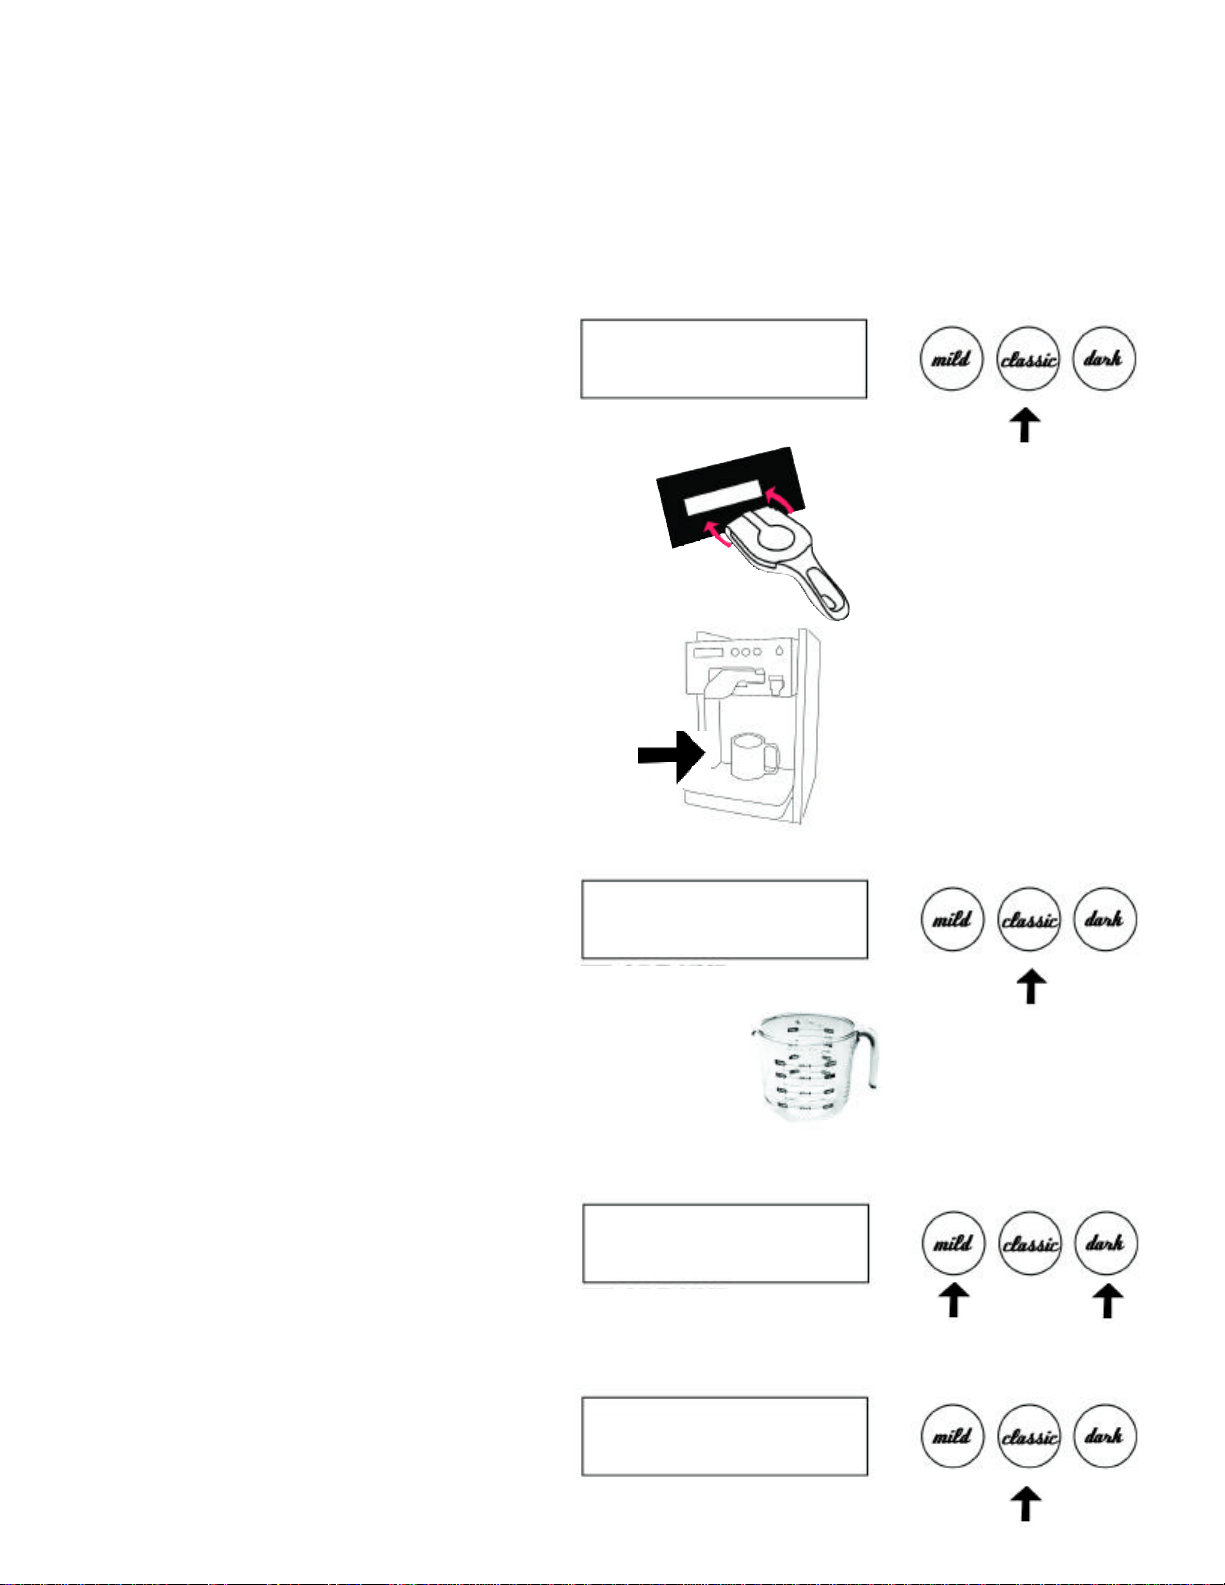
Heat Exchanger Pre-fill
1. Heat Exchanger Pre-fill: Press the
Dark button, on the faceplate, and
power up the brewer. Do not release
the Dark button until the display
scrolls to " Insert POD Holder." The
POD brewing system runs independently through a heat exchanger for its
source of hot water.
Newco Coffee
773126 Rev 1
Smart Cup
**Heating**
Hold
1
Please Insert
POD Holder
Page 4

Fill
3
Line 1
Line 2
2. Put a cup underneath the cup stand.
3. Insert empty POD Holder.
4. The display will read "Please Select
“(Fill) (Drain) (X)"
5. Press the Mild button to fill the heat
exchange. When there is a steady stream of
water push any button to cancel this function.
The heat exchange is full and ready to use.
Note:Heat exchanger and coil holds
approximately 30 ounces of water
Note: If the POD holder is not inserted within 20
seconds the program will default back to its
original setting and the process will have to be
started over again.
Please Select
(Fill) (Drain) (X)
Interpreting The Display:
The LCD has two lines of information. First Line
is the programming function. Second line is the
programming interface. Each symbol or word has
a corresponding button to interact to that specific
step and they are:
Example:
Line 1 = Temperature
Line 2 = Programming buttons
Push Mild Button to decrease temperature
Push Classic Button to finish editing temperature
Push Dark Button to increase temperature
Puch Hot Water Button to exit
Line 1
Line 2
Temperature
(-)(DONE)(+) (X)
Decrease
or
Down
Edit
or
Cal.
Increase
or
Up
Exit
Page 5
"Side Car
Dark
(Bulk Brew) calibra
-
Text Editing.
Calibration Side Car & Smart Cup Overview
=
Calibration
Release
4
Calibration: Hold down the hot water button and power the brewer up until the display reads
Brew". Release the hot water button when Side Car Brew Screen appears Use either the Mild or
button to scroll through the calibration functions. The functions are: A.) Side Car Brew
tion B.) Coffee POD calibration C.) Tea POD calibration D.) Faucet calibration. E) Smart Cup -
Power switch on
back of brewer
Enter
1. Press and hold “Hot Water” button and power up brewer
2. Release Hot Water Button when “Side Car Brew”
screen appears.
3. Use the Mild or Dark button to scroll through the
calibration functions
+
Press
and
Hold
Side Car Brew
(? ) (CAL) (? ) (X)
Power up
Brewer
Mode
Calibration Function Screen Sequence
1
2
4
5
3
Side Car Brew
(? ) (CAL) (? ) (X)
Coffee Pod
(? ) (CAL) (? ) (X)
Tea Pod
(? ) (CAL) (? ) (X)
Faucet
(? ) (CAL) (? ) (X))
Smart Cup
(? ) (EDIT) (? ) (X)
Text Editing
Page 6

Calibration Functions:
) arrow. Pump speed of 16 is
(Done) but
-
Coffee Pod Holder
.
+
+
5
Side Car (Bulk Brew): Put a container underneath brew basket. Push the Classic button (Calibrate).
Enter pump speed from 10 through 20 by using the left (Mild) or right (Dark
the recommended default. Push the Classic button (Done). At this point, the Side Car will run for 1
minute delivering water into the container placed underneath the brew basket. Once this cycle has finished, remove the container and measure the amount of water. Next, input the "Measured Amount" of
water by pushing the Mild (-) or Dark (+) button to the measured volume. Push the Classic
ton and the calibration process is finished for the Side Car. Next prompt will be the
1. Put brew basket and carafe in place
2. Press “Classic” button to begin calibration
3. Enter pump speed by using the “Mild” or
“Dark” (10-20)
(16) is recommended
4. Push the “Classic” button. Side Car will run
for 1 minute delivering water into container
Side Car Brew
(? ) (CAL) (? ) (X)
Press to Calibrate
Speed = 16
(-) (Done) (+) (X)
-
Calibrating: = 0:59
Press any button to abort
Done
5. Measure Volume of water in fluid ounces
6. Input measured amount by Pressing the
“Mild” or “Dark” buttons
Scroll up or down to set the measured volume.
7. Press the “Classic” button and the Side Car
calibration is complete. Prompting to “Coffee
Pod ”
Measure Volume of water
Amount = 15oz
(-) (Done) (+) (X)
-
Amount = 19oz
(-) (Done) (+) (X)
Page 7
Press to finish
+
Coffee POD Holder: Insert the Coffee POD Holder: Press Classic
button to calibrate coffee pod holder.~
-
ished, remove the cup and measure the amount of water. Next, input the "Measured Amount" of water by
(Done) button and the calibration process is finished for the Coffee POD Holder. Next prompt will be the
Coffee Pod Calibration:
6
with a "Coffee POD" in place into the brew chamber. Place a cup or measuring container on the cup
stand minimum size of 10 ounces. Push the Classic button (Calibrate). At this point, the Coffee POD
Holder will run 45 seconds delivering water into the cup placed on the cup stand. Once this cycle is fin
pushing the Mild (Left Arrow) or Dark (Right Arrow) button to the measured volume. Push the Classic
Tea POD holder.
Coffee Pod
1. Press “Classic” button to calibrate
2. Insert Coffee Pod Holder with a coffee pod in
place into Brew chamber
(? ) (CAL) (? ) (X)
Press Calibrate
3. Place 10oz cup or measuring container on cup
stand
4. Push the “Classic” button. Water will run for
:45 seconds into the cup
5. Measure Volume of water in fluid ounces
6. Input measured amount by Pressing the
“Mild” or “Dark” buttons
Scroll up or down to set the measured volume.
Calibrating: = 0:45
Press any button to abort
Measure Volume of water
Amount = 11oz
(-) (Done) (+) (X)
-
7. Press the “Classic” button and the calibration
is complete. Prompting to “Tea POD”
Amount = 8oz
(-) (Done) (+) (X)
Page 8
Tea POD Holder:
Insert the Tea POD Holder ~ with a "Tea POD" into the brew chamber. Place a cup or
button calibrate tea
into the brew chamber. At this point, the
cycle is finished, remove the cup and measure the amount of water. Next, input the "Measured Amount"
(Right Arrow) button to the measured volume. Push the
(Done) button and the calibration process is finished for the Tea POD Holder. Next prompt will be
+
Tea Pod Calibration:
7
measuring container on the cup stand minimum size of 10 ounces. Push the Classic
pod holder Insert the tea pod holder with a tea pod in place
Tea POD Holder will run 45 seconds delivering water into the cup placed on the cup stand. Once this
of water by pushing the Mild (Left Arrow) or Dark
Classic
the Faucet Calibration.
Tea Pod
1. Press “Classic” button to calibrate
2. Insert Tea Pod Holder with a tea pod in place
into Brew chamber
(? ) (CAL) (? ) (X)
Press Calibrate
3. Place 10oz cup or measuring container on cup stand
4. Push the “Classic” button. Water will run for
:45 seconds into the cup
5. Measure Volume of water in fluid ounces
6. Input measured amount by Pressing the
“Mild” or “Dark” buttons
Scroll up or down to set the measured volume.
Calibrating: = 0:45
Press any button to abort
Measure Volume of water
Amount = 11oz
(-) (Done) (+) (X)
-
7. Press the “Classic” button and the calibration is complete. Prompting to “Faucet”
calibration
Amount = 8oz
(-) (Done) (+) (X)
Press to finish
Page 9

button to calibrate. Enter pump speed from 10 through 20 by using the left
+
Hot Water Faucet Calibration
8
Hot Water Faucet: The pump speed can be changed to increase or decrease flow from the hot water
faucet. Press the “Classic”
(Mild) or right (Dark) arrow. (Maximum Pump Speed: 20 Minimum Pump Speed: 10.) Higher the pump
speed the flow rate will increase accordingly. Press the Classic (Done) button and the calibration
process is finished for the Faucet. Next prompt will be the Text Editing -Smart Cup.
1. Press “Classic” button to calibrate.
2. Enter pump speed
Pump speed of 16 is the recommended
default
Faucet
(? ) (CAL) (? ) (X)
Press to
Calibrate
Speed = 16
(-) (Done) (+) (X)
3. Press the “Classic” button and the
calibration is done. Prompting to
“Text Editing”
(-) (Done) (+) (X)
Faucet
-
Decrease
Press
when
finished
Increase
Page 10

Text Editing: To edit text press the Classic (Edit) button. Use the Mild (-) or the Dark
(+) to scroll through
button and
(Next) button at the same time. When the two buttons are pressed simultaneously the flashing
button shifting
(Next) button to continue the preferred text.
9
the alphabet & numbers 0 thru 9. Upper case letters are accomplished by pressing the Hot Water
the Classic
icon will move to the next letter/number position leaving the last letter in upper casing. (Note: There are
hidden symbols located in the numbers 0 thru 9. To access them, simply push the Hot Water
between the number and symbol.) Repeat the process again by using the Mild (-) or Dark (+) buttons to
select the desired letters/numbers and then press the Classic
When the text is finally entered continue to push the Classic (Next) button until it exits out to the next
parameter, which is Temperature setting.
1. Press “Classic” button to edit text.
2. Upon pressing the “Classic” button the
first letter will begin to flash and change in
lower case. Also the word “EDIT”
changes to “NEXT”
3. To change letters or numbers press the
“Dark” button or the “Mild” button to scroll
though the alphabet and numbers. Press the
“Classic” button to jump to the next letter
4. Upper casing is accomplished by pressing
the “Hot Water” button while curser is on that
letter. Once the “Classic” button is pressed it
will move to the next letter
SMART CUP
(-) (EDIT) (+) (? )
sMART CUP
(-) (NEXT) (+) (? )
sMART CUP
(-) (NEXT) (+) (? )
HMART CUP
(-) (NEXT) (+) (? )
Continue to press and hold the “Hot
Water” button to stay in “ALL CAPS” mode.
5. When the text is completed, continue to
press the “Classic” button until (EXIT)
is displayed. Press the “Classic” button one
(-) (EXIT) (+) (?)
Have a Cup
more time to complete the task and exit out
of Text Editing .
Page 11

NOTE: The word (EXIT) will default back to
10
(EDIT) once the “Classic” button is pressed
on (EXIT)
Have a Cup
(-) (EDIT) (+) (X)
To exit out of calibration mode, press the
“Hot Water” button.
Have a Cup
(-) (EDIT) (+) (X)
Have a Cup
(-) (EDIT) (+) (X)
Change “Smart Cup”
to any text you choose.
To make a correction press the classic
(next) button and scroll through the
characters to start over at the beginning.
There is no backspace feature.
-
Decrease
z-a
Next
letter
After the number ”9” and
before the letter “a” is the
blank space selection.
+
Increase
a-z
Page 12

Hold the Side Car start button in and power up the brewer until Temperature is displayed on the LCD
Maximum 15 minutes/Minimum based on Pump Speed, Volume, & Calibration.
button. Enter the desired temperature by pressing the
11
Side Car Programming Parameters
· Temperature Setting: Maximum 205 degrees Fahrenheit/Minimum 170 degrees Fahrenheit.
· Volume Setting: Maximum 150 ounces/Minimum 10 ounces.
· Brew Time Setting:
· Drain Time Setting: Maximum 4 minutes/Minimum 30 seconds.
(Note: The brewing process can be aborted at anytime by pressing the Side Car start button a second
time.)
Interpreting The Display:
The LCD has two lines of information. First Line
is the programming function. Second line is the
programming interface. Each symbol or word has
a corresponding button to interact to that specific
step and they are:
Line 1
Line 2
Temperature
(-) (Done) (+) (X)
Example:
Line 1 = Temperature
Line 2 = Programming buttons
Push Mild Button to decrease temperature
Push Classic Button to edit temperature
Push Dark Button to increase temperature
Puch Hot Water Button to exit
Decrease
or
Down
Edit
or
Cal.
Increase
or
Up
Exit
Temperature Setting: Press the Classic (Edit)
Dark (+) button to increase the temperature setting or press the Mild (-) button to decrease the
temperature setting. Press the Classic (Done) button to "set" the temperature and move on to the next
prompt.
Temperature Setting:
Maximum 205 degrees Fahrenheit
Minimum 170 degrees Fahrenheit
Temperature:198
(-) (EDIT) (+) (X)
Decrease
or
Down
Edit
or
Done
Increase
or
Up
Exit
Page 13

Volume Setting: Press the Classic (Edit) button. Enter the desired volume by pressing the Dark (
+
button to decrease the volume setting. Press
button to decrease the drain time
12
button to increase the volume setting or press the Mild (-)
the Classic (Done) button to "set" the volume and move on to the next prompt.
)
Volume Setting:
Maximum 150 ounces
Minimum 10 ounces
Decrease
Volume:64oz
(-) (EDIT) (+) (X)
or
Down
Edit
Done
or
Increase
or
Up
Exit
Brew Time Setting: Press the Classic (Edit) button. Enter the desired brew time by pressing the
Dark (+) button to increase the time setting or press the Mild (-) button to decrease the brew time
setting. Press the Classic (Done) button to "set" the brew time and move on to the next prompt.
Brew Time:3:30
Brew Time Setting:
Maximum 15 minutes
Minimum based on Pump Speed, Volume, & Calibration.
(-) (EDIT) (+) (X)
Decrease
or
Down
Edit
or
Done
Increase
or
Up
Exit
Drain Time Setting: Press the Classic (Edit) button. Enter the desired drain time by pressing the
Dark (+) button to increase the drain time setting or press the Mild (-)
setting. Press the Classic (Done) button to "set" the drain time. Press the Hot Water (X) button to exit
Side Car programming.
Drain Time:30
Drain Time Setting:
Maximum 4 minutes
Minimum 30 seconds.
Note: The total of the Brew Time and Drain Time
(combined) will be displayed during the Side Car
brewing process. Example: Brew Time: 2 minutes
45 seconds + Drain Time: 30 seconds = 3 minutes
15 seconds total brewing time.
(-) (EDIT) (+) (X)
Decrease
or
Down
Edit
or
Done
Increase
or
Up
Exit
Page 14

Strength Selection: Select one of brewing profile buttons Mild, Classic, or Dark. Once the selection
would be advisable to write down the strength selection so that confusion does not set in as to the
If the display is blank there will be a flashing icon to begin adding text to the LCD display. To
(+) to scroll through the
button at the same time. When the two buttons are pressed simultaneously the flashing icon
(+) buttons to
button to continue the preferred text.
Down
Up
Hold the Mild button in and power up the brewer until “Insert Pod Holder”
is displayed on the LCD screen.
button. Insert the pod holder and select the strength button you would like to change. To
button to scroll up.
13
Release the Mild
scroll through the different parameters press the Mild button to scroll down or the Dark
There are five different programmable parameters:
· Text Editing.
· POD Holder Identifier: Coffee or Tea.
· Temperature Setting: Maximum 205 degrees Fahrenheit/Minimum 170 degrees Fahrenheit.
· Volume Setting: Maximum 25 ounces/Minimum 4 ounces.
· Brew Time Setting: Maximum 4 minutes/Minimum based on Volume and Calibration.
Insert the desired POD Holder
is made the program will immediately prompt to the next parameter, which is Text Editing. Hint: It
one being modified.
Select the strength you want to program and write it down.
Text Editing:
enter letters/numbers press the Classic (Edit) button. Use the Mild (-) or the Dark
alphabet & numbers 0 thru 9. Upper casing is accomplished by pressing the Hot Water button and the
Classic (Next)
will move to the next letter/number position leaving the last letter in upper casing. (Note: There are hidden
symbols located in the numbers 0 thru 9. To access them, simply push the Hot Water button shifting
between the number and symbol.) Repeat the process again by using the Mild (-) or Dark
select the desired letters/numbers and then press the Classic (Next)
When the text is finally entered continue to push the Classic (Next) button until it exits out to the next
parameter, which is Temperature setting.
Coffee 8oz
(-) (NEXT) (+) (? )
Note: If you change the text setting of “8oz” to
“6oz” you must also change the Brew Volume to
match.
Decrease
or
Edit Increase
or
Shift
Page 15

button. Enter the desired temperature by pressing the
Dark
button to decrease the temperature set
-
POD Holder Identifier: Press the Classic (Edit) button. Enter the desired POD Holder description
button to toggle between Coffee and Tea. Press
button
Classic
14
(Coffee or Tea) by pressing the Dark (+) button or Mild (-)
the Classic (Done) button to "set" the POD Holder description and move on to the next perameter.
Pod Type=Coffee
(-) (DONE) (+) (X)
Decrease
or
Down
Edit
Done
or
Increase
or
Up
Temperature Setting: Press the Classic (Edit)
(+) button to increase the temperature setting or press the Mild (-)
ting. Press the Classic (Done) button to "set" the temperature and move on to the next parameter.
Temperature:198
Temperature Setting:
Maximum 205 degrees Fahrenheit
Minimum 170 degrees Fahrenheit
(-) (DONE) (+) (X)
Decrease
or
Down
Edit
or
Done
Increase
or
Up
Exit
Volume Setting: Press the Classic (Edit) button. Enter the desired volume by pressing the Dark (+)
to increase the volume setting or press the Mild (-) button to decrease the volume setting. Press the
(Done) button to "set" the volume and move on to the next parameter.
Volume:7.5oz
(-) (DONE) (+) (X)
Volume Setting:
Maximum 25 ounces
Minimum 4 ounces.
Decrease
or
Down
Edit
Done
or
Increase
or
Up
Page 16

Brew Time Setting: Press the Classic (Edit) button. Enter the desired brew time by pressing the Dark
button to decrease the brew time setting. Press
15
(+) button to increase the time setting or press the Mild (-)
the Classic (Done) button to "set" the brew time and move on to the next parameter.
Brew TIme:35
(-) (DONE) (+) (X)
Brew Time Setting:
Maximum 4 minutes
Minimum based on Volume and Calibration.
Note: For coffee Pods 8 seconds is added automatically
for purging of the POD Holder by the air valve, and 5 seconds for Tea. Another 4 seconds is added for both Tea
and Coffee pods for pre-infusion
Coffee Pods have 12 seconds added
Tea Pods have 9 seconds added
Decrease
or
Down
Edit
or
Done
Increase
or
Up
To exit out of the program press the Hot Water (X) button. Now the brewer is ready to operate.
Page 17

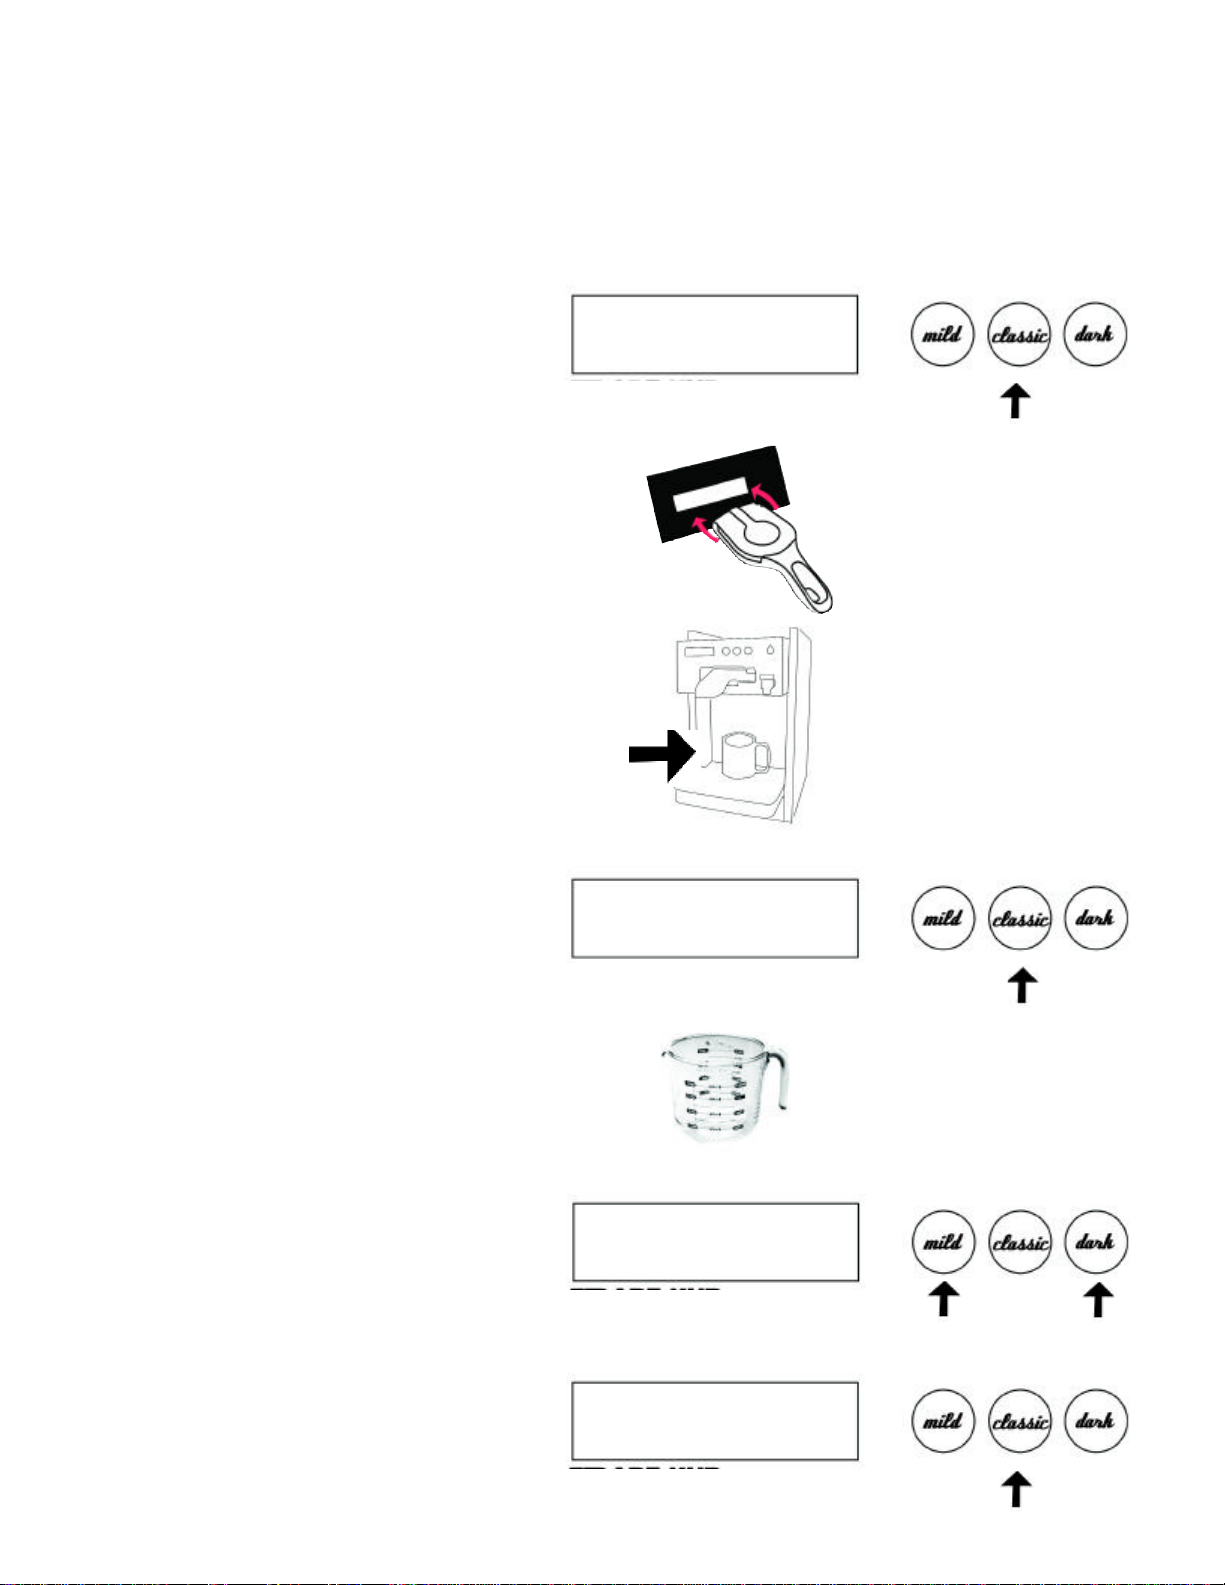
Draining the Tank and Heat Exchanger: SMART CUP Brewing System
button on the faceplate,
release
16
Tank and Heat Exchanger: The water line from the water source must be disconnected, but leave the
water line attached to the brewer inlet fitting for draining. Place the line either in a drain or container and
proceed with the draining procedure. Place any POD holder in the brew chamber but do not push it all
the way in. With the power switch on the back of the brewer off, Press the Dark
and power up the brewer. Do not release the Dark button until the display scrolls to " Insert POD
Holder." Release the Dark button. Push the POD holder all the way in immediately or the function will
default back to its original setting. The display will read "Please Select (Fill) (Drain) (X)" press the
Classic button to drain the heat exchanger.
CAUTION: Hot Water will drain from the water line that is extremely hot! It is recommended to use a
flexible hose with fittings to drain the heat exchange. (During the draining process the tank element is
automatically turned off by default.)
1. Disconnect water line from inlet source.
2. Insert any POD holder but don’t push it all
the way in
3. Press the Dark buttonon the faceplate,
and power up the brewer. Do not release
the Dark button until the display scrolls to
" Insert POD Holder." Release the Dark
button.
4. Push the POD holder all the way in
immediately
Smart Cup
Insert POD Holder
5. Press Classic button to drain the
tank and heat exchanger
Line 1
Line 2
Drain
Please Select
(Fill) (Drain) (X)
Page 18

The Sales Management System program
is a feature that allows the vendor to monitor the product usage.
Master Accumulative Total of PODS. Each individual POD Holder and the Total Number POD count can be
does not affect the Total Number of POD count until it is reset by itself. How to use programming feature:
button and power up the brewer until the display shows "Tea 8 oz." Release the
button. The LCD display will show the POD Holder name on the first line. The second line will dis
-
but
-
button, which goes into the
buttons to
scroll up or down to the next POD Holder without changing the POD holder count. Note: When any of the
buttons are pressed - in the show mode - it will automatically prompt to next POD Holder, Total Number of
17
In this case, up to 15 POD Holders can be monitored identifying each POD Holder by name, and count.
Also the program will store the Total Number of PODS used, from the 15 different Holders, along with a
reset, but the Master Accumulative Total count cannot. When an individual POD Holder count is reset, it
1. Press the Classic
Classic
play (-) = Scroll Down is the Mild button, Show/Reset is the Classic button, (+) = Scroll Up is the Dark
ton, and X = Exit is the Hot Water button.
2. To Show or Reset the count of a particular POD Holder press the Classic
Show count mode. Press the Classic a second time (Reset) to clear the count or the Dark / Mild
PODs, or Master Accumulative Number of PODS.
3. The Total Number of PODS can be reset, however the Master Accumulative Number cannot be
unless the motherboard is replaced.
4. To exit out of the program press the Hot Water (X) button.
Tea
(? ) (SHOW) (? ) (X)
Down
Show
or
reset
Up
Exit
Page 19

Page 20

Page 21

Page 22

Page 23

Page 24

 Loading...