

Page 1
OWNER’S MANUAL
FOR MAXIMUM EFFECTIVENESS
AND
SAFETY,PLEASE READ THIS
OWNER’S MANUAL BEFORE
USING YOUR NEW BALANCE
1200/1400/1500 TREADMILL.
1200/1400
and 1500
Treadmills
Serial No: _______________________
Date of Purchase: ____________
Write the serial number in the
space above for reference.
Serial Number
Decal
For Service or Parts call:
1-800-497-5831
Page 2

Important Safety Instructions ...........................................................2
Introduction/Customer Service Information ..................................3
Unit Warning/Caution Labels and Specifications & Parts.........4-5
Assembly/Setup Instructions .......................................................6-10
Folding and Moving Your Treadmill for Storage .....................11-12
Taking Care of Your Treadmill ...................................................13-14
Electronics Operating Instructions for Your Treadmill ..................15
Quick Reference Guide ......................................................16-17
Display Functions & Program Functions - 1200 .................18-19
Display Functions & Program Functions - 1400/1500........20-21
Using The Pulse Function...........................................................22
Exercise Guidelines .........................................................................23
Knowing the Basics....................................................................23
A Complete Exercise Program............................................23-24
Aerobic Exercise: How Much? How Often? ...........................24
When to Exercise .......................................................................24
Measuring Your Heart Rate .................................................24-25
Clothing ......................................................................................25
Tips to Keep You Going.............................................................25
Heart Rate Target Zone Chart..................................................26
Warm Up & Cool Down Stretches ...........................................27-28
Troubleshooting Guide ...................................................................29
Workout Progress Charts ................................................................30
Parts List 1200/1400 and 1500 ........................................................31
Exploded View 1200/1400 ..............................................................32
Exploded View 1500 ............................................Inside Back Cover
©2005 and ©2006 Fitness Quest Inc. All rights reserved. Made in China.
Fitness Quest
®
is a registered trademark of Fitness Quest Inc.
New Balance
®
and NB®logo are registered trademarks of New Balance Athletic Shoe Inc.
Fitness Quest Inc. is the exclusive licensee of New Balance Athletic Shoe Inc.
No part of this booklet may be reproduced or utilized in any form or by any means
electronic, mechanical or otherwise without the express written consent of the copyright holder.
8/22/06
TABLE OF CONTENTS
Page 3

2
IMPORTANT SAFETY INSTRUCTIONS
1) Before starting this or any other exercise
program, consult your physician, who can assist
you in determining the target heart rate zone
appropriate for your age and physical condition.
Certain exercise programs or types of equipment
may not be appropriate for all people. This is
especially important for people over the age of
35, pregnant women, or those with pre-existing
health problems or balance impairments.
2) Monitor your heart rate while you exercise and
keep your estimated pulse rate within your target
heart rate zone. Follow the instructions on pages
24 and 25 in this manual regarding heart rate
monitoring and how to determine your appropriate target heart rate zone. When used properly,
the heart rate pulse sensors and display monitor
provide a reasonably accurate estimate of your
actual heart rate. This estimate is not exact and
persons with medical conditions and/or a
specific need for accurate heart rate monitoring
should not rely on the estimations provided.
3) Warm up before any exercise program by
doing 5-10 minutes of aerobic activity, followed
by stretching.
4)
Inspect the equipment. Before EACH use, a
complete visual inspection, and test of the features
and functions of the assembled equipment is
required. Do not use equipment if you detect
any incorrect, worn or loose components. NEVER
operate the equipment if the equipment is not
functioning properly.
5) Do not wear loose or dangling clothing while
using the equipment. Wear comfortable clothes
that allow freedom of movement.
6) Wear comfortable shoes made of good support
with rubberized sole.
7) Breathe naturally, never holding your breath
during an exercise.
8) Avoid over training. You should be able to carry
on a conversation while exercising.
9) After an exercise session, cool down with slow
walking and stretching.
10) This equipment should not be used by or near
children.
11) Handicapped or disabled people must have
medical approval before using this equipment
and should be under close supervision when
using any exercise equipment.
12) If you are taking medication which may
affect your heart rate, a physician's advice
is absolutely essential.
13) Use this equipment only for its intended use as
described in this manual. Do not use attachments not recommended by the manufacturer.
14) Only one person at a time should use this
equipment.
15) Do not put hands, feet, or any foreign objects
on or near this equipment when in use by
others.
16) Always use this equipment on a level surface.
17) Care should be taken when mounting or
dismounting the equipment. Do not stand on
the Walking Belt while starting the Treadmill.
Straddle the Belt and stand on the plastic
Foot Rails.
18) Start exercise slowly and gradually increase
the amount of resistance.
19) If the user experiences dizziness, nausea, chest
pain, or any other abnormal symptoms, stop
exercise at once and consult a physician
immediately.
20) Use caution not to pinch fingers or hands in
moving parts when using the equipment.
21)
Risk of electrical shock. This equipment is to be
used only indoors and in a dry location.
22) Have plenty of clearance behind and in
front of your Treadmill. It is important to keep
children, pets, furniture and other objects out
of the way when using your Treadmill. You
should have a minimum of 4 feet of clearance
both in front of and behind your Treadmill and
a minimum of 2 feet of clearance on both
sides of the Treadmill.
Read all instructions before using this equipment.
CAUTION:
Exercise of a strenuous nature, as is customarily done on this equipment, should not
be undertaken without first consulting a physician. No specific health claims are
made or implied as they relate to the equipment.
KEEP THESE INSTRUCTIONS
– THIS EQUIPMENT IS FOR CONSUMER USAGE ONLY –
Page 4

With this product in your home, you have everything you need to start
your own workout program to tone and firm the major muscle groups of
your lower body. This is vital for all of us, regardless of age, sex, or fitness
level, and regardless of whether your primary goal is toning, health
maintenance, or more energy for daily activities.
Proper exercise, including a low fat diet, strength training and aerobic
exercise, tones and conditions the muscles we use every day to stand,
walk, lift and turn. It can actually transform our body composition by
reducing body fat and increasing the proportion of lean muscle in
our bodies. Using the treadmill will help in reducing body fat and
increasing cardiovascular endurance.
Be sure to read through this Owner’s Manual carefully.
It is the authoritative source of information about your New Balance
Treadmill.
Retain this manual for future reference.
CONGRATULATIONS ON PURCHASING YOUR
NEW BALANCE TREADMILL
INTRODUCTION
3
ORDERING REPLACEMENT PARTS
When ordering parts, please contact our
Parts Department, toll free at 1-800-497-5831,
Monday through Friday, 8:30am to 8:00pm, EST.
IMPORTANT: You must have your serial number
and this manual ready when calling for parts.
Serial #: ____________________________
Please also provide the following information:
1) Name, Mailing Address and Telephone Number
2) Date of Purchase
3) Where Product was Purchased
(Name of Retail Store, City)
4) Model Number
(NBT1200-2, NBT1400-2, NBT1500-2)
5) Part Order Number and Description
COMMENTS OR QUESTIONS
Dear Customer,
Congratulations on your purchase of the New
Balance Treadmill.
We’re sure that you will be completely satisfied
with the product and we invite your comments so
that we can hear about your success.
Please write or call our Customer Service Specialists
at the address or phone number listed below, or
contact us on our web site or email us with any
comments or questions you may have.
NEW BALANCE 1200/1400/1500 Treadmill
Customer Service Department
1400 Raff Road SW, Canton OH 44750-0001
1-800-292-5009, Monday through Friday
8:30am to 8:00pm, Eastern Standard Time
Please do not call the above number for Parts.
See Ordering Replacement Parts section to the right.
Email: [email protected]
www.newbalancefitness.com
All details depicted in this Owner’s Manual, and of the
product itself, are subject to change without notice.
Page 5
4
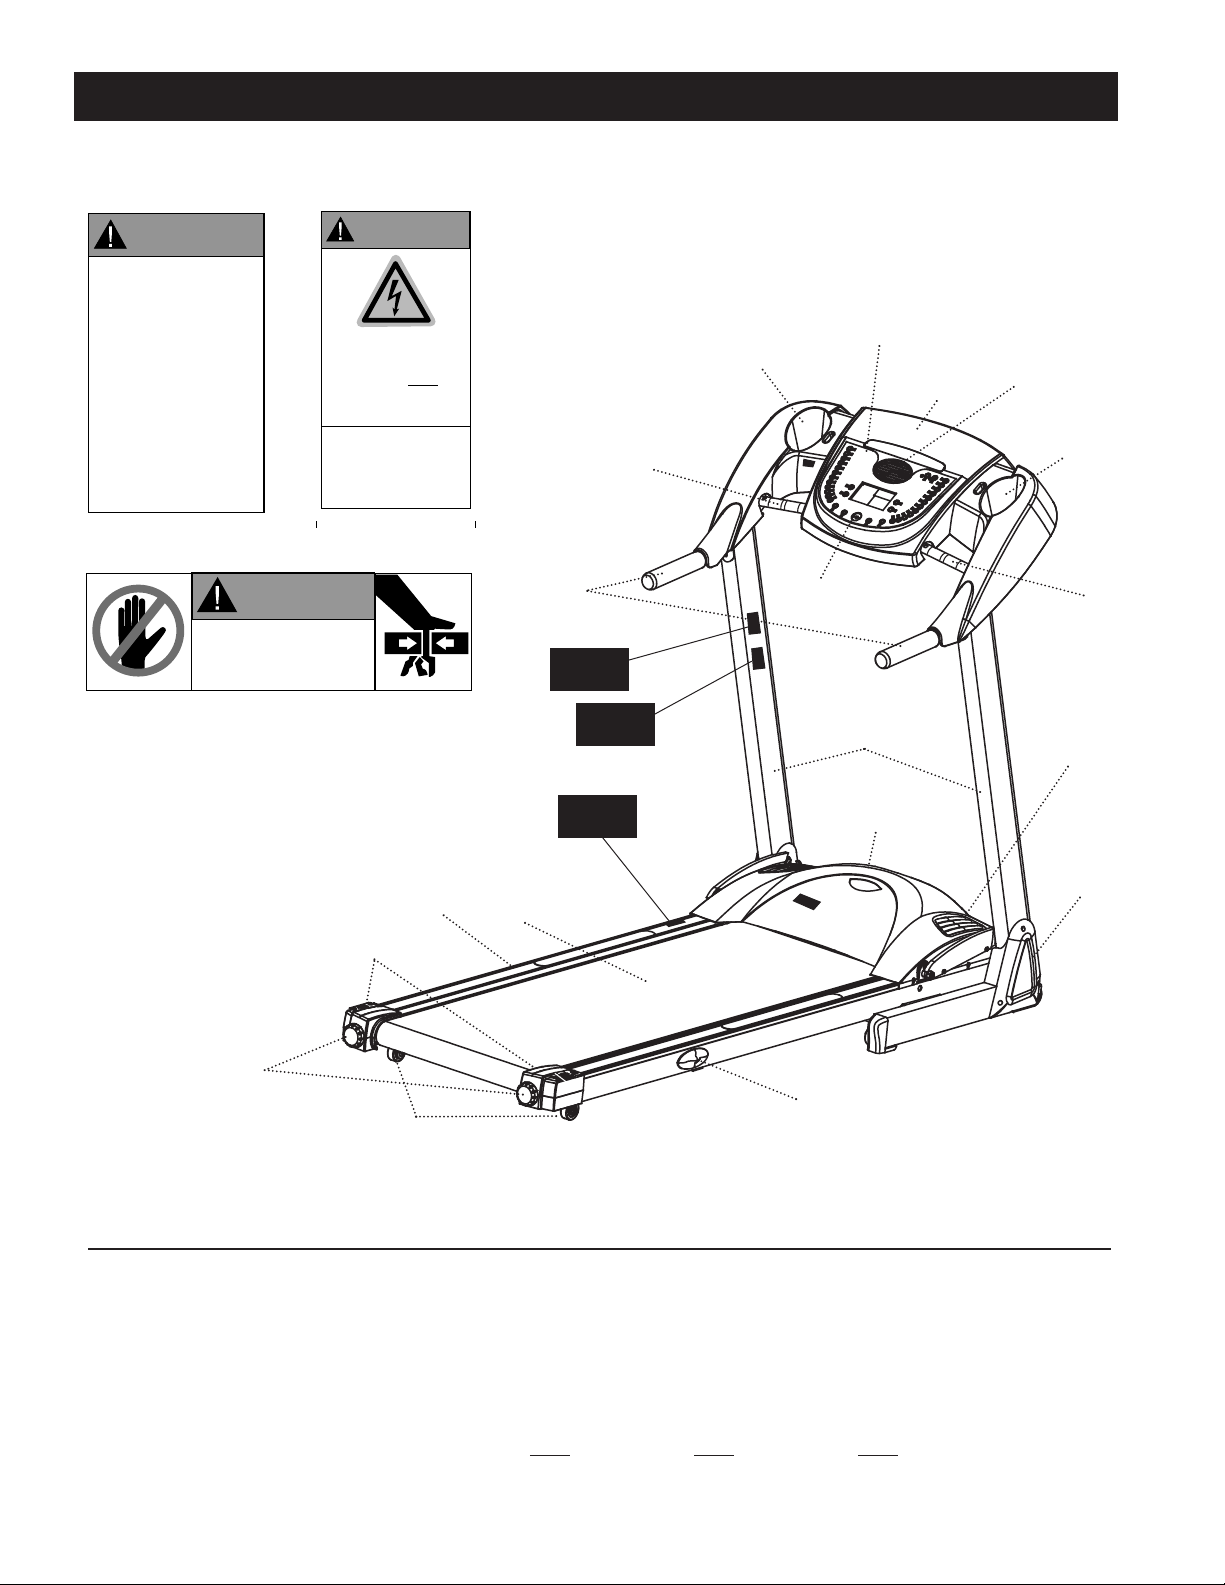
Important: See below for placement of the following warning/caution labels on your Treadmill.
New Balance 1200/1400/1500 Specifications:
Approximate:
1200/ 1400 – Length: 76-3/4” Width: 34-3/4” Height: 53-3/4”
1500 – Length: 76-3/4” Width: 32-3/4” Height: 53-3/4”
Product Weight: 230 lbs.
Maximum User Weight: 1200
- 275 lbs. 1400 - 300 lbs. 1500 - 300 lbs.
UNIT WARNING/CAUTION LABELS AND SPECIFICATIONS & PARTS
Side
Cap
•
•
Hand Grip
Walking
Belt
•
Computer
•
Front Motor
Cover
•
•
Safety Key
Upright
•
Console
Base
•
Belt Adjustment
Knob
•
Right
Console
•
Foot
Rail
•
Rear End
Cap
•
•
Wheel
Power
Cord
•
Fan
•
Left
Console
•
Pulse
Sensors
•
Pulse
Sensors
•
•
Suspension
Walking Deck
FRONT
REAR
WARNING LABEL 1 WARNING LABEL 2
WARNING
LABEL 2
WARNING
LABEL 1
WARNING
LABEL 3
WARNING LABEL 3
WARNING
CRUSH HAZARD
KEEP HANDS CLEAR OF DECK.
FAILURE TO DO SO COULD RESULT
IN CRUSHED HANDS.
WARNING
FAILURE TO READ AND
FOLLOW THE SAFETY
INSTRUCTIONS STATED IN
THE OWNER’S MANUAL
MAY RESULT IN POSSIBLE
SERIOUS INJURY OR
DEATH. KEEP CHILDREN
AWAY. MAXIMUM USER
WEIGHT 275/300 LBS.
REPLACE THIS LABEL IF
DAMAGED, ILLEGIBLE
OR REMOVED. CLASS HC.
WARNING
RISK OF ELECTRICAL
SHOCK. THIS UNIT IS TO
BE USED ONLY
INDOORS AND IN A
DRY LOCATION.
ALWAYS UNPLUG
THE POWER CORD
IMMEDIATELY
AFTER USE.
Page 6
5
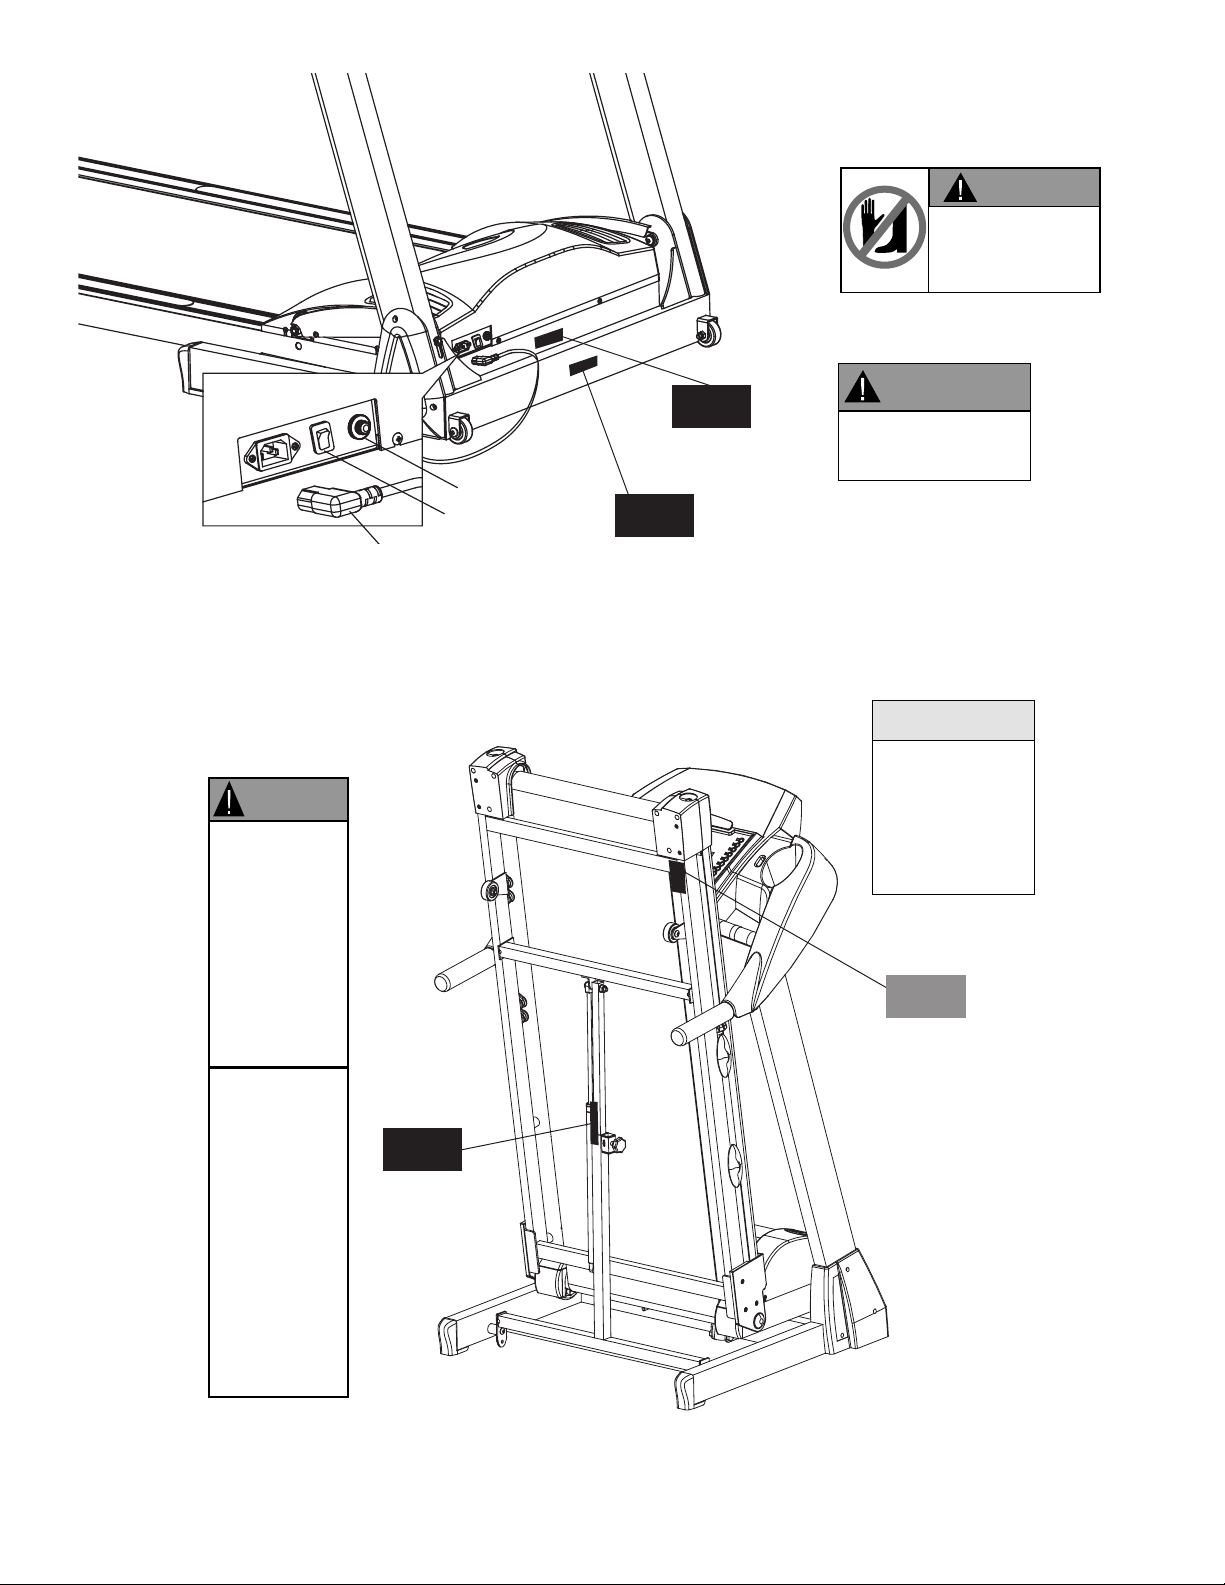
WARNING LABEL 6
WARNING
LABEL 6
power cord
on/off switch
WARNING
LABEL 5
safety switch
WARNING
LABEL 4
WARNING LABEL 4
WARNING LABEL 5
CAUTION
LABEL
CAUTION LABEL
WARNING
CRUSH HAZARD.
KEEP HANDS AND FEET CLEAR
DURING FOLDING. FAILURE TO DO
SO COULD RESULT IN CRUSHED
HANDS AND FEET.
WARNING
After folding the
deck, push and turn
the knob clockwise
on the latch to lock
the deck into place.
Failure to lock the
deck into place may
cause the deck to
fall suddenly
resulting in serious
injury.
WARNING
ALWAYS UNPLUG THE
POWER CORD IMMEDIATELY
AFTER USE.
CAUTION
BEFORE FOLDING THE
TREADMILL, DECREASE
INCLINE TO "0" LEVEL.
FAILURE TO DO SO MAY
RESULT IN SERIOUS
DAMAGE TO TREADMILL
AND VOID WARRANTY.
Before lowering the
deck from its folded
position, turn the
knob counter
clockwise and pull
the knob on the
latch to unlock and
release the deck.
Slowly lower the
deck to the floor
and keep your
hands and feet
clear to avoid
crushing or other
serious injury.
Page 7
6
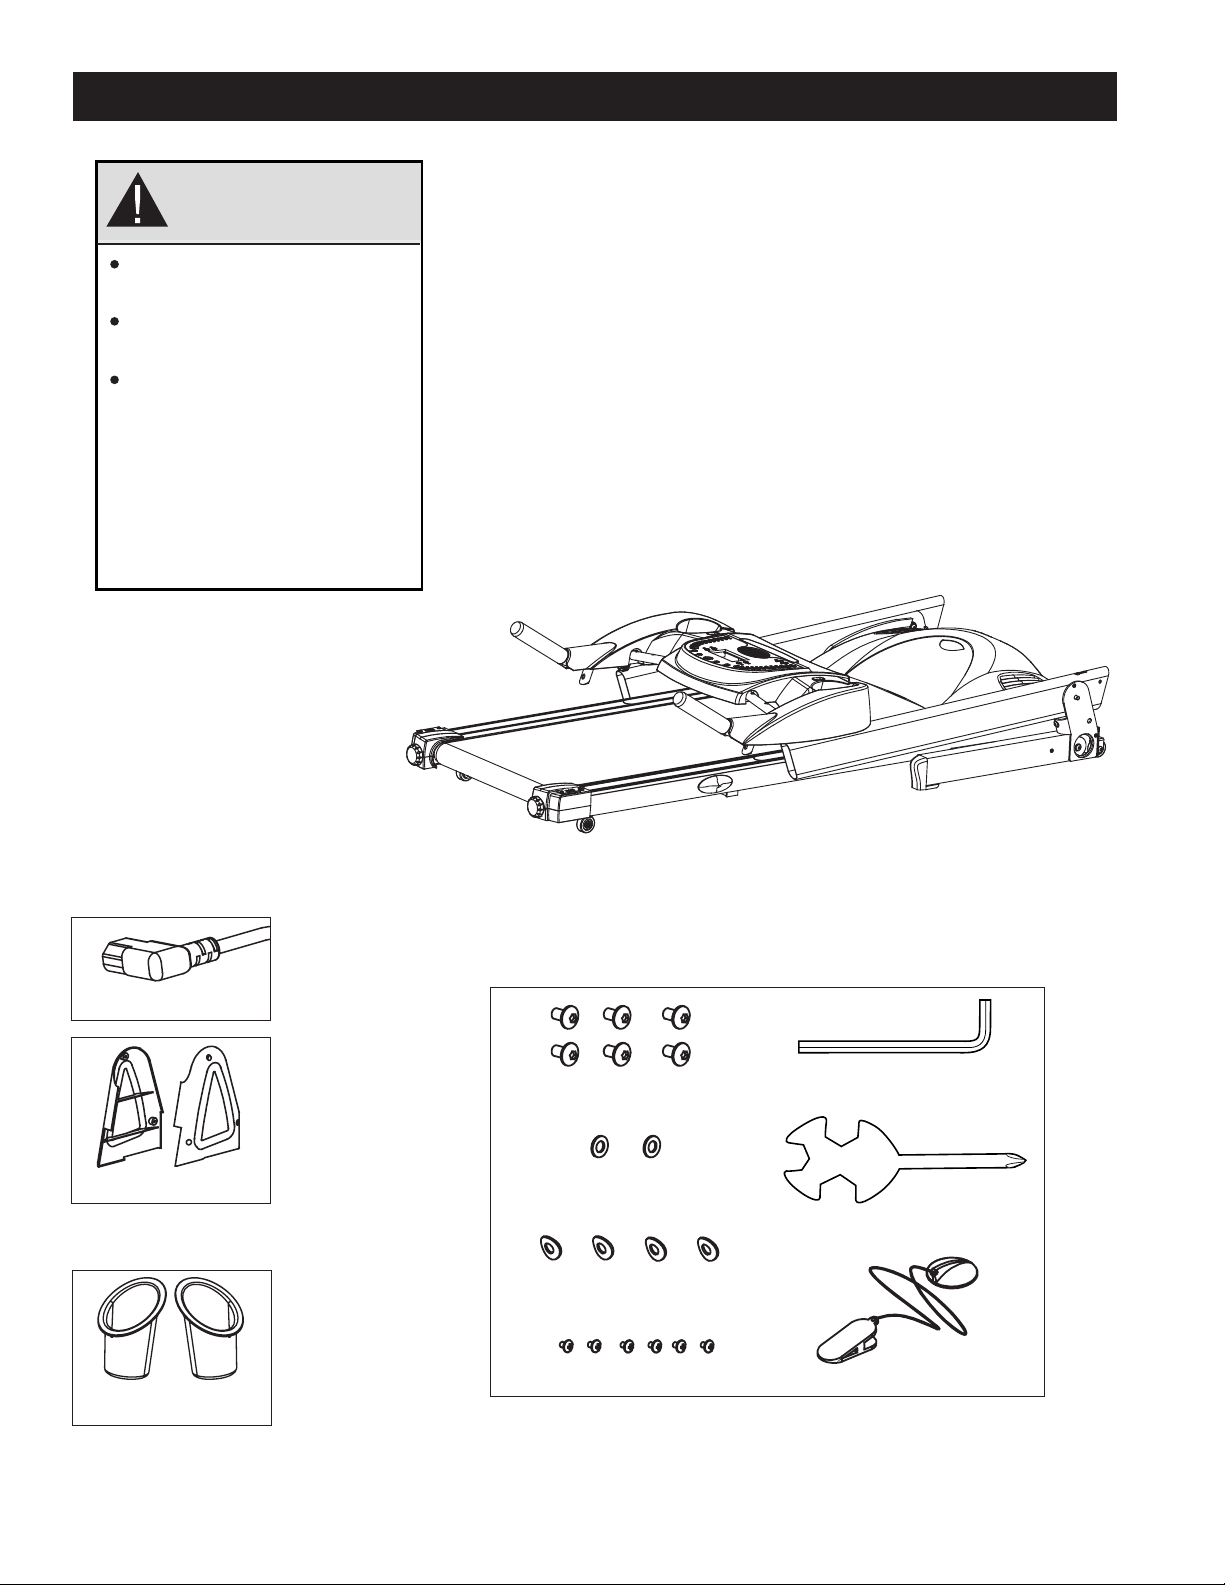
Parts Box
Tools Required: (included)
Allen Wrench
Multi Hex Tool with
Phillips Screwdriver
NOTE: All location references, such as front, rear,
left or right, made in these instructions are from the
user position – on the Treadmill facing the Console.
ASSEMBLY/SETUP INSTRUCTIONS
M8 washer (2)
M8 curved washer (4)
side cap (2)
cup holders (2)
FOR 1500 UNIT ONLY
allen wrench
multi hex tool
with phillips
screwdriver
safety key
M8 x 20mm allen bolt (6)
M4 x 6mm phillips screw (6)
For Maximum Effectiveness and Safety,
Please Read This Owner’s Manual
Before Assembling or Using Your
New Balance 1200/1400/1500 Treadmill.
Fastener Pack
power cord
WARNING
FAILURE TO FOLLOW THIS
PROCEDURE MAY RESULT IN
SERIOUS INJURY.
DO NOT MOVE TREADMILL OUT OF
THE BOX UNTIL UNIT IS ASSEMBLED.
COLLAPSE BOX BOTTOM AND LAY
SIDES DOWN BEFORE ASSEMBLY.
WHEN MOVING ASSEMBLED
TREADMILL OUT OF THE BOX, MOVE
IT OUT OF THE BOX ON ITS WHEELS
WHILE THE DECK IS IN THE FOLDED
AND LOCKED POSITION.
– Console may vary per model –
Page 8
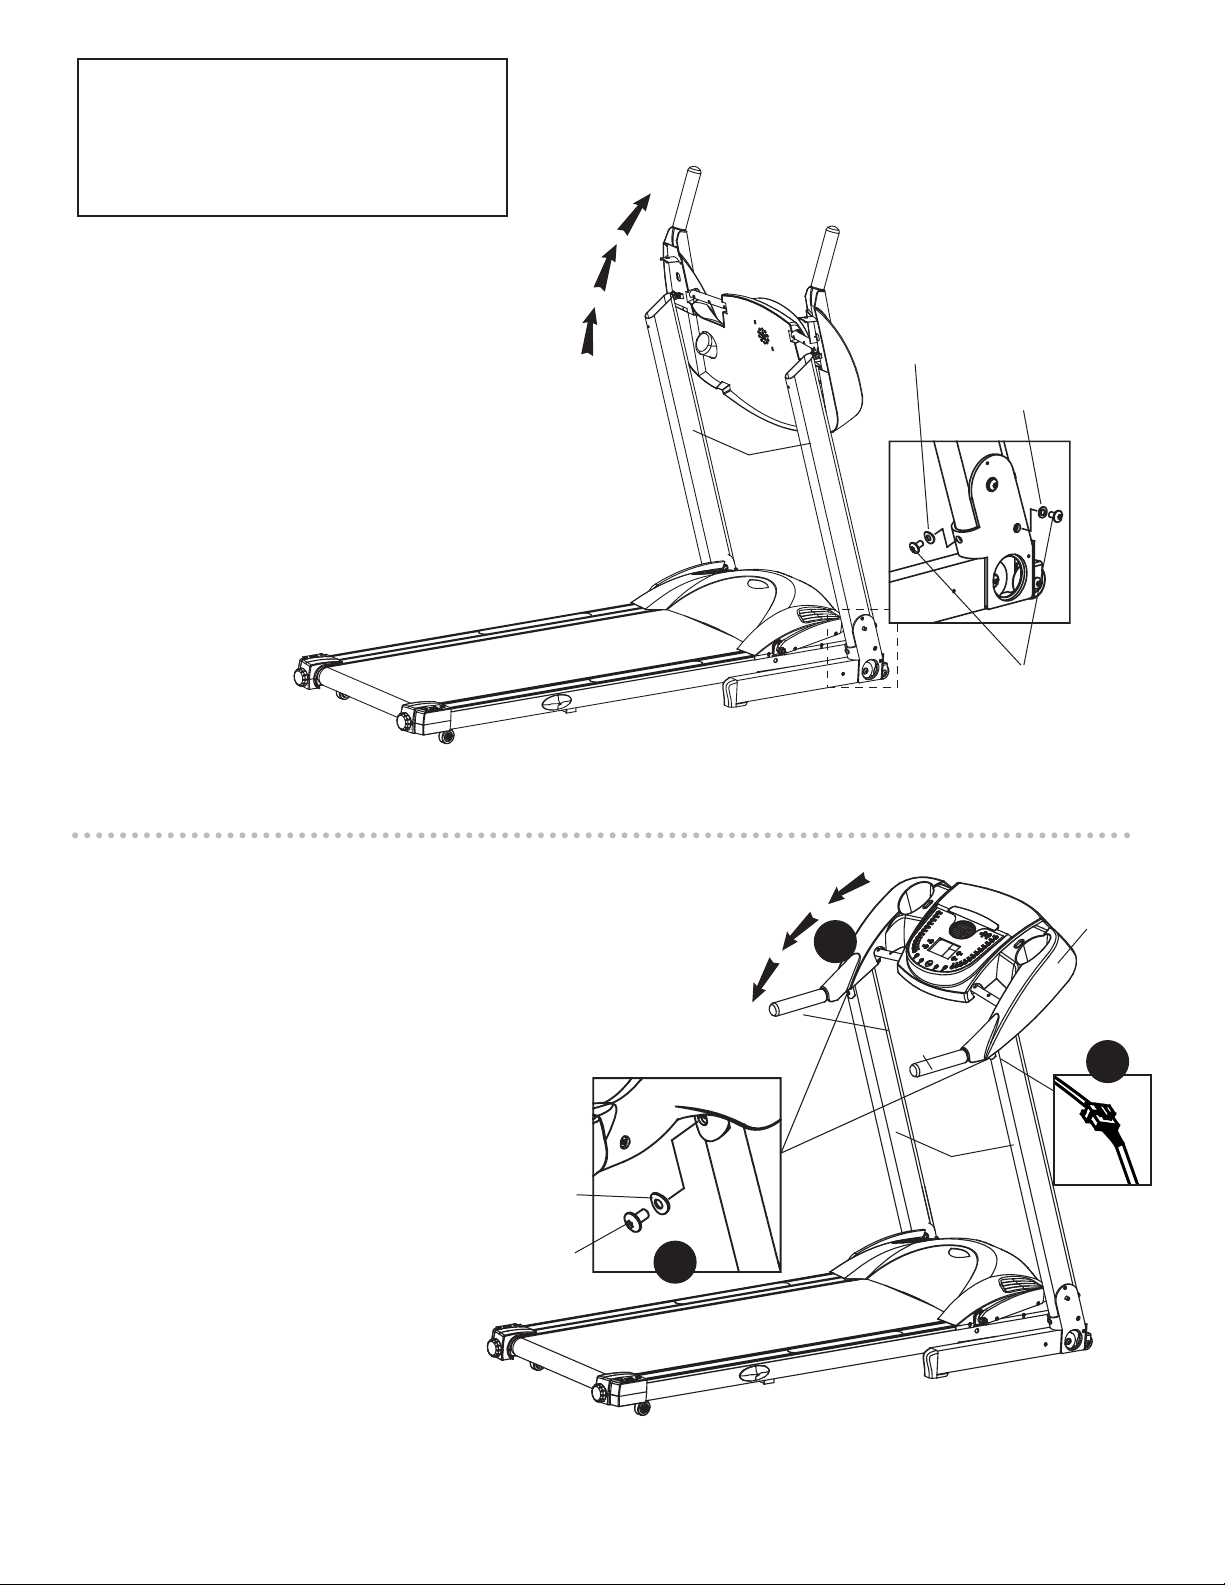
STEP 1 - Upright Assembly
a) Stand on Walking Belt and grip the
uprights and slowly raise them into
the assembled position. Secure the
right side with (2) M8 x 20mm Allen
Bolts (1) M8 Washer and (1) M8
Curved Washer at the bottom of the
right Upright as shown in Figure 1.
Repeat on other side.
b) Use the Allen Wrench provided to
tighten.
STEP 2 - Console Base Assembly
Note: To assure Console Base Assembly does
not fall, hold onto Hand Grips while assembling.
a) Make sure the wires are connected on the
right side. See Figure 2a.
b) While standing on the Walking Belt put the
Console Base Assembly in the user position by
pivoting it carefully down. See Figure 2b.
Note: During assembly, DO NOT PINCH WIRES
when the Console is folded down and
secured to the Upright.
c) Attach the Console Base Assembly
to the Uprights by using an
M8 x 20mm Allen Bolt and
M8 Curved Washer.
Repeat on other side.
Tighten with Allen Wrench
provided. See Figure 2c.
2b
2c
upright
RIGHT SIDE
M8 curved
washer
Figure 1 - Install Uprights
Figure 2 - Install Console Base
M8 x 20mm
allen bolt
M8 washer
M8 x 20mm allen bolt
M8 curved
washer
walking belt
console base
assembly
upright
hand
grip
Note: We recommend setting up the
unit in the area where it will be used.
Remove Box Top. Collapse Box Bottom
and leave unit in box to assemble.
7
2a
Page 9
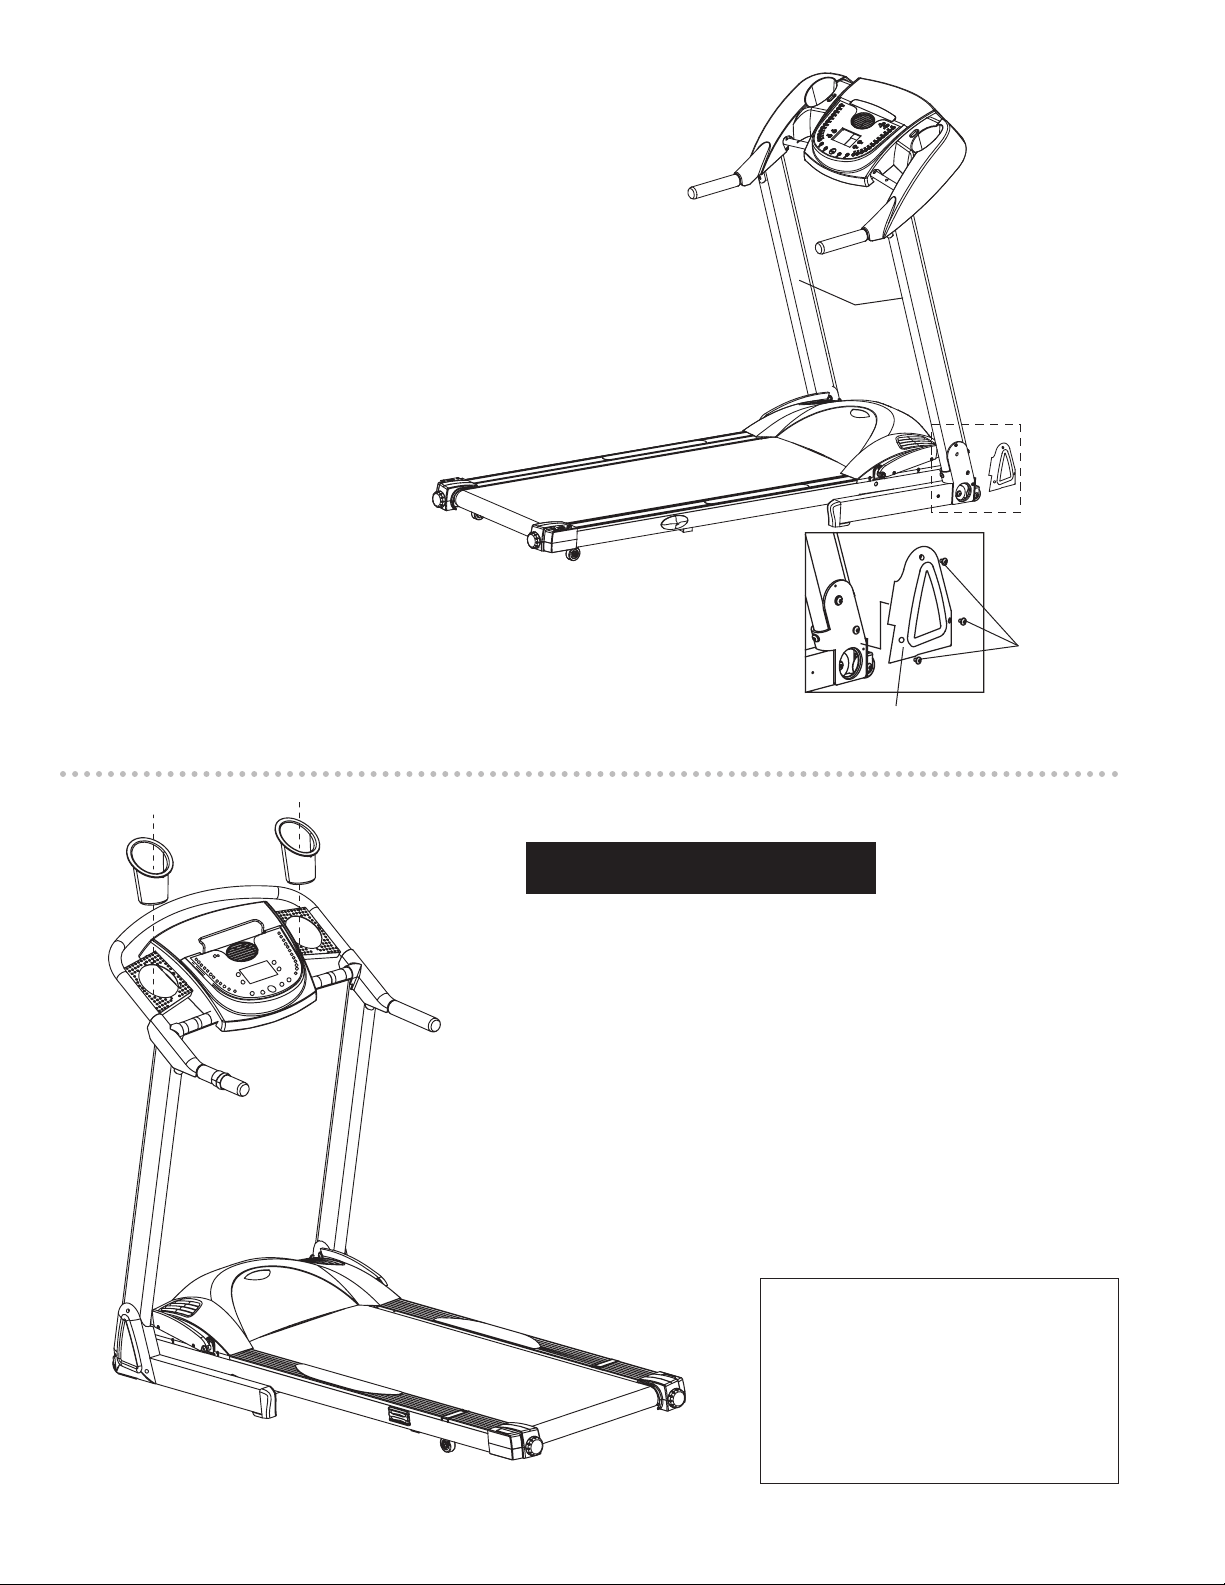
8
STEP 3 – Side Cap Assembly
a) Attach Side Cap with (3) M4 x 6mm Phillips
Screws at the bottom of the Upright.
Repeat on other side.
b) Use the Multi Hex Tool with Phillips Screwdriver
provided to tighten.
STEP 4 – Adding Cup Holders to the
Console Base Assembly
Insert Cup Holders into the two holes provided.
Please make sure the taller side of the Cup Holder
is facing away from the Walking Belt.
Figure 3 - Install Side Caps
upright
M4 x 6mm
phillips
screws
side cap
Assembly is now complete.
IMPORTANT:
Follow the “Setting Up Treadmill for
Use” instructions on the next two
pages to move the treadmill off
the shipping carton so you may
begin your workout.
FOR 1500 UNITS ONLY
Page 10
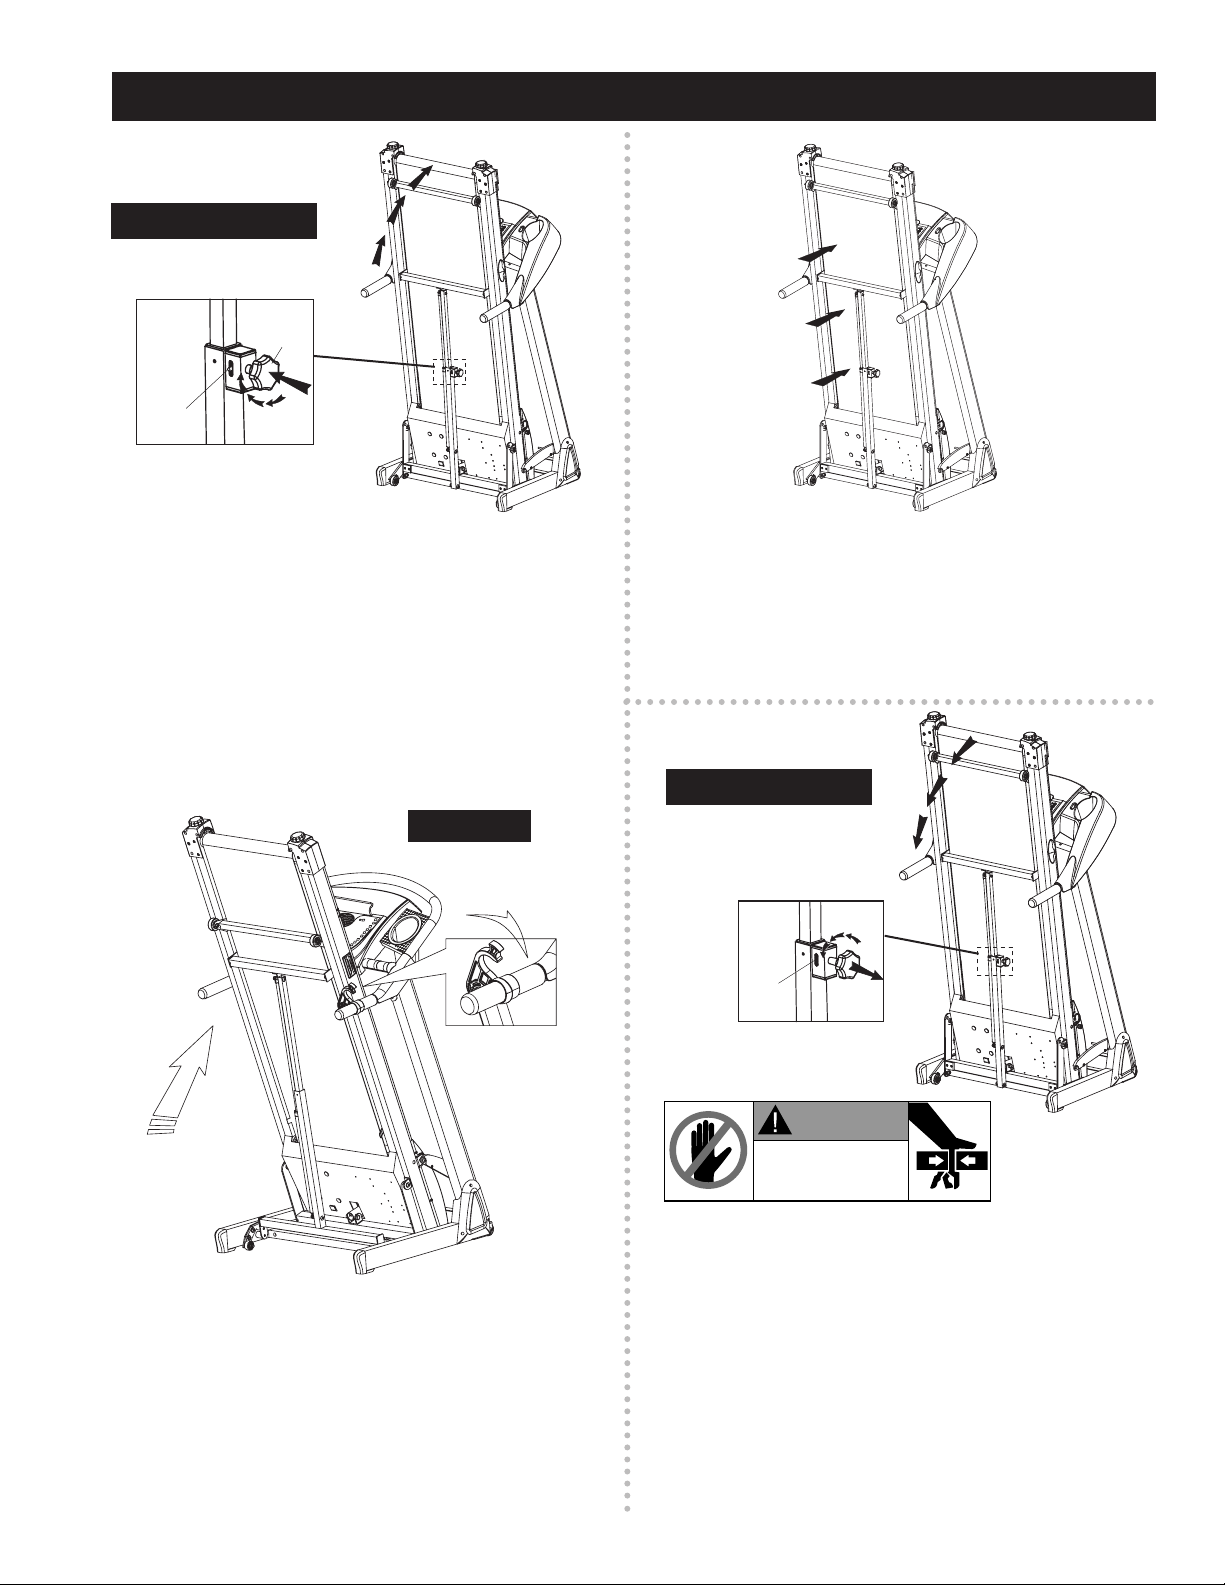
9
SETTING UP TREADMILL FOR USE
Folding the Treadmill to allow removal
of the shipping box.
After assembly is complete, you must fold and
move the Treadmill to remove the box.
To fold the Treadmill, raise the Deck. Secure the
Deck in the upright position by pushing the Knob
in while rotating it clockwise until the Locking
Indicator is fully visible.
Moving the Treadmill (in folded position)
Hold the Hand Grips to move the Treadmill
forward or backward off of the box. The
Treadmill comes with Wheels for easy portability.
DO NOT TIP the Treadmill.
Folding the Treadmill to allow removal
of the shipping box.
After assembly is complete, you must fold and
move the Treadmill to remove the box.
To fold the Treadmill , raise the deck. Secure the
Deck in the upright position by lowering the latch.
It will snap on the handle, and prevent the Deck
from lowering itself.
1200/1400 UNITS
1500 UNIT
STEP 1
STEP 2
Lowering the Walking Deck
Once the Treadmill is in the desired place, lower
the Deck by pushing in and turn the Knob counterclockwise until the Locking Indicator is not visible
and the Deck is released.
NOTICE: This Treadmill has a built-in safety feature to
help the Deck lower slowly when unfolding. Please
make sure there are no children or other things
under the Deck when you lower it.
(Continued on next page)
1200/1400 UNITS
STEP 3
knob
locking
indicator
locking
indicator
not visable
WARNING
CRUSH HAZARD
KEEP HANDS CLEAR OF DECK.
FAILURE TO DO SO COULD RESULT
IN CRUSHED HANDS.
Page 11
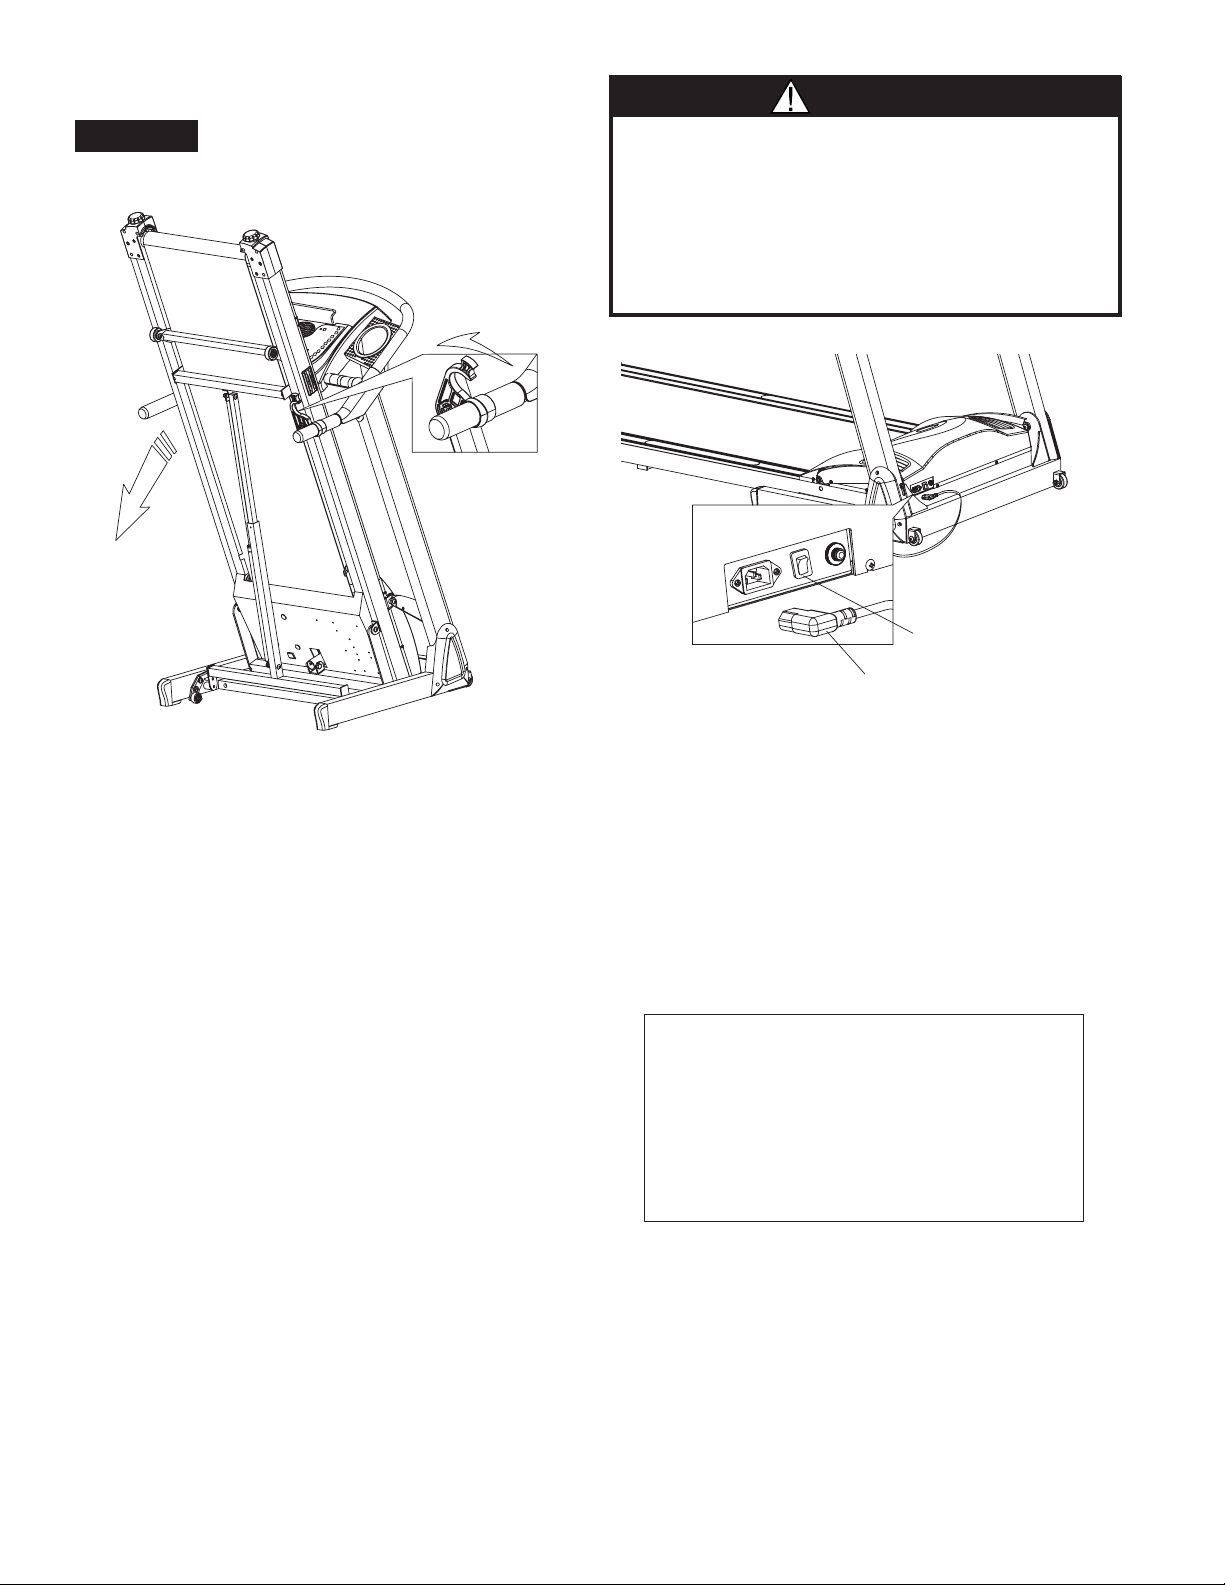
10
Lowering the Walking Deck
Once the Treadmill is in the desired place, lift the
Latch from the Hand Grip of the Treadmill.Then
lightly press down to activate the lowering action
of the Treadmill.
NOTICE: This Treadmill has a built-in safety feature to
help the Deck lower slowly when unfolding. Please
make sure there are no children or other things under
the Deck when you lower it.
power cord
STEP 4 – Power Cord Assembly
Attach Power Cord to Front Motor Cover and plug
unit cord into a dedicated outlet.
STEP 5 – Turning On the Treadmill
Turn the ON/OFF switch to the ON position.
ASSEMBLY AND SETUP ARE
NOW COMPLETE.
IMPORTANT:
Please read this owner’s manual before
beginning your workout for important
instructions on how to use your Treadmill.
on/off switch
TO REDUCE THE RISK OF DAMAGING ELECTRICAL PARTS TO YOUR
TREADMILL, WE STRONGLY RECOMMEND THAT YOU PLUG YOUR TREADMILL
INTO A DEDICATED 20 AMP OUTLET, WITHOUT THE USE OF AN ADDITIONAL
EXTENSION CORD. PLEASE NOTE THAT THIS TREADMILL IS NOT
COMPATIBLE WITH GFCI-EQUIPPED OUTLETS.
IF YOUR TREADMILL HAS BEEN EXPOSED TO COLDER TEMPERATURES,
WE RECOMMEND THAT THE TREADMILL IS WARMED UP TO ROOM
TEMPERATURE BEFORE FIRST TIME USE. FAILURE TO DO SO MAY
CAUSE ELECTRONIC FAILURE.
CAUTION
1500 UNIT
STEP 3 Continued
Page 12
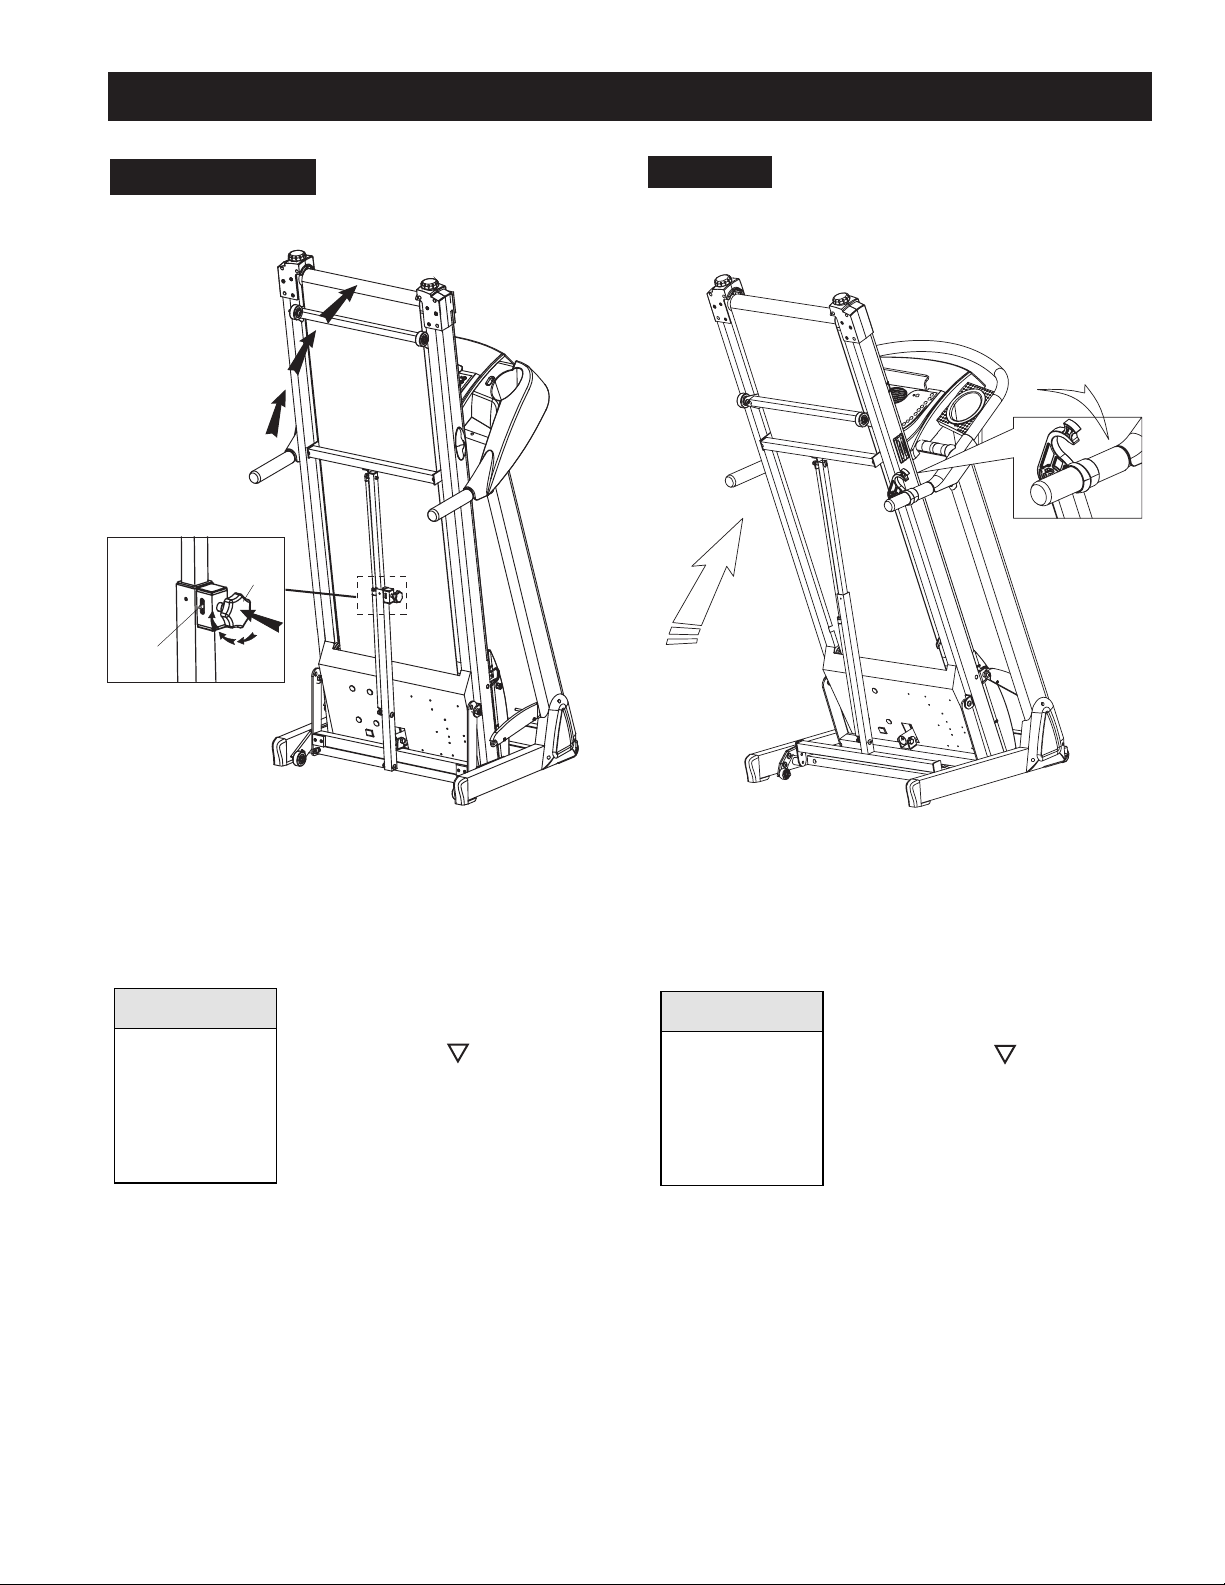
TO FOLD THE TREADMILL
You may fold the Treadmill into the upright
position for storage.
NOTE: Make sure the Treadmill's
elevation is at the lowest position.
Press the Incline Key until
Incline is at “0” level. If the
elevation is not at the lowest
position, it would cause
damage to the mechanism.
TURN OFF AND UNPLUG FIRST!
To fold the Treadmill, raise the Deck. Secure the
Deck in the upright position by pushing the Knob
in while rotating it clockwise until the Locking
Indicator is fully visible.
11
FOLDING AND MOVING YOUR TREADMILL FOR STORAGE
-
1200/1400 UNITS
TO FOLD THE TREADMILL
You may fold the Treadmill into the upright
position for storage.
NOTE: Make sure the Treadmill's
elevation is at the lowest position.
Press the Incline Key until
Incline is at “0” level. If the
elevation is not at the lowest
position, it would cause
damage to the mechanism.
TURN OFF AND UNPLUG FIRST!
To fold the Treadmill, raise the Deck. Secure the
Deck in the upright position by lowering the
Latch. It will snap on the Hand Grip, and
prevent the Deck from lowering itself.
1500 UNIT
-
knob
locking
indicator
CAUTION
BEFORE FOLDING THE
TREADMILL, DECREASE
INCLINE TO "0" LEVEL.
FAILURE TO DO SO MAY
RESULT IN SERIOUS
DAMAGE TO TREADMILL
AND VOID WARRANTY.
CAUTION
BEFORE FOLDING THE
TREADMILL, DECREASE
INCLINE TO "0" LEVEL.
FAILURE TO DO SO MAY
RESULT IN SERIOUS
DAMAGE TO TREADMILL
AND VOID WARRANTY.
Page 13
12
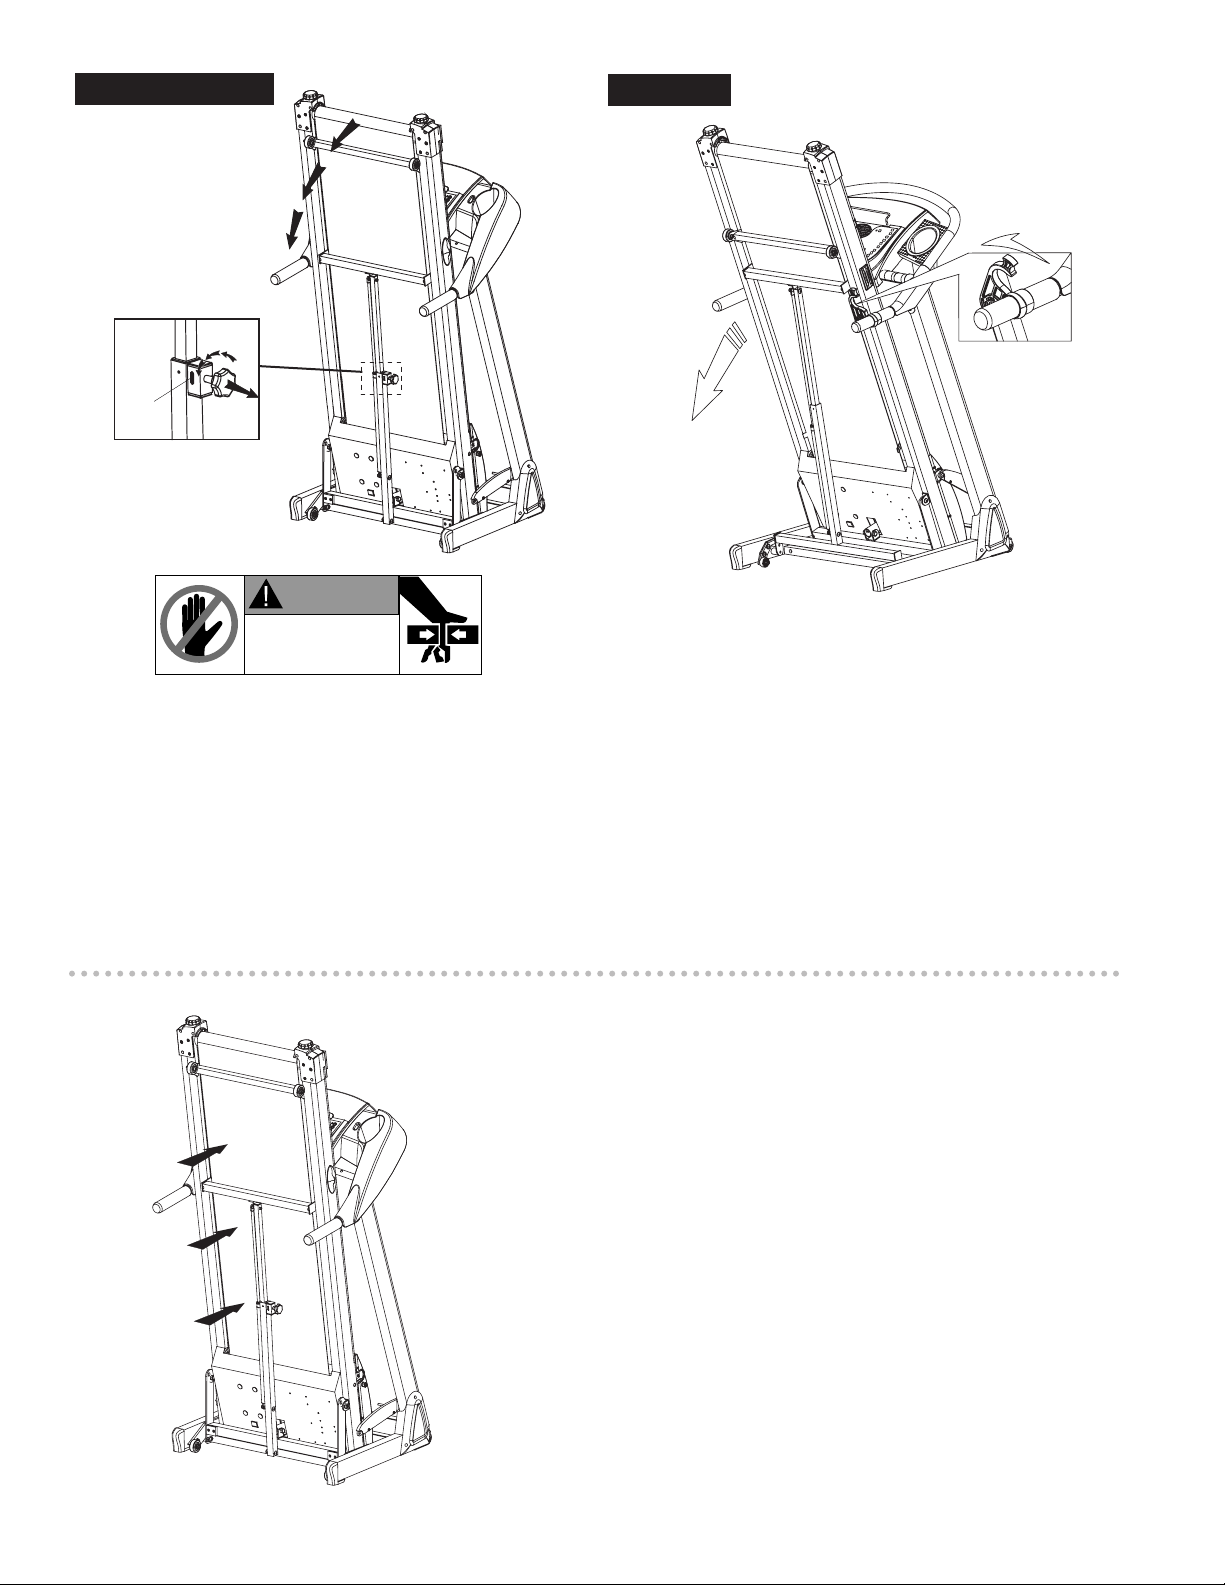
TO MOVE THE TREADMILL (in folded position)
Always make sure the Treadmill is turned off and
unplugged first!
Hold the Hand Grips to move the Treadmill forward or backward. The Treadmill comes with Wheels for easy portability.
DO NOT TIP the Treadmill.
To Lower the Treadmill
To lower the Deck, push in and turn the Knob
counter-clockwise until the Locking Indicator is
not visible and the Deck is released.
NOTICE: This Treadmill has a built-in safety feature to
help the Deck lower slowly when unfolding. Please
make sure there are no children or other things
under the Deck when you lower it.
To Lower the Treadmill
To lower the Deck, lift the Latch from the Hand
Grip of the Treadmill. Then lightly press down to
activate the lowering action of the Treadmill.
NOTICE: This Treadmill has a built-in safety feature
to help the Deck lower slowly when unfolding.
Please make sure there are no children or other
things under the Deck when you lower it.
1500 UNIT
1200/1400 UNITS
locking
indicator
not visable
WARNING
CRUSH HAZARD
KEEP HANDS CLEAR OF DECK.
FAILURE TO DO SO COULD RESULT
IN CRUSHED HANDS.
Page 14
13
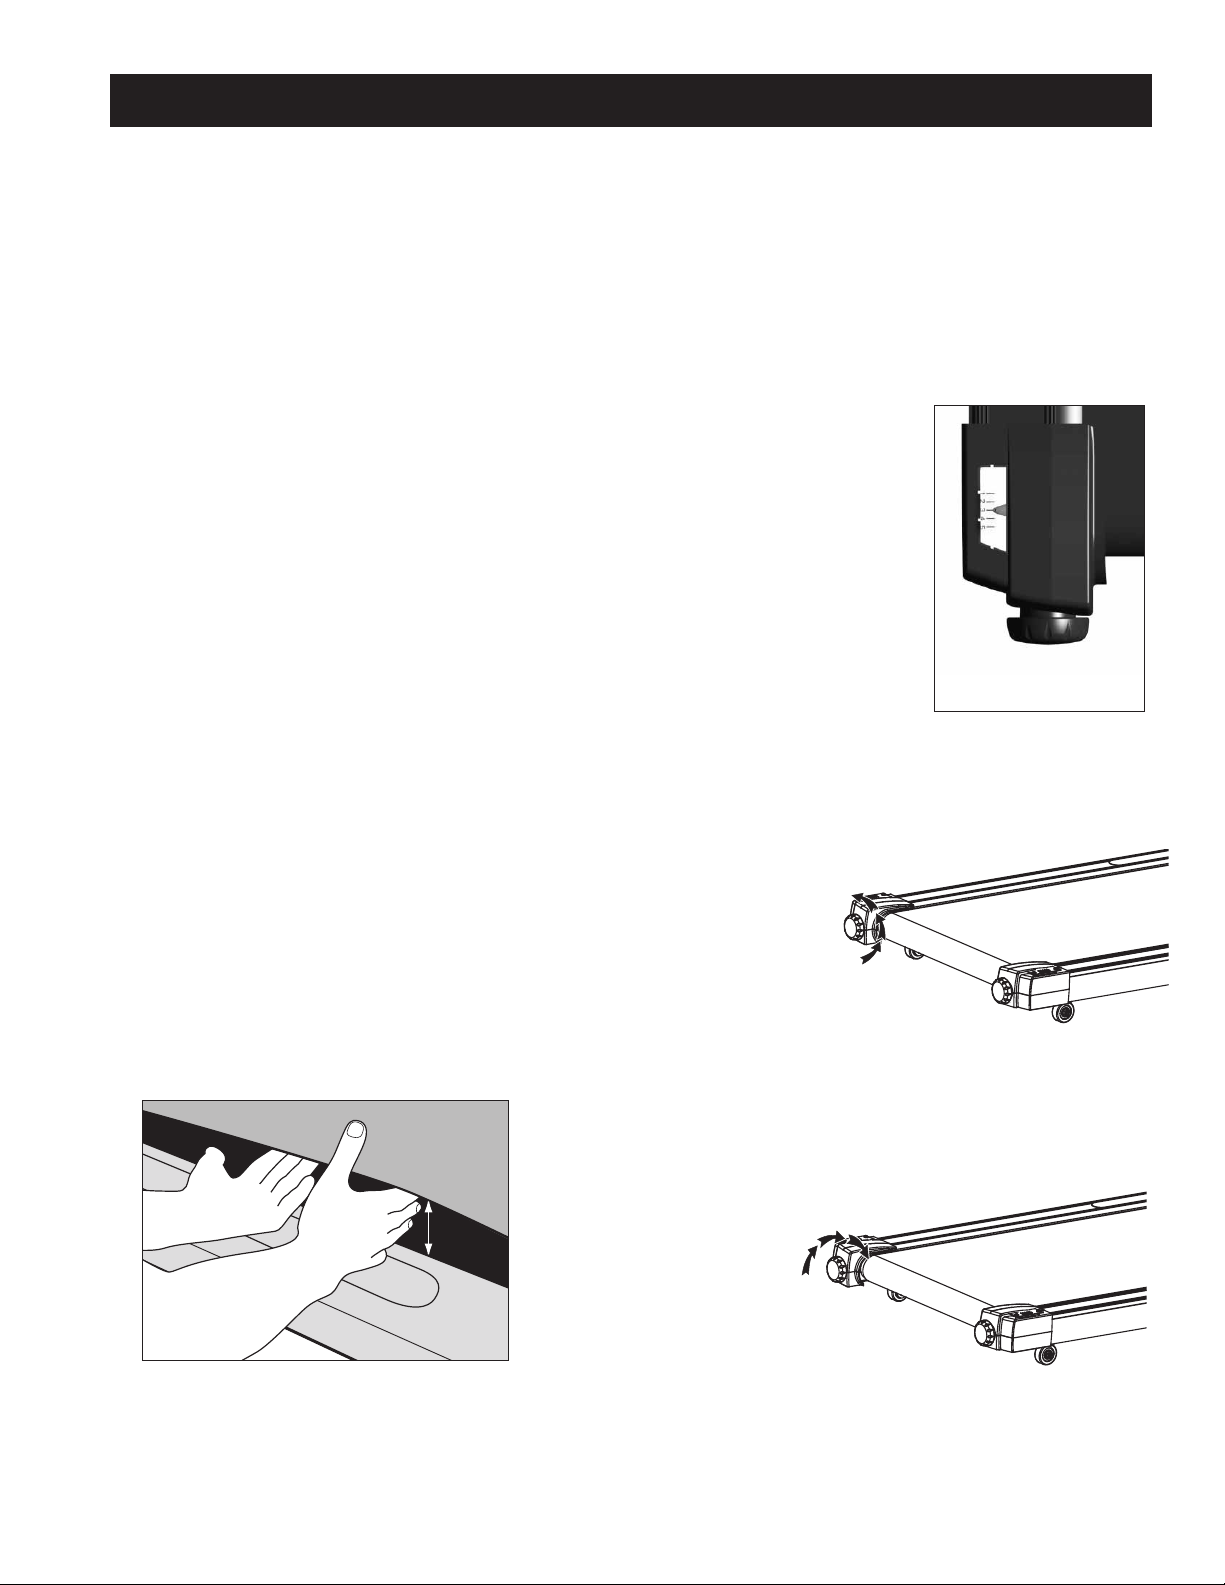
turn clockwise.Turn on the Treadmill and check the
tension. If it needs additional tension, continue to
tighten one turn at a time until the Belt is no
longer slipping.
Be sure to adjust both sides equally to insure correct
Belt alignment.
WALKING BELT CENTERING
The Walking Belt may
occasionally need to be
centered. Your Treadmill
has sight indexes that aid in
keeping the Walking Belt
centered.
First, be sure the Belt is
tensioned properly. Then,
run the Treadmill at 4 mph.
It is easiest to use only the
left Adjustment Knob in
making Walking Belt centering adjustments.
If the Walking Belt has moved to the right, turn the Left
Adjustment Knob a quarter turn to the left. Let the
Treadmill run about 30 seconds,
and if the Belt
does not move,
repeat.
If the Walking Belt has moved to the left, turn the Left
Adjustment Knob a quarter turn to the right. Let the
Treadmill run about 30 seconds, and if the Belt does
not move, repeat.
WARNING: Always turn off and unplug the Treadmill
from the electrical outlet before moving, cleaning,
lubricating, or servicing the Treadmill.
Note: The Treadmill MUST be placed on a level
surface only. If the Treadmill is not level, the belt
will continuously slip to the low side of the Treadmill.
CAUTION: DO NOT USE Treadmill if it is not on a
level surface.
Have plenty of clearance behind and in front of
your Treadmill. It is important to keep children,
pets, furniture and other objects out of the way
when using your Treadmill. You should have a
minimum of 4 feet of clearance both in front of and
behind your Treadmill and a minimum of 2 feet of
clearance on both sides of the Treadmill.
Worn or damaged components should be replaced
immediately. Do not use the Treadmill if it is not
working properly. Only manufactured-supplied or
approved components shall be used to maintain
and repair the Treadmill. It is the sole responsibility
of the user/owner to ensure that regular maintenance is performed.
WALKING BELT TENSION
Walking Belts tend to stretch slightly with use.The
Walking Belt may occasionally need to be tightened. If the Walking Belt is too loose, you may find
the Belt stops or hesitates while running or walking.
However, it is very important not to over-tighten the
Walking Belt as it will damage the Motor, Rollers,
and Electrical Components.
When properly tensioned, you should be able to
lift the side of the Belt about 2-3 inches, or you
should be able to fit three fingers under the edge
of the Belt. This should be done on either side of
the Belt in the center of the Deck.
To tighten the Belt, with the Treadmill off, turn the
Left Knob at the end of the Treadmill one full turn
clockwise, and then turn the Right Knob one full
belt
foot rail
sight index
(preset at 2)
TAKING CARE OF YOUR TREADMILL
Page 15
WALKING BELT AND DECK LUBRICATION
Your Treadmill Belt has been lubricated at the
factory, but periodic lubrication will extend the
life of your Treadmill Belt, Board, and Electrical
Components. We recommend the following
lubrication schedule based on weekly usage:
5+ hours per week Monthly
3 - 5 hours per week Every three months
0 - 3 hours per week Every six months
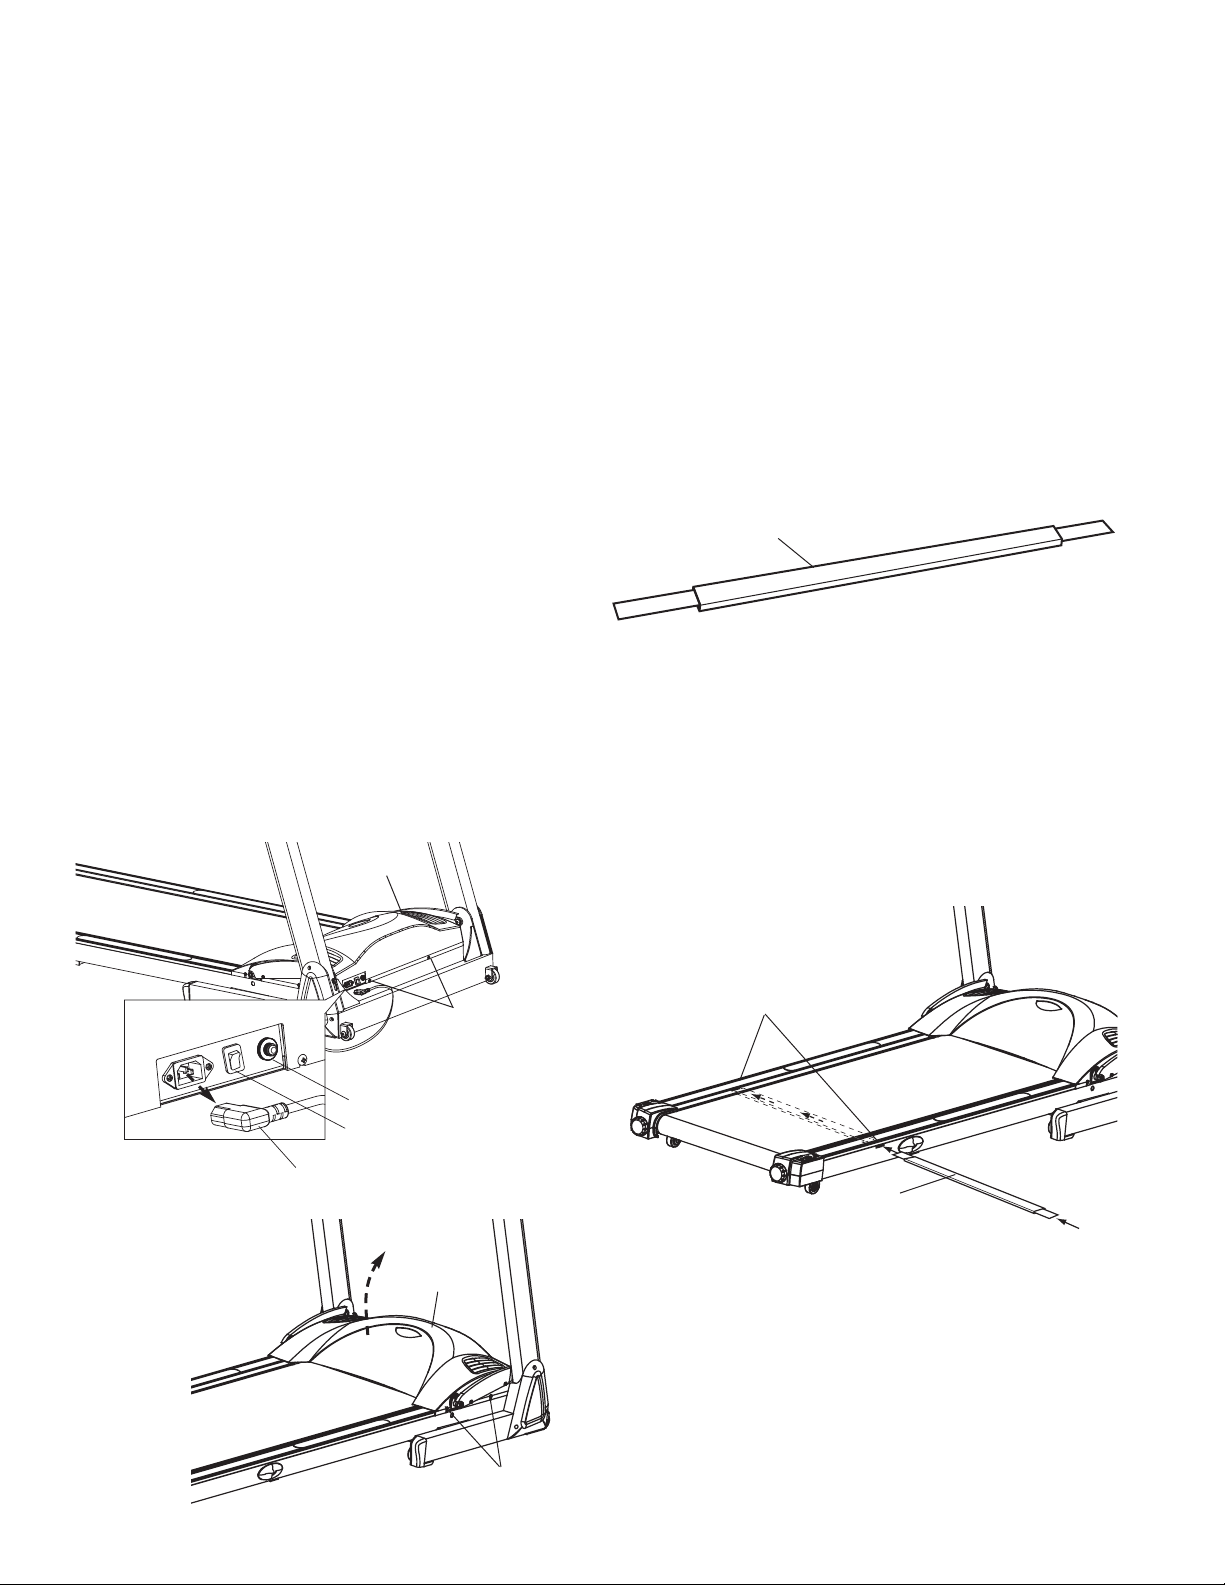
LUBRICATION APPLICATION
1. Put a liberal quantity of lubricant onto foam
side of the Applicator Wand. Apply lubricant
evenly across the foam pad.
2. Insert the Applicator Wand into the lubrication
port on the right hand side of the Treadmill,
under the Walking Belt with the lubricated side
of the Applicator Wand up, against the Belt.
Slide it completely across the Walking Deck
into the lubrication port on the left side of
the Treadmill.
NOTE: Make sure the Applicator Wand is
securely in the left side lubrication port.
3. Start the Treadmill Belt and set the speed at
1.0 mph. Let the Belt run for about 45 seconds
in order to spread the lubrication on the
underneath side of the belt.
4. Place Applicator Wand in plastic sleeve to
retain moisture.
14
WARNING: Always turn off and unplug the
Treadmill from the electrical outlet before cleaning,
lubricating, or servicing the Treadmill.
CLEANING
Keeping the Treadmill clean will prolong the life of
the Treadmill and improve performance.
Regularly dust the unit, especially the exposed part
of the Deck between the Belt and the Side Rails.
For best performance, we recommend your
Treadmill be placed on a Treadmill Mat. A Treadmill
Mat will help to keep dust debris away from your
Treadmill's electrical components.
Clean the top of the Belt with a damp cloth. Be
careful to keep liquid away from inside the frame
or underneath the Belt.
At least once a year remove the Motor Cover and
vacuum under the Motor Cover.
To remove the cover: After turning off and unplugging the Treadmill, loosen the screws (you do not
have to remove the screws) on each side (2) and
in the front (2) of the Motor Cover and carefully lift
the cover off. Be careful, especially around the
wiring on the lower board.
WARNING: Always turn off and unplug the Treadmill
from the electrical outlet before removing the
Motor Cover.
power cord
screw (2)
screw
(2 each side)
motor cover
motor
cover
on/off switch
safety switch
foam pad
lubrication
port
RIGHT
SIDE
LEFT SIDE
applicator
wand
applicator wand
Page 16
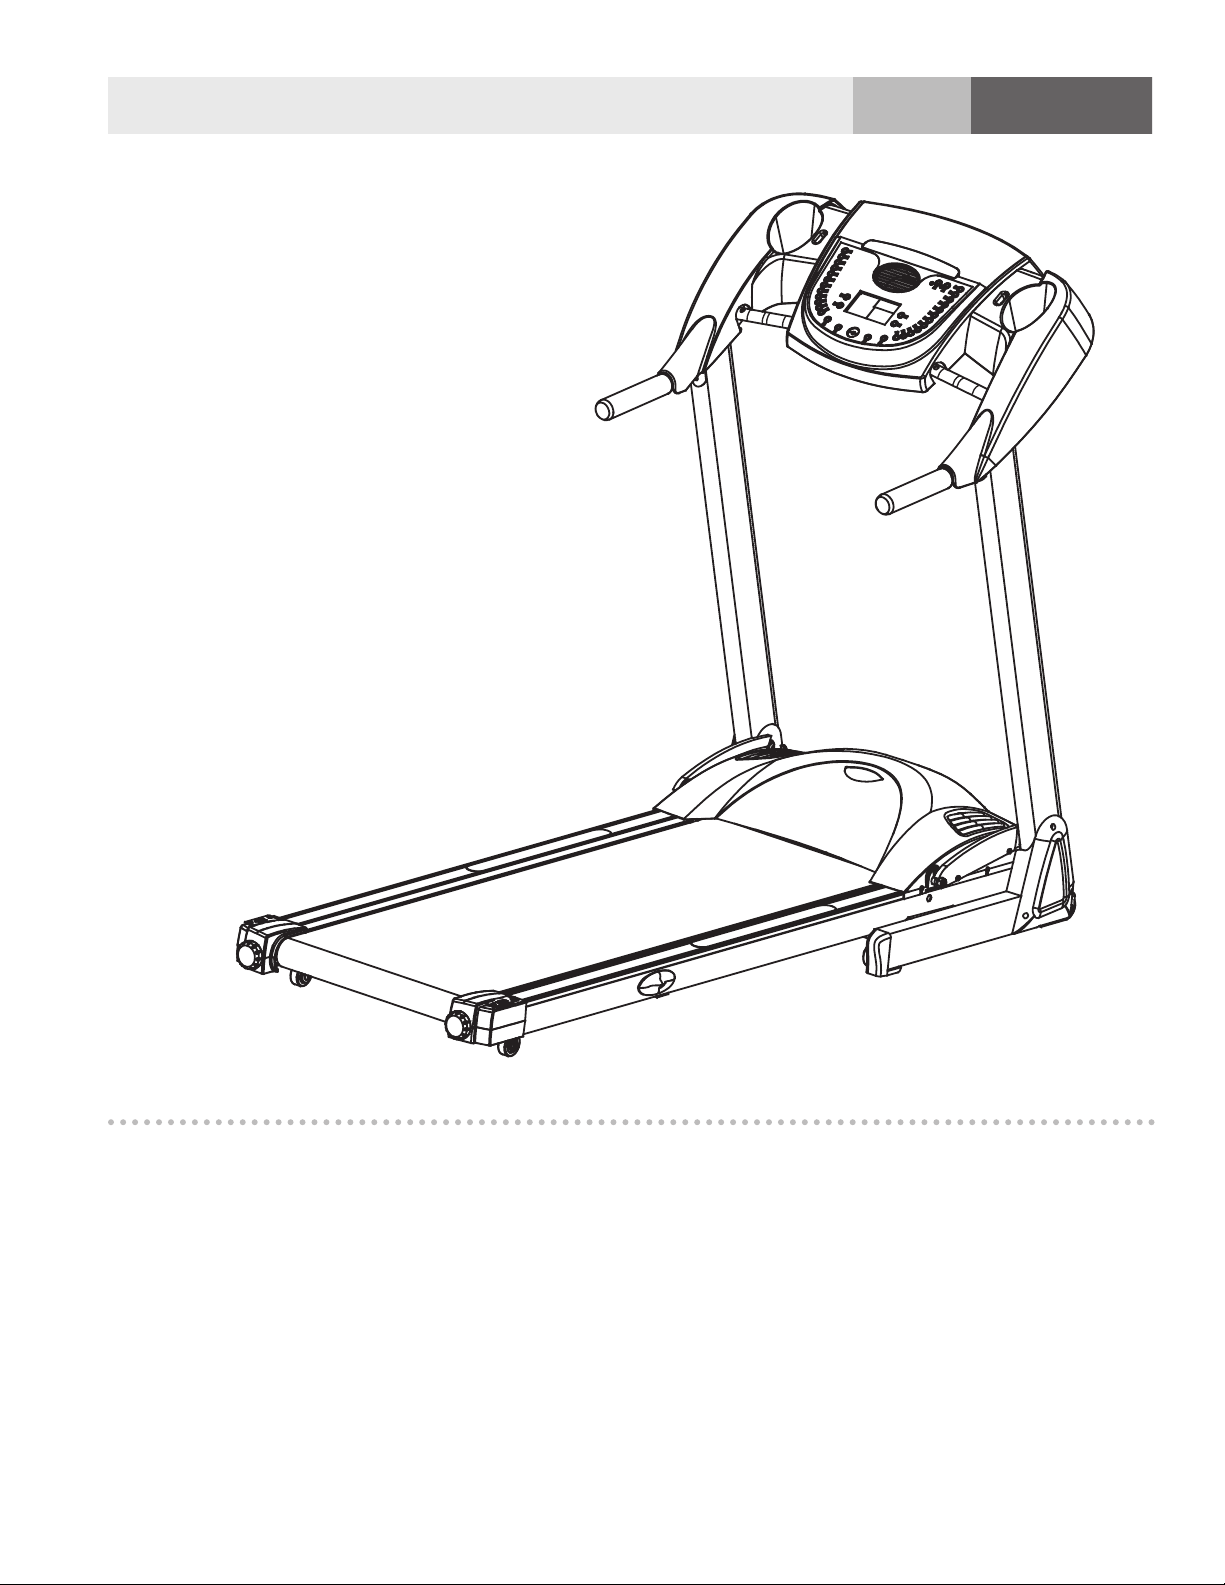
15
Electronics
Operating
Instructions
For Your
Treadmill
1200
1400/1500
SAFETY TIPS:
• Practice mounting and dismounting your
Treadmill before beginning your workout.
• Attach the Safety Key to the Computer (the
Treadmill will not operate without the Safety
Key). Clip the other end of the Safety Key to
your clothing before exercising to ensure the
Treadmill will stop if the user accidentally
walks off the Treadmill.
• If the user falls off the Treadmill, the Safety Key
will come off the Computer and the Treadmill
will stop at once to avoid further injury.
• Do not stand on the Walking Belt while starting
the Treadmill. Straddle the Belt and stand on
the plastic Foot Rails.
• The Treadmill will start at 0.5mph after a 3,2,1
countdown. If you are a new user, stay at a slow
speed and hold onto the Hand Grips until you
become comfortable.
Page 17
16
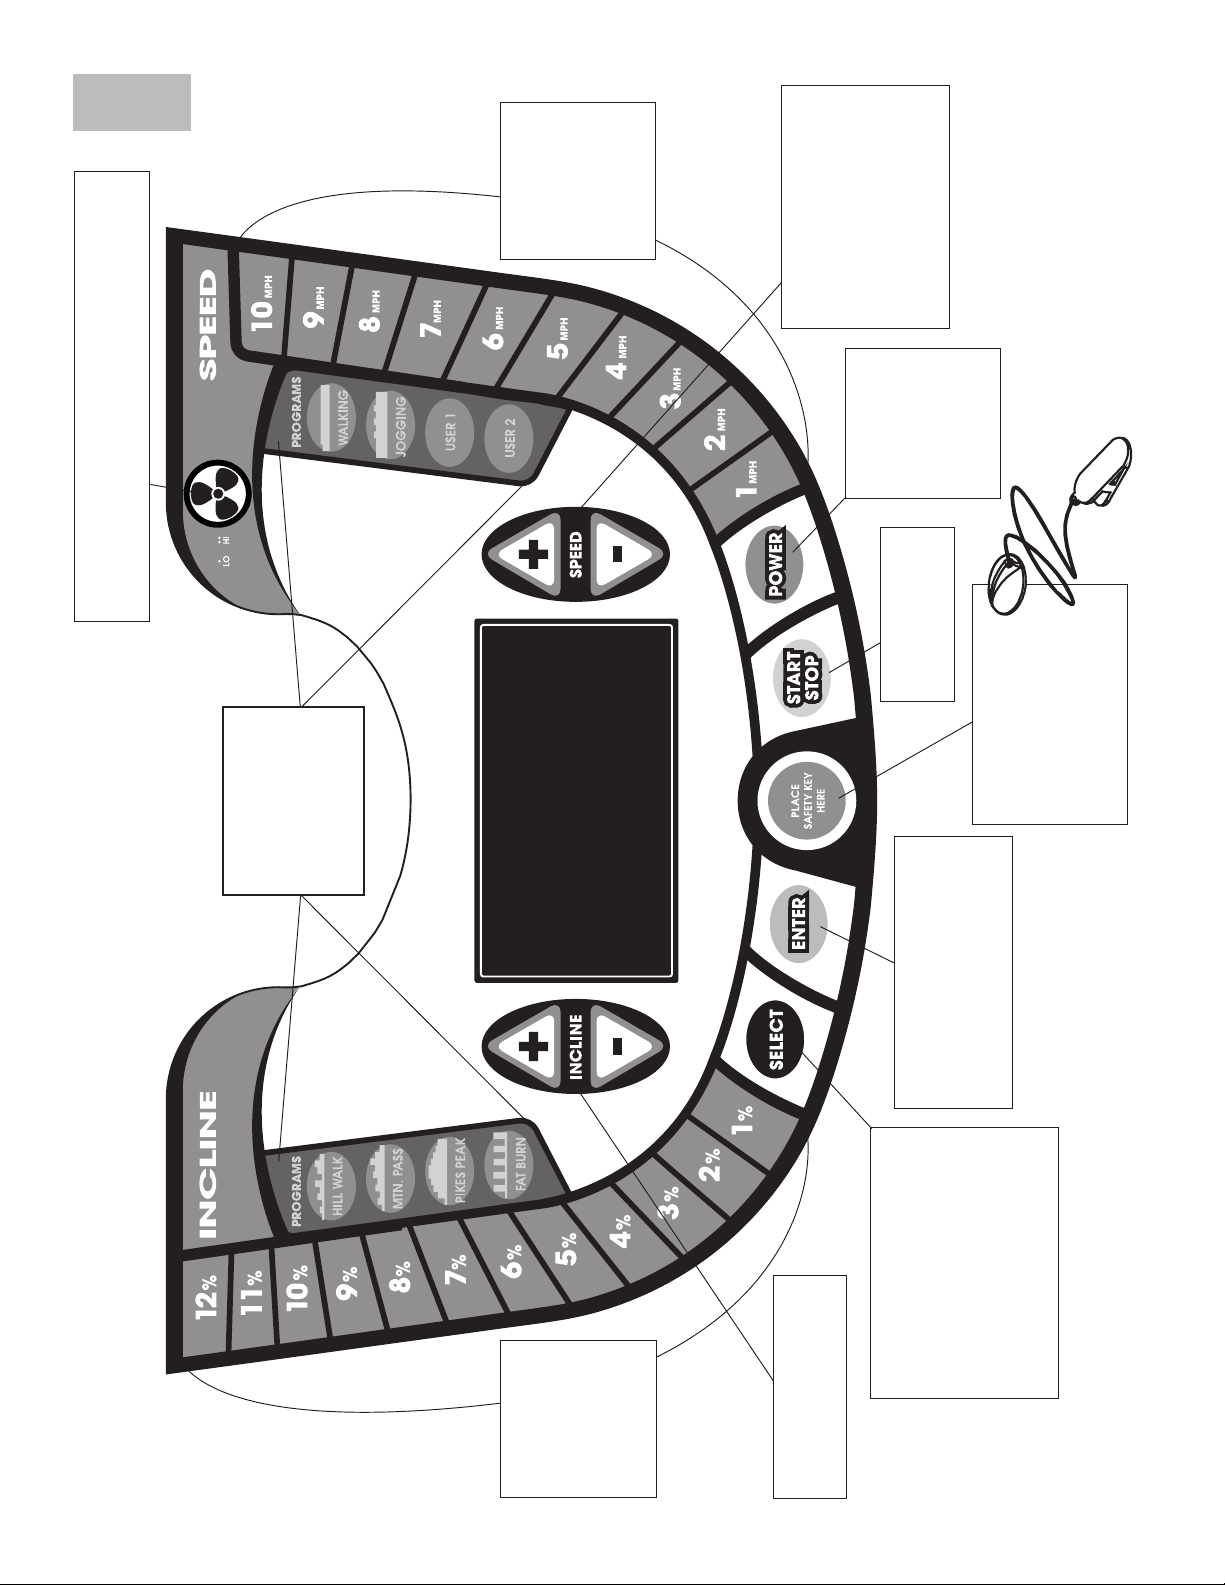
SPEED
QUICK KEYS
1-10 MPH
Pressing these keys
gradually changes
the SPEED to
that value.
POWER KEY
Pressing this key
brings power to
the Treadmill and
must be pressed
before any
other key.
ENTER
Pressing this confirms the selection
of a program. Also confirms the
speed and incline values during
the setting of a user program.
SELECT
Displays the preset
or user programs.
Also will display the elevation
and elevation gain values
for three seconds during workout.
When power is off, press for
2 seconds to change from
miles to kilometers.
PROGRAM KEYS
INCLINE
QUICK KEYS
1-12 %
Pressing these keys
slowly changes
the Incline to
that value.
SAFETY KEY
+ or - KEYS
Increases or decreases
the INCLINE when pressed.
START/STOP KEY
Pressing this starts and
stops the Treadmill Belt.
The Computer can be
operated only with the Safety
Key attached to the Treadmill.
The Computer shuts off and
the Treadmill stops when
this key is removed.
safety key
FAN
Turns fan on/off. Press this key to put the fan on low speed,
again to go to high speed and again to turn the fan off.
+ or - KEYS
Increases or decreases
the SPEED when pressed.
Pressing once increases or
decreases the speed 0.1 mph.
Pressing and holding for
two seconds will increase
or decrease the speed faster.
Pressing these
selects a program.
Press Power, then
select Program,
hit Enter, then Start.
QUICK REFERENCE
GUIDE
1200
Page 18
17
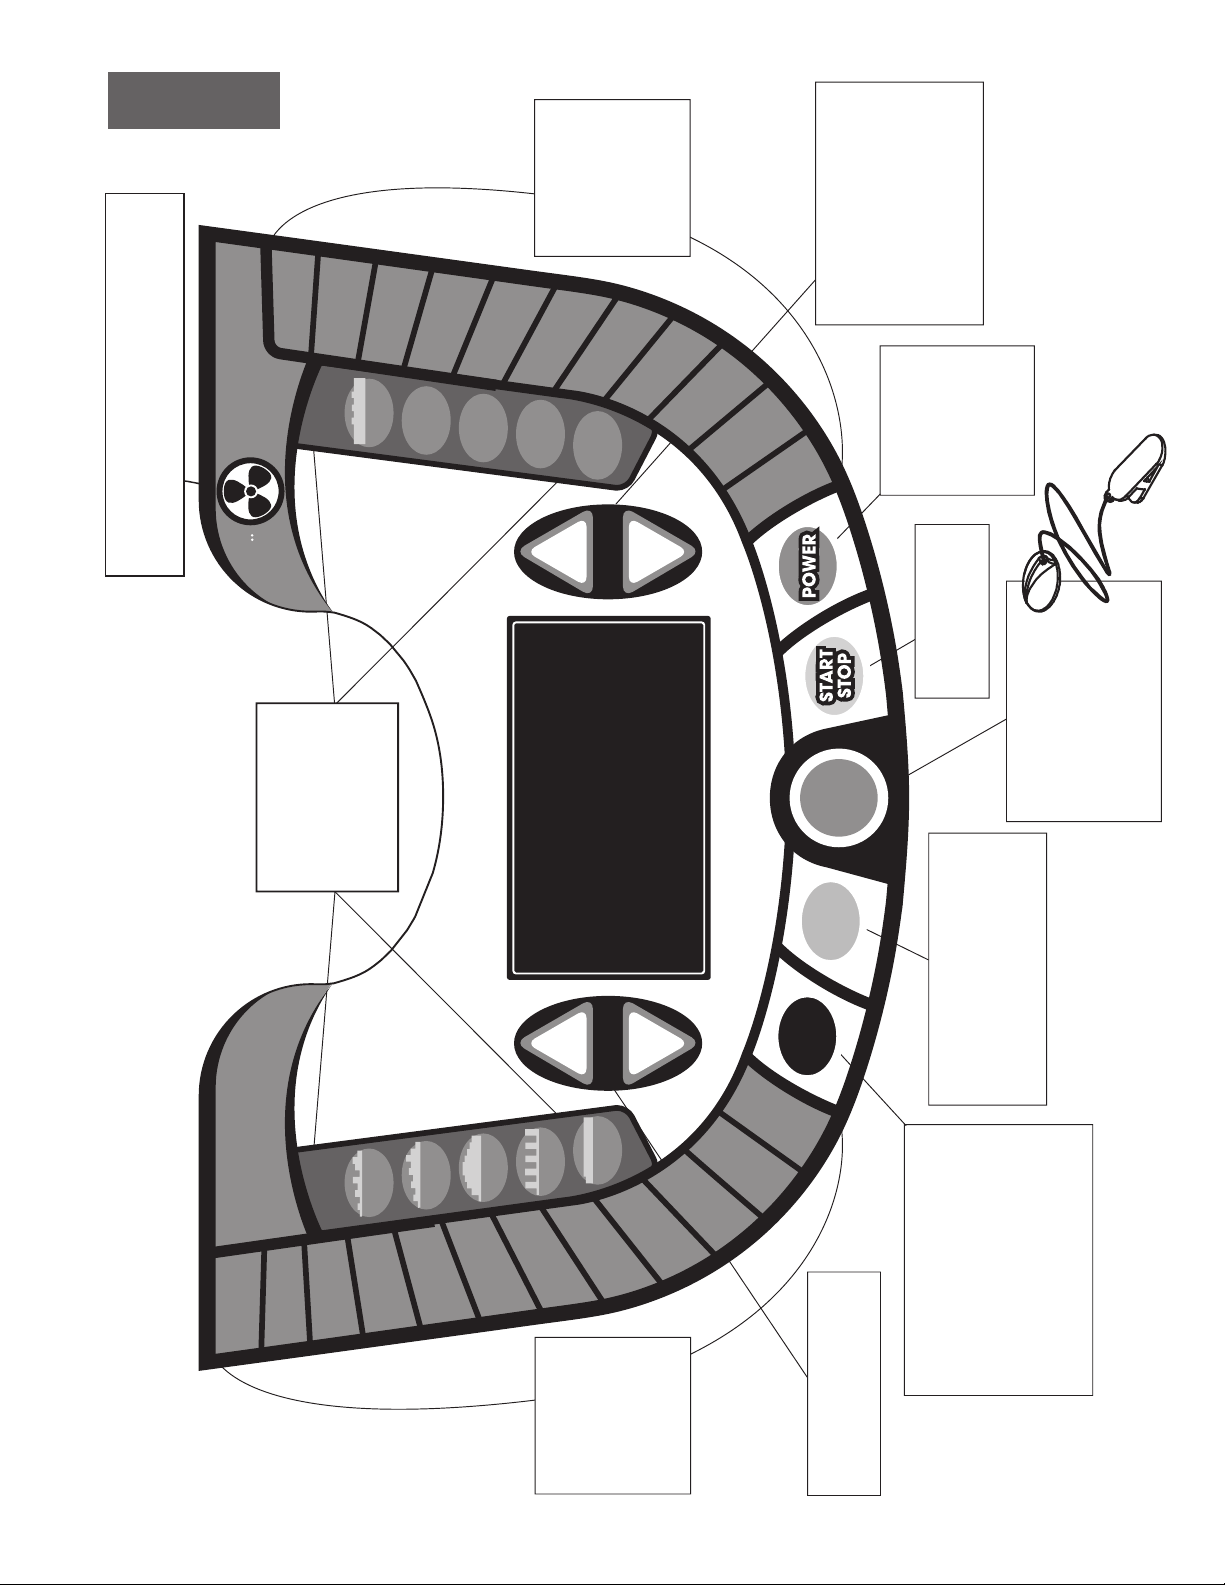
SPEED
QUICK KEYS
1-11 MPH
Pr
i
essing
t
these keys
gradually changes
the SPEED to
that value.
POWER KEY
Pressing this key
brings power to
the Treadmill and
must be pressed
before any
other key.
ENTER
Pressing this confirms the selection
of a program. Also confirms the
speed and incline values during
the setting of a user program.
SELECT
Displays the preset
or user programs.
Also will display the elevation
and elevation gain values
for three seconds during workout.
When power is off, press for
2 seconds to change from
miles to kilometers.
INCLINE
QUICK KEYS
1-12 %
Pressing these keys
slowly changes
the Incline to
that value.
SAFETY KEY
+ or - KEYS
Increases or decreases
the INCLINE when pressed.
START/STOP KEY
Pressing this starts and
stops the Treadmill Belt .
The Computer can be
operated only with the Safety
Key attached to the Treadmill.
The Computer shuts off and
the Treadmill stops when
this key is removed.
safety key
FAN
Turns fan on/off. Press this key to turn the fan on
and press again to turn fan off.
+ or - KEYS
Increases or decreases
the SPEED when pressed.
Pressing once increases or
decreases the speed 0.1 mph.
Pressing and holding for
two seconds will increase
or decrease the speed faster.
SELECT
ENTERENTER
WALKING
JOGGING
DISTANCE
CALORIES
USER 1
USER 2
HILL WALK
MTN. PASS
PIKES PEAK
FAT BURN
PROGRAMS PROGRAMS
HI
+
-
+
-
INCLINE SPEED
PLACE
SAFETY KEY
HERE
1 %
2 %
3 %
4%
5%
6%
7%
8%
9%
10%
11%
12%
INCLINE
SPEED
1MPH
2MPH
3MPH
4MPH
5
MPH
6MPH
7
MPH
8MPH
9
MPH
10
MPH
11MPH
PROGRAM KEYS
Pressing these
selects a program.
Press Power, then
select Program,
hit Enter, then Start.
QUICK REFERENCE
GUIDE
1400/1500
ng
ess
Page 19
18
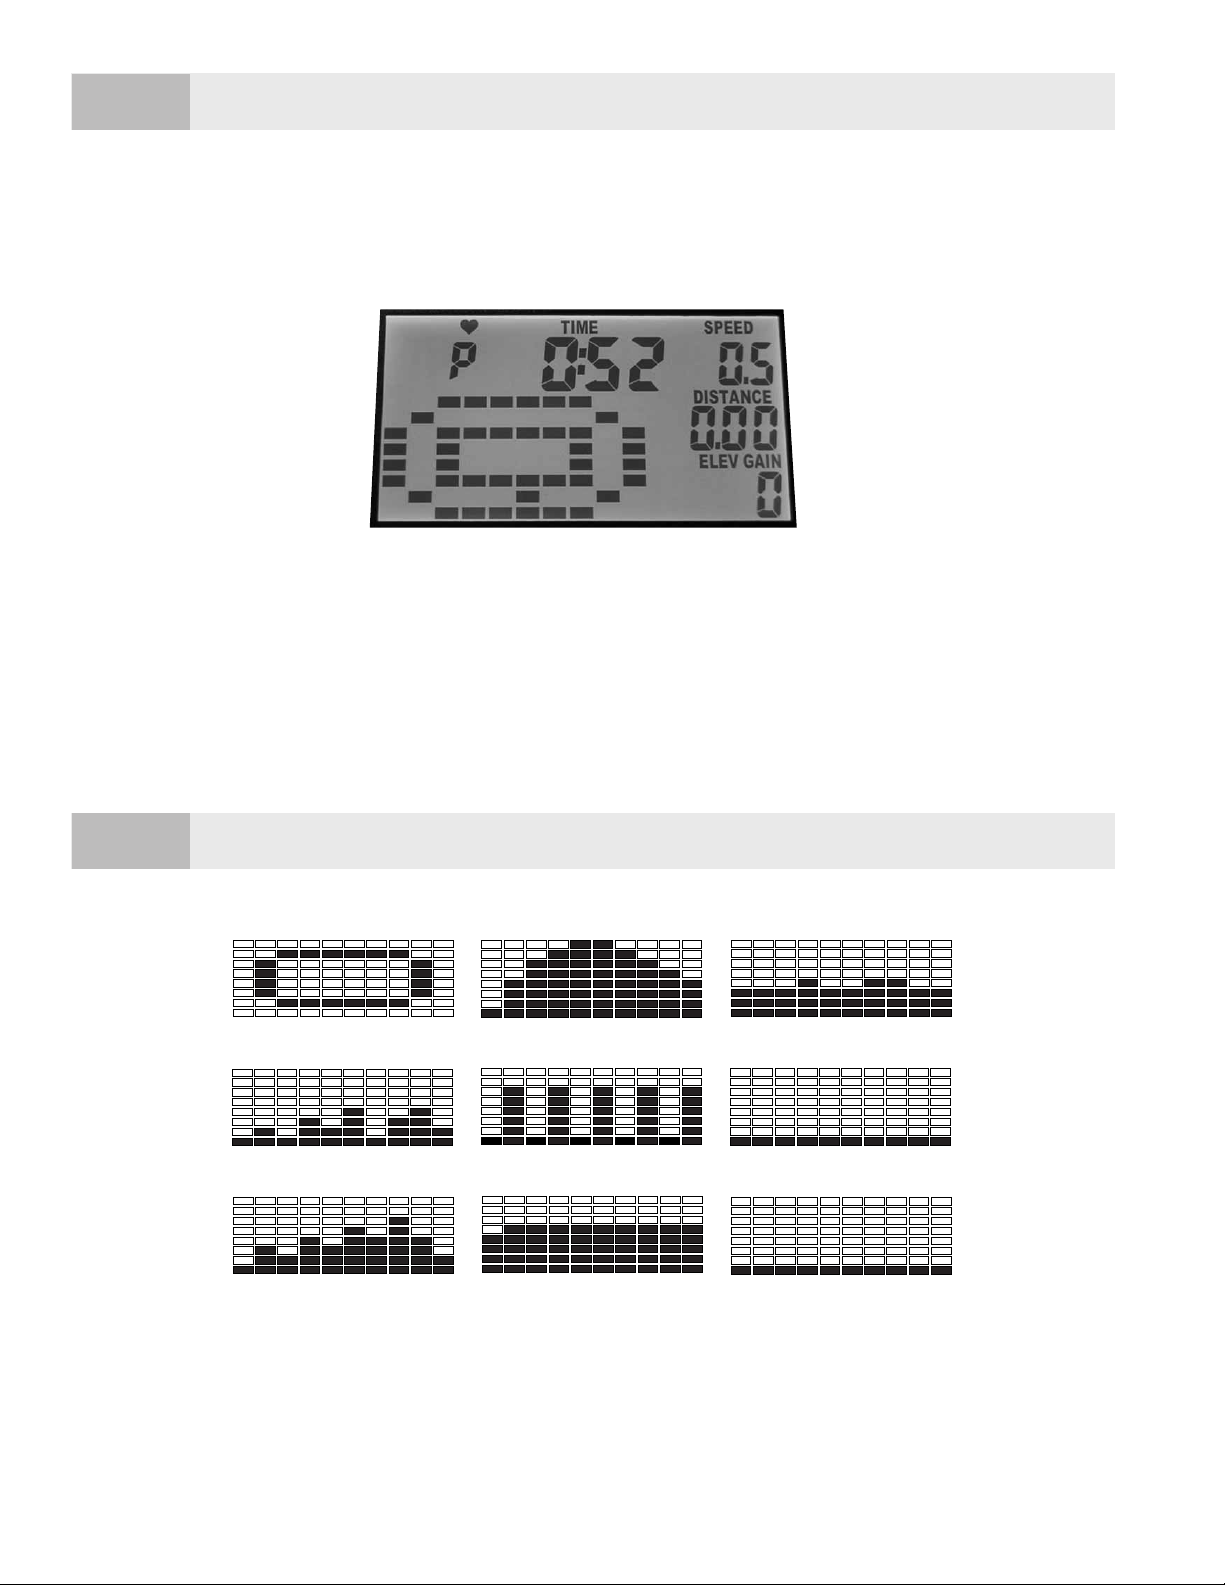
DOT MATRIX: The 8 x 10 dot matrix reflects Incline
on the Elevation Programs (Programs 1-4) and
Speed on the Speed Programs (Programs 5-6)
and the User Programs. In the Manual Mode,
the dot matrix displays a 1/4 mile running track.
Manual Mode shown above.
DISTANCE: Displays the
Distance, in miles or
kilometers, the Treadmill
Belt has gone on the
current workout.
SPEED: Displays the Speed
the Treadmill Belt is moving.
INCLINE/PULSE: Displays pulse
rate except when elevation
is changed or SELECT key is
pressed. To get a pulse rate,
place both of your hands
on the Pulse Grip Bars. It is
recommended to straddle
the Walking Belt to get an
accurate reading. If you
are walking or jogging, it is
difficult for the Computer
to accurately read your
pulse rate. (See page 22
for more details.)
Please read carefully before using the Treadmill.
TIME: Shows workout Time. Time begins at 00:00 and counts up.
The maximum time is 99:59. When the Safety Key is first attached
to the Computer, this display shows the accumulated Distance
(odometer) for one second.
1200
DISPLAY FUNCTION
MANUAL
FAT BURN
USER 2
HILL WALK
WALKING
MOUNTAIN PASS
JOGGING
PIKES PEAK
USER 1
PROGRAM 4
U2
PROGRAM 1
PROGRAM 5
PROGRAM 2
PROGRAM 6
PROGRAM 3
U1
1200
PROGRAM FUNCTION
Odometer: An Odometer showing accumulated distance
will appear in the Time window for one second when the
Safety Key is placed on the Computer.
Time-Out: If the Treadmill is turned on, and the Belt is not
moving, the Computer will shut-off after five minutes.
Re-Start: If the Treadmill is stopped during use,
when the START button is pressed again, the
Treadmill will ramp-up the speed to where it
was stopped. If the Treadmill is stopped for 5
minutes or more, POWER is lost and the
Treadmill will have to be re-started.
CALORIES/ELEVATION GAIN: Displays Calories
consumed. To display Elevation, in feet, the user
has climbed during the current workout, press
SELECT and the value will display for three
seconds. The Calorie Calculation is based on
a 150 pound person.
Page 20

19
4. Fat Burn: This is an interval elevation program
where the elevation alternates between 0%
and 5%. The user controls the speed.
5. Walking: This is a speed program that varies
between 2.5mph and 3.3mph. This is an
excellent program for intermediate walkers.
The user controls the elevation.
6. Jogging: This is a speed program that varies the
speed between 4.0mph and 4.8mph. This is a
good program for beginner joggers and very
fast walkers. The user controls the elevation.
7. User Programs: After selecting one of the user
programs, press ENTER to confirm. Press ENTER
again and adjust the Speed and Incline for
segment one and press ENTER. Continue to
adjust the speed and incline for each segment
and press ENTER. Press START to begin the
workout. If a speed or incline value is changed
during usage, the Computer will store the value
of the speed and incline at the end of each
segment and will retain these values.
PROGRAMS
MANUAL MODE: If you elect to operate the Treadmill
in Manual Mode, press START. The Treadmill will start
at 0.5mph after a 3,2,1 countdown.
PROGRAM MODE: After pressing POWER, press the
desired program using the program Quick Keys or
press SELECT to choose one of the programs.
Note: The program layout appears in the dot matrix
display. Press ENTER to verify the selection.
Press START to begin the program. All programs have
ten segments. The program will repeat after the ten
segments until the user presses STOP. An explanation
of the programs follow:
1. Hill Walk: This is an elevation program that goes
from 0% to 3% grade. The speed is controlled by
the user and the Treadmill will start at 0.5mph.
Each minute, the elevation changes.
2. Mountain Pass: This is an elevation program
that goes from 0% to 5% grade. The speed is
controlled by the user.
3. Pikes Peak: This is a challenging elevation
program that goes from 0% to 7% grade. The
speed is controlled by the user.
1200
Page 21
20
DISPLAYS
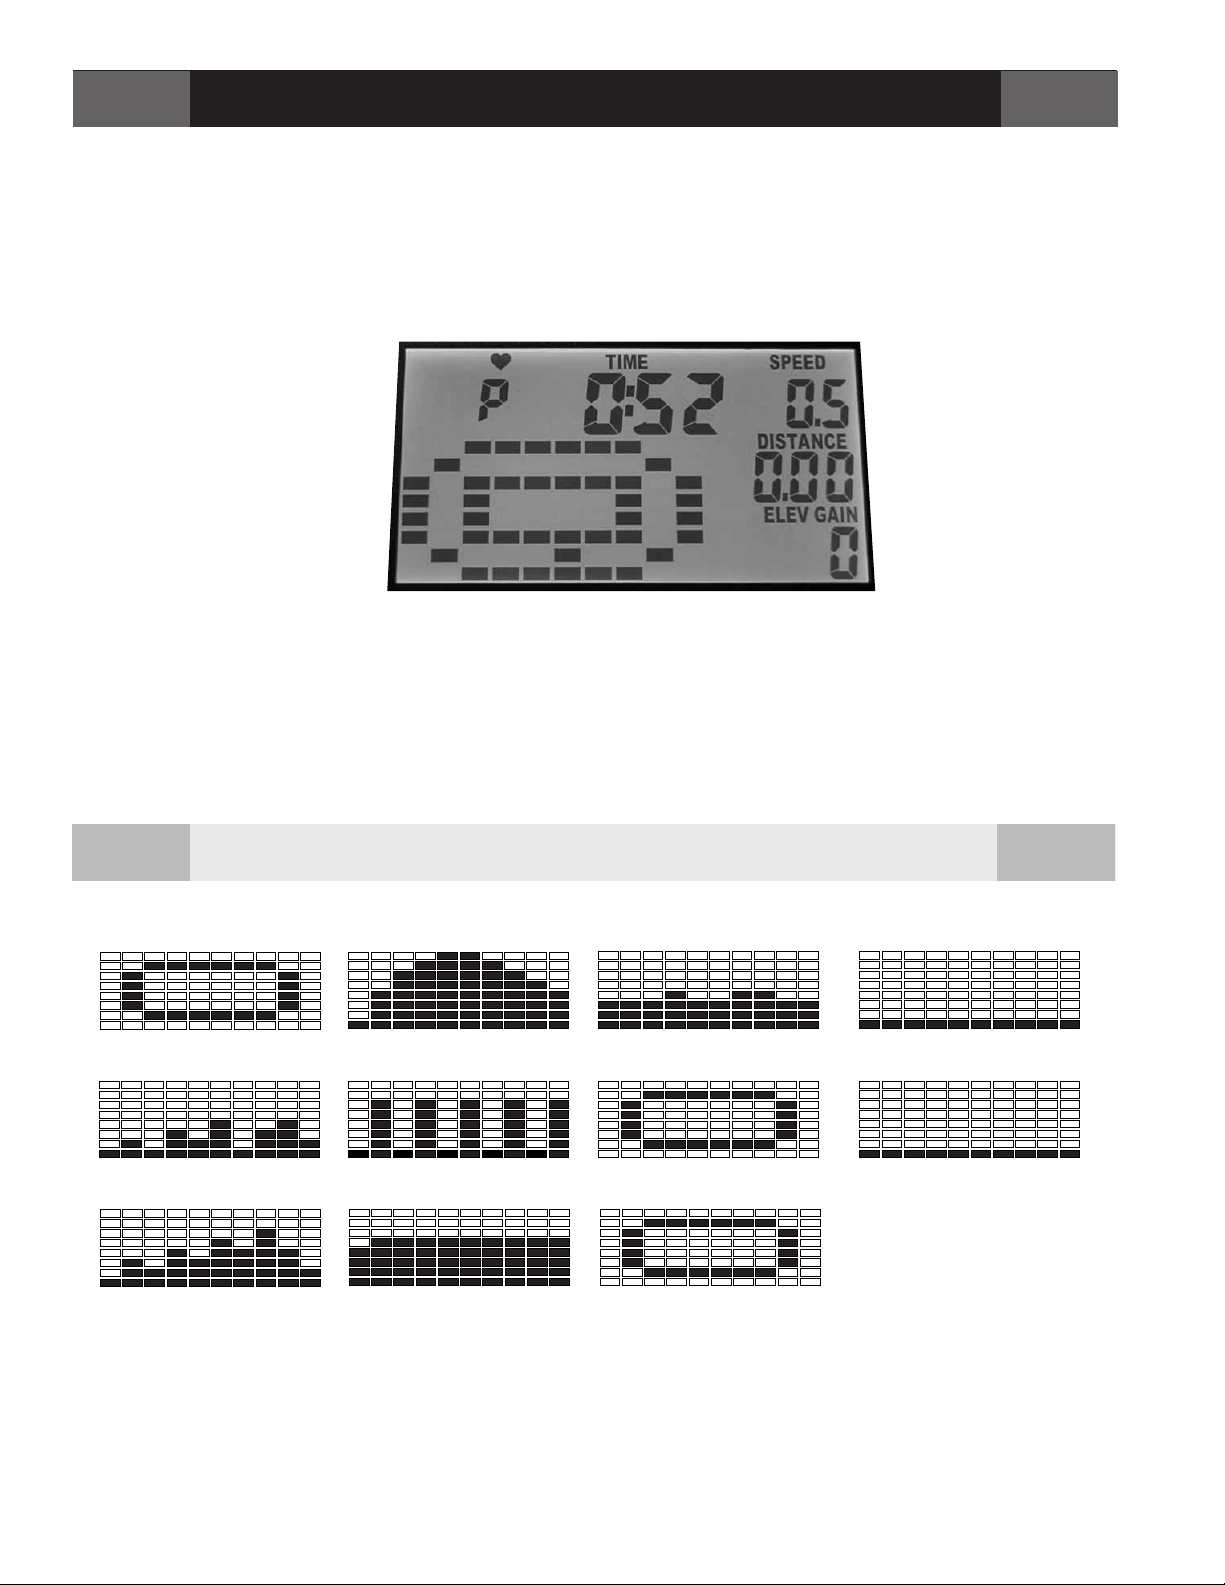
DOT MATRIX: The 8 x 10 dot matrix reflects Incline
on the Elevation Programs (Programs 1-4) and
Speed on the Speed Programs (Programs 5-6)
and the User Programs. In the Manual Mode, the
dot matrix displays a 1/4 mile running track.
Manual Mode shown above.
CALORIES/ELEVATION GAIN: Displays Calories
consumed. To display Elevation, in feet, the user
has climbed during the current workout, press
SELECT and the value will display for three
seconds. The Calorie Calculation is based on
a 150 pound person.
DISTANCE: Displays
the Distance, in miles
or kilometers, the
Treadmill Belt has
gone on the current
workout.
SPEED: Displays the
Speed the Treadmill
Belt is moving.
INCLINE/PULSE: Displays pulse
rate except when elevation
is changed or SELECT key is
pressed. To get a pulse rate,
place both of your hands
on the Pulse Grip Bars. It is
recommended to straddle
the Walking Belt to get an
accurate reading. If you
are walking or jogging, it is
difficult for the Computer
to accurately read your
pulse rate. (See page 22 for
more details.)
TIME: Shows workout Time. Time begins at 00:00 and counts up.
The maximum time is 99:59. When the Safety Key is first attached
to the Computer, this display shows the accumulated distance
(odometer) for one second.
1400
1500
Please read carefully before using the Treadmill.
OPERATION INSTRUCTIONS
MANUAL
FAT BURN
HILL WALK
WALKING
MOUNTAIN PASS
JOGGING
PIKES PEAK
TARGET DISTANCE
PROGRAM 4
TARGET CALORIES
PROGRAM 8
PROGRAM 1
PROGRAM 5
PROGRAM 2
PROGRAM 6
PROGRAM 3
PROGRAM 7
USER 1
USER 2
U1
U2
1400
1500
PROGRAM FUNCTION
Odometer: An Odometer showing accumulated distance
will appear in the Time window for one second when the
Safety Key is placed on the Computer.
Time-Out: If the Treadmill is turned on, and the Belt is not
moving, the Computer will shut-off after five minutes.
Re-Start: If the Treadmill is stopped during use,
when the START button is pressed again, the
Treadmill will ramp-up the speed to where it
was stopped. If the Treadmill is stopped for 5
minutes or more, POWER is lost and the
Treadmill will have to be re-started.
Page 22

21
6. Jogging: This is a speed program that varies the
speed between 4.0mph and 4.8mph. This is a
good program for beginner joggers and very
fast walkers. The user controls the elevation.
7. Target Distance: This program counts down the
distance goal that the user sets before exercising. After confirming the program, the user
enters the distance goal using the speed or
incline arrow keys. Increments are 0.5 miles.
Press ENTER to confirm the distance goal, press
START, the Treadmill Belt starts and the user
controls the speed and incline. The distance
will count down in the distance window.
8. Target Calories: This program counts down the
calorie goal that the user sets before exercising.
After confirming the program, the user enters
the calorie goal using the Speed or Incline
arrow keys. Increments are 10 calories. Press
ENTER to confirm the calorie goal, press START,
the Treadmill starts and the user controls the
speed and incline. The calorie goal will count
down in the Calories window.
9. User Programs: After selecting one of the user
programs, press ENTER to confirm. Press ENTER
again and adjust the Speed and Incline for
segment one and press ENTER. Continue to
adjust the speed and incline for each segment
and press ENTER. Press START to begin the
workout. If a speed or incline value is changed
during usage, the Computer will store the value
of the speed and incline at the end of each
segment and will retain these values.
PROGRAMS
MANUAL MODE: If you elect to operate the Treadmill
in Manual Mode, press START. The Treadmill will start
at 0.5mph after a 3,2,1 countdown.
PROGRAM MODE: After pressing POWER, press the
desired program using the program Quick Keys or
press SELECT to choose one of the programs.
Note: The program layout appears in the dot matrix
display. Press ENTER to verify the selection.
Press START to begin the program. All programs have
ten segments. The program will repeat after the ten
segments until the user presses STOP. An explanation
of the programs follow:
1. Hill Walk: This is an elevation program that goes
from 0% to 3% grade. The speed is controlled by
the user and the Treadmill will start at 0.5mph.
Each minute, the elevation changes.
2. Mountain Pass: This is an elevation program
that goes from 0% to 5% grade. The speed is
controlled by the user.
3. Pikes Peak: This is a challenging elevation
program that goes from 0% to 7% grade. The
speed is controlled by the user.
4. Fat Burn: This is an interval elevation program
where the elevation alternates between 0%
and 5%. The user controls the speed.
5. Walking: This is a speed program that varies
between 2.5mph and 3.3mph. This is an
excellent program for intermediate walkers.
The user controls the elevation.
1400/1500
Page 23
22
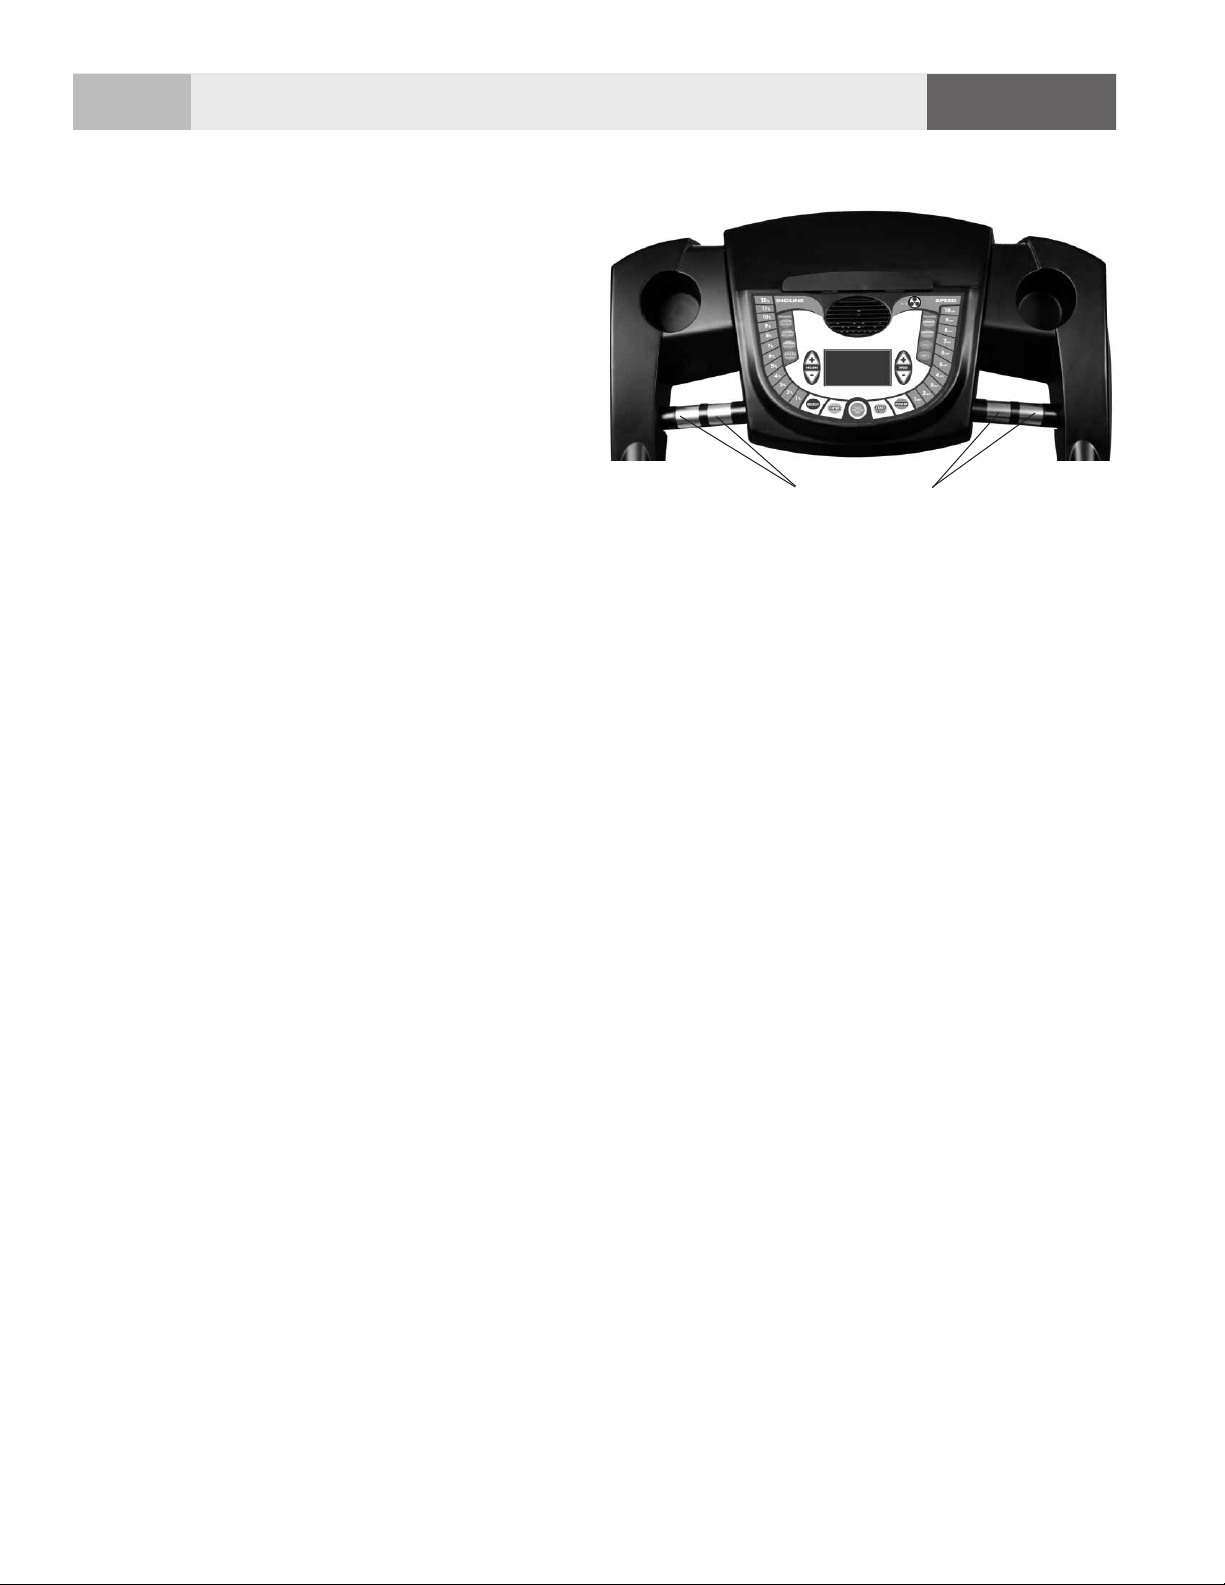
The Pulse Window on your Computer works in
conjunction with the Pulse Sensors found on the
Console. When you are ready to read your pulse:
1. Place both hands firmly on the Pulse Sensors.
For the most accurate reading, it is important
to use both hands.
2. Look at your Pulse Window. The “P” will begin
to blink.
3. Your estimated heart rate will appear in the
window approximately 6 seconds after you
grasp the Pulse Sensors.
4. Refer to the Target Heart Rate Zone Chart
found on page 26 of this manual. For additional
information about the importance of working
within certain heart rate ranges, see pages
24 - 25 – Measuring Your Heart Rate.
5. This estimate is not exact and persons with
medical conditions and/or a specific need for
accurate heart rate monitoring should not rely
on the estimations provided.
When used properly, the heart rate pulse sensors
and display monitor provide a reasonably
accurate estimate of your actual heart rate. This
estimate is not exact and persons with medical
conditions and/or a specific need for accurate
heart rate monitoring should not rely on the
estimations provided.
Pulse Sensors
1200 1400/1500
USING THE PULSE FUNCTION
Page 24

23
IMPORTANT
Please review this section before you begin exercising.
EXERCISE GUIDELINES
IMPORTANT:
If you are over 35 and have been inactive
for several years, you should consult your
physician, who may or may not recommend a
graded exercise test.
If you are just beginning your exercise program,
your target heart rate range should be roughly at
60% of your maximum heart rate.As you become
more conditioned (or if you are already in good
cardiovascular shape) you can increase your
target heart rate to 70%-85% of your maximum
heart rate. Remember, your target heart rate is
only a guide.
You should also consult your physician if you
have the following:
• High blood pressure
• High cholesterol
• Asthma
• Heart trouble
•Family history of early stroke or
heart attack deaths
• Frequent dizzy spells
• Extreme breathlessness after mild exertion
• Arthritis or other bone problems
• Severe muscular, ligament or
tendon problems
• Other known or suspected disease
• If you experience any pain or tightness
in your chest, an irregular heartbeat or
shortness of breath, stop exercising
immediately. Consult your physician
before continuing.
•Pregnant
• Balance impairment
•Taking medications that affect heart rate
KNOWING THE BASICS
Physical fitness is most easily understood by
examining its components, or "parts".
There is widespread agreement that these
five components comprise the basics of
physical training:
CARDIORESPIRATORY ENDURANCE – the ability
to deliver oxygen and nutrients to tissues, and to
remove wastes, over sustained periods of time.
Using your Treadmill will improve this.
MUSCULAR STRENGTH – the ability of a muscle to
exert force for a brief period of time. Upper-body
strength, for example, can be measured by various
weight-lifting exercises.
MUSCULAR ENDURANCE – the ability of a muscle,
or a group of muscles, to sustain repeated contractions or to continue applying force against a fixed
object. Push ups are often used to test endurance
of arm and shoulder muscles.
FLEXIBILITY – the ability to move joints and use
muscles through their full range of motion.The sitand-reach test is a good measure of flexibility of
the lower back and backs of the upper legs.
BODY COMPOSITION – often considered a component of fitness. It refers to the makeup of the body
in terms of lean mass (muscle, bone, vital tissue and
organs) and fat mass. An optimal ratio of fat to lean
mass is an indication of fitness, and the right types
of exercises will help you decrease body fat and
increase or maintain muscle mass. To help track
your progress we have provided Workout Progress
Chart on page 30.
A COMPLETE EXERCISE PROGRAM
How often, how long and how hard you exercise,
and what kinds of exercises you do should be
determined by what you are trying to accomplish.
Your goals, your present fitness level, age, health,
skills, interest and convenience are among the
factors you should consider. For example, an
athlete training for high-level competition would
follow a different program than a person whose
goals are good health and the ability to meet
work and recreational needs.
Your exercise program should include something
from each of the four basic fitness components
Page 25

24
described previously. Each workout should begin
with a warm up and end with a cool down. As a
general rule, space your workouts throughout the
week and avoid consecutive days of hard
exercise.
Here are the amounts of activity necessary for the
average healthy person to maintain a minimum
level of overall fitness. Included are some of the
popular exercises for each category.
WARM UP – 5 -10 minutes of exercise such as
walking, slow jogging, knee lifts, arm circles or
trunk rotations. Low intensity movements that
simulate movements to be used in the activity
can also be included in the warm up.
MUSCULAR STRENGTH –a minimum of two, 20
minute sessions per week that include exercises for
all the major muscle groups. Lifting weights is the
most effective way to increase strength.
MUSCULAR ENDURANCE – at least three, 30 minute
sessions each week that include exercises such as
calisthenics, push ups, sit ups, pull ups, and weight
training for all the major muscle groups.
CARDIORESPIRATORY ENDURANCE – at least
three, 20 minute workouts of continuous aerobic
exercise each week. Working out on your Treadmill
is a good way to obtain this aerobic activity. Other
popular aerobic conditioning activities include brisk
walking, jogging, swimming, cycling, rope jumping,
rowing, cross-country skiing, and some continuous
action games like racquetball and handball.
FLEXIBILITY – 10-12 minutes of daily stretching
exercises performed slowly, without a bouncing
motion. This can be included after a warm up or
during a cool down. Refer to pages 27 and 28
for a list of total body stretches.
COOL DOWN – a minimum of 5 -10 minutes of
slow walking or lower intensity elliptical exercise,
combined with stretching.
AEROBIC EXERCISE:
HOW MUCH? HOW OFTEN?
Experts recommend that you do some form of
aerobic exercise at least three times a week for a
minimum of 20 continuous minutes. Of course, if
that is too much, start with a shorter time span and
gradually build up to the minimum. Then gradually
progress until you are able to work aerobically for
20-40 minutes. If you want to lose weight, you may
want to do your aerobic workout five times a week.
It is important to exercise at an intensity vigorous
enough to cause your heart rate and breathing to
increase. How hard you should exercise depends to
a certain degree on your age, and is determined
by measuring your heart rate in beats per minute.
Refer to the “Measuring Your Heart Rate” section
below and on the following page for more
information on how to determine and measure
your heart rate.
You can do different types of aerobic activities, say
walking one day, and use your Treadmill the next.
Make sure you choose an activity that can be
done regularly, and is enjoyable for you. The
important thing to remember is not to skip too
many days between workouts or fitness benefits
will be lost. If you must lose a few days, gradually
work back into your routine.
WHEN TO EXERCISE
The hour just before the evening meal is a popular
time for exercise.The late afternoon workout
provides a welcome change of pace at the
end of the work day and helps dissolve the day's
worries and tensions.
Another popular time to work out is early
morning, before the work day begins. Advocates
of the early start say it makes them more alert
and energetic on the job.
Among the factors you should consider in
developing your workout schedule are personal
preference, job and family responsibilities,
availability of exercise facilities and weather. It's
important to schedule your workouts for a time
when there is little chance that you will have to
cancel or interrupt them because of other
demands on your time.
You should not exercise strenuously during
extremely hot, humid weather or within two
hours after eating. Heat and/or digestion both
make heavy demands on the circulatory system,
and in combination with exercise can be an
over-taxing double load.
MEASURING YOUR HEART RATE
(see chart on page 26)
Heart rate is widely accepted as a good method
for measuring intensity during running, swimming,
cycling, and other aerobic activities. Exercise that
doesn't raise your heart rate to a certain level and
keep it there for 20 minutes won't contribute
significantly to cardiovascular fitness.
The heart rate you should maintain is called your
Target Heart Rate. There are several ways of arriving
at this figure. One of the simplest is: maximum heart
rate (220 - age) x 70%. Thus, the target heart rate for
a 40 year-old would be 126. In this example for this
Page 26

25
40 year old to get a cardiovascular effect the
individual would need to keep their heart rate
at or above 126 beats per minute to get a
cardiovascular effect. Note: Although 70% was
used in this example, the heart rate range needed
to achieve results falls between 60% and 85% of
your maximum heart rate.
If you are just beginning your exercise program,
your target heart rate range should be roughly at
60% of your maximum heart rate. As you become
more conditioned (or if you are already in good
cardiovascular shape) you can increase your
target heart rate to 70%-85% of your maximum
heart rate. Remember, your target heart rate is
only a guide.
When checking heart rate during a workout, take
your pulse within five seconds after interrupting
exercise because it starts to go down once you
stop moving. Count pulse for 10 seconds and
multiply by six to get the per-minute rate.
Remember, your New Balance Treadmill also comes
with pulse sensors located on the Console.
When used properly, the unit pulse sensors
can help you to determine your estimated
heart rate. To do so:
1. Push the start button on your Computer.
2. Gently grab both metal pulse sensors on
both handlebars. Wait 6 seconds.
3. Your estimated heart rate range will be
displayed on screen. Check the chart on the
following page to see if you are within your
range according to your age.
When used properly, the heart rate pulse
sensors and display monitor provide a
reasonably accurate estimate of your
actual heart rate. This estimate is not exact
and persons with medical conditions and/or
a specific need for accurate heart rate
monitoring should not rely on the
estimations provided.
By using the chart on the next page you can see
where your heart rate falls in the minimum and
maximum target zones.
The above are guidelines, people with any
medical limitations should discuss this formula
with their physician.
CLOTHING
All exercise clothing should be loose-fitting to
permit freedom of movement, and should make
the wearer feel comfortable and self-assured.
Never wear rubberized or plastic clothing, such
garments interfere with the evaporation of
perspiration and can cause body temperature
to rise to dangerous levels.
We recommend wearing a workout shoe with a
rubberized sole unless instructed otherwise.
TIPS TO KEEP YOU GOING
1. Adopt a specific plan and write it down.
2. Keep setting realistic goals as you go along,
and remind yourself of them often.
3. Keep a log to record your progress and make
sure to keep it up-to-date. See page 30.
4. Include weight and/or percent body fat
measures in your log. Extra pounds can easily
creep back.
5. Upgrade your fitness program as you progress.
Your Treadmill provides different workout
programs to keep your workouts challenging.
6. Enlist the support and company of your family
and friends.
7. Update others on your successes.
8. Avoid injuries by pacing yourself and including
a warm up and cool down period as part of
every workout. See page 24.
9. Reward yourself periodically for a job well done!
Page 27
26
TABLE 2
Exercise Warm Up THR% Cool Down Total Sessions Total Time
Week Period Minutes Period Time Per Wk. Per Wk.
1 & 2 5 min 60-65% -8 5 min 17 min 3 51 min
3 & 4 5 min 65-70% -10 5 min 20 min 3 60 min
5 & 6 5 min 70-75% -15 5 min 25 min 3 75 min
7 & 8 5 min 70-80% -20 5 min 30 min 3 90 min
9 & 10 5 min 70-85% -25 5 min 35 min 3 105 min
11 & 12 5 min 70-85% -25 5 min 35 min 3 105 min
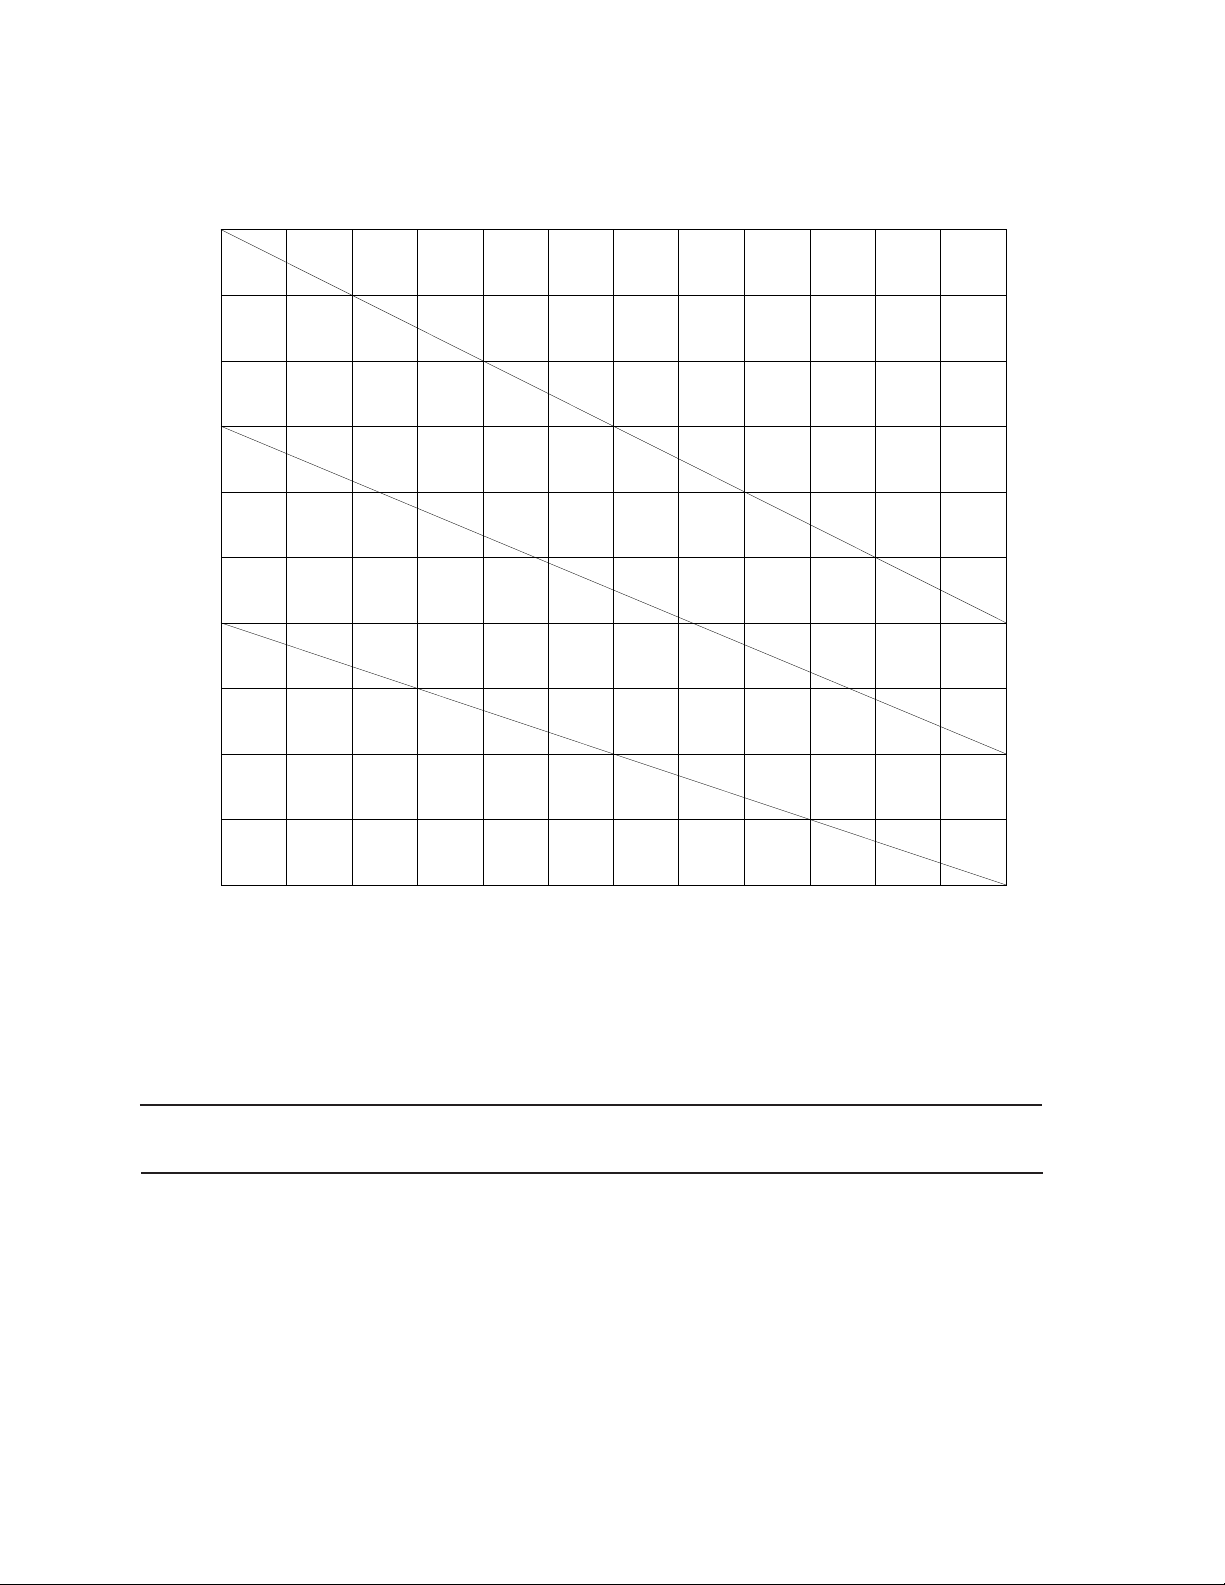
HEART RATE TARGET ZONE
FOR CARDIOVASCULAR FITNESS
TABLE 1
Maximum
Attainable
Heart Rate
85%
Target
Zone
70%
Target
Zone
Heart
Rate
(Beats/
Min)
20 25 30 35 40 45 50 55 60 65 70 75 80
200
190
180
170
160
150
140
130
120
110
100
195
165
136
190
161
133
185
157
129
180
153
129
175
148
129
170
144
119
165
140
115
160
136
112
155
131
108
150
127
105
145
123
101
140
119
98
AGE (YRS)
Page 28
27
Stretches can help improve flexibility and relieve the tightness in muscles
that results from repetitive sport movements that require a limited range
of motion. 10 to 12 minutes of daily stretching is recommended. This can
be done when warming up or cooling down. When performing these
stretches, your movements should be slow and smooth, with no bouncing
or jerking. Move into the stretch until you feel a slight tension, not pain, in
the muscle and hold the stretch for 20 to 30 seconds. Breathe slowly and
rhythmically. Be sure not to hold your breath. Remember that all stretches
must be done for both sides of your body.
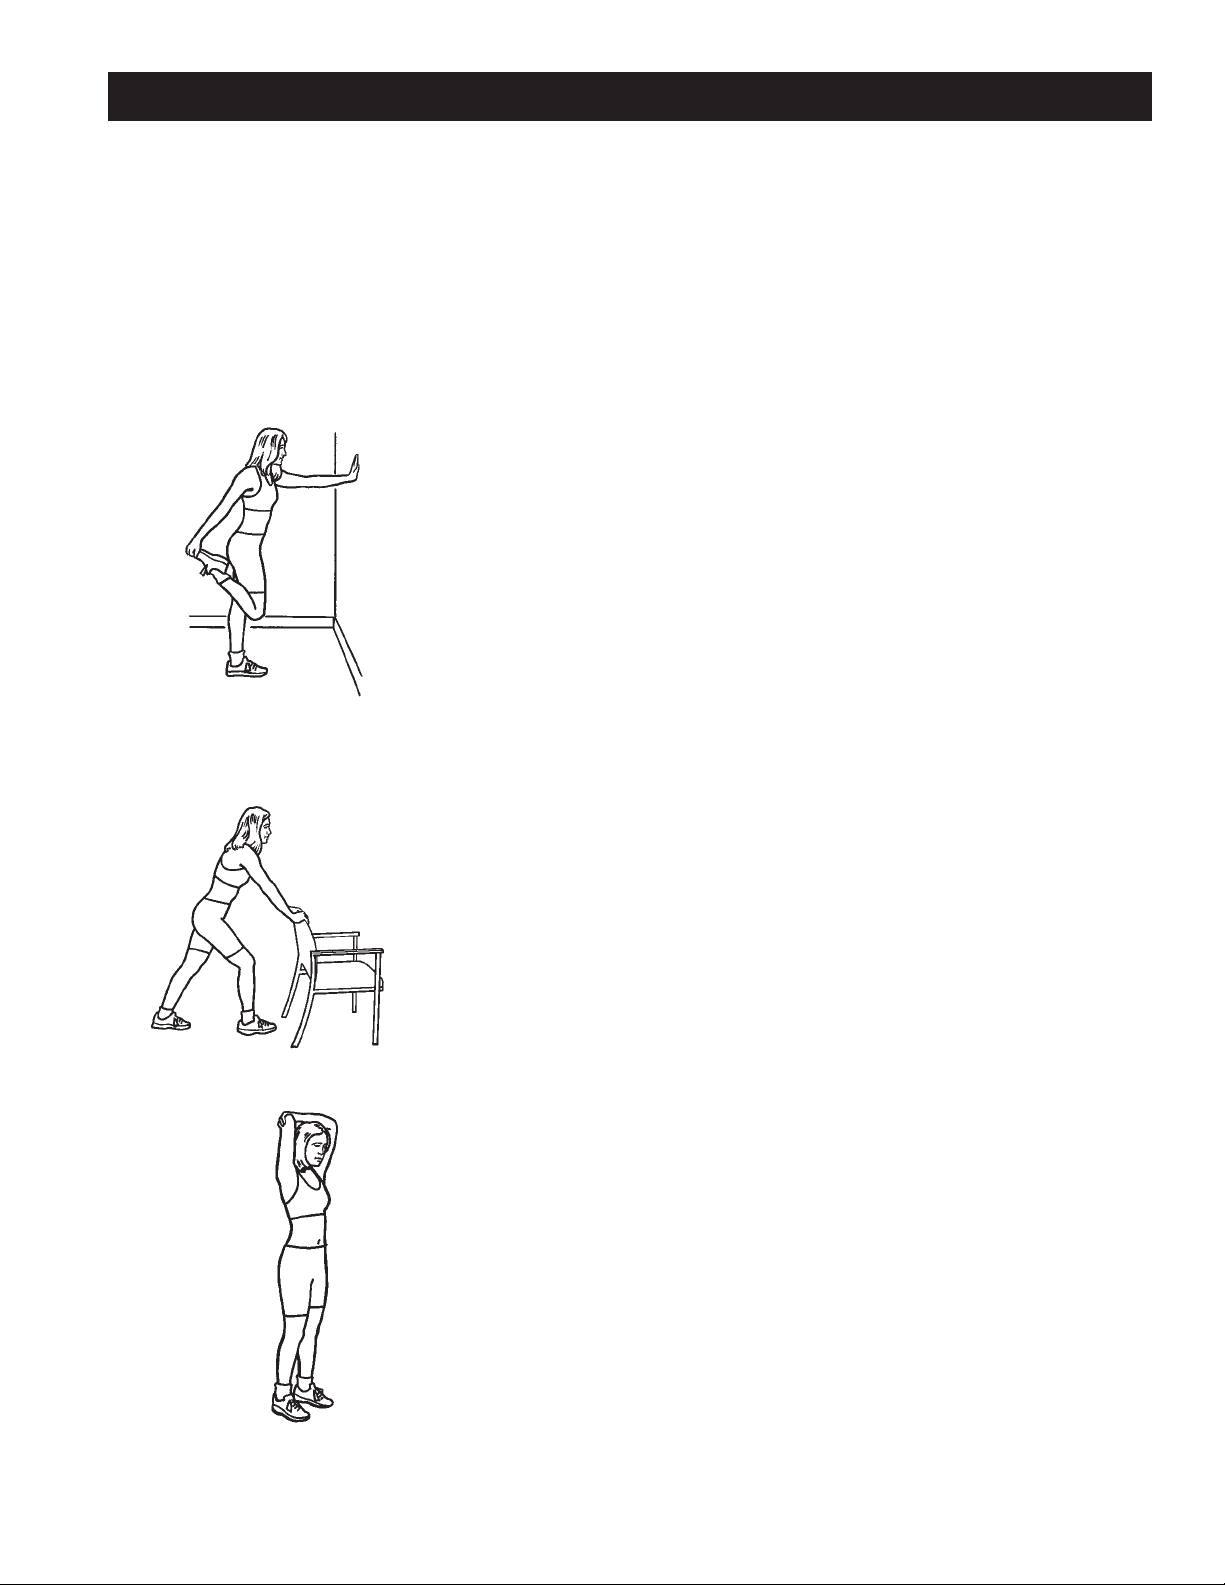
1. Quadriceps Stretch
Stand close to a wall, chair or other solid object. Use one hand
to assist your balance. Bend the opposite knee and lift your heel
towards your buttocks. Reach back and grasp the top of your
foot with the same side hand. Keeping your inner thighs close
together, slowly pull your foot towards your buttocks until you
feel a gentle stretch in the front of your thigh. You do not have
to touch your buttocks with your heel. Stop pulling when you
feel the stretch. Keep your kneecap pointing straight down and
keep your knees close together. (Do not let the lifted knee swing
outward.)
Hold the stretch for 20 to 30 seconds. Repeat for the other leg.
2. Calf and Achilles Stretch
Stand approximately one arms length away from a wall or chair
with your feet hip-width apart. Keeping your toes pointed forward,move one leg in close to the chair while extending the
other leg behind you. Bending the leg closest to the chair and
keeping the other leg straight, place your hands on the chair.
Keep the heel of the back leg on the ground and move your
hips forward. Slowly lean forward from the ankle, keeping your
back leg straight until you feel a stretch in your calf muscles.
Hold for 20 to 30 seconds. Repeat for the opposite leg.
3. Overhead/Triceps Stretch
Stand with your feet shoulder width apart and your knees slightly
bent. Lift one arm overhead and bend your elbow, reaching
down behind your head with your hand toward the opposite
shoulder blade. Walk your fingertips down your back as far as
you can. Hold this position. Reach up with your opposite hand
and grasp your flexed elbow. Gently assist the stretch by pulling
on the elbow.
Hold for 20 to 30 seconds. Repeat for the opposite arm.
WARM UP & COOL DOWN STRETCHES
Page 29
28
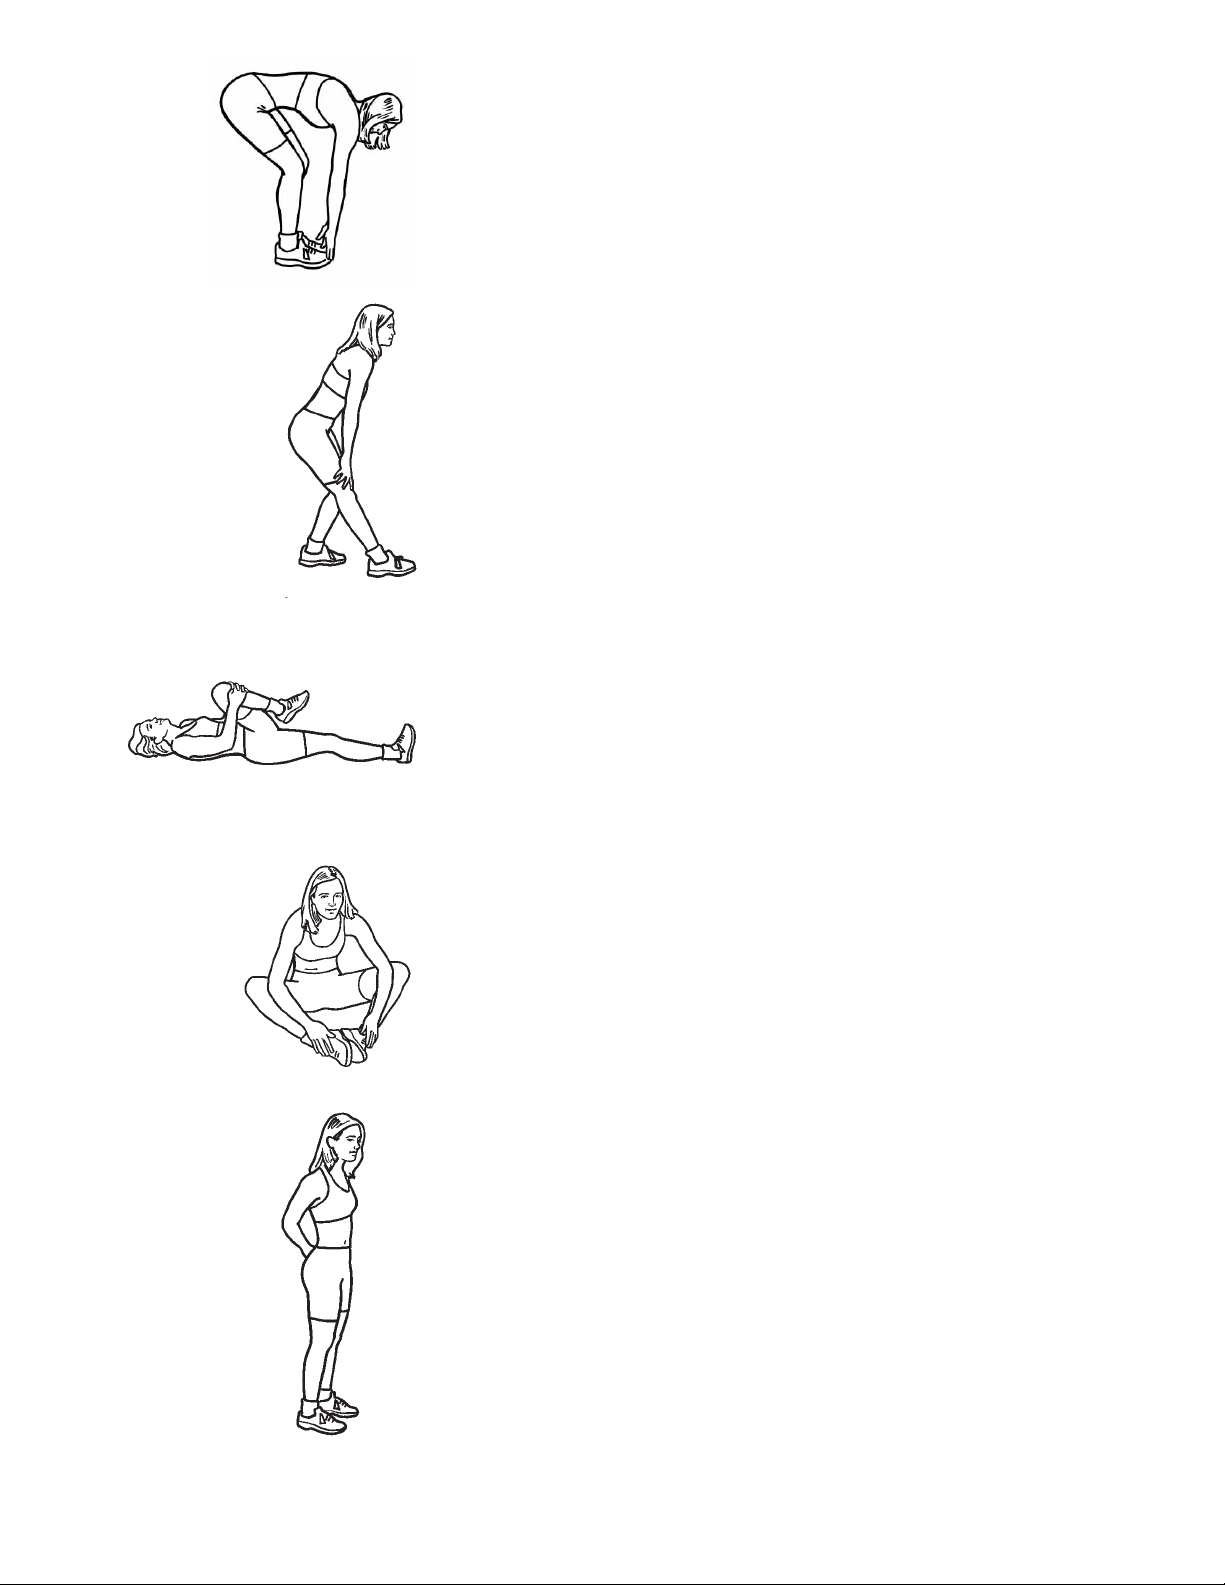
4. Back Stretch
Stand with your legs shoulder width apart and your knees
slightly bent. Bend forward from your waist with your arms
extending loosely in front of your body. Gently bend from
the waist flexing your body as far forward as it will go.
Hold for 20 to 30 seconds. Straighten up and repeat.
5. Standing Hamstrings Stretch
Stand with your legs hip-width apart. Extend one leg out in
front of you and keep that foot flat against the ground. With
your hands resting lightly on your thighs, bend your back leg
and lean forward slightly from your hips until you feel a stretch
in the back of your thigh. Be sure to lean forward from the hip
joint rather than bending at your waist.
Hold for 20 to 30 seconds. Repeat for the opposite leg.
6. Buttocks, Hips and Abdominal Stretch
Lay flat on your back with your hips relaxed against the floor.
Bend one leg at the knee. Keeping both shoulders flat on the
floor, gently grasp the bent knee with your hands and pull it over
your body and towards the ground.You should feel a stretch in
your hips, abdominals and lower back.
Hold for 20 to 30 seconds and release. Repeat for opposite side.
7. Inner Thigh Stretch
Sit on the floor and bend your legs so that the soles of your feet
are together. Place your elbows on your knees. Lean forward
from the waist and press down lightly on the inside of your knees.
You should feel a stretch in the muscles of your inside thigh.
Hold for 20 to 30 seconds and release.
8. Arm Pullback
Stand with your feet shoulder width apart and toes pointing
forward and with your knees slightly bent. Let your arms hang
relaxed on either side of your body. Expand your chest and pull
your shoulders back. Bend your elbows slightly and clasp your
hands behind your back. Slowly straighten your arms as you lift
your hands upward. Raise your hands upward until you feel mild
tension in your shoulder and chest region.
Hold for 20 to 30 seconds. Lower your arms to their original
position and bend your elbows. Release your hands and return
them to your sides.
Page 30
29
TROUBLESHOOTING GUIDE
PROBLEM CAUSE CORRECTION
Treadmill will not start 1. Not plugged in 1. Plug into three prong grounded outlet
2. Not turned on 2. Turn on the Main Power, on/off button
3. Safety Key not on correctly 3. Put Safety Key on Console where
indicated
4. Circuit Breaker opened in home 4. Reset home breaker
5. Treadmill Circuit Breaker tripped 5. Reset Treadmill Circuit Breaker
(see below)
Treadmill Speed Not Correct 1. Treadmill starts at 0.5 calibrated 1. With Monitor powered off, press & hold the
in miles – 0.8 calibrated in Kilometers Select button for 4 sec. to adjust reading
Treadmill Speed Surges 1. Walking Belt slipping 1. Tighten Walking Belt (see page 13)
2. Lubricate Walking Belt 2. Lubricate Belt and Deck (see page 14)
3. Motor Controller not set properly 3. Call 800-497-5831 for service
Treadmill Belt will not move - 1. Lost speed input signal 1. Call 800-497-5831 for service
ERR 1 on screen
Incline will not operate - 1. Lost incline signal 1. Remove and replace Safety Key and
ERR 3 on screen Treadmill will recalibrate
Treadmill Belt Slipping 1. Walking Belt loose 1. Tighten Walking Belt (see page 13)
2. Deck needs lubrication 2. Lubricate Belt and Deck (see page 14)
Treadmill Noisy 1. Loose hardware 1. Tighten all visible Screws, Nuts, and Bolts
2. Motor straining 2. Check Belt tension - 3 finger test
(see page 13)
3. Clicking sound - Roller knocking 3. Adjust Rear Rollers - check for tension
(see page 13)
Inaccurate pulse rate 1. Too much hand movement 1. Stand on Side Rails to get accurate pulse
reading -OR- Must have two hands on grips
2. Palms too wet 2. Dry palms
3. Gripping hand grips too tight 3. Grip using moderate pressure
4. Wearing rings 4. Remove all rings
Inaccurate heart rate strap 1. Electrical interference 1. Keep at least six feet away from
Televisions, Computers and
Fluorescent Lights
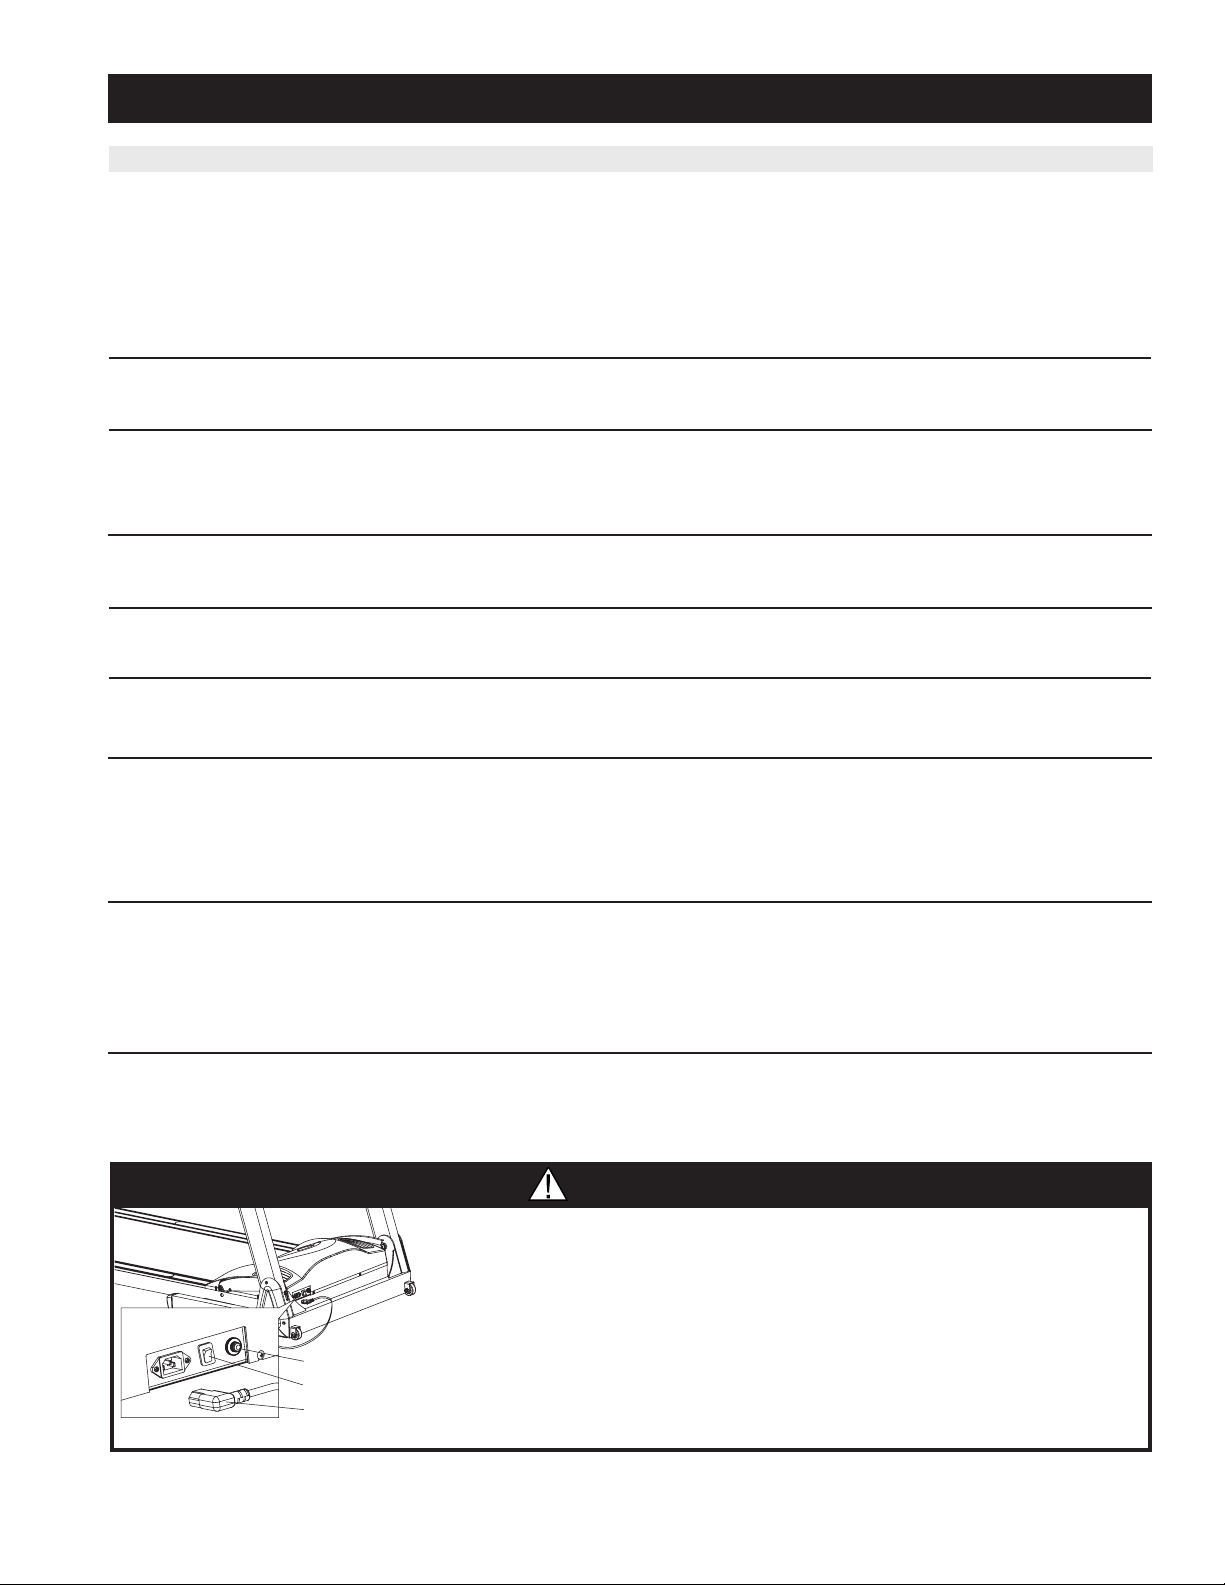
CAUTION
The Treadmill will shut off when the electricity load is above it’s
capacity (example: power surge or storm). To restart the Treadmill,
please follow the procedure below:
A. Unplug the power cord from the Treadmill’s socket.
B. Push in the safety switch.
C. Plug the power cord back into the Treadmill’s socket.
NOTE: DON'T PUSH IN THE SAFETY SWITCH BEFORE
UNPLUGGING THE TREADMILL’S POWER CORD.
safety switch
on/off switch
power cord
Page 31
30
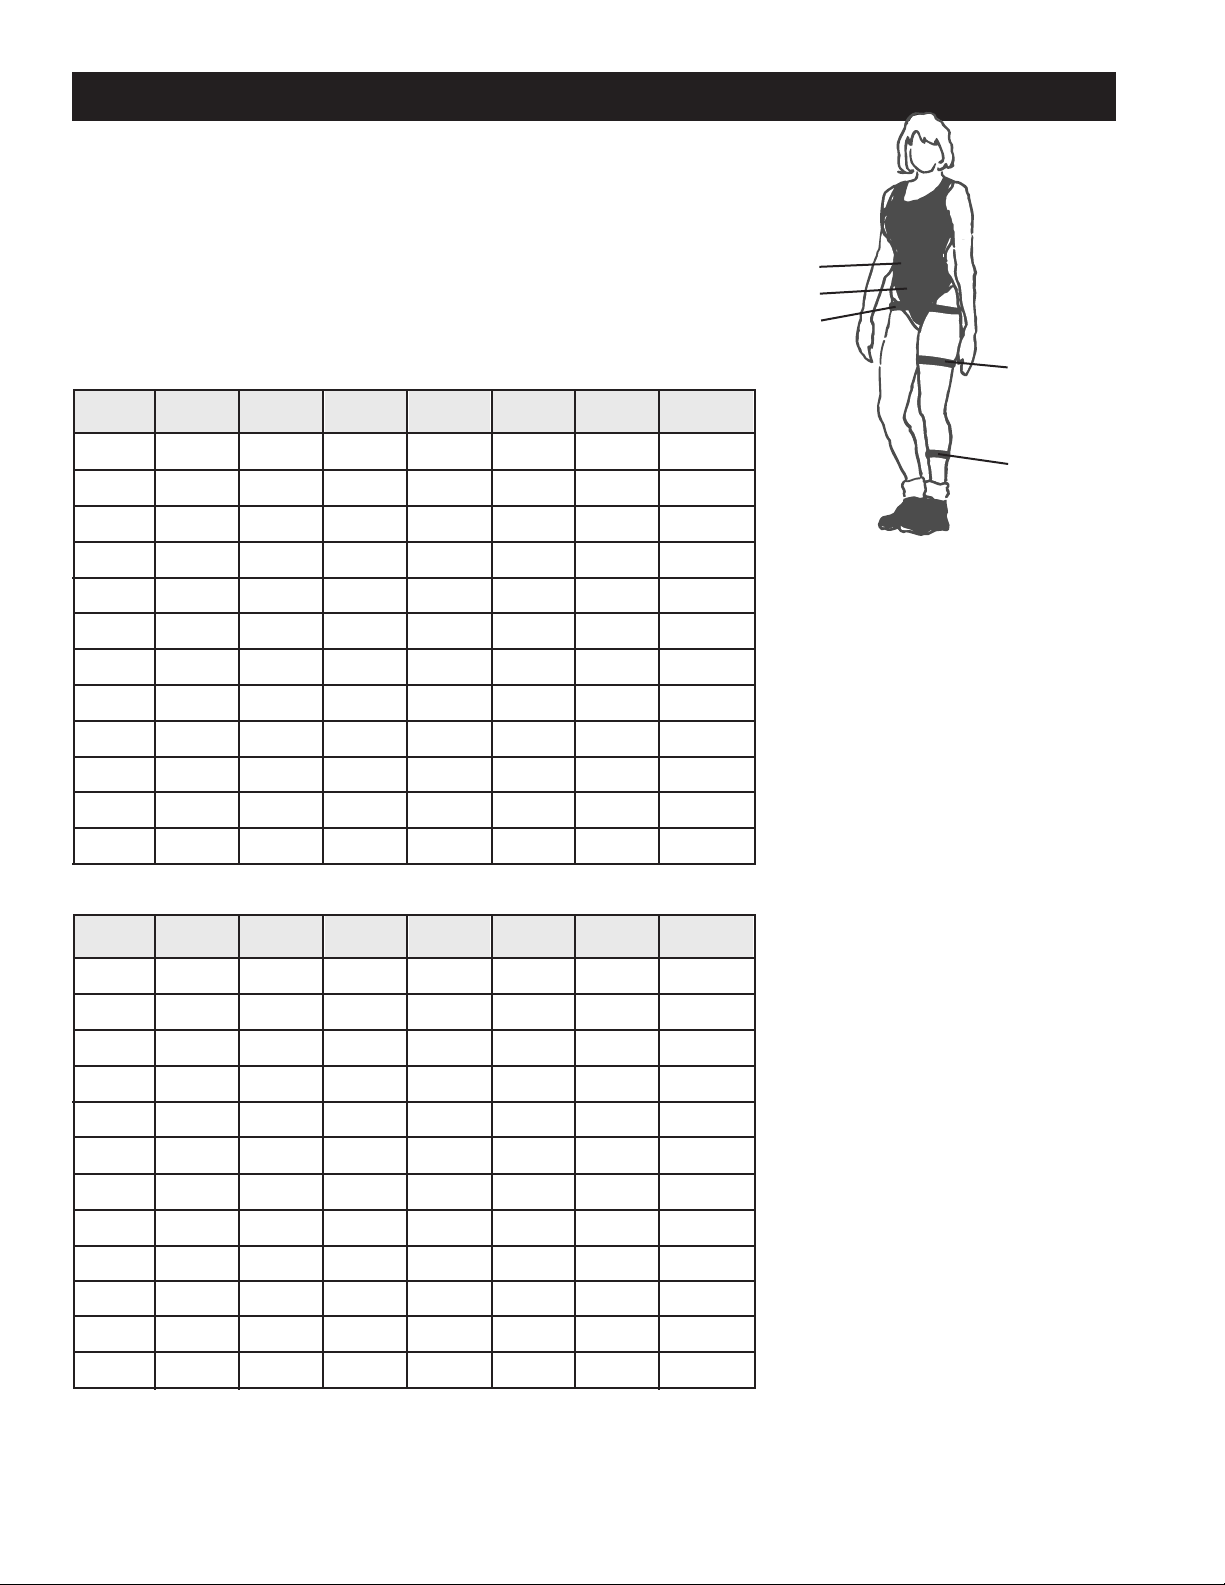
WORKOUT PROGRESS CHARTS
Use the charts below to keep track of your progress
over time. Before writing on them, make as many
copies as you think you’ll need.We suggest you keep
these in a notebook. You will find it both informative
and motivational to look back at what you’ve done,
and this data will help you to chart future fitness goals
as you progress. Every two weeks, measure yourself to
rechart your progress.
Measuring Sites
Waist
Abdomen
Hips
Thighs (L/R)
Calves (L/R)
Resting
Heart Rate
Calves
Thighs
Hips
Abdomen
Waist
Weight
Date
Resting
Heart Rate
Calves
Thighs
Hips
Abdomen
Waist
Weight
Date
Page 32
31
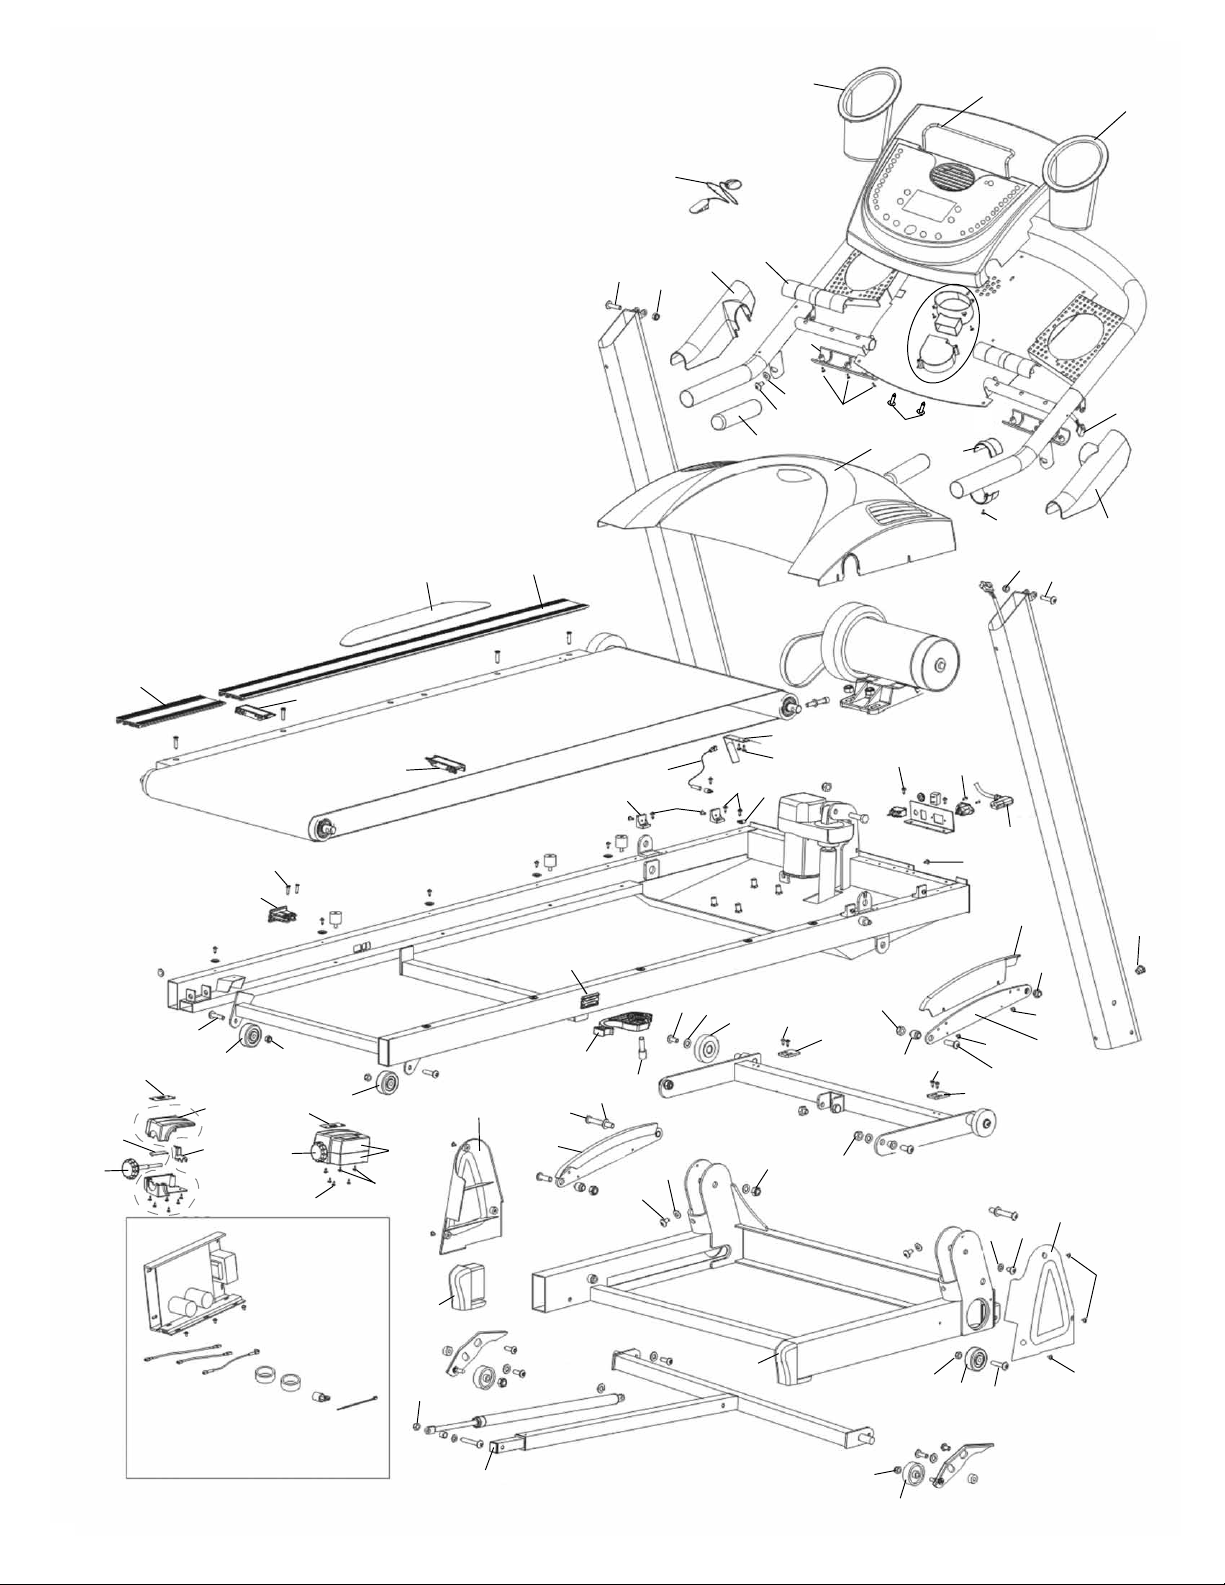
1200/1400 PARTS LIST
1500 PARTS LIST
08 ARC BRACKET T1214-08 2
14 SAFETY KEY TM-01 1
15 LEFT CONSOLE T1200-06 1
T1400-04 1
17 RIGHT CONSOLE TM-03 1
18 BOOK RACK TM-04 1
20 TOP & BOTTOM PULSE SENSOR W/WIRE TM-06 2
21 HAND GRIP TM-07 2
22 FRONT MOTOR COVER (1200) T1200-02 1
22 FRONT MOTOR COVER (1400) T1400-02 1
26 HANDLEBAR WIRE TM-09 1
27 MOTOR COVER BRACKET TM-10 4
29 SPEED SENSOR WIRE T1214-15 1
30 BELT GUIDE T1214-16 2
34 POWER CORD TM-12 1
35 RIGHT ARC BRACKET COVER T1214-20 1
36 LEFT ARC BRACKET COVER T1214-21 1
37 RIGHT SIDE CAP T1214-22 1
38 LEFT SIDE CAP T1214-23 1
39 60mm WHEEL - RUBBER TM-13 2
40 END CAP TM-14 2
41 LOCKING KNOB ASSEMBLY TM-15 1
42 END CAP 22*22 TM-16 3
44 BELT ADJUSTMENT KNOB TM-17 2
45 INDICATOR T1214-26 2
46 LEFT CLEAR CAP TM-18 1
47 RIGHT CLEAR CAP TM-19 1
48 TOP & BOTTOM LEFT REAR END CAP T1214-27 1
49 LEFT SIGHT INDEX TM-20 1
50 50mm WHEEL - PLASTIC T1214-28 2
51 SHOCK ABSORBER T1214-29 2
54 NON SKID TM-21 2
55 FOOT RAIL T1214-32 2
57 TOP & BOTTOM RIGHT REAR END CAP T1214-34 1
59 M8 x 35mm ALLEN BOLT TM-27 4
60 M8 NYLON NUT TM-28 11
61 M4 x 16mm PHILLIPS SCREW TM-29 31
62 M4 x 12mm PHILLIPS SCREW TM-30 42
63 M10 NYLON NUT TM-31 11
66 M4 x 6mm PHILLIPS SCREW TM-34 13
67 M10 x 32mm ALLEN BOLT T1214-37 2
68 21.5 x 18 x 10.2 BUSHING T1214-38 2
69 M8 x 20mm ALLEN BOLT TM-35 8
74 M8 x 40mm ALLEN BOLT TM-40 4
75 M8 CURVED WASHER T1214-40 4
78 M3 x 10mm PHILLIPS SCREW TM-42 2
79 13.5 x 18 x 10.2 BUSHING T1214-42 2
81 M10 STAR WASHER TM-43 2
82 M10 x 70mm ALLEN BOLT T1214-44 2
84 50mm WHEEL - RUBBER TM-26 2
85 WIRE COVER TM-24 1
86 SPEED SENSOR WIRE HOLDER TM-25 1
88 M8 WASHER TM-36 14
90 M10 WASHER TM-44 3
95 M3 x 20mm PHILLIPS SCREW T1214-47 6
96 M5 x 20mm PHILLIPS SCREW TM-48 2
97 RIGHT SIGHT INDEX TM-23 1
LUBE & WALK KIT NBTLW05 1
DECALS (1200) T1200-03 1
BOX TOP T1214-36 1
FASTENER PACK T1214-49 1
OWNERS MANUAL T1214-50 1
DECALS (1400) T1400-03 1
BOX BOTTOM TM-22 1
ITEM # PART NAME PART # QTY.
ITEM# PART NAME PART # QTY.
8ARC BRACKET T1214-08 2
14 SAFETY KEY TM-01 1
15 LEFT HOLDER T1500-04 1
17 RIGHT HOLDER T1500-05 1
18 BOOK RACK TM-04 1
20 TOP & BOTTOM PULSE SENSOR W/WIRE TM-06 2
21 HAND GRIP TM-07 2
22 FRONT MOTOR COVER T1500-02 1
26 HANDLEBAR WIRE TM-09 1
27 MOTOR COVER BRACKET TM-10 4
29 SPEED SENSOR WIRE T1214-15 1
30 BELT GUIDE T1214-16 2
34 POWER CORD TM-12 1
35 RIGHT ARC BRACKET COVER T1214-20 1
36 LEFT ARC BRACKET COVER T1214-21 1
37 RIGHT SIDE CAP T1214-22 1
38 LEFT SIDE CAP T1214-23 1
39 60mm WHEEL - RUBBER TM-13 2
40 END CAP TM-14 2
42 END CAP 22*22 TM-16 1
44 BELT ADJUSTMENT KNOB TM-17 2
45 INDICATOR T1214-26 2
46 LEFT CLEAR CAP TM-18 1
47 RIGHT CLEAR CAP TM-19 1
48 TOP & BOTTOM LEFT REAR END CAP T1214-27 1
49 LEFT SIGHT INDEX TM-20 1
50 50mm WHEEL - PLASTIC T1214-28 2
51 SHOCK ABSORBER T1214-29 2
54 NON SKID T1500-12 2
57 TOP & BOTTOM RIGHT REAR END CAP T1214-34 1
59 M8 x 35mm ALLEN BOLT TM-27 2
60 M8 NYLON NUT TM-28 11
61 M4 x 16mm PHILLIPS SCREW TM-29 31
62 M4 x 12mm PHILLIPS SCREW TM-30 42
63 M10 NYLON NUT TM-31 11
66 M4 x 6mm PHILLIPS SCREW TM-34 14
67 M10 x 32mm ALLEN BOLT T1214-37 2
68 21.5 x 18 x 10.2 BUSHING T1214-38 2
69 M8 x 20mm ALLEN BOLT TM-35 8
74 M8 x 40mm ALLEN BOLT TM-40 4
75 M8 CURVED WASHER T1214-40 4
78 M3 x 10mm PHILLIPS SCREW TM-42 2
79 13.5 x 18 x 10.2 BUSHING T1214-42 2
81 M10 STAR WASHER TM-43 2
82 M10 x 70mm ALLEN BOLT T1214-44 2
84 50mm WHEEL - RUBBER TM-26 4
85 WIRE COVER TM-24 1
86 SPEED SENSOR WIRE HOLDER TM-25 1
88 M8 WASHER TM-36 14
90 M10 WASHER TM-44 3
95 M3 x 20mm PHILLIPS SCREW T1214-47 1
96 M5 x 20mm PHILLIPS SCREW TM-48 2
97 RIGHT SIGHT INDEX TM-23 1
99 SAFETY BUCKLE LOCK T1500-09 1
100 LEFT LUBE STICK GUIDE T1500-15 1
101 RIGHT LUBE STICK GUIDE T1500-16 1
102 SAFETY BUCKLE T1500-10 1
103 FRONT FOOT RAIL T1500-13 2
104 REAR FOOT RAIL T1500-14 2
106 LEFT HANDLEBAR SIDE CAP T1500-07 1
107 RIGHT HANDLEBAR SIDE CAP T1500-08 1
108 M6 x 30mm BOLT T1500-20 1
111 INCLINE BRACKET CUSHION TM-51 2
LUBE & WALK KIT NBTLW05 1
BOX TOP T1214-36 1
FASTENER PACK T1214-49 1
DECALS T1500-03 1
OWNERS MANUAL T1500-17 1
BOX BOTTOM TM-22 1
ITEM # PART NAME PART # QTY.
ITEM# PART NAME PART # QTY.
Page 33
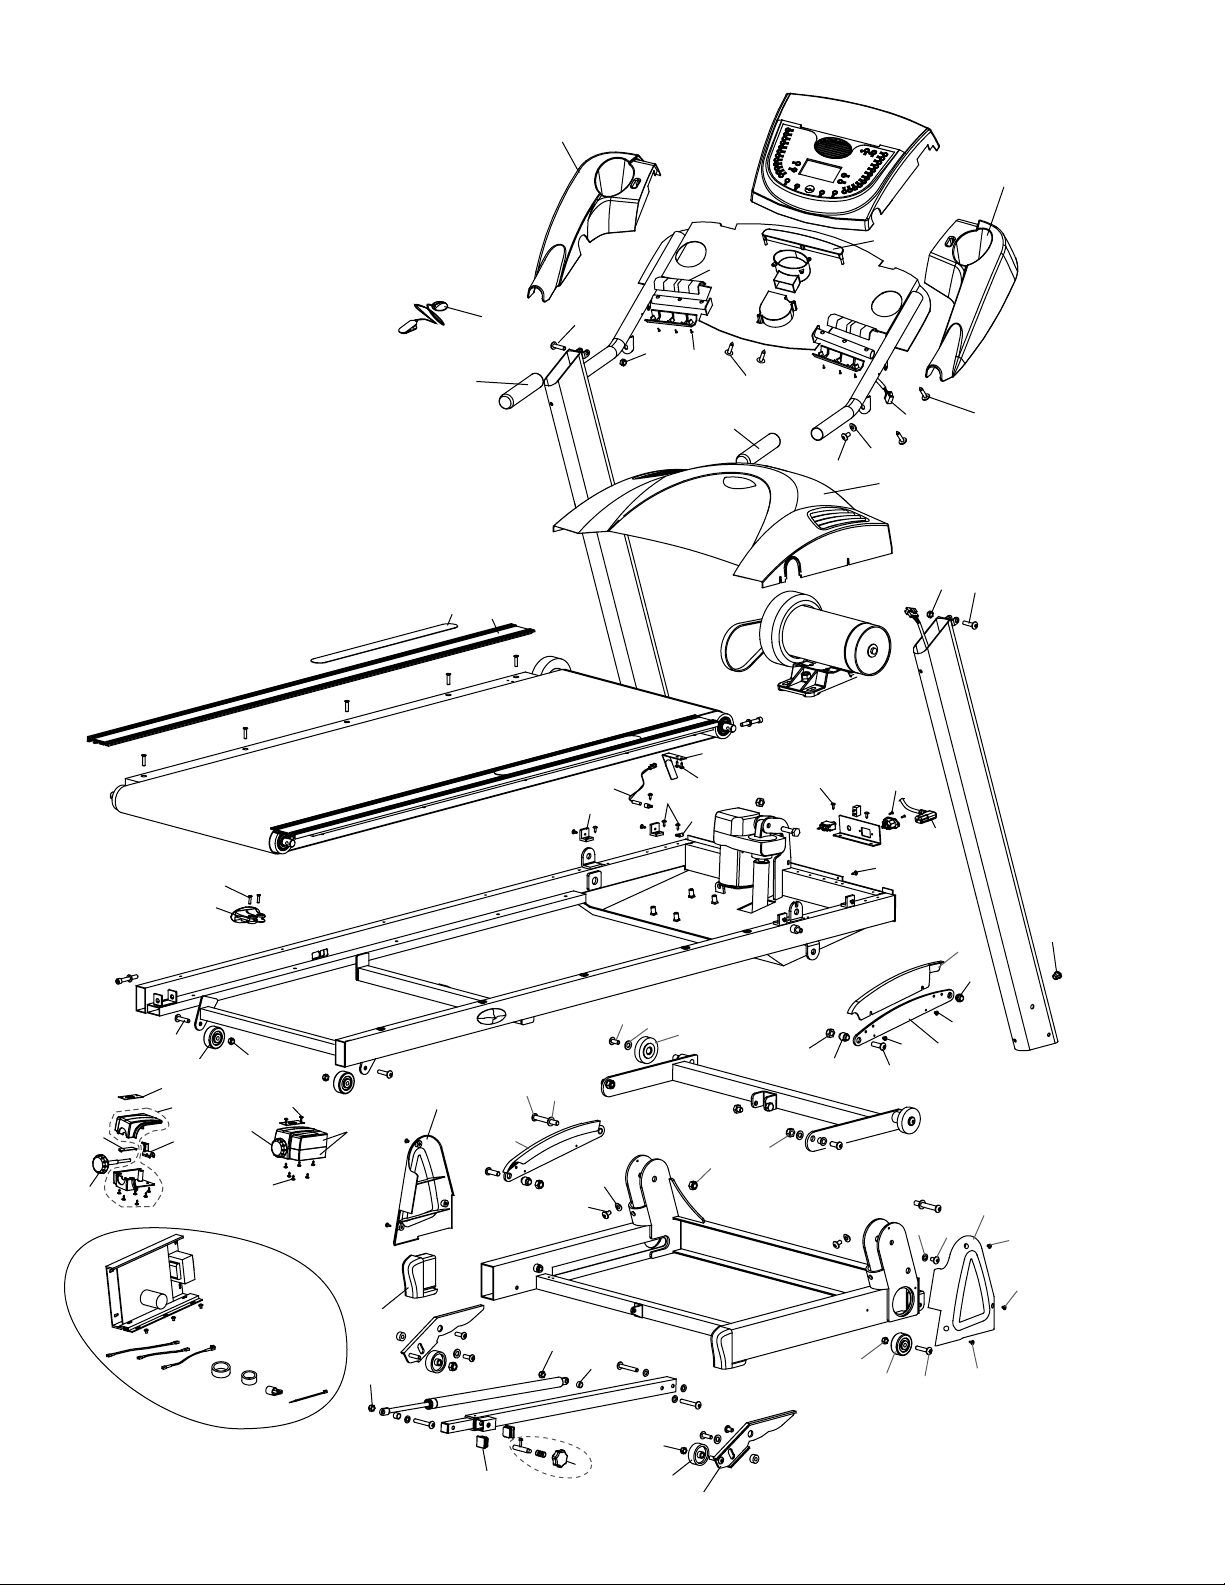
32
1200/1400
EXPLODED VIEW
15
17
18
20
14
21
54
55
89
51
59
60
95
96
21
69
30
29
27
62
62
86
62
26
75
22
78
62
61
60
59
34
35
79
85
44
69
88
74
46
48
49
45
60
50
82
97
47
62
57
40
60
38
42
81
36
75
69
60
60
41
39
63
60
84
12
63
68
63
67
60
50
66
66
08
88
74
37
69
66
66
66
Page 34
15
14
60
59
106
18
17
20
20
61
99
95
60
59
85
35
79
66
08
66
67
62
62
111
111
39
88
69
82
36
38
50
50
74
51
89
104
100
54
103
29
27
62
86
62
101
57
61
62
47
60
44
44
49
45
48
46
81
108
102
69
75
63
63
88
69
37
66
66
74
84
84
60
42
60
40
60
40
51
63
68
34
62
78
62
30
62
26
107
22
75
69
21
96
1500
EXPLODED VIEW
Page 35

We warrant this product to be free from all defects
in material and workmanship when used
according to the manufacturer’s instructions.
See Limited Warranty Card for details.
Save your sales receipt.
(You may wish to staple it into this manual.)
Dedication to Quality
8/22/06
®
 Loading...