

Page 1
1
Page 2
2
Page 3

DEAR CUSTOMERS
Thank you for purchasing the liquid crystal display monitor. This
product employs new integrate circuits and high quality TFT LCD
modules. It is putting out with its low power consumption, emits no
radiation, and other advantage characteristics. This product is
shaped with modern style and is easy to be carried with. The color
TFT LCD is the most suitable display for VGA,VCD, DVD for
motorcars and ships .It also can be used in the office ,in flat ,at
home also in other suitable position. You will certainly benefit from
this monitor in lots of ways, to name some of them: convenience,
safety, space-saving.
We hope that you will have the enjoyment of your new mini color
TFT LCD.
To ensure the best use of the unit, please read this handbook
carefully beforehand.
3
Page 4

NOTICE
1. Please use the adapter attached in the accessory.
2. Do not expose this product to direct sunlight, heat or humid
conditions.
3. Keep away from strong light while using this product so as to
obtain the clearest and the most colorful picture.
4. Please avoid heavy impact or drop onto the ground.
5. Do not use chemical solutions to clean this unit. Please
simply wipe with a clean soft cloth to keep the brightness of
the surface.
6.If the product does not operate normally when the instructions
are followed. Adjust only those controls that are covered by the
instructions. Improper adjustment of other controls may result in
damage and will often require extensive work of a qualified
technician.
CONTENTS
Product description----------------------------------------- Cable connection--------------------------------------------- Menu operation----------------------------------------------- Acessories------------------------------------------------------
Parameter-----------------------------------------------------Trouble shooting-----------------------------------------------
4
Page 5
Ⅰ. Products description
1 POWER: ON/OFF
2 PC/AV: PC/AV switch.
3 > :Selection key or pressing the button to change the brightness level.
4 MENU:Display MENU Key
5 <: Selection key.
6 + :Volume key or using to adjust the number of selected functionin in
menu
7 -: Volume key or using to adjust the numberof selected function in menu
8 IR Sensor
9 TFT LCD monitor
10 12V Power Input
11 SKS Cable Input
Remote controller
5
Page 6
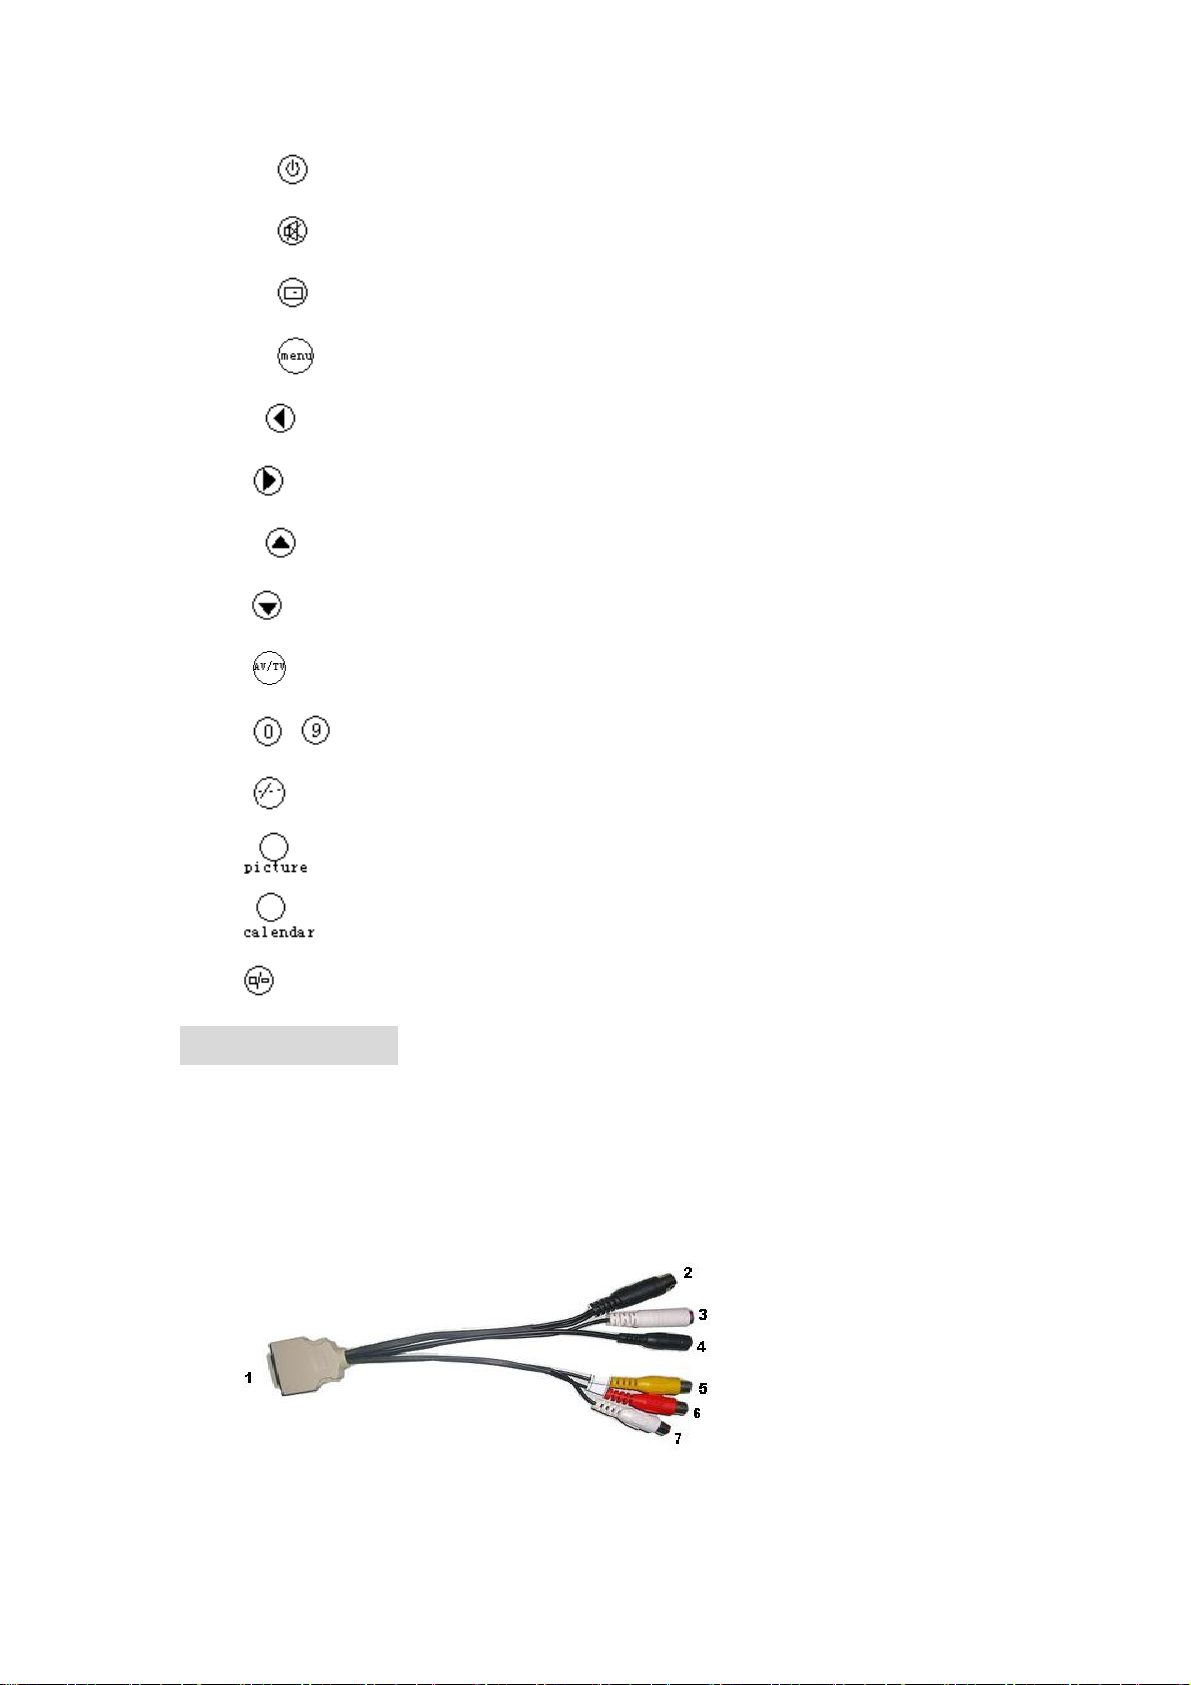
: No use
: Display menu key
: V olume down or to adjust the number of selected function in menu
: Volume up or to adjust the the number of selected function in menu
: AV1, AV2, TV switch
~ : Number key, no use
: POWER ON/OFF
: MUTE
:Program selection key or to select the function in menu
: Program selection key or to select the function in menu
: Unit, double-digit, three-Picture, no use.
: NO USE
: NO USE
: NO USE
ⅡCONNECTION
Match calbes
※SKS cable:
1 26P SKS Input Jack : all kinds of AV signal input ,note that put it correctly
6
Page 7
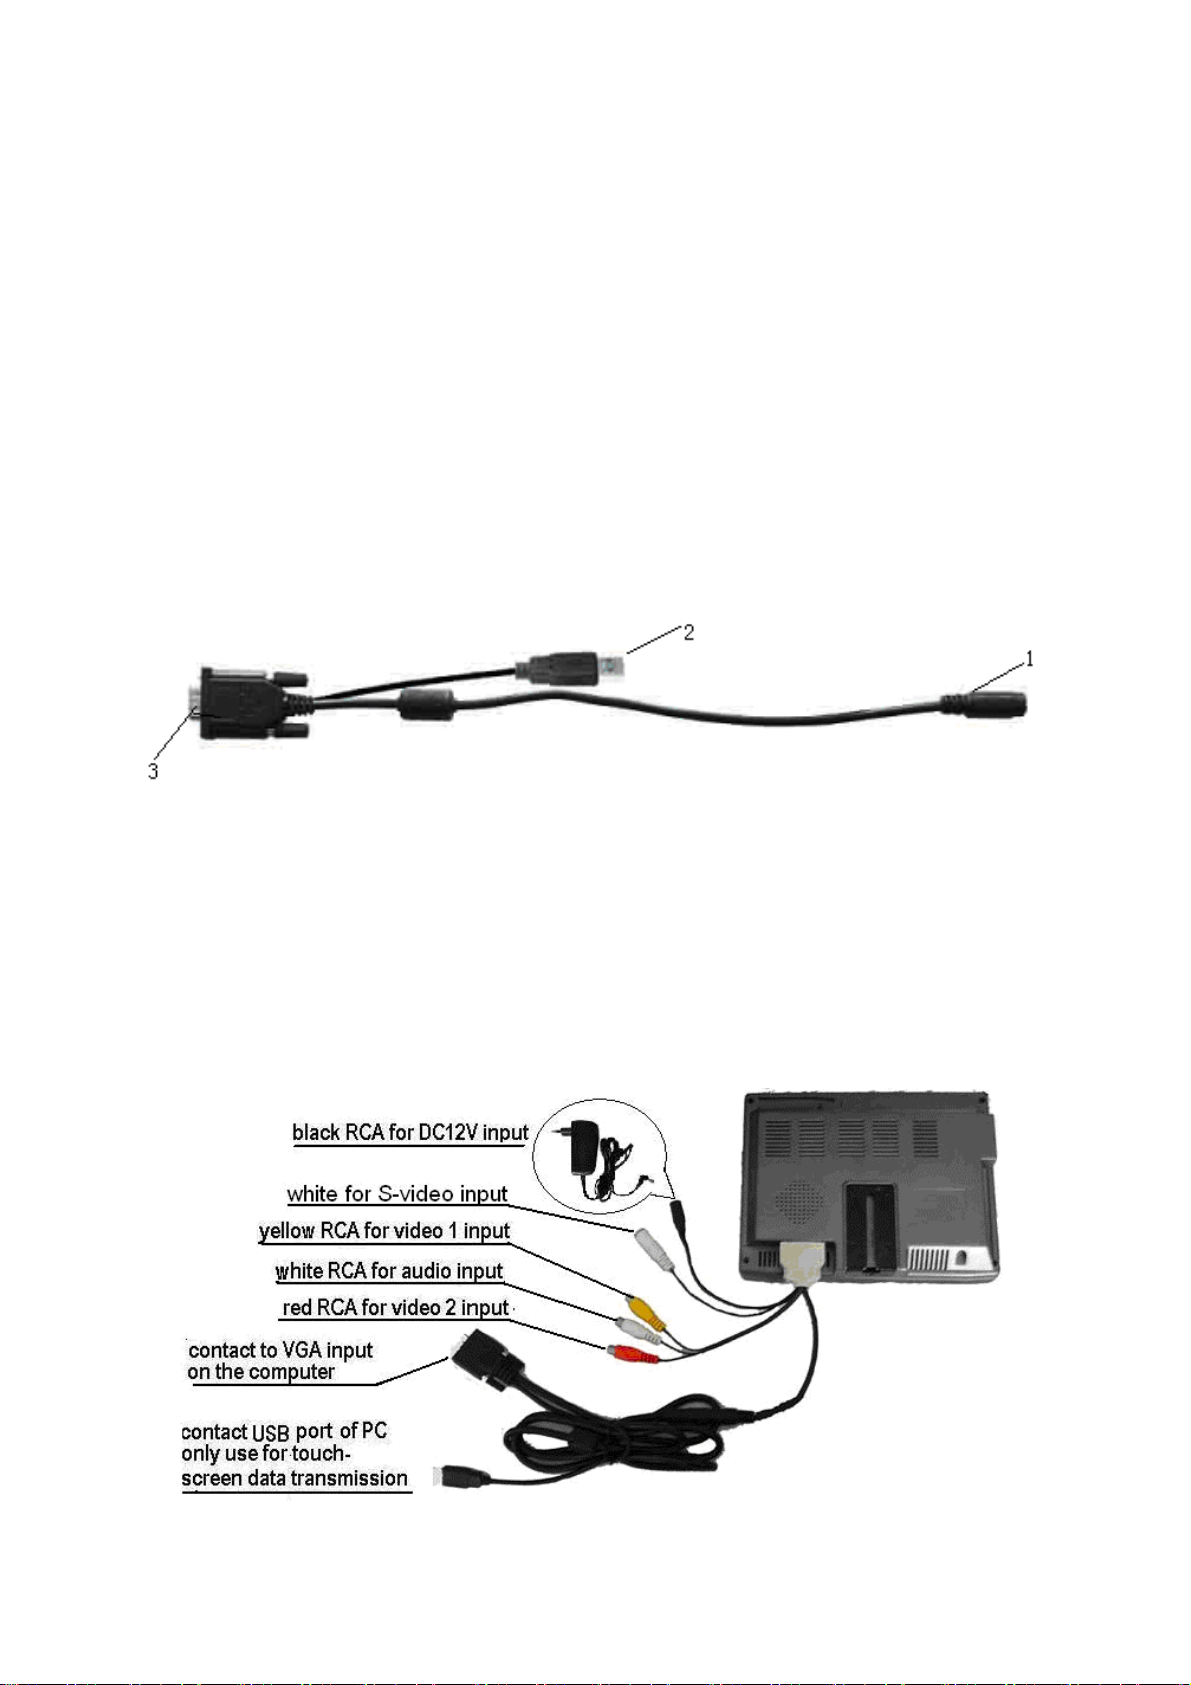
into the SKS input jack of the monitor
2 Black 9-pin VGA signal input jack
3 White S-video input jack
4 Black Jack :DC 12V Power input
5 Yellow RCA :Video signal 1 input
Red RCA :Video signal 2 input
6
7 White RCA :Audio signal input
※VGA cable:
1. Black 9-pin VGA connector, contact to the 9-pin VGA signal input jack of
SKS cable.
2. USB end connect the USB port of computer for touch screen function.
3. 15-pin VGA signal input end connect VGA port of the computer
※Connection
7
Page 8
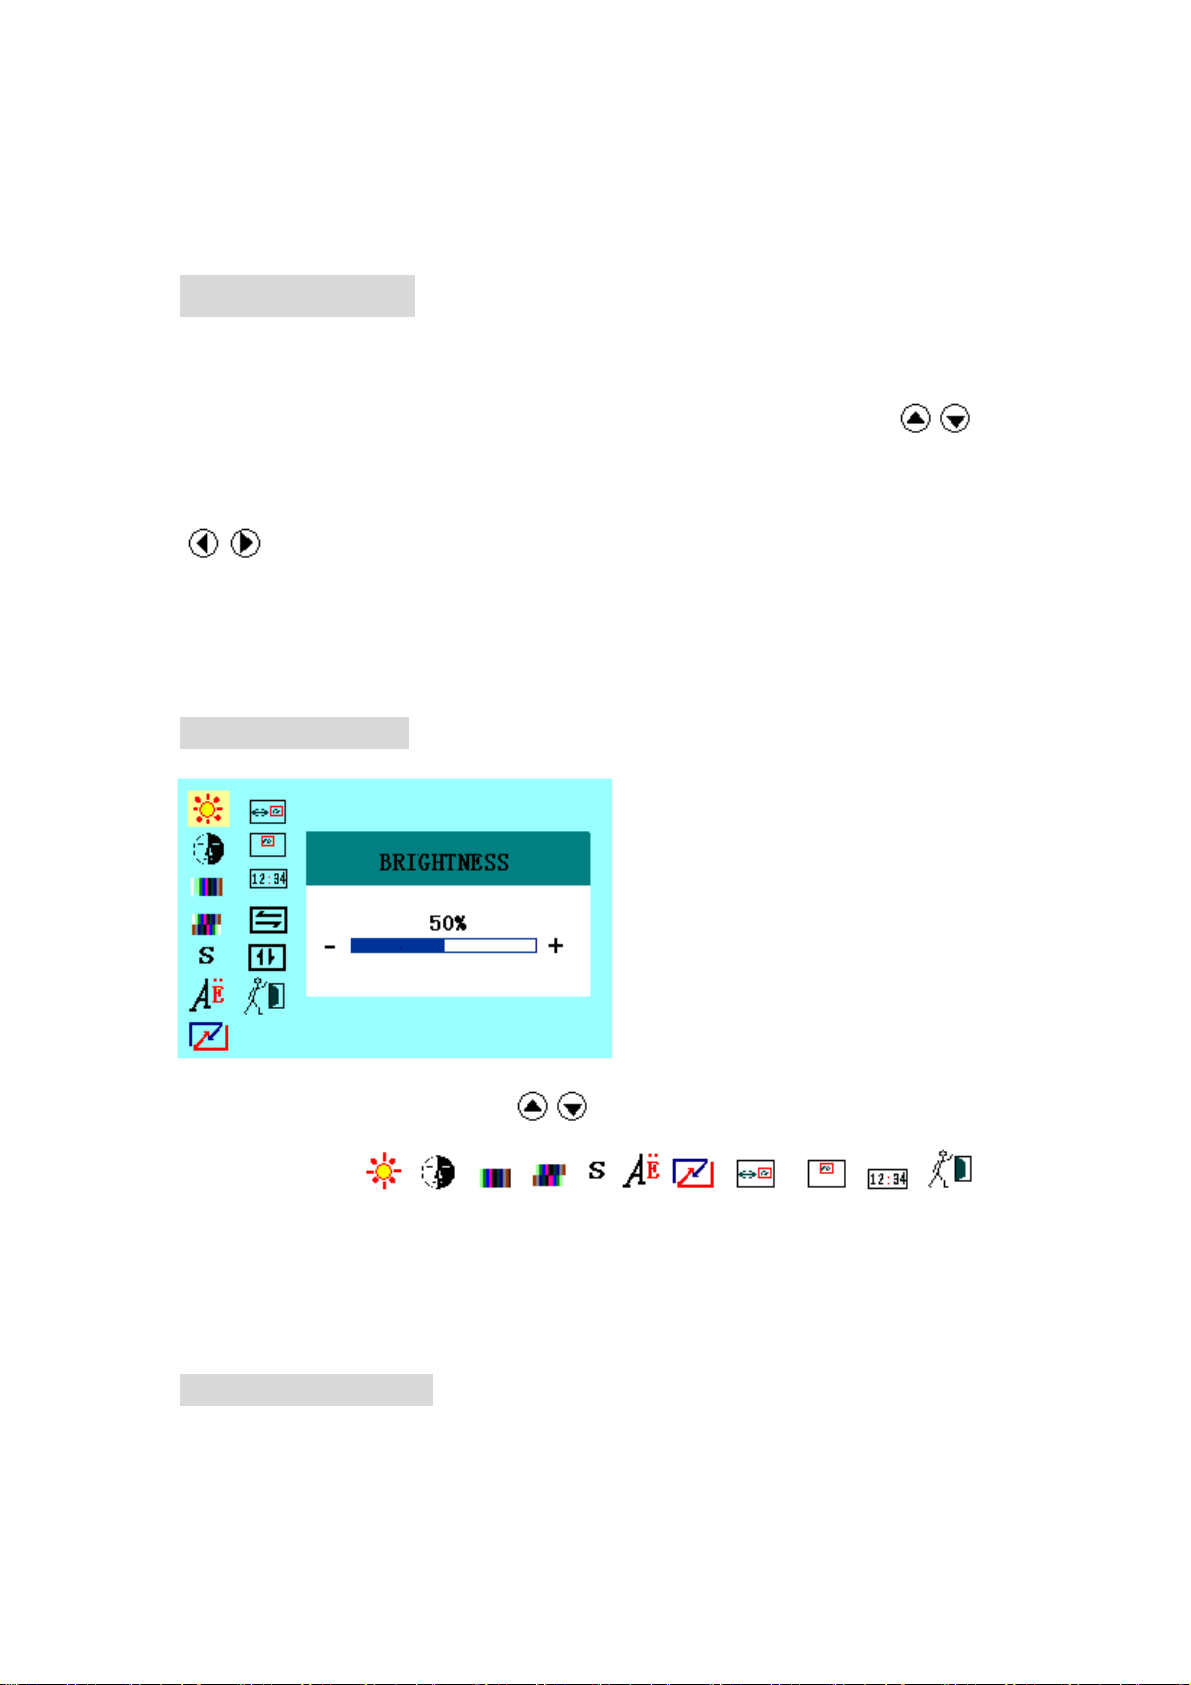
NOTE: When you use the unit, please adopt matched DC adapter, if not,
please note that the power consumption should be less or equal to 15w.
Ⅲ.Menu operation
After connecting, press the button “menu” on the unit or remote controller, the “main
menu” will appear on the screen,This will all you to use “</>”on the unit or
the remote controller to choose the subject demanded, confirm it by pressing"menu”
then adjust the number of selected function in OSD by pressing “-/+”button on the unit or
“ / ” on the remote controller. All the operation of OSD is the same as mentioned
above.
“ / ” on
※•Explanation of OSD
OSD IN AV MODE(as picture following)
you can press “</>”on the unit or “ / ” on the remote controller to select the item
demanded among
line: brightness ,contrast , saturation, tint , sharpness, language , reset , OSD Hposition, OSD V-position ,O SD duration, exit OSD ) and the selected item’s background
will be yellow and the explanation of the item will display in the window which on the right
side of the OSD menu.
, , , , , , , , , , (in
OSD IN VGA MODE(as picture following)
8
Page 9
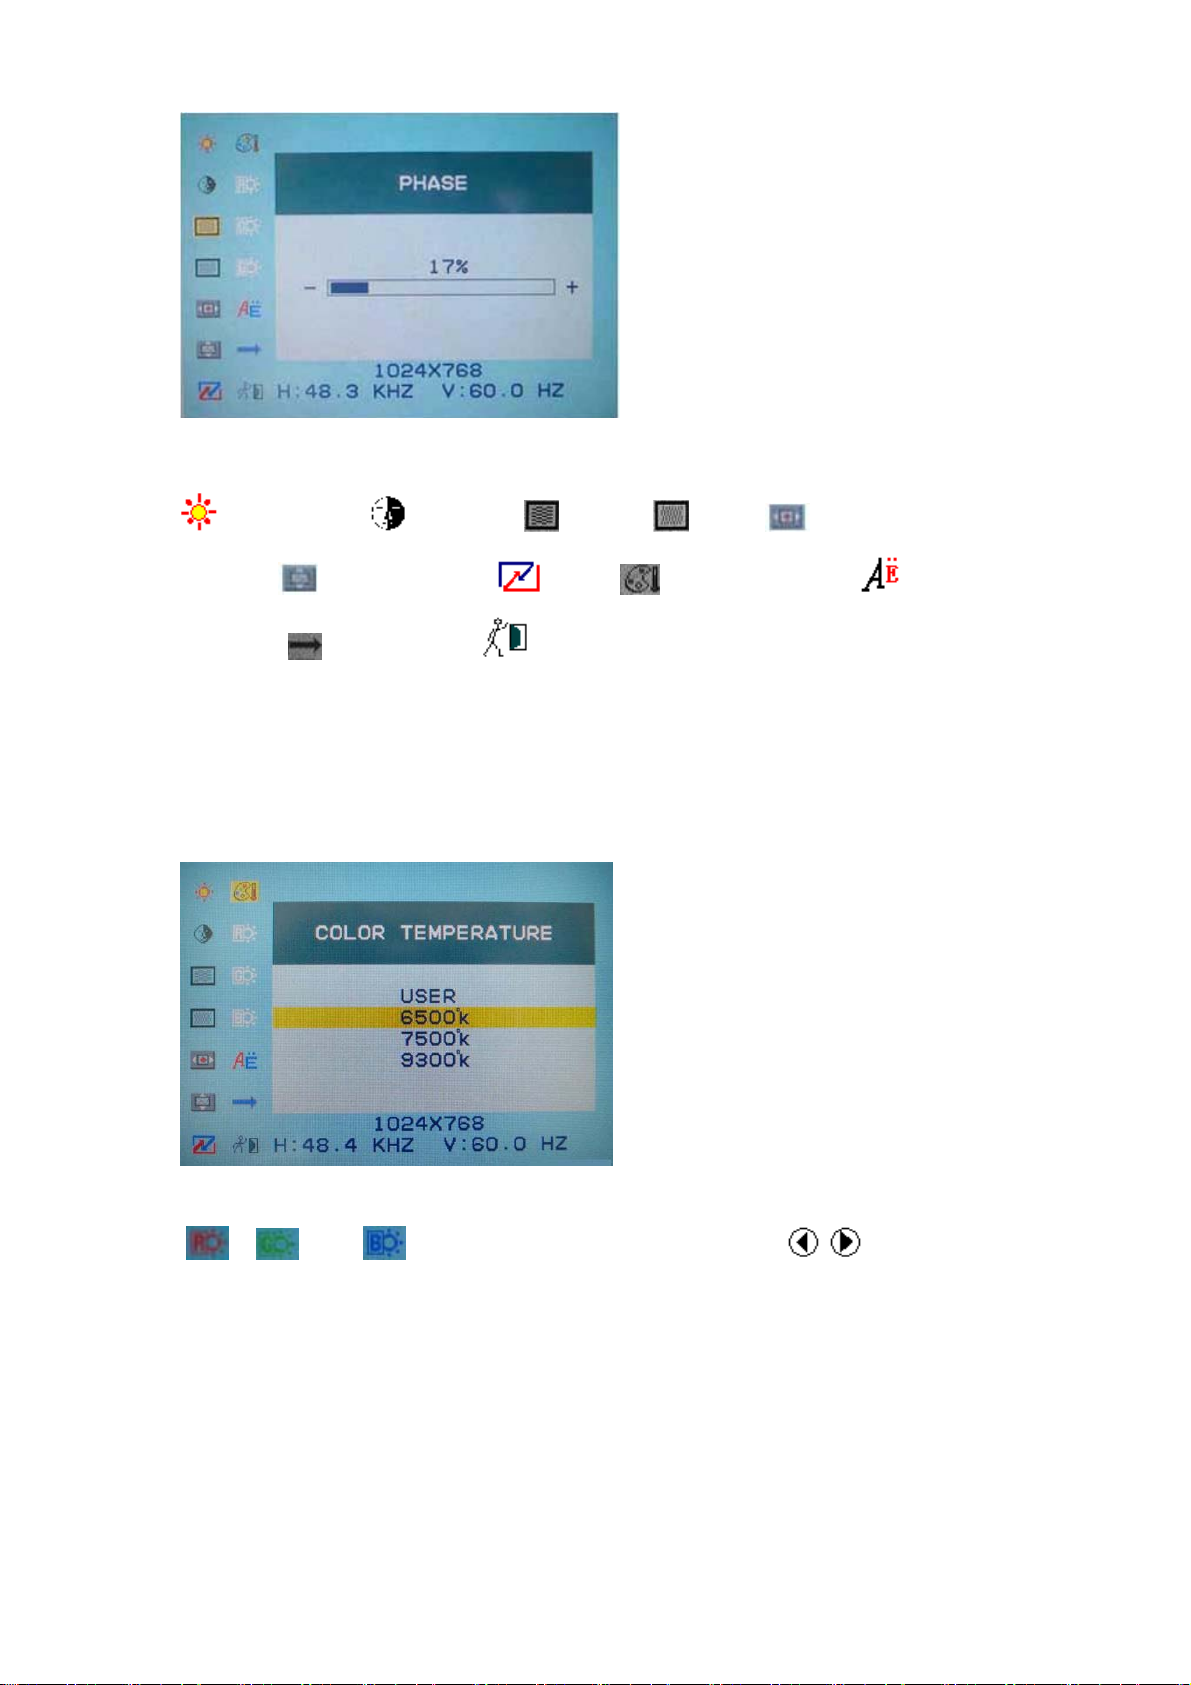
Picture adjustment (in order)
brightness , contrast , phase, clock , OSD H-
position,
OSD V-position, reset, color temperature ,
language, miscellaneous, exit OSD
the selected item’s background will be yellow and the explanation of the item will display in
the window which on the right side of the OSD menu.
OSD color temperature ※
You can choose color temperature such as: 6500 Ks, 7500 Ks or 9300 Ks. as picture
Otherwise you can adjust a color temperature that needs the options “USER". Then adjust
“
”, “ ” and “ ” at will by pressing “-/+” of the unit or “ / ” on the remote
controller. As picture following
“RED”
9
Page 10
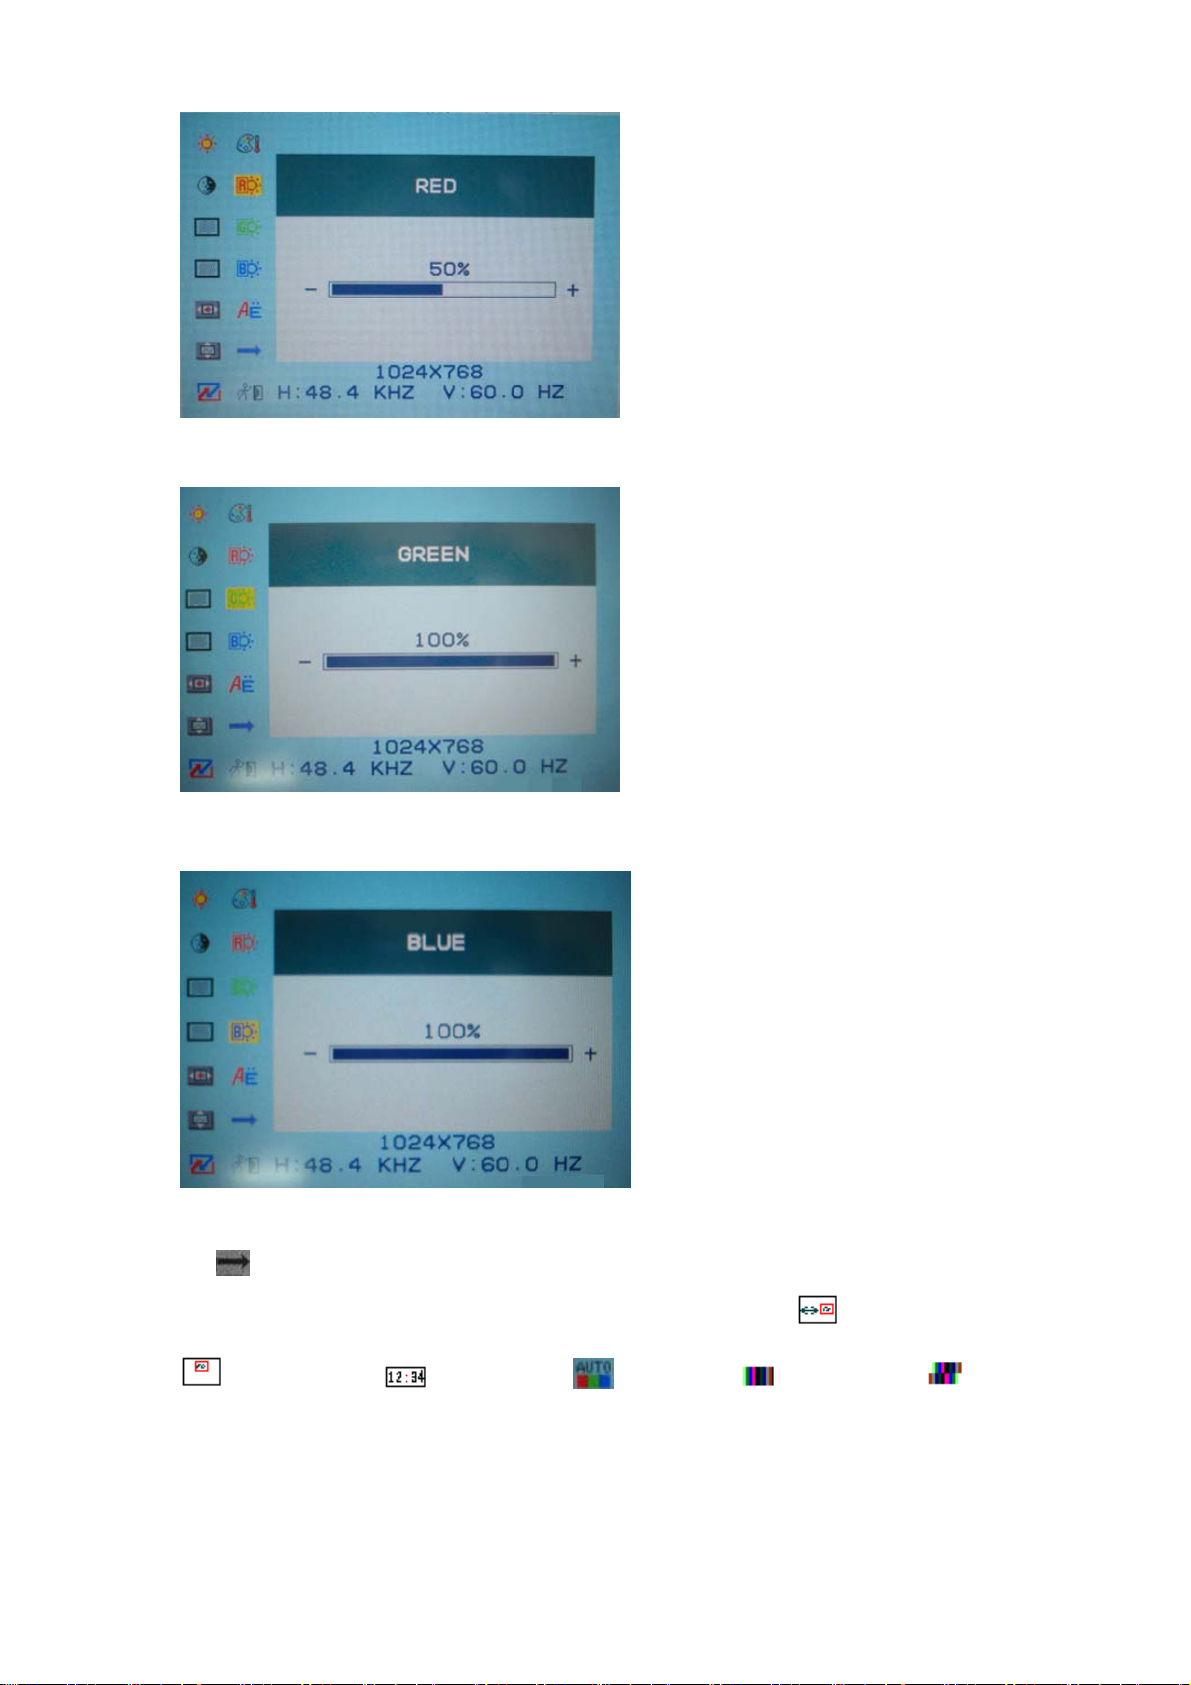
“GREEN”
“BLUE”
※
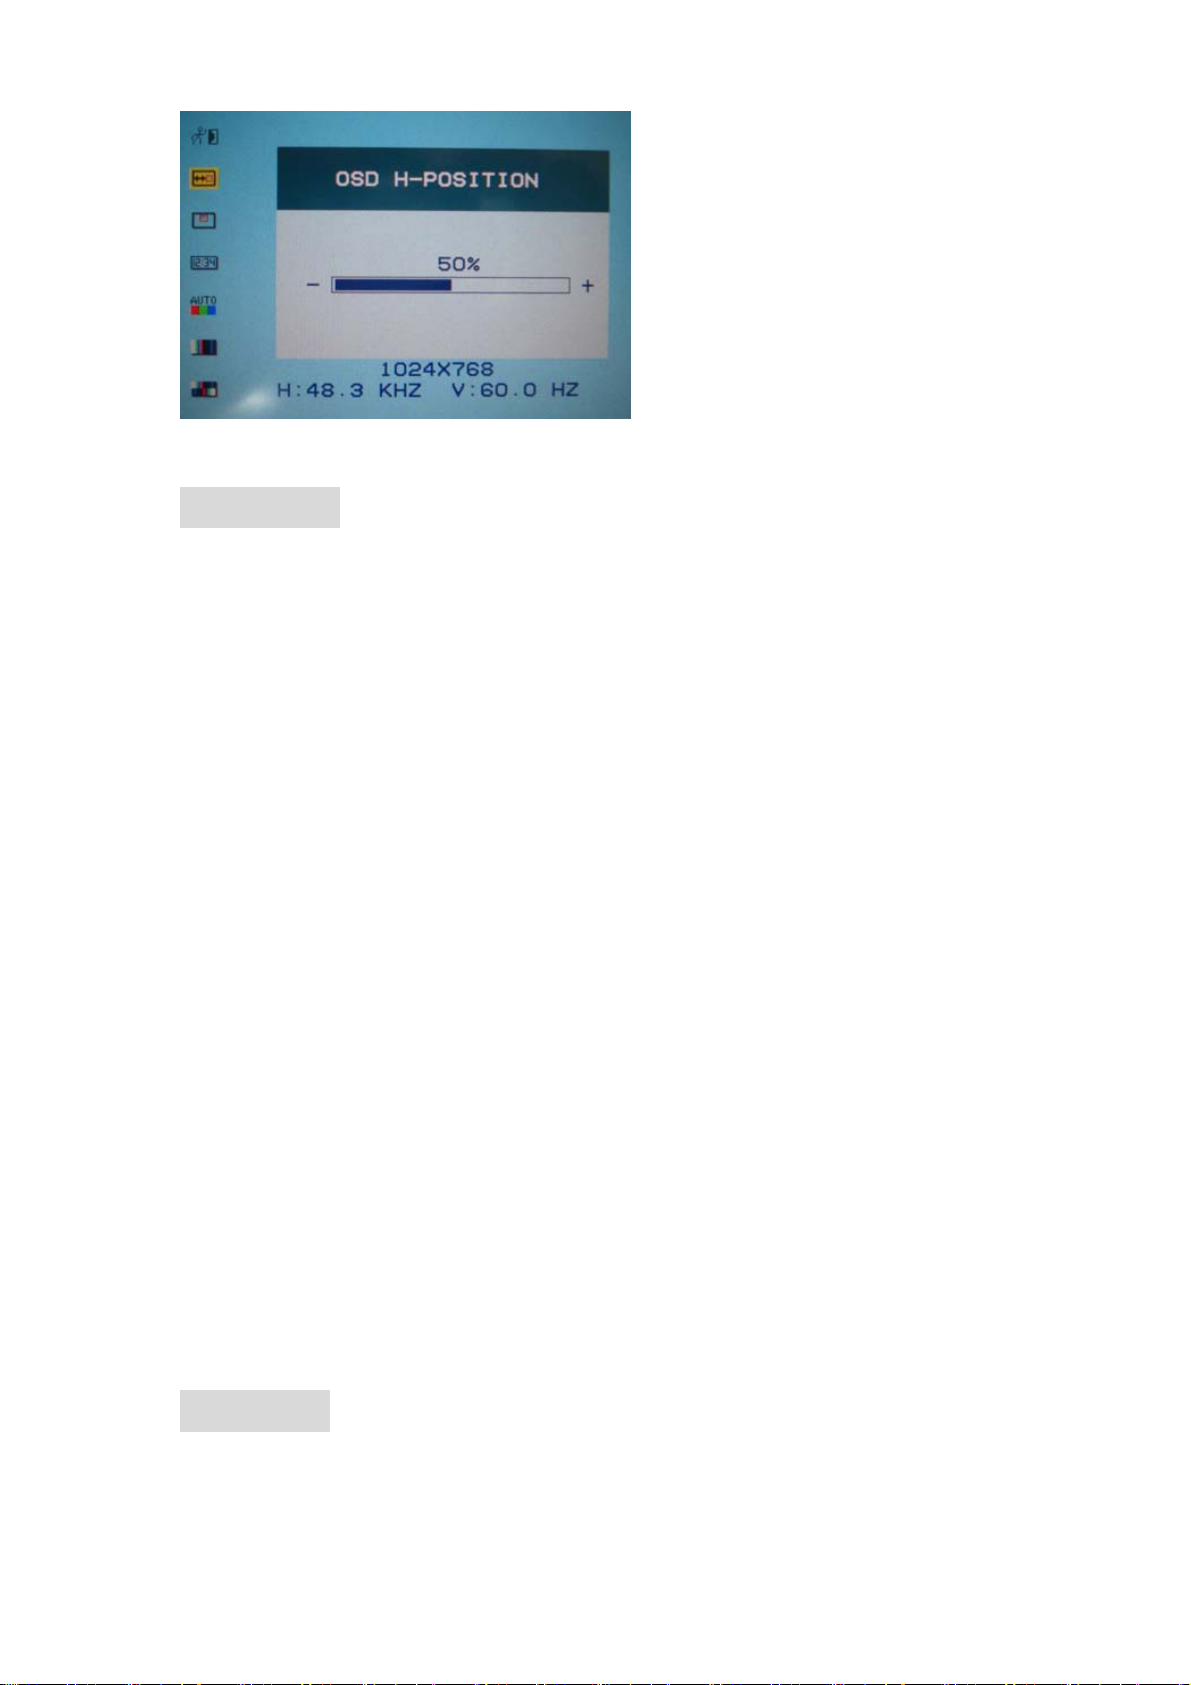
OSD miscellaneous function means to enter into sub menu “
miscellaneous
OSD H- position,
OSD V-position OSD duration auto color, saturation and tint”
adjustment. Please refer to the picture following.
10
Page 11
ⅣAcessories
Home AC adapter 1 piece
Car power cord 1 piece
26 SKS cable 1 piece
VGA signal cable 1 piece
Remote controller 1 piece
Drive disk 1 piece (For touch screen)
Touch pen 1 piece (For touch screen)
Manual 1 copy
ⅤParameter
11
Page 12
Display Screen TFT LCD 8”(202mm)
HIGH RESOLUTION 640*480 (VGA)
AVERAGE BRIGHTNESS 320cd/㎡
VIEWING ANGLE 130°/105°(Horizontal/Vertical)
COLOR SYSTEM PAL-4.43; NTSC-3.58
INPUT VOLUMEB DC12V
INPUT SIGNAL PC (VGA). AV1. AV2
Audio Output 100mW
CONTRAST 200:1
SIZE 206Lx 163Wx 39.5H mm(Folding)
WEIGHT 830g
ⅥTrouble shooting
1.AV MODE
PROBLEM Possible
Cause (s)
Only black
and white
picture
The colour in
the Video
menu is set
Zero
Solution
Adjust the number
by “+/-“on the unit
or
“ / ”button on
No picture 1. check
power
connection
(check the
working
indicater light)
2.check if the
AV cable is
connect well
The remote
controller
can’t work or
insensitive
check battery
install methed
The battery is
used out
the signal are
influenced
the remote
controller
1. Check
powerinput
2.correct the pole
1. correct the
installed
2. adopt new
battery
3. apart away
signal
disturbance
12
Page 13

2. PC MODE
1. Image excursion
Select correct refurbishment and resolution rete
2. Lose colour
Please check the VGA cable if connect aorrectly ,or what is the
matter with the VGA cable ,if any bend or broken in cable, plase
adopt new VGA cable
3. No picture
A. After connect the power ,the indicate light will turn red,then
press”POWER” button ,the unit will work ,if the screen display “NO
SIGNAL”, that is to say no signal input,at this time ,you should open
your computer;if the screen display “OVERRANGE”,that is to say
signal mode input beyonds the range of display ,please adjust the the
refurbish rate of unit.
B.if the green light on the monitor is turned on,the management
mode of the power isactivated.You may press any key on the
computer to activate it.The power of the monitor also has the
management mode,If on effect after pressing the keyboard of the PC
please press “POWER” key on the monitor
C. If theindicate light is turn off,please check the power conection
4.No clear or ready image,shaky picture
Please select correct resolution rate ,renew the refurbishment rate
5.If there are still some problems , you may connect with the rebated
dealers.
Remark:
I. If happen image interruptive , it is possible that the VGA signal
frequency isn’t matche with normalstandard
II. It isnomal that some line will appear on the screen ,when you
turnoff the unit
III. To ensure a longer use , please make Power management
function of PC active.
13
 Loading...