

Page 1
Page 2
Page 3

Dear customers:
Congratulate on your purchasing of our TFT liquid crystal display. This
product is shaped with modern style and is easy to be carried with. It is the
most suitable display for VGA, DVD and GPS system for motorcars and
ships also can be used in flat, office or at home and other suitable position.
This LCD is employs new integrate circuits and high quality modules. It is
putting out with its low power consumption, emits no radiation, and other
advantage characteristics. You will certainly benefit from this monitor in lots
of ways, to name some of them: convenience, safety, space-saving.
We hope that you will have the enjoyment of your new mini color TFT
LCD
To ensure the best use of the unit, please read this handbook carefully
beforehand.
NOTICE
1. Please use the adapter attached in the accessory.
2. Do not set the unit in heat or humid condition.
3. Keep away from strong light while using this product so as to
obtain the clearest and the most colorful picture.
4. Please avoid heavy impact or drop onto the ground.
5. Do not use chemical solutions to clean this unit. Please simply
wipe with a clean soft cloth to keep the brightness of the surface.
6. If the product does not operate normally when the instruction are
followed. Adjust only those controls that are covered by the
instruction. Improper adjustment of other controls may result in
damage and will often require extensive work of a qualified
technician
Page 4
CONTANTS
1.PRODUCT DESCRIPTION --------------------
2.REMOTE CONTROLLER --------------------
3.MATCHED CABLE---------------------------
4.CONNECTION ---------------------------------
5.MENU OPERATION --------------------------
6. ACCESSORIES --------------------------
7. PARAMETER ------------------------------
8.TROUBLESHOOTING--------------------
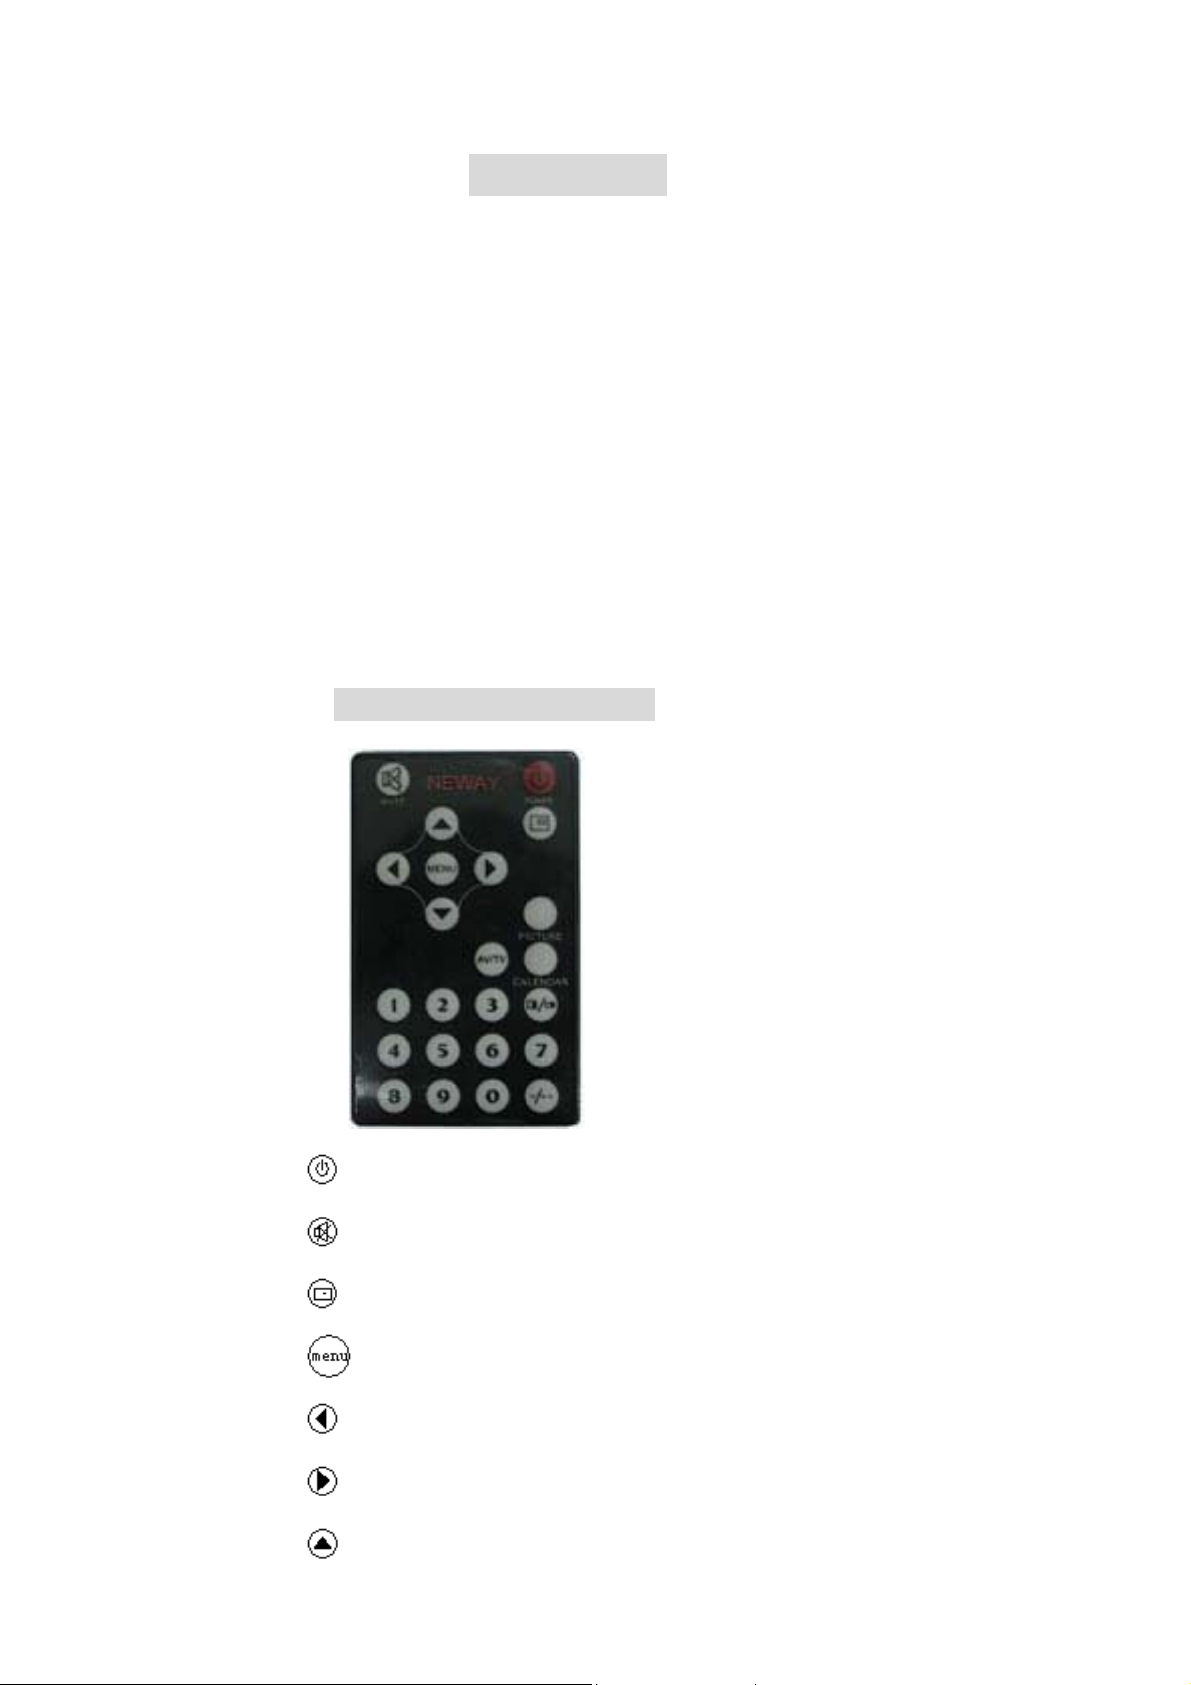
REMOTE CONTROLLER
: POWER ON/OFF
: MUTE
: Display inputted mode
: To activate OSD menu
: Volume down or to adjust the value of setting function
: Volume up or to adjust the value of setting function
: Program selection or to select function on OSD
Page 5
: Program selection or to select function on OSD
MATCHED CABLES
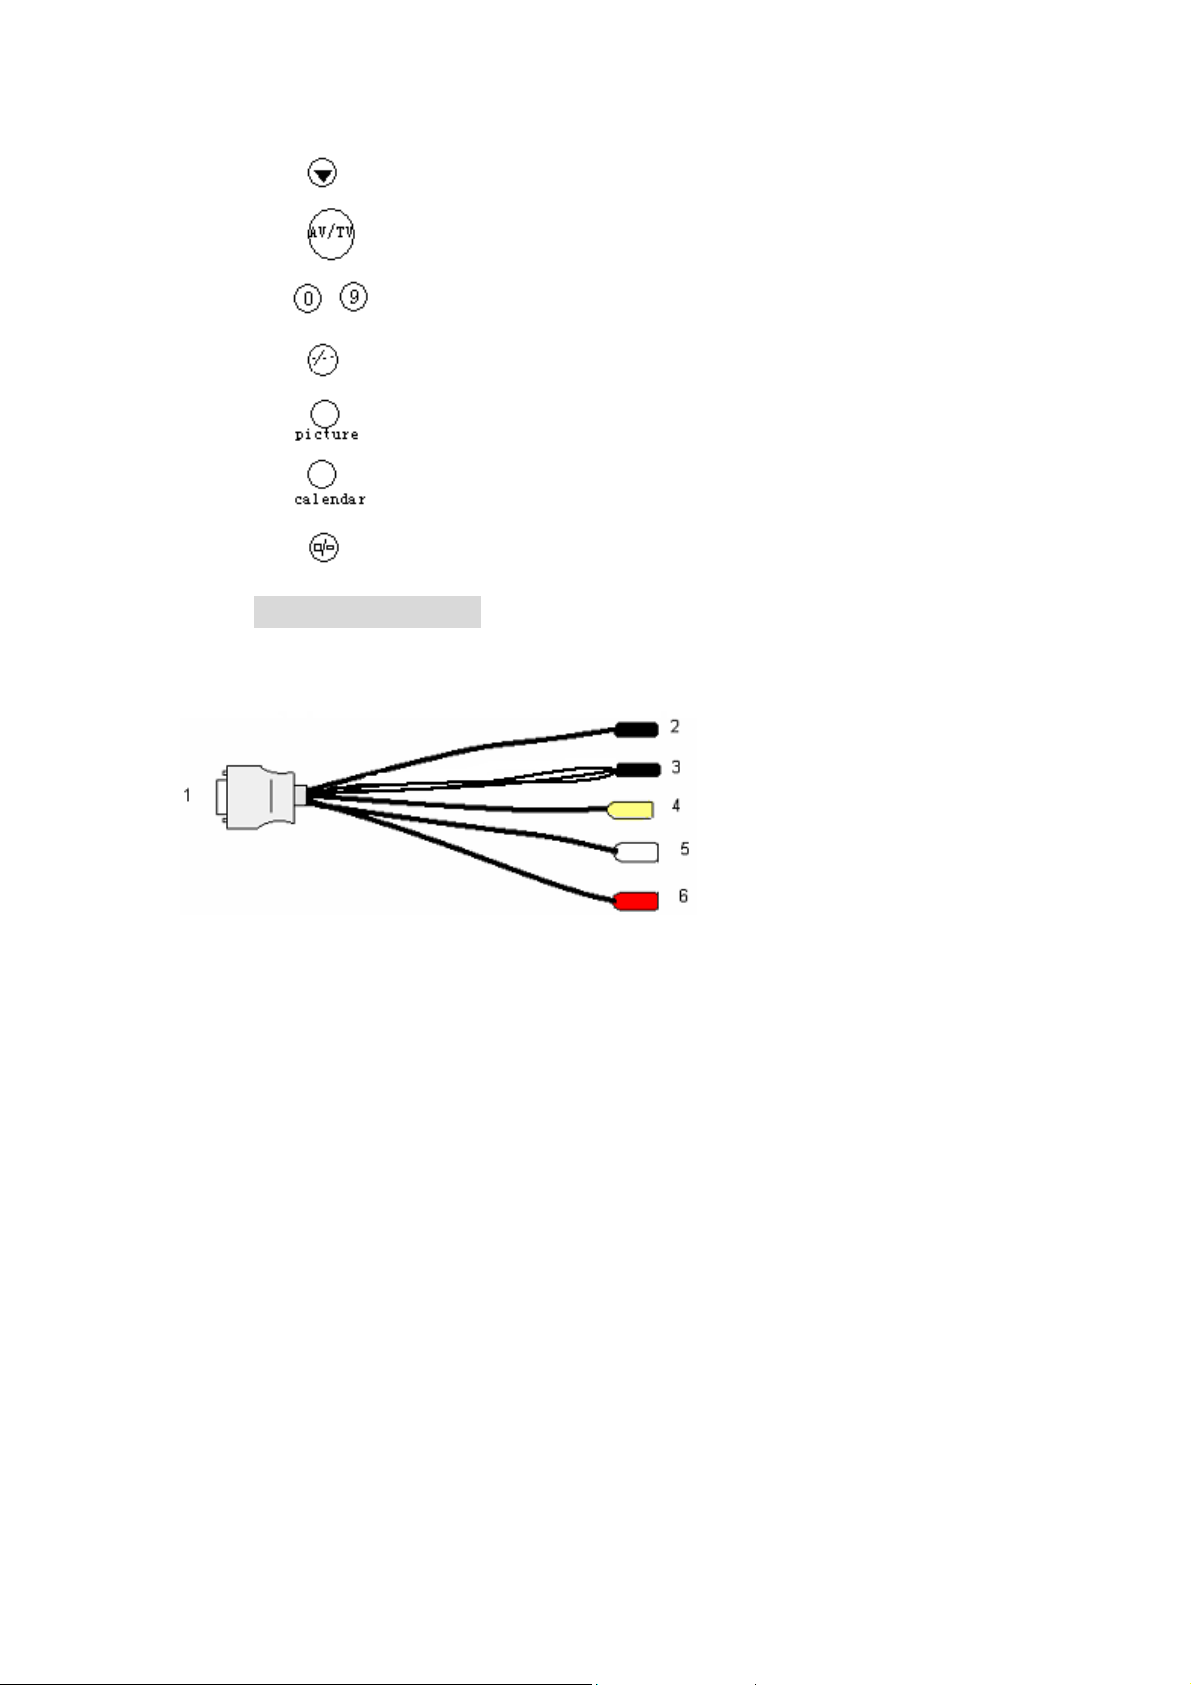
SERIER 1
: AV, VGA,TV switch
~ : Number keys
: Unit, double-digit, three-figure.
: NO USE
: NO USE
: NO USE
1. SKS input connecter connect the SKS input jack of the unit
2. Black jack: DC12v power input
3. Black 9-pin plug for VGA signal input
4. Yellow RCA jack for video 1 input
5. White RCA jack for audio input
6. Red RCA jack for video 2 input
Page 6
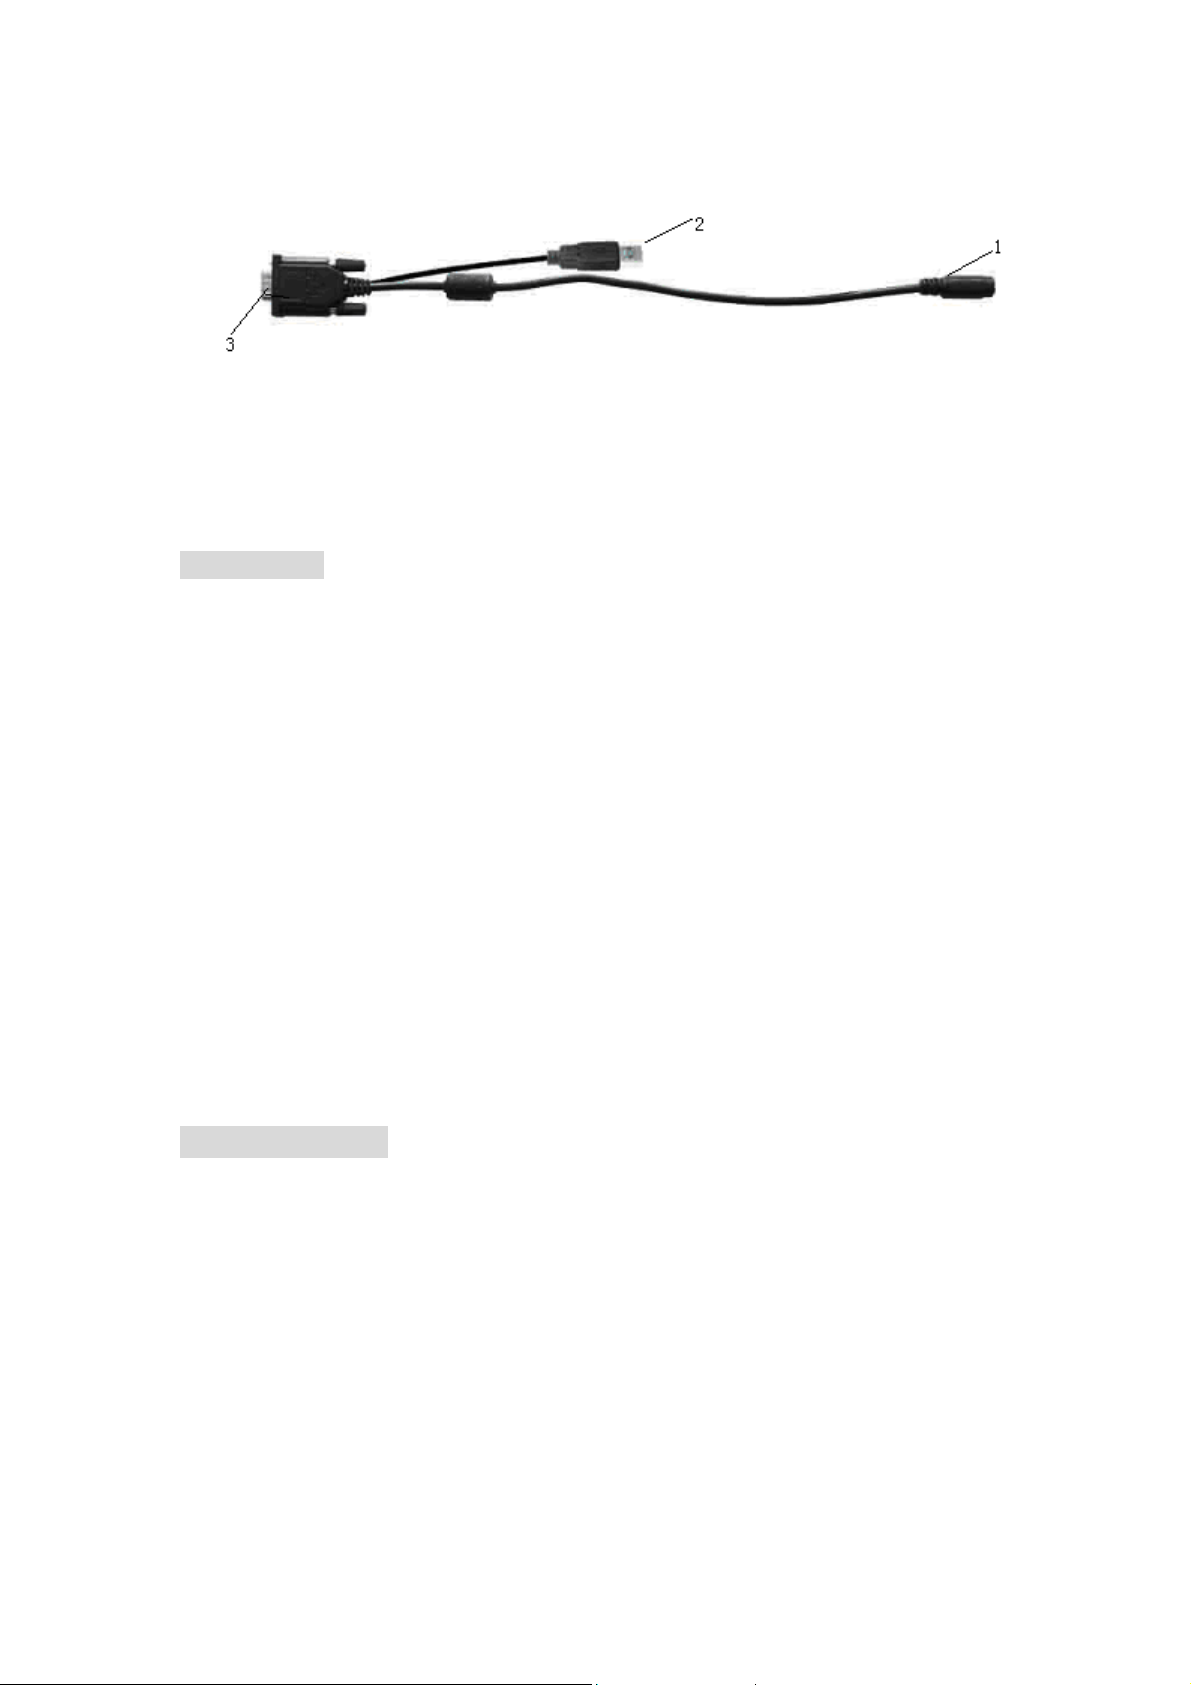
SERIER 2
1. Black 9-pin jack connect 9-pin plug of series 1
2. USB end connect the USB jack of computer for touch screen .
3. VGA signal input connect VGA end of the computer
CONECTION
Put the SKS jack of matched cable seriess1 into the AV input jack of the
monitor after checking the contact is good, the other jack of A/V cable should
be connected with related signal input as follows
1. Black 9-pin plug of series 1 is connected to the 9-pin jack of series 2 (note
the right direction of arrowhead), the VGA signal of series 2 will be
connected to the VGA jack at the back of computer, then tighten the
screws .
2. Yellow RCA jack video signal 1 input
3. Red RCA jack video 2 input
4. White RCA jack audio signal input
5. Black jack DC12v power input
6. When you use the unit, please adopt matched DC adapter, if not, please
note that the power consumption should be exceed 15w. For TV signal
please put the external ANT or CATV signal connecter in the external
antenna input jack.
MENU OPERATION
After connecting power, the unit will be in standby state. Press ‘power’ on
the unit or on the remote controller, the unit begins to work and press PC/AV
on the unit or AV/TV on the remote controller to switch the inputted mode
among AV, TV, PC mode. Press the same button again the unit will return to its
standby state.
When the unit is working press “MENU” and the main menu will appear on
the screen as picture show. Press “</>”on the unit or “^/V” on the remote
controller to select the item you demanded and press MENU to confirm,
meanwhile the secondary will display. Note if no further operation the menu will
disappear in ten sends.
Page 7
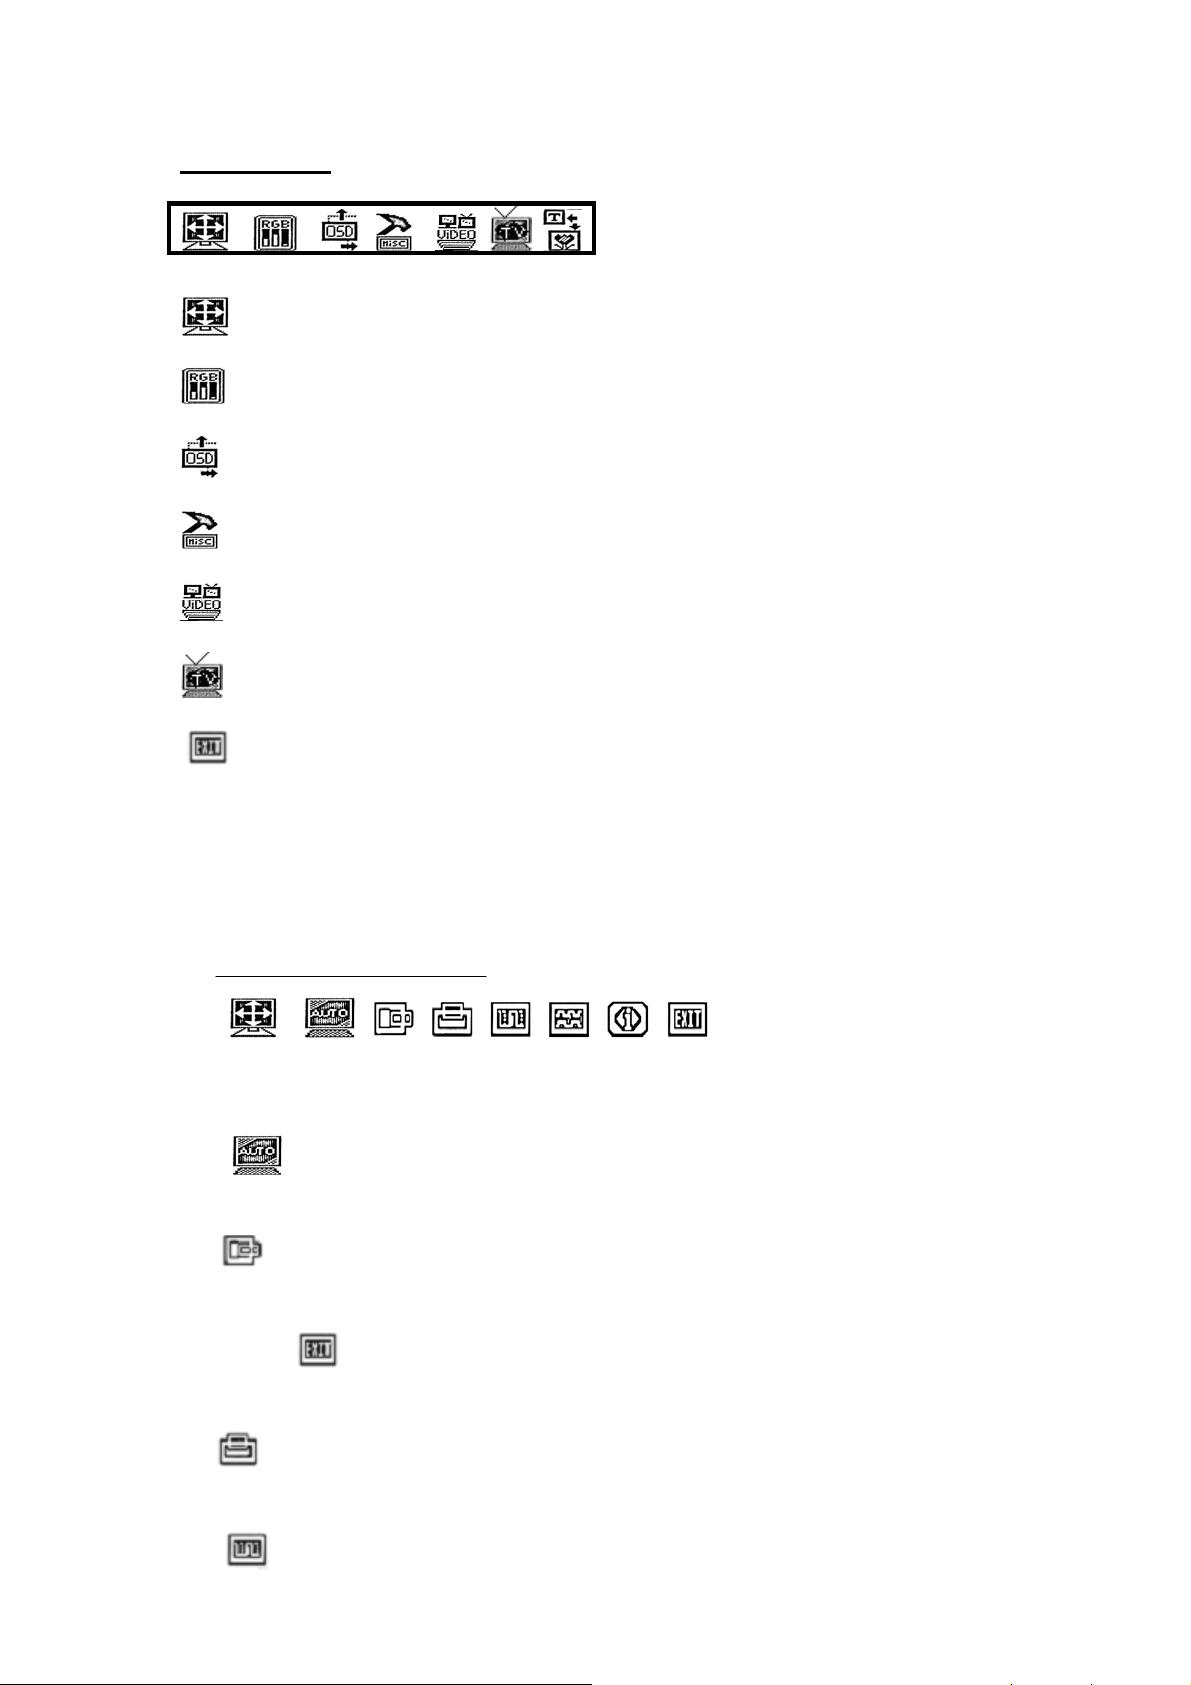
1. Main Manu
: Image position adjustment
: Image adjustment
: OSD position adjustment
: Other function adjustment
: Video adjustment
: TV function
: To exit the OSD menu
When the selected item‘s function menu namely secondary menu is appear,
press “</>”on the unit or “^/v” on the remote controller to select the function
you‘d like to adjust and press“+/-“on the unit or “</>”on the remote controller to
adjust the value of selected function.
2. Secondary Manu:
→
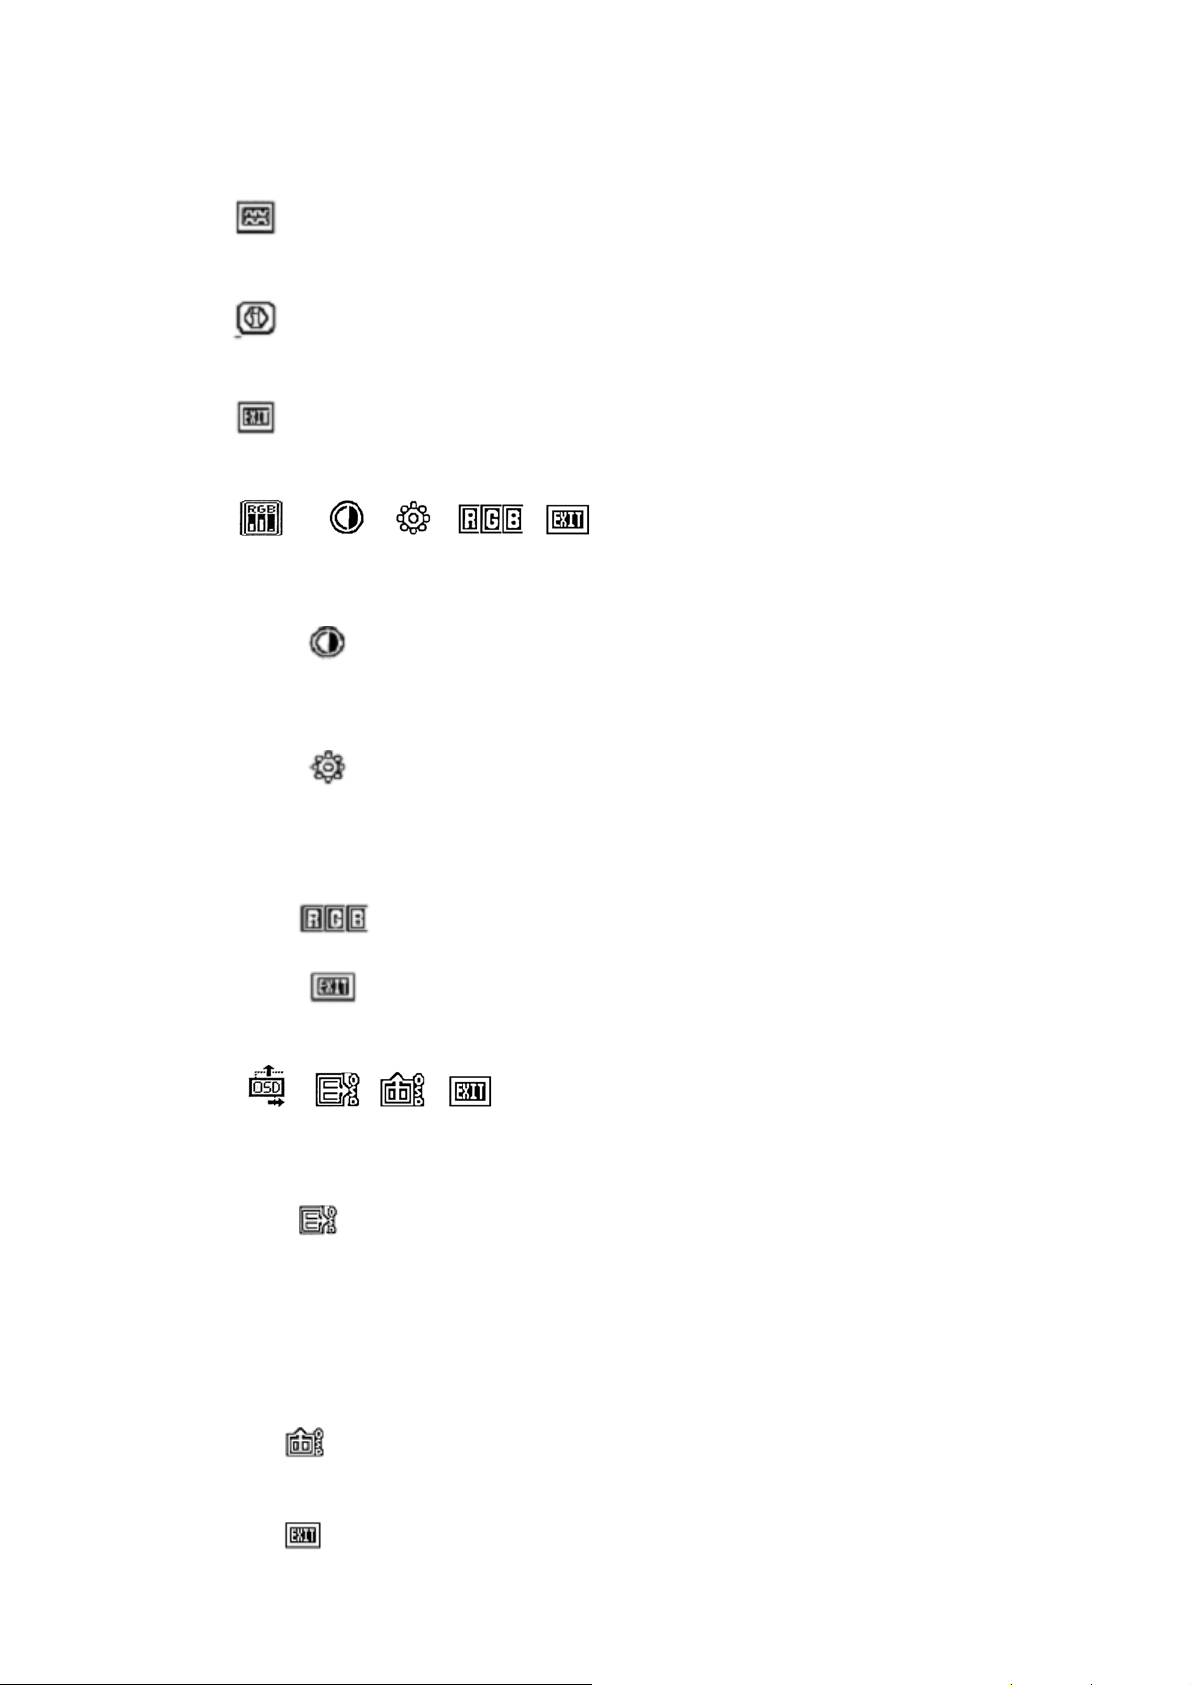
Image position adjustments (IN line): automatic 、horizontal、vertical、
phase、clock, current information inputted、exit.
: Adjust image position in screen automatically in PC mode. After
select this function it will adjust the image position automatically.
: To adjust image position in horizontal in PC mode, you can press
“+/-“ on the unit or “</>”on the remote controller after select this function.
After adjustment press “</>”on the unit or “^/V” on the remote controller to
select
the remote controller to select other function to adjust.
controller to adjust image position in vertical direction.
Select this function then press “+/-“on the unit or “</>”on the remote
Adjust the beginning point and end point of image position in PC
and press MENU to exit or press “</>”on the unit or “^ / V” on
Page 8
mode
Adjust the range of frequency in PC mode press “+/-“ on the unit or
“</>”on the remote controller
Display present input information in PC mode, this function is to
show the mode of inputted signal presently.
After adjustment select this function and confirm by pressing
MENU to exit.
→
Image adjustments(in line): contrast、Brightness、RGB、Exit.
Adjust the contrast in PC mode. You can adjust the value of
this function by pressing “+/-“ on the unit or “</>”on the remote controller
after you selected it.
Adjust the brightness in PC mode, to adjust the brightness
you can use “+/-“ on the unit or “</>”on the remote controller again after
you select this function just the same as adjustment of CONTRAST
mentioned above.
This function is to adjust the RGB value in PC mode.
After Adjustment select this function and confirm by
pressing MENU to exit.
→
OSD adjustments (IN line): horizontal、vertical、Exit.
Adjust OSD position in horizontal direction, you can adjust
the OSD position just as adjustment of IMAGE ADJUSTMENT after
select this function namely press “+/-“ on the unit or “</>”on the remote
controller to adjust and the OSD will move in horizontal direction as your
operation.
You can adjust OSD position in vertical direction. The
operation is the same as mentioned above.
Exit the menu
Page 9
→
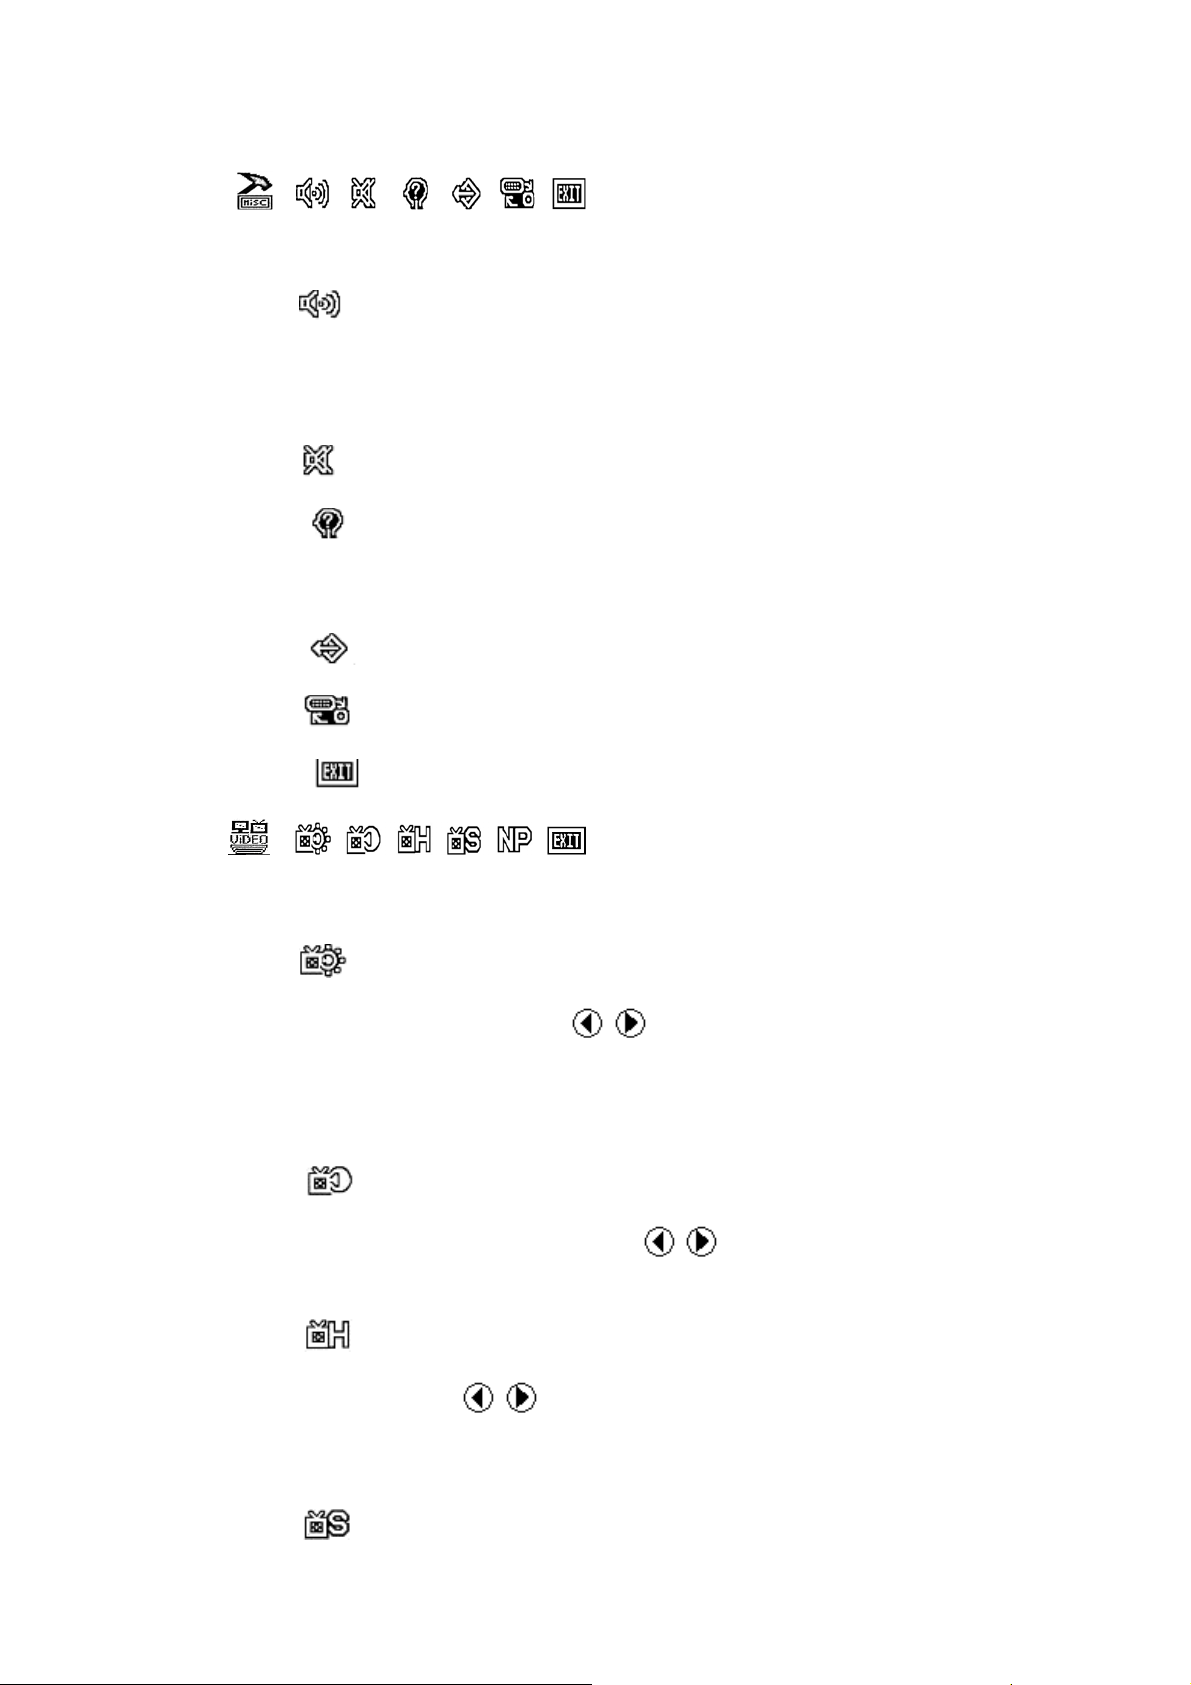
Other parameter(IN line): Volume、Mute、Language、default setting、input
selection、exit.
Adjust volume after select this function, press “+/-“ on the
unit or “</>”on the remote controller to adjust the volume
also you can press +/-“ on the unit or “</>”on the remote
controller directly to adjust the volume
No use
The language selection such as English Chinese so on,
press “+/-“ on the unit or “</>”on the remote controller to
select language you demand when you select the function.
Bring back to the default setting
AV1/AV2/VGA exchange
Exit the menu
→
Video (IN line): Brightness、contrast、color、color system、Exit
: Adjustment of video brightness of image in AV mode. Press
“+/-“ on the unit or “
the value of brightness. Or you can press “>” directly to
change the level of brightness in turn, there is 4 levels of
brightness approved.
: To adjust video contrast of the image in AV mode, you can
press“+/-“ on the unit or “ / ”on the remote controller to
adjust .
: Adjust the hue of the image in AV mode, press“+/-“ on the
/ ”on the remote controller to adjust
unit or “ / ”on the remote controller to adjust as your
requiring.
: This function is to adjust the saturation of image, you can
Page 10
press “+/-“ on the unit or “ / ”on the remote controller
to adjust.
: Select this function to choose the color system in AV mode.
Such as: NTSC, M; PAL, 4.43, 60HZ; NTSC, 4.43, 60HZ;
PAL, M; NTSC, J; AUTO.
: To exit
TV CHANNEL: AUTO SEARCH, MANUAL SEARCH , EXCHANGE
CHANNEL,FINE CHANNEL , AUTO, INERCARRIER SOUND ,EXIT.
“AUTO SEARCH “: To search TV channel automatically, after selecting this
function press “+/-“ on the unit or “</>”on the remote controller and it will start
to search TV channel from low to high or from high to low meanwhile it will
store the TV channel automatically. Note while the TV is searching
automatically, it is in a mute state.
MANUAL SEARCH: If you ‘d like to search TV channel by yourself you can
select this function to search TV channel manually then press “+/-“ on the unit
or “</>”on the remote controller and it will start to search TV channel . It will
stop searching automatically when there was a TV program searched and
stored, press MENU button to confirm and you can repeat the operation as
mentioned to search other programs.
EXCHANGE CHANNEL: Exchange channel choose the function, screen will
display as image:
CURRENT CHANNEL: display the
number of current channel (e.g.: 9)
CHANGL TO :It is to input new number
of current channel you like (e.g.:12)
Press ‘’+/-’’ or “ </> “button on
EXCHANGE CHANNEL
CURRENT CHANNEL 9
CHANGL TO 12
the remote controller to choose new number, then press MENU to confirm,
is to set the double-digit or three-figure number. For example: To set 12, just
press and then input 1 and 2 . Or press twice to set a three-figure
number ,256 for instance press twice then input 2, 5, and 6 in turn then
press
FINE CHANNEL : The FINE CHANNEL is to correct the weak signal and the
nonstandard TV signal stored .
fine tune. Note, the relative button should keep pressing till the good signal
received.
again to exit
After select it press – or V- for lower limit fine tune. Press + or V+ for high
Page 11

AUTO: Auto color system is to set the color system automatically.
INTERCARRIER SOUND: The function is to select sound system
(D/K;M/N;B/G;I/I) for the TV signal that you have received. You can press
“+/-“ on the unit or “</>”on the remote controller to select you need.
:After setting press“</>”on the unit or “^/V” on the remote controller to
select this function and confirm by pressing MENU to exit .
ACCESSORIES
Home AC adapter 1piece
15-pin SKS AV cable 1piece
9-pin VGA cable 1 piece
Remote controller 1piece
Drive disk 1piece
Manual 1copy
Page 12
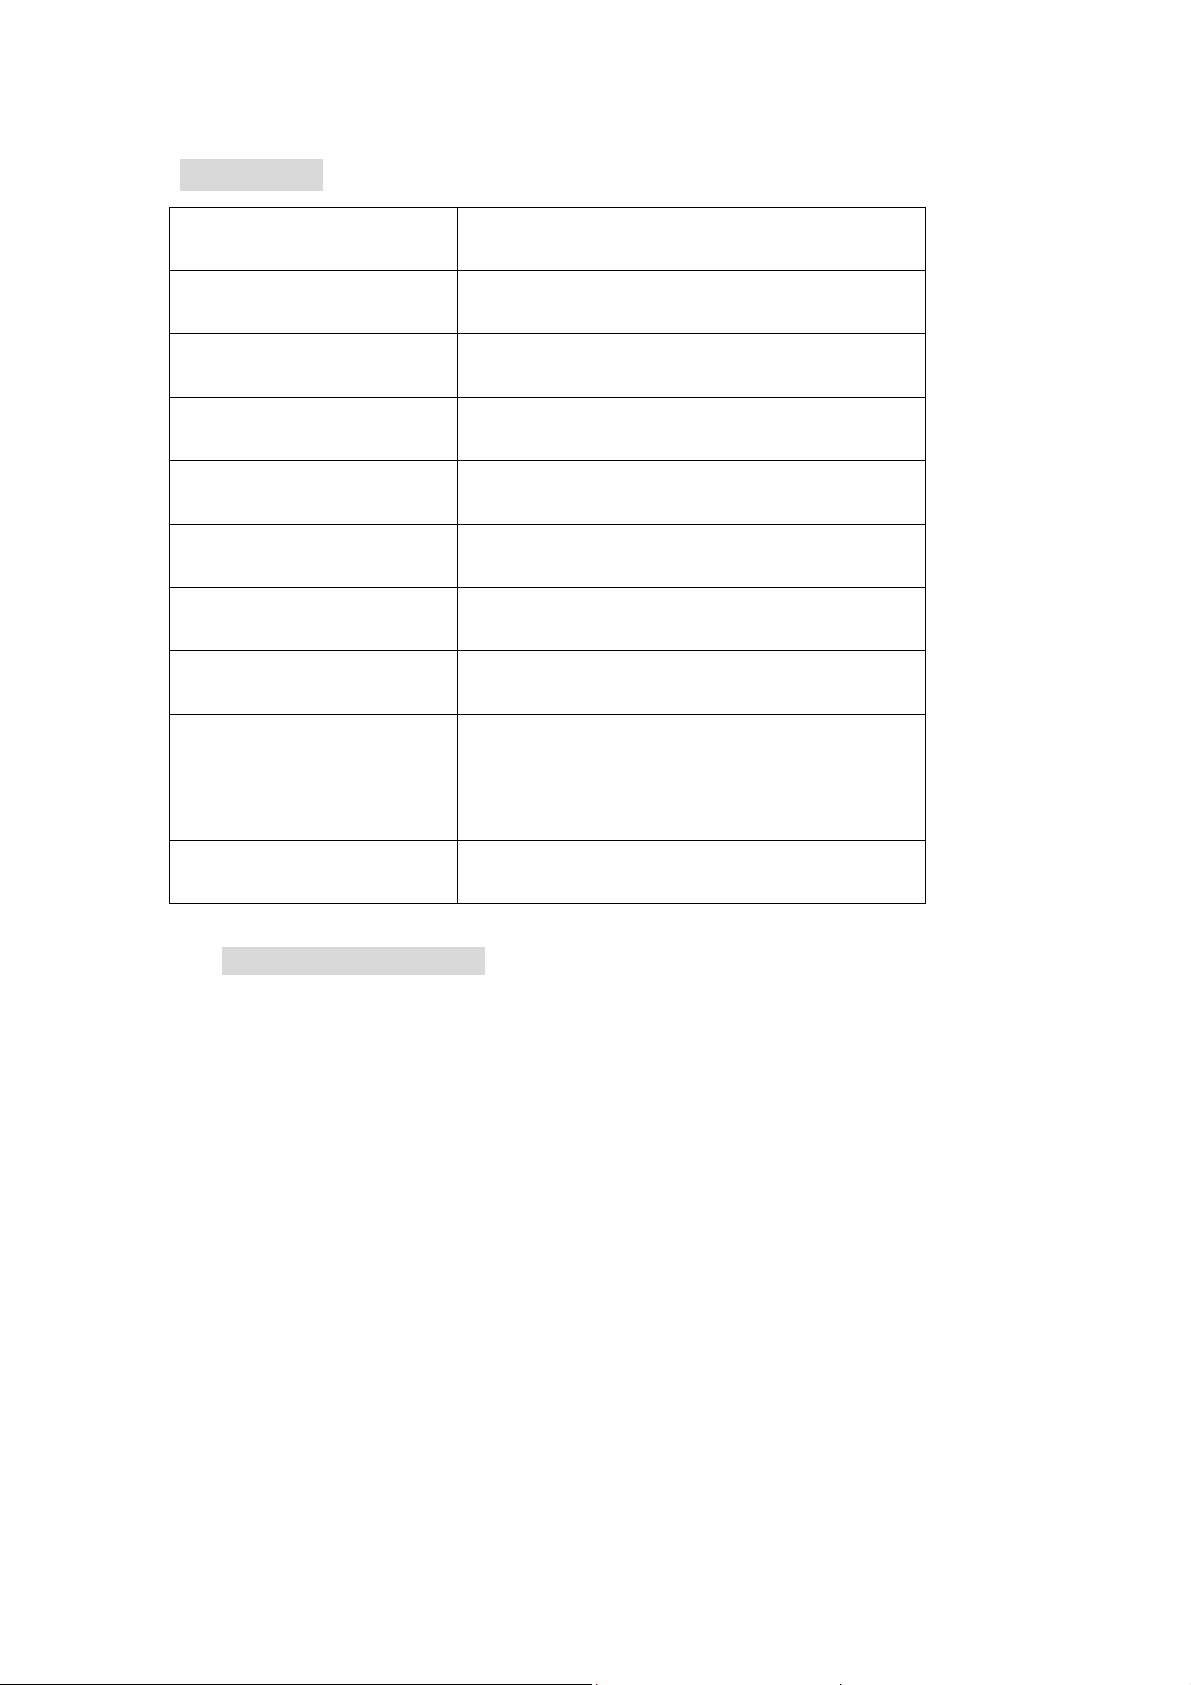
PARAMETER
Panel
Resolution
Contrast
Brightness
Color system
Input voltage
Power consumption
Audio Output
Size
TFTLCD 8’’(202mm)
921600pixels(640*480)
200:1
320cd/㎡
PAL/ NTSC/ SECAM
12V
≤10 w
100mw
205*178*67mm(Folding)
205*150*210mm(Expanding)
Weight
TROUBLE SHOOTING
※ Only black-and-white image
Make the level of color saturation and brightness is proper.
※Power on but no picture
Make sure the AV &VGA cable is tightly connected from the video out
connector & VGA signal output connector. Make sure you are using the
standard power adapter coming with the monitor.
※Wrong or abnormal colors
If any color is missing, check the cables to make sure it is securely
connected. Broken or loose pins in the cable connector can cause a bad
connection.
※Remote controller doesn't work
Check the battery to make sure the battery is installed properly and make
sure it is not a low battery. The signal is interfered by some obstructions.
1215g
Page 13

■ REMARK:
If there are still any problems, you can connect with the related deals
*If interruptive image occurs, it maybe that the VGA signal frequency isn’t
matched with normal standard
*It is a normal condition that some bright lines appear on the screen when you
turn the unit
 Loading...