

Page 1
Page 2
Page 3

DEAR CUSTOMERS
Thank you for purchasing the full-channel liquid crystal TV. This product employs
new integrate circuits (I
power consumption, stable quality, no X-ray radiation and other advantage characteristics. This
product is shaped with modern style and is easy to be carried with. The color LCD TV set is the
most suitable display for cable monitor system, car VCD and GPS system for motorcars and ships.
We hope that you will have the enjoyment of your new mini color TV set.
To ensure the best use of the unit, please read this handbook carefully beforehand.
2
C Bus) and high quality TFT LCD modules. It is putting out with its low
NOTICE
1. Please use the adapter attached in the accessory.
2.Do not remove the rear panel of this product. If in need of service
please call a qualified technician.
3、Do not expose this product to direct sunlight, heat or humid
conditions.
4、Keep away from strong light while using this product so as to obt ain
the clearest and the most colorful picture.
5、Avoid heavy impact or drop onto the ground.
6、Do not use chemical solutions to clean this unit. Please simply wipe
with a clean soft cloth to keep the brightness of the surface.
Page 4
CONTANTS
1.FESTURE -------------------------2.REMOTE CONTROLLER (MONITOR) --------
3.MATCHED CABLE--------------------------4.CONNECTION OF CABLE --------------------------5.MENU OPERATION --------------------------
6.PARAMETER --------------------------
8. ACCESSORIES -----------------------------9.TROUBLESHOOTING-----------------------
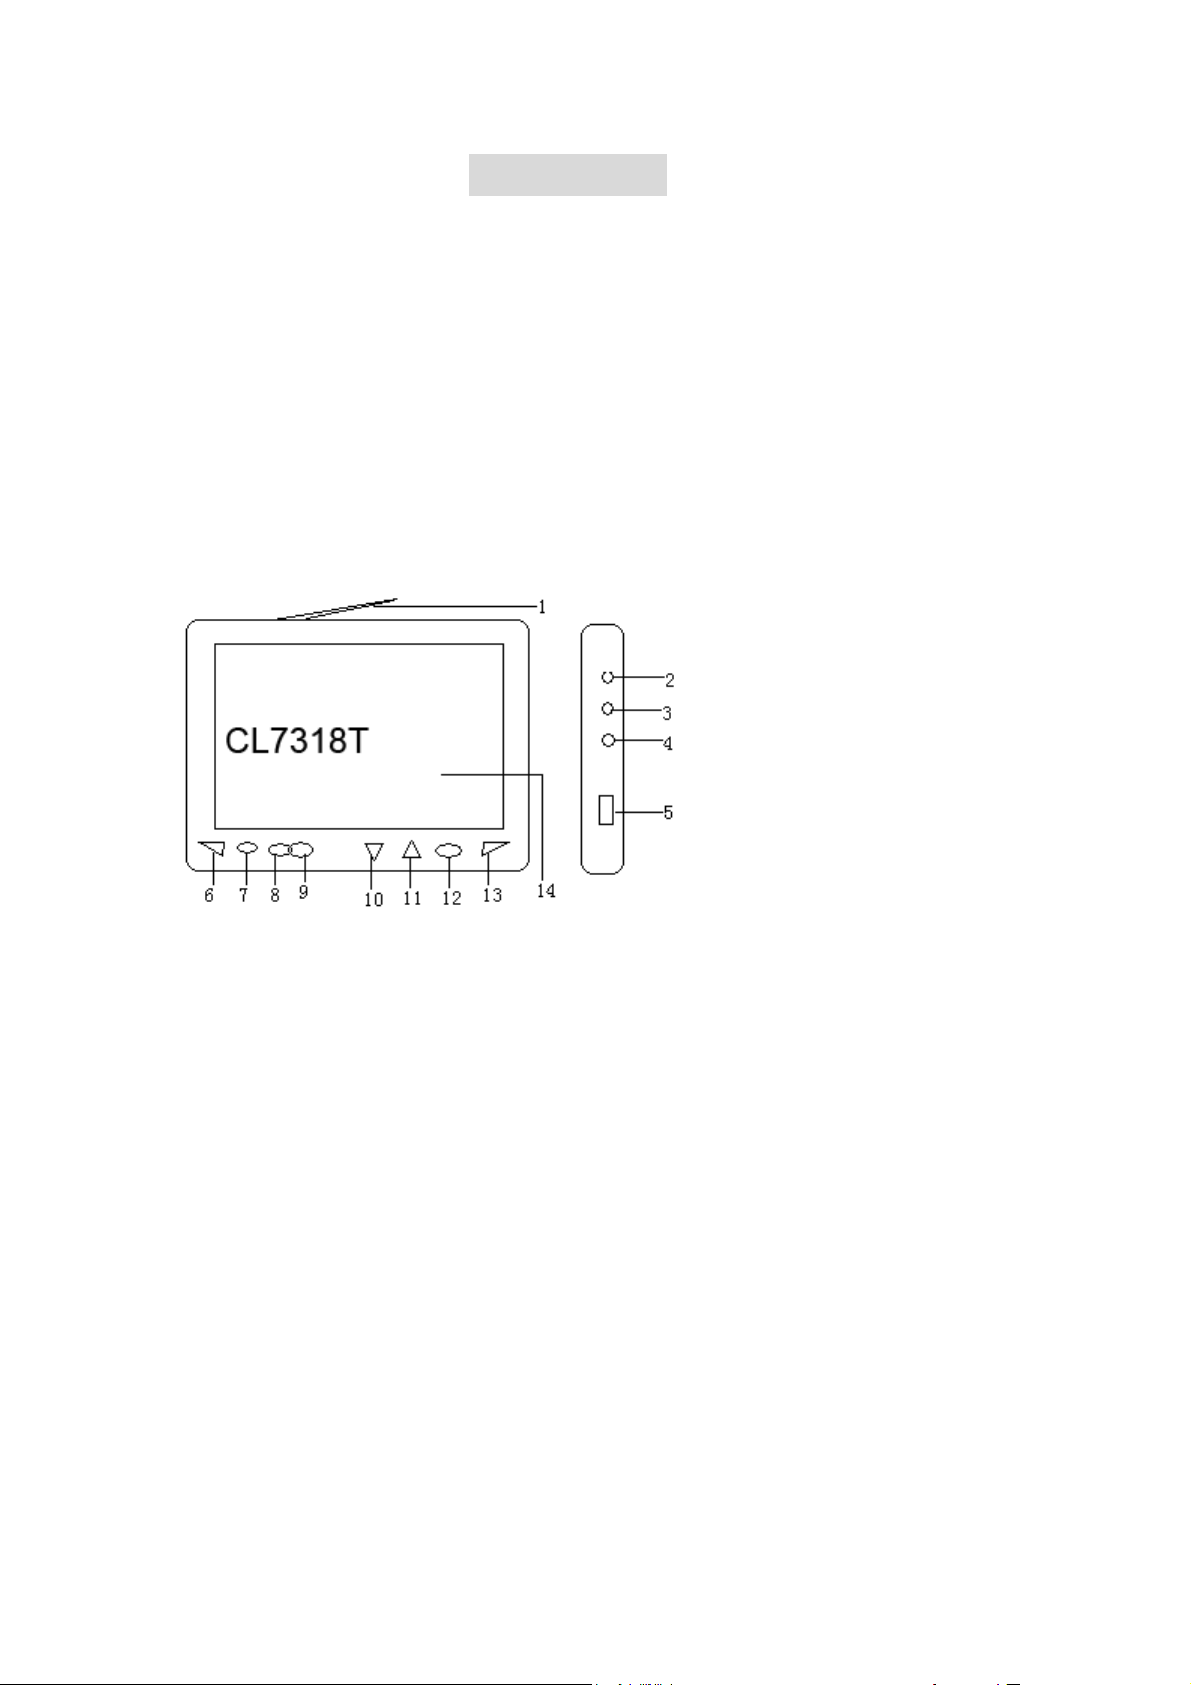
①Antenna rod
②ANT: External antenna input jack
③ERA: Earphone jack
④POW:DC12Vpower input jack
⑤A/V:A/V input jack
⑥Infrared receiving window
⑦MENU: Activate the OSD menu
⑧_:V olume decrease or to adjust the value of selected function on OSD menu;
also used to select the item on the menu.
⑨+:V olume Increase or to adjust the value of selected function on OSD menu;
also used to select the item on the menu.
⑩CH-: Program selection key or to select item on the menu
11,CH+: Program selection key or to select item on the menu
12, A/V: To switch betwee4n the TV signal and AV signal.
13, POW: power on/off/standby
14, Liquid crystal screen
Page 5
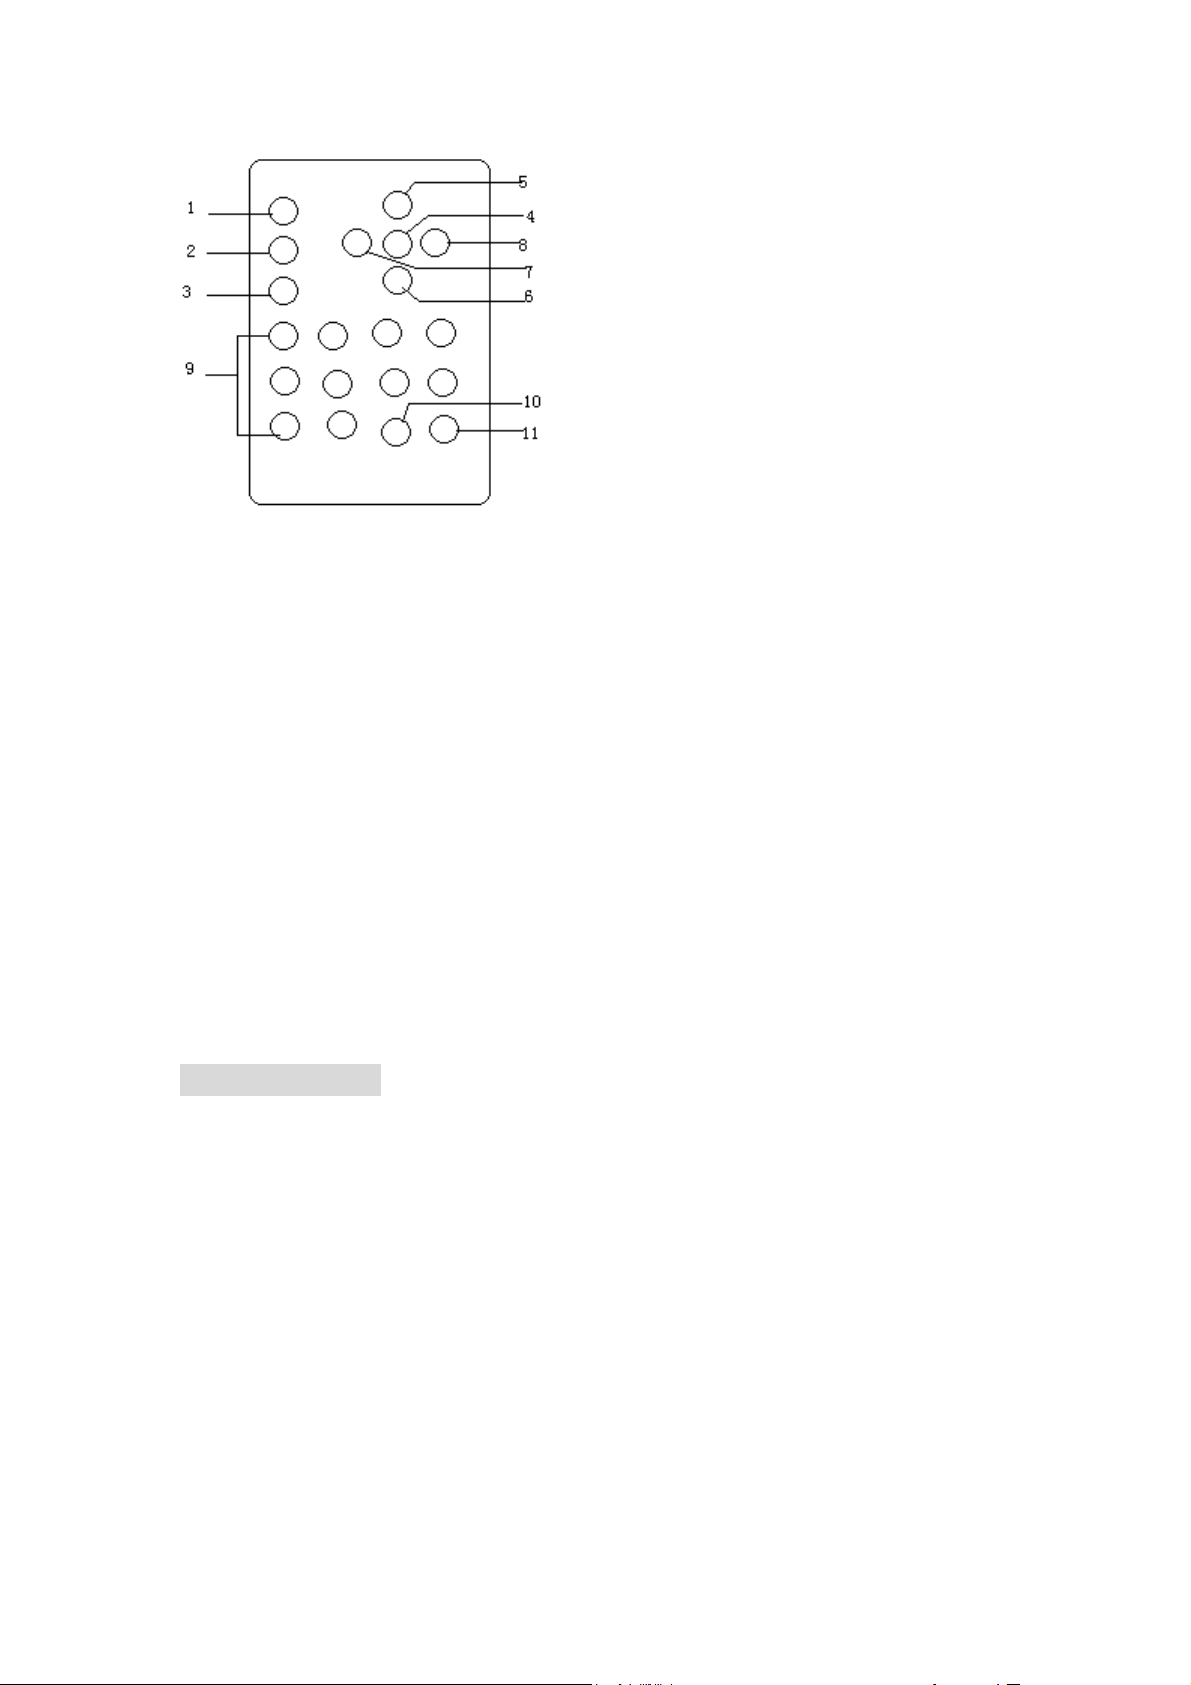
①POWER :on /off /standby
②MUTE: Press this button to close the sound, press it again to return the
sound
③AV/TV: To switch between the TV signal and AV signal
④MENU: Activate OSD menu,
⑤ CH+: Program selection key or to select item on the menu
⑥I CH-: Program selection key or to select item on the menu
⑦v-: Volume decrease or to adjust the value of selected function on menu;
also used to select the item on the menu.
⑧v+: Volume Increase or to adjust the value of selected function on menu;
also used to select the item on the menu.
⑨Number buttons
⑩-/--:Unit/decimal/percentile
11l.WIDE: Switch the display mode of image between 16:9and 4:3
INSTALLATION
Open the shipping carton and check the package content if any items are
damaged or missing please contact us immediately
The package should include the follow items:
-Remote controller
-AV cable
-Power adapter
-Bracket
-TV signal connecter
-DC 12v car power cord
-Manual
Page 6
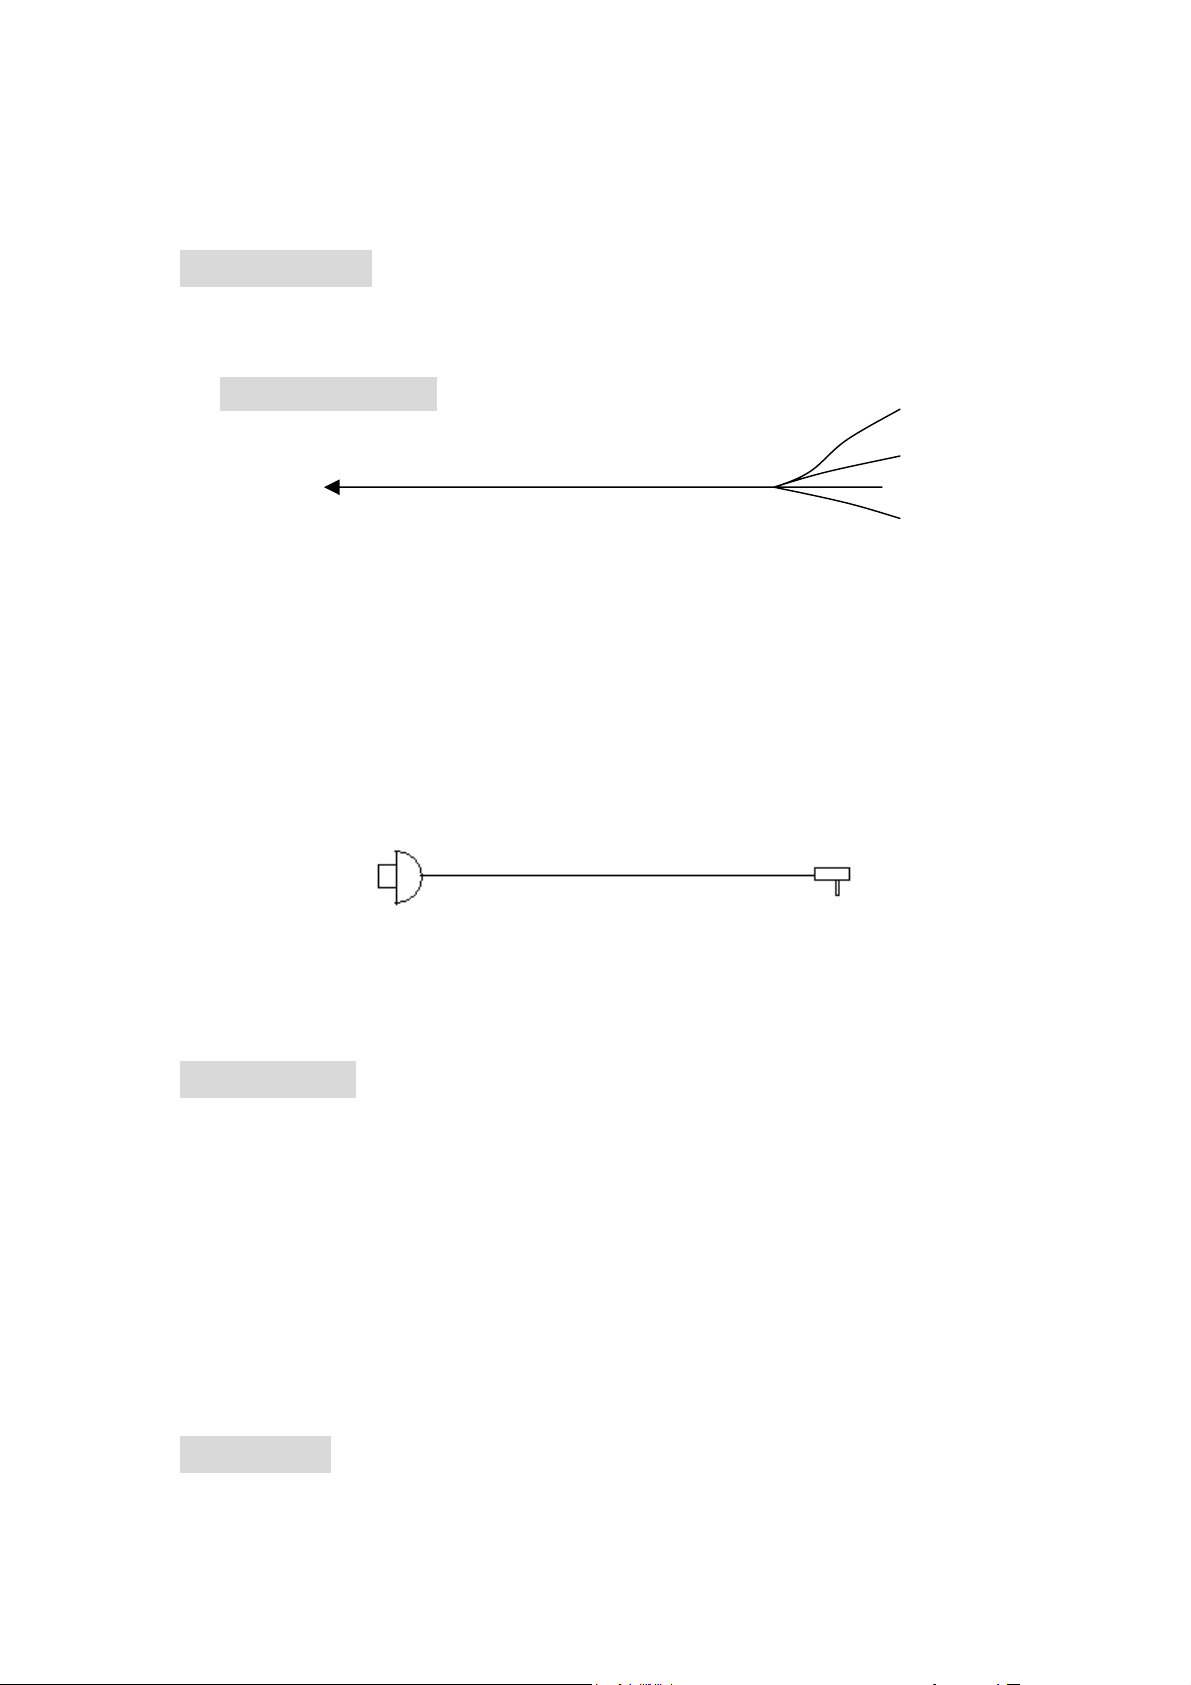
Connection
1.Matched cable ②
SERIES 1 ③
① ④
⑤
1:A/Vsignal input plug ,put the plug in the A/V input jack
2:Yellow plug for video signal 1input
3:Red plug for video signal 2input
4.White audio signal input
5.Black jack DC12v POWER INPUT
SERIES 2
① ②
1:Connect the external ANT or CATV signal
2:Plug in the external antenna jack of the unit for TV signal
Connection
Firstly put the A/V signal input plug of series 1 in the A/V input jack at the back
of the unit ,then connect the other of series 1 to the related signal (yellow plug
for video signal 1Red plug for video signal 2 Black jack for DC12Vpower).
NOTE : the unit only for DC12V,you can transform the city electricity to
DC12Vwith the AC adapter enclosed .Or you can select to use the output
voltage is DC12V car or ship power supply and make sure the power
consumption is 15 watt.
Secondly put the black ① of series 2 in the out ANT or CATV signal then
plug the ② of series 2 in the external antenna jack of the unit for TV signal.
Operation
After connection ,the unit will be in standby state ,press “pow” of the unit or
Page 7
“power” of the remote controller ,the unit begins to work .Press the button
again the unit will return to standby state .
When the unit works ,you can press Av on the unit or TV/AV on the remote
controller to switch signal inputted between video1,video2and TV.You can
adjust the length ,angle or direction of the antenna rod to get the best TV signal
when you are receiving the TV .If the TV signal is poor you had better use an
external antenna or connect the unit with CATV.(connect it as mentioned
above)_
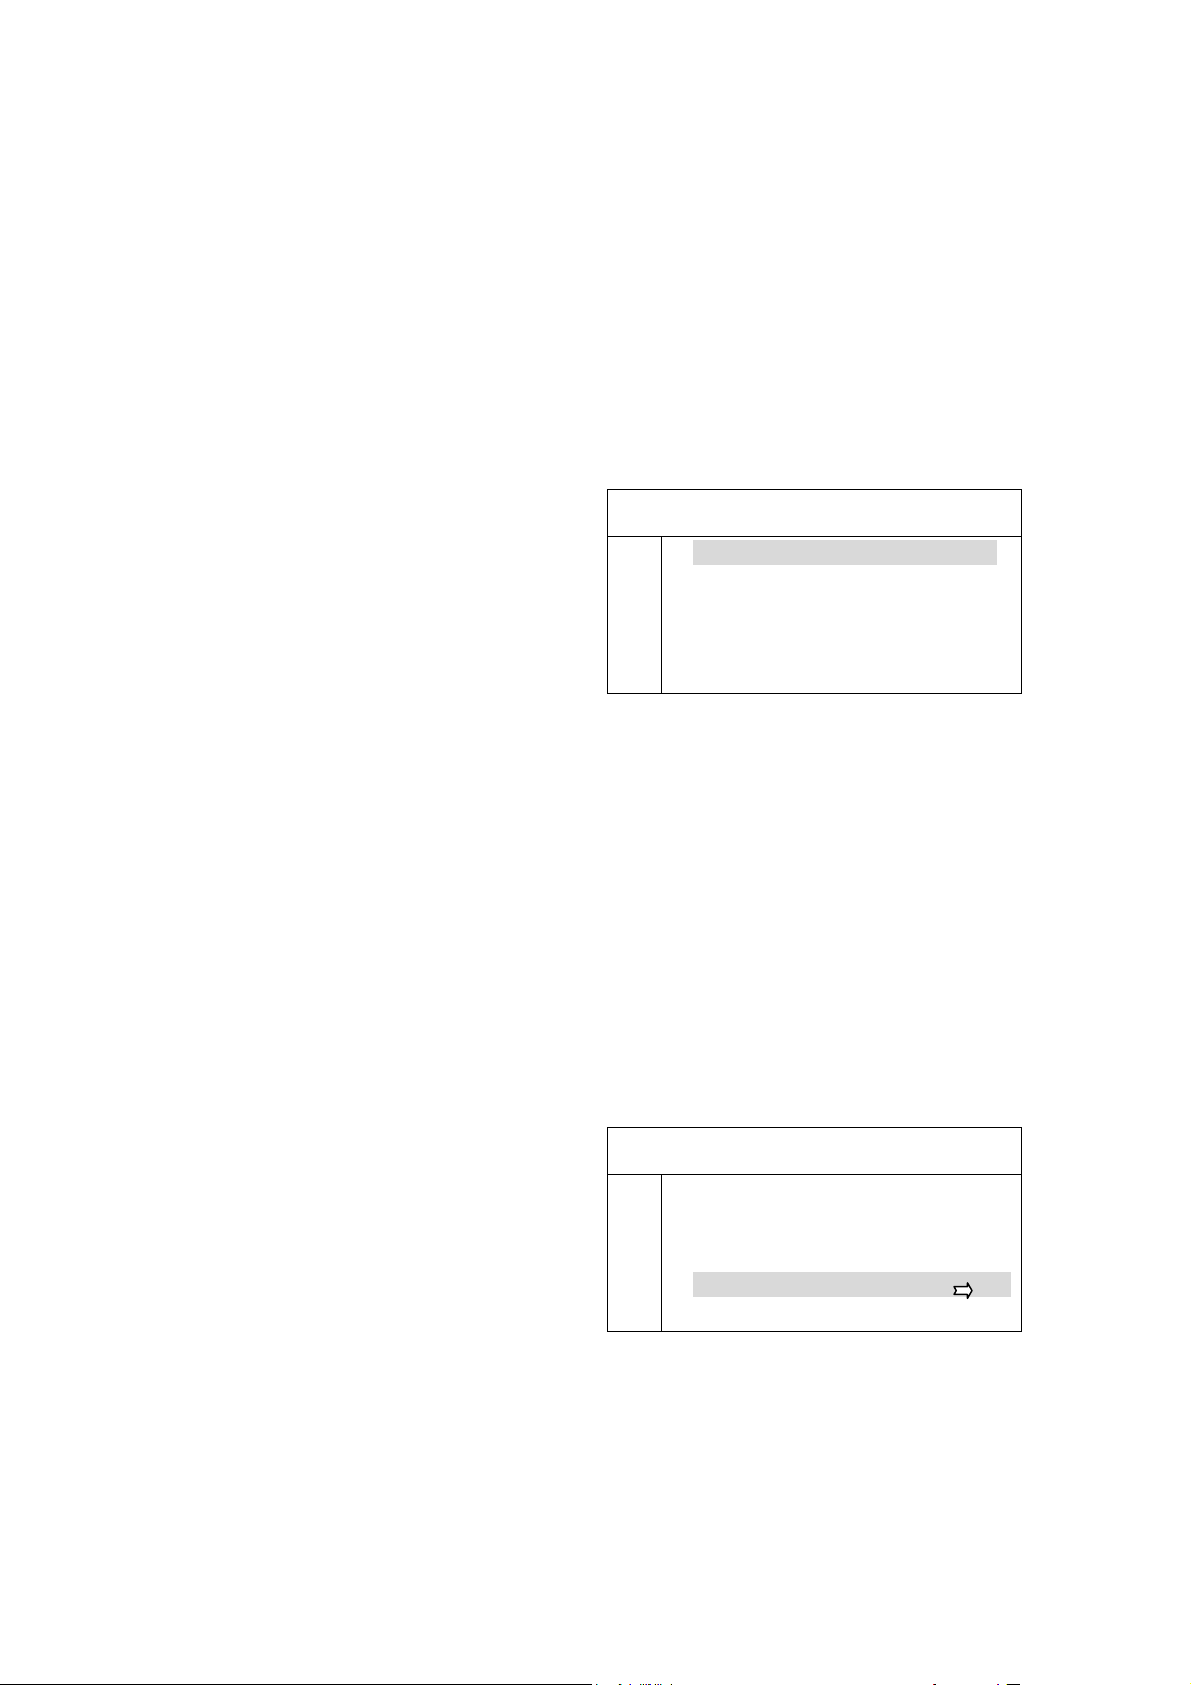
1. SELECT THE LANGUAGE OF OSD MENU
Activate the OSD menu by pressing the
‘MENU’on the unit or the’MENU’ on the
remote controller then press ‘- / +” on the unit
or the “V-/V+”on the remote controller to
choose the “SETUP” item. then the secondary
menu will appear as follows’
LANGUE: The language of the OSD menu.
BACKGROUND: When there is no signal the background will be blue. MODE: The display
mode .UV REV & RL REV :To make the image up and down reverse or left and right reverse.
Select the LANGUAGE by pressing” CH-/CH+” on the unit or on the remote controller ,the
selected character will turn red.
then press the -/ + on the unit or V-/V+ on the remote controller to choose the language you
need, such as : Chinese, English, Russian , German or Arabic . later you can press CH-/CH+” on
the unit or on the remote controller again to select other function to adjust, after that confirm it by
pressing MENU
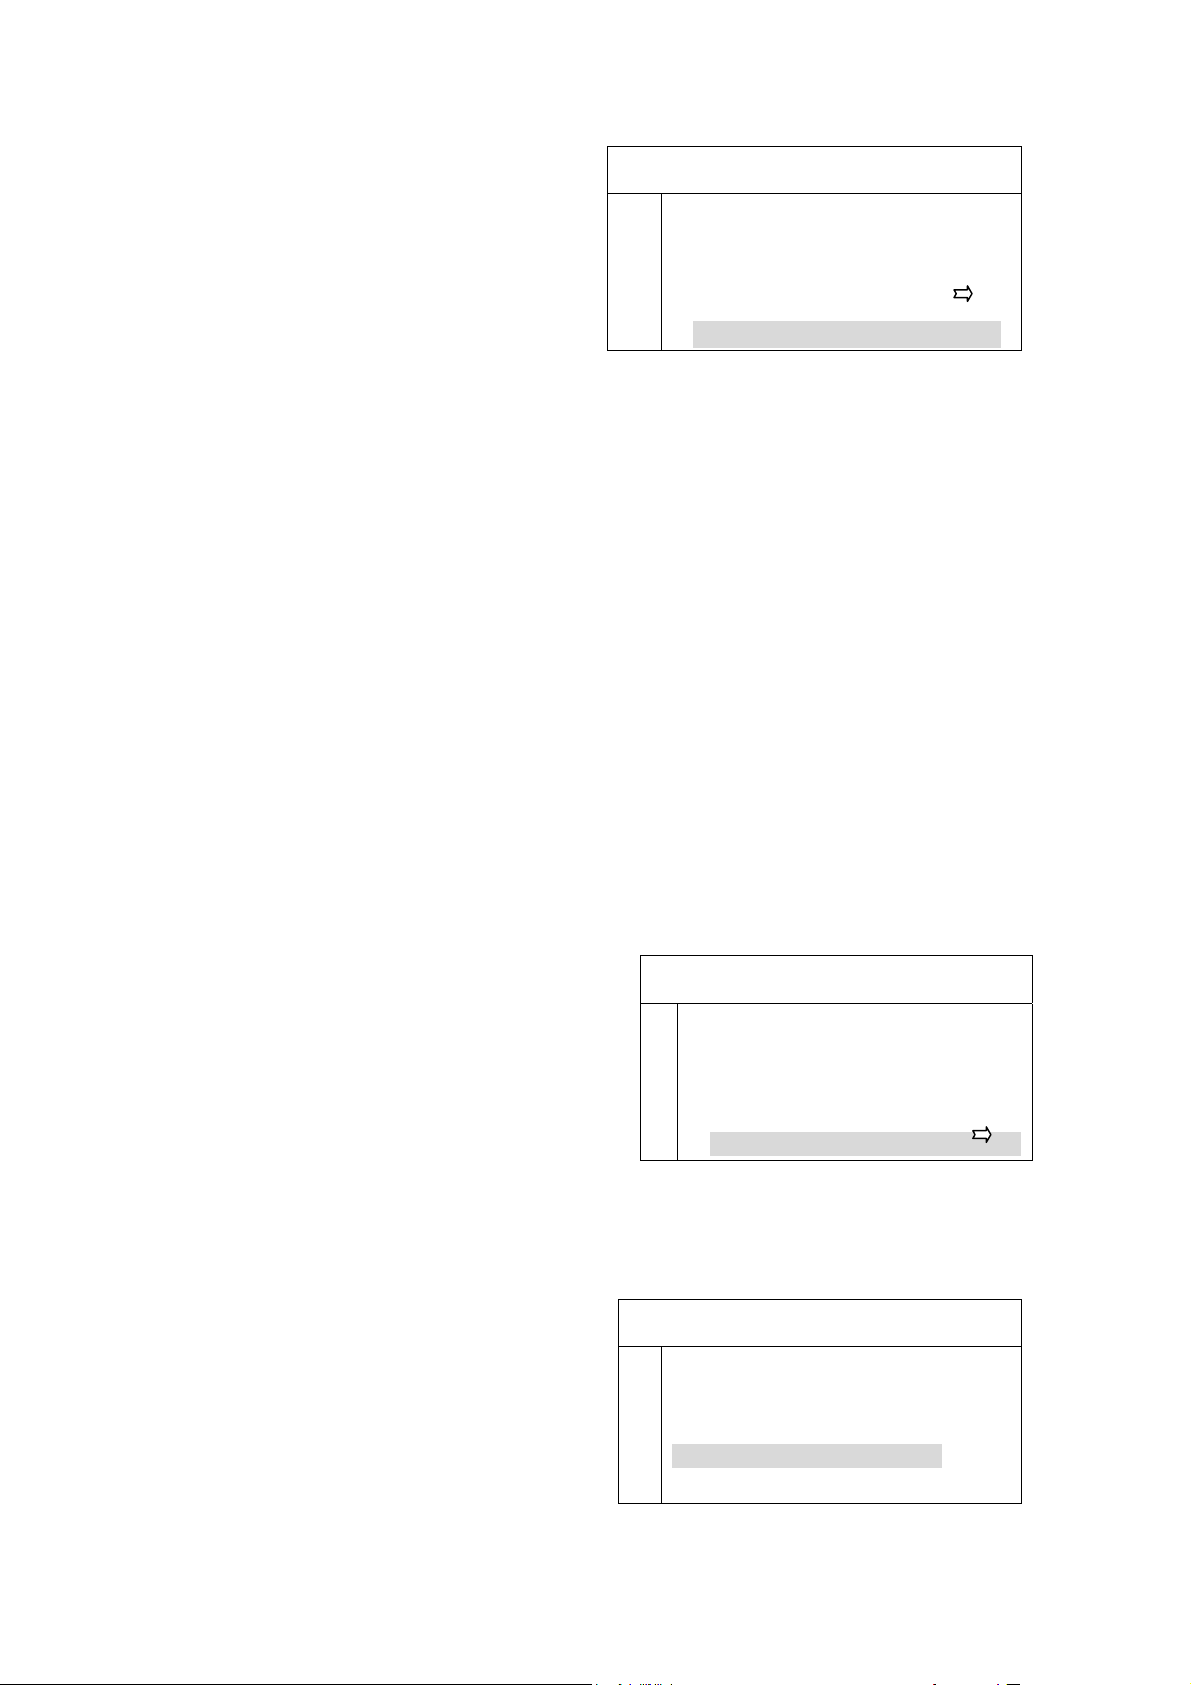
2. AUTO-SEARCH SYSTEM AND CHANNEL SELECTION
Auto-search function search and record the program channel according to the TV program’s
sequence automatically. At first press MENU button to activate the OSD menu , then press -/ + or
V-/V+ on the unit or on the remote control to choose the TUNE item, then press CH-/CH+ to
select AUTO INSTALL, the character turns red.
Secondly, confirm by pressing the -/ + on the
unit or the V-/V+ on the remote controller, at
this moment the TV will search and record the
program channel according to the TV program’s
sequence automatically. (Remark: while the
TV is searching automatically, it is in a mute
state.)
3. MANUAL SEARCH SYSTEM
The users can store their favorite TV program to their favorite number by manual search
system, also can avoid t the cross interference.
Program number setup
S LANGUAGE ENG
E
T
U
P
T
U
N
E
BACKGROUND ON
MODE 1
UV REV ON
RL REV ON
C–SYS AUTO
S–SYS D∕K
CHANNEL 0
AUTO INSTALL
SEARCH
Page 8
To setup the program number you can you
use the number keys on the remote controller
and ‘-/--‘ . You can set number28 by press
‘-/--‘one time then input 2and 8,if the number is
213 you should press ‘-/--‘twice then input
2,1,and3.Or you can use CH-/CH+ for the
desire numbers. You also can activate the
T
U
N
E
S–SYS D∕K
CHANNEL 0
AUTO INSTALL
SEARCH
BAND VHF–L
MENU then press-/ + on the unit or the V-/V+ on the remote controller to choose TUNE item ,
then select “CHANNEL ”function by press CH-/CH+” on the unit or on the remote controller ,and
then to set up the program numbers .
Manual search:
After activating the MENU select the TUNE item, press CH-/CH+” on the unit or on the
remote controller to select the BAND function and then press -/ + on the unit or the V-/V+ on the
remote controller to choose the band you desired (VHF-L,VHF-H,OR UHF) after that press
“CH+” to select“ SEARCH” , then press either “-” on the unit or V- on the remote controller to
search the lower channels ; Or press “+” on the unit or V+ on the remote controller to search the
higher channels. The TV will automatically stop searching when there was a TV program searched
and stored, press MENU button to confirm.You can repeat the operation as mentioned above to
search other programs.
4.FINE TUNE
The fine tune function is use to correct the weak signal or the nonsta ndard TV signal that’s
stored.
1. Press MENU button to activate the menu, and with the help of “-/+” or “V-/V+” on the remote
control to choose the “TUNE” item.
2. Press “CH-/CH+” button to choose the FINE TUNE function (The character of FINE TUNE
turns red )
Press “- “ on the unit or V- on the remote controller
for the lower limit fine tune and press “+” on the
T
unit or V+ on the remote controller for the
higher limit fine tune, during fine tune process, the
relative button should be kept pressing until the
good result received, then release it.
5.SKID
CHANNEL 0
U
AUTO INSTALL
N
SEARCH
BAND VHF–L
E
FINE TUNE
When you feel that there are some repeated TV programs or the image and audio founded not
good, so you need to skip some program and quick to select, you can operate as follows:
Use the CH-/CH+ button to choose the channel numbers or you can just use the “-/--“ button
and numbers keys on the remote controller to set the channel numbers that you want to skip.
To select the SKID function as FINE TUNE
mentioned above. Then pressing “-/+” on the unit
SEARCH
or V-/V+ on the remote controller to make SKID
ON and it will work.( Remark: Skip function
only work when choosing the program in
sequence by using the program selection button
of CH-/CH+).
T
BAND VHF-H
U
FINE TUNE
N
E
SKIP ON
PG EXCHANGE
Page 9
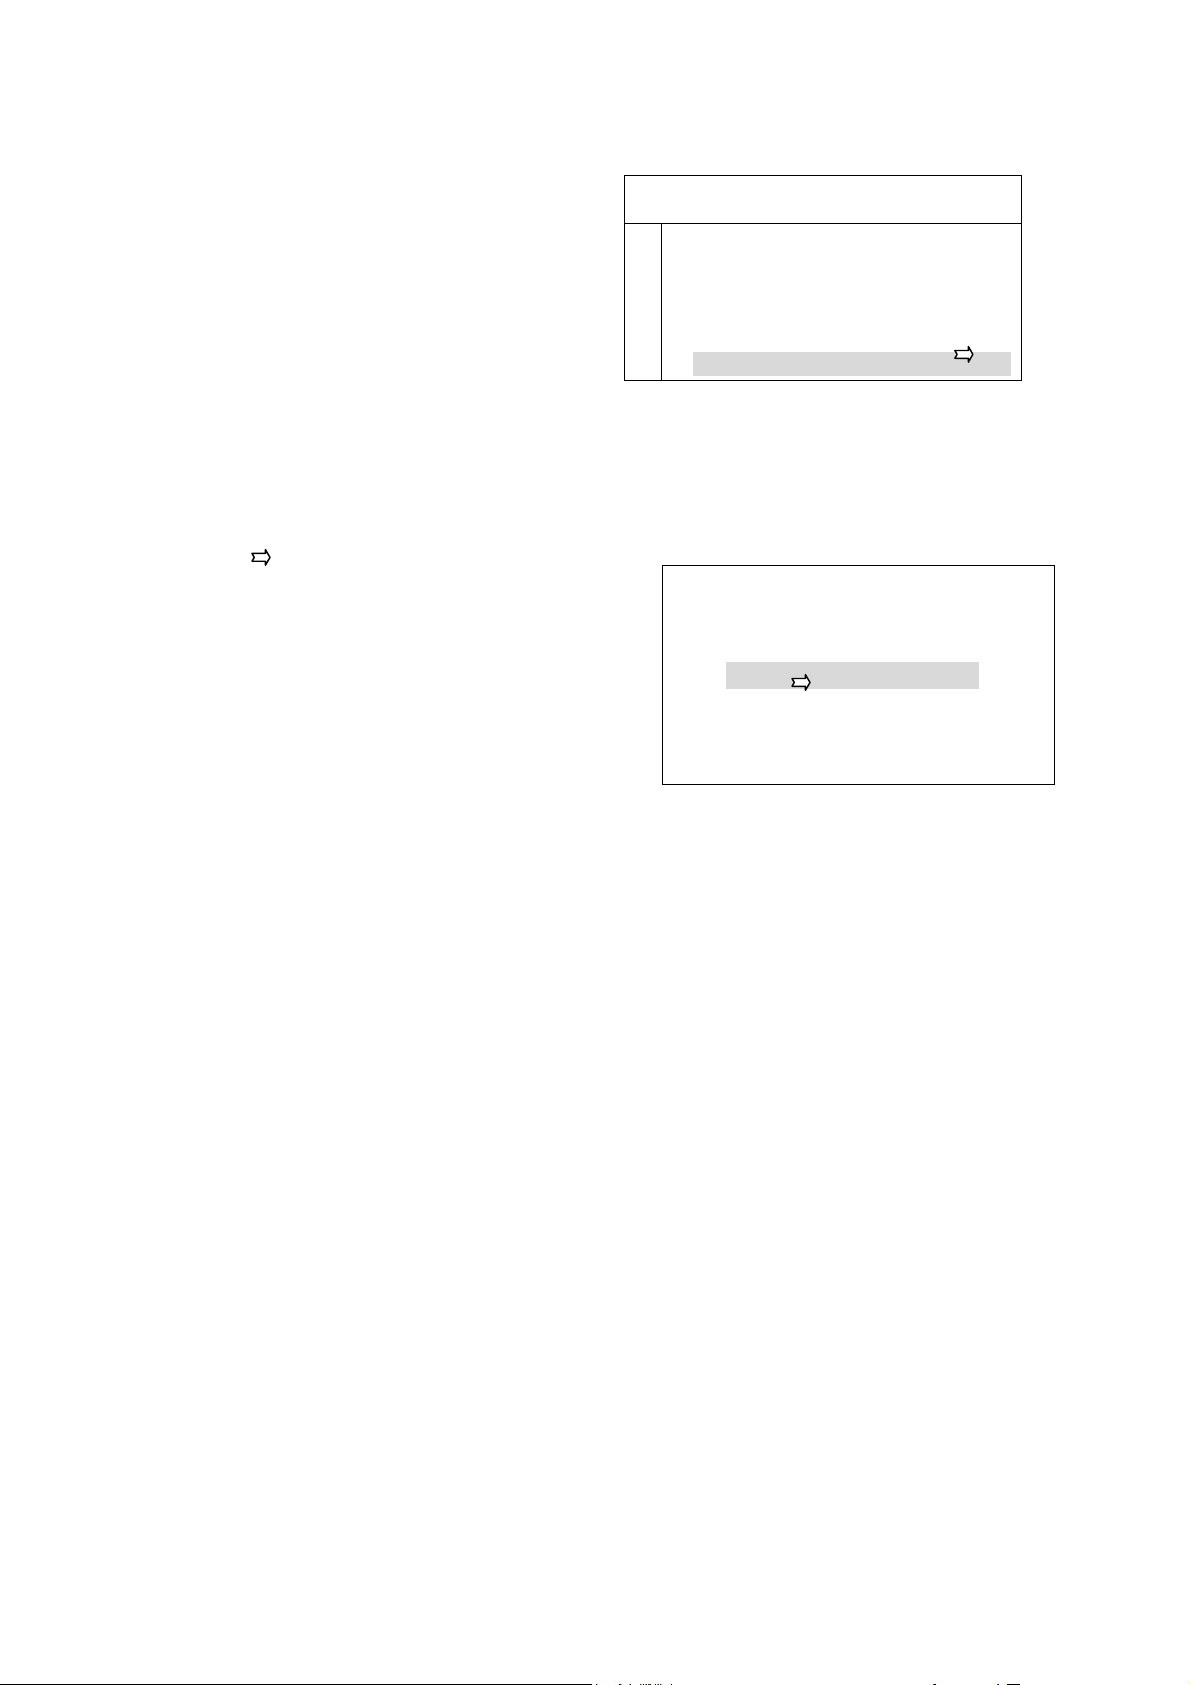
6 PG EXCHANGE
The program exchange function is use for change
the program number stored to your new favorite
number.
Press MENU button to activate the main menu,
and press “-/+” on the unit or V-/V+ on the remote
controller for TUNE item., then press CH-/CH+
on the unit or on the remote controller to select
PG EXCHANGE function.
press “-/+” button on the unit or V-/V+ on the Remote controller, and the screen will appear as the
image
When CHANNEL is red, use “-/+”on the unit or V-/V+ on the remote controller to select the
program numbers that have been stored ,then press CH-/CH+
select and it will turn red as the picture
showed.. Then use the -/+ button or V-/V+(on the
remote controller) to set the number you want to
change for, and then select PG EXCHANGE by
pressing CH-/CH+ again and confirmed by pressing
-/+ or V-/V+ button on the remote controller .After that
you can press menu to exit it.
7. PROGRAM SELECTION
If you want to select the program when you watch TV, pls operate as the following steps :
Program selection button CH-/CH+ on the unit or on the remote controller is to select the program
in sequence, the number buttons on the remote controller also can be used.
There are numbers from “0-9” and unit/decimal/percentile(-/--) selection buttons on the remote
controller .You can press the -/-- selection button to switch the state between unit ,decimal and
percentile . (The TV can store 256 TV programs).When you want to input unit number, simply
press “0-9” button, if you input decimal number, you can choose program from “0-99”. For
instance :for NO. 28 program, just press once “-/--“ button and then input “2” and “8”. When you
choose to input percentile numbers, press”-/--“ button twice and then input the numbers (in the
percentile position, only 0, 1, and 2 are available, the input of more than 3 will not be available).
Press “-/--“ button again for exit it
8.IMAGE ADJUSTMENT
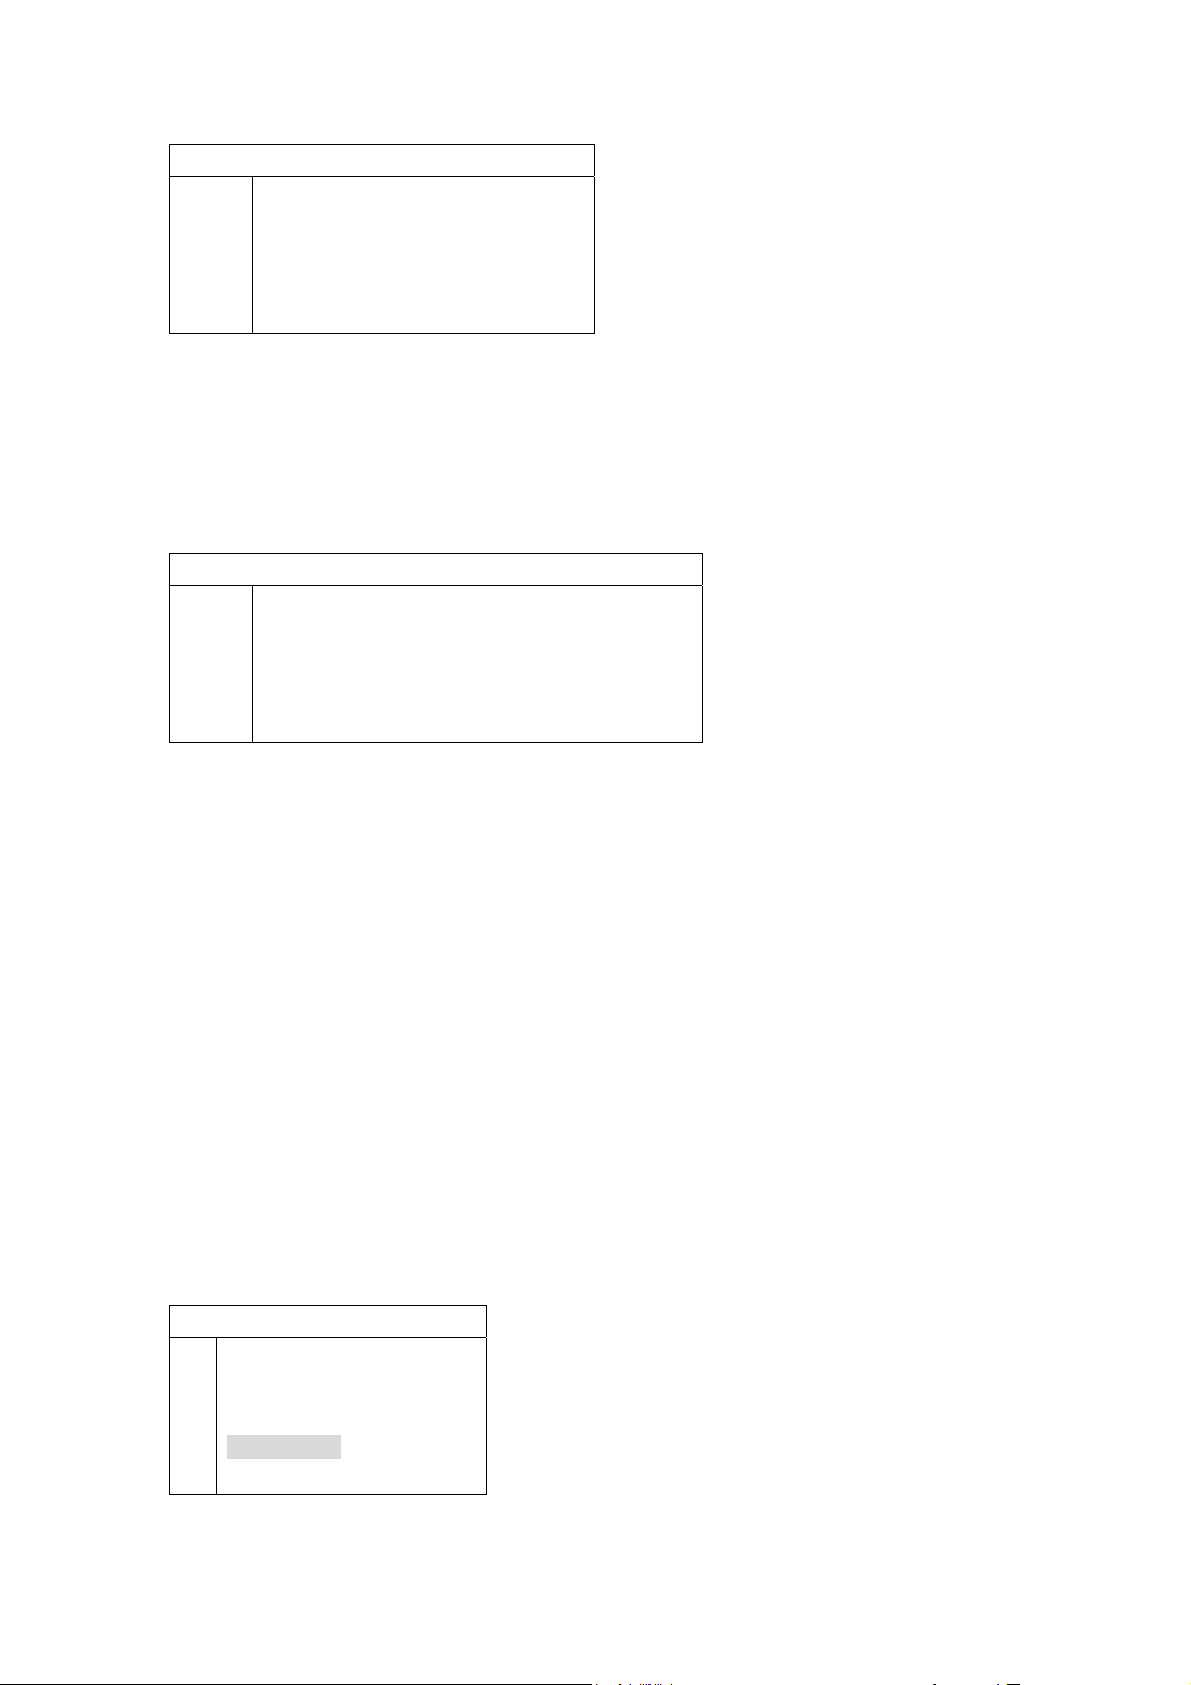
When the unit is working you can adjust the brightness, contrast, color and volume to your
favorite.
Press MENU button to activate menu, and press -/+ or V-/V+ on the remote controller to choose
the VIDEO item.
Use CH-/CH+ button to choose the function you want to adjust, the selected function turns red,
then press -/+ or V-/V+ on the remote controller to adjust the value of function as your favourite.
Repeat the operation as above mentioned, you can adjust the brightness, contrast, color and
sharpness of the image
.
SEARCH
T
BAND
U
FINE TUNE
N
SKIP
E
PG EXCHANGE
CHANNEL 9
12
PG EXCHANGE
Page 10
V
I
D
E
O
9.SET UP OF DISPLAY STATE
Entering the main MENU, choose SETUP item by -/+ or V-/V+, then adjust each state as below:
1. Screen background ( blue screen)set up: press CH-/CH+ button to choose the
S
E
T
U
P
2. Press CH-/CH+ button to choose “MODE” so that you can adjust the display state of sc reen
3. The unit has the function of image “Up and Down Reverse “ and “Left and Right Reverse” .
10.PERPETUAL CALENDAR:
Perpetual calendar is set in the unit . Choosing the SETUP item in the main MENU by
the help of -/+on the unit or V-/V+ on the remote controller ,and then press CH-/CH+ for
CALENDAR, and then confirm by pressing the -/+ on the unit or V-/V+on the remote controller,
the TV will be in the state of Perpetual calendar , at this time, you can press
CH-/CH+ for year selection and press -/+ or V-/V+ for month selection .After that
press MENU to exit the function of calendar .
S
E
T
U
P
BRIGHTNESS 50
CONTRAST 50
COLOR 50
SHARPNESS 50
TINT 00
BACKGROUND and the characters of BACKGROUND turns red, then press -/+ or V-/V+
button to choose “ON”. (When there is no signal, the background is blue colour).
LANGUAGE ENG
BACKGROUND ON
MODE 1
UV REV ON
RL REV OFF
size. Press -/+ or V-/V+on the remote controller, when you select “1”, the display st ate is16:9
if you choose “2” or “4”, it is 4:3 and choose “3” is 16:9 in full screen display.
Press “WIDE” key on the remote controller , you can switch the image display between
16:9 and 4:3 directly .
You can use CH-/CH+ to choose “UV REV ” or “RL REV”, then press -/+ on the unit o r
V- /V+ on the remote controller to make the image Up and Down Reverse or Left and Right
Reverse.
MODE 1
UV REV ON
RL REV OFF
CALENDAR
GAME
Page 11
11.TIMING FUNCTION
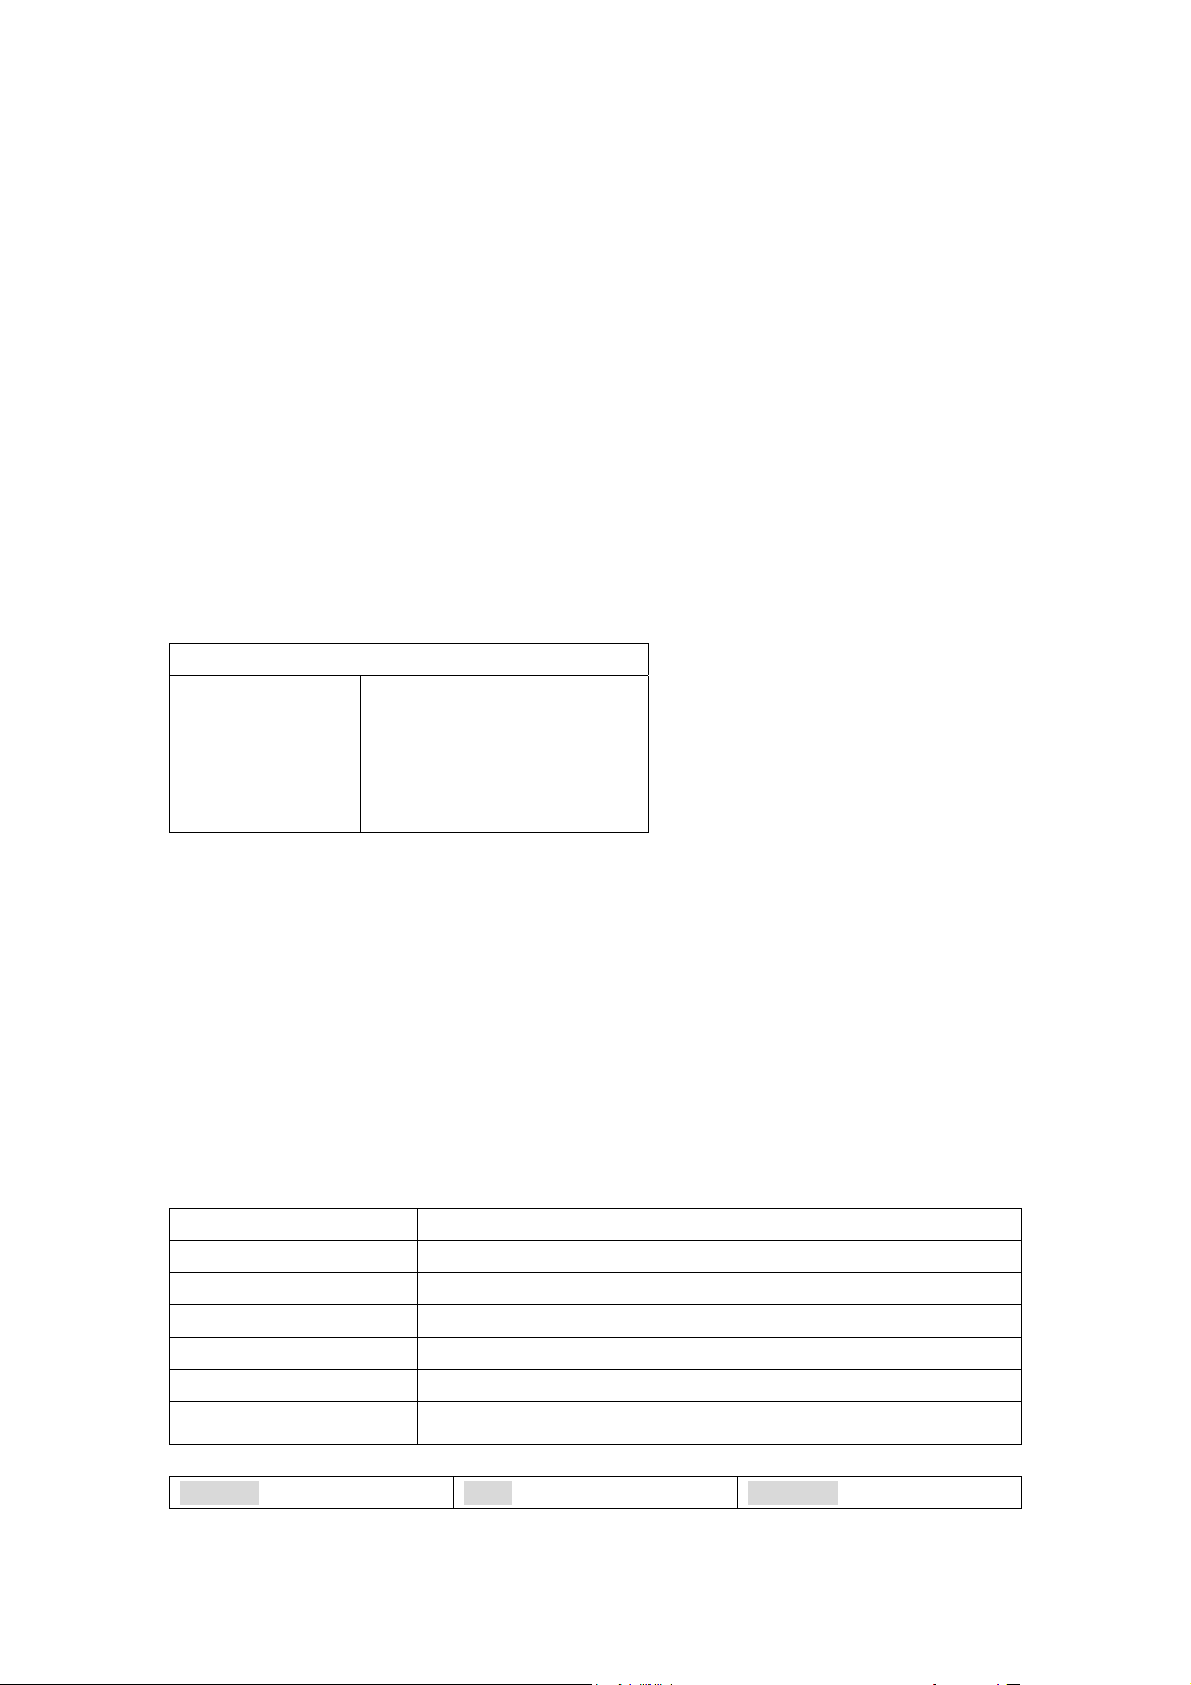
There is function of TIMER OFF and TIMER ON , at the TIMER ON position, you
can prearrange the certain channel that you want to switch on, you can operation as belows:
1. First pre ss MENU bu tton to en ter th e main menu an d then press -/+ button on the unit or
V-/V+on the remote controller for TIMER item.
2. Press CH-/CH+ button to choose “CLOCK” item, when the CLOCK turns red and
you can refer to the current time and set the time by using the button of -/+ or
V-/V+ (24 hours system)
3. After setting up the present time, choose ON or OFF by pressing CH-/CH+
button, then using VOL-/VOL+ on the remote controller or -/+ on the unit to set up the
relative time.(timer on and timer off are 24 hours system)
4. If you set up TIMER ON, using CH-/CH+ to choose the prearranged channel and input the
channel that you want to prearrange.(Remark: the TV should be at the standby state
so that the function of channel prearranged can be applied)
T
I
M
E
R
CLOCK --:-OFF --:-ON --:-ON CHANNAL ---
12.GAME
This unit has the game of “PUSHING BOX’. After entering the state of GAME , Press A/V
button on the unit or TV /AV button on the remote controller to select the level of the game . There
are 26 game levels for selection .In order to make the character to move, press CH+ button to
move upwards, press CH- button to move downwards, Press - to move left , Press + to move
right .Press MENU to return the original state of this level. Press MUTE to exit the game .It will
make the unit return to the working state that before you entering the GAME function.
parameter
DISPLAY SCREEN TFT 178mm(7.0”) 336960 pixels
COLOR SYSTEM PAL;NTSC; SECAM
SOUND SYSTEM B/G;D/K; I; M
RECEIVING CHANNEL VHF1-12;UHF13-56;CATV(with supplementary channel)
AUDIO OUTPUT 100mV
INPUT VOLTAGE
DISPLAY MODE 4:3, 16:9
PRODUT SPECIFICATION
MODEL SIZE WEIGHT
DC 11-13V POWER CONSUMPTION: ≤9.5W
Page 12
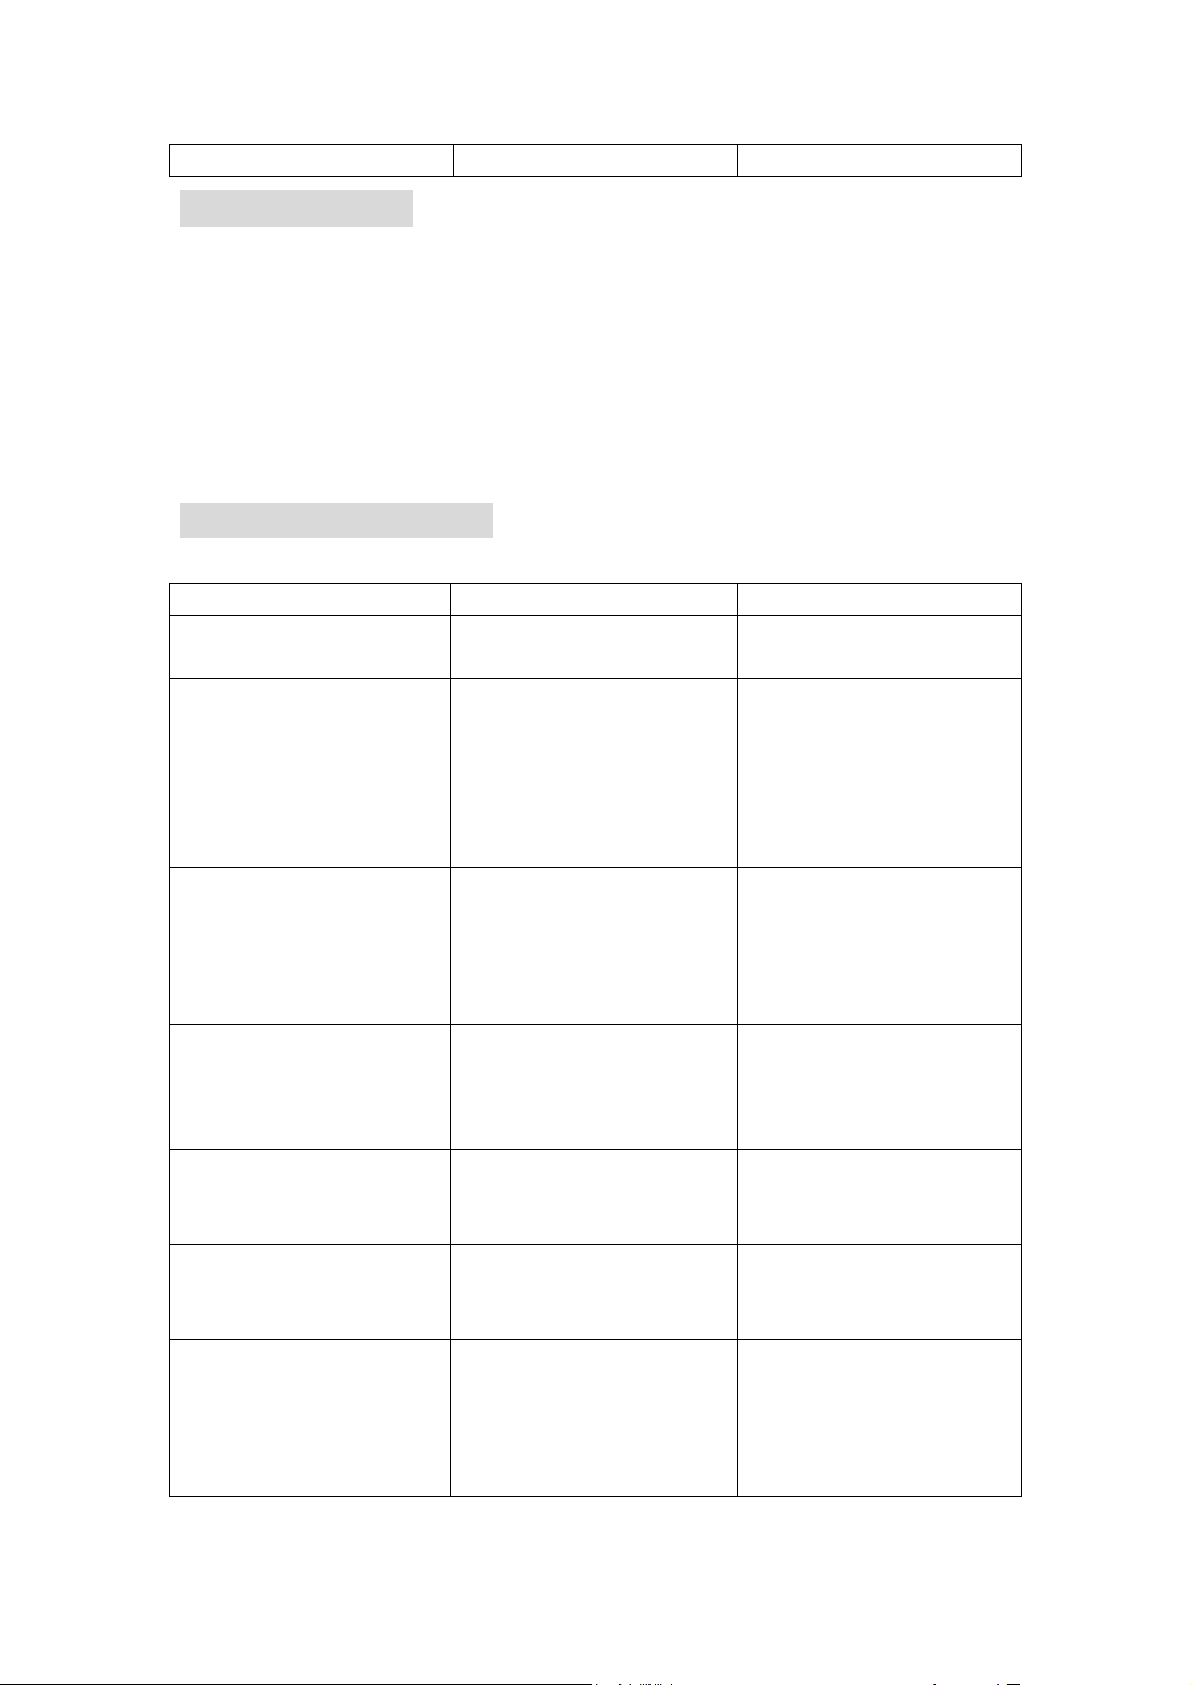
CL7318T 194X122X26(mm) 580g
ACCESSORIES
Remote controller 1 piece
A/V cable 1 piece
Home AC Adapter 1 piece
DC 12V Car power cord 1 piece
Automotive bracket 1 piece
Operation manual 1 copy
TROUBLE SHOOTING
Make sure to the following simple checks when you come across the trouble:
Case(condition) Possible causes Countermeasures
No picture and sound After
the power is on
Snowy and unclear picture, or
noisy sound.
Level rolling picture,
shaking of
the tuning line.
No clear image, shaky p icture
and multiple Figure.
Black & white picture,
strong
contrast.
Interference with net shape Interference from outside:
Bright and blank screen ,No
image display .
1. Check power connection
2. Misuse the pole.
1.Antenna no connection
2.Signal input wire open.
3. Poor local signal
4. Not proper tuning
1.Input voltage lower than 11V
or city voltages lower
than AC 200V
2.Not enough adapter output
power consumption
Poor signal or no proper
antenna length & angle, no
proper direction of outdoor
antenna.
Color saturation, contrast
and brightness not proper.
Cars/Motorcycles,
Radiophone, electric welding
Low input voltage of the
external power supply ;Low
power consumption to cause
the machine working not
properly.
1.Check power input.
2.Correct the pole
1.Check antenna input,
change into outdoor aerial or
CATV cable.
2.Change manual tune or
perform fine tuning to the
proper frequency.
1.Adjust the input power
DC voltage to the range of
12-15V.
2. Change adapter of power.
Change into outdoor aerial
and readjust or had better
use CATV cable .
Readjust.
Improve the receiving
condition.
Check the external power if
suit for the requirement for the
unit .
 Loading...