

Page 1

Sintonizador Digital Terrestre Alta Definición con
USB Grabado r
NVR-2503DSUGHD
MANUAL DE INSTRUCCIONES
1
Page 2

TABLA DE CONTENIDO
INSTRUCCIONES IMPORTANTES DE SEGURIDAD ................................................................................. 4
1 Mando a distancia .................................................................................................................................. 5
1.1 Apariencia del mando a distancia ..................................................................................................5
1.2 INSTALACIÓN ...................................................................................................................................7
2 Funciones básicas.................................................................................................................................... 8
3 Instalación ............................................................................................................................................. 14
3.1 Búsqueda automática ................................................................................................................... 14
3.2 Búsqueda manual ......................................................................................................................... 15
3.3 Filtro de los canales ...................................................................................................................... 15
4 Canales .................................................................................................................................................. 16
4.1 Administrador de canales ............................................................................................................ 16
4.2 Lista de Favoritos.......................................................................................................................... 17
5 Ajustes de preferencias ....................................................................................................................... 18
5.1 Idioma OSD .................................................................................................................................... 18
5.2 Subtítulos de preferencia ............................................................................................................. 18
5.3 Configuración PVR ....................................................................................................................... 19
6 Configuración del Sistema .................................................................................................................. 21
6.1 Temporizador ................................................................................................................................. 21
6.2 Bloqueo para niños ....................................................................................................................... 22
6.3 Fecha Hora ..................................................................................................................................... 23
6.4 Reajuste de fábrica ....................................................................................................................... 23
6.5 Actualización ................................................................................................................................. 24
6.6 Versión ........................................................................................................................................... 24
7 Configuración AUDIO / VIDEO ............................................................................................................ 24
7.1 Contraste .......................................................................................................................................... 25
7.2 Brillo ................................................................................................................................................. 25
7.3 saturación ........................................................................................................................................ 25
7.4 - Color ............................................................................................................................................... 25
7.5 Relación de aspecto ..................................................................................................................... 25
7.6 Salida de video .............................................................................................................................. 25
7.7 Resolución de vídeo ..................................................................................................................... 25
7.8 Audio HDMI .................................................................................................................................... 26
8 Multi-Media ............................................................................................................................................ 26
2
Page 3

8.1 Modo de Selección de Medios de Comunicación ...................................................................... 26
8.2 Película ........................................................................................................................................... 26
8.2.1 Navegador de archivos de películas ........................................................................................... 26
8.2.2 Reproduc ción de pel íc ulas .......................................................................................................... 27
8.2.3 Cuando se reproduce el video, la información siguiente se muestra en el menú de pantalla: ... 27
8.2.4 Ir al menú .................................................................................................................................... 27
8.2.5 Marcapáginas .............................................................................................................................. 27
8.3 Música ............................................................................................................................................ 28
8.4 Administrador de grabaciones .................................................................................................... 28
8.4.1 Navegador Administrador de grabaciones .................................................................................. 28
8.4.2 Cambiar el nombre ...................................................................................................................... 28
8.5 Foto ................................................................................................................................................. 29
8.6 E-Book ............................................................................................................................................ 29
8.7 Administrador de Discos .............................................................................................................. 29
9 ESPECIFICACIONES .............................................................................................................................. 30
10. SOLUCIÓN DE PROBLEMAS ............................................................................................................. 31
3
Page 4

INSTRUCCIONES IMPORTANTES DE SEGURIDAD
Para informar a los usuarios de los posibles peligros que conlleva el uso del aparato o sus componentes, los
símbolos anteriores se pueden aplicar.
Para reducir el riesgo de incendios y descargas eléctricas, no exponga esta unidad a la lluvia o la humedad.
Por favor, lea cuidadosamente estas precauciones e instrucciones antes de operar esta unidad. Guarde el manual
para futuras consultas.
Protección del cable de alimentación
Para evitar cualquier mal funcionamiento de la unidad y para proteger contra descargas eléctricas, incendios o
lesiones personales, tenga en cuenta lo siguiente:
Mantenga el enchufe conectado firmemente o desconecte el cable de alimentación de la corriente.
Mantenga el cable de alimentación lejos de fuentes de calor.
No coloque objetos pesados sobre el cable de alimentación.
No trate de reparar o reconstruir el cable de alimentación.
Nunca haga ni cambie conexiones con la corriente conectada.
INSTRUCCIONES IMPORTANTES DE SE G URIDAD
- No debe obstruirse la ventilación cubriendo las aberturas de ventilación con objetos como periódicos, manteles,
cortinas, etc;
- No debe colocar sobre el aparato fuentes de llamas, como velas encendidas;
- Se debe cuidar el medio ambiente, al tirar la pila. No tire las pilas usadas al cubo de basura. Póngase en
contacto con su distribuidor con el fin de proteger el medio ambiente.
- No utilice el aparato en climas tropicales;
- El aparato no debe ser expuesto a goteos o salpicaduras, ni objetos que contengan líquidos, como floreros.
- Si el enchufe de la red se utiliza como dispositivo de desconexión, el dispositivo de desconexión debe estar
accesible fácilmente. El enchufe principal debe estar siempre disponible.
- Mantenga las distancias mínimas (5 cm) alrededor del aparato para una ventilación suficiente. (Distancia
mínima alrededor del aparato para la ventilación necesaria.)
- Si el cable eléctrico está dañado, debe ser reemplazado por el fabricante, o por las personas de cualificación, a
fin de evitar peligros.
4
Page 5
1 Mando a distancia
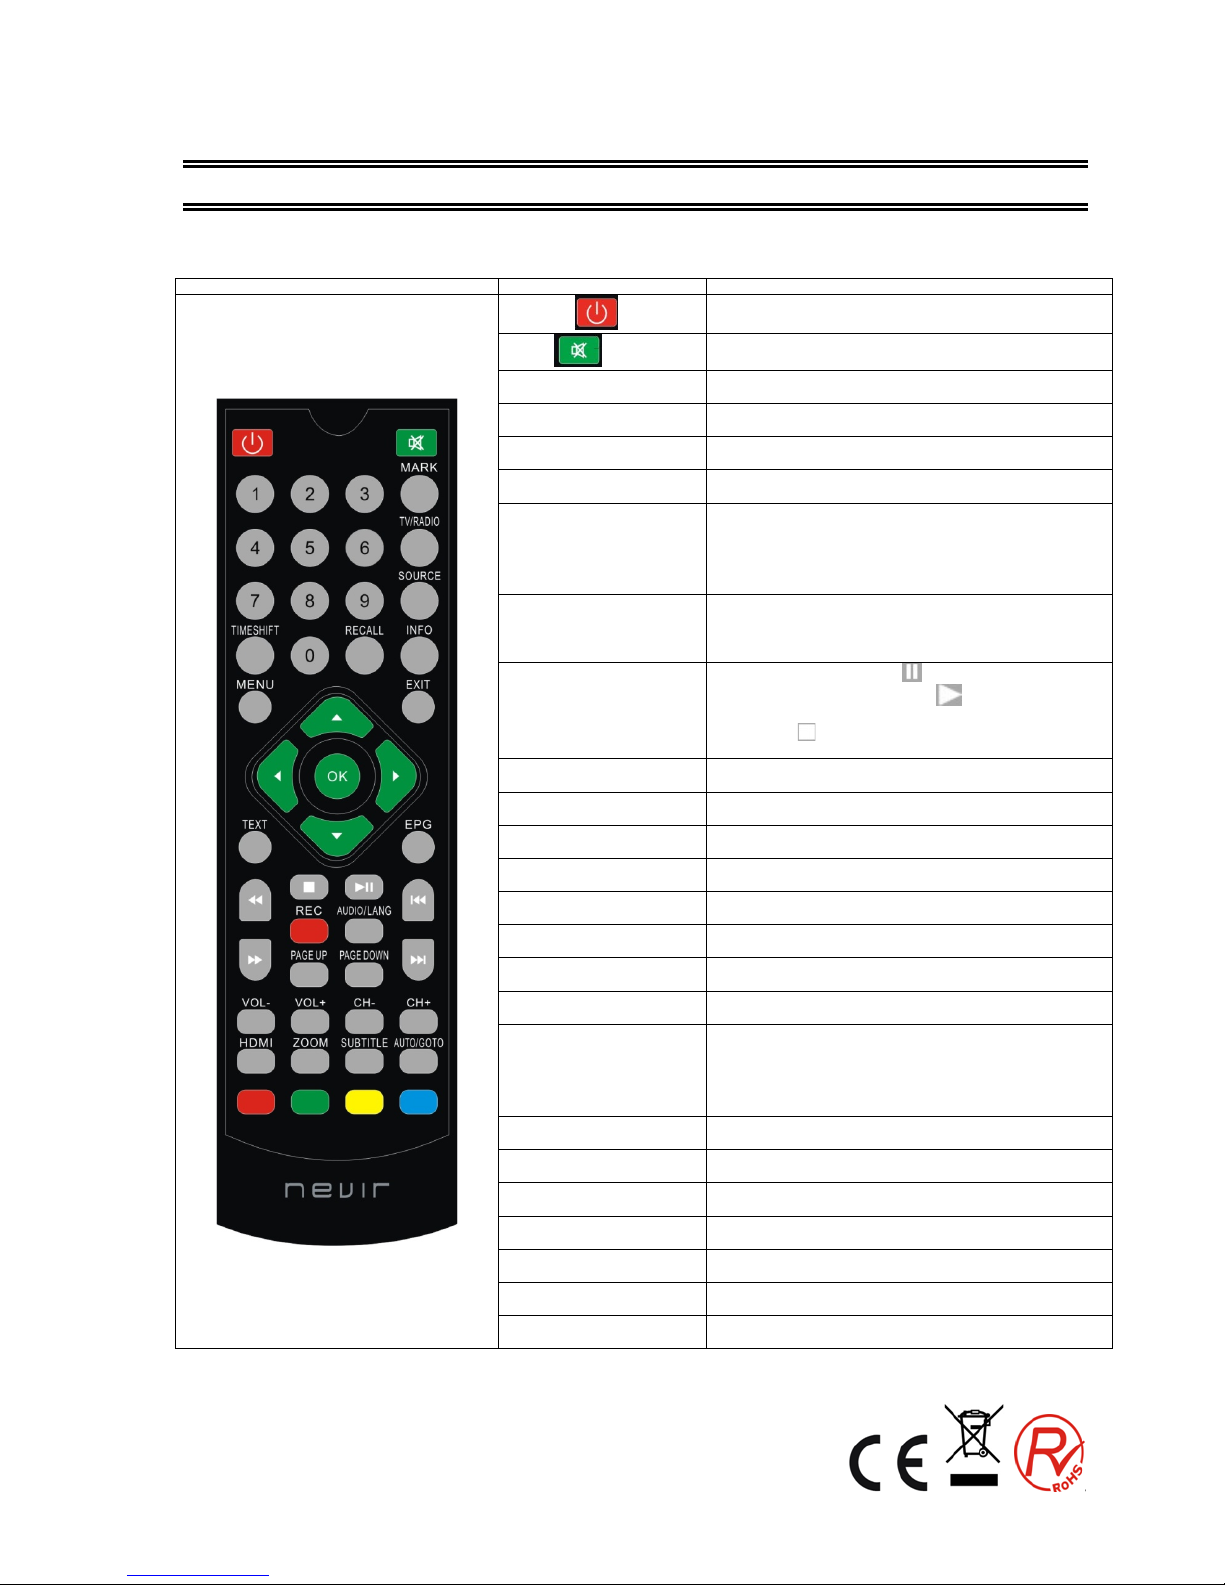
1.1 Apariencia del mando a distancia
Fotografía
Bot’on
Función
Encendido
Interruptor de encendido / apagado
MUTE
Control de si lencio
MARK
Introducir marcador de menú (consulte sección 8. Multi Media)
TV / RADIO
Pulse para cambiar entre TV y radio.
SOURCE (FUENTE)
Cambio entre la TV y Multimedia
teclas numéricas 0 a 9
Para la entrada de números o para seleccionar un canal de TV
INFO
(1) Muesta pantalla de información del programa que se esté
viendo
(2) Muestra información extendida correspondiente al estado de la
guia de TV
RECALL
(1) Volver al menú superior
(2) Pulse la tecla "RECALL" mientras ve la televisión para
recuperar el canal visto previamente.
TIMESHIFT
En modo Ti meShift, pulse la tecla
para entrar en el estado
TIMESHIFT suspendido; Pulse el botón
para entrar en el estado
TIMESHIFT de reproducción;
Pulse el botón
para salir del estado de TIMESHIFT, presione info
para ver la información detallada;
EXIT (SALIR)
Durante la reproducción multimedia, vuelve al programa de TV anterior.
Salir del menú actual, volver al menú anterior sin guardar
MENÚ
Para visualizar el menú principal, pulse de nuevo para salir del menú
actual
Teclas de navegación : arriba /
abajo / izquierda / derecha y ok
navegación para mover hacia arriba, abajo, izquierda y derecha y pulse
la tecla OK para confirmar un ajuste
OK
Introducir canal / lista de favoritos
TEXT
Teletexto
GUÍA
Visite programación d e TV
STOP (Detener)
Detener la reproducción multimedia (USB)
PLAY/PAUSE Reproducir /
Pausar
Reproducir / Pausa en modo multimedia (USB)
F.R & F.F
1) Entrar en el modo ZOOM, la imagen puede hacer zoom
acercándose/alejándose.
(2) Avance rápido hacia delante / atrás, en reproducion multimedia
(USB)
PREV / NEXT
Anterior / siguiente en modo reproducion multimedia (USB)
AUDIO/LANG
Pulse para ajustar el modo Audio o el idioma
REC
Entrar en el menú REC
PÁGINA ARRIBA / ABAJO
Página arriba / abajo en el teletexto
VOL+ / -
Ajustar volumen
CH - / CH +
Seleccionar anterior / siguiente canal
HDMI
Cambiar el tipo de salida HDMI- Las siguientes opciones estan
disponibles: 480p-60 / 576p-50 / 576i-50 / 720p-60 / 720p-50 / 1080i-60
5
Page 6
/ 1080i-50 / 1080p-60 / 1080i-60
ZOOM
(1) activar / desactivar l zoom;
(2) Cambiar a modo diario (página GUIA)
(3) activar / desactiva bloqueo programa en el menú de Gestión de
Canales
SUBTITLE (SUBTÍTULO)
Cambie el idioma de los sub títulos
AUTO/GO TO (IR)
Auto escaneo de canales de TV y radio
Entre en el menú IR, seleccione el tiempo de reproducción o parada de
Medios
ROJO
Según indicaciones del Me nu OS D
VERDE
Según indicaciones del Me nu OS D
AMARILLO Según indicaciones del Me nu OS D
AZUL Según indicaciones del Me nu OSD
Nota: Al conectar un disco duro, el disco duro deberá tener su propia fuente de alimentación.
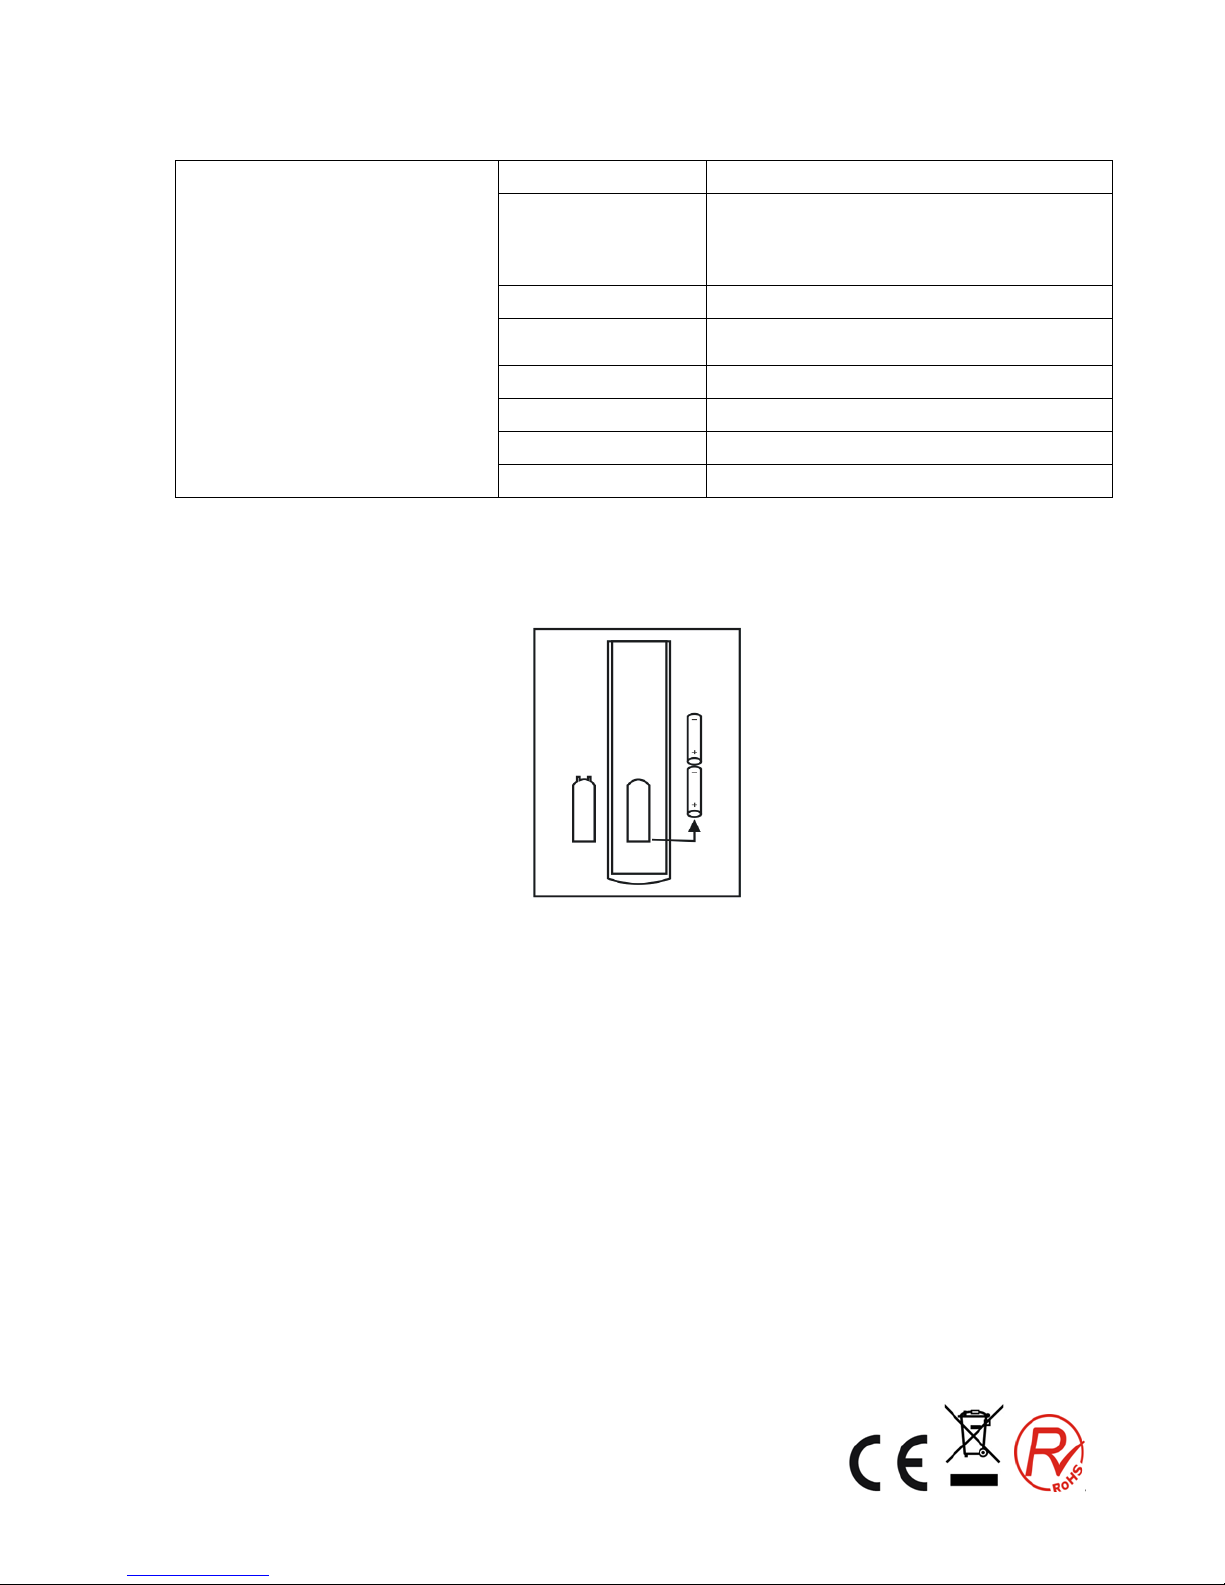
Instalación de las pilas
Coloque 2 pilas observando la polaridad correcta (+) y (-) como se muestra a continuación:
Acerca de las baterías
Si la unid ad de mando a distancia deja de funcionar incluso cuando se opera cerca del televisor, por favor
cambie las pilas.
Usa 2 pilas UM-4 (AAA)
Notas:
No utilizar pilas recargables (Ni-Cd).
No intentar recargar, cortocircuitar o tirar las pilas en el fuego.
No deje cae r, pisar ni causar ningún impacto a la unidad de mando a distancia. Esto puede dañarlo, dando
como resultado un mal funcionamiento.
No mezcle pilas nuevas con viejas.
Si la unidad de mando a distancia no se va a usar durante mucho tiempo, quite las pilas.
Precaución
Mantenga las pilas fuera del alcance de los niños. Si se tragan las pilas, póngase en contacto con un médico
inmediatamente.
6
Page 7
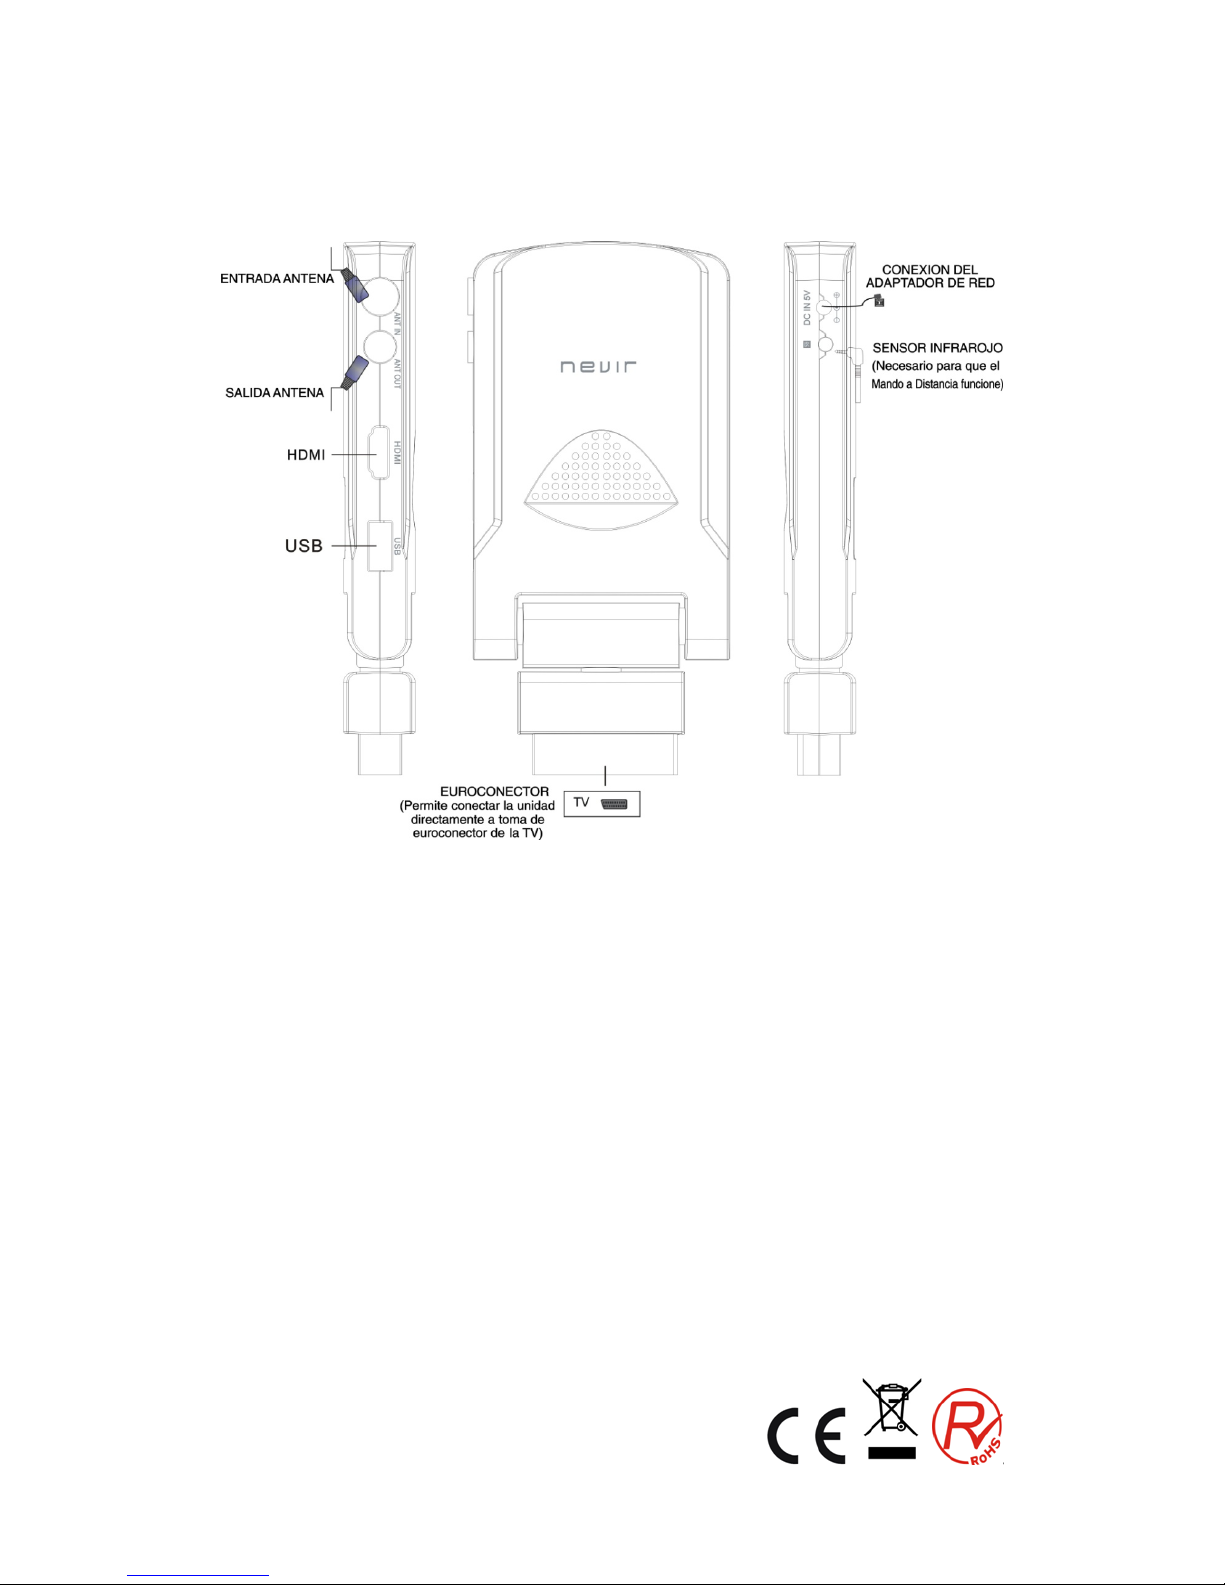
1.2 INSTALACIÓN
7
Page 8
2 . Funciones básicas
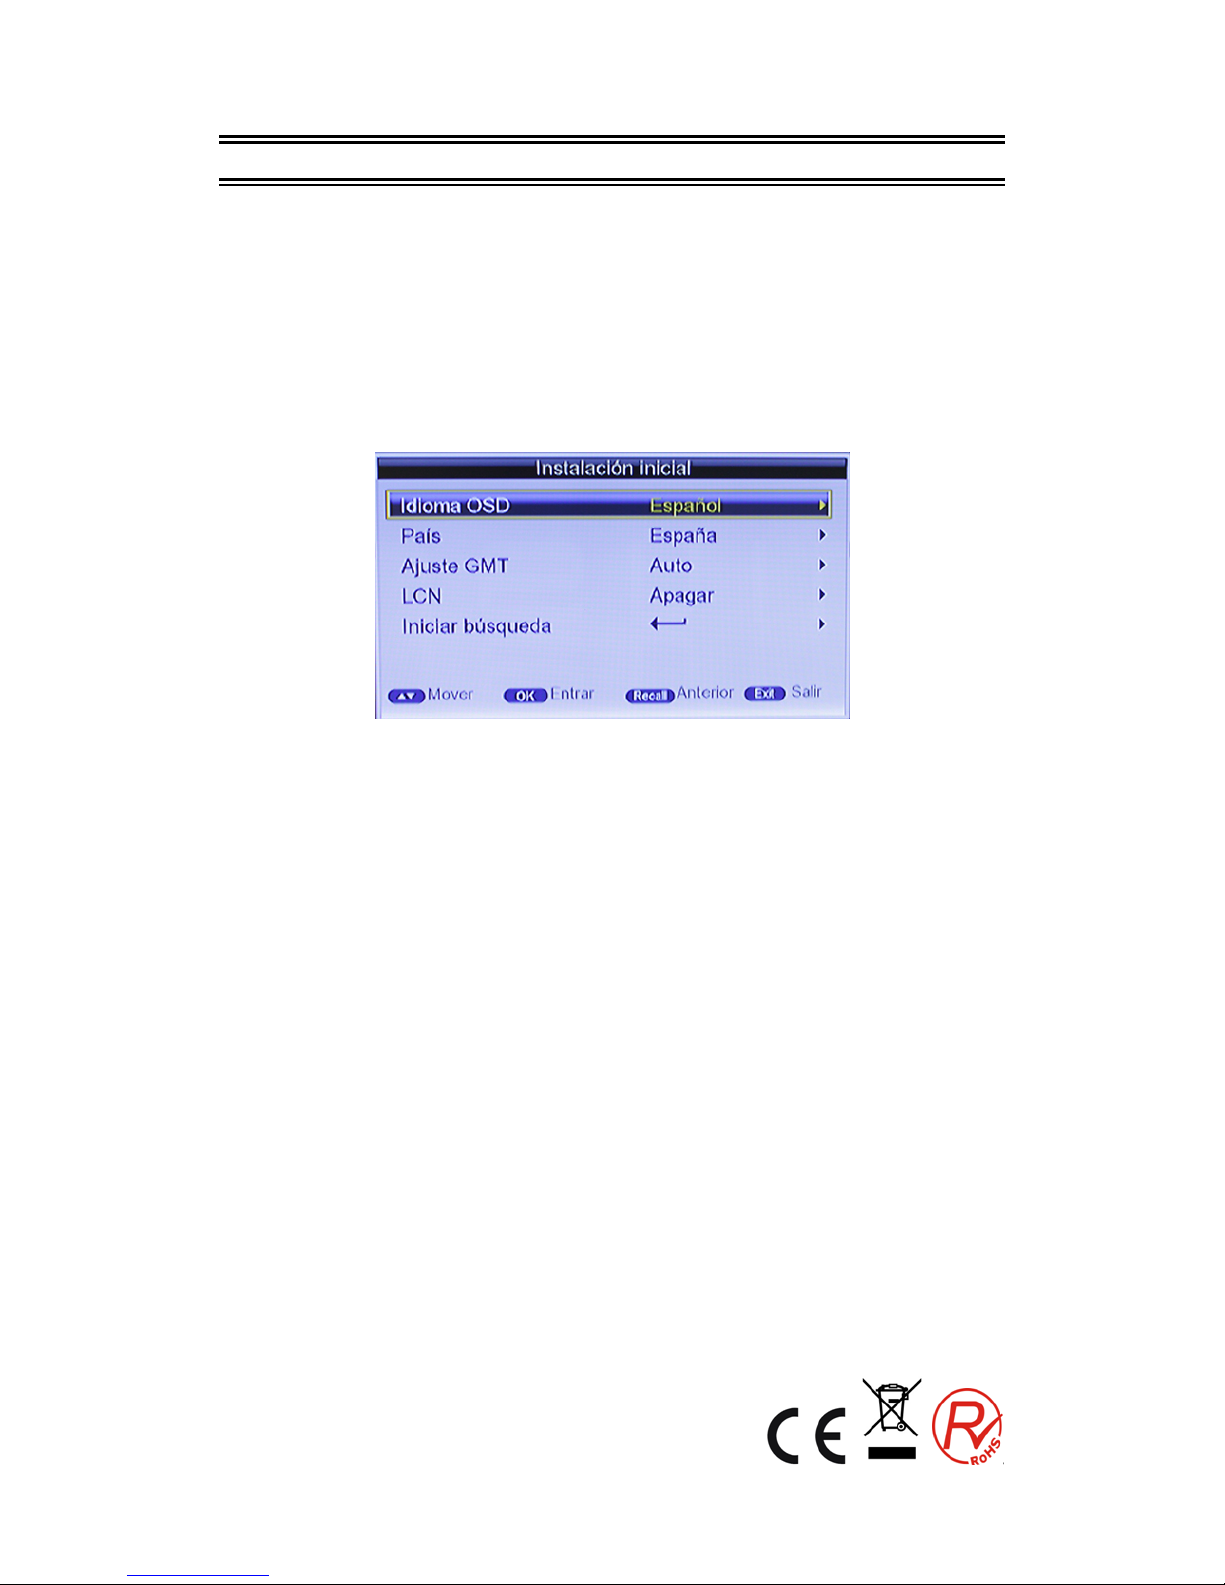
Primera instalación
Si está utilizando la unidad por primera vez o se han restaurado en la unidad los valores
predeterminados de fábrica, el Menú de la Guía de instalación aparecerá en la pantalla del
televisor. Siga cada uno de los pasos del menú de instalación para configurar el idioma de
menú preferido y el país adecuado (Región), etc
Primera instalación deberá conf ig urar alg unos parámetros importantes.
Utilice las teclas de flecha del mando a distancia para seleccionar su idioma preferido, el país,
zona horaria, LCN. A continuación, seleccione la búsqueda de canales.
Cambiar Programa de TV / Radio
Pulse el botón "TV / Radio" para cambiar entre programas de TV digital y los
programas de la radio digital.
Cambiar de canal
1. Pulse el botón "CH + / CH-" para cambiar al programa anterior o siguiente.
2. Pulse las teclas de números para introducir el número del programa.
Lista de canales FAV de TV y de Radio
Pulse el botón "OK" para acceder a la lista de canales, pulse el botón "IZQUIERDA /
DERECHA" para seleccionar la columna deseada y pulse el botón "ARRIBA / ABAJO"
para seleccionar el elemento deseado.
Pulse el botón "Aceptar" para confirmar la selección y pulse "SALIR".
Si hay creado una lista de canales favoritos, sólo tiene que pulsar "OK" para entrar en la lista.
Pulse el botón "ARRIBA / ABAJO" para seleccionar los canales favoritos, pulse el botón
"OK" para confirmar la selección, pulsar la tecla "RECALL" para volver al menú anterior.
Información de los programas
Pulse el botón "INFO" para mostrar la información del programa actual cuando se
encuentra en estado de reproducción normal.
Programa de rellamada
Pulse el botón "RECALL" en estado de p ant alla co mpleta pa ra v olver al p rograma que
se reproducía previamente.
8
Page 9

Cambiar idioma de audio y canal L / R
El programa puede tener varios idiomas idiomas de audio y transmisión de audio en
modos diferentes tales como estéreo, izquierda o derecha. Todos los idiomas de
audio disponibles se mostrarán en la pantalla mientras se pulsa la tecla AUDIO /
LANG.
La captura de pantalla se ilustra a continuación. Si no hay salida de audio d espués de
seleccionar el idioma de audio, se indica que no hay audio en el modo de audio actual,
así que tiene que seleccionar el modo de audio preferible.
1. Pulse el botón "AUDIO" para cambiar el idioma de los programas actuales y cambiar entre
"estéreo" "izquierda" "derecho" (estéreo canal izquierda canal derecho).
2. Pulse el botón "IZQUIERDA / DERECHA" para cambiar entre "estéreo" "izquierda"
"derecho" (estéreo canal izquierdo canal derecho), pulse el botón "ARRIBA / ABAJO"
para cambiar el idioma del sonido.
3. Pulse el botón "OK" para confirmar la selección y volver al modo de reproducción a
pantalla completa, pulse "EXIT" para volver al modo de reproducción a pantalla completa y
guardar la configuración.
Guía de programas de TV(EPG)
1. Puede pulsar "EPG" en el mando a distancia para entrar en la página de la guía de
TV y para saber más sobre los programas que se reproducirán.
Entre en el menú por defecto de TV GUIDE. El menú en este modo contienen 7
partes:
9
Page 10
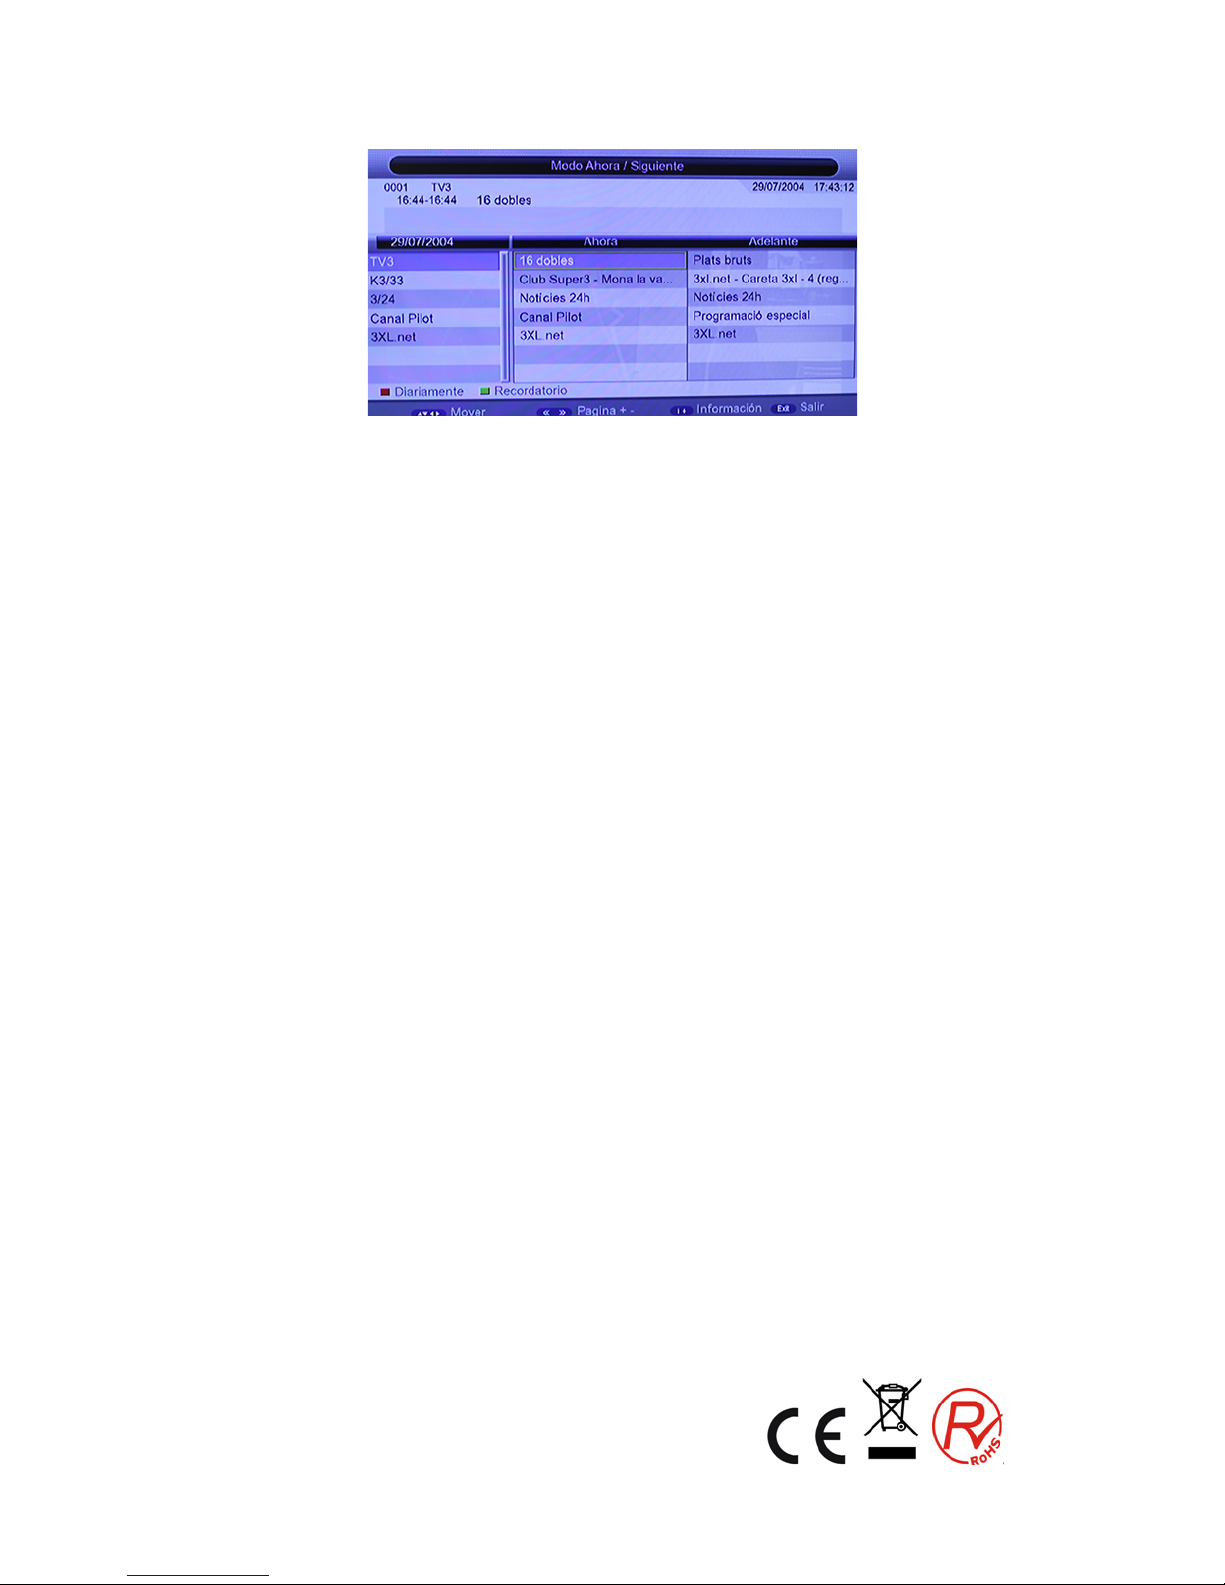
(1) Parte 1 muestra el título.
(2) Parte 2 muestra la fecha y hora de la lista.
(3) Parte 3 muestra lista del dia en particular
(4) Part e 4 muestra la lista de programas, pu lse el botón "ARRI BA / ABAJO" para
cambiar entre programas.
(5) Parte 5 muestra los horarios e información de programas, pulse "FR" y "FF" para
ver horarios e información de programas sobre la base de los días de la semana.
(6) Parte 6 muestra información mas detallada de la selección realizada en el
apartado anterior. .
(7) Parte 7 pulse el botón "IZQUIERDA / DERECHA" para cambiar entre AHO RA y
SIGUIENTE.
2. Presione "tecla roja" para entrar en el modo diario / semanal y mostrar los
programas y la información de los mismos en intervalos de tiempo diferentes
(1) Pulse la tecla roja para cambiar entre Domingo - Sábado.
(2) Pulse el botón "ARRIBA / ABAJO" para cambiar entre los diferentes
programas.
(3) Pulse "IZQUIERDA / DERECHA" para ver la información en intervalos de
tiempo diferentes.
3. Pulse el botón "INFO" para seleccionar la información detallada correspondiente al
programa actual.
4. Pulse la tecla verde para programar el temporizador sobre determindados
programas.
5. Pulse el botón "exit" para salir de la Guía de TV.
10
Page 11
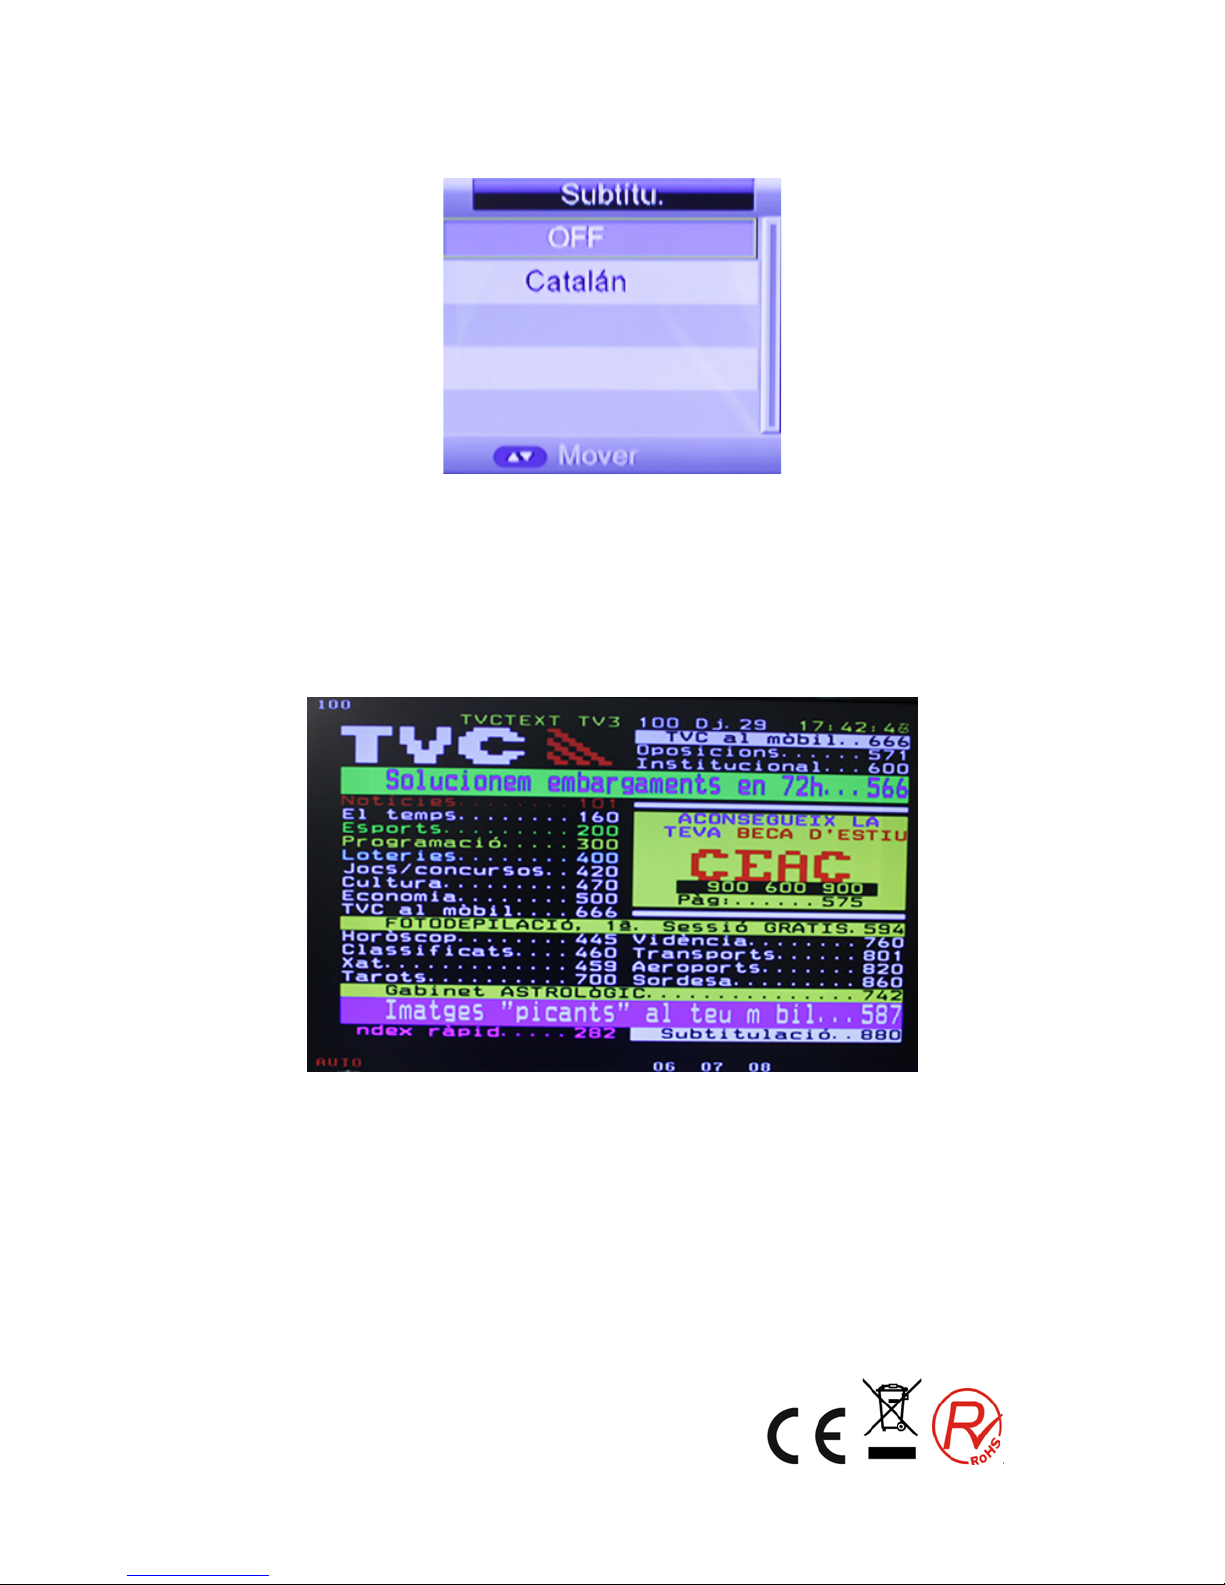
Subtítulos
1. Los Subtítulos por defecto están desconectados. Los programas pueden tener
información de subtítulos multilingüe. Pulse el botón "SUBTITLE" del mando a
distancia para entrar en el menú de subtítulos. Se mostrarán todos los idiomas de
subtítulos disponibles.
2. Pulse el botón "ARRIBA / ABAJO" para moverse hacia arriba y hacia abajo y
seleccionar el idioma.
Teletexto
1. Si desea ver el teletexto, por favor presione "TEXT" en el mando a distancia para
entrar en la página de teletexto.
2. Introduzca tres dígitos para ir a la página correspondiente que desea ver.
3. Pulse el botón "ARRIBA" para ir a la página anterior, y presione "ABAJO" para ir a
la página siguiente;
4. Pulse el botón "OK" para ajustar la transparencia de la página de teletexto.
5. Pulse el botón "TEXT" o "EXIT" para salir del menú de teletexto.
11
Page 12
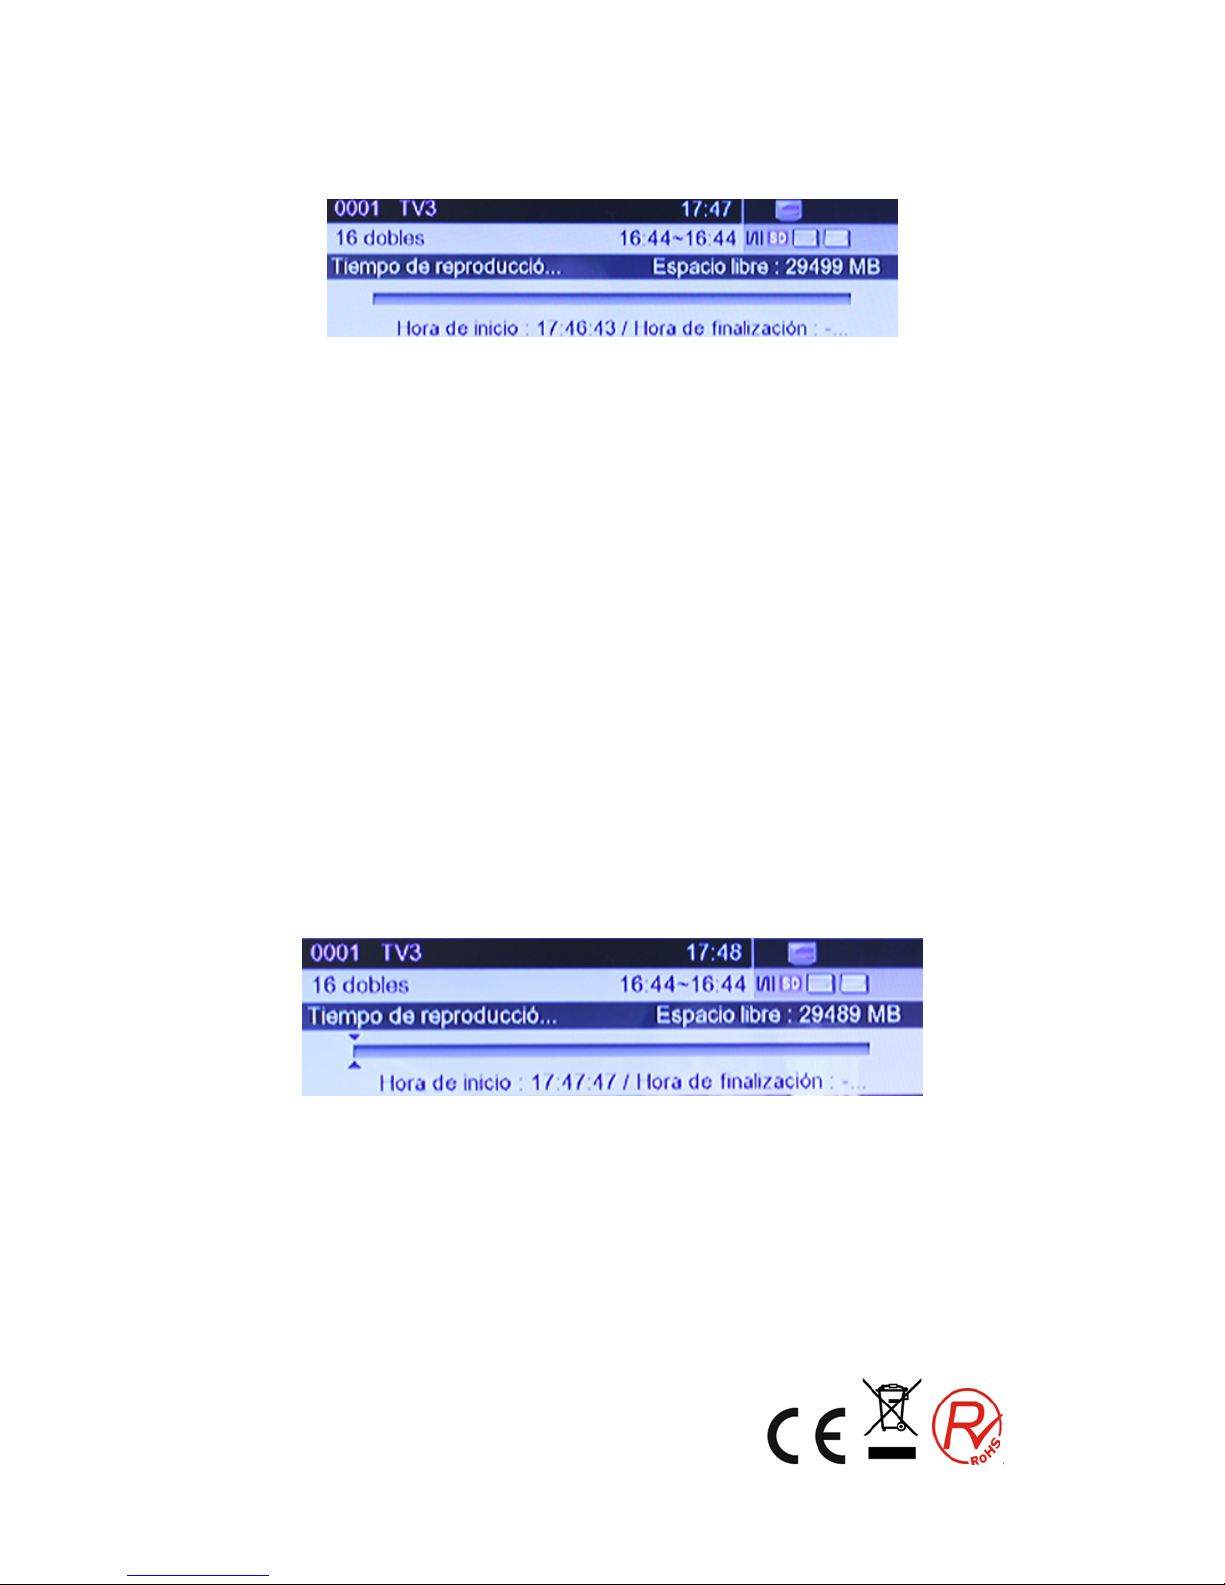
REC y funciones TIMESHIFT
REC (grabación instantánea)
Mientras esté viendo la Tv presione el botón "REC" para iniciar la grabación, el
sistema tiene 3 segundos para la inicialización.
Una vez finalizada la inicialización, la parte superior izquierda de la pantalla mostrará
el icono "REC", entonces se está grabando la reproducción del programa actual.
Puede pulsar "Info" para ver la información actual grabada.
Pulse el botón "stop" durante la grabación, dejará de grabar y volverá al modo de
reproducción normal.
En el modo de grabación, también puede utilizar la tecla REC para ajustar el
temporizador para el registro de parada de grabación, además de que puede
restablecer el tiempo de forma opcional. (Se puede establecer la longitud de tiempo
de cancelación (00:00), o el usuario puede definir la longitud).
Cuando el espacio es insuficiente durante la grabación, aparece el mensaje
"Dispositivo de almacenamiento está lleno" y luego se detiene la grabación y volverá
de nuevo al modo normal de reproducción.
Durante la grabación, si se produjo un error de escritura, el sistema se cerrará y
detendrá la grabación.
En el modo de grabación, también puede utilizar el menú, TV Guide, TTX, subtitle y
demás funciones del modo de reproducción normal.
TIMESHIFT (grabación diferida)
1) En el modo de TIMESHIFT, se puede ver el programa mientras se graba.
2) En las opciones siguientes presione "PAUSE" para entrar en el modo TIMESHIFT, el icono
"TIMESHIFT " aparecerá en el lado izquierdo superior de la pantalla, y la grabación del
programa en reproducción comenzará a grabarse a la hora de inicio:
a) En modo de reproducción normal y Timeshift establecido como Automático o pausa
dentro del menú de configuración de PVR.
b) En modo de grabación.
12
Page 13

3) En las opciones siguientes, al presionar la tecla "<<" también se entra en modo
TIMESHIFT, y el programa en reproducción retrocederá rápidamente.
a) En modo de reproducción normal y Timeshift establecido como Automático o pausa
dentro del menú de configuración de PVR.
b) En modo de grabación.
4) En el modo TIMESHIFT, cuando pulse "STOP" saldrá del modo TimeShift .
5) En el modo TIMESHIFT, cuando presione avance rápido, la grabación todavía está en
curso.
13
Page 14

3 Instalación
Hay dos tipos de modo de instalación:
1. Búsqueda automática
2. Búsqueda manual
3.1 Búsqueda automática
Búsqueda automática es una especie de modo inteligente y conveniente de
búsqueda de programas, que abarca los programas de todos los puntos frecuentes
de los países o regiones de destino.
En la actualidad, este sistema cubre muchos países de destino y regiones,
incluyendo: Alemania / Reino Unido / Italia / Francia / España / Holanda / Taiwán /
China / Noruega / Finlandia, etc
1. Puede mover el cursor a "búsqueda automática" presionando las teclas "ARRIBA /
ABAJO" en el "menú de instalación", presione "OK" para entrar en la página de
búsqueda automática.
2. Después de entrar en la página de búsqueda automática, el sis tema buscará todos
los programas uno por uno en los puntos de frecuencia actuales de los países o
regiones seleccionados de forma automática.
3. Durante la exploración, pulse "EXIT" para parar y salir de la exploración.
4. Si se detecta un programa y el proceso de búsqueda ha terminado, el sistema va a
salir de la página de búsqueda y guarda el programa, al mismo tiempo vuelve al
menú "Instalación" y los reproduce.
14
Page 15
3.2 Búsqueda manual
Si usted entiende mucho acerca de la televisión digital y conoce la frecuencia del
programa o si desea buscar el programa en una frecuencia determinada, puede
seleccionar la búsqueda de manual, que le permitirá ahorrar mucho tiempo.
1. Puede mover el cursor a "búsqueda manual" presionando las teclas "ARRIBA /
ABAJO" en el "menú de instalación", presione "OK" para entrar en la página de
búsqueda manual.
2. Antes de la búsqueda manual, es necesario configurar los parámetros de interés,
como:
(1) frecuencia (KHz): la frecuencia por defecto es establecida para los diferentes
países, puede introducir los dígitos pertinentes para modificarlo.
(2) Ancho de banda: el valor predeterminado de ancho de banda se ha establecido
para los diferentes países, mientras que usted puede configurarlo pa ra 6M H z , 7MHz,
8MHz.
3. Pulse el botón "OK" después de ajustar todos los parámetros para iniciar la
exploración manual.
Muévase a iniciar la Búsqueda, y luego presione "OK" para iniciar la búsqueda
manual.
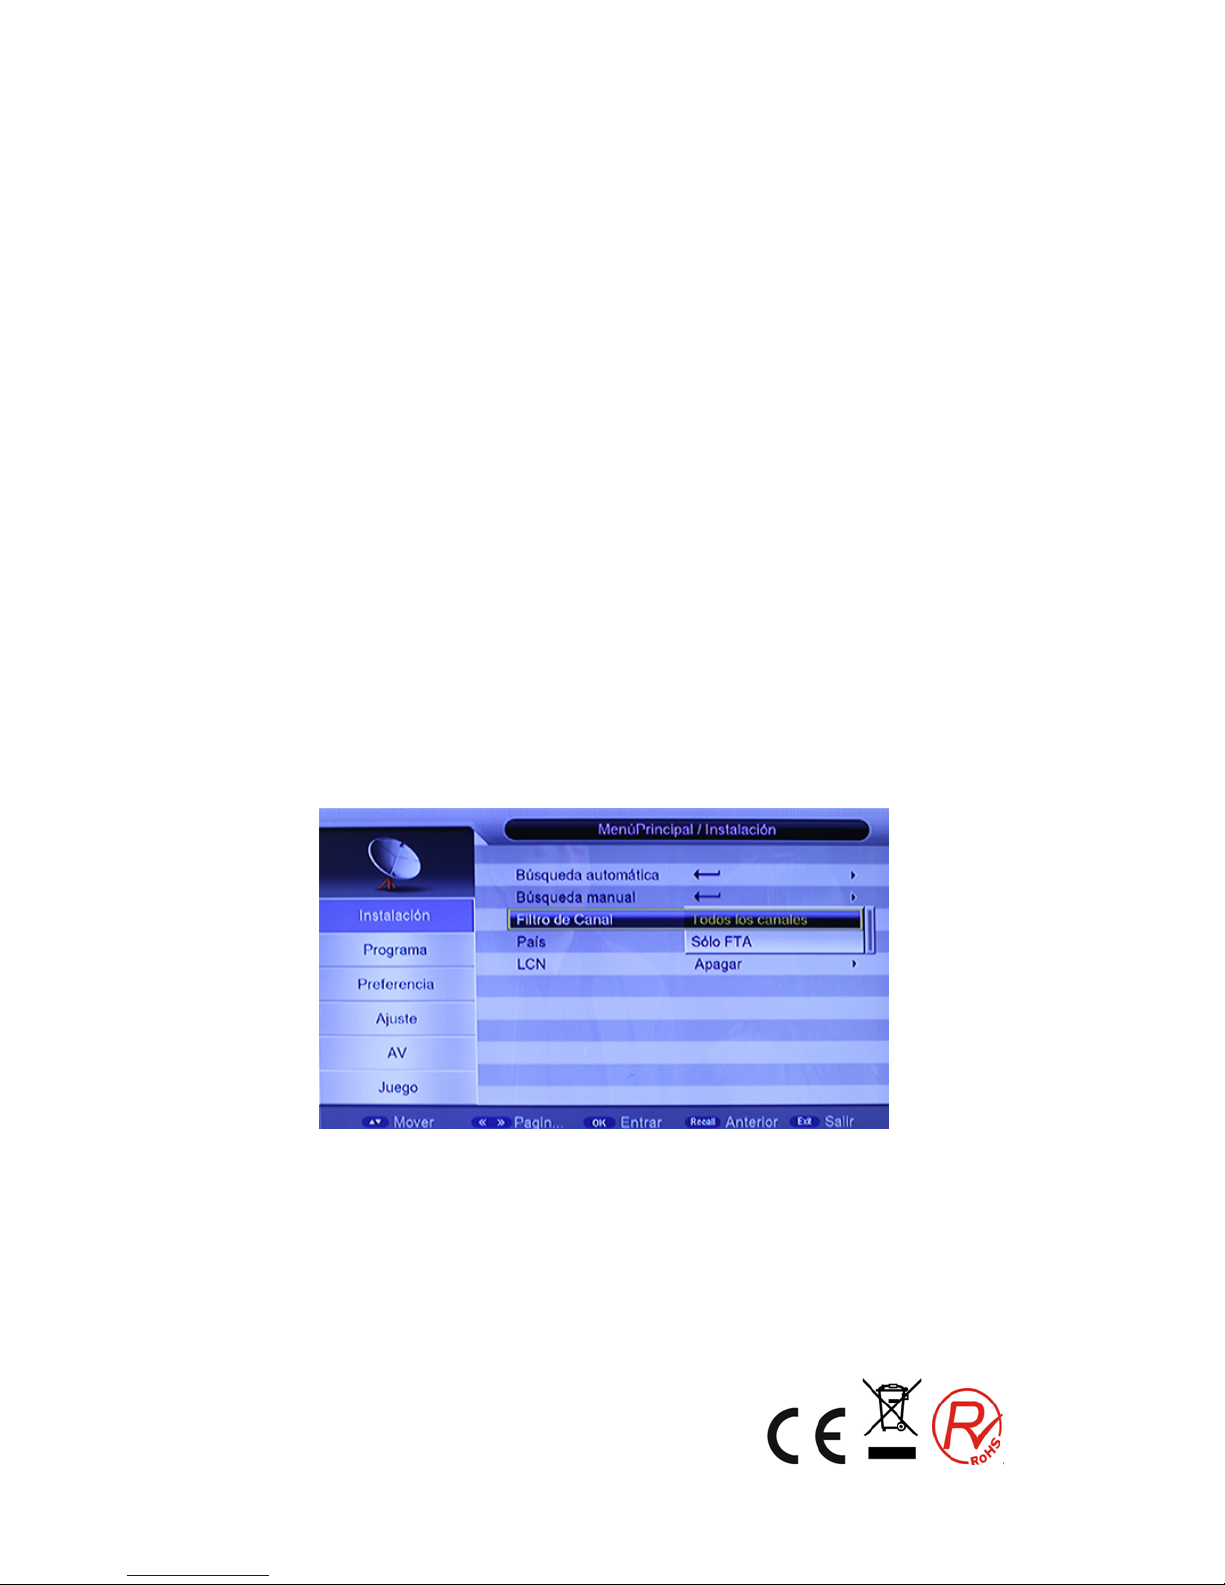
3.3 Filtro de los canales
Todos los canales o sólo los canales no codificados se exponen a ser buscados por
los ajustes selectivos.
15
Page 16
4 Canales
El sistema ofrece una función eficaz de gestión de canales como borrar, marcar,
mover, bloquear, renombrar y agrupación de canales.
Hay dos páginas independientes para la gestión de canales: TV y Radio
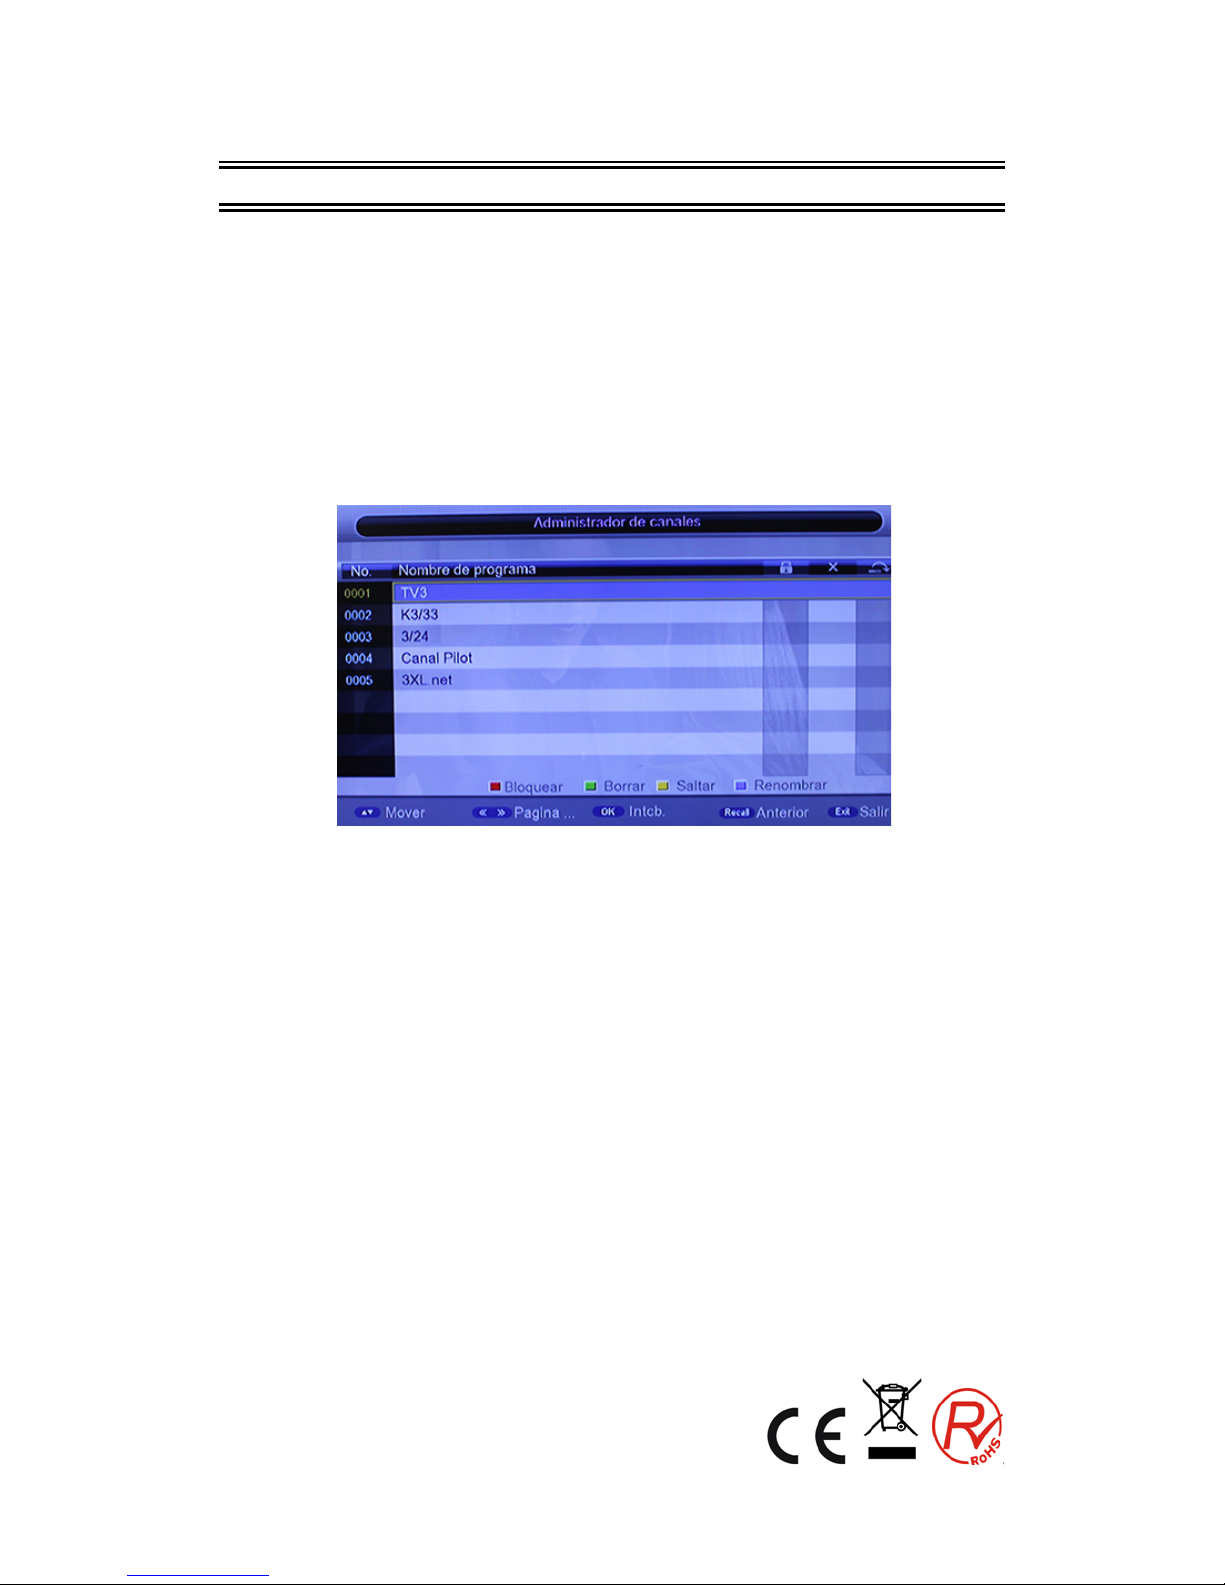
4.1 Administrador de canales
La página administrador de canal incluye borrar, mover, bloquear y cambiar el
nombre.
1. Usted puede entrar en la página como se muestra en la figura de abajo a través de
"MENÚ-> canal-> Administrador de canal".
2. Se mostrará un cuadro de diálogo de "canal no disponible" cuando no hay canales en la
base de datos para entrar, y no va a entrar en las páginas de organización del canal.
3. Menú Administrador de Canales incluye: Eliminar Canal, Saltar Canal, el bloqueo de
canales y cambio de nombre del canal. Pulse el botón "ARRIBA / ABAJO" para
seleccionar la línea donde está el canal, pulse la tecla de 4 colores en el mando a
distancia:
• pulse la tecla roja para establecer y cancelar el bloqueo de canales,
• la tecla verde para ajustar o cancelar borrar canal,
• pulse la tecla amarilla para ajustar o cancelar salto de canal,
• la tecla azul para ajustar o cancelar el cambio de nombre del canal. Después del ajuste,
aparecerá la cifra correspondiente.
4. Para cambiar el nombre del canal, pulse el botón "ARRIBA / ABAJO" para seleccionar la
línea en la que está el canal para cambiar de nombre, pulse la tecla azul para entrar en la
página para cambiar el nombre del canal.
5. Pulse la tecla azul para salir de la página del Cambiar nombre de canal.
6. Para ajustar o cancelar el bloqueo de programas, el sistema pedirá a la entrada una
contraseña por defecto “0000”. Para establecer borrar programa, el sistema le pedirá
16
Page 17
verificación a través del cuadro de diálogo "¿desea borrar el canal?", Las teclas
"IZQUIERDA / DERECHA" son para seleccionar, elegir la opción "Sí" para eliminar el
programa o elegir la opción "No" para cancelar.
7. Pulse el botón "SALIR" para salir de la página del administrador de canales y guardar el
resultado de la edición.
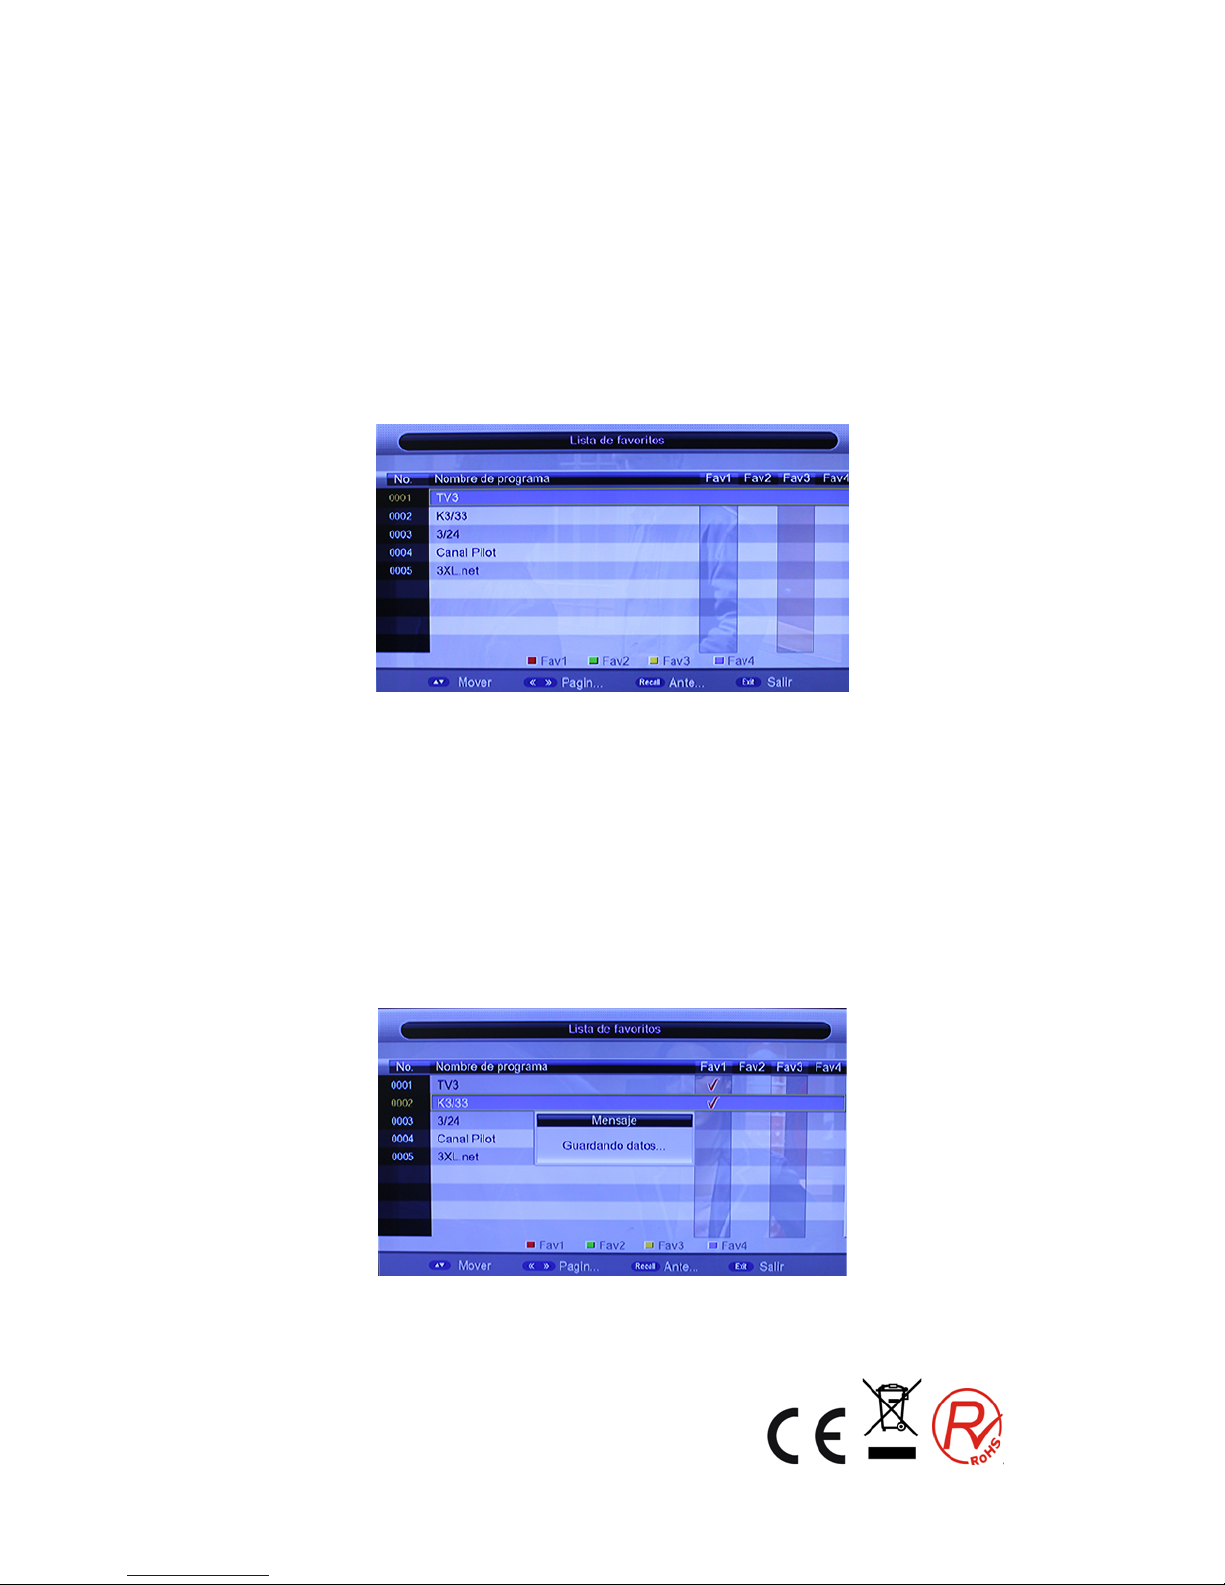
4.2
Lista de Favoritos
1. Usted puede entrar en la página de abajo a través de la siguiente secuencia "Menú
principal-> canal-> lista de favoritos".
2. Se mostrará un cuadro de diálogo de " canal no disponible" cuando no existen
programas en la base de datos para entrar, y no va a entrar en la página agrupación
de canales.
3. Pulse el botón "ARRIBA / ABAJO" para seleccionar la línea en la que está el canal
que va a ser agrupado, a continuación, presione las teclas de colores del mando a
distancia para establecer el agrupamiento de diferentes canales.
4. Cuando el cambio a canales favoritos se haya terminado, presione "SALIR", y
luego se guardará la selección e indicará "Guardando los datos ...".
17
Page 18
5 Ajustes de preferencias
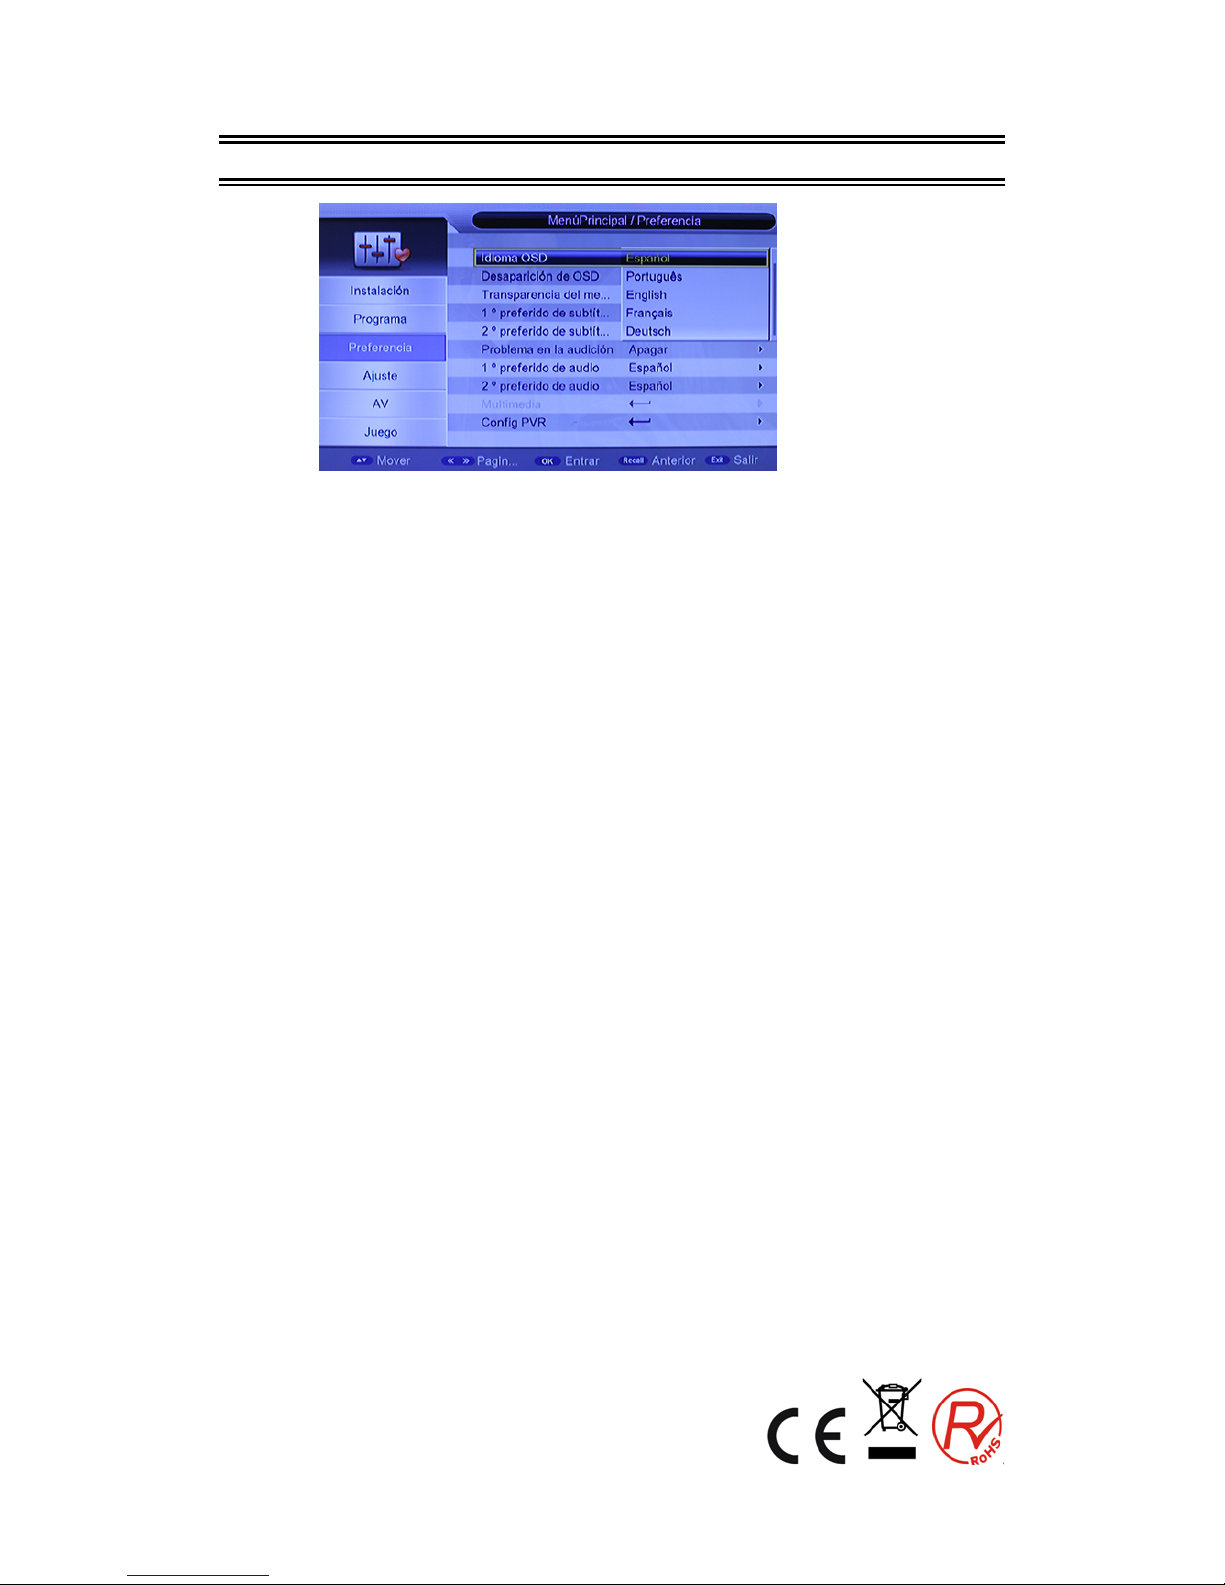
5.1
Idioma OSD
Opción Idioma del OSD: El sistema dispone de una interfaz de usuario que soporta unos
cuantos idiomas, puede configurar el idioma a través de la opción Idioma del menú:
(1) Mueva el cursor hasta la opción Idioma del menú, pulse "derecha" para entrar en la lista
Idioma de OSD.
(2) Pulse el botón "ARRIBA / ABAJO" para seleccionar el idioma.
(3) Pulse el botón "Aceptar" para confirmar la interfaz del sistema de selección de idioma,
entonces el ajuste es efectivo, y luego el idioma de la interfaz se convierte en el idioma
elegido en la actualidad, el cursor se puede mover en la opción Idioma del menú de la
izquierda.
(4) Tiempo de espera OSD
Para establecer el tiempo de salida automática desde el menú: 1S-6S.
(5) Transparencia del OSD
Para establecer la transparencia del MENU: de 0% a 60%.
5.2 Subtítulos de preferencia
(1) Configure el idioma preferido de los subtítulos inglés, francés, alemán, italiano,
español, portugués.
(2) Cuando el idioma deseado para los subtítulos se selecciona, se mostrará de forma
automática mientras que tenga el subtítulo seleccionado.
(3) El usuario puede configurar otro idioma preferido para los subtítulos en la opción
"segundo idioma preferido para los subtítulos".
18
Page 19
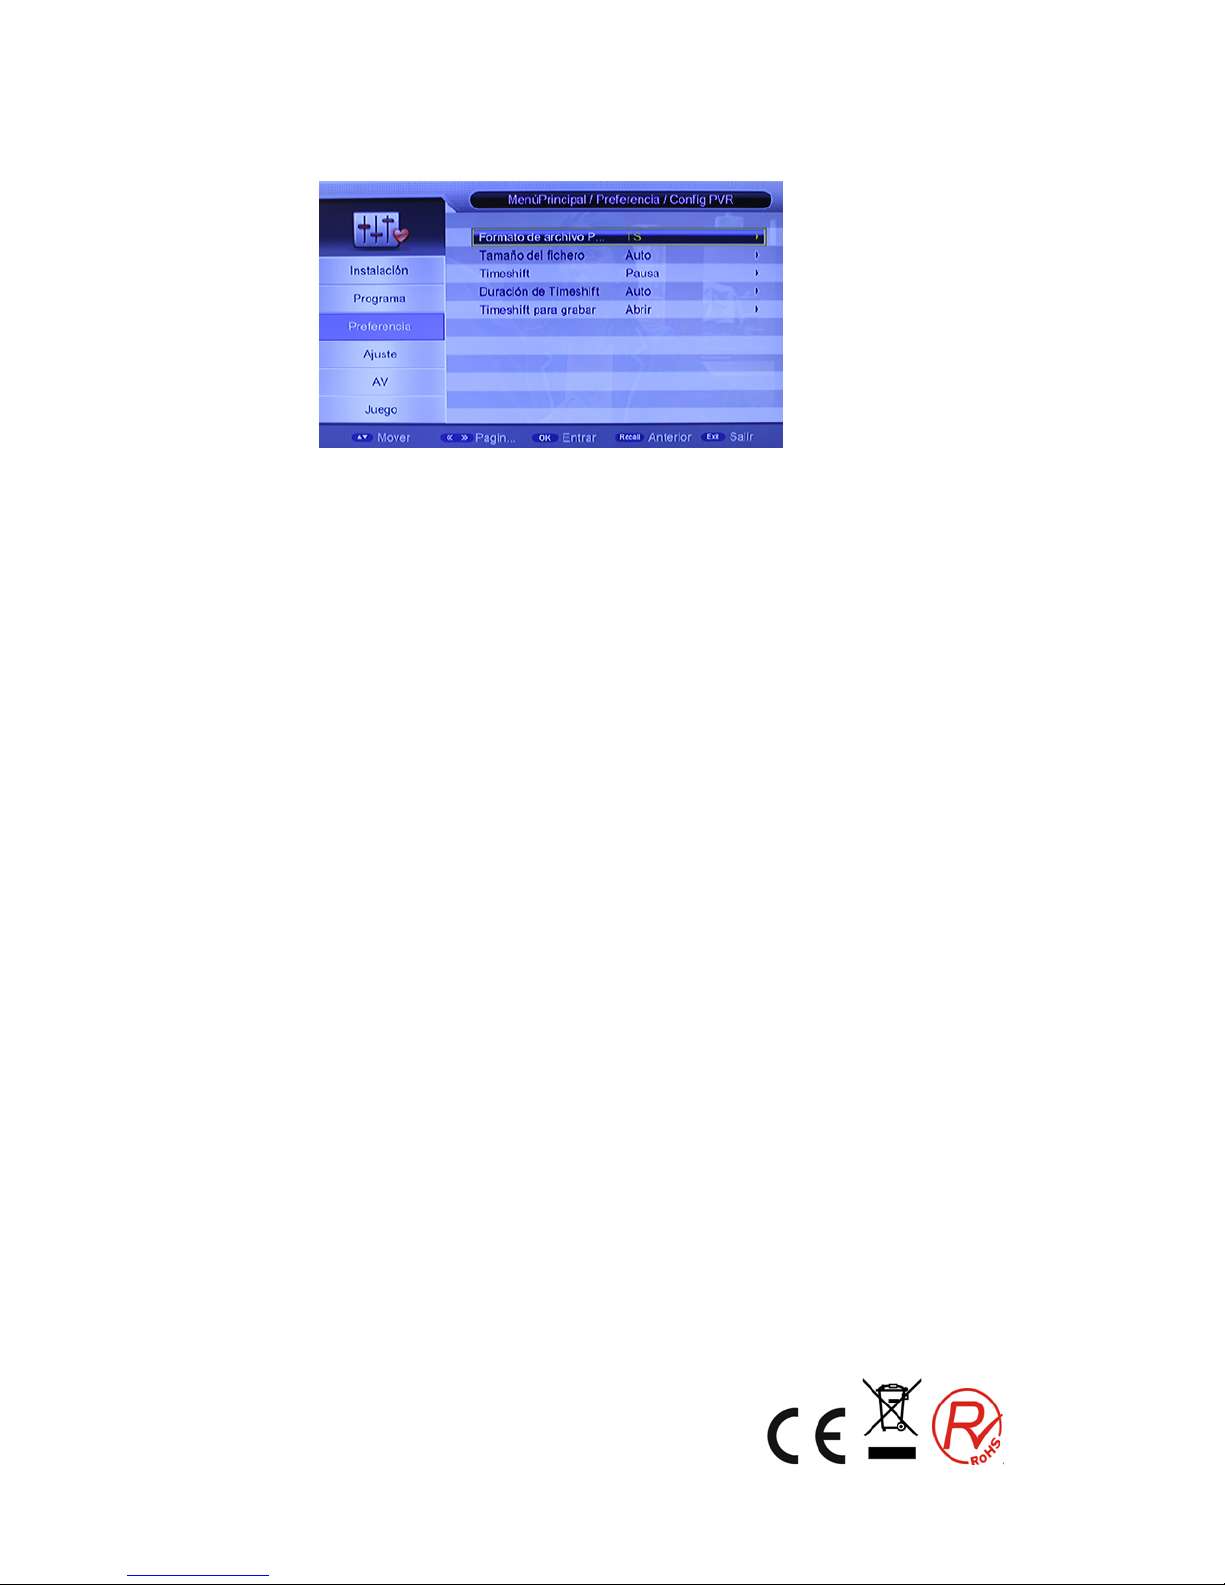
5.3 Configuración PVR
Usted puede entrar en la página a través de "MENÚ-> Preferencias-> Configuración PVR"
que contiene cinco opciones como sigue:
Formato de archivo PVR
Tamaño del archivo
TIMESHIFT
Longitud de TIMESHIFT
TIMESHIFT para grabar
1. Formato de archivo PVR
Cualquiera de las opciones, TS / PS, se pueden seleccionar para ajustar el formato del
archivo que se almacena; si se selecciona el modo TS, psi/si o información de la tabla de
secuencia de código puede ser grabada durante la grabación del programa, o si está
seleccionado el modo PS, sólo son grabados los datos de AV.
2. Tamaño del archivo
Cualquiera de las opciones, 4G/3G/2G/1G, se pueden seleccionar para configurar el
tamaño del archivo a grabar, si el tamaño del archivo supera el tamaño establecido en la
grabación del programa, el programa grabado se divide en archivos de diferentes
configuraciones.
3. TIMESHIFT
Cualquiera de las opciones, AUTO / OFF / PAUSE, pueden ser seleccionadas para
establecer el estado de la reproducción diferida actual, si se selecciona AUTO, la
operación se realiza de forma automática Timeshift en segundo plano, puede cambiar de
canal, pero descarta el TimeShift anterior y reinicia uno nuevo; Si se selecciona OFF, la
operación Timeshift se detendrá, si se selecciona Pausa, la operación diferida será de
arranque manual con la tecla PAUSA, congelamiento de pantalla a la vez, puede volver
con la tecla PLAY, permite el cambio único DE canal en el mismo TP, TIMESHIFT
sólo graba el primer canal; y si las últimas tres opciones se cambian cuando se selecciona
AUTO, T im eshift se reiniciará.
4. longitud de TIMESHIFT
Cualquiera de las opciones, AUTO/30min/1h/2h, pueden ser seleccionados para
19
Page 20

establecer la longitud temporal de la reproducción diferida, si se selecciona AUTO, la
longitud temporal de la reproducción diferida dependerá del tamaño del equipo USB, y si
cualquiera de las opciones, 30min/1h/2h, se selecciona, la longitud del tiempo de uso de
Timeshift es 30min/1h/2h en el caso de que el tamaño disponible de los equipos USB sea
lo suficientemente grande, mientras que la longitud del tiempo de uso de la reproducción
diferida depende del tamaño disponible del equipo USB.
5. Grabación Timeshift
Cualquiera de las opciones, ON / OFF, se puede seleccionar. Si se selecciona ON, la
operación Timeshift se detendrá y el buffer grabado por Timeshift será almacenado en el
equipo USB, si se selecciona OFF, Timeshift funcionará en forma continua y el archivo
grabado por la reproducción diferida no se almacenará en el equipo USB.
20
Page 21

6 Configuración del Sistema
Menú de configuración del sistema puede proporcionar la configuración del sistema
más conveniente.
6.1 Temporizador
Si desea ajustar el canal a reproducir en un determinado momento o grabar (REC) algunos
programas, puede ajustarlo a través del menú del temporizador.
La aplicación mostrará una lista de eventos (programas) para agregar, ver, editar
y eliminar.
El menú "Temporizador" deberá enumerar todos los eventos añadidos a través de
la "Guía de Programación de TV", así como los que se han agregado
manualmente por el usuario a través del menú "Temporizador".
La aplicación admite un máximo de 10 eventos.
.
Fecha: especifica la fecha del evento
Nombre del programa: Especifica el canal para el que se establece el temporizador
Hora de inicio: Especifica la hora de inicio del evento
Hora de finalización: Especifica la hora de finalización del evento, se utilizará en el tipo de
grabación
Duración: Especifica el tiempo de duración del evento, se utilizará en el tipo de grabación
Modo: Especifica la frecuencia del temporizador, la duración puede ser cualquiera de las
siguientes:
Una vez - el temporizador se activa sólo una vez.
diario – el temporizador se activará todos los días a la hora espe cificada.
21
Page 22

Semanal – el temporizador se activará todas las semanas a la hora especificada.
Mensual – el temporizador se activará cada mes a la hora especificada.
Tipo:: Especifica el tipo de canal para el que se establece el temporizador, el
usuario puede seleccionar las siguientes opciones::
Canal, Grabación, en espera, o encendido.
Canal: se puede programar la hora de cambiar a un canal seleccionado. Sólo se
puede entrar en HORA DE INICIO, pero no poner hora de finalización ni duración.
En espera: puede predeterminar el tiempo que desea que la unidad entre en
modo de espera. Sólo se puede entrar en HORA DE INICIO, pero no poner hora de
finalización ni duración
On : puede predeterminar la hora en que desea que la unidad se encienda.
Introduzca la hora de inicio y luego apagar la unidad. La unidad se enciende en la
hora preseleccionada.
Grabación: se puede establecer el canal que desea grabar, el tiempo de inicio y
la duración. Después de establecer la duración, el sistema calculará
automáticamente la hora de finalización.
Pulse la botón OK para confirmar la configuración y pulse el botón POWER de
prensa para entrar a la unidad en modo Standby.
¡ADVERTENCIA! Por favor, no te olvide insertar un dispositivo USB en el puerto
USB compatible con la función de grabación, de lo contrario, verá un mensaje de
error durante la programación
Si selecciona el tipo grabación, se puede establecer en Activar o desactivar opciones
de grabación com AD, grabación de subtítulos y grabación TXT.
Pulse el botón "OK" después de la configuración y el sistema volverá al menú
anterior.
6.2 Bloqueo para niños
El menú de bloqueo para niños puede conseguir una configuración de bloqueo
deseada, como se muestra en la figura 6.5:
22
Page 23

1. Aquí se puede estable cer Ac tivado o desactiv ado el bloqueo del sistema, y también
puede determinar el ratio paterno 0 a 18.
2. Usted puede revisar la contraseña del sistema.
(1) Pulse las teclas numéricas 0-9 en el mando a distancia para introducir la
contraseña antigua, la contraseña por defecto se establece como “0000”.
(2) Si la contraseña se introduce correctamente, el cursor se puede mover a la
opción de introducir nueva contraseña, pulse las teclas numércias de 0-9 en el
mando a distancia para introducir una nueva contraseña de 4 dígitos.
6.3 Fecha Hora
El Menú del reloj contiene diferentes configuraciones de reloj. El siguiente cuadro muestra
los ajustes de tiempo.
Si el "modo de hora" está ajustado como "Auto", entonces "Zona Horaria" y "DST" estarán
activas para su edición. Si el modo es "Manual", estas opciones est án deshabilitadas.
Si el "modo de hora" está ajustado como "Manual", entonces, "Fecha" y "Tiempo" estarán
activos para su edición. Si el modo es "Auto", estas opciones están deshabilitadas.
6.4 Reajuste de fábrica
Le permite restaurar la unidad a sus valores predeterminados de fábrica. Cuando se selecciona
23
Page 24

esta opción, se le pedirá que introduzca su contraseña (o password por defecto "0000"). Pulse
OK para devolver a la unidad a los valores predeterminados de fábrica.
6.5 Actualización
Si desea actualizar el software, por favor contacte con su proveedor.
Atención: Por favor , no cortar la ener g ía cuan d o se est é actua lizand o el softw ar e.
6.6 Versión
A través del menú (MEN U-> Con figuración-> Versión) podrá comprobar la versión del
software.
7 Configuración AUDIO / VIDEO
El modo de salida de vídeo se puede cambiar el modo de salida de vídeo, en que
puede ajustar el modo de TV de acuerdo a la situación real de un equipo de
recepción.
24
Page 25

1 Mueva el cursor hasta la opción correspondiente a ajustar ypulse la tecla OK /
derecha para mostrar las opciones disponibles, a continuación,
presione ARRIBA / ABA J O p ara moverse circularmente y elegir la opción
deseada.
2 Pulse la tecla OK para guardar los ajustes.
7.1 Contraste
Contraste de la imagen se puede ajustar de 0 a 24.
7.2 Brillo
El brillo de la imagen se puede ajustar de 0 a 24.
7.3 saturación
Rango de saturación de la imagen se puede ajustar de 0 a 24.
7.4 - Color
Amplia tonalidad de la imagen se puede ajustar de -30 a +30.
7.5 Relación de aspecto
(1) Mueva el cursor a la opción de relación de aspecto, pulsa en "OK / DERECHA"
para que aparezcan las opciones, a continuación, pulse el botón "ARRIBA / ABAJO"
para mover circularmente y elija las opciones.
(2) Relación de aspecto se puede establecer como 16:9, 4:3 PanScan, 4:3 Letterbox,
16:9 PanScan.
(3) Pulse el botón "OK" para guardar la configuración
7.6 Salida de video
Modo de salida AV puede cambiar el modo de salida de vídeopara ajustar el aparato
de TV de acuerdo con el dispositivo conectado.
Las opciones disponibles son: RGB SCART o euroconectorCVBS
7.7 Resolución de vídeo
A continuación se muestran las opciones disponibles que usted puede ajustar la
resolución del vídeo:
Auto detect / 480p_60 /480i_60 / 576p_50 / 576i_50 / 720p_60 / 720p_50 / 1080i_60 /
1080i_50 / 1080p_60 / 1080p_50
25
Page 26

7.8 Audio HDMI
A continuación se muestran las opciones disponibles:
HDMI (sin sonido) / HDMI PCM (sonido digital) / HDMI RAW (en bruto de sonido).
8 Multi-Media
Este producto es compatible para reproducir los archivos MP3, JPEG y MPEG.
Se pueden soportar sólo los archivos que se muestran en la lista y con los que el
formato de archivos de este producto es compatible.
Colocar el dispositivo externo USB al puerto USB compatible del decodificador.
Presione SOURCE para entrar en el menú de medios.
Pulse EXIT para volver al programa de TV visto anteriormente y salir del menú Multi
Media.
8.1 Modo de Selección de Medios de Comunicación
Utilice la tecla "IZQUIERDA" o la tecla "DERECHA" para seleccionar música / foto /
película ... etc en el modo de reproducción. A continuación, pulse "OK" para entrar en
la lista de archivos.
8.2 Película
8.2.1 Navegador de archivos de películas
Este menú permite al usuario seleccionar y reproducir una película a partir de una lista de
películas que se almacenan en el dispositivo USB.
Los formatos de archivo son MPG, AVI, VOB, DAT, MKV, RM, WMV, TSF, QT.
El diseño del menú siguiente muestra el menú "película".
26
Page 27

8.2.2 Reproducción de películas
8.2.3 Cuando se reproduce el video, la información siguiente se muestra en el
menú de pantalla:
b. Nombre de archivo.
c. El tiempo total y la hora actual para el archivo reproducido.
d. Estado de reproducción de este video.
e. Barra de progreso.
f. Tamaño de archivo y la resolución de este video.
g. Modo de repetición, como apagado / uno / dir.
8.2.4 Ir al menú
Utilice el botón GOTO del mando a distancia para cambiar a la sección en cualquier
momento del tiempo de una película y comenzar la reproducción. Pulse el botón
GOTO de nuevo para salir.
8.2.5 Marcapáginas
Para mantener el recuerdo de la sección de reproducción de cualquier archivo
multimedia, e iniciar la reproducción en ese momento, en otro momento después.
Pulse la tecla Marcapáginas en el mando a distancia para entrar en el menú de
Marcapáginas. Pulse la tecla Marcapáginas de nuevo para salir.
27
Page 28

8.3 Música
Este menú permite al usuario seleccionar y reproducir una canción de una lista de canciones
que se almacenan en el dispositivo de almacenamiento. WMA, WAV, DTS, RA y el formato
MP3 serán compatibles con la reproducción.
Cuando se reproduce el archivo de música, la siguiente información se mostrará en el menú
de pantalla (ver imagen de abajo)
g. Ecualizador de información.
h. El tiempo total para el archivo en reproducción.
i. Estado de reproducción del archivo de música.
j. Barra de progreso.
k. Número actual de este archivo en la lista tot al de los archiv o s.
l. El tamaño del archivo, artista, álbum y género.
8.4 Administrador de grabaciones
8.4.1 Navegador Administrador de grabaciones
Para ver los programas de TV grabados guardados en un dispositivo de almacenamiento.
8.4.2 Cambiar el nombre
En este menú el usuario puede cambiar el nombre del programa, al que le guste.
28
Page 29

8.5 Foto
Para ver todas las fotos almacenadas en el dispositivo de almacenamiento. Siga las
instrucciones en la parte inferior de la pantalla de OSD.
Para ir a la foto siguiente, pulse la tecla de navegación hacia la derecha. Pulse OK para
ver la imagen en la pantalla.
• Pulse las Teclas de navegación, se puede invertir la imagen de arriba, abajo, derecha,
izquierda.
Función de zoom:
• pulse la tecla ZOOM para activar y desactivar la función ZOOM. Durante la
presentación, la imagen se detiene. A continuación, utilice la tecla F.F. para aumentar el
tamaño de la imagen (x2, x3, x4). Utilice la tecla F.R. para reducir.
8.6
E-Book(s
ó
lo archivos *.txt)
Por favor, descargue el archivo de texto en Internet y guárdelo en su disco USB e insértelo
en el dispositivo.
Presione el botón "OK" para acceder a E-book en la pantalla y encontrar el archivo de
texto en la unidad USB y, a continuación se puede leer el archivo en la pantalla.
8.7 Administrador de Discos
Usted puede - Mover / Copiar, Renombrar, Eliminar, Eliminar todo – lo que se almacenan en
el dispositivo USB. Por favor, siga las sugerencias del menú OSD al pulsar la tecla
correspondiente del mando a distancia.
29
Page 30

9. ESPECIFICACIONES
Sintonizador
Conector de entrada
IEC 16902. Hembra
Rango de frecuencia
UHF
Número de Entradas RF
1
Impedancia de entrada
75 ohm
Conector de salida de RF
(bypass)IEC 169-2 Macho
Bucle
Soporte
Demodulación
Estándar
ETSI EN300 744
Guardia de los modos de
intervalo
1/32,1/16,1/8 duración activa de símbolos
Tasa de los modos FEC
1/2,2/3,3/4,5/6,7/8
Transporte/constelación
Todos los modos soportados incluidos los no jerárquicos
Demodulación
COFDM(QPSK/QAM16/QAM64) 2K y 8K
Ancho de banda del canal
8 MHz
Decodificador de V ideo
Estándar
ISO/IEC 13818-2 y ISO/IEC 14496-10
Flujo de transporte
ISO/IEC 13818-1
Descodificación de víd eo
MPEG-2 SD/HD (MP@ML y MP@HL), MPEG-4 H.264/AVC SD/HD
DivX 4.X ~ 5.X, AVI, VOB, MOV, MKV, TS, PEG, BMP, PNG, GIF
Relación de aspecto
4:3, 16:9
Descodificador de audio
Estándar
ISO/IEC13818-3 TR101 1154
Decodificación de audio
MPEG-1 y MPEG-2 Layer I & II, Audio Dolby Digital, E-AC3,WMA
y HE-AAC Audio Digital
Dolby Digital (AC-3)
Mezcla estéreo de las salid as de audio analógicas y digital es ( incluyendo HDMI).
Para las salidas digitales , se proporciona L-PCM est ér eo
Frecuencia
32 kHz, 22.1 kHz, 44.1KHz,48 kHz
Subtítulos
Subtítulos
Subtítulos DVB
Accesorios
Unidad de control remoto
IR (38kHz) RC3 / otros bajo petición (38kHz)NEC
Manuel de usuario
1
Alimentación
Rango de entrada de CA
DC 5V 2A
Consumo de energía
< 6W
Consumo en espera
< 0.5W
Peso
0.65 kgs
30
Page 31

10. SOLUCIÓN DE PROBLEMAS
La tabla siguiente es una lista de problemas comunes que pueden ocurrir con su receptor
Fallo
Posible Causa
Solución
Encendido, pero nada en la
pantalla de visualización
Unidad no está encendi da en
el interruptor de la red
Asegúrese de que el enchu fe
de alimentación está
ench
ufado a la toma de
pared y el interruptor está
activado.
Imagen de TV se retira y la
unidad muestra el mensaje
"No hay señal"
La antena no está c onectada
correctamente o está en u na
zona de mala recepción
Hable con su técnic o l oc al de
la antena de telev isión sobre
los problemas de recepción
en su área y quizás sería
conveniente una nueva
antena.
Se recibe la TV digital, pero
faltan algunos canales
La antena no está c onectada
correctamente o está en u na
zona de mala recepción
Hable con su técnic o l oc al de
la antena de telev isión sobre
los problemas de recepción
en su área y quizás sería
conveniente una nueva
antena
El mando a distancia no
funciona
Las pilas están agotadas o
hay interferencias
Trate de reemplazar las pilas
del mando a distancia y
asegurars
e de que no hay
ninguna luz directa del sol en
la unidad de mando a
distancia.
“Para dar cumplimiento a la Norma UNE EN-60065, indicamos que si el cable flexible se daña,
únicamente puede ser sustituido por un taller de reparación reconocido por el fabricante NEVIR,
S.A., ya que se necesitan herramientas especiales”
31
Page 32

SCART HD DVB-T RECEIVER
NVR-2503DSUGHD
INSTRUCTION MANUAL
32
Page 33

Contents
IMPORTANT SAFETY INSTRUCTIONS .................................................................................................... 35
1.Remote Control .................................................................................................................................... 36
1.1 Appearance of Remote Control ................................................................................................... 36
1.2 INSTALLATION .............................................................................................................................. 38
2 Basic Functions .................................................................................................................................... 39
2.1 First Installation ............................................................................................................................. 39
2.2 TV/RADIO Programs Switch ......................................................................................................... 39
2.3 Channel Switch .............................................................................................................................. 39
2.4 TV & Radio Channel List / FAV List ............................................................................................. 39
2.5 Display Information of Programs ................................................................................................ 40
2.6 Program RECALL .......................................................................................................................... 40
2.7 Audio Language Switch and L/R Channel Switch ..................................................................... 40
2.8 TV Program Guide (EPG) .............................................................................................................. 40
2.9 Subtitle ........................................................................................................................................... 42
2.10 Teletext ........................................................................................................................................... 42
2.11 REC & Time shift functions .......................................................................................................... 43
2.11.1 REC (instant recording) ............................................................................................................... 43
2.11.2 Time shift ..................................................................................................................................... 43
3 Installation ............................................................................................................................................. 45
3.1 Auto Search ................................................................................................................................... 45
3.2 Manual Search ............................................................................................................................... 45
3.3 Channel Filter ................................................................................................................................ 46
4 Channel .................................................................................................................................................. 47
4.1 Channel Manager .......................................................................................................................... 47
4.2 Favorite List ................................................................................................................................... 48
5 Preference Setting ................................................................................................................................ 49
5.1 OSD Language ............................................................................................................................... 49
5.2 Preferred Subtitle .......................................................................................................................... 49
5.3 PVR Configuration ........................................................................................................................ 50
6 System Setting ...................................................................................................................................... 52
6.1 Timer ............................................................................................................................................... 52
6.2 Child Lock ...................................................................................................................................... 53
33
Page 34

6.3 Date Time ....................................................................................................................................... 54
6.4 Factory Reset ................................................................................................................................. 54
6.5 Upgrade .......................................................................................................................................... 54
6.6 Version ........................................................................................................................................... 55
7 AUDIO / VIDEO Setting ......................................................................................................................... 55
7.1 Contrast .......................................................................................................................................... 55
7.2 Brightness ...................................................................................................................................... 55
7.3 Saturation ....................................................................................................................................... 55
7.4 Hue .................................................................................................................................................. 55
7.5 Aspect Ratio .................................................................................................................................. 56
7.6 Video Output .................................................................................................................................. 56
7.7 Video resolution ............................................................................................................................ 56
7.8 HDMI Audio .................................................................................................................................... 56
8 .Multi-Media ........................................................................................................................................... 56
8.1 Media Selection Mode ................................................................................................................... 56
8.2 Movie .............................................................................................................................................. 57
8.2.1 Movie File Browser ...................................................................................................................... 57
8.2.2 Movie Pla yback ........................................................................................................................... 57
8.2.3 Go to Menu .................................................................................................................................. 57
8.2.4 Book Mark Menu ......................................................................................................................... 57
8.3 Music .............................................................................................................................................. 58
8.4 Recorder Manager ......................................................................................................................... 59
8.4.1 Recorder Manager Browser ........................................................................................................ 59
8.4.2 Rename ....................................................................................................................................... 59
9. SPECIFICATIONS ................................................................................................................................... 61
10. TROUBLESHOOTING .......................................................................................................................... 62
34
Page 35

! As a switching equipment, power adaptor should be convenient for
operating
the device should be far away from water dropping and splashing, as
well as vase full of liquid
To inform users of possible dangers on the apparatus or on its components, the above symbols can
be applied.
To reduce the risk of fire and electric shock, do not expose this unit to rain or moisture.
Please carefully read these precautions and instructions before operating this unit. Keep the
manual for future reference.
Power Cord Protection
To avoid any malfunctions of the unit and to protect against electric shock, fire or personal injury,
please observe the following:
Hold the plug firmly when connecting or disconnecting the AC power cord.
Keep the AC power cord away from heating appliances.
Never put any heavy object on the AC power cord.
Do not attempt to repair or reconstruct the AC power cord in any way.
Never make or change connections with the power switched on.
IMPORTANT SAFETY INSTRUCTIONS
- The ventilation should not be impeded by covering the ventilation openings with items, such
as newspapers, table-cloths, curtains, etc.;
- No naked flame sources, such as lighted candles, should be placed on the apparatus;
- Attention should be drawn to the environment aspects of battery disposal. Don’t throw used
batteries in dustbin. Please contact your retailer in order to protect the environment.
- Don’t use the apparatus in tropical climates;
- The apparatus shall not be exposed to dripping or splashing and that no objects filled with
liquids, such as vases, shall be placed on the apparatus.
35
Page 36

- Where the mains plug is used as the disconnect device, the disconnect device shall remain
readily operable. The main plug shall remain readily operable.
- Keep minimum distances (5 cm) around the apparatus for sufficient ventilation. (Minimum
distance around the apparatus for sufficient ventilation.)
- If the electric cable is damaged, it must be replaced by the manufacturer, or by the
qualification persons, in order to avoid a danger.
1.Remote Control
1.1 Appearance of Remote Control
Photograph Key Function
POWER switch off/on power supply
MUTE mute control
MARK enter bookmark me n u (refer to 8. MULTI MEDIA)
TV / RADIO Press t o switc h between TV progr am and Radio program.
SOURCE change source between TV and Media
NUMBER 0 to 9
Numeric keys : for input of numbers or for selecting a TV
channel
INFO
(1) display information of programs
(2) display corresponding extended information at TV
GUIDE state
RECALL
(1) return to upper menu
(2) press “RECALL” while watching TV to recall
previously viewed channel.
TIMESHIFT
Into the TIMESHIFT state, press
key t o enter the
TIMESHIFT suspended state; Press
button to enter
TIMESHIFT playback state;
Press
button to exit the TIMESHI FT state; press info to
see detailed information;
EXIT
During multimedia playback, go back to previous TV program.
Exit from curr ent Men u, Back to prev ious me nu without
saving
MENU To displa y ma i n menu, press again to e xit c urre nt men u
Navigation keys : UP /
DOWN / LEFT / RIGHT &
OK
Navigation keys to move up, down, left & right & press OK
key to confirm one setting
OK Enter channe l / Favor it e list
TEXT Teletext
EPG Pulsa la tecla EPG para mostrar la información EPG de 7 días.
STOP stop playing Media
PLAY / PAUSE Play/Re play / p ause Media
F.R & F.F
(1) enter ZOOM mode, image can zoom in/out
(2) Fast play backward / forward w hile Media playing
PREV / NEXT play previous/next of Media in USB Storage
36
Page 37

AUDIO/LANG Press to set AUDIO mode / press to select Language
REC enter REC menu
PAGE UP / DOWN page up/down in Teletext
VOL+ / - volume adjusting
CH - / CH + Select previous / next channel
HDMI
Change the type of HDM I output – following options are
available : 480p-60 / 576p-50 / 576i-50 / 720p-60 / 720p-50 /
1080i-60 / 1080i-50 / 1080p-60 / 1080i-60
ZOOM
(1) enable/disable zoom;
(2) Switch to Daily Mode (GUIDE page)
(3) set/unset program locked in channel manager menu
SUBTITLE Switch the diffe r ent la n guage o f subtitle
AUTO/GOTO
Auto scan channels of TV & Radio /
Enter into GOTO menu, select time of playing or stopping
Media
RED Depend on OSD Hints
GREEN Depend on OSD Hints
YELLOW
Depend on OSD Hints
BLUE Depend on OSD Hints
Remark: When connecting outside hard-disk, the hard-disk must have its own power source.
Battery Installation
Insert 2 pieces batteries while observing the corre ct (+) and (-) polarities as illustrated
below:
About the batteries
If the remote control unit fail s to work even when it is operated near the receiver,
please replace the batteries (not included).
Use 2 batteries of UM-4 (AAA) size (not included).
37
Page 38

Notes:
Do not use rechargeable (Ni-Cd) batteries.
Do not attempt to recharge, short circuit, disassem ble or throw th e batteries i nto the
fire.
Do not drop, step on or cause any impact to the remote control unit. This may damage
it, resulting malfunction.
Do not mix old and new batteries.
If the remote control unit is not going to be used for a long time, remove the batteries.
Caution
Keep batteries out of children’s reach. If batteries are swallowed, contact a physician
immediately.
1.2 INSTALLATION
38
Page 39

2 Basic Functions
2.1
First Installation
If you are using the unit for the first time or have restored the unit to Factory Default, the
installation Guide Menu will appear on your TV screen. Follow each of the option of the
Installation Menu to setup your preferred menu language and suitable country (Region) etc.
First installation shall setup some important settings.
Use the arrow keys on the remote control to select your preferred Language, Country, Time
Zone, LCN, then select channel search.
2.2
TV/RADIO Programs Switch
Press “TV/RADIO” to switch between Digital TV programs and Digital Radio programs
when watching TV.
2.3
Channel Switch
Press “CH+/CH-” to switch to the previous or next program.
Press number keys to input program number.
2.4 TV & Radio Channel List / FAV List
Press “OK” to switch to channel program list, press “LEFT/RIGHT” to select different
program
Column, press “UP/DOWN” to select program item.
Press “OK” to confirm the program selection, press “EXIT” to exit the program list.
If there are some favorite programs that have been set up, just press “OK” to enter
into the favorite program list.
Press “UP/DOWN” to select favorite program, press “OK” to confirm the selection,
39
Page 40

press “RECALL” to return to previous menu.
2.5
Display Information of Programs
Press “INFO” to show the information of current program when it is in normal playing
state.
2.6
Program RECALL
Press “RECALL” under state of ful l-screen to return to the previously played program.
2.7
Audio Language Switch and L/R Channel Switch
The program might ha ve multilingual audio languag es and the audio broadcast on different
audio mode such as Stereo, Left or Right. All the a vailable aud io languages will be displayed
while you press AUDIO/LANG key.
The screenshot is illustrated as below. If there is n o audio output after you select the audio
language, it indicates t hat ther e is no aud io on the c urrent au dio m ode, so you have to select
preferable audio mode.
1. Press “AUDIO” to switch the language of sound of current programs and switch
among “stereo” “left” “right” (stereoleft channelright channel).
2. Press “LEFT/RIGHT” to switch among “stereo” “left” “right” (stereoleft
channelright channel), press “UP/DOWN” to switch the language of sound.
3. Press “OK” to confirm the selection and return to full-screen play mode, press “EXIT” to
return to full-screen play mode and save the setting.
2.8
TV Program Guide (EPG)
1. You can press “EPG” on the remote control to enter into the TV GUIDE page to
know more about the programs to be played.
Enter into TV GUIDE menu default enter Now/Next Mode, menu under this mode
40
Page 41

contain 7 parts:
(1) Tab 1 shows the title.
(2) Tab 2 shows time and date list.
(3) Tab 3 shows particular date list.
(4) Tab 4 shows program list, press “UP/DOWN” to switch between programs.
(5) Tab 5 shows the time range and program information, press “F.R” and “F.F”
circularly to choose to browse the time range and program information on basis of
days of every week.
(6) Tab 6 shows the detailed program information in Tab 5.
(7) Press “LEFT/RIGHT” to switch between NOW and NEXT.
2. Press “Red key” to enter into Daily/Weekly Mode to display the programs and
progr am i nf orm ation in different time ranges of the current program list within one
week.
(1) Press RED key to switch between Sunday -- Saturday in Tab 3.
(2) Press “UP/DOWN” to move upward and downward to switch between the
different programs.
(3) Press “LEFT/RIGHT” to choose to view the program information in different
time ranges.
3. Press the “INFO” to select the detailed information corresponding to the current
program.
4. Press the green key to set Timer to book programs.
5. Press “EXIT” to exit from TV GUIDE.
41
Page 42

2.9
Subtitle
1. Subtitle is defaulted to be off. The programs might have multilingual subtitle
information.
Press “SUBTITLE” key on the remote control to enter the Subtitle menu
of the current programs. All available subtitle languages will be displayed.
2. Press “UP/DOWN” to move upward and downward to select the language.
2.10 Teletext
1. If you want to watch Teletext, please press “TEXT” on the remote controller to enter
into Teletext page.
2. Input three digits to go to corresponding page you want to reach,
3. Press “UP” to go to the previous page, while press “DOWN” to go to the next
page;
4. Press “OK” to adjust the transparence of the Teletext page.
5.
Press “TEXT” or “EXIT” to exit from teletext menu.
42
Page 43

2.11
REC & Time shift functions
2.11.1 REC (instant recording)
During TV watching press “REC” to start recording, system has 3 seconds for initialization.
When initialization is finished, the screen left top will show “REC” icon, then it’s recording
and playing current program. You can press “info” to watch current recorded information.
Press “stop” while recording, will stop recording and resume normal play mode.
In the recording mode, you can also use REC key to set timer for subscribe stop record,
besides you can reset the time optionally. (Can set the time length as cancel (00:00), or user
define length).
When the space is insufficient while recording, system will show “Storage Device Disk is
Full” then stop recording and resume normal play back mode.
During recording, if a write failure happened, system will exit and stop recording.
In the recording mode, you also can operate Menu, TV GUIDE, TTX, Subtitle and so on
functions like normal playback mode.
2.11.2 Time shift
1) In Timeshift mode, you can watch the program meanwhile record the program.
2) In the below case press “PAUSE” key to enter into Timeshift mode, then the
“TIMESHIFT” icon will be shown on left top side of the screen, and record program play will
begin at recordin g sta rt time.
a) In normal playback mode, and Timeshift set as Auto or Pause within PVR Config
menu.
b) In recording mode.
3) In the below case press “<<” key also can enter into time shift mode, and playing program
will fast rewind.
a) In normal playback mode, and time shift set as Auto or Pause within PVR Config
menu.
b) In recording mode.
43
Page 44

4) In Timeshift mode, when press “STOP” will exit Timeshift mode and other functions will
be continued.
5) In Timeshift mode, when operate fast forward, the recording is still going on.
44
Page 45

3 Installation
There are two kinds of Installation mode as follow:
1. Auto Search
2. Manual Search
3.1
Auto Search
Auto search is a kind of intelligent and convenient mode o f programs sea rching, whi ch
covers programs of all frequent points of target countries or regions.
At present, this system covers many target countries and regions including: Germany
/ UK / Italy / France / Spain / Holland / Taiwan / China / Norway / Finland, etc.
_ You can move the cursor to “auto search” via press “UP/DOWN” under
“installation menu”, then press “OK” to enter into Auto searching page.
_ Aft er entering into auto search page, system will scan all programs one by one
under frequency points of current countries or regions selected automatically.
_ Dur ing scanning, press “EXIT” to stop and exit scanning.
_ W hen all channels are detected and the scanning process is finished, press EXIT
to quit the “Main Menu / Installation” page and display the channel to play.
3.2
Manual Search
If you understand much about digital TV and know the frequency of the program or if
you want to scan the program at any frequency required, you can select manual
search, which will allow you to save much time.
1. You can move the cursor to “manual search” via press “UP/DOWN” under
“installation menu”, then press “OK” to enter into manual search page.
45
Page 46

2. Prior manual search, you need to setup relevant parameters including:
(1) Frequency (KHz): the default frequency is settled by different country, you can
input relevant digitals to modify it.
(2) Bandwidth: the default value of bandwidth is settled by different country, while
you can set it to 6MHz, 7MHz, 8MHz.
3. Press “OK” after setting all parameters to start manual scan.
Move to START SEARCH, then press “OK” to start the manual search.
3.3
Channel Filter
All of channels or only unencrypted channels are set to be searched by selective
settings.
46
Page 47

4 Channel
System offers an efficient function of channel management such as channel deleting,
marking, moving, locking, rename and grouping.
There are two independent pages for channel management: TV and RADIO,
4.1
Channel Manager
Channel manager page includes channel deleting, moving, locking and rename.
1. You can enter the page as shown in the figure below via “MENU->channel->
Channel Manager”.
2. It will pop up a dialogue box prompting that “Channel not available” when there are no
channels in database to enter into, and it will not enter into channel organizer page.
3. Channel organizer menu includes: Delete Channel, Skip Channel, Lock Channel and
Channel Rename. Press “UP/DOWN” to choose the line where channel is, then press the
4-color key on the remote control:
• press the red key to set and cancel Lock Channel,
• the green key to set or cancel Delete Channel,
• press the yellow key to set or cancel Skip Channel,
• the blue key to set or cancel Rename Channel. After setting, corresponding figure will
appear.
4. To rename channel , press “UP/DOWN” to choose the line where the channel to be
renamed , press the blue key to enter the page to rename the channel.
5. Press the blue key to exit Channel Rename page.
6. To set or cancel Lock Program, the system will hint to input “0000”. To set Delete
Program, the system will hint to choose dialogue box “Delete selected Channels?”,
Press “LEFT/RIGHT” to choose, choose “Yes” to delete the program or choose “No” to
cancel.
7. Press “EXIT” to exit Channel manager page and saving the edit result.
47
Page 48

4.2 Favorite List
1. You can enter the page in the figure below via “Main menu->channel-> Favorite list”.
2. It will pop up a dialogue box prompting that “Channel not available” when there are
no programs in database to enter into, and i t w ill not enter into channel grouping p age.
3. Press “UP/DOWN” to choose the line where the channel to be grouped in is, and
then press the color keys on the remote control to set different channel grouping.
4. When changing favorite channel is finished, press “EXIT”, and then saving the
selection and indicating with the hint of “Data Saving…”.
48
Page 49

5 Preference Setting
5.1 OSD Language
OSD Language option: The system has the user interface supporting a couple of languages,
you can set language via OSD Language option:
(1) Move the cursor onto OSD Language option, Press “RIGHT” to enter OSD Language
List.
(2) Press “UP/DOWN” to choose language.
(3) Press “OK” to confirm system interface language selection, then the setting is effective,
and then the interface language turns into the currently chosen language, the cursor
can move onto OSD Language option on the left.
(4) OSD TIMEOUT
To set the automatic exit time from MENU: 1S-6S.
(5) OSD TRANSP ARENCY
To set the transparency of MENU: from 0% to 60%.
5.2
Preferred Subtitle
(1) Set the preferred subtitle to English, French, German, Italian, Spanish, Portuguese.
(2) When the preferred subtitle is selected, it will be displayed automatically while the
stream has the selected subtitle.
(3) User can set another preferred subtitle language in the “2
nd
preferred subtitle”
option.
49
Page 50

5.3
PVR Configuration
You can enter the page via “MENU->Preference->PVR Config”. it contains five options as
follow:
PVR File Format
File Size
Timeshift
Timeshift Length
Timeshift to Record
1. PVR File Format
Either of options, TS/PS, can be selected to set the format of the file to be stored; if TS
mode is selected, related psi/si table information in code stream can be recorded during
the record of the program, or if PS mode is selected, AV data are recorded only.
2. File Size
Any of options, 4G/3G/2G/1G, can be selected to set the size of the file to be recorded; if
the size of the file exceeds the setting size during the record of the program, record
program will divide the file into different set files.
3. Timeshift
Any of options, AUTO/OFF/ PAUSE, can be selected to set the status of the current
Timeshift, if AUTO is selected, Timeshift operation will perform automatically on the
background,
can change channel but discard previous Timeshift buffer and restart a new
one; if OFF is selected, Timeshift operation will stop; if PAUSE is selected, Timeshift
operation will be Manual start by PAUSE key, screen freeze at once, can resume by
PLAY key, allow channel change only in the same TP, Timeshift buffer only record first
channel; and if the preceding three options are changed when the AUTO is selected,
Time shif t wi ll re s ta rt.
4. Timeshift Leng th
Any of options, AUTO/30min/1h/2h, can be selected to set the time depth of the
Timeshift; if AUTO is selected, the time depth of the Timeshift is depended on the
available size of USB equipment; if any of options, 30min/1h/2h, is selected, the usable
50
Page 51

time depth of the Timeshift is 30min/1h/2h in the case that the available size of USB
equipment is big enough, whereas, the usable time depth of the Timeshift is depended on
available size of USB equipment.
5. Timeshift to Record
Either of options, ON/OFF, can be selected. If ON is selected, Ti meshift operation will
stop and the recorded file buffered by the Timeshift will be stored in USB equipment; if
OFF is selected, Timeshift will operate continuously and the recorded file buffered by the
Timeshift will not be stored in USB equipment.
51
Page 52

6 System Setting
System Setup menu can provide convenient system setup.
6.1
Timer
If you want to set channel playing at certain time or REC some programs, you can
set via Timer menu.
Application shall provide li st of timer for adding, viewing, editing and deleting.
“Timer” shall list all the timers that are added through the “TV PROGRAM
GUIDE” as well as the timer that are manually added by the user through the
“Timer” menu.
Application supports a maximum of 10 “Timer”.
In Timer Edit menu, the system can support at most 10 events.
Date: Specifies the timer date
Program Name: Specifies the channel for which the timer is set
Start time: Speci fies the start time of the timer
End time: Specifies the end time of the timer,be used in Recorder Type
Duration: Specifies the duration time of the timer,be used in Recorder Type
Mode: Specifies the frequency of the timer, duration can be any of the following:
Once - timer will be triggered only once.
Daily - timer will be triggered daily at the specified time.
Weekly - timer will be triggered every week at the specified time.
Monthly - timer will be triggered every Monthly at the specified time.
Type: Specifies the channel type for which the timer is set, user can select the
below options :
52
Page 53

Channel, Recorder, Standby, or On.
Channel : you can preset the time to switch to selected channel. You can only
enter START TIME but not End Time and Duration.
Standby : you can preset the time you want the unit to go into standby mode.
You can only enter START TIME but not End Time and Duration.
On : you can preset the time you want the unit to power ON. Enter the start time
and then switch off the unit. The unit will power on at the preselected Start time.
Recorder : you can set the Channel you want to record, the start time and the
duration. After setting the duration, the system will calculate the End Time
automatically.
Then press OK key to confirm your settings and press POWER key to enter the unit into
standby mode.
Remark : WARNING ! Please do not omit to insert an USB device in the USB port
compatible for record ing function.
If you select recorder type, it can be set Enable or Disable options such as AD
Record, Subtitle Record and Txt Record.
Press “OK” after your settings and the system will return to previous menu.
6.2
Child Lock
Child Lock menu can provide convenient locked setup, as shown in Figure 6.5:
1. Here you can set Enables or Disables the system lock, and also can set the parental
rating from 0 t o 18.
2. You can revise system password.
(1) Press the 0-9 number key on the remote control to input Old Password, the
default password is set as “0000”.
53
Page 54

(2) If the password is input correctly, the cursor can move onto Input New Password
option, press 0-9 number key on the remote control to input new 4-digit Password.
6.3
Date Time
Clock Menu contains different clock settings. Following menu layout shows the Time
Settings.
If the “Time Mode” is set to “Auto”, then “Time Zone” and “DST” shall be active for editing.
If the Mode is “Manual”, these options shall be disabled.
If the “Time Mode” is set to “Manual” then, “Date” and “Time” shall be active for edi tin g. If
the Mode is “Auto”, these options shall be disabl ed.
6.4
Factory Reset
It allows you to restore the unit to its default factory settings. When you select this option,
you will be asked to enter your password (or default password “0000”). Press OK to resume
the unit to factory default settings.
6.5
Upgrade
If you want to Upgrade the software, please contact supplier.
54
Page 55

Caution: Please don’t cut off the power when you are upgrading the software.
6.6
Version
Via menu (MENU->setting-> Version) to check the software version.
7 AUDIO / VIDEO Setting
Video output mode can change the mode of video output, you can adjust TV mode
according to the actual situation of you receiving equipment.
(2) Move the cursor to the corresponding option to be adjusted and press OK /
Right key to display the available settings, and then press UP/DOWN key to
move circularly and choose the desired option.
(3) Press OK key to save the settings.
7.1 Contrast
Contrast of the picture can be set from 0 to 24.
7.2 Brightness
Brightness of the picture can be set from 0 to 24.
7.3 Saturation
Saturation range of the picture can be set from 0 to 24.
7.4 Hue
Hue range of the picture can be set from -30 à +30.
55
Page 56

7.5 Aspect Ratio
Aspect Ratio can be set as 16:9, 4:3PanScan, 4:3LetterBox, Full screen.
7.6 Video Output
AV output m ode can change the mode of video output to adjust TV set according to
your connected device.
The available options are : RGB SCART or CVBS SCART
7.7 Video resolution
Below are the available options you can adjust under Video resolution : Auto Detect /
480p_60 / 480i_60 / 576p_50 / 576i_50 / 720p_60 / 720p_50 / 1080i_60 / 1080i_50 /
1080p_60 / 1080p_50
7.8 HDMI Audio
Below are the available options : HDMI Mute; HDMI PCM, HDMI RAW.
8 .Multi-Media
This product is compatible to play the M P3, JPEG and MPEG files. It can support only
the files displaying in the list and the file format this product is compatible with.
Insert USB external device into the USB port compatible of the decoder.
Press SOURCE key to enter into the Multi Media menu.
Press EXIT key to return to previously viewed TV program and exit the Multi Media
menu.
8.1
Media Selection Mode
Use the “LEFT” or “RIGHT” key to select the music / photo / movie…etc. playback
mode. Then press “OK” to enter the file list.
56
Page 57

8.2
Movie
8.2.1 Movie File Browser
This menu helps the user to select and play a movie from a list of movies that are stored in the
USB device.
Supported file formats are MPG, AVI, VOB, DAT, MKV, RM, WMV, TSF, QT.
Following menu layout shows the “Movie” menu.
8.2.2 Movie Playback
When the video is playing, the following information shall be displayed on OSD:
h. File name.
i. Tota l time and the current time for this playing file.
j. Play state of this video.
k. Progress bar.
l. File size and resolution of this video.
m. Repeat mode such as off/one/dir.
8.2.3 Go to Menu
Use the GOTO button of the Remote Control to switch to anytime time section of a
movie and start the playback. Press GOTO button again to exit.
8.2.4 Book Mark Menu
To keep a memory of the playback section of any multi-media file, and start the
playbac k at t hat par t i cu l ar ti m e at a ny time again. Press the MARK key on the remote
control to enter book mark menu. Press MARK key again to exit.
57
Page 58

8.3
Music
This menu helps the user to select and play a song from a list of songs that are stored in the
storage device. W MA, WAV, DTS, RA and MP3 format will be supported for playing.
When the music file is playing, the following information shall be displayed on OSD (see
below picture)
n. Equalizer information.
o. Total time for this playing file.
p. Play state of this music.
q. Progress bar.
r. Current number of this file in total file list.
s. File size, artist, album and genre.
58
Page 59

8.4
Recorder Manager
8.4.1 Recorder Manager Browser
To view the recorded TV programs stored in storage device.
8.4.2 Rename
In this menu the user can change the program’s name as they like.
8.5 Photo
To view all the photos stored in the storage device. Follow the instructions at the bottom of
the OSD screen.
To go to next picture, press Right navigation key. Press OK to see the picture on the screen.
To navigation keys , you can reverse the picture up, down, right, left.
Zoom function :
• press ZOOM key to enable & disable ZOOM function. During slide show, picture
will pause. Then use F.F. key to increase picture size (x2, x3, x4). Use F.R. key to
Zoom out.
8.6 E-Book(only reads *.TXT files)
59
Page 60

Please download the text file on the internet and save in your USB drive and insert to
device.
Press “OK” to enter to E-book on the screen and find text file in USB Drive and then you
can read the file on the screen.
8.7 Disc manager
You can - MOV E/COPY, RENAME, DELETE, DELETE ALL – which are stored in the USB
device. Please follow the OSD Hints to press the corresponding key of the remote controller.
60
Page 61

9. SPECIFICATIONS
Tuner
Input Connector
IEC 16902. Female
Input Frequency Range
UHF
Num of RF Inputs
1
Input impedance
75 ohm
RF output Connector
(bypass)IEC 16902 Male
Loop through
support
Demodulation
Standard
ETSI EN300 744
Guard interval Modes
1/32,1/16,1/8 Active Symbol duration
FEC Modes Rate
1/2,2/3,3/4,5/6,7/8
Carriers/Constellation
All modes supported including non hierarchical
Demodulation
COFDM(QPSK/QAM16/QAM64) 2K and 8K
Channel bandwidth
8 MHz
Video Decoder
Standard
ISO/IEC 13818-2 and ISO/IEC 14496-10
Transport stream
ISO/IEC 13818-1
Video decoding
MPEG-2 SD/HD (MP@ML and MP@HL), MPEG-4 H.264/AVC SD/HD
DivX 4.X ~ 5.X, AVI, VOB, MOV, MKV, TS, JPEG、BMP、PNG、GIF
Aspect ratio
4:3, 16:9
Audio Decoder
Standard
ISO/IEC13818-3 TR1011154
Audio decoding MPEG-1 and MPEG-2 Layer I & II, Dolby Digital Audio, WMA and HE-
AAC
Digital Audio
Dolby Digital (AC-3)
Stereo down-mixing to analog and digital audio outputs (including HDMI).
For digital outputs, L-PCM stereo encoding is provided
Sample rate
32 kHz, 22.1 kHz, 44.1 KHz , 48 kHz
Subtitles
Subtitle
DVB Subtitle
Accessories
Remote control unit
IR (38kHz) RC3 / other on request (38kHz)
User Manual
1 pcs
Power
AC input range
DC 5V 2A
Power consumption
< 6W
Standby consumption
< 0.5W
Weight
0.65 kgs
61
Page 62

10. TROUBLESHOOTING
The below table is a list of common problems that may occur with your receiver.
Fault
Possible Cause
Solution
Power on, but nothing display on
screen
Unit not turned on at mains
switch
Ensure power plug is plugged
into wall socket and switch is on.
TV picture drops out and the unit
displays “No signal”
Antenna is not properly
connected or you are in a bad
reception area
Tal k to your local TV antenna
technician about reception
problems in your area and
whether a new antenna would
benefit you.
Receiving digital TV but missing
some channels
Antenna is not properly
connected or you are in a bad
reception area
Talk to your local TV antenna
technician about reception
problems in your area and
whether a new antenna would
benefit you.
Remote is not working Batteries are flat or there is
interference
Try replacing batteries in the
remote and ensure that there is
no direct sunlight on the remote
or unit.
In order to fulfill ruling UNE EN-60065, we indicate that if the flexible wire is damaged, it can
only be substituted by a technical service recognized by NEVIR, S.A., as per special tooling is
required.
62
Page 63

DECLARACIÓN DE CONFORMIDAD
NEVIR, S.A. declara bajo su responsabilidad que el aparato indicado cumple los requisitos
de las siguientes directivas:
EMC DIRECTIVE 2004/108/EC LOW VOLTAGE DIRECT IVE 2006/95/EC
EN 55013:2001 +A1:2003+A2:2006 EN60065:2002+A1:2006+A11:2008
EN 61000-3-2: 2006
EN 61000-3-3:1995+A1:2001+A2:2005
EN 55020:2007
Descripción del aparato:
NVR-2503DSUGHD Sintonizador Digital Terrestre Alta Definición con USB Grabador
Import: NEVIR S.A.
Dirección de importador:
Nevir S.A.
C/ Canteros, 14
Parque Empresarial Puerta de Madrid
28830 San Fernando de Henares - Madrid
63
 Loading...