

Page 1
※ GUI or functions in the manual may differ depending on the software version.
※ Due to the format-free feature the device has, past video clips can be played back through general media players depending on file size.
※ Due to the format-free feature the device has, some settings of memory card can be restricted.
(e.g. intervals for recordings, image quality and etc.)
※ Due to the format-free feature the device has, memory card efficiency may be affected.
※ The Qvia application can be found on the Google Play Store and the App Store.
※ The Qvia application can be used with Android 4.0 or later, iOS 5.0 or later.
※ Content of this manual regarding Qvia Application may differ from the one installed depending on the application version or the model of the device.
※ Wi-Fi connection could be interrupted depending on wireless environment and/or type of smartphone.
※ Recorded videos will be saved as ‘Normal video quality’ when Wi-Fi is connected.
2CH DASHCAM
Installation Guide ver. 1.0
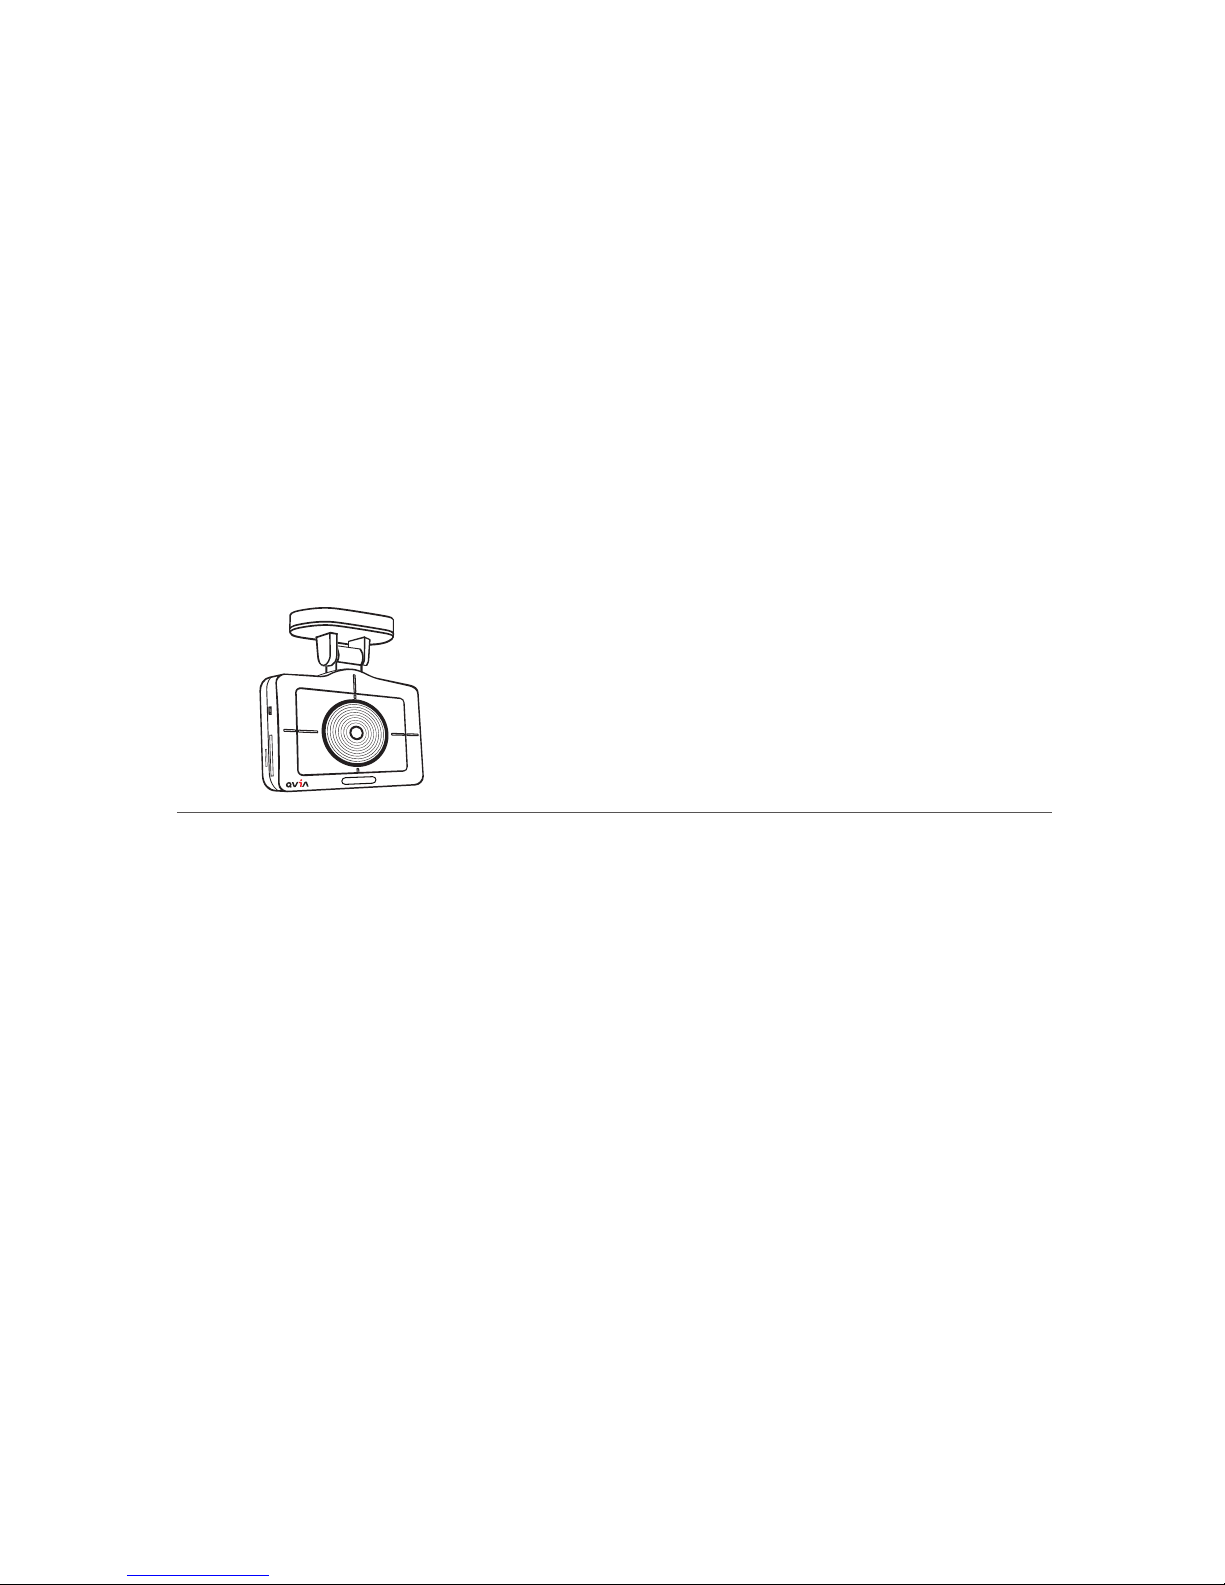
QVIA Dash Cam
R975
Page 2

Thank you for purchasing QVIA Dash Camera.
This manual is for the users of the R975 model.
There may be some technical & editorial errors and omissions.
You can download the latest and updated manual & firmware at our website www.qvia1.com.
▒
Read carefully before using this product
▒
▒
Scope of guarantee and responsibility
▒
※ This device is an equipment for recording videos and sounds to provide visual proof of a vehicular accident, but we do not guarantee that it will
record all accident videos and sounds
.
※ We will not be held responsible for any damages caused by malfunction of this device, data loss, or other damages related to this device
※ In general, the memory card lifespan is about 6 months and there may be data loss due to static electricity or external voltage existing in the
surrounding environment. For this reason, it is highly recommended to copy and save important data to other media devices.
(hard disk, CD, portable memory etc.)
※ Although this device comes with a format-free feature, the memory card(s) may obtain corrupted videos (omissions in recording,
image cuts, omissions due to changes in frame rates, & other recording defects) due to a decrease in reading/writing speed. For the best
results, please use a genuine Qvia SD card and format it on a regular basis (once a month for 8G SD and microSD cards).
※
This device is an auxiliary device to record driving videos. Please use this device for reference purposes only.
There may be times when recording is unstable due to various driving conditions.
※ This manual should be reviewed and retained for future reference.
※ Qrontech reserves all rights to this manual in accordance with the copyright law.
※ Content of this manual is subject to change without notice to ensure quality control.
※ Device functionality may differ depending on firmware versions.
※ This device was designed as a guide for safe driving. In the event of an accident, the driver must take full responsibility.
Please use this device accordingly.
※ We will not be held responsible for any damages related to engine output if the user chooses to record in parking mode without any extra
external battery.
Page 3

CONTENTS
Instructions For Use
1-1. Precautions and Notices
1-2. Installation
1-3. GPS
1-4. Memory Card
‥‥‥‥‥‥‥‥‥‥‥
‥‥‥‥‥‥‥‥‥‥‥‥‥‥‥‥‥
‥‥‥‥‥‥‥‥‥‥‥‥‥‥‥‥‥‥‥‥
‥‥‥‥‥‥‥‥‥‥‥‥‥‥‥
4
6
6
7
Components
3-1. Package Guide
3-2. Names & Functions of Each Part
‥‥‥‥‥‥‥‥‥‥‥‥‥‥‥
‥‥‥‥‥‥1011
Installation
‥‥‥‥‥‥‥‥‥‥‥‥‥‥‥‥‥
‥‥‥
‥
‥‥‥‥‥‥‥
‥‥‥
‥‥‥‥‥‥‥‥‥‥‥‥‥‥‥
‥‥‥‥‥‥‥‥‥‥‥‥
4-1. Precautions
4-2. Step-by-Step Installation
4-3. How to Hardwire Continuous Power Cable
4-4. Camera Angle
4-5. Memory Card Usage
12
12
14
15
16
Features
‥‥‥‥‥‥‥‥‥‥‥‥‥‥‥‥‥‥ 8
1.
2.
3.
4.
Product Usage
5-1. Basic Operation Guide
5-2. Starting the Device
5-3. Video Playback
5-4. Live View
5-5. Setting
5-6. Card Format
5-7. Time Setting
5-8. User Guide
5-9. OBD II
5-10. Getting Started with the Qvia App
5-11. Connecting th the Qvia App
5-12. How to Use Qvia App
5-13. How to Upgrade Firmware on Qvia App
5-14. Qvia Viewer
‥‥‥‥‥‥‥‥‥‥‥
‥‥‥‥‥‥‥‥‥‥‥
‥‥‥‥‥‥‥‥‥‥‥‥‥
‥‥‥‥‥‥‥‥‥‥‥‥‥‥‥‥
‥‥‥‥‥‥‥‥‥‥‥‥‥‥‥‥‥‥
‥‥‥‥‥‥‥‥‥‥‥‥‥‥‥
‥‥‥‥‥‥‥‥‥‥‥‥‥‥‥
‥‥‥‥‥‥‥‥‥‥‥‥‥‥‥‥‥
‥‥‥‥‥‥‥‥‥‥‥‥‥‥‥‥‥‥
‥‥‥‥‥
‥‥‥‥‥‥
‥‥‥‥‥‥‥‥‥‥
‥‥
‥‥‥‥‥‥‥‥‥‥‥‥‥‥
17
20
22
23
24
31
32
33
34
35
35
36
36
40
5.
Specification & Customer Service
6-1. Specifications
6-2. Quality Assurance
‥‥‥‥‥‥‥‥‥‥‥‥‥‥‥
‥‥‥‥‥‥‥‥‥‥‥‥4445
6.
Page 4

1. Instructions For Use
4 ... DASH CAM
▒
1-1. Precautions and Notices
▒
1. Do not expose the device to direct sunlight or cold weather for extended periods of time.
Direct exposures to sunlight and extreme temperatures may damage the device. When not in use, storage temperatures should also be considered.
Note that colors of UV filter or exterior of the device may change if exposed to harsh sunlight for a prolonged period of time.
2. Do not attempt to service the device.
Do not attempt to disassemble, modify, or repair the device. Warranty cover will be void if a repair has been attempted by the user or anyone
unauthorized.
3. Do not dismantle or alter the device accessories.
Modifying or cutting power cable can lead to damages to the device or the vehicle. We are not reponsible for any damages caused by such
modifications.
4. Do not expose the device to liquids.
Please note this device is not waterproof and exposure to liquids and foreign substances may cause malfunction, short circuit, and/or fire.
Be cautious when cleaning the device using a soft and dry cloth.
5. Do not expose the device to heavy impacts.
Excessive impacts to this device can cause a malfunction. Handle the device with care.
6. Only use manufacturer-approved power cable and accessories.
Any damages to the device/vehicle incurred as a result of using accessories incompatible with the device will not be covered under manufactures
warranty.
7. Do not operate the device for extended periods of time while the vehicle is not running.
Excessive use of the device while vehicle is off can cause drainage to the vehicle’s battery.
8. Extreme changes in lighting conditions can affect video quality.
Video quality can be affected in extreme dark/light areas and conditions. Most notability when entering/exiting a tunnel or parking garage.
9. Data may not be recorded if an impact detected is too subtle
In extreme cases, the device may not record data during an accident due to possible low impact forces. In addition, a high force impact may
disrupt power to the device and data may be lost.
Page 5
User's Manual ... 5
10.
11.
Do not disconnect the power source while the device is turned-on.
Disconnecting the power source may cause the device to malfunction. Please use only the recommended voltage for power connection.
Please adjust the angles of both front and rear camera lens if AE operation malfunctions.
The camera cannot be connected via Wi-Fi more than one device at the same time.
12.
Some PCs may not support Qvia Viewer or there may be some disconnections in voice/image depending on the PC’s specifications.
13.
AE operations at night may vary depending on the color of the vehicle(black, red) reflecting less light.
15.
14.
There may be frame omissions due to rapid AE operational changes in low light areas. Please adjust the angle of the camera lens if AE
operation malfunction.
Videos may contain noises if rrecorded in poor lighting environments.
In the event of a sudden frame change or switching between parking & driving modes, there may be a loss of data.
Motion detectors may malfunction in the event of extreme changes in lighting conditions surrounding the vehicle.
The motion detection function may not operate properly when parking in environments with poor lighting due to noise and vehicle security LED(s).
The left and right side of video footage may differ in quality due to characteristics of the wide-angle lens.
Traffic lights may appear to be flickering due to its location or signal frequency.
16.
17.
18.
19.
This device supports OBD Ⅱ, but users are recommended to inquire of distributor or customer center about applicable vehicle, model and
more detailed information before use. (Software/hardware modification).
20.
21.
22.
Please ensure all accessories are connected to the device(s) to avoid data loss.
23.
For playback of recorded videos using Wi-Fi, Wi-Fi signal may vary according to the transmission power and the types of smartphones.
24.
The range of Wi-Fi signal may vary.
25.
If you suspect any malfunction, stop using the device and contact our CS center or your local distributor.26.
We will not be held responsible for any damages related to engine output if user records in parking mode without any extra external battery.
Page 6

▒
1-2. Installation
▒
▒
1-3. GPS
▒
1. A typical GPS receiver achieves an accuracy of 15 meters. There may be conditions where GPS signals cannot be received depending on the
driving environments such as tunnels, underpasses,skyscrapers,and street lights which affect the accuracy level.
2. It may take some time to receive GPS signal for the first time after power is turned on depending on the weather or other factors.
3. External devices (electronic, toll device) and window tinting may affect GPS reception.
4. Driving speed may vary (range of 1-30 km/h) depending on where the vehicle is parked.
5. GPS information may be lost if the device is turned off.
6. Time errors can occur if the device does not have GPS.
6 ... DASH CAM
1. Keep the surrounding of the device clear.
Please ensure the surrounding area is clutter-free, specially on the dashboard to avoid reflections in the windshield that may reduce the
video/audio quality.
2. Ensure camera lens are clean at all times.
3. Do not attempt to operate or install the device while driving.
For your safety, do not attempt to operate or install the device while driving to avoid possible accidents.
4. Please keep the device securely mounted at all times.
Improper installation of the device can result in a fall or malfunction, which can lead to breakdown or driving inturruption.
5. Video footage can be blurry or distorted in a vehicle excessively tinted windshield glass.
6. Install this device at the point as furthest away from other antenna or receiver as possible.
The electromagnetic waves produced by other devices may interfere with GPS signals.
7. Videos may appear dark when using a CPL filter.
We don’t recommend using a CPL filter at night or with vehicles with excessive window tints.
Depending on tinting conditions, a 'rainbow effect' may appear on recorded data.
8. Please remove the UV filter when using a CPL filter.
Page 7
▒
1-4. Memory Card
▒
1. Do not remove the memory cards by force while the device is in recording mode.
Be sure to turn off the device before removing the memory cards. Removing the cards with the device running may damage the video file or
cause an operational error of the memory cards.
2. Formatting SD card and microSD once a month at minimum (8G) is recommended.
Repetitive writing and deleting of memory cards can cause damage to the the cards themselves as well as the files stored in them. Therefore, periodic
formatting can prevent the cards or files from such damages. In addition, the longest lifespan of a memory card is 6 months and the manufacturer
is not responsible for recording problems that take place due to prolonged use of a memory card past the lifespan.
4. Handle with care when inserting and removing memory cards to avoid burns.
The memory cards operate at very high temperatures, so you must be careful of handling the cards.
3. Use memory cards supplied by the manufacturer.
We shall not be responsible for any problems caused by using memory cards not provided by the manufacturer.
5. Operating temperatures may vary depending on the performance of memory cards.
6. Be sure to backup your recorded videos using an extra storage device. (PC, external HDD, etc.).
A backup of the memory card data using an external storage device can prevent the loss of important data.
7. Be sure to format the SD card when changing mode setting on Qvia viewer.
8.
9.
10.
After formatting memory card, the latest settings will be automatically applied to the device. No firmware or configuration file is required.
As the latest set value is saved on the device, it is automatically applied to the formatted memory card.
Please format memory cards without removing it from the device. You can format them on the formatting menu right from the device.
Be sure to insert microSD card into the device.
11. Do not insert the microSD card into the SD card slot using a microSD card adaptor. It may cause malfunction or damages.
12. This model has a format-free feature. Malfunctions may occur if unsupported files are copied to, moved or deleted from the memory card(s).
13. When formatting on a PC, we recommend that users opt for a full format option rather than quick format option.
Without microSD card, event recordings cannot be saved.
User's Manual ... 7
Page 8

▶ Supports a variety of recording functions
Distortion-free recording with wide angle lens▶
▶
4-inch LCD(800X480) + Full Touch, IPS Panel
Equipped with car battery discharge prevention function
▶
▶
Front view dash cam : CMOS Sony Exmor R IMX291 Full HD dedicated sensor
Rear view dash cam : CMOS Sony Exmor IMX322 Full HD dedicated sensor
Multi-booting support (ON - ACC - OFF)
Leakage current 100uA or less
Front view : 1920X1080p Full HD recording, wide screen at max. 30fps
Rear view : 1920x1080p Full HD recording, at max. 24fps
Supports a variety of recording functions
Supports maximum memory capacity of 1,024G
Supports voice guidance in 21 languages (English, Korean, Russian, Chinese, French, European Spanish, Latin America Spanish, Arabic,
Japanese, Thai, Vietnamese, German, Mogolian, Turkish, Italian, Hindi, Czech, Cantonese,
Portuguese, Bahasa Indonesia, Bahasa Melayu)
- Continuous recording: continuously records 3-minute videos
- Event recording: records before/after impact occurs for 30 seconds in total
-
Dual Slot (SD + microSD). Dual Save (Always+Event/ Motion+Event)
▶
Supports Dual Security LED
▶
Supports Integrated GPS (optional)
▶
Stores 2 million driving information data
▶
▶
2. Features
8 ... DASH CAM
▶
Supports Wi-Fi (802.11b/g/n (2.4~2.4835GHz))
Page 9
Parking alert function
Catalogues the number of motions and events during parking mode recording (optional in configuration setting)
▶
▶
Built-in super capacitor
An internal battery replacement is not necessary due to a built-in semi-permanent super capacitor which will write all files onto the SD card(s)
before the device turns off
▶
Direct memory card format
Able to format the memory card(s) directly from the device (refer to 31 page)
▶
Built-in microphone
Records audio simultaneously
▶
Firmware upgrade support
Firmware will be upgraded for improvement of performance and fixing errors.
▶
Video playback
Videos can be viewed from the PC & Mac using Qvia Viewer and other media players. Or simply, it can be viewed on the LCD screen of the device
▶ Configuration setting available
Users are able to customize the device settings and a variety of functions including customized recording, directly from Qvia Viewer or by using the
device settings menu
User's Manual ... 9
UV filter(included), CPL Filter(optional)
▶
Operating temperature: -20℃~ 70℃(highest temp. for models with LCD)
▶
Detachable fixed/rotating mounts
▶
No interruption with rear window sunshade by minimizing the height of rear view camera
▶
Supports OBD II (optional)
▶
Page 10
3. Components
▒
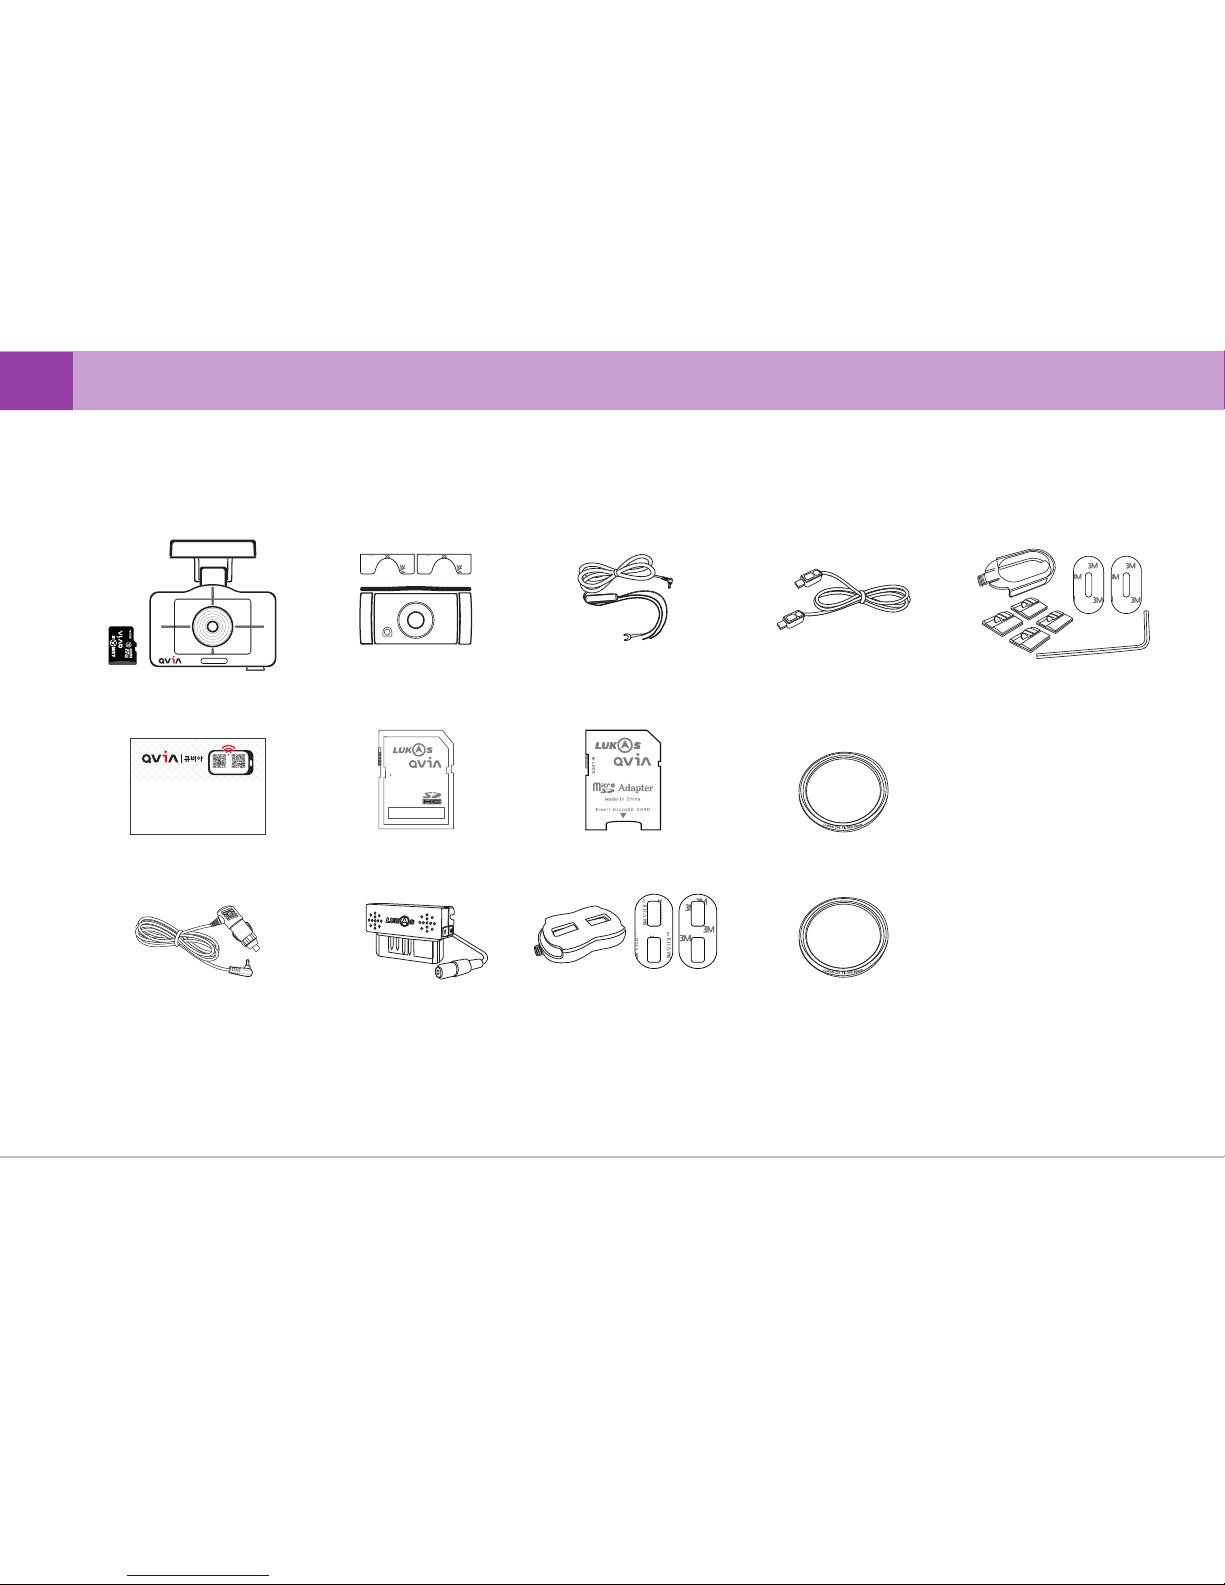
3-1. Package Guide
▒
10 ... DASH CAM
Hard wire power cable Front/rear connection cable
microSD Card adapter SD CardUser's Guide
Cigar cable (optional)
Rear view camera
adhesive tape
OBD II (optional)
Fixed type bracket set
Rotating type bracket set
(optional)
Front Camera
(microSD card 8GB )
- Please handle the components with care.
- The package is subject to change depending on different models and types. (Hard wire power cable is not included in type D).
- Be sure to use genuine components provided by the manufacturer.
- Do not use microSD card adaptor in the device or it may malfunction.
CPL Filter (Optional)
UV Filter
※ 본 설명서는 정부시책에 따른 포켓 설명서이며, 전체 설명서는 큐비아 홈페이지에서 다운로드할 수 있습니다.
※ 본 설명서는 R975를 기준으로 작성되었습니다.
※ SD카드와 micro SD카드는 최소한 한 달에 한 번(8G 기준) 포맷하시기를 권장합니다.
※ 본 제품은 포맷 프리 적용 제품으로, 일반 플레이어(다음팟, 곰플레이어 등)로 재생할 경우 녹화 파일의 크기에 따라 과거 파일이 재생될 수 있습니다.
※ 본 제품은 포맷 프리 적용 제품으로, 일부 메모리 카드 설정이 제한됩니다. (예 : 저장 간격 시간, 전 . 후방 영상 품질, 상시 . 동작감지 영상 저장 공간 비율 등)
※ 본 제품은 포맷 프리 적용 제품으로, 메모리 카드 사용 효율이 낮아질 수 있습니다.
※ 큐비아 애플리케이션은 구글 플레이스토어와 애플 APP스토어에서 다운로드 받을 수 있습니다.
※ 큐비아 애플리케이션은 Android 4.0이상, iOS 5.0이상에서 사용할 수 있습니다.
※ 무선 환경과 스마트폰 기종에 따라 와이파이 연결이 불안정하거나 끊길 수 있습니다.
※ 본 매뉴얼의 큐비아 애플리케이션에 대한 내용은 해당 버전 및 제품의 타입에 따라 실제와 다를 수 있습니다.
※ 당사는 주차 중 녹화를 권장하지 않습니다. 주차 중 녹화를 원하시는 경우에는 보조 배터리 설치를 권장하여드리며, 보조배터리 없이 주차 녹화 중
발
생하는 배터리 방전 등 차량 손상에 대해서 어떤 책임도 지지 않습니다.
※ 블랙박스는 쓰기와 지우기를 반복함으로 인해 메모리카드 및 파일이 손상될 수 있습니다. 따라서 주기적으로 포맷을 해주면 메모리카드 및 파일 손상을
방지할 수 있습니다. 메모리카드의 보증기간은 6개월이며, 보증기간이 지난 메모리카드를 계속 사용하여 발생되는 녹화 오류에 대해서는 당사에 책임이
없습니다.
FHD+FHD 2채널 Wi-Fi 블랙박스
통합 포켓 설명서 Ver. 1
[구글 플레이스토어에서
APP 다운로드]
[애플 APP스토어에서
APP 다운로드]
LOCK
Page 11
▒
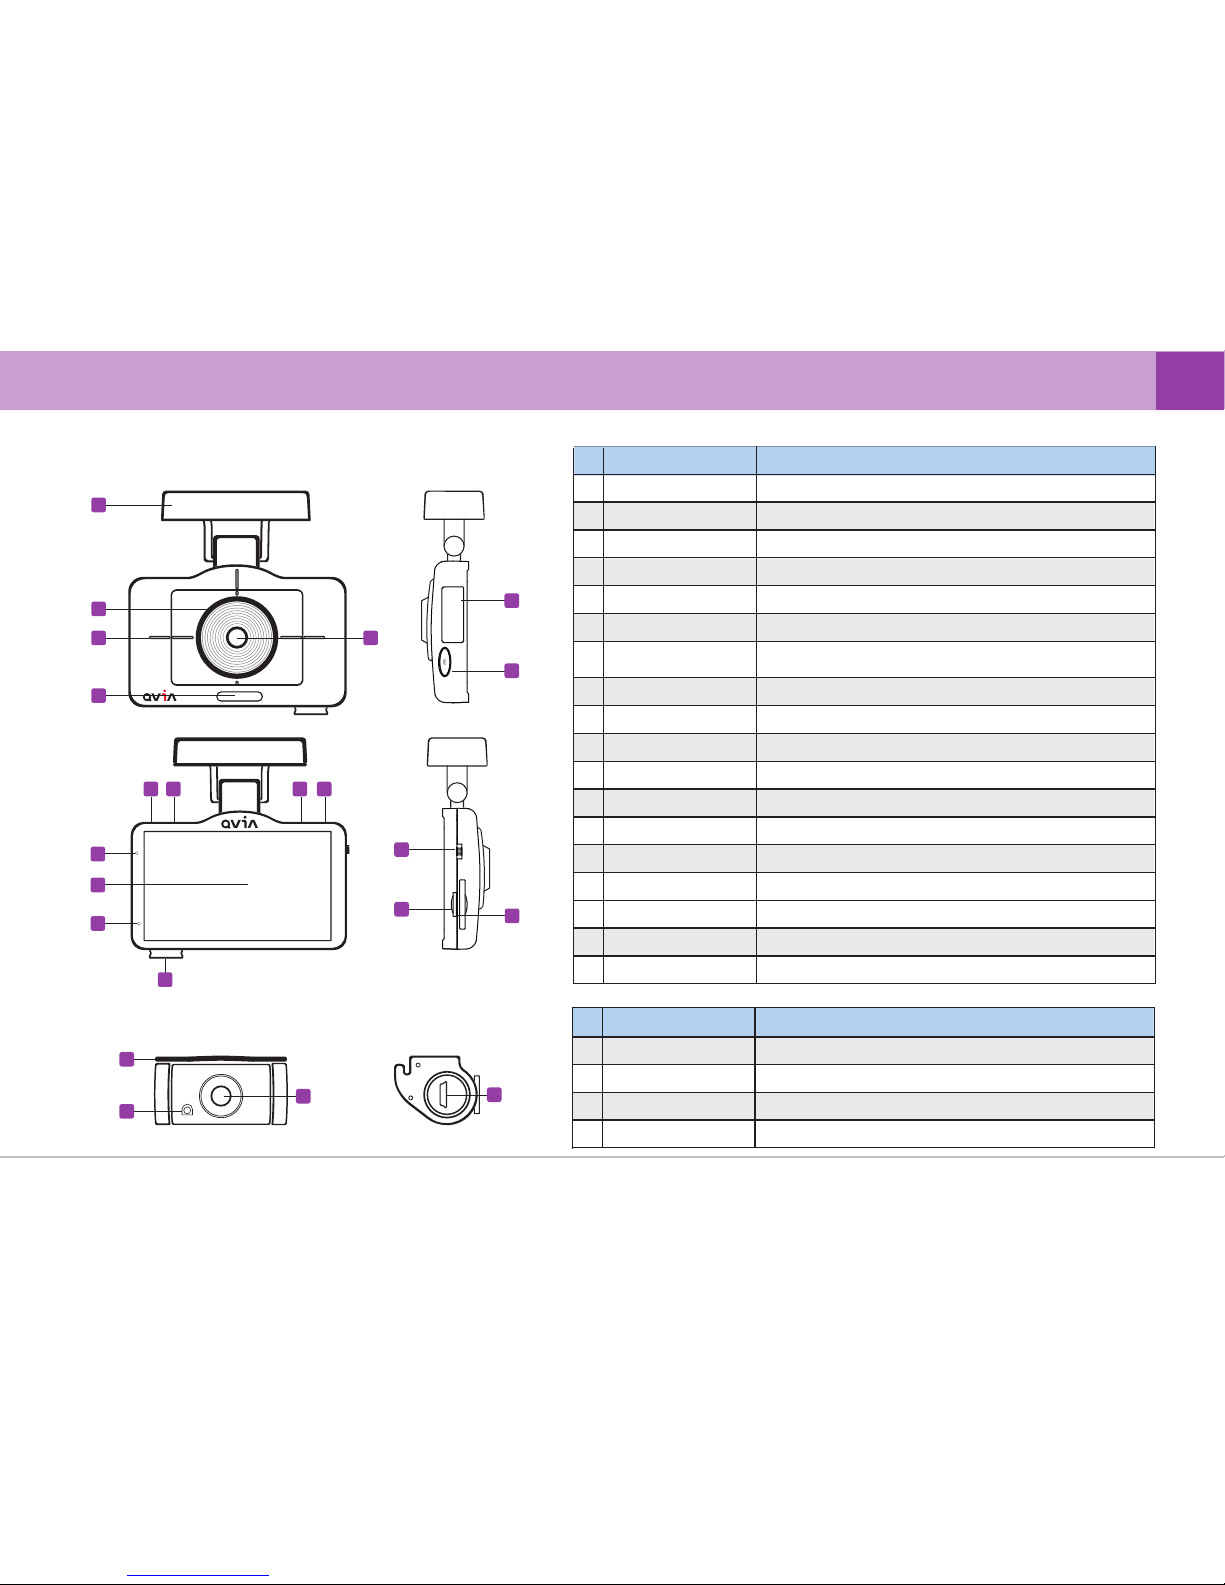
3-2. Names & Functions of Each Part
▒
User's Guide ... 11
Function
1
Allows rear view camera to be mounted on vehicle
2
Displays dash cam operation status, gives warning
3
Rear view cable connection terminal
4
Name
Rear Stand
Security LED
Cable Connection
Camera Lens Video signal input
3
1
2
4
1
2
3
4
12
13
14
15
5
8 9 10 11
16
17
18
7
6
OBD DC-IN TS-IN CAM-IN
MIC
ON
ACC
OFF
SD
CARD
Name Function
1
Installed into vehicle & receives GPS info(only applies to device with GPS stand)
2
3
4
5
7
6
9
10
8
12
13
11
14
16
17
18
Stand & GPS(Built-In)
15
Video signal input (CMOS Digital Sensor)
Protects lens from sunlight and lengthen life of camera sensor
Camera Lens
37mm UV Filter
Voice signal input
Displays driving video and video being recorded. Set configuration settings
Displays dash cam operation status etc.
Dash cam power supply switch
Used to insert/remove microSD card
Used to insert/remove SD card
Manual recording when necessary
(generate 30 second file in event folder)
Product name & product serial number
Rear camera input connection
OBD connection (Only for type D model)
Turn signal input connection (Only for ADAS model)
MIC
LCD & Touch
Wi-Fi DongleWi-Fi
Operation Status LED
Power Switch
microSD Slot
SD Slot
Emergency Recording
(E) Button
S/N Label
CAM-IN
OBD
DC-IN
Speaker Audio signal output
Security LED Displays dash cam operating status, gives warning
Supplies power to dash cam through power connection
TS-IN
Page 12
4. Installation
▒
4-1.
Pre
cautions ▒
▒
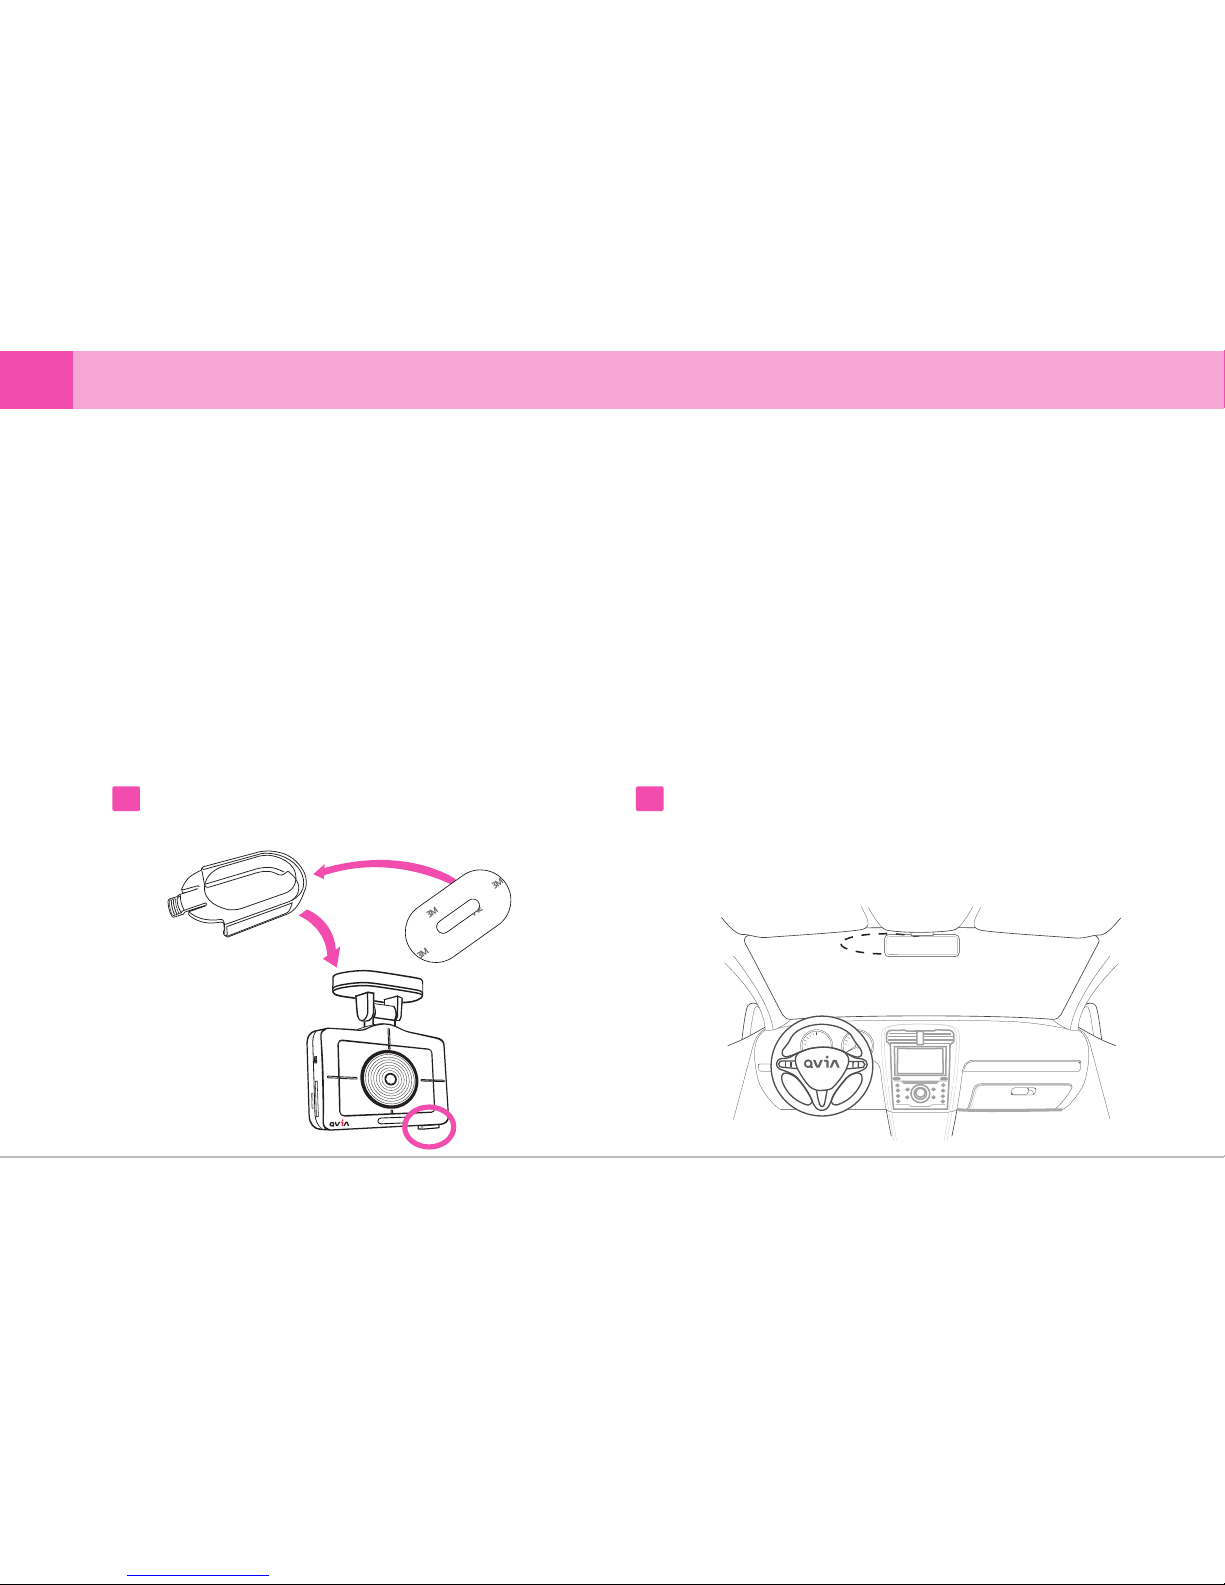
4-2. Step-by-Step Installation
▒
1 2
①
②
Apply double-sided adhesive tape on front/rear stand of the device.
Make sure Wi-Fi dongle is inserted into the device. (Front cam)
12 ... DASH CAM
※ Before installation, park your vehicle on flat ground where there is some light.
Turn off the engine and remove the key. (Be sure parking brake is ON)
※ Pick a spot for the device on the rear view mirror not blocking the driver's vision.
※ Do not install the device with the lens facing upwards or it may cause weak GPS signals and/or continuous recording in event mode.
※ Clean the windshield where the device will be installed.
※ Adjust camera lens angle, so that it shows approximately 40% of the car bonnet on the bottom of the LCD screen.
- If the lens is installed excessively facing downwards, traffic signs will not be recorded, keeping you from retrieving exact information.
When the lens is installed facing too high, the screen looks dark overall due to the bright sky.
Select a spot not blocking the driver's vision. Then, attach front camera
to the windshield glass around the rear view mirror.
Do the same with the rear camera onto the rear windshield.
※ Detaching and reattaching the adhesive tape causes the tape to
lose its stickiness.
Page 13
OBD DC-IN TS-IN CAM-IN
MIC
ON
ACC
OFF
SD
CARD
▒
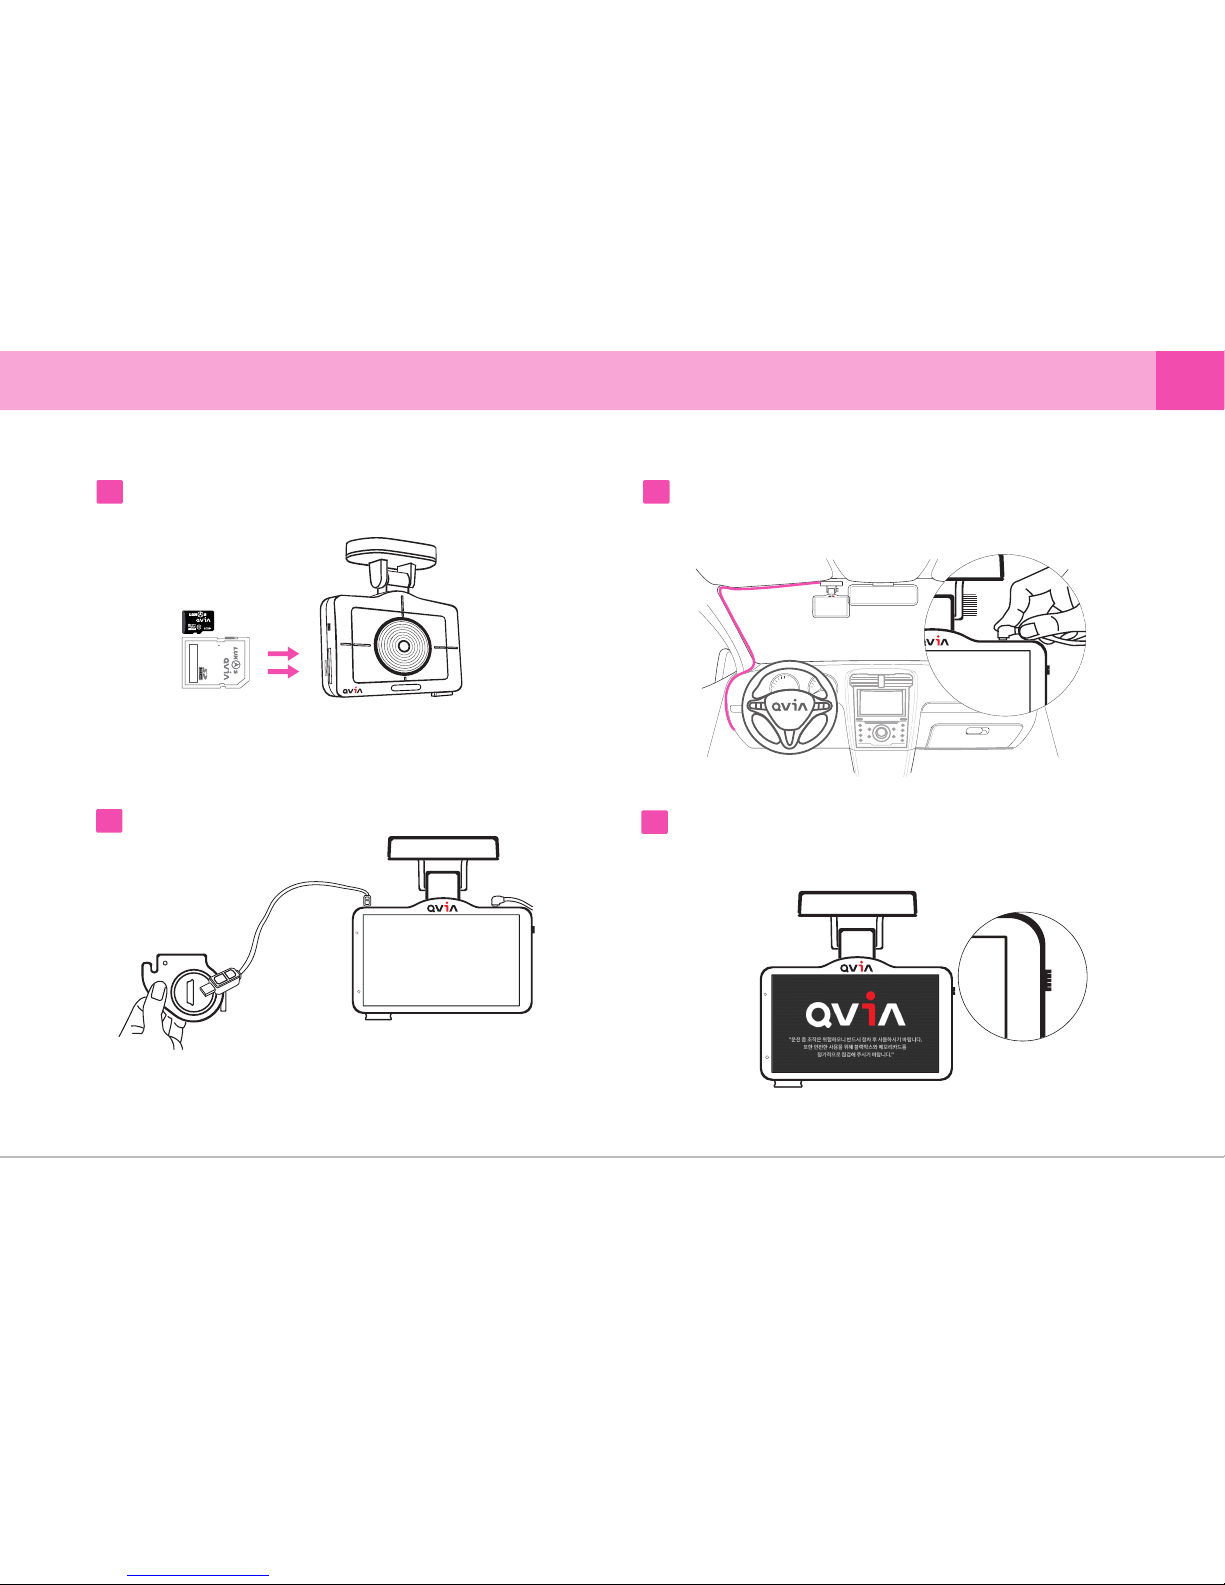
4-2. Step-by-Step Installation
▒
※
Do not insert the microSD card into the SD card slot using the microSD
card adaptor. It may cause malfunction or be damaged.
3 4
Insert SD card and microSD card into front camera.
After connecting power cable to the front camera, run the power cable
along the windshield headliner all the way to the driver side A-pillar trim.
(as shown in the picture colored pink.)
※ If you do not insert microSD, event files are not saved.
5
6
Connect front camera and rear camera with front/rear
connection cable.
After installation, turn on the engine first followed by switching on the
power button(ACC or ON) of the device. Check if the device turns on
and works properly by examining the LCD screen.
User's Manual ... 13
※ If there is no SD card, the device will not work.
※ The device is rebooted when the rear camera connection cable gets
plugged or unplugged in the main body.
※ The device does not work properly if the rear connection cable is not firmly
connected to the rear camera.
※ Make sure the device is turned OFF when connecting/disconnecting
the power cable of the rear camera. Otherwise, damage may be done
to the device.
CAM-IN GPS-IN DC-IN OBD
MIC
ON
ACC
OFF
SD/
MICRO SD
CAM-IN
ON
ACC
OFF
LOCK
ON
ACC
OFF
OBD DC-IN TS-IN CAM-IN
MIC
ON
ACC
OFF
SD
CARD
Page 14
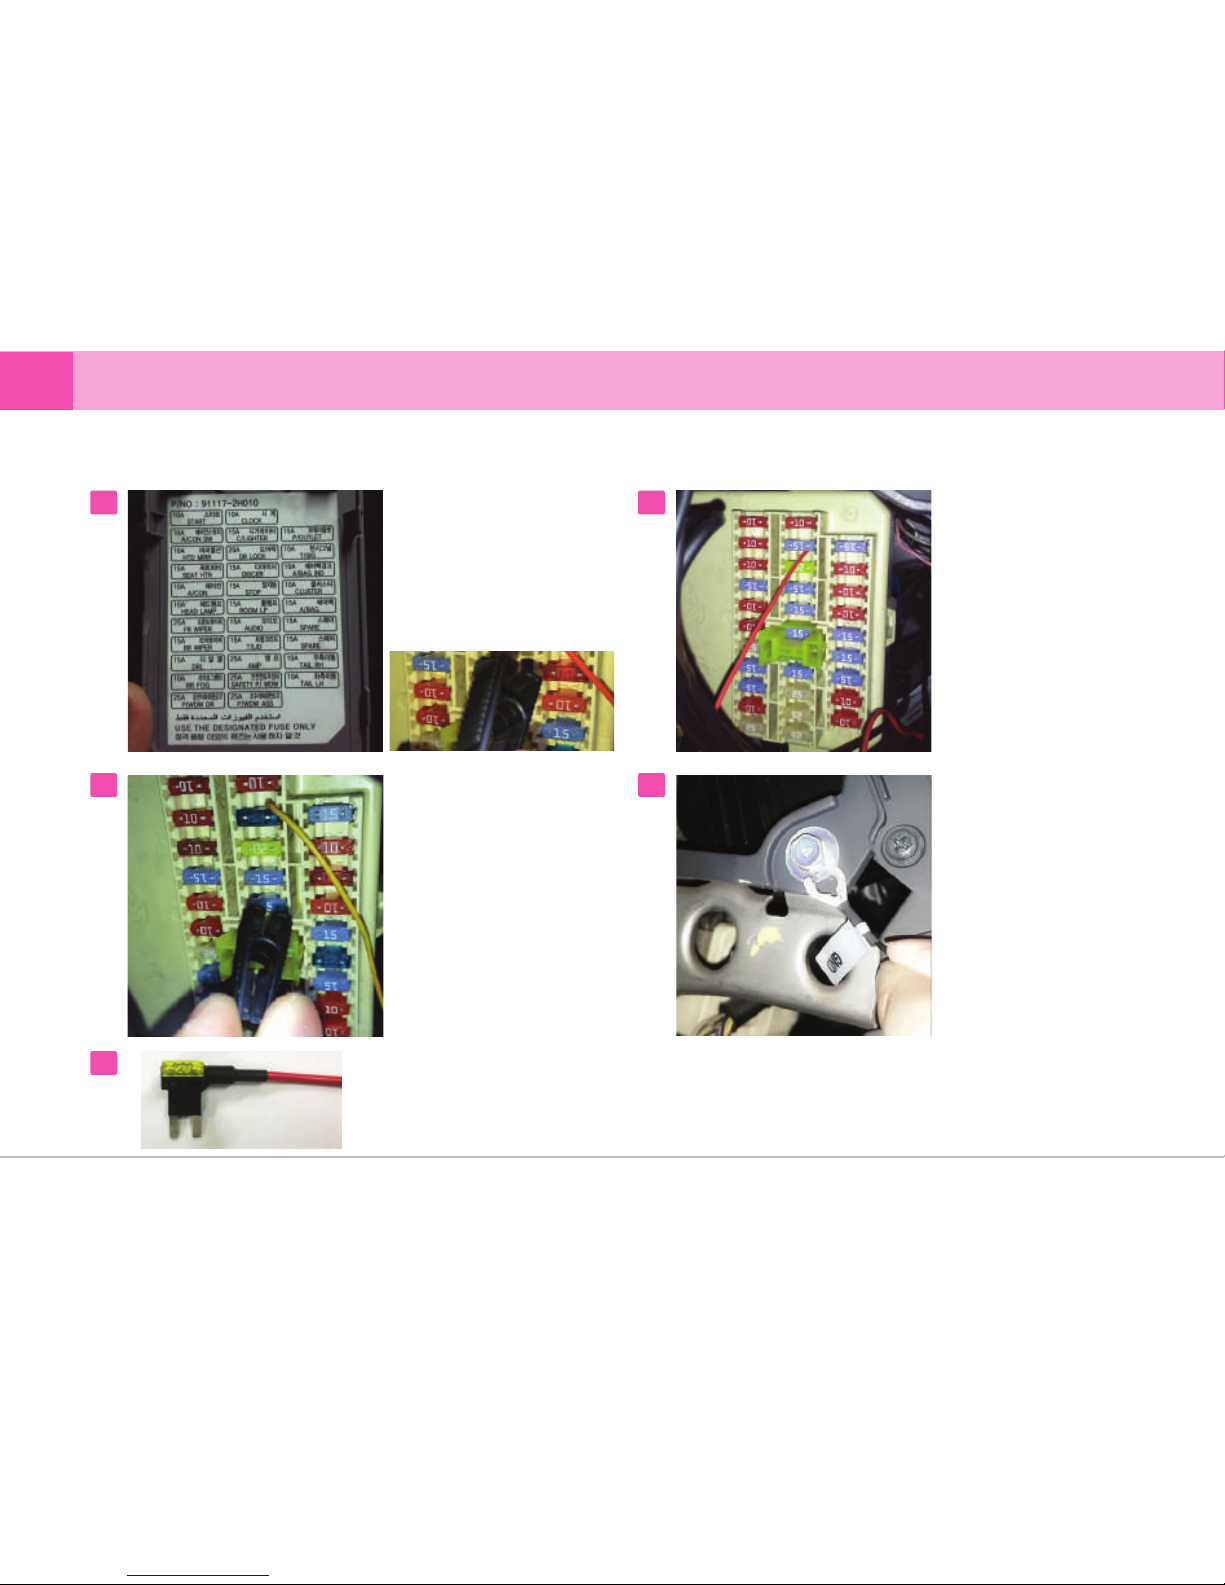
▒
4-3. How to Hardwire Continuous Power Cable
▒
1 2
3 4
Identify a fuse that has no power
(e.g. cigarette lighter, audio etc.) to
connect with the red ACC wire and
insert it back to fuse box.
※ Location of ACC power supply
may differ depending on the vehicle.
※ Please connect the ACC wire to
the output terminal. If wired the
other way around, there is a risk
of fire.
Identify a fuse that has power
(e.g. emergency lamp, indoor
lamp, tall lamp etc.) to connect
with the yellow B+ wire and insert
it back to fuse box.
※ Location of B+ may differ depending
on the vehicle.
※ Please connect the ACC wire to
the output terminal. If wired the
other way around, there is a risk
of fire.
Connect the black GND terminal to a
grounding source.
(e.g. metal component)
14 ... DASH CAM
If the power cable is improperly hard-wired, the device will not function properly.
We recommend that users use a dual fuse holder as seen in the adjacent photo to make the process easier.
※
Before you open or work on a fuse
box, be sure that your vehicle’s
ignition is turned off. Then, locate the
fuse box and the chart that shows
you what each fuse is for. Choose
where to wire the continuous power
cord and the ACC wire.
※ Use fuse tongs to easily insert
and remove individual fuses.
Page 15
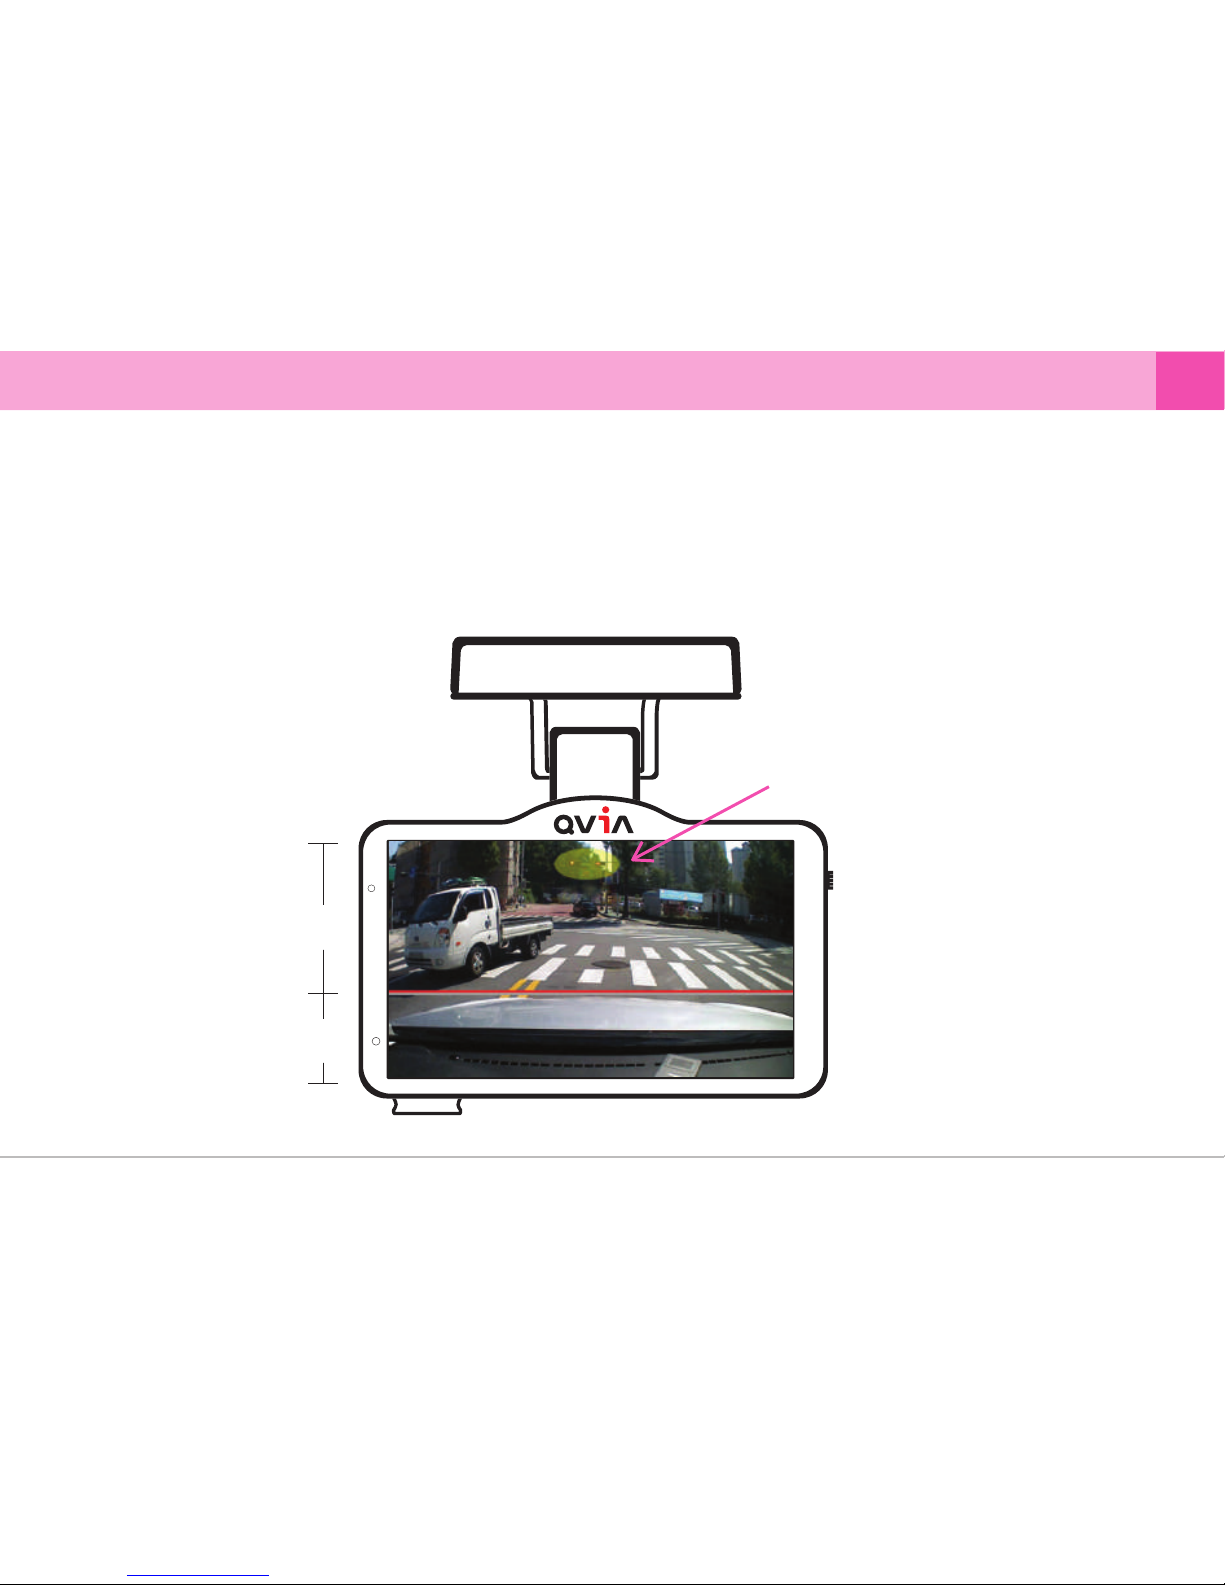
▒
4-4. Camera Angle
▒
▶
▶
Users can adjust preferred viewing angle easily while viewing the LCD screen.
Adjust camera lens angle to display approximately 40% of the vehicle hood(bonnet) on the LCD screen as shown below.
※
If the lens is facing too low, it may not record traffic lights. On the contrary, lens facing high up may darken video footage.
OBD DC-IN TS-IN CAM-IN
MIC
ON
ACC
OFF
SD
CARD
Traffic Lights
Moving
image
60%
Still
image
40%
User's Manual ... 15
Page 16
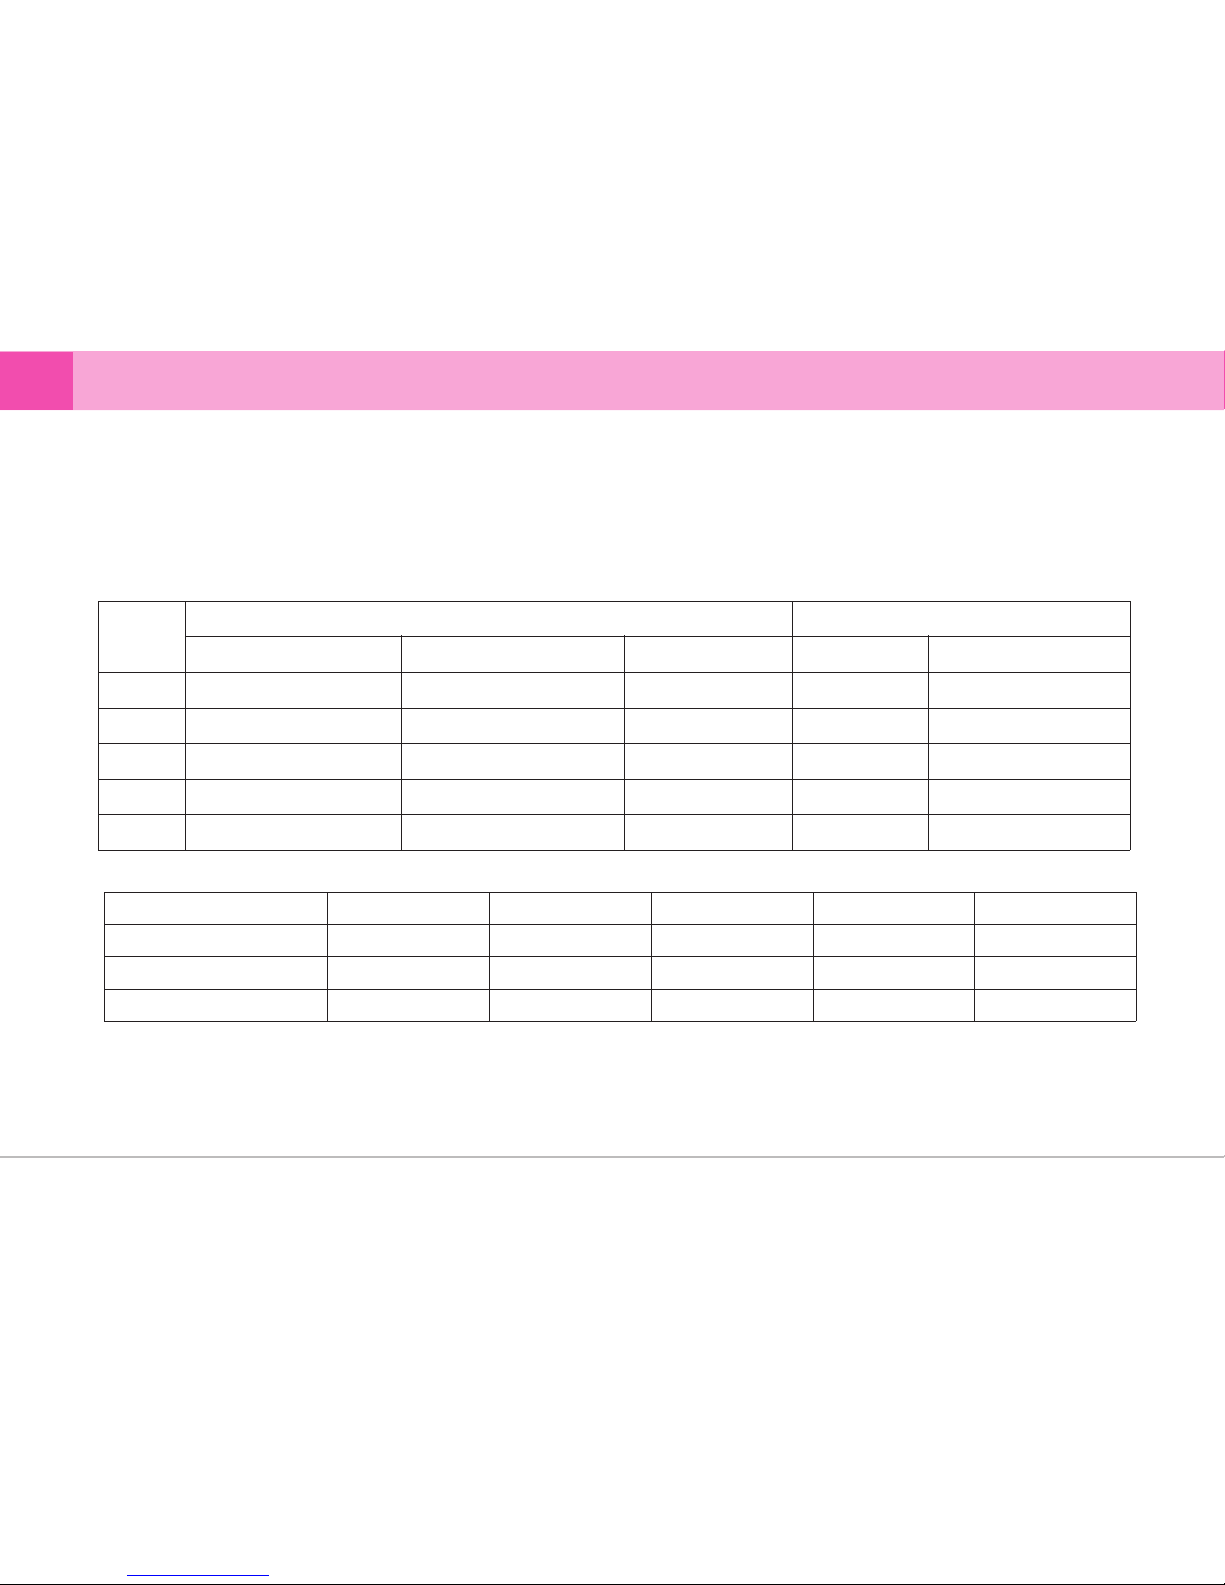
▒
4-5. Memory Card Usage
▒
- Video is recorded at 3-minute interval for continuous recording, 30-second interval for motion and event recording.
- The below table is based on the SD Card setting which is set to the following proportional storage assignment for different recording modes:
continuous 70% and motion detection 30%
※ Front and rear motion detection files are stored separately.
※ The total usage time above is an approximation. There may be some variation with actual recording time and the number of files stored
depending on the user's environment.
※ The above 'Total usage time' is calculated by adding the recording times of front/rear videos.
(Videos for the front and rear cameras are saved separately.)
16 ... DASH CAM
1. SD card usage time
2. microSD card usage time (event recording)
16G
Continuous recording
Total usage time Total no. of files Total usage time
30 / 1h 30min 3h 110 55min
60 / 3h 6h 224 1h 52min
120 / 6h 12h 448 3h 44min
249 / 12h 27min
30 / 1h 30min
60 / 3h
120 / 6h
249 / 12h 27min 24h 54min 911
No. of files for front view No. of files for rear view
8G
14 / 42min 1h 24min 53 26min 30sec14 / 42min
7h 35min 30sec
Motion detection recording
32G
64G
128G
No. of files for front view
Total usage time
No. of files for rear view
8G 16G 32G 64G 128G
107 214 450 900 1,800
107 214 450 900 1,800
54min 1h 47min 3h 45min 7h 30min 15h
Page 17
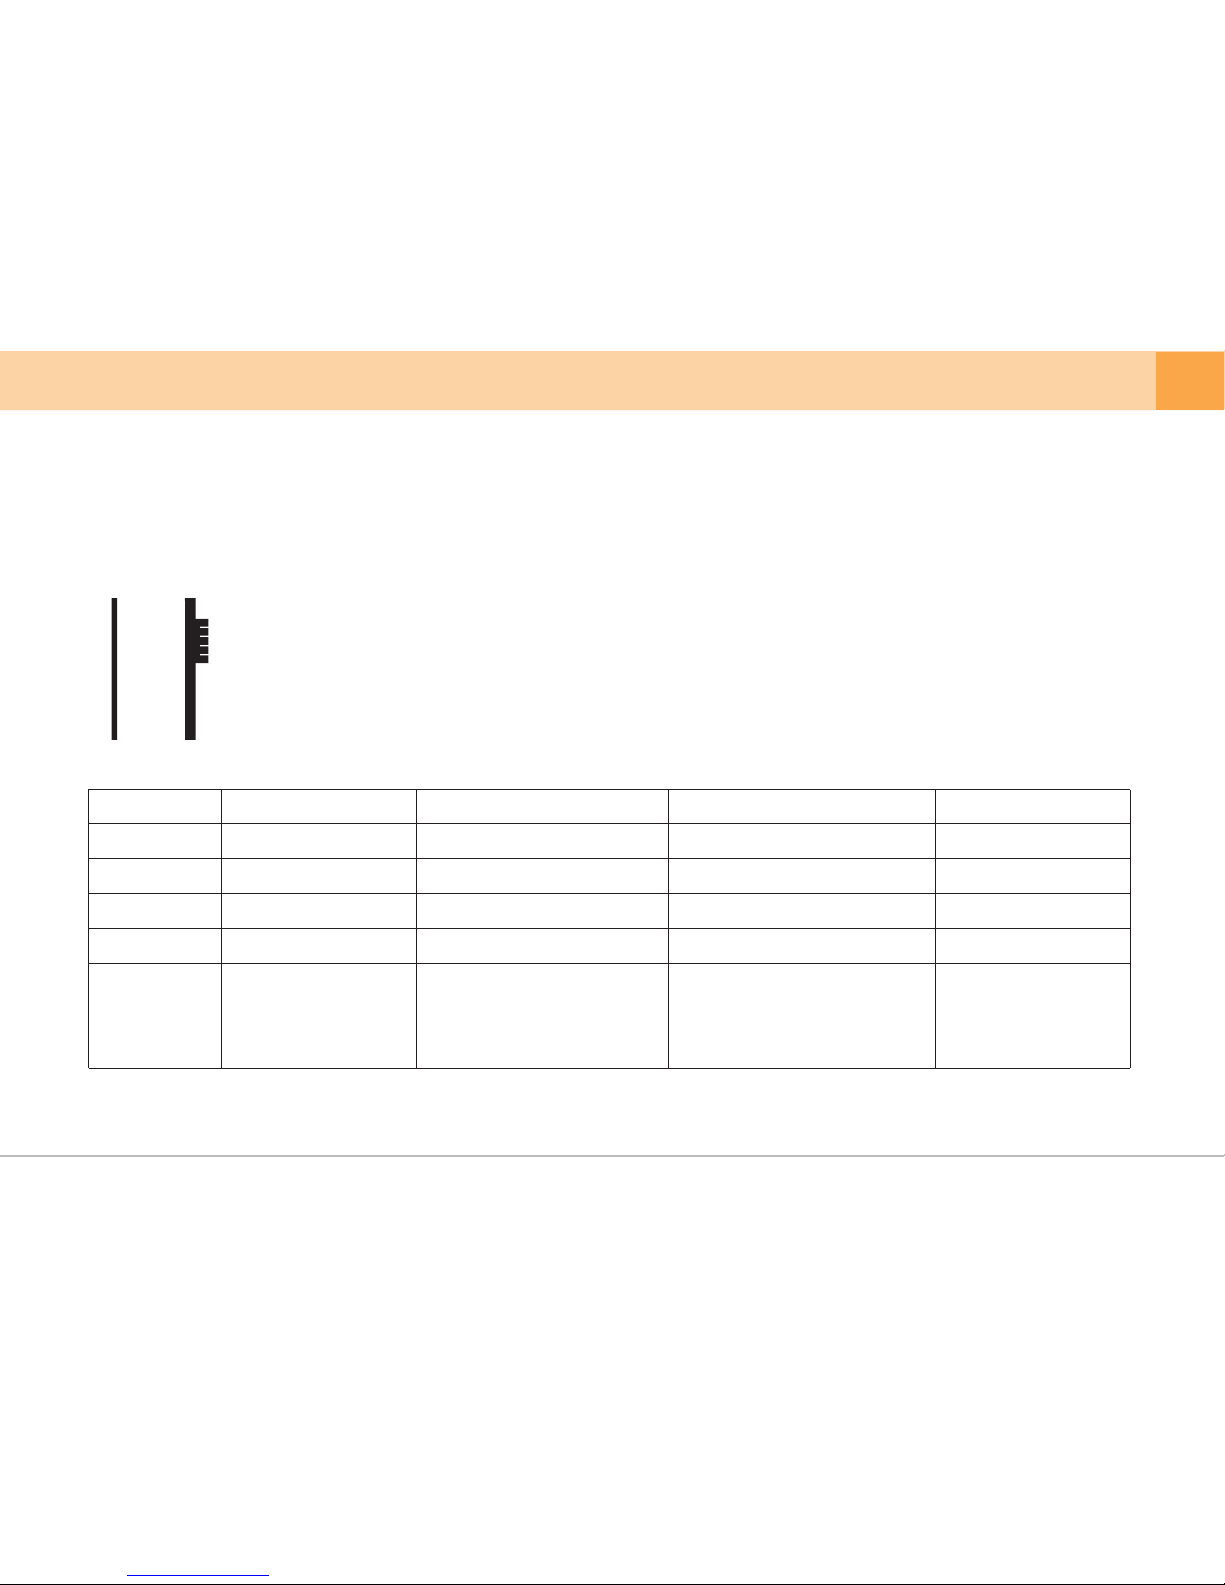
ON
ACC
OFF
5. Product Usage
▒
5-1. Basic Operation Guide
▒
User's Manual ... 17
1. How to start and stop recording
- ON : supports recording during driving/parking (operates up to set voltage or time during parking)
- ACC : supports recording during driving (the device begins to operate when the engine is on and it stops operating when engine is off)
- OFF : power not supplied to the device
※ Check if the memory cards are in the device before turning it on.
※ When booting proceeds after power is supplied, Qvia logo will be shown on LCD screen.
※ After the device has successfully started, it will start recording after voice message “Drive safely”.
2. Standard Recording Mode
Folder
Storage Medium
Continuous Recording
SD card
AlwaysMovie
3min
always
Records continuously
while driving
Event Recording
SD card/microSD card
AlwaysMovie / EventMovie
30sec
always + event / event
- Records when impact is
detected during driving or
parking
- Able to set the level of motion
detection sensitivity
SD card
MotionMovie
30sec
parking
- Records when motion is
detected if motion detection
function is enabled.
- Able to set the level of motion
detection sensitivity
Motion Detection Recording
microSD card
EventMovie
30sec
event
Records whenever you
need to by pressing
emergency recording
button
Emergency Recording
Storage Duration
Video
Characteristics
You can easily set 'power safety function' by manipulating power switches on the device
※ If a microSD card is inserted, videos from event recordings are saved onto the microSD card in the EventMovie folder.
Continuous recordings will be saved in the AlwaysMovie folder of the SD card.
※ If there is no microSD card inserted, videos from event recordings will not be saved. Only videos from continuous recording will be saved onto the SD card.
Page 18
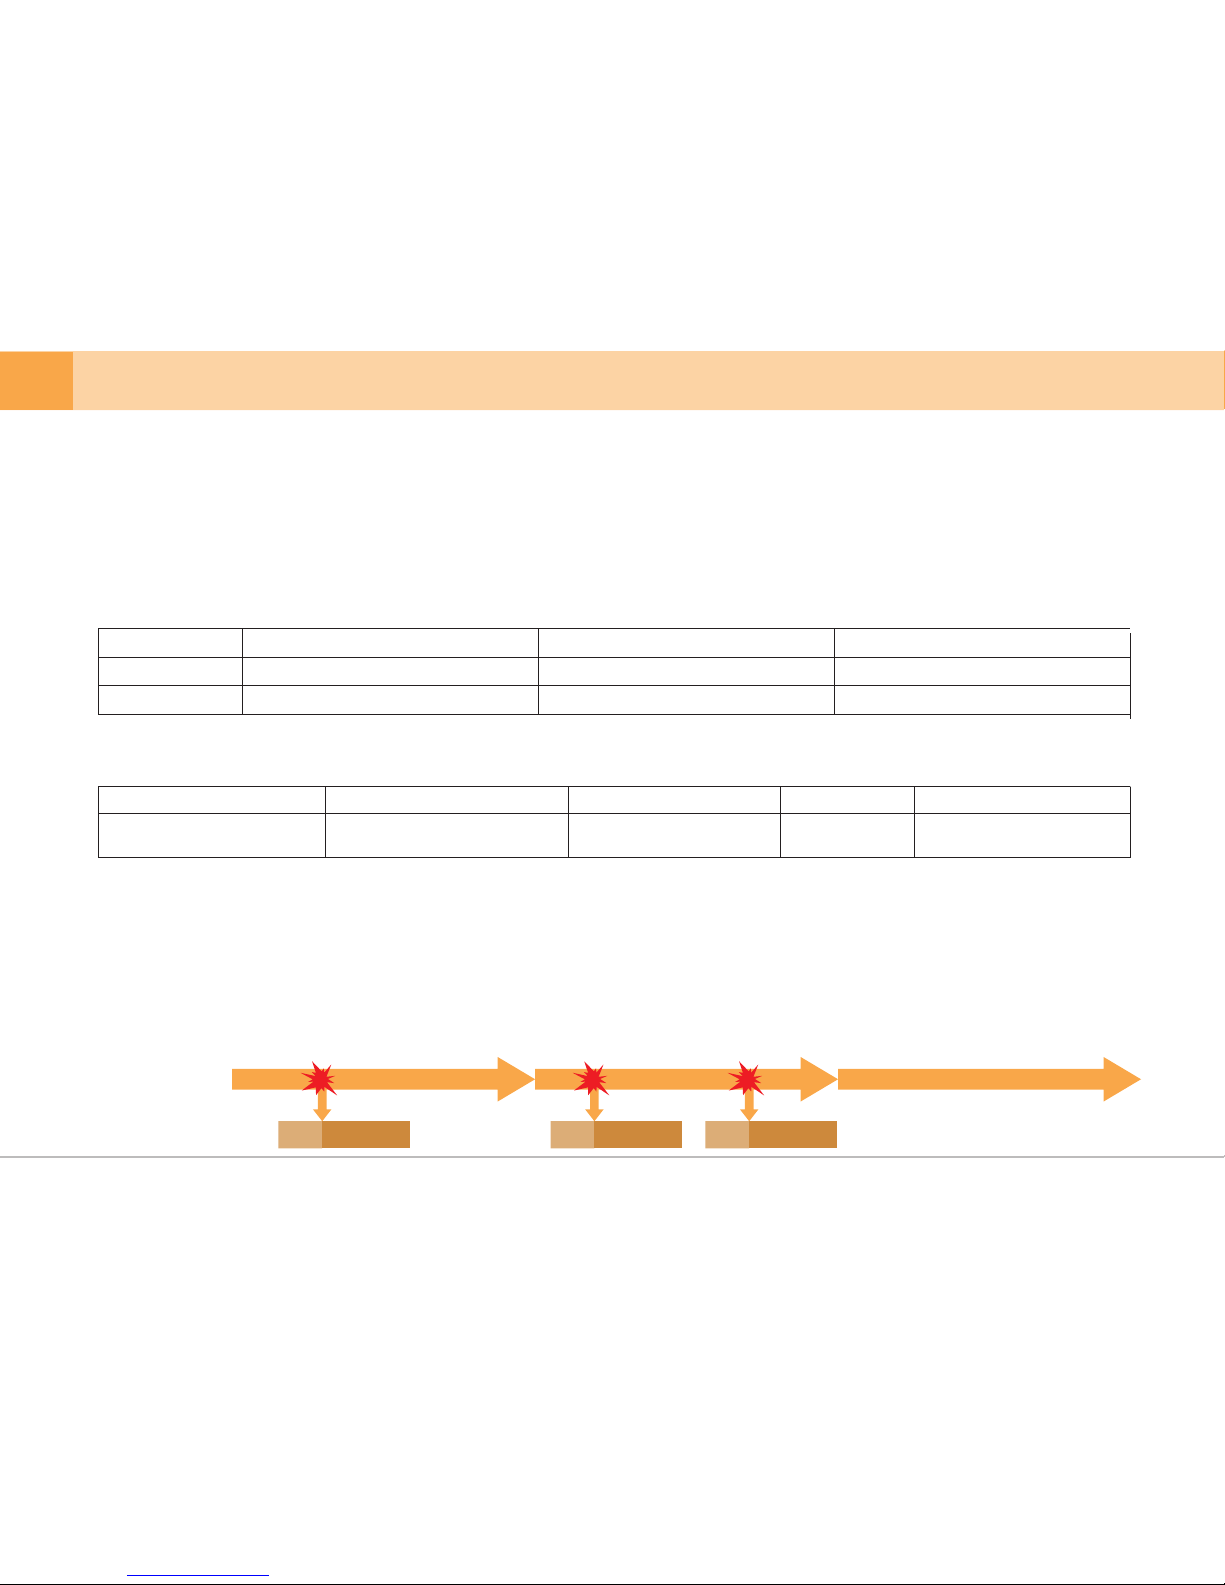
18 ... DASH CAM
Front LED Status
Rear LED Status
Blue LED stays on continuously Red LED blinks fast
Blue LED stays on continuously Blue LED blinks fastBlue LED blinks slowly
Blue LED blinks slowly
Event/Motion taking PlaceDuring Recording while ParkingDuring Continuous Recording
- Check real-time video :
3. Video Playback
You can see the video in real-time after you start the device.
Dash Cam LCD : When you touch real-time video button on main menu, you can check video being recorded.
APP : When you touch ‘Qvia View’ icon on Qvia APP, you can check video being recorded. (When Wi-Fi is connected)
- Check recorded video : Dash Cam LCD : When you touch video playback button on main menu, you can watch recorded videos.
APP : When you touch ‘Internal Storage’ icon on Qvia APP, you can check recorded videos.
PC : You can see recorded videos using Qvia Viewer or other media players by inserting SD card/microSD card to PC.
- Continuous recording :
6. Recording during driving
Records for 30 seconds in total - 10 seconds before/20 seconds after impact occurs - and saved in EventMovie folder.
※ Emergency recording cannot operate during event recording and vise versa.
※“Always”is displayed on the bottom part of the screen when playing back the videos recorded in continuous mode.
Continuous Recording (always) Continuous Recording (always) Continuous Recording (always)
※ You can turn on and off the LED lights on Configuration setting > additional function or APP/Viewer Setting. When LED is off, security LED does
not operate.
- Event recording :
When pressing emergency recording button for approx. 1 second, recording starts immediately with a sound,
and a 30-second video is saved in EventMovie folder.
- Emergency recording :
Records and saves videos during driving at 3-minute interval in AlwaysMovie folder
4. Security LED operation
SD Card :
Event triggered
microSD Card:
10sec 20sec
Event triggered
10sec 20sec
Event triggered
10sec 20sec
※ The device will turn off after blue LED lights blink fast as the device enters ‘Power safety mode’ by setting a specific voltage level or time span.
5. Operating status LED operation
Red LED blinks fast
Event/Motion taking Place
Blue LED
blinks slowly
ACC OFF
Blue LED blinks fast
Entering power safety mode
Red LED blinks slowly
During Recording while Parking
Blue LED stays
on continuously
During Continuous Recording
Page 19
User's Manual ... 19
6. Recording During Parking
-
Parking mode is activated when the device power is ON.
7. Driving Information Check
-
Qvia dash cam can record up to approximately 2 million driving information data onto the SD card. After you have set the time interval for saving
the driving information on the configurations settings, the device will automatically save the data on a regular basis.
Note that recording and the device itself will be turned off if the vehicles’ battery drops below the voltage level set by the user.※
- Recording in parking mode :
When converting from continuous, event, or manual recording mode to parking mode, each recording will be ended and converted into
parking mode. For this reason, video loss may occur.
※
-
When selecting ‘Use motion detection’ in the configuration settings, video will be recorded for 30 seconds in total, consisting of 10 seconds of
video before the impact and another 20 seconds following the impact. Files will be saved in the Motion Movie folder.
Motions may continue to be detected and recorded according to changes in the environment. Therefore, the level of sensitivity must be set
to in accordance with your parking environment.
(E.g. When parking in an alley or underground, frequent movements may interfere with motion recording if the level of sensitivity is too high.)
※
Motion detection or frame omission may occur depending on surrounding environment.※
-
How to change to parking mode :
Automatic conversion to parking mode can be set up in the “Configuration Setting > Basic Functions” of the Qvia viewer or on the Qvia
mobile app: “Qvia Setting > Basic Functions”.
The device can be programed with a set time to activate the 'auto-conversion to parking mode' function.
When the device converts to parking mode, a voice guide (“Switched to parking mode”) is announced.
When playing back the recorded videos in parking mode, it will say "Motion" on the bottom of LCD screen.
※
As recoding stops and converts to parking or driving mode, less than 5 seconds of video may be lost.※
Recording time during parking mode may vary depending on the vehicles’ battery status.※
Motion detection may fail when the surrounding of the vehicle is too dark.※
RED LED will blink while motion recording is activated.※
You can set the motion detection function on the Qvia Viewer :“Configuration Setting > Motion Detection”or directly from the Qvia App :
“Qvia Setting > Motion Detection”.
※
For efficient memory management only the camera(either front or rear) that detects the motion will be activated.※
Page 20
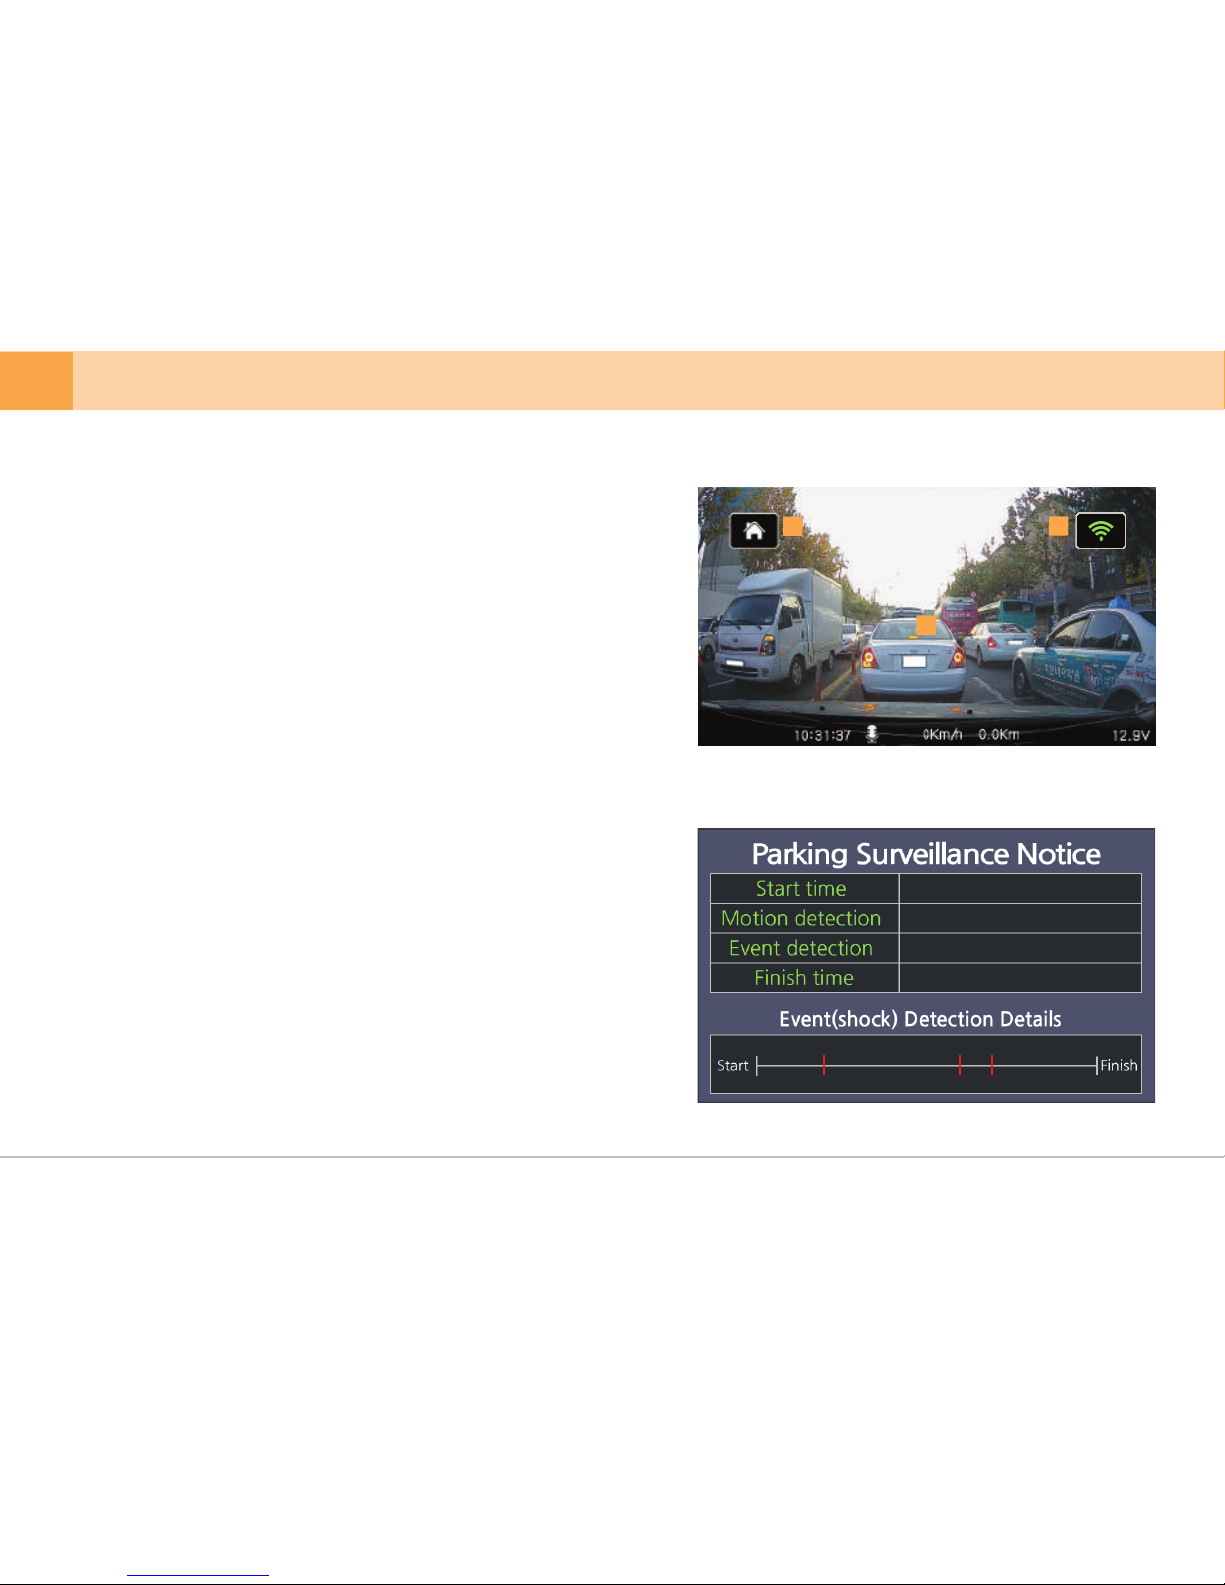
2016.04.17 21:57:00
37
3
2016.04.18 11:57:00
2016.04.17 21:57:00 2016.04.18 11:57:00
2016.04.17 [A]
※
After starting the car engine and turning on the power button on the right side
of the device, the power will be turned on. When the device has successfully
started, it will automatically start recording and real-time video will be shown on
the LCD screen.
1.
Live View : video being recorded by the device is displayed on the LCD screen.
2.
Home (main menu) : touching the home button on the upper left-hand side of the
screen, main menu appears.
-
Screen conversion :
by touching the screen when rear view camera is
connected, it will be converted from the front view in
the order of the following. ▶ rear view ▶
Reverse rear L/R ▶ front/rear view left & right ▶
front/rear view up & down ▶
front/rear view PIP screen ▶ rear/front PIP.
When rear view camera is not connected, only front view
screen is displayed. (the device will be re-booted when
rear view camera connection cable is
separated/connected during recording.)
▒
5-2. Starting the Device
▒
1
2
20 ... DASH CAM
3
4.
Parking Surveillance Notice :
display the number of motion detections and events that take place during parking.
※ number of motion detections is displayed separately for front and rear cameras.
※ as event detection is recorded simultaneously for front and rear cameras,
the number of event detections for front and rear cameras is displayed together
as one.
It shows Wi-Fi connection status and on/off the Wi-Fi
※ Green icon : Wi-Fi ON / Grey Icon: Wi-Fi off
※ By touching the Wi-Fi Icon, you can turn on/off the Wi-Fi
3. Wi-Fi :
Page 21
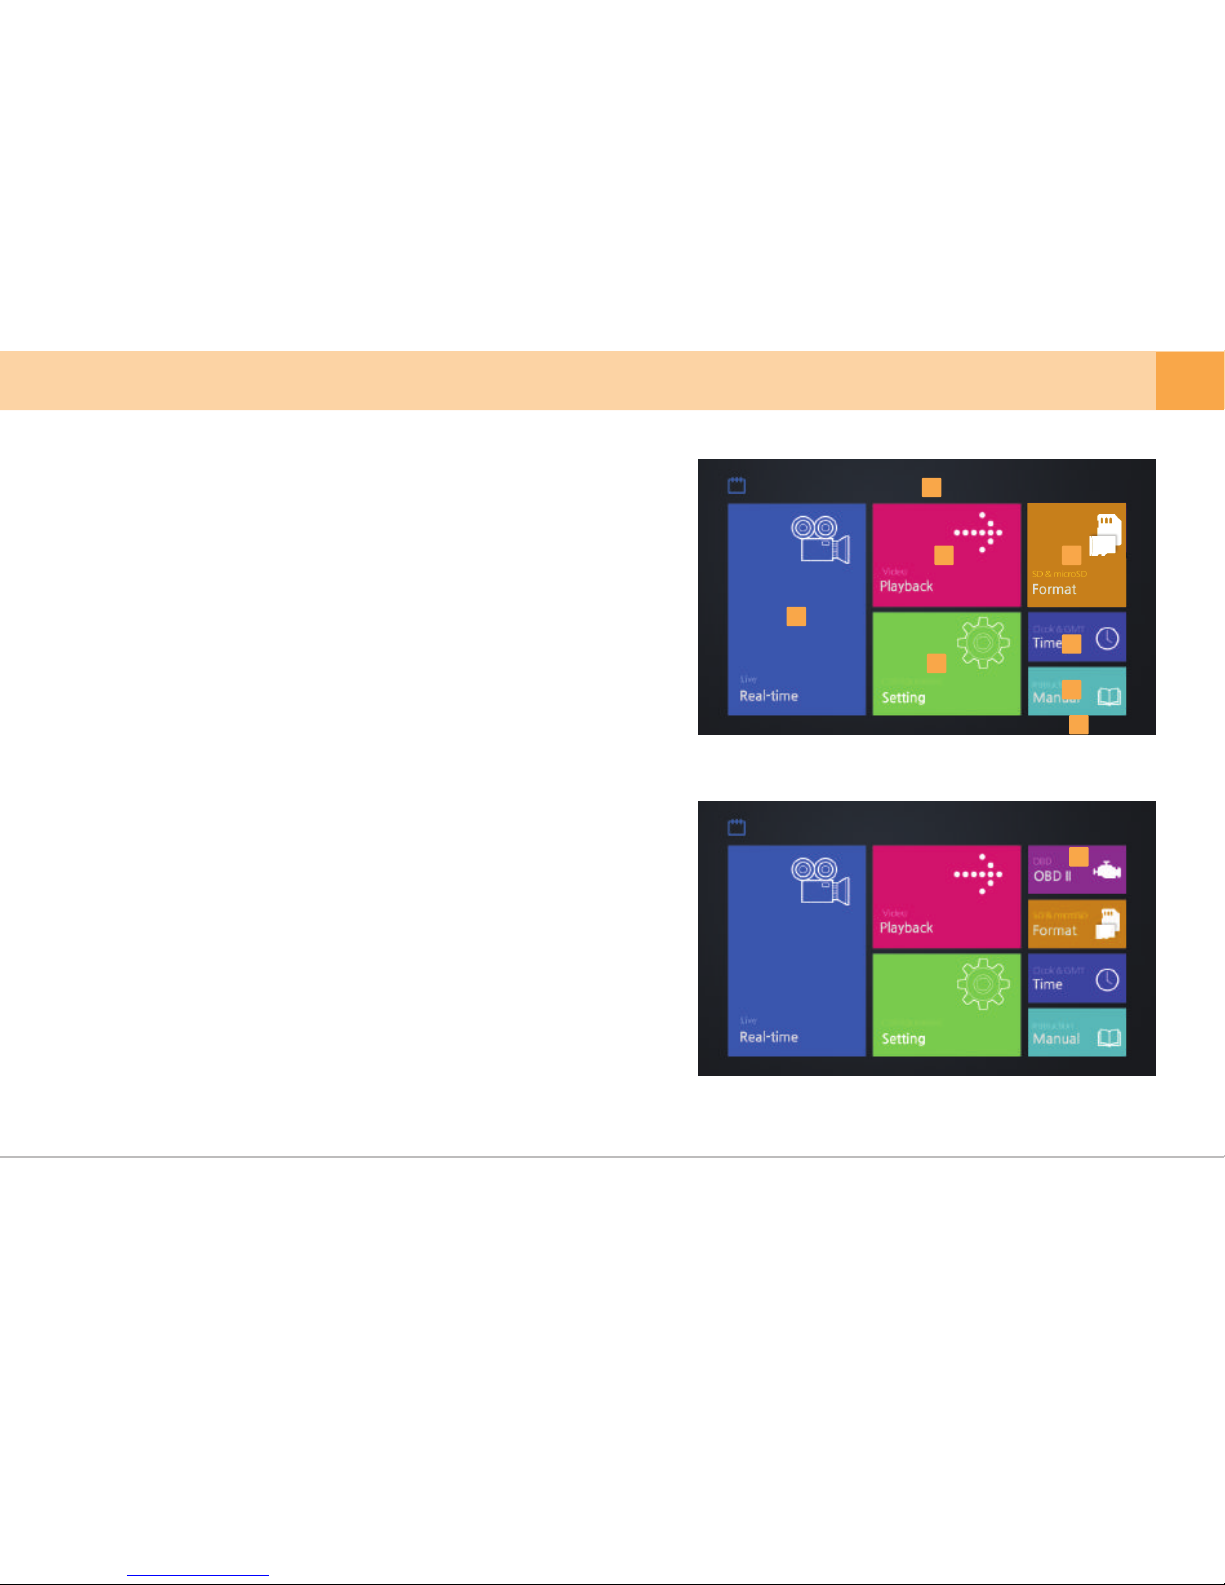
※
When you touch the home button on live view video screen, the following
menu will appear.
8.
Display Front / Rear View Device Firmware Version
9.
User Guide: able to check user guide.
2.
Current Date & Time Display
4.
Video Playback : able to check videos recorded in continuous, event, and
motion detection modes.
Live View : front/rear view video being recorded is displayed.
Configuration Setting : set video, basic functions, LCD, additional functions,
audio and OBD II function.
3.
5.
6.
7.
Time Setting : set date & time of dash cam.
When time is changed, memory card format is necessary.
Time can be set manually when there is no GPS.
Card Format : format SD card and microSD card,
1.
OBD II : display OBD II information (OBD II is optional).
User's Manual ... 21
2016.04.17 AM 11:57
LKV5.7.1
2016.04.17 AM 11:57
LKV5.7.1
8
3
2
5
6
4
1
7
9
Normal (Type B)
OBD II Firmware (Type D)
Page 22
22 ... DASH CAM
2
4
1
2
4
5
alwa_20160417_153647_F.avi
2016.04.17 10:31:25
2016.04.17 10:31:25
2016.04.17 10:26:25
2016.04.17 10:26:25
2016.04.17 10:21:25
2016.04.17 10:21:25
1
3
3
▒
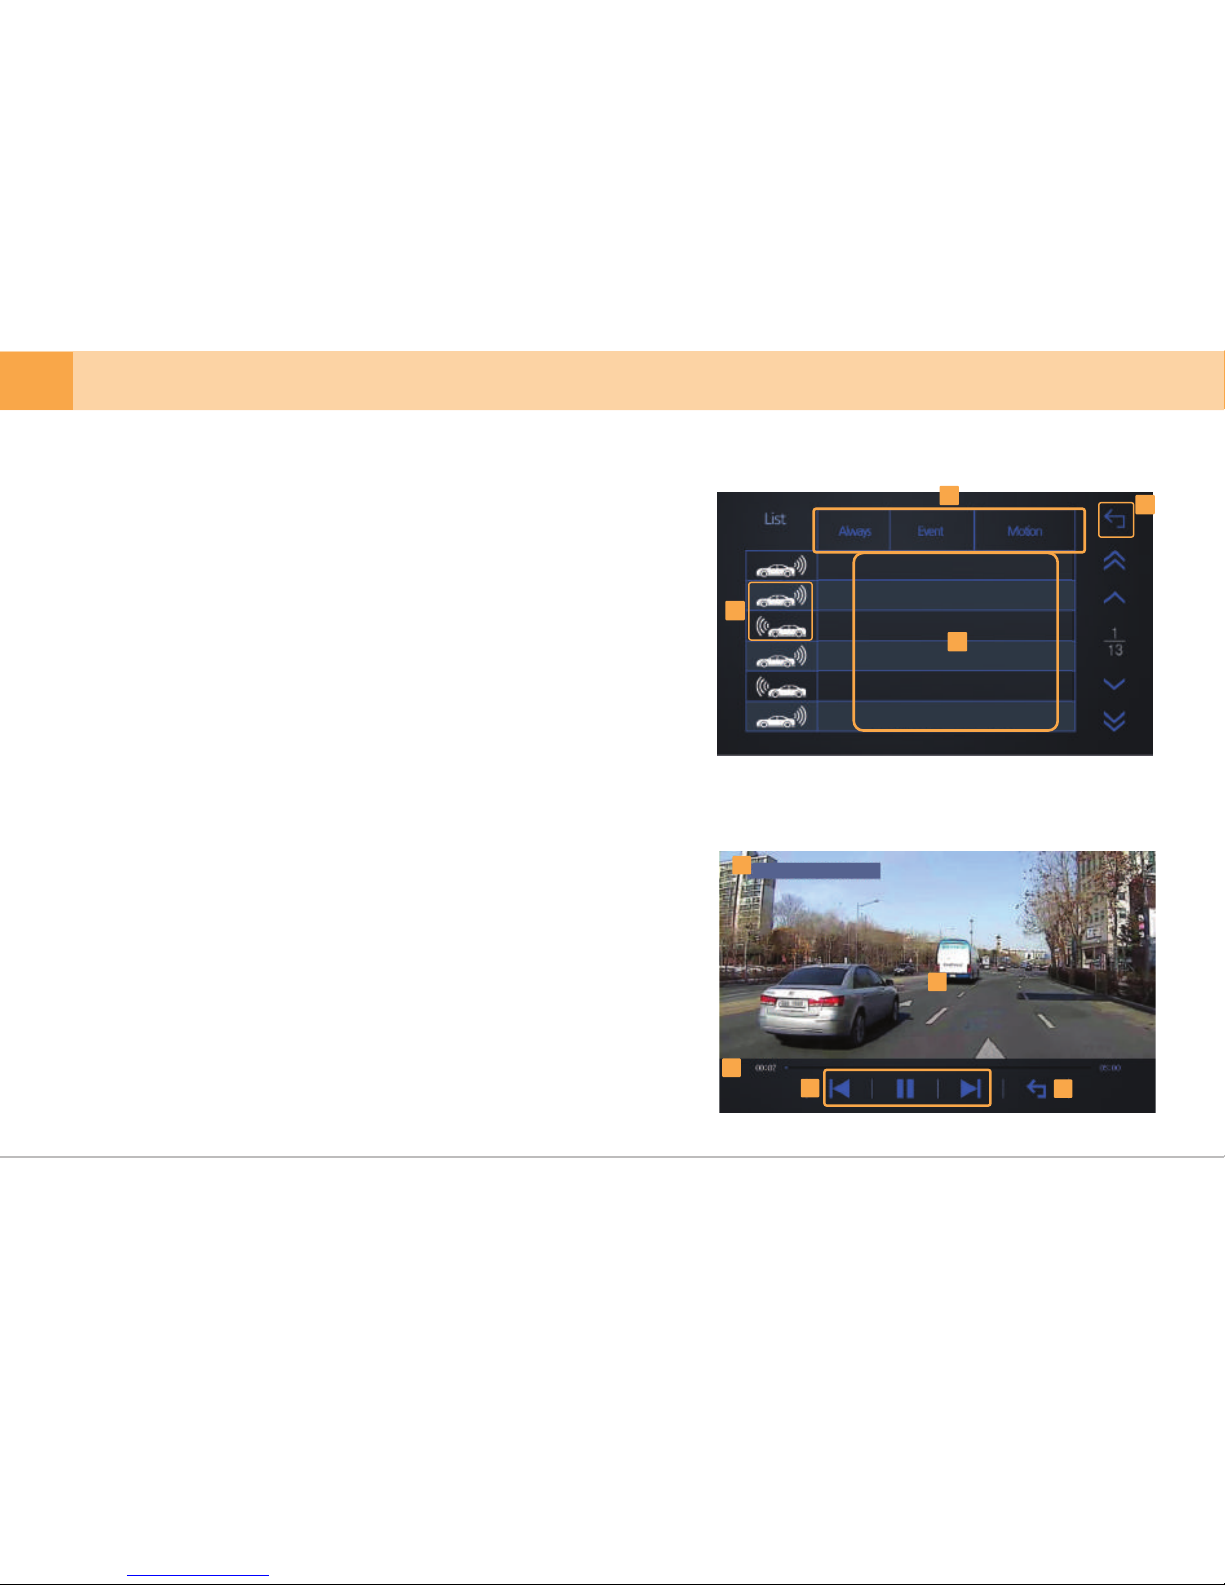
5-3. Video Playback
▒
※
When you touch video playback button on main menu, the list of saved
videos will appear.
※
As front/rear view videos are not recorded during video playback, stop
the car in a safe place before playing the video.
※
Video recording starts automatically when video playback screen returns to
menu screen.
※
Video files are automatically generated with the name in "Year/Month/Day/
Time" format.
※
When you touch video name in playlist, the video will play on screen.
Note) video recording will be stopped when recorded video is being played.
※
After the video starts playing, status bar will disappear automatically.
If you re-touch the screen, the status bar will appear again.
1. Video Play List : display play list in sequential order
When you touch the video name, the video will play
immediately.
▲,▼ : sorting in ascending/descending order
1. Video playback screen : recorded video will be played on LCD screen.
When the currently playing video ends, the next
video will be played.
2. File name display : file name of the video being played is displayed.
3. Playback progress bar : display progress time of the video currently
playing and the duration of the video.
4. Player button : able to play/pause the video being played and move to
previous/next video.
5. Previous menu button : move to the previous menu(video play list)
2. Mode Selection Button : divided into always/event/motion detection
recording modes.
3. Front/Rear View Icon : icons to distinguish front/rear view video.
4. Move to Previous Screen : move to the previous screen.
Page 23
3
1
4
5
76 8 9 10
2
2016.04.17
※
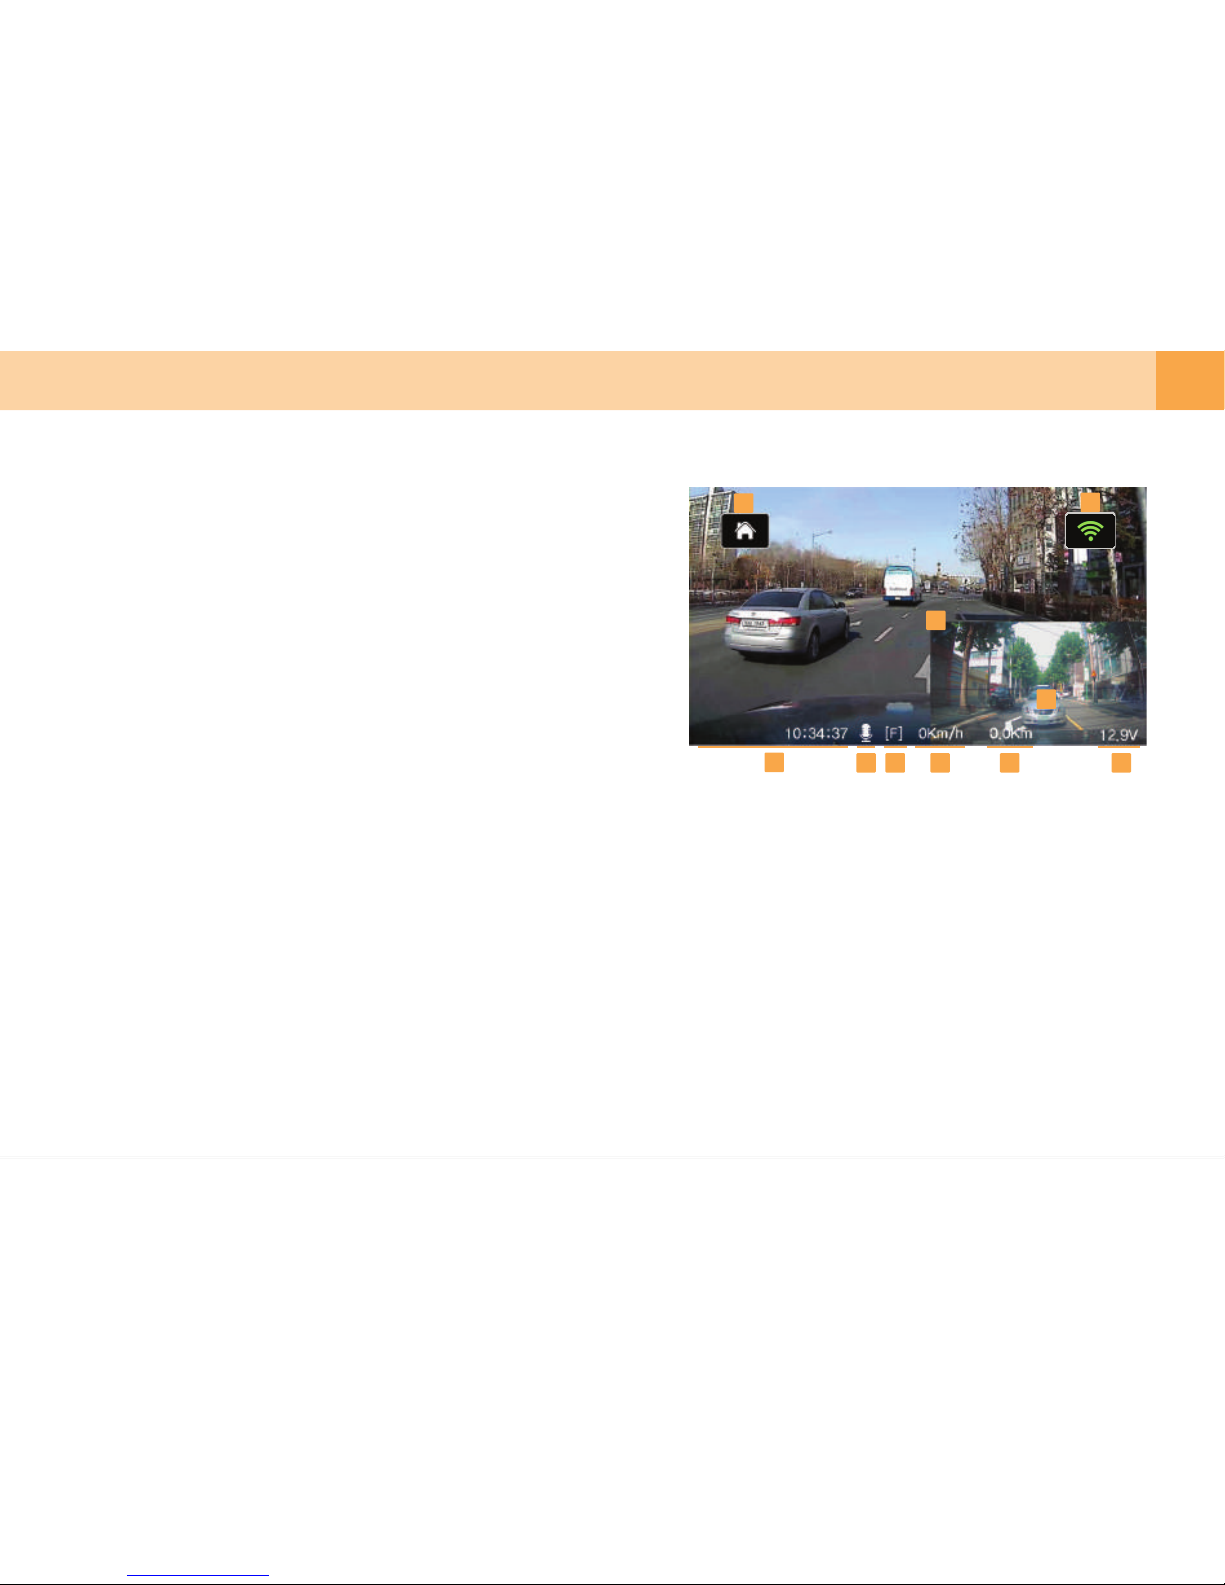
Video being recorded by the device is displayed on LCD screen.
※
▒
5-4. Live View
▒
3
User's Manual ... 23
When you touch other parts than the home button, the screen switches in the
following order. front view ▶ rear view ▶ Reverse rear L/R ▶
front/rear view left & right ▶ front/rear view up & down ▶
front/rear view PIP screen ▶ rear/front PIP screen.
3. Front / Rear view video screen
4. PIP screen
5. Driving date & time
1. Home
2.
6. Voice recording
7. GPS reception info :
A : GPS received
V : no GPS reception
F : GPS power is not connected
8. Driving speed
9. Mileage display
※
Vehicle voltage display indicates voltage supplied to the device and
it can be different from the voltage supplied from vehicle (battery) due to various reasons including the loss of dash cam power cable.
10. Vehicle voltage display(voltage supplied to dash cam)
Display Wi-Fi connection / Wi-Fi on/off button
Page 24
1 2 3
4 5
6
▒
5-5. Setting
▒
※
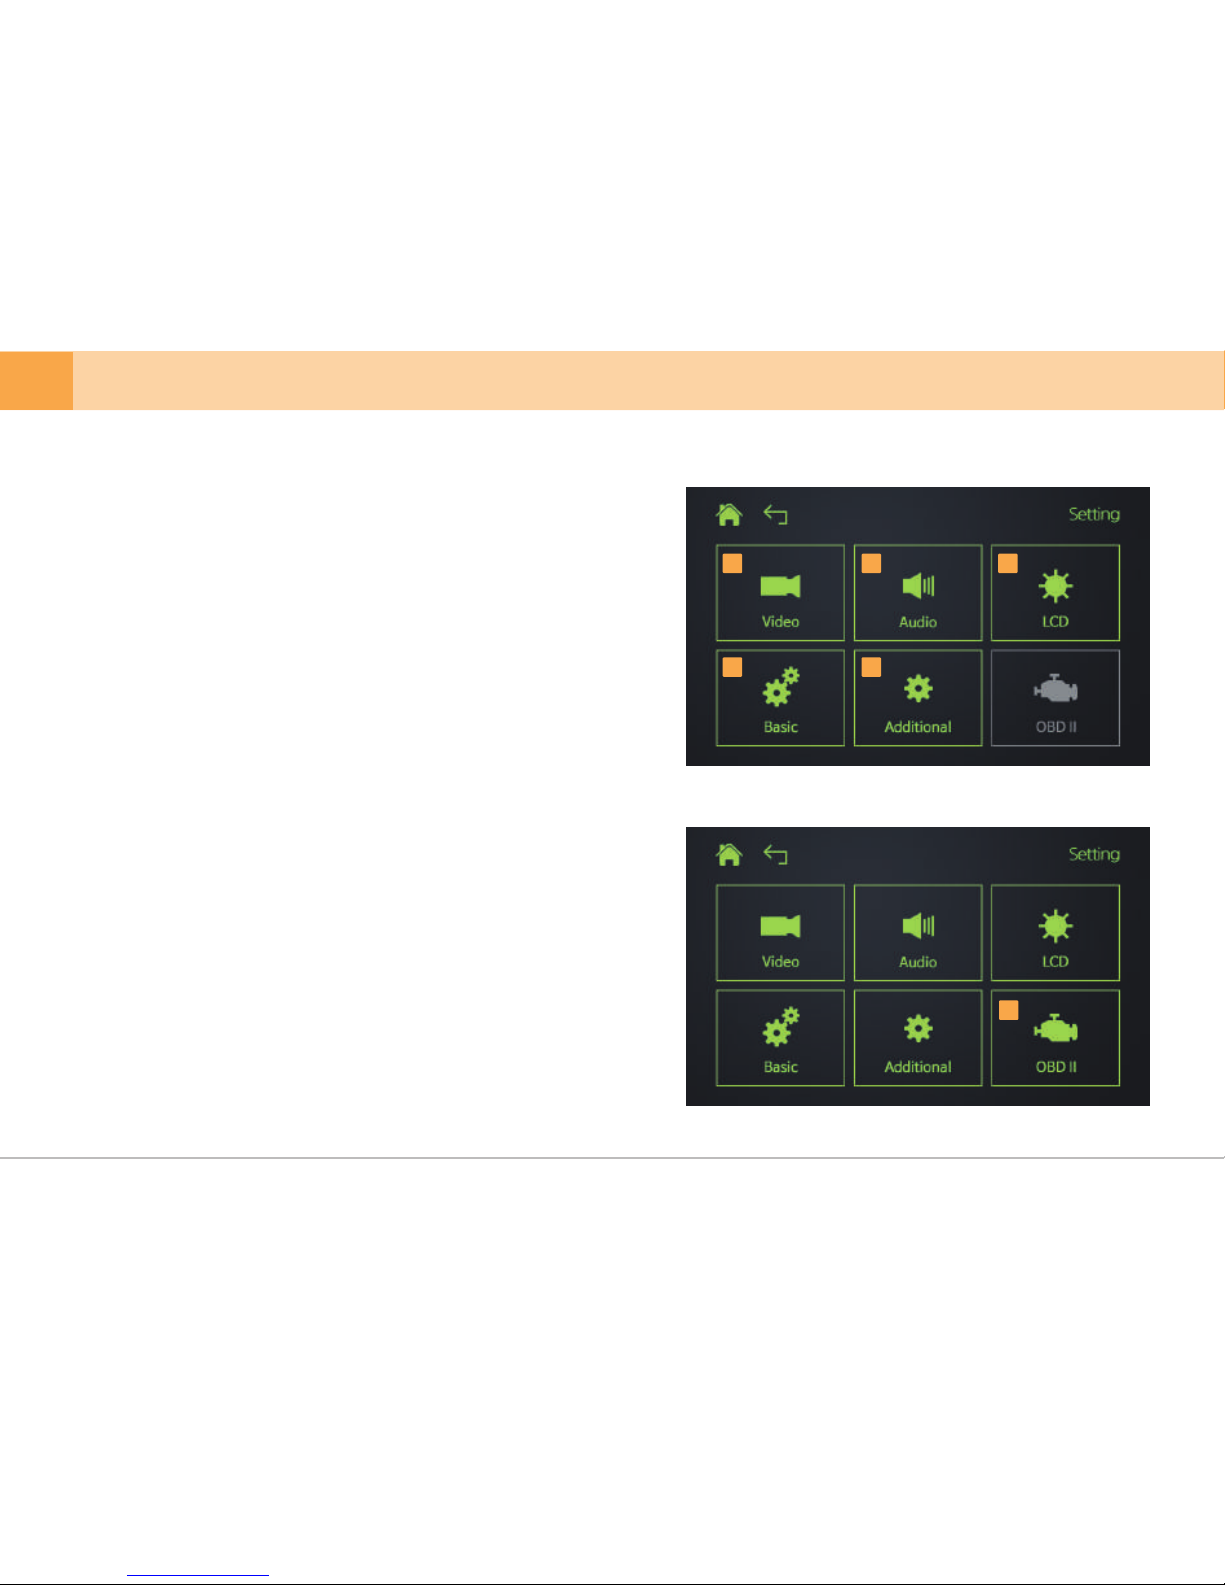
When you select the Settings button on menu screen, the following screen will
be displayed.
※
New settings are applied when you exit the configuration setting screen.
1. Video : set front and rear camera brightness, mirror images setting for
rear camera.
2.
Basic : set G-sensor, auto-conversion to parking mode, front view motion
detection and rear view motion detection, set PIP position.
4.
3. LCD : set screen stand-by time, screen brightness, screen protector and
LCD touch sensitivity
Additional :set power safety, LED and initialize configuration setting.
5.
Audio : set recording, speaker, hourly alarm and voice guidance.
6. OBD : set functions related to OBD II module.
※ OBD II module can be purchased optionally.
24 ... DASH CAM
Page 25
▒
5-5-1. Setting - Video
▒
※
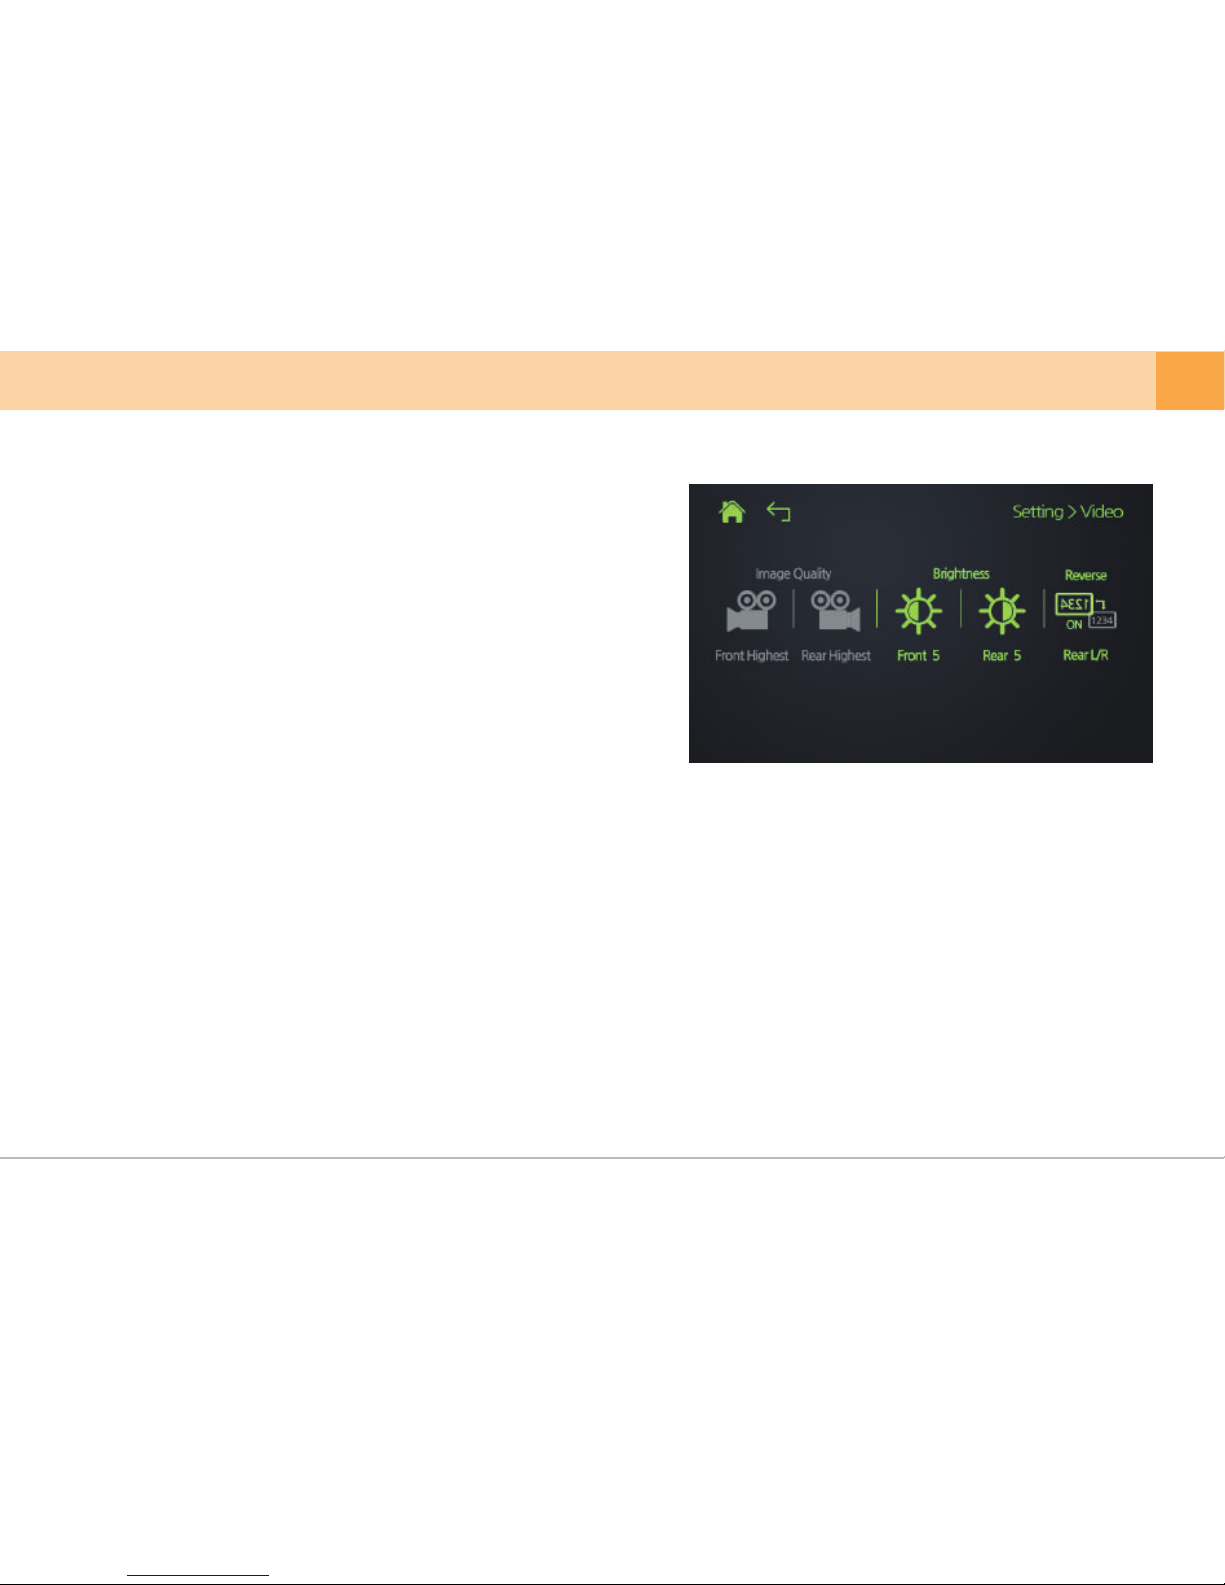
When you select the Video button on the settings screen, the following screen
will be displayed.
※
You can change settings by selecting the icons on each screen.
1.
2.
3.
Front Camera brightness : set front view camera brightness from 1-5 stages.
Rear Camera brightness : set rear view camera brightness from 1-5 stages.
Reverse : Reverse L/R for Rear Camera
User's Manual ... 25
Page 26
▒
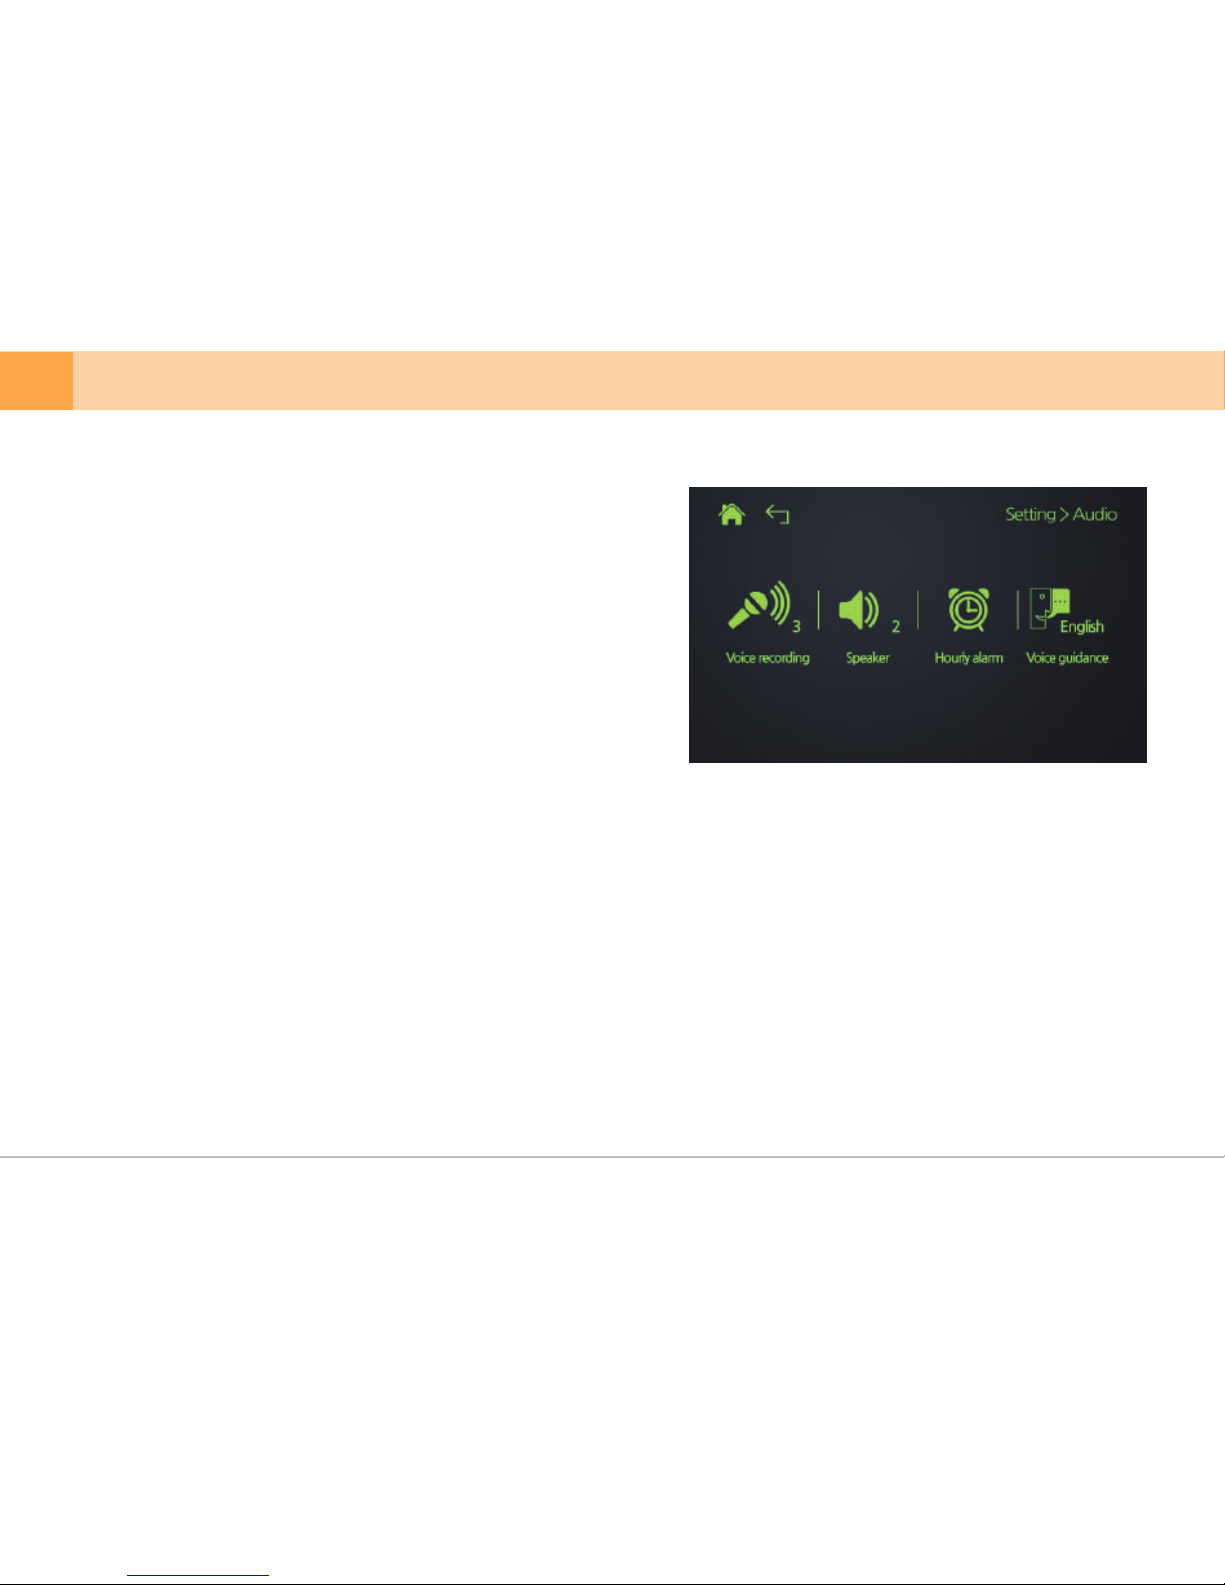
5-5-2. Setting - Audio
▒
※
When you touch the audio button on configuration setting screen, the right
screen will be displayed.
1. Voice Recording : adjust sound volume of voice recording.
2. Speaker Setting :
adjust sound and volume for speaker.
3. Hourly Alarm : set function that tells time at every hour.
4. Voice Guidance Language :
able to choose language for guidance.
(Korean, English, Russian, Chinese, Arabic,
French, European Spanish,
Latin America Spanish, Japanese, Thai,
Vietnamese, German, Mogolian, Turkish, Italian,
Hindi, Czech, Cantonese, Portuguese,
Bahasa Indonesia and Bahasa Melayu)
26 ... DASH CAM
※ Foreign language(Voice guidance, GUI language) is not supported for products sold in Korea.
Page 27
▒
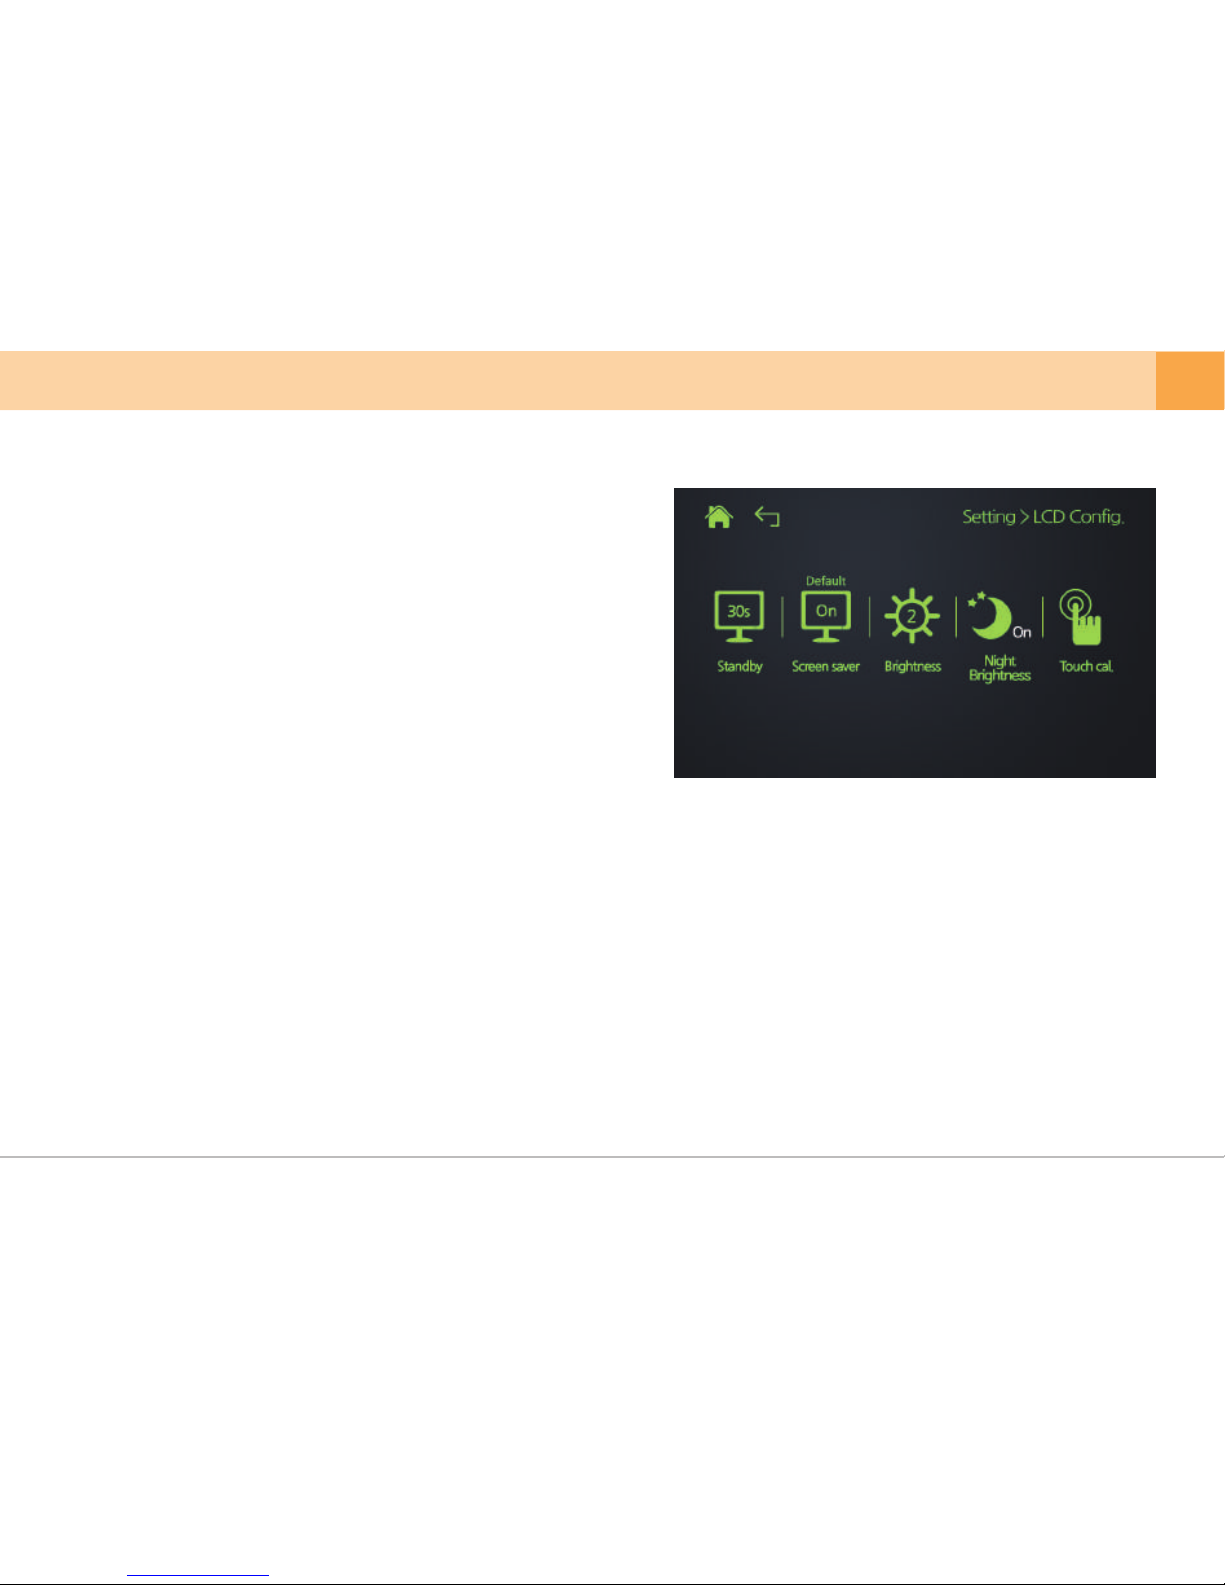
5-5-3. Setting - LCD Config.
▒
User's Manual ... 27
※
When you select the LCD configuration button on the settings screen,
the following screen will be displayed.
1. Screen Stand-by Time : set time during which LCD is turned on
(screen saver : converted only when the function
is activated.) Set it to always, 15sec, 30sec. 60sec.
When set to always, the screen will not be turned off.
(However, it will still be turned off automatically in
parking mode.)
3. Screen Brightness : set LCD brightness from 1~3 stages.
2. Screen Saver : turn on/off screen saver
The screen saver image can be chosen by the user.
→ 1. Edit the image you want in 800x480 size
2. Set the edited image file name and its extension as screen.png
(If file name and its extension are not as above, it will not be recognized as
screen saver image. Be sure to save it as screen.png)
3. Save it in the top most most folder of SD card.
(If you save it in other folders, it will not be applied to screen saver.)
5. Touch Sensitivity : adjust LCD touch sensitivity
4. Night Brightness : When you activate it, it changes LCD brightness automatically
during 8:00 PM and 6 AM.
Page 28
▒
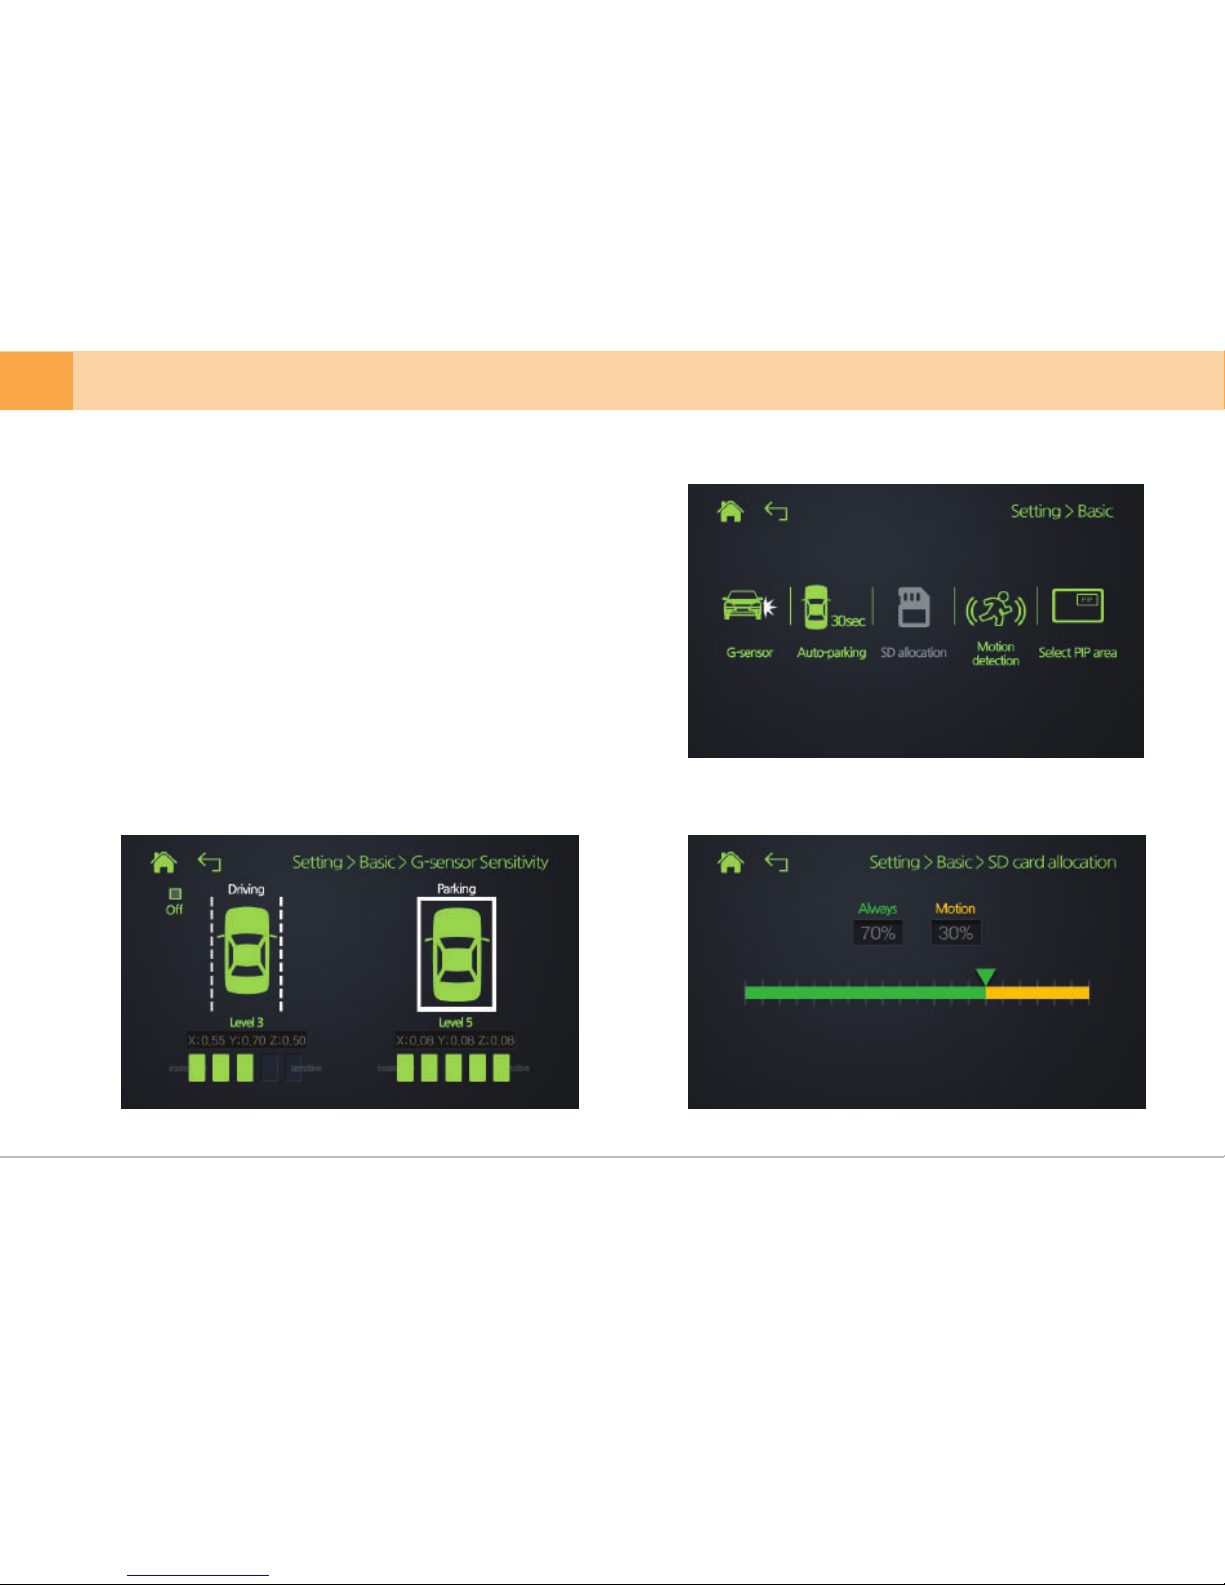
5-5-4. Setting - Basic
▒
※
When you touch basic button on configuration setting screen, the following
screen will be displayed.
3.
4.
<G-sensor sensitivity setting> <SD card capacity setting>
28 ... DASH CAM
1. G-sensor : able to set the level of G-sensor sensitivity according to user
environment for driving and parking modes from 1-5 stages.
2. Auto parking : set to do not use Auto-conversion to parking mode, 10sec,
30sec, 1min, 2min, 3min, 5min, 7min and 10min.
Motion detection : able to set sensitivity of motion detection in parking mode.
Select PIP area : able to change the position of PIP(Picture-in Picture) on
the LCD screen in Live View.
Page 29
▒
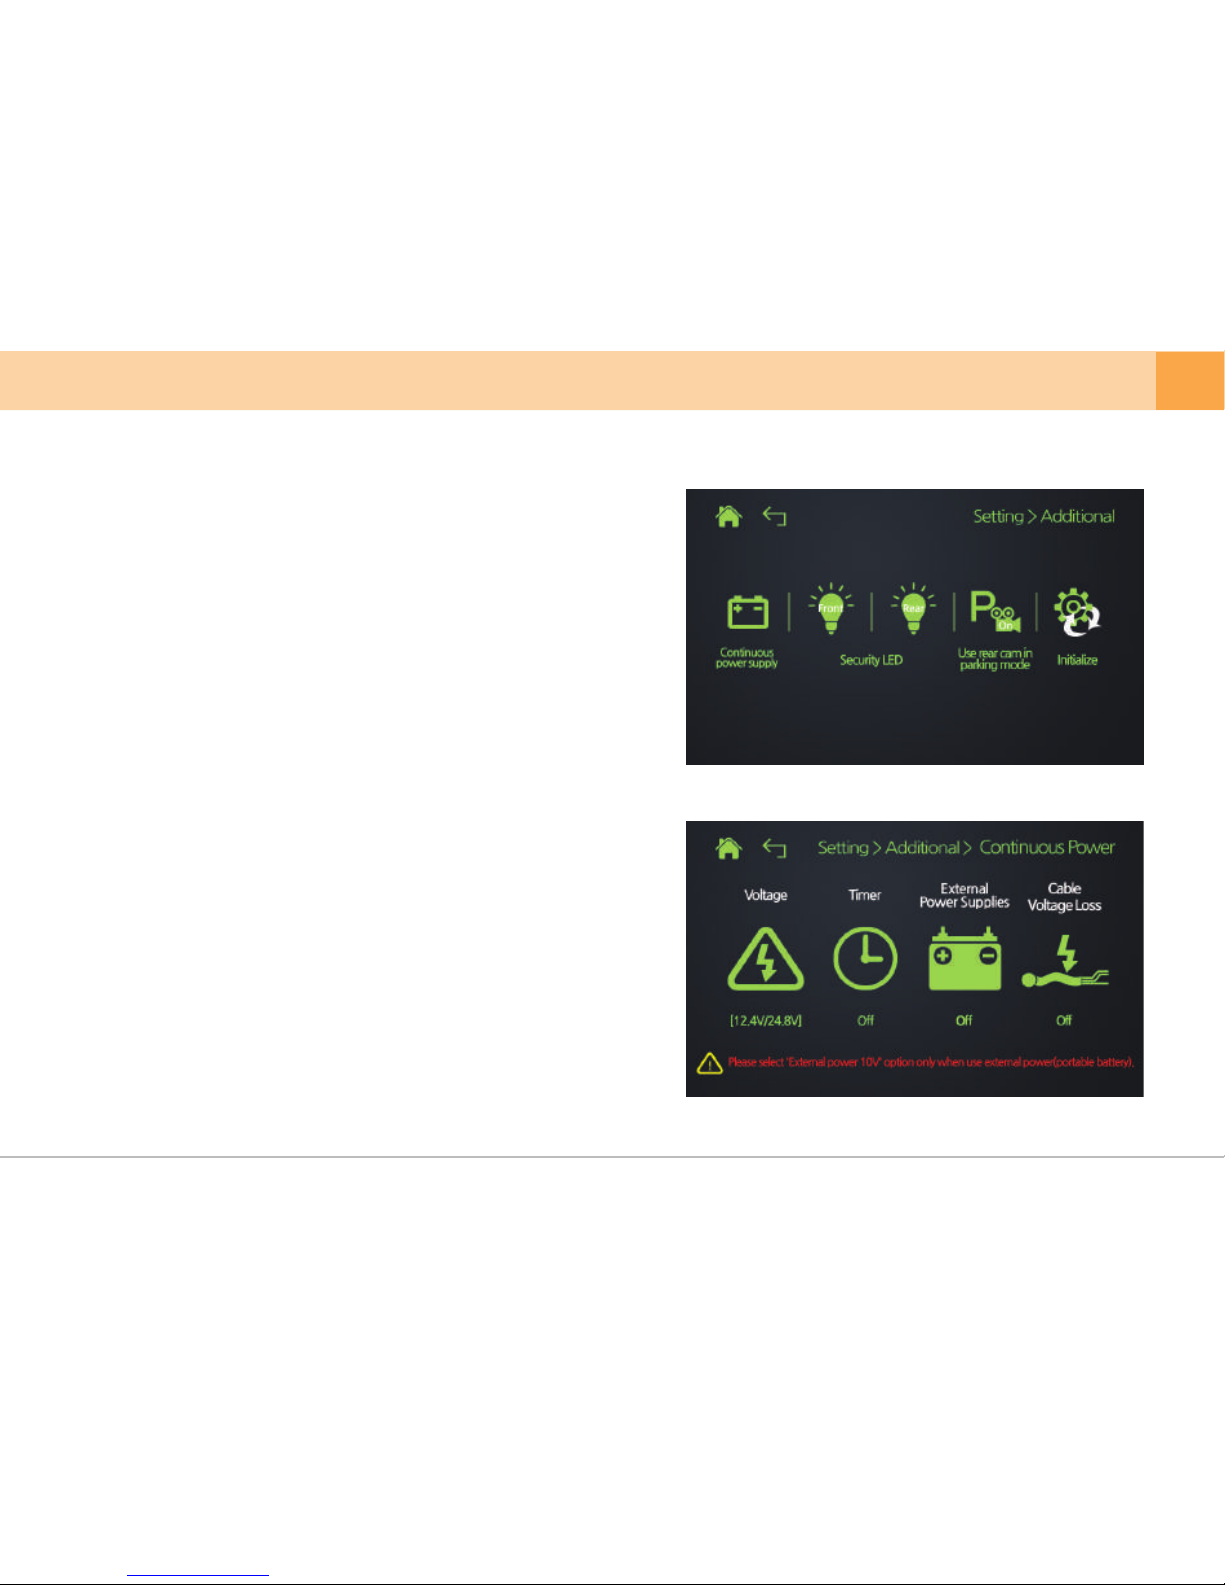
5-5-5. Setting - Additional
▒
User's Manual ... 29
※
When you select the Additional button on the settings screen, the following
screen will be displayed.
1. Continuous Power supply : set cut-off voltage or cut-off time to prevent
battery discharge during parking mode.
(low voltage cut-off function)
2. Security LED : turn on/off front and rear view Security LEDs.
3. Use rear cam in parking mode : turn on/off rear cam recording in parking
mode.
4. Initialize configuration setting : initialize configuration settings.
※ When using external power other than your vehicle battery, adjust the
setting to using external power.
※ When using external power(external battery), cut-off voltage and cut-off
time will not be activated, and it needs to be re-activated after connecting
the external power.
Page 30
▒
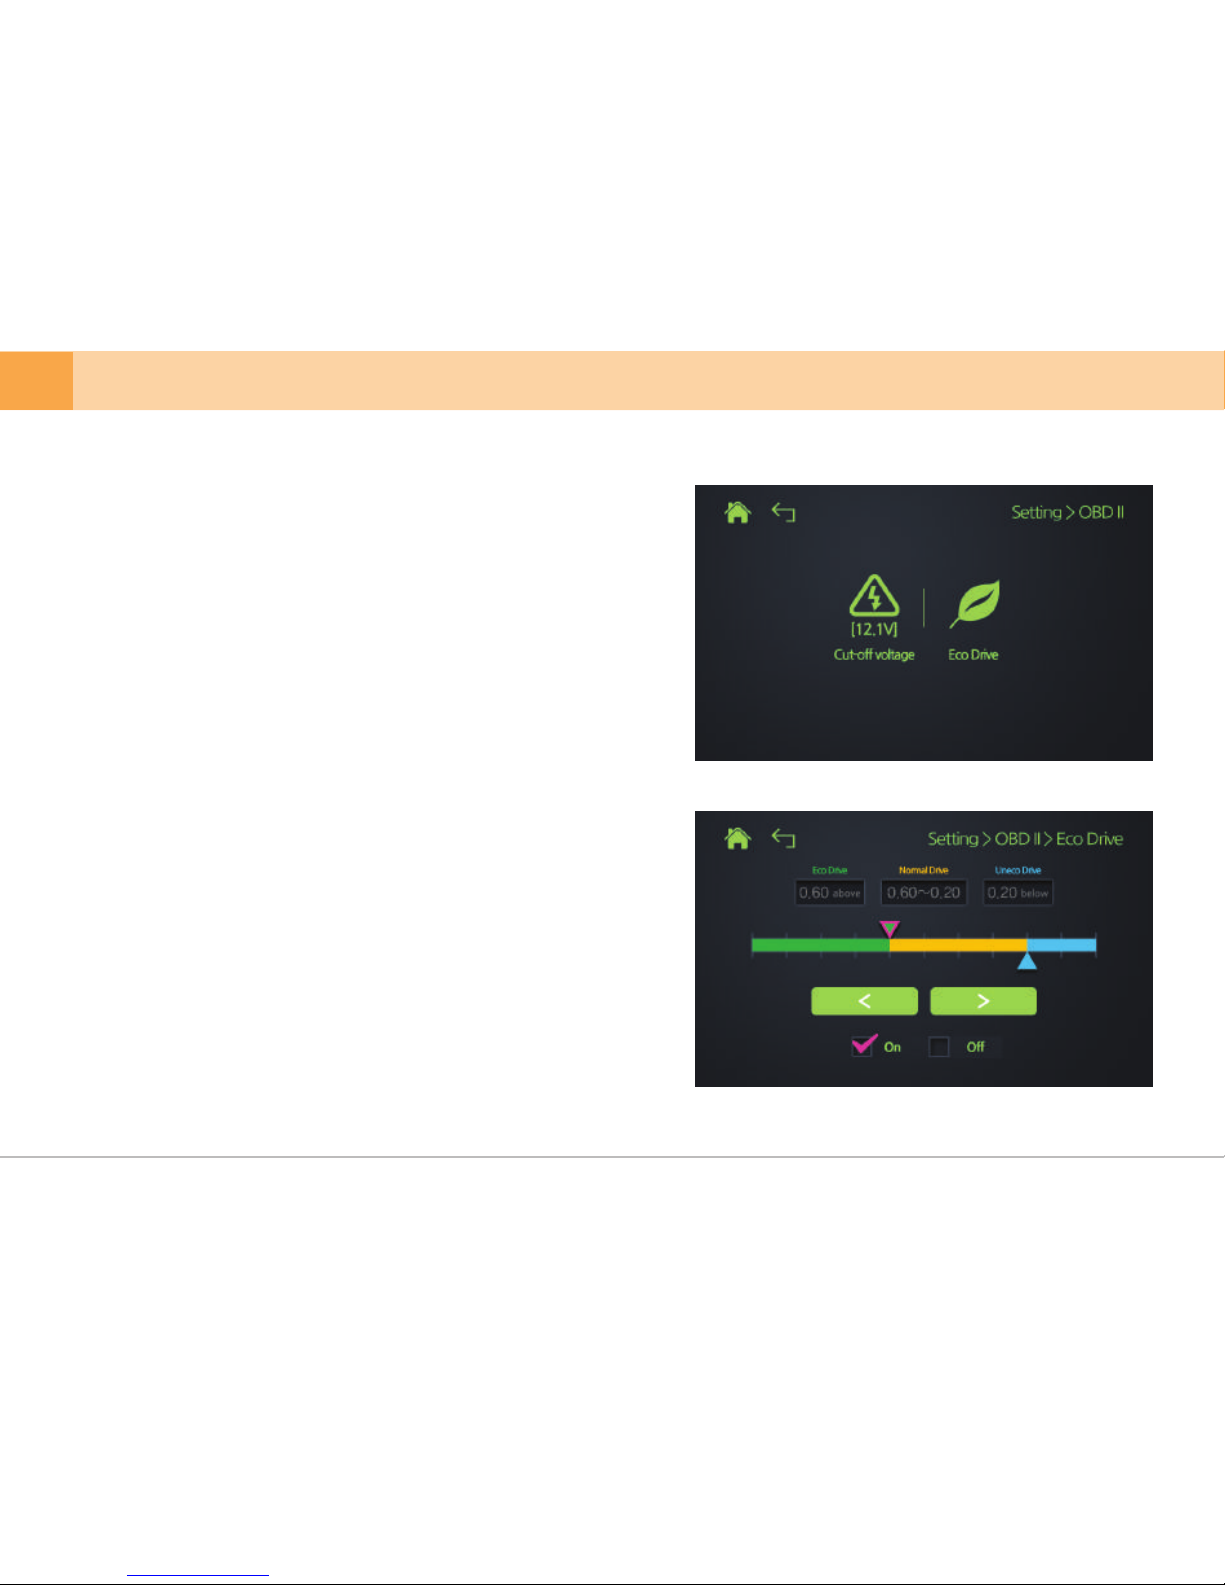
5-5-6. Setting - OBD II
▒
30 ... DASH CAM
※
메뉴화면에서 오디오 버튼을 터치하면 다음과 같은 화면이 표시됩니다.
1.
2.
※
When you select the OBD II button on the settings screen, the following screen
will be displayed.
1. Cut-off Voltage : set cut-off voltage.
※
2. Eco Drive Setting : set Eco Drive according to the user environment.
Cut-off voltage may have errors in the cut-off level depending on vehicle
model.
※ Be sure to use OBD II power supply when connecting OBD II.
※ Duplicated power supply using both LK-750 OBD II module and
hardwire power cable can cause problems.
※ Contact seller or maufacturer for a proper use of LK-750 OBD II module
and hardwire power cable before installation.
Page 31
User's Manual ... 31
※
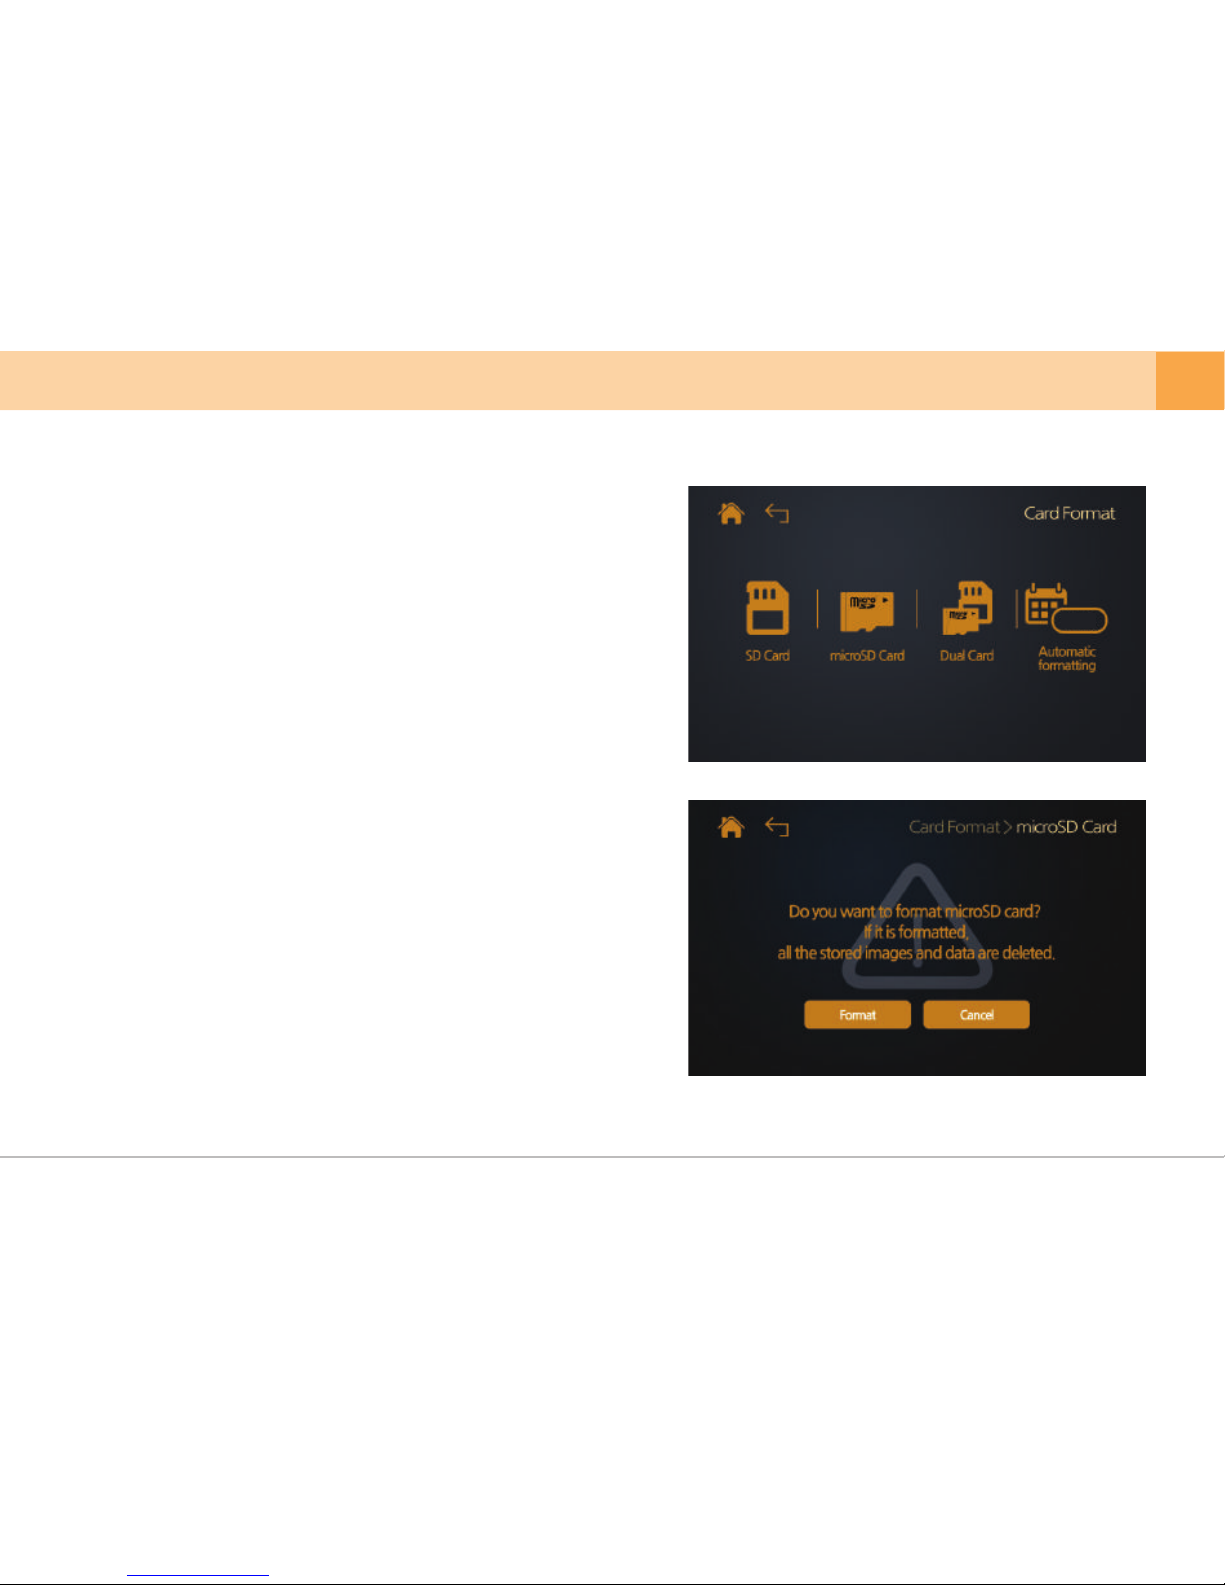
When you select the Card Format button on the menu screen, the following
screen will be displayed.
※
Formatting SD and microSD card once a month (8G) is recommended.
※
Be sure to save important data in other storage devices before you format the
memory cards.
▒
5-6. Card Format
▒
1. SD Card : Formatting SD Card.
2. microSD Card: Formatting microSD Card.
3. Dual Card : Formatting both SD and microSD Card at the same time.
4. Automatic formatting : Setting an automatic formatting cycle for SD Card and
microSD Card as every 4 week, 8 weeks, 16 weeks,
32 weeks or off.
4 wk
Page 32
32 ... DASH CAM
※
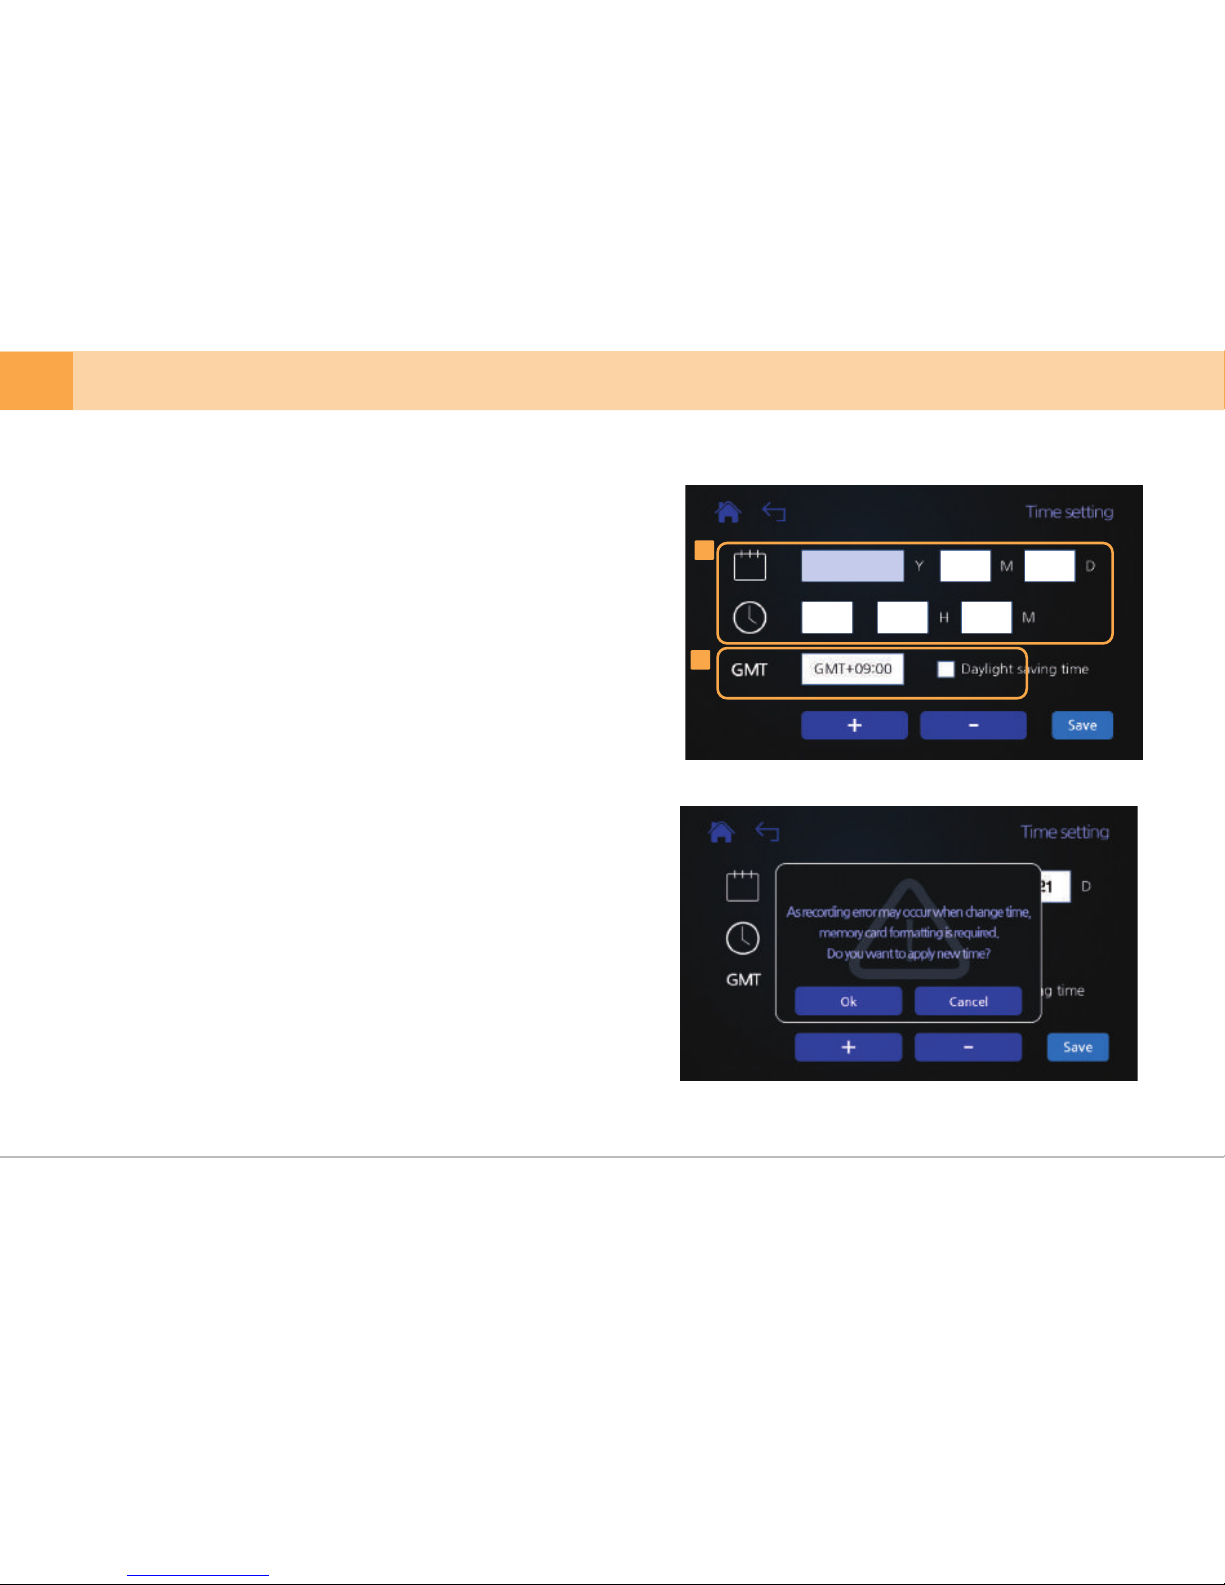
When you select the Time Settings button on the menu screen, the following
screen will be displayed.
※
Configuring the time setting is only necessary when the device has no GPS
module. Time will be automatically set when GPS module is installed.
※
When you change time, the memory card should be formatted.
1. Time Setting :
▒
5-7. Time Setting
▒
manually set time on the device.
2. GMT Setting : set GPS standard time.
1
2
2016 4 17
11AM 57
Page 33
※
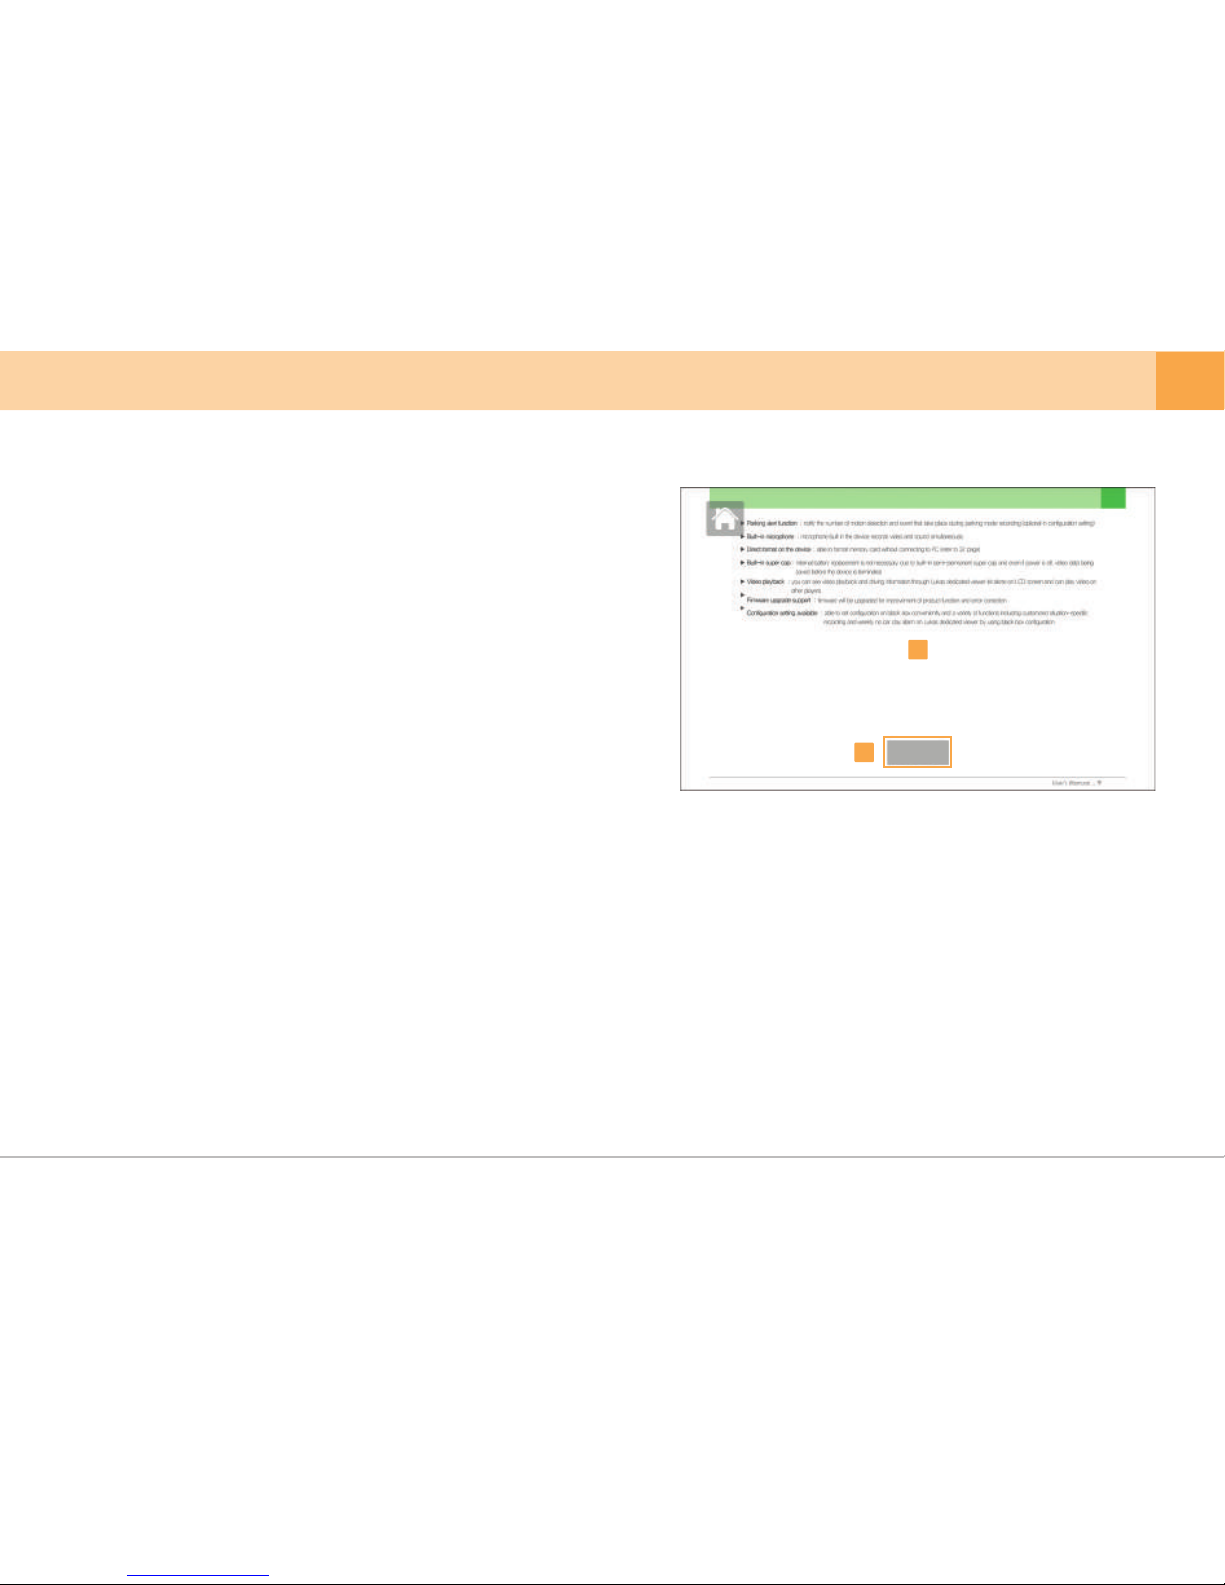
Touching the Manual button will display the picture on the right.
▒
5-8. User Guide
▒
1.
2.
To look up the Manual on the screen.
- For the next page, touch right side of the screen.
- For the previous page, touch left side of the screen.
The current page number
User's Manual ... 33
2
1
9/40
Page 34
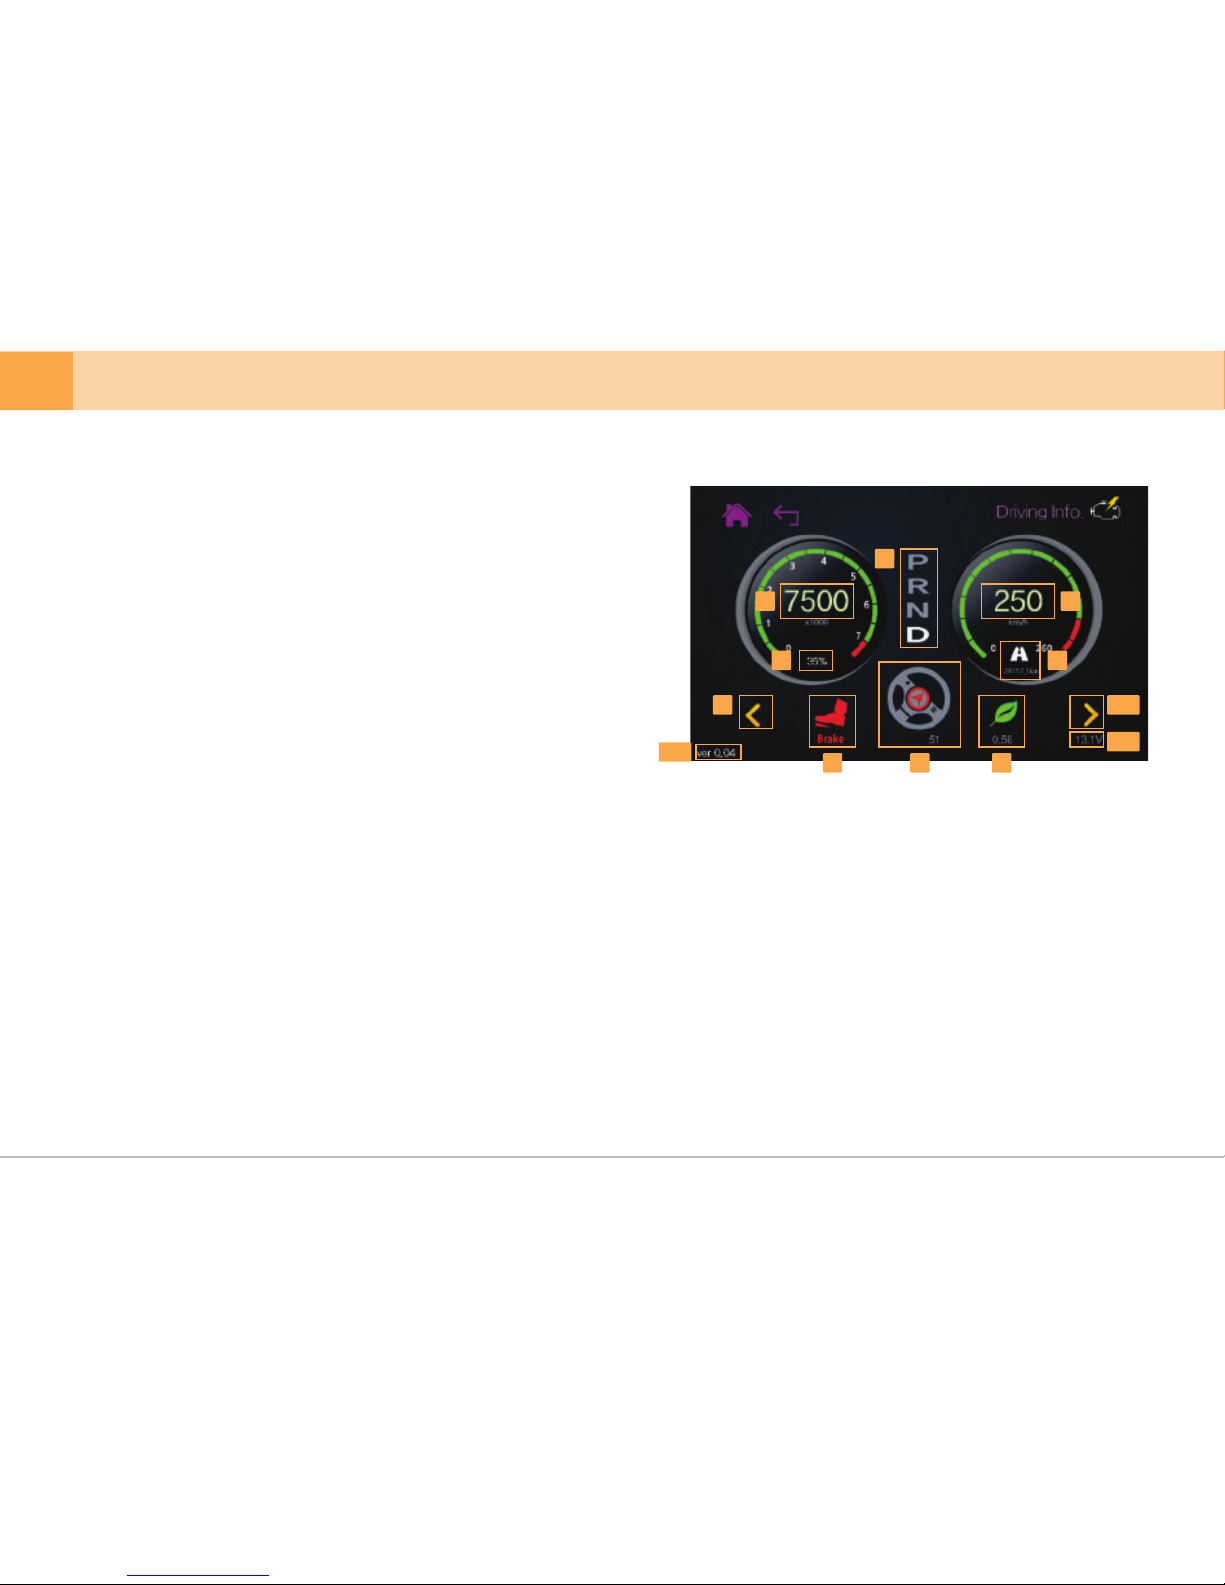
※
※
Voltage supplied to OBD II may differ from voltage supplied to vehicle
(battery voltage).
▒
5-9. OBD II
▒
1.
Gear position
OBD II version info
2.
Left turn light
Right turn light
3.
Brake status
4.
Steering wheel turning angle – steering wheel turning angle displayed
with numbers
5.
Eco Drive info
6.
Voltage supplied to OBD II
7.
RPM info
8.
Accelerator (displays intensity in the range of 0~99%)
9.
Current speed
10.
11.
12.
Mileage
1
2
3
4
5
6
7 8 9
10
11
12
34 ... DASH CAM
When you select the OBD II button on the menu screen, the following screen
will be displayed.
Page 35
▒
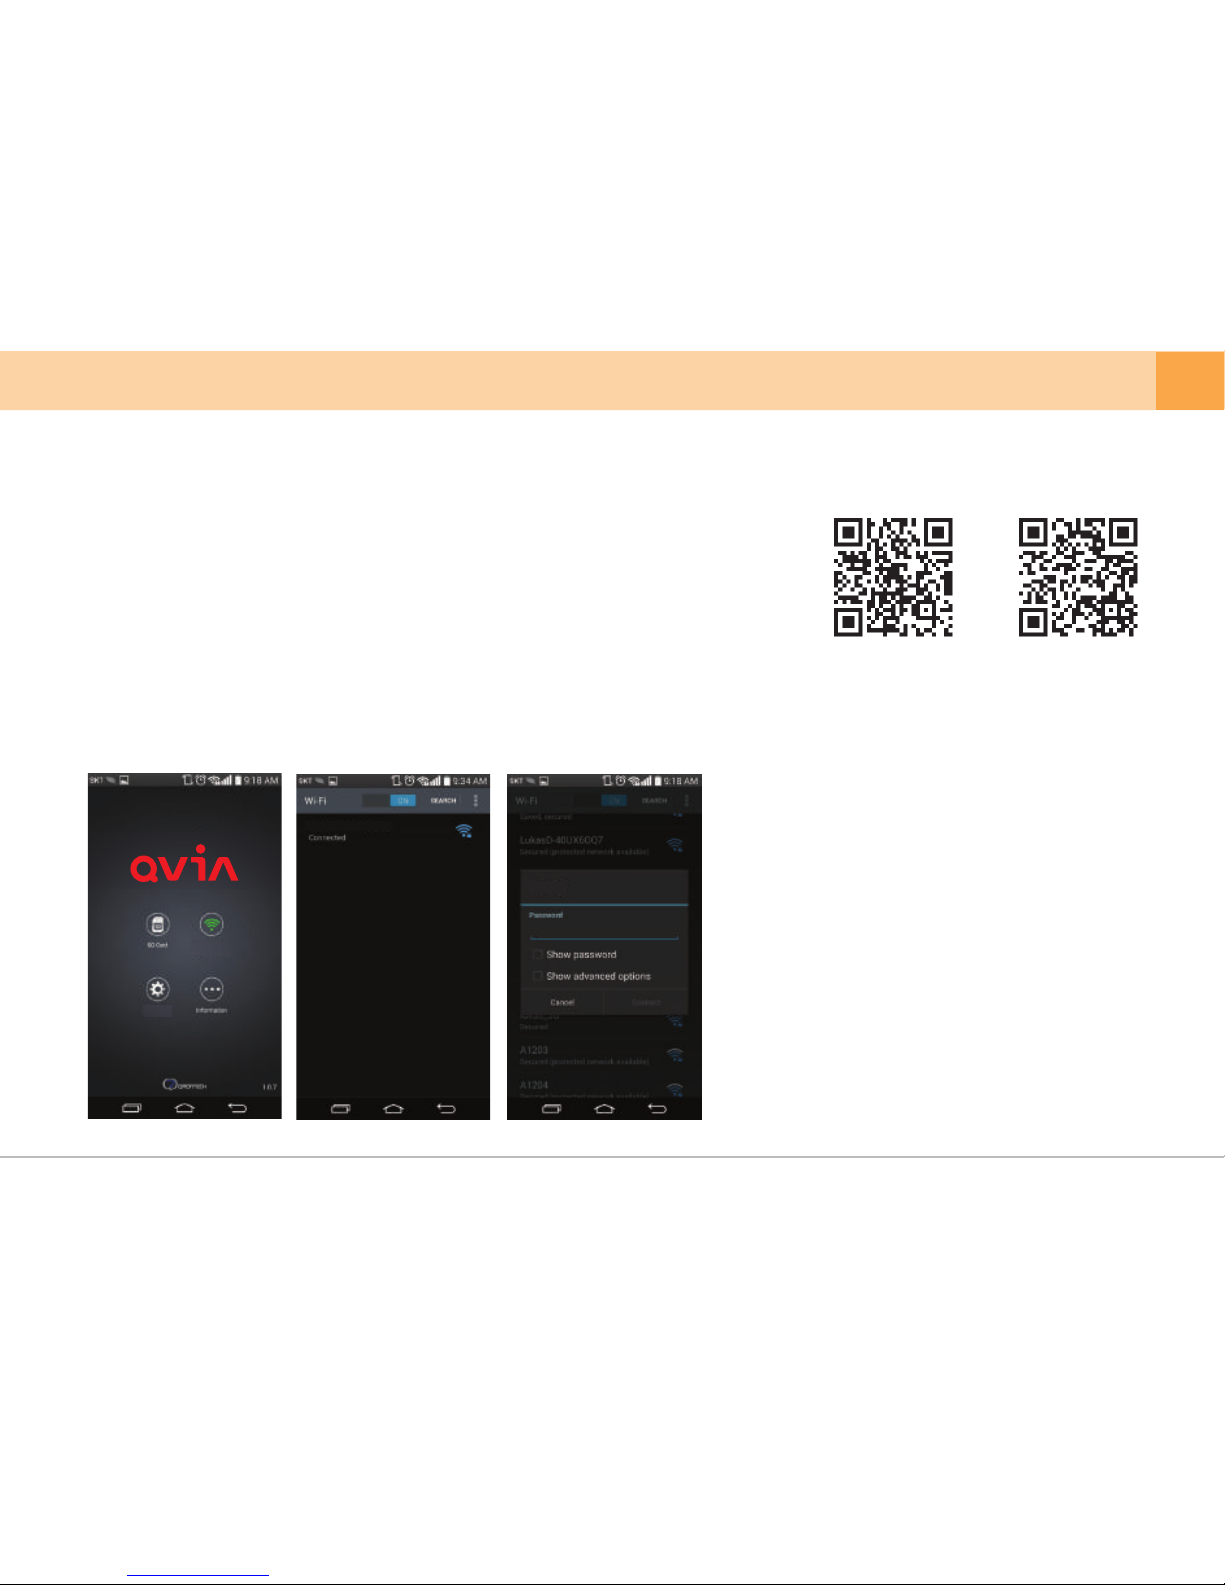
5-10. Getting Started with the Qvia App
▒
▒
5-11. Connecting to the Qvia App
▒
※
Download the Qvia application on your smartphone. The Qvia app can be found on the
Google Play Store and the App Store for iPhone.
※
※
※
※
Turn the Wi-Fi button to On located at the bottom of the device.
For playback of recorded videos using Wi-Fi, the reception may vary according to the data
transfer rate.
The range of Wi-Fi reception may vary.
The storage path of recorded videos may vary depending on the type of smartphone
※
Recorded videos will be saved with a bit rate of approx. 3Mbps if connected to Wi-Fi,
regardless of configuration setting.
※
For a stable connection, please remain within close proximity
with your dash cam.
※
When the device is connected with your smartphone,
the Qvia Connection icon will turn green.
※
Change your password to prevent others from accessing
your dash cam.
※
You can change the device name and password on the
Qvia Viewer program or Qvia app.
1.
Select the Qvia Connection button on the main screen.
2.
Select ‘Qvia’ on the Wi-Fi list.
3.
Enter in the default password : ‘11111111’
- The Qvia app can be used with Android 4.0 or later, iOS 5.0 or later.
- The Qvia app may not be supported depending on the type of smartphone.
[Connect smartphone with Wi-Fi][Qvia app main menu] [Enter password ]
[Download the Qvia App on
Google Play Store]
[Download the Qvia App on
Apple App Store]
User's Manual ... 35
QVIA
Connection
Settings
QVIA
QVIA
Page 36
▒
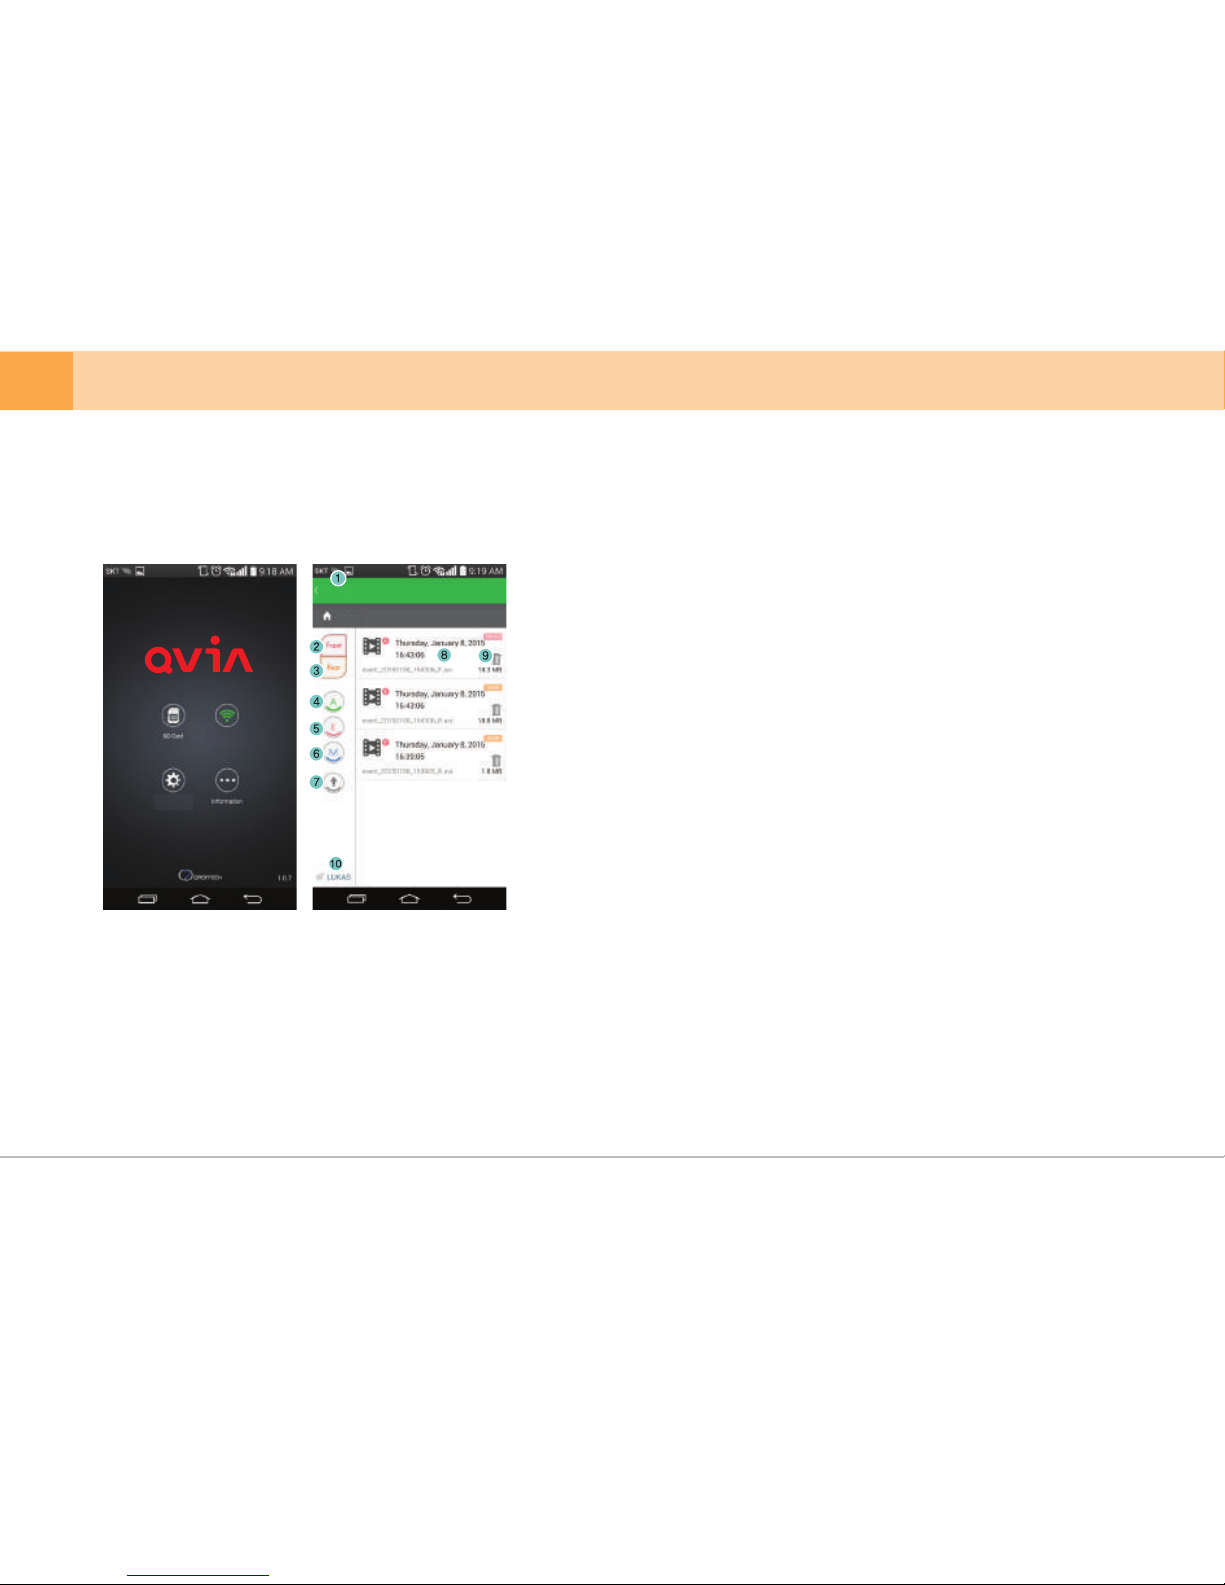
5-12-1. How to Use Qvia App - SD Card
▒
※
You can view your recorded videos saved on the SD Card right from the Qvia App
1.
Back : Go back to the Main Screen.
2.
Front Camera : Display videos captured by the Front Camera.
3.
Rear Camera : Display videos captured by the Rear Camera.
4.
Always Video : Display videos captured in Always Recording mode.
5.
Event Video : Display videos captured in Event Recoding mode.
6.
Motion Detection Video : Display videos captured in Motion Detection mode.
7.
Customize : Arrange the order of videos by time sequence (ascending/descending).
8.
Play : View video file.
9.
Delete : Delete video file.
10.
Wi-Fi : Go to ‘Qvia Connection’.
QVIA
Connection
Settings
QVIA
/QVIA
36 ... DASH CAM
Page 37
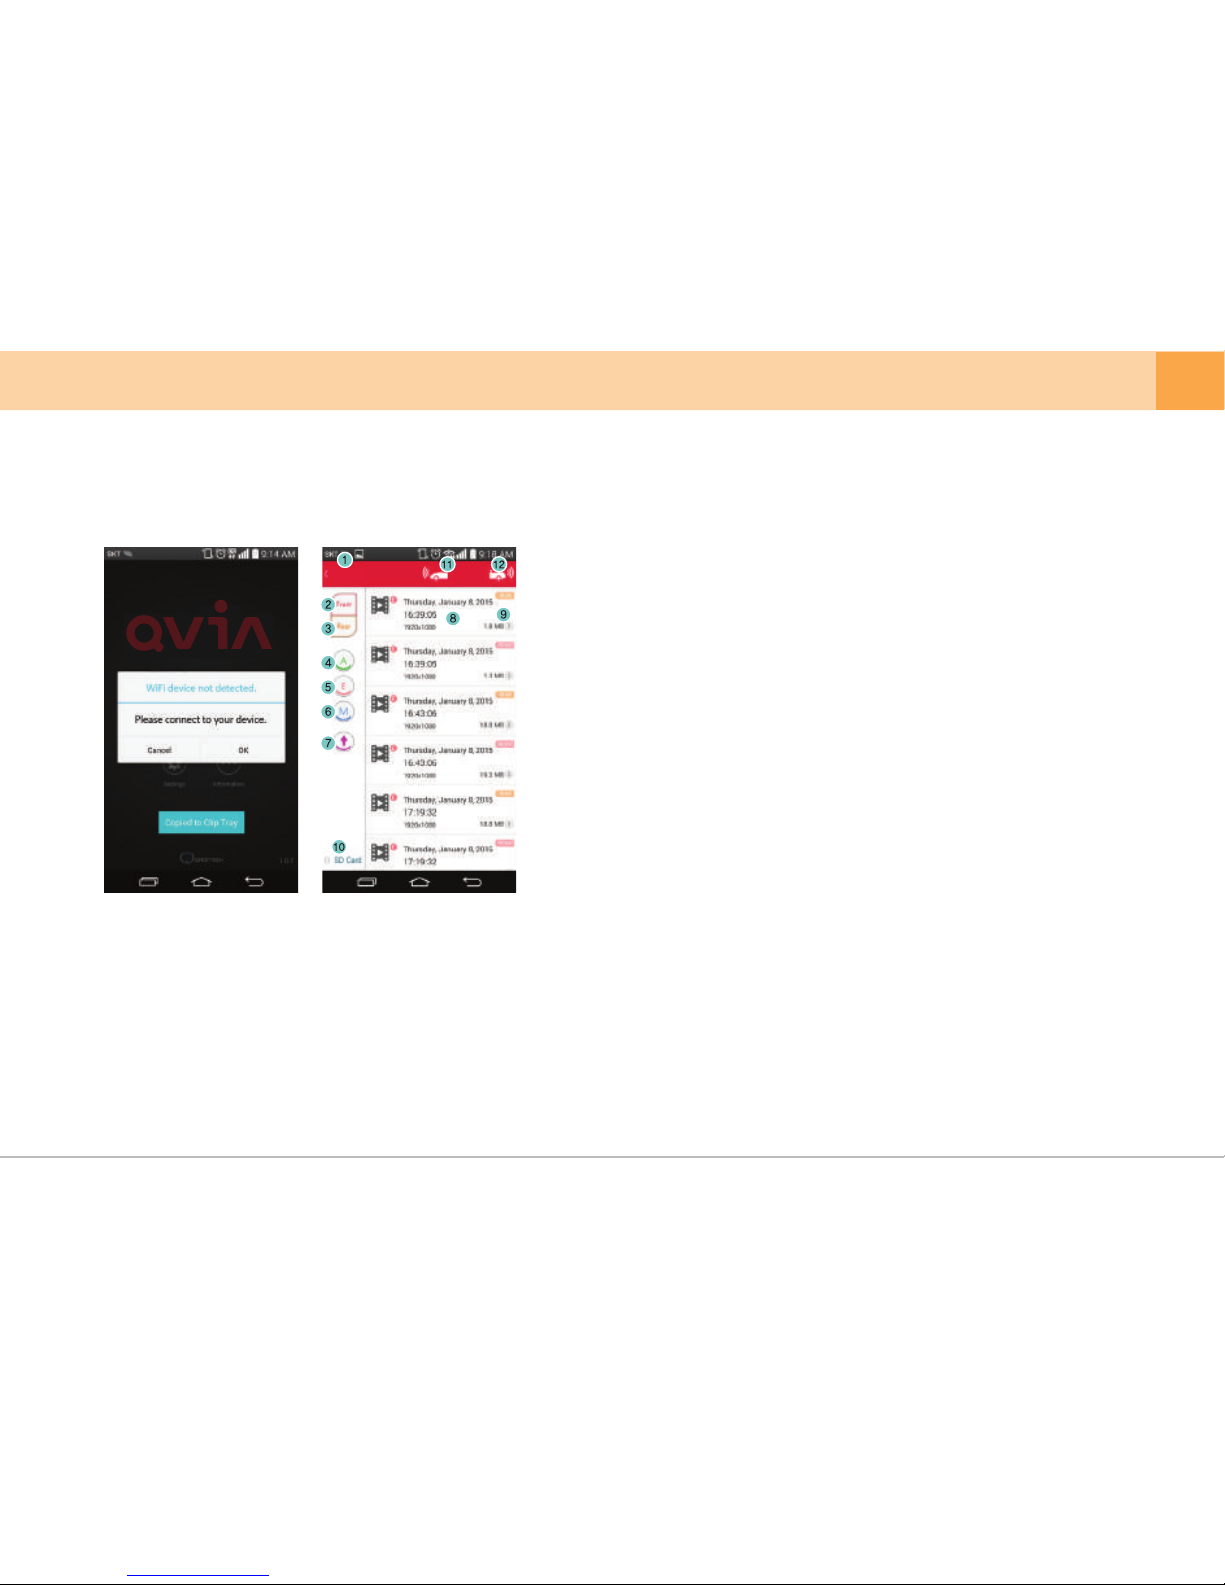
[ Disconnect Wi-Fi] [Wi-Fi Connection]
▒
5-12-2. How to Use Qvia App– Qvia Connection
▒
※
Connect with your Qvia device to view recorded videos. Green indicates a successful connection with the device.
1.
Back : Go back to the Main Screen
2.
Front Camera : Display videos captured by the Front Camera.
3.
Rear Camera : Display videos captures by the Rear Camera.
4.
Always Video : Display videos captured in Always Recording mode.
5.
Event Video : Display videos captured in Always Recording mode.
6.
Motion Detection Video : Display videos captured in Motion Detection mode.
7.
Customize Order : Arrange the order of videos by time sequence
(ascending/descending).
8.
Play : View video file
9.
Download : Save video file onto your Smartphone as a movie clip.
※ File path may vary depending on the type of smartphone and OS.
10.
SD Card : Go to ‘SD Card’.
11.
Front Camera LIVE : View a live video stream from the Front Camera.
12.
Rear Camera LIVE : View a live video stream from the Rear Camera.
User's Manual ... 37
QVIA
Page 38
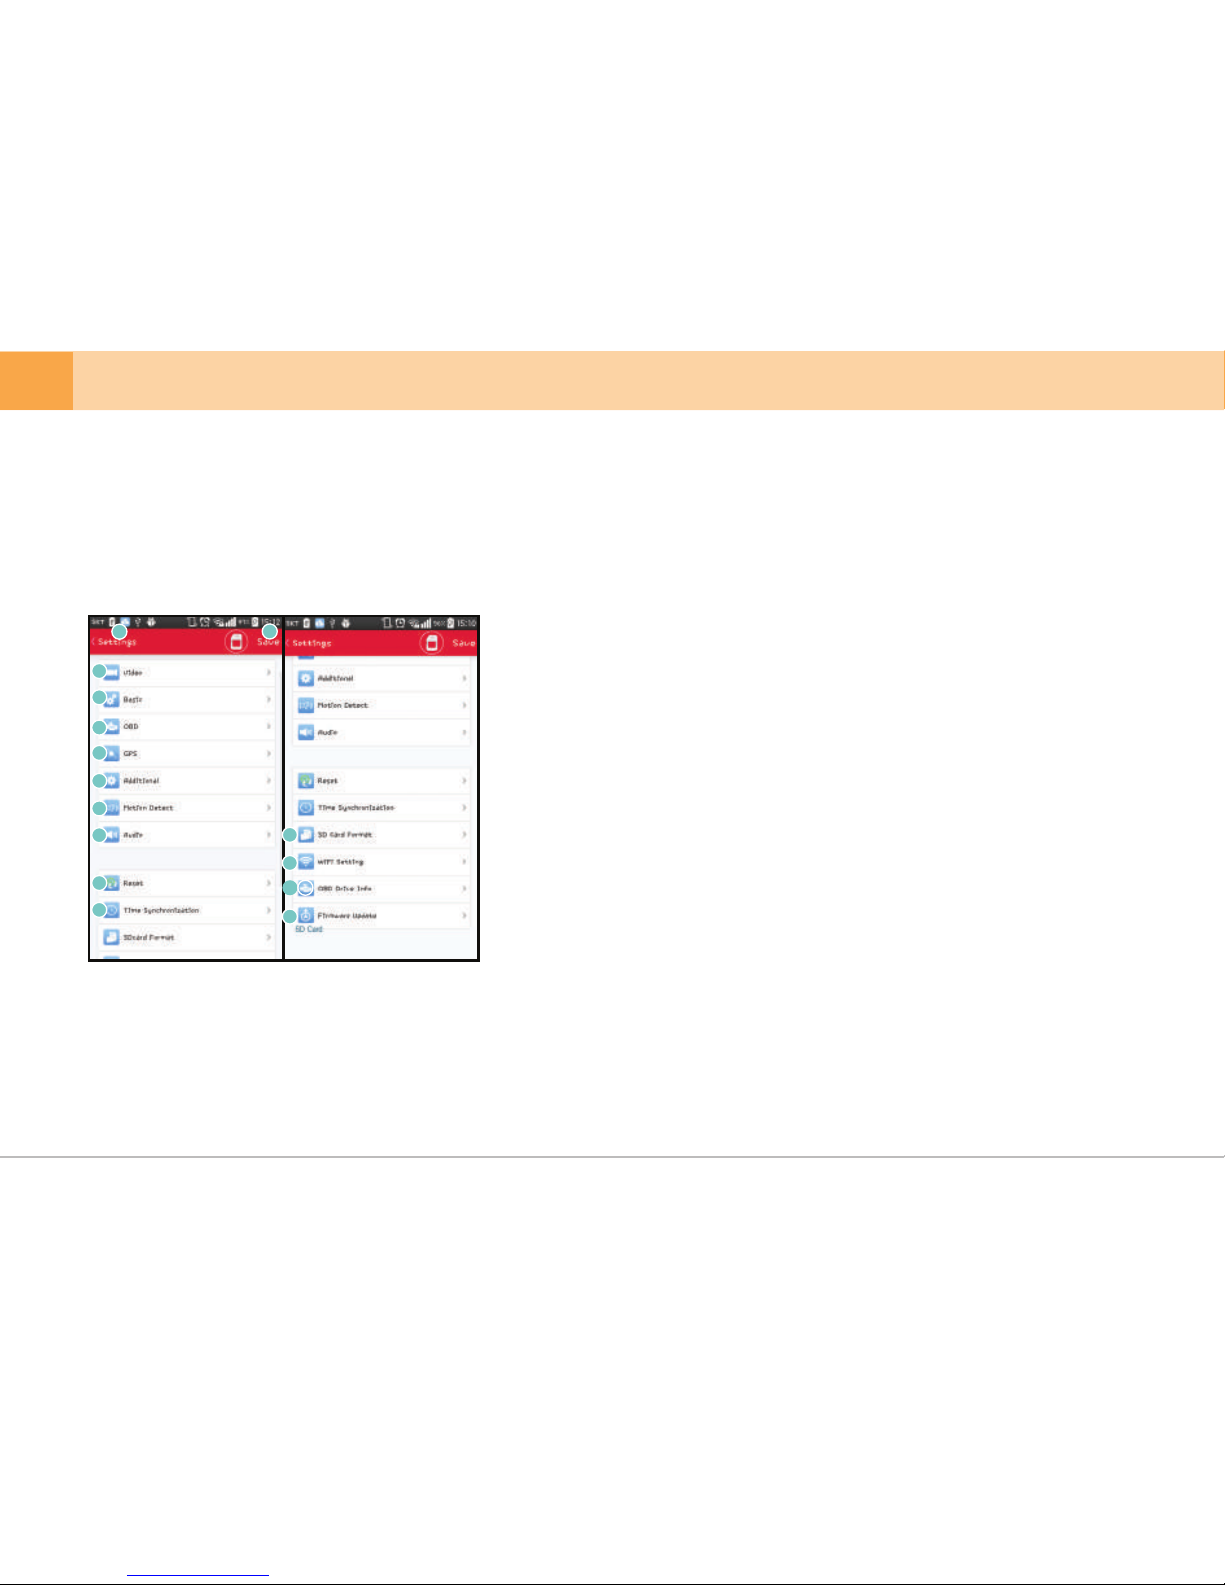
▒
5-12-3. How to Use Qvia App - Settings
▒
※
※
Menu items may vary depending on the model of your device.
Keep the device turned on while saving changed setting data
※
Settings only available when the device is connected to your Smartphone.
1.
Back : Go back to the Main Screen.
2.
Save Changes : Changes will be saved.
3.
Video : Go to Video settings menu.
4.
Basic : Go to Basic settings menu.
5.
OBD : Go to OBD II settings menu.
(Only applicable to devices connected to OBDII module)
6.
GPS : Go to GPS settings menu.
7.
Additional : Go to Additional settings menu.
8.
Motion Detection : Go to Motion Detection settings menu.
9.
Audio : Go to Audio settings menu
10.
Reset : Reset all settings applied to the device to default.
LDC : Go to LCD settings menu.
11.
Time Synchronization : Synchronize time on the device with Smartphone.
12.
SD Card Format : Format microSD / SD Card.
13.
WiFi Settings : Verify changes to the Wifi network of the device.
14.
OBD Driving Information : View the OBD driving screen.
15.
※ Only applicable to devices connected to OBD II module
16.
Firmware Update : Updates available for your device.
1
2
3
4
5
6
7
10
8
9
11
12
13
15
14
38 ... DASH CAM
Page 39
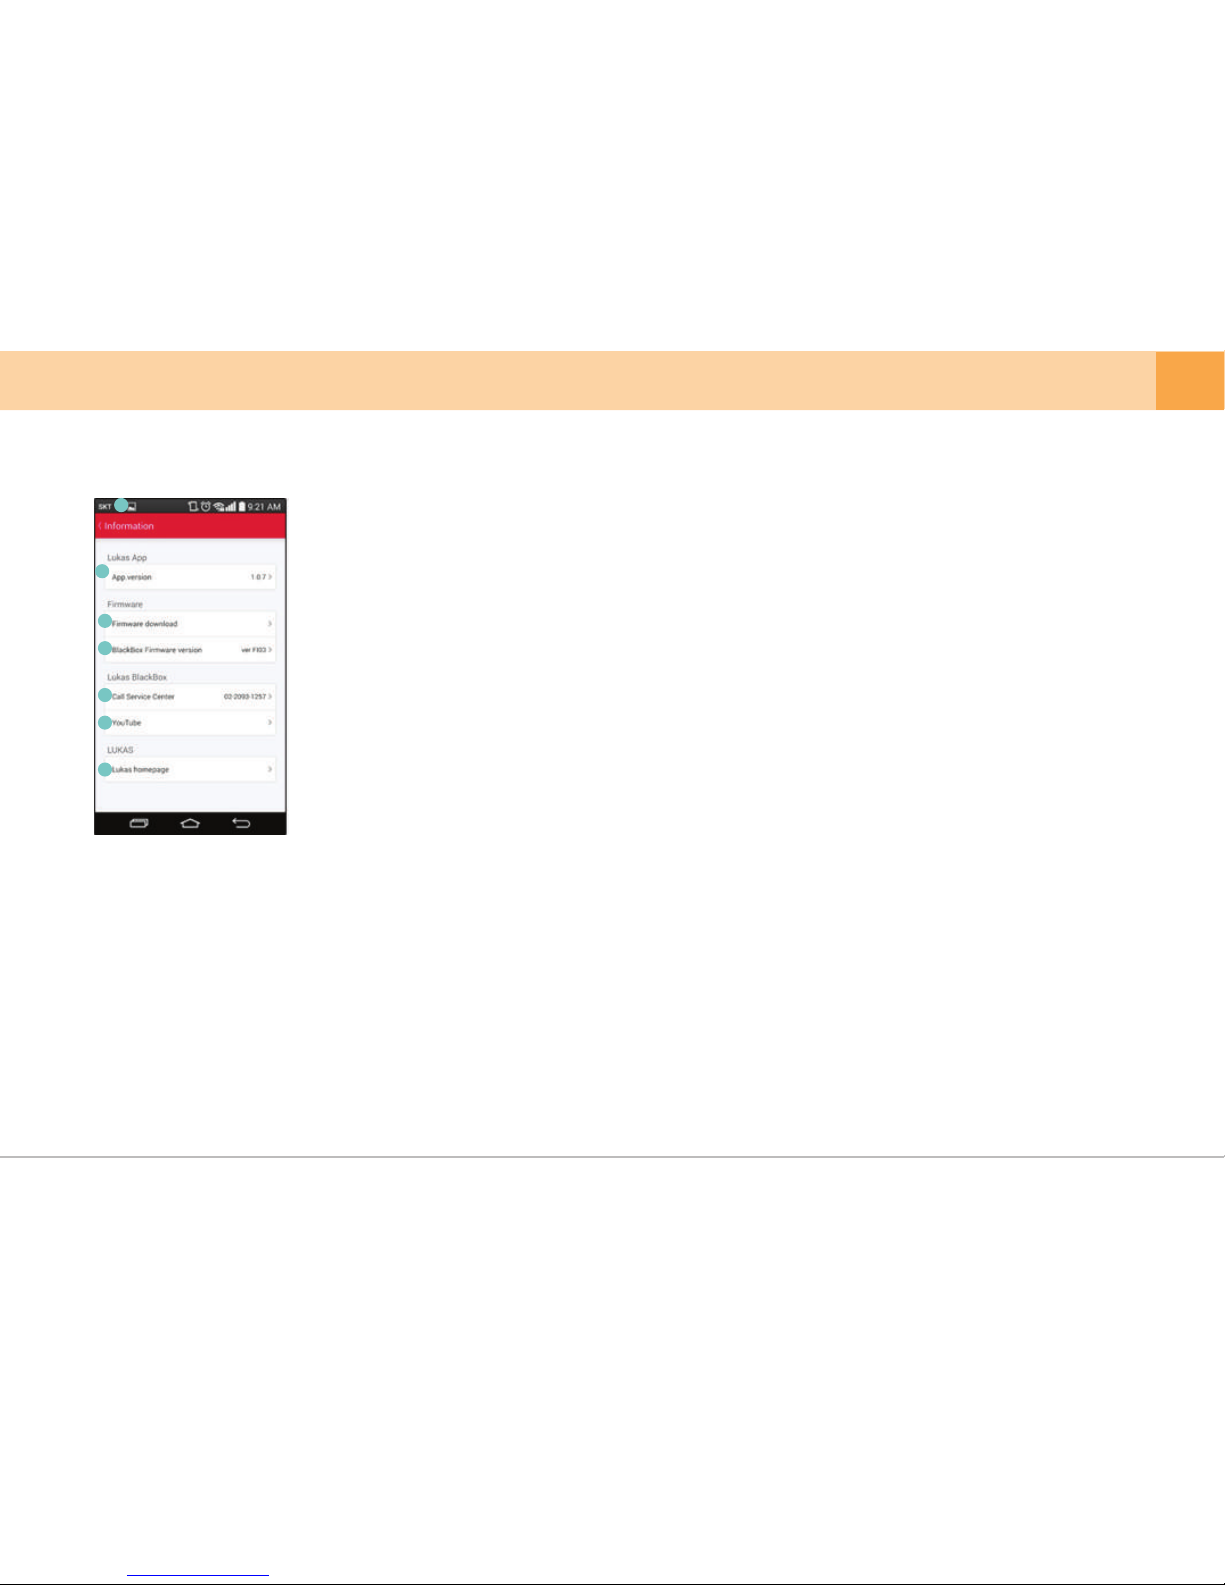
▒
5-12-4. How to Use Qvia App - Information
▒
▒
5-13. How to Upgrade Firmware on Qvia App
▒
1. Connect Qvia application with the device to view current firmware version. (’Information -> Dash Cam Firmware version’)
2. Go to Firmware Download (’Information -> Firmware Download’) after disconnecting Wi-Fi on your smartphone.
3. Download the latest firmware available (Charges may apply for data usage).
4. Make sure the device and your smartphone is connected via Wi-Fi for uploading the downloaded fimware.
5. Upload firmware to your device. (’Qvia Configuration -> Firmware Update’)
6. Please wait until firmware has completely been installed, and the device to restart.
※ Please do not manually restart your smartphone or the device while the firmware is being installed.
1.
Back : Go back to the Main Screen.
2.
Application Version : Shows current mobile app version.
3.
Firmware Download : Download the latest firmware.
4.
Firmware Version : Shows current firmware version of your device.
5.
Call Service Center : Contact information of Qvia
6.
YouTube : View Qvia YouTube channel.
7.
Qvia Homepage : Visit Qvia homepage for more information.
1
2
3
4
5
6
7
User's Manual ... 39
Page 40
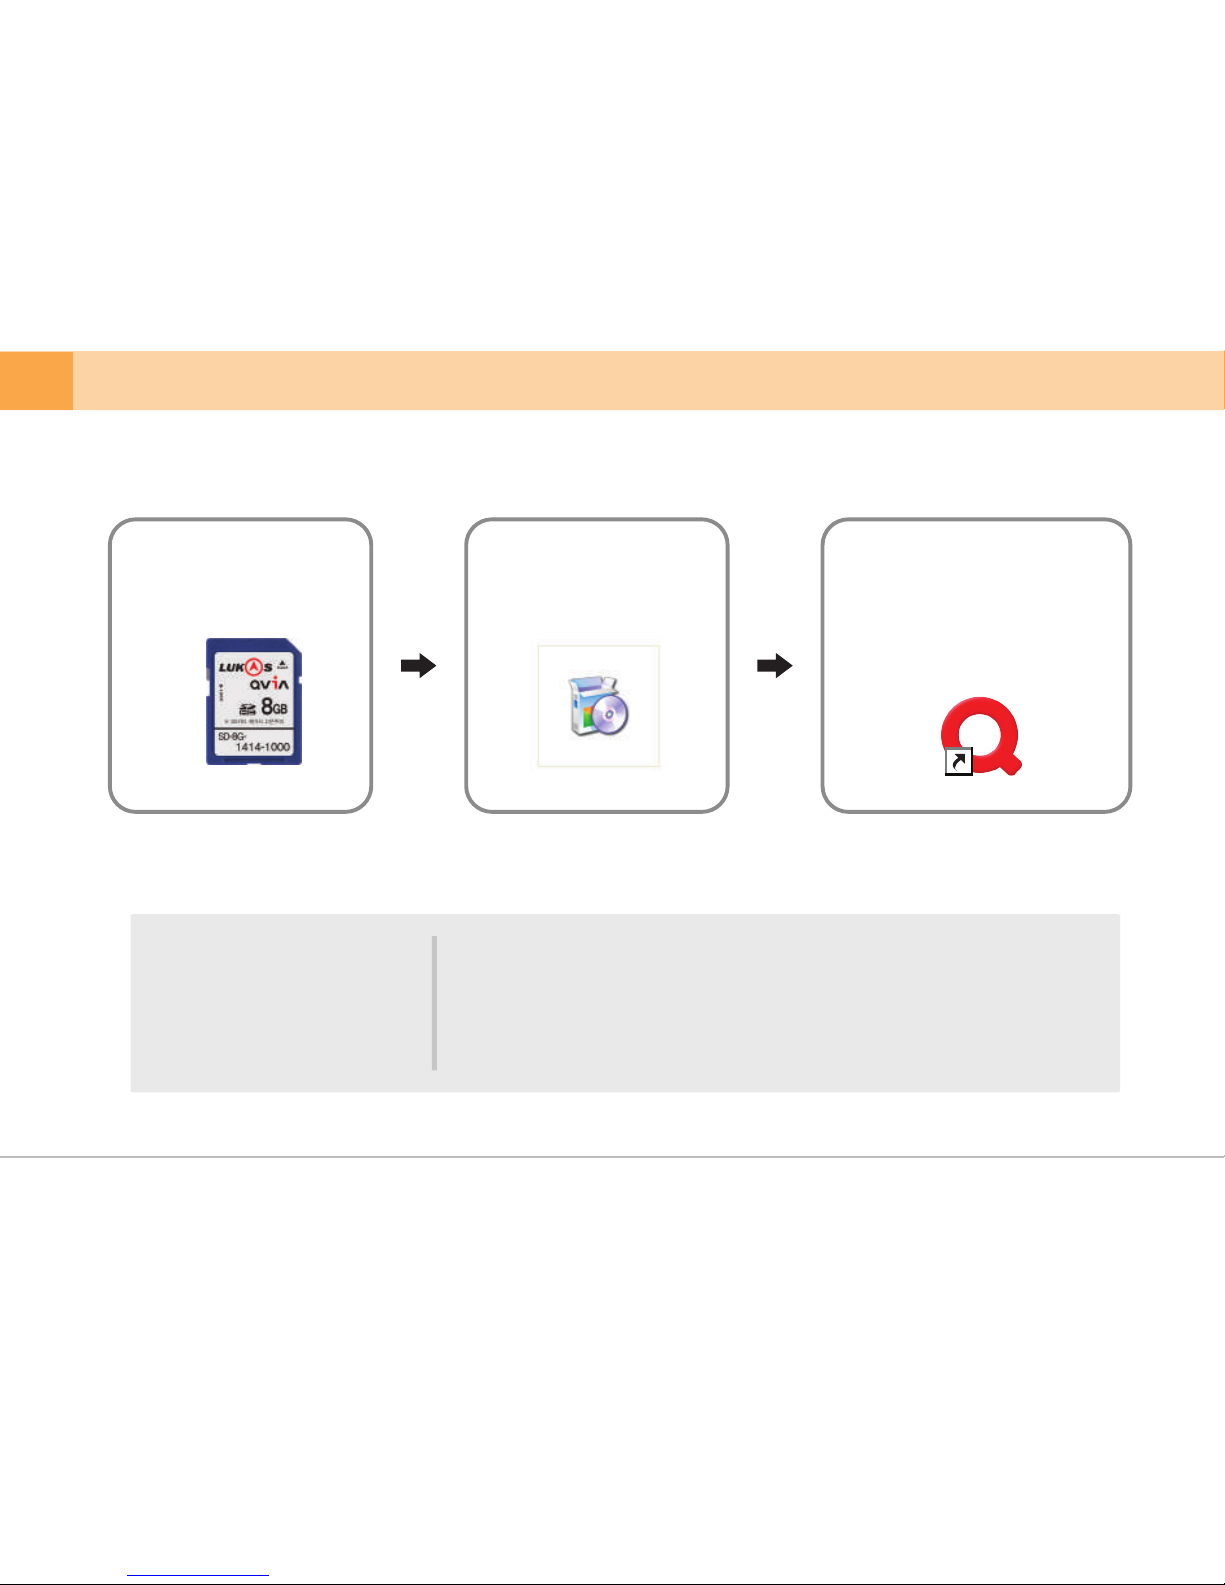
1. Program Installation
▒
5-14. Viewer
▒
1
Connect the SD card
to PC.
Setup.exe
2
Click “Setup.exe” to
install Qvia viewer.
3
※ For best results, please use the Qvia viewer distributed for your device.
There may be occasional display and sound cuts, as well as changes in play speed and other errors depending on computer specifications.
※ Qvia Viewer can be downloaded at any time from our website (www.qvia1.com).
※ Name of viewer icon may vary depending on OBDII compatibility.
OS: Windows XP SP3, Vista (32Bit), WIN 8 (32/64bit)
H/W: Quad core 2.8Ghz/ 4G RAM
Web browser: Microsoft internet explorer 7.0
Direct X version: Direct X9.0 (JUNE2010)
Others: Windows.NET Framework 4
Recommended PC
specifications for using
Qvia viewer
Double click the shortcut
once installation is
completed.
(The icon name may differ
according to the product
model.)
40 ... DASH CAM
R975
Page 41
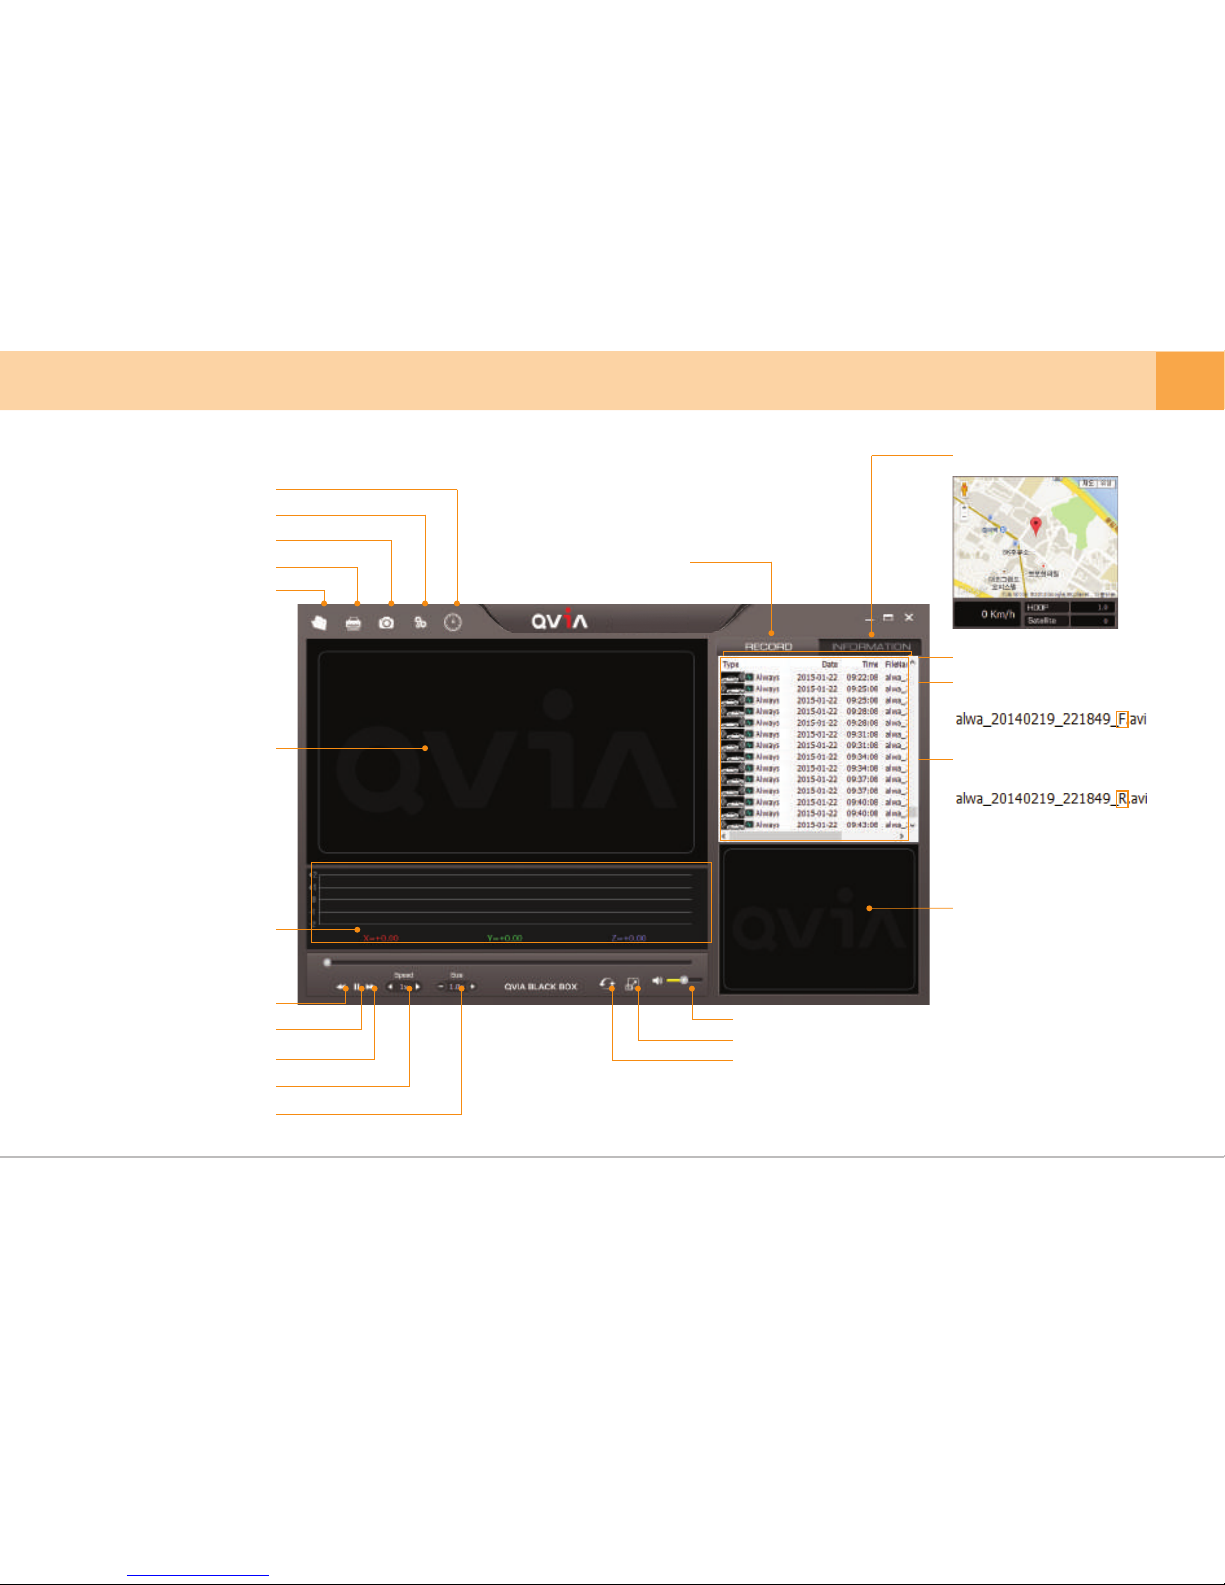
2. Viewer screen composition
Load file
Main video play window
G-sensor (acceleration)
graph
Rewind video by 10 seconds
Pause
Forward video by 10 seconds
Double the speed of video playback
Adjust sound volume
View full screen
Convert Main/Sub video play window
Zoom in/Zoom out
Print video being played
Screenshot
Settings
Set time
File list
GPS info
File list & event info
Front view camera display icon
Rear view camera display icon
Sub video play window
Front view video file name :
Rear view video file name :
※ GPS map information may not be displayed if PC is not connected to the Internet or GPS reception is unstable.
※ Map synchronization is supported only with Internet Explorer 7.0 or above.
※ To take full advantage of Full HD resolution, play video in full screen.
※ Viewer image may be different when in sync with OBD II.
R975
User's Manual ... 41
Page 42
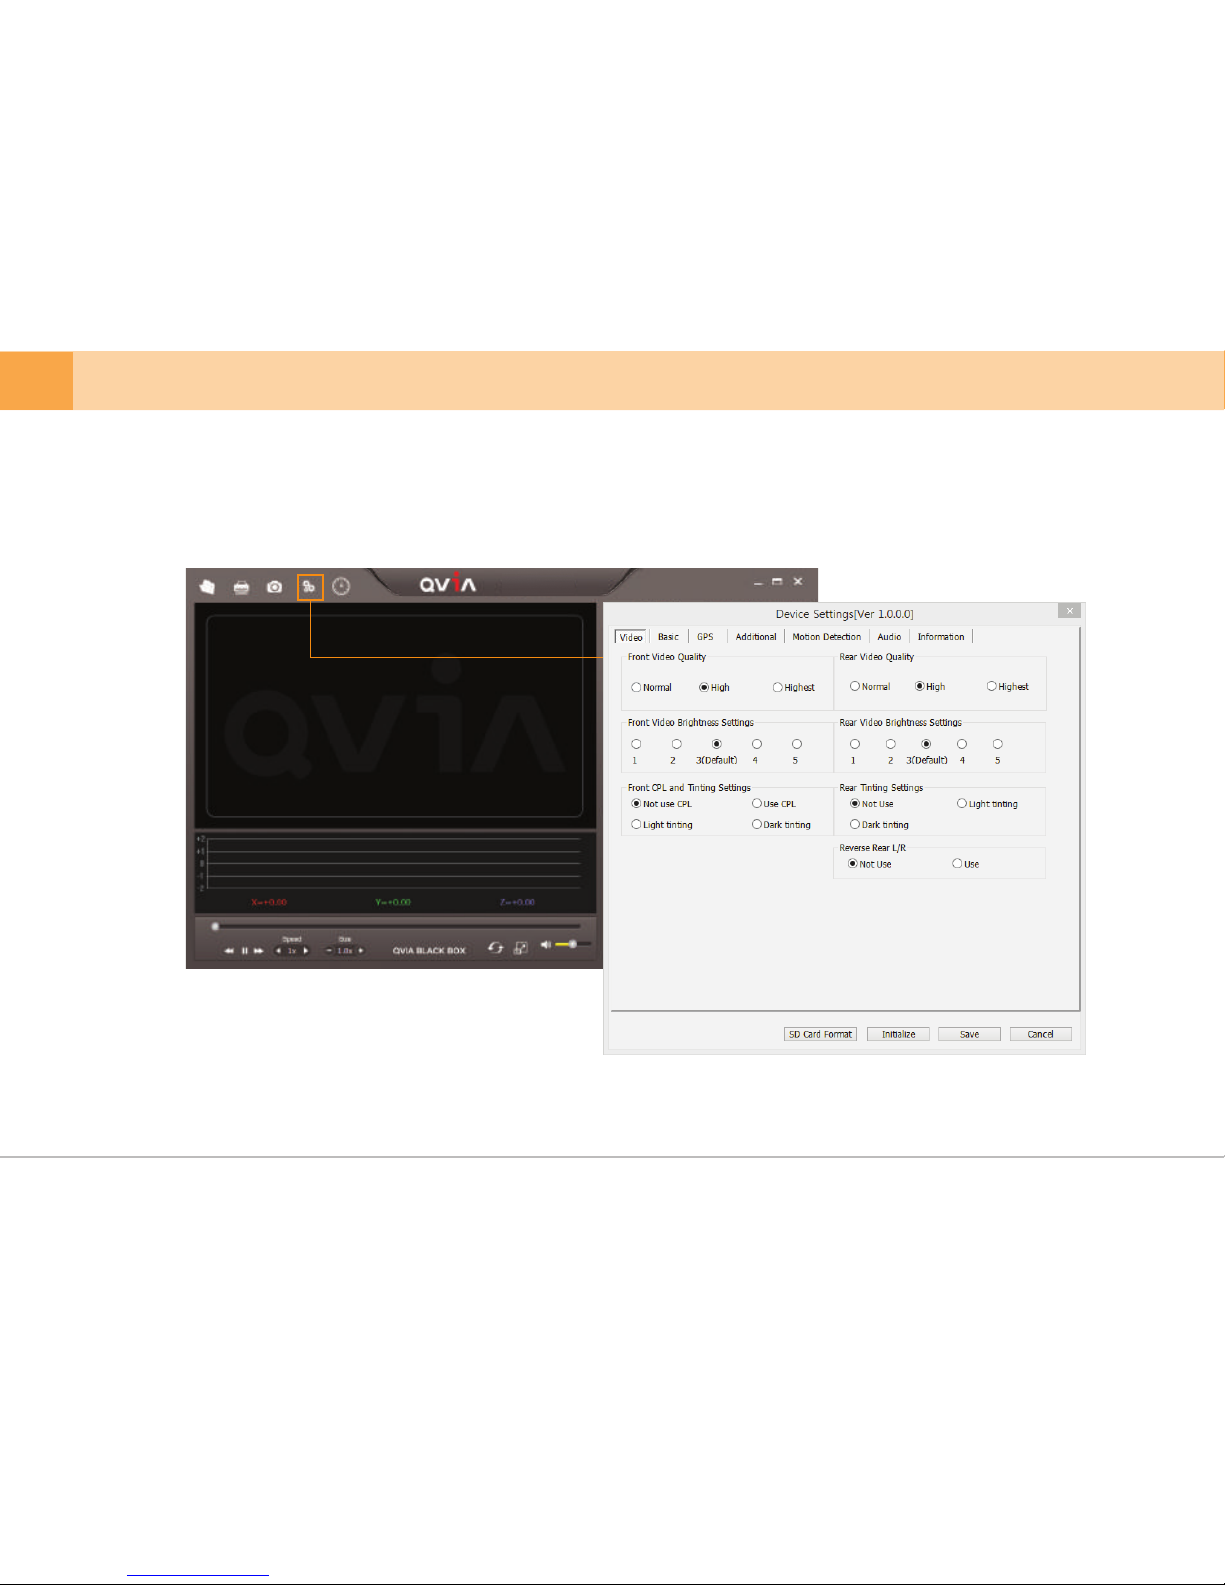
3. Settings
Users can change device settings (i.e. recording configuration, system configuration, additional functions, and time, etc.) to their preferences by altering
‘Device Settings’ on the Viewer program menu.
-
R975
42 ... DASH CAM
Page 43
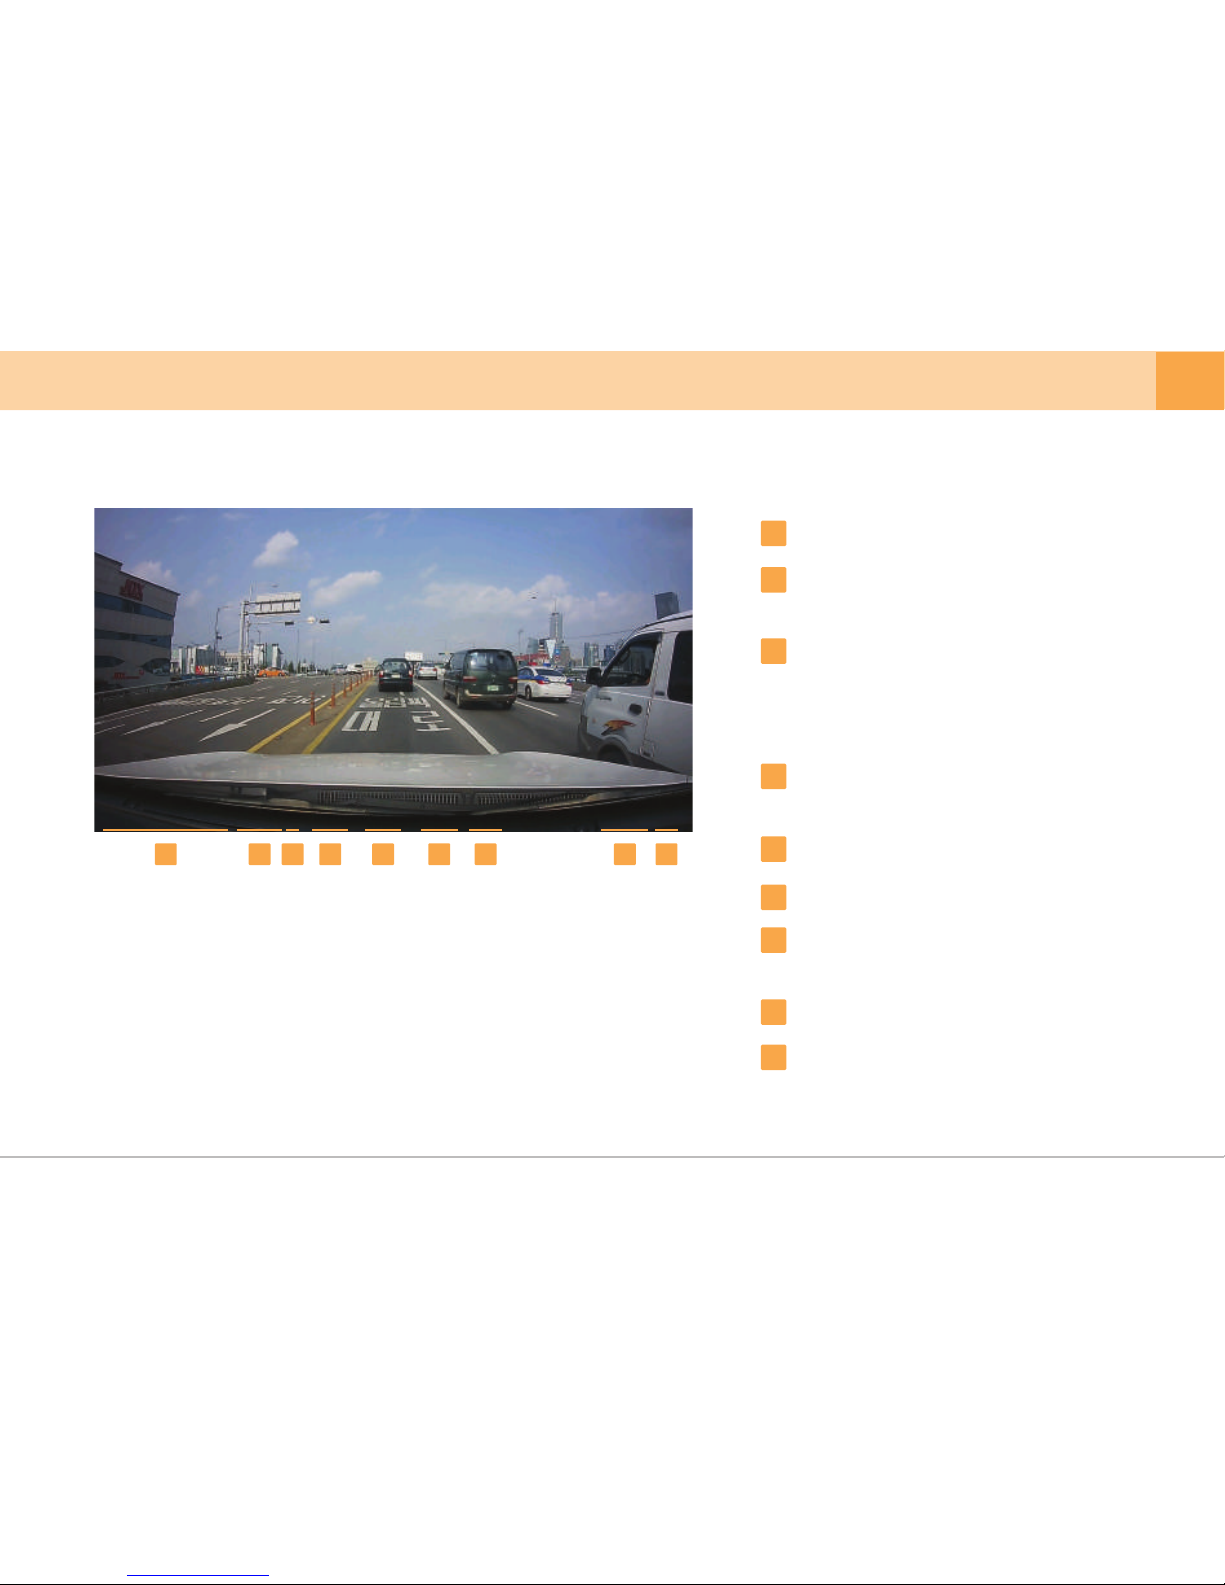
4. Video Playback Screen
Date & Time
Driving Speed
※ Only with GPS or OBD II
GPS Reception Status
-A: GPS connected
-V: GPS NOT connected
-F: GPS Power NOT supplied
Mileage
※ Only with GPS or OBD II
Dash Cam Voltage level
Recording Mode
Vehicle Plate Number
(enter up to 8digits.)
Device Model
Image Quality (video saving data speed/sec)
※ S : Best quality
1
2
3
4
5
6
7
8
9
1 2 3 4 5 6 7 8 9
2016/01/07 11:57:00 33Km/h A 2.7km/ /12.1V always /Qvia /R975/ S
User's Manual ... 43
Page 44
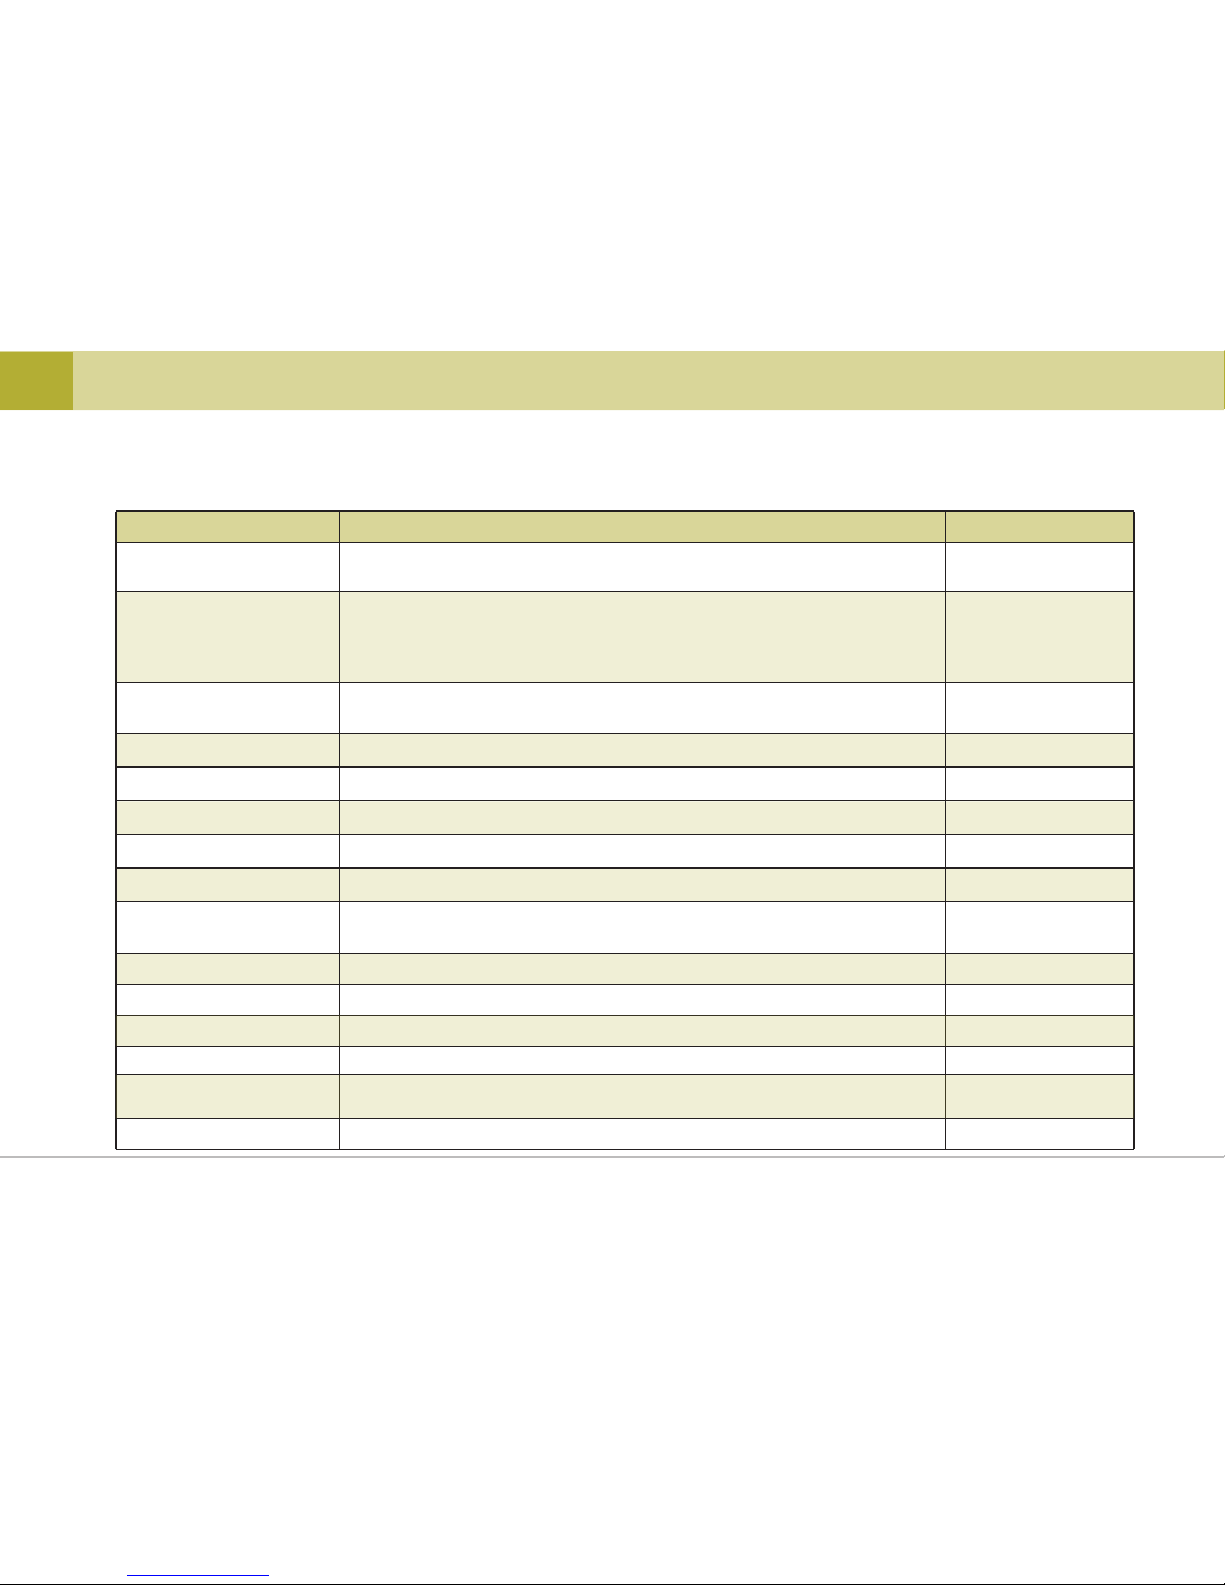
6. Specifications & Customer Service
▒
6-1. Specifications
▒
Item RemarkSpecification
*Specifications are subject to change without notice for improvement.
Camera
Front : Full HD dedicated SONY Exmor R CMOS Sensor, 1/2.8(inch)
Rear : Full HD dedicated SONY Exmor CMOS Sensor, 1/2.9(inch)
Viewing Angle
Front : Diagonal(approx. 135°)
Effective angle: Horizontal (approx. 107°), Vertical (approx. 55°)
Rear : Diagonal(approx. 130°)
Effective angle: Horizontal (approx. 104°), Vertical (approx. 54°)
Recording resolution &
Frame
Front : 1920×1080p(Full HD), 30fps
Rear : 1920×1080p(Full HD), 24fps
LCD resolution & Size
Video Compression
Gravity Sensor
GPS
Storage Media
Player Program
Audio
Power & Current consumption
Low Voltage Cut-off
Operating &
Storage Temperature
Size/Weight
H.264(AVI format) / Codec profile : HIP(High profile)
Built-in 3-axis Impact sensor(impact, sudden brake, sudden start)
Ublox 7 / Ublox 8
Type A, Brighteness 2
Including GPS
SD card : SDHC / SDXC memory card (standard 8G, max. 512G)
microSD : microSDHC / microSDXC (standard 8G, max. 512G)
General media player / Qvia viewer
Built-in speaker, Microphone
Power: DC 9V~24V, Power consumption: 340㎃ (13.4V) , approx. 4.5W
Able to set time & voltage, supports multi-booting
Operating : -20℃ ~ 70℃(-4℉~158℉)
Storage : -30℃ ~ 80℃(-22℉~176℉)
Front : 100 X 101 X 33.3 (mm) , 151g / Rear : 50 X 26 X 31 (mm), 25g
Resolution(800x480) / Size : 4”(inch), Built-in Touch
44 ... DASH CAM
Wi-Fi
802.11b/g/n (2.4~2.4835 GHz)
Page 45
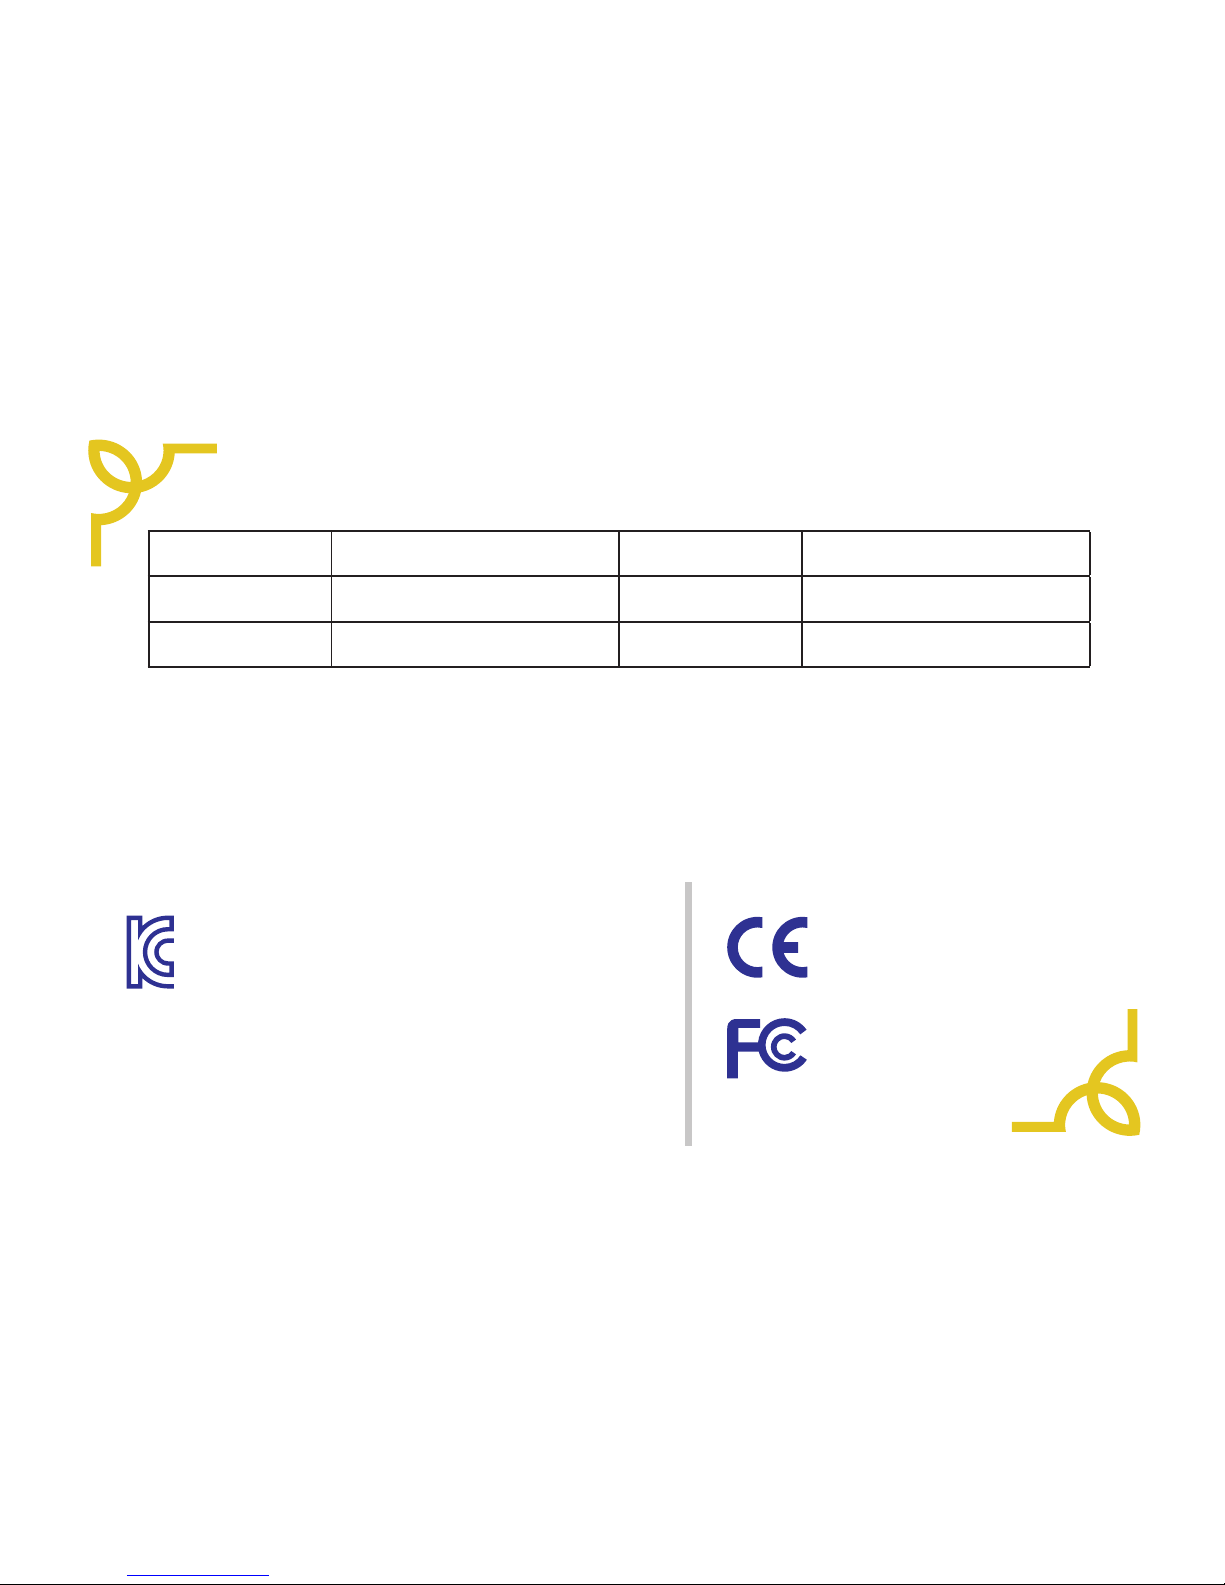
Quality Assurance
Model Name Product S/N
Customer Name
Date of Purchase MM / DD / YY
Customer Phone No. Place of Purchase
1. A standard 1-year warranty is provided from the date of purchase.
However, a six-month warranty is provided for accessories, including memory card.
2. This product has undergone strict quality control and inspection procedures.
5. We are not responsible for any costs incurred to install or uninstall the product, as it is not covered by warranty.
4. This user manual is a proof of purchase and warranty and will not be re-issued. Take extra care keeping the manual safe.
3. Be sure to bring this manual with you when you request repair service.
▒
Certified company info.
▒
1. Certified company : Qrontech Co., Ltd.
U.S. Federal Communications
Commission /
Electromagnetic Wave
Compatibility Certificate
2. Device name (model name) : QVIA Dash Camera(Dash Cam)
3. Certificate No. :
4. Manufacturer/Manufacturing country : Qrontech Co., Ltd. /
Korea
Seller and user must note that this device is electromagnetic wave
compatible only for business use, not domestic.
Conformity European Marking
EU Joint Specification Certificate
(R975, R975G, R975D, R975GD)
MSIP-REM-QRN-QRFHD
 Loading...