

Page 1

NEUTON
Trimmer
An Attachment to the
NEUTON Cordless Electric Mower
and the NEUTON Power Pod
NEUTON Cordless
Electric Trimmer
Safety & Operating
Instructions
Model: MA 3.0
COUNTRY HOME PRODUCTS®, INC.
www.neutonowners.com
NEUTON Cordless
Electric Trimmer
Safety & Operating
Instructions
Model: MA 3.0
COUNTRY HOME PRODUCTS®, INC.
www.neutonowners.com
NEUTON
Trimmer
An Attachment to the
NEUTON Cordless Electric Mower
and the NEUTON Power Pod
Page 2

Dear NEUTON Owner,
Thank you for purchasing the NEUTON Cordless Electric Trimmer Attachment!
This incredibly handy, patented device enables you to put the finishing touches on your lawn. No
more second, or even third trips around your property to trim around hard-to-reach spots, or to
edge along walkways, driveways, and garden borders with separately-powered equipment.
This attachment makes your NEUTON the only mower in the world that also trims and edges!
You’ll wonder why no one ever thought of this smarter way to maintain your lawn before.
Please take a few minutes to read this manual, to familiarize yourself with the proper use of this
work-saving attachment. And if you have any questions at all — now or in the future — please call
us, toll-free, at 1-(866)-NEUTON1 (638-8661), and one of our Technical Support Representatives
will be happy to assist you.
Thank you again for choosing the NEUTON — the new idea in lawn care!
Sincerely!
for all of us at...
Country Home Products, Inc.
Country Home Products
®
, Inc.
Meigs Road
P.O. Box 25
Vergennes, VT 05491
Toll-free phone: 1-(866)-NEUTON1 (638-8661)
Fax: 1-(802)-877-1213
Web site: www.neutonowners.com
E-mail: [email protected]
COPYRIGHT AND TRADEMARKS
2004 Country Home Products®, Inc. NEUTON™and the NEUTON logo are trademarks of Country Home Products, Inc.
All rights reserved.
D
OCUMENTATION
Written by PDI Creative Communication
Page 3

NEUTON MA 3.0 Cordless Electric Trimmer Safety & Operating Instructions iii
Table of Contents
Chapter 1: Introducing the NEUTON Trimmer . . . . . . . . . . . . . . . . . . . . . . . . . . . . . . . .1
About this Manual . . . . . . . . . . . . . . . . . . . . . . . . . . . . . . . . . . . . . . . . . . . . . . . . . . . . . . . . . . .1
Chapter 2: Important Safety Considerations . . . . . . . . . . . . . . . . . . . . . . . . . . . . . . . . .2
Safety and Information Labels . . . . . . . . . . . . . . . . . . . . . . . . . . . . . . . . . . . . . . . . . . . . . . . . . .2
Protecting Yourself and Those Around You . . . . . . . . . . . . . . . . . . . . . . . . . . . . . . . . . . . . . . . .3
Dressing Appropriately . . . . . . . . . . . . . . . . . . . . . . . . . . . . . . . . . . . . . . . . . . . . . . . . . . . . . . .3
Preparing to Use Your Trimmer . . . . . . . . . . . . . . . . . . . . . . . . . . . . . . . . . . . . . . . . . . . . . . . . .3
Operating Your Trimmer . . . . . . . . . . . . . . . . . . . . . . . . . . . . . . . . . . . . . . . . . . . . . . . . . . . . . .4
Servicing Your Trimmer . . . . . . . . . . . . . . . . . . . . . . . . . . . . . . . . . . . . . . . . . . . . . . . . . . . . . . .5
Maintaining and Storing Your Trimmer . . . . . . . . . . . . . . . . . . . . . . . . . . . . . . . . . . . . . . . . . . . .5
Chapter 3: Using Your NEUTON Trimmer . . . . . . . . . . . . . . . . . . . . . . . . . . . . . . . . . . .6
Before Starting . . . . . . . . . . . . . . . . . . . . . . . . . . . . . . . . . . . . . . . . . . . . . . . . . . . . . . . . . . . . .7
Attaching and Removing the Trimmer . . . . . . . . . . . . . . . . . . . . . . . . . . . . . . . . . . . . . . . . . . . .8
Adjusting the Trimmer . . . . . . . . . . . . . . . . . . . . . . . . . . . . . . . . . . . . . . . . . . . . . . . . . . . . . . . .9
Trimming and Edging Positions . . . . . . . . . . . . . . . . . . . . . . . . . . . . . . . . . . . . . . . . . . . . . . . .11
Starting Your Trimmer . . . . . . . . . . . . . . . . . . . . . . . . . . . . . . . . . . . . . . . . . . . . . . . . . . . . . . .12
Stopping Your Trimmer . . . . . . . . . . . . . . . . . . . . . . . . . . . . . . . . . . . . . . . . . . . . . . . . . . . . . .12
Advancing the Cord . . . . . . . . . . . . . . . . . . . . . . . . . . . . . . . . . . . . . . . . . . . . . . . . . . . . . . . . .13
Tips for Using Your Trimmer . . . . . . . . . . . . . . . . . . . . . . . . . . . . . . . . . . . . . . . . . . . . . . . . . .13
Chapter 4: Maintaining Your NEUTON Trimmer . . . . . . . . . . . . . . . . . . . . . . . . . . . . . .14
Cleaning Your Trimmer . . . . . . . . . . . . . . . . . . . . . . . . . . . . . . . . . . . . . . . . . . . . . . . . . . . . . .14
Replacing the Spool . . . . . . . . . . . . . . . . . . . . . . . . . . . . . . . . . . . . . . . . . . . . . . . . . . . . . . . .15
Replacing the Cartridge Housing . . . . . . . . . . . . . . . . . . . . . . . . . . . . . . . . . . . . . . . . . . . . . . .15
Removing the Trimmer Shield . . . . . . . . . . . . . . . . . . . . . . . . . . . . . . . . . . . . . . . . . . . . . . . . .15
Addendum A: Parts List and Schematic Drawing . . . . . . . . . . . . . . . . . . . . . . . . . . . .16
Schematic Drawing . . . . . . . . . . . . . . . . . . . . . . . . . . . . . . . . . . . . . . . . . . . . . . . . . . . . . . . . .18
Page 4

iv NEUTON MA 3.0 Cordless Electric Trimmer Safety & Operating Instructions
Page 5
NEUTON MA 3.0 Cordless Electric Trimmer Safety & Operating Instructions 1
Chapter 1: Introducing the NEUTON Trimmer
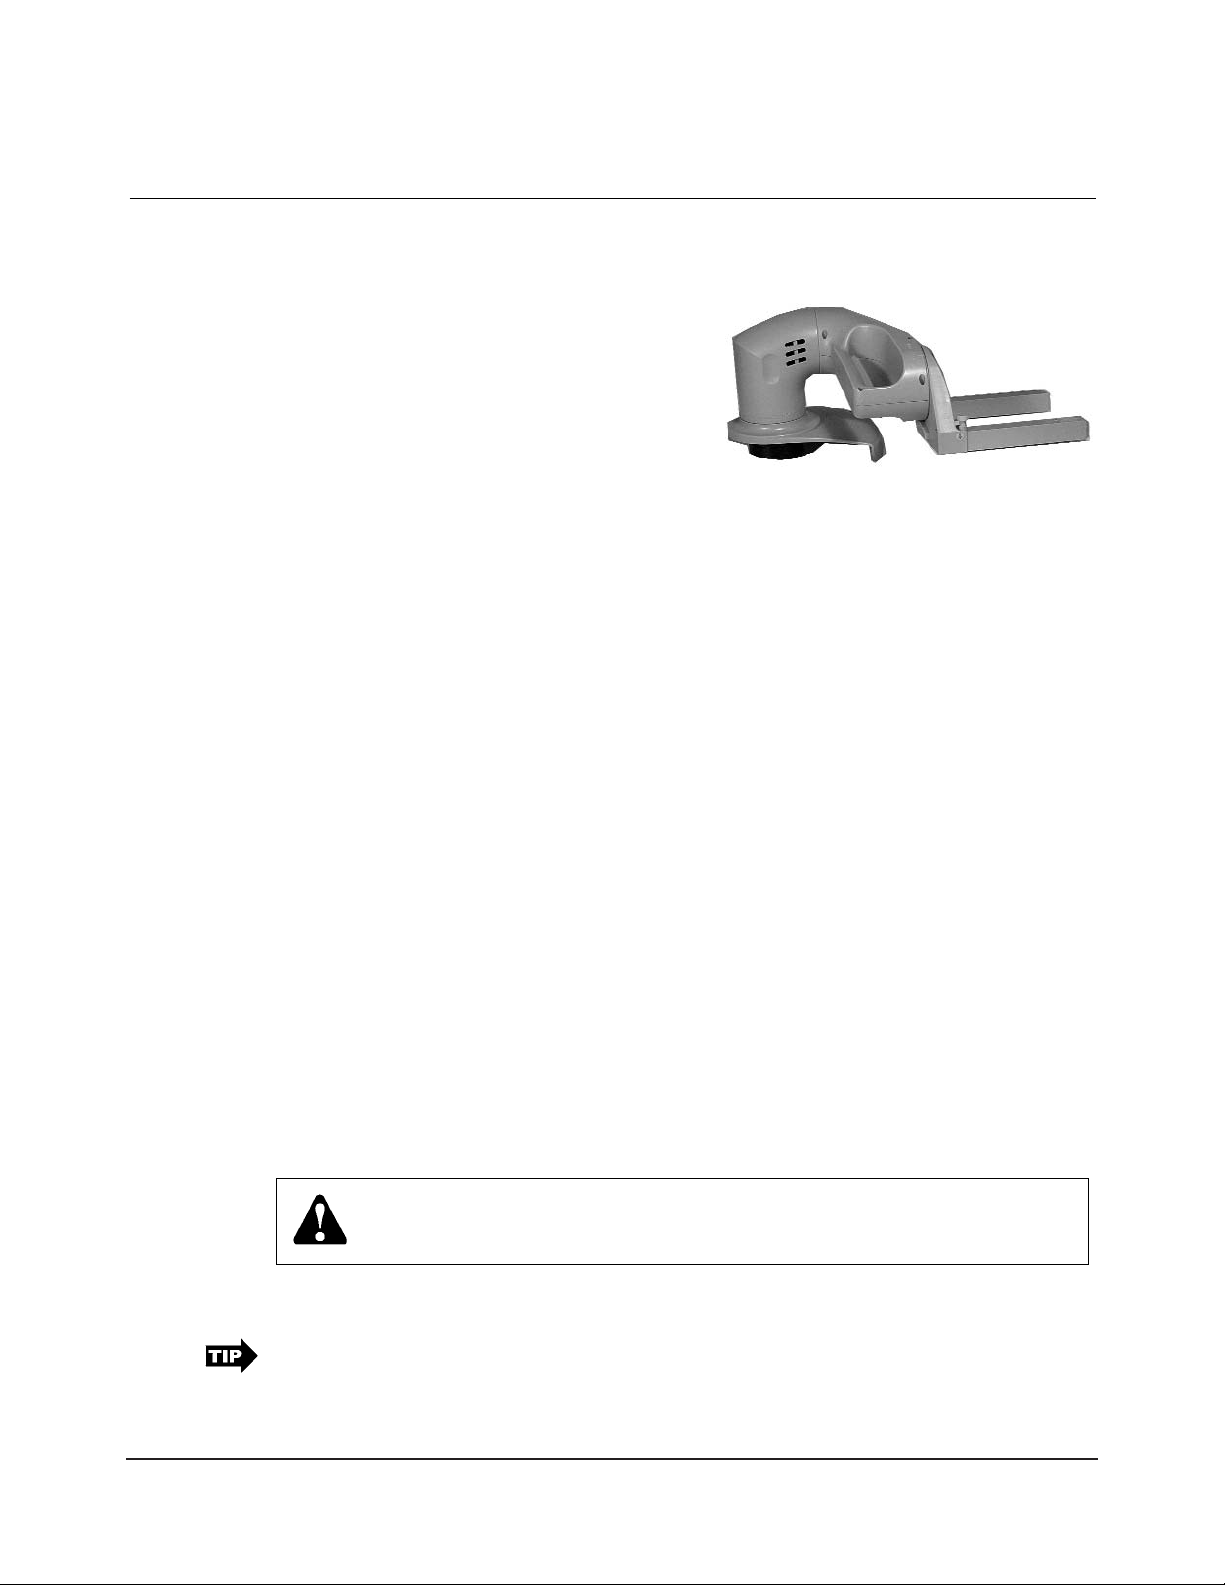
Thank you for purchasing the NEUTON Trimmer Model MA 3.0 (Figure 1).
This manual will help you safely operate your
new Trimmer with your NEUTON Mower and
NEUTON Power Pod. Carefully adhering to the
safety and operating instructions in this manual
will ensure many years of productive use.
If you have any questions, please call toll-free
1-(866)-NEUTON1 (638-8661) and one of our
Technical Support Representatives will be happy
to assist you.
To familiarize yourself with the operation and
use of your Trimmer, please read this entire manual before attaching and using your Trimmer.
We hope you will enjoy many years of satisfied use with your NEUTON Trimmer attachment.
About this Manual
This manual is organized into the following chapters:
Chapter 1: Introducing the NEUTON Trimmer
■ Explains the organization of this manual.
■ Provides contact information for Country Home Products, Inc.
Chapter 2: Important Safety Considerations
■ Explains guidelines for safe operation of your NEUTON Trimmer.
Chapter 3: Using Your NEUTON Trimmer
■ Provides instructions for starting and stopping the machine’s motor.
■ Explains the many cutting and trimming features of your machine.
Chapter 4: Maintaining Your NEUTON Trimmer
■ Provides machine maintenance tips.
In addition to these chapters, the manual includes a parts list, a schematic drawing of the
NEUTON Trimmer, a section for your notes, and your warranty.
Conventions used in this manual
Important: This information is important for the proper use of your machine. Failure to
follow this instruction could result in injury to you or damage to your Trimmer.
This is a helpful hint to guide you in getting the most out of your Trimmer.
Note: This information may be helpful to you in using your Trimmer.
WARNING! The exclamation point within an equilateral triangle alerts you to
essential operating, safety, and maintenance (servicing) instructions.
Figure 1. NEUTON Trimmer
Page 6

2 NEUTON MA 3.0 Cordless Electric Trimmer Safety & Operating Instructions
Chapter 2: Impor tant Safety Considerations
We want you to enjoy years of safe and productive use from your Trimmer attachment for your
NEUTON Cordless Electric Mower or NEUTON Power Pod. We don’t want you to get injured, so
please take a few moments to read the following guidelines for safely operating your new machine.
Important: Please read these safety considerations before using your Trimmer.
Safety and Information Labels
You will find the following label on your NEUTON Trimmer.
Trimmer Warning and Safety
Instructions label (195971)
Trimmer Danger label (195941)
Page 7

NEUTON MA 3.0 Cordless Electric Trimmer Safety & Operating Instructions 3
Protecting Your self and Those Ar ound You
Tragic accidents can occur if the operator is not alert to the presence of children. Children are
often attracted to the Trimmer and the trimming activity. Never assume that children will remain
where you last saw them.
■ Be sure the area is clear of other people before using your Trimmer. Do not allow children,
other bystanders, or pets in your work area when the Trimmer is being operated. Stop the
Trimmer if anyone enters the area.
■ Keep children out of the trimming area and under the watchful care of a responsible adult.
■ Be alert and turn the Trimmer off if children enter the area.
■ Only allow responsible individuals who have a thorough understanding of these instructions to
operate the Trimmer. Never allow children to operate the Trimmer.
■ Before and while pulling the Trimmer backwards, look behind and down for small children and
for secure footing.
■ Use extra care when approaching blind corners, shrubs, trees, or other objects that may obscure
your vision.
■ If you are ever unsure about an action you are about to take, please don’t do it.
Dressing Appr opriately
■ Always use safety goggles or glasses when using your NEUTON Trimmer to protect your eyes
from possible thrown objects. Use a face or dust mask if operating in dusty conditions.
■ Wear shoes with non-slip treads when using your Trimmer. If you have safety shoes, wear
them. Do not use the Trimmer while barefoot or wearing open sandals.
■ Wear long pants while trimming.
■ Avoid wearing loose clothing or jewelry that might be caught in the Trimmer’s moving parts.
Preparing to Use Your Trimmer
■ Read, understand, and follow all instructions on the Trimmer and any related manuals.
Be thoroughly familiar with the controls and the proper use of the machine before starting.
■ Never operate the NEUTON Trimmer, Mower, or Power Pod without the proper guards,
safety switches, or other safety and protective devices in place and properly connected. Inspect
the Trimmer, Mower or Power Pod and cutting cord to determine that these safety devices are
properly installed, in good repair, and operate properly. If the condition or operation of these
devices is questionable, they must be repaired or replaced before using the machine.
■ Follow the instructions for the proper installation and operation of accessories. Use only
accessories approved by the manufacturer. Do not alter any aspect of the Mower, Power Pod,
attachments, or accessories in any way. Modifying or changing your Trimmer in any way could
cause personal injuries and property damage, and will void your warranty.
WARNING! This cutting machine is capable of amputating hands and feet and
throwing objects. Failure to observe the following safety instructions could result
in serious injury or death.
Page 8
4 NEUTON MA 3.0 Cordless Electric Trimmer Safety & Operating Instructions
■ Thoroughly inspect the area where the Trimmer is to be used, and remove all stones, sticks,
wire, pet supplies or lawn toys, and any other foreign objects that could be thrown by the
Trimmer cord. Objects struck by the Trimmer cord can cause severe injuries. Also note the
location of holes, ruts, bumps, stumps, and other possible hazards.
■ Trim only in daylight or in an area well-lit by artificial light.
Operating Your Trimmer
■ Do not force the Trimmer forward in thick grass. Your NEUTON Trimmer will do a better
and safer job when cutting at a steady rate.
■ Do not insert the safety key into the Mower or Power Pod until you are ready to operate the
machine. Store the safety key away from children and people not authorized to use the machine.
■ The cutting cord always turns when the motor is running. Learn how to quickly stop the
machine — simply release the control bar. Remember that the cord will continue to rotate for
up to three seconds after the Mower’s or Power Pod’s motor has stopped.
■ Do not put your hands or feet near the spinning cutting cord or under the machine. Keep clear
of the discharge area at all times.
■ Only use the Trimmer for trimming grass, weeds, and other vegetation.
■ Never operate the Trimmer in the rain or when the grass is wet. Always be sure of your
footing.
■ Keep a firm hold on the handle, and walk — never run.
■ Use extreme caution when maneuvering backwards. Always look first to check your footing,
look down and behind you before moving backwards.
■ Stop the motor when crossing over loose materials such as gravel drives, walks, or roads, as
objects discharged by the machine can be hazardous.
■ After striking a foreign object, or if the machine vibrates abnormally, stop the motor and
remove the safety key. Inspect the machine for any damage and repair the damage before
restarting and operating the Trimmer.
Note: Excessive vibration is generally a sign of trouble.
■ Stay alert and watch what you are doing.
■ Do not operate the Trimmer when you are tired or under the influence of drugs or alcohol.
■ Do not use your Trimmer for any job other than those for which it is intended.
WARNING! ALWAYS stop the motor, wait for the cord to stop moving, and
remove the safety key whenever you leave the Trimmer for any reason. This
includes inspecting and cleaning the Trimmer, performing routine maintenance,
clearing grass, making adjustments, repairing the Trimmer, and removing or
attaching other accessories.
Page 9

NEUTON MA 3.0 Cordless Electric Trimmer Safety & Operating Instructions 5
Operating on Slopes
Slopes are a major factor related to slip-and-fall accidents, which can result in severe injury. All
slopes require caution. If you feel uneasy on a slope, do not trim it.
Do:
■ Use caution on slopes. Whenever possible, trim across slopes, not up and down. Exercise
caution when changing directions on slopes.
■ Remove objects such as rocks and tree limbs, or any other potential object that could be thrown
by the cutting cord. Objects struck by the Trimmer cutting cord can cause severe injuries.
■ Watch for holes, ruts, or bumps. Tall grass can hide obstacles.
Do Not:
■ Do not edge or trim steep slopes or other areas where stability or traction is in doubt.
■ Do not edge or trim near drop-offs, ditches, or embankments. You could lose your footing or
balance.
■ Do not edge or trim on wet grass. Unsure footing could cause you to slip.
Ser vicing Your Trimmer
■ Never make adjustments or repairs when the motor is running. Remove the safety key to
prevent accidental starting.
■ Keep all nuts and bolts tight, especially blade attachment bolts, and keep the equipment in good
condition.
■ Never tamper with safety devices. Check their proper operation regularly.
■ Keep the Trimmer free of grass, leaves, or other debris build-up.
■ Allow the Mower and Trimmer to cool for at least 5 minutes before servicing or storing.
Maintaining and Storing Your Trimmer
■ Maintain the Trimmer with care. Follow the instructions in this manual.
■ Do not operate the machine if it does not start normally or does not stop normally when the
control bar is released.
■ Keep the Trimmer clean and dry. Use a damp cloth or sponge with a mild soap or detergent
when cleaning your Trimmer. Never use water, gasoline, solvents, or other petroleum-based or
solvent-based products when cleaning — remember, this is an electric machine.
■ When not in use, store the Trimmer indoors in a dry place and out of the reach of children.
Note: Country Home Products, Inc. reserves the right to discontinue, change, and improve its
products at any time without notice or obligation to the purchaser. The descriptions and
specifications contained in this manual were in effect at printing. Equipment described within this
manual may be optional. Some illustrations may not be applicable to your machine.
WARNING! Always remove the safety key and battery before performing any
adjustments or repairs, or storing your machine.
Page 10
6 NEUTON MA 3.0 Cordless Electric Trimmer Safety & Operating Instructions
Chapter 3: Using Your NEUTON Trimmer
The NEUTON Trimmer is a versatile machine
that trims and edges your lawn without your
having to buy both a separate trimmer and edger.
You can also adjust the angle and direction of
the Trimmer to cut in different positions. In
addition, you can trim on either the right or left
side of your machine!
The Trimmer is powered by your NEUTON
Mower or NEUTON Power Pod. The Trimmer
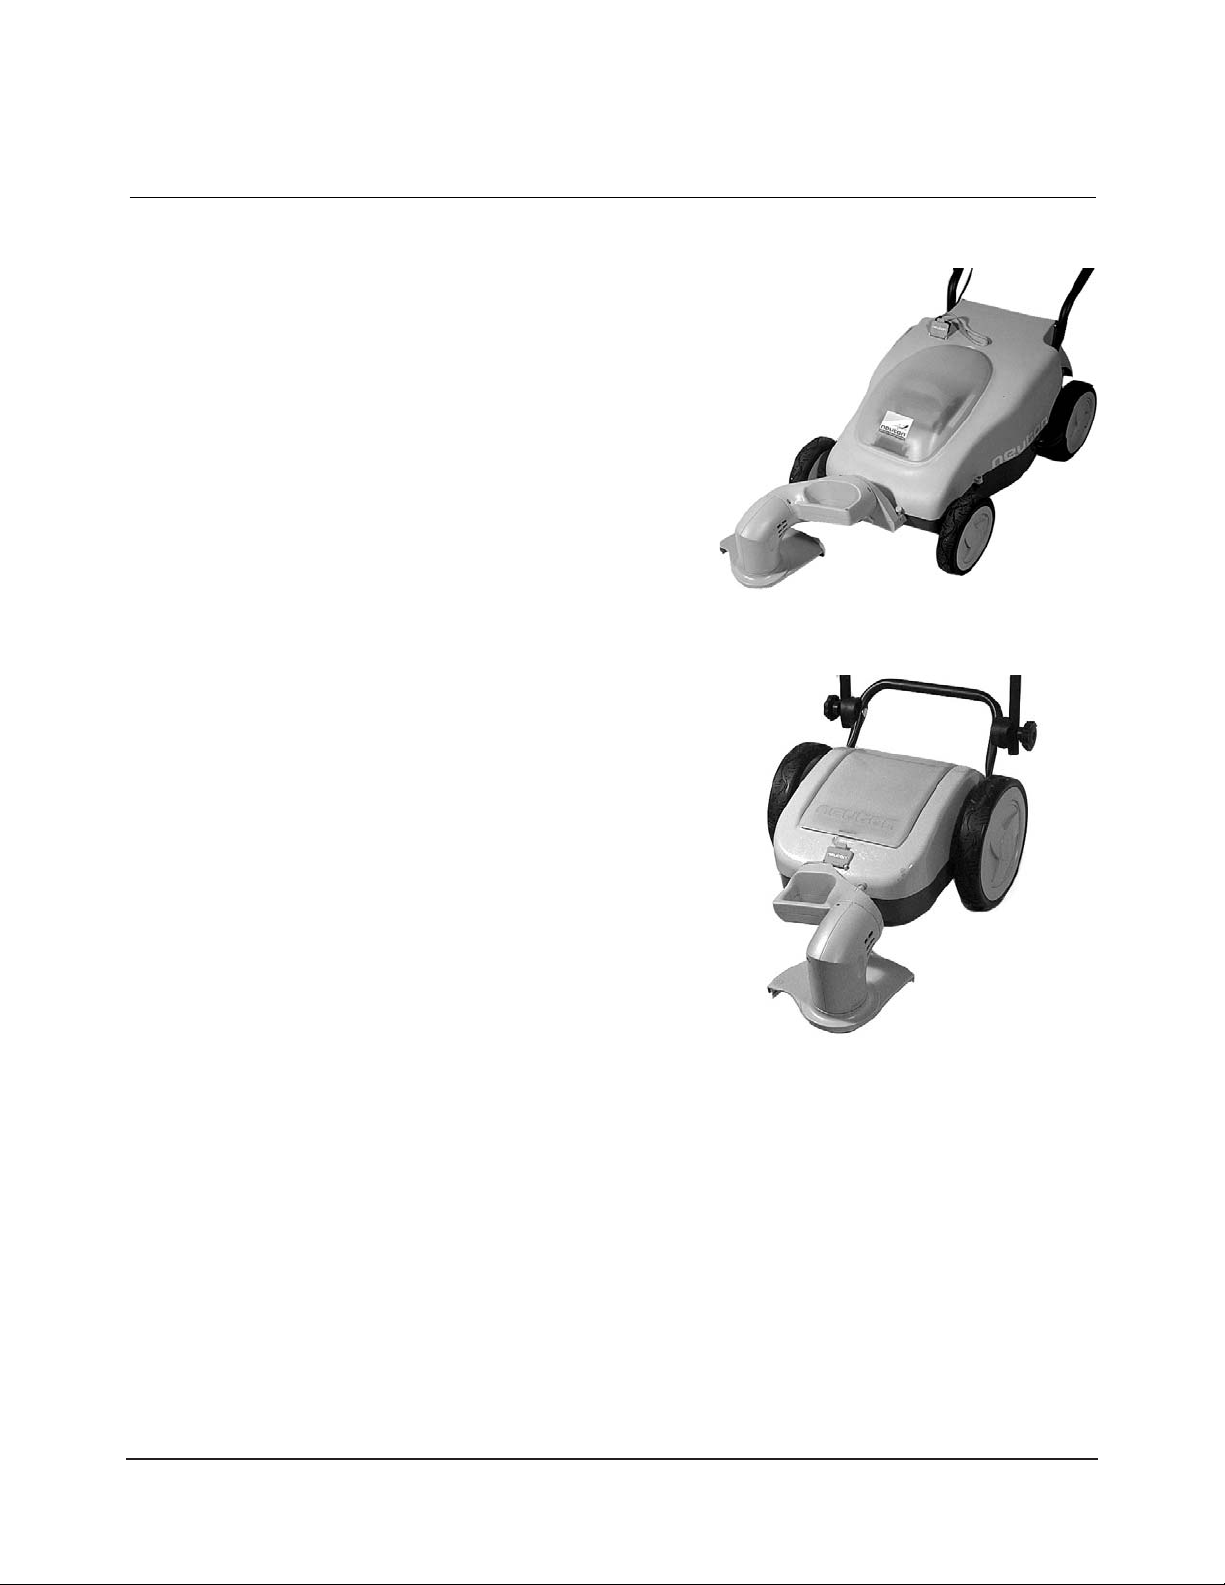
quickly and easily attaches to the front of the
Mower (Figure 2) or Power Pod (Figure 3).
The Mower is described in a separate manual, the
NEUTON™ Cordless Electric Mower EM 4.1 Safety
& Operating Instructions, which you should have
received with your Mower.
The Power Pod is described in a separate
manual, the NEUTON™ Power Pod EP 1.1 Safety
& Operating Instructions, which you should have
received with your Power Pod.
If you have any questions about any of these
products, please contact Country Home Products
at 1-(866)-NEUTON1 (638-8661) or visit us on
the Web at www.neutonowners.com.
The NEUTON Trimmer is shipped fully
assembled and ready to use with your Mower or
Power Pod. Also included are two replacement
cord spools for the Trimmer.
Figure 2. NEUTON Trimmer attached to your
NEUTON Mower
Figure 3. NEUTON Trimmer attached to your
NEUTON Power Pod
Page 11

NEUTON MA 3.0 Cordless Electric Trimmer Safety & Operating Instructions 7
Before Star ting
Important: Before you install your new NEUTON Trimmer or begin using it, take the time to
carefully and completely read the information in “Chapter 2: Important Safety
Considerations.” Also, read the other chapters in this manual to familiarize yourself with the
Trimmer before installing and operating it.
Perform the following checks before operating your Trimmer each time.
■ Make sure all bolts, attachments, and covers are in place and securely attached. Inspect for any
visible damage to the Trimmer, and remove any accumulation of dirt, dust, or dried grass
clippings.
■ Make sure that the cord spool is properly attached to the Trimmer.
■ Be sure the battery is fully charged.
■ If you are using the Trimmer with the NEUTON Mower, be sure the Mower/Auxiliary Switch
is set to Auxiliary.
■ Push the machine (before starting it) to the area to be edged or trimmed.
WARNING! Remove the safety key from your Mower or Power Pod until you
have completed all of the pre-start checks, installed the Trimmer, and moved to
the work area.
Page 12
8 NEUTON MA 3.0 Cordless Electric Trimmer Safety & Operating Instructions
Attaching and Removing the Trimmer
Attaching and removing your Trimmer is quick and easy; just a few simple steps.
Attaching the Trimmer
When attaching the Trimmer, it is easiest to have
the housing in edge mode and have the head
turned up (position 4). This assures that the
Trimmer head is out of the way and will not hit
the ground when sliding into position. (Please
refer to “Adjusting the Trimmer” on page 9 for
details on adjusting the Trimmer housing and
head.)
1. If attaching the Trimmer to your Mower,
adjust the cutting height lever to position 6,
setting the cutting height to its highest level.
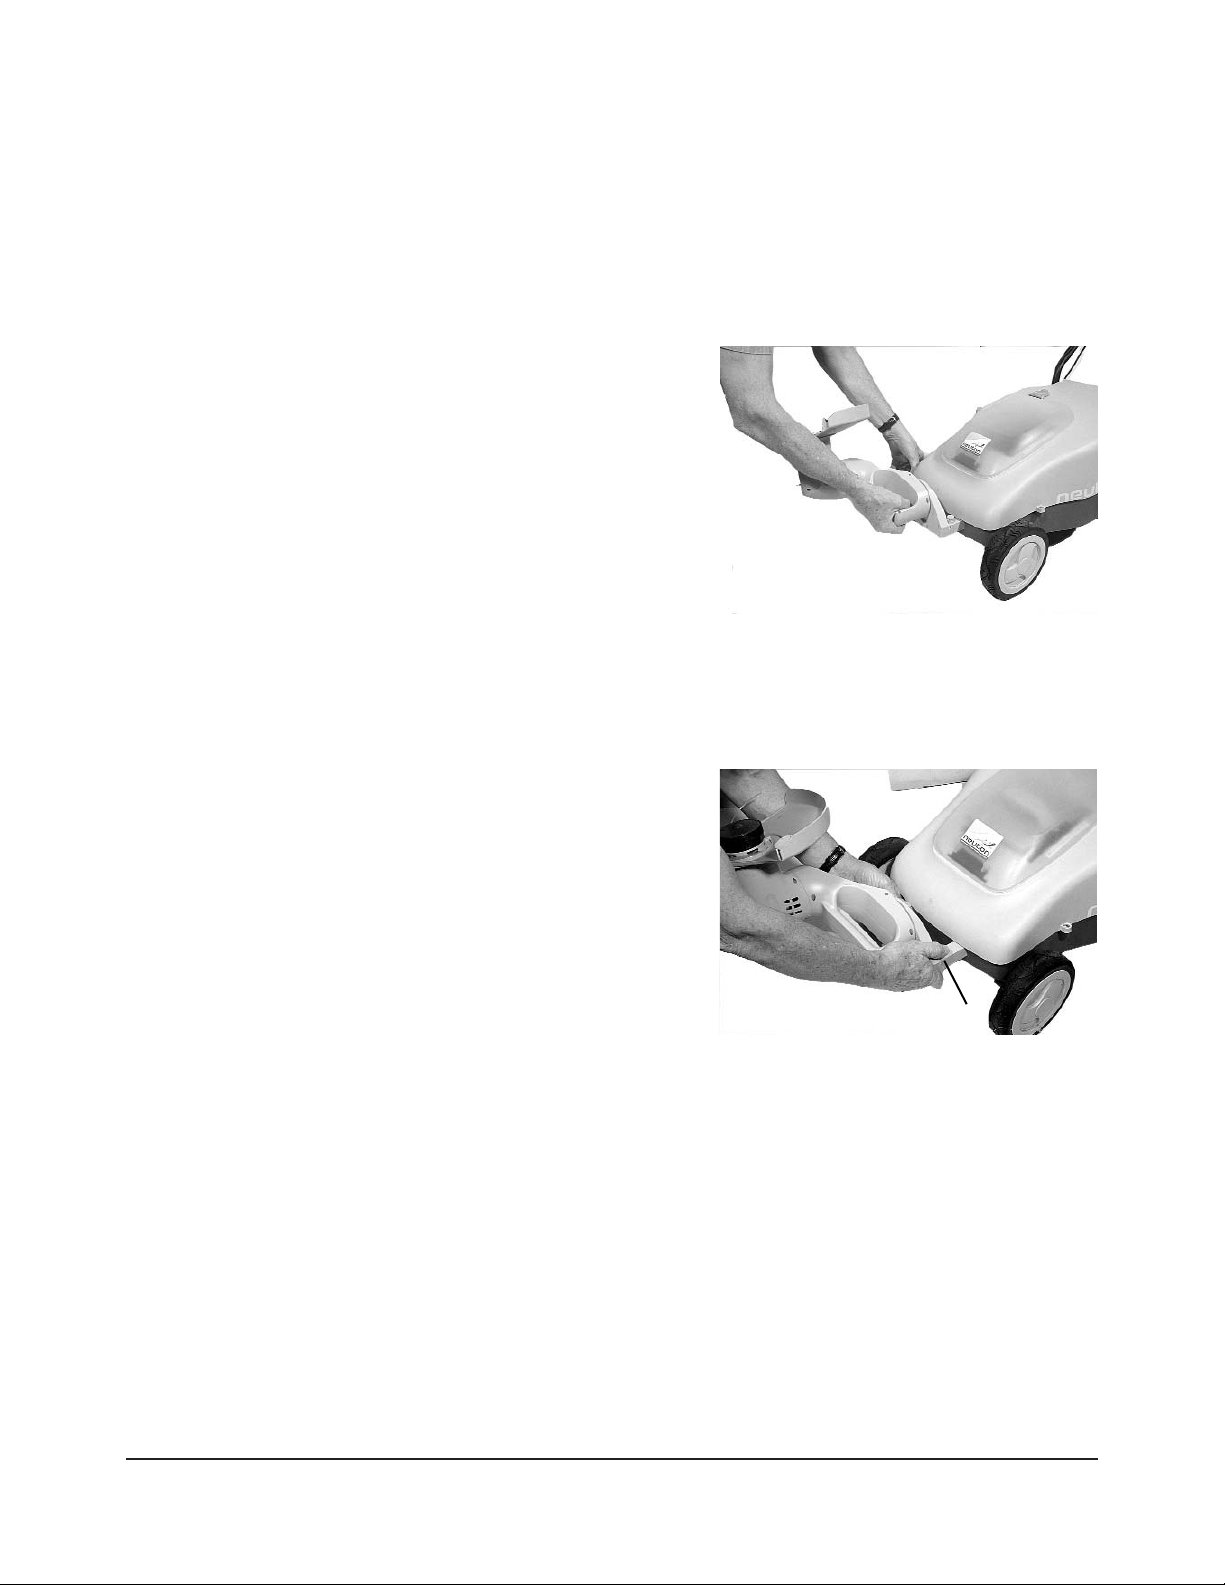
2. Slide the Trimmer posts into the slots in the
front of the Mower or Power Pod (Figure 4).
The posts snap into place when properly attached.
Removing the Trimmer
1. Hold the Trimmer posts and push down
the orange release button with your right
thumb (Figure 5).
2. Slide the Trimmer out of position. Once it
has started to slide out, you can release the
orange button.
Figure 4. Attaching the Trimmer
Figure 5. Push down the orange button to
remove the trimmer
Orange release button
Page 13
NEUTON MA 3.0 Cordless Electric Trimmer Safety & Operating Instructions 9
Adjusting the Trimmer
Before adjusting your Trimmer, you must first
decide to edge or trim your lawn. Then you must
decide the angle to use that will best accomplish
the job.
■ You set the trimmer housing for edging or
trimming.
■ You set the trimmer head for the angle of
the cut.
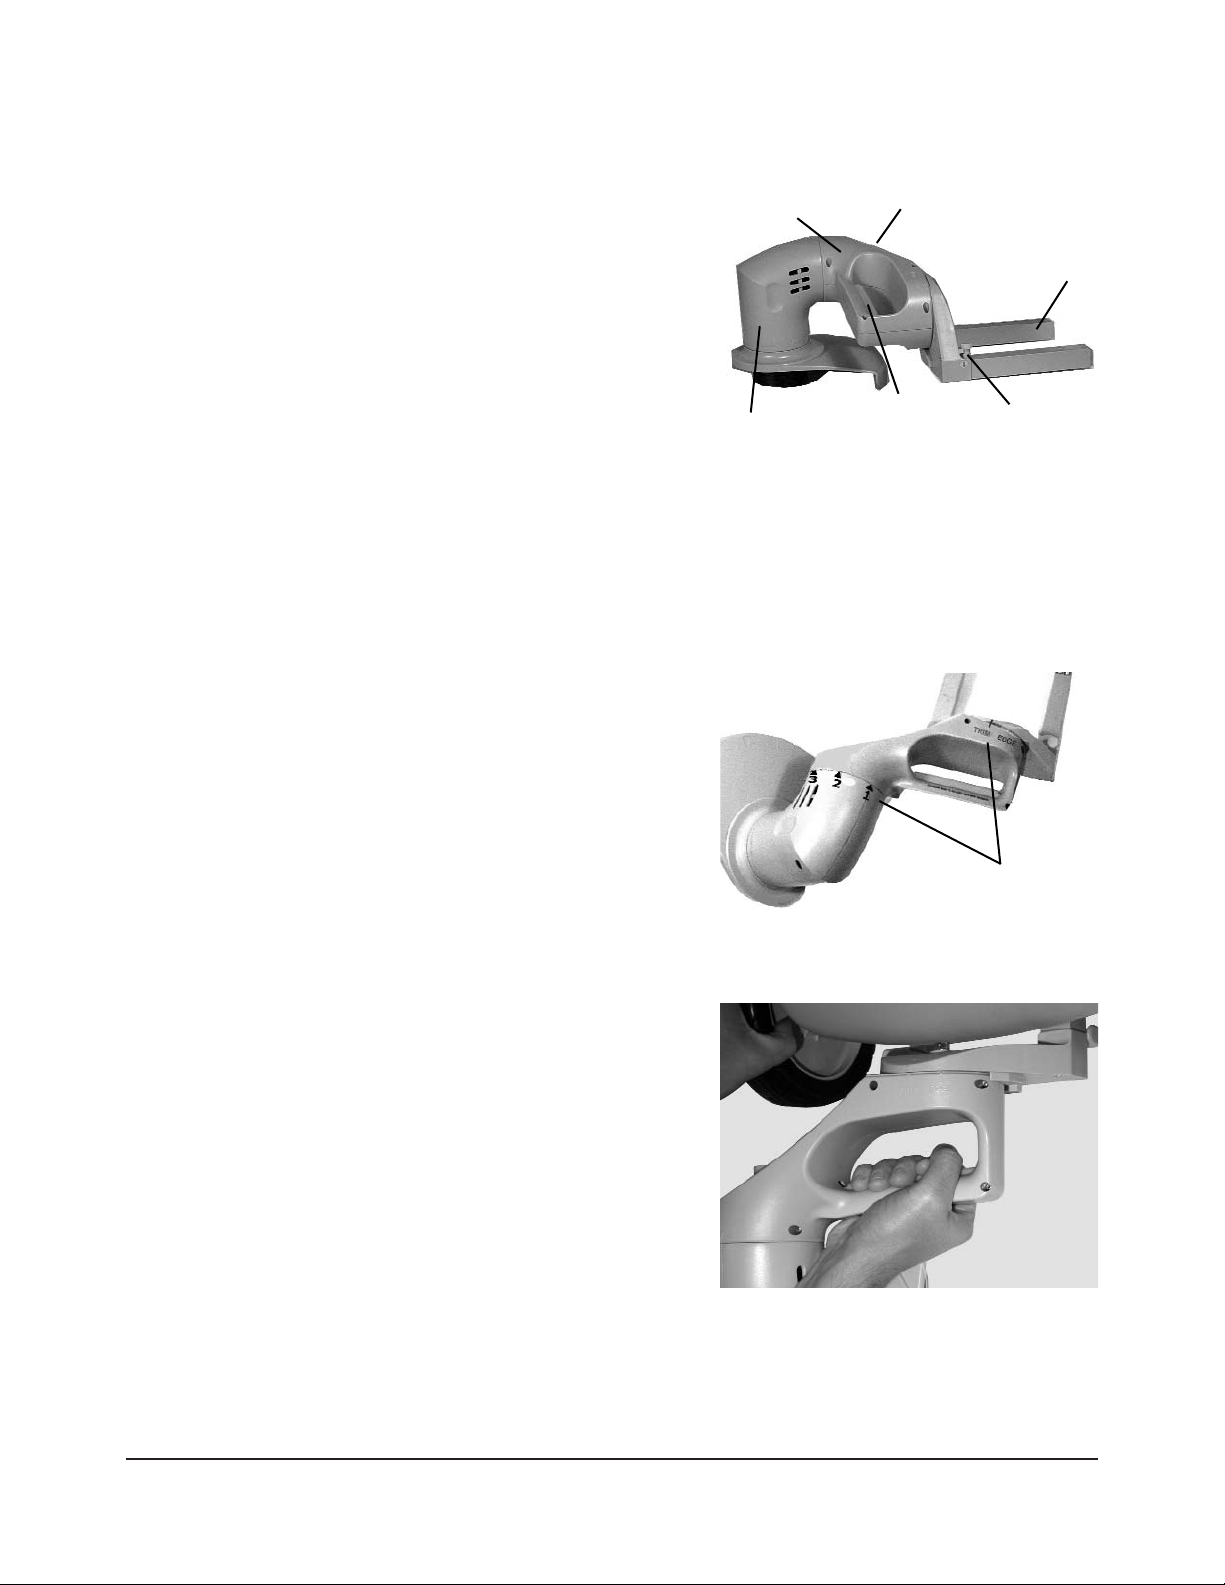
Make sure that both the housing and head (Figure
6) have been set to the proper positions — set
for either trimming or edging, and set to the proper cutting angle — before using your Trimmer.
Please review Figures 7 through 10 to become familiar with the parts and settings of your Trimmer.
This will help you better understand the instructions for positioning your Trimmer.
Setting the Trimmer Housing
The Trimmer housing has two clearly marked
settings: one for trim and one for edge (Figure 7).
(This figure also shows the position marks for
setting the cutting angle).
You can set the Trimmer housing to any of these
clearly marked positions:
■ Trim on the right side as you push.
■ Trim on the left side as you push.
■ Edge on the right side (only) as you push.
(The Trimmer cannot be set to edge on the
left side.)
Switch between the Edge and two Trim positions
to set the housing to the proper setting.
1. Squeeze the orange housing rotation bar and
hold it (Figure 8).
2. Begin to twist the housing to the desired
position.
3. Release the handle when you reach the
desired position. The housing locks into the
setting position.
Make sure the housing snaps securely into place.
Figure 6. Parts of the Trimmer
Figure 7. Trimmer setting: Trim or Edge on the
body; Cutting angle positions on the head
Figure 8. Squeeze the orange handle to adjust
the body to trim or edge
Head
Orange housing
rotation bar
Orange
release
button
Housing
Mounting
posts
Orange head
rotation button
(hidden)
Position marks
Page 14
10 NEUTON MA 3.0 Cordless Electric Trimmer Safety & Operating Instructions
Setting the Trimmer Head
The Trimmer head sets the cutting angle for trimming or edging. The head has one setting for
trimming and three settings for edging. To set the head, simply twist it to the desired position.
You can set the Trimmer head to any of these clearly marked positions:
■ Trimming: Position 1
■ Edging horizontally: Position 2
■ Edging at a 45 degree angle: Position 3
■ Edging vertically: Position 4
You can rotate among the four Trimmer head
settings.
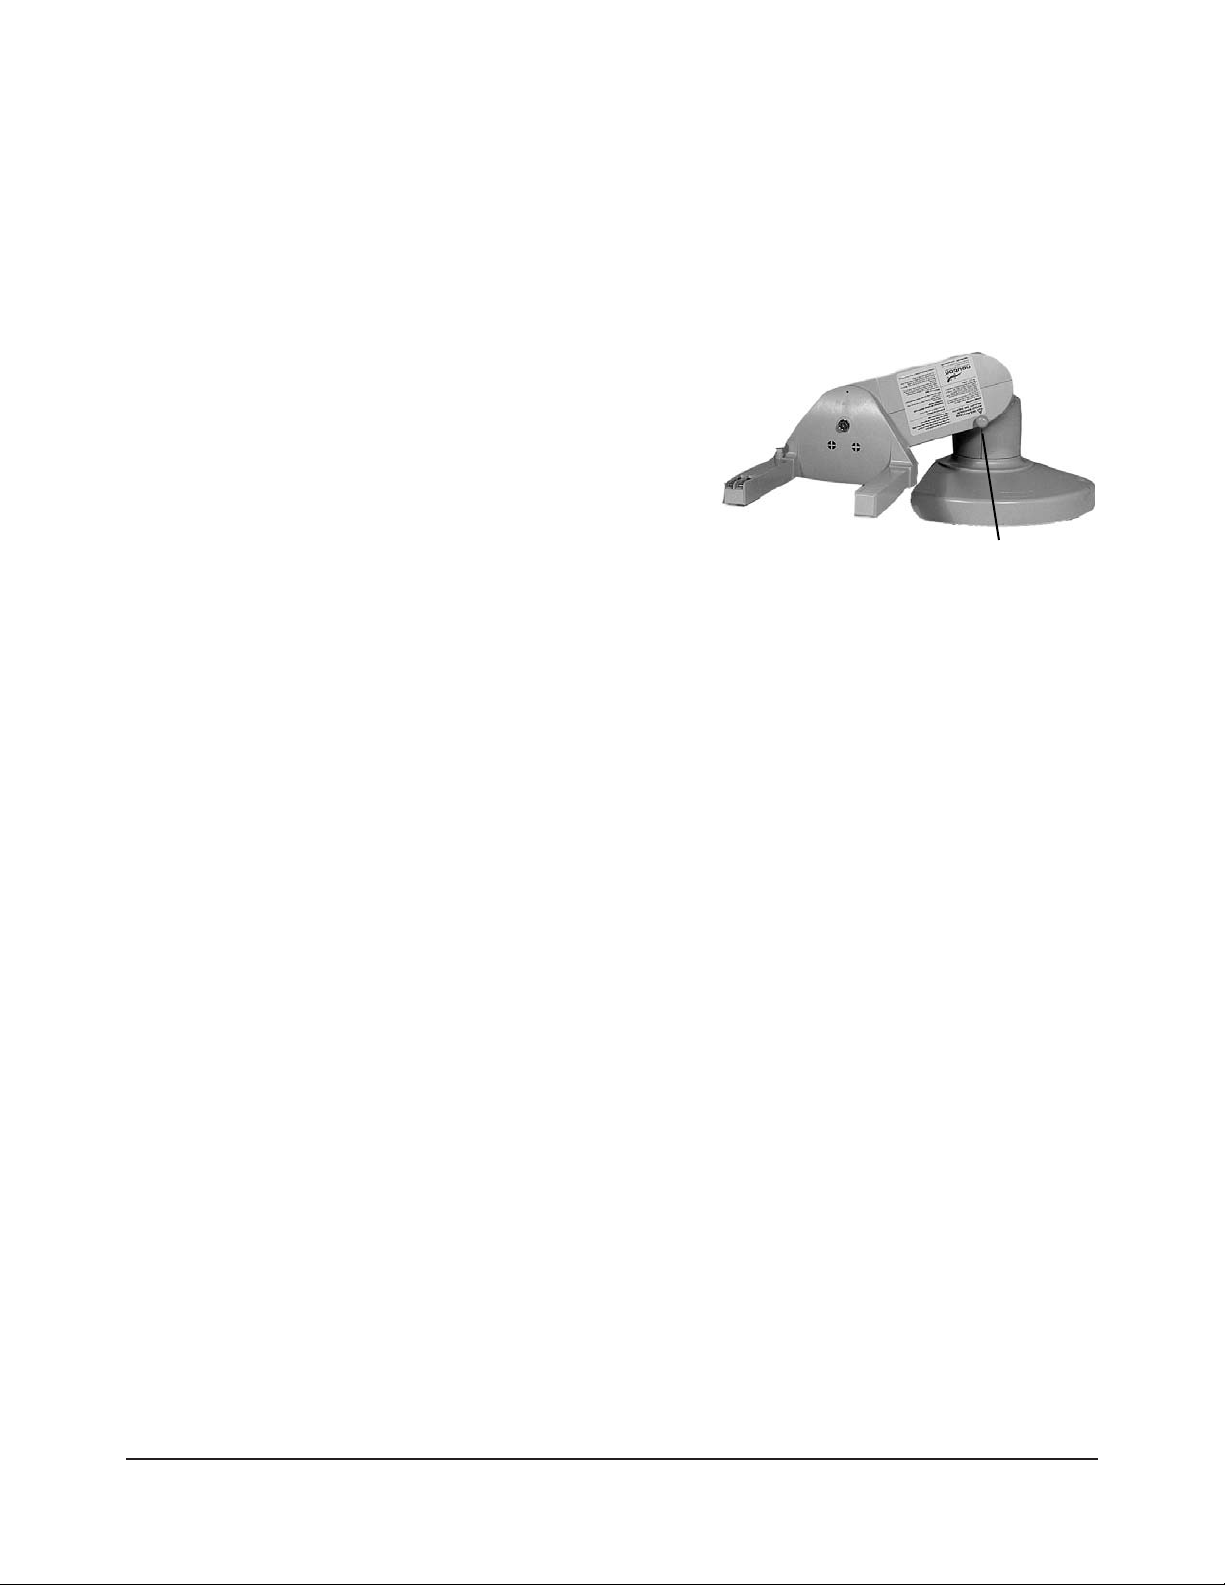
1. Pull the orange head rotation button and hold
it (Figure 9).
2. Begin to twist the head to the position for the
desired cutting angle.
3. Release the button when you reach the
desired cutting position. The head locks into
the position.
Make sure the head snaps securely into place.
To trim on the left side, rotate the trimmer head 180° then set the trimmer housing to right trim.
(Please refer to Figure 10-Rotate and Figure 10-Left Trim on the next page.)
Figure 9. Pull the orange head rotation button
to twist the head to the cutting position
Orange head
rotation button
Page 15
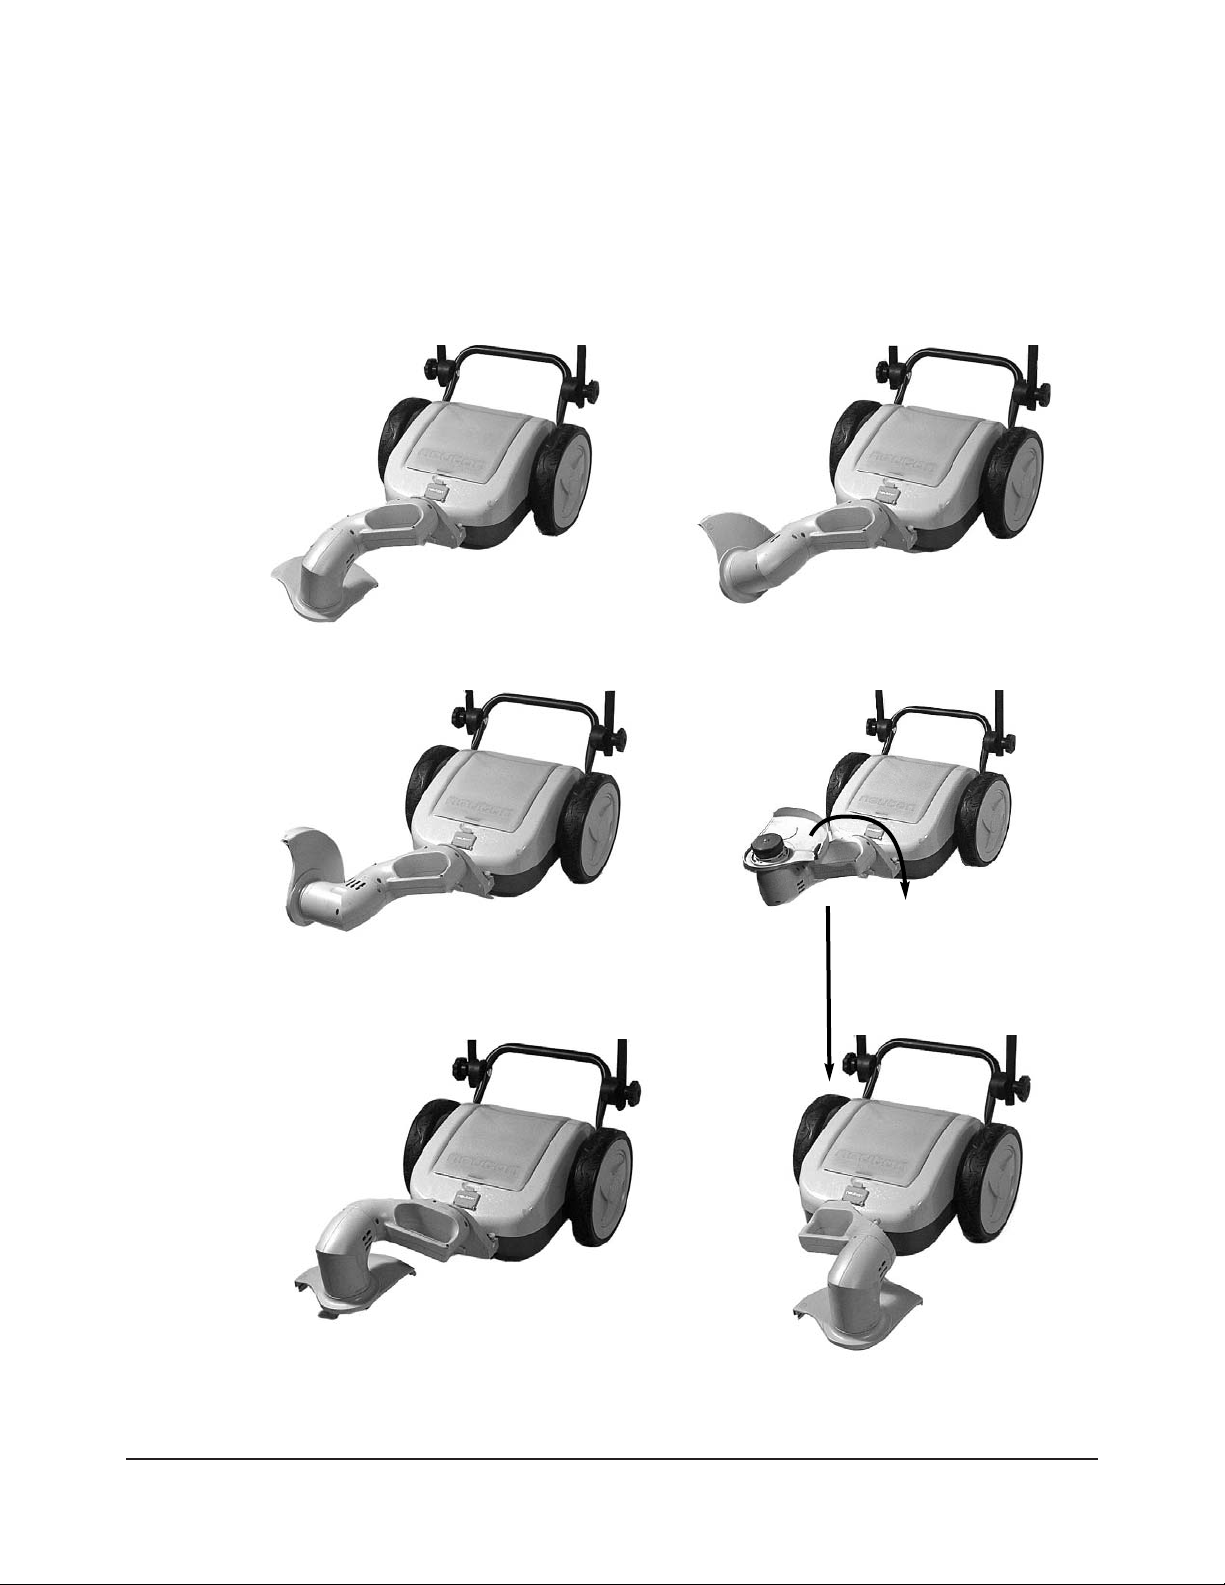
Figure 10. The edging and trimming positions
Right Trim. Body: right side TRIM;
Head: position 1
Left Trim. Body: left side TRIM
Head : position 1
(after rotating 180°)
Trimming and Edging Positions
You can choose from two different trimming positions: left side or right side. Or you can choose
from three different edging positions. Figure 10 not only shows these different positions, but also
tells you the appropriate Trimmer head and housing settings.
Edge 2. Body: EDGE
Head: position 2
Edge 3. Body: EDGE
Head: position 3
Edge 4. Body: EDGE
Head: position 4
NEUTON MA 3.0 Cordless Electric Trimmer Safety & Operating Instructions 11
Rotate. Body: right side TRIM
Head: rotate 180°
to set for left trim
Page 16
12 NEUTON MA 3.0 Cordless Electric Trimmer Safety & Operating Instructions
Star ting Your Trimmer
To start your Trimmer, you must first attach it to the Mower or Power Pod, then start that machine.
The battery in either the Mower or Power Pod powers the Trimmer, making it spin. Make sure the
battery is fully charged before you begin.
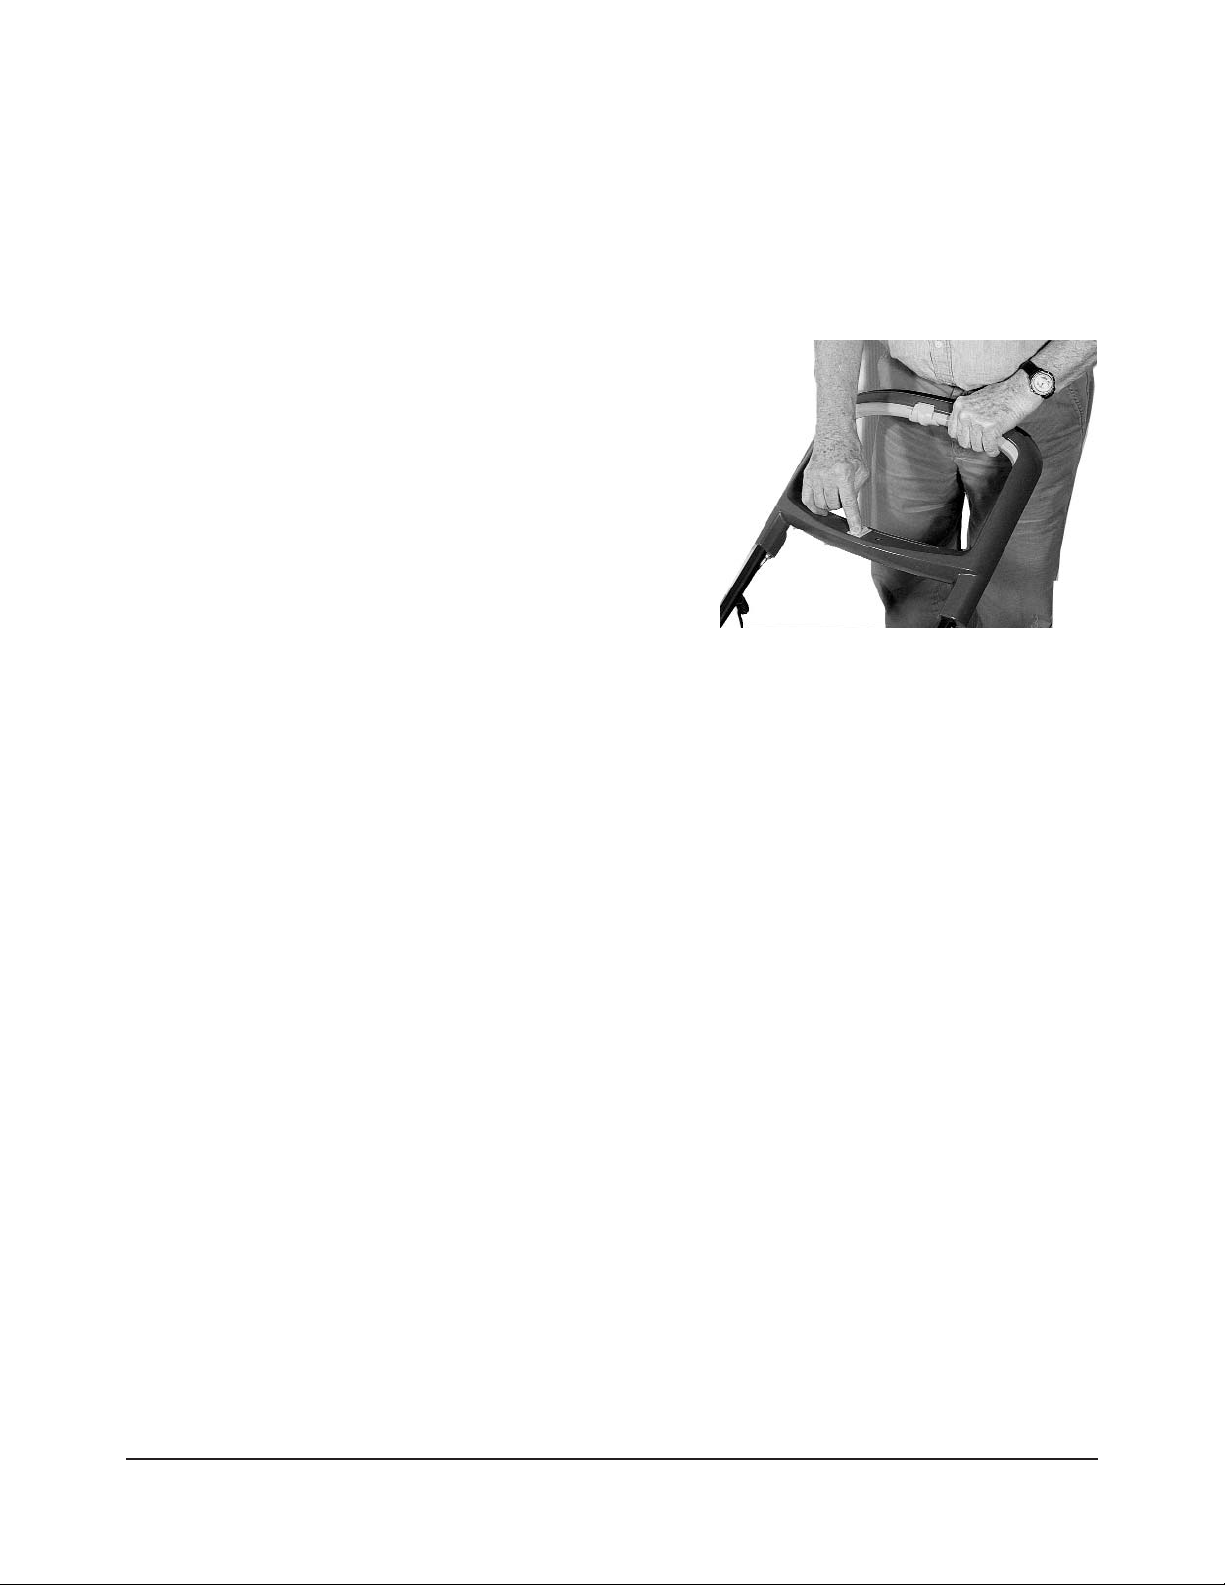
1. If you are using your Trimmer on the
NEUTON Mower, set the Mower/Auxiliary
switch to Auxiliary (Figure 11).
Note: The blade on your Mower does not turn
when the Mower/Auxiliary switch is set to
Auxiliary.
2. Insert the safety key into the key slot. The
green indicator light should come on.
3. Slide the orange start knob to the left.
4. Squeeze and hold the orange control bar.
5. The Trimmer starts (it may take several
seconds).
Continue to hold the control bar for as long as
you want the motor to run.
Note: For more detailed instructions on starting your Mower or Power Pod, please refer to the
appropriate manual shipped with that machine.
Stopping Your Trimmer
Simply release the control bar to stop the Trimmer.
Important: The Trimmer will continue to rotate for a few seconds. Wait for the motor to stop
before restarting or moving the Mower or Power Pod.
If you are finished trimming or edging, remember to remove the safety key.
Figure 11. Set the Mower/Auxiliary switch to
Auxiliary
Page 17
NEUTON MA 3.0 Cordless Electric Trimmer Safety & Operating Instructions 13
Advancing the Cord
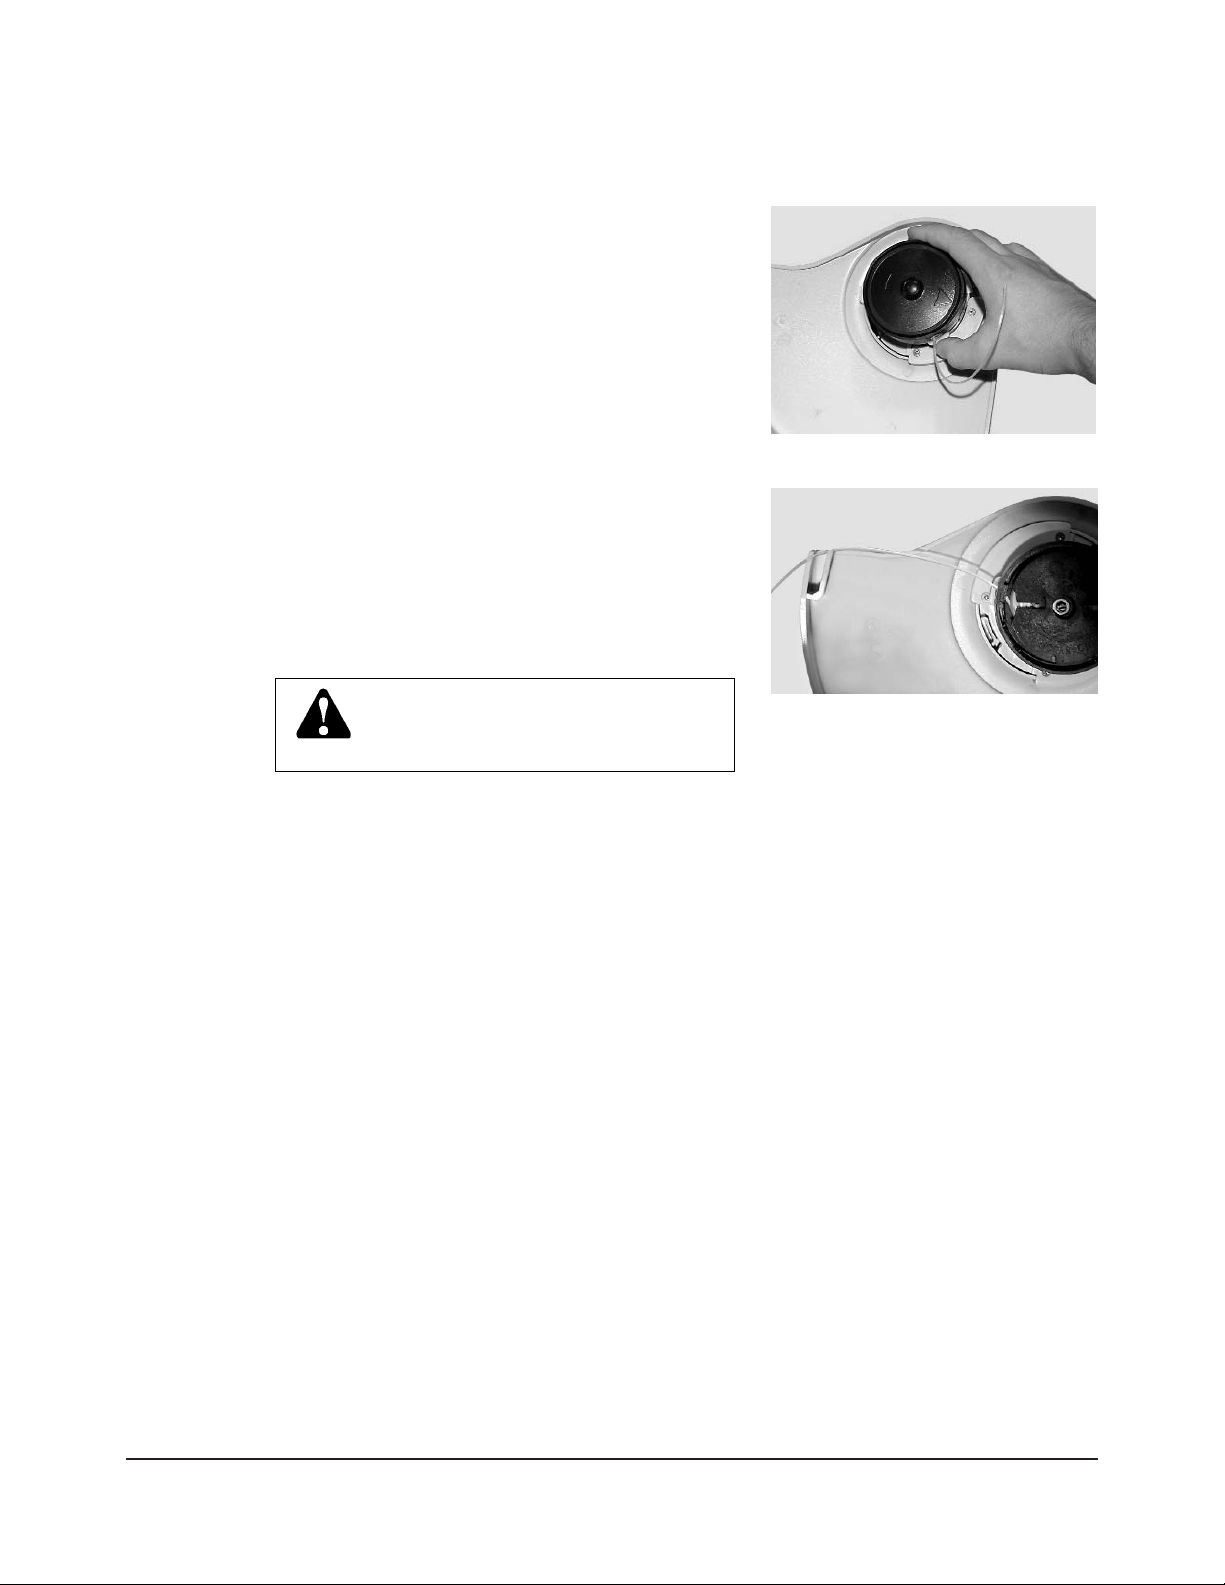
Each time the Trimmer starts or comes to a complete
stop, the Trimmer’s cutting cord automatically advances
and cuts itself to the proper length.
You can also manually advance the cord.
1. Release the orange control bar to stop the Mower
or Power Pod.
2. Remove the safety key.
3. Push the white button on the side of the cartridge
housing and pull the cord to advance it (Figure 11).
The cord advances in small increments, so you might
have to press the button a few times.
Important: Try not to advance the cord too much.
If the cord is too long, the cutter on the Trimmer shield
automatically trims the length of the cord (Figure 12).
Tips for Using Your Trimmer
Following these tips will enhance the performance of your Trimmer:
■ Always stop the Mower before toggling the Mower/Auxiliary switch.
■ If you are using your Mower, you can adjust the cutting height of the Trimmer by raising or
lowering the Mower’s cutting height level. Make sure you first stop the Mower and remove the
safety key before changing the height.
■ Stop the Mower or Power Pod and remove the safety key before changing the position of the
Trimmer head or housing.
■ The battery runs down more quickly in edger mode. You can realistically expect up to 45
minutes of use in edger mode, and approximately one hour in trim mode. This is when having
an extra charged battery comes in handy. Be sure to remove the safety key when you change the
battery.
■ Be sure to clean the Trimmer head frequently, keep the cooling vents and air intake holes free
of debris.
WARNING! Be careful: the excess cord
will fly off when you start the Trimmer
and could be dangerous.
Figure 12. Manually advancing the cord
Figure 13. Automatically cutting the cord
Page 18

14 NEUTON MA 3.0 Cordless Electric Trimmer Safety & Operating Instructions
Chapter 4: Maintaining Your NEUTON Trimmer
This chapter explains how to clean your Trimmer, replace the spool, change the cartridge, and
remove the Trimmer shield.
Cleaning Your Trimmer
Periodically, clean your Trimmer to ensure peak performance.
Supplies needed:
• Clean, damp cloth or sponge
• Mild soap or detergent (if needed)
• Soft nylon brush (if needed)
1. Remove the safety key and battery from the NEUTON Mower or Power Pod, and remove the
Trimmer from the machine.
2. Using a damp cloth or sponge with a mild soap or detergent, clean the Trimmer.
3. Use a soft nylon brush or non-metallic scrubbing pad to remove any clippings that have
accumulated on the Trimmer. Do not use a wire brush; it will scratch and harm the surface
of your Trimmer.
4. Remove any grass or weeds that are wound around the spool.
WARNING! ALWAYS remove the safety key and the battery from the NEUTON
Mower and Power Pod before performing any adjustments, maintenance, spool
changes, or repairs to your Trimmer.
Page 19
NEUTON MA 3.0 Cordless Electric Trimmer Safety & Operating Instructions 15
Replacing the Spool
Replace the spool when the cord runs out.
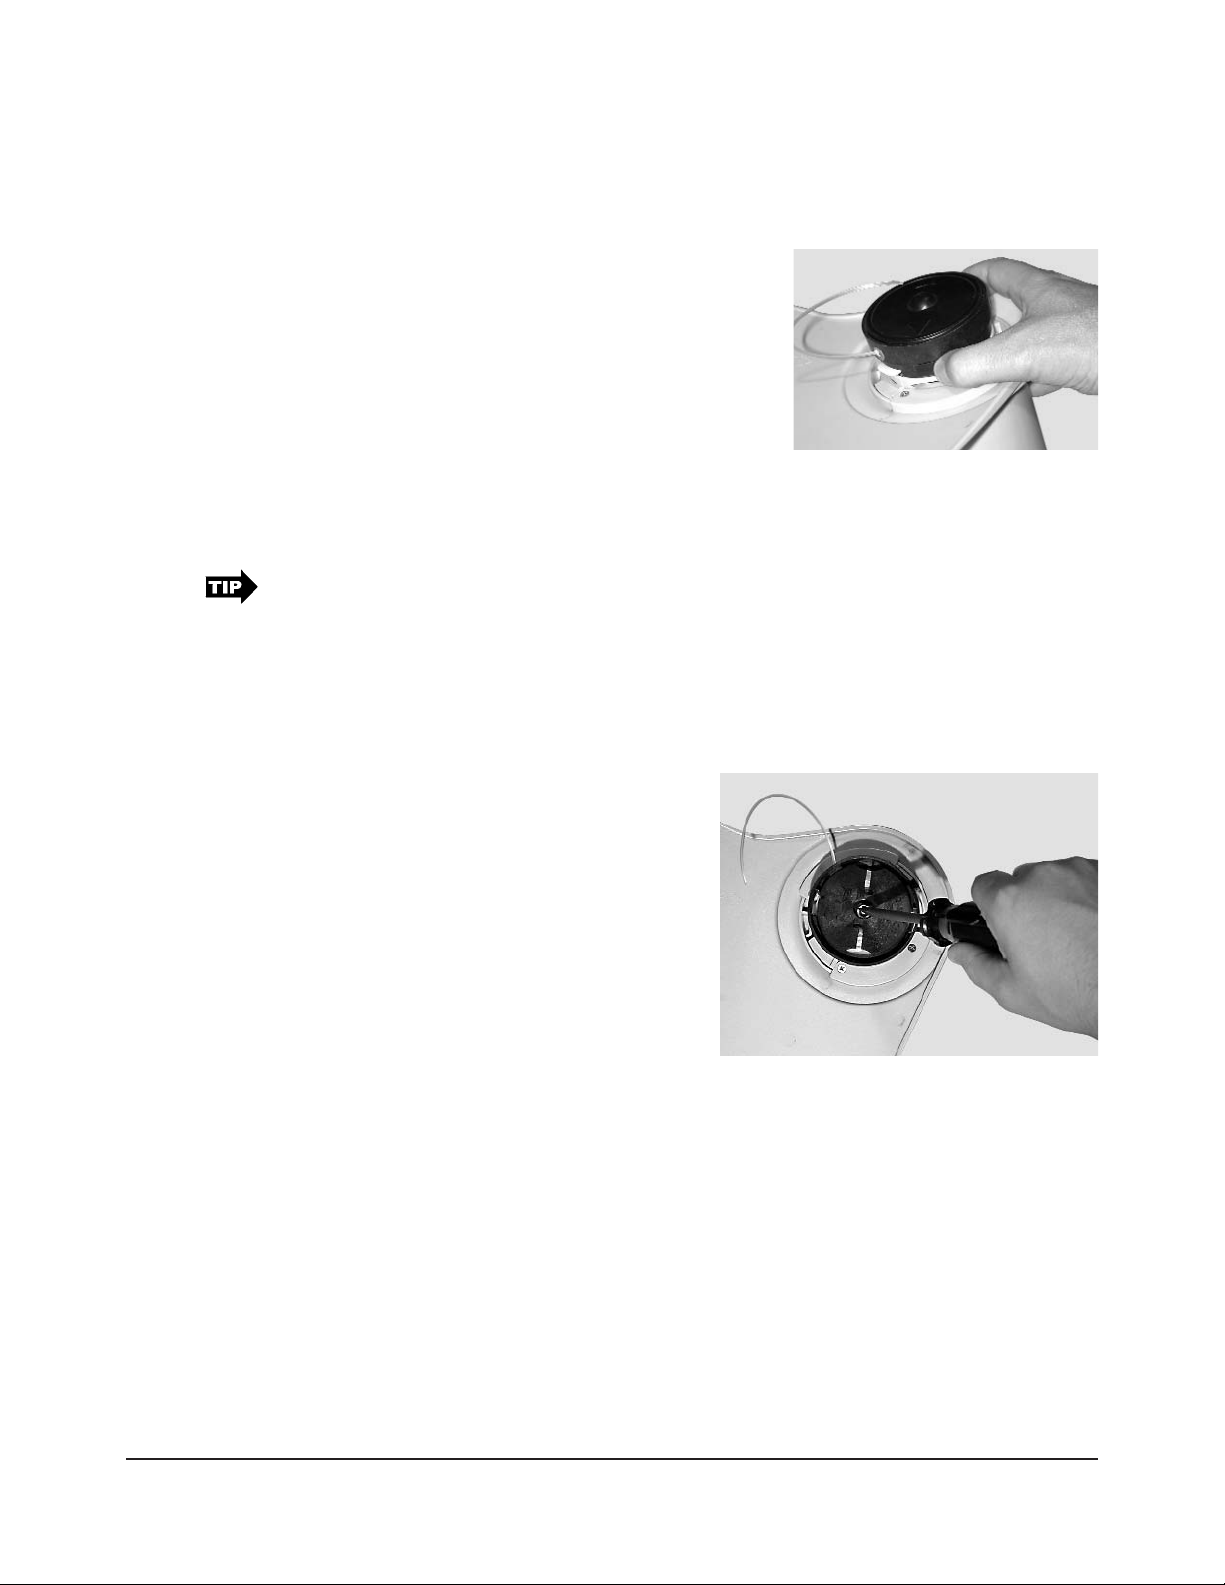
1. Remove the green cartridge cover.
Using two fingers, press the clips on the side of the
cartridge housing (Figure 14) and push them up
slightly towards you. The green cover pops up part
way; remove it. (The outer black cartridge housing
stays on the Trimmer.)
2. Remove the spool.
3. Thread the end of the new cord through the metal
opening on the cartridge housing.
4. Insert the new spool with the printed side facing out (so you can read it).
Try gently pulling on the cord to help seat the spool.
5. Replace the green cover. Make sure the clips in the cover align with the slots in the cartridge
housing. If they don’t, press the clips and turn the cartridge housing until the clips and slots
align. The clips must snap securely into place.
Replacing the
Car tridge Housing
You only need to replace the cartridge housing if
it is damaged or cracked. You do not need to
remove the shield to replace the cartridge. If the
cord runs out, you need only change the spool.
1. Remove the green cartridge cover. (See
“Replacing the Spool” for details.)
2. Using a flat-head screwdriver, hold the shaft
in place (Figure 15). Don’t let it turn.
3. Unscrew the cartridge with your hand and
remove it, turning counterclockwise.
4. Replace a new cartridge.
5. Using the screwdriver to hold the shaft in place, tighten the entire cartridge by hand.
Removing the Trimmer Shield
You do not need to ever remove the Trimmer shield unless it is cracked or broken.
To remove the shield, simply unscrew (counterclockwise) the three small set screws that hold the
shield in place. Install the new shield, and screw in the set screws. Make sure they are snug.
Figure 14. Removing the green
cartridge cover
Figure 15. Hold the shaft steady while
removing and replacing the cartridge housing
Page 20

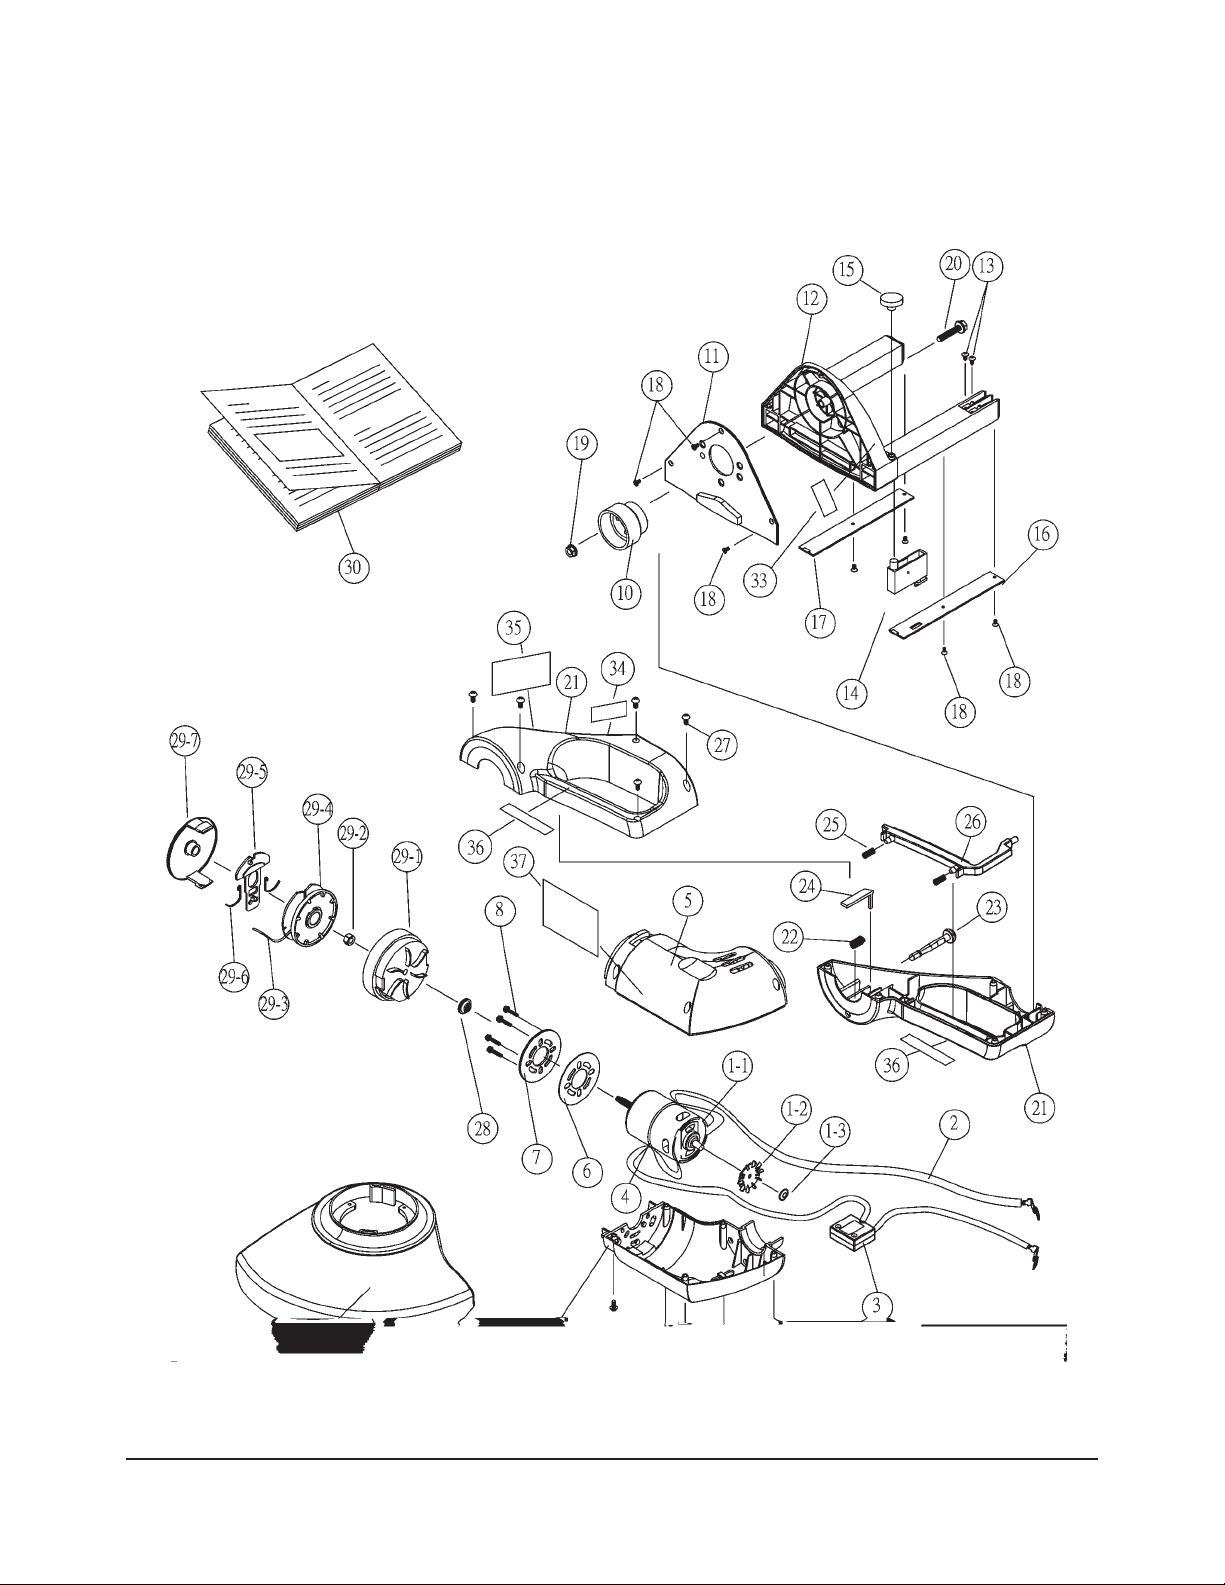
Addendum A: Parts List and Schematic Drawing
The item number for each part corresponds to the numbers in the schematic drawing.
Item # Description Qty. Part Number
1 Motor set (parts 1-1, 1-2, 1-3, 2, 3, 4) 1 176891
1-1 Motor 1 195691
1-2 Fan 1 195701
1-3 Fan nut 1 195711
2 Motor cable and electrical contacts 1 195721
3 Motor cable, safety switch, elec contacts 1 195731
4 Zip tie for motor 1 195741
5 Trimmer head housing (top & bottom) 1 195751
6 Motor insulation gasket 1 176941
7 Motor mounting plate 1 176951
8 Motor mounting plate screws and washers 4 195761
9 Trimmer head screws 5 176991
10 Axle 1 176851
11 Pillar base cover plate 1 195771
12 Pillar base and electrical contacts 1 195781
13 Contact screws 2 176811
14 Trimmer release button housing 1 195791
15 Orange trimmer release button 1 195801
16 Pillar cover (right) 1 195811
17 Pillar cover (left) 1 195821
18 Pillar screws 7 195831
19 Axle nut 1 176861
20 Pillar bolt 1 176871
21 Handle housing (top & bottom) 1 195841
22 Connection spring 1 195851
23 Orange head rotation button (pull) 1 195861
24 Spring fixed holder 1 195871
25 Housing rotation bar springs 2 177021
26 Housing rotation bar 1 195881
27 Housing screws 5 176991
28 Cartridge housing copper nut 1 177031
16 NEUTON MA 3.0 Cordless Electric Trimmer Safety & Operating Instructions
Page 21

NEUTON MA 3.0 Cordless Electric Trimmer Safety & Operating Instructions 17
Item # Description Qty. Part Number
29 Cutter head assembly (parts 29-1 to 29-7) 1 177051
29-1 Cartridge housing 1 195891
29-2 Cartridge nut 1 177121
29-3 Trimmer cord 1 177091
29-4 Trimmer cord spool 1 177071
29-5 Cord feeding driver 1 195901
29-6 Cartridge metal springs 2 177131
29-7 Green cartridge cover 1 195911
30 Trimmer Safety & Operating Instructions 1 195921
31 Trimmer shield 1 195931
32 Trimmer Danger label 1 195941
33 Attachment label 1 195951
34 Head adjustment label 1 195961
35 Warning & Safety Instructions label 1 195971
36 Housing attachment labels 2 195981
37 Neuton label 1 176681
Spool with cord 1 177221
Page 22
18 NEUTON MA 3.0 Cordless Electric Trimmer Safety & Operating Instructions
Schematic Drawing
Page 23

LIMITED ONE-YEAR WARRANTY
Terms and Conditions
The NEUTON™ Cordless Electric Trimmer is warranted for one (1) year against defects in materials or
workmanship when put to personal residential household use.
For the purposes of the warranty, “personal residential household use” refers to non-commercial residential use and
further excludes misuse, alterations, modifications, accidents, or damage due to inadequate maintenance.
Country Home Products, Inc. certifies that the NEUTON™ Cordless Electric Trimmer is fit for ordinary purposes
for which a product of this type is used. Country Home Products, Inc., however, limits the implied warranties of
merchantability and fitness in duration to a period of one (1) year in personal residential household use.
The Limited 1-Year Warranty on the NEUTON™ Cordless Electric Trimmer starts on the date the machine is
shipped from our factory. The Limited 1-Year Warranty is applicable only to the original owner.
The owner is responsible for the performance of all the required maintenance as defined by the manufacturer’s
owner’s manuals.
The owner is responsible for replacement of normally wearing parts including cord spools and cartridges.
During the warranty period, the warranty holder is responsible for any and all shipping and transportation
charges, if required.
SOME STATES DO NOT ALLOW LIMITATIONS ON THE LENGTH OF IMPLIED WARRANTIES, SO
THE ABOVE LIMITATIONS MAY NOT APPLY TO YOU.
Country Home Products, Inc. shall not be liable under any circumstances for any incidental or consequential
damages or expenses of any kind, including, but not limited to, cost of equipment rentals, or cost of hiring
services to perform tasks normally performed by the NEUTON™ Cordless Electric Trimmer.
SOME STATES DO NOT ALLOW THE EXCLUSION OR LIMITATION OF INCIDENTAL OR
CONSEQUENTIAL DAMAGES, SO THE ABOVE LIMITATIONS MAY NOT APPLY TO YOU.
Technical Suppor t Hotline
Country Home Products, Inc.’s objective is to have 100% satisfied customers. For that reason, we operate a 6-dayper-week Technical Support Department for our NEUTON owners. You can access a Representative by dialing our
toll-free hotline at 1-(866)-NEUTON1 (638-8661). The sole job of our well-trained and friendly folks is to ensure
that you get any help you need in a timely fashion. They are there to answer all your questions, including: (1) inquiries
on the warranty, (2) inquiries about replacement parts, and (3) your questions regarding service, maintenance, and
operation.
THIS WARRANTY GIVES YOU SPECIFIC LEGAL RIGHTS, AND YOU ALSO HAVE OTHER RIGHTS
WHICH VARY FROM STATE TO STATE.
Page 24

COUNTRY HOME PRODUCTS, Inc.
MEIGS ROAD, P.O. BOX 25, VERGENNES, VERMONT 05491
1-(866)-NEUTON1 (638-8661) www.neutonowners.com 2004 CHP, Inc. 195921
 Loading...