

Page 1
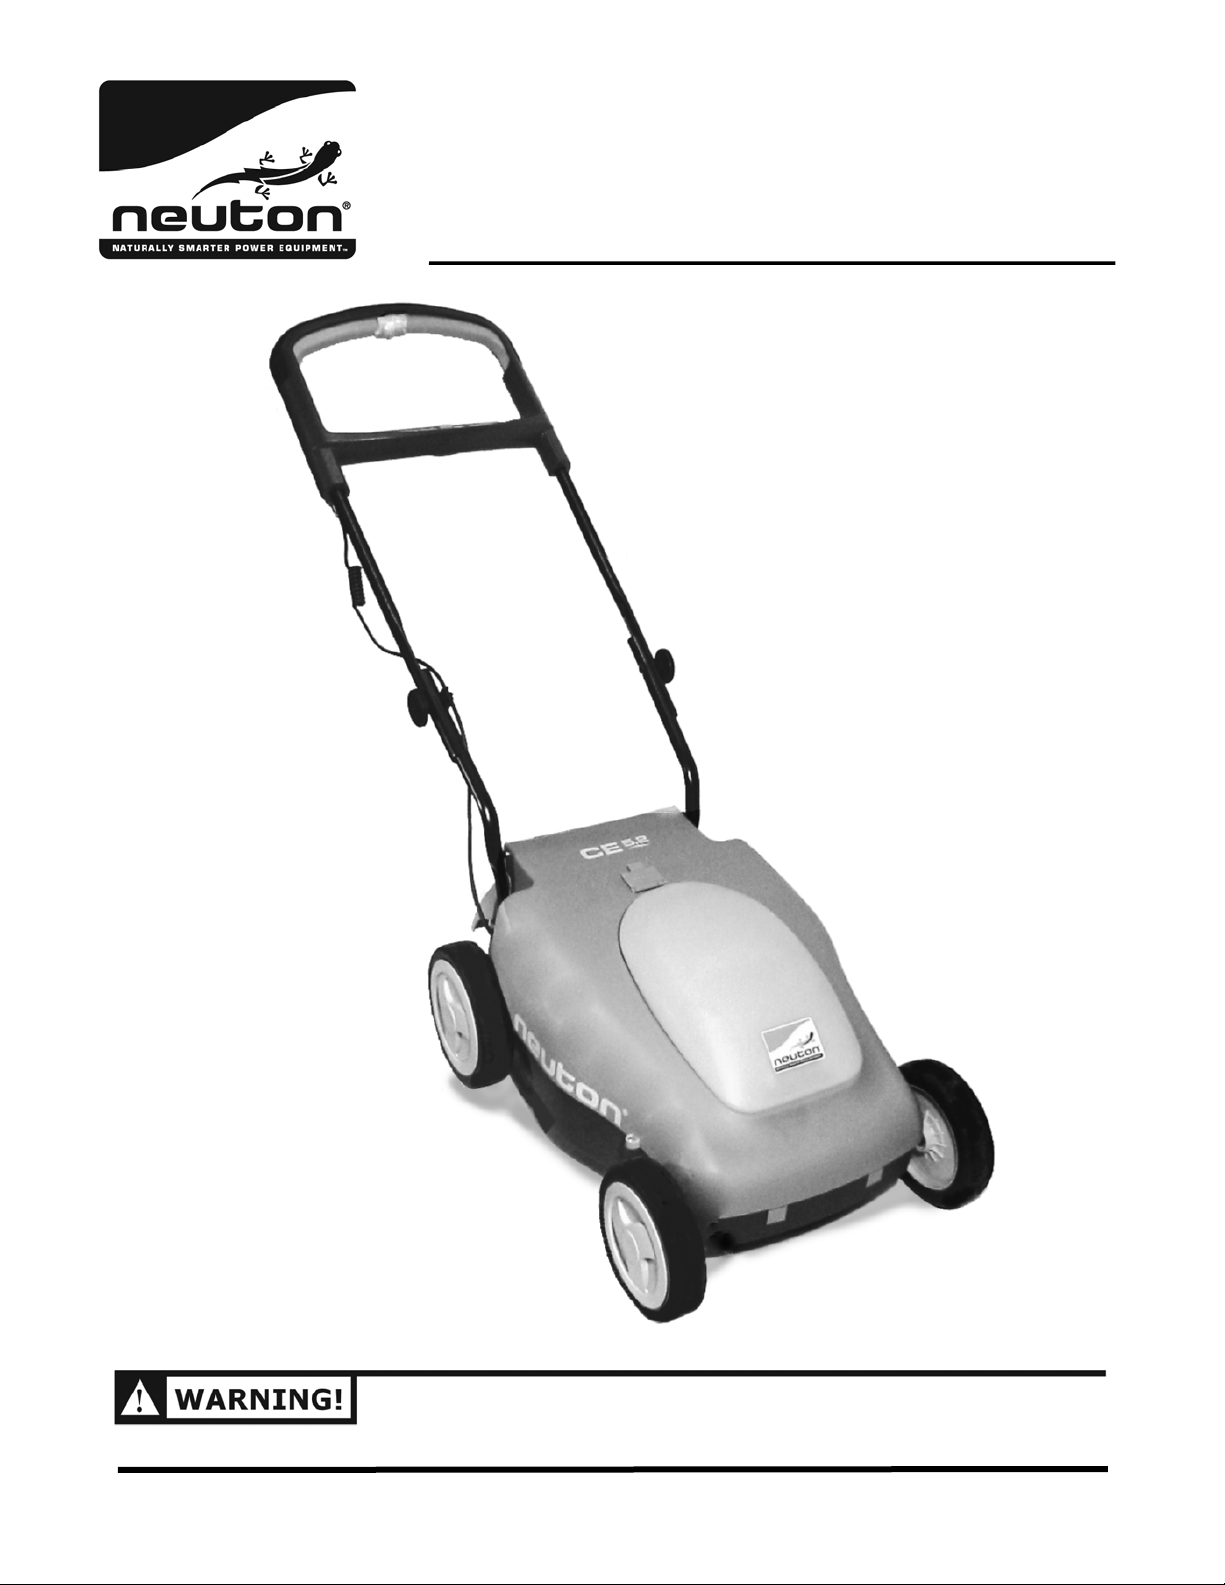
Battery-Powered Mower
Safety & Operating Instructions
Model: CE 5.2
READ AND UNDERSTAND THIS MANUAL AND ALL INSTRUCTIONS BEFORE OPERATING THIS MOWER.
Page 2

Thank You!
®
Congratulations on your purchase of the NEUTON
Lawns.
The design of the NEUTON Mower CE 5.2 is with state-of-the-art Battery technology to make mowing your
lawn as easy and enjoyable as possible.
If you have not already ordered it, be sure to try the CE 5.2’s Trimmer Attachment, too. This option makes the
CE 5.2 the only mower that can also trim and edge your lawn – saving you steps, plus a whole garage full of
separately powered equipment.
Please call us, toll-free, at 1-866-NEUTON1 (638-8661) if you have any questions or difficulties as you get
used to your new mower.
We also hope to hear from you on how much you like your new helper!
Thanks once again!
Tom Hughes
Sales Manager
for all of us at…
Neuton Power Equipment.
Battery-Powered Mower CE 5.2 – the Smart Mower for Small
®
NEUTON
127 Meigs Road
P.O. Box 25
Vergennes, VT 05401
Toll-Free phone: 1-866-NEUTON1 (638-8661)
Fax: 1-802-877-1213
Web site: www.neutonowners.com
E-mail: [email protected]
Copyrights and Trademarks
©2008 NEUTON Power Equipment
NEUTON and NEUTON logo are trademarks of NEUTON Power Equipment
All rights reserved.
Documentation
Produced in Taiwan R.O.C. exclusively for NEUTON Power Equipment and meets CPSC Blade Safety requirements.
Power Equipment
ii 1-866-NEUTON1 (638-8661) www.neutonowners.com
Page 3

Table of Contents
Chapter 1: Introducing the NEUTON Mower CE 5.2...................................................................................... 1
About this Manual ..........................................................................................................................................................1
Conventions used in this Manual.............................................................................................................................. 2
Chapter 2: Important Safety Considerations ................................................................................................ 3
Safety and Information Labels ...................................................................................................................................3
Protecting Yourself and Those around You ..........................................................................................................4
Dressing Appropriately................................................................................................................................................. 4
Preparing to Use Your Mower or Trimmer............................................................................................................. 5
Operating Your Mower or Trimmer Safely............................................................................................................. 6
Handling the Battery Safely......................................................................................................................................... 7
Chapter 3: Setting Up Your NEUTON Mower ................................................................................................ 9
Assembling Your NEUTON Mower .........................................................................................................................11
Controls and Features .................................................................................................................................................20
Neuton CE 5.2 Product Specifications...................................................................................................................22
Chapter 4: Operating Your NEUTON Mower ...............................................................................................23
Pre-Start Checks ............................................................................................................................................................23
Adjusting the Cutting Height...................................................................................................................................24
Mowing on Slopes........................................................................................................................................................24
Starting the Motor and Engaging the Blade .......................................................................................................25
Starting the Mower ......................................................................................................................................................25
Stopping the Motor and Blade ................................................................................................................................26
When Finished Mowing..............................................................................................................................................26
Mowing and Lawn Care Tips.....................................................................................................................................26
Chapter 5: Charging and Caring for the Battery.........................................................................................27
The Battery .....................................................................................................................................................................27
Charging the Battery ...................................................................................................................................................28
Recharging to Full Charge for Off-Season Storage...........................................................................................30
Caring for the Battery ..................................................................................................................................................31
Recycling your Used Battery .....................................................................................................................................31
Chapter 6: Optional Attachments................................................................................................................33
NEUTON Trimmer .........................................................................................................................................................33
Spare Battery ..................................................................................................................................................................33
Spare Aero Cutting Blade...........................................................................................................................................33
Blade Sharpener ............................................................................................................................................................33
Utility Shelf .....................................................................................................................................................................34
Chapter 7: Maintaining and Storing Your NEUTON Mower....................................................................... 35
Servicing Your Mower.................................................................................................................................................35
Cleaning Your Mower..................................................................................................................................................36
Cleaning the Handlebar .............................................................................................................................................36
Removing and Attaching the Blade .......................................................................................................................37
Sharpening the Blade..................................................................................................................................................38
Balancing the Blade .....................................................................................................................................................39
Storing Your NEUTON Mower ..................................................................................................................................40
Chapter 8: Troubleshooting Tips .................................................................................................................41
Troubleshooting Table................................................................................................................................................41
NEUTON CE 5.2 Battery-Powered Mower -
Safety & Operating Instructions
iii
Page 4

Chapter 9: Optional MA 3.1 Trimmer...........................................................................................................43
Safety and Information Labels .................................................................................................................................43
Operating Your Trimmer Safely...............................................................................................................................44
Trimming on Slopes Safely........................................................................................................................................44
Using the NEUTON Trimmer .....................................................................................................................................44
Attaching, Removing and Using the Trimmer....................................................................................................45
Adjusting the Trimmer Head ....................................................................................................................................46
Starting the Trimmer ...................................................................................................................................................47
Stopping the Trimmer.................................................................................................................................................47
Advancing the Cord.....................................................................................................................................................48
Safety Tips for using the Trimmer...........................................................................................................................48
Maintaining and Storing the NEUTON Trimmer................................................................................................49
Replacing the Spool.....................................................................................................................................................49
Replacing the Spool Housing ...................................................................................................................................49
Cleaning the Trimmer .................................................................................................................................................50
Chapter 10: Parts Lists, Schematic Diagrams, and Warranty.....................................................................51
Parts List - NEUTON CE 5.2 Mower..........................................................................................................................51
Schematic Diagrams - NEUTON CE 5.2 Mower...................................................................................................54
Parts List - Optional MA 3.1 Trimmer .....................................................................................................................56
Schematic Diagram - Optional MA 3.1 Trimmer................................................................................................57
iv 1-866-NEUTON1 (638-8661) www.neutonowners.com
Page 5

Chapter 1: Introducing the NEUTON Mower CE 5.2
Congratulations on purchasing your new NEUTON Mower CE 5.2, the Smart Mower for Small Lawns. The
advanced technology built into your NEUTON Mower makes lawn care easy and enjoyable, year after
year. As you get to know your NEUTON Mower, you will discover that it is strong, light, easy to maintain,
and whisper quiet. It is clean, too, because it runs on a Battery. You will breathe easy and keep your
lawn beautiful the smart fun way – with your NEUTON Mower.
These Safety & Operating Instructions explain how to set up and safely operate your new NEUTON
Battery-Powered Mower, Model CE 5.2. Carefully adhering to the Safety & Operating Instructions in this
manual will ensure many years of productive use.
Please let us know if you have any questions. Just call Toll-Free 1-866-NEUTON1 (638-8661); our
Technical Support Department will be happy to help you. When you call, please have your serial
number, or order number available so we can help you quickly.
About this Manual
This manual is organized into the following chapters:
Chapter 1: Introducing the NEUTON Mower CE 5.2
• Explains the organization of, and conventions used, in this manual.
• Provides contact information for NEUTON Power Equipment.
Chapter 2: Important Safety Considerations
• Describes the Safety Labels on your Mower.
• Explains guidelines for safely operating your Mower.
Chapter 3: Setting up your NEUTON Mower
• Describes the contents of the Mower package as shipped.
• Explains how easy the Mower is to set up.
• Describes and explains the Mower’s features and controls.
Chapter 4: Operating your NEUTON Mower
• Provides instructions for starting and stopping your Mower.
• Explains how to adjust the Mower’s Cutting Height.
• Offers useful tips when using your Mower to care for your lawn.
Chapter 5: Charging and caring for the Battery
• Explains how to use and care for the Battery that powers your NEUTON Mower.
Chapter 6: Optional Attachments
• Describes the Attachments available for use with your NEUTON Mower, and how to use
them.
Chapter 7: Maintaining and storing your NEUTON Mower
• Provides tips on maintaining your Mower.
• Describes how to best store your Mower.
Chapter 8: Troubleshooting Tips
• Lists common problems and their solutions.
In addition to these chapters, the manual includes a Parts List, Schematic Drawings of the NEUTON
Mower, a section for your notes, the Warranty, and a Check List of daily maintenance procedures (on the
back cover) to help you keep your Mower performing well for years to come.
NEUTON CE 5.2 Battery-Powered Mower -
Safety & Operating Instructions
1
Page 6
Conventions used in this Manual
THIS INDICATES A HAZARDOUS SITUATION, WHICH, IF NOT AVOIDED, COULD RESULT IN DEATH OR SERIOUS
INJURY.
THIS INDICATES A HAZARDOUS SITUATION, WHICH, IF NOT AVOIDED, COULD RESULT IN MINOR OR
MODERATE INJURY.
THIS INFORMATION IS IMPORTANT IN THE PROPER USE OF YOUR MOWER. FAILURE TO FOLLOW THIS
INSTRUCTION COULD RESULT IN DAMAGE TO YOUR MACHINE OR PROPERTY.
TIP
This is a helpful hint to guide you in getting the most out of your NEUTON Mower.
NOTE: This information may be helpful to you in using your Mower.
Tools Needed:
This indicates you will need a special tool to perform a maintenance function on your
Mower.
NOTE: NEUTON Power Equipment reserves the right to discontinue, change, and improve its
products at any time without notice or obligation to the purchaser. The descriptions and
specifications contained in this manual were in effect at printing. Equipment described
within this manual may be optional. Some illustrations may not be applicable to your
machine.
2 1-866-NEUTON1 (638-8661) www.neutonowners.com
Page 7
Chapter 2: Important Safety Considerations
We want you to enjoy years of safe and productive use from your NEUTON Battery-Powered Mower.
We do not want you to have injuries, so please take a few moments to read the following instructions
for safely operating your new machine.
PLEASE READ THESE INSTRUCTIONS BEFORE USING YOUR MOWER.
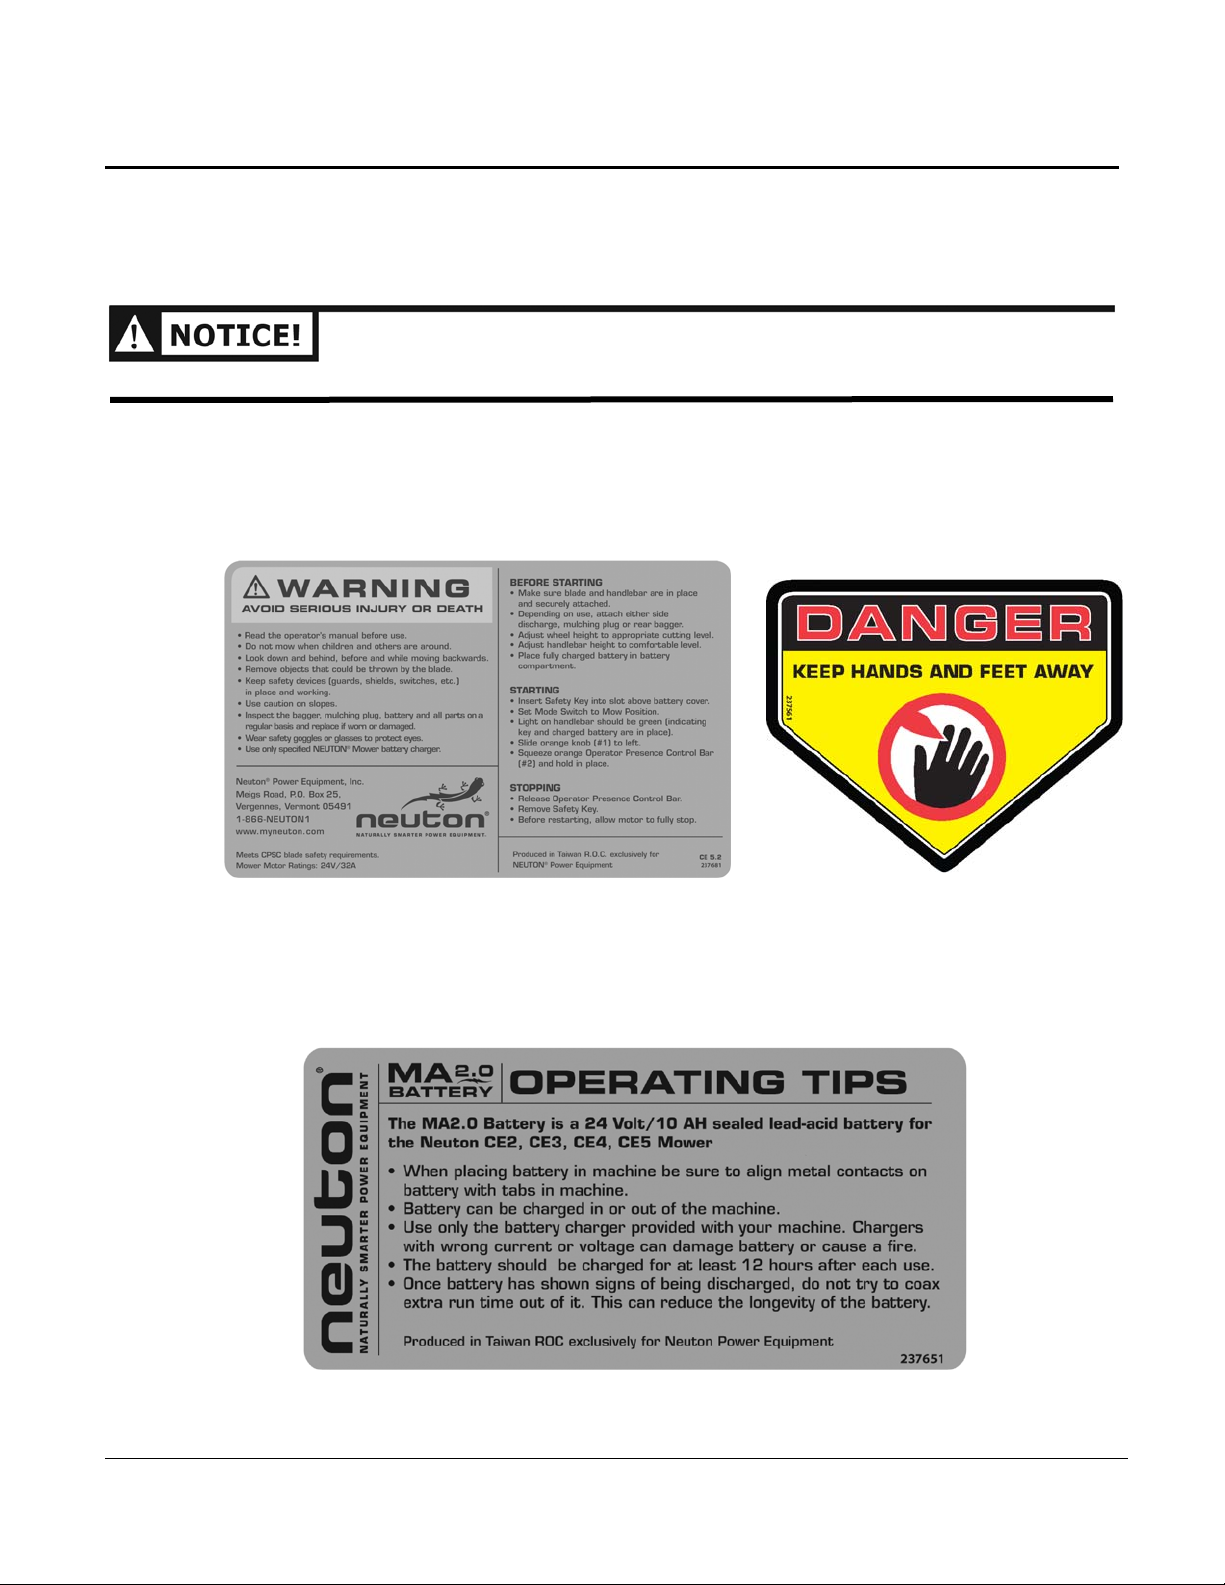
Safety and Information Labels
You will find the following two labels on your NEUTON Mower.
The following label appears on your NEUTON Battery.
Mower Danger Label (237561) NEUTON Mower Warning and Safety Instructions Label (237681)
NEUTON Battery operating tips label. (237651)
NEUTON CE 5.2 Battery-Powered Mower -
Safety & Operating Instructions
3
Page 8
Protecting Yourself and Those around You
Tragic accidents can occur if the operator is not alert to the presence of children. Children are often
attracted to the Mower and the activity of mowing or trimming. Never assume that children will
remain where you last saw them.
• THIS CUTTING MACHINE IS CAPABLE OF AMPUTATING HANDS AND FEET, AND THROWING OBJECTS.
FAILURE TO OBSERVE THE FOLLOWING SAFETY INSTRUCTIONS COULD RESULT IN SERIOUS INJURY OR
DEATH.
• BE SURE THE AREA IS CLEAR OF OTHER PEOPLE BEFORE MOWING OR TRIMMING. NEVER ALLOW
CHILDREN, OTHER BYSTANDERS, OR PETS IN YOUR WORK AREA WHEN OPERATING THE MOWER OR
TRIMMER. STOP THE MACHINE IF ANYONE ENTERS THE AREA.
• KEEP CHILDREN OUT OF THE WORK AREA AND UNDER THE WATCHFUL CARE OF A RESPONSIBLE
ADULT.
• BE ALERT AND TURN THE MACHINE OFF IF CHILDREN ENTER THE AREA.
• ONLY ALLOW RESPONSIBLE INDIVIDUALS WHO HAVE A THOROUGH UNDERSTANDING OF THESE
INSTRUCTIONS TO OPERATE THE MOWER OR TRIMMER. NEVER ALLOW CHILDREN TO OPERATE THE
MACHINE.
• BEFORE AND WHILE PULLING THE MACHINE BACKWARDS, LOOK BEHIND AND DOWN FOR SMALL
CHILDREN AND FOR SECURE FOOTING.
• USE EXTRA CARE WHEN APPROACHING BLIND CORNERS, SHRUBS, TREES, OR OTHER OBJECTS THAT
MAY OBSCURE YOUR VISION.
• IF YOU ARE EVER UNSURE ABOUT AN ACTION YOU ARE ABOUT TO TAKE, PLEASE DO NOT DO IT.
Dressing Appropriately
• ALWAYS WEAR PROTECTIVE GOGGLES OR SAFETY GLASSES WITH SIDE SHIELDS WHEN USING YOUR
NEUTON MOWER OR TRIMMER TO PROTECT YOUR EYES FROM POSSIBLE THROWN OBJECTS. USE A
FACE OR DUST MASK WHEN OPERATING IN DUSTY CONDITIONS.
• WEAR SHOES WITH NON-SLIP TREADS WHEN USING YOUR MACHINE. IF YOU HAVE SAFETY SHOES,
WEAR THEM. DO NOT USE THE MOWER OR TRIMMER WHILE BAREFOOT OR WEARING OPEN SANDALS.
• WEAR LONG PANTS WHILE TRIMMING AND MOWING.
• AVOID WEARING LOOSE CLOTHING OR JEWELRY, WHICH MIGHT CATCH ON THE MACHINE’S MOVING
PARTS.
4 1-866-NEUTON1 (638-8661) www.neutonowners.com
Page 9

Preparing to Use Your Mower or Trimmer
• READ, UNDERSTAND, AND FOLLOW ALL INSTRUCTIONS ON THE MACHINE AND IN THE MANUAL. BE
THOROUGHLY FAMILIAR WITH THE CONTROLS AND THE PROPER USE OF THE MOWER AND TRIMMER
BEFORE STARTING.
• NEVER OPERATE THE NEUTON MOWER OR TRIMMER WITHOUT THE PROPER GUARDS, SAFETY
SWITCHES, OR OTHER SAFETY AND PROTECTIVE DEVICES IN PLACE AND PROPERLY CONNECTED.
INSPECT THE MACHINE AND CUTTING BLADE (CORD) TO DETERMINE PROPER INSTALLATION OF THESE
DEVICES, AND THEY ARE IN GOOD REPAIR, AND OPERATE PROPERLY. IF THE CONDITION OR
OPERATION OF THESE DEVICES IS QUESTIONABLE, YOU MUST REPAIR THEM OR REPLACE THEM
BEFORE USING THE MACHINE.
• FOLLOW THE INSTRUCTIONS FOR THE PROPER INSTALLATION AND OPERATION OF ACCESSORIES. USE
ONLY ACCESSORIES APPROVED BY THE MANUFACTURER. DO NOT ALTER ANY ASPECT OF THE
MOWER, ATTACHMENTS, OR ACCESSORIES IN ANY WAY. MODIFYING OR CHANGING YOUR MOWER OR
ITS ATTACHMENTS AND ACCESSORIES IN ANY WAY COULD CAUSE PERSONAL INJURIES AND
PROPERTY DAMAGE, AND WILL VOID YOUR WARRANTY.
• THOROUGHLY INSPECT THE AREA WHERE YOU WILL BE USING THE MOWER OR TRIMMER, AND
REMOVE ALL STONES, LAWN TOYS, WIRE, BONES, STICKS, PET SUPPLIES, AND ANY OTHER FOREIGN
OBJECTS WHICH COULD BE PICKED UP AND THROWN BY THE MOWER BLADE OR TRIMMER CORD.
OBJECTS STRUCK BY THE MOWER BLADE OR TRIMMER CORD CAN CAUSE SERVE INJURIES. ALSO, NOTE
THE LOCATION OF HOLES, RUTS, BUMPS, STUMPS, AND OTHER POSSIBLE HAZARDS TO AVOID.
• NEVER TURN THE MOWER OVER WHILE THE MOTOR IS RUNNING. THE BLADE MAY THROW OBJECTS OR
COME LOOSE AND CAUSE INJURY.
• MOW OR TRIM ONLY IN DAYLIGHT OR IN AN AREA WELL LIT BY ARTIFICIAL LIGHT.
• DO NOT CHARGE THE MOWER BATTERY IN WET OR RAINY CONDITIONS.
NEUTON CE 5.2 Battery-Powered Mower -
Safety & Operating Instructions
5
Page 10
Operating Your Mower or Trimmer Safely
Your Mower can operate as a Discharging, Mulching, or Bagger Mower. Learn how to use the Side
Discharge Chute, Mulching Plug, and Rear Bagger as appropriate.
• ALWAYS STOP THE MOTOR, WAIT FOR THE BLADE OR CORD TO STOP MOVING, AND REMOVE THE
SAFETY KEY WHENEVER YOU LEAVE THE OPERATING POSITION (BEHIND THE HANDLEBAR) FOR ANY
REASON. IN ADDITION, REMOVE THE BATTERY WHEN INSPECTING AND CLEANING THE MACHINE,
PERFORMING ROUTINE MAINTENANCE, CLEARING GRASS, MAKING ADJUSTMENTS, AND ATTACHING
OR REMOVING ACCESSORIES.
• NEVER INSERT THE SAFETY KEY INTO THE MOWER UNTIL YOU ARE READY TO OPERATE THE MOWER.
STORE THE SAFETY KEY AWAY FROM CHILDREN AND PEOPLE NOT AUTHORIZED TO USE THE MOWER.
• THE CUTTING BLADE OR CORD ALWAYS TURNS WHEN THE MOTOR IS RUNNING. LEARN HOW TO
QUICKLY STOP THE MACHINE’S MOTOR – SIMPLY RELEASE THE ORANGE CONTROL BAR. REMEMBER
THAT THE BLADE OR CORD WILL CONTINUE TO ROTATE FOR UP TO THREE (3) SECONDS AFTER YOU
RELEASE THE ORANGE BAR.
• DO NOT PUT YOUR HANDS OR FEET NEAR OR UNDER THE ROTATING BLADE OR CORD. KEEP CLEAR OF
THE DISCHARGE AREA AT ALL TIMES.
• NEVER OPERATE THE MOWER OR TRIMMER IN THE RAIN OR WHEN THE GRASS IS WET. ALWAYS BE
SURE OF YOUR FOOTING.
• KEEP A FIRM HOLD ON THE HANDLEBAR, AND WALK – NEVER RUN.
• STAY ALERT AND WATCH WHAT YOU ARE DOING.
• WATCH OUT FOR TRAFFIC WHEN MOWING OR TRIMMING NEAR ROADWAYS.
• STOP THE MOTOR WHEN CROSSING OVER LOOSE MATERIALS SUCH AS GRAVEL DRIVES, WALKS, OR
ROADS, AS OBJECTS DISCHARGED BY THE MOWER OR TRIMMER CAN BE HAZARDOUS.
• DO NOT OPERATE THE MACHINE WHEN YOU ARE TIRED OR UNDER THE INFLUENCE OF MEDICATION,
DRUGS, OR ALCOHOL.
• REMOVE THE SAFETY KEY WHEN THE MACHINE IS NOT IN USE.
• KEEP THE BLADE CUTTING EDGES SHARP AND CLEAN FOR THE BEST AND SAFEST PERFORMANCE.
KEEP ALL NUTS, BOLTS, AND SCREWS TIGHT TO BE SURE THE MOWER IS IN SAFE OPERATING
CONDITION. FOLLOW THE INSTRUCTIONS IN THIS MANUAL FOR CHANGING ACCESSORIES.
• NEVER PULL THE MOWER OR TRIMMER TOWARD YOU WHILE CUTTING GRASS. BY DESIGN, YOU
SHOULD ONLY PUSH THE NEUTON MOWER OR TRIMMER FORWARD WHILE CUTTING.
• USE EXTREME CAUTION WHEN MANEUVERING BACKWARDS. ALWAYS STOP THE MOTOR, LOOK FIRST
TO CHECK YOUR FOOTING, LOOK DOWN AND BEHIND YOU BEFORE MOVING BACKWARDS.
• IF YOU STRIKE A FOREIGN OBJECT, OR IF THE MOWER OR TRIMMER VIBRATES ABNORMALLY, STOP
THE MOTOR, REMOVE THE SAFETY KEY, AND INSPECT THE MACHINE FOR ANY DAMAGE. REPAIR THE
DAMAGE BEFORE RESTARTING AND OPERATING THE MACHINE.
NOTE: Excessive vibration is generally a sign of trouble.
• DO NOT USE YOUR NEUTON MOWER OR TRIMMER FOR ANY JOB OTHER THAN THE INTENDED USE.
• ONLY USE THE TRIMMER FOR TRIMMING GRASS, WEEDS, AND OTHER VEGETATION.
• DO NOT OPERATE THE MACHINE IF IT DOES NOT START NORMALLY OR STOP NORMALLY WHEN YOU
RELEASE THE CONTROL BAR.
• EMPTY THE REAR BAGGER OF ALL DEBRIS FOLLOWING EACH USE. THE FABRIC WILL WEAR AND
DETERIORATE UNDER NORMAL USAGE. BEFORE EACH USE, CHECK THE BAGGER FOR WEAR AND
REPLACE IF IT IS TORN, OR WORN.
6 1-866-NEUTON1 (638-8661) www.neutonowners.com
Page 11

Handling the Battery Safely
• NEVER CHARGE THE LAWN MOWER BATTERY IN THE RAIN OR IN WET CONDITIONS.
• USE ONLY THE CHARGER PROVIDED TO CHARGE THE BATTERY. USE OF A DIFFERENT CHARGER MAY
CAUSE A FIRE OR EXPLOSION.
•
EXERCISE CARE IN HANDLING THE BATTERY IN ORDER NOT TO SHORT-CIRCUIT IT WITH CONDUCTING
MATERIALS SUCH AS RINGS, BRACELETS, AND KEYS. WHEN SHORT-CIRCUITED, THE BATTERY OR
CONDUCTOR MAY OVERHEAT AND CAUSE BURNS.
• NEVER ATTEMPT TO REPLACE THE INDIVIDUAL BATTERY CELLS INSIDE THE BATTERY. MIXING FRESH
AND DISCHARGED BATTERIES COULD INCREASE INTERNAL CELL PRESSURE AND RUPTURE THE
DISCHARGED BATTERY. IMPROPER WIRING WITHIN THE BATTERY COULD RESULT IN LEAKAGE OR
EXPLOSION.
• NEVER DISPOSE OF BATTERIES IN A FIRE, AS THE BATTERY CELLS MAY EXPLODE. NEVER OPEN OR
MUTILATE THE BATTERY. RELEASED ELECTROLYTE (BATTERY ACID) IS CORROSIVE AND WILL CAUSE
DAMAGE TO EYES, SKIN, OR CLOTHES. BATTERY ACID IS TOXIC IF SWALLOWED OR IF THE FUMES ARE
INHALED.
• NEVER THROW AWAY USED BATTERIES IN YOUR HOUSEHOLD TRASH. BRING THEM TO A RECYCLING
CENTER OR HOUSEHOLD HAZARDOUS WASTE DEPOT FOR PROPER DISPOSAL. PLEASE REFER TO
“RECYCLING YOUR USED BATTERY” ON PAGE 31 FOR MORE INFORMATION.
NOTE: See additional details on Battery care in “Chapter 5: Charging and Caring for the Battery”.
No list of Warnings and Cautions can be all-inclusive. If situations occur not covered by this manual,
the operator must apply common sense and operate the NEUTON Mower or Trimmer in a safe
manner. Call 1-866-NEUTON1 (638-8661) for assistance.
NEUTON CE 5.2 Battery-Powered Mower -
Safety & Operating Instructions
7
Page 12

8 1-866-NEUTON1 (638-8661) www.neutonowners.com
Page 13

Chapter 3: Setting Up Your NEUTON Mower
This chapter outlines a few simple steps needed to set up your new Mower. Before beginning
assembly, it may be helpful to familiarize yourself with the controls and features on your Mower by
reviewing the photograph of the Mower on page 19 (Figure 22) and reading about the Mower’s
controls and features.
Please check that you have all of the components listed below. If anything is missing, please call
NEUTON Power Equipment Toll-Free at 1-866-NEUTON1 (638-8661).
NEUTON Mower Package Checklist
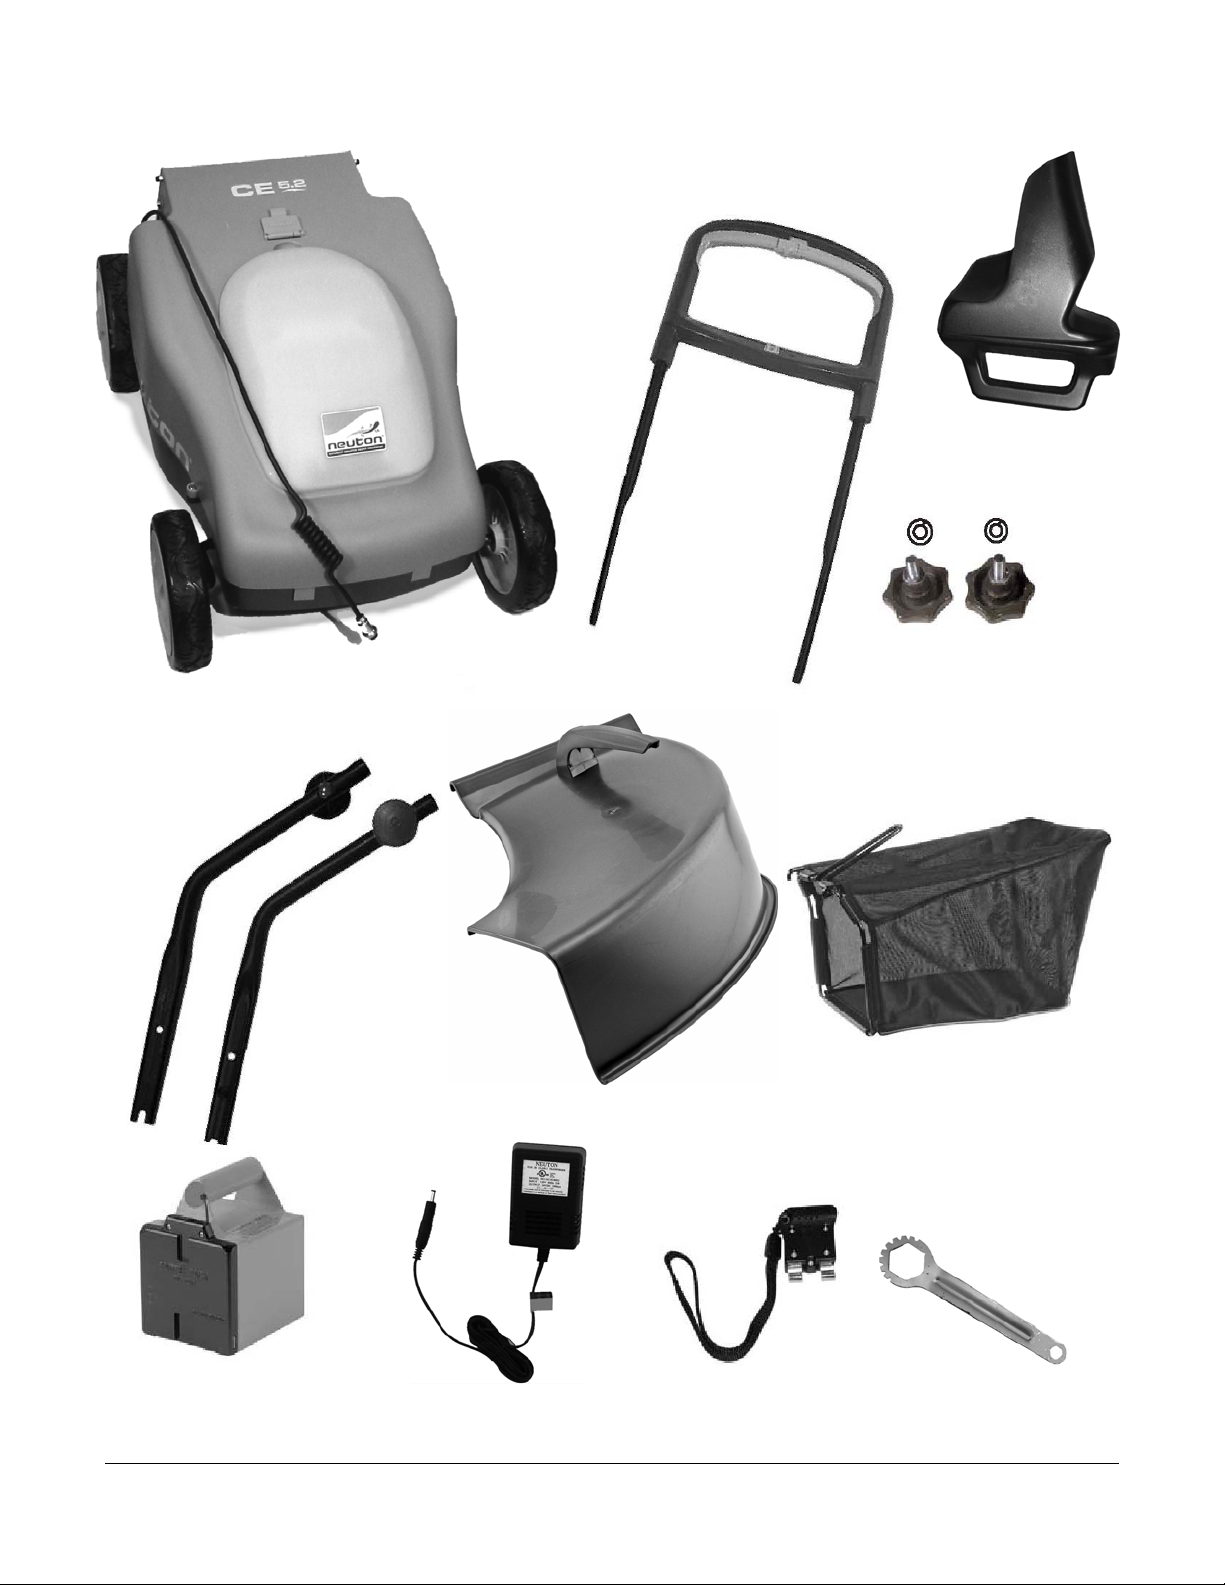
NEUTON Power Equipment ships the following items (Figure 1 on page 10) in your Mower package.
Please check to make sure you have everything listed below:
• NEUTON CE 5.2 Battery-Powered Mower
• Upper Handlebar Assembly
• (2) Green Quick-Connect Knobs w/Lock Washers used to connect the Lower Handlebars to the
Mower.
• (2) Lower Handlebars with two (2) Black Connector Knobs attached (used to connect the Upper and
Lower Handlebars together).
• Side Discharge Chute w/Handle
• Rear Bagger
• Mulching Plug
• Battery (inside the Mower)
• Battery Charger
• Safety Key
• 36mm Wrench (to remove the Blade)
• NEUTON CE 5.2 Battery-Powered Mower Safety & Operating Instructions Manual
NEUTON CE 5.2 Battery-Powered Mower -
Safety & Operating Instructions
9
Page 14
r
y
r
y
r
Mulching Plug
Lock Washers
NEUTON Mowe
Lower Handlebars w/Black
Connector Knobs
Upper Handlebar Assembl
Green Quick-Connect Knobs
Bagge
Side Discharge Chute
Battery
10 1-866-NEUTON1 (638-8661) www.neutonowners.com
Battery Charge
Figure 1
36mm WrenchSafety Ke
Page 15

Assembling Your NEUTON Mower
To allow you to quickly begin using your NEUTON Mower, it shipped to you partially assembled. The
assembly process is easy and does not require any special tools, knowledge, or strength.
Assembling your NEUTON Mower takes just a few steps:
Step 1: Read the Safety & Operating Instructions before proceeding
Step 2: Remove the Battery
Step 3: Charge the Battery before your first use
Step 4: Attach the Low Handlebar Sections
Step 5: Attach the Upper Handlebar Assembly
Step 6: Attach the Cable to the Handlebar Assembly
Step 7: Attach the Side Discharge Chute, Mulching Plug, or Rear Bagger
Step 8: Insert the Battery after being fully charged
Each of these steps is described in detail below: (See Figure 22 on page 19 for a photograph of the
fully assembled Mower)
THE SAFETY KEY, WITH ITS BUILT-IN CIRCUIT BREAKER, AS WELL AS THE BATTERY, SHOULD NEVER BE
INSERTED DURING ASSEMBLY, ADJUSTMENTS, CLEANING, BLADE REPLACEMENT, OR WHEN THE MOWER IS
NOT IN USE. REMOVING THE SAFETY KEY WILL PREVENT ACCIDENTAL STARTING, AND HELP AVOID
SERIOUS PERSONAL INJURY.
Step 1: Read the Safety & Operating Instructions before proceeding
The NEUTON Mower is a motorized cutting machine that uses a sharp Blade. For your safety, and for best
results, it is important to read the information in “Chapter 2: Important Safety Considerations” before you
assemble or use the Mower.
To familiarize yourself with the assembly, features, and operation of your Mower, please read the remainder of
this manual before proceeding.
NOTE: Do not discard the shipping box and packaging material until you are fully satisfied with your new
NEUTON Battery-Powered Mower.
NEUTON CE 5.2 Battery-Powered Mower -
Safety & Operating Instructions
11
Page 16
TIP
Step 2: Remove the Battery
You can quickly and easily remove the Battery from your Mower.
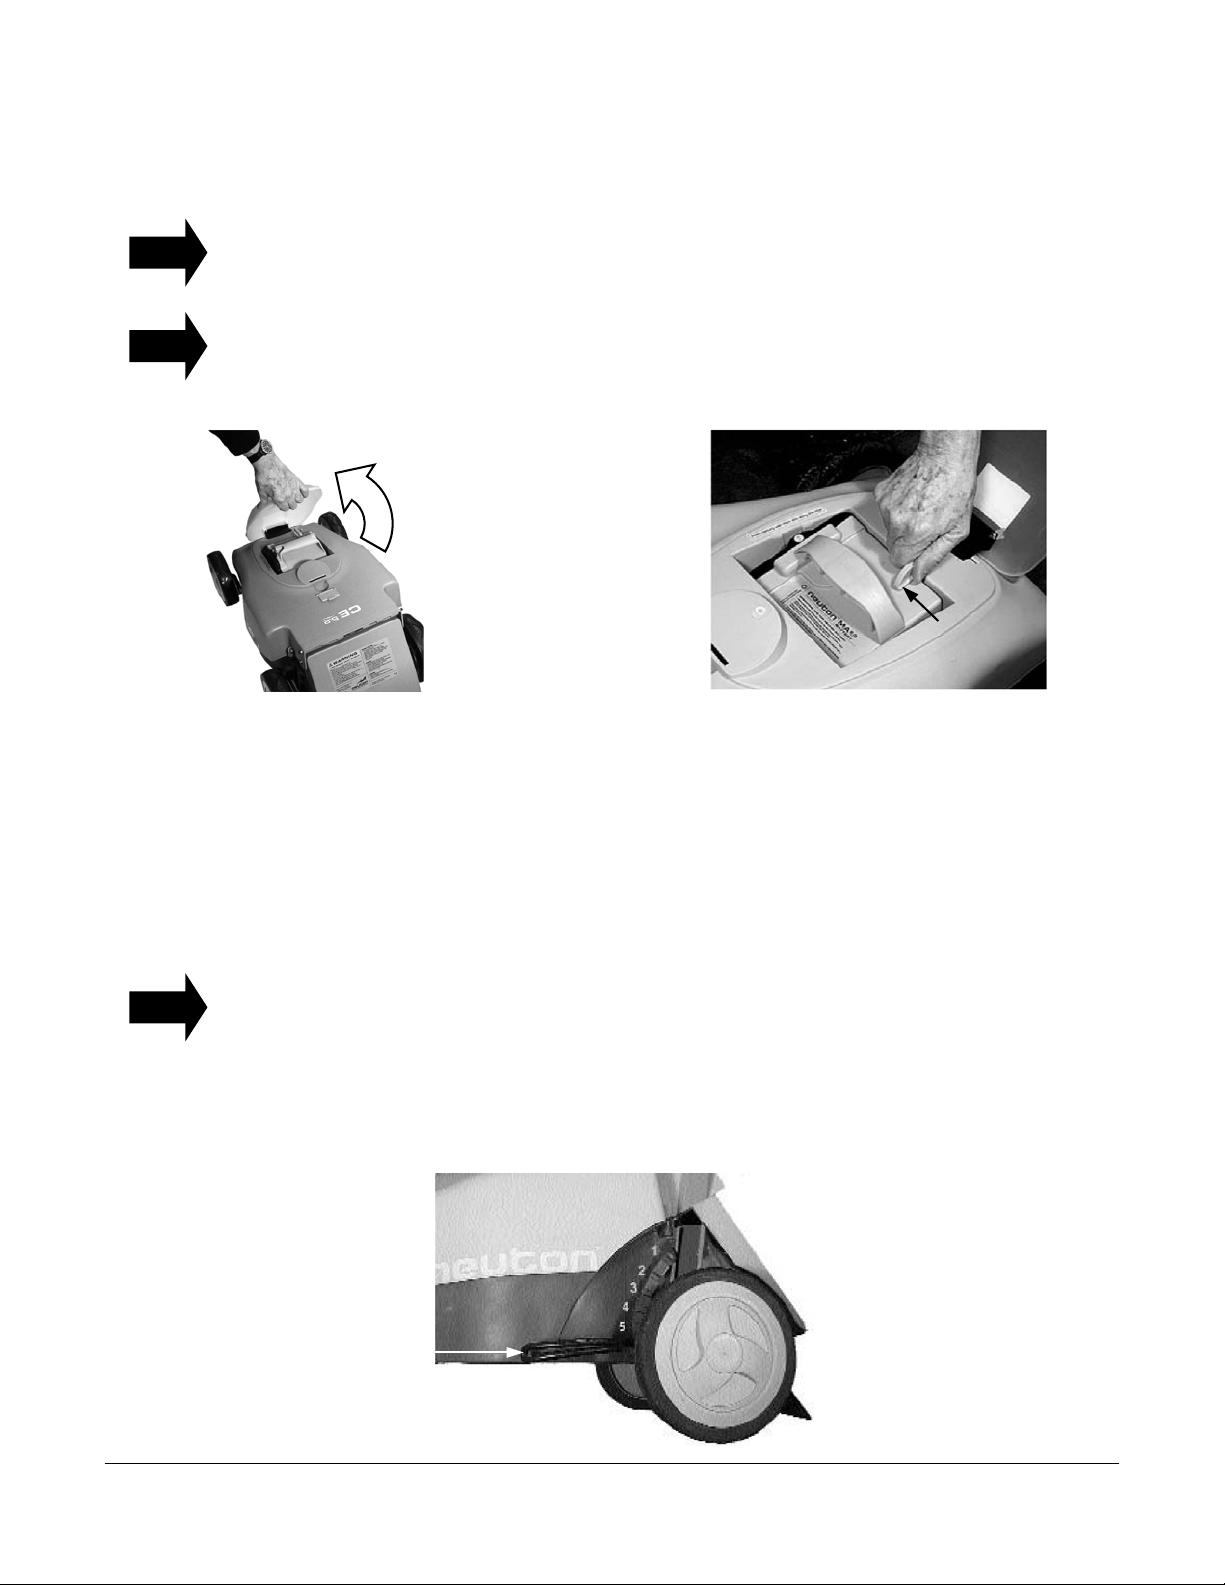
1. Open the Battery Cover (Figure 2).
Press down on the Mower body next to the Battery Cover Handle before pulling the Cover open.
2. Turn the Battery Retainer Arm until it is no longer blocking the Battery (Figure 3).
TIP
To help keep the Mower from rolling while removing the Battery, put one foot behind a wheel for
stability.
3. Pull the Battery straight up and remove it.
Figure 2 Figure 3
Step 3: Charge the Battery before Your First Use
You MUST charge the Battery for twelve (12) hours before you use the Mower for the first time. If you
do not charge it before using the Mower, the Battery’s charging capacity may decrease.
For instructions on removing and charging the Battery, read “Chapter 5: Charging and Caring for the
Battery” before you operate the Mower.
Retainer Arm
Step 4: Attach the Lower Handlebar Sections
TIP
To keep the Mower from moving while you assemble it, place your foot behind one of the wheels.
NOTE: You will use the green Quick-Connect Knobs to attach the Lower Handlebar sections to the Mower.
Install both handlebars the same way.
1. Set the Cutting Height Lever (Figure 4) to the highest adjustment (position 6 as molded into the
Mower body). This makes it easier to reach the slots on the Mower frame.
Cutting Height Lever
(in position 6)
Figure 4
12 1-866-NEUTON1 (638-8661) www.neutonowners.com
NOTE: The position numbers are high
lighted in this photo for clarity.
Page 17
7
Figure 5
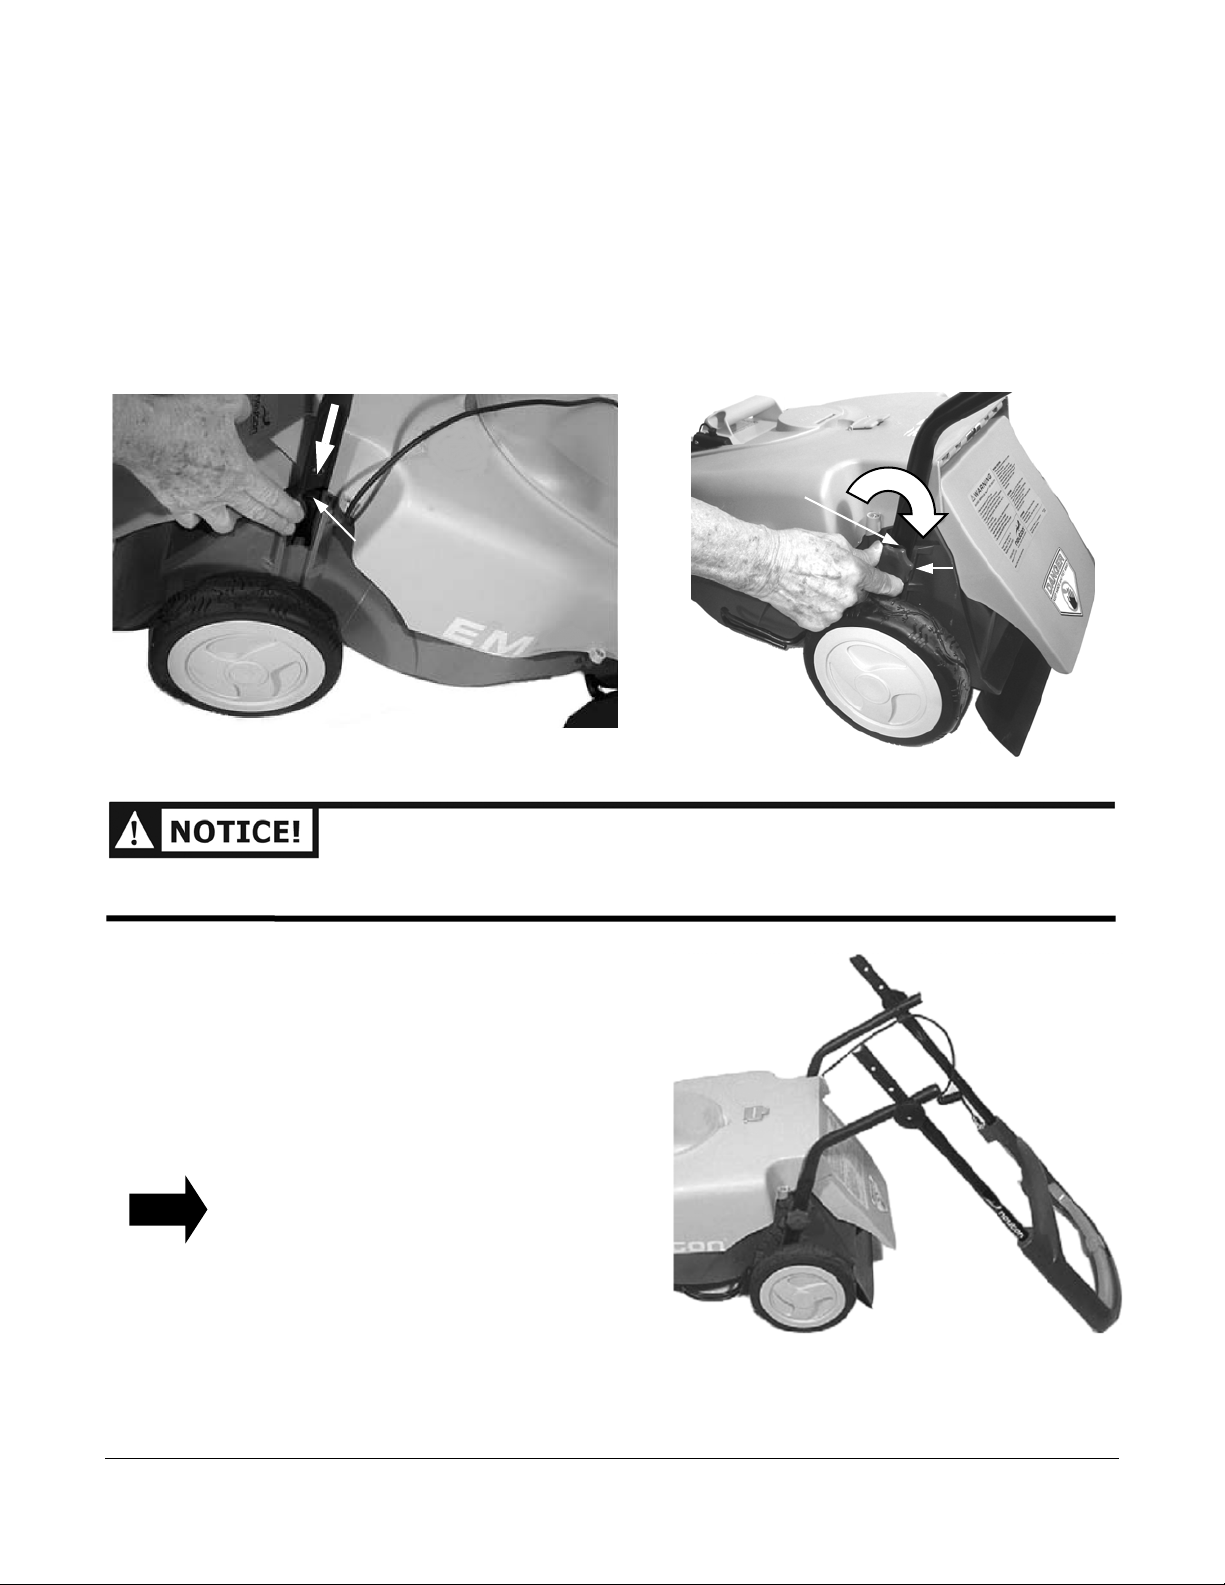
2. Position the Lower Handlebar with the smooth side against the frame of the Mower. Slide it down
fully into the slot on the frame until the holes line up (Figure 5).
NOTE 1: Place the Lower Handlebar with the cord clip on the right side (viewed from the Operator’s position
behind the Handlebar) of the Mower.
NOTE 2: Be sure you slide the Handlebar all the way down to the bottom of the slot. When you do this, the
cutout notch on the end of the Handlebar aligns with the base of the channel in the Mower’s frame.
3. Insert a green Quick-Connect Knob with a Lock Washer through the lined-up holes on the
Handlebar and Mower frame (Figure 6). Turn the Knob clockwise until firmly snug. Repeat this
step for the other side.
Lock Washer
Holes aligned
Green Quick-
Connect Knob
Figure 6
BE SURE TO TIGHTEN THE GREEN QUICK-CONNECT KNOBS BY HAND. DO NOT USE A TOOL TO TIGHTEN
THEM; YOU COULD EASILY OVER TIGHTEN THEM AND DAMAGE THE PARTS.
Step 5: Attach the Upper Handlebar Assembly
NOTE: You will use the black Connector Knobs and
Bolts (already attached to the Lower
Handlebars) to connect the Upper and
Lower Handlebar sections together.
1. Remove the black Connector Knobs and
Connector Bolts from the upper ends of the
Lower Handlebars.
TIP
Let the Upper Handlebar Assembly lean on the
ground during this process (Figure 7). It is easier
to start with the Upper Assembly in this position,
so you don’t have to hold and balance it while
connecting the sections. Once you have the
Handlebars loosely connected, you can swing
the Upper Assembly into place and tighten it
further (Figure 8) on page 14.
Figure
Upper Handlebar in a position
for ease of attachment.
(shown already attached)
NEUTON CE 5.2 Battery-Powered Mower -
Safety & Operating Instructions
13
Page 18
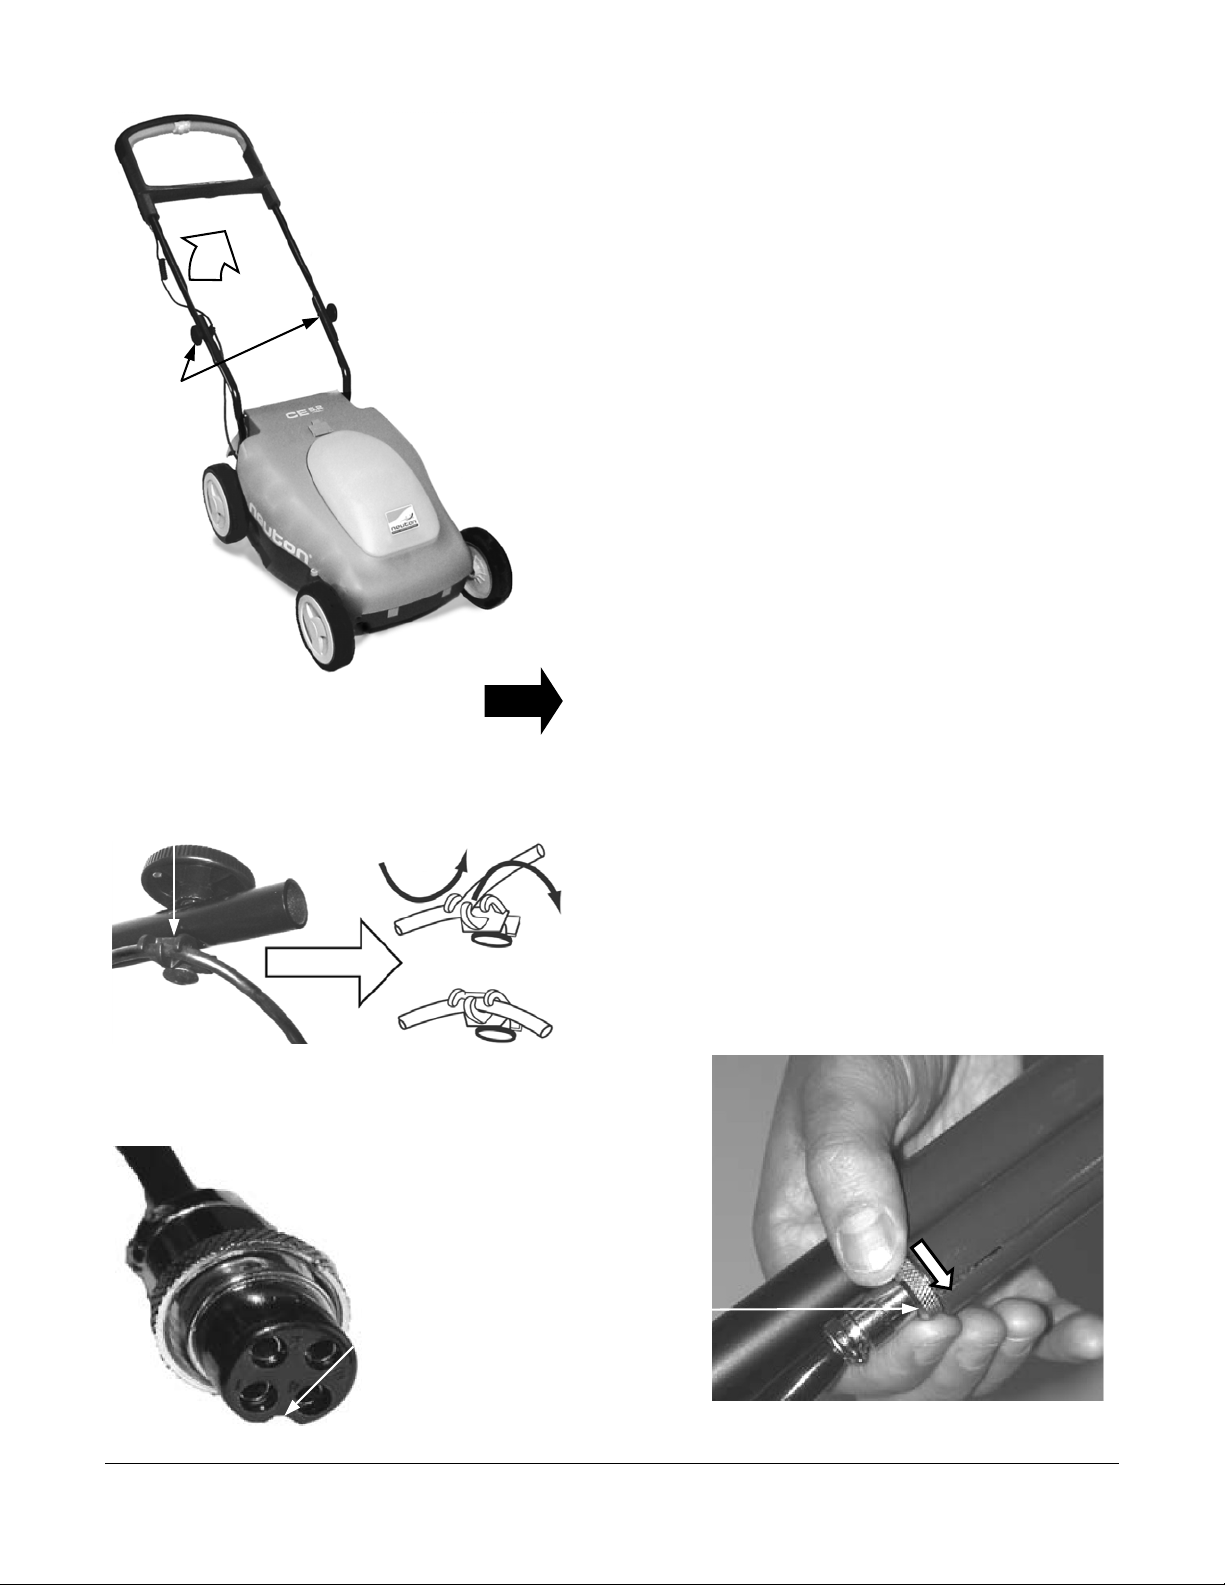
Black
t
Connector
Knobs
Figure 8
2. Line up the holes of the Upper Handlebar Assembly with
the holes in the Lower Handlebar sections.
NOTE: There are three (3) height positions (holes in the Upper
Handlebar) for the Upper Handlebar Assembly. Connect
the Upper and Lower Handlebar sections together using
the appropriate holes at a height that is most
comfortable for you.
3. Slide the Connector Bolts (from the inside of the
Handlebars, outward) through the predetermined holes
in the Upper and Lower Handlebar sections on each side
of the Mower and lightly screw on the black Connector
Knobs just enough to hold the Upper and Lower
Handlebar sections together.
4. Swing the Upper Handlebar Assembly into an upright
position so that the Upper and Lower Handlebars line up
and slide into place (Figure 8). Tighten the black
Connector Knobs by hand until they are snug.
5. Check the length the Handlebar for comfort. If necessary,
reconnect the Upper and Lower (up or down) to a height
that is best for you.
Cord Clip
Figure 9
TIP
Connector Knobs to move the Upper Handlebar Assembly
forward onto the Mower’s Deck.
Step 6: Attach the Cable to the Handlebar Assembly
1. Run the Cable through the Cord Clip (Figure 9) on the
To save space for storage, you can loosen these black
1
2
right Lower Handlebar section.
2. Align the Half-Moon Cutout in the Cable End (Figure 10)
with the Cable Housing on the Handlebar, and slide them
together.
3
3. Tighten the Locking Nut by hand to connect the Cable
(Figure 11) with the Housing.
Tighten
Half-Moon Cutou
Locking Nut
Figure 10
14 1-866-NEUTON1 (638-8661) www.neutonowners.com
Figure 11
Page 19
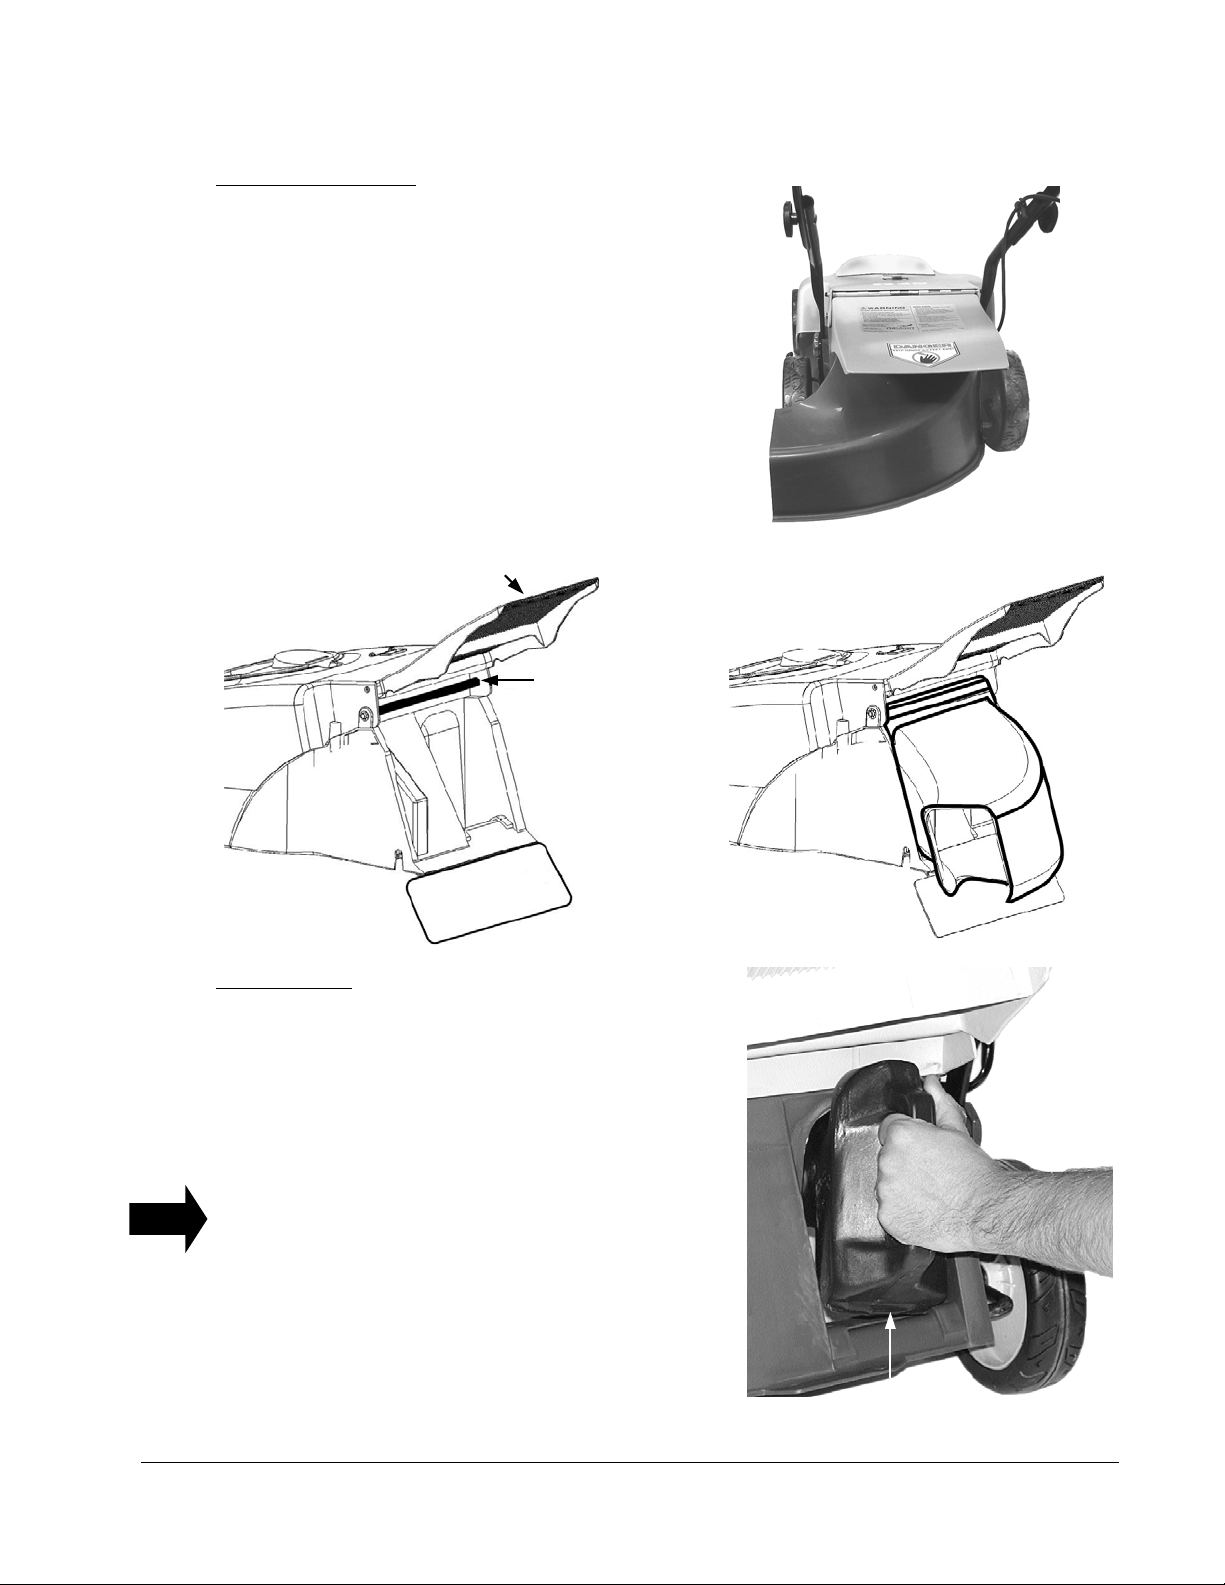
Step 7: Attach the Side Discharge Chute, Mulching Plug, or Rear Bagger
Side Discharge Chute
The Side Discharge Chute (Figure 12) allows for proper
discharge of the grass, which prevents clogging. The Chute
shipped without the Handle so you will have to install the
Handle prior to use using a small Phillips Screwdriver.
1. Raise the hinged Discharge Guard on the back of the
Mower (Figure 12a).
2. Orient the Discharge Chute as shown in Figure 12b.
Position the top front groove of the Chute over the
Support Rod (Figure 12a) and lower the Chute into
place (Figure 12b).
3. Lower the hinged Discharge Guard.
Discharge Guard
Support Rod
Side Discharge Chute
Figure 12
Side
Discharge
Chute
TIP
Figure 12a Figure 12b
Rear Flap
Mulching Plug
To mulch your grass, install the Mulching Plug.
Discharge Guard
1. If necessary, remove the Rear Bagger or Side
Discharge Chute from the Mower.
2. Install the Mulching Plug (Figure 13). Be sure to
push the Plug all the way in until the Notch in its
bottom is engaged.
There’s a slight knack to installing the Plug; push the
Plug in with a slightly arcing motion as follows:
• Align the Plug in the Mower.
• Start to push the top of the Plug in first.
• Then put pressure towards the bottom and slide in
the Plug.
Figure 13
Engage Notch
NEUTON CE 5.2 Battery-Powered Mower -
Safety & Operating Instructions
15
Page 20
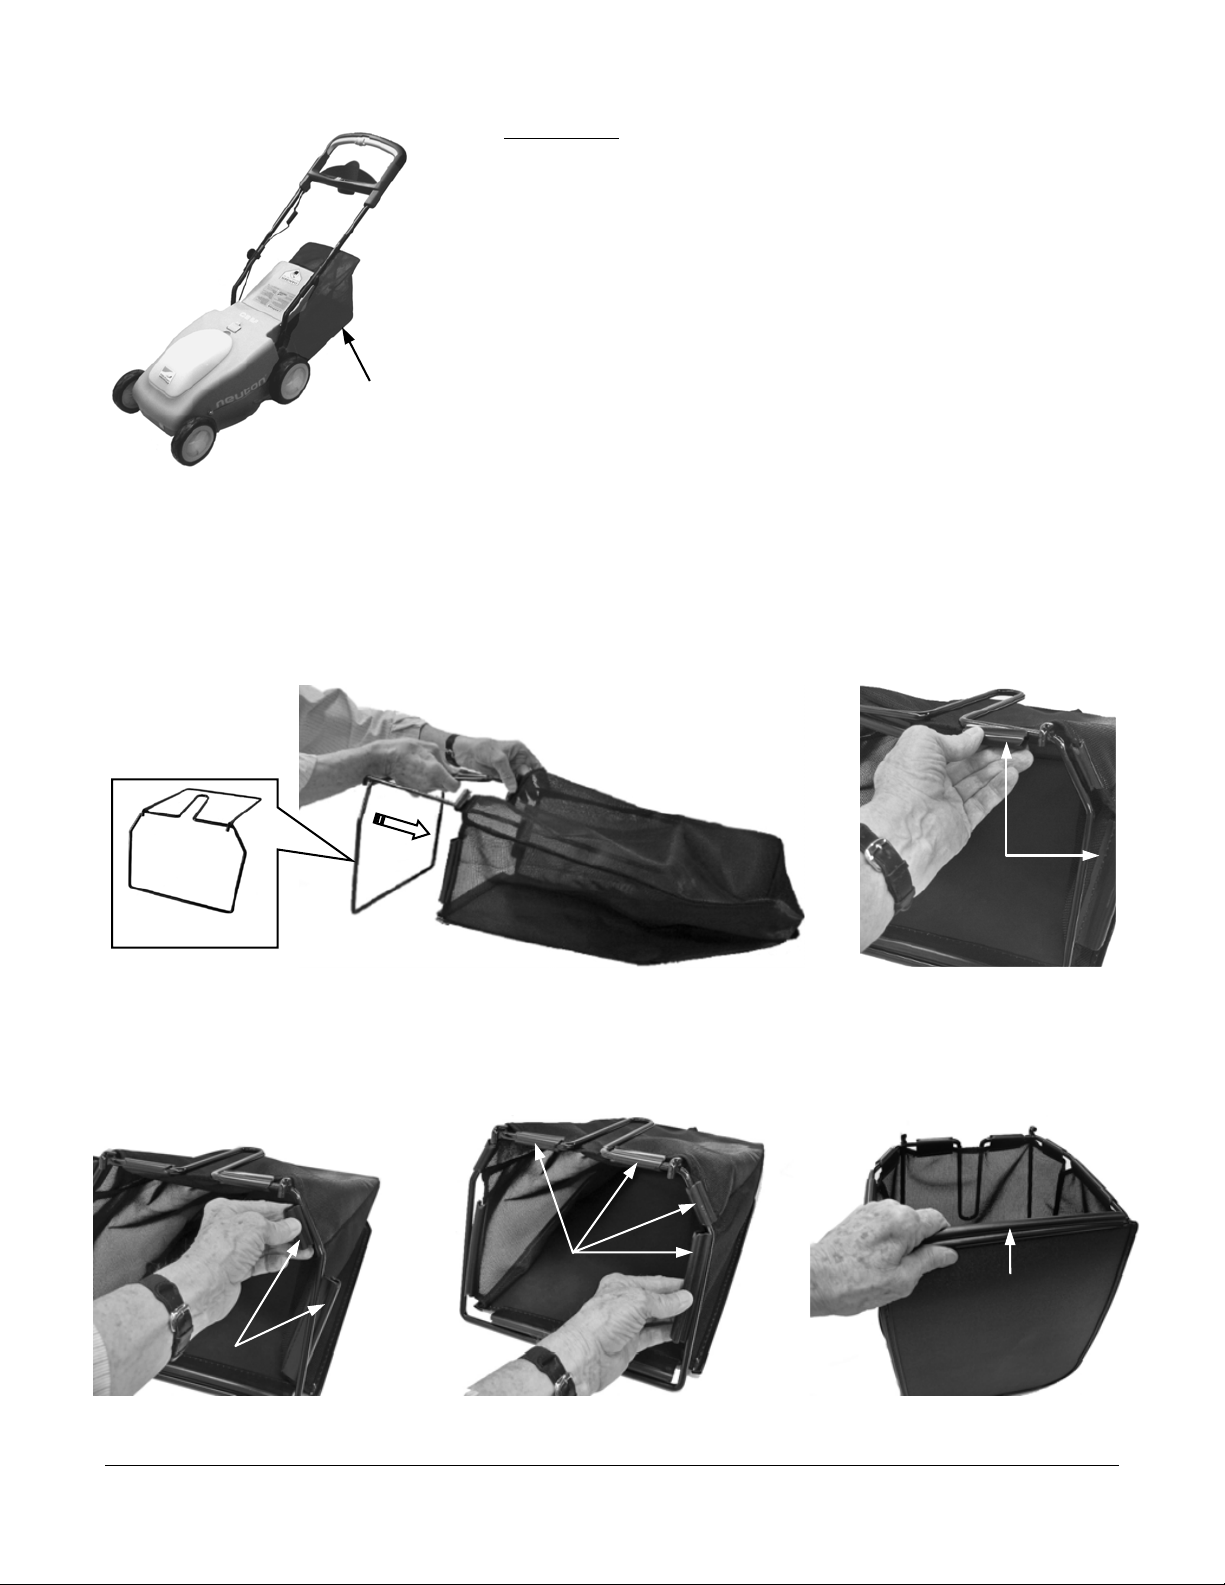
Rear Bagger
r
c
The NEUTON Rear Bagger lets you cut and catch your grass clippings,
eliminating the need to rake. The Rear Bagger easily attaches to the
rear of the Mower (Figure 14). The Bagger is shipped unassembled.
The following instructions outline the steps necessary to assemble,
install, and remove the Bagger.
Figure 14
Rear Bagge
Assembling the Bag to the Bag Frame
1. With the Bottom Stiffener Board facing down, insert the Frame into the Bag (Figure 15).
2. Snap the Bag Clips around the Frame top, sides and bottom (Figures 16a – 16d) to secure the Bag
to the Frame.
Frame
Stiffener Board
Bag Clips
Figure 15
Bag Clips
Bag Clips
Figure 16b Figure 16
16 1-866-NEUTON1 (638-8661) www.neutonowners.com
Figure 16a
Bag Clip
Figure 16d
Page 21
7
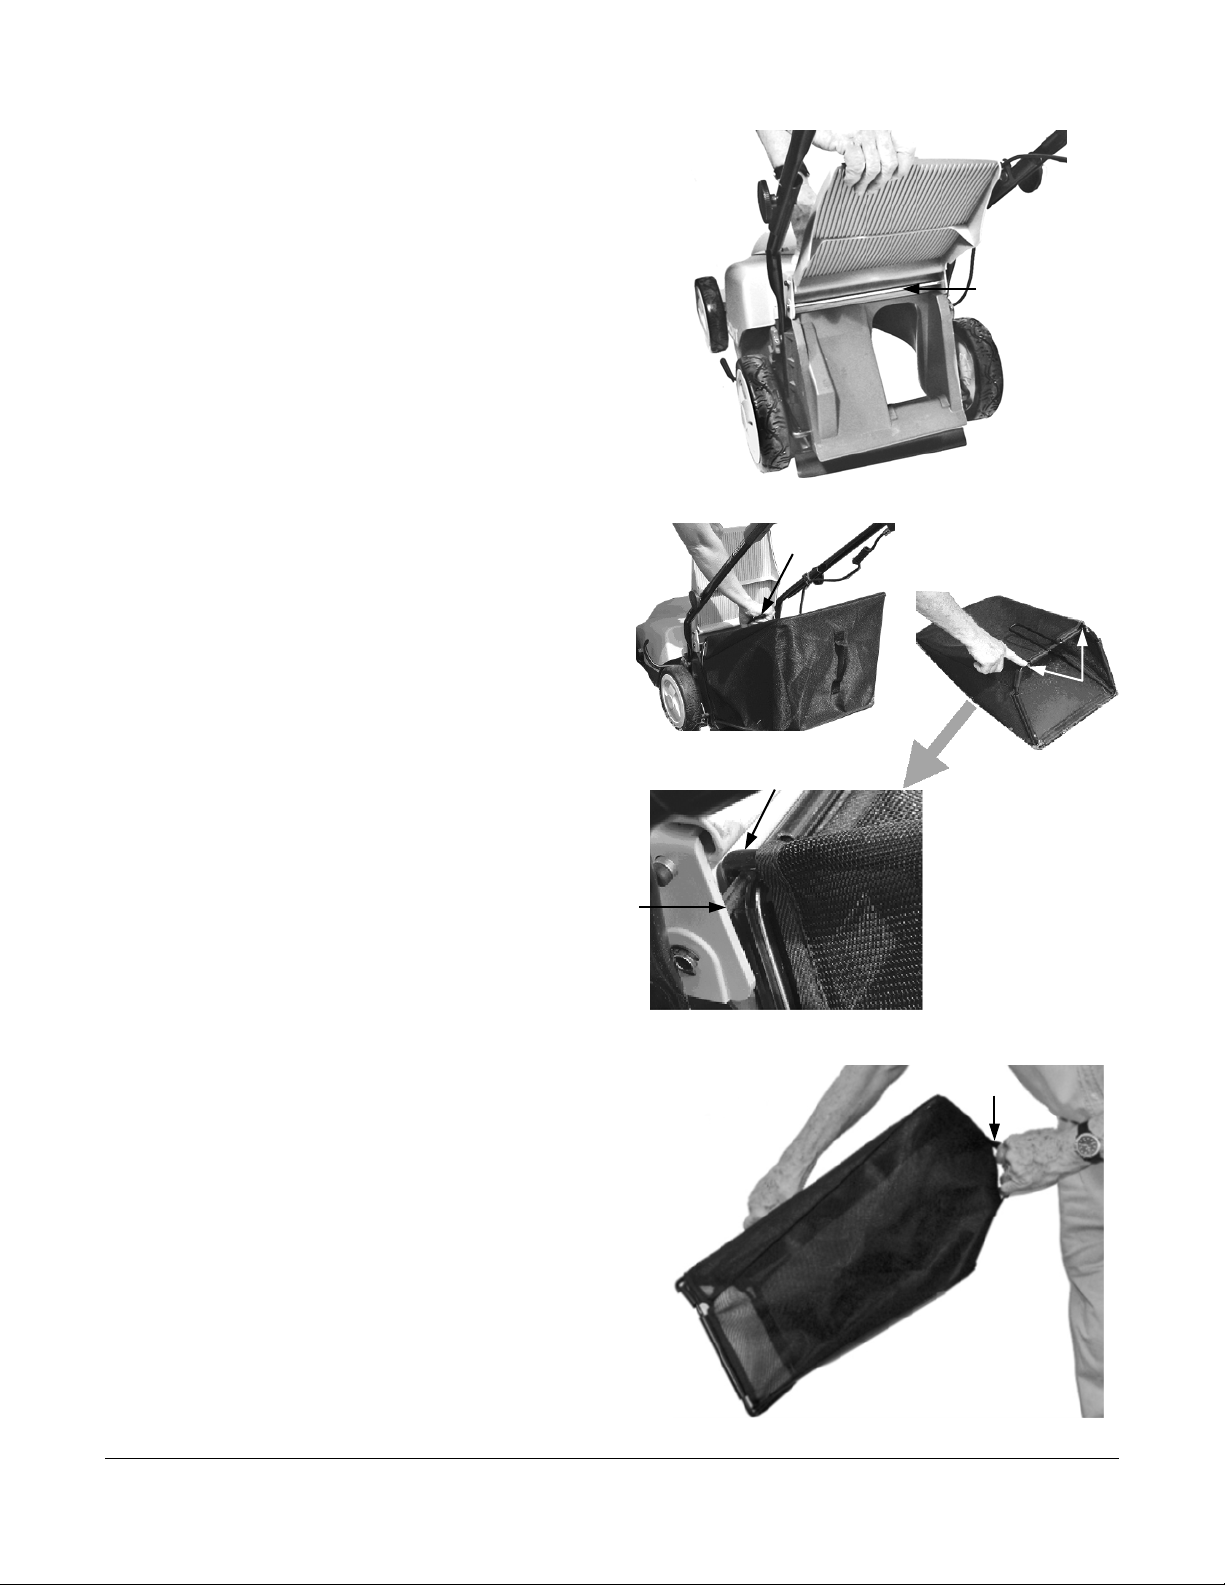
Installing the Bagger
1. Raise the Discharge Guard on your Mower
(Figure 17) and note the metal Support
Rod at the rear of the Mower.
Discharge
Guard
2. Grasp the Bagger by the Top Handle
(Figure 18) and center it at the back of the
Support Rod
Mower.
3. Align the Metal Latch Hooks (Figure 18)
over the Support Rod (Figure 19) and
lower the Bagger in place until the Wire
Frame at the bottom of the Bagger rests
on the Mower.
4. Lower and close the Discharge Guard.
Removing and Emptying the Bagger
1. Raise the Discharge Guard.
2. Using the Top Handle of the Bagger, lift
the Bagger off the Support Rod and away
from the Mower.
3. Lower the Dischage Guard.
4. To empty the Bagger, tilt the Top Handle
forward. Use the Cloth Handle (Figure 20)
at the rear of the Bagger to move the
contents toward the front as you empty
the Bagger.
Support Rod
Figure 1
Top
Handle
Latch Hooks
Figure 18
Latch Hook
Figure 19
NEUTON CE 5.2 Battery-Powered Mower -
Cloth Handle
Figure 20
Safety & Operating Instructions
17
Page 22
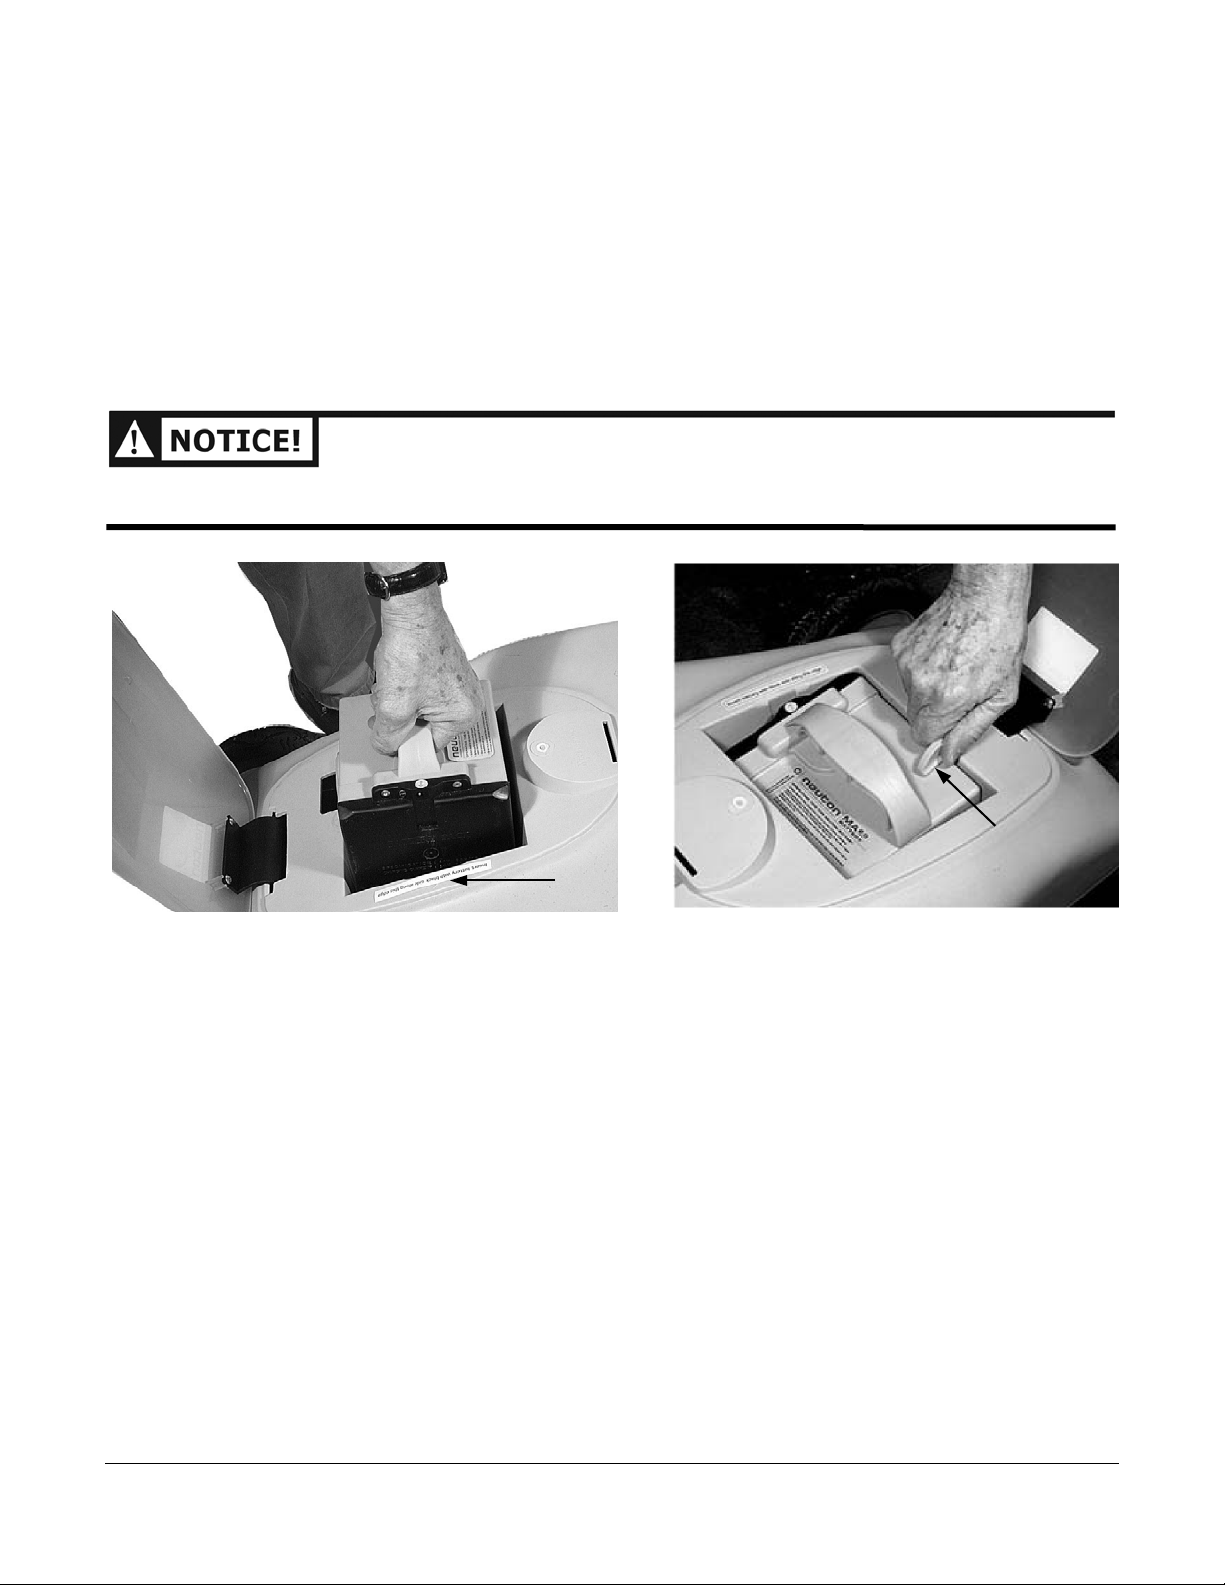
Step 8: Insert the Battery after Being Fully Charged
1. Orient the Battery as shown in Figure 21a. Align the black side of the Battery with the side of the
Mower housing where the label reads “Insert Battery with the black side along this edge.”
NOTE: The indentations on the bottom of the Battery must line up with the metal tabs in the bottom the
Battery compartment.
2. After confirming the correct orientation of the Battery, insert the Battery fully into the Battery
compartment.
3. Turn the Battery Retainer Arm back over on top of the Battery to secure it in place (Figure 21b).
IF THE BATTERY IS NOT ORIENTED CORRECTLY, IT WILL NOT FULLY DEPRESS INTO THE OPENING. IF THIS
HAPPENS, REMOVE THE BATTERY, RECHECK THE ORIENTATION, AND TRY AGAIN.
Figure 21a
Retainer Arm
Label
Figure 21b
18 1-866-NEUTON1 (638-8661) www.neutonowners.com
Page 23
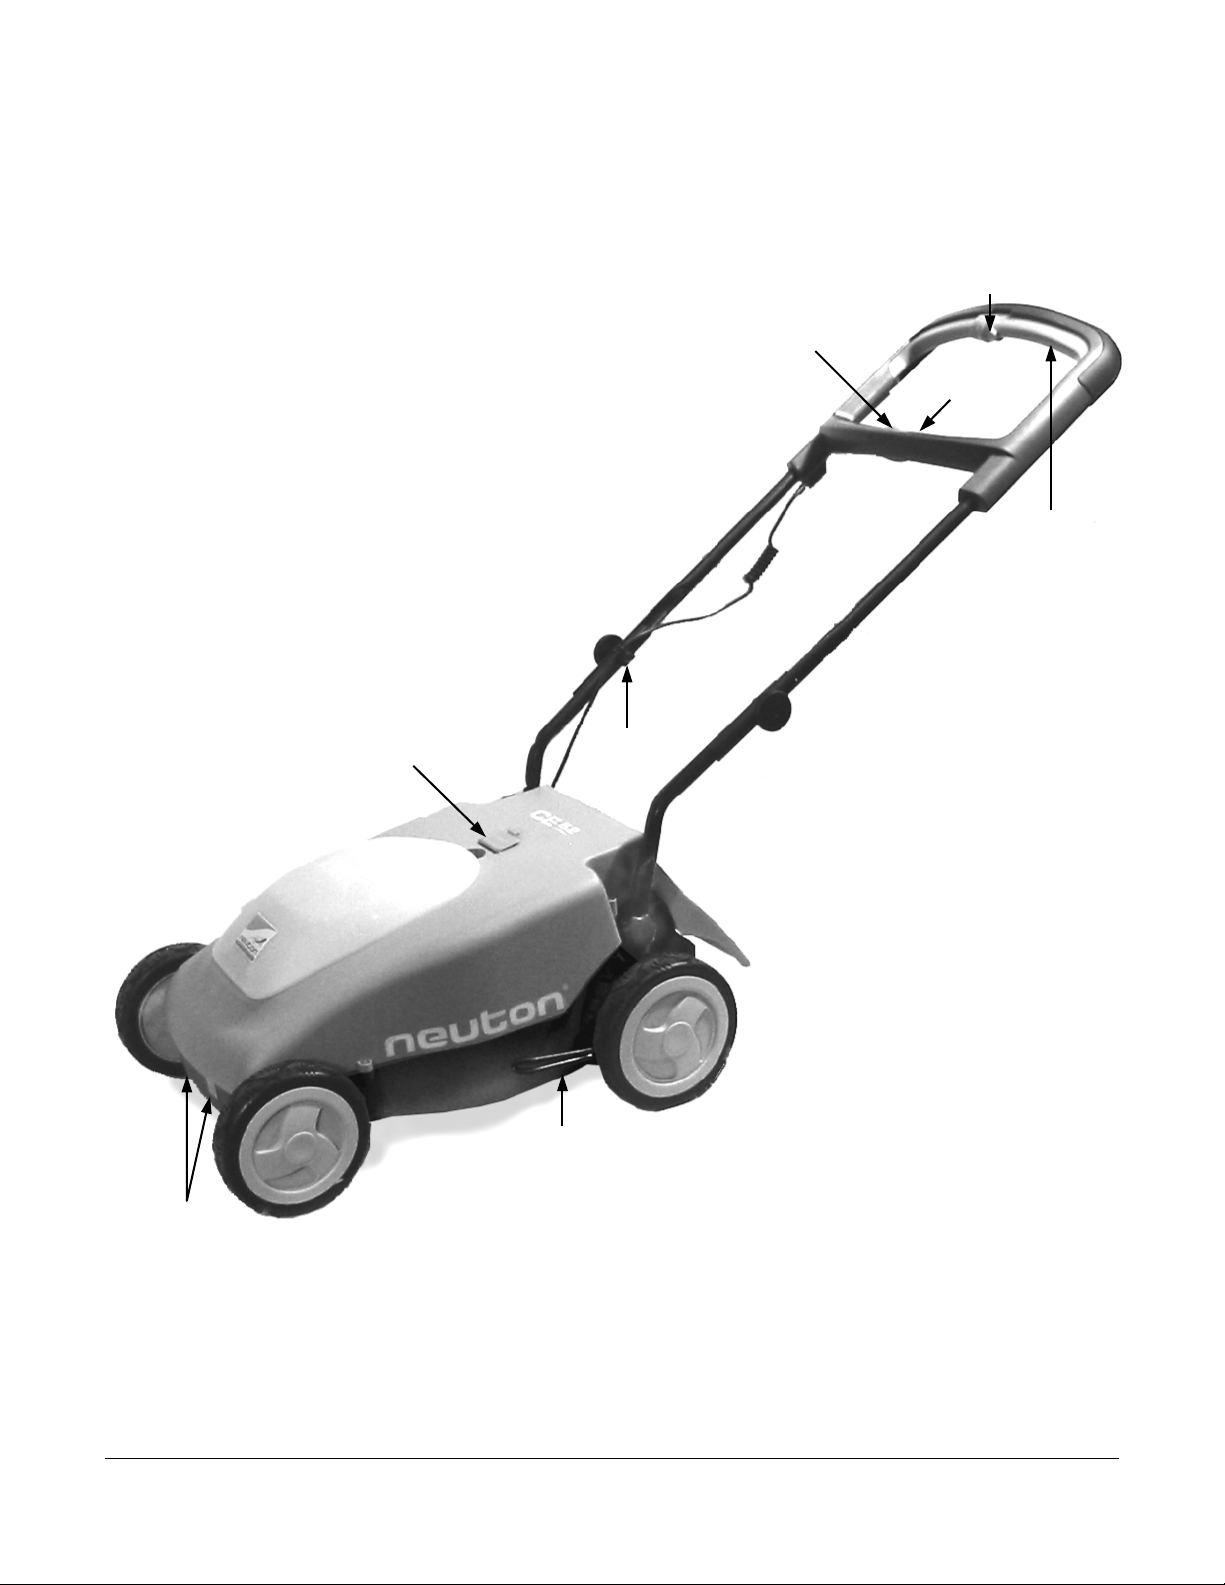
t
t
r
Your Fully Assembled NEUTON Mower
Start Knob
Safety Key Slo
Battery Cover
Mower/Auxiliary Switch
Status
Indicator
Ligh
Control Ba
Cable Guide
Cutting Height Lever
Optional Trimmer
insertion ports
Figure 22
NEUTON CE 5.2 Battery-Powered Mower -
Safety & Operating Instructions
19
Page 24

Controls and Features
Make certain that you are familiar with the Controls, Parts, and operation of your NEUTON Mower
before using it.
⇒ Safety Key Slot
The Safety Key Slot is for the Safety Key.
⇒ Safety Key
The Safety Key, after you insert it into the Mower, allows the Motor to start and run. You can insert
the Safety Key either way – it has no front or back. You should remove the Safety Key when not in
use.
The Safety Key has a Built-In Circuit Breaker to protect the Motor.
NOTE: If the Built-In Circuit Breaker trips, the white Button on top of the Safety Key will pop up. Before
attempting to restart the Mower, push the white Button all the way down until it locks into place.
⇒ Start Knob
The orange Start Knob is a safety feature that you must push across to the left before the Control Bar
can be depressed.
⇒ Control Bar
The orange Control Bar is a safety feature. You must squeeze the Bar into the Handlebar for the
Motor to start and run, and the Cutting Blade to spin. When the Control Bar is released, the Motor
shuts off and the Blade stops spinning within three (3) seconds.
⇒ Mower/Auxiliary Switch
The Mower/Auxiliary Switch controls the optional Mower attachments. This Switch has two (2)
settings.
• Mower (rear position), used for normal mowing, and
• Auxiliary (forward position), used when operating an attachment. For more information about
options available for your NEUTON Mower, see “Chapter 6: Optional Attachments”.
20 1-866-NEUTON1 (638-8661) www.neutonowners.com
Page 25
t
r
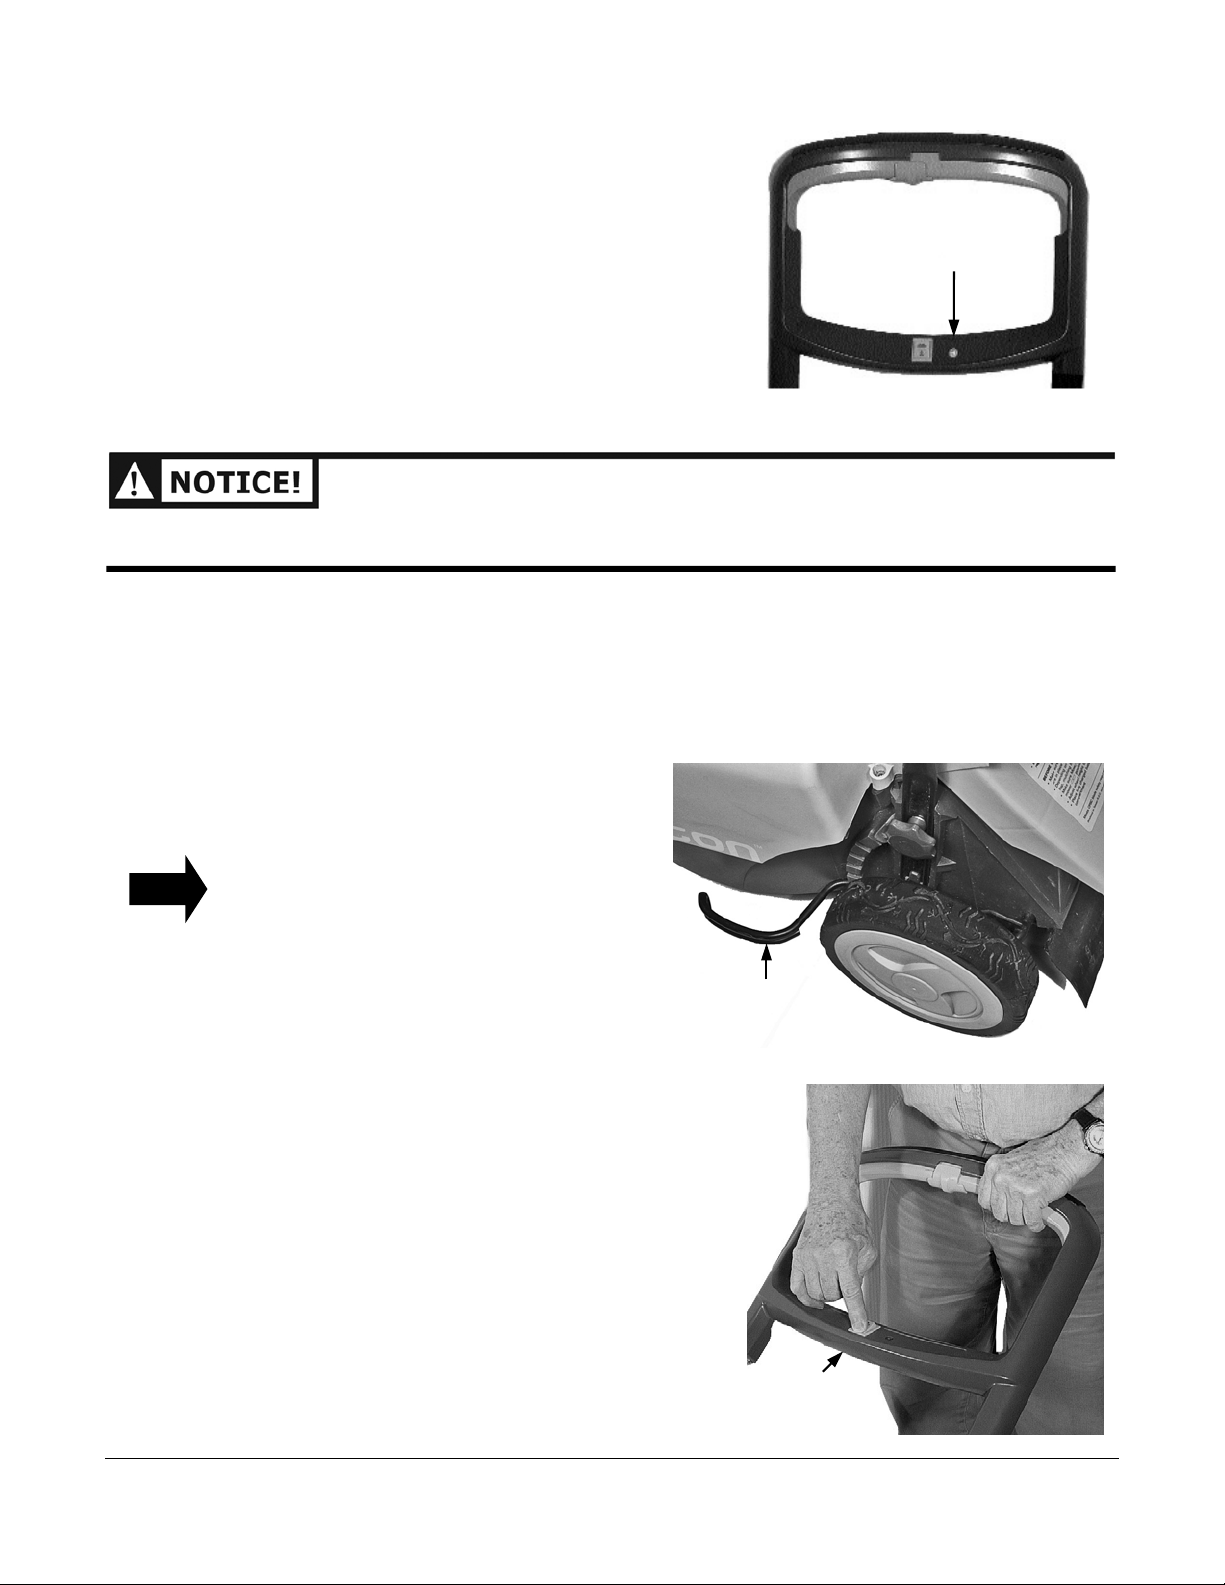
Status Indicator Light
The green Status Indicator Light on the Lower
Crossbar (Figure 23) lights up when you install a
charged Battery and insert the Safety Key.
NOTE: A green Status Indicator Light does not
guarantee that the Battery is fully
charged, only that it has some charge, the
Safety Key has been inserted, the electrical
system is ready, and that the Mower can
be started.
Figure 23
IF THE GREEN STATUS INDICATOR LIGHT GOES OUT, DO NOT OPERATE THE MOWER AGAIN UNTIL THE
BATTERY IS FULLY CHARGED. IF YOU DO, THIS WILL RESULT IN DECREASED CHARGING CAPACITY.
NOTE: Although you may notice that a short period of rest may restore the Status Indicator Light, you
still must fully charge the Battery before continuing to mow. For best results, be sure to always
fully charge the Battery after every use.
Status Indicator Ligh
TIP
Cutting Height Lever
The Cutting Height Lever (Figure 24) allows
you to easily adjust how high or low you cut
the grass. Notice that there are six (6) different
Height Positions etched into the Mower body.
To easily move the Cutting Height Lever, hold
the Handlebar with your right hand to keep
the Mower steady and adjust the Lever with
your left hand.
To easily adjust this Lever, pull the Lever out
before lifting or lowering it. Once you pull the
Lever out, it very easily adjusts to a different
level.
Mower/Auxiliary Switch
The Mower/Auxiliary Switch (Figure 25)
controls the optional Mower attachments. This
Switch has two (2) settings.
• Mower (rear position), used for normal
mowing, and
• Auxiliary (forward position), used when
operating an attachment. For more
information about options available for
your NEUTON Mower, see “Chapter 6:
Optional Attachments”.
Cutting Height Leve
Figure 24
Mower/Auxiliary
Switch
Figure 25
NEUTON CE 5.2 Battery-Powered Mower -
Safety & Operating Instructions
21
Page 26

Neuton CE 5.2 Product Specifications
Motor
RPM 4300
Tip Speed 16,000 ft./min.
AMP Idle 4 – 5
AMP Cutting 8 – 10
Size 500W, 24V DC/32 Amp
Noise Under 80 Decibels
Controls
Start/Stop Safety Control Bar
Shape Ergonomically Designed
Key Removable Safety Key w/Circuit Breaker
Electric System Electro-mechanical Relay
Housing
Material Injected Polypropylene
Handlebar Height Adjustment
(at lowest housing height setting) 35" - 37"
Wheels, Front 7" x 1.6", Molded Rubber Tread
Wheels, Rear 8" x 1.9", Molded Rubber Tread
Weight 48 lbs. (including Battery)
33 lbs. (without Battery)
Housing Length 30"
Housing Width 18"
Housing Height 12.5"
Cutting
Cutting Deck Width 14.2"
Blade 14" Aero Blade
Blade Nut Torque 16.6 ft-lbs.
Cutting Height Adjustable from 1.2 - 3.0 inches
Discharge Chute Included
Bagger Included
Bagger Capacity 1 Bushel (1.26 cubic ft.)
Mulching Plug Included
Trimming Optional Attachment
Battery
Voltage 24V DC
AMP 10 Amp-Hour
Type Sealed, Lead/Acid
Weight 15 lbs.
Approximate Run Time 45 - 60 minutes for fully charged Battery
Battery Charger Included. 24Volt Charger, plugs into standard electrical outlet
Charge Time 12 – 24 Hours
Meets CPSC Mower Safety Standards
22 1-866-NEUTON1 (638-8661) www.neutonowners.com
Page 27

Chapter 4: Operating Your NEUTON Mower
This chapter explains how to Start, Stop, and adjust the Cutting Height of your Mower.
NOTE: If the Mower Battery is not fully charged or if you are unpacking a new Mower for the first time, read
“Chapter 5: Charging and Caring for the Battery” before operating the Mower. You should charge
the Battery for a minimum of twelve (12) hours before use.
Pre-Start Checks
DO NOT INSERT THE SAFETY KEY UNTIL YOU HAVE COMPLETED ALL OF THE PRE-START CHECKS AND YOU
HAVE MOVED THE MOWER TO THE AREA THAT YOU ARE GOING TO MOW.
Perform the following checks each time before operating your Mower.
• Check under the Mower Deck and make sure that the Blade is attached securely. Inspect for any
visible damage to the Blade or Deck, and remove any accumulation of dirt, dust, or dried grass
clippings.
• Make sure all Knobs, Bolts, Attachments, Guards, and Covers are in place and securely attached.
• Attach the Side Discharge Chute, the Rear Bagger, or the Mulching Plug.
• Set the Mower to the desired Cutting Height. See “Adjusting the Cutting Height” on page 24 for
details.
• Be sure the Battery is fully charged.
• Be sure to set the Mower/Auxiliary Switch to “Mowing” (the “Mowing” side of the switch, toward
you, is pushed down).
• Push the Mower (before starting it) to the lawn area that you wish to mow.
NOTE: The length of time that a Battery can hold a charge while mowing depends upon lawn conditions;
tall or thick grass makes the Mower work harder causing the Battery to discharge faster.
NEUTON CE 5.2 Battery-Powered Mower -
Safety & Operating Instructions
23
Page 28
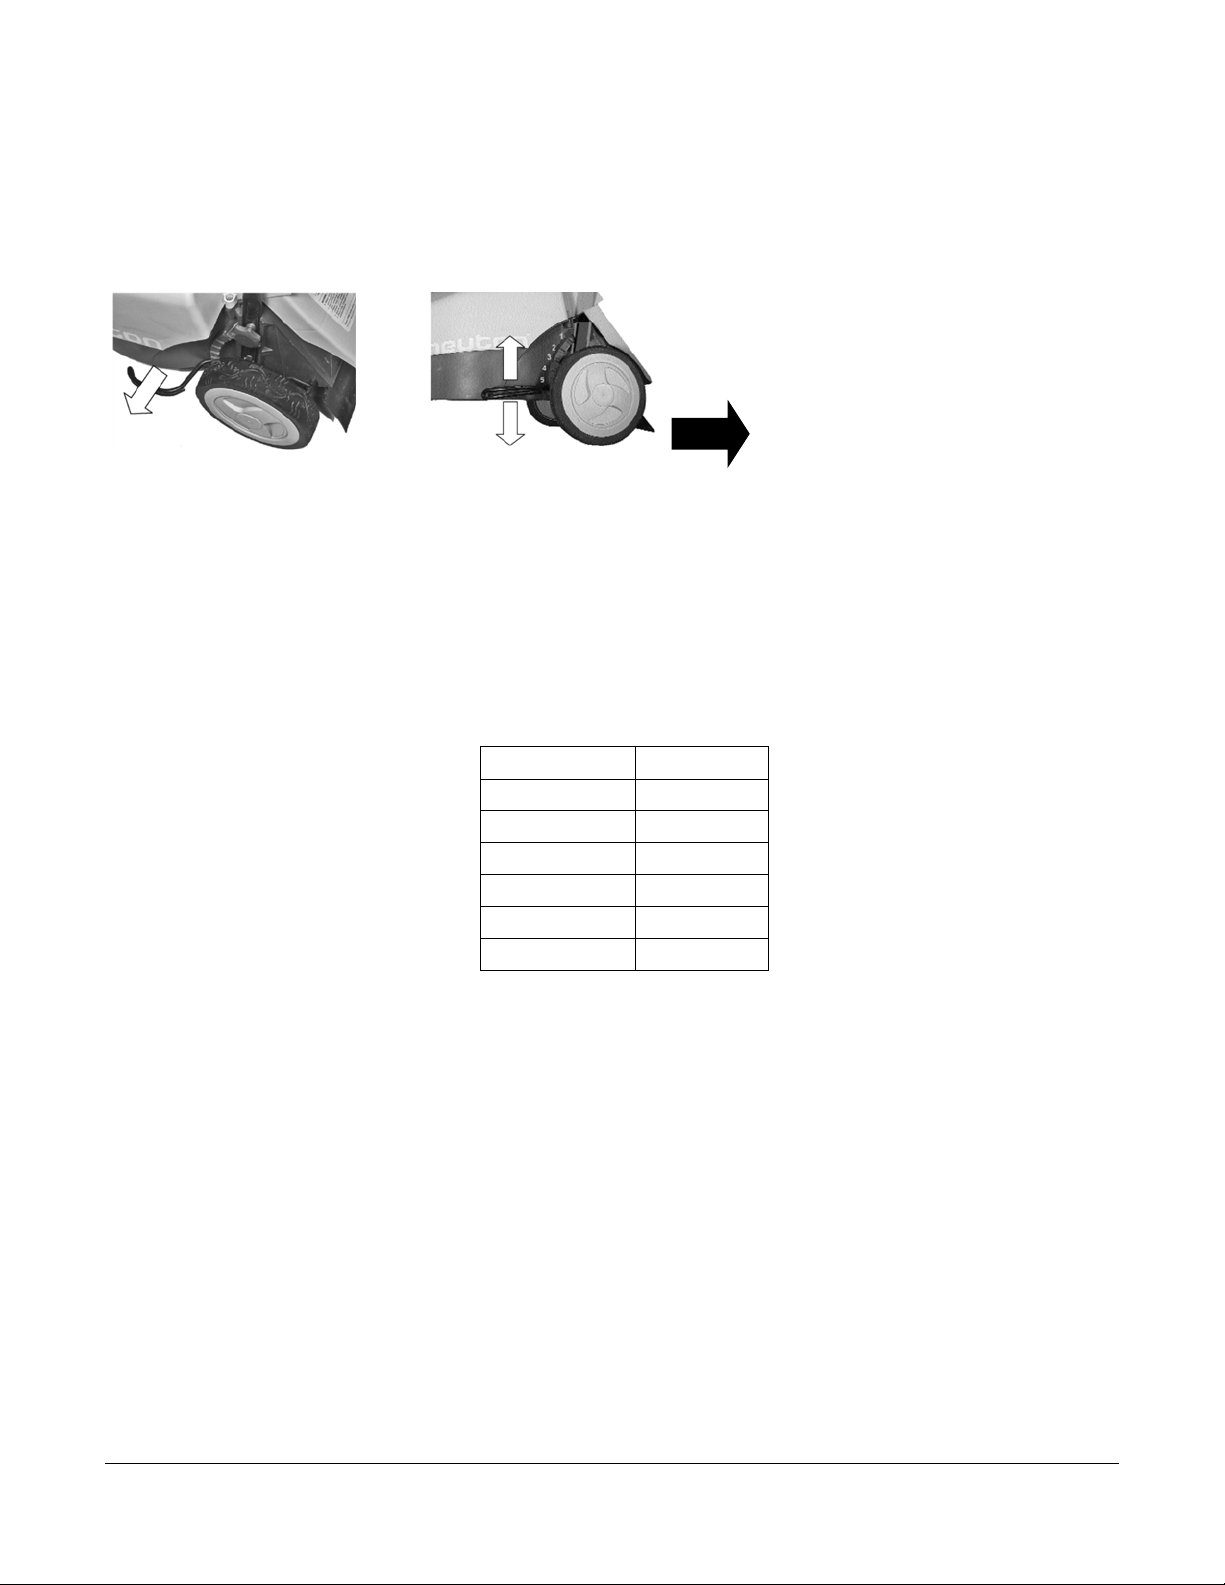
Adjusting the Cutting Height
Using the Cutting Height Lever (Figure 26), adjust the Cutting Height so that you cut off only one (1)
to two (2) inches of grass at a time.
1. Remove the Safety Key.
2. Make sure all four (4) Wheels are level.
3. Pull the Cutting Height Lever (toward
the Wheel) out of its present position
Notch. The Cutting Height Lever is
spring-loaded.
Figure 26
TIP
Pull out and then up
or down to adjust.
Each position adjusts the Mower’s Blade level to a different Cutting Height. Pulling the Cutting
Height Lever up towards Position 1 cuts more grass (which leaves your grass shorter); pushing the
Lever down towards Position 6 cuts less grass (leaving your grass longer).
The following table lists the final cut grass heights.
Lever Position Cut Height
1 1.2" (30 mm)
2
3 1.9" (47 mm)
4 2.2" (56 mm)
5 2.6" (65 mm)
6 3.0" (75 mm)
1.5" (38 mm)
To easily move the Cutting Height
Lever, hold the Handlebar with your
right hand to keep the Mower steady
and adjust the Lever with your left
hand.
4. Move the Lever to any one (1) of the six
(6) Cutting Height Settings.
Mowing on Slopes
Slopes are a major factor related to slip-and-fall accidents, which can result in severe injury. All slopes
require caution. If you feel uneasy on a slope, do not mow it.
Always:
• Use caution on slopes. Whenever possible, mow across the face of slopes, not up and down.
Exercise caution when changing direction on slopes.
• Remove objects such as rocks and tree limbs, or any other potential object possibly thrown by
the Mower Blade. Objects struck by the Mower Blade can cause severe injuries.
• Watch for holes, ruts, or bumps. Tall grass can hide obstacles.
Never:
• Never mow near drop-offs, ditches, or embankments. You could lose your footing or balance.
• Never mow steep slopes or any other areas where stability or traction is in doubt.
• Never mow on wet grass. Unsure footing could cause you to slip.
24 1-866-NEUTON1 (638-8661) www.neutonowners.com
Page 29
7
y
Starting the Motor and Engaging the Blade
• STARTING, STOPPING, AND RESTARTING AN ELECTRIC MOTOR REPEATEDLY WITHIN A FEW SECONDS
CAN GENERATE A GREAT DEAL OF HEAT AND DAMAGE THE MOTOR. TO PROTECT THE LIFE OF YOUR
NEUTON MOWER, ALWAYS WAIT AT LEAST FIVE (5) SECONDS AFTER STOPPING BEFORE RESTARTING
THE MOWER.
• THE CUTTING BLADE ALWAYS TURNS WHEN THE MOTOR IS RUNNING; THERE IS NO CLUTCH TO ALLOW
THE BLADE TO STOP ROTATING WHILE THE MOTOR IS RUNNING.
1. Perform the Pre-Start Checks listed previously.
2. Insert the Safety Key into the Key Slot (Figure 27). You
can insert the Safety Key either way. The green Status
Indicator Light on the Lower Crossbar should come on.
Safety Ke
Starting the Mower
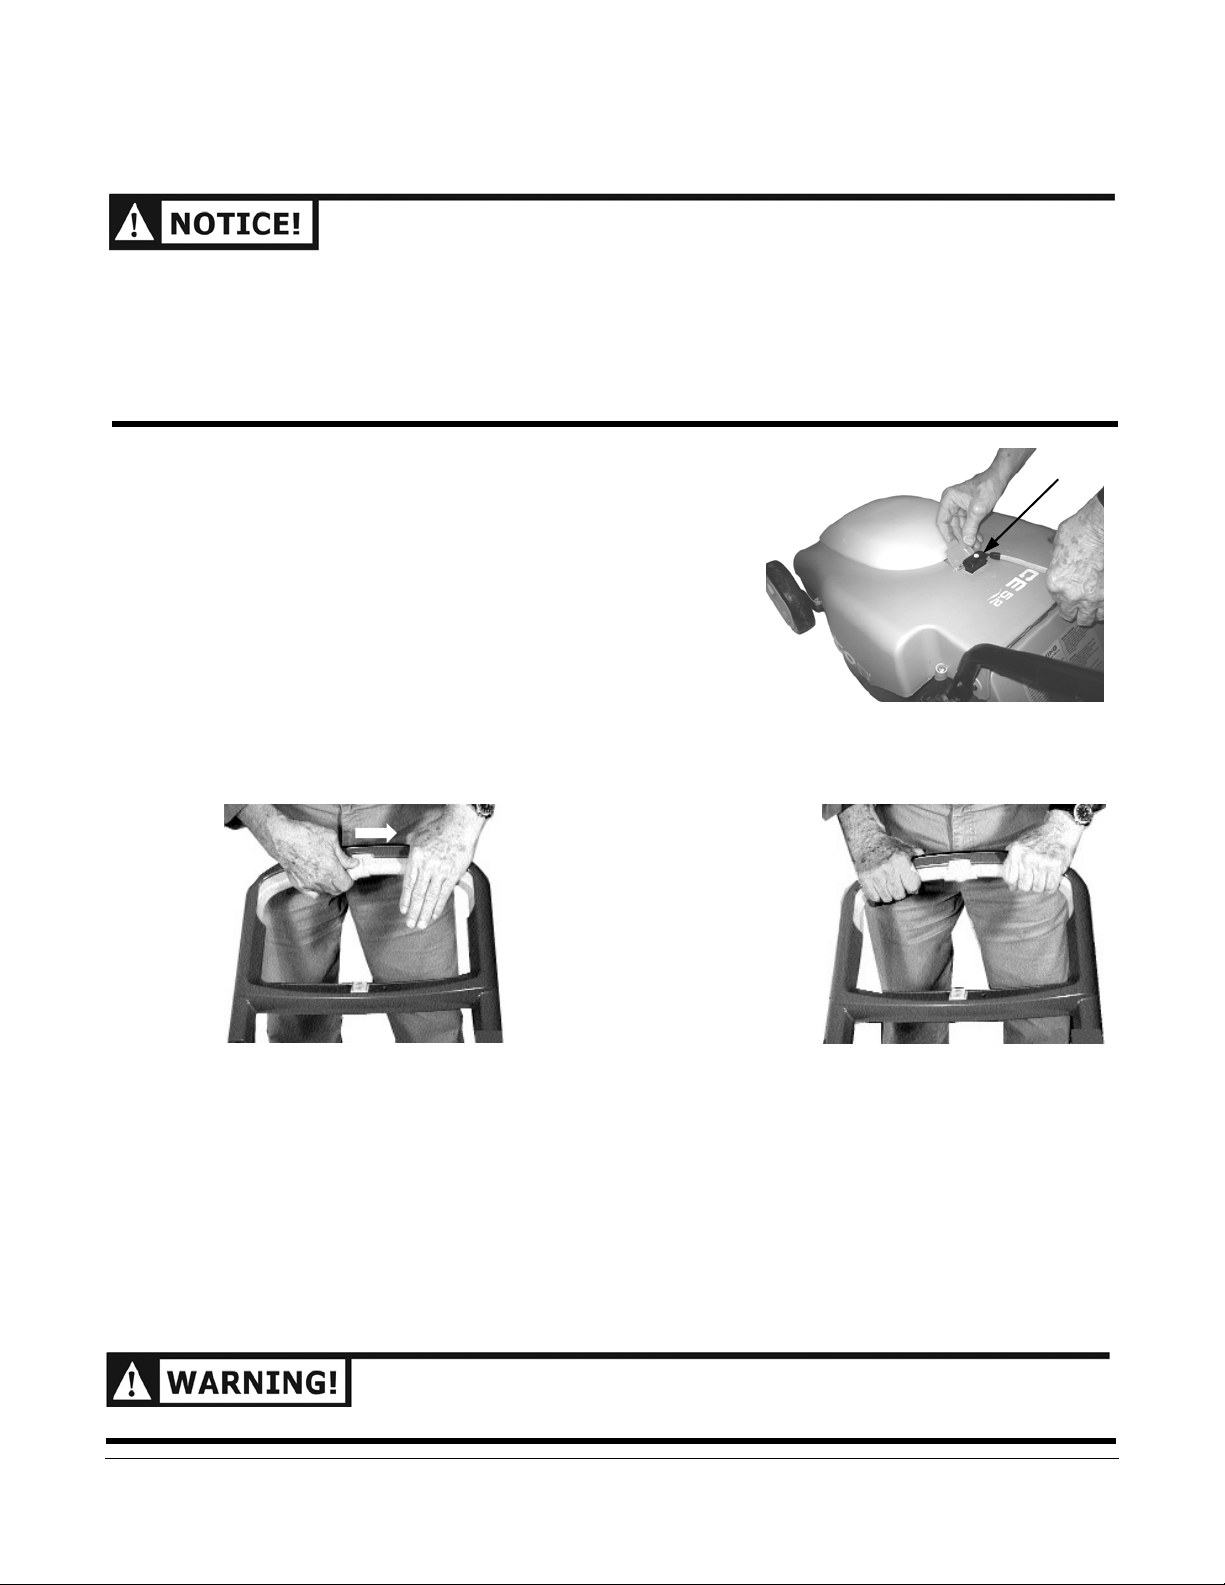
1. Slide the orange Start Knob to your left (Figure 28).
2. Squeeze and hold the orange Control Bar (Figure 29).
The orange Start Knob fits snugly into the Slot on top of
the Handlebar.
3. Continue to hold the Control Bar against the Handlebar for as long as you want the Motor to run.
Figure 28 Figure 29
If the Mower does not start, first check for simple solutions:
Figure 2
• Make sure the Battery is in, the Safety Key is in, and the Status Indicator Light is green.
• Make sure the Mower/Auxiliary Switch is in the Mower position.
• Make sure the white Circuit Breaker Button on the Safety Key is depressed.
• Did you follow the two (2)-step Start sequence: slide the orange Start Knob to the left,
then squeeze and hold the Control Bar?
NOTE: If the Mower still does not start, follow the steps in “Chapter 8: Troubleshooting Tips”.
THE ORANGE CONTROL BAR IS A SAFETY DEVICE; DO NOT TAMPER WITH IT.
NEUTON CE 5.2 Battery-Powered Mower -
Safety & Operating Instructions
25
Page 30
Stopping the Motor and Blade
Simply releasing the orange Control Bar stops the Motor and Blade.
THE BLADE CONTINUES TO ROTATE FOR A FEW SECONDS AFTER YOU SHUT OFF THE MOTOR.
When Finished Mowing
• Remove the Safety Key when the Mower is unattended.
• Remember to recharge the Battery after each use; no matter how short a time you used it. See
“Charging the Battery” on page 28 for details.
YOU SHOULD NEVER HAVE THE SAFETY KEY WITH ITS BUILT-IN CIRCUIT BREAKER AND THE BATTERY
INSERTED DURING ADJUSTMENTS OR BLADE REPLACEMENT. REMOVING THE SAFETY KEY WILL PREVENT
ACCIDENTAL STARTING, AND HELP AVOID SERIOUS PERSONAL INJURY.
Mowing and Lawn Care Tips
• For the best mowing results, mow at a steady pace. If you try to walk too quickly, especially in tall
or thick grass, the quality of the cut may not be uniform. To avoid damage and extend Battery life,
always mow at a pace allowing the Motor to run smoothly.
• The length of time that the Battery can hold a charge while mowing depends upon lawn
conditions; tall, thick, or damp grass make the Mower work harder, causing the Battery to
discharge faster. Under normal mowing conditions, the run time is between forty-five (45) and
sixty (60) minutes. To mow longer, consider purchasing a second Battery and keep it fully charged.
• Before starting the Mower, adjust the Cutting Height so that you only cut one (1) to two (2) inches
of grass at a time. Cut thicker grass at a higher Cutting Height, or cut a narrower swath. Do not
force the Mower forward in thick grass; rather, cut it with a couple of passes. Your NEUTON Mower
will do a better and safer job when cutting at a steady pace.
• Mowing dense grasses, such as St. Augustine or Bermuda grass, requires more power to cut
properly. For these grasses, it may be necessary to move more slowly to ensure a quality cut.
• Mow as often as needed so that you are only cutting one (1) to two (2) inches of grass each
mowing session. Trying to cut more than two (2) inches at a time will drastically reduce the charge
life of the Battery and quality of the cut.
• For the healthiest lawn, avoid removing more than one third (1/3) of the leaf blade during any one
(1) mowing session. When more than one third (1/3) of the leaf blade is removed, the grass plant
produces less food for itself and therefore becomes weaker and more susceptible to disease and
insect damage.
• Frequent stopping and restarting of the Mower will use additional Battery energy. Try to work
continuously and smoothly when mowing.
• Keep your Mower Blade sharp. A sharp Blade cuts the grass quickly and cleanly, using less of the
Mower’s power, which conserves Battery life. For best results, inspect the Blade often and have an
extra, sharp Blade ready to install as a replacement while you have the dull Blade sharpened.
• Mow across slopes; never up and down.
26 1-866-NEUTON1 (638-8661) www.neutonowners.com
Page 31
Chapter 5: Charging and Caring for the Battery
BEFORE CHARGING THE BATTERY, READ ALL INSTRUCTIONS AND CAUTIONARY MARKINGS IN THIS
MANUAL AND ON YOUR MOWER. DO NOT OPERATE YOUR MOWER UNTIL YOU HAVE READ AND
UNDERSTAND ALL INSTRUCTIONS AND THE BATTERY IS FULLY CHARGED.
The Battery
The NEUTON Mower comes with a sealed, lead acid Battery already installed at the factory. The Battery
is 24 volts and rated at 10 amp-hours. The Battery should not leak, regardless of the position in which it
is stored. Read “Handling the Battery Safely” in Chapter 2 for additional information.
The Battery is completely maintenance free. You never need to add water. However, as with all
rechargeable Batteries, after years of use they will eventually need replacement. With proper care, this
Battery should last up to five (5) years. Please refer to “Chapter 7: Maintaining and Storing Your
NEUTON Mower” for more information.
NEVER ATTEMPT TO ALTER OR OPEN THE BATTERY.
TIP
TIP
TIP
PERIODICALLY INSPECT THE CORDS ON THE CHARGER UNIT AND THE HANDLEBAR FOR DAMAGE. IF
DAMAGE OCCURS, DO NOT USE THE MOWER UNTIL THE CORDS HAVE BEEN REPLACED OR REPAIRED.
Under normal conditions, the Battery charge should last for approximately forty-five (45) to sixty
(60) minutes per use. The length of time depends on the length, density, and dampness of the
grass. If you generally intend to use your Mower and Trimmer for a longer duration, NEUTON
Power Equipment recommends that you purchase an extra Battery. That way, you could have a
second fully charged Battery ready so you can continue mowing.
It may take up to five (5) charging and discharging cycles before your Battery provides maximum life.
A Battery may last much longer if you charge it as soon as it starts to lose power and not let it
completely discharge. You should not try to coax a little more power out of your Battery.
NEUTON CE 5.2 Battery-Powered Mower -
Safety & Operating Instructions
27
Page 32
Charging the Battery
You must charge the Battery before using your Mower for the first time and after every use.
You can charge the Battery in or out of the Mower. The performance of your Mower is the same,
regardless of which charging method you choose.
WHILE THE BATTERY IN YOUR MOWER WAS CHARGED AT THE FACTORY, YOU MUST RECHARGE IT FULLY
(AT LEAST TWELVE (12) HOURS) BEFORE USING YOUR MOWER. OTHERWISE, YOU MAY DECREASE THE
CHARGING CAPACITY OF THE BATTERY. AGAIN, USE ONLY THE CHARGER SUPPLIED WITH THE MOWER.
As the Battery ages, you may need to charge the Battery longer, even up to twenty-four (24) hours. A
good time to consider purchasing a replacement Battery is when the Battery takes longer than
twenty-four (24) hours to charge.
USE NORMAL HOUSEHOLD VOLTAGE (110 VOLTS) WHEN CHARGING THE BATTERY. PLUG THE CHARGER
DIRECTLY INTO THE ELECTRICAL OUTLET. DO NOT ABUSE THE CORDS. NEVER CARRY THE CHARGER BY
THE CORD. ALWAYS PULL THE PLUG – AND NOT THE CORD – WHEN DISCONNECTING THE CORDS FROM
THE ELECTRICAL OUTLET (WALL OUTLET) AND FROM THE CHARGER.
Note: When using an extension cord with your Charger, use a heavy-duty extension cord of a type “suitable
for outdoor use” (although you should never charge the Battery in the open outdoors).
ALWAYS CONNECT THE CHARGER TO THE BATTERY FIRST, AND THEN PLUG THE CHARGER INTO THE WALL
OUTLET. WHEN UNPLUGGING, REVERSE THE PROCESS; UNPLUG THE CHARGER FROM THE WALL OUTLET
FIRST, AND DISCONNECT IT FROM THE BATTERY.
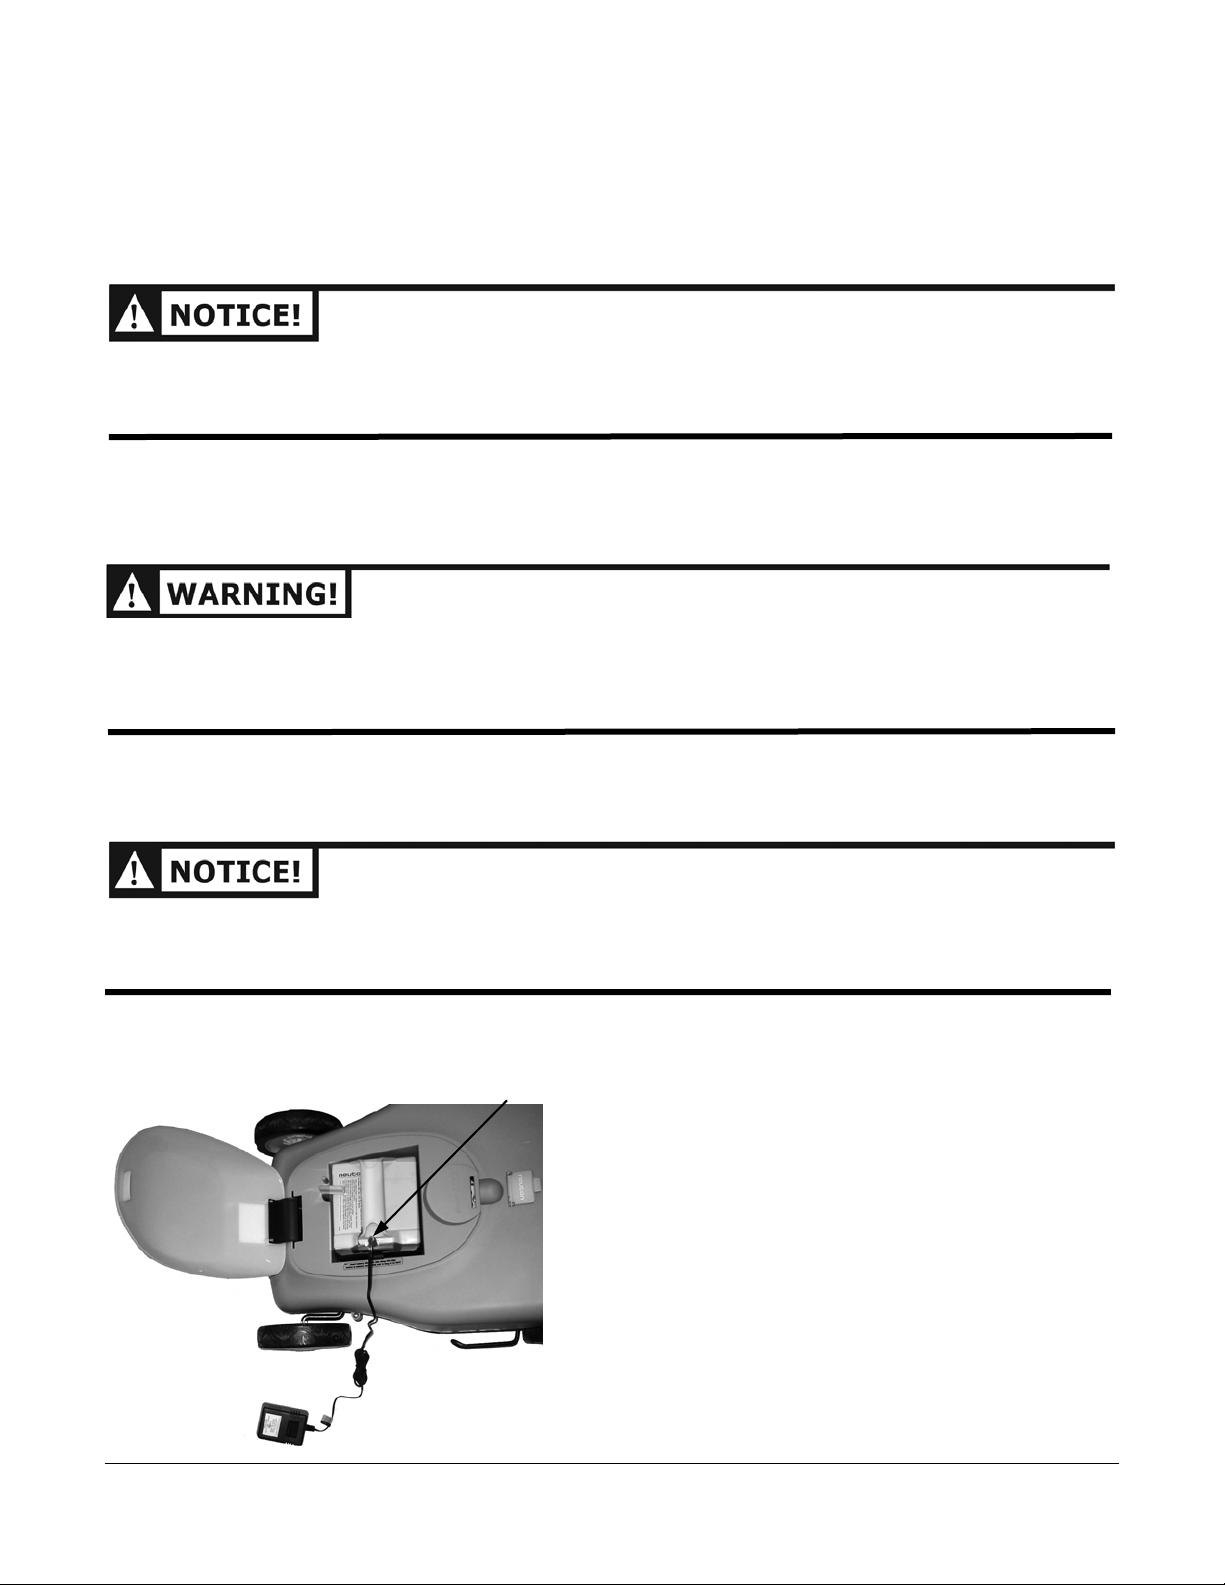
Charging the Battery in the Mower
Charger in Mating Plug
Figure 30
1. Make sure all four (4) Wheels of the Mower touch the
floor.
2. Remove the Safety Key.
3. Plug the Charger’s round plug into the Mating Plug on
top of the Battery (Figure 30).
4. Plug the Charger into a wall outlet. The RED light on the
Battery will light up indicating a connection between
the Battery and Charger.
NOTE: A full charge takes at least twelve (12) hours, and up to
twenty-four (24) hours. For the first five (5) hours, the
Charger will be warm to the touch. This is normal and
does not indicate a problem.
28 1-866-NEUTON1 (638-8661) www.neutonowners.com
Page 33
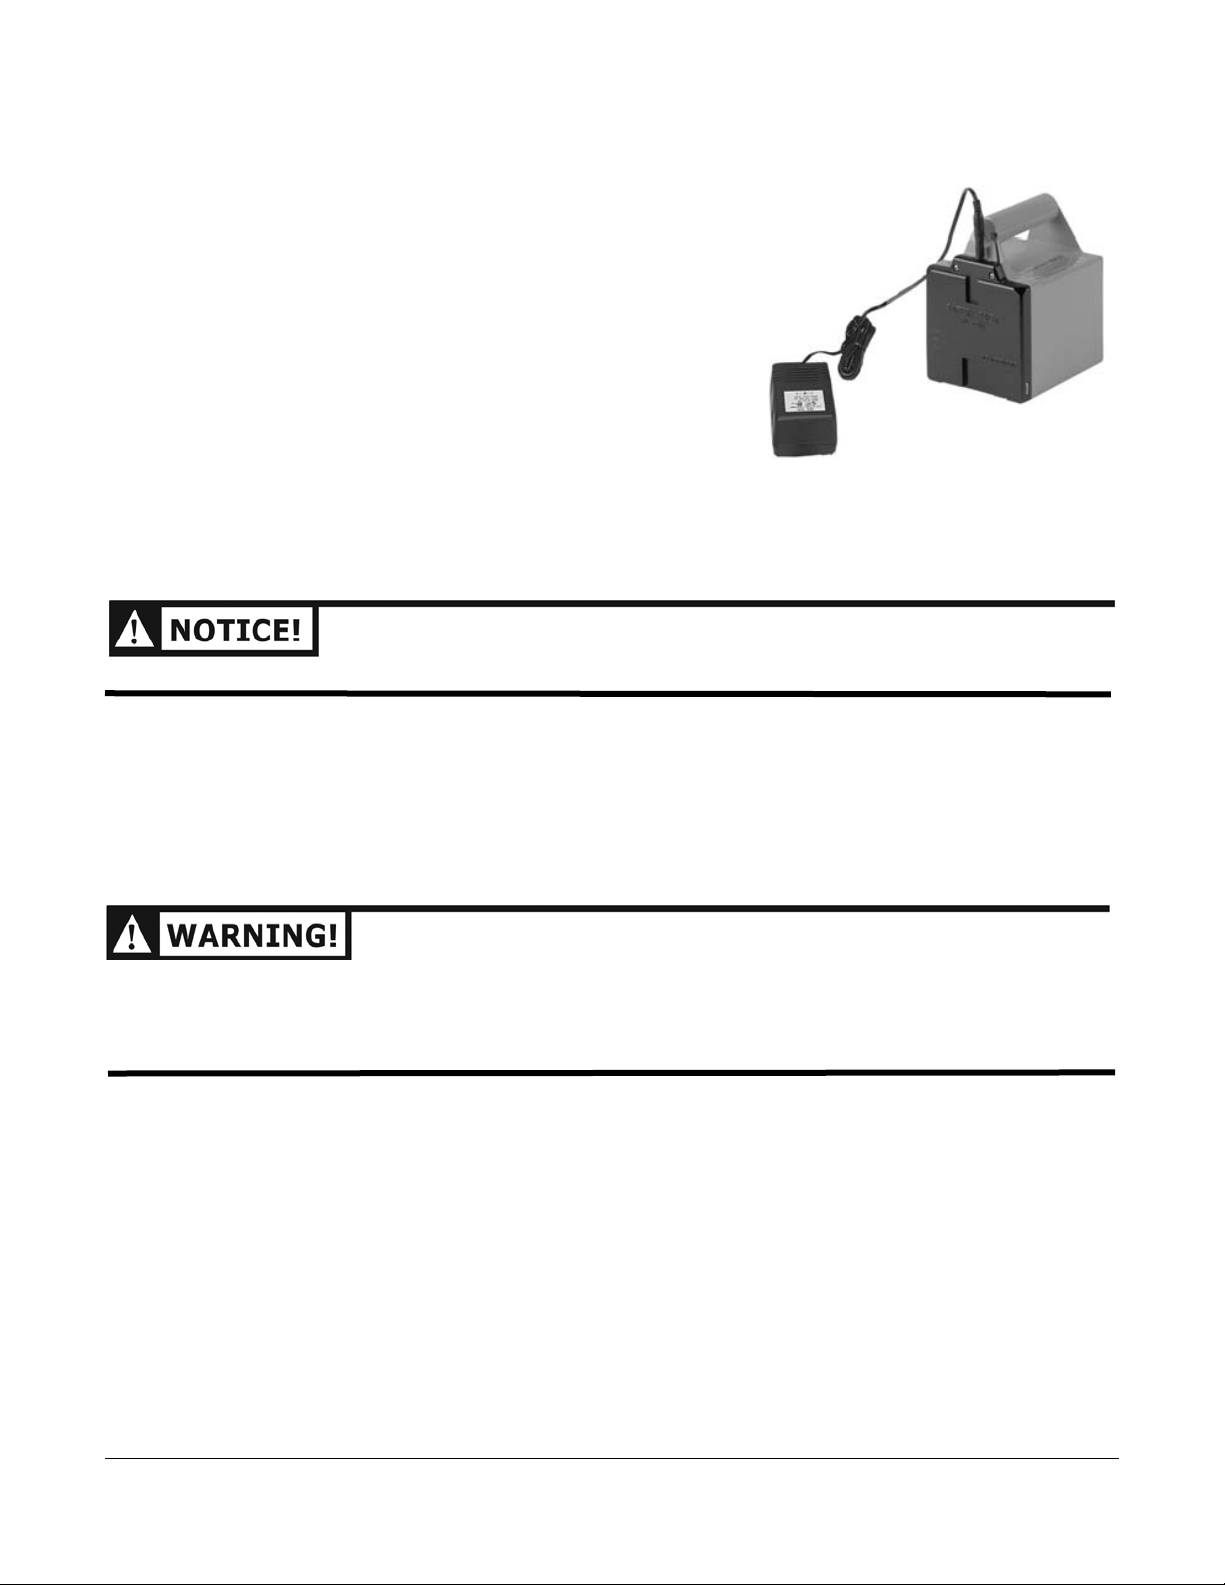
Charging with the Battery out of the Mower
1. Remove the Battery from the Mower.
2. Plug the round Charger Connector into the Charger
Receptacle on the Battery (Figure 31).
3. Plug the 110V Charger plug into a wall outlet. The RED
light on the Battery will light up indicating a connection
between the Battery and the Charger.
NOTE: The RED light on the Battery only indicates that the
Charger and Battery are connected – the Charger and
the light will not automatically turn off or the light
change color when charging is complete. As with
charging in the Mower, a full charge takes at least twelve
(12) hours, and up to twenty-four (24) hours. For the first
five (5) hours, the Charger will be warm to the touch. This
is normal and does not indicate a problem.
ALWAYS KEEP THE BATTERY IN A DRY PLACE.
Figure 31
Disconnecting the Charger
Remember to disconnect the Battery from the Charger using this sequence:
1. Pull the plug from the Charger out of the wall outlet.
2. Disconnect the Charger from the Battery.
ALWAYS DISCONNECT THE CHARGER FROM THE ELECTRICAL (WALL) OUTLET FIRST, AND THEN
DISCONNECT THE ROUND CHARGER PLUG FROM THE BATTERY. IF YOU REMOVE THE ROUND CHARGER
PLUG FIRST, THE EXPOSED CONNECTOR COULD BE ACCIDENTALLY SHORT-CIRCUITED BY FOREIGN
MATERIAL, WHICH MIGHT CAUSE A FIRE.
Recharging after each use of the Mower
Always fully recharge the Battery immediately after each use; no matter how short a time you used it.
Fully recharge even if the Status Indicator Light on the Mower is still green. This is important in order
to maintain maximum Mower performance and extend the useful life of the Battery. If you are using
the Mower and the green Indicator Light goes out, suggesting low Battery charge, then you should
stop using the Mower and either replace or recharge the Battery.
Unlike “Smart Batteries” found in devices such as cell phones, you should NOT run the NEUTON
Mower Battery until completely drained. You will reduce the long-term performance of the Battery if
allowed to run to full depletion.
Leaving the Battery on the Charger for an extended time (up to six (6) months in cold climates) will
not damage the Battery. It will not overcharge the NEUTON Battery.
NEUTON CE 5.2 Battery-Powered Mower -
Safety & Operating Instructions
29
Page 34

Recharging to Full Charge for Off-Season Storage
IF A DEPLETED BATTERY IS STORED, THE CHARGING CAPACITY OF THE BATTERY MIGHT DECREASE.
When storing the Battery for periods up to six (6) months, NEUTON Power Equipment recommends
that you leave the Battery connected to the Charger. It is important that the Battery be stored in a dry
location and that the temperature remains between -4ºF (-20ºC) and +104ºF (+40ºC).
For Off-Season storage of the Battery, it is important that the Battery is fully charged. Consider these
facts when choosing your method of storing the Battery:
• Leaving the Battery with a full charge is the best way to store the Battery.
• Over time, Batteries will slowly discharge.
• You will not damage the Battery by leaving it on the Charger for an extended period (up to six (6)
months).
For continued storage of the Battery for a period over six (6) months, fully charge the Battery, remove
it from the Charger, and store it in a dry and temperate location. If possible, recharge the Battery for
at least twelve (12) hours every two (2) to three (3) months. When ready to use the Mower again, you
should recharge the Battery for twelve (12) hours prior to use.
Storage Temperature Range
For superior Battery performance, always store the Battery in temperatures between -4ºF (-20ºC) and
+104ºF (+40ºC). Make sure the storage temperatures will never be outside these limits. The lower the
storage temperature is within the specified range, the better. The Battery will discharge more slowly
at low temperatures.
For more information on storing your Mower, see “Chapter 7: Maintaining and Storing your NEUTON
Mower”.
30 1-866-NEUTON1 (638-8661) www.neutonowners.com
Page 35
Caring for the Battery
You can lengthen the life of your Battery by following some simple guidelines.
• Always charge the Battery indoors in a garage or other covered area where it will be dry and
protected from the weather.
• Only charge the Battery when the temperature is at least 32ºF (0ºC) – above freezing – but not
more than 104ºF (40ºC). Charging in lower or higher temperatures can be harmful to the Battery.
• Always keep the Battery away from water, heat sources (stoves, radiators, open flame, etc.), and
hazardous chemicals.
• Always use the NEUTON Mower CE 5.2 Charger to charge the Battery; never attempt to use any
other Charger. Use of a different Charger may cause a fire or explosion.
• Never use the Charger on any other product. Never operate a damaged Charger. If there is
damage to a cord or the Charger Unit, replace the Charger or have it repaired.
• Do not worry about leaving the Battery charging for longer than twelve (12) hours – you cannot
overcharge the Battery and will not cause damage after twelve (12) hours. It will not impact the
Battery to leave it on the Charger for up to six (6) months.
• When storing the Battery after removing it from the Mower, follow the storage guidelines in
“Chapter 7: Maintaining and Storing Your NEUTON Mower”.
• For long-term storage, please see “Recharging to Full Charge for Off-Season Storage” on page 30.
• If the Motor will not run after you have fully charged the Battery, consult the techniques in “Chapter
8: Troubleshooting Tips”. If you still need help, call Toll Free 1-866-NEUTON1 (638-8661) and one
of our Technical Support Representatives will be happy to assist you.
Recy c ling your Used Ba ttery
NEVER ATTEMPT TO DISPOSE OF YOUR BATTERY IN A FIRE. THE CELLS MAY EXPLODE.
PLEASE DISPOSE OF USED BATTERIES RESPONSIBLY, ACCORDING TO YOUR LOCAL HAZARDOUS
MATERIALS REGULATIONS. NEVER THROW AWAY USED BATTERIES IN YOUR HOUSEHOLD TRASH.
Please dispose of your used Batteries responsibly by recycling them. Call your local Solid Waste
Management District or your local waste handler to locate the collection site nearest you. Some
collection sites recycle Batteries year-round; others collect them periodically.
You can also visit the Web site of Earth 911 for more information [www.earth911.org]. Once there,
click the Municipal HHW link under Hazardous Household Waste, and enter your zip code. The site
lists recycling centers located near you.
For a fee, you can recycle your Batteries with the International Metals Reclamation Company. Visit
them at www.inmetco.com and click Services; or contact them at:
INMETCO, P.O. Box 720, 245 Portersville Road, Ellwood City, PA 16117, (724) 758-2825; fax (724) 7582845
To learn more about hazardous waste recycling, visit the Web site for Battery Council International
[www.batterycouncil.org] or for the Environmental Protection Agency [www.epa.gov].
NEUTON CE 5.2 Battery-Powered Mower -
Safety & Operating Instructions
31
Page 36

32 1-866-NEUTON1 (638-8661) www.neutonowners.com
Page 37
t
Chapter 6: Optional Attachments
You can purchase Optional Attachments for your NEUTON Mower. To order any of these Optional
Attachments, please call NEUTON Power Equipment Toll Free at:
1-866-NEUTON1 (638-8661) or visit us on the Web at www.neutonowners.com.
Your NEUTON Mower shipped with the Side Discharge Chute, allowing you to discharge grass
clippings as the standard mowing mode, a rear Bagger which allows you collect grass clippings, and a
Mulching Plug that allows you to mulch clippings.
NEUTON Trimmer
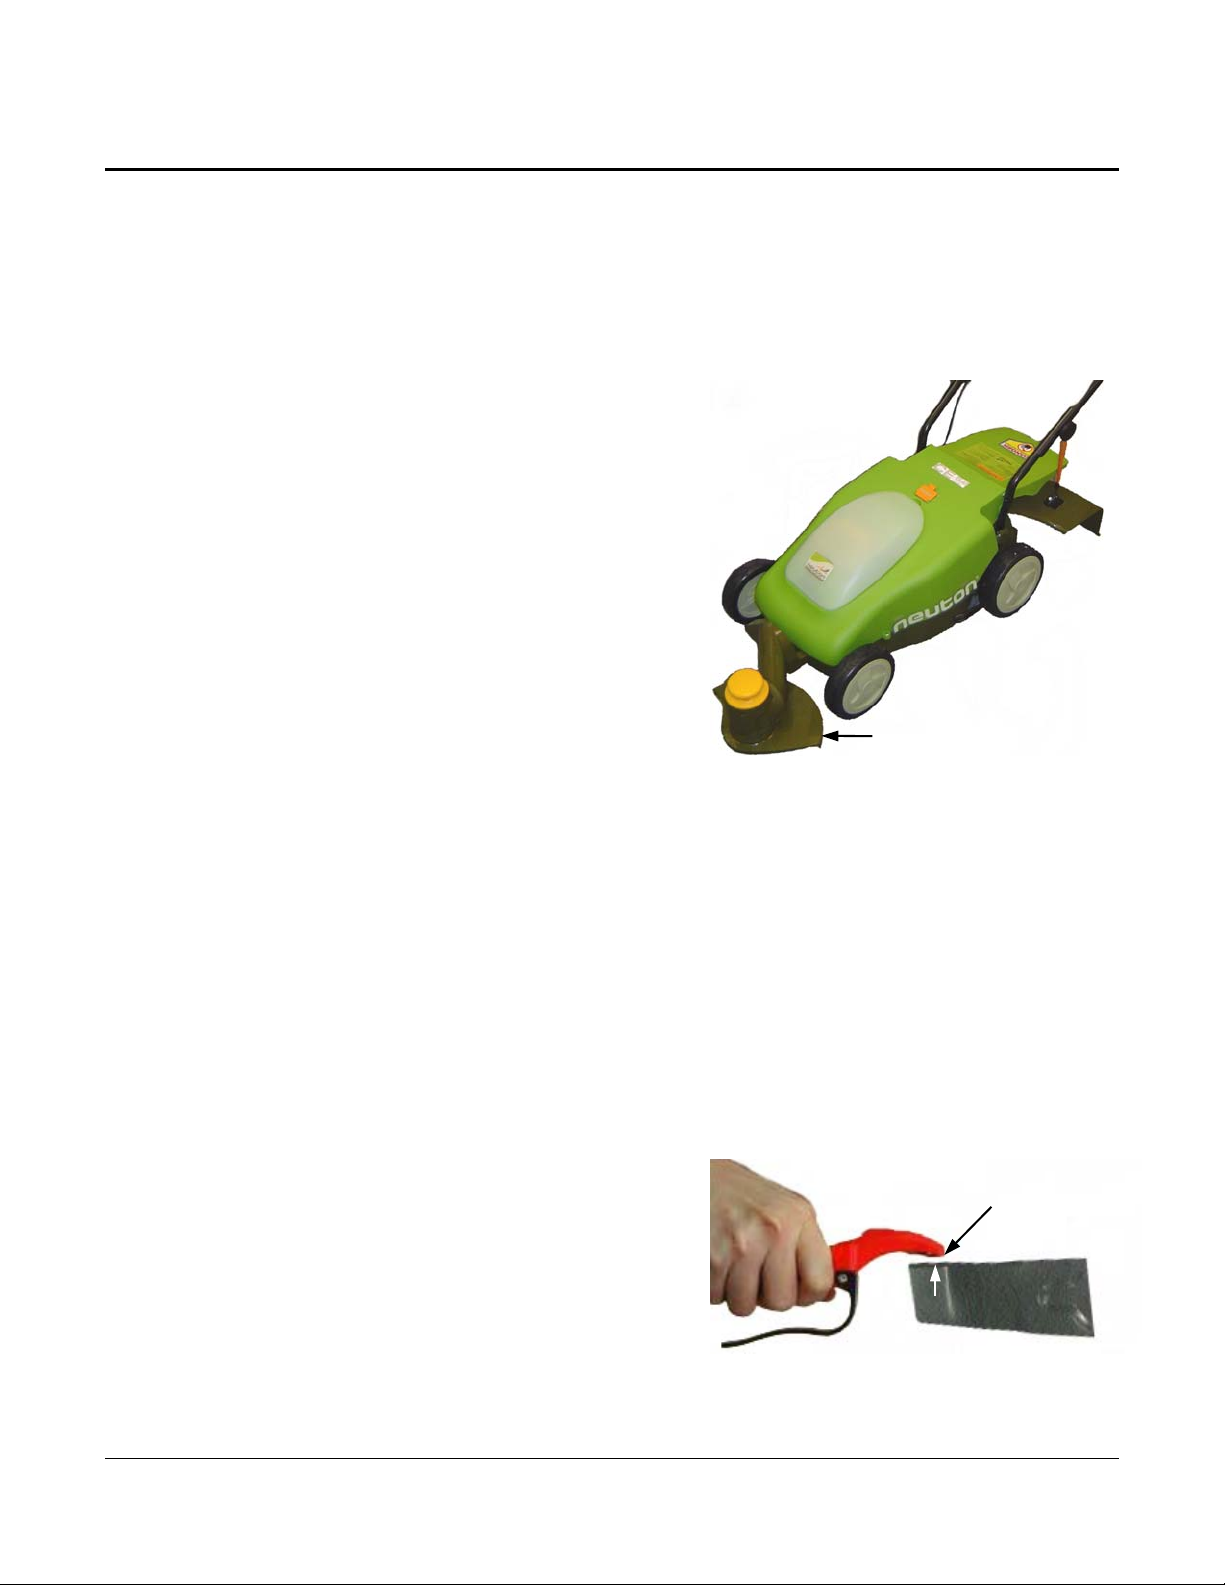
The NEUTON Trimmer is a unique attachment that,
when used with your NEUTON Mower (Figure 32),
enables you to trim and edge your lawn and yard
without having to buy a separate trimmer and edger
– it’s like having three (3) machines in one (1). The
Trimmer simply plugs into the front of your Mower.
The description and operation of the Trimmer is in
Chapter 9 of this manual. For more information
about the NEUTON Trimmer Attachment, please call
NEUTON Power Equipment Toll Free at:
1-866-NEUTON1 (638-8661) or visit us on the Web
at www.neutonowners.com.
Optional Trimmer Attached
Figure 32
Spare Battery
Owning a Spare Battery can be a wonderful time saver. A spare Battery allows you to quickly insert a
fully charged Battery when the one you are using to mow loses its charge.
Spare Aero Cutting Blade
Owning a Spare Aero Cutting Blade can make mowing more efficient. With the purchase of a
replacement Blade (a new Blade Nut is included), when the existing Blade becomes dull, install
the new spare Blade and then sharpen the dull Blade when you have the time. See “Sharpening
the Blade” in Chapter 7 for more information.
Blade Sharpener
The NEUTON Blade Sharpener (Figure 33) is a very
useful hand-held sharpener.
1. Remove the Blade and secure it in a vise.
2. Position the carbide insert of the Sharpener, which
has a “-“ sign, against the edge to be sharpened.
3. Press down firmly and pull the Sharpener from the
inside edge toward you. Usually 3 or 4 strokes is
sufficient. Repeat for the opposite end of the
Blade. It’s as simple as that!
Figure 33
Carbide Inser
Edge to be sharpened
Blade secured in vise.
NEUTON CE 5.2 Battery-Powered Mower -
Safety & Operating Instructions
33
Page 38
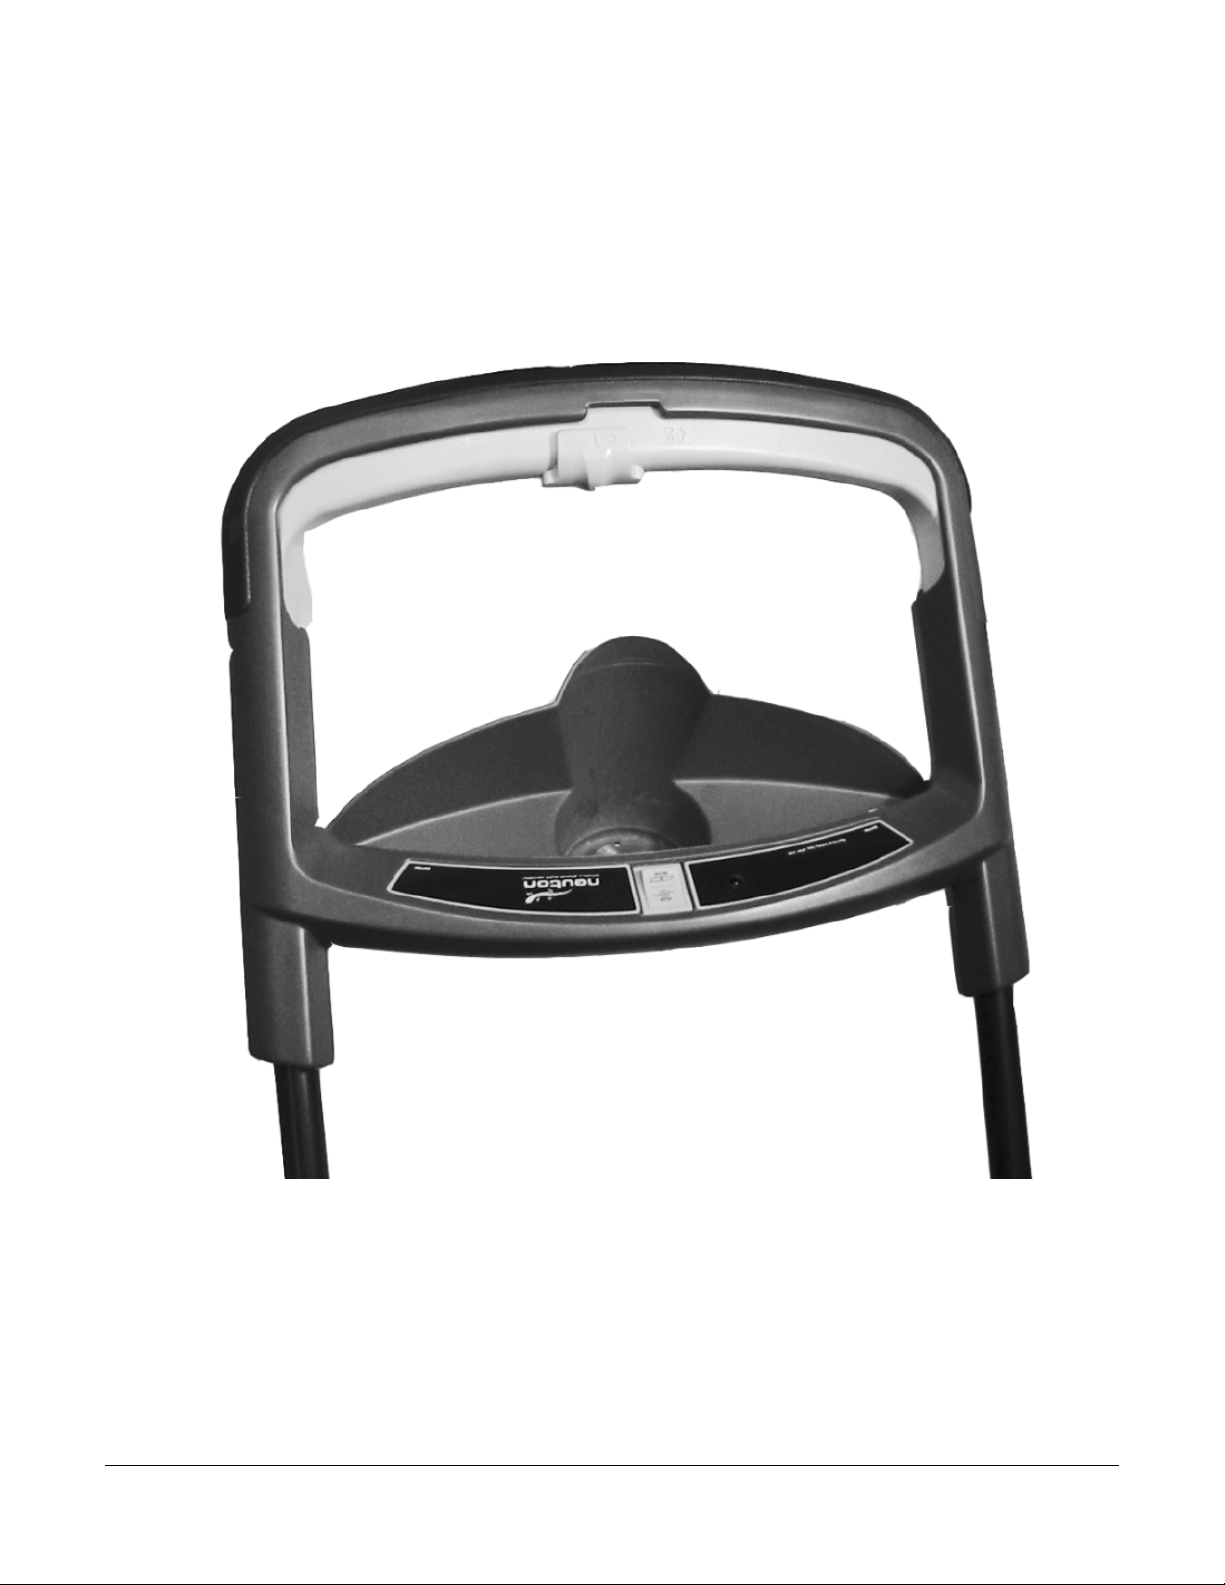
Utility Shelf
The Utility Shelf attaches to the Handlebar frame (Figure 34) and is a convenient place to hold small
tools or a water bottle while you are mowing.
Utility Shelf
Figure 34
34 1-866-NEUTON1 (638-8661) www.neutonowners.com
Page 39
Chapter 7: Maintaining and Storing Your NEUTON Mower
This chapter explains how to clean your Mower; change, sharpen, and balance the Blade; and store
your Mower for long term.
Servicing Your Mower
• NEVER MAKE ADJUSTMENTS OR REPAIRS WITH THE MOTOR RUNNING. ALWAYS STOP THE MOTOR,
WAIT FOR THE BLADE TO STOP MOVING, REMOVE THE SAFETY KEY AND REMOVE THE BATTERY TO
PREVENT ACCIDENTAL STARTING.
• NEVER TAMPER WITH SAFETY DEVICES. CHECK THEIR PROPER OPERATION REGULARLY.
• NEVER ATTEMPT TO MAKE WHEEL-HEIGHT ADJUSTMENTS WHILE THE MOTOR IS RUNNING.
• GRASS CATCHER COMPONENTS ARE SUBJECT TO WEAR, DAMAGE, AND DETERIORATION, WHICH
COULD EXPOSE MOVING PARTS OR ALLOW OBJECTS TO BE THROWN. CHECK COMPONENTS
FREQUENTLY, AND REPLACE THEM WITH THE MANUFACTURERS RECOMMENDED PARTS WHEN
NECESSARY.
• CHECK THE BLADE AND MOTOR MOUNTING BOLTS AT FREQUENT INTERVALS FOR PROPER
TIGHTNESS. USE ONLY AUTHORIZED NEUTON REPLACEMENT PARTS.
• KEEP YOUR MOWER FREE OF GRASS, LEAVES, OR OTHER DEBRIS BUILD-UP.
• ALLOW THE MOWER TO COOL FOR AT LEAST FIVE (5) MINUTES BEFORE SERVICING OR STORING.
• THE MOWER BLADE IS SHARP, IT CAN AND WILL CUT. WRAP THE BLADE OR WEAR GLOVES, AND USE
EXTRA CAUTION WHEN WORKING ON IT.
NEUTON CE 5.2 Battery-Powered Mower -
Safety & Operating Instructions
35
Page 40
Cleaning Your Mower
Periodically clean your Mower to ensure peak performance.
BEFORE PERFORMING THE FOLLOWING CLEANING PROCEDURES, REMOVE THE SAFETY KEY AND BATTERY
TO PREVENT ACCIDENTAL STARTING.
Supplies Needed:
• Clean, damp cloth or sponge
• Mild soap or detergent (if needed)
• Soft nylon brush (if needed)
1. Using a damp cloth or sponge with a mild soap or detergent, clean the Mower. Never use water,
gasoline, solvents, or other petroleum-based or solvent-based products when cleaning –
remember that this is an electric Mower.
2. Use a soft nylon brush or non-metallic scrubbing pad to remove any clippings that have
accumulated on the underside of the Deck and in the Side Discharge Chute. Do not use a wire
brush; it will scratch and harm the surface of your Mower.
3. You may use water to clean the Rear Bagger when not attached to the Mower. For proper grass
collection, make sure the Bagger is clean and the mesh holes are unclogged. Allow the Rear
Bagger to dry thoroughly before using it again.
NOTE: A wet Rear Bagger will clog quickly and hamper grass collection.
Cleaning the Handlebar
Remember to clean and lubricate the Handlebar on your Mower at least once a year or whenever
grime builds up on the sliding parts of the Handlebar.
BEFORE PERFORMING THE FOLLOWING CLEANING PROCEDURES, REMOVE THE SAFETY KEY AND BATTERY
TO PREVENT ACCIDENTAL STARTING.
Supplies Needed:
• Clean cloth or paper towel
• WD-40® or similar lubricant
36 1-866-NEUTON1 (638-8661) www.neutonowners.com
Page 41
• USE ONLY LUBRICANTS THAT ARE COMPATIBLE WITH ELECTRICAL COMPONENTS SUCH AS WD-40®.
• NEVER USE SILICONE OR GRAPHITE BASED LUBRICANTS.
1. Spray a small amount of WD-40® or similar lubricant on a paper towel or clean cloth.
2. Clean both sides all along the top and sides of the orange Control Bar (Figure 22 on page 19).
3. Slide the Start Knob (Figure 28 on page 25) to the left and squeeze the orange Control Bar up into
the top of the Handlebar as if you were starting the Mower (Figure 29 on page 25).
4. Holding the orange Control Bar in this position, clean the inside side walls of the Handlebar
where the orange Control Bar slides up and down.
5. Operate the orange Control Bar several times to insure that it is moving freely and properly
returns to the OFF (down) position.
IF YOU HAVE QUESTIONS OR IF THE ORANGE CONTROL BAR DOES NOT MOVE DOWN EASILY AND SHUT
OFF THE MOWER IMMEDIATELY WHEN YOU RELEASE IT, DO NOT OPERATE THE MOWER. CALL US TOLL
FREE: 1-866-NEUTON1 (638-8661). ONE OF OUR TECHNICAL SUPPORT REPRESENTATIVES WILL BE HAPPY
TO HELP YOU.
Removing and Attaching the Blade
• YOU MUST REMOVE THE BLADE TO SHARPEN IT.
• ALWAYS CHECK THE BLADE FOR SHARPNESS, DAMAGE, AND TIGHTNESS BEFORE AND AFTER EACH
USE. REPLACE THE BLADE PROMPTLY IF IT IS BENT OR DAMAGED.
• REPLACE THE BLADE WHEN WORN OR DAMAGED, BUT DO NOT USE IT FOR OVER FIVE (5) YEARS.
Tools and Supplies Needed:
• 36mm Wrench (supplied with Mower)
• 3/4" Wrench or Socket
• Torque Wrench
• Heavy Gloves
WEAR HEAVY GLOVES TO PROTECT YOUR HANDS WHEN REMOVING AND ATTACHING THE BLADE.
NEUTON CE 5.2 Battery-Powered Mower -
Safety & Operating Instructions
37
Page 42
r
1. Remove the Safety Key and the Battery. If you are
charging the Battery in the Mower, first disconnect the
Charger from the electrical (wall) outlet.
2. While holding the Handlebar (as if you were mowing)
36mm Wrench
turn the Mower over on its right side to expose the Blade.
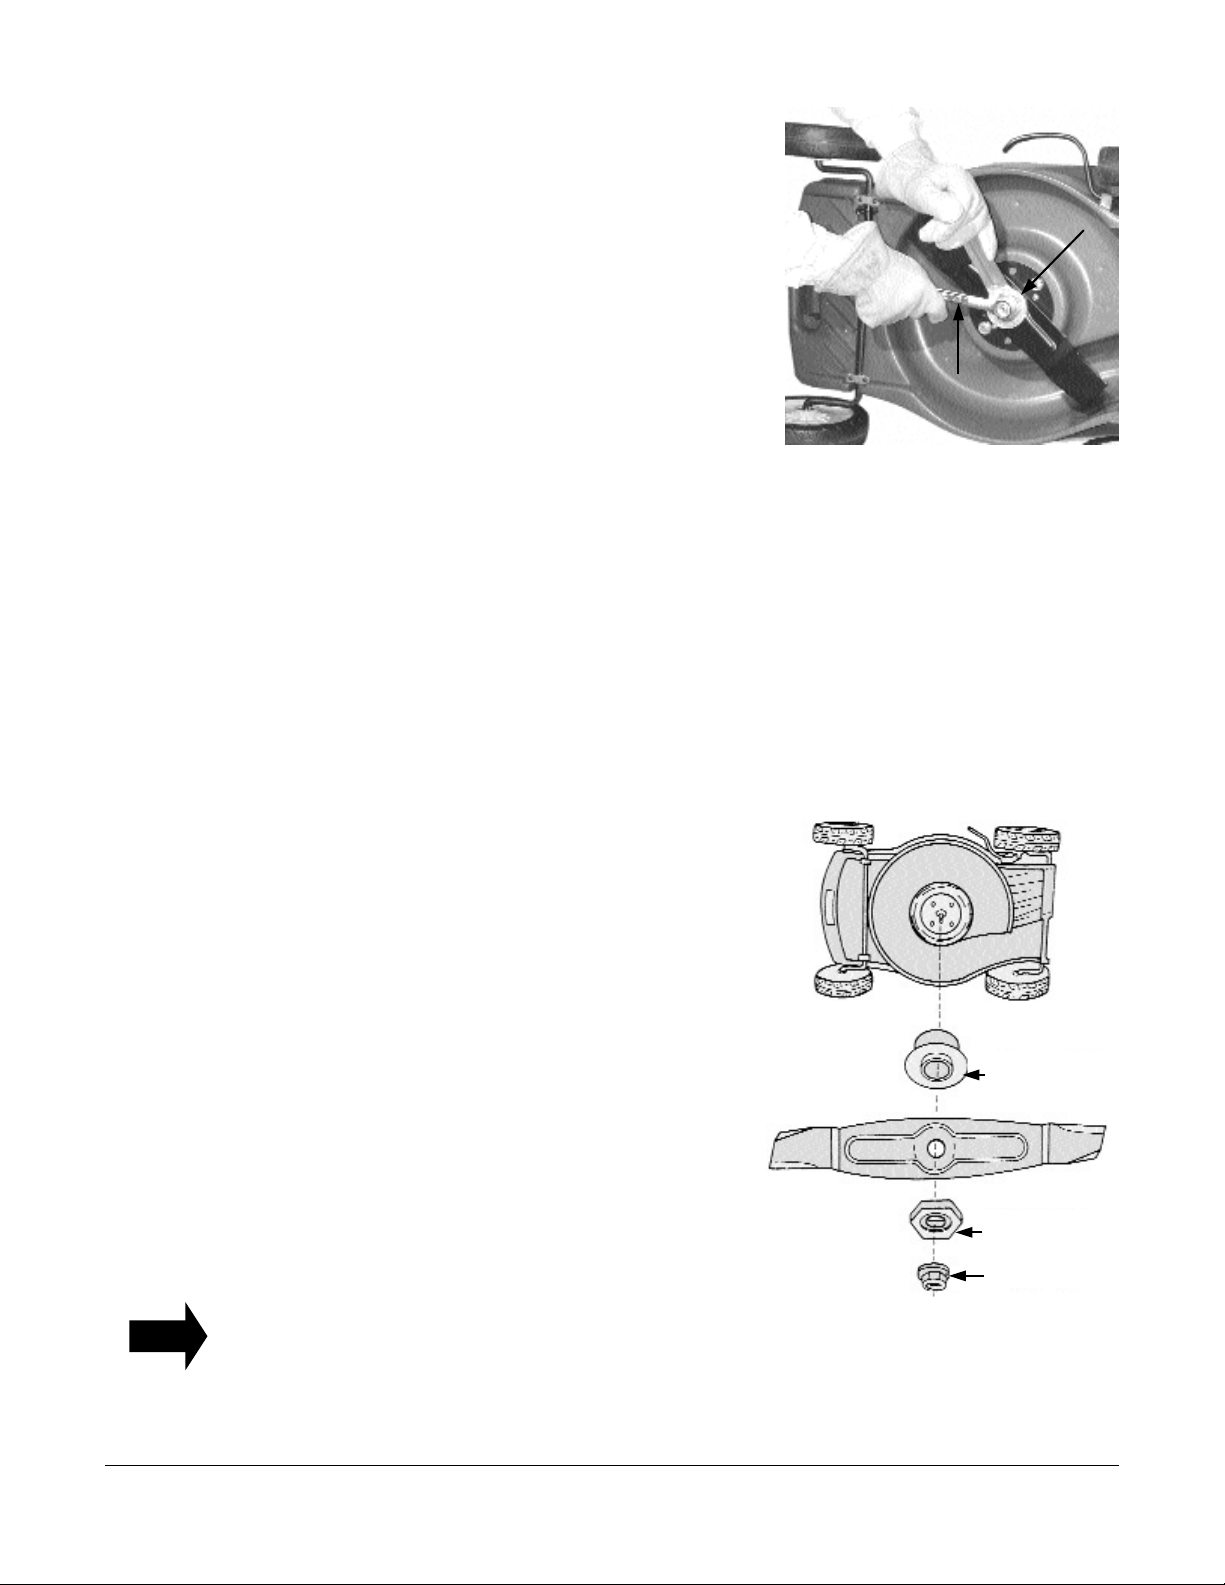
3. Place the 36mm Wrench over the Steel Hex Adapter (the
large metal piece that holds the Blade in position) and
place a 3/4" Socket or Wrench over the Blade Nut
(Figure 35).
4. While holding the Hex Adapter in place, loosen the
3/4" Wrench
Blade Nut by turning counterclockwise. Be careful, hold
the Hex Adapter firmly in place so that the Blade does
not spin and strike your hand.
Figure 35
5. Remove the Blade Nut, Steel Hex Adapter, Blade, and Steel Blade Adapter in that order (Figure 36).
6. To install a sharpened Blade or a new Blade, reverse the order of step 5. Be sure to replace all
parts exactly as you removed them (Figure 36) and make sure to properly seat the Blade.
NOTE: Be sure that the stamping on the Blade “THIS SIDE TOWARDS MOWER” is facing the Mower. Also, if
replacing the Blade with a new one, use the new Nut supplied. If you assemble the Blade more than
ten (10) times, replace the Blade Nut with a new one.
7. Place the 36mm Wrench over the Steel Hex Adapter, then place a Torque Wrench with a 3/4"
Socket over the Blade Nut (Figure 35) and while holding the Hex Adapter in place, tighten the
Blade Nut by turning clockwise to 16.6 ft-lbs. Again, be careful, hold the Hex Adapter firmly in
place so that the Blade does not spin and strike your hand.
TIP
8. Make sure the Blade is firmly attached, and then turn your Mower upright.
Sharpening the Blade
When the Blade is dull, the cut ends of the grass end up ragged
and may turn brown soon after mowing. A dull blade also
causes the Battery to discharge faster. When this occurs,
sharpen the Blade (assuming the Blade is otherwise in good
condition).
Tools and Supplies Needed:
• (See list on previous page)
• Fine-Toothed File or NEUTON Blade Sharpener (optional)
• Safety Glasses
• Vise
1. Remove the Blade (see steps 1 thru 5 above).
2. Secure the Blade in a sturdy Vise and while wearing Safety
Glasses, carefully file the Cutting Edges of the Blade using
even strokes. Be sure to file both sides and both ends
equally.
Simply counting the number of strokes per edge will help to
keep the sharpening equal.
Figure 36
Blade Adapter
Hex Adapte
Blade Nut
3. Check the blade after sharpening to be sure it is still
balanced (see next page).
38 1-866-NEUTON1 (638-8661) www.neutonowners.com
Page 43
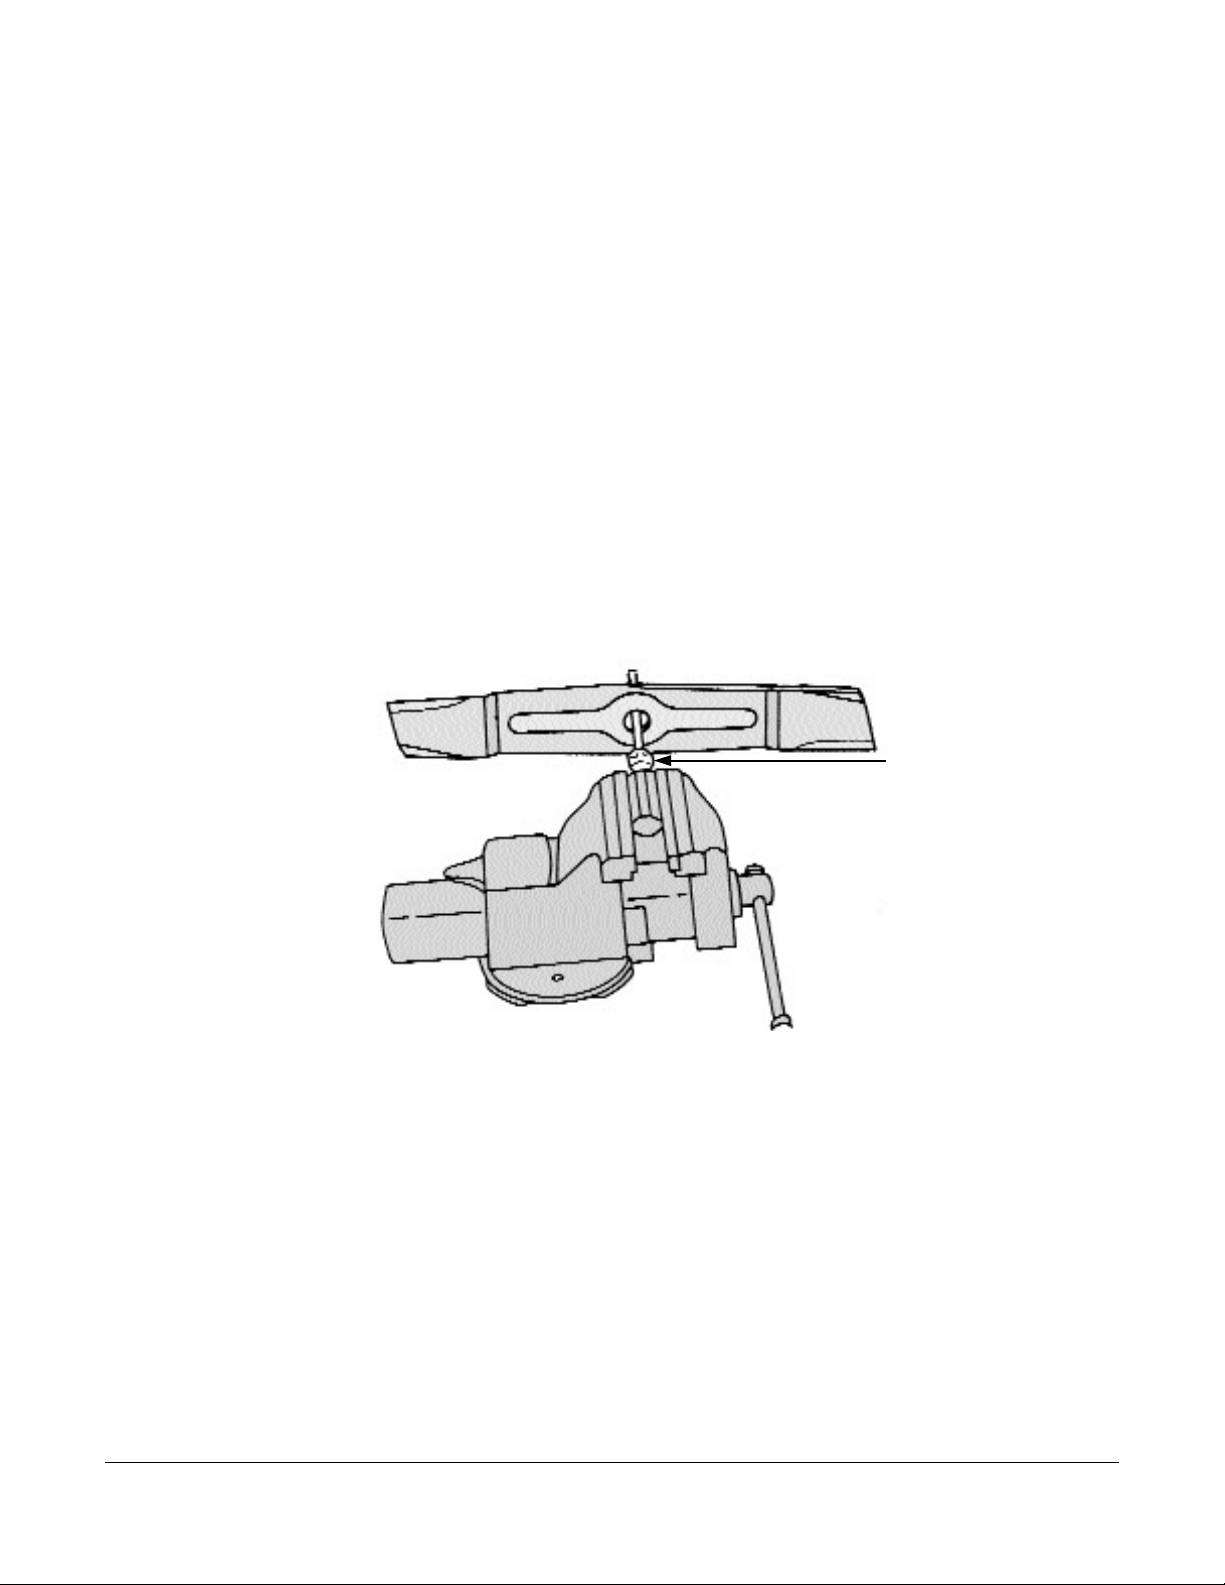
Balancing the Blade
An out-of-balance Blade causes your machine to vibrate excessively. Excessive vibration may cause
damage to the Mower, especially the Motor.
Because you are removing metal from the Blade, make sure to remove an equal amount from each
end to keep the Blade balanced. The best way to balance a Blade is with a Blade Balancer (available at
most local Hardware stores); or with a large Screwdriver, Nail, or Bolt.
Tools and Supplies Needed:
• Gloves
• Blade Balancer, or a large Screwdriver, Nail, or Bolt
1. After sharpening the Blade, hang it on the Balancer and check the level (Figure 37). If one side of
the Blade tips lower than the other side, sharpen the lower end a little at time until the Blade is
level (balanced).
NOTE: When sharpening a used Blade, be especially careful to keep it balanced. If in doubt, replace the
Blade with a new one. Of course, you can always have a Mower Service sharpen and balance your
Blade.
Balanced
Screwdriver
Figure 37
NEUTON CE 5.2 Battery-Powered Mower -
Safety & Operating Instructions
39
Page 44

Storing Your NEUTON Mower
ALWAYS STOP THE MOTOR, WAIT FOR THE BLADE TO STOP MOVING, REMOVE THE SAFETY KEY AND
REMOVE THE BATTERY TO PREVENT ACCIDENTAL STARTING DURING STORAGE.
Whether you store the Mower for a short or long period, always remember these important guidelines:
• Always store the Mower with a full Battery charge and follow the recharging instructions in
“Chapter 5: Charging and Caring for the Battery”.
• Always store the Mower in an environment where the temperature is between -4ºF (-20ºC) and
+104ºF (+40ºC). Make sure the storage temperature will never be outside these limits. For longterm storage, store the Battery in an environment where the temperature is lower, since the
Battery self-discharges slower at lower temperatures.
• Store the Mower in a dry environment. Water will damage the Mower and Battery.
• Do not store the Mower near chemicals, such as fertilizers. These products are often highly
corrosive and may cause permanent damage to your Mower.
• Do not store the Battery in proximity to organic or other solvents.
• Always keep the Safety Key in a safe place away from children.
• You can safely keep the Battery in the Mower when storing them for the long term.
If you must store the Battery outside the Mower, follow these rules:
• If you will use the Battery again, give it a full charge.
• Do not store the Battery close to a source of heat, sparks, or open flame.
• The surrounding temperature range must be between -4ºF (-20ºC) and +104ºF (+40ºC).
• Do not expose the Battery to abnormal shaking or shocks.
• Store the Battery away from children and animals.
• Store the Battery in as DRY an environment as possible. Do not store it on a floor that may be
damp or subject to accidental flooding.
• Regularly observe the external appearance of the Battery and keep it clean and dry. Never use a
Battery that shows cracks, changes shape, leaks, or obviously damaged.
• During long-term storage of Batteries that are intended for reuse, periodically recharge the Battery,
as recommended in “Chapter 5: Charging and Caring for the Battery”.
40 1-866-NEUTON1 (638-8661) www.neutonowners.com
Page 45
Chapter 8: Troubleshooting Tips
Most difficulties are easy to fix. Consult the Troubleshooting Table for common problems and their
solutions. If you continue to experience problems or need repairs beyond these minor adjustments,
call NEUTON Power Equipment Toll Free at 1-866-NEUTON1 (638-8661) for assistance.
ALWAYS REMOVE THE SAFETY KEY AND BATTERY BEFORE PERFORMING ANY ADJUSTMENTS,
MAINTENANCE, OR REPAIRS TO YOUR MOWER.
Troubleshooting Table
ROBLEM CORRECTIVE ACTION
P
The Motor fails to
start with the Safety
Key inserted, and
the Control Bar
depressed.
The Mower stops
while mowing (for
reasons other than
releasing the
Control Bar).
Excessive vibration
or noise.
⇒ Check to make sure that you properly inserted the Safety Key and the green
Status Indicator Light is ON.
⇒ Check to see if the white Button on the Safety Key has popped up; if it has, then
depress the Button to reset it.
⇒ Check that you installed the Battery correctly and that the Battery is fully charged.
The green Status Indicator Light should be ON. If not, replace with a fully charged
Battery or recharge the Battery.
⇒ Check the Cable attachment to assure a proper connection. See page 14.
⇒ Check to make sure the Mower/Auxiliary Switch is in the correct position.
⇒ Make sure you follow the correct starting sequence of sliding the orange Start
Knob to the left and squeezing the orange Control Bar.
⇒ Possibly the Blade is obstructed. Remove the Safety Key and Battery, turn the
Mower over, and check the Blade.
⇒ The Battery has completely depleted its charge. Recharge the Battery fully or
replace it with a fully charged Battery.
⇒ The Mower was probably overloaded. If the Status Indicator Light is out, the
Circuit Breaker inside the Safety Key has tripped to protect the Motor. Reset
Breaker by pushing in the white Button in the Safety Key and restart the Mower.
⇒ The grass may be too high for the cutting height. Raise the cutting height or
narrow your cutting swath and try again.
⇒ The Blade, Mower Deck, or Side Discharge Chute probably clogged with debris.
Remove the Safety Key and Battery, turn the Mower over, and clean if necessary.
⇒ The white Circuit Breaker Button in the Safety Key may not be pushed in fully.
Reset it and try again.
⇒ If the Mower bogs down or stalls in heavy grass, raise the cutting height, walk
more slowly, or cut a narrower swath. If the grass is wet, let it dry before mowing.
⇒ The Blade may be loose. Remove the Safety Key and the Battery; turn the Mower
over and check that the Blade is securely attached.
⇒ The Blade may be unbalanced, bent, or damaged. Remove the Safety Key and
Battery, turn the Mower over, remove the Blade, and check its condition. Replace
with a new Blade if necessary.
NEUTON CE 5.2 Battery-Powered Mower -
Safety & Operating Instructions
41
Page 46
ALWAYS REMOVE THE SAFETY KEY AND BATTERY BEFORE PERFORMING ANY ADJUSTMENTS,
MAINTENANCE, OR REPAIRS TO YOUR MOWER.
ROBLEM CORRECTIVE ACTION
P
The Mower runs,
but the cutting
performance is
unsatisfactory, or
there is a loss of
power.
The Mower is hard
to push.
⇒ The Battery was probably not at full charge prior to Mowing. Charge the Battery,
if necessary.
⇒ The Blade may be dull, bent, loose or damaged. Remove the Safety Key and the
Battery, turn the Mower over, and check the condition of the Blade. Sharpen,
tighten, or replace the Blade, if necessary.
⇒ The grass may be too high or too thick for the cutting height. Raise the cutting
height or narrow your cutting swath and try again.
⇒ The grass may be too high or too thick for the cutting height. Raise the cutting
height or narrow your cutting swath and try again.
⇒ The Wheels may not be rotating freely. Remove the Safety Key and the Battery,
turn the Mower over, and check the Wheels for damage.
The Battery loses its
charge quickly.
⇒ The Battery was probably not at full charge prior to Mowing. Charge the Battery,
if necessary.
NOTE: You will need to charge a new Battery at least five (5) times to achieve maximum
cutting time.
⇒ The grass may be too high or too thick for the cutting height. Raise the cutting
height or narrow your cutting swath and try again.
⇒ The Battery may be getting old. After some time, usually about five (5) years, you
will need to replace the Battery.
The Mower rear
Bagger is collecting
grass poorly.
⇒ The rear Bagger is full. Empty the Bagger, and clean it if necessary.
⇒ The grass is too long or the Mower is cutting too low. Raise the cutting height.
⇒ The Mower is moving too fast, slow down.
⇒ The mesh holes in the rear Bagger are clogged, clean them out.
⇒ The rear Bagger is wet. Allow it to dry thoroughly before using it again.
42 1-866-NEUTON1 (638-8661) www.neutonowners.com
Page 47
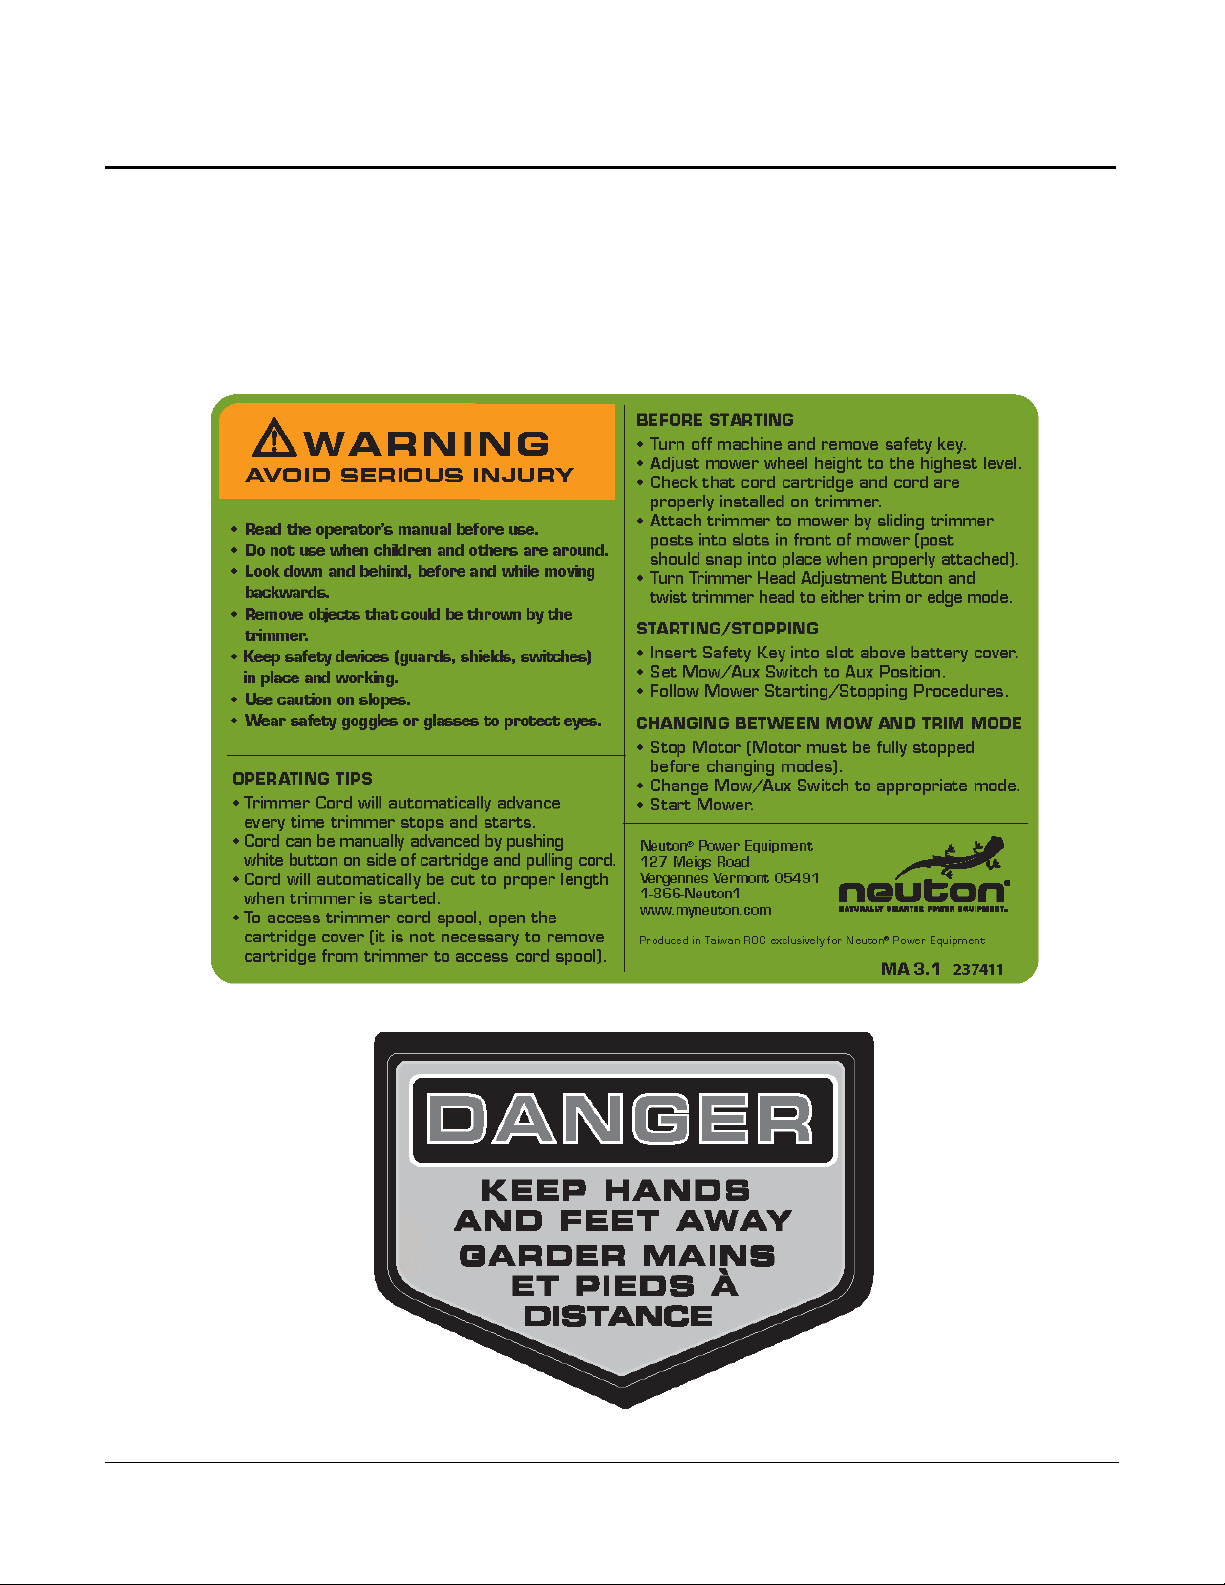
T
T
Chapter 9: Optional MA 3.1 Trimmer
This chapter explains the safe operation, use, and maintenance of the MA 3.1 Trimmer. Please read this
entire chapter before attaching and using the Trimmer.
Safety and Information Labels
You will find the following labels on the Trimmer
rimmer Warning and Safety Instructions label (237411)
rimmer Danger label (237771)
NEUTON CE 5.2 Battery-Powered Mower -
Safety & Operating Instructions
43
Page 48
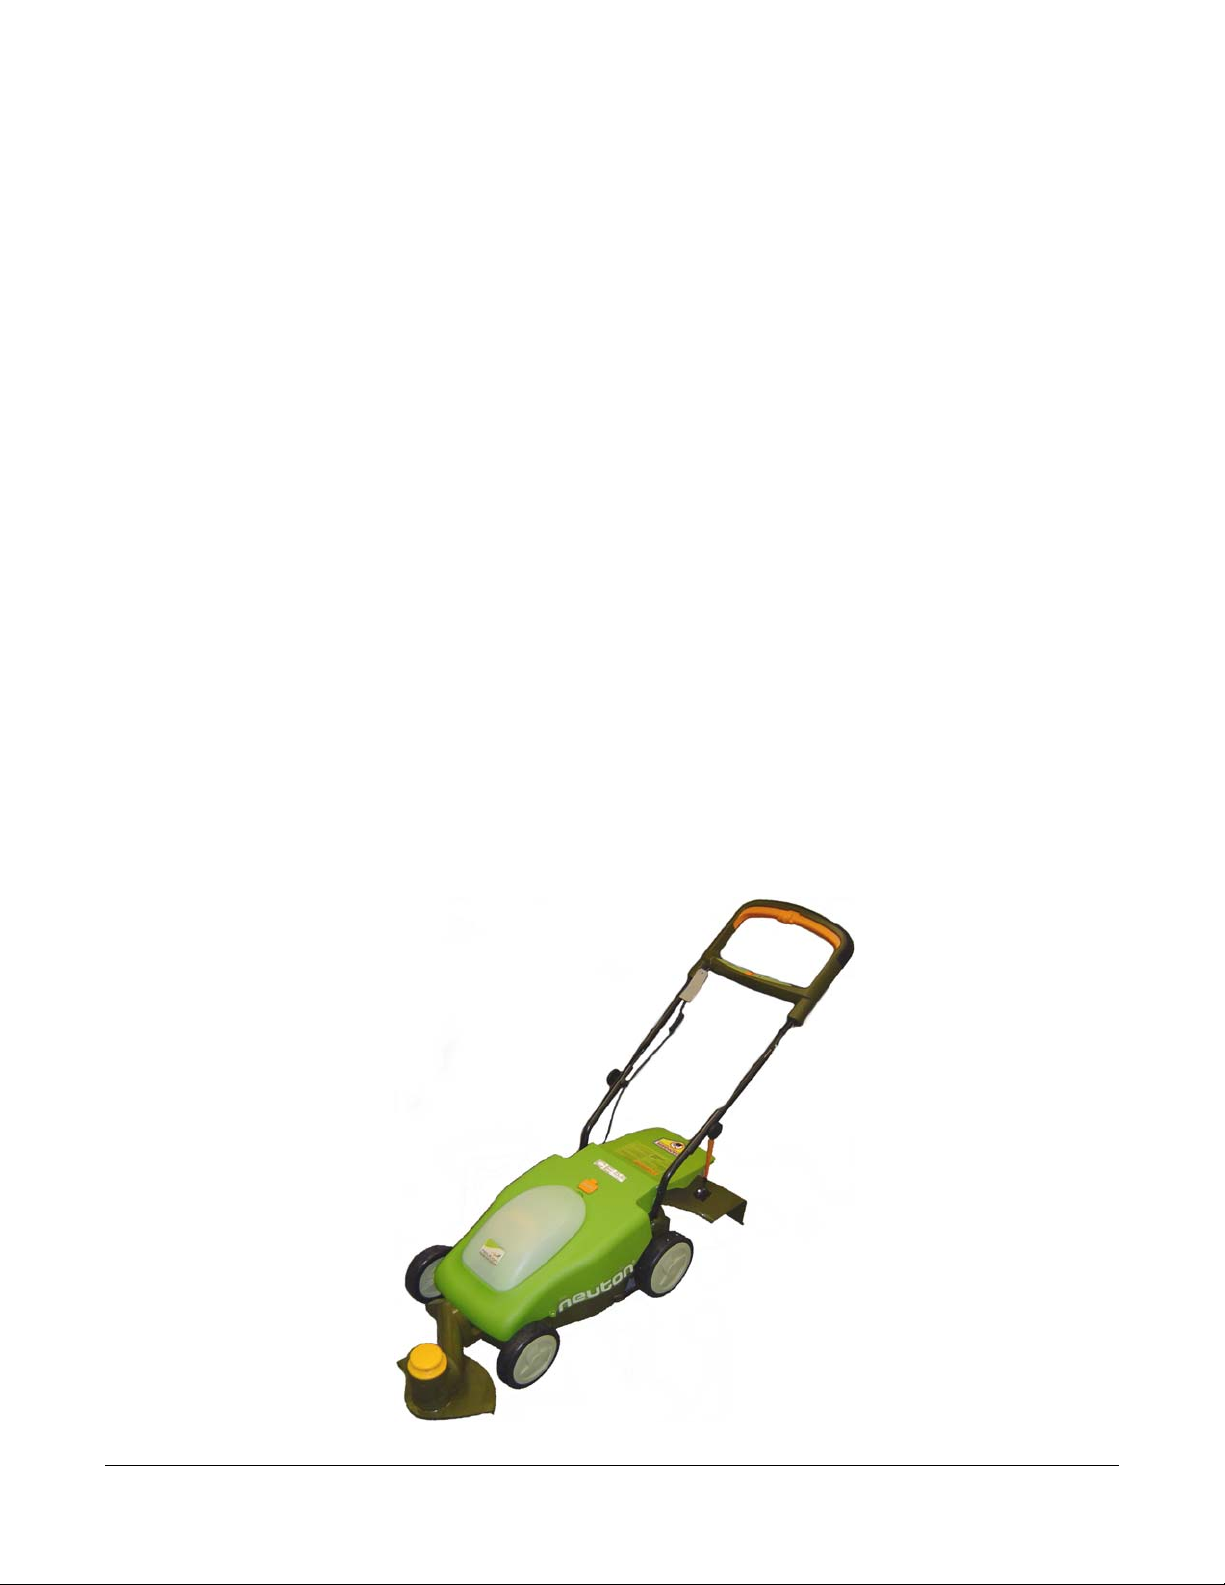
Operating Your Trimmer Safely
Before operating your Trimmer, please review “Chapter 2: Important Safety Considerations”.
Trimming on Slopes Safely
Slopes are a major factor related to slip-and-fall accidents, which can result in severe injury. All slopes
require caution. If you feel uneasy on a slope, do not trim or edge it.
Always:
• Use caution on slopes. Whenever possible, trim or edge across the face of slopes, not up and
down. Exercise caution when changing direction on slopes.
• Remove objects such as rocks and tree limbs, or any other potential object possibly thrown by
the Cutting Cord. Objects struck by the Cord can cause severe injuries.
• Watch for holes, ruts, or bumps. Tall grass can hide obstacles.
Never:
• Never trim or edge near drop-offs, ditches, or embankments. You could lose your footing or
balance.
• Never trim or edge steep slopes or any other areas where stability or traction is in doubt.
• Never trim or edge on wet grass. Unsure footing could cause you to slip.
Using the NEUTON Trimmer
The NEUTON Trimmer (powered by your NEUTON Mower) is a versatile machine that quickly and
easily attaches to the front of the Mower (Figure 38) to trim and edge your lawn without your having
to buy both a separate Trimmer and Edger. The Trimmer can cut an eleven (11) inch swath.
The NEUTON Trimmer ships fully assembled and ready to use. Also included are two (2) replacement
Cord Spools for the Trimmer.
Figure 38
44 1-866-NEUTON1 (638-8661) www.neutonowners.com
Page 49
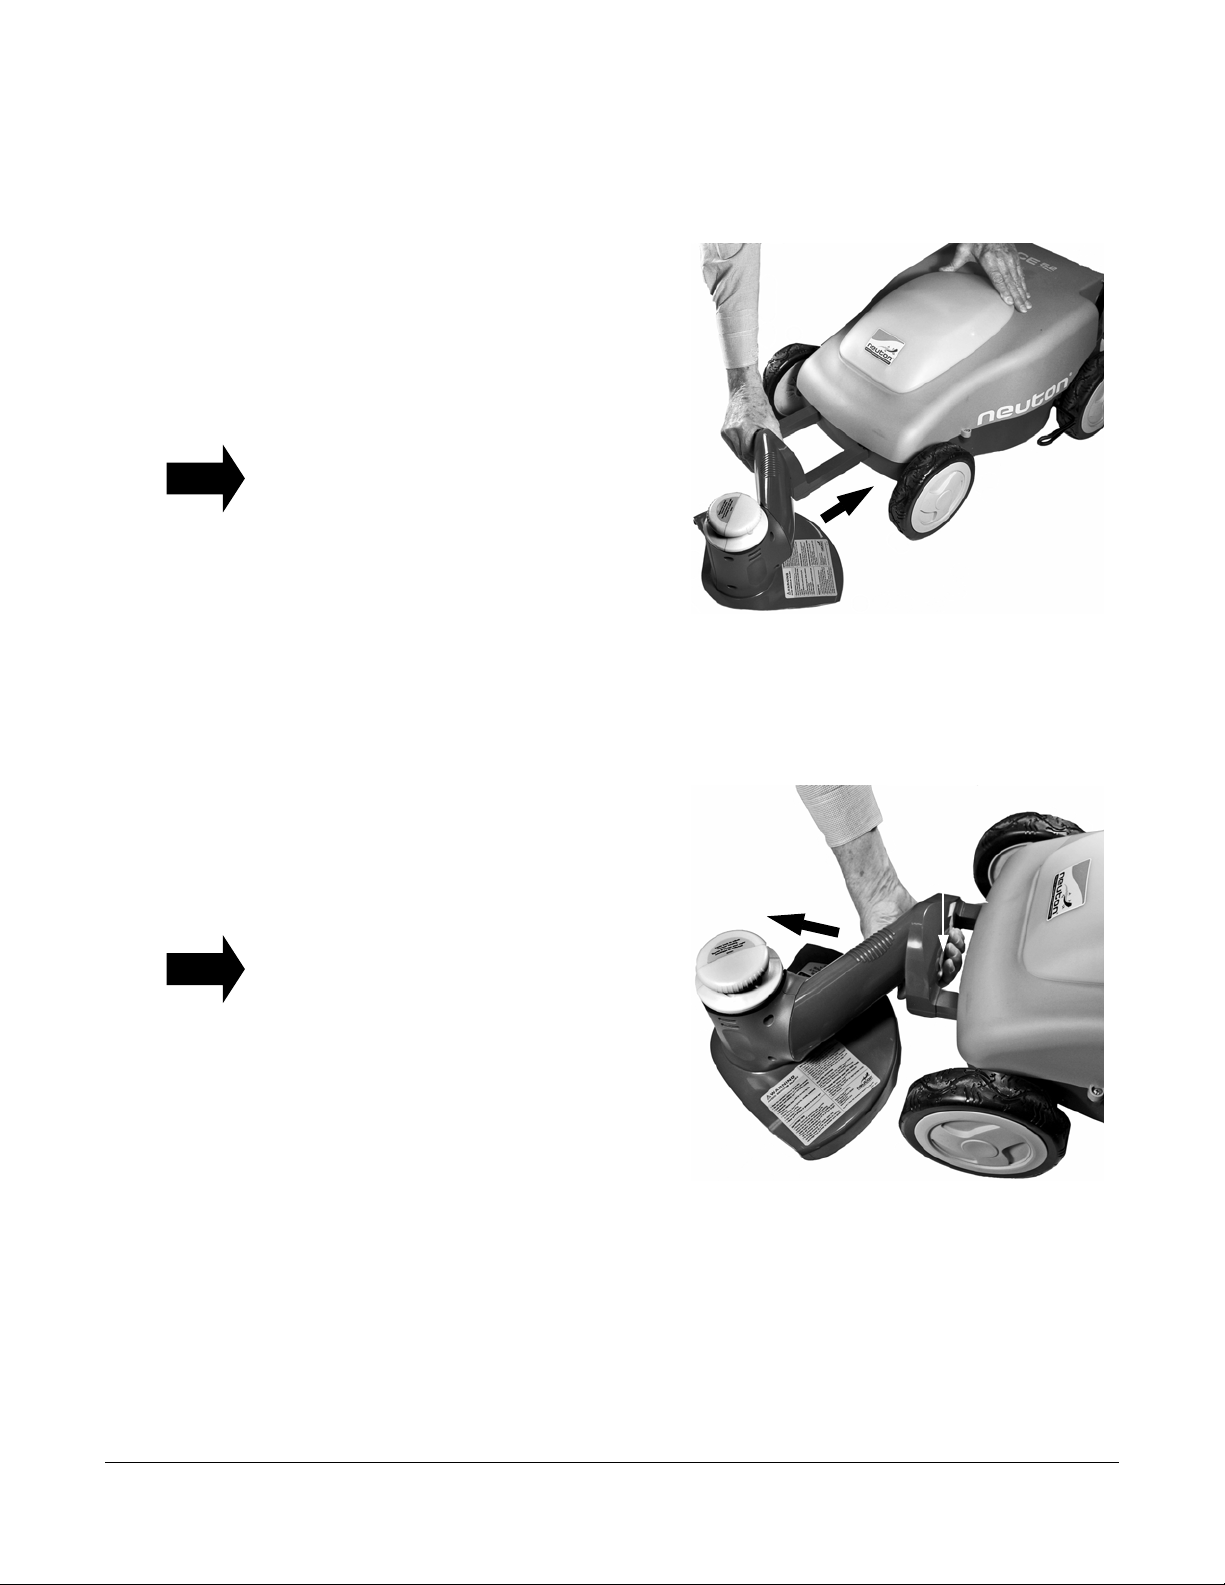
Attaching, Removing and Using the Trimmer
Attaching and removing the Trimmer is quick and easy.
Attaching the Trimmer
1. Adjust the Mower Cutting Height Lever to
position 6; this sets the Cutting Height to the
highest level.
2. Slide the Trimmer Posts into the slots in the
front of the Mower (Figure 39). The Posts
will snap into place when fully inserted.
TIP
TIP
Hold the Mower so that it will not roll
backward (Figure 39) when inserting the
Trimmer.
Removing the Trimmer
1. Adjust the Mower Cutting Height Lever to
position 6, setting the Cutting Height to the
highest level.
2. Squeeze the Release Bar (Figure 40) and
slide the Trimmer out of the Mower. Once it
has started to slide out, you can release the
Bar.
To hold the Mower so that it will not roll
forward when removing the Trimmer, simply
place your foot or hand on the front wheel.
Figure 39
Release
Bar
NEUTON CE 5.2 Battery-Powered Mower -
Safety & Operating Instructions
Figure 40
45
Page 50
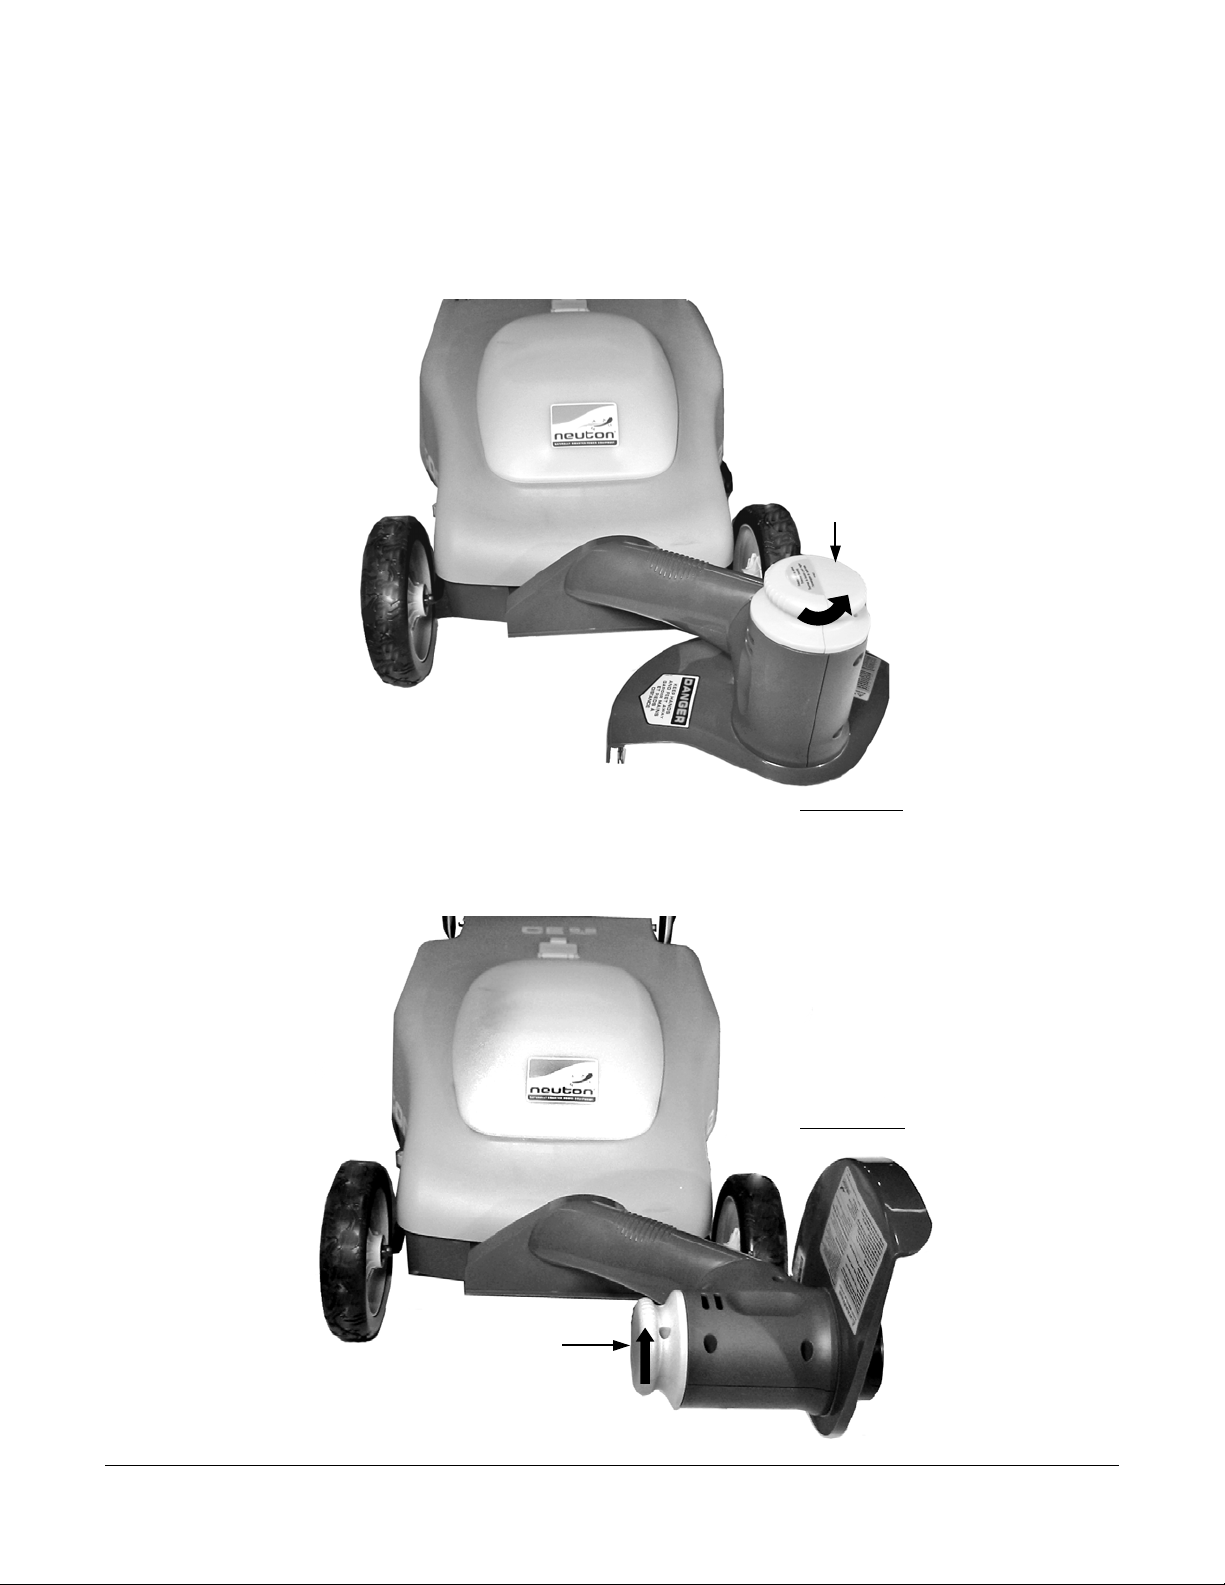
Adjusting the Trimmer Head
A
A
Before adjusting the Trimmer, you must first decide to Edge or Trim your lawn.
To set the Trimmer Head for edging or trimming, turn the orange Adjust Knob on top of the Trimmer
counterclockwise and rotate the Trimmer Head to the Trim or Edge position (Figure 41 or 42).
djust Knob
djust Knob
Trim Position
Figure 41
Edge Position
Figure 42
46 1-866-NEUTON1 (638-8661) www.neutonowners.com
Page 51
Starting the Trimmer
The Battery in the NEUTON Mower powers the Trimmer, making the cutting cord spin. Make sure the
Battery has a full charge before you begin.
• STARTING, STOPPING, AND RESTARTING AN ELECTRIC MOTOR REPEATEDLY WITHIN A FEW SECONDS
CAN GENERATE A GREAT DEAL OF HEAT AND DAMAGE THE MOTOR. TO PROTECT THE LIFE OF YOUR
NEUTON TRIMMER, ALWAYS WAIT AT LEAST FIVE (5) SECONDS AFTER STOPPING BEFORE RESTARTING
THE TRIMMER.
• THE CUTTING CORD ALWAYS TURNS WHEN THE MOTOR IS RUNNING; THERE IS NO CLUTCH TO ALLOW
THE CORD TO STOP ROTATING WHILE THE MOTOR IS RUNNING.
1. Set the Mower/Auxiliary Switch to Auxiliary (Figure 25 on page 21).
NOTE: The Cutting Blade on the Mower does not turn when the Mower/Auxiliary Switch is to Auxiliary.
2. Insert the Safety Key into the Key Slot. The green Status Indicator Light should come ON.
3. Slide the orange Start Knob to the left and then squeeze and hold the orange Control Bar
(Figures 28 & 29 on page 25). The Trimmer motor will now start and run for as long as you are
squeezing the Control Bar.
Stopping the Trimmer
Simply release the Control Bar to Stop the Trimmer.
THE TRIMMER WILL CONTINUE TO ROTATE FOR A COUPLE OF SECONDS AFTER YOU RELEASE THE CONTROL
BAR. WAIT FOR THE MOTOR TO STOP BEFORE MOVING THE MOWER. REMEMBER TO WAIT AT LEAST FIVE
(5) SECONDS AFTER STOPPING BEFORE YOU RESTART THE TRIMMER MOTOR.
When you are finished trimming or edging, remember to remove the Safety Key.
NEUTON CE 5.2 Battery-Powered Mower -
Safety & Operating Instructions
47
Page 52
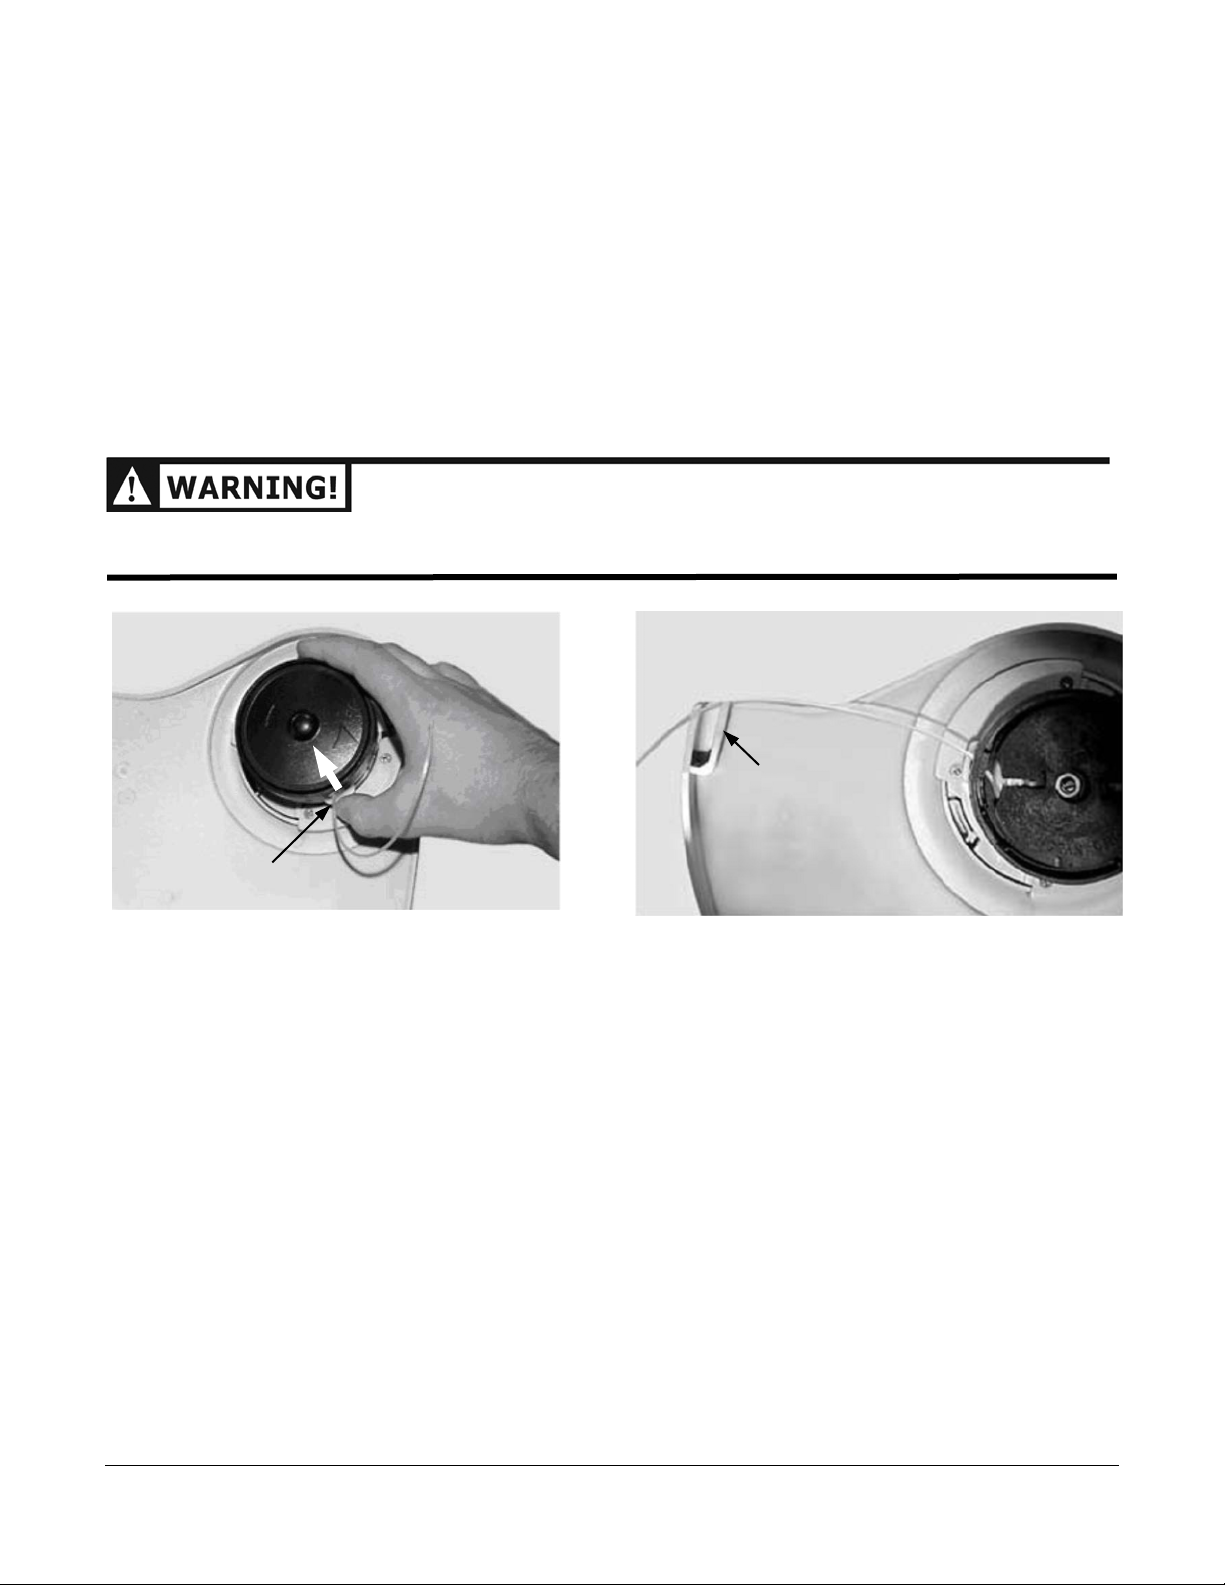
Advancing the Cord
r
Each time the Trimmer starts or comes to a complete stop, the Trimmer’s Cutting Cord automatically
advances and cuts itself to 5-1/2"; resulting in an eleven (11) inch cutting swath.
You can also manually advance the Cord.
1. Release the orange Control Bar to stop the Trimmer motor and remove the Safety Key.
2. Push in the white Button on the side of the Spool Housing (Figure 43) and pull the Cord to
advance it. The Cord advances in small increments so you might have to push the Button a few
times.
NOTE: Try not to advance the Cutting Cord past the Trimmer Shield. If you do pull out too much Cord, the
Cutter on the Trimmer Shield automatically trims the length of the Cord (Figure 44).
BE CAREFUL, THE EXCESS CORD WILL FLY OFF WHEN YOU START THE TRIMMER AND COULD BE
DANGEROUS.
White Button
Figure 43
Cord Cutte
Figure 44
Housing
Safety Tips for using the Trimmer
Following these tips will provide safe operation and enhance the performance of your Trimmer:
• Always stop the motor before toggling the Mower/Auxiliary Switch.
• You can adjust the cutting height of the Trimmer by raising or lowering the Mower’s cutting
height level. Make sure you first stop the motor and remove the Safety Key before changing the
height.
• Stop the motor and remove the Safety Key before changing the position of the Trimmer Head or
Housing.
• The Battery will drain more quickly in the Edger mode. You can realistically expect up to 45
minutes of use in the Edger mode, and approximately one (1) hour in Trim mode. This is when
having an extra charged Battery comes in handy. Be sure to remove the Safety Key when you
change the Battery.
• Be sure to clean the Trimmer Head frequently keeping the cooling vents and air intake holes free
of debris.
48 1-866-NEUTON1 (638-8661) www.neutonowners.com
Page 53
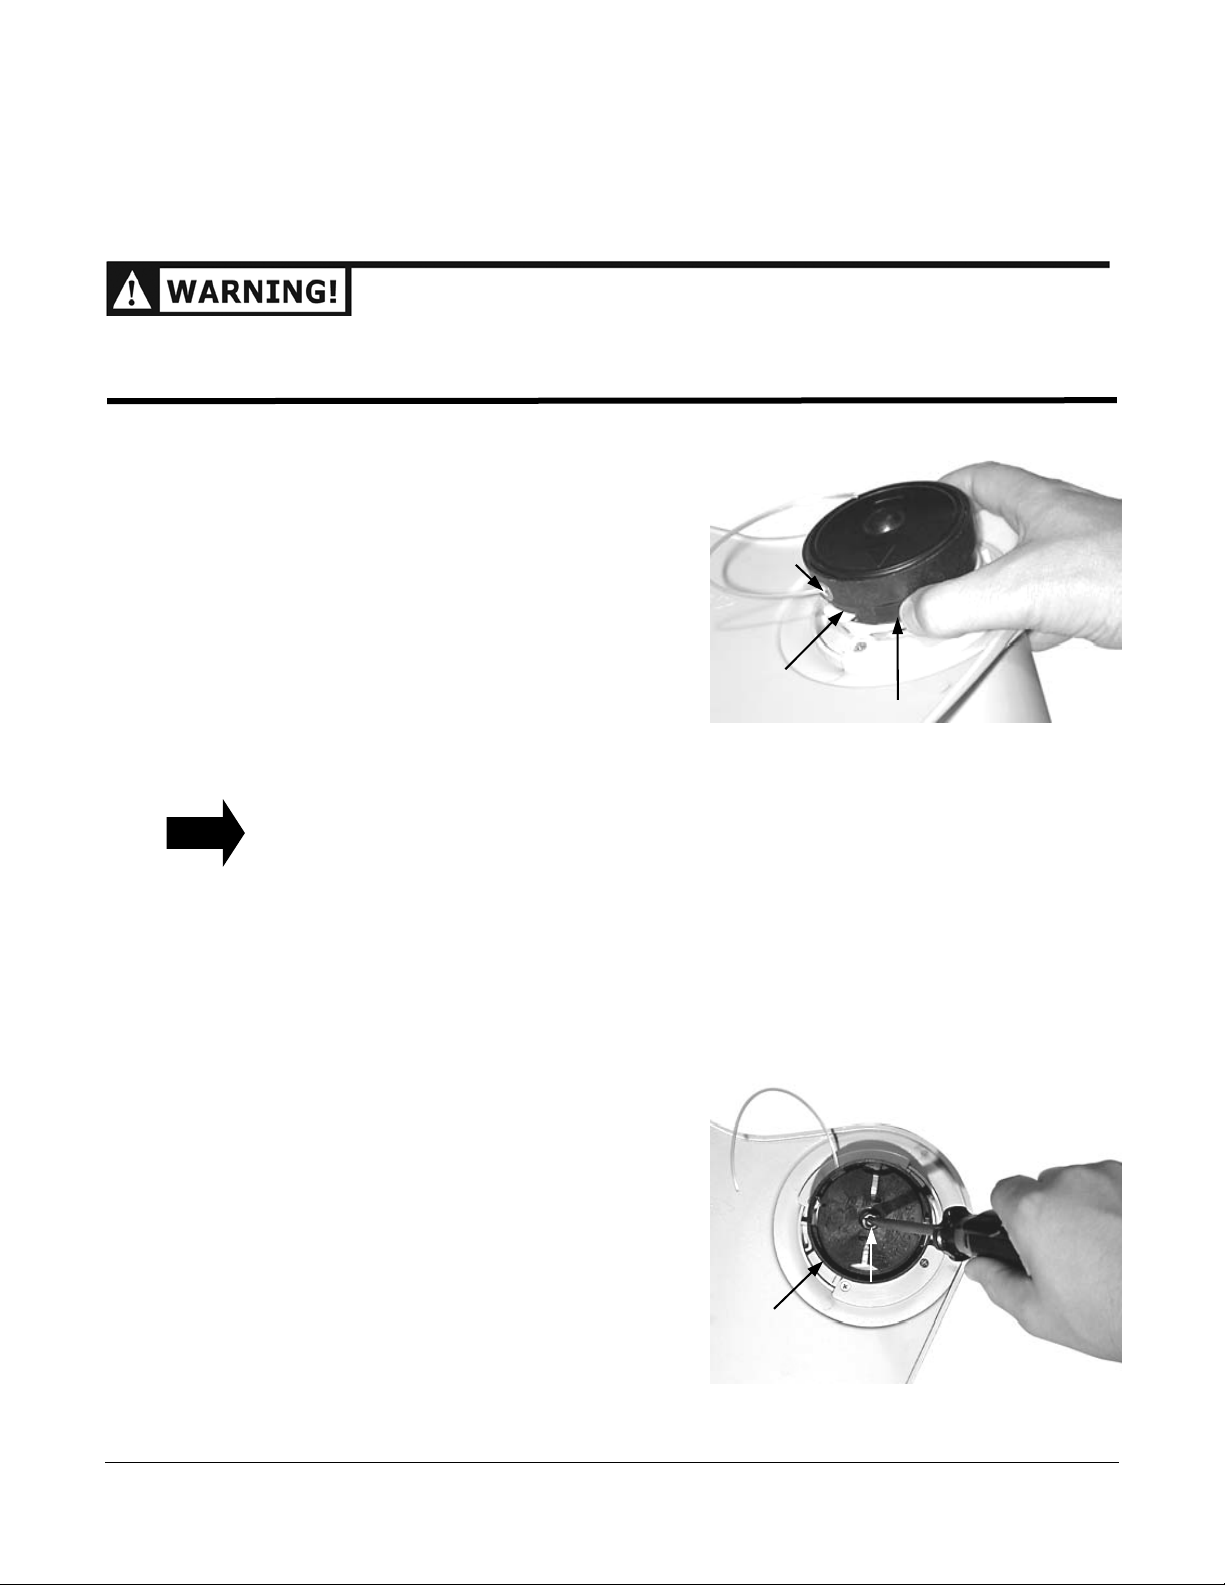
Maintaining and Storing the NEUTON Trimmer
This section explains how to replace the Spool, change the Spool Housing, clean, and store the
Trimmer.
ALWAYS REMOVE THE SAFETY KEY BEFORE REMOVING THE TRIMMER FROM THE MOWER, PERFORMING
ANY ADJUSTMENTS, MAINTENANCE, SPOOL CHANGES, OR REPAIRS TO THE TRIMMER. ALLOW THE
TRIMMER TO COOL AT LEAST FIVE (5) MINUTES BEFORE SERVICING OR STORING.
Replacing the Spool
Replace the Spool when the Cord runs out.
1. Using two (2) fingers, press the Clips on the side
of the Spool Housing (Figure 45) and push them
UP slightly towards you. The green Cover will
pop up part way and then remove it. The outer
black Spool Housing stays on the Trimmer.
2. Lift out the empty Spool.
3. Thread the end of the new Cord through the
metal opening in the Spool Housing.
4. Insert the new Spool with the printed side facing
out (so you can read it).
TIP
Try gently pulling on the Cord to help seat the
new Spool.
5. Replace the green Cover. Make sure the Clips in
the Cover align with the Slots in the Spool
Housing. If they don’t, press the Clips and turn
the Spool Housing until the Clips and Slots align.
The Clips must snap securely into place.
Replacing the Spool Housing
You only need to replace the Spool Housing if it is
damaged or cracked. You do not need to remove
the Shield to replace the Spool Housing. If the Cord
runs out, only change the Spool.
Opening
Housing
Figure 45
Cover
Clip – 1 each side
1. Remove the green Spool Cover. See “Replacing
the Spool” for details.
2. Using a flat-head Screwdriver, hold the Shaft in
place (Figure 46) so it won’t turn and unscrew
(counterclockwise) the Spool Housing with your
hand and remove it.
3. Install a new Spool Housing in the reverse order
and securely tighten by hand.
NEUTON CE 5.2 Battery-Powered Mower -
Shaft
Housing
Figure 46
Safety & Operating Instructions
49
Page 54

Cleaning the Trimmer
Periodically clean the Trimmer to ensure peak performance.
Supplies Needed:
• Clean, damp cloth or sponge
• Mild soap or detergent (if needed)
• Soft nylon brush (if needed)
1. Remove the Safety Key and remove the Trimmer from the Mower.
2. Using a damp cloth or sponge with a mild soap or detergent, clean the Trimmer. Never use
water, gasoline, solvents, or other petroleum-based or solvent-based products when cleaning –
remember that this is an electric Trimmer.
3. Use a soft nylon brush or non-metallic scrubbing pad to remove any clippings that have
accumulated on the Trimmer and underside of the Trimmer Shield. Do not use a wire brush; it
will scratch and harm the surface of your Trimmer.
4. Remove any grass or weeds that might have wound around the Spool.
5. Store the Trimmer indoors in a dry place and out of the reach of children.
50 1-866-NEUTON1 (638-8661) www.neutonowners.com
Page 55

Chapter 10: Parts Lists, Schematic Diagrams, and Warranty
Parts List - NEUTON CE 5.2 Mower
NOTE: Part numbers listed are available through NEUTON Power Equipment.
Item # Description Qty Part # Item # Description Qty Part #
1-16 Handlebar Assembly
w/Labels #103, #104 & #107
2 Upper Handlebar Top
Housing
3 Upper Handlebar Bottom
Housing
4 General Connector Screws 3 155191 22 Washer, Lock 2 200061
5 Control Bar, Orange 1 196341 23 Knob, Quick- Connect, Green 2 243751
6 Internal Control Bar Fixed
Piece
7 Start Knob, Orange 1 196361 25 Cover, Safety Key 1 175811
8 Screw 2 196371 26 Spring, Safety Key Cover 1 175821
9 Control Bar Spring 2 196381 27 Pin, Safety Key Cover 1 175831
10 Start Knob Extension Spring 1 196391 28 Guard, Discharge 1 243561
1 202051 19 Guide, Cable 1 198481
1 196311 20 Bolt, Handlebar Connector 2 175781
1 196321 21 Knob, Handlebar Connector,
Black
1 196351 24 Housing, Upper 1 243581
2 175791
11 Anchor, Cable 1 200191 29 Spring, Discharge Guard 1 175851
12 Screw, 3.5mm x 20mm 12 175711 30 Bar, Discharge Guard 1 175861
13 Switch, Cable w/Indicator
Light
14 Switch, Mow/Aux., Orange 1 182821 32 Cover, Battery Pack 1 243571
15 Upper Handlebar Steel Tubes
(3 holes)
16 Screw, 4mm x 6mm 1 175901 34 Safety Key 1 175931
17 Lower Handlebar Steel
Tubing (right)
18 Lower Handlebar Steel
Tubing (left)
NEUTON CE 5.2 Battery-Powered Mower -
1 196631 31 End Cap, Discharge Guard 2 175871
2 196641 33 Hinge, Battery Cover 1 175891
1 175731 35 Strap, Safety Key (orange) 1 206511
1 175741 36 Screw, 4mm x 12mm 2 226831
Safety & Operating Instructions
51
Page 56

Item # Description Qty Part # Item # Description Qty Part #
37 Screw, Housing 4 175921 60 Wire, Battery, Black, #12
1 243631
330mm L
38 Bar, Rear Discharge for
Bagger and Chute
39 E - Clip 2 210901 62 Circuit Board w/Mower &
1 210421 61 Wire, Trimmer, Red, #16
560mm L
1 243641
1 243661
Trimmer Relays
41 Deck, Mower, Lower 1 243581 65 Screw, 4mm x 10mm 1 196911
42 Motor 1 243591 66 Washer 1 243691
43 Plate, Mounting, Motor 1 175971 67 Contact, Electrical, CU
2 176101
Connector
44 Screw w/3mm Lock Washer 4 175981 68 Screw w/Washer, Contact 2 176111
45 Adapter, Blade 1 196731 69 Screw, 4mm x 16mm 4 243701
46 Blade, Aero Cutting 1 243601 70 Cable, Main 1 243651
47 Adapter, Hex 1 196671 71 Front Wheel Assembly (R) 1 196811
48 Nut w/Flange, Blade 1 243611 72 Front Wheel Assembly (L) 1 196821
49 Wrench, 36mm 1 176281 73 Bearing, Axel, Plastic 8 243711
50 Cap, Rear Axle 1 210451 74 Axle, Front 1 243721
51 Screw, 4mm x 12mm 15 176991 75 Washers, Axle, Flat 8 176321
52 Flap, Rear 1 210461 76 Nut, Axle 4 176331
53 Bar, Rear Flap 1 210471 77 Cap, Front Wheel 2 176341
54 Spring, Lever 1 176131 78 Plate, Metal, Axle 3 176351
55 Pin, Lever Spring 1 176141 79 Rear Wheel Assembly (R) 1 196831
56 Washer 1 196701 80 Rear Wheel Assembly (L) 1 196841
57 Arm, Battery 1 196441 81 Axle, Rear w/Cutting Height
1 243731
Lever
58 Wire, Black, #16, 200mm L 1 196051 82 Cap, Rear wheel 2 176391
59 Wire, Battery, Red, #12,
410mm L
1 243621 83 Connecting Rod Height
Adjustment, Axle
1 176401
52 1-866-NEUTON1 (638-8661) www.neutonowners.com
Page 57

Item # Description Qty Part # Item # Description Qty Part #
84 Support, Trimmer Arm 1 176421 104 Label, Transparent Light
1 196931
Cover
85 Flap, Trimmer Arm Support 2 243741 105 Label, Battery Operating Tips,
1 237651
English
86 Hinge, Leading Channel 2 176441 106 Label, Battery Alignment,
1 224641
Bilingual
87 Spring, Leading Channel
2 176451 107 Label, Serial Number 2 210551
Hinge
88 Channel, Electrical Contact 2 176461 108 Label, Battery Operating Tips,
1 237641
French
89 Screw, Electrical Contact
Channel
90 Plate, Rear Axle, Metal 2 210491 110 Optional Blade Sharpener w/
2 176471 109 Label, Battery Charger
Warning
1 237781
1 226921
Oil soaked Sponge
91 Nut, Connector 2 176411
92 Bagger 1 208921
93 Frame, Bagger, Steel 1 210501
94 Discharge Chute Assembly
1 208901
(includes Discharge Chute
and Handle w/Screw)
95 Mulching Plug 1 203831
96 Battery Charger 1 196081
97 Battery Pack, orange 1 178781
98 Mower Safety & Operating
1 237721
Instructions Manual
99 Label, Danger, English 1 237561
100 Label, Warning & Safety
1 237681
Instructions
101 Label, Neuton 1 237691
102 Label, Bagger 1 237451
103 Label , PC (right & left) 1 237701
NEUTON CE 5.2 Battery-Powered Mower -
Safety & Operating Instructions
53
Page 58
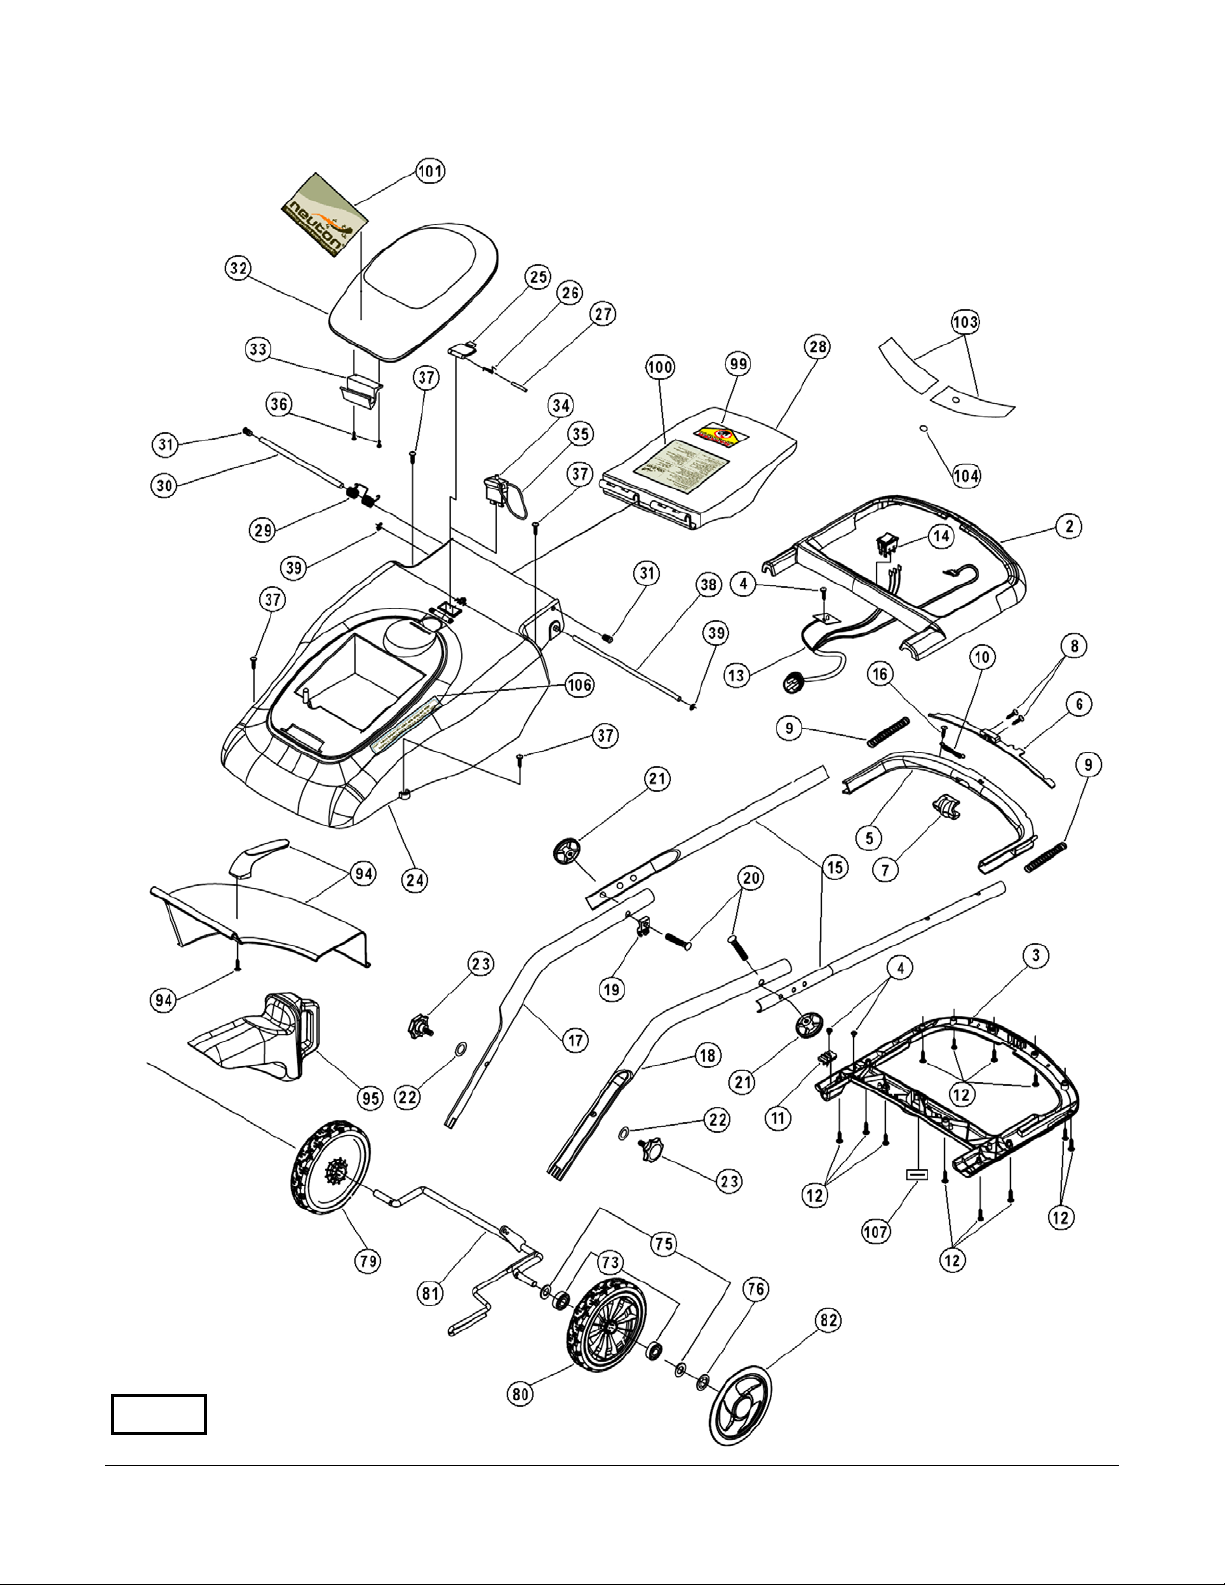
Schematic Diagrams - NEUTON CE 5.2 Mower
071101
54 1-866-NEUTON1 (638-8661) www.neutonowners.com
Page 59
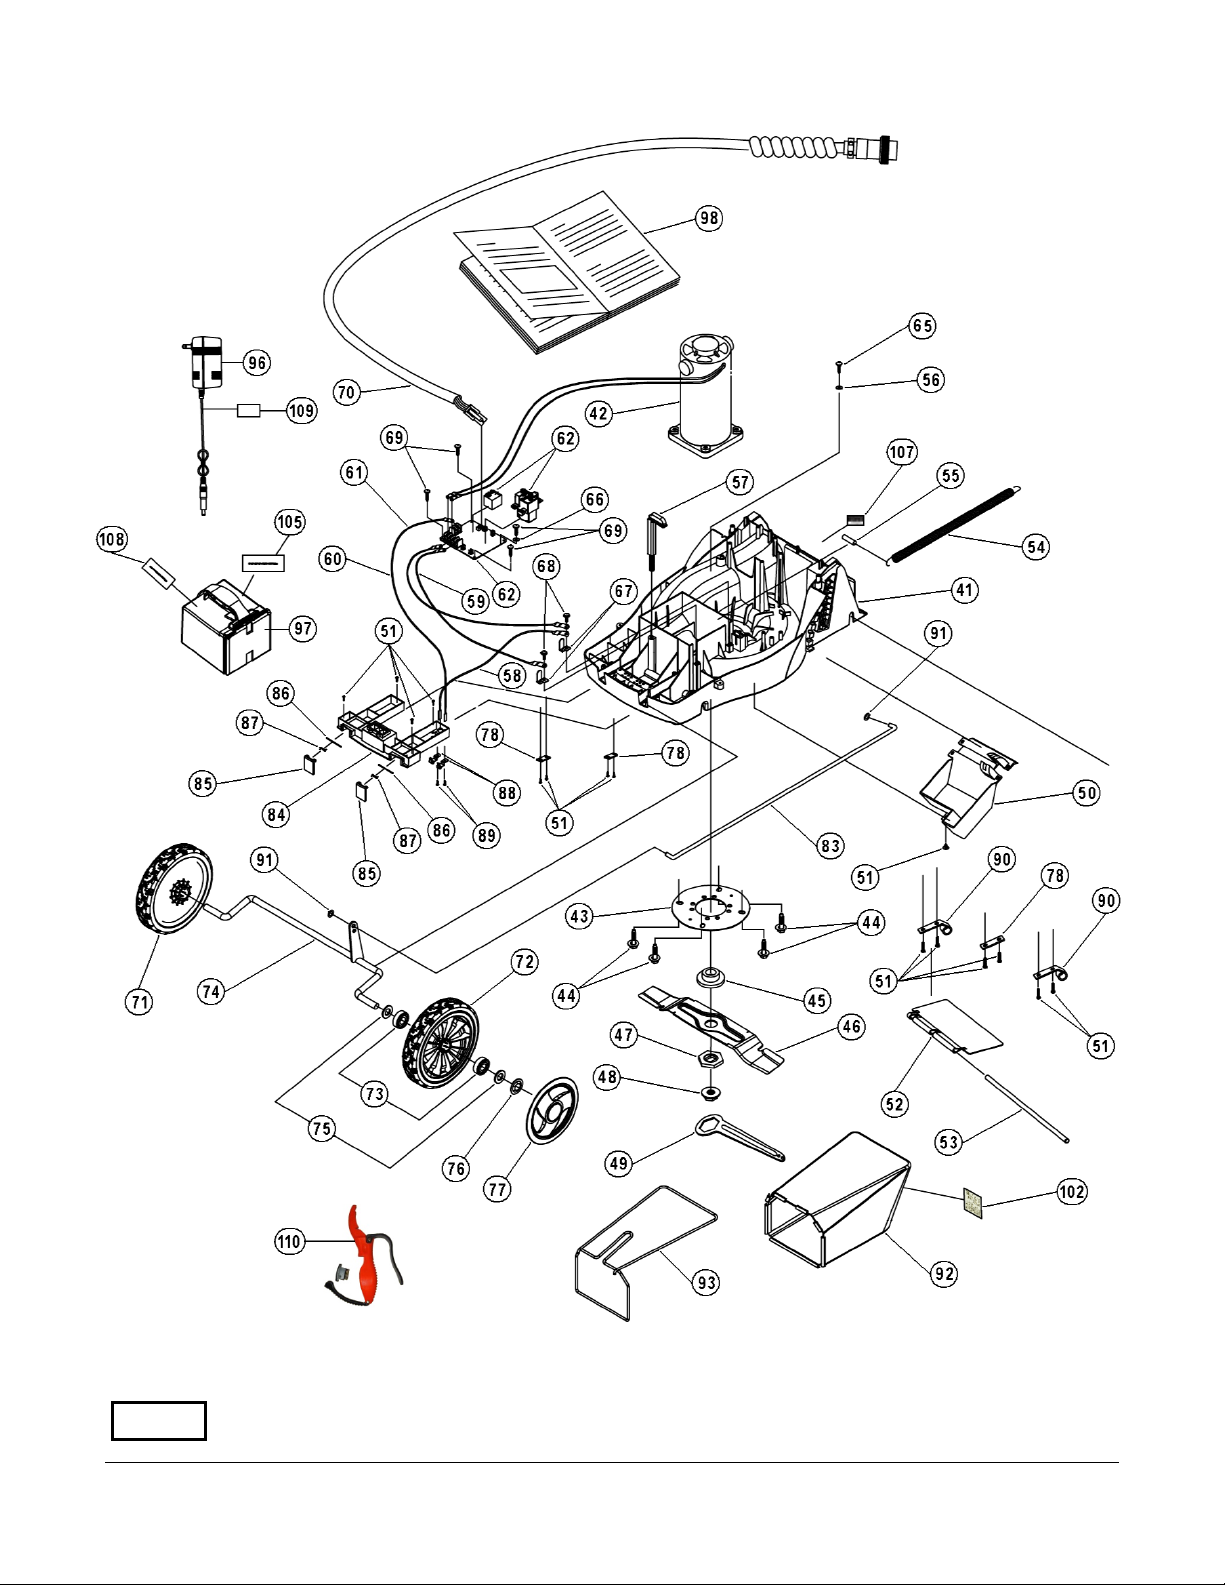
071120
NEUTON CE 5.2 Battery-Powered Mower -
Safety & Operating Instructions
55
Page 60

Parts List - Optional MA 3.1 Trimmer
NOTE: Part numbers listed are available through NEUTON Power Equipment.
Item # Description Qty Part # Item # Description Qty Part #
1+2+3Pillar Base Set 1 243251 17 Fan, Motor 1 195701
1 Pillar Base (Upper) 1 243261 18 Motor 1 195691
2 Pillar Base ( Lower ) 1 243271 19 Switch, Safety 1 195731
3 Cover, Pillar Base 1 243281 20 Sleeve, Motor Shaft 1 184161
4 Press-Bar w/Hook 1 243291 21 Gasket, Motor Insulation 1 176941
5 Screw, 3mm x 8mm 2 176811 22 Plate, Motor Mounting 1 243421
6 Screw, 4mm x 16mm 12 196371 23 Screw w/Washer, Motor
Mounting Plate
7 Screw, 3mm x 19mm 6 243301 24 Shield 1 243431
8 Spring, Press-Bar 2 243311 25-31 Cutter Head Assembly 1 177051
9 + 10 Knob Housing Set 1 243321 25 Rivet, Housing 1 177111
9 Housing, Knob (R) 1 243331 26 Housing, Spool 1 195891
10 Housing, Knob (L) 1 243341 27 Nut, Housing 1 177121
11 Spring, Knob 1 243351 28 Spool w/Cord 1 243091
12+13 Motor Protecting Housing Set1 243361 29 Driver, Cord Feeding 1 195901
12 Housing, Motor Protecting (R) 1 243371 30 Spring, Metal, Spool Housing 2 177131
13 Housing, Motor Protecting (L) 1 243381 31 Cover, Spool Housing, Green 1 195911
14 L Hook 1 243391 32 Label, Operating 1 237411
15 Gear, Motor 1 243401 33 Label, Danger - Bilingual 1 237771
4 195761
16-20 Motor Set 1 243411 34 Label, Head Adjustment -
Bilingual
16 Nut, Motor Fan 1 195711 35 Label, Housing Removal -
Bilingual
56 1-866-NEUTON1 (638-8661) www.neutonowners.com
1 237631
1 237621
Page 61
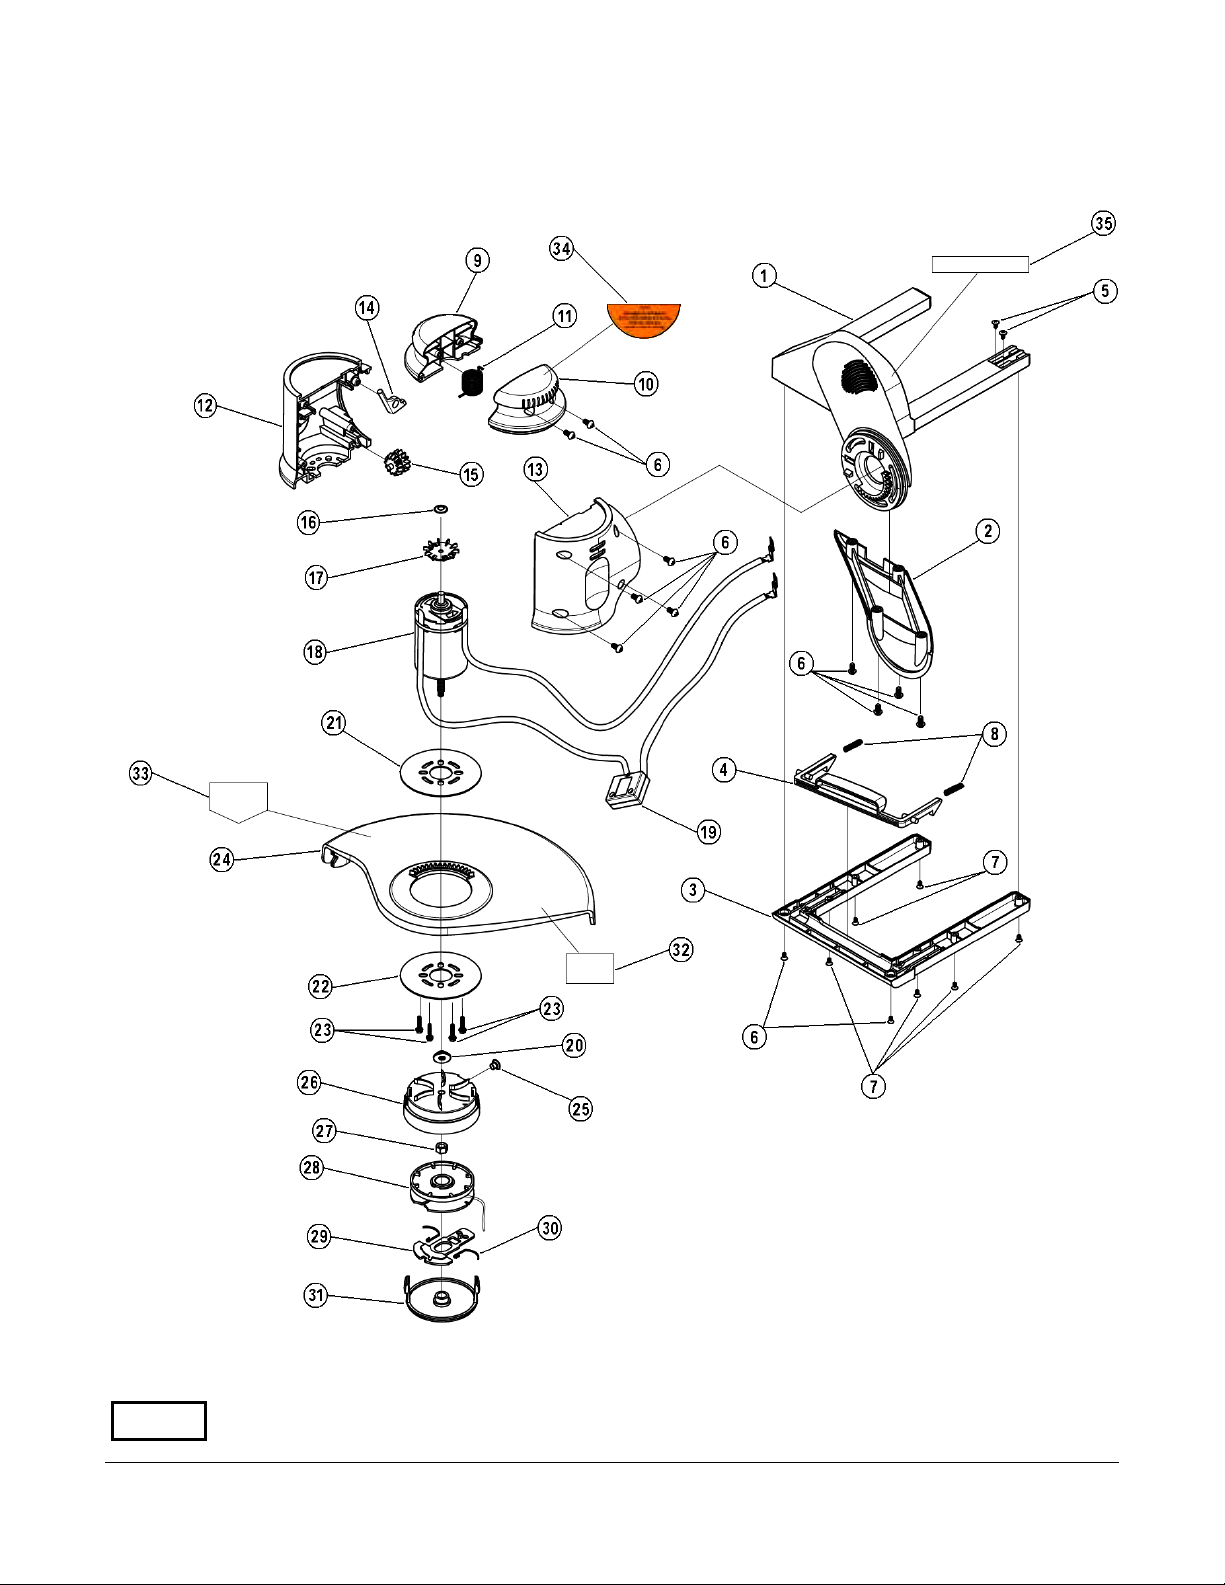
Schematic Diagram - Optional MA 3.1 Trimmer
071101
NEUTON CE 5.2 Battery-Powered Mower -
Safety & Operating Instructions
57
Page 62

Notes:
58 1-866-NEUTON1 (638-8661) www.neutonowners.com
Page 63

2-Year Limited Warranty
Terms and Conditions
The NEUTON® CE 5.2 Battery-Powered Mower is warranted for two (2) years, one (1) year for the NEUTON®
Attachments and Accessories, against defects in materials or workmanship when put to personal residential
household use.
For the purposes of the warranty, “personal residential household use” refers to non-commercial residential use and
further excludes misuse, accidents, or damage due to inadequate maintenance.
®
NEUTON Power Equipment certifies that the NEUTON
which a product of this type is used. NEUTON Power Equipment however, limits the implied warranties of
merchantability and fitness in duration to a period of two (2) years, one (1) year for the NEUTON
Accessories, in personal residential household use.
The 2-Year Limited Warranty on the NEUTON® CE 5.2 Battery-Powered Mower, one (1) year for the NEUTON®
Attachments and Accessories, starts on the date the machine shipped from our factory. The 2-Year Limited Warranty,
one (1) year for the NEUTON
The owner is responsible for the performance of all the required maintenance as defined by the manufacturer's owner
manual.
The owner is responsible for the replacement of normally wearing parts including the Blade, Blade Nut, and Battery for the
Mower and the Cord Spool and Spool Housing for the Trimmer.
During the warranty period, the owner is responsible for all shipping and transportation charges, if required.
SOME STATES DO NOT ALLOW LIMITATIONS ON THE LENGTH OF IMPLIED WARRANTIES, SO THE ABOVE LIMITATIONS MAY
NOT APPLY TO YOU.
®
Attachments and Accessories, is applicable only to the original owner.
CE 5.2 Battery-Powered Mower is fit for ordinary purposes for
®
Attachments and
NEUTON Power Equipment shall not be liable under any circumstances for any incidental or consequential
damages or expenses of any kind, including, but not limited to, cost of equipment rentals, or cost of hiring services
to perform tasks normally performed by the NEUTON
and Accessories.
SOME STATES DO NOT ALLOW THE EXCLUSION OR LIMITATION OF INCIDENTAL OR CONSEQUENTIAL DAMAGES, SO THE
ABOVE LIMITATIONS MAY NOT APPLY TO YOU.
®
CE 5.2 Battery-Powered Mower or the NEUTON® Attachments
Technical Support Hotline
NEUTON Power Equipment’s objective is to have 100% satisfied customers. For that reason, we operate a 6-day-perweek Technical Support Department for our NEUTON
FREE Hotline at 1-866-NEUTON1 (638-8661). The sole job of our well-trained and friendly folks is to ensure that you
get any help you need in a timely fashion. They are there to answer all your questions including: (1) inquiries on any
of the above warranties, (2) inquiries about replacement parts, and (3) your questions regarding service, maintenance,
and operation.
THIS WARRANTY GIVES YOU SPECIFIC LEGAL RIGHTS, AND YOU HAVE OTHER RIGHTS, WHICH VARY FROM STATE TO STATE.
®
owners. You can access a Representative by dialing our TOLL-
NEUTON EM 5.1 Battery-Powered Mower -
Safety & Operating Instructions
53
Page 64

Daily Checklist for your NEUTON Mower
To help maintain your NEUTON Mower for optimum performance, we recommend you follow this
checklist each time you use your machine.
[ ] BATTERY: Make sure the Battery has a full charge.
[ ] CLEAN: Before inserting the Safety Key, inspect the Mower Blade and clean it to remove any
debris (such as grass or twigs) that might be clinging to the Blade from its last use.
For the best performance and longest life of the Blade, it is best to clean the Blade of
any clinging debris after each use. Always follow the safety precautions when
cleaning the Blade.
Make sure the Control Bar is clean and operating smoothly. See page 36.
[ ] NOISES: If you notice anything unusual, such as a vibration or odd sound, shut the Mower
down immediately. Remove the Safety Key and, following all safety procedures,
inspect the Mower Blade and underside of the Mower for any obstructions.
If you cannot find the cause of the problem or are uncertain what to do, then have the
Mower inspected by a qualified repair shop before using it or call NEUTON Power
Equipment Technical Support Department, Toll Free, at 1-866-NEUTON1 (638-8661).
[ ] MOWING: If you are uncertain whether the grass you want to cut is too long or thick for optimal
cutting, then raise the Blade Height and mow the yard in multiple passes, cutting it
slightly shorter each time. It is best to mow more frequently, rather than let the grass
become excessively long. For the best results, see “Mowing and Lawn Care Tips” in
Chapter 4.
We hope you will enjoy many years of satisfied use with your NEUTON Mower.
This manual made from recycled paper and is recyclable.
Tom Hughes
Sales Manager
NEUTON Power Equipment
MEIGS ROAD, P.O. BOX 25, VERGENNES, VERMONT 05491
1-866-NEUTON1 (638-8661) • www.neutonowners.com ©2008 NEUTON Power Equipment 237721
 Loading...