

Page 1

POWER PULLEY KIT
2014-UP Audi A3(8V) 1.8/2.0 TSI and 2015 VW GTI 2.0 TSI
PART # 62.10.94
PART LIST: 1 – CRANKSHAFT PULLEY 1 – BELT
1 – CRANKSHAFT BOLT
TOOLS REQUIRED: 1 – 16mm Wrench 1 – Ratchet Wrench
1 – T25 Torx 1 – VW Tool T10355 Counter Holder
1 – 24mm Socket 1 – Torque Wrench
1 – Long Handle Breaker Bar
NOTE: FACTORY TOOL REQUIRED AND PROFESSIONAL INSTALLATION RECOMMENDED.
1. Car Hoist required, vehicle not high enough from
ground with a jack or jack stands. NOTE: VW
GTI shown.
INSTALLATION INSTRUCTIONS
5. Before removing ribbed belt, mark running
direction with marking pen if the stock belt and
pulley is ever to be re-installed.
2. Remove passenger side wheel, then remove
lower engine splash guard. (8) T25 Torx screws.
3. Underneath bottom corner of bumper cap
remove the (2) T25 Torx screws.
6. Using a 16mm wrench, rotate idler pulley center
bolt upwards to release tension and remove
ribbed belt. Now slowly release belt tensioner.
7. Using the 24mm socket on crankshaft pulley
bolt, rotate engine clockwise to the “TDC”
position (Top Dead Center).
4. Remove the lower half inner fender liner. (4)
T25 Torx screws.
NEUSPEED • 3300 Corte Malpaso • Camarillo, CA 93012 • 805.388.7171 • 805.388.0030 FAX
www.neuspeed.com
Page 2
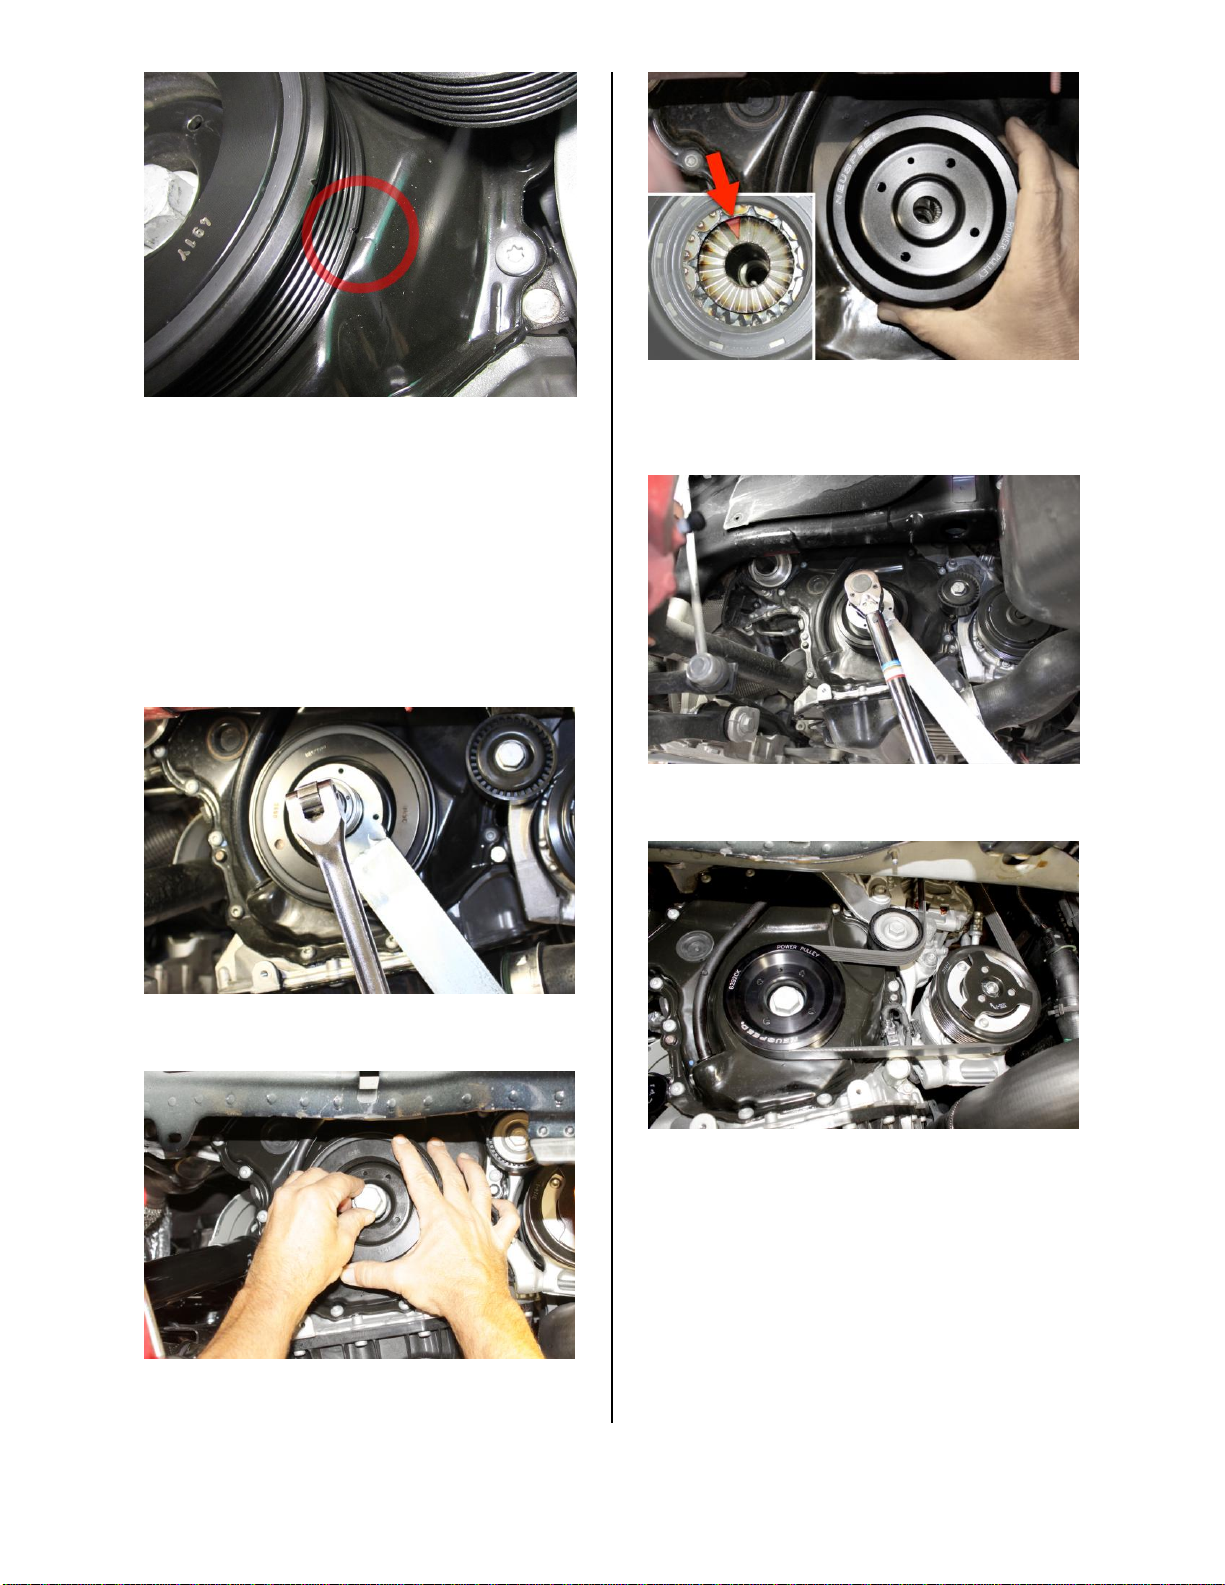
8. The notch on the pulley must line-up with the
arrow marking on the lower timing chain cover
located at the 4 o’clock position.
CAUTION: THE CRANKSHAFT MUST
NOT BE MOVED OUT OF THE “TDC”
POSITION WHEN THE PULLEY AND
BOLT IS REMOVED OR ENGINE
DAMAGE WILL RESULT. DO NOT LET
ENGINE TURN WHEN REMOVING OR
TIGHTENING PULLEY BOLT.
11. Use a little oil on timing cover seal and “O” ring
on bolt. Install NEUSPEED pulley matching up
tooth contour on pulley with crankshaft chain
sprocket, while holding against chain sprocket
install new bolt supplied and hand tighten.
9. Loosen pulley bolt using 24mm socket with long
handle breaker bar and T10355 Counter Holder
tool to hold engine from turning.
10. Apply pressure on pulley to crankshaft to hold in
place when un-screwing bolt. Remove bolt and
pulley.
12. Torque bolt to 150Nm (111 ft. lbs.) + 90° (¼)
turn with torque wrench and T10355 Counter
Holder tool. Then install supplied ribbed belt.
13. Re-install fender liner and lower engine splash
guard.
14. Re-install wheel and torque to manufactures
recommended specifications.
15. Carefully check complete installation to be sure
all fasteners are tight, the belt is correctly
seated in grooves of each pulley and that
nothing interferes with the pulleys or belt.
©Copyright 2014 NEUSPEED® All rights reserved. Reproduction in whole or in part
prohibited.
DOC.62.10.94 Rev. 06.24.2014
NEUSPEED • 3300 Corte Malpaso • Camarillo, CA 93012 • 805.388.7171 • 805.388.0030 FAX
www.neuspeed.com
 Loading...