

Page 1
KURZANLEITUNG
no
no
no
L
L
R
A
B
B
R
A
A
A
B
B
A
B
no
no
no
Bitte lesen Sie auch unsere ausführliche
Gebrauchsanweisung. Das Anleitungsvideo
finden Sie unter www.neurotech-vital.de!
If you are using the Neurotech Vital product, please refer to steps
4-12 overleaf for garment set up and application instructions. Please
refer to your user manual for full product instructions.
Si vous utilisez Vital Compact, les instructions de mise en place des
cuissardes sont référencées au verso, étapes de 4 à 12 . Référez-vous
à votre manuel d'utilisation pour les instructions complètes .
Für Fragen und
weitere Informationen:
+49 7553 59 09 90 70
E-Mail: [email protected]
Bevor Sie beginnen
no
no
no
no
no
no
no
no
no
no
no
no
• Inhalt
no
no
no
no
no
no
no
no
no
no
no
no
no
no
no
no
no
no
no
no
no
auspacken
1
L
no
no
no
no
no
no
no
no
no
no
no
no
no
no
no
no
no
no
no
no
no
no
Vorbereiten der Manschetten
no
no
no
no
no
no
no
no
no
no
no
no
no
no
no
no
no
no
no
no
no
no
no
no
no
no
no
no
no
no
no
no
no
no
O
P
E
N
R
TOP
TOP
no
no
no
no
no
no
no
no
no
no
no
no
no
no
no
no
no
no
no
no
no
no
no
4
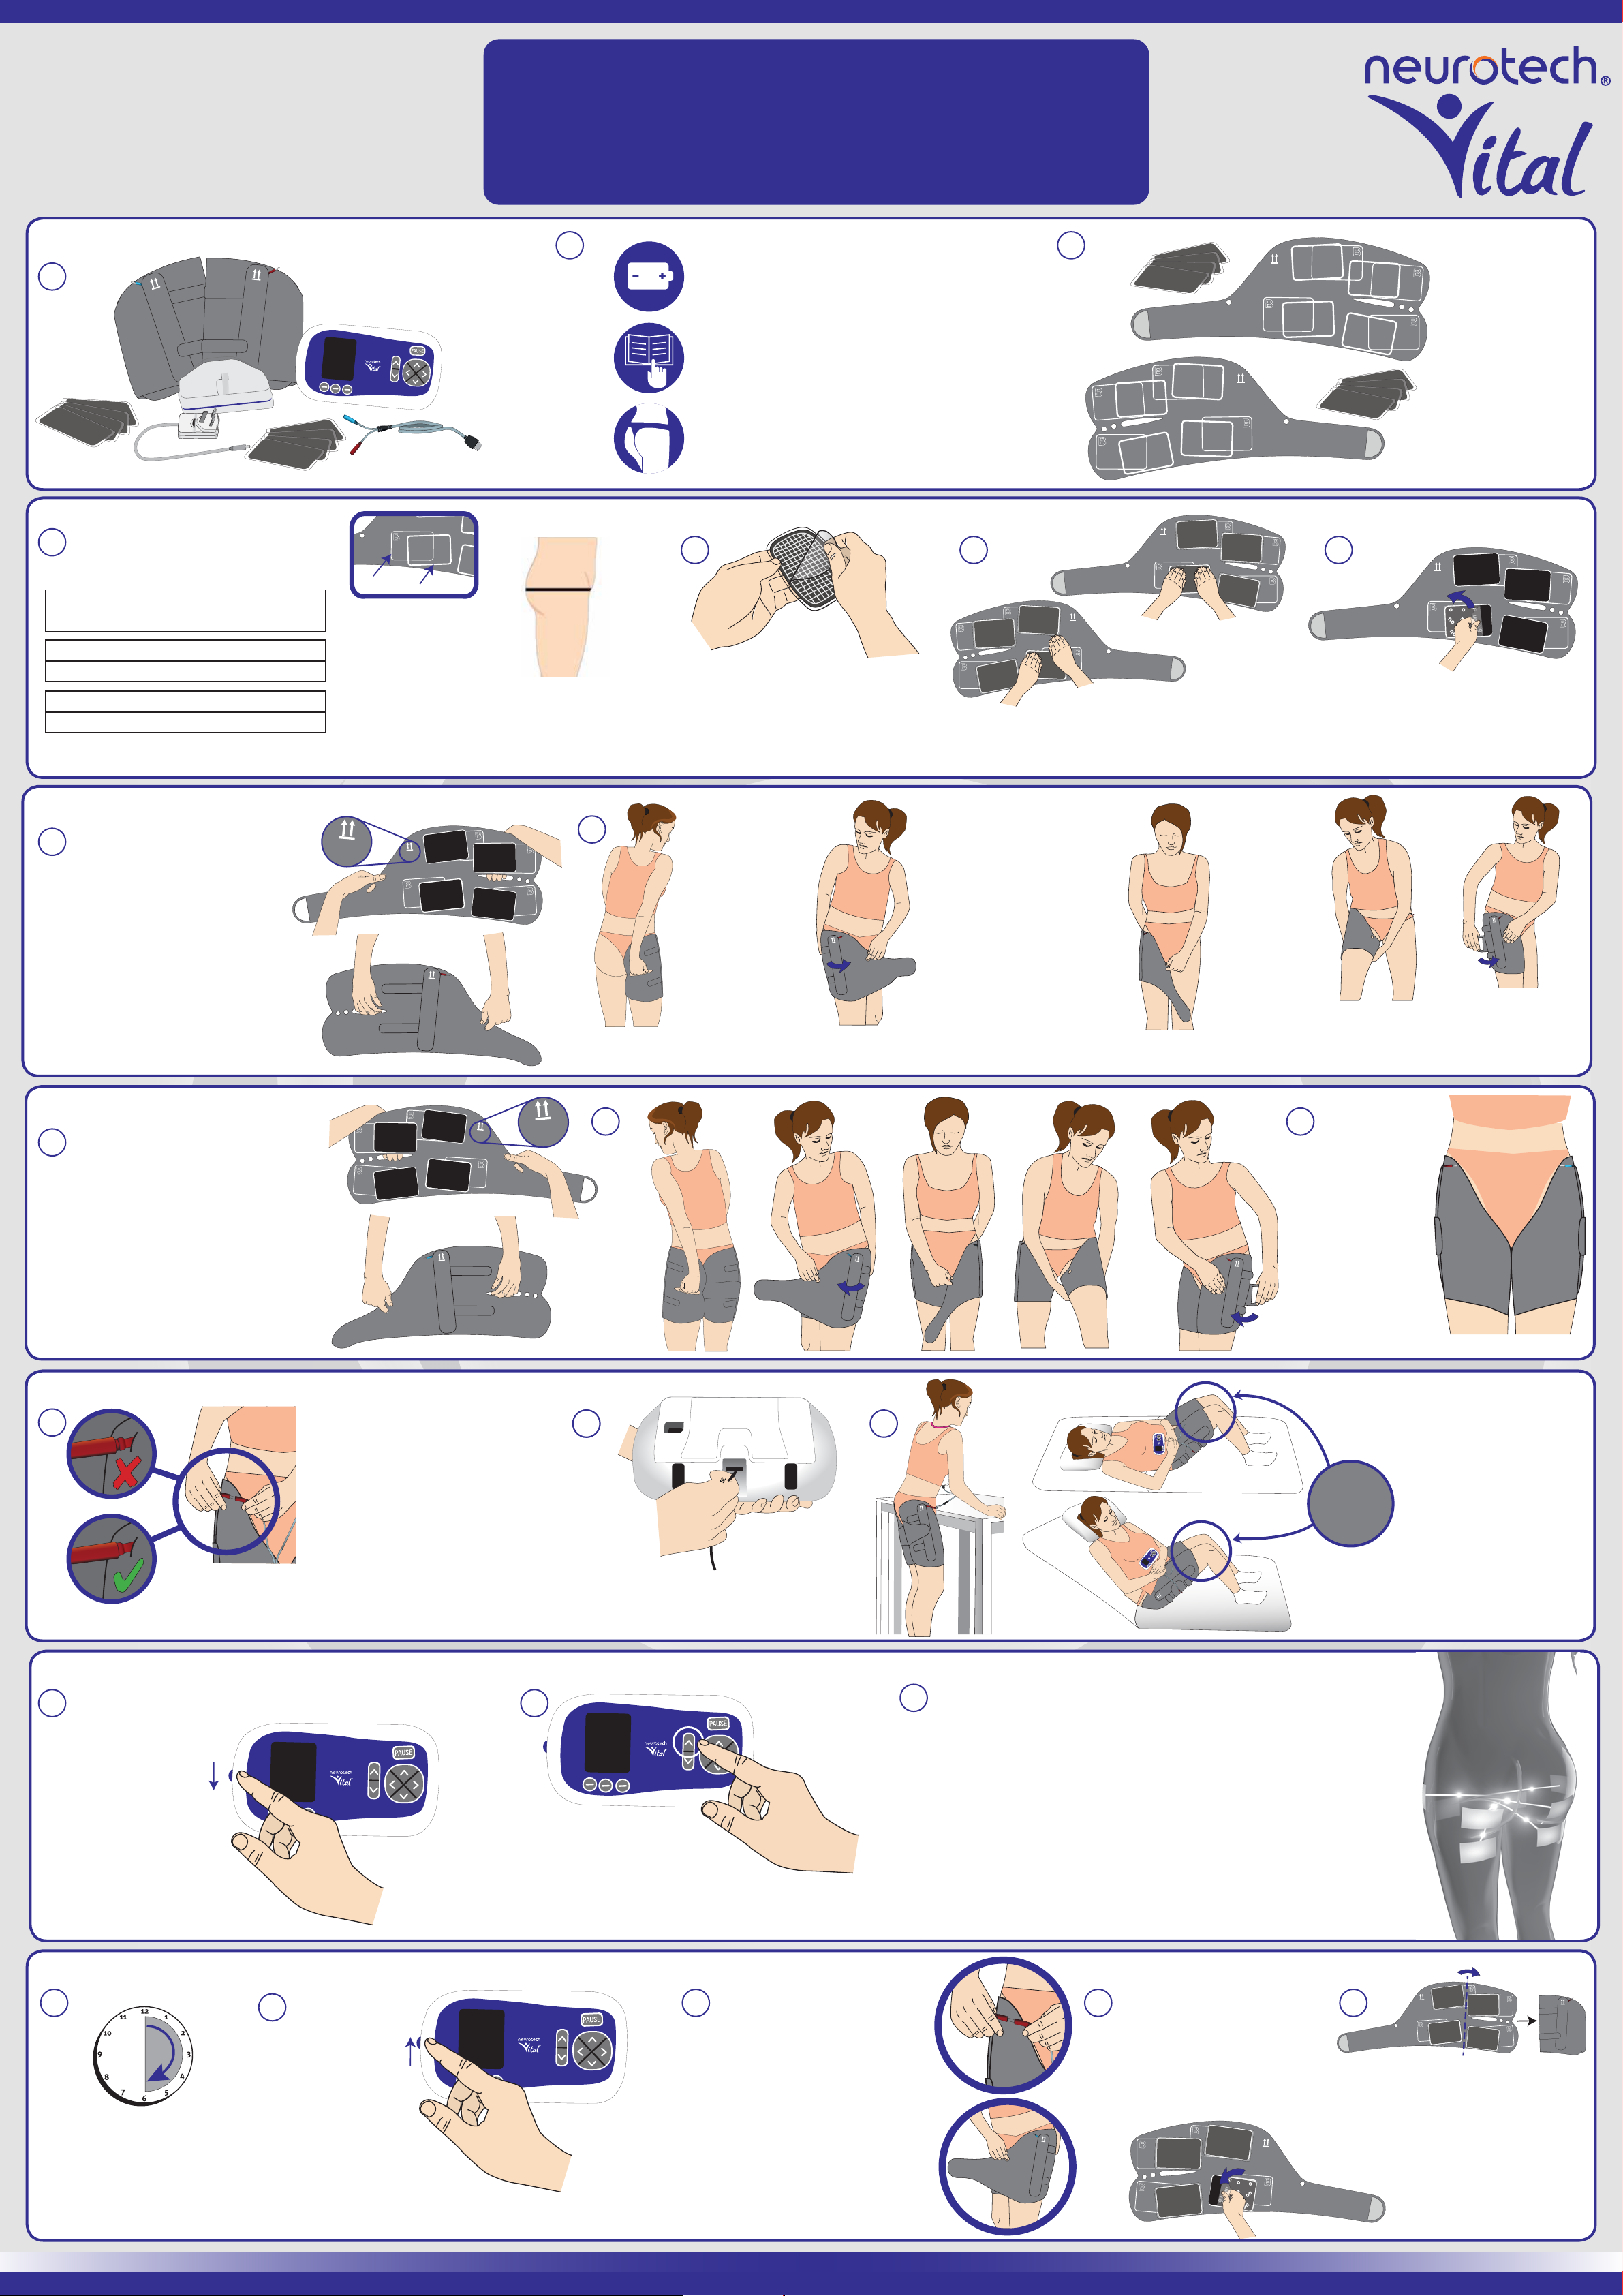
Hüftumfang Größe A oder B
86.3–97.5cm S A
97.6–107.7cm S B
107.9–116.6cm M A
116.8–121.7cm M B
121.9–124.6cm L A
124.7–127cm L B
• Wählen Sie Ihre Elektroden-Position (A oder B).
2 3
a
b
c
• Der Hüftumfang
wird an der
breitesten Stelle
gemessen.
• Es dauert fünf Stunden, bis der
Akku vollständig geladen ist.
• Haben Sie die Gebrauchsanweisung
gelesen und das Anleitungsvideo
angesehen auf neurotech-vital.de?
• Tragen Sie Unterwäsche, die die
Pobacken freilässt?
5 6
B
B
• Entfernen Sie die
Schutzfolien von der
gemusterten Seite der
Elektroden.
• Kleben Sie jeweils 4 Elektroden
in die Manschetten und drücken
Sie sie fest an.
no
no
no
no
no
no
no
no
no
no
no
no
no
no
no
no
no
no
no
no
no
no
no
no
no
no
no
no
no
no
no
no
no
no
no
no
no
no
no
no
no
no
no
no
no
no
no
no
no
no
no
no
no
no
no
no
R
A
B
B
A
B
• Legen Sie
A
A
B
B
L
A
A
B
B
A
no
no
no
no
no
no
no
no
no
no
no
no
no
no
no
no
no
no
no
no
no
no
no
no
no
no
no
no
no
no
B
beide
no
no
no
no
no
no
no
no
no
no
no
no
no
no
no
no
no
no
no
no
no
no
no
no
no
no
Manschetten
auf eine
flache
Oberfläche.
A
no
no
no
no
no
R
no
no
no
B
no
no
no
no
no
no
no
no
B
no
no
no
no
no
nono
no
no
no
no
no
no
A
no
no
no
no
no
no
no
no
no
no
no
no
no
A
no
no
no
no
no
no
no
no
no
no
A
L
no
no
no
A
no
no
no
no
B
no
no
no
no
no
no
no
no
no
no
B
no
no
no
no
no
no
no
no
no
no
no
A
no
no
no
no
no
no
no
A
no
no
no
A
no
no
no
no
no
no
A
B
no
no
no
no
no
no
no
no
no
no
no
B
no
no
no
no
no
7
B
R
A
no
no
B
no
no
no
no
no
A
no
A
B
B
A
• Entfernen Sie die Schutzfolien
auf der schwarzen Seite der
Elektroden und bewahren Sie sie
zur späteren Verwendung auf.
Rechte Manschette anlegen
• Nehmen Sie die rechte
8
Manschette zur Hand,
stecken Sie die Finger
Ihrer rechten Hand
durch den Schlitz und
den linken Zeigefinger
in die kleine Öffnung.
Die Elektroden müssen
dabei zum Körper
hinzeigen.
Linke Manschette anlegen
10
• Nehmen Sie die linke Manschette
zur Hand, stecken Sie die Finger
Ihrer linken Hand durch den Schlitz
und den rechten Zeigefinger in die
kleine Öffnung. Legen Sie die
Manschette an (Schritte 11 a-e).
a
B
R
A
B
A
A
A
B
B
9
• Führen Sie
die Finger der
rechten Hand
zur Pofalte,
drücken Sie
die
R
R
Manschette
fest an den
Körper.
b
• Legen Sie die
R
Manschette um Ihr Bein
und führen Sie Ihren
linken Zeigefinger zur
oberen
Oberschenkelinnenseite.
c
• Wickeln
R
Sie die
Manschette
weiter um Ihr
Bein...
d
• ...und fixieren Sie
e
R
die Manschette gut.
B
B
A
B
A
A
L
A
B
a b
11
c d e
12
• Die
Manschetten
sollten nun,
wie in der
L
L
R
L
Abbildung
gezeigt,
angelegt sein.
Bevor Sie starten
13
Wichtig: Bitte achten Sie darauf, dass beide
Kabel fest in die Anschlüsse gedrückt werden.
Bedienen des Therapiegerätes
16
• Schalten Sie das
Therapiegerät
ein. Schieben Sie
den Schalter auf
der linken Seite
nach unten.
• Verbinden Sie das rote
Ende des Kabels mit dem
roten Stecker an der
Manschette und das blaue
Ende des Kabels mit dem
blauen Stecker.
14
14
• Schließen Sie das Kabel an das
Therapiegerät an.
17
• Drücken Sie auf die
Pfeil-Taste, um die
Intensität zu erhöhen.
• Die Behandlung
15
R
kann stehend,
flach oder mit
leicht erhöhtem
Winkeln
R
Sie die Knie
leicht an
Oberkörper
liegend (mit
leicht
angewinkelten
Knien), erfolgen.
R
• Zu Beginn der Therapie sollten Sie eine Intensität
18
zwischen 25 und 30 erreichen und erste
Kontraktionen des Beckenbodens spüren. Die
Beckenbodenmuskulatur wird richtig kontrahiert, wenn
die Stimulation nicht mehr nur in den Pobacken,
sondern auch deutlich zwischen den Beinen zu fühlen
ist. Sie sollten keine oder nur wenige Kontraktionen
vorn und seitlich auf den Oberschenkeln spüren.
Sobald Sie sich an die Kontraktionen gewöhnt haben,
sollten Sie die Intensität nach und nach erhöhen. Der
optimale Wert liegt bei 50-55.
• Während und nach der Behandlung
no
no
no
no
B
no
no
no
no
no
no
no
no
19
0
20
• Trennen Sie das Kabel
21
vom Therapiegerät
• Ist die
Behandlung
beendet,
30
• Die Behandlung
dauert 30 min.
schalten Sie das
Therapiegerät aus.
Schieben Sie den
Schalter auf der
linken Seite nach oben.
und den Manschetten.
Entfernen Sie die
Manschetten
vorsichtig von Ihrem
Körper, die Elektroden
verbleiben in den
Manschetten für die
weiteren
Behandlungen.
• Legen Sie die
22 23
Manschetten flach auf
eine Oberfläche und
bringen Sie die
Schutzfolien auf den
Elektroden an.
no
no
no
B
no
no
no
no
B
B
no
no
nono
no
no
no
no
no
no
no
A
no
no
no
no
no
no
no
no
no
no
no
A
A
no
no
no
A
no
no
no
no
no
no
no
no
no
no
L
A
no
no
B
nono
no
no
no
no
• Falten Sie die
Manschetten nur einmal
bis zur Hälfte, damit die
Elektroden nicht
geknickt werden.
no
no
no
no
R
A
no
no
no
B
no
no
no
no
no
no
no
no
B
no
no
no
no
no
no
no
no
no
no
no
A
no
no
no
no
no
no
no
no
A
B
no
no
no
no
no
no
no
no
no
A
no
R
Page 2
QUICK START GUIDE
P
i
P
i
no
no
no
L
L
R
A
B
B
R
A
A
A
B
B
A
B
no
no
no
IRE Freephone: 1800 511 511
UK: 0845 600 1332
International: +353 (0)91 774377
Email: [email protected]
Before You Start • Avant De Commencer
1
L
R
2 3
ENG
• Unpack the
Contents
i
P
i
P
TOP
O
TOP
P
E
N
no
no
no
no
no
no
no
no
no
no
no
no
no
no
no
no
no
no
no
no
no
no
no
no
no
no
no
no
no
no
no
no
no
no
no
no
no
no
no
no
no
no
no
no
no
no
no
no
no
no
no
no
no
no
no
no
no
no
no
no
no
no
no
no
no
no
no
no
no
no
no
no
no
no
no
no
no
no
no
no
no
no
no
no
no
no
no
no
no
no
no
no
no
no
no
no
no
no
no
no
no
no
no
no
no
no
no
no
no
no
no
no
FR
• Déballez
Le Contenu
Setting Up The Garments • Mise En Place Des Cuissières
4
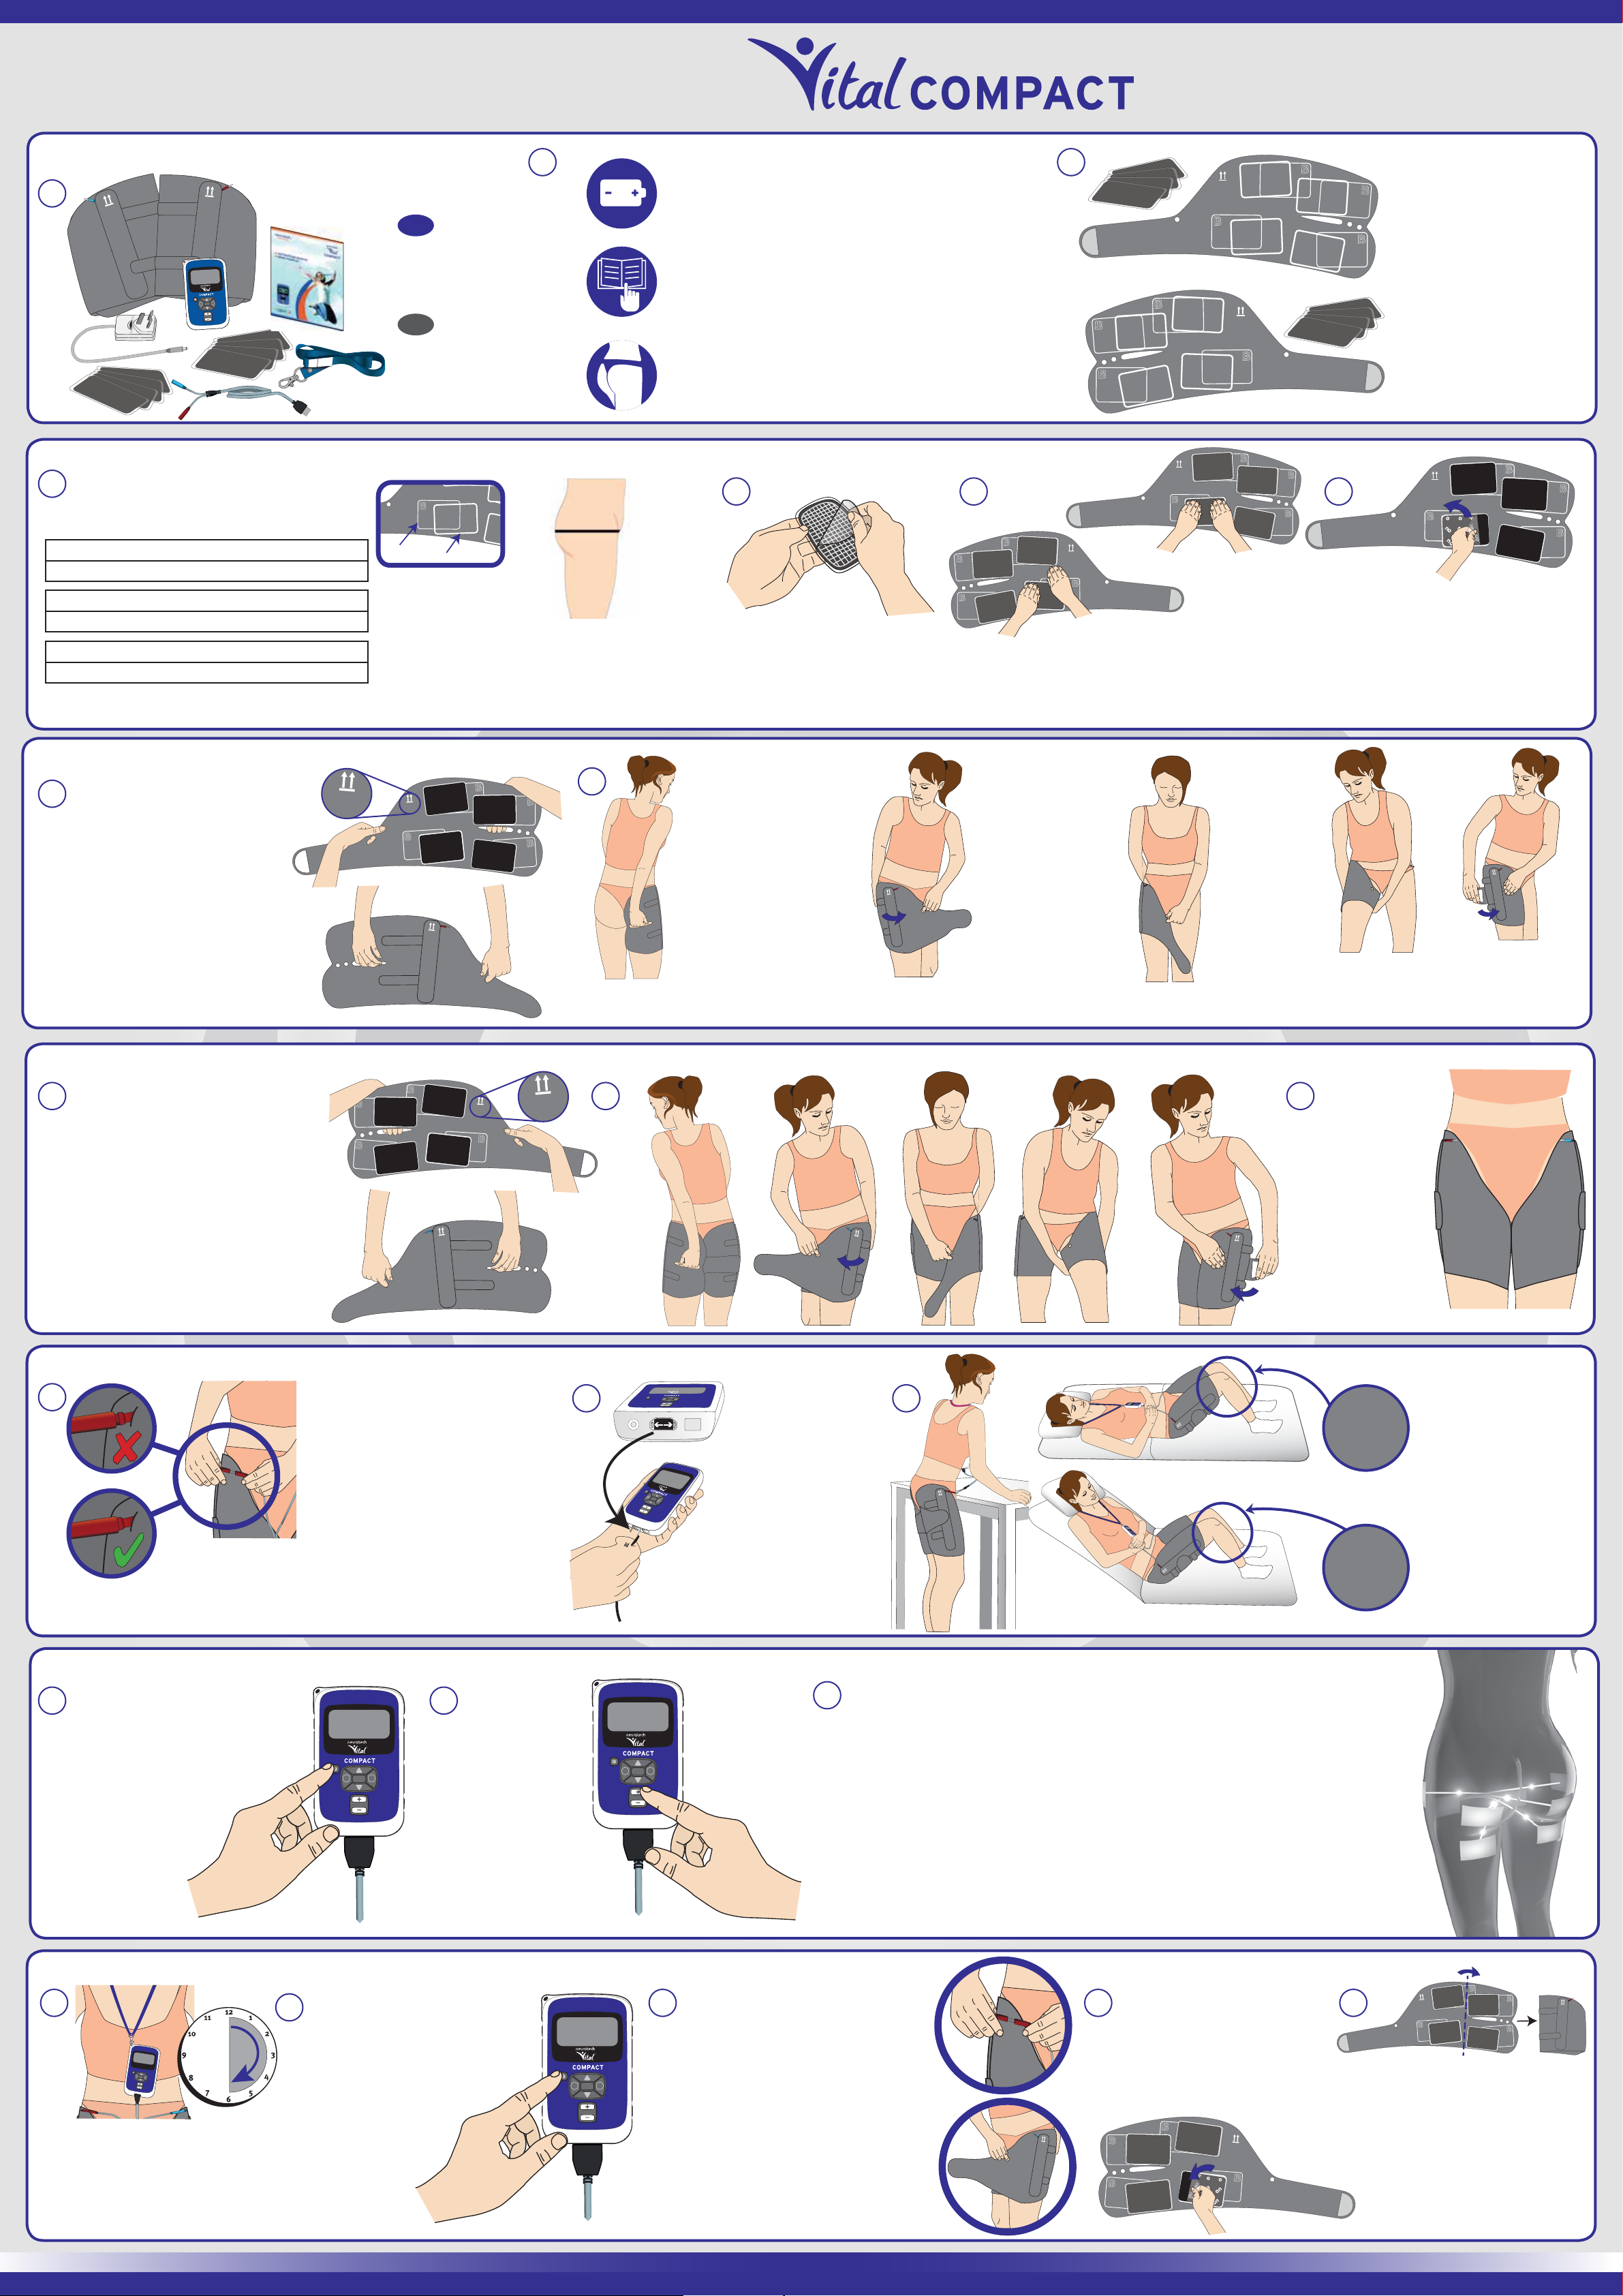
Hip Circumference Size A orB
Tour de hanche Taille A ou B
86.3–97.5cm (34–38.4”) S A
97.6–107.7cm (38.5–42.4”) S B
107.9–116.6cm (42.5–45.9”) M A
116.8–121.7cm (46–47.9”) M B
121.9–124.6cm (48–49”) L A
124.7–127cm (49–50”) L B
should be taken from
the widest part of
the buttock area.
• Choose your gel pad position (either A or B)
• Choisissez votre positionnement d'électrodes (entre A et B).
• Your hip
measurements
a
b
c
• La mesure doit
être réalisée au
niveau de la
partie la plus
charnue.
• Your battery will take 5 hours to fully charge.
• Prévoyez 5 heures pour recharger pleinement
la batterie.
• Ensure you have read the instruction manual
and watched the video.
• Avez-vous lu le manuel et visionné la vidéo.
• Are you wearing underwear that exposes the
buttocks?
• Portez-vous une culotte très échancrée sur les
fesses (ex: string)?
5 6
no
no
B
no
no
no
no
no
no
no
B
no
no
no
no
no
• Remove liners from the grid
patterned side of the gel pads.
• Retirez les protections côté
quadrillé des électrodes.
• Apply 4 gel pads to each garment by pressing
firmly on each one.
• Positionnez les 4 électrodes sur chaque cuissière
en appuyant fermement sur chacune d'entre elles.
no
no
no
no
no
no
no
no
no
no
no
no
no
no
no
no
no
no
no
no
no
no
no
no
no
no
no
no
no
no
no
no
no
no
no
no
no
no
no
no
no
no
no
no
no
no
no
no
no
no
no
no
no
no
no
no
R
A
B
B
A
B
B
A
A
no
no
B
B
L
A
A
no
no
no
no
no
no
no
no
no
no
no
no
no
no
no
no
no
no
no
no
no
no
no
no
no
no
no
no
no
no
no
no
no
no
no
no
no
no
no
no
• Lay both garments on
a flat surface.
no
• Mettez à plat les
no
no
no
no
no
no
no
no
no
no
no
no
no
cuissières.
B
B
A
A
no
no
no
no
no
R
no
no
no
B
no
no
no
no
no
no
no
no
B
no
no
no
nono
no
no
A
no
no
no
no
no
no
no
A
no
no
no
no
no
no
no
no
A
L
no
no
no
A
no
no
no
no
B
no
no
no
no
no
no
no
no
no
no
B
no
no
no
no
no
no
no
no
no
no
no
A
no
no
no
no
no
no
no
A
no
no
no
A
no
no
no
no
no
no
A
B
no
no
no
no
no
no
no
no
no
no
no
B
no
no
no
no
no
7
R
A
no
no
B
no
no
no
no
no
B
B
A
no
A
B
A
• Remove liners from black side.
Keep them as you will need them
later.
• Retirez les protections du côté
noir. Conservez-les pour après,
vous en aurez besoin.
Put On The Right Garment • Prenez La Cuissière Droite
8
• From the outer side, place the tips
of your fingers of your right hand
into the slit. Place your left index
finger in the small hole as shown.
Lift the garment with gel pads
facing your body.
• Placez les doigts de votre main
droite dans la fente et votre index
gauche dans le petit trou comme
indiqué. Tenez la cuissière avec les
électrodes faisant face au corps.
R
B
R
B
A
A
A
A
B
B
R
Put On The Left Garment • Positionnez La Cuissière Gauche
10
• Pick up the left garment by placing the tips
of your fingers of your left hand into the
slit. Place your right index finger in the
small hole as shown. Lift the garment with
gel pads facing your body.
• Prenez la cuissière gauche. Placez les
doigts de votre main gauche dans la fente
et votre index droit dans le petit trou (cf. 11
a-b). Puis mettez la cuissière comme
indiqué précédemment (cf. 11 a-e).
B
B
B
L
A
A
A
B
A
L
a
9
a b
11
• Guide your right finger
tips to the crease of
your buttocks and press
the garment onto your
skin.
• Le bout de vos doigts
droits doit vous
permettre de
positionner la cuissière
dans le pli des fesses.
Soulevez légèrement
votre fesse et plaquez la
cuissière à l'arrière de la
cuisse.
b
• Wrap the
garment around
c
d
e
your leg guiding
your left index
finger to the
bikini line...
R
• Enveloppez la
cuissière autour
de votre jambe en
vous servant de
votre index
gauche placé au
niveau de l'aine...
c d e
• ...then wrap
the strap
around inside
your leg and
R
back of
thigh...
• Puis enrouler
le scratch
autour et à
l’arrière de
votre cuisse.
R
• ...and fasten the
garment securely.
• ...et serrez au
maximum le scratch.
12
• Your garments
should look like
this when correctly
positioned on the
body.
L
R
L
• Vos cuissières
doivent être
positionnées
comme indiqué.
Before Using Vital Compact
13
Important: Make sure both connectors are
pushed firmly into place.
Important : Veillez à ce que les deux embouts
soient totalement connectés.
• Connect the red end of the
lead to the re pin on the
garment and the blue end to
the blue pin.
• Connectez le câble à embout
rouge sur le connecteur
rouge et le bleu au
connecteur bleu.
Using The Controller • Utilisation De l’unité De Contrôle
16
• When in position turn on
the controller by pressing
the power button.
• Lorsque vous êtes prête,
allumez l'unité de
contrôle en appuyant
sur le bouton de
mise en marche.
P
i
17
• Press the + button
to increase the
intensity.
• Appuyez sur le
bouton + afin
d'augmenter
l'intensité.
14
• Choose whether you
15
i
P
R
Knees
must be
bent
will carry out your
session in the
standing, reclining or
lying position. Refer
to your instruction
manual for more
information.
• Choisissez votre
position pour la
séance, debout ou
allongée (dos à plat
ou relevé)?
• Connect the lead to
the controller.
• Connectez le câble
principal à l'unité de
contrôle.
R
P
i
R
Pliez les
genoux
• At first you should increase the intensity to 30-40, to start feeling the pelvic
18
floor contracting. You will know your pelvic floor is contracting when the
sensation shifts from the bottom muscles slightly forward so that it can be felt
both in the bottom and between the legs. You should feel little or no activity on
the front and sides of the legs. As you become familiar with the sensation you
P
i
should increase the intensity level over time to reach the optimum level of
70-75.
• Vous pouvez démarrer sur une intensité comprise entre 30 et 40 afin
d'appréhender la contraction du périnée. Vous saurez qu’il se contracte
lorsque la stimulation se déplace des muscles fessiers vers l'avant. Vous
devez donc ressentir la contraction à la fois au niveau des fessiers et entre
les jambes mais très peu, voire pas du tout, à l'avant et sur le côté des
jambes. Une fois familiarisée avec la sensation, augmentez l'intensité
progressivement pour atteindre un niveau optimal compris entre 70 et 75.
During and After Your Session • Pendant et Aprés Votre Séance
19
• You can use the neck strap during
the treatment, which will take 30
minutes.
• Vous pouvez utiliser le tour de cou lors de
la séance. Votre séance dure 30 minutes.
0
30
20
• Press the on/off button for
2 seconds to switch the unit
off after your session.
• Lorsque votre séance est
terminée, éteignez l'unité
de contrôle en
maintenant
appuyé le bouton
on/off 2
secondes.
P
i
• Disconnect the lead from the
21
controller and garments.
Remove garments by
unfastening and carefully
peeling from the body. Leave
the gel pads on the garments.
• Déconnectez le câble de l'unité
de contrôle et des cuissières.
Otez les cuissières en retirant le
velcro et en décollant
délicatement les électrodes de
votre corps. Les électrodes
doivent rester en place pour les
prochaines séances.
22 23
• Lay both garments flat and
replace the liners.
• Mettez les cuissières à plat
et remettez les protections
en plastique des électrodes.
no
no
no
B
no
no
no
no
B
B
no
nono
no
no
no
no
no
no
no
A
no
no
no
no
no
no
no
no
no
no
no
no
no
A
no
no
no
no
no
no
no
no
no
no
no
no
L
A
no
no
B
nono
no
A
A
no
no
no
no
no
no
no
B
no
no
no
no
no
no
no
no
no
no
no
no
R
A
no
no
no
B
no
no
no
no
no
no
no
no
B
no
no
no
no
no
no
no
no
no
no
no
A
no
no
no
no
no
no
no
no
A
B
no
no
no
no
no
no
no
no
no
A
no
R
• Fold garments in half to
ensure the gel pads remain
flat when packed away.
• Pliez en deux les cuissières
afin de maintenir les
électrodes à plat lorsque
vous les rangez.
 Loading...