

Page 1
®
XTENDEX
Series
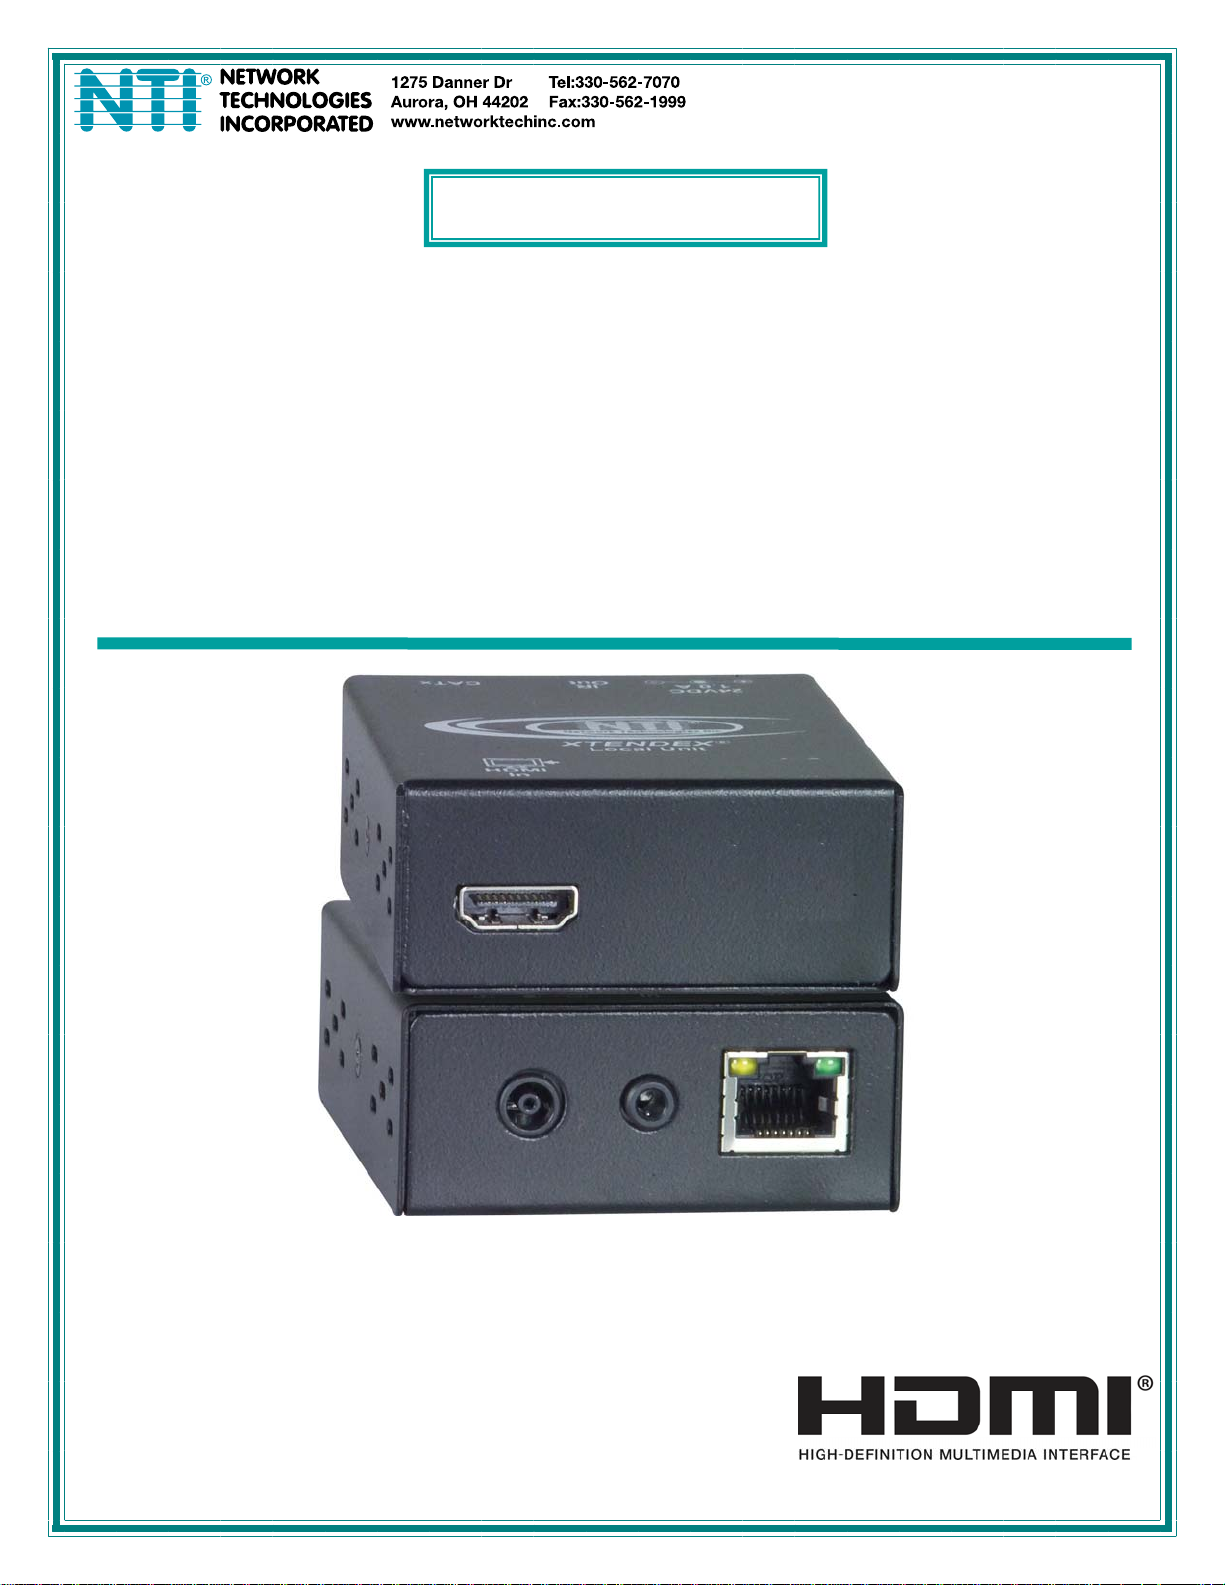
ST-C6HD(-A)-300
ST-C6HD-(A)IR-300
300 FOOT HDMI, STEREO AUDIO AND IR
EXTENDER
Installation and Operation Manual
MAN111 Rev Date 4/11/2012
Page 2

TRADEMARK
XTENDEX is a registered trademark of Network Technologies Inc in the U.S. and other countries.
COPYRIGHT
Copyright © 2008, 2012 by Network Technologies Inc. All rights reserved. No part of this publication may be reproduced, stored
in a retrieval system, or transmitted, in any form or by any means, electronic, mechanical, photocopying, recording, or otherwise,
without the prior written consent of Network Technologies Inc, 1275 Danner Drive, Aurora, Ohio 44202.
CHANGES
The material in this guide is for information only and is subject to change without notice. Network Technologies Inc reserves the
right to make changes in the product design without reservation and without notification to its users.
Note: CATx connection cable used between NTI XTENDEX Series Local and Remote or any XTENDEX Series products
should not be run underground, outdoors or between buildings.
WARNING: Outdoor or underground runs of CATx cable could be dangerous and will void the warranty.
i
Page 3

TABLE OF CONTENTS
Introduction...................................................................................................................................................................... 1
Materials.......................................................................................................................................................................... 2
Connectors And LEDs..................................................................................................................................................... 3
Limitations ....................................................................................................................................................................... 4
Preparation for Installation ..............................................................................................................................................4
Installation ....................................................................................................................................................................... 5
Installing The Local Unit ..............................................................................................................................................5
Installing The Remote Unit .......................................................................................................................................... 6
Connect the CATx Cables ...........................................................................................................................................7
Plug-in and Boot Up..................................................................................................................................................... 7
Rackmount Modules (optional)................................................................................................................................... 8
Mount the ST-C6RCK-24 Rackmount Extender Module Tray.................................................................................. 8
Connect the HDMI Video/Audio Source ...................................................................................................................9
Connect Local Display(s)........................................................................................................................................ 10
Connect the CATx cable......................................................................................................................................... 10
Plug-in and Boot Up................................................................................................................................................... 11
Infrared Control .............................................................................................................................................................12
Technical Specifications................................................................................................................................................13
Interconnection Cable Wiring Method ........................................................................................................................... 14
Troubleshooting............................................................................................................................................................. 14
Warranty Information.....................................................................................................................................................15
TABLE OF FIGURES
Figure 1- Connect the XTENDEX Local Unit to the source................................................................................................................ 5
Figure 2- Connect the XTENDEX Local Unit to stereo audio source ................................................................................................. 5
Figure 3- Connect the extended video display to the Remote Unit .................................................................................................... 6
Figure 4- Connect self-powered stereo speakers to the Remote Unit ...............................................................................................6
Figure 5- Connect CATx cable........................................................................................................................................................... 7
Figure 6- Connect the AC adapter ..................................................................................................................................................... 7
Figure 7- Mount ST-C6RCK-24 Extender Module Tray in a rack.......................................................................................................8
Figure 8- Secure each module to the tray.......................................................................................................................................... 8
Figure 9- Secure each power supply to the tray ................................................................................................................................9
Figure 10- Connect cable between video/audio source and module .................................................................................................9
Figure 11- Connect Local Display....................................................................................................................................................10
Figure 12- Connect the CATx cable between the Local and Remote Units .....................................................................................10
Figure 13- Connect AC adapters ..................................................................................................................................................... 11
Figure 14- Connect IR Emitter and Receiver (models with IR support only) .................................................................................... 12
Figure 15- View looking into RJ45 female........................................................................................................................................ 14
ii
Page 4
NTI XTENDEX 300 Foot HDMI and IR Extender
INTRODUCTION
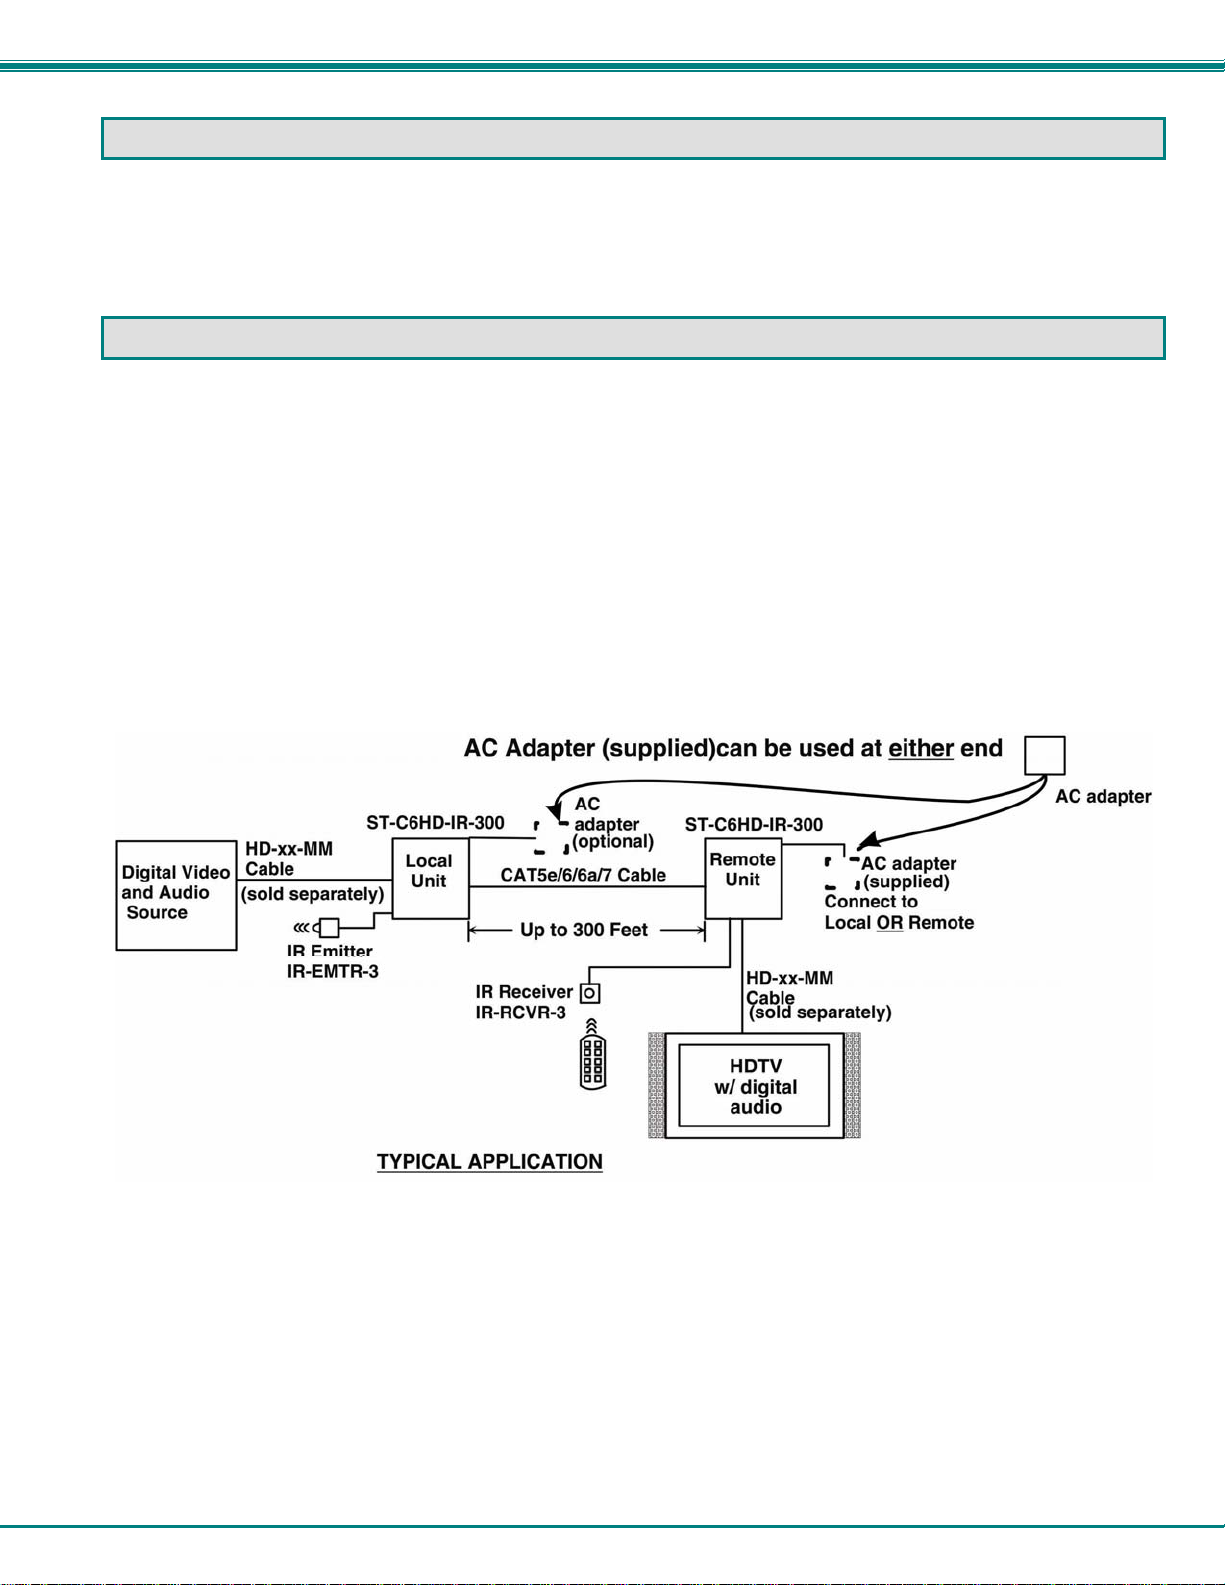
The XTENDEX Series ST-C6HD-300 CAT6 HDMI and IR Extender (XTENDEX) is designed to enable the video and audio output
from one digital video/audio source to be viewed and heard by a remote user. Each video extender consists of a local unit that
connects to an HDMI source and optional IR emitter, and a remote unit that connects to an HDMI display and optional IR receiver
as much as 300 feet away via Category 5e,6, 6a or 7 twisted-pair cable.
The XTENDEX Series Extender is extremely simple to install and has been thoroughly tested to insure reliable performance.
Through the use of CAT5e/6/6a/7 (CATx) cable it is possible to economically increase the flexibility of a computer system. Here
are some of the features and ways this can benefit any workplace:
• Allows the placement of an HDMI-enabled monitor in a location where only these parts are needed without having the
video/audio source there too, taking up valuable space
• Allows digital video/audio to be viewed and heard by a remote user (up to 300 feet away)
• Provides crisp and clear computer resolution to 1920 x 1200 and HDTV resolutions to 1080p (see page 8 for more
details)
• Transmits HDMI signal over one CATx cable.
• Only one power supply is necessary (Power supply can be connected to either the local or remote unit.)
• Supports an HDMI or DVI monitor. (DVI requires optional adapter cable- see page 2)
• Supports 480p, 720i/p and 1080i/p video formats
OPTIONS:
Available with optional full Infrared Remote (IR) extension-full IR control of HDMI source from remote HDTV extension
(add “IR” to the model number ST-C6HD-IR-300)
Available with optional stereo audio extension (add “A” to the model number- ST-C6HD-A-300)
Rackmount Modules
The XTENDEX Series CAT6 Local Extenders can be ordered as rackmount modules- add “M” to the model number (i.e. STC6HD-LA-L-300M). When ordering rackmount modules, also order the ST-C6RCK-24 Rackmount Extender Module Tray (see
page 8). The XTENDEX® Rackmount Extender Module Tray allows you to mount up to 12 extender modules in a space-saving
2RU shelf. The local extender modules and remote extenders are interconnected via one CAT5e/6/7 cable. Rackmount Modules
include support for locally mounted video devices (“local access”) and IR extension as standard features.
Only one power supply is necessary per local rackmount module to power both the local module and remote unit(s).
Optional CEC (Consumer Electronic Control) support for local display-add a “C” to the model number
(i.e. ST-C6HD-CLA-L-300M) CEC support for remote display is standard.
Optional dual HDMI support- includes two local units in one case- add a “2” to the model number
(i.e. ST-C6HD-LA-2L-300M)
Model Single HDMI
ST-C6HD-LA-L-300M Y N N Y
ST-C6HD-CLA-L-300M Y N Y Y
ST-C6HD-LA-2L-300M N Y N Y
ST-C6HD-CLA-2L-300M N Y Y Y
• HDMI 1.3, HDCP 1.2 compliant
Supports:
• x.v.Color
• Dolby Digital and DTS
• Dolby TrueHD and DTS-HD Master Audio
• bandwidth to 225 MHz (6.75 Gbps)
• 12-bit Deep Color
• Supports the DDC2B protocol.
• Lip Sync
• Supports digital aud io format, such as LPCM/Dolby Digital (AC-3)/(Plus)/DSD
• Support for CEC (consumer electronic control) compatible devices.
Support
Dual HDMI
Support
CEC Support Local Access
1
Page 5
NTI XTENDEX 300 Foot HDMI and IR Extender
MATERIALS
Materials Included with ST-C6HD-300 kit:
9 NTI ST-C6HD-300 Local Unit
9 NTI ST-C6HD-300 Remote Unit
9 1-100VAC to 240VAC at 50 or 60Hz-24VDC/1.0A AC Adapter
9 1- Power Cord- country specific
9 This manual
Additional Materials Included with ST-C6HD-IR-300 kit:
9 3 Foot IR-EMITTER (IR-EMTR-3)
9 3 Foot IR-RECEIVER (IR-RCVR-3)
Additional Materials Included with Modular Local Unit:
9 3 Foot IR-EMITTER (IR-EMTR-3) (Models with dual HDMI include 2pcs of IR-EMITTER)
Additional materials may be required but are not supplied:
¾ CAT5e solid/stranded UTP ; 6/6a solid UTP; CAT7 solid STP (CATx) twisted-pair cables terminated with RJ45 connectors
wired straight thru- pin 1 to pin 1, etc. (see page 14 for proper EIA/TIA 568 B wiring method)
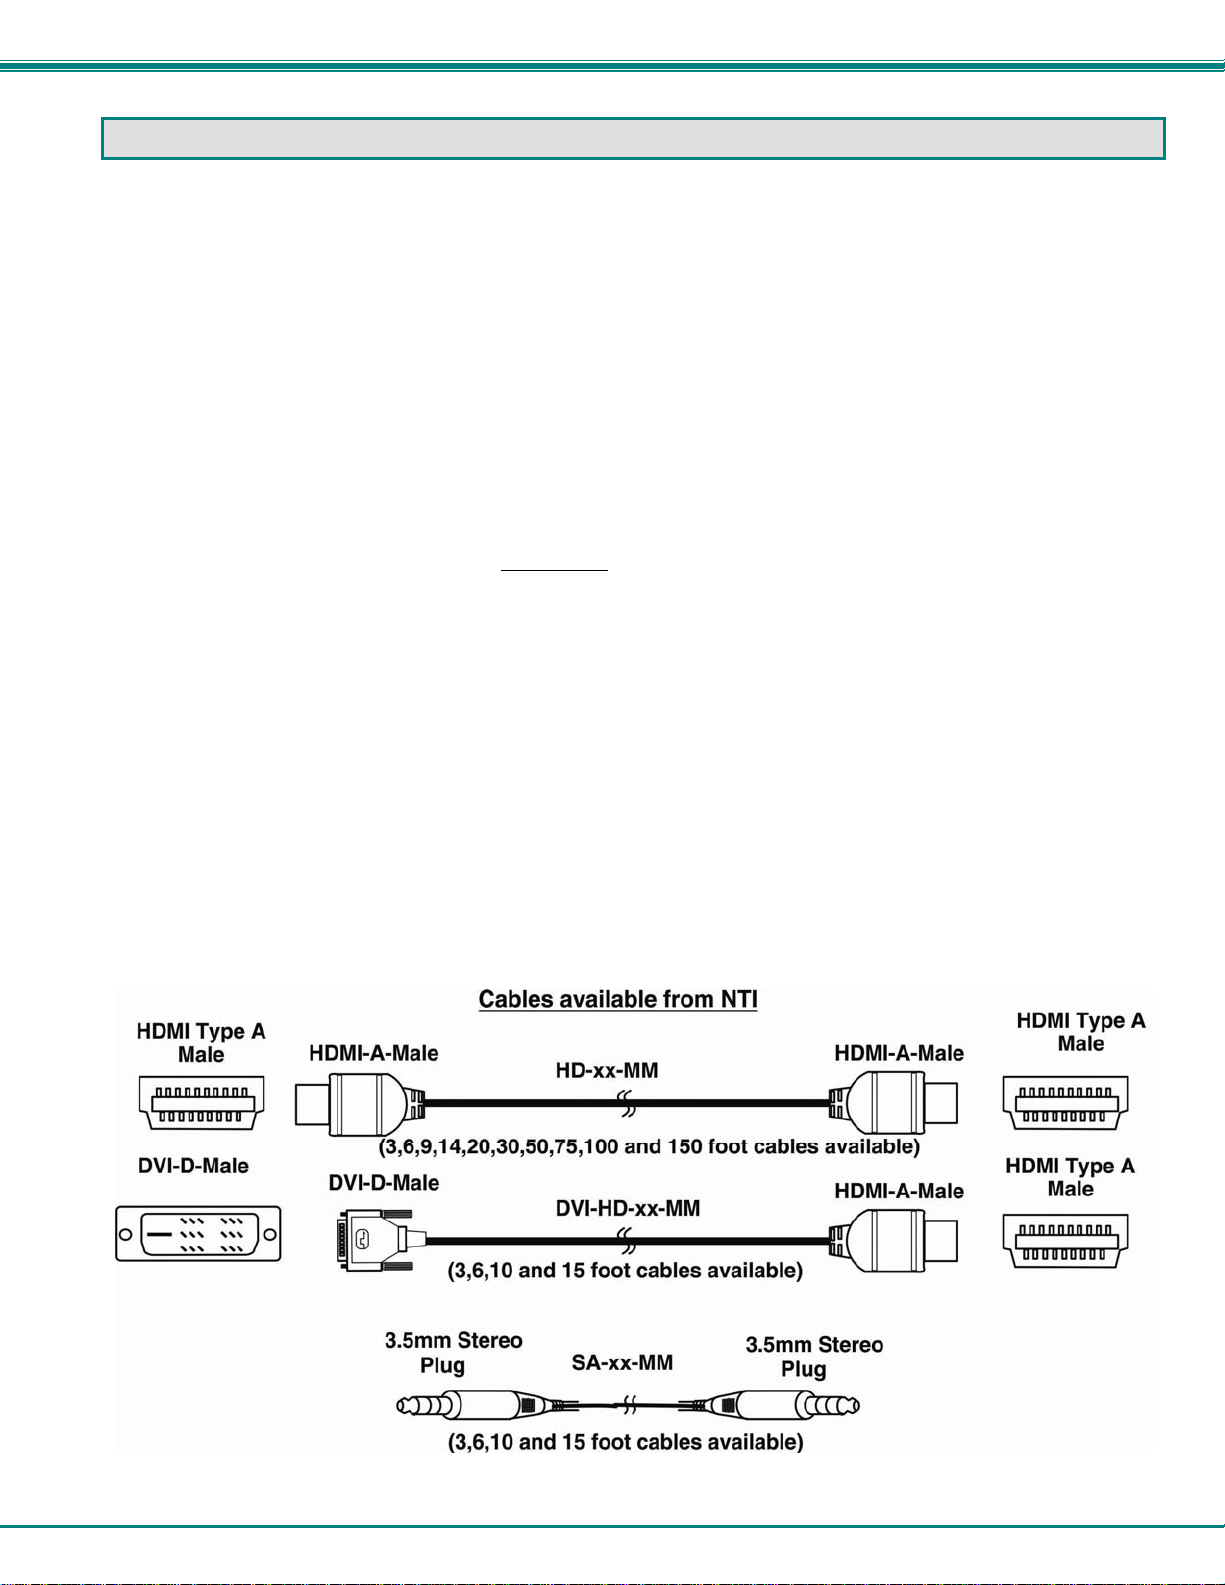
¾ HDMI male-male cable to connect a HDMI source or display (Order NTI # HD-xx-MM where xx=3, 6, 9,14,20,30, 50,75,100
and 150 foot cable).
¾ DVI-D male to HDMI-A male single link cable to connect a DVI source or display (Order NTI # DVI-HD-xx-MM where xx=3, 6,
10, or 15 foot cable)
¾ 3.5mm Stereo plug male-to-male cable to connect stereo audio source or self-powered stereo speakers.
(Order NTI# SA-xx-MM where xx= 3, 6, 10 or 15 foot cable)
Always use the shortest possible cable for best performance.
Contact your nearest NTI distributor or NTI directly for all of your KVM needs at 800-RGB-TECH (800-742-8324) in US & Canada
or 330-562-7070 (Worldwide) or at our website at http://www.networktechinc.com and we will be happy to be of assistance.
2
Page 6
NTI XTENDEX 300 Foot HDMI and IR Extender
CONNECTORS AND LEDS
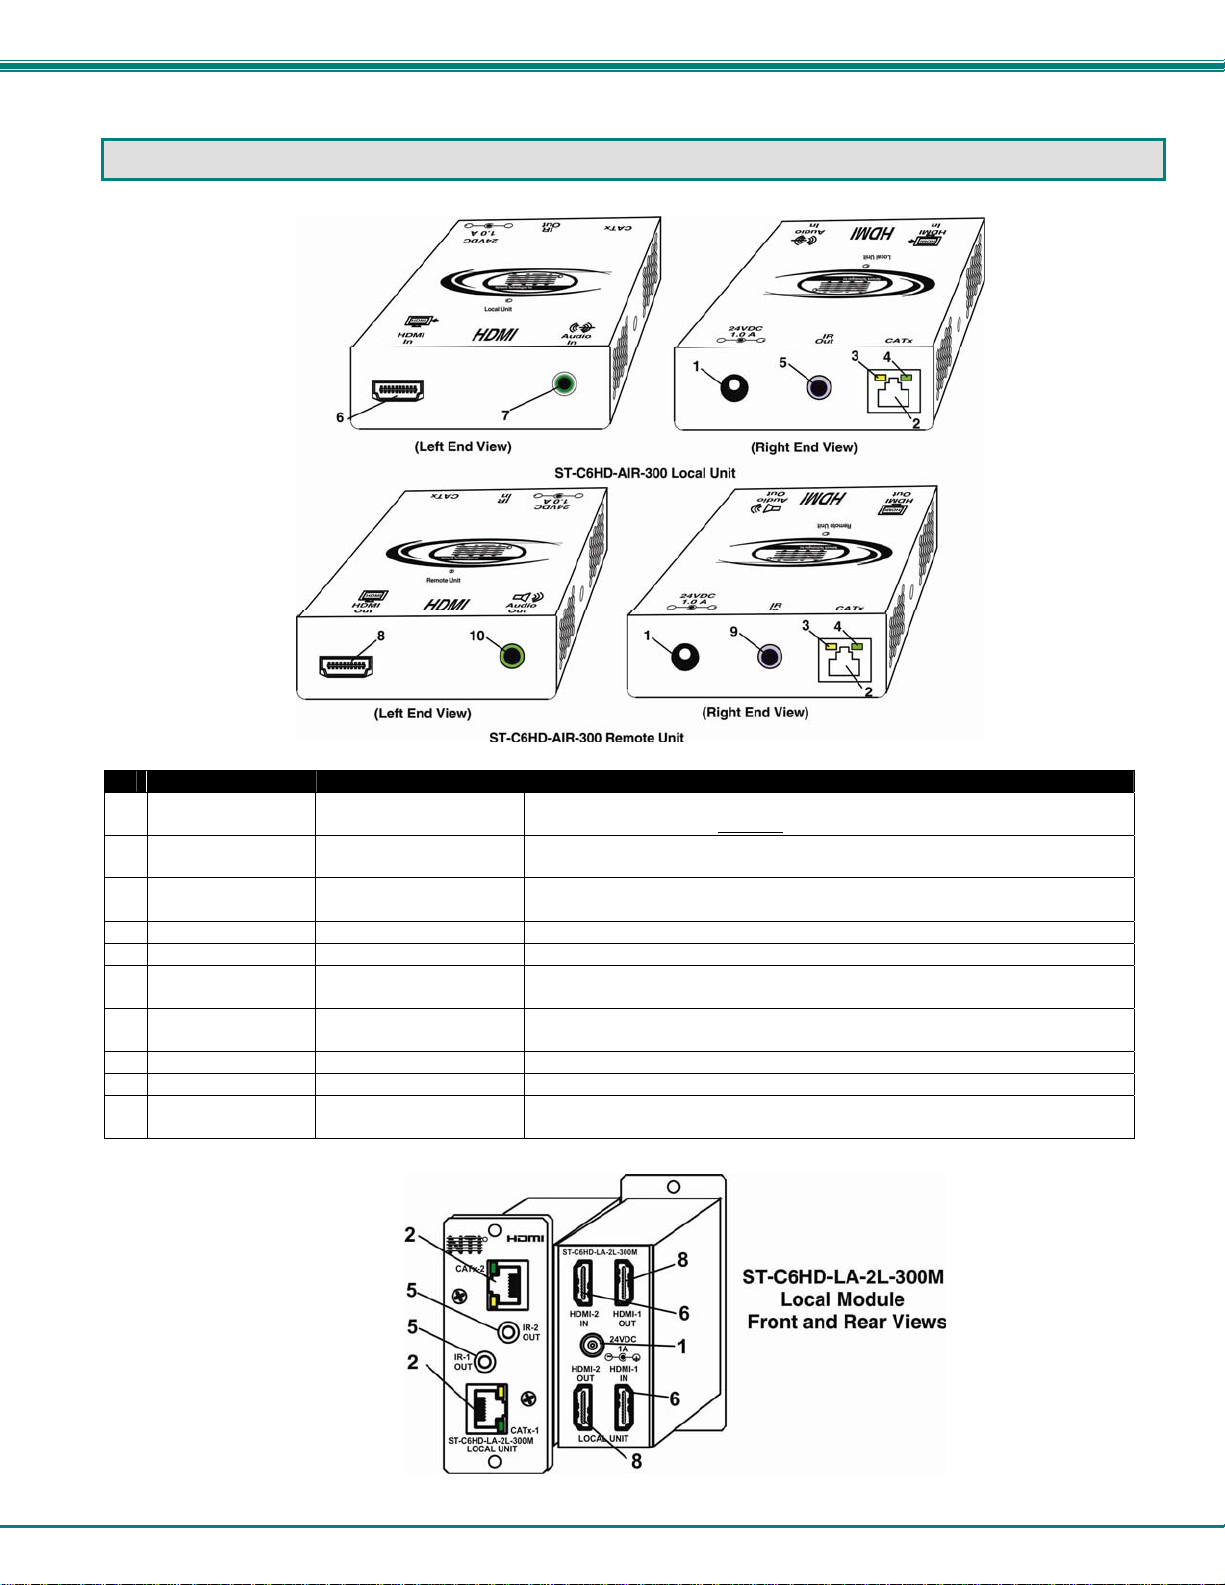
#
LABEL CONNECTOR DESCRIPTION
1 24VDC- 1.0A
2 CATx
3 Yellow LED -- traffic indicator- illuminates when there is communication between the
4 Green LED -- power indicator- illuminates when power has been supplied to the unit
5 IR Out
6 HDMI In
7 Audio In
8 HDMI Out
9 IR In
10 Audio Out
1.0mm Power Jack connection jack for the AC adapter (only the Local or the Remote Unit
needs to be powered, not both)
RJ45 connector for connecting the CAT5e/6/6a/7 cable between the Local and Remote
units
local and remote units.
3.5mm Stereo Jack for connecting the IR Emitter (models with IR support only)
HDMI Type A Female for connecting an HDMI cable between the Local Unit and the video
source
3.5mm Stereo jack For connecting to stereo audio source (models with stereo audio support
only)
HDMI Type A Female for connecting the remote display device
3.5mm Stereo Jack for connecting the IR Receiver (models with IR support only)
3.5mm Stereo jack For connecting self-powered stereo speakers (models with stereo audio
support only)
3
Page 7
NTI XTENDEX 300 Foot HDMI and IR Extender
LIMITATIONS
• The use of CAT5e unshielded or all shielded CATx cabling will reduce the maximum distance and resolution.
PREPARATION FOR INSTALLATION
• Locations should be chosen for the monitor that also has space to connect the Remote unit within the distance provided by
the cables. If extension cables are needed, contact NTI for the cables required.
• The CATx cables must be run to the locations where the Remote and Local units will be connected. Be careful to route the
cables away from any sources of magnetic fields or electrical interference that might reduce the quality of the video signal
(i.e. AC motors, welding equipment, fluorescent lighting, etc.).
• All cables should be installed in such a way that they do not cause stress on their connections to the equipment. Extended
lengths of cable hanging from a connection may interfere with the quality of that connection. Secure cables as needed to
minimize this.
• Properly shut down and disconnect the power from the video source and monitor to be separated. If other equipment is
involved whose connections are being interrupted, be sure to refer to the instruction manuals for that equipment for proper
disconnection and reconnection procedures before proceeding.
4
Page 8
NTI XTENDEX 300 Foot HDMI and IR Extender
INSTALLATION
Installing The Local Unit
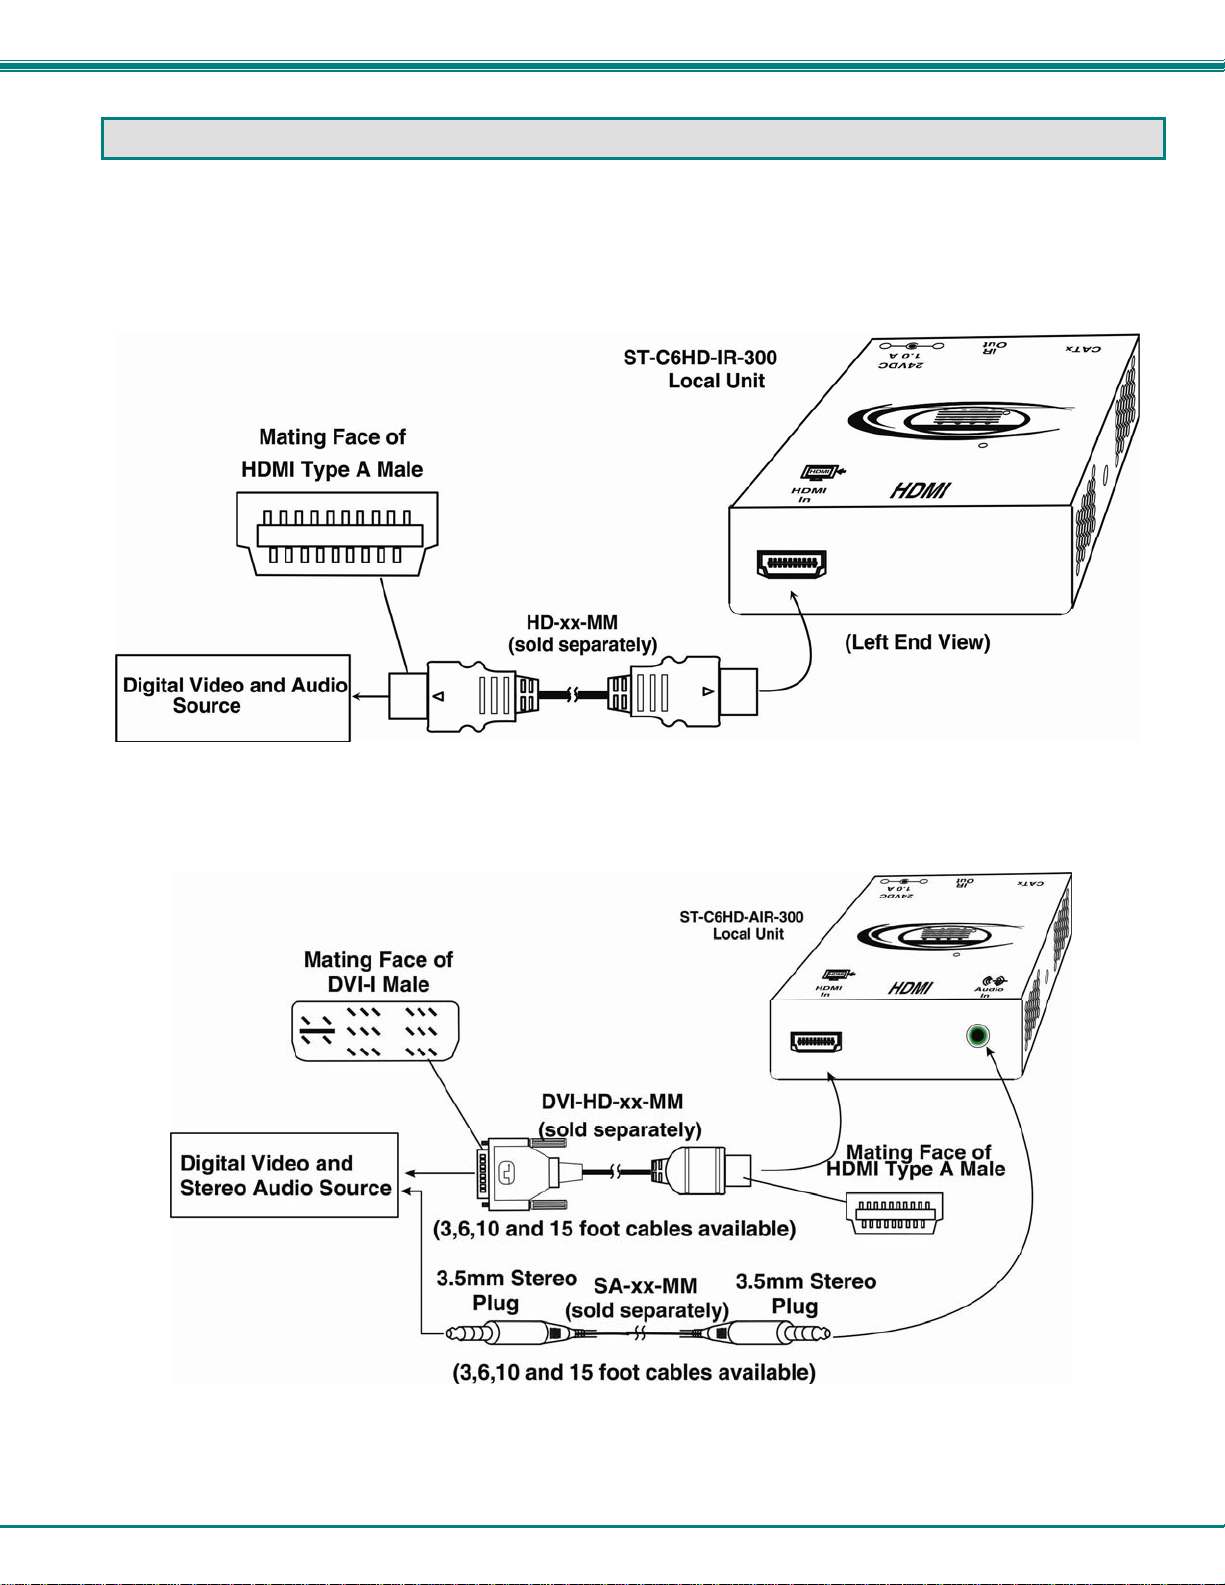
Connect an HD-xx-MM or DVI-HD-xx-MM cable (page 2) between the video source and the "HDMI In" connector on the
Local Unit (Figure 1). If stereo audio support is present, a stereo audio source can be connected (Figure 2).
Figure 1- Connect the XTENDEX Local Unit to the source
Figure 2- Connect the XTENDEX Local Unit to stereo audio source
5
Page 9
NTI XTENDEX 300 Foot HDMI and IR Extender
Installing The Remote Unit
1. Position the Remote Unit such that the CATx cable and the monitor cables can each reach the Remote Unit without
putting strain on the cables.
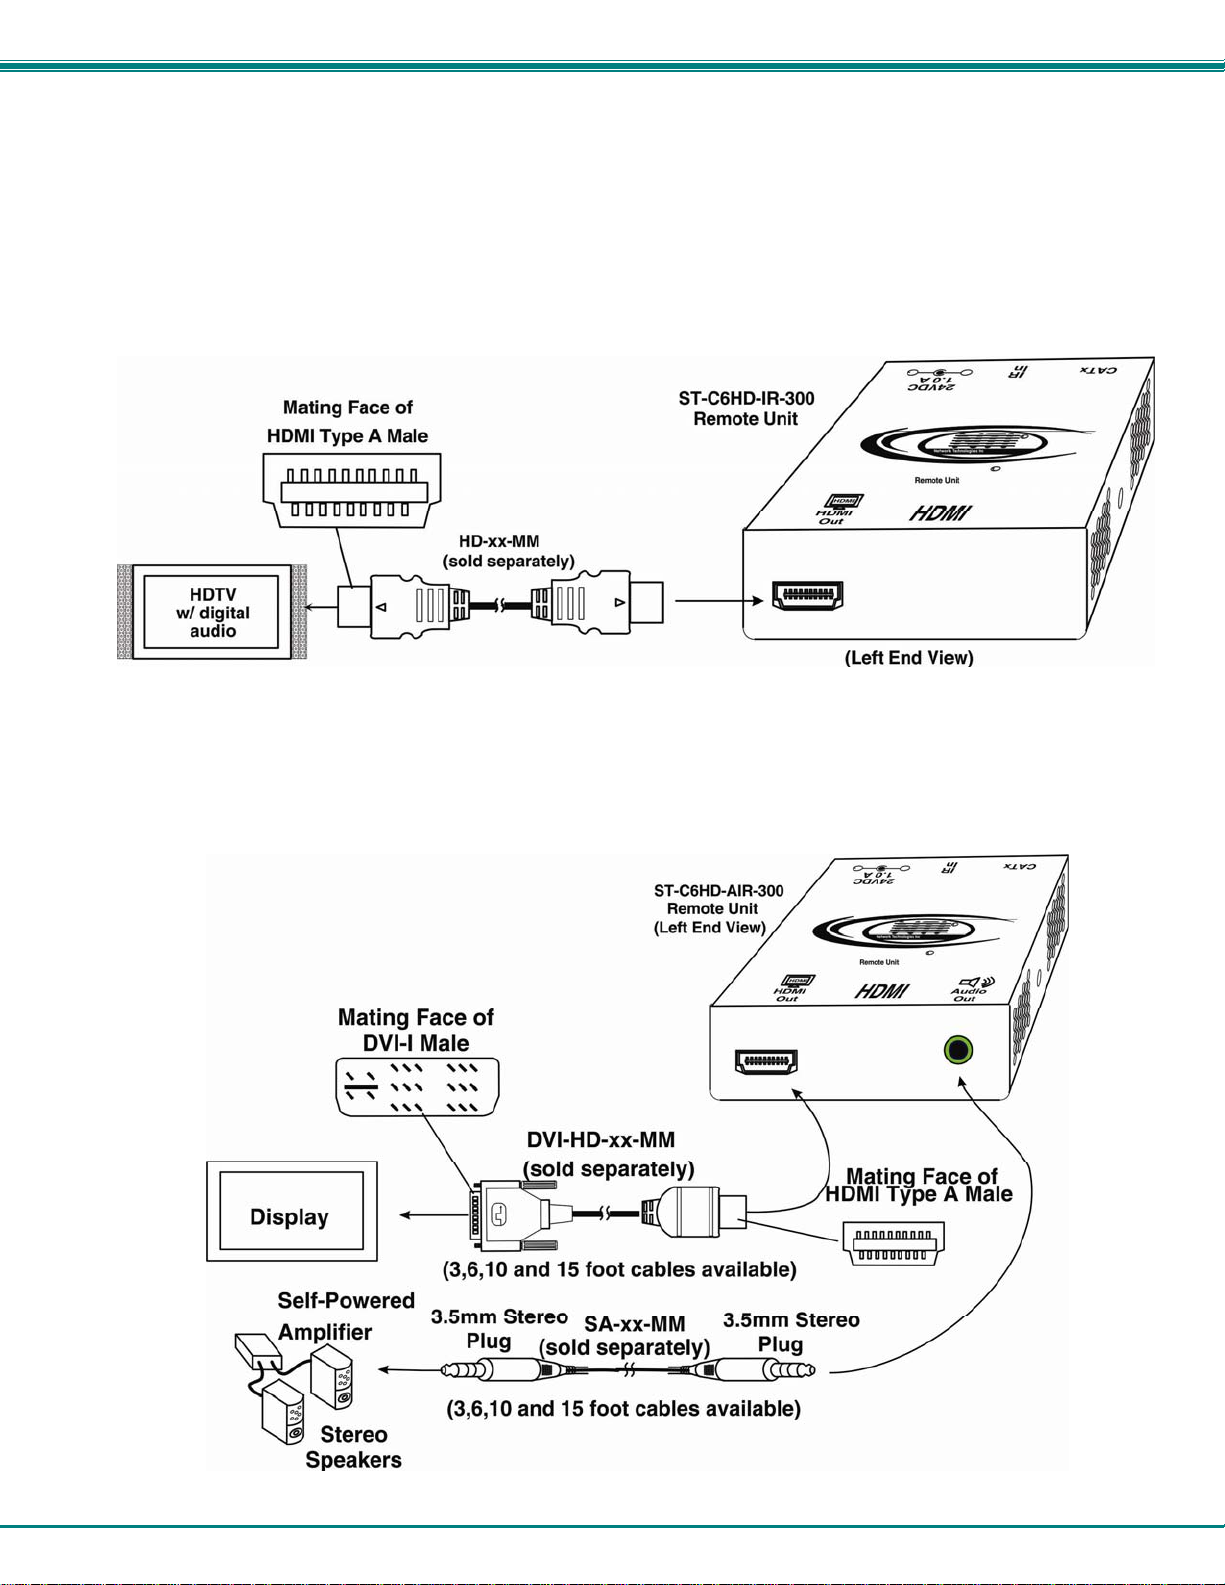
2. Connect a HD-xx-MM (or DVI-HD-xx-MM cable depending upon what connector your display will accept) to the
female HDMI video connector labeled "HDMI Out" on the Remote Unit.
Figure 3- Connect the extended video display to the Remote Unit
3. If your model includes stereo audio support, an SA-xx-MM cable can be connected between the “Audio Out” connector
on the Remote Unit and a set of self-powered stereo speakers.
Figure 4- Connect self-powered stereo speakers to the Remote Unit
6
Page 10
NTI XTENDEX 300 Foot HDMI and IR Extender
Connect the CATx Cables
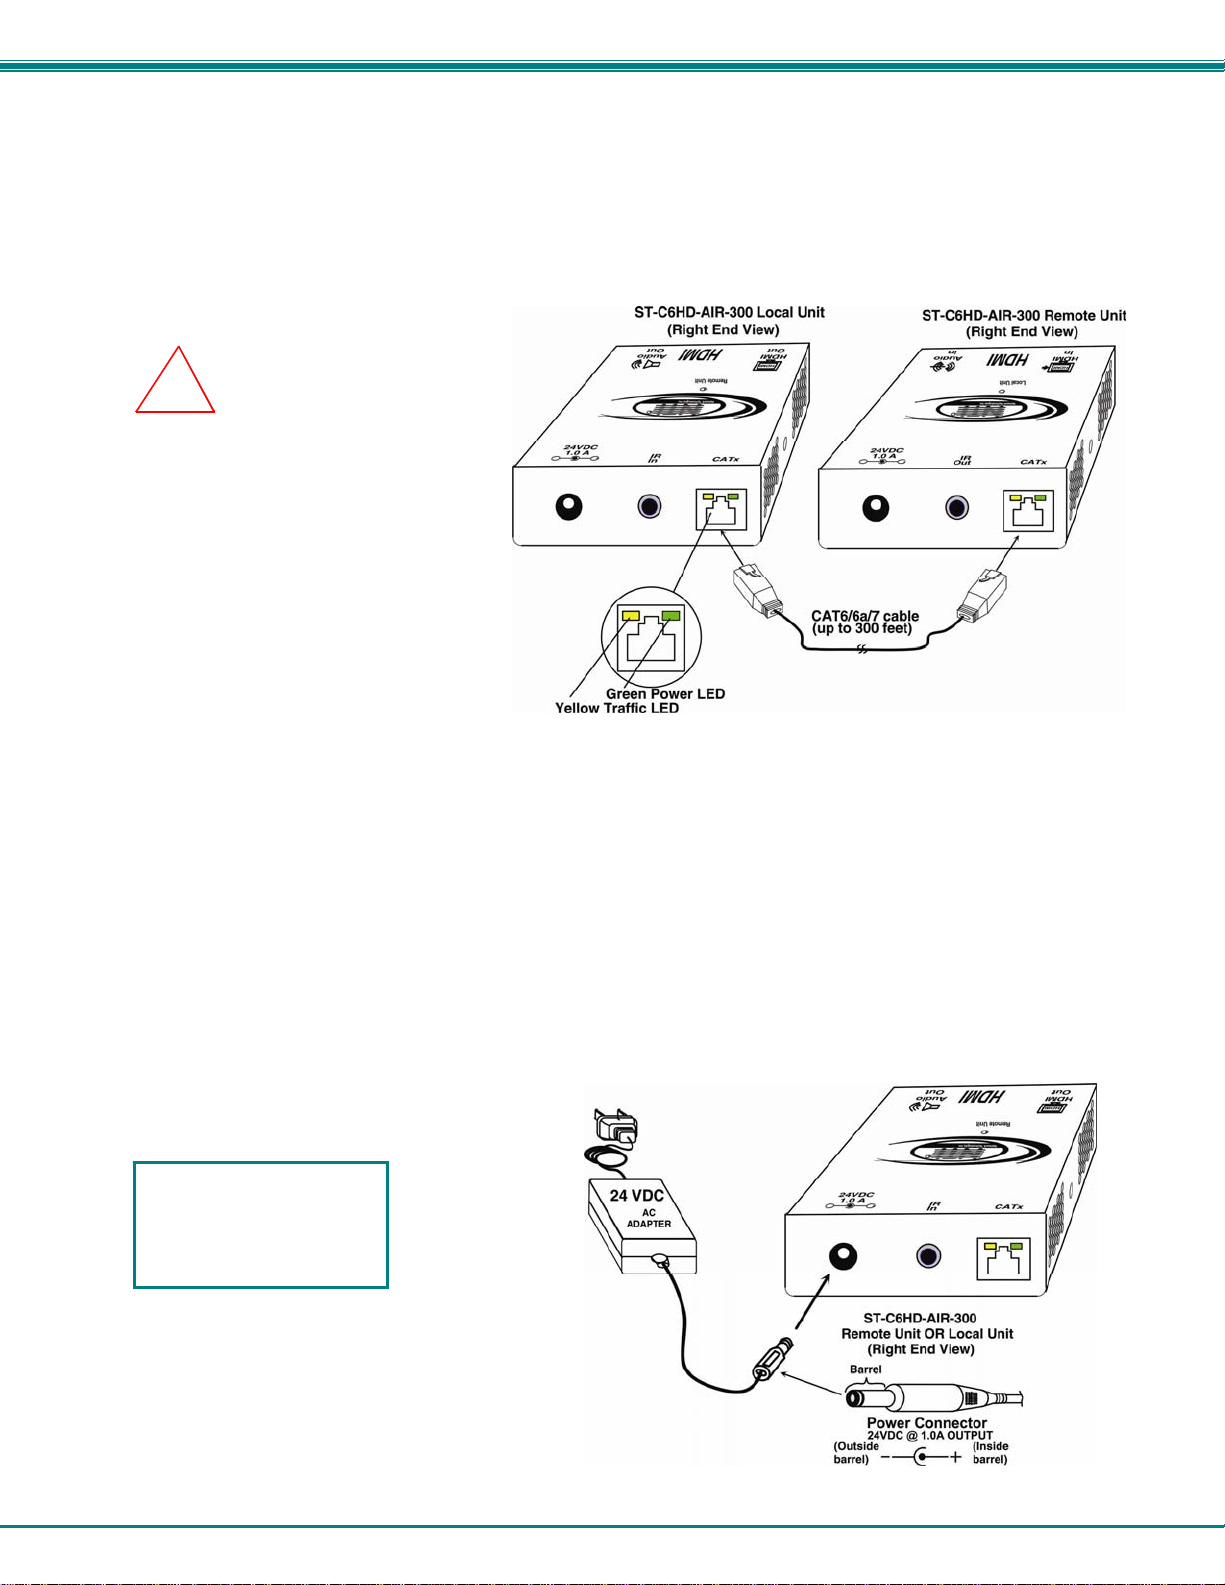
Connect the CATx cable between the “CATx” ports on the Local and Remote Unit. (See Figure 5.) When properly inserted
the cable ends should snap into place.
!
WARNING: Never connect the
XTENDEX to an Ethernet card, Ethernet
router, hub or switch or other Ethernet
RJ45 connector of an Ethernet device.
Damage to devices connected to the
Ethernet may result.
Figure 5- Connect CATx cable
Plug-in and Boot Up
1. Plug the power cord from the monitor into the power outlet.
Connect an AC adapter power connector to the 24VDC port on the Remote Unit or the Local Unit. Plug the AC adapter into a
2.
power outlet. The green LED on the RJ45 connector of both the Remote and Local Units should illuminate, indicating that a
proper power connection has been made to them. (See Figure 6)
3. Turn ON the video/audio source and video display device. The yellow LED on both the Local and Remote Units should
illuminate. The source and display device should each react as if directly connected to each other.
The AC adapter can be
connected to either the
Local Unit OR the
Remote Unit to make the
XTENDEX function
Figure 6- Connect the AC adapter
7
Page 11
NTI XTENDEX 300 Foot HDMI and IR Extender
Rackmount Modules (optional)
If ST-C6-300M Series XTENDEX rackmount Local Unit modules are being installed, then an ST-C6RCK-24 Rackmount Extender
Module Tray must be used (sold separately) to mount the modules to a RACK. The ST-C6RCK-24 provides a convenient
mounting method for up to 12 Local XTENDEX modules.
Mount the ST-C6RCK-24 Rackmount Extender Module Tray
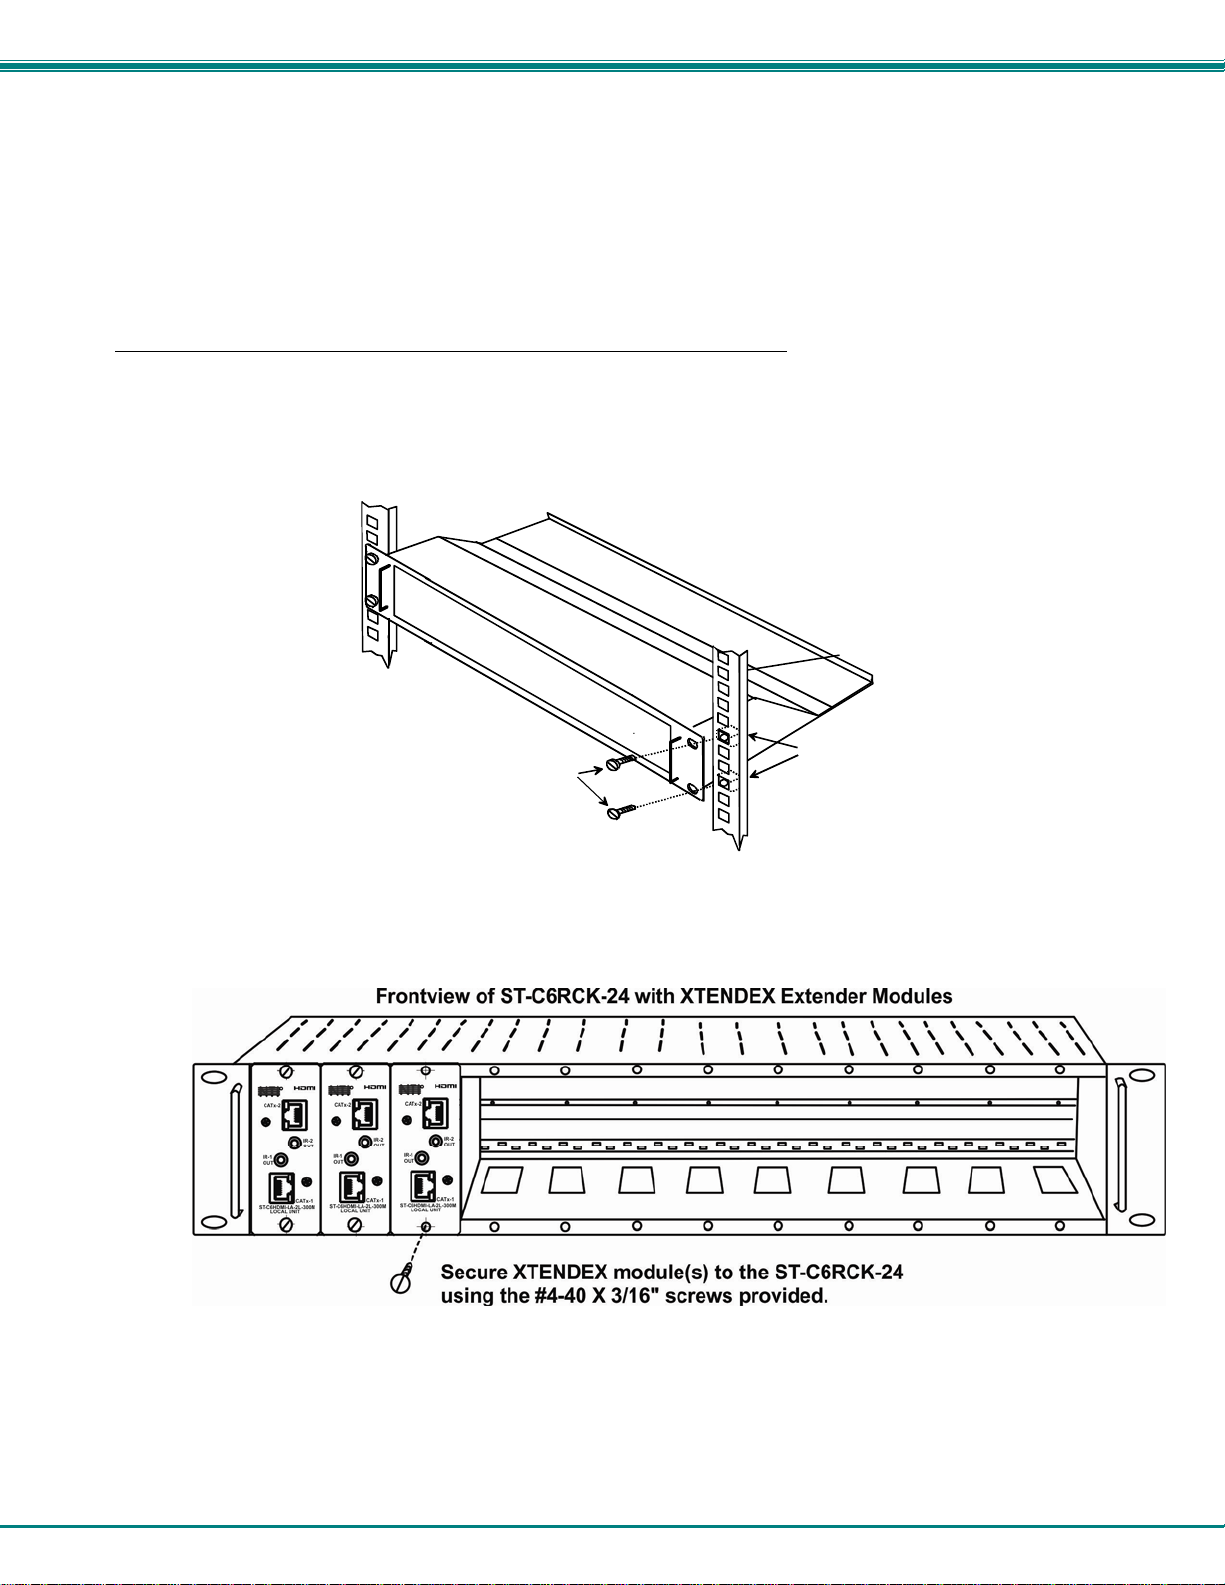
1. The ST-C6RCK-24 Rackmount Extender Module Tray was designed to be directly mounted in a rack. It includes a mounting
flange to make attachment easy.
2. Install 4 cage nuts (supplied) to the rack in locations that line up with the holes in the mounting flange on the tray.
Then secure the tray to the rack using four #10-32 x 3/4” screws (supplied). Be sure to tighten all mounting screws securely.
#10-32 x 3/4"
Rack Screws
(supplied)
Rack
Cage Nuts
(supplied)
Figure 7- Mount ST-C6RCK-24 Extender Module Tray in a rack
3. Slide each module into the tray and line up the holes in the mounting plate on the module with corresponding holes in the tray.
Secure the module(s) using the two screws provided. Blank plates and screws are provided to cover empty module spaces.
Figure 8- Secure each module to the tray
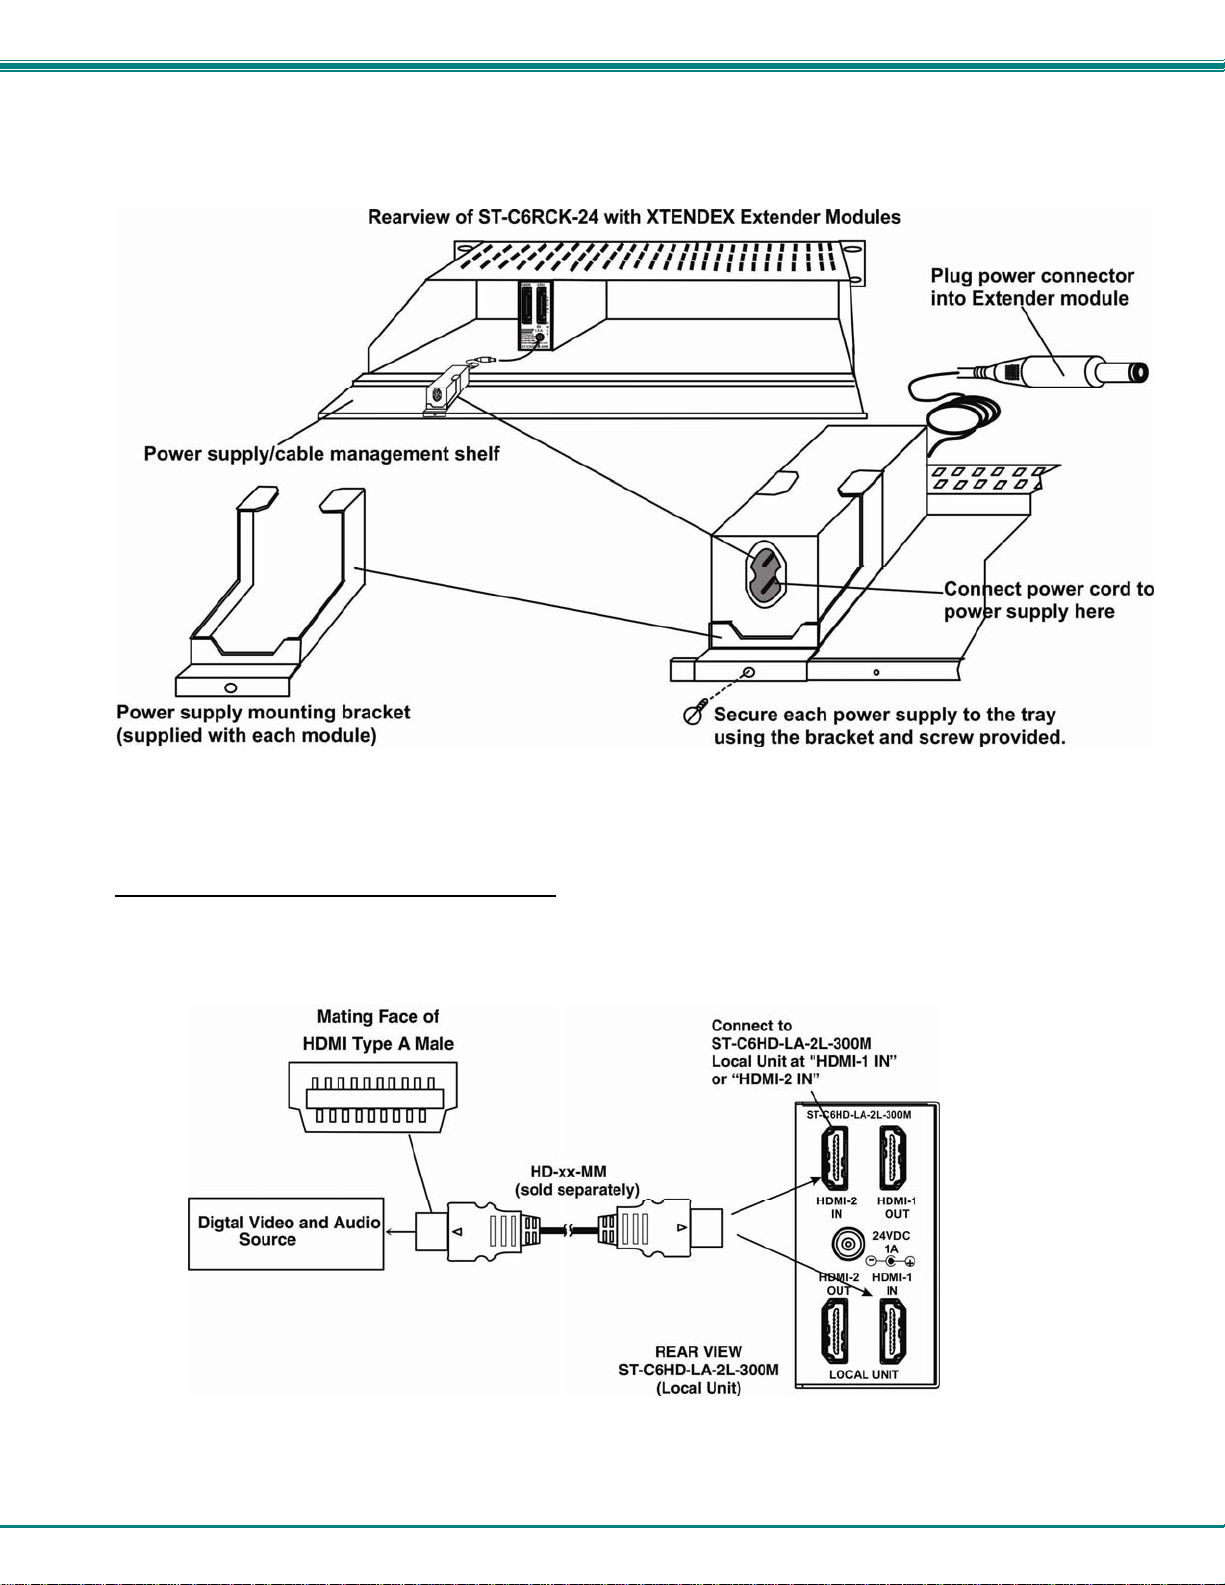
4. Secure the power supply for each module to the power supply/cable management shelf at the rear of the tray using the bracket
and screw supplied.
8
Page 12
NTI XTENDEX 300 Foot HDMI and IR Extender
Figure 9- Secure each power supply to the tray
Connect the HDMI Video/Audio Source
¾ Connect a cable between the Local Unit and the HDMI video source. Figure 10 shows the proper connections for the ST-
C6HD-LA-2L-300M using a HD-xx-MM cable (xx= 3, 6, 9,14,20,30, 50,75,100 and 150 foot length). Make sure connections
are firmly seated. If your local unit includes CEC support, a CEC-enabled source will be fully supported when using the IR
remote control.
Figure 10- Connect cable between video/audio source and module
9
Page 13
NTI XTENDEX 300 Foot HDMI and IR Extender
Connect Local Display(s)
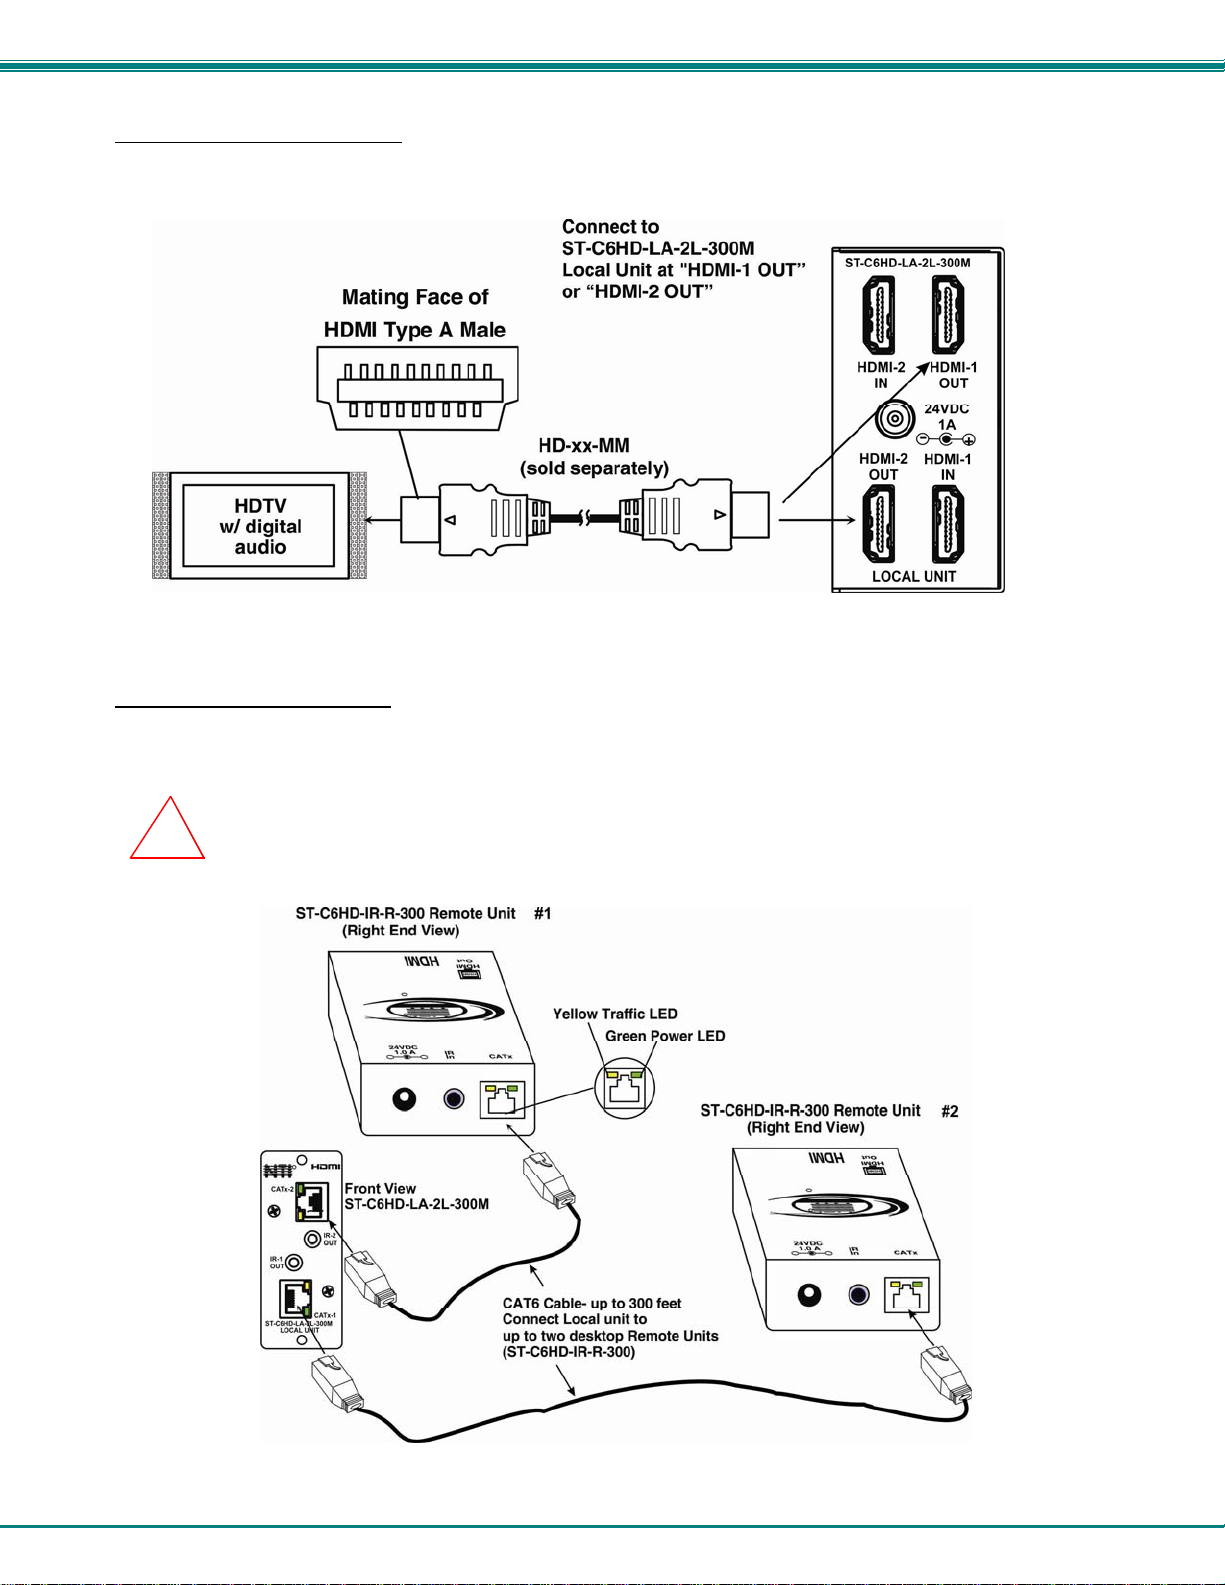
If desired, connect a local display to the local unit at “HDMI-1 OUT”. If your extender module has dual HDMI support, up to two
local displays can be connected.
Figure 11- Connect Local Display
Connect the CATx cable
Connect the CATx cable to a “CATx-1” or “CATX-2” port on the front of the Local Unit (see Figure 12). When properly
inserted the cable end should snap into place. Connect the other end of the cable to the “CATx” port on the Remote
Unit.
WARNING: Never connect the XTENDEX to an Ethernet card, Ethernet router hub or switch
or other Ethernet RJ45 connector of an Ethernet device. Damage to devices connected to the Ethernet may
!
result.
Figure 12- Connect the CATx cable between the Local and Remote Units
10
Page 14
NTI XTENDEX 300 Foot HDMI and IR Extender
Plug-in and Boot Up
1. Plug the power cord(s) from the video and audio source(s) into power outlet(s).
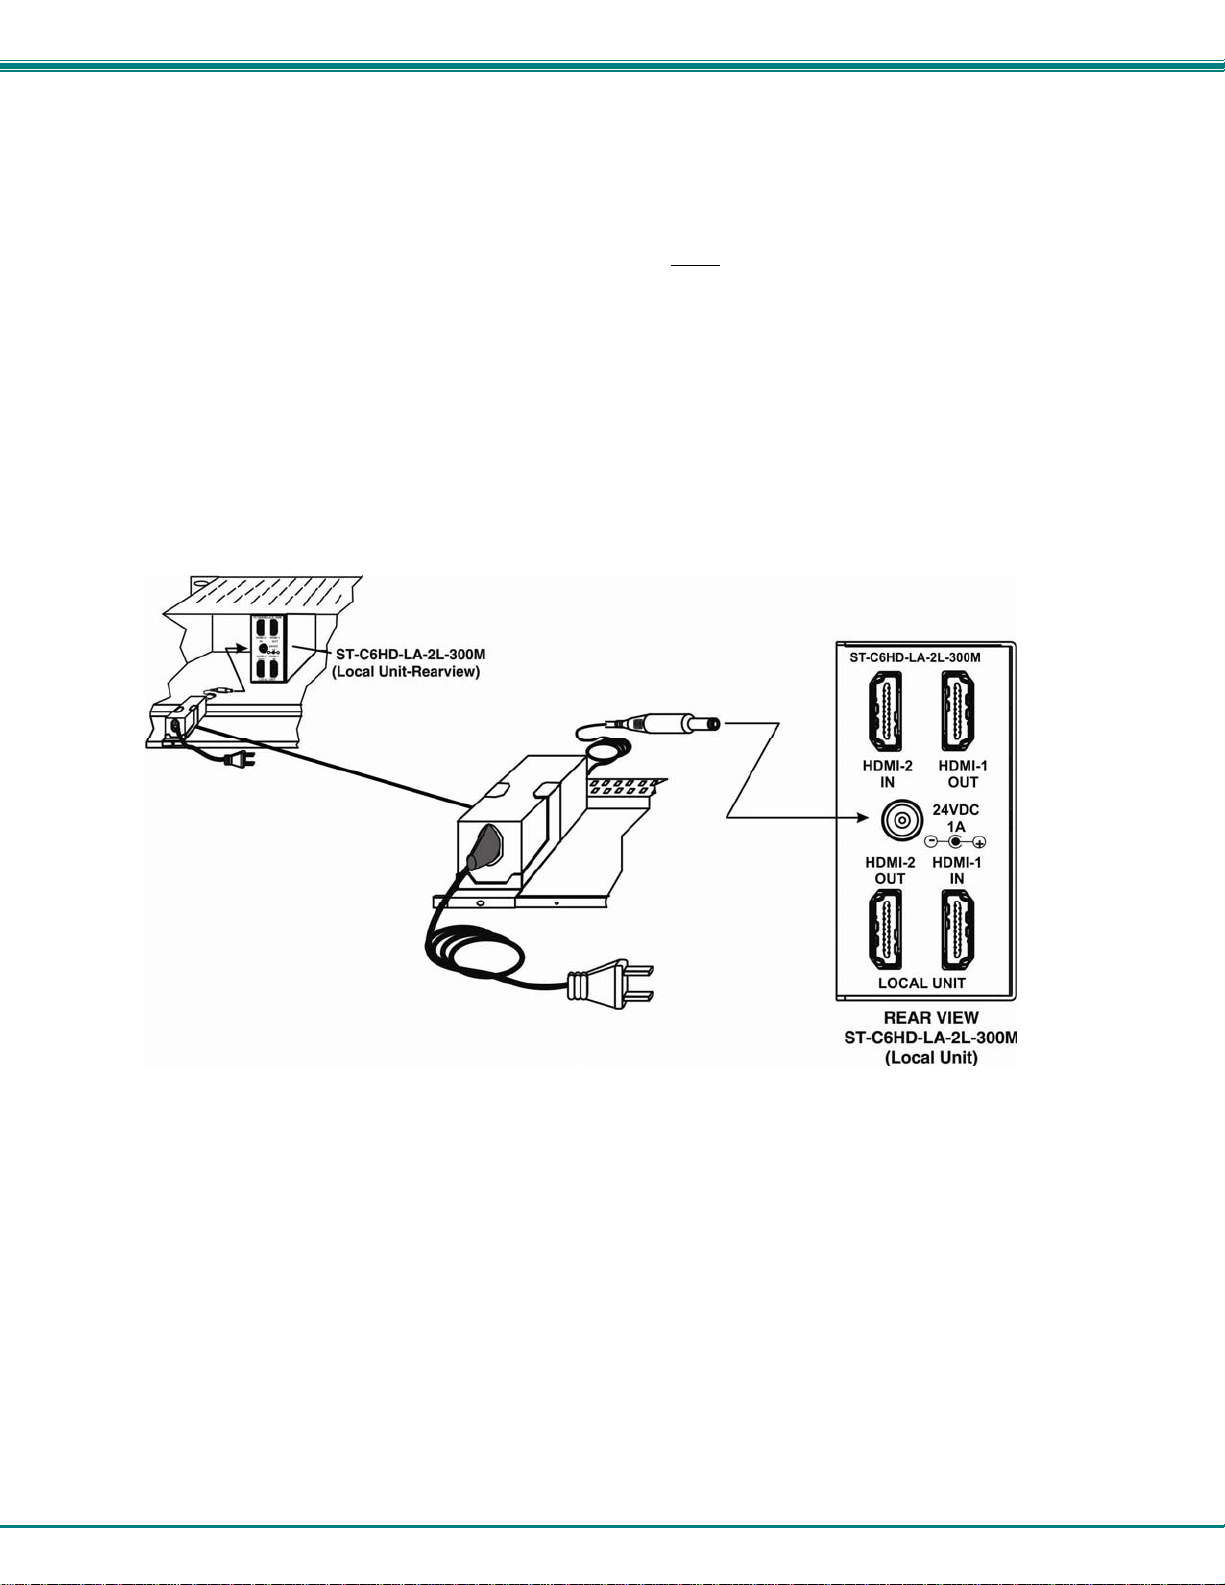
2. Connect the AC adapter power connectors to the 24VDC port on either the Remote or Local Unit. (AC adapter shown in
Figure 13)
3. Plug the AC adapter into a power outlet. The “Power” LED (green) on the CAT5 connector of each unit should illuminate,
indicating that a proper power connection has been made.
4. Turn ON the video/audio source(s) and display devices. They should each react as if they were directly connected to each
other. The yellow “Traffic” LEDs on the Remote and Local Units (see Figure 12) should blink indicating there is proper
communication between them.
Note: A loss of signal (blank screen) may be experienced for an instant during the automatic video quality adjustment
process after powering-up. This may also occur if the XTENDEX senses a loss of or weak signal connection in the
CATx cable.
Figure 13- Connect AC adapters
11
Page 15
NTI XTENDEX 300 Foot HDMI and IR Extender
INFRARED CONTROL
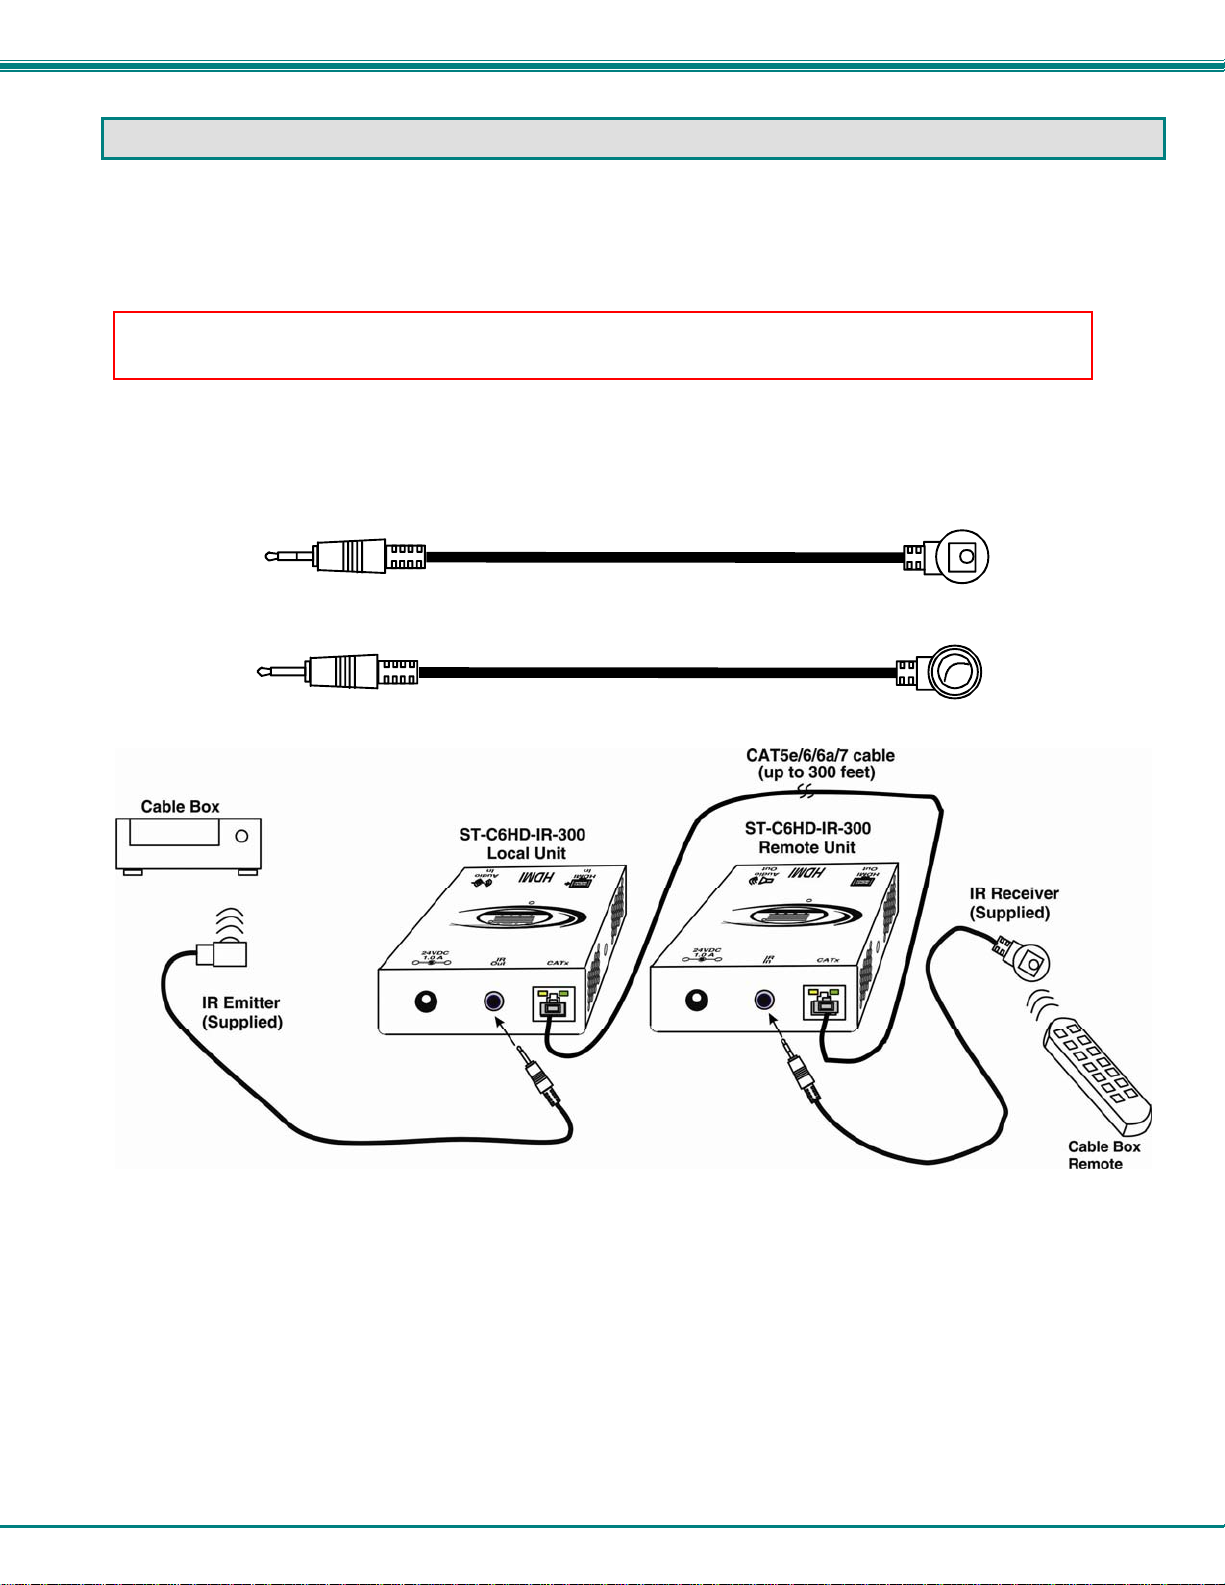
Model ST-C6HD-IR-300 (and each rackmount module) includes ports for connecting an infrared emitter and receiver (included) to
work in conjunction with the IR remote control used to operate the video/audio source. Connect the receiver to the “IR IN” port
on the Remote Unit and the emitter to the “IR OUT” port on the Local unit. Position the end of the receiver such that the signal
from the remote control can easily reach the IR sensor. Position the end of the emitter such that the extended signal can be
sent to the video/audio source.
Note: The IR Emitter and Receiver work within a frequency range of 33-40kHz. Check the
specifications for the device you are extending to make sure the XTENDEX will work with it.
3.5MM Stereo Plug
3.5MM Mono Plug
IR Receiver
IR-RCVR-3
IR Emitter
IR-EMTR-3
Figure 14- Connect IR Emitter and Receiver (models with IR support only)
12
Page 16
NTI XTENDEX 300 Foot HDMI and IR Extender
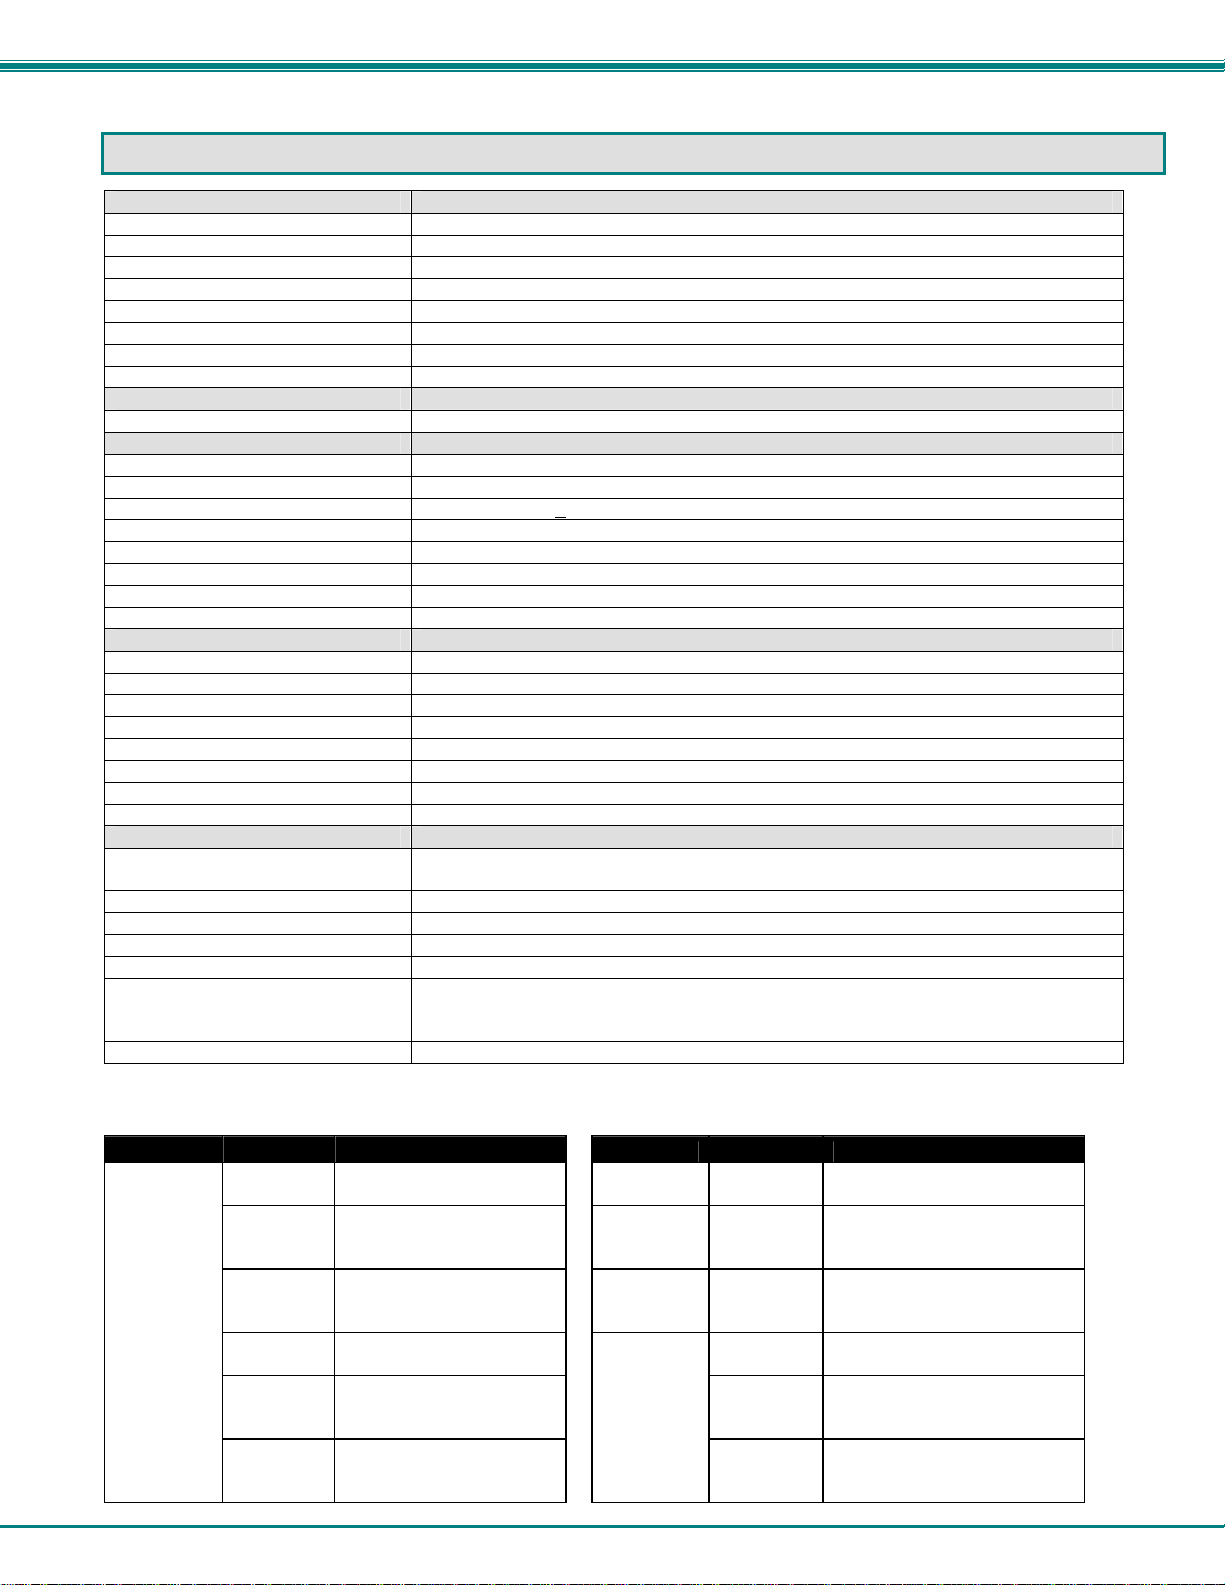
TECHNICAL SPECIFICATIONS
Video
Video Compatibility PC Resolution up to 1920x1200 @60Hz / HDTV resolution up to 1080p
Video Connectors HDMI Type A Female
Input Video Signal TMDS
Video Color Format Standard (24bit); Deep color (30,36bit);RGB, 4:2:2, 4:4:4
HDMI Version HDMI 1.3a
DVI Support DVI 1.0
DDC Support DDC2b
HDCP Version HDCP 1.2
Digital Audio
Digital Audio Format LPCM,Dolby Digital (AC3)(Plus),DTS,DSD, Dolby TrueHD,DTS-HD Master Audio
Stereo Audio
Audio Connectors 3.5mm stereo jack
Signal Type Line Level, stereo, unbalanced
Audio Frequency Response 20Hz to 20Khz, + 1dB
Signal-to-noise ratio 76 dBA
Stereo Crosstalk -70 dB
Audio Maximum I/O Levels 3.1Vp-p
Output Impedance Max 2K Ohms, unbalanced
THD+N 0.017%,F=20-20KHz, RL=2K Ohm, Vout=1 Vrms
IR
Input/Output 3.5mm Stereo Jack
Signal Type TTL, 0-5VDC
Input Impedance 1.5 kohm
Output Impedance 33 ohm
Maximum Input/Output Level 5.2 Vp-p
Center Carrier Frequency 36kHz
Frequency Range 33-40kHz
Maximum Distance (from receiver) 14 feet, straight; 6 feet at 45 degree angle
General
Interconnect Cable CAT5e solid/stranded UTP (550MHz or better); CAT6/6a Solid UTP; CAT7 Solid STP
Operating Temperature 0-50º C
Operating Humidity Range 5 to 90% non-condensing RH
Remote Unit Power 100V to 240VAC at 50 or 60Hz-24VDC/1.0A via AC Adapter
Enclosure type Electro-galvanized steel black powder coated
Size (In.) WxDxH
Desktop Units
Rackmount Modules
Compliance Certifications CE, RoHS
Distances and Resolutions for CAT5e,CAT6 and CAT7 Cables
Solid and Stranded Unshielded (UTP) and Shielded (STP) Twisted Pair Resolutions
Cable Length ft. Max. Resolution
50
1920x1200 / 60Hz / 32-bit
75
1920x1200 / 60Hz / 32-bit
100
CAT6
Solid UTP
150
200
250
EIA/TIA 568 B wiring with male RJ45 connectors
2.5x3.1x1.2
1.38x3.51.3.5
Cable Length ft. Max. Resolution
1080p / 60Hz / 36-bit
CAT6
Solid UTP
1080p / 60Hz / 30-bit
1080i / 60Hz / 36-bit
1080p / 60Hz / 24-bit
1080i / 60Hz / 36-bit
1080p / 60Hz / 24-bit
CAT5e
Solid UTP
CAT5e
Stranded
UTP
1080i / 60Hz / 36-bit
1080p / 24Hz
1080i / 60Hz / 36-bit
720p / 60Hz / 36-bit
1080p / 24Hz
CAT7
Solid
STP
1080i / 60Hz / 24-bit
480p / 60Hz / 36-bit
300
100
100
150
200
279
480p /60Hz / 36-bit
800x600/ 75hz / 32-bit
1080p / 24Hz
1080i / 60Hz / 36-bit
720p / 60Hz / 36-bit
1080p / 24Hz
1080i / 60Hz / 36-bit
720p / 60Hz / 36-bit
1080p / 60Hz / 24-bit
1080i / 60Hz / 36-bit
1080p / 60Hz / 24-bit
1080i / 60Hz / 36-bit
1080p / 24Hz
1080i / 60Hz / 24-bit
480p / 60Hz / 36-bit
13
Page 17
NTI XTENDEX 300 Foot HDMI and IR Extender
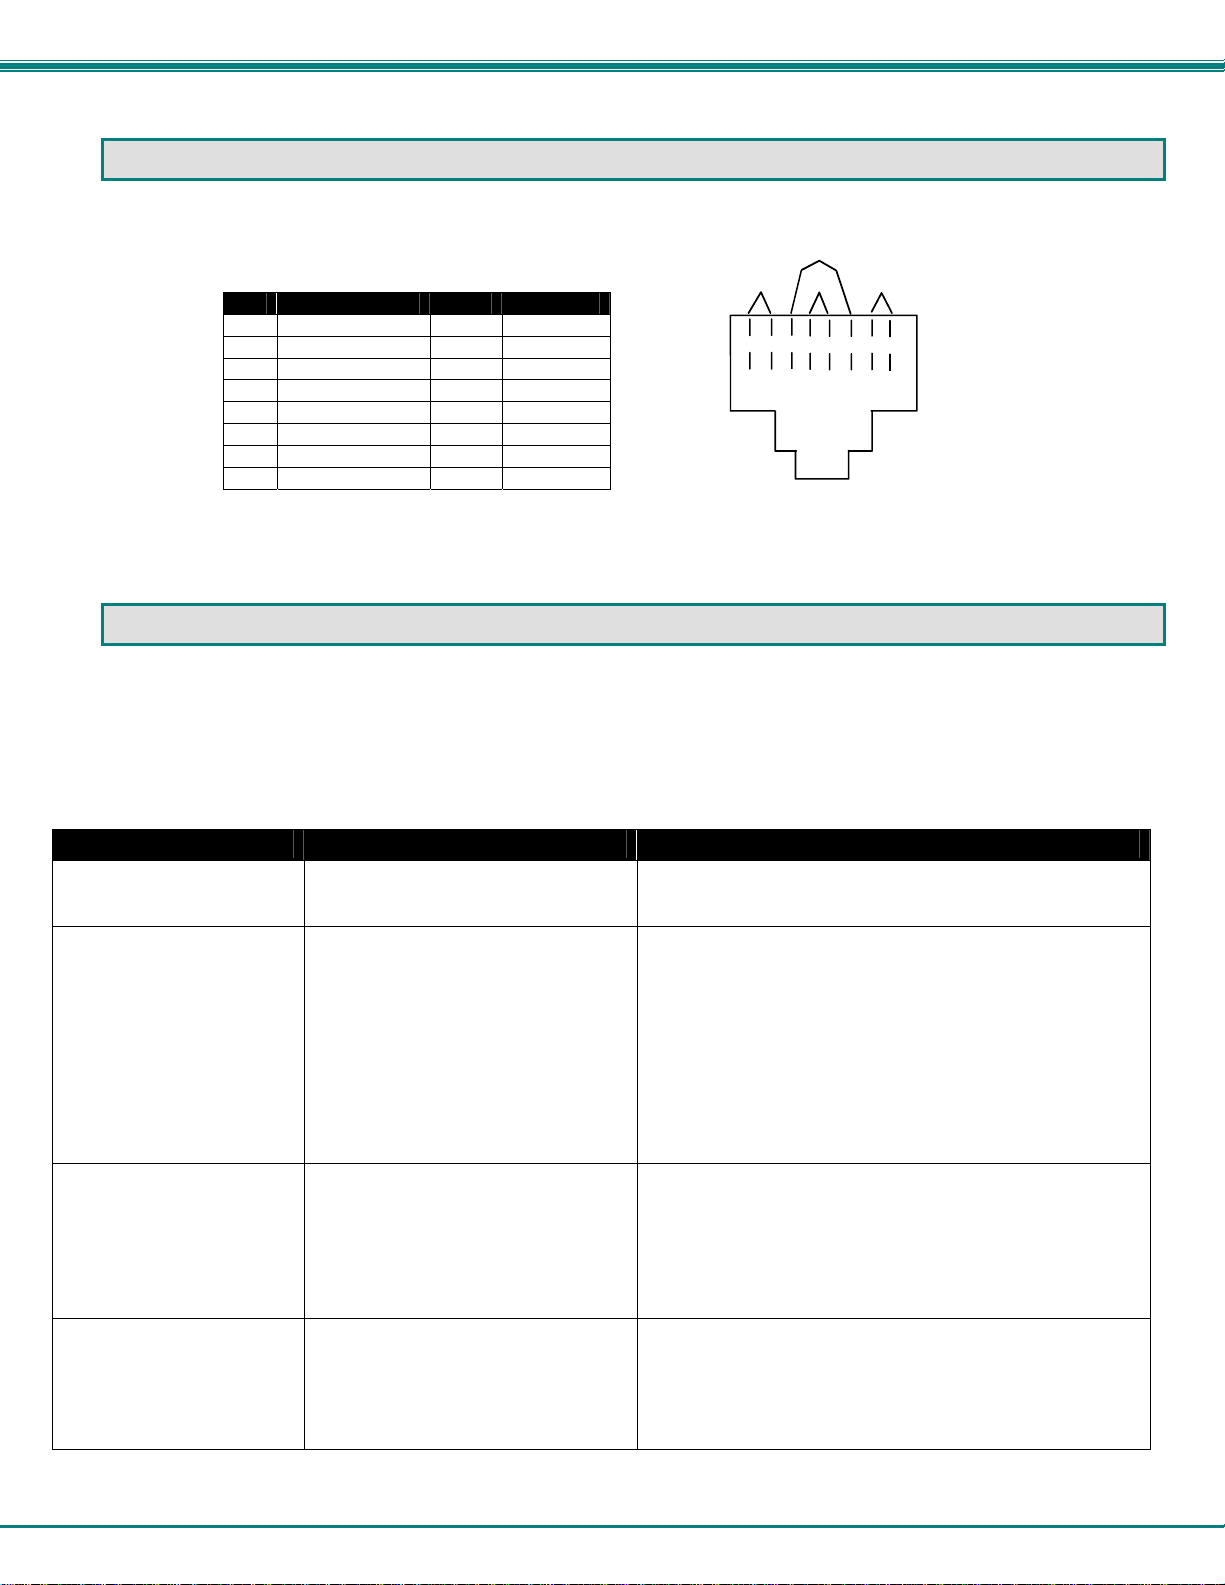
INTERCONNECTION CABLE WIRING METHOD
The CATx connection cables between the Remote and Local are terminated with RJ45 connectors and must be wired according
to the EIA/TIA 568 B industry standard. Wiring is per the table and drawing below.
Pin Wire Color Pair Function
Pair 3
Pair 2 Pair 1
Pair 4
1 White/Orange 2 T
2 Orange 2 R
3 White/Green 3 T
4 Blue 1 R
5 White/Blue 1 T
R
T
3
1
2
4
5
+
+
-
-
+
R
R
T
8
6
7
+
-
-
T
T
R
6 Green 3 R
7 White/Brown 4 T
8 Brown 4 R
Figure 15- View looking into RJ45 female
TROUBLESHOOTING
Each and every piece of every product produced by Network Technologies Inc is 100% tested to exacting specifications. We
make every effort to insure trouble-free installation and operation of our products. If problems are experienced while installing this
product, please look over the troubleshooting chart below to see if perhaps we can answer any questions that arise. If the
answer is not found in the chart, please check the FAQs (Frequently Asked Questions) on our website at
http://www.networktechinc.com or contact us directly for help at 1-800-742-8324 (800-RGB-TECH) in US & Canada or 1-330-5627070 worldwide. We will be happy to assist in any way we can.
Problem Cause Solution
Power LED does not
illuminate
No Video on monitor
Video Picture is noisy
• Power supply is not connected or
plugged-in.
• One or more video cables is loose
or disconnected.
• No power to Remote Unit.
• CATx cable is not connected.
• CATx cable is too long
• HDMI/DVI cable is too long
• All Video Cables are not firmly
seated.
• CATx cable is too long
• HDMI/DVI cable is too long
• The CATx cable is not properly
connected.
• Make sure outlet is live and AC adapter is plugged-in.
• Make sure 24VDC jack is fully connected
• Check all video cable connections
• Make sure “Power” LED is illuminated on local and
remote. If not, see solutions for first problem above.
• With all the cables properly connected, power cycle the
video/audio source. Make sure “Traffic” LED on local
and remote is illuminated.
• Make sure they are snapped-in properly and completely
and reboot.
• Switch to shorter cable or lower resolution (see table on
page 13)
• Check all connections. Make sure all cables are fully
seated.
• Switch to shorter cable or lower resolution (see table on
page 13)
• Check cable connections. Make sure they are snapped-
in properly and completely.
Monitor flashes or goes
blank for a second or two
• Electrical power system is very
noisy, particularly the ground.
• The CATx cable is not properly
connected.
• CATx cable is too long
• HDMI/DVI cable is too long
• Make sure the interconnection cable is not near any
power lines.
• Check cable connections. Make sure ends are snapped-
in properly and completely.
• Switch to shorter cable or lower resolution (see table on
page 13)
14
Page 18

NTI XTENDEX 300 Foot HDMI and IR Extender
WARRANTY INFORMATION
The warranty period on this product (parts and labor) is two (2) years from the date of purchase. Please contact Network
Technologies Inc at (800) 742-8324 (800-RGB-TECH) or (330) 562-7070 or visit our website at
http://www.networktechinc.com/return-policy.html for information regarding repairs and/or returns. A return authorization number
is required for all repairs/returns.
Manual 111 Rev. 4/11/12
15
 Loading...