

Page 1
Page 2
1
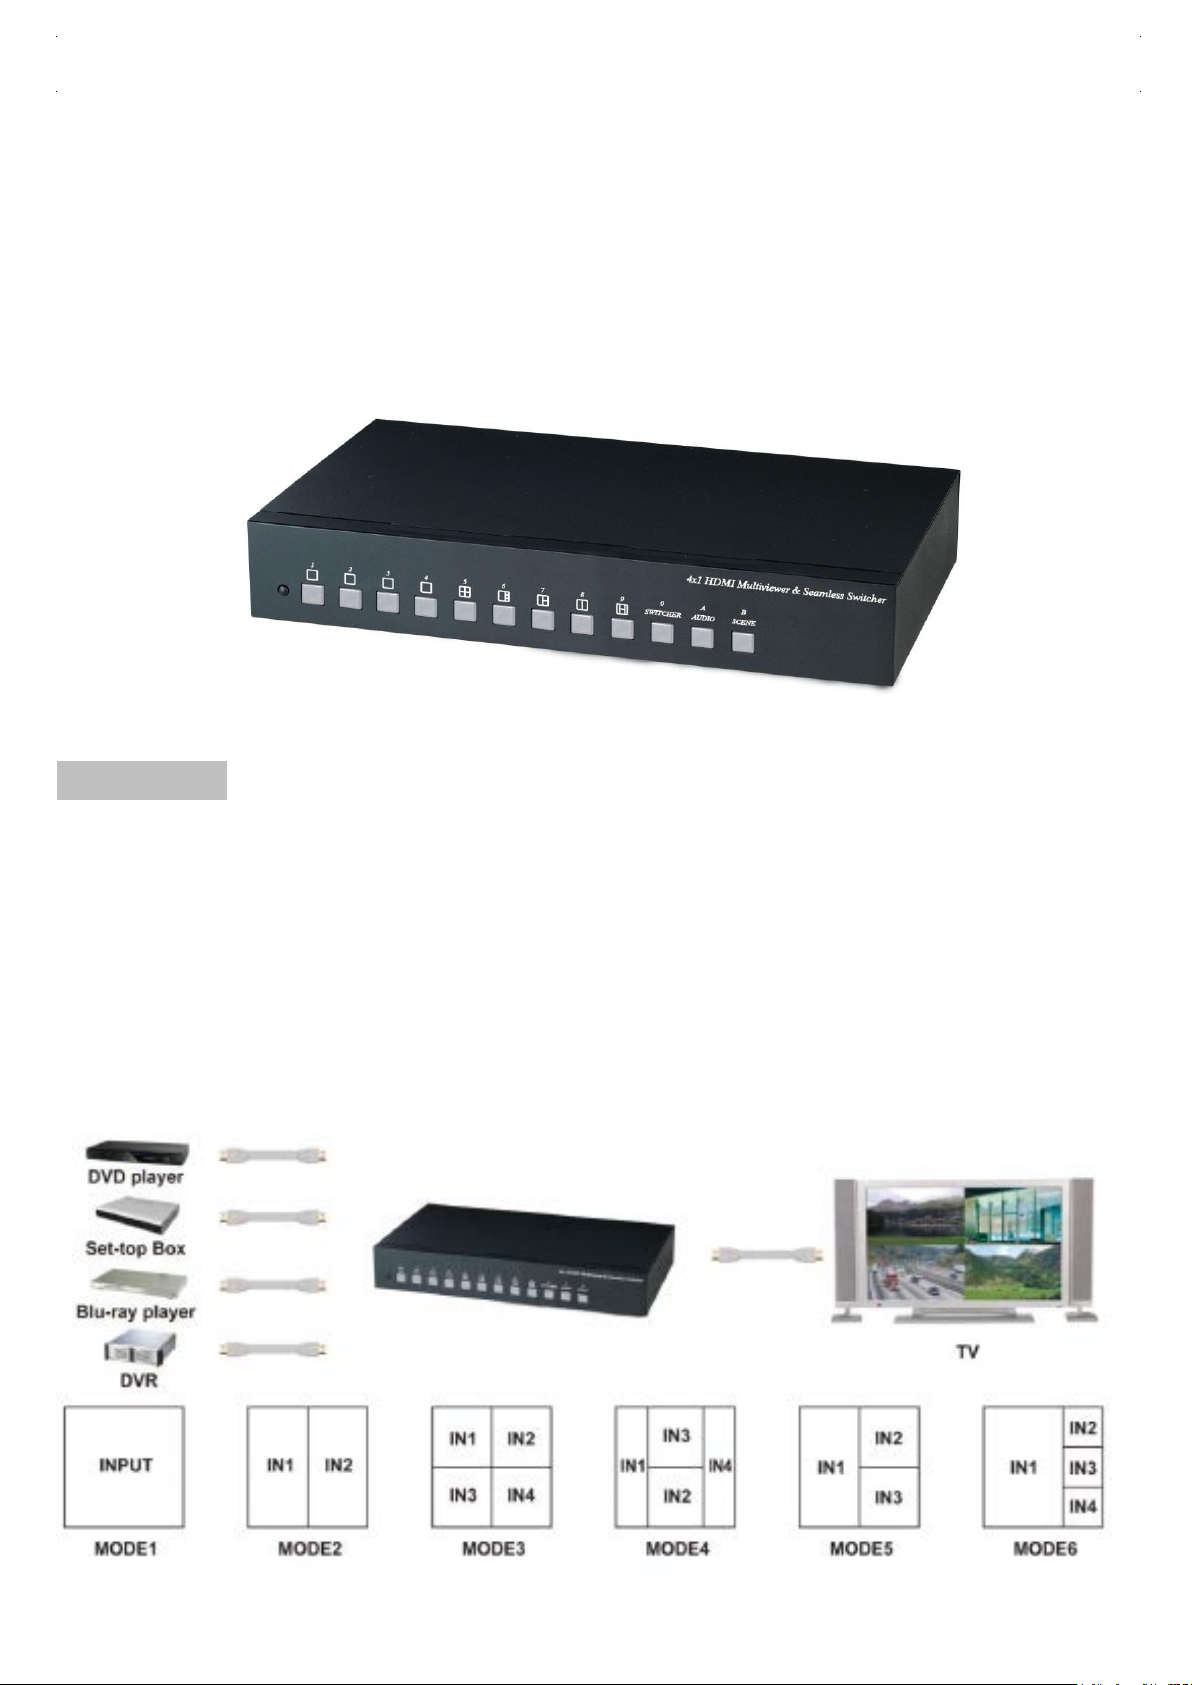
The HDMI Quad Multi-viewer allows you to display HDMI video signals from 4 different sources
onto one HDTV. It supports Quad/POP/full screen with 6 modes and a special feature built-in
auto-switching function between 4 different sources. It is easy to operate with great features for
viewing or monitoring multiple videos on one screen at the same time from video devices such as
computer, Blu-ray player, cable box, DVR, surveillance camera, etc. Perfect to use in surveillance,
advertising, education, industry and commercial applications, private Home Theatres etc.
Features:
Multiplexes 4 HDMI inputs into 1 HDMI output.
Supports resolutions up to 1080p 60Hz.
Supports scaler up to 1080p functions and digital audio format LPCM 2.0.
Control option: IR remote control, front panel buttons.
Supports Quad, multi-view and seamless switching.
Supports auto switching between 4 sources.
HDM 1.3a, HDCP 1.2 ,DVI 1.0 complaint.
Supports different display modes: Quad,
Perfect for controlling remote machines and security monitoring systems, digital
signage applications.
picture on picture (POP) and full screen.
Page 3
2
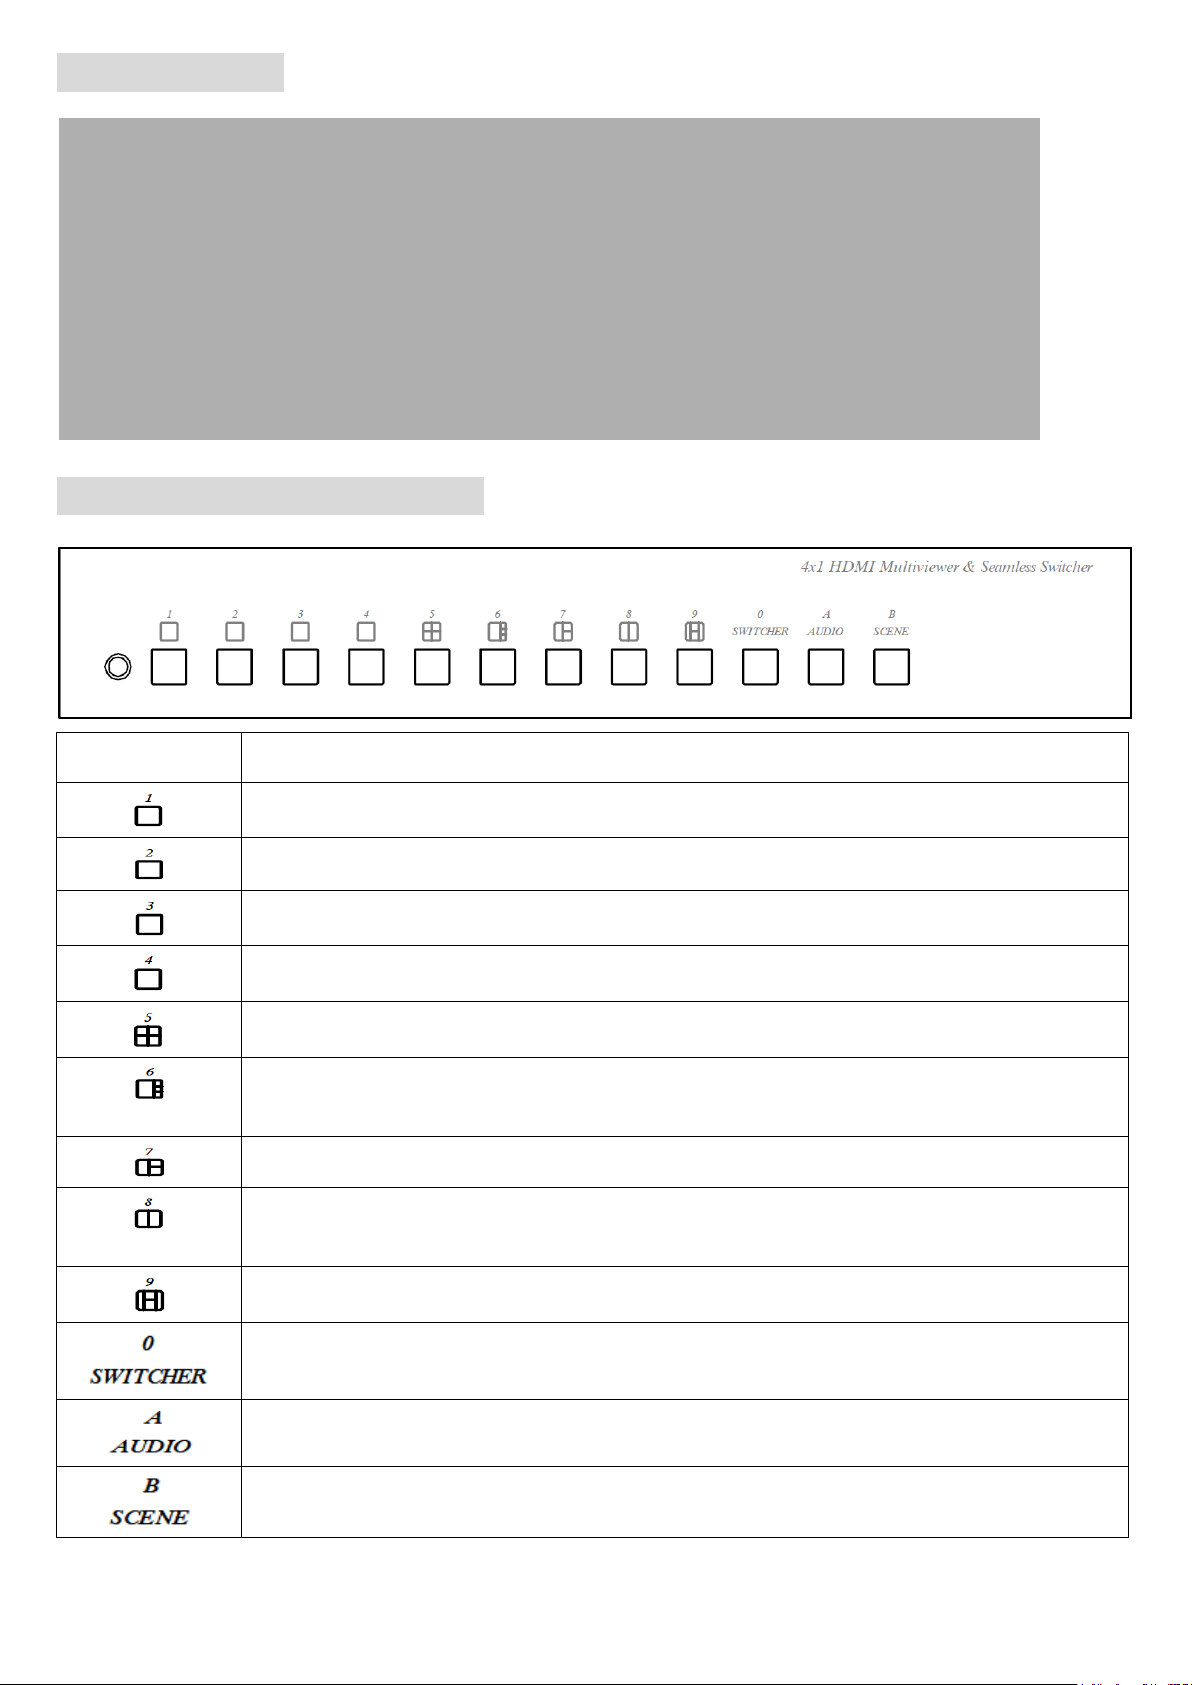
Panel View:
Button
Function
Select Video 1
Select Video 2
Select Video 3
Select Video 4
Quad Picture Display
Select 3 Video Display (Only select input video 1,2,3)
Select 2 Video Display, press this button again to select video input 1,2
or 3,4.
Select 4 Video Display
Auto Switching
Audio Selection
Scene Selection
Panel Button Function:
Quad Picture Display (one big window with three small windows),
press this button again to change 4 video sequence.
Page 4

3
Seamless Switch Function:
Press button 1 – 4: the video output will be a single full screen, and the button
light goes ON to indicate the source of video input.
Multi-view Switch Function:
Press button 5 – 9: the video output will be a multi-view window; the button light
goes ON to indicate the Multiview mode.
SWITCHER Function:
SWITCHER has video auto switching function, you could select two or four videos
to automatically display, with the switching time duration set as indicated below:
Press SWITCHER button: (the button light goes ON) then press button 1 – 4 to select the
video for auto switching.
Press button 5 – 9 to select the auto switching timing :
5 : 5 seconds
6 : 10 seconds
7 : 20 seconds
8 : 30 seconds
9 : 60 seconds
Press the SWITCHER button again to leave switching mode.
AUDIO Function:
When in Multiview display mode, only one audio input can be selected:
Press AUDIO button (the button light goes ON), then press button 1 – 4 to select the
audio source. Press the AUDIO button again to leave audio selection mode.
SCENE Function:
The SCENE button for the scene function. There are 9 sets of saved scene modes for
easy save and load.
SCENE Saved method:
Press SCENE button for 3 seconds until button light flash, then press button 1- 9 to
save. Press SCENE button again to exit.
Page 5
4
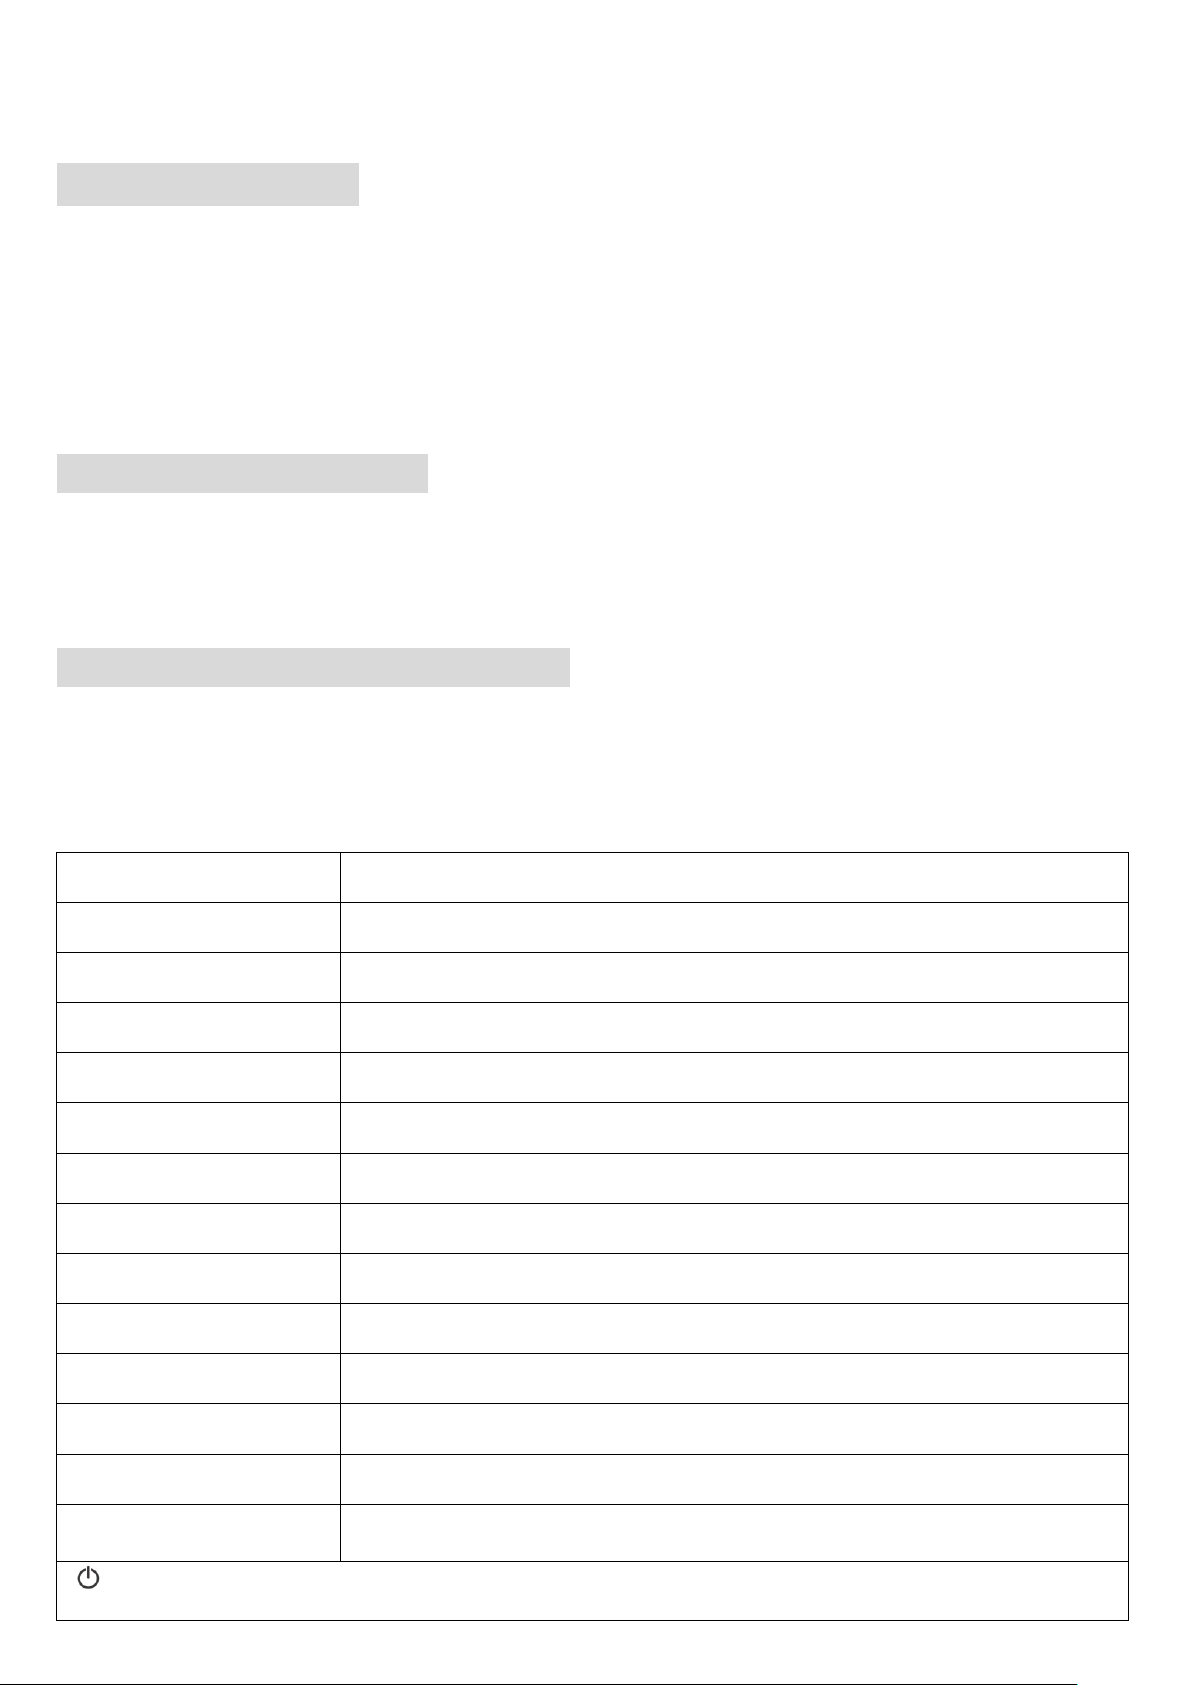
SCENE Load method:
Button
Function
1
same as panel button 1
2
same as panel button 2
3
same as panel button 3
4
same as panel button 4
5
same as panel button 5
6
same as panel button 6
7
same as panel button 7
8
same as panel button 8
9
same as panel button 9
0
same as panel SWITCHER
A
same as panel AUDIO
B
same as panel SCENE
*
SCENE save setting: B → * → 1 ~ 9
、▲ 、▼ 、◀ 、▶ 、#、MENU、ENTER: Reserved
Press the SCENE button (the button light goes ON), then press button 1 - 9 for load and
exit.
Demo Function:
Demo mode: 5 - 9 as multi-view window will be auto-switching by
sequence. Set as indicated below:
Press the SCENE button (the button light goes ON), press the SWITCHER button to turn
on the DEMO mode. Press the SCENE button again to leave DEMO mode.
Output Resolution:
Press button 1 and power ON, output resolution is 720p@60Hz.
Press button 2 and power ON, output resolution is 1080p@60Hz.
IR Remote Control Function:
This device could use IR remote control for function setting and control. The ID number must be setup before
using the IR remote control or changing the batteries. Setup the IR remote ID number: Press and
hold“Power" button on the IR remote control and press number "0".
Page 6
5
CONSOLE Function:
ITEM NO.
Video Input Resolution
480p、576i、720p@50/60Hz、1080i@50/60Hz、
1080p@24/25/50/60Hz
Video Output Resolution
720p@60Hz、1080p@60Hz
HDMI Type A x 1 / HDMI Type A x 4
IR Carrier
38Khz / ± 45° / 5M
CONSOLE
RS-232(F) x 1
Function Button
Button x 12
Power Supply
DC 12V / 1A
Power Consumption
660mA
Temperature
Operation: -10 to 70℃, Storage: -20 TO 85℃,
Humidity: up to 95%
Dimension mm
253 x 144 x 40
Weight g
840
Firmware updated.
Reset Factory Default:
Press SCENE button and power ON. The SCENE button light will flash and the switch will
clear all saved data and set output resolution at 1080p@60Hz.
Package Include:
SPLITMUX-HD-4LC x 1 piece
IR Remote Control x 1 piece
Power adapter x 1 piece
Rubber Pad x 4 pieces
Mounting screws x 1 bag
Specifications:
Video output/Input Interface
SPLITMUX-HD-4LC
REV 9-13-17
 Loading...