

Page 1
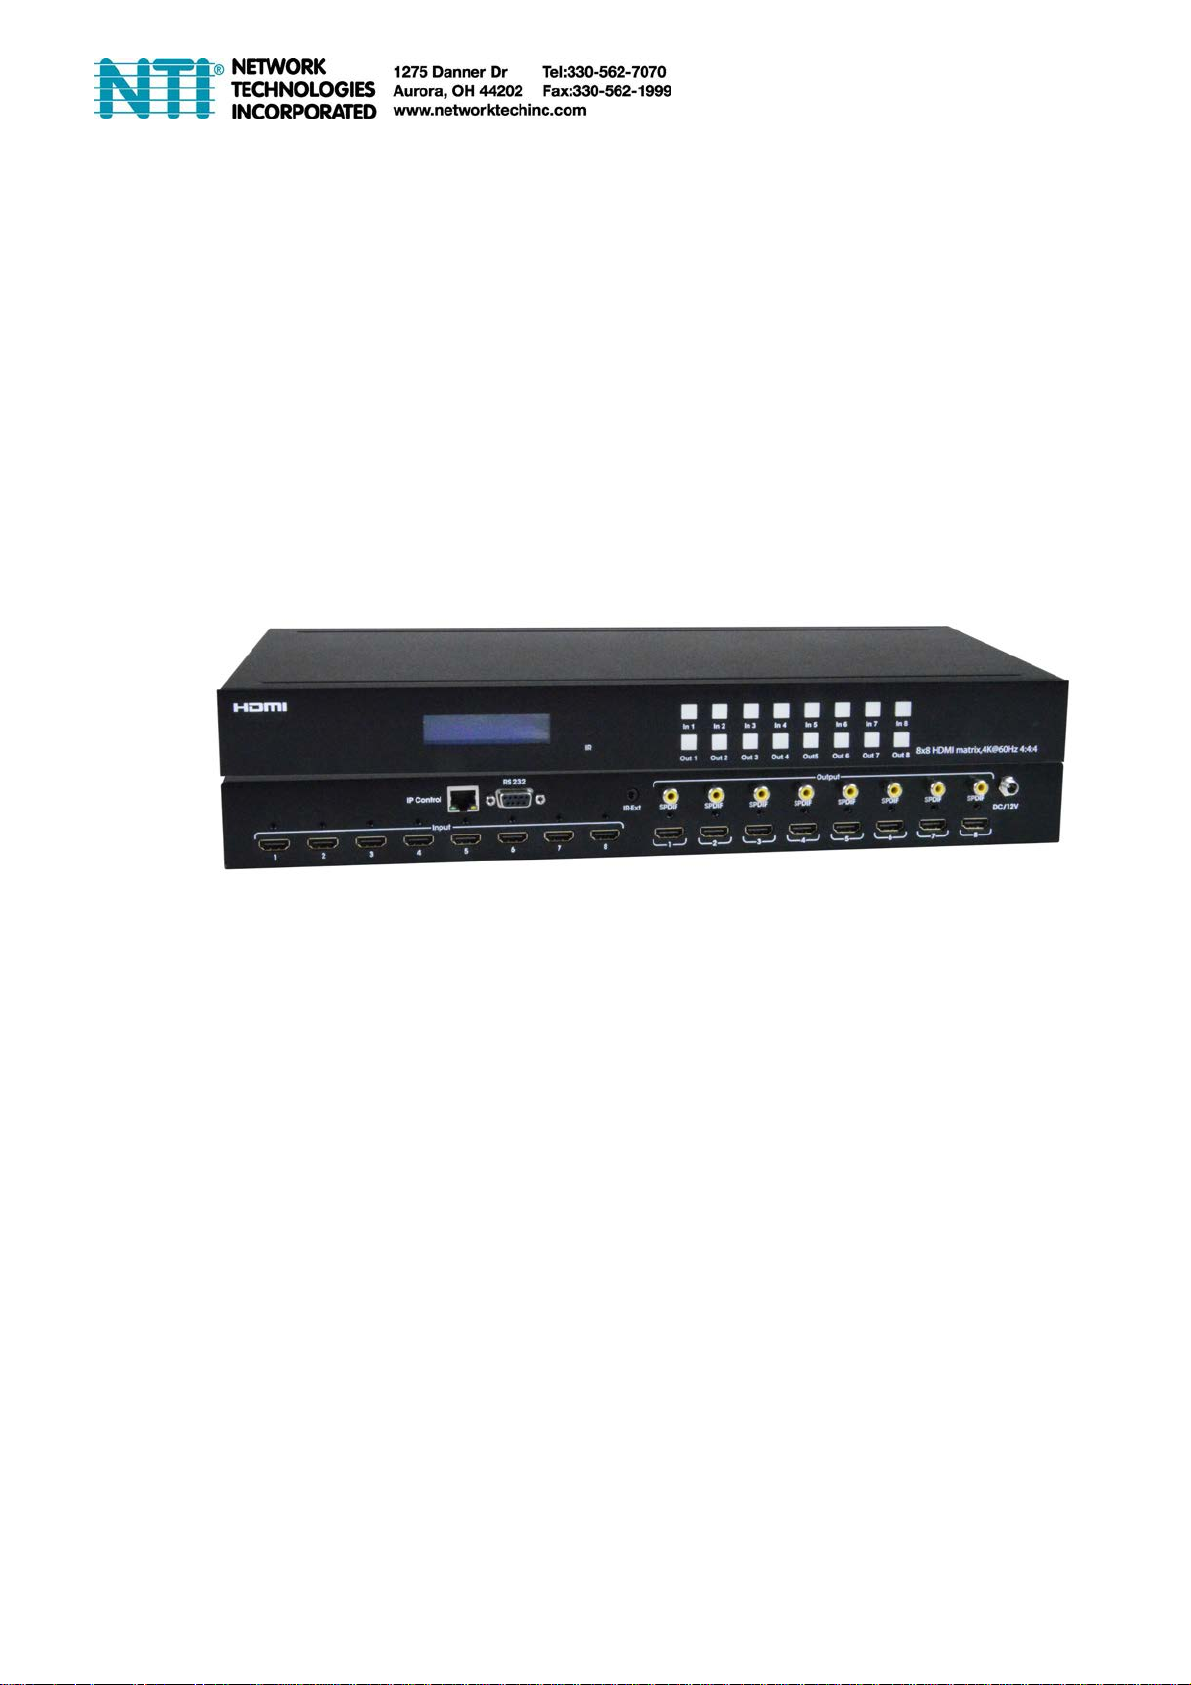
SM-8X8-4K18GB-LC
Low-Cost 4K HDMI Video Matrix Switch: 8x8
Operating Instruction
1
Page 2

Operating Instruction
Thank you for purchasing this product. For optimum performance and
safety, please read these instructions carefully before connecting,
operating or adjusting this product. Please keep this manual for future
reference.
SURGE PROTECTION DEVICE RECOMMENDED
This product contains sensitive electrical components that may be
damaged by electrical spikes, surges, electric shock, lightning strikes,
etc. Use of surge protection systems is highly recommended in order to
protect and extend the life of your equipment.
2
Page 3

Operating Instruction
A
Table of Contents
1. Features.....................................................................................4
2. Package Contents.....................................................................4
3. Specifications............................................................................4
4. Panel Descriptions....................................................................5
5. Connecting and Operating.......................................................7
6. Application Diagrams...............................................................7
7. Remote Control Description.....................................................8
8. RS232 Pin
ssignment.............................................................8
9. RS232 Control............................................................................9
9.1 Software Control
9.2 Command Control
.......................................................................9
...................................................................12
10. Web Control...........................................................................15
3
Page 4

Operating Instruction
Dear Customer
Thank you for purchasing this product. For optimum performance and safety, please read
these instructions carefully before connecting, operating or adjusting this product. Please
keep this manual for future reference.
1. Features
HDMI 2.0 version (Support 4K@60Hz YUV4:4:4)
Support 3D
Bandwidth upto 18Gbps
HDCP2.2 input ,HDCP2.2 output
HDCP1.4 input, HDCP1.4 output
Support HDR10
8xHDMI Input, 8xHDMI output with 8xSPDIFAudio
Any one of the 8 Ultra HD sources to any one of the 8 Ultra HD displays
Support Panel Button, Local IR, RS232 Control with command, IP Control, Web GUI
Control
Support Dolby True HD and DTS-HD master audio
1U rack design, easy installation
Unit size: LxWxH 440X220X44.5mm
2. Package Contents
1). 1x HDMI Matrix
2). 1x 12V DC power supply
3). 1x Remote control
4). 1x IR Ext RX Cable
5). 1x mounting kit
3. Specifications
Bandwidth 18 Gbps
Resolution
Video Input Connectors 8xHDMI Type A, 19-pin, female
Video Output Connectors 8xHDMI TypeA, 19-pin, female
RS-232 serial port DB9, female
Ethernet port (IP control) RJ45, female
IR Ext port 1x3.5mm stereo jack
Rack-Mountable Rack ears included
Dimensions(WxDxH) In. 17.32x8.66x1.75 (440x220x44 mm)
Net Weight 2.8kg
Operating Temperature -4°F to 140°F (-20°C to 60°C)
Storage Temperature -40°F to 158°F (-40°C to 70°C)
Power consumption 19W(Max)
480p@60hz,576P@50hz,720P@60hz,
1080P@24hz,1080P@50hz,1080P@60hz,4K@24hz,4K@30hz,
4K@60hz YUV4:2:0, 4K@ 60hz YUV4:4:4
4
Page 5
Operating Instruction
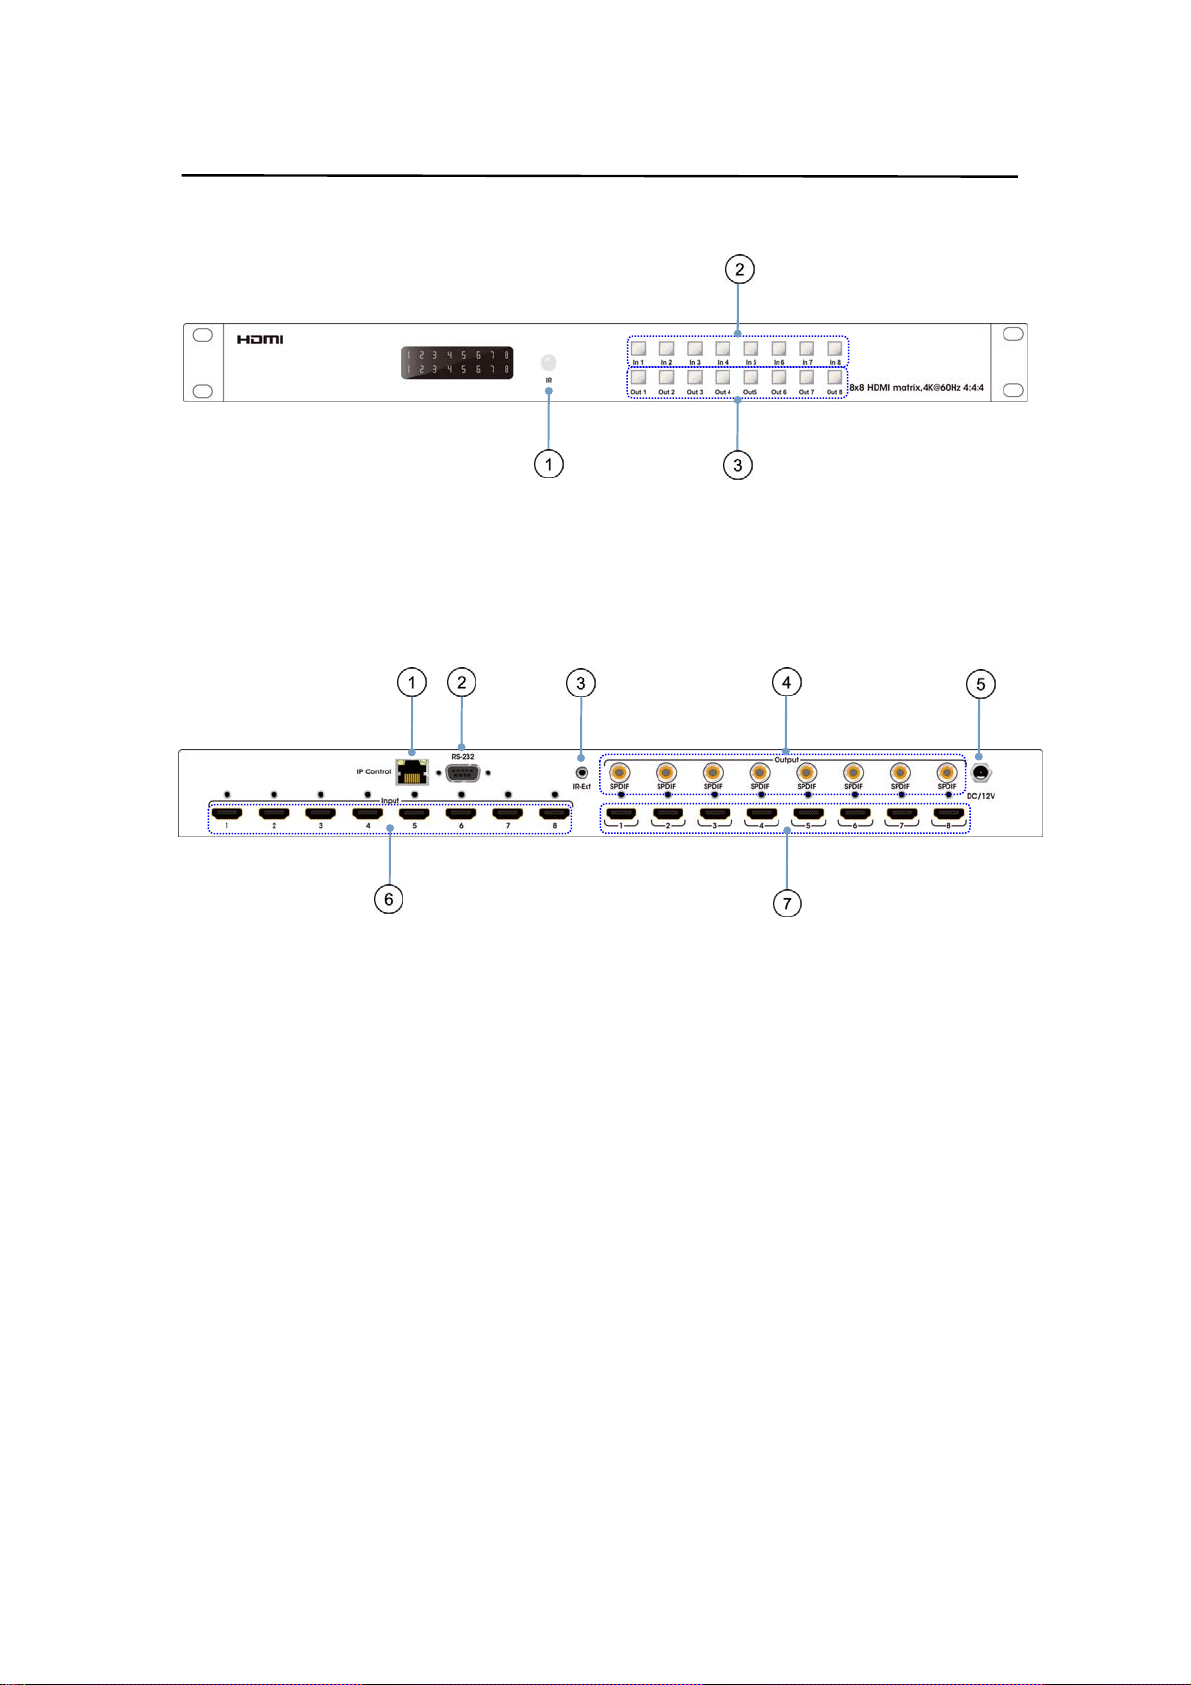
4. Panel Descriptions
① IR receive window.
② Input button IN1~8: choose the desired input port from ports 1~8.
③ Output button OUT1~8: choose the desired output port from ports 1~8.
① IP control.
② RS232 for control.
③ For IR external receiver cable.
④ SPDIF Audio output.
⑤ DC power input.
⑥ HDMI input port.
⑦ HDMI output port.
5
Page 6
Operating Instruction
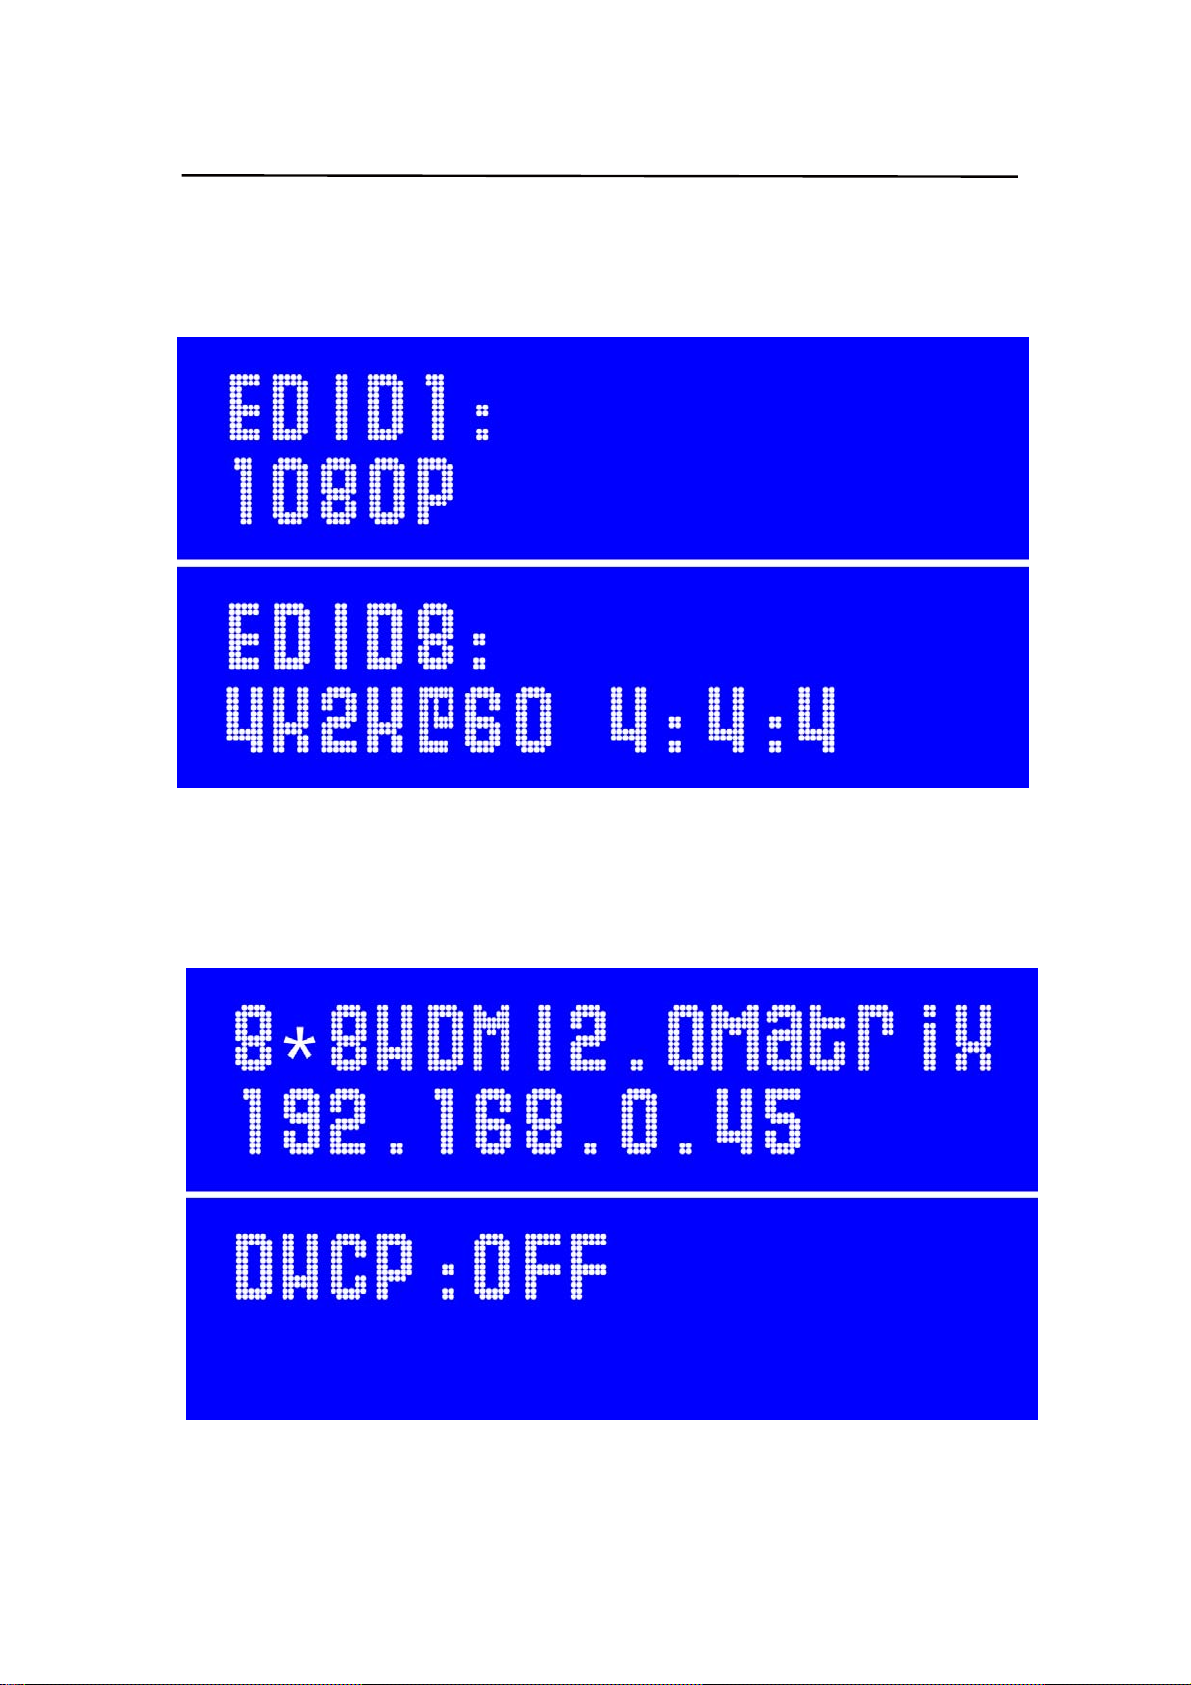
Check the EDID Information by Panel button
Press “In4”for 3 seconds ,then press “In1”or “Out1” to check the EDID information for
each HDMI input.
Press “In5” for 3 seconds, then press “In1” or “Out1” to check the device name , IP
address and DHCP status.
6
Page 7
Operating Instruction
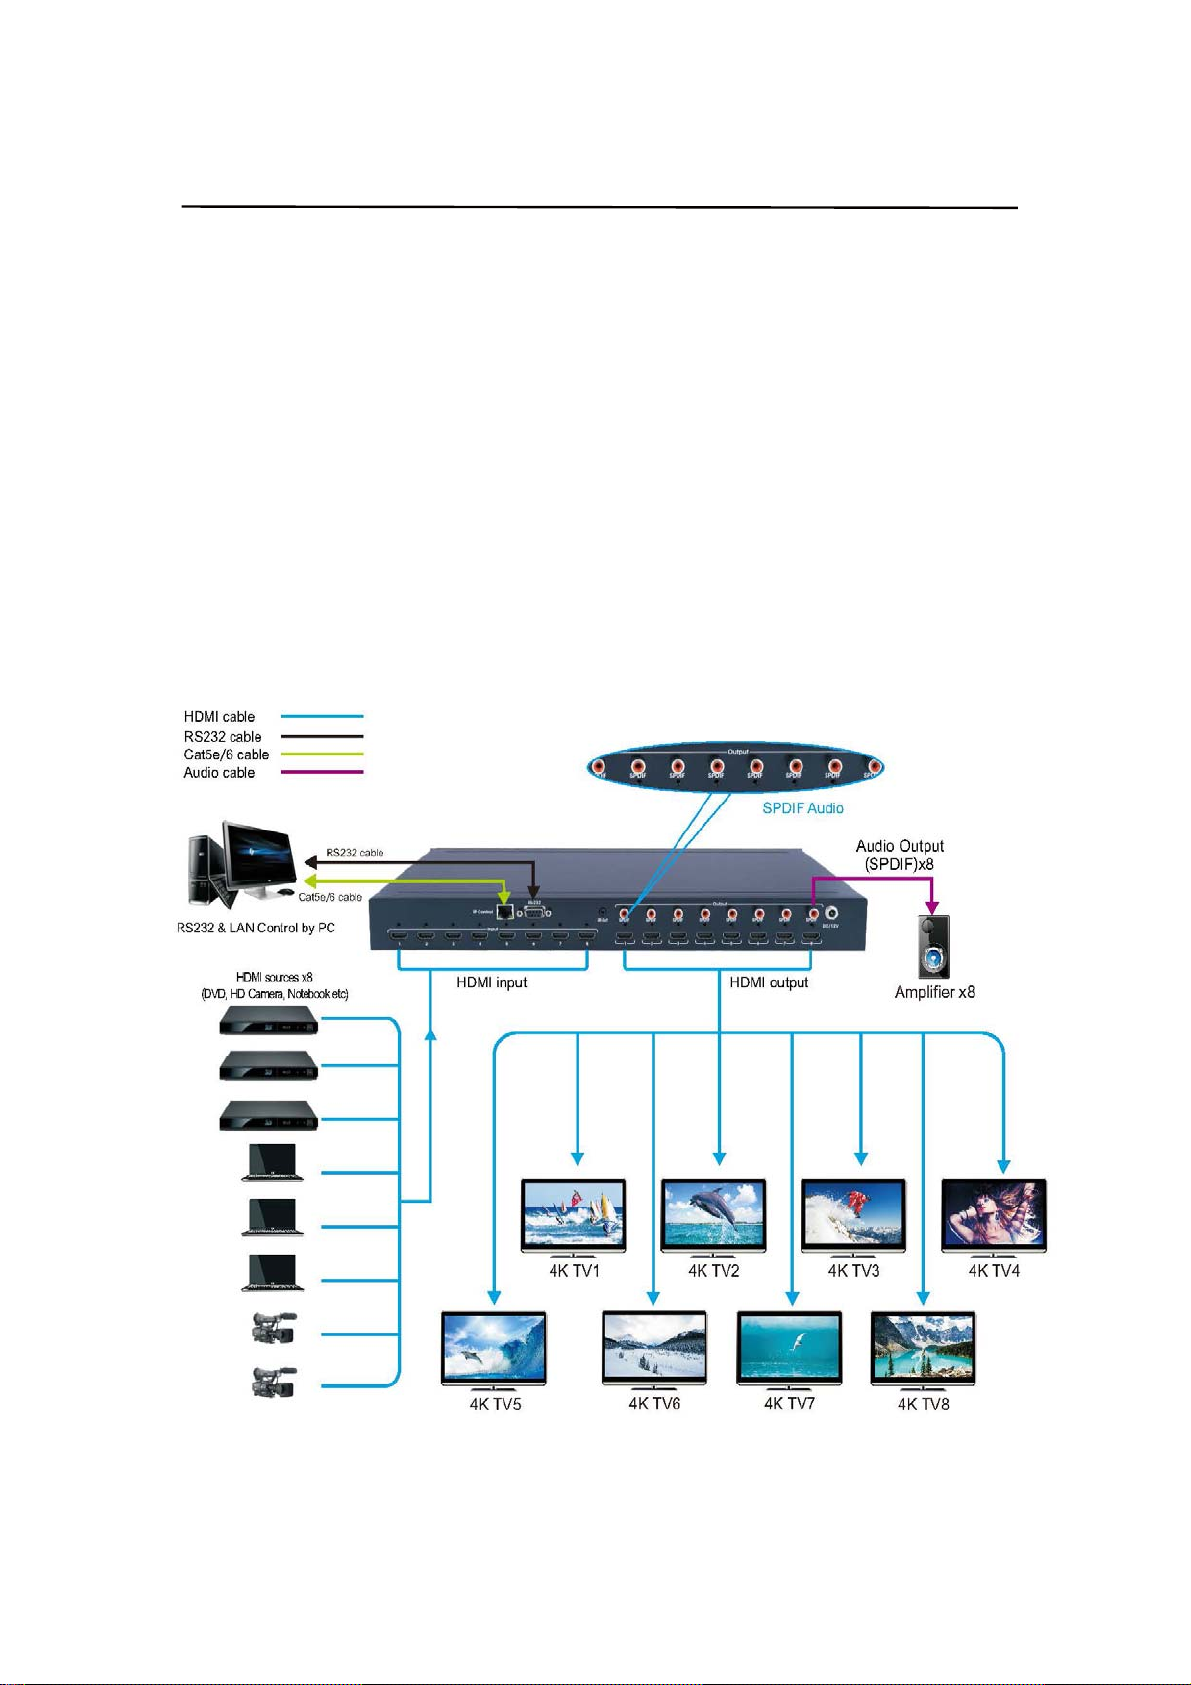
5. Connecting and Operating
1. Connect source devices to input ports of the matrix
2. Connect HDMI output ports to TV or other HDMI sink devices.
3. Optional: connect RS232 cable from PC RS232 port.
4. Optional: connect an Ethernet cable from the TCP/IP port on the matrix to a local area
network.
5. Connect 12V POWER supply to DC power socket.
Power ON the matrix, HDMI sources and displays.
6.
6. Application Diagram
7
Page 8
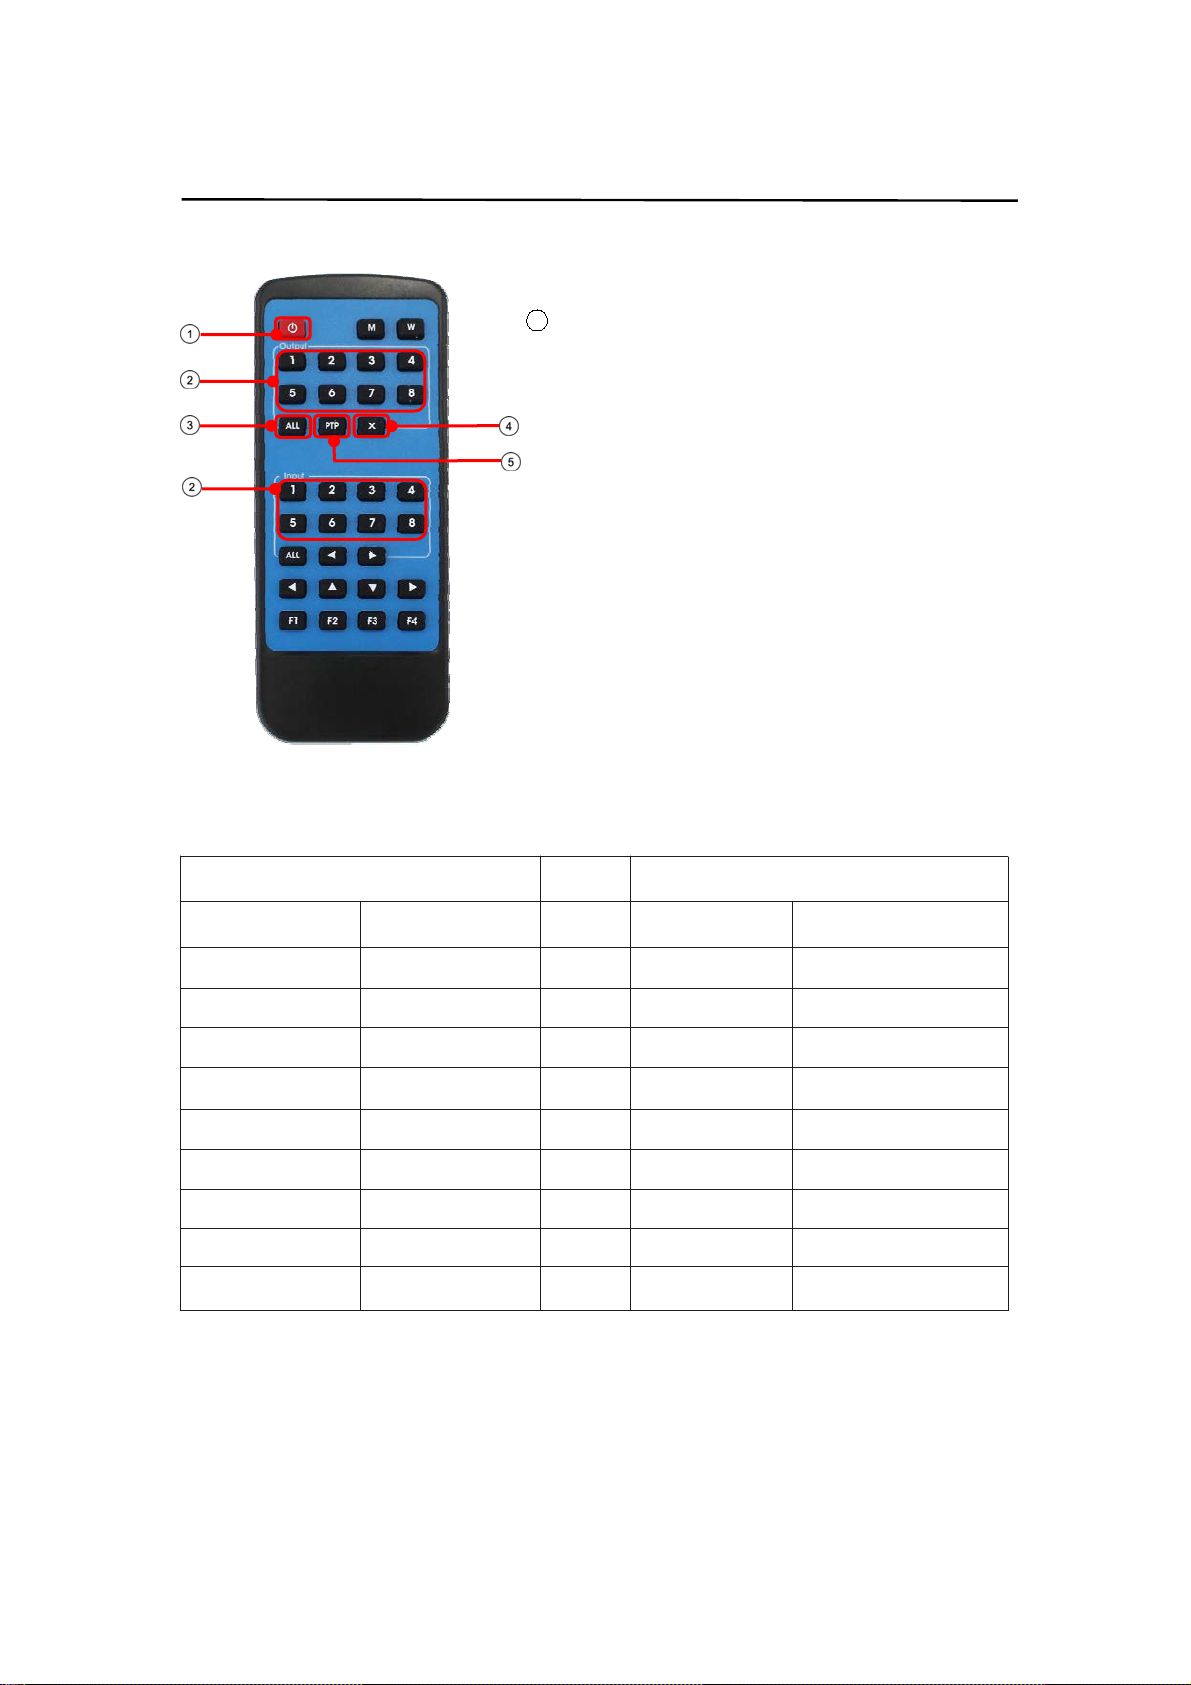
7. Remote Control Description
Operating Instruction
1 Standby Mode.
OUTPUT-X select INPUT-Y:
②
Press OUTPUT-X (X = 1 to 8 of outputs)
Press INPUT-Y (Y = 1 to 8 of inputs)
③
All outputs select INPUT-Y:
Press ALL button in zone "OUTPUT"
Press INPUT-Y button (Y = 1 to 8 of inputs), then
INPUT-Y will be switched to ALL OUTPUTS.
④ Cancel Button: Cancel the switching operation
⑤ PTP button: Mirror all inputs and outputs
(Ex. Input 1 to output 1, input 2 to output 2, etc):
Press PTP button in Zone "OUTPUT".
8. RS232 Pin Assignment
Matrix Remote Control Console
PIN Assignment PIN Assignment
1NC 1 NC
2Tx 2 Rx
3Rx 3 Tx
4NC 4 NC
5 GND 5 GND
6NC 6 NC
7NC 7 NC
8NC 8 NC
9NC 9 NC
Baud Rate: 115200 bps
Data Bits: 8 bit Parity: None Stop Bit: 1 bit
Flow Control: None
8
Page 9
Operating Instruction
9. RS232 Control
9.1 Software control
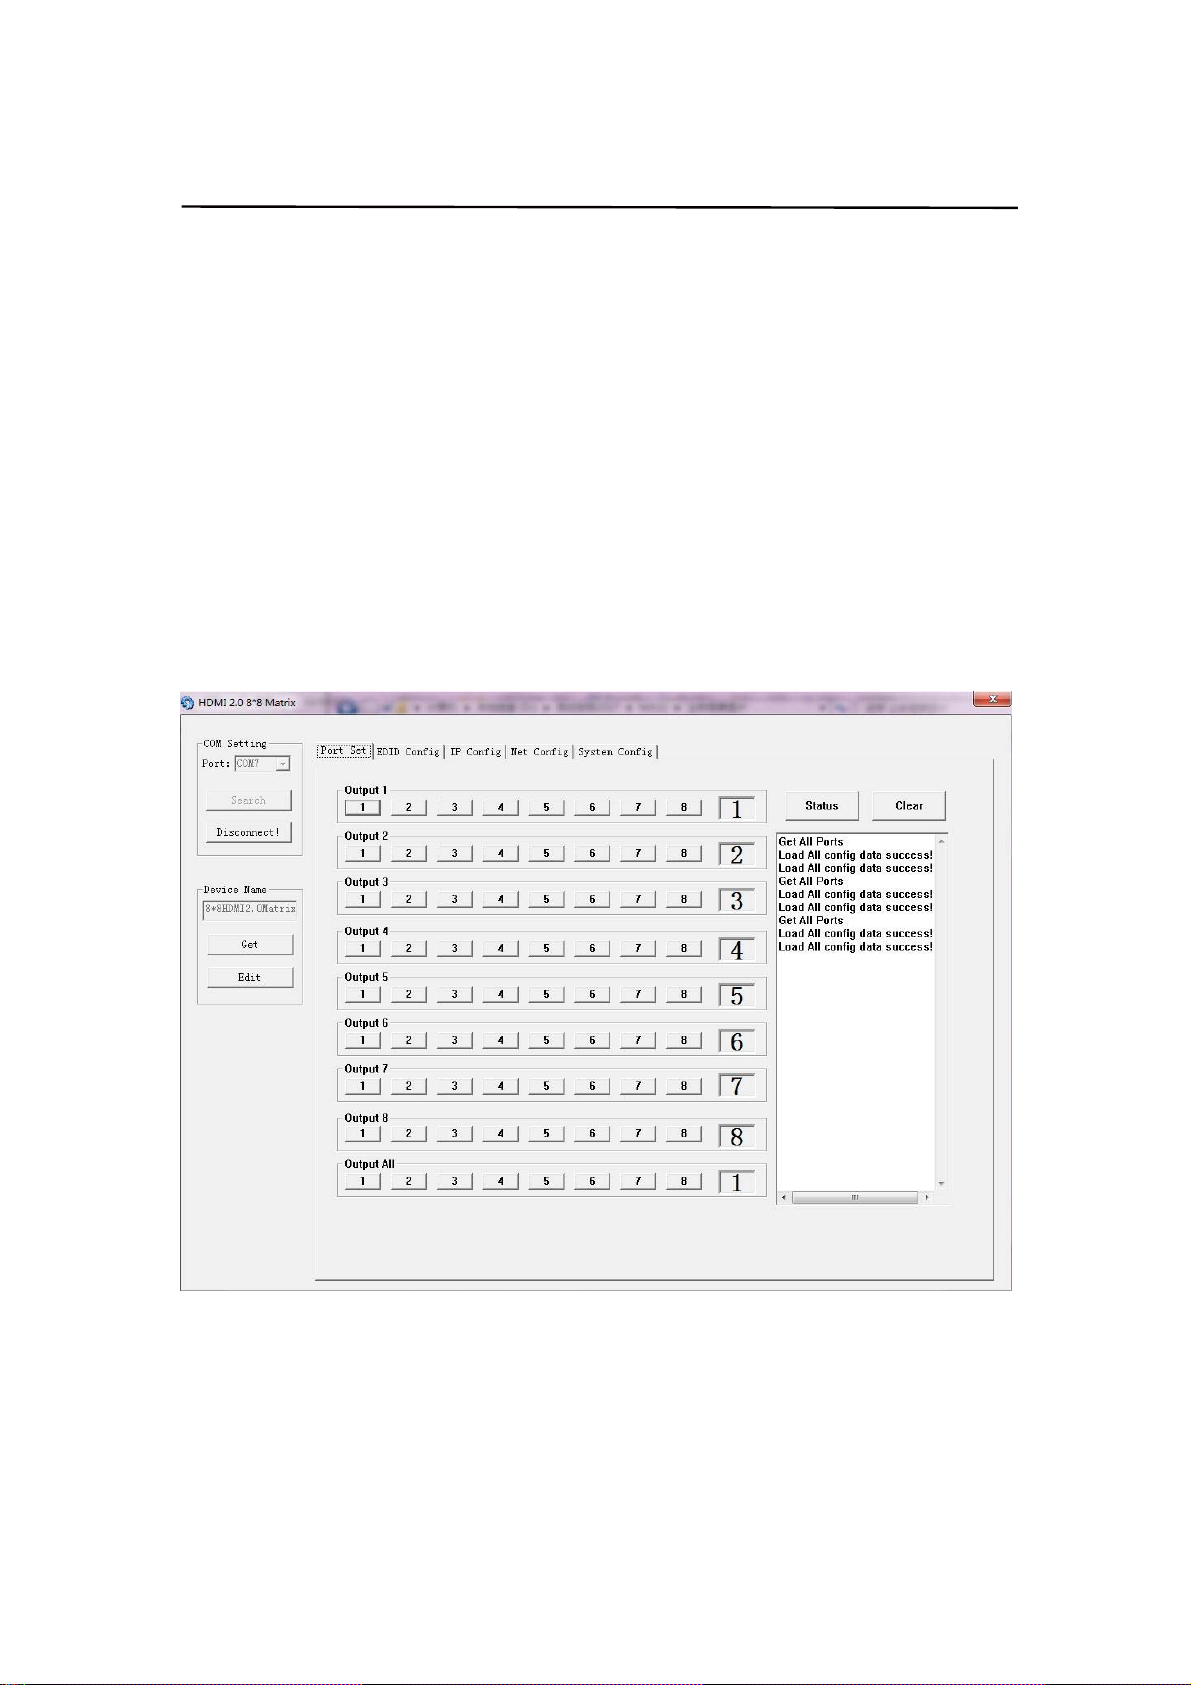
Connect the 8x8 Matrix to PC with a RS232 cable, download and open the software on
your PC. On the COM Setting session, select the COM port according to your PC and
click Connect to get connected.
On this COM setting session, you can also change the Device name, Device name
support up to 16 characters. Save or edit your status by clicking the Edit button.
Open a Port Set session to select or switch your input sources for each output, We can
read the current status by clicking the “Status” button, or Clear our historical operating
record by clicking “Clear” button. The box below "Status" shows the operating history.
Picture 1
9
Page 10
Operating Instruction
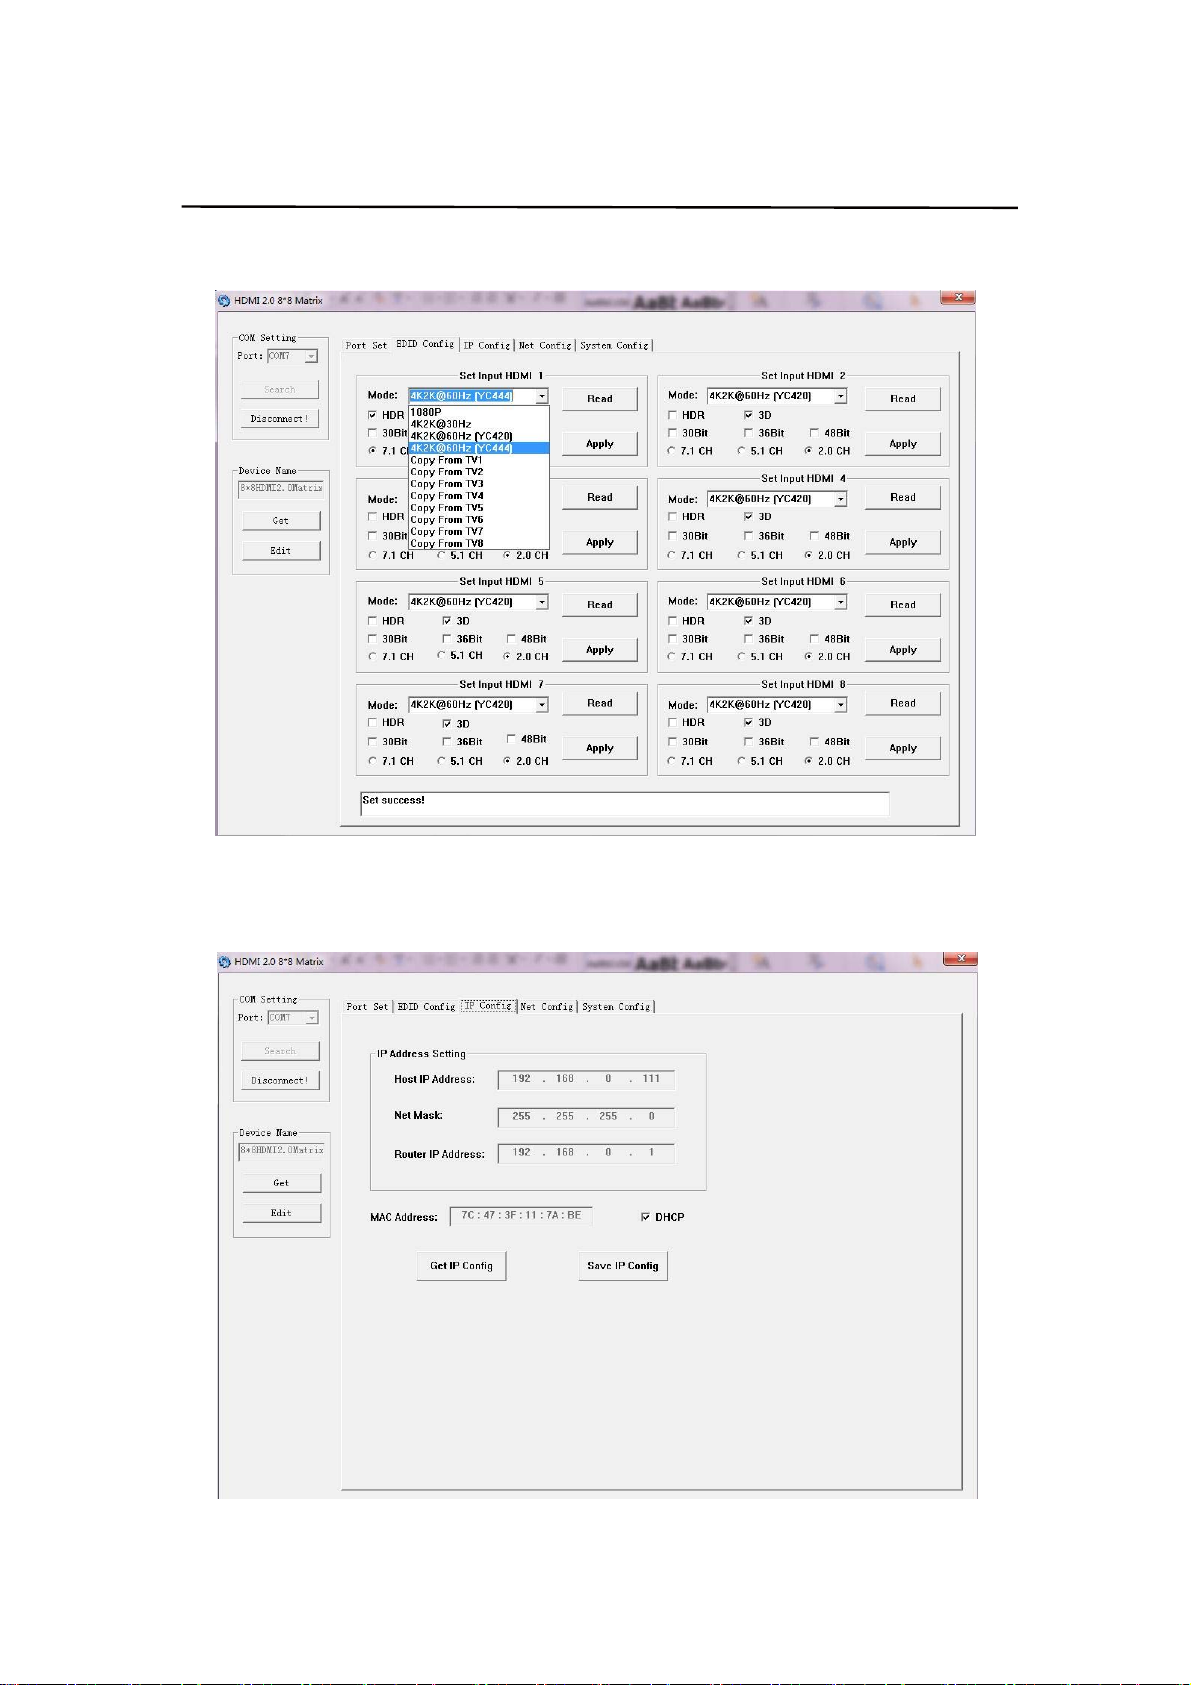
The EDID session helps us to Read and Configure EDID for each input, such as HDR, 3D,
Data rates and Audio channel.
Picture 2
The IP configure session helps to read and configure the IP address and MAC of the
Matrix. Check DHCP if you want the router to automatically assign an IP for the Matrix.
Picture 3
10
Page 11
Operating Instruction
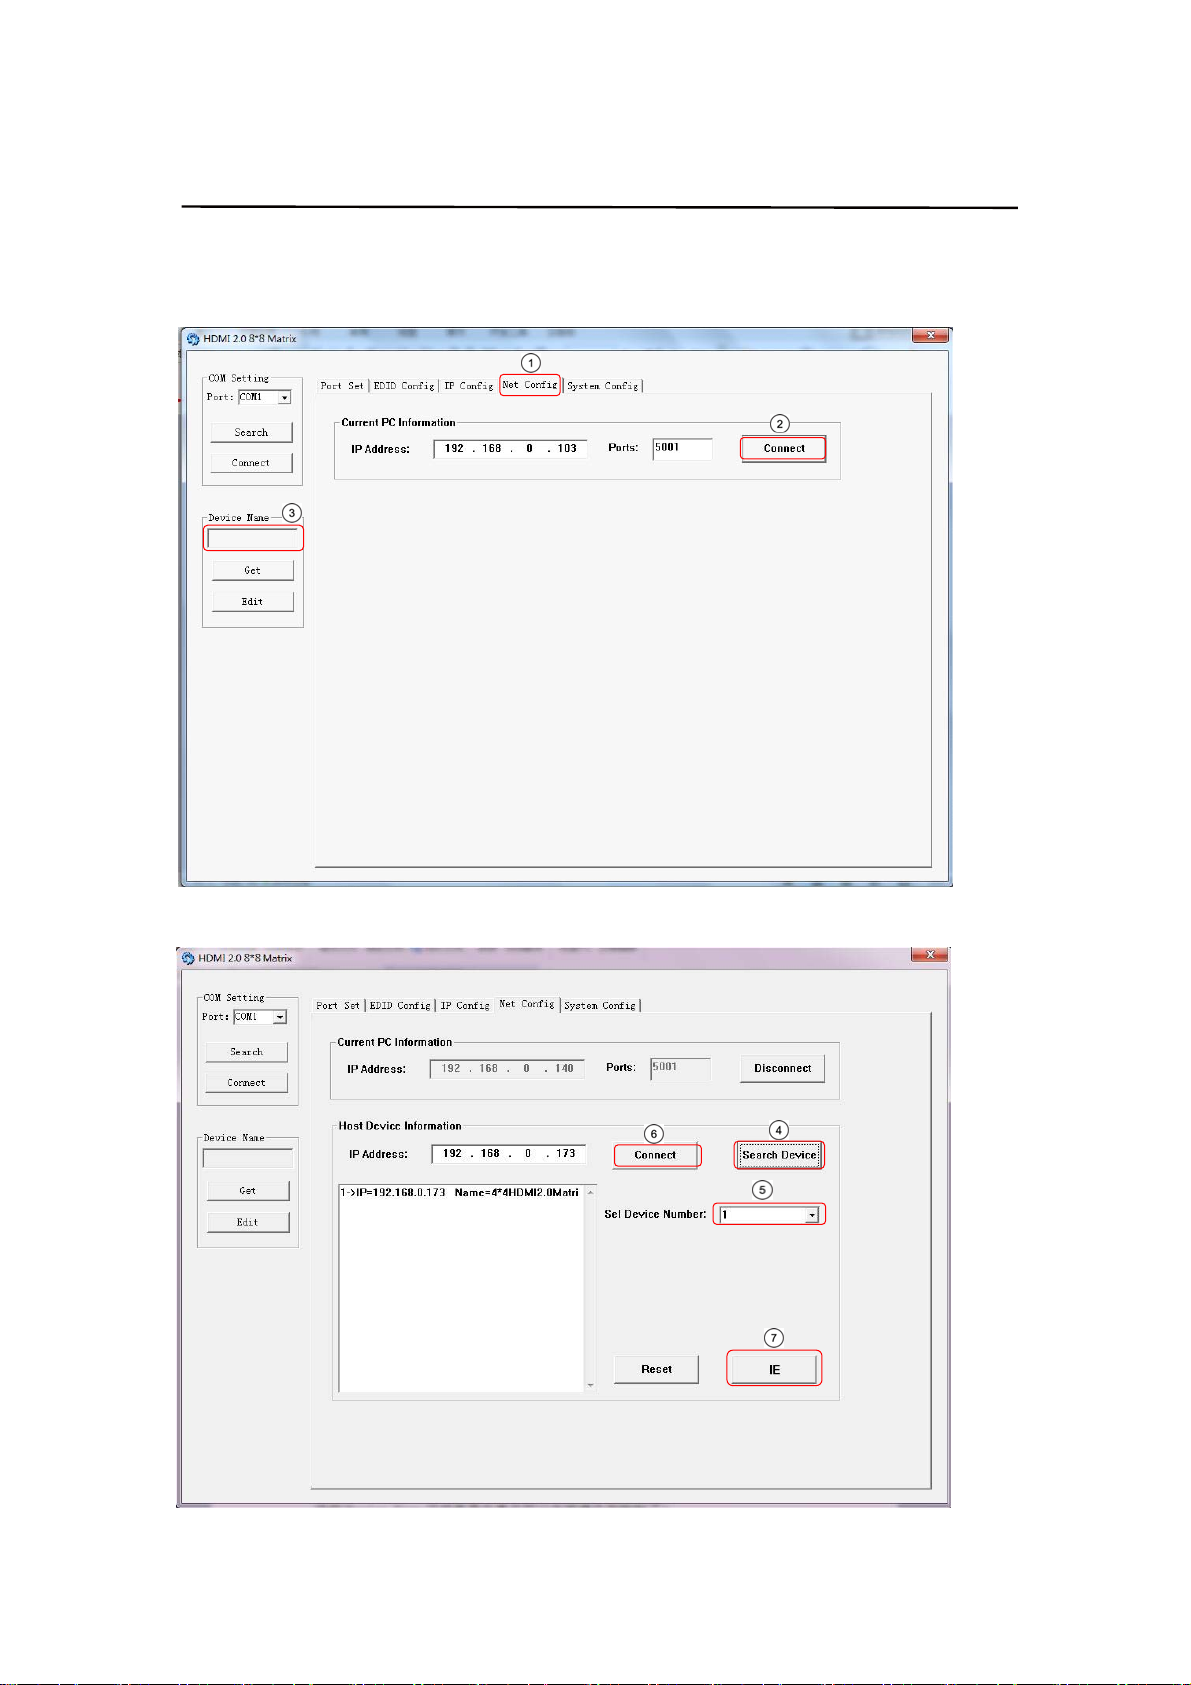
The Net Config session allows us to configure the PC and Matrix in the same LAN with the
IP Address and connection.
Click “Net config” → “Connect” → “Search Device” → “Sel Device Number” →“Connect”
then
you can see the device name, which means it connected successfully.
Picture 4
You can also click “IE”, easy and click to enter into web.
Picture 5
11
Page 12
Operating Instruction
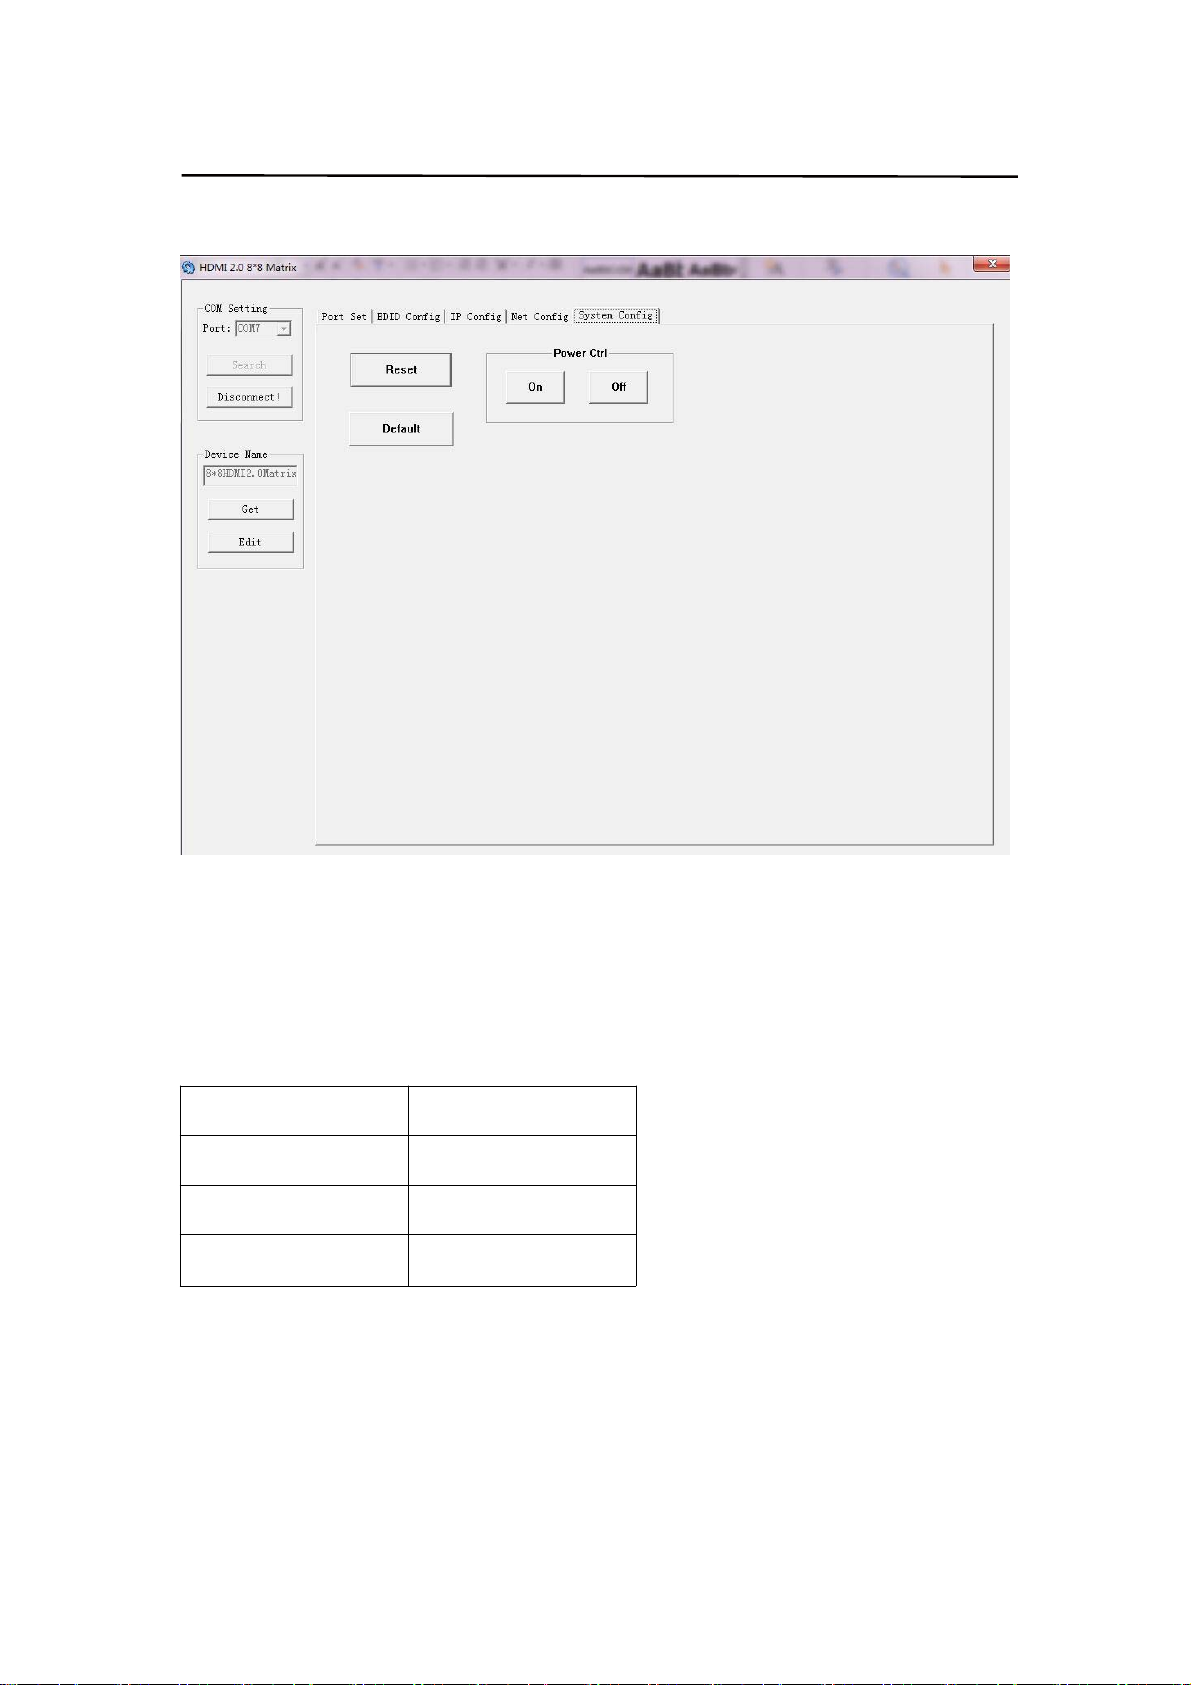
The last session is System Config, which allows power ON/OFF or system Reset, or
Default Reset of the Matrix.
9.2 Command Control
1). Open CommUart Assistant.
2). Comport setting:
Baud Rate: 1 15200 bps
Parity: None
Data Bits: 8 bit
Stop Bits: 1 bit
Picture 6
12
Page 13
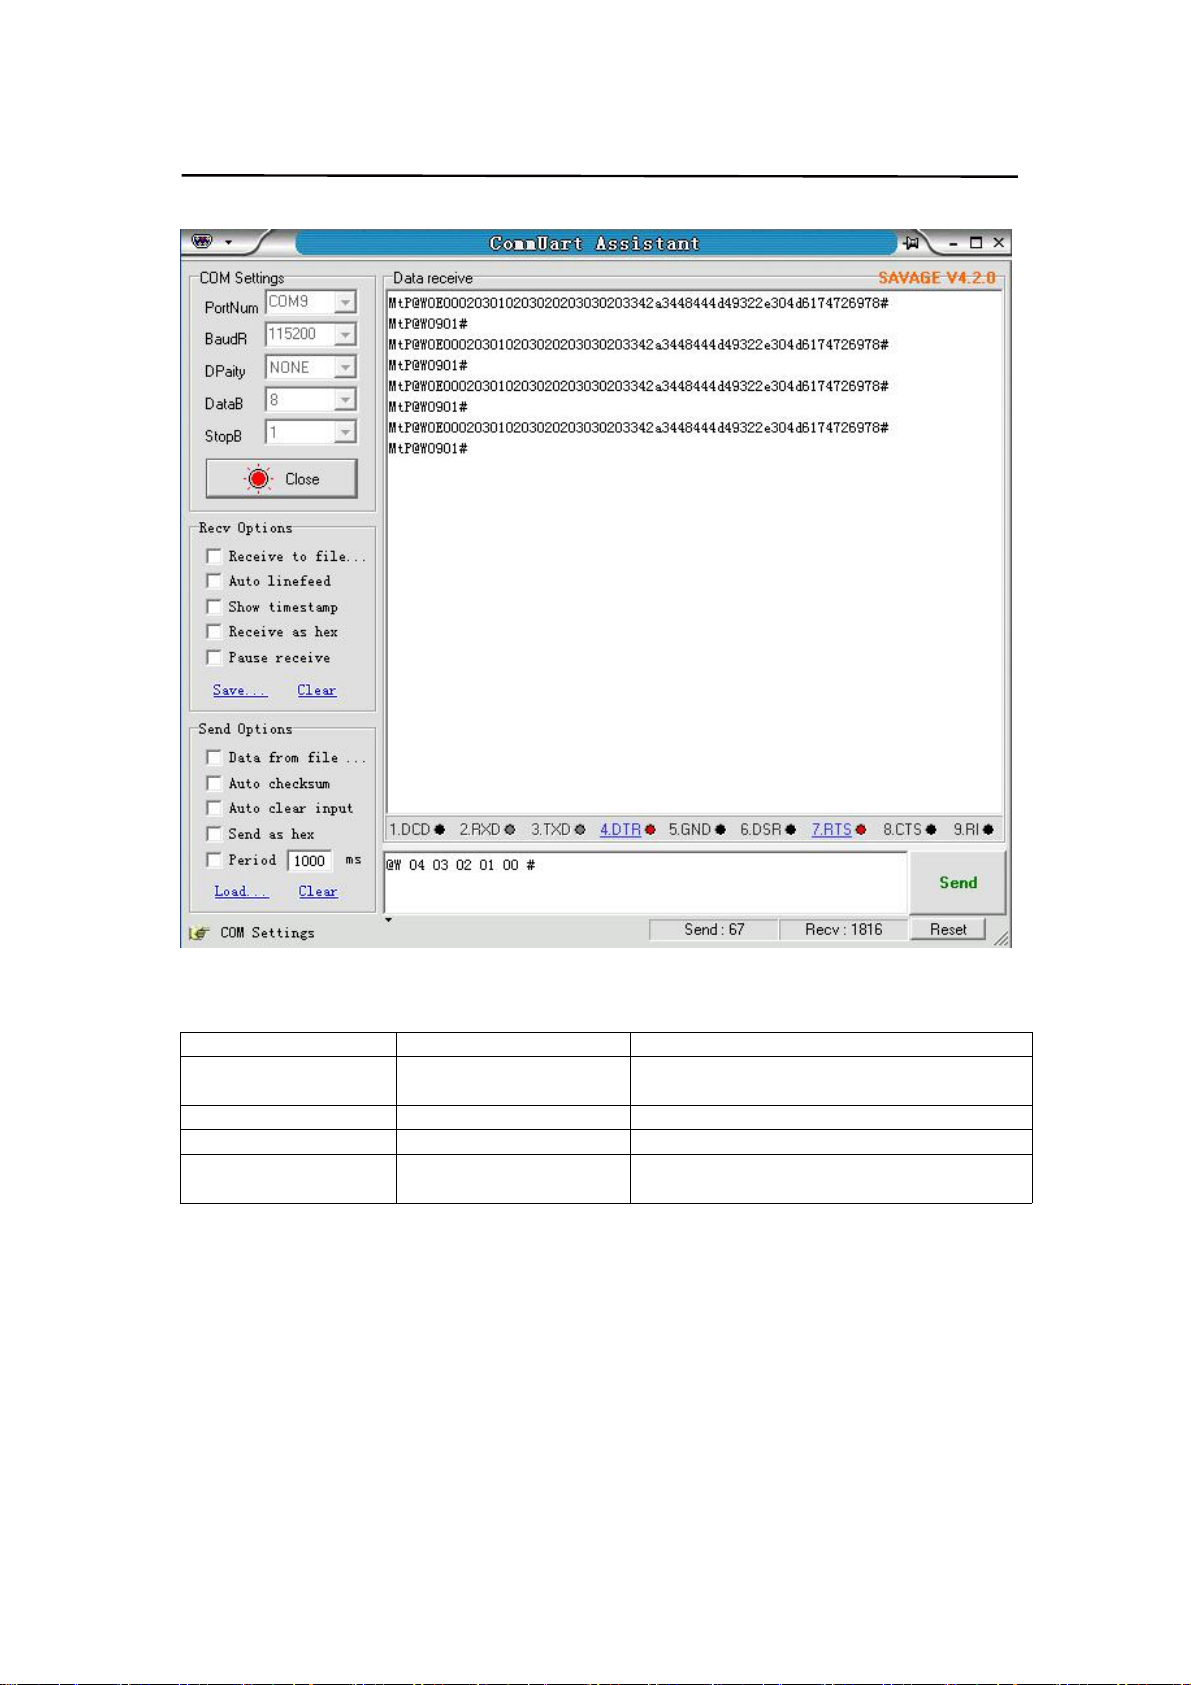
3). Enter Port Command in Send options.
Operating Instruction
Picture 7
4). Command
Command Function Note
@W 04 00 01 02 03 ...# PTP Function
@W 50 # Reboot
@W 51 # Restore Factory Setting
@W 0F 00 # Standby
Mirror all inputs and outputs
(Ex. Input 1 to output 1, input 2 to output 2, etc)
00: Standby Mode
01: Cancel “Standby Mode”
13
Page 14

5). Select HDMI input for HDMI output
Command Description
00 Output1
01 Output2
02 Output3
03 Output4
11 Output5
12
13 Output7
14
04 All Output
00 Input1
01 Input2
02 Input3
03 Input4
04 Input5
05 Input6
06 Input7
07 Input8
Output6
Output8
E.g: @W 00 00 #: Ouput 1 display Input1
Operating Instruction
Ouput 1 Input1
6). EDID Setting
@W XX AA BB #:
Parameter Description:
XX for configuration of “INPUT EDID”
Command 05 06 07 08 15 16 17 18
Description Input1 Input2 Input3 Input4 Input5 Input6 Input7 Input8
AA for selecting “Video Mode”
Command 00 01 02 03
Description 1080P 4K2K_30 4K2K_60(YC420) 4K2K_60(YC444)
BB for selecting belowing function
Bit7 Bit6 Bit5 Bit4 Bit3 Bit2 Bit1 Bit0
HDR 48Bit 36Bit 30Bit 7.1CH 5.1CH 2CH 3D
1 1 1 1 1 1 1 1
0 0 0 0 0 0 0 0
“1” : select the function, “0” : not select the function.
E.g: 11001001: HDR, 48Bit, 7.1CH, 3D
Chang Binary code “11001001” to hexadecimal format “C9”.
E.g: @W 05 03 C9 #
The EDID of input 1 is: 4K2K_60(YC444)、HDR、48Bit、7.1CH、3D.
14
Page 15
Operating Instruction
10. Web Control
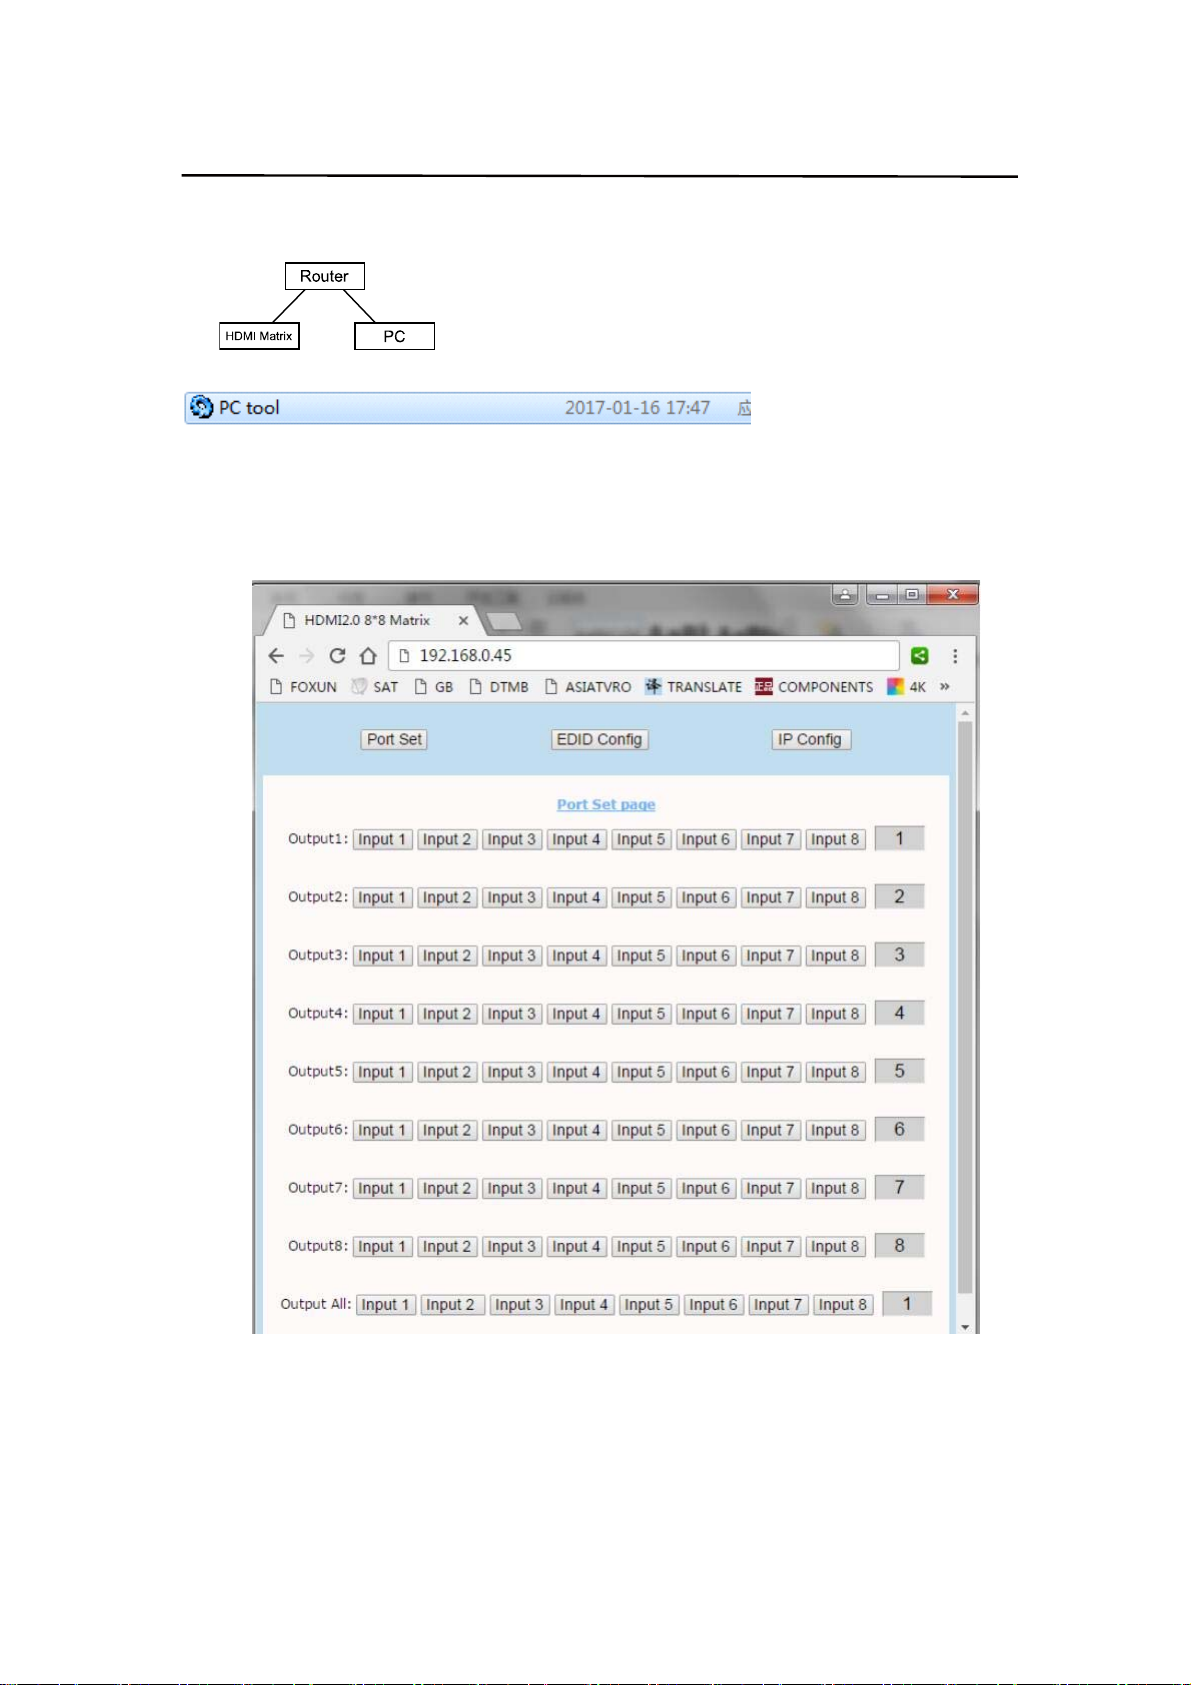
1). Connect the HDMI Matrix and PC to the LAN.
2). Open the PC tool (download from our website).
3). Search the IP address of HDMI Matrix, please refer to picture 4 & picture 5.
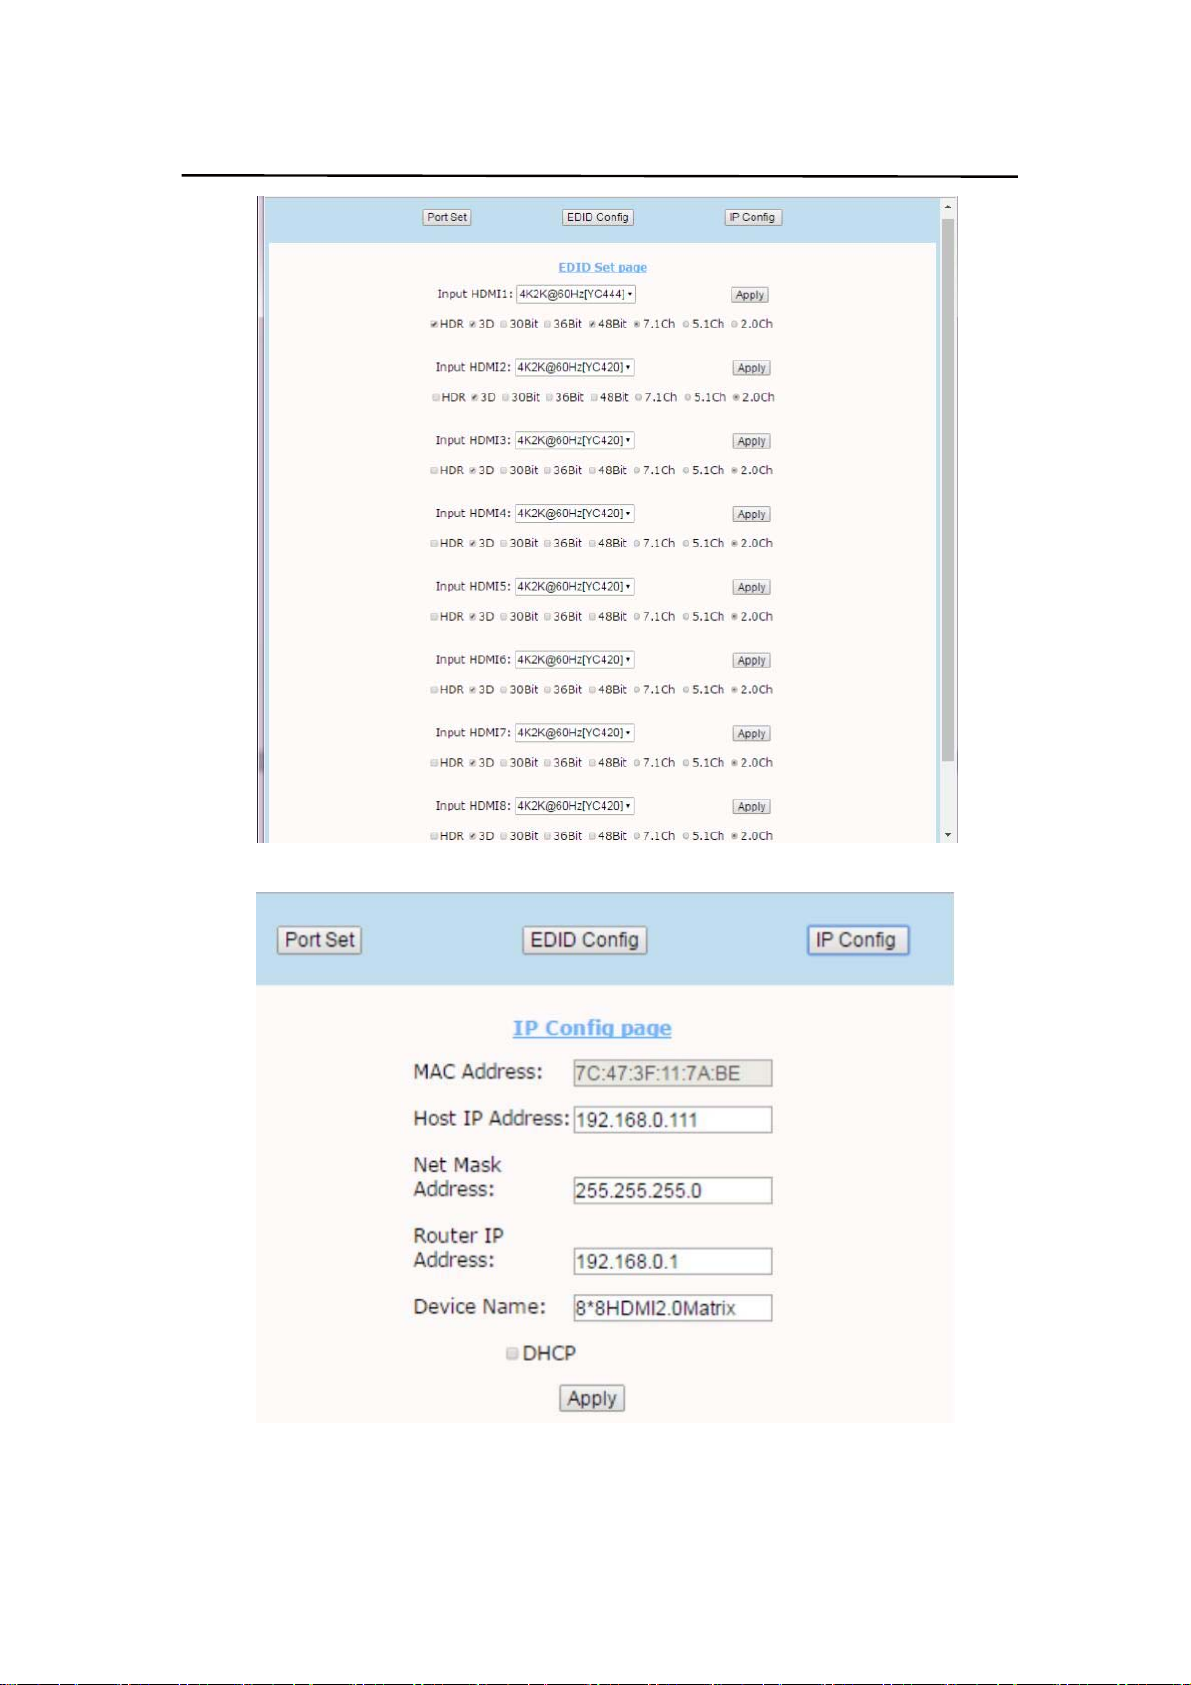
4). Open the web browser and enter the IP address you searched, then you can set the
function as below pictures:
Picture 8: Port Setting Page
15
Page 16
Operating Instruction
Picture 9: EDID Setting Page
Picture 10: IP Configuration Page
16
Page 17

Operating Instruction
MAINTENANCE
Clean this unit with a soft, dry cloth. Never use alcohol, paint thinner of benzine to clean
this unit.
PRODUCT SERVICE
(1)Damage requiring service:
The unit should be serviced by qualified service personnel if:
(a) The DC power supply cord orAC adaptor has been damaged;
(b) Objects or liquids have gotten into the unit;
(c) The unit has been exposed to rain;
(d) The unit does not operate normally or exhibits a marked change in performance;
The unit has been dropped or the cabinet damaged.
(2)Servicing Personnel: Do not attempt to service the unit beyond that described in
these operating instructions.Refer all other servicing to authorized servicing personnel.
(3)Replacement parts: When parts need replacing ensure the servicer uses parts
specified by the manufacturer or parts that have the same characteristics as the
original parts. Unauthorized substitutes may result in fire, electric shock, or other
Hazards.
(4)Safety check: After repairs or service, ask the servicer to perform safety checks to
confirm that the unit is in proper working condition.
17
MAN294 7/27/17
 Loading...