

Page 1

NTI
R
NETWORK
TECHNOLOGIES
INCORPORATED
1275 Danner Dr
Aurora, OH 44202
www.nti1.co m
Tel:330-562-7070
Fax:330-562-1999
UNIMUX-USBV-2 (2-Port USB KVM Switch)
INSTALLATION / USER GUIDE
MAN027 Rev Date 1/14/2003
Page 2

WARRANTY INFORMATION
The warranty period on this product (parts and labor) is one (1) year from the date of purchase. Please contact Network
Technologies Inc at (800) 742-8324 (800-RGB-TECH) in the US and Canada or (330) 562-7070 (worldwide) for information
regarding repairs and/or returns. A return authorization number is required for all repairs/returns.
COPYRIGHT
Copyright © 2003 by Network Technologies Inc. All rights reserved. No part of this publication may be reproduced, stored in a
retrieval system, or transmitted, in any form or by any means, electronic, mechanical, photocopying, recording, or otherwise,
without the prior written consent of Network Technologies Inc, 1275 Danner Drive, Aurora, OH 44202
CHANGES
The material in this guide is for information only and is subject to change without notice. Network Technologies Inc reserves the
right to make changes in the product design without reservation and without notification to its users.
TABLE OF CONTENTS
INTRODUCTION.............................................................................................................................................................1
MATERIALS....................................................................................................................................................................1
FEATURES AND FUNCTIONS.......................................................................................................................................2
INSTALLATION...............................................................................................................................................................3
USING THE NTI SWITCH...............................................................................................................................................5
CPU Select ..................................................................................................................................................................5
Keyboard Control.........................................................................................................................................................5
Command Mode..........................................................................................................................................................6
Scan Mode...................................................................................................................................................................7
Broadcast Mode...........................................................................................................................................................7
Normal Mode...............................................................................................................................................................7
Mice and Trackballs with MACs ..................................................................................................................................7
KEYBOARD FEATURES................................................................................................................................................8
Keyboard-To-Computer Translation............................................................................................................................8
Translation Capabilities ...............................................................................................................................................8
Translation Tables.......................................................................................................................................................8
Country Codes...........................................................................................................................................................10
TECHNICAL SPECIFICATIONS...................................................................................................................................11
TROUBLESHOOTING..................................................................................................................................................11
Page 3

INTRODUCTION
INTRODUCTION
The UNIMUX-USBV-2 (formerly referred to as KEEMUX-USBV-2U) USB KVM switch allows one user to access two USB CPUs
with only one USB keyboard, USB mouse, and 15HD VGA monitor. Internal microprocessors allow both CPUs to boot
simultaneously and error-free. Port selection is accomplished by a front panel push button or commands typed on th e keyboard.
Types of User Input Devices Supported:
• USB keyboard with Windows
®
layout
• USB keyboard with SUN layout
• USB keyboard with MAC layout with mouse
• USB Mouse - (up to 3 buttons)
• USB IntelliMouse
®
(scrollwheel)
• NTI USB-Sun Adapter
• USB Hub
• Microsoft, Logitech, and Kensington mice/trackballs
Types of CPUs Supported:
Any USB CPU supporting USB version 1.0 or above including:
• USB WINxx
• USB MAC
• USB SUN
Limitations
• A USB HUB can only be used provided only a USB keyboard and/or USB mouse are connected to its inputs.
NOTE: A Mac USB keyboard already has a hub incorporated and can only be connected to one of the inputs on the
switch, not to the HUB.
• The maximum number of input devices connected to a HUB is limited to one keyboard and one mouse. Composite devices
(NTI USB-Sun Adapter) should be counted as two USB devices (one keyboard and one mouse ) .
• The last device type (keyboard/mouse) plugged into the KEEMUX-USBV-2U-USB KVM switch will be the only active device
of that type.
NOTE: Removing the second keyboard (mouse) will not re-activate the first one. To make the first keyboard (mouse)
active, the first keyboard (mouse) should be re-plugged to the KEEMUX-USBV-2U USB KVM switch or HUB.
MATERIALS
MATERIALS
Materials Supplied with this kit:
1- NTI UNIMUX-USBV-U USB KVM Switch
1- 5VDC 2.0A AC Adapter
Materials Not Supplied, BUT REQUIRED:
A set of 2 cables for each USB CPU being connected to the switch must be used:
• VEXT-xx-MM for monitor interface
• USB-AB-xM for device (keyboard and mouse) interface.
Legend:
xx is the length of the cable in feet
M is an abbreviation for meters
MM indicates male-to-male connector
Cables can be purchased from Network Technologies Inc by calling (800) 742-8324 (800-RGB-TECH) in the US and Canada or
(330) 562-7070 (worldwide).
1
Page 4
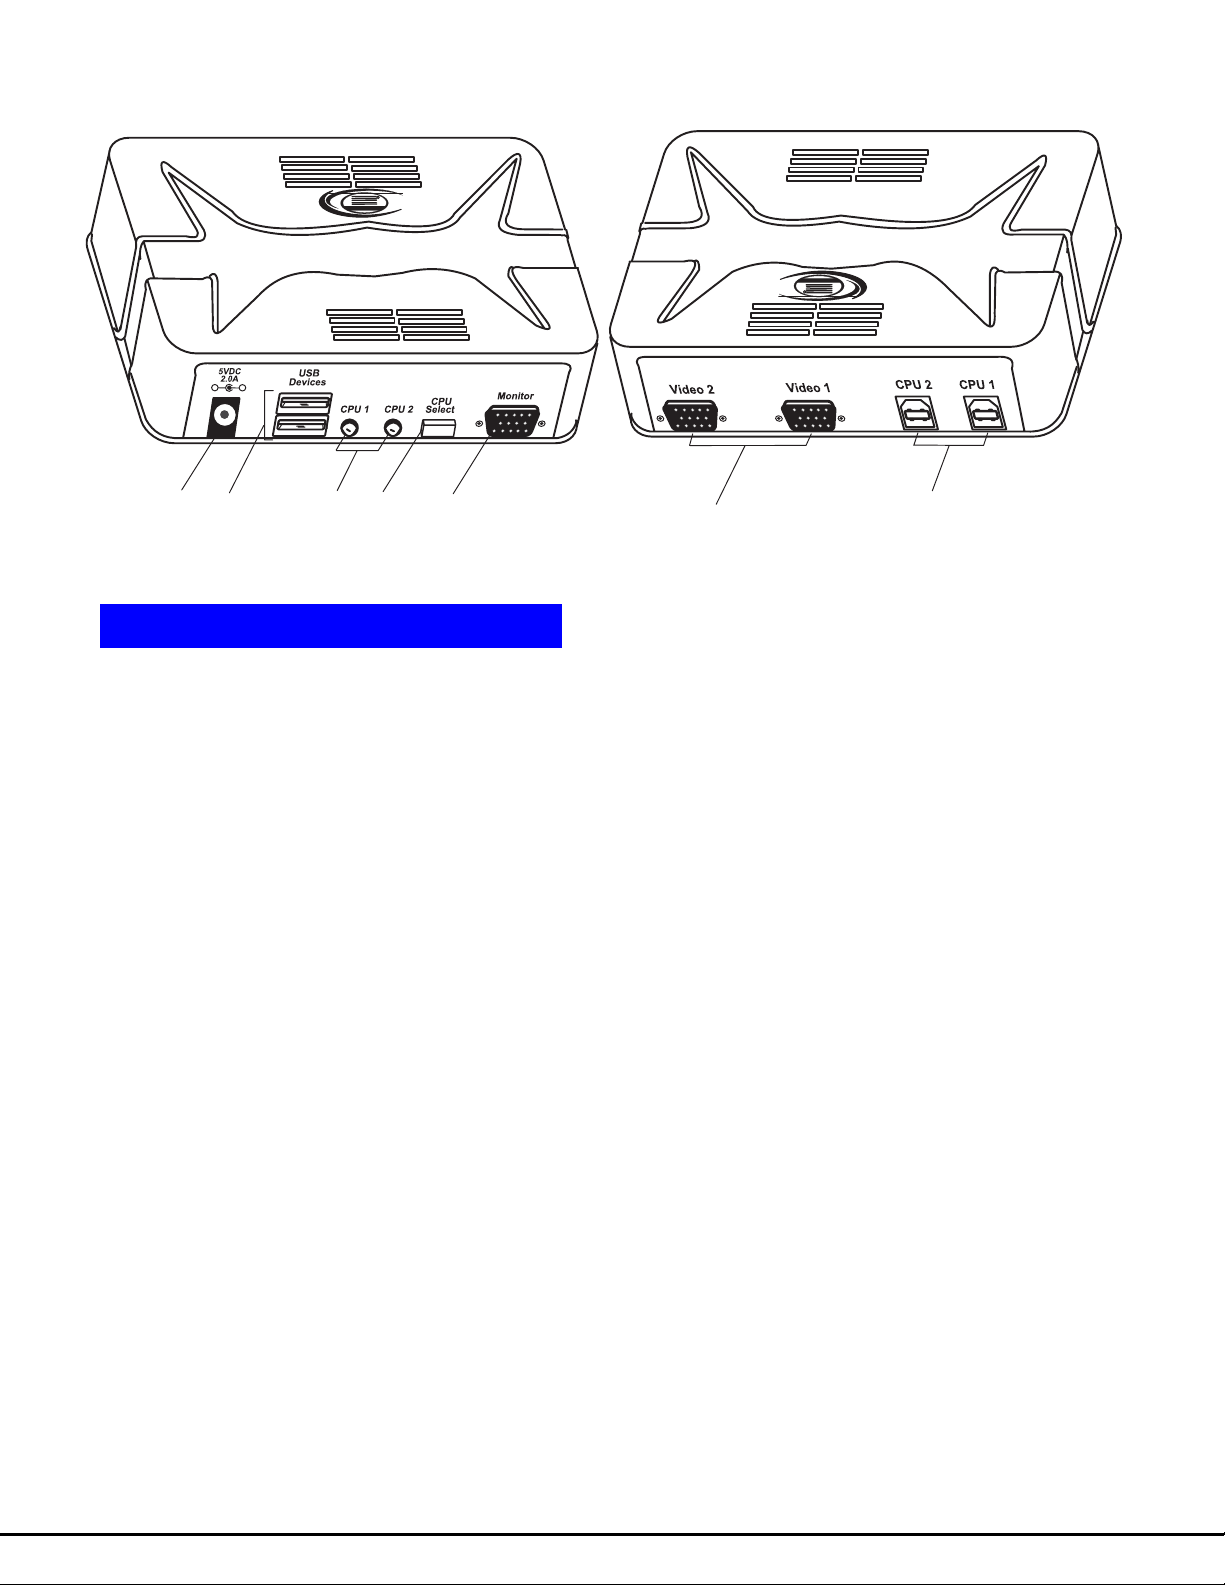
F r o n t V i e w o f U N I M U X - U S B V - 2
R e a r V i e w o f U N I M U X - U S B V - 2
R
N T I
N e t w o r k T e c h n o l o g ie s In c
U N I M U X
-
+
2
1
FEATURES AND FUNCTIONS
FEATURES AND FUNCTIONS
4
3
5
R
6
U N I M U X
N e t w o r k T e c h n o l o g ie s In c
N T I
1. 5VDC- connection jack for the AC adapter
2. USB DEVICES- USB type A female receptacles- for connection of user USB device(s)
7
3. CPU Status/Mode LEDs- for visual indication of switch connection between the user and a specific CPU as well
as mode status
4. CPU Select Switch- push to manually switch to a specific CPU or to change the switch operating mode
5. MONITOR- for connection of the user video monitor
6. VIDEO x- Video connectors- for connecting video cables from CPUs
7. CPU x- USB type B female receptacles-for connection of USB device cables from CPUs
2
Page 5
INSTALLATION
INSTALLATION
1. It is not necessary to turn OFF power to either of the CPUs that will be connected to the UNIMUX-USBV-2 USB KVM switch
before connecting or disconnecting any cables.
NOTE: If a CPU needs to identify a keyboard, it will be necessary to power ON the CPU after it is connected to the
UNIMUX-USBV-2 USB KVM switch and only after the keyboard is connected and the UNIMUX-USBV-2 USB KVM
switch is powered ON.
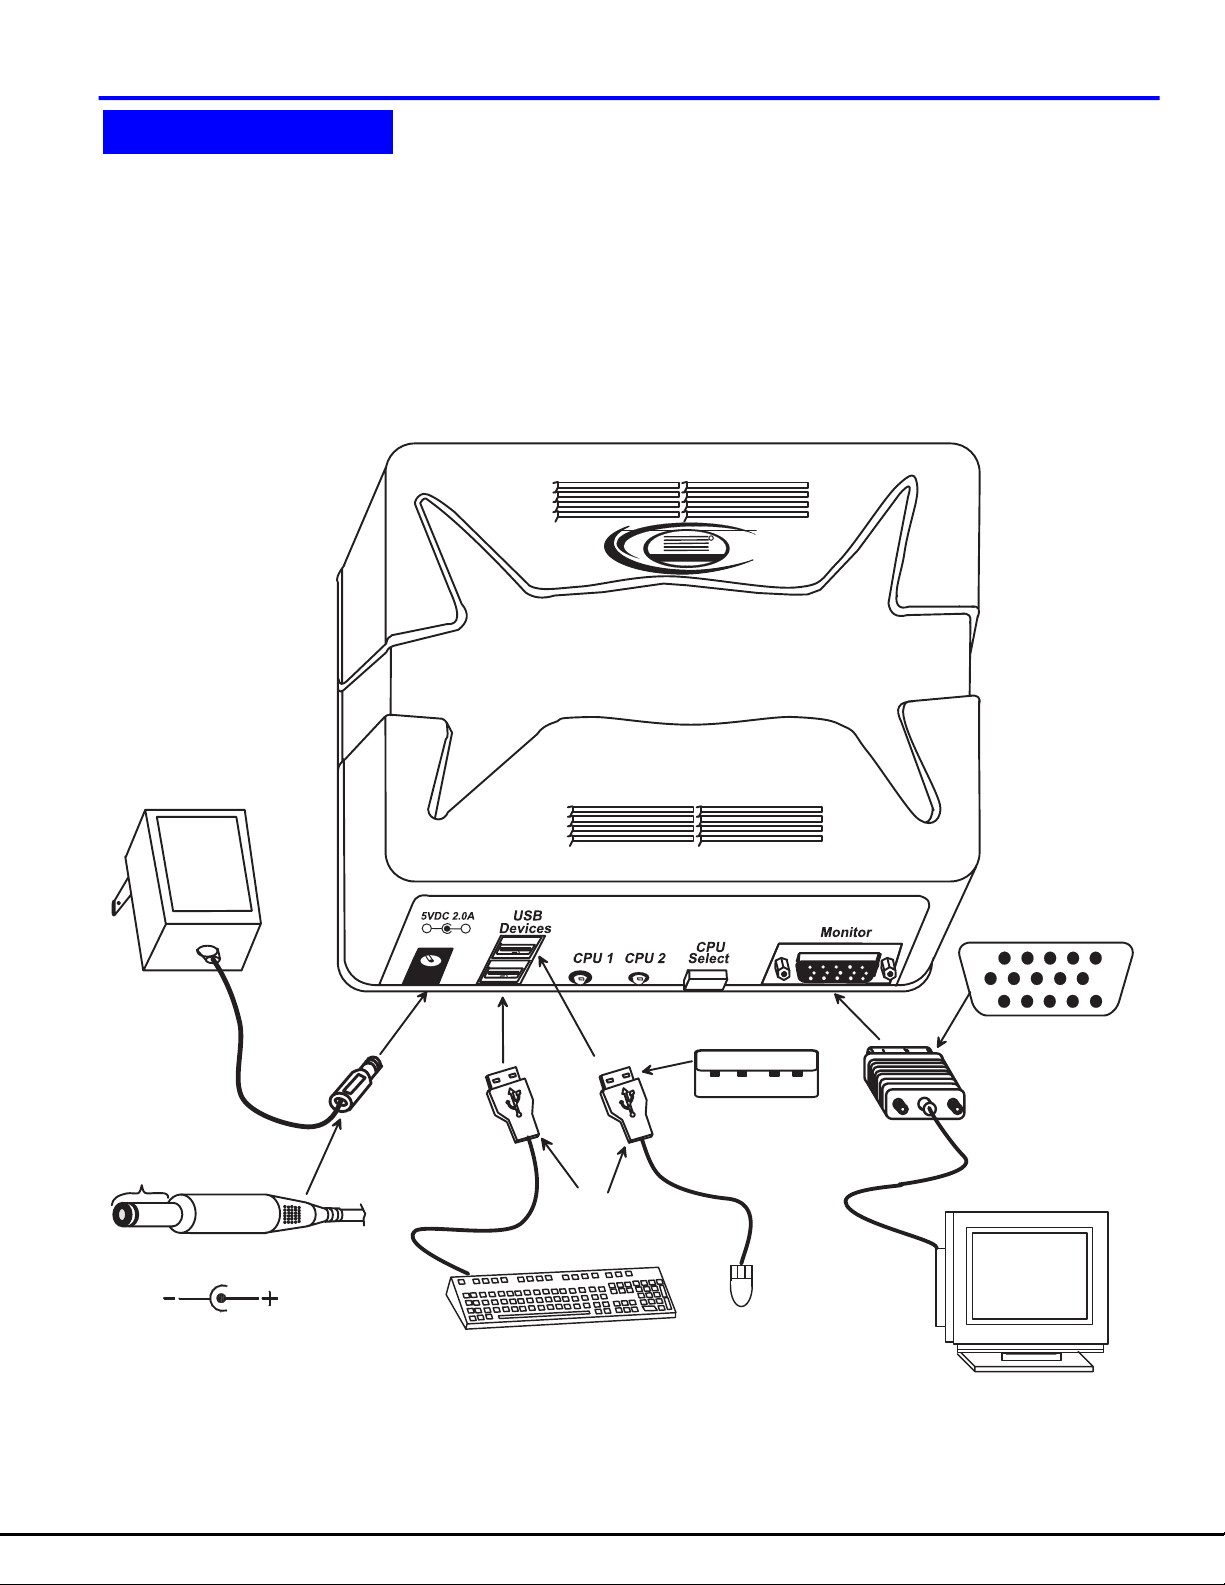
2. Connect a USB keyboard to a female USB type A port labeled "USB DEVICES" on the UNIMUX-USBV-2 USB KVM switch.
See Fig. 1.
3. Connect a USB mouse to the other female USB type A port labeled "USB DEVICES" on the UNIMUX-USBV-2 USB KVM
switch.
4. Connect a VGA multi-scan monitor to the female 15HD VGA port labeled "MONITOR" on the UNIMUX-USBV-2 USB KVM
switch. Be sure to tighten the two screws on the monitor cable connector to the UNIMUX-USBV-2 USB KVM switch
securely.
R
N T I
N e t w o r k T e c h n o l o g i e s I n c
5 V D C
A d a p t e r
A C
A D A P T E R
B a r r e l
P o w e r C o n n e c t o r
5 V D C @ 2 . 0 A O U T P U T
( O u t s i d e
b a r r e l )
2 . 1 m m x 5 . 5 m m F e m a l e
( I n s i d e
b a r r e l )
U N I M U X
1 5 H D m a l e
-
+
U S B T y p e A m a l e
U S B T y p e A
M a l e C o n n e c t o r s
U S B
U S B K e y b o a r d
M o u s e
V i d e o C o n n e c t o r
V G A
M u l t i - S c a n
M o n i t o r
Fig. 1
3
Page 6

5. Using a USB-AB-x-MM cable connect the USB type A device port of a USB CPU to the USB type B port labeled "CPU 1" on
the UNIMUX-USBV-2 USB KVM switch.
6. Using a VEXT-xx-MM connect the video port of the same USB CPU connected in step 5 to the female 15HD port labeled
"VIDEO 1" on the UNIMUX-USBV-2 USB KVM switch . Be sure to tighten the two screws on the cable connector to the
UNIMUX-USBV-2 USB KVM switch securely.
7. Repeat steps 5 and 6 for connecting a second USB CPU to the ports labeled "CPU 2" and "VIDEO 2" . See Fig. 2.
U N I M U X
N e t w o r k T e c h n o l o g i e s I n c
N T I
R
U S B
T Y P E A
P O R T S
V I D E O
P O R T
R e a r V i e w o f U S B C P U
V E X T - x x - M M
U S B T y p e A m a l e
1 5 H D m a l e
V i d e o C o n n e c t o r
U S B - A B - x x M
U S B T y p e B m a l e
Fig. 2
4
Page 7

POWER-UP SEQUENCE
The UNIMUX-USBV-2 USB KVM switch can be powered at any time. The CPUs can be powered at any time although if a CPU
needs a keyboard and/or mouse at power-ON it should be powered after connecting to and powering-ON the UNIMUX-USBV-2
USB KVM switch. USB devices (keyboard and mouse) can be hot plugged to and from the UNIMUX-USBV-2 USB KVM switch at
any time. Remember, the last attached device is the active one.
USING THE NTI SWITCH
USING THE NTI SWITCH
The NTI UNIMUX-USBV-2 USB KVM switch can be operated by the CPU SELECT button on the side of the switch or by
keyboard control.
CPU Select
• Pressing the CPU SELECT button on the UNIMUX-USBV-2 USB KVM switch will toggle between CPU 1 and CPU 2 which
connects the selected CPU to the user's keyboard, monitor, and mouse.
• Holding down the CPU SELECT button for more than 2 seconds will cause the UNIMUX-USBV-2 USB KVM switch to cycle
through all modes of operation: COMMAND, SCAN, BROADCAST, and NORMAL (see pages 6 and 7 for Command, Scan,
Broadcast, and Normal mode sections). After the first change, modes will continue to change every 2 seconds as long as
the CPU SELECT button is still pressed in. The CPUx LEDs will indicate which mode the switch is in (see the table below).
Release the button when the desired mode has been selected.
Switch Mode Indication
MODE CPUx LED INDICATION
COMMAND Both LEDs illuminated
SCAN One LED flashing
BROADCAST Both LEDS flashing alternately
NORMAL One LED illuminated solid
Keyboard Control
In order to control the other features of the switch with the keyboard, Command Mode must be enabled. To enter
Command Mode from the keyboard:
Press
When the Command Mode is enabled, all 3 status lights on the keyboard will illuminate and both LEDs on the U NIMUX-USBV-2
USB KVM switch will illuminate solid to indicate Command Mode is enabled and the following functions are available: (NOTE:
The user must exit Command Mode in order to use the CPU(s) in the selected mode. To exit Command Mode, press ESC on
the keyboard. ) The mouse will not operate while in Command Mode.
NOTE: While in Command Mode, when a proper programming key is pressed and recognized by the switch, the LEDs
on the keyboard will flash once to indicate acceptance. The user must exit Command Mode (by pressing ESC) to see a
change take effect in the switch operation.
NOTE: The UNIMUX-USBV-2 USB KVM switch will automatically exit Command Mode after 10 seconds of inactivity by
the user if the user does not manually exit Command Mode.
Ctrl
+
~
`
`
(ACCENT
KEY)
5
Page 8

Command Mode
Function: Keystroke:
Increment Port
Decrement Port
Toggle Scan Mode
ON and OFF
Sets scan time-out
period for each port.
Toggle Broadcast
Mode ON and OFF
Selects a specific
port
Select a different
control key combination
I
D
S
T
B
P
C
or
or
(When toggled to ON, Scan Mode will be indicated the LED for only the active CPU
flashing ON and OFF .)
(0-2)
-
x
(When toggled to ON, Broadcast Mode will be indicated by both LEDs cycling alternately
ON and OFF in rapid intervals.)
-
0
-
(select the next higher port
ex. 01 02)
(select the next lower port
ex. 02 01)
(0-9)
-
x
x
(1-2)
-
x
x = the d esired key (This will r eplace the Ctrl + ` sequ en ce to en ter
Command Mode)
(P0x would be P01 or P02.)
(0-9)
-
x
KEY SYMBOLS LEGEND:
or
PRESS EITHER KEY
CHORDED SEQUEN CE- PRESS CONSECU TIVELY
AND KEEP KEYS PRESSED UNTIL ALL ARE PRES SED .
+
PRESS CONSECUTI VEL Y
-
(xxx f rom 00 2 to 255. ie . t002
would set the time-out period
for 2 seconds)
Select a specific
country code for
the keyboard
Print the code
version to a text
editor
Configure port to connect
To a MAC CPU
Configure port to connect
To a WINDOWS or SUN
CPU
Exit Command Mode
Default Value Reset
Default factory-set values for Command Mode entry key, Scan dwell time and country code can be restored by
following this procedure:
1. Disconnect power from the UNIMUX-USBV-2 USB KVM switch
2. Press and hold the CPU SELECT button on the switch
3. Re-connect power to the switch
4. Release the CPU SELECT button
L
V
M
W
Esc
x
-
(This will print the version of the code in the KEEMUX-USBV-2U switch to a text editor
window for use when troubleshooting the switch)
x
+
x
+
Note: The user must exit Command
Mode to use the CPU(s) in the
selected mode.
x
-
(x= 1 or 2 <M> + <1> will enable function on Port 1
<M> + <2> will enable function on Port 2. Keyboard
LED's will flash once to confirm command. )
(x= 1 or 2 <W> + <1> will disable function on Port 1
<W> + <2> will disable function on Port 2. Keyboard
LED's will flash once to confirm command. )
(Lxx would be L00-L34, see Country Codes Table on page 9)
6
Page 9

Scan Mode
Scan Mode is indicated by a flashing CPU port LED. In Scan Mode the switch scans back and forth between po rts
making the CPU connected to the port with the flashing LED active. That connected port will remain active while in
use. When the connected port becomes idle for the user selected time out period (default time is 5 seconds), the
UNIMUX-USBV-2 USB KVM switch will connect to the other CPU port. See Command Mode section on page 5 for
configuring the scan time out period.
Fig. 3
A f l a s h i n g C P U L E D m e a n s
t h a t C P U i s b e i n g s c a n n e d
a n d i s a c t i v e .
C P U 1
C P U 2
C P U
S e l e c t
V i e w o f s i d e o f s w i t c h w i t h L E D s
a n d C P U S E L E C T s w i t c h
NOTE: The keyboard and mouse must remain idle for the full scan time out period before the UNIMUX-USBV-2 USB KVM
switch will connect to the other port.
Broadcast Mode
(use with extreme caution)
Broadcast Mode allows the user to send keystrokes to all active CPUs. Broadcast Mode is indicated by illuminating the
CPU x LEDs in rapid alternating intervals . Broadcast Mode has some critical requirements:
a. Broadcast Mode must be OFF when booting any attached CPUs.
b. Broadcast Mode must be ON and the user must exit Command Mode for keystrokes to reach attached CPUs.
NOTE: The mouse is disabled leaving only the keyboard active during Broad cast Mode.
Normal Mode
The UNIMUX-USBV-2 USB KVM switch is in Normal Mode when only the LED for the active CPU is illuminated solid (not flashing
as in Scan Mode). When in Normal Mode, the user is controlling only the CPU to which the user is connected through the
UNIMUX-USBV-2 USB KVM switch. In Normal Mode the UNIMUX-USBV-2 USB KVM switch will only switch between CPUs 1
and 2 when the user uses either keyboard control or button control to do so.
Mice and Trackballs with MACs
The UNIMUX-USBV-2 USB KVM switch can be configured to enable full functionality between mice and trackballs having two or
more buttons and USB MAC CPUs. By default, the ports on the UNIMUX-USBV-2 USB KVM switch are configured for use with
WINDOWS and SUN CPUs and have no special translation for using multi-function mice and trackballs when a MAC CPU is
connected. Using the commands in Command Mode on page 6, either enable or disable this feature as needed for each port.
NOTE: Be sure to re-configure port for connection to a WINDOWS or SUN CPU if a MAC CPU is removed and a
WINDOWS or SUN CPU is then connected.
7
Page 10

KEYBOARD FEATURES
KEYBOARD FEATURES
The keyboard configuration of each CPU is saved in the NTI UNIMUX-USBV-2 USB KVM switch. For example, if the CPU
attached to Port 2 had CAPS LOCK and NUM LOCK selected the last time that CPU was accessed, then they will automatically
be set when that CPU is accessed again.
Keyboard-To-Computer Translation
The NTI UNIMUX-USBV-2 USB KVM switch enables a mixture of otherwise incompatible peripheral computer components to be
connected together. This is accomplished by performing keyboard-to-computer translations automatically (i.e. translate a MAC
keyboard and mouse to a Windows type CPU). The chart below shows the capabilities of devices controlling certain CPU types.
(See Fig. 4 on page 9 for reference.)
Translation Capabilities
CPU
Device
Sun Keyboard
AT101 Keyboard Extra keys emulation Power key emulation Full functionality
Mac keyboard Extra keys emulation Full functionality Full functionality-except
Apple Pro Keyboard Extra keys emulation Extra Keys not supported
Sun Mouse Full functionality Full functionality Full functionality
Wheel Mouse Full functionality Full functionality Full functionality
Apple Mouse Right button emulation Full functionality Right button emulation
Sun Mac Windows
Full functionality Full functionality Full functionality
Application Key
Full functionality
(Eject, Mute, Volume+,
Volume-)
Translation Tables
Use the chart below to type SUN’s additional keys with Win95 and Apple keyboards:
WINxx or Mac Keyboards Sun Extra Keys
Space Bar + F1 Stop
Space Bar + F2 Again
Space Bar + F3 Props
Space Bar + F4 Undo
Space Bar + F5 Front
Space Bar + F6 Copy
Space Bar + F7 Open
Space Bar + F8 Paste
Space Bar + F9 Find
Space Bar + F10 Cut
Space Bar + F11 Help
Space Bar + F12 Compose
Space Bar + Up Arrow Volume +
Space Bar + Down Arrow Volume Space Bar + Left Arrow Mute
Power Key Emulation
Win95 Keyboards Mac CPU Sun CPU
SB+RT Arrow Power Power
Mouse Click Equivalents
To emulate right-button click using an Apple 1-button
mouse, hold down the CMND key (key with open
apple insignia) while pressing the mouse button.
8
Page 11

E s c
T a b
C a p s L o c k
S h i f t
C t r l A l t
A l t
Fig. 4
E n t e r
S h i f t
B a c k s p a c e
C t r l
N u m
L o c k
E n t e r
H e l p
S t o p
P r o p s
F r o n t
O p e n
F i n d C u t
e s c
t a b
c a p s L o c k
c o n t r o l
A g a i n
U n d o
C o p y
P a s t e
a l t
o p t i o n
E s c
T a b
C a p s L o c k
S h i f t
C t r l A l t
T y p i c a l W i n d o w s K e y b o a r d
D e l e t e
r e t u r n
s h if ts h if t
a l t
c o n t r o l
o p t i o n
M A C K e y b o a r d
B a c k s p a c e
E n t e r
S h i f t
C o m p o s e
S U N K e y b o a r d
A l t
G r a p h
P o w e r
k e y
n u m
l o c k
c l e a r
e n t e r
S u s p e n d
k e y
N u m
L o c k
E n t e r
International Sun Keyboards
The UNIMUX-USBV-2 USB KVM switch can recognize international layouts for Sun keyboards. In order to use
an international Sun keyboard, follow this procedure:
1. Disconnect the CPU from the UNIMUX-USBV-2 USB KVM switch
2. Connect the international keyboard to be used to the UNIMUX-USBV-2 USB KVM switch
3. Disconnect power to the UNIMUX-USBV-2 USB KVM switch for at least 3 seconds
4. Reconnect power to the UNIMUX-USBV-2 USB KVM switch
5. Reconnect the CPU to the UNIMUX-USBV-2 USB KVM switch
9
Page 12

It is also possible to configure the UNIMUX-USBV-2 USB KVM switch to emulate a specific international Sun
keyboard regardless of what actual keyboard is connected. This is recommended when the CPU needs the layout
code (i.e. a SUN CPU) and the keyboard doesn't have an explicit layout code (i.e. some Windows keyboards). To
do this, manually set the UNIMUX-USBV-2 USB KVM switch to indicate the international keyboard identification
number to the CPU using the following procedure;
1. Connect the keyboard to be used to the UNIMUX-USBV-2 USB KVM switch
2. Disconnect power from the UNIMUX-USBV-2 USB KVM switch for at least 3 seconds
3. Reconnect power to the UNIMUX-USBV-2 USB KVM switch
4. Enter Command Mode
5. Type Lxx, where xx is the number from the list below that corresponds to the desired country code
6. Exit Command Mode
7. Disconnect power from the UNIMUX-USBV-2 USB KVM switch for at least 3 seconds
8. Reconnect power to the UNIMUX-USBV-2 USB KVM switch
9. Reboot the CPU connected to the UNIMUX-USBV-2 USB KVM switch.
Country Codes
00 Not Supported 18 Netherlands/Dutch
01 Arabic 19 Norwegian
02 Belgian 20 Persian (Farsi)
03 Canadian-Bilingual 21 Poland
04 Canadian-French 22 Portuguese
05 Czech Republic 23 Russia
06 Danish 24 Slovakia
07 Finnish 25 Spanish
08 French 26 Swedish
09 German 27 Swiss/French
10 Greek 28 Swiss/German
11 Hebrew 29 Switzerland
12 Hungary 30 Taiwan
13 International (ISO) 31 Turkish
14 Italian 32 UK
15 Japan (Katakana) 33 US
16 Korean 34 Yugoslavia
17 Latin American 35-99 Reserved
10
Page 13
TECHNICAL SPECIFICATIONS
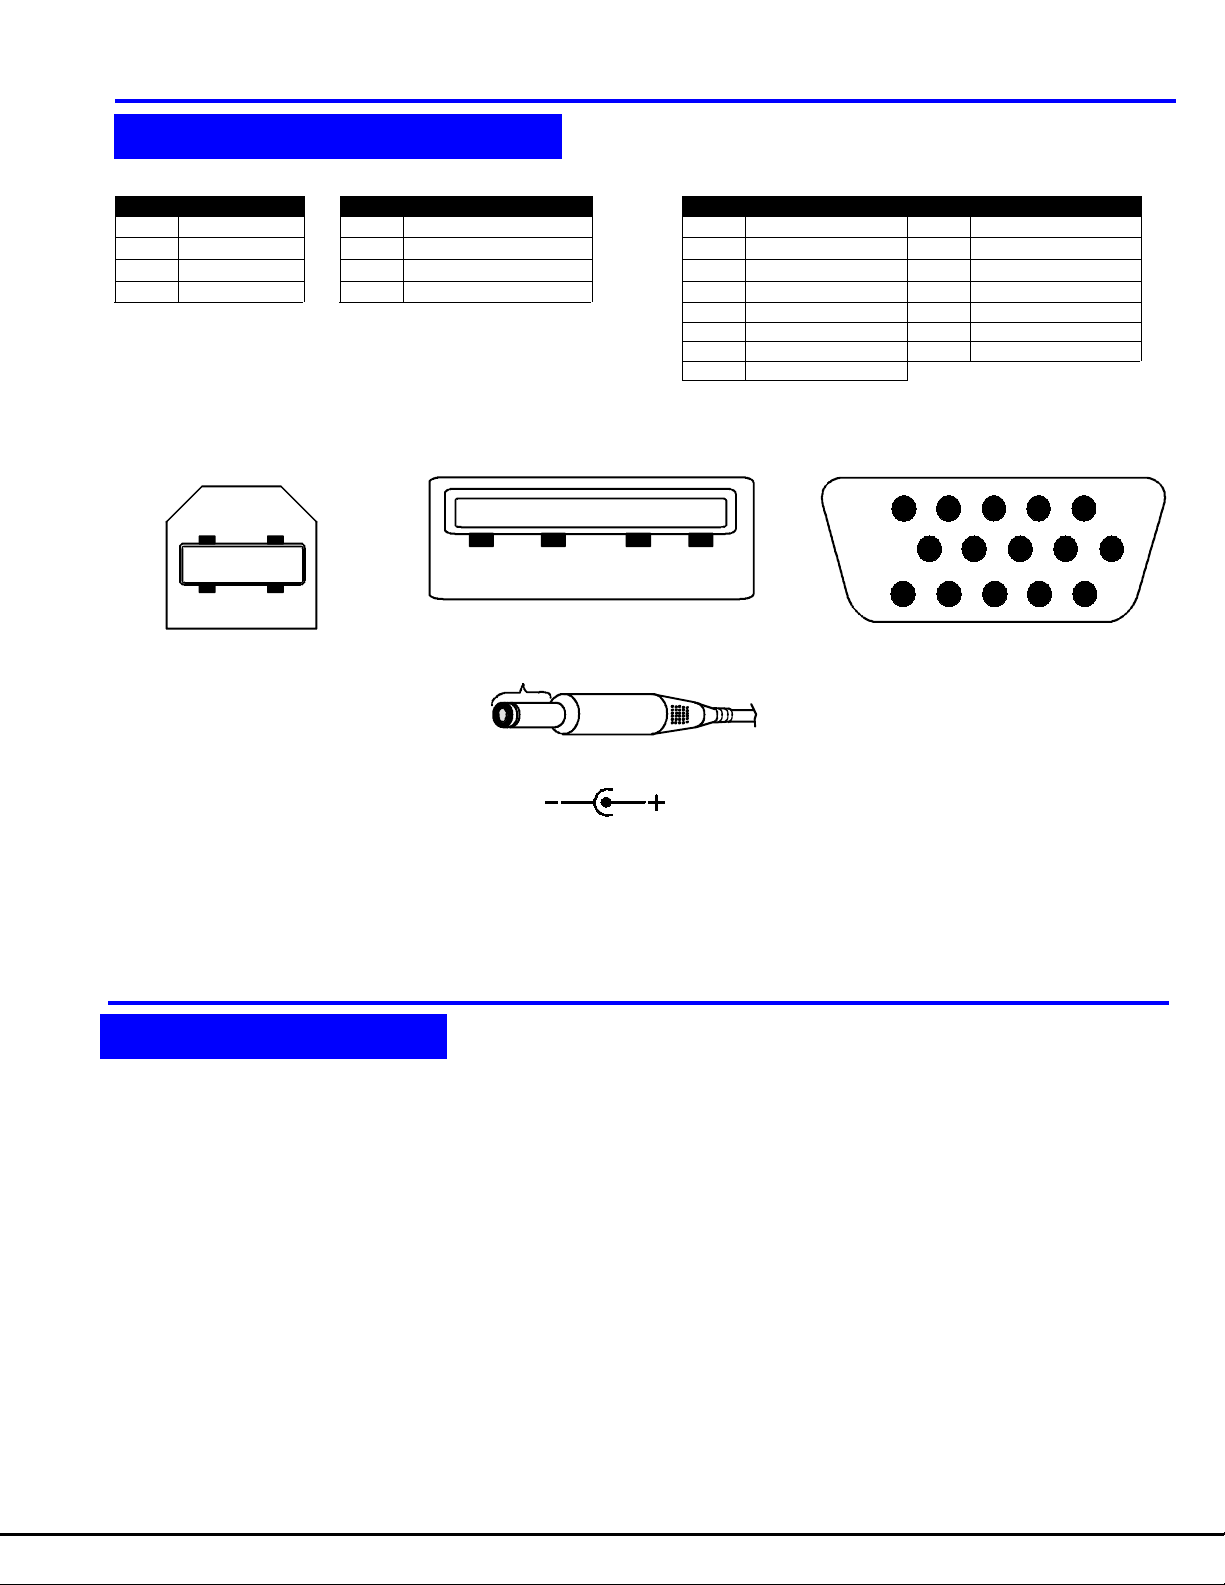
TECHNICAL SPECIFICATIONS
USB Type B USB Type A VGA Video
Pin # Signal Pin # Signal Pin # Signal Pin # Signal
1+VCC 1+VCC
2- DATA 2- DATA
3+DATA 3+DATA
4GND 4GND
1RED 9NC
2 GREEN 10 GND
3BLUE 11ID0
4ID2 12ID1
5TST 13HS
6RED GND 14VS
7 GREEN GND 15 ID3
8BLUE GND
Mating face of a USB Type B Female
21
43
Mating face of a USB Type A Female
1
2
Barrel
34
Power Connector
5VDC @ 2.0A OUTPUT
(Outside
barrel)
2.1 mm x 5.5 mm Female
(Inside
barrel)
Mating face of a 15HD female
VGA VIDEO
423
51
10
15
98 6
14
13 12 11
7
TROUBLESHOOTING
TROUBLESHOOTING
1. Verify all cables are securely connected and that the installation procedure was carefully followed.
2. If a CPU seems to be locked up,
• cycle the power to the KEEUMUX-USBV-2U USB KVM switch OFF, then ON.
• unplug the "USB DEVICES" keyboard and mouse cables (not the "CPU x" keyboard and mouse) from the UNIMUX-
USBV-2 USB KVM switch and reconnect them.
• reset default values as described on page 6.
• reboot the CPU
If the NTI UNIMUX-USBV-2 USB KVM switch still seems work improperly, help may be found in the Frequently Ask
Questions (FAQ’s) section of our website at http://www.nti1.com or call us directly at (
(330) 562-7070 and we will be happy to assist in any way we can.
800) 742-8324 (800-RGB-TECH) or
11
Page 14

MODEL NO: UNIMUX-USBV-2
SERIAL NO.:
DATE:
INSPECTED BY:
12
 Loading...