

Page 1

WAN Probe Kit
Installation & Quick Start Guide
August 2003
Page 2

Page 3

Trademark Notices
© 1994-2004 by Network Instruments, LLC (Limited Liability Corporation). All rights reserved.
“Observer”, “Network Instruments” and the “N with a dot” logo are registered trademarks of Network Instruments, LLC,
Minneapolis, Minnesota, USA.
Limited Warranty—Hardware
Network Instruments, LLC. ("Network Instruments") warrants this hardware product against defects in materials and workmanship for a period of 90 days from the date of shipment of the product from Network Instruments, LLC. Warranty is for
depot service at Network Instruments Corporate headquarters in Minneapolis, MN, or Network Instruments’ London, UK
office. Warranties and licenses may give you more coverage in certain local jurisdictions; Network Instruments also offers
extended warranties as part of its maintenance agreement program.
If a defect exists, at its option Network Instruments will (1) repair the product at no charge, using new or refurbished
replacement parts, or (2) exchange the product with a product that is new or which has been manufactured from new or serviceable used parts and is at least functionally equivalent to the original product. A replacement product assumes the
remaining warranty of the original product or 60 days, whichever provides longer coverage for you. When a product or part
is exchanged, any replacement item becomes your property and the replaced item becomes Network Instruments' property.
This manual is furnished under license and may only be used or copied in accordance with the terms of such license. The
information in this manual is furnished for informational use only, is subject to change without notice, and should not be
construed as a commitment by Network Instruments, LLC. Network Instruments, LLC assumes no responsibility or liability
for any errors or inaccuracies that may appear in this manual. Network Instruments, LLC does not warrant that the hardware
will meet your requirements or that the operation of the hardware will be uninterrupted or that the hardware will be errorfree.
NETWORK INSTRUMENTS, LLC SPECIFICALLY DISCLAIMS ALL OTHER WARRANTIES, EXPRESSED OR
IMPLIED, INCLUDING BUT NOT LIMITED TO, IMPLIED WARRANTIES OF MERCHANT ABILITY AND FITNESS
FOR A PARTICULAR PURPOSE. IN NO EVENT SHALL NETWORK INSTRUMENTS, LLC BE LIABLE FOR ANY
LOSS OF PROFIT OR ANY OTHER COMMERCIAL DAMAGE, INCLUDING BUT NOT LIMITED TO SPECIAL,
Limited Warranty—Software
Network Instruments, LLC will replace defective media or documentation for a 60-day period after the shipment of the
product from Network Instruments, LLC. Should Network Instruments, LLC release a newer version of the software within
60 days of shipment of the product, Network Instruments, LLC will update the copy of the software upon request, provided
request is made by the licensed user within the 60-day period of shipment of the new version. This update may consist of a
CD, or a manual, or both at the discretion of Network Instruments, LLC. User may be charged a shipping fee for updates.
Network Instruments, LLC shall not be liable for material, equipment, data, or time loss caused directly or indirectly by
proper or improper use of the software. In cases of loss, destruction, or corruption of data, Network Instruments, LLC shall
not be liable. Network Instruments, LLC does not take any other responsibility. Network Instruments, LLC does not warrant
that the product will meet your requirements or that the operation of the product will be uninterrupted or that the product
will be error-free.
NETWORK INSTRUMENTS, LLC SPECIFICALLY DISCLAIMS ALL OTHER WARRANTIES, EXPRESSED OR
IMPLIED, INCLUDING BUT NOT LIMITED TO, IMPLIED WARRANTIES OF MERCHANT ABILITY AND FITNESS
FOR A PARTICULAR PURPOSE. IN NO EVENT SHALL NETWORK INSTRUMENTS, LLC BE LIABLE FOR ANY
LOSS OF PROFIT OR ANY OTHER COMMERCIAL DAMAGE, INCLUDING BUT NOT LIMITED TO SPECIAL,
INCIDENTAL, CONSEQUENTIAL, OR OTHER DAMAGES.
Network Instruments, LLC makes no other warranty, expressed or implied.
© 2003 Network Instruments, LLC i
Page 4

Technical Support
Network Instruments provides technical support:
By phone (depending on where you are located):
US & Countries outside Europe at (952) 932-9899
UK and Europe at +44 (0) 1959 569880
By fax (depending on where you are located):
US & Countries outside of Europe at (952) 932-9545
UK and Europe at +44 (0) 1959 569881
Or by email at:
support@networkinstruments.com
Network Instruments provides technical support for a period of 90 days after the purchase of the product at no charge. After
the 90-day initial support period, support will only be provided to those customers who have purchased a maintenance
agreement.
Telephone technical support hours are between 9:00am and 5:00pm (local time for each office).
Suggestions are welcomed. Many of the improvements made to our products have originated as end user suggestions. Please
submit detailed suggestions in writing to: support@networkinstruments.com or by fax at: (952) 932-9545. Please submit
any corrections to or criticism of Network Instruments’ publications to: pubs@networkinstruments.com or by fax at (952)
932-9545.
To subscribe to the Network Instruments email newsletter (delivered in HTML format), send an email to:
End User License Agreement
Network Instruments' products are neither shareware nor freeware. Network Instruments' products are commercial software
and/or hardware products that are subject to international copyright laws.
with the word "subscribe" in the subject line.
Upon purchase and registration of the specific Network Instruments’ product, you have a non-transferable right to use the
specific product at one site on one network one personal computer (PC). Additional networks can be monitored by
purchasing additional Probe licenses or Observer licenses which will grant you the right to use additional Probes, Probe
instances, or consoles for each license purchased. The purchase of a Probe does not include a license for Observer. Should
you need additional Observer consoles, you will need to purchase additional licenses separately.
To install Network Instruments’ Observer on additional PCs or laptops, you must purchase an additional Observer license
for each system. If you are installing Probes on PCs or laptops, you will need to purchase a Probe for each system.
Network Instruments’ Observer software and license numbers are the property of Network Instruments, LLC and may not
be copied by any means for purposes other than backup.
After you purchase a Network Instruments software license, you will receive license and activation numbers. These license
and activation numbers are your proof of purchase. Y ou will need to produce this information for upgrades. You may need to
provide the activation numbers to receive technical support.
This software is licensed as stated above. The license does not constitute ownership of the software, only the right to use the
software.
listserver@networkinstruments.com
ii WAN Probe Kit Quick Start and Installation Guide
Page 5

Contents
Getting Started ................................................................................... 1
Installation Overview ............................................................................................ 1
Unpacking and Inspecting the Parts .................................................................... 2
Hardware and Software Requirements ................................................................ 3
Hardware Requirements ................................................................................ 3
Software Requirements ................................................................................. 3
WAN Probe Kit Quick Installation Diagrams ........................................................ 4
Digital T1/E1 TAP Quick Installation Diagram (2-Port) .................................. 4
Digital DS3/E3 TAP Quick Installation Diagram ............................................ 5
Installing the Interface Cards and Drivers ....................................... 9
Safety and Handling Precautions ......................................................................... 9
Installing the Interface Cards ............................................................................. 10
Updating the WAN and 10/100 Drivers .............................................................. 11
WAN and 10/100 Driver Installation: Windows 2000 ................................... 11
WAN and 10/100 Driver Installation: Windows XP ...................................... 18
Configuring Ports Into Logical Links ................................................................... 23
Starting the Configuration Utility .................................................................. 23
TAP Status LEDs and Switches ......................................................................... 24
Digital T1/E1 TAP ........................................................................................ 25
Digital DS3/E3 TAP ..................................................................................... 25
Serial T1 TAP .............................................................................................. 25
HISSI TAP ................................................................................................... 25
Running Observer Software with the WAN Probe ........................ 27
WAN Probe/Device Setup .................................................................................. 27
Digital DS3/E3/HSSI Probe Settings ........................................................... 28
Digital T1/E1 Probe Settings ....................................................................... 28
Serial T1/E1 Probe Settings ........................................................................ 29
Operating Observer Passively ........................................................................... 29
Analyzing a WAN Link with Observer ................................................................ 30
Discover Network Names ............................................................................ 30
Bandwidth Utilization ................................................................................... 32
WAN Vital Signs by DLCI ............................................................................ 32
WAN Load by DLCI ..................................................................................... 33
Top Talkers .................................................................................................. 35
WAN Filtering .............................................................................................. 36
Triggers and Alarms .................................................................................... 37
© 2003 by Network Instruments, LLC iii
Page 6

iv WAN Probe Kit Installation and Quick Start Guide
Page 7

Getting Started
Thank you for purchasing Network Instruments WAN Probe Kit. The WAN Probe Kit,
®
when coupled with Network Instruments Observer
capture, decode, and analysis for T1/E1, DS3/E3 and HSSI WAN links.
Installation Overview
To install the WAN Probe Kit, you must follow these overall steps:
1. Make sure that your system meets the requirements for hardware and software
installation as described in Hardware and Software Requirements on page 3 of this
Guide.
2. Install the network interface cards (NICs), and their custom software drivers. See
Installing the Interface Cards and Drivers on page 9 of this Guide for detailed
instructions.
3. Cable the NICs to the network. See “WAN Probe Kit Quick Installation Diagrams” on
page 4 for a diagram that shows how to cable the TAP for a T1/E1 link; page 5 shows
how to cable the TAP for a DS3/E3 link.
4. Run the WAN Configuration Utility (NIWANCFG.EXE) to define and name the links
you wish to monitor.
5. Install and run the Probe software. See the RMON1/2 & Advanced Probe User Guide
for details.
software, offers full-featured frame
6. Run Observer and redirect the WAN Probe to the Observer console. See Running
Observer Software with the WAN Probe on page 27 of this Guide for important
information about running Observer with the WAN Probe Kit.
1
Page 8
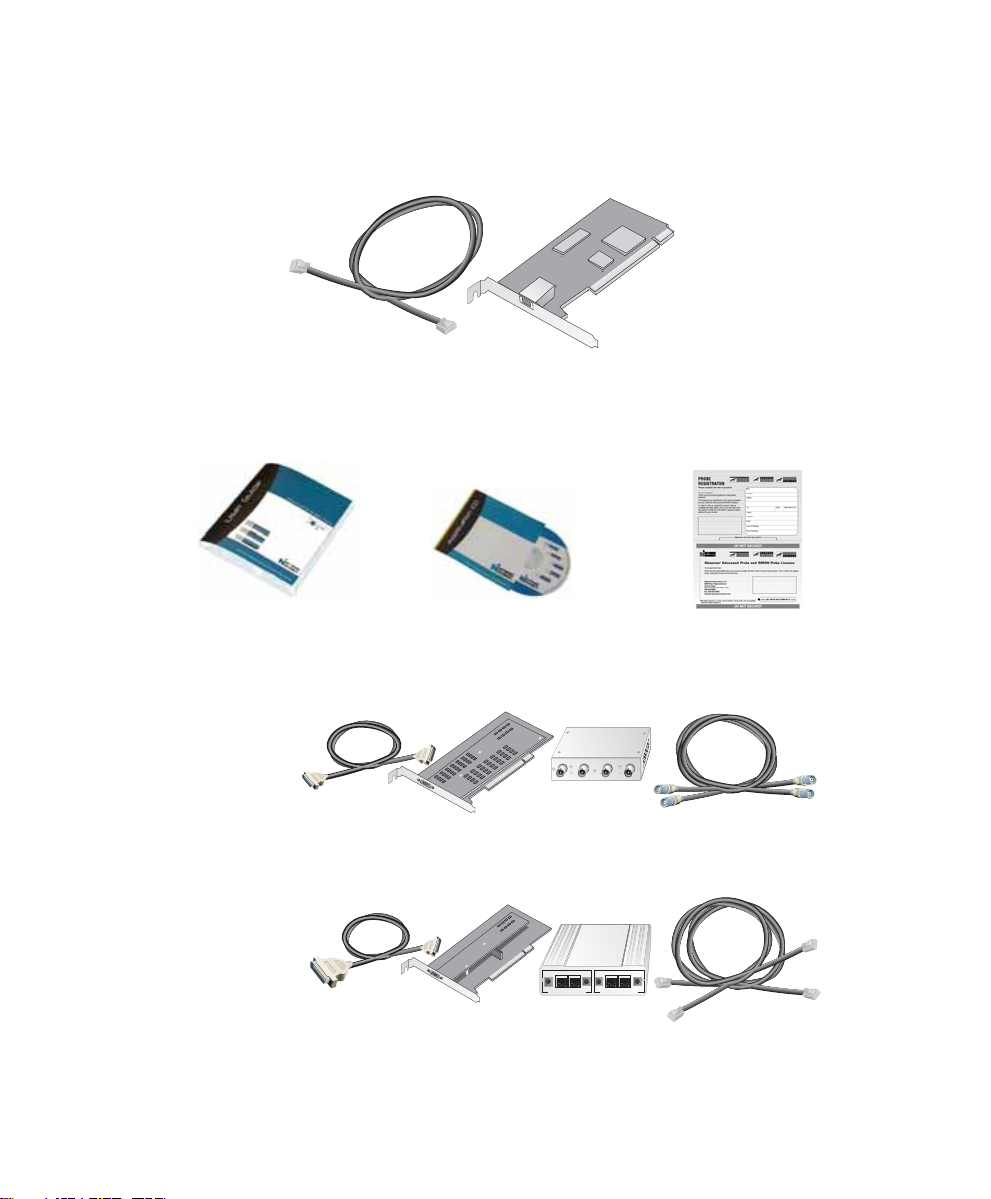
Unpacking and Inspecting the Parts
Your WAN Probe Kit includes a number of components. Take a moment after unpacking
the kit to locate and inspect all of the parts.
• One (1) 10/100 Ethernet Network Interface Card and cable:
• The Network Instruments Product CD-ROM/Application CD, the WAN Probe Kit
Installation and Quick Start Guide (this manual), the RMON1/2 & Advanced Probe
User Guide, and the Probe License Card:
• Depending on the option you purchased, one of the following T AP kits, each of which
includes a WAN Interface, TAP, and cables:
2
Unpacking and Inspecting the Parts
One (1) DS3/E3 WAN
Interface Card & Cable
One (1) T1/E1 WAN
Interface Card & Cable
Digital DS3/E3 TAP Kit
DSE
DTE
DCE
LOS
LOS
LOF
LOF
POWER
IN
IN
OUT
One (1) DS3/E3 TAP
Digital T1/E1 TAP Kit (2-Port)
LINK1 LINK2
MONITOR
MONITORTXMONITOR
RX
TX
OUT
IN
IN
One (1) T1/E1 Dual Link TAP
OUT
One (1) full-duplex
DS3/E3 Coax
Cable
MONITOR
RX
OUT
Two (2)
T1/E1 Cables
Page 9

Two (2) T1/E1 WAN
Interface Cards & Cables
Digital T1/E1 TAP Kit (4-Port)
LINK1 LINK2
MONITOR
MONITORTXMONITOR
TX
RX
OUT
IN
IN
LINK1 LINK2
MONITOR
MONITORTXMONITOR
TX
RX
OUT
IN
Two (2) T1/E1 Dual Link TAPs
IN
MONITOR
RX
OUT
MONITOR
RX
:
OUT
Two (2)
T1/E1 Cables
(V.35 Version shown; others look slightly different)
One (1) Serial T1 WAN
Interface Card & Cable
Serial T1/E1 TAP Kit
B
POWER
ACTIVEOUTPUT
One (1) Serial T1/E1 TAP
DTE
DCE
MODE
AB
One Serial Splitter
Cable
Hardware and Software Requirements
Make sure that the system on which you plan to install the Probe Kit meets these
requirements before you begin installing the kit.
Hardware Requirements
The PC must meet or exceed these specifications:
• To guarantee T1/E1 or DS3/E3 wire-speed: Pentium III 1.3 GHz or AMD 1700 1
GHz or faster.
• 512MB RAM
• 20 GB hard disk space
• 2 available PCI slots
Software Requirements
The WAN Probe must be installed on Windows 2000 or Windows XP. Only the latest
versions of Expert Observer and Observer Suite consoles are guaranteed to connect to the
WAN Probe.
Getting Started
3
Page 10

WAN Probe Kit Quick Installation Diagrams
Follow the diagrammed steps below to install the WAN Probe Kit. More detailed NIC and
software installation instructions follow in this Guide.
Digital T1/E1 TAP Quick Installation Diagram (2-Port1)
The diagram below shows the WAN Probe Kit as it would be cabled to
analyze a digital T1/E1 link with a Channel Service Unit/Data Service Unit
(CSU/DSU). For a DS3/E3 and Serial T1 cabling diagrams, see the following
pages.
Install the interface cards,
1
drivers, and cabling.
Install the
2
Network
Instruments
Probe
software.
10/100
NIC
Probe
Service
Installed
WAN
Card
Connect Interface
card to TAP with
Interface cable.
Use the supplied
10/100 cable to
connect the Probe
to a TCP/IP LAN
with an Observer
system attached.
CSU/DSU
(DTE)
TCP/IP
LAN
Observer
Console
T1
TAP
TAP sockets
and cable
are
provided for
LINK 1 LINK 2
MONITOR
A
TX
IN
MONITORTXMONITOR
RX
OUT
MONITOR
OUT
IN
Use the
supplied T1
cable to
complete the
passthrough
Link back to the
T1 Line.
RX
analyzing a
2nd loadbalanced
line, if
necessary.
T1 Line
TX
RX
TX
RX
Move the DCE
connector from
the T1 line to
one of the
ports on the TAP.
From the Observer
3
Console, the newly-
IN
(DCE)
configured Probe will
now be available on
Observer’s Probe List.
1. The 4-Port version of this system has an additional PC interface card, and an additional TAP and cable kit. Connect the
second TAP kit as shown in the diagram. Run NIWANCFG to define and name the links you want to monitor.
4
WAN Probe Kit Quick Installation Diagrams
Page 11
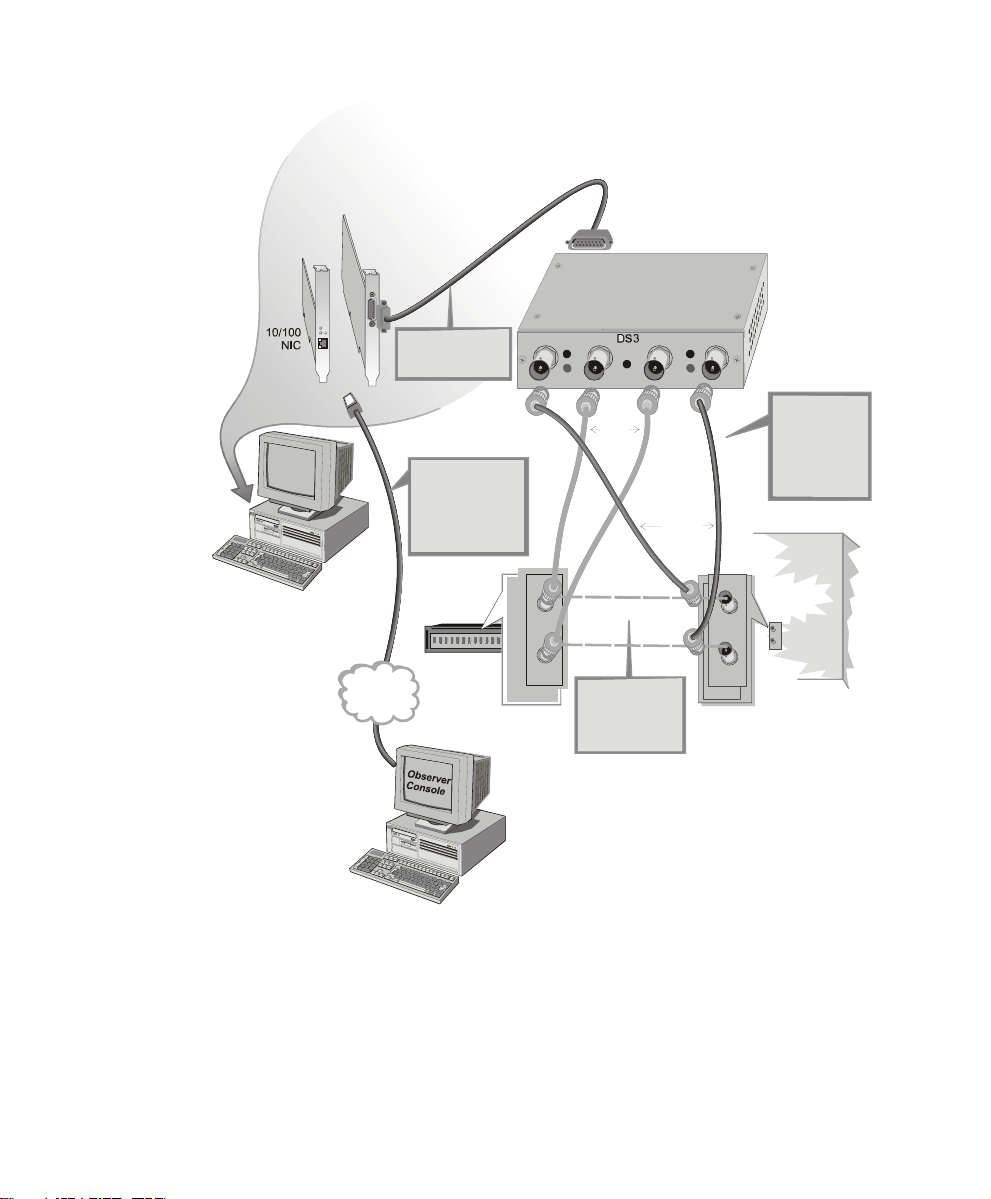
Digital DS3/E3 TAP Quick Installation Diagram
Install the interface cards,
1
drivers, and cabling.
Frame
Relay
Card
DS3
TAP
Install the
2
Network
Instruments
Probe
software.
Connect Interface
card to TAP with
Interface cabl e.
P
r
o
b
e
S
e
r
v
i
c
e
R
u
n
n
i
n
g
A
A
Use the supplied
10/100 cable to
connect the Probe
to a TCP/ IP LAN
with an Observer
system attached.
CSU/DSU
(DTE)
TX
RX
TCP/IP
LAN
DTE DCE
B
LOS
LOS
POWER
LOF
LOF
IN OUT IN OUT
(TX)
IN (RX)
TX
RX
OUT (TX)
From the Observer
3
Console, the newly-
Move
DS3
link
cables to
TAP
(RX)
Original DS3 link
connection
Move the DCE
connectors from
the DS3 line to
IN OUT
the &
ports on the TAP.
LOS
LOS
LOF
LOF
(RX)
(TX)
Supplied
cables
completing
passthru
OUT (TX)
IN (RX)
Use the
supplied DS3
cable to
complete the
passthrough
Link back to the
DS3 Line.
DS3 Line
(DCE)
IN
OUT
configured Probe will
now be available on
Observer’s Probe List.
Getting Started
5
Page 12

Serial T1 TAP Quick Installation Diagram
Splitter cable
patched between
TX
TX
RX
RX
DTE and DCE
TX
TX
RX
RX
CSU/DSU
DTE
1
WAN
10/100
NIC
Probe
Service
Running
Install the
Network
Instruments
Probe
software.
Install the interface cards,
drivers, and cabling.
Card
A
A
TCP/IP
LAN
Use the supplied
10/100 cable to
connect the Probe to a
TCP/IP LAN with an
Observer system
attached.
B
POWER
Observer
Console
INPUT
ACTIVE OUTPUT
Router
(DCE)
Serial
MODE
AB
T1/E1
TAP
DTE
DCE
From the Observer
3
Console, the newlyconfigured Probe will
now be available on
Observer’s Probe List.
6
WAN Probe Kit Quick Installation Diagrams
Page 13
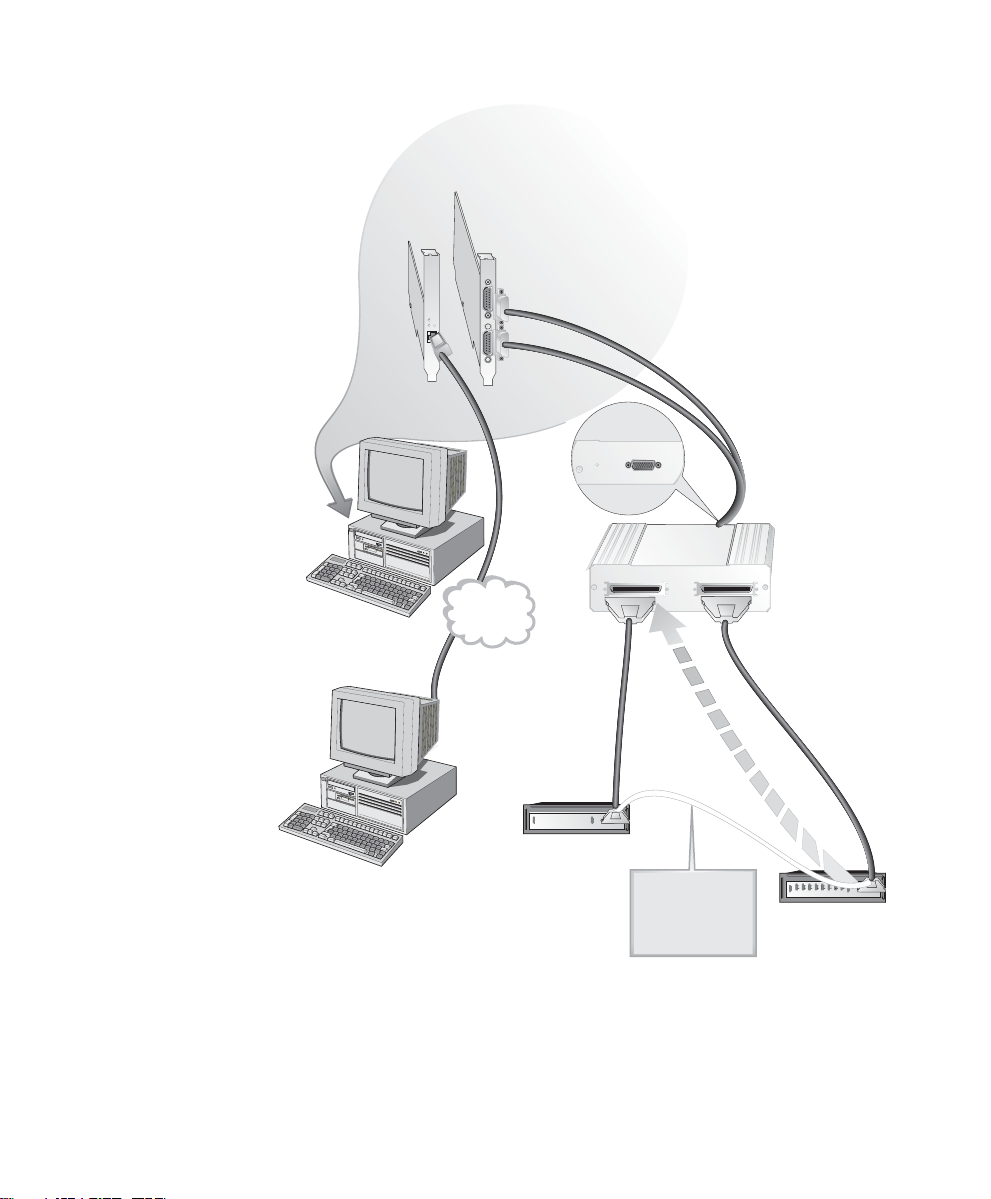
HSSI TAP Quick Installation Diagram
Install the
2
Network
Instruments
Probe
software.
10/100
NIC
Probe
Service
Running
Observer
Console
WAN
Card
Install the interface cards,
1
drivers, and cabling.
TCP/IP
LAN
Use the supplied
10/100 cable to
connect the Probe to a
TCP/IP LAN with an
Observer system
attached.
POWER
B
INPUT
T3 WANMONITOR TAP MO
OUTPUTTO PROBE
HSSI
TAP
HSSI IN HSSI OUT
From the Observer
3
Console, the newlyconfigured Probe will
now be available on
Observer’s Probe List.
TX
TX
RX
RX
CSU/DSU
DTE
Move the DCE
connector from
the HSSI line to
one of the
IN
ports on the TAP.
TX
RX
Router
(DCE)
Getting Started
TX
RX
7
Page 14

1. Install the Interface Cards, Drivers, and Cabling
The T AP kit allows the Probe to capture fra mes from a T1/E1 or DS3/E3 link. The 10/100
NIC allows the Probe to communicate with the Observer console via TCP/IP, or to capture
packets from a 10/100 network.
• For detailed card installation instructions, refer to Installing the Interface Cards on
page 10 of this Guide.
For driver installation instructions, refer to Updating the WAN and 10/100 Drivers on
page 11 of this Guide.
2. Install the Probe Software
The Probe software turns the system into a data collection device for any Expert Observer
or Observer Suite console. It also installs the custom driver files that you will use to
update the NIC drivers in Step 2.
•The Advanced and RMON Probe User Guide describes in detail how to install and
run the Probe software. When prompted for the product to install, select Advanced
Probe
• Make sure that you also read and follow the instructions for software license and
registration.
• Run NIWANCFG if you need to define single or multiport links.
3. Connect to the WAN Probe from the Observer Console
Once the Probe system is installed, running, and cabled, you must redirect the Probe so
that it appears on the Observer main window’s Probe list. From the Observer console,
Click Tools->Redirect Probe and enter the Probe’s IP address.
The Probe will now appear on the probe list on the left side of the Observer main window .
Click on the Probe to connect.
8
WAN Probe Kit Quick Installation Diagrams
Page 15

Installing the Interface Cards and Drivers
Safety and Handling Precautions
Danger!
!
Electrical current from power, phone and communications cables can be
hazardous.
To avoid potential shock hazards:
• Only use grounded sockets for connecting equipment to the power supply.
• Do not carry out any installation, maintenance or (re)configuration work and do not
connect or disconnect any power cables during an electrical storm.
• If installing in a Hot Plug system, please follow the safety instructions specific to this
system. Read the relevant documentation.
• Electrical installations must comply with the safety regulations relating to the country
in which they are operated.
Caution
Electrostatic discharge may damage or destroy circuit boards.
• Do not open the antistatic bags until you are ready to install the cards.
• We recommend you wear an antistatic wrist strap when installing the interface cards.
Remove the computer cover and connect the wrist straps (using an electric conductor)
to the computer chassis. Note: Do NOT connect the wrist strap to the ground
terminal of the power supply. Faulty wiring could make this terminal live and
potentially lethal.
• Hold the antistatic packaging of the interface cards for at least two seconds against the
bracket of an extension slot on your computer. This reduces the static charge in the
packaging and in your body.
• Do not touch any circuits on the network cards or any of their port contacts. Do not
place the network cards on the computer cover or any other metal surface.
• Avoid unnecessary movement since this can increase electrostatic charge.
• Never use excessive force when working with the network card or the PCI bus. If you
need to place the network card somewhere after removing it from the antistatic bag,
make sure that you place it on the antistatic bag and on a level surface.
9
Page 16

Installing the Interface Cards
Have the computer manual available and if necessary, a key or screwdriver
to open the cover.
1. Install the Network Instruments Probe Software as described in the RMON1/2 &
Advanced Probe User Guide. You must install this software before you install the
hardware so that Windows will have access to the custom drivers.
2. Switch off the computer in which the network cards are to be installed.
3. Disconnect the power cord from the power outlet. Follow the safety instructions set
out above.
4. Open the computer cover as described in your computer manual. You may need a
screwdriver or key to loosen the fasteners on the cover.
If you are installing the network cards in a tower computer it is best to lay the
computer on its side so you can apply the correct force to insert the cards
into the PCI bus slots.
5. Locate two open PCI bus slots on the motherboard. Consult the section in your computer
manual that describes how to install expansion cards in the system motherboard.
6. Remove the brackets (if any) from the expansion slots. Follow the instructions in your
computer manual.
Choose any 2 PCI Slots
7. Remove the interface cards from their antistatic bags.
8. Insert the interface cards in the appropriate PCI bus slots.
10
Installing the Interface Cards
Page 17

Make sure that the contacts of the network cards are correctly aligned with
the PCI bus slots on the motherboard. Push the network cards down
vertically until they are properly seated in the bus slots.
10/100 Ethernet NIC
WAN Interf ace
9. Tighten the locking screws on the fixing brackets until the cards are firmly connected
to the computer cover (or to the attachment provided for expansion cards).
10. Close the computer cover and replace and tighten any screws.
11. Reconnect the power supply, following the safety instructions.
12. Turn the system on. The new hardware will be recognized differently depending on
whether you are running Windows 2000 or Windows XP. Refer to the appropriate
section that follows to complete the driver installation.
Updating the WAN and 10/100 Drivers
After you have installed the cards and turned on the computer, both Windows 2000 and
Windows XP will attempt to recognize and install drivers to match the new hardware.
Make sure that you have installed the Network Instruments Probe software; you must
supply a directory that the Network Instruments install program creates to the Found New
Hardware wizard.
Installing the Interface Cards and Drivers
11
Page 18

WAN and 10/100 Driver Installation: Windows 2000
The procedure for each NIC is different because of the way Windows 2000 recognizes the
two cards:
• The WAN Interface card isn’t recognized at all, so you need to have already installed
the Network Instruments Probe software when you turn the system on. When the
Found New Hardware wizard asks you for the driver location, specify the
C:\Observer Files\Drivers\WAN directory , which contains the custom driver for the
WAN Interface card.
• The 10/100 card is recognized, but a standard driver is installed. You must manually
update the driver, specifying its location in
C:\Observer Files\DRIVERS\Intel21143\Win2000 directory. You must specify the
location; Windows will not install the custom driver if you tell it to search for the
driver.
These procedures are described in more detail in the sections that follow.
Letting the Wizard Search for the WAN Driver
When Windows 2000 starts up after the card installation, the
Found New Hardware Wizard
opening dialog is displayed. Follow these steps to complete the wizard.
1. Click Next. The wizard asks you how you want to install the custom driver:
12
Updating the WAN and 10/100 Drivers
Page 19

2. Choose “Search for a suitable driver for my device.” Click Next. The wizard asks
where it should look for the driver files:
3. Choose “Specify a Location” and click Next.
The wizard displays a file locator:
4. Enter or browse to the following directory (assuming C:\Observer Files is your
Observer directory):
C:\Observer Files\DriversWAN
Installing the Interface Cards and Drivers
13
Page 20

The wizard tells you which driver it found:
5. Click Next. The wizard informs you that the driver it found lacks a Microsoft digital
signature:
6. Click Yes. Network Instruments has tested and verified that the driver works correctly
with Observer and Probe on Windows 2000.
After installing the driver, the wizard displays a confirmation dialog telling you that
the driver was successfully installed. Click Finish to close the wizard.
14
Updating the WAN and 10/100 Drivers
Page 21

Manually Updating the 10/100 NIC Driver by Specifying a Directory
Although Windows 2000 reports that it found the correct driver for the Network
Instruments 10/100 NIC, the standard driver that it has installed needs to be updated to
work best with Network Instruments Probe or Observer.
A custom driver is required to make the 10/100 NIC work optimally with Probe and
Observer. Therefore you must manually update the driver as described in the following
steps.
1. Right-click on My Network Places icon on the desktop and select Properties from
the pop-up menu. The Network Connections folder is displayed.
2. Right-click on the Intel 21143 Based PCI Fast Ethernet connection and select
Properties from the pop-up menu. Click Configure... on the Intel 21143 Based PCI
Fast Ethernet Adapter Properties window. Click the Driver tab at the top of the
resulting window, and the following dialog is displayed:
3. Click Update Driver...
Installing the Interface Cards and Drivers
15
Page 22

The Upgrade Device Driver Wizard’s Welcome dialog is displayed. Click Next and
the wizard asks you whether you want to search for a driver or pick one from a list:
4. Choose “Search for a suitable device” and click Next. The wizard asks you where to
search for the driver:
5. Choose “Specify a Location” and click Next.
16
Updating the WAN and 10/100 Drivers
Page 23

The wizard displays a file locator dialog:
6. Enter (or browse to) the following path (assuming the Observer directory is
C:\Observer):
c:\Observer Files\drivers\intel21143\win2000
7. Click OK, and the following dialog is displayed:
Installing the Interface Cards and Drivers
17
Page 24

8. Choose “Install one of the other drivers” and click Next. The wizard shows a list of
drivers to pick from:
9. Choose “Network Instruments Intel 21143 Based Adapter Driver” and click Next.
After installing the device driver, the wizard displays an information dialog telling
you that the driver was successfully installed. Click Finish to complete the driver
installation.
WAN and 10/100 Driver Installation: Windows XP
When you reboot after installing the NICs, Windows XP will find drivers in its own
library that it reports as matching. These drivers will not work correctly with Probe and
Observer software: You must manually update the driver for each card, using the drivers
supplied on the Network Instruments Application CD.
Follow the instructions in the section below to install the driver for each card.
18
Updating the WAN and 10/100 Drivers
Page 25

Manually Updating the NIC Drivers
1. From the desktop Start menu, highlight My Computer and right-click. Choose
Properties... on the pop-up menu. Click the Hardware tab on the resulting properties
dialog, and the following is displayed:
2. Click Device Manager... The Device Manager browser is displayed:
3. Browse to and right-click on the Network Adapters > WAN Analyzer driver (which
will be named according to type: Digital T1/E1, DS3/E3, or Serial T1). Choose
Installing the Interface Cards and Drivers
19
Page 26

Properties... and click the Driver tab on the resulting dialog, which will display the
properties for that device.
4. Click Update Driver...,
The Hardware Update Wizard asks you how you want it to install the driver:
5. Choose “Install from a specific location” and click Next. The wizard then asks where
to look for the file:
6. Select “Don’t search...I will choose the driver to install.” and click Next.
20
Updating the WAN and 10/100 Drivers
Page 27

The Wizard then shows you what it thinks is the matching driver:
7. Click Have Disk..., and a file locator dialog is displayed:
8. Enter (or browse to) the following path and click OK (assuming your Observer
directory is C:\Observer Files):
C:\Observer Files\Drivers\WAN
Installing the Interface Cards and Drivers
21
Page 28

The wizard then displays the driver it found:
Depending on which card you have installed, one of the following adapters will be
listed:
DS3/E3/HSSI WAN Analyzer (Digital)
T1/E1 WAN Analyzer (Digital)
T1 WAN Analyzer (Serial)
9. Click Next.
Windows informs you that the driver lacks a Microsoft digital signature:
22
Updating the WAN and 10/100 Drivers
Page 29

10. Click Continue Anyway . Network Instruments has tested and verified that the driver
works correctly with Probe and Observer on Windows XP.
11. After the wizard finishes installing the driver, Click Finish to close the confirmation
dialog.
12. Repeat these same steps for updating the 10/100 NIC. When asked to specify a
location for the driver, enter (or browse to) this path (assuming C:\Observer Files is
your Observer directory):
c:\observer files\drivers\intel21143\win2000
13. Click through the rest of the wizard as you did for the 10/100 driver. After you click
Finish... on the last dialog, the custom driver installation is complete.
Configuring Ports Into Logical Links
You must define the physical ports on the WAN interface card or cards into logical links.
Each WAN interface card includes 1, 2 or 4 physical ports. By using the WAN Driver
Configuration tool to define logical links consisting of 1 or more ports, you will be able to:
• in the case of links with more than one port, obtain a cumulative view of statistics
from more than one port
• in all cases, create meaningful names that you will see in the Observer probe list.
A good situation in which to view multiple ports as a single link is in the case of a pair of
load-balancing WAN lines. Some link groupings make no sense and are not
recommended, such as configuring a link consisting of ports connected to WAN lines
coming from separate ISPs. Note that you can only create links from ports of the same
type; for example you cannot create a link that contains both HSSI and DS3 ports.
Starting the Configuration Utility
Before you start the configuration utility, make sure you have closed Observer and shut
down any Network Instruments Probe instances that may be running.
Click on Start->Observer->WAN Driver Configuration.
The configuration tool scans the system for NI WAN interface cards, displaying them in
the order they are physically installed in the bus. Each card is identified by bus and device
# (displayed at the top of the card), and the number of the physical slot the card occupies
in the PC bus.
The ports on each card are listed under the card ID label, along with any logical links the
port is associated with. If this is the first time the utility has been run, (or you have
Installing the Interface Cards and Drivers
23
Page 30

performed a Clear All and Rescan), the utility will assign a logical link to each port, as
shown in this two-card example:
T o create a link, use Shift+Click to select the ports you want to add to the link and choose
Link->Add Selected Ports to Link->New... from the main menu (or right-click menu).
The utility prompts you to name the link. As you create links, they are added to the Link
menu for easy selection.
The example below shows the display after a number of logical links have been
configured. Note that the New York link includes physical ports from both interface cards.
The color coding helps you see immediately which ports belong to the same link:
Click Save/Exit when you have configured the links you wish to create. The links you
have configured will appear as named interfaces in Observer’s WAN Probe list.
TAP Status LEDs and Switches
Take a moment to understand the TAP status LEDs, and the switch settings on the type of
TAP you have installed on your Probe.
24
TAP Status LEDs and Switches
Page 31

Digital T1/E1 TAP
p
LOOP Should remain unlit for normal operation.
LOOP
POWER
TEST
Digital DS3/E3 TAP
Loss of Signal,
—unlit when the
given device
(DTE or DCE)
drops carrier.
Serial T1 TAP
B
POWER
NETWORK INTERFACE UNIT
TO PROBE
POWER light should be
lit whenever TAP is
cabled to Interface Card.
DTE
LOS
LOF
IN
DSE
POWER
OUT
IN
POWER light should be lit
whenever TAP is cabled to
Interface Card.
ACTIVE OUTPUT
E1T1RJ
INTERFACE SELECTOR
DCE
BANTAM
LOS
LOF
OUT
DTE
MODE
AB
DCE
E1T1RJ
BANTAM
Leave setting
on RJ
position.
Loss of Frame
—unlit when the
given device
(DTE or DCE)
drops a frame.
MODE
AB
Leave on
setting B.
HSSI TAP
POWER light should be lit
whenever TAP is cabled
to Interface Card.
B
POWER
T3 WAN MONITOR T AP MODULE
OUTPUT TO PROBE
POWER light should be lit
whenever TAP is cabled
to Interface Card.
Link activity LEDs--both should be lit
for normal operation.
INTERLOCK
Interlock LED--should be lit for
normal o
eration.
Installing the Interface Cards and Drivers
25
Page 32

26
TAP Status LEDs and Switches
Page 33

Running Observer Software with the WAN Probe
After you have installed the WAN Probe Kit hardware, drivers, and Probe software, you
can run Network Instruments Observer to connect to the Probe and begin analyzing the
network. To connect to the Probe, follow these steps:
1. Start Observer. From the Tools menu, select Redirect Probe...
2. Enter the name and IP address of the Probe system.
You can now select the Probe from the Observer Probe list. Observer works with the WAN
Probe just as it does with any other Network Instruments Probe, with a number of
differences, which are described below.
WAN Probe/Device Setup
Before you can analyze the WAN link, you must set some device options. Right-click on
the WAN icon in the Probe List and select Probe or Device Setup from the pop-up menu
(or from the Options menu). Depending on what type of WAN link you are analyzing,
click the T1/E1, DS3/E3/HSSI, Serial T1/E1, or Serial DS3/E3 tab.
27
Page 34

Digital DS3/E3/HSSI Probe Settings
Setting Explanation
WAN/Frame Relay Type Choose DS3 (T3) , E3 or HSSI to match the type of link you are
Encapsulation You must set this to match the settings on the frame relay
Subprotocol If ATM or LAPB is the selected encapsulation method, you must
Fractionalized Check if your link is configured for fractionalized operation.
Bandwidth Set to match the bandwidth setting of the link you are analyzing.
analyzing.
CSU/DSU. The encapsulation options are:
-ATM-DXI - ATM Data Exchange
-Frame Relay - Cisco
-Frame Relay - IETF Standard
-HDLC - Cisco Proprietary
-LAPB (modulo-128)
-LAPB (modulo-8)
-PPP - Point-to-Point Protocol
-X.25 over LAPB (modulo-128)
-X.25 over LAPB (modulo-8)
choose the subprotocols on the link.
ATM subprotocol choices are NLPID and SNAP multi-protocol;
LAPB subprotocol choices are IP and Ethertype multi-protocol
Digital T1/E1 Probe Settings
Setting Explanation
WAN/Frame Relay Type Choose T1 or E1 to match the type of link you are analyzing.
Encapsulation You must set this to match the settings on the frame relay
28
WAN Probe/Device Setup
CSU/DSU. The encapsulation options are:
-ATM-DXI - ATM Data Exchange
-Frame Relay - Cisco
-Frame Relay - IETF Standard
-HDLC - Cisco Proprietary
-LAPB (modulo-128)
-LAPB (modulo-8)
-PPP - Point-to-Point Protocol
-X.25 over LAPB (modulo-128)
-X.25 over LAPB (modulo-8)
Page 35

Setting Explanation
Subprotocol If ATM or LAPB is the selected encapsulation method, you must
Link 1 and Link 2 Channel Settings (Note that for the link and settings to be activated, you
must check the “On” checkbox for that link).
Fractionalized Check if this link is configured for fractionalized operation.
Channel selector
checkboxes
Include in Util.
Thermometer.
choose the subprotocols on the link.
ATM subprotocol choices are NLPID and SNAP multi-protocol;
LAPB subprotocol choices are IP and Ethertype multi-protocol
Choose the channels you want to be included in the analysis.
Check if you want to include statistics from this link in the
Bandwidth Utilization Thermometer.
Serial T1/E1 Probe Settings
Setting Explanation
WANFrame Relay Type Choose T1 or E1 to match the type of link you are analyzing.
Encapsulation Y ou must set this to match the settings on the frame relay router.
The encapsulation options are:
-ATM-DXI - ATM Data Exchange
-Frame Relay - Cisco
-Frame Relay - IETF Standard
-HDLC - Cisco Proprietary
-LAPB (modulo-128)
-LAPB (modulo-8)
-PPP - Point-to-Point Protocol
-X.25 over LAPB (modulo-128)
-X.25 over LAPB (modulo-8)
Fractionalized Check if your link is configured for fractionalized operation.
Bandwidth Set to match the bandwidth setting of the link you are analyzing.
Operating Observer Passively
When analyzing a WAN link via the Observer Probe, Observer runs “passively.” Passive
operation guarantees that analysis will not affect the WAN link; however, it does have
some implications when running Observer. Because there is no link over which the Probe
system can transmit frames on the link, the following features are unavailable:
• Traffic Generation
• Collision Test
Running Observer Software with the WAN Probe
29
Page 36

• Efficiency History
• Replay Packet Capture
Analyzing a WAN Link with Observer
In general, the WAN analysis works much like Ethernet analysis. One difference is that,
when appropriate, Observer identifies WAN links by their Data Link Connection Identifier
(DLCI) rather than by MAC address as is done with standard protocol analysis. In
addition, many WAN statistical modes break out the data by DCE, DTE, and summary to
reflect the full-duplex nature of WAN links. Modes unrelated to WAN analysis are greyed
out and unavailable.
The following sections describe how the available Observer modes operate to analyze a
WAN link.
Discover Network Names
To access this mode, choose Tools->Discover Network Names
Discover Network Names mode will show DLCIs instead of MAC addresses. You can
also define the Committed Information Rate for each DLCI you are monitoring with WAN
Observer.
Setting the Committed Information Rate (CIR) for a DLCI
The Committed Information Rate defines the guaranteed bandwidth for a WAN
connection. If you want Observer’s WAN V ita l Signs and WAN Load by DLCI to monitor
CIR compliance, you must specify the CIR. A number of WAN triggers and alarms also
use this information, allowing you to be notified if the link is not performing to the CIR.
30
Analyzing a WAN Link with Observer
Page 37

To set the CIR for a DLCI or group of DLCIs, click the edit DLCI CIR button on the
Discover Network Names mode window. The following dialog is displayed:
Add a DLCI (or select one from the list and click Modify). Type or use the spinbox to set
the CIR in Kbits/sec for the DLCI. Click OK when you are done.
WA N Bandwidth UtilizationI
T o see the percentages of bandwidth saturation on DCE, DTE and DCE+DTE (Summary)
for each configured link, choose Statistics->Bandwidth Utilization. The mode starts
automatically:
WAN links have two ports (DCE and DTE), so for a dual link T1, you could display up to
5 charts (including the summary). The mode is available in chart,
Running Observer Software with the WAN Probe
31
Page 38

pie, graph and dial views. The display setup dialog (click Settings to access), lets you
choose what ports to display as well as color and scale options.
The Bandwidth Utilization display is not subject to any filters as it compares
the actual activity on the network to the network’s theoretical capacity.
WAN Vital Signs by DLCI
In WAN Observer, the Network Vital Signs display is replaced by the WAN V ital Signs by
DLCI mode. This mode provides a summary of the errors occurring on a WAN link
(E1/T1/DS3/E3).
You can choose what portion of traffic you wish to view from the list box in the upper left
corner of the window: DCE, DTE, or Summary.
DTE (Data Terminal Equipment), in the context of a WAN link, refers to the DSU/CSU.
DCE (Data Circuit-terminating equipment) refers to the WAN switch (which may reside
remotely at the line provider's site). Summary view shows a concatenation of traffic from
both ends of the link.
List View
The following statistics are shown, broken down by DLCIs (which are listed in the
leftmost column). You can change the sort order by clicking on any of the column
headings:
Column Description
DLCI Data Link Connection Identifier of the statistics that follow.
DCE KBits/s Max The maximum bit rate sensed so far from the DCE side of this DLCI, in
DTE KBits/s Max The maximum bit rate sensed so far from the DTE side of this DLCI, in
DCE Kbits/s Avg The average bit rate sensed on the DCE side of this DLCI, in Kbits per
DTE Kbits/s Avg The average bit rate sensed on the DTE side of this DLCI, in Kbits per
DCE FECN
under CIR
32
Analyzing a WAN Link with Observer
Kbits per second.
Kbits per second.
second.
second.
The number of packets seen on the DCE side of the link that had the
Forward Explicit Congestion Notification bit set, even though the
bandwidth usage was within the Committed Information Rate (CIR).
Normally this number should be zero. If bandwidth usage exceeds CIR,
congestion is expected.
Page 39

Column Description
DTE FECN under
CIR
DCE BECN
under CIR
DTE BECN
under CIR
The number of packets seen on the DTE side of the link that had the
Forward Explicit Congestion Notification bit set, even though the
bandwidth usage was within the Committed Information Rate (CIR).
Normally this number should be zero. If bandwidth usage exceeds CIR,
congestion is expected.
The number of packets seen on the DCE side of the link that had the
Backward Explicit Congestion Notification bit set, even though the
bandwidth usage was within the Committed Information Rate (CIR).
Normally this number should be zero. If bandwidth usage exceeds CIR,
congestion is expected.
The number of packets seen on the DTE side of the link that had the
Backward Explicit Congestion Notification bit set, even though the
bandwidth usage was within the Committed Information Rate (CIR).
Normally this number should be zero. If bandwidth usage exceeds CIR,
congestion is expected.
WAN Load by DLCI
In a WAN installation, Observer’s Network Activity Display is called WAN Load by
DLCI. This mode shows critical WAN transfer rate and congestion statistics in a number
of formats. This display can show you the health of a WAN link at a glance and can warn
of impending slowdowns due to congestion or other error conditions.
The WAN Load by DLCI mode can be viewed as a dial, graph, or list display. Except for
list view, there are no setup options for WAN Load by DLCI mode. Every view includes a
dropdown box that lets you select which DLCI you want to monitor.
To activate WAN Load by DLCI, choose Statistics > WAN Load by DLCI. Press the
Play button to start the mode.
Dial View
Running Observer Software with the WAN Probe
33
Page 40

The WAN Load by DLCI mode in dial view shows transfer rate, CRC error rate,
FECN/BECN frame rates graphed on dial meters.
DLCI CIR Setup
Click Settings and then the DLCI CIR Setup tab to display a dialog that lets you enter
DLCIs and their corresponding Committed Information Rates. You can eithe enter the
DLCIs manually, or automatically add DLCIs from Observer’s current alias list.
Graph View
The WAN Load display in graph view shows these same statistics (transfer rate, CRC
error rate, and FECN/BECN frame rates) as superimposed spike meters. The Committed
Information Rate (CIR) is also shown, allowing you to view the network activity against
the baseline performance you have contracted to receive from your WAN service provider
You can select line, point, or bar-style meter, and the colors for each statistic by rightclicking on the chart. The dropdown menus at the top of the display let you select what
DLCIs to view, and how the chart should be scaled (linearly, logarithmically, or
autoscale). For linear scales, you can also set the CIR or the line rate as the maximum
value for the chart.
List View Display Properties
The Network Activity List view has only one display property option. To reset the
columns to their default widths, click on the icon or go to Mode Commands->Display
Properties (or simply right-click on the display).
To reset column widths to their default values, click Yes. To leave them in their present
state, click No.
34
Analyzing a WAN Link with Observer
Page 41

Top Talkers
Just as in standard Observer, Top Talkers shows the IP and MAC address of stations on
your network sorted by volume of traffic generated and received. In WAN Observer, the
MAC Address tab shows DLCIs sorted by volume of traffic. Also, the sorting and charting
statistical criteria (such as percentage of packets, packets per second, etc.) that apply to
WAN is a subset of those available for standard network analysis.
WAN Filtering
In addition to the standard Observer packet filtering rules (station address, pattern
matching, etc.), there are two WAN-specific filtering rules available for use with WAN
probes:
• DLCI Address, which lets you enter the number of the DLCI address you wish
include or exclude.
• WAN Conditions, which let you include or exclude frames based on flow direction,
forward and backward congestion, and discard eligibility.
To create a WAN filter rule, choose Actions->Filter Setup for Selected Probe. The
default filter rule (any address<-->any address) is displayed. Select and right click on the
rule to display the popup menu:
Running Observer Software with the WAN Probe
35
Page 42

Choose the desired filter rule from the menu. A dialog is displayed letting you set the filter
rule options. Refer to the Observer Reference Guide and online help for further
information about using filters and editing rules.
Triggers and Alarms
WAN Observer adds WAN-related criteria to the standard Triggers and Alarms mode.
Click the button located in the lower left corner of Observer’s main window . A
dialog that allows you to select the Probe or Probes for which you want to set alarms is
displayed:
The Alarm List tab lets you turn alarms on and off:
36
Analyzing a WAN Link with Observer
Page 43

Check the alarms you wish to set, then click the Triggers tab to set the criteria by which
the alarms will be triggered:
Note that most WAN alarms can be set on the DTE or DCE side or both; note also that the
Committed Information Rate displayed is that which you set in Discover Network Names
mode. See “Setting the Committed Information Rate (CIR) for a DLCI” on page 30. The
Actions tab lets you define actions to launch if an alarm is triggered. You can log
messages, send email, or even send a pager alarm.
Running Observer Software with the WAN Probe
37
Page 44

Notes:
38
 Loading...