

Page 1
00P5DG600DGSEA3 1
network DynaGuard™ 600 Series DVR
Setup Guide
Package Content
Inspect the packaging carton. Make sure the network DynaGuard™ 600 Series DVR is properly
delivered. Remove all items from the box and make sure the box contains the following items.
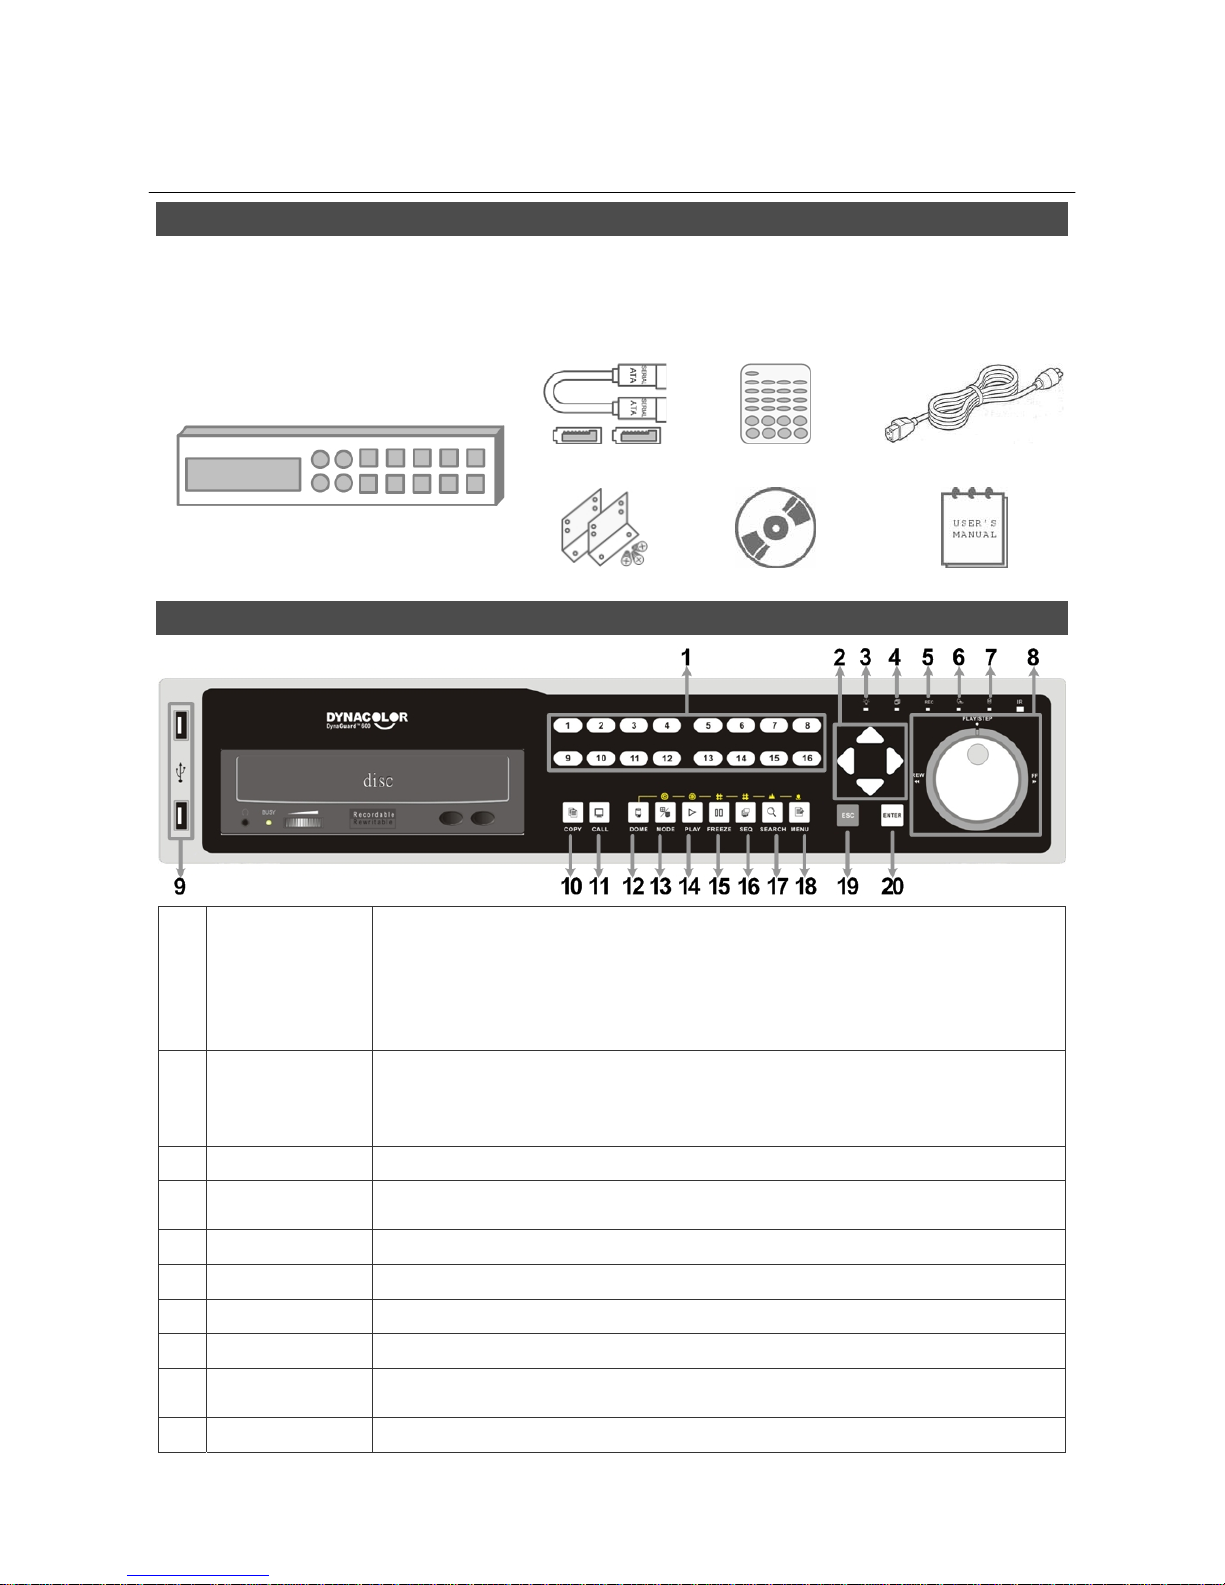
SATA Cable Remote Controller Power Cord
Mounting Kit Software CD-CMS User’s Manual
network DynaGuard™ 600 Series DVR
Front Panel
1 Channels
1. In Live and Playback modes, press any key to view the corresponding
video in full-screen.
2. In input interface, 1~10 can be used for direct input of numbers 0~9.
3. In Dome Camera Control mode, 1 is for entering the Set/ Go preset
menu; 2 is for hiding or displaying the hint screen; 11~16 is for quick
access of preset points 1~6.
2 Direction Keys
1. In Zoom mode, these keys function as normal direction keys.
2. In the OSD setup menu, the direction keys are used to move the
cursor to previous or next fields. To change the value in the selected
field, press UP / DOWN keys.
3 Power LED
It lights up when power source is connected.
4 Network LED
It lights up when network is connected. In addition, it blinks when data is
being transmitted via the network.
5 Record LED
It blinks when videos are being recorded.
6 Alarm LED
It lights up when an alarm is triggered.
7 HDD LED
It lights up when data is processed to or from the connected HDD(s).
8 Shuttle/ Jog
This is used to control playback operations.
9 USB 2.0 Port
The USB 2.0 port allows users to connect an external USB device to the
unit, such as a USB ThumbDrive© or a USB mouse.
10 COPY
This key is used for marking time in quick video export function.
Page 2
2
11 CALL
Press this key to control call monitor or 2nd main monitor.
12 DOME
Press this key to enter Dome Camera Control mode.
13 MODE
Press this key to view in full-screen or multiple window modes.
14 PLAY/STOP
Press once to start the playback of recorded video. Press again to exit.
15 FREEZE
Press this key to freeze the current viewing screen.
16 SEQ
Press this key to start automatic sequence display of cameras.
17 SEARCH
Press this key to search recorded video by date/time or event.
18 MENU
Press this key to enter the OSD setup menu.
19 ESC
Press this key to cancel or exit from certain control mode.
20 ENTER
1. In OSD menu or selection interface, press these key to make the
selection or save settings.
2. In live full-screen viewing mode, press this key to view a 2× zoom
image; press it again to return.
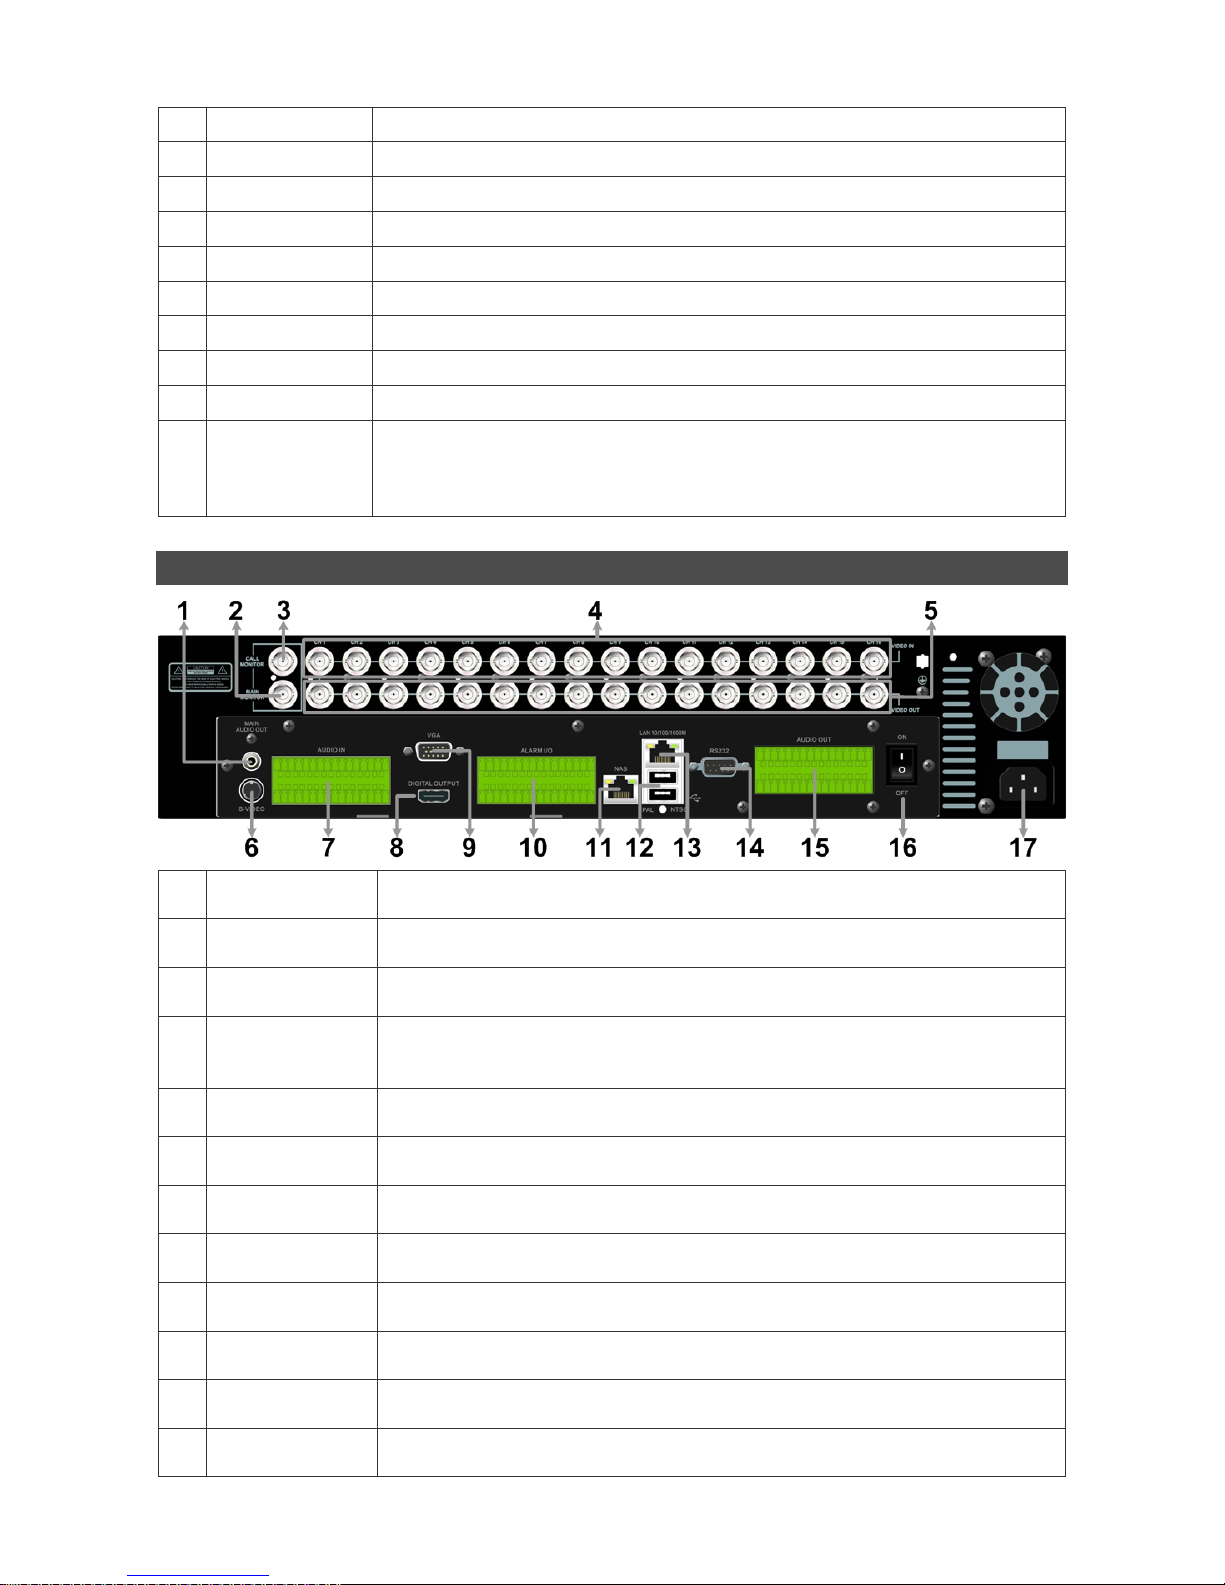
Rear Panel
1
Main Monitor
Audio Out
A RCA connector is provided to output audio associated with the main
monitor.
2
Main Monitor
(BNC)
A BNC connector is provided for connecting to a main monitor.
3
Call Monitor
(BNC)
A BNC connector is provided for connecting to a call monitor.
4 Video In (BNC)
A group of BNC connectors is offered for video input streams from
installed cameras. The number of connectors equals to the number of
channels.
5
Video Out
(BNC)
The same amount of BNC connectors underneath Video IN (BNC) is
offered for looping out the video input.
6
Main Monitor
(S-Video)
An S-Video connector is provided for connecting to a main monitor.
7 Audio In
The DVR provides audio in connectors (a terminal block) for each
channel to connect its individual audio source device.
8
Main Monitor
(Digital Output)
A digital output connector is provided for connection to a displaying
device that transfers data digitally to show the best video quality.
9
Main Monitor
(VGA)
A VGA output connector is offered for connecting to a VGA main monitor.
10
Alarm I/O &
RS-485
The DVR provides alarm I/O and RS-485 ports that offer users the
flexibility required to connect the unit to other devices.
11 NAS Device
The NAS connector allows users to connect to a Network-Attached
Storage (NAS) device to expand HDD capacity of the DVR.
12
USB 2.0 Ports
(×2)
Two USB 2.0 ports are located on the rear panel for users to connect
external USB devices to the unit, such as ThumbDrive® or a USB mouse.
Page 3
3
13
LAN
10/100/1000M
(RJ-45)
The DVR is capable of networking and it allows the videos to be viewed
over the LAN network or the Internet by using the Internet Explorer.
14 RS232
The DVR provides a RS232 communication port for sending and
receiving signals.
15
Audio Out
(Optional)
Optional Audio Out connectors can be installed for each channel to
connect its individual audio output device.
16
Power Switch
Use this switch to power on / off the DVR.
17 Power Jack
Connect the power supply cord shipped with the DVR. Use of other
power supply cords may cause overloading.
NOTE: Refer to User’s Manual Appendix E: Simultaneous Output Options
for detailed
information about monitor functionality.
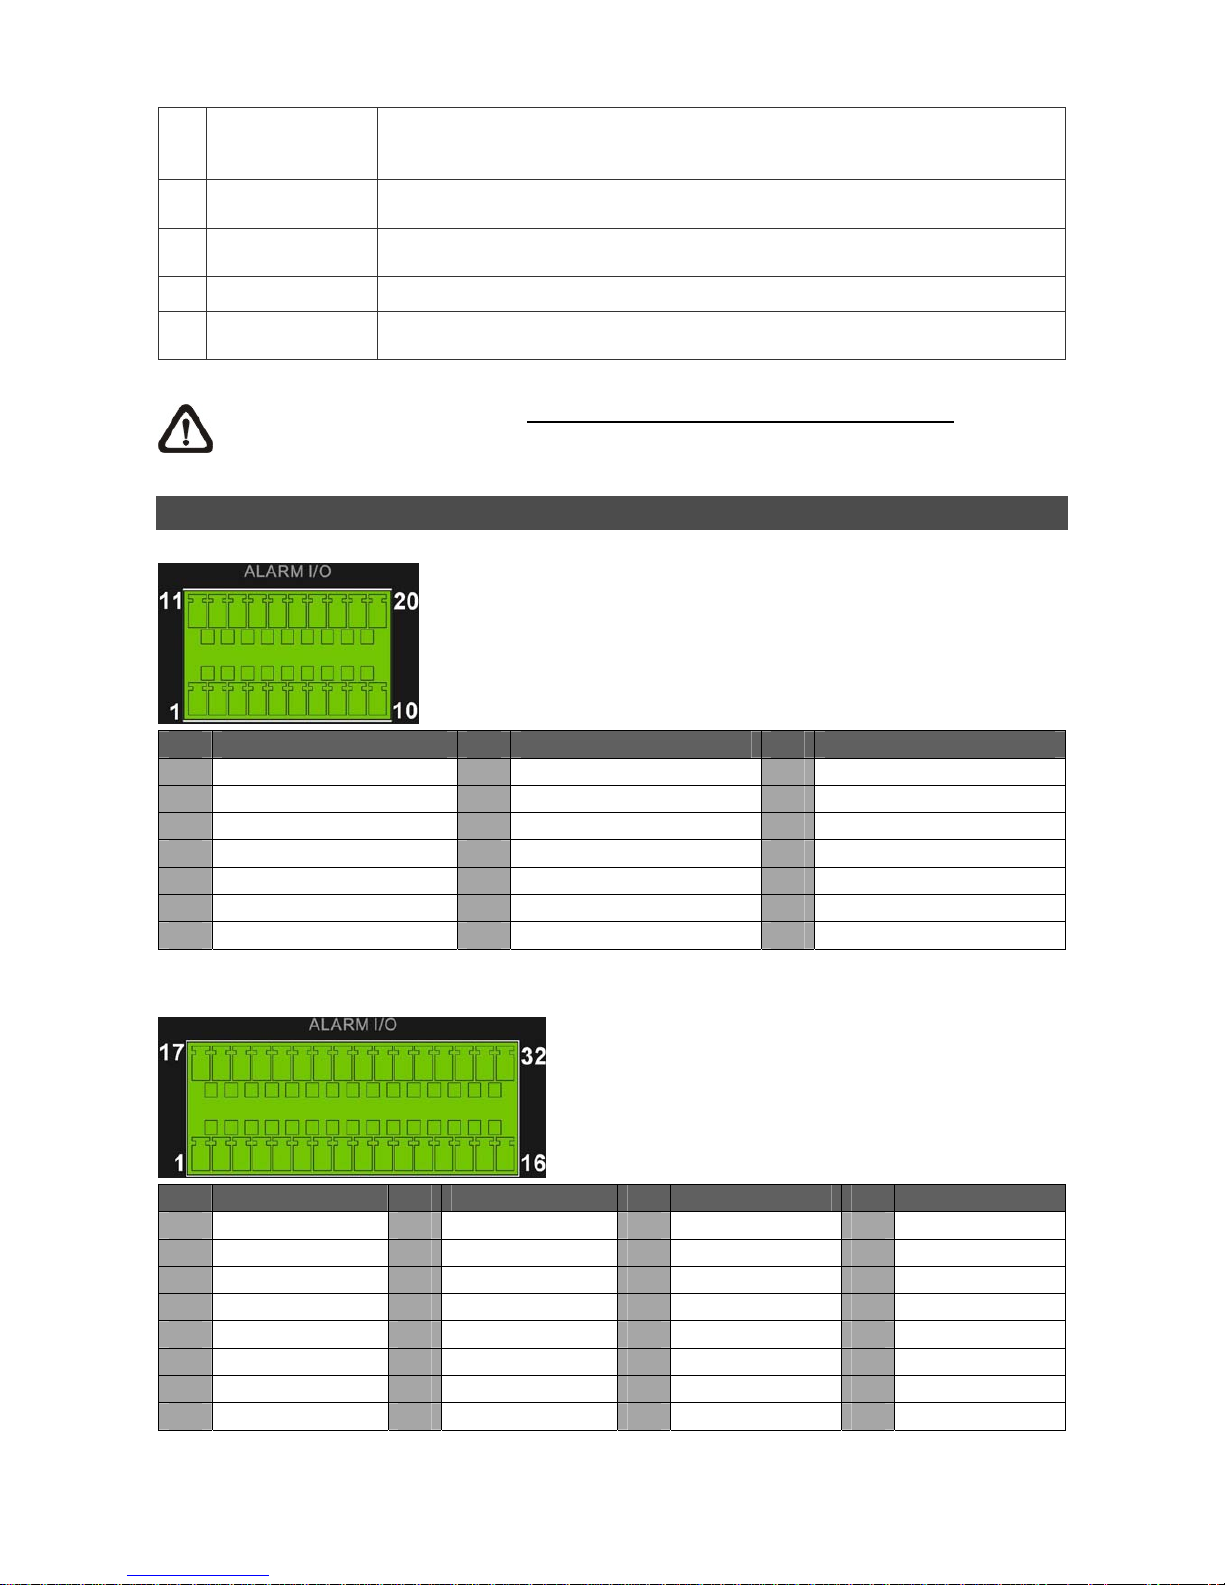
Pin Definition of Alarm I/O & RS-485
4ch-Model / 8ch-Model:
Pin Definition Pin Definition Pin Definition
1 RS485 D+ 8 Normal Close B 15 Alarm In 5 (8ch model)
2 RS485 D− 9 Common Node B 16 Alarm In 6 (8ch model)
3 Ground 10 Normal Open B 17 Alarm In 7 (8ch model)
4 Normal Close A 11 Alarm In 1 18 Alarm In 8 (8ch model)
5 Common Node A 12 Alarm In 2 19 N/A
6 Normal Open A 13 Alarm In 3 20 N/A
7 Ground 14 Alarm In 4
16ch-Model:
Pin Definition Pin Definition Pin Definition Pin Definition
1 RS485 D+ 9 Common Node B 17 Alarm In 1 25 Alarm In 9
2 RS485 D− 10 Normal Open B 18 Alarm In 2 26 Alarm In 10
3 Ground 11 Ground 19 Alarm In 3 27 Alarm In 11
4 Normal Close A 12 Normal Close C 20 Alarm In 4 28 Alarm In 12
5 Common Node A 13 Common Node C 21 Alarm In 5 29 Alarm In 13
6 Normal Open A 14 Normal Open C 22 Alarm In 6 30 Alarm In 14
7 Ground 15 Ground 23 Alarm In 7 31 Alarm In 15
8 Normal Close B 16 Ground 24 Alarm In 8 32 Alarm In 16
Page 4
4
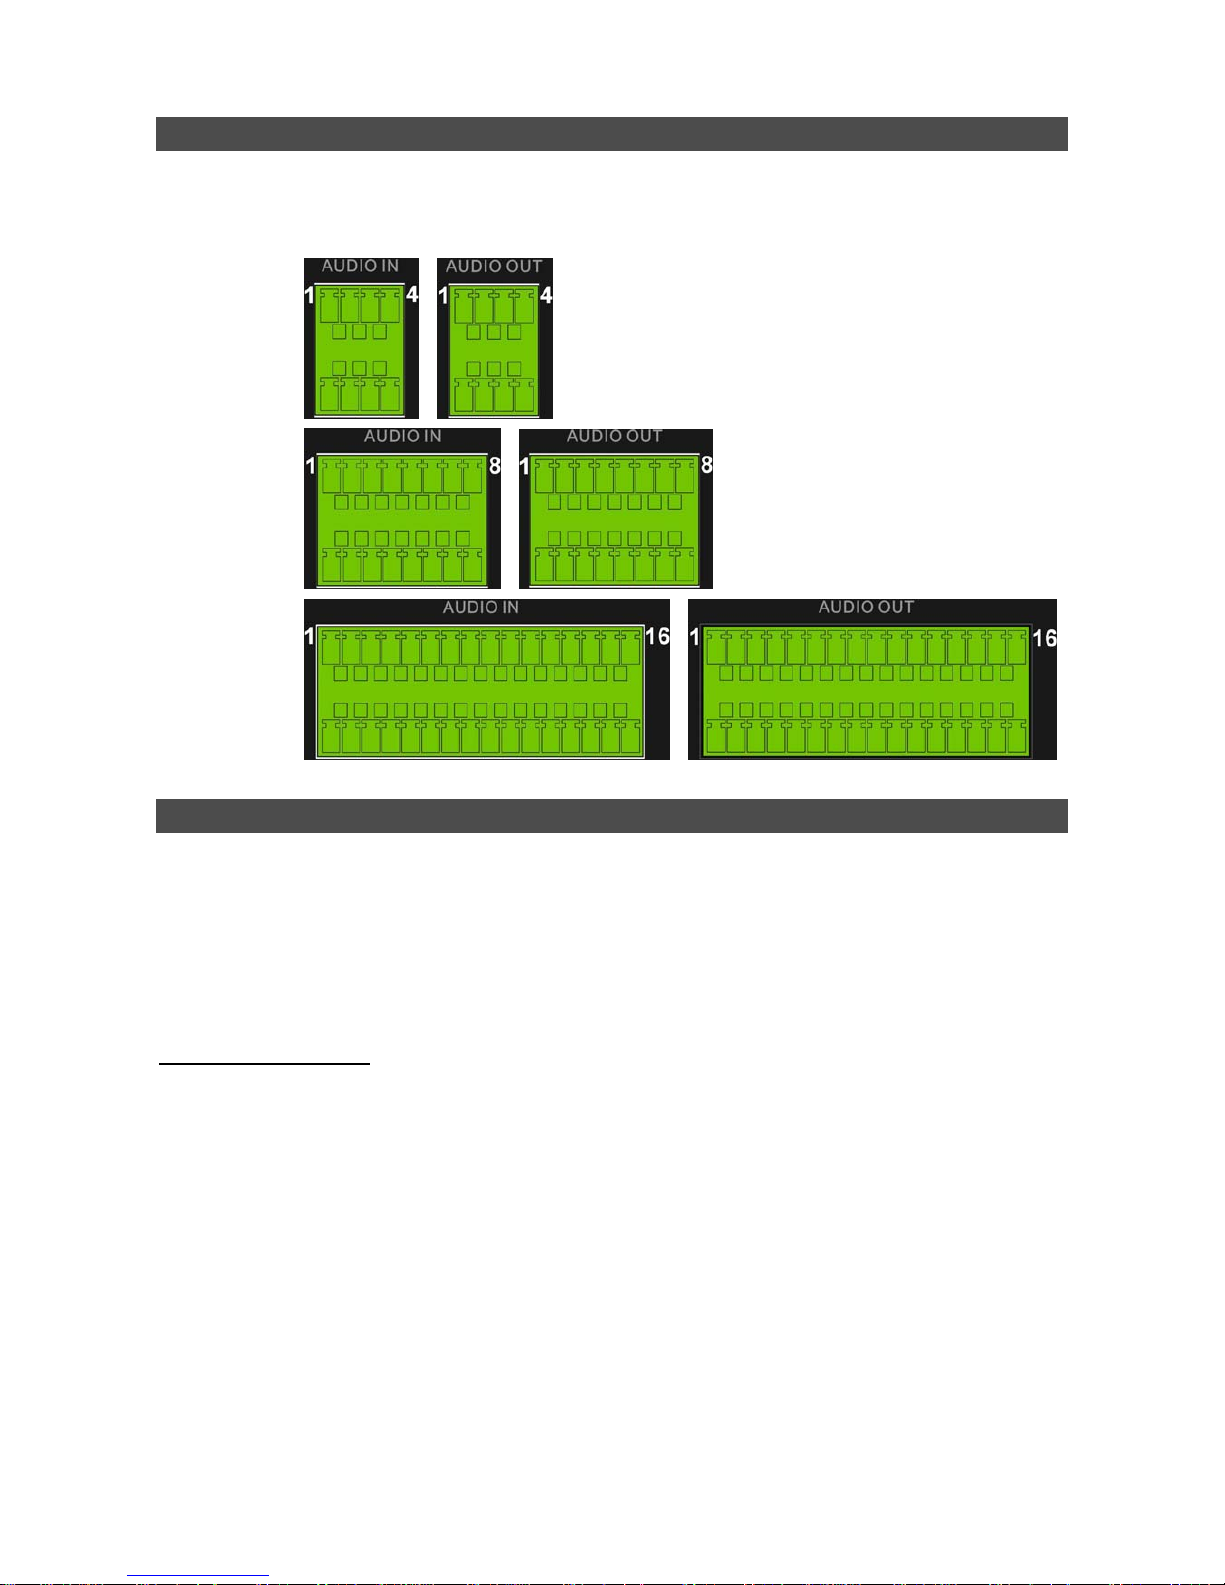
Pin Definition of Audio In / Audio Out
For terminal blocks of Audio In and Audio Out, shown as below pictures, pins on the upper row are
Audio In / Audio Out connectors for all channels, in sequential order from left to right. All other pins
on the bottom row are for ground connection.
4ch-Model:
8ch-Model:
16ch-Model:
Power On the DVR
Please follow the proper power on procedures to avoid damaging the DVR.
• Connect all necessary components, e.g. monitor and cameras, before power on the DVR.
• Check the type of power source before plugging in the power cord to the DVR. The acceptable
power input is between AC110V ~ AC240V.
• Press the power switch on the rear panel to power on the DVR.
Select Viewing Mode:
• Press MODE button repeatedly to select the wanted display mode. The available viewing modes
are full-screen, 2×2, 3×3, and 4×4 split-window.
• Press FREEZE button to pausethe current viewing image.
Page 5

5
Basic Setup
Enter the OSD main menu and setup some basic configuration of the DVR. The basic configuration
can be set via either the DVR or DynaRemote™, the remote software.
Enter OSD Main Menu:
• Press MENU to enter the OSD main menu.
• Select the administrator account “admin” to login. Enter the preset password “1234”.
• It is strongly suggested to change the password to prevent unauthorized access.
Date / Time Setting:
Follow steps below to setup date/time before the recording starts. Refer to the User’s Manual for
advanced setup of Time Sync function.
• Select <Date/Time> in System Setup menu.
• Select the date and time using LEFT/RIGHT keys; then adjust the value using UP/DOWN keys.
• The new date and time settings take effect after the changes are confirmed.
Language Setting:
If users wish to change language of the DVR system, follow the steps below.
• Select <Language> in System Setup menu and press ENTER.
• Press the UP/DOWN keys to select the desired language.
Network Setup
Configure the LAN setup when users plan to use a LAN, WAN, or Internet connection without a
dialup modem. It requires an Ethernet connection to a network. The default ID of the network
DynaGuard™ 600 Series DVR must be changed to avoid network conflicts.
• From OSD main menu, select <System Setup> Æ <Network Setup>, set the <LAN Select>
item to <LAN> or <PPPoE> according to the network application, and enter <LAN Setup>.
• For DHCP users, set the DHCP to <ON>. The IP address, Netmask, Gateway and DNS settings
are retrieved from network servers. DHCP is dynamic that the settings change from time to time.
• For Non-DHCP users, set the DHCP to <OFF>. IP address, Netmask, Gateway and DNS
settings must be set. Please obtain the information from the network service provider.
• To change the IP address, Netmask, Gateway and DNS value, press UP/DOWN keys to move
the cursor to the item. Use LEFT/RIGHT keys to access each section of the value and press
ENTER, then change the value using UP/DOWN keys.
• PPPoE users must set the <PPPoE Account>, <PPPoE Password> and <PPPoE Max Idle>
as well.
• When the settings are complete, press ENTER to confirm and save the settings; or ESC to
abort.
Page 6
6
Dome Camera Control
Dome Camera Connection & Settings:
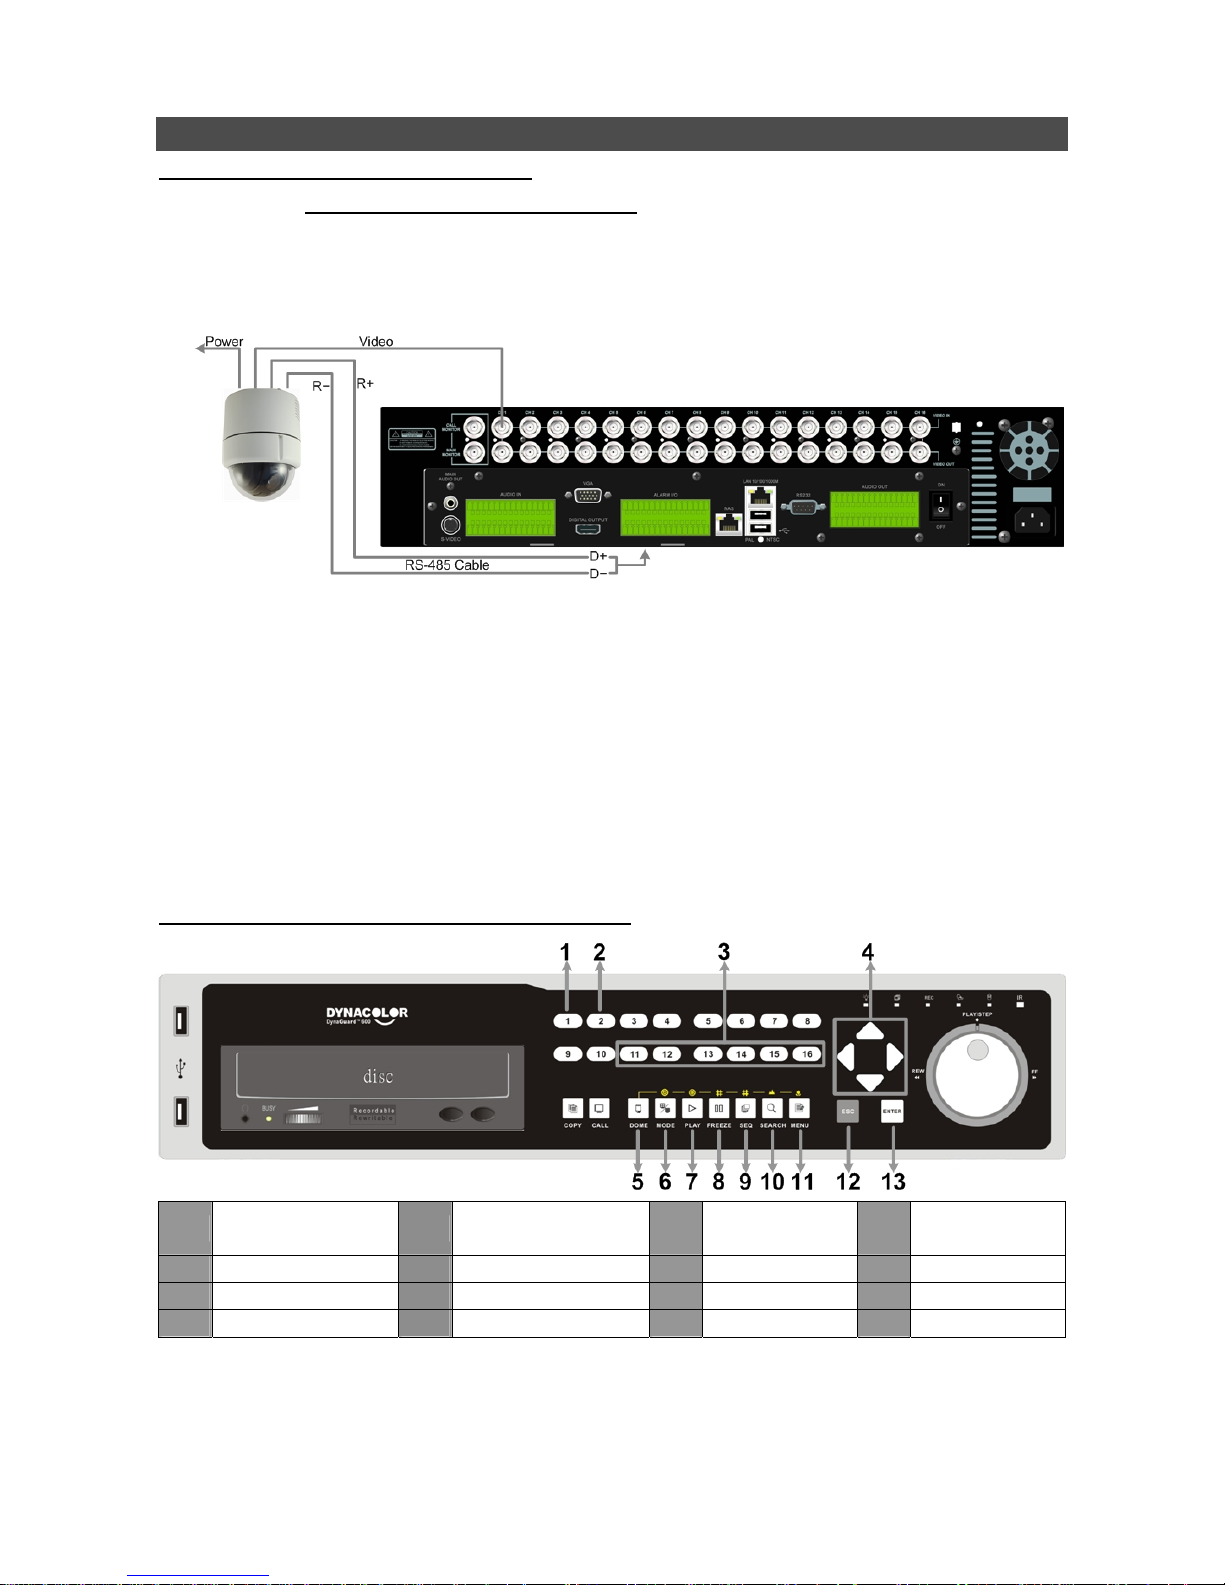
• See section Pin Definition of Alarm I/O & RS-485
for RS-485 port pin definition.
• Refer to the following figure. Connect the R+, R− terminals on the dome camera to the D+, D−
terminals on the RS-485 port by RS-485 cable respectively.
• To set up dome camera’s protocol and ID, press MENU to access the OSD main menu, and
select <Camera Setup>. Then select <Dome Protocol> and choose the corresponding
protocol. Next select <Dome ID> and choose a preferred ID number. Note that the ID number
must match the ID address defined by the dome camera.
• To configure the RS-485 parameters, select <System Setup> from OSD main menu, and then
select <RS485 Setup>. The default RS-485 settings are 9600 Baud, 8 Data Bits, 1 Stop Bit and
No Parity.
Control Buttons in Dome Camera Control Mode:
1 Set / Go Preset 5
Enter Dome Camera
Control Mode
9 Focus Near 13 Enter / Auto
2 Toggle Hint Screen 6 Iris Open 10 Zoom Out
3 Go Presets 1~6 7 Iris Close 11 Zoom In
4 Pan / Tilt 8 Focus Far 12 ESC
Page 7
7
Basic Playback Operation
Search By Time:
• Press SEARCH to enter the Search menu.
• Move the cursor to “From” and press ENTER will start playing recorded video from the specified
“From” time.
• Move the cursor to “End” and press ENTER will start playing recorded video from the specified
“End” time.
• Move the cursor to “Select” and press LEFT/RIGHT to choose date/ time. Press ENTER and
adjust the values by UP/DOWN keys. Press ENTER again to confirm or press ESC to abort.
• Move the cursor to <Begin Playback> and press ENTER to start playing back recorded video of
the selected time. Press PLAY/STOP again to return to live video.
NOTE: If there is no available recorded video that matches the specified time and date,
the unit starts to playback from the next available video.
Calendar Search:
• Press SEARCH to enter the Search menu.
• Move the cursor to <Calendar Search> and press ENTER. A calendar will show up.
• Move the cursor to year/ month and press ENTER. Then press UP/DOWN to adjust the value
and press ENTER again to confirm.
• Move the cursor and press ENTER to select any date shown in bold and underlined font. The
bar below the calendar will change according to the recorded data of the selected date.
• Then select preferred time from the time bar. Alternatively, move the cursor to the time shown at
the bottom. Press ENTER and adjust the values of hour/ minute/ second via UP/DOWN keys.
• The <From> and <End> buttons allows users to playback video from the beginning or end of
the database.
• Note that the time blocks highlighted in red represent events occurred.
• Select <Begin Playback> and press ENTER to start playing back selected video.
Page 8
8
Smart Search:
• Press SEARCH to enter the Search menu.
• Move the cursor to <Smart Search> and press ENTER. The Smart Search menu will show up.
• Specify the From/End time to search for recorded video within the period.
• Choose a channel for smart search and setup the monitoring area.
• Specify detection sensitivity and threshold according to environment and required application.
• Specify the time interval to separate the time period into segments.
• When the criteria are all set, select <Smart Search List> and press ENTER to start the smart
search.
• When the Smart Search List is displayed, use Direction keys to scan through the list.
• Press ENTER to playback any desired item, or press ESC to exit the list.
Search by Event:
• Press SEARCH to enter the Search menu.
• To search event video that was recorded on a specific camera, use LEFT/RIGHT keys to move
the cursor and press ENTER to select or de-select a channel.
• Move the cursor to <Event List> and press ENTER to list the event video of the selected
channels.
• The list displays each event by date, time, triggered camera and alarm type. The latest recorded
event video will be listed on the top. To exit the event list, press ESC.
• Use UP/DOWN keys to scroll through the Event List. Press ENTER to play back the selected
event record.
NOTE: The event list displays only the first 1024 events; as some events are deleted,
others are displayed.
Playback Controls:
Button Description
LEFT
The button is for rewinding the recorded video while playing back. Press the button
repeatedly to increase the speed of reverse playback by 1×, 2×, 4×, 8×, 16×, or 32×.
RIGHT
The button is used to play the recorded video fast forward. Press the button
repeatedly to increase the speed of forward playback by 1×, 2×, 4×, 8×, 16×, or 32×.
FREEZE
Press FREEZE to pause the playback video. When the recorded video is paused,
press LEFT / RIGHT to resume playback video single step reverse / forward
respectively. Press FREEZE again to continue playing video.
PLAY
Press to start the playback or to stop playing back video and return to live mode.
Page 9
9
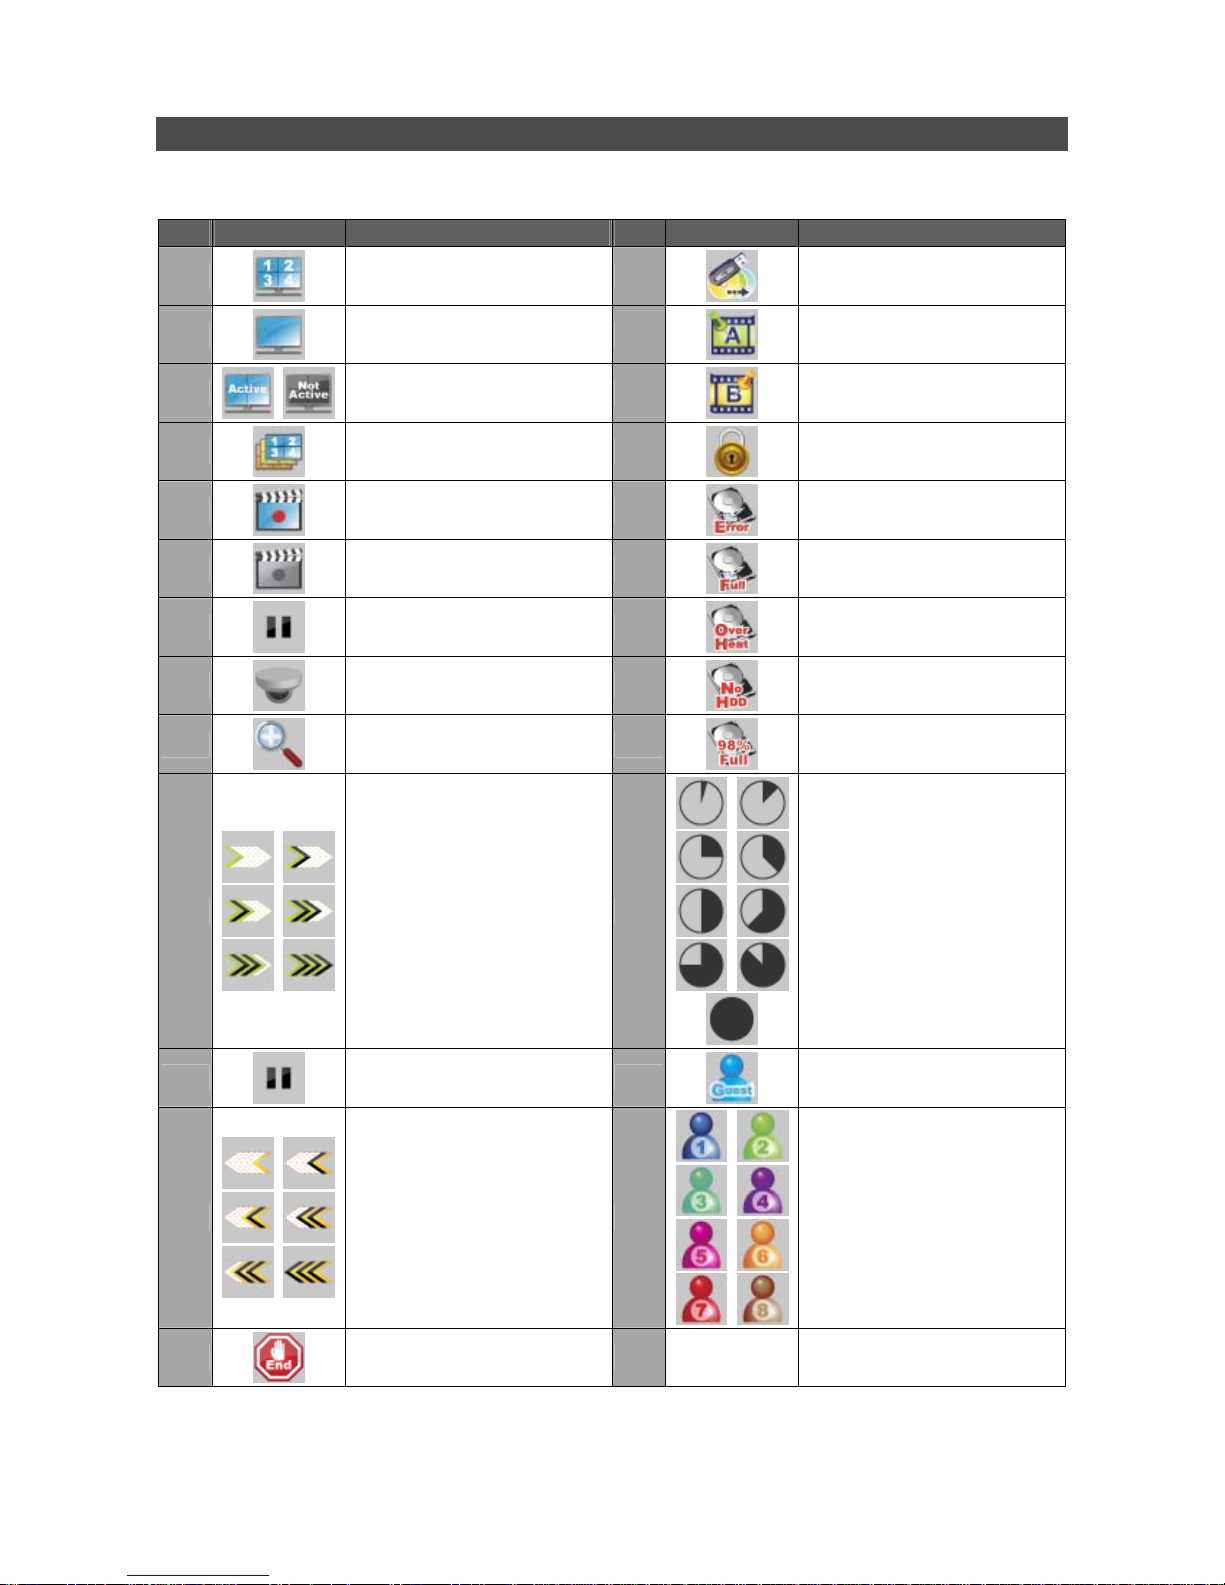
DVR Status Bar Icons
Icons that will be displayed in the status bar are listed in the following table with their descriptions.
Item Icon Description Item Icon Description
1
Main Monitor
14
Quick Export
2
Call Monitor
15
Stamp A
3
Monitor Active/Inactive
16
Stamp B
4
Sequence
17
Lock
5
Record
18
Disk Error
6
Event Record
19
Disk Full
7
Freeze @ Live Mode
20
Disk Overheat
8
Dome Camera Control
21
No Disk
9
Zoom
22
Disk Almost Full
10
Forward Playback Speed:
1x, 2x,
4x, 8x,
16x, 32x
23
HDD Usage
11
Pause @ Playback mode
24
Guest
12
Backward Playback Speed:
1x, 2x,
4x, 8x,
16x, 32x
25
User’s Authority Level
13
End of Video
Page 10
10
Connect the DVR via the Remote Software
Setup Requirements:
• Make sure the PC is connected to the Internet.
• Obtain IP address of the network DynaGuard™ 600 Series DVR. To check the DVR’s IP
address, press MENU on the front panel and select <System Setup> Æ <Network Setup> Æ
<LAN Setup> Æ <IP> to check the IP.
Changing Internet Setting:
• Start the IE; select <Tools> from the main menu of the browser, then <Internet Options> and
then click the <Security> tab.
• Select <Trusted Sites> and click <Sites> to specify its security setting.
• Uncheck “Require server verification (https:) for all sites in this zone”. Type the IP address of the
unit in field and click <Add> to add this website to the zone.
• In the Security Level area, click <Custom Level>. Under <ActiveX controls and plug-ins>, set
all items to <Enable> or <Prompt>.
• Click <OK> to accept the settings and close the <Security Settings> screen.
Using the Remote Software:
• Start the IE and enter the IP address of the network DynaGuard™ 600 Series DVR in the
address bar.
• The ActiveX controls and plug-ins dialog will show up twice for confirmation; click <YES> to
accept ActiveX plug-ins. DynaRemote™ plug-ins will be downloaded and installed on the PC
automatically when the connection is successfully made.
NOTE: Do not enter any leading “0” characters in the address, for example,
“192.068.080.006” should be entered “192.68.80.6”.
NOTE: If the default trigger port 80 is changed into another one, take port 81 for
example, users should enter the IP address as “192.68.80.6:81”.
• Version verification starts automatically to verify whether DynaRemote™ was installed. This
process may take up to 30 seconds.
• When the software is completely downloaded and installed, the Login Screen is displayed.
• Enter username and password. The default username and password is admin and 1234.
Page 11
11
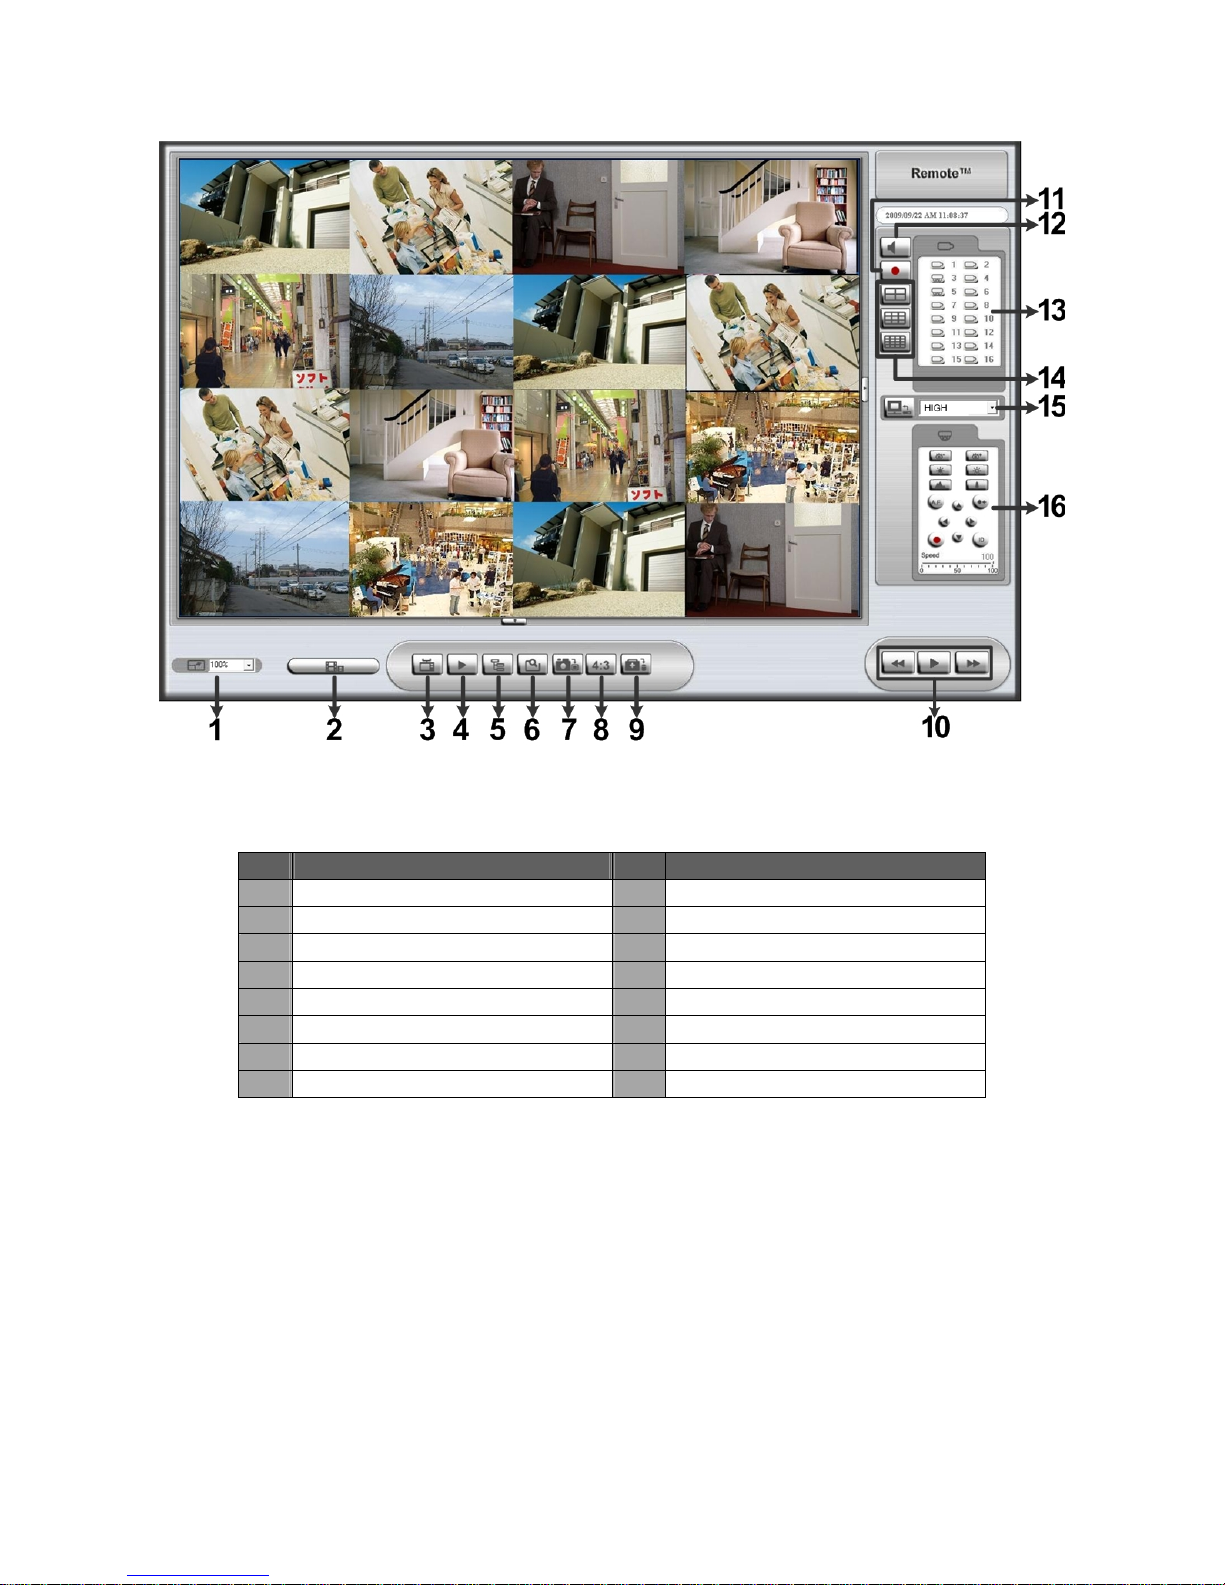
The following picture shows the display window of the DynaRemote™:
Refer to the table below for brief description of functional items:
Item Description Item Description
1 Select Picture Size 9 HDD Health Status
2 Download DVRPlayer 10 Playback Control
3 View Live Camera 11 Instant Recording
4 Playback Video 12 Audio On/Off
5 Setup Menu 13 Select Camera
6 Search Event List 14 Display Mode
7 Capture Snapshot 15 Bandwidth – Normal/Dual Stream
8 4:3 Viewing Aspect 16 Dome Camera Control Panel
For more information on DynaRemote™, see User’s Manual.
Page 12
12
DynaRemote™ Playback
Playback Remote Video:
• Click <Play> on the main window toolbar, and then <Remote Playback> tab.
• The <From> and <To> on top of the screen display the date and time from which recorded video
is available for playback.
• Choose <Playback> in <Select> field for playback recorded video.
• Select the date and time of the segment to play back from the <Start> field. Users can change
the date and time either by typing desired numbers directly or using the arrow buttons.
• Click <OK> to start the playback, or click <Close> to abort.
Playback Local *.drv File:
• Click <Play> on the main window toolbar, and then <Local Playback> tab.
• Click <Open> and the file selection screen is displayed. Select the *.drv video file to playback
and click <OK>.
• Click <OK> to start the playback, or click <Cancel> to abort.
• View the video playback using the Playback controls.
• To end the playback, click <Live> to return to live video.
Playback Local *.avi Files:
• Start the windows media player or other media player from <Start> menu (or any other possible
access).
• Select <File> and then <Open>.
• Select the wanted *.avi file, and click <Open>.
NOTE: The *.avi files for each channel are stored separately. Therefore the video can
be played back in single channel, full screen mode only.
Playback Event Video:
• Click SEARCH on the main window toolbar. The Event List appears.
• Scroll through the Event List and highlight the interested events.
• Double-click on the desired event to view the event video.
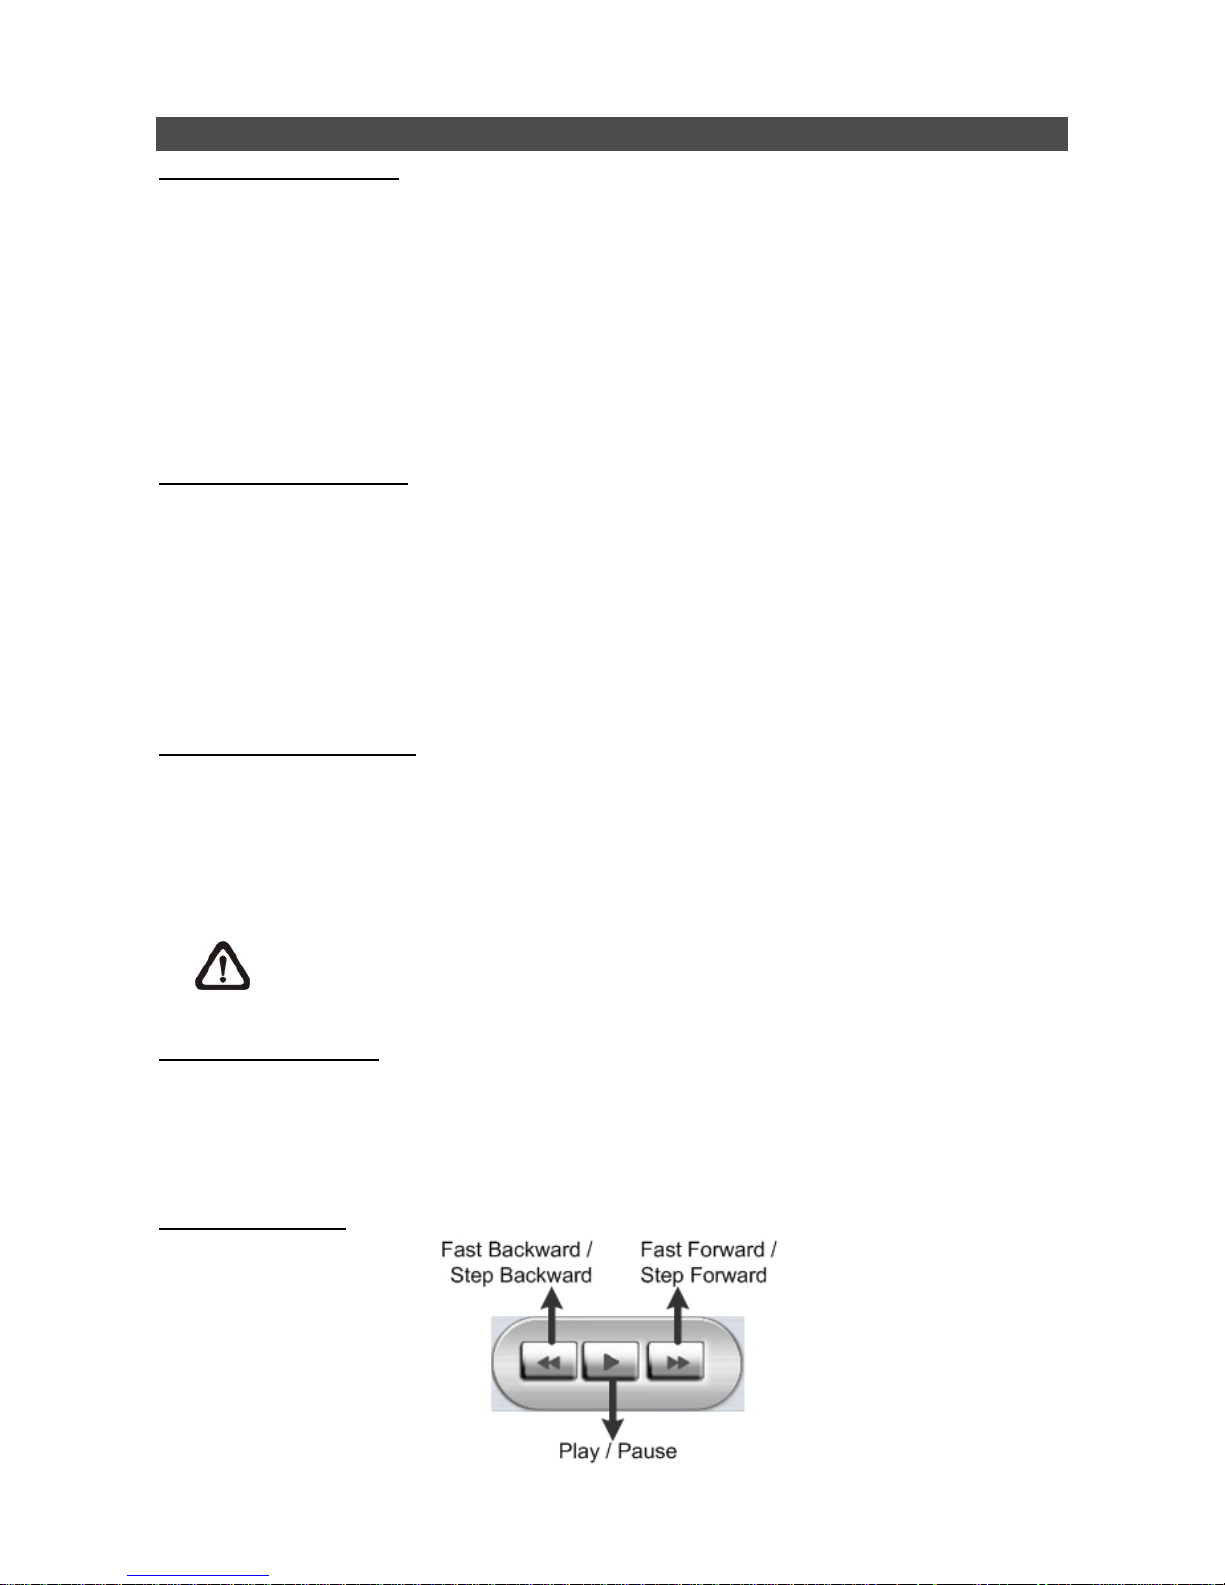
Playback Controls:
Page 13
13
Mobile View Software
Mobile View software allows users to timely monitor via a mobile device with internet connection.
Refer to below for brief introductions of installation (JAVA mobile devices) and basic operations.
Download and Installation:
• Access the java installation menu on a JAVA mobile device and connect the website that
provides Mobile View software to directly download the software to the mobile device.
• After the download is completed, follow the instruction shown on the JAVA mobile device to
installed Mobile View software.
Basic Operation:
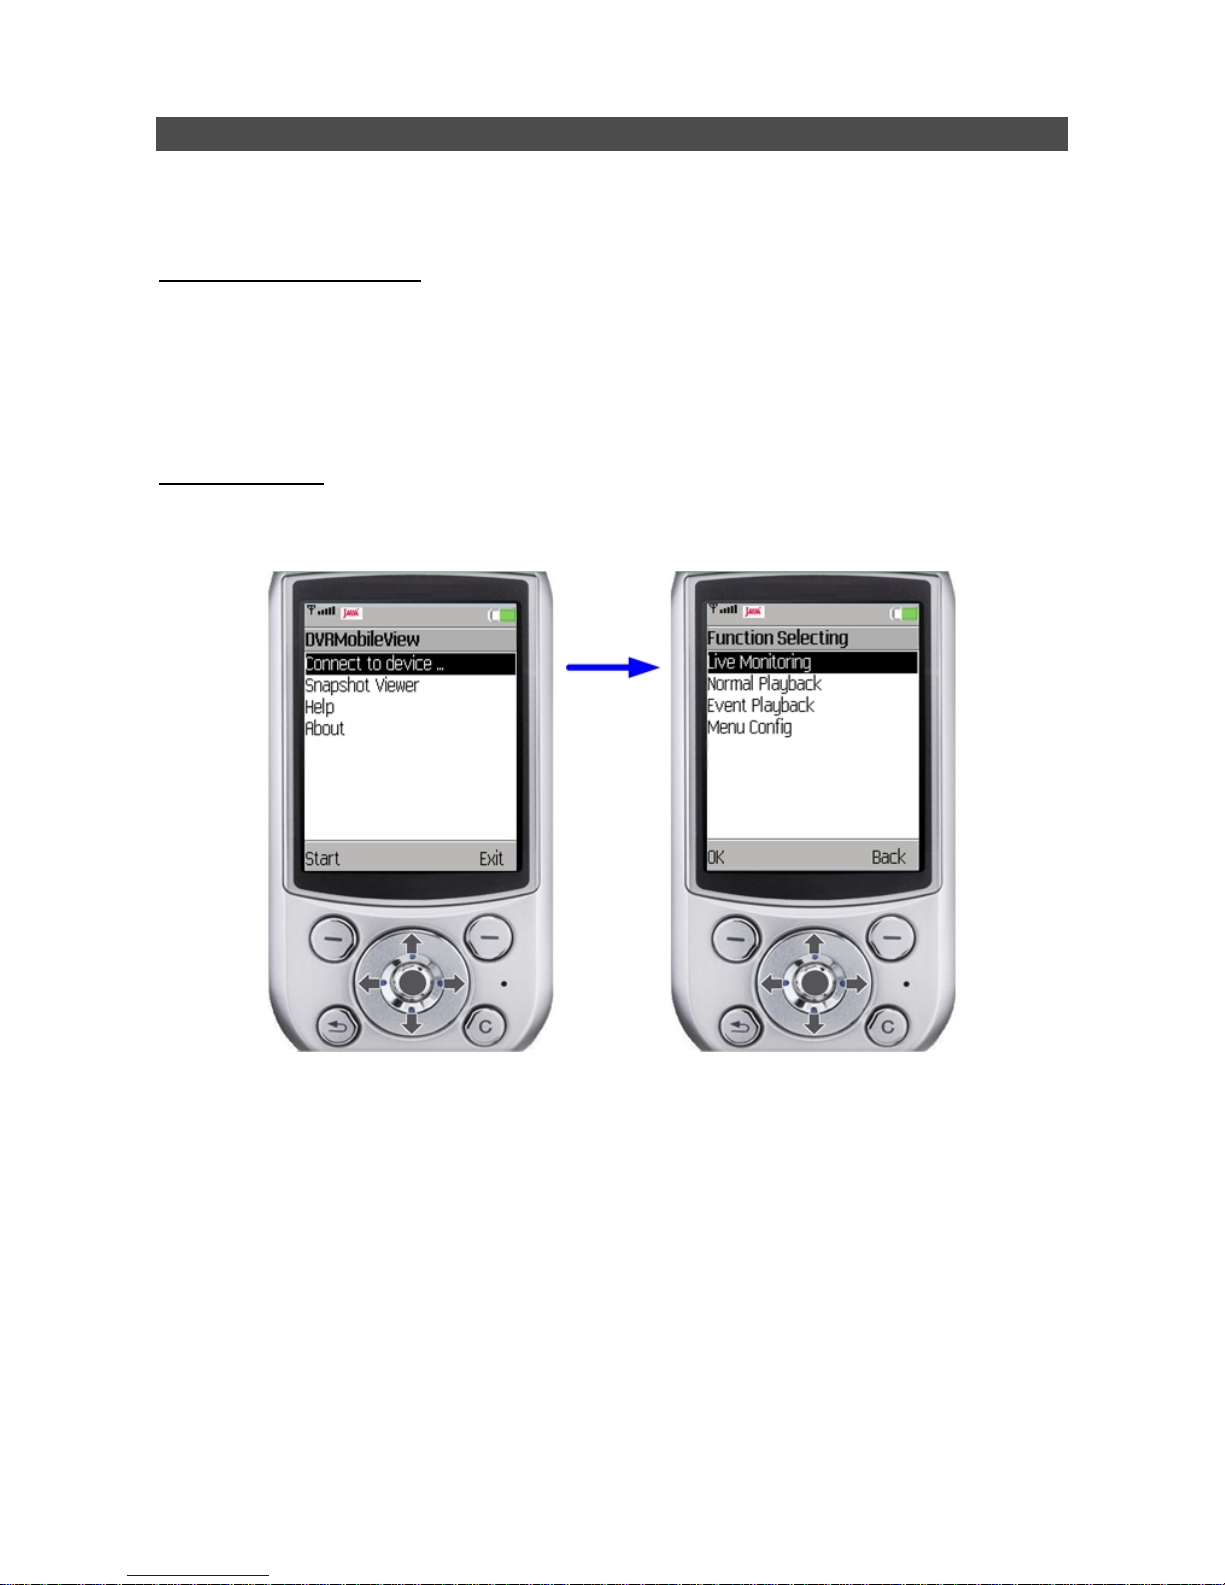
Locate the installed Mobile View software and launch it. The main window will be shown as below
on the left.
• Access <Connect to device> and users can create bookmarks for DVRs or IP cameras via
entering hostname/IP address, port, username, and password of the devices.
• If a DVR is connected, the available functions will be listed as shown above on the right. Users
can select <Live Monitoring> to view the live video. <Normal Playback> and <Event Playback>
allow users to playback recorded normal and event videos. <Menu Config> enables users to
setup part of the DVR’s configuration.
• If an IP camera is connected, live video of the IP camera will be directly shown on the screen.
• <Snapshot Viewer> is where the snapshot pictures can be viewed after they were saved to the
database of the mobile devices.
Refer to Mobile View Software User’s Manual for installation of Blackberry phones and detailed
information of all functions.
 Loading...