

Page 1
LSQ-40L
LABEL PRINTING SCALE
QUICK START
MANUAL
REV 1.0
PAGE 1
Page 2

INDEX
Before you begin……………………………………………………………2
Cleaning the scale
Requirements for using a computer to program
Setting up scale for first use………………………………………………..4
Testing printer
Printing your first label……………………………………………………..5
Setting up the network……………………………………………………..6
Connecting the devices
Installing the software
Configuring you computer
Configuring your scale(s)…………………………………………………..7
Starting up the software……………………………………………………8
Adding scales to the network
Configuring general information…………………………………………..9
Adding products…………………………………………………………..10
Moving products to/from scale……………………………………………11
Access Direct
General configuration……………………………………………………..12
Bar code setup
Printed text on labels……………………………………………………...13
Headlines
Passwords
Programming using the keyboards…………………………………………14
Entering store information
Edit scrolling message………………………………………………….…15
Configuration……………………………………………………………….16
Setting up label print………………………………………………………17
Setting up bar code
Placing text on label……………………………………………………….18
Set up text on label……………………………………………………...…19
Add plu’s…………………………………………………………………..20
Key assignation
Troubleshooting……………………………………………………………22
Page 2
Page 3

BEFORE YOU BEGIN
Please read this section carefully. The following has some important safeguards to
prevent damage or failure of your scale.
CLEANING THE SCALE:
1). You may use stainless cleaner or mild soap to wipe down the metal areas of the
scale. The keyboards and display should be wiped down with a damp cloth only.
While the keyboards and display are reasonably sealed, do not allow liquids to get
between the plastic surfaces and the metal.
2). Use only the supplied cleaning kit to clean the print head. Do not use sharp
objects around the print head or the pinch roller below it. Damaging these parts will
cause your label printouts to be unreadable or you may even cause internal damage
to the scale.
3). Do not immerse the power supply in water. This will cause possible electrical
shock and failure of the adapter. Unplug adapter from power and wipe down with a
damp cloth. Do not spray the adapter with cleaning fluids.
4). Keep the print cartridge area clean of any food or other debris. If contaminants
are picked up by the labels and brought across the print head, it can cause labels to
print poorly. This can also damage the print head.
COMMUNICATIONS WITH THE SCALE:
If you are going to program your scale using a personal computer, here are a few
things you will need.
1). You will need to purchase a network adapter (hub) and two (2) category 5 cables.
These can be purchased from electronics or department stores that sell computer
equipment. A network adapter allows you to plug your computer and scale(s) into
one hub. NOTE: You cannot plug the scale directly into your computer. Being your
scale is actually a computer; all computers that communicate with each other
require a network adapter to control data flow between machines.
Page 3
Page 4
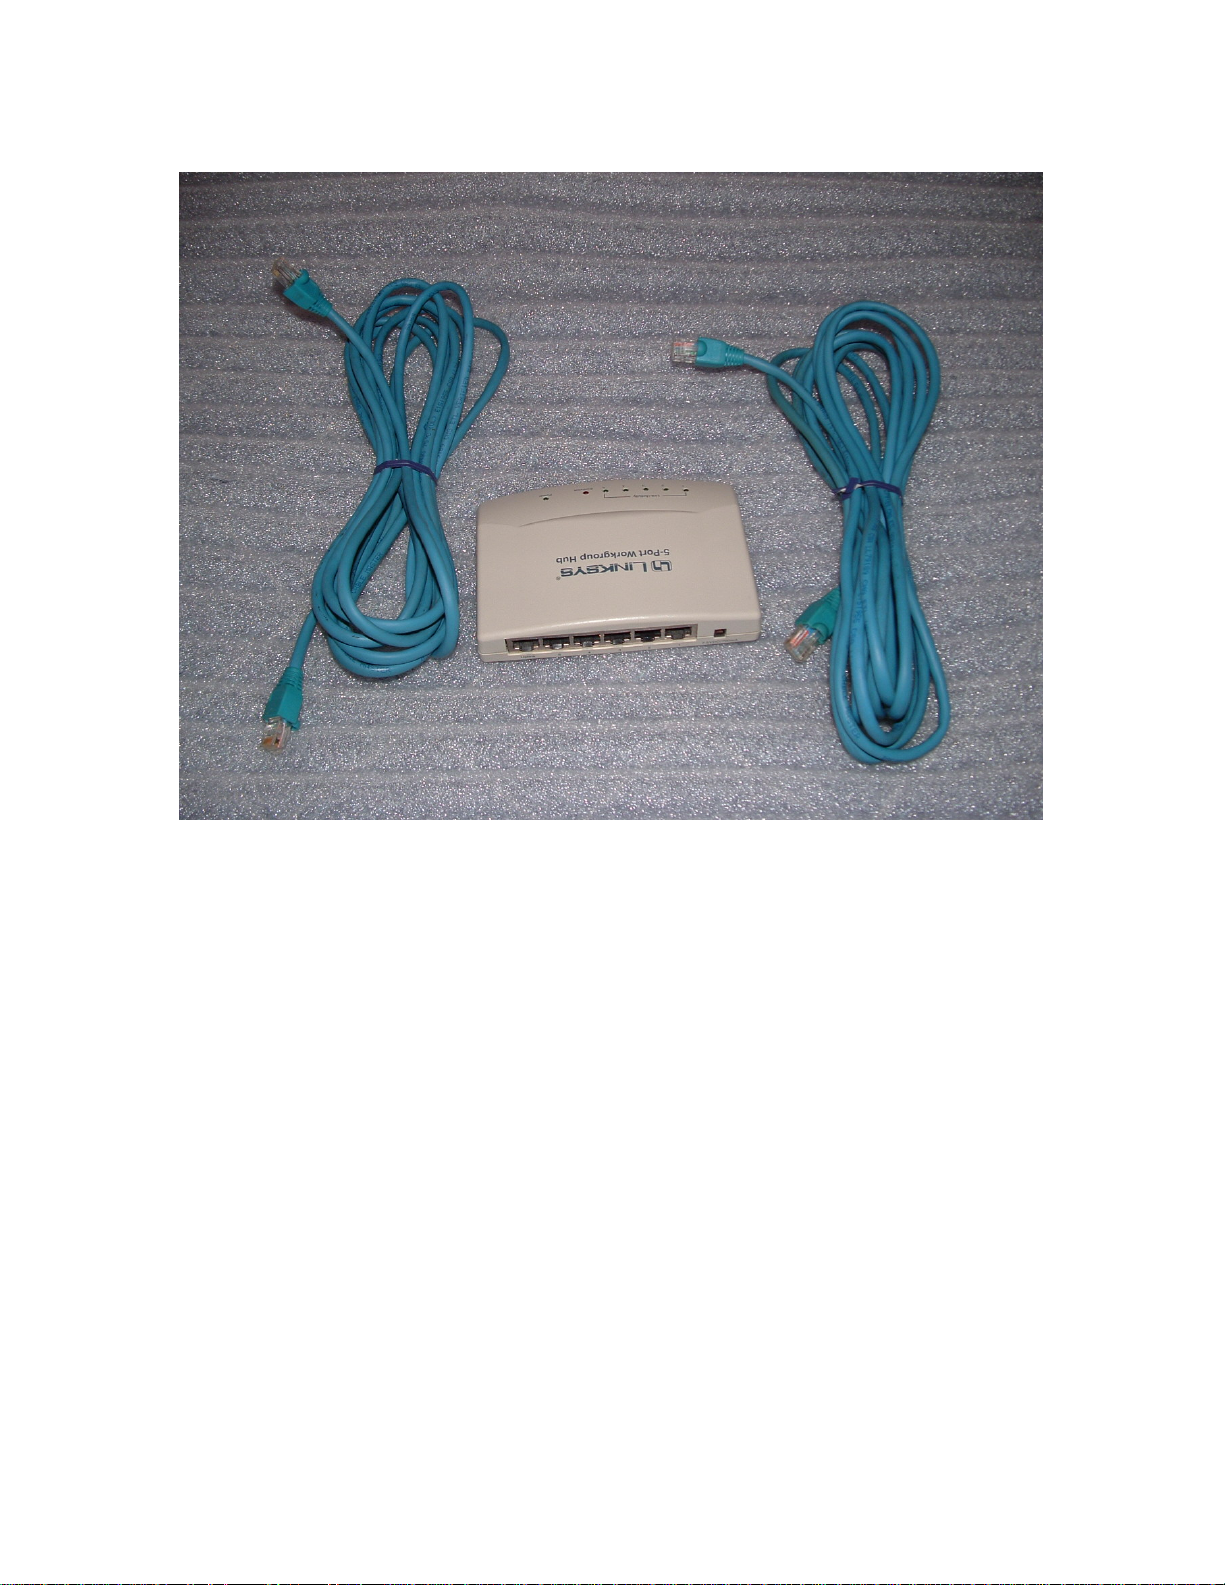
Network Adapter with category 5 cables
The picture above shows an example of a 5 port hub. One computer and up to 4
scales can be connected for programming.
NOTE: It is not necessary to have a computer to program your scale. Programming
can be done by using the keyboard on the scale. However, it is much easier to
program using a computer especially if you have more than one scale.
A few other advantages of using a computer are:
1). Information can be saved to your hard drive or other backup device.
2). You can communicate to the scales from a remote location such as a back office.
You would not have to go to the machine or move it to program/update.
3). You can generate reports from the scale and print them without interrupting
normal operations of the day.
Page 4
Page 5

SETTING UP THE SCALE FOR FIRST TIME
1). Carefully unpack scale from its box. Lift the indicators arm all the way up until
it stops. Adjust the correct angle of the indicator by loosening the black nut on the
arm next to the indicator. Move the indicator to the correct angle and then tighten
the nut. DO NOT over tighten.
2). Plug in the ac adapter to the wall socket and the other end into the scale. The
connector may appear tight on a new scale. You might try twisting the connector as
you are pushing it into the scales receptacle.
3). Turn on the scale. It should do a regressive countdown, then a label should
dispense. If the scale does not turn on, try twisting the connector again while
leaving the switch in the on position.
QUICK TEST OF THE PRINTER:
1). Remove the template from the main keyboard. There is a tab on the left side so it
can be pulled out. This exposes the programming keyboard.
2). Find the key(s) that came with the scale. Insert the key into the lock on the
bottom right of the scale. Turn it right 90 degrees.
3). The indicator should display PWD? Press the PRINT key. The scrolling message
should say PROGRAMMING MODE.
4). On the programming keyboard, press CONFIG. Using the arrow down button,
scroll down until it says MODE.
5). Press ENTER. The indicator should say AGENTS. Press ENTER.
6). Arrow up/dn until you see DISABLE. Press ENTER.
7). Arrow down until you see NON PLU. Press ENTER.
8). Arrow up/dn until you see ENABLE. Press ENTER.
9). Press ESC on the small keyboard until the scrolling message says
PROGRAMMING MODE again. Turn the key to the left and remove it.
Page 5
Page 6

TO PRINT A LABEL (continued):
1). Place a product on the platter. Enter in the price. Press PRINT.
A label should dispense with printed information such as weight, date, total sale,
etc.
NOTE: The printer will not print a label if no price is entered, no weight is on the
platter or negative weight is displayed on the indicator. Repeat steps on page 5 if no
label comes out.
**CONGRADULATIONS!!** You have just printed your first label.
Page 6
Page 7
SETTING UP THE NETWORK
(Skip this part if not using a computer)
____________________________
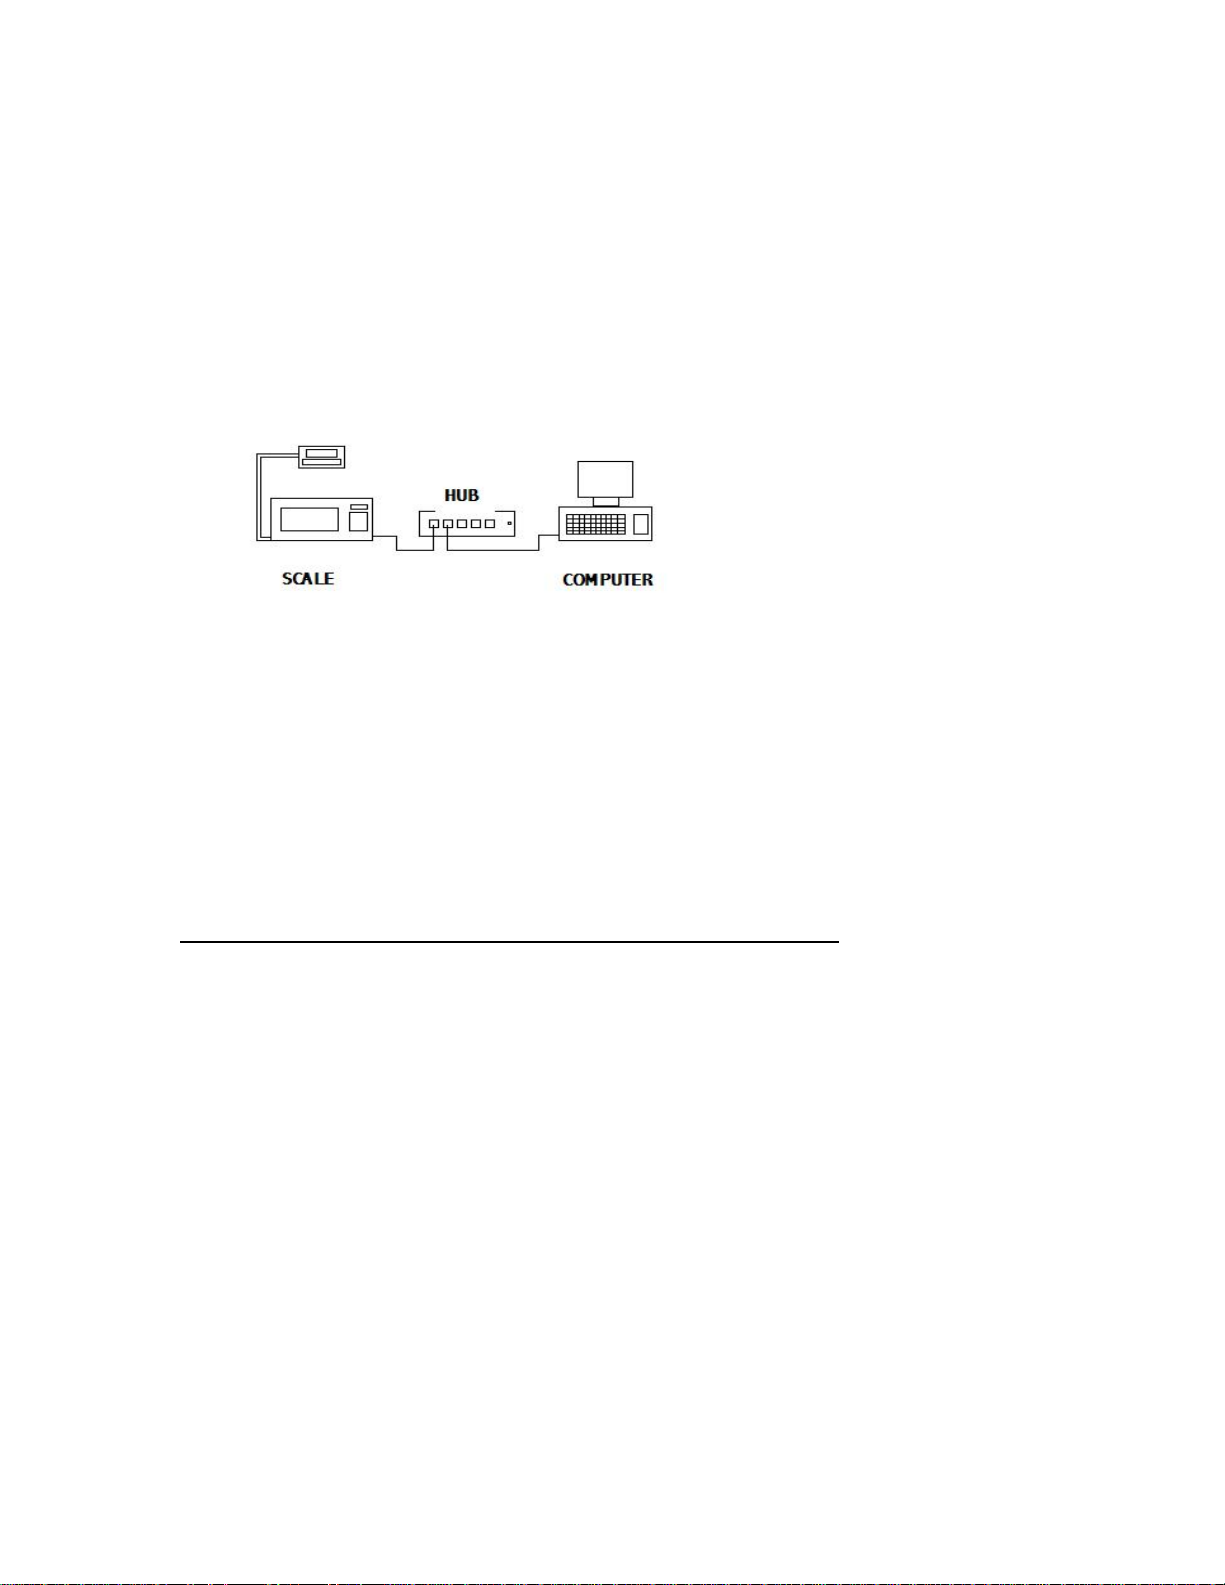
1). Connect up the equipment as shown in the drawing below.
2). Place the Scalenet (LSQ-40L) software CD in your drive. The auto install should
begin automatically. Complete the installation as instructed.
NOTE: This software is intended to run on a Windows XP operating system with
SP2 (Service Pack 2) installed only.
CONFIGURING YOUR NETWORK ON YOUR COMPUTER:
1). Click on START, and then NETWORK CONNECTIONS.
2). Click on LOCAL AREA NETWORK.
3). Click on PROPERTIES.
4). Scroll down on window and click ONCE on INTERNET PROTOCAL TCP/IP.
5). Click on PROPERTIES.
6). Click on MANUALLY ENTER IP ADDRESS.
7). Enter in the IP address 131.1.100.100. Click OK.
Page 7
Page 8

NOTE: If you are already using a network connection for another application, you
may want to create a new connection and configure it for scale communications.
CONFIGURING YOUR NETWORK ON THE SCALE:
The scales network IP address should already be configured from the factory. If
you want to check it or if you are using more than one scale, follow the procedure
below.
TO SEE/CHANGE SCALES IP ADDRESS:
1). If the scale is on, turn it off.
2). Turn on the scale. During the countdown, press and release the following keys in
sequential order. Press X, +, and then AGENT before the countdown completes.
3). Display should go blank. Enter 2005 and press PRINT.
4). Press PRINT to scroll thru the address numbers. At any time you may change
them by entering the new numbers. The first scales address should be 131.1.100.101.
5). Press ESC when complete.
If you are using more than one scale on the network, then each scale must have its
own network address. EXAMPLE: SCALE#1 131.1.100.101
SCALE#2 131.1.100.102
SCALE#3 131.1.100.103
NOTE: You should write down each address. You will need to type it in again later
to add them to the network.
Page 8
Page 9
STARTING UP THE LSQ-40L SOFTWARE
(Be sure your scale and hub are powered up and connected at this time)
1). Launch the LSQ-40L software. On the logon screen, do not enter a password.
Click on ACCEPT to continue.
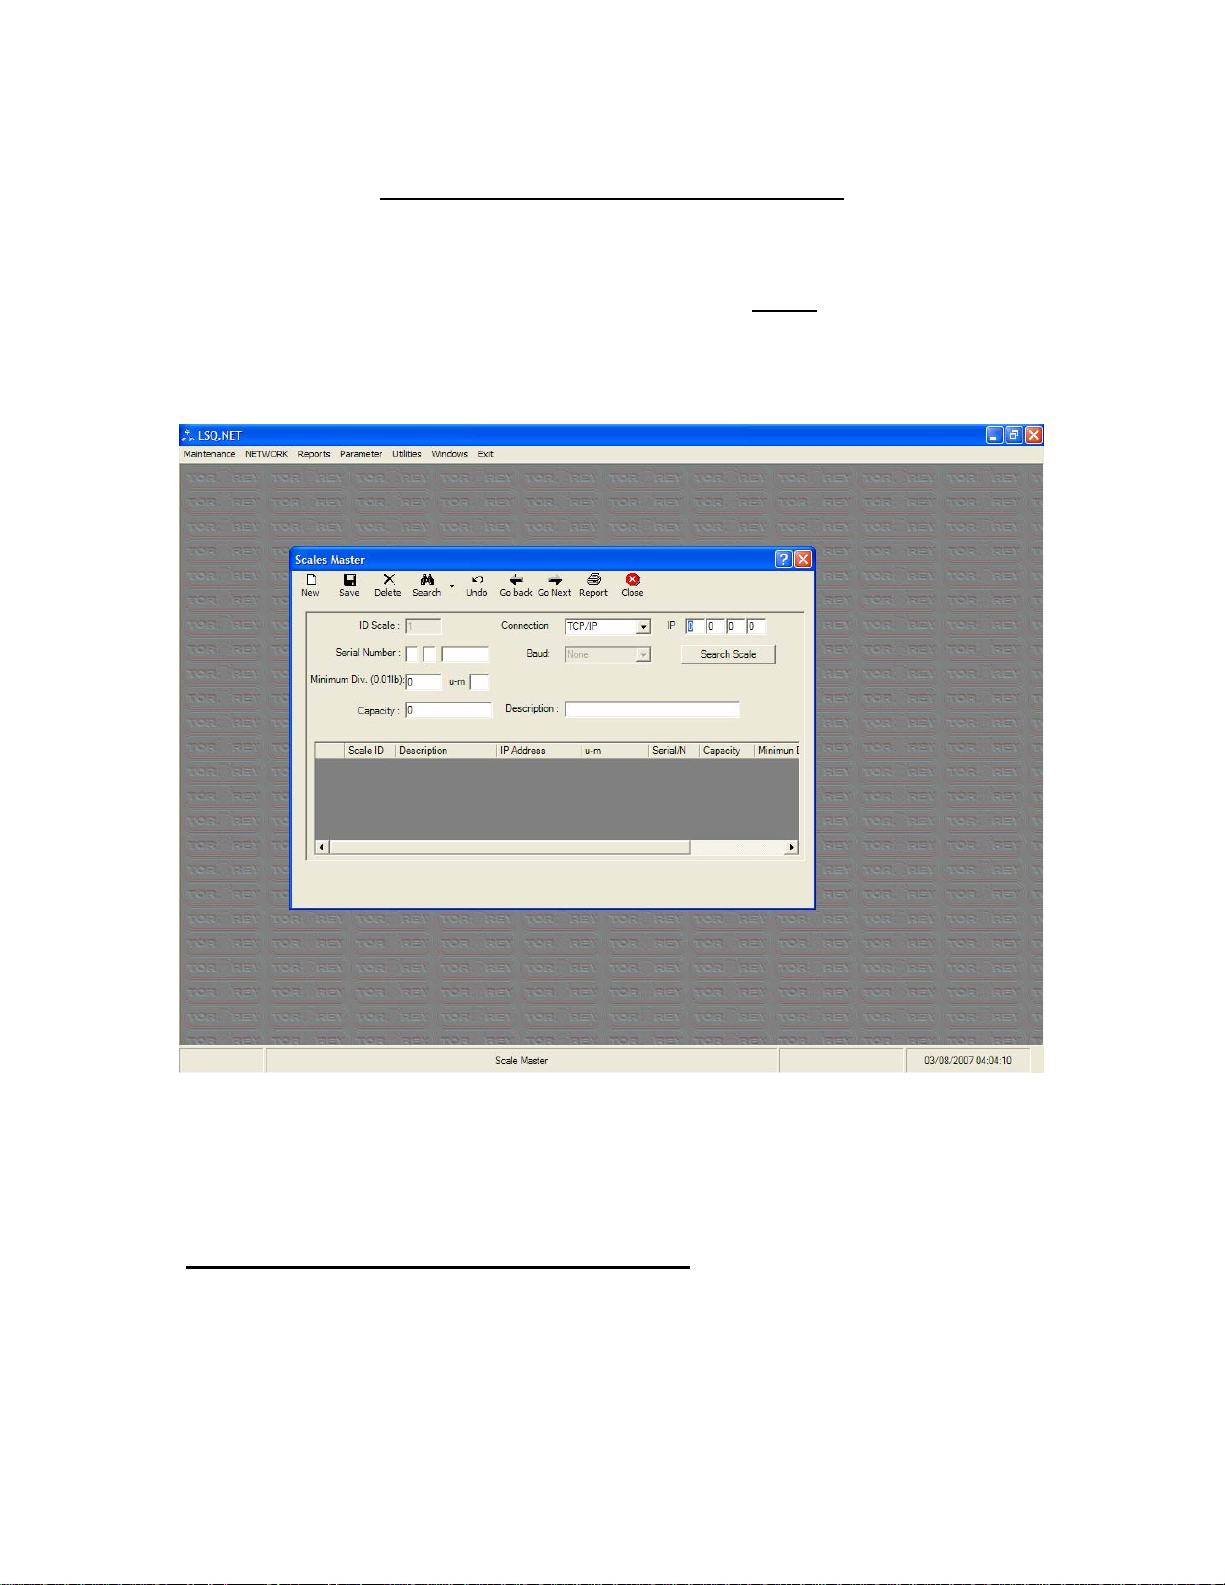
2). At the top of the screen, click on MAINTENANCE and then SCALE MASTER.
Below is the screen you should be viewing at this point.
SCALE MASTER allows you to add new scales to the network. You will have to
add each scale to the network one at a time. As long as you use the same computer
each time you communicate to your network, you should not have to add them
again.
TO ADD A NEW SCALE TO THE NETWORK:
1). Click on NEW.
Page 9
Page 10

2). Go to the first IP box and click in it. Enter the first number. Press TAB and
enter the second number. Repeat for the last two numbers.
3). Click on SEARCH FOR SCALES. If the network detects the scale, it will ask you
‘Do you want to add scale?’. Click YES.
4). The scales information should appear on the screen. If you have more than one
scale, repeat step 1.
NOTE: If you get an Enable message, the network did not find the scale. Either you
entered the wrong IP address, or the network is not configured correctly. If you
have more than one network configured, you may have to disable the other
networks.
CONFIGURE GENERAL PARAMETERS:
To set up for North America (USA) operations and currency, on the top of the
screen click on PARAMETER and then SYSTEM COFIGURATION.
1). Under the COMPANY INFORMATION tab, enter your stores information.
2). Under the SYSTEM DATA tab, enter the following information:
Current Symbol = $
Decimal Symbol = .
Decimal Number= 2
3). Click on SAVE the CLOSE.
Page 10
Page 11

ADDING PRODUCTS TO THE SCALE:
1). Click on NETWORK, then NET DISTRIBUTION (keep this window open while
programming).
On the left side of the screen, you can see your scale(s) and a Group1 icon. This is
the network tree. You can drag and drop scales into different groups. You can also
create/delete groups by right clicking in the tree box. By creating groups, you can
program several scales at once with the same information. When you click on a
group, all scales in that group will be programmed at the same time.
2). Click once on the scale you wish to program.
3). At the top of the screen, click on the PLU’s arrow (pull down). Clicking on PLU
READ will download the plu’s from the scale. If you have not entered any plu’s into
the scale yet, go to next step.
4) Click on Maintenance, then PRODUCTS MASTER.
5). Click on ADD to enter new products. Be sure to SAVE after each entry.
WHAT YOU CAN ENTER ON THIS SCREEN:
Description: Product Name
PLU#: Product number (1-300). This number can be typed during a sale to bring up
the information (Desc., price, etc.).
Price: Price of the product per pound or total cost for it (see Type PLU).
Tax: Tax on the product (must be a whole number).
Expire day: How many days before product expires (EX: 7 would equal day label
was printed + 7 days).
Group:
Dept:
Name of group scale belongs to (optional).
Department product belongs to by entering a number (must be defined in the
department table).
Type PLU: Determines how the product is to be sold.
Weighed/Lock Sold per pound/Price per pound locked
Weighed/Unlock Sold per pound/Price per pound can be changed
Unweighed/Lock Sold per unit. Product is not weighed/price locked
Unweighed/Unlock Sold per unit/Price can be changed
NOTE: If the product is locked, only the programmer can change the price.
User 1-3:
Defined by programmer.
Page 11
Page 12

Ingredient: Enter number as defined by ingredient table. This table has to be
programmed in the Ingredients Master selection (found under MAINTENANCE).
MOVING PRODUCTS TO AND FROM SCALE:
1). Click on PLU’S pull down arrow and click on READ.
2). Click on COPY. This should open 2 windows. The left window is what will be
uploaded to the scale. The right window is the master products selection.
3). To add a product to the plu list, click on the product the click COPY PLU.
4). When you are finished, click on UPDATE and SELECT ALL. The scale will
upload the new plu list to the scale.
ASSIGNING PRODUCTS TO THE MAIN KEYBOARD:
During the sale, you can press a single key on the main keyboard to bring up a preprogrammed product. This works by placing a product on the platter, pressing the
appropriate (programmed) key, and press PRINT. A label will be printed with the
products information including weight and total sale.
1). If you are in the PLU’s –MEMORIES READ selection, you can click on
ACCESS DIRECT to see the keyboard and products window. Drag and drop the
products on the key you want it assigned to. Remember to write the product names
on the template that fits over the program keyboard.
2). When you are finished, click on UPDATE, then ONLY ACCESS DIRECT. This
updates the scales keyboard configuration (product location).
Page 12
Page 13

GENERAL CONFIGURATION:
This will configure label printing features, and lock/unlock other features, setting
up the bar code, etc. Click on CONFIGURATION, then READ.
SCROLLING MESSAGE: This message will scroll across your indicator when
there are no sales in progress.
INGREDIANTS: The number of lines dedicated for ingredient text on the label.
HEADLINES: The number of lines of text that appears at the top of the label.
Usually your store name, address, etc.
NOTE: The more lines you dedicate for ingredients and headlines, the less space
that will be available for other information.
UNDER THE OPTIONS BOX:
ALLOW AGENTS: If you want to keep track of your employees sales. This will
place the employees name on the label (if configured). Before each sale, the
employee must enter his employee#.
NON PLU’S: You can sell a product that has not been programmed in the scale.
KEY NOT REQUIRED: You can enter PROGRAM MODE by pressing the PROG
MENU key. This bypasses the security feature of having a key.
BAR CODE TAB:
You can select from 4 different bar code configurations or select CUSTOMIZED to
configure your own. This depends on your POS system and the information you
want in the bar code.
If you do not want a bar code, follow these steps:
1). Click on the LABEL FORMAT tab.
2). Click LABEL WITH GAP and then CUSTOMIZED.
3). Click on VIEW. The widow shows how the information is placed on the label.
Right click on bar code, and then click DELETE.
Page 13
Page 14

PRINTED TEXT ON LABEL:
This allows you to change the text as it appears on the label. An example is if you
would like to change Agent and have it print Employee instead.
PRINT FORMAT:
You can choose a selection of print formats. You can use labels or paper rolls.
There are 4 preset formats or you can customize your own label.
TO CUSTOMIZE A LABEL:
1). Select a LABEL/PAPER type.
2). Select CUSTOMIZE and then VIEW.
3). In the label window, you can drag and drop where you want the information to
be printed on the label.
4). Right clicking on a text object allows you to select font size, justify, or you can
delete it.
5). You can also drag and drop text objects from the DATA FIELDS window on the
right or select FIELD by right clicking in the text object.
NOTE: Do not make the label width larger than 58mm. Making font sizes as small
as possible will save space on the label. Font sizes are as follows:
1= smallest 5= largest
HEADLINES TAB:
Enter in the information you want printed at the top of the label. This is usually a
store name, etc. The amount of lines that will be printed is configured in the
GENERAL TAB.
PASSWORDS:
You can set additional passwords to prevent unauthorized programming. However
resetting passwords because they were lost will require the machine to be returned
to the factory. This is not covered under warranty. The owner of the scale will be
required to pay all shipping costs and labor.
Page 14
Page 15

PROGRAMMING USING THE SCALES KEYBOARDS
This Section is for programming and editing without the use of a computer. Before
you start programming your scale, you should perform startup operations on pages
4 and 5. This will confirm the scale is operating normally and will make
programming easier. You can change the settings later if you need to.
NOTE: At any time you need to enter PROGRAMMING MODE, please follow
steps 1 to 3 on page 4 under QUICK TEST OF THE PRINTER.
TO ENTER STORE INFORMATION:
(This will be printed on the top of your label)
1). Enter PROGRAMMING MODE.
2). Press PROG. FORMAT.
3). Arrow down until you see HEADLINES. Press ENTER.
4). LINE 1 is displayed. Press ENTER.
5). TEXT is displayed. Press ENTER.
6). MY STORE IS DISPLAYED (or previous text). Press DEL until all text is
erased.
7). Type in your stores name and press ENTER.
8). TEXT will appear again. Arrow down until you see SIZE (1-6). Press ENTER.
9). Press DEL. Enter the font size you want. (1=smallest 5=largest). Press ENTER.
NOTE: The larger you make the font; the more space is used on the label. Also
fewer characters will appear on label. LINE 1 recommended size is 2.
10). Press Arrow down. POSITION will appear. Press ENTER.
11). By using the arrow buttons, you can select if you want the text to be centered on
the label, or start left or right on the label. Press ENTER when selected.
12). Press ESC once. Arrow down to the second line (LINE 2). Press ENTER.
Repeat lines 5 to 11 to edit.
Page 15
Page 16

NOTE: You can have up to 10 lines printed on the label. It is recommended no
more than 2 lines used so all other text can be printed. Too much text will go past
the end of the label causing another label to be used. You can correct this by making
font sizes smaller, using less text lines, or using longer labels.
TO SET AMOUNT OF TEXT LINES TO BE PRINTED:
1). Press ESC until HEADLINES appear. Press ENTER.
2). LINE 1 appears. Press arrow down until # LINES appear. Press ENTER.
3). Press DEL. Type in the amount of text lines you want printed (how many
HEALINES you typed in). Press ENTER.
4). Press ESC until PROGRAMMING MODE appears. Your store information is
now programmed in the scales memory. It will appear at the top of a label each time
you print.
EDIT SCROLLING MESSAGE:
This is the message that scrolls across the lower window of the display when the
scale is idle (not being used). This can be your store name, a special of the day, etc.
1). Enter PROGRAMMING MODE.
2). Press EDIT SCROLLING MESSAGE key.
3). Press DEL to erase previous text.
4). Type in new text you want displayed. Press ENTER.
Page 16
Page 17

CONFIGURATION:
This sets up the scales time, date, and prefences of the scale. Extreme care should
be used as some features can cause loss of memory or be locked out of programming
features.
1). Enter PROGRAMMING MODE.
2). Press the CONFIG button.
What you can program in CONFIG:
DATE (DDMMYR) Must be in this format.
HOUR (HRMM) Must be in 24 hour format.
MODE (AGENTS – ENABLE/DISABLE) and (NON PLU – ENABLE/DISABLE)
NOTES: AGENTS enabled requires employee to enter in their id# before a
transaction can proceed. NON PLU enabled allows a product label to be printed
that is not been programmed in the scale. You have to have weight on the platter
and enter a price before pressing PRINT.
VALIDATE (DISCOUNTS – ENABLE/DISABLE) AND (PLU RETURN – EN/DI)
PASSWORD (PROG ACCESS, SUPERVISOR)
CONTRAST (LIGHT/DARKESS OF PRINT [1=LIGHT 2=DARK])
RESET MEMORY (PLUS = erases all plu’s from memory – TOTAL=erases ALL
memory)
MENU (ENABLED= Can enter PROGRAMMING MODE without using a key by
pressing the PROG MENU button).
VERSION (Displays the firmware version of scale – Not a user function).
3). Press ESC until PROGRAMMING MODE appears when finished.
Page 17
Page 18

SETTING UP THE LABEL PRINT:
If you are satisfied the way the labels are being printed, you can skip this section. If
you are using Safe Handling Labels or want to customize your own label, then
proceed to the next step.
REMOVING THE BAR CODE:
1). Enter PROGRAMMING MODE.
2). Press PROG FORMAT.
3). Press ENTER when you see FORMAT.
4). Use arrow up/dwn to find LABEL W/ GAP. Press ENTER.
5). Use arrow up/dwn to find CUSTOMIZED. Press ENTER.
6). Press ESC twice. Arrow down to NO BAR CODE. Press ENTER.
If you decide later to have a bar code, repeat the above procedure and select either
EAN-13 or UPC-13 (depending on your POS).
SETTING UP THE BARCODE:
If your POS system cannot recognize the bar code, you may have to alter the way
the bar code encodes the product data (makes the barcode).
1). Enter PROGRAMMING MODE.
2). Press PROG FORMAT.
3). Press ENTER when you see FORMAT.
4). Use arrow up/dwn to find LABEL W/ GAP. Press ENTER.
5). Use arrow up/dwn to find CUSTOMIZED. Press ENTER.
6). Press ESC twice. Arrow up/dwn and select either EAN-13 or UPC-13. Press
ENTER.
7). Arrow up/dwn until you see CUSTOMIZED. Press ENTER.
Page 18
Page 19

You should see something similar to PCCCCCCWWWWW.
This is the bar code layout. Below are the meanings of the letters that make up the
bar code.
P = PREFIX (start code)
W= WEIGHT
C= PRODUCT CODE
T = TOTAL SALE
A = AGENTS#
N = QUANTITY OF PRODUCTS
X = NULL VARIABLE
The prefix code usually starts with 2 or 02. So the first letter(s) will have to be P or
PP. Most weighed barcodes look like PCCCCCCTTTTT or PPCCCCCTTTTT. The
13th digit is the end code that is set by the scale. The car code has to be 12 digits long
or the POS may not read it.
You can change the code by using left and right arrow buttons and make changes
by typing letters on the keyboard. Press ENTER when finished.
After pressing ENTER, PREFIX will appear. Type in the code and press ENTER.
PLACING TEXT ON THE LABEL:
Some planning on how to layout the label is strongly recommended before
proceeding. One way to do this is by using the template below.
LEFT CENTER RIGHT
LINE 1
LINE 2
LINE 3
LINE 4
LINE 5
LINE 6
LINE 7
LINE 8
LINE 9
LINE
10
NOTE: You must consider the font size and what text you actually need to have on
the label. You can print samples as you are formatting the label.
Page 19
Page 20

Below is a list of what you can put on a label.
HEADLINE- Store information
DESCRIPTION- Product name
WEIGHT TEXT- The word WEIGHT
WEIGHT – The weight of the product
PRICE TEXT- The word PRICE
PRICE- The price of the product
TOTAL TEXT- The word TOTAL
INGREDIENTS- Ingredients
BAR CODE- The bar code (usually at the bottom but above add. text)
DATE TEXT- The word DATE
DATE- Today’s date
SELL BY TEXT- The words SELL BY
SELL BY- Expiration date of product
ADDITIONAL TEXT- Usually appears below bar code (Thank you, etc.)
HOUR- Time label printed
AGENT TEXT- The word AGENT
AGENT#- Agents employee number
AGENT NAME- Agents name
SPACE- Line space. Important for spacing over safe handling information
SET UP TEXT ON LABEL:
1). Enter PROGRAMMING MODE.
2). Press PROG FORMAT.
3). Press ENTER when you see FORMAT.
4). Use arrow up/dwn to find LABEL W/ GAP. Press ENTER.
5). Use arrow up/dwn to find CUSTOMIZED. Press ENTER.
6). The next two questions are the width and length of the label. The scale has a
sensor to detect the end of the label, so there is no need to change the dimensions.
Exceeding 56mm width or 99mm in length can cause printer error. Press ENTER 3
times to get to next step.
7). LIN 1 ( ) should be in the display. You can arrow down to program what line
you want to place text on. Press ENTER.
NOTE: If you go past LIN 20, you can print a sample label to preview your layout.
8). Use arrow up/down to justify where you want it one the line. Press ENTER.
Page 20
Page 21

9). Arrow up/down to select what text you want placed on the coordinates you
selected. Press ENTER.
10). SIZE (1-6) is displayed. Type font size and press ENTER. (1-sm 6-lg)
11). Repeat steps 7 to 9 until all text has been entered.
12). Press ESC to go back to PROGRAMMING MODE.
ADDING PLU’S:
The list below explains the information needed when adding a new plu.
DESCRIPTION- Product name
CODE- Product identifier number you POS system recognizes
DEPARTMENT- Department number (defined in department table) [Optional]
GROUP- Group of scales [Optional]
PRICE- Price of product by pound or item
TYPE- (See page 10) Press ENTER the select by using arrow up/down. Press Enter
TARE- Type number as defined in TARE table [Optional]
EXPIRATION DATE- Type number of days from today [Optional]
TAX- Must be a whole number [Optional]
INGREDIENTS- Type number as defined in ingredients table [Optional]
1). Enter PROGRAMMING MODE.
2). Press NEW PLU.
3). Enter in the plu number (1 to 300) and press ENTER.
4). Enter the information or you can press ENTER on optional lines.
5). When NEW PLU appears again, you can type in another product or ESC to go
back to PROGRAMMING MODE
KEY ASSIGNATION:
During normal operation of the scale, you can type a plu# and press PLU to pull a
product from memory, or you can use the main keyboard as quick access keys.
However you have to assign the plu’s to a button.
1). Go to PROGRAMMING MODE.
2). Press KEY ASSIGNATION. Press ENTER.
Page 21
Page 22

3). Type in plu# and press ENTER.
4). Press the button on the main keyboard where you want it assigned to.
5). Press ENTER and repeat step 3 an 4 to assign another plu or ESC to go back to
PROGRAMMING MODE.
PL
PLU PRODUCT PRICE T
U PRODUCT PRICE T
1 26
2 27
3 28
4 29
5 30
6 31
7 32
8 33
9 34
10 35
11 36
12 37
13 38
14 39
15 40
16 41
17 42
18 43
19 44
20 45
21 46
22 47
23 48
24 49
25 50
Page 22
Page 23

TROUBLESHOOTING
PROBLEM CAUSE
Scale will not turn on
Fuse Blown Replace fuse
No power at outlet Plug in at a different outlet
Too many labels come out
Make font sizes smaller 19
Label sensor Clean sensor
Bad sensor
Printout stretched out
Poor printing of label Dirty print head Clean print head 2
Contrast too low Set contrast darker 16
Defective print head Replace print head
Out of paper Out of paper Replace with new roll of labels
Paper sensor
Print head up error Print head up
Defective print head position sensor
Label comes out but print Print board Replace board
Print head Replace print head
Printer error Print board Replace board
Print head Replace print head
Cannot communicate
using computer
Cable plugged in wrong on hub
Check configuration 8
Not using a cat 5 Ethernet cable 3
No label comes out Set for paper mode
No weight on platter or neg 5
Labels tearing
Label roll snaps bad label roll Install new label roll
Label and wax paper
comes out
Power not getting to
scale
Too much text
attempting to be printed
Defective step gear.
motor
Label wrapped around
pinch roller
IP address wrong Check scales ip address 7
Cartridge guide too
tight
Paper came of spooler Reinstall label roll
SOLUTION PAGE
Twist plug as you are inserting in
scale.
Remove some of the text that is being
printed
Contact dealer 2
Remove stuck labels
Labels moved away from sensor.
Adjust cartridge guide
Close print head by moving lever
down.
Disable all networks except the one for
scale in computer
Check plug on cartridge is in D
position
Check configuration-should be label
with gap
Open gap where label passes thru
4
6
17
Page 24

Label roll snapped
Defective label roll/replace
Defective dc motor Replace motor
Scale say unload or help
Strange characters on
display
Scale drifts
Quick access keys show
only a letter or other
character when pressed
possible load cell
damage
Corrupted memory
Vibration or air blowing
on platter
In ABC mode
Check if too tight coming thru
cartridge
Contact dealer
Go to config/total reset/reset scales
memory (all data will be lost)
Relocate scale to hard/quiet area.
Press ESC. Press ABC button to turn
off
If you are experiencing mechanical problems you must contact your dealer first! It is up
to your dealer to decide a course of action to take to resolve any matter concerning your
scale. No returns will be accepted without a return authorization number. You may
contact us for any technical questions you might have. Please read carefully the warranty
sheet supplied with the scale.
Page 25

Limited Warranty Statement (1) Year Warranty
TOR REY ELECTRONICS, INC. “TOR REY” WARRANTS THIS PRODUCT AGAINST
DEFECTS IN MATERIALS OR WORKMANSHIP FOR A PERIOD OF ONE YEAR FROM THE
DATE OF ORIGINAL PURCHASE.
Should any manufacturing defect be discovered within one year from date of purchase, you
must deliver the entire product to the TOR REY dealer that sold it or to a TOR REY service
center in its original packaging or in packaging affording an equal degree of protection, along with
proof of purchase. TOR REY will at its option, repair or replace on an exchange basis with an
equal or equivalent unit, the defective unit, without charge for parts and labor. The transportation
and insurance charges to and from the TOR REY service center are not included in this warranty.
What this warranty does not cover.
1-This warranty covers only normal consumer use in Canada and the United States. This
warranty does not cover wear parts, which due to the nature of the machine, have a limited
usable life, and have to be replaced on a use and wear basis, nor:
a. Damage caused by disasters such as fire, flood, lightning, and improper
electrical current.
b. Improper or inadequate installation.
c. Improper or inadequate maintenance.
d. Unauthorized modification or misuse.
e. Damage caused by service other than by an authorized TOR REY service
center.
2-This warranty does not cover in-house call service to your location. Your product has
to be shipped or taken (properly packaged to prevent damage) to a TOR REY dealer or
service center for service and or repairs. (Some dealers may opt to offer an optional added
value in-house call service warranty policy. Please consult with your dealer for details)
Limitations of Warranty
NEITHER TOR REY ELECTRONICS, INC. OR ANY OF ITS THIRD PARTY SUPPLIERS
MAKES ANY OTHER WARRANTY OF ANY KNID, WHETHER EXPRESS OR IMPLIED, WITH
RESPECT TO TOR REY PRODUCTS.
THIS WARRANTY IS EXCLUSIVE AND IN LIEU OF ALL OTHER EXPRESS
WARRANTIES AND UNLESS STATED HEREIN, ANY STATEMENTS OR
REPRESENTATIONS MADE BY OTHER PERSON OR FIRM ARE VOID.
THE DURATION OF ANY IMPLIED WARRANTIES OF MERCHANTABILITY OR
FITNESS FOR A PARTICULAR PURPOSE ON YOUR TOR REY PRODUCT SHALL BE
LIMITED TO THE DURATION OF THE EXPRESS WARRANTY SET FORTH ABOVE.
EXCEPT AS PROVIDED IN THIS WRITTEN WARRANTY, NEITHER TOR REY
ELECTRONICS, INC. NOR ITS AFFILIATES SHALL BE LIABLE FOR ANY LOSS,
INCONVINIENCE, OR DAMAGE, INCLUDING DIRECT, SPECIAL, INCIDENTAL, OR
CONSEQUENTIAL DAMAGES, RESULTING FROM THE USE OR INABILITY TO USE THE
TOR-REY PRODUCT, WHETHER RESULTING FROM BREACH OF WARRANTY OR ANY
OTHER LEGAL THEORY.
Page 26

Some states do not allow limitations on how long an implied warranty lasts and some
states do not allow the exclusion or limitation of incidental or consequential damages, so the
above limitation and exclusion may not apply to you.
This warranty gives you specific legal rights, and you may also have other rights, which
vary from state to state.
How to obtain Warranty Service
1. Refer to the troubleshooting guide in you owner’s manual. This list may
solve your problem.
2. Call the TOR REY dealer that sold you the product, it has a complete service
department that should be able to help you and fix or repair your product.
3. If unable to find service at the dealer that sold you your TOR REY product
call the TOR REY toll free number 888-748-3934 for technical assistance and
instructions. (Your warranty covers any manufacturing defects but does not
cover in-house service calls.)
4. If your product needs to be serviced it would have to be shipped to a TOR
REY service center be sure to obtain a “RMA” number (return authorization)
from the TOR REY service center at 888-748-3934.
5. Arrange for the delivery of the product to the authorized TOR REY service
center. Products shipped to any service center must be insured and
safely and securely packaged, preferably in the original carton, and a letter
explaining the defect and also a copy of the bill of sale or other proof of
purchase must be enclosed.
6. Make sure to include inside the package a complete description of the defect
or trouble with the unit and complete names, address, and phone numbers
of who to contact for more questions and who to ship to.
7. Make sure to clearly write outside of the package the “RMA” number and
the full address for the TOR REY service center
In the United States contact
TOR REY ELECTRONICS, Inc
3739 Yale St.
Houston, TX 77018
Or via the Internet at http://www.tor-rey-electronics.com
Page 27

Customer Support
If the suggestions in the user’s manual and the accompanying documentation do not solve your
problem, please call your TOR REY dealer or the TOR REY service center at 1-
for additional support.
888-748-3934
IMPORTANT: PACKING AND SHIPPING INSTRUCTIONS
When you send the product to a TOR REY service center, you should use the
original box, and packaging material. Insert the original carton box containing the
unit into another carton, using more packing material to ensure it will not be
damaged during shipping.
 Loading...