

Page 1

DUAL AIR COMMAND
0 150
30
120
60 90
200
400
600
800
1000
psi
kPa
PSI
AIR CONTROL
ACCESSORY KIT
2168 /2179 / 2244 / 2248 / 2261
INSTALLATION INSTRUCTIONS
Congratulations on your purchase of a new Air Control
Accessory Kit. This kit was designed to provide inflation
control of your air helper springs. This kit will be an asset to
your vehicle, meeting your air supply needs.
Please take a few minutes to read through the instructions,
identify the components, and learn how to properly install your
Air Control Accessory Kit.
NOTE:
The Air Control Accessory Kit can be used with most air
helper spring products. If you are installing an air helper
spring kit, do not install the air line tubing into the air springs
as stated in the air helper spring manual. If you are adding the
Air Control Accessory Kit to an existing air helper spring
system, you will need to deflate the air springs and remove the
air line tubing.
NOTE ON CONNECTING THE AIR LINE TUBING
Cut the air line tubing as square as possible. To connect the
air line tubing to the fittings, push the tubing into the fitting as
far as possible. If for any reason the tubing must be removed,
make sure the air helper springs are deflated, then push the
collar of the fitting toward the body of the fitting and the tubing
can be removed. To reassemble, make sure the tubing is cut
square and push back into the fitting.
PARTS LIST
STEP 1 - PREPARE THE COMPONENTS
A) COMPRESSOR
Install the rubber isolators to the compressor in the holes
located on the compressor feet. Insert the brass sleeve into the
top of the rubber isolator see Figure "B". Install the threaded
end of the T-fitting into the compressor head. Tighten the
fitting sufficiently to engage the orange thread sealant. Next,
install the pressure switch into the female end of the T-fitting.
Crimp a blue female terminal connector onto the red lead from
the compressor. Install the female terminal connector onto
either spade on the pressure switch see Figure "A".
B) AIR TANK
Thread two (2) 1/4" NPT male push-to-connect fittings into
the air ports on the air tank see Figure "A". Tighten the fittings
securely to engage the orange thread sealant.
C) GAUGE PANEL
Cut two pieces of air line tubing 3-1/2" in length, making the
cut as square as possible. Insert one end of each 3-1/2" piece
of air line into the hole marked IN on the back of the paddle
switches see Figure "C". Insert the remaining ends of the
3-1/2" lengths of tubing into a push-to-connect T-fitting see
Figure "A".
STEP 2 - SELECT A MOUNTING LOCATION
A) COMPRESSOR ATTACHMENT
Begin by removing the positive battery cable. Select a
convenient location to mount the compressor. This location
should provide ample air flow and be protected from airborne
debris and moisture. The mounting surface should be rigid to
support the compressor, such as under the hood on a fender well
COMPRESSOR 9210 1
AIR TANK 9124 1
PRESSURE SWITCH 9016 1
DUAL AIR CONTROL PANEL 1
30 FT. AIR LINE TUBING 9008 2
25 FT. EXTENSION HOSE 1
#10-32 x 1" MACHINE SCREW 5
#10-32 LOCK NUT 5
#10 FLAT WASHER 7
3/8" -16 1" HEX BOLT 2
3/8" -16 FLNAGED HEX NUT 2
3/8" FLAT WASHER 2
5/16" FLAT WASHER 2
24-8164 04-04 NCD-5993-4
COMPRESSOR T-FITTING 1
PUSH-TO-CONNECT T-FITTING 3
PUSH-TO-CONNECT MALE FITTING 2
PUSH-TO-CONNECT
INFLATION VALVE 1
NYLON TIE 12
15 FT. 18 GAUGE WIRE 1
15 FT. 16 GAUGE WIRE 1
FEMALE TERMINAL 4
RING TERMINAL 2
WIRE CONNECTOR 2
IN-LINE FUSE HOLDER 1
20 AMP BLADE FUSE 1
Page 2
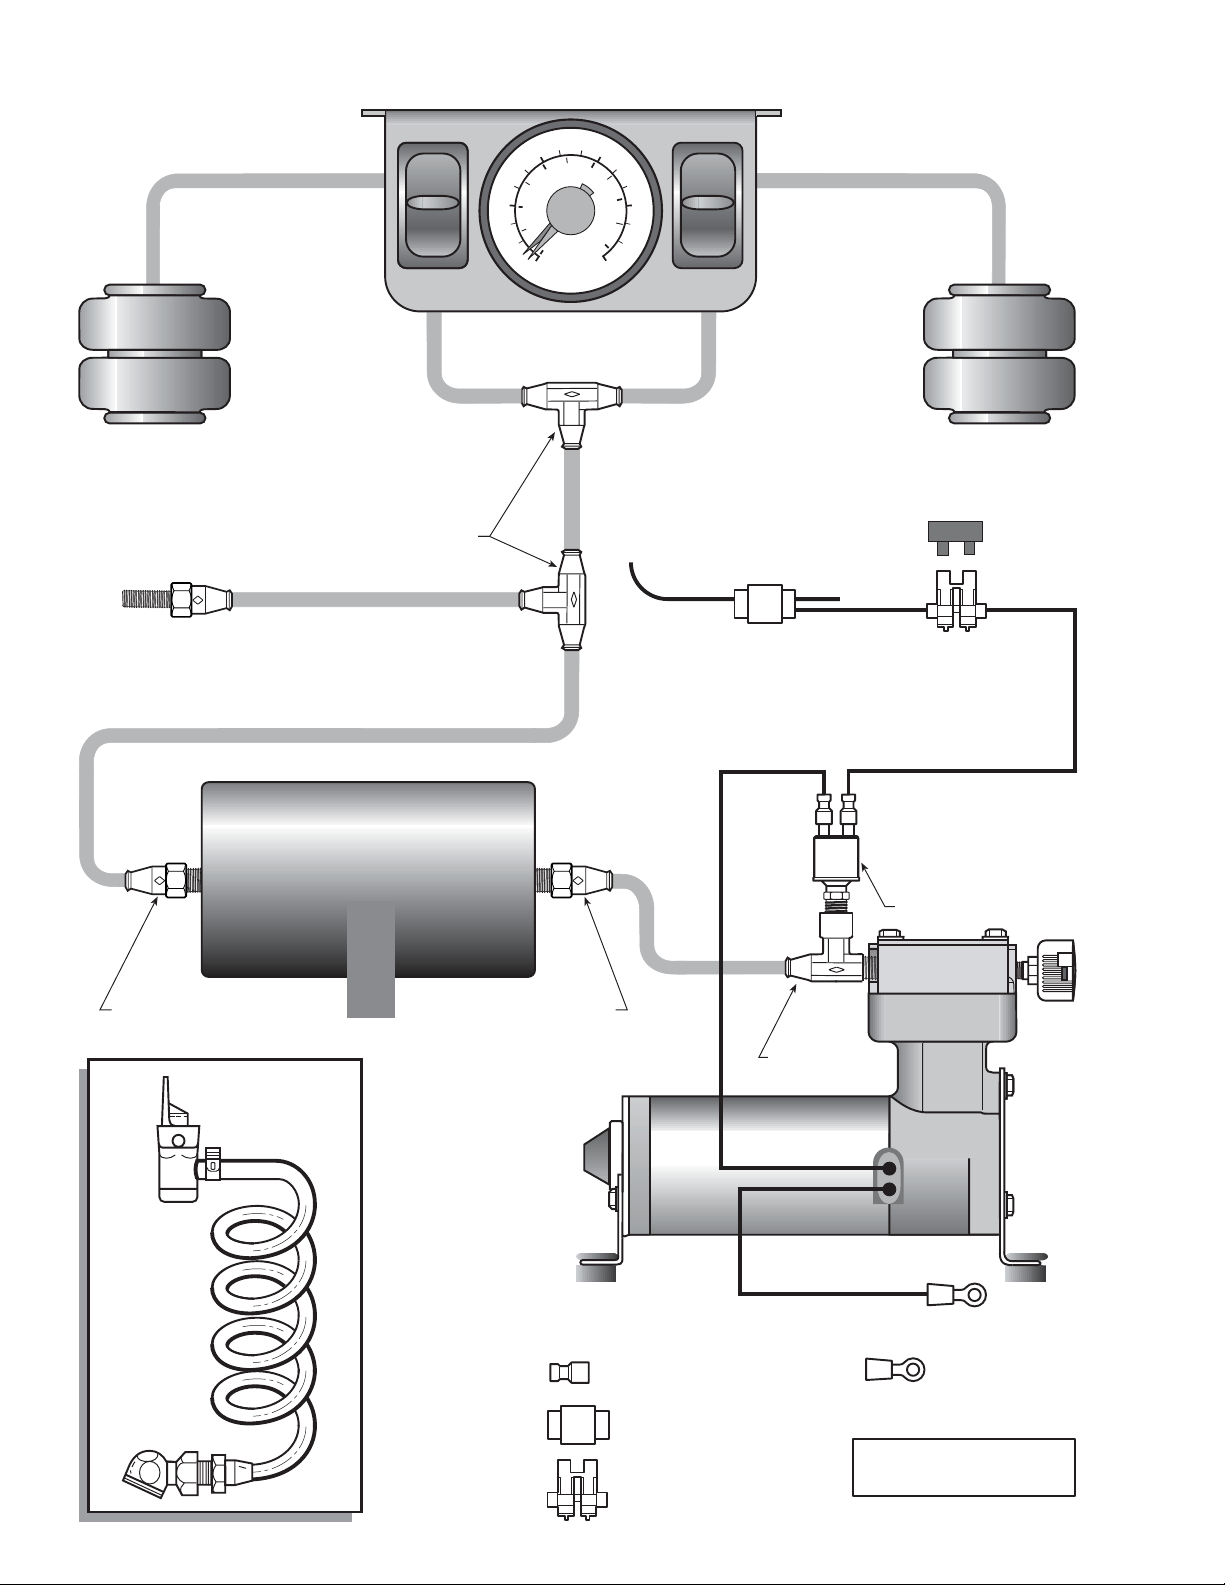
2168
AIR LINE
60 90
600
400
30
200
psi
0 150
1000
kPa
PSI
CONTROL PANEL
120
800
AIR LINE
AIR SPRING
(sold separately)
MANUAL INFLATION VALVE
PUSH-TO-CONNECT
MALE CONNECTOR
25' Extension
Hose
PUSH-TO-CONNECT
T-FITTING
SUPPLY
AIR TANK
PUSH-TO-CONNECT
MALE CONNECTOR
16 GAUGE WIRE TO
IGNITION ACTIVATED
POSITIVE 12 VOLT, 20
AMP POWER SOURCE
RED
COMPRESSOR
T-FITTING
AIR SPRING
(sold separately)
FUSE
16 GA. WIRE
PRESSURE
SWITCH
Connectors:
Female Terminal Connector
Wire Connector
Inline Fuse Holder
BLACK
Ring Terminal
FIGURE “A”
Page 3

#10 -32 LOCK
NUT
BRASS SLEEVE
COMPRESSOR
FOOT
RUBBER
ISOLATOR
#10 FLAT WASHER
BRASS SLEEVE
COMPRESSOR
FOOT
or in a vented storage compartment. (Note: The compressor can be mounted in
any orientation.)
Using the compressor feet as a template, mark and drill three 1/4" holes. Any
burrs in the holes should be removed to prevent damage to the rubber isolators.
Mount the compressor using the #10-32 x 1" machine screws, #10-32 lock nuts,
and #10 washers supplied with the kit see Figure "B". Maximum vibration
isolation can be achieved by properly mounting the compressor. The machine
screw and nut should be tightened only enough to bottom-out the brass insert see
Figure "B". DO NOT OVER-TIGHTEN. Over-tightening will crush the brass
insert and the insulator, thereby reducing vibration isolation.
RUBBER
ISOLATOR
VEHICLE
MOUNTING
SURFACE
#10-32 x 1” PAN HEAD
SCREW
#10 FLAT WASHER
Figure "B"
SIDE VIEW OF CONTROL PANEL
TO AIR SPRINGS
BARB FITTING
FROM AIR TANK
OUT
IN
Figure "C"
LOCK NUTS
WASHERS
CONTROL PANEL
BRACKET
WASHERS
MACHINE SREWS
B) AIR TANK ATTACHMENT
Select a location to mount the air tank. This should be in a protected location
to prevent damage from rocks or airborne debris. Mark and drill two 7/16" holes
2-1/2" apart. Bolt the air tank in place using the 3/8" -16 x 1-1/2" hex bolts with
the 3/8" -16 flanged lock nuts and 3/8" washers provided. Ensure that the
installation allows unrestricted access to the air ports on the tank.
C) GAUGE PANEL ATTACHMENT
Select a mounting surface for the gauge panel under the dashboard of your
vehicle or other protected location. Using the gauge panel as a template, center
mark the mounting holes on the dashboard. Drill a 3/16" hole on each center mark
see Figure "D". Do not attach the panel to the dashboard at this time.
STEP 3 - ROUTE THE AIR LINE
A) AIR TANK AND COMPRESSOR TO GAUGE PANEL
Cut a piece of air line tubing that will reach from the gauge panel mounting
location to the air tank. Insert the end of the air line tubing into the T-fitting on
the back of the gauge panel. Route the air line from the gauge panel to the air tank
see Figures "A" & "C". It may be necessary to drill a hole in the fire wall to route
the air line. Make sure that the air line tubing is protected from sharp edges. Insert
the other end of the tubing into either push-to-connect fitting on the air tank.
Secure the tubing to the vehicle with the provided nylon ties. Do not fold or kink
the air line tubing.
Cut a piece of air line tubing that will reach from the air tank to the
compressor. Insert one end of the air line tubing into the brass T-fitting on the
compressor. Route the tubing to the air tank, avoiding sharp edges and direct
heat. Insert the other end of the air line tubing into the remaining push-to-connect
fitting on the air tank see Figure "A". Secure the tubing to the vehicle with the
provided nylon ties.
Figure "D"
Cut two lengths of air line tubing that will reach from the gauge panel to each
of the air helper springs. It may be necessary to drill a hole in the fire wall to allow
the air line tubing to reach the rear of the vehicle. Ensure that the air line tubing is protected from sharp edges. Before installing
the tubing to the gauge panel, soak one end of the tubing in hot water for a few minutes to soften the tubing. Slide the tubing onto
the barbed fitting on the back of the gauge panel as far as possible. Do not use pliers to work the air line onto the barbed fitting,
as the tubing may be damaged.
Install the other end of the air line tubing into the push-to-connect fitting on the air spring see Figure "A". Insert the tubing
as far as possible into the fitting. Route the tubing to avoid sharp edges and direct heat from the exhaust system. Secure the tubing
to the vehicle with the nylon ties provided.
STEP 4 - INSTALL THE MANUAL INFLATION VALVE
Cut the air line tubing in a convenient location between the gauge panel and the air tank. Install a push-to-connect T-fitting
between the gauge panel and the air tank see Figure "A". Select a location on the vehicle for the manual inflation valve. This
location can be anywhere on the chassis of the vehicle, as long as it is in a protected location so the valve will not be damaged,
but maintain accessibility for the air chuck. Drill a 5/16" hole and install the air inflation valve using two 5/16" flat washers per
valve see Figure "F". Route the air line tubing from the T-fitting to the inflation valve. Avoid direct heat from the exhaust pipe
B) GAUGE PANEL TO AIR SPRINGS
Page 4

AIR LINE
PUSH-TO-CONNECT
INFLATION VALVE
BODY OF
VEHICLE
IC
R
T
S
O
T
LA
C
P
E
N
N
O
C
CONNECTING WIRE
FLAT WASHER
HEX NUT
VALVE CAP
FUSE HOLDER
EXISTING
WIRE
and away from sharp edges. Secure the tubing with the provided nylon ties. Push
the end of the air line tubing into the inflation valve as far as possible see Figure "F".
STEP 5 - ROUTE THE ELECTRICAL WIRE
All necessary electrical wire and connectors have been included with this
kit. Review the electrical schematic before beginning installation see Figure
"A".
Crimp a blue ring terminal onto the end of the black lead from the compressor.
Secure the ring terminal to a grounded component of the chassis.
Next, route a length of wire from the pressure switch to a positive 12 volt, 20
amp, ignition activated power source on the vehicle. Cut a length of 16 gauge
wire from the 6' length included with this kit. Crimp a blue female terminal
connector onto the black lead from the comprssor. Install the female terminal
connector over the remaining spade on the pressure switch. Connect the lead
from the pressure switch to the 12 volt wire with a wire connector. Slide the wire
connector over the existing wire and insert the un-stripped lead from the
pressure switch into the wire connector. Close the wire connector over both
wires with pliers see Figure "G".
Next, install the in-line fuse holder in the positive pressure switch lead. Cut
the pressure switch lead near the wire connector and insert the un-stripped ends
of the wire into the fuse holder. Close the fuse holder over the wires with pliers
and install the fuse see Figure "H".
STEP 6 - WIRE THE GAUGE PANEL FOR ILLUMINATION
From the 15' length of 18 gauge wire, cut a length that will reach from the
gauge panel to a dashboard illumination wire. This will allow the gauge panel light
to be activated with the dashboard lights. Strip one end of the wire 1/4" and crimp
a red female terminal connector onto the wire. Slip the female connector onto
either spade on the back of the gauge see Figure "I". Attach the other end of the
wire to a dashboard illumination wire using a wire connector. Slip the wire
connector over the existing dashboard wire and insert the un-stripped gauge
panel wire into the wire connector. Close the wire connector over the wires with
pliers see Figure "G". Route a length of 18 gauge wire from the gauge panel to
a suitable ground source. Strip both ends of the ground wire and crimp a red
female terminal connector on one end and a red ring terminal on the other end.
Slip the female terminal connector over the remaining spade on the back of the
gauge and secure the ring terminal to the ground source see Figure "I".
STEP 7 - ATTACH THE GAUGE PANEL TO THE DASHBOARD
Install the gauge panel on the dashboard where the holes were drilled
in Step 2C. Attach the gauge panel to the dashboard or other mounting
surface using the enclosed #10-32 x 1" machine screws, #10-32 lock nuts,
and #10 washers see Figure "D".
TERMINAL
CONNECTOR
BACK OF
GAUGE
STEP 8 - TEST THE SYSTEM
RING
CONNECTOR
GROUND WIRE
POSITIVE WIRE
Figure "I"
springs to 70 P.S.I. and check the fittings for air leaks with an applied solution of soap and water. If a leak is detected at a tubing
connection, check to make sure that the tube is cut as square as possible and that it is pushed completely into the fitting. The
tubing can easily be removed from the fitting by first releasing the pressure from the air spring, then by pushing the collar towards
the body of the fitting and then pulling out the air line tubing.
TERMINAL
CONNECTOR
With the Air Control Accessory Kit and air helper springs installed,
you are ready to test the system. Re-attach the positive battery cable. Turn
on the ignition. The compressor will start and build pressure in the system.
Push the paddle switch upward to inflate the air springs. The gauge will
display how much air pressure is in the air springs. Inflate the air helper
SYSTEM OPERATION
The air control accessory kit allows the air springs to be inflated from the inside of the vehicle. Push the paddle switch up
to inflate the air springs and down to deflate the air springs.
If the air compressor fails to operate for any reason, air can be introduced into the system by using the manual inflation valve
installed with the air accessory kit. This can be accomplished by inflating the system through the manual inflation valve.
 Loading...