

Page 1
Page 2
Table of Contents
01
Table of Contents
01.
Table of Contents
02.
Warnings
03.
Supplied Accessories
04.
Controls
Front Panel Controls and LEDs
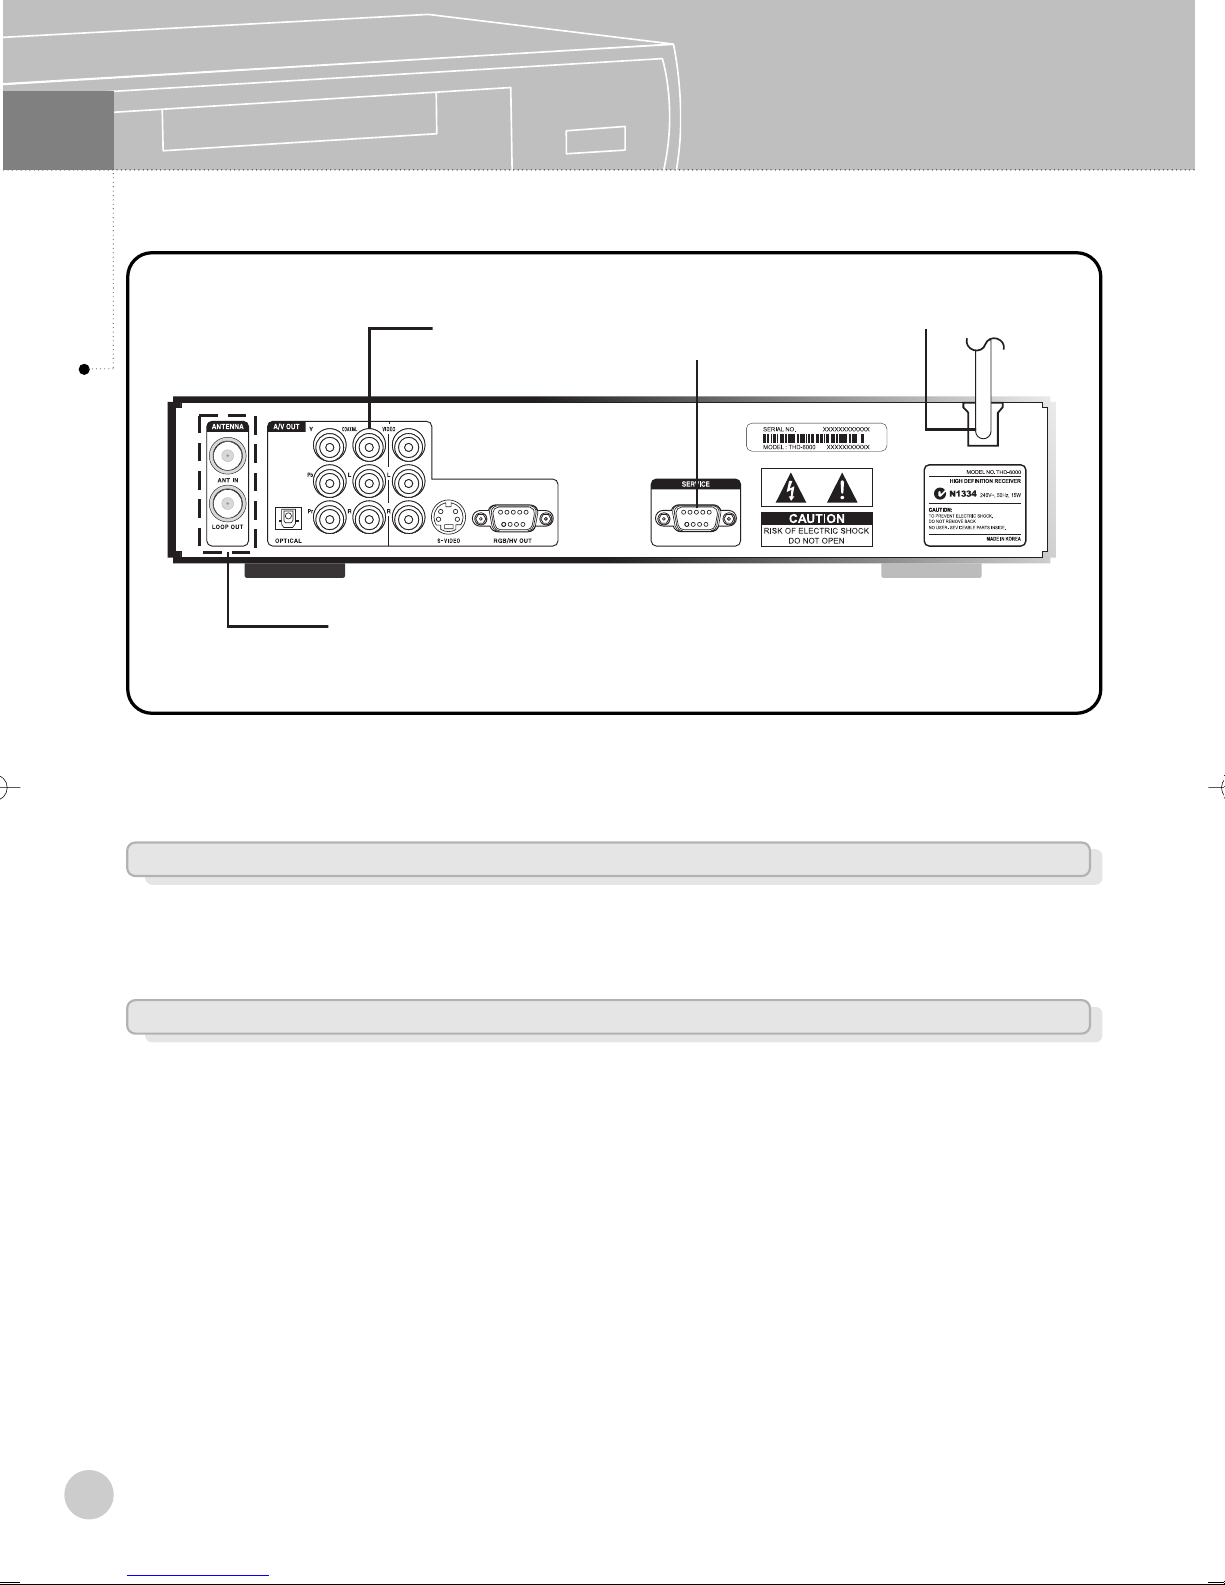
Rear Panel Connectors and Video Select Switch
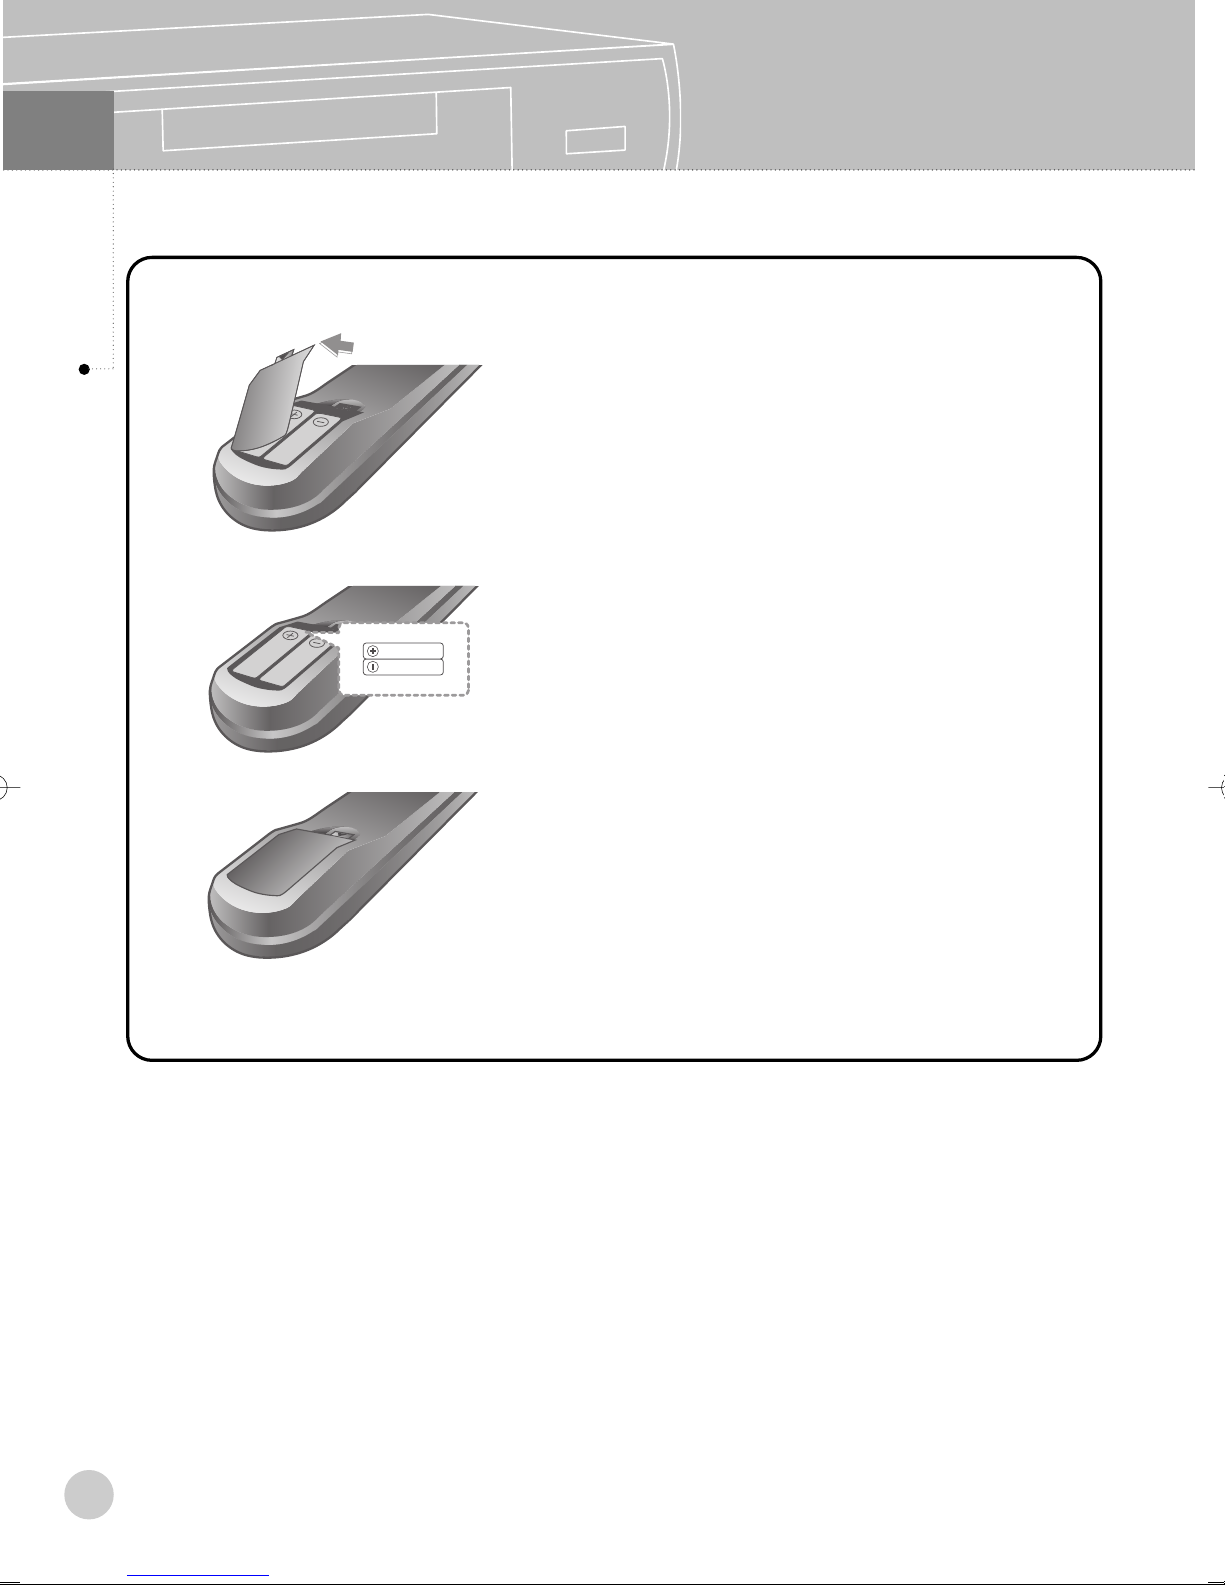
Battery Installation for Remote Control
05.
Installation
Antenna Input
Connection to Digital TV (YPbPr)
Connection to Digital TV (RGB/HV)
Connection to RGB PC Monitor
Connection to Analog TV (Composite/S-Video)
Connection to Digital Audio Amplifier
1~2
3~5
6
7
8~9
10
11
12
13
14
15
16
06.
Basic Operation
Remote Control
07.
Closed Caption
Closed Caption
08.
On Screen Display
Teletext
Channel Guide
Channel List
Channel Information
Channel Status
17~19
20
21
22
23
24
25
2
Page 3
01
Table of Contents
09.
Table of Contents
Setting up Channel
Channel Edit
26
Add/Del Favourite Channel
Channel Scan
Manual Scan
10.
Video Control
Monitor Setup
Aspect Ratio
Display Position
11.
Preference
Digital Audio
Volume Control Setup
Opacity
Channel Sorting
12.
System
Parental Rating - Set
27
28
29
30
31
32
33
34
35
36
37
Parental Rating - New Password
Time Zone
Daylight Saving
Factory Default
About
13.
Specifications
14.
Troubleshooting
3
38
39
40
41
42
43
44
Page 4
Warnings
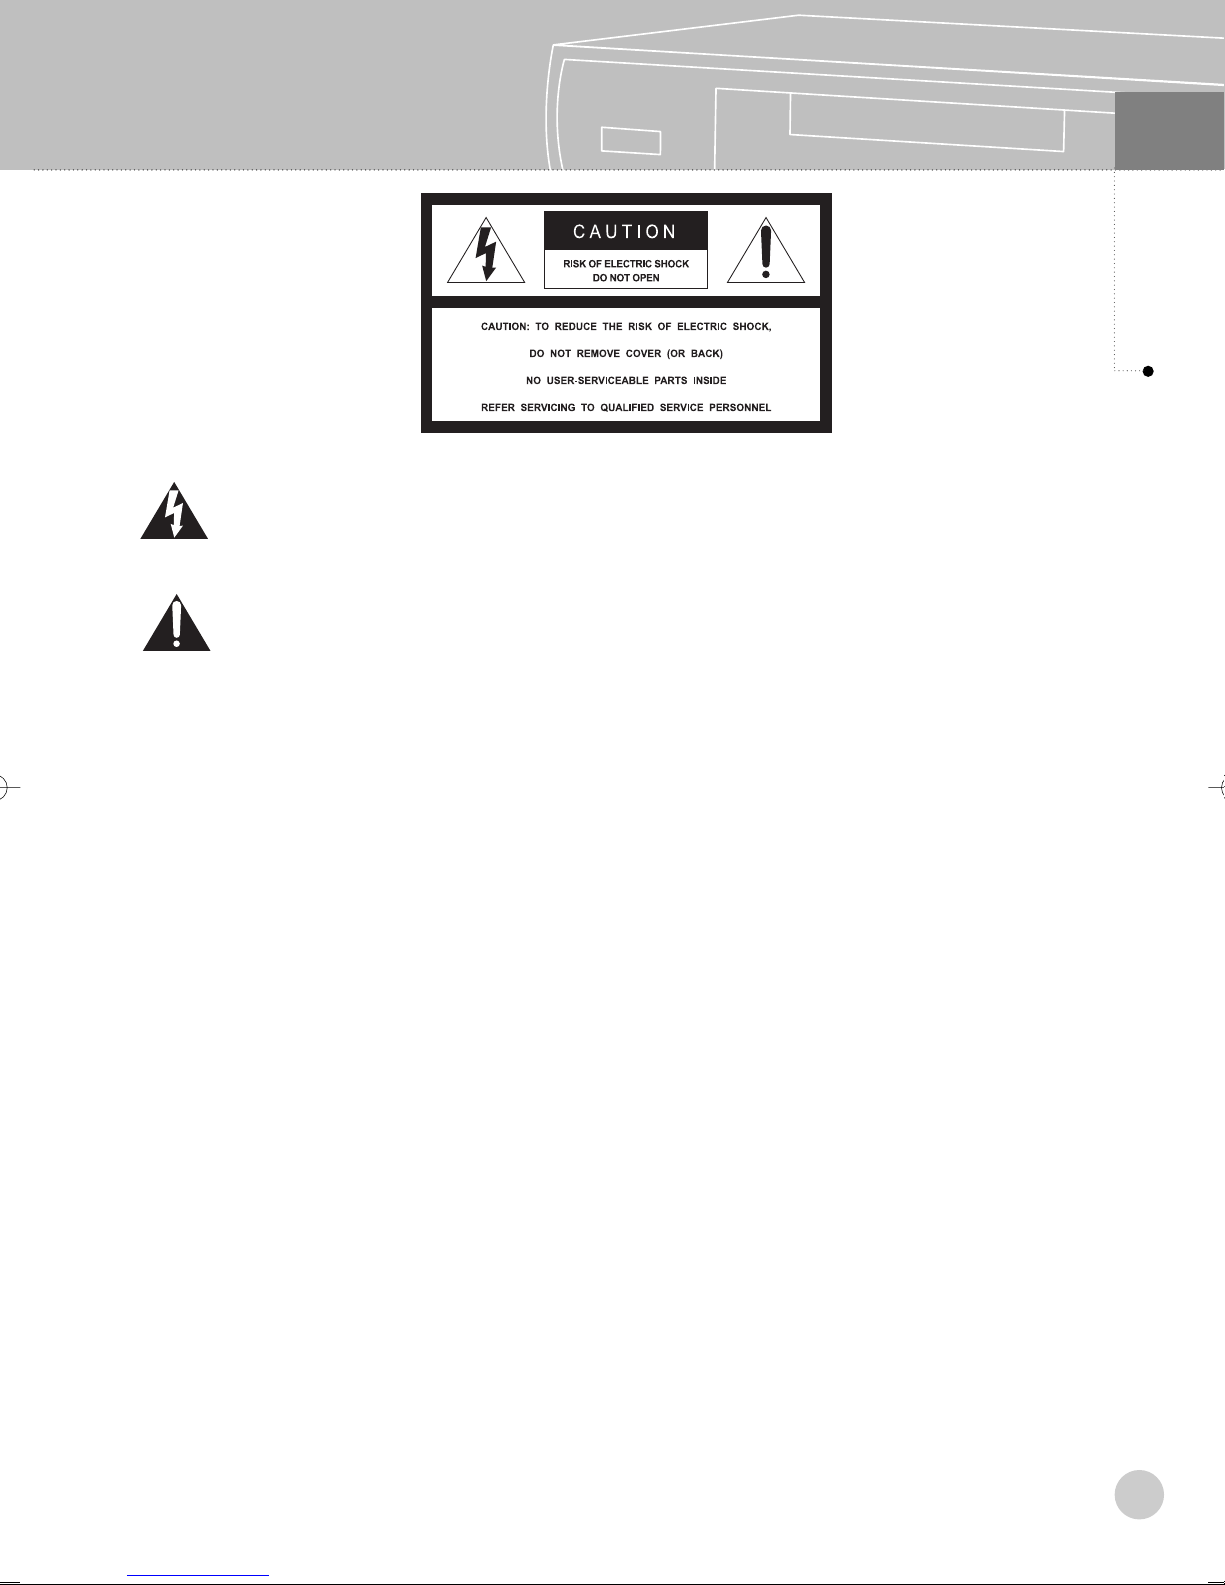
The lightning flash with arrowhead symbol, within an equilateral triangle, is intended to
alert the user to the presence of uninsulated "dangerous voltage" within the product's
enclosure that may be of sufficient magnitude to constitute a risk of electric shock to
persons.
The exclamation point within an equilateral triangle is intended to alert the user to the
presence of important operating and maintenance (servicing) instructions in the literature
accompanying the appliance.
WARNING : To prevent fire of shock hazard, do not expose this appliance to rain or moisture.
02
Warnings
Important Safeguard
CAUTION :
Read Instructions : All the safety and operating instructions should be read before the product is
1.
operated.
Retain Instructions : The safety and operating instructions should be retained for future reference.
2.
Heed Warnings : All warnings on the product and in the operating instructions should be adhered to.
3.
Follow Instructions : All operation and use instructions should be followed.
4.
The appliance is not intended for use by young children / infirmed persons without
supervision.
Young Children should be supervised to ensure that they do not play with the appliance.
To prevent electric shock do not use this (polarized) plug with a receptacle or other outlet
unless the blades can be fully inserted to prevent blade exposure.
Change or modification not expressly approved by the party responsible for compliance
could void the factory warranty.
The apparatus shall not be exposed to dripping or splashing and that no objects filled with
liquids, such as vases, shall be placed on the apparatus.
Cleaning : Unplug this product from the wall outlet before cleaning. Do not use liquid cleaners or
5.
aerosol cleaner. Use a damp cloth for cleaning.
Attachment : Do not use attachments not recommended by the product manufacturer as they may
6.
cause hazards.
4
Page 5
02
Warnings
Warnings
Water and Moisture : Do not use the product near water - for example, near a bath tub, wash bowl,
7.
kitchen sink, or laundry tub ; in a wet basement ; or near a swimming pool ; and the like.
Accessories : Do not place this product on an unstable table. The product may fall, causing serious
8.
injury to a child or adult, and serious damage to the product. Use only with a table recommended
by the manufacturer, or sold with the product. Any mounting of the product should
follow the manufacturer's instructions, and should use a mounting accessory
recommended by the manufacturer.
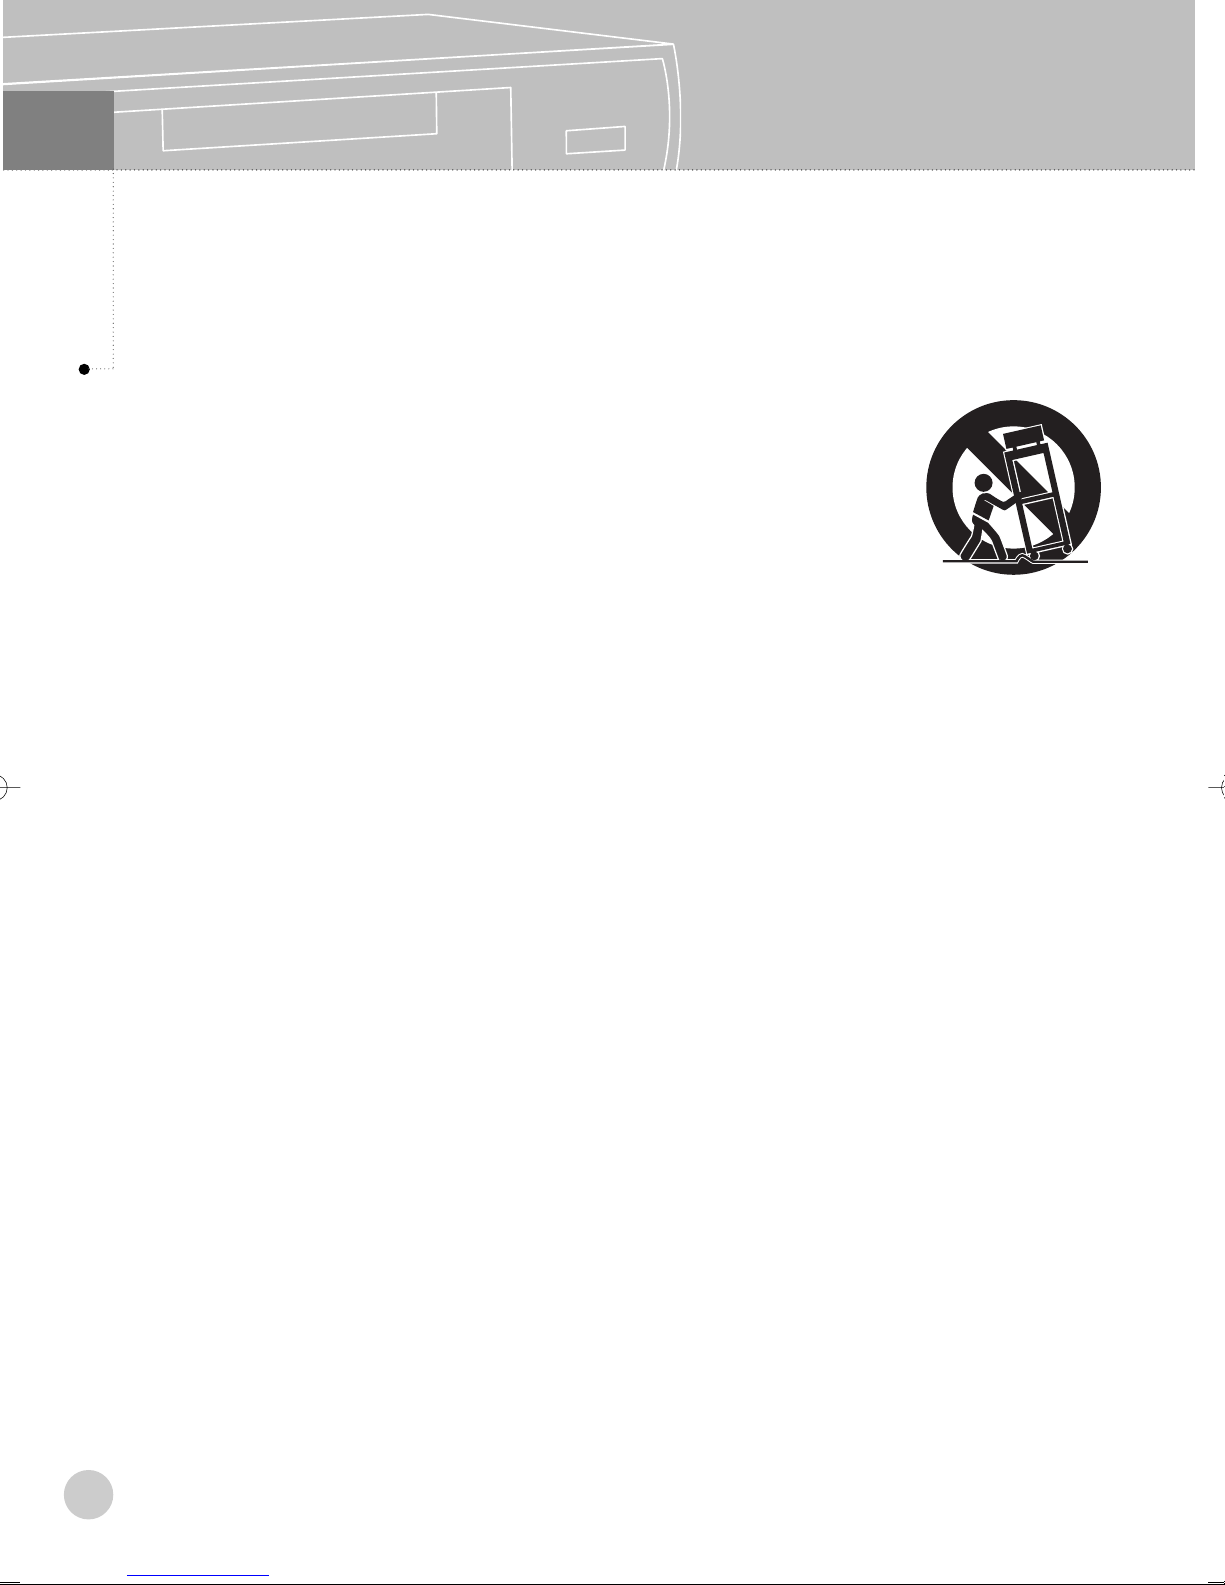
A product and cart combination should be moved with care. Quick stops,
9.
excessive force, and uneven surface may cause the product and cart
combination to overturn. Please refer to picture on the right.
Ventilation-Slot and openings in the cabinet are provided for ventilation and to
10.
ensure reliable operation of the product and to protect it from overheating, and
these openings must not be blocked or covered. The openings should never be blocked by placing
the product on a bed, sofa, rug, or other similar surface. This product should not be placed in a
built-in installation such as a bookcase or rack unless proper ventilation is provided or the
manufacturer's instructions have been adhered to.
Power Sources : This product should be operated only from the type of power source indicated on
11.
the marking label. If you are not sure of the type of power supply to your home, consult your
product dealer or local power company. For products intended to operate from battery power, or
other sources, refer to the operating instructions.
Grounding or Polarization : This product may be equipped with a polarized alternating-current line
12.
plug(a plug having one blade wider than the other). This plug will fit into the power outlet only one
way. This is a safety feature. Do not defeat the safety purpose of the polarized plug.
Alternate Warning : This product is equipped with a three-wire grounding-type plug, a plug having
a third(grounding) pin. This plug will only fit into a grounding-type power outlet. This is a safety
feature. If you are unable to insert the plug into the outlet, contact your electrician to replace your
obsolete outlet. Do not defeat the safety purpose of the grounding-type plug.
Power-Cord Protection : Power-supply cords should be routed so that they are not likely to be
13.
walked on or pinched by items placed upon or against them, paying particular attention to cords at
plugs, convenience receptacles, and the point where they exit from the product.
Lighting : For added protection for this product during a lighting storm, or when it is left unattended
14.
and unused for long periods of time, unplug it from the wall outlet and disconnect the antenna or
cable system. This will prevent damage to the product due to lighting and power-line surges.
Power Lines : An outside antenna system should not be located in the vicinity or overhead power
15.
lines or other electric light or power circuits, or where it can fall into such power lines or circuits.
When installing an outside antenna system, extreme care should be taken to keep from touching
such power lines or circuits as contact with them might be fatal.
Overloading : Do not overload wall outlets, extension cords, or integral convenience receptacles as
16.
this can result in a risk of fire or electric shock.
5
Page 6
Warnings
Object and Liquid Entry : Never push objects of any kind into this product through opening as they
17.
may touch dangerous voltage points or short-out parts that could result in a fire or electric shock.
Never spill liquid of any kind on the product.
Servicing : Do not attempt to service this product yourself as opening or removing covers may
18.
expose you to dangerous voltage or other hazards. Refer all servicing to qualified service
personnel.
Damage Requiring Service : Unplug this product from the wall outlet and refer servicing to qualified
19.
service personnel under the following conditions :
a) When the power-supply cord or plug is damaged.
b) If liquid has been spilled, or objects have fallen into the product.
c) If the product has been exposed to rain or water.
d) If the product does not operate normally by following the operating instructions. Adjust only those
controls that are covered by the operating instructions as an importer adjustment of other controls
may result in damage and will often require extensive work by a qualified technician to restore the
product to its normal operation.
e) If the product has been dropped or damaged in any way.
) When the product exhibits a distinct change in performance-this indicate a need for service.
f
02
Warnings
Replacement Parts - When replacement parts are required, be sure the service technician has used
20.
replacement parts specified by the manufacturer or have the same characteristics as the original part.
Unauthorized substitutions may result in fire, electric shock, or other hazards.
Safety Check : Upon completion of any service or repairs to this product, ask the service
21.
technician to perform safety checks to determine that the product is in proper operating condition.
Heat : The product should be situated away from heat sources such as radiators, heat registers,
22.
stoves, or other products (including amplifiers) that produce heat.
RF Interference : Do not operate a mobile phone in close proximity, as this may cause picture and
23.
sound breakup and damage to main parts.
6
Page 7
03
Supplied Accessories
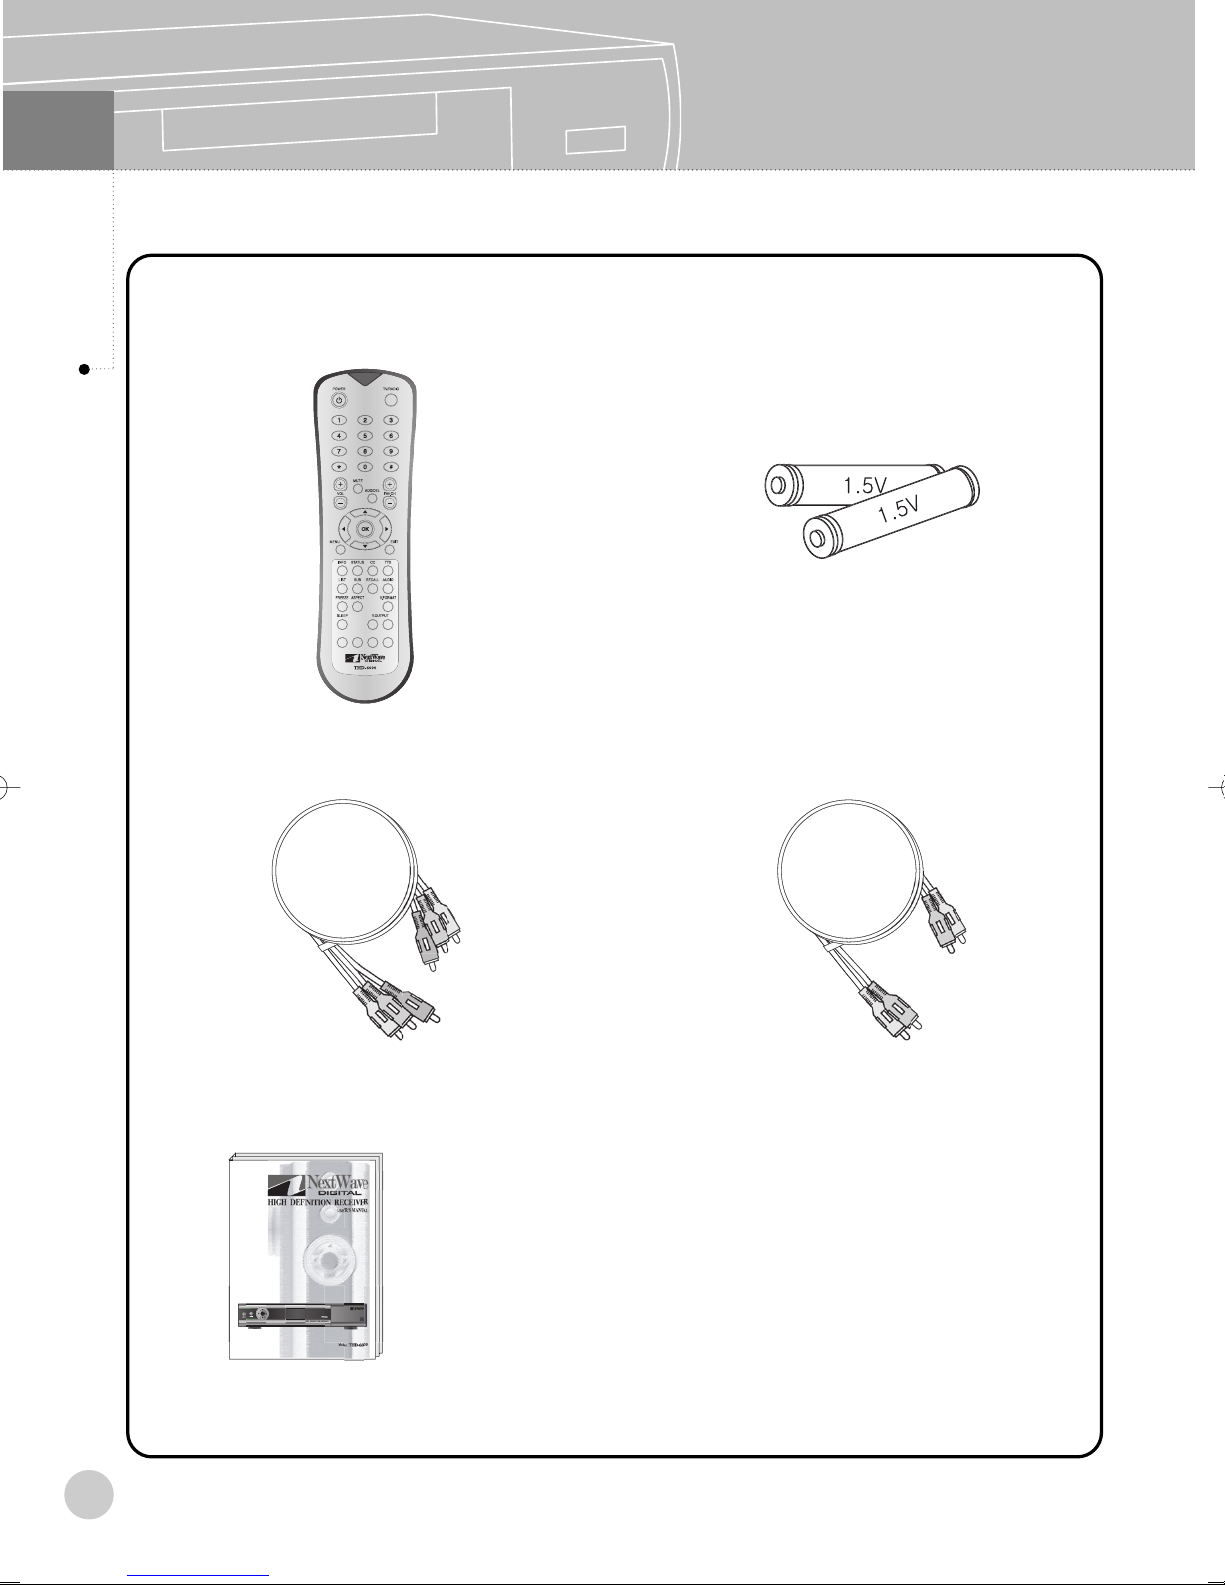
■ Make sure the following accessories are provided with product.
Supplied Accessories
1. Remote Control Handset 2. Batteries
3. Component Video Cable 4. Audio Cable(L/R)
5. User’s Guide
7
Page 8
Front Panel Controls and LEDs
04
Controls
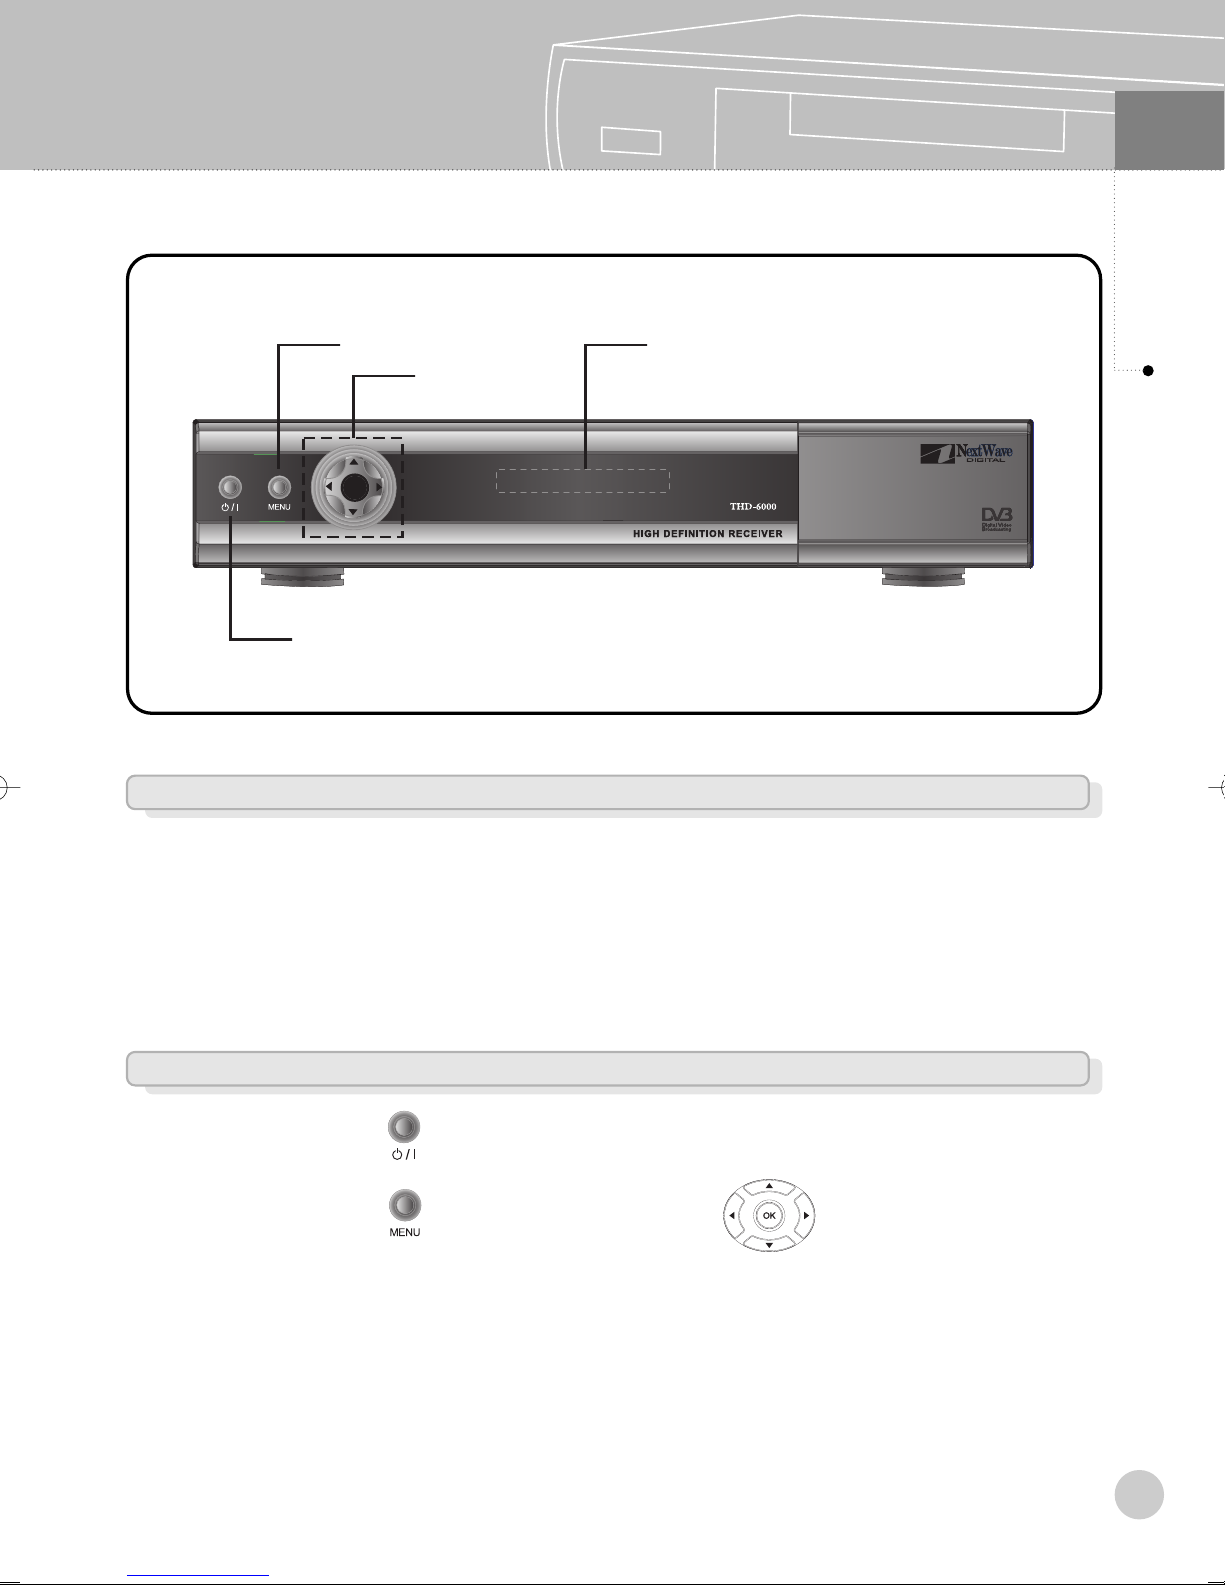
< MENU >
< POWER >
< CHANNEL >
<
Front Side >
< Remote Control Sensor >
LED Indicators
< Power On > C100 means digital channel number is 100.
A200 means radio channel number is 200.
< Power Off > Clock is displayed.
Buttons
< POWER > Press < > to turn the power ON/OFF.
< MENU > Press < > to pop up MENU, when < > buttons will be used.
< CHANNEL > Press < ▲ > or press < ▼ > to change channel.
8
Page 9
04
Rear Panel Connectors and Video Select Switch
Controls
< A/V Output >
< Antenna Input >
<
※ Note. Connection of input/output connector in rear panel should be done while power is OFF.
< Service Port >
Rear Side >
Power Cord
< Power Cord >
Connect to the AC power (AC 240 ~ 250V / 50Hz).
Antenna Input
Connect the cable from an off-air TV antenna to this jack.
9
Page 10
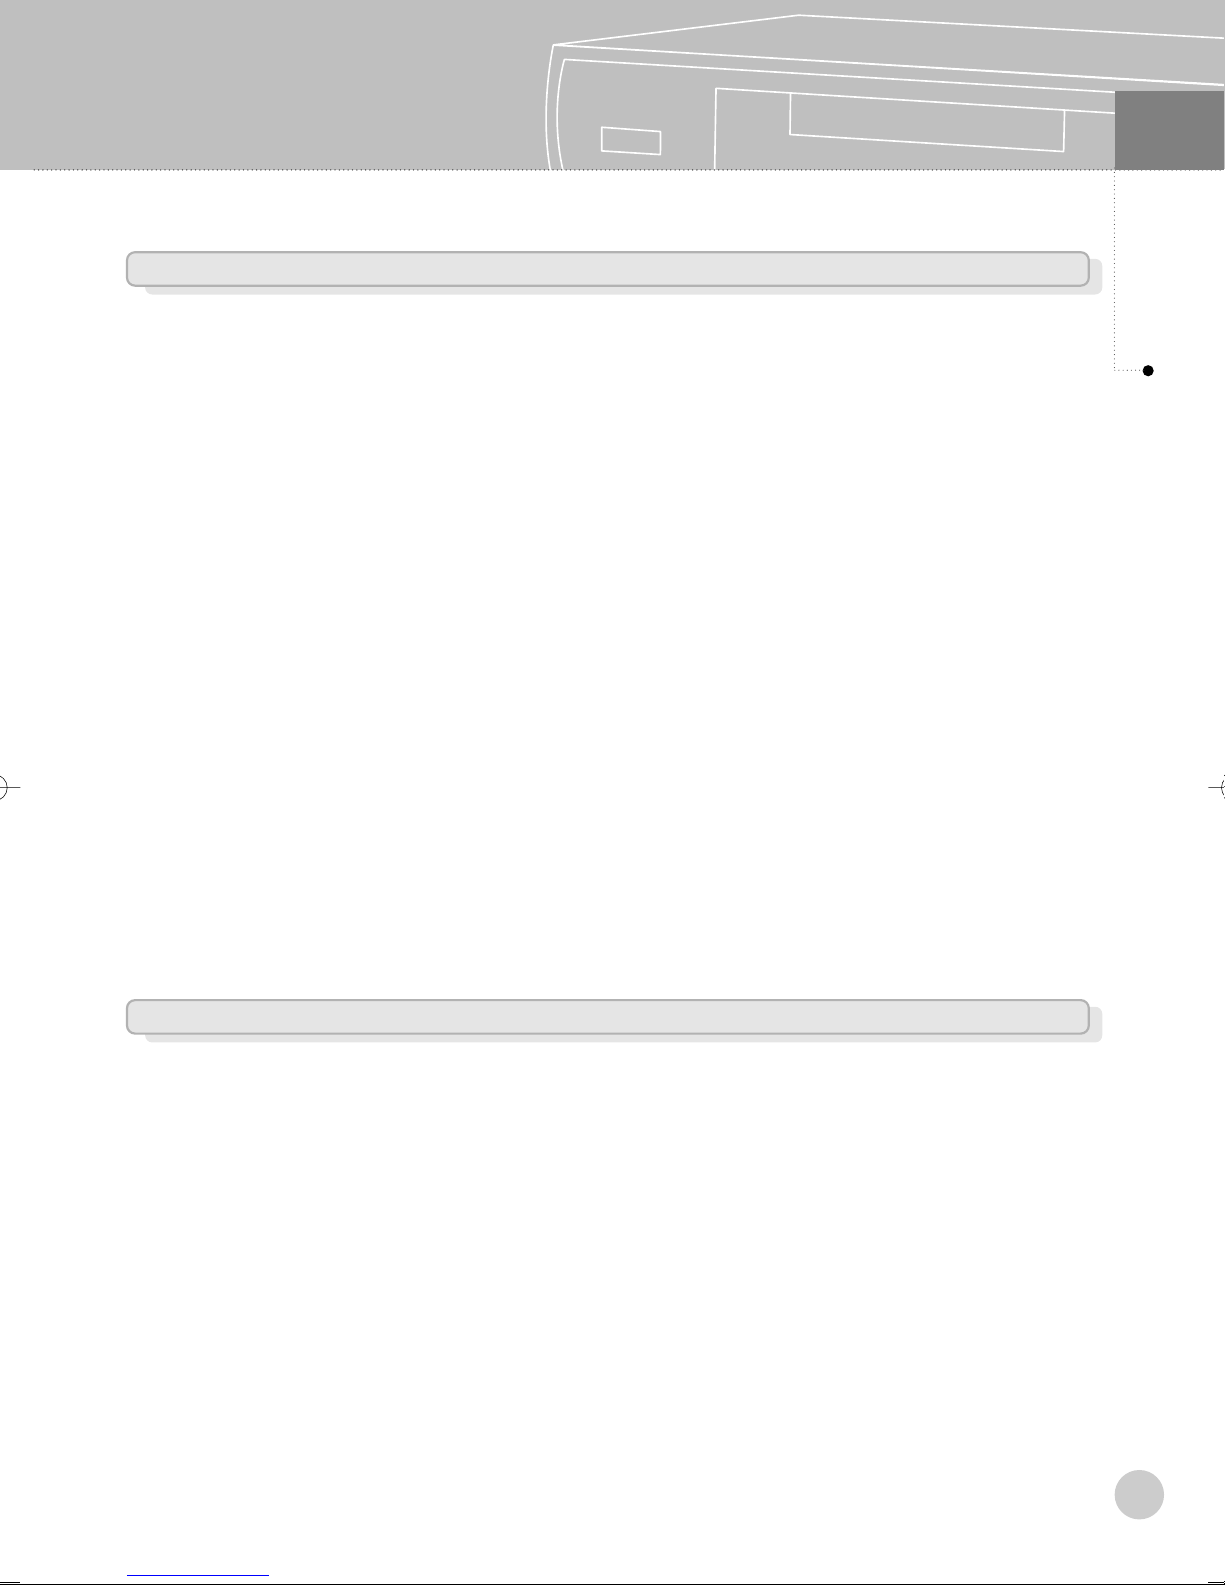
Rear Panel Connectors and Video Select Switch (Cont.)
04
A/V Output
The ‘A/V output’ consist of the followings :
< Y, Pb, Pr > : Component video output (576i, 576p, 720p, 1080i)
< RGB/HV > : RGB, PC monitor output (576p, 720p, 1080i)
< Video or S-Video > : Composite video or S-Video output (576i)
< L, R > : Analog audio output
< COAXIAL > : Digital audio output (Coaxial)
< OPTICAL > : Digital audio output (Optical)
Controls
Service Port
The service port is for maintenance and software upgrade in the future.
10
Page 11
04
Controls
Battery Installation for Remote Control
■
Remove the battery cover and install batteries like the diagram below.
1. Unlatch the battery compartment cover on the back
of remote control.
2. Insert 2 AAA batteries as shown, making sure the
+ and - ends of each battery line up with the
corresponding marks in the battery compartment.
3. Snap the cover back to the remote control.
11
Page 12
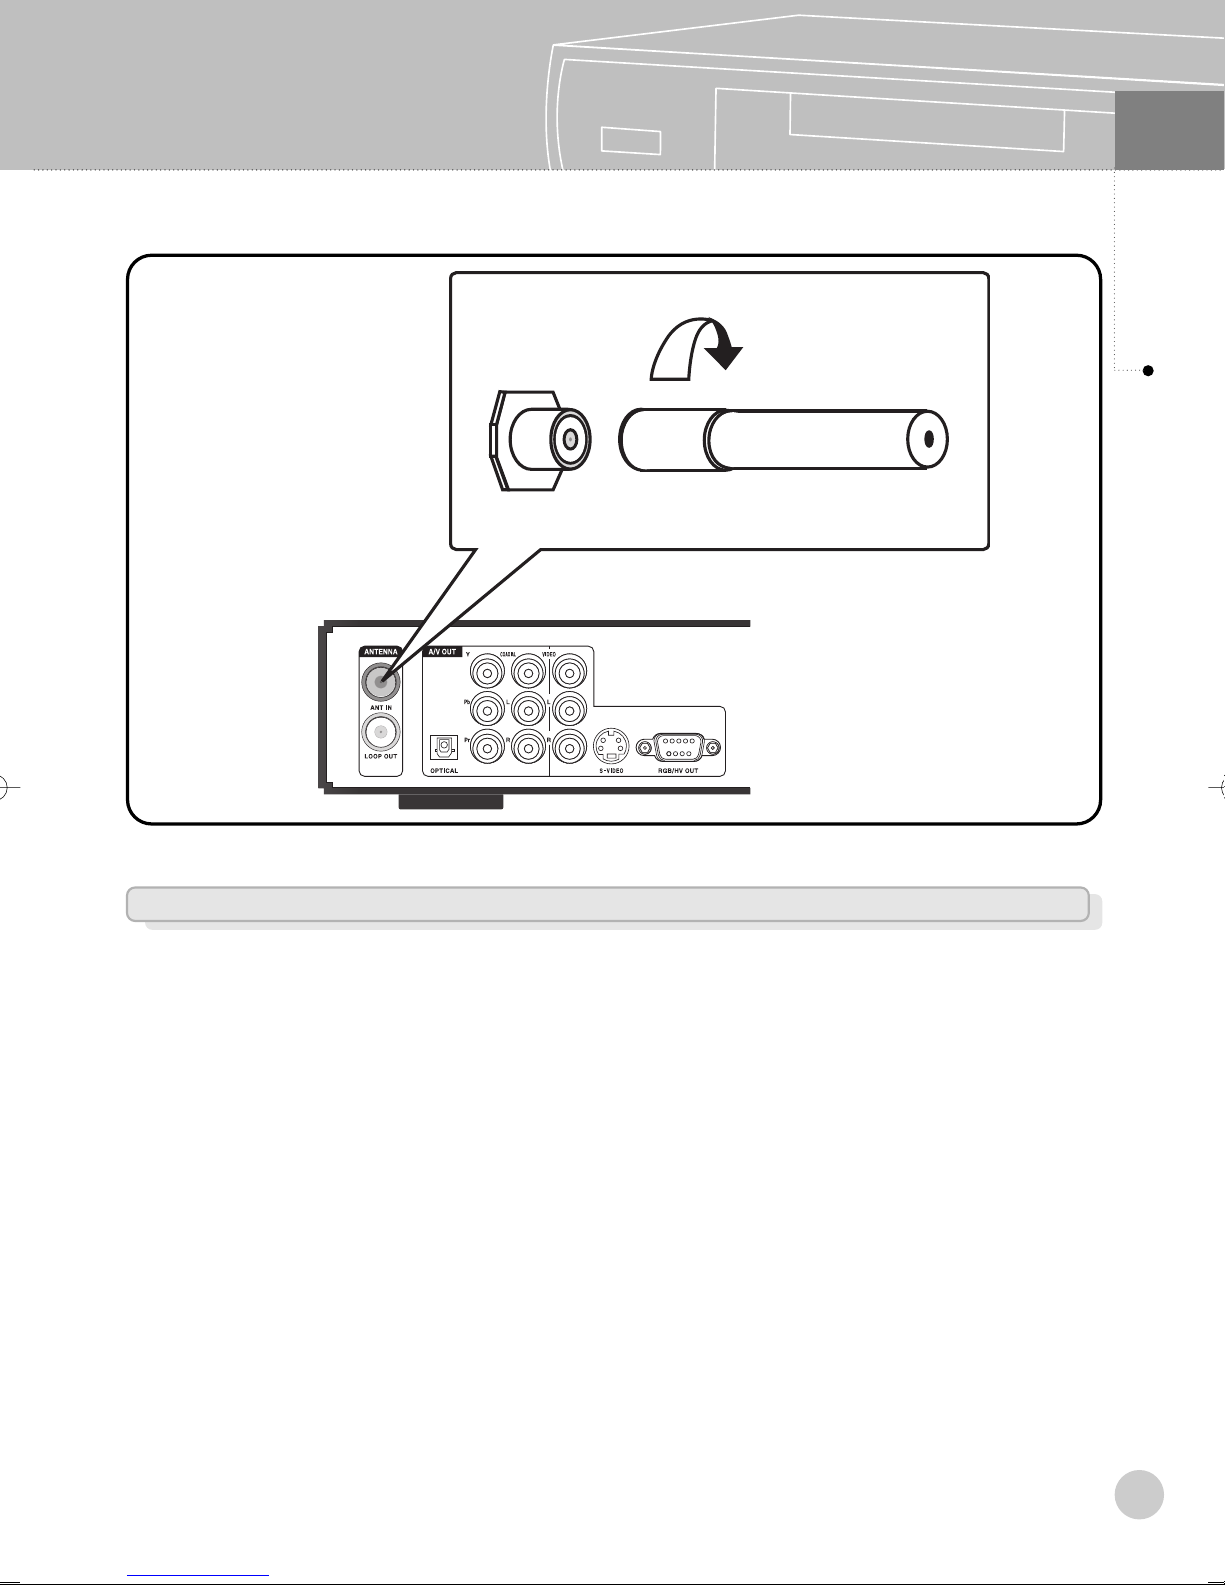
Antenna Input
05
Installation
Connecting Antenna
Connect the antenna or RF cable wire directly to ANT IN.
※ Note. The STB(Set Top Box) should be unplugged before connecting antenna. (Power OFF mode)
12
Page 13
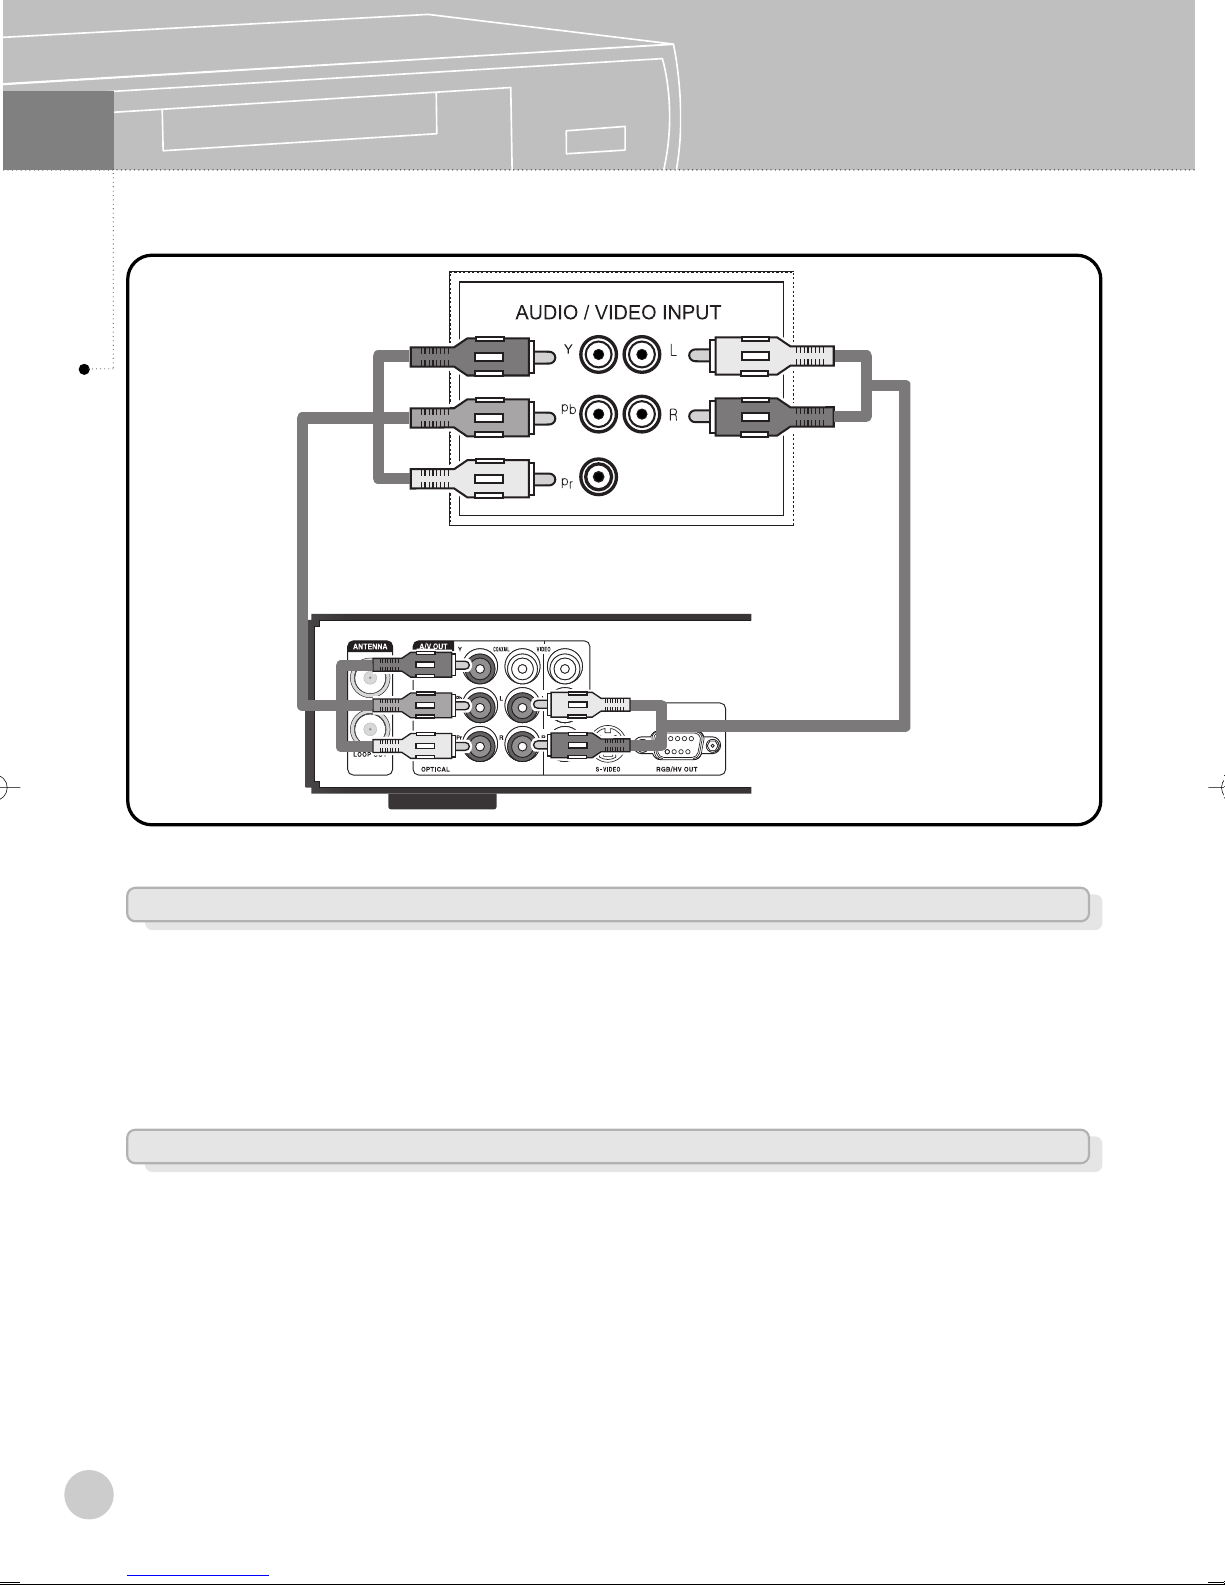
05
Installation
Connection to Digital TV (YPbPr)
Digital TV
<
>
Connect the Video Cables
Connect a video cable between the Component video output(Y : Green, Pb : Blue, Pr : Red)
jacks of the STB(Set Top Box) and the Component input jacks on the Digital TV according to
corresponding colour. On the Video Out Mode, select YPbPr as Video Output Type and select
one of 1080i, 720p as Video Output Resolution according to your digital TV.
Connect the Audio Cables
Connect an audio cable between the L/R Audio output jacks of the STB and the L/R Audio
input jacks of the digital TV or digital audio amplifier. (Refer to page 16)
13
Page 14
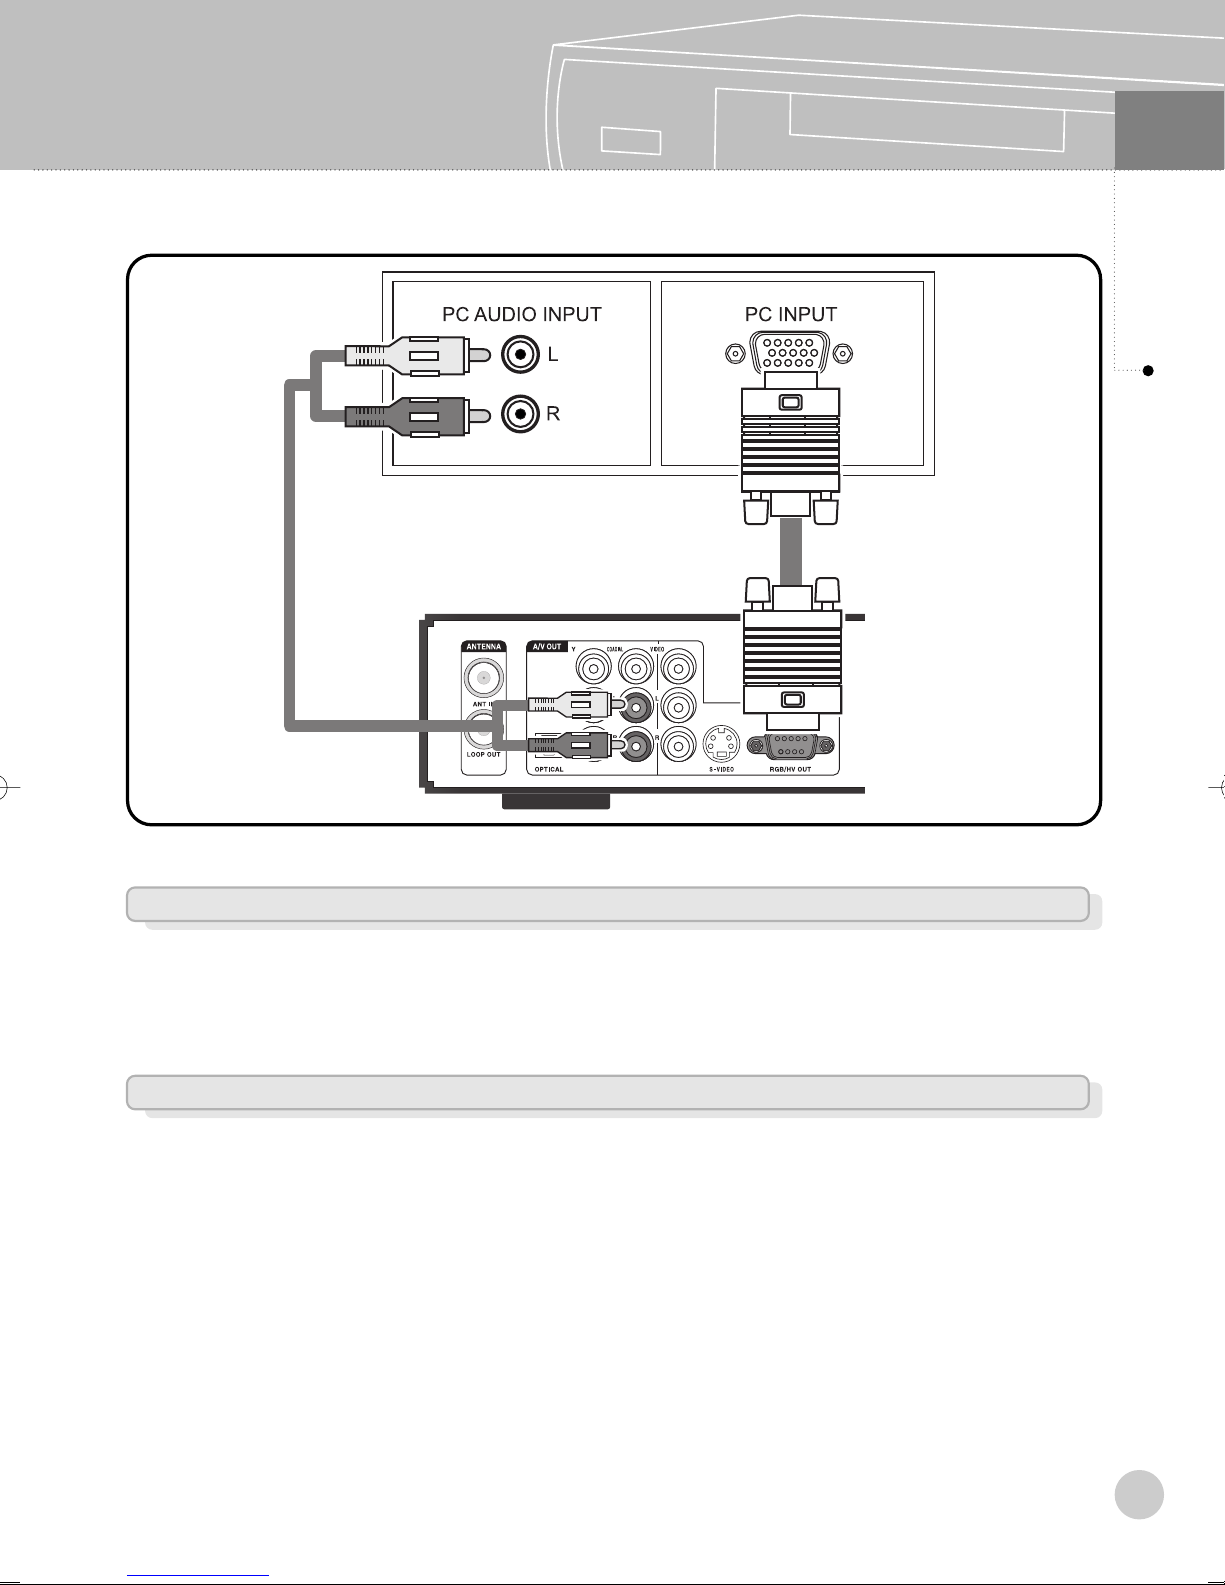
Connection to Digital TV (RGB/HV)
Digital TV
<
>
05
Installation
Connect the Video Cables
Connect the RGB/HV output jack of the STB to the RGB input jack of the PC RGB input on the
digital TV. In regard to the Video Out Mode, select RGB as Video Output Type and select one
of 1080i, 720p, 576p as Video Resolution according to your digital TV.
Connect the Audio Cables
Connect an audio cable between the L/R Audio output jacks of the STB and the L/R PC Audio
input jacks of the digital TV or digital audio amplifier. (Refer to page 16)
14
Page 15
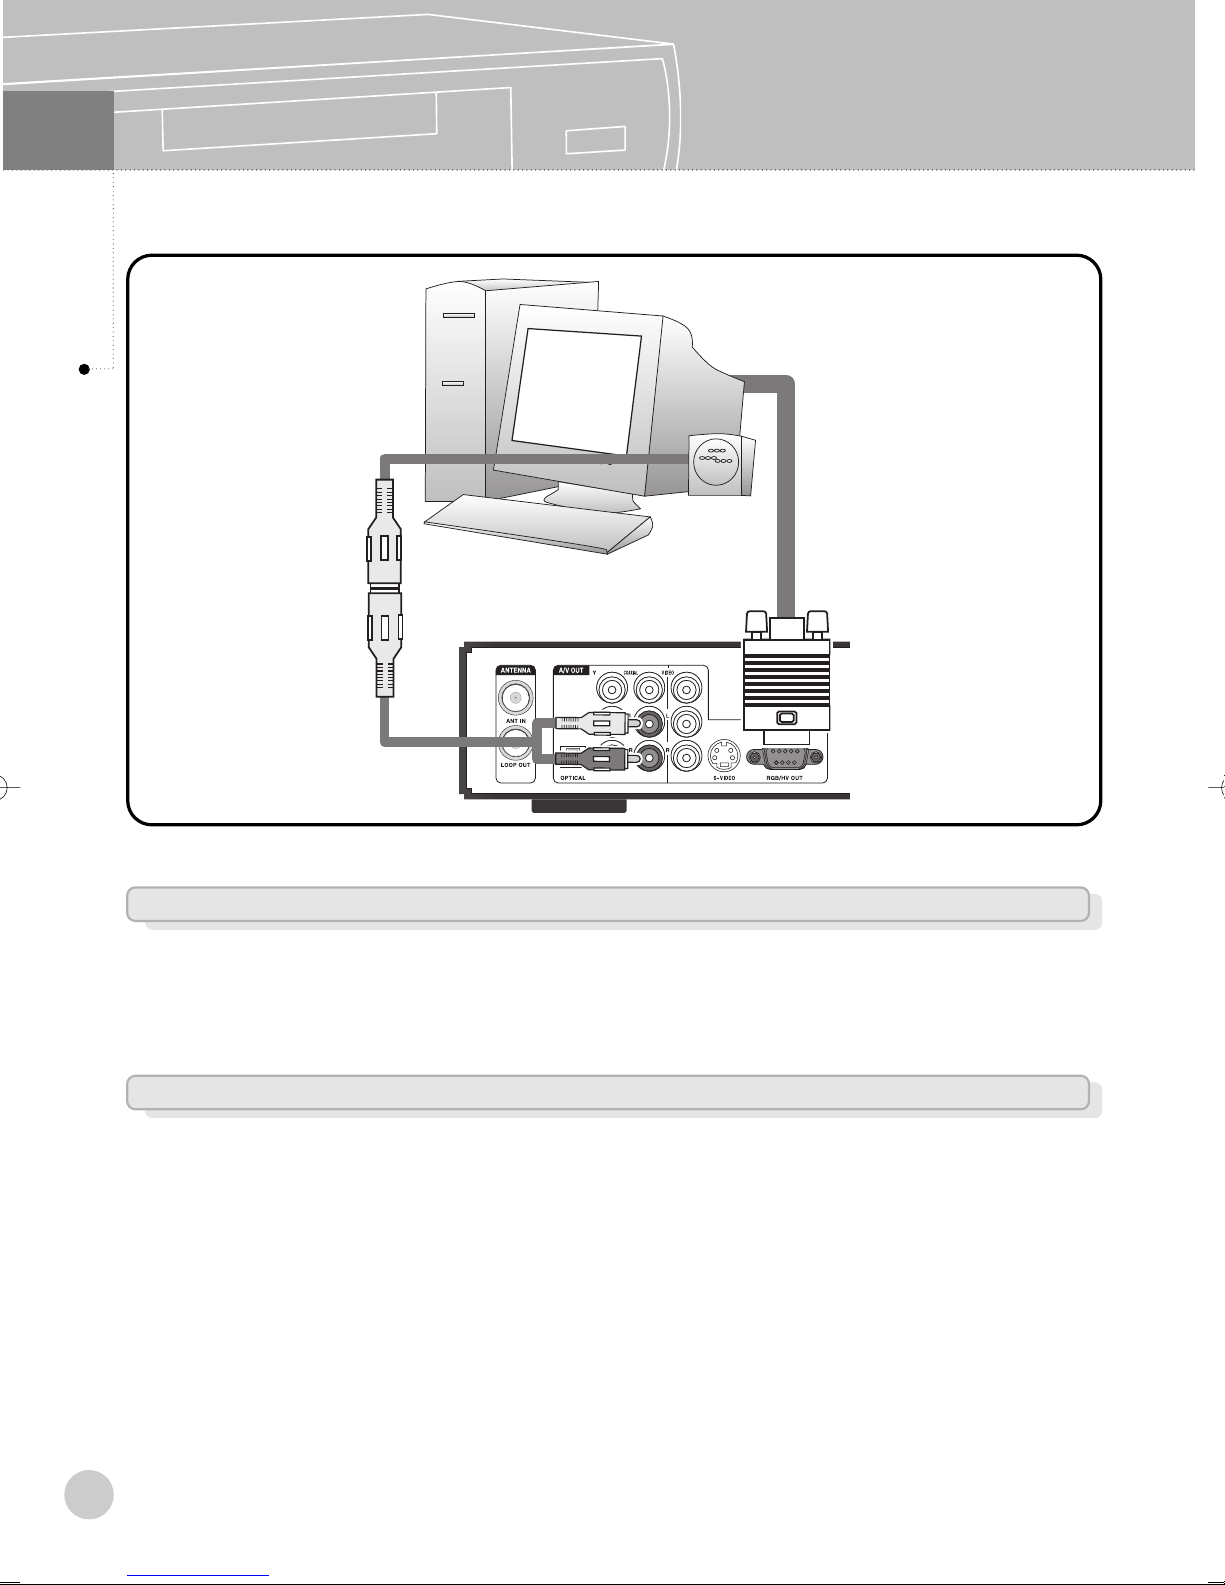
05
Installation
Connection to RGB PC Monitor
Connect the Video Cables
Connect RGB/HV video output jack of the STB to the RGB jack of the PC monitor. In regard to
the Video Out Mode, select RGB as Video Output Type and select one of 1080i, 720p,576p
according to Video Output Resolution of your PC monitor.
Connect the Audio Cables
Connect an audio cable between the L/R Audio output jacks of the STB and the external
speakers that contain a sound amp. (Purchase separate jacks for PC speakers.)
15
Page 16
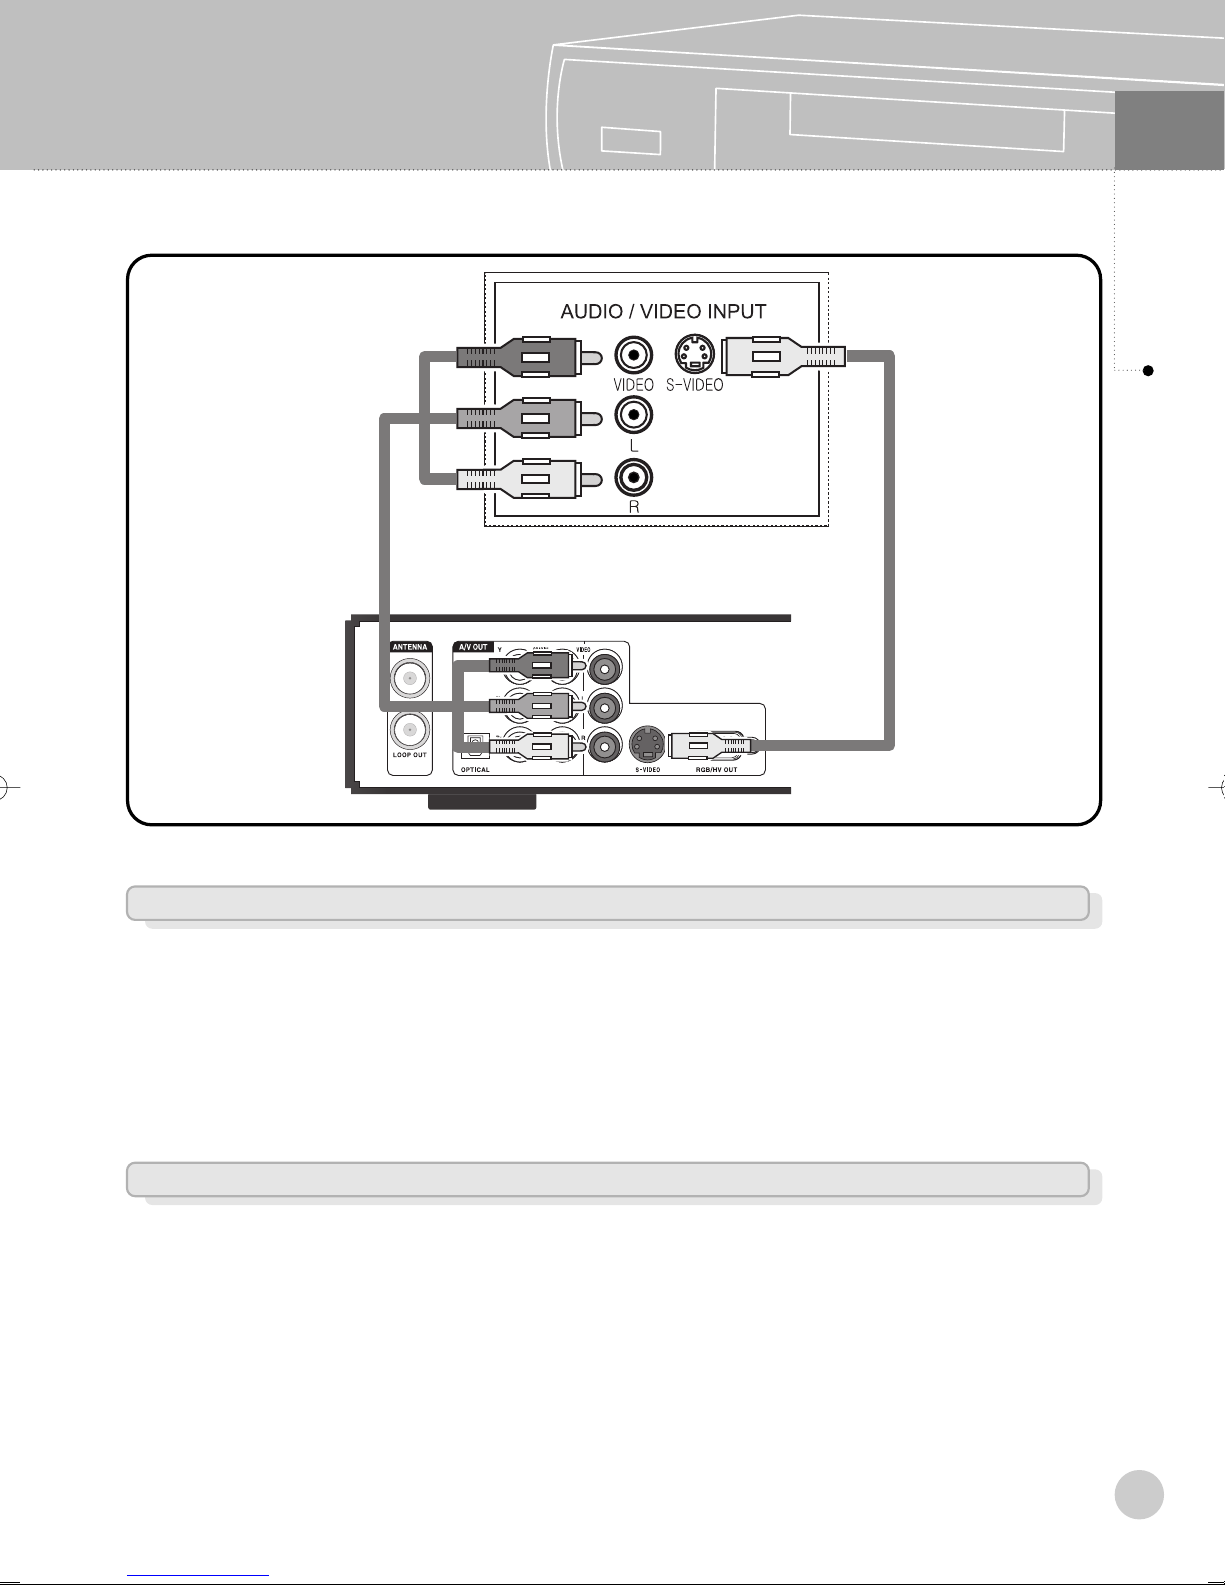
Connection to Analog TV (Composite/S-Video)
Analog TV
<
>
05
Installation
Connect the Video Cables
Connect a composite cable between the Video output jack of the STB and the Video input jack
of the analog TV. Or, connect an S-Video cable between the S-Video output jack of the STB
and the S-Video input jack of the analog TV. You can connect either composite Video or SVideo cable. In regard to the Video Out mode, select TV as Video Output Type as shown
above, when the Video Output Resolution switch has no effect any more.
Connect the Audio Cables
Connect an audio cable between the L/R Audio output jacks of the STB and the L/R Audio
input jacks of the analog TV.
16
Page 17
05
Installation
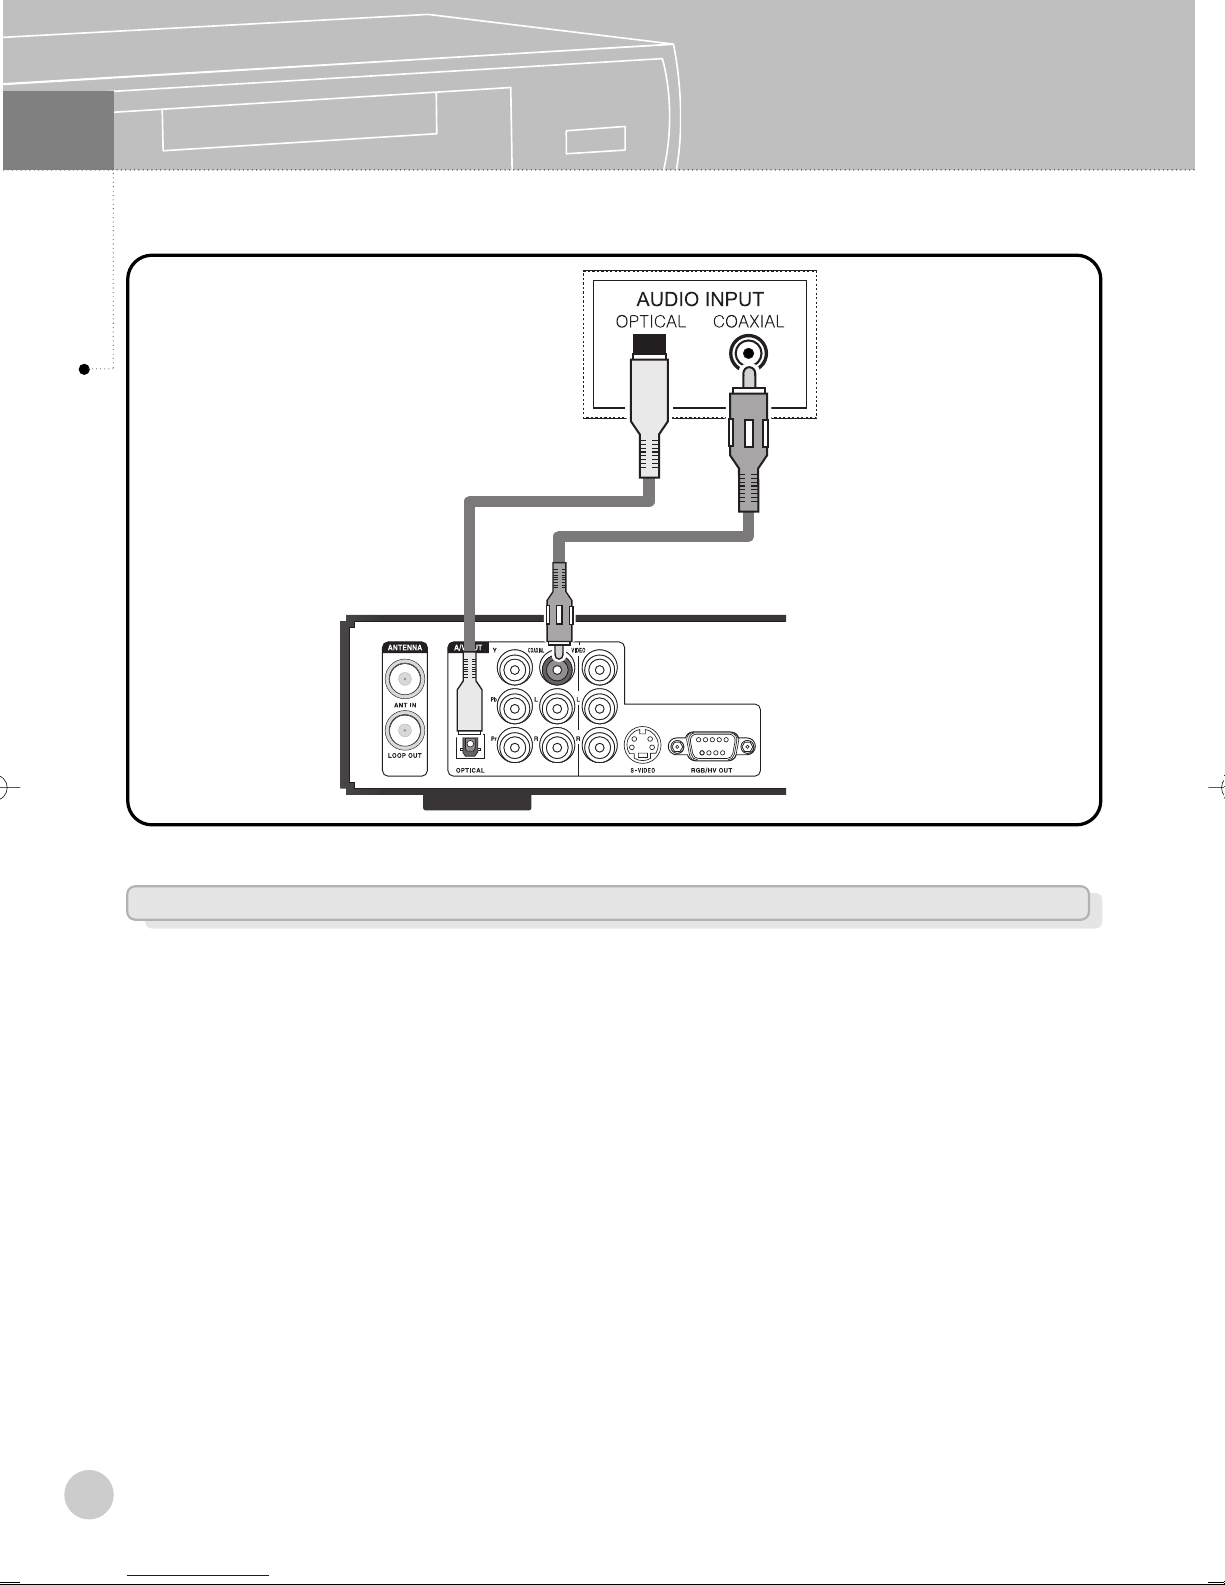
Connection to Digital Audio Amplifier
Audio Amplifier
<
>
Connect the Digital Audio Output
Connect audio cables from the OPTICAL or COAXIAL digital audio output jacks of the STB to the
the OPTICAL or COAXIAL digital audio input jacks of the digital audio decoder or the amplifier.
Do not connect the coaxial and optical audio output simultaneously and be sure to connect either
optical or coaxial cable to avoid any damage to digital audio decoder or amplifier that may occur.
It is recommended to use OPTICAL connection if a digital audio decoder or amplifier provides
both OPTICAL and COAXIAL input jacks.
17
Page 18
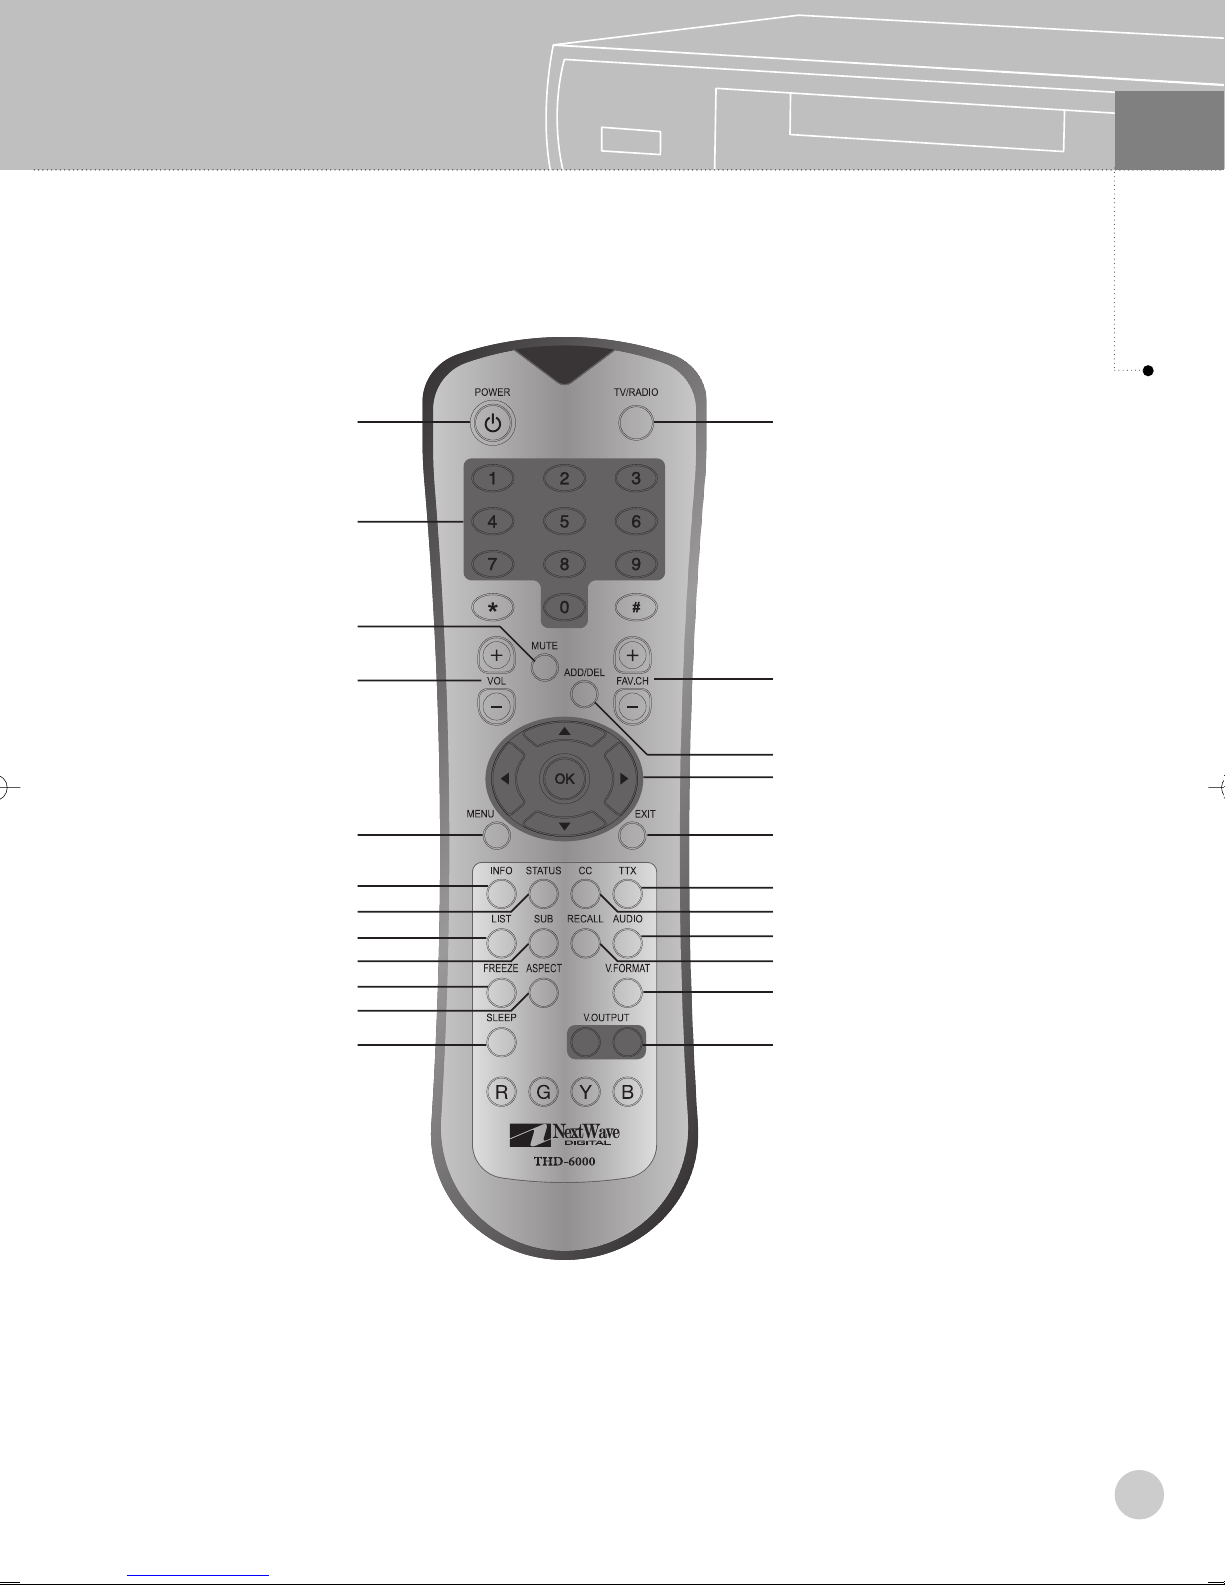
Remote Control
06
Basic Operation
< Power >
< Number >
< Mute >
< Volume Control >
< Menu >
< Information >
< Status >
< Program List >
< Sub-Channel >
< Freeze >
< Aspect Ratio >
< Sleep >
< TV/Radio >
< Favourite Channel Change >
< Favourite Channel ADD/DEL >
< Arrow Buttons >
< Exit >
< Teletext >
< Closed Caption >
< Audio >
< Recall >
< V.Format >
< V.Output >
18
Page 19
06
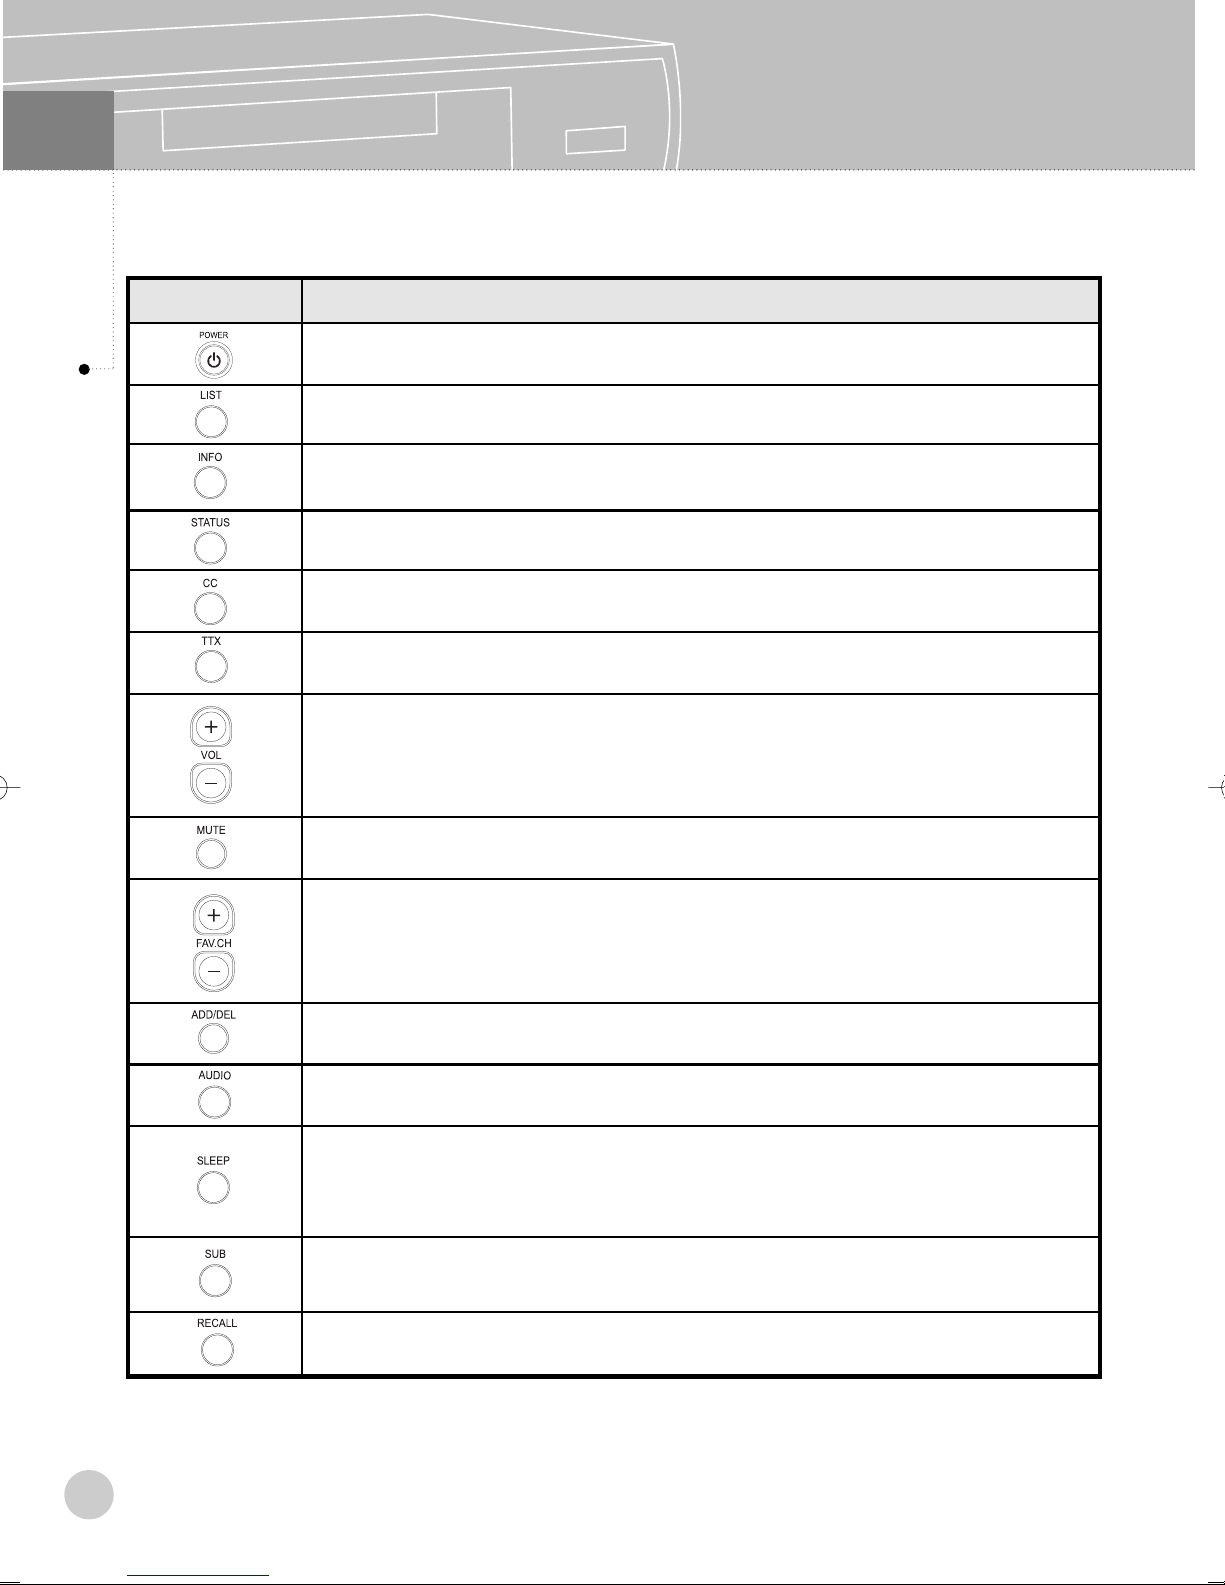
Remote Control (Cont.)
Button
Basic Operation
Description
Press to turn the power ON or OFF.
Press to display the channel list and select one channel from the list.
Press to display information on current program and box settings.
Please refer to the page 24 for detailed information.
Press to display Channel Information. (Signal Quality, Physical Number and etc)
Press to turn Closed Captions ON or OFF.
Press to turn Teletext ON or OFF.
Press to control volume. (if volume control is ON)
By pressing the MUTE button, you can turn sound ON or OFF.
19
Press to change a channel in memorized favourite channels.
Press to add or delete a current channel in favourite channels.
Press to change audio mode. (AC-3, MPEG)
Use to turn off the set top box after a specific time is selected.
Whenever this button is pressed, ‘Cancel-10 min-20min-...-60 min’ is ordering
automatically. If you select 20 min, the set top box will be turned off after 20 minutes.
Press to move in sub channels. It is available only in broadcasts that has sub-channels.
It may be used to change sub-channels between same physical channel.
Press to go to previous channel.
Page 20
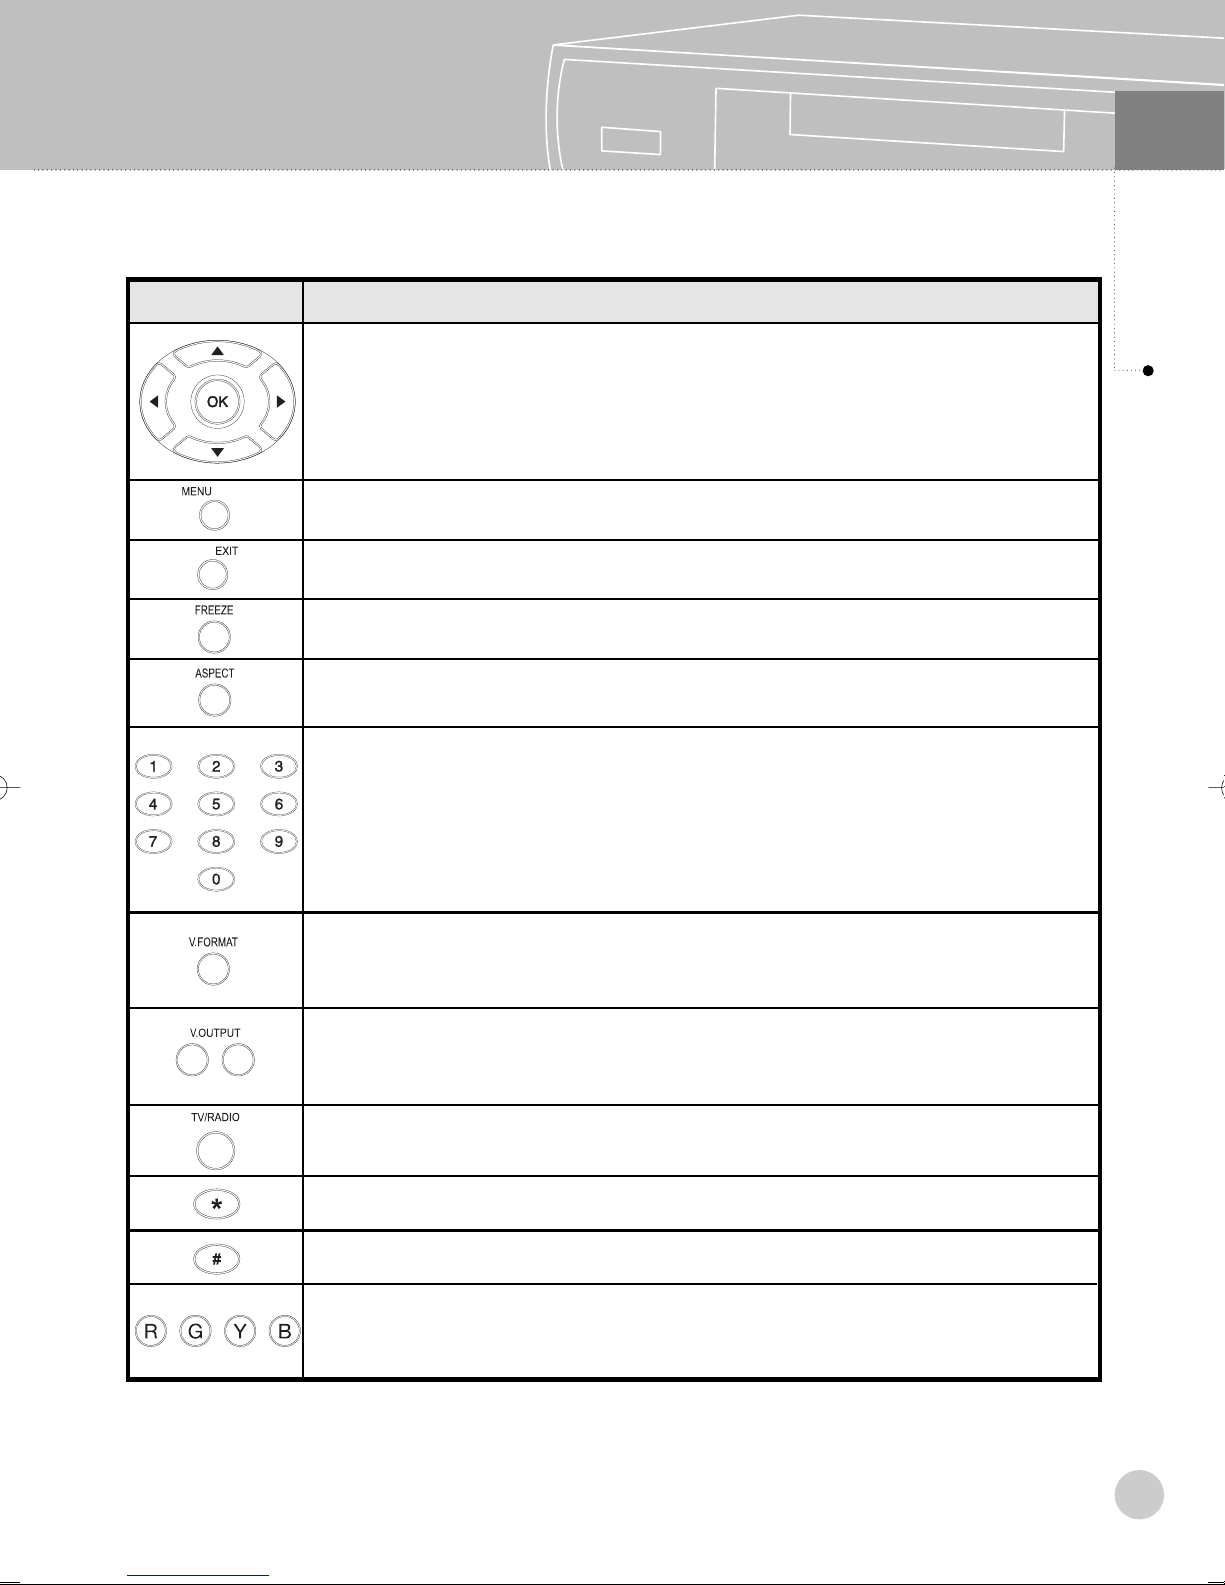
Remote Control (Cont.)
06
Basic Operation
Button
Description
< ▲▼ > : Channel Up/Down or Menu navigation in up or down direction.
< ◀▶> : Menu navigation in left or right direction.
< OK > : Selection.
Press to display or exit the on-screen Menu.
Press to switch back to the previous Menu screen that was displayed.
Press to freeze the picture. (to return to normal operation, press any button)
Press to change the screen format to one of Full, Letter/Piller Box, Hor.Zoom,
Ver.Zoom or HV Zoom.
Channel Number buttons from #0 to #9. Press to directly tune to a particular
channel.
Press to change the output video format from one of resolutions, such as
1080i, 720p, 576p or 576i.
Press both buttons one by one without regular sequence to change the video
out to RGB or YPbPr.
Select TV or Radio Channel.
Press to turn ON or OFF Channel Guide.
Same as OK button.
Using in Teletext mode.
(RED, GREEN : Page Up/Down, YELLOW : Freeze Teletext, BLUE : Unfreeze Teletext)
20
Page 21
07
Closed Caption
■
Closed Caption
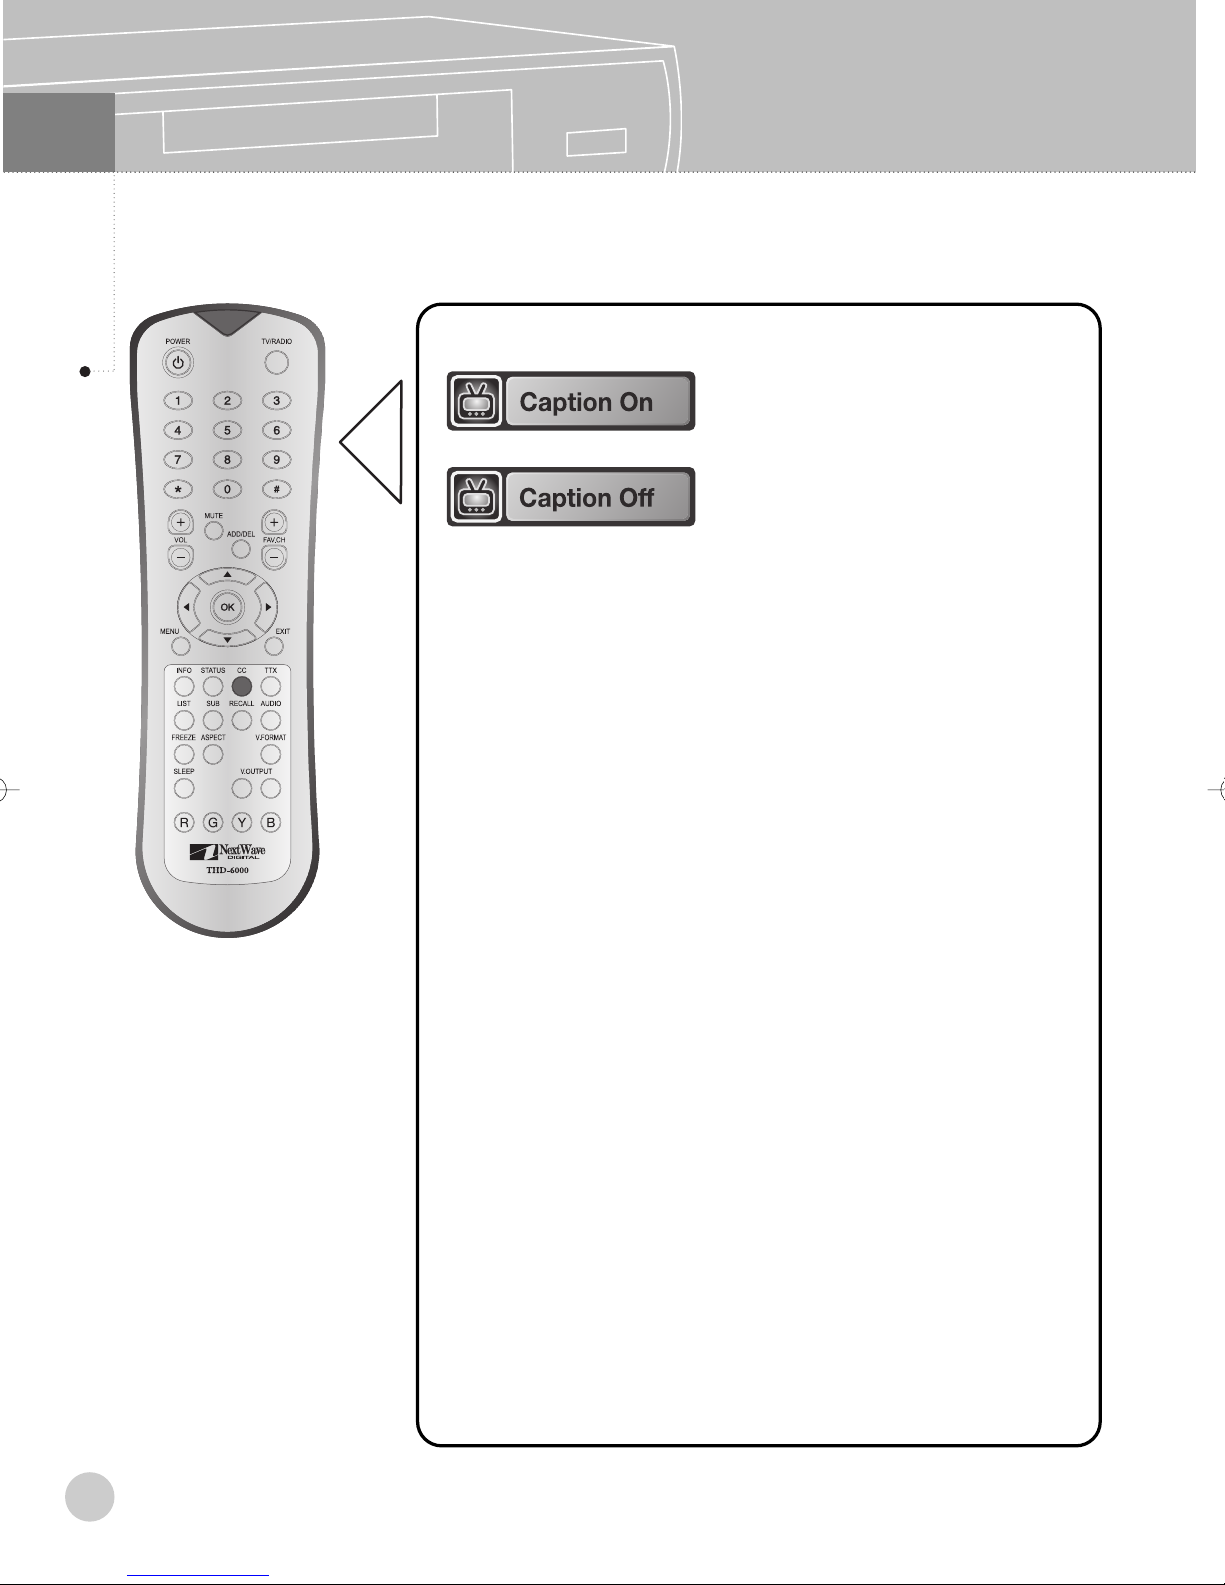
Press CC button to turn on/off closed caption.
1. To turn on of off caption press
CC button.
2. Every time CC button is
pressed, ‘Caption On’ icon or
‘Caption Off’ icon will appear in
due order.
20
Page 22
■
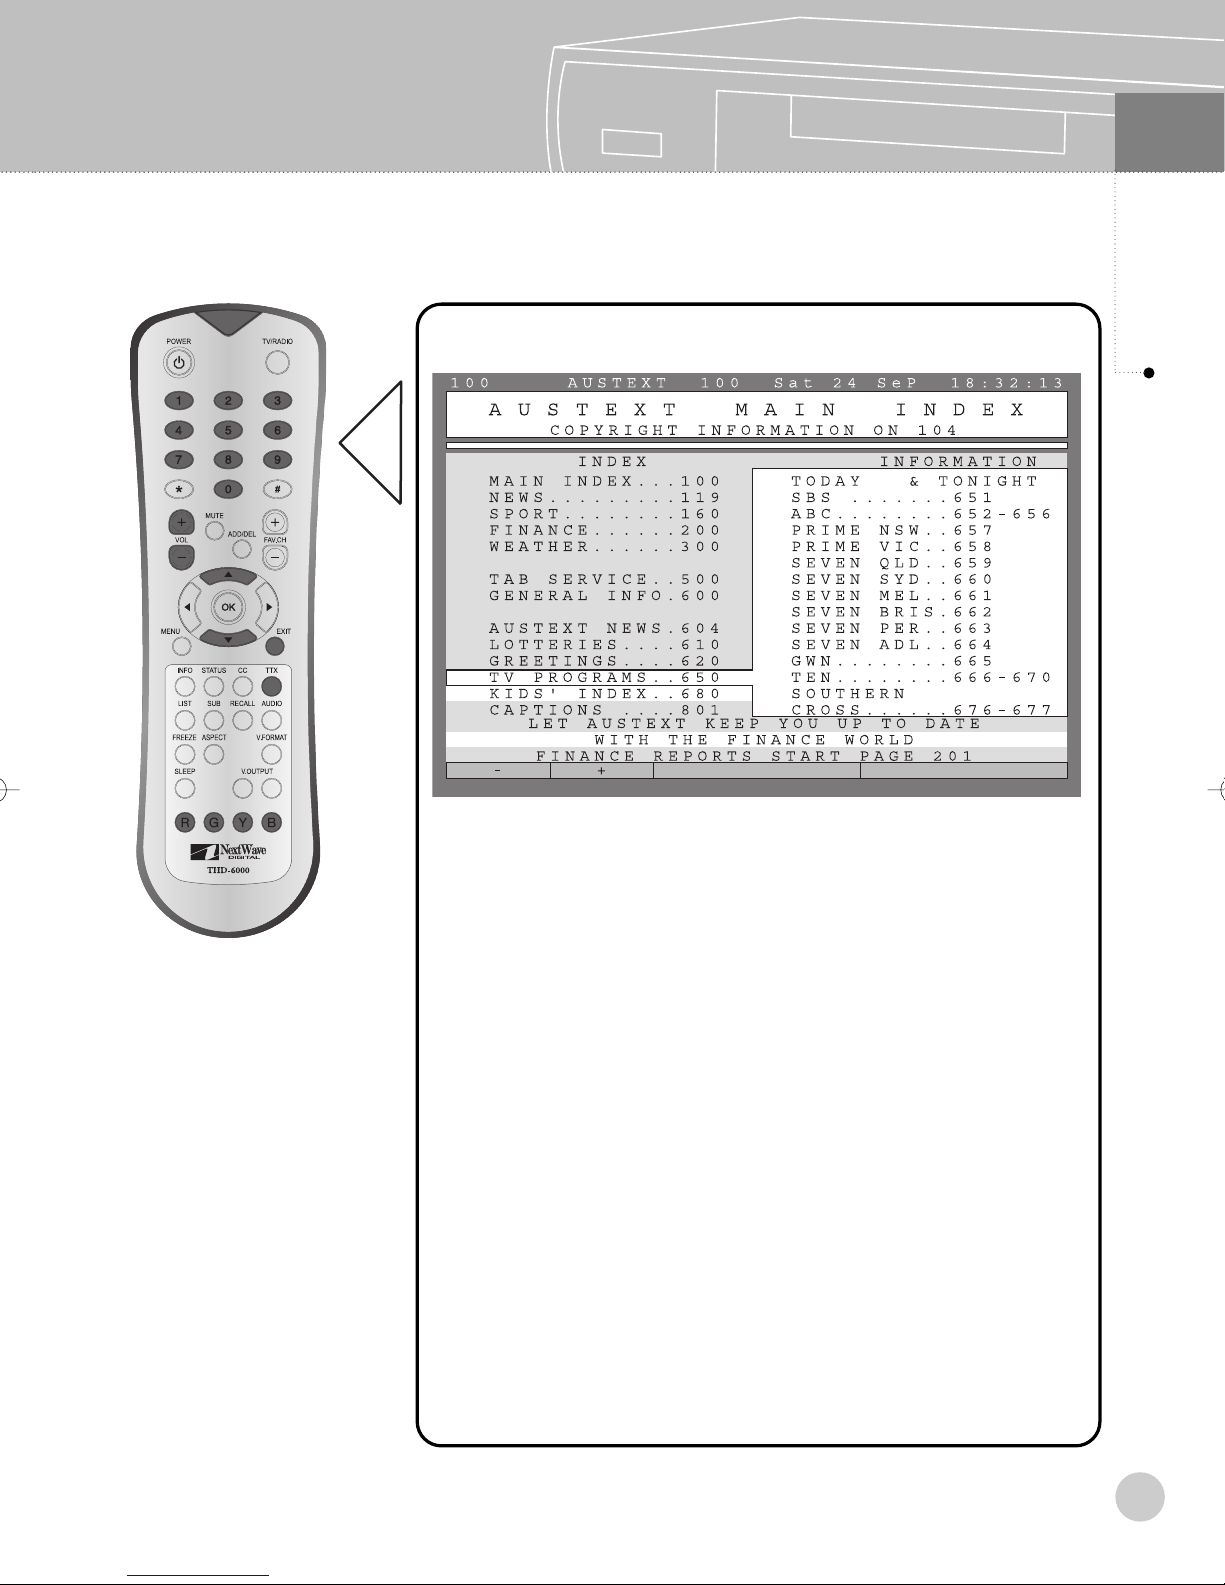
Press TTX button to display current teletext.
Teletext
08
On Screen Display
Press ▲,▼ button to turn pages up and down, press number 100
to 899 to turn the direct number page.
·RED button : Page Down
·GREEN button : Page Up
·YELLOW button : Freeze Teletext
·BLUE button : Unfreeze Teletext
※ To exit immediately, press the TTX button.
21
Page 23
08
Channel Guide
■
On Screen Display
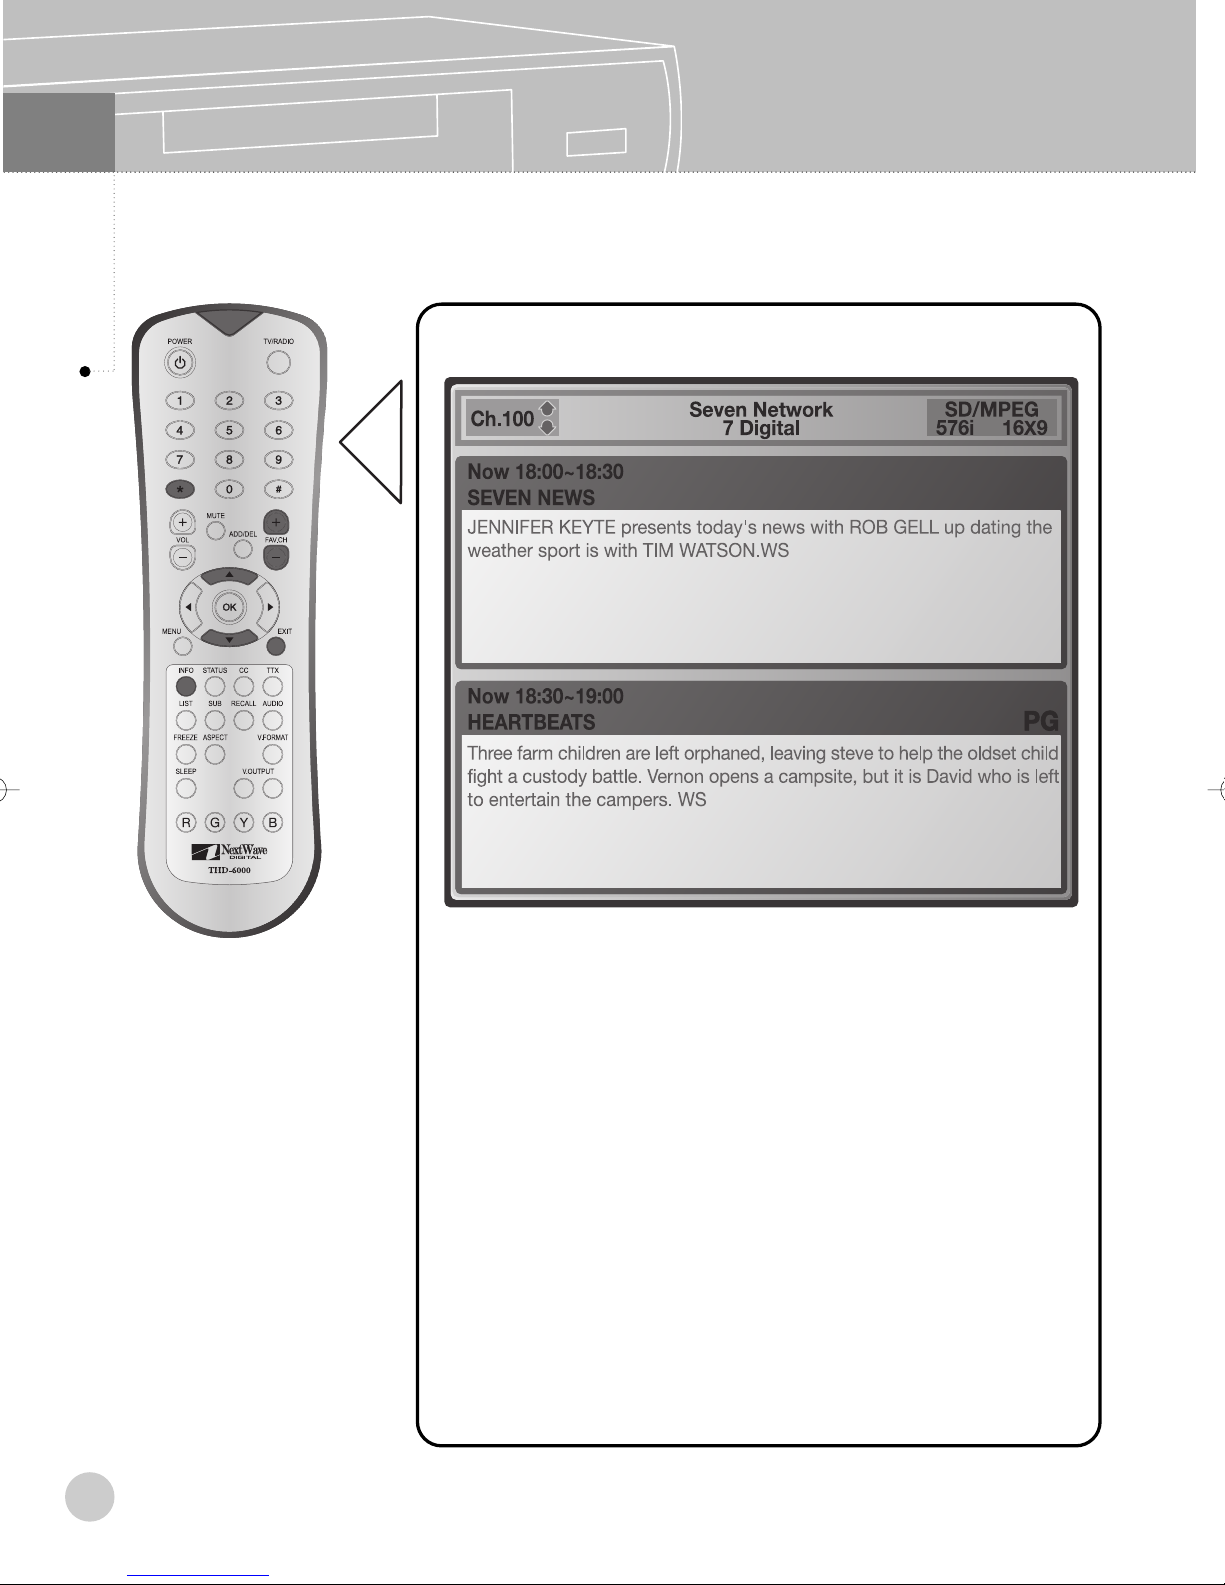
Press INFO button twice or *button to select Channel Guide.
22
1. Press *button, Or INFO button twice.
2. Press ▲, ▼, FAC.CH (+/-) buttons to change the channel.
※ To exit immediately, press the OK or EXIT button.
Page 24
■
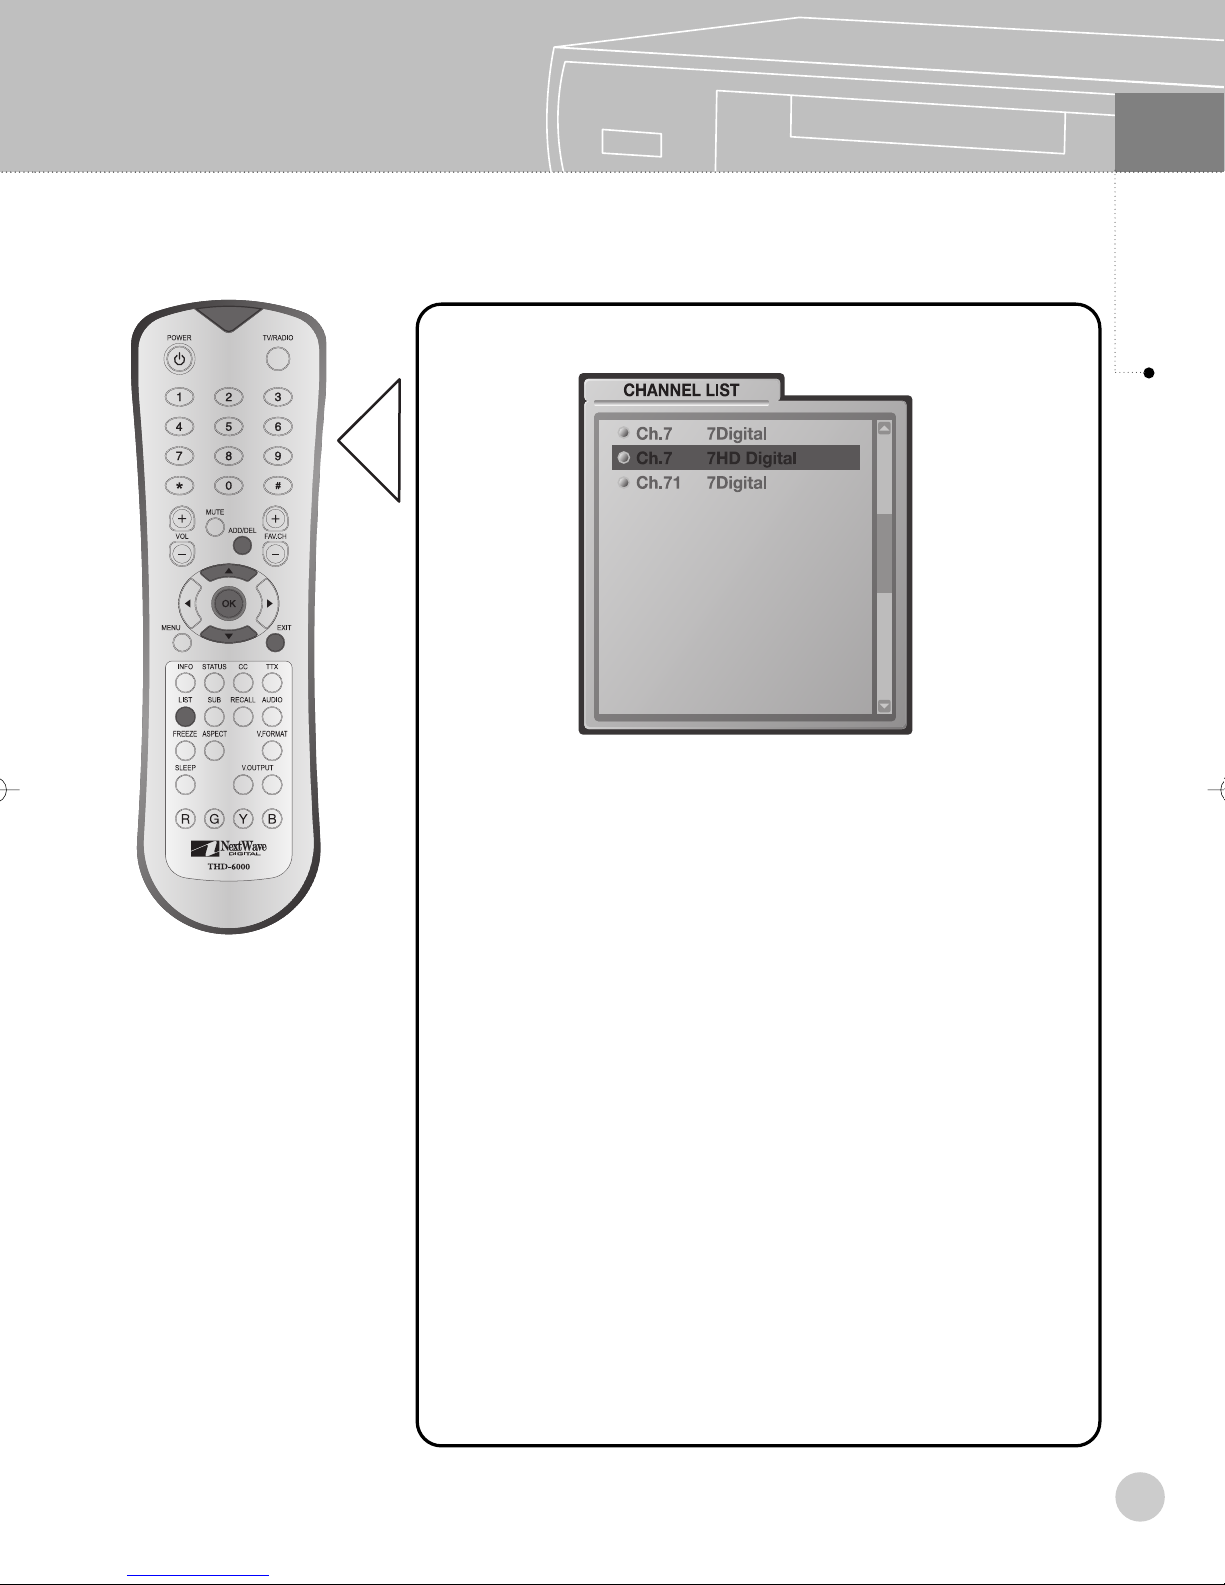
Press LIST button to select Service on Channel List menu.
Channel List
08
On Screen Display
1. Press LIST button.
2. Press ▲,▼ button to highlight ‘Channel List’.
3. Press OK to tune a channel.
4. Press ▶ button to add channels to ‘Channel List’ or press ◀
button to delete channels to ‘Channel List’. If channel is added
to ‘Channel List’, the colour of the channel number is changed
to white. If a channel is deleted from ‘Channel List’, the colour of
the channel number is changed to grey.
5.Press ADD/DEL button to add a channels to the Favourite
Channel list, and press again to delete the channel from the
Favourite Channel list. If a channel is added to ‘Favourite
Channel List’, the colour of the channel number is changed to
white and circle is marked in front of the channel number. If a
channel is deleted from Favourite Channel List, The circle as a
favourite channel indicator is removed.
※ If we see the channel list by pressing LIST button, deleted
channels are not shown.
※ To exit immediately, press the LIST or EXIT button.
23
Page 25
08
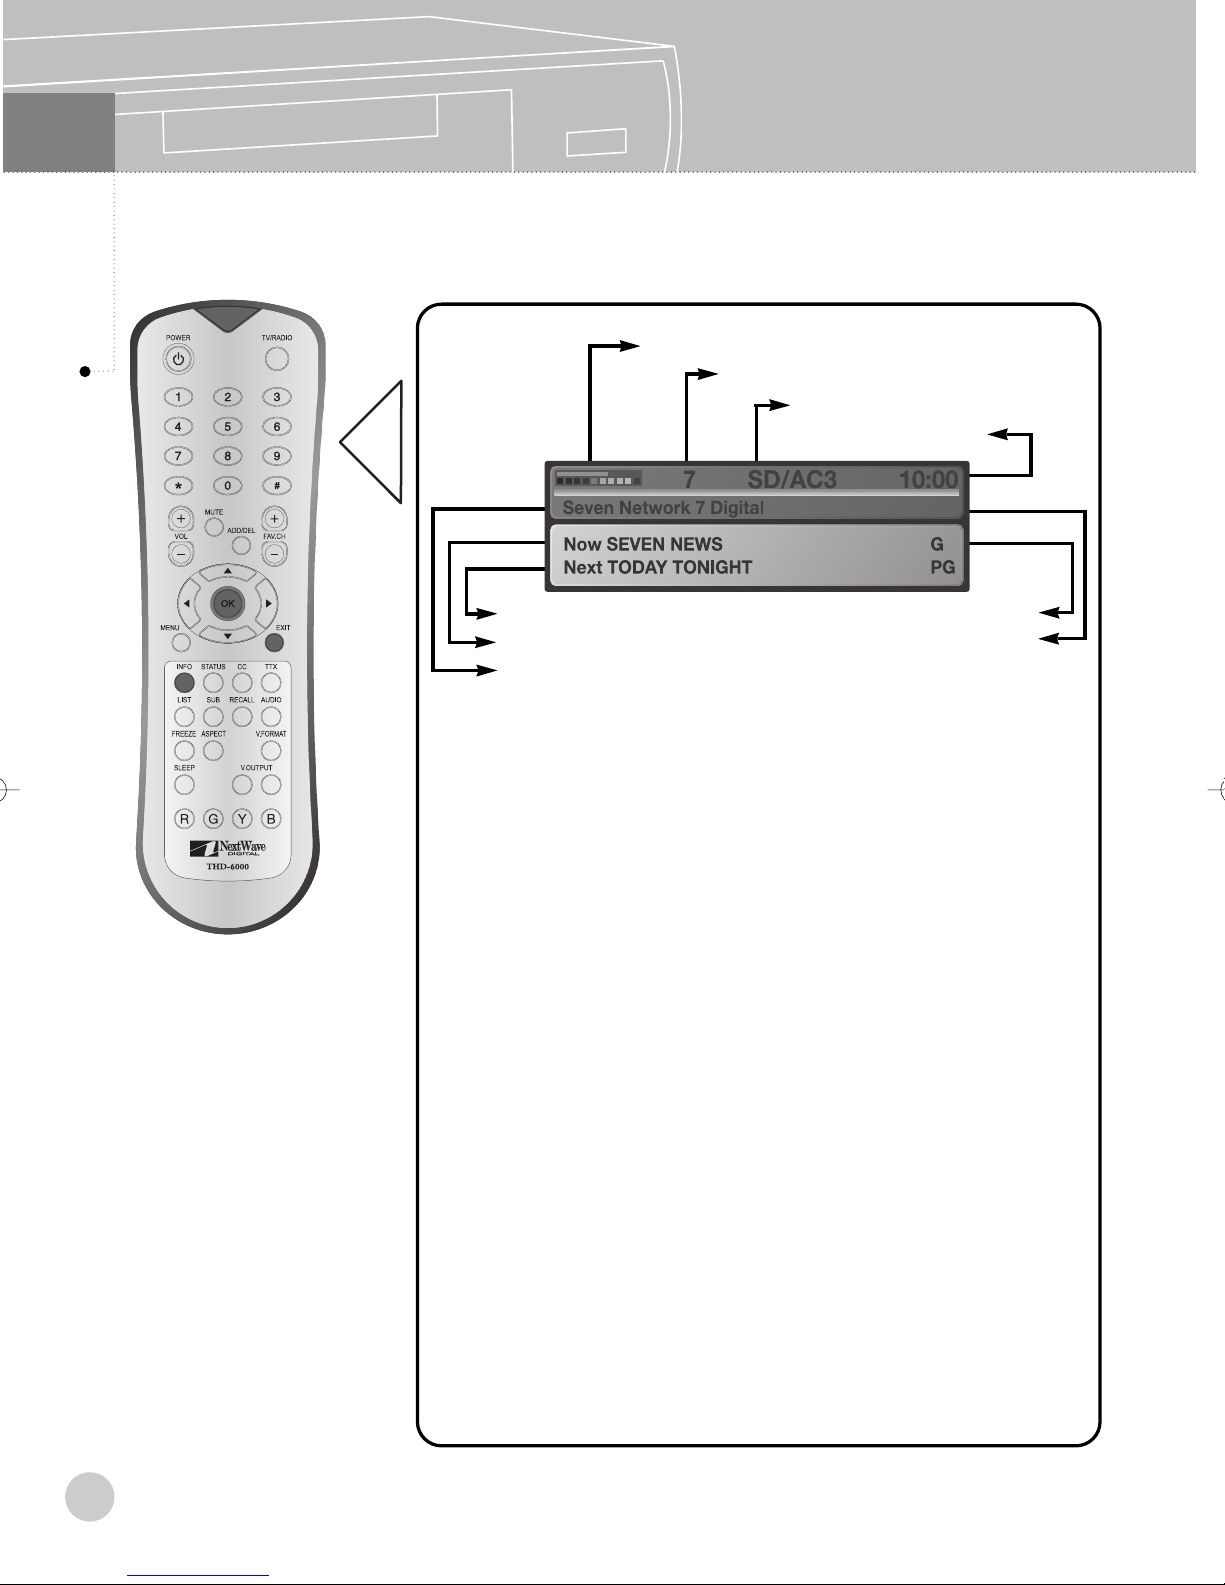
Channel Information
■
Press the INFO button to display the following screen.
On Screen Display
< 1. RF Signal Strength >
< 2. Channel Number >
< 3. A/V Info. >
< 4. Current Time >
< 8. Next Program > < 9. Parental Guidance Rating >
< 7. Current Program >
< 5. Service Provider Name >
1. RF Signal Strength
Indicates the signal strength of the selected channel.
2. Channel Number
Current Logical Channel Number.
3. A/V Information
Indicates Video Resolution and Audio type.
< 6. Service Name >
24
4. Current Time
Displays current time.
5. Service Provider Name
Displays the service provider name.
6. Service Name
Current Service Title.
7. Current Program
Displays current program name of current channel.
8. Next Program
Displays next program name of current channel.
9. Parental Guidance Rating
※ The channel information menu automatically closes in a few
seconds. To exit immediately, press the OK or EXIT button.
Page 26
■
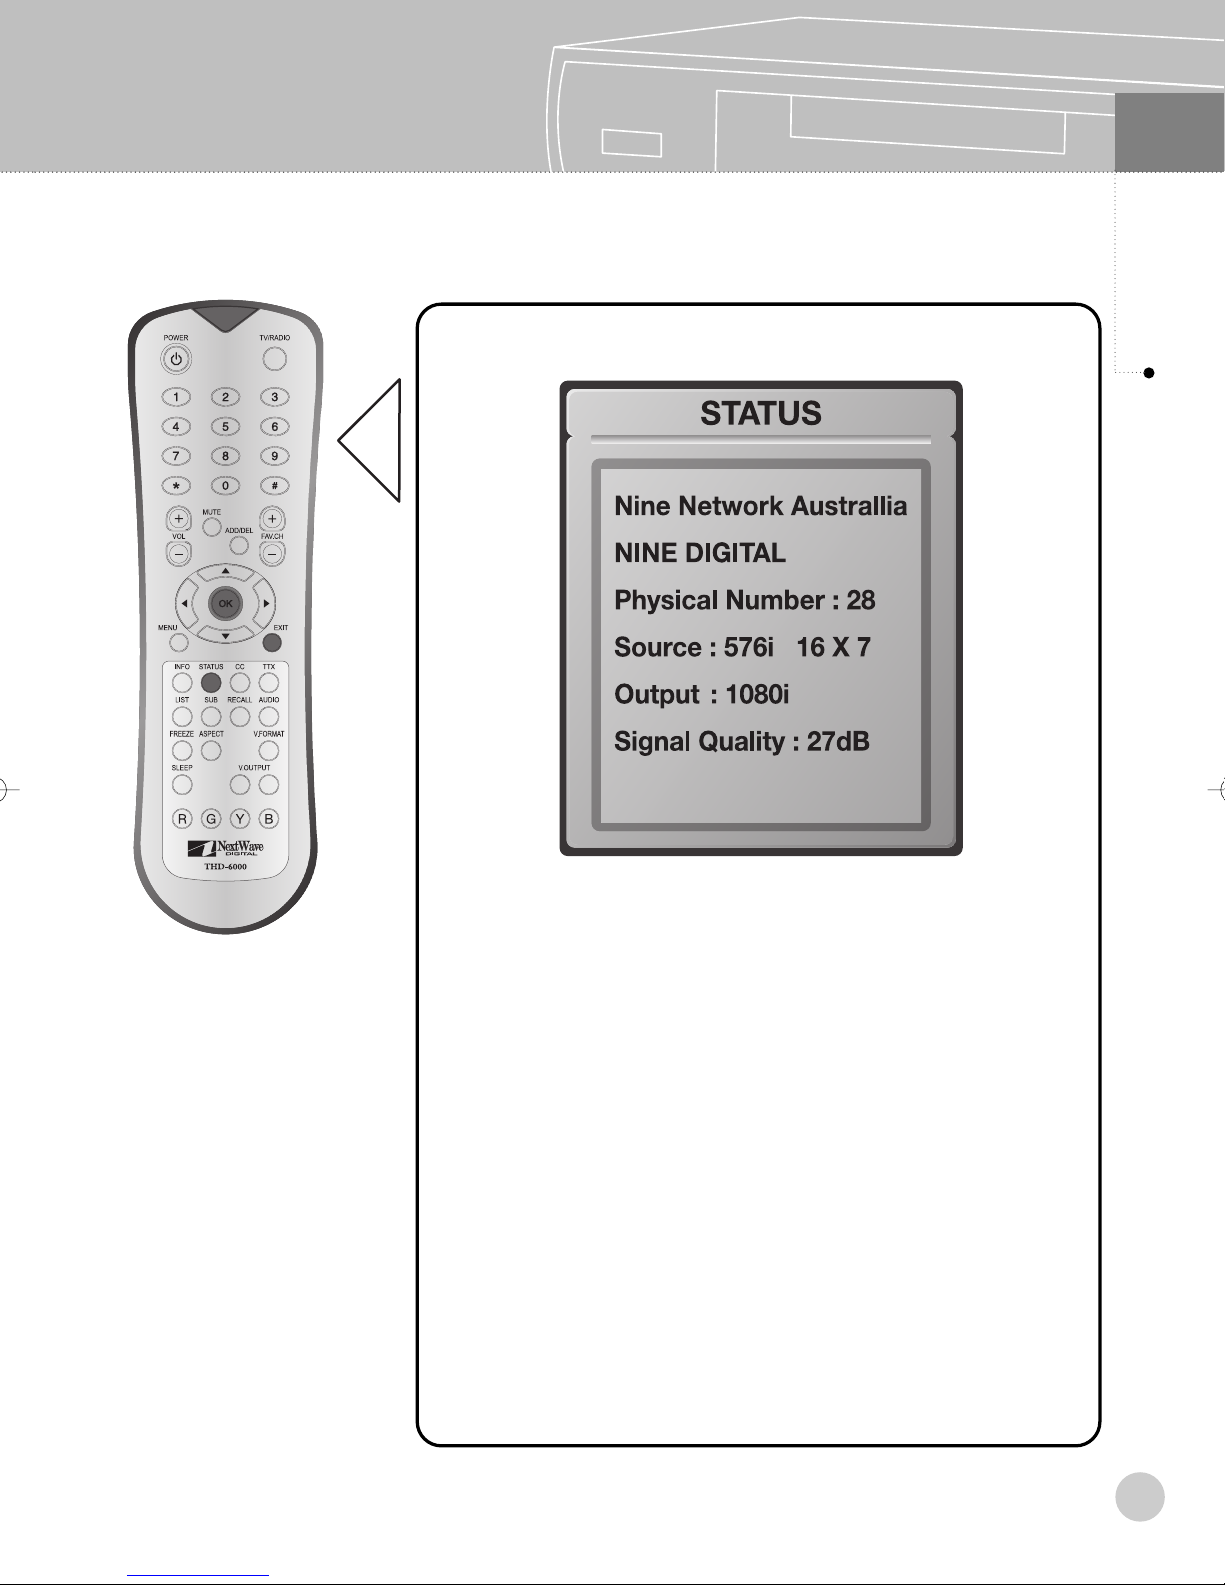
Press STATUS button to display current channel status and information.
Channel Status
08
On Screen Display
Press STATUS button to display current channel status and
information. It displays service provider name, service
provider title, physical channel number, source video format,
output video format and signal quality.
※ To exit immediately, press the OK or EXIT button.
25
Page 27
09
Channel Edit
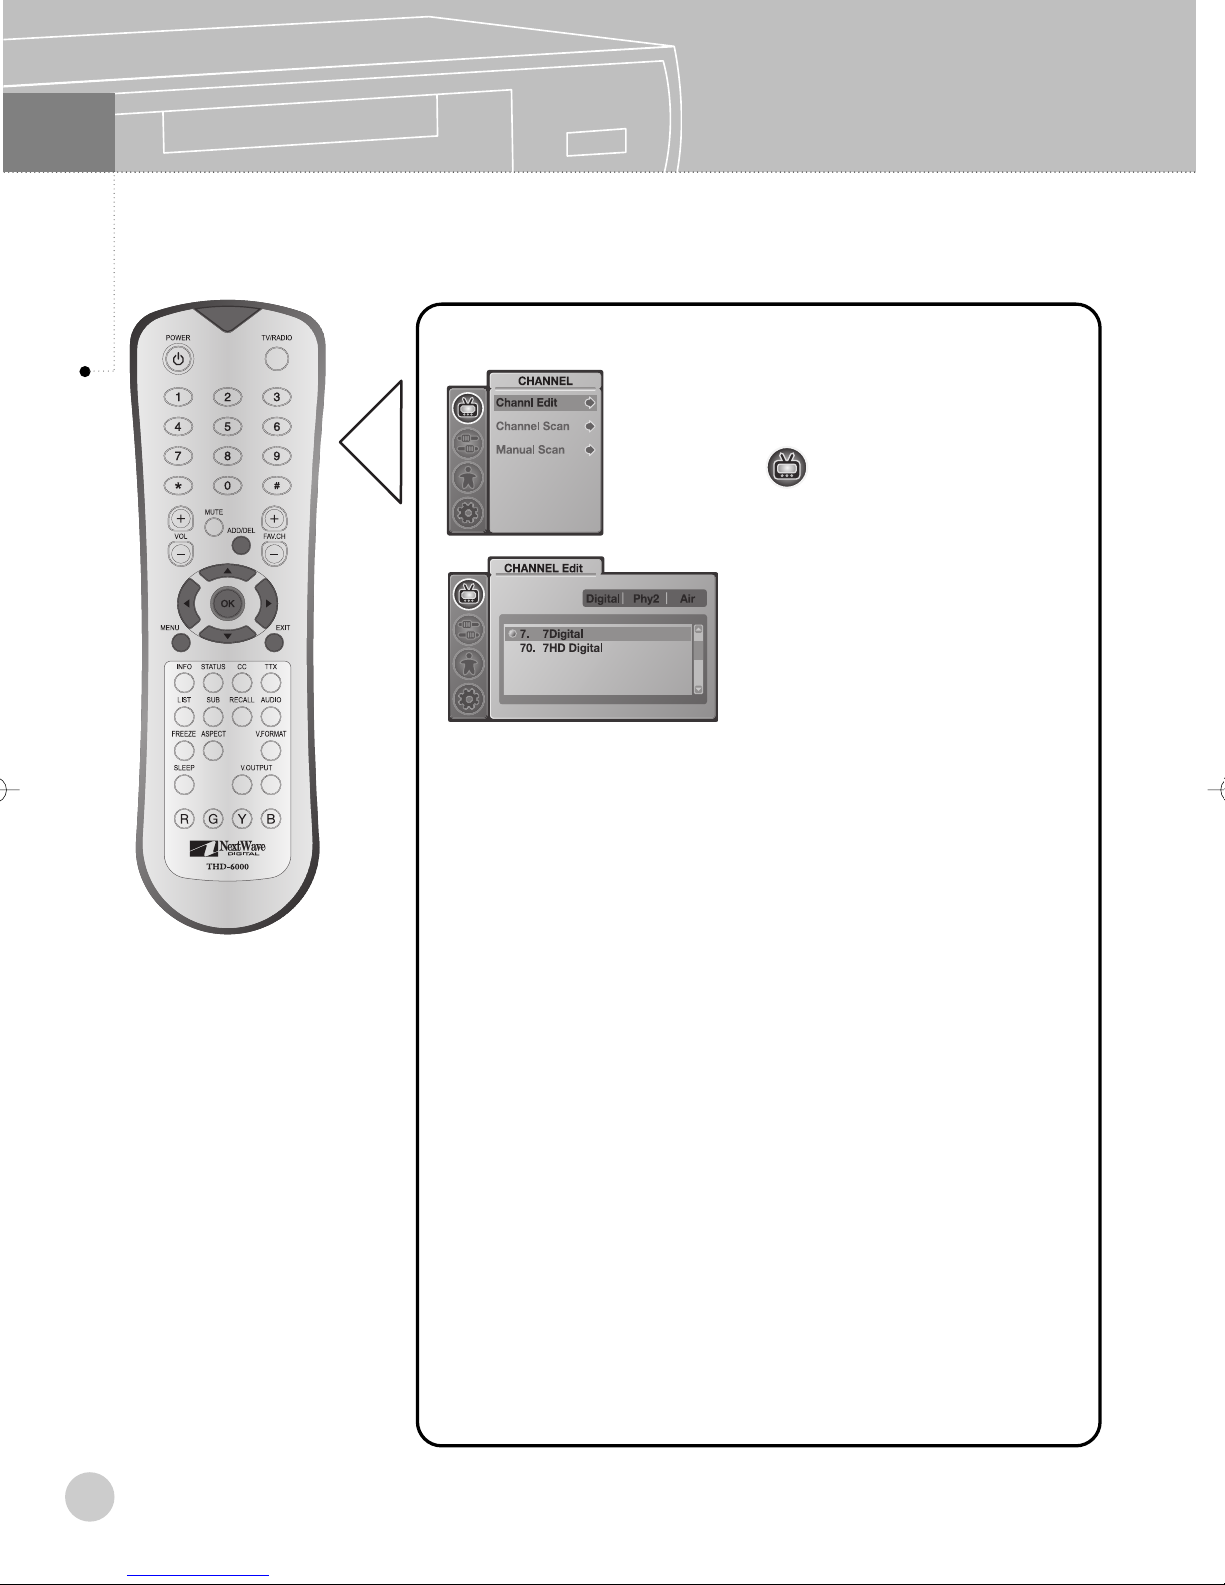
■ Memorize your choice of channels.
Setting Up Channel
1. Press MENU button.
2. Use ▲,▼ button to highlight
icon, then press OK.
3. Press ▲,▼ button to highlight
‘Channel Edit’, then press OK .
4. Use
delete channels. Selected
channels will be white coloured,
deleted channels will be grey
coloured.
5. Press ▶ button to add
channels to channel list or press
◀ button to delete channels to
‘Channel List’. If channel is
added to ‘Channel List’, the
colour of the channel number is
changed to white. If a channel is
deleted from’ Channel List’, the
colour of the channel number is
changed to grey.
6. Press ADD/DEL button to add
a channel to the Favourite
Channel list, and press again to
delete the channel from the
Favourite Channel list. If a
channel is added to Favourite
Channel List, the colour of the
channel number is changed to
white and a circle is marked in
front of the channel number. If a
channel is deleted from
Favourite Channel List, The
circle as a favourite channel
indicator is removed.
◀,▶ button to select and
26
※ Press MENU button to exit the menu screen.
※ Press EXIT button to switch to previous step on the menu screen.
※ Use OK button to make selection.
Page 28
Add/Del Favourite Channel
■
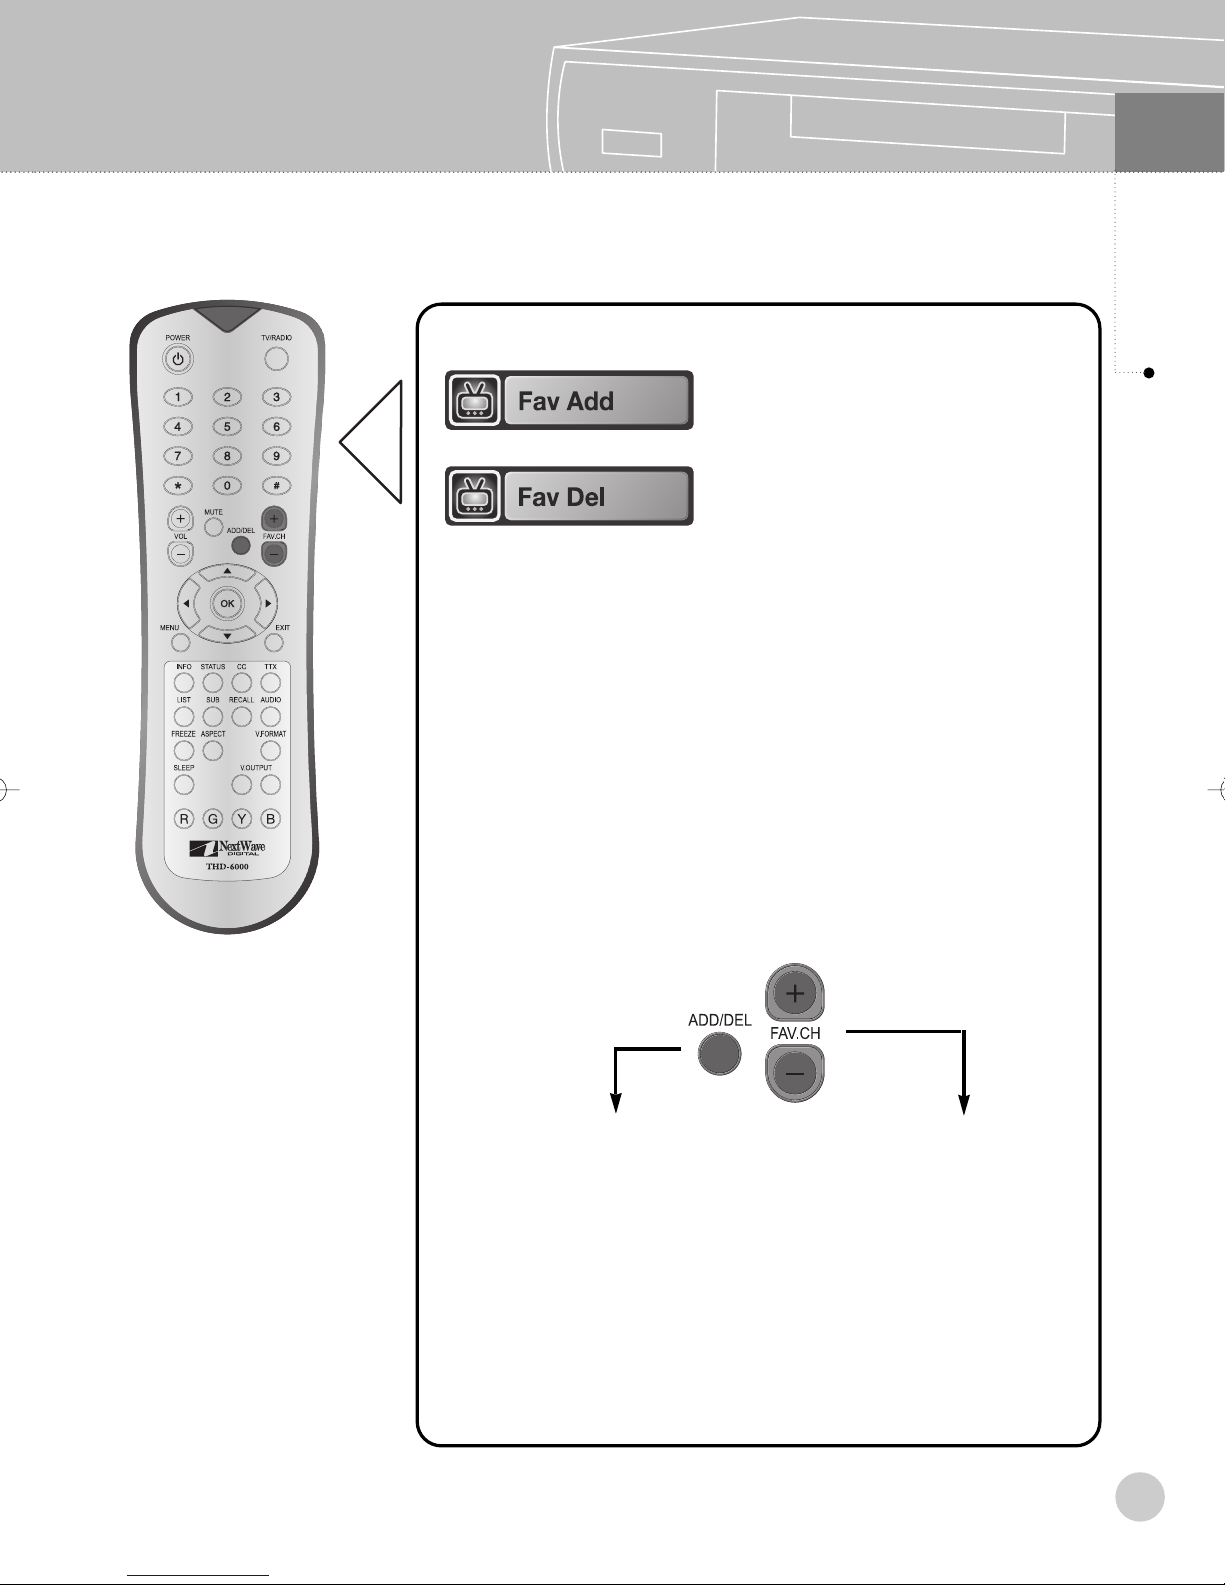
Register the favourite channels to easily switch around those channels.
1. To add or delete currently
viewing channel, press ADD/DEL
button on the remote control.
2. Every time ADD/DEL button
is pressed, ‘Fav Add’ icon or
‘Fav Del’ icon will appear in
due order.
3. To register the channel as a
favourite channel leave the
icon as ‘Add Favourite
Channel’, To delete a favourite
channel , leave the icon as
‘Delete Favourite Channel’.
09
Setting Up Channel
※ Note. Once registered as a Favourite Channel, FAV.CH(+/-) can
be used to change the channels.
Favourite Channel ADD/DEL button
※ Favourite channels can be registered at ‘Channel Edit’ menu or
‘Channel List’.
※ Favourite channels appear as green colour on ‘Channel Edit’
menu.
FAV.CH (+/-) buttons
27
Page 29
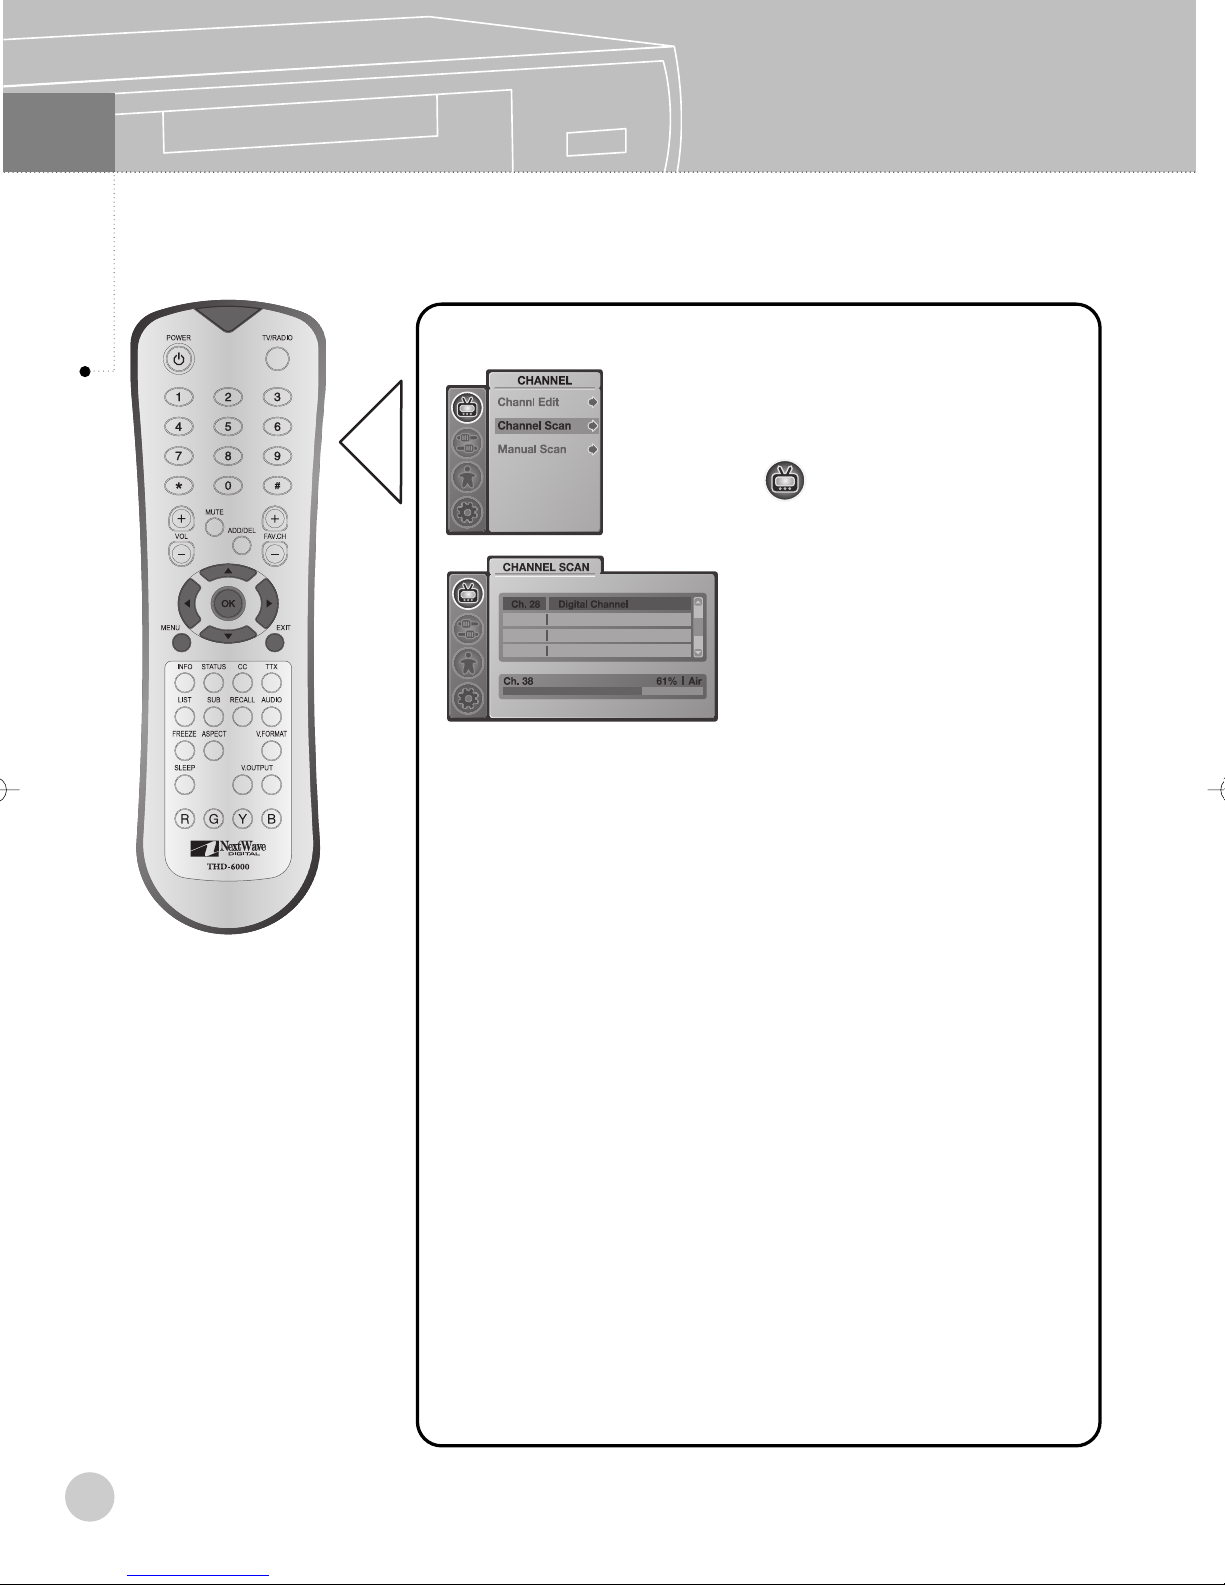
09
Channel Scan
■
Have an automatic channel set up. The Auto Search selects currently available channels.
Setting Up Channel
1. Press MENU button.
2. Use ▲,▼ button to highlight
icon, then press OK.
3. Use ▲,▼ button to highlight
‘Channel Scan’, then press
OK.
4. The STB will automatically
scan and store all of the
channels that are available in
your local area.
(To stop the auto searching,
press EXIT button.)
5. The scanned channel is
displayed when done.
6. It is possible to memorize
user’s choice of channels as is
doone in ‘Channel Edit’ menu
or ‘Channel List’.
※ Press MENU button to exit the menu screen.
※ Press EXIT button to switch to previous step on the menu screen.
28
Page 30
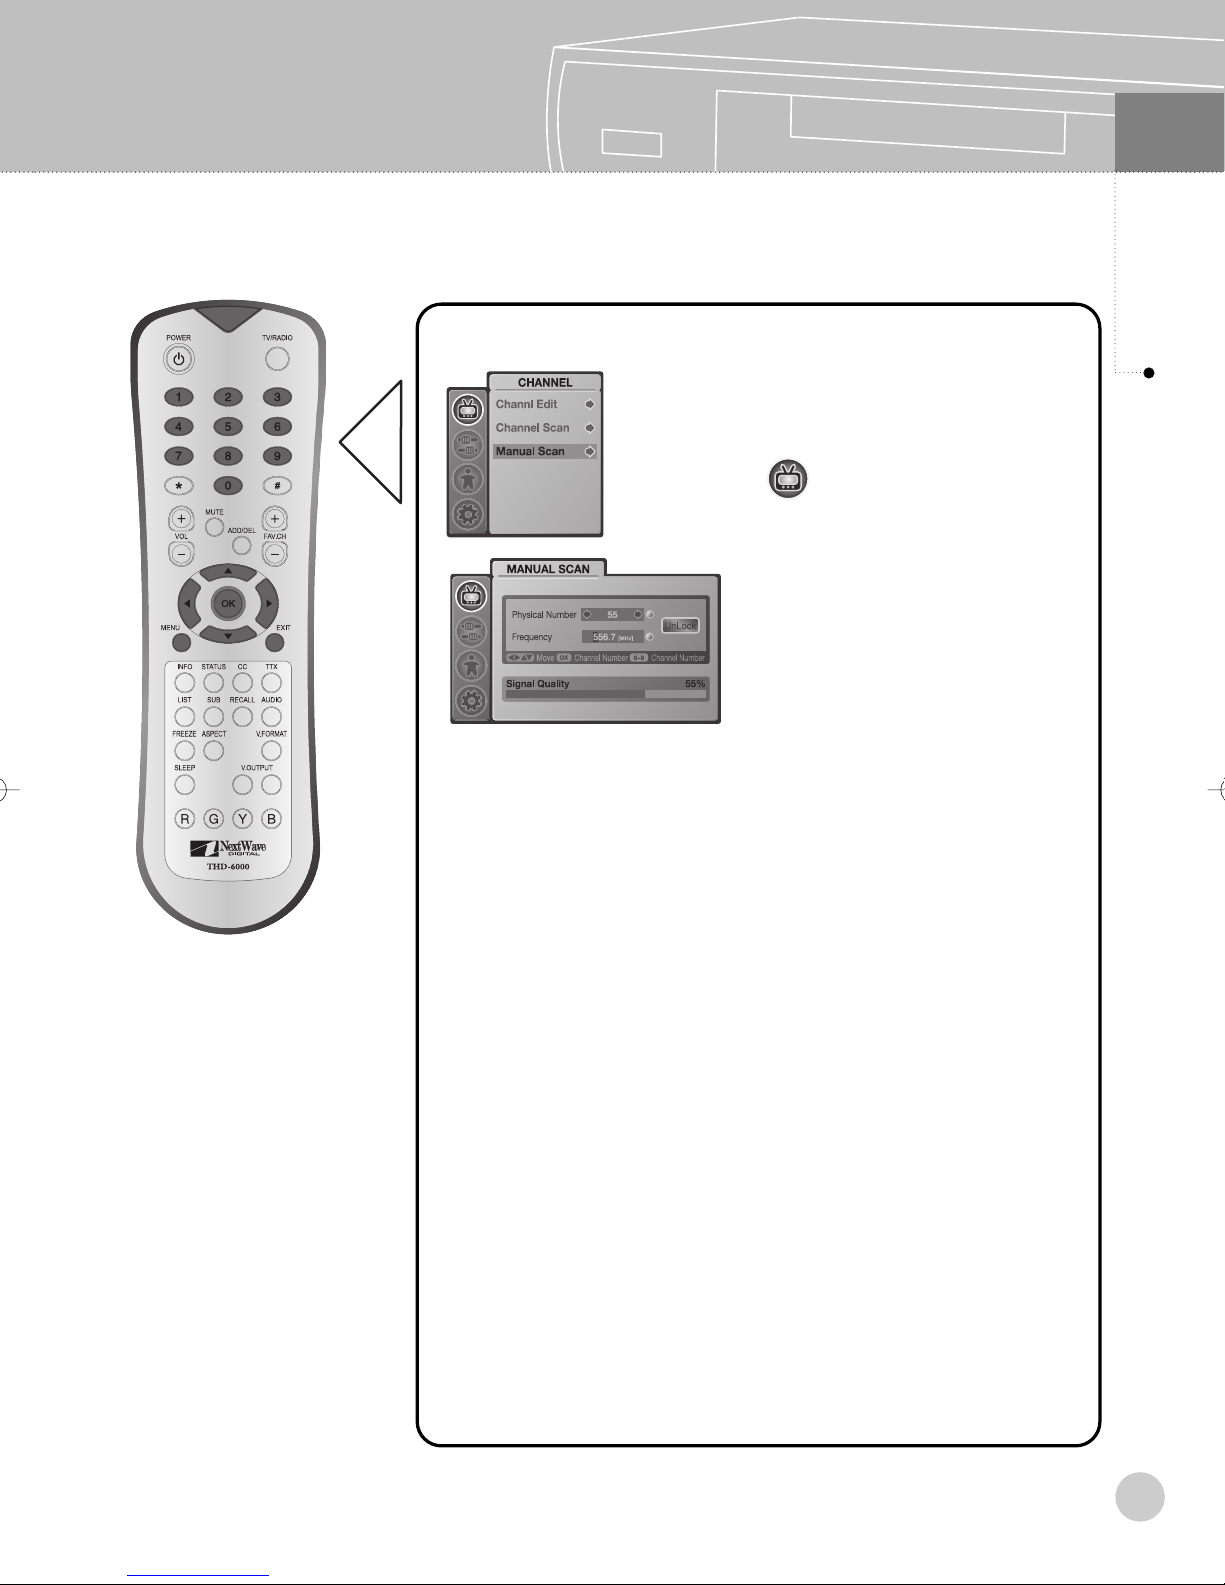
■ Have an manual channel set up.
Manual Scan
1. Press MENU button.
2. Use ▲,▼ button to highlight
icon, then press OK.
3. Use ▲,▼ button to highlight
‘Manual Scan’, then press OK.
4. Press ◀,▶ button to select
physical channel, or press ‘0’ to
‘9’ button to input channel
frequency.
09
Setting Up Channel
5. Press OK button to tune and
memorize channel information.
※ Press MENU button to exit the menu screen.
※ Press EXIT button to switch to previous step on the menu screen.
29
Page 31
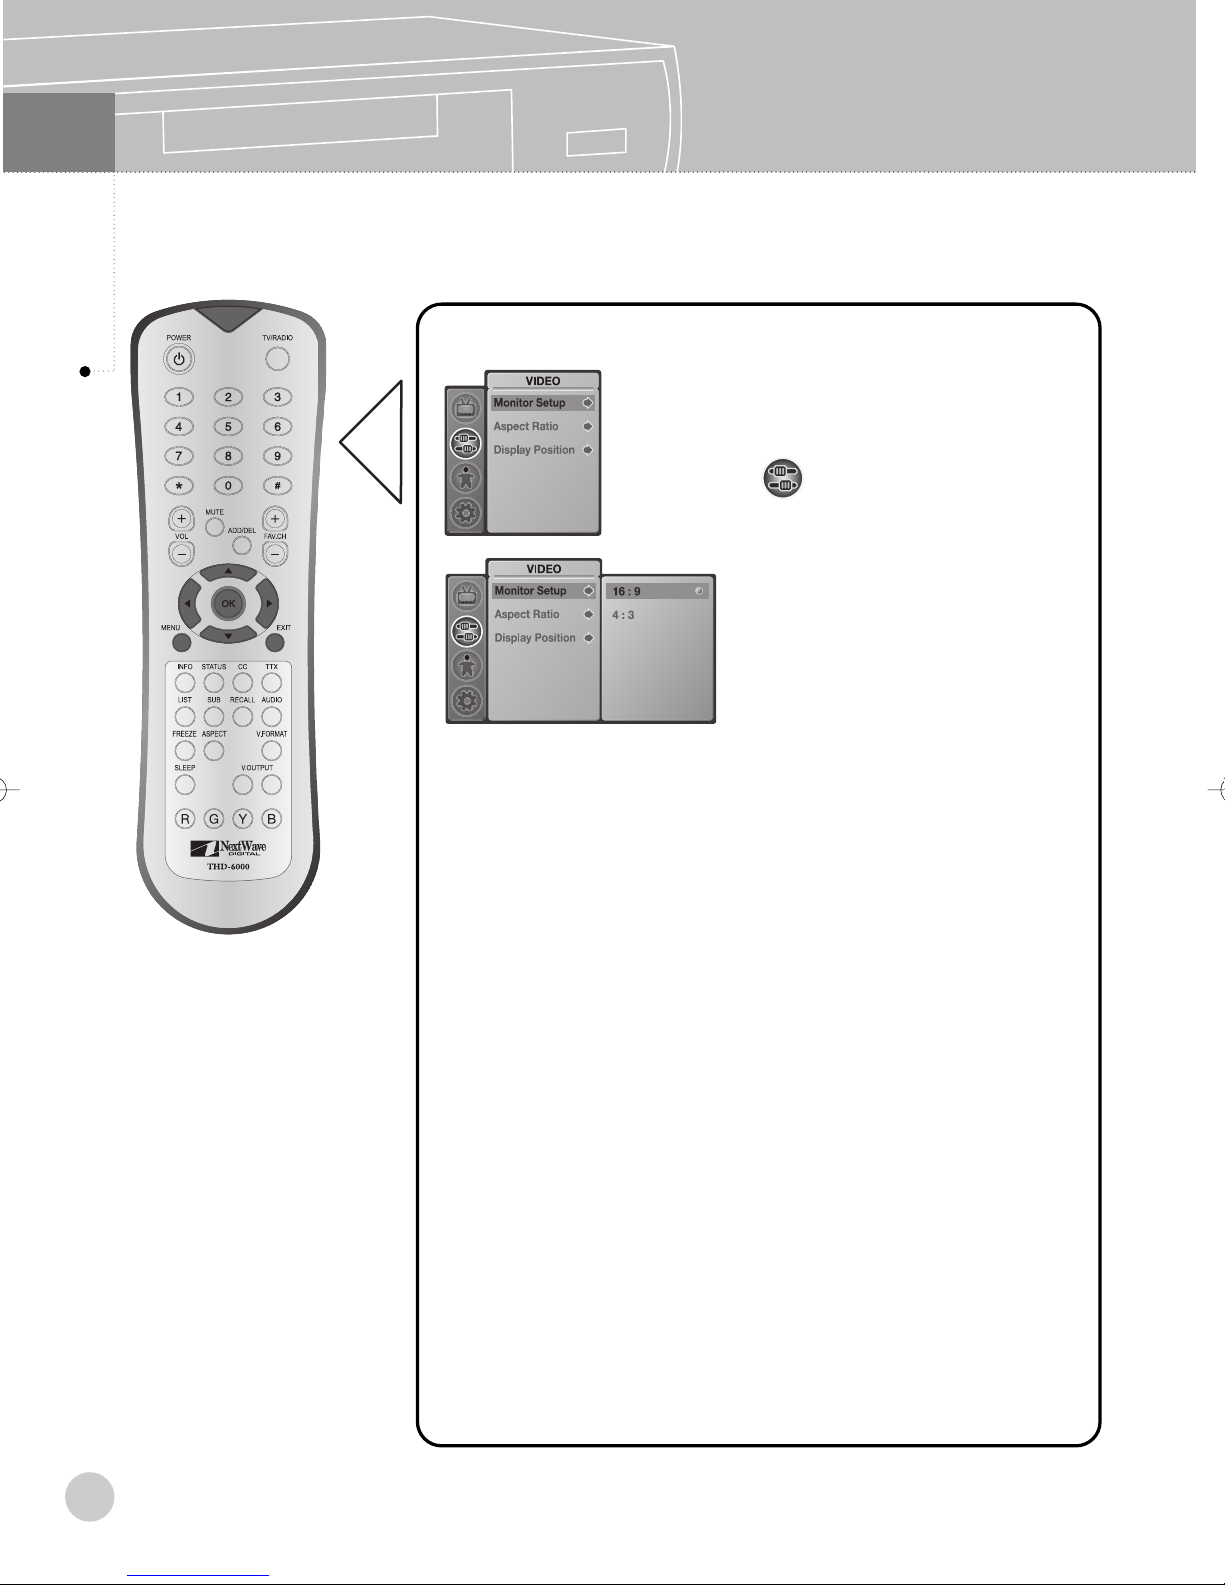
10
Monitor Setup
■ Select Monitor type.
Video Control
1. Press MENU button.
2. Use ▲,▼ button to highlight
icon, then press OK.
3. Use ▲,▼ button to highlight
‘Monitor Setup’, then press OK.
4. Customize the Monitor type
to fit user’s TV or display.
· 16 : 9
· 4 : 3
30
※ Press MENU button to exit the menu screen.
※ Press EXIT button to switch to previous step on the menu screen.
Page 32
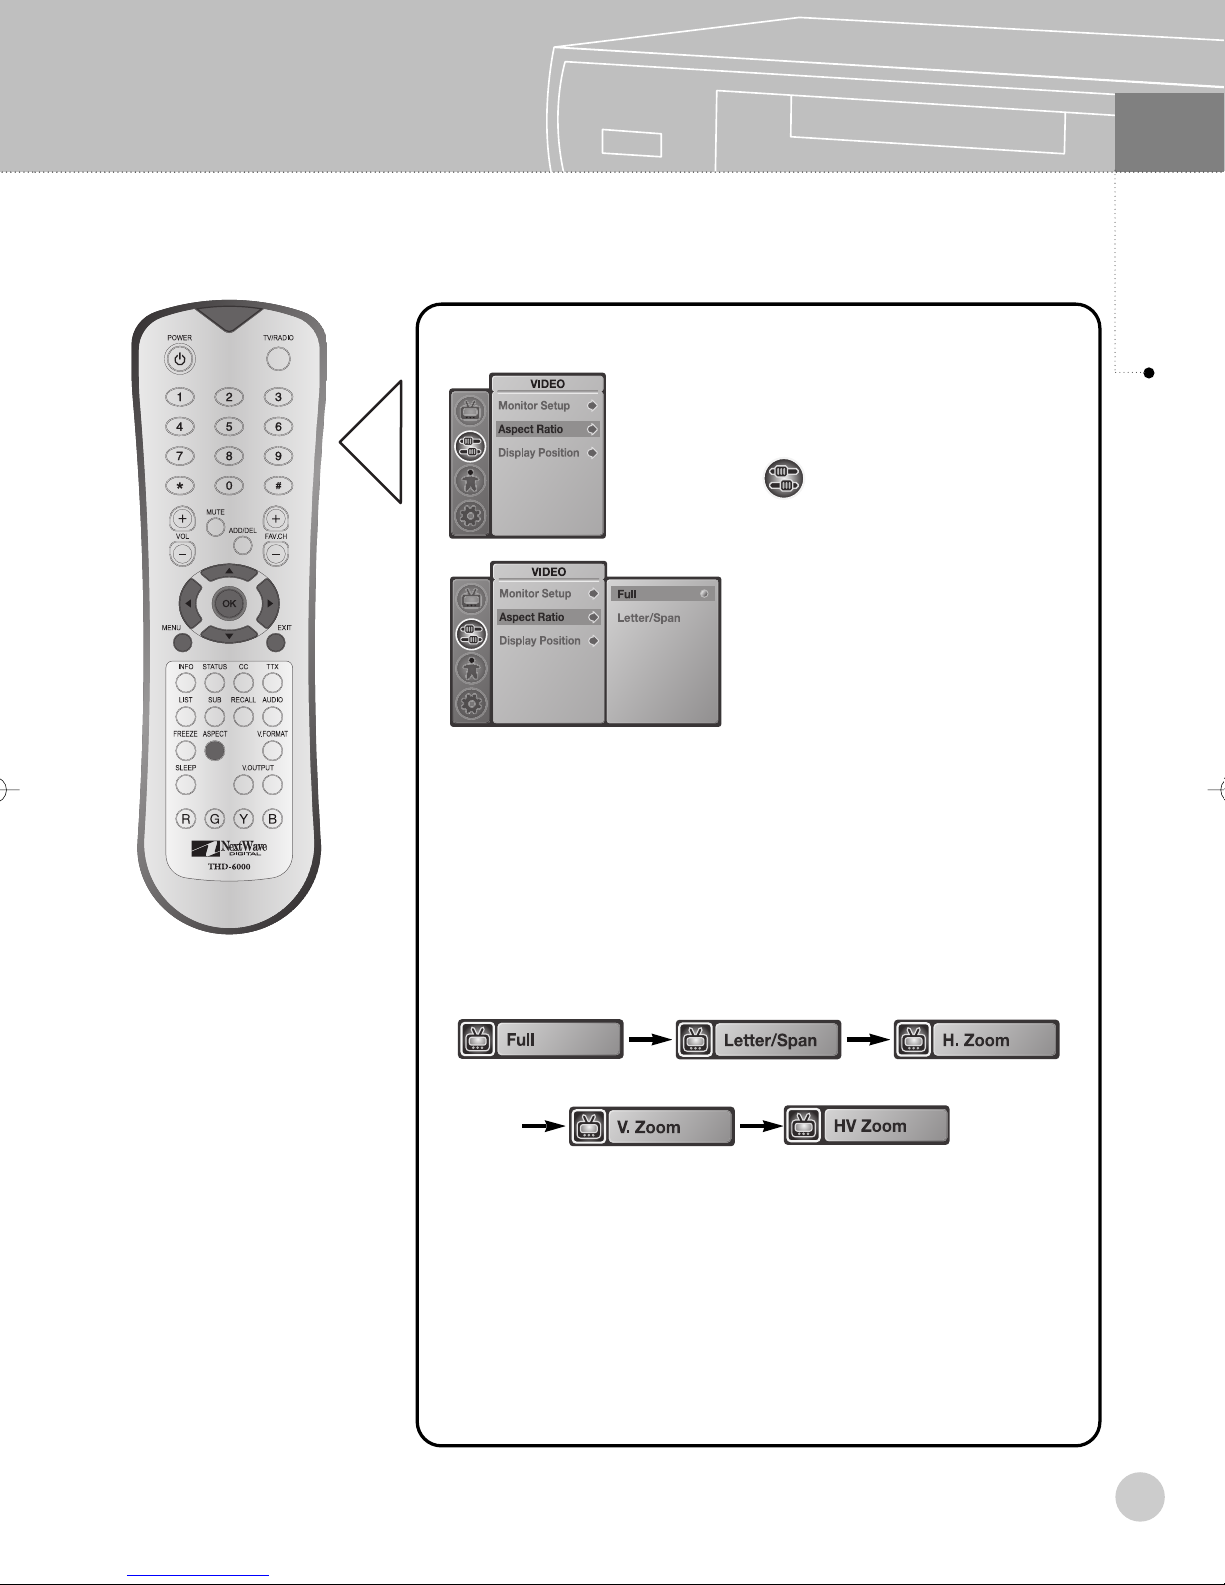
Aspect Ratio
10
■ Change aspect ratio.
Video Control
1. Press MENU button.
2. Use ▲,▼ button to highlight
icon, then press OK.
3. Use ▲,▼ button to highlight
‘Aspect Ratio’, then press OK.
4. Customize the display type
to fit user’s TV or display.
· Full
· Letter/Span
※ Note. Press ASPECT button, you can change Aspect Ratio
sequentially.
※ Press MENU button to exit the menu screen.
※ Press EXIT button to switch to previous step on the menu screen.
31
Page 33
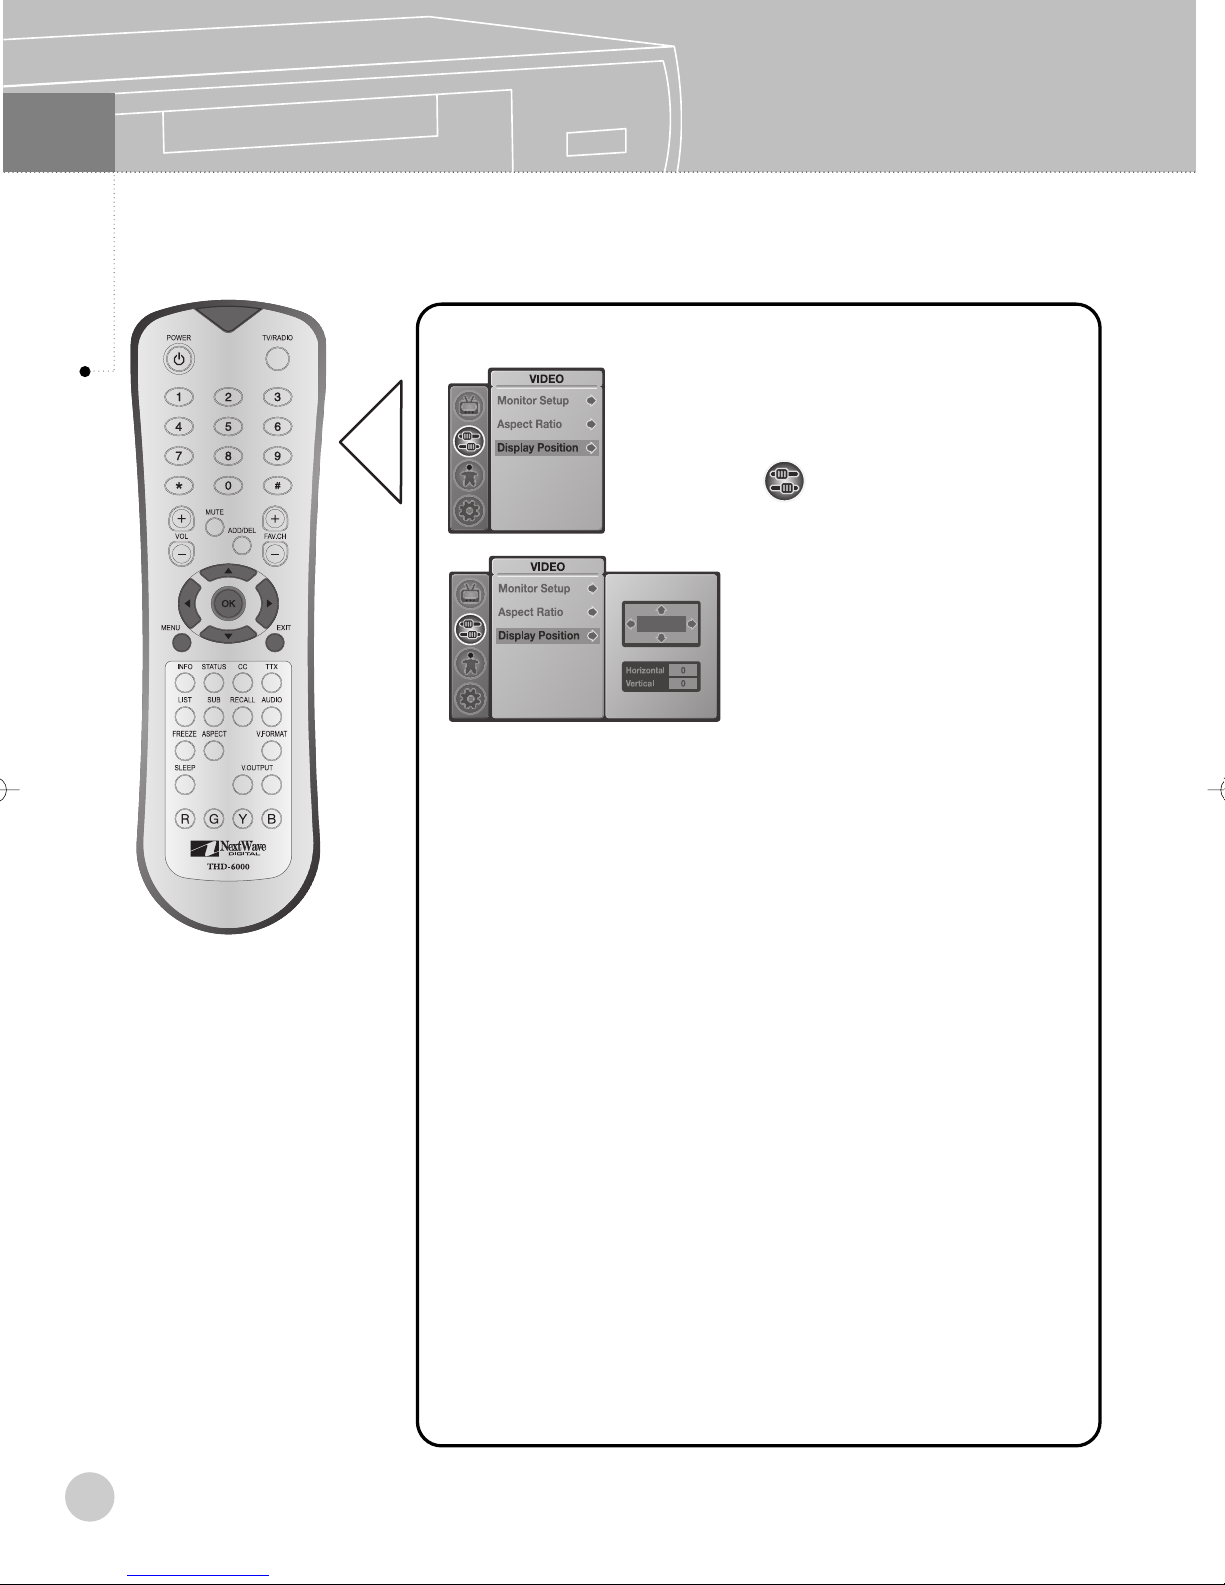
10
Display Position
■ Adjust display position.
Video Control
1. Press MENU button.
2. Use ▲,▼ button to highlight
icon, then press OK.
3. Use ▲,▼ button to highlight
‘Display Position’, then press
OK.
4. Customize the display position
to fit user’s TV or display.
·Horizontal : Use ◀,▶ button.
·Vertical : Use ▲,▼ button.
※ Press MENU button to exit the menu screen.
※ Press EXIT button to switch to previous step on the menu screen.
※ If you change the resolution, display position is initalized to factory
default.
32
Page 34
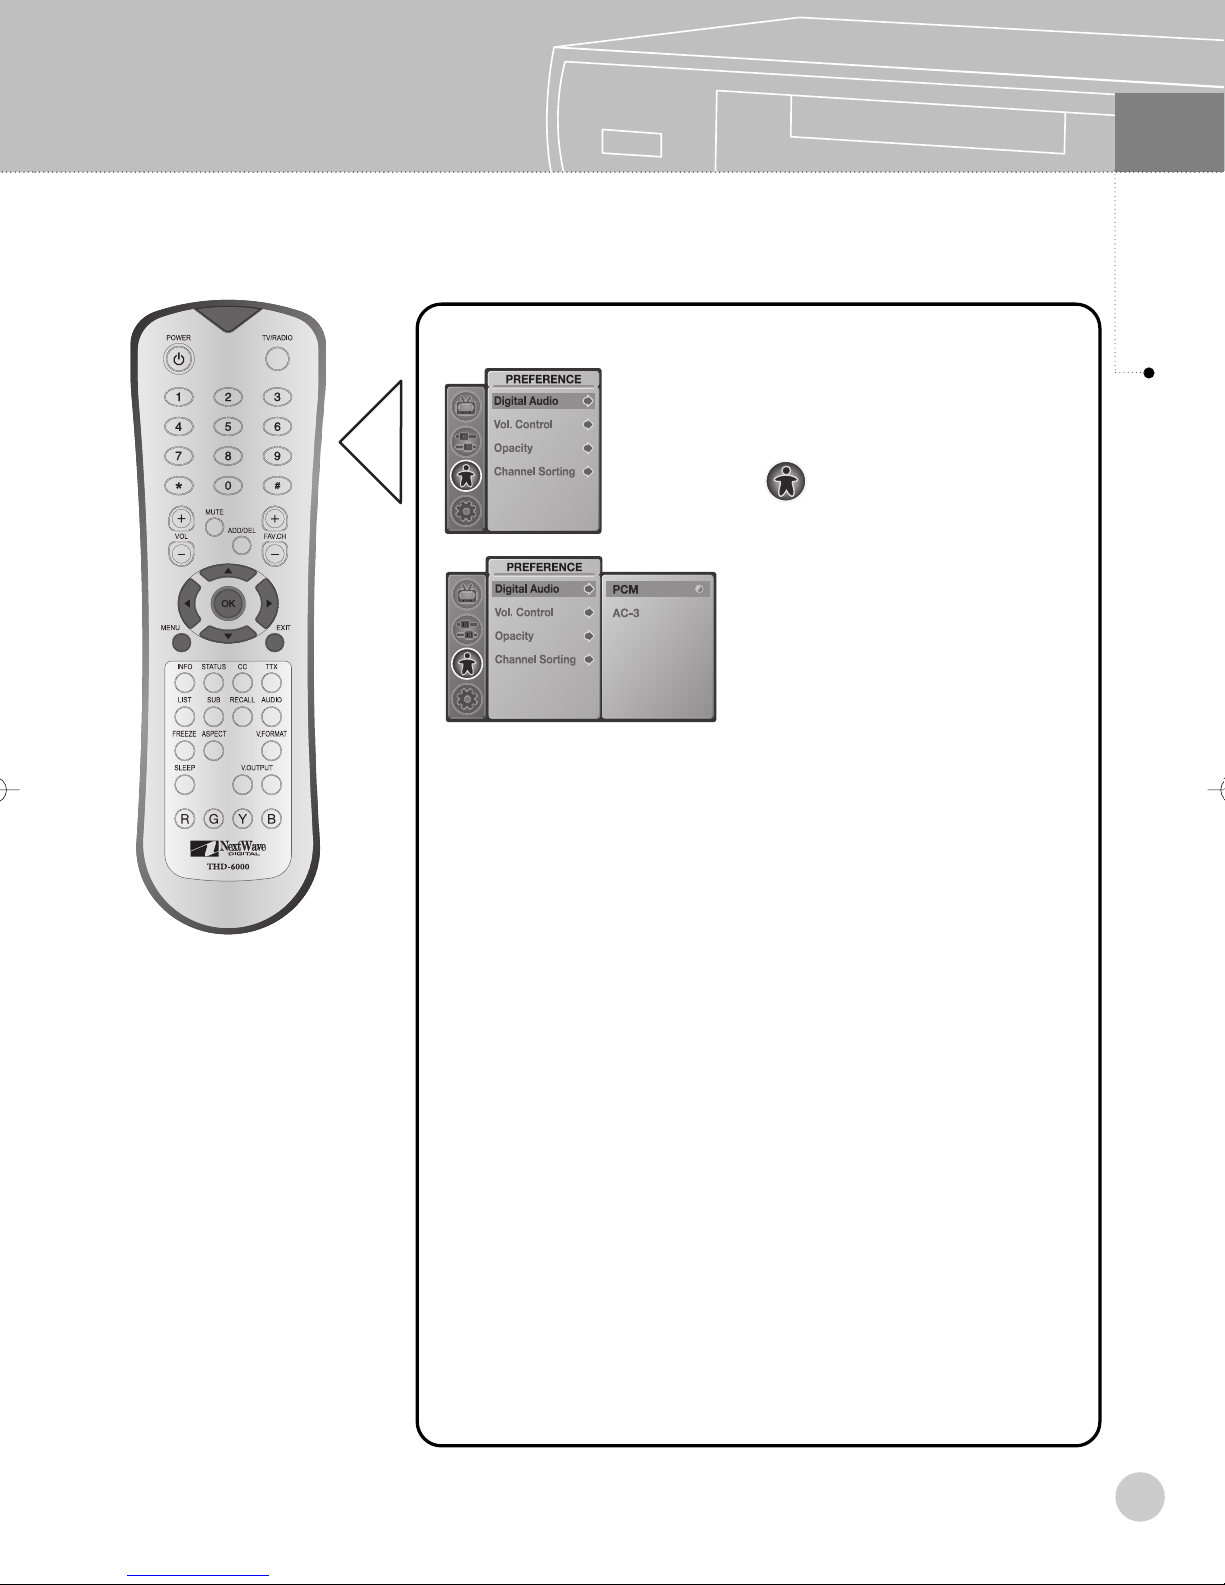
■
Controls digital audio output type.
Digital Audio
1. Press MENU button.
2. Use ▲,▼ button to highlight
icon, then press OK.
3. Use ▲,▼ button to highlight
‘Digital Audio’, then press OK.
4. Use ▲,▼ button to make a
choice, then press OK.
·PCM : Digital Audio Output
is always PCM.
·AC-3 : Digital Audio output
is AC-3 in case of AC-3 audio
stream comes in.
11
Preference
※ Press MENU button to exit the menu screen.
※ Press EXIT button to switch to previous step on the menu screen.
33
Page 35
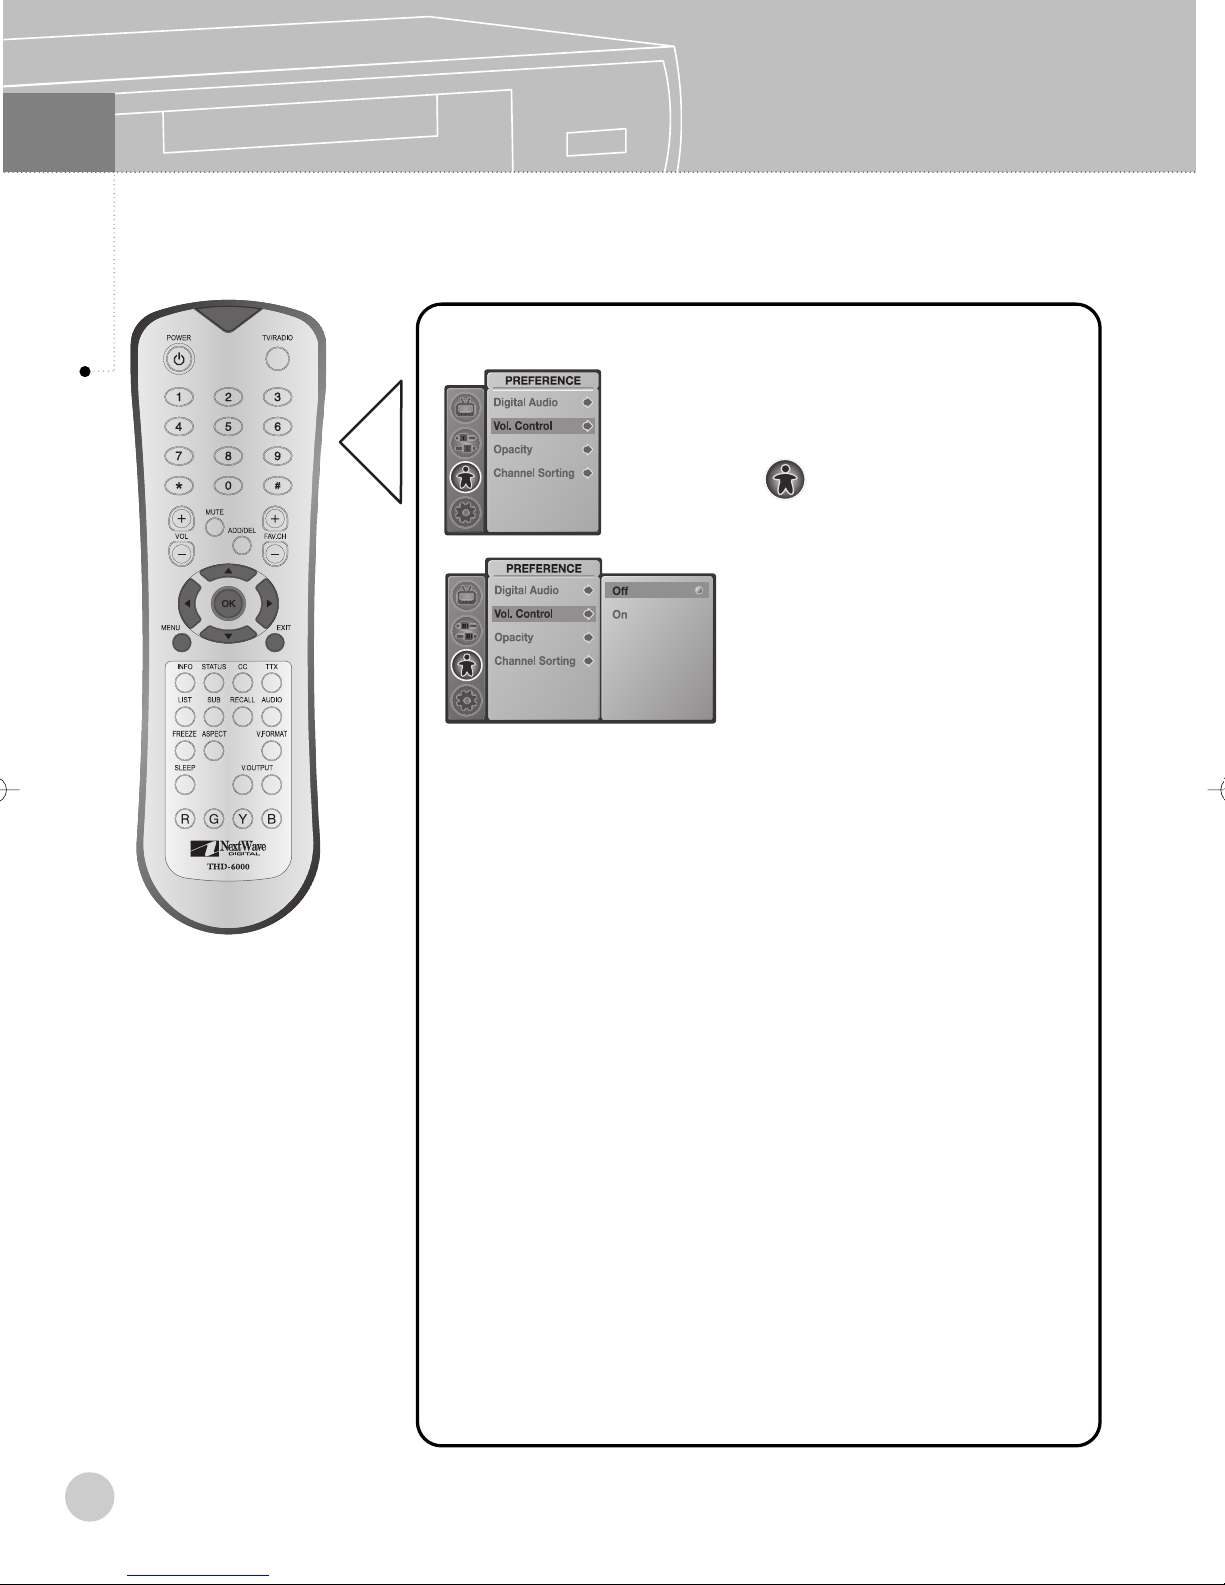
11
Preference
Volume Control Setup
■ Turn on and off the remote controller volume control functionality.
1. Press MENU button.
2. Use ▲,▼ button to highlight
icon, then press OK.
3. Use ▲,▼ button to highlight
‘VOL.Control’, then press OK.
4. Use ▲,▼ button to make a
choice, then press OK.
·OFF : Volume of the STB
can not be controlled by
remote control.
·ON : Volume of the STB can
be controlled by remote
control.
34
※ Press MENU button to exit the menu screen.
※ Press EXIT button to switch to previous step on the menu screen.
※ Note. When the volume is off, the MUTE button will operate as
normal. However you will not be able to control volume.
Page 36
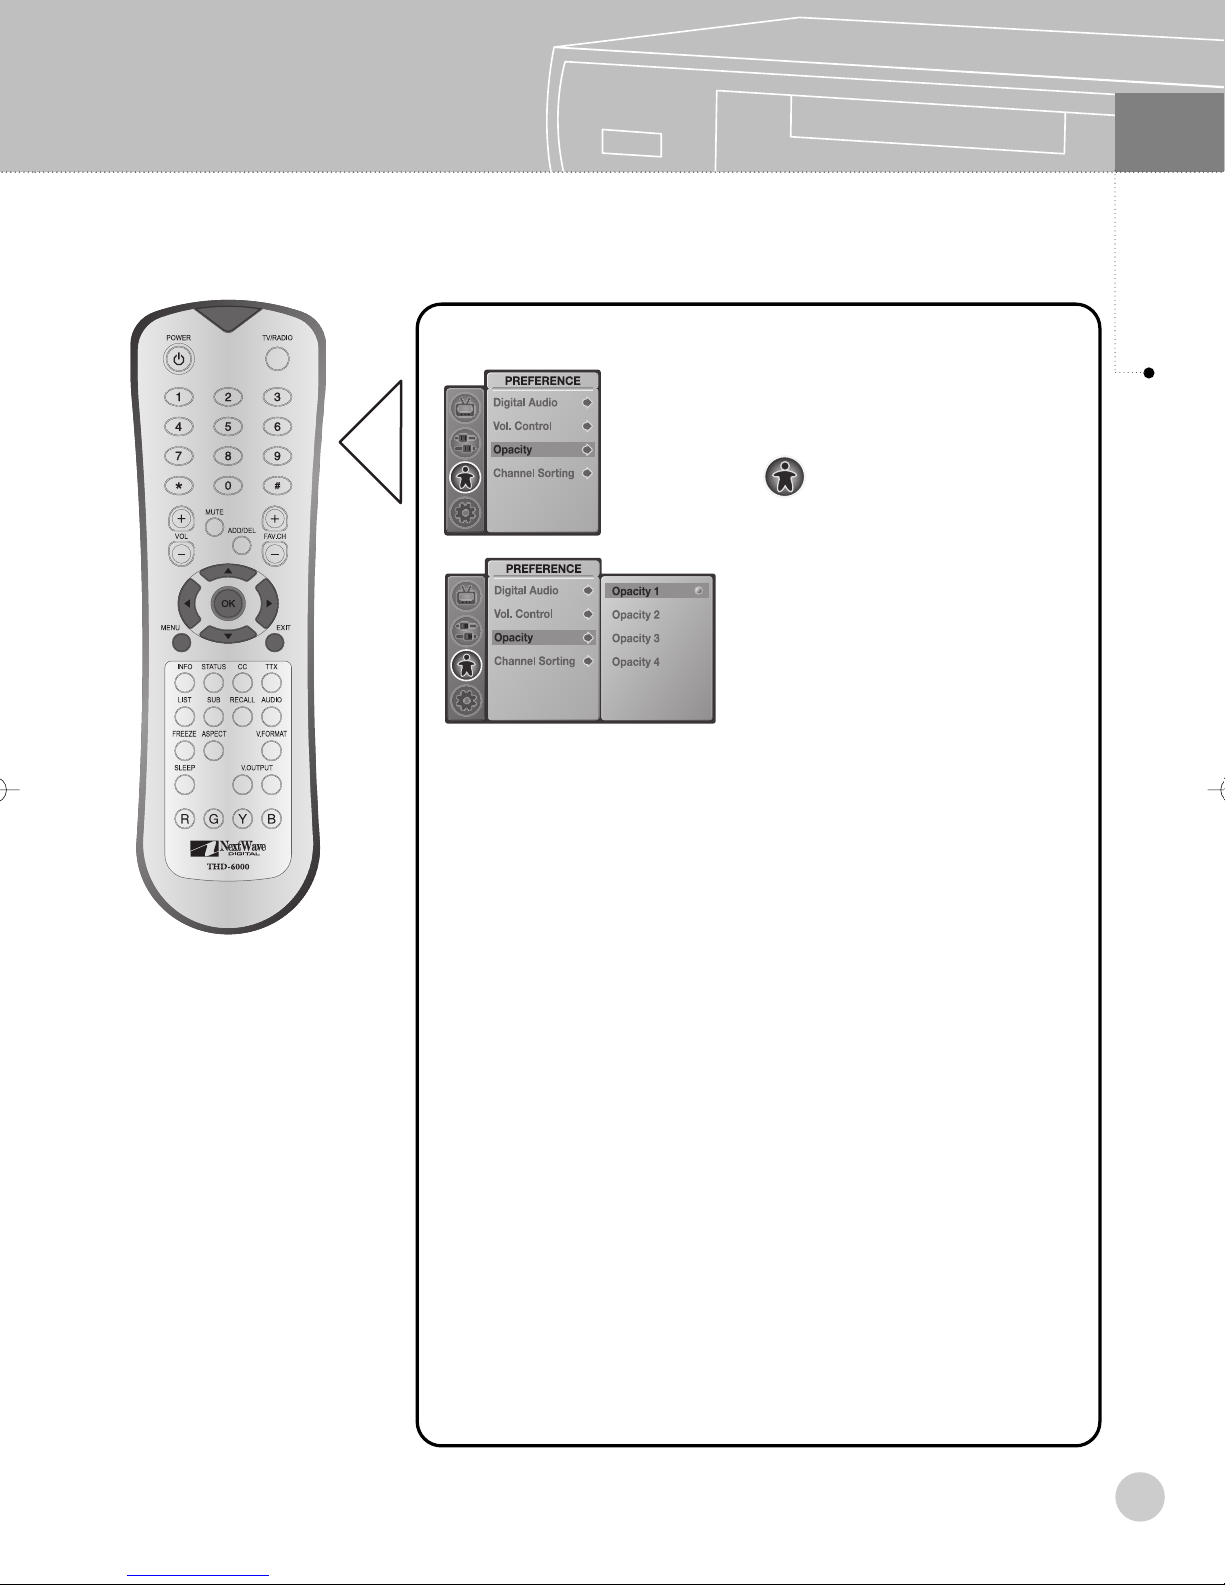
■ Control opacity of menu screen, TTX and Closed Caption.
Opacity
1. Press MENU button.
2. Use ▲,▼ button to highlight
icon, then press OK.
3. Use ▲,▼ button to highlight
‘Opacity’, then press OK.
4. Press ▲,▼ button to make a
choice, then press OK.
·Opacity1 : Very Dark
·Opacity2 : Dark
·Opacity3 : Light
·Opacity4 : Very Light
11
Preferenc
※ Press MENU button to exit the menu screen.
※ Press EXIT button to switch to previous step on the menu screen.
35
Page 37
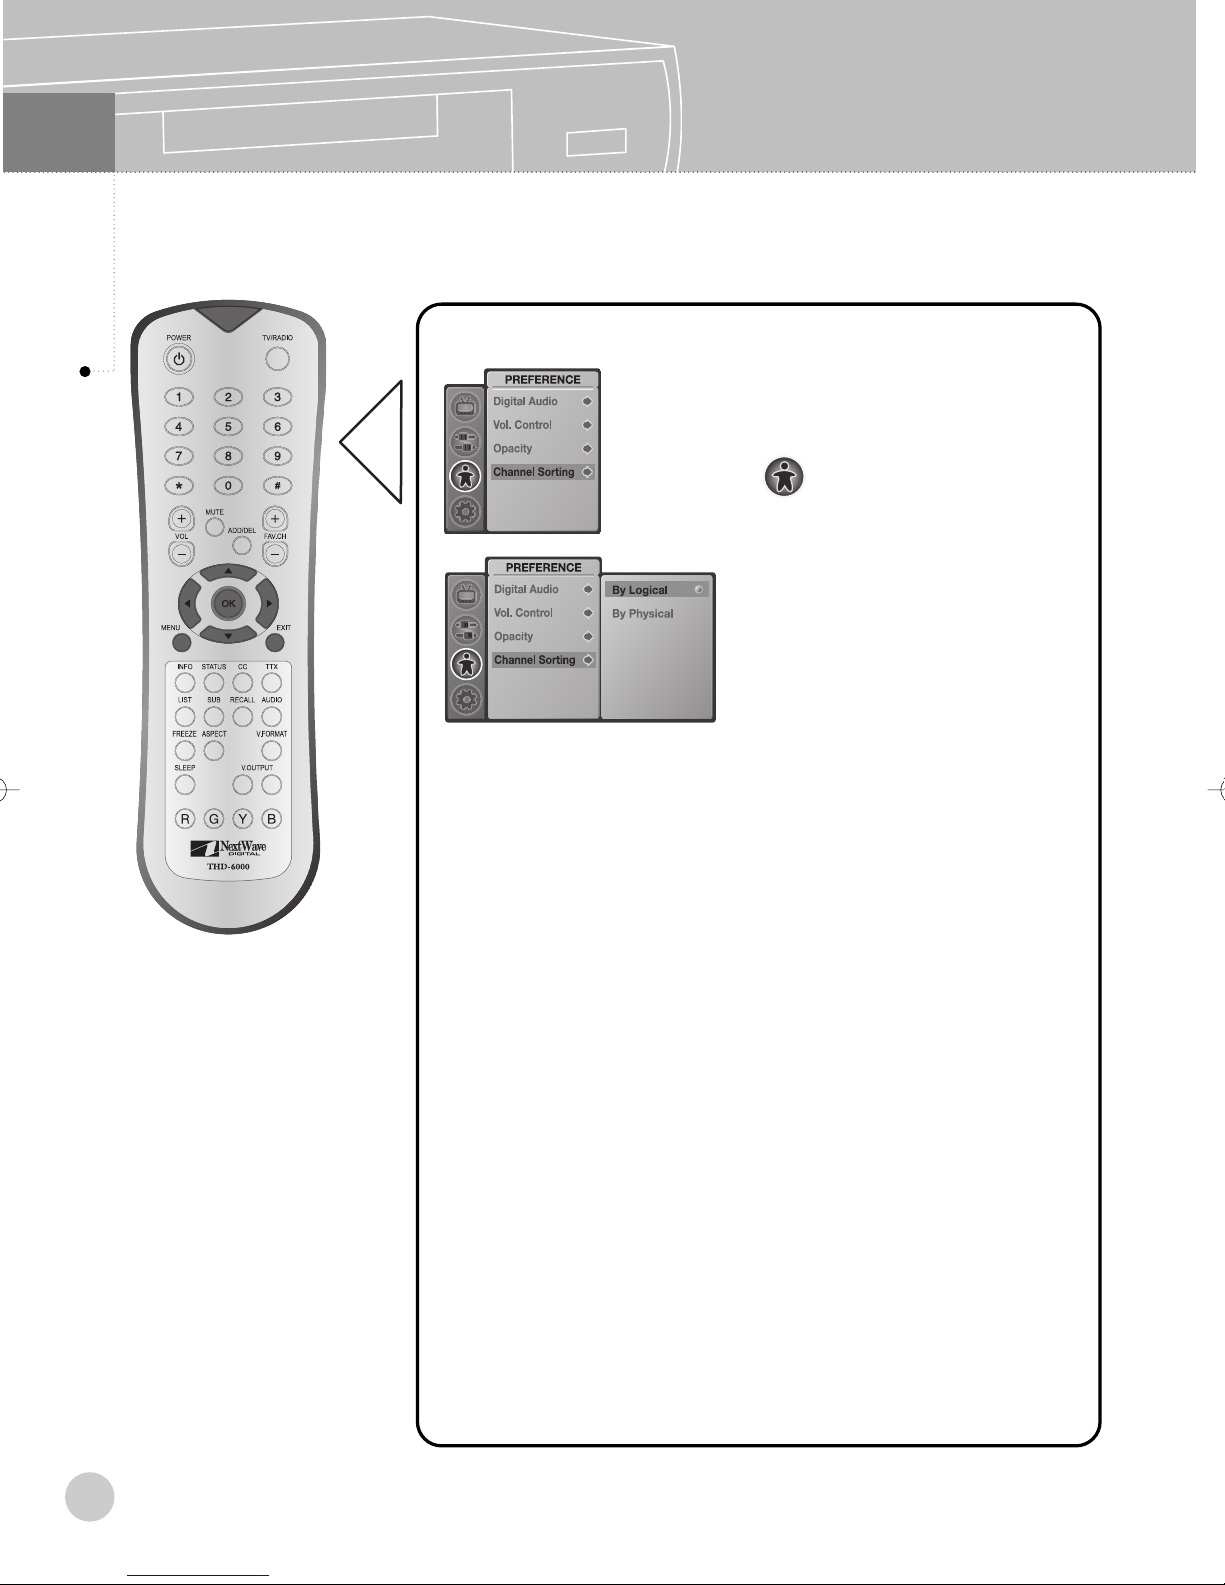
11
Preference
Channel Sorting
■ Select channel sorting method.
1. Press MENU button.
2. Use ▲,▼ button to highlight
icon, then press OK.
3. Use ▲,▼ button to highlight
‘Channel Sorting’, then press
OK.
4. Use ▲,▼ button to make a
choice, then press OK.
·By Logical : Channel List is
sorted by logical channel
number.
·By Physical : Channel List is
sorted by physical channel
number.
※ Press MENU button to exit the menu screen.
※ Press EXIT button to switch to previous step on the menu screen.
36
Page 38
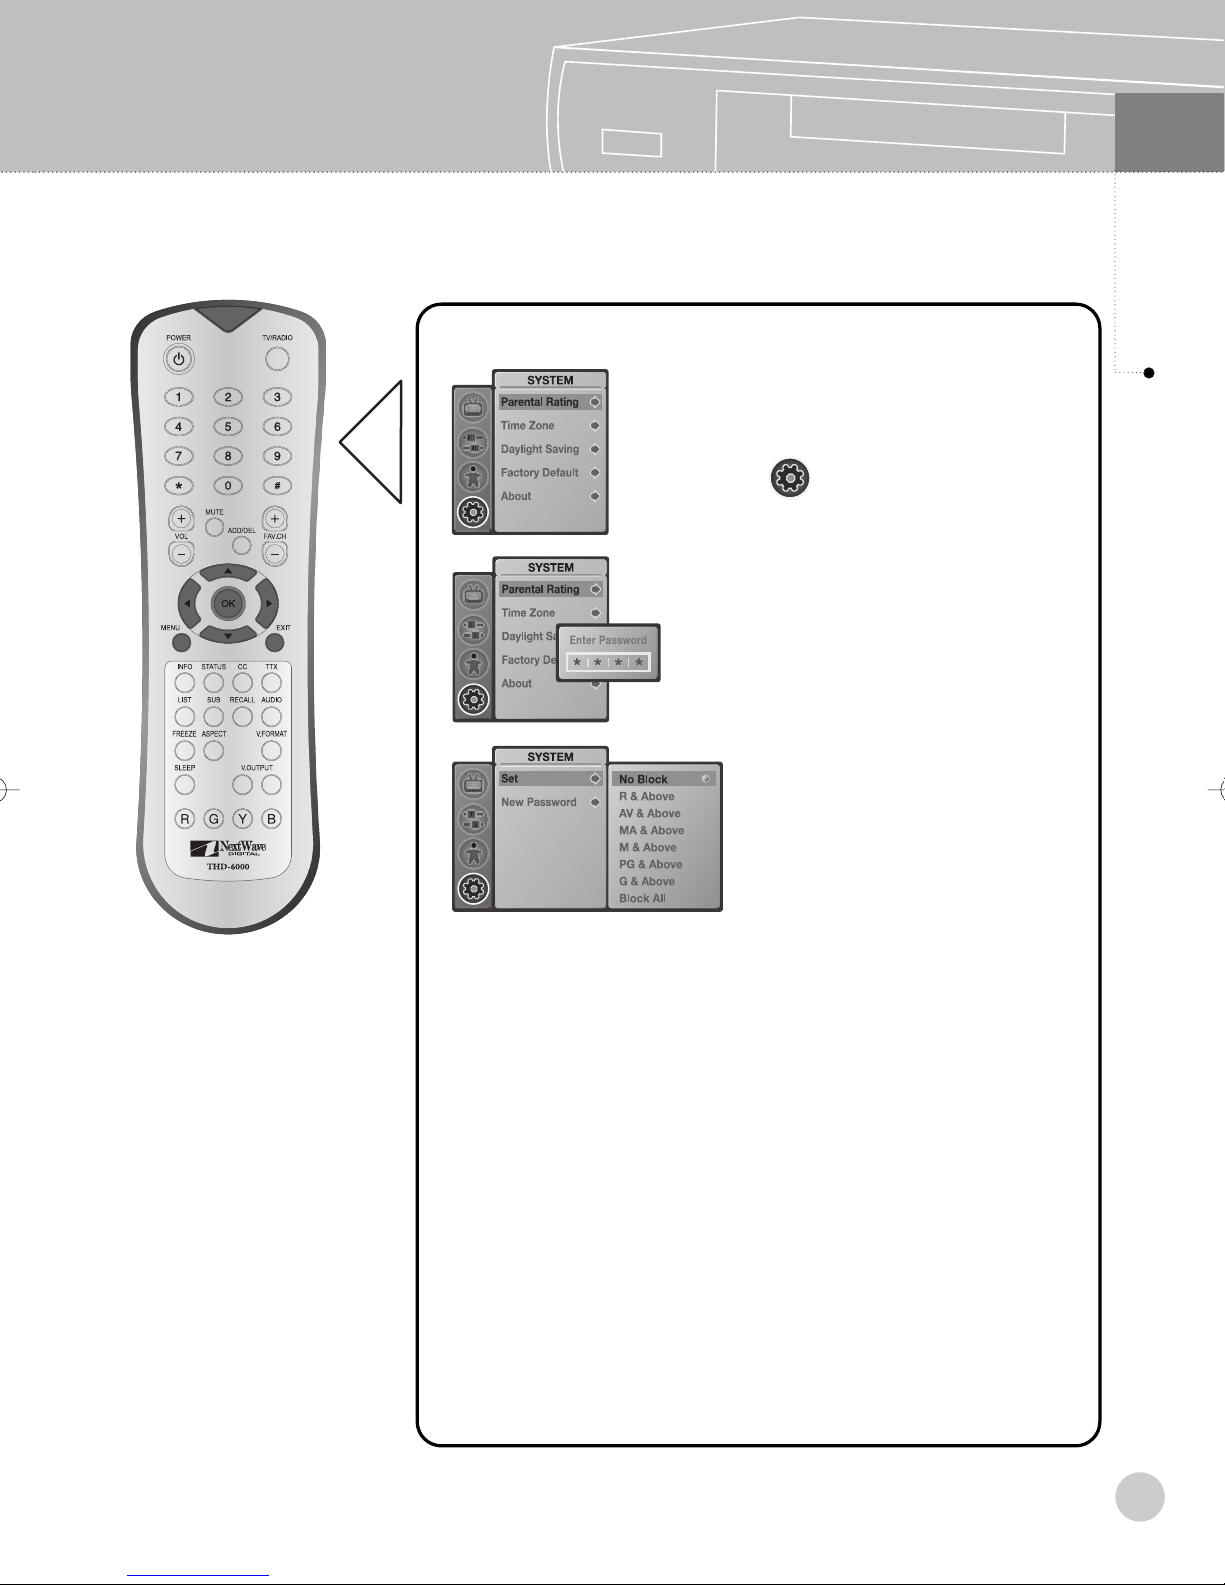
■ Set Parental Guidance Rating.
Parental Rating - Set
1. Press MENU button.
2. Use ▲,▼ button to highlight
icon, then press OK.
3. Use ▲,▼ button to highlight
‘Parental Rating’, then press
OK.
4. Enter password to proceed.
5. Use ▲,▼ button to highlight
‘Set’, then press OK.
12
System
6. Use ▲,▼ button to make a
choice from the rating levels,
then press OK.
·No Block
·R & Above
·AV & Above
·MA & Above
·M & Above
·PG & Above
·G & Above
·Block All
※ Press MENU button to exit the menu screen.
※ Press EXIT button to switch to previous step on the menu screen.
37
Page 39
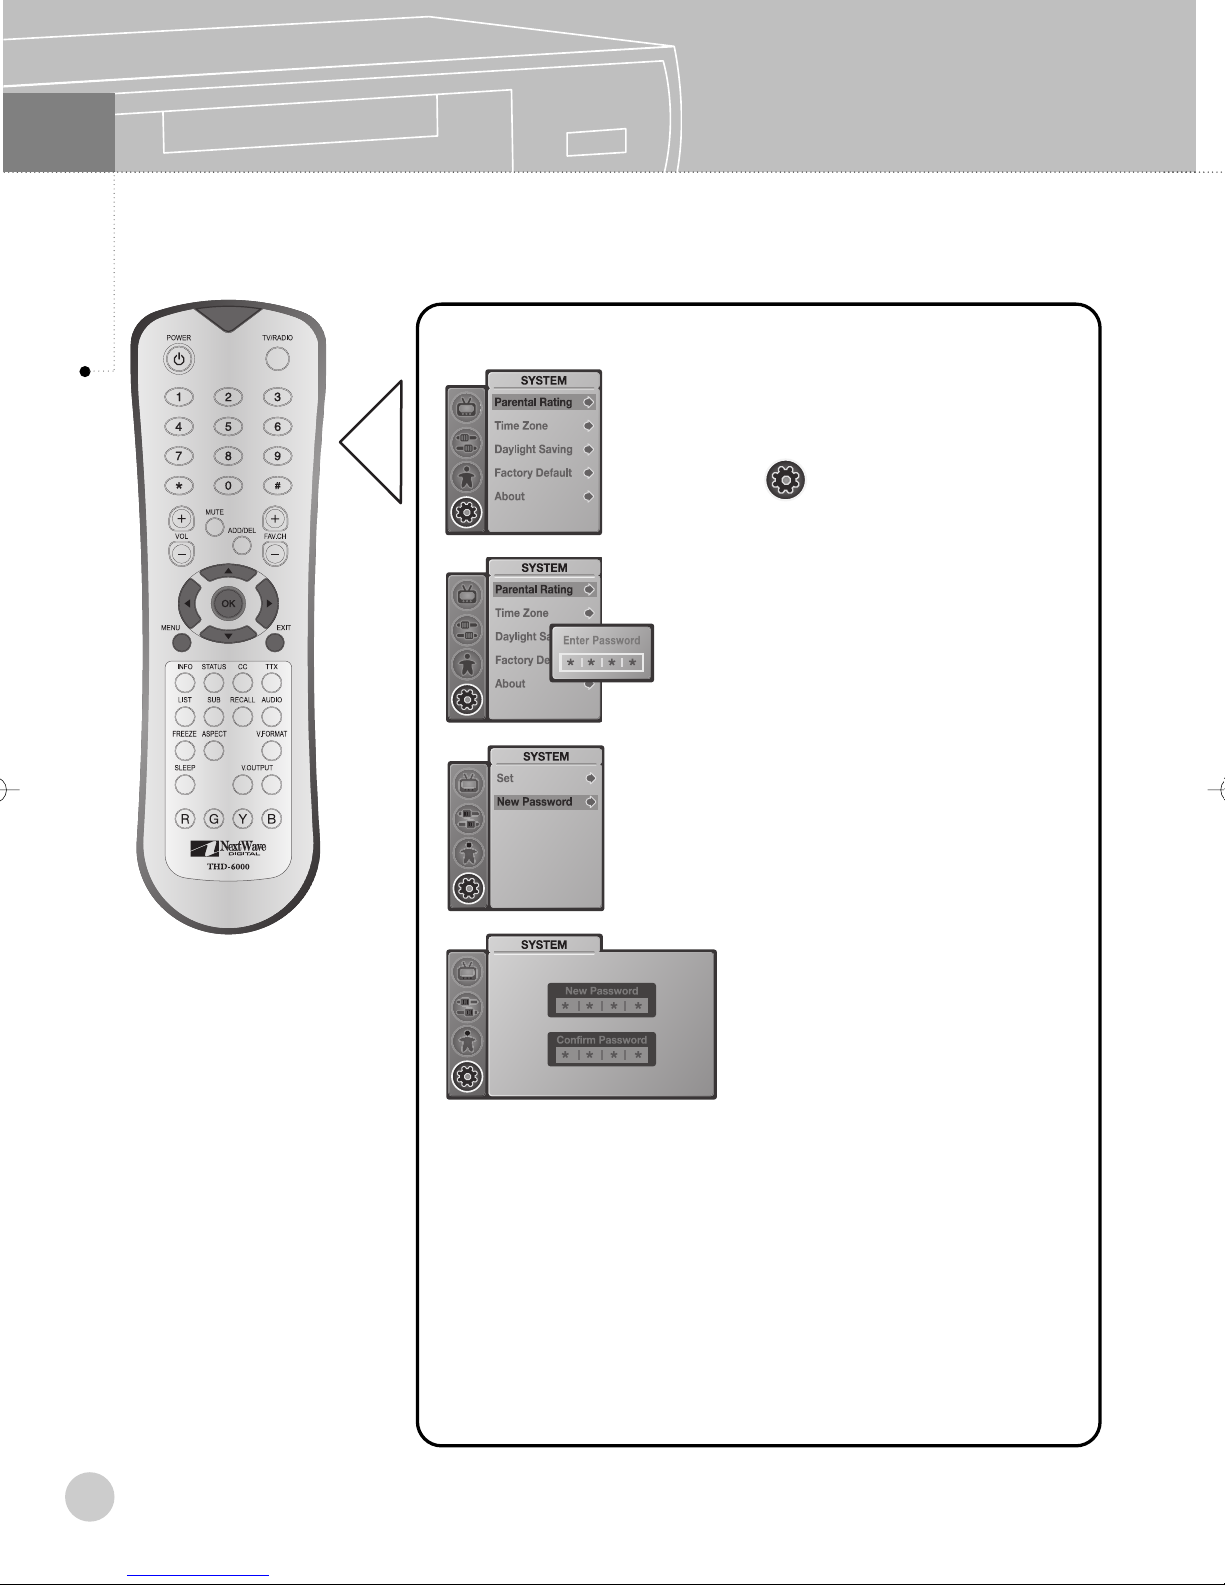
12
System
Parental Rating - New Password
■ Change the 4-digit password.
1. Press MENU button.
2. Use ▲,▼ button to highlight
icon, then press OK.
3. Use ▲,▼ button to highlight
‘Parental Rating’, then press
OK.
4. Enter password to proceed.
5. Use ▲,▼ button to highlight
‘New Password’, then press
OK.
6. Enter new password and
make a confirmation using
number key on the remote
controller.
※ Press MENU button to exit the menu screen.
※ Press EXIT button to switch to previous step on the menu screen.
※ The factory default password is 0-0-0-0.
※ When the program rating exceeds the level set on this menu,
you will see the OSD above and audio and video will be blocked.
Enter password to wacth the program. The pass state will be
valid until power is off.
38
Page 40
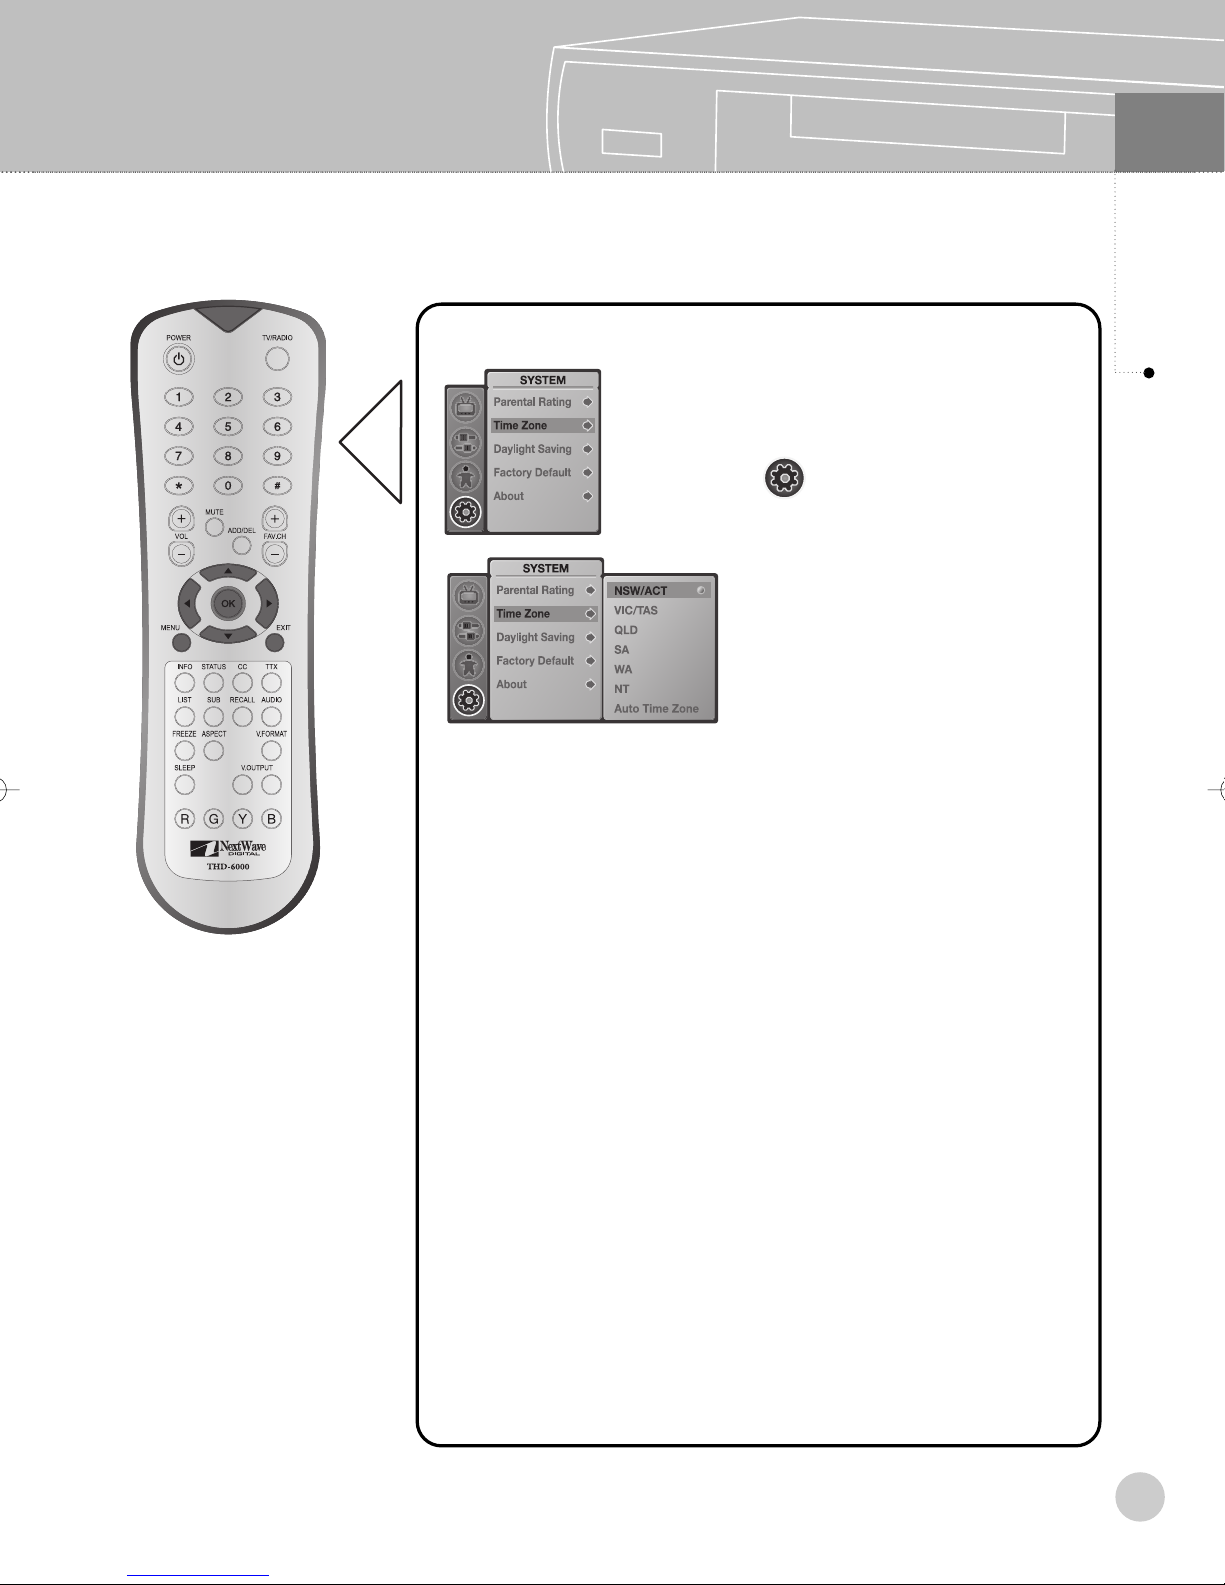
■
Select time zone.
Time Zone
1. Press MENU button.
2. Use ▲,▼ button to highlight
icon, then press OK.
3. Use ▲,▼ button to highlight
‘Time Zone’, then press OK.
4. Use ▲,▼ button to make a
choice, then press OK.
·NEW/ACT
·VIC/TAS
·QLD
·SA
·WA
·NT
·Auto Time Zone
12
System
※ Press MENU button to exit the menu screen.
※ Press EXIT button to switch to previous step on the menu screen.
39
Page 41
12
System
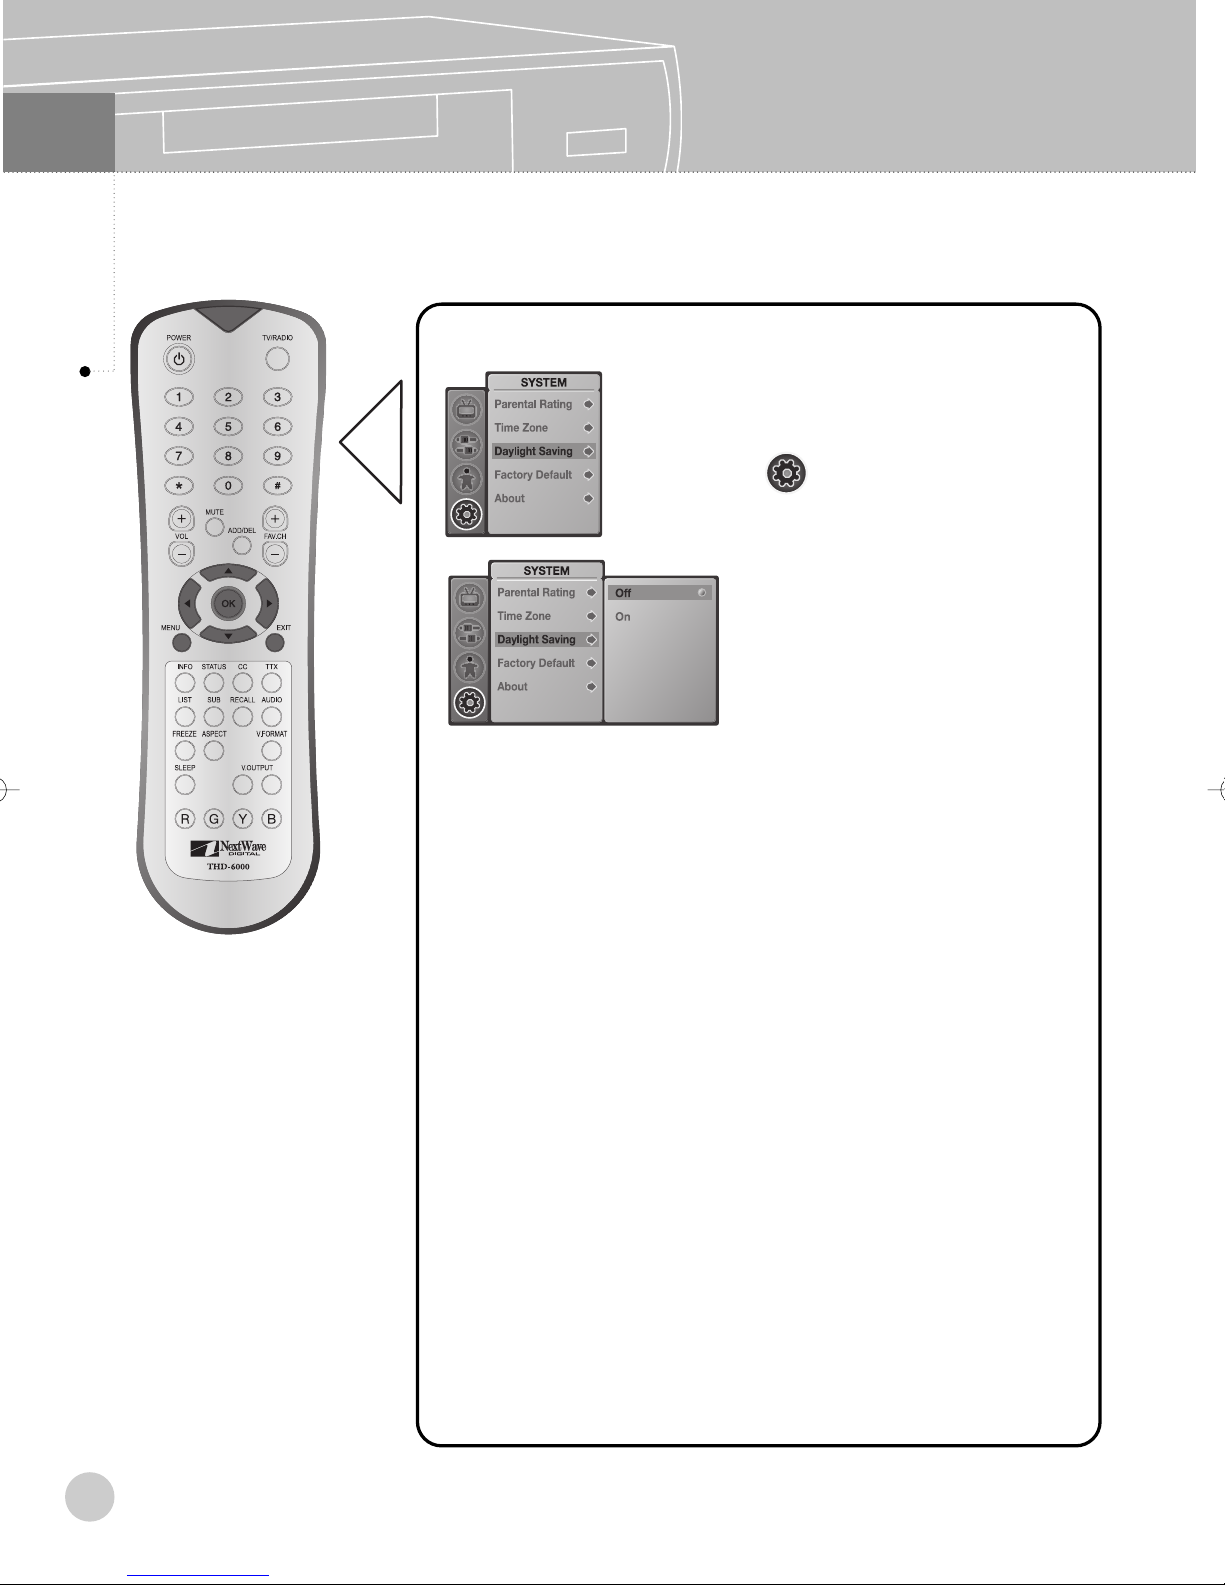
Daylight Saving
■
Select Daylight Saving.
1. Press MENU button.
2. Use ▲,▼ button to highlight
icon, then press OK.
3. Use ▲,▼ button to highlight
‘Daylight Saving’, then press
OK.
4. Use ▲,▼ button to make a
choice, then press OK.
·Off
·On
※ Press MENU button to exit the menu screen.
※ Press EXIT button to switch to previous step on the menu screen.
※ Note. If you select Auto time Zone, Daylight Saving On/Off does
not work.
40
Page 42
■
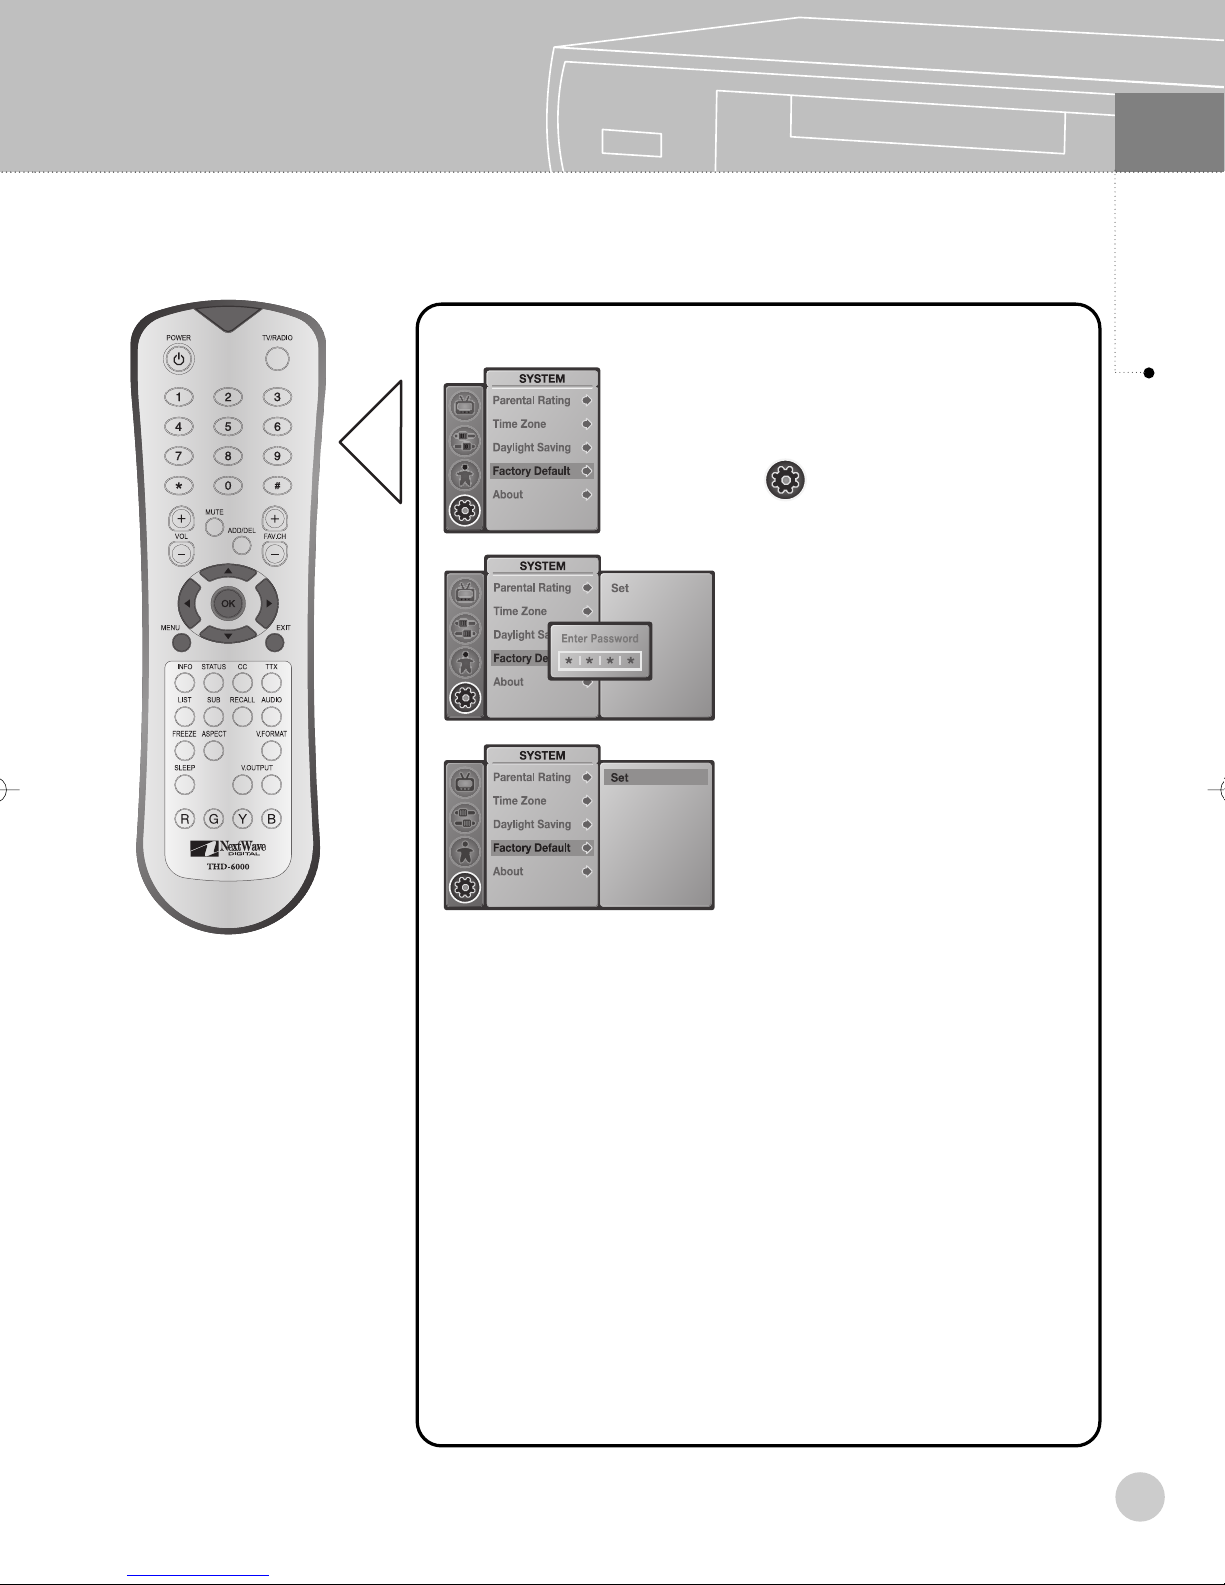
Set Factory Default.
Factory Default
1. Press MENU button.
2. Use ▲,▼ button to highlight
icon, then press OK.
3. Type 4-digit Password.
4. Press OK to set to Factory
Default.
12
System
※ Press MENU button to exit the menu screen.
※ Press EXIT button to switch to previous step on the menu screen.
Set to Factory Default, it takes 25 second.
※
※ Don’t Power Off during set to Factory Default.
41
Page 43
12
System
About
■
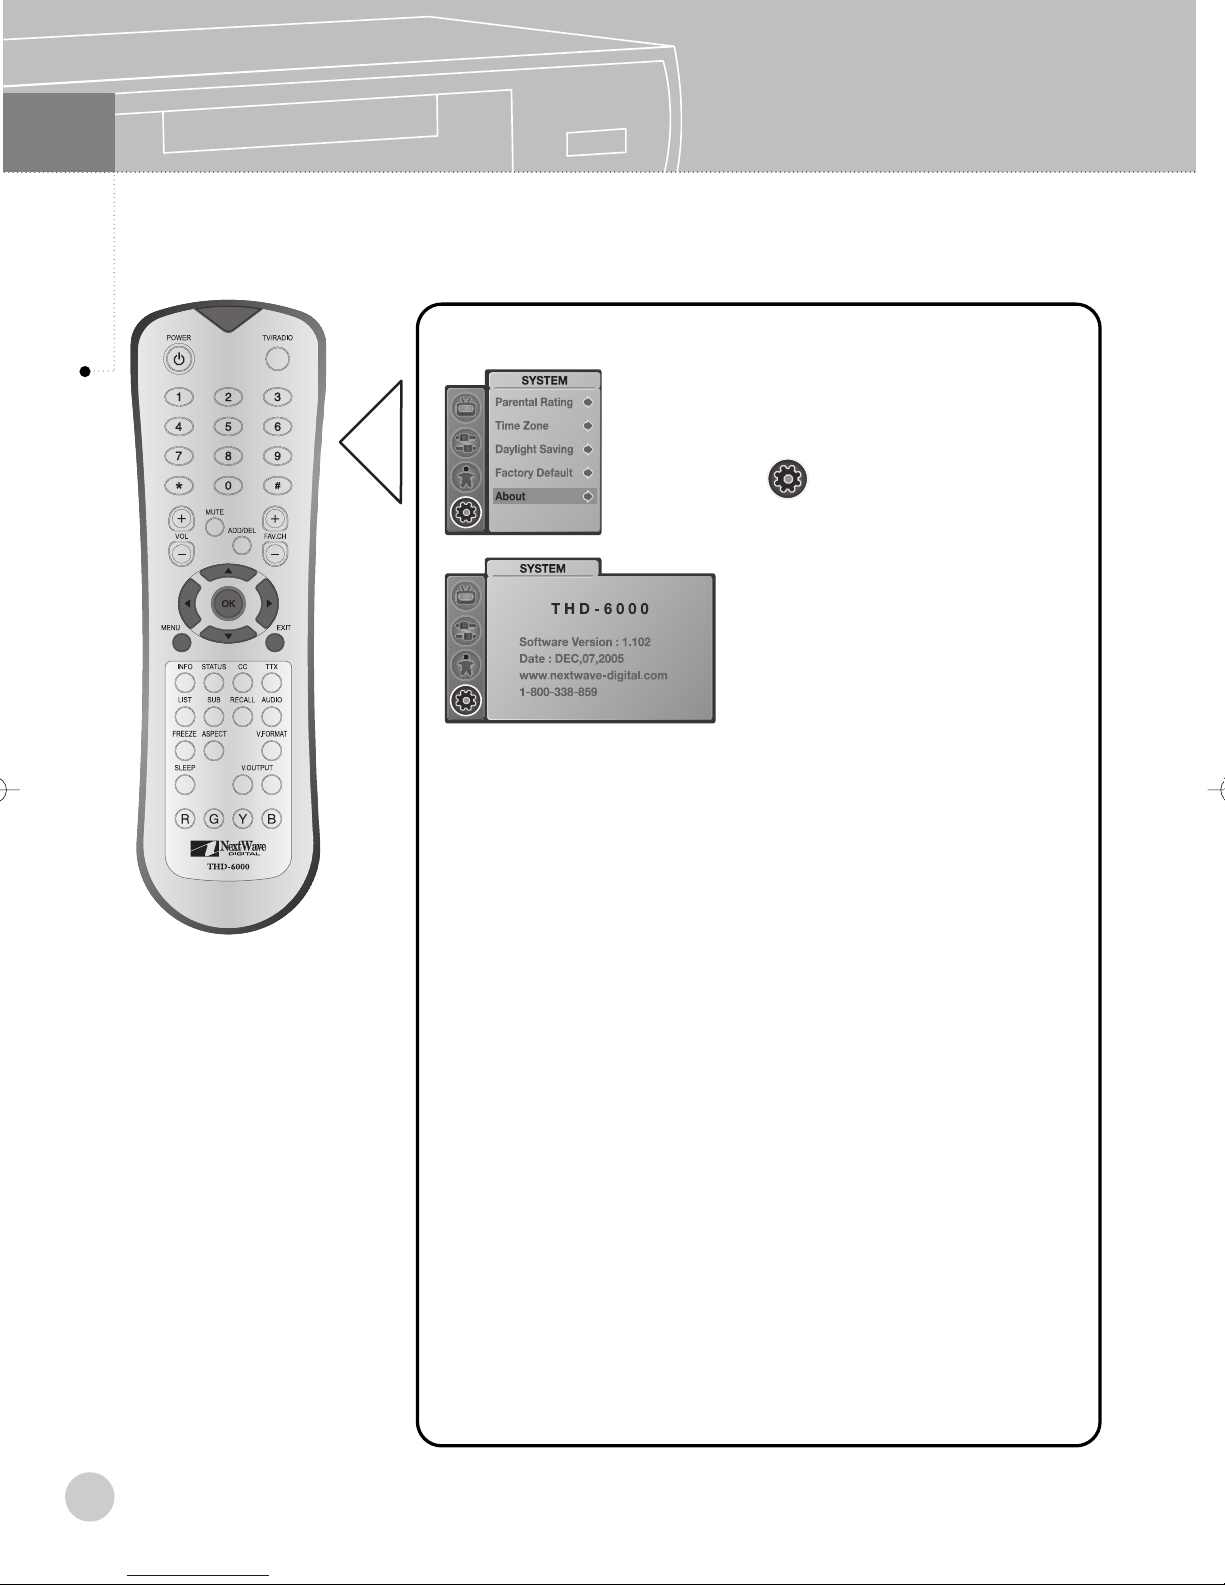
Show the software version and date.
1. Press MENU button.
2. Use ▲,▼ button to highlight
icon, then press OK.
3. Use ▲,▼ button to highlight
‘About’, then press OK.
42
※ Press MENU button to exit the menu screen.
※ Press EXIT button to switch to previous step on the menu screen.
Page 44
Specifications
13
Specifications
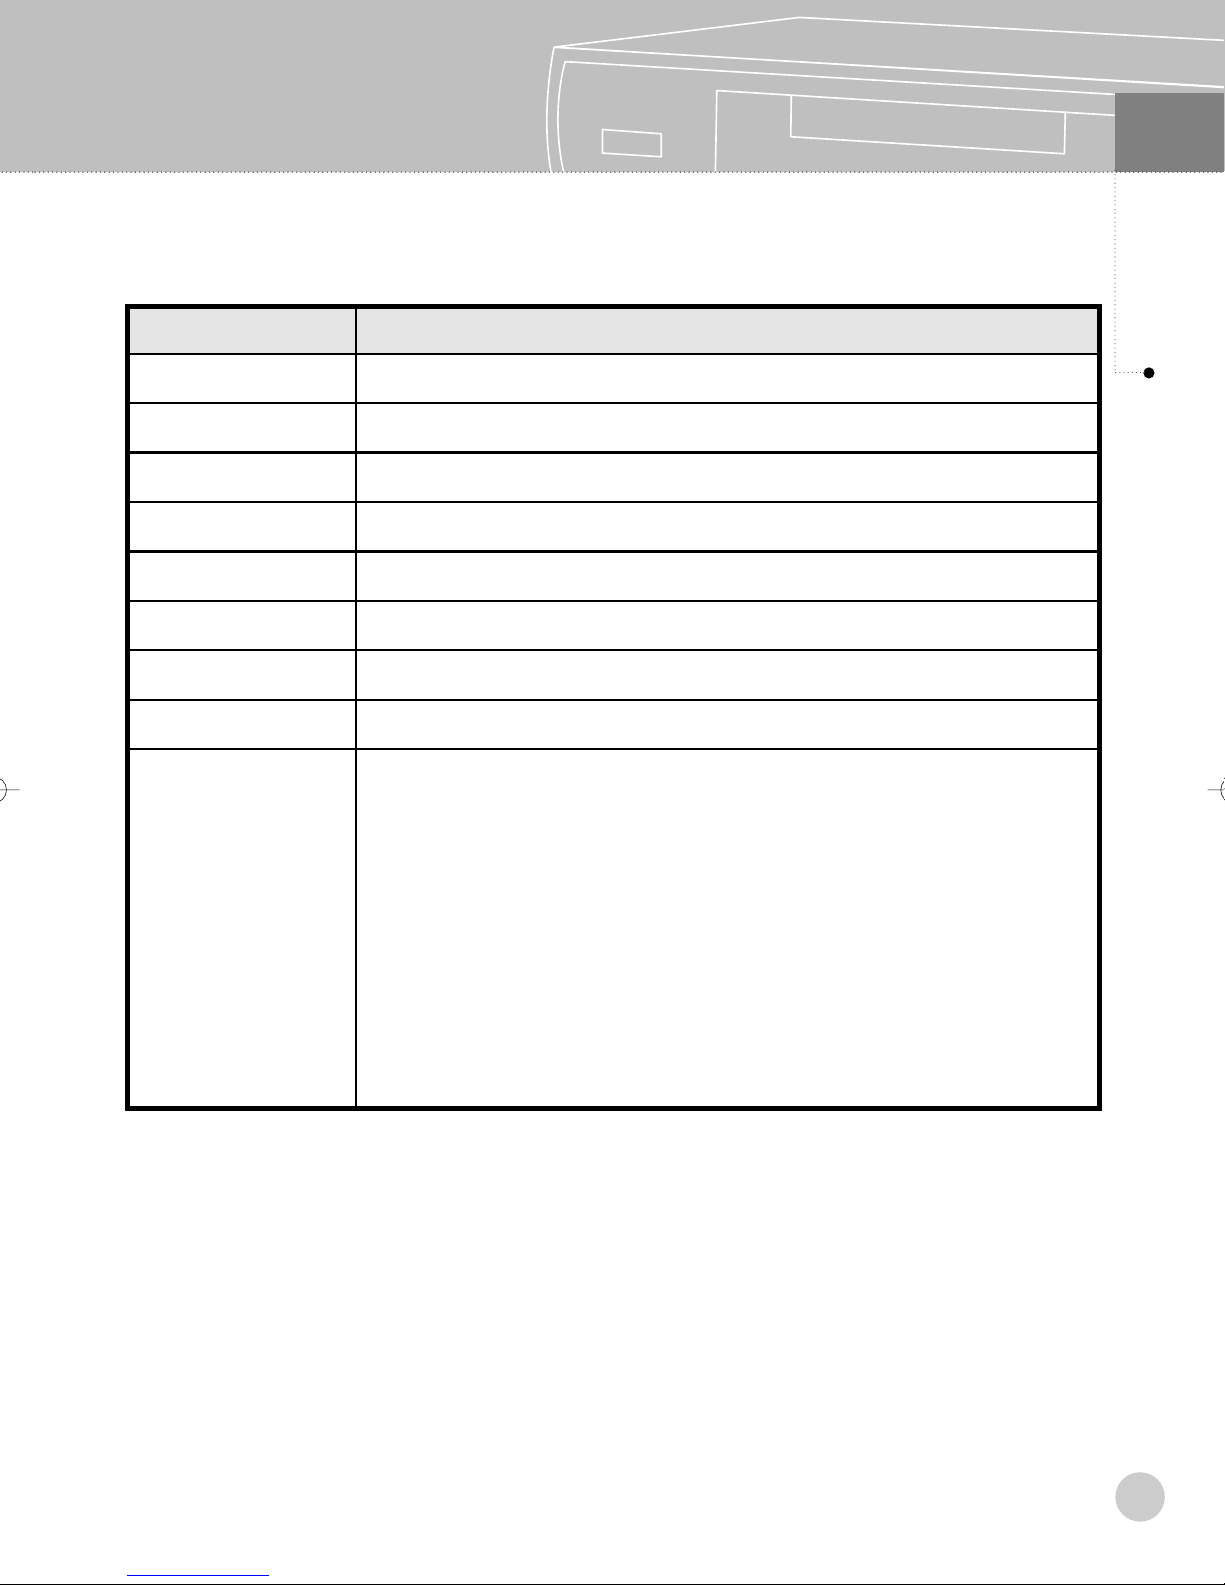
SPECIFICATIONSITEM
Product Name
Model
Supply Voltage
Power Consumption
Size (W X H X D)
Weight (Kg)
Channel
Antenna Impedance
Input/Output
(THD-6000)
High Definition Receiver
THD-6000
AC 240V, 50Hz
Operation : 12.6W max, Standby : 2.6W max
340mm x 65mm x 245mm
2.0 Kg
Band-III(137-230MHz), Band-IV(519-820MHz)
75Ω
Antenna input 1ea & Loop Output 1ea
Component (Y, Pb, Pr) Output 1set
RGB/HV Output 1ea
S-Video Output 1ea
Composite Output 1ea
Digital Audio Output(Optical) 1ea
Digital Audio Output(Coaxial) 1ea
Analog Audio Output(L/R) 2sets
Service Port (RS232-C) 1ea
43
Page 45
14
Troubleshooting
Troubleshooting
Q : It takes a while to display picture on the screen after turning power on or after changing
A : In case of digital broadcasting, it could take 1 to 2 seconds to receive data.Therefore, it is
Q : There is no picture on the screen.
A : Make sure the power is on.
channel.
not a inferior STB if the screen displays picture at the end.
Make sure the cable between the product and TV is connected properly.
Make sure TV’s external video input mode is selected correctly.
Make sure STB’s video output mode is selected correctly.
In case antenna cannot receive signal due to weak broadcasting signal, picture may not
display on the screen.
Try turning STB back on.
Q : Poor video quality or screen flickering.
A
It results from the weak signal of your local digital broadcasting.
:
Q : No sound.
A : Make sure cable between STB and the TV audio jack is connected properly.
Try MUTE button.
Check audio control button.
Try turning STB back on.
Q : The remote control does not work.
A : Make sure the remote control sensor is not covered by other obstacle.
Check that the batteries are installed with the correct polarities (+ and -).
44
Page 46
Service Centres
Page 47
WARRANTY CERTIFICATE
FOR THE NEXTWAVE THD-6000
AUSTRALIAN DIGITAL TV RECEIVER
This product carries a warranty against any
defect in workmanship for a period of twelve
months from date of purchase.
Under warranty,
repairs will be carried out at an
approved Service Centre
Please keep this Warranty Certificate with your tax invoice as proof of purchase. It will be needed when
claiming service in terms of this warranty.
The Warranty shall not apply to malfunction or damage after installation, resulting from transport and/or
handling or to malfunction or damage due to incorrect voltages or faults in the house wiring, Product
misuse, improper use, abuse, neglect or negligence by the Purchaser or anybody else, or any use of the
Product other than that described in the operating manual, malfunction or damage due to fire,
earthquake, flood, lightning or any other natural disaster, abnormal voltage, war or any other disturbance
(revolution, riot etc), unforeseen accidents, wear and tear, or any other external factors beyond the
Manufacturer’s control or the control of any Authorised Service Centre, or to any product installed,
repaired, adjusted, rebuilt, modified, changed or converted by any person (including the Purchaser) other
than Authorised installers or Service Centres, and any Product on which the serial number has been
changed, tampered with or removed.
This warranty shall not apply to batteries or any other parts of a limited natural life.
Where the Purchaser wishes to return the Product other than by hand to an Authorised Service Centre
for warranty service, the Purchaser should contact the Authorised Service Centre to make the necessary
arrangements and the Product should be returned, at the Purchaser’s risk and expense together with a
copy of the Warranty Certificate, a valid proof of purchase and a detailed written explanation of the
problem.
IMPORTED and DISTRIBUTED BY
NATIONWIDE ANTENNA SYSTEMS
(ACN 010 372 362 ABN 46 010 372 362)
28 Newstead Tce,
Newstead Qld, 4006
Ph: [07]3252 2947
Fax: [07] 3252 8541
Email: [email protected]
Web: www.nextwave-digital.com
Support Ph: 1800 338 859
 Loading...