

Page 1
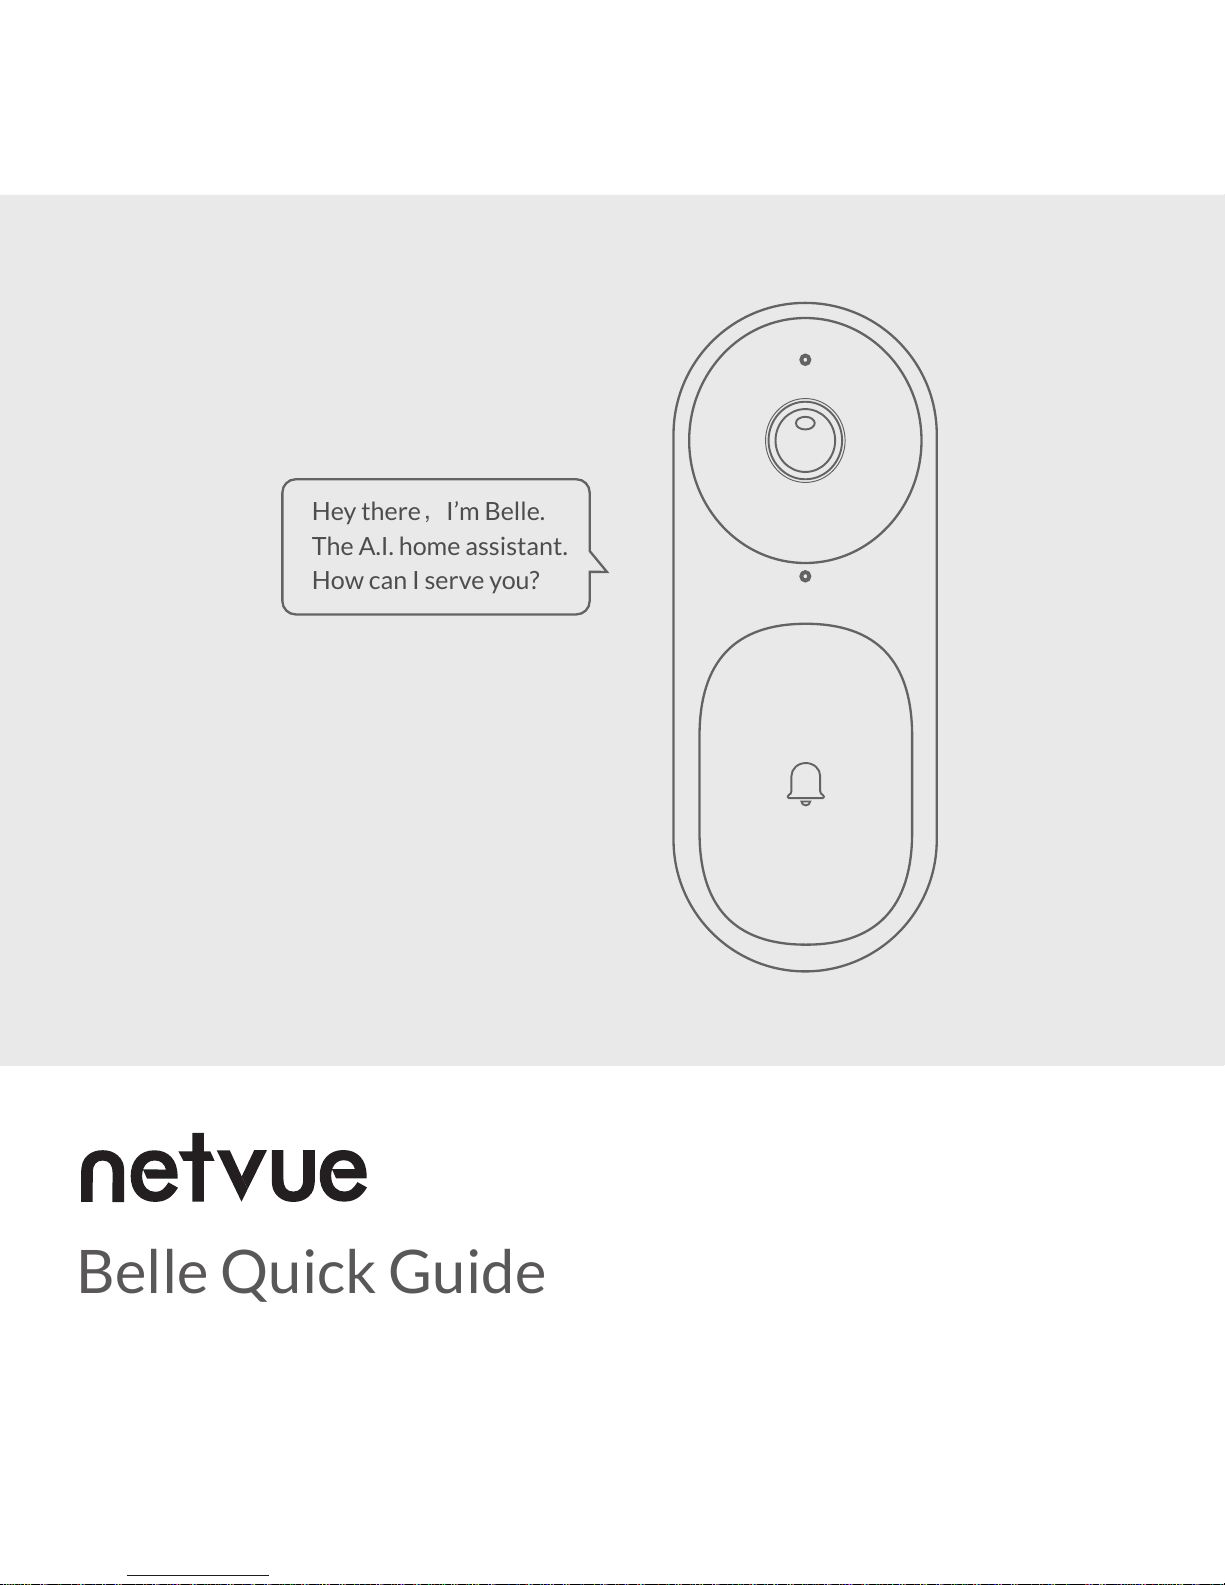
Belle Quick Guide
Hey thereI’m Belle.
The A.I. home assistant.
How can I serve you?
Page 2
Warning
This equipment has been tested and found to comply with the limits for a Class
B digital device, pursuant to Part 15 of the FCC Rules. These limits are
designed to provide reasonable protection against harmful interference when
the equipment is operated in a commercial environment. This equipment
generates uses and can radiate radio frequency energy and, if not installed and
used in accordance with the instructions, may cause harmful interference to
radio communications.
The antennas used for this transmitter must be installed to provide a separa-
tion distance of at least 20 cm from all persons and must not be co-located for
operating in conjunction with any other antenna or transmitter.
FCC (USA) 15.9 prohibition against eavesdropping except for the operations of
law enforcement officers conducted under lawful authority, no person shall
use, either directly or indirectly, a device operated pursuant to the provision of
this part for the purpose of overhearing or recording the private conversations
of other unless such use is authorized by all of the parties engaging in the
conversation.
CE RED
This product can be used across EU member states.
Page 3
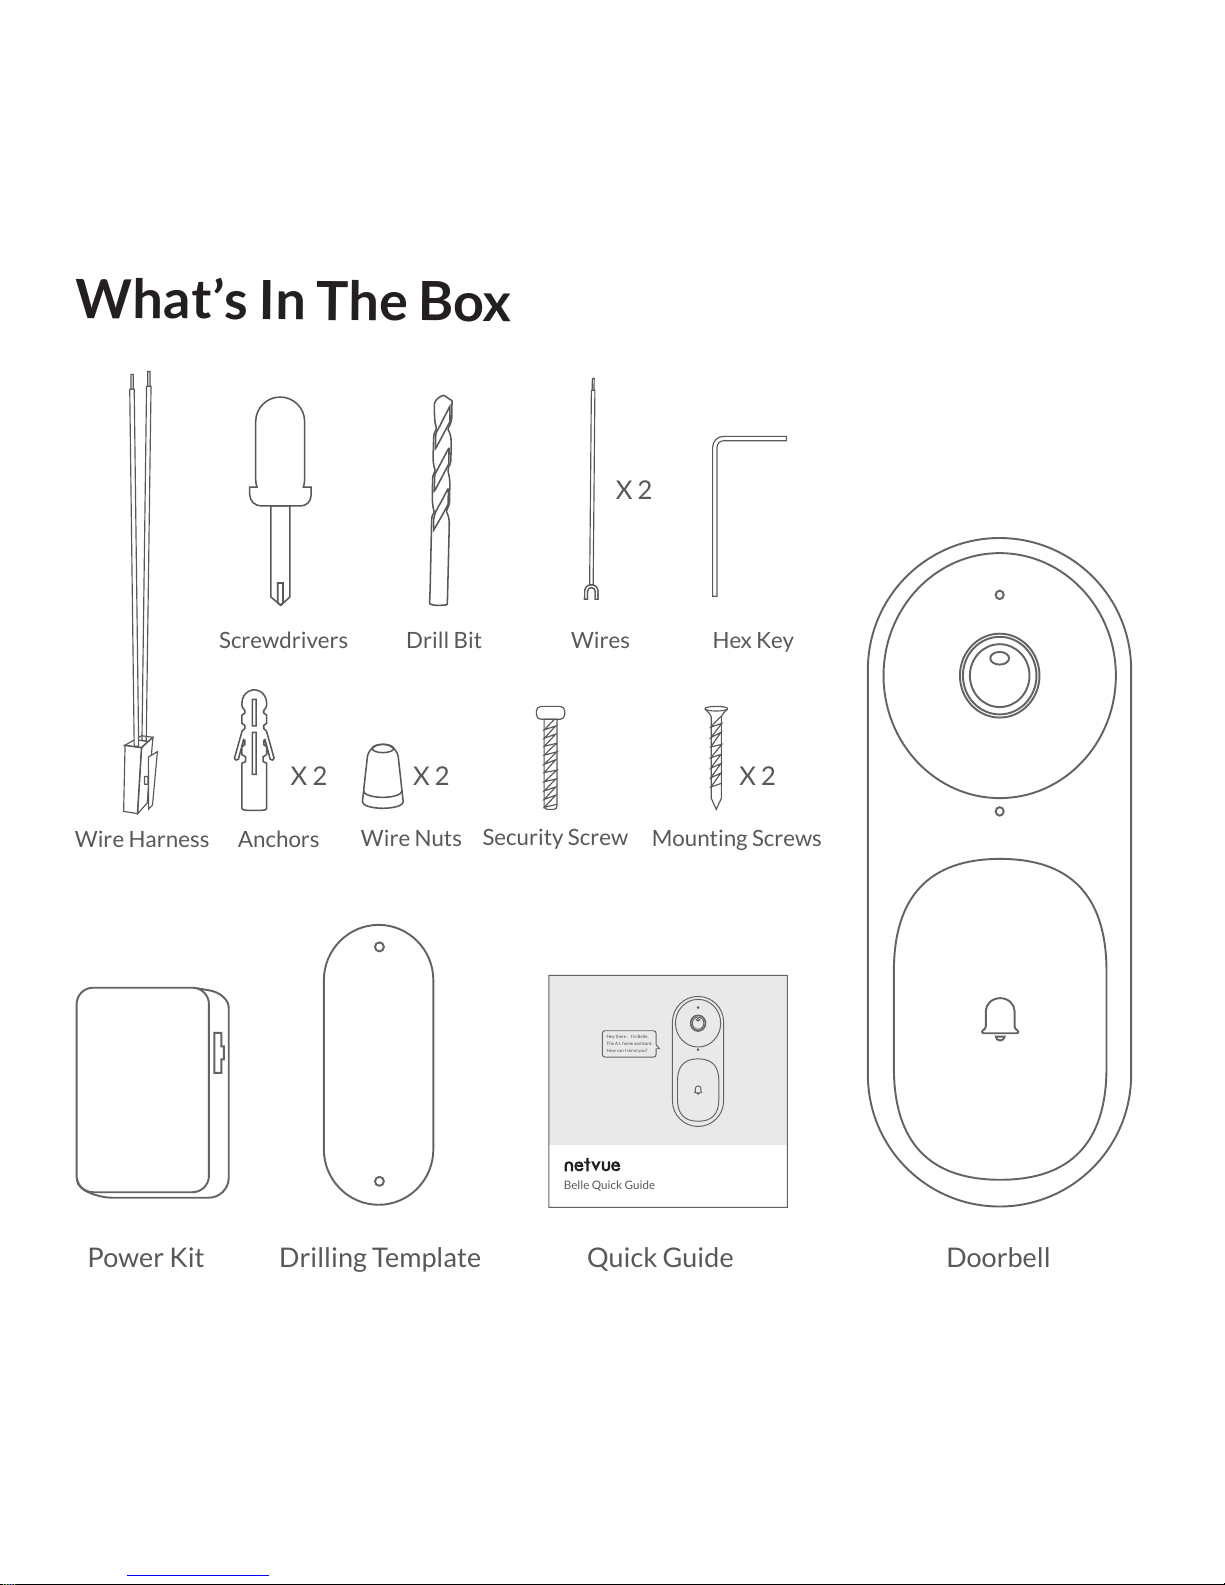
What’s In The Box
DoorbellQuick GuidePower Kit
Drilling Template
Belle Quick Guide
Hey thereI’m Belle.
The A.I. home assistant.
How can I serve you?
Wires
Wire Nuts
Security Screw
Mounting Screws
X 2X 2
Drill BitScrewdrivers Hex Key
Anchors
X 2
X 2
Wire Harness
Page 4
1. More about Netvue Belle
2. Read Before Installation
3. Power Kit Installation
4. Physical Installation
5. Set Up With Netvue App
6. Status Light
7. Troubleshooting
P. 1-2
P. 3
P. 4-7
P. 8-15
P. 16-22
P. 23
P. 24-25
Installation Guide Catalogue
Page 5
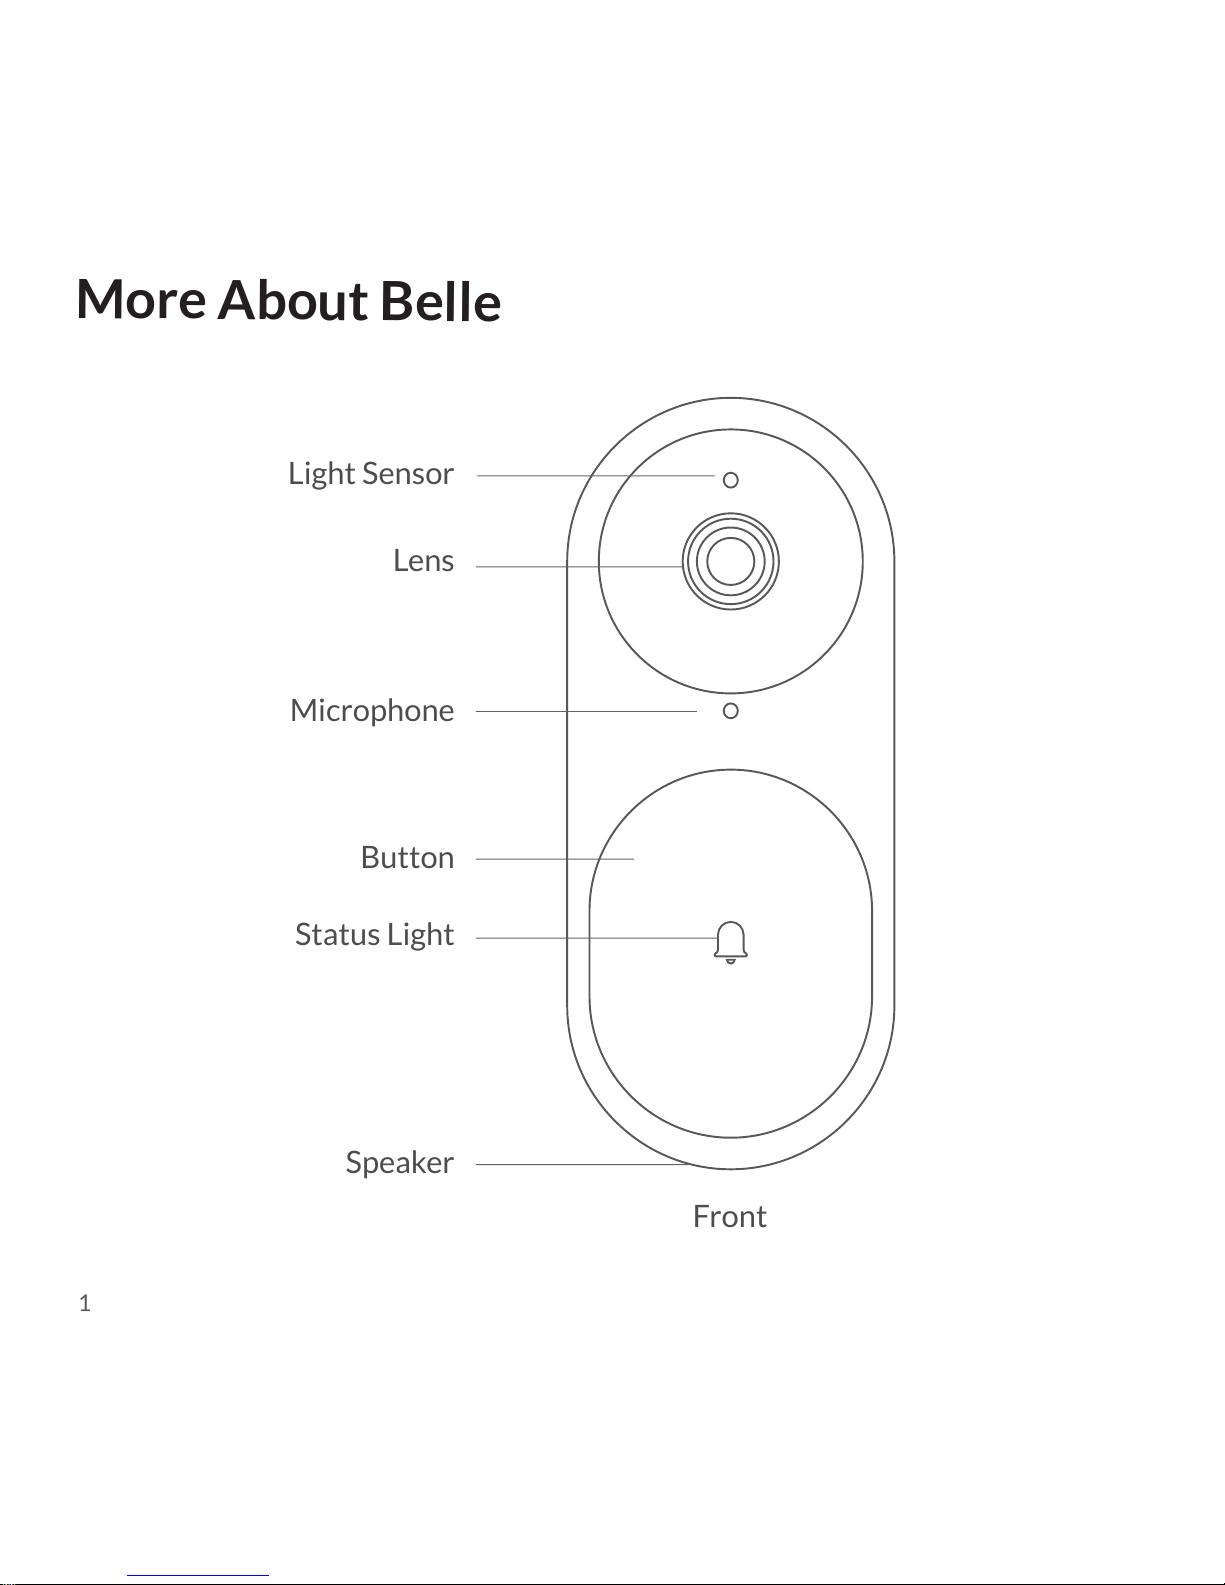
More About Belle
Light Sensor
Front
Lens
Button
Status Light
Speaker
Microphone
1
Page 6
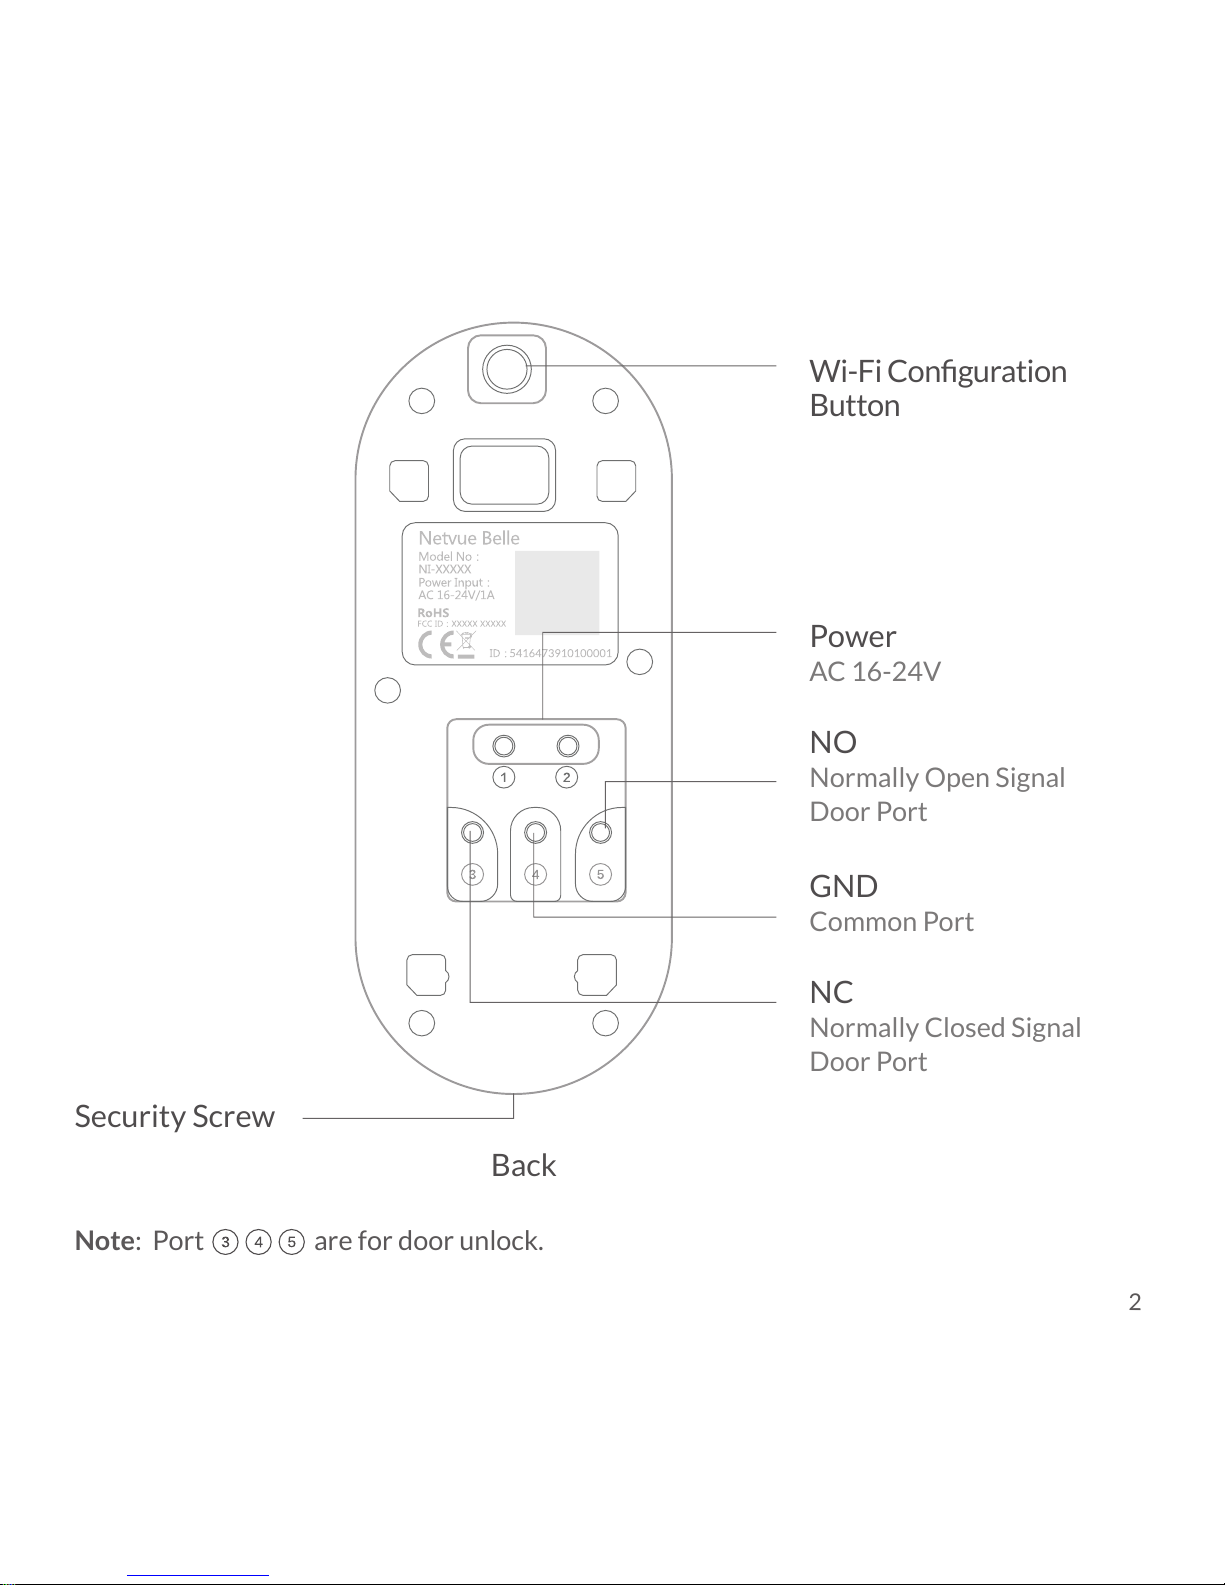
Back
Wi-Fi Configuration
Button
NC
Normally Closed Signal
Door Port
GND
Common Port
Power
AC 16-24V
NO
Normally Open Signal
Door Port
Security Screw
Note: Port are for door unlock.
2
Page 7
1. Keep the doorbell and all accessories out of reach of children and pets.
2. Please note that Netvue Belle is only compatible with wired doorbell chime.
3. Netvue Belle requires doorbell wires or transformer which has the voltage
range from 16 to 24 VAC (≥500mA).
4. Installation tools such as drill bit and screwdriver are included in the package.
5. Please try to avoid placing doorbell close to the metal frame or electronic
devices such as microwave oven since they would interfere with Wi-Fi signal.
6. The product can only be used in proper temperature and humidity:
7. Please do not expose the camera lens to direct sunlight.
Read Before Installing
Operating temperature: -20°C - 50°C (-4°F-122°F)
Operating humidity: 0-90%
3
Page 8
Power Kit Installation
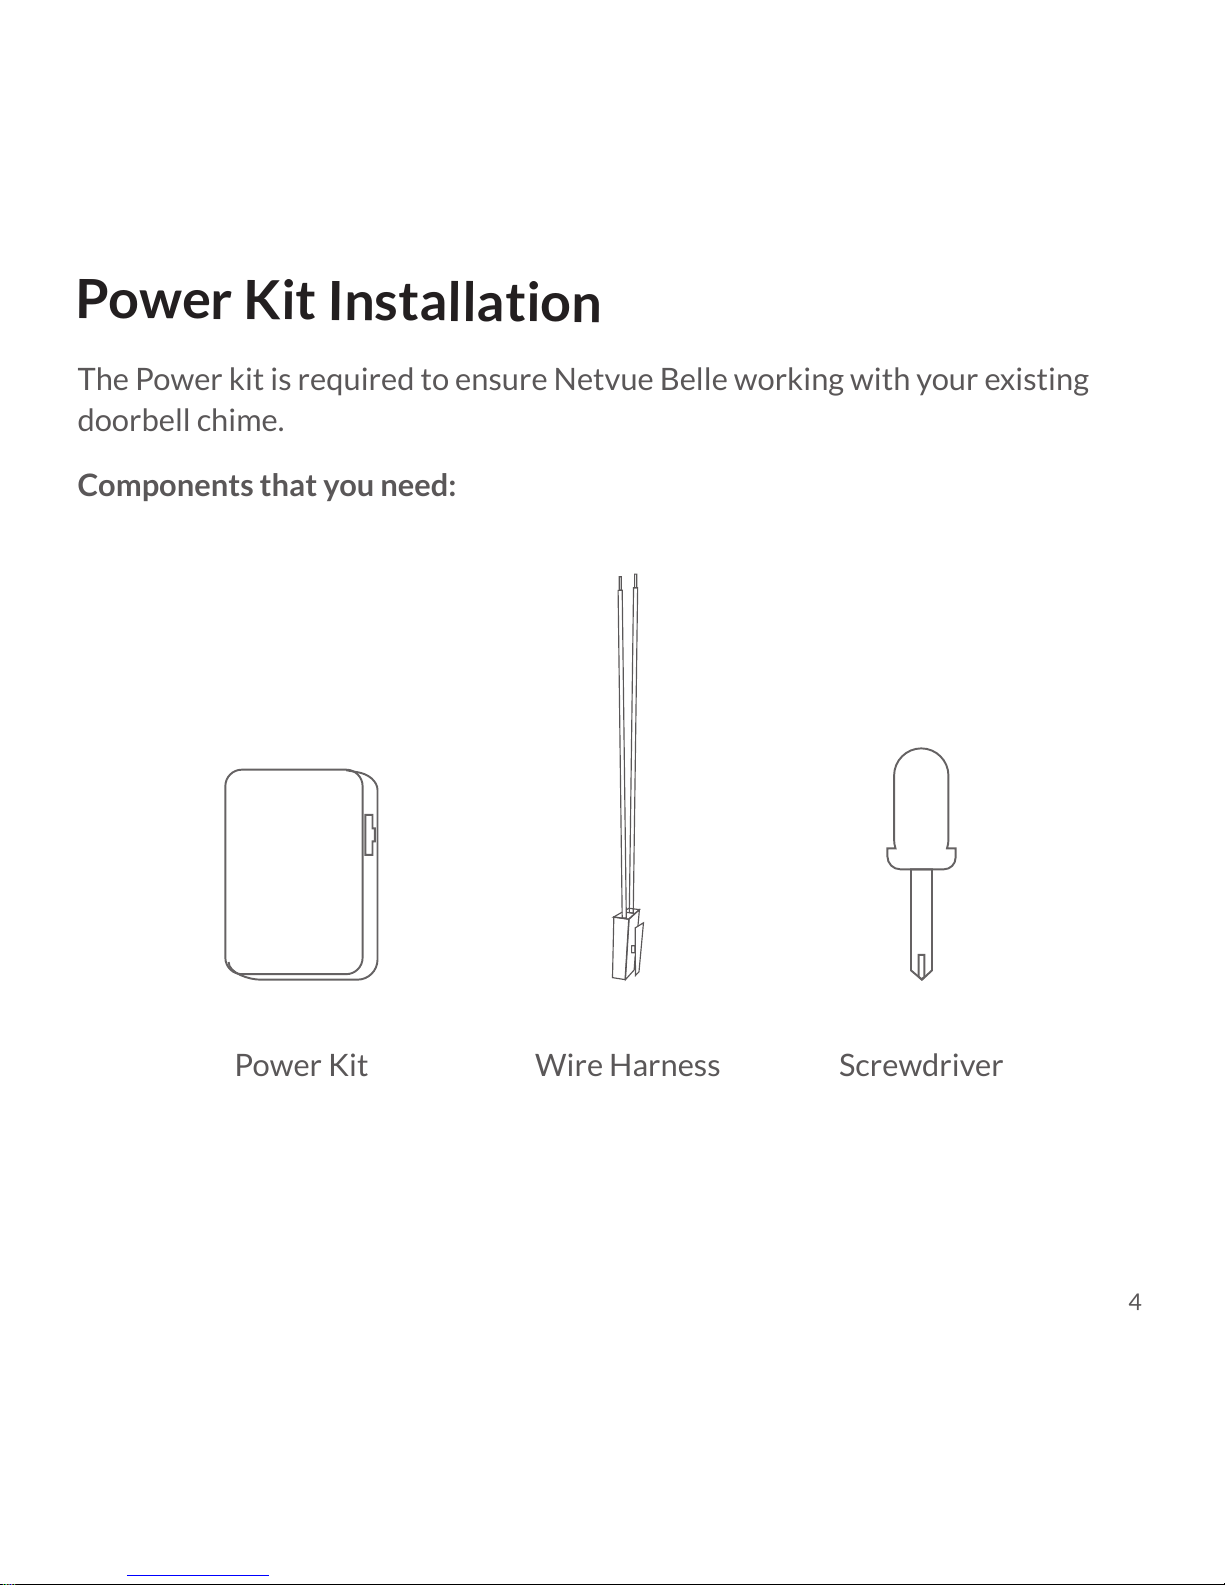
The Power kit is required to ensure Netvue Belle working with your existing
doorbell chime.
Components that you need:
Power Kit Wire Harness Screwdriver
4
Page 9
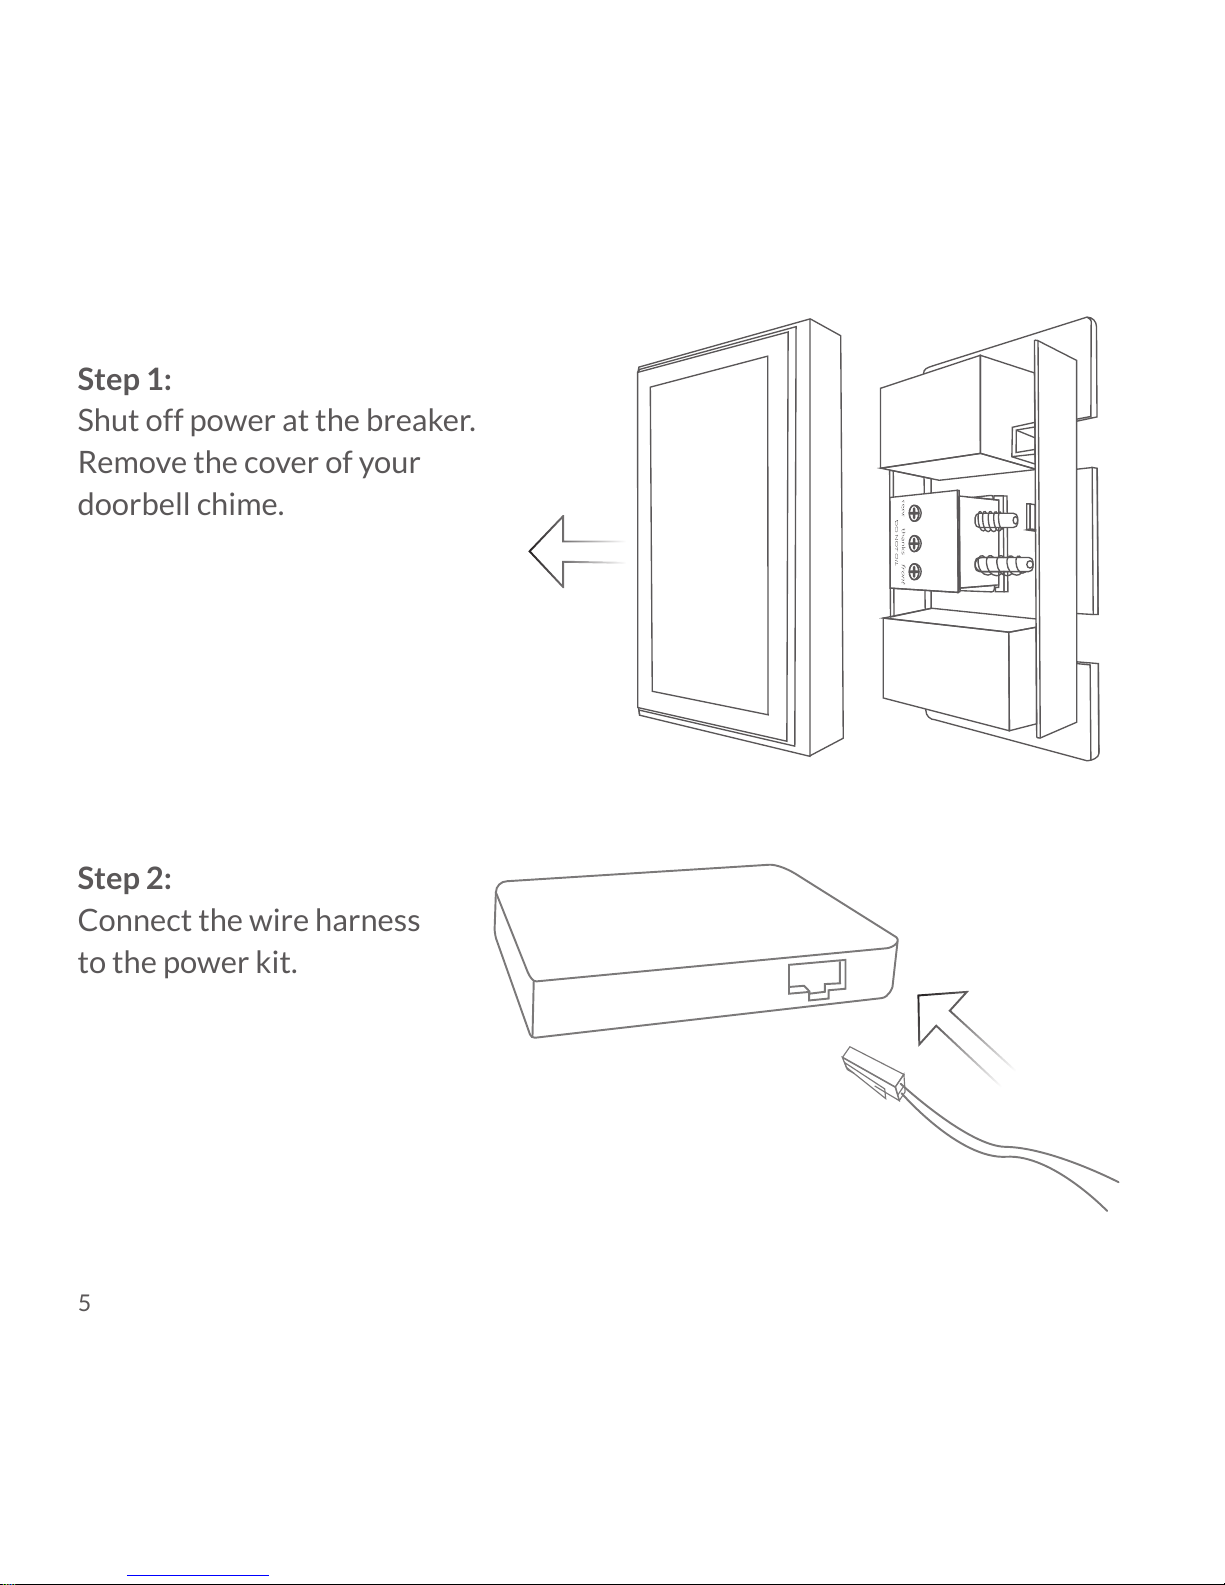
Step 1:
Shut off power at the breaker.
Remove the cover of your
doorbell chime.
Step 2:
Connect the wire harness
to the power kit.
5
Page 10
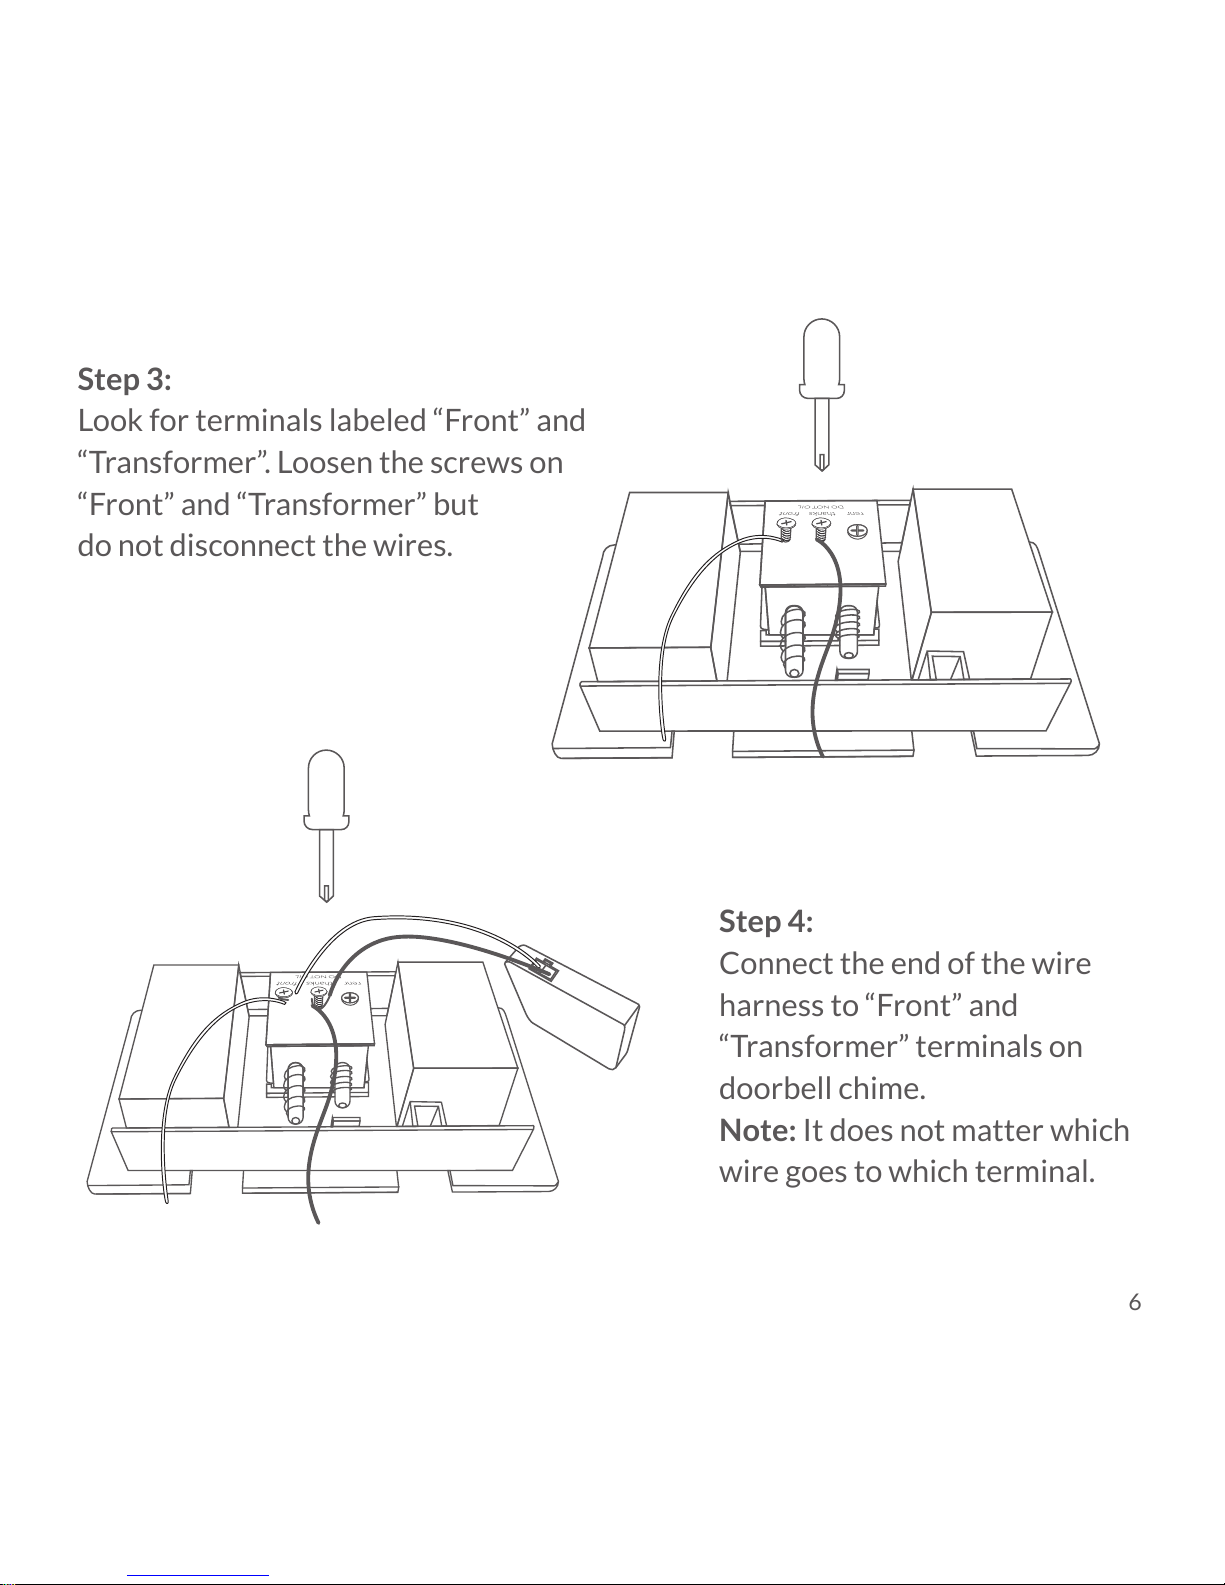
Step 3:
Look for terminals labeled “Front” and
“Transformer”. Loosen the screws on
“Front” and “Transformer” but
do not disconnect the wires.
Step 4:
Connect the end of the wire
harness to “Front” and
“Transformer” terminals on
doorbell chime.
Note: It does not matter which
wire goes to which terminal.
6
Page 11
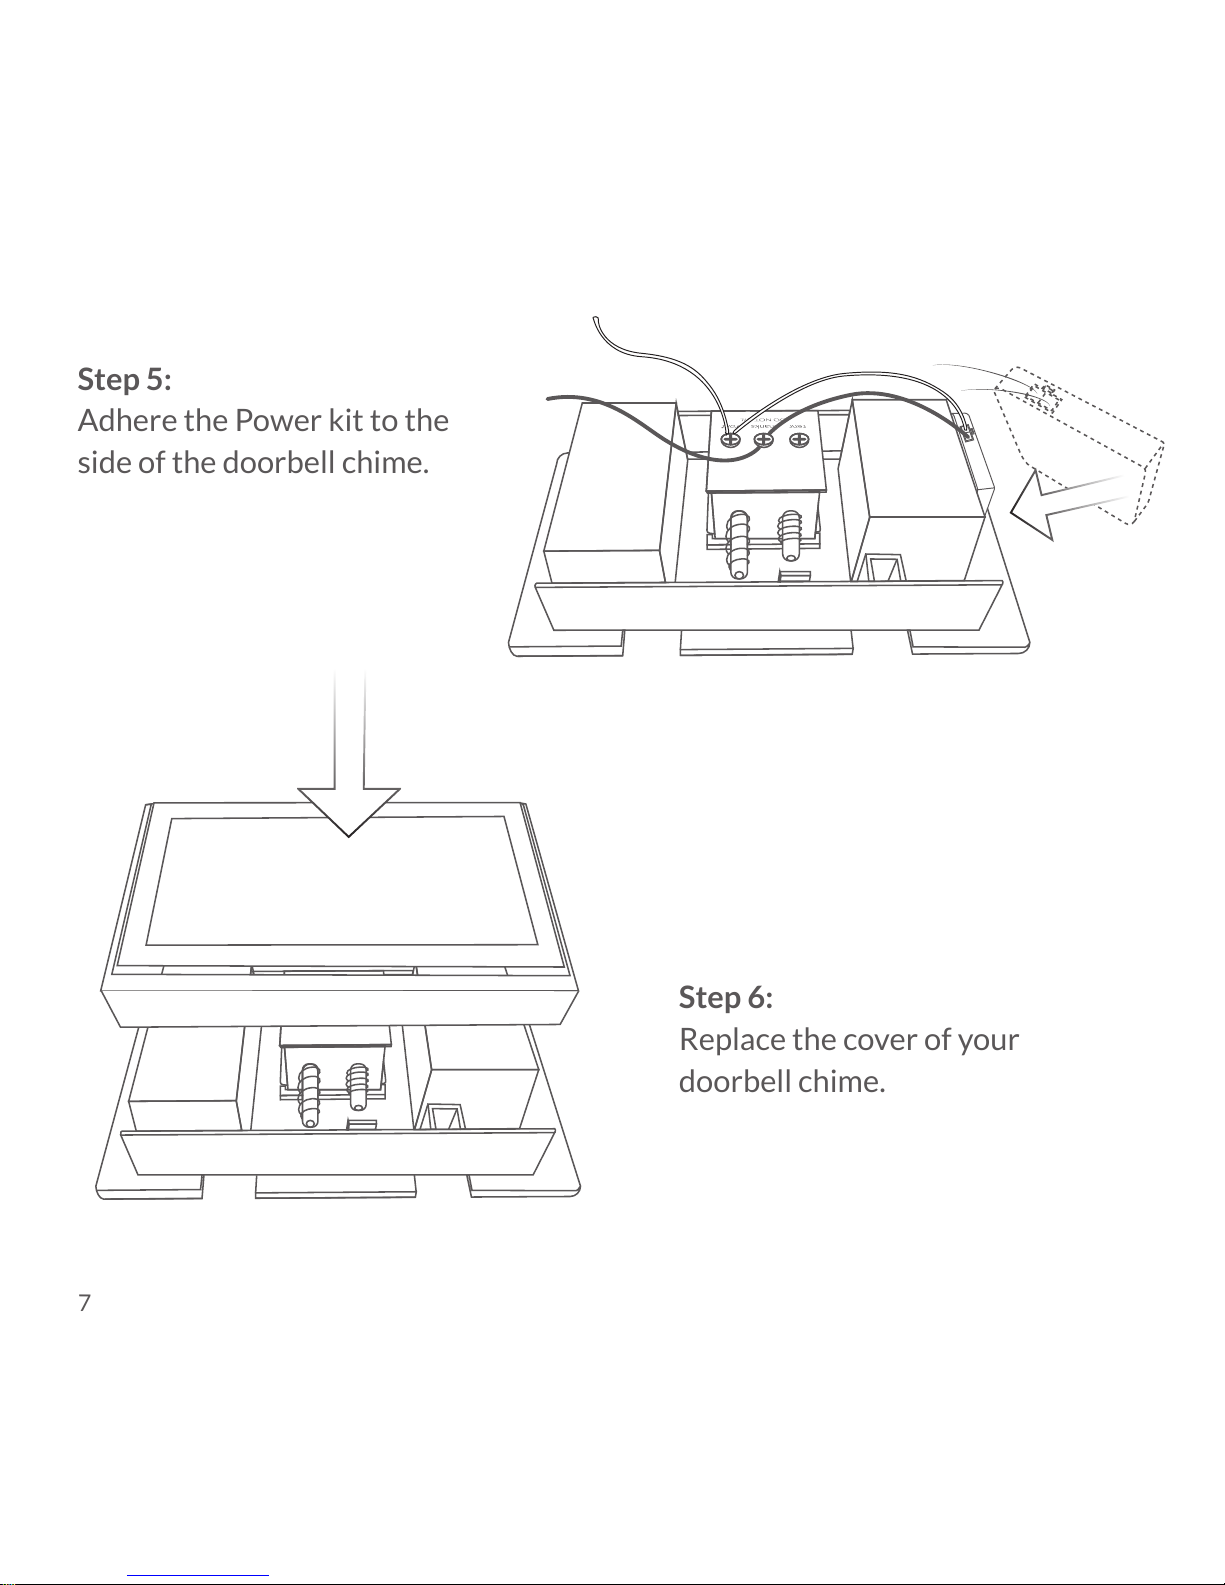
Step 5:
Adhere the Power kit to the
side of the doorbell chime.
Step 6:
Replace the cover of your
doorbell chime.
7
Page 12
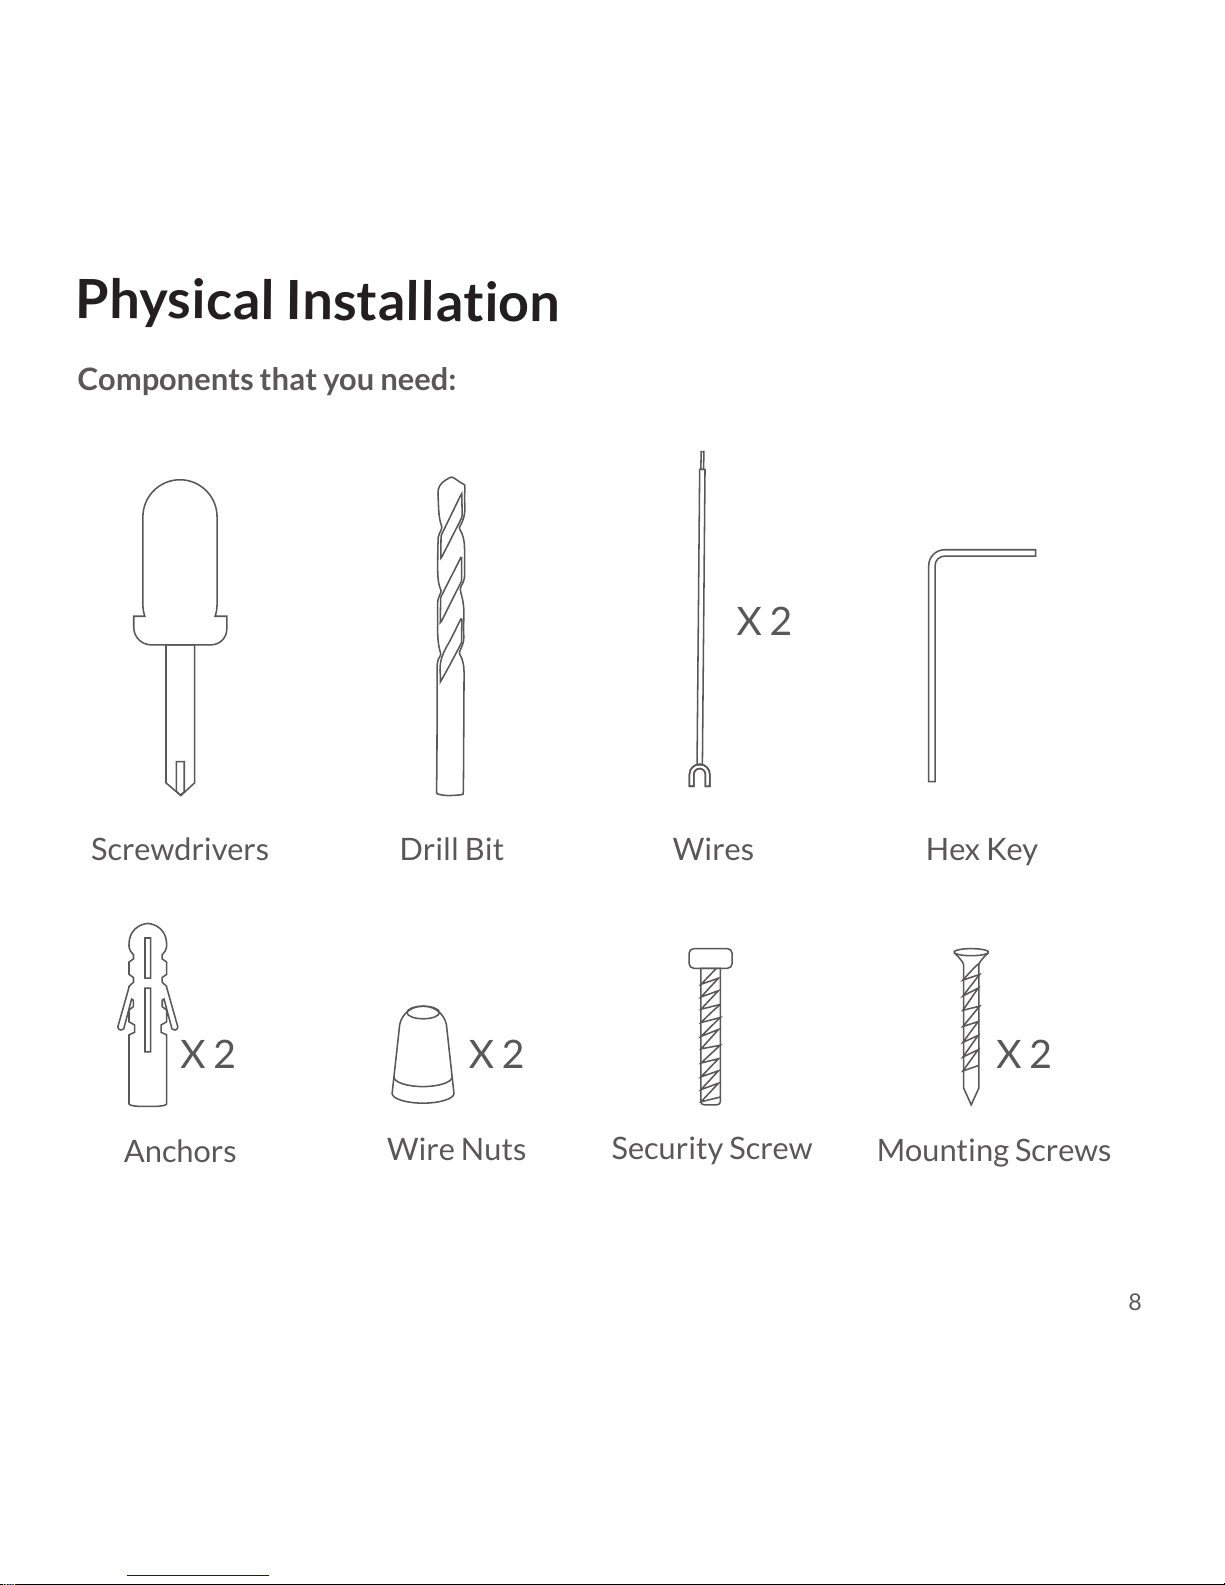
Physical Installation
Components that you need:
Wires
Wire Nuts
Security Screw
Mounting Screws
X 2X 2
Drill BitScrewdrivers Hex Key
Anchors
X 2
X 2
8
Page 13
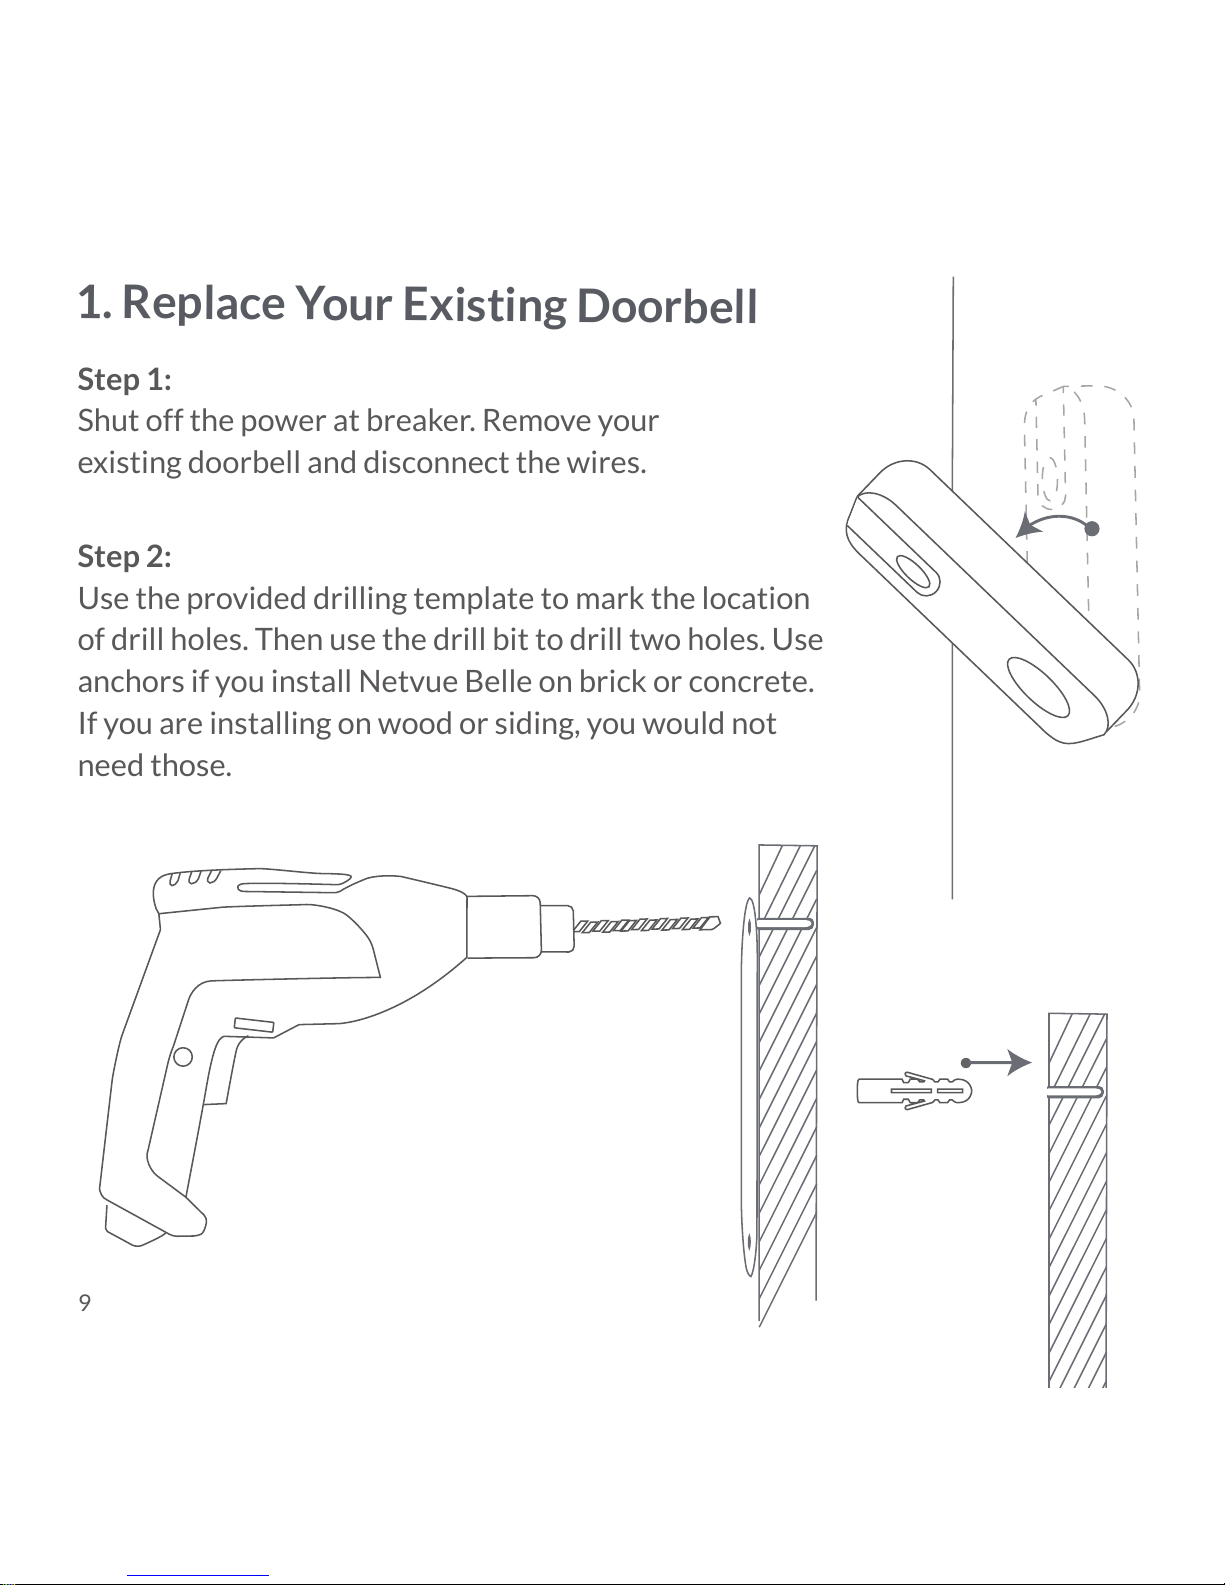
Step 1:
Shut off the power at breaker. Remove your
existing doorbell and disconnect the wires.
Step 2:
Use the provided drilling template to mark the location
of drill holes. Then use the drill bit to drill two holes. Use
anchors if you install Netvue Belle on brick or concrete.
If you are installing on wood or siding, you would not
need those.
1. Replace Your Existing Doorbell
9
Page 14
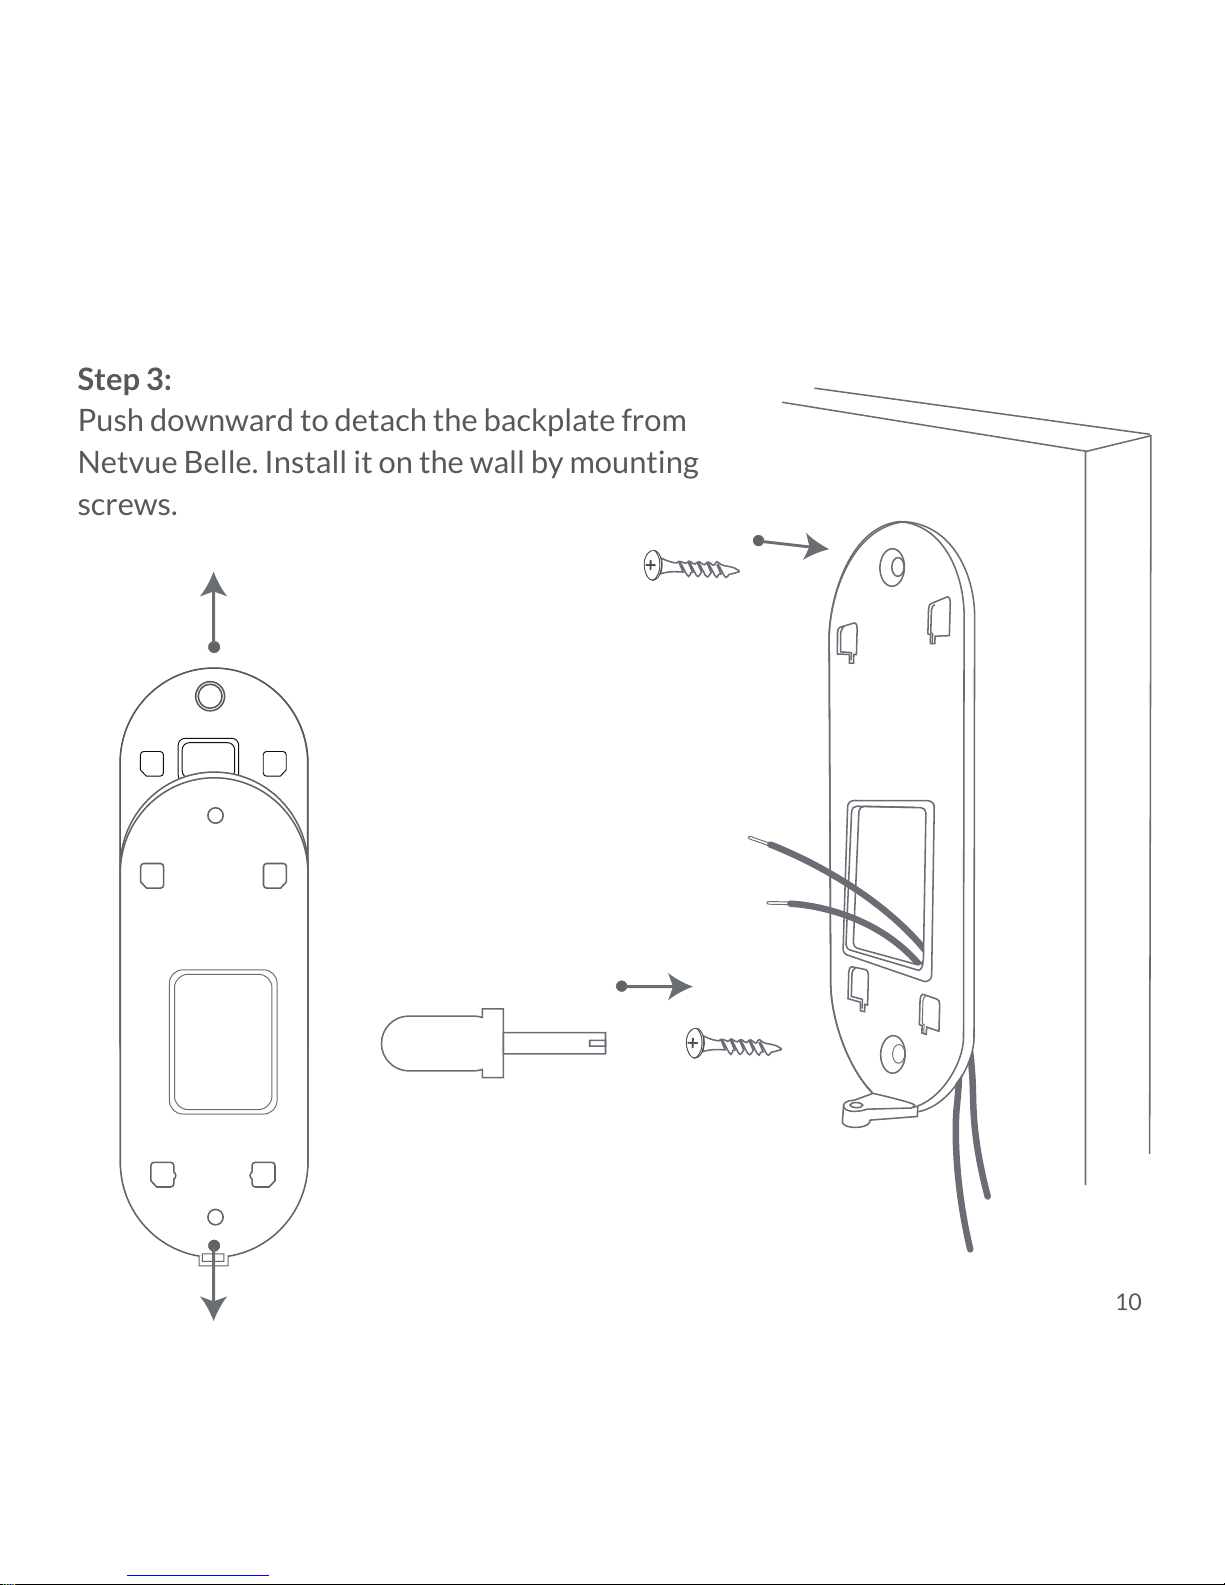
Step 3:
Push downward to detach the backplate from
Netvue Belle. Install it on the wall by mounting
screws.
10
Page 15
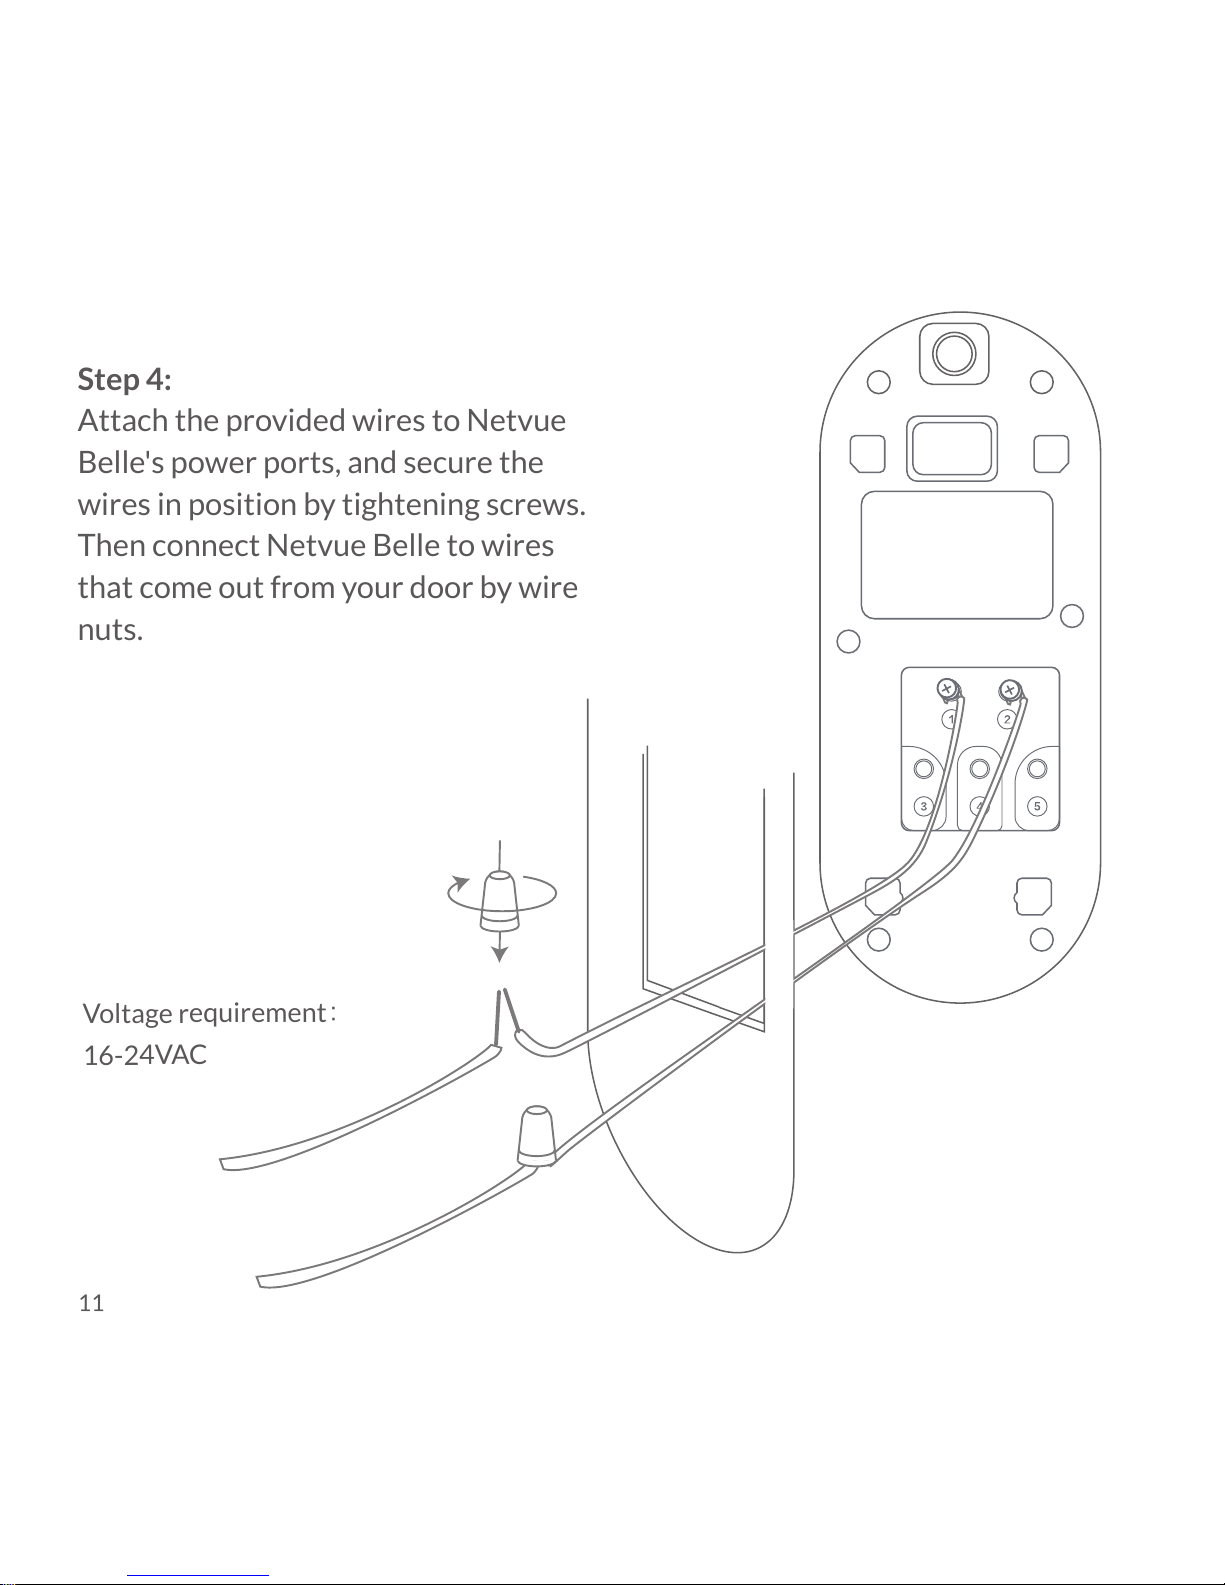
Step 4:
Attach the provided wires to Netvue
Belle's power ports, and secure the
wires in position by tightening screws.
Then connect Netvue Belle to wires
that come out from your door by wire
nuts.
Voltage requirement
16-24VAC
11
Page 16
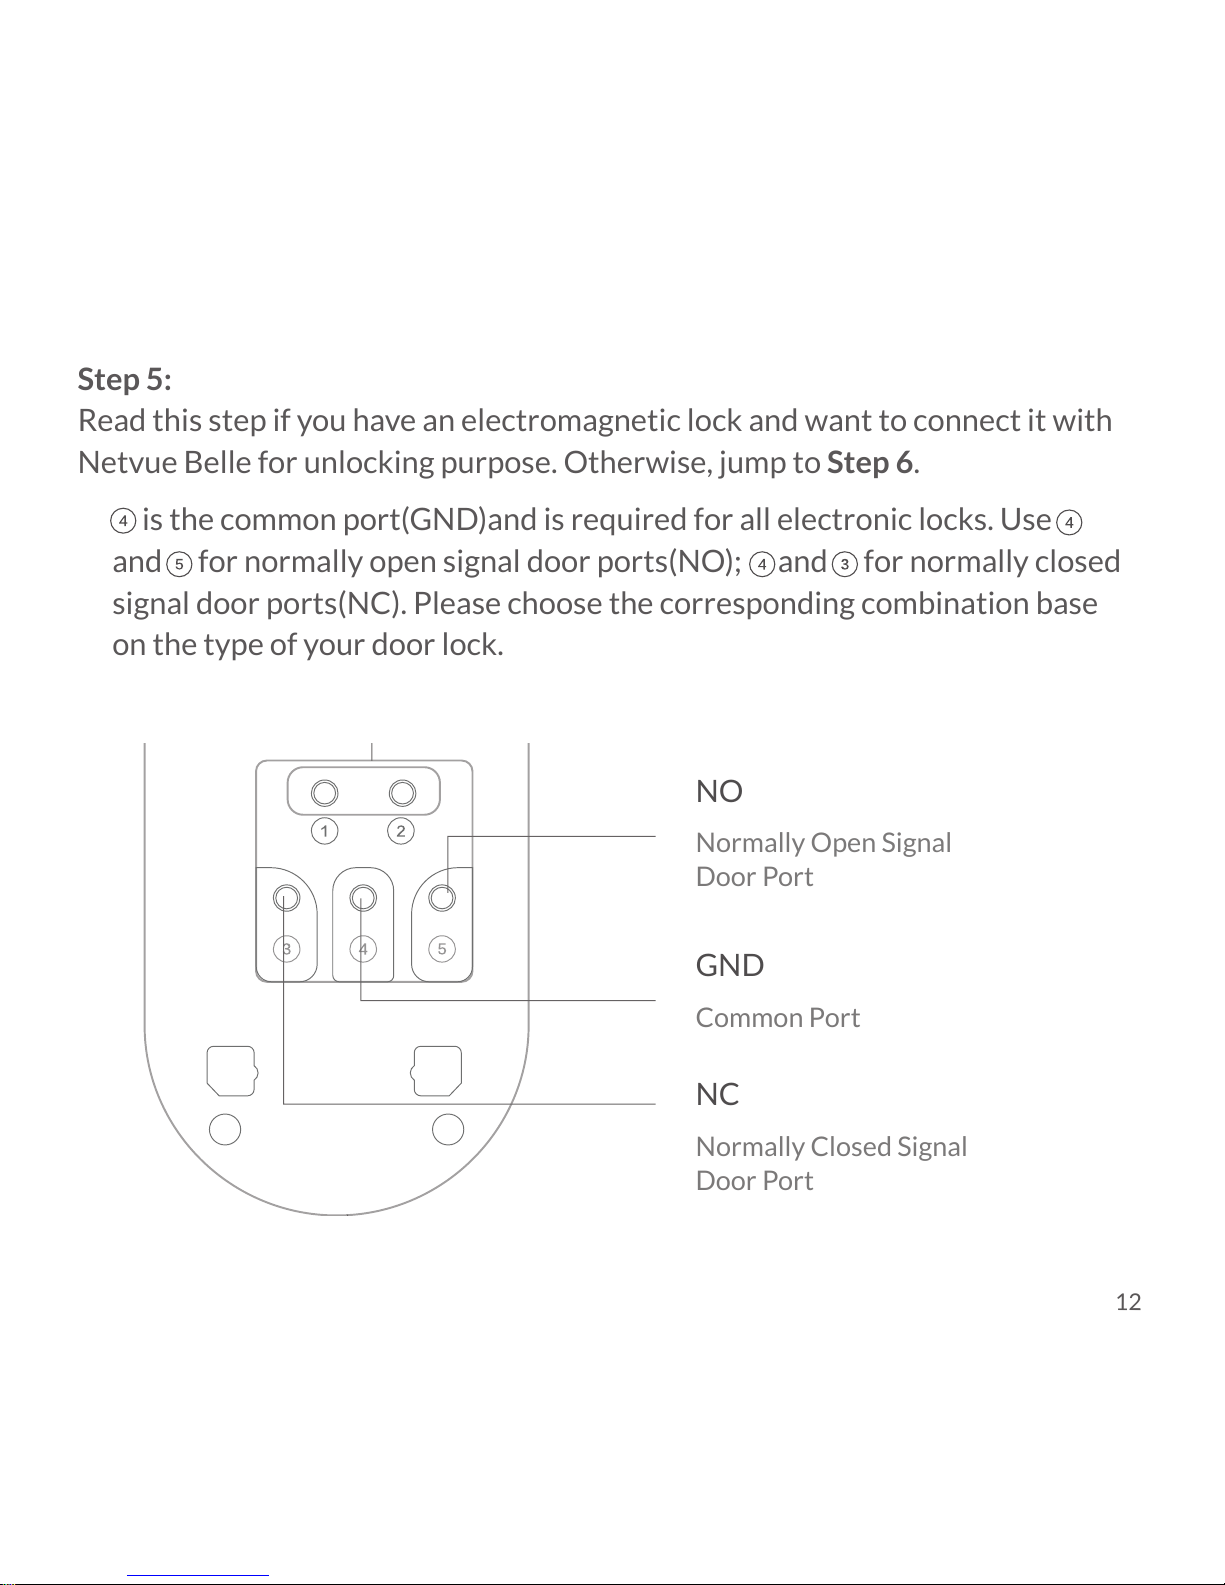
is the common port(GND)and is required for all electronic locks. Use
and for normally open signal door ports(NO); and for normally closed
signal door ports(NC). Please choose the corresponding combination base
on the type of your door lock.
Step 5:
Read this step if you have an electromagnetic lock and want to connect it with
Netvue Belle for unlocking purpose. Otherwise, jump to Step 6.
NC
Normally Closed Signal
Door Port
GND
Common Port
NO
Normally Open Signal
Door Port
12
Page 17
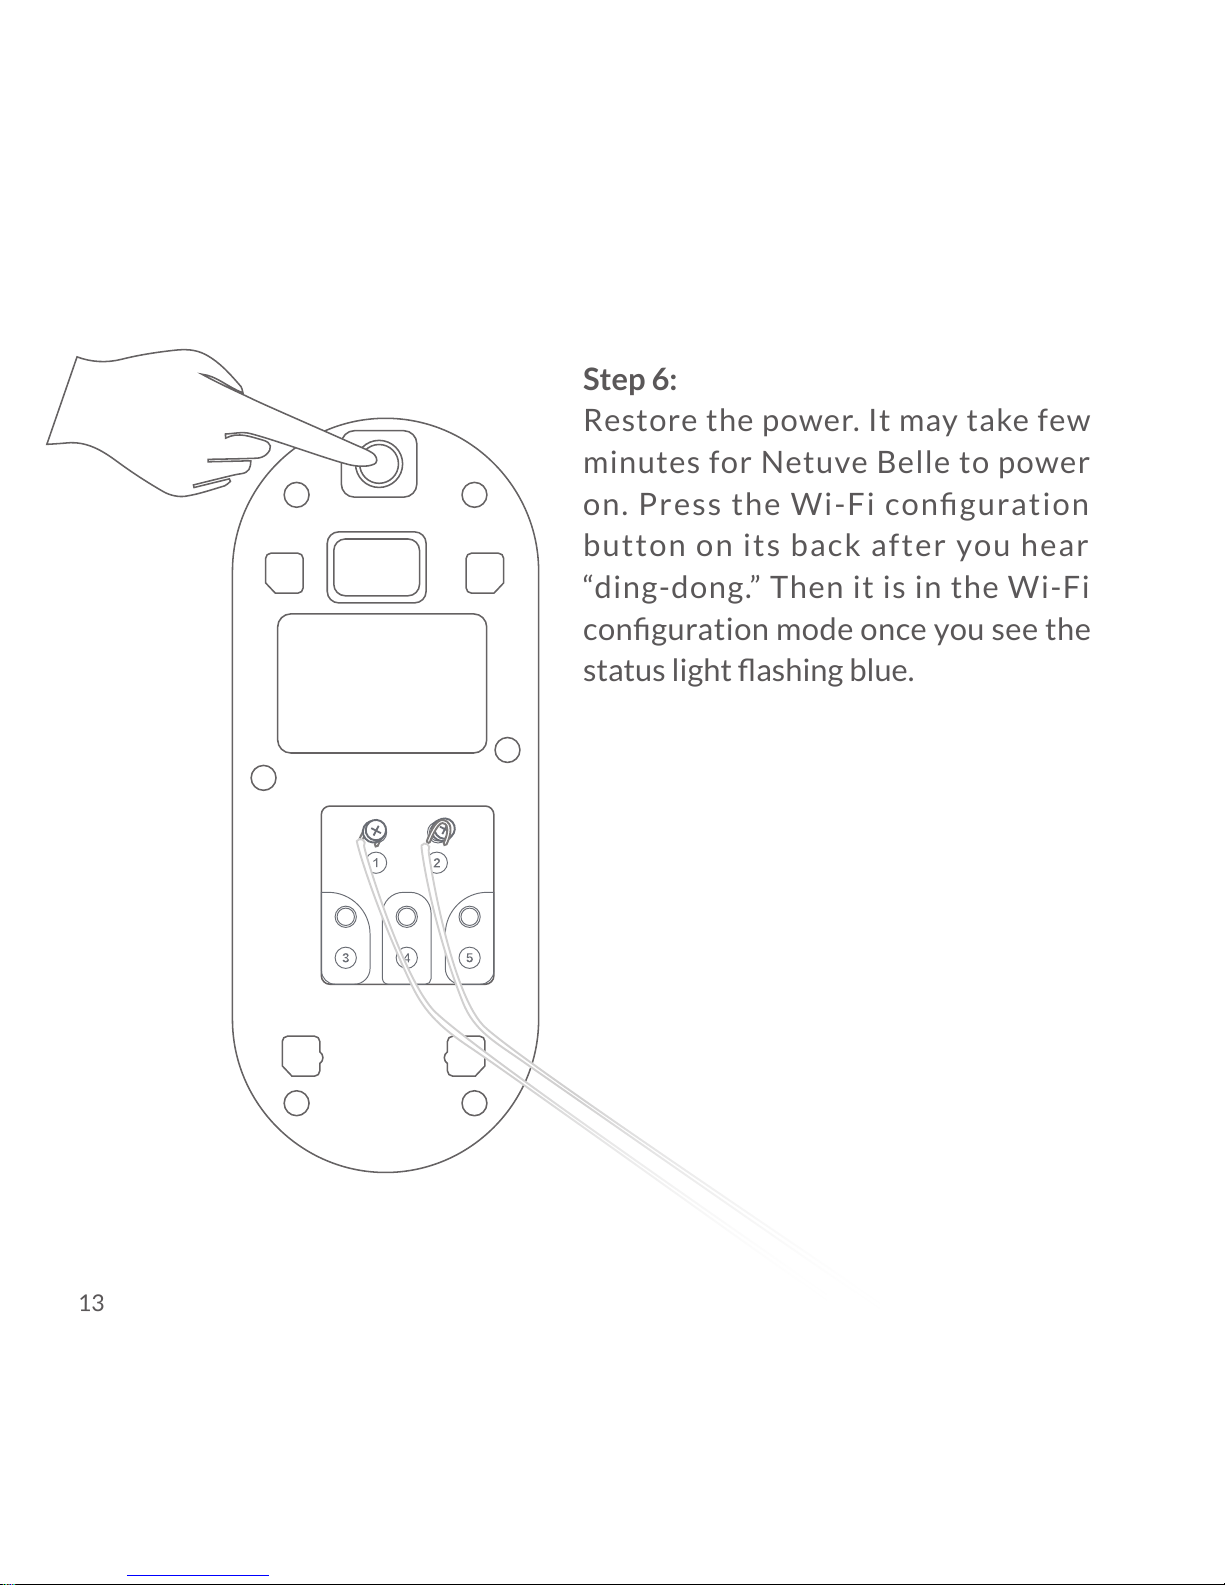
Step 6:
Restore the power. It may take few
minutes for Netuve Belle to power
on. Press the Wi-Fi configuration
button on its back after you hear
“ding-dong.” Then it is in the Wi-Fi
configuration mode once you see the
status light flashing blue.
13
Page 18
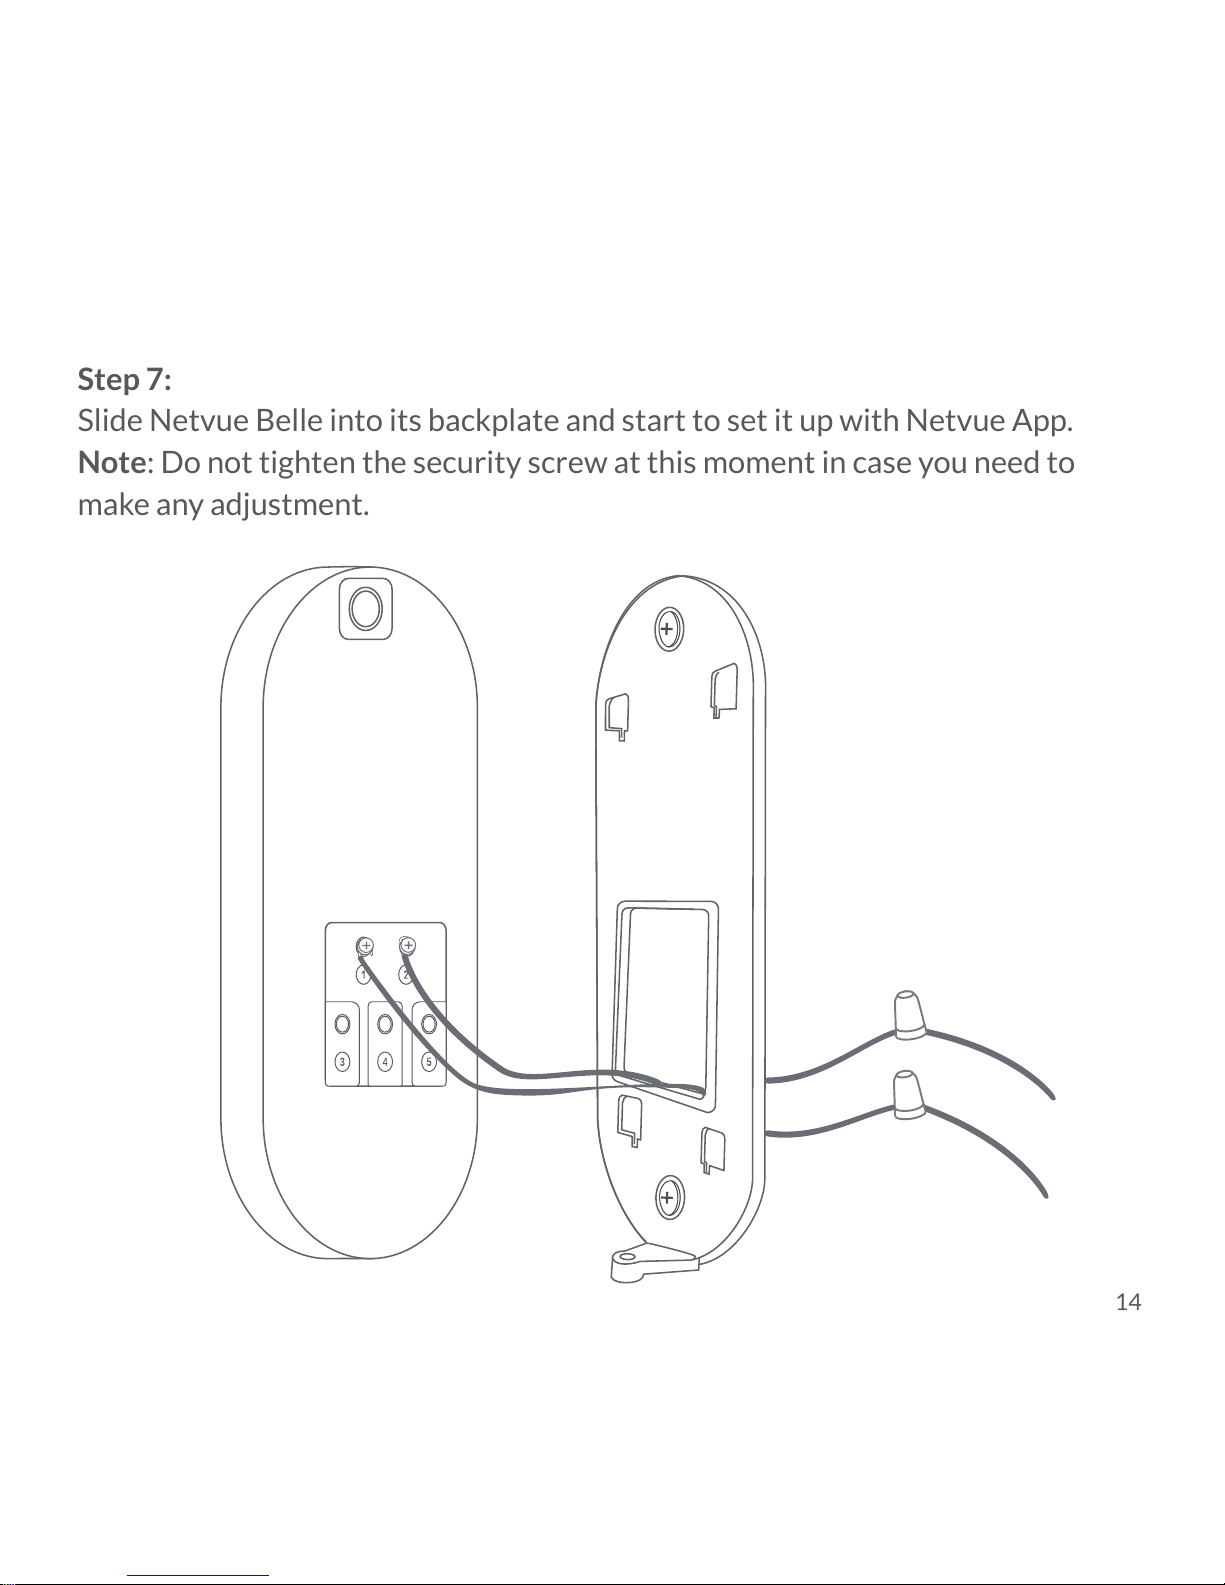
Step 7:
Slide Netvue Belle into its backplate and start to set it up with Netvue App.
Note: Do not tighten the security screw at this moment in case you need to
make any adjustment.
14
Page 19
Shut off the power supply. Run two conductor wires (#22-18ASG US standard
wire size) connecting to an AC power transformer (16-24VAC). The following
are options for Netvue Belle’s power supply:
Once you are done with Netvue Belle’s power supply, please repeat prior Step
2-7 in Replace Your Existing Doorbell section(Page 9) to finish the entire
physical installation process.
2. If You Don’t Have a Existing Doorbell
Existing facility/house Alarm Control using the AUX 16VDC
(≥500mA) power.
Standard CCTV Camera 24VAC (≥500mA) power supply/transformer.
A 16-24 VAC (≥500mA) power wall adapter/transformer outlet.
15
Page 20
Set Up With The Netvue App
Download Netvue App
1. Download the Netvue App from App Store or
Google Play.
16
Page 21
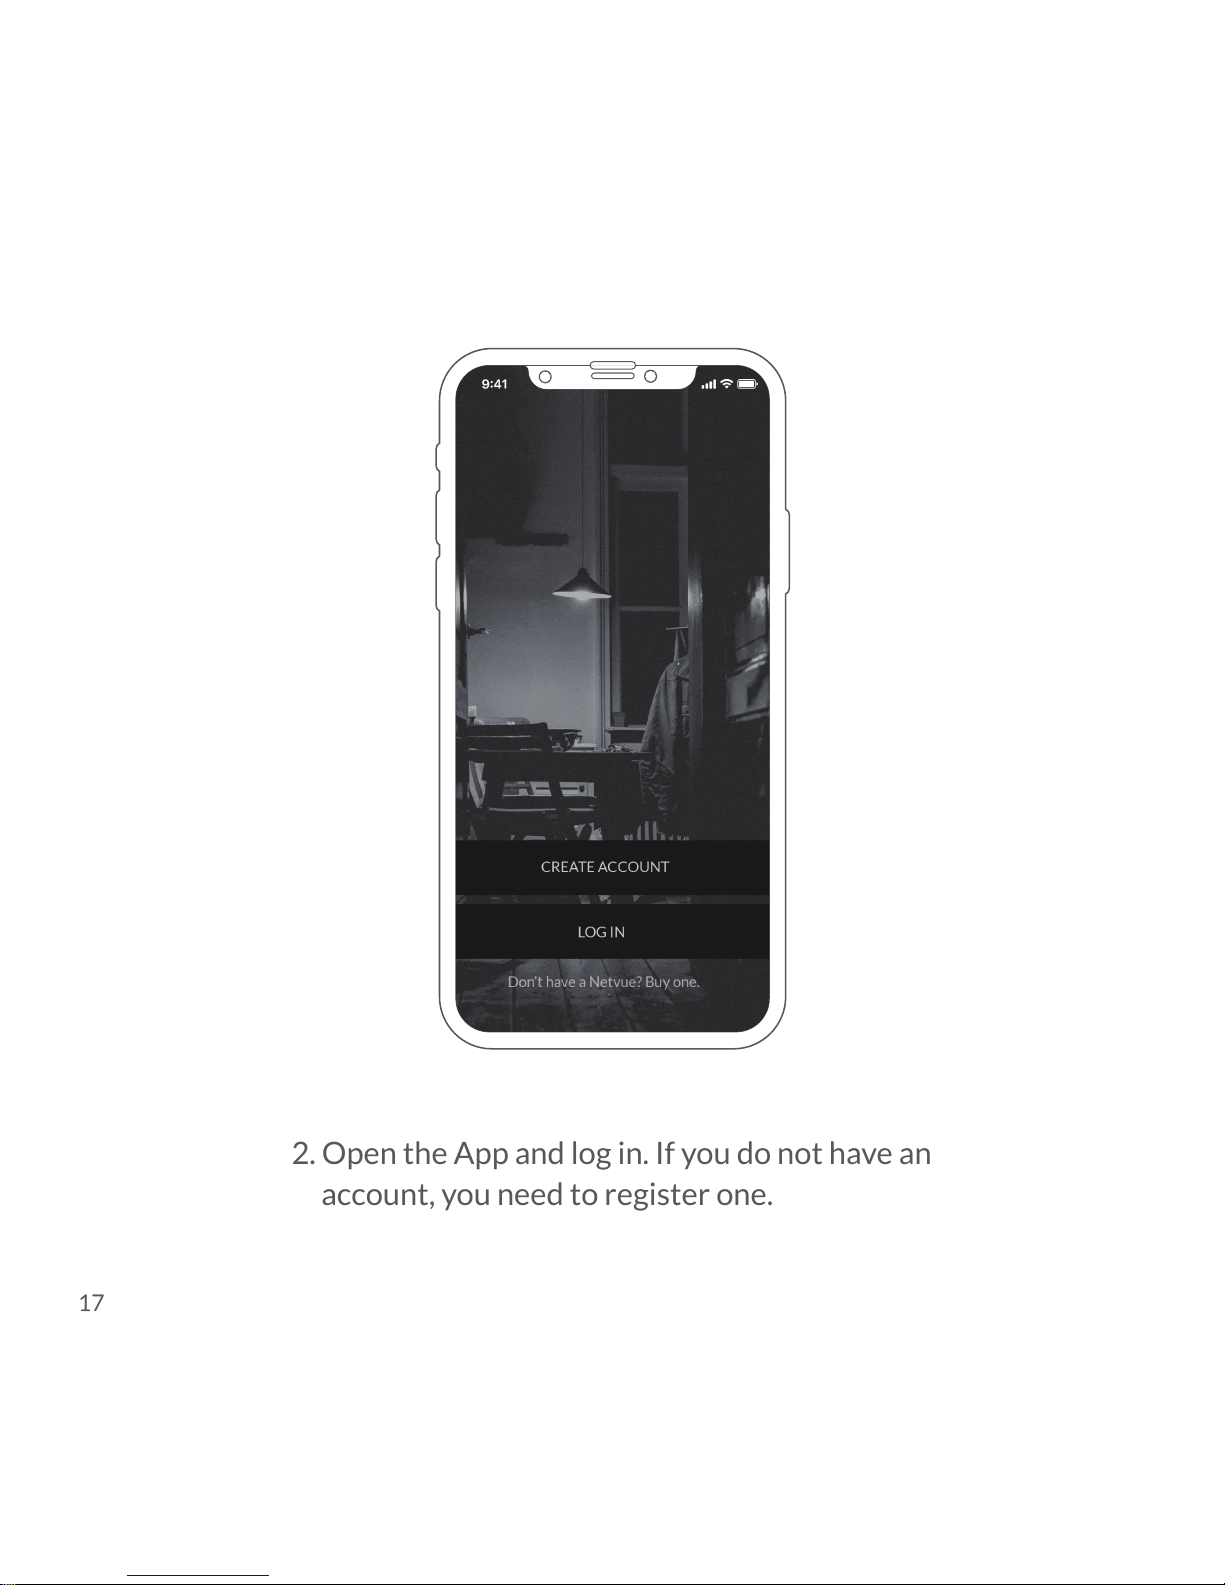
2. Open the App and log in. If you do not have an
account, you need to register one.
17
Page 22
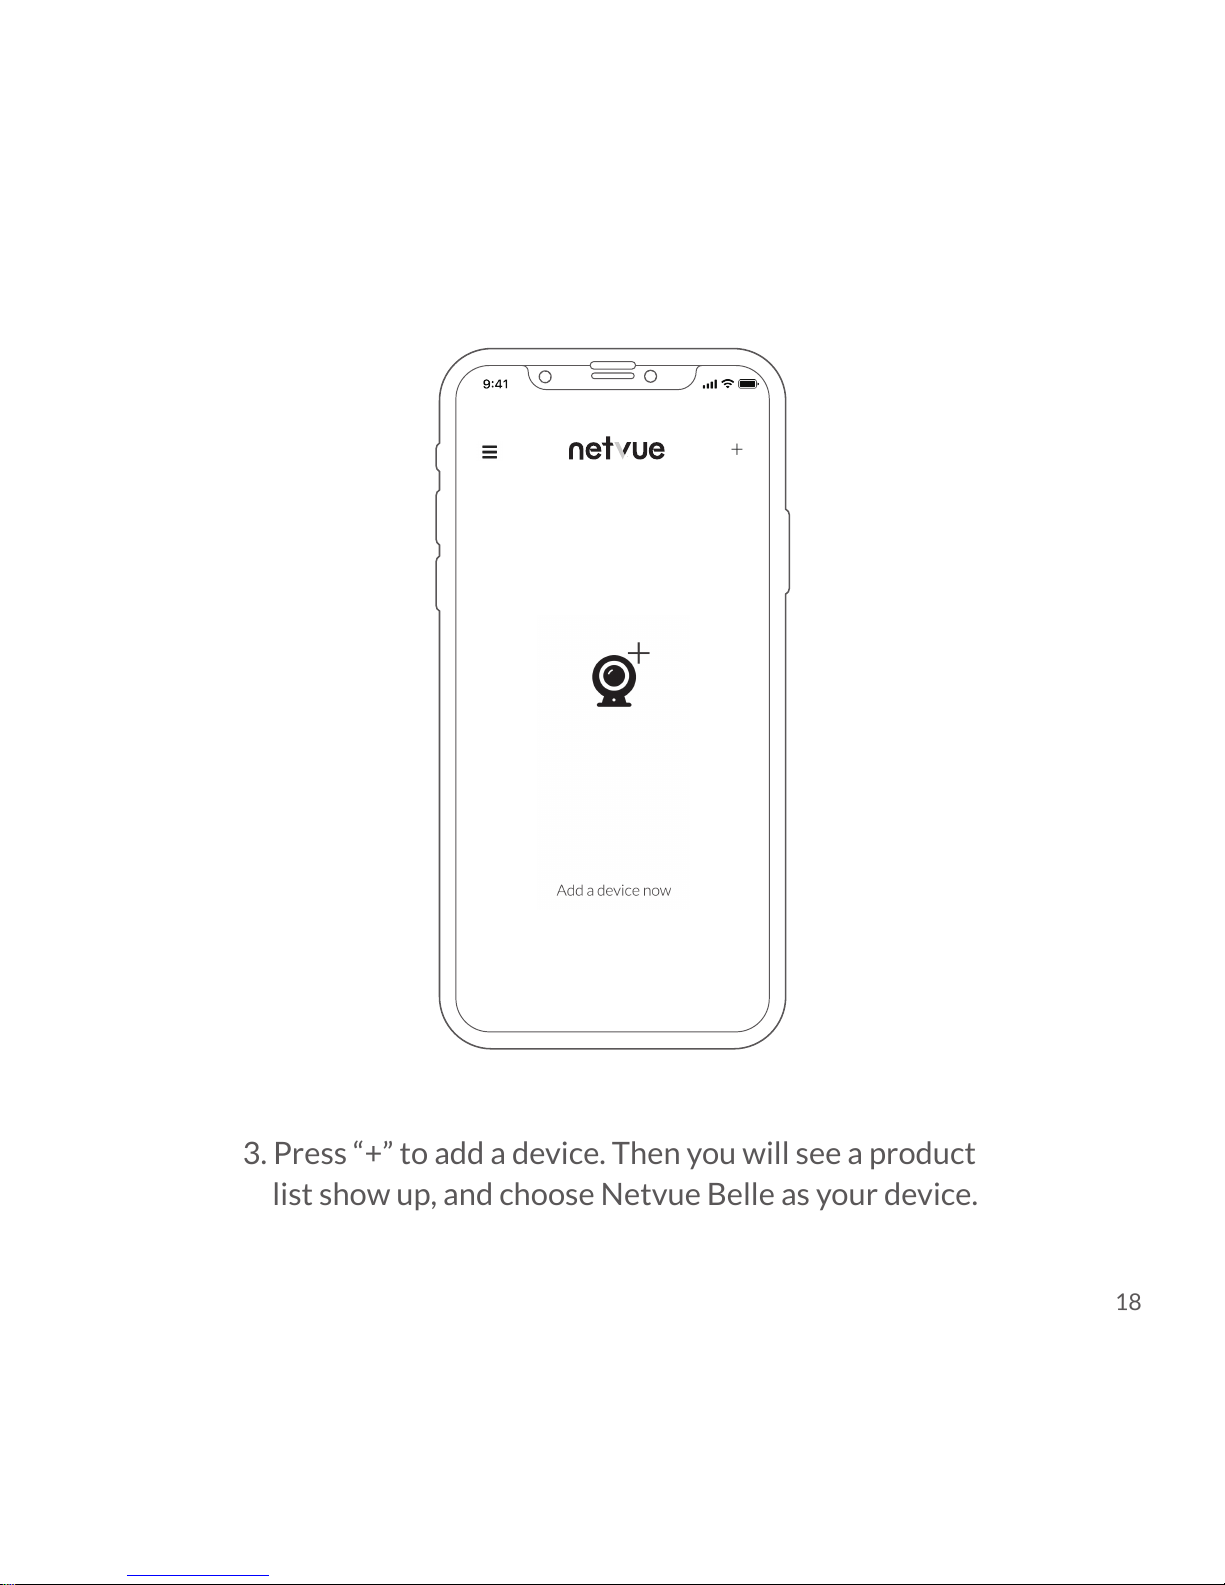
3. Press “+” to add a device. Then you will see a product
list show up, and choose Netvue Belle as your device.
+
18
Page 23
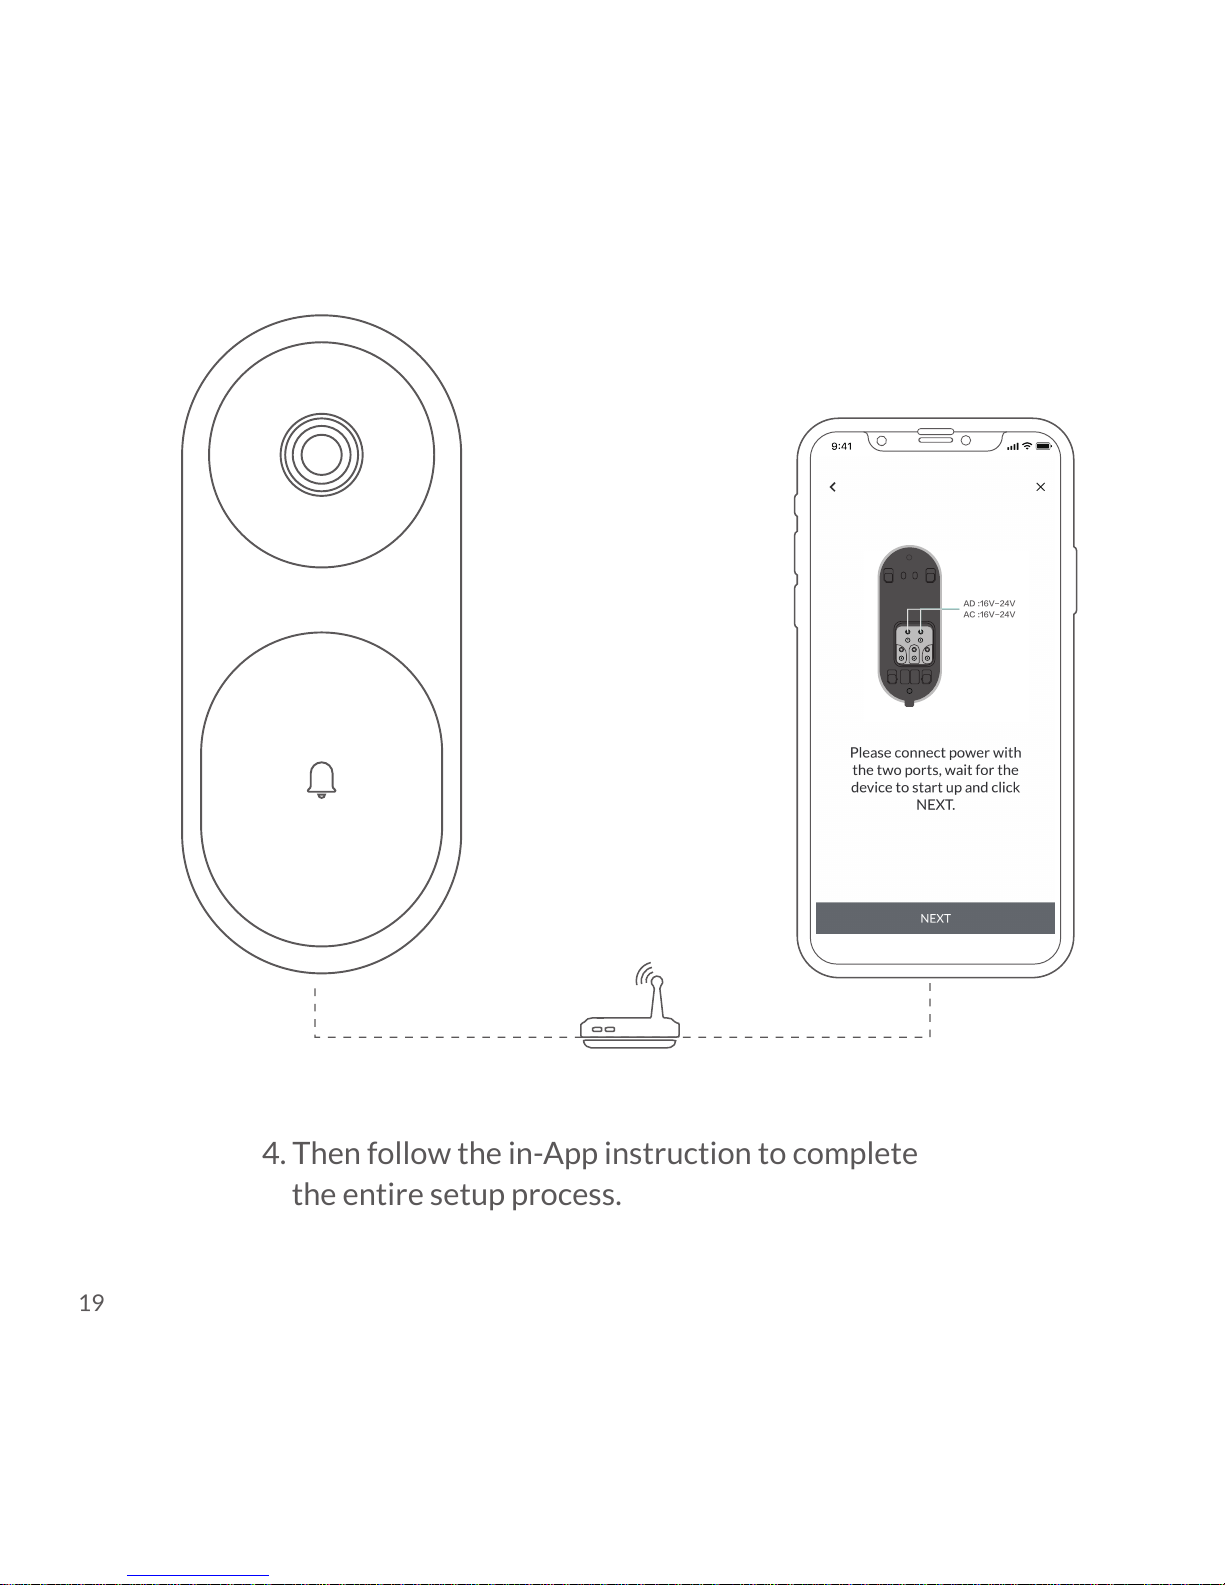
4. Then follow the in-App instruction to complete
the entire setup process.
19
AD :16V-24V
AC :16V-24V
Page 24
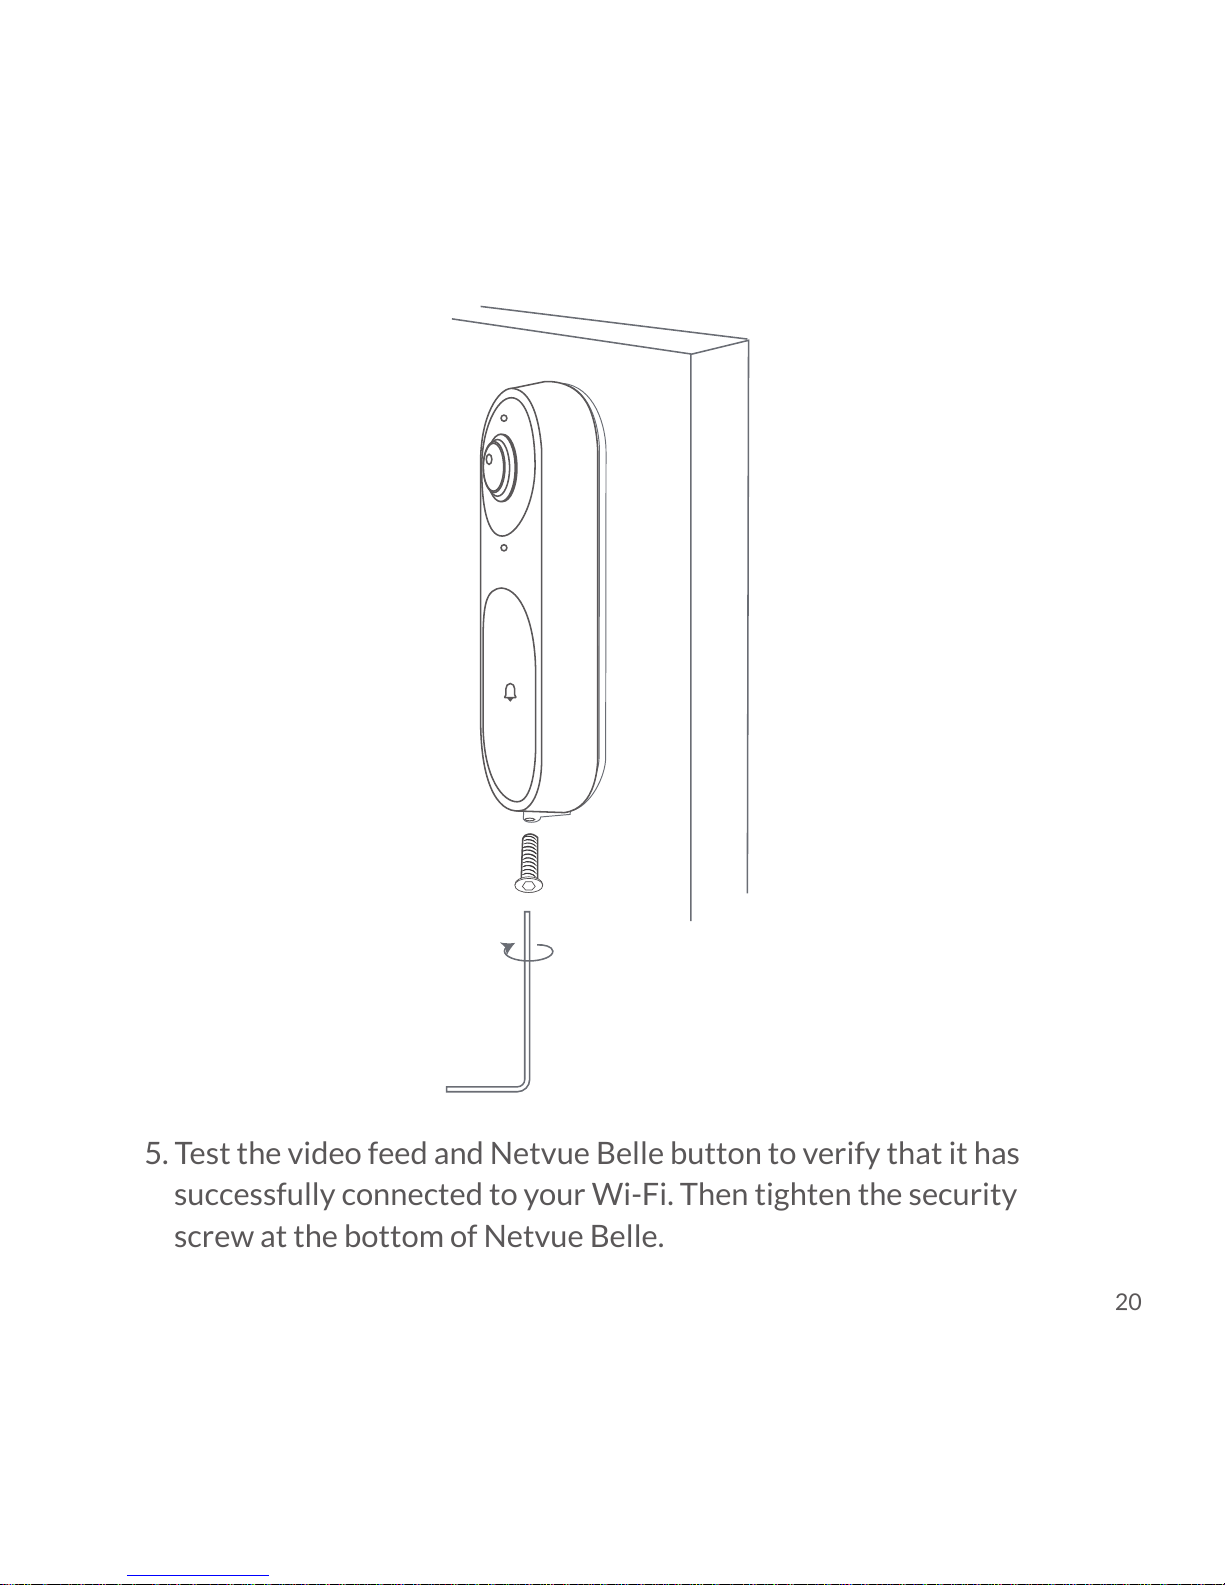
5. Test the video feed and Netvue Belle button to verify that it has
successfully connected to your Wi-Fi. Then tighten the security
screw at the bottom of Netvue Belle.
20
Page 25
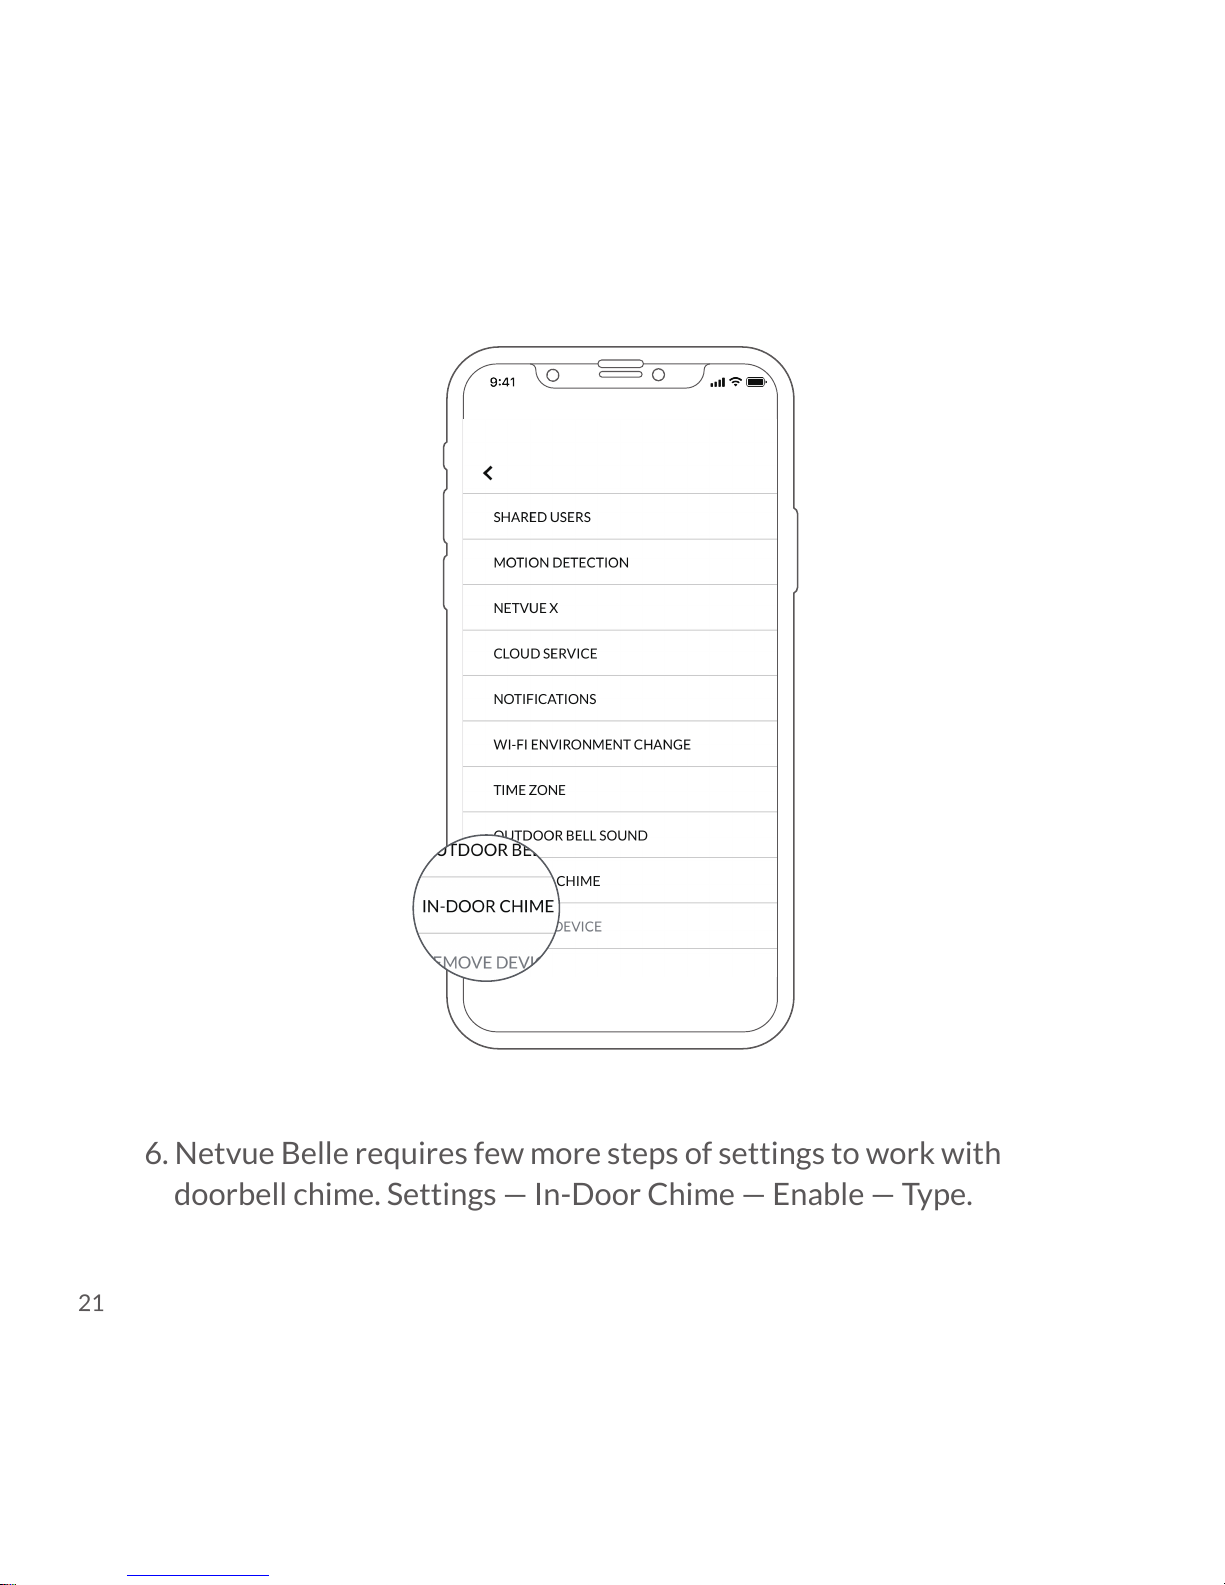
6. Netvue Belle requires few more steps of settings to work with
doorbell chime. Settings — In-Door Chime — Enable — Type.
21
Page 26
Note :
1.Difference between mechanical and digital doorbell chime.
Mechanical doorbell chime plays"ding-dong."
Digital doorbell chime plays a melody.
2.For Wi-Fi configuration, please wait for the status light turns to solid red, and then press
the configuration button.
3. Netvue Belle only works with 2.4 GHz Wi-Fi.
4. For Wi-Fi connection setup, hold your phone in front of Netvue Belle and let it scan the
QR code on your phone. The distance between Netvue Belle and your phone should
about 2-4 inch (5-10 cm).
22
Page 27
Status Light
Netvue Belle uses status light to communicate messages.
DescriptionStatus Light
Flashing Blue
Solid Blue
Slowly Flashing Red
None
Wi-Fi configuration
Working normally
Have connected to Wi-Fi but fail to connect to Netvue Server
Fail to connect to Wi-Fi
23
Page 28
Here are three scenarios:
1. Netvue Belle can’t speak to you
You probably haven’t turned on the Netvue X in the settings or having
network issues.
2. Not hearing voice from your phone’s speaker
You probably turn off Netvue Belle’s mic on App or your phone’s
speaker is off.
3. Not hearing voice from Netvue Belle’s speaker
You probably turn off Netvue Belle’s speaker on App or having issue
with your phone’s mic.
Why can’t hear voice from the Netvue Belle?
Open the App — Choose the corresponding device — Tap settings icon
at the top right corner — Motion detection — Turn on the MOTION
DETECTION.
You can change the default motion detection time range to you
preferred one. Motion sensitive and motion zones also can be
customized.
Why cannot receive motion detection or how to set motion detection?
Troubleshooting
24
Page 29
Open the App — Choose the corresponding device — Tap settings Icon at
the top right corner – SHARED USERS — Enter shared user’s account name.
If you share device with user who log in with Wechat or Facebook account,
check their username in App account info. Please note that username of
Wechat or Facebook is not the account name. Same account can be login on
different phones at the same time.
How to share device with other users?
Open the App — Choose the corresponding device — Tap “HISTORY”
at the bottom left corner — Press and hold the event you want to
delete for 2-3 seconds—A confirmation window pops up—Tap
“CONFIRM”.
How to delete history?
25
Page 30
Feel free to contact us for additional help:
www.netvue.com
240 W Whitter Blvd Ste A, La Habra, CA 90631
© 2010-2017 Netvue Technologies Co., Ltd. All Rights Reserved.
@NetvueTech
Chat with us through App
1(866)749-0567
 Loading...