

Page 1
For more detailed user’s guide,
Please visit www.netviewtech.com
Version 1.0
2016 Netview Technologies (Shenzhen) Co. ltd
All rights reserved
QUICK START GUIDE
App Store Android
Internet Video Doorbell
Once users have successfully installed and enabled
corresponding features, users are considered to
understand and acknowledge all functions (includes but
not restricted to camera, audio, and live video). NetView
Technologies (Shenzhen) Co., Ltd is not responsible of
any legal disputes related to information recorded
and/or stored by its products.
Disclaimer and Waiver of Liability
Page 2

01 02
This equipment has been tested and found to comply with
the limits for a Class B digital device, pursuant to Part 15
of the FCC Rules. These limits are designed to provide
reasonable protection against harmful interference when
the equipment is operated in a commercial environment.
This equipment generates uses and can radiate radio
frequency energy and, if not installed and used in
accordance with the instructions, may cause harmful
interference to radio communications.
The antennas used for this transmitter must be installed
to provide a separation distance of at least 20 cm from all
persons and must not be co-located for operating in
conjunction with any other antenna or transmitter
Except for the operations of law enforcement officers
conducted under lawful authority, no person shall use,
either directly or indirectly, a device operated pursuant to
the provision of this part for the purpose of overhearing or
recording the private conversations of other unless such
use is authorized by all of the parties engaging in the
conversation.
The VueBell Outdoor Unit will remain lightless if no one
approaches. The PIR sensor will automatically activate
the Outdoor Unit. A bell pattern with lighting around will
be visible when someone comes close enough (within 3
meter). It will also activate the camera and allows it to
take photos. Only if when PIR sensor and motion
detection sensor detects movements, it will trigger the
VueBell Outdoor unit to take snapshots. Photos will be
saved on cloud storage for user’s reference. At the same
time, user will receive a notification on their device which
can lead them directly to the photos.
Once the visitor see the bell-shaped touch button and
touch it to ring the bell, it will send a signal to the
Receiver which will sound. The touch on the screen also
triggers the camera to take a photo and send it to the
user. User will receive a notification on their device with
option to live chat with the visitor through VueBell. User
will also be able to unlock the door through VueBell
application (if applicable).
FCC (USA) 15.9 prohibition
against eavesdropping
FCC radiation exposure statement
Warning How to use VueBell?
Download VueBell APP from APP store
or Google play market.
APP Set-up
Page 3
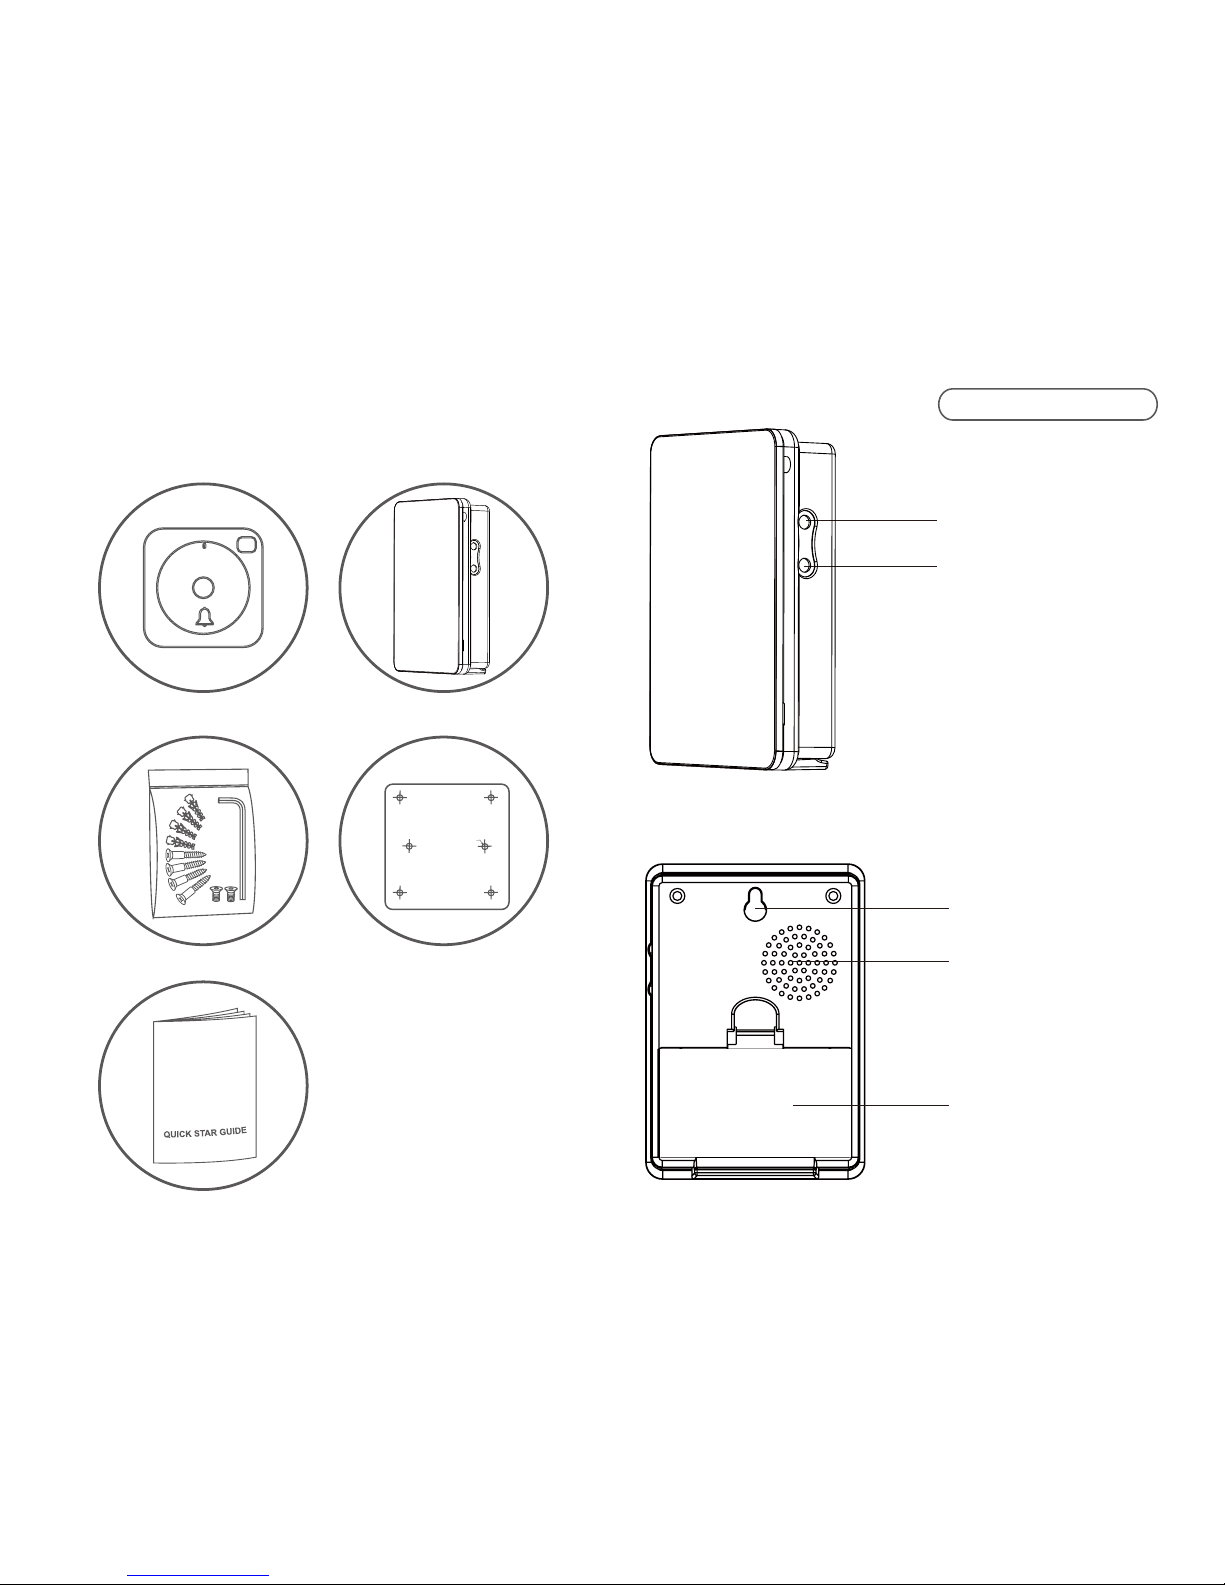
Packing list
5. quick start guide
3. accessories
2. indoor receiver1. outdoor unit
4. location label
screw hole
Drilling template
Receiver back side
Receiver front side
Volume Button
Melody Selector
Hanging Hole
Speaker
Battery Cover
Names for parts
03 04
Page 4
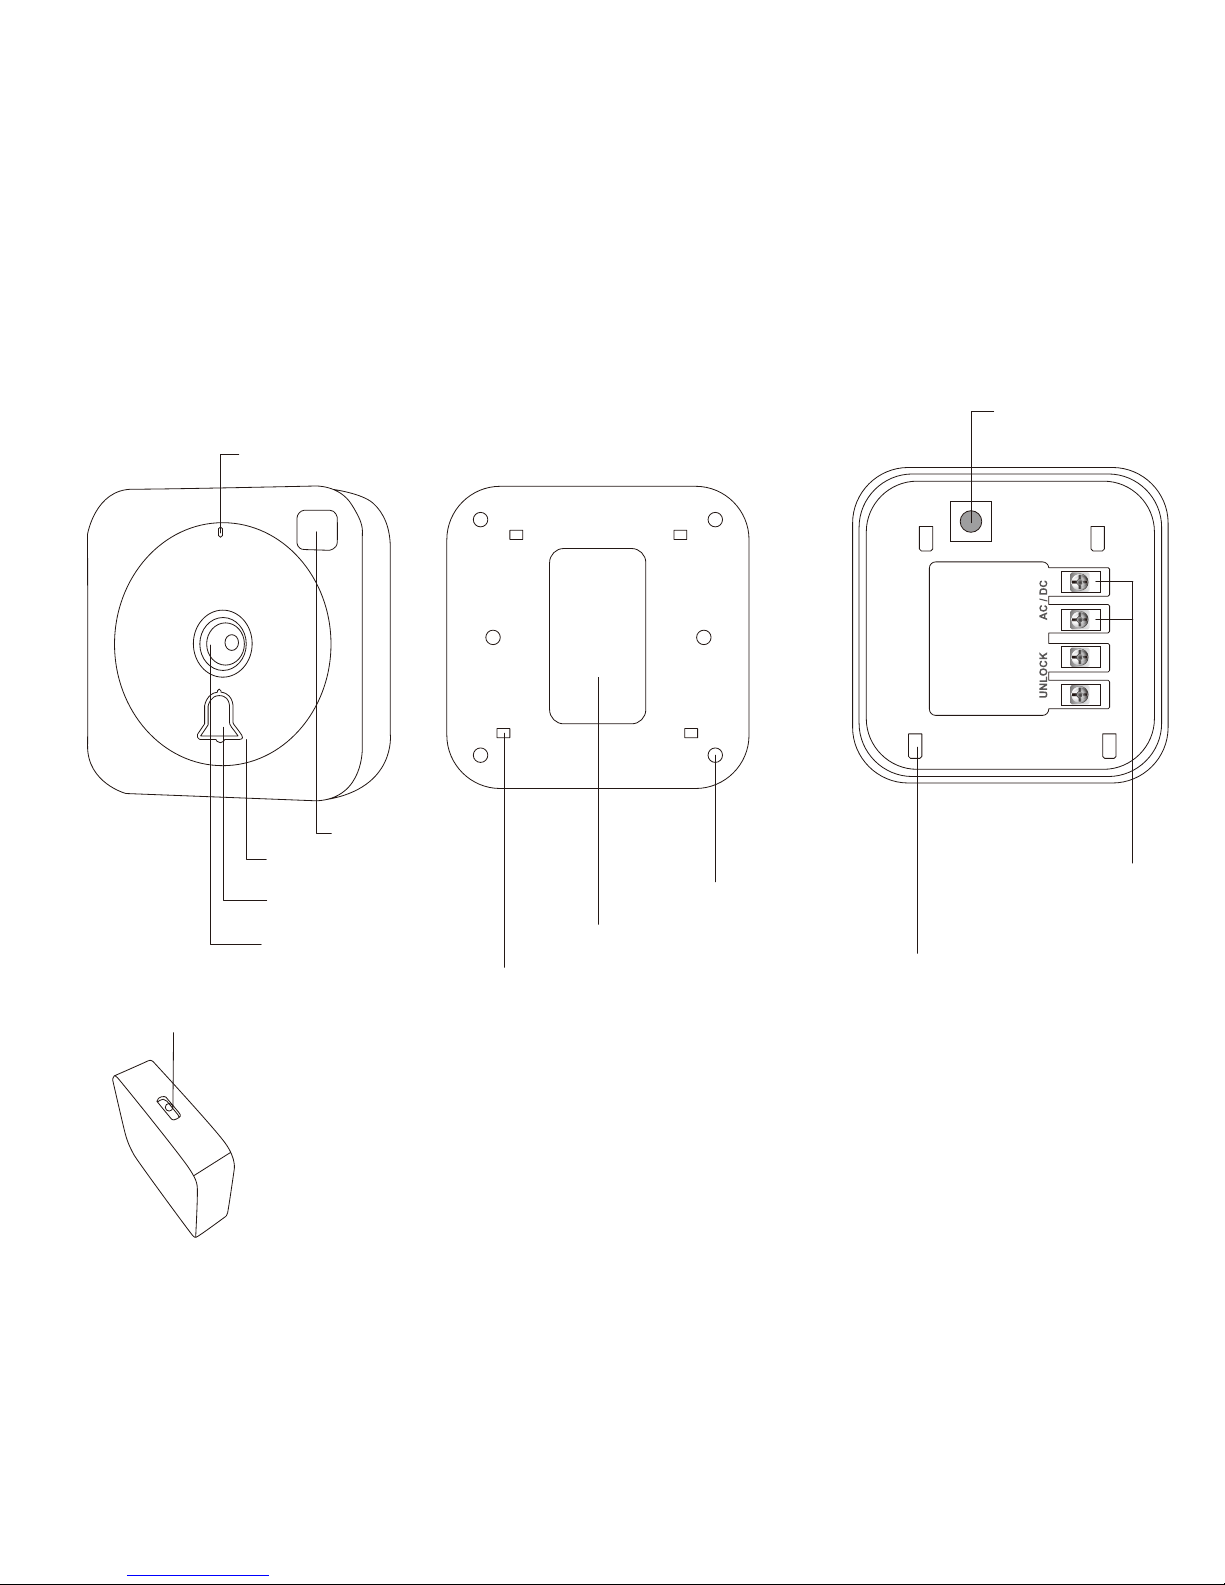
Name of parts
Wide angle HD camera
PIR sensor
Microphone
Touch button
Speaker
Front cover and back cover hook
LED
holes for screws
hole for wire
05 06
Reset
Connect with AC/DC power
Front cover and back cover hook
Page 5
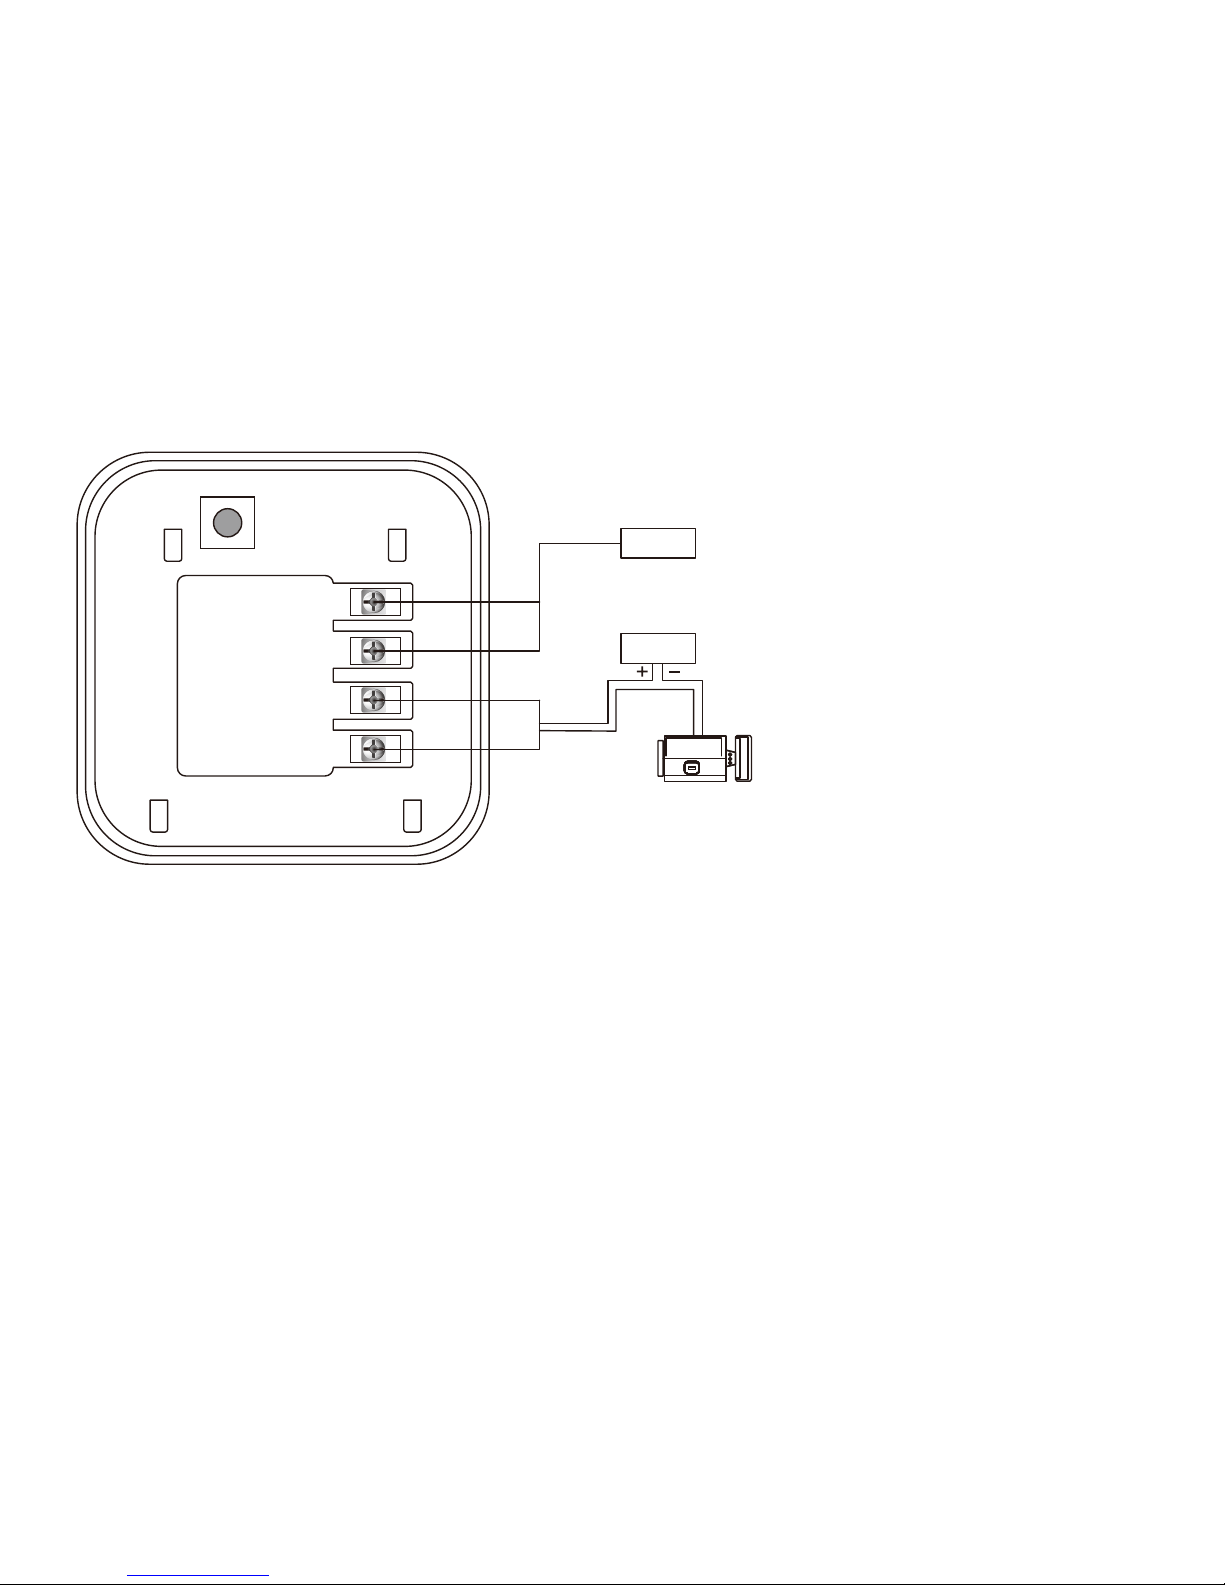
Wiring diagram
1. Before installation and operation, you will require a drill,
a cross-headed screwdriver, a flat head screwdriver, fixing
screws and wall plugs. All of these are not supplied with
this kit.
2. Avoid the Transmitter positioning on Metal Frames.
3. Avoid positioning above heat sources such as radiators,
or in damp areas such as a kitchen or bathroom.
Notes before Installation
4. The range of operating voltage and the Maximum power
: AC8~24V, DC8~36V
5. Please let the lens stay out of the sun when installation.
07 08
AC / DCUNLOCK
Power
Power
Page 6
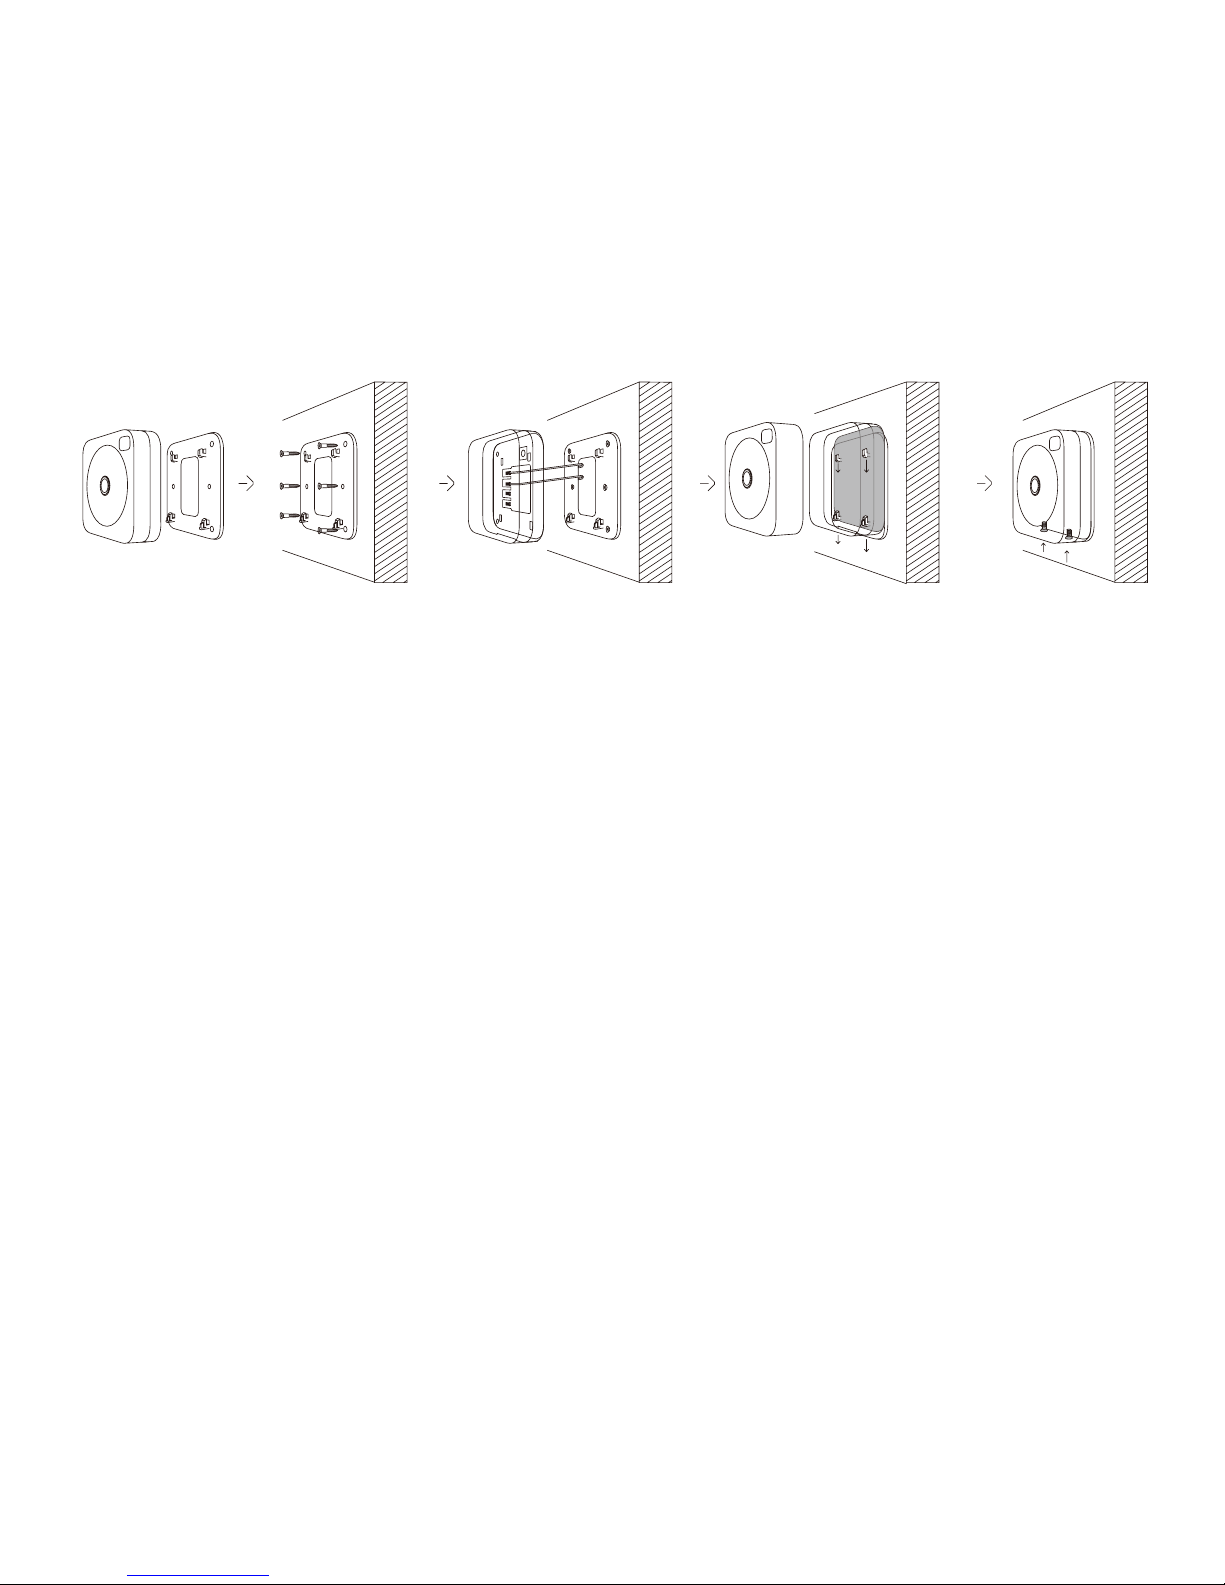
Installation Procedures
1.Turn off the power at the circuit breaker or fuse box
(typically installed on the wall near the front/back door)
-Remove all security screws from the old Receiver, then
disable your old Receiver, then you will find the power
wire on wall.
-Twist the metal part of the power wires together, then
we don’t need this old chime device anymore.
-Plug VueBell Indoor Receiver into the AC power.
2.Disable your old bell button and replace it with your
new VueBell Outdoor Unit.
-Remove all security screws from the old bell button,
Keep the AC/DC power wires and discard the old bell
button.
-Stick the location label on the area where you choose
to install the VueBell Outdoor unit, punching the screws
on the location, then get rid of the label.
-Put the Outdoor unit back cover on wall, AC/DC power
wire through the wire hole, then install the screws.(step
②① ④③ ⑤
①and②)
-Drive each of the two wires to one of the top two
screws(which marked “AC/DC Power” on the backside)
on the VueBell Outdoor unit front cover. Make sure the
metal wires are directly touching the screws. The order
does not matter. Tighten the security screws. The bell
pattern will be lighting.(step③)
-Hook them up, the outdoor unit front cover and the
outdoor unit back cover.(step④)
-Install the security screws.(step⑤)
-Wait 40 seconds for the VueBell system to be ready.
In the case which you have two old bell buttons (one for
the front door and one for the back door), follow the
same procedures and disregard the second bell button.
In the case which you have two bell buttons and would
like to install a second VueBell, simply repeat step 3 for
installation of the second VueBell.
09 10
Page 7

Remove the battery cover and insert 2×1.5V AA
batteries; Ensure battery polarity match the internal
markings.
Fix a screw on the wall. Then hang the Indoor Receiver
by the hole at the back of the unit. Avoid positioning on
UPVC Frames, above heat sources (e.g. radiator) or in
damp areas such as a kitchen or bathroom.
Important: Test the Indoor Receiver before drilling any
holes to ensure it is within operating range.
Note: As an alternative, the Indoor Receiver can also
be placed on the flat surface, such as table.
Melody Selection
There is a melody selector located at right side of the
door chime. Press the selector to change different
melody.
Volume Adjustment
There is a volume button at right side of the door
chime. Press it to adjust the sound volume to be high,
medium and low.
User Hints
If the Indoor Receiver does not sound, please check
the following:
● Flat batteries in Receivers-change the batteries.
● Wrong battery polarity in Receivers-reinsert the
batteries.
● Units are out of range-Operate the Indoor Receiver
within the operation range.
What is Auto-learning Code?
The Outdoor unit sends wireless signal to the Indoor
Receiver. The Indoor Receiver would automatically
register and memorize the signal as an operation code.
So the Outdoor unit can work with the Indoor Receiver by
this code.
Auto-learning Code Set Up
The Indoor Receiver is equipped with auto-learning
operation code ability.
1. Operation for 1 Outdoor unit and 1 indoor receiver
After power supply on Outdoor unit and battery
installation on Indoor Receiver, press the Outdoor unit
once to generate a new operation code. The Indoor
Receiver will sound, which indicates that a new operation
code is registered and memorized.
2. Operation for 2 Outdoor units and 1 indoor receiver
After power supply on the two Outdoor units firstly and
then battery installation on Indoor Receiver, press the
push button on each Outdoor unit once within 15
seconds to generate new operation codes. The Indoor
Receiver will sound, which indicates that two new
operation codes are registered and memorized. This is
the only way for the 2 Outdoor units to work with the
Indoor Receiver.
(If user press the push button on each Outdoor unit after
15 seconds, only the first Outdoor unit will generate a new
operation code and the Indoor Receiver will sound to
indicate the first operation code is registered and
memorized.)
Indoor Receiver
11 12
Page 8

13 14
3. Interference from another door chime operating nearby
(For example, Indoor Receiver sounds for no reason):
Remove the batteries from the Indoor Receiver and rest
for 30 seconds, this will erase the memory. Insert the
batteries, and then the Outdoor units and the Indoor
Receiver are ready for the new code registration.
4. Operation for the 3rd / 4th / 5th Outdoor units and the
indoor receiver (There is 2 Outdoor units included):
(a) Remove the batteries from the Indoor Receiver and
rest for 30 seconds, this will erase the memory.
(b) Load the batteries into Indoor Receiver, and the Indoor
Receiver is ready for the new code registration.
(c) Press the Outdoor units once per each within 15
seconds, they will individually generate new operation
codes randomly and send wireless signals to the Indoor
Receiver which will sound to indicate that new operation
codes are registered and memorized. (The Indoor
Receiver has 15 seconds to learn maximum 5 operation
codes after batteries are installed. If there is no operation
code sent from Outdoor unit within 15 seconds, the Indoor
Receiver would be only ready for 1 new code registration.
It means, only the 1st Outdoor unit can work with 1 Indoor
Receiver after 15 seconds.)
(d) It is important to remember that when you replace the
run-out batteries with new ones that you will need to follow
the same procedure of the auto-learning code set-up as
above.
Notes
(a) If the Indoor Receiver sounds for no reason during the
digital code setting, it is indicated that it has been
interfered by other similar Door Chime nearby, reset the
auto-learning code as per point 3 above.
(b) 1 Indoor Receiver can only work with maximum 5
Outdoor units at the same time. If the Outdoor unit is
missing, terminal user can buy the only Outdoor unit from
store and set up the auto-learning code
as instruction above.
IMPORTANT:
PLEASE KEEP THESE INSTRUCTIONS FOR
FUTURE REFERENCE WHEN REPLACING
BATTERIES
Page 9
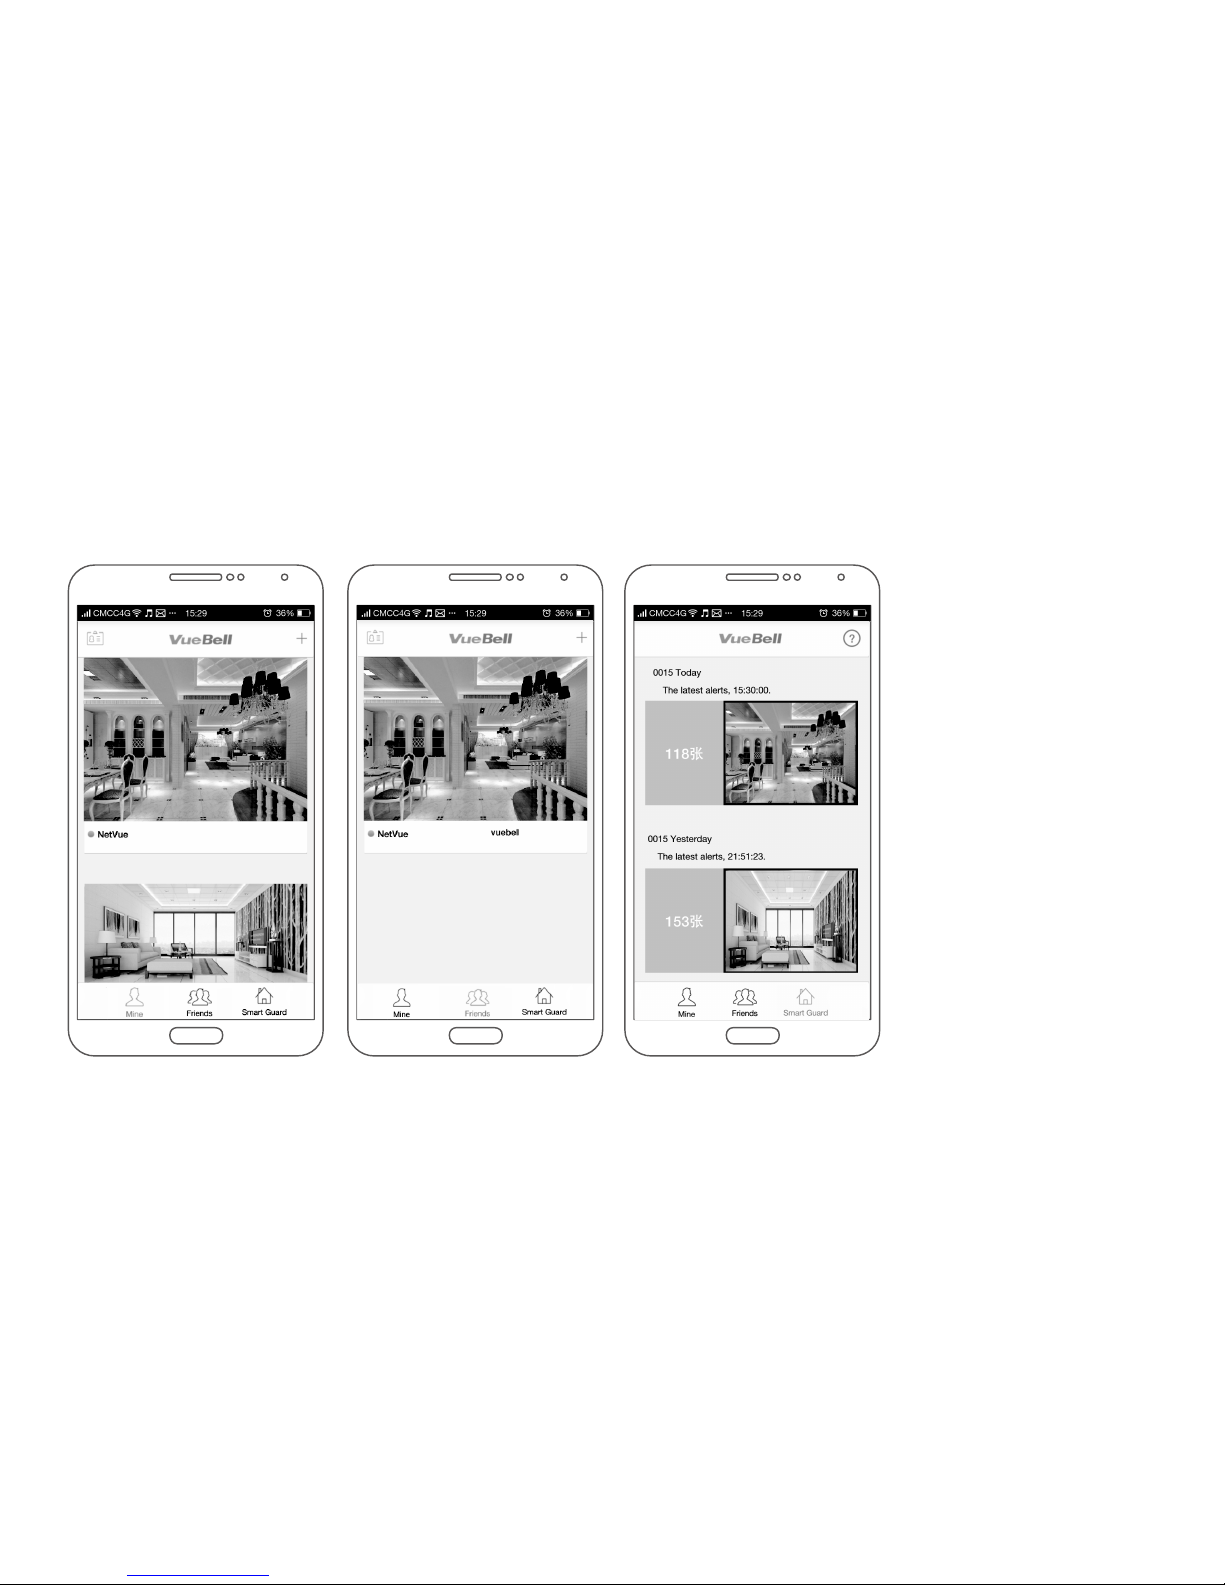
15 16
VueBell APP introduction
②① ③
②
①
③
Mine:
All VueBells listed in this account.
Smart Guard:
The snapshoots of this function
under events' list
Friends:
The VueBells which your friends
shared with you
Page 10
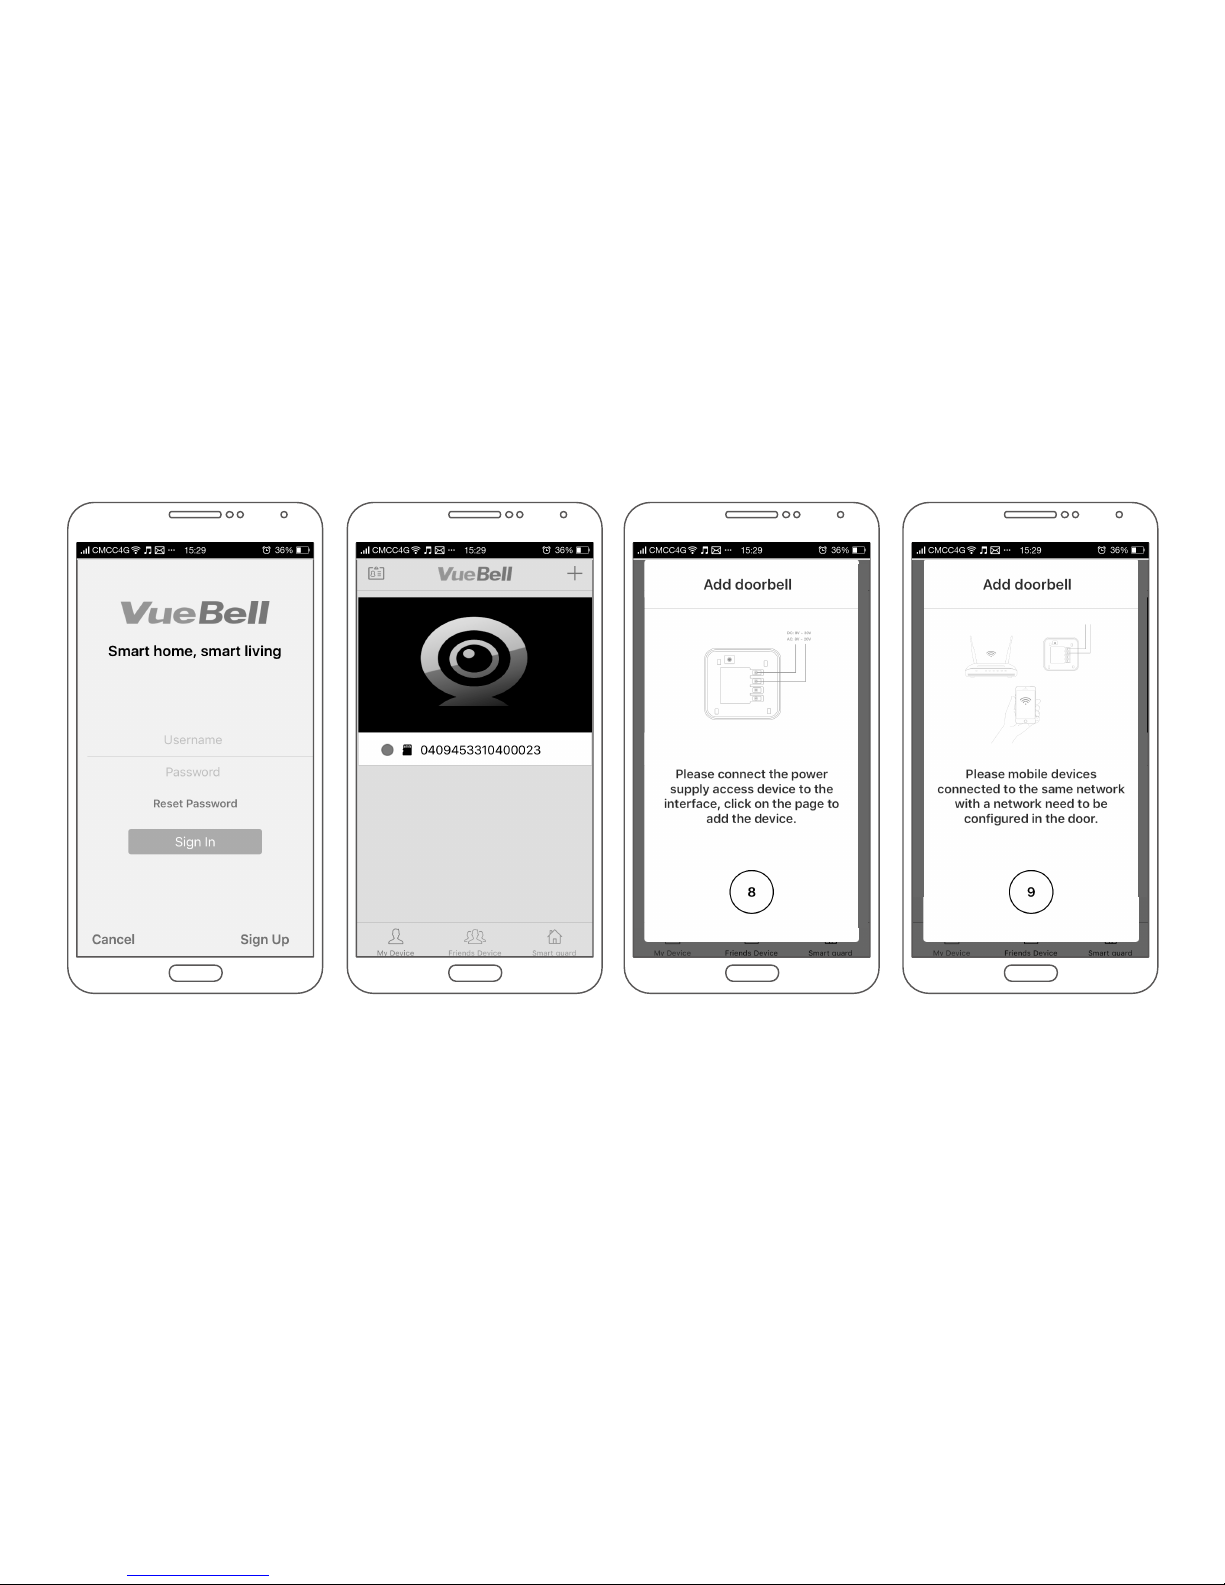
17 18
1
Registration and log in
2
Press + to add VueBell
3
.Connect VueBell with
AC DC power
4
Make sure all the devices in
the same network
Add outdoor unit in VueBell account
Page 11
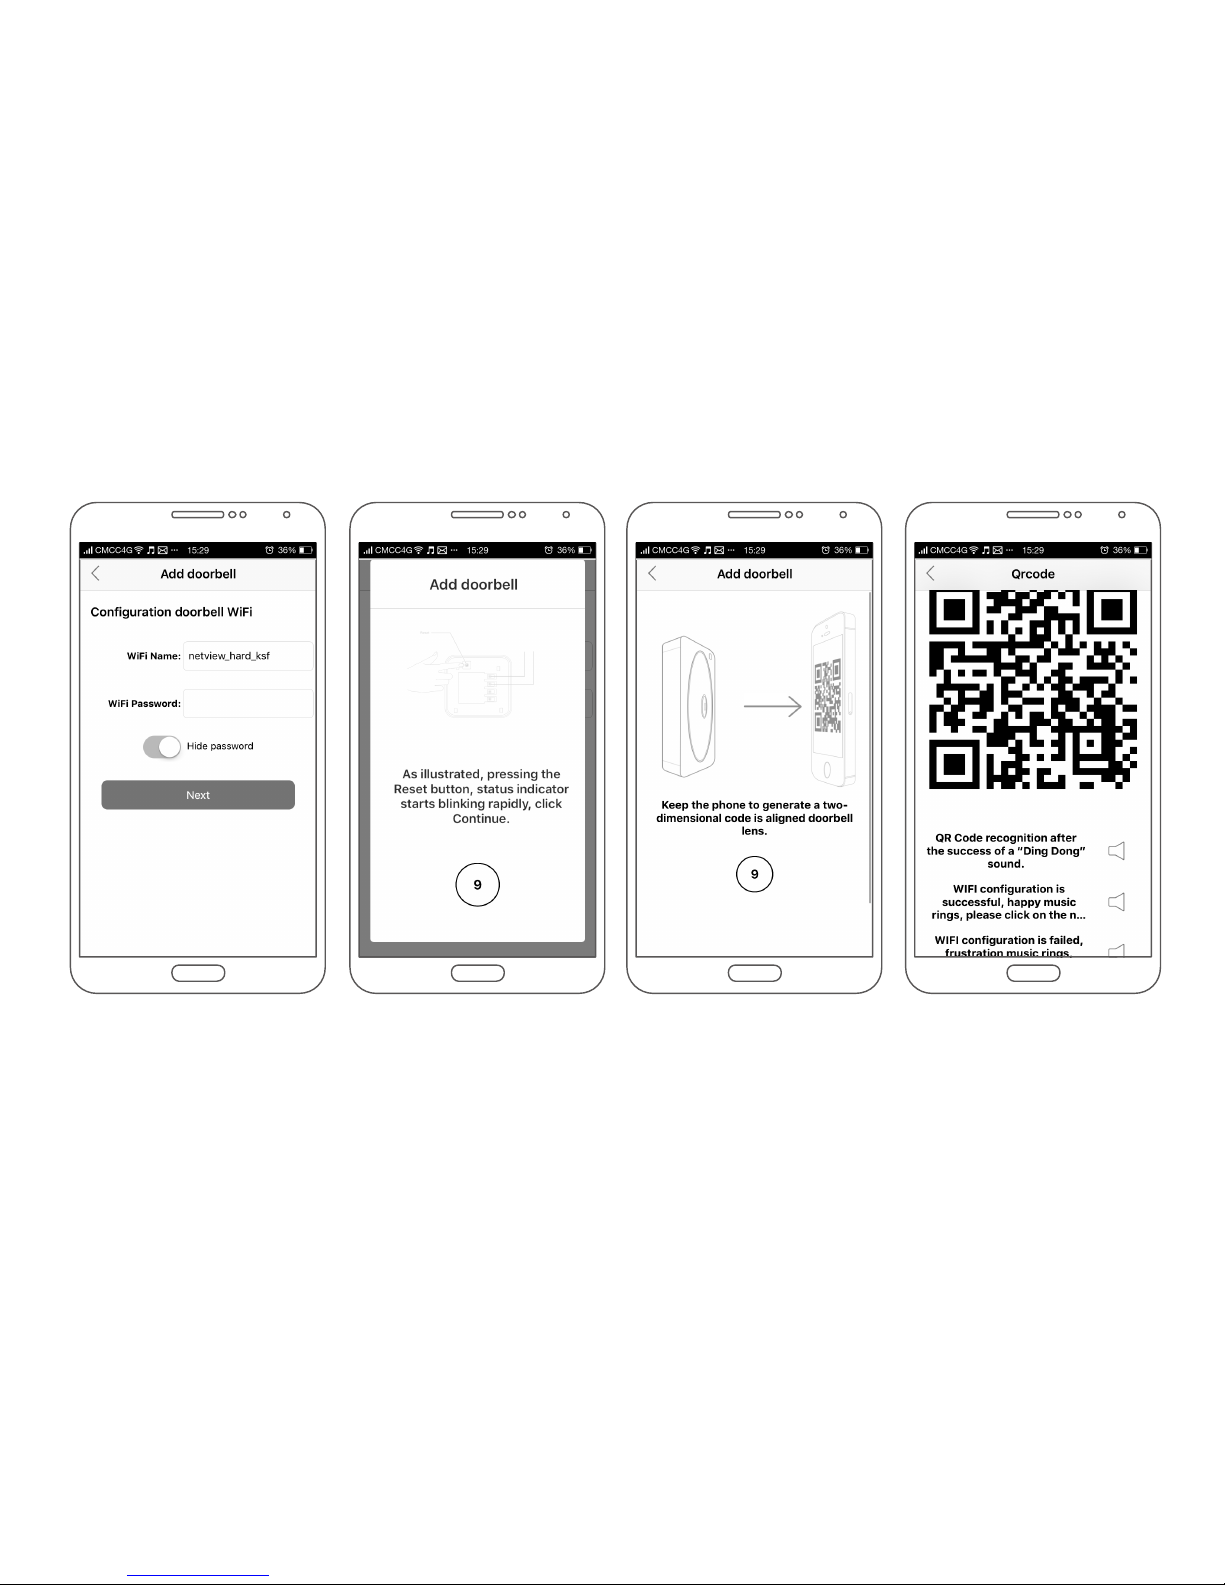
19 20
5
Get into WiFi
6
Press RESET button to
reset the VueBell
7
Show you how to scan
the QR code
8
Create a QR code
8-15cm
Page 12
21 22
1.Will constantly in blue light when power on.
2.Lights out for 30s after driver loaded successfully.
3.Blue light will flashing quickly after touch the RESET button.
4.Blue light will flashing in slow speed after device connecting
with WiFi.
5.Blue light will constantly on after device get in touch with the
server successfully, will lights out after 15s
6.BLN mode with blue light will be on when PIR triggering.
7.BLN mode with blue light will be on when trigged the touch
button, lights off after 75s.
8.Means abnormal network connection when indicator light
turns white.
1. Indoor Receiver is designed for indoor use only.
2. Do not mount the Outdoor unit onto any metal surface or
UPVC door frames, as this will reduce the operation range.
3. Do not expose either unit directly to rain or immerse in
water.
4. Do not mount either unit close to fireplace or expose to
high temperature.
5. If leaving the chime for long periods, remove the battery
from compartment to prevent leakage.
6. Dispose of old batteries in accordance with the relevant
legislation.
Status on Indicator light
Important
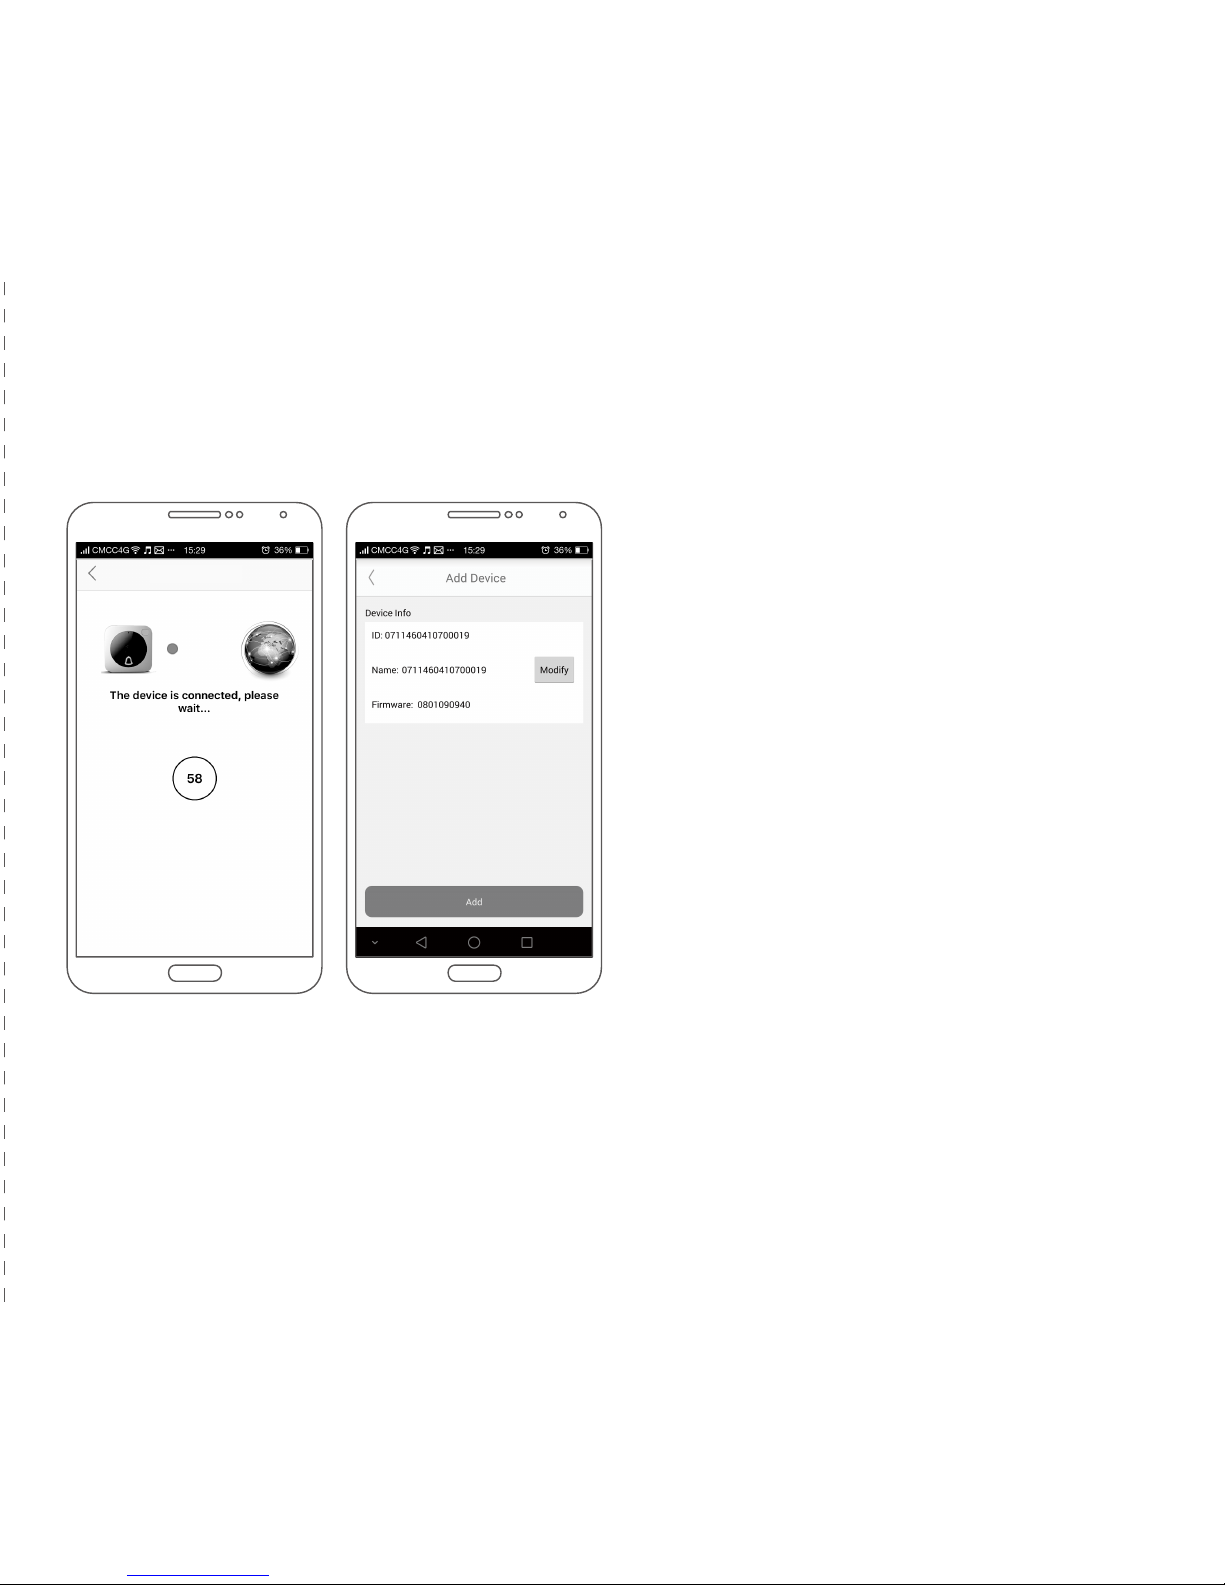
9
Wait for the VueBell to
connect with network
10
After connect with the network
successfully,the information of the
devicewill appear:the ID number,
the name and the reware.
Click the “Add” button to conrm
and add the device under your
account.
 Loading...