

Page 1
■
USER
MANUAL
User Manual
20” LCD 1152 x 900 Native Resolution
SNP120
1U SUN LCD Drawer
Options :
- DC power
Page 2

Contents
< Part. 1 > SNP120
1.1 Package Content P.1
1.2 Structure Diagram & Dimension P.1 - 2
1.3 Installation P.3
< Part. 2 > Specifications / OSD
2.1 Product Specifications P.4 - 5
2.2 On-screen Display Operation ( OSD ) P.6 - 7
< Part. 3 > Options
3.1 48V, 24V or 12VDC power
P.8
User Manual
Page 3
Before Installation
■ It is very important to mount the equipment in a suitable cabinet or on a stable surface.
■ Make sure the place has a good ventilation, is out of direct sunlight, away from sources of
excessive dust, dirt, heat, water, moisture and vibration.
Unpacking
The equipment comes with the standard parts shown in package content. Check and make sure they are
included and in good condition. If anything is missing, or damaged, contact the supplier immediately.
How To Clean Your LCD Monitor
Caution :
■ To avoid the risk of electric shock, make sure your hands are dry before unplugging your monitor from or
plugging your monitor into an electrical outlet.
■ When you clean your monitor, do not press down on the LCD screen. Pressing down on the screen can
scratch or damage your display. Pressure damage is not covered under warranty.
■ Use only cleansers made specifically for cleaning monitors and monitor screens. Cleansers not made to
clean monitors and monitor screens can scratch the LCD display or strip off the fi nish.
■ Do not spray any kind of liquid directly onto the screen or case of your monitor. Spraying liquids directly
onto the screen or case can cause damage which is not covered under warranty.
■ Do not use paper towels or abrasive pads to clean your monitor. Using an abrasive pad or any wood based
paper product such as paper towels can scratch your LCD screen.
Cleaning Your Monitor
To clean your LCD safely, please follow these steps :
1 Disconnect the power cord.
2 Gently wipe the surface using a clean, dry microfiber cloth. Use as little pressure as possible.
Cleaning Tough Marks and Smudges
To remove tough marks and smudges, please follow these steps :
1 Disconnect the power cord.
2 Spray a small amount of non-abrasive cleanser on a microfiber cloth.
Caution : Do not spray or apply any liquids directly onto the monitor. Always apply the solution to your
microfiber cloth first, not directly on the parts you are cleaning.
3 Gently wipe the surface. Use as little pressure as possible.
4 Wait until your monitor is completely dry before plugging it in and powering it up.
User Manual
Page 4
<Part 1 >
< 1.1 > Package Content
SNP120
SNP120 unit X 1
- 6ft VGA cable X 1
- Power cord X 1
- M6 screw, cage nut & cup washer X 8
The above package content is only for the pure model ( VGA and DVI-D only ).
It varies with options such as DC power.
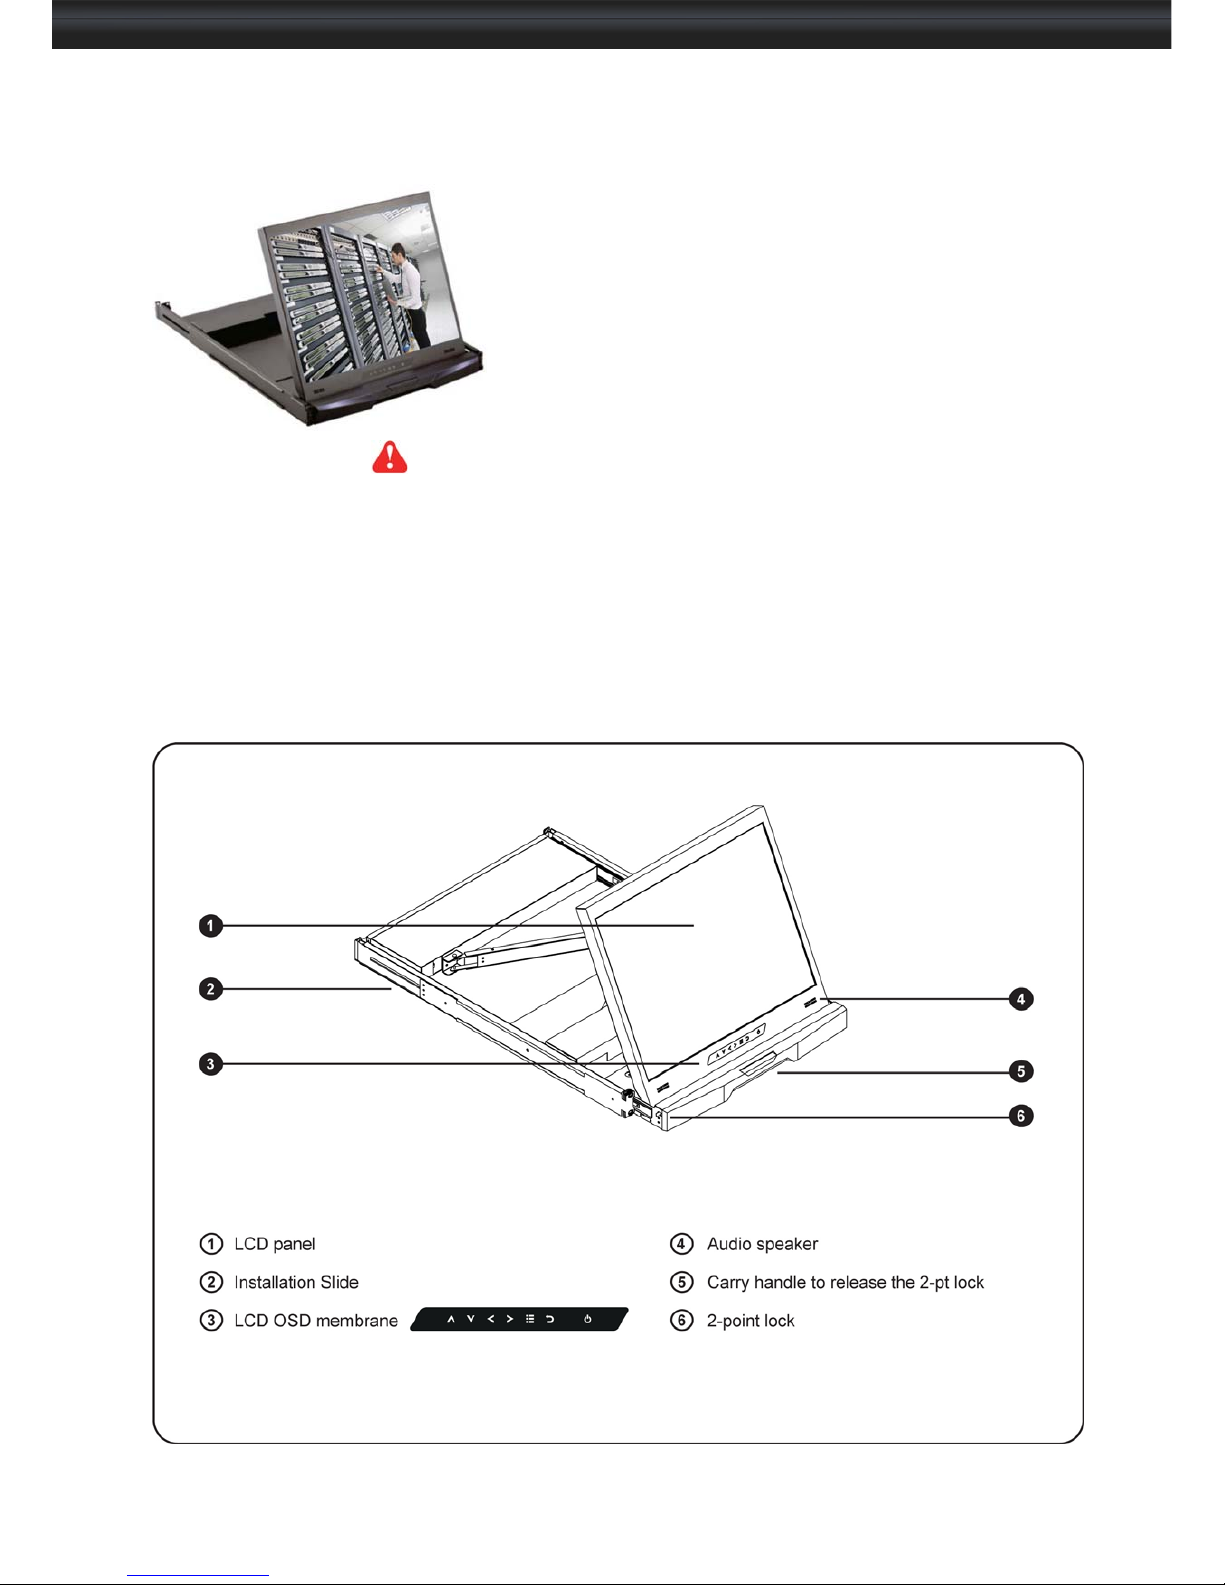
< 1.2 > Structure Diagram
P.1
User Manual
Page 5
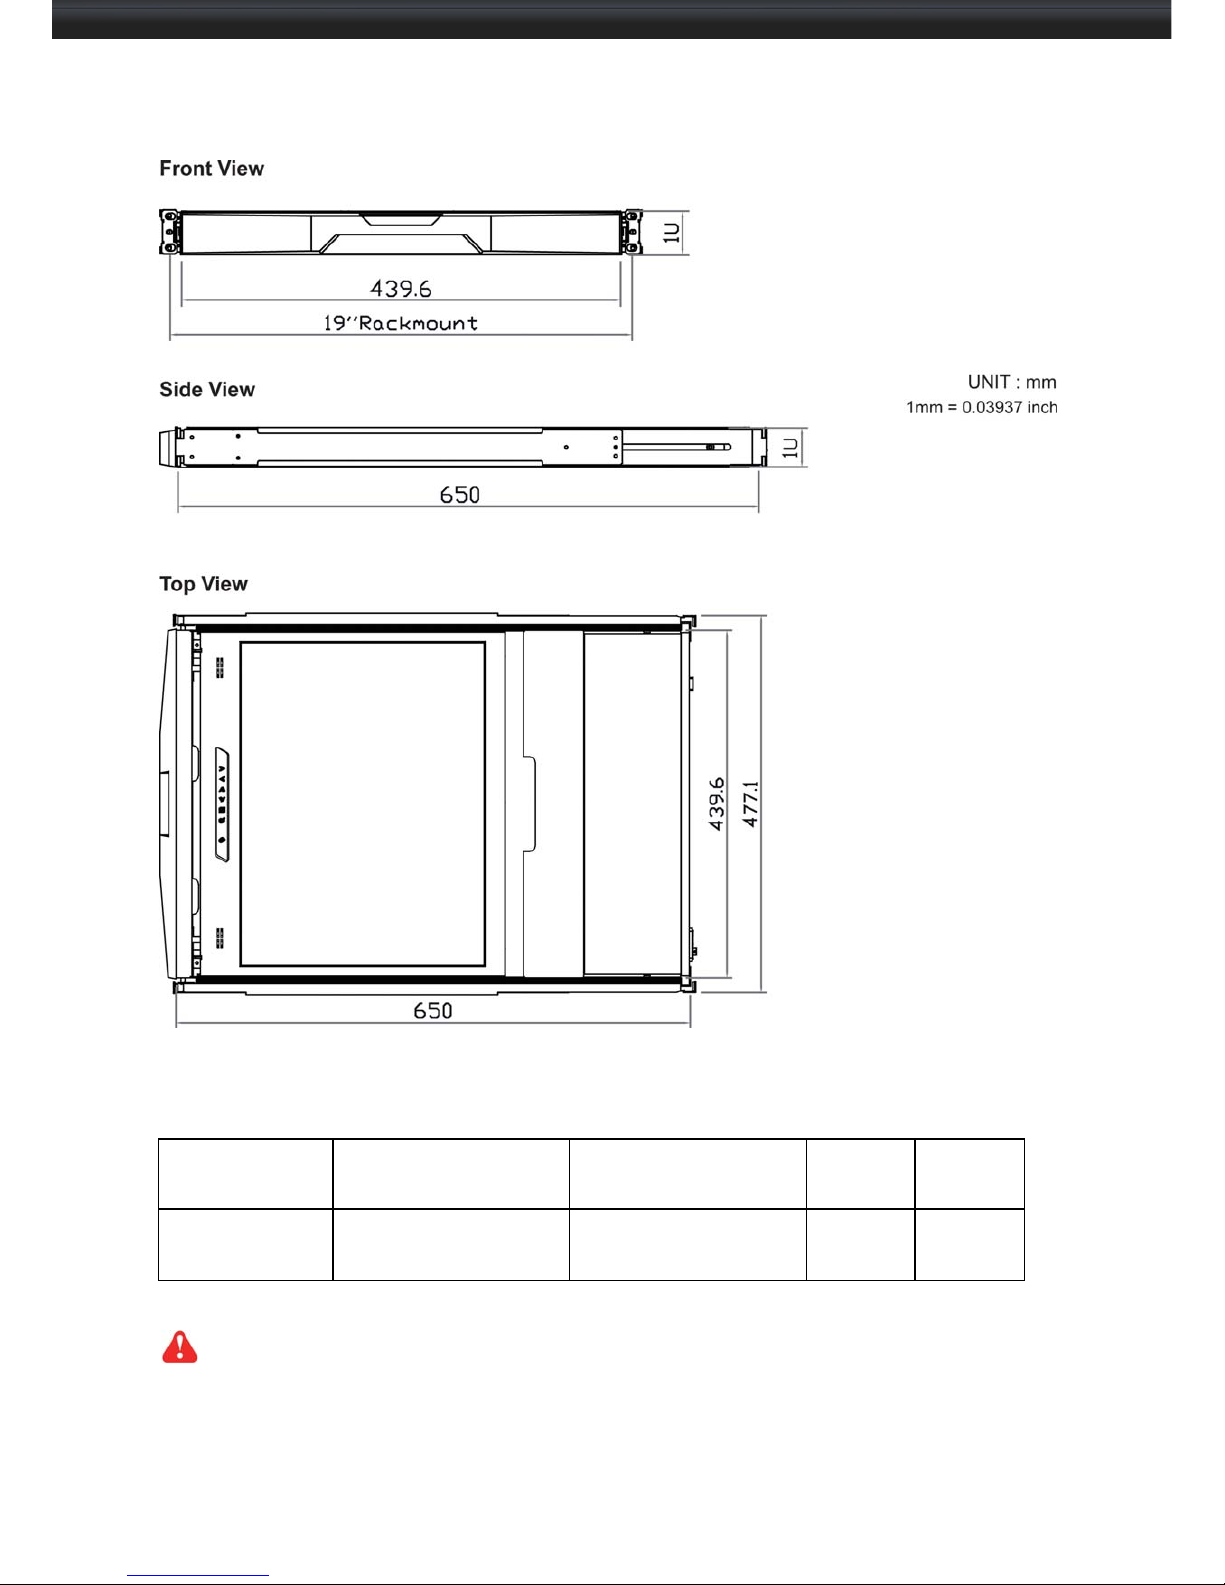
< 1.2 > Dimension
Model
Product Dimension (W
x D x H)
Packing Dimension (W
x D x H)
Net
Weight
Gross
Weight
SNP120
439.6 x 650 x 44 mm
17.3 x 25.6 x 1.73"
595 x 860 x 140 mm
23.4 x 33.9 x 5.5”
13.5 kg
30 lb
17.5 kg
39 lb
The weight is only for the pure models. It varies with accessories & options such as
DC power.
P. 2
User Manual
Page 6
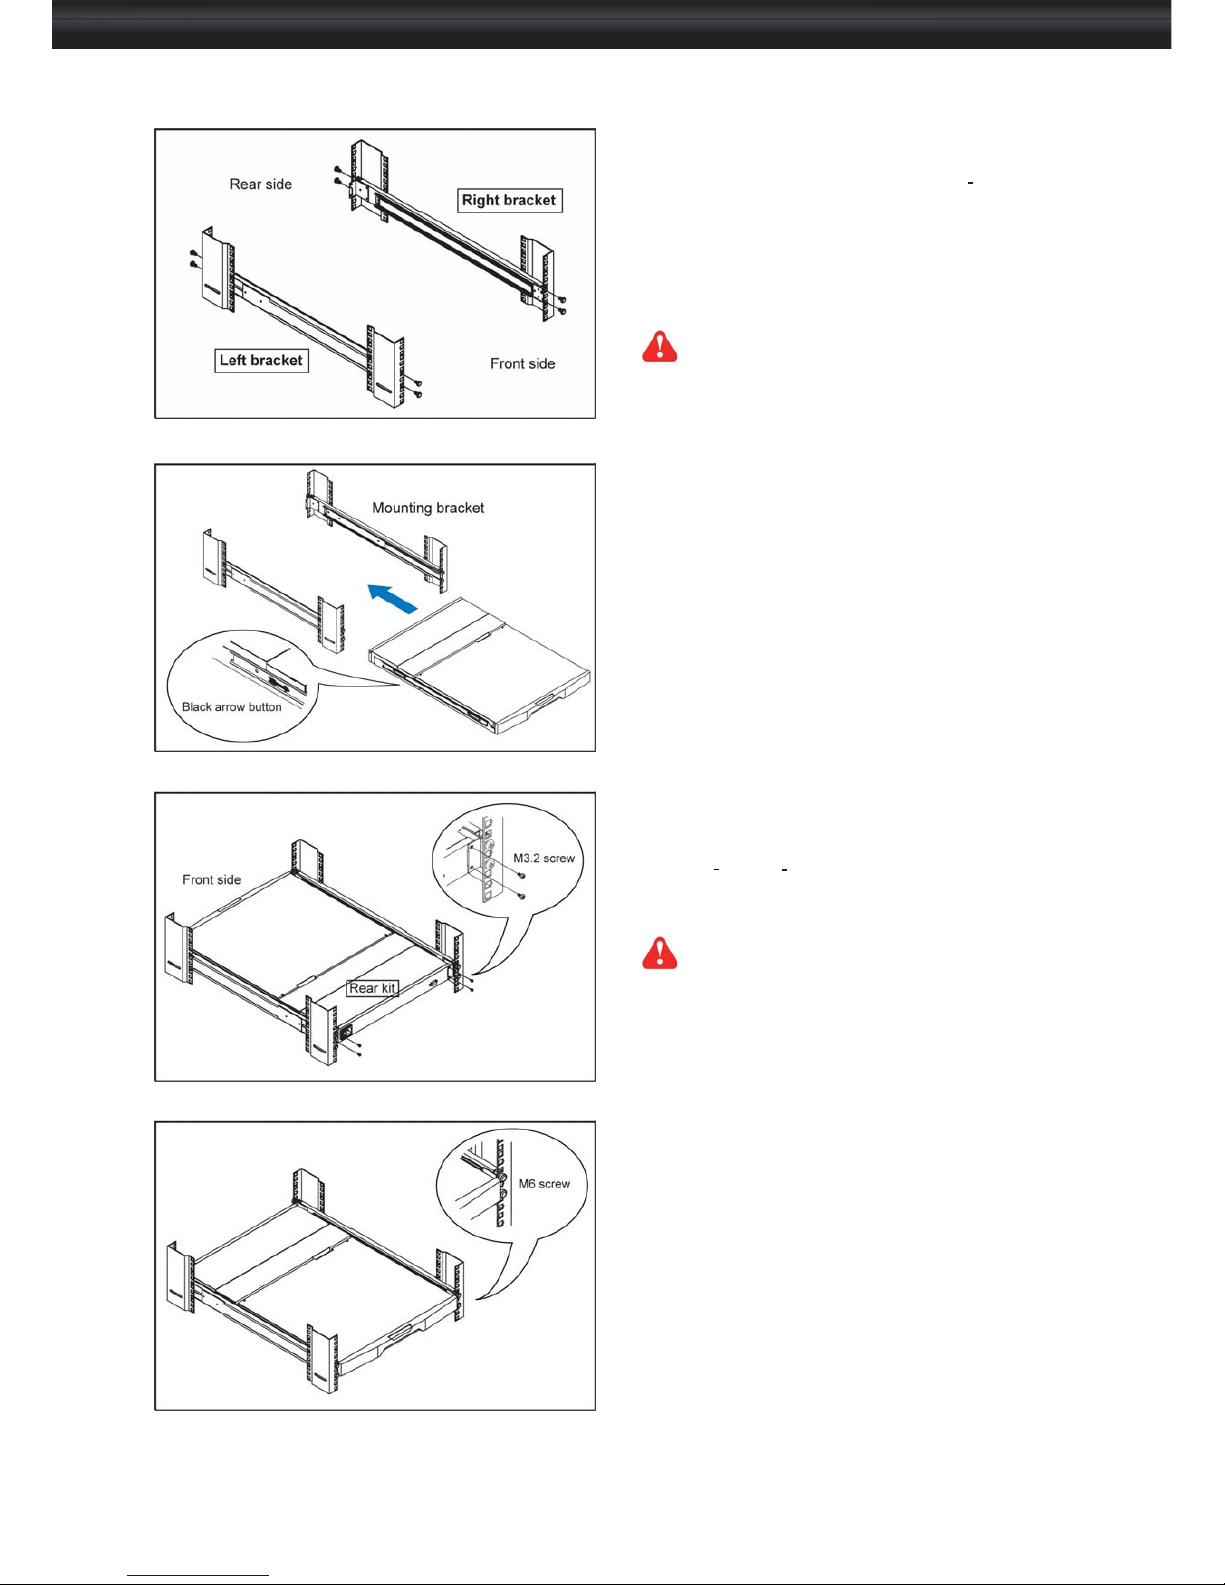
< 1.3 > Installation - How to install 1U 20" LCD Tray
SNP120
Step 1
■ Attach the left and right mounting bracket | to rack
19" mounting rails.
■ Adjust the mounting bracket to fit your rack.
■ M6 screw x 8 pcs included.
Leave all M6 screws slightly loose, until you
complete the installation in step 3 333
Step 2
■ Pick up the LCD tray.
■ Pull and hold the left & right black arrow buttons
on the rails.
■ Return the LCD tray to park position.
Step 3 3
■ Fix the [rear kit | to the mounting bracket with M3.2
screw x 4 pcs included.
This step is necessary. Failure to complete this
will cause damage.
Step 4 4
Complete the installation
■ Tighten all 8 pcs of M6 screw to complete the
installation.
P. 3
User Manual
Page 7
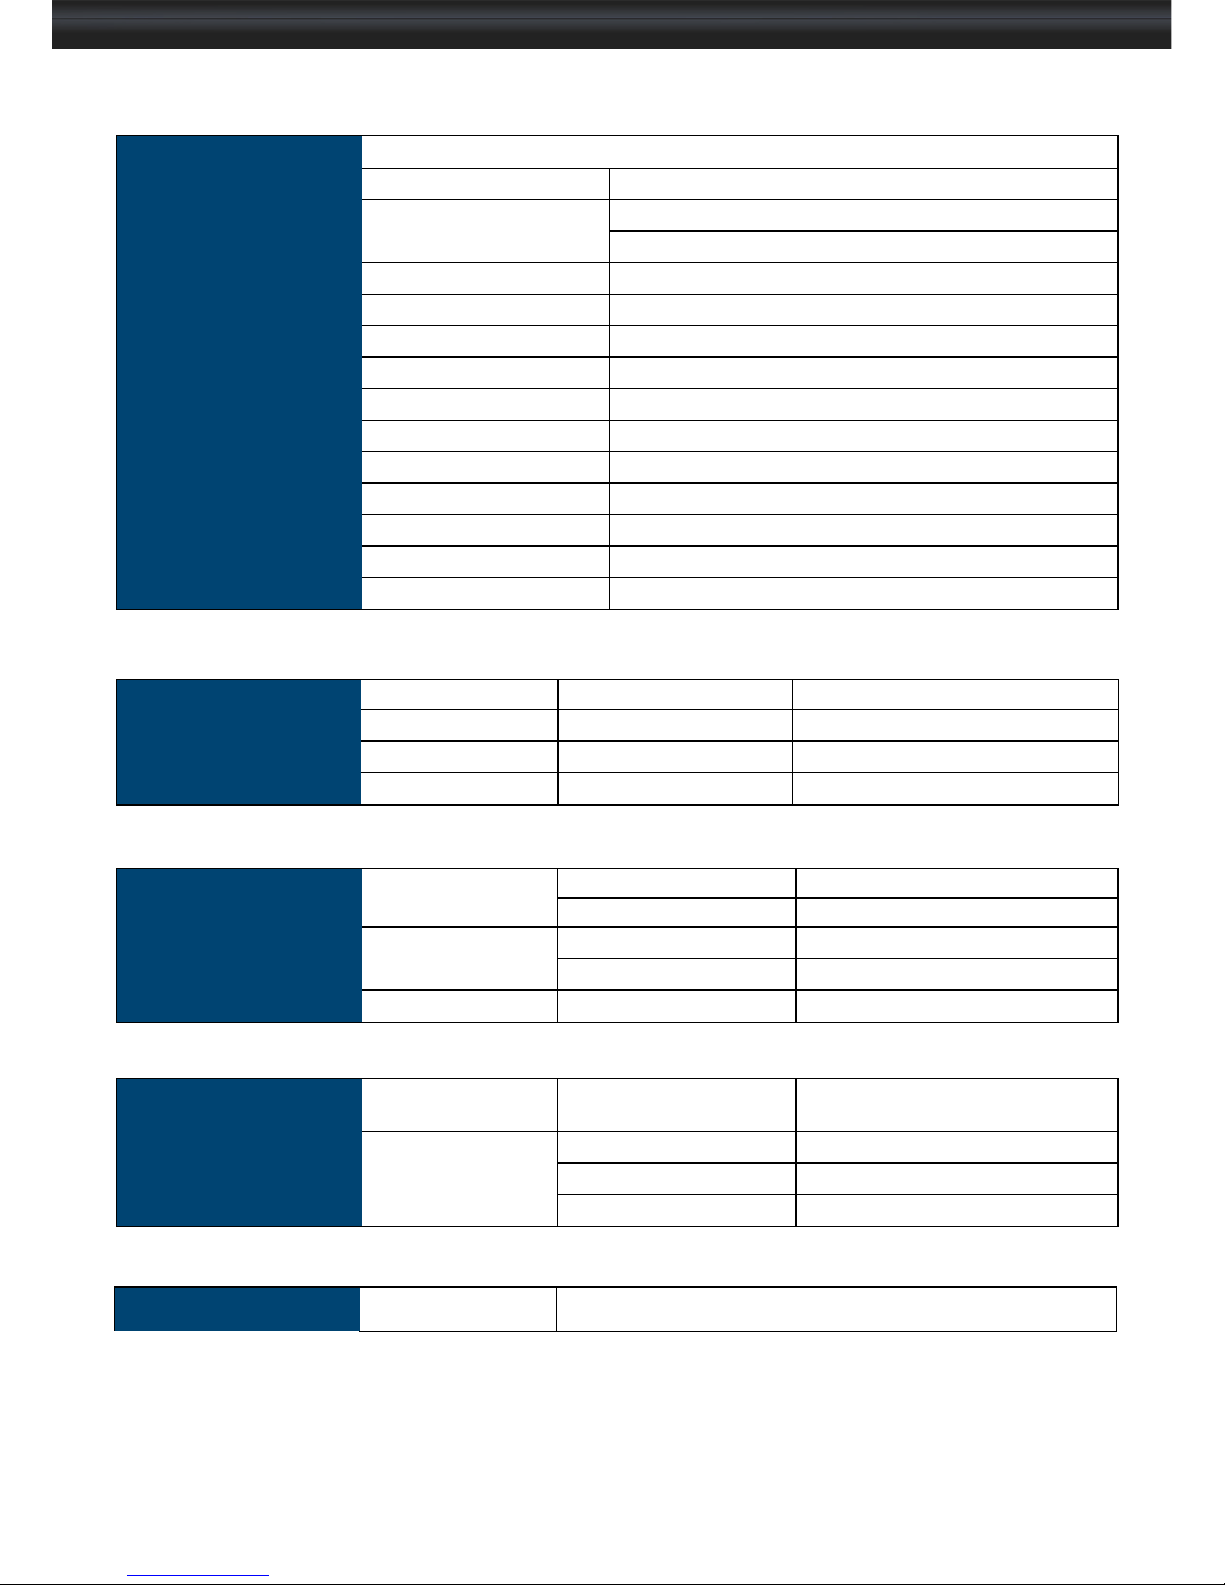
<Part 2 >
< 2.1 > Product Specifications
LCD
Panel
Manufacturer
LG
Panel Size ( diagonal ) 20-inch TFT color LCD
Display pixel ( dots x lines ) 1152 x 900 ( Direct )
1600 x 1200 ( Native )
Brightness ( typ. ) 300
Contrast Ratio ( typ. )
800:1
Color
16.7 M
Viewing Angle ( L/R/U/D )
89/89/89/89
Response Time ( ms ) 16
Dot pitch ( mm )
0.255
Display Area ( mm )
408.00H x 306.00V
Surface treatment Anti-glare, Hard-coating
Surface hardness 3H
Backlight Type
CCFL
MTBF ( hrs )
45,000
Video
Connectivity
Digital DVI DVI-D, TMDS single link
Analog VGA Analog 0.7Vp-p
Plug & Play DVI / VGA VESA EDID structure 1.3
Synchronization VGA Separate, Composite & SOG
Audio
Connectivity
Audio Input Connector 3.5mm stereo jack
Impedance / Power level
30kQ / 750mV
Audio Output Connector 3.5mm stereo jack
Resistance / Power level
30kQ / 2.8V
Speaker Output Power
2 x 2W
*When the audio output is connected, speaker output is OFF
Power
Power Supply Range
Auto-sensing 100 to 240VAC,
50 / 60Hz
Power Consumption Screen display ON 48W or less
Power saving mode 4W or less
Power button OFF 1W or less
P. 4
Regulatory
Safety Approval cUL, FCC & CE, RoHS
User Manual
Page 8
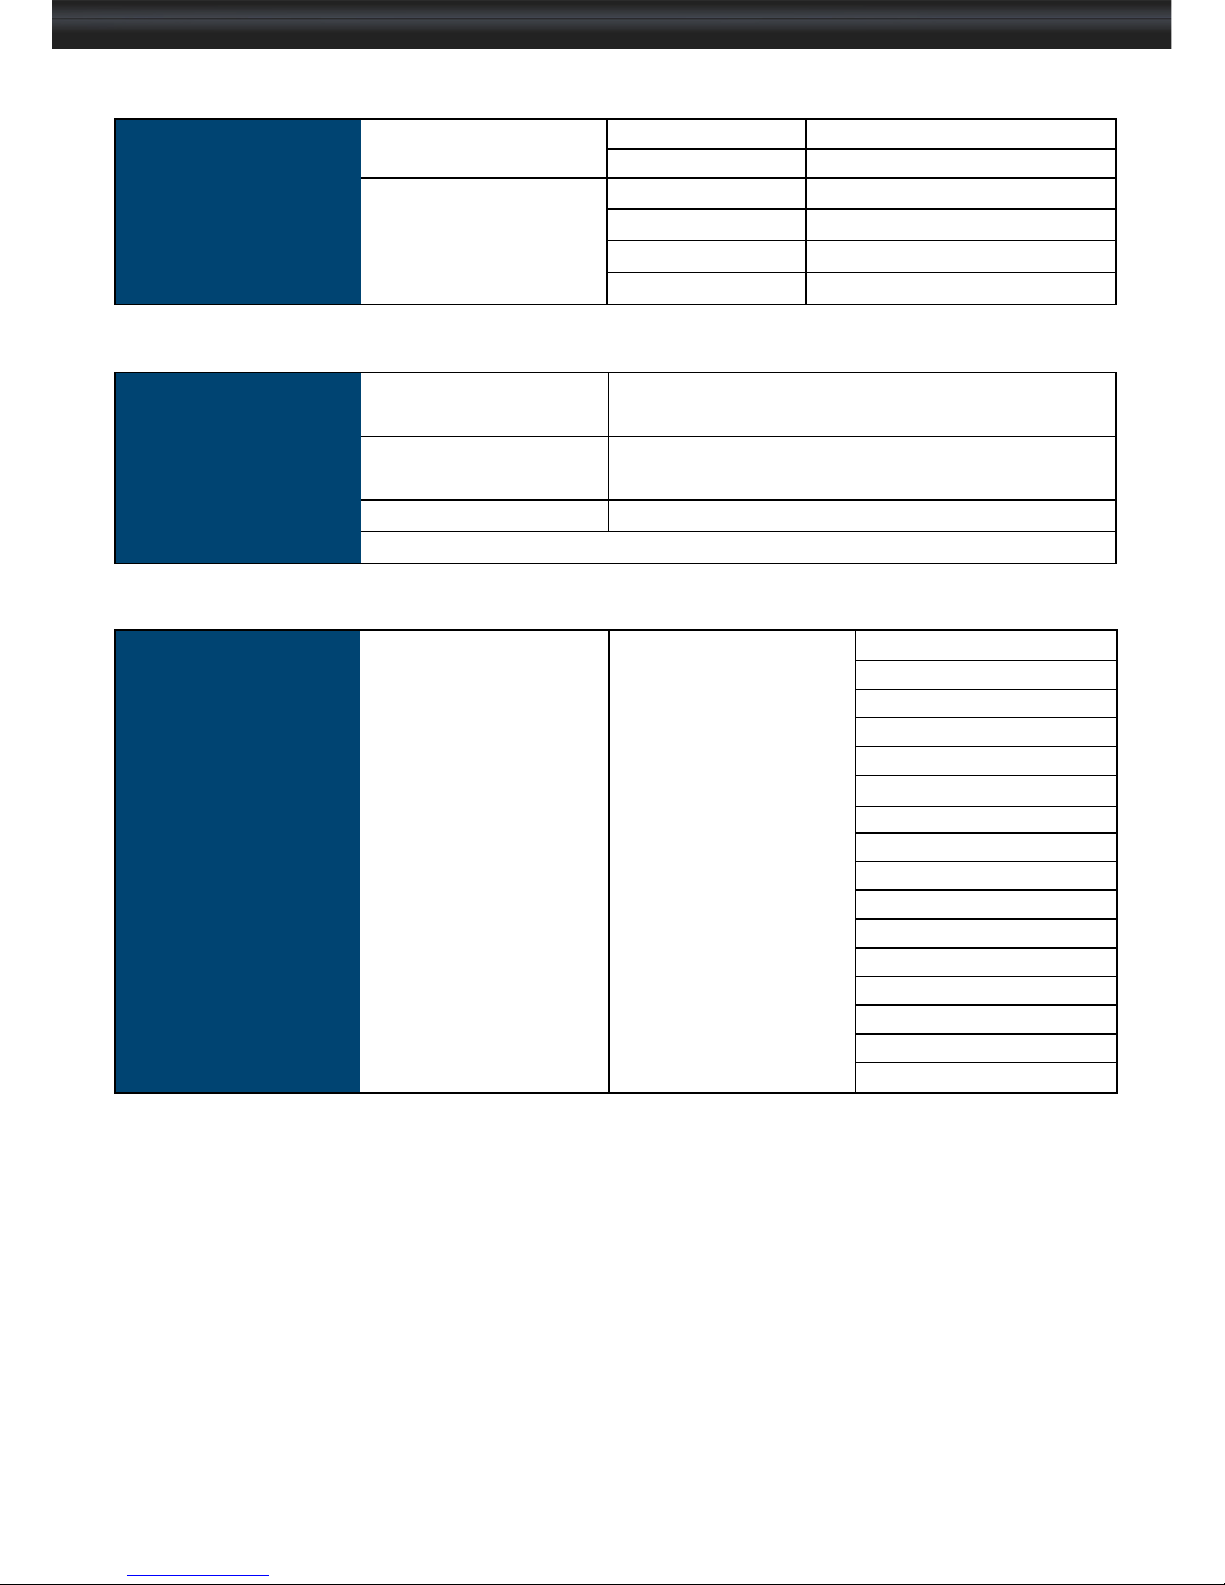
SNP120
Environmental
Conditions
Operating Temperature 0 to 50°C degree
Humidity 20~90%, non-condensing
Storage Temperature -5 to 60°C degree
Humidity 5~90%, non-condensing
Shock 10G acceleration (11ms duration)
Vibration 5~500Hz 1G RMS random
Physical
Specifi cation
Product ( W x D x H )
439.6 x 650 x 44 mm
17.3 x 25.6 x 1.73 inch
Packing ( W x D x H )
595 x 860 x 140 mm
23.4 x 33.9 x 5.5 inch
Net Weight 13.5 kgs / 30 lbs
Gross Weight 17.5 kgs / 39 lbs
Applicable
Format
DVI-D / VGA Input PC Signal 1152 x 900 x 66Hz
1600 x 1200 x 60Hz
1400 x 1050 x 60Hz
1440 x 900 x 60Hz
1360 x 768 x 60Hz
1280 x 1024 x 60 / 75Hz
1280 x 960 x 60Hz
1280 x 760 x 60 / 75Hz
1152 x 864 x 75Hz
1024 x 768 x 60 / 70 / 75Hz
848 x 480 x 60Hz
800 x 600 x 60 / 72 / 75Hz
720 x 400 x 70Hz
640 x 480 x 60 / 72 / 75Hz
640 x 400 x 70Hz
640 x 350 x 70Hz
P. 5
User Manual
Page 9
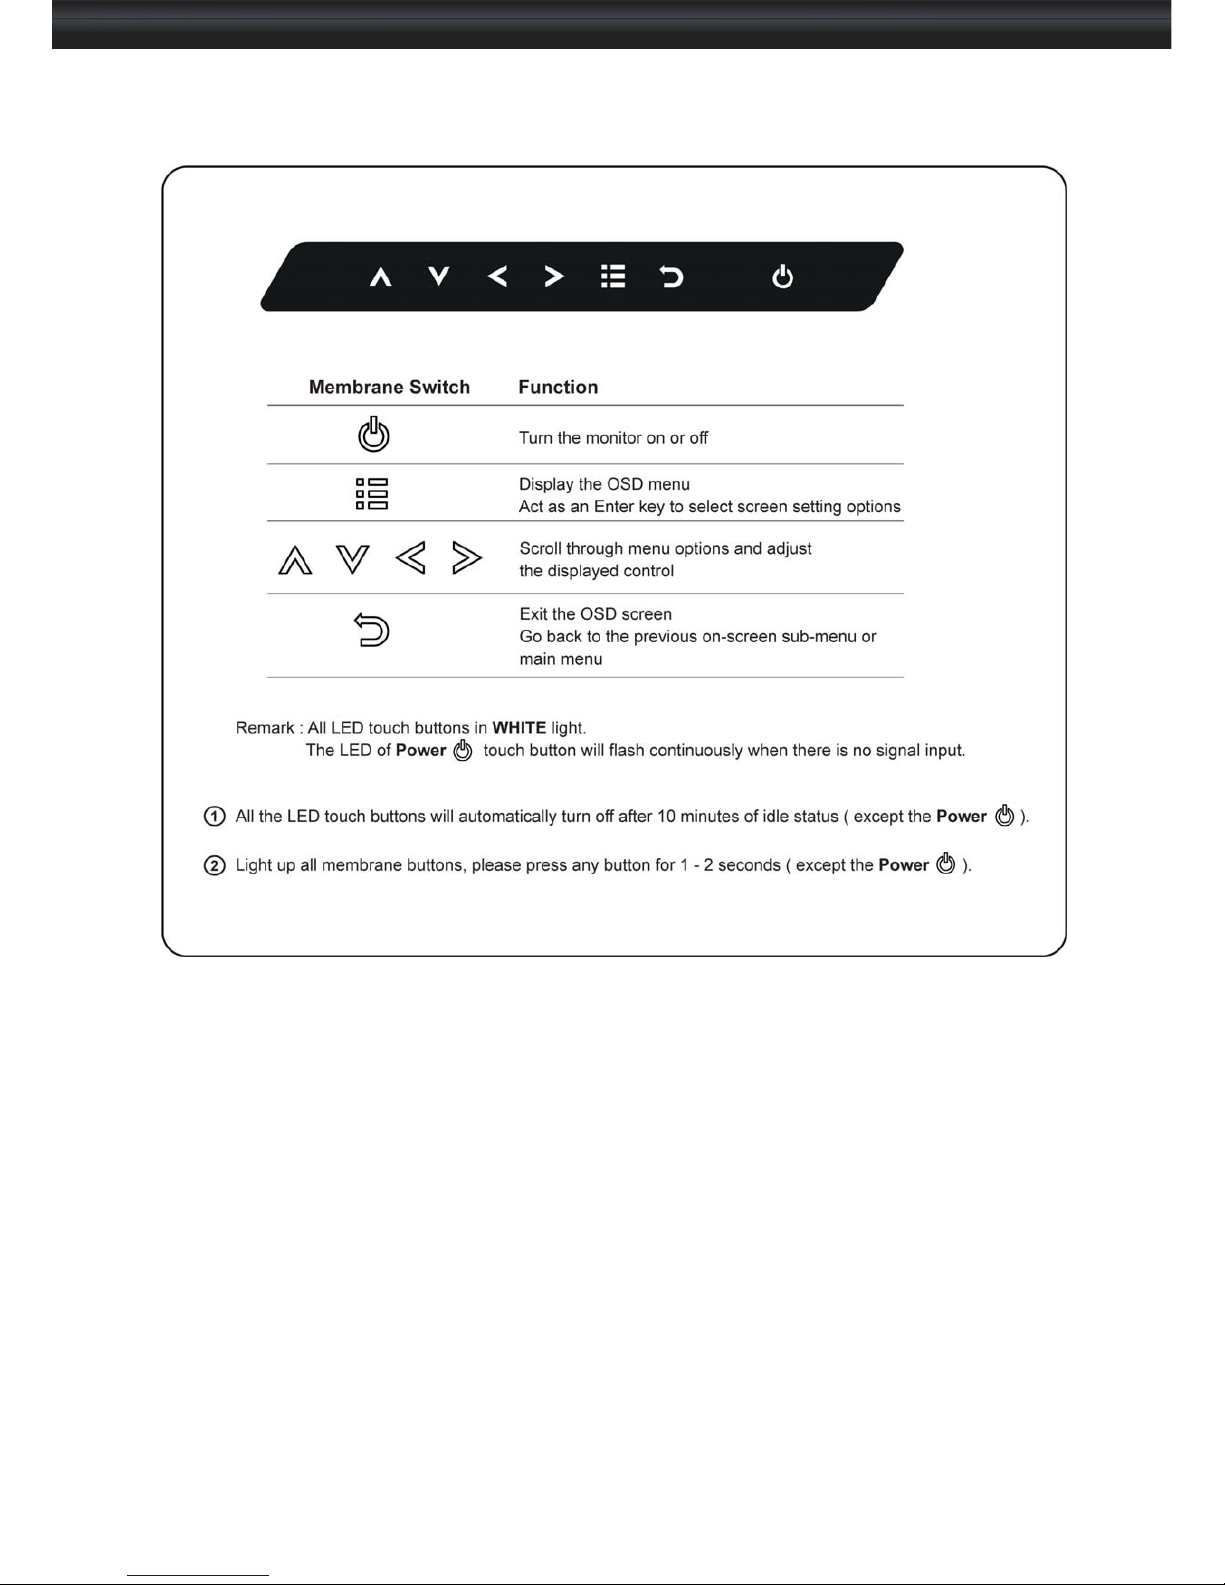
< 2.2 > On-screen Display Operation ( OSD )
P. 6
User Manual
Page 10
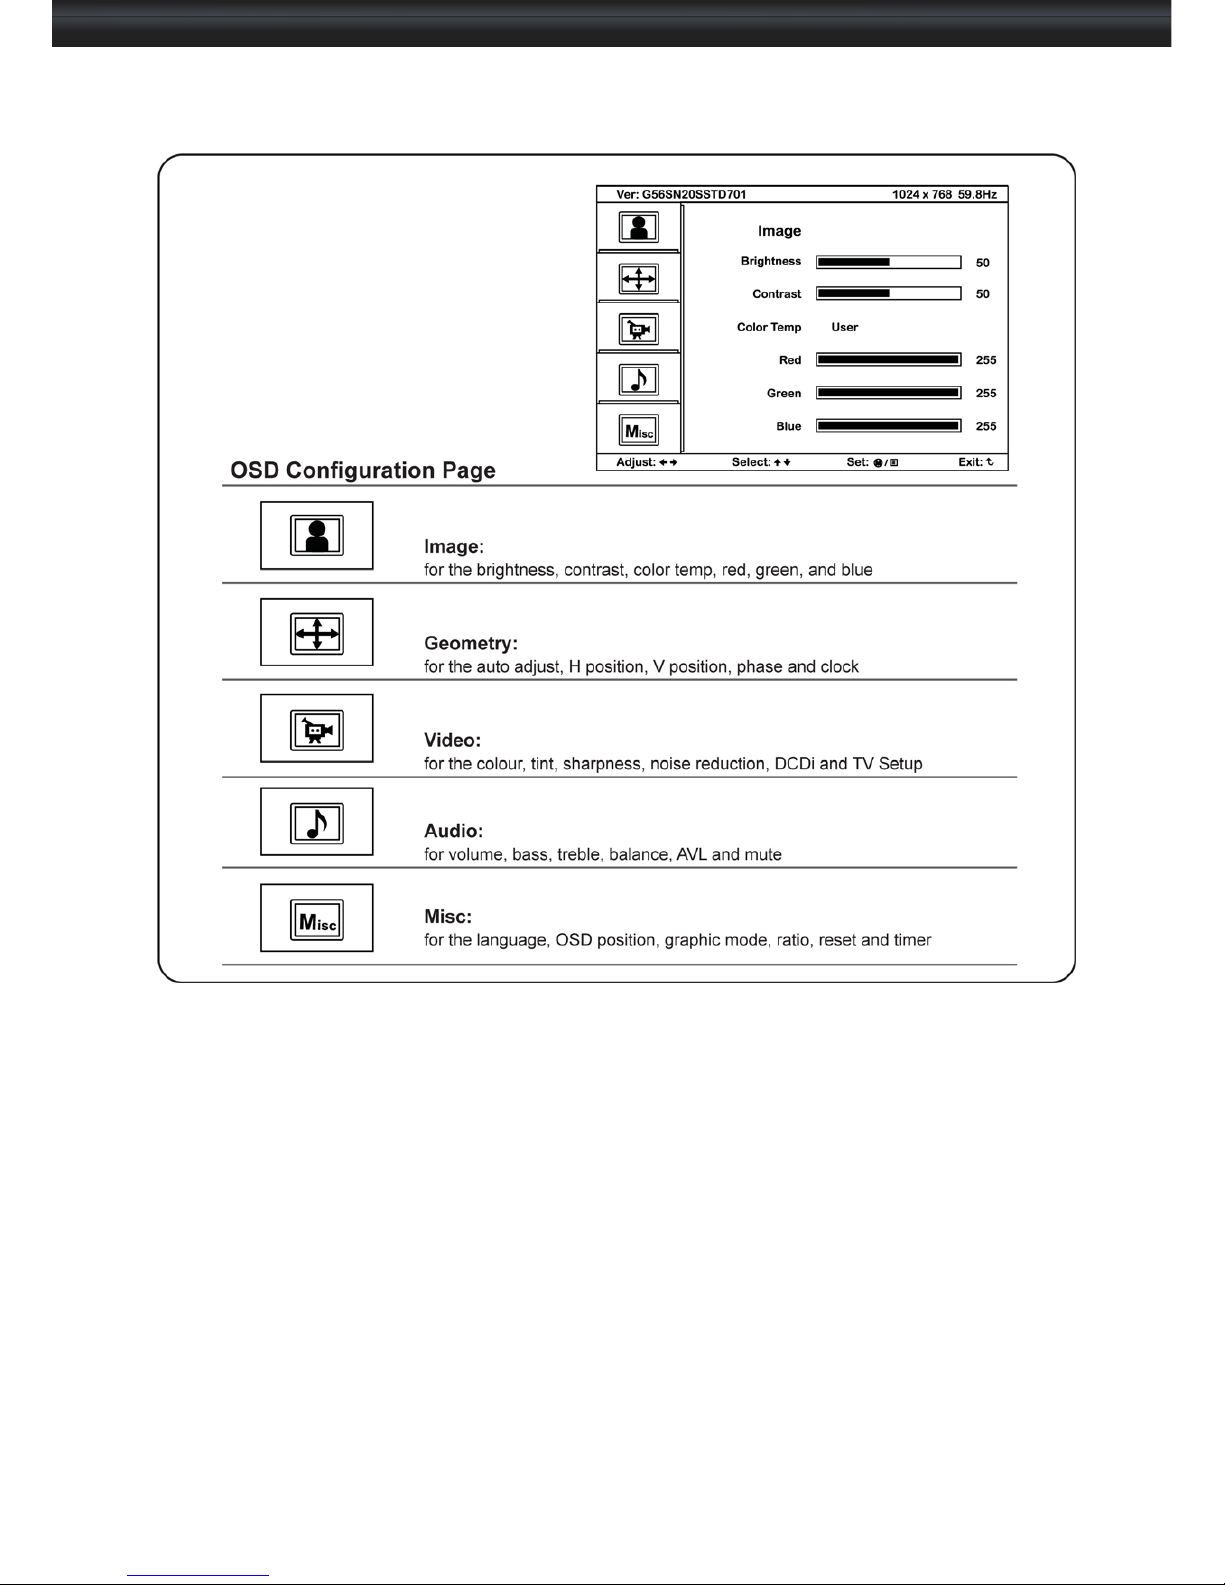
< 2.2 > On-screen Display Operation ( OSD ) SNP120
P. 7
User Manual
Page 11
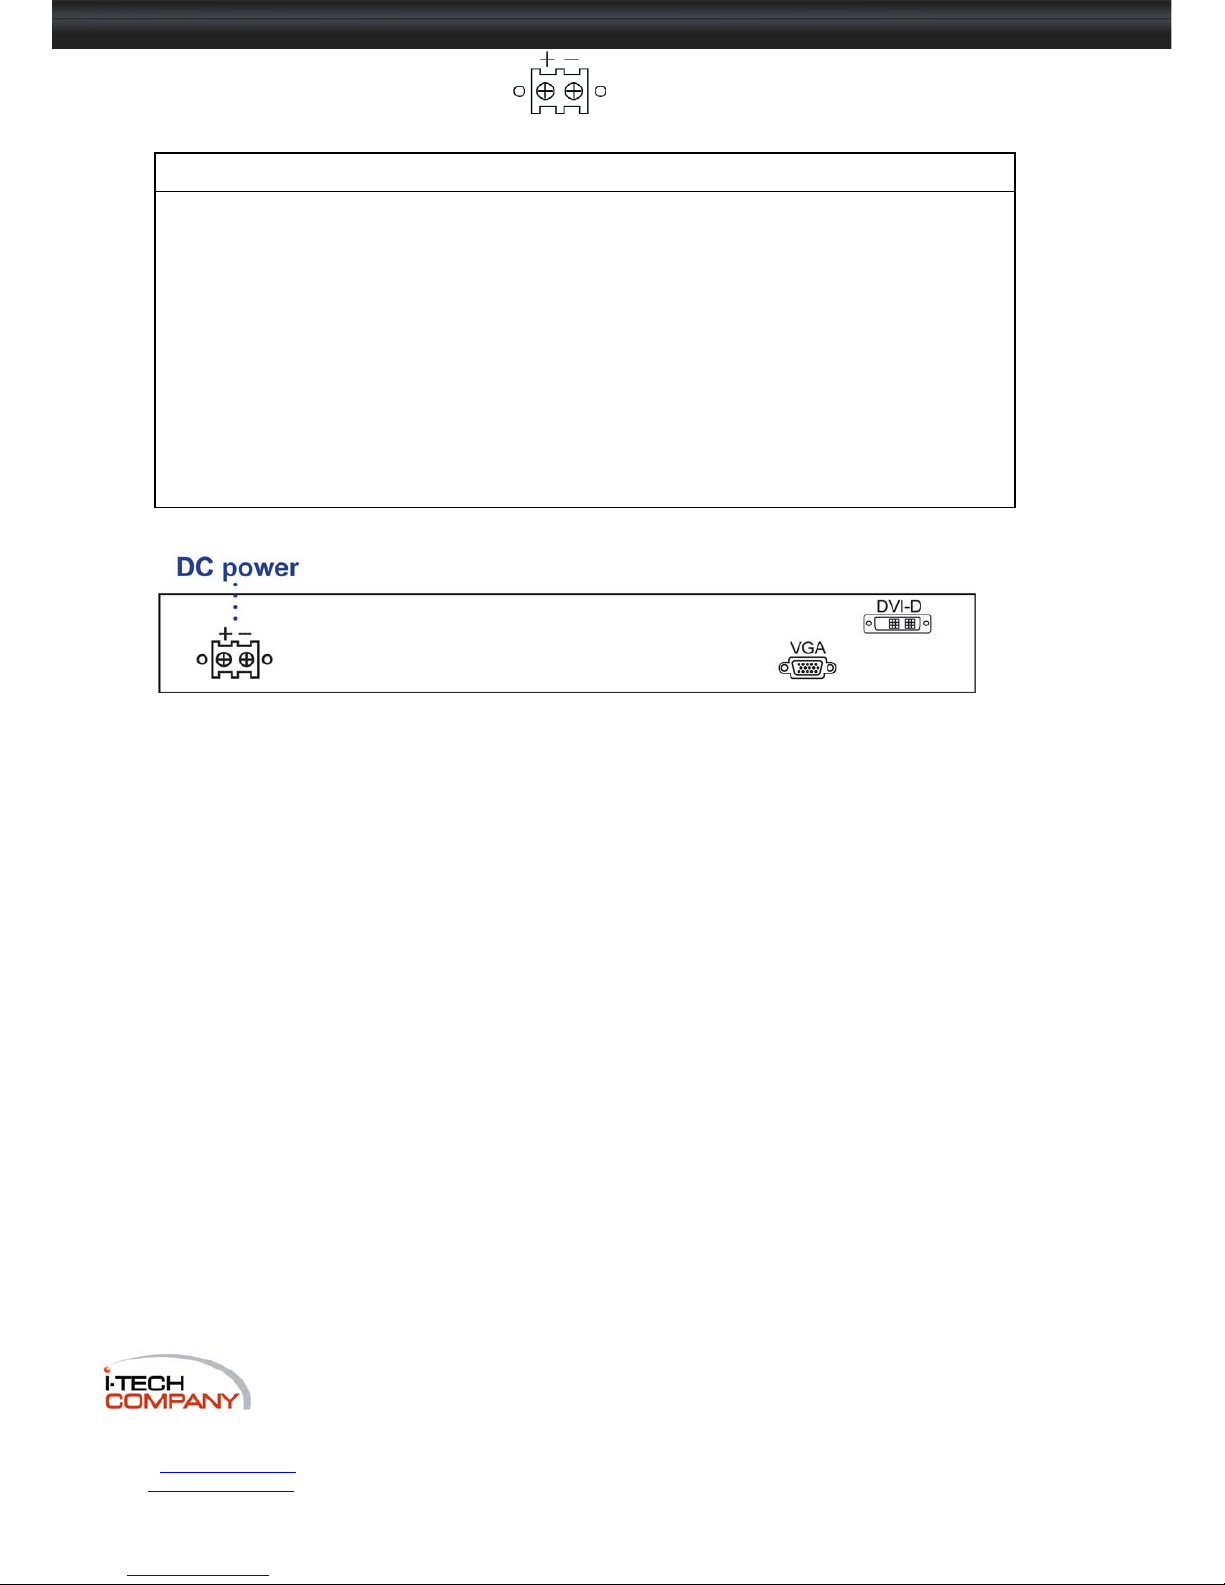
< 3.3 > Options : DC Power
Model
12V 24V 48V
Input rating
Input voltage: 12-Volt 24-Volt 48-Volt
Input range: 9 ~ 18V 18 ~ 36V 36 ~ 75V
Input current
- No load 50 mA 50 mA 50 mA
- Full load 4950 mA 2450 mA 1220 mA
Output rating
Output voltage: 12-Volt 12-Volt 12-Volt
Output current: 4.16A 4.16A 4.16A
Efficiency
84% 85% 85%
Option excludes 1 x power cord and 1 x AC power adapter
.
P. 8
User Manual
 Loading...