


NetUP Streamer HEVC
User manual
20 March 2019
1/7, Ulofa Palme str., Moscow, Russia
+7 (495)510-1025 | info@netup.tv | http://netup.tv

NetUP Streamer HEVC. User manual
Contents
Chapter 1 Introduction ............................................................................ 3
Appearance and illustration ................................................................................................... 3
Specifications ......................................................................................................................... 4
Chapter 2 Installation guide ..................................................................... 5
Device’s installation flow chart .............................................................................................. 5
Packing list check ................................................................................................................... 5
Safety instructions ................................................................................................................. 5
Environment requirement ..................................................................................................... 6
Grounding requirement ......................................................................................................... 6
Chapter 3 WEB NMS Operation ............................................................... 7
Login ....................................................................................................................................... 7
Summary → Status ................................................................................................................. 8
Parameters → Encoder .......................................................................................................... 9
Parameters → IP Stream ...................................................................................................... 10
System → Network .............................................................................................................. 11
System → Account ............................................................................................................... 11
System → Configuration ...................................................................................................... 12
System → Firmware ............................................................................................................. 12
System → Log ....................................................................................................................... 13
Troubleshooting .........................................................................................14
2

NetUP Streamer HEVC. User manual
Indicators
NMS (Network Management Port), Data Port (for IP output) and USB
Power switch, fuse, power socket and grounding pole
4
4 HDMI input ports
Chapter 1 Introduction
NetUP Streamer HEVC is a professional HD audio and video encoding and multiplexing device. It has
4/8/12 SDI/HDMI video input interfaces, and supports H.265 HEVC/H.264 AVC video encoding and
MPEG 1 Layer 2 audio encoding. This device can simultaneously encode 4/8/12 channels HD audio &
video; moreover, the IP output can support 1MPTS and 4/8/12SPTS (4/8/12 HDMI inputs) IP output
from Data port.
Appearance and illustration
1
2
3
3

NetUP Streamer HEVC. User manual
4/8/12×HDMI input (1.4), HDCP 1.4
Encoding Format
H.265/HEVC, H.264/AVC
Resolution
1920×1080_60P, 1920×1080_59.94P
Chroma
4:2:0
Bitrate
1Mbps~15Mbps (each channel)
Rate Control
CBR/VBR
GOP Structure
IBBP, IPPP
Encoding Format
MPEG-1 Layer 2
Sampling rate
48KHz
Bit-rate
48Kbps~384Kbps (each channel)
Audio Gain
0~255
1 MPTS and 4/8/12 SPTS output over UDP/RTP/RTSP,
Web-based management
Ethernet software upgrade
Dimension (W×L×H)
482mm×328mm×44mm
Approx. weight
4kg
Temperature
0~45℃ (work); -20~80℃ (storage)
Power requirements
AC 100V-220V±10%, 50/60Hz
Specifications
Input
Video
encoding
Audio
encoding
Output
4/8/12×SDI input
1920×1080_50P, 1920×1080_30P
1280×720_60P, 1280×720_59.94P
1280×720_50P, 1280×720_30P
1000M/100M Base-T Ethernet interface (unicast/multicast),
IP null packet filter
System
Other
parameters
4
NetUP Streamer HEVC. User manual
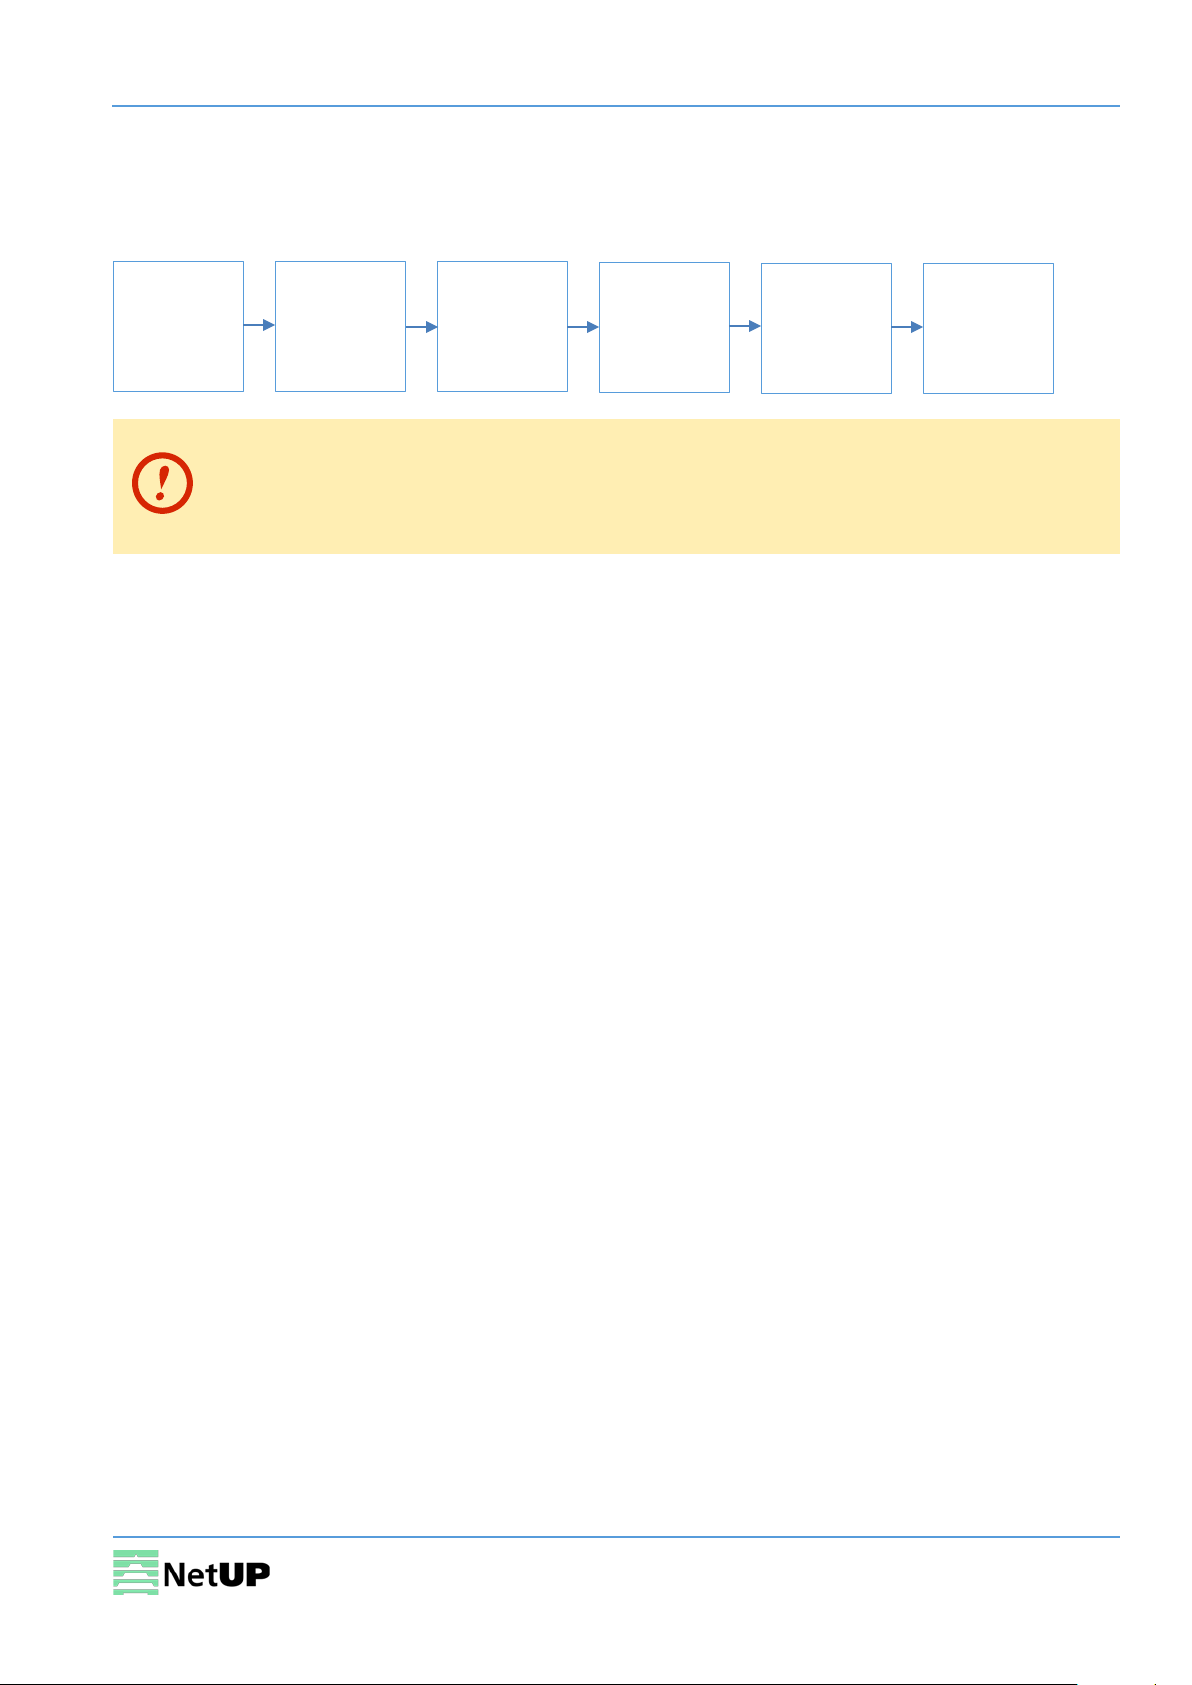
Chapter 2 Installation guide
Device’s installation flow chart
Packing list check
Installing
device
Before installing and connecting the device, carefully read the environment and
grounding requirements, as well as safety instructions for the sake of your safety and for
the safety of the device
Packing list check
Check items according to packing list. Normally it should include the following items:
• NetUP Streamer HEVC
Connecting
grounding
wire and
power cord
Connecting
signal cable
Setting
parameter
Running
device
• Power Cord
• HDMI/SDI cable
• Network cable
Safety instructions
• Before installing and connecting the device make sure that the device was not damaged during
delivery.
• Install the device in an appropriate place. The device is designed to work in a clean and dry room.
It must be operated and maintained free of dust.
• Before switching on the device make sure that it is adjusted to the mains voltage you intend to
use. Make sure that you keep within the specifications – AC 100V-220V±10%, 50/60Hz.
• Check that all the cables are connected properly. Connect cables only to a device that is turned
off.
5

NetUP Streamer HEVC. User manual
Item
Requirement
Room space
When installing a rack in the room, make sure the distance between two
Room floor
Electric isolation. Dust free. The volume resistivity of ground anti-static
Environment
5~40℃ (sustainable), 0~45℃ (short time).
Relative temperature
20%~80% (sustainable); 10%~90% (short time).
Pressure
86~105KPa
Door & window
Install rubber strip for sealing door-gaps and dual level glasses for windows
Walls
Can be covered with wallpaper or dark paint.
Fire protection
Fire alarm system and extinguisher.
Power
The device requires AC 100V-220V±10%, 50/60Hz.
Environment requirement
rows of racks is 1.2~1.5m and the distance to the wall is at least 0.8m.
material: 1×10⁷~1×10¹⁰ Ω. Grounding current limiting resistance: 1M (Floor
bearing should be greater than 450Kg/m2).
temperature
Installing air-conditioning is recommended.
Please carefully check before running.
Grounding requirement
• Connect the ground wire to the grounding hardware on the device. Ground resistance should be
no more than 1 Ω.
Grounding is essential for device’s functionality, surge and electronic interference
protection
• Keep proper contact with the metal housing of the device
• Grounding wire must be made out of copper and as thick and short as possible
• Make sure the two ends of grounding wire conduct electricity and are not rusty
• It is prohibited to use any other devices as a part of grounding electric circuit
• All racks should be connected with a protective copper strip. Ground loops should be avoided
• Grounding wire’s contact area with the rack should be no less than 25mm
2
6

NetUP Streamer HEVC. User manual
Chapter 3 WEB NMS Operation
Use the Web interface to control NetUP Streamer HEVC.
Login
Connect a personal computer and the device with net cable, and use ping command to confirm they
are on the same network segment.
Make sure that the computer’s IP address is different from the device’s IP address;
otherwise, it would cause an IP conflict
The default IP address of NetUP Streamer HEVC is 192.168.0.136. Thus, set the computer’s IP address
to 192.168.0.X, where X can be from 0 to 255, except 136. Open a web browser, enter the device’s IP
address in the browser address bar and press Enter. If the network is configured correctly, you will
see the login interface (Figure 1).
Enter username and password and click LOGIN to enter the web interface. Default username is
“admin”, default password is “admin”.
Figure-1
7

NetUP Streamer HEVC. User manual
Use this menu to
System information
Summary → Status
After login, you will get the Status page which displays the current system status (Figure-2).
navigate between the
interface pages
Figure-2
8

NetUP Streamer HEVC. User manual
Set
Select a channel
Check the
and bitrate
Confirm
Parameters → Encoder
Use the Encoder page to set video and audio parameters for each encoding channel (Figure-3).
parameters
Figure-3
input
program
information
changes
9

NetUP Streamer HEVC. User manual
Quick config
Channel config
Parameters → IP Stream
Use the IP Stream page to set IP output parameters (Figure-4).
Figure-4
Clik on the Quick config button to open the dialog box as Figure-5:
Figure-5
Clik on the Channel config button to open the dialog box as Figure-6:
Figure-6
10
NetUP Streamer HEVC. User manual
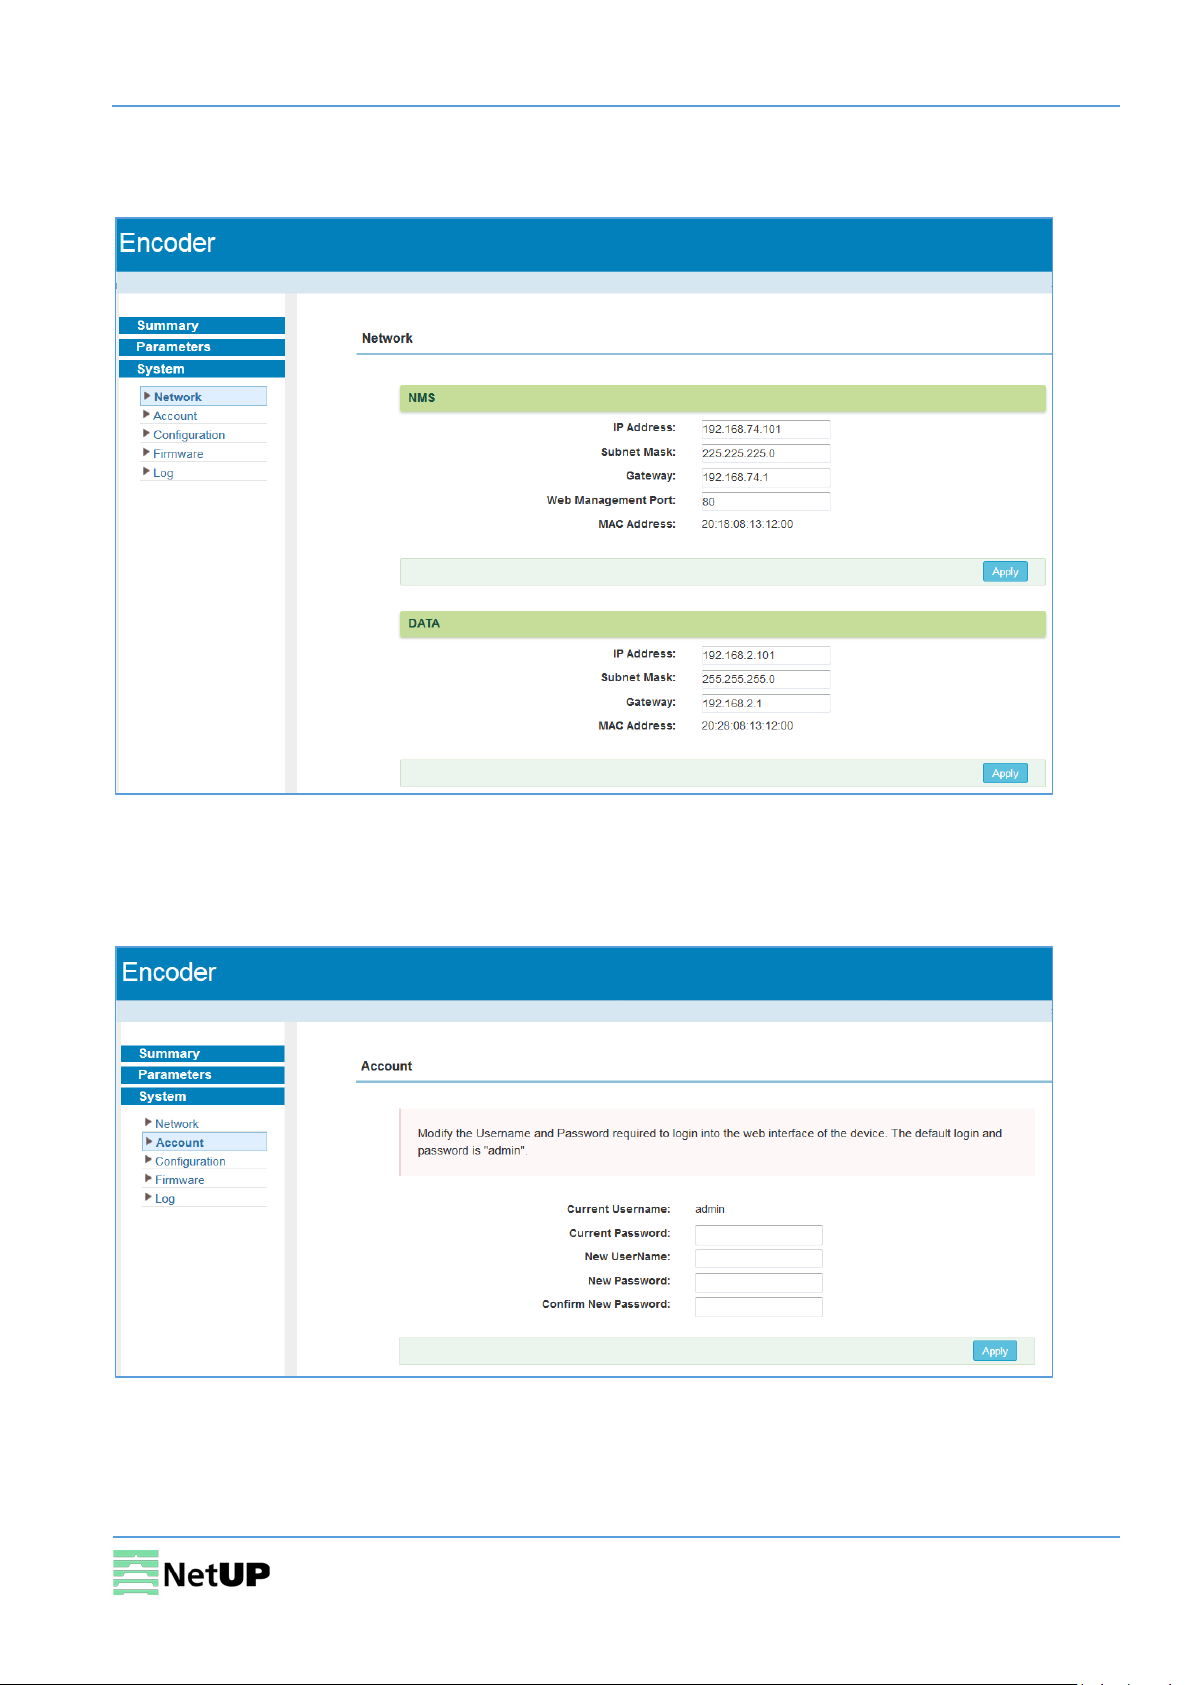
System → Network
Use the Network page to edit networking parameters (Figure-7).
Figure-7
System → Account
Use the Account page to change current password and username (Figure-8).
Figure-8
11

NetUP Streamer HEVC. User manual
System → Configuration
Use the Configuration page to save or restore system configuration, to revert to factory settings, to
work with backups or to load configurations (Figure-9).
Figeru-9
System → Firmware
Use the Firmware page to upgrade firmware for the device (Figure-10).
Figure-10
12

NetUP Streamer HEVC. User manual
System → Log
Use the Log page to see system logs (Figure-11).
Figure-11
13

NetUP Streamer HEVC. User manual
Troubleshooting
Check the following before troubleshooting:
• Whether the server room is well ventilated and hot air from the back panel of the device is
effectively removed?
• Does the supply voltage meet the power requirements of the device?
• Are all cables connected correctly?
Turn off the device and unplug the power cord in the following cases:
• The power cord or socket is damaged.
• A liquid is splashed on the device.
• A short circuit has occurred.
• The device is in damp environment.
• The device suffered from physical damage.
• Longtime idle.
• After switching on and restoring to factory setting, device still cannot work properly.
• Maintenance needed.
Frequent on and off switching is prohibited; the interval between switching the device on
and off must be more than 10 seconds
14
 Loading...