

Page 1

My-Netti.com
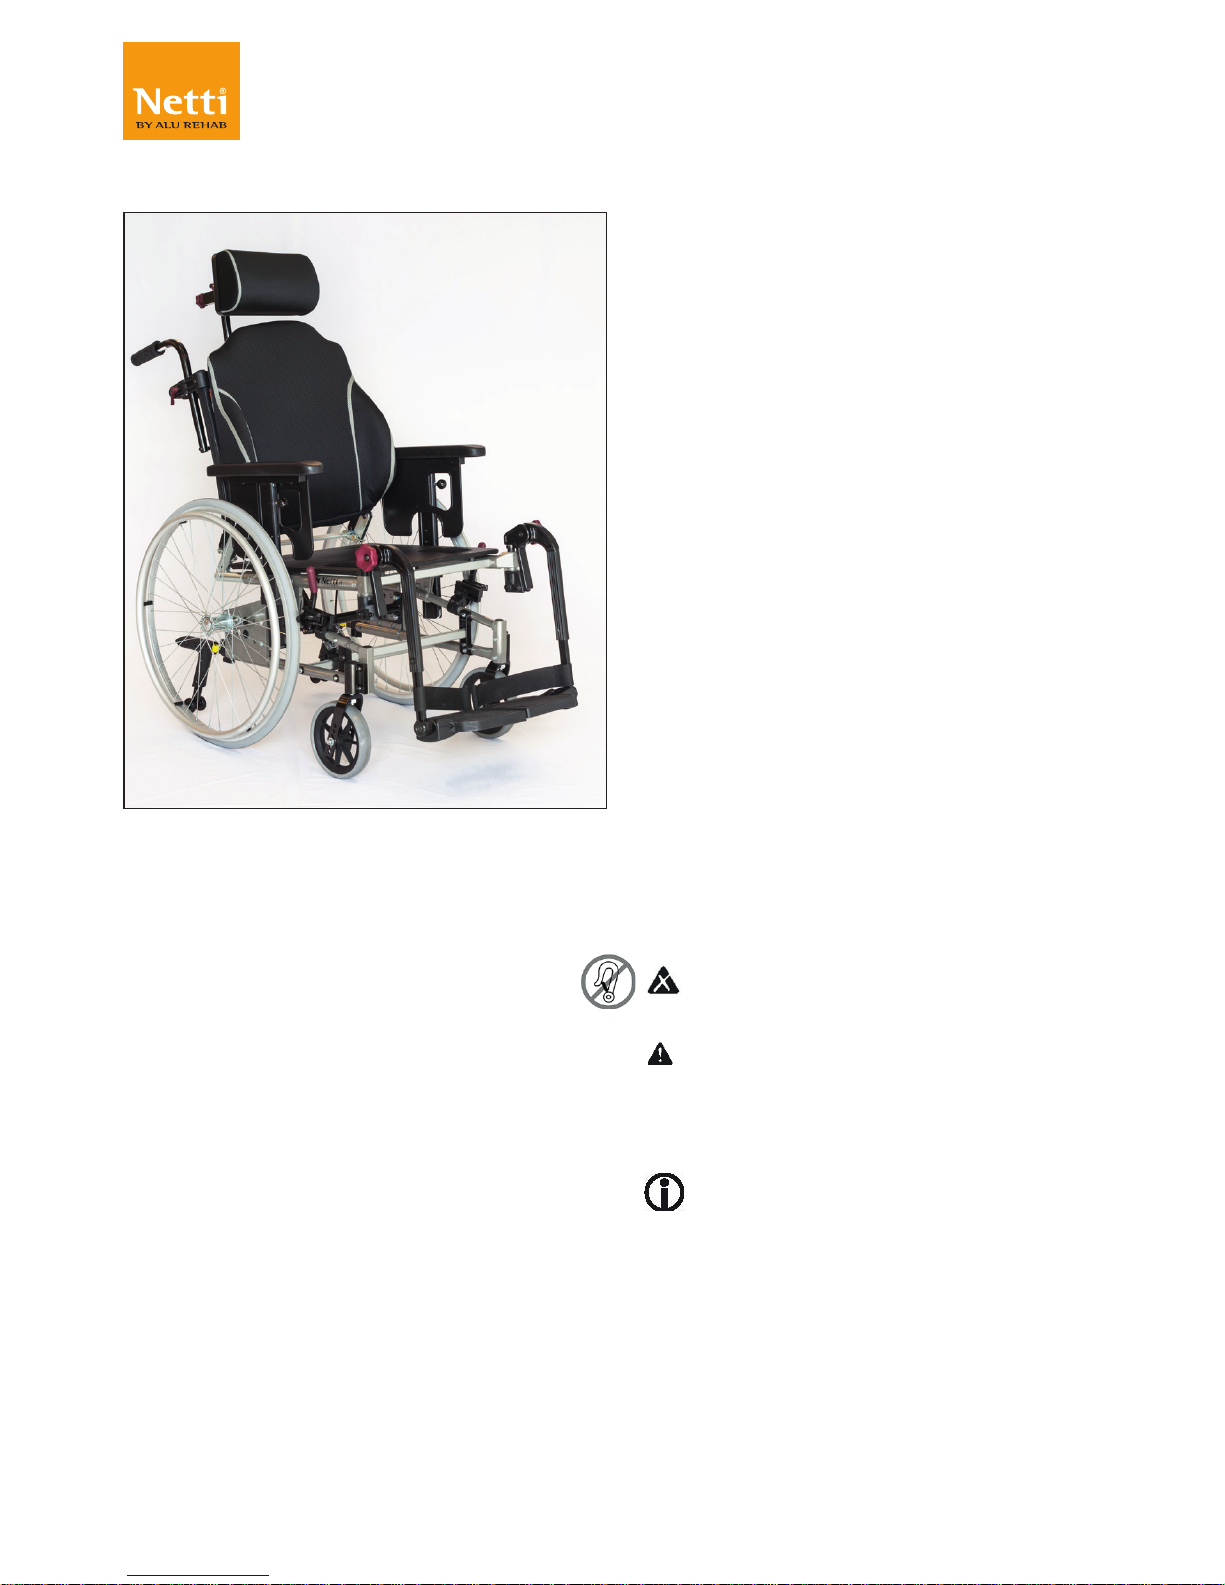
NETTI II
II FAMILY
COMFORT
USER
MANUAL
This product conrms to
93/42/EEC for medical products
Page 2

2
My-Netti.com
Model: Netti II
Language: English Version: 2018-11
CONTENTS
1. INTRODUCTION 4
1.1 Areas of use/indications for Netti II 5
1.2 Contra indications 5
1.3 Quality and durability 5
1.4 Environment and disposal 5
1.5 Information for re-use 6
1.6 About this manual 6
1.7 Vital measurements 7
2. QUICK REFERENCE 8
3. DESCRIPTION 9
4. FEATURES OF NETTI II 10
5. ACCESSORIES 11
5.1 Assembly of Hip Belt 14
5.2 Assembly of H-Belt 14
5.3 Electrical components 15
6. ASSEMBLING AND ADJUSTING 16
6.1 Unpacking 16
6.2 Main wheels 16
6.3 Front fork 16
6.4 Front castors 17
6.5 Seat height at the front 17
6.6 Seat height at the rear 17
6.7 Back rest 18
6.8 Adjusting seat depth at the rear 18
6.9 Adjusting seat depth at the front 19
6.10 Anti tip 20
6.11 Adjusting arm supports 20
6.12 Cushions 20
6.13 Adjusting the Velcro back 20
6.14 Leg support 21
6.15 Head support 23
6.16 Push handles 24
6.17 Adjusting the brakes 24
Page 3

3
My-Netti.com
Model: Netti II
Language: English Version: 2018-11
7. SEAT ANGLE / TILT AND BACK ANGLE 26
7.1 Seat angle 26
7.2 Backrest angle 26
7.3 Keywords regarding tilt and recline 26
7.4 Decrease the possibility of sliding, shear and pressure sore 26
7.5 Operating the tilt handle 27
8. TRANSPORT 28
8.1 Folding for transport 28
8.2 Transport in air plane 28
9. MANOEUVRING 29
9.1 Driving - general techniques 29
Access to emergency escape routes 29
9.2 Driving - step up 29
9.3 Driving - step down 30
9.4 Driving - slope 30
9.5 Driving - up stairs 31
9.6 Driving - down stairs 31
9.7 Transfer 32
9.8 Point of balance 32
9.9 Lifting the chair 33
9.10 Camber angle 33
9.11 Push rim 33
10. MAINTENANCE 34
10.1 Maintenance 34
10.2 Cleaning and washing 34
10.3 Long term storing 34
11. TROUBLESHOOTING 35
12. TESTS AND WARRANTY 36
12.1 Tests 36
12.2 Guarantee 36
12.3 Claim 36
12.4 Netti Customized / Individual adaptations 37
12.5 Combination with other products 37
12.6 Service and repair 37
13. MEASUREMENTS AND WEIGHTS 38
Page 4
4
My-Netti.com
Model: Netti II
Language: English Version: 2018-11
1. INTRODUCTION
Netti II is an all round comfort wheelchair
meant for both indoor and outdoor use.
It is tested to DIN EN 12183:2014.
The tests were carried out by TÜV SÜD
Product Service GmbH in Germany
In Alu Rehab we believe that wheelchairs
should be chosen based on a thorough
assessment focusing on the needs of the
user and demands from the environment.
Therefore it is important to know about
the possibilities and restrictions of the
wheelchair. Netti II is a wheelchair
designed for users with the need for
comfort and relief. The combination
between the seating system and the
ergonomically solutions in the frame
construction, offers many possibilities for
adaptation and adjustments.
The wheelchair is constructed for indoor
and outdoor use, and offers the possibility
to vary the sitting position from activity to
rest using tilt functions.
Max user weight 125 kg.
Netti II is not approved for being
used as a seat in a vehicle.
When mounting accessories such as
power kit etc, the weight of the
accessories must be subtracted from
the max user weight.
Specications varies between
countries.
Page 5

5
My-Netti.com
Model: Netti II
Language: English Version: 2018-11
1.3 QUALITY AND
DURABILITY
The Netti II wheelchair is
tested at TÜV SÜD Product
Service GmbH in Germany,
following the European
Standard DIN EN 12183:2014.
As manufacturer, Alu Rehab A.S evaluates
the test to be equal to 5-6 years of normal
use of the chair. The disability of the user
as well as the level of maintenance done
foremost decides the durability of the
wheelchair. Thus, the durability will vary
depending on these two factors.
1.4 THE
ENVIRONMENT
AND WASTE
DISPOSAL
Alu Rehab and its suppliers
wish to protect
the environment.
This means:
• That we avoid using environmentally
harmful substances and processes to
the greatest extent possible.
• That Alu Rehab’s products are
ensured a long service life and a high
degree of flexibility - to benefit the
environment and economy.
• That all packaging can be recycled.
• That the wheelchair was designed to
be separated into its component
materials - to make recycling easier.
Contact your local recycling
agent to get correct information
how to handle in your area.
Netti II is designed for temperature
range from -10°C to +40°C
1.1 AREAS OF USE/
INDICATIONS NETTI II
Netti II is a multi-functional wheelchair for
partially or fully immobile persons with
physical and/or mental disabilities. These
disabilities may have multiple causes. Netti
II has an adjustable seat and back angle,
thus facilitating for the user change of
position, mobilisation or posture correction
(stabilization), wherever the following
functional impediments with their multiple
possible causes are present:
• limited or lacking mobility
• limited or lacking muscle power
• limited movement range
• lacking or limited trunk and body stability
• hemiplegia
• rheumatic-type disorders
• craniocerebral injuries
• amputations
• other neurological or geriatric disorders.
If our standard solutions does not cover
you needs, please contact our customer
service for Netti customized solutions.
1.2 CONTRA INDICATIONS
With strongly muscular spasticity we
recommend the Netti Dynamic System which
offers a frame construction that follows the
movement pattern of the user.
Ignoring this advice could in unfavourable
circumstances lead to the deformation or
fracture of metal parts in the area of the back
tube, the leg rests or the arm rests.
Page 6

6
My-Netti.com
Model: Netti II
Language: English Version: 2018-11
1.6 ABOUT THIS MANUAL
In order to avoid damages while using the
Netti II wheelchair, please read this manual
carefully before starting to use the chair.
Symbol of forbidden actions.
No warranty can be claimed when ever these actions are
implemented.
Symbol of warning.
Whenever this symbol is used,
caution has to be taken.
Symbol for
important
information.
Symbol for useful tips.
Symbol for tools.
7
°
Symbol for parking brake safe
slope.
Max.
135
kg
Symbol for max user weight.
Please note that this manual is updated
according to the year and date stated on
each page.
User Manual on web
For enhanced readability ( advantageous for
users with visibility challenges) please find
our user manual om our web page:
www.My-Netti.com - manuals - user manual Netti II.
Latest user manual updates, product safety
notes, addresses and other product
information like recalls etc. will be published
on our web page.
1.5 INFORMATION FOR
RE-USE
All products from Alu Rehab are designed
to give years of maintenance-free service.
All products can be adapted for re-use by
an authorised dealer. In order to guarantee
performance and safety, Alu Rehab
recommends the following tests prior to
any re-use.
Please examine the following components
for function, integrity etc. and replace
parts as necessary:
• Wheels (tyre tread)
• Wheelchair frame
• Front castors and quick release
• Hubs
• Brake function
• Directional stability of wheels
• Bearings: test for wear and
lubrication.
• Cushions
• Leg supports
• Arm supports
• Recline/tilt function
• Push bar / handles
• Anti tip
Please also note the content of chapter
10.2 Cleaning and care.
For hygienic reasons: please replace the
head support for a new user.
Anti-tip
Correctly fitted, the anti-tip will secure the
chair from tipping backwards. We strongly
recommend use of the anti-tips.
Page 7
7
My-Netti.com
Model: Netti II
Language: English Version: 2018-11
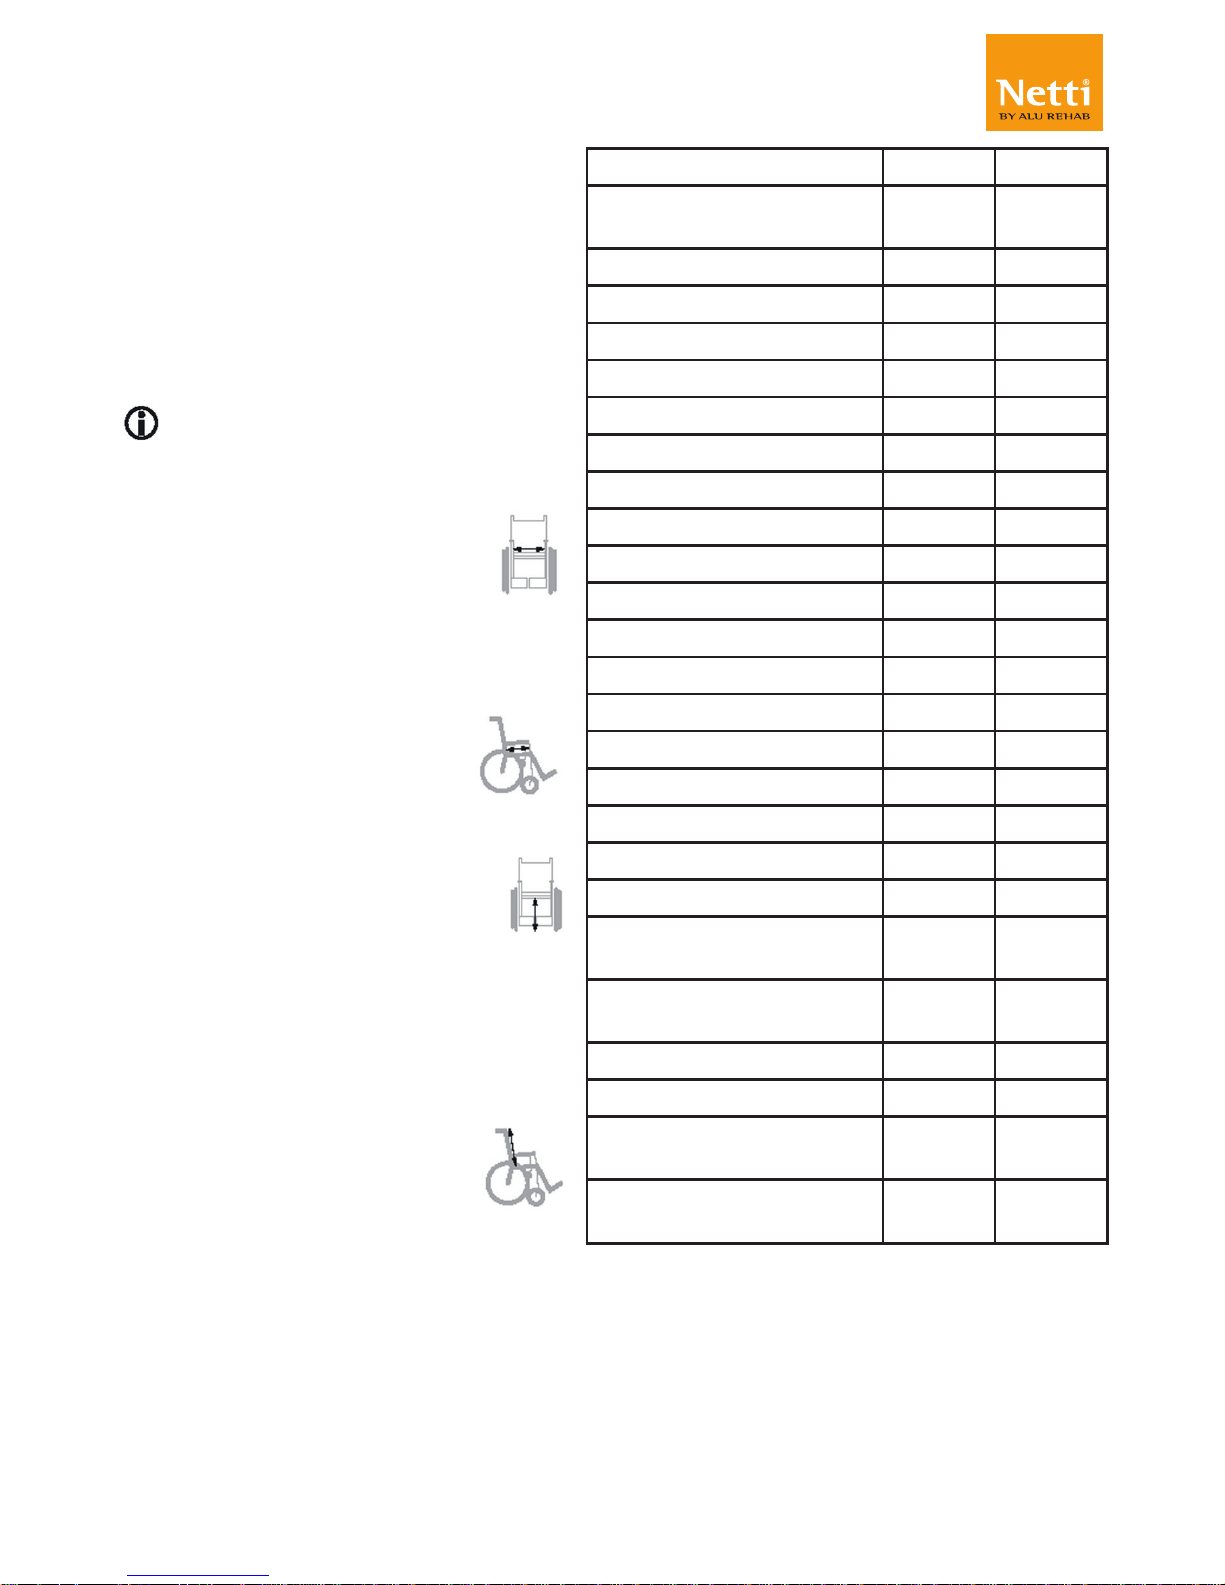
Specications Min. Max.
Overall length with leg
supports
1100 mm 1100mm
Overall width 590 mm 740 mm
Folded length 760 mm 760 mm
Folded width 504 mm 654 mm
Folded height 420 mm 420 mm
Total mass 25 kg 26,5 kg
Mass heaviest part frame 12,9 kg 14,3 kg
Mass heaviest part wheel 1,9 kg 1,9 kg
Static stability down hill 0 13º
Static stability up hill 0º 18º
Static stability sideway 15º 15º
Seat plate angle -9º 16º
Effective seat depth 400 mm 500 mm
Effective seat width 375 mm 525 mm
Seat surface height at front 460 mm 490 mm
Back angle - 3 steps 83º 107º
Back height, ex cushion ** 480 mm 600 mm
Distance foot plate to seat 240 mm 510 mm
Angle foot plate - seat plate 62º 158º
Distance armrest -seat
plate
185 mm 325 mm
Front location arm support
structure
340 mm 390 mm
Push rim diameter 535 mm 535 mm
Horizontal axle location* -30 mm 95 mm
Parking brake max safe
slope
0 7º
Minimum turning radius,
vertical leg supports
R675
mm
R702
mm
Model with 24”wheels.
* With frame extender.
1.7 VITAL MEASURES
Netti II is a all-round comfort wheelchair
designed for both outdoor and indoor
use.
Min. dimensions in table refer to seat
width 350 mm. Max dim refers to seat
width 500 mm.
Specifications varies between
countries.
Total weight: 26 Kg
(450 mm wide chair)
Seat width:
350, 380, 400, 430, 450, & 500 mm
Seat depth:
(From back rest cushion to
front of seat plate)
400, 425, 450, 475, 500 mm
Seat height:
(From oor to top seat plate
using 24” main wheels in upper position).
440 mm*
*By changing type of and position of
main wheels, it is possible to achieve
seat heights from 340 - 500 mm. Tilting
the seat unit gives greater seat height in
front.
Back height:
500 mm**
** Using back extenders gives 600 mm.
Always use anti tippers by driving up-hill.
Page 8

8
My-Netti.com
Model: Netti II
Language: English Version: 2018-11
Drive carefully!
Be aware that friction against push
rims can create a warm surface.
Salt water can increase risk of
corrosion. Further precautions related
to environmental conditions not
needed.
When the chair is tilted rearwards,
the anti tips and brakes should
always be in use.
Be sure to lock all handles properly.
The anti-tips should always be used
for the safety of the user.
Watch out for pinching danger when
folding and unfolding, tilting, reclining
and all other adjustment movements.
Surface temperature of metal parts in
frame structure might increase when
exposed to direct sunlight.
Never stand on the foot plates due
to risk of tipping forwards.
Never lift the wheelchair by the leg
supports, arm supports or head
support.
Product configuration may vary
between different countries.
For visually impaired people,
manuals and catalogues can be
downloaded at www.My-Netti.com
If in doubt - contact your dealer!
2.0 QUICK
REFERENCE.
The content of this page is a summary of the
whole manual. It gives a brief introduction to
the use and care of the Netti II wheelchair.
The quick reference is not a replacement
for the manual, only a reminder/check list.
• Unpack the wheelchair (Chapter 6.1)
• Mount the main wheels (Chapter 6.2)
• Mount the front castors (Chapter 6.4)
• Fold the back rest up ( Chapter 6.7)
• Mount the arm support. ( Chapter 6.11)
• Mount the seat cushion (Chapter 6.12)
• Mount the leg supports (Chapter 6.14)
• Mount the head support (Chapter 6.15)
• Set anti-tip in active position
(Chapter 6.7)
• Mount accessory. (See chapter 5 for more
information. Mounting descriptions will
follow the accessory.)
Adjust the wheelchair to the user:
Adjust seat depth and eventually the
wheelchair balance, leg support height, arm
support height, head support height and
depth, chair back cushion height.
For more information about adapting
the wheelchair to the user, please see:
My-Netti.com Knowledge center.
For troubleshooting, see chapter 11.
For mounting and adjustments see
chapter 6.
Announcements to product safety
and eventually product recalls will be
published on our home page
www.My-Netti.com
Page 9
9
My-Netti.com
1
2
3
4
5
7
8
6
18
13 12
9
10
11 15
14
16
17
Model: Netti II
Language: English Version: 2018-11
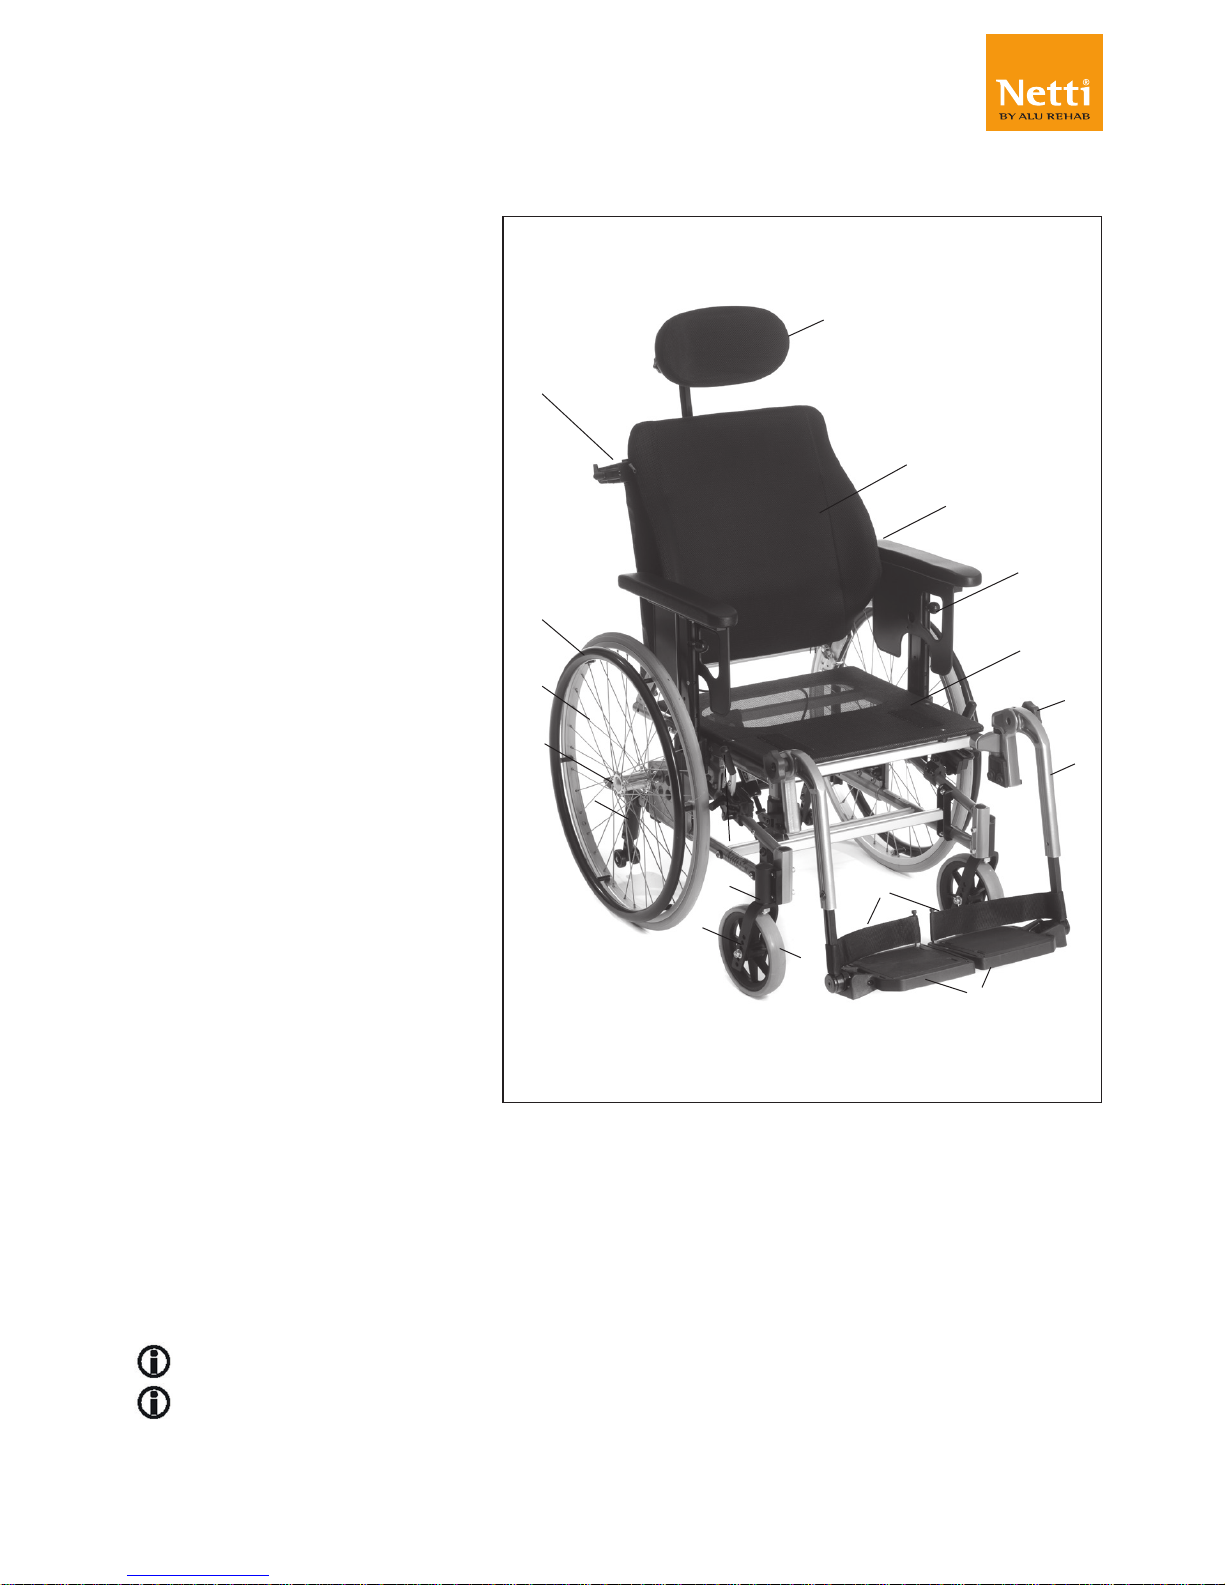
3. DESCRIPTION
1. Head support
2. Push bow
3. Back cushion
4. Arm support with pad
5. Arm support handle
6. Main wheel
7. Push rim
8. Seat plate
9. Anti tip
10. Brake
11. Front castor bearing house
12. Universal leg support
13. Main wheel quick release
14. Front castor fork
15. Heel strap
16. Front castor
17. Foot plate
18. Angle adjustment wheel
for leg support.
* * Be aware that specifications may vary between countries.
If any of these parts are missing, please contact your dealer.
For complete information, please contact your dealer.
Page 10

10
My-Netti.com
Model: Netti II
Language: English Version: 2018-11
4. FEATURES OF NETTI II
STANDARD
SEAT
• Seat cushion has to be ordered separately
• Tilt -9° til +16°
• Adjustable height 400 mm to 470 mm by
change of wheels
• Adjustable seat depth: 100 mm
• Comfort seat plate
WHEELS*
• 24” x 1 ” puncture proof drive wheels
with quick release axle
• Push rim: Aluminium
• 7” Puncture proof front castors with
quick release axle
* Standard main wheels may vary
between countries.
PUSH HANDLES
• Height adjustable, turnable and
demountable push handles
BRAKE user brake, pull-to-lock wheel lock
ANTI TIPPERS
• Height and length adjustable, turnable.
BACKREST
• Netti Smart back cushion
• Angles: 82°, 97°, 107°
• Height: 500 mm
• Back cushion height adjustable with inte-
grated lumbar support and side support.
LEG SUPPORTS
• Angle adjustable
• Height and angle adjustable foot plates.
ARM SUPPORTS
• Height adjusbale and removable.
• Depth adjustable armrest pads.
HEAD SUPPORT
• B - Height, depth and angle adjustable
• Removable
ACCESSORIES
SEAT
• Sliding seat (See chapter 5)
TABLE
• Universal table (See chapter 5)
BELTS
• Pelvic belt and restraint harness (See
chapter 5)
WHEEL
• Puncture proof PU wheels (See chapter 5)
• Pneumatic drive wheels
• Drive wheels with drum brake.
• One-arm drive
• Camber angle: 2° or 4°
• Pneumatic front castors
• Spoke protector
• Push rings
BRAKE attendant operated running brakes.
BACKREST
• Back rest extender (See chapter 5)
• Lumbar support and wedge
• Different backrest cushions with different
sizes and firmness (See product catalogue)
LEG SUPPORT
• Universal leg support (See chapter 5).
• Grandis angle adjustable leg support.
• Amputation support.
• Knee and thigh support.
ARM SUPPORT
• Different types armrest pads (See chapter 5)
• Hemi cushions.
HEAD SUPPORT
• Different head support models
Page 11
11
My-Netti.com
Model: Netti II
Language: English Version: 2018-11
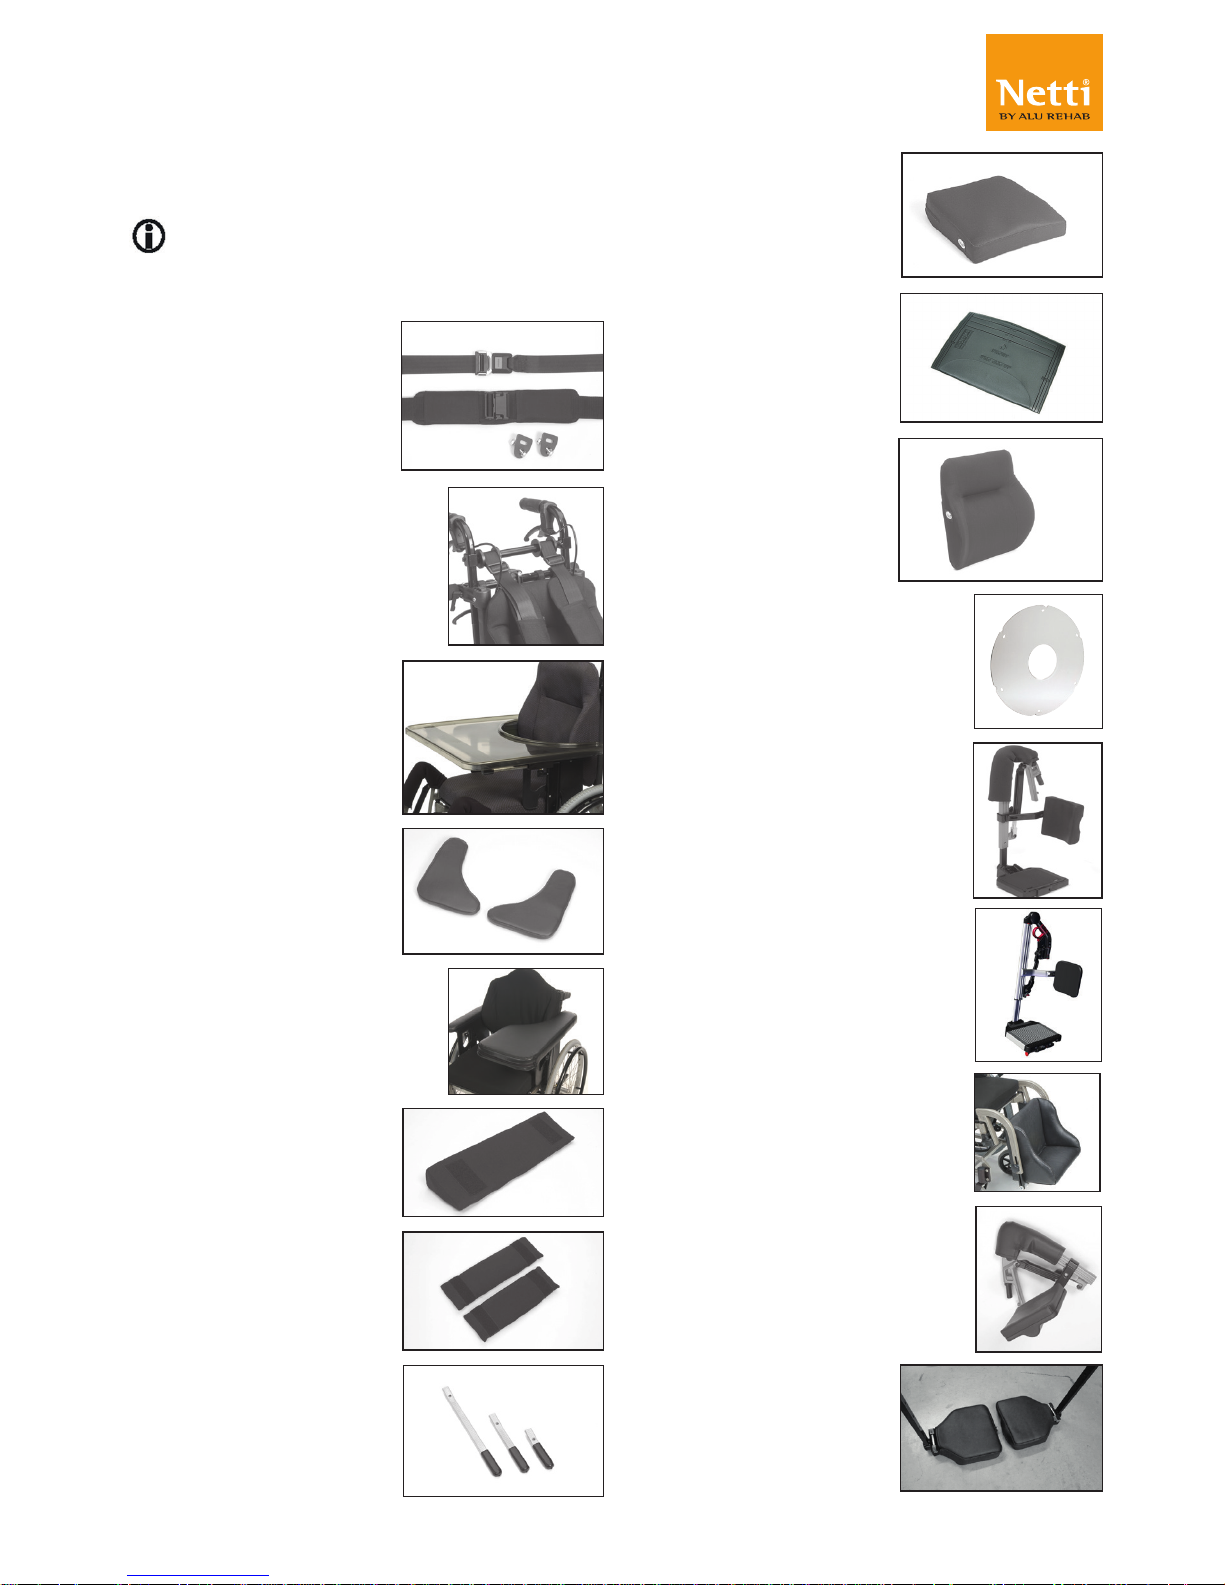
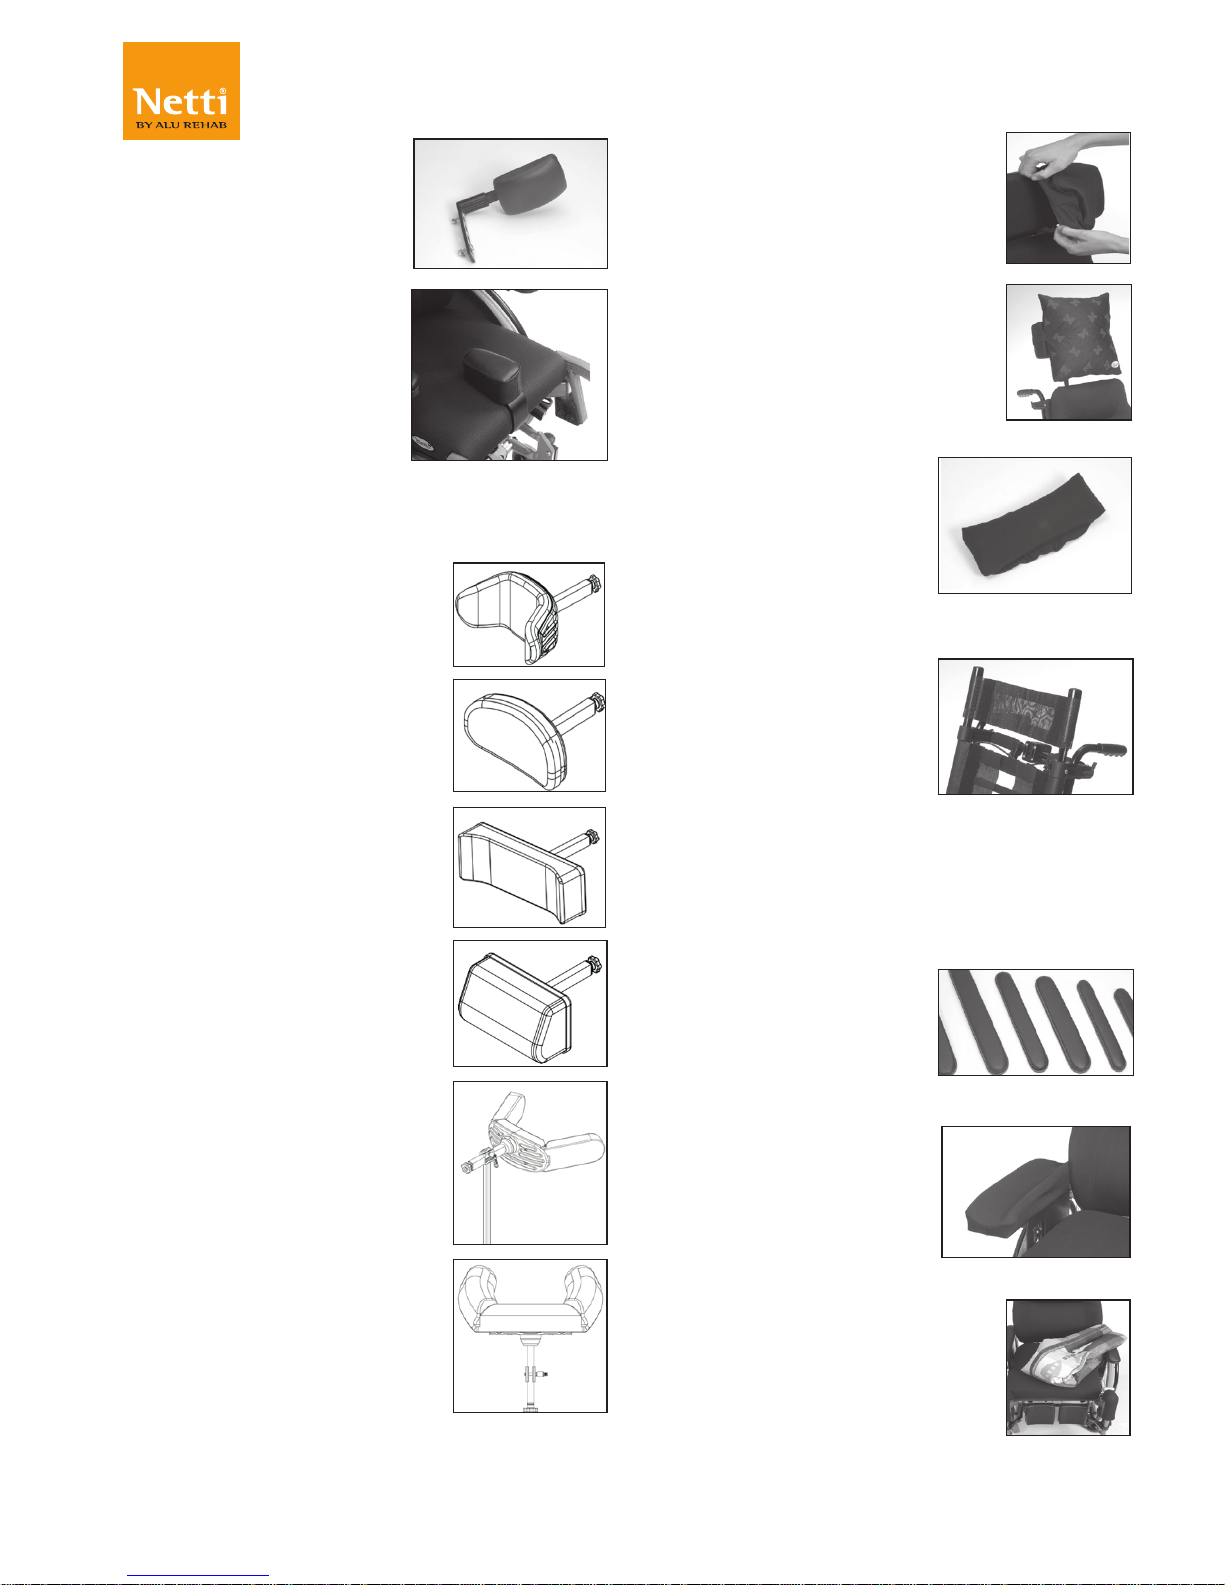
Seat Cushions
Many to choose from.
Please see our home
page or contact your
dealer.
Vital Base Integral
Pelvic stabilizer.
Backrest Cushions
Several models
Please contact your
dealer or se our
homepage
www.My-Netti.com
Spoke protectors
For 20”, 22” and 24”.
Transparent
Leg supports:
Angle adjustable
Netti Grandis
Foot box
Upholstered
Amputation support
Foot plate
upholstery
5. ACCESSORIES
The anytime updated complete accessory and spare part catalogue can be
downloaded from our home page
www.My-Netti.com
Belts and harnesses
Several models: Hip
belts with or without
upholstery and with
plastic lock or car lock.
(chapter 5.1 for mounting)
H-Belt attachment bar
To be mounted onto separate
bars or to the push handles.
Comes in two sizes with
telescopic bar.
(See chapter 5.2)
Trays
3 models: Swingable,
lockable and standard
“push on” model.
Upholstery for tray
Offers a soft base for
the arm resting on the
tray.
Half tray
Swingable upholstered half
tray. The tray replaces the
existing standard armrest.
Wedge
Increases side support.
Lumbar support
Increases lumbar
curvature.
Brake extender
90 mm
120 mm
250 mm
Page 12
12
My-Netti.com
Model: Netti II
Language: English Version: 2018-11
Knee / Thigh support
The support reduces
abduction.
Abduction block
The block reduces
abduction.
Small: 80 mm width
Medium: 110 mm width
Large: 140 mm width
Head supports
Support A Side support
also available with
forehead strap
Support B Small
Support C Large
Support D comfort pressure
distributive
Support E adjustable
side supports
Support F with cheek/chin
support band
Hygiene cover
Protects the core of the
head support.
Head cushion
400 x 400 mm cushion
with Kospoflex filling and
rubber.
Head cushion
Comfort
Cushion with Kospoflex
filling to pull onto
head rest.
Back rest extender
120 mm extender.
To be used together
with 600 mm back rest
cushion. When using
Netti III with seat width
500 mm and more as
seat in car, the back rest
extender and enforced
head support is required.
Arm support pads
Wide: 415 x 80 mm
Long: 445 x 70 mm
Long/Wide: 525 x 80 mm
Short: 333 x 58 mm
Standard: 385x58 mm
Arm support pad bended
Hemi arm support
Offers extra support for
the affected arm. Can
be set in fixed positions.
Hemi cushion
A more accommodating
support than the hemi
arm support.
Page 13
13
My-Netti.com
Model: Netti II
Language: English Version: 2018-11
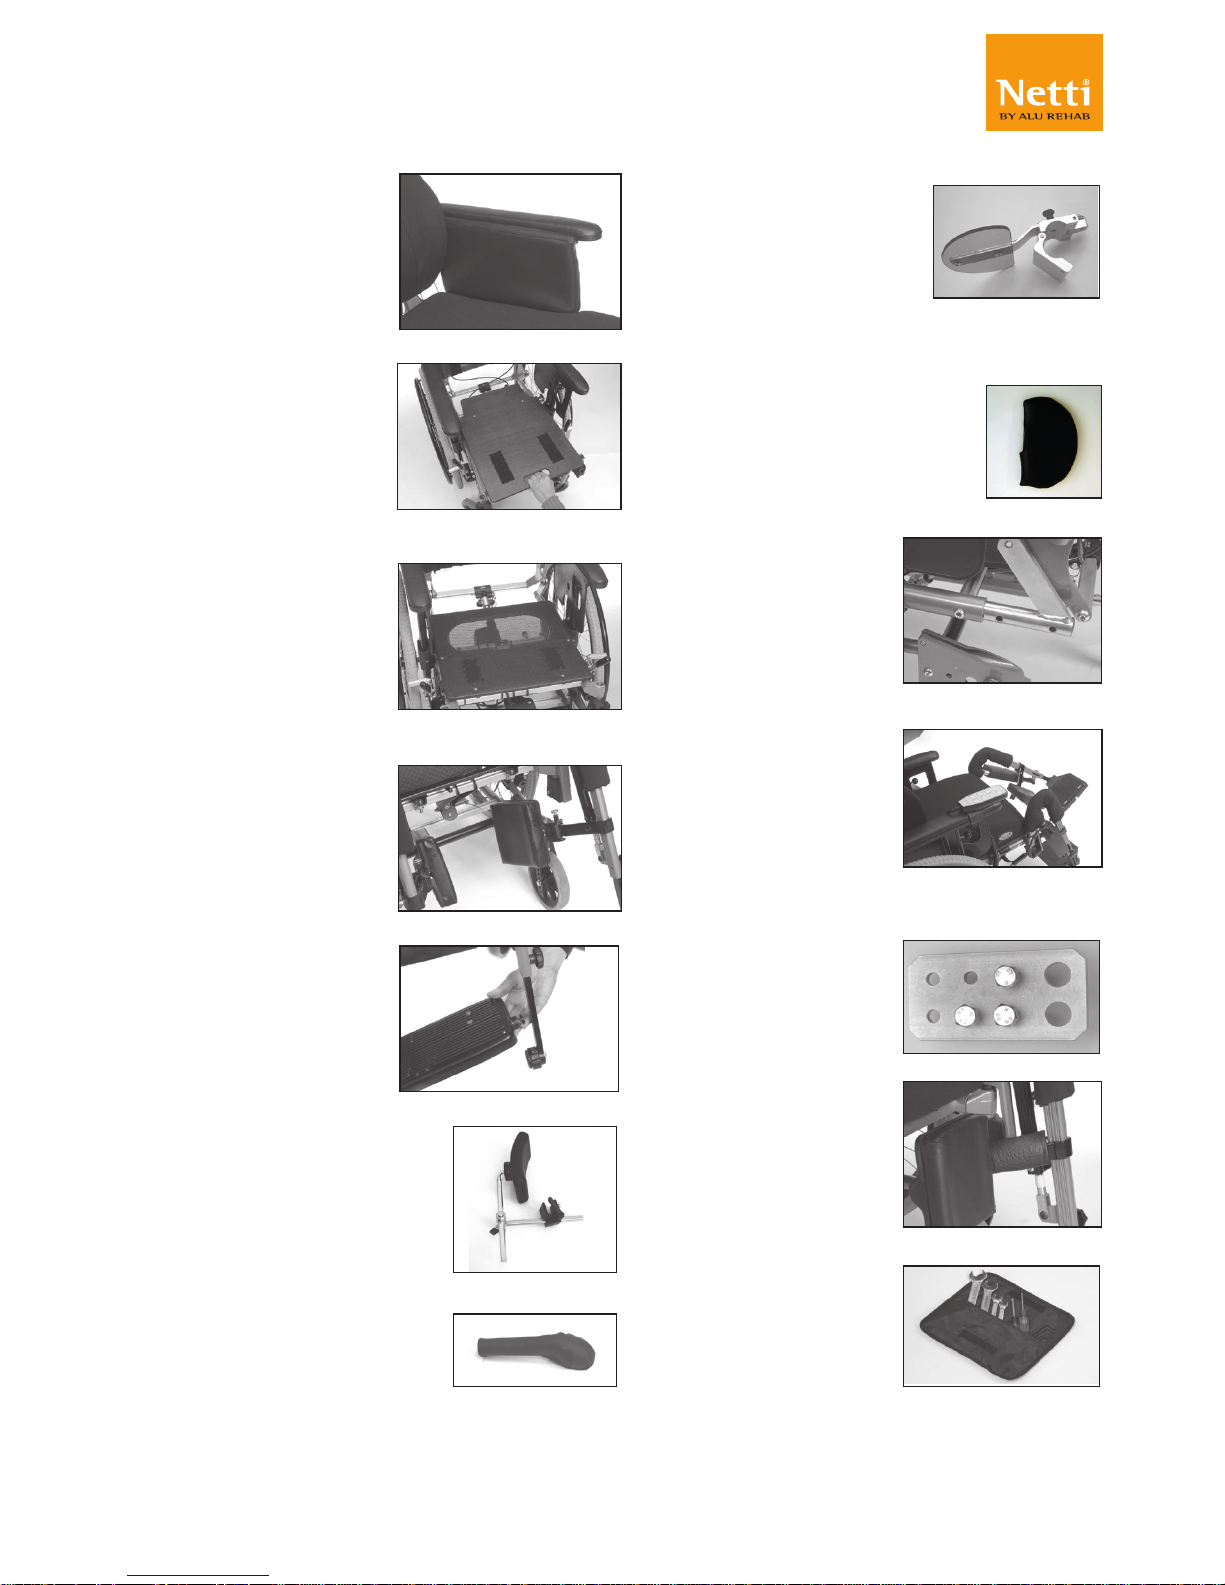
Comfort pads
To be attached to the
skirt guard. Offers a
pressure distributing
effect. 25 mm, 35 mm
and 45 mm.
Sliding seat
The seat can be pulled
out and pushed in
while the user sits in
the seat. This eases
transfer and
positioning of the user
Comfort plate
The plate has a hole in
the rear, which in cooperation with the seat
cushion increases pelvic
stabilization.
Calf pad hinged
The user doesn’t have to
lift the legs when
mounting or dismounting the leg
supports.
Foot board with lock
The leg supports can
be swung to the side
like standard leg
supports.
Side support Correction
Meant for correction of bad
postures in the upper trunk.
For optimal function use
together with flip backrest.
Pad for side support
Correction
Side support Stable
Meant for users with decreased stability of the
upper trunk. For optimal
function use together
with Stable cushion.
Pad for side support
Stable
Long back rest
hinge
Covers seat depth:
545, 570 and 590 mm.
Must be used with
extra long locking
head.
El. components
For tilt, back rest and
leg supports,
separate or complete.
Please study order
form at My-Netti.com for detailed
information.
Frame extender
Increases distance
between main wheels
and front castors.
Reduces tipping risk.
Upholstery for calf
support bracket
Reduces pressure.
Tool set
Page 14
14
My-Netti.com
Model: Netti II
Language: English Version: 2018-11
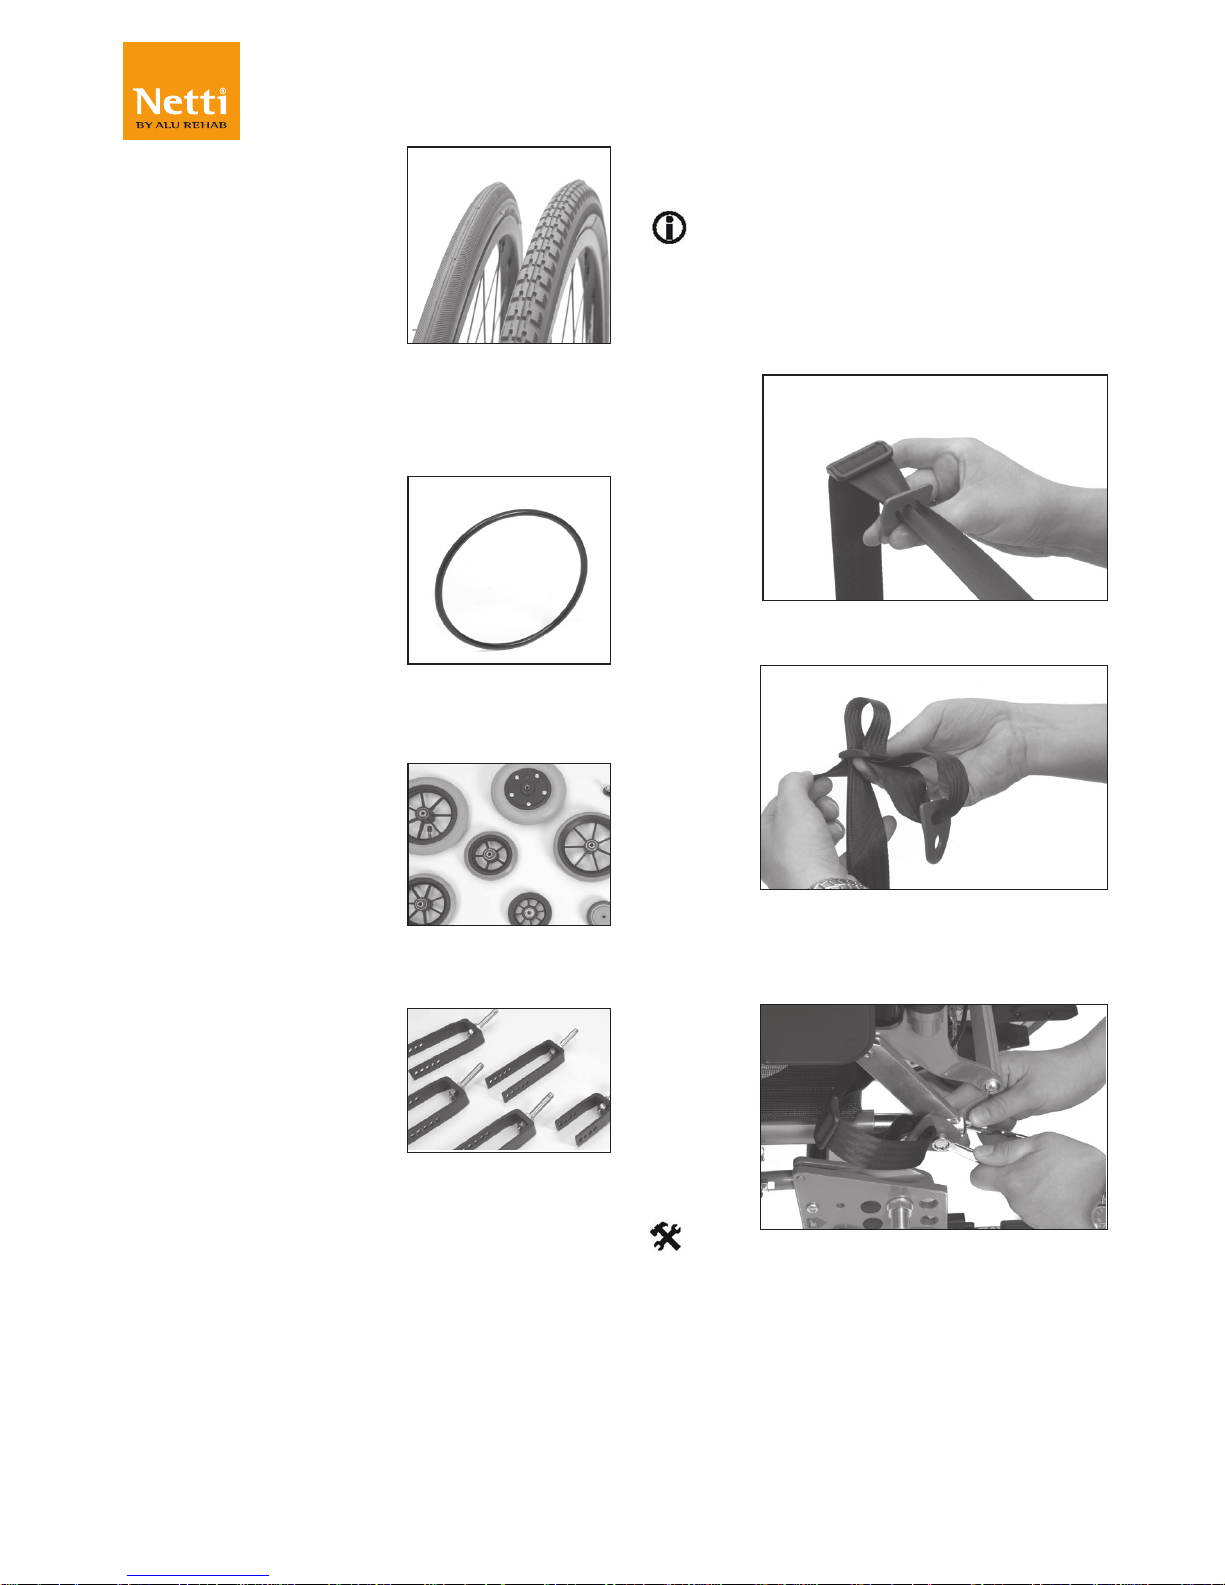
5.1 MOUNTING OF HIP BELT
Please see www.My-Netti.com for
continuously updated overview of belts and
harnesses and installation instructions.
• Pull the belt thorough the hole in the hip
belt bracket.
• Thread the belt back through the belt
clamp.
• Fix the hip belt bracket to the rearmost
hole in the back hinge, using the enclosed
screws and nuts.
2 pc 13 mm open-end spanner.
Drive wheels
available in sizes:
12”, 16”, 20”, 22”, 24”
& 26”. All wheels
available 2 widths: 1”
and 1 3/8”. Puncture
proof Flexel or PU or
pneumatic. Inflation
pressure is clearly
marked on pneumatic
tyres.
Push rims
Aluminium:
20”, 22”, 24”, 26”
Friction push rim
20”, 22”, 24”, 26”
Front castors
Sizes available: 3”, 4”,
5”, 6”, 7” & 8”.
Castor available in
Flexel or PU puncture
proof qualities or
pneumatic.
Front forks
Standard w/ axle
Long w/ axle
Short w/ axle
Wide w/ axle
Long/Wide w/ axle
Page 15
15
My-Netti.com
Model: Netti II
Language: English Version: 2018-11
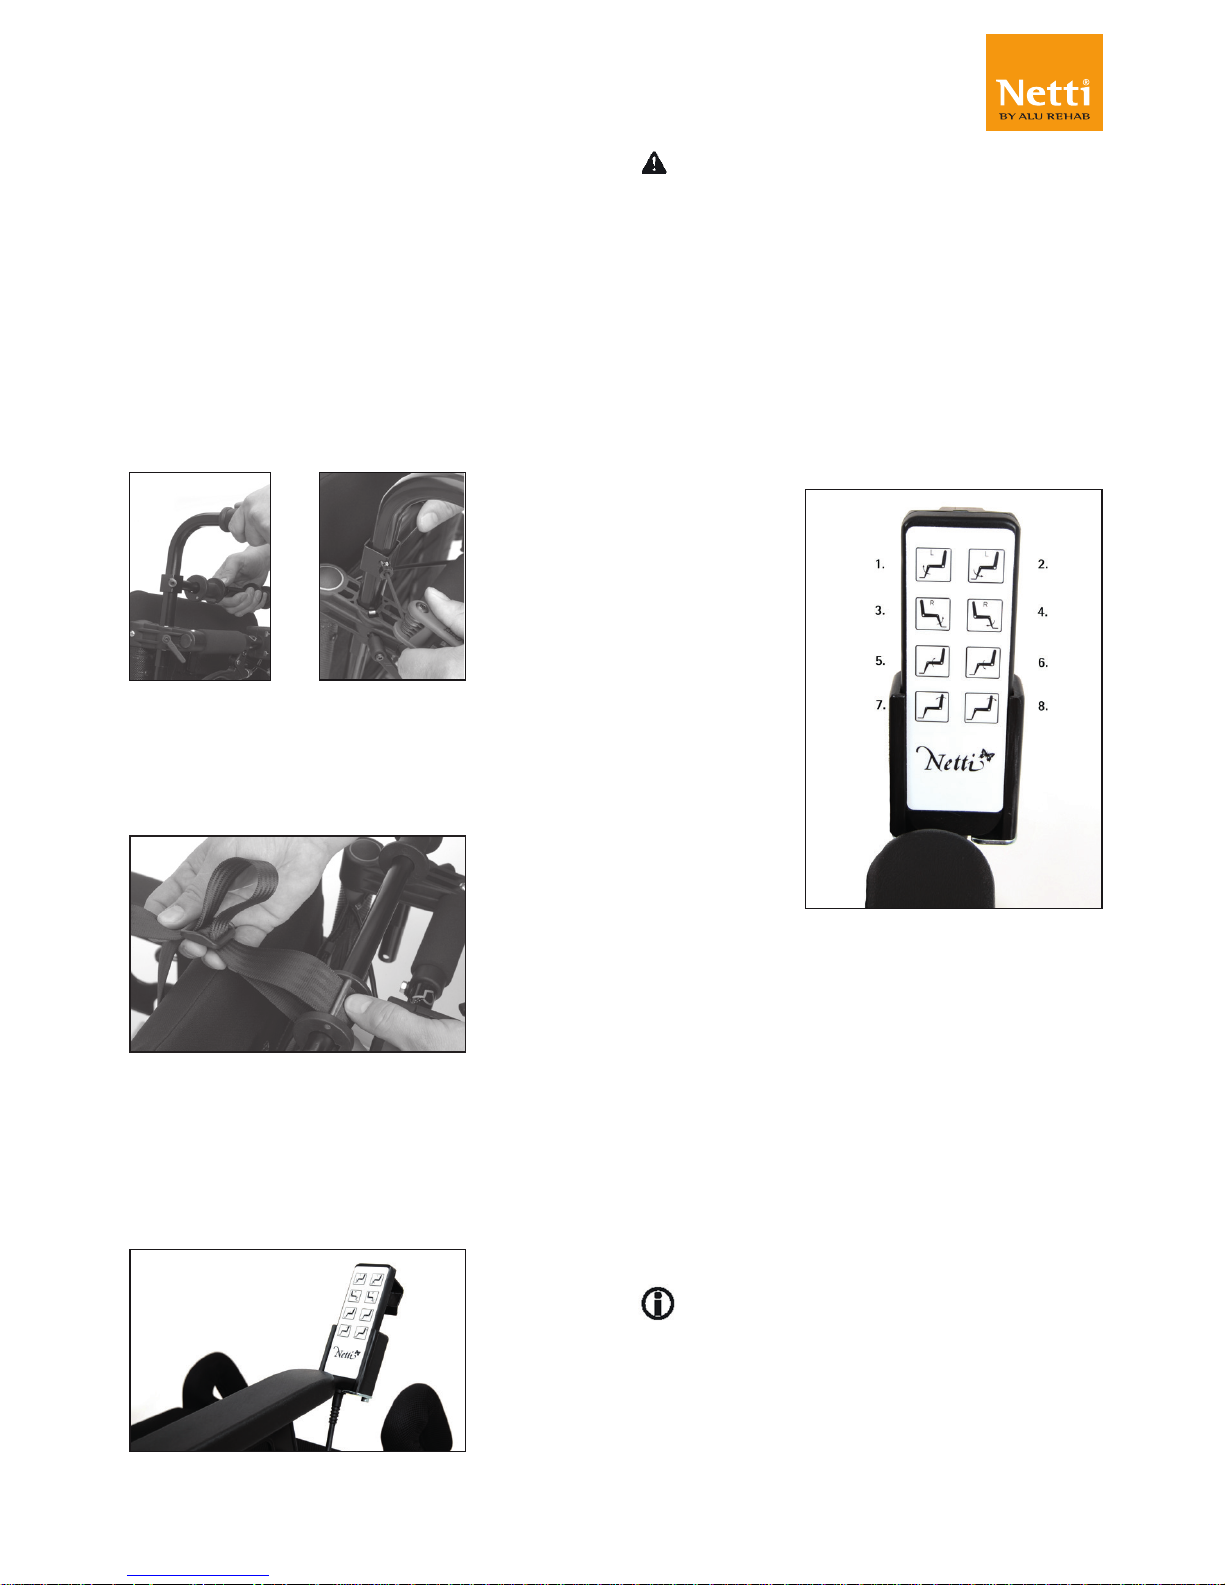
5.2 MOUNTING OF H-BELT
BAR FOR H-BELT AND VEST
• See separate mounting description
MD0074 for Harness adapter kits.
Demount the push handles and insert the
H-belt bar to them before fixing them to
the wheelchair .
• Fix the push handles in correct position
and lock firmly. Then fix the bar at the
right position/height. The height should
be level with the shoulders of the user.
• Thread the belt through the rolls and lock
the belt by pulling the belt through the
belt clamp. Adjust to the requested length
of belt.
5.3 ELECTRICAL
COMPONENTS
Netti II is available with electrical operation
of tilt and leg supports. Functions can be
mounted one by one, or all together, and
are operated with a hand control.
Electrical components are to be
mounted by Alu Rehab or certified
personnel.
Hand control functions.
1. Left foot support up
2. Left foot support down
3. Right foot support up
4. Right foot support down
5. Tilt back
6. Tilt forward
7. Recline forward - not used
8. Recline back - not used
A holder for hand control can be
mounted as accessory
Weight of components:
Control box: 1900 gram
Tilt actuator: 1650 gram
Leg support actuator: 984 gram
each
Hand control: 240 gram
Cable for charger: 20 gram
Total weight all inclusive: 5778 gram
An additional user manual
describing maintenance, charging and
handling will follow any Netti chairs
mounted with electrical functions.
Page 16
16
My-Netti.com
Model: Netti II
Language: English Version: 2018-11
6. ASSEMBLING
AND ADJUSTING
6.1 UNPACKING
1. Unpack all the parts, and check that
everything is there according to the
packing list.
2. Mount main wheels and front castors.
3. Mount back rest, arm supports,
cushions and leg supports.
4. Mount accessories.
Weight of components (450 mm chair
width):
Main wheels: 1,9 kg each
Front castors: 0,8 kg each
Leg support Universal: 1,8 kg each
Netti Uno|Back: 1,25 kg
Netti |Smart
(to be ordered separately): 1 kg
Head support D: 1 kg
Arm support: 1,1 kg
Necessary tools are described under each
chapter. Accessories described in chapter 5
is a presentation of options, and will be
delivered with separate mounting
descriptions.
When seating and wheel adjustments are
done in the possible positions by standard
equipment, the adjustments will not exceed
safe limits.
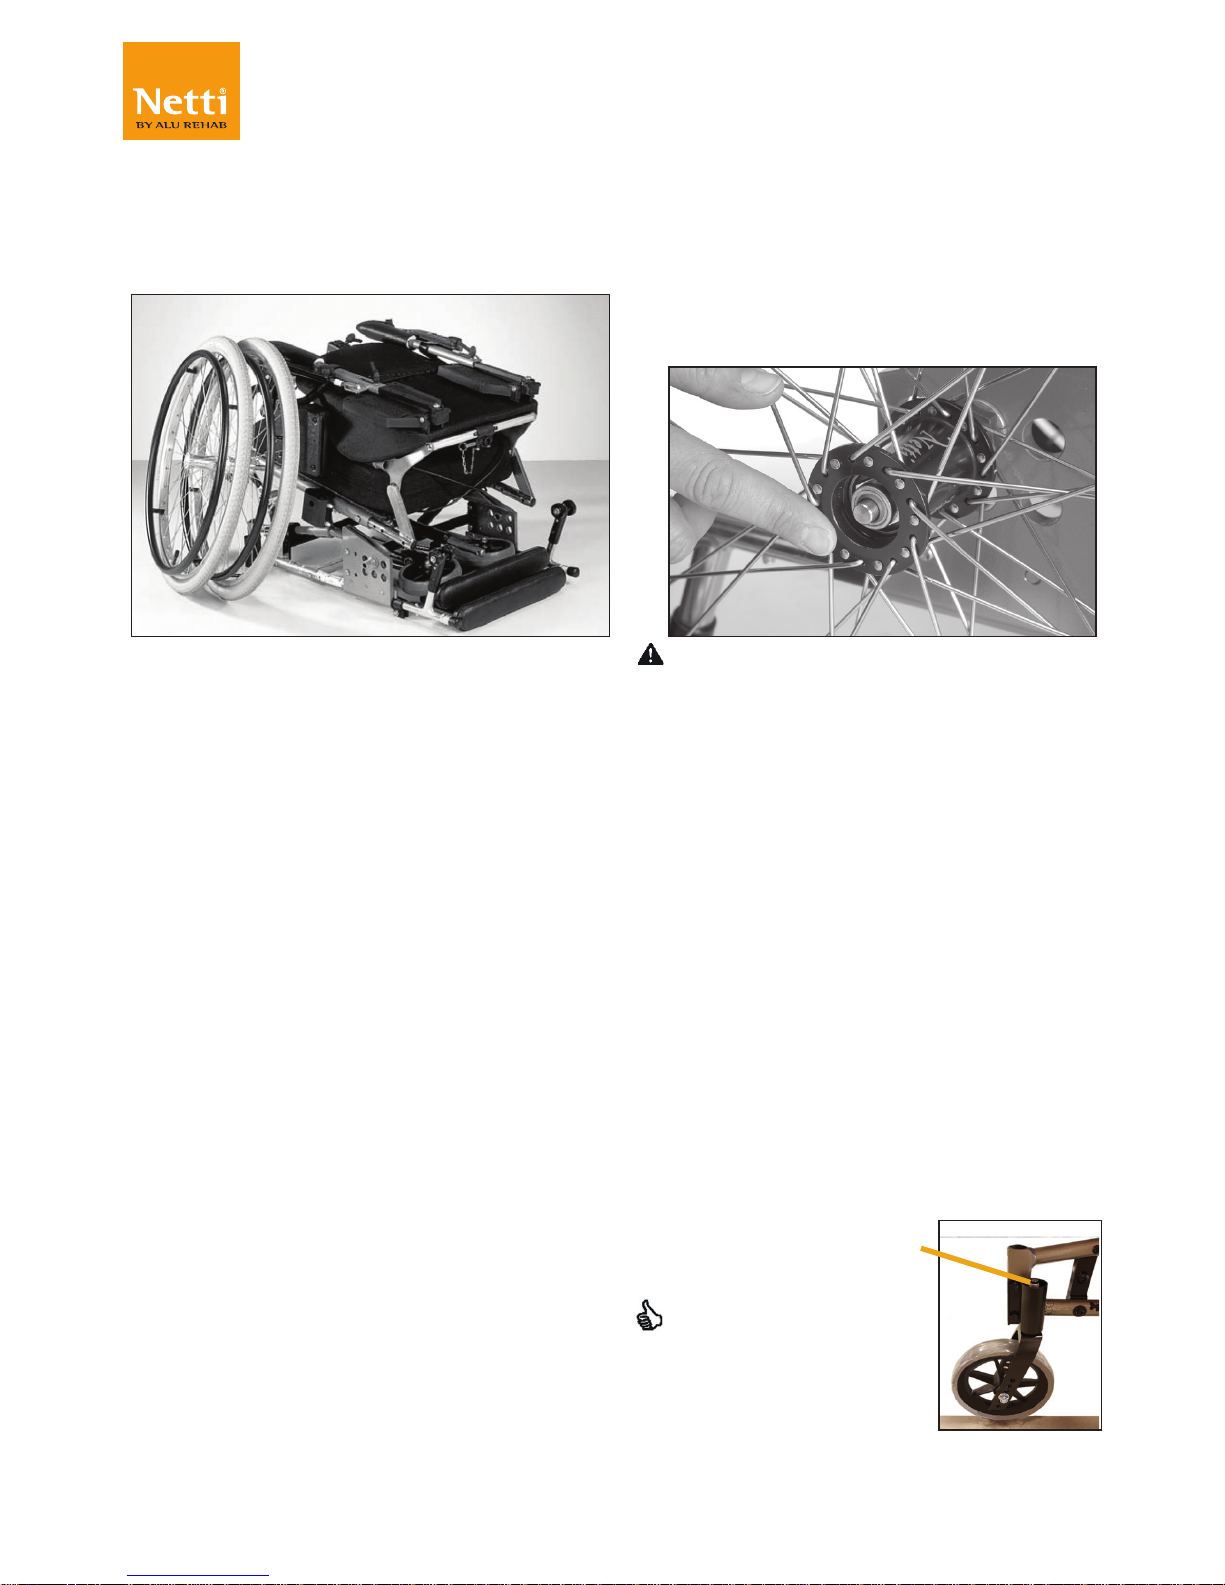
6.2 DRIVE WHEELS
To mount the drive wheel remove the quick
release bolt from the hub bushing, lead it
through the centre of the main wheel and
into the hub bushing while pressing the
knob in centre.
To check that the drive wheel is
properly attached to the hub, remove
the finger from the central knob and
pull the main wheel.
If the drive wheel does not lock, do
not use the wheelchair but contact
your dealer.
Sand and sea water (salt used for
gritting in the winter) can damage
the bearings of the main wheels.
Clean the wheelchair thoroughly
after exposure.
6.3 FRONT FORK
Front forks come as standard
with quick release axles. The
front fork is easily removed
by pressing the knob on top
of the QR on top of the
bearing house.
Check angle of castor
bearing house. (See
chapter 6.5).
Page 17
17
My-Netti.com
Model: Netti II
Language: English Version: 2018-11
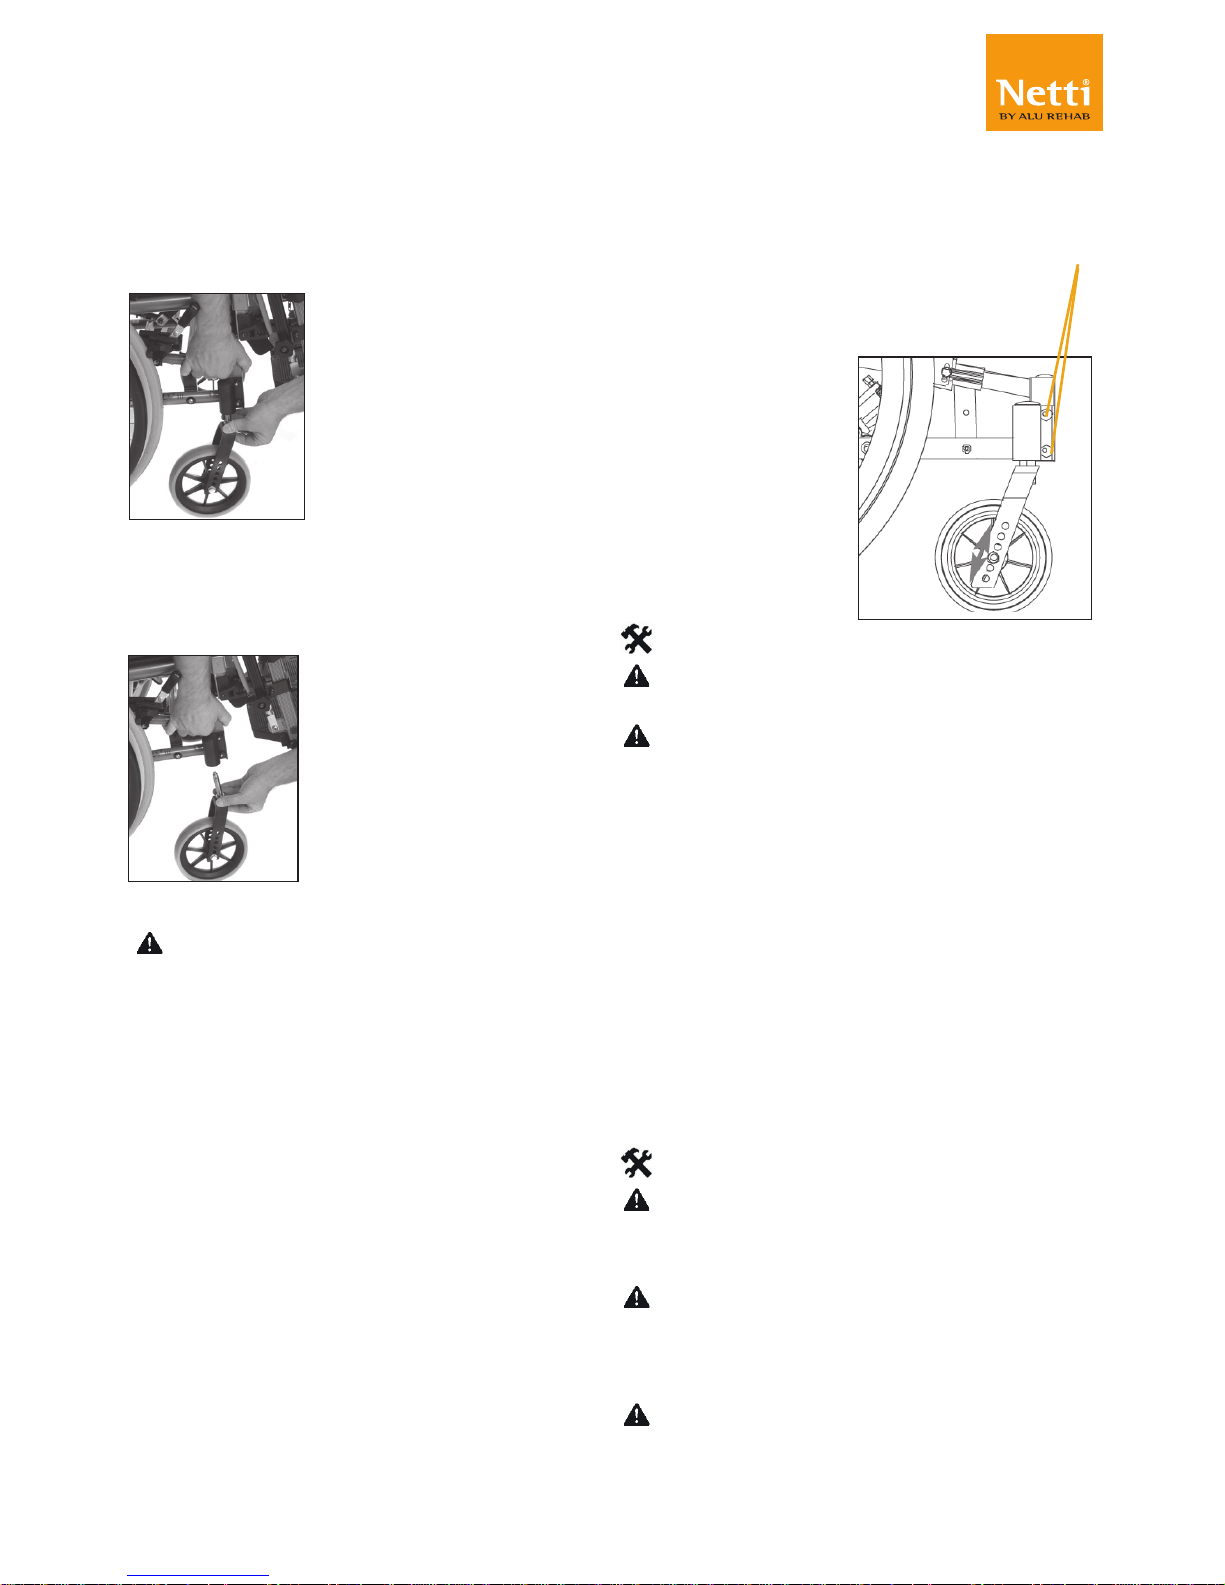
6.4 FRONT CASTORS
To take of
• Press the quick release button on the top of
the fork on top of the bearing house.
To mount
• Lead the quick release axle into the
bearing house. Pull the fork slightly to
ensure that the fork is fully locked.
Sand and sea water (salt used for
gritting in the winter) can damage the
bearings of the front castors. Clean the
wheelchair thoroughly after exposure.
6.5 SEAT HEIGHT AT THE
FRONT
The seat height depends on:
• Size of front castors.
• Size of front fork.
• Check the angle of the castor bearing
house.
In chapter 5 the overview shows that you
can choose between several models of both
front castors and front forks. To change the
height of the front castors - unfix the wheel
and replace it in the required
position in the front fork.
Angle of bearing house
Correctly adjusted angle of the front fork is
important to achieve proper manoeuvring
qualities of the wheelchair. Unfix the two
screws on the inside of the frame enough to
adjust the eccentric nuts. Angle the bearing
house, so that it is 90° relative to the
ground. Tighten the screws with 16 Nm
1 pc 5 mm Allen key
The bearing house cannot be height
adjusted.
Check and adjust the position of the
anti tip if necessary.
6.6 SEAT HEIGHT AT THE
REAR
The seat height at the rear depends on:
• Size of drive wheel.
• Position of drive wheel.
Drive wheel
Unfix the hub bushing, including washer and
nut, and mount it in required position in the
drive wheel bracket.
2 pc 24 mm open-end spanner
Make sure that the nut on the inside
of the frame totally wreathes the wheel
bushing.
When the seat height is changed make
sure that the bearing house of the front
castors are adjusted vertical to the
ground.
The risk for tipping increases when the
drive wheel is moved forward in the
drive wheel bracket.
Page 18
18
My-Netti.com
Model: Netti II
Language: English Version: 2018-11
Check the position of anti tip. ( See
chapter 6.10)
Readjust the brakes. (See chapter 6.17).
Readjust the angle of the bearing
house. (See chapter 6.5)
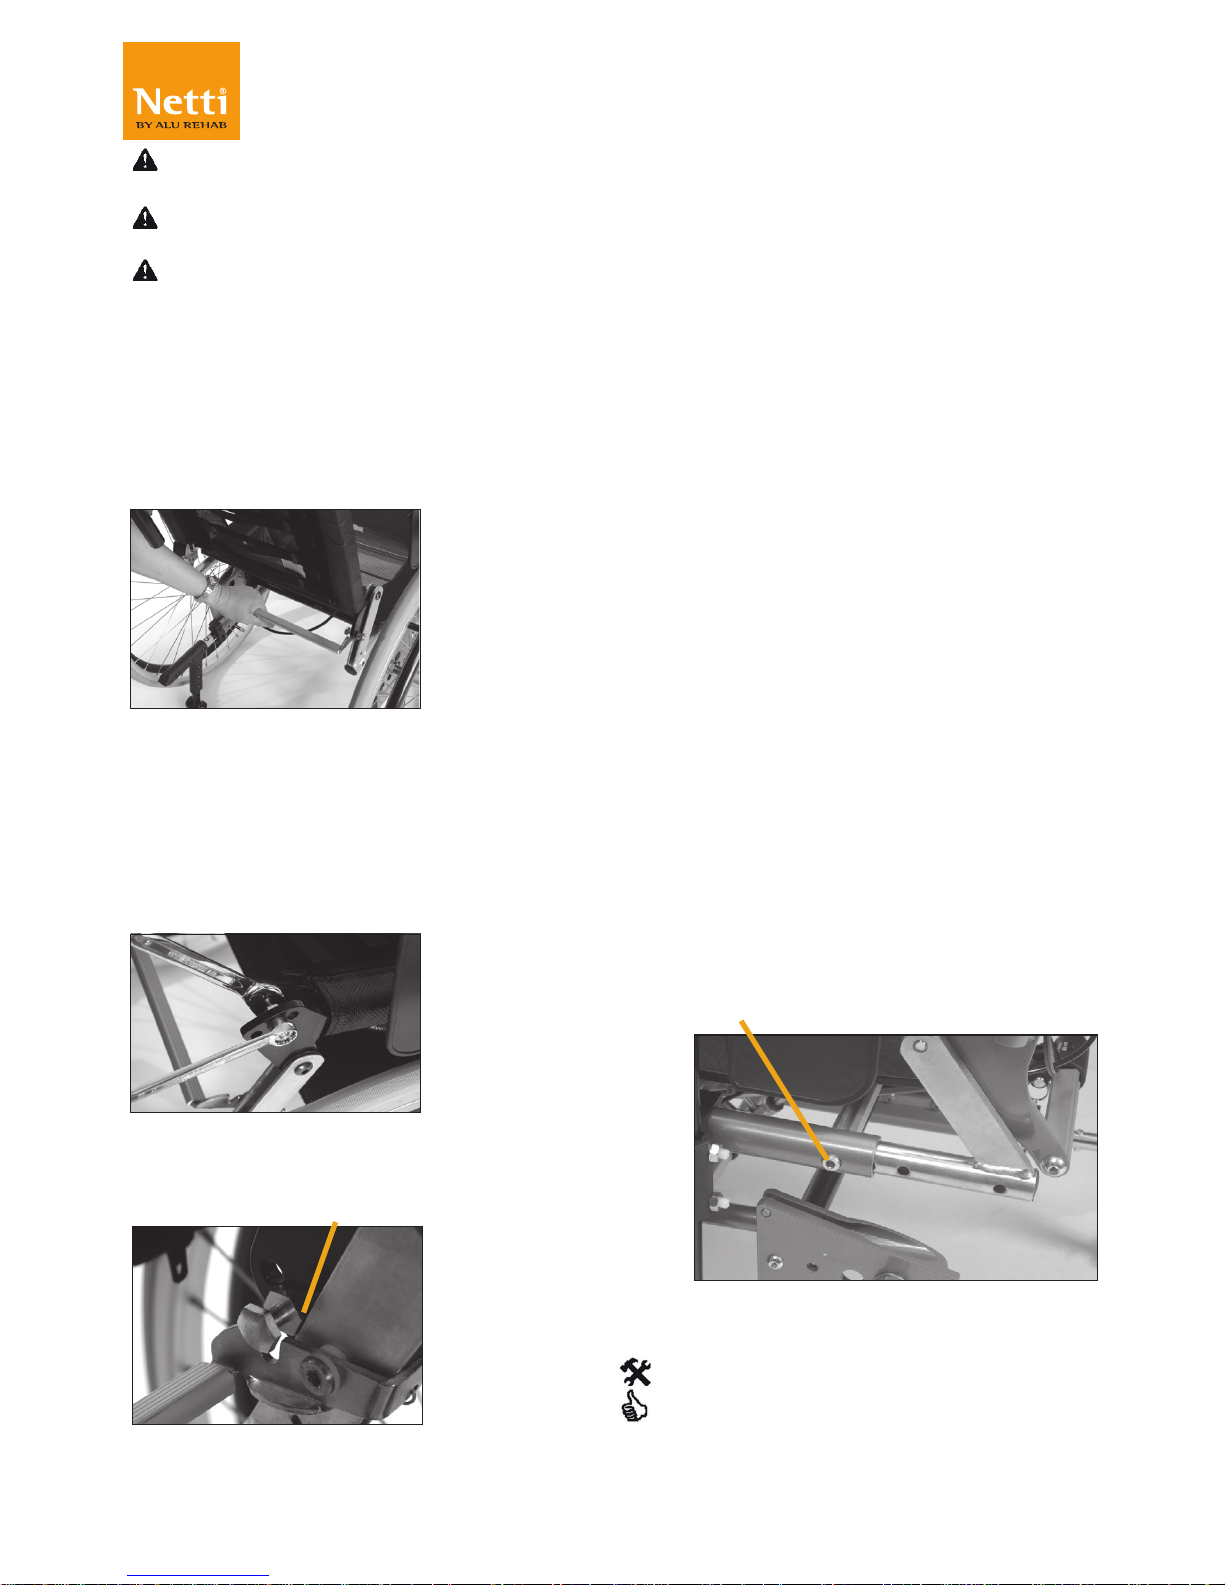
6.7 BACK REST
The back is easily folded forwards by
pressing the release handle. The back folds
forward into the seat. When the back is
folded back up, check that it clicks into
position.
The back angle can be adjusted into 3
different positions. Standard back angle is
97°. Alternative angles are 107° & 83°.
Adjustment of the back angle
• Unscrew the screw as shown on the
picture. Reposition it to desired position.
• Tighten the screw.
To ensure safe locking it is recommended to
adjust the inner nut to have one of its sides
parallel to the back hinge. See picture.
6.8 ADJUSTING THE SEAT
DEPTH
The seat depth can be adjusted both in the
back and in the front of the seat. Adjustments
are done to give the user a comfortable
seating position with proper lumbar support
while the knee joint is aligned with the leg
support knee joint.
By adjusting the seat depth the chair balance
and the driving characteristics may change.
A well balanced chair is easy to drive without
easily tipping backwards. Always start with
adjusting the seat depth backwards, then
adjust the leg support fixing bracket to make
the leg support knee joint align with the user
knee joint. If necessary the driving wheel
position also needs to be change.
The seat depth can be adjusted 100 mm in the
rear and 100 mm in front.
ADJUSTING SEAT DEPTH AT
THE REAR
Adjusting seat depth at the rear:
• The back rest hinge has 5 holes with 25 mm
distance between them.
• The seat depth can be adjusted from 400500 mm (Measured from front of the seatplate to backrest tube without cushion).
• Tilt the seating unit most forward.
• Push the release bar of the backrest down,
and fold the backrest forwards on to the seat.
• Remove the screws holding the back rest
hinge and reposition it to desired position.
• Tighten the screws. Same position on both
sides!
6 mm Allan key 13 mm open end spanner
When using the comfort seat plate it
is recommended to change seat plate
when changing seat depth. The seat
plate comes in depth: 400 mm, 430 mm
& 460 mm..
Page 19
19
My-Netti.com
Model: Netti II
Language: English Version: 2018-11
By using the Velcro adjustment straps
in the chair-back you can gain a few cm
on depth.
When adjusting the seat depth at the
rear, the screw in the backrest hinge
must be tightened with 14 Nm
When changing seat depth, you also
change the tipping point of the chair.
This can be prevented by changing the
position of the main wheel in the main
wheel bracket. (See chapter 6.6).
Adjust anti-tippers accordingly chapter 6.10
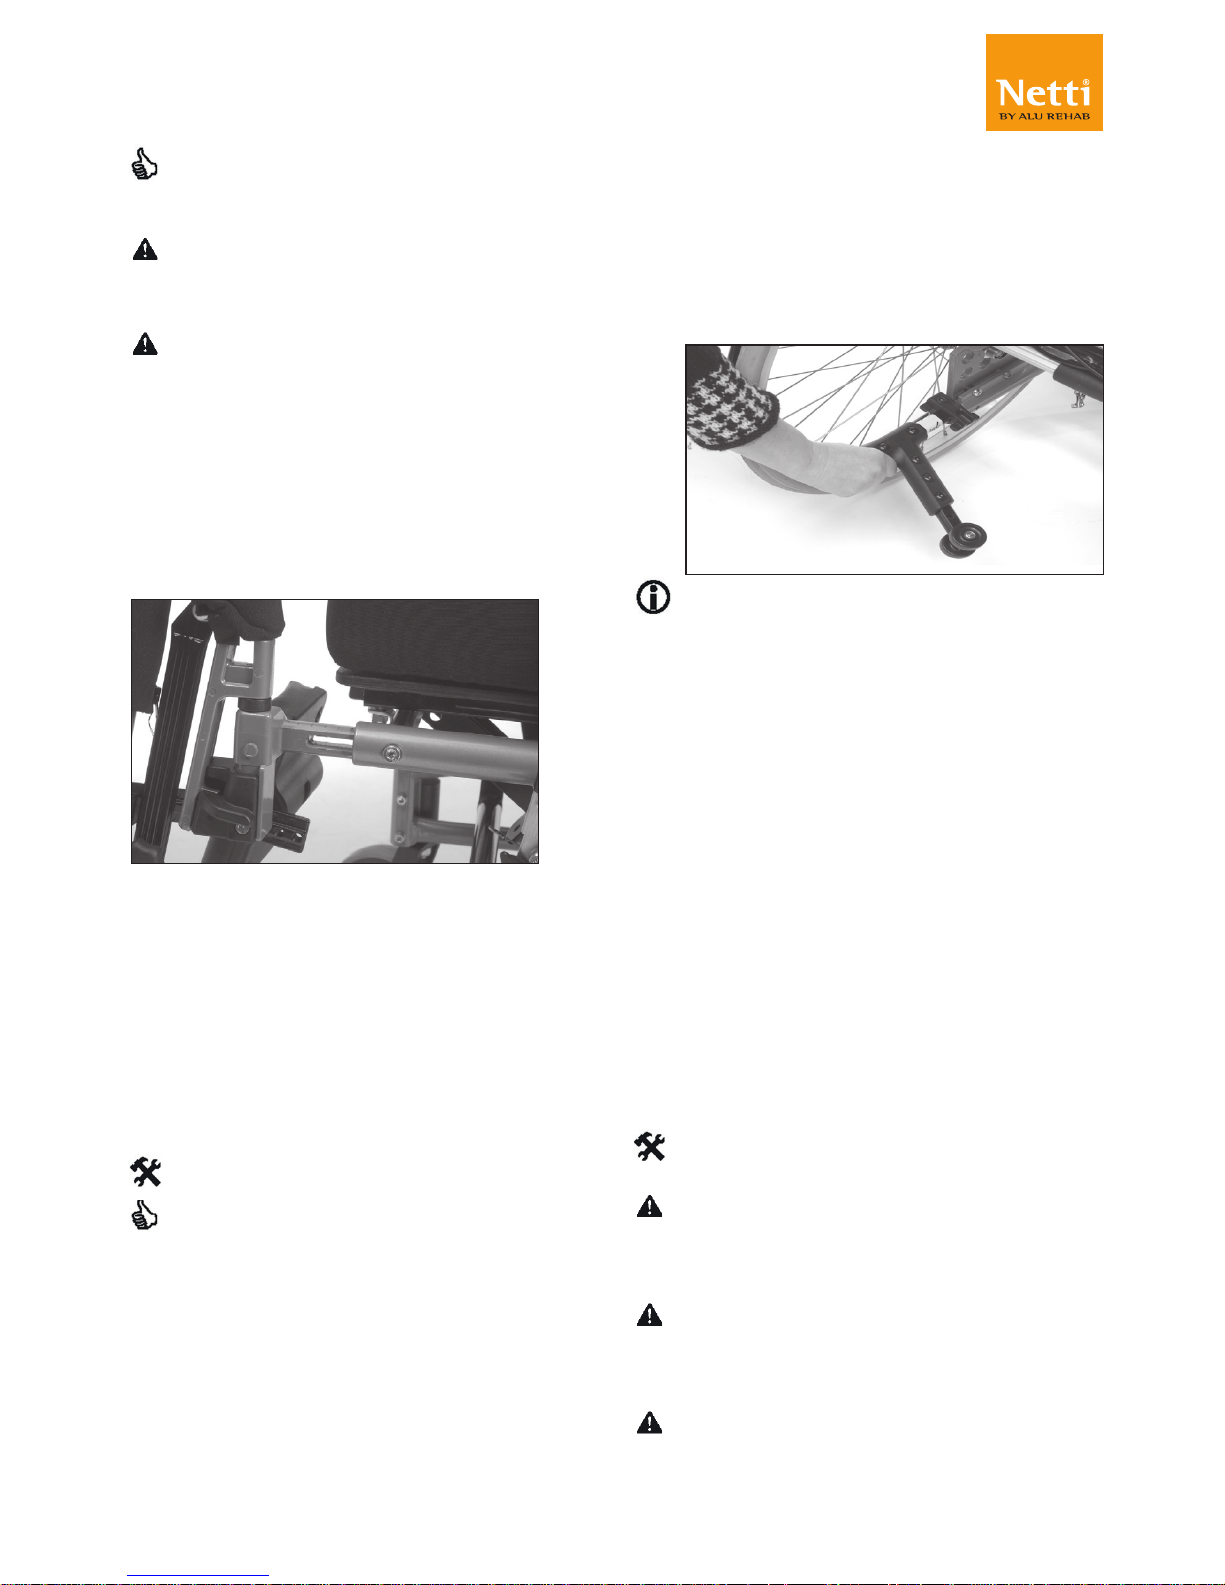
6.9 ADJUSTING SEAT DEPTH
AT THE FRONT
It is possible to adjust the seat depth up to
100 mm at the front. By restless users the
extension piece should not be pulled out
more than 50 mm. Do the following:
• Unfix the screw holding the extension piece
for the leg support.
• Set the extension piece to the required
position.
• Fix the screws, tighten them with 25 Nm
6 mm Allen key.
By setting the extension pieces to
different positions, it is possible to
compensate for a rotated pelvis or different
length of thighs.
6.10 ANTI-TIP
• Adjust the anti-tip so that it does not stick
outside the radius of the wheel.
• Pull the anti-tip out / rearwards from chair.
• Turn it down 180°.
• Lock it in position by letting it move
forwards with the spring tension.
The anti-tips are delivered adjusted
according to ordered main wheel size
in standard position. If other adjust-
ments are carried out, anti-tips have to
be adjusted accordingly.
Adjusting anti-tip
The anti-tips must be adjusted whenever the
position or dimension of the main wheels are
changed.
Correctly adjusted anti-tips should be
positioned just on the inside of the radius
of the main wheel. Anti-tips are adjusted as
follows:
• Unfix the locking clamp on the anti-tip bar
using an Allen key.
• Pull or push the bar to required position.
• Fix the locking clamp.
• Do the same procedure on the opposite
side.
6 mm Allen key
Check that both anti-tips have the same
length. The gap between the anti-tip
wheels and the floor must be 20 - 30 mm.
If the anti-tip is positioned on the
outside of the main wheel radius, it
will interfere with curbs and stairs.
The anti-tip should always be used
for the safety of the user.
.
Page 20
20
My-Netti.com
Model: Netti II
Language: English Version: 2018-11
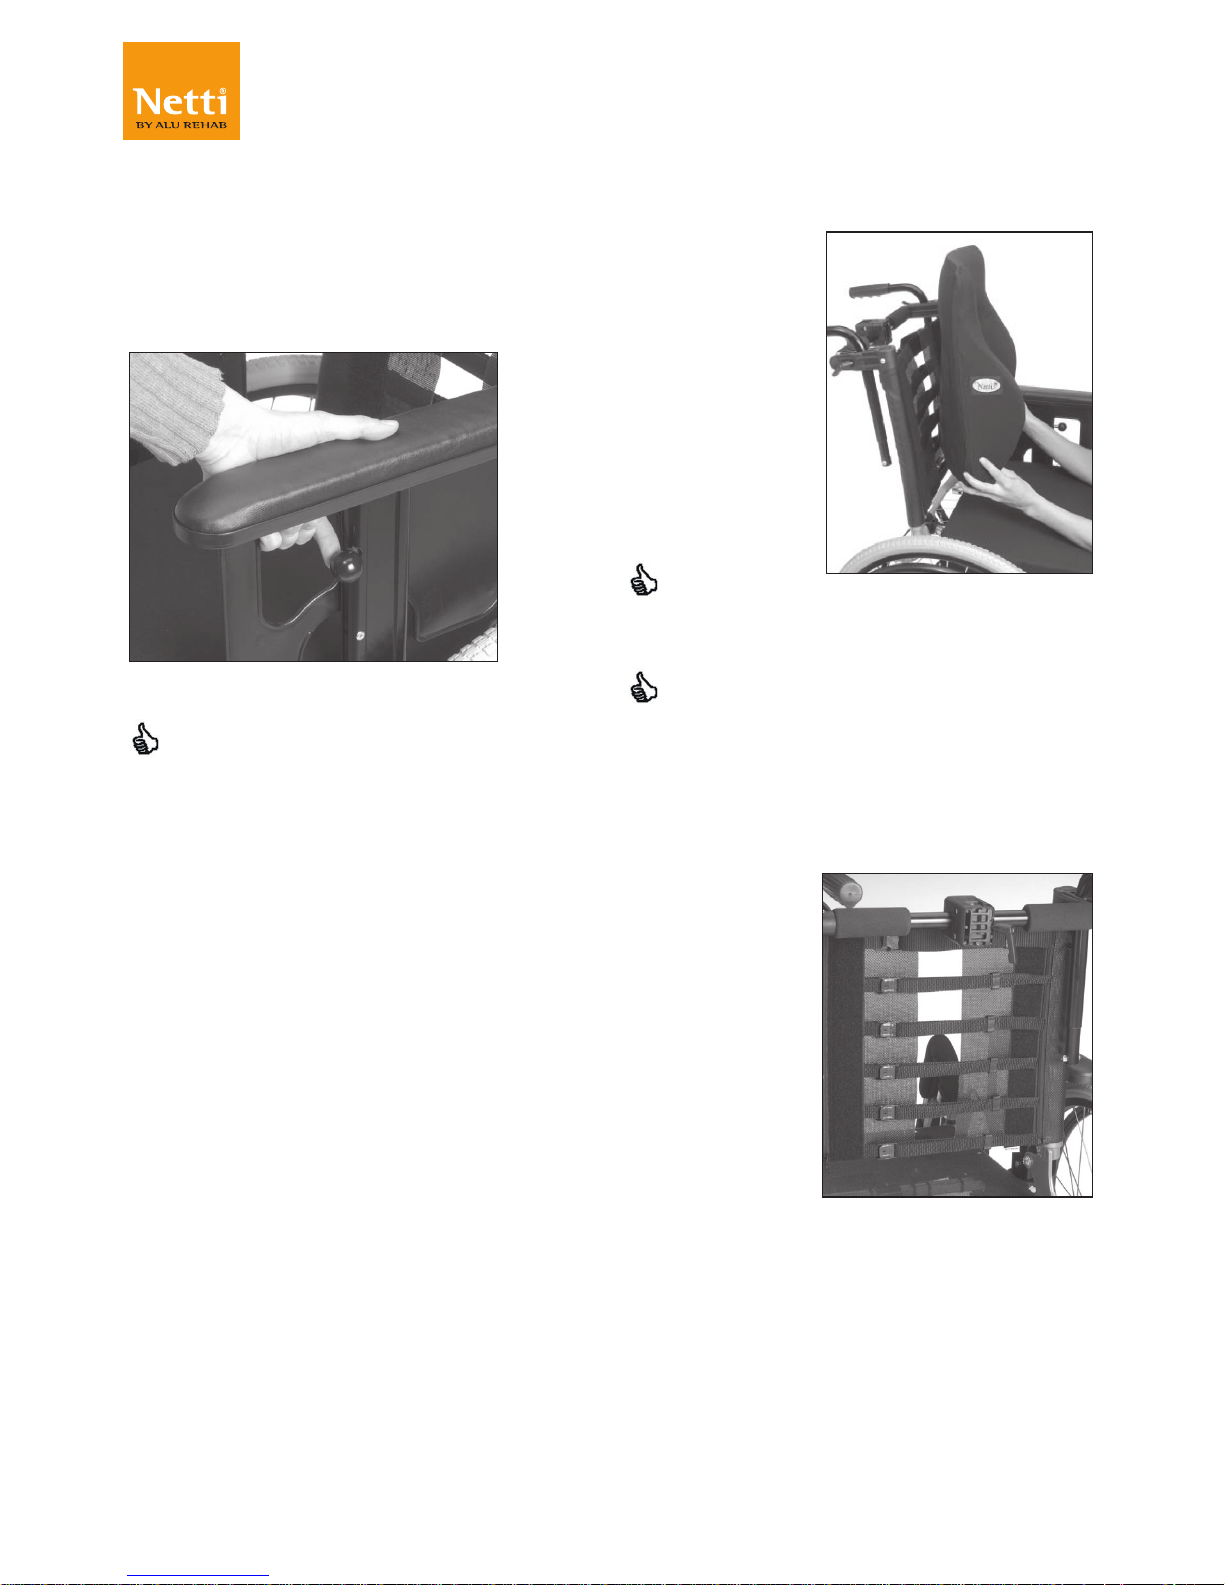
6.11 ADJUSTING ARM
SUPPORTS
• Turn the arm support release handle to
the side and hold.
• Adjust the armrest to the required height
and release the handle. Lift or lower the
armrest slightly until it locks.
The arm pad and locking screw are set
in the middle position. This can be
adjusted to fit the user.
6.12 CUSHIONS
Cushions are fixed and adjusted
on the wheelchair using the Velcro.
It is imperative to correctly set-up
the cushion in order to ensure good
seating comfort.
The cushion covers are washable and
thereby reusable. Follow the
instruction on the back of the
cushion for correct maintenance and
washing of the cushion.
6.13 ADJUSTING THE
VELCRO
BACK
• Loosen the straps, and place the back
rest cushion so that user gets room for the
bottom and the integrated lumbar support
in correct position.
• Tighten the straps so that they follow the
curvature of the spine and gives a little
extra support at the top of the sacrum.
Page 21
21
My-Netti.com
Model: Netti II
Language: English Version: 2018-11
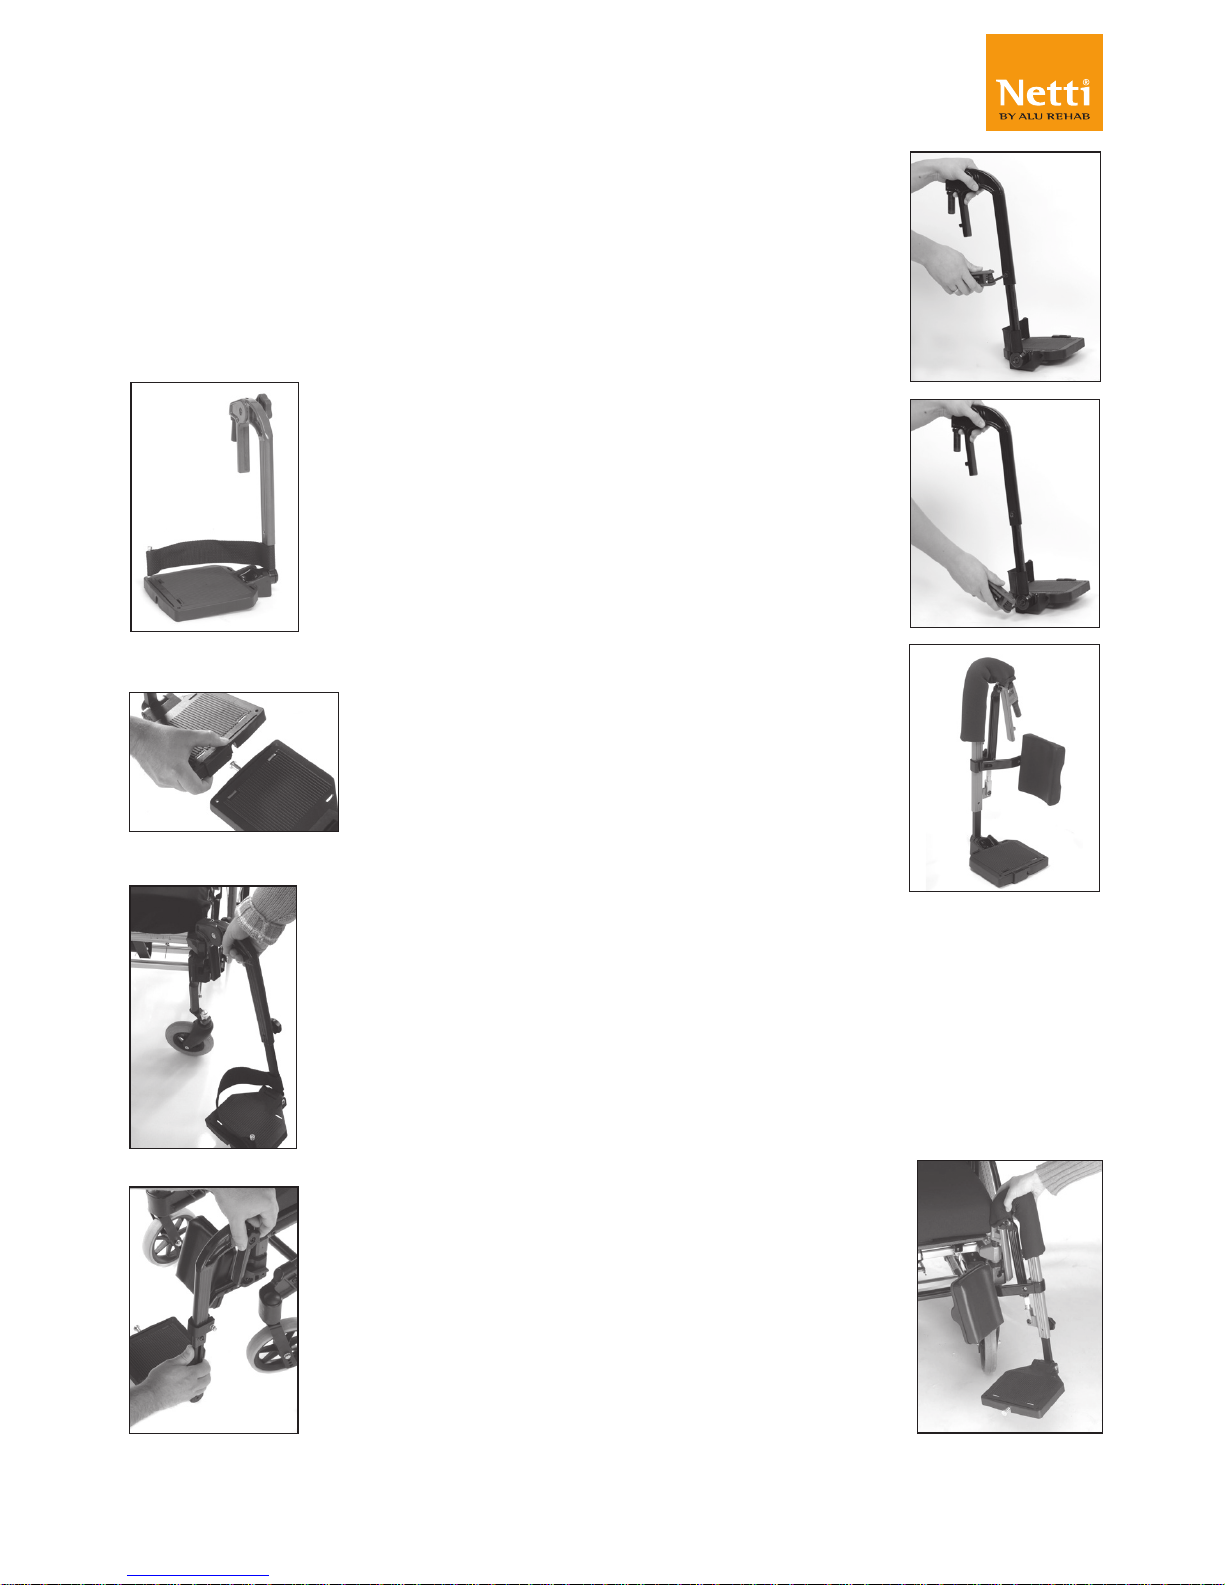
6.14 LEG SUPPORTS
Netti II is as a standard equipped with
Universal leg supports. Angle adjustable
leg supports can also be ordered. Both are
described in this chapter.
As alternative amputation support and foot
box are available.
UNIVERSAL LEG
SUPPORTS
with foot plates and heel
strap are angel- and height
adjustable, they can be
swung aside and removed.
The foot plates can be
folded up and also angled
in xed positions.
The foot plates can be
equipped with a lock
connecting them.
The lock increases
the strength of the foot
plates and helps reduce
maintenance. The foot
plate lock can be retro-
tted if desired.
Mounting the leg support
• Hold the leg support in
the upper curve.
• Insert the bolt into the
extension piece on the
wheelchair, holding the
leg support slightly
swung outwards.
• Swing the leg support
inwards, pushing down
until it clicks into lock.
Angle adjustment
• Loosen the star wheel
on the outside of the leg
support.
• Swing to desired angle.
• Tighten the tar wheel.
Height / length adjustment:
The foot plates can be
steppless height adjusted.
• Loosen the screw on the
side.
• Adjust to required length.
• Tighten rmly.
Foot plate angle
is adjusted by:
• Loosening the screw as
shown on the picture with
5 mm Allan key.
• Adjust the angle and
tighten the screw..
ANGLE ADJUSTABLE
LEG SUPPORT
with foot-plates, foot-plate
lock and calf supports.
It is freely angle adjustable.
It is also swingable and
removable. The foot plates
are foldable and can be
angled in fixed positions.
It is delivered with height
and depth adjustable calf
support.
The foot plates are as a
standard equipped with a
lock connecting them.
The lock increases the
strength of the foot
plates and helps reduce
maintenance. The foot plate
lock can be retrotted if
desired.
Mounting of leg support
• Grip the leg support in
the hinge point.
• Hold it in an angle of app.
20° to the side frame.
• Insert into the leg support
lock on the wheelchair.
• Swing it in and push down
Page 22
22
My-Netti.com
Model: Netti II
Language: English Version: 2018-11
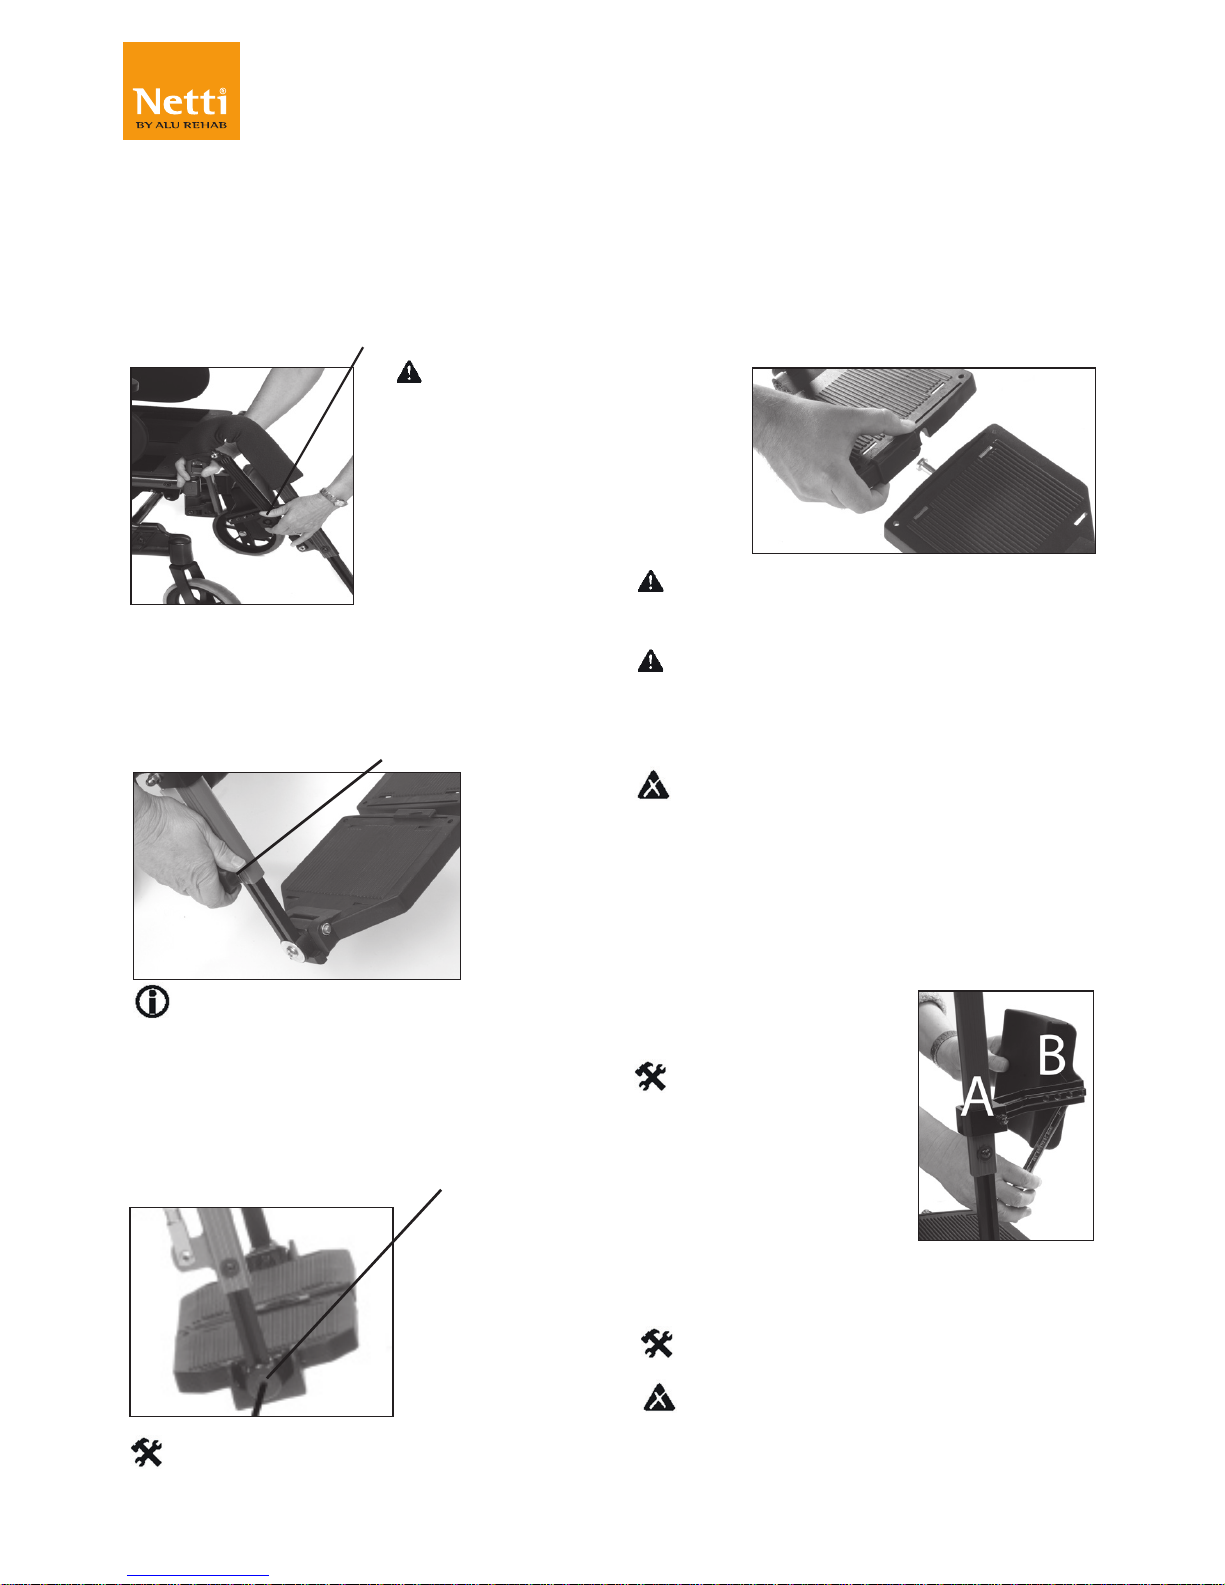
Adjusting the angle
• The angle of the leg support can be
adjusted using the star wheel.
• Loosening this star wheel enables you to
adjust the leg support to the required
angle.
• Fix the angle by tightening the star
wheel.
Adjusting the length of the leg support
• Loosen the screw to make the inner
adjustment tube move
• Adjust the leg support in required length
and tighten the screw properly.
As seen on the picture, a star wheel can
be supplied for easy length adjustment.
Adjusting the angle of the footplate
• The foot plates angle can be adjusted.
• Loosen the screw and adjust the
foot plate to the required angle.
• Tighten the screw properly.
5 mm Allan key
Locking and releasing the foot plates
• The foot plates come with a lock which
makes the plates stronger
• To lock the foot plates, pull the plastic
lock on the right foot plate and place the
lock over the bolt on the left foot plate.
• To release the foot plate pull the plastic
lock and lift the right foot plate up.
While making the adjustment there
must be no load on the foot plates.
For outdoor use, there should be a
clearance of 40-50 mm between the
foot plate and the ground. Indoor
20-30 mm is sufficient.
Never stand on the foot-plates. The
wheelchair can tip.
Adjusting the calf support
The calf support is height and depth
adjustable. To adjust height unfix the nut
on the outside of the calf support bracket,
find the required height and fix the nut
again (A).
10 mm open-end
spanner
To adjust in depth, the calf
pad is removed from the
bracket by using an
open-end spanner
between the pad and the bracket.
Find the required position and refix it (B)
13 mm open-end spanner
Never lift the wheelchair by the
leg supports.
Squeeze
hazard. When
adjusting leg
supports in
angle, do not
put the fingers
in the adjusting
mechanism
between the
moving parts.
Page 23
23
My-Netti.com
Model: Netti II
Language: English Version: 2018-11
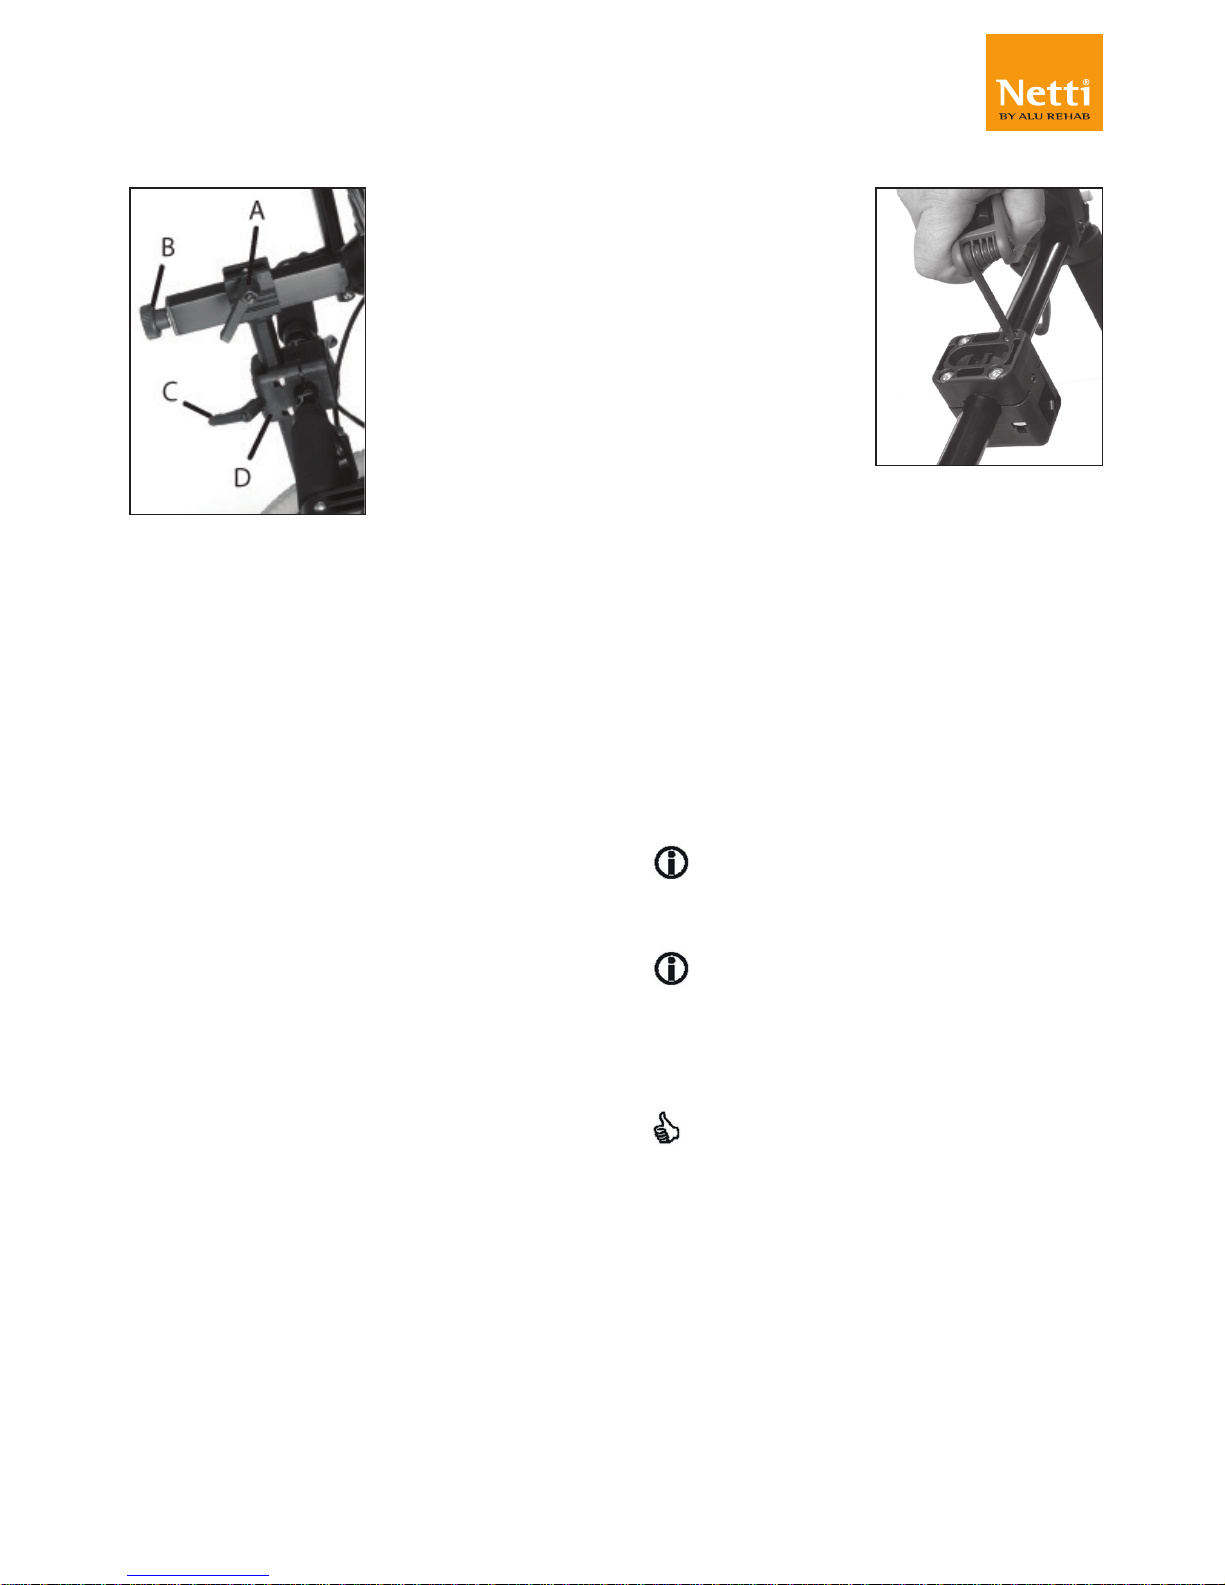
6.15 HEAD SUPPORT
A - Lever for depth adjustment
B - Wheel for angle adjustment
C - Lever for height adjustment
D - Head support bracket
Adjusting the head support in depth:
• Release the locking lever on top of the
vertical bar (A).
• Adjust the head support and fix it in
required position.
Adjusting the head support in height:
• Release the locking lever on the head
support adapter (C).
• Adjust the head support and fix it in
required position.
Adjusting the head support in angle:
• Release the adjustment wheel at the rear
of the horizontal bar (B).
• Adjust the head support and fix it in
required position.
In some cases
moving and adjusting the position of the
head support bracket (D) is required.
Adjusting the head support sideways:
• The head support bracket can be
moved both to the right and left,
giving the possibility to accommodate
special needs for head support.
• Loosen the four screws holding the
bracket together.
• Move the bracket to the required
position and fix the bracket by
tightening the screws diagonally.
If the head support stand does not fit
the bracket perfectly the bracket is
probably fixed too tight or unevenly.
After fitting the head support fix it
properly by tightening the little set
screw in the centre on top of the
head support bracket using an
Allen key.
If the head support seems to short
in height, it can be turned 180° by
releasing the adjustment wheel at
the rear of the horizontal bar (B)
Page 24
24
My-Netti.com
Model: Netti II
Language: English Version: 2018-11
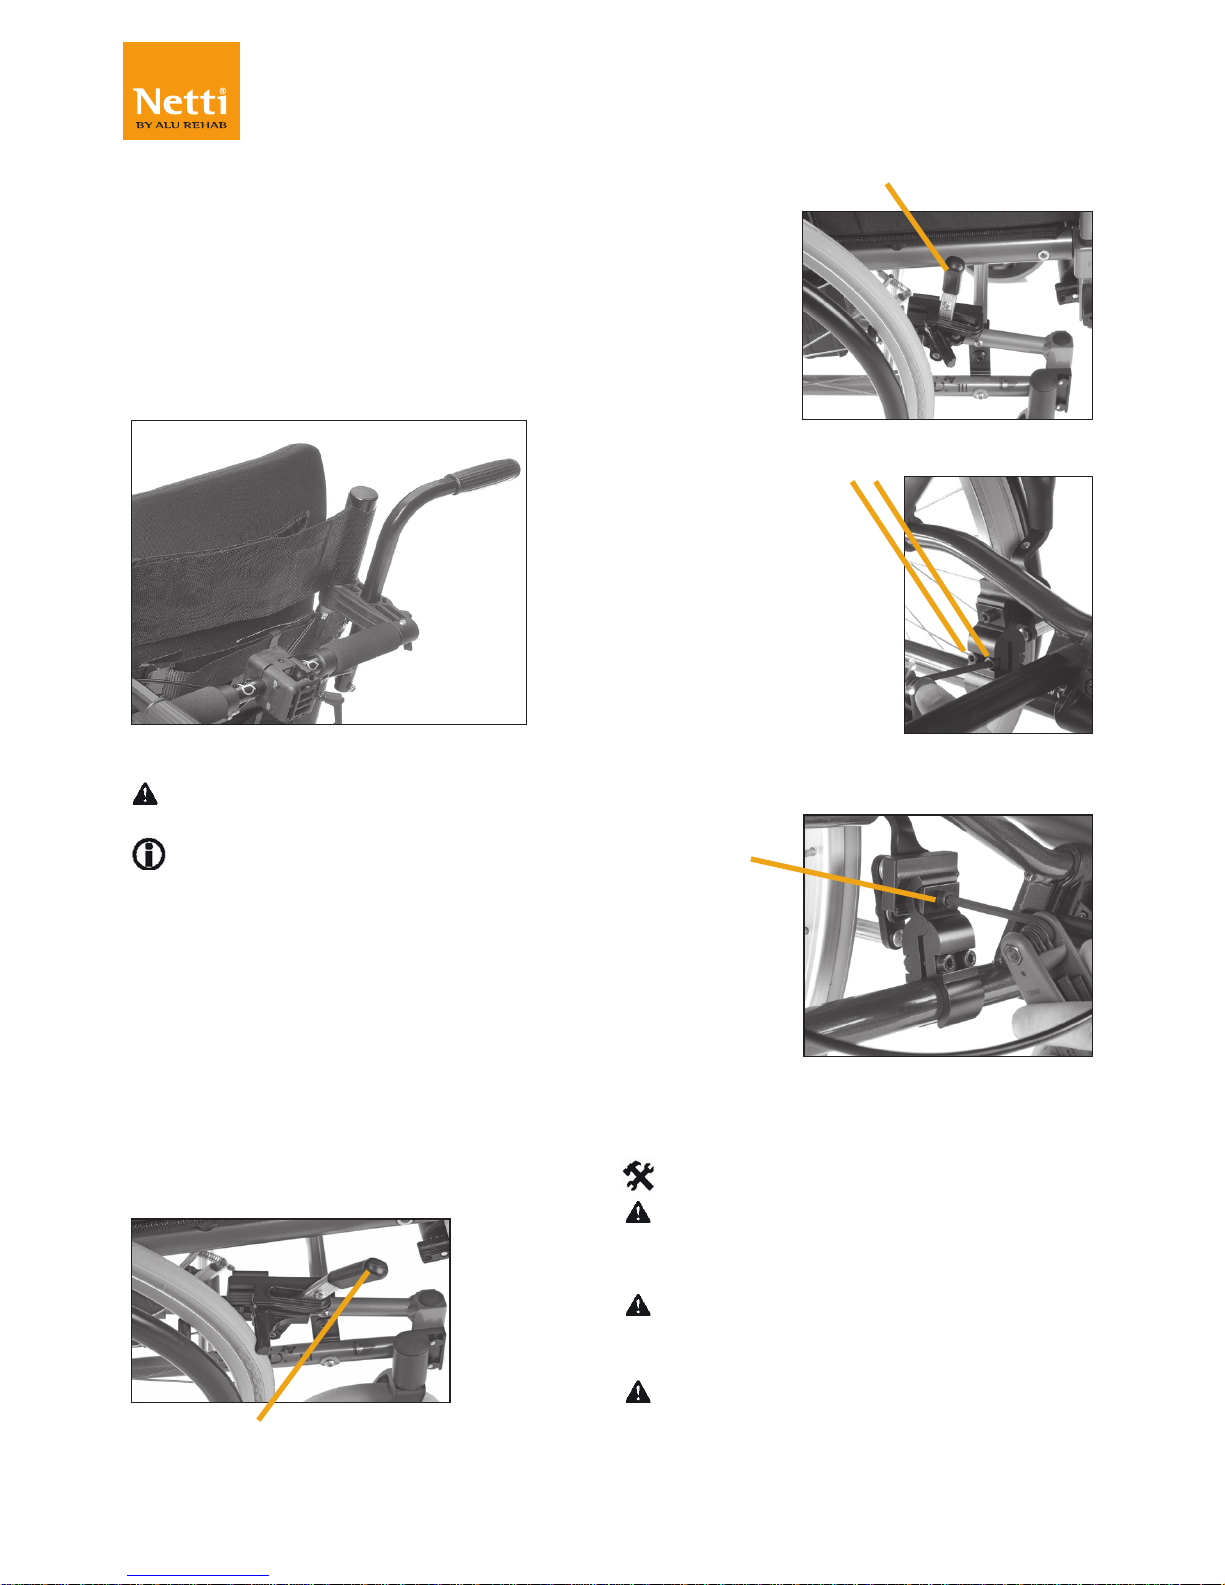
6.16 PUSH HANDLES
Adjustment of push handles:
• Release the lever on the side and lift
the handle all the way up.
• Turn the handles into required position.
• Adjust height.
• Lock the handle in required position by
tightening the lever.
Check that the safety screw is
mounted and properly tightened.
To remove the handles, the safety
screw at the bottom of the handles
also has to be removed.
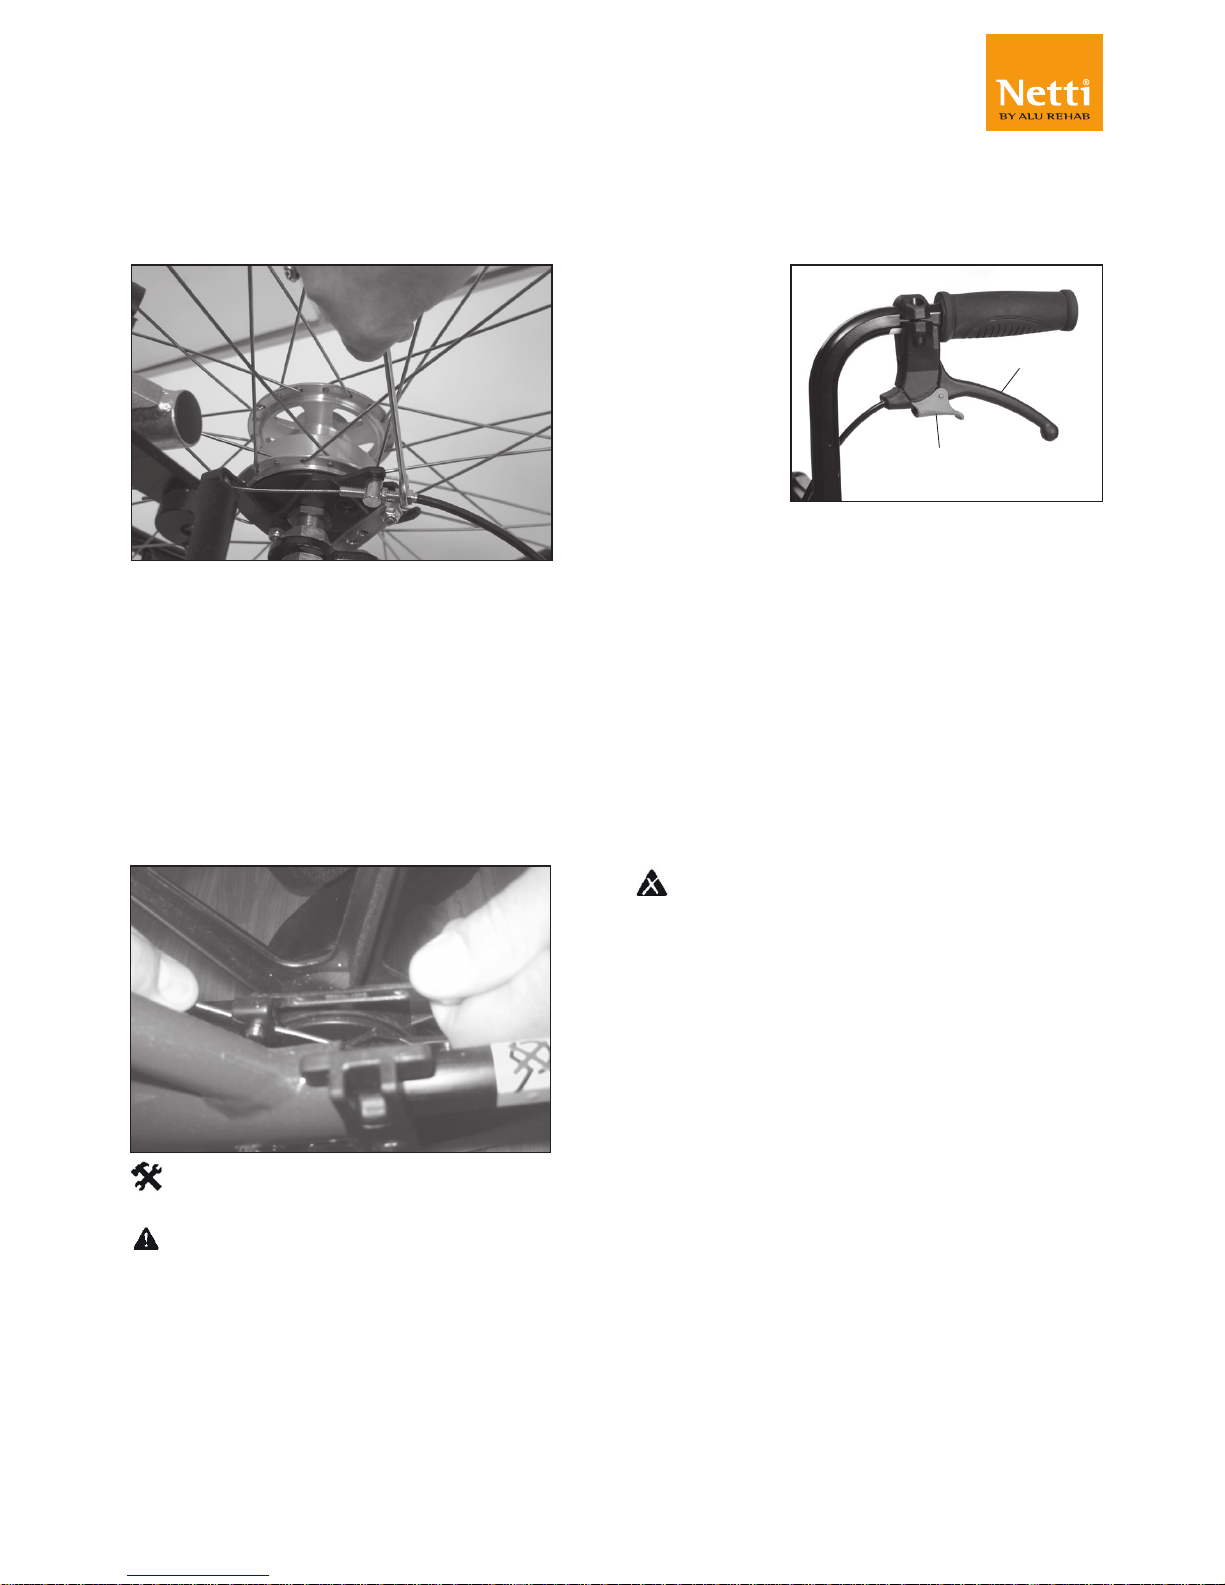
6.17 ADJUSTING THE
BRAKES
• The brakes are freely adjustable along
the frame tube.
• To activate the brake, push the handle
forward
• To release the brake, pull the handle
rearwards
• To reposition the brake,
loosen the two
screws on the
inside of the brake
clamp
• Adjust the position of
the brake and tighten
the screws.
• For fine
adjustment,
loosen the upper
screw on the
inside of the
brakes.
• Adjust the
brake position
and tighten the screws.
5 mm Allen key
Check that the brakes are correctly
adjusted by activating the brakes and be
sure that the wheelchair does not move.
The brakes are constructed as parking
brakes and shall not be used as driving
brakes.
Be aware of potential squeeze hazard
between brake and tyre.
Page 25
25
My-Netti.com
1
2
Model: Netti II
Language: English Version: 2018-11
DRUM BRAKE
If the wheelchair is fitted with hand
operated hub brake, they operate drum
brakes.
If the brake does not brake properly:
To adjust the wire on one or both sides,
adjust the foot screw 2-4 rounds out. Then
re-check the brakes.
If the wire is too loose:
Adjust the foot screw all the way in.
Tighten the wire by loosening the wire
clamp before pulling the wire further
through it. Tighten the wire clamp, and
adjust the foot screw out again.
1 pc 10 mm open-end spanner.
To ensure the correct functions of
the wire, these must never be taut.
OPERATING AND APPLYING THE BRAKE
The wheelbase in drum brake is fitted with
hand operated hub brakes to allow regulation
of speed on hills and whilst travelling along.
These are
located on the
push handles.
• To apply the brakes, pull the brake
levers (1) evenly and smoothly towards
handle and bring the wheel-base to a stop.
• For activating and locking the parking
brake (2) press the lever (1) against the
push handle and lock the parking brake
with the finger. Be sure that both parking
brakes are locked.
• The parking brake will be released
when you press the lever (1) against
the push handle. It is locked with a
spring and this will release it.
Do not leave the user in the
wheelchair without activating the
parking brake.
Page 26
26
My-Netti.com
Model: Netti II
Language: English Version: 2018-11
7. SEAT ANGLE / TILT
AND BACK ANGLE /
RECLINE
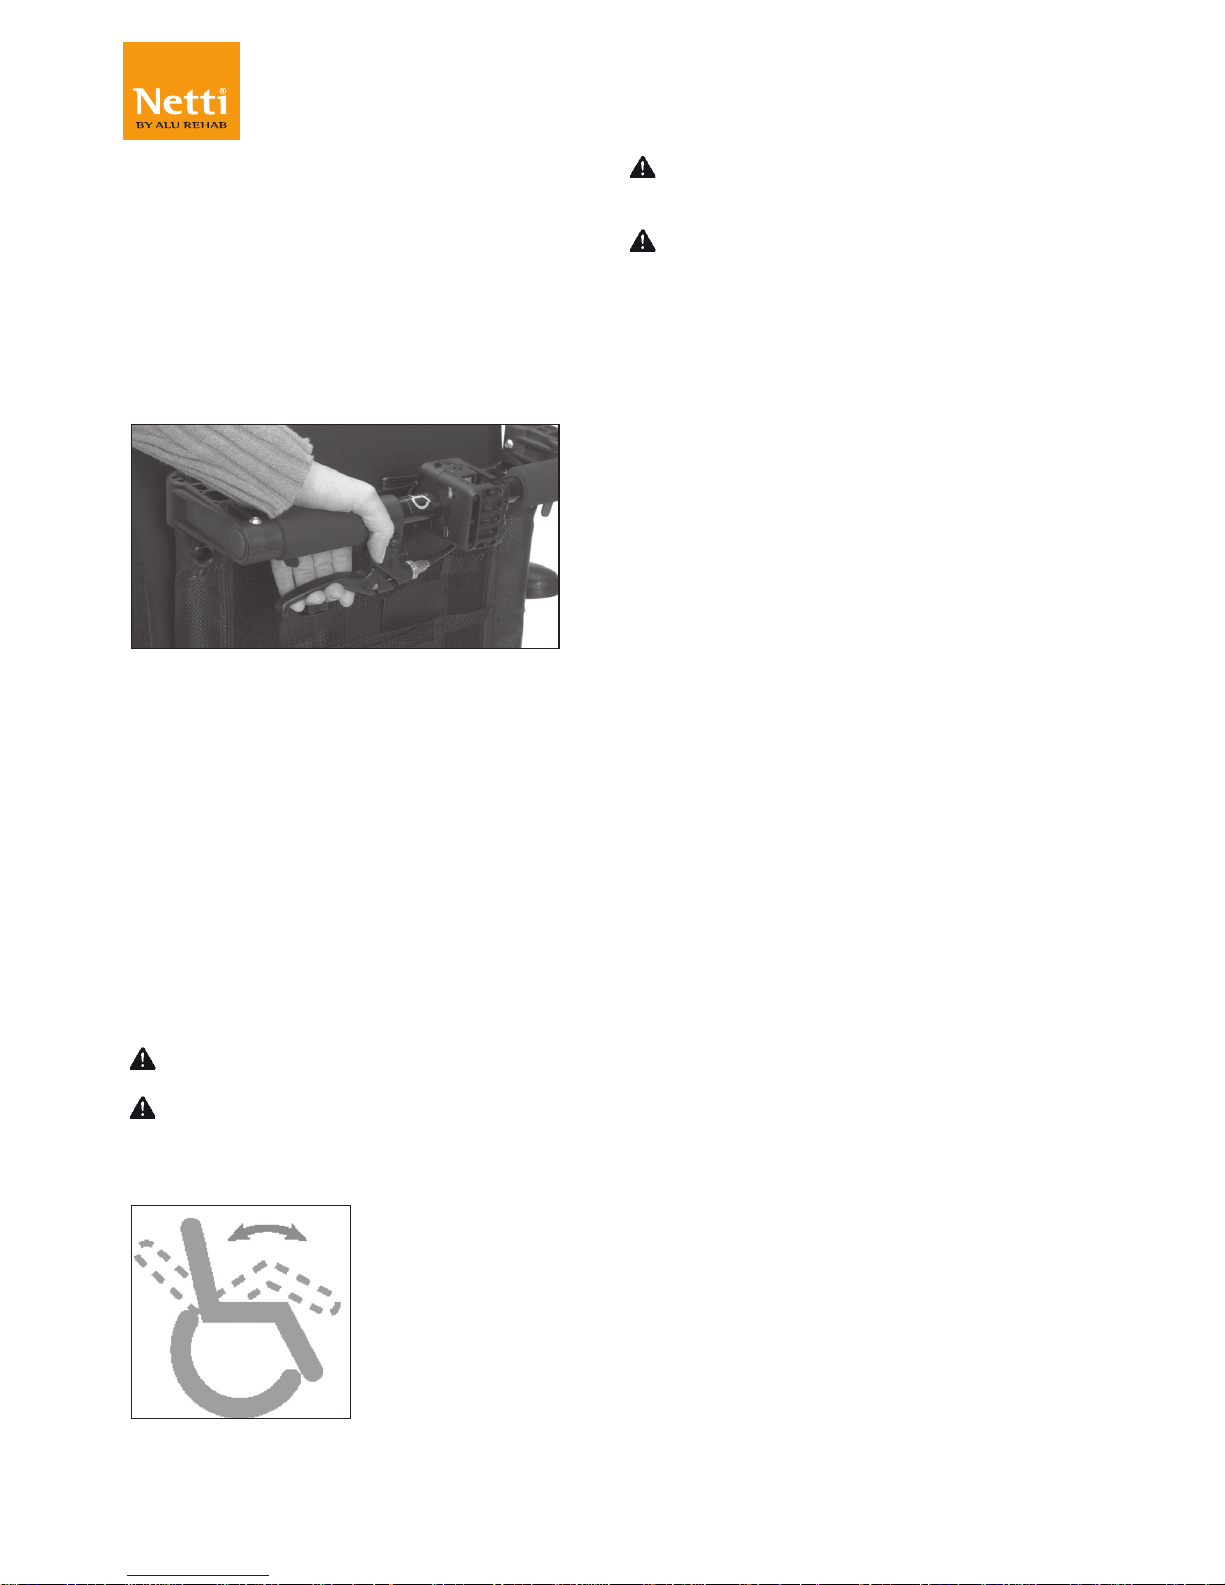
7.1 SEAT ANGLE
The seat angle is regulated using the release
handle mounted on the push bar.
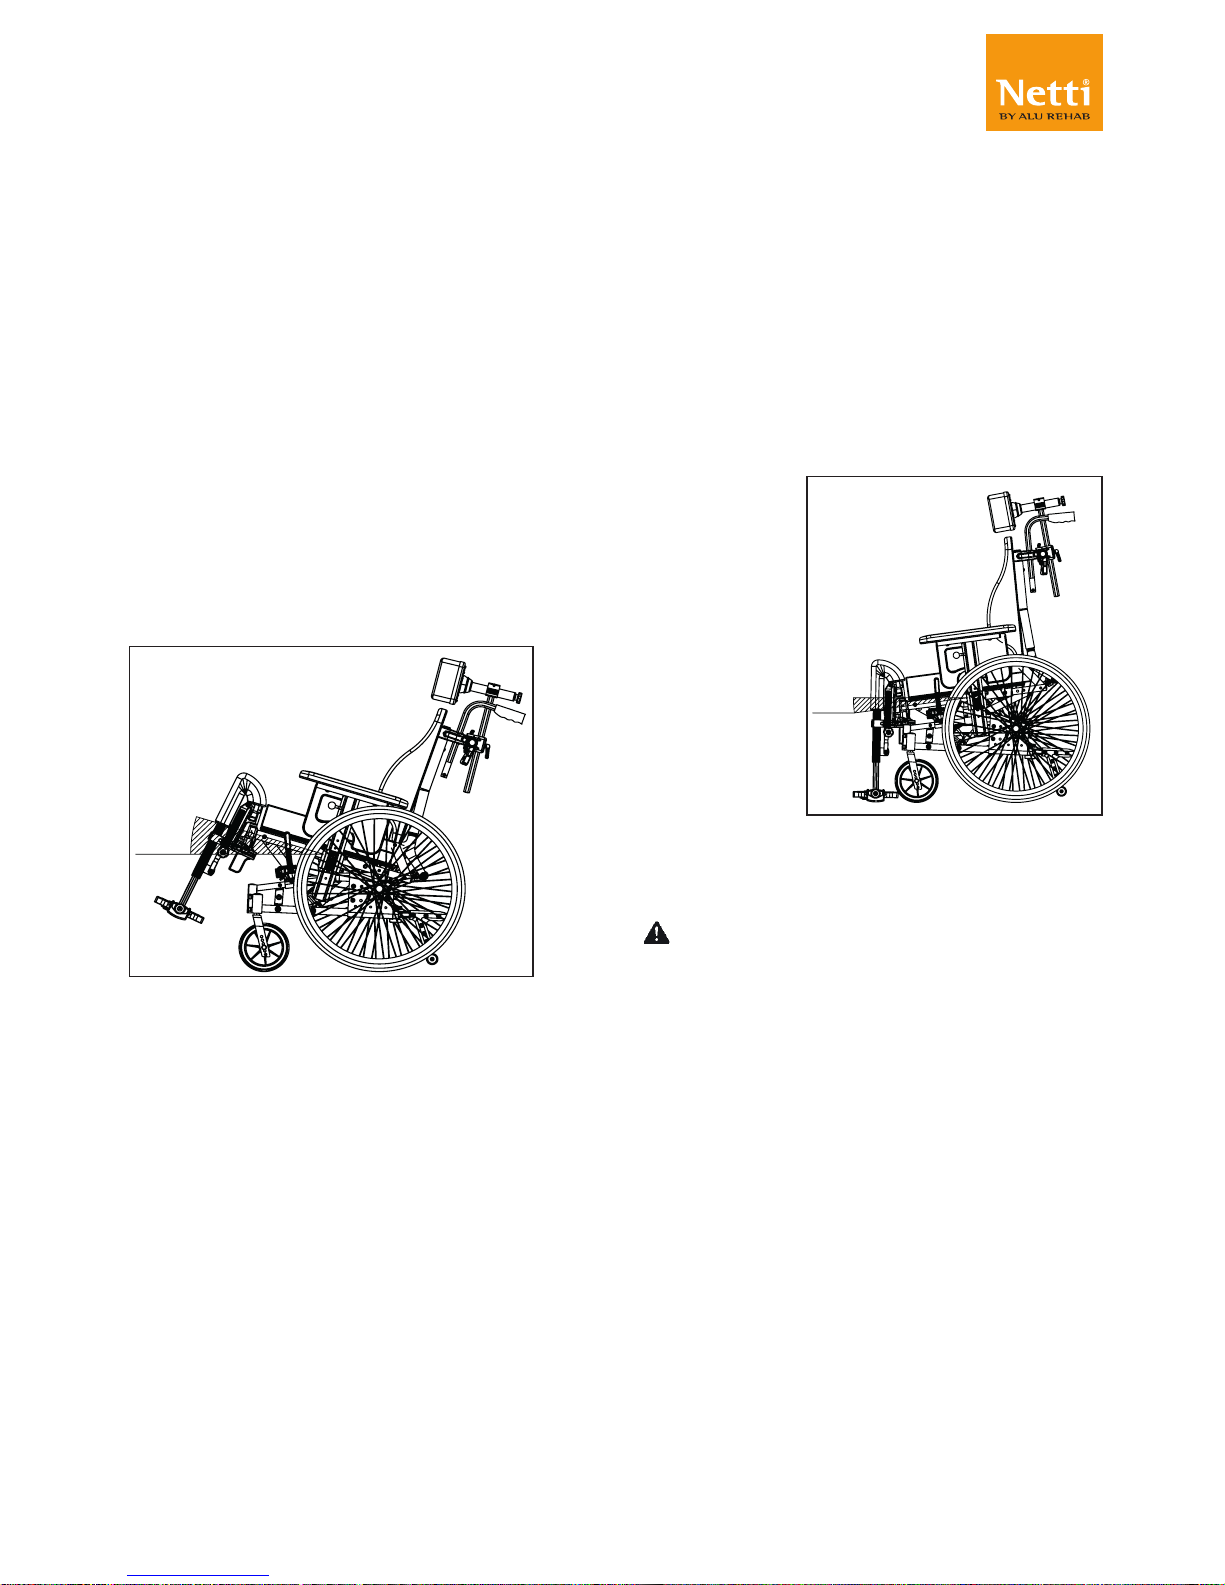
The seat unit can be tilted from -9° to +16°.
7.2 BACKREST ANGLE
The backrest angle for Netti II is adjusted to
one of the following 3 positions:
n Backrest angle 83° - steep back angle for
users with corset or lordosis. The back can
be adjusted as optimal as possible using
the Velcro bands in the back.
n Back angle 97° is standard position for
normal support.
n Back angle 107° is used for users with need
for more open hip angle. Coxit seat cushion
can also help to achieve this.
To ensure correct function of the
wires, these must never be taut.
The seat angle must not be adjusted
without using the anti-tips.
The release handle has the following label:
Tilt
Risk for tipping.
Check the position of anti-tip.
When chair back extension is
mounted, the tipping risk increases. If
necessary it should be improved by moving
the main wheels further back. Always use
anti tippers when tilt function is being
activated.
7.3 KEY WORDS REGARDING TILT FUNCTION OF
STATIC COMFORT WHEELCHAIRS,
Tilt is the basic benefit of a comfort
wheelchair. It allows for varying seating
positions during the time in the wheelchair.
Tilting the seating unit of the wheelchair is
mostly used to give the user varying sitting
positions and preventing sliding, shearing
and thereby pressure sores.
7.4 DECREASE THE POSSIBILITY OF SLIDING, SHEAR AND
PRESSURE SORES:
Use the tilt function to give the user
variation of the seating positions.
MAKE SURE THAT THE USER IS
SAFE WHEN THE TILT FEATURE
IS BEING ADJUSTED:
This is a great benefit for the user: The care
giver is able to establish eye contact with
the user when the tilt function is going to
be used. The care giver is also able to communicate with the user before the tilt function is used. The user will feel more safe
when he/she is aware that the seating unit
of the wheelchair is going to be tilted.
Page 27
27
My-Netti.com
0° - 16°
0° - -9°
Model: Netti II
Language: English Version: 2018-11
7.5 OPERATING TILT HANDLE:
TILTING THE SEATING UNIT
Press the left handle on the push bar and
put pressure to the push bar to tilt the
seating unit with one of your hands, while
you have eye contact with the user and put
the other hand on the arm support.
The correct relative angle between the
body parts remain the same when the seating unit is tilted.
Wherever you let the handle loose, the
seating unit will stay in this position.
To bring the seating unit up, press the
handle and the tilt cylinder will assist you
lifting the seating unit up.
A backward tilted seat unit gives a
steeper seating angle in relation to the surface, and prevent sliding of the wheelchair
user.
A forward tilted seat unit brings the user
in a position where activities - for instance
by a table or by standing up from the
wheelchair, is supported.
The tilt handle and the tilt sign is on the
push bar - shown on the previous page.
Never leave the user alone when the
seat is tilted forwards. The user can slide
forward.
Page 28

28
My-Netti.com
Model: Netti II
Language: English Version: 2018-11
8. TRANSPORT
Netti II is not approved for being used
as a seat in a vehicle.
8.1 FOLDING FOR
TRANSPORT
When the wheelchair is unoccupied, fold
it as described below. Put the wheelchair
in the trunk or the back seat. When placed
in the back seat, secure the frame using
safety belts. Secure all parts to make sure
they are of no danger for passengers by an
accident.
• Remove the head support (chapt. 6.15)
• Turn anti tips up (chapt. 6.10)
• Swing push handles in (chapt. 6.16)
• Remove arm supports (chapt. 6.11)
• Remove leg supports (chapt. 6.14)
• Remove backrest cushion (chapt. 6.12)
• Release backrest and fold it (chapt. 6.7)
• Remove main wheel (chapt. 6.2)
• Remove front castor (chapt. 6.4)
The total unfolded chair width of
Netti II with seat width 500 mm is bigger
than 700 mm as specied in PRM-TSI. This
may limit the possibilities for transport by
railway and other public transport.
8.2 TRANSPORT IN AIR
PLANE
Netti II wheelchair may be transported in
air plane without any restrictions. Netti
II wheelchairs are equipped with 2 gas
springs. These are however not classified
as dangerous goods. Contrary to general
dangerous goods instruction UN3164, the
IATA-DGR ( special regulation A114) rules
that the goods that contain gas and are
determined to function as shock absorbers
( including energy-absorbing devices or
pneumatic springs) are NOT subject to the
transport instructions i.e. they are indemnified from the following requirements:
a) each article has a gas volume which
does not exceed 1,6 l and a charge pressure not exceeding 250 bar, where the
product of the capacity expressed in litres
and charge pressure expressed in bars
doesn’t not exceed 80.
b) Each article has a minimum burst pressure of 4 times the charge pressure at +20
degree Celsius for products not exceeding
0,5 l gas space capacity.
c) Each article is made of material that will
not fragment.
d) Each article was manufactured in accordance to quality standard which is
approved by the responsible national
authority.
e) It is proven and shown that the article relives its pressure by means of a fire
degradable seal or other pressure relief device such that the article will not fragment
and the article does not rocket.
Page 29
29
My-Netti.com
Model: Netti II
Language: English Version: 2018-11
9. MANOEUVRING
9.1 GENERAL TECHNIQUES
The weight and balance of the chair
influences the manoeuvring ability of the
wheelchair.
The weight, size and sitting position of
the user are also influencing factors. Also
the position of the wheels will influence
the driving performance. The more weight
placed over the main wheels, the easier it
is to manoeuvre. If heavy weight is placed
over the front castors, the chair will be
heavy to manoeuvre.
Companion: If the user is left alone in
the wheelchair, always lock the brakes and
secure that the anti-tips are turned down.
Parking:
Increase the underneath support of the
wheelchair by moving the chair about 100
mm backwards making the front castors
turn forward.
Step approach:
Always approach the step in slow motion
preventing the front castors to hit the step
with force. The user could fall out of the
chair by the impact. The front castors could
brake.
Driving forward down steps/ sidewalks
Be cautious that you do not drive down
steps higher than 30 mm. The leg supports
may hit the ground first. Thereby you might
loose the control and the leg supports may
brake.
Driving on soft, rough or slippery
ground can make safe manoeuvring more
difficult as the wheels may loose traction
and it is difficult to control the wheelchair.
EMERGENCY EXIT
The total chair width of Netti II with seate
width 500 mm is bigger than 700 mm,
it may therfore have difculties passing
through emergency escape exits.
9.2 DRIVING TECHNIQUES
- STEP UP -
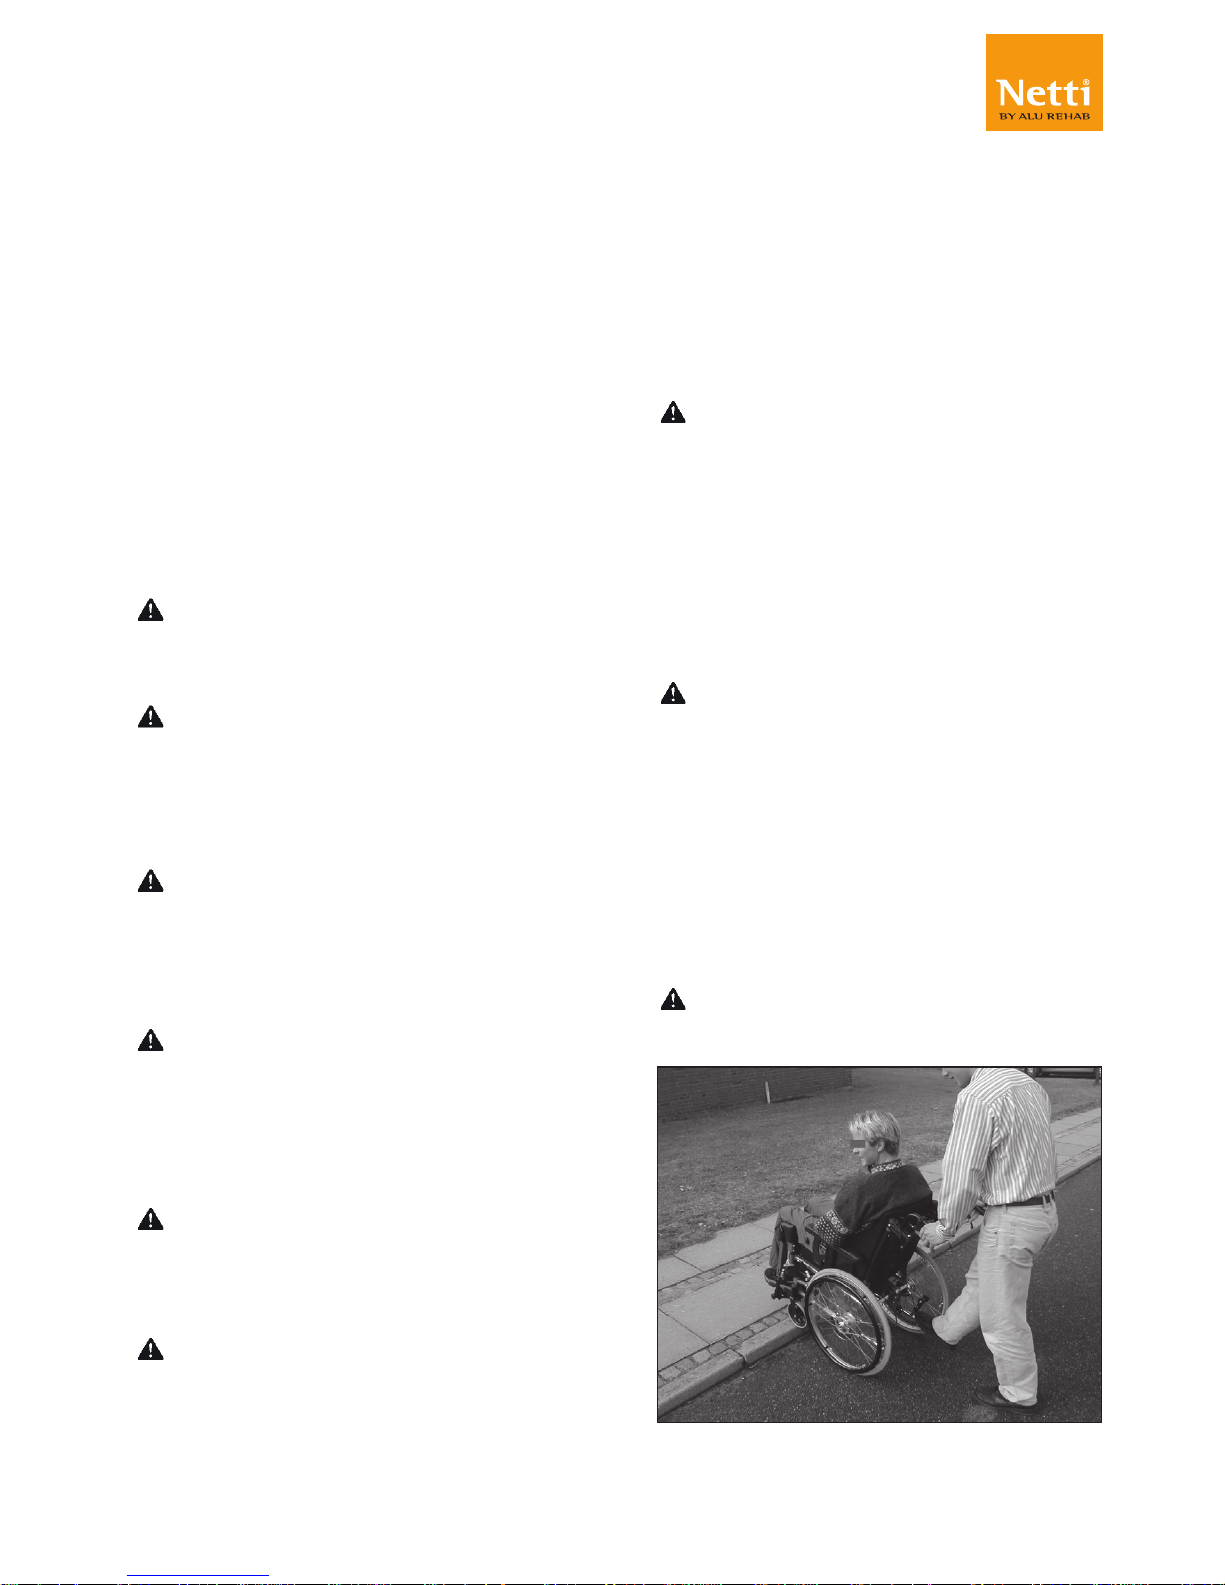
Companions, drive up a step forwards:
• Check that the anti tip is turned up
• Angle the wheelchair backwards.
• Lift the push handles while pushing the
chair onto the step.
Turn the anti tip down.
Users, drive up a step backwards:
This technique is only useful if the step is
very low. It also depends on the clearance
between the foot plates and the ground.
• Check that the anti tip is turned up.
• Drive the chair backwards towards the
step.
• Make a firm grip on the push rims and
move the body forward while pulling.
Turn the anti tip down.
Companions, drive up a step backwards:
• Check that the anti tip is turned up
• Pull the chair backwards next to the
step
• Angle the wheelchair backwards,
moving the front castors slightly up in
the air.
• Pull the wheelchair up the step and go
backwards long enough to put down
the front castors on the step.
Turn the anti tip down.
Page 30
30
My-Netti.com
Model: Netti II
Language: English Version: 2018-11
9.3 DRIVING TECHNIQUES
- STEP DOWN -
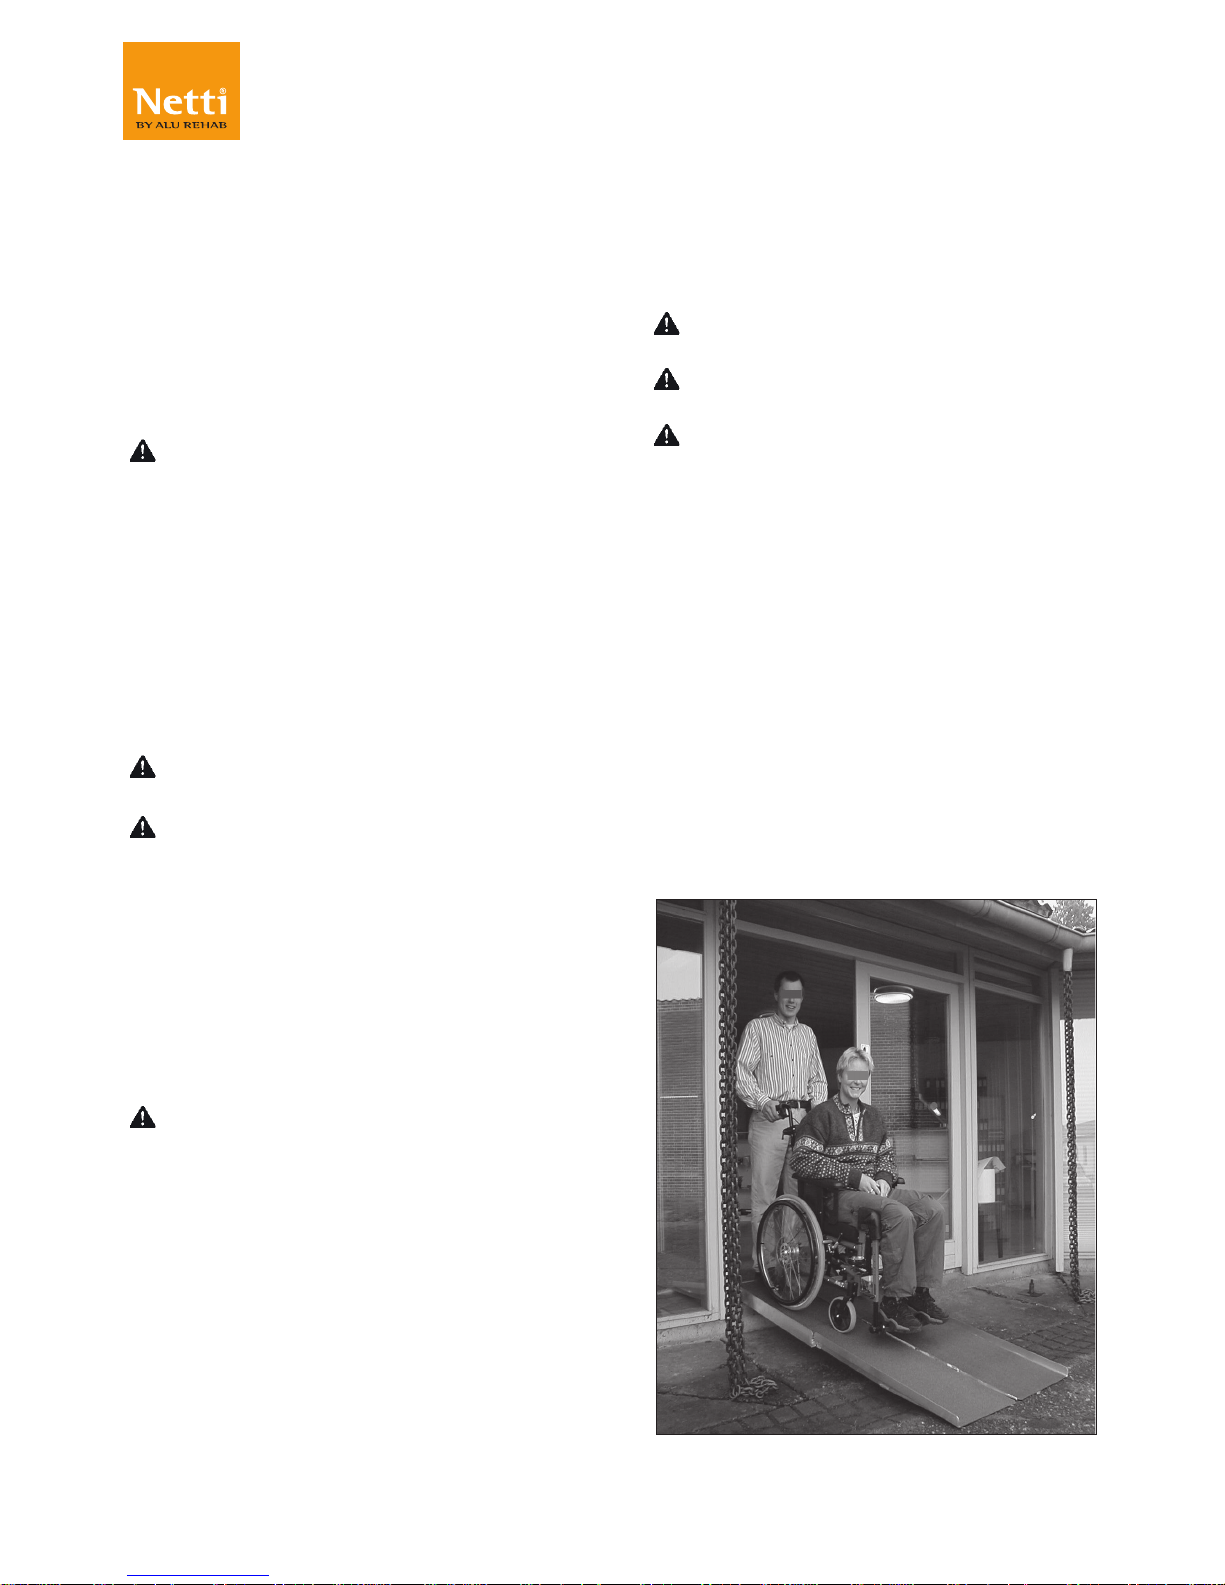
Companions, drive down a step forwards:
• Check that the anti tip is turned up
• Angle the wheelchair backwards,
moving the front castors slightly up in
the air.
• Drive carefully down the step and angle
the wheelchair forward putting the front
castors back on the ground.
Turn the anti tip down.
Users, drive down a step backwards:
This technique is only for very experienced
users. This technique should not be used if
the height of the step is more than 100 mm.
• Check that the anti tip is turned up.
• Move the wheelchair backwards to the
step.
• Move carefully down the step backwards
while moving the body forward to keep
the balance of the chair.
Doing this increases the risk of
tipping backwards.
Turn the anti tip down.
Companions, drive down a step backwards:
• Check that the anti tip is turned up.
• Move the wheelchair backwards to the
step.
• Drive carefully down the step and move
the wheelchair backwards on the main
wheel until the front castors have come
away from the step.
• Put the front castors down on the ground.
Turn the anti tip down.
9.4 DRIVING TECHNIQUES
- SLOPE -
Important advise for driving down and up
hill avoiding the risk of tipping.
Avoid turning the wheelchair in the
middle of a slope.
Always drive as straight as possible.
It is better to ask for assistance than
taking risks.
Driving uphill:
Move the upper part of the body forwards
in order to maintain the balance of the
chair.
Driving downhill:
Move the upper part of the body backwards to maintain balance of the chair.
Control the speed of the chair by
clutching the push rims.
Do not use the brakes.
Page 31
31
My-Netti.com
Model: Netti II
Language: English Version: 2018-11
9.5 DRIVING TECHNIQUES
- UP STAIRS -
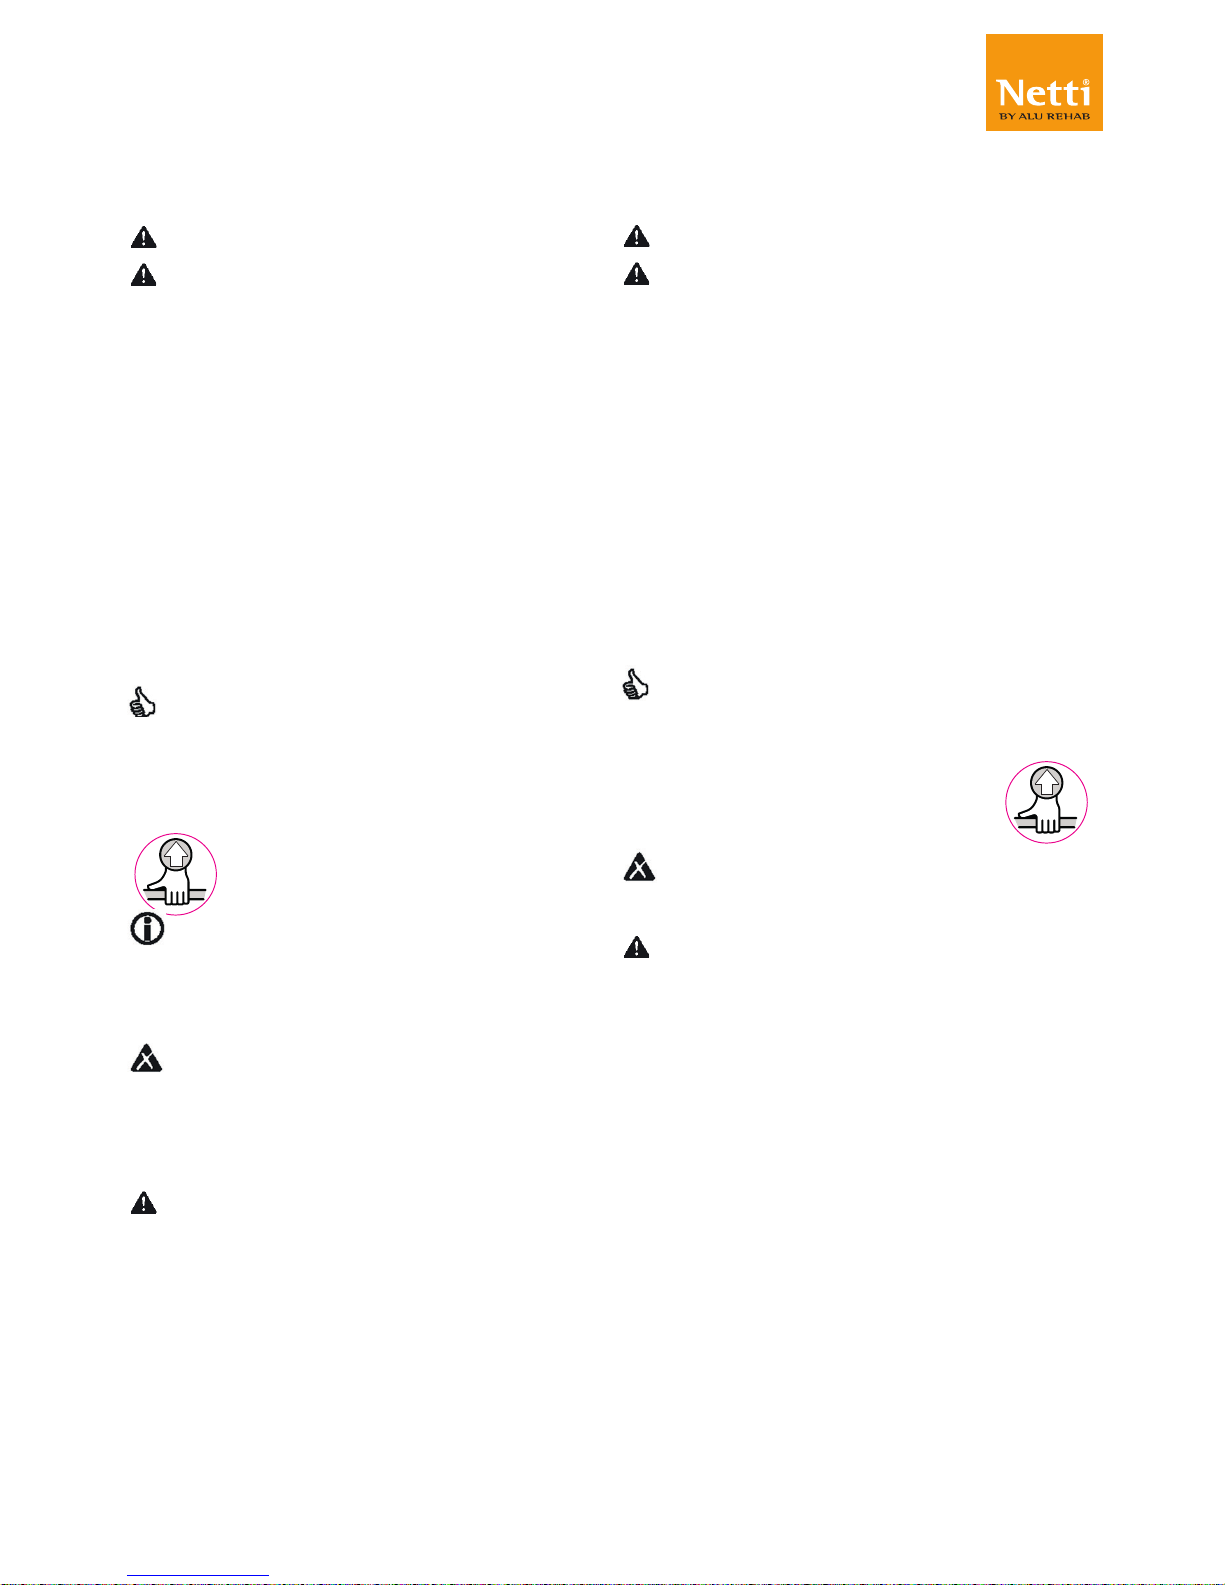
Always ask for assistance.
Never use escalators, even if assisted
by a companion.
With assistance, backwards.
• Check that the anti tip is turned up, and
that the push handles are fixed properly.
• Pull the wheelchair backwards to the first
step of the stairs.
• Angle the wheelchair backwards on the
main wheels.
• Pull the wheelchair slowly up the stair,
one step at the time keeping the balance
on the main wheel.
• Reaching the top of the stair, pull the
wheelchair backwards far enough to put
the front castors safely down on the floor.
If two companions are present, one
person can assist lifting in the front of
the frame. Lifting points on the frame
are marked with this sign:
The companions should use the
strength in their legs carrying the chair,
avoiding unnecessary stress on the
back.
Do not lift the wheelchair holding onto
the leg,- arm or head supports. They
may detach, the wheelchair may
fall and the user may get hurt and the
wheelchair damaged.
Turn the anti tip down.
9.6 DRIVING TECHNIQUES
- DOWN STAIRS -
Always ask for assistance.
Never use escalators, even if assisted
by a companion.
With assistance, forwards
• Check that the anti tip is turned up and
that the push handles are fixed properly.
• Drive the wheelchair forward to the first
step of the stair.
• Angle the wheelchair backwards on the
main wheels.
• Have a firm grip on the push handles, and
keep the balance on the main wheel taking
one step at the time.
• Reaching the bottom of the stair, put the
front castors safely down on the floor.
If two companions are present, one
person can assist lifting in the front of
the frame. Lifting points on
the frame are marked with
this sign:
Do not lift the wheelchair holding onto
the leg- arm or head supports.
Turn the anti tip down.
Page 32
32
My-Netti.com
Model: Netti II
Language: English Version: 2018-11
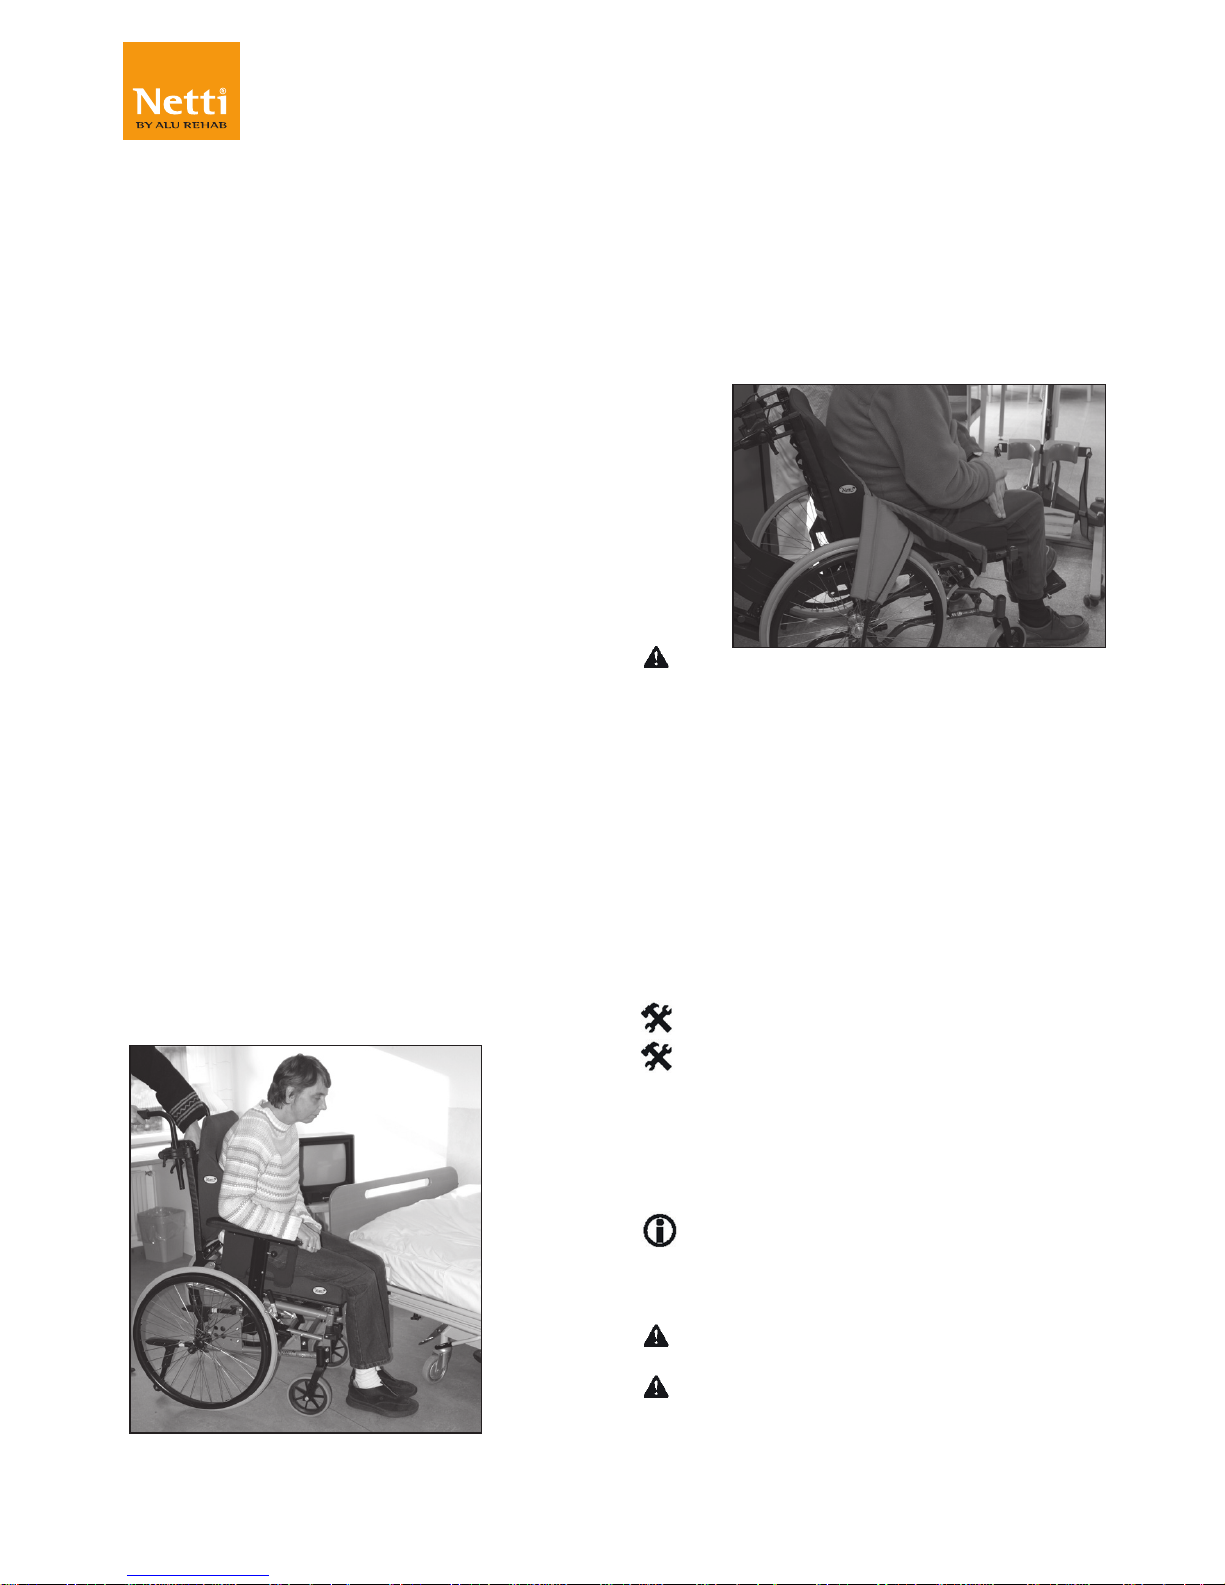
9.7 TRANSFER
Techniques for transferring to/from the
wheelchair should be practiced well with
the persons involved. Here, we give some
important advices for preparation of the
chair:
With or without companion - sideways.
Before transfer:
• The wheelchair should be placed as
close as possible to the destination of
the transfer.
• Pull the wheelchair backwards 50-100
mm in order to make the front castors
turn forward.
• Lock the brakes.
• Remove foot support and arm support
on the side of the transfer.
With or without companion – forwards.
Before transfer:
• The wheelchair should be placed as
close as possible to the destination of
the transfer.
• Pull the wheelchair backwards 50-100
mm in order to make the front
castors turn forward.
• Lock the brakes.
• Tilt chair forward.
Using a lift:
Before transfer to chair:
• Tilt the chair back
• Remove the head support
• Remove the leg supports
• Open the back rest angle slightly
• Replace the components when
transfer is finished.
Never stand on the foot plates due to
the risk of tipping the chair forwards.
9.8 POINT OF BALANCE
Adjust the point of balance by changing
the position of the main wheel in the main
wheel bracket.
• Move the main wheel hub and the
main wheel. (Chapt. 6.6)
• Adjust the brakes. (Chapt. 6.17)
2 pcs 24 mm open-end spanner
5 mm Allen key
When the main wheels are moved
forward, it will be easier to manoeuvre
the wheelchair, but the risk of tipping
backwards increases.
The point of balance can also be
changed by adjusting the seat angle
and/or angle of backrest.
It is recommended to use the anti tip.
Check that the main wheel and quick
release are locked properly. (Chapt 6.2)
.
Page 33
33
My-Netti.com
Model: Netti II
Language: English Version: 2018-11
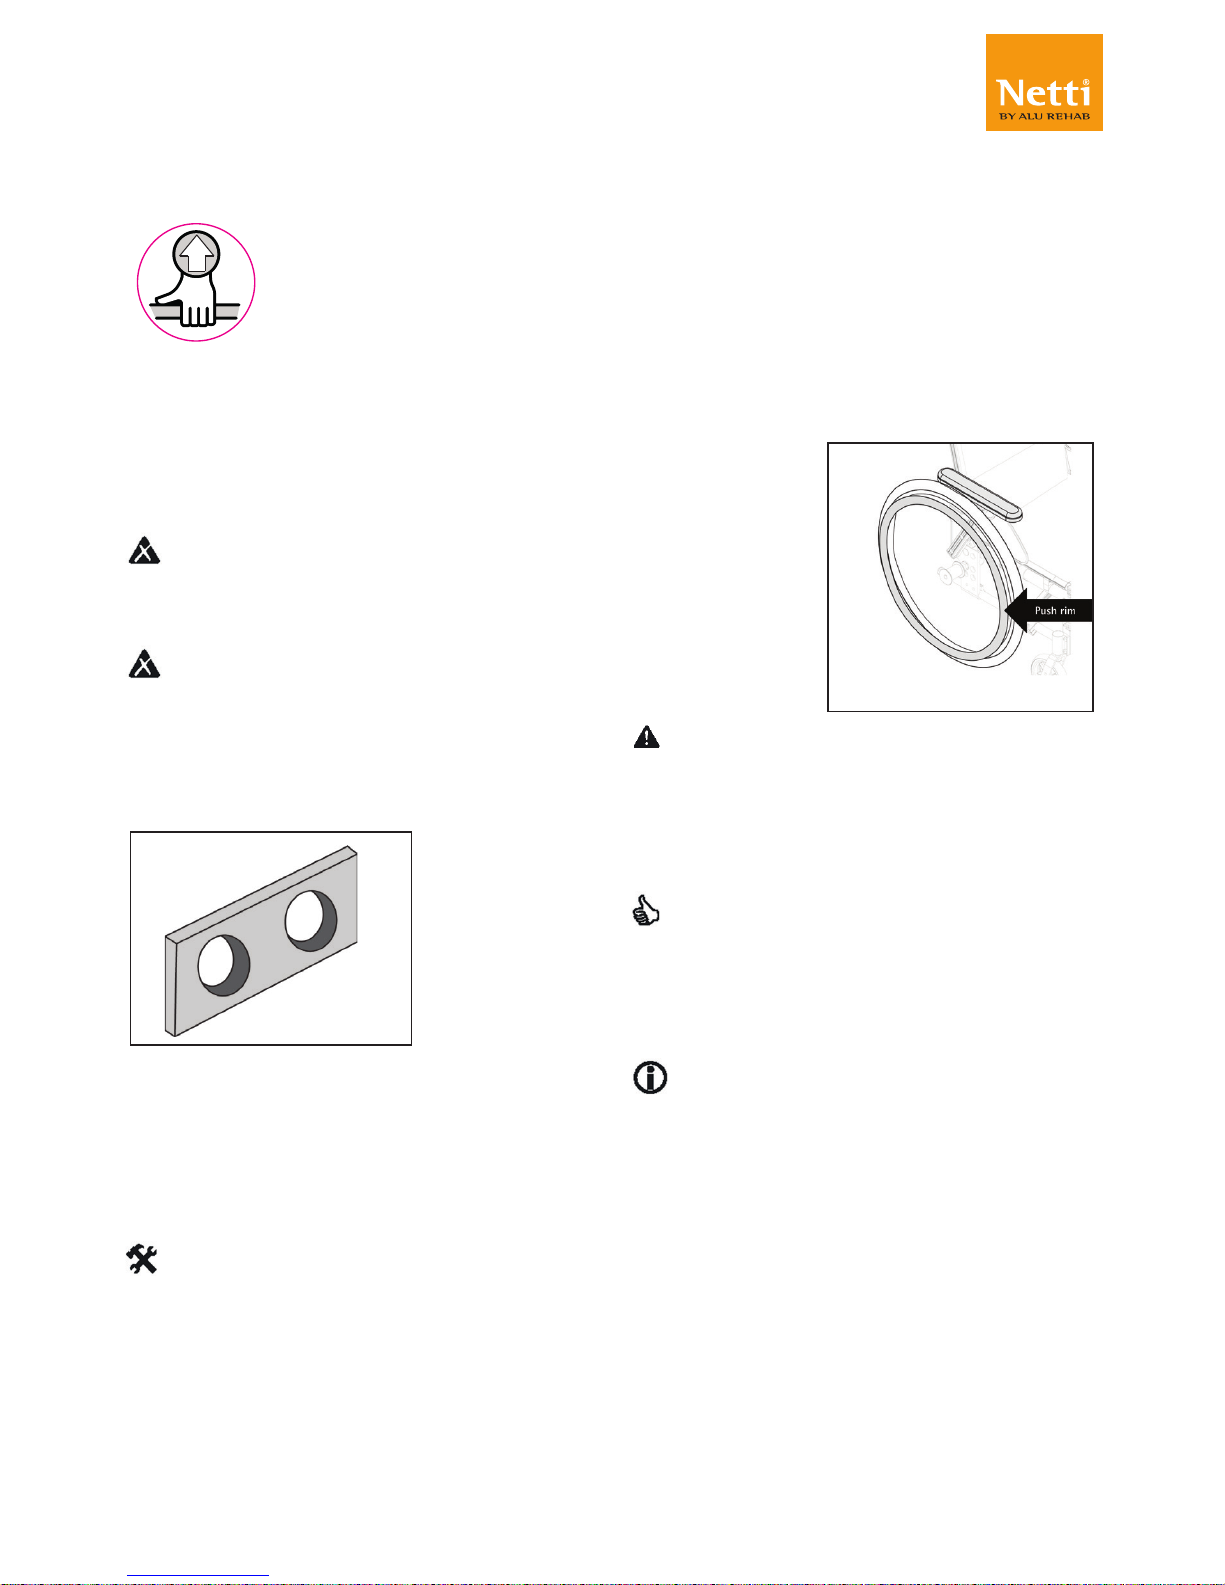
9.9 LIFTING THE
WHEELCHAIR
• The unfolded wheelchair should be lifted
from 2 persons holding on to the frame
and push bar only.
It is marked with the below symbol where
it should be lifted.
Never lift the wheelchair holding on to
the leg-, arm- or head supports. They
may detach and the wheelchair may fall
and get damaged.
Never lift the wheelchair with a user
in it.
9.10 CHANGE OF CAMBER
ANGLE
Drivewheels are as a standard mounted
without camber angle.
The camber angle can be changed by
installing the bracket ( accessory) between
bearing house and nut.
2 pc 24 mm open-end-spanner.
9.11 PUSH RIM
Netti wheelchairs are delivered with
aluminium push rims as standard. The
material and distance to the main wheel
influences the ability of the user to grip.
Contact your dealer to get information
about push rims that fit your chair.
Alternative push rims may give better
grip, but the friction may increase.
When using the hands to stop the
chair, the risk for burning of the hands
increases.
A squeezing and trapping hazard of the
fingers may occur when passing
through narrow passages and if the
fingers come between the spokes.
To avoid this risk, we recommend spoke
protectors as accessory.
If you want/need to change push rims
or increase/decrease the distance
between the push rims and the wheel,
please contact your dealer.
Page 34
34
My-Netti.com
Model: Netti II
Language: English Version: 2018-11
10. MAINTENANCE
10.1 MAINTENANCE
INSTRUCTIONS
The Netti chairs are built of modules. Alu
Rehab carries stock of all parts and is
ready to supply these on short notice.
Necessary instructions for mounting will
follow the parts.
Parts to be handled by user are defined
in spare part catalogues that can be
downloaded at www.My-Netti.com. These
parts can, if needed, also be removed and
sent to manufacturer/distributor upon
request.
Parts related to wheelchair frame
construction must be handled by
manufacturer or authorized service
facility.
If defects or damages occur,
please contact your dealer.
Check/re-adjust screws and nuts
at regular intervals.
Sand and sea water (salt used for
gritting in the winter) can damage
the bearings of the front castors
and main wheels. Clean the
wheelchair thoroughly after use.
For small damages to the surface,
original surface paint can be
ordered from the manufacturer.
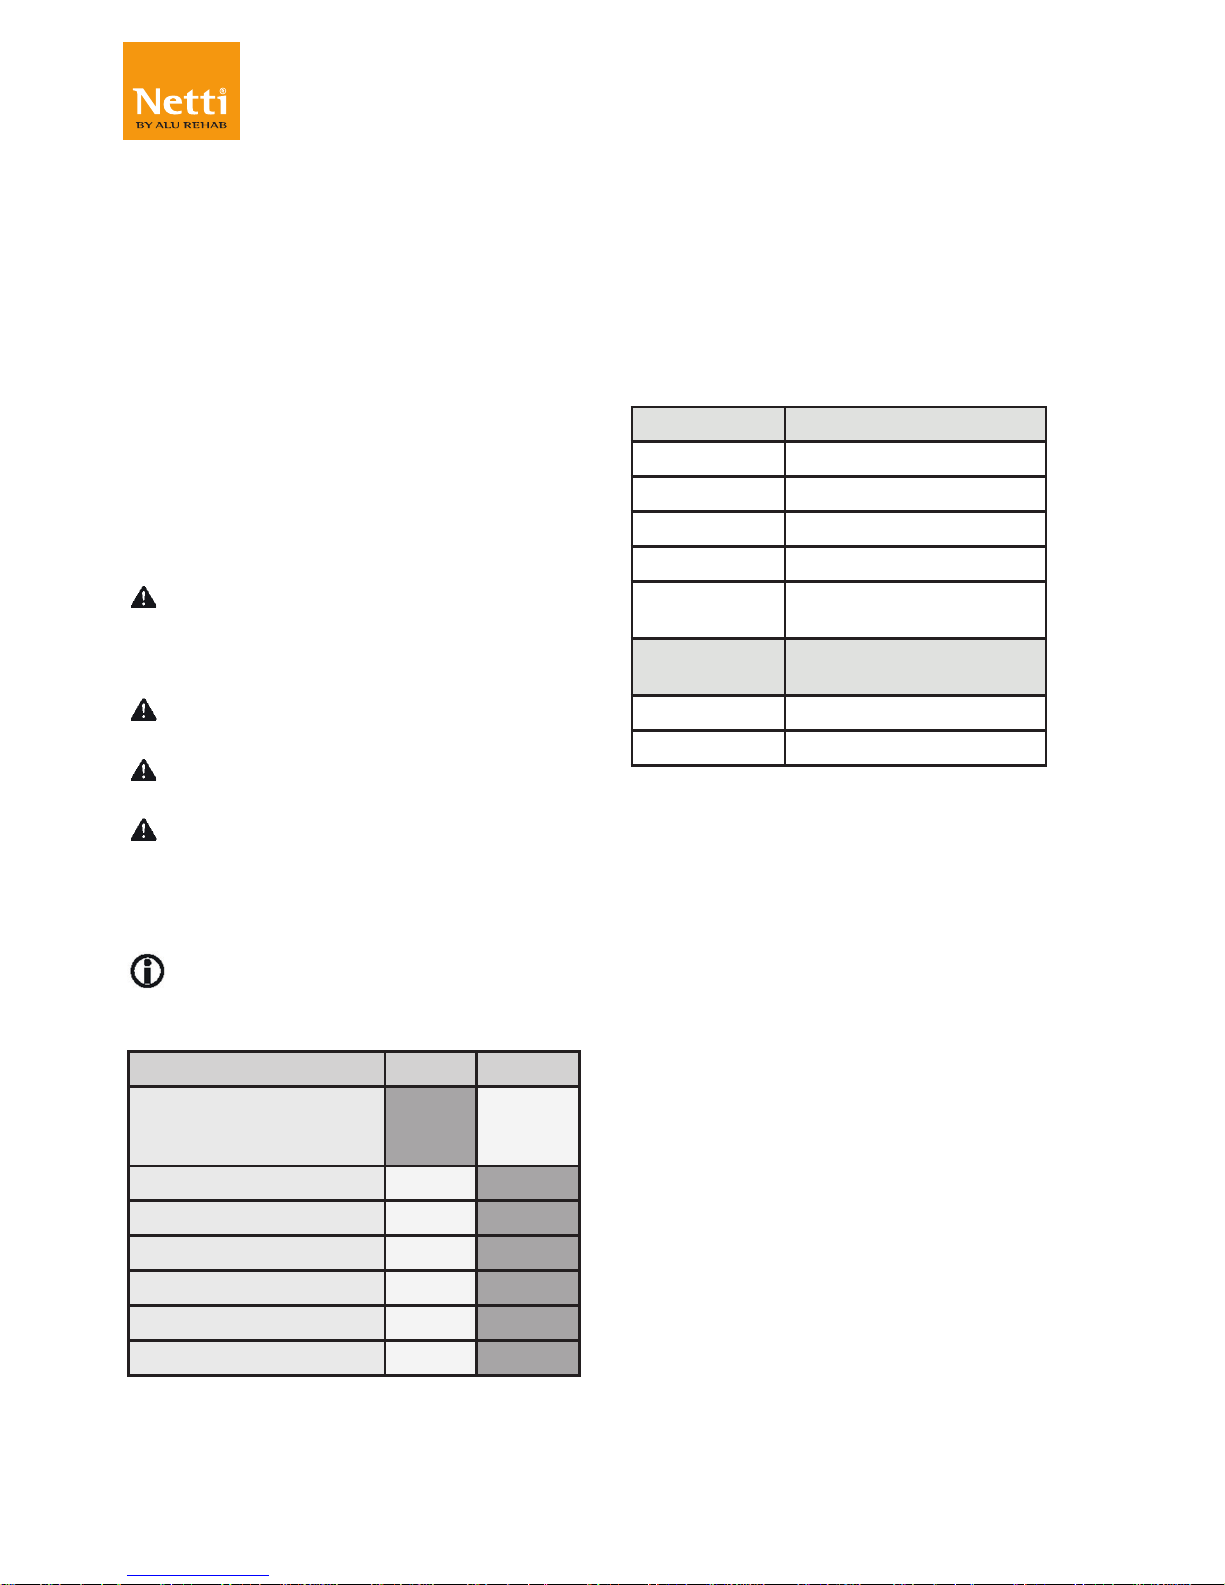
Maintenance Frequency Weekly Monthly
Check defects/damages
E.g. breakage/missing
parts
X
Washing of wheelchair X
Oiling of bearings X
Washing of cushions X
Check anti tip function X
Check brake adjustment X
Check tyre wear X
* As a rule of thumb, use oil on movable
parts and all bearings. Alu Rehab
recommends use of ordinary bicycle oil
10.2 CLEANING AND WASHING
1. Remove cushions before washing
the wheelchair.
2. Clean cushions and covers according to
instructions printed on cushions.
Cushion cleaning procedures
CORE
Washing Hand wash 40ºC
Disinfection Virkon S
Auto clave 105ºC
Drying Squeeze
Air dry standing
edgewise
OUTER
COVER
Washing Machine wash 60ºC
Drying Tumble dry max 85ºC
3. Clean frame using water and a rag.
4. We recommend using soft soap.
5. Rinse the wheelchair well using clean water
to remove all the soap.
6. Use methylate spirit to remove any dirt
left.
7. Wipe disinfection: use a soft rag wetted
with Hydrogen peroxide or technical
alcohol and wipe the whole chair clean.
Hydrogen peroxide recommended:
NU-CIDEX “Johnsen and Johnsen”.
10.3 LONG TERM STORING
If the wheelchair is to be stored for longer
time - (longer than 4 months) no particular
actions are needed. We recommend that the
chair is cleaned before storing. Before it being
used again, complete the above maintenance
instructions.
Page 35

35
My-Netti.com
Model: Netti II
Language: English Version: 2018-11
11. TROUBLESHOOTING
Symptom Reason/Action Reference
in manual
The wheelchair is
going askew
• The angle of the bearing house might not be 90°.
• Check that the front castors are fitted in the same
height.
• The drive wheel hubs might be incorrectly mounted.
• One of the brakes might be too tight.
• The user are sitting very askew in the chair.
• The user might be stronger on one side than the other
6.4
6.3
6.6
6.17
The wheelchair
is heavy to
manoeuvre
• The drive wheel hubs might be incorrectly mounted.
• Clean the front castors and forks for dirt.
• Too much weight over the front castors.
(Adjust the point of balance by moving the drive
wheels backwards).
6.6
The wheelchair is
hard to turn
• Control that the front castors are not fixed too tight.
• Adjust the angle of the bearing house.
• Clean the front castors and forks for dirt.
• Too much weight over the front castors
adjust the point of balance.
6.4
6.5
The front castors
are wobbling
• The front castors are not fixed properly.
• Check that the front forks are fitted in the same
height.
• The angle of the bearing house might not be 90° to
the ground.
• Too much weight over the front castors
adjust the point of balance.
6.4
6.4
6.3
6.5
The drive wheels
are difficult to take
off and put on.
• Clean and grease the quick release.
• Adjust the length of the hub bushing.
6.6
The brakes are not
working well
• Check the wheels and the distance to the brakes.
• Adjust the brake.
6.17
The wheelchair
feels ”shaky”
• Check screws and adjustment points in general.
Please contact your dealer for information about authorized service facilities that
can give support if solution is not reached in this form.
When in need of spare parts, please contact your dealer.
When making changes affecting frame construction, contact dealer / manufacturer
for confirmation before you start.
Page 36

36
My-Netti.com
Model: Netti II
Language: English Version: 2018-11
12. TESTS &
WARRANTY
12.1 TESTS
Netti II is tested and has been approved
for usage both indoors and outdoors.
The chair is CE marked.
Maximum user weight: 125 kg
It is tested by TÜV SÜD Product Service
GmbH according to DIN EN 12183:2014
Netti seating system is tested for fire
resistance according to: EN 1021-2:2014
12.2 WARRANTY
Alu Rehab is providing you with a 5-year
warranty on all frame components and
on the cross-tube assembly. There is a
2-year warranty on all other CE labelled
components except batteries. For
batteries a 6 month warranty is provided.
Alu Rehab is not responsible for any
damage resulting from inappropriate or
unprofessional installation and/or repairs,
neglect, wear from changes in wheelchair
assemblies by institutions not approved
by Alu Rehab or by use of spare parts
delivered or produced by third parties.
In such cases, this warrant shall be
considered null and void.
This warranty is only valid when
the user use, maintain and handle the
wheelchair as described in the user
manual.
12.3 CLAIM
If a product has developed a fault during
the warranty period as a result of a defect in
design or manufacturing, you may forward a
warranty claim.
• Claims are to be forwarded as soon as a
defect is discovered and not later than 2
weeks after the defect is discovered.
• Claims are to be addressed to the sales
agent of the wheelchair. Please note
that sales documentation has to be
filled in and signed correctly with serial
number en eventually NeC number in
order to document time and place of the
purchase of the specific wheelchair.
• The sales agent and Alu Rehab are to
decide whether a defect is covered by
the warranty. The claimer will be informed
about the decision as soon as possible.
• If the claim is accepted, the sales agent
and the Alu Rehab representative are
to decide if the product will be repaired,
replaced or the customer is entitled to a
reduced prize.
• If a warranty claim is judged to be invalid
- after careful inspection of the defect by
an Alu Rehab technical specialist (defect
due to wrong use and/ or lack of required
maintenance) you are free to decide if you
want to have the defect product repaired
( if possible) at your expense, or if you
want to purchase a new product.
Normal wear, incorrect use or
incorrect handling is not a reason for
claims.
12.4 NETTI CUSTOMIZED /
INDIVIDUAL ADAPTATIONS
Netti Customized / individual adaptations
are defined as all adjustments that are
not included in this manual. Individual
customizations made by Alu Rehab are
labelled with a unique NeC number for
identification.
Page 37

37
My-Netti.com
Model: Netti II
Language: English Version: 2018-11
Wheelchairs that are especially adjusted/
adapted by the customer cannot keep the
CE mark given by Alu Rehab A.S Norway.
If the adjustments are performed by other
than Alu Rehabs approved dealers, the
warranty given by Alu Rehab A.S Norway
will not be valid.
If any uncertainty about special fitting and
adaptations, please contact Alu Rehab
A.S.
If you have different needs than what
our standard wheelchair program can
cover, please contact customer
service for eventually special
adjustments or Netti Customized
solutions.
12.5 COMBINATIONS WITH
OTHER PRODUCTS
Combinations of Netti and other products
not manufactured by Alu Rehab A.S:
Generally in these cases, the CE mark of
all the products involved will not be valid.
However, Alu Rehab A.S has made
combination agreements with some
manufacturers about some combinations.
By these combinations the CE mark and
guarantees are valid.
For further information, please
contact your dealer or Alu Rehab A.S
Norway directly.
PRODUCT RESPONSIBILITY
Netti II with different configurations of
Netti equipment has been tested /risk
evaluated by Alu Rehab.
Any alterations or substitutions must not
be made to the wheelchair securment
points or to structural and frame parts
without consulting the wheelchair
manufacturer Alu Rehab.
Substitutions or alterations of components
from third part suppliers to Netti II requires
the risk evaluation and acceptance of the
product responsibility and safety for use of
the wheelchair from the manufacturer that
is performing the substitution or alteration.
12.6 SERVICE AND REPAIR
Information about service and repair
services in you area, please contact your
local dealer.
A unique identification number / serial
number is to be found on the bottom
frame on left side of the chair.
A spare part catalogue for the
wheelchair can be obtained through
your local dealer or downloaded at
www.My-Netti.com
A refurbishment manual for the
wheelchair can be obtained through
your local dealer or downloaded at
www.My-Netti.com
Information on product safety notices
and product recalls are available at
www.My-Netti.com
Page 38
38
My-Netti.com
Model: Netti II
Language: English Version: 2018-11
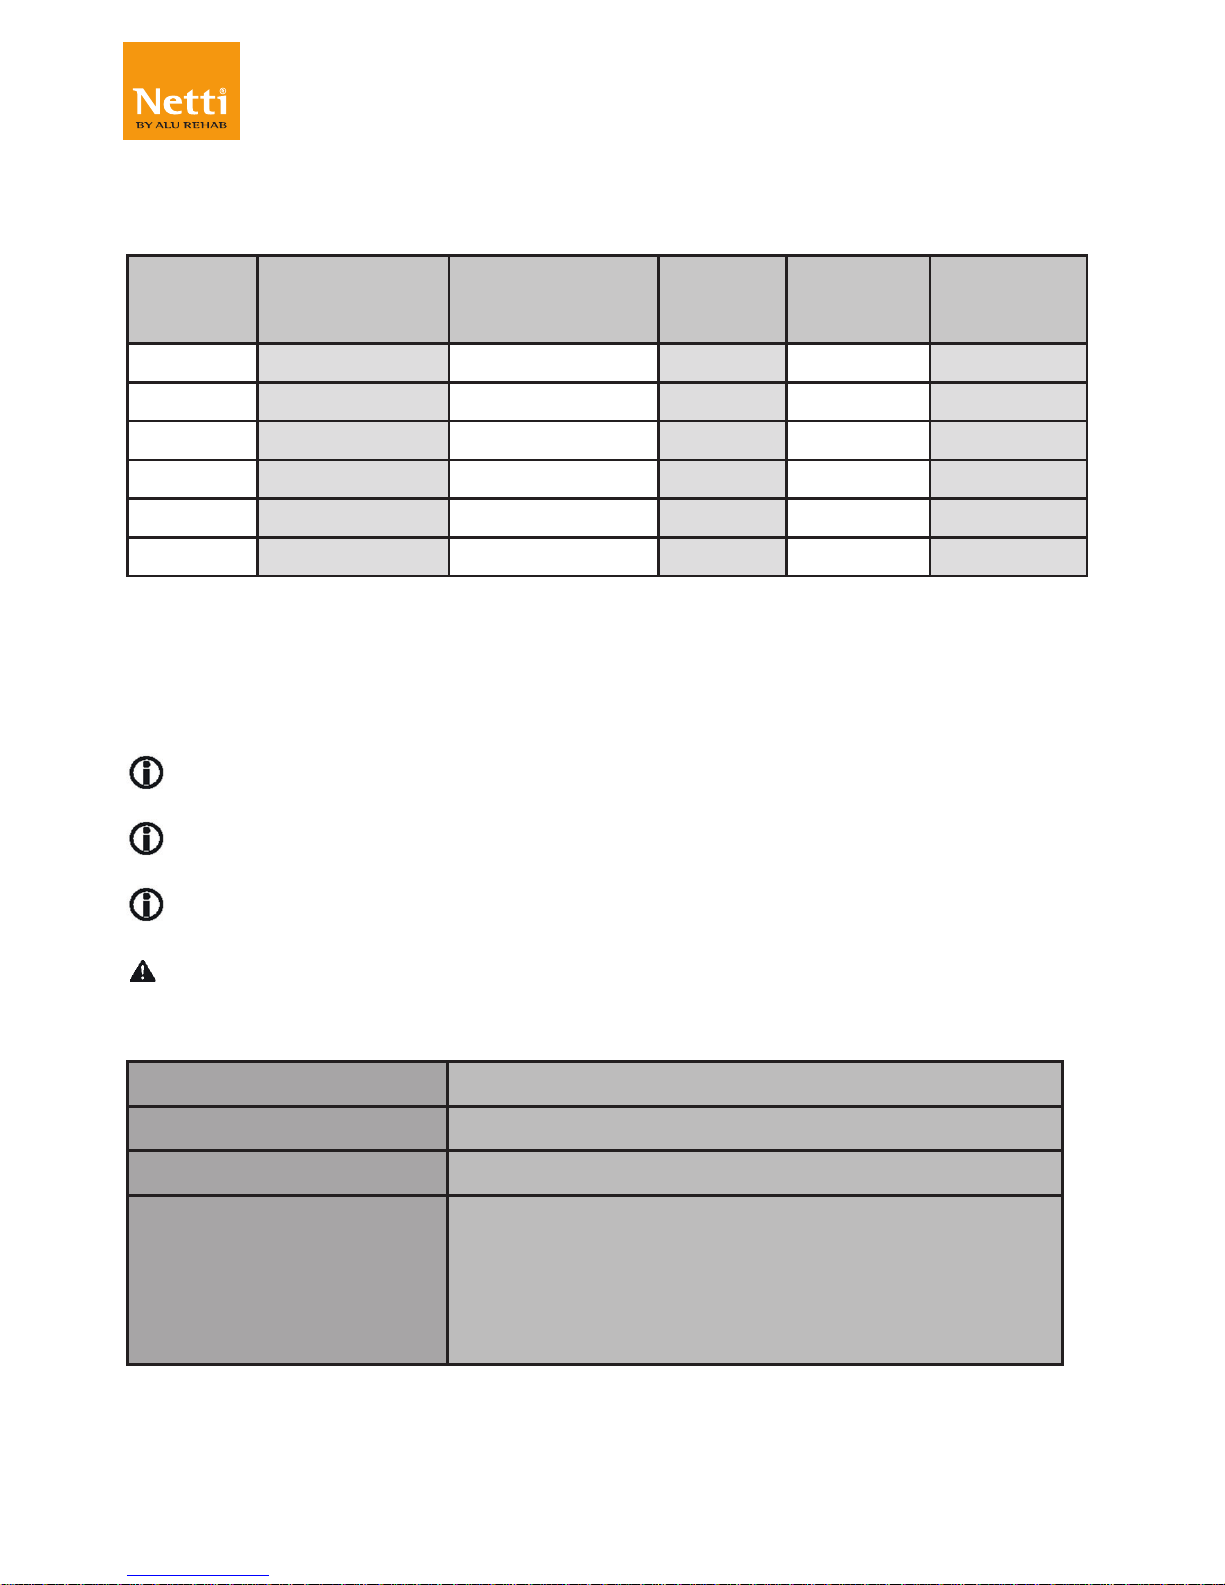
13. MEASUREMENTS & WEIGHTS
Size* Seat depth
Standard**
Back rest
height***
(Extender)
Total with Transport
width
Weight
350 mm 400-500 mm 500 (600) mm 580 mm 504 mm 25,0 kg
380 mm 400-500 mm 500 (600) mm 610 mm 534 mm 25,3 kg
400 mm 400-500 mm 500 (600) mm 630 mm 554 mm 25,6 kg
430 mm 400-500 mm 500 (600) mm 660 mm 584 mm 25,9 kg
450 mm 400-500 mm 500 (600) mm 680 mm 604 mm 26,1 kg
500 mm 400-500 mm 500 (600) mm 730 mm 654 mm 26,5 kg
* Measured between edges of frame tubes. For the distance between skirt guards
add 25 mm.
** Measured from front of seat plate to back rest hinge without cushion.
Using standard Uno back rest cushion subtract approximately 30 mm.
*** Measured from seat plate to top of back rest cushion.
The weight is including drive wheels, front castors, leg supports and arm supports.
No cushion.
Recommended inflation pressure using air tyres is: 60-65 PSI.
Max user weight is 125 kg.
When mounting accessories such as power kit etc. the weight of the accessories
must be subtracted from the max user weight.
Dealer:
Frame number.:
Date:
Stamp:
Page 39

39
My-Netti.com
Model: Netti II
Language: English Version: 2018-11
Page 40

Alu Rehab AS
Bedriftsvegen 23
4353 Klepp Stasjon
NORWAY
T: +47 51 78 62 20
[email protected]
My-Netti.com
Alu Rehab ApS
Kløftehøj 8
DK-8680 Ry
T: +45 87 88 73 00
F: +45 87 88 73 19
[email protected]
III FAMILY
COMFORT
UM0104 UK
2018-11
IN DIALOGUE WE CREATE
SIMPLE SOLUTIONS AND
ENABLE JOY OF LIFE
This product conrms to
93/42/EEC for medical products
FEEL FREE TO CONTACT US:
MANUFACTURER:
DISTRIBUTION EU:
 Loading...