

Page 1

N
V
-
6
0
0
L
I
/
R
I
N
V
-
6
0
0
L
I
/
R
I
L
L
L
I
2
2
2
C
C
C
O
O
O
/
/
/
C
C
C
P
P
P
E
E
E
R
R
R
o
o
o
u
u
u
t
t
t
e
e
e
r
r
r
N
V
-
6
0
0
L
I
/
R
M
a
n
a
g
e
d
I
n
d
u
s
t
r
i
a
l
G
r
a
d
e
V
D
M
a
n
a
g
e
d
I
n
d
u
s
t
r
i
a
l
G
r
a
d
e
M
a
n
a
g
e
d
I
n
d
u
s
t
r
i
a
l
G
r
a
d
e
V
V
D
D
S
S
S
U
U
U
S
S
S
E
E
E
R
R
R
’
’
’
S
S
S
M
M
M
A
A
A
N
N
N
U
U
U
A
A
A
L
L
L
Page 2
NV-600LI/RI Managed Industrial Grade VDSL2 CO/CPE Router USER’S MANUAL Ver. A4
Copyright
Copyright © 2012 by National Enhance Technology Corp. All rights reserved.
Trademarks
NETSYS is a trademark of National Enhance Technology Corp.
Other brand and product names are registered trademarks or trademarks of their respective holders.
Legal Disclaimer
The information given in this document shall in no event be regarded as a guarantee of conditions or characteristics. With respect
to any examples or hints given herein, any typical values stated herein and/or any information regarding the application of the
device, National Enhance Technology Corp. hereby disclaims any and all warranties and liabilities of any kind, including without
limitation warranties of non-infringement of intellectual property rights of any third party.
Statement of Conditions
In the interest of improving internal design, operational function, and/or reliability, NETSYS reserves the right to make changes to
the products described in this document without notice. NETSYS does not assume any liability that may occur due to the use or
application of the product(s) or circuit layout(s) described herein.
Maximum signal rate derived from IEEE Standard specifications. Actual data throughput will vary. Network conditions and
environmental factors, including volume of network traffic, building materials and construction, and network overhead, lower actual
data throughput rate. Netsys does not warrant that the hardware will work properly in all environments and applications, and makes
no warranty and representation, either implied or expressed, with respect to the quality, performance, merchantability, or fitness for
a particular purpose. Make sure you follow in line with the environmental conditions to use this product.
1
Page 3
NV-600LI/RI Managed Industrial Grade VDSL2 CO/CPE Router USER’S MANUAL Ver. A4
Foreword: Industrial-grade VDSL2 Router solution
Attention:
Be sure to read this manual carefully before using this product. Especially Legal Disclaimer, Statement
of Conditions and Safety Warnings.
Netsys' NV-600LI/NV-600RI is an industrial of management VDSL2 router that leverages the extraordinary bandwidth promise of
VDSL2 (max. 100Mbps symmetric) technology, the next step in the delivery of new high-speed Internet applications in industrial
environments. In addition to using a DIN-Rail design that is quick, easy and economical to install and maintain, it offers
high-performance broadband/multimedia services to industrial environments such as Factories, MRT, Train stations, Ticket vending
machines, Parking systems, Monitoring systems and point to point applications. The NV-600LI works with the NV-600RI over
existing copper wire infrastructure. NV-600LI is a CO(Central Office) device while NV-600RI is a CPE (Customer Premise Equipment)
device.
Netsys' NV-600LI/RI DIN-Rail and Industrial-grade design offers quick, easy, economical and high-performance
broadband/multimedia services to industrial environments such as Factory, MRT, Train station, Ticket vending machine, Parking
system, Monitoring system and point to point applications.
Caution:
The NV-600LI/RI is for indoor applications only. It can be used in industrial-grade applications. This product does not have
waterproof protection, please do not used in outdoor applications.
2
Page 4
NV-600LI/RI Managed Industrial Grade VDSL2 CO/CPE Router USER’S MANUAL Ver. A4
Safety Warnings
For your safety, be sure to read and follow all warning notices and instructions before using the device.
DO NOT open the device or unit. Opening or removing the cover may expose you to dangerous high voltage points or other
risks. ONLY qualified service personnel can service the device. Please contact your vendor for further information.
Use ONLY the dedicated power supply for your device. Connect the power to the right supply voltage (110V AC used for
North America and 230V AC used for Europe. NV-600LI/RI supports 12 to 48 VDC dual power input (Redundant power)).
Place connecting cables carefully so that no one will step on them or stumble over them. DO NOT allow anything to rest on
the power cord and do NOT locate the product where anyone can work on the power cord.
DO NOT install nor use your device during a thunderstorm. There may be a remote risk of electric shock from lightning.
DO NOT expose your device to dampness, dust or corrosive liquids.
DO NOT use this product near water, for example, in a wet basement or near a swimming pool.
Connect ONLY suitable accessories to the device.
Make sure to connect the cables to the correct ports.
DO NOT obstruct the device ventilation slots, as insufficient air flow may harm your device.
DO NOT place items on the device.
DO NOT use the device for outdoor applications directly, and make sure all the connections are indoors or have waterproof
protection place.
Be careful when unplugging the power, because it may produce sparks.
Keep the device and all its parts and accessories out of the reach of children.
Clean the device using a soft and dry cloth rather than liquid or atomizers. Power off the equipment before cleaning it.
This product is recyclable. Dispose of it properly.
3
Page 5
TABLE OF CONTENTS
NV-600LI/RI Managed Industrial Grade VDSL2 CO/CPE Router USER’S MANUAL Ver. A4
COPYRIGHT ........................................................................................................................................................ 1
FOREWORD: INDUSTRIAL-GRADE VDSL2 ROUTER SOLUTION .................................................................... 2
SAFETY WARNINGS ........................................................................................................................................... 3
CHAPTER 1. UNPACKING INFORMATION......................................................................................................... 9
1.1 Check List ......................................................................................................................................................................................9
CHAPTER 2. INSTALLING THE ROUTER .......................................................................................................... 9
2.1 Hardware Installation....................................................................................................................................................................10
2.2 Pre-installation Requirements ......................................................................................................................................................10
2.3 General Rules .............................................................................................................................................................................. 11
2.4 Connecting the Router .................................................................................................................................................................12
2.5 Terminal Block and DIN-Rail mount installation......................................................................................................................13
2.6 Connecting the RJ-11 / RJ-45 Ports ............................................................................................................................................. 14
4
Page 6
NV-600LI/RI Managed Industrial Grade VDSL2 CO/CPE Router USER’S MANUAL Ver. A4
2.7 Industrial VDSL2 router Application .........................................................................................................................................16
CHAPTER 3. HARDWARE DESCRIPTION........................................................................................................ 19
3.1 Front Panel...................................................................................................................................................................................20
3.2 Front Indicators ............................................................................................................................................................................21
3.3 Rear Panel...................................................................................................................................................................................22
3.4 Side Panel ...................................................................................................................................................................................23
CHAPTER 4. CONFIGURE THE NV-600LI/RI VIA WEB BROWSER ................................................................. 28
4.1 Login ...........................................................................................................................................................................................29
4.2 Select the Menu Level................................................................................................................................................................30
4.3 Select “SYSTEM” .......................................................................................................................................................................32
4.3.1 Administrator Setting..............................................................................................................................................................33
4.3.2 System Time ..........................................................................................................................................................................34
4.3.3 Firmware Upgrade .................................................................................................................................................................35
4.3.4 Device Mode.........................................................................................................................................................................37
4.3.5 System Status ......................................................................................................................................................................38
4.3.6 Reboot ..................................................................................................................................................................................39
4.3.7 Reset System .......................................................................................................................................................................40
5
Page 7
NV-600LI/RI Managed Industrial Grade VDSL2 CO/CPE Router USER’S MANUAL Ver. A4
4.3.8 Logout....................................................................................................................................................................................40
4.4 Select “WAN”..............................................................................................................................................................................41
4.4.1 Dynamic IP ............................................................................................................................................................................42
4.4.2 IP Settings ............................................................................................................................................................................43
4.4.3 PPPoE...................................................................................................................................................................................45
4.4.4 DNS .......................................................................................................................................................................................47
4.5 Select “LAN”...............................................................................................................................................................................48
4.5.1 Select LAN Settings and set the IP Address .....................................................................................................................49
4.5.2 DHCP Client List ..................................................................................................................................................................51
4.5.3 LAN Switch Port Setting......................................................................................................................................................52
4.5.4 LAN Port Status ...................................................................................................................................................................53
4.6 Select “NAT” ...............................................................................................................................................................................54
4.6.1 Virtual Server .......................................................................................................................................................................55
4.6.2 Virtual Server .......................................................................................................................................................................57
4.6.3 DMZ.......................................................................................................................................................................................59
4.7 Select “Firewall”.........................................................................................................................................................................61
4.7.1 Firewall Options...................................................................................................................................................................62
4.7.2 Client Filtering......................................................................................................................................................................64
4.7.3 MAC Control.........................................................................................................................................................................66
4.8 Select “Route”............................................................................................................................................................................68
4.8.1 Static Routing.......................................................................................................................................................................69
6
Page 8
NV-600LI/RI Managed Industrial Grade VDSL2 CO/CPE Router USER’S MANUAL Ver. A4
4.8.2 Routing Table List................................................................................................................................................................71
4.9 Select “UPNP” ............................................................................................................................................................................72
4.10 Select “SNMP”..........................................................................................................................................................................74
4.10.1 SNMP Setting .....................................................................................................................................................................75
4.10.2 SNMPv3 Setting .................................................................................................................................................................77
CHAPTER 5. OPERATING THE VDSL2 SYSTEM............................................................................................. 80
5.1 Select “Channel Config”............................................................................................................................................................82
5.2 Select “Line Config” ..................................................................................................................................................................86
5.3 Select “Profile Config”...............................................................................................................................................................88
5.4 Select “Loop Back”....................................................................................................................................................................98
5.5 Select “Activate Deactivate” ...................................................................................................................................................100
5.6 Select “Line Status” ................................................................................................................................................................. 102
5.7 Select “Channel Status” ..........................................................................................................................................................105
5.8 Select “Version Info”................................................................................................................................................................106
5.9 Select “SNR Graphs”...............................................................................................................................................................107
7
Page 9
5.10 Select “Bits Graphs”.............................................................................................................................................................. 111
NV-600LI/RI Managed Industrial Grade VDSL2 CO/CPE Router USER’S MANUAL Ver. A4
CHAPTER 6. CONFIGURE THE NV-600LI/RI VIA CONSOLE ........................................................................ 114
6.1 Setup on Hyperterminal........................................................................................................................................................... 114
6.2 Check IP via CLI command...................................................................................................................................................... 116
6.3 Reset the system to default configuration............................................................................................................................. 117
APPENDIX A: CABLE REQUIREMENTS ......................................................................................................... 118
APPENDIX B: PRODUCT SPECIFICATION..................................................................................................... 120
APPENDIX C: TROUBLESHOOTING .............................................................................................................. 123
APPENDIX D: IP-30 PROTECTION OF METAL CASE .................................................................................. 130
APPENDIX E: COMPLIANCE INFORMATION ................................................................................................. 132
WARRANTY ..................................................................................................................................................... 135
CHINESE SJ/T 11364-2006.............................................................................................................................. 136
8
Page 10
2 CO or
1 x 6pin
NV-600LI/RI Managed Industrial Grade VDSL2 CO/CPE Router USER’S MANUAL Ver. A4
CHAPTER 1.
1.1 Check List
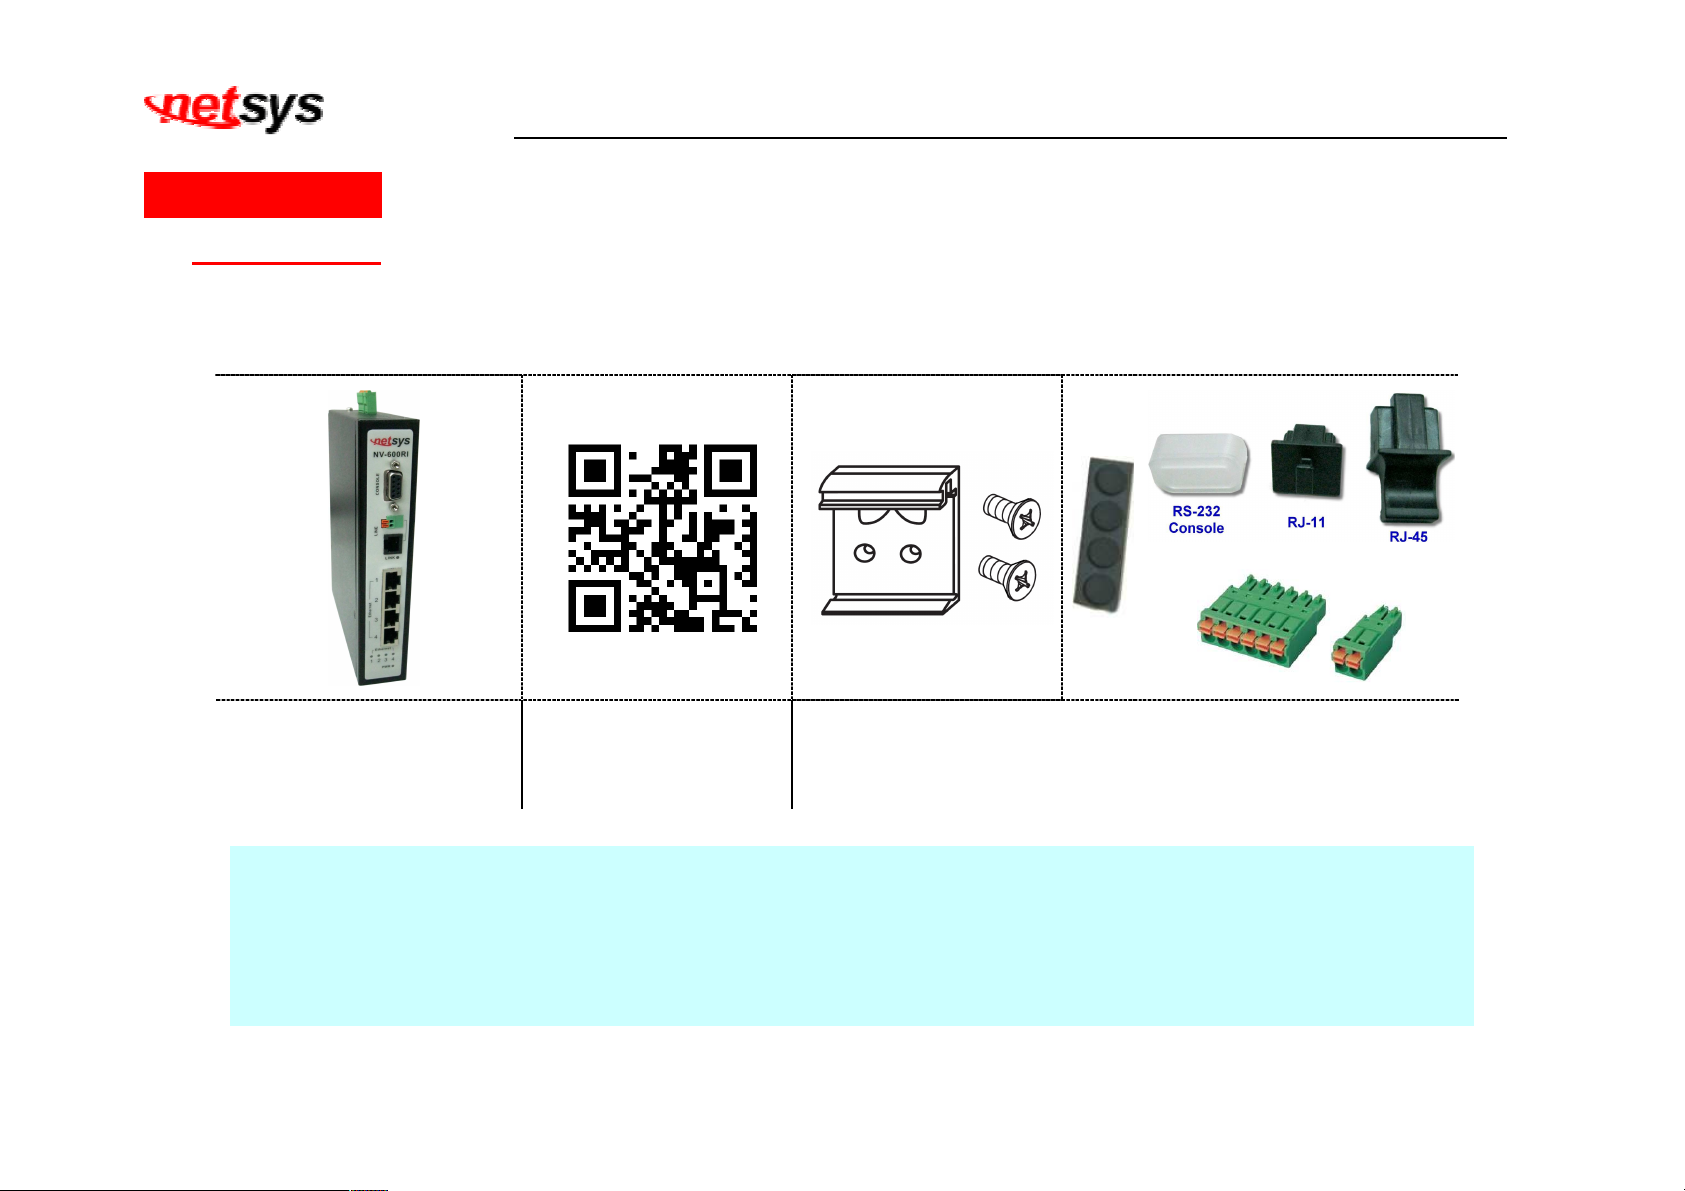
Carefully unpack the package and check its contents against the checklist.
Package Contents:
1 x Industrial VDSL
CPE router
UNPACKING INFORMATION
1 x QR code for user’s
manual hyperlink.
Accessory Kit : 1 x DIN-Rail mounting plate, 2 x screws, 4 x
Feet, Protective caps (Console*1, RJ-11*1, RJ-45*3),
Terminal Block, 1 x 2pin Terminal Block
Notes:
1. Please inform your dealer immediately for any missing or damaged parts. If possible, retain the carton including the
original packing materials. Use them to repack the unit in case there is a need to return for repair.
2. If the product has any issue, please contact your local distributor.
3. Please use the provided protective caps for unused ports.
4. Please look for the QR code on the bottom of the product, the user can launch the QR code scanning program to
scan and download the user’s manual electronic format file. Above QR code icon is for reference.
9
Page 11
NV-600LI/RI Managed Industrial Grade VDSL2 CO/CPE Router USER’S MANUAL Ver. A4
Chapter 2. Installing the Router
2.1 Hardware Installation
This chapter describes how to install the router and establish the network connections. The NV-600LI/RI may be
installed on any level surface (e.g. a table or shelf). However, please take note of the following minimum site
requirements before you begin
2.2 Pre-installation Requirements
Before you start the actual hardware installation, make sure you can provide the right operating environment, including
power requirements, sufficient physical space, and proximity to other network devices that are to be connected.
Verify the following installation requirements:
• Power requirements: DC 12 to 48VDC redundant power.
• The router should be located in a cool dry place, with at least 10cm/4in of space at the front and back for
ventilation.
• Place the router away from direct sunlight, heat sources, or areas with a high amount of electromagnetic
interference.
• Check if the network cables and connectors needed for installation are available.
• Do not install phone lines strapped together with AC power lines, or telephone office line with voice signal.
• Avoid installing this device with radio amplifying station nearby or transformer stations nearby.
10
Page 12
2.3 General Rules
Before making any connections to the router, please note the following rules:
• Ethernet Port (RJ-45)
• VDSL2 Port (RJ-11)
NV-600LI/RI Managed Industrial Grade VDSL2 CO/CPE Router USER’S MANUAL Ver. A4
All network connections to the router Ethernet port must be made using Category 5 UTP/STP or above for
100Mbps, Category 3, 4 UTP for 10Mbps.
No more than 100 meters of cabling may be use between the MUX or HUB and an end node.
All network connections to the RJ-11port must use 24~26 gauge with twisted pair phone wiring.
We do not recommend the use of the telephone line 28 gauge or above.
The RJ-11 connectors have six positions, two of which are wired. The router uses the center two pins. The
pin out assignment for these connectors is presented below.
Please note that the line port is no polarity, therefore user can reverse the two wires of the phone cable
when installed.
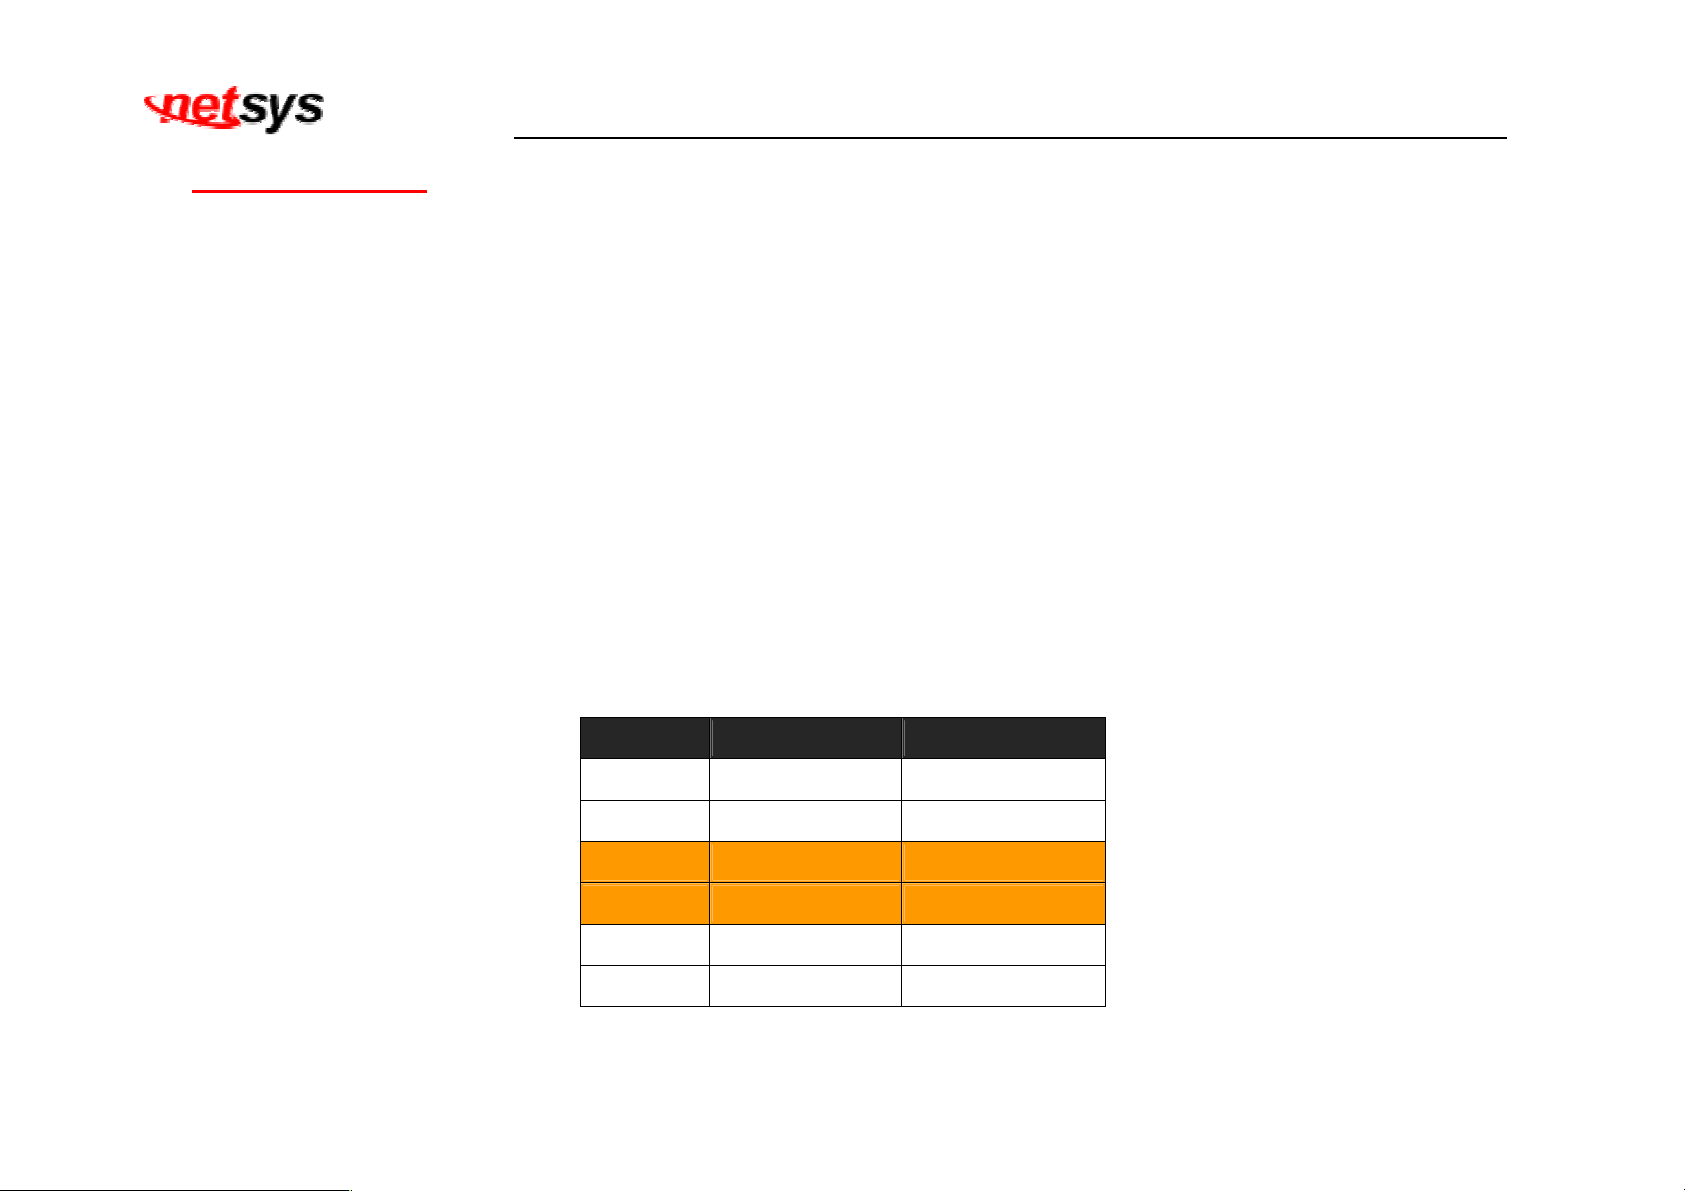
RJ-11 Pin out Assignments
Pin# MNEMONIC FUNCTION
1 NC Unused
2 NC Unused
3 DSL Used
4 DSL Used
5 NC Unused
6 NC Unused
11
Page 13
2.4 Connecting the Router
The router has four Ethernet port which support connection to Ethernet operation. The devices attached to these ports
must support auto-negotiation or 10Base-T or 100Base-TX unless they will always operate at half duplex. Use any of
the Ethernet ports to connect to devices such as Monitor system, Server, Switch, bridge or router.
Note:
1. The RJ11 Line port is used to connect to telephone that is connected to VDSL CO and CPE router (Point-to-point
solution).
2. Use the provided protective caps for unused ports to avoid dust intrusion.
3. The Slave device (CPE) must be connected to the Master device (CO) through the telephone wire. The Slave
cannot be connected to another Slave, and the Master cannot be connected to another Master.
NV-600LI/RI Managed Industrial Grade VDSL2 CO/CPE Router USER’S MANUAL Ver. A4
12
Page 14
NV-600LI/RI Managed Industrial Grade VDSL2 CO/CPE Router USER’S MANUAL Ver. A4
2.5 Terminal Block and DIN-Rail mount installation
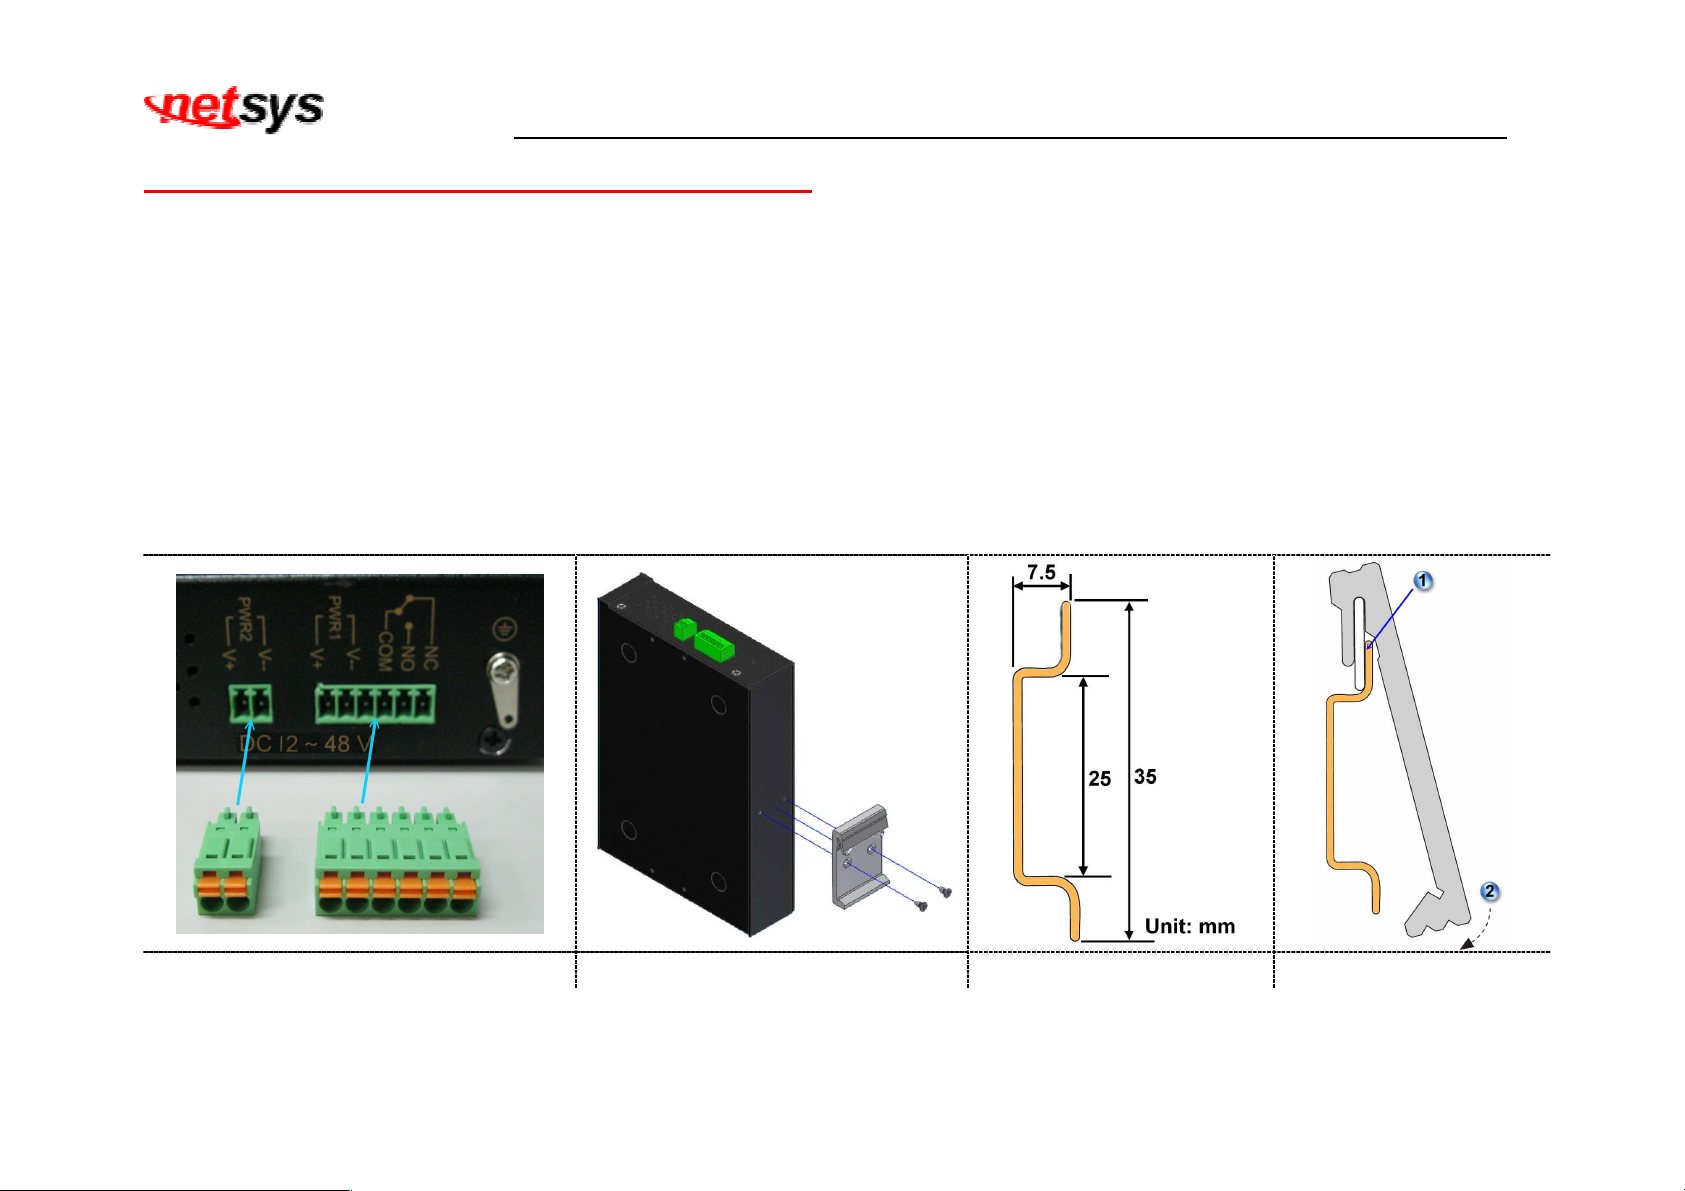
This section describes how to install the Terminal Block and DIN-Rail to the router, if you do not install the DIN-Rail, please paste
the 4 rubber feet at the bottom of the hulled to avoid scratches of metal housing.
Take out the “2pin / 6pin terminal block” from inside the accessory kit, and install to the router properly. (Figure 2.6.1)
Please refer to install the DIN-RAIL as following step:
1. Install the DIN-Rail mounting plate to the NV-600LI/RI. (Figure 2.6.2)
2. Please use the suitable DIN-Rail to install, please refer to the dimensions of the DIN-Rail.(Figure 2.6.3)
3. Insert the top of the DIN-Rail into the top slots on the DIN-Rail mounting plate and the DIN-Rail mounting plate will snap into
place. (Figure 2.6.4)
Figure 2-1 Figure 2-2 Figure 2-3 Figure 2-4
13
Page 15
NV-600LI/RI Managed Industrial Grade VDSL2 CO/CPE Router USER’S MANUAL Ver. A4
2.6 Connecting the RJ-11 / RJ-45 Ports
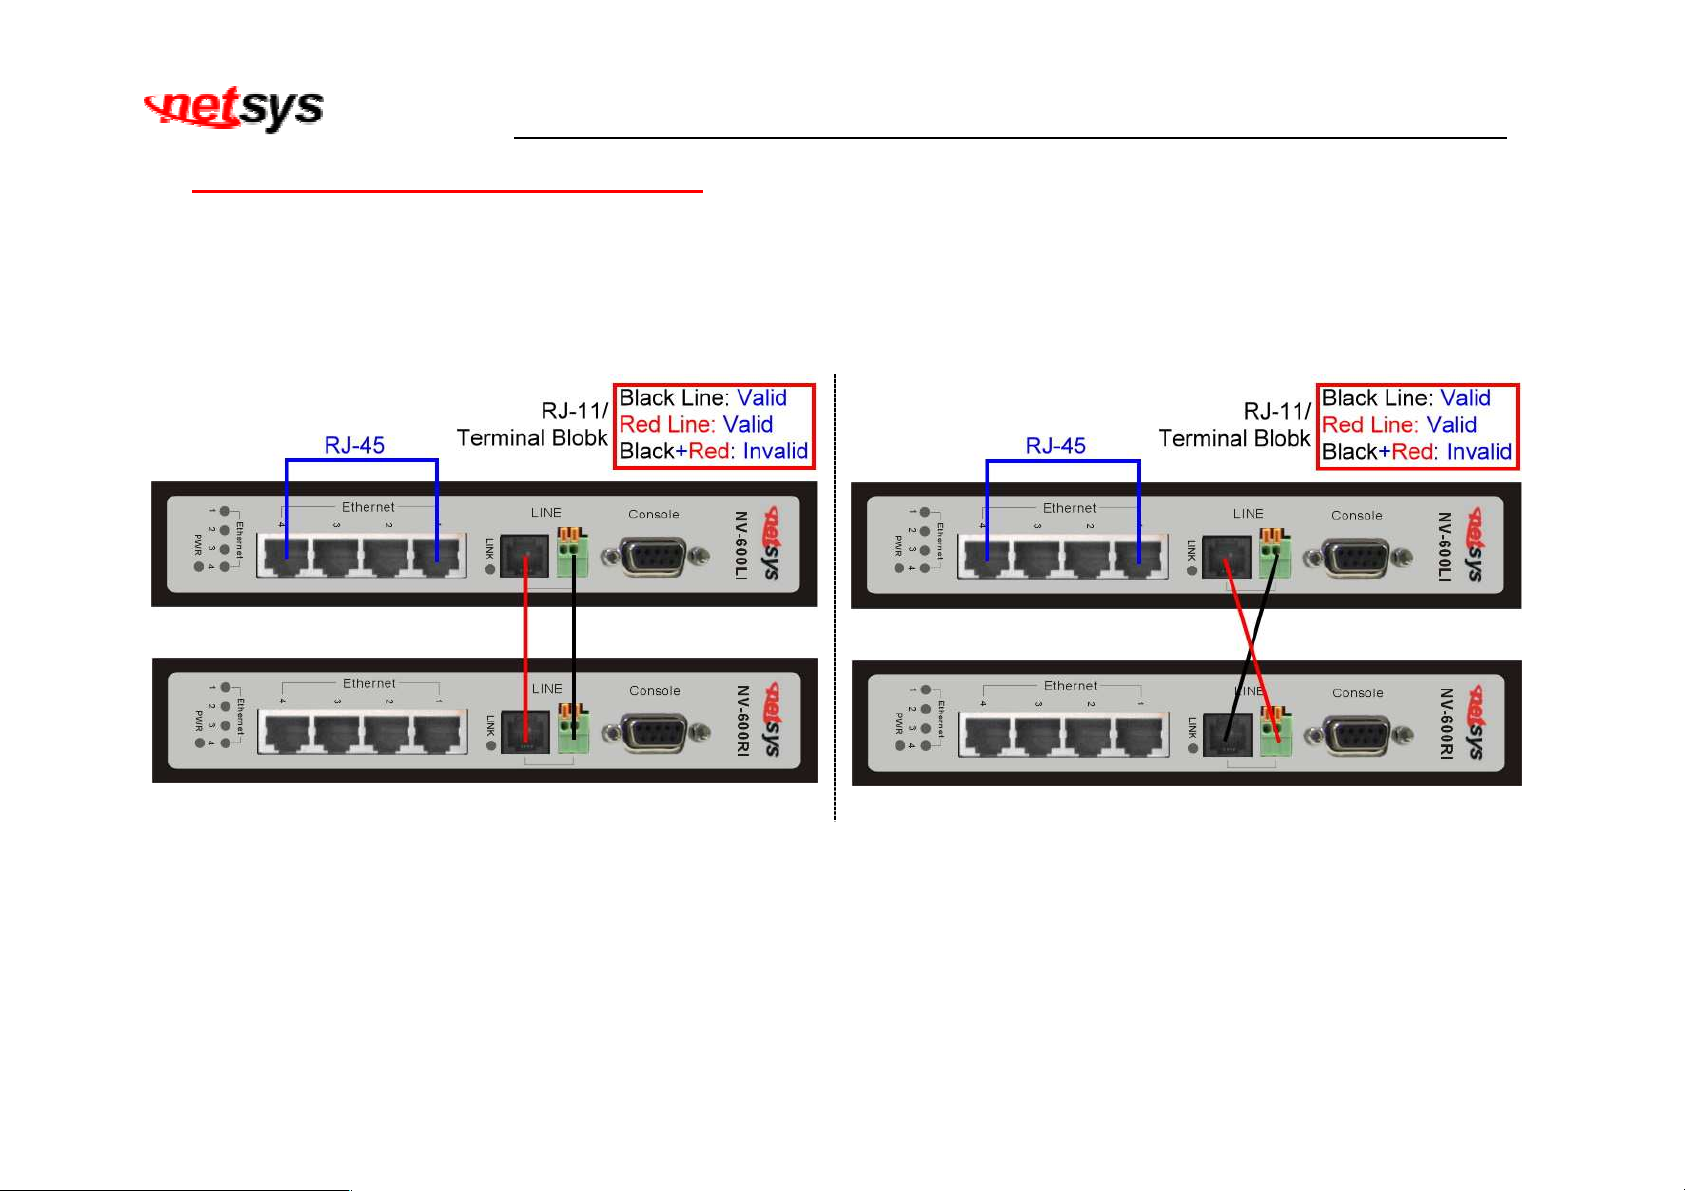
The line port has 2 connectors: RJ-11 and terminal block. It is used to connect from NV-600LI(CO) using single pair phone cable
to NV-600RI(CPE) bridge side (point to point solution). Take note that NV-600 line port cannot be used at the same time. Either
RJ-11 port is connected or terminal block is connected using straight connection (Figure 2.4) or cross-over connection(Figure
2.5)
Figure 2.4 NV-600LI/RI line ports straight connection
Figure 2.5 NV-600LI/RI line ports crossover connection
When inserting a RJ-11 plug, make sure the tab on the plug clicks into position to ensure that it is properly seated.
Do not plug a RJ-11 phone jack connector into the Ethernet port (RJ-45 port). This may damage the router. Instead, use only
twisted-pair cables with RJ-45 connectors that conform to Ethernet standard.
14
Page 16
Notes:
NV-600LI/RI Managed Industrial Grade VDSL2 CO/CPE Router USER’S MANUAL Ver. A4
1. Be sure each twisted-pair cable (RJ-45 ethernet cable) does not exceed 100 meters (333 feet).
2. We advise using Category 5~7 UTP/STP cables for making Bridge or Router connections to avoid any
confusion or inconvenience in the future when you attach high bandwidth devices.
3. Use 24 ~ 26 gauge twisted pair phone wiring, we do not recommend 28 gauge or above.
4. Be sure phone wire has been installed before NV-600LI/RI boot.
15
Page 17
NV-600LI/RI Managed Industrial Grade VDSL2 CO/CPE Router USER’S MANUAL Ver. A4
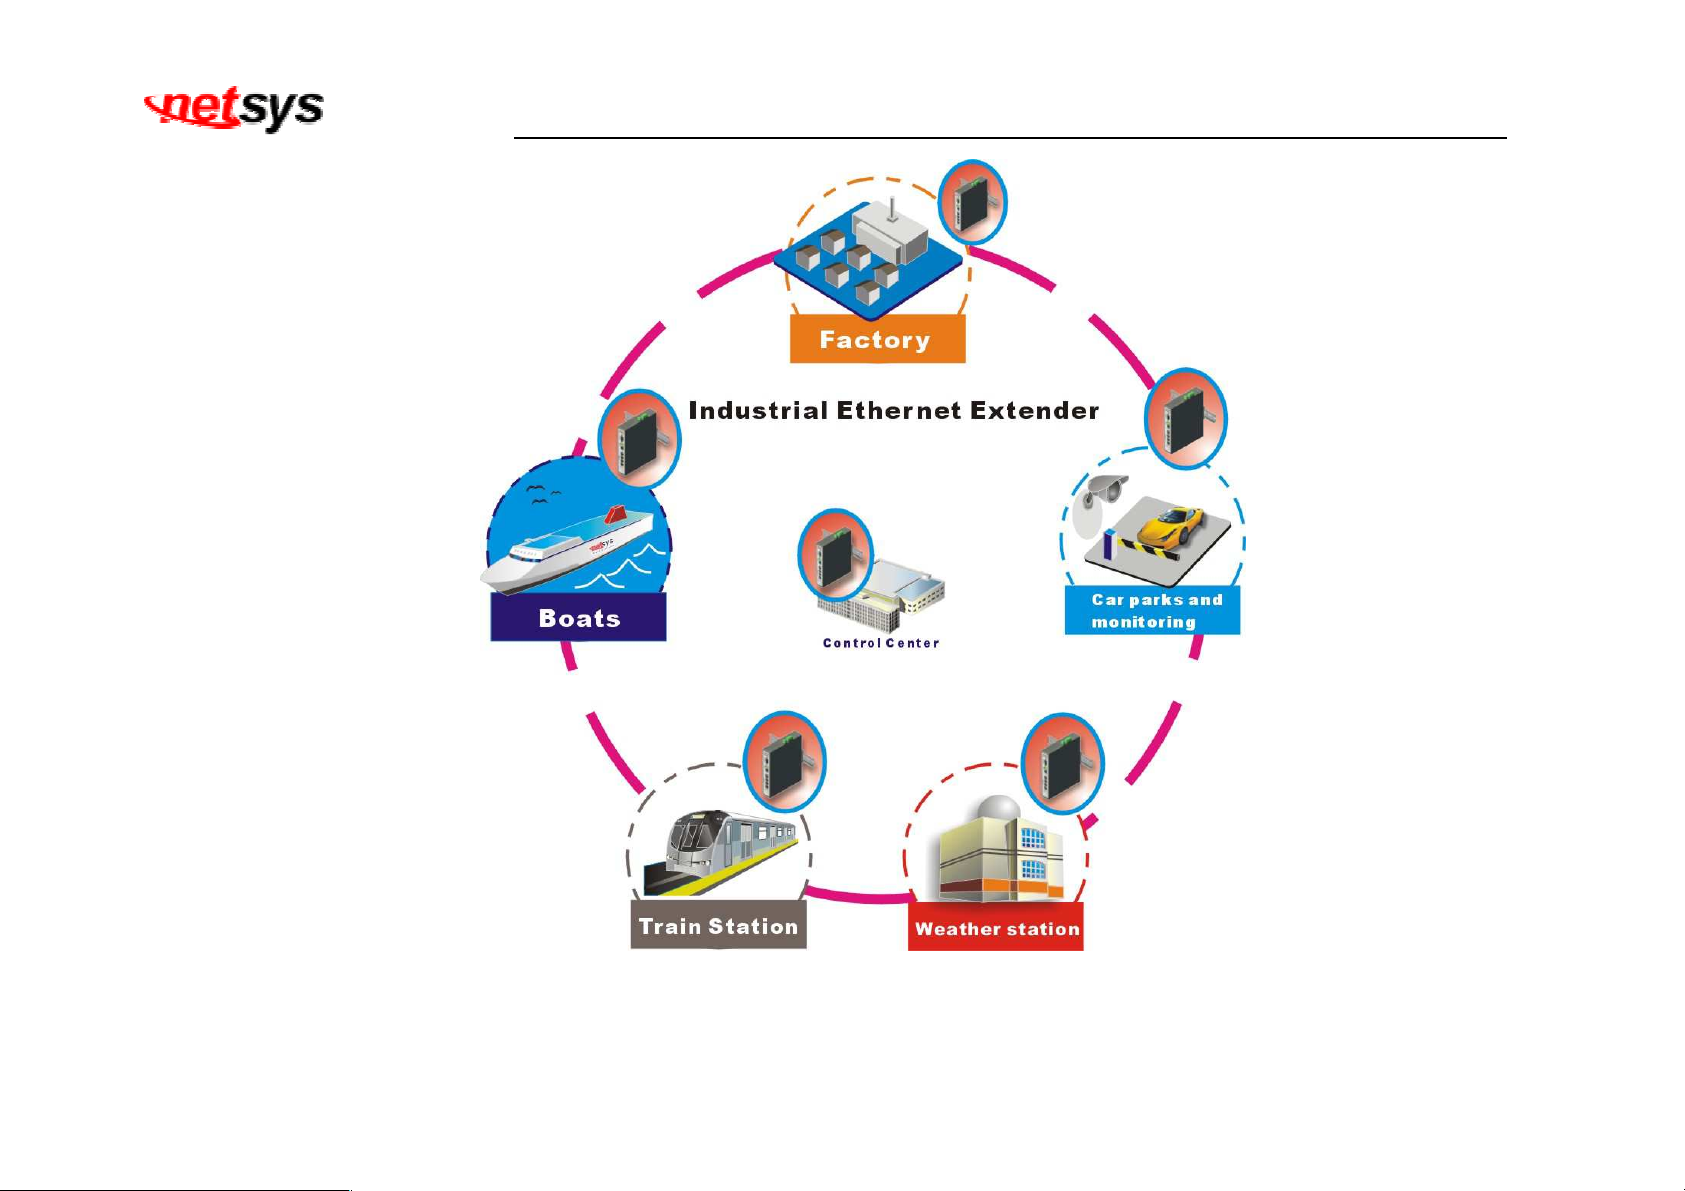
2.7 Industrial VDSL2 router Application
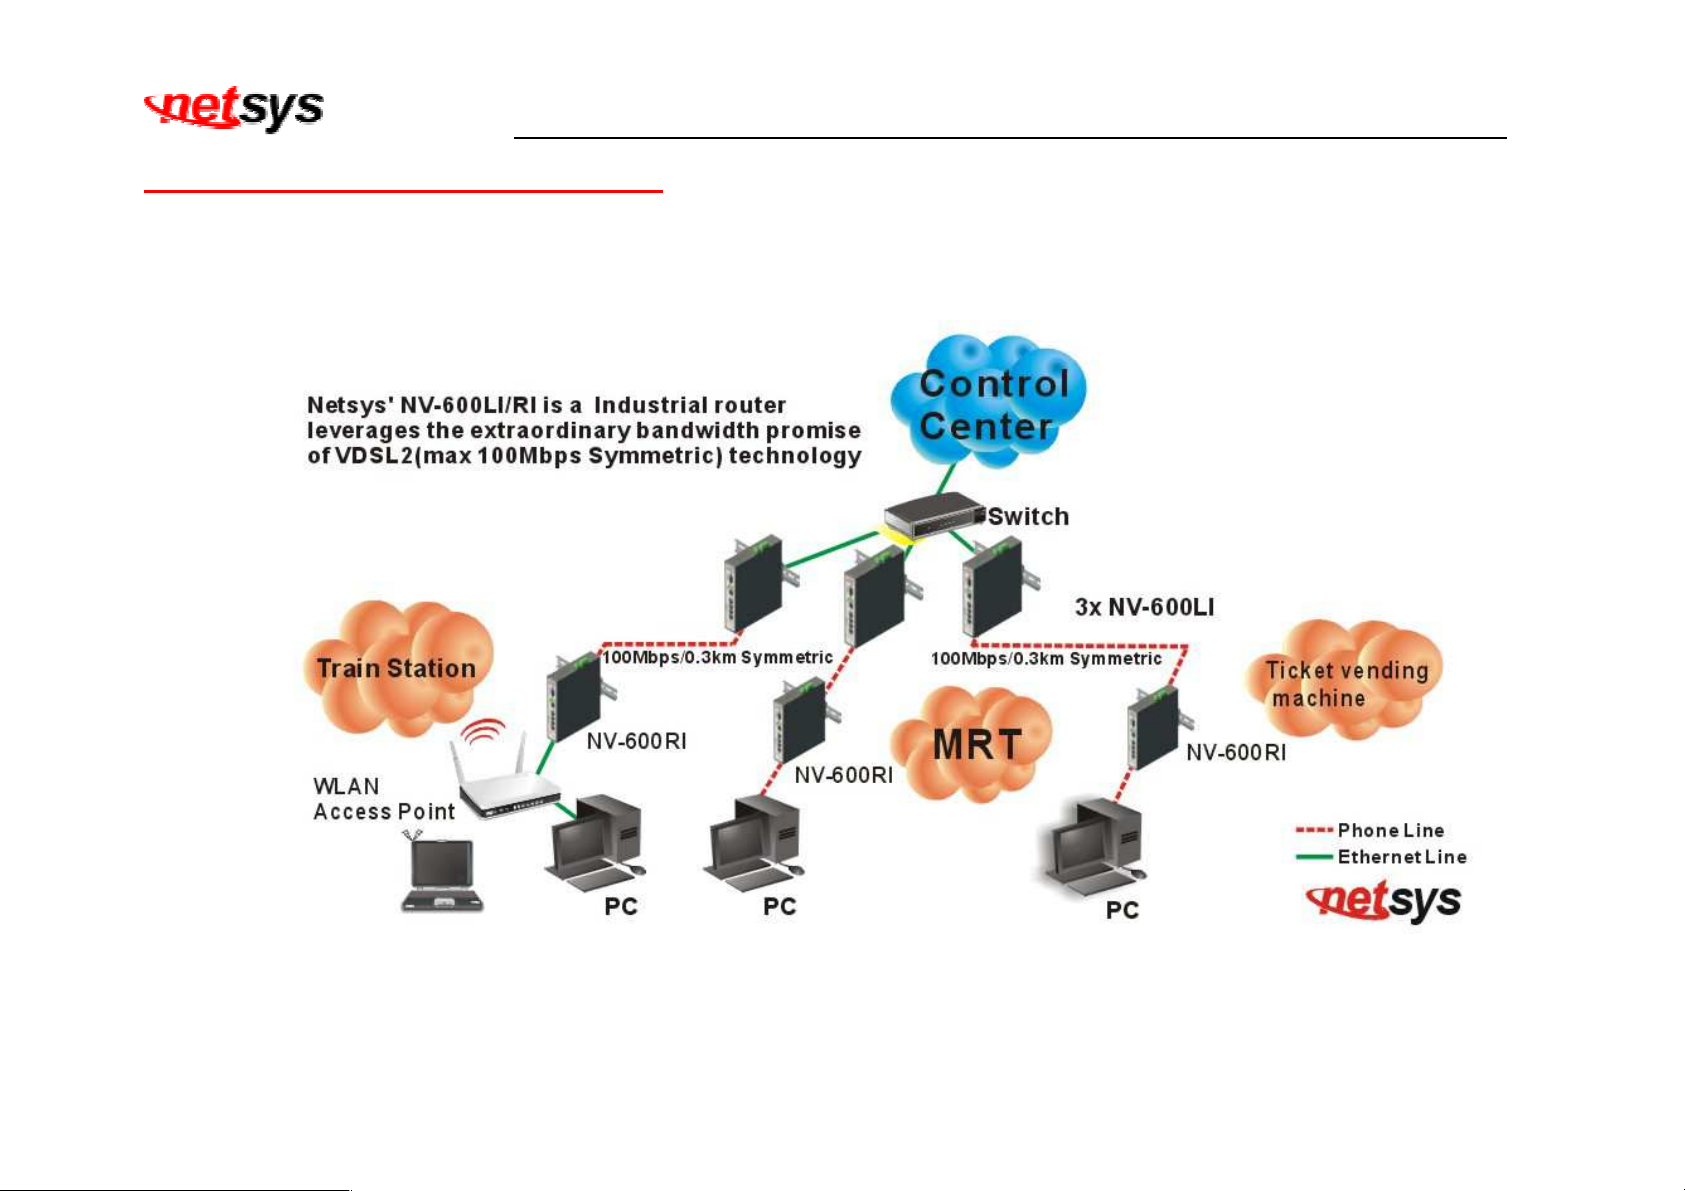
The router’s line port supports 100Mbps/0.3km for data service across existing phone wiring. It is easy-to-use which do not require
installation of additional wiring. Every modular phone jack in the home can become a port on the LAN. Networking devices can be
installed on a single telephone wire that can installation within suitable distance (depends on speed) (Figure 2.6)
Figure 2.6 NV-600LI/RI application
16
Page 18
NV-600LI/RI Managed Industrial Grade VDSL2 CO/CPE Router USER’S MANUAL Ver. A4
Figure 2.7 NV-600LI/RI industrial-grade application
17
Page 19
2.7.1 Connect the NV-600LI and the NV-600RI to the Line
The objective for VDSL2 is to pass high speed data over a twisted pair cable. In the setup, connects NV-600LI to NV-600RI
through phone wire(24~26 AWG) or line simulator or any other hardware representation of a cable network, with or without noise
injection and crosstalk simulations.
2.7.2 Connect the NV-600LI and the NV-600RI to LAN Devices
In the setup, usually an Ethernet tester serves as representation of the LAN side as well as representation of the WAN side.
2.7.3 Run Demos and Tests
The Ethernet tester may send data downstream as well as upstream. It also receives the data in order to check the integrity of
the data transmission. Different data rates can be tested under different line conditions.
NV-600LI/RI Managed Industrial Grade VDSL2 CO/CPE Router USER’S MANUAL Ver. A4
18
Page 20
NV-600LI/RI Managed Industrial Grade VDSL2 CO/CPE Router USER’S MANUAL Ver. A4
Chapter 3. Hardware Description
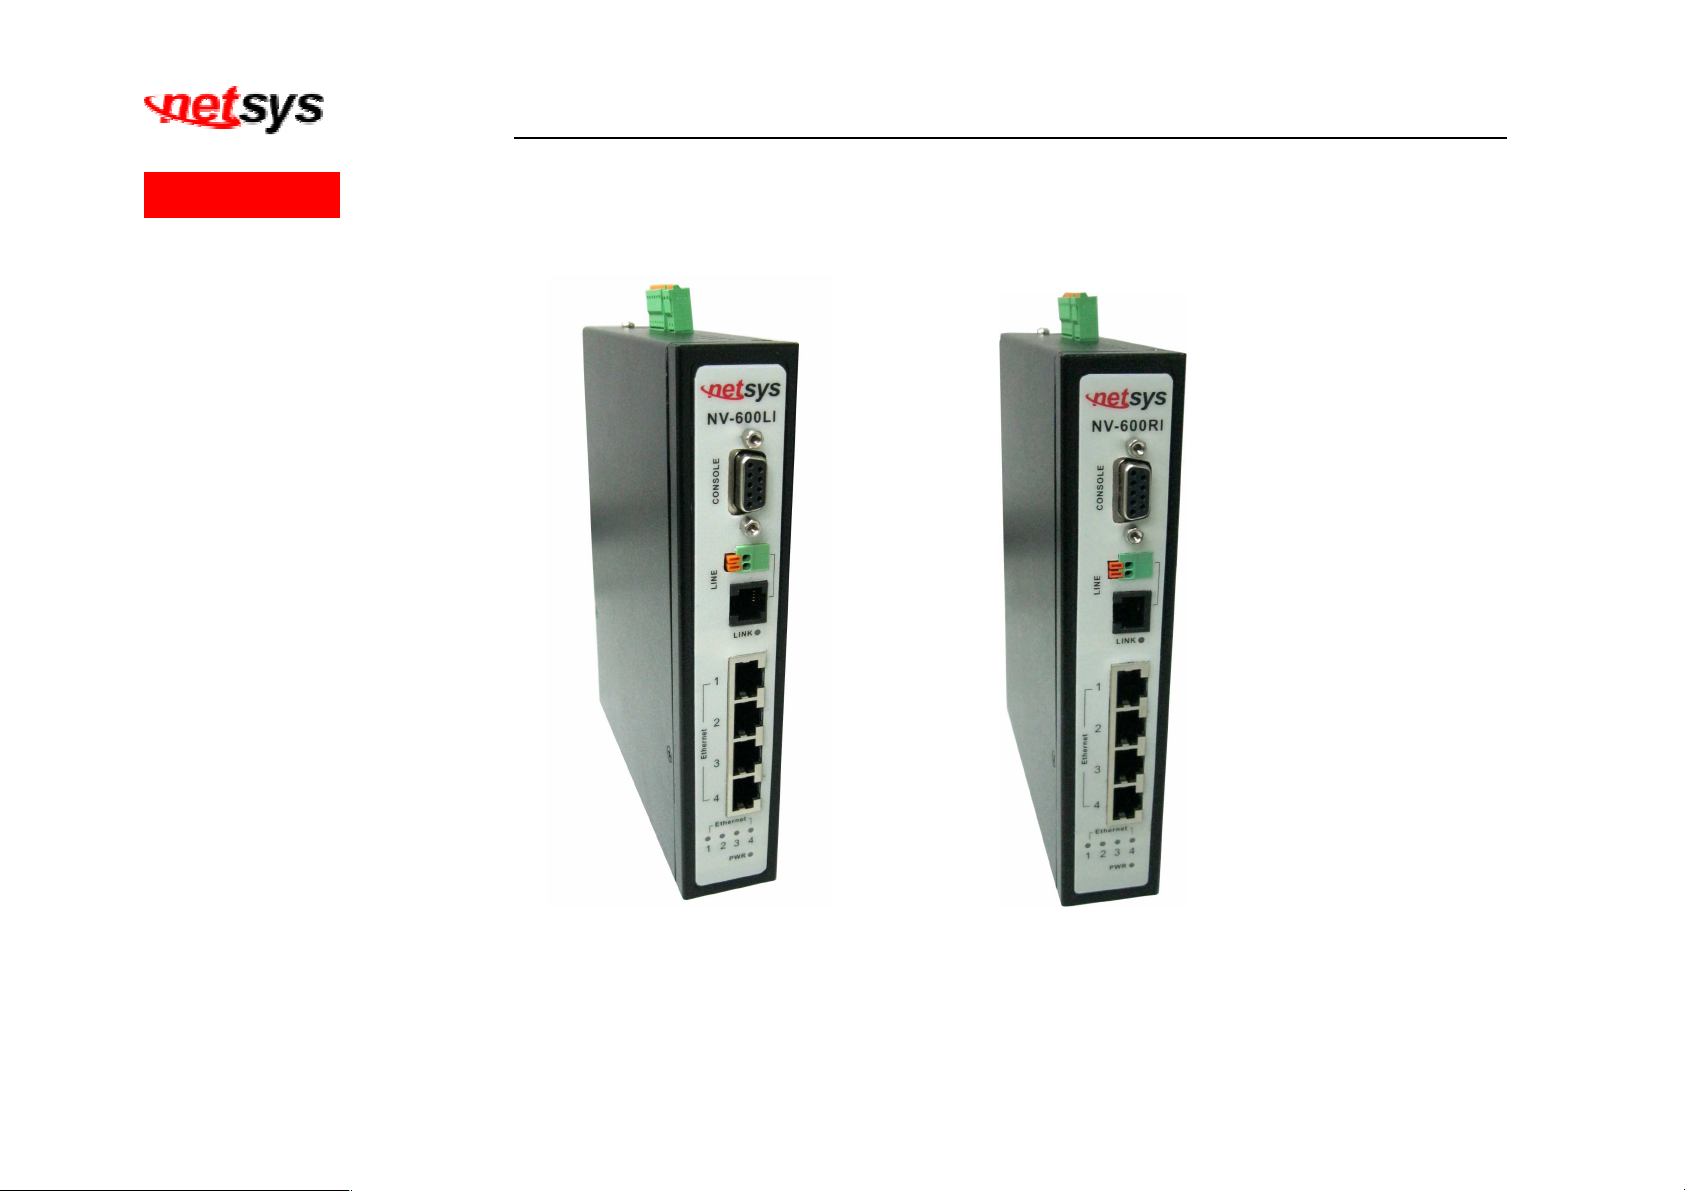
This section describes the important parts of the router. It features the front panel, side panel and rear panel.
NV-600LI Outward NV-600RI Outward
19
Page 21
NV-600LI/RI Managed Industrial Grade VDSL2 CO/CPE Router USER’S MANUAL Ver. A4
3.1 Front Panel
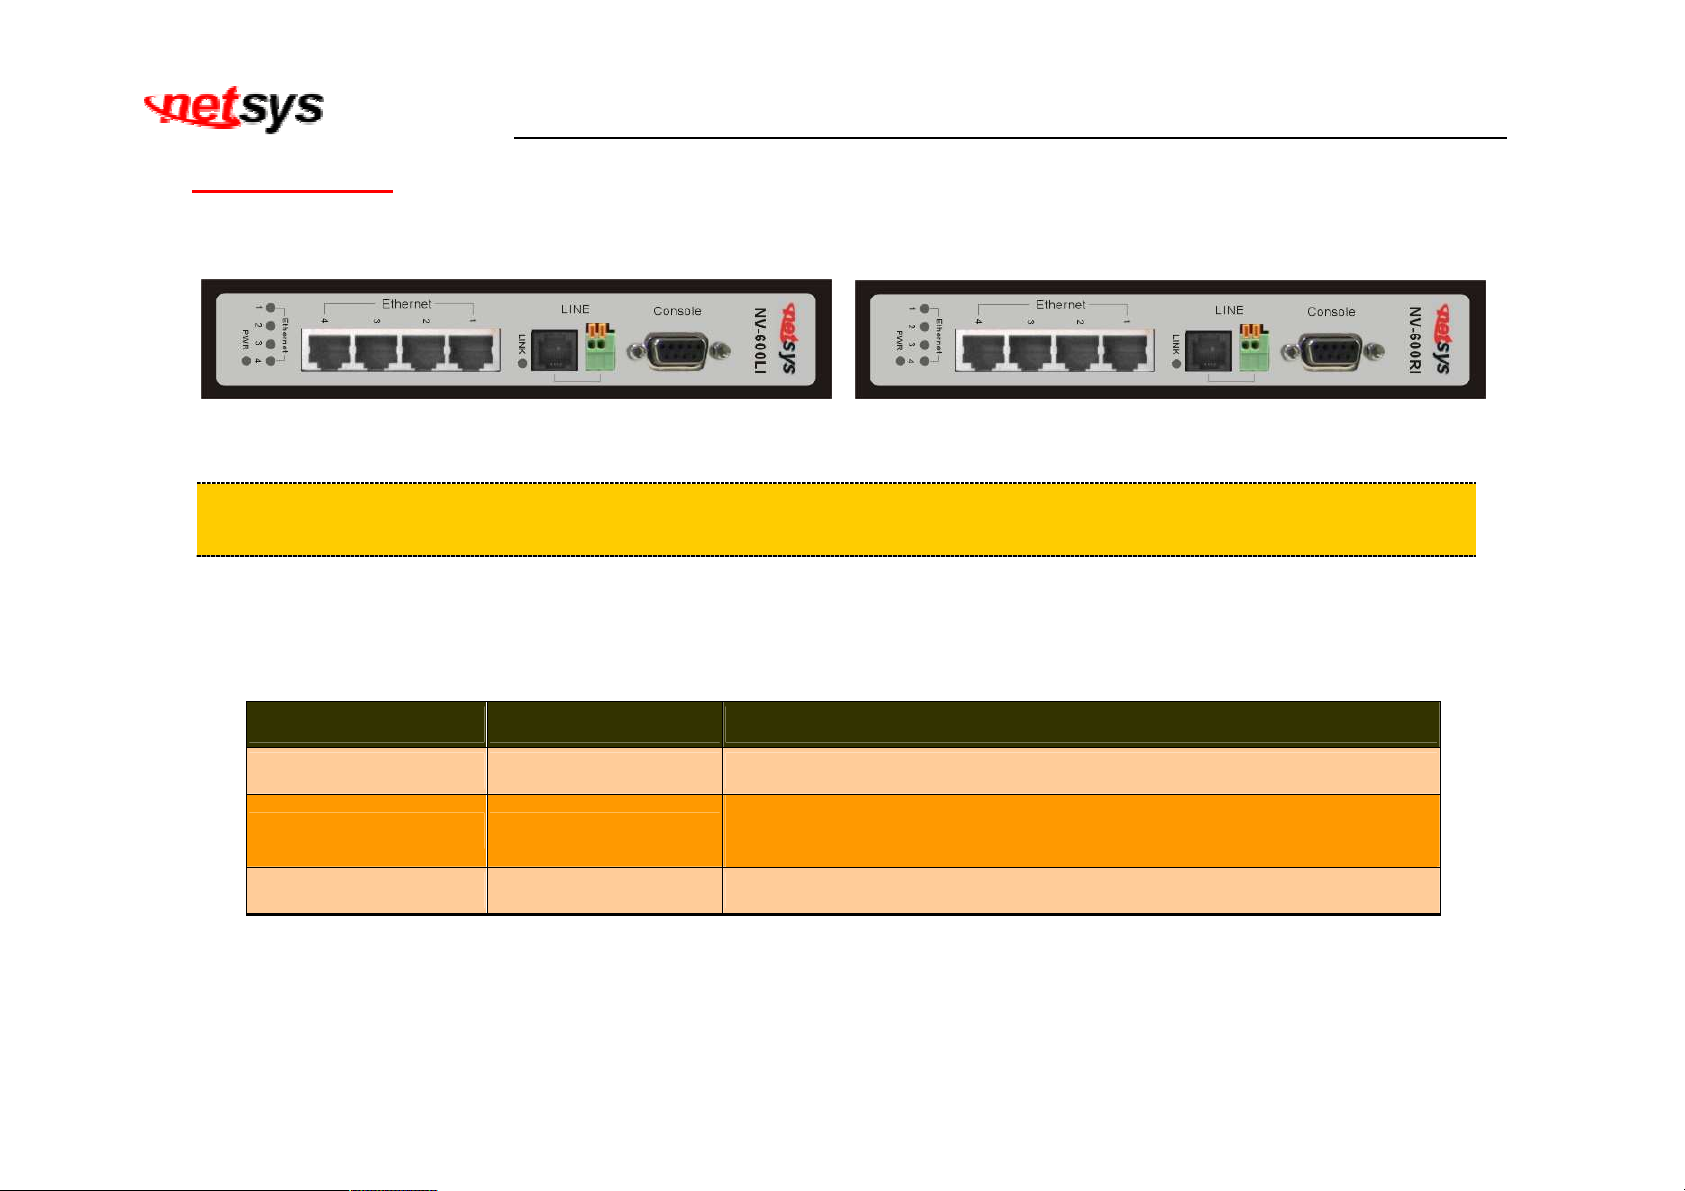
The front panel provides a simple interface monitoring of the router. The figure shows the front panel. (Figure 3.1)
Figure 3.1 Front panels (NV-600LI / NV-600RI)
Tip:
At a quick glance of the front panel, it is easy to determine if it has Ethernet signal from its RJ-45 port and
if there is vdsl line signal on RJ-11 port.
And the table shows the description. (Table 3-1)
Table 3-1 Description of the router front connectors
Connectors Type Description
Ethernet(1-4) RJ-45 For connecting to a Ethernet equipped device.
For connecting to VDSL2 bridge. (Do not use RJ11 and Terminal
Line RJ-11/Terminal Block
Block at the same time.)
Console RS-232 For connecting to PC with RS-232 serial port over a D-SUB Cable
20
Page 22
NV-600LI/RI Managed Industrial Grade VDSL2 CO/CPE Router USER’S MANUAL Ver. A4
3.2 Front Indicators
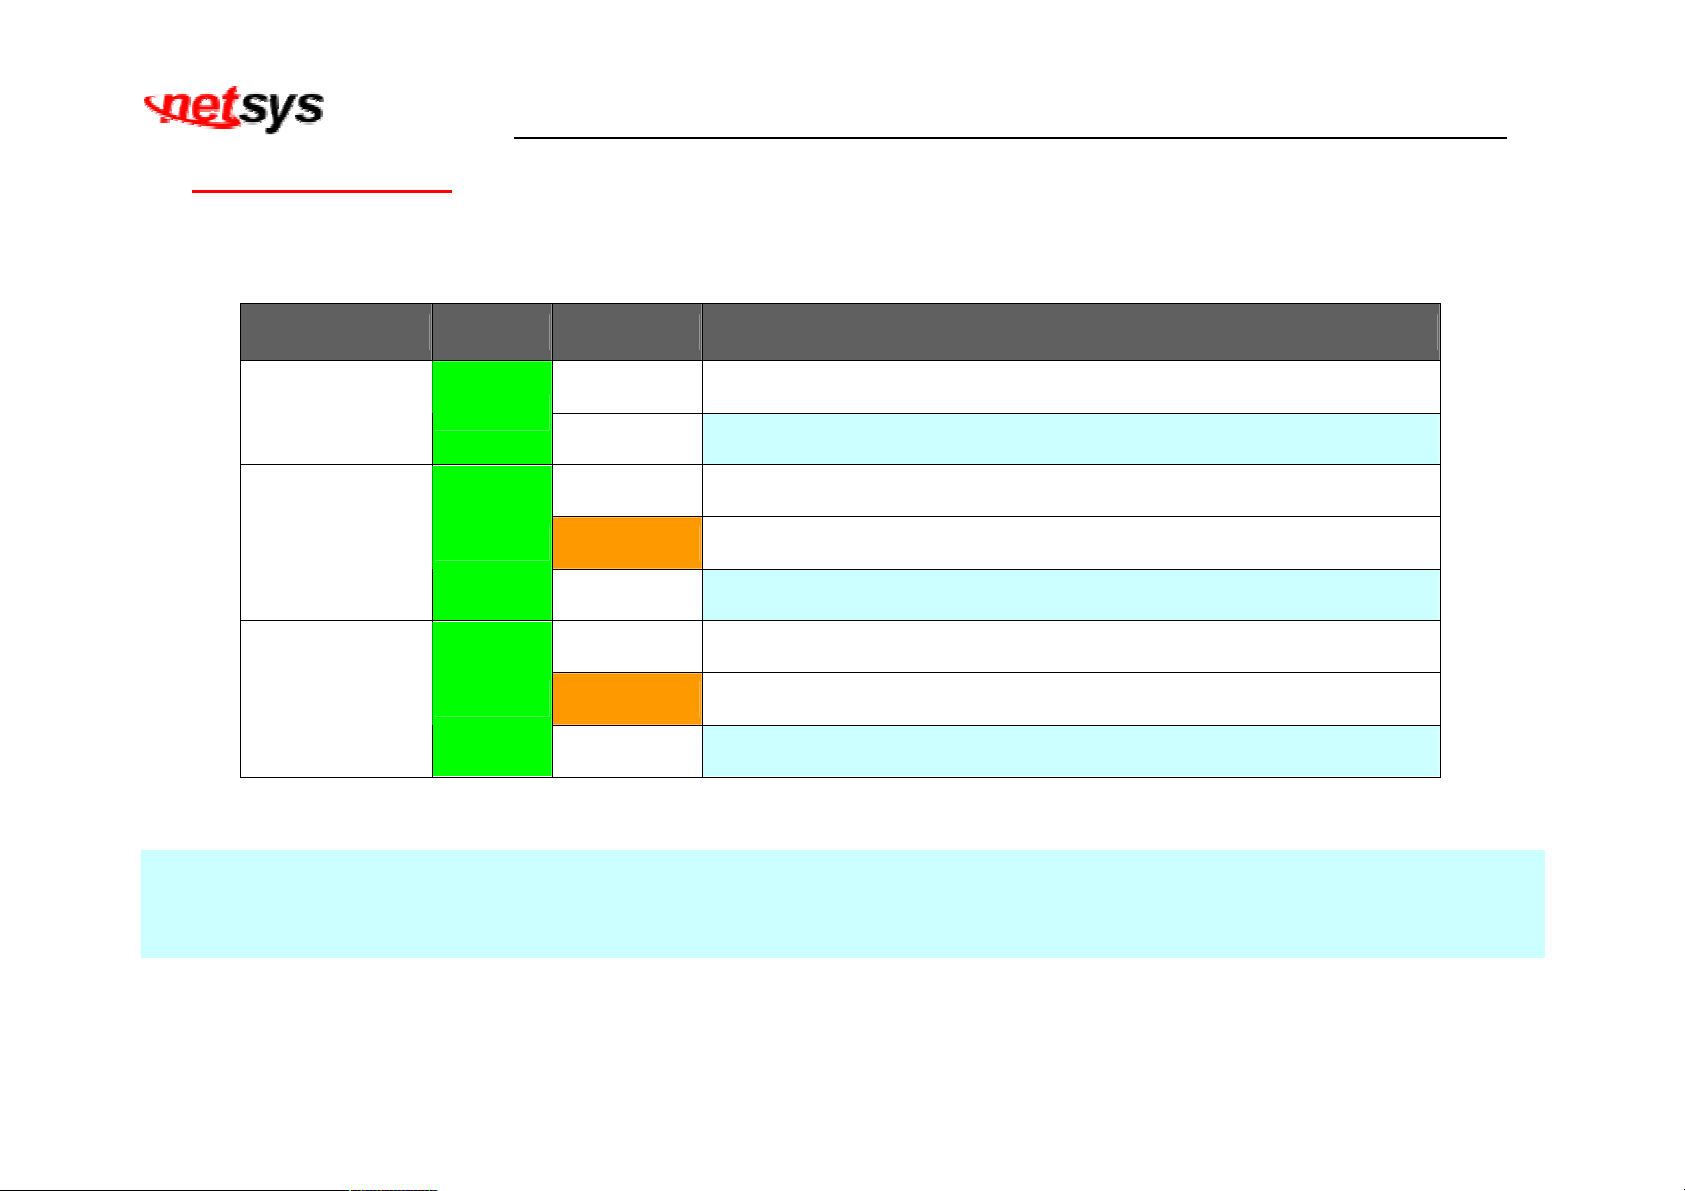
The router has Six LED indicators. The following Table shows the description. (Table 3-3)
Table 3-3 LED Indicators Description and Operation
LED Color Status Descriptions
PWR
Green
(Power LED)
ETHERNET 1-4
Green
(Ethernet LED)
LINK
Green
(VDSL2 LED)
Note:
It is normal for the connection between two Routers to take up to 3 minutes, due to NV-600L/W to establish a link mechanism in
auto-negotiation, that detects and calculates CO and CPE both PBO and PSD level, noise levels and other arguments for getting a
better connection.
On(Steady) Lights to indicate that the VDSL2 router had power
Off The device is not ready or has malfunctioned.
On(Steady) The device has a good Ethernet connection.
Blinking The device is sending or receiving data.
Off The LAN is not connected.
On(Steady) The Internet or network connection is up.
Blinking The device is sending or receiving data.
Off The Internet or network connection is down or has malfunctioned.
21
Page 23
3.3 Rear Panel
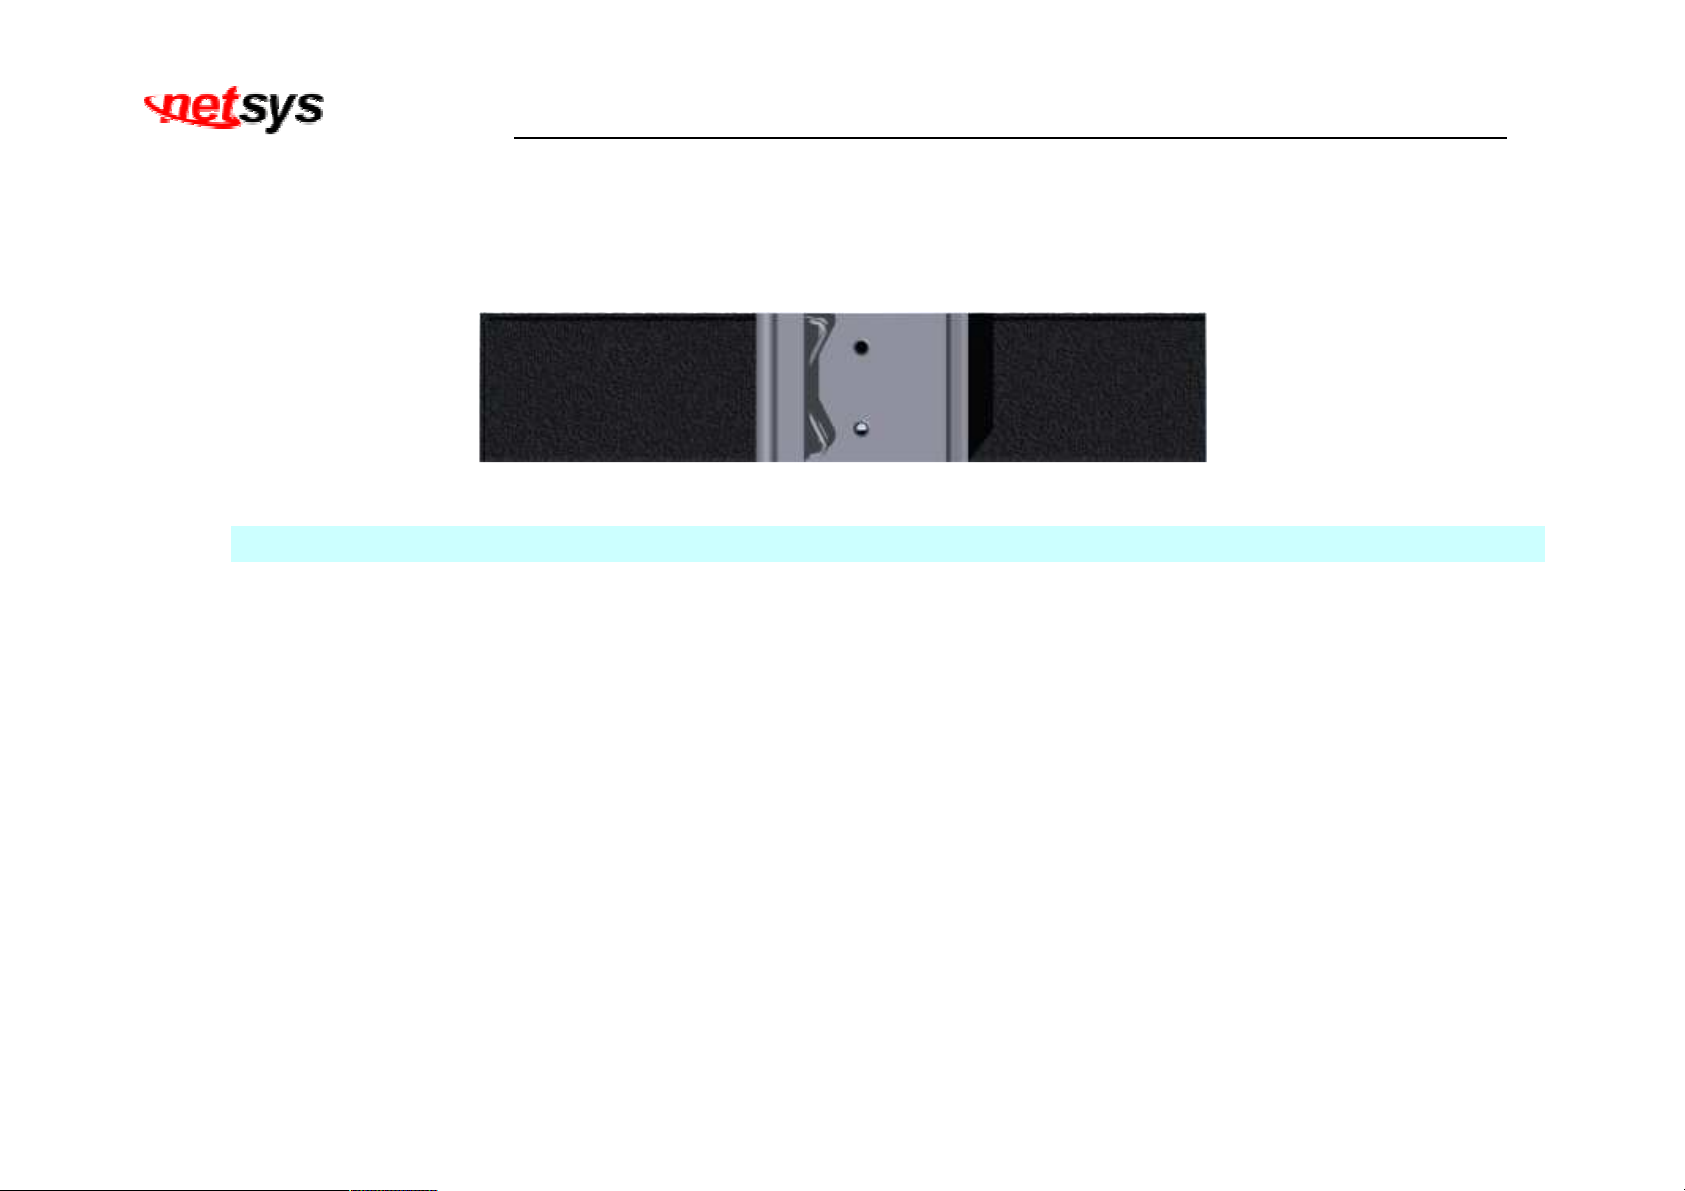
The rear panel provides the din rail install hole. The following figure shows the rear panel. (Figure 3.3)
Note:
Please refer to section 2.5 to install DIN RAIL.
NV-600LI/RI Managed Industrial Grade VDSL2 CO/CPE Router USER’S MANUAL Ver. A4
Figure 3.3 Rear Panel
22
Page 24
NV-600LI/RI Managed Industrial Grade VDSL2 CO/CPE Router USER’S MANUAL Ver. A4
3.4 Side Panel
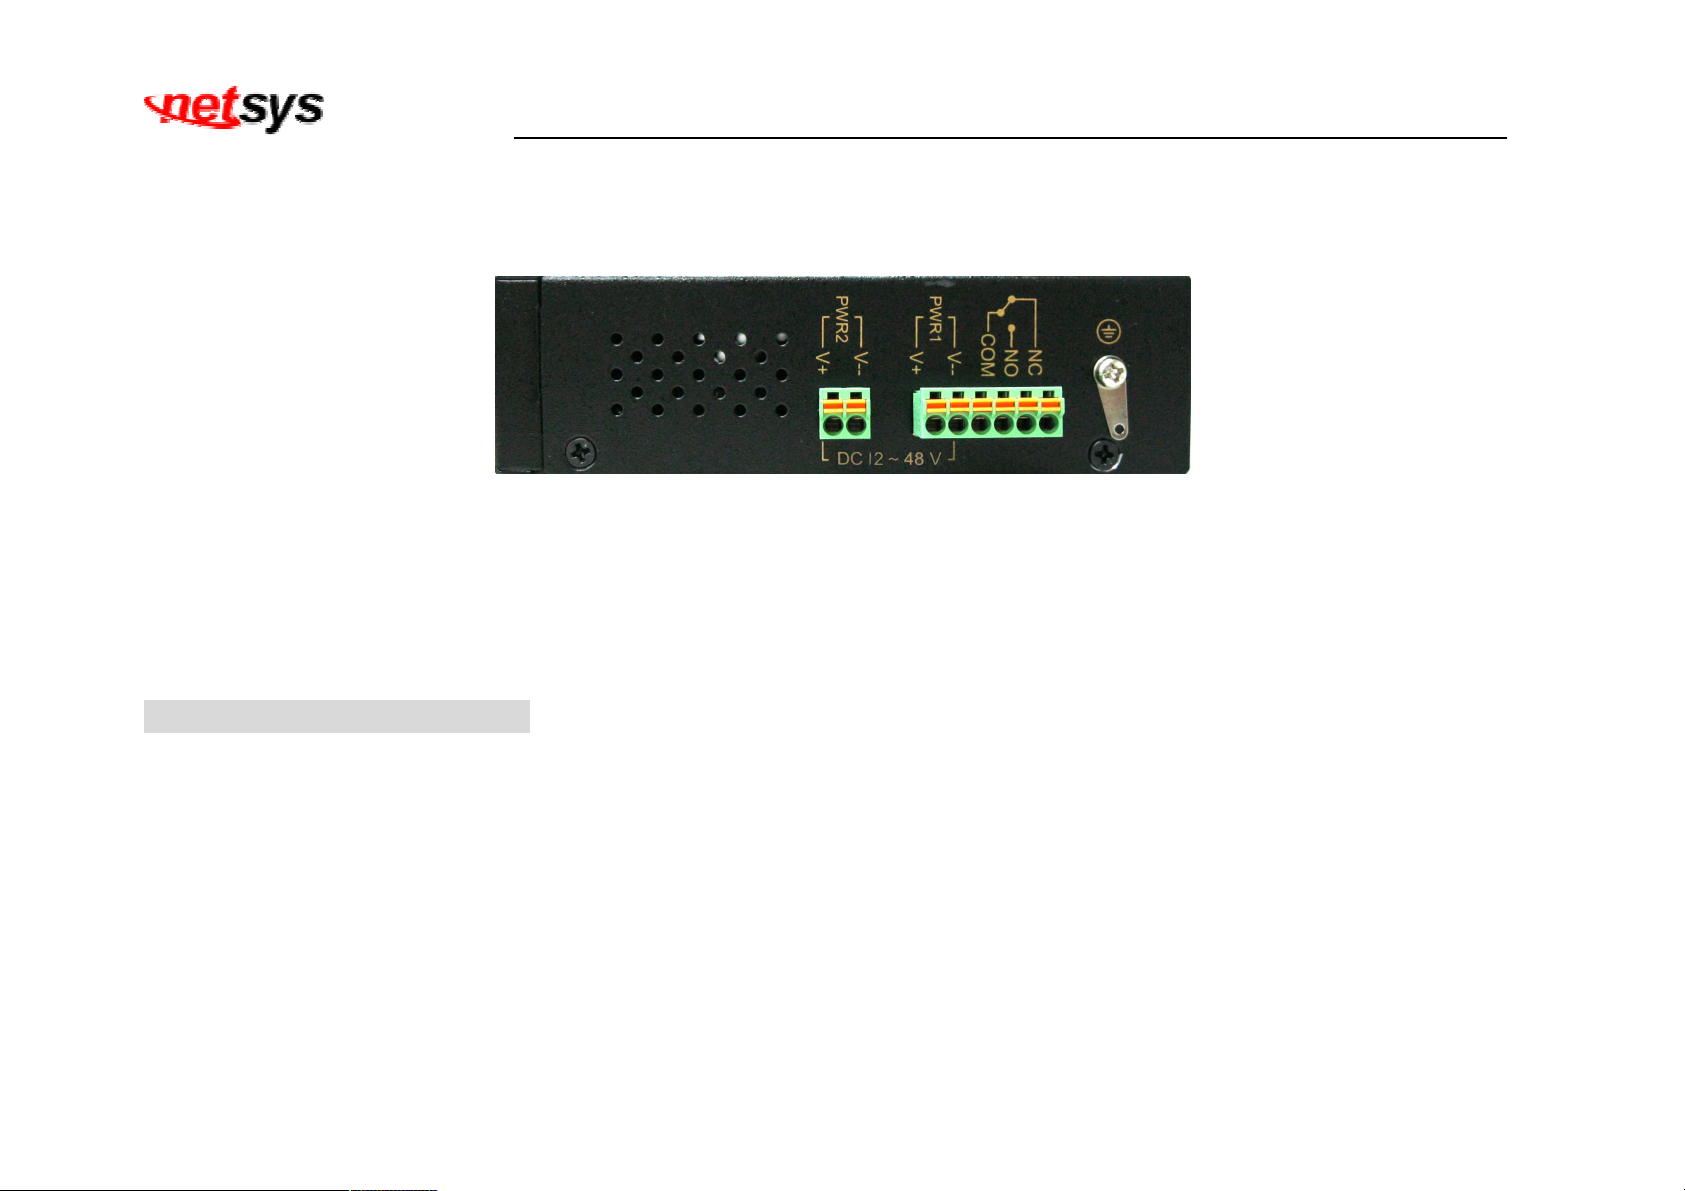
The following figure shows the side. (Figure 3.4)
Figure 3.4 Rear connectors
The following description introduce Dual power and Relay Contact.
Wiring the dual Power Inputs
The NV-600LI/RI has two sets of power inputs, power 1 and power 2, which are located on the NV-600I’s side panel. Power 1 pins
are the bottom two contacts of the upper 6-contact terminal block and power 2 pins are the only two contacts on the lower 2-contact
terminal block.
23
Page 25
NV-600LI/RI Managed Industrial Grade VDSL2 CO/CPE Router USER’S MANUAL Ver. A4
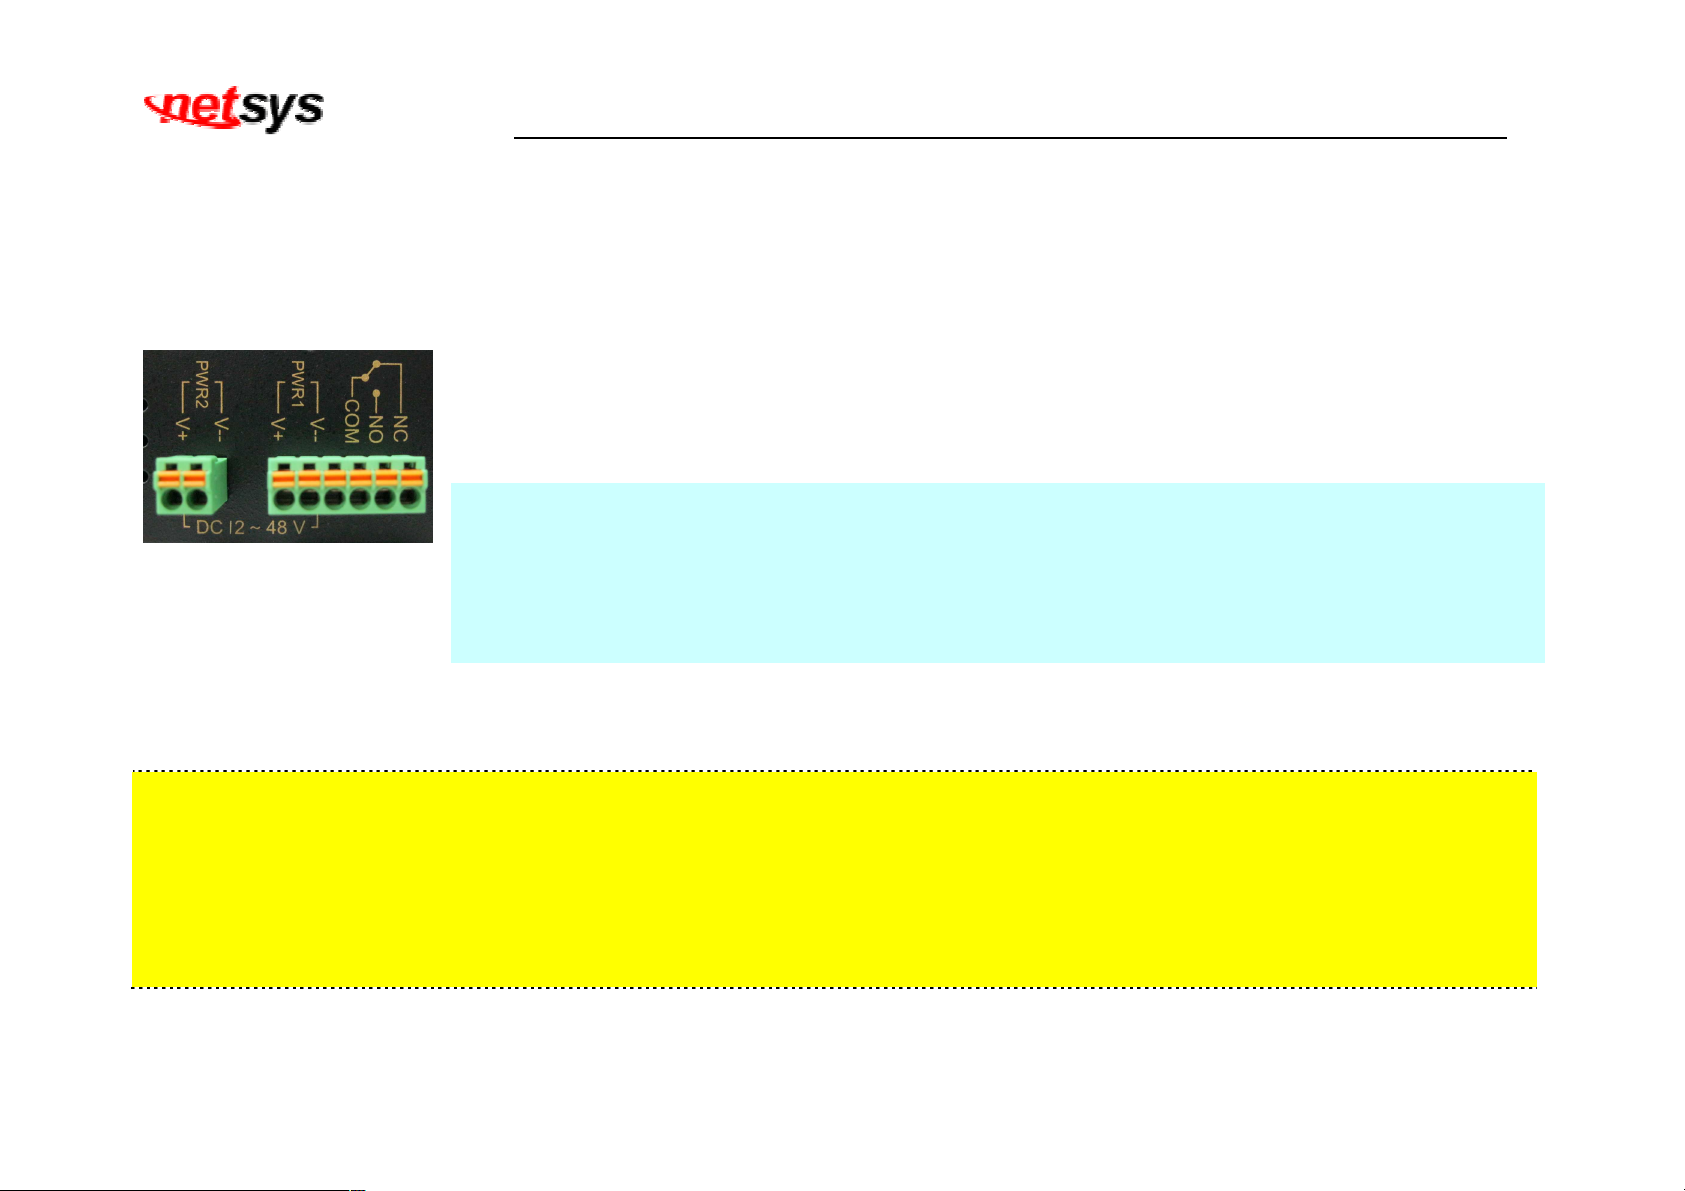
STEP 1: Insert the negative/positive DC wires into the V-/V+ terminals, respectively.
STEP 2: Place the DC wires into terminal block connector: Push the orange switch of the terminal block
with a small flat-blade screwdriver, then the DC wires insert the orange button below of the circle hole,
and release the small flat-blade screwdriver.
STEP 3: Insert the plastic terminal block connector prongs into the terminal block receptor, which is
located on the NV-600I’s side panel.
Attention:
1. Please note that the negative DC wire must connect into the V- terminal, positive DC wire must
connect V+terminal. If contrary to the location of the wiring, NV-600LI/RI will enable Reverse
Polarity Protection function automatically. DC power will not be able to directly through the machine.
2. Please note that if the DC power current exceeds 3A, NV-600LI/RI will enable Overload Current
Protection function automatically. DC power will not be able to directly through the machine.
Safety Caution!
1. Be sure to disconnect the power when installing (uninstalling) the terminal block and power cables.
2. Please note that the user can use 12~48VDC dual power input (Redundant Power). Do not exceed DC 48V.
3. Be sure to disconnect the power before installing and/or wiring your NV-600LI/RI router.
4. Please calculate the maximum possible current in each power wire and common wire. Observe all electrical codes
dictating the maximum current allowable for each wire size. If the current goes above the maximum ratings, the wiring
could overheat, causing serious damage to your equipment.
24
Page 26
NV-600LI/RI Managed Industrial Grade VDSL2 CO/CPE Router USER’S MANUAL Ver. A4
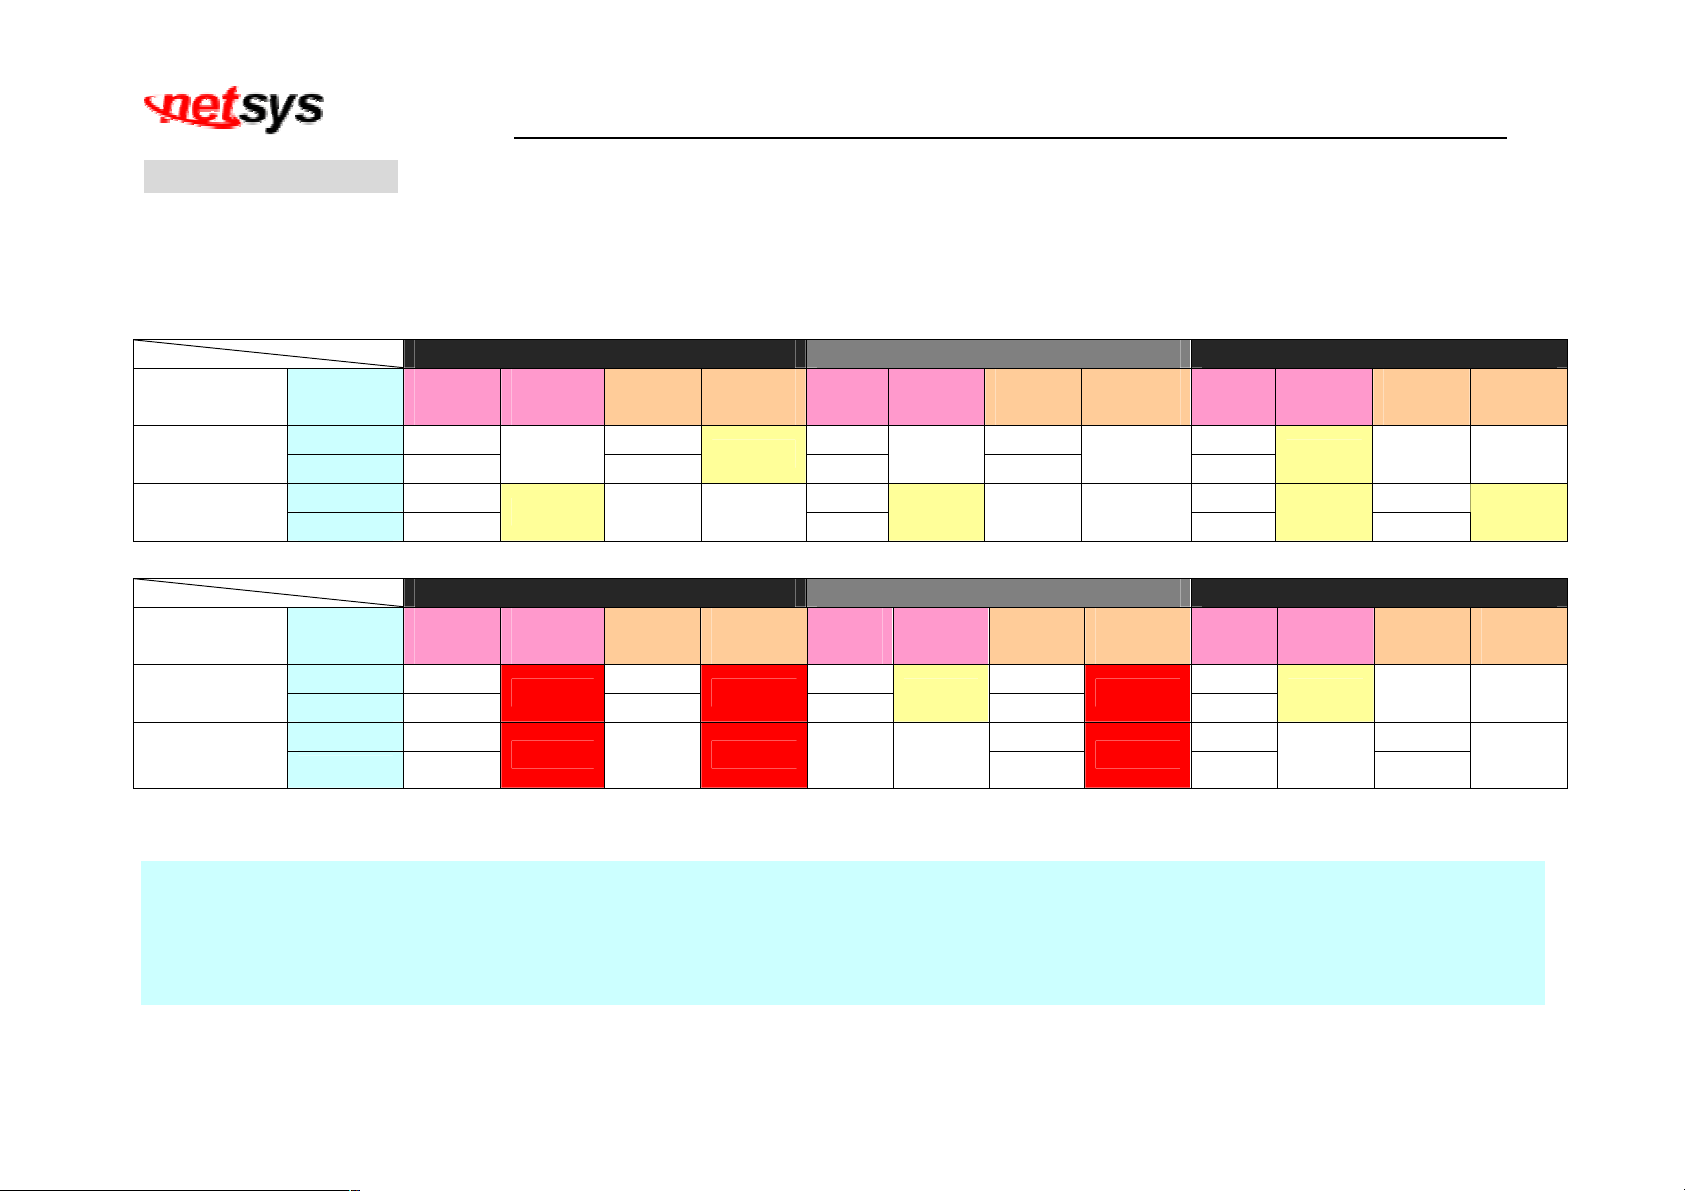
Power Input Status
The following Table shows the examples of the power input status. (Table 3-4)
Table 3-4
Example 1 Example 2 Example 3
Power Item
Power 1
Power 2
Power Item
Power 1
Power 2
Default
Polarity
–
+
–
+
Example 4 Example 5 Example 6
Default
Polarity
–
+
–
+
Power
Input1
12V– 12V– 12V
12V+
24V– 24V
24V+
Power
Input1
12V– 12V– 12V
12V+
60V– 60V– 48V
60V+
Output
State1
OFF
ON
Output
State1
Malfunction
Malfunction
Power
Input2
12V+
No
Power
Power
Input2
12V+
No
Power
Output
State2
ON
OFF
Output
State2
Malfunction
Malfunction
Power
Input1
+
12V
–
–
24V
+
Power
Input1
–
12V
+
No
Power
Output
State1
Protection
ON
Output
State1
ON
OFF
Power
Input2
12V+ 48V
12V–
No
Power
Power
Input2
12V– 48V
12V+
60V+
Output
State2
Protection
OFF
Output
State2
Malfunction
Malfunction
Power
Input1
48V
48V
48V
Power
Input1
48V
48V
–
+
–
+
–
+
+
–
Output
State1
ON
ON
Output
State1
ON
Protection
Power
Input2
No
Power
48V–
48V+
Power
Input2
No
Power
48V+
48V–
Output
State2
OFF
ON
Output
State2
OFF
Protection
Notes:
1. State 1 always happens before state 2.
2. Protection means enable Reverse Polarity Protection function.
3. Please note that if use different DC voltage, higher voltage will feeding to NV-600LI or NV-600RI.
4. Please note warranty is void if exceed DC 48V.
25
Page 27
NV-600LI/RI Managed Industrial Grade VDSL2 CO/CPE Router USER’S MANUAL Ver. A4
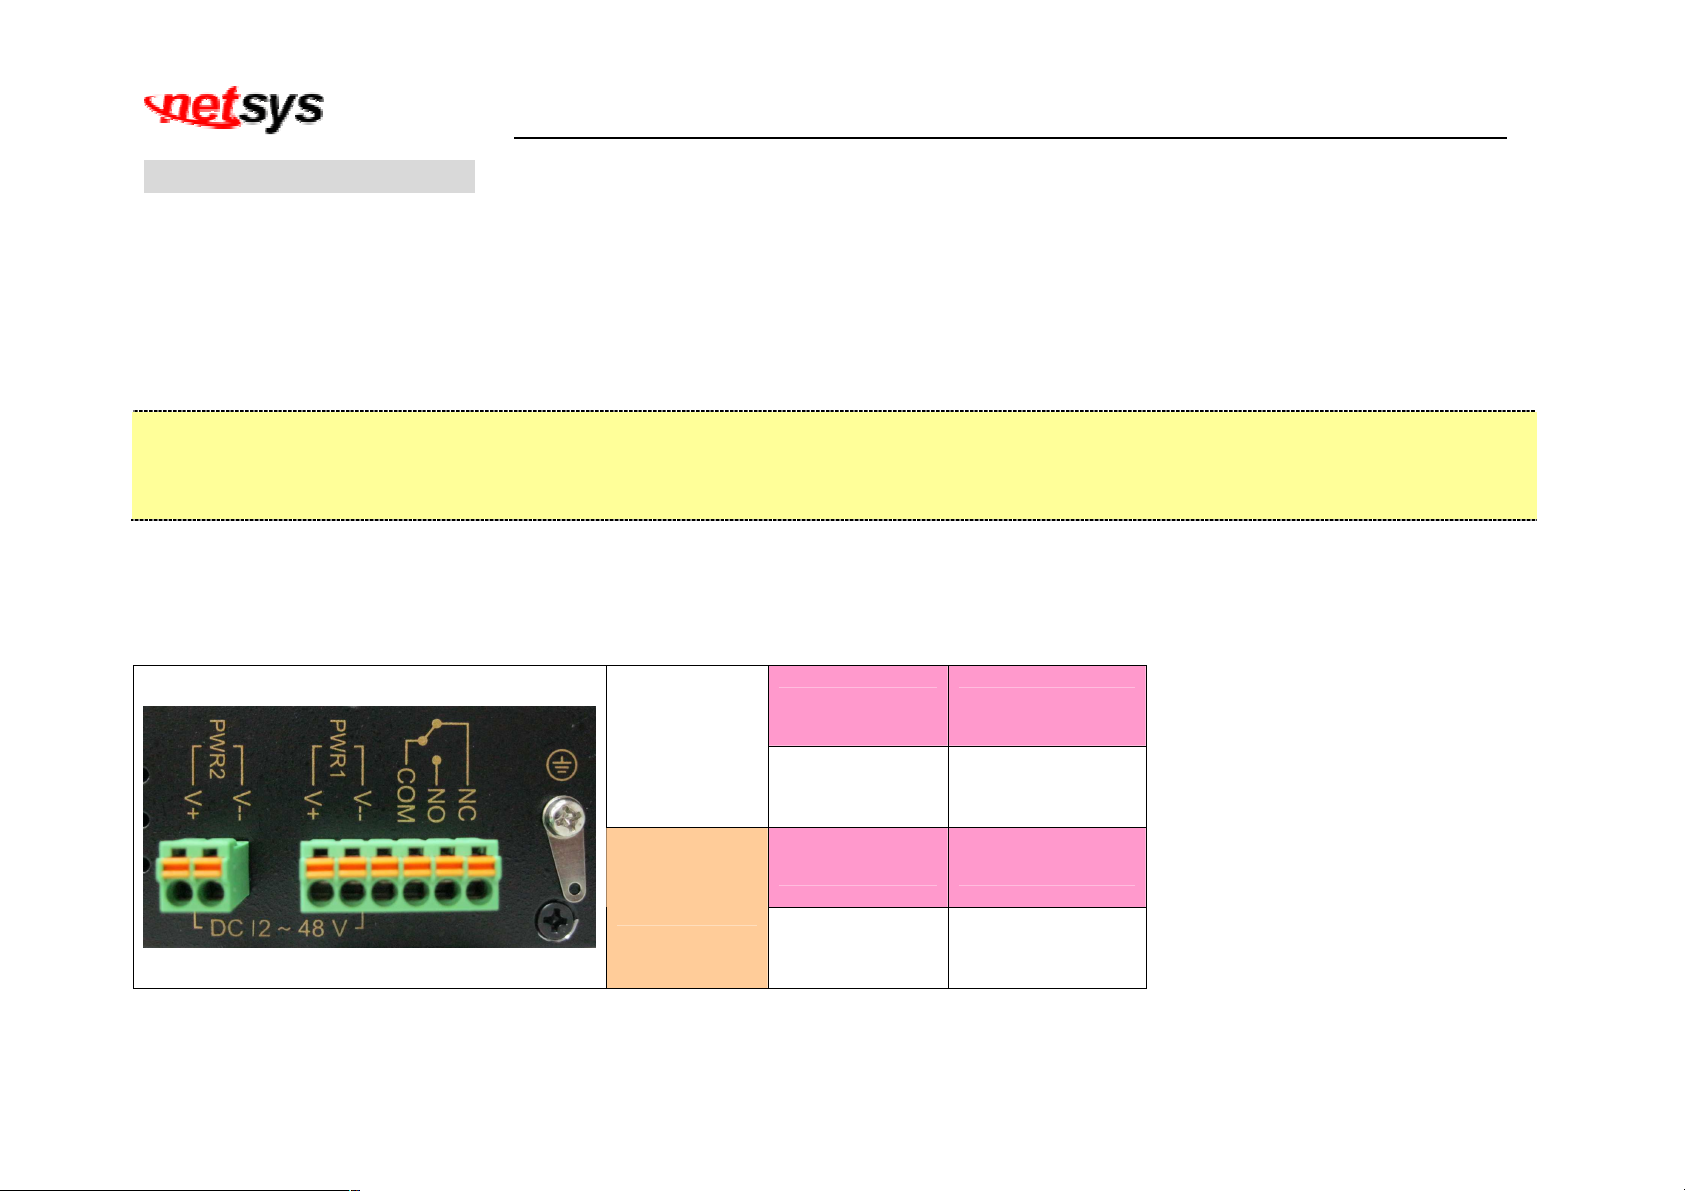
Wiring the Relay Contact
The NV-600LI/RI has a set of relay outputs. The relay contact uses two of the terminal block’s contacts located on the NV-600’s side
panel. Refer to the following table shows how to connect the wires to the terminal block connector. In this section, we illustrate the
meaning of the two contacts used to connect the relay contact.
Fault Tip:
The relay contacts of the 6-pin terminal block connector are used to detect user-configured events. The three wires attached to the
fault contacts form an open circuit when a user-configured event is triggered. If a user-configured event does not occur, the fault
circuit remains closed. The relay output has current carrying capacity of 1 A @ 24 VDC.
The following Table shows the Relay circuit and power status. (Table 3-5)
Table 3-5 Relay Circuit Status and Power ON/OFF Status.
COM & NC Open Circuit
Power ON
COM & NO Short Circuit
COM & NC Short Circuit
Power OFF
COM & NO Open Circuit
26
Page 28
Grounding the NV-600LI/RI
NV-600LI/RI is designed to enhance EMS performance by grounding. NV-600LI/RI come with metal DIN-Rail brackets for grounding
the switches. For optimal EMS performance, connection of the right of the NV-600LI/RI side panel ground lug to the grounding point.
NV-600LI/RI Managed Industrial Grade VDSL2 CO/CPE Router USER’S MANUAL Ver. A4
Before user installed power and device, please read and follow these essentials:
Use separate paths to route wiring for power and devices. If power wiring and device wiring paths must cross make sure the
wires are perpendicular at the intersection point.
Note:
Do not run signal or communications wiring and power wiring through the same wire conduit. To avoid interference, wires with
different signal characteristics should be routed separately.
You can use the type of signal transmitted through a wire to determine which wires should be kept separate. The rule of thumb
is that wiring sharing similar electrical characteristics can be bundled together.
You should separate input wiring from output wiring.
We recommend that you mark all equipment in the wiring system.
27
Page 29
NV-600LI/RI Managed Industrial Grade VDSL2 CO/CPE Router USER’S MANUAL Ver. A4
Chapter 4.
The NV-600LI/RI provides a built-in HTML based management interface that allow user configure the NV-600LI/RI via
Internet Browser. Best viewed using Chrome or Firefox browsers.
In order to use the web browser configure the device, you may need to allow:
• Web browser pop-up windows from your device. Web pop-up blocking is enabled by default in windows XP
• Java Scripts. (Enabled by default)
• Java permissions. (Enabled by default)
Launch your web browser and input the IP address 192.168.16.249 (NV-600LI) or 192.168.16.250 (NV-600RI) in the
Web page.
The default username and password can be found in the following section.
Configure the NV-600LI/RI via Web Browser
SP2 or above.
28
Page 30
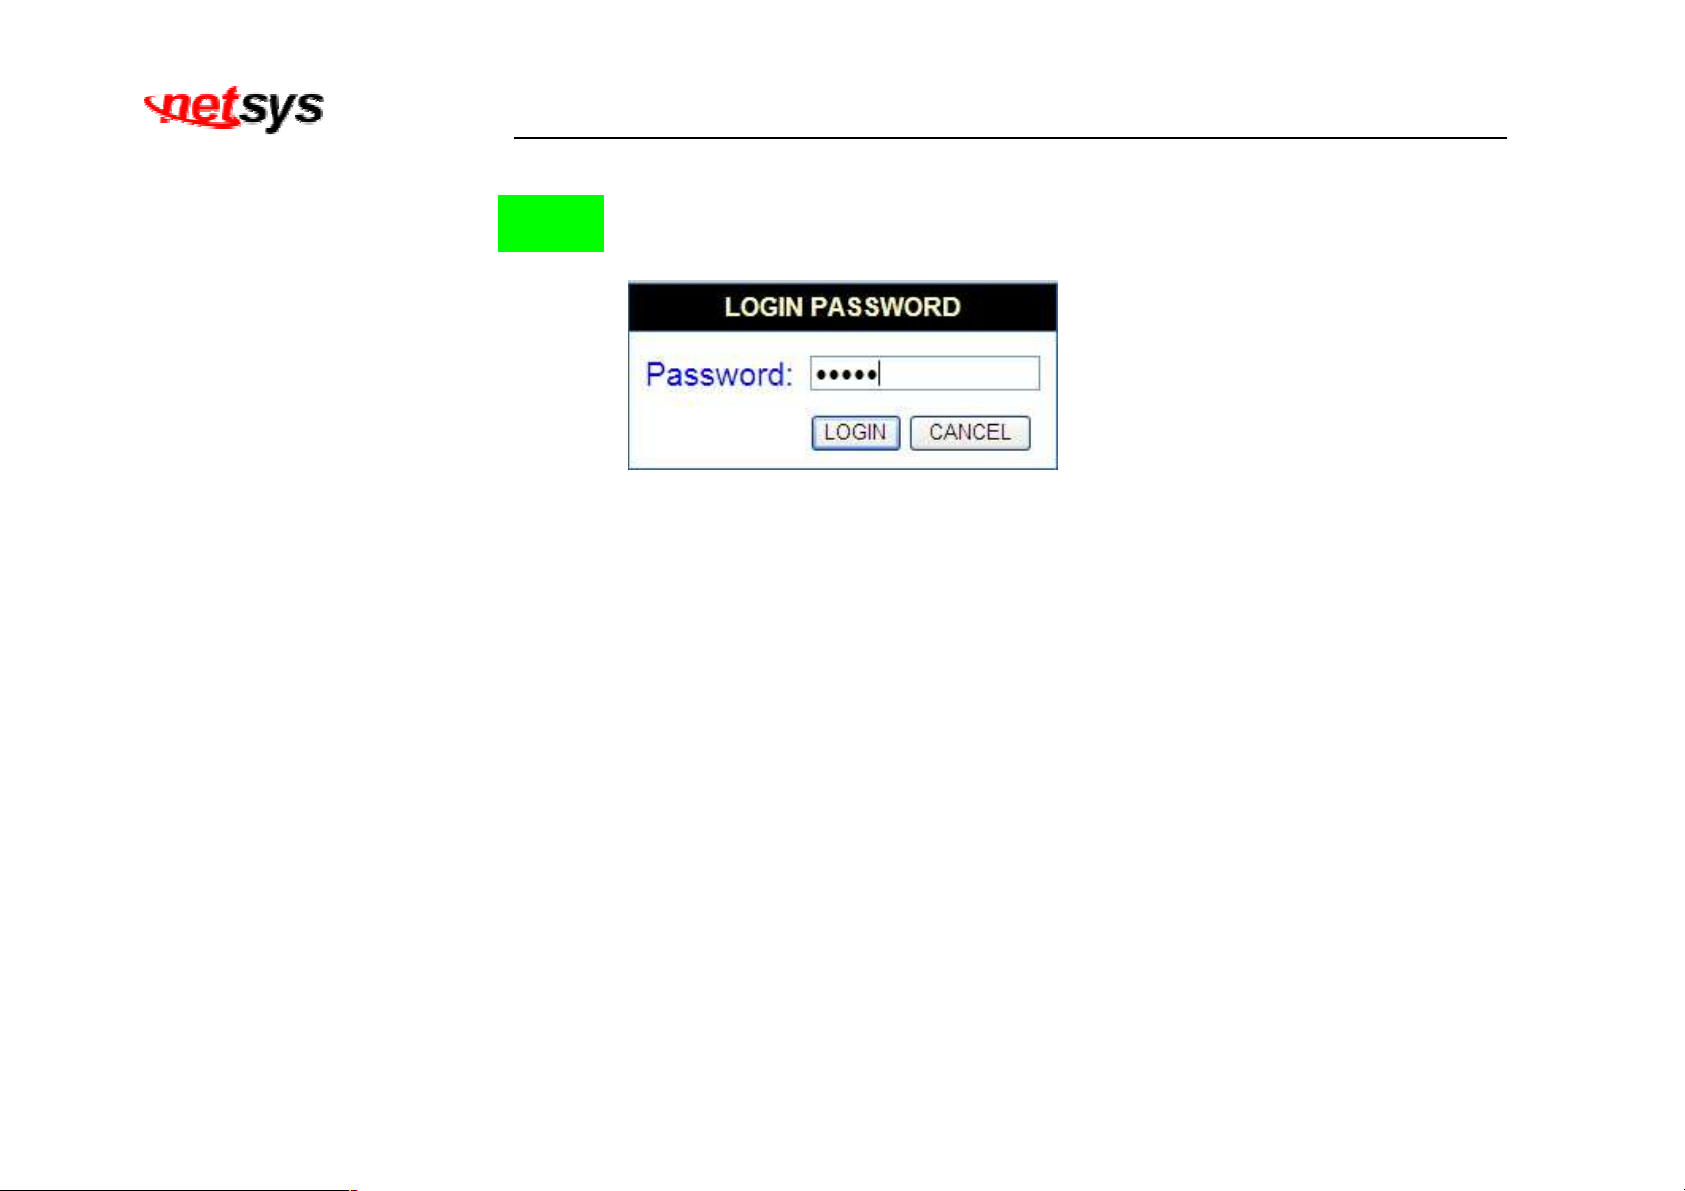
4.1 Login
The default password is “admin“. The password is changeable in Administrator Settings.
NV-600LI/RI Managed Industrial Grade VDSL2 CO/CPE Router USER’S MANUAL Ver. A4
Figure 4.1 Login Password
29
Page 31
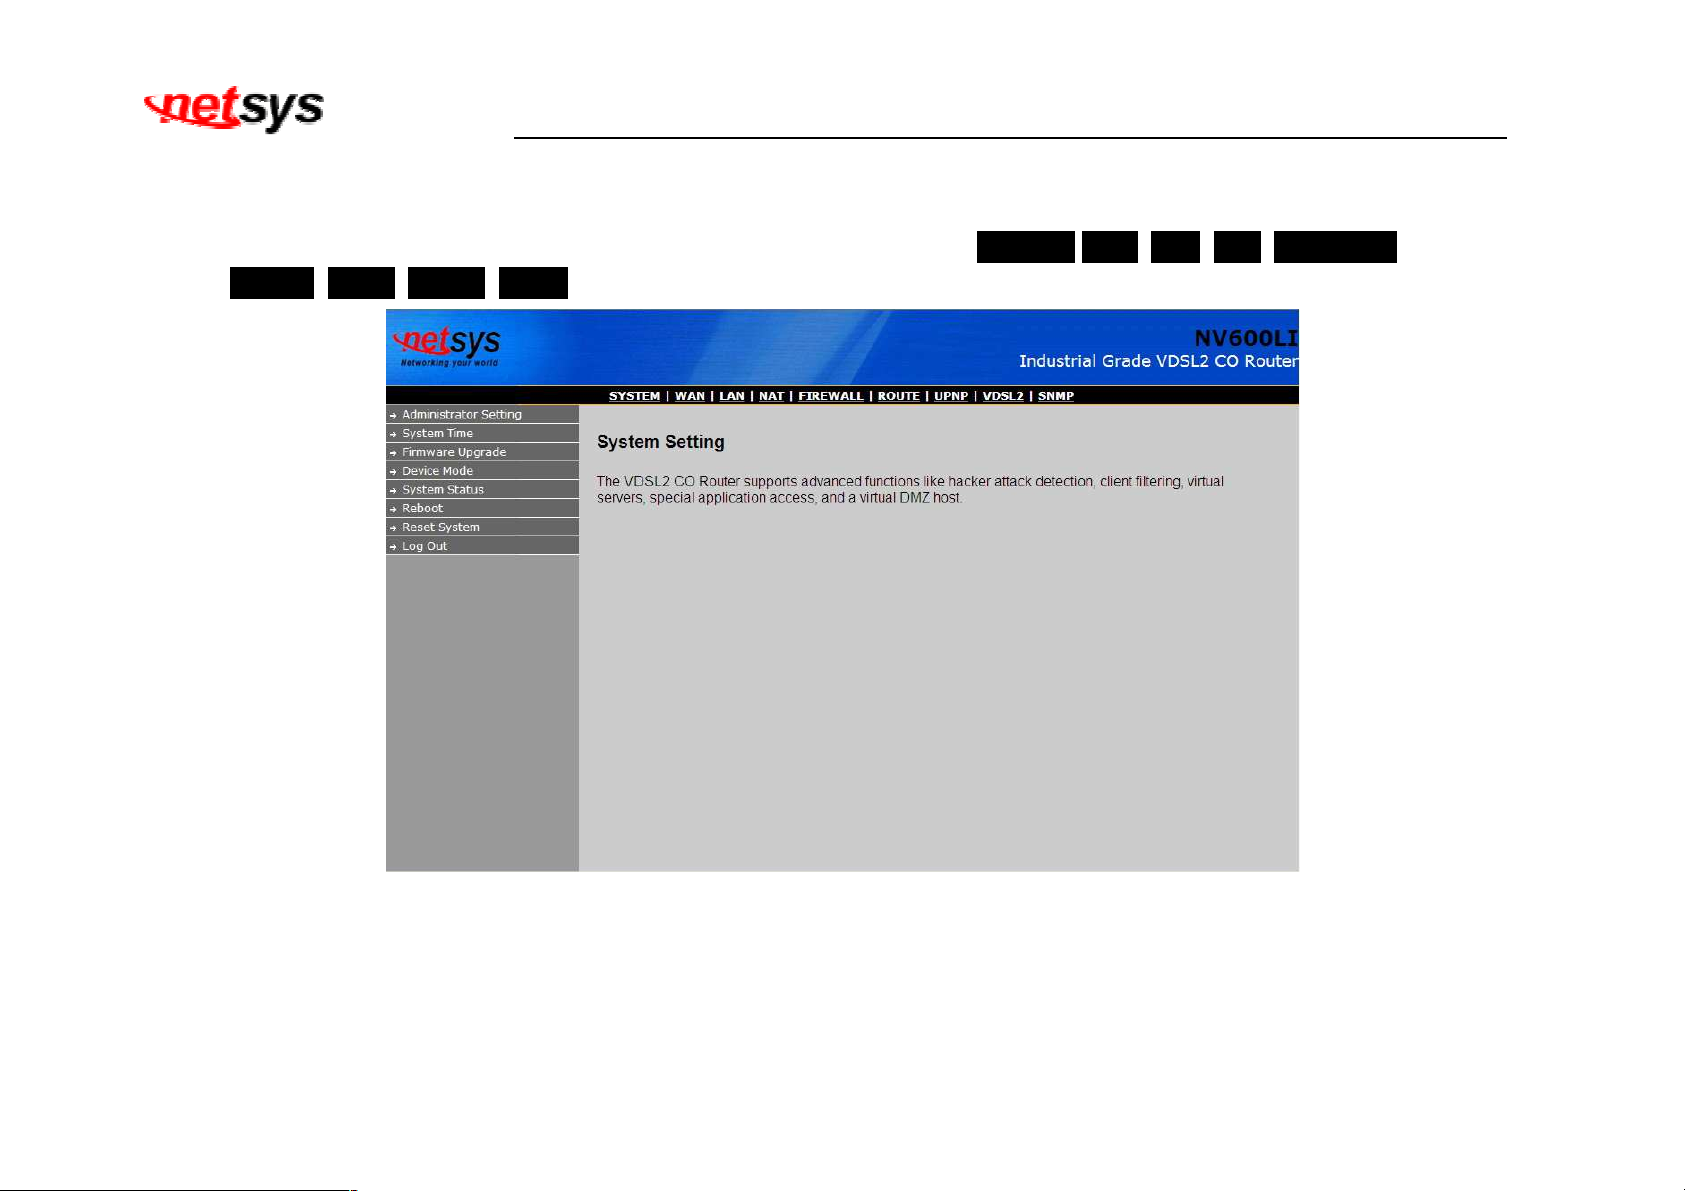
4.2 Select the Menu Level
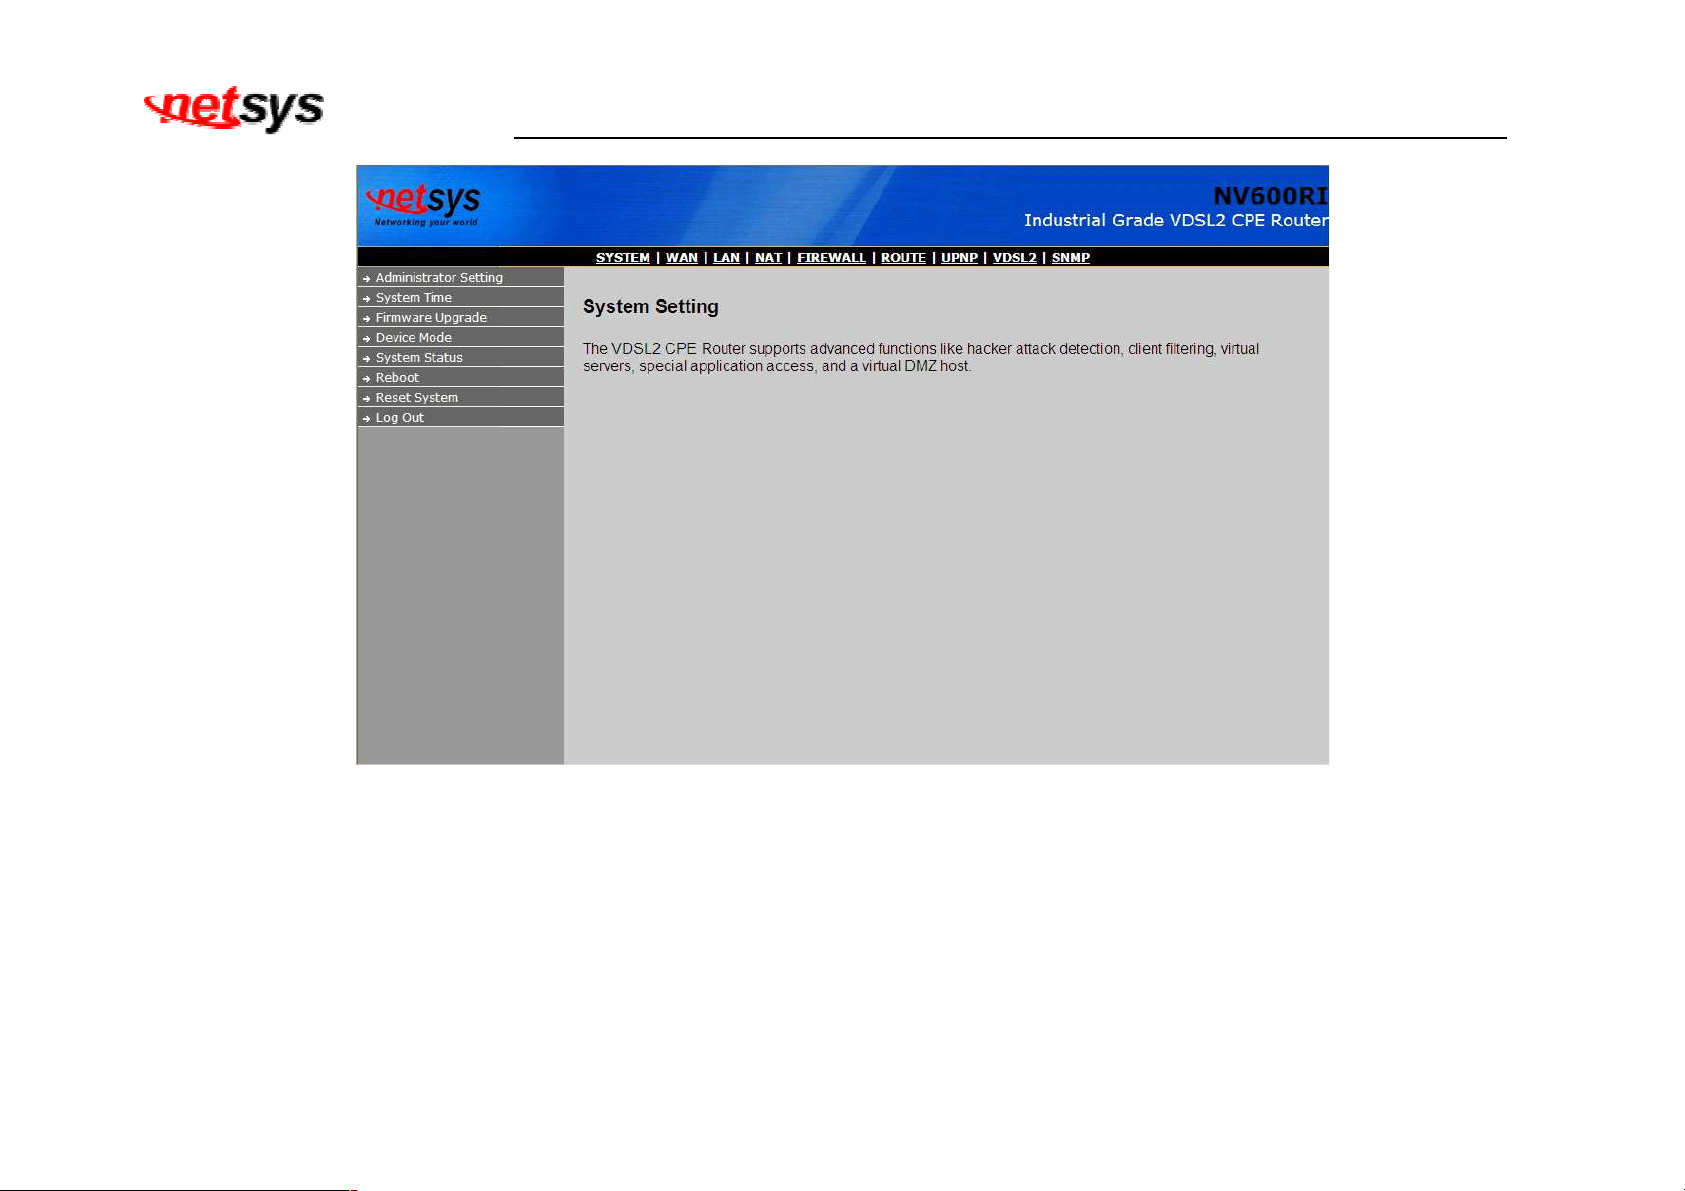
There is an easy Setup for end users at the setup of NV-600LI/RI with SYSTEM,WAN, LAN, NAT, FIREWALL,
ROUTE, UPNP, VDSL2, SNMP for more detail configurations.
NV-600LI/RI Managed Industrial Grade VDSL2 CO/CPE Router USER’S MANUAL Ver. A4
Figure 4.2.1 Select the Menu Level (NV-600LI)
30
Page 32
NV-600LI/RI Managed Industrial Grade VDSL2 CO/CPE Router USER’S MANUAL Ver. A4
Figure 4.2.2 Select the Menu Level(NV-600RI)
31
Page 33
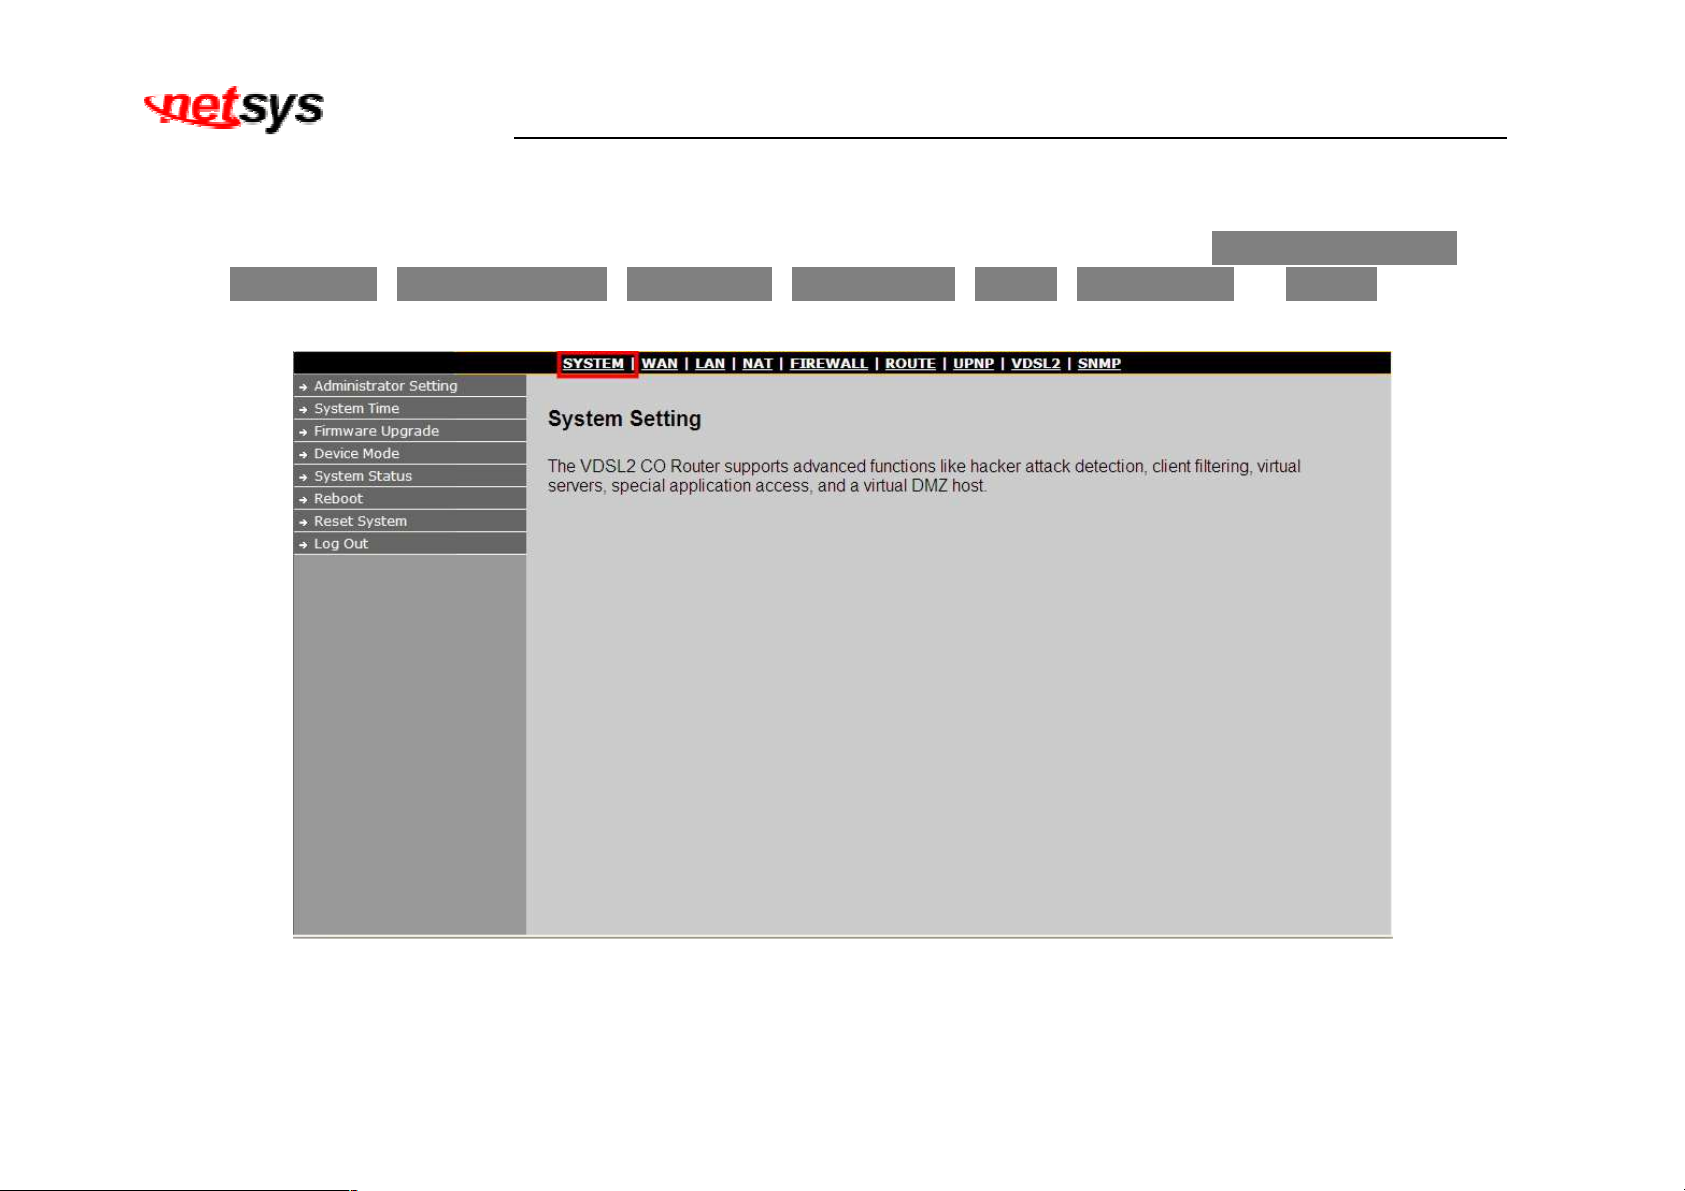
4.3 Select “SYSTEM”
Select the “SYSTEM”. The menu below will be used frequently. It includes the sub-menus of Administrator Setting、
System Time、Firmware Upgrade、Device Mode、System Status、Reboot、Reset System and Log Out. A screen
is displayed as shown in Figure 4.3
NV-600LI/RI Managed Industrial Grade VDSL2 CO/CPE Router USER’S MANUAL Ver. A4
Figure 4.3 System Setup
32
Page 34
NV-600LI/RI Managed Industrial Grade VDSL2 CO/CPE Router USER’S MANUAL Ver. A4
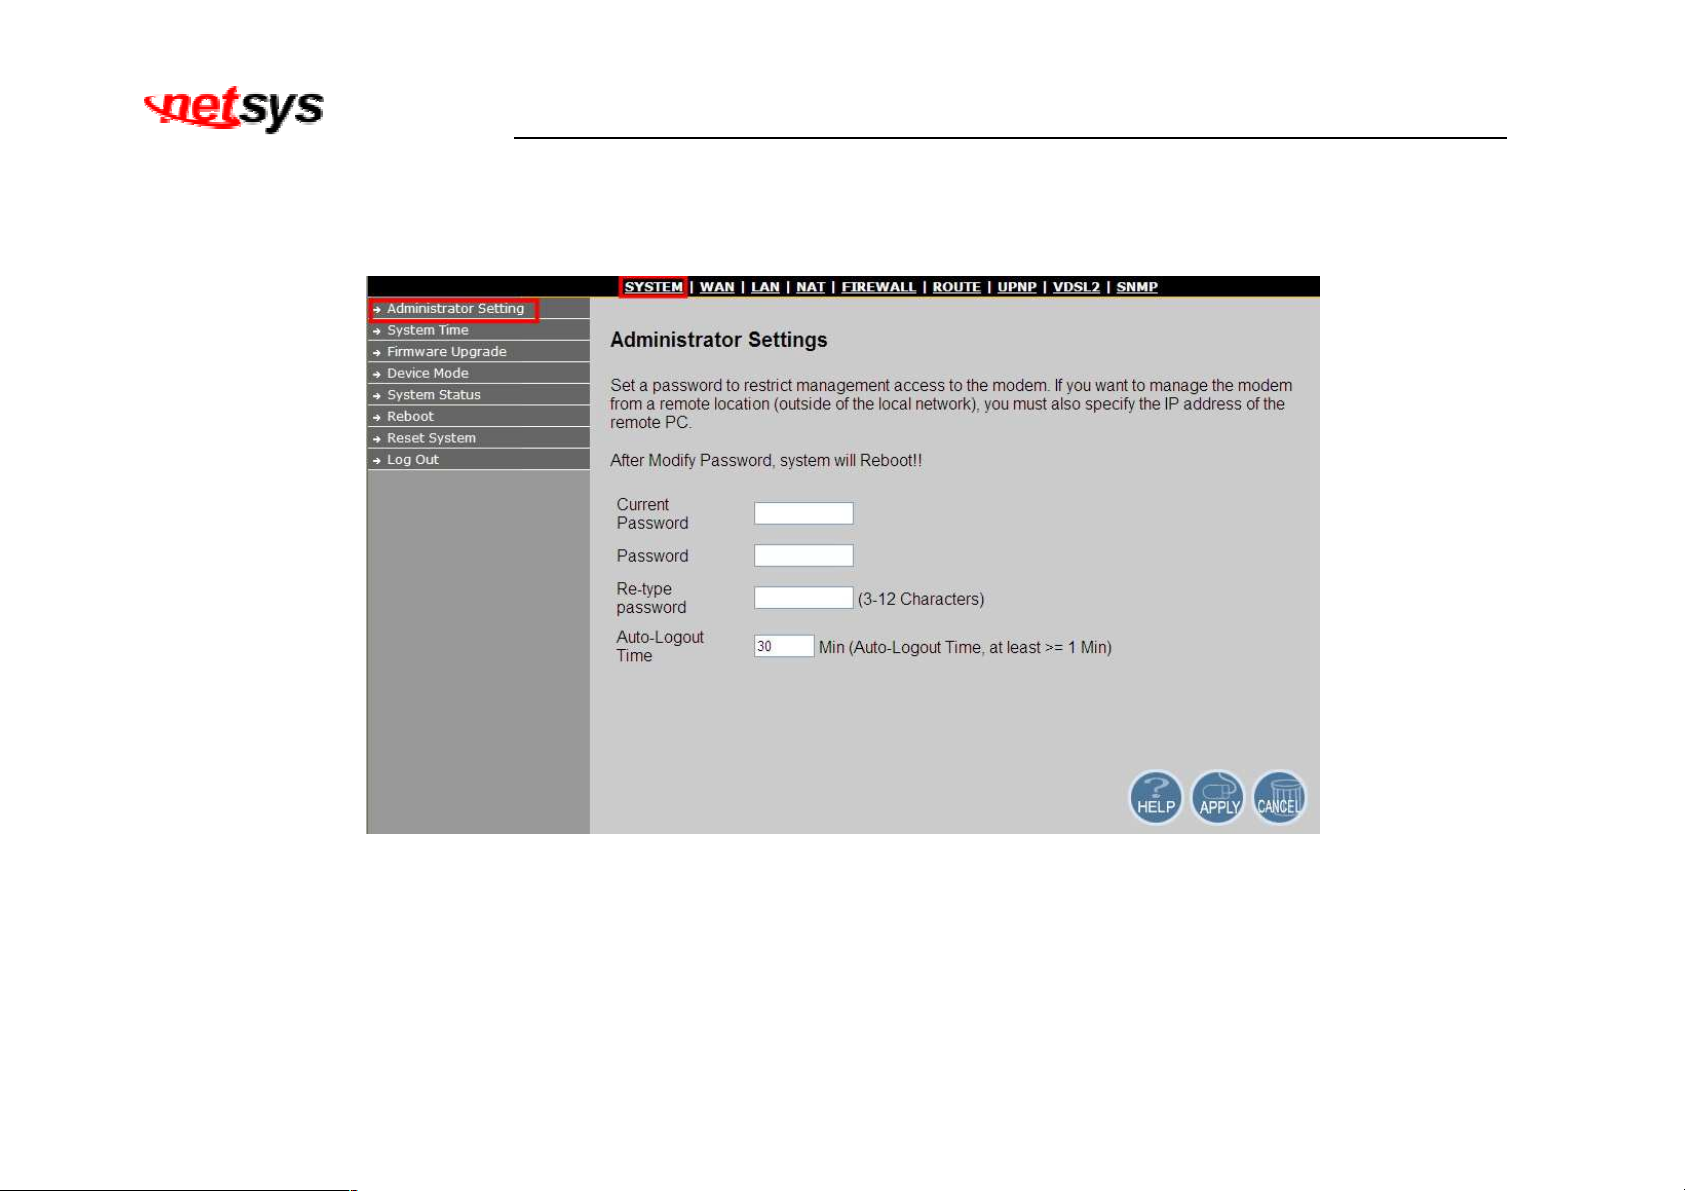
4.3.1 Administrator Setting
To add a user or change user’s password, click on the “Administrator Settings” link in the left navigation bar. A screen is displayed as
shown in Figure 4.3.1.
Figure 4.3.1 Administrator Settings Configuration
Current Password / Password Characters: 3-12.
Auto-Logout Time: Please set at least one minute.
33
Page 35
NV-600LI/RI Managed Industrial Grade VDSL2 CO/CPE Router USER’S MANUAL Ver. A4
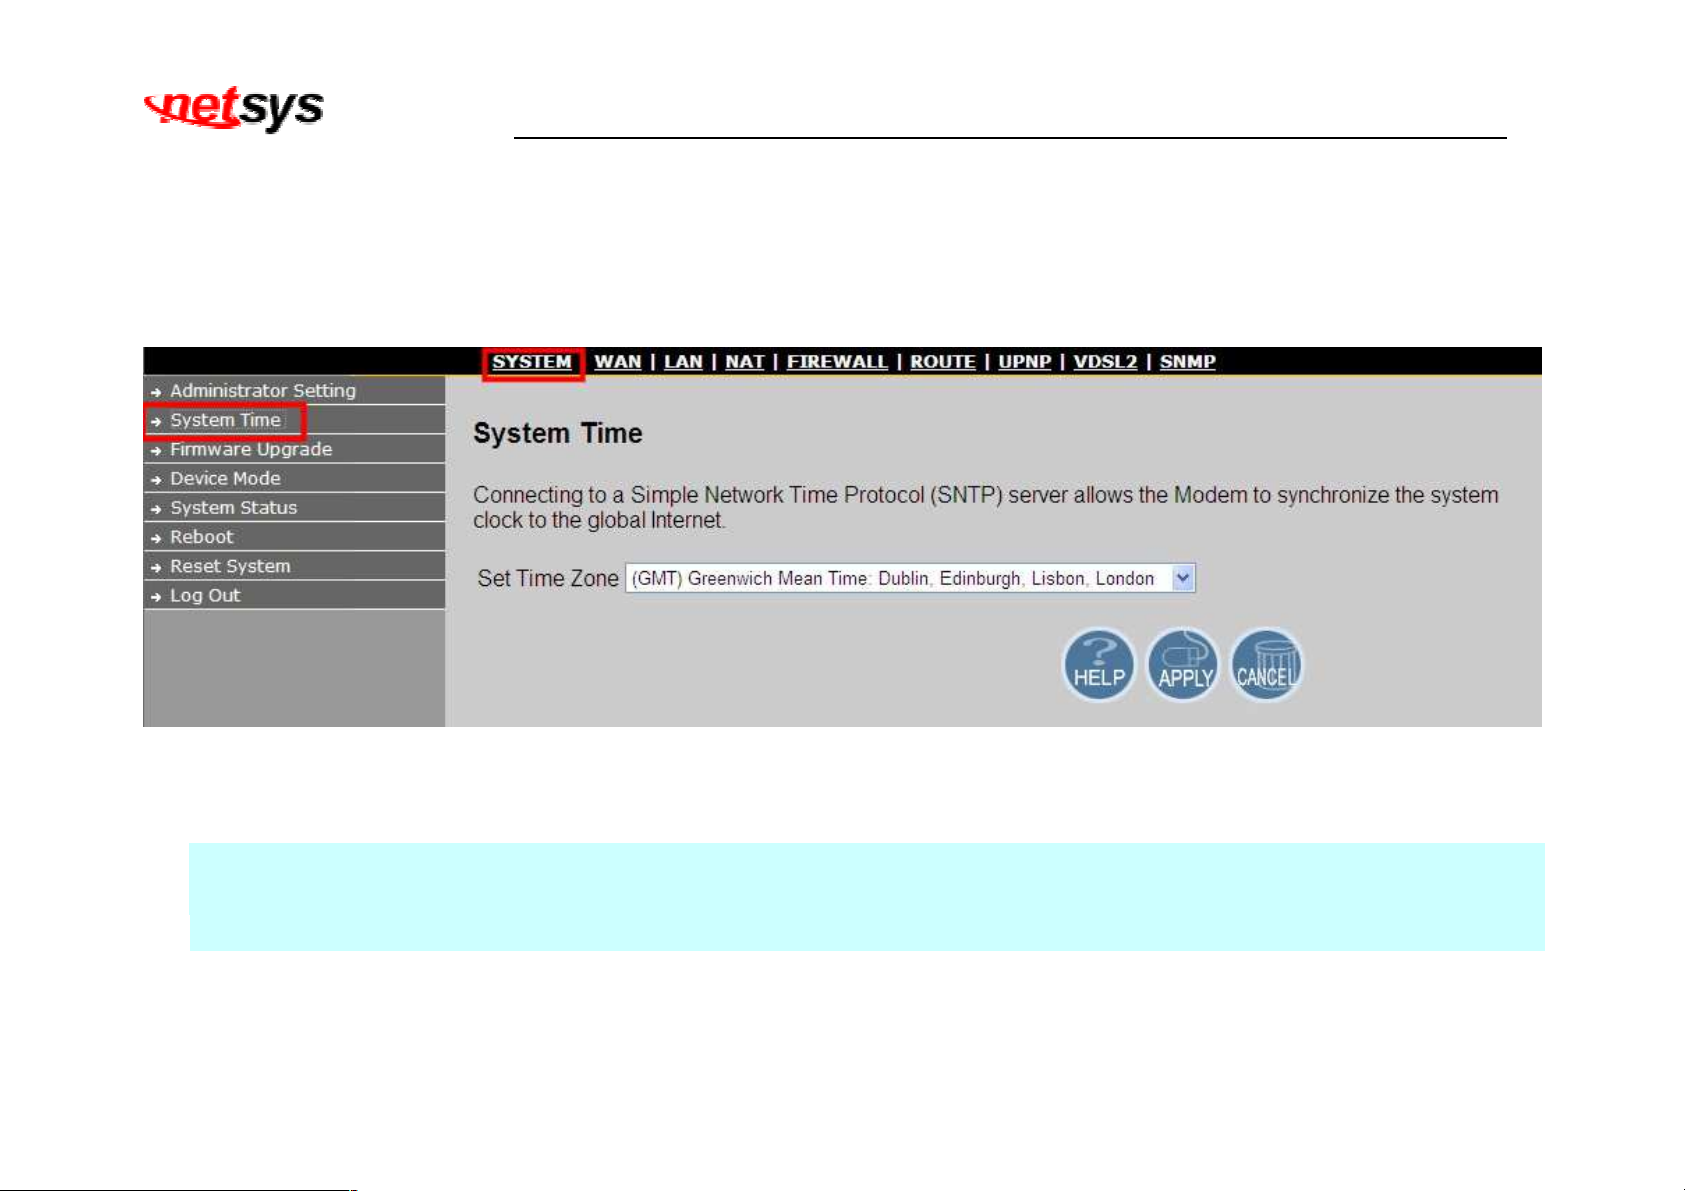
4.3.2 System Time
You can set System Time by connecting to a Simple Network Time Protocol (SNTP) server allows the Modem to synchronize the
system clock to the global Internet. The synchronized clock in the Modem is used to record the security log and control client filtering.
A screen is displayed as shown in Figure 4.3.2.
Figure 4.3.2 System Time Configuration
Note:
Static Routing functionality is used to define the connected Gateway between the LAN and WAN. For example,
if we want to activate the Network Time Protocol (NTP) service, and we have to define the Gateway connected
to NTP server in the WAN. Please refer to section 4.8.1.
34
Page 36
NV-600LI/RI Managed Industrial Grade VDSL2 CO/CPE Router USER’S MANUAL Ver. A4
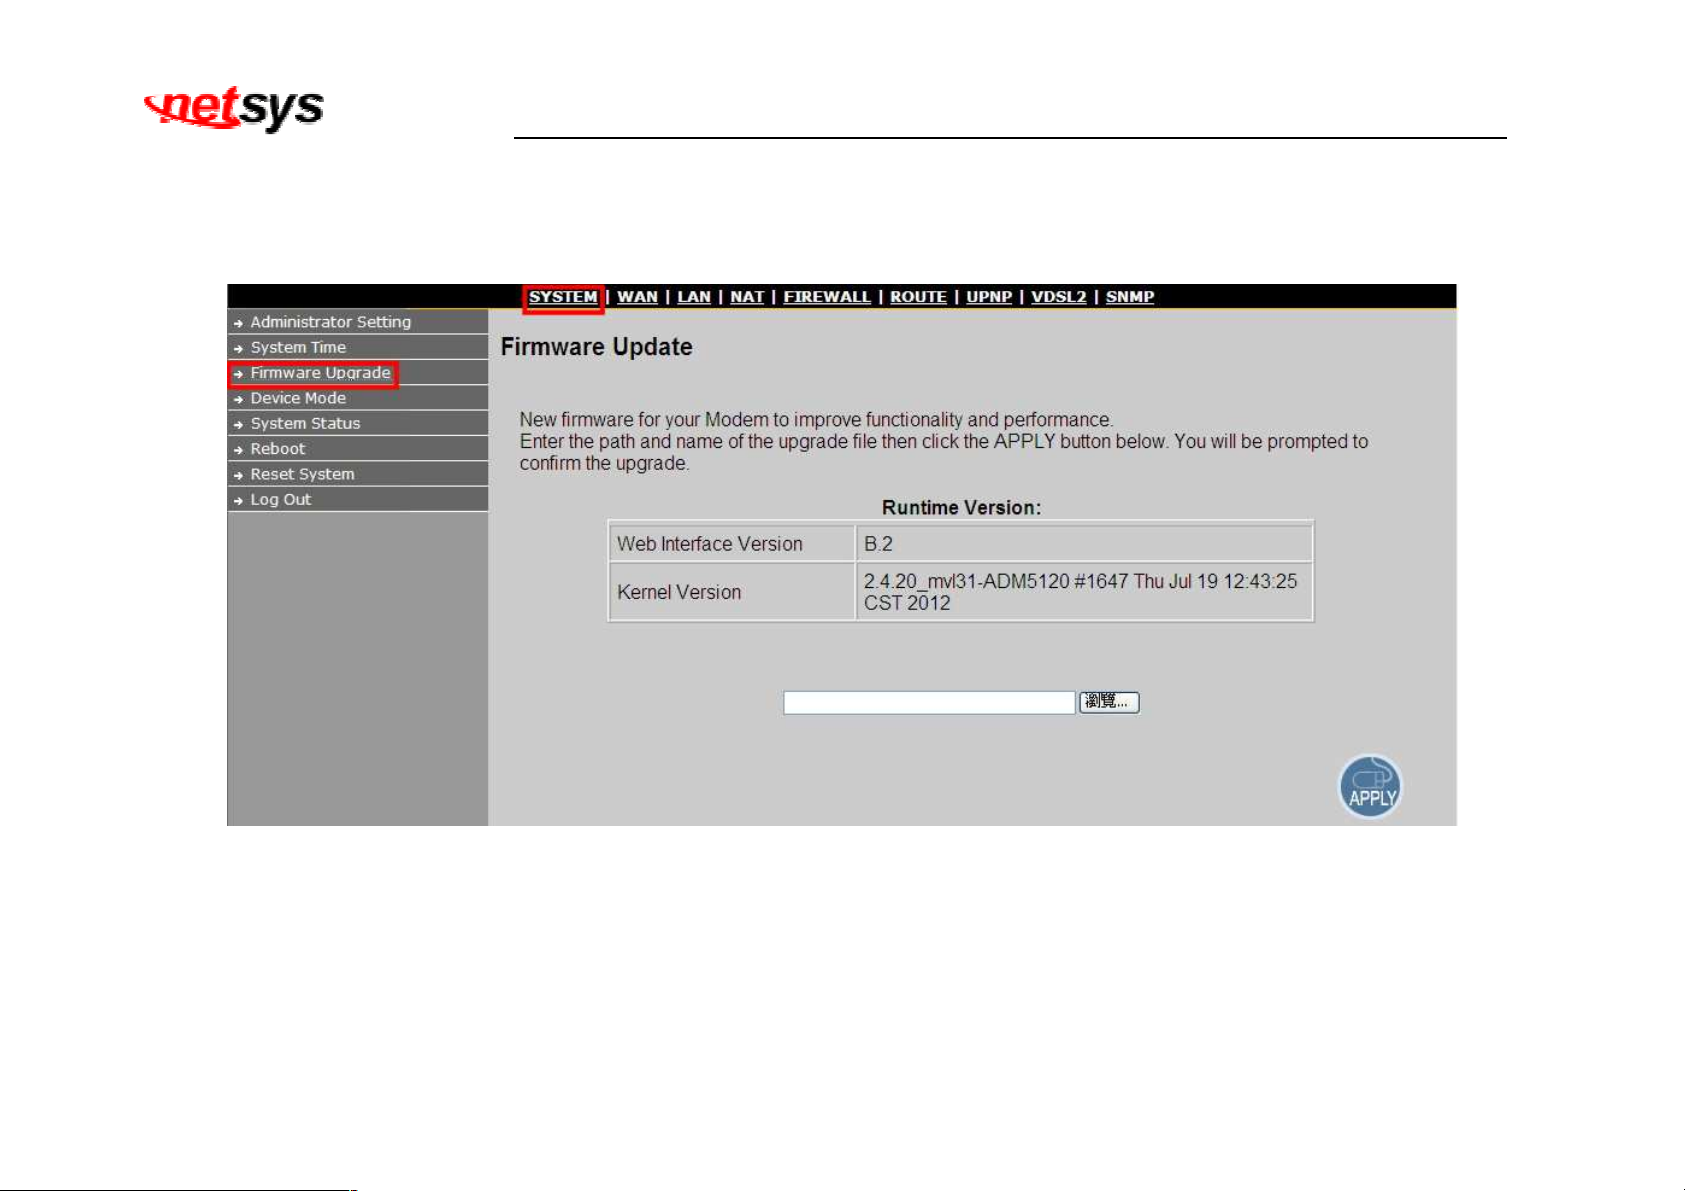
4.3.3 Firmware Upgrade
To update the system firmware, click on the “Firmware Upgrade” link in the left navigation bar. A screen is displayed as shown in
Figure 4.3.3
Figure 4.3.3 Firmware Upgrade
The screen contains the following detail:
• Click "Browse" to select a specific file name in preparation upgrade the firmware.
• Click “APPLY” to start the firmware update.
• The firmware of web interface version: Web Interface Version.
35
Page 37
Notes:
1. If the machine firmware version is too old to be updated with the current firmware version of the gap, after the firmware upgrade
must be reset system to default to avoid the new features can not use or system error.
2. “2.4.20_mvl31-ADM5120” of kernel version means the CPU number of an IC. # 1647 means a serial number of records compiled
firmware. The date means the date of the firmware is compiled.
3. Please note that NV-600LI and NV-600RI firmware is different, therefore you can not use the same firmware upgrade.
NV-600LI/RI Managed Industrial Grade VDSL2 CO/CPE Router USER’S MANUAL Ver. A4
36
Page 38
NV-600LI/RI Managed Industrial Grade VDSL2 CO/CPE Router USER’S MANUAL Ver. A4
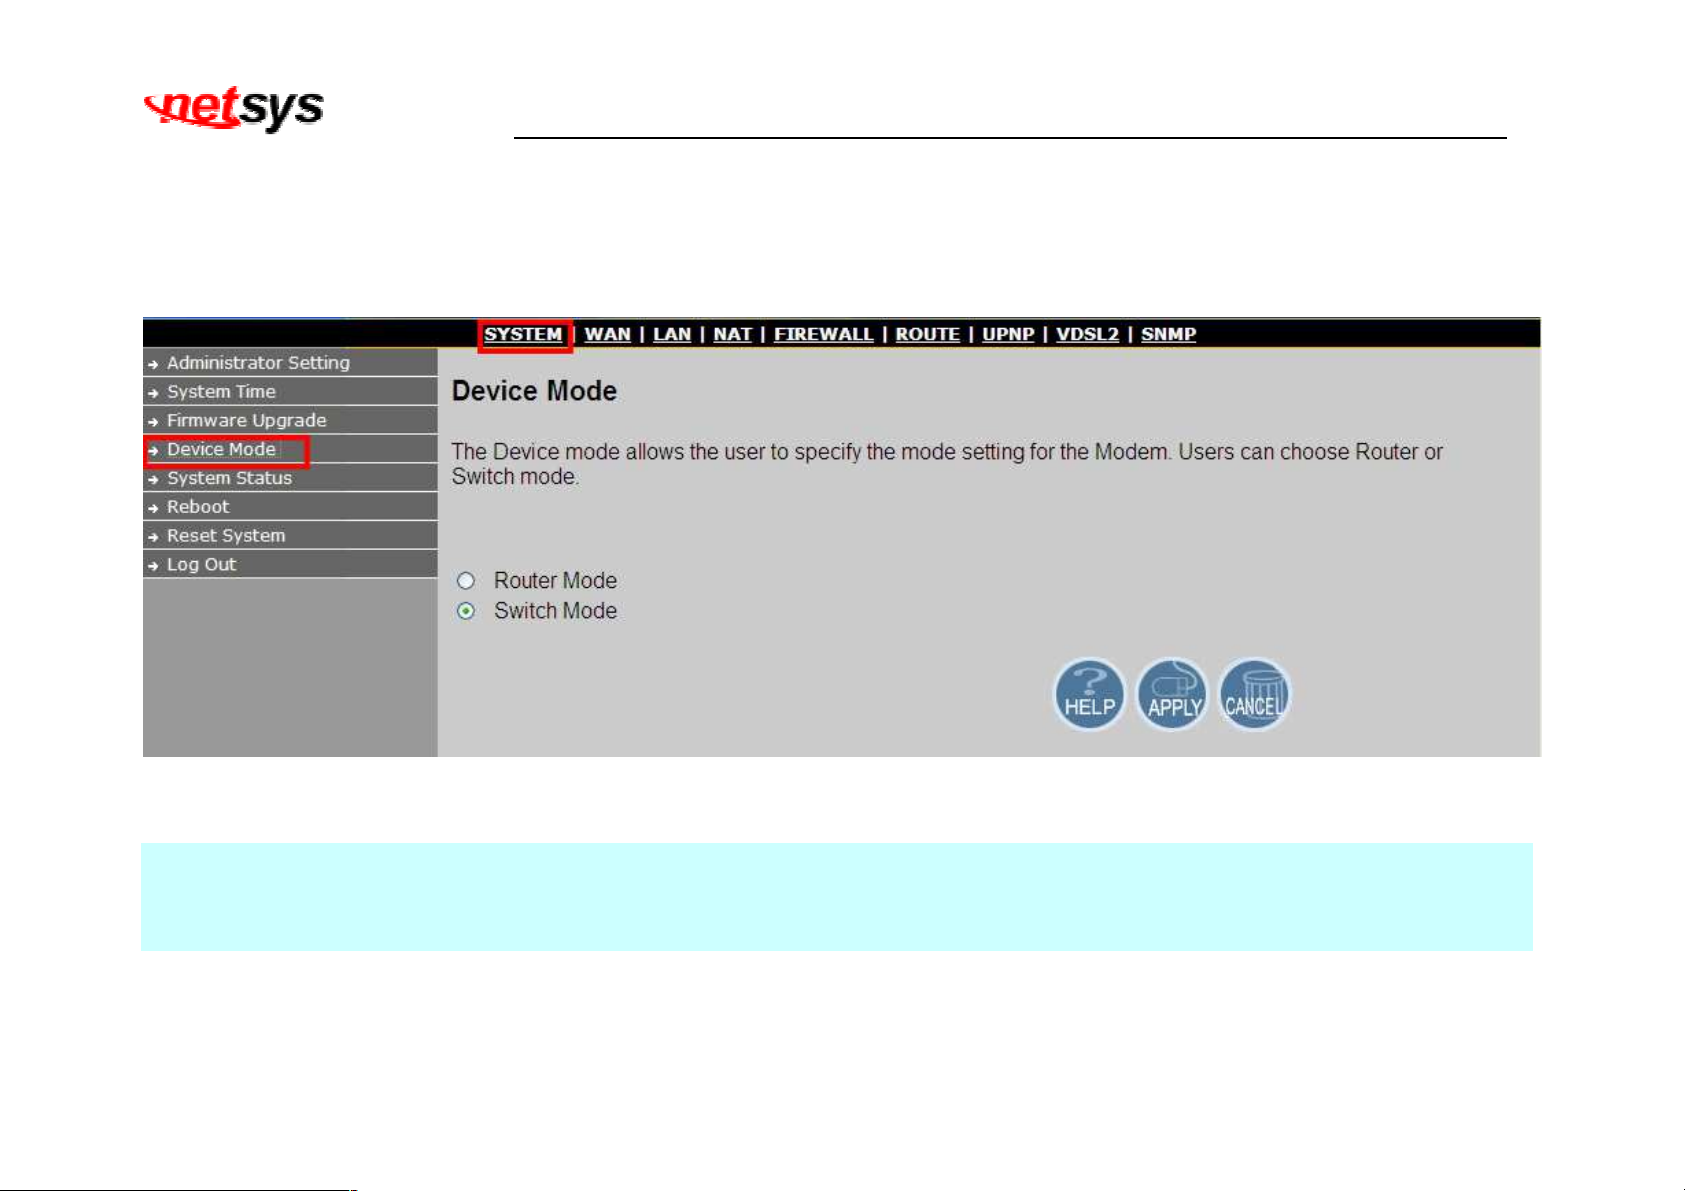
4.3.4 Device Mode
The network processor used in the reference system is able to act as either a switch or a router. Allow the user to change the mode
of operation, click on the “Device Mode” link in the left navigation bar. A screen is displayed as shown in Figure 4.3.4
Figure 4.3.4 Device Mode
Notes:
1. The default setting is in Switch (Bridge) mode, it is not necessary to change the setting in most of the case. In situations, which
devices (e.g. PC, Server, VoIP) connected to CPE requires Router function. Hence, set the NV-600LI/RI on Router mode.
2. Switch (Bridge) mode can pass through any packet, include vlan packet.
37
Page 39
NV-600LI/RI Managed Industrial Grade VDSL2 CO/CPE Router USER’S MANUAL Ver. A4
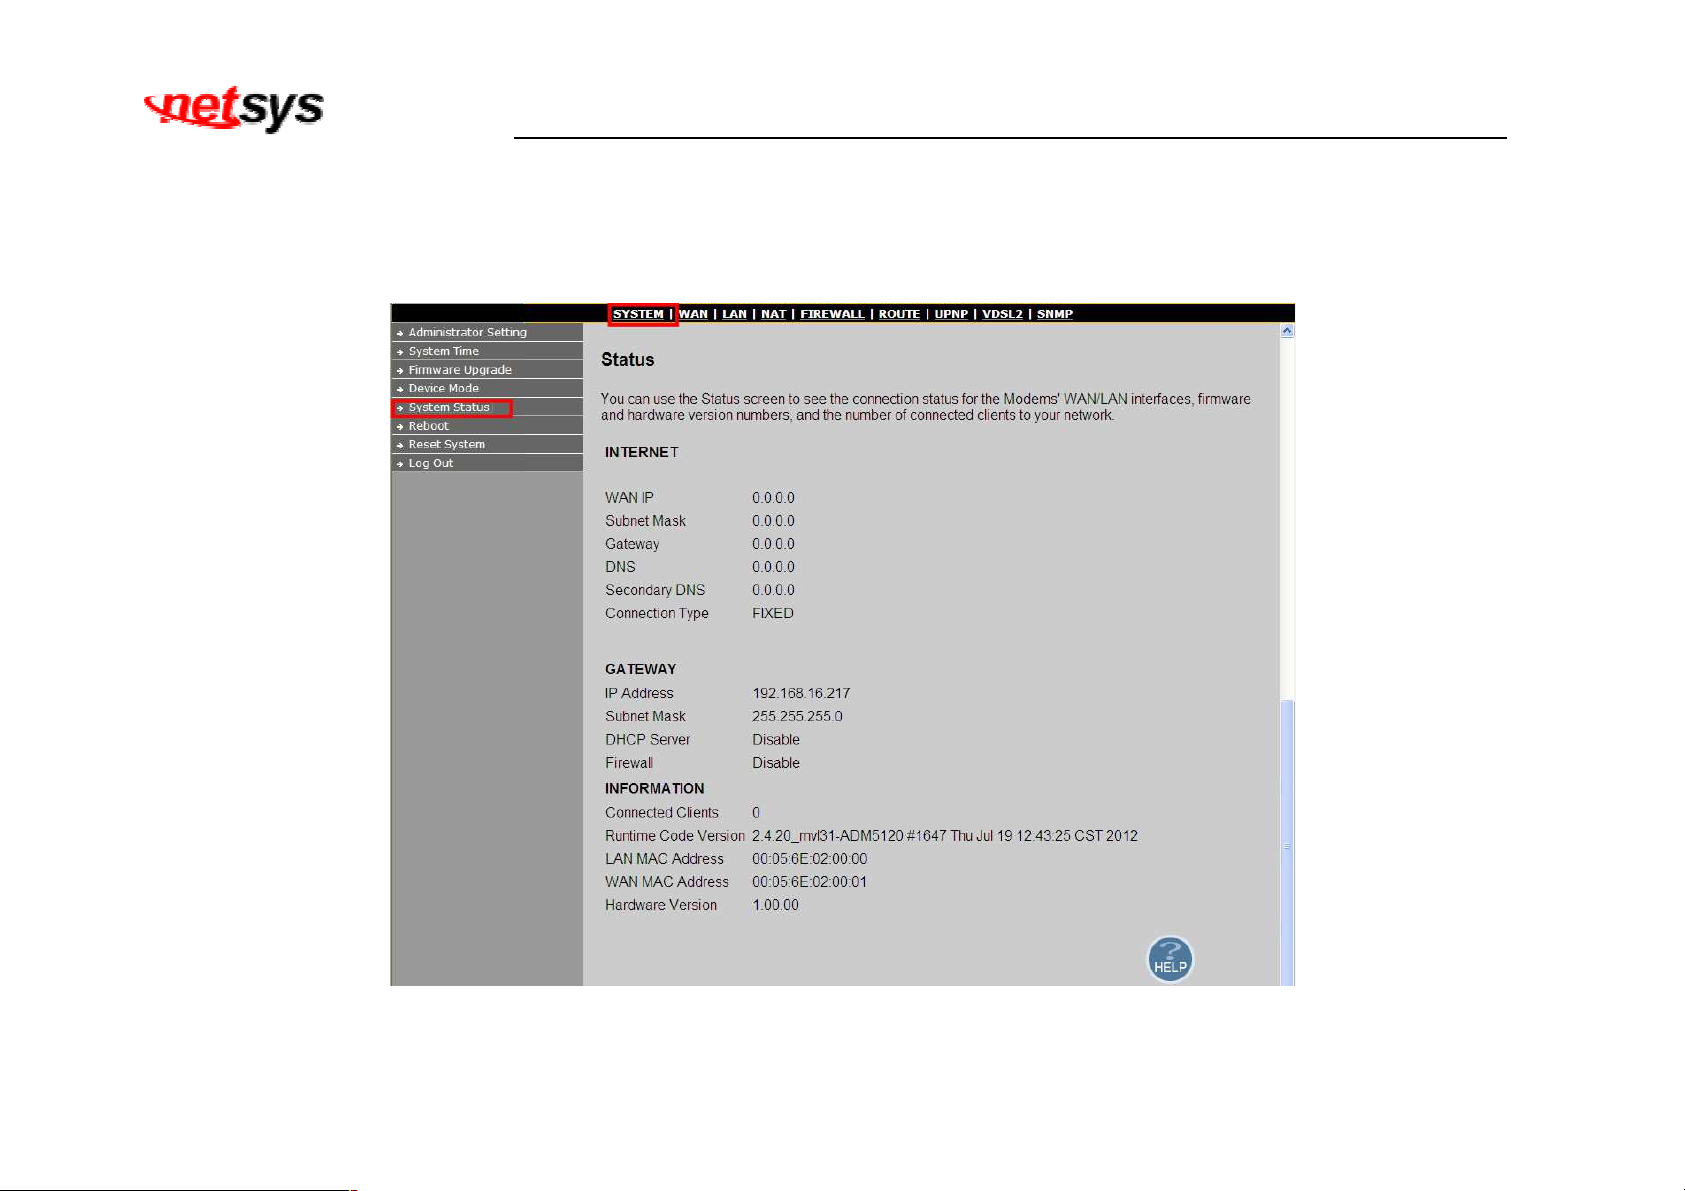
4.3.5 System Status
To view system status, click on the “System Status” link in the left navigation bar. A screen is displayed as shown in Figure 4.3.5
Figure 4.3.5 System Status
38
Page 40
NV-600LI/RI Managed Industrial Grade VDSL2 CO/CPE Router USER’S MANUAL Ver. A4
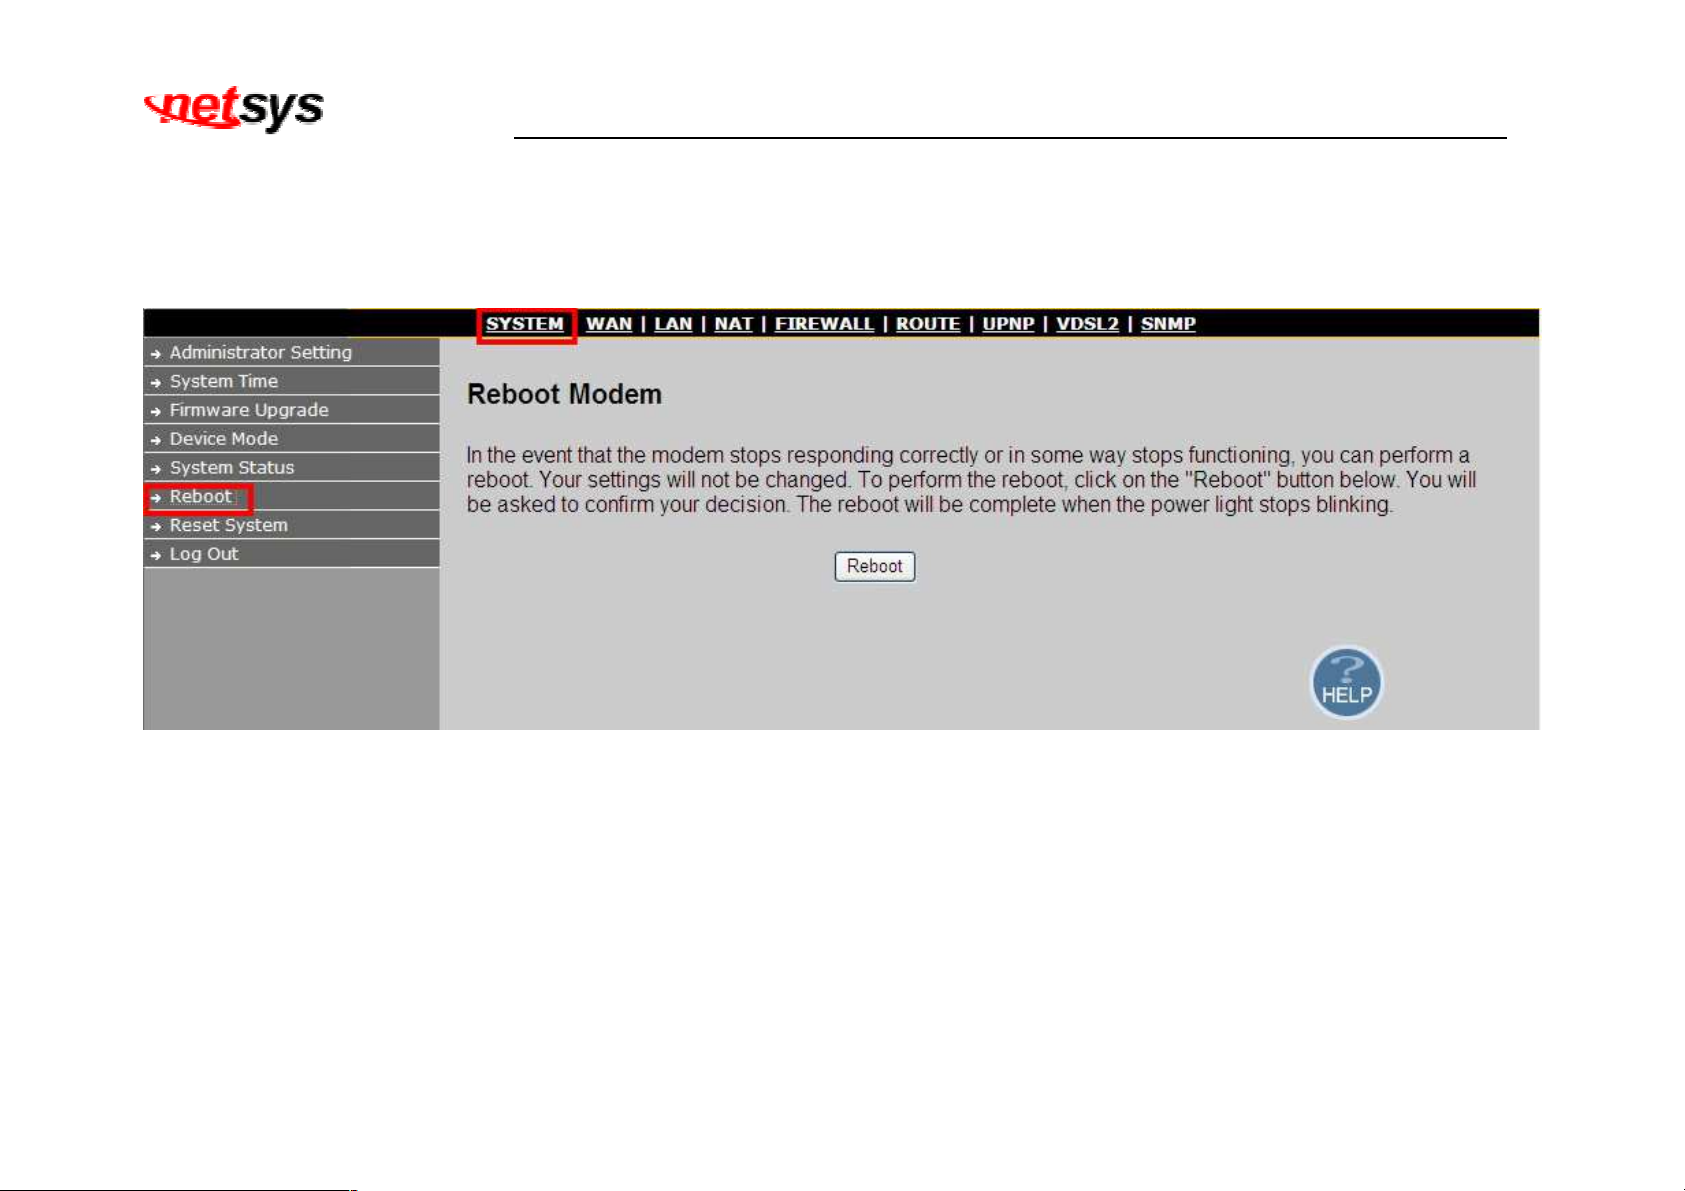
4.3.6 Reboot
To reboot the unit, click on the “Reboot” link in the left navigation bar. A screen is displayed as shown in Figure 4.3.6
Figure 4.3.6 Reboot
Click “Reboot” to restart the unit.
Wait at least 30 sec and refresh the web browser.
39
Page 41
NV-600LI/RI Managed Industrial Grade VDSL2 CO/CPE Router USER’S MANUAL Ver. A4
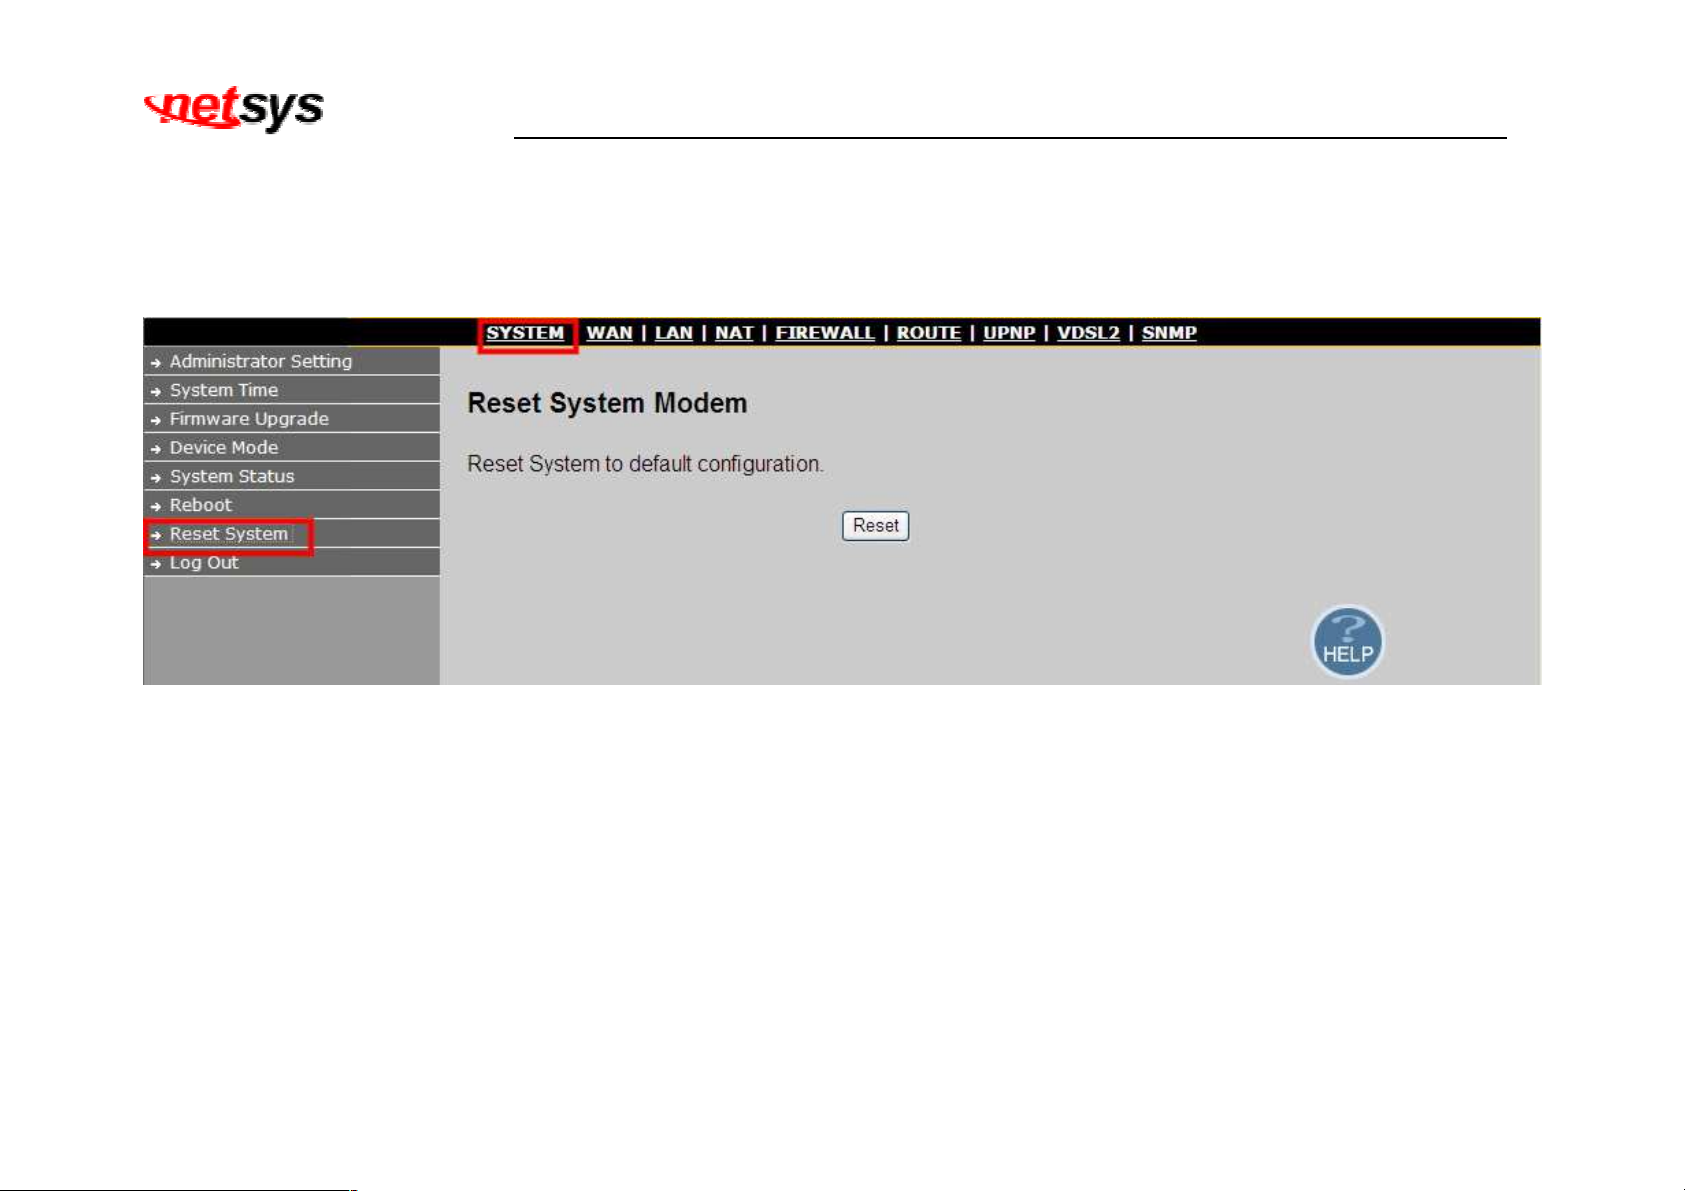
4.3.7 Reset System
To reset system to default, click on the “Reset System” link in the left navigation bar. A screen is displayed as shown in Figure
4.3.6
Figure 4.3.7 Reset NV-600LI/RI Router
Click Reset button to restart the system to default configuration.
After upgrade the firmware, and then automatically reboot.
All settings will be cleard, and return to the default IP(192.168.16.249 / 192.168.16.250)
4.3.8 Logout
User can quit the configuration page from web ui, please click on the “Log out” link in the left navigation bar.
40
Page 42
NV-600LI/RI Managed Industrial Grade VDSL2 CO/CPE Router USER’S MANUAL Ver. A4
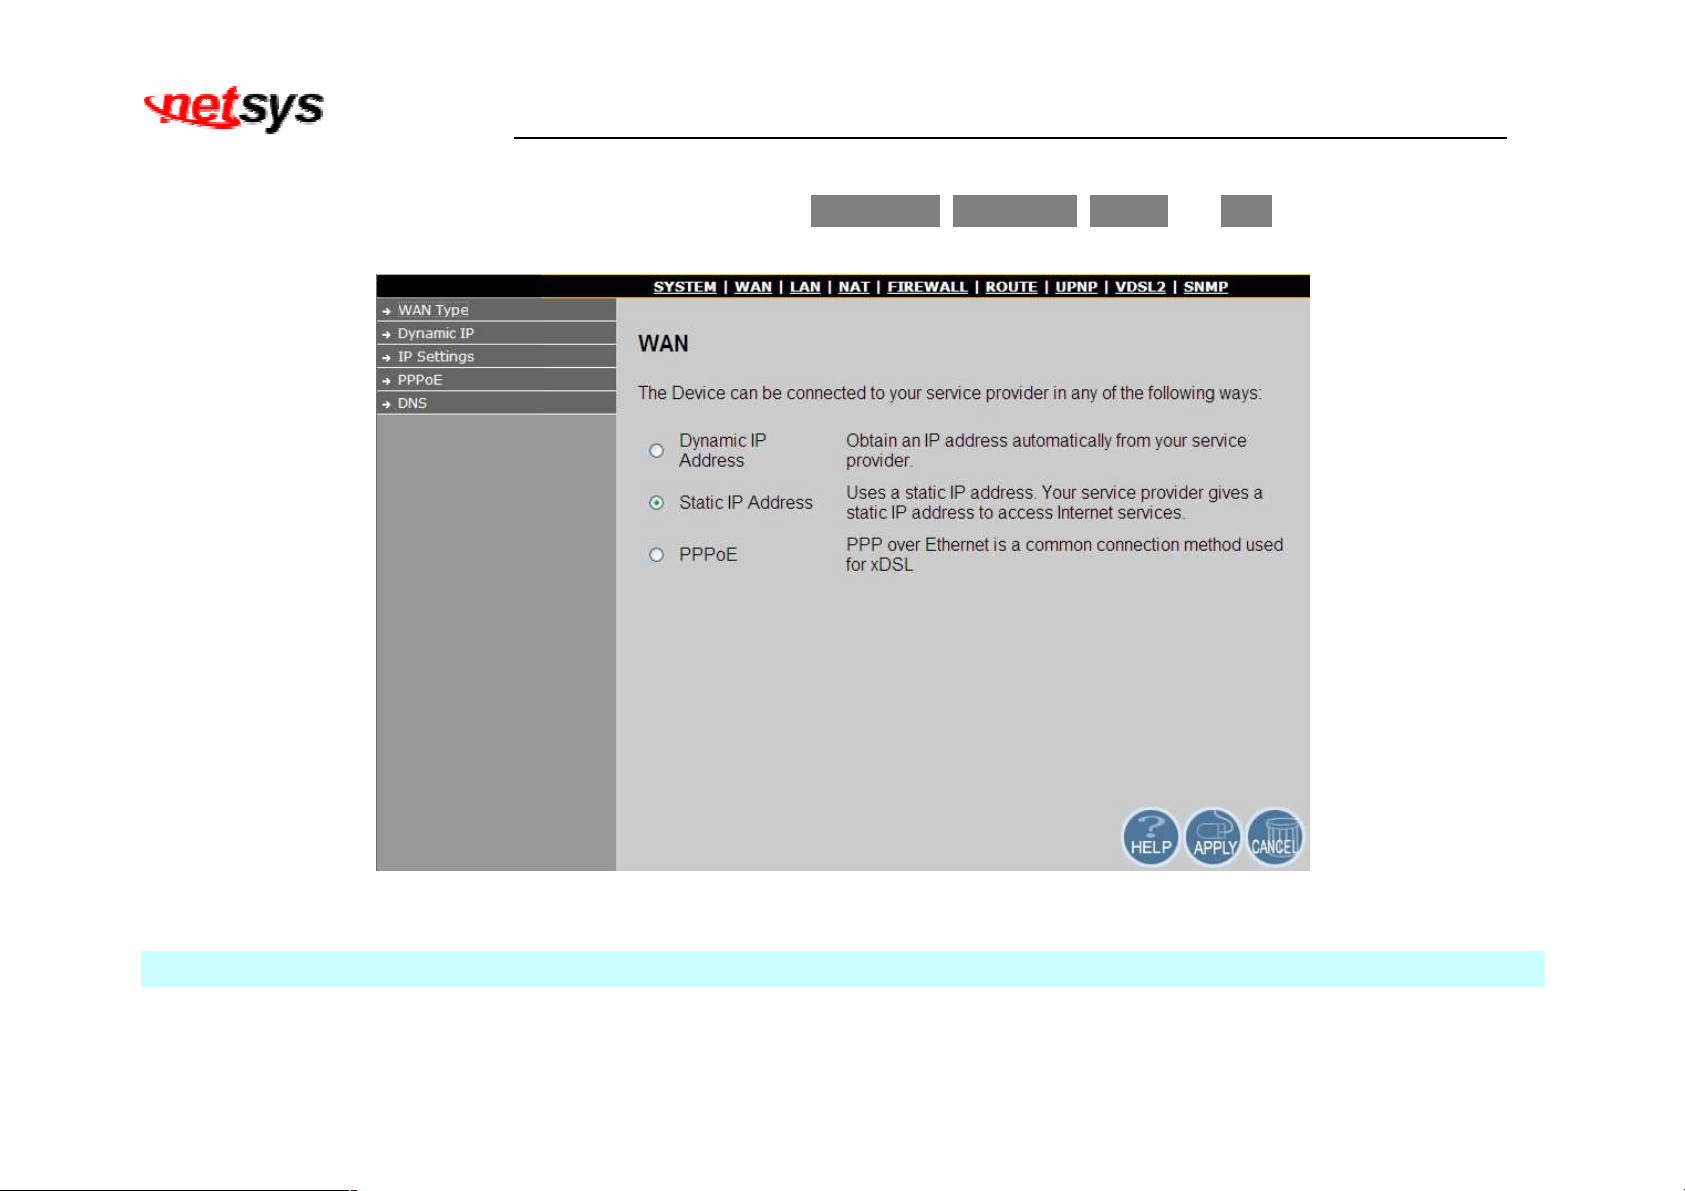
4.4 Select “WAN”
Select the “WAN”. The menu below includes the sub-menus of Dymanic IP, IP Settings, PPPoE and DNS. A screen is displayed as
shown in Figure 4.4.
Figure 4.4 WAN type in the left navigator bar
Note:
Please select the WAN mode you need.
41
Page 43
NV-600LI/RI Managed Industrial Grade VDSL2 CO/CPE Router USER’S MANUAL Ver. A4
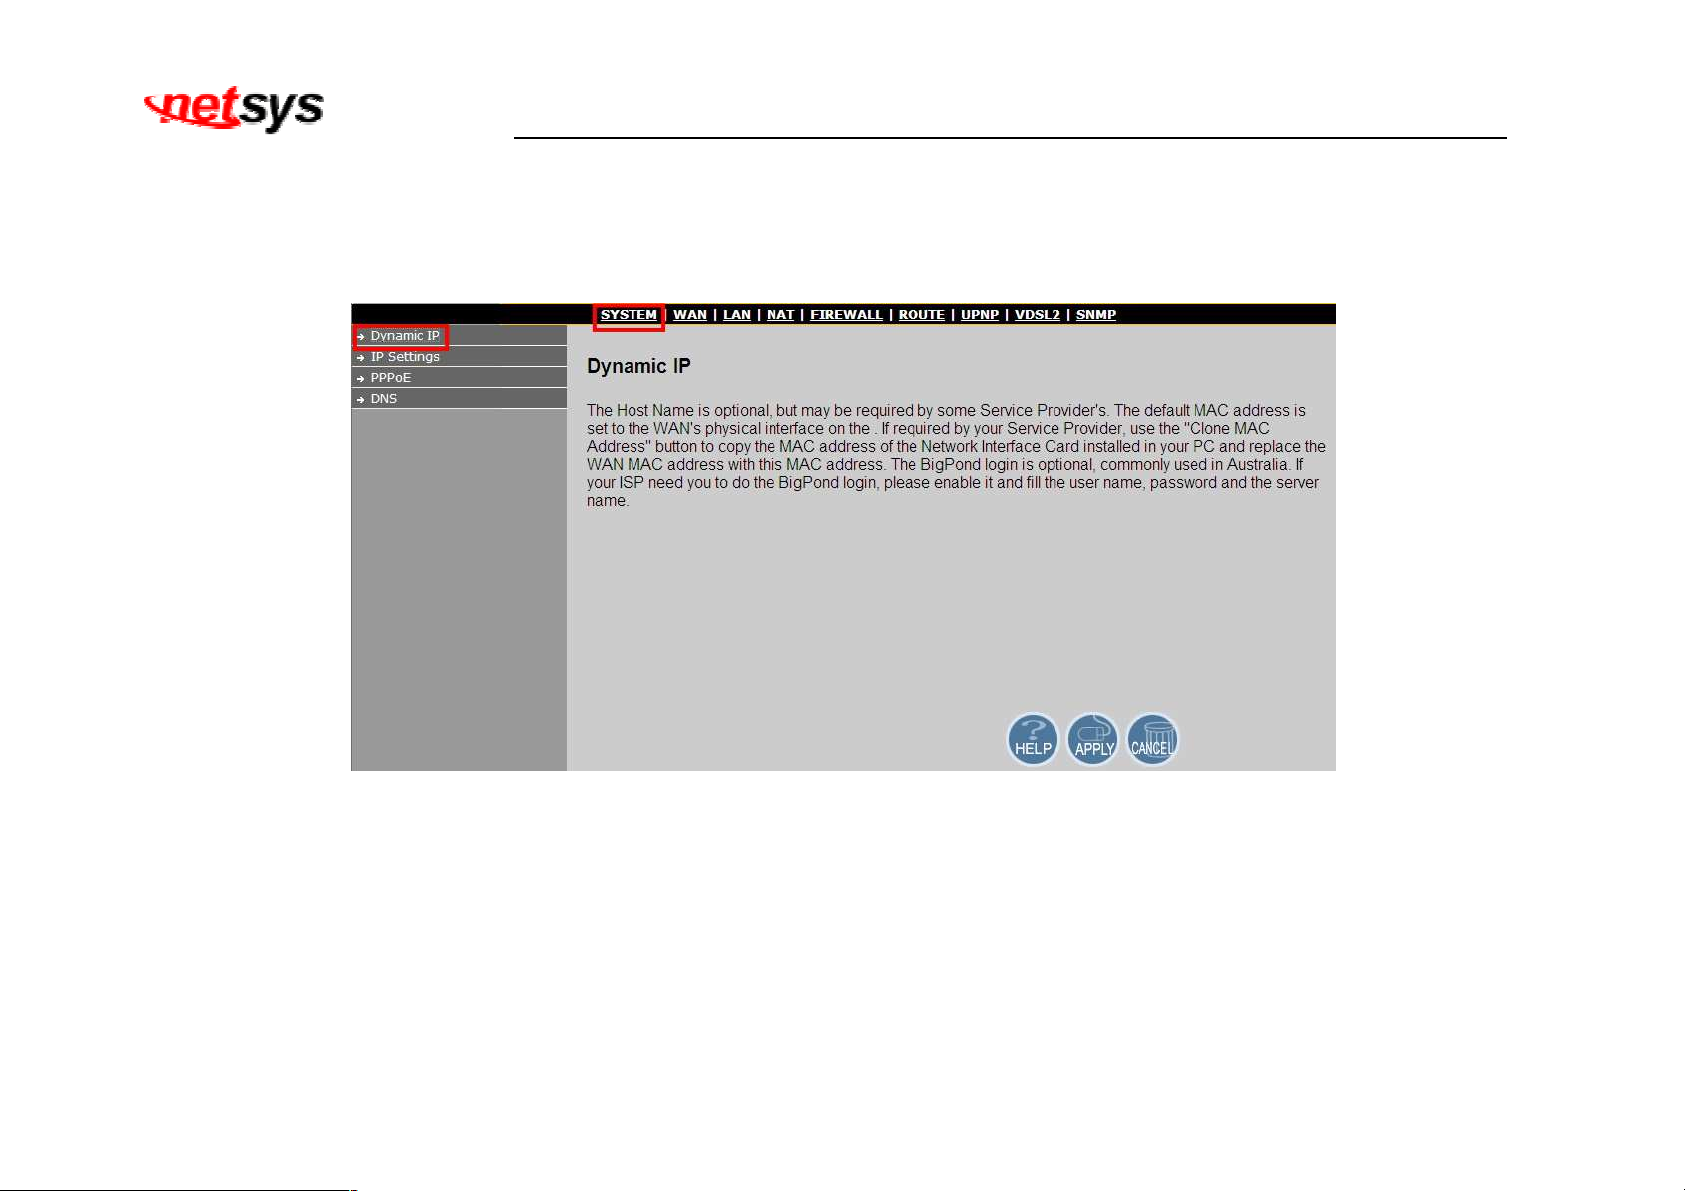
4.4.1 Dynamic IP
To configure the WAN interface to dynamically obtain an IP Address, click on the “Dynamic IP” link in the left navigation bar. A
screen is displayed as shown in Figure 4.4.1
Figure 4.4.1 Dynamic IP Configuration
The screen contains the following details:
Click APPLY to save the information that has been entered.
Click CANCEL to exit from this page.
42
Page 44
NV-600LI/RI Managed Industrial Grade VDSL2 CO/CPE Router USER’S MANUAL Ver. A4
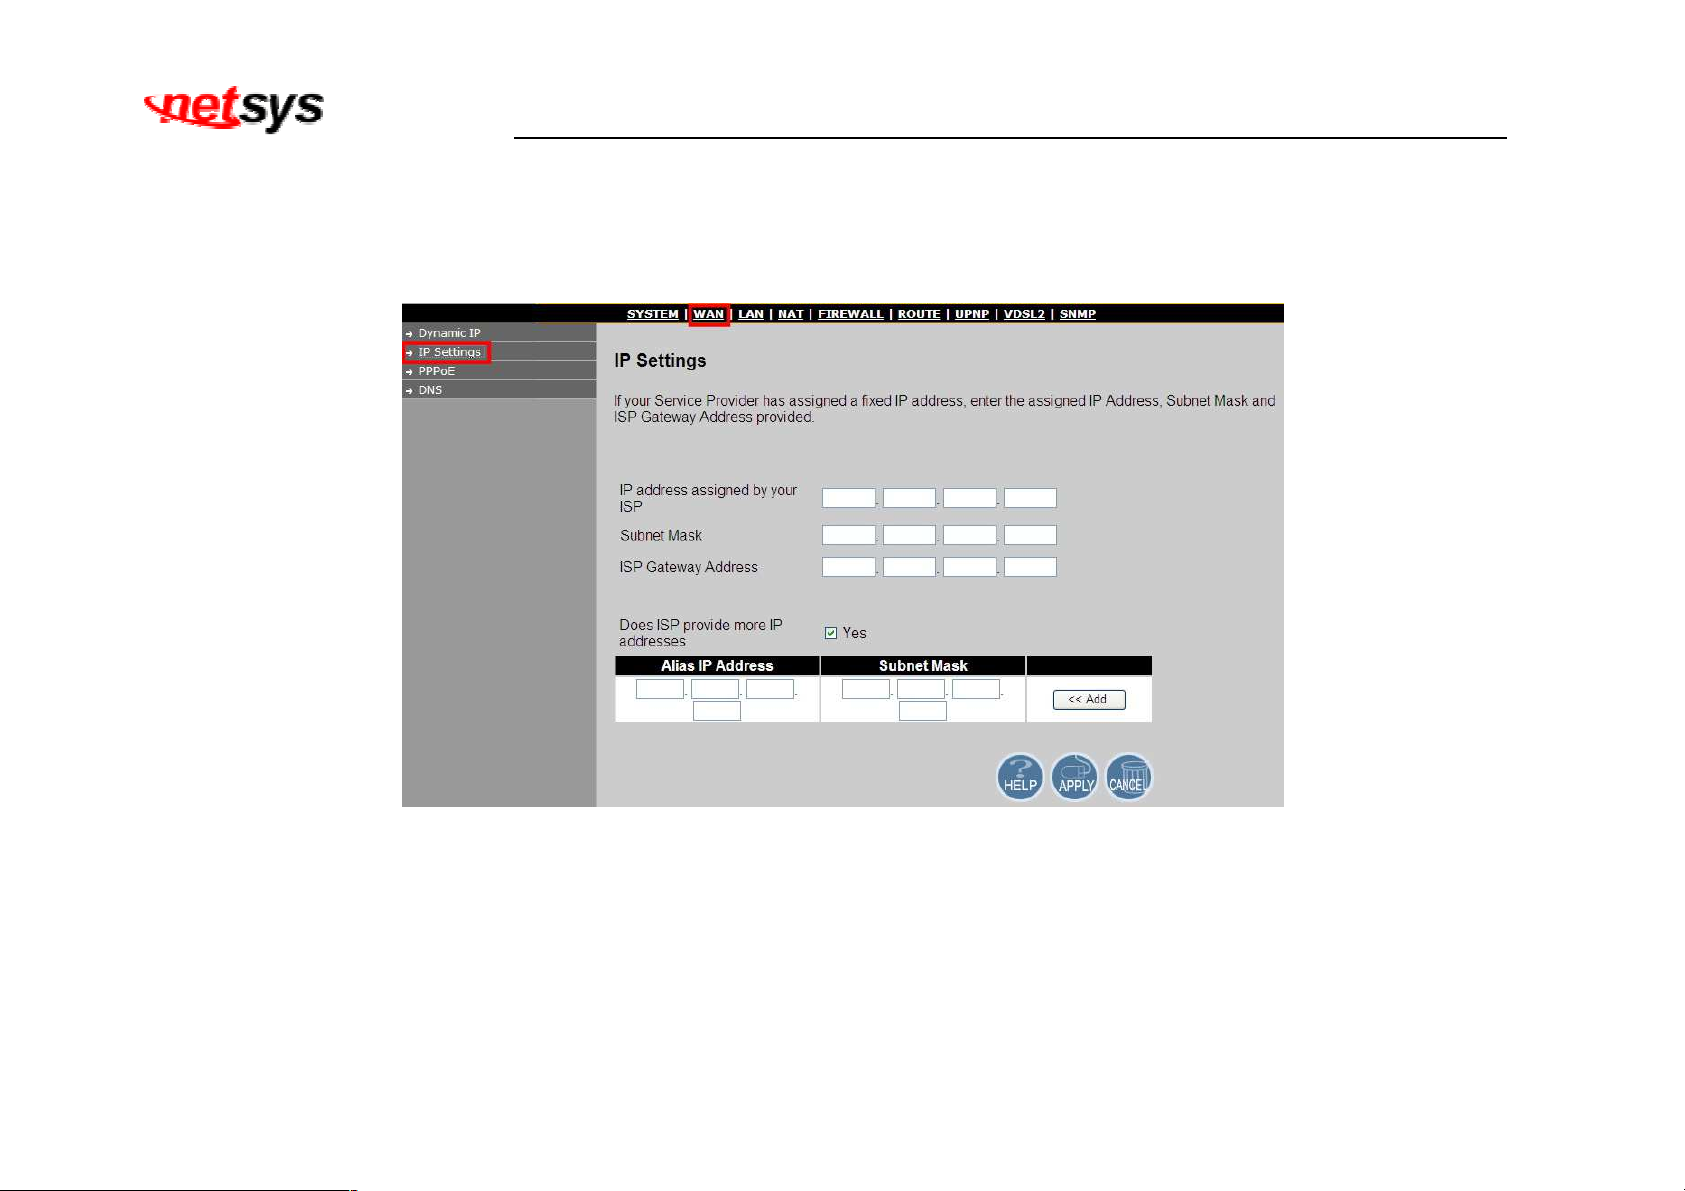
4.4.2 IP Settings
To configure the WAN interface to use a Static IP Address, click on the “Static IP” link in the left navigation bar. A screen is displayed
as shown in Figure 4.4.2
Figure 4.4.2 IP Settings Configuration
The screen contains the following details:
43
Page 45
NV-600LI/RI Managed Industrial Grade VDSL2 CO/CPE Router USER’S MANUAL Ver. A4
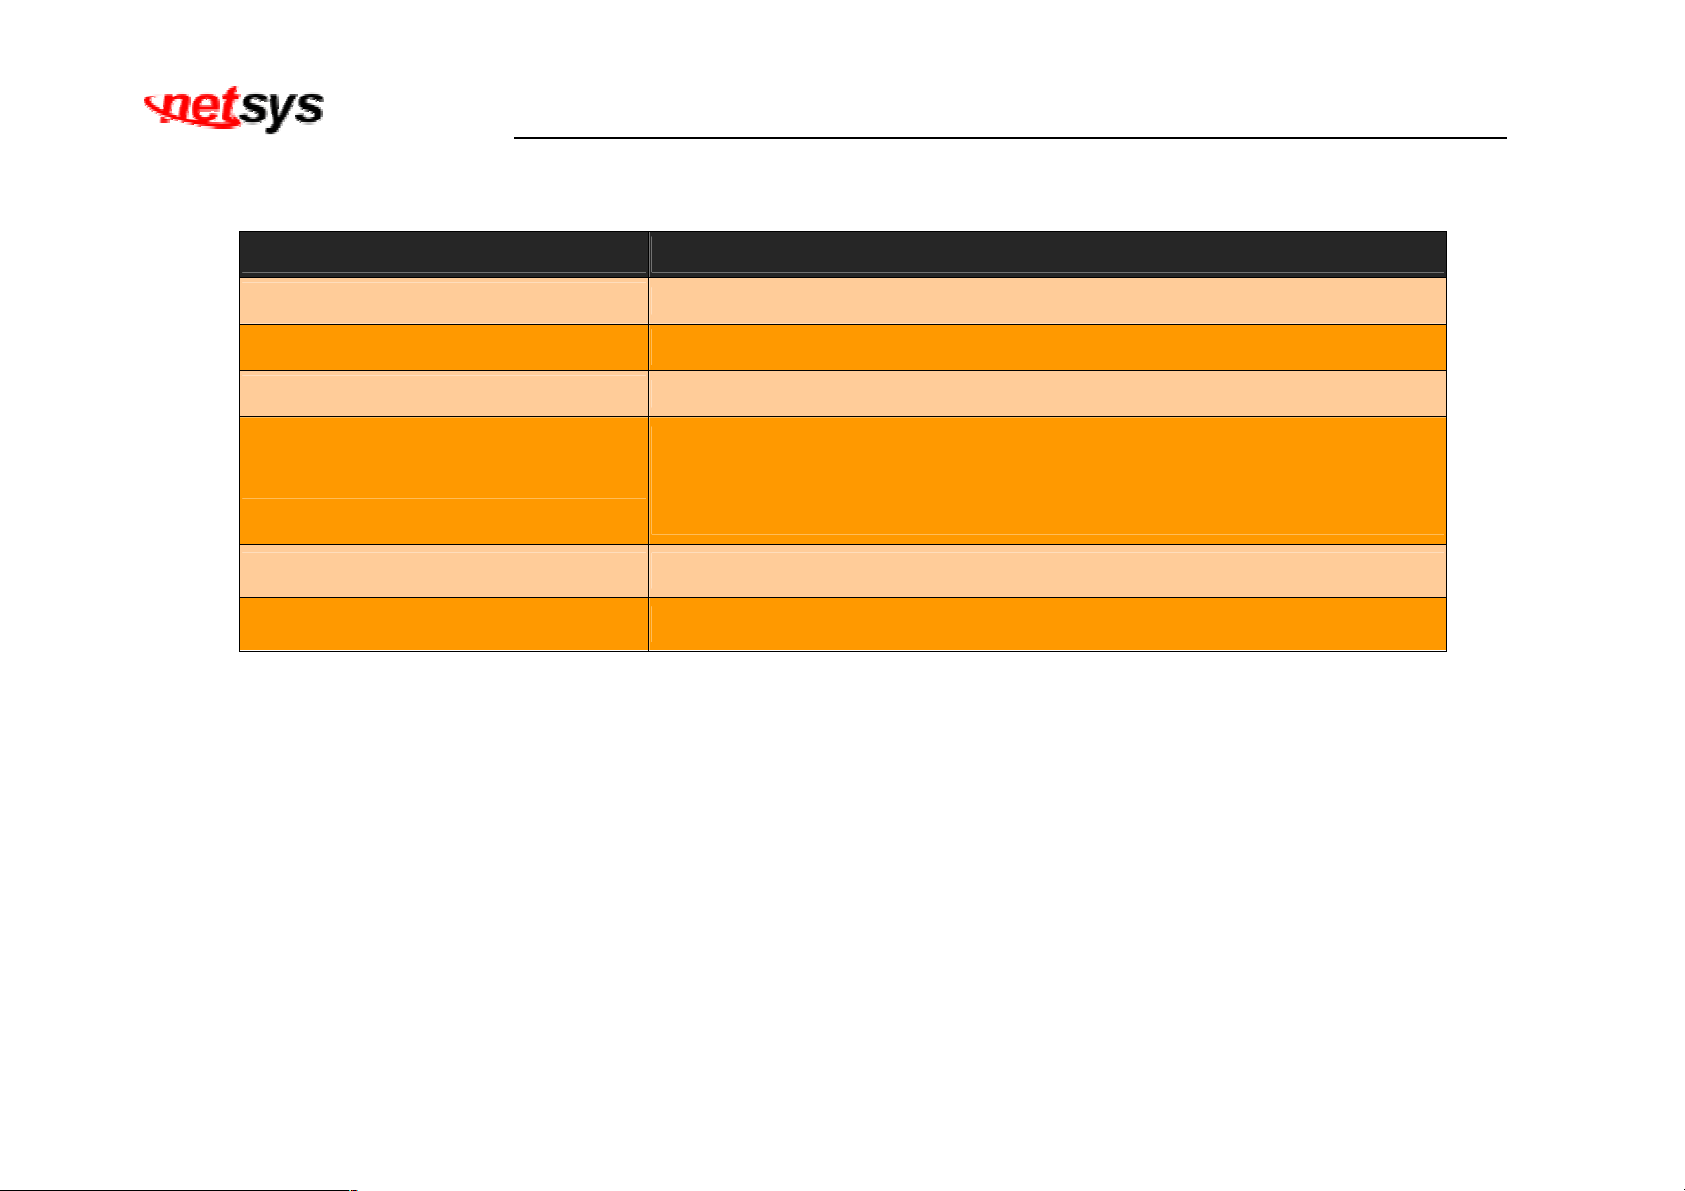
Fields in IP Settings:
Field Description
IP Address assigned by your ISP
Enter the IP Address of NV-600LI/RI.
Subnet Mask Enter the Subnet Mask of NV-600LI/RI.
ISP Gateway Address
Enter the Gateway address of the NV-600LI/RI.
Provides more IP Addresses of the WAN interface. Select the check
Does ISP provide more IP Address
box to enable this option. A screen is displayed as shown in Figure
4.4.2. Click Add to add IP Address and Subnet Mask.
Alias IP Address Enter the other IP address for ISP provide
Subnet Mask Enter the other Subnet Mask for ISP provide
• Click APPLY to save the information that has been entered.
• Click CANCEL to exit from this page without saving the changes.
44
Page 46
NV-600LI/RI Managed Industrial Grade VDSL2 CO/CPE Router USER’S MANUAL Ver. A4
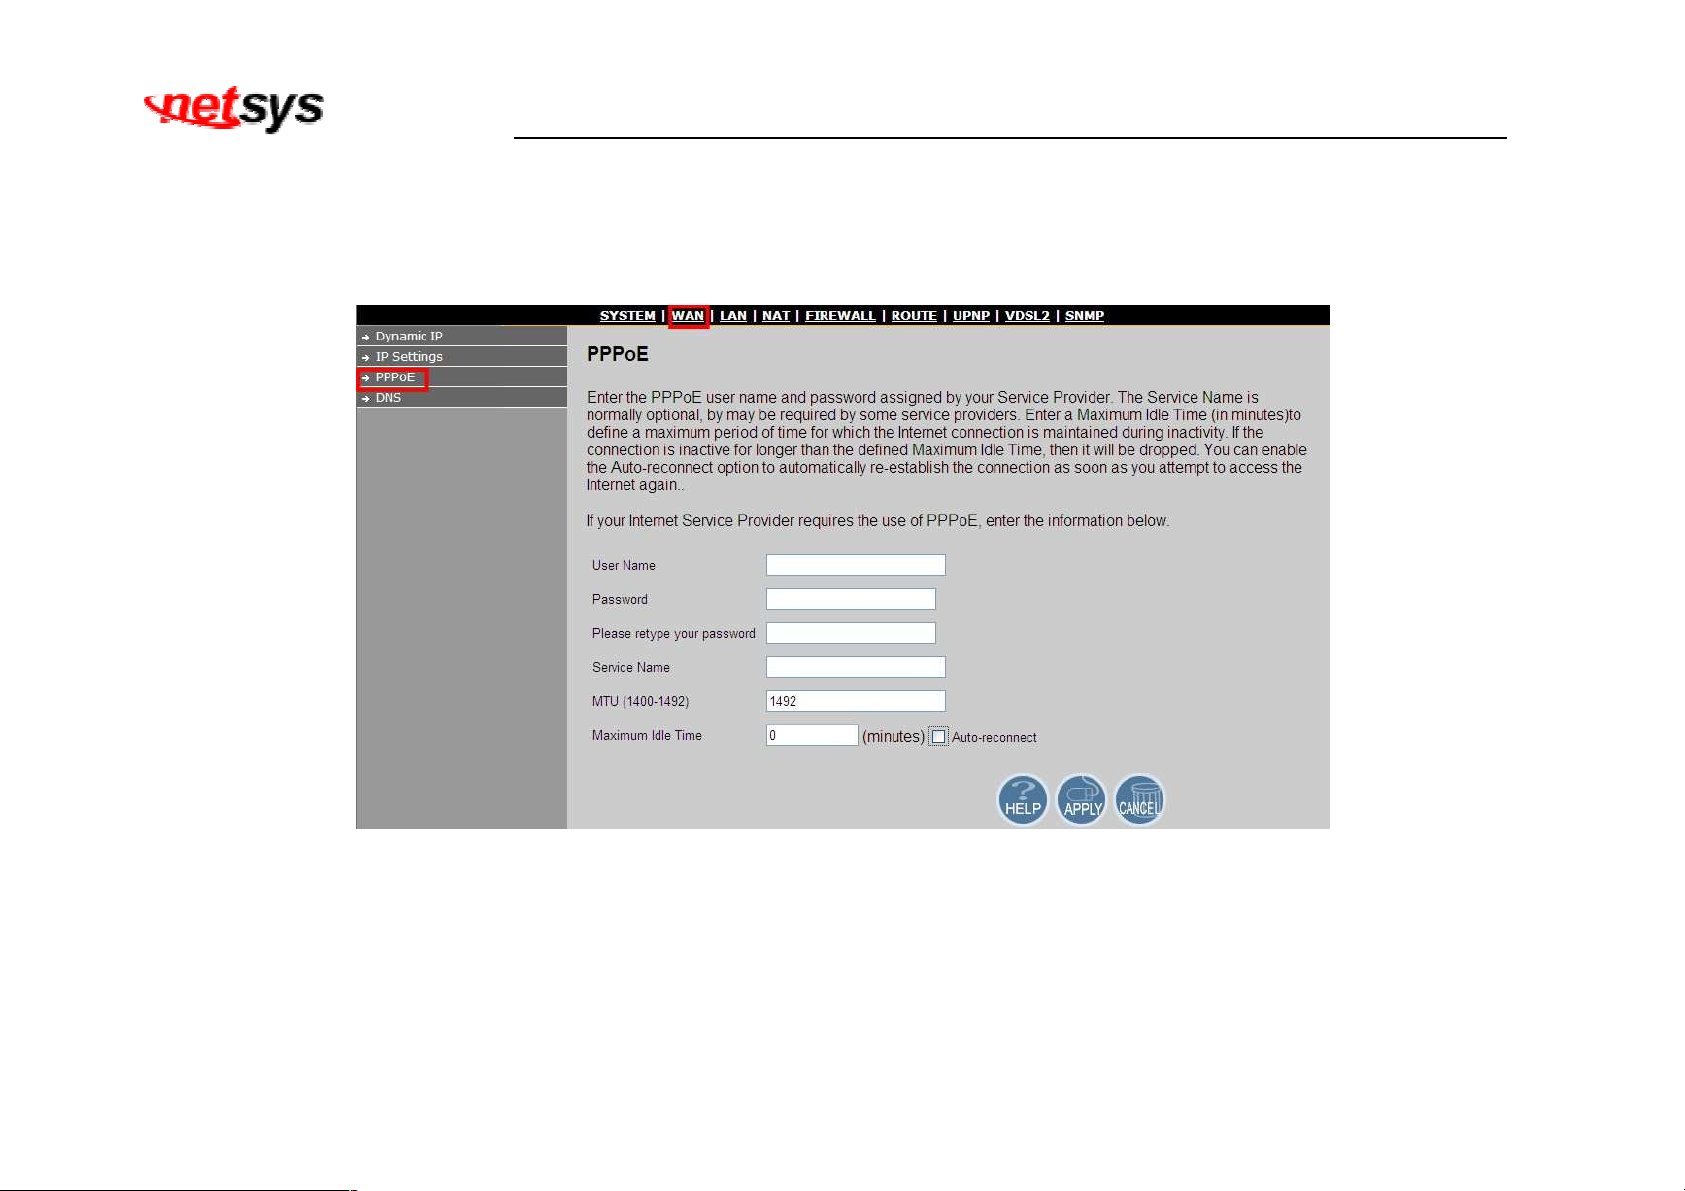
4.4.3 PPPoE
To configure the WAN interface to use PPPoE, click on the “PPPoE” link in the left navigation bar. A screen is displayed as shown in
Figure 4.4.3
Figure 4.4.3 PPPoE Configuration
The screen contains the following details:
45
Page 47
NV-600LI/RI Managed Industrial Grade VDSL2 CO/CPE Router USER’S MANUAL Ver. A4
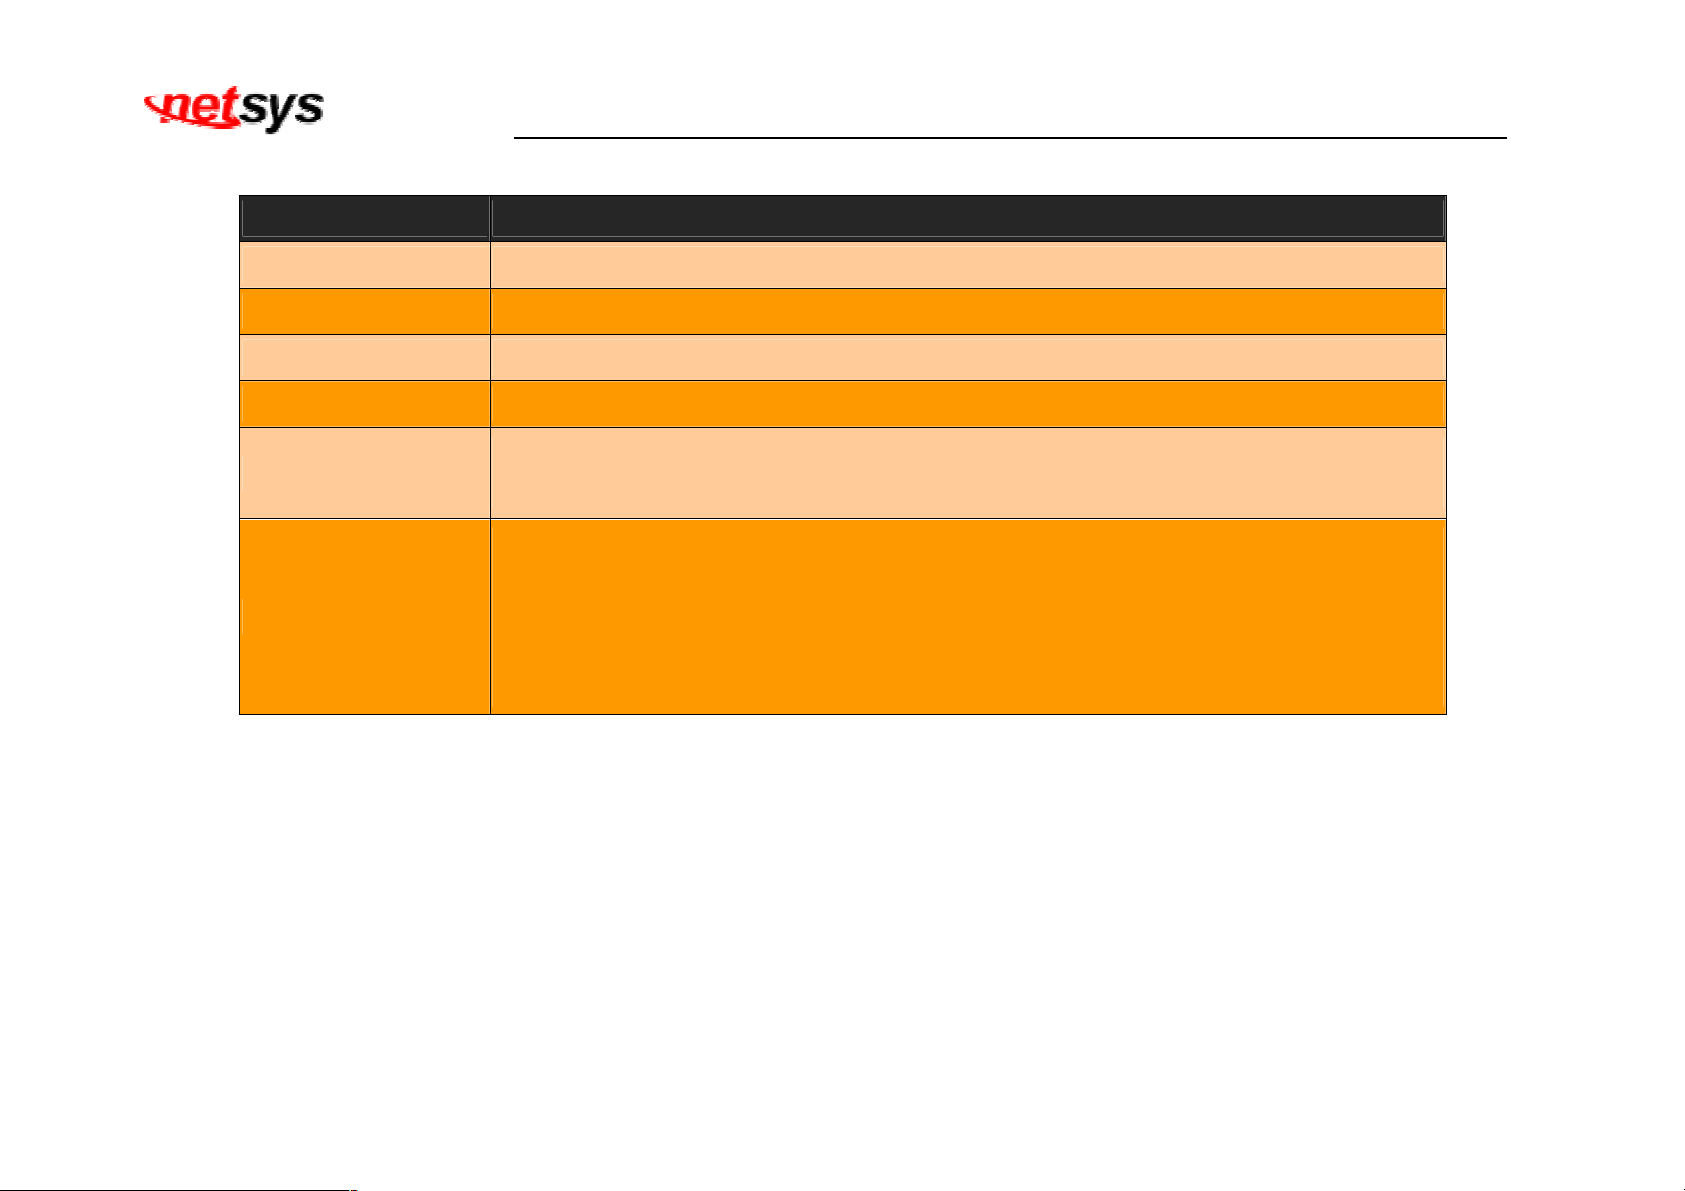
Fields in PPPoE:
Field Description
User Name Enter a name to use the PPPoE session. (50 characters maximum)
Password Enter the password of the login user. (50 characters maximum)
Retype Password Enter the password again to reconfirm. (50 characters maximum)
Service Name Enter a service name. (50 characters maximum)
MTU
Enter the maximum connection units of the PPPoE. The MTU range is 1400 to 1492
bytes. By default, it is 1492.
This is the period of time required to keep the connection alive if no packets are
transmitted. If no packets are transmitted between LAN port and WAN port or between
Maximum Idle Time
NV-600LI/RI and WAN, the connection is disconnected after the 'Maximum idle time.
If the Auto-reconnect check box is selected, the PPP connection is re-established if there
is some data that is received from the upper layers to be transmitted on this link.
• Click APPLY to save the information that has been entered.
• Click CANCEL to exit from this page without saving the changes.
The Point-to-Point Protocol over Ethernet (PPPoE) is a network protocol for encapsulating Point-to-Point Protocol (PPP) frames
inside Ethernet frames. It is used mainly with DSL services where individual users connect to the DSL modem over Ethernet and in
plain Metro Ethernet networks. It was developed by UUNET, Redback Networks and RouterWare (now Wind River Systems)
and is available as an informational RFC 2516.
46
Page 48
NV-600LI/RI Managed Industrial Grade VDSL2 CO/CPE Router USER’S MANUAL Ver. A4
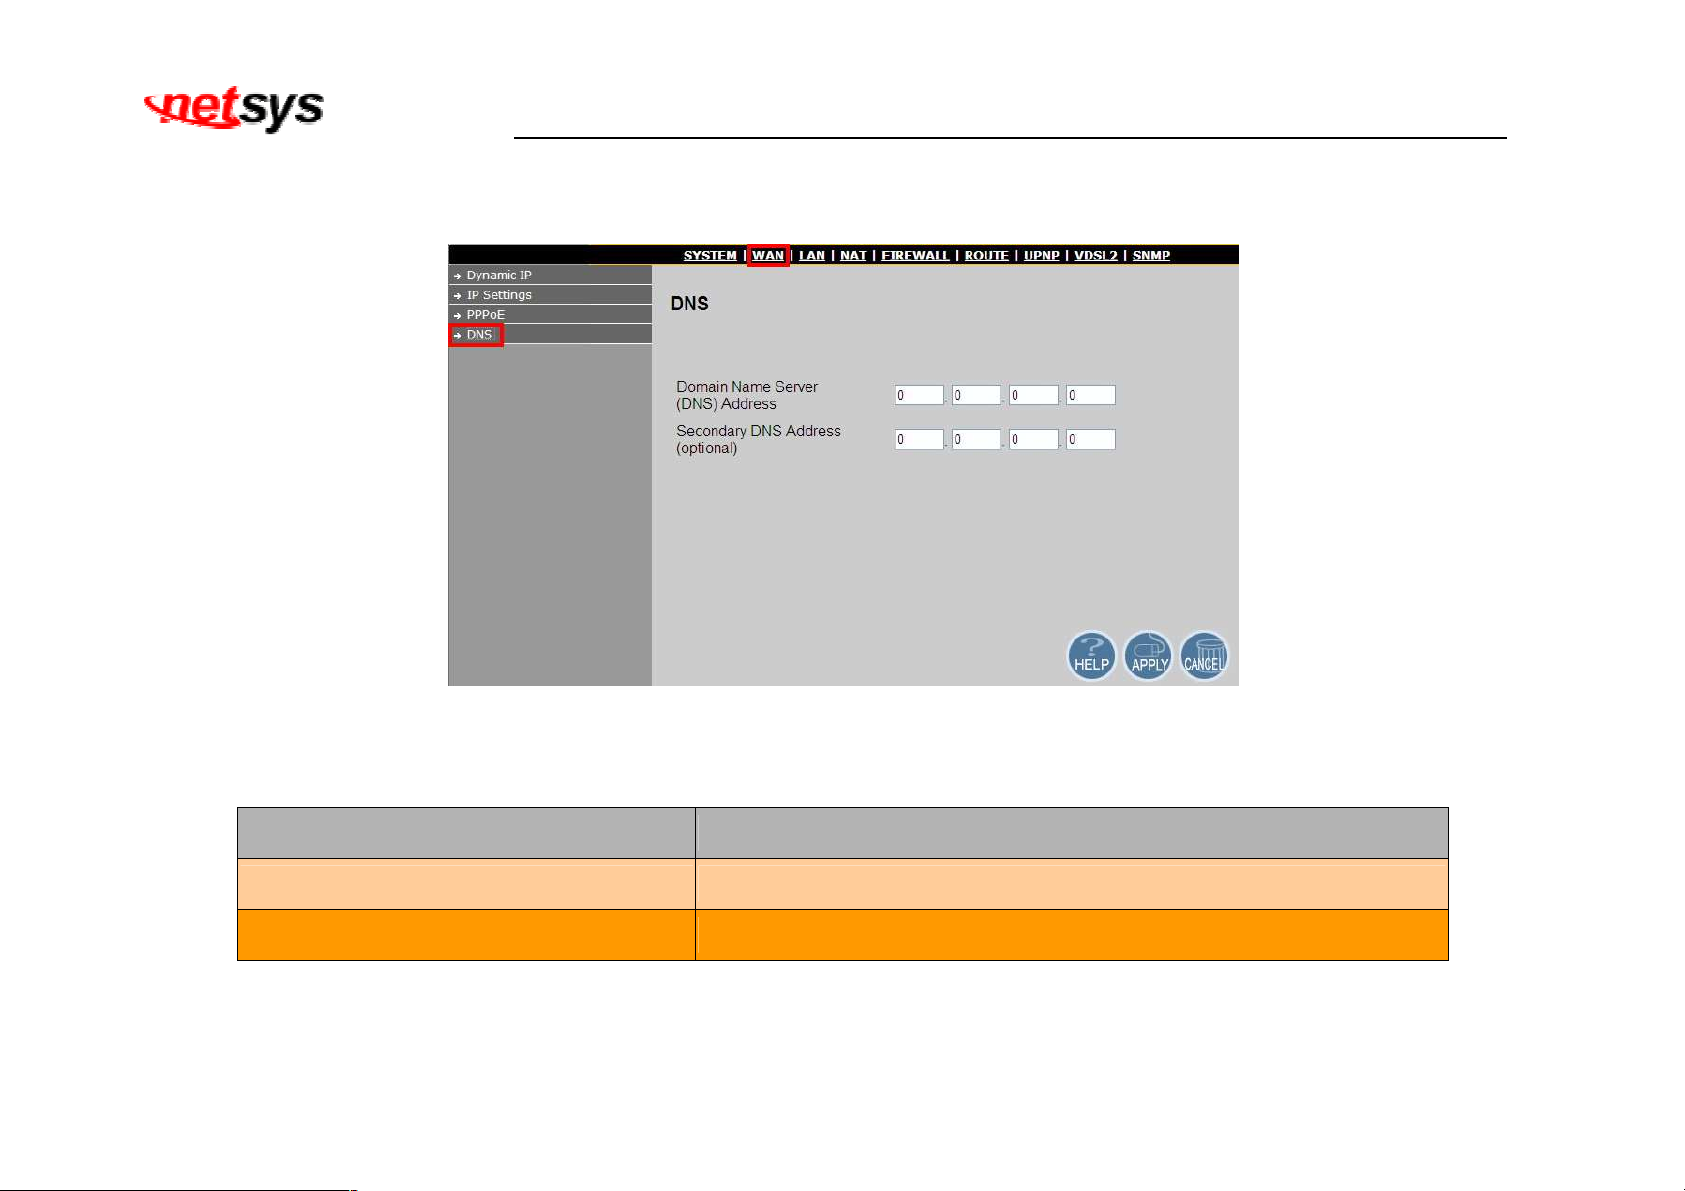
4.4.4 DNS
To configure the DNS address, click on the “DNS” link in the left navigation bar. A screen is displayed as shown in Figure 4.4.4
Figure 4.4.4 DNS Configuration
The screen contains the following details:
Fields in DNS:
Field Description
Domain Name Server(DNS) Address
Enter the DNS address of the primary DNS server.
Secondary DNS Address(optional) Enter the address of the secondary DNS server, if available.
• Click APPLY to save the information that has been entered.
• Click CANCEL to exit from this page without saving the changes.
47
Page 49
NV-600LI/RI Managed Industrial Grade VDSL2 CO/CPE Router USER’S MANUAL Ver. A4
4.5 Select “LAN”
The menu below will not be used very often, but when connecting the NV-600LI/RI to a new control PC, one may want to go
through the following steps in order to make the IP address previously set by ifconfig in the console or on some later occasion
one may want to change it again without using the console then the menu below will be helpful. In order to set the IP address,
click on “LAN Settings”.
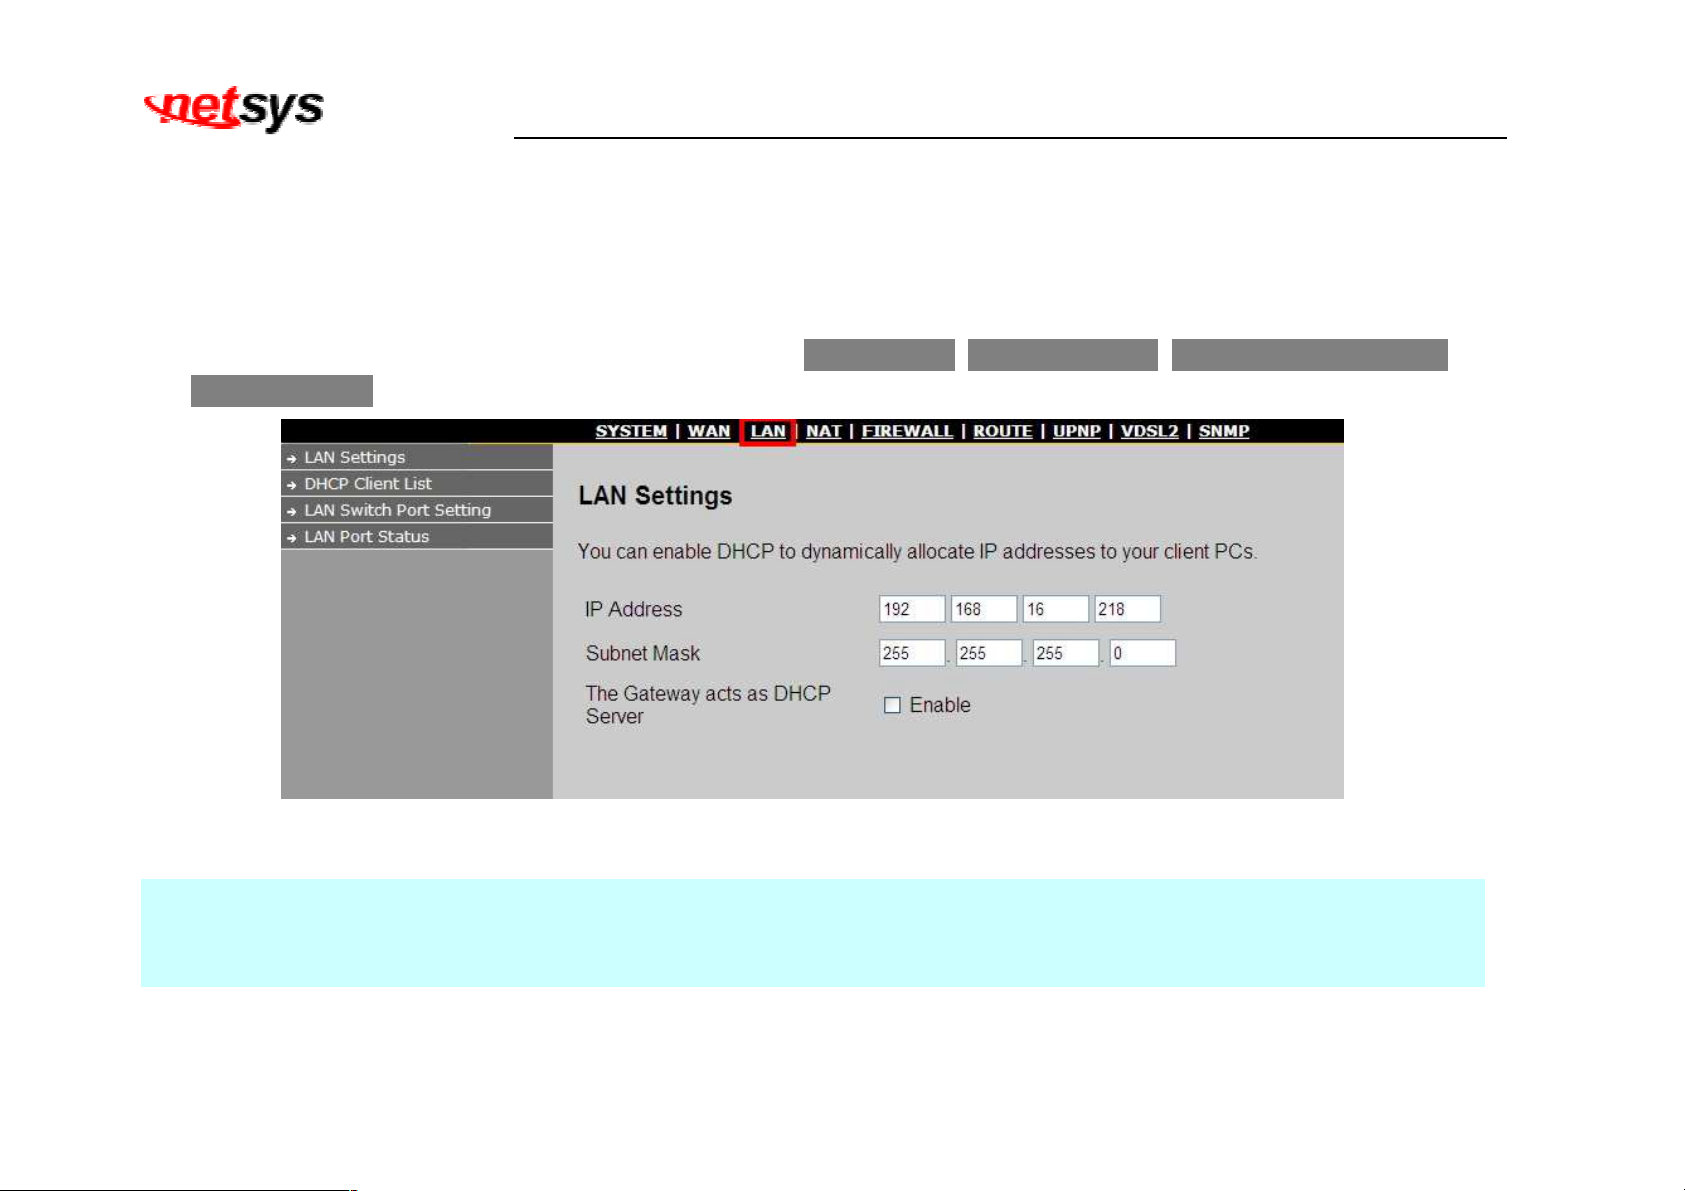
Select the “LAN”. The menu below includes the sub-menus of LAN Settings, DHCP Client List, LAN Switch Port Setting
and LAN Port Status. A screen is displayed as shown in Figure 4.5.
Figure 4.5 Select LAN
Note:
The settings in the Section 4.5 only need to be performed in order to change LAN settings. Such a change may be necessary
when connecting the NV-600LI/RI to a new control PC and/or in order to turn the IP address changed via a shell command into
a default address for the next restart of the board.
48
Page 50
NV-600LI/RI Managed Industrial Grade VDSL2 CO/CPE Router USER’S MANUAL Ver. A4
4.5.1 Select LAN Settings and set the IP Address
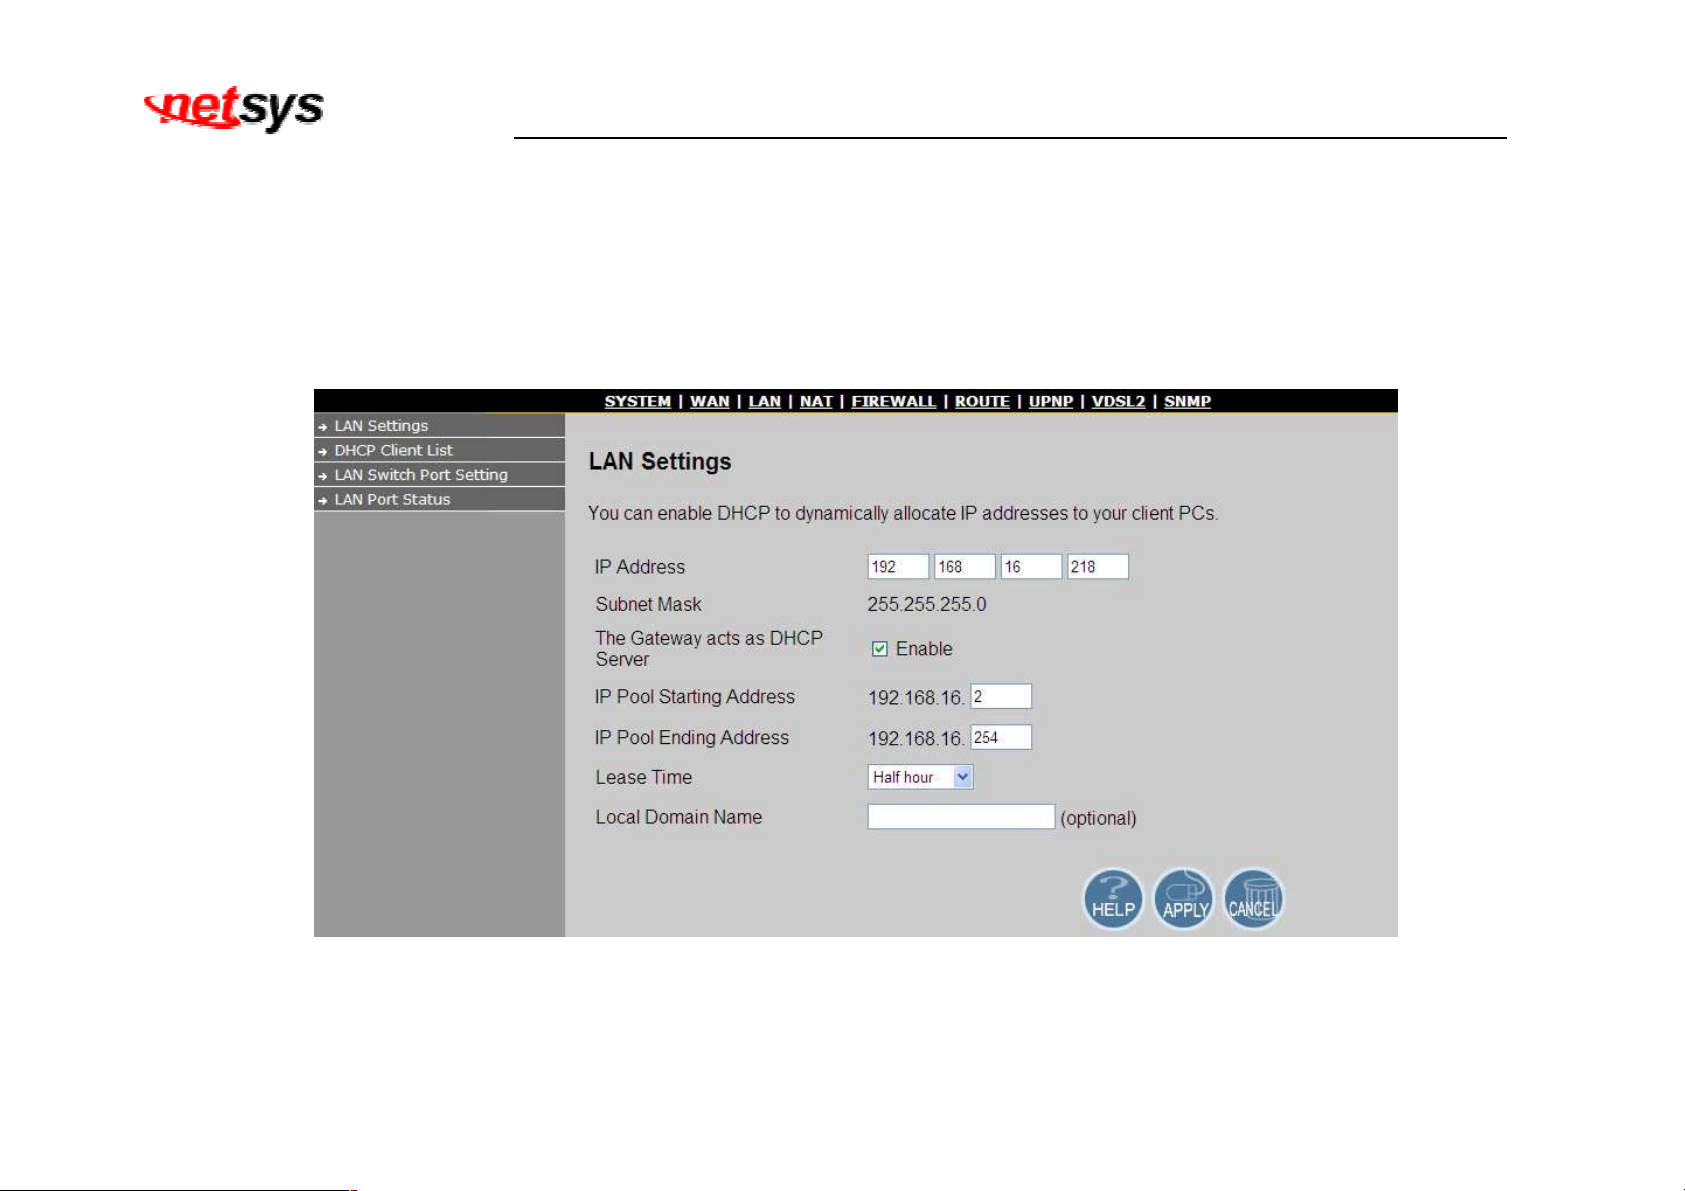
The form below is used to change the IP address of the LAN port “adm0” in the NV-600LI/RI.
The proposed IP address is either the default address of adm0 or it is the address changed by an ifconfig command via the shell
running in the terminal. The Subnet Mask display can be ignored. In case the DHCP checkbox is checked, some additional data and
options will be on display. The DHCP server is not required to work with VDSL2 in a lab environment. It recommend to uncheck the
box if it is not unchecked already. A screen is displayed as shown in Figure 4.5.1
Figure 4.5.1 LAN Settings
49
Page 51
NV-600LI/RI Managed Industrial Grade VDSL2 CO/CPE Router USER’S MANUAL Ver. A4
Now the IP address either may be changed or left as it is. If it has been changed in the form or after it has been
changed through console ifconfig command, it needs to be “APPLY” in order to make the displayed IP address new
default address.
Note:
For the NV-600LI/RI it is recommended to select a simple IP setting suitable to controlled lab environments. Set a static IP
address and don’t use DHCP.
The screen contains the following details:
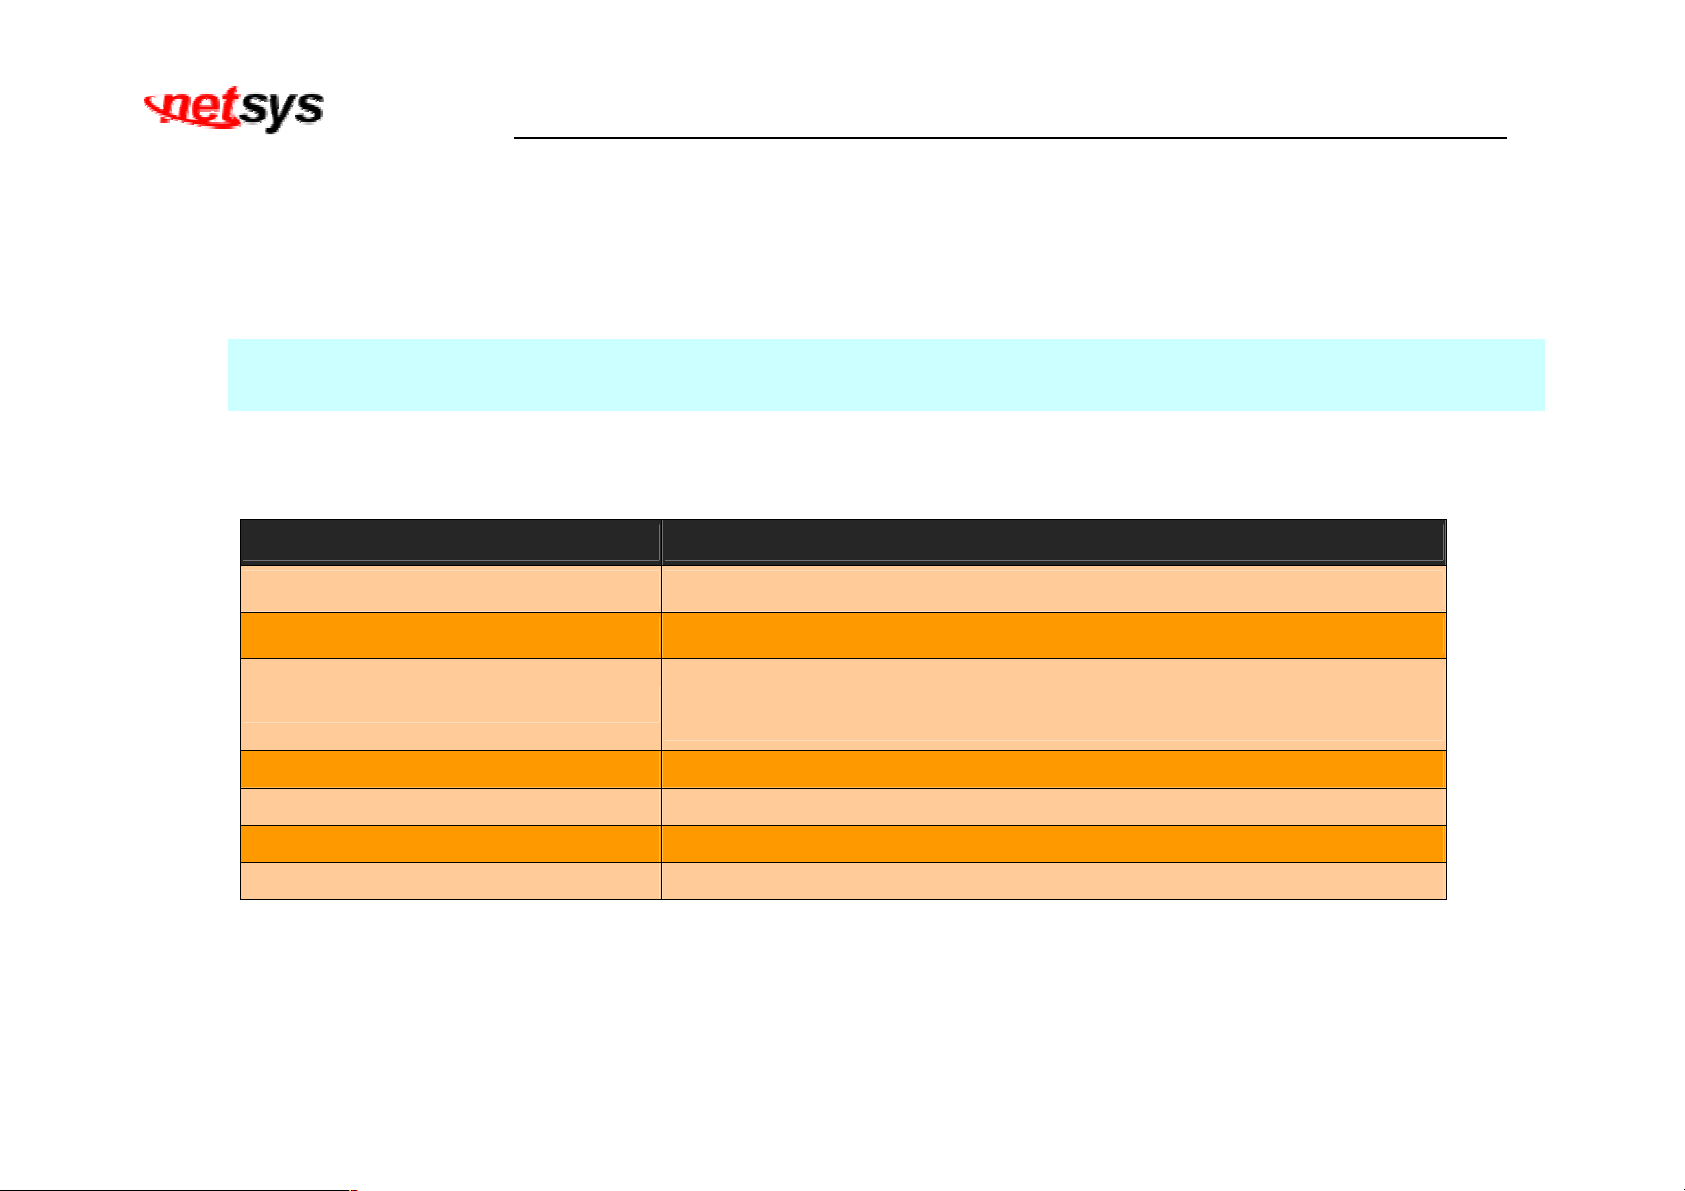
Fields in LAN Settings:
Field Description
IP Address Enter the LAN interface IP Address of NV-600LI/RI. (Web IP)
Subnet Mask Enter the LAN Subnet Mask of NV-600LI/RI.
The Gateway acts as DHCP Server
Enable or disables the DHCP Server of the NV-600LI/RI. Select the
check-box to enable this option.
IP Pool Starting Address Enter the starting IP Pool Address.
IP Pool Ending Address Enter the ending IP Pool Address.
Lease Time Enter the Lease Time from half hour to two weeks.
Local Domain Name Enter the Local Domain Name but is optional.
• Click APPLY to save the information that has been entered.
• Click CANCEL to exit from this page without saving the changes.
50
Page 52
NV-600LI/RI Managed Industrial Grade VDSL2 CO/CPE Router USER’S MANUAL Ver. A4
4.5.2
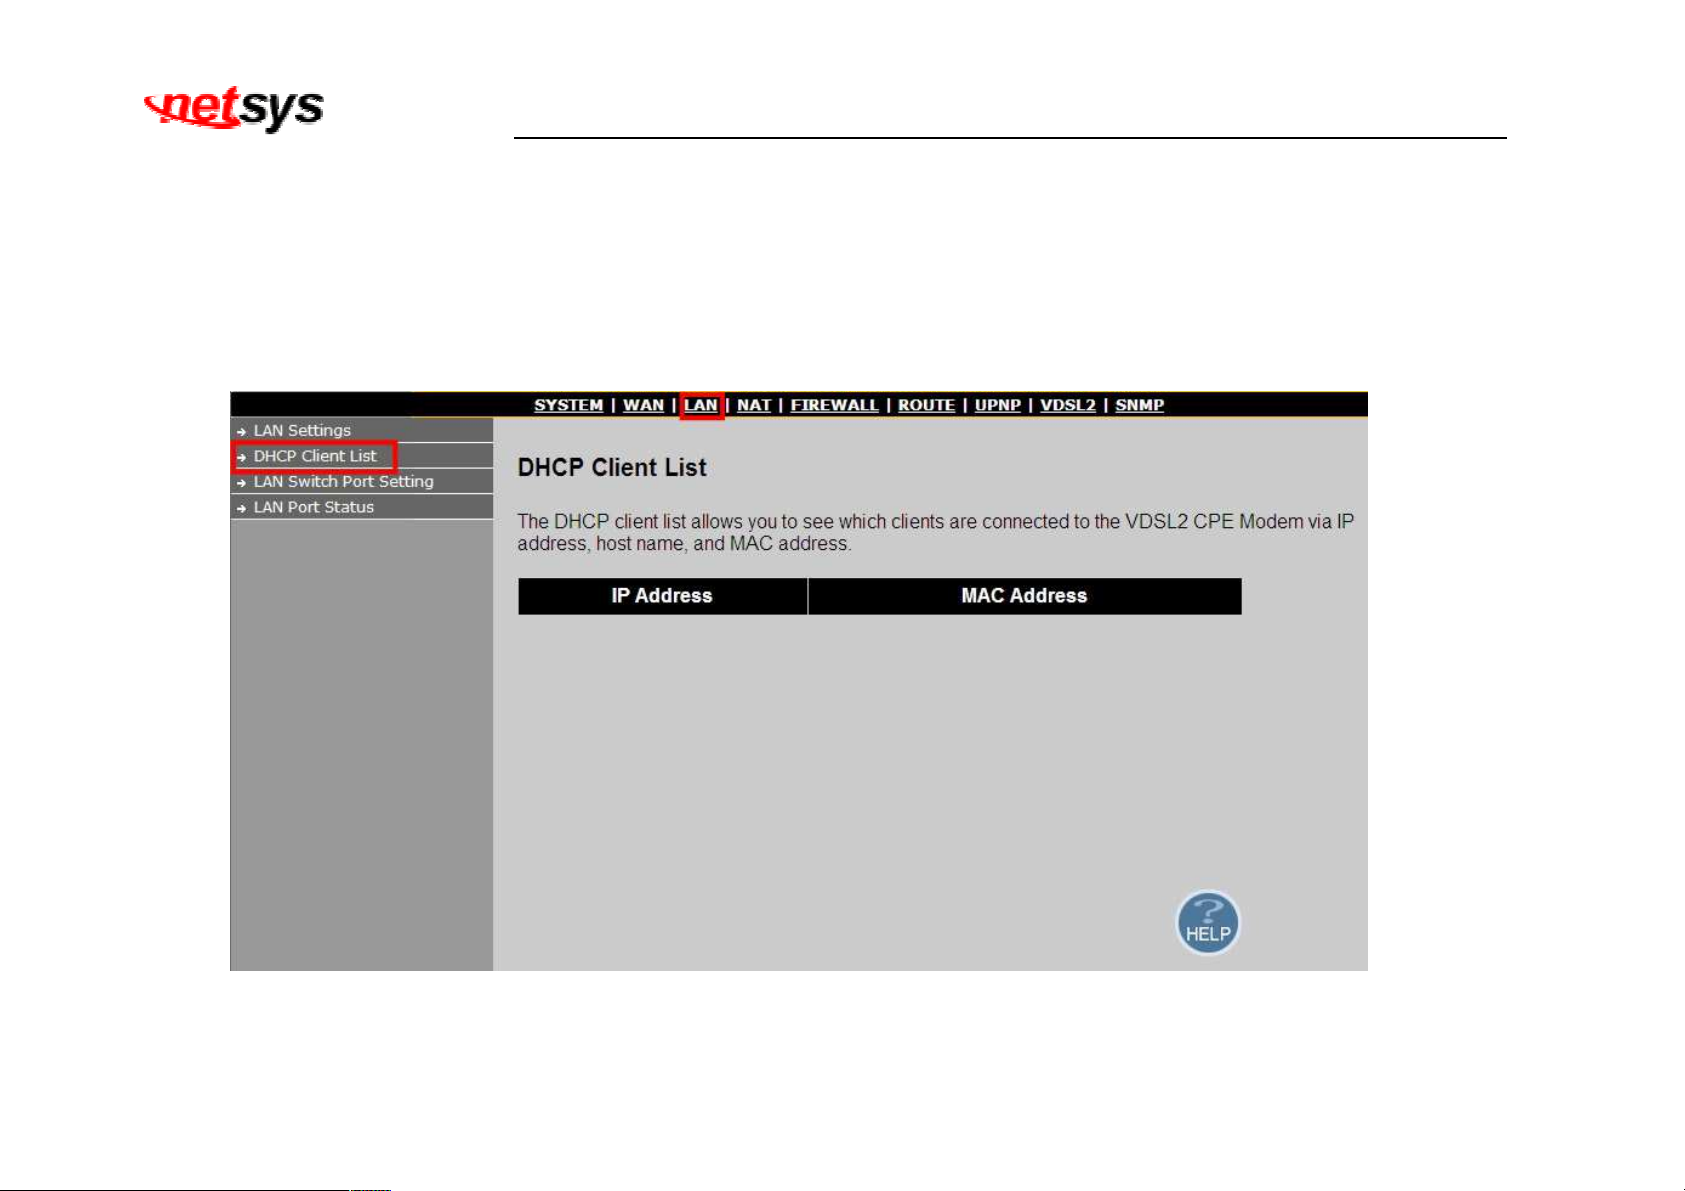
DHCP Client List
The DHCP client list allows you to see which clients are connected to the VDSL2 CPE Modem via IP address, host name, and MAC
address. To view the DHCP client list, click on the “DHCP Client List” link in the left navigation bar. A screen is displayed to list all
DHCP client connection with IP Address and MAC Address as shown in Figure 4.5.2
Figure 4.5.2 DHCP Client List
51
Page 53
NV-600LI/RI Managed Industrial Grade VDSL2 CO/CPE Router USER’S MANUAL Ver. A4
4.5.3
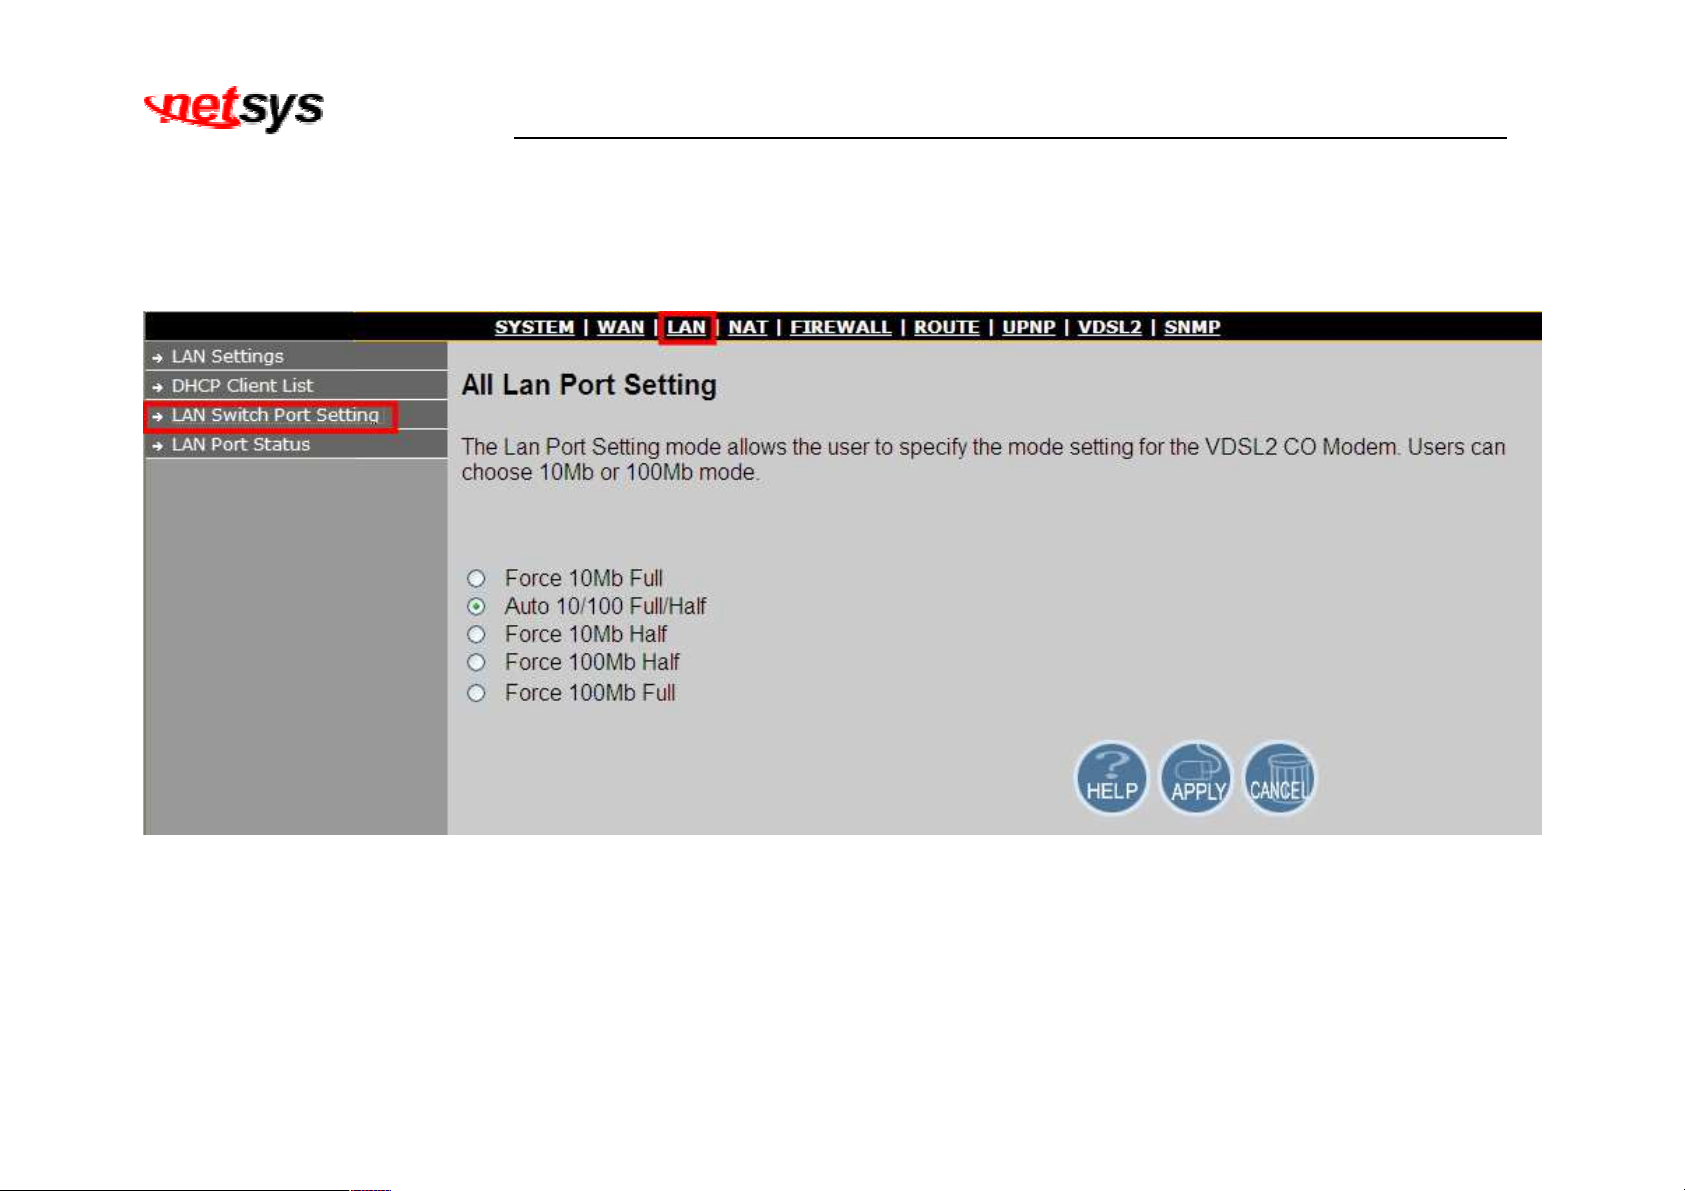
LAN Switch Port Setting
To view the All LAN Port Setting, click on the “Lan Switch Port Setting” link in the left navigation bar. A screen is displayed to all
LAN Port Setting as shown in Figure 4.5.3
Figure 4.5.3 LAN Switch Port Setting
• Default value is “Auto 10/100 Full/Half”.
• Click APPLY to save the information that has been entered.
• Click CANCEL to exit from this page without saving the changes.
52
Page 54
NV-600LI/RI Managed Industrial Grade VDSL2 CO/CPE Router USER’S MANUAL Ver. A4
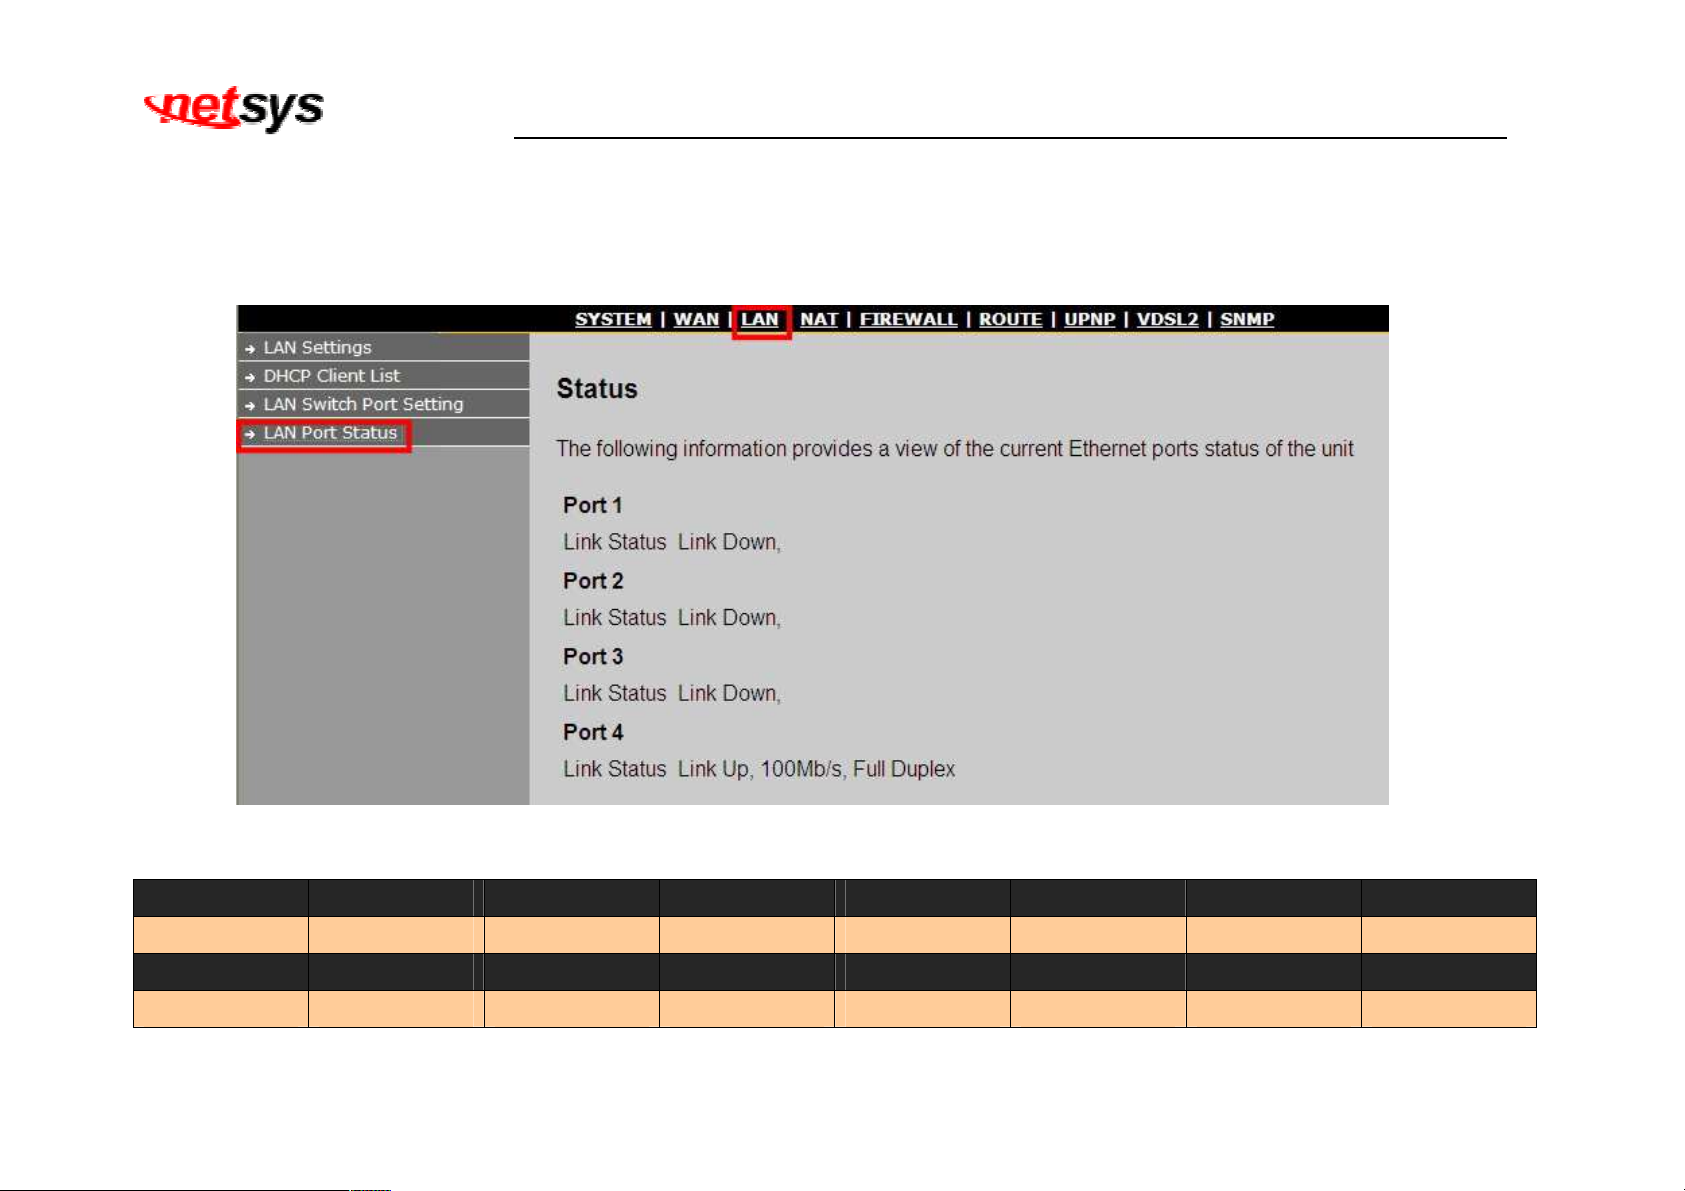
4.5.4
LAN Port Status
To view the All LAN Port Status, click on the “Lan Port Status” link in the left navigation bar.The following information provides a
view of the current Ethernet ports status of the unit. A screen is displayed to Status as shown in Figure 4.5.4
Figure 4.5.4 LAN Port Status
Example Table:
Input 1 Output 1 Input 2 Output 2 Input 3 Output 3 Input 4 Output 4
NWAY 10M Full
10M Full Force 10M Full 10M Half None Link Down NWAY 10M Half
10M Half
Input 5 Output 5 Input 6 Output 6 Input 7 Output 7 Input 8 Output 8
NWAY 100M Half
100M Half Force 100M Full
100M Half Auto 100M Full 100M full Auto 100M FULL
53
Page 55
NV-600LI/RI Managed Industrial Grade VDSL2 CO/CPE Router USER’S MANUAL Ver. A4
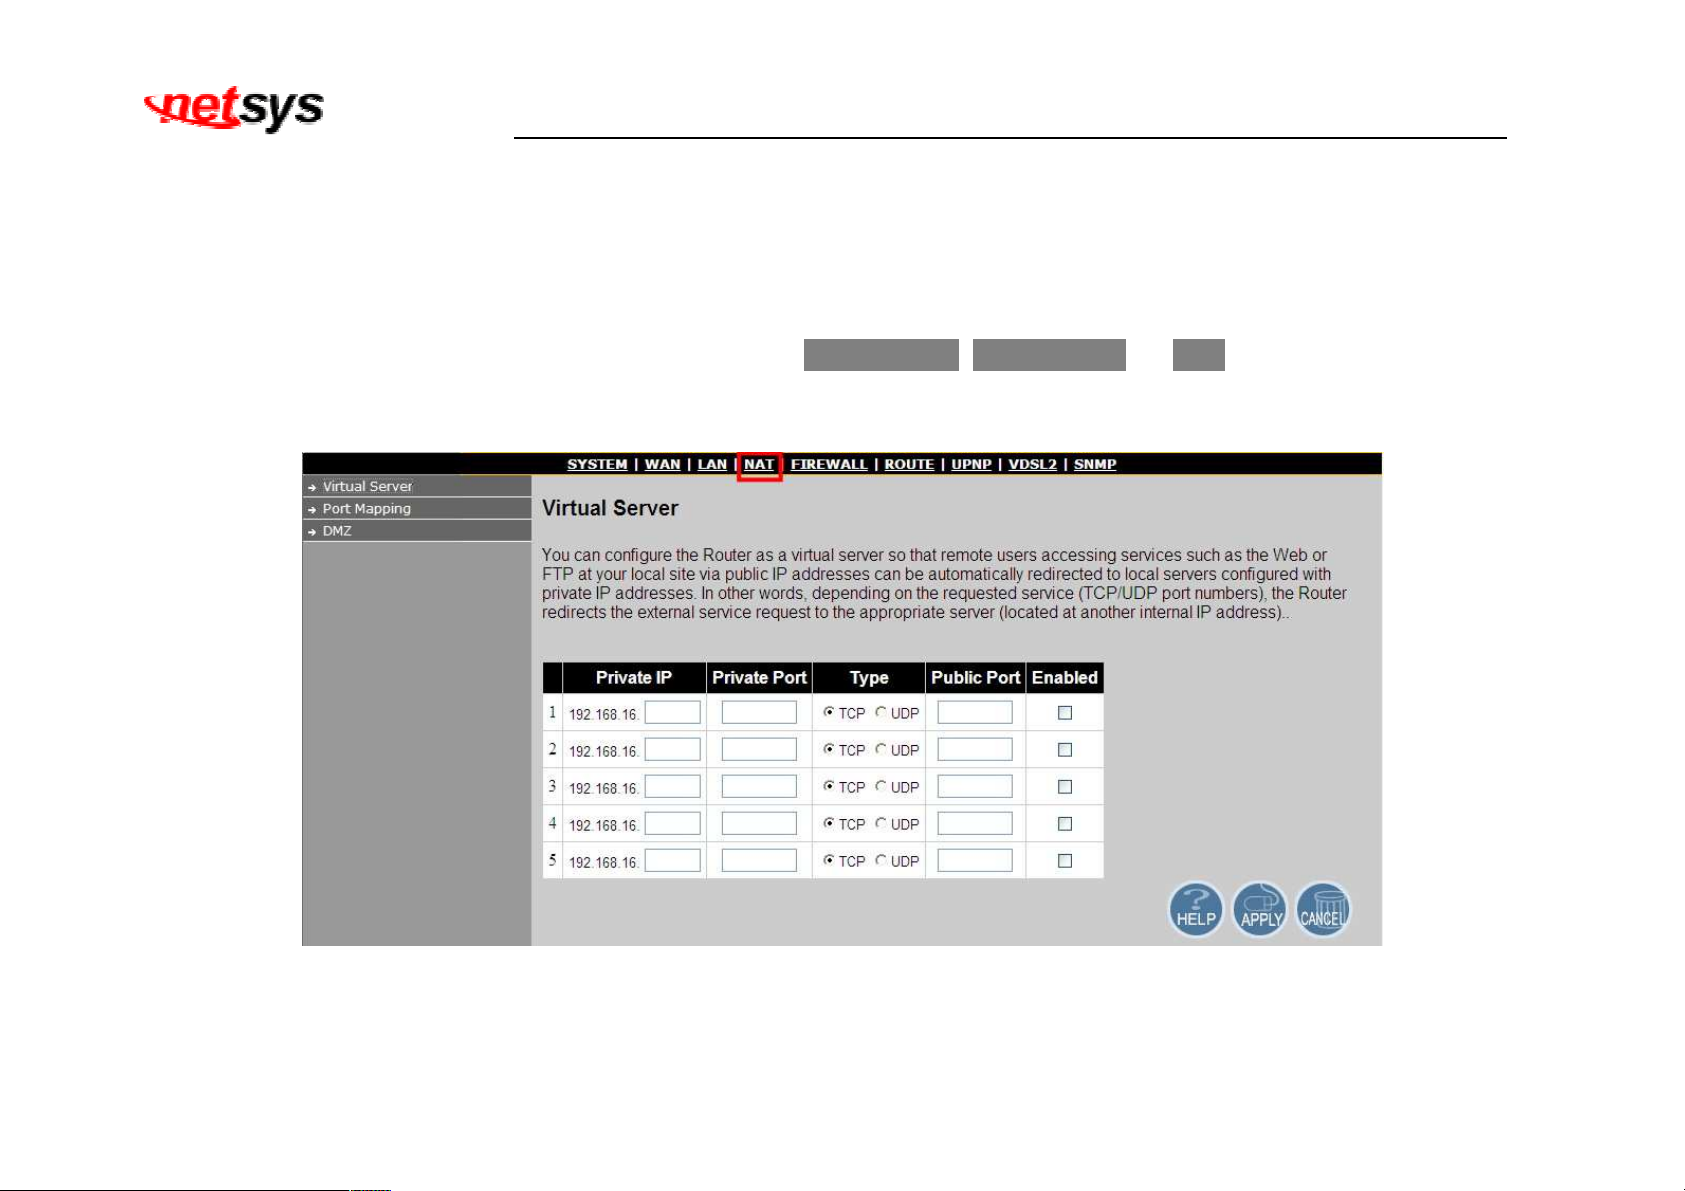
4.6 Select “NAT”
Network Address Translation(NAT) allows multiple users at your local site to access the internet through a single public IP address or
multiple public IP address. NAT can also prevent hacker attacks by mapping local address to public address for key services such as
the Web or FTP.
Select the “NAT”. The menu below includes the sub-menus of Virtual Server, Port Mappingand DMZ. A screen is displayed as
shown in Figure 4.6.
Figure 4.6 NAT type in the left navigator bar
54
Page 56
NV-600LI/RI Managed Industrial Grade VDSL2 CO/CPE Router USER’S MANUAL Ver. A4
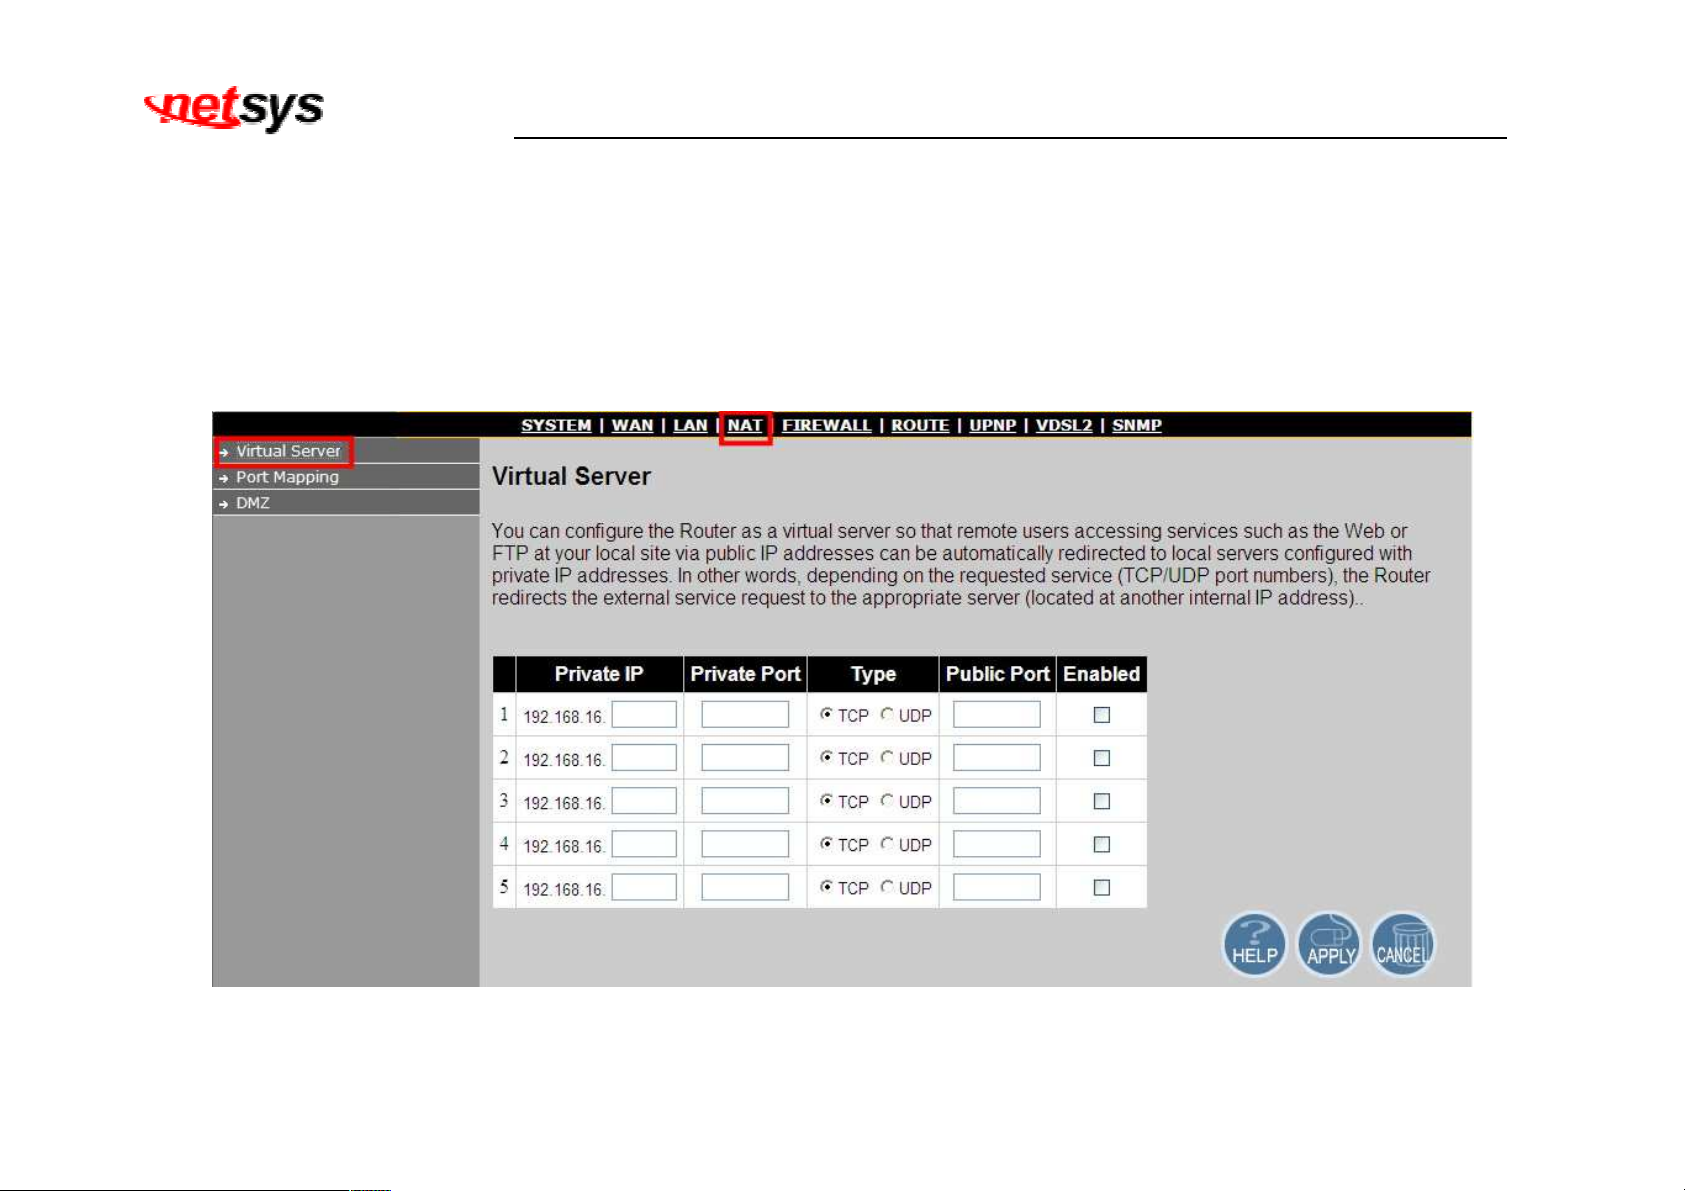
4.6.1
Virtual Server
You can configure the Router as a virtual server so that remote users accessing services such as the Web or FTP at your local site
via public IP addresses can be automatically redirected to local servers configured with private IP addresses. In other words,
depending on the requested service (TCP/UDP port numbers), the Router redirects the external service request to the appropriate
server (located at another internal IP address).
To configure virtual server, click on the “Virtual Server” link in the left navigation bar. A screen is displayed as shown in Figure
4.6.1
Figure 4.6.1 Virtual Server Configuration
55
Page 57
NV-600LI/RI Managed Industrial Grade VDSL2 CO/CPE Router USER’S MANUAL Ver. A4
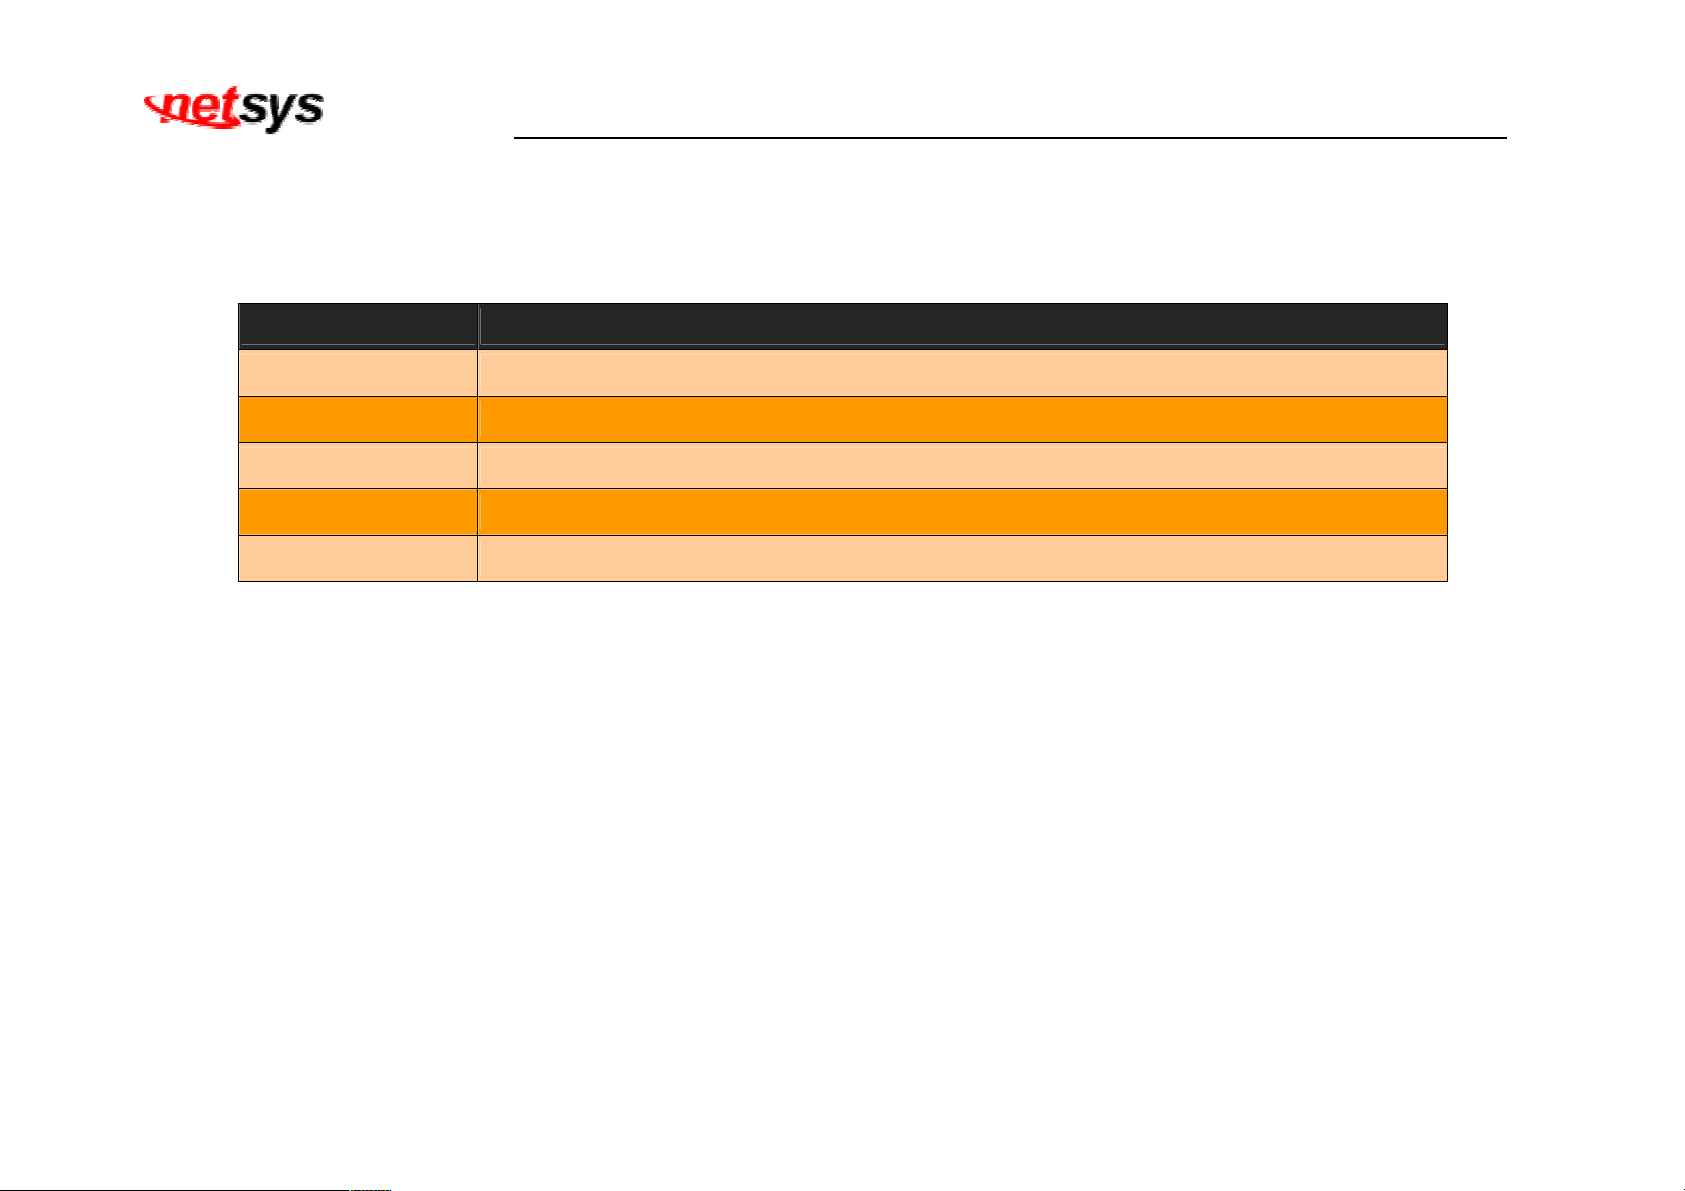
The screen contains the following details:
Fields in Virtual Server:
Field Description
Private IP Enter a private IP Address of specified entry.
Private Port Enter a private Port number of the specified entry.
Type Select virtual server protocol type of the specified entry.
Public Port Enter a public port number of the internet user to access the virtual server.
Enabled Enable the specified entry of the virtual server.
• Click APPLY to save the information that has been entered.
• Click CANCEL to exit from this page without saving the changes.
56
Page 58
NV-600LI/RI Managed Industrial Grade VDSL2 CO/CPE Router USER’S MANUAL Ver. A4
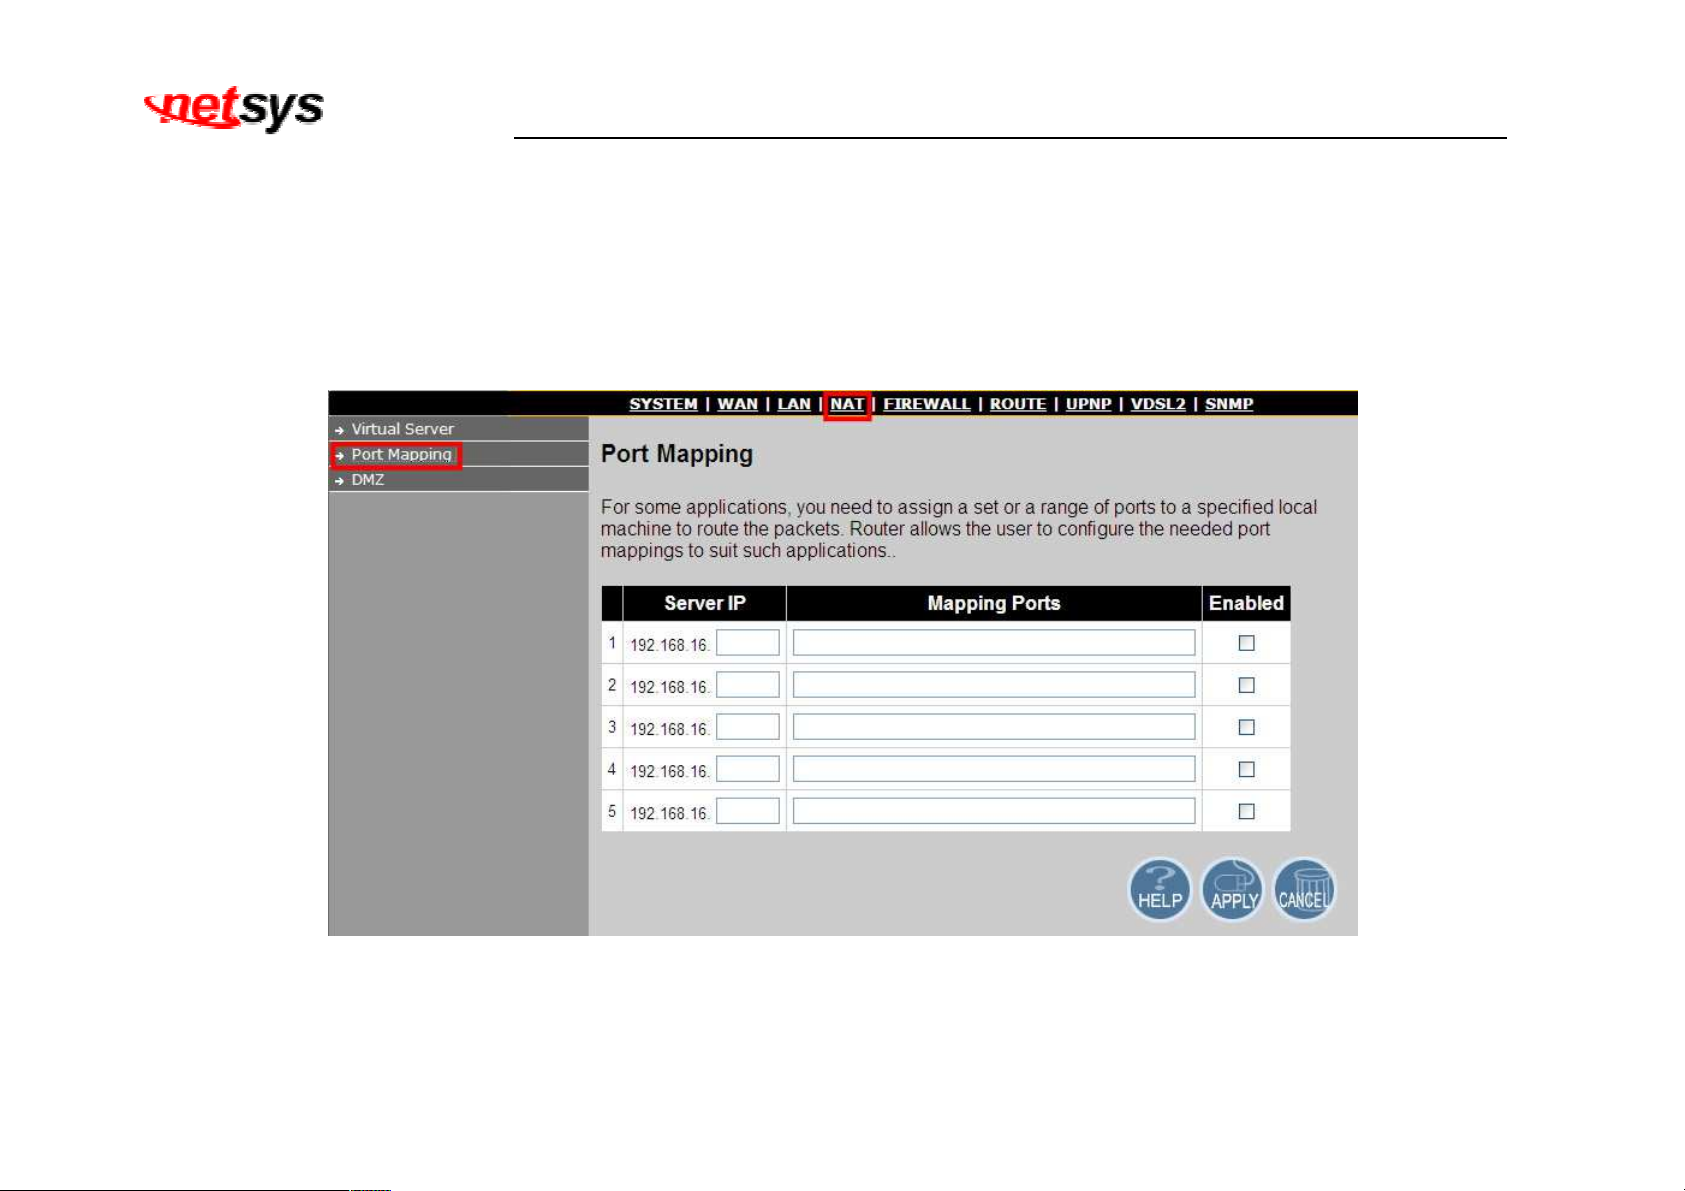
4.6.2
Virtual Server
For some applications, you need to assign a set or a range of ports to a specified local machine to route the packets. Router allows
the user to configure the needed port mappings to suit such applications.
To configure Port Mapping, click on the “Port Mapping” link in the left navigation bar. A screen is displayed as shown in Figure
4.6.2
Figure 4.6.2 Port Mapping Configuration
57
Page 59
NV-600LI/RI Managed Industrial Grade VDSL2 CO/CPE Router USER’S MANUAL Ver. A4
The screen contains the following details:
Fields in Port Mapping:
Field Description
Server IP Enter the IP Address of a specified local machine.
Mapping Port Assign a range of port or specific port number to route the packets.
Enabled Enable a specified entry of the Port Mapping.
• Click APPLY to save the information that has been entered.
• Click CANCEL to exit from this page without saving the changes.
58
Page 60
NV-600LI/RI Managed Industrial Grade VDSL2 CO/CPE Router USER’S MANUAL Ver. A4
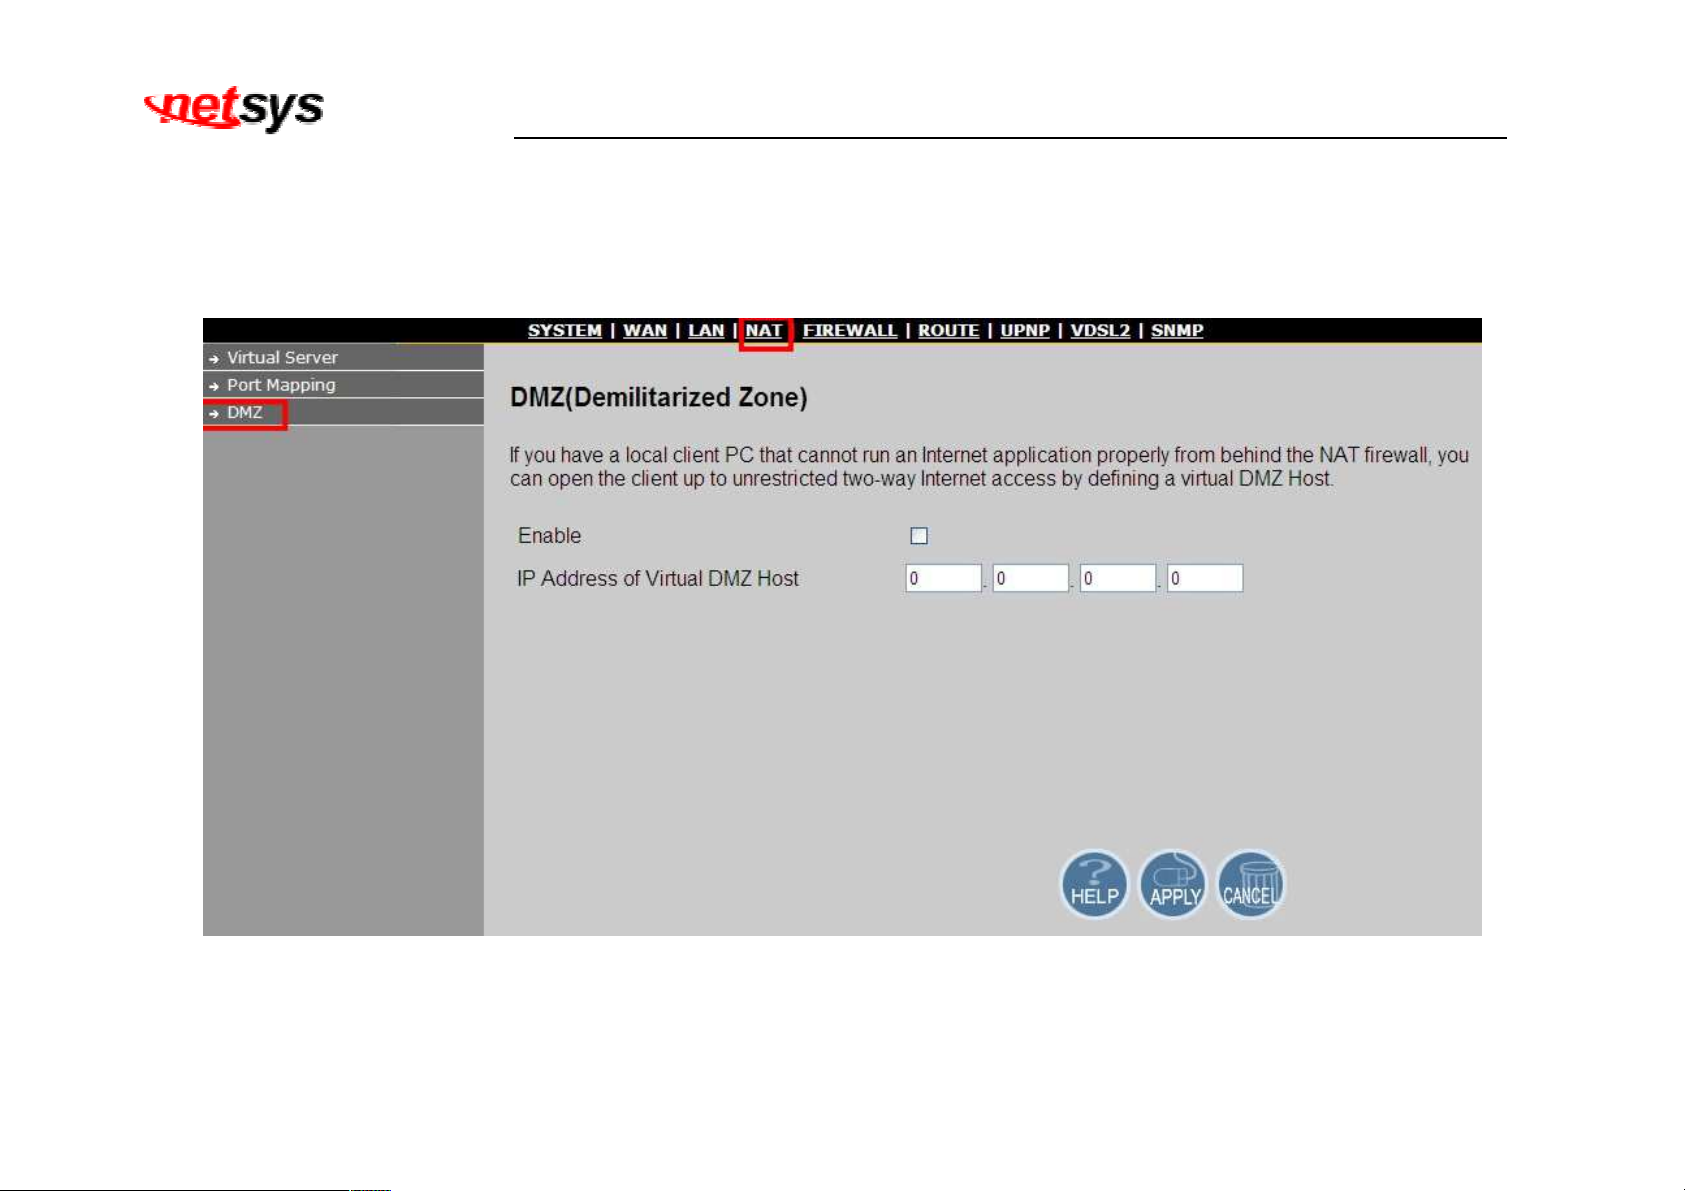
4.6.3
DMZ
If you have a local client PC that cannot run an Internet application properly from behind the NAT firewall, you can open the
client up to unrestricted two-way Internet access by defining a virtual DMZ Host.
To configure the DMZ, click on the “DMZ” link in the left navigation bar. A screen is displayed as shown in Figure 4.6.3
Figure 4.6.3 DMZ Configuration
59
Page 61
NV-600LI/RI Managed Industrial Grade VDSL2 CO/CPE Router USER’S MANUAL Ver. A4
The screen contains the following details:
Fields in DMZ:
Field Description
Enable
Enable or disable the DMZ setting of NV-600LI/RI. Select the check box to enable this
option.
IP Address Enter IP Address of the DMZ host.
• Click APPLY to save the information that has been entered.
60
Page 62
NV-600LI/RI Managed Industrial Grade VDSL2 CO/CPE Router USER’S MANUAL Ver. A4
4.7 Select “Firewall”
The industrial-grade VDSL2 router provides extensive firewall protection by restricting connection parameters to limit the risk of
instrusion and defending against a wide array of common hacker attacks. However, for applications the require unrestricted access
to the internet, you can configure a specific client/server a demilitarized zone(DMZ).
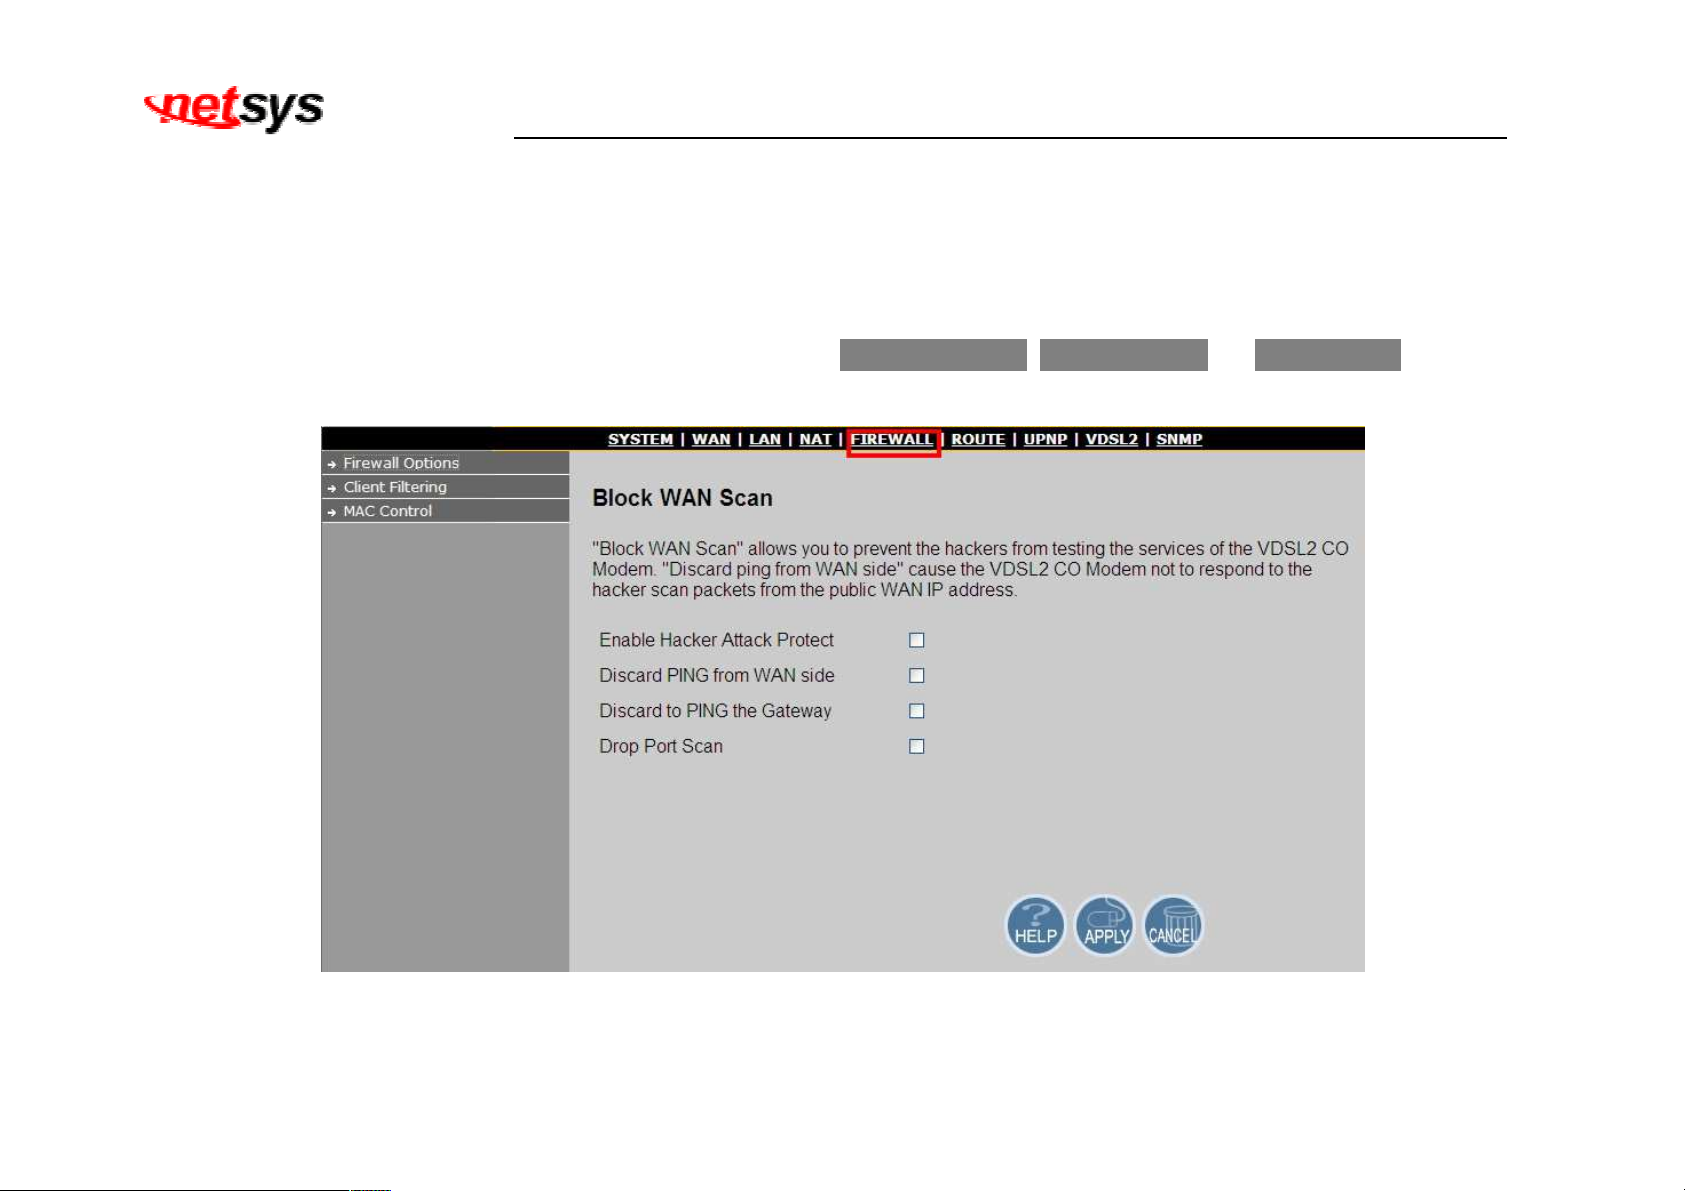
Select the “Firewall”. The menu below includes the sub-menus of Firewall Options, Client Filteringand MAC Control. A
screen is displayed as shown in Figure 4.7.
Figure 4.7 Firewall in Left Navigator Bar
61
Page 63
NV-600LI/RI Managed Industrial Grade VDSL2 CO/CPE Router USER’S MANUAL Ver. A4
4.7.1
Firewall Options
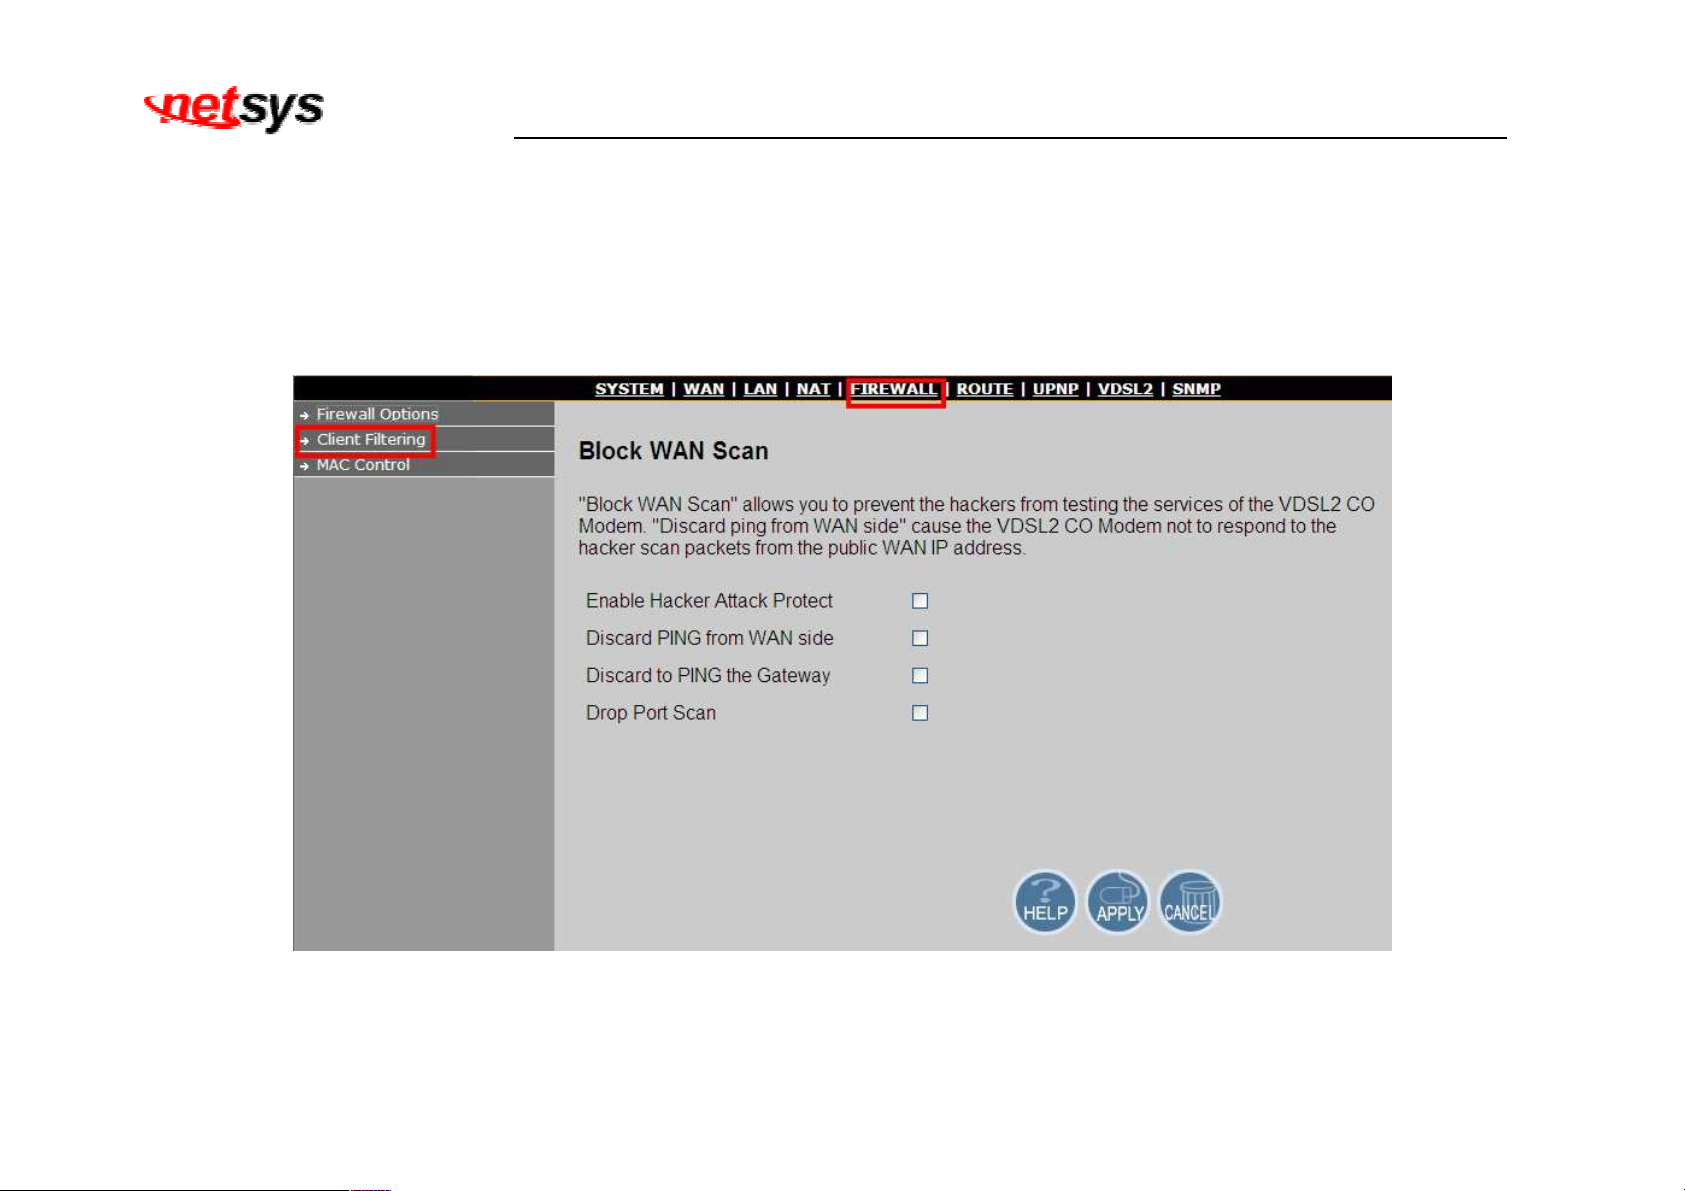
"Block WAN Scan" allows you to prevent the hackers from testing the services of the VDSL2 CO Modem. "Discard ping from WAN
side" cause the VDSL2 CO Modem not to respond to the hacker scan packets from the public WAN IP address.
To enable the firewall options, click on the “Firewall Options” link in the left navigation bar. A screen is displayed as shown in
Figure 4.7.1
Figure 4.7.1 Firewall Options Configuration
62
Page 64
NV-600LI/RI Managed Industrial Grade VDSL2 CO/CPE Router USER’S MANUAL Ver. A4
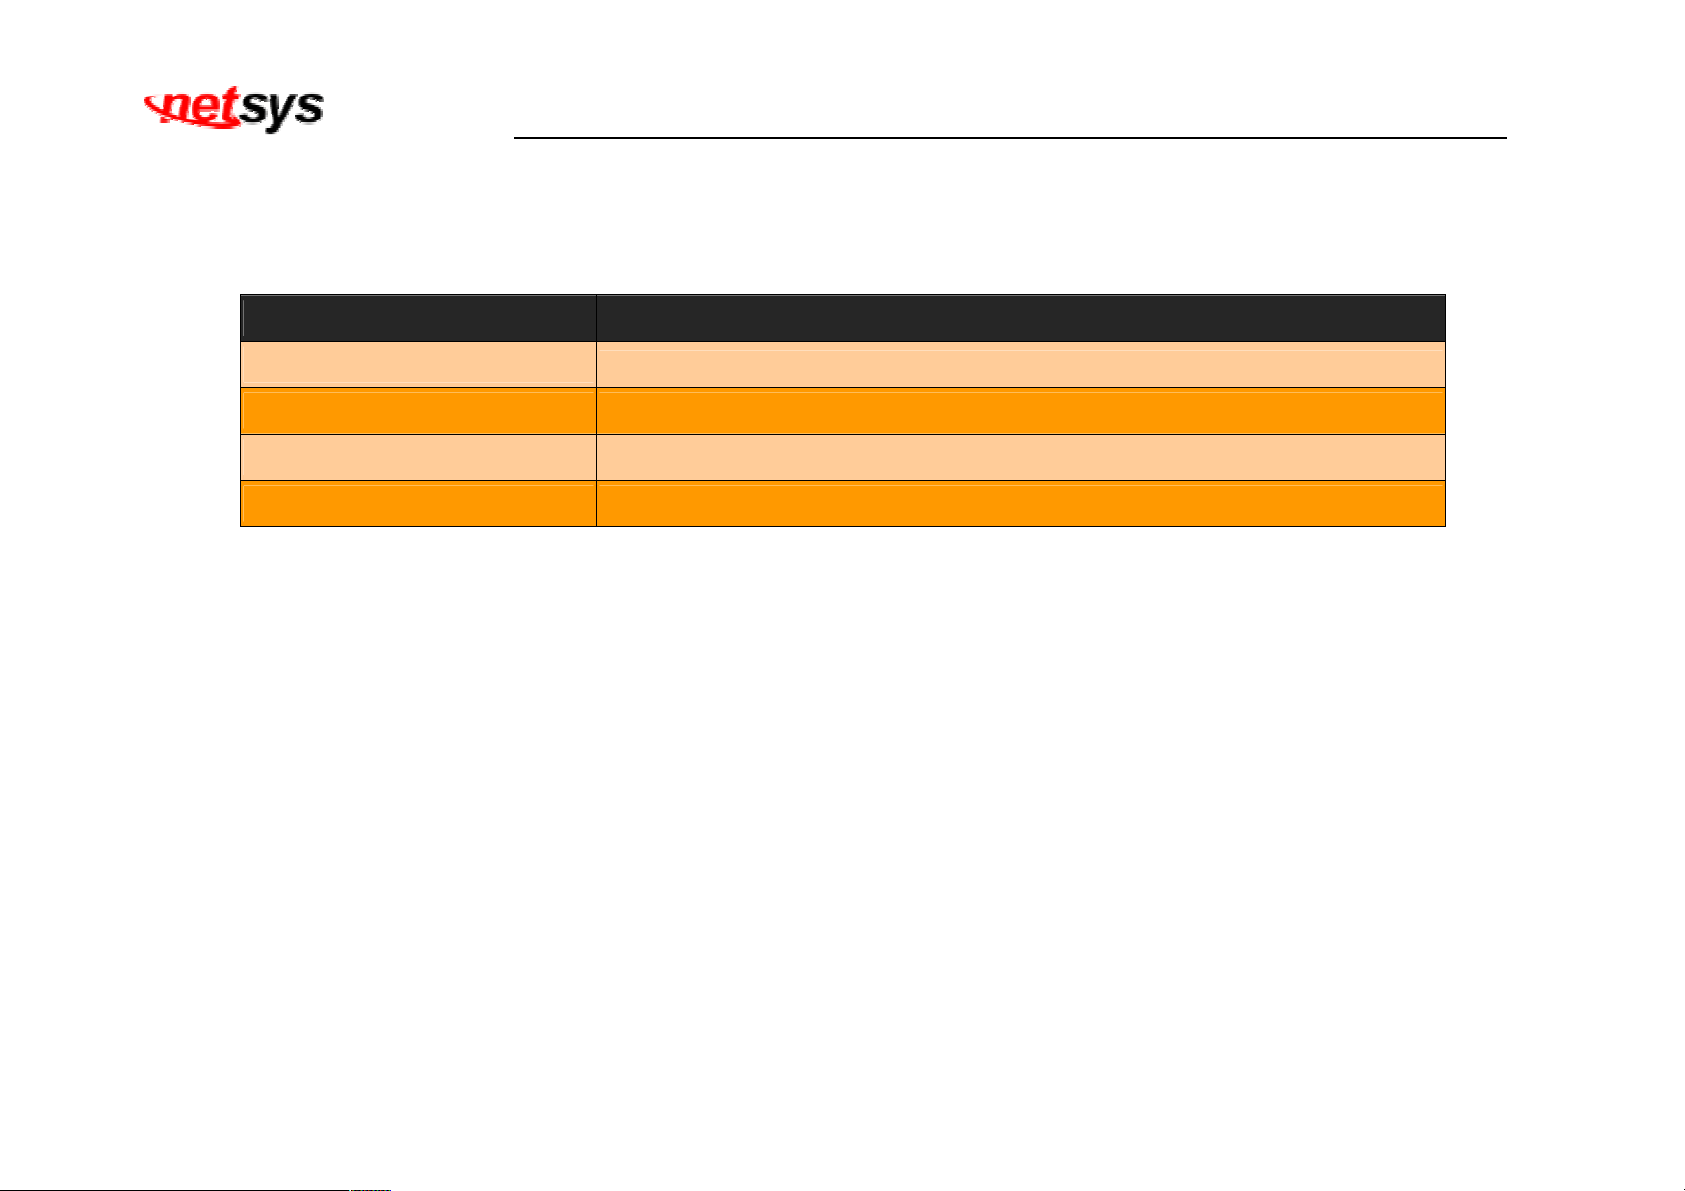
The screen contains the following details:
Fields in Firewall Options:
Field Description
Enable Hacker Attack Protect
Select the check box to log and drop all the hacker attack events.
Discard PING from WAN Select the check box to drop all PING from the WAN side.
Discard PING the Gateway Select the check box to drop all PING to NV-600LI/RI packet for the LAN side.
Drop Port Scan Select the check box to drop all the port scan packets.
• Click APPLY to save the information that has been entered.
• Click CANCEL to exit from this page without saving the changes.
63
Page 65
NV-600LI/RI Managed Industrial Grade VDSL2 CO/CPE Router USER’S MANUAL Ver. A4
4.7.2 Client Filtering
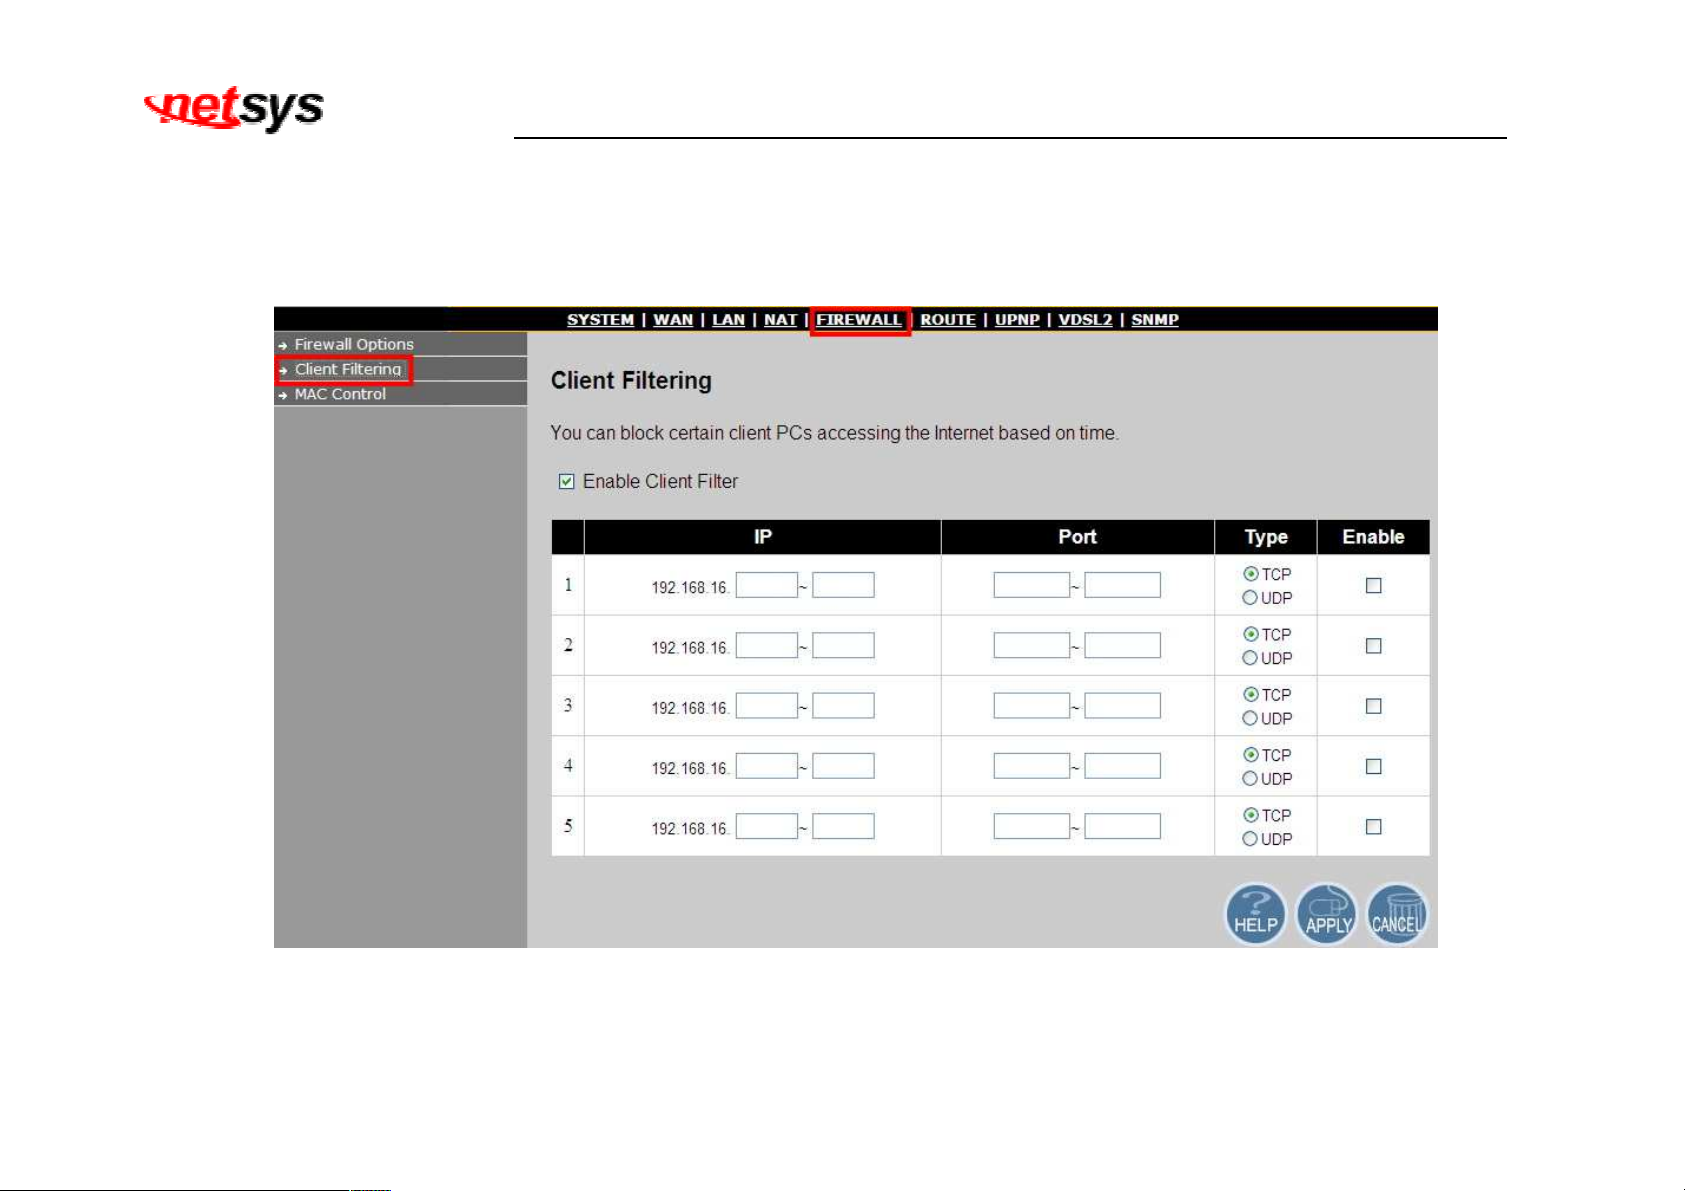
To enable Client Filter, click on the “Client Filtering” link in the left navigation bar. A screen is displayed as shown in
Figure 4.7.2.
Figure 4.7.2 Client Filter Configuration
64
Page 66
NV-600LI/RI Managed Industrial Grade VDSL2 CO/CPE Router USER’S MANUAL Ver. A4
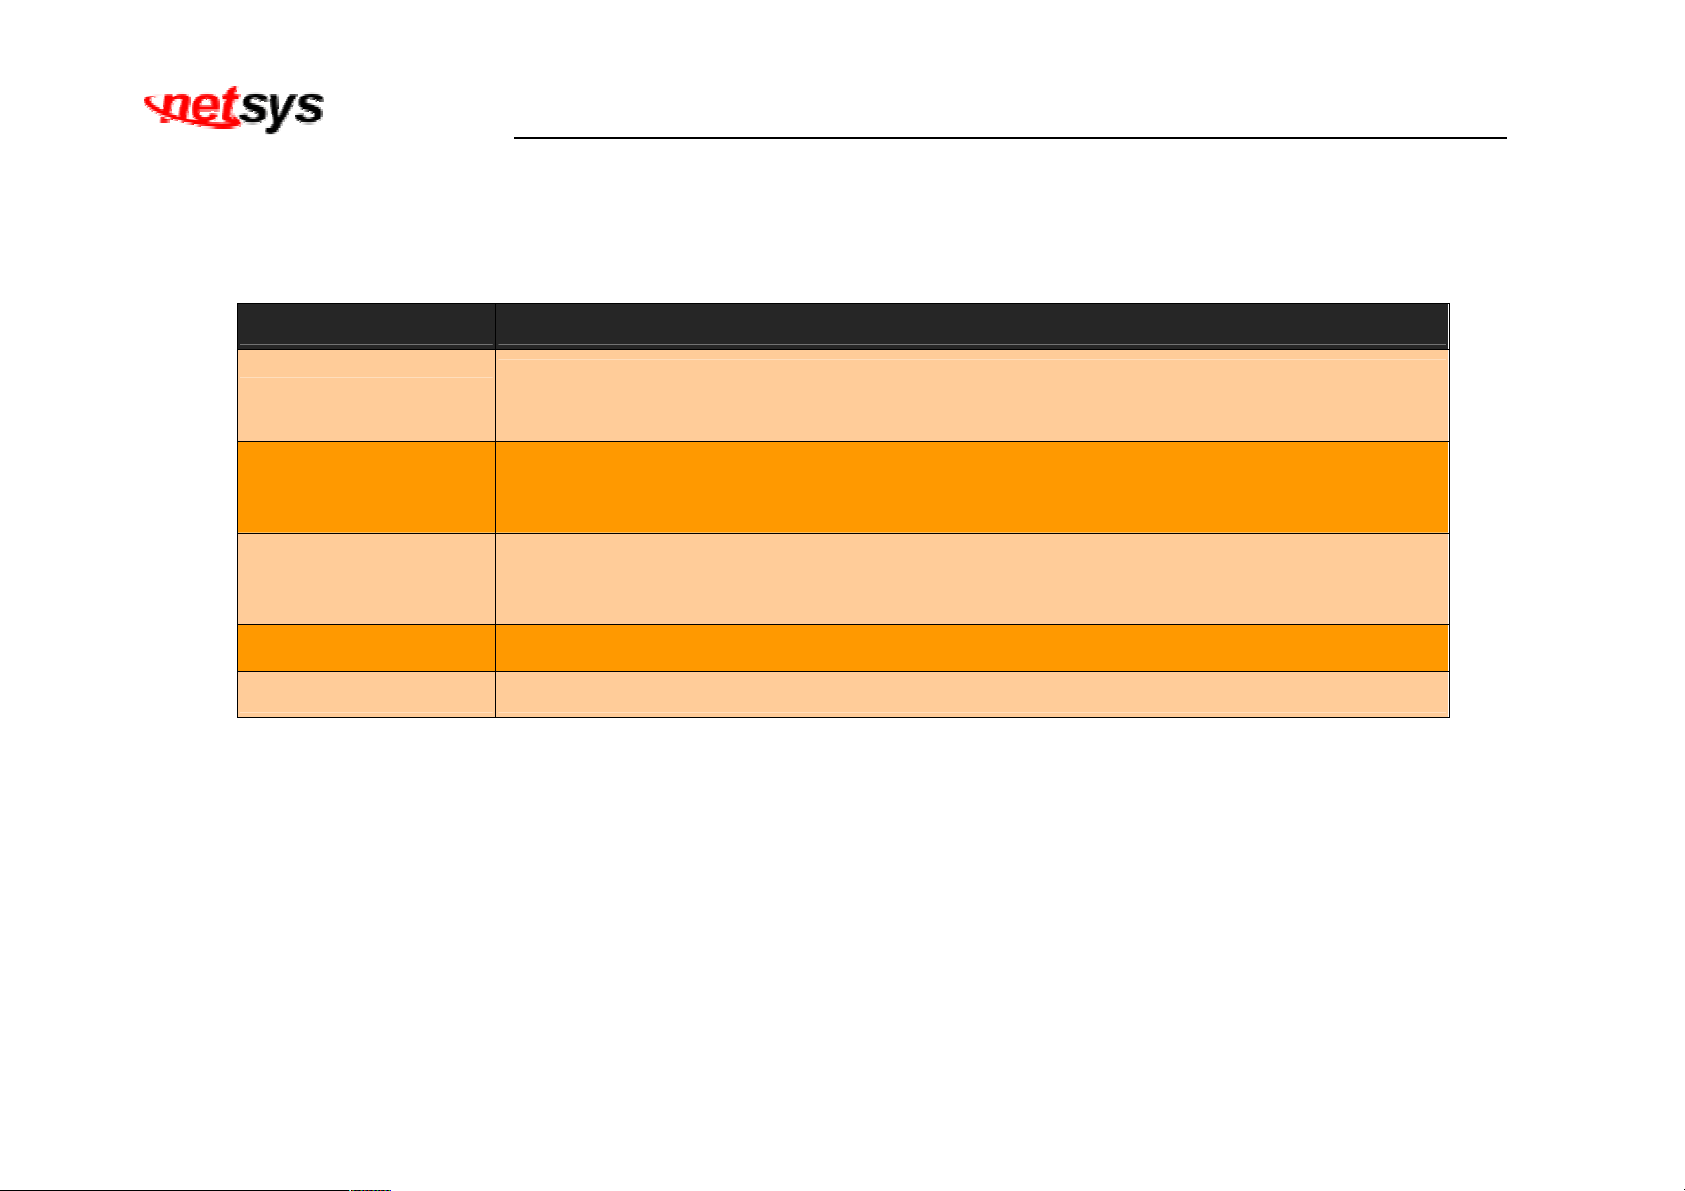
The screen contains the following details:
Fields in Client Filter:
Field Description
Enable Client Filter
Enable or disable the Client Filter feature of VDSL2 CO&CPE ROUTER. Select the
check box to enable this option.
Enter the filter IP Address range of the local machines under VDSL2 CO&CPE
IP
ROUTER.
Enter the filter Port number range of the local machines under VDSL2 CO&CPE
Port
ROUTER.
Type Select TCP or UDP to filter the protocol type packets from the local machines.
Enable Provides more IP Addresses of the WAN interface.
• Click APPLY to save the information that has been entered.
• Click CANCEL to exit from this page without saving the changes.
65
Page 67
NV-600LI/RI Managed Industrial Grade VDSL2 CO/CPE Router USER’S MANUAL Ver. A4
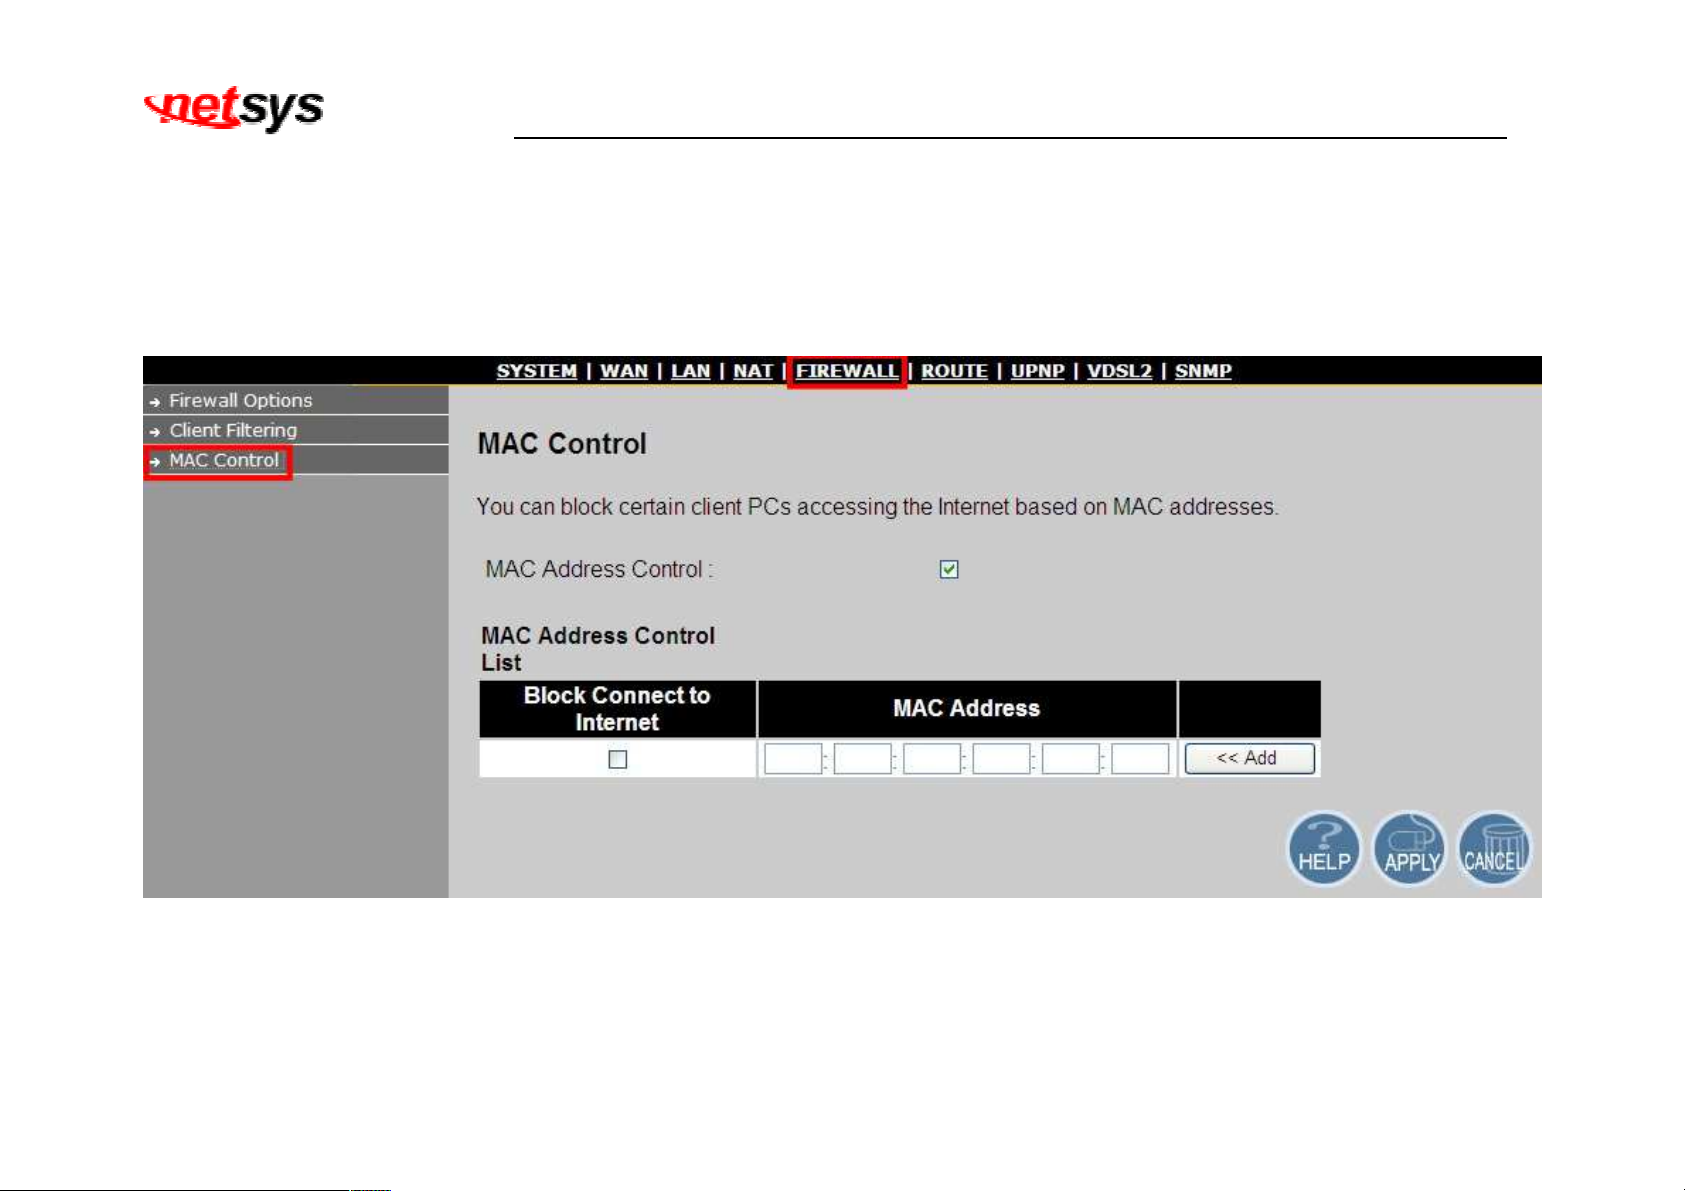
4.7.3 MAC Control
You can block certain client PCs accessing the Internet based on MAC addresses.
To configure MAC Control, click on the “MAC Control” link in the left navigation bar. A screen is displayed as shown in Figure
4.7.3
Figure 4.7.3 MAC Control Configuration
66
Page 68
NV-600LI/RI Managed Industrial Grade VDSL2 CO/CPE Router USER’S MANUAL Ver. A4
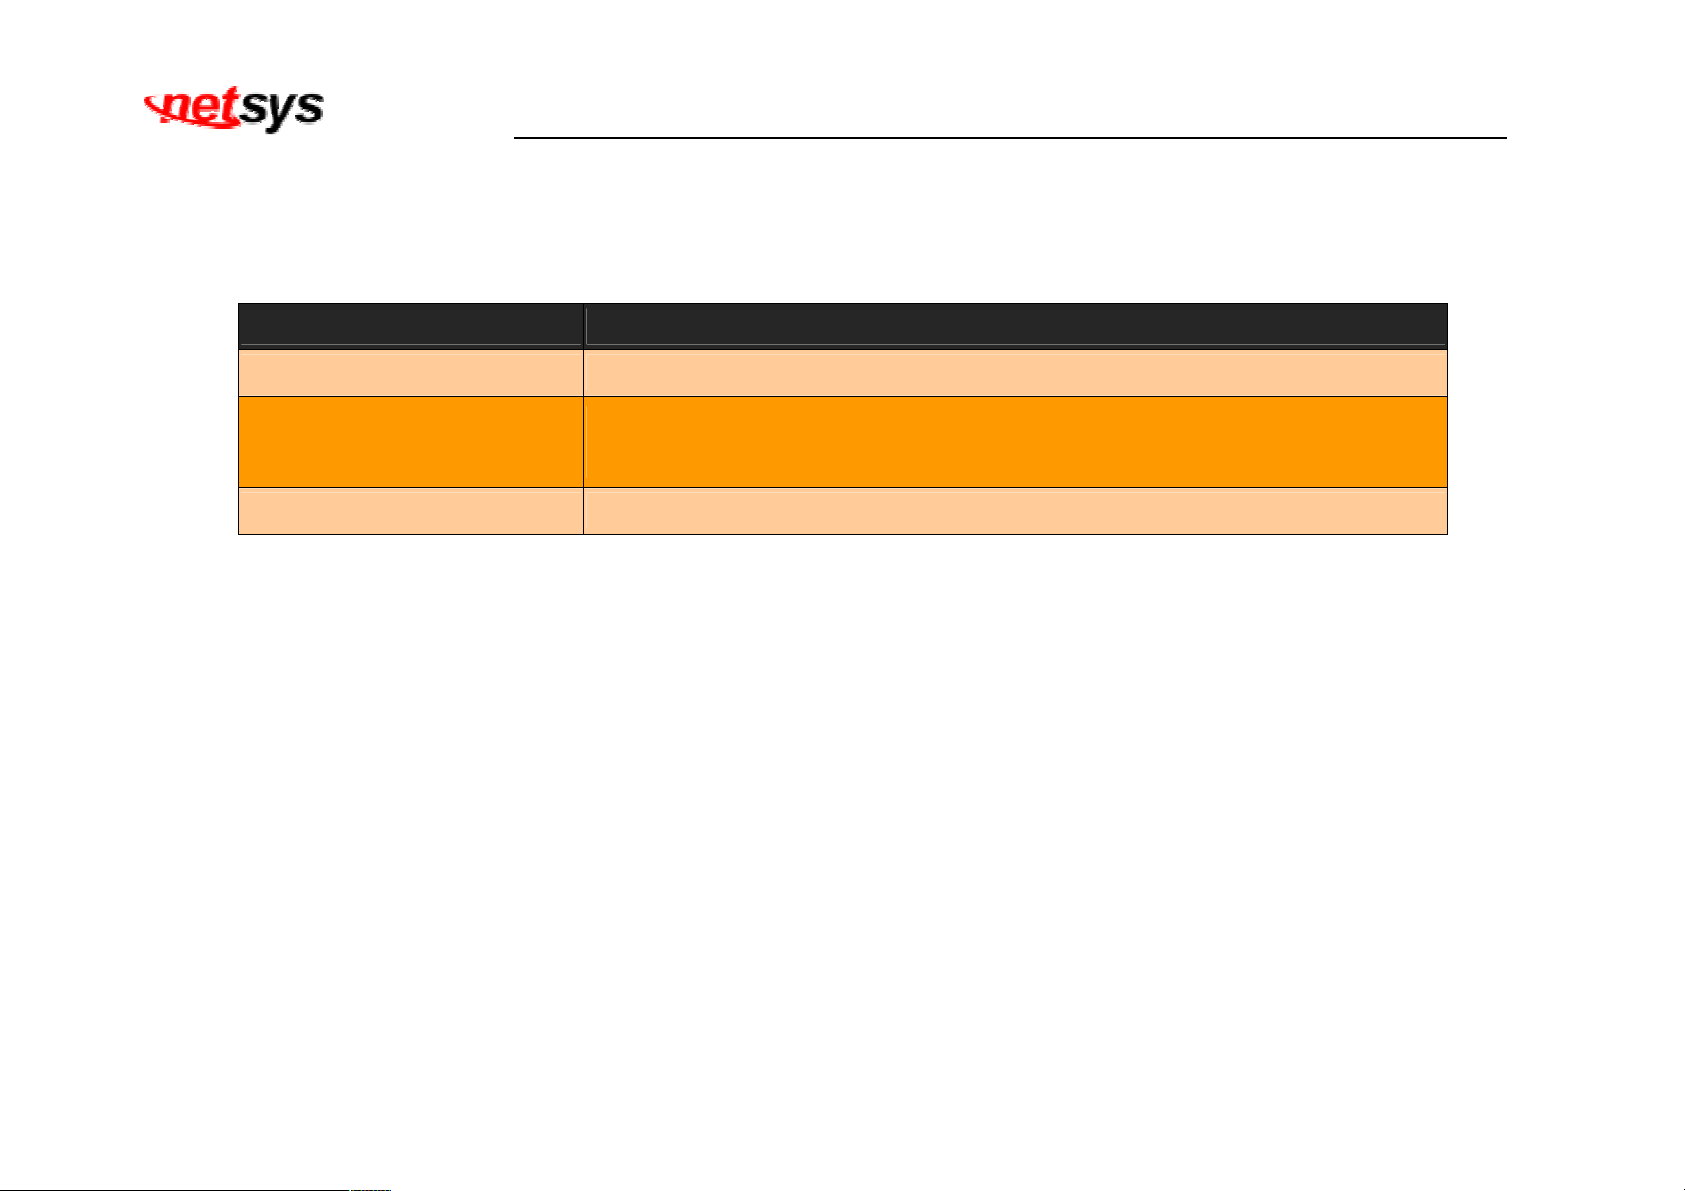
The screen contains the following details:
Fields in MAC Control:
Field Description
MAC Address Control Enable or disable the MAC address control.
Block Connection to Internet
Enable or disable block status. If the check box is selected, it blocks the
specified MAC address.
MAC Address Assign the blocking MAC address for local machine.
• Click APPLY to save the information that has been entered.
• Click CANCEL to exit from this page without saving the changes.
67
Page 69
NV-600LI/RI Managed Industrial Grade VDSL2 CO/CPE Router USER’S MANUAL Ver. A4
4.8 Select “Route”
If there are multiple routers installed on your network, it is necessary to configure the VDSL2 router unit’s routing functions.
Select the “Route”. The menu below includes the sub-menus of Static Routing and Routing Table List. A screen is displayed
as shown in Figure 4.8.
Figure 4.8 Firewall in Left Navigator Bar
68
Page 70
NV-600LI/RI Managed Industrial Grade VDSL2 CO/CPE Router USER’S MANUAL Ver. A4
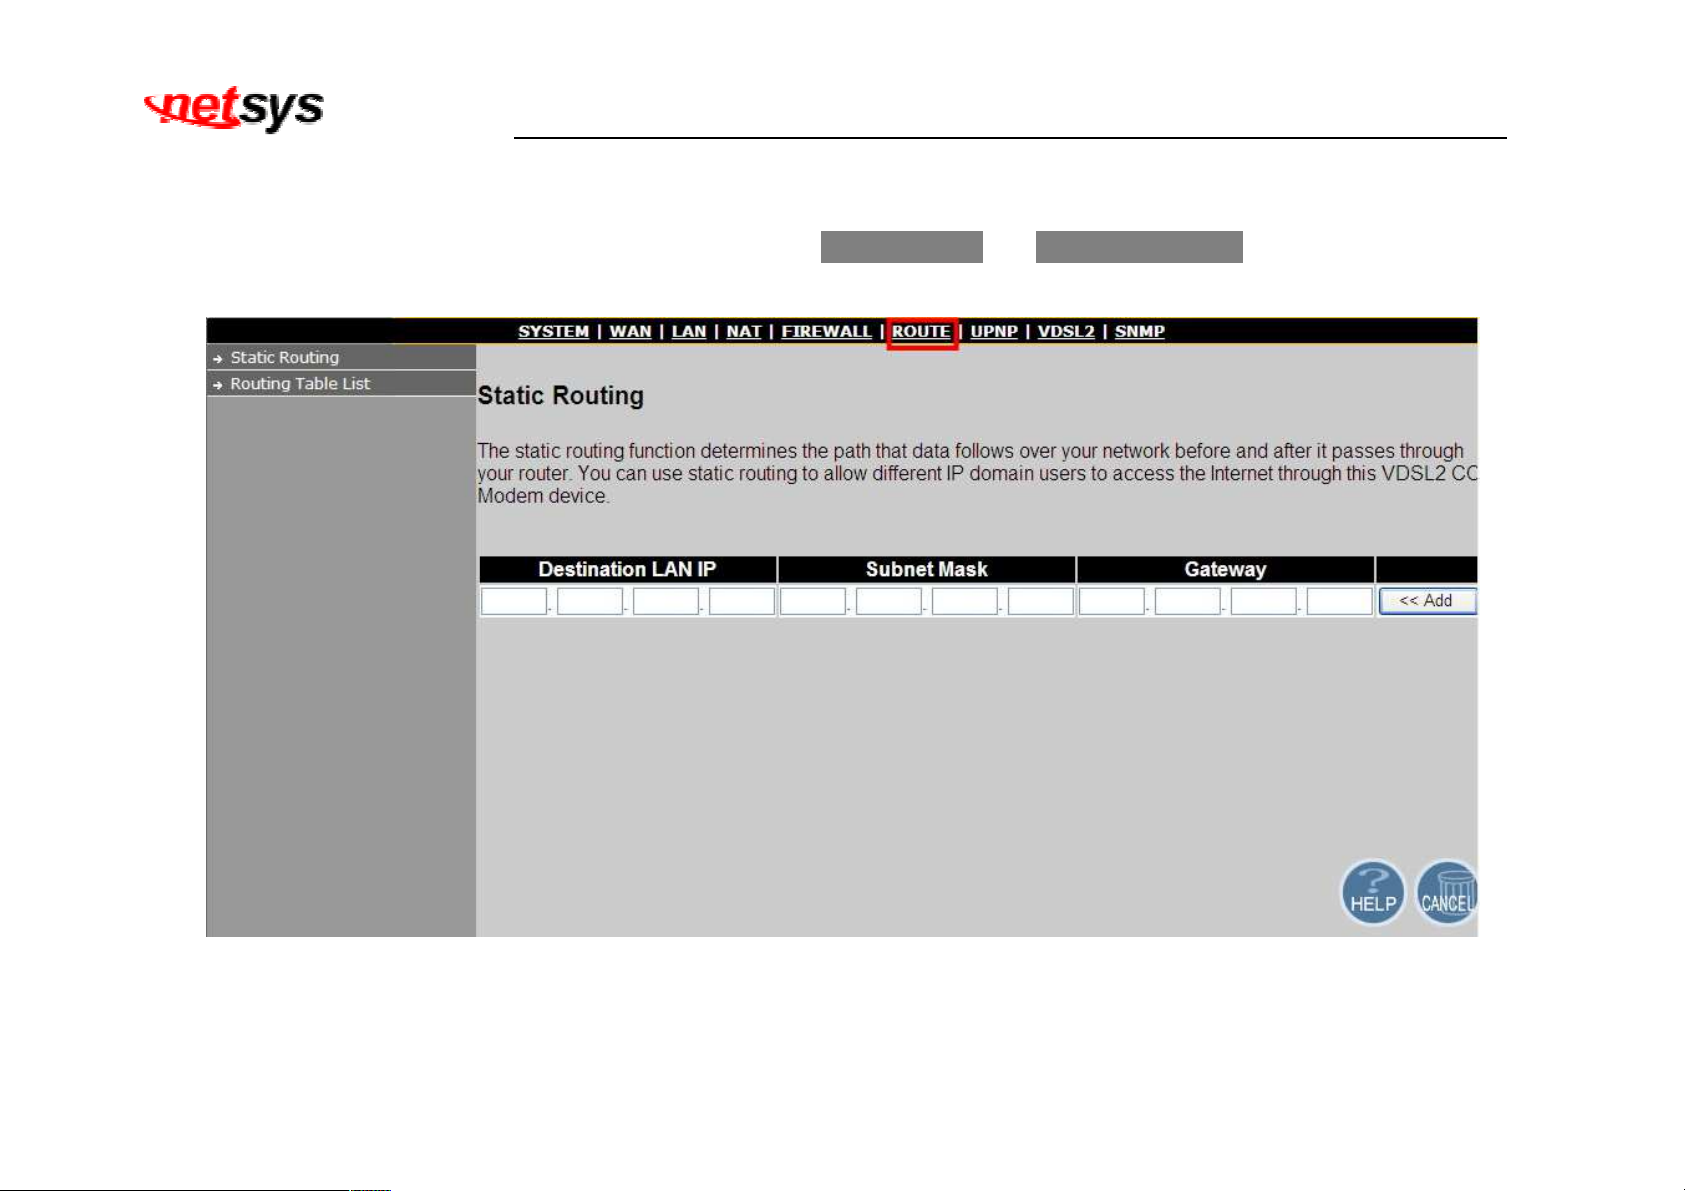
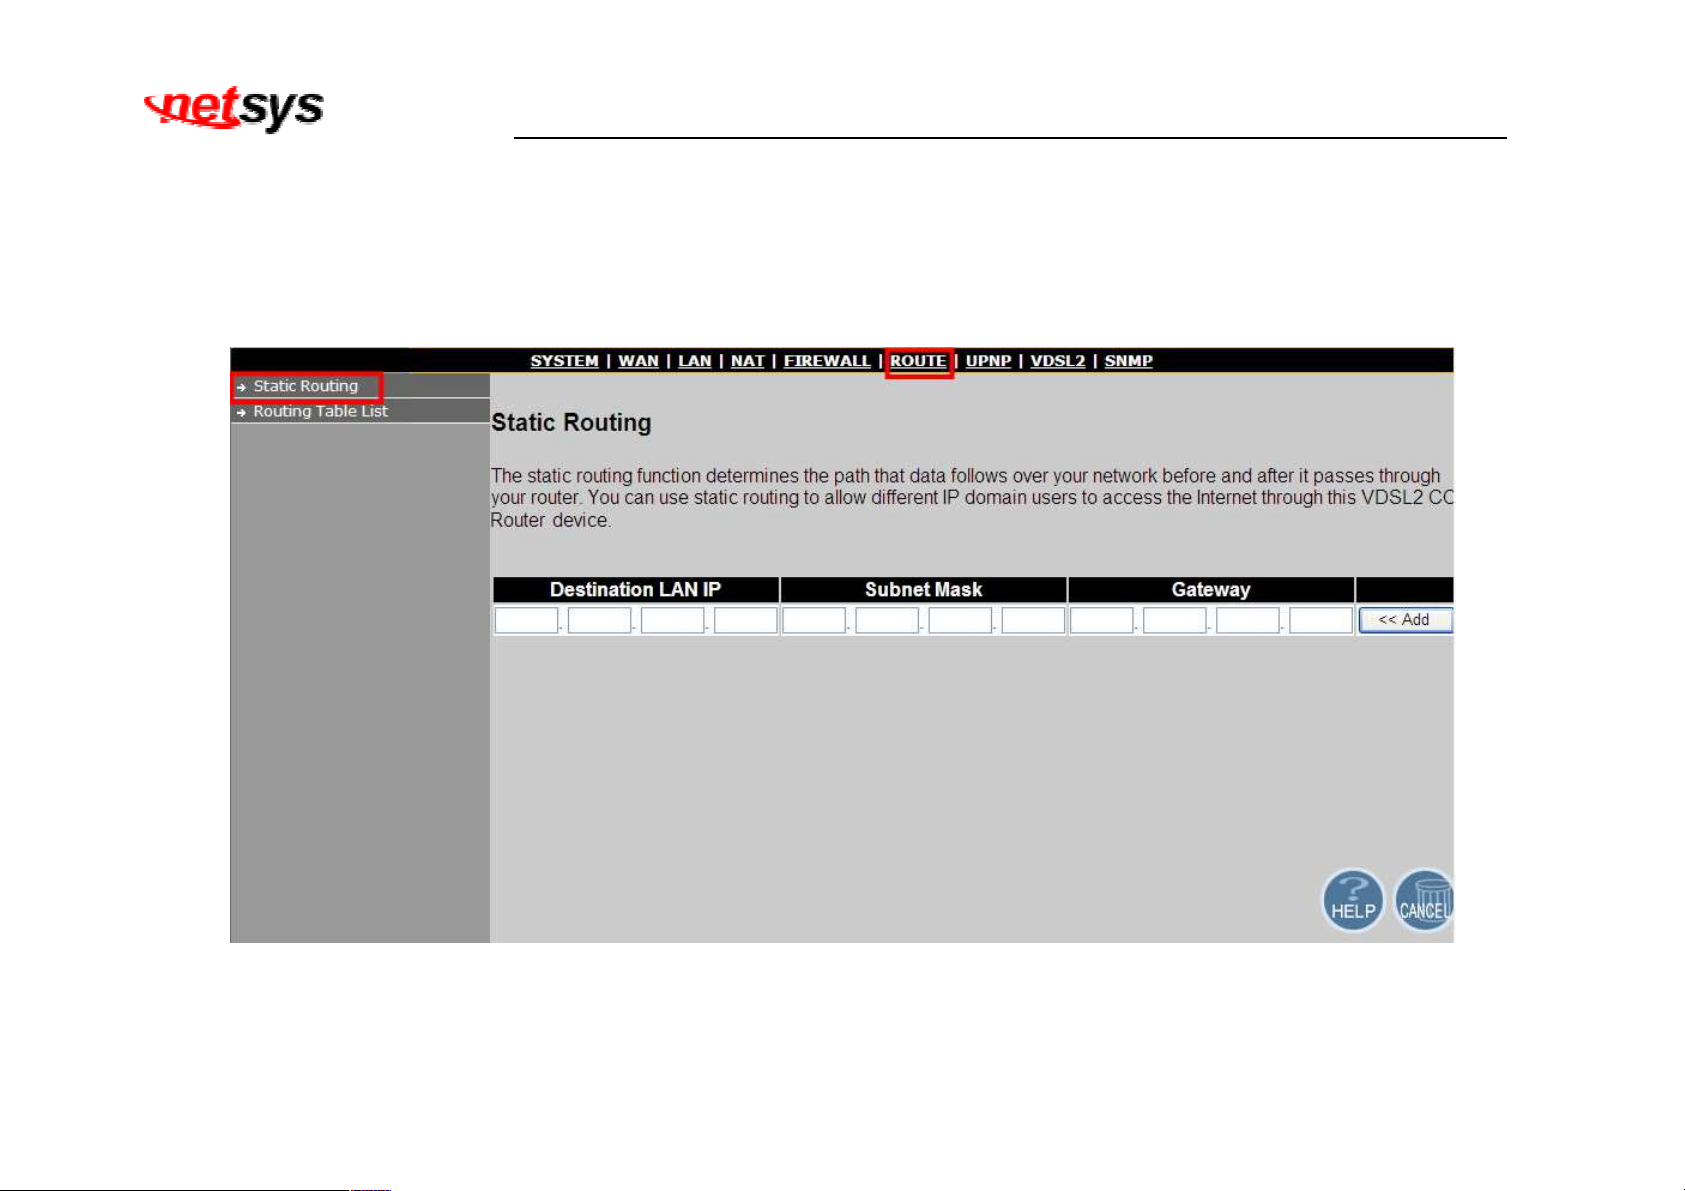
4.8.1 Static Routing
The static routing function determines the path that data follows over your network before and after it passes through your router. You
can use static routing to allow different IP domain users to access the Internet through this VDSL2 Router device.
To setup Static Routing, click on the “Static Routing” link in the left navigation bar. A screen is displayed as shown in Figure
4.8.1.
Figure 4.8.1 Static Routing Configuration
69
Page 71
NV-600LI/RI Managed Industrial Grade VDSL2 CO/CPE Router USER’S MANUAL Ver. A4
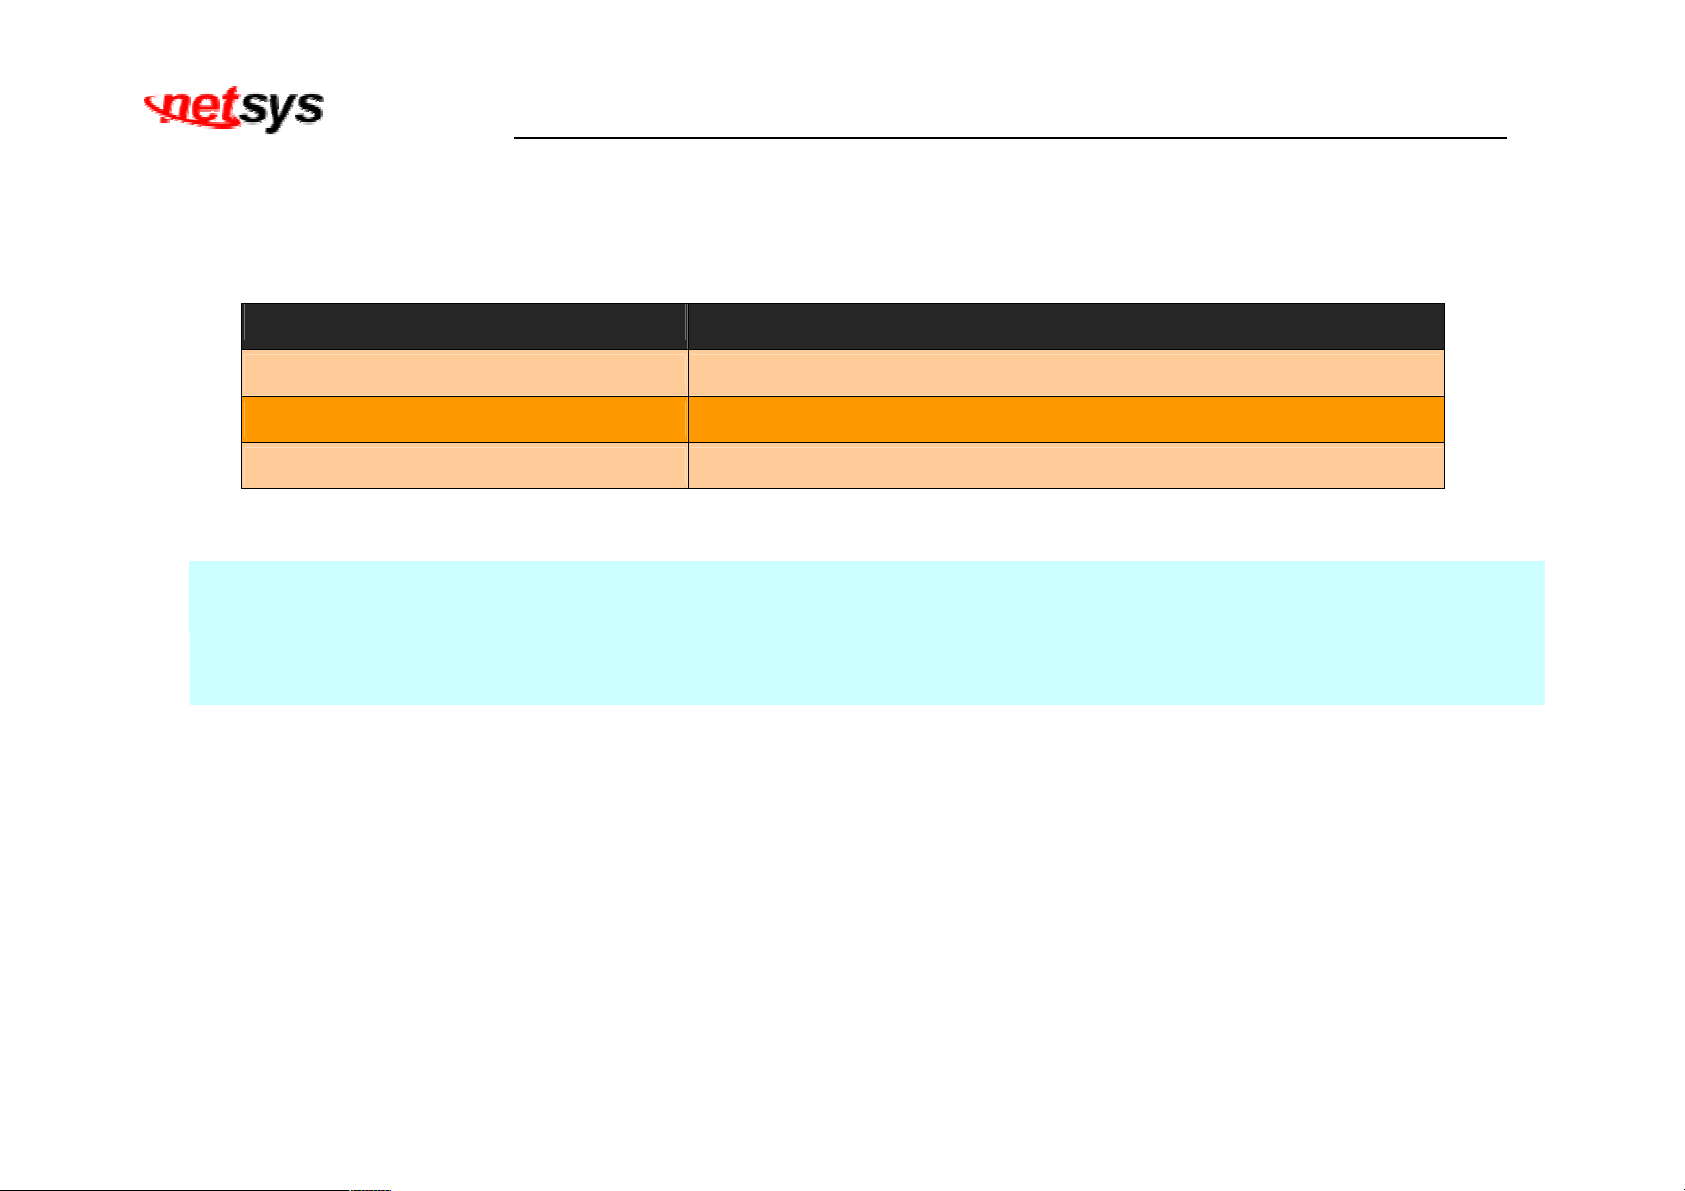
The screen contains the following details:
Fields in Static Routing:
Field Description
Destination LAN IP
Subnet Mask
Enter the IP Address 0-0-0-0 of routing entry.
Enter the Subnet Mask 0-0-0-0 of routing entry.
Gateway Enter the Gateway address of routing entry.
• Click Add to add the information that has been entered.
Note:
1. Static Routing functionality is used to define the connected Gateway between the LAN and WAN. For example,
if we want to activate the Network Time Protocol (NTP) service, and we have to define the Gateway connected
to NTP server in the WAN.
2. The gateway of static routing just used for switch(Bridge) mode.
70
Page 72
NV-600LI/RI Managed Industrial Grade VDSL2 CO/CPE Router USER’S MANUAL Ver. A4
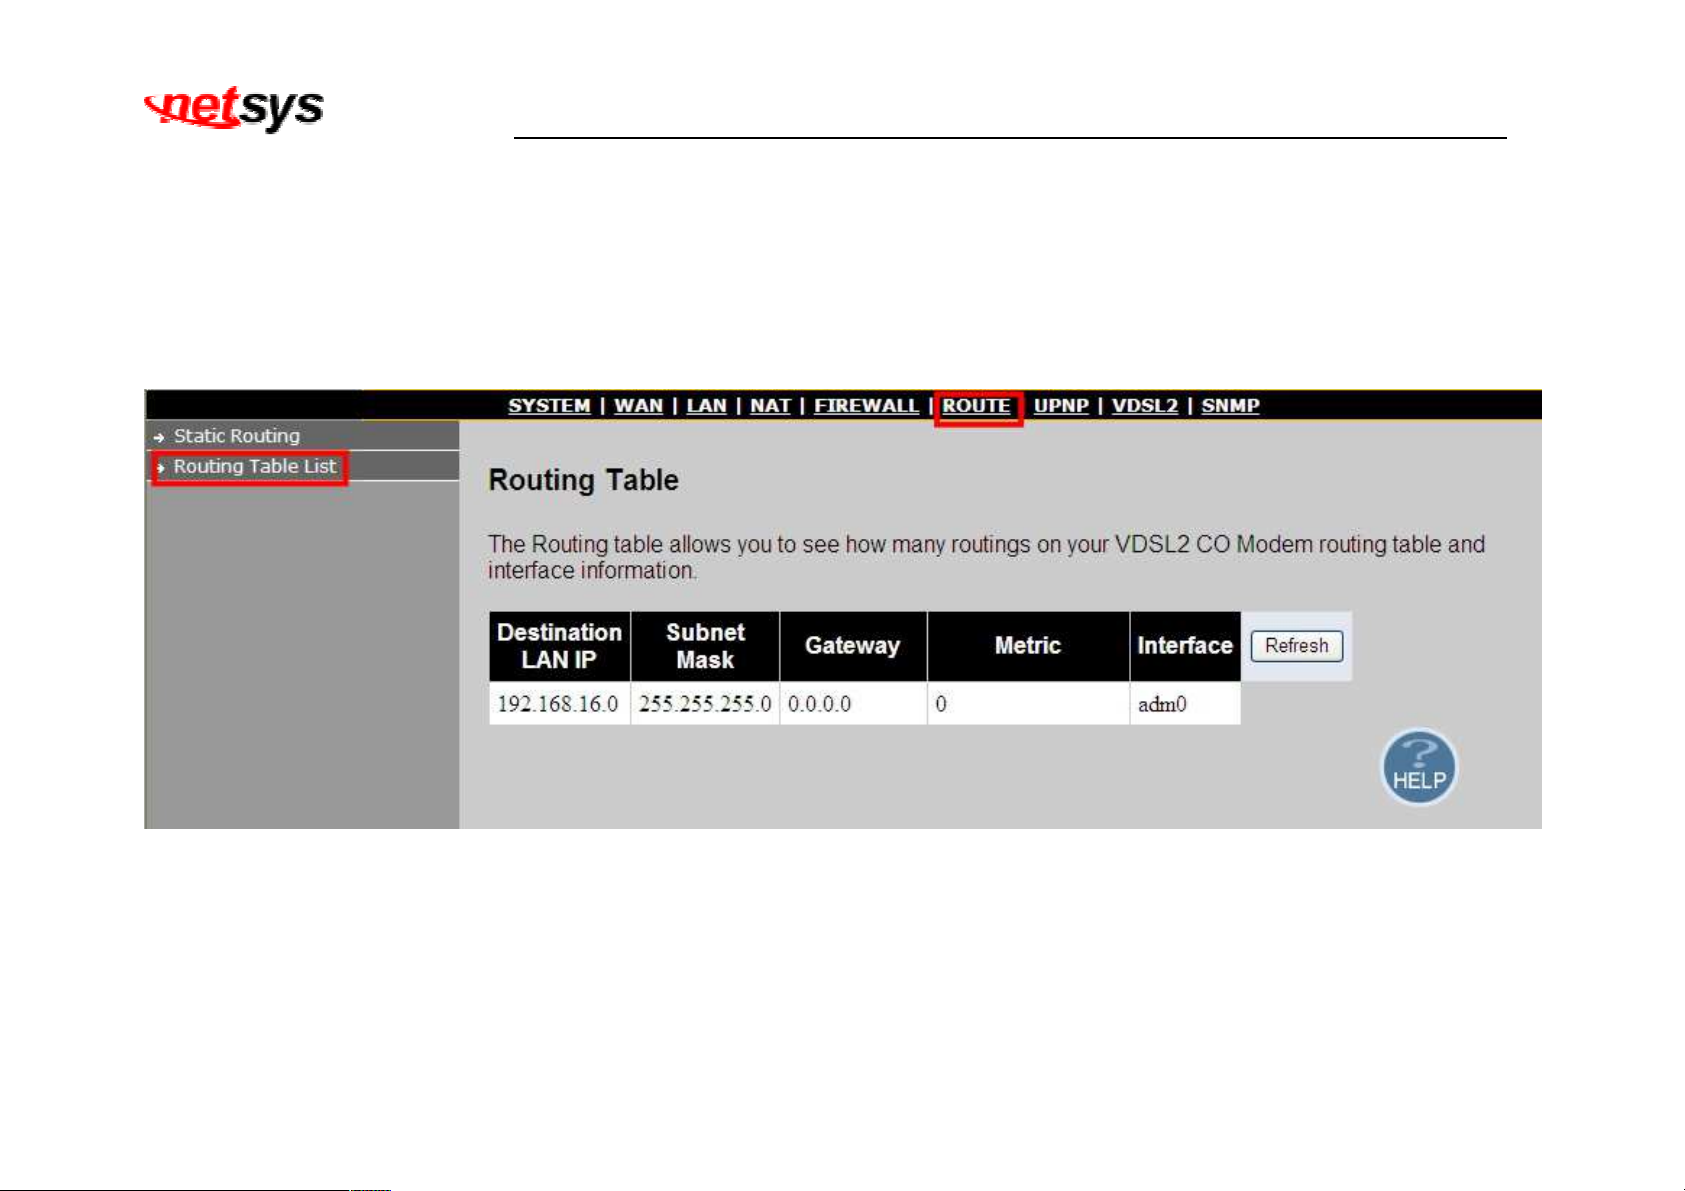
4.8.2 Routing Table List
The Routing table allows you to see how many routings on your VDSL2 router routing table and interface information.
To view the Routing entry table list of NV-600LI/RI, click on the “Routing Table List” link in the left navigation bar. A screen is
displayed as shown in Figure 4.8.2.
Figure 4.8.2 Routing Table List
The screen contains the following details:
• Click Refresh to update currently routing list of the NV-600LI/RI.
71
Page 73
NV-600LI/RI Managed Industrial Grade VDSL2 CO/CPE Router USER’S MANUAL Ver. A4
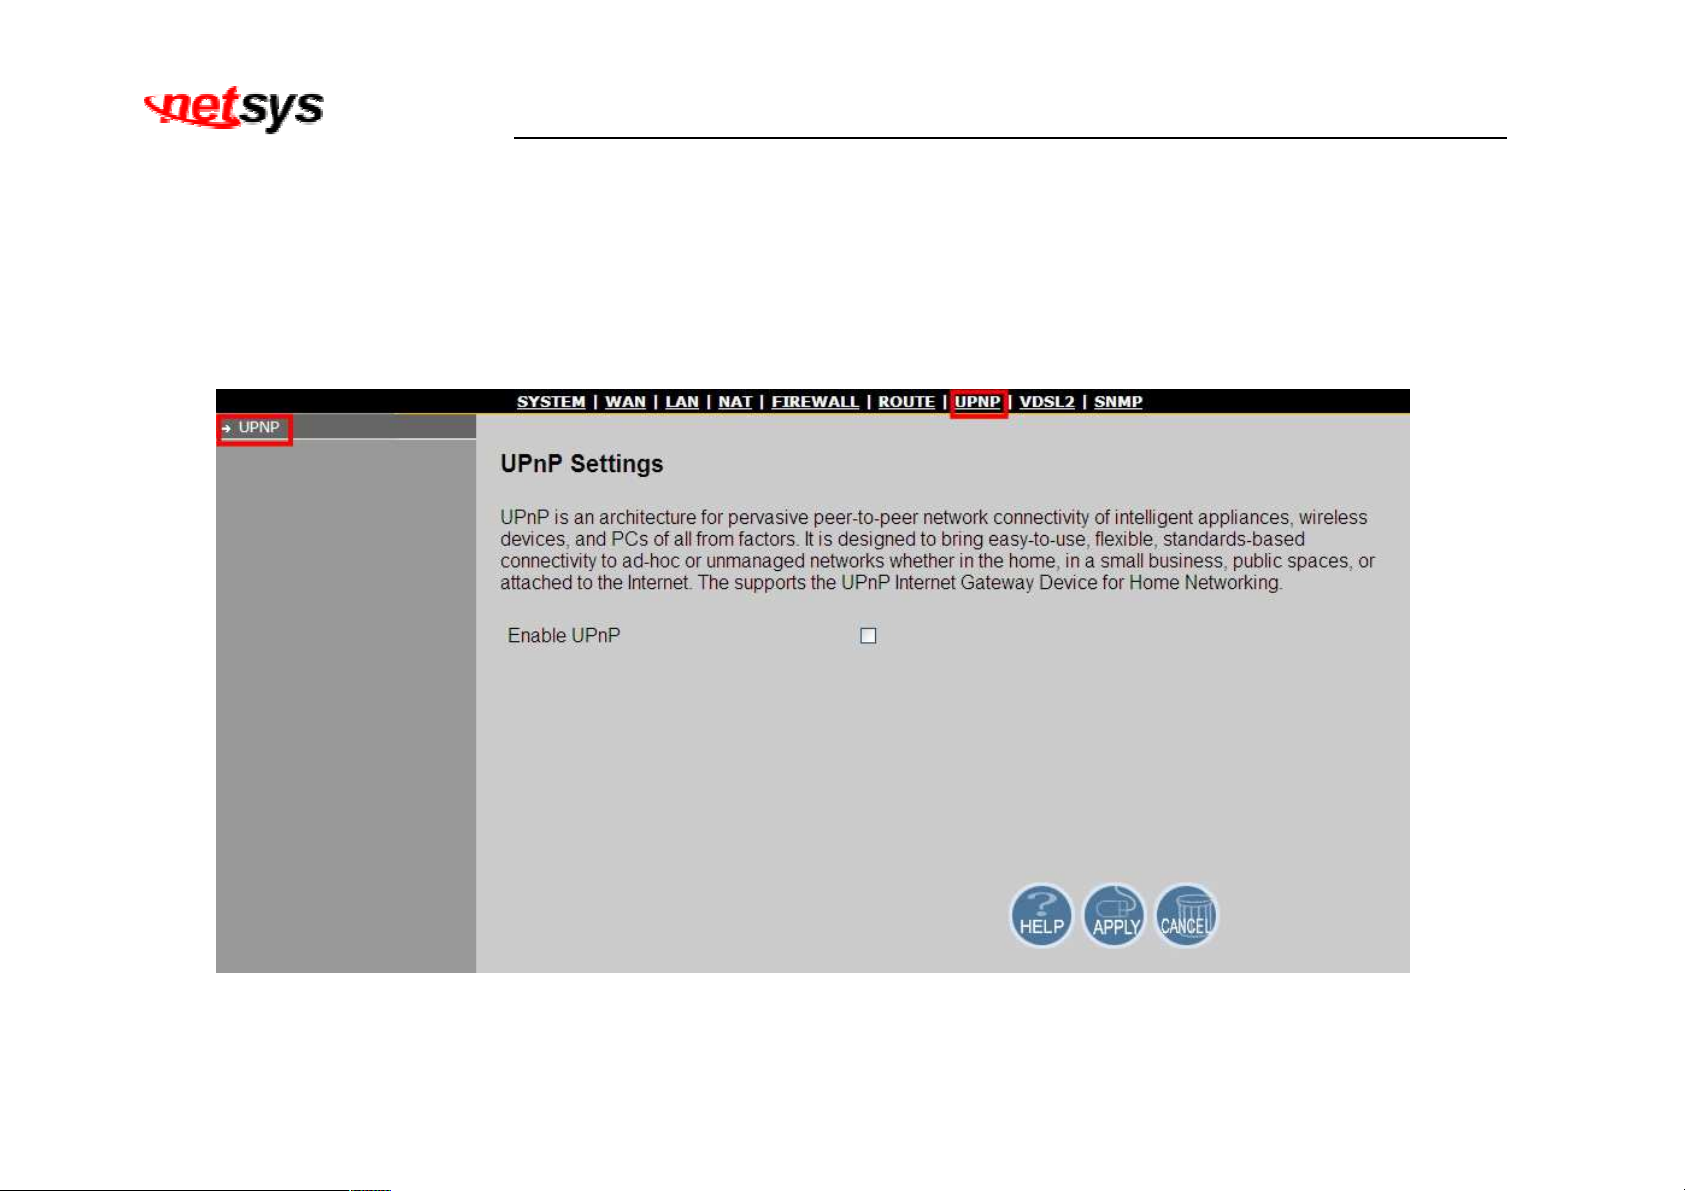
4.9 Select “UPNP”
UPnP is an architecture for pervasive peer-to-peer network connectivity of intelligent appliances, wireless devices, and PCs of
all from factors. It is designed to bring easy-to-use, flexible, standards-based connectivity to ad-hoc or unmanaged networks
whether in the home, in a small business, public spaces, or attached to the Internet. The supports the UPnP Internet Gateway
Device for Home Networking. The UPnP Settings can be viewed in the left navigation bar. The following are the options
available under UPnP, as shown in Figure 4.9
Figure 4.9 UPNP in Left Navigator Bar
72
Page 74
NV-600LI/RI Managed Industrial Grade VDSL2 CO/CPE Router USER’S MANUAL Ver. A4
The screen contains the following details:
Fields in UPnP Settings:
Field Description
Enable UPnP
To enable or disable UPnP Setting. Select the check box to Enable or Disable the UPnP
function of SPEED-VDSL2 CO&CPE ROUTER.
• Click APPLY at any time during configuration to save the information that you have entered.
• Click CANCEL to exit from this page without saving the changes.
73
Page 75
NV-600LI/RI Managed Industrial Grade VDSL2 CO/CPE Router USER’S MANUAL Ver. A4
4.10 Select “SNMP”
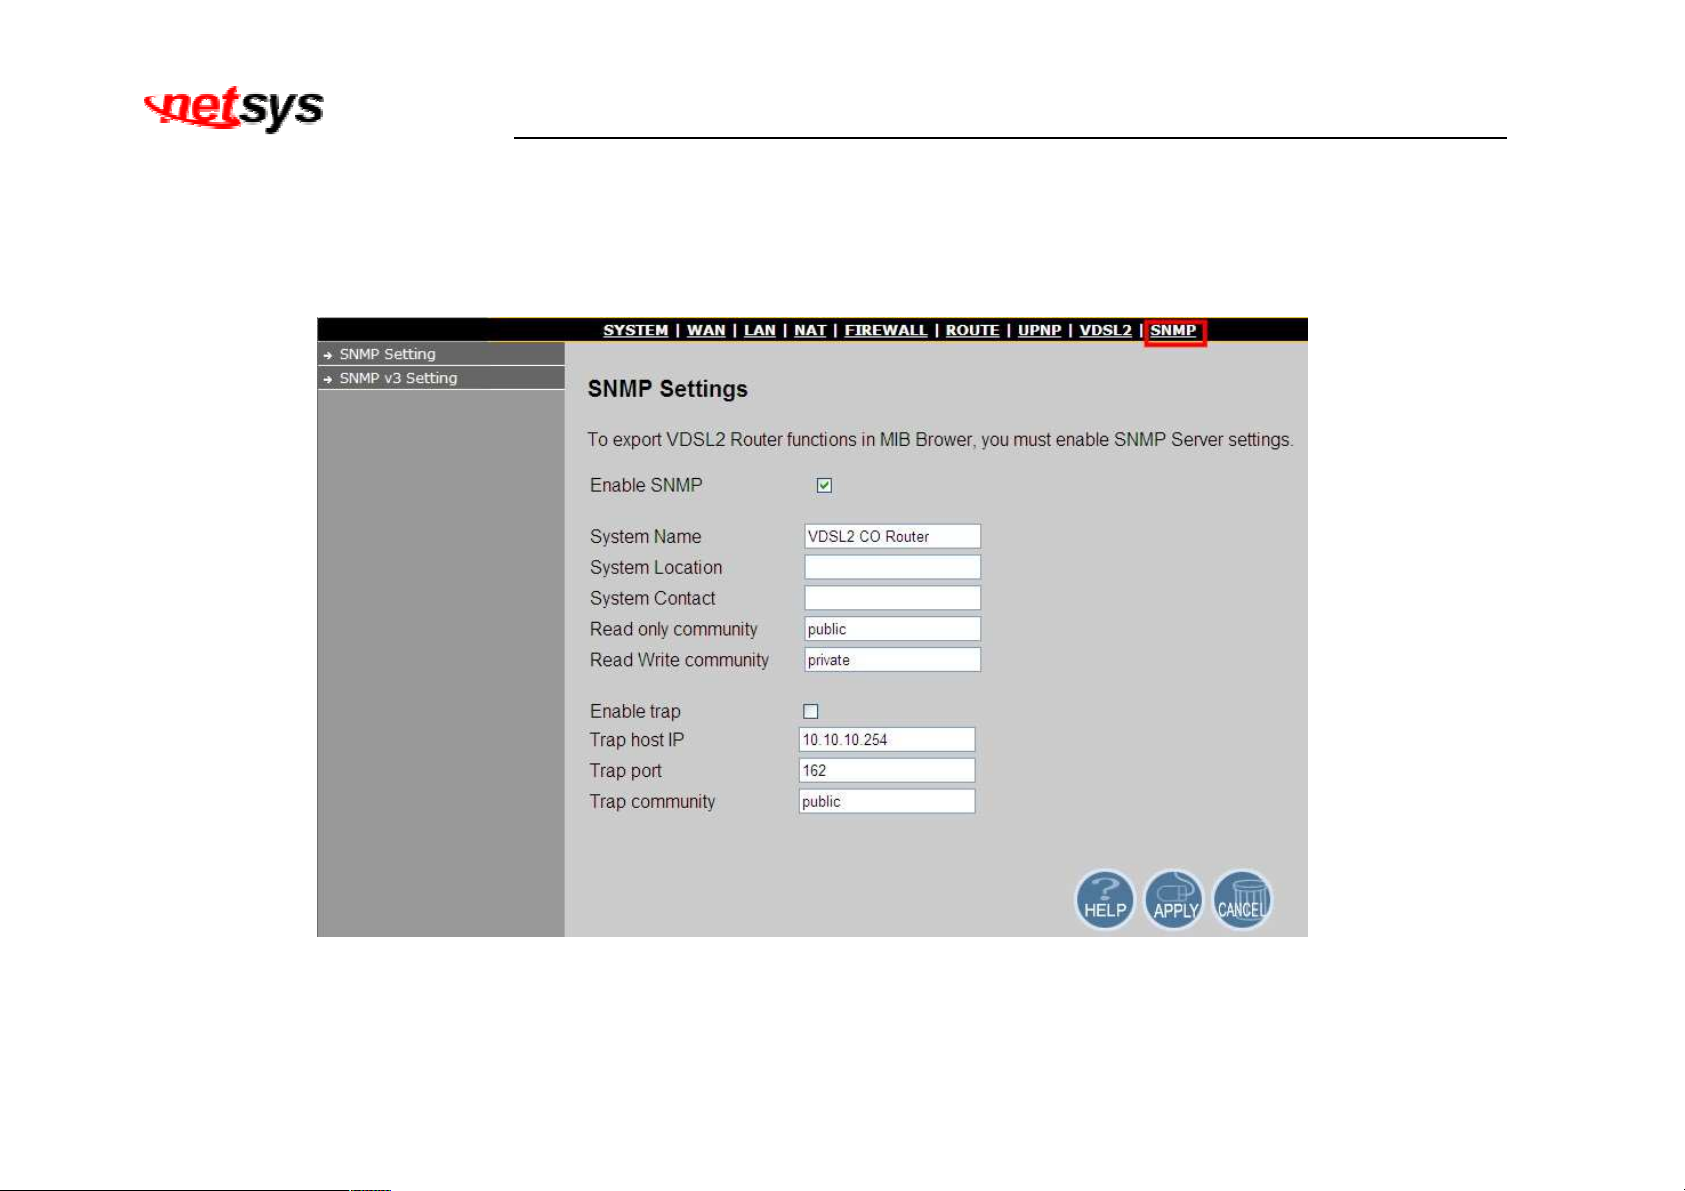
The SNMP Settings can be viewed in the left navigation bar. The following are the options available under SNMP, as shown in
Figure 4.10
Figure 4.10 SNMP in Left Navigator Bar
74
Page 76
NV-600LI/RI Managed Industrial Grade VDSL2 CO/CPE Router USER’S MANUAL Ver. A4
4.10.1 SNMP Setting
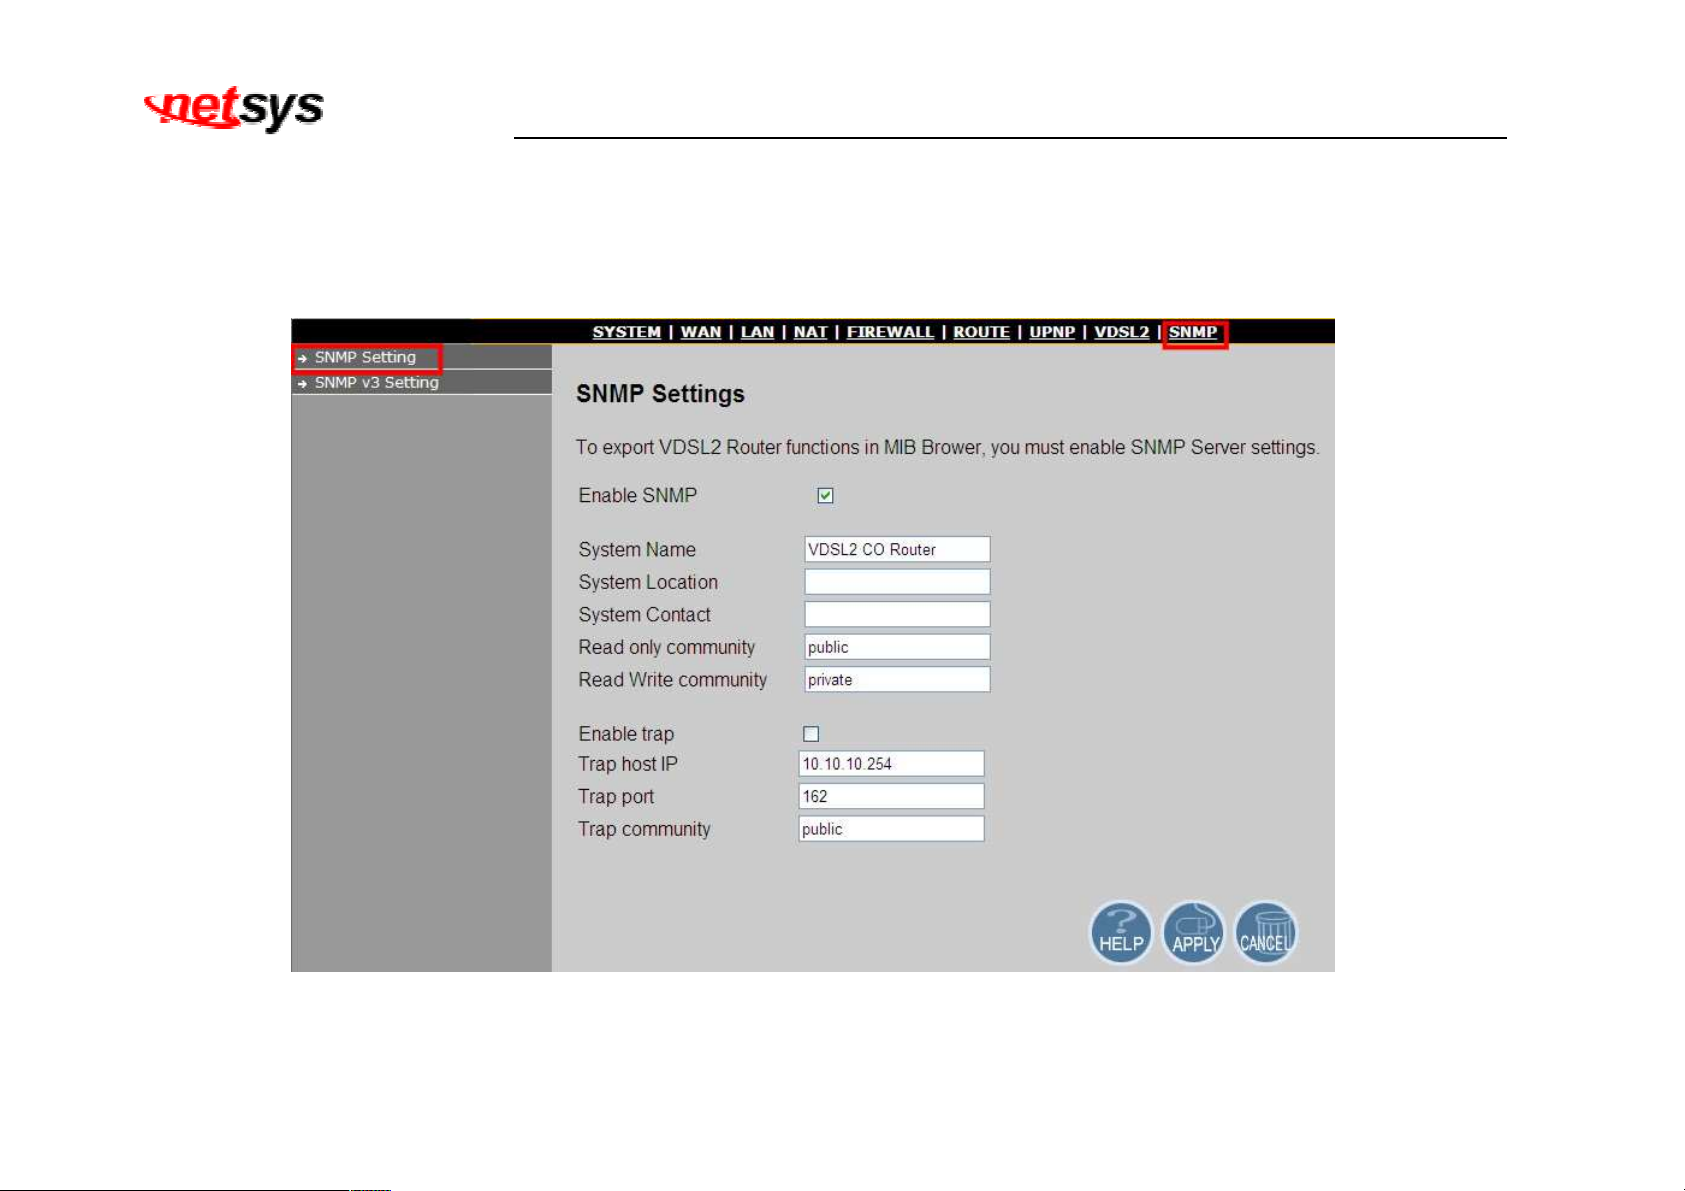
To enable or disable the SNMP Settings, click on the “SNMP Setting” link in the left navigation bar. A screen is displayed as
shown in Figure 4.10.1
Figure 4.10.1 SNMP Setting
75
Page 77
NV-600LI/RI Managed Industrial Grade VDSL2 CO/CPE Router USER’S MANUAL Ver. A4
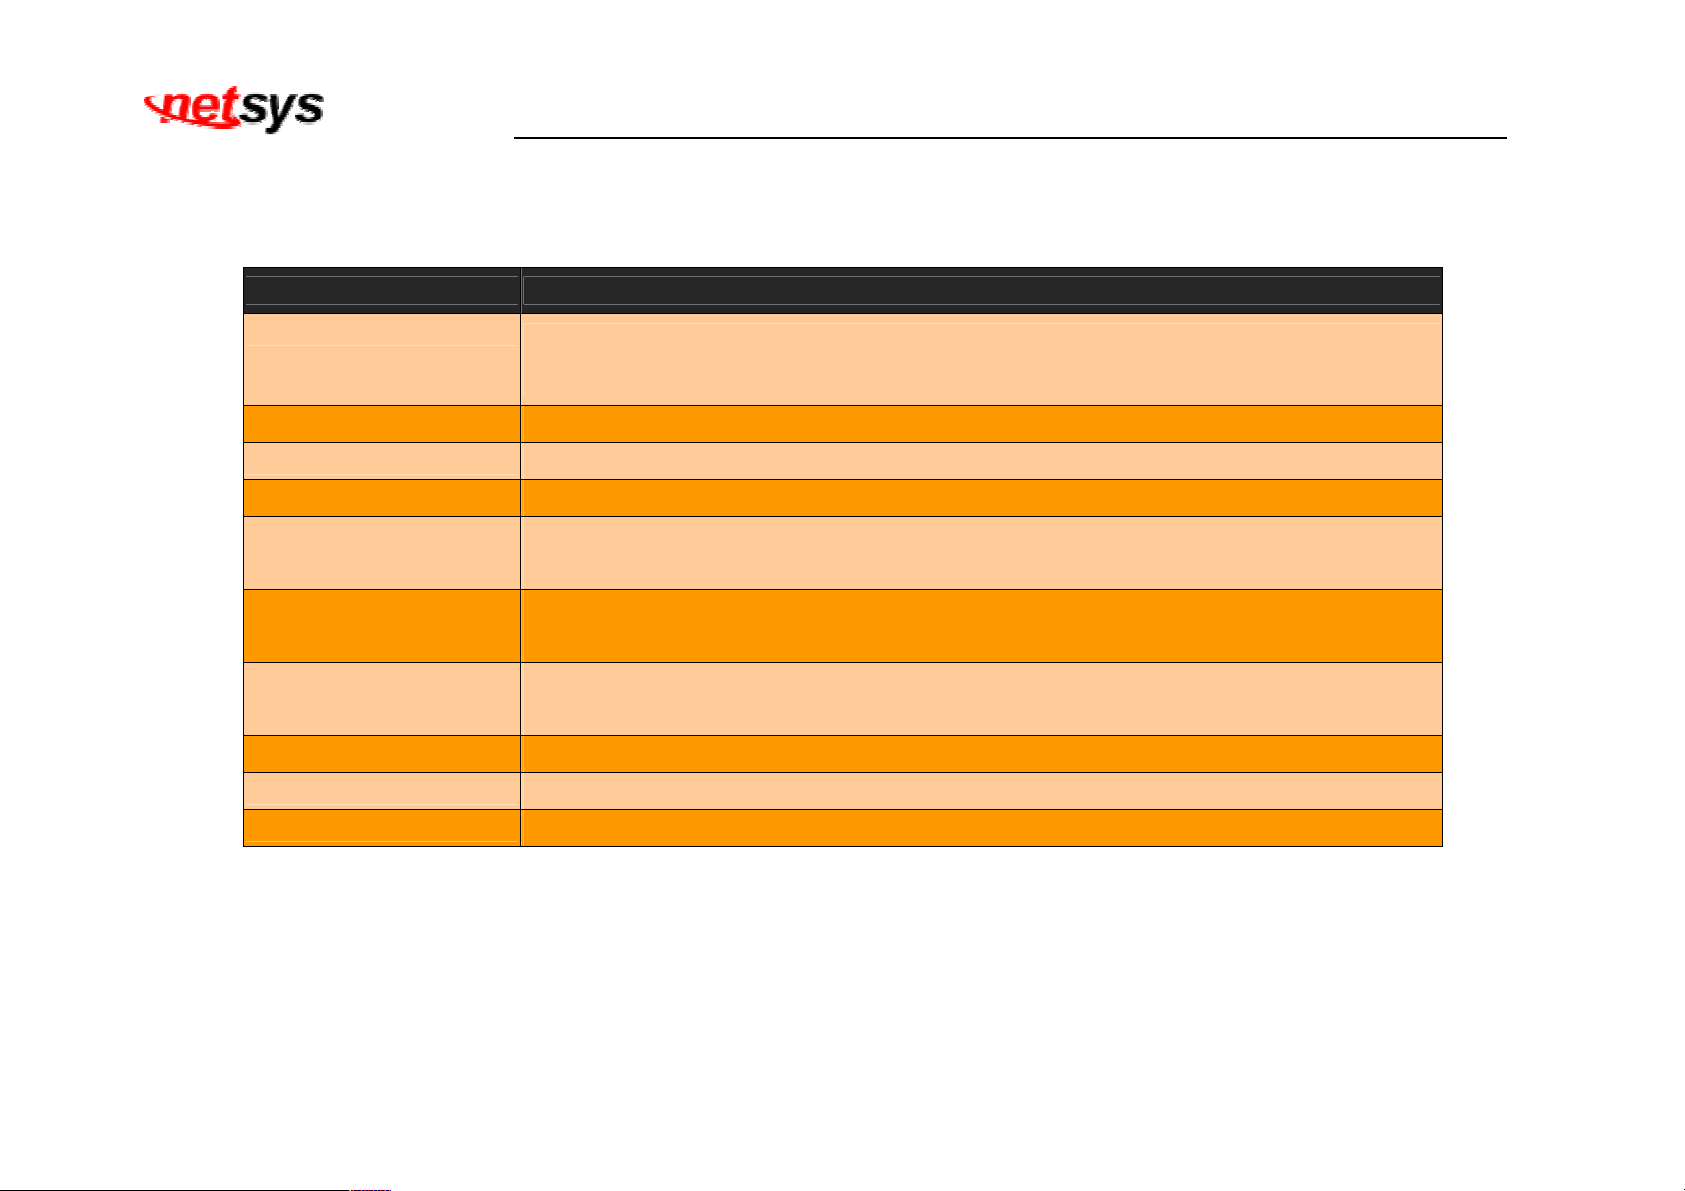
The screen contains the following details:
Fields in SNMP Settings:
Field Description
Enable SNMP
To enable or disable SNMP Setting. Select the check box to Enable or Disable the
SNMP function of NV-600LI/NV-600RI.
System Name
System Loaction
Enter a system name to be used for the VDSL2 Router
Enter the system location of the VDSL2 Modem
System Contact Enter the name of a person or organization
Enables requests accompanied by this string to display MIB-object information.
Read only community
Deafult word is “public”.
Enables requests accompanied by this string to display MIB-object information and
Read Write community
to set MIB objects. Deafult word is “private”.
To enable or disable Trap Setting. Select the check box to Enable or Disable the
Enable Trap
Trap function of NV-600LI/NV-600RI.
Trap Host IP
Trap port
Trap community
Create a trap manager by entering the IP address.
Specifies the trap port. Default trap port is “162”.
Create a trap manager by entering a community string.
• Click APPLY at any time during configuration to save the information that you have entered.
• Click CANCEL to exit from this page without saving the changes.
76
Page 78
NV-600LI/RI Managed Industrial Grade VDSL2 CO/CPE Router USER’S MANUAL Ver. A4
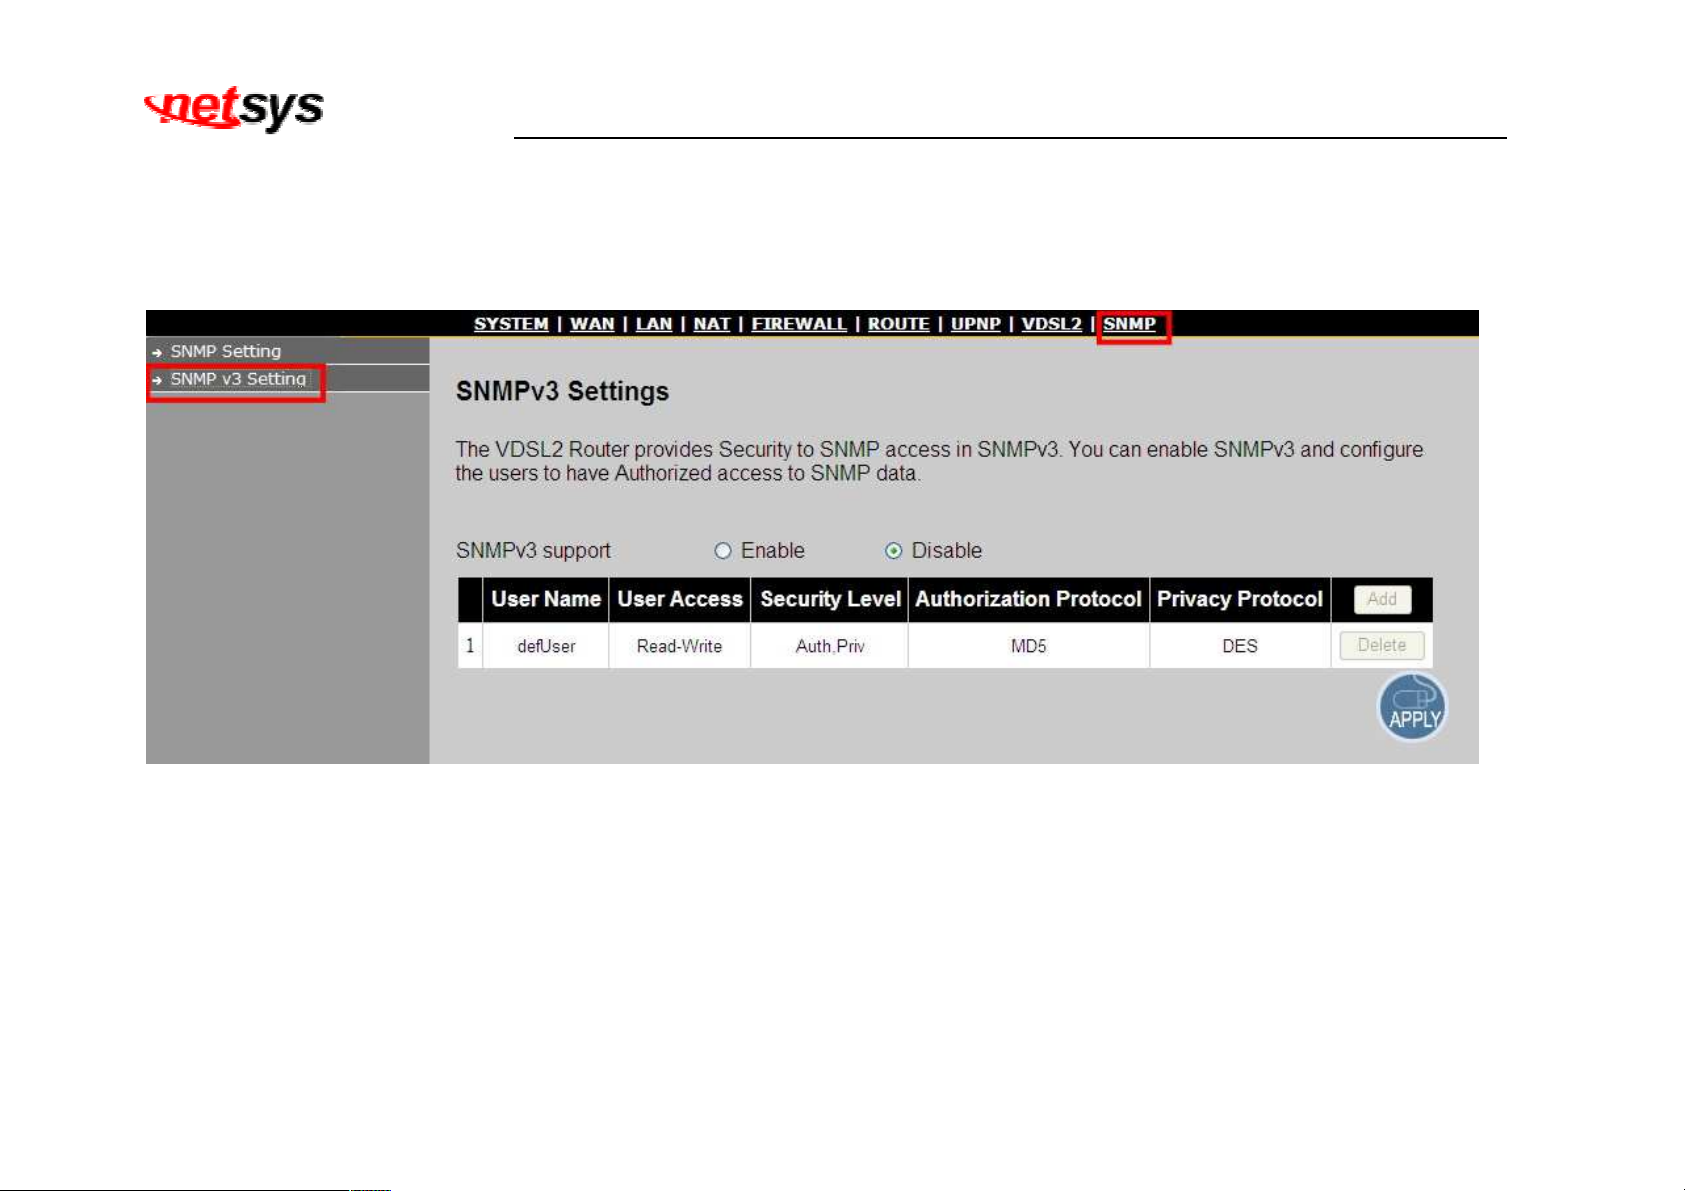
4.10.2 SNMPv3 Setting
To enable or disable the SNMPv3 Settings, click on the “SNMPv3 Setup” link in the left navigation bar. A screen is displayed as
shown in Figure 4.10.2
Figure 4.10.2 SNMPv3 Setting(Disable)
77
Page 79
NV-600LI/RI Managed Industrial Grade VDSL2 CO/CPE Router USER’S MANUAL Ver. A4
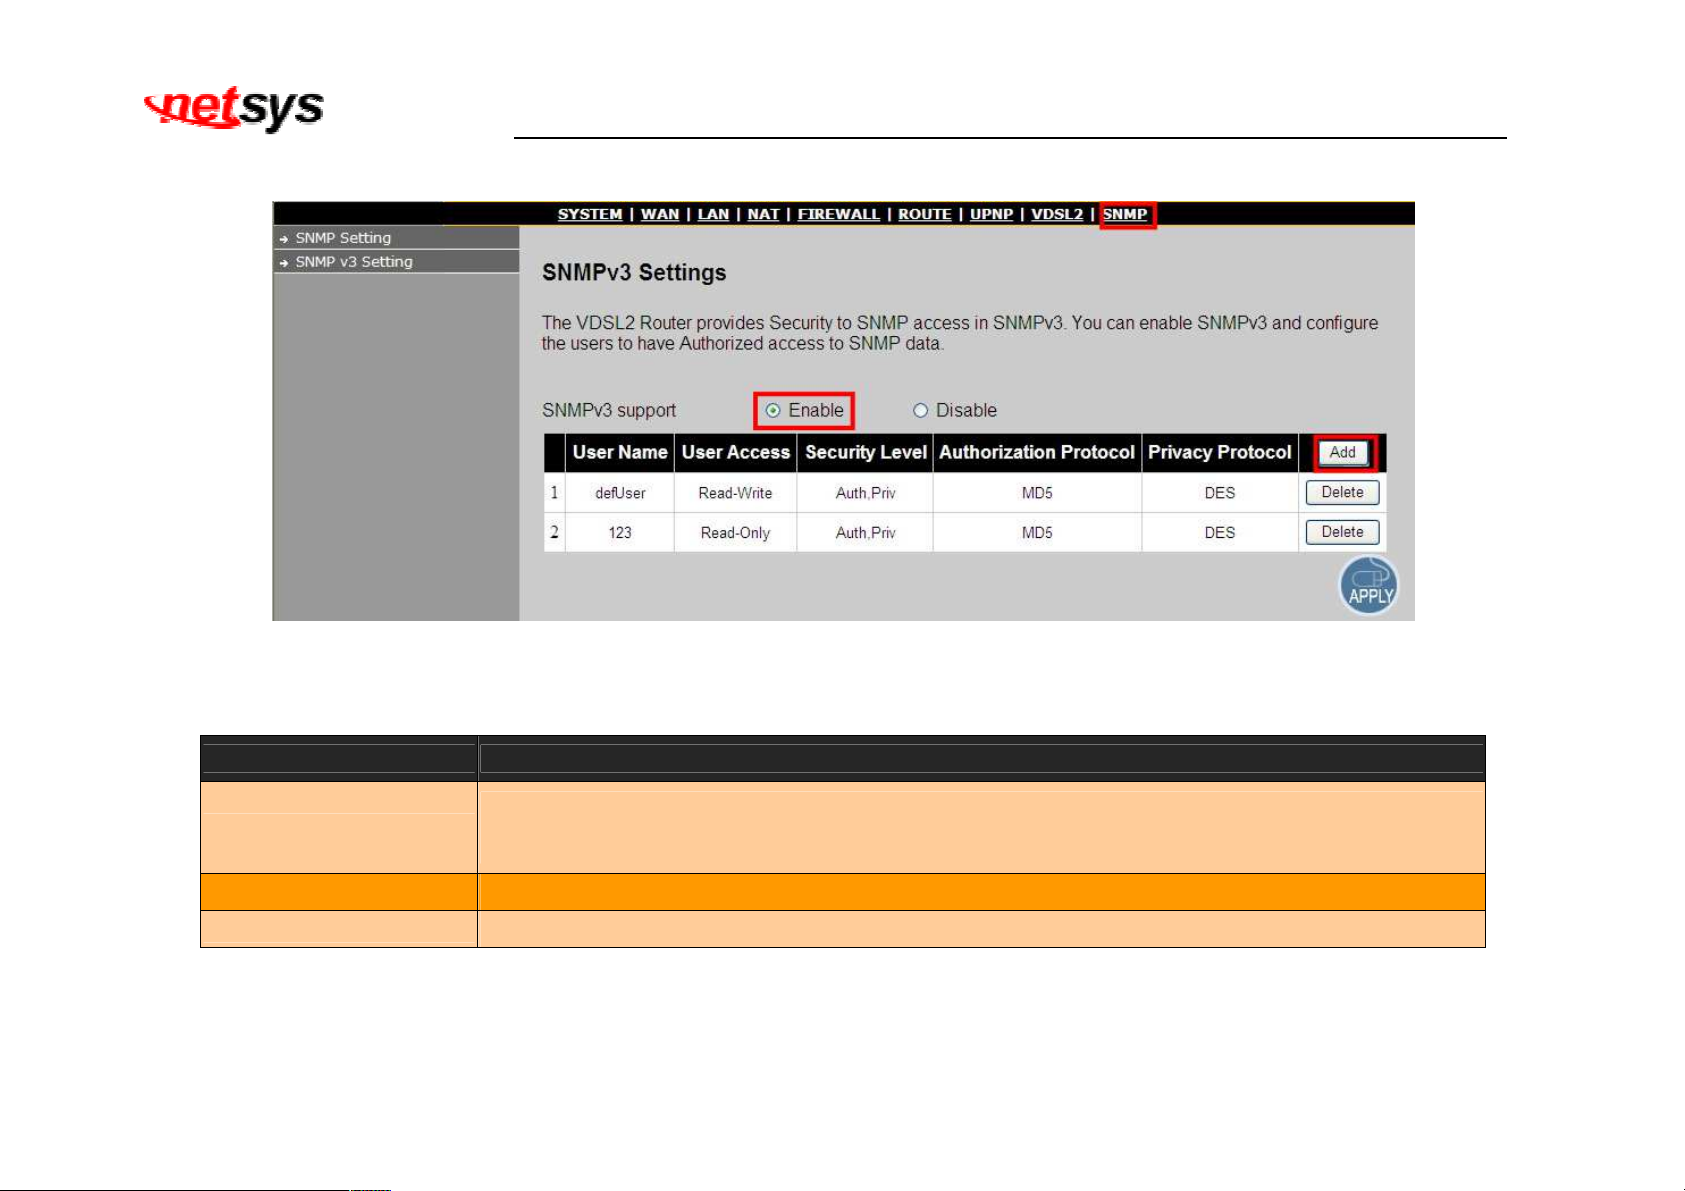
The screen contains the following details:
Figure 4.10.2-1 SNMPv3 Setting(Disable)
Fields in SNMPv3 Settings: A screen is displayed as shown in Figure 4.10.2-1.
Field Description
To enable or disable SNMP Setting. Select the check box to Enable or Disable the SNMP
Enable SNMPv3
function of NV-600LS/NV-600RS.
Add
Delete
Add a SNMPv3 user
Delete a SNMPv3 user
78
Page 80
NV-600LI/RI Managed Industrial Grade VDSL2 CO/CPE Router USER’S MANUAL Ver. A4
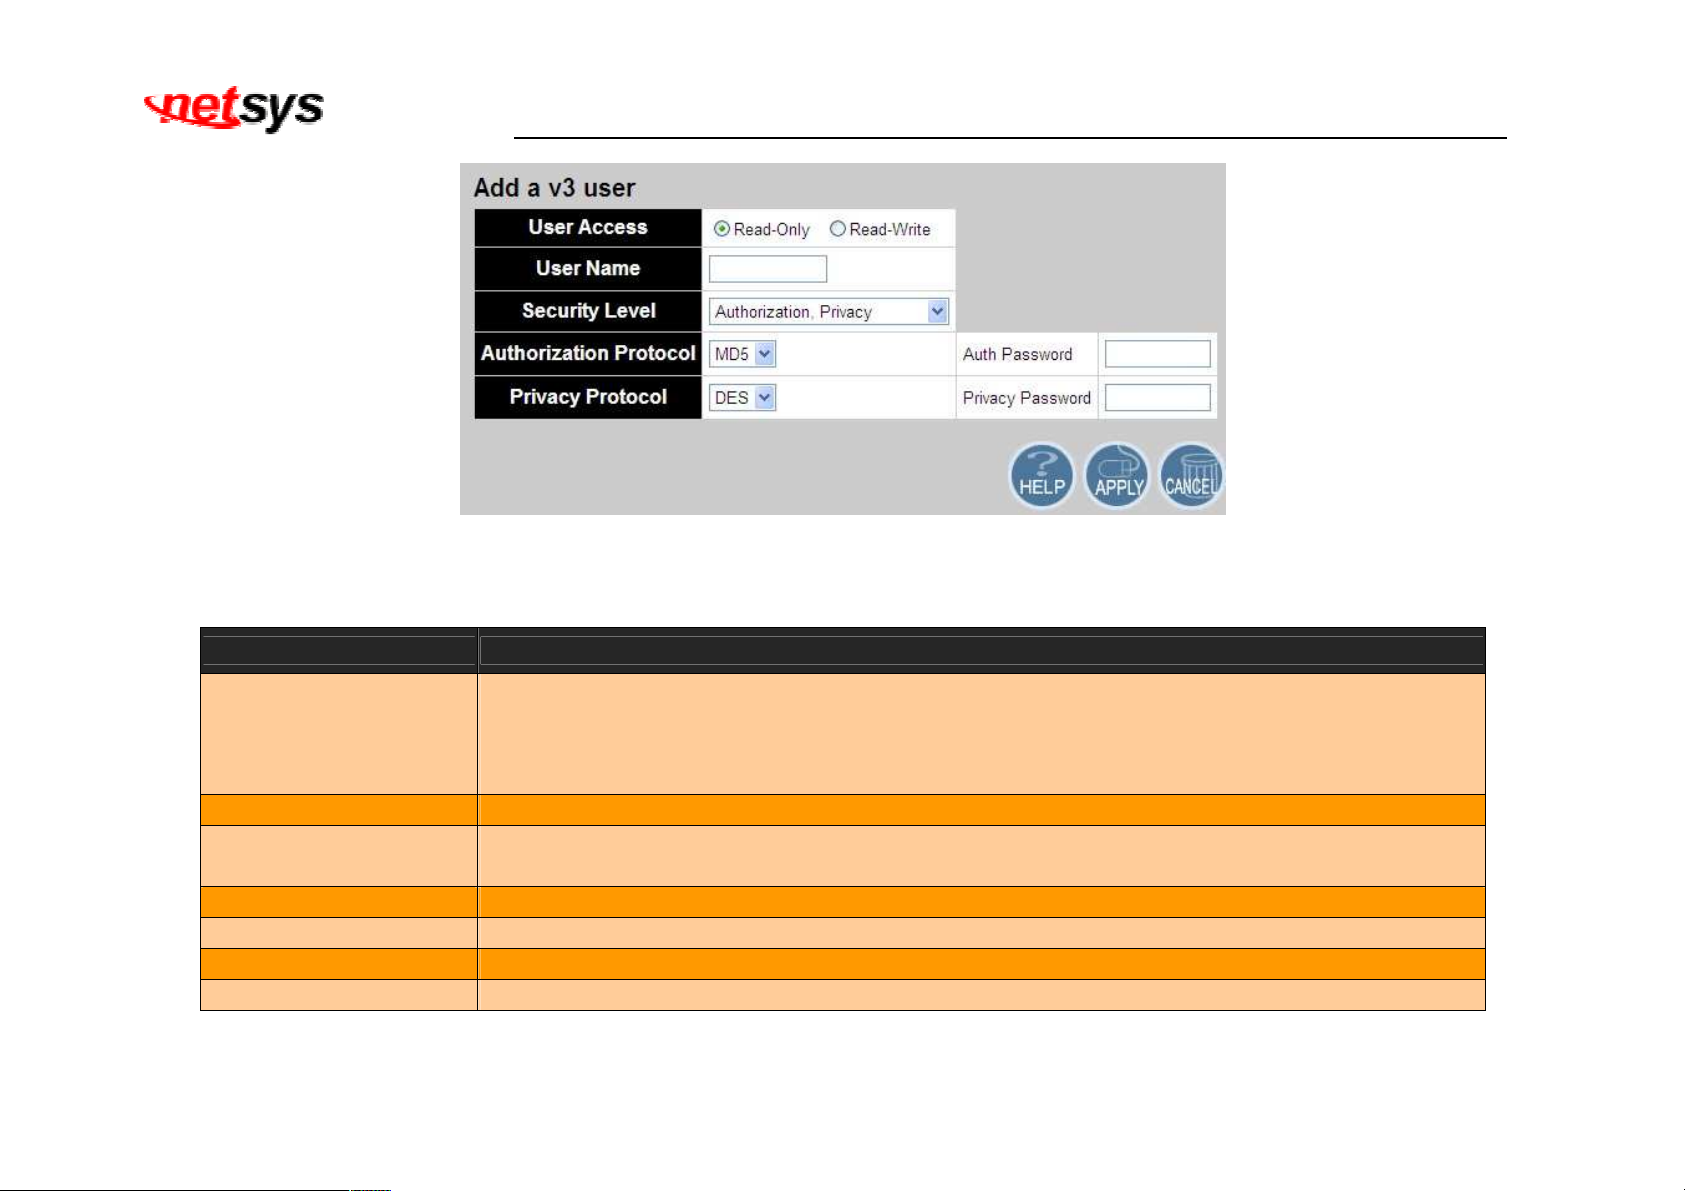
Figure 4.10.2-2 Add a v3 user
Fields in SNMPv3 Add Settings: A screen is displayed as shown in Figure 4.10.2-2.
Field Description
Select the check box to Read-Only or Read-Write.
User Access
Read-Only: Enables requests accompanied by this string to display MIB-object information.
Read-Write: Enables requests accompanied by this string to display MIB-object information
and to set MIB objects.
User name Specifies the user name. (1~15 chars)
Security Level
Specifies security level of your need:
1. No Authorization, No Privacy 2. Authorization, No Privacy 3. Authorization, Privacy
Authorization Protocol Specifies the authorization type. (MD5 / SHA)
Auth Password Specifies the authorization password. (8~15 chars)
Privacy Protocol Specifies the privacy type. (DES / AES)
Privacy Password Specifies the privacy password. (8~15 chars)
79
Page 81
NV-600LI/RI Managed Industrial Grade VDSL2 CO/CPE Router USER’S MANUAL Ver. A4
Chapter 5.
Operating the VDSL2 System
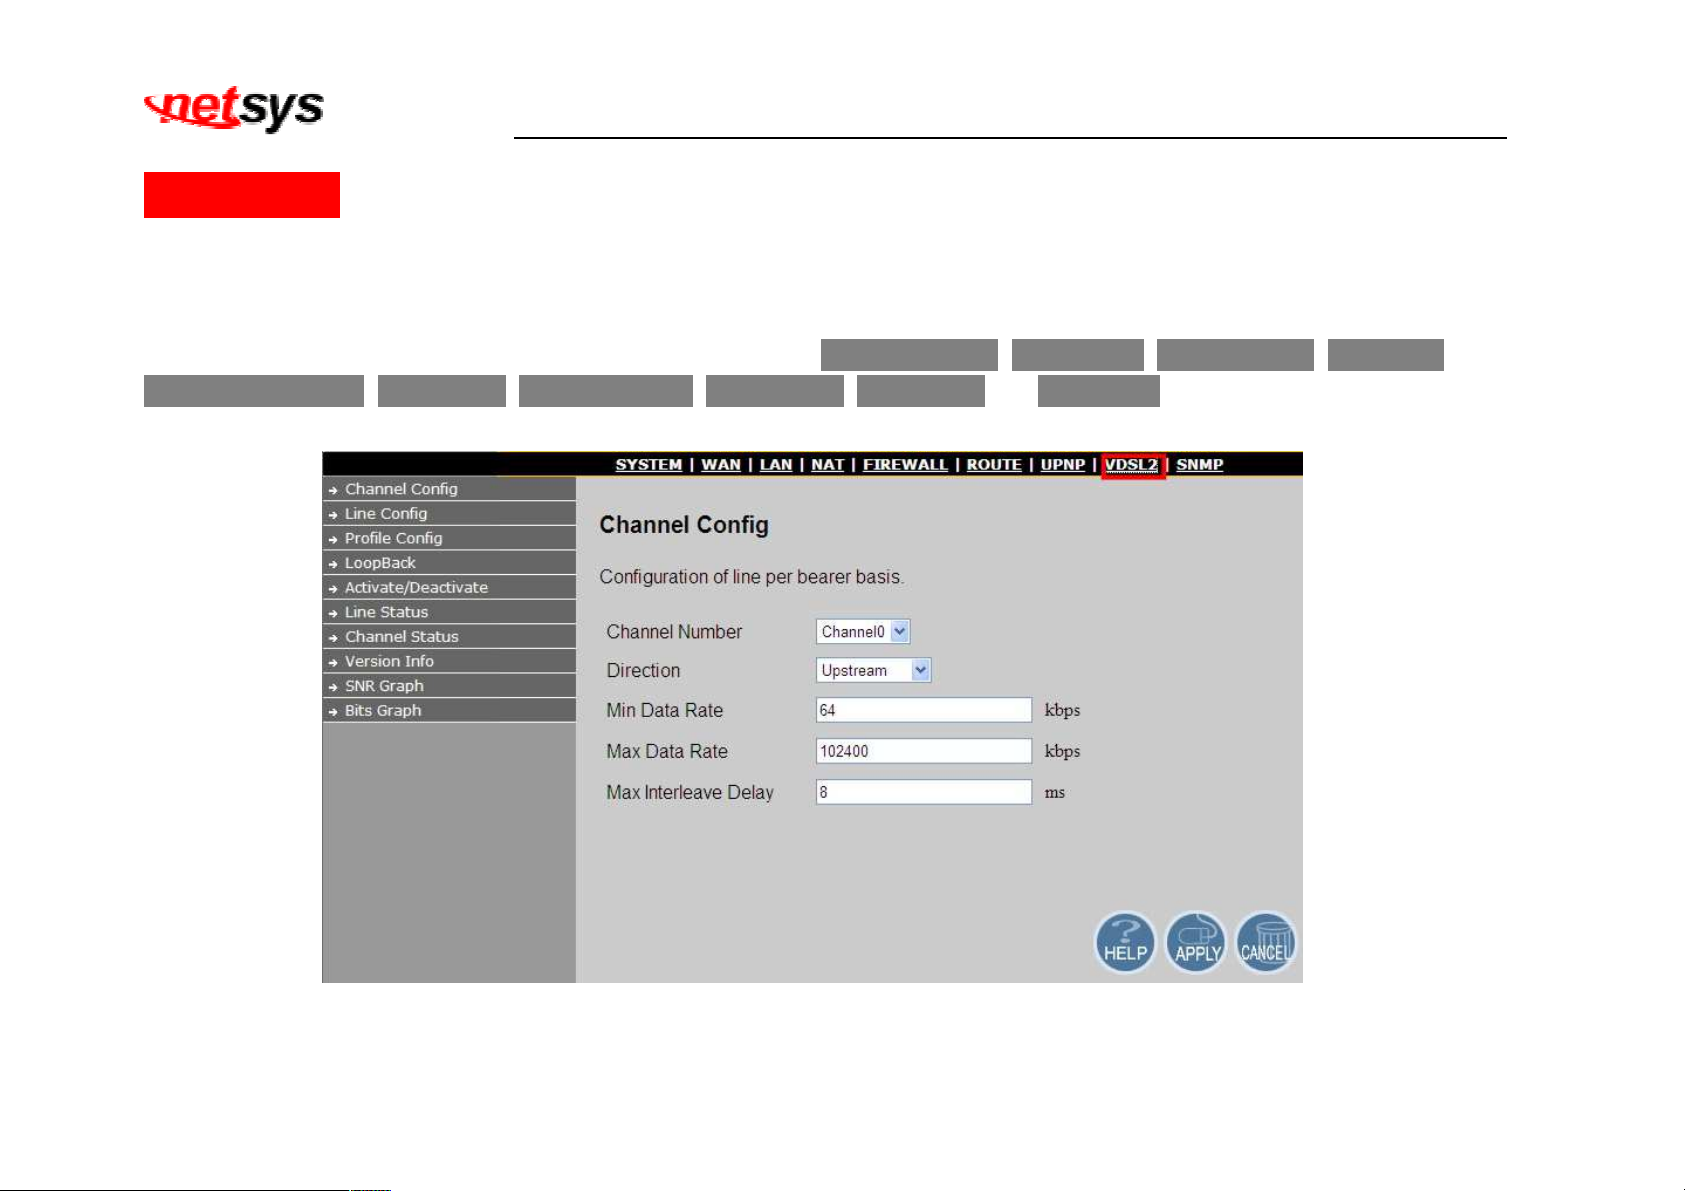
After the VDSL2 system has been set up, one may want to configure the settings that are related to VDSL2.
Configuration of operation modes, test modes (loop back) and the display of status information are supported by GUI
(Graphical User Interface).
Select the “Route”. The menu below includes the sub-menus of Channel Config, Line Config, Profile Config, LoopBack,
Activate/Deactivate, Line Status, Channel Status, Version Info, SNR Graph and Bits Graph. A screen is displayed as
shown in Figure 5-1
Figure 5-1 VDSL2 in Left Navigator Bar
80
Page 82
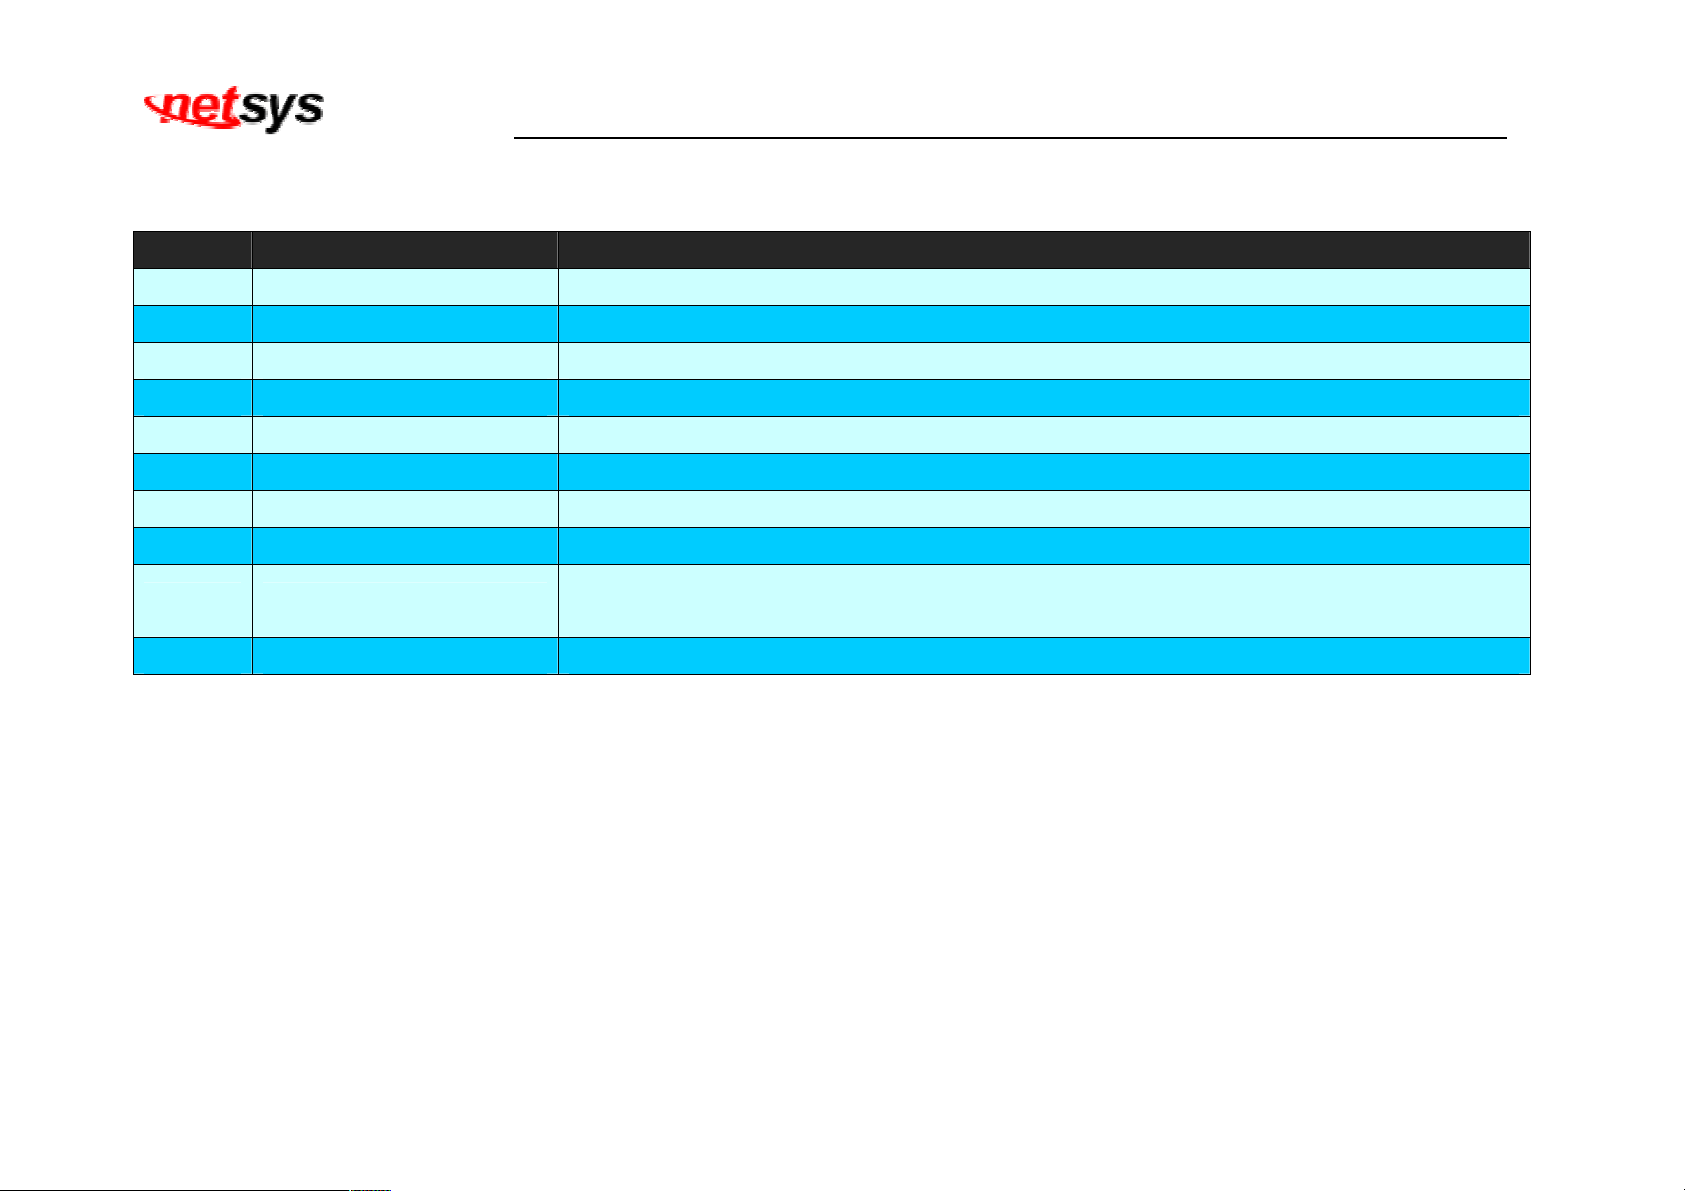
VDSL2 menu table list:
Section Item Description
NV-600LI/RI Managed Industrial Grade VDSL2 CO/CPE Router USER’S MANUAL Ver. A4
5-1 Channel Config
5-2 Line Config
5-3 Profile Config
5-4 Loop Back
5-5 Activate Deactivate
5-6 Line Status
5-7 Channel Status
5-8 VDSL2 Version Info
5-9 SNR Per Tone Graph
5-10 Bits Per Tone Graph
Configuration of line per bearer basis.
Configuration of line.
Configuration of line for specific band plans.
Setting Of Loop Backs.( System - System Loop, or Line Side Loop)
Activating or Deactivating the line
Downstream/Upstream SNR status of the Line.
Status of the bearer
VDSL2 Version Numbers.
Shown power level in upstream and downstream spectrum, The higher the SNR
value, the better the performance.
Shown tone length in upstream and downstream spectrum.
81
Page 83
NV-600LI/RI Managed Industrial Grade VDSL2 CO/CPE Router USER’S MANUAL Ver. A4
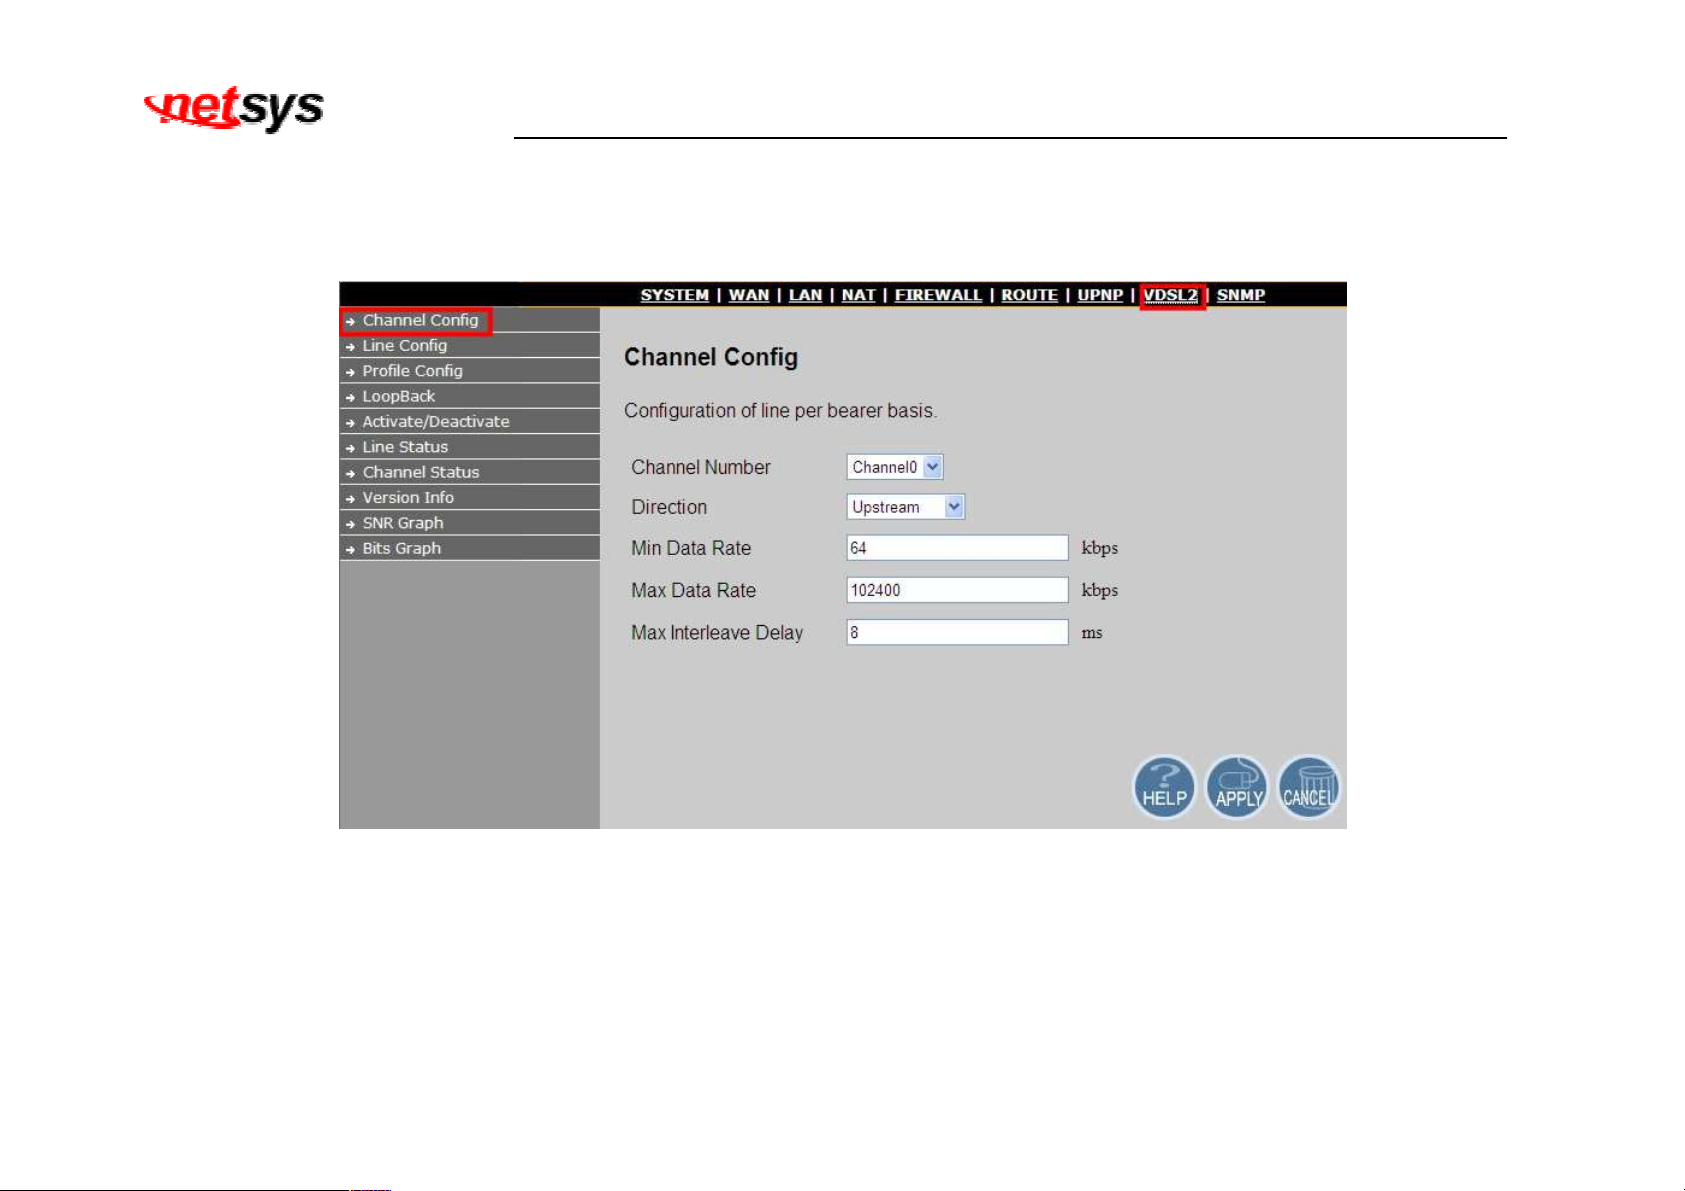
5.1 Select “Channel Config”
To config the VDSL2 channel, click on the “Channel Config” link in the left navigation bar. A screen is displayed as shown in Figure
5.1
Figure 5.1 Channel Configuration Menu
82
Page 84
NV-600LI/RI Managed Industrial Grade VDSL2 CO/CPE Router USER’S MANUAL Ver. A4
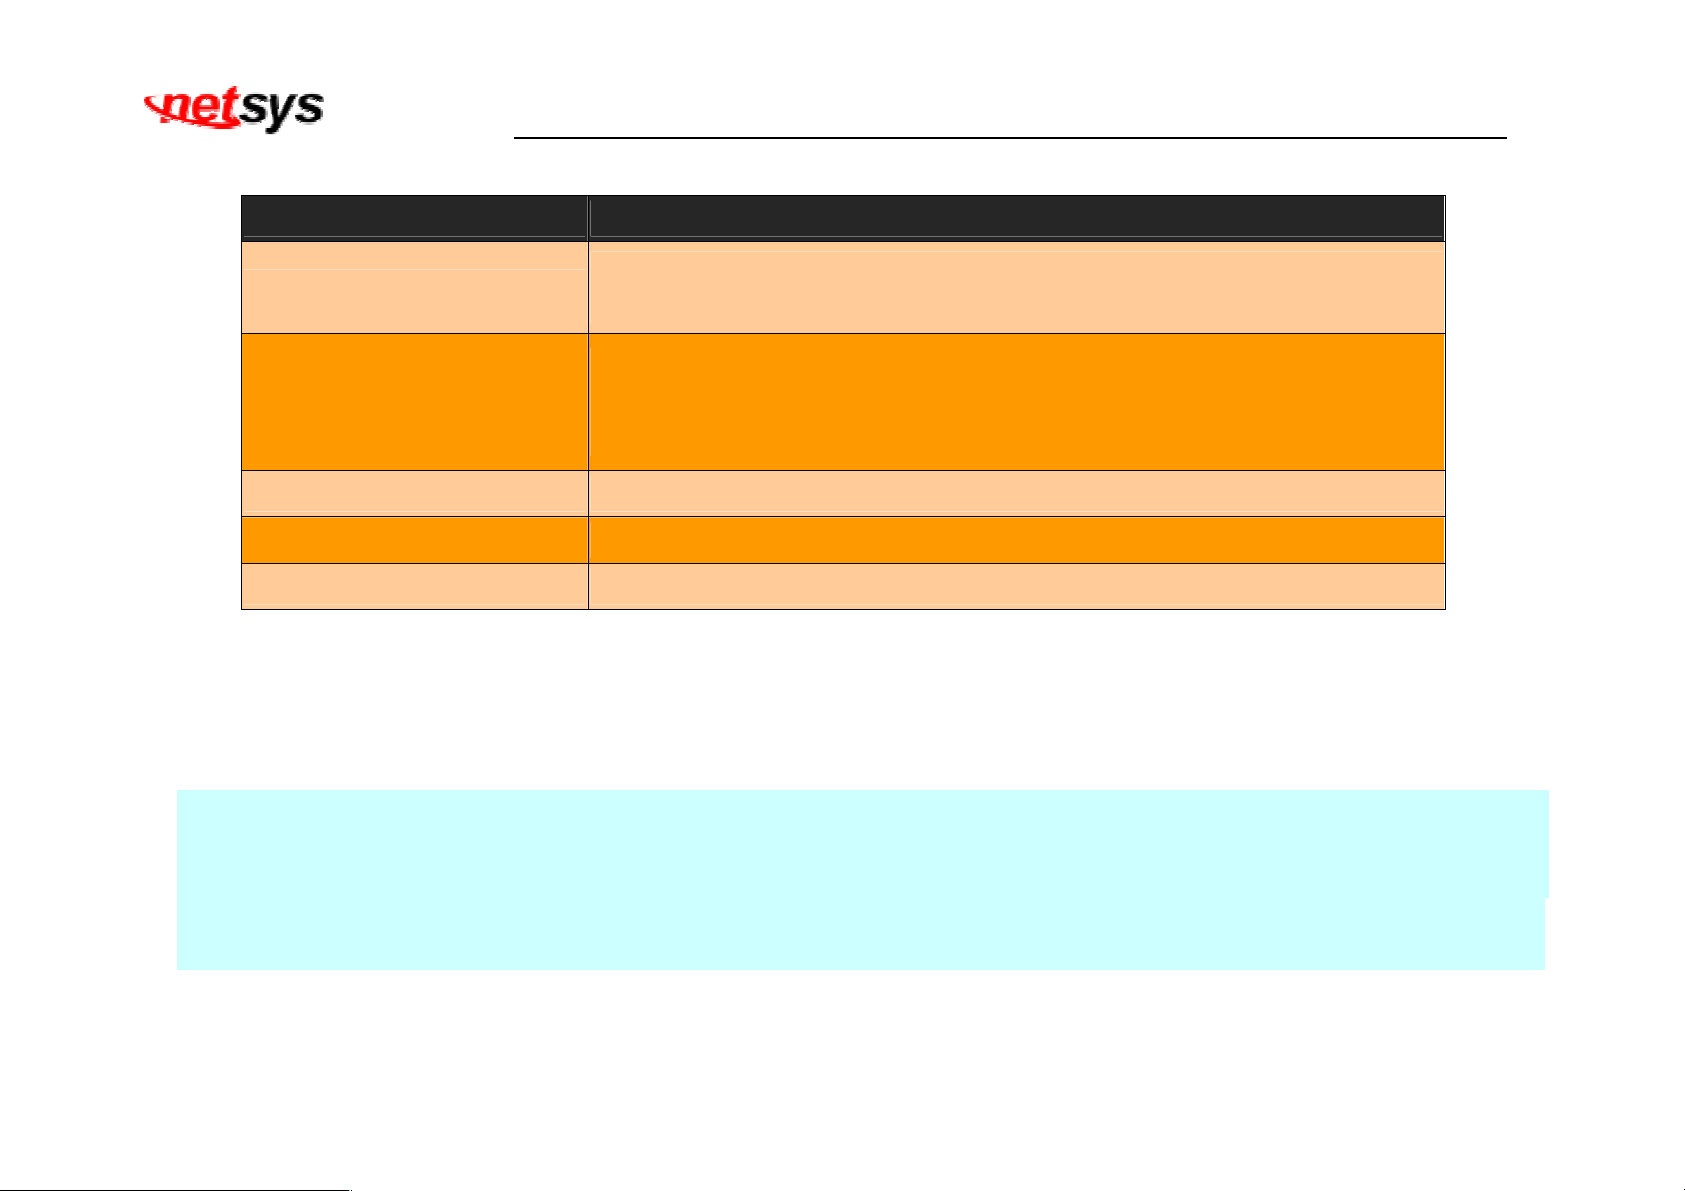
Channel Configuration Settings:
Setting Description
Channel Number
To which bearer channel number shall the settings apply?
Channel 0
To which direction shall the settings apply?
Direction
Upstream
Downstream
Min Data Rate Minimum Payload Data Rate values
Max Data Rate Maximum Payload Data Rate values
Max Interleave Delay
Maximum Interleave Delay values (set from 0 to 255ms)
• Click APPLY at any time during configuration to save the information that you have entered.
• Click CANCEL to exit from this page without saving the changes.
Notes:
1.Regarding the interleave delay value time function for anti-noise purpose, due to the noise of each environment are different,
so you could adjust interleave delay value when filed environment has heavy noise. Please note that increase interleave
delay time will reduce few vdsl2 bandwidth and depond on interleave delay time.
2. The Min and Max Data Rate function similar rate control function, you can limit rate for the VDSL2 port.
3. Please note you must deactivate then activate once on config port when you config VDSL2 arguments.
83
Page 85
NV-600LI/RI Managed Industrial Grade VDSL2 CO/CPE Router USER’S MANUAL Ver. A4
The following description about interleave delay function:
Interleave delay function is used in digital data transmission technology to protect the transmission against noise issue
and data error.
If during transit more than a certain amount of data has been lost then the data cannot be correctly decoded. Short
bursts of noise on the line can cause these data packets to become corrupt and the router has to re-request data which
in turn can slow down the overall rate at which data is transmitted.
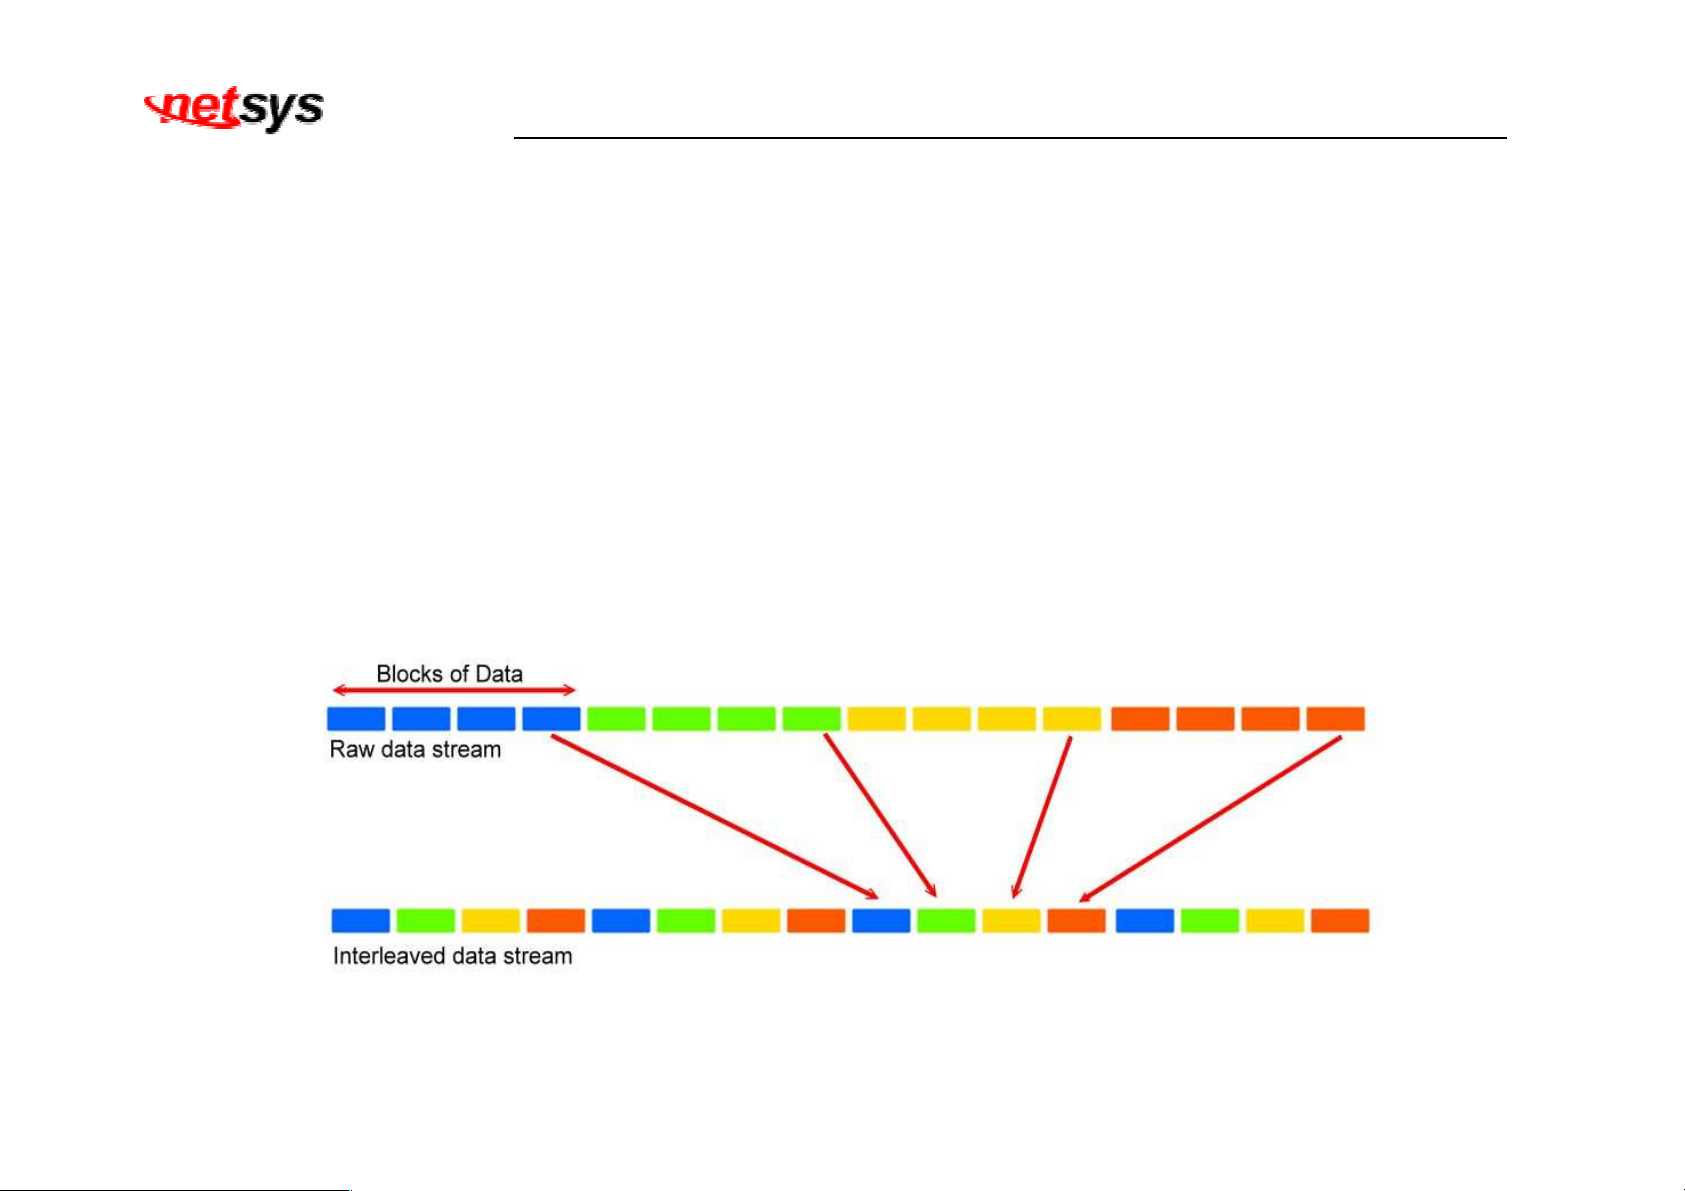
Interleaving is a method of taking data packets, chopping them up into smaller bits and then rearranging them so that
once contiguous data is now spaced further apart into a non continuous stream. Data packets are re-assembled by
your router.
The diagram below is an example of how interleaved traffic is transmitted.
84
Page 86
If your line is particularly susceptible to bursts of noise then interleaving should improve your VDSL2 experience simply
because if you lose a whole batch of data then this could cause your router to loose sync with the exchange.
Using Interleaving, the router is able to re-assemble the data or if necessary just re-request the part of the data that it is
unable to recover. By increasing the interleave depth of each ports that are susceptible to noise, this will improve error
performance and stability of marginal lines.
NV-600LI/RI Managed Industrial Grade VDSL2 CO/CPE Router USER’S MANUAL Ver. A4
85
Page 87
NV-600LI/RI Managed Industrial Grade VDSL2 CO/CPE Router USER’S MANUAL Ver. A4
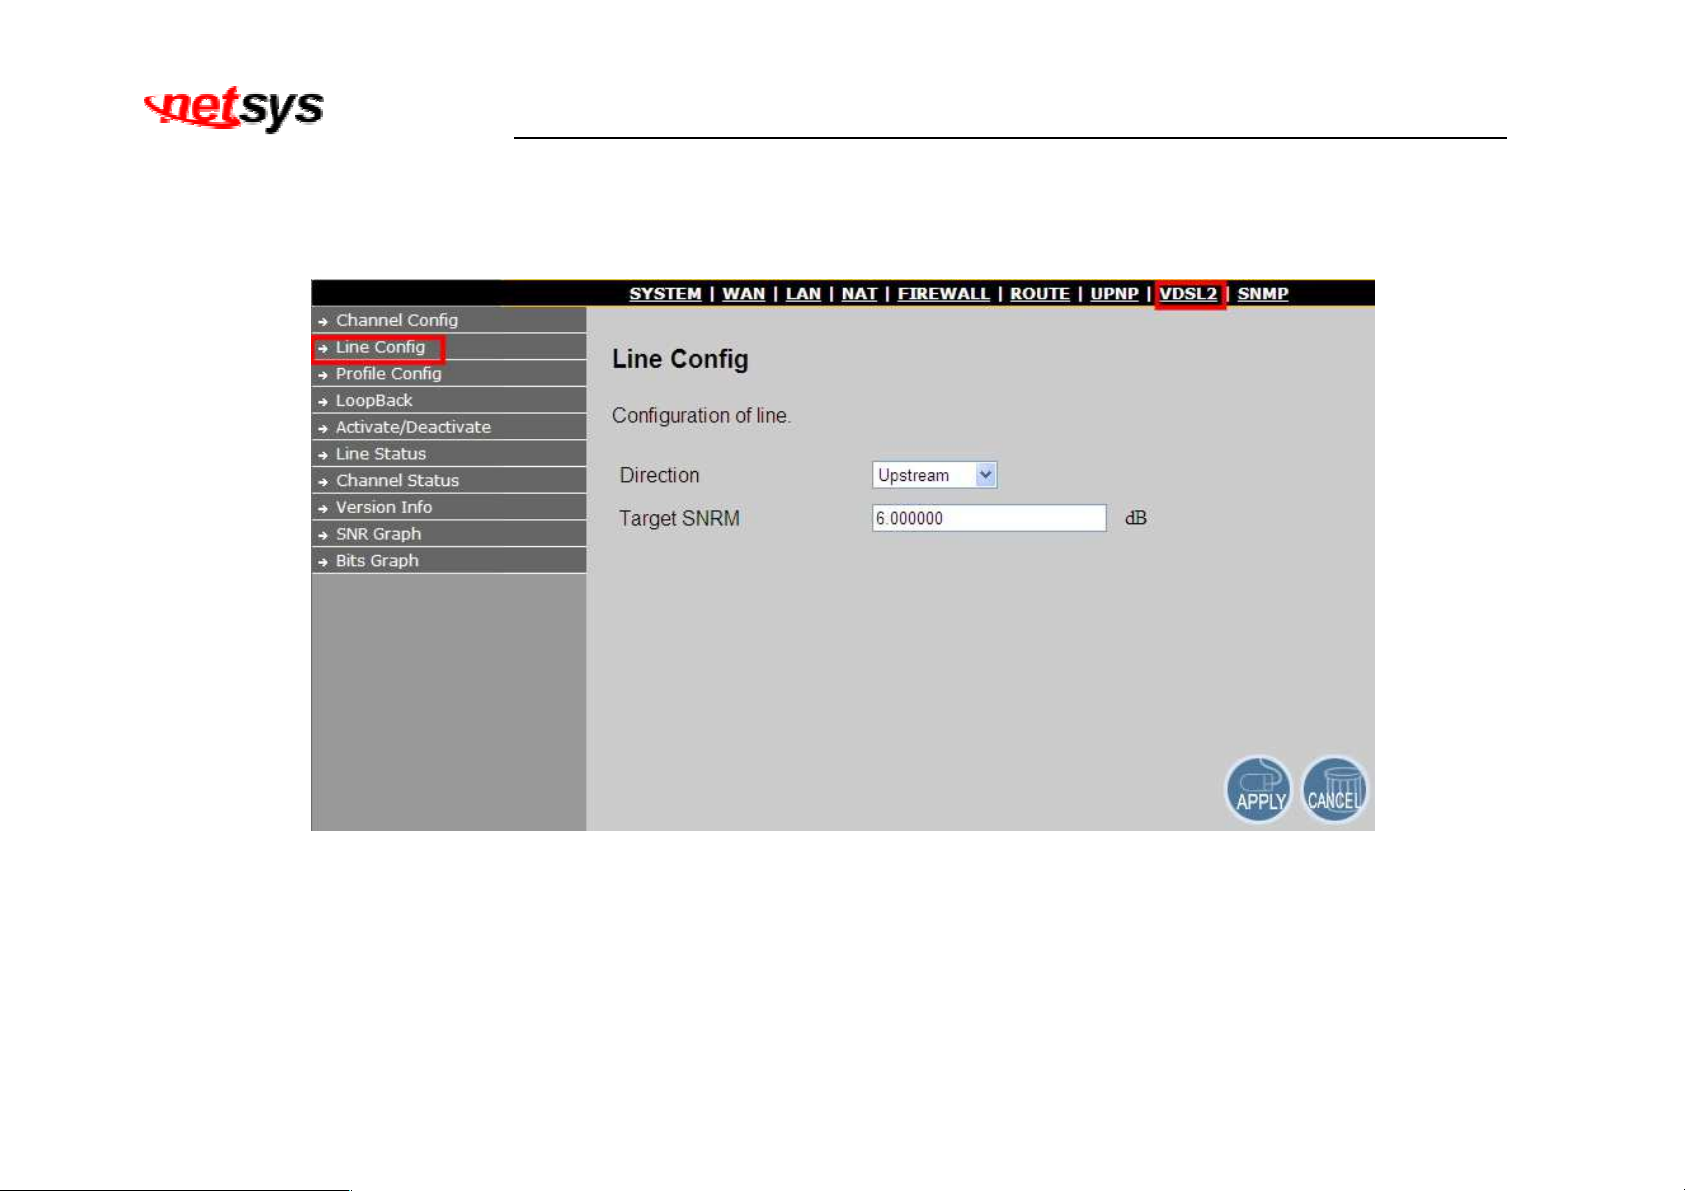
5.2 Select “Line Config”
To config the Line, click on the “Line Config” link in the left navigation bar. A screen is displayed as shown in Figure 5.2
Figure 5.2 Line Configuration Menu for SNR Margin Selection
86
Page 88
NV-600LI/RI Managed Industrial Grade VDSL2 CO/CPE Router USER’S MANUAL Ver. A4
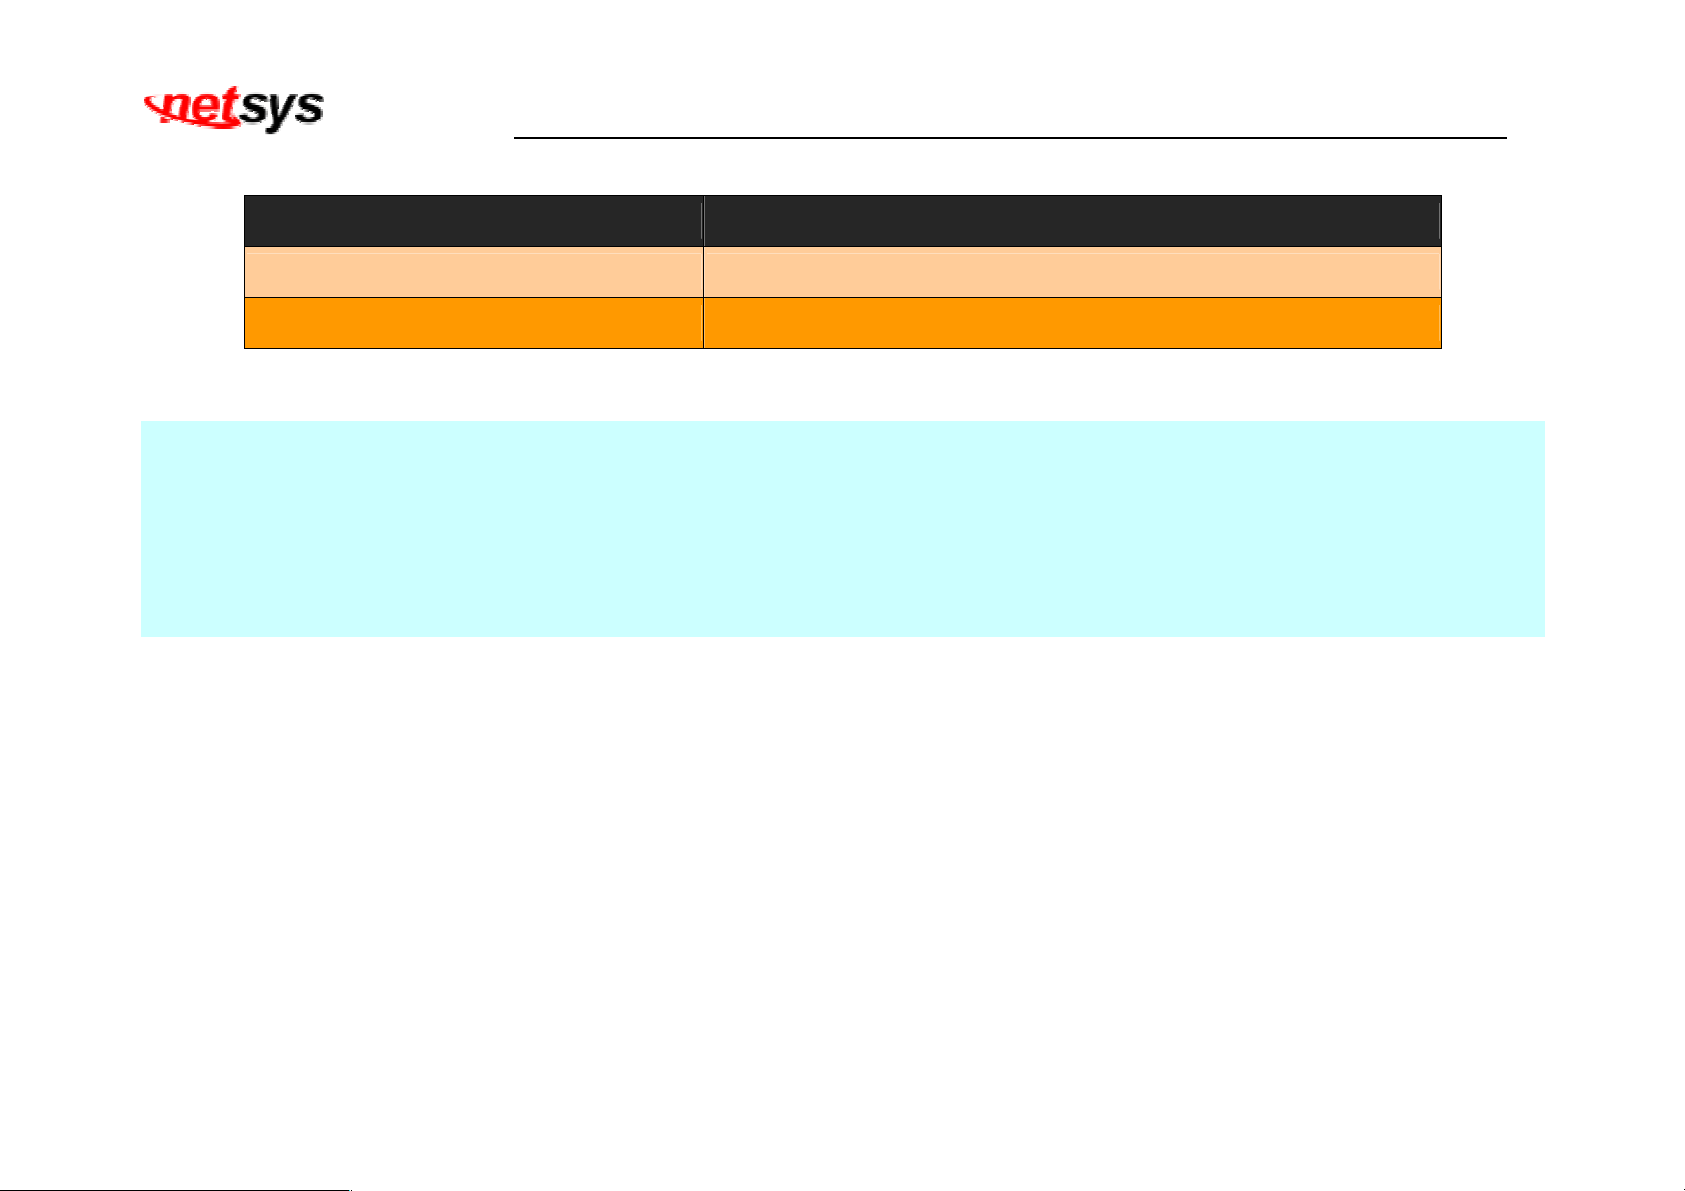
Line Configuration Settings:
Setting Description
Direction Select the target direction.
Target SNRM
Set the required SNR Margin *10 (60=6dB)
Note:
Noise Margin is the non-technical term for Signal to Noise Ratio Margin (SNRM). Domestic standard modems and VDSL2 routers
often use the terms Noise Margin or SNR when reporting on its value. The Signal to Noise Ratio, as its name implies, is the ratio
between the strength of the signal and the level of noise on the line.
That ratio is a major factor in determining the connection speed, as the higher the ratio the higher the possible speed. The SNRM is a
margin which by which the noise level can rise before connection is lost.
Taking the default (target) value of 6 dB applied is follow up telecom standard. Basically, you don't need adjust this value.
87
Page 89
NV-600LI/RI Managed Industrial Grade VDSL2 CO/CPE Router USER’S MANUAL Ver. A4
5.3 Select “Profile Config”
For this function, NV-600LI/RI provides world wide telecom standard band plan, such as meet European telecom
standard band plan 998(17a), USA telecom standard band plan 997(8a, 8b) and APAC Telecom standard band plan
(30a) etc.
Annex A specifies bandplans for the North American region and enables NV-600 to be deployed with traditional
POTS telephony or in an all-digital mode.
Annex B specifies bandplans for Europe and enables NV-600 deployment with underlying POTS and ISDN
services.
Annex C allows NV-600 to coexist with TCM-ISDN services, found primarily in APAC.
NV-600 has numerous configuration profiles and bandplans to meet regional service provider requirements. The
frequency bandwidth has increased to 30 MHz, with configuration options at 8.5 MHz, 12 MHz, 17.7 MHz and 30 MHz.
Band profile and band plan can only be configured at NV-600L as NV-600R will auto-follow up on the settings of
NV-600L. The only thing that NV-600R must be configured so that the routers will link is the tone mode. However, the
default tone mode for NV-600LI/RI is V43, so at default there’s no need to change the tone mode unless it is required
by the telecom companies to use different tone mode. Another important thing is that band profile and band plan
setting must be compatible to each other if not access error will show when applied. Please deactivate and activate
once the setting has been changed.
88
Page 90
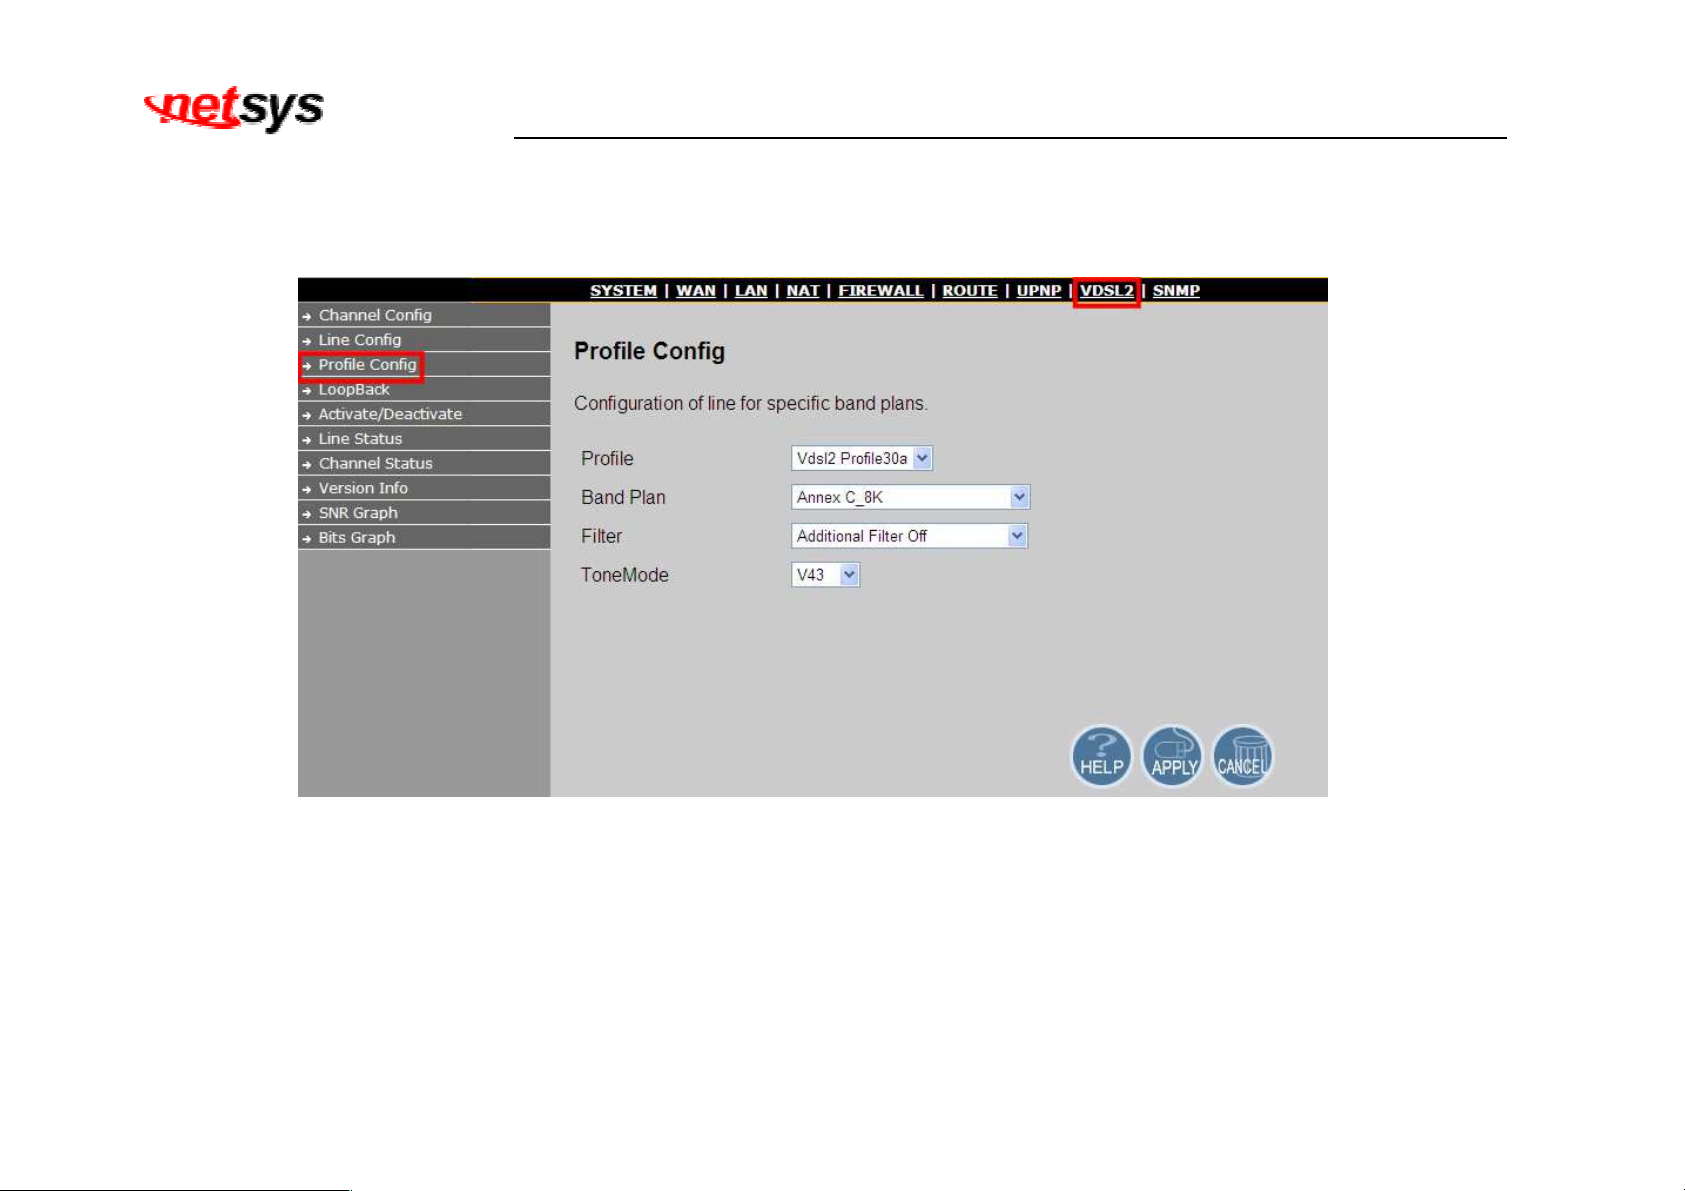
NV-600LI/RI Managed Industrial Grade VDSL2 CO/CPE Router USER’S MANUAL Ver. A4
To config the Profile, click on the “Profile Config” link in the left navigation bar. A screen is displayed as shown in Figure 5.3.1 &
5.3.2
Figure 5.3.1 NV-600LI Profile Configuration
89
Page 91
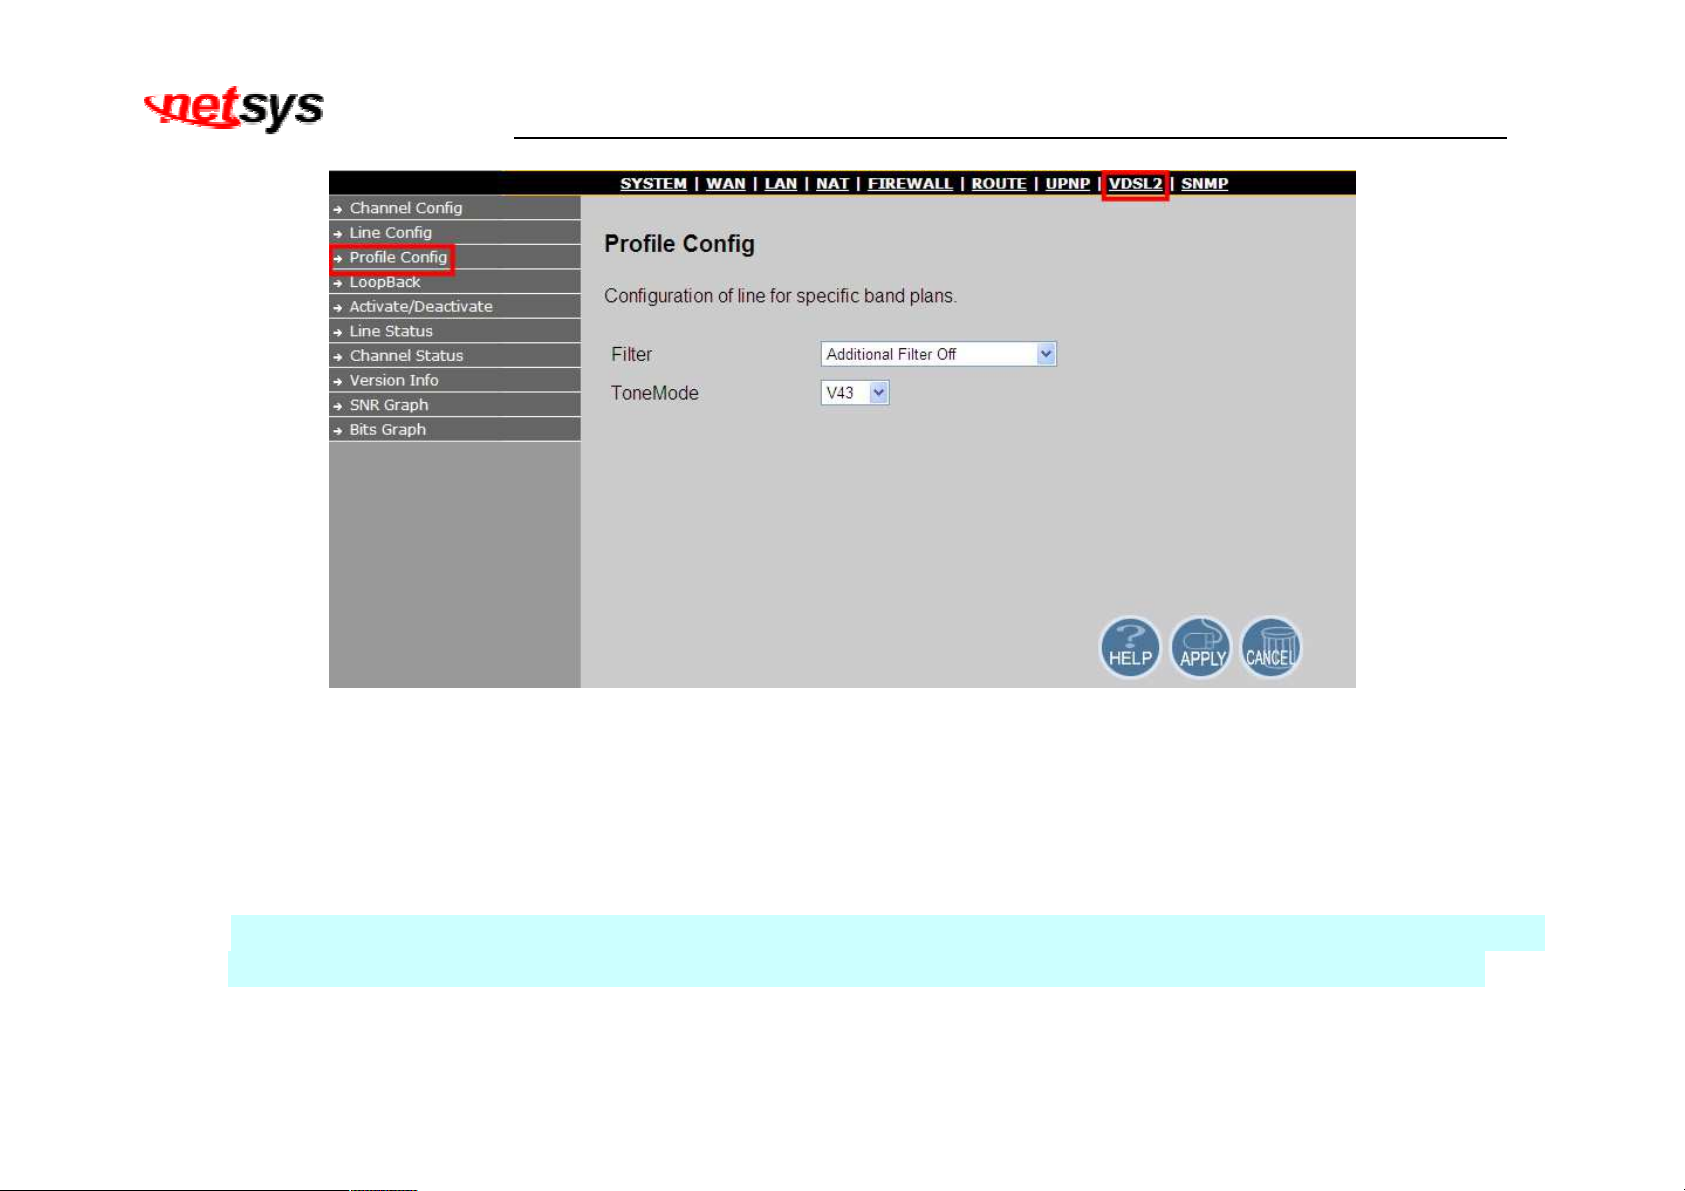
NV-600LI/RI Managed Industrial Grade VDSL2 CO/CPE Router USER’S MANUAL Ver. A4
Figure 5.3.2 NV-600RI Profile Configuration
• Click APPLY at any time during configuration to save the information that you have entered.
• Click CANCEL to exit from this page without saving the changes.
Note:
Filter and Tone Mode of NV-600LI and NV-600RI need to match.
(Factory Default for Filter is Off, for Tone Mode is V43)
90
Page 92
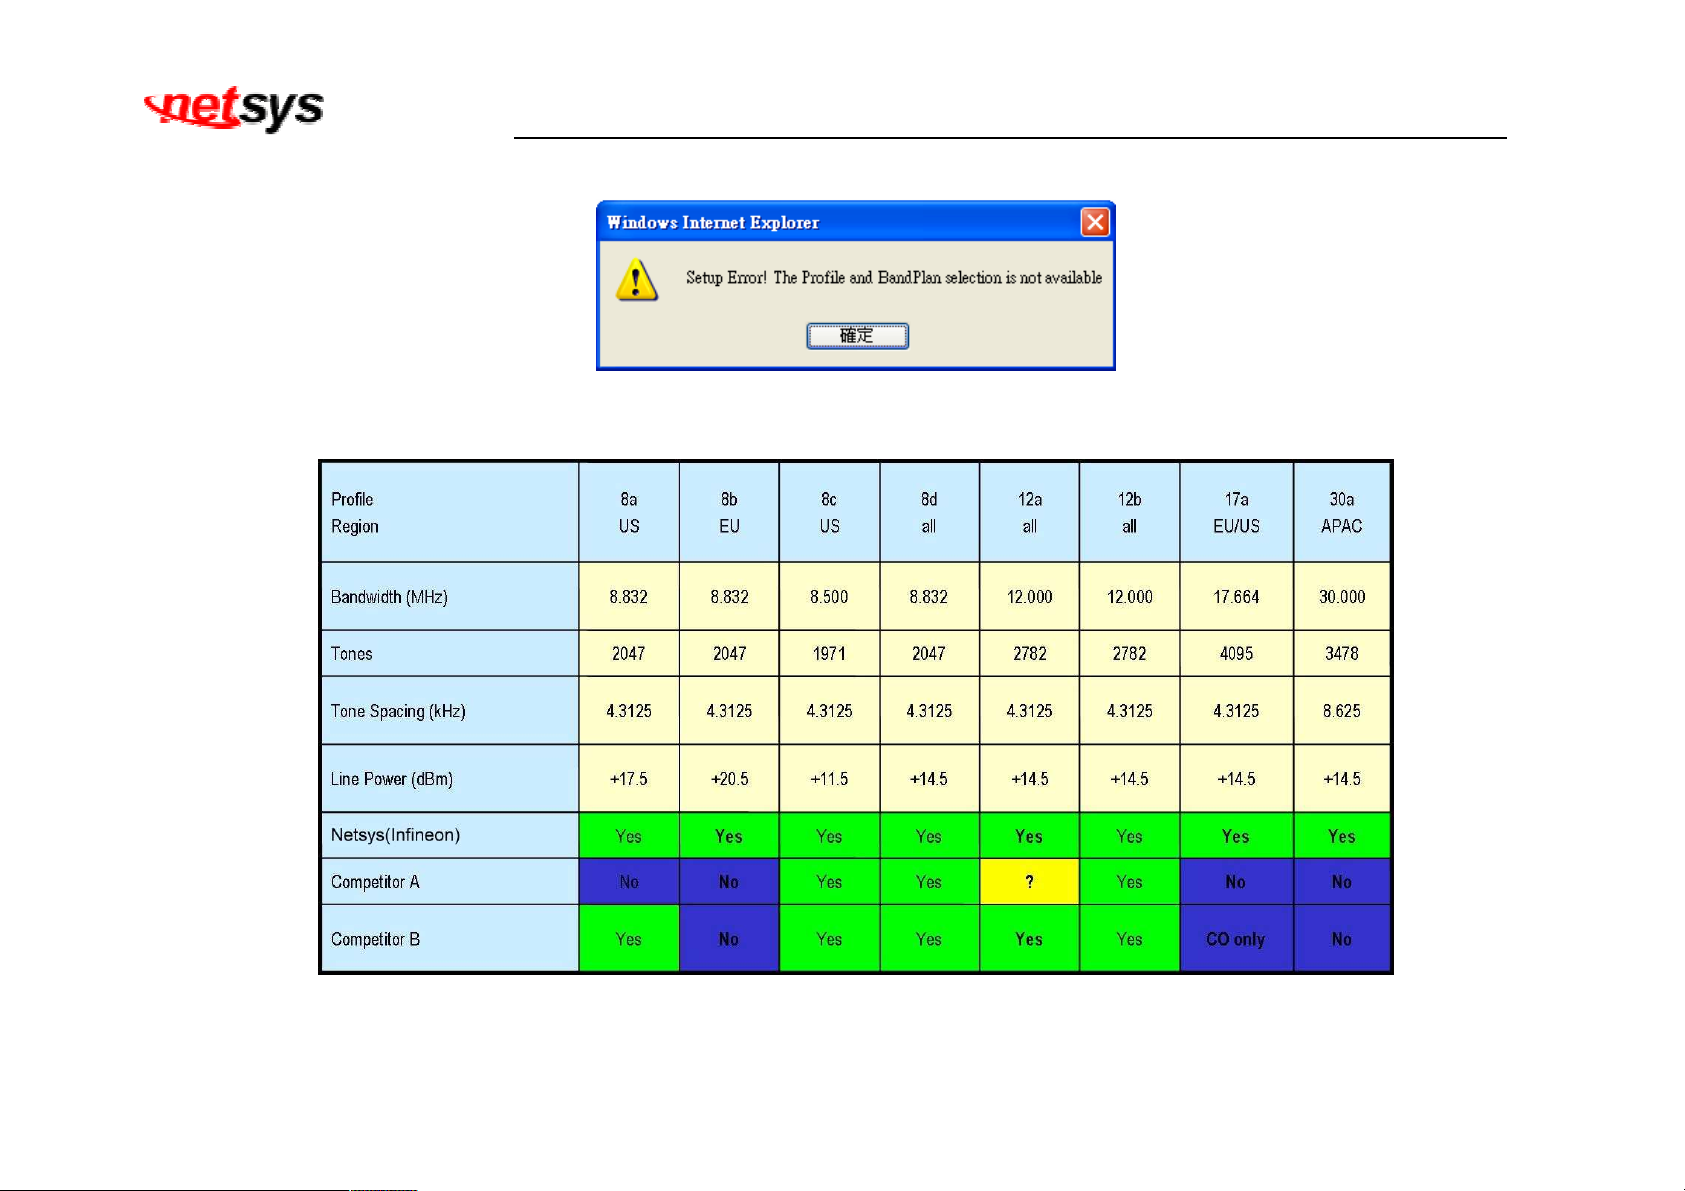
NV-600LI/RI Managed Industrial Grade VDSL2 CO/CPE Router USER’S MANUAL Ver. A4
Figure 5.3.3 Band Profile and Plan Setup Error
Figure 7.1.3.4 Band Profile Region
91
Page 93
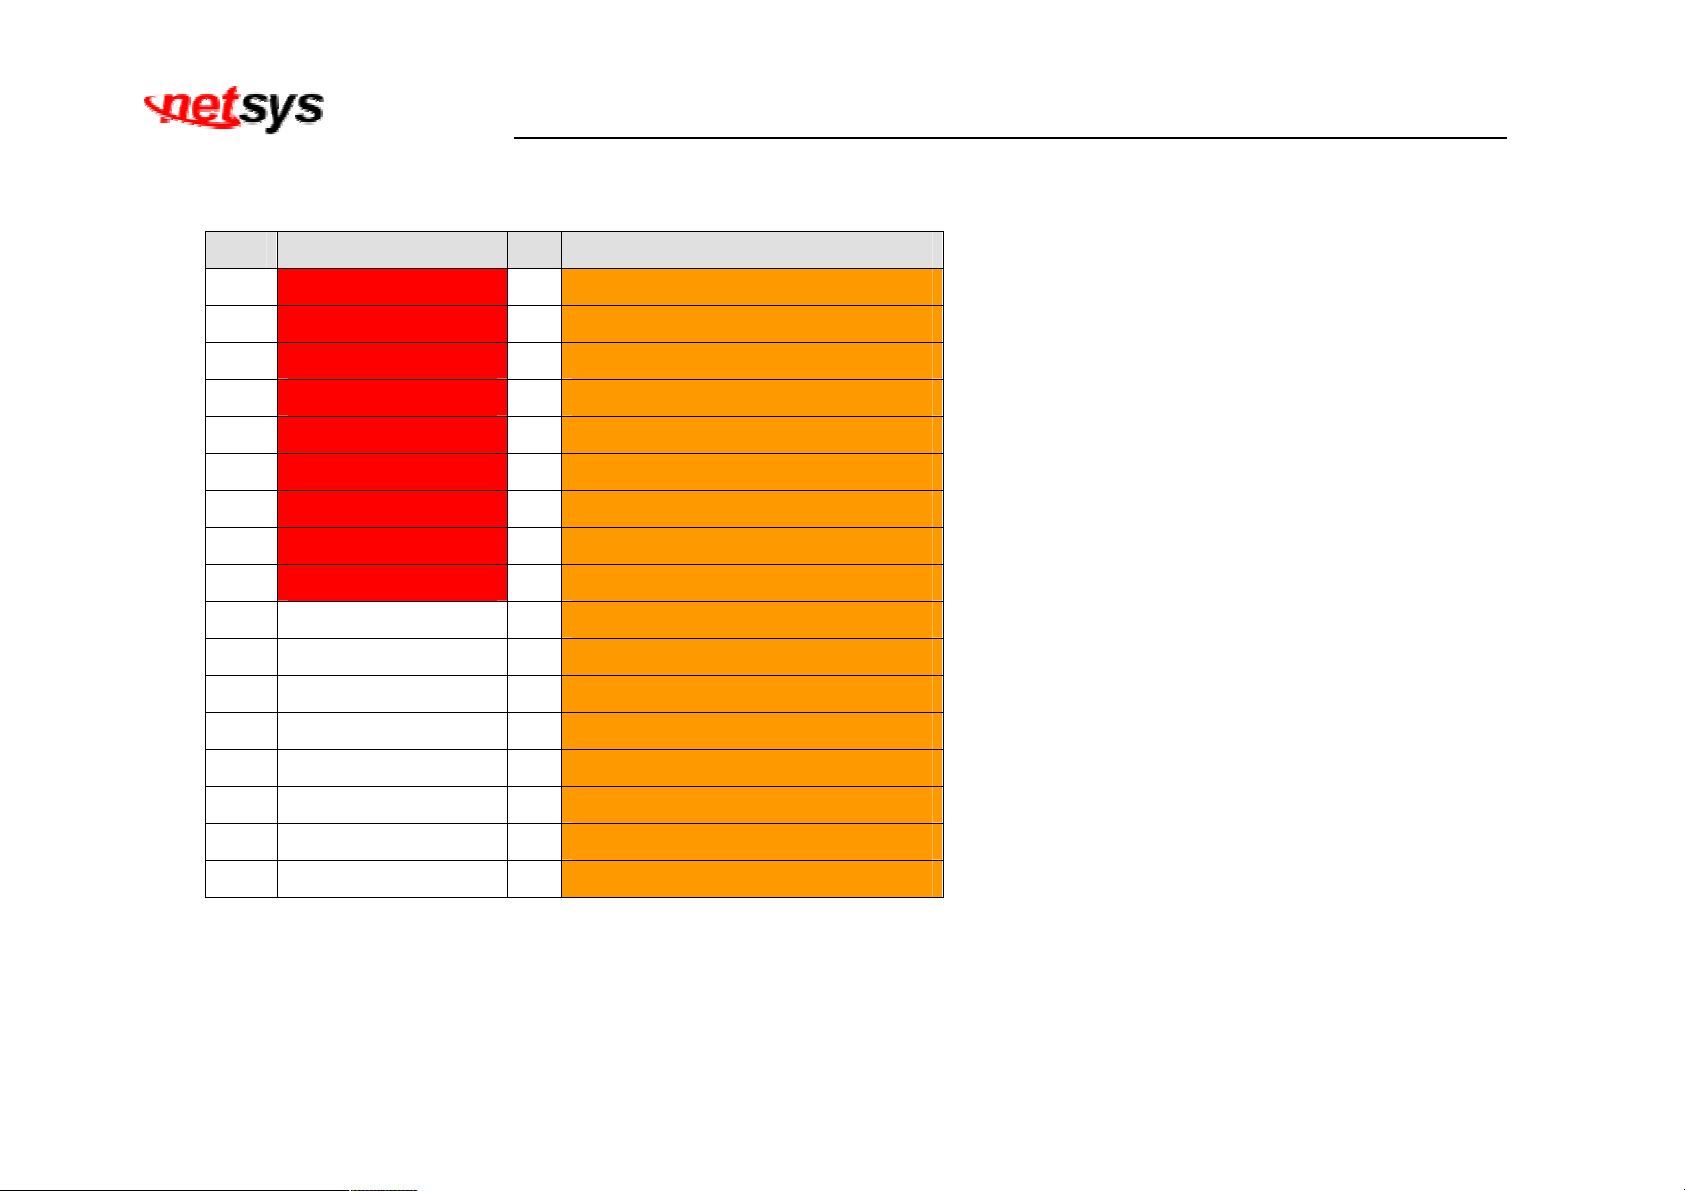
NV-600LI/RI Managed Industrial Grade VDSL2 CO/CPE Router USER’S MANUAL Ver. A4
The following shows the band profile and band plan compatibility:
0
1
2
3
4
5
6
7
8
Band Profile List
VDSL2 Profile8a
VDSL2 Profile8b
VDSL2 Profile8c
VDSL2 Profile8d
VDSL2 Profile12a
VDSL2 Profile12b
VDSL2 Profile17a
VDSL2 Profile30a
VDSL2 Profile17b
Band Plan List
Annex A M1_EU32
0
Annex A M9_EU64
1
Annex B 997-M2x-A (B05)
8
Annex B 997-M2x-M (B06)
9
Annex B 997-M1c-A-7 (B07)
10
Annex B 998-M1x-B (B08)
11
Annex B 998-M2x-A (B10)
13
Annex B 998-M2x-M (B11)
14
Annex B 998-M2x-B (B12)
16
Annex B 998-M2x-NUS0 (B13)
18
Annex C
20
Annex C_8K
21
Annex B 997-M2x-NUS0
22
Annex C 1M1
23
Annex C_8K 1M1
24
Annex B 998E17-M2x-A
25
Annex B 998E17-M2x-NUS0
26
92
Page 94
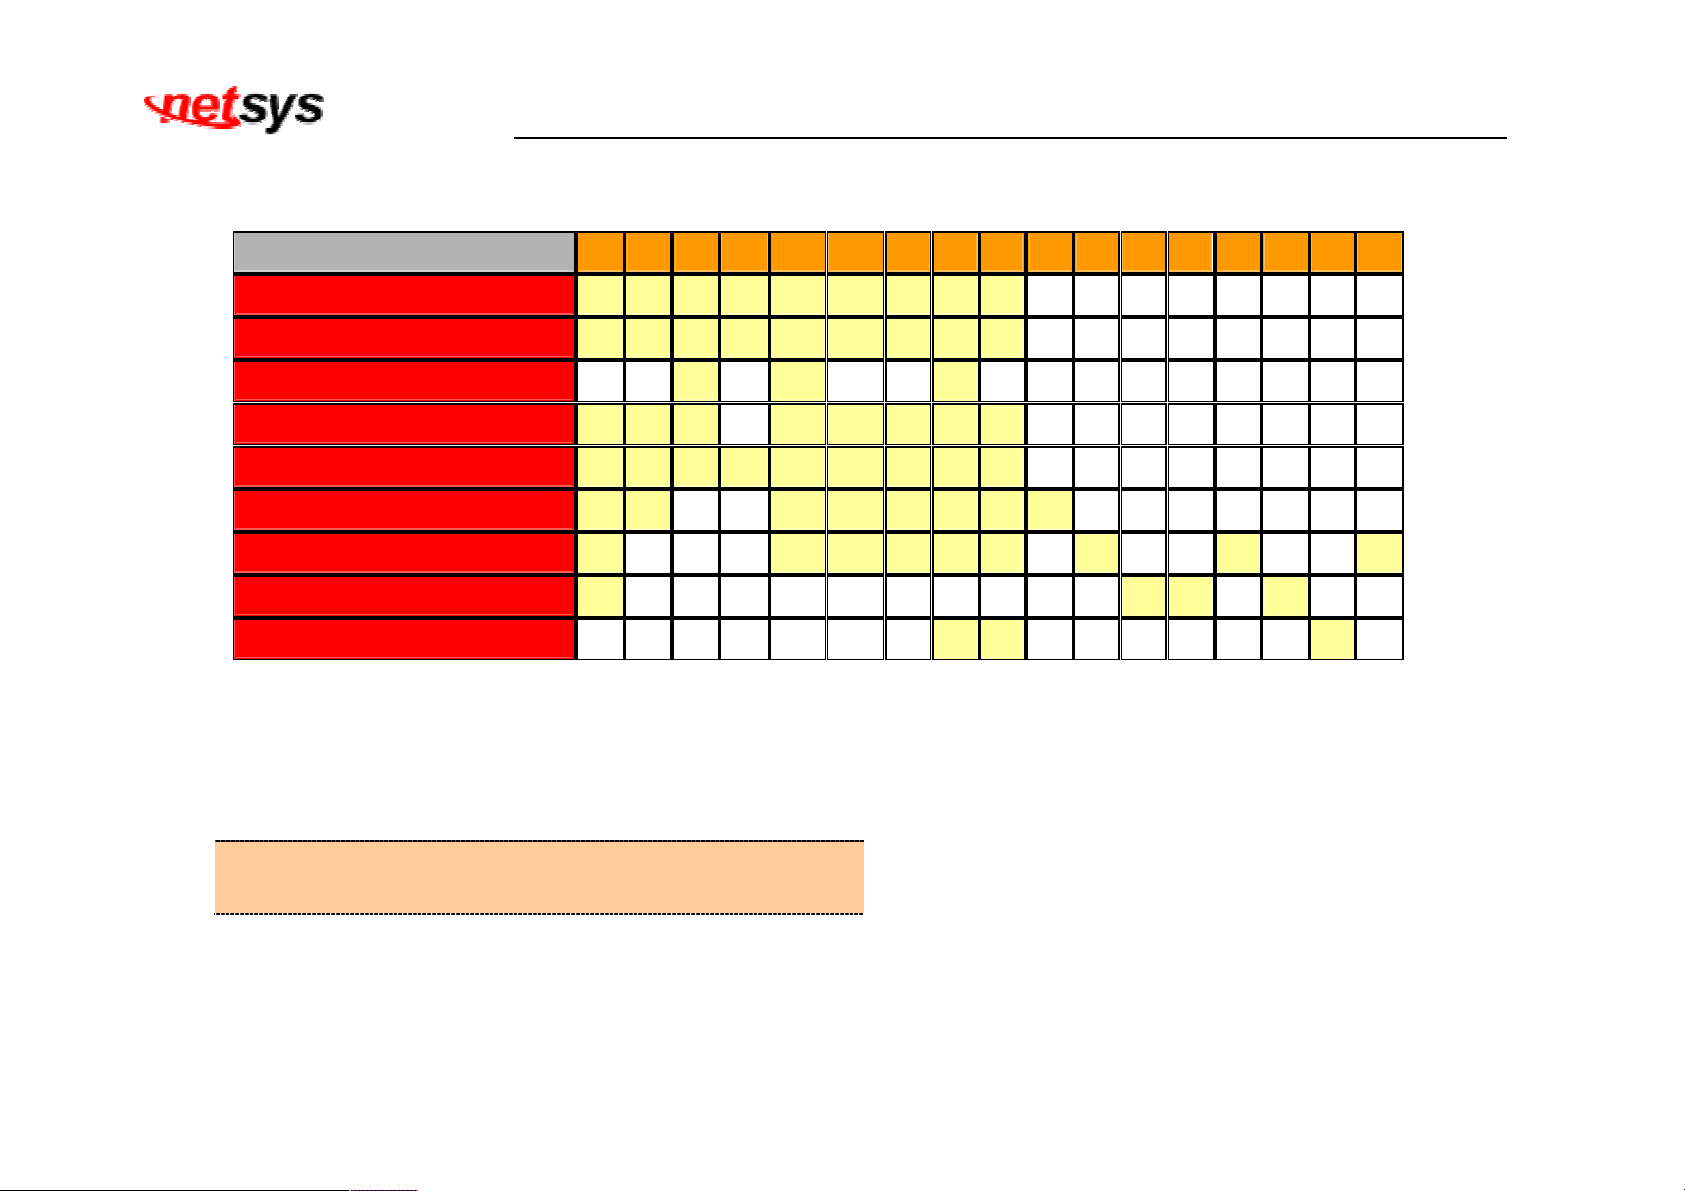
NV-600LI/RI Managed Industrial Grade VDSL2 CO/CPE Router USER’S MANUAL Ver. A4
Band Profile \ Band Plan 0 1 8 9 10 11 13 14 16 18 20 21 22 23 24 25 26
0 O O O O O O O O O X X X X X X X X
1 O O O O O O O O O X X X X X X X X
2 X X O X O X X O X X X X X X X X X
3 O O O X O O O O O X X X X X X X X
4 O O O O O O O O O X X X X X X X X
5 O O X X O O O O O O X X X X X X X
6 O X X X O O O O O X O X X O X X O
7 O X X X X X X X X X X O O X O X X
8 X X X X X X X O O X X X X X X O X
Note: O = Compatible; X = Not Compatible
Tip:
Downstream: Traffic from Transmitter to Receiver
Upstream: Traffic from Receiver to Transmitter
93
Page 95
NV-600LI/RI Managed Industrial Grade VDSL2 CO/CPE Router USER’S MANUAL Ver. A4
Following examples for band profile and band plan combination, you can find minimum distance and maximum
distance relationship.
Please note that the following data represents test result in a lab environment and are for reference only, the actual data
rate will vary on the quality of the copper wire and environment factors.
Porfile
8a
8a
8a
8a
8a
8a
8a
8a
8a
8b
8b
8b
8b
Band Plan
Annex A M1_EU32
Annex A M9_EU64
Annex B 997 M2x-A (B05)
Annex B 997 M2x-M (B06)
Annex B 997 M1c-A-7 (B07)
Annex B 998 M1x-B (B08)
Annex B 998 M2x-A (B10)
Annex B 998 M2x-M (B11)
Annex B 998 M2x-B (B12)
Annex A M1_EU32
Annex A M9_EU64
Annex B 997 M2x-A (B05)
Annex B 997 M2x-M (B06)
Minimum Distance Maximum Distance Band
Distance Upstream Downstream
Distance Upstream Downstream
100 m 4.5 Mbps 84.2 Mbps 2100 m 0.1 Mbps 18.9 Mbps
100 m 6.8 Mbps 83.3 Mbps 2100 m 0.7 Mbps 11.6 Mbps
100 m 23.1 Mbps 56.7 Mbps 2000 m 0.1 Mbps 19 Mbps
100 m 26.2 Mbps 56.6 Mbps 2200 m 0.5 Mbps 9.3 Mbps
100 m 5.5 Mbps 75.8 Mbps 2000 m 0.1 Mbps 19 Mbps
100 m 7 Mbps 75.3 Mbps 2100 m 0.5 Mbps 11.9 Mbps
100 m 4.9 Mbps 80.4 Mbps 2100 m 0.1 Mbps 19.5 Mbps
100 m 7 Mbps 81.8 Mbps 2100 m 0.8 Mbps 12 Mbps
100 m 6.8 Mbps 81.7 Mbps 2200 m 0.5 Mbps 10.2 Mbps
100 m 5.1 Mbps 82.6 Mbps 1700 m 0.1 Mbps 25.1 Mbps
100 m 7.4 Mbps 85.1 Mbps 2100 m 0.5 Mbps 12.2 Mbps
100 m 21.5 Mbps 58.4 Mbps 1400 m 1.9 Mbps 24.4 Mbps
100 m 27.8 Mbps 58.2 Mbps 2100 m 0.5 Mbps 11.9 Mbps
8b
8b
Annex B 997 M1c-A-7 (B07)
Annex B 998 M1x-B (B08)
100 m 7.2 Mbps 84.8 Mbps 1700 m 0.1 Mbps 23 Mbps
100 m 8.5 Mbps 85.8 Mbps 2100 m 0.3 Mbps 11.7 Mbps
94
Page 96
NV-600LI/RI Managed Industrial Grade VDSL2 CO/CPE Router USER’S MANUAL Ver. A4
Porfile
8b
8b
8b
8c
8c
8c
8d
8d
8d
8d
8d
8d
Band Plan
Annex B 998 M2x-A (B10)
Annex B 998 M2x-M (B11)
Annex B 998 M2x-B (B12)
Annex B 997 M2x-A (B05)
Annex B 997 M1c-A-7 (B07)
Annex B 998 M2x-M (B11)
Annex A M1_EU32
Annex A M9_EU64
Annex B 997 M2x-A (B05)
Annex B 997 M1c-A-7 (B07)
Annex B 998 M1x-B (B08)
Annex B 998 M2x-A (B10)
Minimum Distance Maximum Distance Band
Distance Upstream Downstream
100 m 6.8 Mbps 85 Mbps 1800 m 0.1 Mbps 23.7 Mbps
100 m 7.7 Mbps 84.5 Mbps 2100 m 0.5 Mbps 12.4 Mbps
100 m 7.6 Mbps 84 Mbps 2100 m 0.3 Mbps 12.7 Mbps
Distance Upstream Downstream
100 m 13 Mbps 60 Mbps 2100 m 0.2 Mbps 14.6 Mbps
100 m 7.4 Mbps 84.7 Mbps 2100 m 0.2 Mbps 14.9 Mbps
100 m 8.5 Mbps 86.2 Mbps 2100 m 1 Mbps 5.8 Mbps
100 m 6.5 Mbps 86.6 Mbps 2100 m 0.2 Mbps 16.2 Mbps
100 m 7.5 Mbps 85.5 Mbps 2100 m 0.9 Mbps 8.3 Mbps
100 m 26.8 Mbps 58.4 Mbps 2100 m 0.1 Mbps 17.9 Mbps
100 m 6.6 Mbps 80.1 Mbps 2100 m 0.1 Mbps 16.7 Mbps
100 m 7.7 Mbps 79.8 Mbps 2100 m 0.7 Mbps 10.2 Mbps
100 m 6.4 Mbps 84.4 Mbps 2100 m 0.2 Mbps 17.5 Mbps
8d
8d
Annex B 998 M2x-M (B11)
Annex B 998 M2x-B (B12)
100 m 7.6 Mbps 83.9 Mbps 2100 m 1 Mbps 9.2 Mbps
100 m 7.3 Mbps 84 Mbps 2100 m 0.7 Mbps 10 Mbps
12a
12a
12a
Annex A M1_EU32
Annex A M9_EU64
Annex B 997 M2x-A (B05)
100 m 26.7 Mbps 88.4 Mbps 2000 m 0.1 Mbps 12.4 Mbps
100 m 32.6 Mbps 87.8 Mbps 2000 m 0.8 Mbps 7.8 Mbps
100 m 48.5 Mbps 59.2 Mbps 2000 m 0.1 Mbps 14.8 Mbps
95
Page 97
NV-600LI/RI Managed Industrial Grade VDSL2 CO/CPE Router USER’S MANUAL Ver. A4
Porfile
12a
12a
12a
12a
12a
12a
12b
12b
12b
12b
12b
12b
12b
Band Plan
Annex B 997 M2x-M (B06)
Annex B 997 M1c-A-7 (B07)
Annex B 998 M1x-B (B08)
Annex B 998 M2x-A (B10)
Annex B 998 M2x-M (B11)
Annex B 998 M2x-B (B12)
Annex A M1_EU32
Annex A M9_EU64
Annex B 997 M1c-A-7 (B07)
Annex B 998 M1x-B (B08)
Annex B 998 M2x-A (B10)
Annex B 998 M2x-M (B11)
Annex B 998 M2x-B (B12)
Minimum Distance Maximum Distance Band
Distance Upstream Downstream
Distance Upstream Downstream
100 m 51.9 Mbps 58.6 Mbps 2000 m 0.8 Mbps 8.1 Mbps
100 m 33 Mbps 82.5 Mbps 2000 m 0.1 Mbps 18.6 Mbps
100 m 33.6 Mbps 81.9 Mbps 1900 m 0.7 Mbps 13.9 Mbps
100 m 28.7 Mbps 85.9 Mbps 2000 m 0.1 Mbps 14.8 Mbps
100 m 32.5 Mbps 85.6 Mbps 2100 m 0.8 Mbps 0.7 Mbps
100 m 32.6 Mbps 85.6 Mbps 2000 m 0.7 Mbps 9.8 Mbps
100 m 31.9 Mbps 88.4 Mbps 1500 m 1.1 Mbps 31 Mbps
100 m 31.9 Mbps 87.9 Mbps 1500 m 1.3 Mbps 31 Mbps
100 m 33 Mbps 82.5 Mbps 1400 m 0.9 Mbps 32.7 Mbps
100 m 33.5 Mbps 81.8 Mbps 1400 m 1 Mbps 31.4 Mbps
100 m 32.2 Mbps 85.6 Mbps 1400 m 1.3 Mbps 34.7 Mbps
100 m 32 Mbps 85.9 Mbps 1400 m 0.8 Mbps 33.8 Mbps
100 m 32.1 Mbps 85.9 Mbps 1400 m 0.7 Mbps 33.7 Mbps
12b
Annex B 998-M2x-NUS0(B13)
100 m 31.9 Mbps 85.9 Mbps 1400 m 0.7 Mbps 33.5 Mbps
17a
17a
17a
17a
Annex A M1_EU32
Annex B 997 M1c-A-7 (B07)
Annex B 998 M1x-B (B08)
Annex B 998 M2x-A (B10)
100 m 28.6 Mbps 100 Mbps 1400 m 1.7 Mbps 31.1 Mbps
100 m 29.4 Mbps 100 Mbps 1300 m 1.1 Mbps 34.2 Mbps
100 m 29 Mbps 100 Mbps 1300 m 1.4 Mbps 34.6 Mbps
100 m 28.4 Mbps 100 Mbps 1400 m 1.1 Mbps 34.5 Mbps
96
Page 98
NV-600LI/RI Managed Industrial Grade VDSL2 CO/CPE Router USER’S MANUAL Ver. A4
Porfile
17a
17a
17a
17a
17a
17b
17b
17b
30a
30a
30a
30a
Band Plan
Annex B 998 M2x-M (B11)
Annex B 998 M2x-B (B12)
Annex C
Annex C 1M1
Annex B 998E17-M2x-NUS0
Annex B 998 M2x-M (B11)
Annex B 998 M2x-B (B12)
Annex B 998E17-M2x-A
Annex A M1_EU32
Annex C_8K
Annex B 998E17-M2x-NUS0
Annex C 8K_1M1
Minimum Distance Maximum Distance Band
Distance Upstream Downstream
100 m 28.5 Mbps 100 Mbps 1400 m 1 Mbps 34.2 Mbps
Distance Upstream Downstream
100 m 28.3 Mbps 100 Mbps 1400 m 0.5 Mbps 33.4 Mbps
100 m 31.2 Mbps 100 Mbps 1300 m 2.2 Mbps 28.6 Mbps
100 m 32.3 Mbps 100 Mbps 1300 m 1 Mbps 22.7 Mbps
100 m 38.3 Mbps 100 Mbps 1300 m 1.3 Mbps 35.4 Mbps
100 m 29.4 Mbps 100 Mbps 2000 m 0.9 Mbps 8.1 Mbps
100 m 28.9 Mbps 100 Mbps 2000 m 0.7 Mbps 8.3 Mbps
100 m 37.3 Mbps 100 Mbps 2000 m 0.1 Mbps 13.6 Mbps
100 m 77.2 Mbps 100 Mbps 1400 m 1.6 Mbps 30 Mbps
100 m 100 Mbps 100 Mbps 1300 m 2.4 Mbps 25.5Mbps
100 m 100 Mbps 100 Mbps 200 m 80.8Mbps 100 Mbps
100 m 100 Mbps 100 Mbps 1300 m 2.8 Mbps 21.8 Mbps
97
Page 99
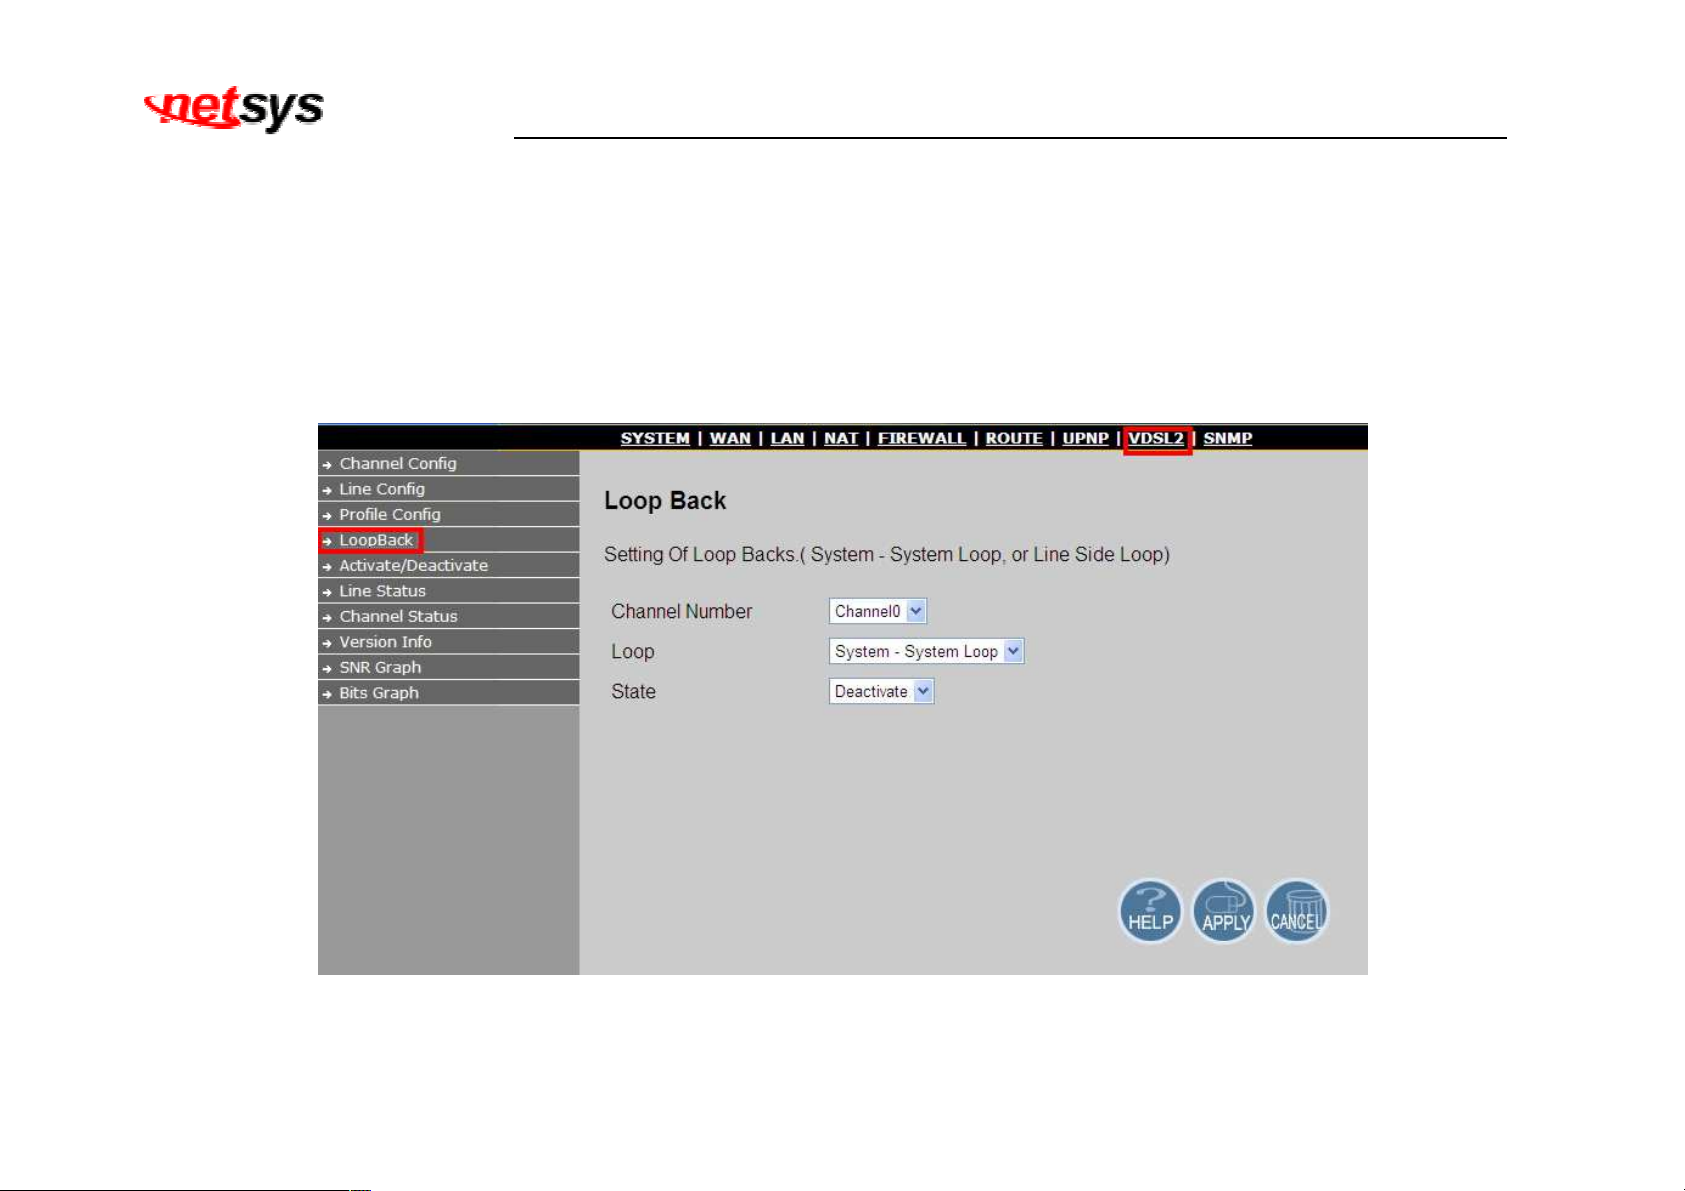
NV-600LI/RI Managed Industrial Grade VDSL2 CO/CPE Router USER’S MANUAL Ver. A4
5.4 Select “Loop Back”
Loopback (loop-back) describes ways of routing electronic signals, digital data streams, or flows of items from their originating facility
back to the source without intentional processing or modification. This is primarily a means of testing the transmission or
transportation infrastructure.
The loop back testing function for checking phone wire link problem: 1. System Loop. 2. Line Side Loop
To config the Loop Back, click on the “Loop Back” link in the left navigation bar. A screen is displayed as shown in Figure 5.4
Figure 7.1.4 Loop Back Activation/Deactivation Menu
98
Page 100
NV-600LI/RI Managed Industrial Grade VDSL2 CO/CPE Router USER’S MANUAL Ver. A4
The screen contains the following details:
Loop Back
Setting Description
Channel No.
To which bearer channel number shall the settings apply?
Channel 0
Loop System loop or line side loop
State Activate or deactivate loop back within the transmission convergence layer
• Click APPLY at any time during configuration to save the information that you have entered.
• Click CANCEL to exit from this page without saving the changes.
Example applications(Reference only):
Performing transmission tests of access lines from the serving switching center, which usually does not require the
assistance of personnel at the served terminal.
Testing between stations (not necessarily adjacent) where in two lines are used, with the test being done at one station and
the two lines interconnected at the distant station. Commonly called loop around when the interconnecting circuit is
accessed by dialing.
A patch cable, applied manually or automatically, remotely or locally, that facilitates a loop-back test.
A communication channel with only one endpoint. Any message transmitted through such a channel is immediately
received by the same channel.
99
 Loading...