


1
netsurfer
®
Tablet PC: Model Numbers
FMT-NT7A41-01
FMT-NT7A41-02
FMT-NT7A41-03
User Manual
Your netsurfer® allows you to connect to the internet, interact in real-time with friends and family online, send and receive email, play music and videos as well as
view documents and spread-sheets on- the- go! Your netsurfer® is light weight (less than 350gram), small, portable and convenient. This fantastic pocket power unit
has a Dual Core 1 GHz processor for extra fast speed.

2
Contents
Introduction to your Mobile Internet Device .................................................................................................................................................................................................. 3
Key Features ........................................................................................................................................................................................................................................... 3
What your netsurfer® looks like this .............................................................................................................................................................................................................. 4
Description .............................................................................................................................................................................................................................................. 4
Colour ..................................................................................................................................................................................................................................................... 4
Technical Specifications .......................................................................................................................................................................................................................... 5
Important Information ............................................................................................................................................................................................................................. 5
Intended Use ................................................................................................................................................................................................................................................... 6
Before you get started ............................................................................................................................................................................................................................. 7
Using the Virtual Keyboard ............................................................................................................................................................................................................................ 7
Abbreviation/Terminology ...................................................................................................................................................................................................................... 7
Introduction to your netsurfer® ...................................................................................................................................................................................................................... 8
Package Contents .............................................................................................................. ...................................................................................................................... 8
Preparing for use ..................................................................................................................................................................................................................................... 8
Operating Guide .............................................................................................................................................................................................................................................. 8
Buttons and Function Keys ..................................................................................................................................................................................................................... 8
Start up and Shut down ........................................................................................................................................................................................................................... 9
Using the Touch Screen ........................................................................................................................................................................................................................... 9
The extended home page ....................................................................................................................................................................................................................... 10
The Short-cut Icons Management Tool. ................................................................................................................................................................................................ 10
Remove the icons in desktop .................................................................................................................................................................................................................. 11
Change the desktop wallpaper ............................................................................................................................................................................................................... 11
Applications Menu ................................................................................................................................................................................................................................. 11
USB Connection .................................................................................................................................................................................................................................... 11
Storage Configuration ............................................................................................................................................................................................................................ 11
Virtual Keyboard ................................................................................................................................................................................................................................... 12
Widgets and Application Shortcuts ....................................................................................................................................................................................................... 12
Settings Menu ............................................................................................................................................................................................................................................... 12
Sim Management .................................................................................................................................................................................................................................. 12
Data Usage ............................................................................................................................................................................................................................................ 13
More ...................................................................................................................................................................................................................................................... 13
Wi-Fi Setup ........................................................................................................................................................................................................................................... 15
Bluetooth ............................................................................................................................................................................................................................................... 15
Audio Profiles ....................................................................................................................................................................................................................................... 16
Display .................................................................................................................................................................................................................................................. 16
Managing Applications (Apps) ............................................................................................................................................................................................................. 17
SD Card and netsurfer Storage .............................................................................................................................................................................................................. 17
Date and Time ....................................................................................................................................................................................................................................... 18
Language Setting ................................................................................................................................................................................................................................... 18
Safety and Security Settings .................................................................................................................................................................................................................. 18
Multi-Media .................................................................................................................................................................................................................................................. 20
Music ..................................................................................................................................................................................................................................................... 20
Video ..................................................................................................................................................................................................................................................... 20
Photos .................................................................................................................................................................................................................................................... 20
HDMI .................................................................................................................................................................................................................................................... 20
Camera .................................................................................................................................................................................................................................................. 20
Communication ............................................................................................................................................................................................................................................. 21
Phone ..................................................................................................................................................................................................................................................... 21
SMS/MMS Message ............................................................................................................................................................................................................................. 21
Contact List ........................................................................................................................................................................................................................................... 22
Email ..................................................................................................................................................................................................................................................... 22
Other Applications ........................................................................................................................................................................................................................................ 24
Status and Reminder Bar ............................................................................................................................................................................................................................... 26
Restore Factory Settings ............................................................................................................................................................................................................................... 26
Battery Saving Techniques ............................................................................................................................................................................................................................ 26

3
Introduction to your Mobile Internet Device
Thank you for purchasing the netsurfer® Mobile Internet Device and welcome to the world of the Mobile Internet, Touch Screen Technology,
Free APPS, Online Communities, Real-Time Videos, 3G connectivity, e-Mail and much more. Your netsurfer® is your gateway to a truly mobile
life and a whole new way to keep in contact with friends, family & colleagues, get access to the web and relax with music, photos and videos.
Your netsurfer® runs a Google® Android 4.1.2 operating system. Google® Android 4.1.2 integrates the widest range of applications, services and
hardware in a familiar way so you can easily and confidently use technology to achieve your goals and pursue your passions.
The product has been designed specifically for the South African market and includes many unique features such as 2 sim card slots, 3G/HSDPA ,
WIFI, Bluetooth and GPS. With 2 sim cards inserted into your tablet, you will be browsing the Internet in no time and have full data control on
selected sim cards and with the added GPS module you should never get lost again.
This manual systematically introduces the functions, useful techniques and important information so please read the information below carefully
before using your tablet.
Also please observe the safety warnings so you don’t damage your netsurfer® or cause harm to yourself.
Key Features
Connect to the Internet using embedded 3G Technology or Wi-Fi technology
Dual Sim Functionality enables you to have 2 sim cards.
Your
netsurfer® uses the latest Dual Core Technology - optimized for multitasking and multimedia
Dual Camera’s. One at the back for taking photos and videos and one in the front for internet video calls where your friends and family
can see you whilst you are talking to them
Full Access to the 1Mobile and SlideMe Marketplace for downloading thousands of free apps and games.
Multi Touch Pinch-to-Zoom functionality as well as Double-Tap Zoom functionality
Quick access to all media related files stored on your tablet using the Android® optimized Gallery
Enjoy the latest blockbuster movies on your netsurfer® with the enhanced Video Player and High Pixel Density LCD optimized for
multimedia.
Be in touch with loved ones and friends instantly using Skype® Video Calling / Audio Calling / IM
Interact with friends, family and work colleagues on Facebook, Twitter, Mxit and many other social networking sites
Watch music videos and other videos on YouTube for free – just connect to the internet
Connect your netsurfer® to your Television using the mini HDMI port and watch high definition music videos or movies on your television
Instant access to your email using the internal Email Software
Unrestricted access to the latest websites using the standard Android ® browser.
Hyper fast and Super BIG 8GB (FMT-NT7A41-01/02) /16GB (FMT-NT7A41-03) Internal Storage.
Expand the Internal Storage with a Micro-SD/ TF card - up to size 32GB at a time.
Enjoy longer than usual usage on the netsurfer® with an enhanced battery life. Please see Technical Specifications opposite for more
information regarding Battery Life and please view the manual for important battery saving techniques.
The netsurfer® can do so much more than browsing the Internet including reading your favorite novel in E-Book form using one of many
EBook Reader apps available for download on the internet.
Open up any Microsoft Word, Excel or PowerPoint file using the pre-installed Office Suite Viewer application. For full editing
functionality, purchase the upgrade to Office Suite Pro online.
4
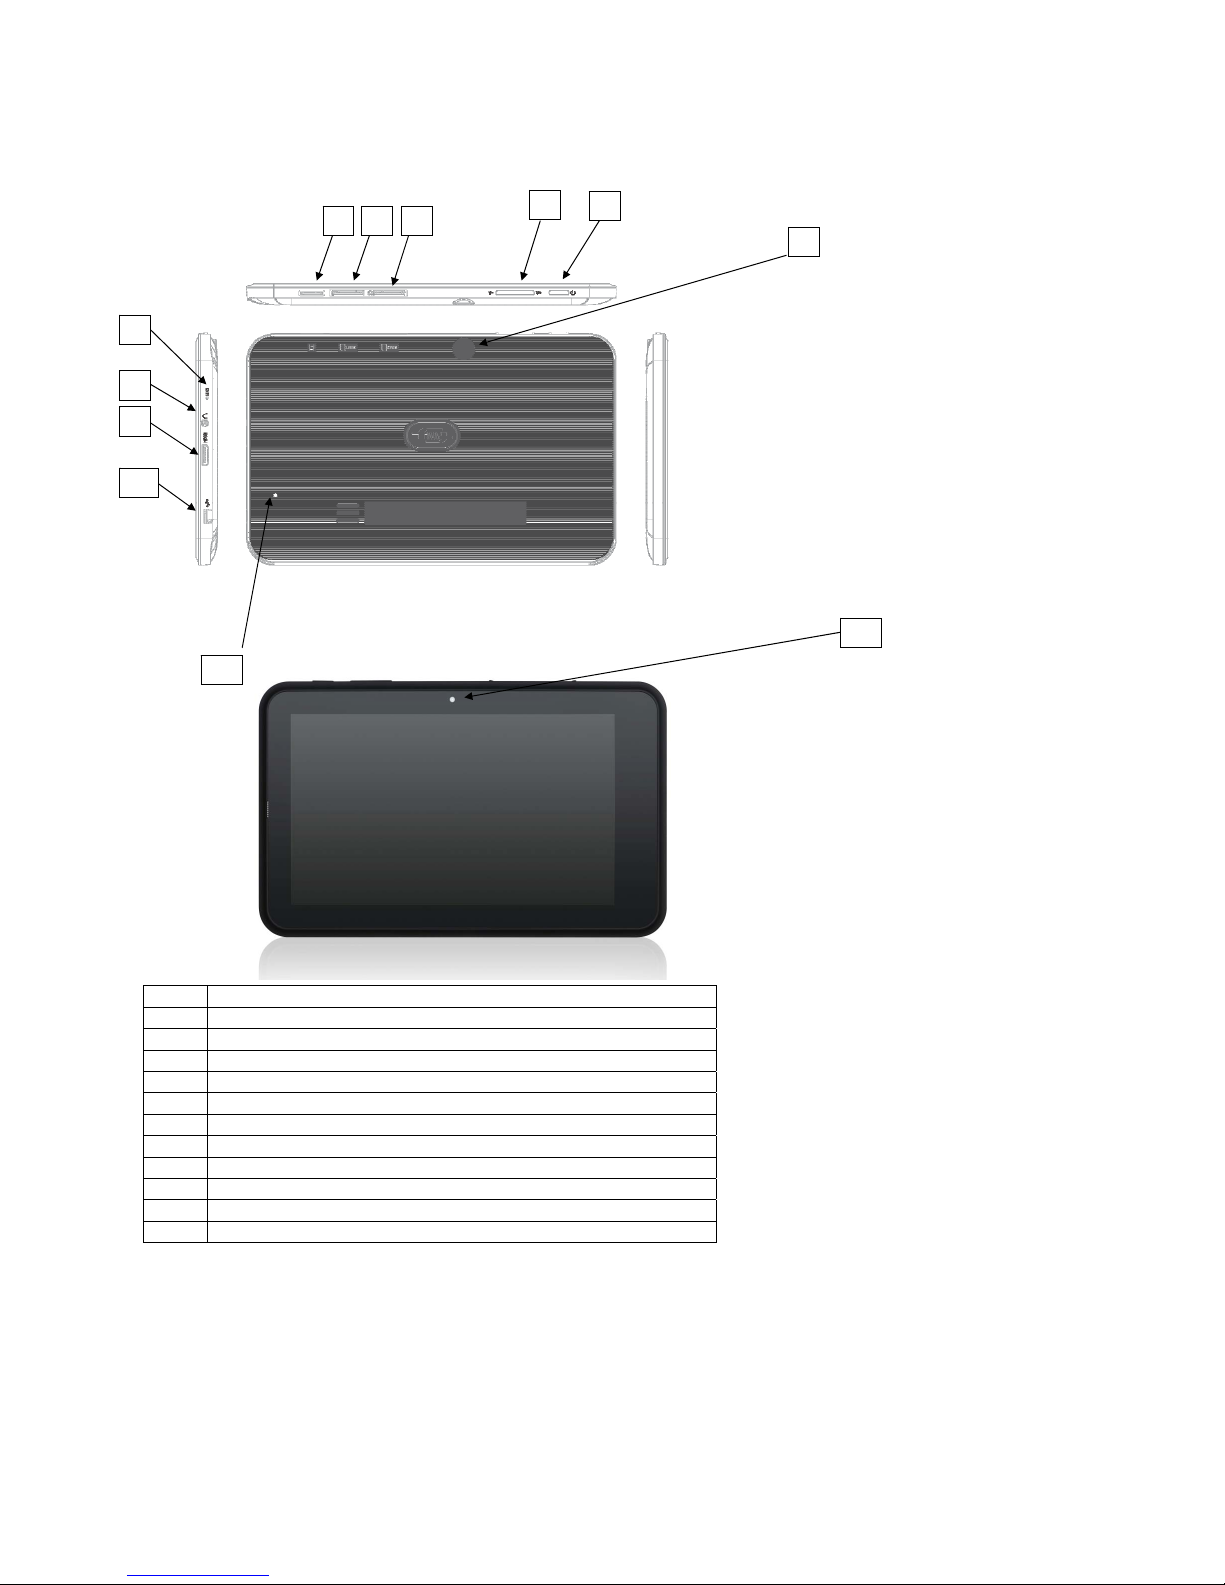
What your netsurfer® looks like this
1 TF/Micro SD Card Slot
2 Sim Slot 1
3 Sim Slot 2
4 Volume
5 Power
6 Back Camera
7 Microphone
8 Earphone
9 HDMI
10 Mini USB
11 Reset Hole
12 Front Camera
Description
7-inch netsurfer® Tablet with ARM Technology and built in Dual Sim Card support
Colour
Black
10
2 3
4
5
6
7
8
9
1
11
12

5
Technical Specifications
Model Number(s):
FMT-NT7A41-01/2
FMT-NT7A41-03
Display
7” Multi-Touch (Capacitive)
1024 x 600 pixels
Components
Dual Sim
CPU: ARM Cortex A9 Dual Core
CPU Speed: 1Ghz
Memory: 1GB DDR3
Storage: FMT-NT7A41-01&02:8GB Internal Memory
Storage: FMT-NT7A41-03:16GB Internal Memory
File Formats
Audio: : MP3, OGG, FLAC, WAV, AAC, M4A
Photo: JPEG,PNG,BMP,GIF
Video: AVI, RM/RMVB, MPEG4, H.264, H.263, MP4, MKV
Software
Android 4.1.2 ( Jelly Bean)
Flash 11.1
Office Suite Viewer: FMT-NT7A41-01/02
Office Suite Pro:FMT-NT7A41-03
Connectivity
Embedded 3G: WCDMA 900 & 2100 Mhz
GSM/GPRS 900 & 1800 Mhz
Satellite GPS
Wi-Fi: 802.11b/g/n
Bluetooth
Input / Output
Micro SD Card slot (up to 32GB)
3.5mm audio jack
Mini USB v2.0 port
Mini HDMI output 1280x720p
Camera
Front: 0.3 Megapixels
Back: 2.0 Megapixels
Battery Power
FMT-NT7A41-01: 3100mAh; 3.7V
FMT- N T7A 41-02 /03: 4300mAh; 3.7V
Physical Attributes
Dimensions: 190.2mm x 120.5mm x 13.5mm
Weight: FMT-NT7A41-01: 310g
Weight: FMT-NT7A41-02/03: 350g
Power Adaptor
Input: 100 – 240v~; 50/60 Hz; 0.3A .
Output: 5V; 2.1A
Important Information
Preventative Maintenance
Always keep the product dry. To avoid the product developing an electrical shortage problem and/or corrosion please prevent the product,
battery and charger from having any contact with moisture and/or water.
Do not drop your product, misuse your product or operate it under extreme weather or temperature conditions. This will result in product
failure including battery and/or charger failure.
Disassembly of the product or an attempt to repair the product oneself will void the warranty and is dangerous to one’s health.
Safety Precautions
Before operating the product, please read this section.
Never use the product whilst driving.
Please abide by the related rules and regulations when visiting medical areas.
To avoid wireless signal interference whilst flying please ensure the product is switched off or ensure that it is set to Airplane mode.
To avoid electronic equipment failure, please switch off the product whilst in the vicinity of high-currency electronic fields.
Do not disassemble the product and/or accessories. Only authorized agents have access to service the product. Failing to adhere to this will
VOID your product’s Warranty.
Never use the product in the vicinity of high temperature or inflammable gasses.
Do not play music too loud. Excessive sound pressure from earphones and headphones can cause hearing loss.
USB Port - Due to the used enclosure material, the product should only be connected to a USB Interface of version 2.0 or higher or to the
USB power adaptor provided.
Power Adaptor - The adapter should be installed near the equipment and should be easily accessible.
Temperature - Do not use the product in extreme temperature environments, in direct strong sunlight, in damp conditions or in dusty
conditions. Suitable operating temperature is 0Ԩ-40Ԩ.
Do not subject the p r o d u c t to severe impact o r drop it from he ights
Avoid using the produc t near strong magnetic fields
Keep the product away from water and other liquids. In the event that water or other liquids en ter the product, power off the product

6
immediately and clean the product
Do not use chemicals to clean the product in order to avoid corrosion. Clean it with a dry cloth
We are not responsible for damage or lost data caused by malfunction, misuse, modification of the product or battery replacement
If the prod u ct will not be used for an extended period of time, please charge the battery at least once per month to maintain battery life
Charge the battery
if:
o The battery level icon displays
(An empty battery)
o The product powers off automatically when restarted.
o There is no response when pressing keys with keys u nlocked and battery
f
ull
Do not interrupt the connection when you are transferring files otherwise data may become corrupt or lost
When the product is used as a portable hard drive please use it only as per the instructions otherwise permanent data loss could occur
Never disconnect the USB cable from your p r oduct during data transfer. Once finished, correctly disconnect the product from
the operating system otherwise info rmation loss and malfunctions could occur
Please transfer data using the accessories provided
and only according to the manufacturer’s ins
t
ructions
Do not leave the product on or in a confined space such as a book case or similar area.
The ventilation should not be impeded by
covering the ventilation openings with items such as newspaper, table-cloths, curtains, etc.
No open flames, such as lighted candles, should be placed on the product.
Use the product in moderate temperatures a n d climates
Please refe r to the information on the bottom of the product for ele ctrical and safety information before installing data or operating the
product
To reduce the risk of fire or electric shock, do not expose this product to rain or moisture. The product should not be exposed to
dripping or splashing. Never place objects filled with liquids, such as vases, on the product
There is a danger of explosion if the battery is replaced incorrectly.. Do not use unauthorized repair agents to replace the battery.
The battery (battery or batter ies or battery pack) should no
t be
exposed to excessive heat such as sunlight, fire or the like
Please follow responsible procedures for battery disposal
If the power adaptor is disconnected from the product, the product will remain operable as long as the battery has sufficient charge
Safety symbol explanation:
The lightning flash with arrowhead symbol within an equilateral triangle is intended to alert the user to the presence of non-insulated
“dangerous voltage” within the product’s enclosure that may be of sufficient magnitude to constitute a risk of electric shock
To reduce the risk o f electric shock, do not remove the cover (or back) as there are no user-serviceable parts in side. Refer se rvicing to
the manufacturer
The exclamation point within an equilateral triangle is intended to alert the user to the presence of important operating and maintenance
instructions in the literature accompanying the product
Battery Information
CAUTION: THERE IS A RISK OF EXPLOSION IF THE BATTERY IS REPLACED BY AN INCORRECT BATTERY TYPE. DISPOSE OF
USED BATTERIES IN A SAFE AND SECURE MANNER.
Intended Use
The product is a computer and also desig ned for various multi-media activities including playing music and video files in commonly used formats,
showing photos, accessing the internet using the built-in 3G and Wi-Fi functions, taking photos and carrying out basic document related functions.
It is exclusively meant for these purposes and must not be used for any other purpose.
This also include s paying a ttention to all information co ntaine d in this operating manual, especially the safety instructions. Any other usage is
considered to be improper and may lead to material damages and even personal injuries. Moreover, it will result in the immediate loss of the
manufacturer’s warranty. The manufacturer does not bear any liability for damages caused due to improper use.

7
Before you get started
After unpacking your netsurfer® please check you have all the package contents (as detailed on the box) and they are in good order. If you are missing anything or any
item has been damaged please contact customer services on:
Telephone - 0860 94 94 97
If you have any problems or questions rather call the helpdesk first to see if our experts can assist you over the phone.
Important Numbers and information
Customer Service Times:7 Days/Week excluding public holidays
Customer Service: 0860 94 94 97
Warranty Registration by SMS – 0785723289
Email: support@futuremobile.biz
Important
Please charge the netsurfer®’s battery for a minimum of 12 hours prior to starting it for the first time.
You can do this by plugging the power cable into the Mini USB port on the side of the netsurfer® (as indicated in the diagram on the next page) and then plug the
power cord into the wall socket. The netsurfer® must be switched off w hile charging at all times.
Using the Virtual Keyboard
The virtual keyboard appears automatically if or when you have to type in something. eg searching the internet, writing an email or sms. By
default it is set up for a 101 key UK Keyboard (depending on your language selection on the first start-up). You will notice that there is by default
no number keys or alternative (ALT) key on the keyboard when it pops up at the bottom. To be able to use those keys you will have to change the
keyboard to the numerical keyboard by simply tapping on the key that reads “123”on the bottom left of the keyboard. You will see now that the
on-board keyboard changes to numerical and special keys including the @ sign for email usage appear. When you want to switch back to the
normal keyboard mode, simply tap on the same key at the bottom right (it will now read ABC) and the virtual keyboard will change back to
default. See pictures below for more detail.
Abbreviation/Terminology
Abbreviation/Terminology Full Name Description
netsurfer®
Mobile Internet
Product
Mobile Internet Terminal
Wi-Fi
Wireless Fidelity
Based on IEEE
802.11b/g/n standard
wireless LAN
TF
Trans Flash
Alternative name Micro
SD,
HDMI
High Definition
Multimedia Interface
High Definition
Multimedia Interface

8
Introduction to your netsurfer®
Package Contents
Android Tablet PC (netsurfer® Model Number: FMT-NT7A41-01/02/03)
Power Adaptor
1 X Mini USB to Male USB Cable
1 X Mini USB to Female USB Cable
Earphones with Mic
PU Leather Pouch
User manual
Warranty Card
Preparing for use
Charging the Battery
Before initial startup, please ensure that your product has been charged for a minimum of 12hrs. This will ensure that the battery will function
according to technical specifications.
Switch off your product and connect the charger to your product.
Connect the charger to the wall power socket.
Switch on the power socket.
Continue charging the product for the full 12hrs on initial charge.
Operating Guide
Buttons and Function Keys
Power button Press for 2 to 3 seconds to power on and off the product. Press quickly to put the product into sleep
mode or to wake up the product.
Volu me +(up) Increase the volume
Volu me -(down) Decrease the volume
HOME button (home)
Touch the home button to return immediately to the home screen at any time and from any other
screen.
Back button(back)
Touch it at any time to return to the previous menu
Menu button
This button will display various menu options available to the particular App which you are using
Recently Used Apps
Displays Recently Accessed Apps

9
Start up and Shut down
Start up
Press the POWER key for about three seconds until the Android boot up screen appears. The system automatically boots into a locked screen
mode. Please unlock it by sliding the round “circle” icon to the right (see picture)
Shut down
Press the POWER key until it shows the shut-down window. This window gives you the option to “mute”, enable “airplane” mode or to shut down the netsurfer®
Click Shutdown to switch the product off
Unlock/Open and Lock/Close of the Screen
The screen will automatically lock itself after 1min if there is no user activity. This is done to preserve battery life. To continue using the product
simply un-lock the touch panel as described previously.
To force lock the screen, simply press once on the POWER button.
Switch on the screen when it is blank/switched off
If the screen is blank or “closed” it will appear like the product has switched itself off. This is not the case. It has simply “switched off” the screen
to save battery. To switch on the screen, quickly press the POWER button to enable the screen. The touch panel will still be locked though so
simply slide the icon on the screen to the right to unlock the touch panel or to the left to have quick access to the Camera.
Using the Touch Screen
Operating methods
There are various methods of utilizing the touch screen functionality in Android :
Touch Once
When you want to use the virtual keyboard or to open up an application you only need to touch it once with your finger.
Press and Hold
To access advanced features of selected app, object, icon or website press and keep your finger pressed on the screen. A menu will appear which
will give you advanced features eg. Bookmarking a website or editing a photo of your choice.
Quick Slide
The faster you slide your finger across the touch screen, the faster it will respond with the desired effect or option
Drag & Drop
With the Drag & Drop feature you can move icons around on your screen to your liking as well as create shortcut links on your desktop of your
favorite programs. Simply press the icon you wish to drag and drop and whilst keeping your finger on it, move it around on the screen.
Rotate
Using the embedded accelerometer by tilting the product through its horizontal and vertical axis, you can immediately swop between horizontal
and vertical viewing modes.
Home Page
The main interface of the product is pictured below. Press anywhere on the screen and various options will appear. These options will allow you to
set the wallpaper, create folders, add widgets and create shortcuts of your favorite programs.

10
The extended home page
The home page can be extended beyond the wideness of the screen to provide more space, which you can put new added shortcuts and widgets.
Touch the blank space in home page then slide right or left to extend to the right or left of the screen. In the home page, there are two extended
pictures, as in the next picture.
The Short-cut Icons Management Tool.
Android 4.1 allows you to group multiple programs/apps into dedicated folders. Drag the required icons on top of another icon thus creating a
group of overlayed icons (see next picture).Then click the overlayed icon group to create a folder name for the selected group of icons (see
following picture)
Return to previous
app
Home
View recently-used application
Reminder
Message/Notice Bar
Time
Apps
Battery capacity
Cellular Signal Strength

11
Remove the icons in desktop
Press the icons that you want to be removed and continue pressing for approximately 2 seconds. Then drag the selected icons into the
icon which will appear on the right hand side.
Change the desktop wallpaper
In the home page, Press any blank space for approximately two seconds. A window will pop up allowing you to change the wallpaper.
Click the gallery or wallpaper gallery to select the desired wallpaper.
Applications Menu
Click on the top right hand corner of the Home Page to enter the Application menu interface and choose the desired program to open
from the list showing on the screen. The programs are organized in alphabetical order so if you are missing any of your programs swipe the screen
to the left to open up the next page of icons of the installed programs. On each screen a maximum of 18 icons can appear.
USB Connection
Storage Configuration
Before attempting any transfers of files between the netsurfer® and a pc, ensure there is adequate storage space available.
Connect your netsurfer® to a pc using the USB cable provided.
Upon connection, open up the Reminder Bar on the netsurfer® and select USB Connected.
Select Turn on USB storage in the newly opened window (see picture below)
If done correctly, the Android Logo would have turned Orange
Open up your My Computer on the pc and find the two new drive letters that would have appeared in the list. The first one is the internal
storage space and the 2nd drive will be the Micro SD/TF card storage (if inserted)
Return to
home page

12
Notice: 1. When the netsurfer® is connected with the USB cable, and you open the USB storage configuration, you will not be able to view the MICRO SD/TF
card through the netsurfer®. Only after you detach the USB cable, you can view the TF/MICRO SD card in the netsurfer®.
Virtual Keyboard
Using the Virtual Keyboard
When an open program requests user info or feedback to complete a task, the virtual keyboard will automatically open up at the bottom of the
screen
Choosing the desired Keyboard layout and language
Click the Settings icon in the Application Menu
Select the Language and Keyboard option.
o All pre-installed keyboard layouts and language packages will appear.
o Select the desired layout of your choosing.
Use and switch of input method
1 Switch between Caps and Lowercase
2 Switch between letters and symbols
3 Click to insert a space
4 Delete the character in the left of cursor, click and hold to delete all the characters in the left of the cursor.
5 Click input to execute / create a new line
Widgets and Application Shortcuts
Enter widgets interface
In the Application Menu, select Widgets on the top of the screen. Press and hold any widget to create its shortcut on the desktop.
Create application shortcut icons in the desktop
In the application interface or widgets interface, press and hold any icon to switch into desktop automatically. Drag and hold the icon to move it to
any position on the desktop.
If the target position has no space, the widget won’t be added.
Settings Menu
Sim Management
The netsurfer® incorporates the latest technology regarding the dual sim slots embedded inside the tablet. This means more freedom, more control and more options
for you, the customer.
Selecting active sim cards
On startup the tablet will auto-scan the sim cards inside the tablet and will give you feedback as to which sim cards are inserted. See next picture.
From here you can decide if you want both sim cards active at the same time or just one. The choice is yours.
①
②
③
⑤
④

13
Selecting feature control per simcard
For each of the two detected simcards there will be a list of options you can choose from. Each option will determine what you use each sim card
for. You can choose which sim card to use for the internet, which to use for sending sms’s or making calls. The next picture illustrates how you
can choose which sim card will be used for your data connection to access the internet.
Contacts and SIM
This menu allows you to add existing contacts on your tablet to the simcard of your choice.
Data Usage
Android 4.1.2 allows you view and control the data usage on your tablet. Not only does it give you a full history on which program has used the
most data over a certain period of time, but you can also set up data restrictions for cellular connections. See picture below for more info.
More
Mobile Network Settings
In the More Settings Menu you will find all the advanced Mobile Network connectivity settings.

14
Please Note : To enable maximum data connectivity speed, please ensure that the selected sim card being used under the Data Connection
option is the same as the sim card selected in the 3G Service Setting in your Mobile network Settings. Failing to do so will result in limited data
connection speed and Internet access.
Tethering and Portable Hotspot
By using the tethering function, you will be able to turn your netsurfer® into a portable Wi-Fi hotspot, so that your friends and family can connect to the internet using
your 3G connection on your netsurfer®. To create a Wi-Fi hotspot, touch on the More option and then touch on the Portable Wi-Fi hotspot. To set a password for your
Wi-Fi hotspot so that only people you authorize can use your connection to connect to the internet, touch on “Set up Wi-Fi hotspot” and enter your password.

15
Wi-Fi Setup
Connect Wi-Fi
In the main menu or interface, choose the settings application procedure.
Ensure the Wi-Fi option is set to “ON”. The netsurfer® will automatically search the available Wi-Fi (wireless internet) access points. As
per the following picture.
Choose the Wi-Fi network you want to connect to. If the network requires a password, a pop-up will appear prompting you to enter the
password. Enter the password and press on Connect.
Bluetooth
Bluetooth Setup & Options
Select the Settings icon in the Application Menu.
Select Bluetooth from the list of options.
As soon as bluetooth is enabled, the netsurfer® will auto-start the search function for nearby devices (see next picture).
Select the chosen Bluetooth product from the list that is displayed. If a password is required, you will be prompted to enter a password. If
the passwords match, the two products will pair.
Please Note: You have to enable Visible to Other Products options by hand. The software won’t automatically enable this feature. Without
this being enabled you will not be able to connect to any other product properly.
The default time for the netsurfer® to discover another Bluetooth product is 2minutes. You can change the value of this to up to 1 hour.
See next picture for more information.

16
Audio Profiles
Android 4.1 gives you the option to enable different audio settings for different environments.
You can also create your own personalized Audio Profile and enable it after completing the necessary setup information (see next picture).
Display
Adjusting the brightness of the screen
Select the Settings icon in the Application Menu.
Select Display then choose Brightness.
Change the Brightness Level slide bar to desired brightness level and select OK
Please Note: LCD Brightness Levels have a major effect on the final battery life of your tablet in-between charges.

17
Adjusting the screen standby time
Click the Settings Icon in the applications procedure list.
Click Display.
Click Sleep.
The Screen standby time setting will display. Choose the time you want to set.
Managing Applications (Apps)
Choose the Settings Icon in the application procedure list.
Select “Apps”. Once selected you can manage and delete installed applications.
Picture 4.6
SD Card and netsurfer Storage
Checking the SD card and the netsurfer®’s available space
Choose the Settings Icon in the application procedure list
Click Storage.
Check the available space of SD card.
Check the netsurfer®’s internal storage space.
Safely removing the SD card
Safely removing the SD card can protect your SD card and extend its working life.
Choose the Settings Icon in the application procedure list
Click Storage.
Click Remove SD card.
Now it is safe to remove SD card.

18
Date and Time
The default settings are that the system time, date and time zone will be automatically updated from the cellular networks settings.
To manually set date, time and time zone, please follow the next instructions:
Choose the Settings Icon in the application procedure list
Slide down the screen, then touch: Date & time.
Turn off “Automatic date & time”.
Turn off “Automatic time zone’.
Select “Select time zone”. Scroll through the list until you see the time zone you wish to select. Select the time zone but touching it.
Select “Set date”. Choose the date from the calendar presented and touch on Set.
Select “Set time”. Set the timer to the correct time by scrolling up or down and touch on Set.
Select “Use 24-hour format” if you wish to see the time in 24hr format. Ensure this option is un-ticked if you do not wish to view time in
24hr format.
Select ‘Select date format” to choose the format you want to show how you wish to view the date.
Language Setting
Choose the Settings Icon in the application procedure list
Click Language and keyboard.
Click Language Selection, then choose the language you want, slide down to view more languages.
Safety and Security Settings
Set locked screen
With this function you can lock the touch screen so that it can only be unlocked by a password or picture.
Set unlock picture
Choose the Settings Icon in the application procedure list.
Select: “Security”
Select: “Screen Lock”
Select “Pattern”
Select “Next”
The “unlock” pattern board will be displayed. There are nine touch spots. Connect 4 points from vertical, horizontal or diagonal direction as per the next

19
picture. The system will record your new unlock pattern.
Select “Continue”.
You will then be asked to confirm you pattern. Enter the pattern again and press “Confirm”.
Set unlock PIN code
Choose the Settings Icon in the application procedure list.
Select: “Security”
Select: “Screen Lock”
Select “PIN”
A message will prompt you to “Choose your Pin”. Enter your PIN in the space provided. The system will record your new unlock PIN and you will be
prompted to enter it again. .
Enter the PIN again and press “Next”.
Set unlock Password code
Choose the Settings Icon in the application procedure list.
Select: “Security”
Select: “Screen Lock”
Select “Password”
A message will prompt you to “Choose your Password”. Enter your Password in the space provided. The system will record your new unlock password and
you will be prompted to enter it again. .
Enter the Password again and press “Next”.

20
Multi-Media
The Gallery application can automatically search for photos and video files on your Micro SD card and will classify these as either photos or
videos. You can apply the photo gallery to view and edit photos, set the photos as wallpaper and watch videos.
Music
To Access the music player: in the menu or desktop touch the music icon. Select the music you want to play.
Video
Enter video player: choose application in main menu, choose the video you want to play.
Photos
To view pictures:
Select the Gallery application in the main interface.
Select the folder you want to view.
Select the picture you want to view. The system will play it in full screen mode automatically.
The pictures can be zoomed in and zoomed out by using the Pinch to Zoom Functionality.
Note: When you browse the pictures, slide left or right to view more pictures.
Edit and set
pictures
When viewing the pictures in full screen mode, click the menu icon to display a list of menu options. You can choose
what you wish to do regarding editing, viewing or and sending pictures to someone.
Slide Show
Click slide show, to automatically display photos (or choose button in picture folder)
Crop
Select “Crop”. Touch, hold and drag related area to adjust the cropper.
Click cropper and drag it inside and outside to adjust the image.
After adjusting the size you want, click crop.
Touch “Cancel” to return to picture browser.
Edit
1. Select “Edit”
2. Adjust the brightness, style or colour, setting
3. Select “Save”
4. Touch “Return” to return to picture browse.
HDMI
A mini HDMI cable port is available to connect to a standard HDMI connection on a TV or Projector.
Camera
In the main interface or desktop, click the camera application to enter the camera.
To switch from the front to back camera:
select the menu icon
Select switch front/back camera,

21
Communication
Phone
Touch the Phone Application to make a call.
SMS/MMS Message
Enter into main menu, choose application procedure.
At the top right, Select: New Message
The following screen will appear
Enter the cell phone number in the space labeled: To or Touch on the “Contact” icon and select the contact.
Enter the message where it indicates: Type Message:
Dial Pad
View pictures and videos
Switch front/back
camera
Click it to take
pictures
Video
Panoramic Mode
Camera shooting
mode
Number Dialed will be
displayed here
Call Log
Contacts

22
Contact List
By selecting the Contact list icon in the main interface you open up the Contacts app as seen in the following picture.
To search your contacts: Touch the icon
To add a contact: Touch the icon
Email
The Email application contains a set up guide which gives detailed instructions on how to add your email including adding POP3, IMAP, Outlook
or web based email accounts email accounts (For instance, Yahoo, Gmail, and Hotmail). The following picture shows the various functions:
Input phone number
Contacts
Type Message
SEND Icon

23
Setting up your email account
Select the email icon to see the email setup guide
Input your email address and password in the spaces provided
Select “Manual setup” to manually enter your email type: Choose from the following options: POP3, IMAP or Outlook
Confirm all your details as provided by your Internet Service provider
Select “Next”
The email app will attempt to access your mail server and download your email. If you don’t have an internet connection or if the account
and password details you entered are incorrect, you will get a message: “Couldn’t open connection to server”
If you receive this message, please check your settings and internet connection and try again
Deleting your email account
Enter into your mail box.
Press the Menu key.
Select Account
Select the account you wish to delete.
Select “Confirm” to remove.
Sending an E-mail
Select to access your mail box.
By selecting the inbox your new email will automatically be downloaded. Touch each email to read it.
Press the Menu key to access the menu options.
Click Edit
to edit any emails.
Input the receiver’s email address.
Input the subject and email content.
If you want to add an attachment, select the menu key and then:
o Select “Add attachment” (pictures, video).
Click “send” to send the email out.
Add
attachment

24
Other Applications
Clock
By selecting the Clock application you will see the following application.
Calculator
By selecting the following application icon: you will see the following Calculator.
Enter into the basic board of calcu lat or.
Soft touch the numbers to use the calculator
File Manager
By using the File manager you can copy, cut, delete or rename files and folders.
In the main menu or desktop, select the document manager icon to enter into document/file manager.
Set alarm
Internal
storage
SD card

25
Recorder
In the main interface or desktop, select the recorder icon to access the recorder application. Click record key to start to record. Click
Stop key to stop recording. Click Play key to play the recorded sound.
The system will prompt you to either save or delete the recorded sound.
To play the recorded sound, you will be prompted to choose the video player with which you wish to play it with. Choose the video player in the
source manager.

26
Status and Reminder Bar
When receiving notifications in your Reminder Bar you will need to select/touch the icon to open the reminder list. Choose the option you need,
and confirm the information. You can close the reminder window by touching anywhere on the screen outside the Reminder Bar. Please refer to
the below status icons and screenshot showing the Reminder Bar whilst opened:
New Email
Airplane Mode on
USB connected
USB adjustment connected
Return button
Downloading
Recently Used Apps List
Home button
Current Battery Status
WIFI connected to Internet
Restore Factory Settings
Should your software become corrupt or you mi splace your password you may wish to restore your netsurfer® to its original factory settings. This option will erase all
personal data and configurations but in certain instances may be the only option. Below is the procedure to follow to restore your product to original Factory Settings:
Go to the Settings Menu and scroll down to Backup & Reset
Select Factory data reset from the options showing on the right side of the screen.
You will have an extra option available to choose called Erase Internal Memory. This is disabled by default as it will also delete all user
data when doing the System Restore.
Click on Reset Tablet followed by Erase Everything showing on the screen following.
The netsurfer® tablet will restart afterwards and reset the software back to default. This may take a couple of minutes to complete, so
please make sure that you have at least 50% battery life before attempting this.
Once the tablet has restarted, the restore has been completed.
Battery Saving Techniques
Satellite GPS is the most demanding software/hardware combination on the system. In extreme circumstances it can halve the battery life
(per charge) on the tablet. It is recommended to Switch Off/Disable the Location function completely and only switch it on when required.
Reduce LCD brightness to a more comfortable level
Switch off 3G mode if you are not going to be using the internet. Emails can still be checked and updated on a 2G network if required.
Turn off unnecessary start up apps. These can cause the netsurfer® to use extra power when starting up
We recommend that you charge the battery when it reaches 15%. Android is programmed to automatically switch into a battery saving
mode which will result in slower response times to perform specific tasks as well as slow internet download speeds.
Please Note: Running more than one battery saving app will confuse the Android system resulting in the apps giving out incorrect readings.

27
Popular W ebsites, Apps and Tips
SlideMe
The SlideMe App comes pre-installed on your netsurfer®. It is one of the largest websites on the internet for downloading free apps. You can also
purchase apps on SlideMe. SlideMe updates their site and apps marketplace continuously with the latest and best applications and games that are
available for Android. To access SlideMe, simply touch on the app icon on your desktop. To open up the search function in SlideMe, simply touch
on the Menu Key on the right hand side of your netsurfer®. This will pop up some options at the bottom of the screen. Select Search.
Twitter
Twitter is a world famous website where you can receive live updates on your favorite celebrities as well as friends. To access Twitter on your
netsurfer® simply log onto www.twitter.com . It will automatically recognize that you are accessing it from a mobile device and change the
settings for ease of use.
Facebook
Facebook is the world’s biggest social network website where millions of people go to meet up with old friends or meet new ones . The best way
to access Facebook is through your browser by going to www.facebook.com
Youtube
YouTube is the world’s biggest video clip collection website where you can see all the latest music video, funnies and world news updates. Go to
www.youtube.com and search for your favorite video file or what’s new on YouTube and select it by simply tapping on the description underneath
the respective image. If you are having problems viewing video files on Youtube, make sure your browser settings are set to Desktop. If you
need help, contact the helpdesk.
Aldiko eBook Reader
Aldiko is one of the most popular eReaders available. This app will allow you to download and install thousands of free eBooks from the internet.
All you need to do is go to www.aldiko.com, click on the Blogs tab at the top and scroll down until you see the option to install from the Web Site.
Click on this and follow the instructions. If you need help, contact the helpdesk.
 Loading...