

Second edition, Mar. 2019
User Manual
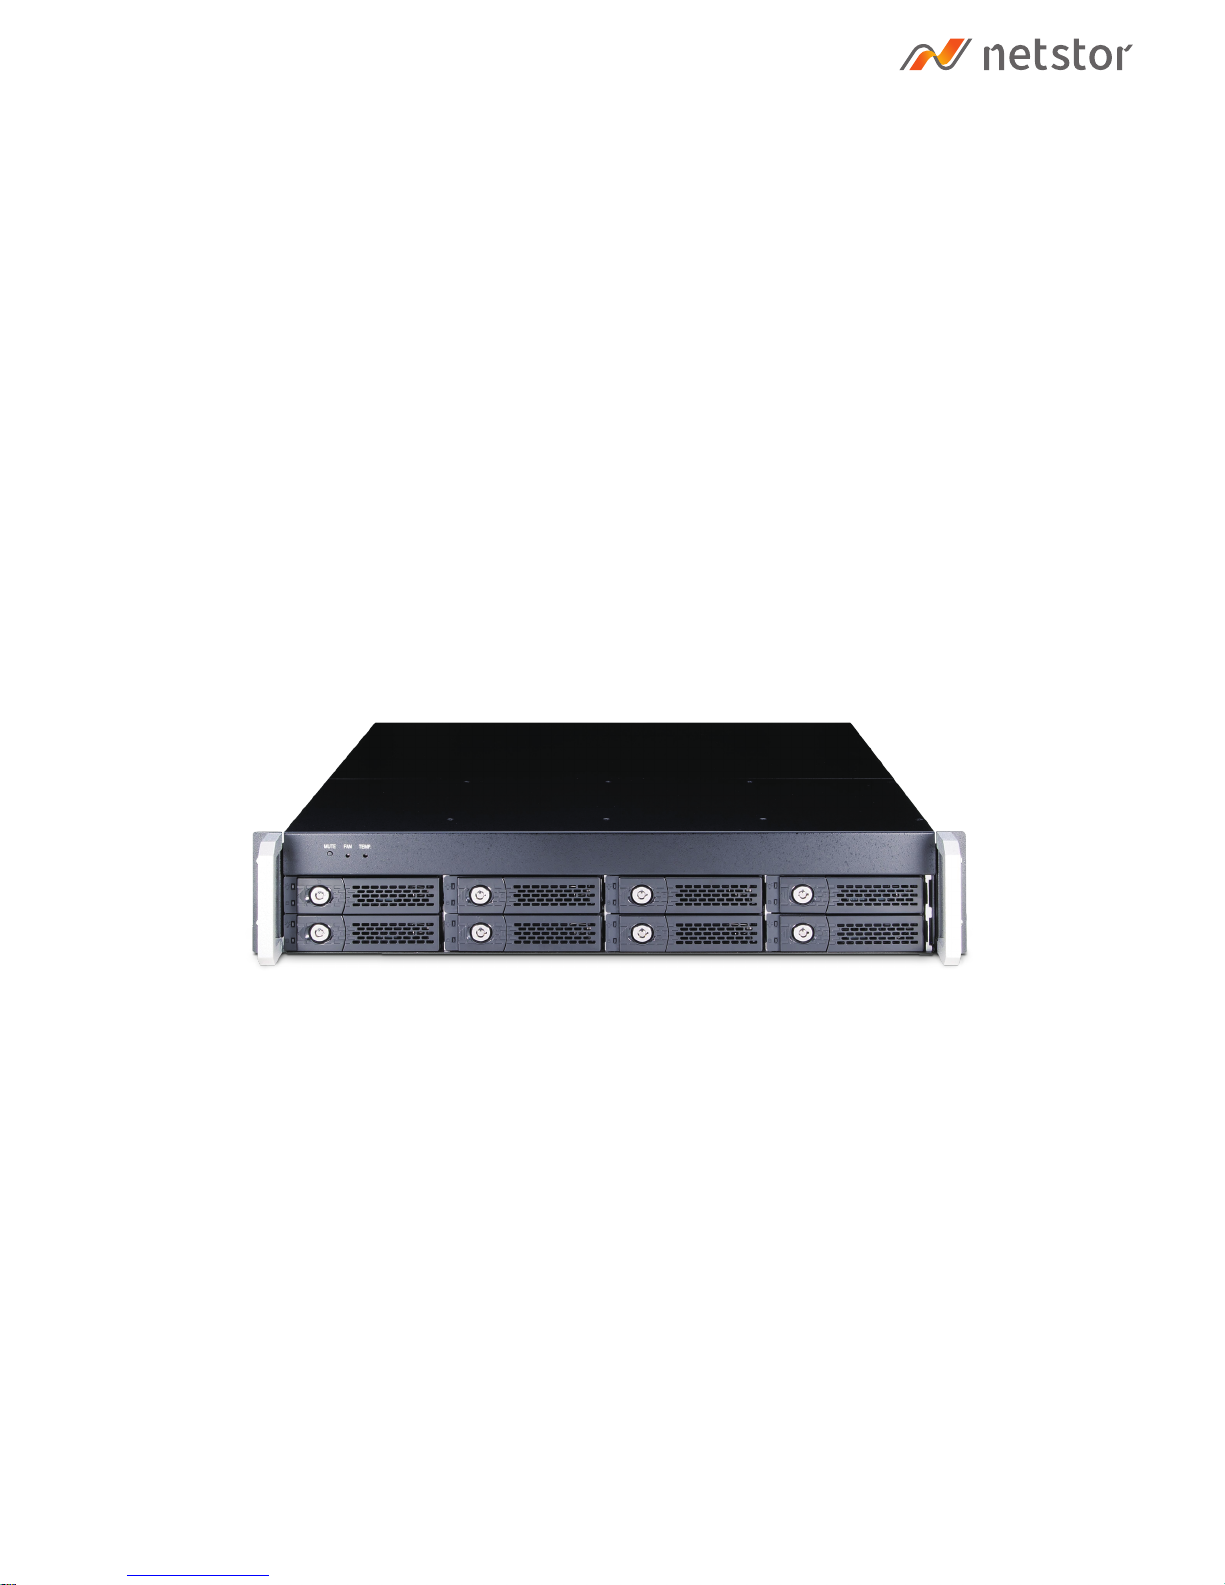
NA341TB3
Rackmount 2U 8 bay (3.5"/ 2.5") Thunderbolt™ 3 RAID Storage

1. Unpack the NA341TB3
2. Storage Enclosure Description
3
3
5. Verification
10
6. Thunderbolt 3 Card LEDs Status
17
4. Power On/Off NA341TB3
9
3
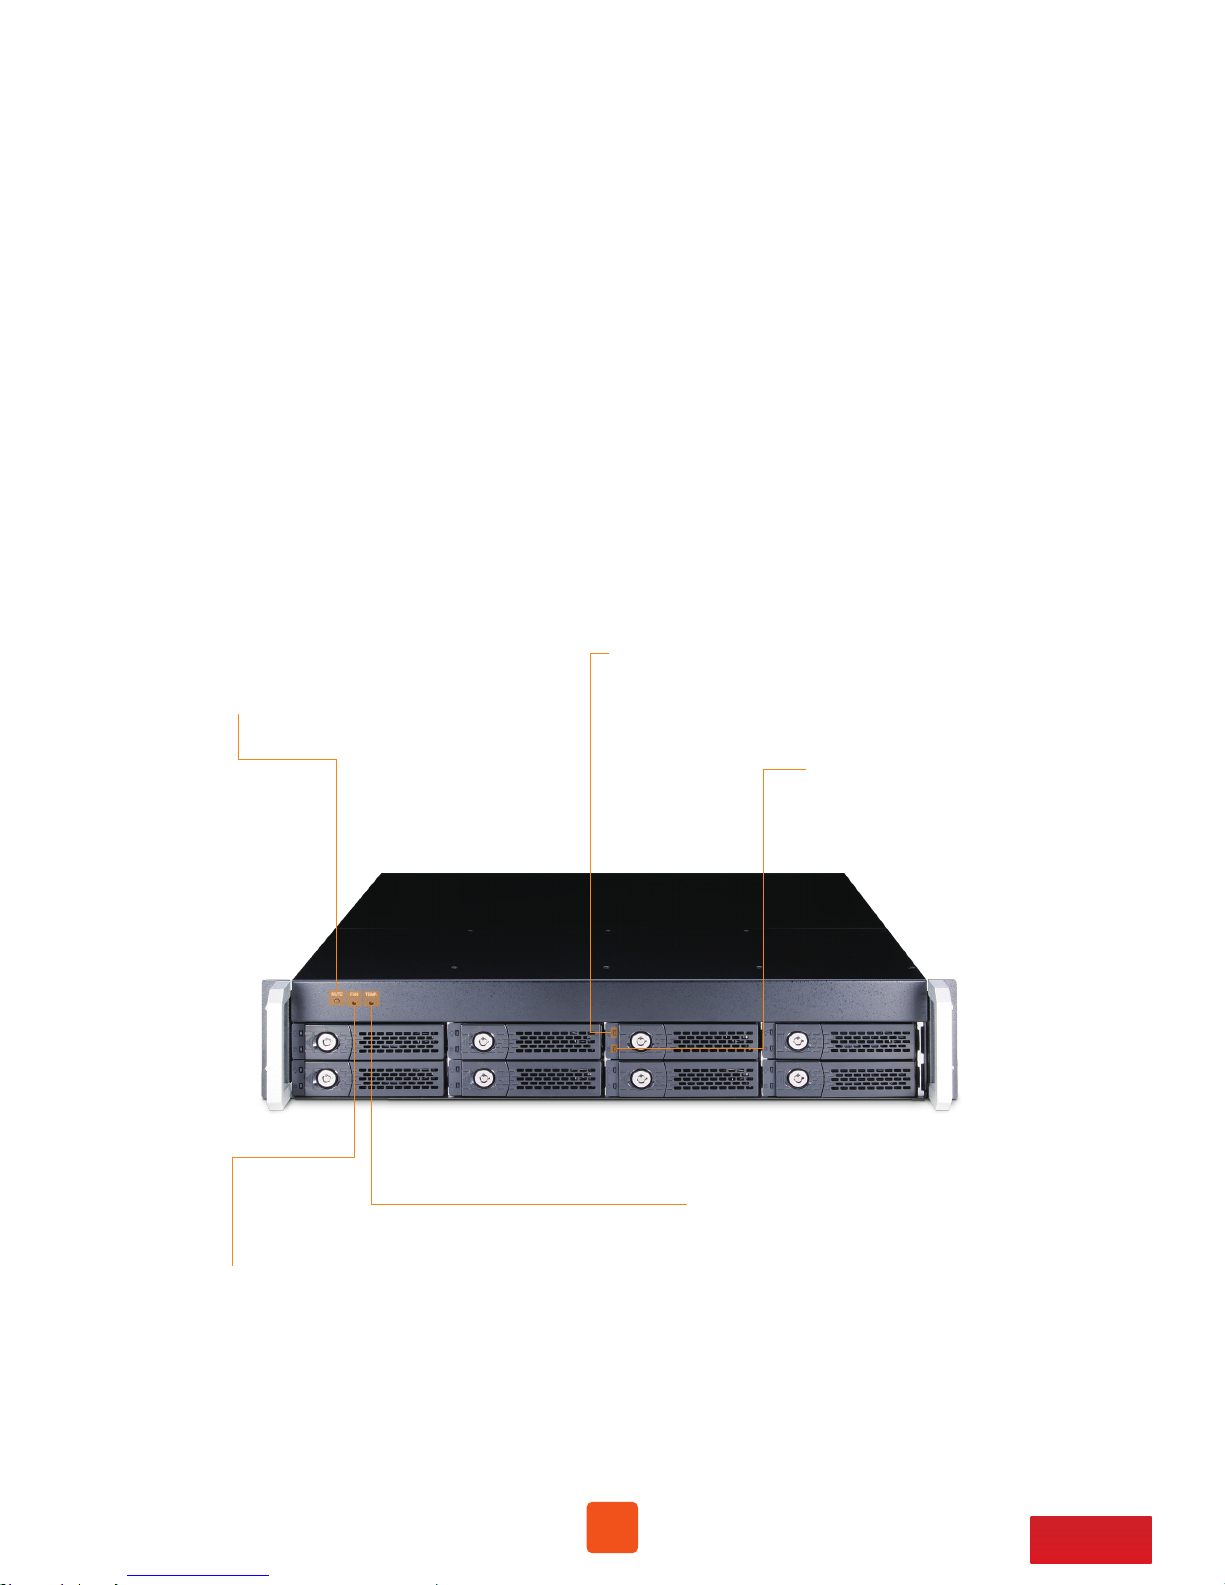
2.1 Panel Layout
5
2.2 Environmental Control Board LED Status
3. Setup Procedure
6
6
3.1 Storage Setup
8
3.2 Blower Fan Speed Adjustment
10
5.1 macOS
13
5.2 Windows Operating System
3
Go Top ↑
1. Unpack the NA341TB3
2. Storage Enclosure Description
2.1 Panel Layout
The box contains the following items:
。Netstor NA341TB3 storage
。HDD tray × 8 (installed in enclosure)
。Thunderbolt 3 cable (2 meters) × 1
。Power cord × 1
。HDD mounting screws
。Key for HDD tray × 2
1. HDD Power LED
。White - Power On Indicator
4. Fan LED
。Green – normal
。Red – fan failure (low frequency of RPM or stop)
5. Temperature LED
。Green – normal
。Red – over temperature
3. Mute Button
。Mute Buzzer Beeping
2. HDD Status LED
。Flash Blue - HDD Accessing Indicator
。Red - HDD Failure Indicator
4
Go Top ↑
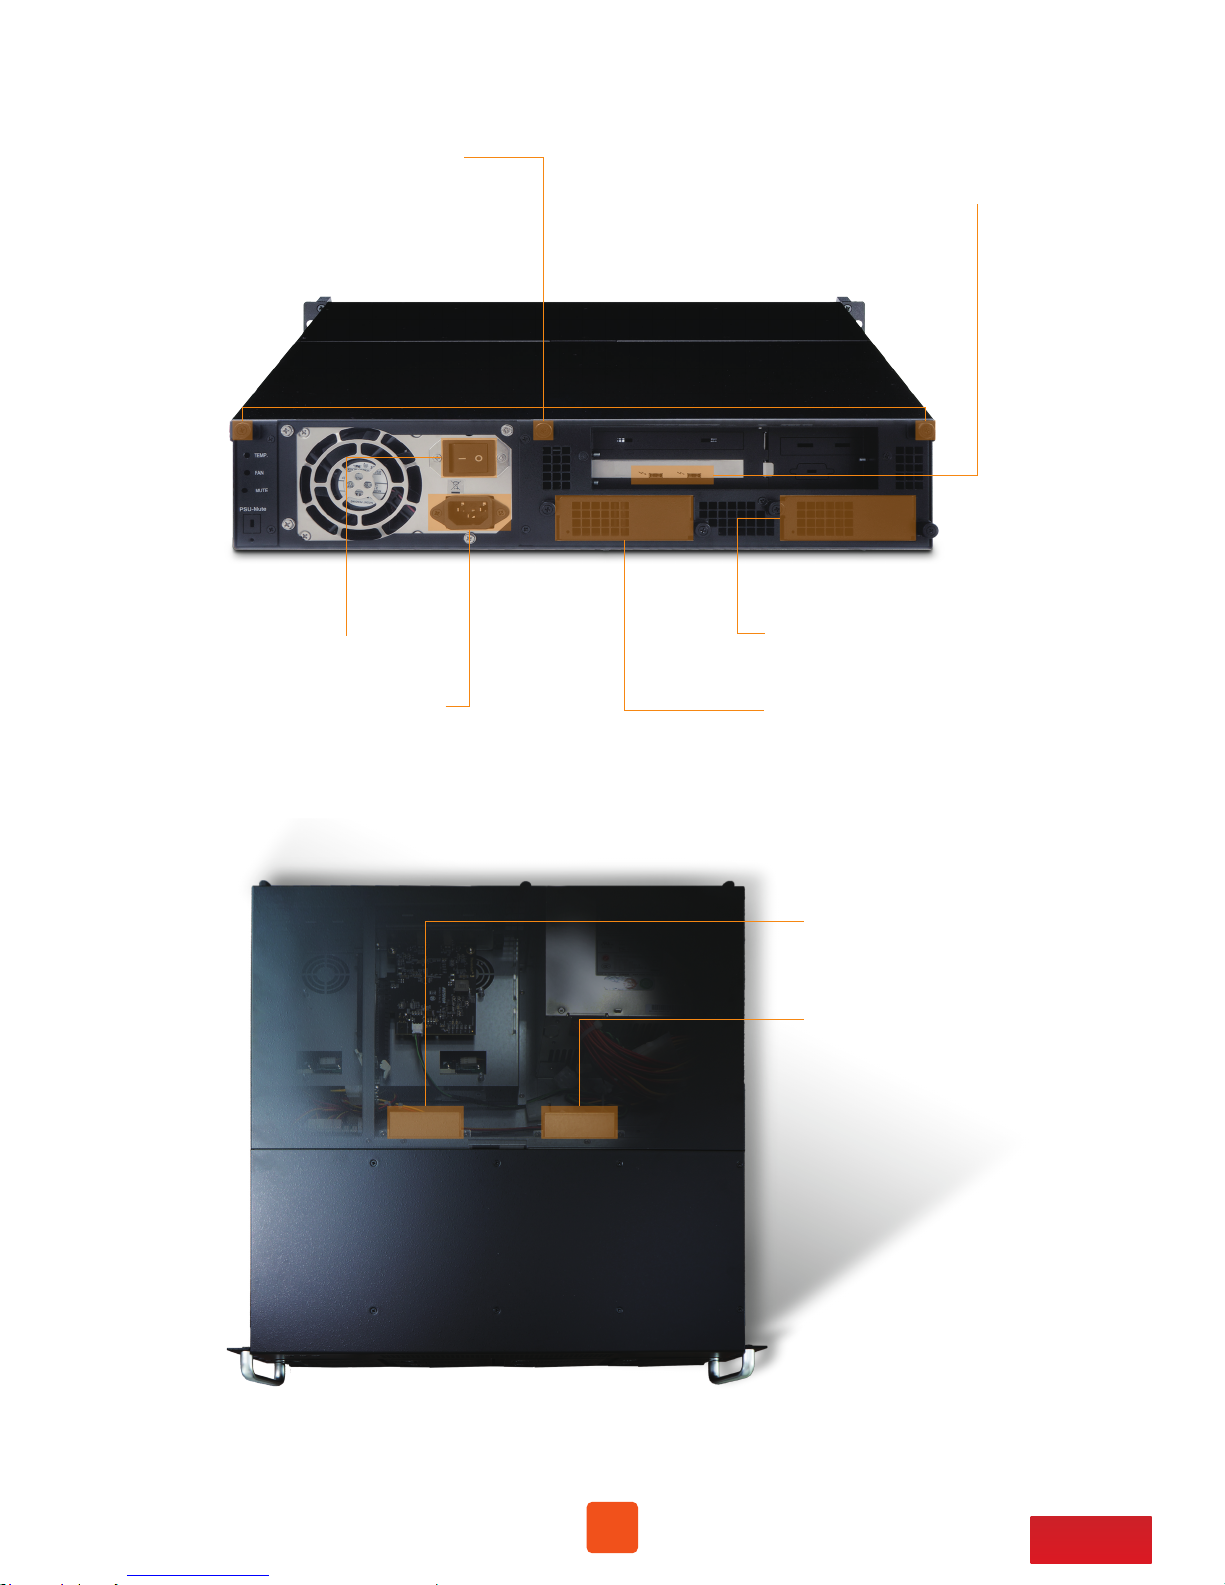
8. Hot-Swappable Blower Fan 1
。75 × 75 × 28 mm
9. Hot-Swappable Blower Fan 2
。75 × 75 × 28 mm
10. Inner Cooling Fan 3
。60 × 60 × 25 mm
11. Inner Cooling Fan 4
。60 × 60 × 25 mm
12. Thunderbolt 3 Connectors
。Connecting Thunderbolt 3 cables to host
and downstream device
6. Power Cord Receptacle
7. PSU Power Switch
13. Thumbscrews to loosen/
tighten the top cover
5
Go Top ↑
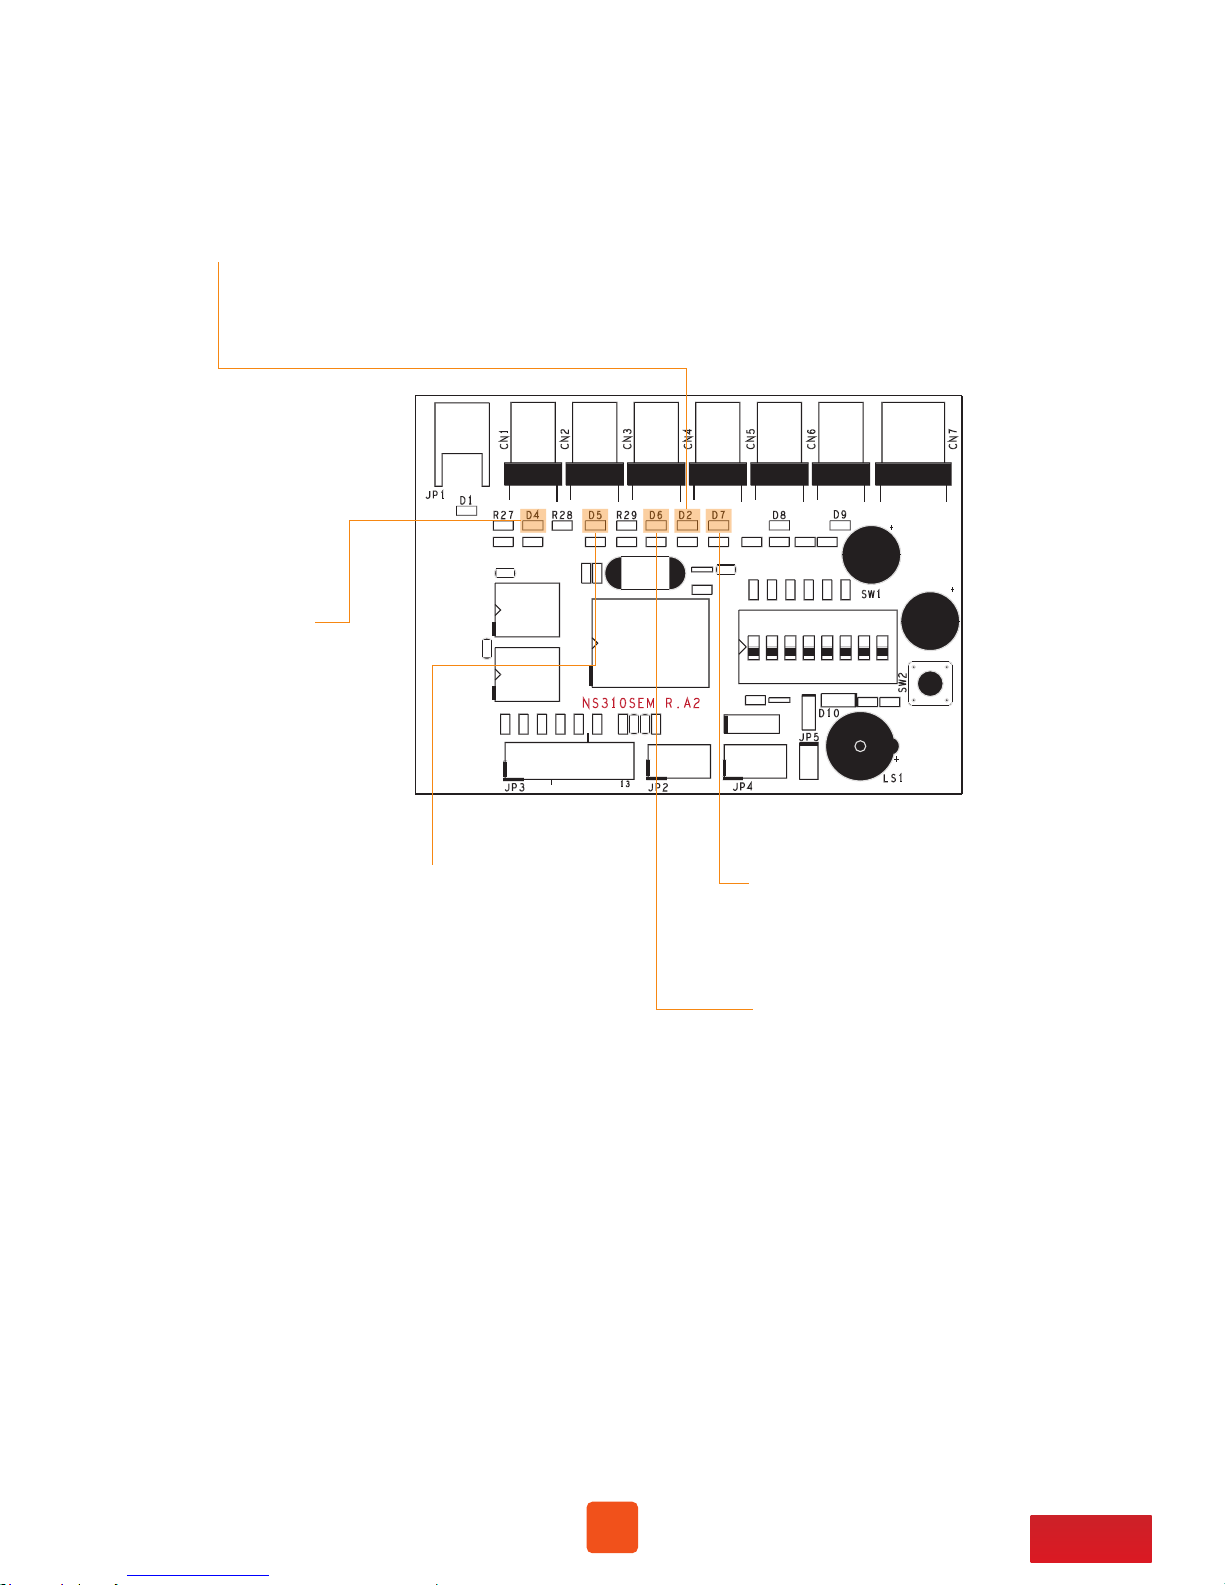
2.2 Environmental Control Board LED Status
D2 LED: fan failure indicator
。D2 LED no light: all cooling fans are normal
。D2 LED red light: one of the fans fails
D4 LED: fan 1 status
。D4 LED no light: fan 1 is normal
。D4 LED red light: fan 1 fails
D5 LED: fan 2 status
。D5 LED no light: fan 2 is normal
。D5 LED red light: fan 2 fails
D6 LED: fan 3 status
。D6 LED no light: fan 3 is normal
。D6 LED red light: fan 3 fails
D7 LED: fan 4 status
。D7 LED no light: fan 4 is normal
。D7 LED red light: fan 4 fails

6
Go Top ↑
3. Setup Procedure
3.1 Storage Setup
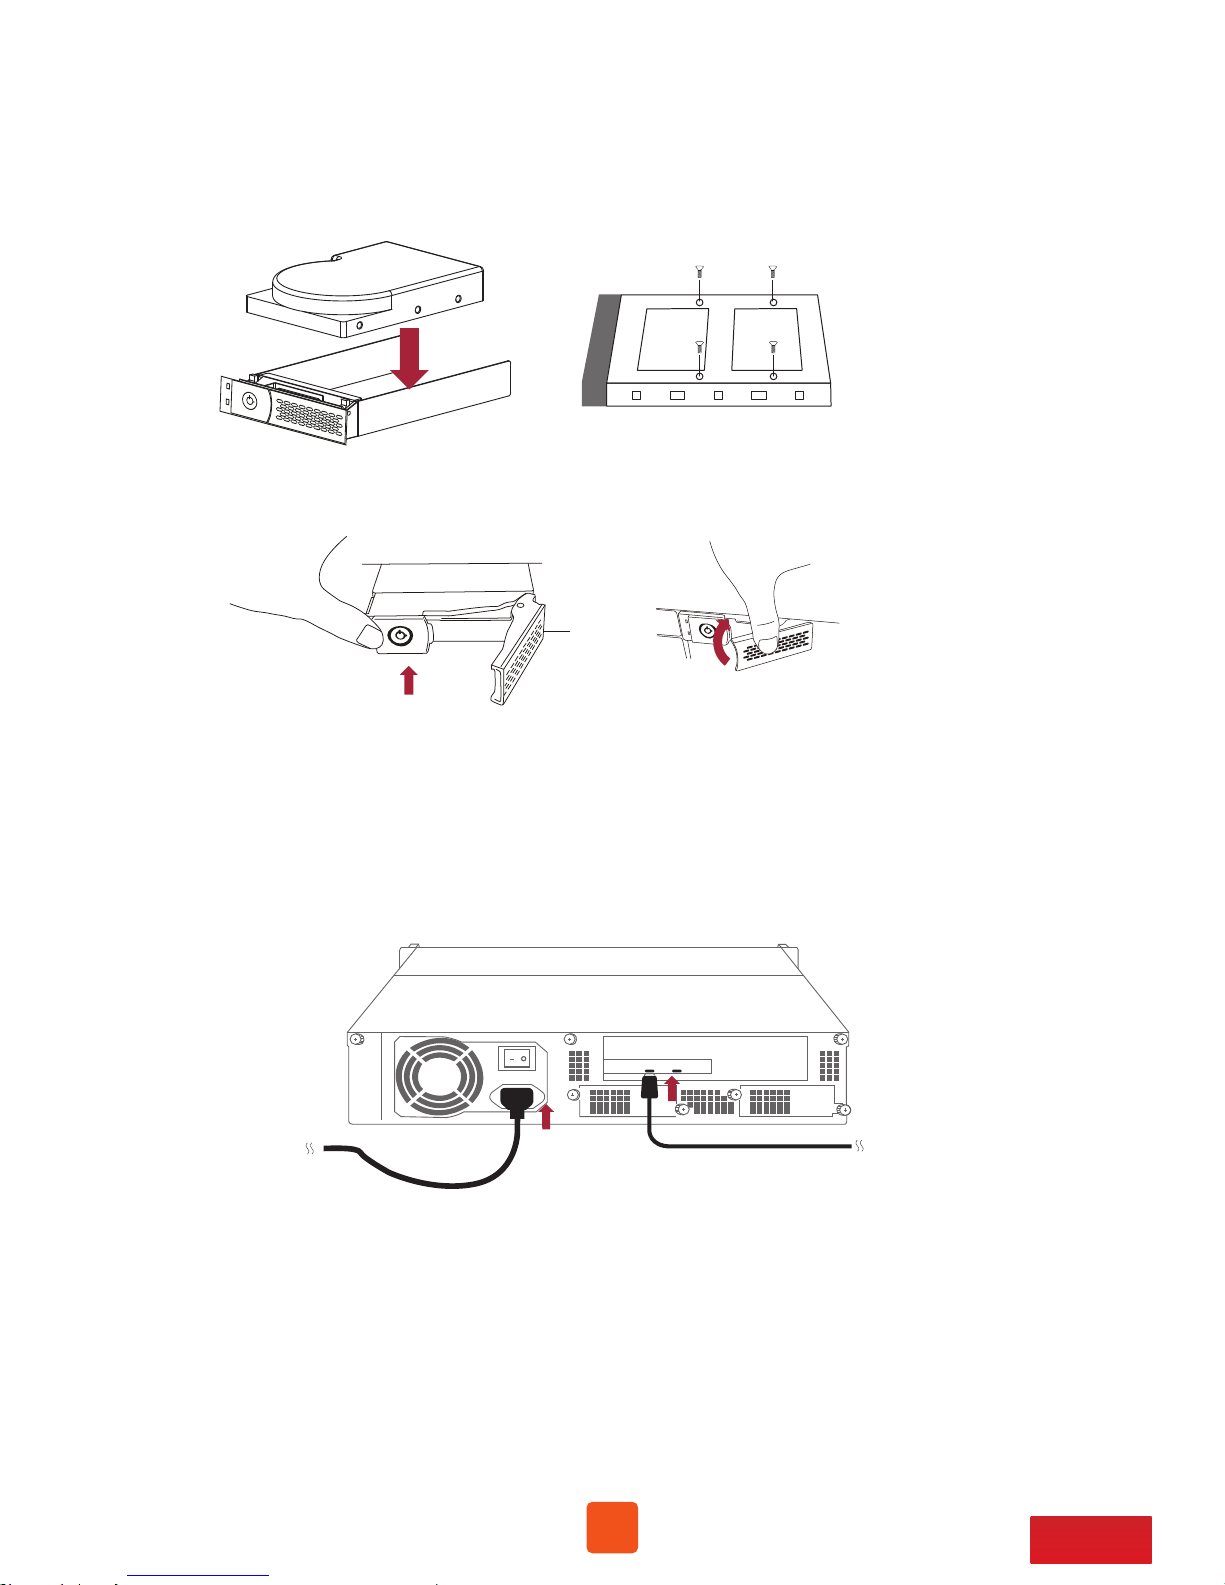
1. Place NA341TB3 storage on a level surface on a stable table.
2. Take out all the eight HDD trays.
7
Go Top ↑
3. Place HDDs in the trays and fix them with the included hard drive mounting
screws. And then put the trays with HDDs back to NA341TB3 storage.
4. Connect NA341TB3 and Thunderbolt 3 computer with Thunderbolt cable,
and then connect Netstor storage with power source.
Host
Power

8
Go Top ↑
3.2 Blower Fan Speed Adjustment
1. There are two hot-swappable 75×75×28 mm blower fans for ventilation at rear of NA341TB3.
After loosening the two thumbscrews on the fan module, the blower fan can be pulled out of
the storage enclosure.
2. The rear 75×75×28 mm blower fan speed can be adjusted. As the blower fan module is
pulled out, there are four sets of jumpers labeled with 6V, 8V, 10V, 12V from top to
bottom on the fan connector board. The default setting is the jumper being placed over
pin 7 and 8 for label 6V for slowest speed. The speed increases from label 8V to label 12V.
As jumper is not placed over pins, the fan will spin at 12V full speed.
6V
8V
10V
12V

9
Go Top ↑
4. Power On/Off NA341TB3
1. NA341TB3 storage is designed to be powered on/off simultaneously with
the Thunderbolt 3 computer as NA341TB3 is connected to computer by
Thunderbolt cable. Therefore, power on computer first, and then NA341TB3
will be powered on automatically.
2. As NA341TB3 storage is connected to computer by Thunderbolt cable, when
shutting down computer, the NA341TB3 will be shut down automatically as well.
※ NA341TB3 supports hot-plug and hot-unplug for powering on and off.
※ If there is a PSU power switch on Netstor storage, remember to switch it
to “I” position to enable the PSU first.

10
Go Top ↑
5. Verification
5.1 macOS
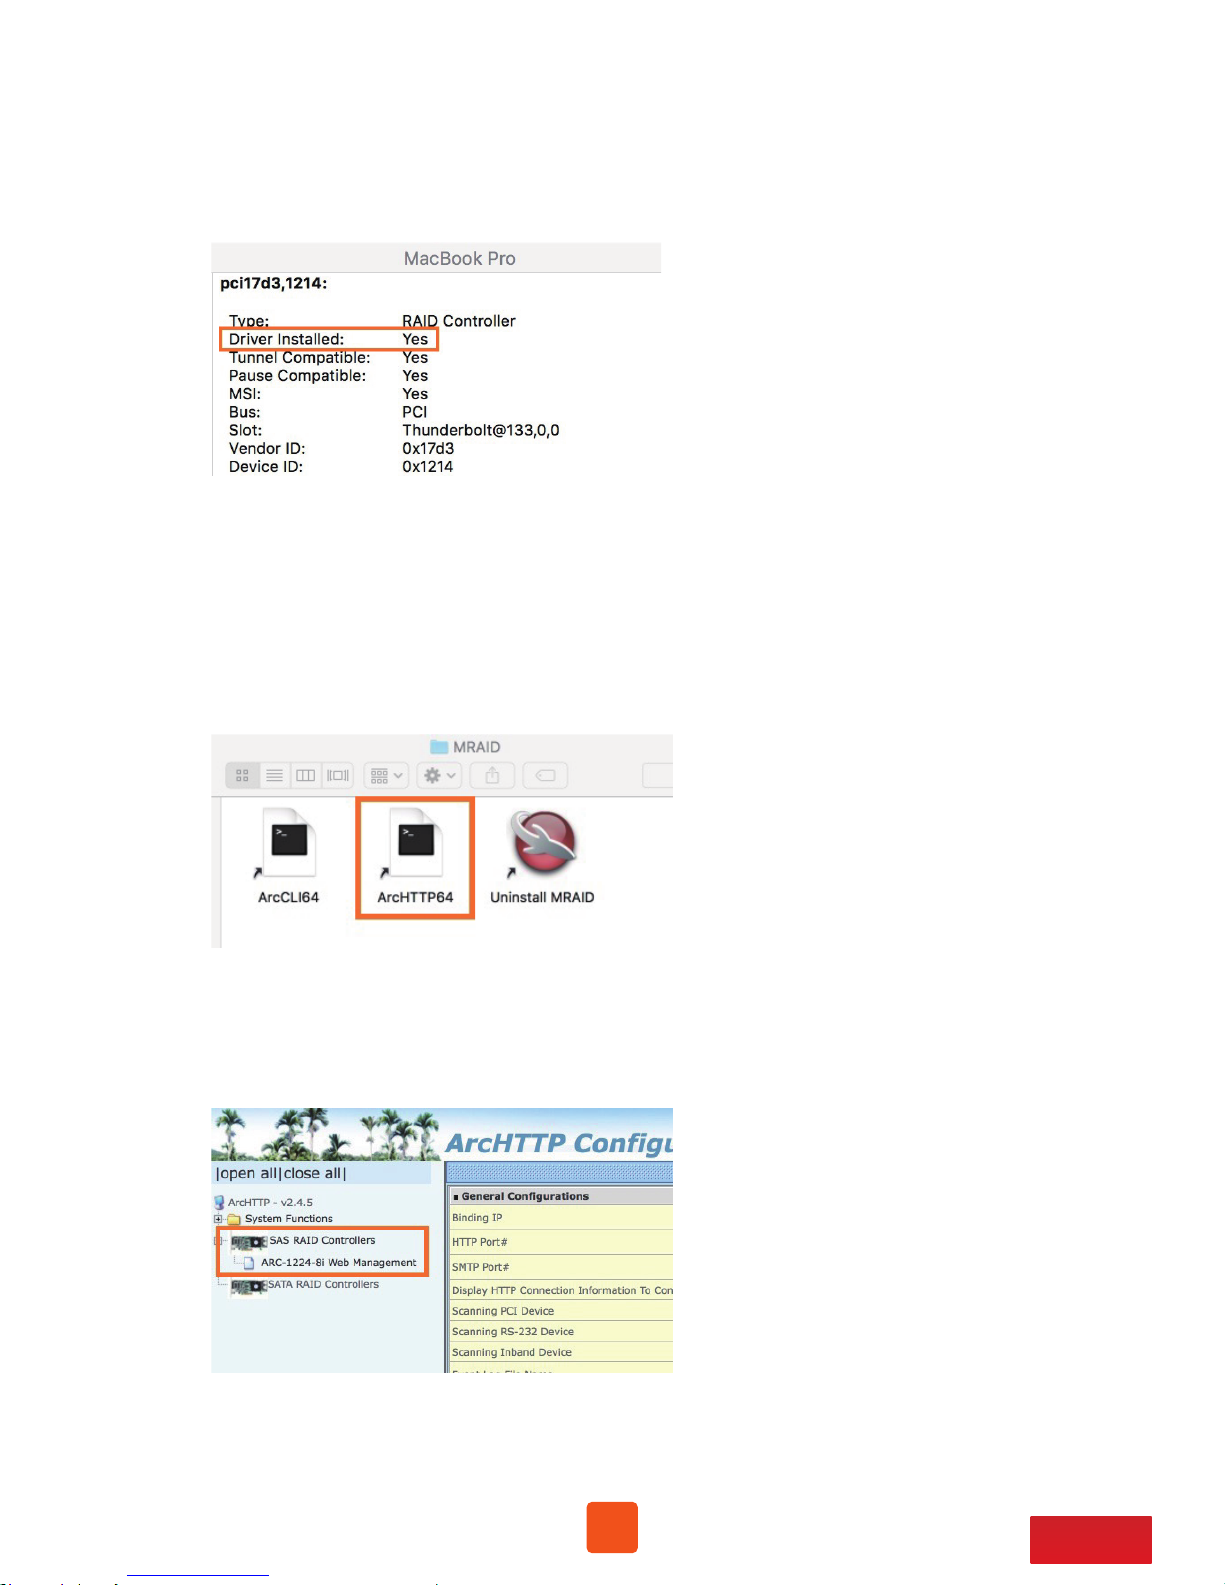
1. Verify Netstor NA341TB3 is recognized by computer. Click Apple icon at the top
menu bar, select About This Mac, and click System Report button. Click Thunderbolt
in the left column, as NA341TB3 appears in the information, it means Netstor storage
is recognized correctly by computer.
2. Verify RAID controller of NA341TB3. Right after the above point 1, click PCI in the left column,
and information about NA341TB3 RAID controller will appear. (For RAID controller, from starting
up, it will take more time for its info to be shown)
11
Go Top ↑
4. Download MRAID GUI program to configure and set up RAID volume for NA341TB3.
To download MRAID GUI program, please visit: www.netstor.com.tw
5. After downloading and installing MRAID GUI program, open MRAID folder, and double
click ArcHTTP64 icon to enter configuration page on web browser.
6. When at first page of web GUI, click SAS RAID Controllers, select Web Management,
and then a login pane will pop up.
3. Verify the driver of NA341TB3 RAID controller. Following point 2, there is an item
Driver Installed indicating the status of RAID controller’s driver. The driver is already
embedded in macOS 10.12 and later.

12
Go Top ↑
NOTE
To eject the RAID volume on macOS,
click Go at the top menu bar, and
select Computer. Right click the RAID
volume, and select Eject to safely eject
the RAID volume from computer.
7. Input admin for name and 0000 for password to enter.
8. After logging in, for quick setup of RAID volume, click Quick Function in the left column,
and select Quick Create. After RAID volume is created, a pane will pop up providing three
selections for action. Click Initialize button to format the RAID volume.
9. Select the RAID volume, click Erase button at top side. Name the RAID volume in center
part, and click Erase button at bottom right to format the RAID volume. After formatting,
the RAID volume is ready for use.

13
Go Top ↑
1. Verify Netstor NA341TB3 is recognized by computer. Right click This PC, and select
Manage. As window of Computer Management pops up, click Device Manager in the
left column, click View at the top menu bar, and select Devices by connection.
2. Click ACPI x64-based PC, select Microsoft ACPI-Compliant System, and click PCI Express
Root Complex. Open the PCI Express Root Port, and NA341TB3’s RAID controller will be
shown, meaning Netstor storage is recognized correctly by computer.
3. Install Windows MRAID that contains Windows driver of NA341TB3 RAID controller
and Windows GUI program. To download Windows MRAID,
please visit: www.netstor.com.tw
5.2 Windows Operating System

14
Go Top ↑
4. After installing the driver and the GUI program, launch the GUI program by
selecting ArcHttpSrvGUI in All Programs in Windows Start to run the application.
5. Subsequent to running ArcHttpSrvGUI application, the web-based GUI will appear.
Select SAS RAID Controllers, and then select Web Management to enter the web GUI
6. Key in admin for name and 0000 for password to enter.

15
Go Top ↑
7. After logging in, for quick setup of RAID volume, click Quick Function in the
left column, and select Quick Create.
8. After creating RAID volume, right click This PC, and select Manage. As window of
Computer Management pops up, click Disk Management in the left column, and
a window will pop up; select GPT (GUID Partition Table), and click OK.
9. Following selecting GPT (GUID Partition Table), the RAID volume will appear in the
center field of the window. Right click the section of the RAID volume, and select
New Simple Volume to format the RAID volume.

16
Go Top ↑
10. As formatting is completed, the RAID volume will be shown in This PC, and it is
ready for use.
It is strongly recommended when under RAID initializing or rebuilding,
the sleep mode be disabled temporarily for speeding up the process.
While computer goes in sleep mode, the NA341TB3 will go into sleep
as well for energy saving; when computer wakes up, the initializing or
rebuilding will resume automatically. Hence, the process can be
completed in a short time without sleep mode interruption.
NOTE
To eject the RAID volume on Windows, click the Safely Remove
Hardware icon at the bottom right of the screen, and select
Eject SCSI Disk Device.
17
Go Top ↑
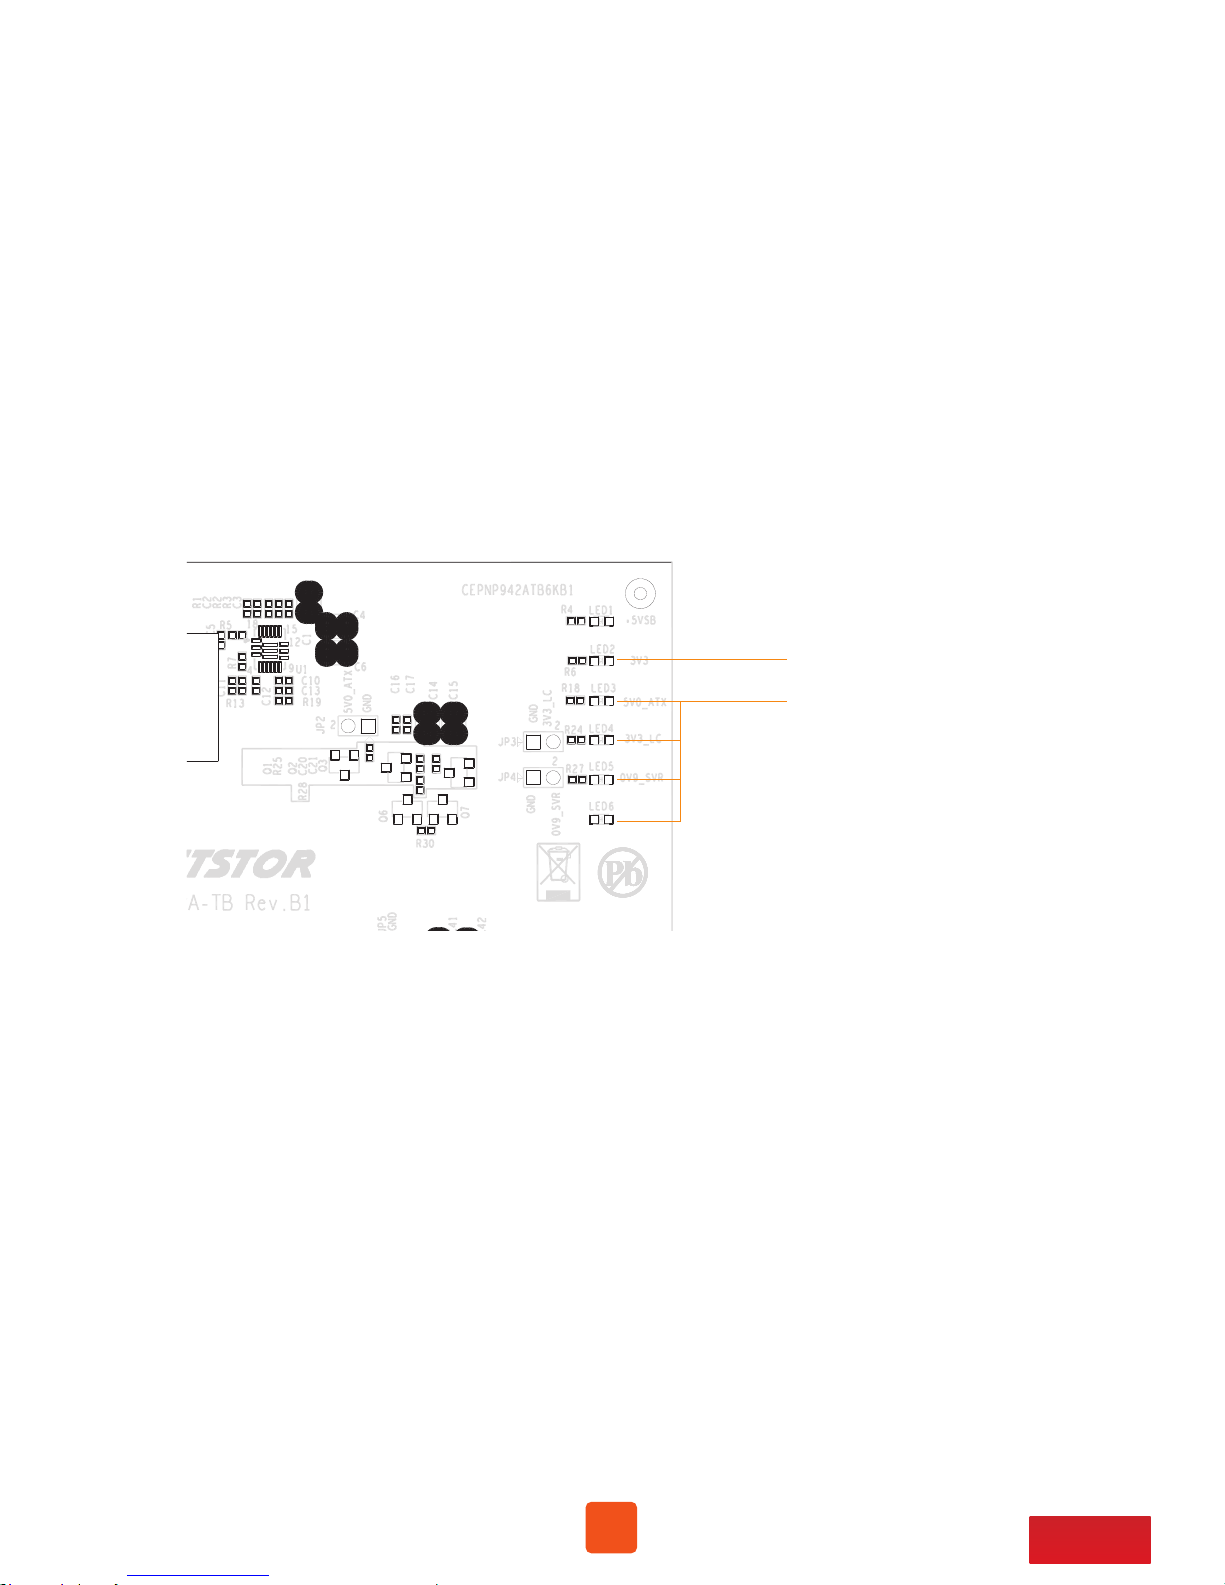
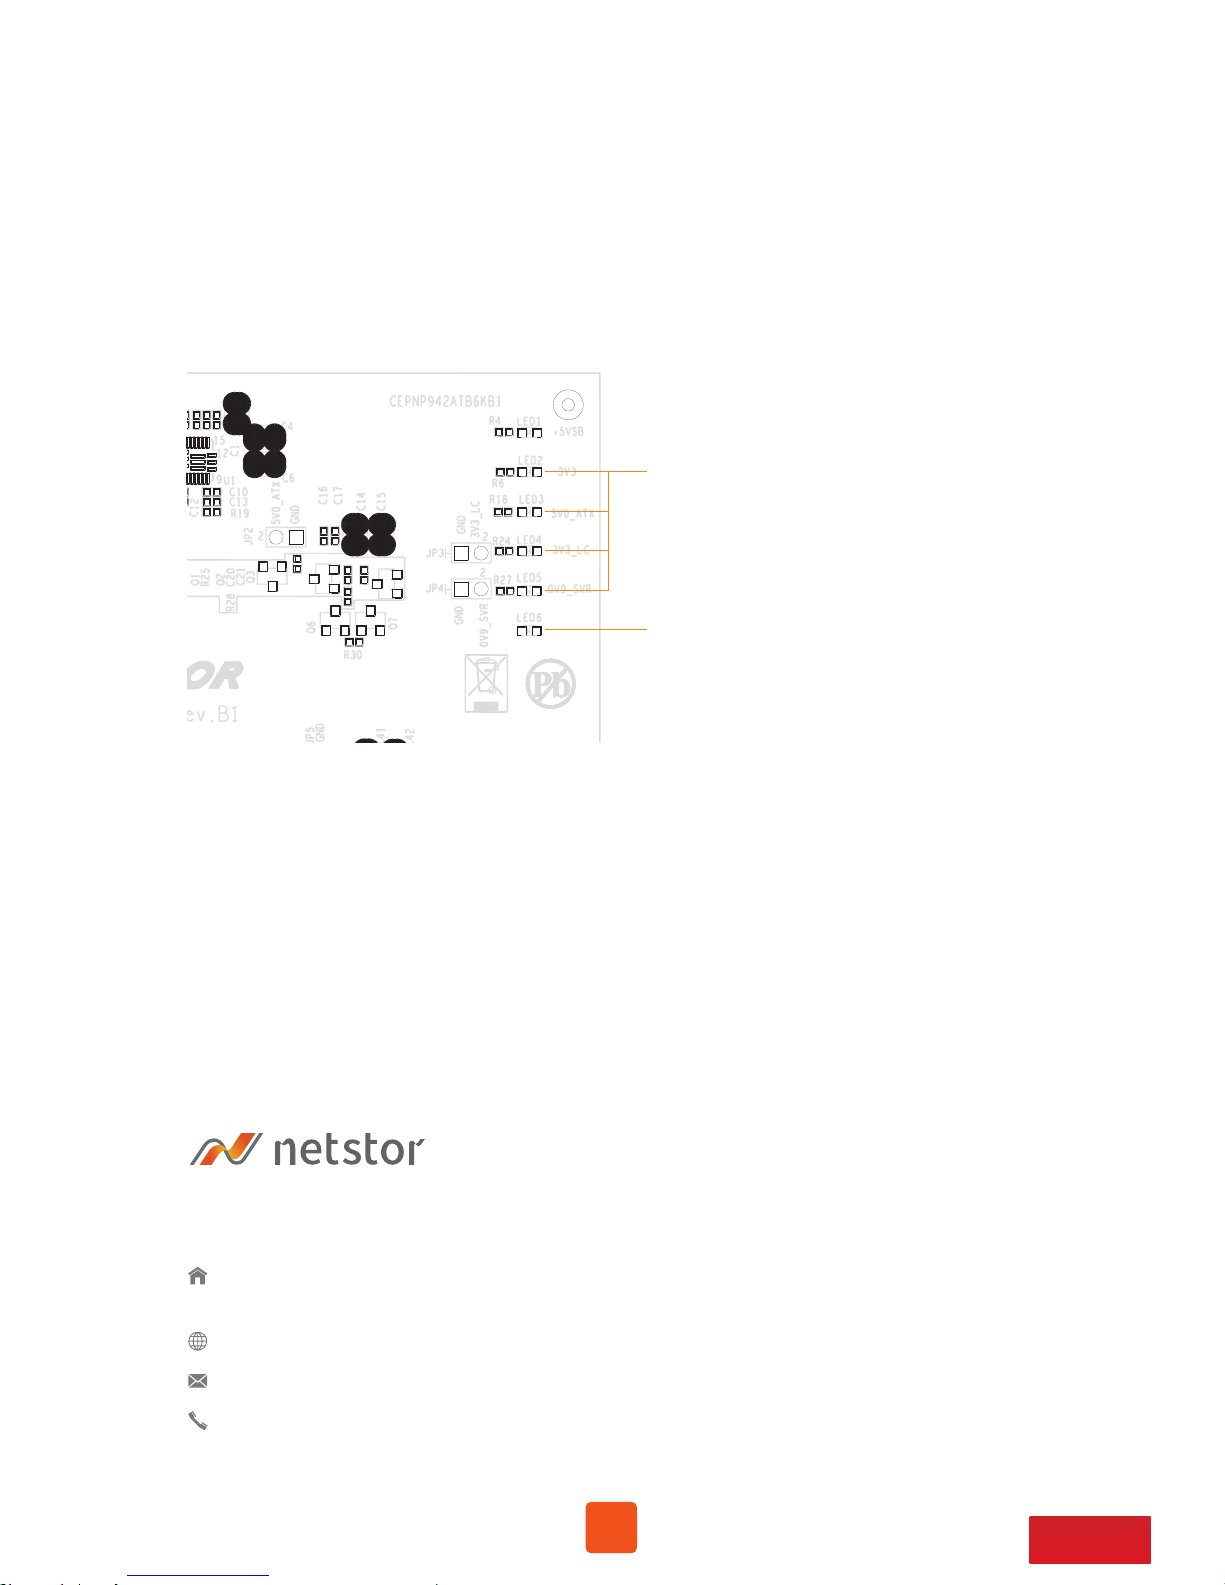
6. Thunderbolt 3 Card LEDs Status
On the Thunderbolt 3 card within the NA341TB3 storage, there are totally
five LEDs. From top to bottom, they are: LED 2 (for 3V3), LED 3 (for 5V0_ATX),
LED 4 (for 3V3_LC), LED 5 (for 0V9_SVR), and LED 6 (for 0V9_USB). The following
information describes what the LEDs lighting status will be before NA341TB3
is powered on and after the Netstor unit is powered on.
Power-off:
Before NA341TB3 is powered on, only LED 2 will show green light, and the
rest LED 3 through LED 6 will not show light.
green light
not show light
18
Go Top ↑
Power-on:
After NA341TB3 is powered on, LED 2 through LED 5 will show green light. At
this time, if a USB device or a monitor is daisy chained to the second Thunderbolt 3
port on the Netstor Thunderbolt 3 card, then LED 6 will show green light. On the
other hand, provided the second Thunderbolt 3 port is not connected with any
device/monitor, LED 6 will not show light.
green light
(green light)
connected / not connected with any device
(not show light)
If you have any questions, please contact your regional distributor,
or Netstor Technology, Taiwan.
Netstor Technology Co. Ltd.
www.netstor .com.tw
6F, No. 1, Alley 16, Lane 235, Baoqiao Rd., Xindian District,
New Taipei City 231-45, Taiwan, R.O.C.
sales@netstor.com.tw
+886 2 2917 1500
 Loading...